
Creative Ways to Add Green Screen Effects In Photoshop for 2024

Creative Ways to Add Green Screen Effects In Photoshop
Removing green screen backgrounds and replacing them with stunning videos is a common practice in video and movie making. The same process is applicable to still photos as well. You can take a photo with a green screen background and replace the screen with any photo as per your preference and requirement. You will need a high-quality photo editor to add green screen effects to your photo. There is no better photo editor in the world than Adobe Photoshop.
First, you have to opt for remove green screen Photoshop and then add anything you want in place of the green screen. The difference between Chroma key Photoshop and any other photo editor is that you can pay attention to details and remove the entire green screen halo effect around the main subject or object on the photo. Therefore, there will be no jittery green edges and green patches to disturb the overall photo quality. Here are the steps to use green screen effect in Adobe Photoshop.
1. How To Use Green Screen in Photoshop?
There are various ways available to remove greenscreen Photoshop. The beginners prefer using the Magic Wand tool but there will always be green patches around the main object on the photo. These green patches will get highlighted when you insert any image in the background. Therefore, we are using the best method to Chroma key Photoshop and that is through Color Range option. Here are the detailed steps to use color keying in Photoshop to use green screen effect.
Step 1: Launch Adobe Photoshop and open your photo with green screen background.
Step 2: Go to Select menu and click on Color Range.

Step 3: Pick the Eyedropper tool. Hold Shift key to select the green background. You can also hold Alt key to remove any selection that you might have done by mistake. When you are perfectly ok with the selection of the green screen background, you should click on OK button.

Step 3: Go to Select menu and click on Inverse. Now, the selection will be on the main subject instead of the background.

Step 4: If you want to see a preview of the selection in your photo, you should select Image radio button and from Selection Preview, select any option other than None.

Step 5: Go to Select menu again and click on Refine Edge. Use the sliders to fine-tune the selection so that the selection is smooth on the edges of the main subject of the photo. Once done, click on OK button.

Step 6: Go to Select menu and click on Inverse again.
Step 7: Press Delete key to delete the green screen background selection.
Step 8: Open the replacement image which you want to put in the place of the green screen background that you have just deleted.
Step 9: Select the entire replacement image and copy the replacement. Come back to your photo and paste the replacement image. Make sure that the layer of the replacement image must be placed below the layer of your photo.

Step 10: You can adjust the size of the images as per your requirement so that everything fits perfectly in the frame. Similarly, you should adjust the color scheme so that the superimposition does not look awkward.
2. Best Way To Add Green Screen Effect To Video
In the previous section, we have stated how to remove the green screen background in any image and replace that with a stunning background photo. In this section, we will state how to add green screen effects in a video. There are many who think that adding green screen effects in a video takes a lot of expertise, but it is not the case.
If you select the suitable video editor, it is a matter of a few steps only. We recommend Wondershare Filmora to add green screen effects to your video where you have shot the scenes with green screen backgrounds. Here are the steps to follow to remove green screen backgrounds and replace with any photo or video as per your preference.
For Win 7 or later (64-bit)
For macOS 10.12 or later
Step 1: Download and install Wondershare Filmora.
Step 2: Launch Filmora and go for Create New Project option to get started.
Step 3: Import your video with green screen background and move it to the Timeline.
Step 4: Import the replacement photo or video and put it directly on the Timeline.
On the Timeline, your recorded video should be below the replacement photo or video.

Step 5: Double-click on your video, and you will come across a panel on the upper-left side. From that panel, you have to turn on Chroma Key option. This will enable the green screen effect due to which you will see the replacement photo or video superimposed on your recorded video in the green screen background.

Step 6: Finally, adjust the parameters available to fine-tune the overall green screen effect. Lastly, click on Ok button.
Conclusion
If you are looking to add green screen effects to your photo, you can opt for Chroma key Photoshop. Adobe Photoshop is the best photo editor to remove the green screen backgrounds on your photo and replace them with any image you want. Color keying in Photoshop enables you to change any solid color background to anything you want. Similarly, you can use Wondershare Filmora to add green screen effects to your video in simple steps.
For macOS 10.12 or later
Step 1: Download and install Wondershare Filmora.
Step 2: Launch Filmora and go for Create New Project option to get started.
Step 3: Import your video with green screen background and move it to the Timeline.
Step 4: Import the replacement photo or video and put it directly on the Timeline.
On the Timeline, your recorded video should be below the replacement photo or video.

Step 5: Double-click on your video, and you will come across a panel on the upper-left side. From that panel, you have to turn on Chroma Key option. This will enable the green screen effect due to which you will see the replacement photo or video superimposed on your recorded video in the green screen background.

Step 6: Finally, adjust the parameters available to fine-tune the overall green screen effect. Lastly, click on Ok button.
Conclusion
If you are looking to add green screen effects to your photo, you can opt for Chroma key Photoshop. Adobe Photoshop is the best photo editor to remove the green screen backgrounds on your photo and replace them with any image you want. Color keying in Photoshop enables you to change any solid color background to anything you want. Similarly, you can use Wondershare Filmora to add green screen effects to your video in simple steps.
For macOS 10.12 or later
Step 1: Download and install Wondershare Filmora.
Step 2: Launch Filmora and go for Create New Project option to get started.
Step 3: Import your video with green screen background and move it to the Timeline.
Step 4: Import the replacement photo or video and put it directly on the Timeline.
On the Timeline, your recorded video should be below the replacement photo or video.

Step 5: Double-click on your video, and you will come across a panel on the upper-left side. From that panel, you have to turn on Chroma Key option. This will enable the green screen effect due to which you will see the replacement photo or video superimposed on your recorded video in the green screen background.

Step 6: Finally, adjust the parameters available to fine-tune the overall green screen effect. Lastly, click on Ok button.
Conclusion
If you are looking to add green screen effects to your photo, you can opt for Chroma key Photoshop. Adobe Photoshop is the best photo editor to remove the green screen backgrounds on your photo and replace them with any image you want. Color keying in Photoshop enables you to change any solid color background to anything you want. Similarly, you can use Wondershare Filmora to add green screen effects to your video in simple steps.
For macOS 10.12 or later
Step 1: Download and install Wondershare Filmora.
Step 2: Launch Filmora and go for Create New Project option to get started.
Step 3: Import your video with green screen background and move it to the Timeline.
Step 4: Import the replacement photo or video and put it directly on the Timeline.
On the Timeline, your recorded video should be below the replacement photo or video.

Step 5: Double-click on your video, and you will come across a panel on the upper-left side. From that panel, you have to turn on Chroma Key option. This will enable the green screen effect due to which you will see the replacement photo or video superimposed on your recorded video in the green screen background.

Step 6: Finally, adjust the parameters available to fine-tune the overall green screen effect. Lastly, click on Ok button.
Conclusion
If you are looking to add green screen effects to your photo, you can opt for Chroma key Photoshop. Adobe Photoshop is the best photo editor to remove the green screen backgrounds on your photo and replace them with any image you want. Color keying in Photoshop enables you to change any solid color background to anything you want. Similarly, you can use Wondershare Filmora to add green screen effects to your video in simple steps.
How to Add Subtitles to Videos With Kapwing
Content creators always prefer to add subtitles to their videos for better comprehension. The reason is that some people cannot understand your language and needs subtitles to understand the content. Moreover, if your viewer is facing an audio problem and won’t be able to hear your voice, subtitles can help there. In this article, we will introduce the Kapwing subtitle maker, through which you can add subtitles in many ways.
There are some drawbacks to using online tools, such as file size restrictions or internet availability. Yet, with the Kapwing tool, you won’t get disappointed. Kapwing is an online tool that offers various options to edit videos. One of the great features of Kapwing is its subtitle maker, which can help you in adding subtitles to your videos easily. To learn how to use the Kapwing subtitles feature, continue reading this article.
Part 1: Upload the Subtitle File to Kapwing
If you have a subtitle file for your video, Kapwing can help you. If you have a subtitle file for your video, Kapwing can help you. Without creating a user account, you can upload the subtitle file on this tool. With this subtitle editor, you can upload video files from your computer or cloud storage platforms. Moreover, it supports the subtitle files of SRT and VVT format. To use Kapwing subtitle maker for uploading a subtitle file, read the below steps:
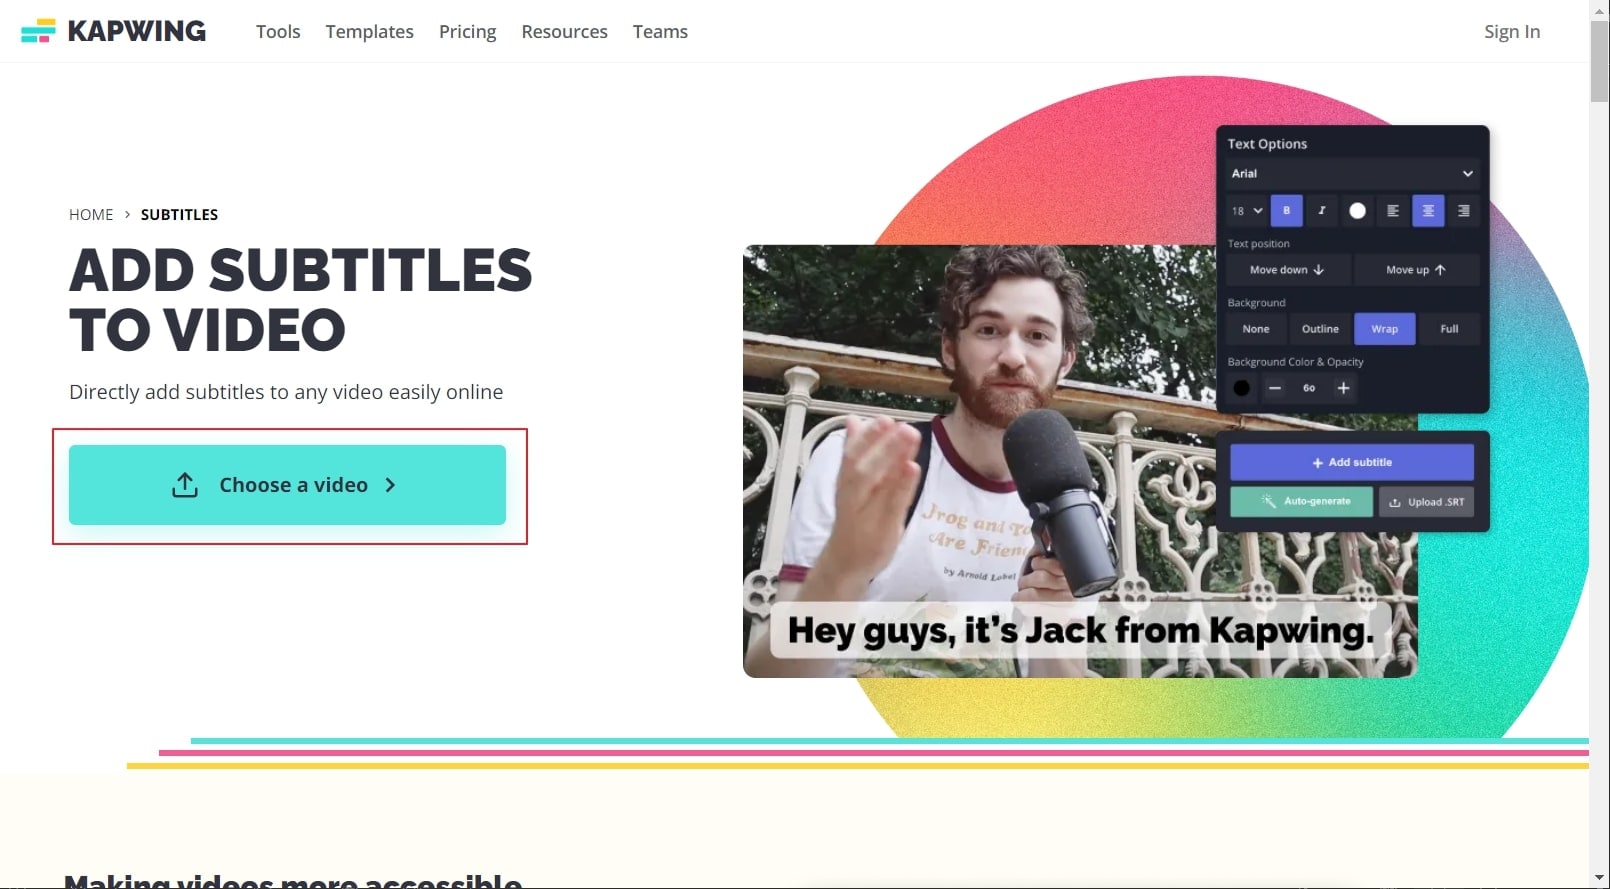
Step 1 Navigate to the official site of Kapwing and select its “Subtitles” tool. Afterward, click on “Choose a video,” which will open a new window on your screen.

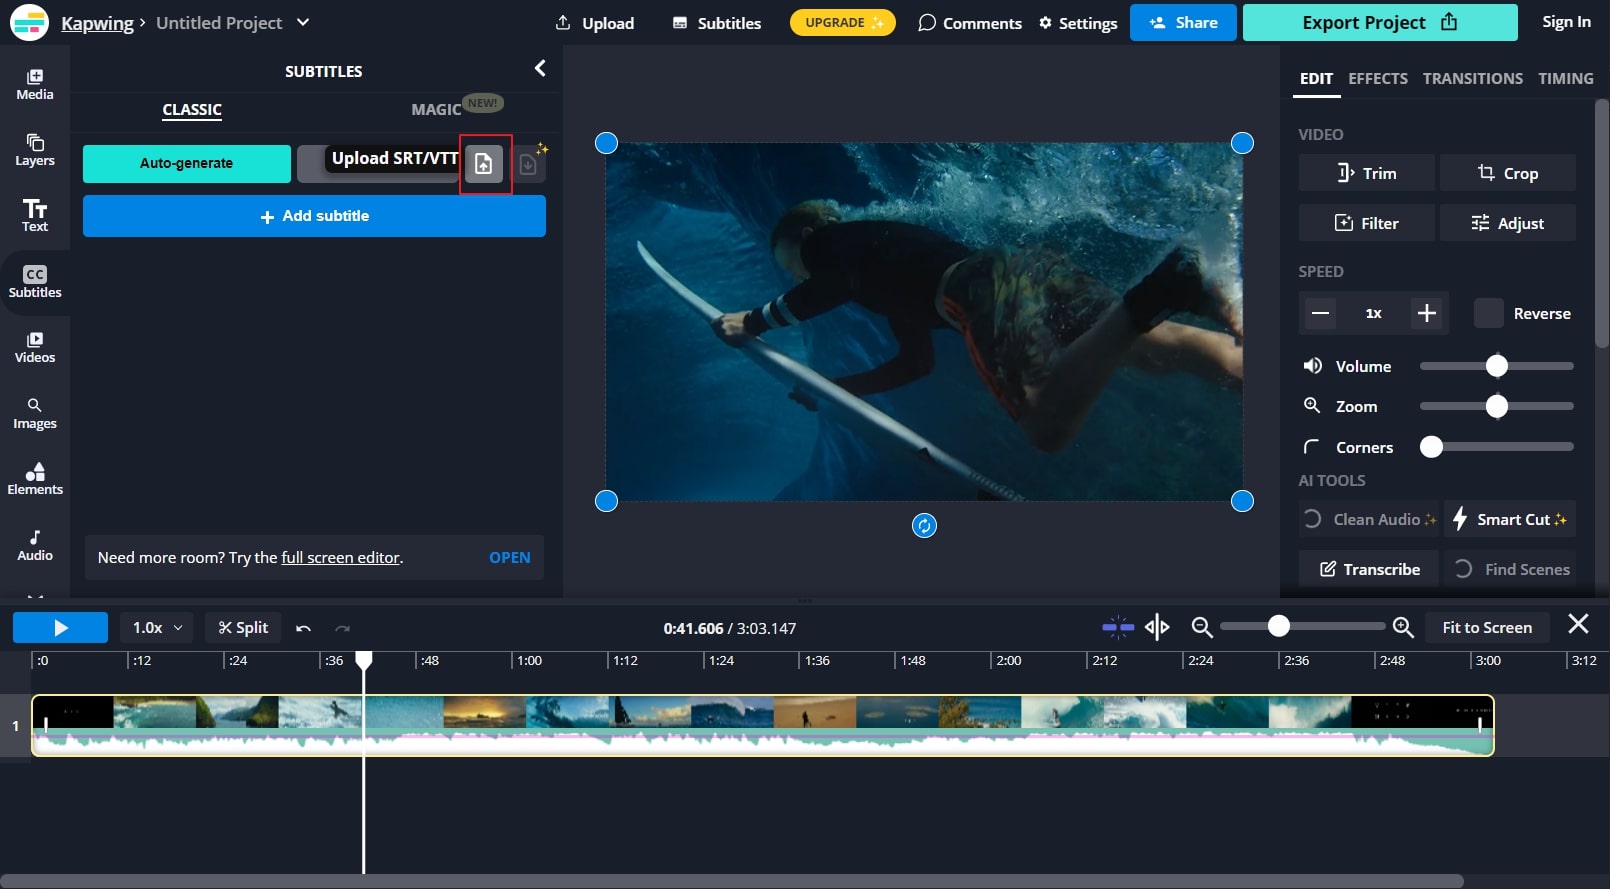
Step 2 Click on the “Upload” button given on top to import your video file on this tool. Once done, click on the “Subtitle” option displayed on the left side. On the subtitles window, click on the “Upload SRT/VVT” button to import your subtitle file.
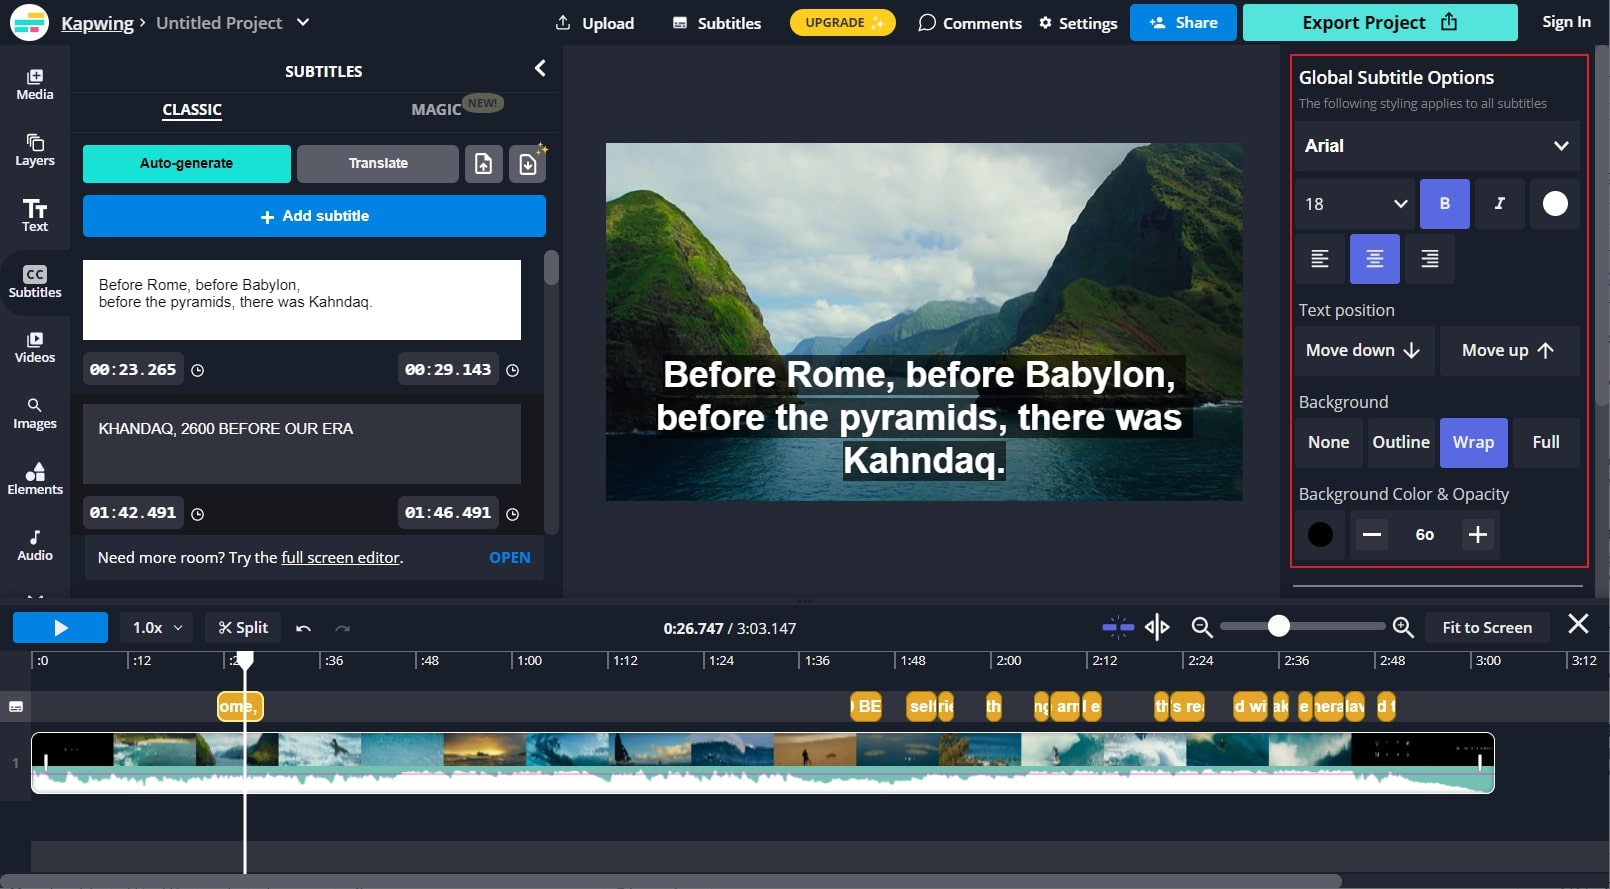
Step 3 After uploading the file, your subtitles will sync with your video. To edit your subtitles, navigate to the right panel. From that, you can select text position, background color, opacity, font, and alignment.
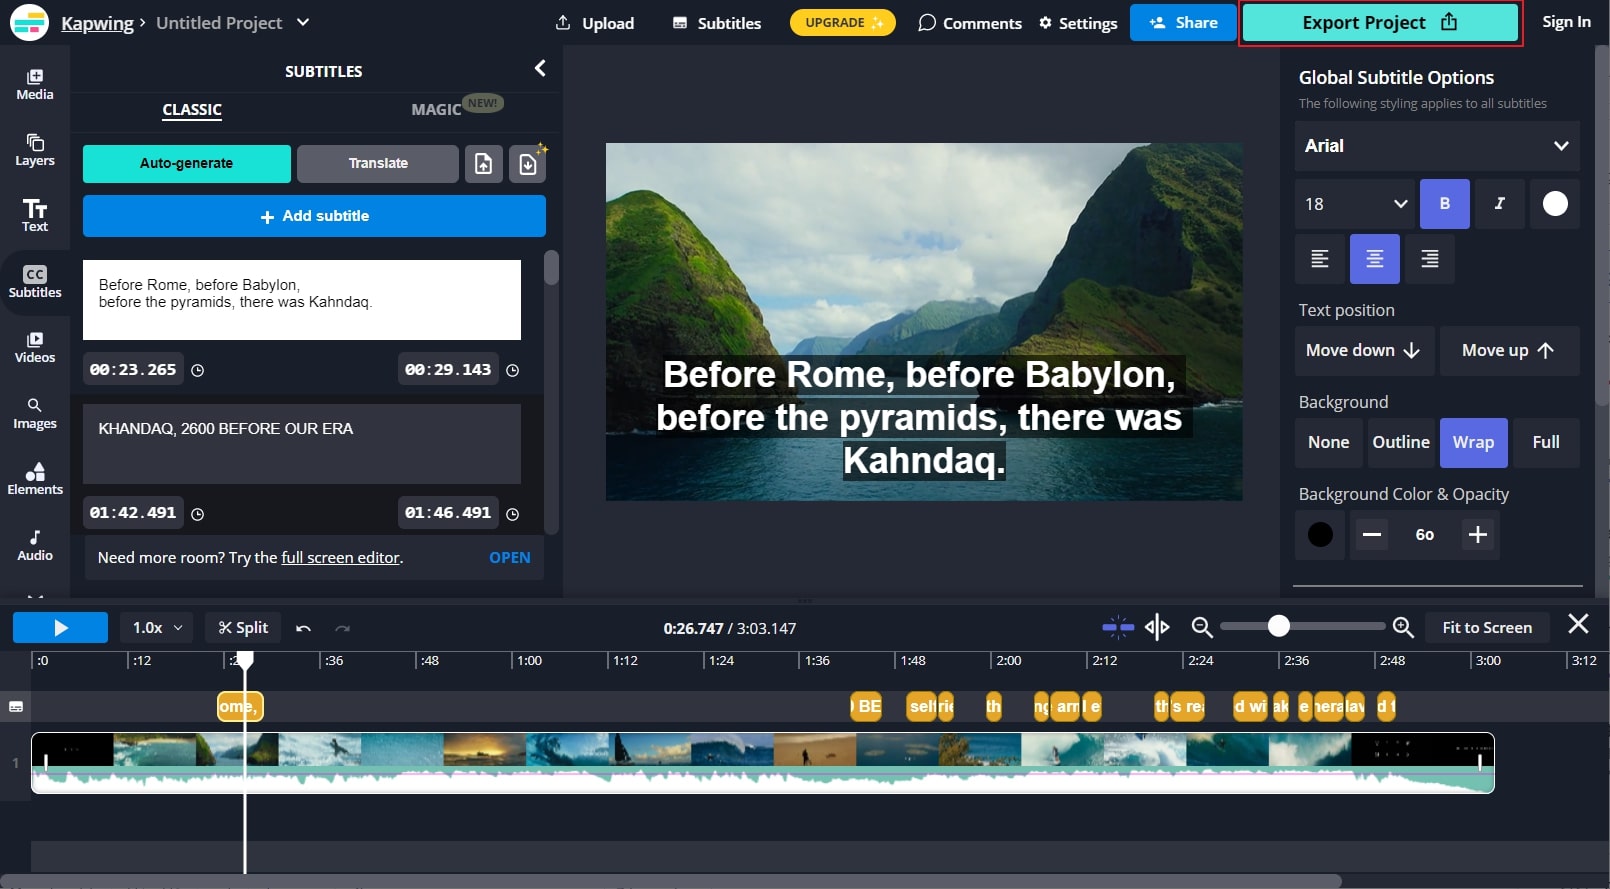
Step 4 Once done with making the changes on added subtitles, you can click on the “Export Project” button to save or share the file.
Part 2: Automatically Generate your Subtitle on Kapwing
Do you want to generate subtitles for your video instantly? Kapwing subtitle maker offers an Auto-Subtitle Generator that converts your voice into subtitles. This feature supports many languages so that anyone across the world can utilize this tool. Moreover, it also offers a translating feature that can help you in converting your subtitles into another language.
However, to use this feature, you must create your user account. Also, you should upgrade your account to fully use this feature without any restrictions. If you don’t have an upgraded account, you can only auto-generate subtitles for the 7 minutes video. To use the auto-subtitle generator of Kapwing, check the below steps:
Step 1 Begin by accessing the website of the Kapwing tool. Click on “Subtitles” from the “Tools” tab and then tap on the “Choose a video” button. Upload the video file on which you want to add subtitles from your PC.

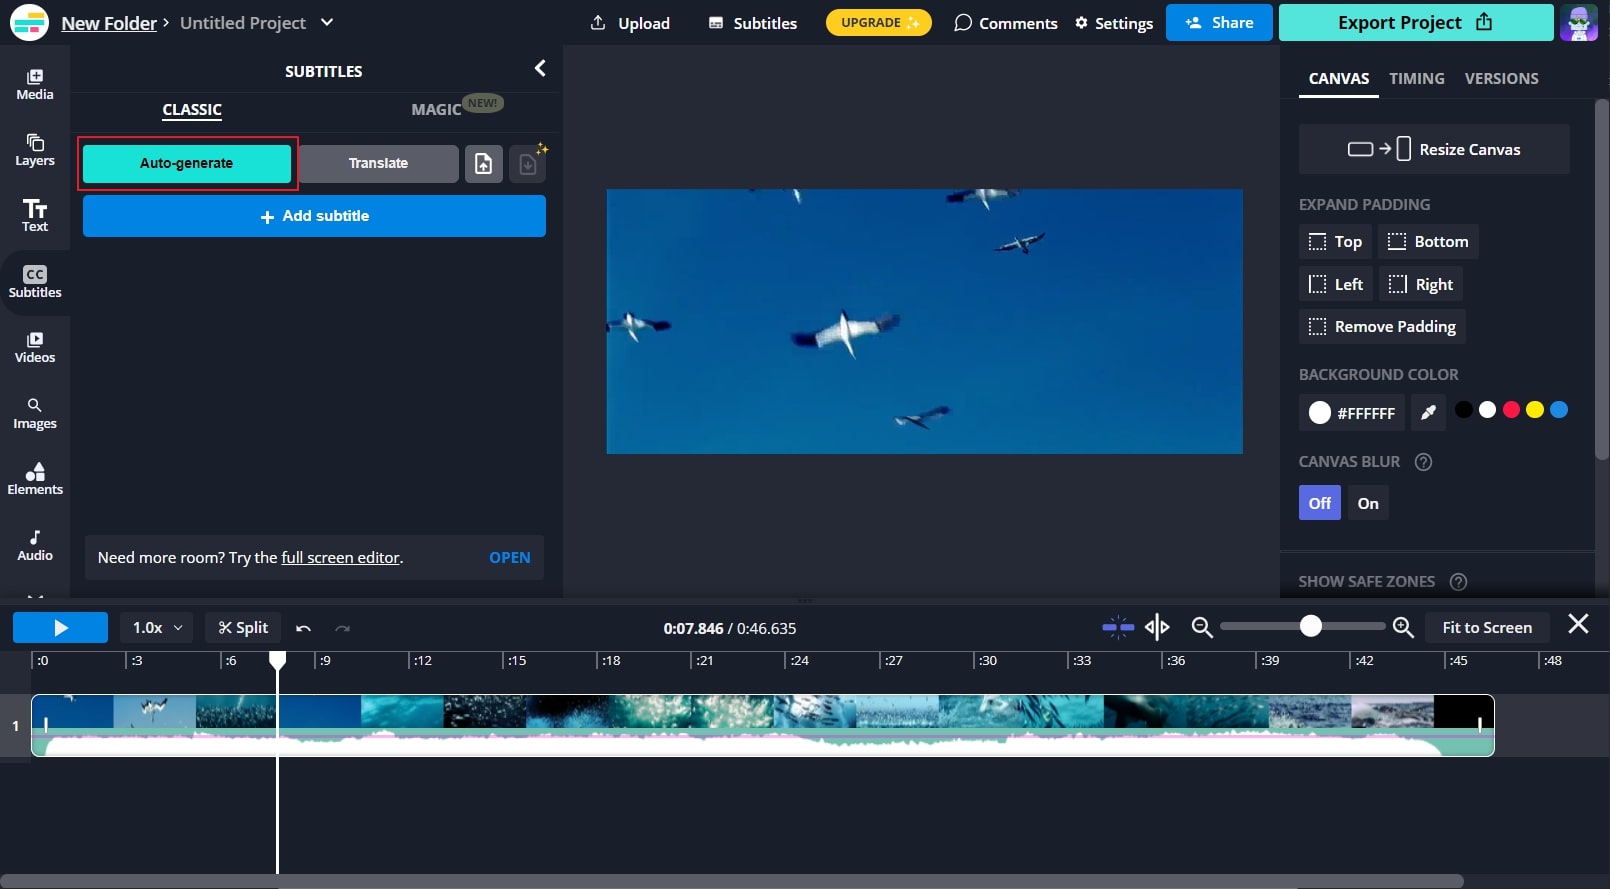
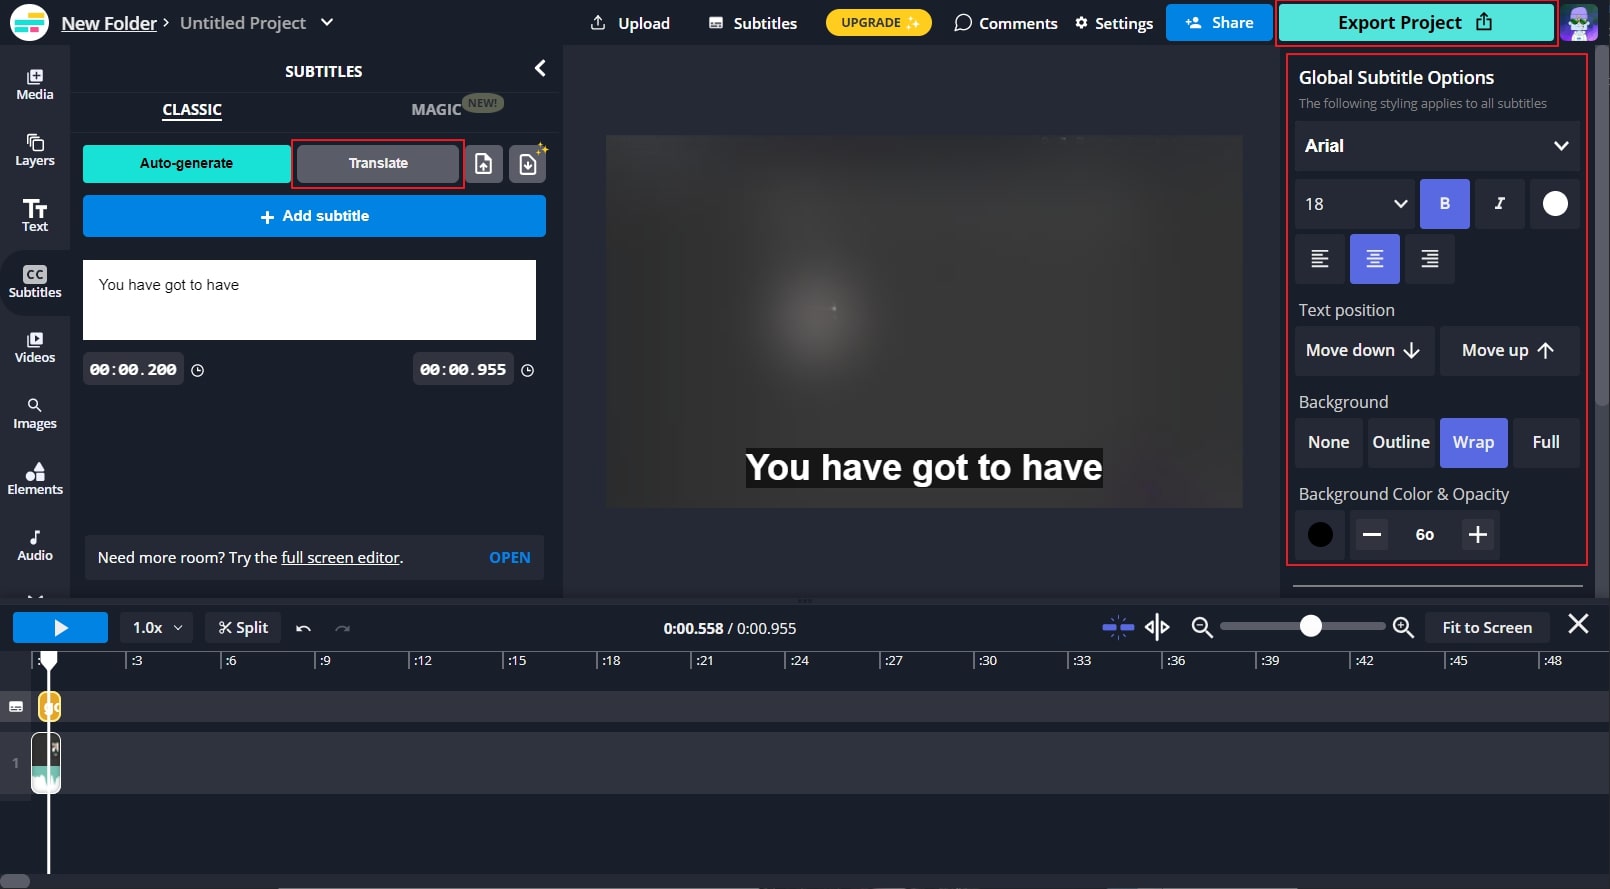
Step 2 Once done with importing the video, click on “Subtitles” from the left section. From the new window, click on “Auto-generate.” The tool will automatically create subtitles for your video by detecting the language.
Step 3 Once you created the subtitles through this feature, go to the “Translate” tab to translate subtitles into your preferred language. You can also edit the subtitles to change their background, opacity, text font, and size. Once done, click on the “Export Project” button.
Part 3: Manually Add Subtitles to the Video on Kapwing
If you don’t want to use the auto-generator and do not have a subtitle file, you can use the manual option. Kapwing allows you to add subtitles manually in its friendly user interface. After adding Kapwing captions, you can choose your preferred font and style for further enhancement.
Step 1 After accessing the website of Kapwing, select the “Subtitles” tool to proceed. Now select the “Choose a video” button to open the Kapwing editor window.
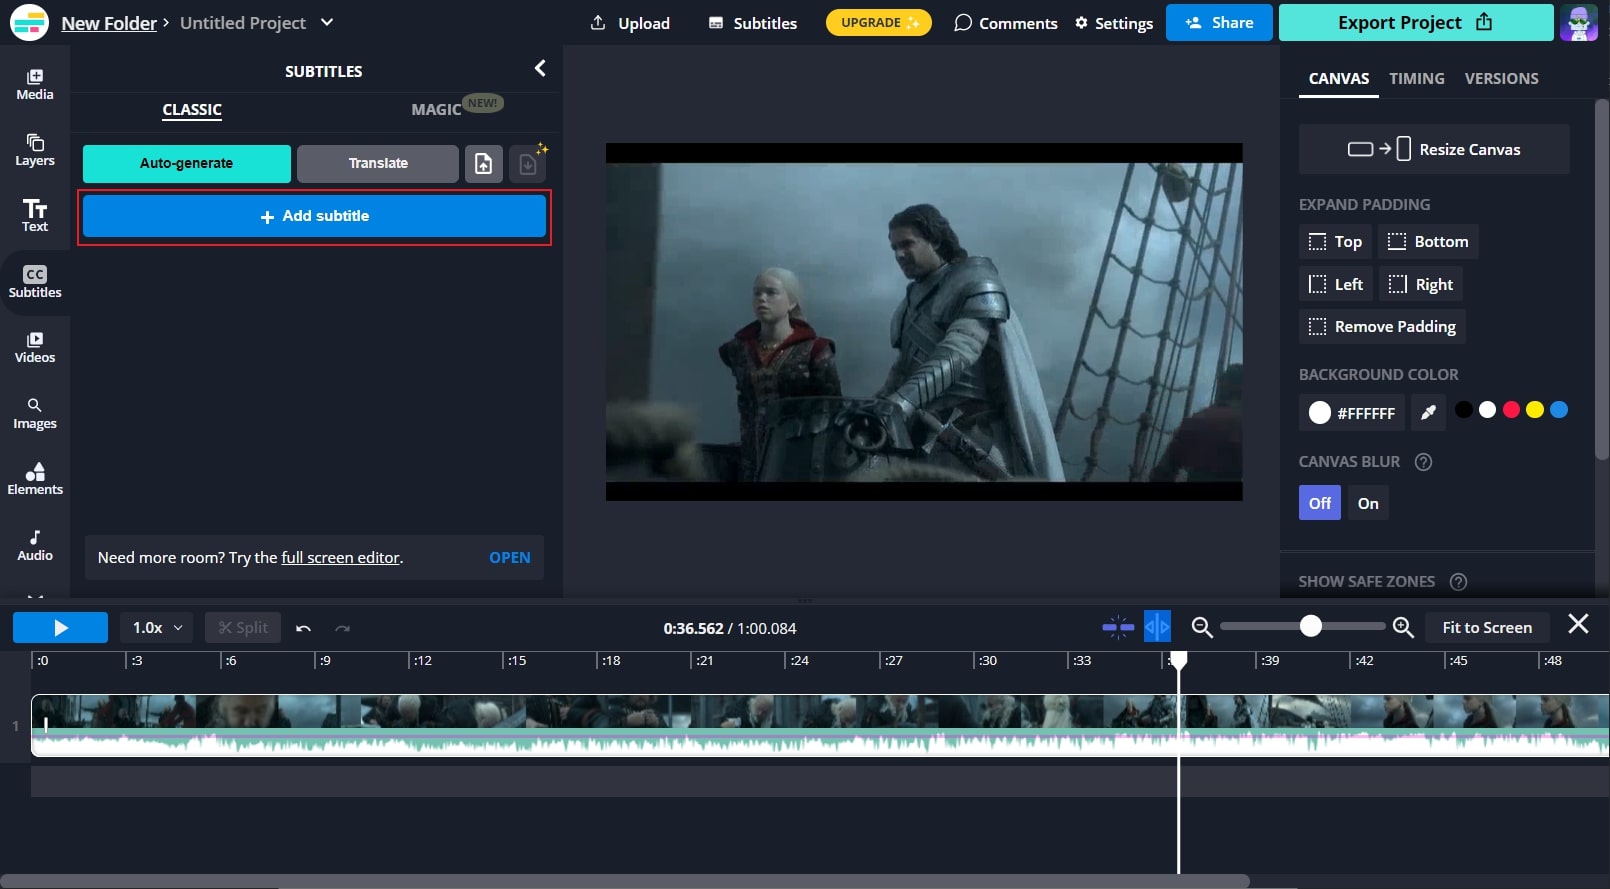
Step 2 Import your video file by tapping on the “Upload” button. Afterward, go to the “Subtitles” section and click on the “Add Subtitle” button. On the typing space, enter your subtitles. You can also choose the duration for your subtitles from the same window. To add subtitles further, you can click on the “Add Subtitles” button again.
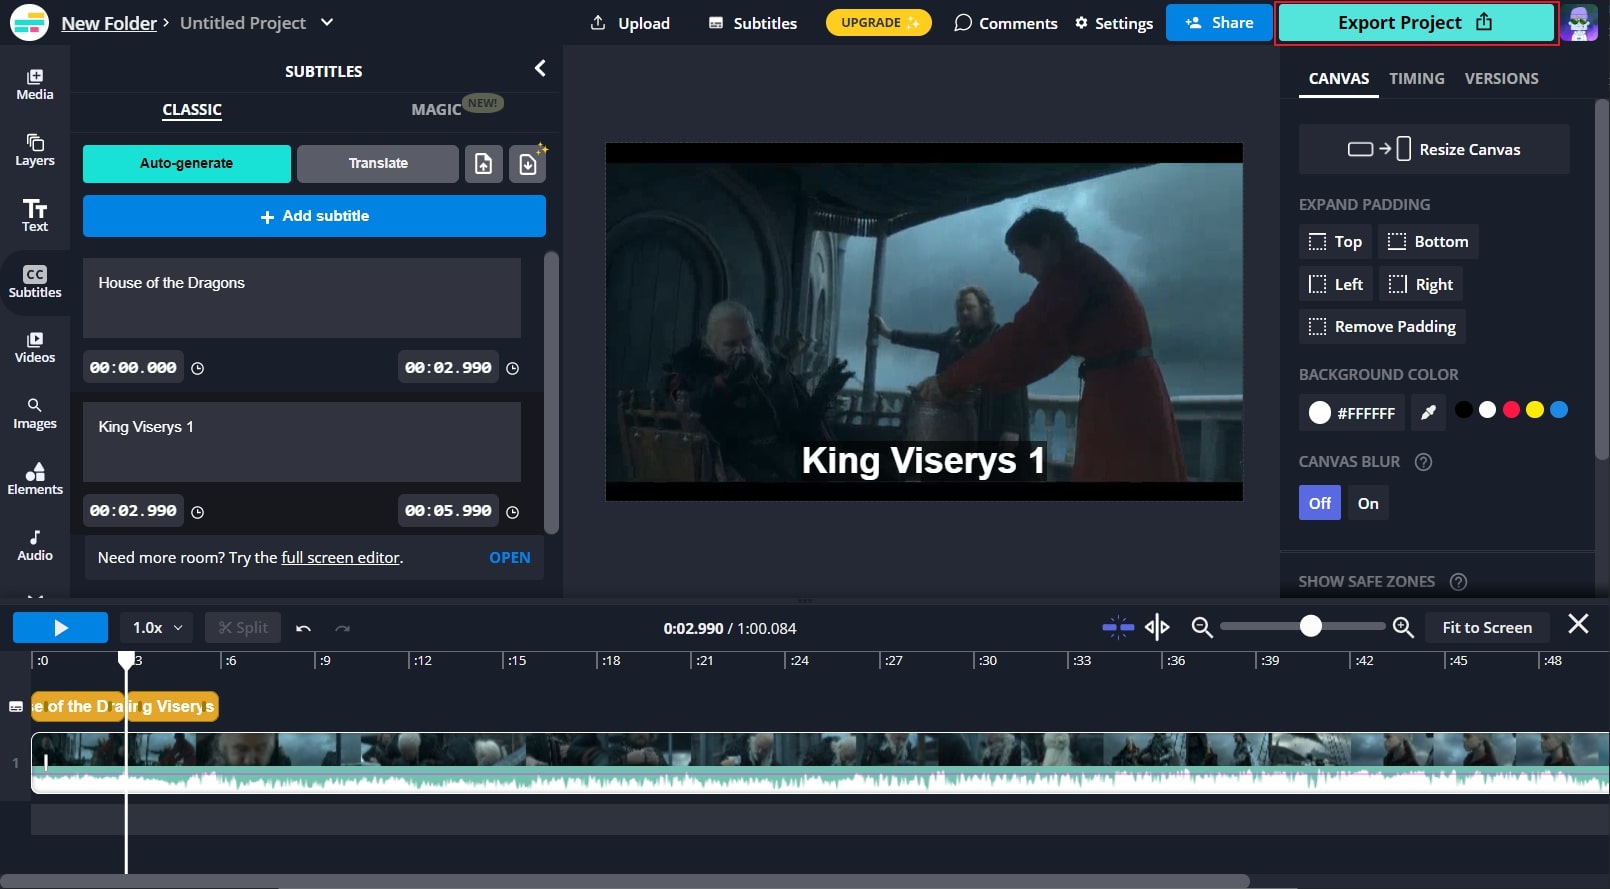
Step 3 After adding the complete subtitles, you can choose their font, style, color, and opacity from the right panel. Once done, hit the “Export Project” button.
Part 4: How to Add Subtitles to Videos with the Best Alternative of Kapwing
If you are not satisfied with the performance of the Kapwing subtitle maker, you can try the Wondershare Filmora tool. As Kapwing is an online tool, it does come with certain restrictions. For example, the time to upload video files on this tool can be time-consuming. Moreover, you would need a strong internet connection throughout. But, with Filmora, you can add subtitles to your video files without facing file size restrictions.
Free Download For Win 7 or later(64-bit)
Free Download For macOS 10.14 or later
Filmora has an easy-to-use interface that offers multiple options to edit and alter video files. This platform is compatible with a mainstream operating system such as Windows. It provides a “Speech to Text” feature that enables you to create subtitles for your video automatically. With a single tap, you can add subtitles to your video without any hassle. To use the Speech to Text feature, check the below steps:
Step 1 Import Video File from the PC
Launch Filmora on your PC and click on the “Create New Project” button to open the Filmora editor on your device. To import your video file from your PC, tap on the “Arrow” icon. After uploading the file, drag it to the timeline.

Step 2 Enable Speech to Text Feature
From the timeline, locate the feature of “Speech to Text.” Now choose the language in which you want to create the subtitles and specify the other settings as well. Afterward, tap on the “OK” button to begin the process.

Step 3 Customize Subtitles and Save the Changes
After the conversion, you can double-click the added subtitles to make modifications. After making the adjustments, hit the “OK” button. Now go to the “Export” button and select the video format in which you want to export the video, or you can also share it on social media platforms.

Conclusion
By adding subtitles to your video, you can enhance your targeted audience and can also engage with them. It also helps in making your video content diverse for people across the globe. There are various online subtitle generators like Kapwing that can help you in adding subtitles, as described in this article. However, there are some drawbacks to using the Kapwing subtitle maker that can disrupt your work. If you want to use a proficient subtitle maker, you can use Wondershare Filmora to get the best results.
Free Download For macOS 10.14 or later
Filmora has an easy-to-use interface that offers multiple options to edit and alter video files. This platform is compatible with a mainstream operating system such as Windows. It provides a “Speech to Text” feature that enables you to create subtitles for your video automatically. With a single tap, you can add subtitles to your video without any hassle. To use the Speech to Text feature, check the below steps:
Step 1 Import Video File from the PC
Launch Filmora on your PC and click on the “Create New Project” button to open the Filmora editor on your device. To import your video file from your PC, tap on the “Arrow” icon. After uploading the file, drag it to the timeline.

Step 2 Enable Speech to Text Feature
From the timeline, locate the feature of “Speech to Text.” Now choose the language in which you want to create the subtitles and specify the other settings as well. Afterward, tap on the “OK” button to begin the process.

Step 3 Customize Subtitles and Save the Changes
After the conversion, you can double-click the added subtitles to make modifications. After making the adjustments, hit the “OK” button. Now go to the “Export” button and select the video format in which you want to export the video, or you can also share it on social media platforms.

Conclusion
By adding subtitles to your video, you can enhance your targeted audience and can also engage with them. It also helps in making your video content diverse for people across the globe. There are various online subtitle generators like Kapwing that can help you in adding subtitles, as described in this article. However, there are some drawbacks to using the Kapwing subtitle maker that can disrupt your work. If you want to use a proficient subtitle maker, you can use Wondershare Filmora to get the best results.
Easy Way to Apply Green Screen to YouTube Videos
This is a large green backdrop that is placed in the background of a shot to allow for digital effects later on. A majority of popular YouTube vloggers use green to enhance interesting background views to their videos. Screen replaces the background and adds depth and visually interesting patterns that ends up keeping the viewer captivated.
Why use Green Screen
1. Creativity
There are several effects that can be applied to green screen video editing in the editing process, it gives one a chance to explore their imagination. A good editor can really customize the video to make the production really stand out from those of the competitors.
2. Flexibility
There are portable green screens that can be taken to any location of choice for video shooting. Location allows one endless possibilities without having to spend time and resources doing assembling of different sets and backgrounds. The desired feel to the video can be simply achieved by an image.
3. Budget
Filming YouTube using green screen is a cost effective way of producing professional video content on a small budget. This is a great idea for upcoming YouTube vloggers as expenses catering for travel and location are eliminated.
4. Consistency
At some point in YouTube green screen use, you may be affected by the weather and worse pf all, natural lighting may end up being problematic while you are on location doing your video shots. However, with YouTube Video green screen technology, ambient lighting is blocked out and the screen can be lit the same way every time. This brings consistency over a number of videos the user applies green screen on.
5. Clarity
Youtube video green screen allows for an additional visual ellements and diagrams such as graphics, this can be added on to the video to illustrate what the speaker is saying. This green screen effect helps the viewer to gain a better understanding of any concepts or complex illustrations mentioned by the presenter.
6. Branding
YouTube green screen logo and branding colors can be easily added into the video, this can easily make the viewers to identify the video with your business. Apart from standing out from other competitors, you will also have a professional, high quality and reliable video to use anytime you please.
Best Places to find Green Screen Effects
Filmstock
Filmstock features a massive library full of royalty-free stock video, video effects, sound effects, video templates, and so much more. There are resources on the platform for all kinds of creators, including video editors, content creators, social media influencers, and marketers. You get unlimited access to all these resources for a single price when you subscribe to Filmstock. While there are other marketplaces that offer similar options, Filmstock does things differently.
Green Screen Effects
1. Balance Beam
Ever wanted to walk across a small beam way high up in the air? Me neither, but you can make a cool effect that looks like you did. Throwing a green screen on the ground and then building a balance beam over top of it you can start recording the main shot. Strap a GoPro to your head and look down while walking across the beam.
2. Shrink Effect
Okay this one is really easy. Take some footage of a person walking in front of a green screen, ideally looking at something to be featured in the main shot to sell the effect. Then take a close up of a small object. Key out the green behind the person, take the footage and drop it over your close up, and then scale it to match. Duplicate it, mirror it horizontally to act as a reflection and then drop the opacity and add some blur to make it look more realistic. It’s a fun little trick.
3. Floating Object
This is a simple one, making an object appear to be floating. This is another two clip shot. First, take a shot with the object hanging in front of a blue screen. Then on the same location, take another shot but while pretending to levitate the hammer. Masking around the hammer will get rid of the string for hanging, key out the blue, and then dropping it on top of the other clip is all you need.
Best Green Screen Video Editor for YouTube
Filmora
If you’re just starting out with video editing, or just want a simple program that works, Wondershare Filmora might be what you’re looking for. It has the essential tools, and anyone can learn to use it easily.
Wondershare Filmora is the one of best video editing software with cool features that compares to other competing video editing Softwares. Many video editing programs claim to offer professional results; Filmora is one of a few consumer-level tools that actually delivers.
For Win 7 or later (64-bit)
For macOS 10.12 or later
Installation Steps
- Click the icon in the center of the Media Library to add files directly.
- Go File > Import Media > Import Media Files.
- Drag and drop to the Media Library directly.
While importing a media file, Wondershar Filmora may ask you if you wish to create a proxy file to accelerate the editing process. Select “Yes” to have a fast video editing experience.
You can also import video clips using your Touch Bar controls if your computer has Touch Bar.
Record a media file
Apart from the videos shot by your digital devices, you can also directly import media files by recording video from your webcam, capturing the computer screen, or recording a voice-over.
Find green screen effects: Now you can select the different types of green screen effects.

Apply green screen: drag the effects to the timeline to apply it to your videos.

Save and Export: Then you can save or export the video.
A green screen is a green surface used as a background when filming so that any image can replace the screen behind the actor or presenter. Shooting with a green screen involves filming a person or adding visual effects in front of a solid color. Then, by digitally removing or “keying out” that color, you can drop that scene onto the background of your choice in post-production. Removing the colored background is also referred to as “chroma keying.”
Steps with Images
The first step is to record footage in front of a green screen so that you can import it into WeVideo as a media file. To capture footage that is optimal for the Green Screen effect, please ensure the following:
- There is ample lighting distributed evenly around you with no shadows.
- You are in front of a solid background with no creases. Green or blue is the recommended color for your background.
- The quality of your camera is high enough so that the footage is not pixelated or grainy. 720p HD footage or above is recommended.
Step 2) Add media to the Timeline
Once you’ve captured the footage you want to use for the Green Screen effect, import that media file and add it to the Timeline. Remember to place the green screen footage in the Video 2 track and the clip you would like to use as the background in the Video 1 track.
If you are using more than two video tracks, place the green screen footage in the track above whichever track holds the background footage to ensure proper layering techniques are used.
Step 3) Open the clip editor
Double click on the green screen clip in the Timeline to open the clip editor. In the clip editor, navigate to the Color Keying tab.
Step 4) Use the color picker tool
Select the color picker tool and then click anywhere on the green screen footage to apply the effect.
Step 5) _(optional) Adjust the color settings
The Green Screen effect should automatically apply without the need to adjust the color settings. However, if you would like to make these additional modifications, you can use the scroll bars to make the following adjustments:
- **Show- You can select Mask to reveal a black and white representation of the mask you are applying using the color keying tool. Notice that the black area represents transparent sections of your video, while the white area represents opaque sections.
- **Color Balance- This adjusts how selective the effect is. The further right you scroll, the wider the range of tints and shades are removed.
- **Color Sensitivity- This smooths out any pixelation and rough edges of color that remain.
- **Defringe- This helps reduce color bleeding at the edges of your mask. The left and right sliders control the level of white and black respectively to help match the edges of the mask with your new background color.
For macOS 10.12 or later
Installation Steps
- Click the icon in the center of the Media Library to add files directly.
- Go File > Import Media > Import Media Files.
- Drag and drop to the Media Library directly.
While importing a media file, Wondershar Filmora may ask you if you wish to create a proxy file to accelerate the editing process. Select “Yes” to have a fast video editing experience.
You can also import video clips using your Touch Bar controls if your computer has Touch Bar.
Record a media file
Apart from the videos shot by your digital devices, you can also directly import media files by recording video from your webcam, capturing the computer screen, or recording a voice-over.
Find green screen effects: Now you can select the different types of green screen effects.

Apply green screen: drag the effects to the timeline to apply it to your videos.

Save and Export: Then you can save or export the video.
A green screen is a green surface used as a background when filming so that any image can replace the screen behind the actor or presenter. Shooting with a green screen involves filming a person or adding visual effects in front of a solid color. Then, by digitally removing or “keying out” that color, you can drop that scene onto the background of your choice in post-production. Removing the colored background is also referred to as “chroma keying.”
Steps with Images
The first step is to record footage in front of a green screen so that you can import it into WeVideo as a media file. To capture footage that is optimal for the Green Screen effect, please ensure the following:
- There is ample lighting distributed evenly around you with no shadows.
- You are in front of a solid background with no creases. Green or blue is the recommended color for your background.
- The quality of your camera is high enough so that the footage is not pixelated or grainy. 720p HD footage or above is recommended.
Step 2) Add media to the Timeline
Once you’ve captured the footage you want to use for the Green Screen effect, import that media file and add it to the Timeline. Remember to place the green screen footage in the Video 2 track and the clip you would like to use as the background in the Video 1 track.
If you are using more than two video tracks, place the green screen footage in the track above whichever track holds the background footage to ensure proper layering techniques are used.
Step 3) Open the clip editor
Double click on the green screen clip in the Timeline to open the clip editor. In the clip editor, navigate to the Color Keying tab.
Step 4) Use the color picker tool
Select the color picker tool and then click anywhere on the green screen footage to apply the effect.
Step 5) _(optional) Adjust the color settings
The Green Screen effect should automatically apply without the need to adjust the color settings. However, if you would like to make these additional modifications, you can use the scroll bars to make the following adjustments:
- **Show- You can select Mask to reveal a black and white representation of the mask you are applying using the color keying tool. Notice that the black area represents transparent sections of your video, while the white area represents opaque sections.
- **Color Balance- This adjusts how selective the effect is. The further right you scroll, the wider the range of tints and shades are removed.
- **Color Sensitivity- This smooths out any pixelation and rough edges of color that remain.
- **Defringe- This helps reduce color bleeding at the edges of your mask. The left and right sliders control the level of white and black respectively to help match the edges of the mask with your new background color.
For macOS 10.12 or later
Installation Steps
- Click the icon in the center of the Media Library to add files directly.
- Go File > Import Media > Import Media Files.
- Drag and drop to the Media Library directly.
While importing a media file, Wondershar Filmora may ask you if you wish to create a proxy file to accelerate the editing process. Select “Yes” to have a fast video editing experience.
You can also import video clips using your Touch Bar controls if your computer has Touch Bar.
Record a media file
Apart from the videos shot by your digital devices, you can also directly import media files by recording video from your webcam, capturing the computer screen, or recording a voice-over.
Find green screen effects: Now you can select the different types of green screen effects.

Apply green screen: drag the effects to the timeline to apply it to your videos.

Save and Export: Then you can save or export the video.
A green screen is a green surface used as a background when filming so that any image can replace the screen behind the actor or presenter. Shooting with a green screen involves filming a person or adding visual effects in front of a solid color. Then, by digitally removing or “keying out” that color, you can drop that scene onto the background of your choice in post-production. Removing the colored background is also referred to as “chroma keying.”
Steps with Images
The first step is to record footage in front of a green screen so that you can import it into WeVideo as a media file. To capture footage that is optimal for the Green Screen effect, please ensure the following:
- There is ample lighting distributed evenly around you with no shadows.
- You are in front of a solid background with no creases. Green or blue is the recommended color for your background.
- The quality of your camera is high enough so that the footage is not pixelated or grainy. 720p HD footage or above is recommended.
Step 2) Add media to the Timeline
Once you’ve captured the footage you want to use for the Green Screen effect, import that media file and add it to the Timeline. Remember to place the green screen footage in the Video 2 track and the clip you would like to use as the background in the Video 1 track.
If you are using more than two video tracks, place the green screen footage in the track above whichever track holds the background footage to ensure proper layering techniques are used.
Step 3) Open the clip editor
Double click on the green screen clip in the Timeline to open the clip editor. In the clip editor, navigate to the Color Keying tab.
Step 4) Use the color picker tool
Select the color picker tool and then click anywhere on the green screen footage to apply the effect.
Step 5) _(optional) Adjust the color settings
The Green Screen effect should automatically apply without the need to adjust the color settings. However, if you would like to make these additional modifications, you can use the scroll bars to make the following adjustments:
- **Show- You can select Mask to reveal a black and white representation of the mask you are applying using the color keying tool. Notice that the black area represents transparent sections of your video, while the white area represents opaque sections.
- **Color Balance- This adjusts how selective the effect is. The further right you scroll, the wider the range of tints and shades are removed.
- **Color Sensitivity- This smooths out any pixelation and rough edges of color that remain.
- **Defringe- This helps reduce color bleeding at the edges of your mask. The left and right sliders control the level of white and black respectively to help match the edges of the mask with your new background color.
For macOS 10.12 or later
Installation Steps
- Click the icon in the center of the Media Library to add files directly.
- Go File > Import Media > Import Media Files.
- Drag and drop to the Media Library directly.
While importing a media file, Wondershar Filmora may ask you if you wish to create a proxy file to accelerate the editing process. Select “Yes” to have a fast video editing experience.
You can also import video clips using your Touch Bar controls if your computer has Touch Bar.
Record a media file
Apart from the videos shot by your digital devices, you can also directly import media files by recording video from your webcam, capturing the computer screen, or recording a voice-over.
Find green screen effects: Now you can select the different types of green screen effects.

Apply green screen: drag the effects to the timeline to apply it to your videos.

Save and Export: Then you can save or export the video.
A green screen is a green surface used as a background when filming so that any image can replace the screen behind the actor or presenter. Shooting with a green screen involves filming a person or adding visual effects in front of a solid color. Then, by digitally removing or “keying out” that color, you can drop that scene onto the background of your choice in post-production. Removing the colored background is also referred to as “chroma keying.”
Steps with Images
The first step is to record footage in front of a green screen so that you can import it into WeVideo as a media file. To capture footage that is optimal for the Green Screen effect, please ensure the following:
- There is ample lighting distributed evenly around you with no shadows.
- You are in front of a solid background with no creases. Green or blue is the recommended color for your background.
- The quality of your camera is high enough so that the footage is not pixelated or grainy. 720p HD footage or above is recommended.
Step 2) Add media to the Timeline
Once you’ve captured the footage you want to use for the Green Screen effect, import that media file and add it to the Timeline. Remember to place the green screen footage in the Video 2 track and the clip you would like to use as the background in the Video 1 track.
If you are using more than two video tracks, place the green screen footage in the track above whichever track holds the background footage to ensure proper layering techniques are used.
Step 3) Open the clip editor
Double click on the green screen clip in the Timeline to open the clip editor. In the clip editor, navigate to the Color Keying tab.
Step 4) Use the color picker tool
Select the color picker tool and then click anywhere on the green screen footage to apply the effect.
Step 5) _(optional) Adjust the color settings
The Green Screen effect should automatically apply without the need to adjust the color settings. However, if you would like to make these additional modifications, you can use the scroll bars to make the following adjustments:
- **Show- You can select Mask to reveal a black and white representation of the mask you are applying using the color keying tool. Notice that the black area represents transparent sections of your video, while the white area represents opaque sections.
- **Color Balance- This adjusts how selective the effect is. The further right you scroll, the wider the range of tints and shades are removed.
- **Color Sensitivity- This smooths out any pixelation and rough edges of color that remain.
- **Defringe- This helps reduce color bleeding at the edges of your mask. The left and right sliders control the level of white and black respectively to help match the edges of the mask with your new background color.
Unlock the Power of Shotcut: The Ultimate Guide to Rotating Videos
Video editing has come a long way in recent years, and with the advancement of technology, it’s now easier than ever to produce high-quality videos. However, one common issue that many video editors encounter is uneven footage. Various reasons can cause this, but the solution is simple - rotating your videos. Shotcut is a powerful video editing software that provides various tools to help you rotate your videos easily.
This guide will explore the ins and outs of using Shotcut to rotate your videos. Whether you’re a seasoned editor or just starting, this guide will provide you with everything you need to know to get the perfect shot every time. This guide has everything from rotating your footage to more advanced tips and tricks. So, if you’re ready to take your video editing skills to the next level, keep reading!
Overview of Shotcut Video Editor
Shotcut is a free, open-source video editing software that offers a range of features for basic video editing. Before downloading Shotcut, it is important to know its features to determine if it suits your video editing needs. Here are the key features of Shotcut that stand out:

- Video Capture. Shotcut allows for screen and webcam capture and audio capture from the system or external microphone. It supports 4K resolution.
- Standard Editing. Shotcut allows for trimming, cutting/copying/pasting of clips and keyframes for video filters and markers. It also uses proxy editing for high-resolution video files.
- Audio Features. Shotcut includes several audio filters for enhancing audio clips and volume control, audio mixing, tone generator, and pitch adjustment options.
- Video Effects. Shotcut offers a range of effects and filters, including blending modes, track compositing, and transitions. It also supports 360-degree filters, reverse video clips, and video scopes.
- Wide Support. Shotcut supports a variety of video and audio formats, as well as photo file formats. The multi-format timeline allows for the mixing of different parameters, and the software supports network streaming and alpha-channel videos.
Shotcut is a versatile video editor that offers a range of features for basic video editing and is a great choice for those looking for a free and open-source video editor.
How To Rotate Videos in Shotcut?
Rotating videos in Shotcut is a simple process. With its user-friendly interface, you can quickly and easily adjust the orientation of your videos to get the perfect shot every time. Whether you need to rotate your footage 90 degrees or make more subtle adjustments, Shotcut has all the tools you need to get the job done.
In this section, we’ll walk you through the steps to rotate your videos in Shotcut and provide you with tips and tricks to ensure that your footage is perfectly aligned every time. So, if you’re ready to rotate your videos, let’s get started!
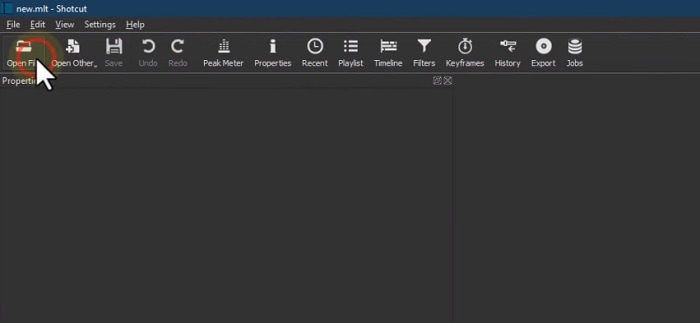
Step1 Start a new Shotcut project and import the video
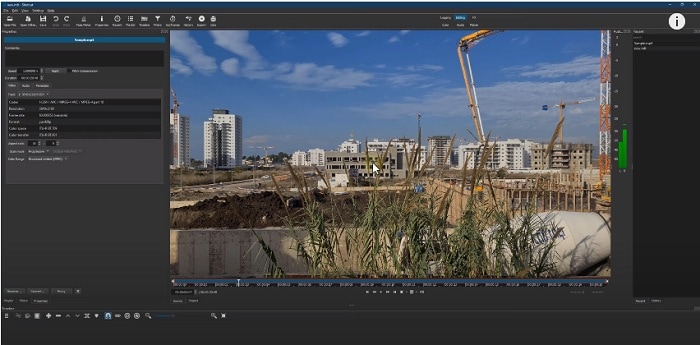
Step2 Drag the video to the Timeline
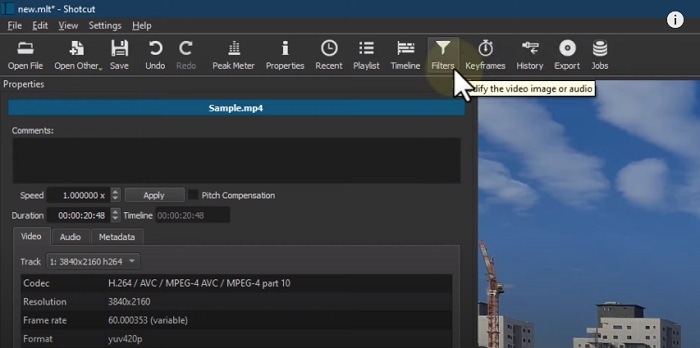
Step3 Go to “Filters“ and press the “+” icon
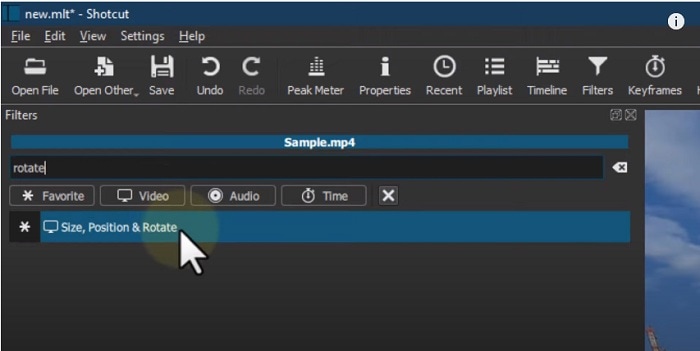
Step4 Search for “Rotate“ and select “Size, Position & Rotate.”
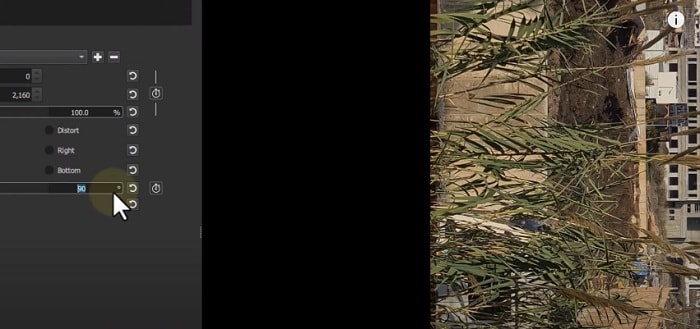
Step5 Use the bar or enter degrees in numbers to rotate the video.
How To Mirror or Flip Videos in Shotcut?
Do you want to flip or mirror your videos in Shotcut? This feature can add a creative twist to your footage and make your videos stand out. Luckily, Shotcut makes it easy to mirror or flip your videos with just a few simple steps.
Whether you want to add a reflection effect or change the direction of your footage, Shotcut has the tools you need to get the job done. So, get ready to take your videos to the next level with Shotcut’s mirroring and flipping capabilities!
For Steps 1-3, follow the steps from the “How To Rotate Videos in Shotcut?“ section.
Step4 Search for the “Mirror“ effect.
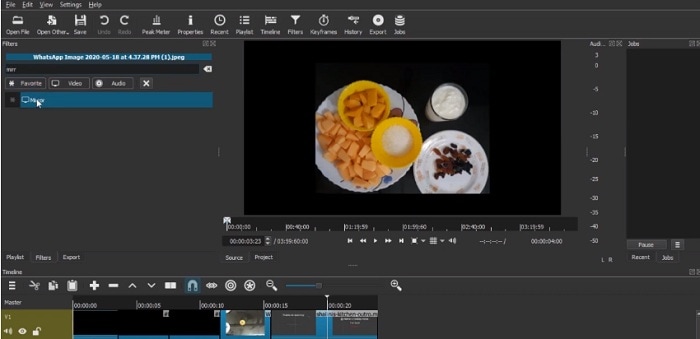
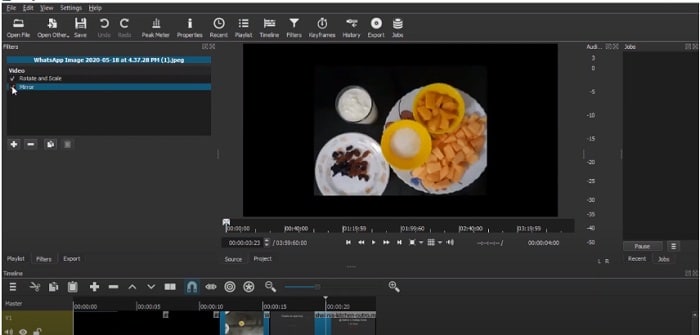
Step5 Select the “Mirror“ effect, and your video will be automatically flipped or mirrored.
How To Make a Vertical Video Horizontal in Shotcut
Are you tired of having a vertical video that doesn’t fit the standard aspect ratio? Don’t worry; Shotcut makes it easy to convert your vertical video into a horizontal format. By converting your vertical video into a horizontal format, you’ll be able to showcase your footage in a more professional and visually appealing manner.
In this section, we’ll walk you through making your vertical video horizontal in Shotcut. With these simple steps, you’ll be able to turn your vertical footage into a horizontal masterpiece in no time!
Step1 Drag the video to the timeline
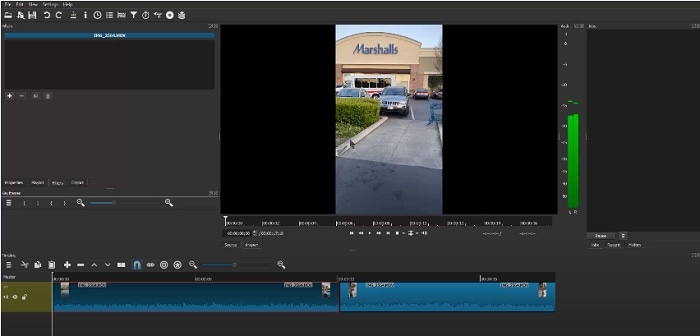
Step2 Go to “Filters“ and press the “+” icon. Search for the “Crop Source“ effect.
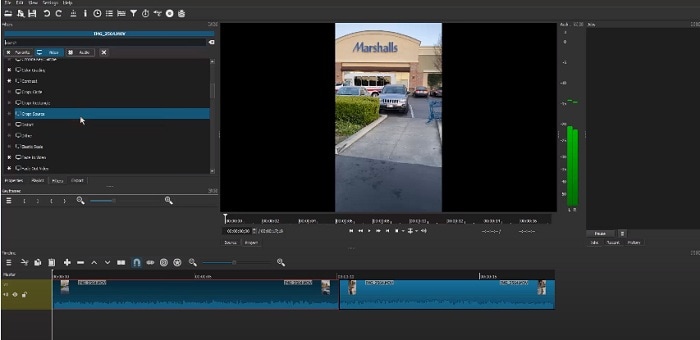
Step3 Toggle “Center“ and notice that it removed the black padding of the horizontal video.
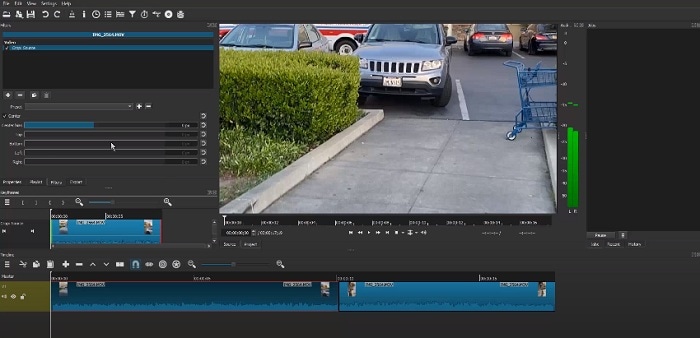
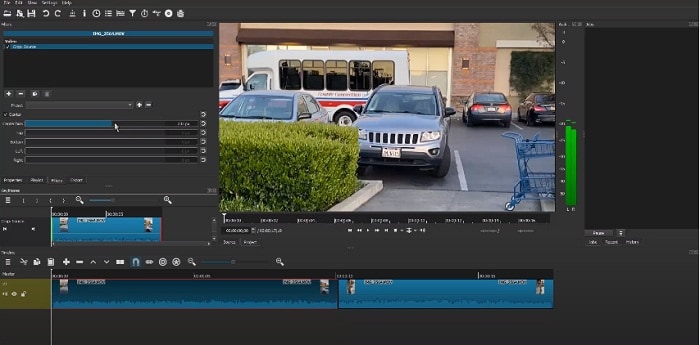
Step4 Adjust the part you want your video to focus on.
Wondershare Filmora – Shotcut’s Alternative To Rotate Videos
If you’re looking for an alternative to Shotcut for rotating your videos, consider Wondershare Filmora . This powerful video editing software is packed with features and is ideal for both beginners and professionals. While Shotcut is a great option for rotating videos, Filmora offers additional capabilities that make it an excellent choice for those who need a more advanced video editing solution.
Free Download For Win 7 or later(64-bit)
Free Download For macOS 10.14 or later

With Wondershare Filmora, you’ll be able to rotate your videos with ease, as well as perform a variety of other editing tasks. From adding music, filters, and text to splitting, trimming, and merging videos, Filmora has you covered.
Additionally, you’ll enjoy the user-friendly interface of Filmora that makes it easy to navigate and find the features you need. Whether you’re just starting with video editing or are a seasoned professional, Wondershare Filmora is the perfect solution for rotating videos and more.
How To Rotate or Flip a Video With Wondershare Filmora?
Wondershare Filmora is a great alternative to Shotcut for those looking to rotate or flip their video clips. It offers an intuitive and user-friendly interface, making rotating or flipping a video simple.
To mirror your video in Filmora, you follow a few easy steps. Whether you want to flip your video horizontally or vertically, Filmora’s rotating tool will help you achieve the perfect reflection with just a few clicks.
In addition to its rotating capabilities, Wondershare Filmora also offers a wide range of features for video editing. From basic video editing tools like trimming and cutting to advanced features like color correction and audio editing, Filmora has everything you need to take your video projects to the next level.
With its user-friendly interface and comprehensive feature set, Wondershare Filmora is a great option for anyone looking for an alternative to Shotcut for their video editing needs.
Step1 Choose between “Flip Horizontal“ or “Flip Vertical“ in the “Flip“ section to mirror the clip left to right or turn it upside down.

Step2 Select either the “Clockwise“ or “Counterclockwise“ icon under the “Rotate“ section to rotate the clip.

Step3 Enter a specific angle value in the “Rotate“ tab or adjust the dot in the circle to reach the desired rotation angle.

How To Make a Vertical Video Horizontal With Filmora?
Are you looking for a solution to convert a vertical video into a horizontal one? Filmora is a great video editing software that can help you do that!
Step1 Launch Filmora and import the video.

Step2 Drag the video to the timeline.

Step3 Right-click on the video and then click on “Crop and Zoom.”
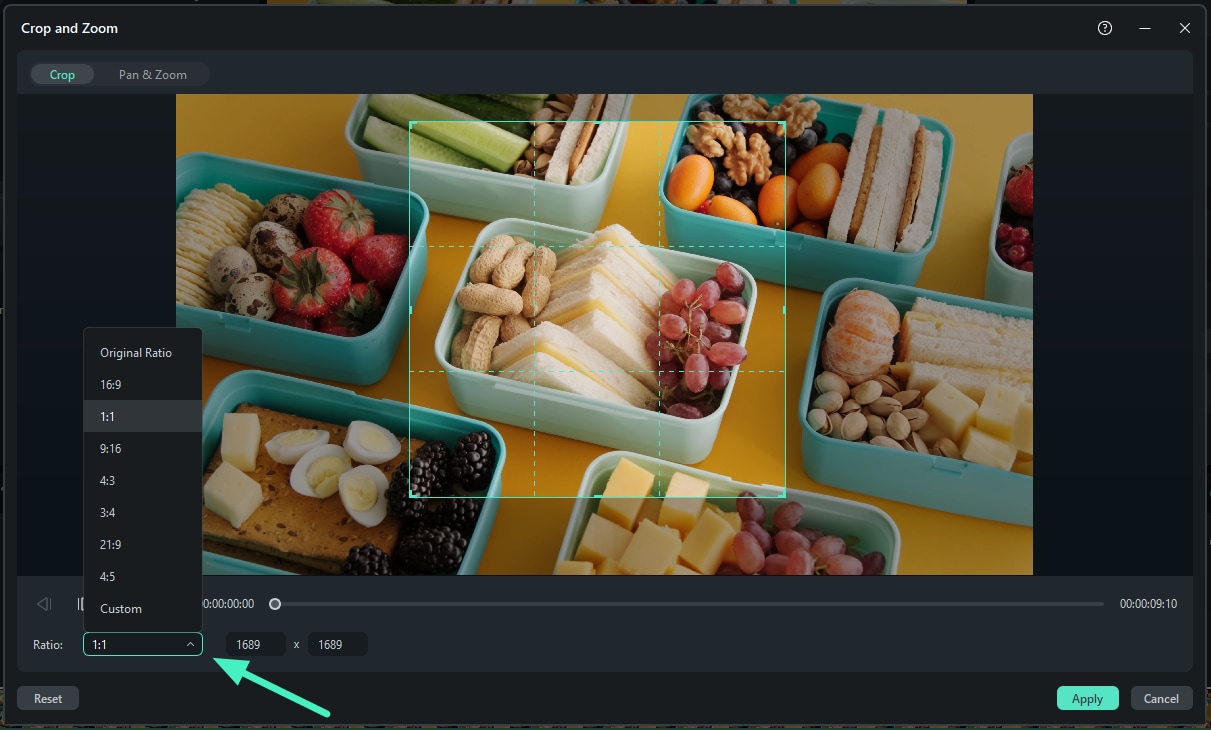
Step4 Click on the “Aspect Ratio“ option and change it to “16:9.”
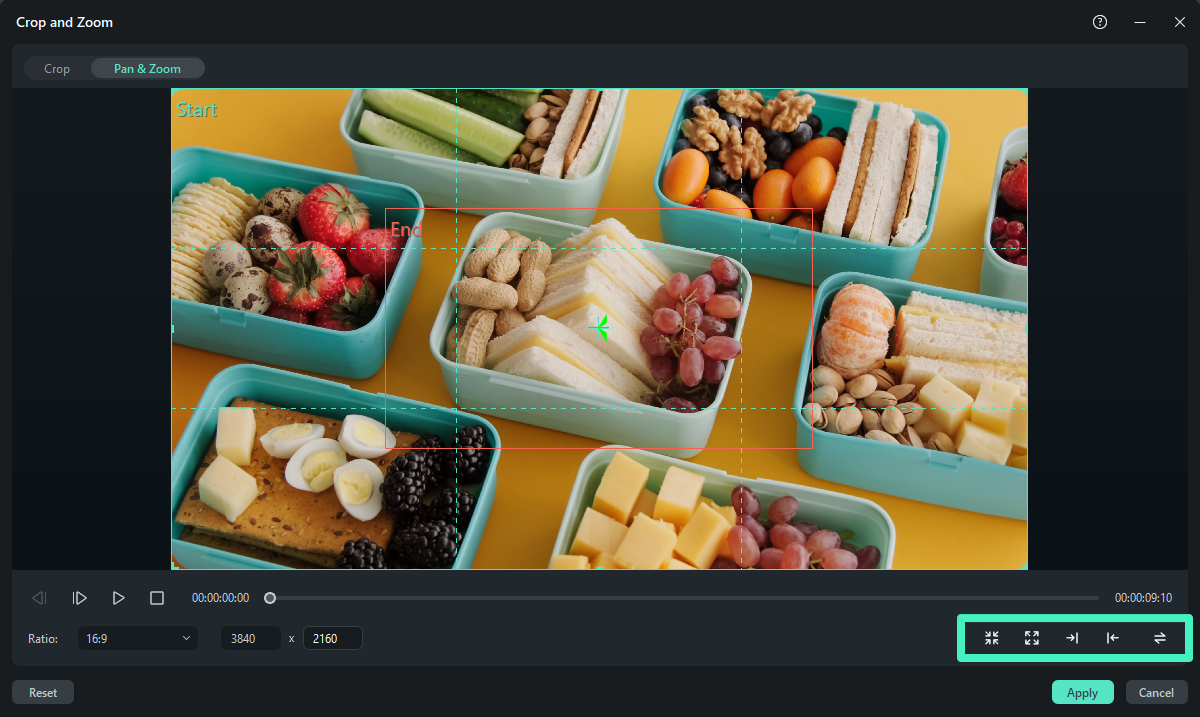
Step5 Keep the video part that you want to focus on, then click “OK.”
Step6 Your vertical video is now horizontal.
Conclusion
Rotating a video in Shotcut or Wondershare Filmora is a simple process. Both video editing software provides a user-friendly interface and various options to achieve the desired result. Shotcut and Filmora can help you achieve the perfect reflection with a few clicks, whether you want to rotate, flip, or make a horizontal or vertical video. So, choose the one that fits your needs and start creating stunning videos.
Free Download For macOS 10.14 or later

With Wondershare Filmora, you’ll be able to rotate your videos with ease, as well as perform a variety of other editing tasks. From adding music, filters, and text to splitting, trimming, and merging videos, Filmora has you covered.
Additionally, you’ll enjoy the user-friendly interface of Filmora that makes it easy to navigate and find the features you need. Whether you’re just starting with video editing or are a seasoned professional, Wondershare Filmora is the perfect solution for rotating videos and more.
How To Rotate or Flip a Video With Wondershare Filmora?
Wondershare Filmora is a great alternative to Shotcut for those looking to rotate or flip their video clips. It offers an intuitive and user-friendly interface, making rotating or flipping a video simple.
To mirror your video in Filmora, you follow a few easy steps. Whether you want to flip your video horizontally or vertically, Filmora’s rotating tool will help you achieve the perfect reflection with just a few clicks.
In addition to its rotating capabilities, Wondershare Filmora also offers a wide range of features for video editing. From basic video editing tools like trimming and cutting to advanced features like color correction and audio editing, Filmora has everything you need to take your video projects to the next level.
With its user-friendly interface and comprehensive feature set, Wondershare Filmora is a great option for anyone looking for an alternative to Shotcut for their video editing needs.
Step1 Choose between “Flip Horizontal“ or “Flip Vertical“ in the “Flip“ section to mirror the clip left to right or turn it upside down.

Step2 Select either the “Clockwise“ or “Counterclockwise“ icon under the “Rotate“ section to rotate the clip.

Step3 Enter a specific angle value in the “Rotate“ tab or adjust the dot in the circle to reach the desired rotation angle.

How To Make a Vertical Video Horizontal With Filmora?
Are you looking for a solution to convert a vertical video into a horizontal one? Filmora is a great video editing software that can help you do that!
Step1 Launch Filmora and import the video.

Step2 Drag the video to the timeline.

Step3 Right-click on the video and then click on “Crop and Zoom.”

Step4 Click on the “Aspect Ratio“ option and change it to “16:9.”

Step5 Keep the video part that you want to focus on, then click “OK.”
Step6 Your vertical video is now horizontal.
Conclusion
Rotating a video in Shotcut or Wondershare Filmora is a simple process. Both video editing software provides a user-friendly interface and various options to achieve the desired result. Shotcut and Filmora can help you achieve the perfect reflection with a few clicks, whether you want to rotate, flip, or make a horizontal or vertical video. So, choose the one that fits your needs and start creating stunning videos.
Also read:
- [New] In 2024, How To Deal with YouTube Trolls and Negative Comments
- Augmented Adventures: Strategies to Transform Your Dungeons & Dragons
- How to Cast Huawei Nova Y71 to Computer for iPhone and Android? | Dr.fone
- How to Overcome HAL Initialization Errors and Get Your PC Running Smoothly Again
- In 2024, How to Unlock a Network Locked Lava Blaze 2 Phone?
- In 2024, Stats Galore! Visualize YouTube's Fascinating Facts (2017)
- New 2024 Approved Have You Ever Used an Adjustment Layer in Photoshop? Read This Article to Find Out How to Add, Resize, Change, and Use an Adjustment Layer in Photoshop Efficiently
- New How to Zoom In and Out on Mac for 2024
- New Master Premiere Pro Custom Sequence Presets for 2024
- Passos Fáceis Para Extrair Audio De Um Filme Em Formato MKV
- Troubleshooting Guide for Unavailable DTS Channel in Preferred Device
- Updated 2024 Approved How to Zoom Webcam on PC
- Updated 2024 Approved Through Speed Ramping, Create a Smooth Transition in Slow-Motion Videos. Follow This Guide and Learn About Premiere Pro Slow Motion and a Better Alternative
- Updated 2024 Approved Use The Best LUTs for Lightroom
- Updated In 2024, What Should Be Considered to Choose A Nice GoPro for Vlogging?
- Title: Creative Ways to Add Green Screen Effects In Photoshop for 2024
- Author: Morgan
- Created at : 2024-10-03 17:24:29
- Updated at : 2024-10-05 19:15:16
- Link: https://ai-video-editing.techidaily.com/creative-ways-to-add-green-screen-effects-in-photoshop-for-2024/
- License: This work is licensed under CC BY-NC-SA 4.0.
