
:max_bytes(150000):strip_icc():format(webp)/samsung-smart-tv-lifestyle-alt-5c89160046e0fb00013365c2.jpg)
Deep Learning of AI Video Recognition for 2024
Deep Learning of AI Video Recognition - Guide
Deep Learning of AI Video Recognition
An easy yet powerful editor
Numerous effects to choose from
Detailed tutorials provided by the official channel
Artificial Intelligence (AI) software is used to mimic human behavior by learning various insights and data patterns. High features of AI software should include speech and voice recognition, machine learning, virtual assistants, etc. In addition, AI software combined with machine learning can provide various users with the required functionality to simplify the business process.

AI software can develop and build an intelligent application from the beginning with the help of deep learning capabilities and Machine learning. In addition, video recognition AI is the machine’s capacity to analyze, obtain, and process information that it receives from a visual source, specifically video. The video recognition systems help computers comprehend the information received in the large volumes of video feeds, frame by frame.
In this article
01 [What is AI Video Recognition and How Does Video Recognition Work?](#Part 1)
02 [Difference Between AI Video Recognition and Facial Recognition?](#Part 2)
03 [Understanding 6 Top Video Recognition Software](#Part 3)
Part 1 What is AI Video Recognition and How Does Video Recognition Work?
AI Video Recognition is the capability of machines to obtain, analyze, and process information received from videos. It allows us to quickly assess video data by detecting objects, behaviors, people, and vehicles of concern.
In today’s world, we all look at video as a piece of critical evidence used in different situations such as security investigations and law enforcement because it holds a lot of valuable data. In addition, video is seen as a very unclear format lacking context, scheme, and structure, making it hard to deal with. But with the use of AI in machines, you can effectively handle data with video recognition.
Also, video recognition is not the same as facial or image recognition, regardless of its name, even though they are interrelated. Video recognition is referred to as video content analysis or intelligent video analytics because it entails many tasks. Thus, AI is used in video recognition to rapidly reduce the time for research from weeks or months to seconds and process mass video data.
Video recognition employs AI to complete the tasks by applying enhanced deep learning (DL) and computer vision (CV) models to live video streams or recorded video footage. The following are the most common ways AI video recognition works:
● Classification of Image: It allows the selection of the right category for a video
● Localization: It helps to locate a target object in the video
● Detection of Object: Categorize and locate the object in the video
● Identification of Object: Instances of the object of interest
● Tracking of Object: It can track the object’s trajectory, which will change in the video.

Part 2 Difference Between AI Video Recognition and Facial Recognition?
Video recognition AI primarily focuses on comprehending the information or data received from many video feeds, frame by frame. It is the ability to use Artificial Intelligence to quickly process mass video data and reduce the required time for analysis.
Alternatively, facial recognition describes a biometric technology beyond recognizing when a human face is present (Facial detection). Facial recognition attempts to establish the owner of a particular face. AI Facial recognition works by quickly utilizing a computer application that captures an individual’s face’s digital image, sometimes taken from a video frame, and compares it to images stored in the database records.

Part 3 Understanding 6 Top Video Recognition Software
Video Recognition AI Software (VRS) is an AI-powered software that works with digital video surveillance systems to recognize and detect threats. In addition, these threats can be single objects like knives and guns or more complex disturbances and crowd movements. However, the software does not aim to replace the eye of security personnel but to focus their eyes.
01Nova A.I.
This software employs various audio and video recognition technologies to categorize and understand even the most minor details within your content.
Features of Nova A.I
● Analyze: It extracts and discovers every vital moment with computer vision technologies.
● Index: Allows the storage of newly found metadata within your cloud account.
● Awareness: Discover where and when certain content concept appears in your video. It helps understand the in and out of the video.
● Leverage: Utilization of various recognition technologies to leverage all library content instantly
● Differentiate between human speech from the vast pool of sounds available in your video.

02Sensifai
This software uses AI tools to recognize live images and videos. It also aims to identify logos, attributes, nudity, actions, scenes, objects, celebrities, and landmarks.
Features of Sensifai
● It finds and tags drinking, nudity, smoking, violence, and swearwords in videos and images.
● Sensifai recognizes and tags millions of actions, attributes, concepts, objects, and sports in your images and videos.
● It recognizes explosions, fire, unknown person on your property, and suspicious sounds, including window and cry breaking.
● It can also add sub-title automatically to your audio and video files and make them searchable.
● It can permanently monitor your loved ones when they are all alone and receive an alarm when you feel there is a threat.

03Object Detection
This AI-powered software turns your computer into a powerful video-security system by allowing you to watch what is going on remotely in your business or home.
Features of Object Detection
● The intelligent subsystem can single-handedly detect IP cameras and connects them to the application.
● It enriches video surveillance with artificial intelligence to recognize objects in real-time.
● It has a web camera cloud that helps use video surveillance based on artificial intelligence.
● Perfect for video surveillance cloud
● The software will automatically upload the video to Telegram messenger or YouTube during specific events.

04Cloud Video Intelligence API
This powerful AI, video recognition software, powered by Google Cloud, enables powerful content discovery and engaging video experiences.
Features of Cloud Video Intelligence API
● Allows for precise video analysis that helps to recognize over 20,000 places, objects, places, and actions in a video
● It helps to extract rich metadata at the video frame level or shot
● Assists in the creation of custom personal entity labels with AutoML Video Intelligence
● Gain near real-time insights with object-based event triggers and streaming video annotation
● Helps in building engaging customer experiences with recommendations, highlight reels, etc.

05Valossa
Valossa is an AI software that helps to reveal the real meaning of content inside audio and visual data. This cognitive AI helps video-based businesses to manage and grow their business safely.
Features of Valossa
● Perfect software for businesses working with video
● This video recognition software is available as an on-premise and SaaS service software solution.
● The AI technology combines recognition with high-level semantic inferencing and multimodal video analysis to make sense of video content data.
● It helps to profile videos for contextual advertising.
● Allows the application of AI automation for immersive video on demand (VOD) and over-the-top (OTT) user experiences.

06Thetake.ai
This software harnesses machine learning to identify people and products in a video automatically. It is an artificial intelligence tool that understands the video.
Features of Thetakeai
● Perfect for Content Creators and Hardware Manufacturers to Power Shoppable Content.
● Provides efficiency for viewers in identifying the products they discover in the content they love
● It helps in improving the viewer’s experience
● Transform ways in product discovery and content engagement
● More focused on problem-solving

07****Wondershare Filmora Video Editor **
Filmora’s new update brings a set of exclusive features with which you can create high-quality AI videos with a touch of a few fingers.
For Win 7 or later (64-bit)
For macOS 10.12 or later
For example, you can add effects to a particular object by pinpointing its movement with its motion tracking feature. Similarly, its new Speed Ramping feature assists you in adjusting the speed of the video and lets you create incredible movie-like effects. You can add music to your game video with its Auto Beat Sync feature, and the Instant Mode will help you complete your video recognition AI mode in minutes.
● Ending Thoughts →
● First, we learned what AI is and how AI recognition works.
● Then, we compared AI recognition with Facial recognition.
● The report also listed the top 6 AI recognition software you should know and
● Lastly, we recommended Filmora as the best software for editing videos recognition with AI software.
● So, try out an AI video recognition today and see the incredible magic.
Artificial Intelligence (AI) software is used to mimic human behavior by learning various insights and data patterns. High features of AI software should include speech and voice recognition, machine learning, virtual assistants, etc. In addition, AI software combined with machine learning can provide various users with the required functionality to simplify the business process.
AI software can develop and build an intelligent application from the beginning with the help of deep learning capabilities and Machine learning. In addition, video recognition AI is the machine’s capacity to analyze, obtain, and process information that it receives from a visual source, specifically video. The video recognition systems help computers comprehend the information received in the large volumes of video feeds, frame by frame.
In this article
01 [What is AI Video Recognition and How Does Video Recognition Work?](#Part 1)
02 [Difference Between AI Video Recognition and Facial Recognition?](#Part 2)
03 [Understanding 6 Top Video Recognition Software](#Part 3)
Part 1 What is AI Video Recognition and How Does Video Recognition Work?
AI Video Recognition is the capability of machines to obtain, analyze, and process information received from videos. It allows us to quickly assess video data by detecting objects, behaviors, people, and vehicles of concern.
In today’s world, we all look at video as a piece of critical evidence used in different situations such as security investigations and law enforcement because it holds a lot of valuable data. In addition, video is seen as a very unclear format lacking context, scheme, and structure, making it hard to deal with. But with the use of AI in machines, you can effectively handle data with video recognition.
Also, video recognition is not the same as facial or image recognition, regardless of its name, even though they are interrelated. Video recognition is referred to as video content analysis or intelligent video analytics because it entails many tasks. Thus, AI is used in video recognition to rapidly reduce the time for research from weeks or months to seconds and process mass video data.
Video recognition employs AI to complete the tasks by applying enhanced deep learning (DL) and computer vision (CV) models to live video streams or recorded video footage. The following are the most common ways AI video recognition works:
● Classification of Image: It allows the selection of the right category for a video
● Localization: It helps to locate a target object in the video
● Detection of Object: Categorize and locate the object in the video
● Identification of Object: Instances of the object of interest
● Tracking of Object: It can track the object’s trajectory, which will change in the video.
Part 2 Difference Between AI Video Recognition and Facial Recognition?
Video recognition AI primarily focuses on comprehending the information or data received from many video feeds, frame by frame. It is the ability to use Artificial Intelligence to quickly process mass video data and reduce the required time for analysis.
Alternatively, facial recognition describes a biometric technology beyond recognizing when a human face is present (Facial detection). Facial recognition attempts to establish the owner of a particular face. AI Facial recognition works by quickly utilizing a computer application that captures an individual’s face’s digital image, sometimes taken from a video frame, and compares it to images stored in the database records.
Part 3 Understanding 6 Top Video Recognition Software
Video Recognition AI Software (VRS) is an AI-powered software that works with digital video surveillance systems to recognize and detect threats. In addition, these threats can be single objects like knives and guns or more complex disturbances and crowd movements. However, the software does not aim to replace the eye of security personnel but to focus their eyes.
01Nova A.I.
This software employs various audio and video recognition technologies to categorize and understand even the most minor details within your content.
Features of Nova A.I
● Analyze: It extracts and discovers every vital moment with computer vision technologies.
● Index: Allows the storage of newly found metadata within your cloud account.
● Awareness: Discover where and when certain content concept appears in your video. It helps understand the in and out of the video.
● Leverage: Utilization of various recognition technologies to leverage all library content instantly
● Differentiate between human speech from the vast pool of sounds available in your video.
02Sensifai
This software uses AI tools to recognize live images and videos. It also aims to identify logos, attributes, nudity, actions, scenes, objects, celebrities, and landmarks.
Features of Sensifai
● It finds and tags drinking, nudity, smoking, violence, and swearwords in videos and images.
● Sensifai recognizes and tags millions of actions, attributes, concepts, objects, and sports in your images and videos.
● It recognizes explosions, fire, unknown person on your property, and suspicious sounds, including window and cry breaking.
● It can also add sub-title automatically to your audio and video files and make them searchable.
● It can permanently monitor your loved ones when they are all alone and receive an alarm when you feel there is a threat.
03Object Detection
This AI-powered software turns your computer into a powerful video-security system by allowing you to watch what is going on remotely in your business or home.
Features of Object Detection
● The intelligent subsystem can single-handedly detect IP cameras and connects them to the application.
● It enriches video surveillance with artificial intelligence to recognize objects in real-time.
● It has a web camera cloud that helps use video surveillance based on artificial intelligence.
● Perfect for video surveillance cloud
● The software will automatically upload the video to Telegram messenger or YouTube during specific events.
04Cloud Video Intelligence API
This powerful AI, video recognition software, powered by Google Cloud, enables powerful content discovery and engaging video experiences.
Features of Cloud Video Intelligence API
● Allows for precise video analysis that helps to recognize over 20,000 places, objects, places, and actions in a video
● It helps to extract rich metadata at the video frame level or shot
● Assists in the creation of custom personal entity labels with AutoML Video Intelligence
● Gain near real-time insights with object-based event triggers and streaming video annotation
● Helps in building engaging customer experiences with recommendations, highlight reels, etc.
05Valossa
Valossa is an AI software that helps to reveal the real meaning of content inside audio and visual data. This cognitive AI helps video-based businesses to manage and grow their business safely.
Features of Valossa
● Perfect software for businesses working with video
● This video recognition software is available as an on-premise and SaaS service software solution.
● The AI technology combines recognition with high-level semantic inferencing and multimodal video analysis to make sense of video content data.
● It helps to profile videos for contextual advertising.
● Allows the application of AI automation for immersive video on demand (VOD) and over-the-top (OTT) user experiences.
06Thetake.ai
This software harnesses machine learning to identify people and products in a video automatically. It is an artificial intelligence tool that understands the video.
Features of Thetakeai
● Perfect for Content Creators and Hardware Manufacturers to Power Shoppable Content.
● Provides efficiency for viewers in identifying the products they discover in the content they love
● It helps in improving the viewer’s experience
● Transform ways in product discovery and content engagement
● More focused on problem-solving
07****Wondershare Filmora Video Editor **
Filmora’s new update brings a set of exclusive features with which you can create high-quality AI videos with a touch of a few fingers.
For Win 7 or later (64-bit)
For macOS 10.12 or later
For example, you can add effects to a particular object by pinpointing its movement with its motion tracking feature. Similarly, its new Speed Ramping feature assists you in adjusting the speed of the video and lets you create incredible movie-like effects. You can add music to your game video with its Auto Beat Sync feature, and the Instant Mode will help you complete your video recognition AI mode in minutes.
● Ending Thoughts →
● First, we learned what AI is and how AI recognition works.
● Then, we compared AI recognition with Facial recognition.
● The report also listed the top 6 AI recognition software you should know and
● Lastly, we recommended Filmora as the best software for editing videos recognition with AI software.
● So, try out an AI video recognition today and see the incredible magic.
Online Calculate and Change Video Aspect Ratio
Versatile Video Editor - Wondershare Filmora
An easy yet powerful editor
Numerous effects to choose from
Detailed tutorials provided by the official channel
While watching movies, you might have noticed specific clips have black lines at the sides of the screen. It is because the original video’s aspect ratio is different from that of the screen on which you see it.
Nowadays, people are using multiple devices with different aspect ratios. Videos are an effective marketing tool that most marketers are using to expand their business. Therefore, the video aspect ratio has become vital.
Some people feel technical aspects such as video aspect ratio or using aspect ratio editor are a bit intimidating. But they are easy and simple to understand. So, let us know more about them.
In this article
01 [How to Calculate Video Aspect Ratio Online?](#Part 1)
02 [Websites to Change Video Aspect Ratio Online](#Part 2)
Part 1 How to Calculate Video Aspect Ratio Online?
Do you want to make changes to the video? If yes, then it is important to understand the basic concepts of video aspect ratios. Moreover, you can determine the specifications using an aspect ratio editor online.
Every photo, canvas, responsive design, digital video, or frame is rectangular with precise proportions. Outline the aspect ratios to create shapes according to different mediums like computers, TV, movies, or camera screens.
With the help of aspect ratio calculators, you can calculate the image’s value and new size. You can also use it to convert the image size and keep the objects in shape to make them look natural.
The formula to find an aspect ratio is: Width / Height
Aspect Ratio Calculation Process
Calculating the aspect resolution is pretty straightforward. The steps mentioned below will help you to get the correct height for the edited image:
- Take the original height-for example, 2400 units.
- Take the actual width- for example, 3200 units.
- Then, divide the height by width- for example, 2400/3200=0.75.
- Multiply the result (quotient) by new expected width- for instance, 0.75*600=450.
- The resulting figure is a new height.
Part 2 Websites to Change Video Aspect Ratio Online
If you want to change the video aspect ratio, you can easily crop the size of the video online with the help of different websites. These websites offer other aspect ratio options. So, let us learn more about them:
Free Convert

FreeConvert.com is a free editing website that allows you to edit video aspect ratio online. Usually, it is a cloud-based editor that converts a variety of files. So, you can use it to change the video aspect ratio of your clip.
You can see various options such as aspect ratio, codec, screen resolution, or more during video file conversion. For example, you can opt for an aspect ratio as per your requirements there.
Then, this converter will fix the clip automatically in the resolution selected by you. This website can process multiple files up to 1GB at once.
Pros:
- No Pop-ups occur while converting
- It did not affect the download speed
- Easy to convert the files
Cons:
- You have a limit of 25 minutes to convert files. After that, you need to upgrade to pro by making monthly payments.
CloudConvert

Cloud Convert is a file conversion service supporting around 200 file formats online for free. You can adjust the aspect ratio of videos on this website easily.
You have to upload a video clip and select its output format as per your original file. Then go to output video configuration to change the aspect ratio there. Choose the aspect ratio from the options given.
Pros:
- Several conversion options for high-quality files
- Supports cloud services
- Platform independent
- User-friendly
- Supports batch conversion
- It offers a powerful API
Cons:
- Get 25 minutes a day to convert the files
Kapwing

It is a free online aspect ratio editor to create content online. This tool has several features and a collection of online material. For example, through this aspect ratio editor, you can crop the size of video online.
You can select or resize video aspect ratio according to different social media platforms. But you can export only 720 p quality through this website for free after that; you have to create an account.
Pros:
- Merge multiple videos or images collectively in any order and add audio.
- Reduce the video size of any format with a single click.
- Add video subtitles
- Resize or crop videos for all social media posts.
- Cut out multiple sections of a video.
Cons:
- 250MB file upload limit
- Export only in 720p quality
- Export video clips for 7 minutes
- Edit or store content till two days
IMOVIE

Try the iMovie iPhone aspect ratio editor if you want to drag or drop the interface for editing videos simply. It has primitive tools to edit videos or images, and you can also import content from local drives or cloud storage with it.
It offers various visual effects like picture-in-picture, split-screen, or green screen effects. You can also enable viewers to zoom in or pass the scenes. Imovie set aspect ratio gives videos a cinematic feel using its 13 different video filters.
Pros:
- It has a simple interface.
- Its 4K resolution support allows you to give a cinematic feel to videos.
- iMovie has great speed controls that enable you for optimal pace-setting of scenes.
Cons:
- It does not have many output controls options.
- It only works on Mac systems.
Wondershare Filmora
If you permanently want to change the aspect ratio online, you must opt for a video converter or editor. Wondershare Filmora is the most remarkable aspect ratio editor that allows you to easily create videos of 4:3, 9:16, 16:9, and 1:1 aspect ratios.
Moreover, it is a convenient tool to edit videos on YouTube, Apple TV, Vimeo, or mobile devices. So, many YouTubers or bloggers are using it.
It is a reliable and cost-effective tool that offers drop and drag effects, audio, templates, soundtracks, filters, and other options. In addition, you can access features like split-screen, green screen, motion tracking, etc.
Its keyframing feature allows you to include custom animations, while motion tracking helps you track objects. Then, the color matching feature enables you to copy the color settings of one video and apply them to another clip.
You can even assign hotkeys shortcuts for various tools to save your time. Moreover, you can use different transitions, motion elements, filters, clips, titles, audios, and many other things with a simple drag and drop option.
Wondershare Filmora
Get started easily with Filmora’s powerful performance, intuitive interface, and countless effects!
Try It Free Try It Free Try It Free Learn More >

With its green screen feature, you can remove or change the video background. Then, you have an audio ducking feature to lower down the background volume or fade the audio track to another.
Here are various methods to change the aspect ratio in Wondershare Filmora:
Method 1: Change Aspect Ratio at the Starting Interface
Wondershare Filmora allows you to resize video aspect ratio when you launch the editor program. First, go to the drop-down menu button. Then, click on it to see various aspect ratios such as 16:9, 1:1, 4:3, 9:16, or 21:9.
Choose the aspect ratio that you want by simply clicking on it.

Method 2: Change Aspect Ratio under Project Settings
You can change the aspect ratio by clicking on the “Project Settings.” You can decide the target aspect ratio based on the aspect ratio of the media source.
For instance, if the aspect ratio of media source files is 4:3, select the standard aspect ratio of 4:3. Then, media files with other aspect ratios will show black bars.
In case of any discordance or if you want to change the aspect ratio, choose the proper ratio from project settings.

Method 3: Change Aspect Ratio during Editing
Even after importing the videos or images into Filmora’s timeline, you can easily change the ratio from the Crop and Zoom tool.
- Go to timeline and right-click on the video clip. Then, select “Crop and Zoom.” You will see the pop-up window.
- Click on 16:9, 4:3, 1:1, or 9:16 manually at the bottom if you like to change the video aspect ratio.
- You can also manually enter the video aspect ratio. Next, click on the “Ok” button.

After changing the aspect ratio, add background blur effects if you notice a black bar. It will enhance the video. You can also intensify your video by using filters, visual effects, overlays, or titles.

Method 4: Change the Aspect Ratio with Auto-Reframe
If you use Filmora’s latest versions, you will notice Auto Reframe helps to change the aspect ratio. Other than cropping, it will find the object in clips and crop it automatically if needed.
The following are steps to change the aspect ratio using the Auto-Reframe option:
Step1 Once you upload the video clips to the media library, right-click on it and choose the Auto-Reframe option

Step2 You will see the Auto Reframe window appear on the screen. Replace the existing video with a new clip. Then, change the video aspect ratio and video motion speed. Make sure to change the aspect ratio that fits most with different social media platforms

Step3 Once you choose the aspect ratio, click on the “Analyze” button. Filmora will Auto-Reframe the video itself. Once the process completes, you can see results in the preview window
Drag box to adjust the frame or to keep the object in it. It will automatically remove the content outside the box.

Step4 After completing adjustment or reframing, click on the “Export” button to save your video
Change the name of the video and select the location where you want to save the video. Now, click on the “Export” again to save.

Method 5: Change Aspect Ratio at Exporting
You can save the clip to your system or smartphones, depending on your requirements. Then, upload them directly to Youtube or burn them into DVD by clicking on the “Export button.” In this way, you can watch on widescreen or standard TV whenever you want.

● Change Aspect Ratio for the Local Computer
First, you will see the “Local” tab. There you can save the clip in a particular aspect ratio to your system.
You can see all resolutions with various aspect ratios after selecting the format. The output video depends on the media click resolution.
● Change Aspect Ratio for a Device
Change the “Device” tab to save the video in formats compatible with popular devices, including iPod, iPhone, PSP, iPad, etc. Once you choose the device, you will see all resolutions. Choose your favorite or the best resolution.
The video quality will continue improving with higher resolutions. But it will also increase the size of the file.
● Change Aspect Ratio for YouTube
Go to the “YouTube” tab and fill in the information. Then, click the “Export” button. Selecting the aspect ratio again is not necessary. It will directly upload your videos to YouTube.
● Change Aspect Ratio for DVD TV
When you go to the “DVD” tab, you will notice various aspect ratio options. Switching the aspect ratio for TV from 4:3 to 16:9 is pretty straightforward. To do so, select what you think is right.
Conclusion
From the article above, you have learned about different online converters. Now you know how to change the video aspect ratio online and use the video aspect ratio editor. Also, understand how to calculate aspect ratios.
So, you can decide for yourself that Wondershare Filmora video editor is one of the best tools. Using its different methods you can change the aspect ratio easily.
Furthermore, you can use it to make changes on both social media platforms and your devices because it is an effective and reliable tool.
For Win 7 or later (64-bit)
For macOS 10.12 or later
While watching movies, you might have noticed specific clips have black lines at the sides of the screen. It is because the original video’s aspect ratio is different from that of the screen on which you see it.
Nowadays, people are using multiple devices with different aspect ratios. Videos are an effective marketing tool that most marketers are using to expand their business. Therefore, the video aspect ratio has become vital.
Some people feel technical aspects such as video aspect ratio or using aspect ratio editor are a bit intimidating. But they are easy and simple to understand. So, let us know more about them.
In this article
01 [How to Calculate Video Aspect Ratio Online?](#Part 1)
02 [Websites to Change Video Aspect Ratio Online](#Part 2)
Part 1 How to Calculate Video Aspect Ratio Online?
Do you want to make changes to the video? If yes, then it is important to understand the basic concepts of video aspect ratios. Moreover, you can determine the specifications using an aspect ratio editor online.
Every photo, canvas, responsive design, digital video, or frame is rectangular with precise proportions. Outline the aspect ratios to create shapes according to different mediums like computers, TV, movies, or camera screens.
With the help of aspect ratio calculators, you can calculate the image’s value and new size. You can also use it to convert the image size and keep the objects in shape to make them look natural.
The formula to find an aspect ratio is: Width / Height
Aspect Ratio Calculation Process
Calculating the aspect resolution is pretty straightforward. The steps mentioned below will help you to get the correct height for the edited image:
- Take the original height-for example, 2400 units.
- Take the actual width- for example, 3200 units.
- Then, divide the height by width- for example, 2400/3200=0.75.
- Multiply the result (quotient) by new expected width- for instance, 0.75*600=450.
- The resulting figure is a new height.
Part 2 Websites to Change Video Aspect Ratio Online
If you want to change the video aspect ratio, you can easily crop the size of the video online with the help of different websites. These websites offer other aspect ratio options. So, let us learn more about them:
Free Convert
FreeConvert.com is a free editing website that allows you to edit video aspect ratio online. Usually, it is a cloud-based editor that converts a variety of files. So, you can use it to change the video aspect ratio of your clip.
You can see various options such as aspect ratio, codec, screen resolution, or more during video file conversion. For example, you can opt for an aspect ratio as per your requirements there.
Then, this converter will fix the clip automatically in the resolution selected by you. This website can process multiple files up to 1GB at once.
Pros:
- No Pop-ups occur while converting
- It did not affect the download speed
- Easy to convert the files
Cons:
- You have a limit of 25 minutes to convert files. After that, you need to upgrade to pro by making monthly payments.
CloudConvert
Cloud Convert is a file conversion service supporting around 200 file formats online for free. You can adjust the aspect ratio of videos on this website easily.
You have to upload a video clip and select its output format as per your original file. Then go to output video configuration to change the aspect ratio there. Choose the aspect ratio from the options given.
Pros:
- Several conversion options for high-quality files
- Supports cloud services
- Platform independent
- User-friendly
- Supports batch conversion
- It offers a powerful API
Cons:
- Get 25 minutes a day to convert the files
Kapwing
It is a free online aspect ratio editor to create content online. This tool has several features and a collection of online material. For example, through this aspect ratio editor, you can crop the size of video online.
You can select or resize video aspect ratio according to different social media platforms. But you can export only 720 p quality through this website for free after that; you have to create an account.
Pros:
- Merge multiple videos or images collectively in any order and add audio.
- Reduce the video size of any format with a single click.
- Add video subtitles
- Resize or crop videos for all social media posts.
- Cut out multiple sections of a video.
Cons:
- 250MB file upload limit
- Export only in 720p quality
- Export video clips for 7 minutes
- Edit or store content till two days
IMOVIE
Try the iMovie iPhone aspect ratio editor if you want to drag or drop the interface for editing videos simply. It has primitive tools to edit videos or images, and you can also import content from local drives or cloud storage with it.
It offers various visual effects like picture-in-picture, split-screen, or green screen effects. You can also enable viewers to zoom in or pass the scenes. Imovie set aspect ratio gives videos a cinematic feel using its 13 different video filters.
Pros:
- It has a simple interface.
- Its 4K resolution support allows you to give a cinematic feel to videos.
- iMovie has great speed controls that enable you for optimal pace-setting of scenes.
Cons:
- It does not have many output controls options.
- It only works on Mac systems.
Wondershare Filmora
If you permanently want to change the aspect ratio online, you must opt for a video converter or editor. Wondershare Filmora is the most remarkable aspect ratio editor that allows you to easily create videos of 4:3, 9:16, 16:9, and 1:1 aspect ratios.
Moreover, it is a convenient tool to edit videos on YouTube, Apple TV, Vimeo, or mobile devices. So, many YouTubers or bloggers are using it.
It is a reliable and cost-effective tool that offers drop and drag effects, audio, templates, soundtracks, filters, and other options. In addition, you can access features like split-screen, green screen, motion tracking, etc.
Its keyframing feature allows you to include custom animations, while motion tracking helps you track objects. Then, the color matching feature enables you to copy the color settings of one video and apply them to another clip.
You can even assign hotkeys shortcuts for various tools to save your time. Moreover, you can use different transitions, motion elements, filters, clips, titles, audios, and many other things with a simple drag and drop option.
Wondershare Filmora
Get started easily with Filmora’s powerful performance, intuitive interface, and countless effects!
Try It Free Try It Free Try It Free Learn More >
With its green screen feature, you can remove or change the video background. Then, you have an audio ducking feature to lower down the background volume or fade the audio track to another.
Here are various methods to change the aspect ratio in Wondershare Filmora:
Method 1: Change Aspect Ratio at the Starting Interface
Wondershare Filmora allows you to resize video aspect ratio when you launch the editor program. First, go to the drop-down menu button. Then, click on it to see various aspect ratios such as 16:9, 1:1, 4:3, 9:16, or 21:9.
Choose the aspect ratio that you want by simply clicking on it.
Method 2: Change Aspect Ratio under Project Settings
You can change the aspect ratio by clicking on the “Project Settings.” You can decide the target aspect ratio based on the aspect ratio of the media source.
For instance, if the aspect ratio of media source files is 4:3, select the standard aspect ratio of 4:3. Then, media files with other aspect ratios will show black bars.
In case of any discordance or if you want to change the aspect ratio, choose the proper ratio from project settings.
Method 3: Change Aspect Ratio during Editing
Even after importing the videos or images into Filmora’s timeline, you can easily change the ratio from the Crop and Zoom tool.
- Go to timeline and right-click on the video clip. Then, select “Crop and Zoom.” You will see the pop-up window.
- Click on 16:9, 4:3, 1:1, or 9:16 manually at the bottom if you like to change the video aspect ratio.
- You can also manually enter the video aspect ratio. Next, click on the “Ok” button.
After changing the aspect ratio, add background blur effects if you notice a black bar. It will enhance the video. You can also intensify your video by using filters, visual effects, overlays, or titles.
Method 4: Change the Aspect Ratio with Auto-Reframe
If you use Filmora’s latest versions, you will notice Auto Reframe helps to change the aspect ratio. Other than cropping, it will find the object in clips and crop it automatically if needed.
The following are steps to change the aspect ratio using the Auto-Reframe option:
Step1 Once you upload the video clips to the media library, right-click on it and choose the Auto-Reframe option
Step2 You will see the Auto Reframe window appear on the screen. Replace the existing video with a new clip. Then, change the video aspect ratio and video motion speed. Make sure to change the aspect ratio that fits most with different social media platforms
Step3 Once you choose the aspect ratio, click on the “Analyze” button. Filmora will Auto-Reframe the video itself. Once the process completes, you can see results in the preview window
Drag box to adjust the frame or to keep the object in it. It will automatically remove the content outside the box.
Step4 After completing adjustment or reframing, click on the “Export” button to save your video
Change the name of the video and select the location where you want to save the video. Now, click on the “Export” again to save.
Method 5: Change Aspect Ratio at Exporting
You can save the clip to your system or smartphones, depending on your requirements. Then, upload them directly to Youtube or burn them into DVD by clicking on the “Export button.” In this way, you can watch on widescreen or standard TV whenever you want.
● Change Aspect Ratio for the Local Computer
First, you will see the “Local” tab. There you can save the clip in a particular aspect ratio to your system.
You can see all resolutions with various aspect ratios after selecting the format. The output video depends on the media click resolution.
● Change Aspect Ratio for a Device
Change the “Device” tab to save the video in formats compatible with popular devices, including iPod, iPhone, PSP, iPad, etc. Once you choose the device, you will see all resolutions. Choose your favorite or the best resolution.
The video quality will continue improving with higher resolutions. But it will also increase the size of the file.
● Change Aspect Ratio for YouTube
Go to the “YouTube” tab and fill in the information. Then, click the “Export” button. Selecting the aspect ratio again is not necessary. It will directly upload your videos to YouTube.
● Change Aspect Ratio for DVD TV
When you go to the “DVD” tab, you will notice various aspect ratio options. Switching the aspect ratio for TV from 4:3 to 16:9 is pretty straightforward. To do so, select what you think is right.
Conclusion
From the article above, you have learned about different online converters. Now you know how to change the video aspect ratio online and use the video aspect ratio editor. Also, understand how to calculate aspect ratios.
So, you can decide for yourself that Wondershare Filmora video editor is one of the best tools. Using its different methods you can change the aspect ratio easily.
Furthermore, you can use it to make changes on both social media platforms and your devices because it is an effective and reliable tool.
For Win 7 or later (64-bit)
For macOS 10.12 or later
How To Split Screen On Tiktok
TikTok is probably the most popular video-sharing app in the world right now. Many TikTokers have become famous for making videos that have a significant impact and encourage creativity and new ideas. One of the most popular TikTok trends is the split-screen effect. You’ve probably seen a lot of TikTok split-screen videos with cool effects that made you wonder how the user split their screen. Becoming skilled in using TikTok effects is not as difficult as it might look. It only requires a significant amount of practice. Read on as we show you how to make a TikTok split-screen video.
Using CapCut To Split Screen
CapCut is the official free TikTok Video Maker and Video Editor with Music for TikTok that is multifunctional. Its interface is quite similar and easy to use.
CapCut includes free advanced capabilities such as keyframe animation, stabilization, and Picture-in-Picture (PIP). These are in addition to its fundamental functions, such as video editing, adding stickers, text, and music.
Steps to Split Screen Video with CapCut On Android and IOS Devices
- To use the app, you need to install it first. iPhone and Android users can download CapCut. Navigate to the appropriate app store of your choice and download CapCut.
- After installation, launch the app.
- Then go ahead and grant CapCut permission to view your camera roll. Incorporating video clips into your project has never been easier. Go to the app’s main screen and select “New Project“ from the drop-down menu.
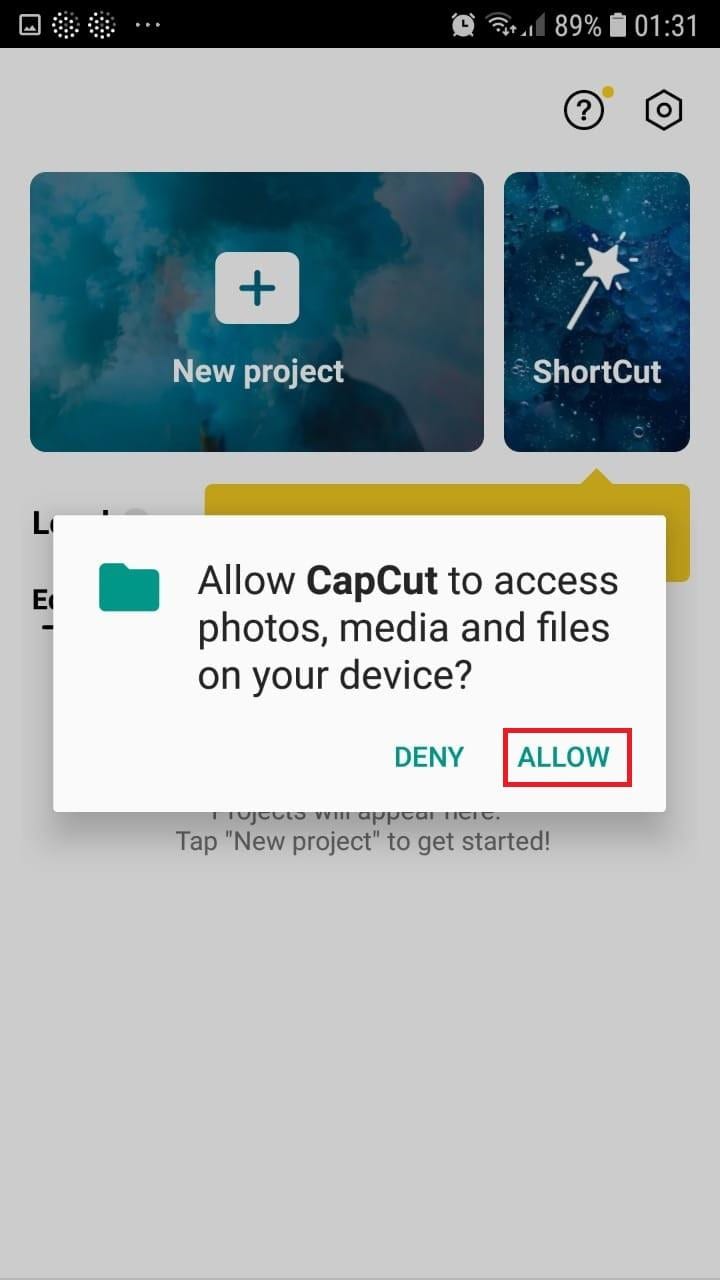
- To confirm your selection, click the green Accept This confirms that CapCut requires access to your photographs to function correctly. Tap on the button on the following pop-up window to gain access to all the photos. This is a one-time process that must be carried out the first time you launch the application.
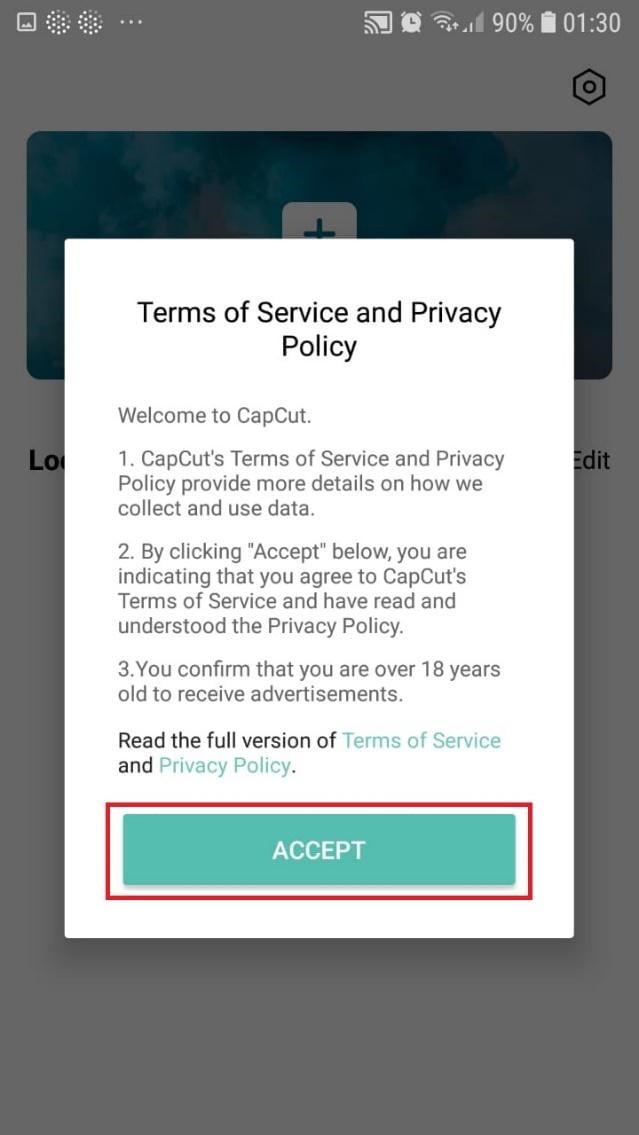
- Begin a New Project. After opening the app, press the “New Project“ icon to bring up a new screen showing your device’s videos.

- Choose a video clip. Locate the desired video clip for your project by scrolling through the pages displaying your camera roll. Tap the video’s thumbnail and then tap the “Add“ icon in the screen’s lower part.
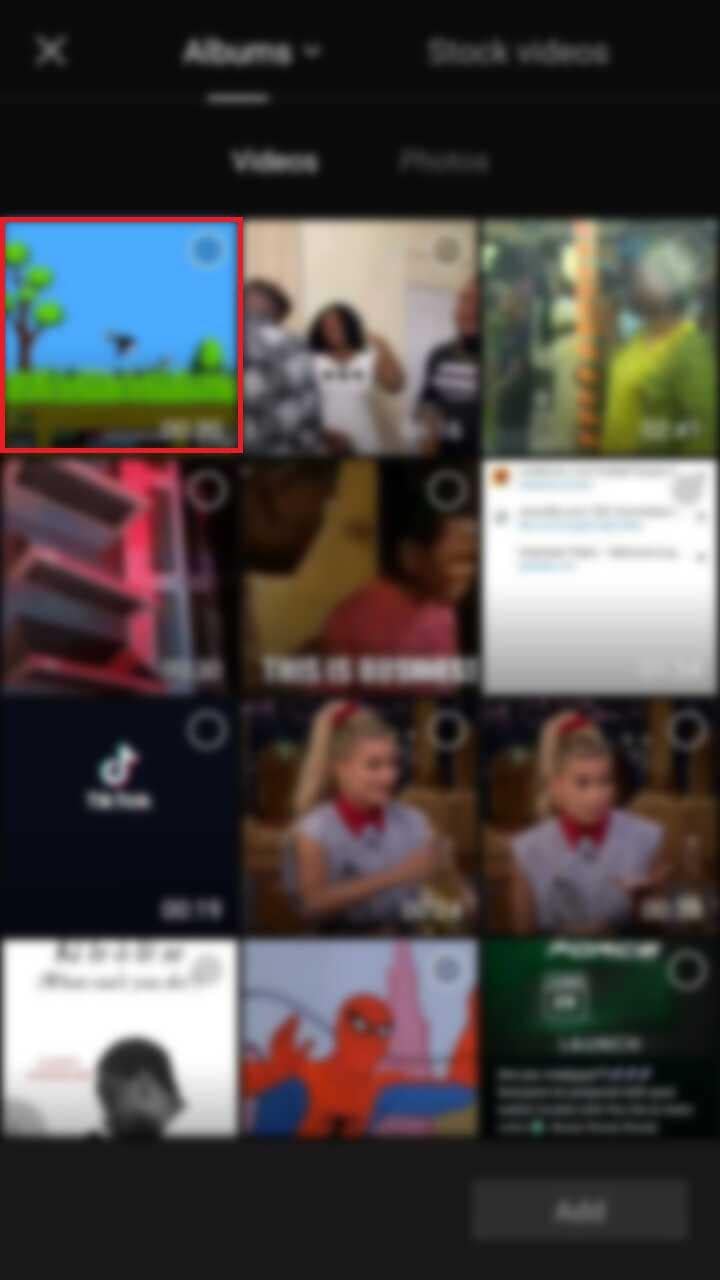
- Get familiar with your workspace. Upon uploading your first clip, CapCut leads you to the primary workspace. This is where you will spend most of your time within the app. The preview panel, the timeline, and the toolbar are in order from top to bottom.
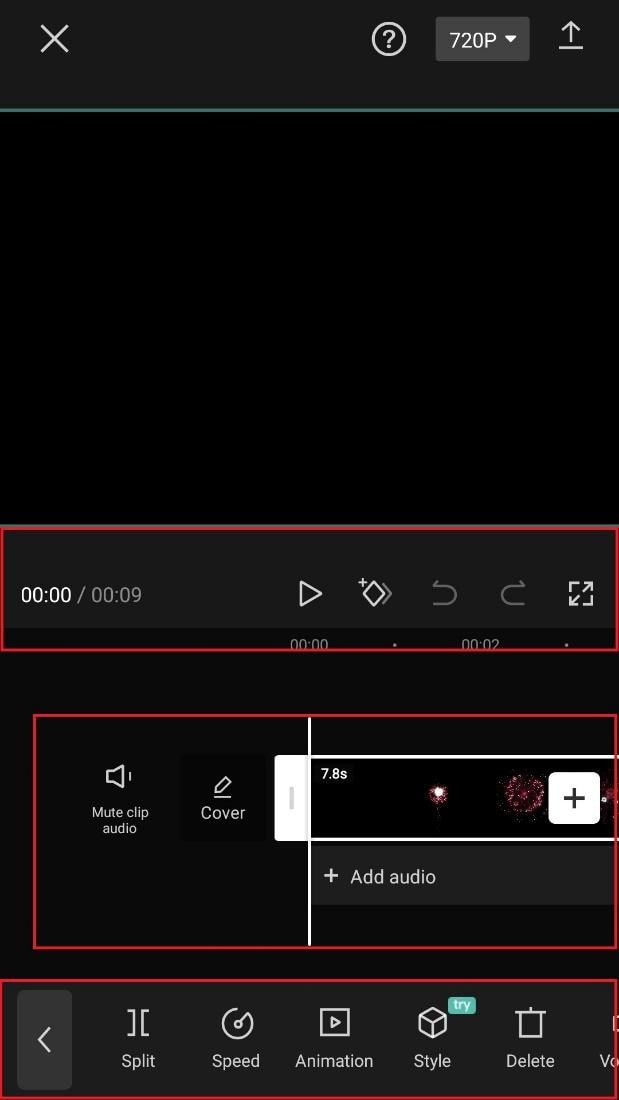
- View the toolbar and timeline. They represent your screen’s bottom half. The timeline, located below the preview panel, is where you’ll make all your adjustments. You can access all your video editing tools, including split, text, audio, effects, stickers, and more, on the toolbar at the bottom of your screen.
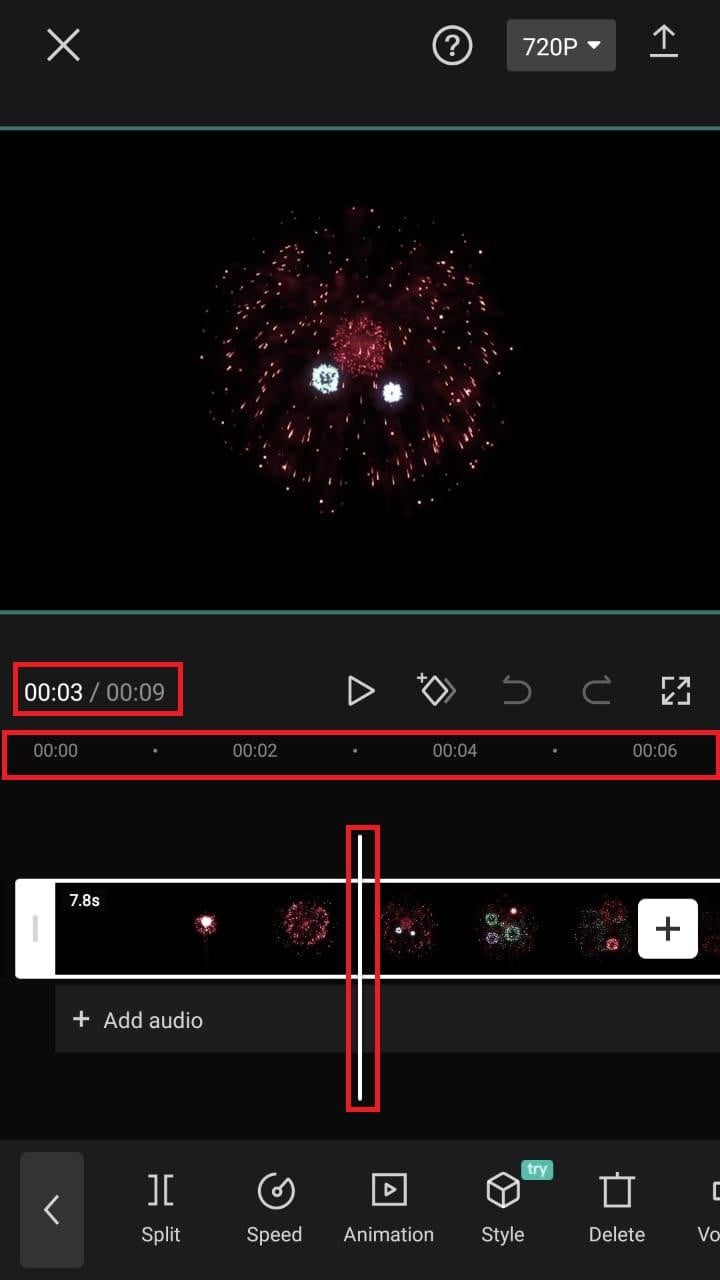
- Split video clips. To split a video clip in half, move the play head to the desired location on the timeline. Tap on your clip, then press the “Split“ toolbar icon. Your result now shows two different clips, not just one.
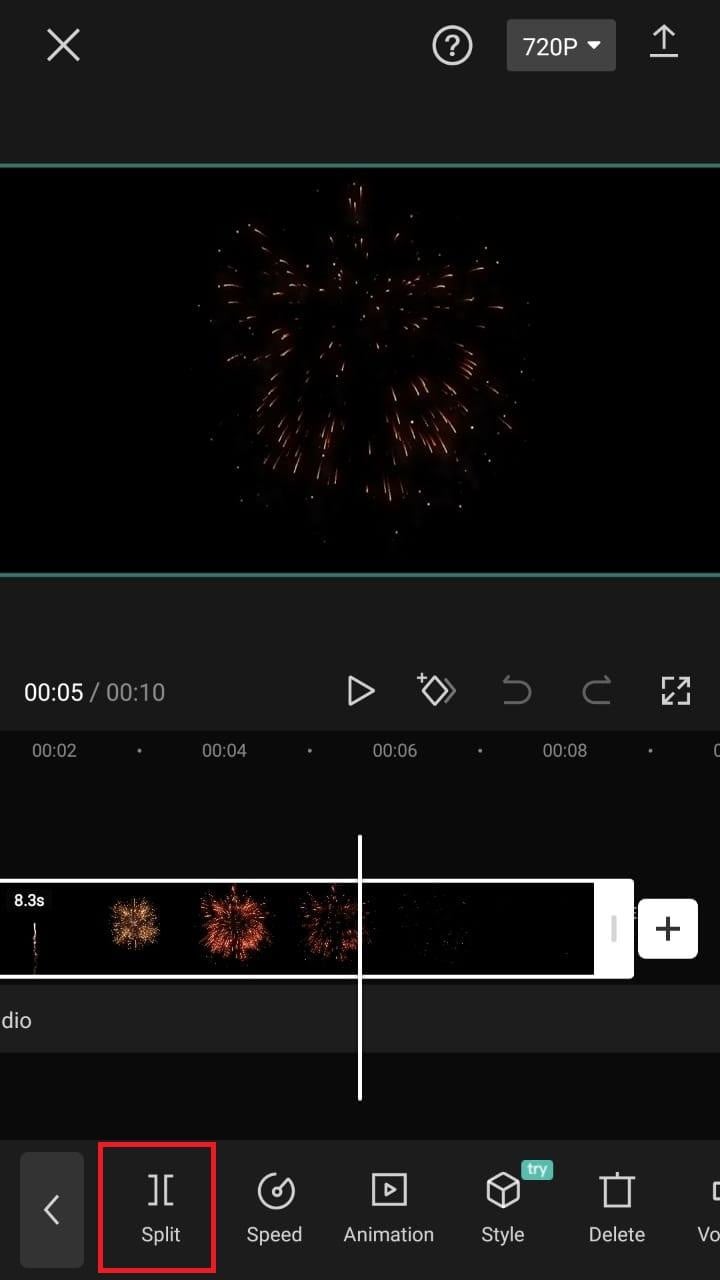
A Better Split-Screen Effect Video Editor
Filmora is one of the best free HD video makers and video editors with several functionalities, including text, backgrounds, filters, special effects, emoji, audio, and special effects.
Filmora is a feature-packed video editor which has a variety of tools to work with. With this video editor, producing memes, videos with images, pictures, music, stickers, and sound effects and editing videos for YouTube, Twitter, WhatsApp, Facebook, TikTok, and Instagram is simple and entertaining.
Free Download For Win 7 or later(64-bit)
Free Download For macOS 10.14 or later
Steps to Split Screen Video with Filmora
- Download Filmora from the App store
- After installation, launch it.
- Click on “Continue” to continue to use the app.

- Click on Allow to grant Filmora access to your photos and videos.
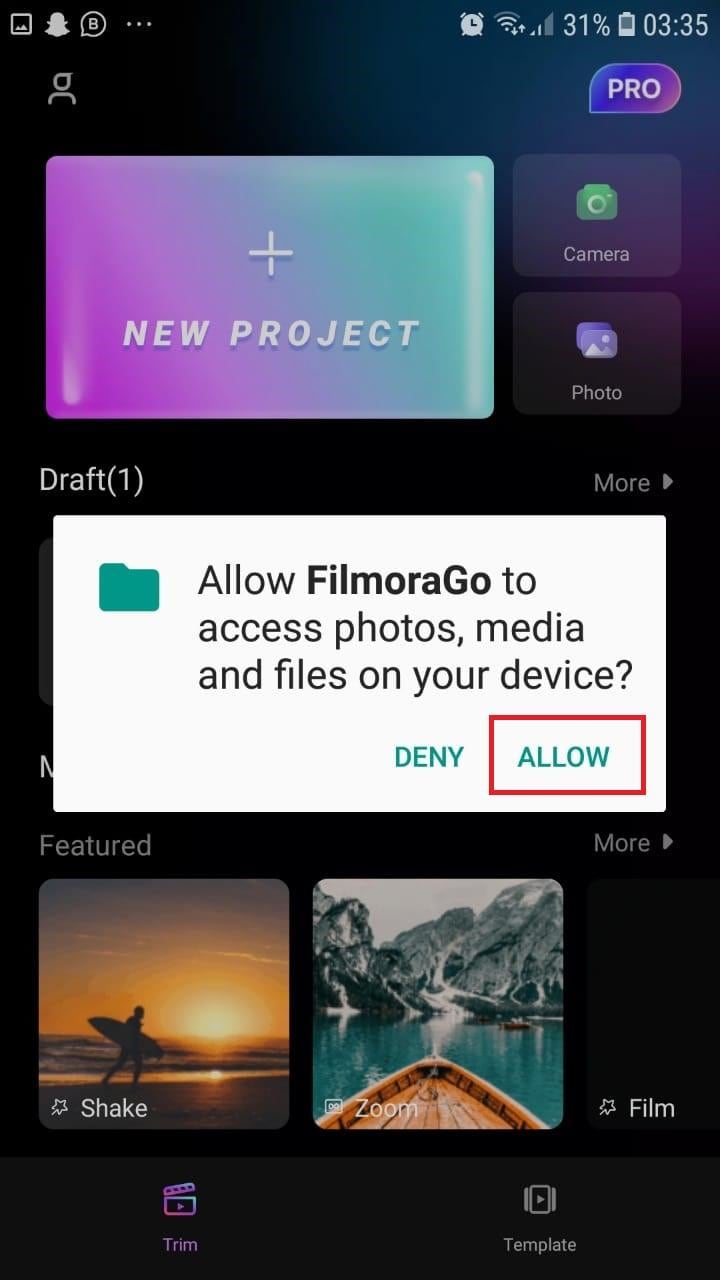
- You can now tap on “New Project” with the + Symbol.
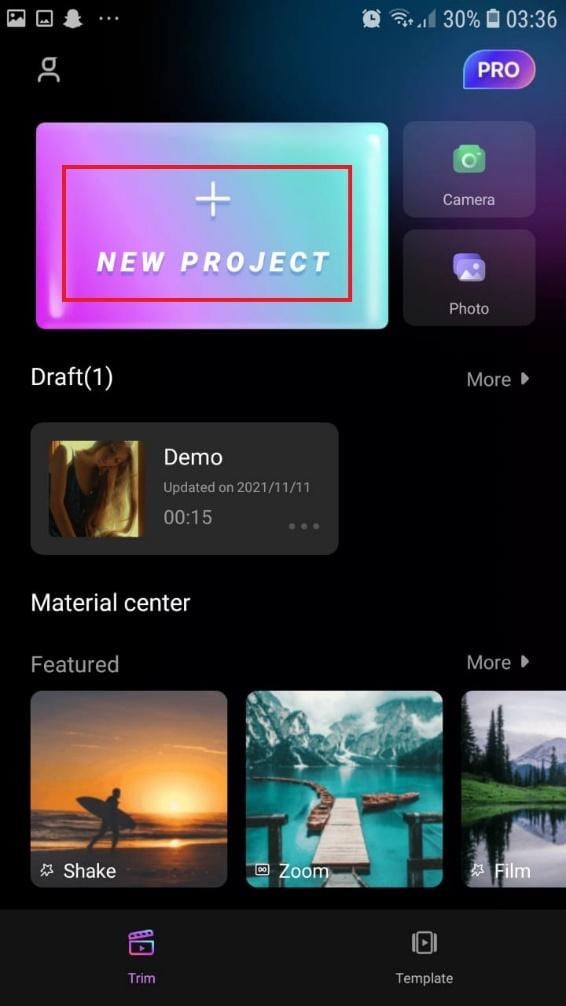
- Select your desired video and tap on “Next” at the bottom right of your screen
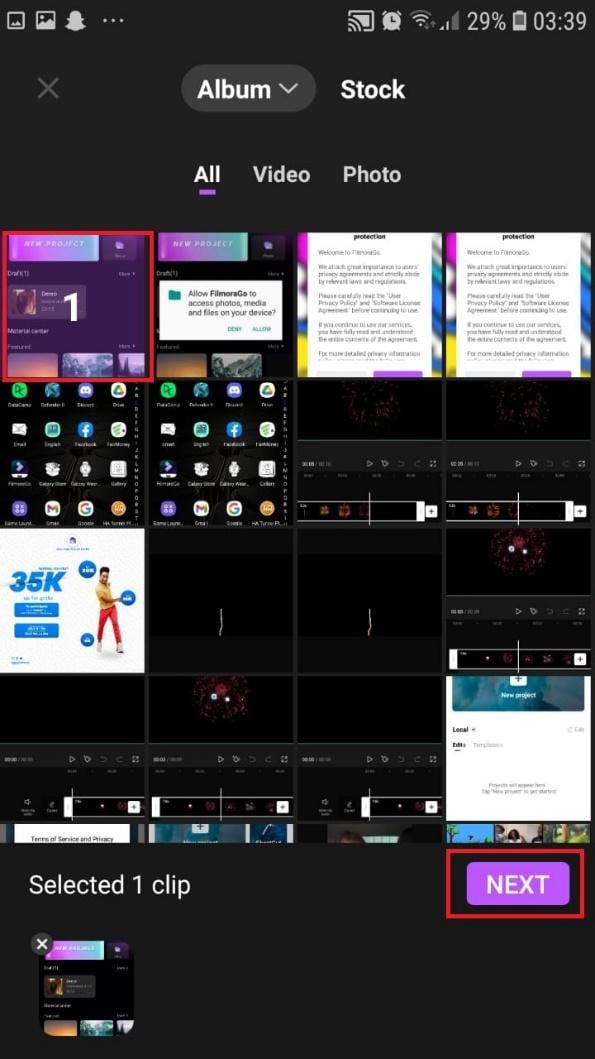
- You can select various options from the bottom of your screen to edit the selected video the way you like.

- Click on trim, and then you will see the different split-screen and collage feature options. Pick any that appeals to you.
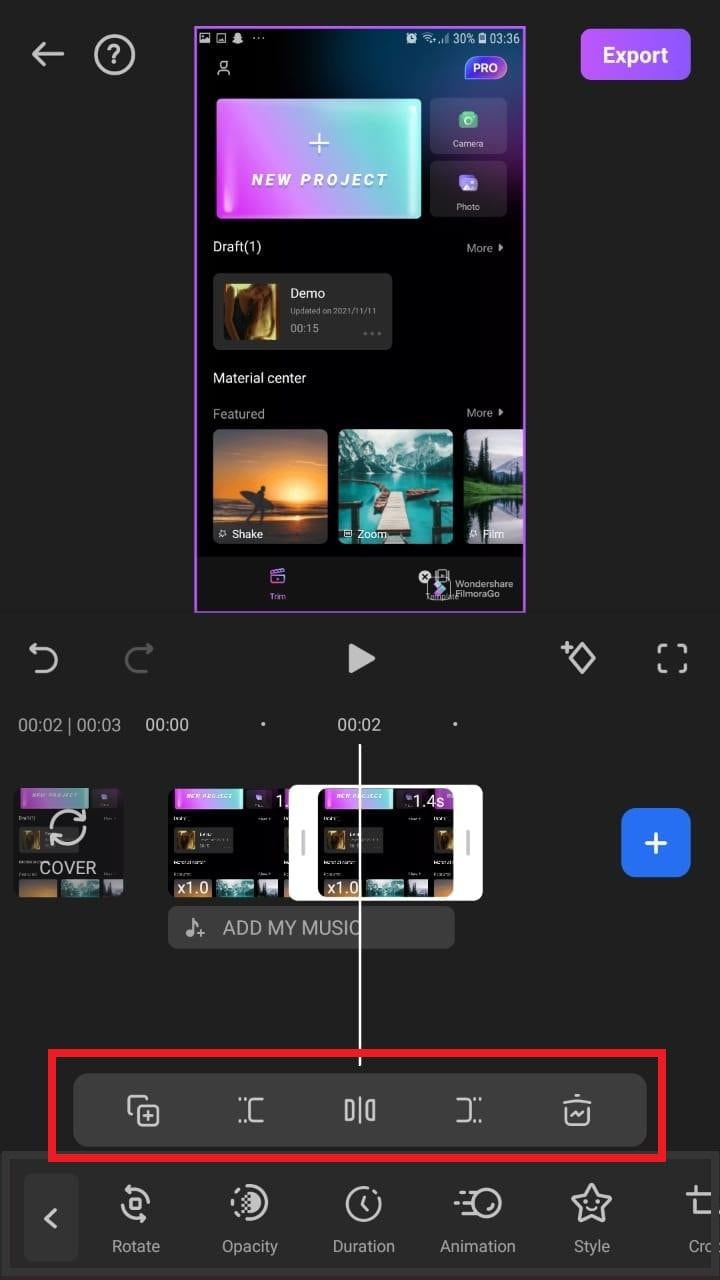
- When you are done with the editing, tap on “Export” at the top right of your screen.

- Go ahead and tap on “Export” on the next screen. Your video will be successfully exported and saved to your camera roll.
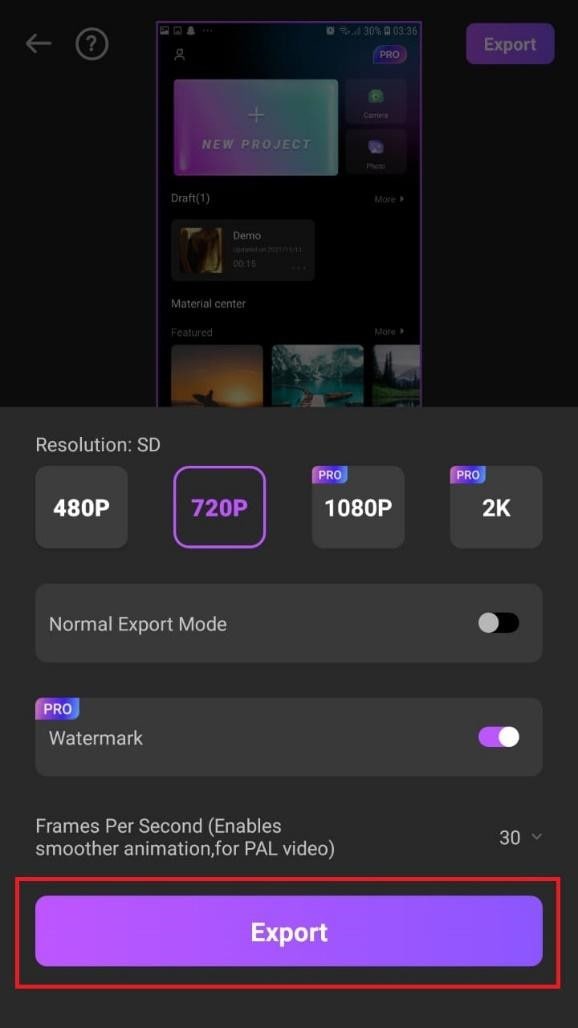
Using Filmora is very efficient in splitting your videos and making collage features for TikTok. It is a very simplified app available on both the Google Play Store and Apple Appstore.
Conclusion
TikTok is a platform that users use worldwide to create and share content. It could be pictures, videos, reels, or any other media type. Some people create videos for their audience on TikTok to educate them, while others do it to entertain them.
In any case, the goal is to build a more significant following on TikTok and garner greater attention from its users. You could even make money off the app.
One of the methods to impress your fans and explore multiple possibilities to build unique reels is to use the TikTok split-screen and collage feature effect available on TikTok. Although there are a few different ways to create a Split Screen on TikTok, the steps highlighted in this article are the most straightforward.
Free Download For macOS 10.14 or later
Steps to Split Screen Video with Filmora
- Download Filmora from the App store
- After installation, launch it.
- Click on “Continue” to continue to use the app.
- Click on Allow to grant Filmora access to your photos and videos.
- You can now tap on “New Project” with the + Symbol.
- Select your desired video and tap on “Next” at the bottom right of your screen
- You can select various options from the bottom of your screen to edit the selected video the way you like.
- Click on trim, and then you will see the different split-screen and collage feature options. Pick any that appeals to you.
- When you are done with the editing, tap on “Export” at the top right of your screen.
- Go ahead and tap on “Export” on the next screen. Your video will be successfully exported and saved to your camera roll.
Using Filmora is very efficient in splitting your videos and making collage features for TikTok. It is a very simplified app available on both the Google Play Store and Apple Appstore.
Conclusion
TikTok is a platform that users use worldwide to create and share content. It could be pictures, videos, reels, or any other media type. Some people create videos for their audience on TikTok to educate them, while others do it to entertain them.
In any case, the goal is to build a more significant following on TikTok and garner greater attention from its users. You could even make money off the app.
One of the methods to impress your fans and explore multiple possibilities to build unique reels is to use the TikTok split-screen and collage feature effect available on TikTok. Although there are a few different ways to create a Split Screen on TikTok, the steps highlighted in this article are the most straightforward.
What Are the Top 15 Slideshow Presentation Examples Your Audience Will
What’s the Best 15 Slideshow Presentation Examples Your Audience Will Love
An easy yet powerful editor
Numerous effects to choose from
Detailed tutorials provided by the official channel
No matter what type of industry or business you are in, slideshow presentations have become an important tool for several tasks like showcasing your products, and services, engaging with the clients and prospective buyers, changing their perceptions, leading to sales, and much more. Great presentations are a combination of style, content, effects, text, media files, and much more. There are several tools and software available these days that can help you create a slideshow presentation of your choice.

More in detail about these presentations, best powerpoint slideshow examples, and more are discussed in the following parts of the topic.
In this article
01 [Tips for creating an impressive slideshow presentation](#Part 1)
02 [Best 15 slideshow presentation examples](#Part 2)
03 [The best tool to edit your videos for slideshow presentations- Wondershare Filmora](#Part 3)
Part 1 Tips For Creating An Impressive Slideshow Presentation
To create a unique and engaging slideshow presentation, we have shortlisted some tips that will surely work. Check them as below.
● Have a theme
First of all, have a theme for a slideshow based on which the other elements can be selected. The theme or the story you want to portray can be based on the target audience and the purpose of creating a slideshow. For instance, if you want to generate sales from your products, create a slideshow that shows the benefits of your products and compares them with others in the same category.
● Keep it simple
The real purpose of a slideshow presentation is to convey your data or message in a simple manner that can be easily related. Since the slides move one after the other in a slideshow, they should be created in a manner so that the viewer can quickly understand them.
● Keep minimum text
Though text can be included in a slideshow, keep them to a minimum. A slideshow is a creative presentation having pictures, videos, graphs, and several other elements. So, keep the text whenever necessary and don’t include too much-written content. Moreover, a viewer can relate to and recall the product, brand, or service more through a message rather than a text.
● Include compelling visuals
Include relevant visuals like videos and images into your slideshow. Make sure that the files are in high resolution and clear and support the theme or the message you are trying to convey through the presentation.
● Add effects, filters, overlays, and other elements
Instead of adding the raw image and video footage, edit and customize them to make them more interesting and engaging. There are several professional video editing tools like Wondershare Filmora and others that can help you add effects, transitions, overlays, filters, and customize files as needed. Additional elements like graphs, charts, and more can also be added to the presentation.
● Use Templates
Templates are ready-made design that helps you create a slideshow presentation quickly and easily. The templates in a variety of designs in different categories are available for you to choose the most suitable one. You can check the collection of templates from various online sites and tools.
Part 2 Best 15 Slideshow Presentation Examples
A wide range of presentations in different categories is created by people. To help you check what a unique and engaging presentation looks like, below listed are the top slideshow examples.
What would Steve Do? 10 Lessons from the World’s most captivating presenters by HubSpot

Powerful Body Language Tips for your next presentation

Fix your bad PowerPoint by Seth Godin

How I got 2.5 million views on SlideShare by Nick Demey

Killer ways to design the same slide

How to Produce Better Content Ideas by Mark Johnstone

How Google Works by Eric Schmid

Why Content Marketing Fails by Rand Fishkin

Digital Strategy 101 By Bud Caddell

The History of SEO by HubSpot

How to really get into marketing by Inbound.org

Search for meaning in B2B Marketing by Velocity Partners

The What If techniques by Motivate Design

Ways to Win the Internets by Upworthy

Crap: The Content Marketing Deluge by Velocity Partners

Part 3 The Best Tool To Edit Your Videos For Slideshow Presentations - Wondershare Filmora
As discussed in the above parts of the article, images and videos play a very crucial role in creating an impressive slideshow presentation. To further make these media files bright, clear, and relevant to your theme editing and customization can be done for this task, several software and programs are available. One such excellent tool is Wondershare Filmora Video Editor which works as a complete video editing software with advanced features.
Your files can be edited like a professional and that too in a hassle-free manner using the program. Some of the key editing features of the software include cropping, cutting, adding effects, transitions, overlays, green screen, split screen, AI portrait, masking, and more.
For Win 7 or later (64-bit)
For macOS 10.12 or later
Additionally, the tool also supports making a slideshow with music files and also has a built-in media library. Templates in different categories are also present.

● Ending Thoughts →
● Slideshow presentations are used for creating awareness about products and services, sending a message, presenting data, and several other tasks.
● To create a slideshow, several factors like media files, theme, colors, text, effects and other factors have to be considered.
● Several popular great slideshow presentation examples can be referred to as what a unique presentation looks like.
● Wondershare Filmora is an excellent tool for editing slideshow videos and also for creating a slideshow.
No matter what type of industry or business you are in, slideshow presentations have become an important tool for several tasks like showcasing your products, and services, engaging with the clients and prospective buyers, changing their perceptions, leading to sales, and much more. Great presentations are a combination of style, content, effects, text, media files, and much more. There are several tools and software available these days that can help you create a slideshow presentation of your choice.
More in detail about these presentations, best powerpoint slideshow examples, and more are discussed in the following parts of the topic.
In this article
01 [Tips for creating an impressive slideshow presentation](#Part 1)
02 [Best 15 slideshow presentation examples](#Part 2)
03 [The best tool to edit your videos for slideshow presentations- Wondershare Filmora](#Part 3)
Part 1 Tips For Creating An Impressive Slideshow Presentation
To create a unique and engaging slideshow presentation, we have shortlisted some tips that will surely work. Check them as below.
● Have a theme
First of all, have a theme for a slideshow based on which the other elements can be selected. The theme or the story you want to portray can be based on the target audience and the purpose of creating a slideshow. For instance, if you want to generate sales from your products, create a slideshow that shows the benefits of your products and compares them with others in the same category.
● Keep it simple
The real purpose of a slideshow presentation is to convey your data or message in a simple manner that can be easily related. Since the slides move one after the other in a slideshow, they should be created in a manner so that the viewer can quickly understand them.
● Keep minimum text
Though text can be included in a slideshow, keep them to a minimum. A slideshow is a creative presentation having pictures, videos, graphs, and several other elements. So, keep the text whenever necessary and don’t include too much-written content. Moreover, a viewer can relate to and recall the product, brand, or service more through a message rather than a text.
● Include compelling visuals
Include relevant visuals like videos and images into your slideshow. Make sure that the files are in high resolution and clear and support the theme or the message you are trying to convey through the presentation.
● Add effects, filters, overlays, and other elements
Instead of adding the raw image and video footage, edit and customize them to make them more interesting and engaging. There are several professional video editing tools like Wondershare Filmora and others that can help you add effects, transitions, overlays, filters, and customize files as needed. Additional elements like graphs, charts, and more can also be added to the presentation.
● Use Templates
Templates are ready-made design that helps you create a slideshow presentation quickly and easily. The templates in a variety of designs in different categories are available for you to choose the most suitable one. You can check the collection of templates from various online sites and tools.
Part 2 Best 15 Slideshow Presentation Examples
A wide range of presentations in different categories is created by people. To help you check what a unique and engaging presentation looks like, below listed are the top slideshow examples.
What would Steve Do? 10 Lessons from the World’s most captivating presenters by HubSpot
Powerful Body Language Tips for your next presentation
Fix your bad PowerPoint by Seth Godin
How I got 2.5 million views on SlideShare by Nick Demey
Killer ways to design the same slide
How to Produce Better Content Ideas by Mark Johnstone
How Google Works by Eric Schmid
Why Content Marketing Fails by Rand Fishkin
Digital Strategy 101 By Bud Caddell
The History of SEO by HubSpot
How to really get into marketing by Inbound.org
Search for meaning in B2B Marketing by Velocity Partners
The What If techniques by Motivate Design
Ways to Win the Internets by Upworthy
Crap: The Content Marketing Deluge by Velocity Partners
Part 3 The Best Tool To Edit Your Videos For Slideshow Presentations - Wondershare Filmora
As discussed in the above parts of the article, images and videos play a very crucial role in creating an impressive slideshow presentation. To further make these media files bright, clear, and relevant to your theme editing and customization can be done for this task, several software and programs are available. One such excellent tool is Wondershare Filmora Video Editor which works as a complete video editing software with advanced features.
Your files can be edited like a professional and that too in a hassle-free manner using the program. Some of the key editing features of the software include cropping, cutting, adding effects, transitions, overlays, green screen, split screen, AI portrait, masking, and more.
For Win 7 or later (64-bit)
For macOS 10.12 or later
Additionally, the tool also supports making a slideshow with music files and also has a built-in media library. Templates in different categories are also present.
● Ending Thoughts →
● Slideshow presentations are used for creating awareness about products and services, sending a message, presenting data, and several other tasks.
● To create a slideshow, several factors like media files, theme, colors, text, effects and other factors have to be considered.
● Several popular great slideshow presentation examples can be referred to as what a unique presentation looks like.
● Wondershare Filmora is an excellent tool for editing slideshow videos and also for creating a slideshow.
Also read:
- Updated In 2024, Do You Wish to Make Your Discord PFP an Attention-Seeker? If Yes, Try the Animated Discord PFP. Lets Go over Essential Facts on the Topic, Including How to Get an Animated Discord PFP
- New What Are the Best 10 GIF Creator?
- New Are You Looking for Ways to Add Background to Green Screen Video Online? Worry Not, as in This Article; We Shall Discuss Using a Green Screen Background Adder in Filmora
- 2024 Approved Finding the Best GIF Websites Was Never Easier
- In 2024, A Review On 3D LUT Creator
- Do You Need to Make Your Video More Immersive? You Can Make It 60 FPS to Achieve That. And Here Are the 5 Best Tools that You Can Use
- New 10 Best Movie Trailer Voice Generators Windows, Mac, Android, iPhone & Online
- Updated 2024 Approved Learn How to Slow Down Time-Lapse Videos on iPhone to Make Detailed and Captivating Slow-Motion Effects in Your Time-Lapse Captures
- In 2024, Unlock the Power of Shotcut The Ultimate Guide to Rotating Videos
- Updated 2024 Approved Create Glitch Text Effect
- New In 2024, Best 5 Tools to Help You Know More Freeze-Frame Video Editing Skills
- 6 Instant Mp4 to GIF Online Tools for You for 2024
- New Tips That Show Anybody How To Create Youtube Slideshow – Guaranteed for 2024
- If You Want an App to Make Videos with Pictures and Music for Social Media Posts, We Are with the Best Apps to Make Videos with Music and Pictures for 2024
- 2024 Approved How to Make Coin Magic With Filmora
- Forgot Pattern Lock? Heres How You Can Unlock Vivo Y36i Pattern Lock Screen
- Top 10 Best Spy Watches For your Vivo V27e | Dr.fone
- How to Unlock iCloud Activation Lock and iCloud Account From Apple iPhone 13?
- In 2024, Complete Guide on Unlocking Apple iPhone 12 Pro with a Broken Screen?
- Undelete lost messages from Infinix Hot 40i
- In 2024, 3 Facts You Need to Know about Screen Mirroring Itel P55+ | Dr.fone
- How To Transfer Data From iPhone 13 mini To Other iPhone 12 Pro devices? | Dr.fone
- A Comprehensive Guide to Mastering iPogo for Pokémon GO On Apple iPhone 14 Plus | Dr.fone
- How to Change Google Play Location On Infinix Smart 8 Plus | Dr.fone
- In 2024, Best Nubia Pattern Lock Removal Tools Remove Android Pattern Lock Without Losing Data
- How to Transfer Music from Xiaomi 14 to iPod | Dr.fone
- 4 Ways to Transfer Music from Samsung Galaxy M34 to iPhone | Dr.fone
- In 2024, How to Screen Mirroring Nokia C110 to PC? | Dr.fone
- The Ultimate Guide to Get the Rare Candy on Pokemon Go Fire Red On Realme Note 50 | Dr.fone
- In 2024, A Comprehensive Guide to Apple iPhone 6s Plus Blacklist Removal Tips and Tools | Dr.fone
- Title: Deep Learning of AI Video Recognition for 2024
- Author: Morgan
- Created at : 2024-05-19 05:11:57
- Updated at : 2024-05-20 05:11:57
- Link: https://ai-video-editing.techidaily.com/deep-learning-of-ai-video-recognition-for-2024/
- License: This work is licensed under CC BY-NC-SA 4.0.
