
:max_bytes(150000):strip_icc():format(webp)/AE-lock-572ece975f9b58c34c0a2492.jpg)
Detailed Tutorial to Crop a Video in KineMaster
Detailed Tutorial to Crop a Video in KineMaster
“Create. Edit. Share. Transform your videos with KineMaster! Powerful tools, easy to use.” – a few words we read when we come up with the official web-site of KineMaster, a mobile video editing application.

Scrolling down, we see a rich list of all the features KineMaster offers to its users, such as: Assets, Projects, Backup and Share, Blending Modes, Reverse, Chroma Key, High Resolution, Video Layers. Simply put, on KineMaster, you can download projects, add more than 2 500 effects, use powerful tools, add cinematic color, etc…

This many features make you think – how come it is possible to do all that on a mobile phone? How come Kinemaster is not only a software you can download, pay for, and use on your computer, which, on its behalf, should also be a powerful one? It would be a logical question, but remember, we are in 2022 already, so, no limits are put to the technology of today! On Google Play Store, in the description of the abovementioned app, it reads: “KineMaster makes video editing fun on your phone, tablet, or Chromebook!” – So, why not use this opportunity, to explore new ways of making our content better and as appealing as ever for our viewers?
Even though Kinemaster deserves a bigger article with more explanation of each tool, for now, we will only be focusing on cropping a video in this app. First off, why crop a video at all? – well, sometimes we have a wonderful footage but the aspect ratio just doesn’t work for us. It might be because we want to upload our clip on a platform needing a specific aspect ratio, or, we just need to crop and pan (which means to move around within a clip or an image) because we don’t like some things shown in the original video – we might as well need to zoom in and out, in order to get the best out of our footage. For whatever reason, when you need or just wish to crop a video, it should not be a big deal, and let’s see how KineMaster makes it a good and easy experience.
So, the first thing we do in almost every situation is to access the platform or an application itself! – you guessed it right, download KineMaster from Google Play Store! Once you have it on your phone, open it and enjoy the introduction of the app itself.

The interesting fact you will notice is that the layout of the app is horizontal, not vertical, unlike in most cases. So, it makes you feel like you are at least close to what video editors who work on their computers represent. The interface of the app is quite enjoyable for your eyes, as it is kind of fun, as well.
It is needless to say that, if you are going to do a specific “operation” to the video, such as cropping, you will already have figured out which one of your footage you want to crop and pan. So, it’s wise to jump on the button which says: Create New.

This will take you to the editor. Even though in the media section you will find the video you want to work on, but you might be struggling to notice a Crop button. It is because unfortunately, it’s not possible to crop your video right away in KineMaster – first, you will need to add a background, for example, a black one.

Then, you will go back to the menu and find Media section again to add the video clip you want to crop.

After adding it to the editor, you need to tap on the video file which has appeared in the sequence – this will show you different features you can use on the right. You have to scroll down a little and Voila! – here you find Cropping. After having clicked on that, a little cropping window will appear on the screen.

You can resize the clip, and in order to crop the video, turning on the mask option is needed.


After you have finished cropping and resizing it to your liking, you need to click on the icon on the top right, and it will take you to the Save and Share page.

There, you will choose the Resolution and Frame rate, and Save as Video.

You can check your new cropped video on your gallery.
An easier way to crop video in Wondershare Filmora
An alternate way of cropping your video would be Filmora Video Editor , which is a software you can download and install on your computer and use its features only then. You can also try your hand at this very handy computer program which has an easy and user-friendly interface.
For Win 7 or later (64-bit)
For macOS 10.14 or later
Frist, as mentioned, you need to download and install Wondershare Filmora X. To add your files, you will need to click on Import Media Files Here.

You will choose your clip(s) you would like to crop and then drag and drop it in the sequence.

Above your video in the sequence you will see little icons and find a Crop one.

After clicking on it, a new window will open – it’s for Crop and Zoom, where you can choose a needed ratio or do it manually (for it, you have to select Custom first).

After clicking OK, your video will be cropped as you like. Then, you can proceed with Exporting it – click on Export, choose your preferred settings, and save the video at last.

So, in this article, you have learned how to crop a video using a mobile app KineMaster, as well as using a software – Wondershare Filmora X. of course, there are many other ways in which you can crop your video and make the best out of it. The technology and innovation gives us the opportunity to have great results with as little work as just a few minutes. You might need to crop your video for your channel on Youtube, or for your page on social media, or an official web-page of your company; last but not least is cropping and editing your video for your own pleasure, which is also a great way to interact with the virtual world around us.
Scrolling down, we see a rich list of all the features KineMaster offers to its users, such as: Assets, Projects, Backup and Share, Blending Modes, Reverse, Chroma Key, High Resolution, Video Layers. Simply put, on KineMaster, you can download projects, add more than 2 500 effects, use powerful tools, add cinematic color, etc…
This many features make you think – how come it is possible to do all that on a mobile phone? How come Kinemaster is not only a software you can download, pay for, and use on your computer, which, on its behalf, should also be a powerful one? It would be a logical question, but remember, we are in 2022 already, so, no limits are put to the technology of today! On Google Play Store, in the description of the abovementioned app, it reads: “KineMaster makes video editing fun on your phone, tablet, or Chromebook!” – So, why not use this opportunity, to explore new ways of making our content better and as appealing as ever for our viewers?
Even though Kinemaster deserves a bigger article with more explanation of each tool, for now, we will only be focusing on cropping a video in this app. First off, why crop a video at all? – well, sometimes we have a wonderful footage but the aspect ratio just doesn’t work for us. It might be because we want to upload our clip on a platform needing a specific aspect ratio, or, we just need to crop and pan (which means to move around within a clip or an image) because we don’t like some things shown in the original video – we might as well need to zoom in and out, in order to get the best out of our footage. For whatever reason, when you need or just wish to crop a video, it should not be a big deal, and let’s see how KineMaster makes it a good and easy experience.
So, the first thing we do in almost every situation is to access the platform or an application itself! – you guessed it right, download KineMaster from Google Play Store! Once you have it on your phone, open it and enjoy the introduction of the app itself.
The interesting fact you will notice is that the layout of the app is horizontal, not vertical, unlike in most cases. So, it makes you feel like you are at least close to what video editors who work on their computers represent. The interface of the app is quite enjoyable for your eyes, as it is kind of fun, as well.
It is needless to say that, if you are going to do a specific “operation” to the video, such as cropping, you will already have figured out which one of your footage you want to crop and pan. So, it’s wise to jump on the button which says: Create New.
This will take you to the editor. Even though in the media section you will find the video you want to work on, but you might be struggling to notice a Crop button. It is because unfortunately, it’s not possible to crop your video right away in KineMaster – first, you will need to add a background, for example, a black one.
Then, you will go back to the menu and find Media section again to add the video clip you want to crop.
After adding it to the editor, you need to tap on the video file which has appeared in the sequence – this will show you different features you can use on the right. You have to scroll down a little and Voila! – here you find Cropping. After having clicked on that, a little cropping window will appear on the screen.
You can resize the clip, and in order to crop the video, turning on the mask option is needed.
After you have finished cropping and resizing it to your liking, you need to click on the icon on the top right, and it will take you to the Save and Share page.
There, you will choose the Resolution and Frame rate, and Save as Video.
You can check your new cropped video on your gallery.
An easier way to crop video in Wondershare Filmora
An alternate way of cropping your video would be Filmora Video Editor , which is a software you can download and install on your computer and use its features only then. You can also try your hand at this very handy computer program which has an easy and user-friendly interface.
For Win 7 or later (64-bit)
For macOS 10.14 or later
Frist, as mentioned, you need to download and install Wondershare Filmora X. To add your files, you will need to click on Import Media Files Here.
You will choose your clip(s) you would like to crop and then drag and drop it in the sequence.
Above your video in the sequence you will see little icons and find a Crop one.
After clicking on it, a new window will open – it’s for Crop and Zoom, where you can choose a needed ratio or do it manually (for it, you have to select Custom first).
After clicking OK, your video will be cropped as you like. Then, you can proceed with Exporting it – click on Export, choose your preferred settings, and save the video at last.
So, in this article, you have learned how to crop a video using a mobile app KineMaster, as well as using a software – Wondershare Filmora X. of course, there are many other ways in which you can crop your video and make the best out of it. The technology and innovation gives us the opportunity to have great results with as little work as just a few minutes. You might need to crop your video for your channel on Youtube, or for your page on social media, or an official web-page of your company; last but not least is cropping and editing your video for your own pleasure, which is also a great way to interact with the virtual world around us.
15 Must-Use Gifs Editors
15 Must-Use Gifs Editors in 2024
An easy yet powerful editor
Numerous effects to choose from
Detailed tutorials provided by the official channel
Several websites and companies use the graphics interchange format that is the GIF. It can be seen to be used by a wide number of people on the internet and its format is supported by all platforms. The common goal of all the users can be satisfied.
Are you looking to create and edit gifs online or on your laptop but cannot find a suitable way out?
Finding the best and most user friendly GIF maker is not very hard, especially considering that free gif editor software is offered by so many providers. But if you’re only starting your journey with apps to make GIFs, it can be a difficult choice.
In this article
01 [How to Make GIF Interesting?](#Part 1)
02 [Top 5 Editors for Windows](#Part 2)
03 [Top 5 Editors for iPhone/Android](#Part 3)
04 [Top 5 Editors for Animated GIF Editing](#Part 4)
Part 1 How to Make GIF Interesting?
There are several ways by which a GIF can be made interesting. You can use colorful graphics and drop duplicate frames. Using fewer colors lets you make longer and more involved gifs.
Part 2 Top 5 Editors for Windows
Below are the top 5 editors which will help you to form GIFs for Windows: -
01Adobe Photoshop
Adobe Photoshop could be a useful device for making videos, image redaction, and GIF editing. This GIF code for Windows can allow you to import a GIF file so begin with the modification process.
Therefore, GIF editing is a breeze as you’ll alter the effects, modification the frame animation within the Timeline section, and do plenty a lot with this tool. You’ll simply utilize the free trial version to urge accustomed to the tool initial and then opt for the premium version to try to a lot more.
02EaseUS Video Editor
In the context of GIF makers, EaseUS Video Editor can also be said as one of the best. Free templates of texts, filters, elements, overlays, transitions, and music are available here which its users create GIF images with easily. You can also create lively and fully animated images, convert MP4 to GIFs and share it on YouTube, or other social media platforms.
The capabilities of this animated GIF maker for Windows are not restrained to this alone, as it can be used to edit all kinds of images, audio, and videos.
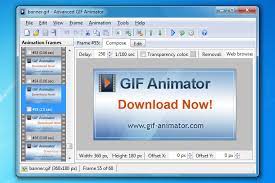
03GIF Animator
GIF animator editor is one of the first-rate GIF makers and is an awesome device for you if you desire to create GIF images, banners, buttons, and GIF videos. The device is very convenient to use and is a favorite of animators and designers.
The measurement of the photo can be modified and alongside that, it is feasible to control the frames, hastily cross texts, and enhance. Corrections to the movies can be brought and the built-in photograph editor can be used to rectify photographs and pictures, you can draw on them and you can convert movies to GIFs by the usage of the fragmented section of the video files.
04**Wondershare Filmora Video Editor **
If you are searching for nice animated GIF makers for Windows computers, then Wondershare Filmora’s animated movies and GIF editor device may want to be a brilliant choice. That’s due to the fact with this GIF maker Windows device lets you add a video, convert it to the GIF structure and then edit it later with its super features.
The interactive UI helps customers manner greater than one hundred fifty file codecs easily. With this device, you can crop, pace up a video, alter the body size, and caption it. Additionally, you add texts, add animation consequences to the images, and alter the pictures and movies in a few steps.

Wondershare Filmora - Best Video Editor for Mac/Windows
5,481,435 people have downloaded it.
Build unique custom animations without breaking a sweat.
Focus on creating epic stories and leave the details to Filmora’s auto features.
Start a creative adventure with drag & drop effects and endless possibilities.
Filmora simplifies advanced features to save you time and effort.
Filmora cuts out repetition so you can move on to your next creative breakthrough.
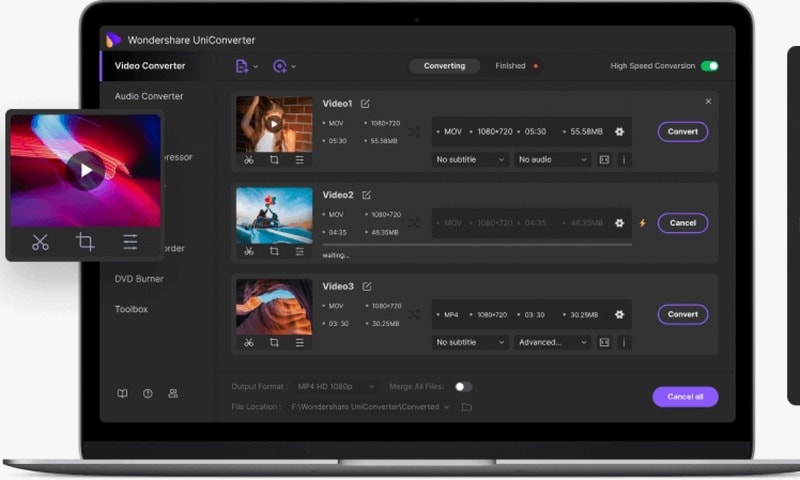
05Wondershare UniConverter
Wondershare UniConverter is one of the fine image, audio, and video editor and converter out there, and ranked the excellent GIF maker here. This GIF editor app is easy for customers and will furnish a pleasant platform for novices to operate their tasks. And when performed to create and edit GIF files, a person can export the GIF archives to both Android or iPhone barring having to use iTunes.
Part 3 Top 5 Editors for iPhone/Android
01PixelStudio
Pixel Studio is an animation app for pixel artwork fans. You can draw your little creations with pixel art. It additionally comes with a textual content tool, aid for matters like Samsung S-Pen, and it auto-saves so you don’t lose work. You can export your creations to GIF as nicely and that makes Pixel Studio one of the quality apps for customized GIFs. It’s normally an artwork app so meme lords may additionally want to put in a little greater effort than usual, however, the consequences are normally well worth it.
02Giphy Cam
Giphy Cam is one of the more recent gif editing apps. The digicam data is a brief phase of video. You can alter that video with lots of filters, different effects, stickers, text, and more. It additionally has a five-shot burst mode alongside its video mode. This is likely the excellent GIF/camera app hybrid. It doesn’t have any digital camera features; however, it does GIFs higher than the others by way of a large margin. It’s free with no in-app purchases.
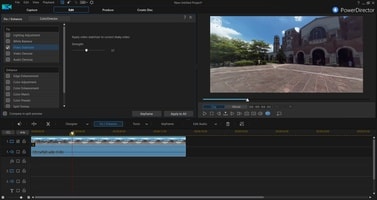
03PowerDirector
PowerDirector is one of many videos modifying apps with GIF support. This one simply takes place to be higher than most of the different ones. It’s a video editor app. Thus, it’ll have comparable features. However, two of the export codecs encompass GIF nonetheless pix and animated GIFs. This will work first-class for turning a video into a shorter GIF. The app is free to download and play with. You may additionally want to buy extra aspects by using in-app purchases.
04ImgPlay – GIF Maker
ImgPlay is a popular GIF editing app that is available for Android and iOS. You have the option of using an existing video or shooting one using your phone’s camera. In GIFs, you can apply 30 effects, crop a portion of your choice, and modify the frame rate.
05Motion Stills
Motion Stills is a Google app that allows you to record short films and turn them into looping GIFs. You can use the app to take a short 3s clip with a single tap or utilize the Fast Forward feature to condense an existing video into a short one. To make yips GIFs even better, you may add motion text and emoticons. After that, save it as a GIF and send it to your friends.
Part 4 Top 5 Editors for Animated GIF Editing
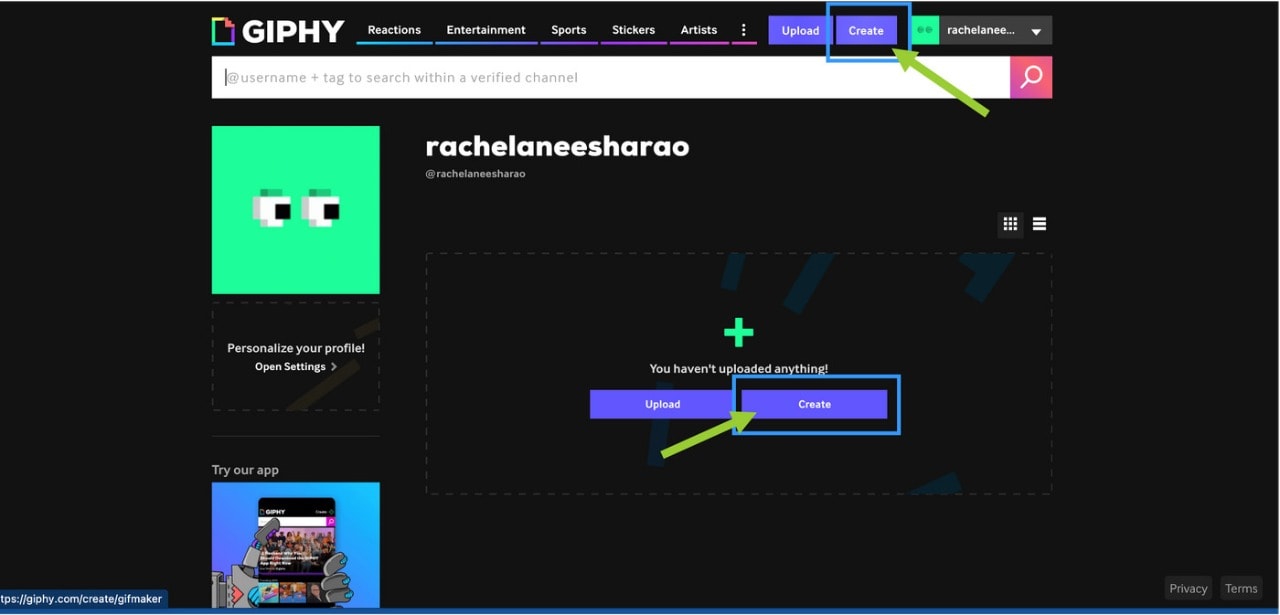
01Giphy
GIPHY is a designing tool that helps customers to create extraordinary GIFs, stickers, and backdrops. You can edit your plan with filters, captions, stickers, and different plan elements. The popular codecs for GIF uploads are JPG, PNG, GIF, MP4, or MOV, whilst the conventional file codecs to convert to stickers are JPG or PNG.
GIPHY permits you to paste URLs from specific sources such as Vimeo, YouTube, GIPHY, and others. The animated GIF maker software program makes it convenient for customers to edit and organize the uploaded archives in the favored order.
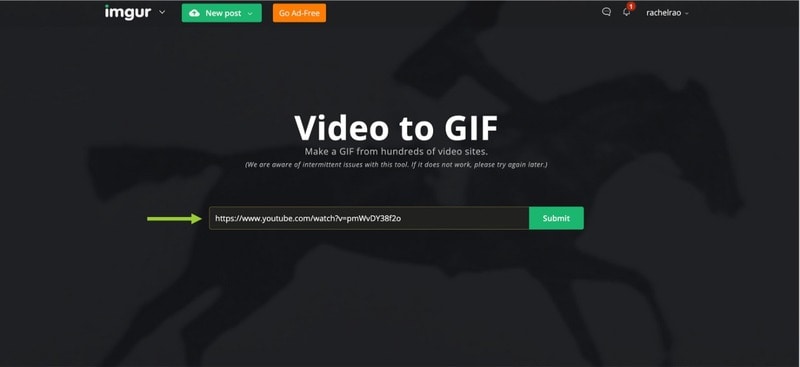
02Imgur
It’s a website that makes it simple to make GIFs. Simply paste the video URL into the web app and wait for it to process. After that, all you must do now is set the start time and duration of your GIF.
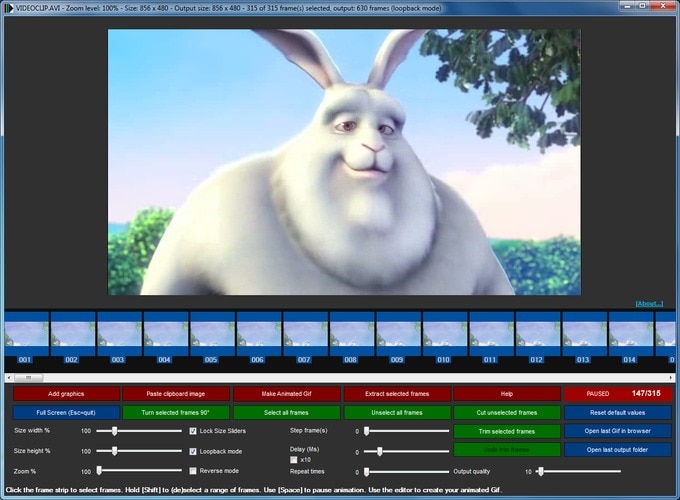
03KickMyGraphics
The utility comes with a humble person interface and it approves you to create animated GIFs from neighborhood images. In addition, you can additionally paste snapshots from your clipboard at once to the application. The utility additionally helps video files; however, you want to convert the video earlier than you can edit it. The utility affords a stay preview so you can see how your animation appears at any time. You can additionally see all handy frames and dispose of useless frames with ease.
As for editing, you can’t add your textual content or alter the brightness of your frames, however, you can trade their width, peak, and zoom level. You can additionally allow Loopback or Reverse mode and set delay, step frames, and a variety of repeats. You can additionally configure output first-class right from the application.
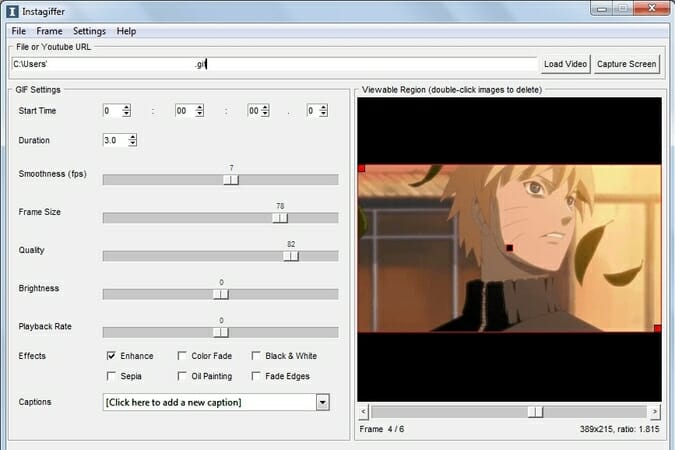
04Instagiffer
Instagiffer is some other easy software that lets you create animated GIFs on your PC. This utility affords a humble consumer interface; however, it makes up for it with an extensive variety of features. The software approves you to convert nearby movies to GIFs, however, you can additionally paste a YouTube URL and convert an online video to GIF with ease. According to the developer, the software additionally works with different video web hosting websites.
05GIMP
The software is free, so you can download and use it except for any restrictions. GIMP is best for picture designers and it comes with all preferences that an image editor needs. You can without problems edit your images, exchange their color, hue, saturation, or brightness, and add exceptional outcomes to them.
In addition, you can create special creations thanks to the built-in layer system. It’s worth citing that the software additionally helps programming algorithms so you can effortlessly edit your photos with the use of scripts.

● Key Takeaways from This Episode →
● If you are typically worried about how you can be able to come up with fascinating GIFs, you ought to hold in thought that you don’t have to create them from scratch.
● You can be capable to advance inspiring GIFs from current movies and photos eight after GIF editor software program free download.
● Hopefully, you are now capable to pick out a perfect GIF creator to use for your modifying tasks.
Several websites and companies use the graphics interchange format that is the GIF. It can be seen to be used by a wide number of people on the internet and its format is supported by all platforms. The common goal of all the users can be satisfied.
Are you looking to create and edit gifs online or on your laptop but cannot find a suitable way out?
Finding the best and most user friendly GIF maker is not very hard, especially considering that free gif editor software is offered by so many providers. But if you’re only starting your journey with apps to make GIFs, it can be a difficult choice.
In this article
01 [How to Make GIF Interesting?](#Part 1)
02 [Top 5 Editors for Windows](#Part 2)
03 [Top 5 Editors for iPhone/Android](#Part 3)
04 [Top 5 Editors for Animated GIF Editing](#Part 4)
Part 1 How to Make GIF Interesting?
There are several ways by which a GIF can be made interesting. You can use colorful graphics and drop duplicate frames. Using fewer colors lets you make longer and more involved gifs.
Part 2 Top 5 Editors for Windows
Below are the top 5 editors which will help you to form GIFs for Windows: -
01Adobe Photoshop
Adobe Photoshop could be a useful device for making videos, image redaction, and GIF editing. This GIF code for Windows can allow you to import a GIF file so begin with the modification process.
Therefore, GIF editing is a breeze as you’ll alter the effects, modification the frame animation within the Timeline section, and do plenty a lot with this tool. You’ll simply utilize the free trial version to urge accustomed to the tool initial and then opt for the premium version to try to a lot more.
02EaseUS Video Editor
In the context of GIF makers, EaseUS Video Editor can also be said as one of the best. Free templates of texts, filters, elements, overlays, transitions, and music are available here which its users create GIF images with easily. You can also create lively and fully animated images, convert MP4 to GIFs and share it on YouTube, or other social media platforms.
The capabilities of this animated GIF maker for Windows are not restrained to this alone, as it can be used to edit all kinds of images, audio, and videos.
03GIF Animator
GIF animator editor is one of the first-rate GIF makers and is an awesome device for you if you desire to create GIF images, banners, buttons, and GIF videos. The device is very convenient to use and is a favorite of animators and designers.
The measurement of the photo can be modified and alongside that, it is feasible to control the frames, hastily cross texts, and enhance. Corrections to the movies can be brought and the built-in photograph editor can be used to rectify photographs and pictures, you can draw on them and you can convert movies to GIFs by the usage of the fragmented section of the video files.
04**Wondershare Filmora Video Editor **
If you are searching for nice animated GIF makers for Windows computers, then Wondershare Filmora’s animated movies and GIF editor device may want to be a brilliant choice. That’s due to the fact with this GIF maker Windows device lets you add a video, convert it to the GIF structure and then edit it later with its super features.
The interactive UI helps customers manner greater than one hundred fifty file codecs easily. With this device, you can crop, pace up a video, alter the body size, and caption it. Additionally, you add texts, add animation consequences to the images, and alter the pictures and movies in a few steps.
Wondershare Filmora - Best Video Editor for Mac/Windows
5,481,435 people have downloaded it.
Build unique custom animations without breaking a sweat.
Focus on creating epic stories and leave the details to Filmora’s auto features.
Start a creative adventure with drag & drop effects and endless possibilities.
Filmora simplifies advanced features to save you time and effort.
Filmora cuts out repetition so you can move on to your next creative breakthrough.
05Wondershare UniConverter
Wondershare UniConverter is one of the fine image, audio, and video editor and converter out there, and ranked the excellent GIF maker here. This GIF editor app is easy for customers and will furnish a pleasant platform for novices to operate their tasks. And when performed to create and edit GIF files, a person can export the GIF archives to both Android or iPhone barring having to use iTunes.
Part 3 Top 5 Editors for iPhone/Android
01PixelStudio
Pixel Studio is an animation app for pixel artwork fans. You can draw your little creations with pixel art. It additionally comes with a textual content tool, aid for matters like Samsung S-Pen, and it auto-saves so you don’t lose work. You can export your creations to GIF as nicely and that makes Pixel Studio one of the quality apps for customized GIFs. It’s normally an artwork app so meme lords may additionally want to put in a little greater effort than usual, however, the consequences are normally well worth it.
02Giphy Cam
Giphy Cam is one of the more recent gif editing apps. The digicam data is a brief phase of video. You can alter that video with lots of filters, different effects, stickers, text, and more. It additionally has a five-shot burst mode alongside its video mode. This is likely the excellent GIF/camera app hybrid. It doesn’t have any digital camera features; however, it does GIFs higher than the others by way of a large margin. It’s free with no in-app purchases.
03PowerDirector
PowerDirector is one of many videos modifying apps with GIF support. This one simply takes place to be higher than most of the different ones. It’s a video editor app. Thus, it’ll have comparable features. However, two of the export codecs encompass GIF nonetheless pix and animated GIFs. This will work first-class for turning a video into a shorter GIF. The app is free to download and play with. You may additionally want to buy extra aspects by using in-app purchases.
04ImgPlay – GIF Maker
ImgPlay is a popular GIF editing app that is available for Android and iOS. You have the option of using an existing video or shooting one using your phone’s camera. In GIFs, you can apply 30 effects, crop a portion of your choice, and modify the frame rate.
05Motion Stills
Motion Stills is a Google app that allows you to record short films and turn them into looping GIFs. You can use the app to take a short 3s clip with a single tap or utilize the Fast Forward feature to condense an existing video into a short one. To make yips GIFs even better, you may add motion text and emoticons. After that, save it as a GIF and send it to your friends.
Part 4 Top 5 Editors for Animated GIF Editing
01Giphy
GIPHY is a designing tool that helps customers to create extraordinary GIFs, stickers, and backdrops. You can edit your plan with filters, captions, stickers, and different plan elements. The popular codecs for GIF uploads are JPG, PNG, GIF, MP4, or MOV, whilst the conventional file codecs to convert to stickers are JPG or PNG.
GIPHY permits you to paste URLs from specific sources such as Vimeo, YouTube, GIPHY, and others. The animated GIF maker software program makes it convenient for customers to edit and organize the uploaded archives in the favored order.
02Imgur
It’s a website that makes it simple to make GIFs. Simply paste the video URL into the web app and wait for it to process. After that, all you must do now is set the start time and duration of your GIF.
03KickMyGraphics
The utility comes with a humble person interface and it approves you to create animated GIFs from neighborhood images. In addition, you can additionally paste snapshots from your clipboard at once to the application. The utility additionally helps video files; however, you want to convert the video earlier than you can edit it. The utility affords a stay preview so you can see how your animation appears at any time. You can additionally see all handy frames and dispose of useless frames with ease.
As for editing, you can’t add your textual content or alter the brightness of your frames, however, you can trade their width, peak, and zoom level. You can additionally allow Loopback or Reverse mode and set delay, step frames, and a variety of repeats. You can additionally configure output first-class right from the application.
04Instagiffer
Instagiffer is some other easy software that lets you create animated GIFs on your PC. This utility affords a humble consumer interface; however, it makes up for it with an extensive variety of features. The software approves you to convert nearby movies to GIFs, however, you can additionally paste a YouTube URL and convert an online video to GIF with ease. According to the developer, the software additionally works with different video web hosting websites.
05GIMP
The software is free, so you can download and use it except for any restrictions. GIMP is best for picture designers and it comes with all preferences that an image editor needs. You can without problems edit your images, exchange their color, hue, saturation, or brightness, and add exceptional outcomes to them.
In addition, you can create special creations thanks to the built-in layer system. It’s worth citing that the software additionally helps programming algorithms so you can effortlessly edit your photos with the use of scripts.
● Key Takeaways from This Episode →
● If you are typically worried about how you can be able to come up with fascinating GIFs, you ought to hold in thought that you don’t have to create them from scratch.
● You can be capable to advance inspiring GIFs from current movies and photos eight after GIF editor software program free download.
● Hopefully, you are now capable to pick out a perfect GIF creator to use for your modifying tasks.
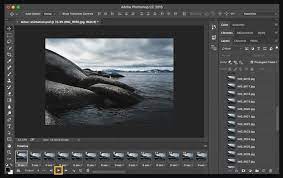
How to Make Foggy Text Reflection Effect
Preparation
What you need to prepare:
- A computer (Windows or macOS)
- Your video materials.
- Filmora video editor
Step 1
Download the Filmora video editor → run it → and click on “New Project”.
Step 2
Go to Titles → drag the Default Title to the Timeline below. Double-click on the clip to open its settings. Here, type in your text → change the font to Montserrat Light. Scroll down and increase Text Spacing to 5.0. Now, select only the first word in the box where you typed your text. Then, change its font to Montserrat Bold. Click OK.

Step 3
Take a Snapshot of the text you just created. Now, delete the Default Title clip from the Timeline and drag the Snapshot you took to the Timeline.

Step 4
Double-click the Snapshot clip → go to the Video tab → click the highlighted button below to flip the text. Then, take a Snapshot of this flipped version of the text and delete the clip from the Timeline.

Step 5
Visit the free stock footage site Mixkit and download any smoke or fog background video you like. Then, go to Filmora → My Media → Import Media → and select the footage you downloaded to import it into the video editor. Then, drag the Smoke clip to the Timeline and make it 6 seconds long.

Step 6
Double-click on the clip → go to Color. Now, change Contrast to “49”, Saturation to “100”, and Brightness to “18”. Below, set the 3D LUT option to “Game of Thrones”. Click OK.

Step 7
Drag the other Smoke clip to Track 2 of the Timeline. Make it 6 seconds long. Then, move the Playhead to the starting point of the video.

Step 8
Double-click on the new smoke clip. Go to Animation. Decrease the Opacity to 0%. Move the Playhead 10 frames forward → increase the Opacity to 6%. Don’t click OK yet.

Step 9
Move the Playhead to 5 seconds. Click on “**+Add**” to add a keyframe to the clip. Then, move the Playhead to the next-to-last frame and increase the Opacity to 100%. Click OK.

Step 10
Set the Playhead to the second frame and drop the first Snapshot we took earlier at that starting point. Drag the clip to be 6 seconds long. Then, double-click on the clip and adjust the settings exactly as you see in this image here. Don’t click on OK yet.

Step 11
Move the Playhead at the 17th frame → increase the Opacity to 6%. Move the Playhead to 5 seconds and 23rd frame → change the X-axis value to “1973”. Click OK.

Step 12
Drag the same Snapshot file to Track 4, directly on top of the clip in Track 3. Make its duration the same too. Now, double-click on this clip and apply the exact same settings as in the image here. Don’t click on OK yet.

Step 13
Move the Playhead to the 17th frame → increase the Opacity to 6%. Now, move the Playhead to 5 seconds and 23rd frame → change X-axis value to “-1944” and the Opacity to 0%. Click OK.

Step 14
Go to Sample Color and drag the White color on Track 6 in the Timeline. Place this clip at the same starting point as the snapshots below it. Set its duration the same as the clips below too. Then, move the Playhead at its starting point.

Step 15
Double-click on the Sample Color clip → go to Video → Mask → Import. Here, select the first Snapshot we created earlier in this tutorial.

Step 16
Now, go straight to the Animation tab and click the “**+Add**” button to add a keyframe. Then, compress the text in the preview screen until it’s not visible anymore on the screen.

Step 17
Add keyframes at the 1-second position and at the 5-second position. Then, move the Playhead once more to the 5-second and 22nd frame. Reduce the Opacity to 1%. Click OK.

Step 18
Drag another White Sample Color to Track 5 this time. Adjust its duration and starting point to be the same as the clip above it. Double-click on it → go to Video → Mask → Import. Here, select the flipped text Snapshot we created earlier.
Step 19
Now, go to Animation and add a keyframe at the starting point. Then, compress the text on the preview screen exactly as we did before with the other one. Then, add a keyframe at the 1-second position of the clip. Then, adjust the Y-axis position to create a reflection effect, just like this.

Step 20
Move the Playhead to the 5-second position and add a keyframe. Now, move the Playhead directly to 5-seconds and 22 frames. Here, reduce the Opacity to 0%.
Step 21
Go back to the Video tab from the upper-left corner of the panel. Now, move the Playhead to the clip’s starting point. Select the Mask tab. Add a keyframe. Move the Playhead to 1 second and set the Blur Strength to 6%.

Step 22
Move the Playhead to 3 seconds. Scroll down and set Vertical to 259%. Set Y-axis to “-157”. Then, increase Blur Strength to 25%. Click OK.

Step 23
Click on the Sample Color in Track 5 and change the Opacity to 40% for the second and third keyframes. You can move between the keyframes on the arrows highlighted below. Click OK.

Step 24
Go to Sample Color and drag the “Gradient 4” color to Track 7 on the Timeline. Allow this clip to start from the very beginning and adjust its end time to be the same as all the other clips.
Step 25
Double-click on the Gradient 4 clip → go to Video → Basic. Change the Blending Mode to “Soft Light”. Reduce the Opacity to 42%. Click OK.

Step 26
Go to Project Media and drag the white smoke clip on Track 8. Place the Playhead at the starting point and double-click on the clip.

Step 27
Change its Blending Mode to “Screen”. Go to the Animation tab and decrease the Opacity to 0%. Move the Playhead to frame 10 → increase Opacity to 12%. Move the Playhead to the 5-second position → add a keyframe. Then, move the Playhead at 5 seconds and 23rd frame → increase the Opacity back to 100%. Click OK.
Step 28
Go to Effects and drag the Cinema effect to Track 9. Adjust its duration to match all the other clips. Double-click on the clip and increase its Border Height to “0.10”. Click OK.

Step 29
Finally, Render the video and watch the final result. You’re done! Congratulations on resting a foggy text reflection effect in Filmora.

Summary
What you’ve learned:
- Create a foggy text reflection effect in the Filmora video editor
- Add and adjust keyframes to clips
- Edit and customize text
- Take and edit snapshots
What you need to prepare:
- A computer (Windows or macOS)
- Your video materials.
- Filmora video editor
Step 1
Download the Filmora video editor → run it → and click on “New Project”.
Step 2
Go to Titles → drag the Default Title to the Timeline below. Double-click on the clip to open its settings. Here, type in your text → change the font to Montserrat Light. Scroll down and increase Text Spacing to 5.0. Now, select only the first word in the box where you typed your text. Then, change its font to Montserrat Bold. Click OK.
Step 3
Take a Snapshot of the text you just created. Now, delete the Default Title clip from the Timeline and drag the Snapshot you took to the Timeline.
Step 4
Double-click the Snapshot clip → go to the Video tab → click the highlighted button below to flip the text. Then, take a Snapshot of this flipped version of the text and delete the clip from the Timeline.
Step 5
Visit the free stock footage site Mixkit and download any smoke or fog background video you like. Then, go to Filmora → My Media → Import Media → and select the footage you downloaded to import it into the video editor. Then, drag the Smoke clip to the Timeline and make it 6 seconds long.
Step 6
Double-click on the clip → go to Color. Now, change Contrast to “49”, Saturation to “100”, and Brightness to “18”. Below, set the 3D LUT option to “Game of Thrones”. Click OK.
Step 7
Drag the other Smoke clip to Track 2 of the Timeline. Make it 6 seconds long. Then, move the Playhead to the starting point of the video.
Step 8
Double-click on the new smoke clip. Go to Animation. Decrease the Opacity to 0%. Move the Playhead 10 frames forward → increase the Opacity to 6%. Don’t click OK yet.
Step 9
Move the Playhead to 5 seconds. Click on “**+Add**” to add a keyframe to the clip. Then, move the Playhead to the next-to-last frame and increase the Opacity to 100%. Click OK.
Step 10
Set the Playhead to the second frame and drop the first Snapshot we took earlier at that starting point. Drag the clip to be 6 seconds long. Then, double-click on the clip and adjust the settings exactly as you see in this image here. Don’t click on OK yet.
Step 11
Move the Playhead at the 17th frame → increase the Opacity to 6%. Move the Playhead to 5 seconds and 23rd frame → change the X-axis value to “1973”. Click OK.
Step 12
Drag the same Snapshot file to Track 4, directly on top of the clip in Track 3. Make its duration the same too. Now, double-click on this clip and apply the exact same settings as in the image here. Don’t click on OK yet.
Step 13
Move the Playhead to the 17th frame → increase the Opacity to 6%. Now, move the Playhead to 5 seconds and 23rd frame → change X-axis value to “-1944” and the Opacity to 0%. Click OK.
Step 14
Go to Sample Color and drag the White color on Track 6 in the Timeline. Place this clip at the same starting point as the snapshots below it. Set its duration the same as the clips below too. Then, move the Playhead at its starting point.
Step 15
Double-click on the Sample Color clip → go to Video → Mask → Import. Here, select the first Snapshot we created earlier in this tutorial.
Step 16
Now, go straight to the Animation tab and click the “**+Add**” button to add a keyframe. Then, compress the text in the preview screen until it’s not visible anymore on the screen.
Step 17
Add keyframes at the 1-second position and at the 5-second position. Then, move the Playhead once more to the 5-second and 22nd frame. Reduce the Opacity to 1%. Click OK.
Step 18
Drag another White Sample Color to Track 5 this time. Adjust its duration and starting point to be the same as the clip above it. Double-click on it → go to Video → Mask → Import. Here, select the flipped text Snapshot we created earlier.
Step 19
Now, go to Animation and add a keyframe at the starting point. Then, compress the text on the preview screen exactly as we did before with the other one. Then, add a keyframe at the 1-second position of the clip. Then, adjust the Y-axis position to create a reflection effect, just like this.
Step 20
Move the Playhead to the 5-second position and add a keyframe. Now, move the Playhead directly to 5-seconds and 22 frames. Here, reduce the Opacity to 0%.
Step 21
Go back to the Video tab from the upper-left corner of the panel. Now, move the Playhead to the clip’s starting point. Select the Mask tab. Add a keyframe. Move the Playhead to 1 second and set the Blur Strength to 6%.
Step 22
Move the Playhead to 3 seconds. Scroll down and set Vertical to 259%. Set Y-axis to “-157”. Then, increase Blur Strength to 25%. Click OK.
Step 23
Click on the Sample Color in Track 5 and change the Opacity to 40% for the second and third keyframes. You can move between the keyframes on the arrows highlighted below. Click OK.
Step 24
Go to Sample Color and drag the “Gradient 4” color to Track 7 on the Timeline. Allow this clip to start from the very beginning and adjust its end time to be the same as all the other clips.
Step 25
Double-click on the Gradient 4 clip → go to Video → Basic. Change the Blending Mode to “Soft Light”. Reduce the Opacity to 42%. Click OK.
Step 26
Go to Project Media and drag the white smoke clip on Track 8. Place the Playhead at the starting point and double-click on the clip.
Step 27
Change its Blending Mode to “Screen”. Go to the Animation tab and decrease the Opacity to 0%. Move the Playhead to frame 10 → increase Opacity to 12%. Move the Playhead to the 5-second position → add a keyframe. Then, move the Playhead at 5 seconds and 23rd frame → increase the Opacity back to 100%. Click OK.
Step 28
Go to Effects and drag the Cinema effect to Track 9. Adjust its duration to match all the other clips. Double-click on the clip and increase its Border Height to “0.10”. Click OK.
Step 29
Finally, Render the video and watch the final result. You’re done! Congratulations on resting a foggy text reflection effect in Filmora.
Summary
What you’ve learned:
- Create a foggy text reflection effect in the Filmora video editor
- Add and adjust keyframes to clips
- Edit and customize text
- Take and edit snapshots
Discovering The Best Wedding LUTs for Premiere Pro | An Overview
A wedding is an important event that legally combines two souls. Hence, this occasion is momentous and special for both partners. Thus, wedding pictures and videos are captured to record these memorable moments. But your visual content may need better quality due to camera problems or amateur photography.
In this situation, using wedding LUTs Premiere Pro is an ideal solution. This article provides the best free wedding LUTs, including implementation steps.
Empower your videos with a new mood using different LUTs. Filmora now offers 100+ top-quality 3D LUTs cover a broad range of scenarios. Transform your videos with Filmora’s powerful 3D LUTs.
Apply LUT on Videos Apply LUT on Videos Learn More


Part 1: What Are The Best Wedding LUTs Available for Premiere Pro?
LUTs and look-up tables are unique editing tools that enhance color gradients. For videos and photos, LUTs are a great source of color-enhancing tools. Meanwhile, for enhancing video content, there are specialized wedding LUTs free. To choose the best wedding LUT for yourself, proceed here:
1. Colorify Wedding LUTs
Upscale your important wedding videography and photography with Colorify Wedding LUTs. This LUT wedding pack has special color presets that provide stunning visual looks. The color presets are packed within filters that enhance color brightness and sharpness. Thus, your important wedding videos and photos will be enhanced with enchanting colors. After all, this is amongst the best wedding LUTs available.

2. Blackmagic Film Wedding and Standard LUTs
Wedding visual content is always special. With Blackmagic wedding LUTs for Premiere Pro, you can enhance color schemas. Hence, your videos can be transformed with engaging black gradients. There are 25 LUTs to upscale the colors of your visual content. Every LUT offers unique color grades for upgrading color resolutions and overall quality.

3. Slog3 Film Wedding and Standard LUTs
Weddings are incomplete without the videos of this critical event. Thus, upscaling video colors is essential to promote video quality and engagement. In this matter, using this wedding LUTs free download is a great solution. After all, the pack contains 25 Sony Slog3 wedding LUTs. So, you can apply LUTs on your all-important wedding videos. The colors will be enhanced with stylish and unique gradients.

4. Film Wedding LUTs Pack
Add cinematic looks to your wedding photos and videos with this LUTs pack. There are 20 LUT film grades that can improve and enhance your wedding content. Meanwhile, you can also adjust intensity, contrast, and saturation. All the LUT colors preset are available in unique color composure and styles. This LUTs Premiere Pro free pack is compatible with Mac and Windows.

5. Rustic Wedding LUTs
Make your wedding photography and videography more enchanting. This wedding LUTs for Premiere Pro pack comprises 11 LUT presets in cube format. So, you can apply these LUTs to your wedding visual content. Meanwhile, you will see instant color corrections and color enhancements. This way, your wedding content will appear livelier and more engaging.

Part 2: How Can You Add Wedding LUTs in Premiere Pro?
Wedding LUTs are useful tools for upgrading colors within wedding visual content. Premiere Pro is the most frequently used tool for video editing with several features. As a user, you may not understand the operations of Premiere Pro software. Thus, to add LUTs through Premiere Pro, follow these easy steps:
Step 1: Open Adobe Premiere Pro on your device. Make sure to add a video clip that needs editing in the timeline. After this, move into the “Color” workspace from the top of your screen.

Step 2: On the bottom left, there is a project window. From there, you need to click the “New Item” tab and choose “Adjustment Layer.” Now adjust the settings of the video from the available panel. This includes “Width,” “Height,” “Timebase,” and “Pixel Aspect Ratio.” Click “OK.” after you are done with settings.

Step 3: Drag the adjustment layer into the timeline from the project window. Set the length of the adjustment layer similar to the video’s length. Select the adjustment layer, and click “Lumetri Color” from the right-hand panel. From the “Basic Correction” category, set “Input LUT” and click the “Browse” option from the drop-down menu. Choose your LUT pack from the folder and press “Open” to apply the LUTs to the video.

Part 3: Finding The Best Wedding LUTs in Wondershare Filmora
Video editing can consume a lot of time and resources. While using LUTs, you can enhance the color gradients of your photos and videos without editing. Meanwhile, finding good yet reliable wedding LUTs can be difficult. In Wondershare Filmora , you can find more than 200 LUTs to support your needs. The interesting thing is every LUT will be unique with more distinctive colors.
Add LUTs on Video For Win 7 or later(64-bit)
Add LUTs on Video For macOS 10.14 or later
Meanwhile, Filmora also upscales video content through effects, stickers, and text. You can even use AI audio stretch, AI audio denoise, and silence detection.

Key Features of Wondershare Filmora
Making video editing simpler and smarter, Wondershare Filmora is a trusted solution. After all, this software comes with extensive functionalities. Let’s find some of its other extended features:
AI Smart Cutout and Reframe
Using AI smart cutout feature, users can paint backgrounds and even people. This way, the imperfections in videos are rectified for a flawless experience. Meanwhile, with auto-reframe, you can even resize a row of videos. No need for any editing skills in all cases.
Unlimited Editing Tools
The availability of pan and zoom, crop, keyframing, masking, and other tools make Filmora special. This means users don’t need to look for other editing tools. Every type of video adjustment is present within a single solution. After video editing, you can proceed with video export to the device.
Extended Audio Technology
With Filmora, you can enhance your video engagement by adding audio tracks. The video and audio synchronization is clear and appropriate. Meanwhile, you can use an audio visualizer to make your music come alive. With audio ducking, fade your music to stand out in the dialogue.
Part 4: What are The Benefits and Drawbacks of Using LUTs?
LUTs are video editing mechanisms that optimally improve video quality. There are many benefits to using LUTs. Also, there are drawbacks of LUTs that cannot be neglected. Let’s discuss both benefits and disadvantages:
Benefits
- LUTs are fast and efficient in their color grading schemas. So they can enhance upscale color resolutions in a calculated way.
- With maximum consistency, LUTs apply color grading across the frames in the video. Hence, this provides a consistent look to the video in unique colors.
- Using LUTs, you can carry experiments on your video through filter presets. The presets are available in different colors and styles, and you can adjust them.
Drawbacks
- There is a lack of personalization in most LUT filter presets. Hence, you cannot customize the color and styles for desired looks.
- Due to limited precision, LUTs can involve color inaccuracies in their process. This happens because LUTs follow discrete values rather than using continuous gradients.
Conclusion
Like other events, weddings are also important occasions. This is why videography and photography are standard in this type of event. To improve the quality of video content, you need wedding LUTs Premiere Pro free. Meanwhile, in this article, you discovered the 5 best wedding LUTs to use. Finally, Wondershare Filmora has the availability of more than 200 LUT presets. You can even find wedding LUTs free in Filmora.
Add LUTs on Video For Win 7 or later(64-bit)
Add LUTs on Video For macOS 10.14 or later
Apply LUT on Videos Apply LUT on Videos Learn More
Part 1: What Are The Best Wedding LUTs Available for Premiere Pro?
LUTs and look-up tables are unique editing tools that enhance color gradients. For videos and photos, LUTs are a great source of color-enhancing tools. Meanwhile, for enhancing video content, there are specialized wedding LUTs free. To choose the best wedding LUT for yourself, proceed here:
1. Colorify Wedding LUTs
Upscale your important wedding videography and photography with Colorify Wedding LUTs. This LUT wedding pack has special color presets that provide stunning visual looks. The color presets are packed within filters that enhance color brightness and sharpness. Thus, your important wedding videos and photos will be enhanced with enchanting colors. After all, this is amongst the best wedding LUTs available.
2. Blackmagic Film Wedding and Standard LUTs
Wedding visual content is always special. With Blackmagic wedding LUTs for Premiere Pro, you can enhance color schemas. Hence, your videos can be transformed with engaging black gradients. There are 25 LUTs to upscale the colors of your visual content. Every LUT offers unique color grades for upgrading color resolutions and overall quality.
3. Slog3 Film Wedding and Standard LUTs
Weddings are incomplete without the videos of this critical event. Thus, upscaling video colors is essential to promote video quality and engagement. In this matter, using this wedding LUTs free download is a great solution. After all, the pack contains 25 Sony Slog3 wedding LUTs. So, you can apply LUTs on your all-important wedding videos. The colors will be enhanced with stylish and unique gradients.
4. Film Wedding LUTs Pack
Add cinematic looks to your wedding photos and videos with this LUTs pack. There are 20 LUT film grades that can improve and enhance your wedding content. Meanwhile, you can also adjust intensity, contrast, and saturation. All the LUT colors preset are available in unique color composure and styles. This LUTs Premiere Pro free pack is compatible with Mac and Windows.
5. Rustic Wedding LUTs
Make your wedding photography and videography more enchanting. This wedding LUTs for Premiere Pro pack comprises 11 LUT presets in cube format. So, you can apply these LUTs to your wedding visual content. Meanwhile, you will see instant color corrections and color enhancements. This way, your wedding content will appear livelier and more engaging.
Part 2: How Can You Add Wedding LUTs in Premiere Pro?
Wedding LUTs are useful tools for upgrading colors within wedding visual content. Premiere Pro is the most frequently used tool for video editing with several features. As a user, you may not understand the operations of Premiere Pro software. Thus, to add LUTs through Premiere Pro, follow these easy steps:
Step 1: Open Adobe Premiere Pro on your device. Make sure to add a video clip that needs editing in the timeline. After this, move into the “Color” workspace from the top of your screen.
Step 2: On the bottom left, there is a project window. From there, you need to click the “New Item” tab and choose “Adjustment Layer.” Now adjust the settings of the video from the available panel. This includes “Width,” “Height,” “Timebase,” and “Pixel Aspect Ratio.” Click “OK.” after you are done with settings.
Step 3: Drag the adjustment layer into the timeline from the project window. Set the length of the adjustment layer similar to the video’s length. Select the adjustment layer, and click “Lumetri Color” from the right-hand panel. From the “Basic Correction” category, set “Input LUT” and click the “Browse” option from the drop-down menu. Choose your LUT pack from the folder and press “Open” to apply the LUTs to the video.
Part 3: Finding The Best Wedding LUTs in Wondershare Filmora
Video editing can consume a lot of time and resources. While using LUTs, you can enhance the color gradients of your photos and videos without editing. Meanwhile, finding good yet reliable wedding LUTs can be difficult. In Wondershare Filmora , you can find more than 200 LUTs to support your needs. The interesting thing is every LUT will be unique with more distinctive colors.
Add LUTs on Video For Win 7 or later(64-bit)
Add LUTs on Video For macOS 10.14 or later
Meanwhile, Filmora also upscales video content through effects, stickers, and text. You can even use AI audio stretch, AI audio denoise, and silence detection.
Key Features of Wondershare Filmora
Making video editing simpler and smarter, Wondershare Filmora is a trusted solution. After all, this software comes with extensive functionalities. Let’s find some of its other extended features:
AI Smart Cutout and Reframe
Using AI smart cutout feature, users can paint backgrounds and even people. This way, the imperfections in videos are rectified for a flawless experience. Meanwhile, with auto-reframe, you can even resize a row of videos. No need for any editing skills in all cases.
Unlimited Editing Tools
The availability of pan and zoom, crop, keyframing, masking, and other tools make Filmora special. This means users don’t need to look for other editing tools. Every type of video adjustment is present within a single solution. After video editing, you can proceed with video export to the device.
Extended Audio Technology
With Filmora, you can enhance your video engagement by adding audio tracks. The video and audio synchronization is clear and appropriate. Meanwhile, you can use an audio visualizer to make your music come alive. With audio ducking, fade your music to stand out in the dialogue.
Part 4: What are The Benefits and Drawbacks of Using LUTs?
LUTs are video editing mechanisms that optimally improve video quality. There are many benefits to using LUTs. Also, there are drawbacks of LUTs that cannot be neglected. Let’s discuss both benefits and disadvantages:
Benefits
- LUTs are fast and efficient in their color grading schemas. So they can enhance upscale color resolutions in a calculated way.
- With maximum consistency, LUTs apply color grading across the frames in the video. Hence, this provides a consistent look to the video in unique colors.
- Using LUTs, you can carry experiments on your video through filter presets. The presets are available in different colors and styles, and you can adjust them.
Drawbacks
- There is a lack of personalization in most LUT filter presets. Hence, you cannot customize the color and styles for desired looks.
- Due to limited precision, LUTs can involve color inaccuracies in their process. This happens because LUTs follow discrete values rather than using continuous gradients.
Conclusion
Like other events, weddings are also important occasions. This is why videography and photography are standard in this type of event. To improve the quality of video content, you need wedding LUTs Premiere Pro free. Meanwhile, in this article, you discovered the 5 best wedding LUTs to use. Finally, Wondershare Filmora has the availability of more than 200 LUT presets. You can even find wedding LUTs free in Filmora.
Add LUTs on Video For Win 7 or later(64-bit)
Add LUTs on Video For macOS 10.14 or later
Also read:
- A Guide to Speed up a Video on Splice for 2024
- New In 2024, Beginners Guide to Green Screen Keying
- Updated In 2024, How to Become a Youtuber?
- New In 2024, Things You Need to Know About Color Grading in Photography
- Updated Easy Ways to Create Procreate GIFs for 2024
- 2024 Approved Step by Step to Crop Videos with CyberLink PowerDirector
- Updated How to Remove Audio From Videos with FFmpeg?
- 2024 Approved Customize PowerPoint Slideshow Icon in Simple Ways
- In 2024, 4 Methods to Crop a Video on Android Easily
- 2024 Approved How to Create Glowing Edge Effect in TikTok Dancing Video
- Updated In 2024, How to Use Twixtor Effect to Add Slow-Motion Effect to Video?
- HDR Photography How to Use HDR Mode on Your Android Devices
- New Have You Ever Played Roblox Games? Read This Article to Find Out How to Get Motion Blur in Roblox Using Simple and Efficient Ways for 2024
- In This Article, You Will Learn About the Top 5 Editors for Windows, Top 5 Editors for iPhone/Android, and Top 5 Editors for Animated GIF Editing
- New | Zoom In and Zoom Out on YouTube for 2024
- 2024 Approved Adding Shake Effects to Your Video With Alight Motion
- New In 2024, Create Promotional Video
- Updated 20 Best Text To Speech Software Windows, Mac, Android, iPhone & O for 2024
- New 2024 Approved How to Apply Video Filters
- In 2024, Step by Step to Cut Videos in Lightworks
- New 2024 Approved Minecraft Pixel Art Is a Trending Subject, and They Simply Consist of In-Game Pixel Artworks, Besides the Minecraft Houses, Farms, or Cities. Lets Explore the Fantastic World of Minecraft Pixel Art
- In 2024, Want to Play a Video on Loop on Vimeo so that It Plays Again and Again? Here Are All the Different Ways to Loop a Video on Vimeo in Simple Steps
- 2024 Approved Detailed Review of Kodak LUTs
- Updated In 2024, You Can Learn How to Color Grade Your Picture in Lightroom Effectively. By Understanding the Process of Color Grading in Lightroom, You Can Create Unique Works, and Improve Your Abilities
- In 2024, Everything You Need to Know about Lock Screen Settings on your Nokia C32
- In 2024, 5 Ways to Move Contacts From Vivo Y200e 5G to iPhone (13/14/15) | Dr.fone
- In 2024, Recommended Best Applications for Mirroring Your Realme C51 Screen | Dr.fone
- In 2024, Unlocking iPhone 6 Plus Lock Screen 3 Foolproof Methods that Actually Work
- Updated In 2024, Top 10 Streaming Services Worth a Try
- Hassle-Free Ways to Remove FRP Lock on OnePlus 11Rwith/without a PC
- iPhone 12 Backup Password Never Set But Still Asking? Heres the Fix | Dr.fone
- Top-Notch Solutions for Disabled Apple ID From iPhone 6 Making It Possible
- In 2024, How to Screen Mirror your Apple iPhone XR Display? | Dr.fone
- Wondering the Best Alternative to Hola On Lava Blaze Pro 5G? Here Is the Answer | Dr.fone
- How to Screen Mirroring OnePlus Ace 2V to PC? | Dr.fone
- How to Stop Google Chrome from Tracking Your Location On Oppo K11 5G? | Dr.fone
- Updated How To Learn Cartoon Sketch Drawing— Pencil Sketch for Beginners for 2024
- In 2024, How to Watch Hulu Outside US On Realme V30T | Dr.fone
- Title: Detailed Tutorial to Crop a Video in KineMaster
- Author: Morgan
- Created at : 2024-05-19 05:11:34
- Updated at : 2024-05-20 05:11:34
- Link: https://ai-video-editing.techidaily.com/detailed-tutorial-to-crop-a-video-in-kinemaster/
- License: This work is licensed under CC BY-NC-SA 4.0.
