:max_bytes(150000):strip_icc():format(webp)/should-you-buy-an-apple-tv-5248431-f35331ef36b749b9895a2c1e3705cf22.jpg)
Discover How to Create Professional Foggy Text Reflection Effects in the Filmora Video Editor

Discover How to Create Professional Foggy Text Reflection Effects in the Filmora Video Editor
Preparation
What you need to prepare:
- A computer (Windows or macOS)
- Your video materials.
- Filmora video editor
Step 1
Download the Filmora video editor → run it → and click on “New Project”.
Step 2
Go to Titles → drag the Default Title to the Timeline below. Double-click on the clip to open its settings. Here, type in your text → change the font to Montserrat Light. Scroll down and increase Text Spacing to 5.0. Now, select only the first word in the box where you typed your text. Then, change its font to Montserrat Bold. Click OK.

Step 3
Take a Snapshot of the text you just created. Now, delete the Default Title clip from the Timeline and drag the Snapshot you took to the Timeline.

Step 4
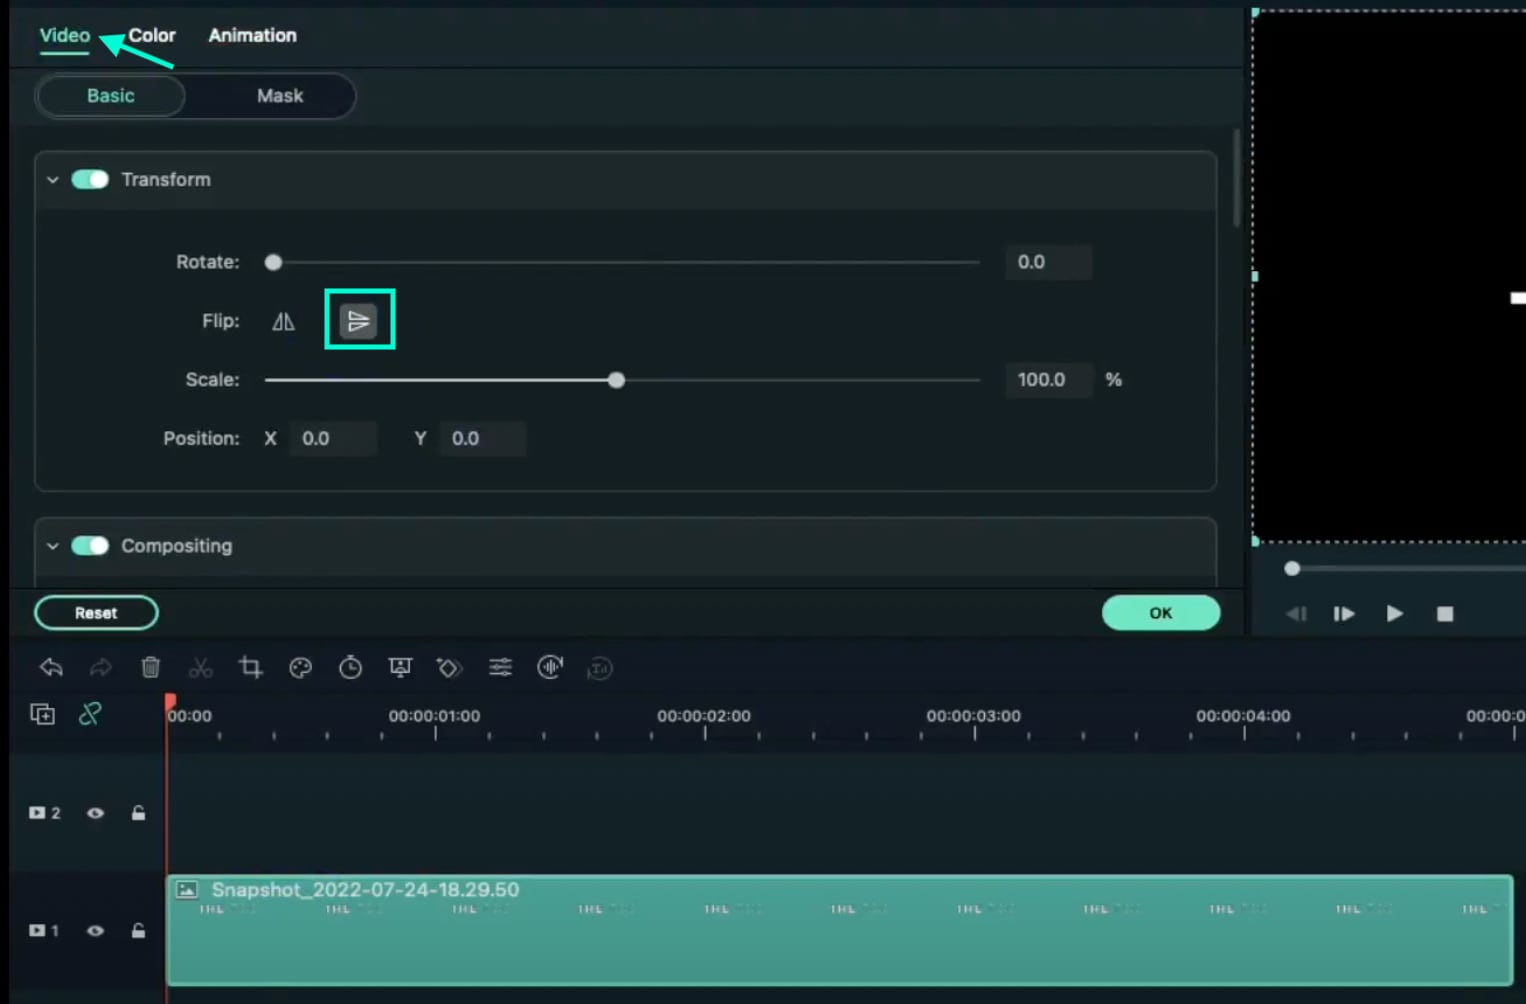
Double-click the Snapshot clip → go to the Video tab → click the highlighted button below to flip the text. Then, take a Snapshot of this flipped version of the text and delete the clip from the Timeline.
Step 5
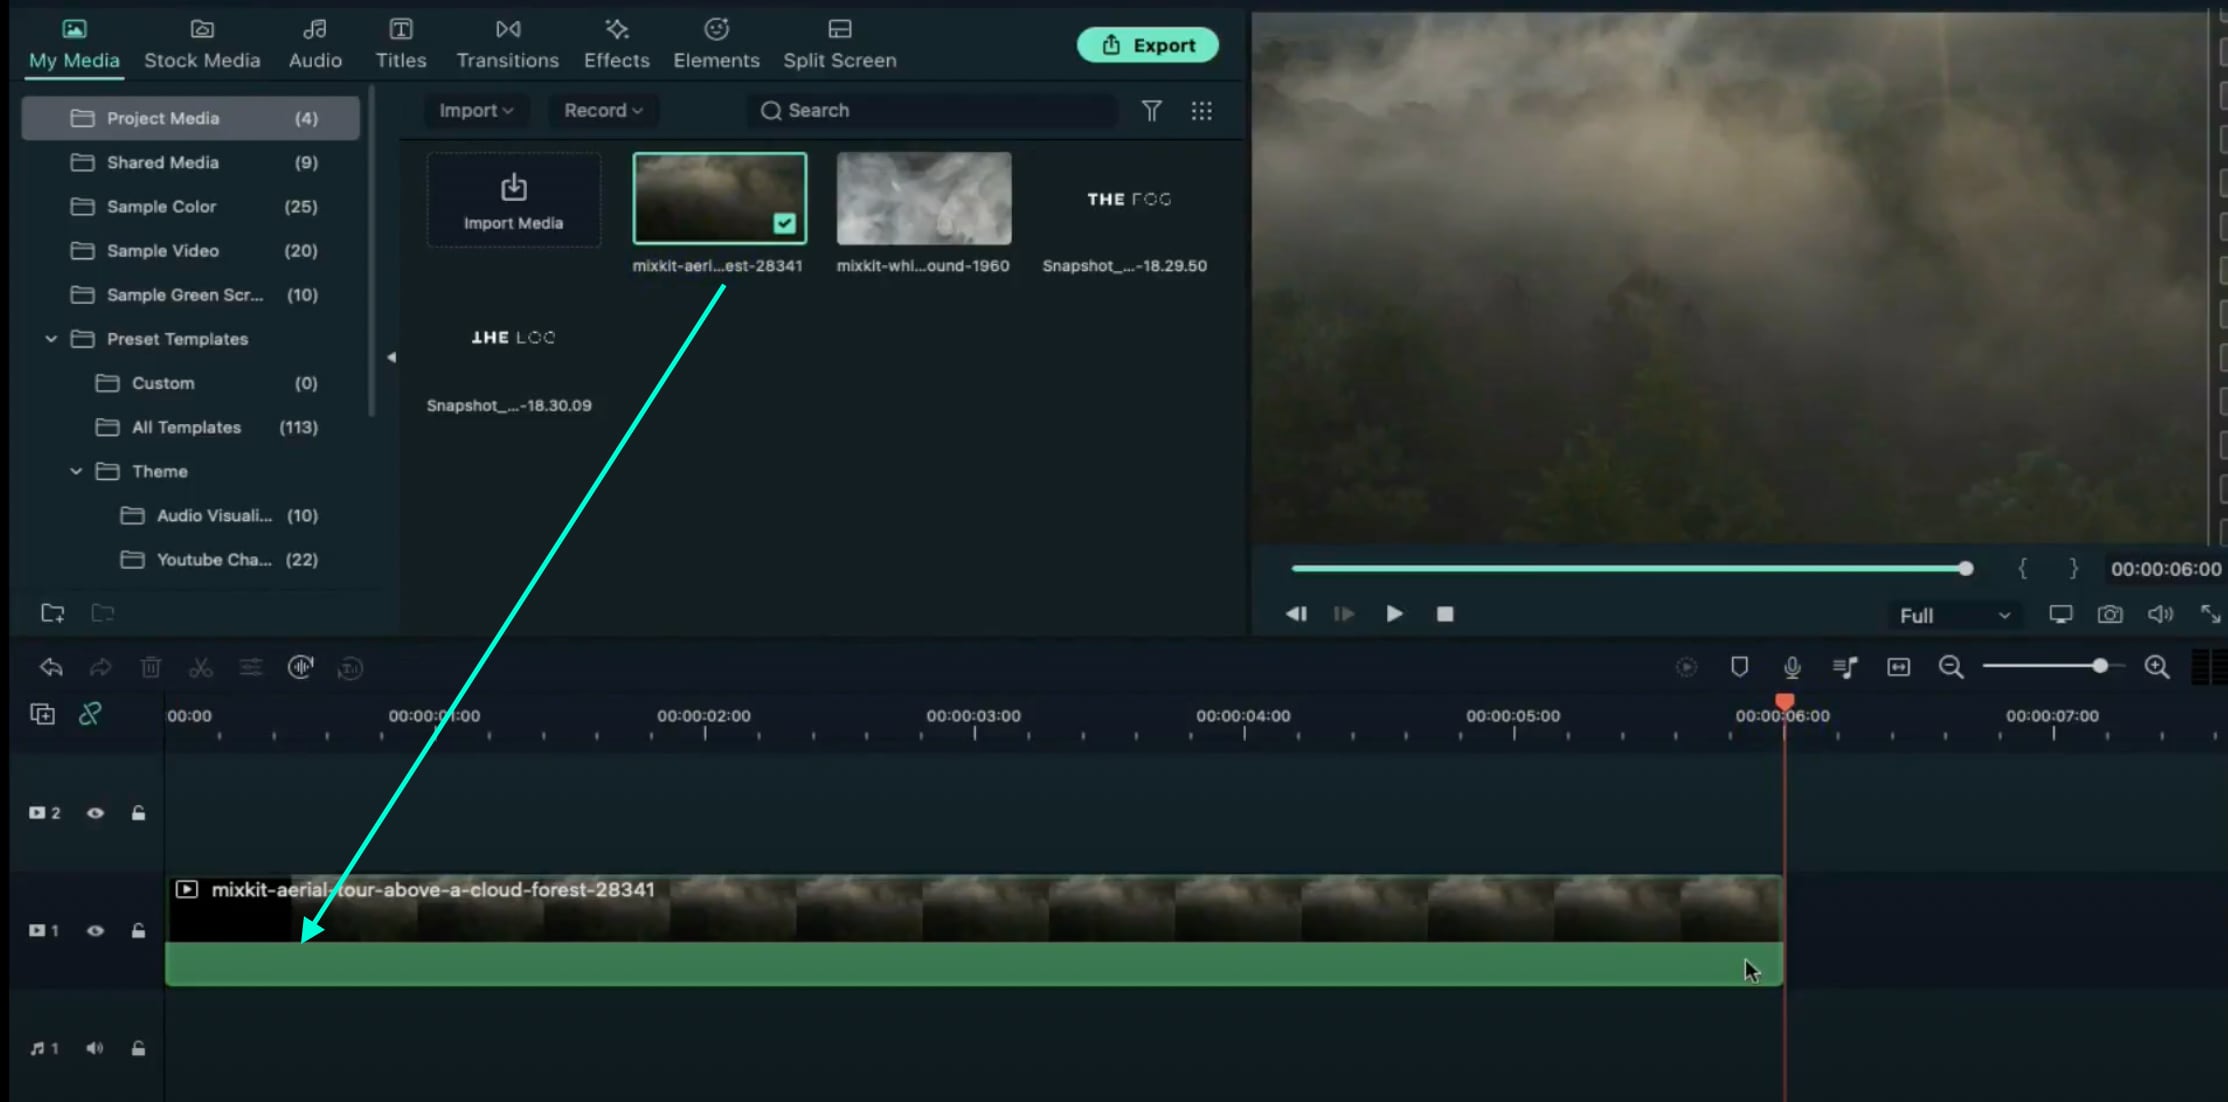
Visit the free stock footage site Mixkit and download any smoke or fog background video you like. Then, go to Filmora → My Media → Import Media → and select the footage you downloaded to import it into the video editor. Then, drag the Smoke clip to the Timeline and make it 6 seconds long.
Step 6
Double-click on the clip → go to Color. Now, change Contrast to “49”, Saturation to “100”, and Brightness to “18”. Below, set the 3D LUT option to “Game of Thrones”. Click OK.

Step 7
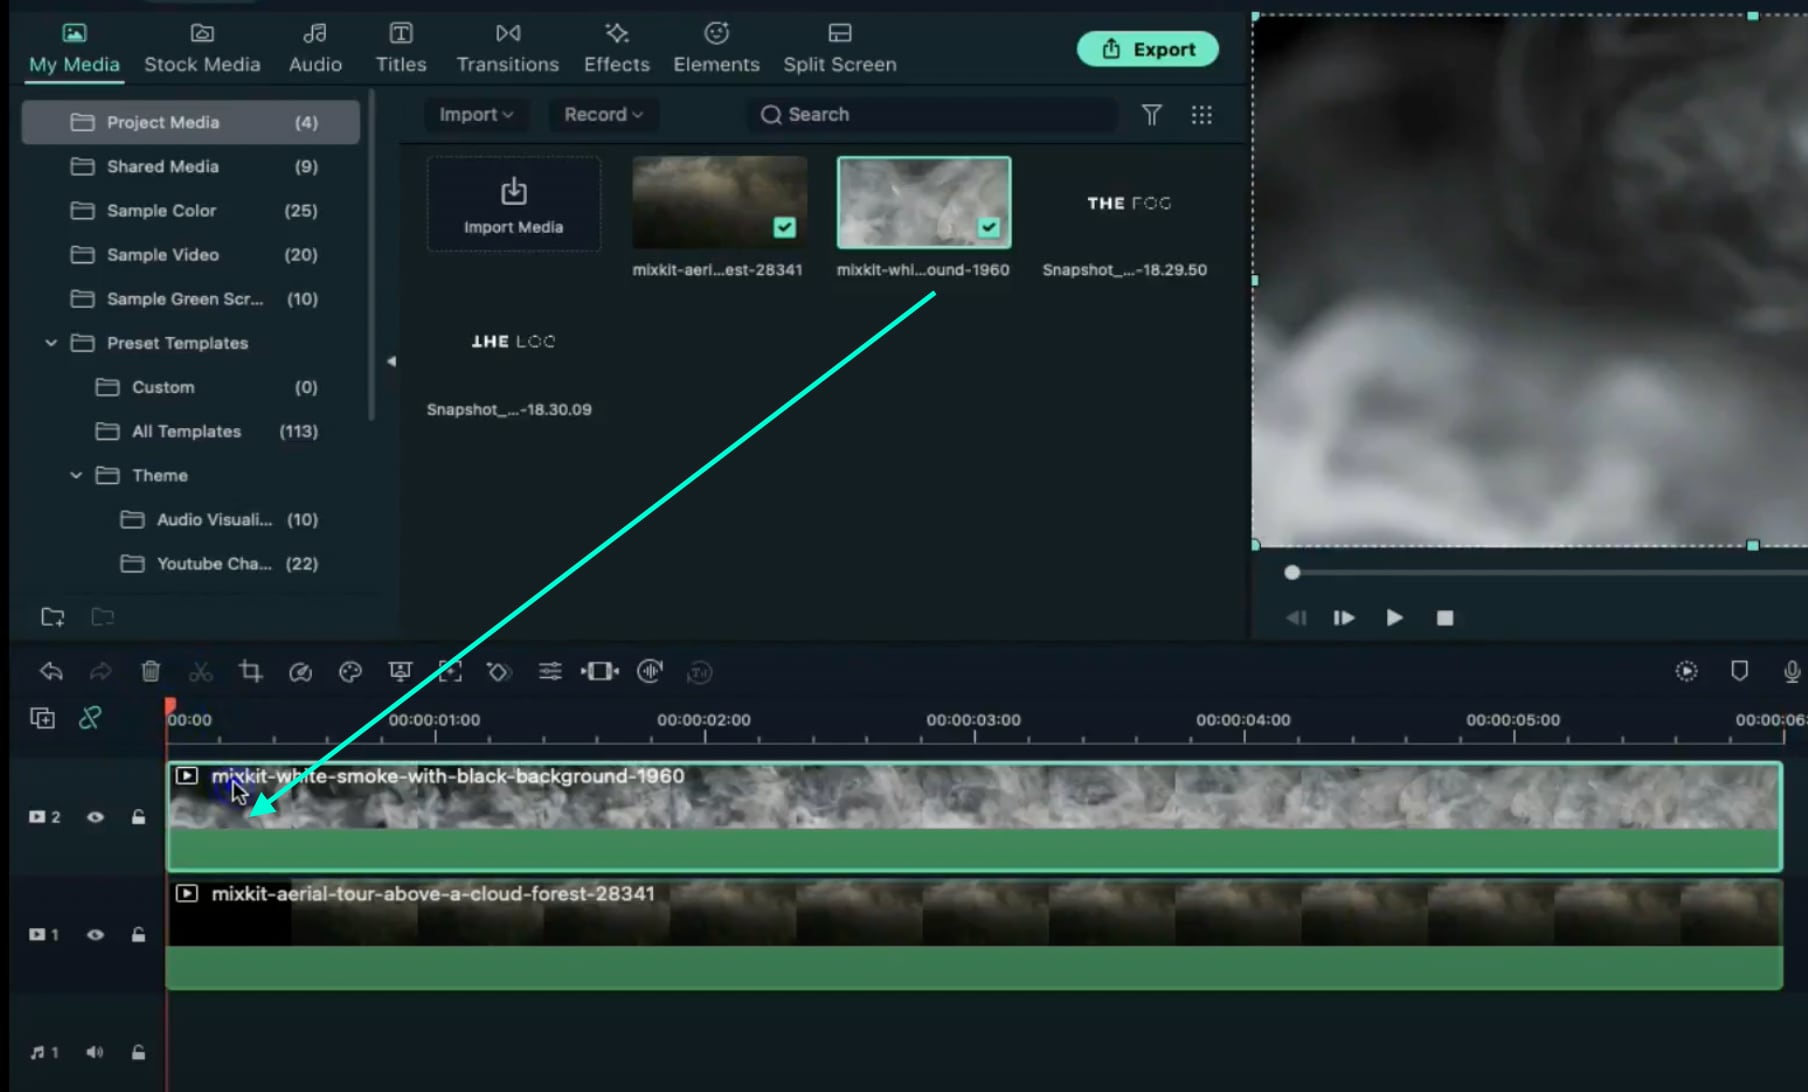
Drag the other Smoke clip to Track 2 of the Timeline. Make it 6 seconds long. Then, move the Playhead to the starting point of the video.
Step 8
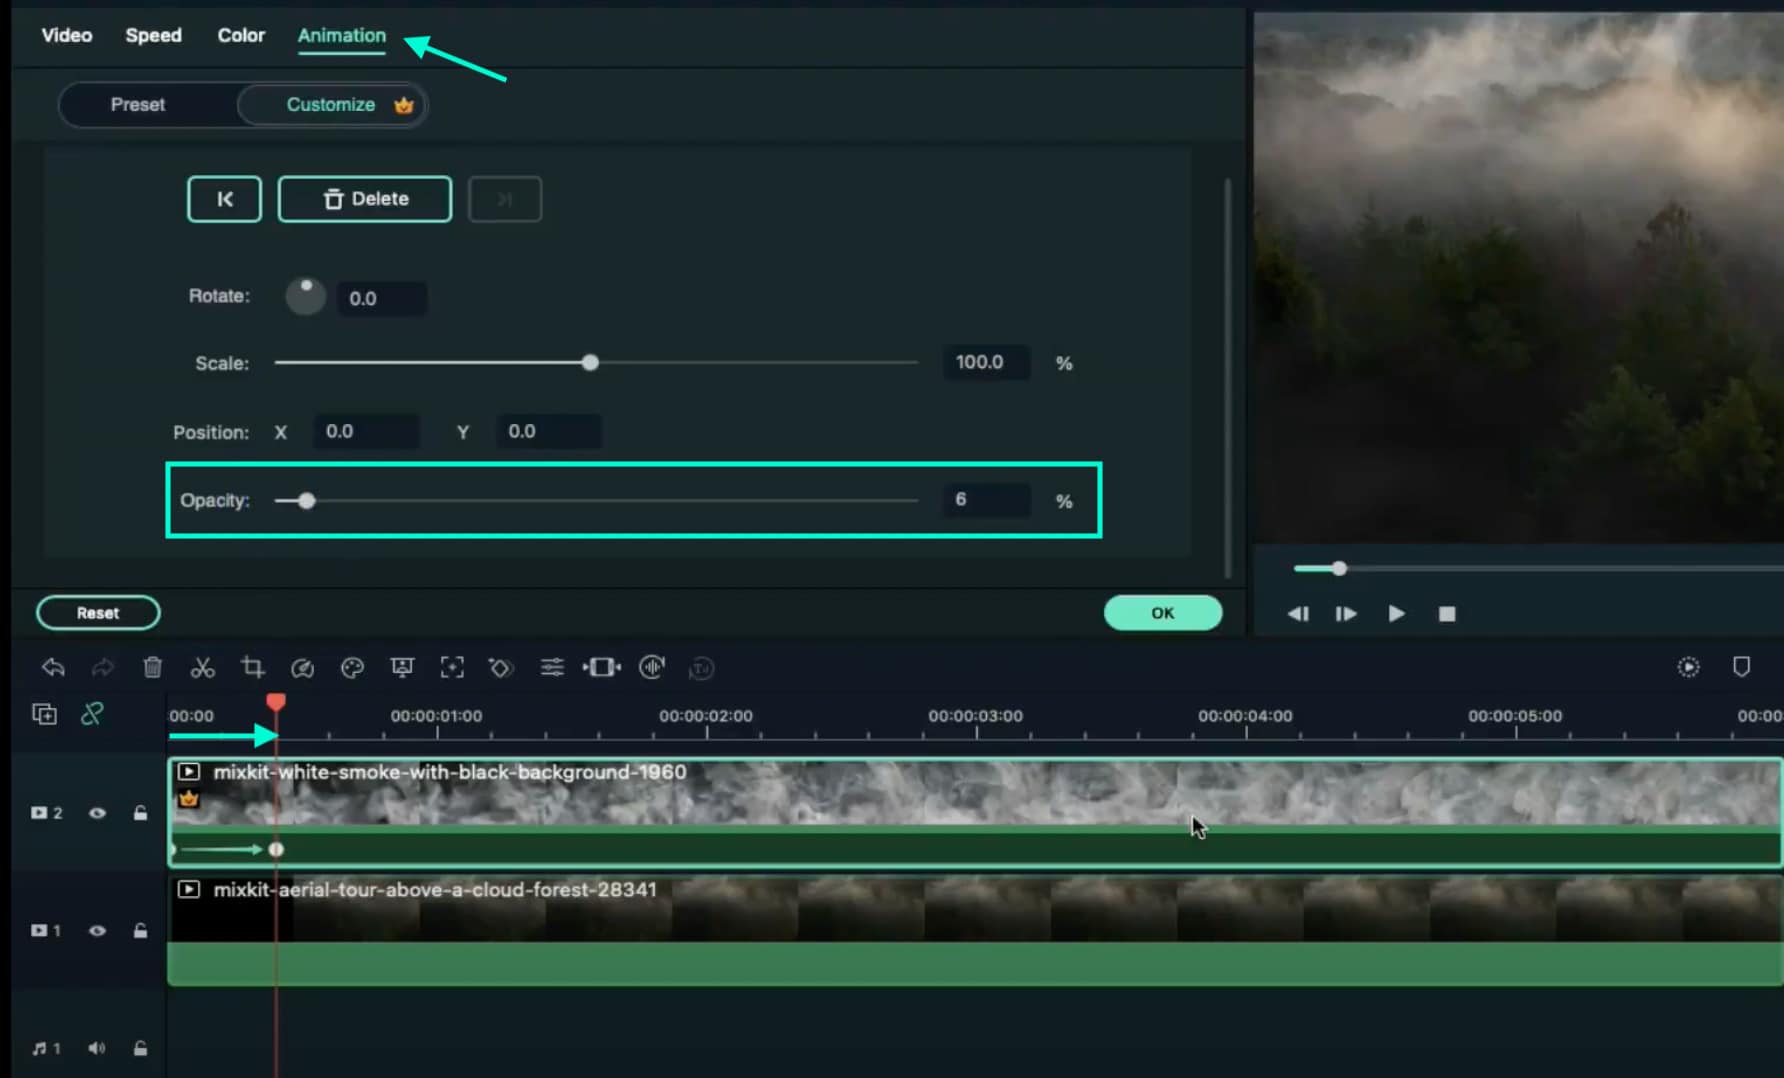
Double-click on the new smoke clip. Go to Animation. Decrease the Opacity to 0%. Move the Playhead 10 frames forward → increase the Opacity to 6%. Don’t click OK yet.
Step 9
Move the Playhead to 5 seconds. Click on “**+Add**” to add a keyframe to the clip. Then, move the Playhead to the next-to-last frame and increase the Opacity to 100%. Click OK.

Step 10
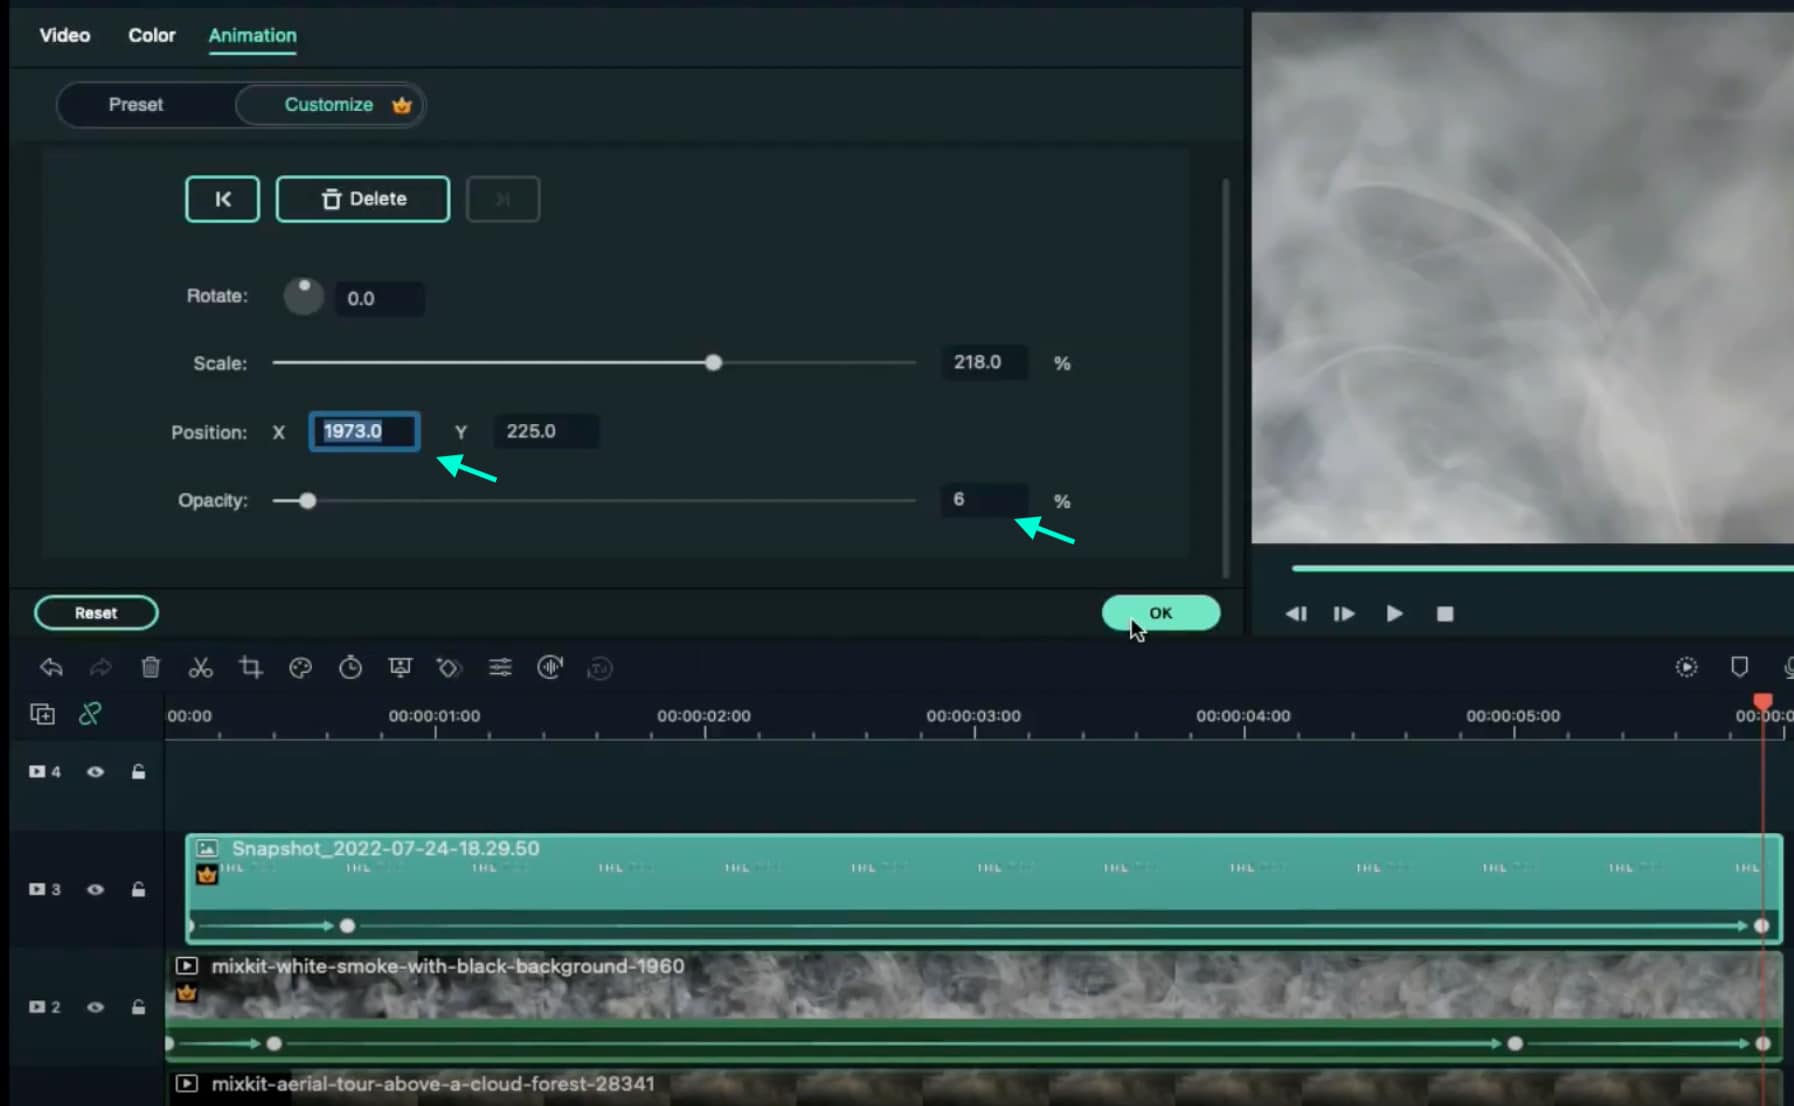
Set the Playhead to the second frame and drop the first Snapshot we took earlier at that starting point. Drag the clip to be 6 seconds long. Then, double-click on the clip and adjust the settings exactly as you see in this image here. Don’t click on OK yet.

Step 11
Move the Playhead at the 17th frame → increase the Opacity to 6%. Move the Playhead to 5 seconds and 23rd frame → change the X-axis value to “1973”. Click OK.
Step 12
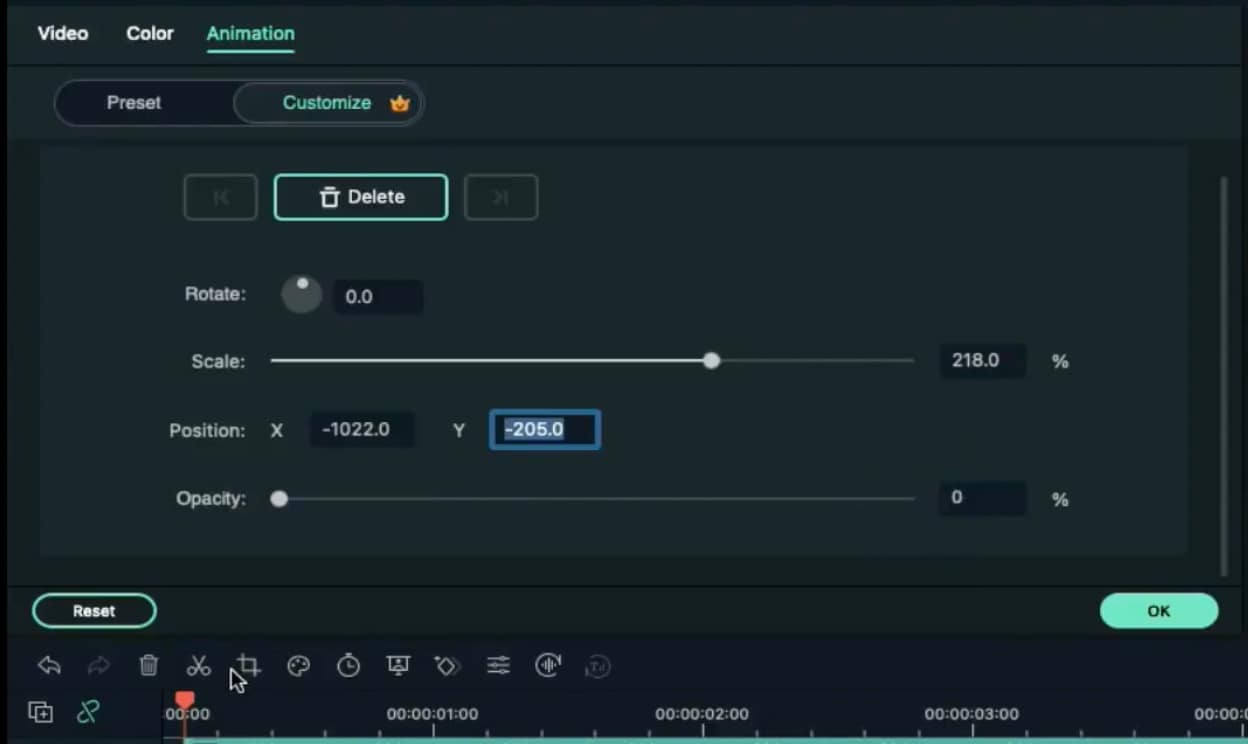
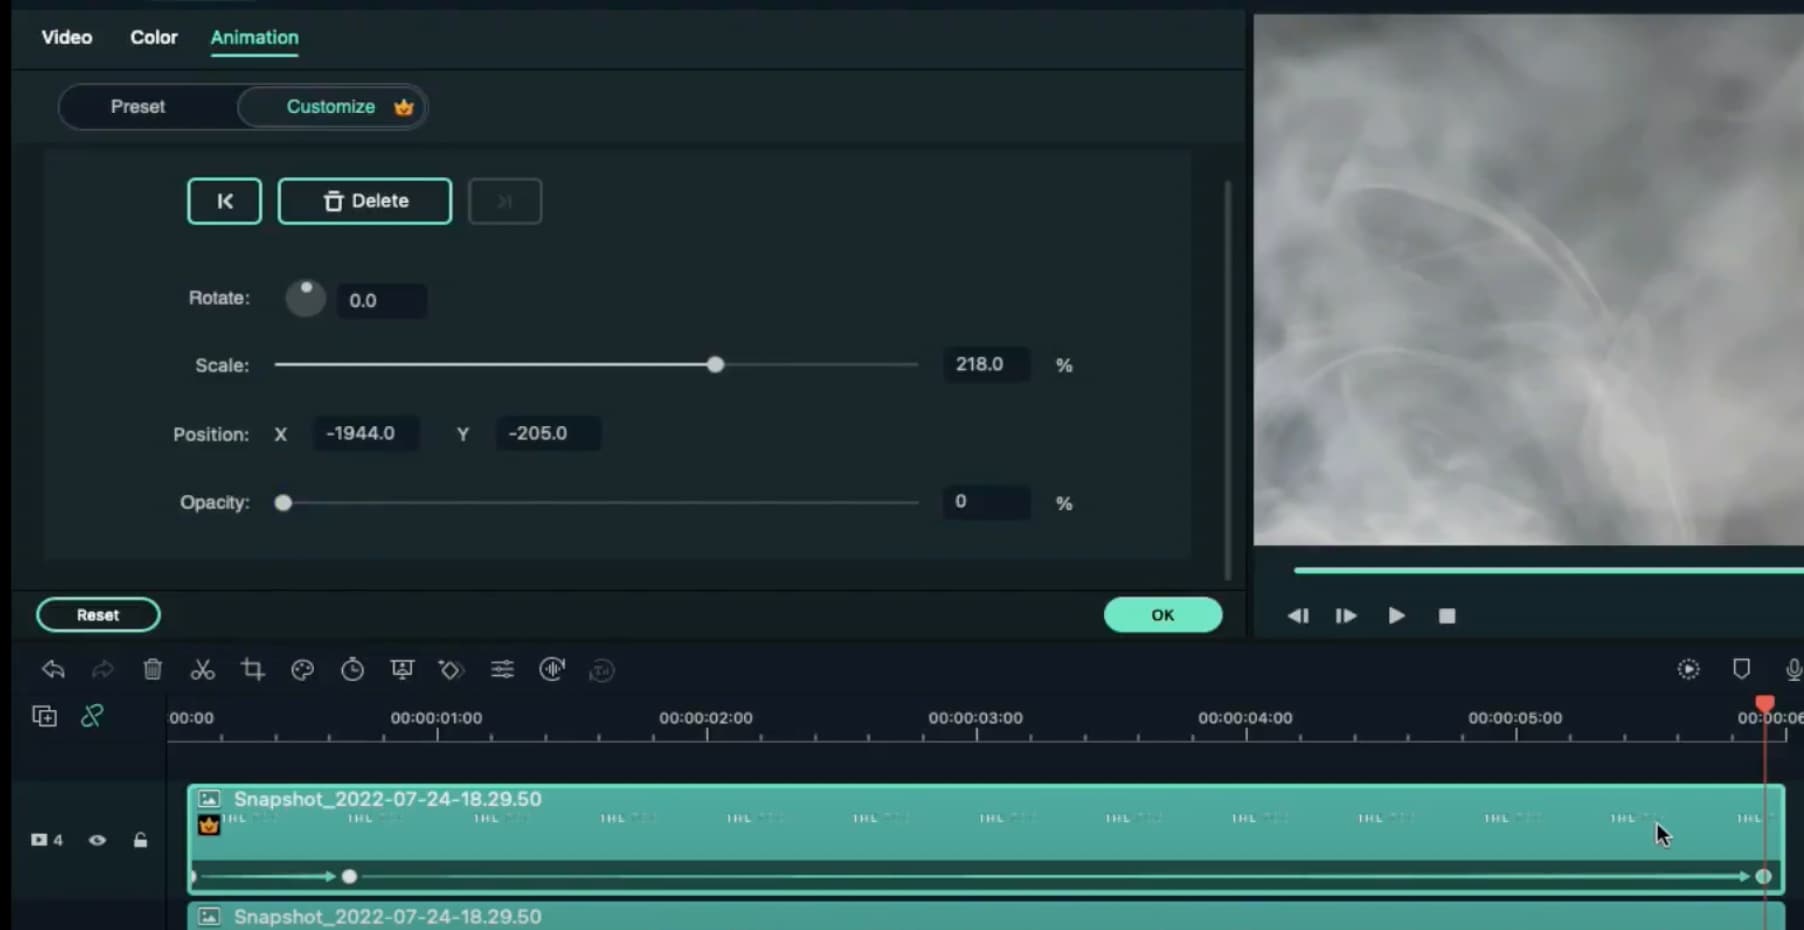
Drag the same Snapshot file to Track 4, directly on top of the clip in Track 3. Make its duration the same too. Now, double-click on this clip and apply the exact same settings as in the image here. Don’t click on OK yet.
Step 13
Move the Playhead to the 17th frame → increase the Opacity to 6%. Now, move the Playhead to 5 seconds and 23rd frame → change X-axis value to “-1944” and the Opacity to 0%. Click OK.
Step 14
Go to Sample Color and drag the White color on Track 6 in the Timeline. Place this clip at the same starting point as the snapshots below it. Set its duration the same as the clips below too. Then, move the Playhead at its starting point.

Step 15
Double-click on the Sample Color clip → go to Video → Mask → Import. Here, select the first Snapshot we created earlier in this tutorial.

Step 16
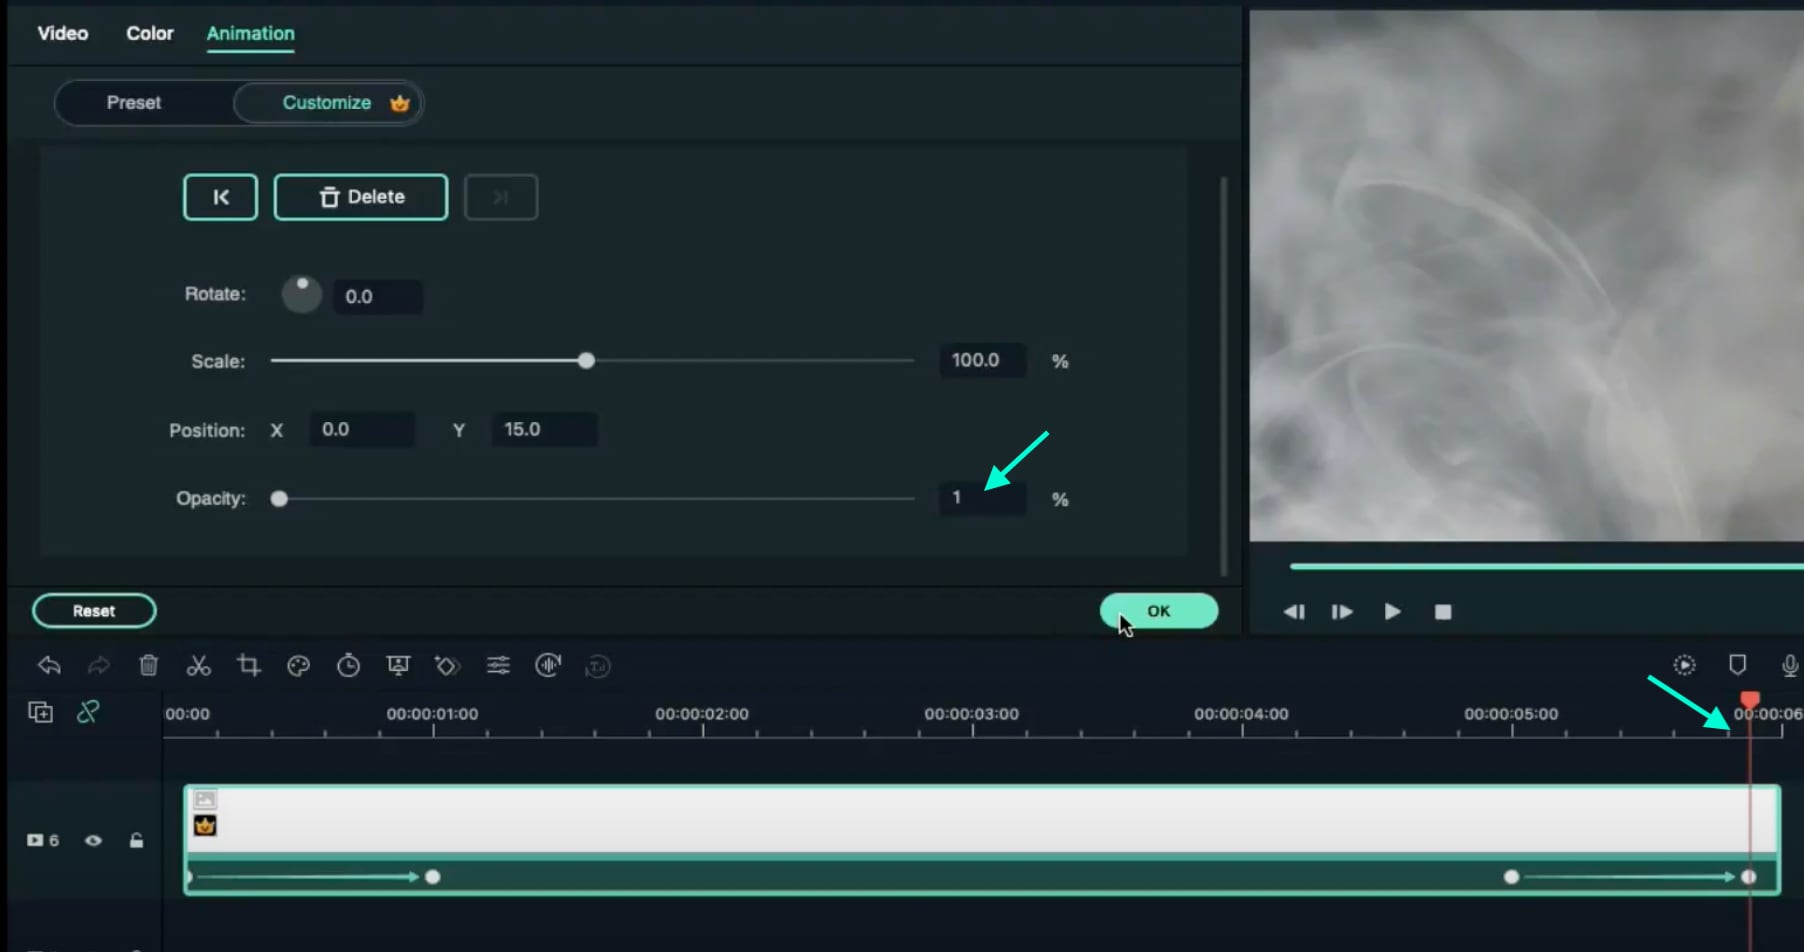
Now, go straight to the Animation tab and click the “**+Add**” button to add a keyframe. Then, compress the text in the preview screen until it’s not visible anymore on the screen.

Step 17
Add keyframes at the 1-second position and at the 5-second position. Then, move the Playhead once more to the 5-second and 22nd frame. Reduce the Opacity to 1%. Click OK.
Step 18
Drag another White Sample Color to Track 5 this time. Adjust its duration and starting point to be the same as the clip above it. Double-click on it → go to Video → Mask → Import. Here, select the flipped text Snapshot we created earlier.
Step 19
Now, go to Animation and add a keyframe at the starting point. Then, compress the text on the preview screen exactly as we did before with the other one. Then, add a keyframe at the 1-second position of the clip. Then, adjust the Y-axis position to create a reflection effect, just like this.

Step 20
Move the Playhead to the 5-second position and add a keyframe. Now, move the Playhead directly to 5-seconds and 22 frames. Here, reduce the Opacity to 0%.
Step 21
Go back to the Video tab from the upper-left corner of the panel. Now, move the Playhead to the clip’s starting point. Select the Mask tab. Add a keyframe. Move the Playhead to 1 second and set the Blur Strength to 6%.

Step 22
Move the Playhead to 3 seconds. Scroll down and set Vertical to 259%. Set Y-axis to “-157”. Then, increase Blur Strength to 25%. Click OK.

Step 23
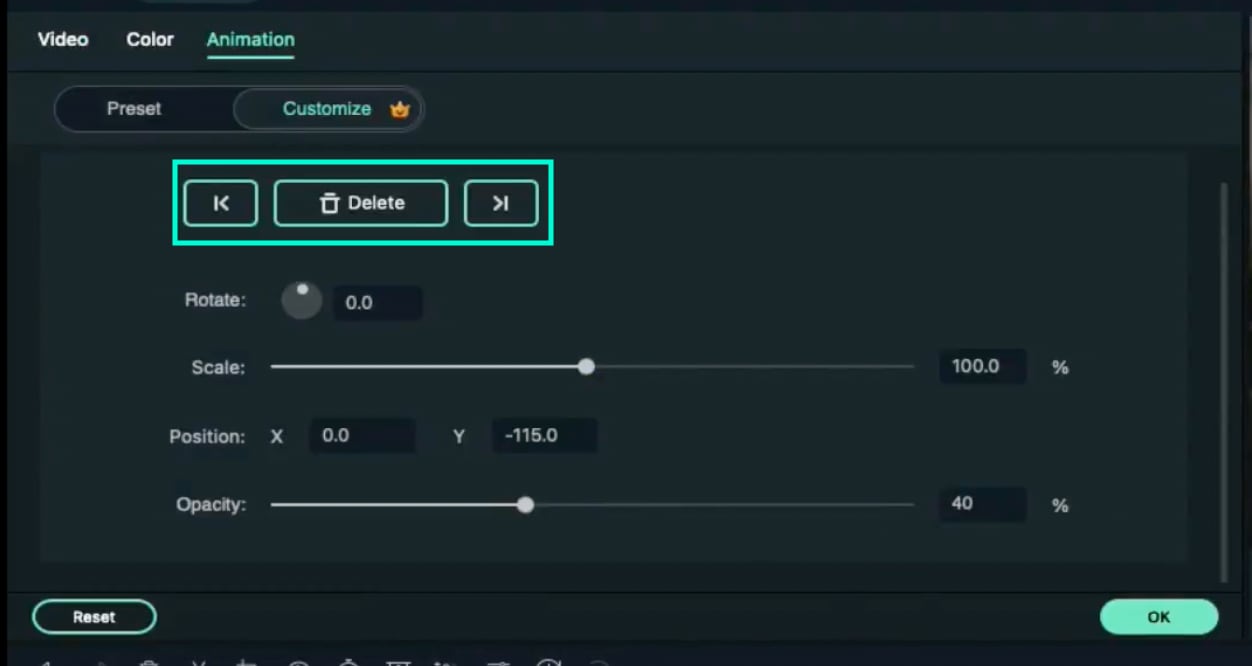
Click on the Sample Color in Track 5 and change the Opacity to 40% for the second and third keyframes. You can move between the keyframes on the arrows highlighted below. Click OK.
Step 24
Go to Sample Color and drag the “Gradient 4” color to Track 7 on the Timeline. Allow this clip to start from the very beginning and adjust its end time to be the same as all the other clips.
Step 25
Double-click on the Gradient 4 clip → go to Video → Basic. Change the Blending Mode to “Soft Light”. Reduce the Opacity to 42%. Click OK.

Step 26
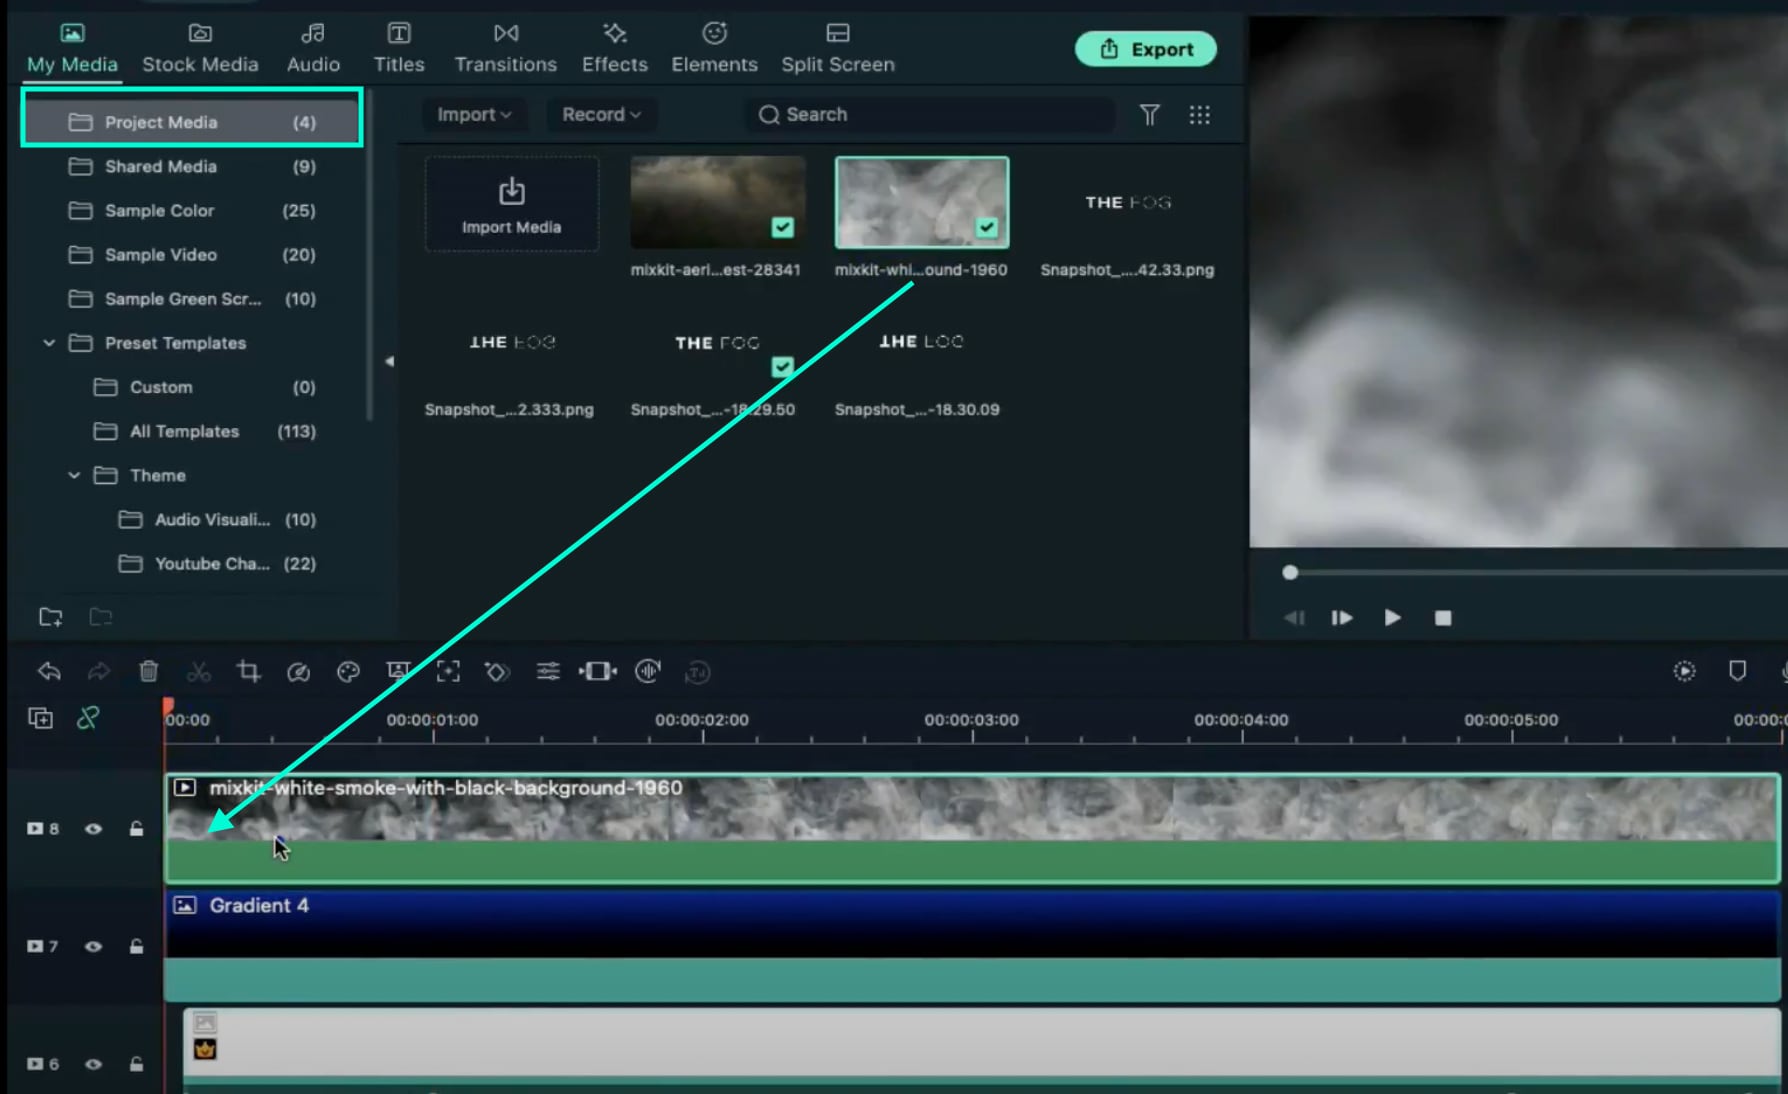
Go to Project Media and drag the white smoke clip on Track 8. Place the Playhead at the starting point and double-click on the clip.
Step 27
Change its Blending Mode to “Screen”. Go to the Animation tab and decrease the Opacity to 0%. Move the Playhead to frame 10 → increase Opacity to 12%. Move the Playhead to the 5-second position → add a keyframe. Then, move the Playhead at 5 seconds and 23rd frame → increase the Opacity back to 100%. Click OK.
Step 28
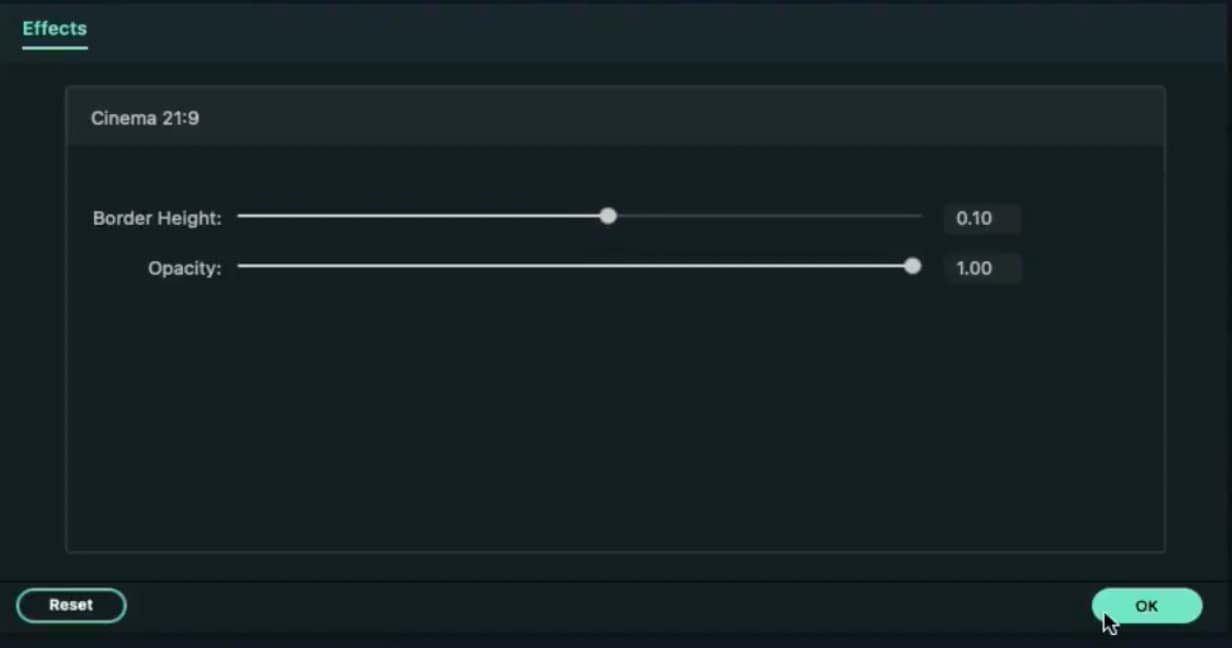
Go to Effects and drag the Cinema effect to Track 9. Adjust its duration to match all the other clips. Double-click on the clip and increase its Border Height to “0.10”. Click OK.
Step 29
Finally, Render the video and watch the final result. You’re done! Congratulations on resting a foggy text reflection effect in Filmora.

Summary
What you’ve learned:
- Create a foggy text reflection effect in the Filmora video editor
- Add and adjust keyframes to clips
- Edit and customize text
- Take and edit snapshots
What you need to prepare:
- A computer (Windows or macOS)
- Your video materials.
- Filmora video editor
Step 1
Download the Filmora video editor → run it → and click on “New Project”.
Step 2
Go to Titles → drag the Default Title to the Timeline below. Double-click on the clip to open its settings. Here, type in your text → change the font to Montserrat Light. Scroll down and increase Text Spacing to 5.0. Now, select only the first word in the box where you typed your text. Then, change its font to Montserrat Bold. Click OK.

Step 3
Take a Snapshot of the text you just created. Now, delete the Default Title clip from the Timeline and drag the Snapshot you took to the Timeline.

Step 4
Double-click the Snapshot clip → go to the Video tab → click the highlighted button below to flip the text. Then, take a Snapshot of this flipped version of the text and delete the clip from the Timeline.

Step 5
Visit the free stock footage site Mixkit and download any smoke or fog background video you like. Then, go to Filmora → My Media → Import Media → and select the footage you downloaded to import it into the video editor. Then, drag the Smoke clip to the Timeline and make it 6 seconds long.

Step 6
Double-click on the clip → go to Color. Now, change Contrast to “49”, Saturation to “100”, and Brightness to “18”. Below, set the 3D LUT option to “Game of Thrones”. Click OK.

Step 7
Drag the other Smoke clip to Track 2 of the Timeline. Make it 6 seconds long. Then, move the Playhead to the starting point of the video.

Step 8
Double-click on the new smoke clip. Go to Animation. Decrease the Opacity to 0%. Move the Playhead 10 frames forward → increase the Opacity to 6%. Don’t click OK yet.

Step 9
Move the Playhead to 5 seconds. Click on “**+Add**” to add a keyframe to the clip. Then, move the Playhead to the next-to-last frame and increase the Opacity to 100%. Click OK.

Step 10
Set the Playhead to the second frame and drop the first Snapshot we took earlier at that starting point. Drag the clip to be 6 seconds long. Then, double-click on the clip and adjust the settings exactly as you see in this image here. Don’t click on OK yet.

Step 11
Move the Playhead at the 17th frame → increase the Opacity to 6%. Move the Playhead to 5 seconds and 23rd frame → change the X-axis value to “1973”. Click OK.

Step 12
Drag the same Snapshot file to Track 4, directly on top of the clip in Track 3. Make its duration the same too. Now, double-click on this clip and apply the exact same settings as in the image here. Don’t click on OK yet.

Step 13
Move the Playhead to the 17th frame → increase the Opacity to 6%. Now, move the Playhead to 5 seconds and 23rd frame → change X-axis value to “-1944” and the Opacity to 0%. Click OK.

Step 14
Go to Sample Color and drag the White color on Track 6 in the Timeline. Place this clip at the same starting point as the snapshots below it. Set its duration the same as the clips below too. Then, move the Playhead at its starting point.

Step 15
Double-click on the Sample Color clip → go to Video → Mask → Import. Here, select the first Snapshot we created earlier in this tutorial.

Step 16
Now, go straight to the Animation tab and click the “**+Add**” button to add a keyframe. Then, compress the text in the preview screen until it’s not visible anymore on the screen.

Step 17
Add keyframes at the 1-second position and at the 5-second position. Then, move the Playhead once more to the 5-second and 22nd frame. Reduce the Opacity to 1%. Click OK.

Step 18
Drag another White Sample Color to Track 5 this time. Adjust its duration and starting point to be the same as the clip above it. Double-click on it → go to Video → Mask → Import. Here, select the flipped text Snapshot we created earlier.
Step 19
Now, go to Animation and add a keyframe at the starting point. Then, compress the text on the preview screen exactly as we did before with the other one. Then, add a keyframe at the 1-second position of the clip. Then, adjust the Y-axis position to create a reflection effect, just like this.

Step 20
Move the Playhead to the 5-second position and add a keyframe. Now, move the Playhead directly to 5-seconds and 22 frames. Here, reduce the Opacity to 0%.
Step 21
Go back to the Video tab from the upper-left corner of the panel. Now, move the Playhead to the clip’s starting point. Select the Mask tab. Add a keyframe. Move the Playhead to 1 second and set the Blur Strength to 6%.

Step 22
Move the Playhead to 3 seconds. Scroll down and set Vertical to 259%. Set Y-axis to “-157”. Then, increase Blur Strength to 25%. Click OK.

Step 23
Click on the Sample Color in Track 5 and change the Opacity to 40% for the second and third keyframes. You can move between the keyframes on the arrows highlighted below. Click OK.

Step 24
Go to Sample Color and drag the “Gradient 4” color to Track 7 on the Timeline. Allow this clip to start from the very beginning and adjust its end time to be the same as all the other clips.
Step 25
Double-click on the Gradient 4 clip → go to Video → Basic. Change the Blending Mode to “Soft Light”. Reduce the Opacity to 42%. Click OK.

Step 26
Go to Project Media and drag the white smoke clip on Track 8. Place the Playhead at the starting point and double-click on the clip.

Step 27
Change its Blending Mode to “Screen”. Go to the Animation tab and decrease the Opacity to 0%. Move the Playhead to frame 10 → increase Opacity to 12%. Move the Playhead to the 5-second position → add a keyframe. Then, move the Playhead at 5 seconds and 23rd frame → increase the Opacity back to 100%. Click OK.
Step 28
Go to Effects and drag the Cinema effect to Track 9. Adjust its duration to match all the other clips. Double-click on the clip and increase its Border Height to “0.10”. Click OK.

Step 29
Finally, Render the video and watch the final result. You’re done! Congratulations on resting a foggy text reflection effect in Filmora.

Summary
What you’ve learned:
- Create a foggy text reflection effect in the Filmora video editor
- Add and adjust keyframes to clips
- Edit and customize text
- Take and edit snapshots
What you need to prepare:
- A computer (Windows or macOS)
- Your video materials.
- Filmora video editor
Step 1
Download the Filmora video editor → run it → and click on “New Project”.
Step 2
Go to Titles → drag the Default Title to the Timeline below. Double-click on the clip to open its settings. Here, type in your text → change the font to Montserrat Light. Scroll down and increase Text Spacing to 5.0. Now, select only the first word in the box where you typed your text. Then, change its font to Montserrat Bold. Click OK.

Step 3
Take a Snapshot of the text you just created. Now, delete the Default Title clip from the Timeline and drag the Snapshot you took to the Timeline.

Step 4
Double-click the Snapshot clip → go to the Video tab → click the highlighted button below to flip the text. Then, take a Snapshot of this flipped version of the text and delete the clip from the Timeline.

Step 5
Visit the free stock footage site Mixkit and download any smoke or fog background video you like. Then, go to Filmora → My Media → Import Media → and select the footage you downloaded to import it into the video editor. Then, drag the Smoke clip to the Timeline and make it 6 seconds long.

Step 6
Double-click on the clip → go to Color. Now, change Contrast to “49”, Saturation to “100”, and Brightness to “18”. Below, set the 3D LUT option to “Game of Thrones”. Click OK.

Step 7
Drag the other Smoke clip to Track 2 of the Timeline. Make it 6 seconds long. Then, move the Playhead to the starting point of the video.

Step 8
Double-click on the new smoke clip. Go to Animation. Decrease the Opacity to 0%. Move the Playhead 10 frames forward → increase the Opacity to 6%. Don’t click OK yet.

Step 9
Move the Playhead to 5 seconds. Click on “**+Add**” to add a keyframe to the clip. Then, move the Playhead to the next-to-last frame and increase the Opacity to 100%. Click OK.

Step 10
Set the Playhead to the second frame and drop the first Snapshot we took earlier at that starting point. Drag the clip to be 6 seconds long. Then, double-click on the clip and adjust the settings exactly as you see in this image here. Don’t click on OK yet.

Step 11
Move the Playhead at the 17th frame → increase the Opacity to 6%. Move the Playhead to 5 seconds and 23rd frame → change the X-axis value to “1973”. Click OK.

Step 12
Drag the same Snapshot file to Track 4, directly on top of the clip in Track 3. Make its duration the same too. Now, double-click on this clip and apply the exact same settings as in the image here. Don’t click on OK yet.

Step 13
Move the Playhead to the 17th frame → increase the Opacity to 6%. Now, move the Playhead to 5 seconds and 23rd frame → change X-axis value to “-1944” and the Opacity to 0%. Click OK.

Step 14
Go to Sample Color and drag the White color on Track 6 in the Timeline. Place this clip at the same starting point as the snapshots below it. Set its duration the same as the clips below too. Then, move the Playhead at its starting point.

Step 15
Double-click on the Sample Color clip → go to Video → Mask → Import. Here, select the first Snapshot we created earlier in this tutorial.

Step 16
Now, go straight to the Animation tab and click the “**+Add**” button to add a keyframe. Then, compress the text in the preview screen until it’s not visible anymore on the screen.

Step 17
Add keyframes at the 1-second position and at the 5-second position. Then, move the Playhead once more to the 5-second and 22nd frame. Reduce the Opacity to 1%. Click OK.

Step 18
Drag another White Sample Color to Track 5 this time. Adjust its duration and starting point to be the same as the clip above it. Double-click on it → go to Video → Mask → Import. Here, select the flipped text Snapshot we created earlier.
Step 19
Now, go to Animation and add a keyframe at the starting point. Then, compress the text on the preview screen exactly as we did before with the other one. Then, add a keyframe at the 1-second position of the clip. Then, adjust the Y-axis position to create a reflection effect, just like this.

Step 20
Move the Playhead to the 5-second position and add a keyframe. Now, move the Playhead directly to 5-seconds and 22 frames. Here, reduce the Opacity to 0%.
Step 21
Go back to the Video tab from the upper-left corner of the panel. Now, move the Playhead to the clip’s starting point. Select the Mask tab. Add a keyframe. Move the Playhead to 1 second and set the Blur Strength to 6%.

Step 22
Move the Playhead to 3 seconds. Scroll down and set Vertical to 259%. Set Y-axis to “-157”. Then, increase Blur Strength to 25%. Click OK.

Step 23
Click on the Sample Color in Track 5 and change the Opacity to 40% for the second and third keyframes. You can move between the keyframes on the arrows highlighted below. Click OK.

Step 24
Go to Sample Color and drag the “Gradient 4” color to Track 7 on the Timeline. Allow this clip to start from the very beginning and adjust its end time to be the same as all the other clips.
Step 25
Double-click on the Gradient 4 clip → go to Video → Basic. Change the Blending Mode to “Soft Light”. Reduce the Opacity to 42%. Click OK.

Step 26
Go to Project Media and drag the white smoke clip on Track 8. Place the Playhead at the starting point and double-click on the clip.

Step 27
Change its Blending Mode to “Screen”. Go to the Animation tab and decrease the Opacity to 0%. Move the Playhead to frame 10 → increase Opacity to 12%. Move the Playhead to the 5-second position → add a keyframe. Then, move the Playhead at 5 seconds and 23rd frame → increase the Opacity back to 100%. Click OK.
Step 28
Go to Effects and drag the Cinema effect to Track 9. Adjust its duration to match all the other clips. Double-click on the clip and increase its Border Height to “0.10”. Click OK.

Step 29
Finally, Render the video and watch the final result. You’re done! Congratulations on resting a foggy text reflection effect in Filmora.

Summary
What you’ve learned:
- Create a foggy text reflection effect in the Filmora video editor
- Add and adjust keyframes to clips
- Edit and customize text
- Take and edit snapshots
What you need to prepare:
- A computer (Windows or macOS)
- Your video materials.
- Filmora video editor
Step 1
Download the Filmora video editor → run it → and click on “New Project”.
Step 2
Go to Titles → drag the Default Title to the Timeline below. Double-click on the clip to open its settings. Here, type in your text → change the font to Montserrat Light. Scroll down and increase Text Spacing to 5.0. Now, select only the first word in the box where you typed your text. Then, change its font to Montserrat Bold. Click OK.

Step 3
Take a Snapshot of the text you just created. Now, delete the Default Title clip from the Timeline and drag the Snapshot you took to the Timeline.

Step 4
Double-click the Snapshot clip → go to the Video tab → click the highlighted button below to flip the text. Then, take a Snapshot of this flipped version of the text and delete the clip from the Timeline.

Step 5
Visit the free stock footage site Mixkit and download any smoke or fog background video you like. Then, go to Filmora → My Media → Import Media → and select the footage you downloaded to import it into the video editor. Then, drag the Smoke clip to the Timeline and make it 6 seconds long.

Step 6
Double-click on the clip → go to Color. Now, change Contrast to “49”, Saturation to “100”, and Brightness to “18”. Below, set the 3D LUT option to “Game of Thrones”. Click OK.

Step 7
Drag the other Smoke clip to Track 2 of the Timeline. Make it 6 seconds long. Then, move the Playhead to the starting point of the video.

Step 8
Double-click on the new smoke clip. Go to Animation. Decrease the Opacity to 0%. Move the Playhead 10 frames forward → increase the Opacity to 6%. Don’t click OK yet.

Step 9
Move the Playhead to 5 seconds. Click on “**+Add**” to add a keyframe to the clip. Then, move the Playhead to the next-to-last frame and increase the Opacity to 100%. Click OK.

Step 10
Set the Playhead to the second frame and drop the first Snapshot we took earlier at that starting point. Drag the clip to be 6 seconds long. Then, double-click on the clip and adjust the settings exactly as you see in this image here. Don’t click on OK yet.

Step 11
Move the Playhead at the 17th frame → increase the Opacity to 6%. Move the Playhead to 5 seconds and 23rd frame → change the X-axis value to “1973”. Click OK.

Step 12
Drag the same Snapshot file to Track 4, directly on top of the clip in Track 3. Make its duration the same too. Now, double-click on this clip and apply the exact same settings as in the image here. Don’t click on OK yet.

Step 13
Move the Playhead to the 17th frame → increase the Opacity to 6%. Now, move the Playhead to 5 seconds and 23rd frame → change X-axis value to “-1944” and the Opacity to 0%. Click OK.

Step 14
Go to Sample Color and drag the White color on Track 6 in the Timeline. Place this clip at the same starting point as the snapshots below it. Set its duration the same as the clips below too. Then, move the Playhead at its starting point.

Step 15
Double-click on the Sample Color clip → go to Video → Mask → Import. Here, select the first Snapshot we created earlier in this tutorial.

Step 16
Now, go straight to the Animation tab and click the “**+Add**” button to add a keyframe. Then, compress the text in the preview screen until it’s not visible anymore on the screen.

Step 17
Add keyframes at the 1-second position and at the 5-second position. Then, move the Playhead once more to the 5-second and 22nd frame. Reduce the Opacity to 1%. Click OK.

Step 18
Drag another White Sample Color to Track 5 this time. Adjust its duration and starting point to be the same as the clip above it. Double-click on it → go to Video → Mask → Import. Here, select the flipped text Snapshot we created earlier.
Step 19
Now, go to Animation and add a keyframe at the starting point. Then, compress the text on the preview screen exactly as we did before with the other one. Then, add a keyframe at the 1-second position of the clip. Then, adjust the Y-axis position to create a reflection effect, just like this.

Step 20
Move the Playhead to the 5-second position and add a keyframe. Now, move the Playhead directly to 5-seconds and 22 frames. Here, reduce the Opacity to 0%.
Step 21
Go back to the Video tab from the upper-left corner of the panel. Now, move the Playhead to the clip’s starting point. Select the Mask tab. Add a keyframe. Move the Playhead to 1 second and set the Blur Strength to 6%.

Step 22
Move the Playhead to 3 seconds. Scroll down and set Vertical to 259%. Set Y-axis to “-157”. Then, increase Blur Strength to 25%. Click OK.

Step 23
Click on the Sample Color in Track 5 and change the Opacity to 40% for the second and third keyframes. You can move between the keyframes on the arrows highlighted below. Click OK.

Step 24
Go to Sample Color and drag the “Gradient 4” color to Track 7 on the Timeline. Allow this clip to start from the very beginning and adjust its end time to be the same as all the other clips.
Step 25
Double-click on the Gradient 4 clip → go to Video → Basic. Change the Blending Mode to “Soft Light”. Reduce the Opacity to 42%. Click OK.

Step 26
Go to Project Media and drag the white smoke clip on Track 8. Place the Playhead at the starting point and double-click on the clip.

Step 27
Change its Blending Mode to “Screen”. Go to the Animation tab and decrease the Opacity to 0%. Move the Playhead to frame 10 → increase Opacity to 12%. Move the Playhead to the 5-second position → add a keyframe. Then, move the Playhead at 5 seconds and 23rd frame → increase the Opacity back to 100%. Click OK.
Step 28
Go to Effects and drag the Cinema effect to Track 9. Adjust its duration to match all the other clips. Double-click on the clip and increase its Border Height to “0.10”. Click OK.

Step 29
Finally, Render the video and watch the final result. You’re done! Congratulations on resting a foggy text reflection effect in Filmora.

Summary
What you’ve learned:
- Create a foggy text reflection effect in the Filmora video editor
- Add and adjust keyframes to clips
- Edit and customize text
- Take and edit snapshots
Mastering the Art of Video Framing
Are you in search of the best practice to frame a video? If yes, then cheer up, as we have got you covered! In this guide, we will share the top 6 types of video framing that even novice and expert users can master.
Framing videos involves focusing on a specific subject and blocking out the irrelevant things in the background. Depending on the results you want, video framing can differ a lot. The information below will help you learn about different frames and how to utilize them effectively.
So, without further ado, let’s get into the deets.
- 01 Establishing Shots
- 02 Single Shot
- 03 Two Shot/Group Shot
- 04 Over-the-shoulder (OTS)
- 05 Insert Shot
- 06 POV Shot (OTS)
Part1 Basic Knowledge About Different Framing
Because framing is related to capturing or focusing an object by the camera lens, it can vary depending on your desired shot. Let’s start with the full-shot first and understand how it works.
01 Full Shot (FS)
Remember the shot of Marvel’s Guardians of the Galaxy, where all the players are focused in one wide frame? This excerpt is a practical example of what a full shot looks like. Full-shot video framing is particularly common in action or thriller movies where the creator wants to generate suspense in the audience.
As the name indicates, a full shot often emphasizes the scenery as your subject fills the frame. Like the background isn’t ignored or blurred out; instead, it isn’t overly stressed as well. In most cases, the camera starts with a wide-angle shot and then eventually ends with focusing on the subject.
A full-camera shot greatly emphasizes the physical presence of the character. It tracks the subject’s movements, gestures, or body language, making it the focal point. As a result, the shot obtained delivers a better understanding of actions and interactions among the character and its surroundings.
02 Medium Shot (MS)
We often see friends in movies, going to a casino, or playing cards at a bar. What do we observe in that shot? Hand movements, facial expressions, body language, and a little context of what is happening in the background. This shot is known as the medium shot and is often called the ¾ shot.
Using the medium shot video framing technique, the camera lens allows the viewers to see the background while still focusing on the main character. It’s like you will know what is happening at the back but still remain close to the character’s emotions and gestures.
A medium shot usually begins by showing the subject from the knees to his face. In other cases, the shot can also start from the character’s waist to the top of their head. Compared to long shots, a medium shot takes you closer to the subject’s emotions.
For example, in The Princess Diary, you can see how medium-shot video framing has been useful in portraying comedic scenes. You can see Mia reaching out for plates and glasses around the tables and her eyes squinting to concentrate on the process. The medium shot captures even the smallest emotions while focusing on the background.
03 Close-Up (CU)
When the subject’s head and face take up most of the frame, framing videos is known as a close-up shot. And a particular example of this shot can be spotted in the airport scene in “Casablanca.” This scene shows how the camera lens takes various shots before ending up on the actor’s face, showcasing a number of emotions and intimacy.
A close-up shot is an eye-level shot, and as a result, it takes the subject to the forefront. As a result, this shot establishes a distinct sense of connection between the audience and the character. Additionally, the environmental distraction is kept minimal throughout this shot. This setup helps maintain the emotional impact that the shot will portray.
Some of the common emotions that would be captured using close-up video framing techniques include:
- Tear-filled gaze
- Furrowed brow
- Subtle smile
Cinematographers often use such shots to intensify climaxes. These shots can be viewed as a window to the characters’ souls, allowing viewers to adapt the emotions on another level.
04 Extreme Close-Up (XCU)
To understand the extreme close-up video framing technique, let us illustrate the movie that remained our favorite action thriller while growing up: Minority Report (2002). In this movie, the shots briefly focus on the character’s eyes before hopping into the future view. This extreme close shot serves as a crucial plot to develop thematic elements in the audience.
So, an extremely close shot focuses on specific details of a character. This can be either the subject’s eyes, ears, or mouth. However, the shot is not often employed casually. Instead, it is used in a stance where it is appropriate and when there is a need to develop heightened emotion among the viewers.
You can see this shot as a magnifying glass that draws attention to even the smallest emotion that would have gone unnoticed otherwise.
Part2 Master framing types
Don’t know how to master framing types? No worries, we have a comprehensive guide on that! First of all, let’s start with the most basic way to frame a video:
01 Establishing Shots
An establishing shot is usually used to develop a context for the next upcoming scene. It is often a movie’s first scene and portrays an extremely wide shot of the context. This frame on the video indicates the location and time of the scene to the audience to engage with them on a deeper level.
One of the least-known things about an establishing shot is that it doesn’t require a narrative to explain what is happening. Instead, it is shot alone, and the context is shot so that the audience gets to know everything as soon as they see the excerpt.
An amazing example of establishing a shot can be seen in Stanely Kubrick’s horror film, The Shining. In the movie’s opening scene, the camera goes through the forest and mountains before getting onto the mountaintop hotel where the action occurs.
02 Single Shot
A single shot frames a video that includes a single subject or character. It occurs when a character is talking or reacting to a scenario. Here, remember that if the lens shifts focus from a subject, it is not a single shot.
In the movie Extraction 2020, you can see a single shot being utilized when the character goes on to rescue his son from the kidnappers. The shot extends a long way, including through a car crash, weapon chasing, and that iconic Hemsworth sliding off a building into a brutal fight. And the incredible part was that all of this was captured in a single shot.
03 Two Shot/Group Shot
As the name indicates, a two-shot or a group shot is used to frame a video that involves more than one character. It could be two people conversing or friends sitting at a cafe gossiping. This shot is particularly helpful in portraying the relationship between the characters in the frame.
A good example of two-shot video framing can be seen in the movie Silverado. During the final shooting scene, you can see two cowboys standing far apart while facing each other. Here, the two-shot technique emphasizes tension before the cowboys draw their guns.
04 Over-the-shoulder (OTS)
OTS, or Over-the-shoulder, is the most used shot in framing videos for making movies. To understand how this shot works, let us take an example of two subjects, one named A and the other named B. Now, A is sitting right in front of subject B. Here; the shot is executed by focusing on subject A from the shoulder of subject B. The basic purpose of the shot is to fill the conversation or the meeting between the subjects.
To understand this situation better, let’s take an example from the movie How to Train Your Dragon. In the scene, Hiccup is seen having a conversation with his father. Here, when Hiccup is talking, the camera is focused on him over his father’s shoulder. And when his father talks, the shot is taken over the shoulder of Hiccup.
05 Insert Shot
Insert short framing technique uses selective focus to draw the audience’s attention to the subject. Whether it be an object or merely a piece of information, insert shot has always been effective in emphasizing details.
For example, in The X-Files, an insert shot is used to provide the audience with a look at the file of Scully. This insert shot reveals the most shocking revelations in the file, including a tissue sample. Additionally, the file insert shot also shows how shady Mulder is.
06 POV Shot
A POV shot is used to frame a video in a way that shows what a character is doing. You can take this as a shot showing the world from the character’s perspective. Our modern-day games, including Call of Duty Black Ops, are a common example of such POV shots.
The movie Friday the 13th is an iconic example of a POV shot frame on video. If you remember, the movie revolved around a killer who wasn’t identified until the end. So, the audience watched the film from the killer’s perspective until he was recognized.
Conclusion
To sum it up, mastering the art of video framing, from full shots to POV shots, is an exciting journey that helps you to weave exciting stories. Understanding these techniques will empower you to craft a compelling narrative to captivate your audience, whether you are a beginner or a professional.
So, begin with framing videos now and let your work speak volumes!
How to Make a Gaming Montage - Guide & Tips
The popularity of gaming montage is growing every day in today’s pop culture. There are currently more than 2.5 billion gamers, and most of them love watching gaming video content on YouTube. Whether people use a montage to parody gaming montages themselves or show off their skills, the effort and time put into them create impressive results.
We will explain how to create gaming montages and give you some tips that you might want to keep in mind to make epic videos.
How to Make a Gaming Montage
You have several options when it comes to creating gaming montages. You can include a random cut of great scenes, a mixture of the highlighted moments you found thrilling and would like to share with other gamers. In other cases, you’ll have to think of an engaging story in advance, then base your gameplay on this story.
Essentially, the workflow will be slightly different for these two scenarios. It’s much easier with the random cut type, especially when using a reliable video editor. Editing montages is as exciting as playing the game.
With that in mind, here is how to make a gaming montage.
1) Decide Your Montage Story/Type
Deciding your montage type beforehand helps clear your mind and create an epic gaming montage that will keep viewers watching. It allows you to choose the relevant video clips for your gaming montage.
Choose the topic of the video and decide the length of each clip and the sequence of the clips. Be sure to put the most epic or funny clips in the last section of your video. And this will make your viewers watch the video until the end.
2) Record Your Gameplay Footage
The methods to capture the gameplay varies depending on the platform where the game is. The most important thing you have to keep in mind is to ensure your recorder supports Replay Buffer; this will allow you to record scenes that occurred minutes or seconds ago.
That means you do not need to record the gameplay the whole time and burn your hardware. Instead, you’ll capture the moment after interesting things occur.
Game consoles like PS4 allow you to record the video natively for a maximum of one hour with the gamepad. A capture card lets you record it longer than 60 minutes.
Once you’ve all the clips you want on your PC, head over to https://filmora.wondershare.net/filmora-video-editor.html and download Filmora and install the software on your computer. This program allows you to edit your video clips and add cool effects that will make viewers keep watching.
3) Import You Videos to Media Library
You only have to import the videos to Filmora’s media library and then drag and drop them into the timeline, where you can start making the edits.
By right-clicking on the clip in your timeline, you’ll see the options to zoom, speed, change, split, or trim your videos. You can also add sound effects by going to the Audio Tab.
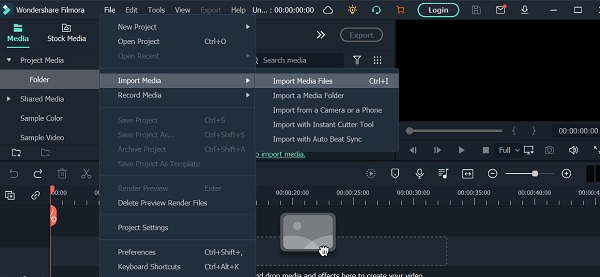
Import Videos
4) Choose Background Music for Your Montage
Music will help make your gaming montage engaging. Make sure you use a license-free track if you plan to post it on social media.
Using copyrighted music tracks and uploading the video on social media platforms can lead to video strikes. Luckily, Filmora has loads of non-copyrighted music tracks.
Navigate to Stock Media, where you’ll find non-copyrighted music on Pixabay, and choose the one you prefer.

Choose Background Music
5) Edit the Gaming Montage
With Filmora’s auto gaming montage maker, you can watch the video clip with the music you have selected. This tool will analyze beat points to change the video and effects.
Additionally, the tool can identify any bad parts in your video and delete them so that the video matches the music.
The Effects tab allows you to add multiple overlays and filters to your gaming montage video. Filmora has different categories of overlays that let you add emotions or personality to your montage. You can also use it to set the tone in your video.
Filters allow you to spice up your gaming videos. There are also different types of filters on Filmora.
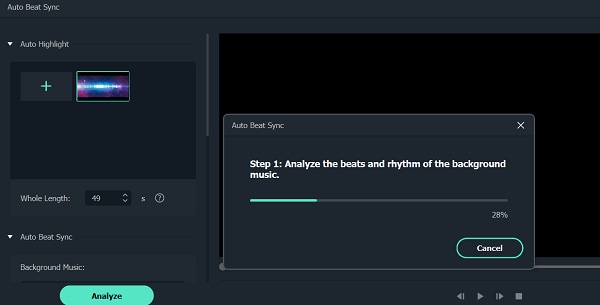
Edit Gaming Montage
6) Export Your Gaming Montage Video
Once you have finished editing your video and added music, hit the Export button. Doing this will allow you to export your edited video and save it on your computer.
You can now enter your login details and upload your gaming montage video on your YouTube channel to share it with other players.
Useful Tips for Making a Gaming Montage
Making gaming montages can help you build a large online community if you do the right thing. When making a gaming montage, there are a few tips that you should keep in mind. They include:
1. Apply Velocity Effects
Adding velocity effects to your montage will help get the attention of viewers. You can couple the transition between scenes with a speed ramping effect.
Include slow motion where there is a gunshot or other big gaming moment. You can then speed up things to quickly move into another scene. You can create these velocity effects in Filmora and make it smooth.
2. Avoid Game Loading Scenes
Do not include game loading scenes or any unnecessary clips in the gaming montage. Your audience does not have the time to wait for the scenes to load because they want to see action fast.
3. Sync Gunshot with Music Beat
Try to match gunshot sounds with beats and rhythms in shooter video games. The beats of the music and the soothing sync of gunshots will catch viewers’ attention and your video will become popular among gamers.
4. Add Creative Transitions
You can spice up your gaming montage by adding transitions, especially when you have loads of clips for the montage. But avoid overusing it, as you could confuse your audience with a range of dazzling and glaring transitions.
5. Color Grade the Video for the Mood
Use color grading to your advantage, as it can set the mood of your viewers. You can decide to make some scenes black and white to catch the viewers’ attention.
6. Add Video Vignettes for Special Occasions
You can add dark edges around the corners of your video to highlight action or create a certain mood. For gameplay based on a story, use vignetting to add a sense of nostalgia or as a flashback that shows viewers the past.
You can use Filmora to apply the vignetting effect by heading to Advanced Color Tuning, then clicking the Vignette option. You can then add the vignette effect to the video. Additionally, you can adjust the vignette’s exposure, feather, roundness, size, and highlights.
Best Gaming Montage for Studying
Here are three gaming montages that are good for studying.
1. Call of Duty: Modern Warfare
Uploaded by DemixB, the Call of Duty Game Montage uses Jacques Offenbach’s Can Can Music track. It’s a happy song that has a tempo of 81 BPM. The track has average danceable energy, and it’s somewhat danceable.
DemixB set the gunshot in the montage video to the music tune. The track builds up to the climax when the gunshot echoes with the attention-grabbing orchestral explosions.
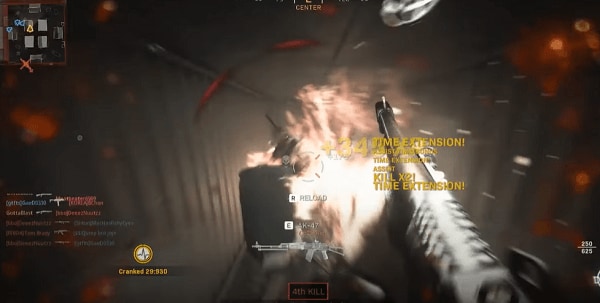
Call of Duty: Modern Warfare
2. ShutteR’s Gaming Montage
In the gaming montage uploaded by ShutteR on his YouTube channel, he used velocity effects to enhance the video. You’ll see that the transition in each scene is paired with adrenaline-pumping, speed-ramping effects.
ShutteR used a slow-motion to highlight action in each scene, then speeds up again when he wants to fast out into the next scene.; this makes the video more engaging to keep viewers glued to their screens.
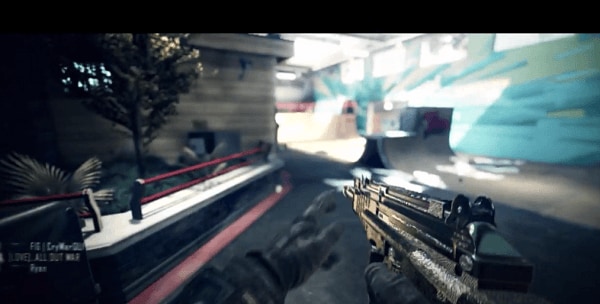
ShutteR’s Gaming Montage
3. NEVERMORE [CS: GO]
NEVERMORE [CS: GO] was uploaded by Fuze on his YouTube channel, and it has creative gameplay. The gaming montage is based on a story. He did the project with Apel, an artist who designed the Fever Dream series skins in the video.
The basic idea of this gaming montage was that the main game character is a corrupted policeman with purple glowing eyes because he’s not human.
When the edits begin, the shape of the main character will shift from CS: GO CT models and turn into his real corrupt CT shape. So that’s why his name keeps changing. You can get his real identity by pausing some of the frames and looking at the “Killfeed.”
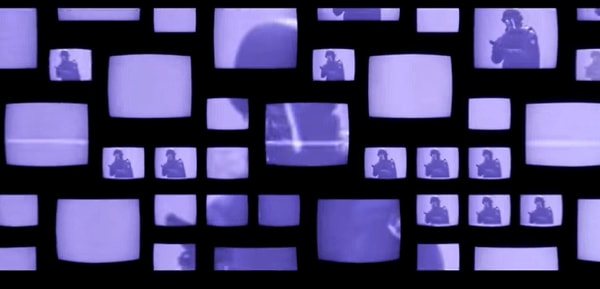
NEVERMORE [CS: GO]
Closing Thoughts:
Gaming montage involves picking and editing a range of video clips, which are brought together to create engaging video content. It consists of the best scenes from gameplay and non-copyrighted background music.
Use Filmora to edit and add effects to your video, including transitions and overlays. Your gaming montage will get more views, hence becoming popular among players.
The popularity of gaming montage is growing every day in today’s pop culture. There are currently more than 2.5 billion gamers, and most of them love watching gaming video content on YouTube. Whether people use a montage to parody gaming montages themselves or show off their skills, the effort and time put into them create impressive results.
We will explain how to create gaming montages and give you some tips that you might want to keep in mind to make epic videos.
How to Make a Gaming Montage
You have several options when it comes to creating gaming montages. You can include a random cut of great scenes, a mixture of the highlighted moments you found thrilling and would like to share with other gamers. In other cases, you’ll have to think of an engaging story in advance, then base your gameplay on this story.
Essentially, the workflow will be slightly different for these two scenarios. It’s much easier with the random cut type, especially when using a reliable video editor. Editing montages is as exciting as playing the game.
With that in mind, here is how to make a gaming montage.
1) Decide Your Montage Story/Type
Deciding your montage type beforehand helps clear your mind and create an epic gaming montage that will keep viewers watching. It allows you to choose the relevant video clips for your gaming montage.
Choose the topic of the video and decide the length of each clip and the sequence of the clips. Be sure to put the most epic or funny clips in the last section of your video. And this will make your viewers watch the video until the end.
2) Record Your Gameplay Footage
The methods to capture the gameplay varies depending on the platform where the game is. The most important thing you have to keep in mind is to ensure your recorder supports Replay Buffer; this will allow you to record scenes that occurred minutes or seconds ago.
That means you do not need to record the gameplay the whole time and burn your hardware. Instead, you’ll capture the moment after interesting things occur.
Game consoles like PS4 allow you to record the video natively for a maximum of one hour with the gamepad. A capture card lets you record it longer than 60 minutes.
Once you’ve all the clips you want on your PC, head over to https://filmora.wondershare.net/filmora-video-editor.html and download Filmora and install the software on your computer. This program allows you to edit your video clips and add cool effects that will make viewers keep watching.
3) Import You Videos to Media Library
You only have to import the videos to Filmora’s media library and then drag and drop them into the timeline, where you can start making the edits.
By right-clicking on the clip in your timeline, you’ll see the options to zoom, speed, change, split, or trim your videos. You can also add sound effects by going to the Audio Tab.

Import Videos
4) Choose Background Music for Your Montage
Music will help make your gaming montage engaging. Make sure you use a license-free track if you plan to post it on social media.
Using copyrighted music tracks and uploading the video on social media platforms can lead to video strikes. Luckily, Filmora has loads of non-copyrighted music tracks.
Navigate to Stock Media, where you’ll find non-copyrighted music on Pixabay, and choose the one you prefer.

Choose Background Music
5) Edit the Gaming Montage
With Filmora’s auto gaming montage maker, you can watch the video clip with the music you have selected. This tool will analyze beat points to change the video and effects.
Additionally, the tool can identify any bad parts in your video and delete them so that the video matches the music.
The Effects tab allows you to add multiple overlays and filters to your gaming montage video. Filmora has different categories of overlays that let you add emotions or personality to your montage. You can also use it to set the tone in your video.
Filters allow you to spice up your gaming videos. There are also different types of filters on Filmora.

Edit Gaming Montage
6) Export Your Gaming Montage Video
Once you have finished editing your video and added music, hit the Export button. Doing this will allow you to export your edited video and save it on your computer.
You can now enter your login details and upload your gaming montage video on your YouTube channel to share it with other players.
Useful Tips for Making a Gaming Montage
Making gaming montages can help you build a large online community if you do the right thing. When making a gaming montage, there are a few tips that you should keep in mind. They include:
1. Apply Velocity Effects
Adding velocity effects to your montage will help get the attention of viewers. You can couple the transition between scenes with a speed ramping effect.
Include slow motion where there is a gunshot or other big gaming moment. You can then speed up things to quickly move into another scene. You can create these velocity effects in Filmora and make it smooth.
2. Avoid Game Loading Scenes
Do not include game loading scenes or any unnecessary clips in the gaming montage. Your audience does not have the time to wait for the scenes to load because they want to see action fast.
3. Sync Gunshot with Music Beat
Try to match gunshot sounds with beats and rhythms in shooter video games. The beats of the music and the soothing sync of gunshots will catch viewers’ attention and your video will become popular among gamers.
4. Add Creative Transitions
You can spice up your gaming montage by adding transitions, especially when you have loads of clips for the montage. But avoid overusing it, as you could confuse your audience with a range of dazzling and glaring transitions.
5. Color Grade the Video for the Mood
Use color grading to your advantage, as it can set the mood of your viewers. You can decide to make some scenes black and white to catch the viewers’ attention.
6. Add Video Vignettes for Special Occasions
You can add dark edges around the corners of your video to highlight action or create a certain mood. For gameplay based on a story, use vignetting to add a sense of nostalgia or as a flashback that shows viewers the past.
You can use Filmora to apply the vignetting effect by heading to Advanced Color Tuning, then clicking the Vignette option. You can then add the vignette effect to the video. Additionally, you can adjust the vignette’s exposure, feather, roundness, size, and highlights.
Best Gaming Montage for Studying
Here are three gaming montages that are good for studying.
1. Call of Duty: Modern Warfare
Uploaded by DemixB, the Call of Duty Game Montage uses Jacques Offenbach’s Can Can Music track. It’s a happy song that has a tempo of 81 BPM. The track has average danceable energy, and it’s somewhat danceable.
DemixB set the gunshot in the montage video to the music tune. The track builds up to the climax when the gunshot echoes with the attention-grabbing orchestral explosions.

Call of Duty: Modern Warfare
2. ShutteR’s Gaming Montage
In the gaming montage uploaded by ShutteR on his YouTube channel, he used velocity effects to enhance the video. You’ll see that the transition in each scene is paired with adrenaline-pumping, speed-ramping effects.
ShutteR used a slow-motion to highlight action in each scene, then speeds up again when he wants to fast out into the next scene.; this makes the video more engaging to keep viewers glued to their screens.

ShutteR’s Gaming Montage
3. NEVERMORE [CS: GO]
NEVERMORE [CS: GO] was uploaded by Fuze on his YouTube channel, and it has creative gameplay. The gaming montage is based on a story. He did the project with Apel, an artist who designed the Fever Dream series skins in the video.
The basic idea of this gaming montage was that the main game character is a corrupted policeman with purple glowing eyes because he’s not human.
When the edits begin, the shape of the main character will shift from CS: GO CT models and turn into his real corrupt CT shape. So that’s why his name keeps changing. You can get his real identity by pausing some of the frames and looking at the “Killfeed.”

NEVERMORE [CS: GO]
Closing Thoughts:
Gaming montage involves picking and editing a range of video clips, which are brought together to create engaging video content. It consists of the best scenes from gameplay and non-copyrighted background music.
Use Filmora to edit and add effects to your video, including transitions and overlays. Your gaming montage will get more views, hence becoming popular among players.
How to Make Fortnite Thumbnail with Motion Blur?
Motion blur has been a provocative effect used in filming and video making. The effect has made a popular mark globally for its realistic base. This is why motion blur is integrated into every other platform directed at creativity. The motion blur effect in creating thumbnails is another highlight of this effect. While many tools provide this service, finding the best one is essential.
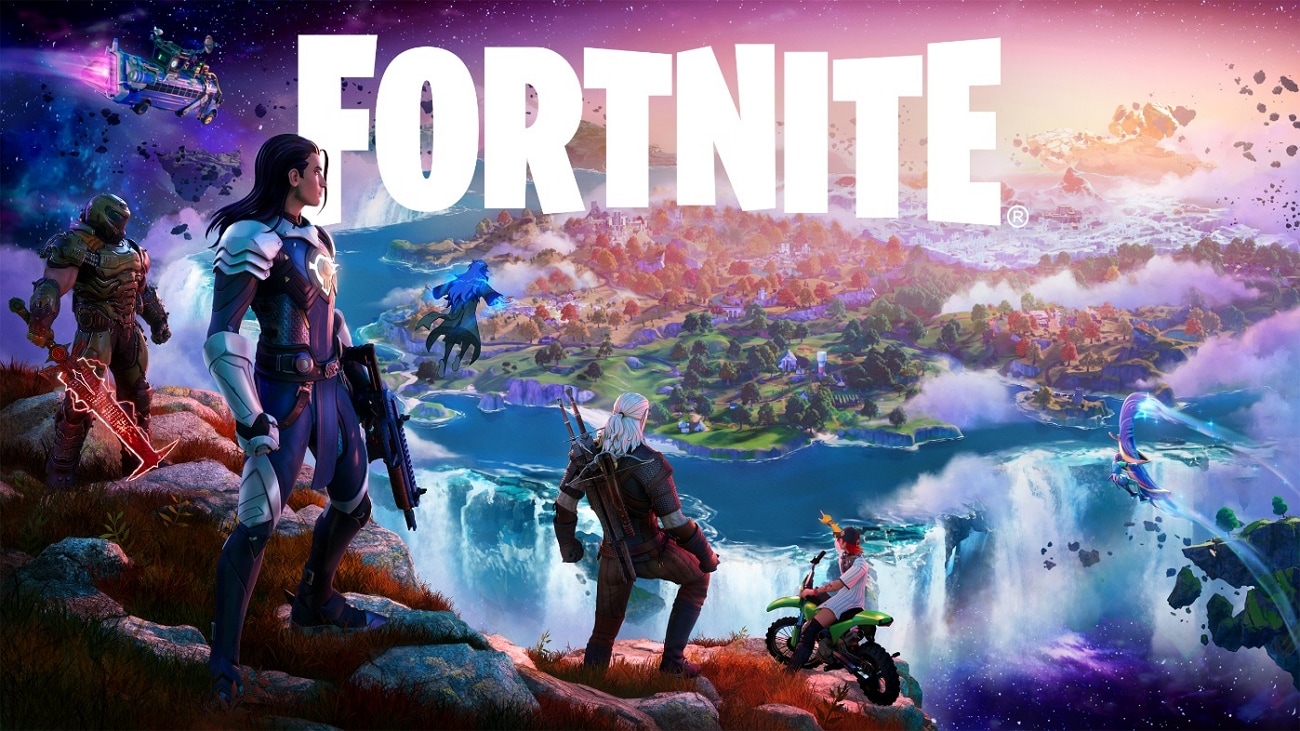
In this article, we will work on the best methods to make a Fortnite motion blur thumbnail. With the help of these methods, you will be able to design the perfect Fortnite thumbnail for your video.
Part 1: How to Add Motion Blur to Fortnite Thumbnail?
There are many ways to add motion blur to Fortnite thumbnails, as stated above. In this article, we will be providing appropriate methods for users of all types. From smartphone to online and desktop solutions, this article has it all.
Way 1: Make Motion Blur Fortnite Thumbnail with Picsart (Smartphone)
For the first method, we will be discussing an appropriate way that can be used to make motion blur in Fortnite thumbnails. Picsart is a known mobile application providing unique photo editing services. This photo editor is a complete package containing some of the best tools. Integrated with artificial intelligence, this tool presents a perfect platform to perform motion blur on Fortnite thumbnails.
Steps to Perform Motion Blur on Fortnite Thumbnail with Picsart
We will proceed to observe the step-by-step guide on performing motion blur on Fortnite thumbnails with the help of Picsart:
Step1 Launch Picsart on Smartphone
Download and install Picsart on your phone and proceed to launch it. As it opens, sign in to the tool, if required, and redirect to the next screen.

Step2 Proceed to Effects Tab After Importing Thumbnail
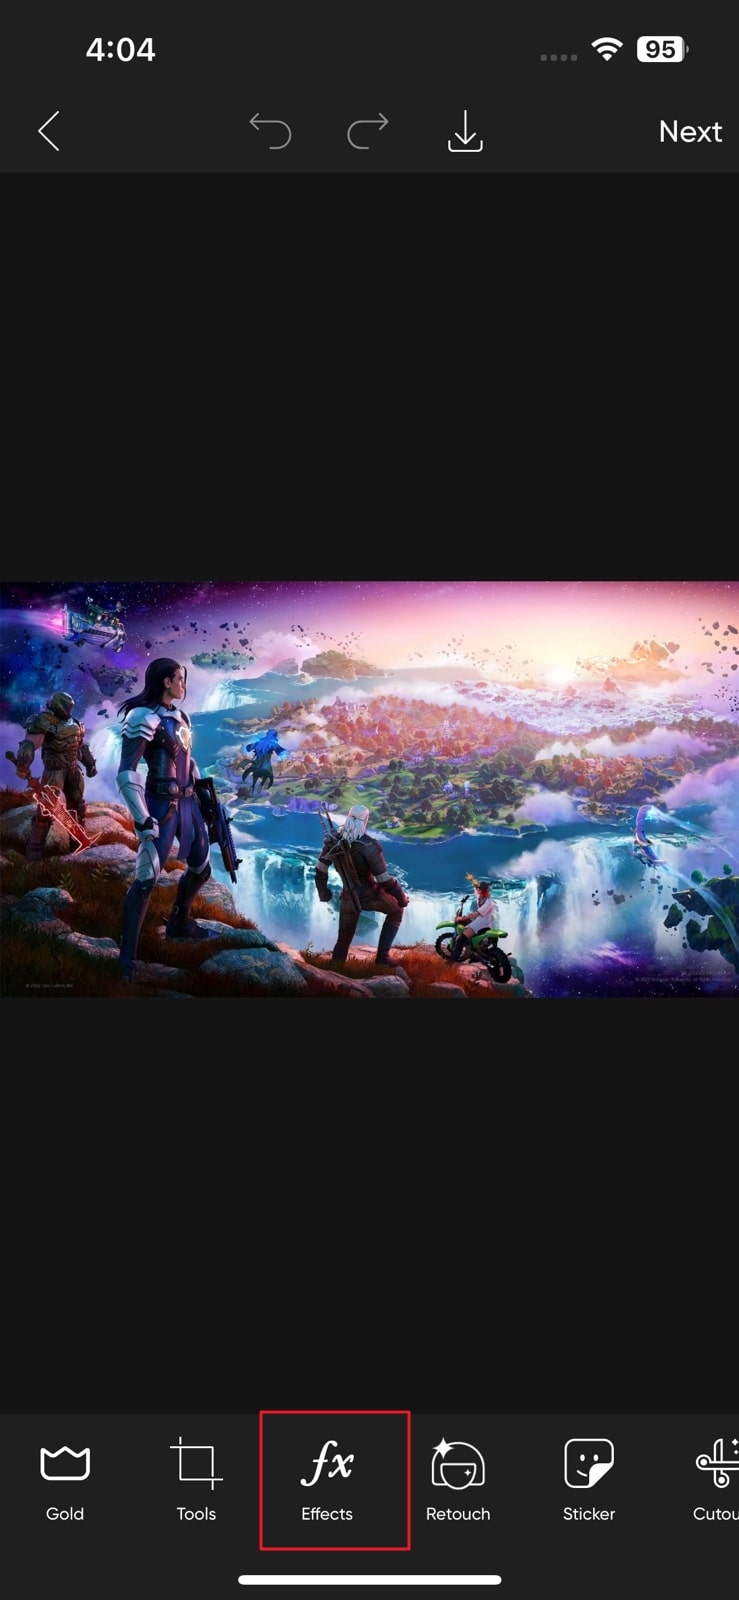
You will have to import the created Fortnite thumbnail that is to be edited. After importing the thumbnail, select “Effects” from the bottom panel of the application.
Step3 Add Motion Blur and Export
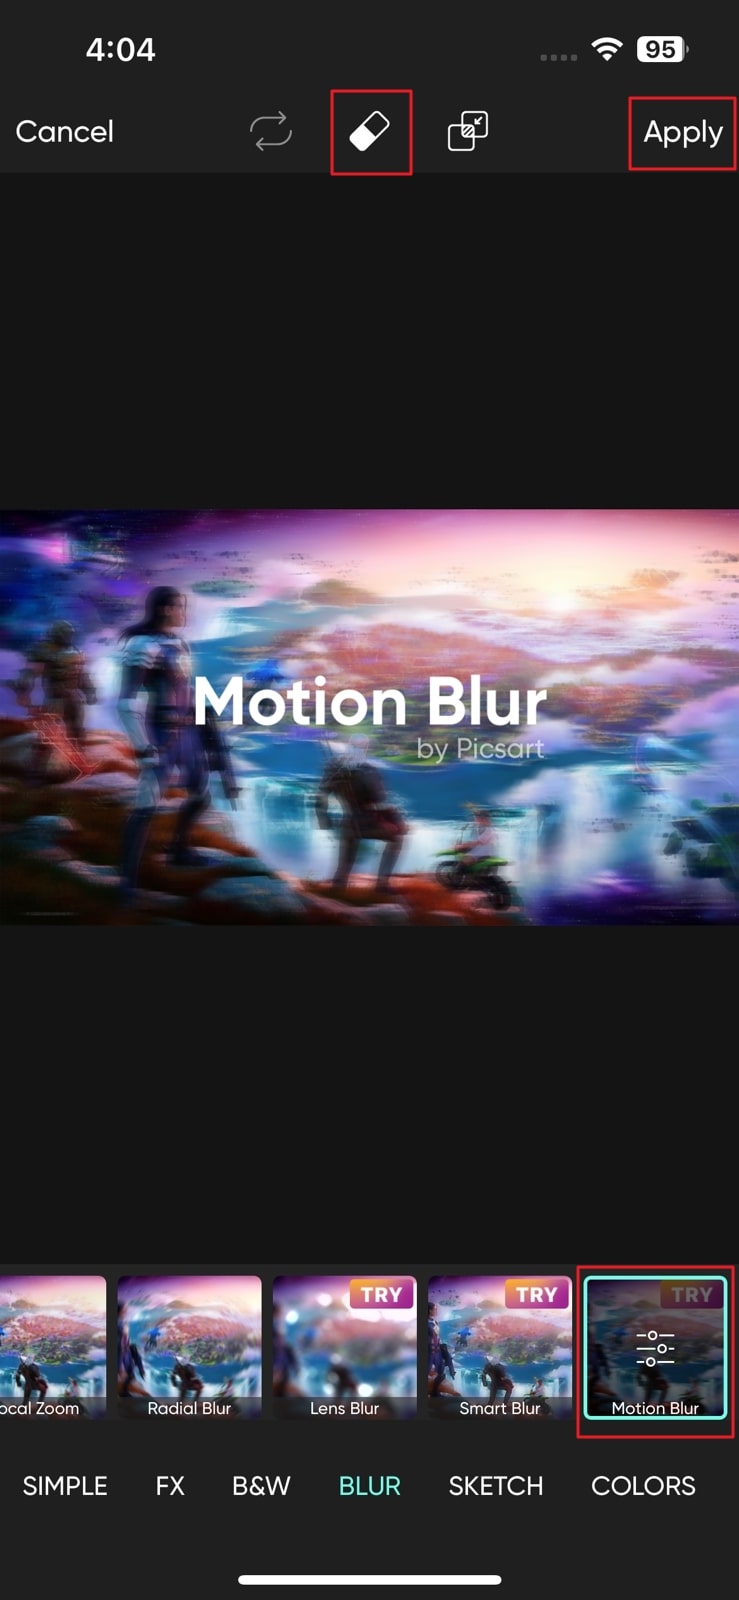
On the next screen, look for the “Blur” section from the bottom and find the “Motion Blur” effect. As it is added, you can use the “Erase” button on the top to adjust the motion blur effect on the image according to the objects. Once done, tap on the “Apply” button to conclude by adding motion blur.
Way 2: Make Motion Blur Fortnite Thumbnail with Fotor (Online)
If you are not a fan of smartphone applications, you can consider opting for online methods. While these platforms do not require installing anything on your desktop, they are easy to manage. Fotor is a great online photo editor featuring exceptional services for enhancing photos. It allows you to make all appropriate edits by including effects, transitions, and other photo enhancements. You can also find its designer for improving your Fortnite thumbnails.
Steps to Add Motion Blur on Fortnite Thumbnail with Fotor
For those who want to know how to create the Fortnite thumbnail motion blur effect with Fotor. The following steps are proper directions for them to follow:
Step1 Open Fotor on the Web
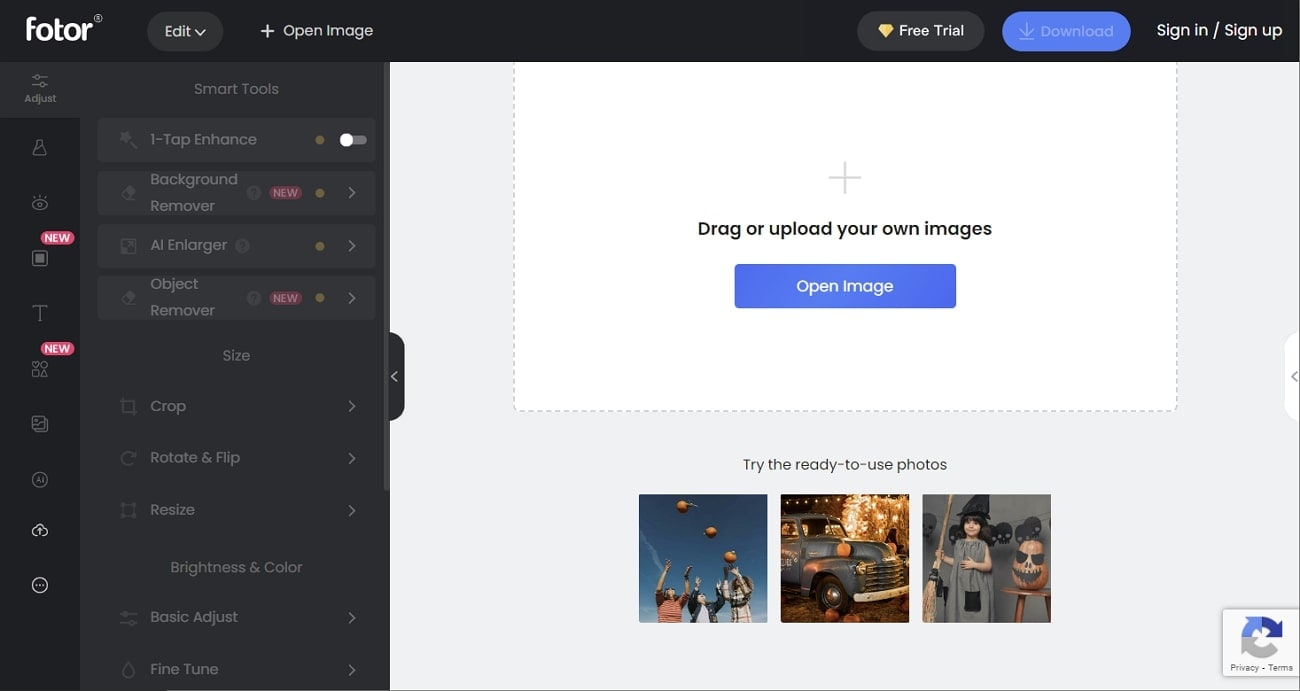
You must open the Fotor Photo Editor on your web browser. Then, proceed to import the thumbnail template that you want to edit.
Step2 Add Motion Blur on Photo
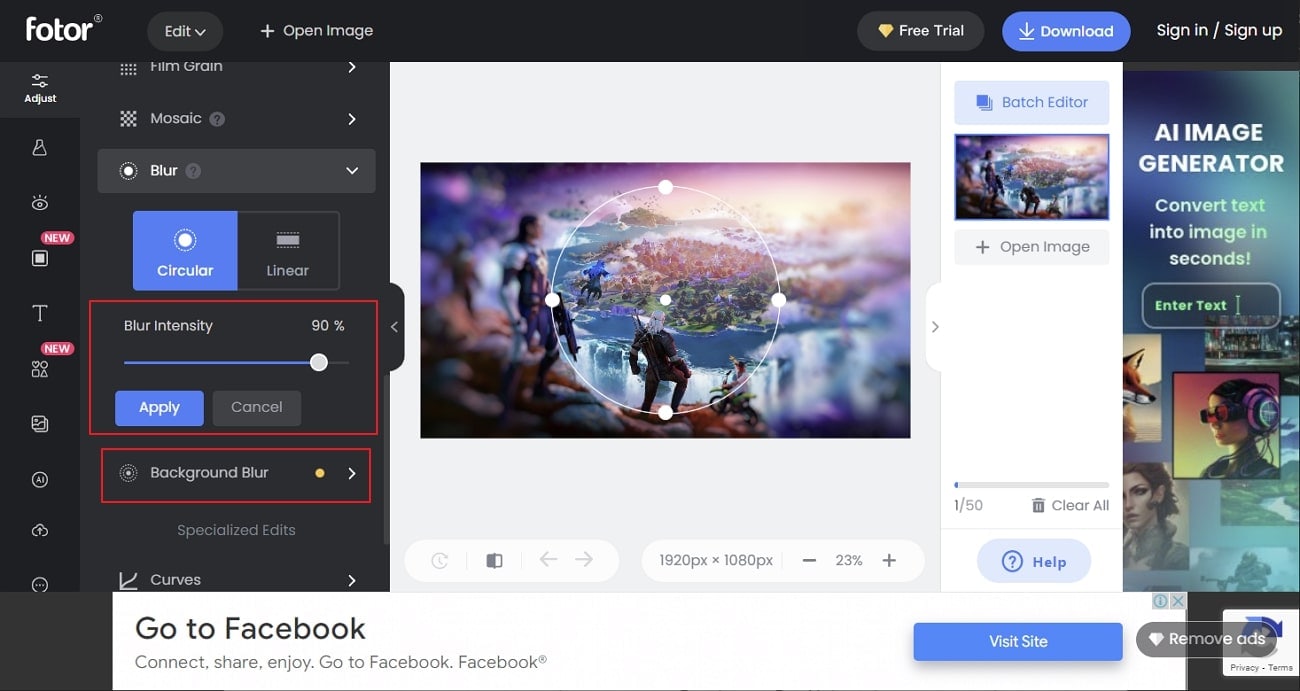
In the “Adjust” tab, look for the “Blur” option for including motion blur within the photo. You can select “Circular” or “Linear” blur, per the requirements.

Step3 Manage Intensity and Download
Continue to set the “Blur Intensity” and make changes by clicking “Apply.” If you wish to blur your background, consider using the “Background Blur” option in the list. Once the editing completes, click “Download” to export the Fortnite thumbnail.
Way 3: Make Motion Blur Fortnite Thumbnail with Photoshop (Desktop)
Adobe Photoshop stands among one of the best and most professional tools designed to enhance the quality of your photos. Although it is based on users who are professionals in editing, it gives a detailed set of options to make the most creative idea out of a photo. While adjusting the blur effect, it offers multiple settings for highlighting the image’s objects and colors.
Steps to Implement Motion Blur Effect on Fortnite Thumbnail with Photoshop
You might have come to know much about Photoshop. We will now see a guide explaining how to add a Fortnite motion blur thumbnail using Photoshop:
Step1 Start Adobe Photoshop and Add Thumbnail
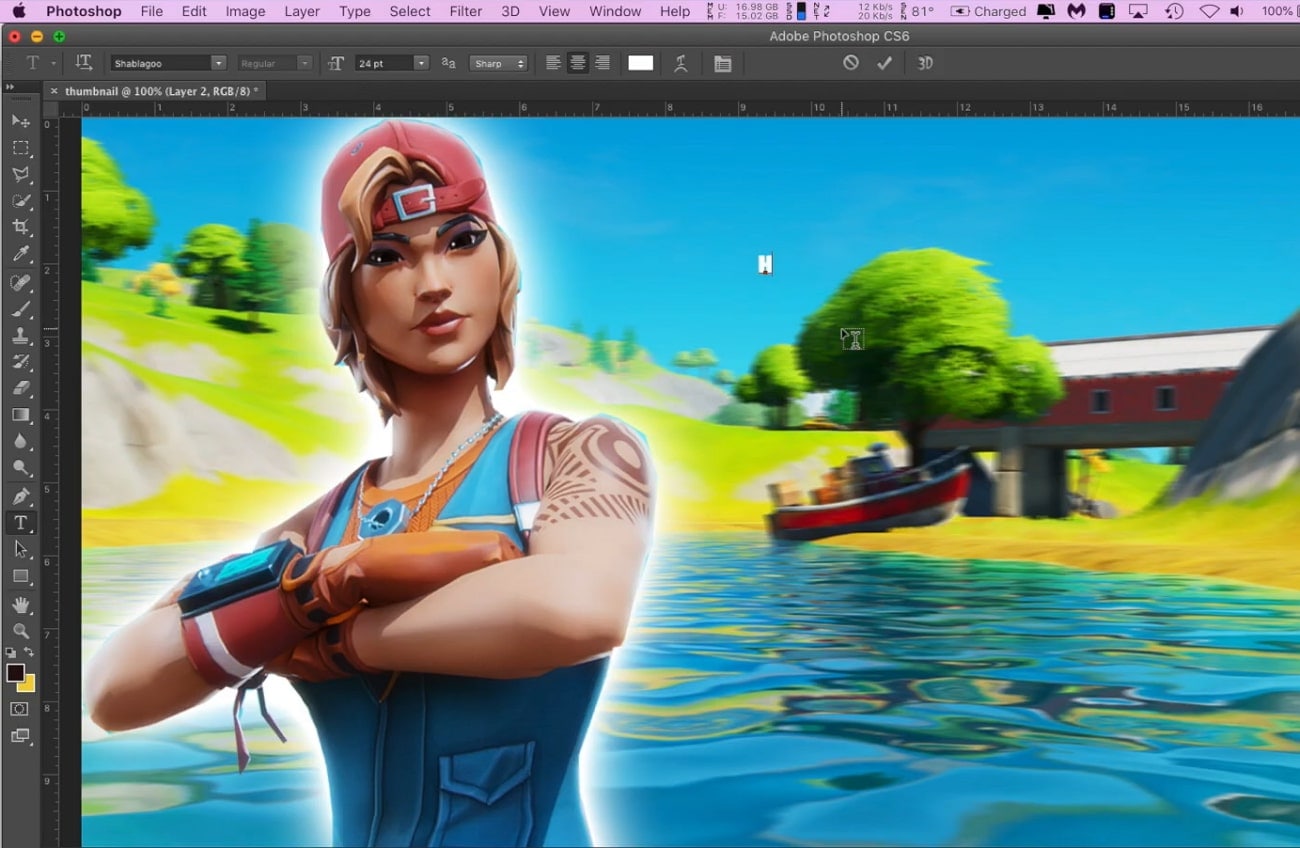
You must start Adobe Photoshop on your desktop after downloading and installing it. Proceed to import the thumbnail that you wish to edit. Make the initial adjustments on the photo to continue adding motion blur.
Step2 Create a Separate Object Layer
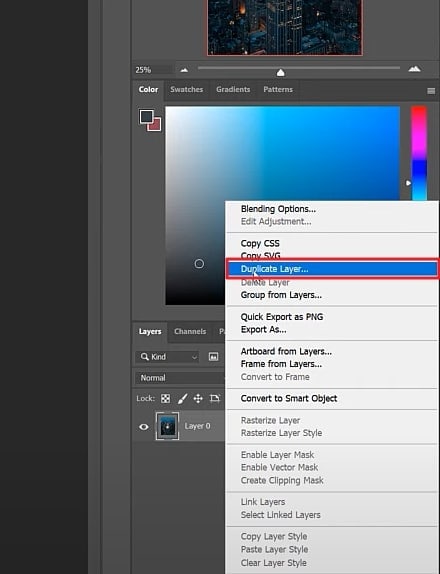
To start with the process, right-click and create a duplicate layer by selecting the respective option from the drop-down menu. Use the “Polygonal Lasso” tool to mark the object you want to exempt from the motion blur. Once done, use the “Layer Mask” button to isolate the object.
Step3 Add Motion Blur to Object
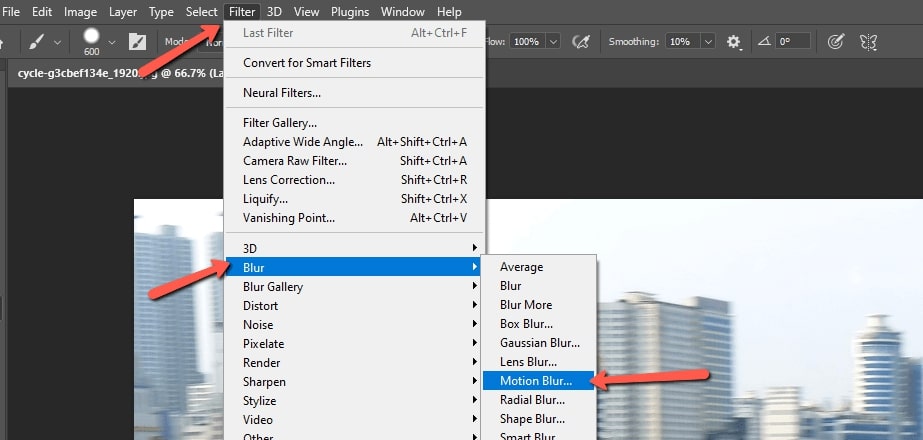
Create another duplicate layer and proceed to the “Filter” tab. Look for “Blur Gallery” in the options and select “Motion Blur” from the following menu. You must set the “Angle,” “Distance,” and other appropriate settings to continue. Once done, save the Fortnite thumbnail with the added motion blur.
Last Words
Many tools can be used to add motion blur within photos and videos. As you create a thumbnail for Fortnite, you will need a proper tool to help you add motion blur. We have discussed several tools in this article for adding motion blur.
Also, these applications serve their purpose for a respective device or platform. This is why they can be considered the best way to add a Fortnite motion blur thumbnail. You can select any option to add the respective effect for perfect results.
Motion blur has been a provocative effect used in filming and video making. The effect has made a popular mark globally for its realistic base. This is why motion blur is integrated into every other platform directed at creativity. The motion blur effect in creating thumbnails is another highlight of this effect. While many tools provide this service, finding the best one is essential.
In this article, we will work on the best methods to make a Fortnite motion blur thumbnail. With the help of these methods, you will be able to design the perfect Fortnite thumbnail for your video.

Part 1: How to Add Motion Blur to Fortnite Thumbnail?
There are many ways to add motion blur to Fortnite thumbnails, as stated above. In this article, we will be providing appropriate methods for users of all types. From smartphone to online and desktop solutions, this article has it all.
Way 1: Make Motion Blur Fortnite Thumbnail with Picsart (Smartphone)
For the first method, we will be discussing an appropriate way that can be used to make motion blur in Fortnite thumbnails. Picsart is a known mobile application providing unique photo editing services. This photo editor is a complete package containing some of the best tools. Integrated with artificial intelligence, this tool presents a perfect platform to perform motion blur on Fortnite thumbnails.
Steps to Perform Motion Blur on Fortnite Thumbnail with Picsart
We will proceed to observe the step-by-step guide on performing motion blur on Fortnite thumbnails with the help of Picsart:
Step1 Launch Picsart on Smartphone
Download and install Picsart on your phone and proceed to launch it. As it opens, sign in to the tool, if required, and redirect to the next screen.

Step2 Proceed to Effects Tab After Importing Thumbnail
You will have to import the created Fortnite thumbnail that is to be edited. After importing the thumbnail, select “Effects” from the bottom panel of the application.

Step3 Add Motion Blur and Export
On the next screen, look for the “Blur” section from the bottom and find the “Motion Blur” effect. As it is added, you can use the “Erase” button on the top to adjust the motion blur effect on the image according to the objects. Once done, tap on the “Apply” button to conclude by adding motion blur.

Way 2: Make Motion Blur Fortnite Thumbnail with Fotor (Online)
If you are not a fan of smartphone applications, you can consider opting for online methods. While these platforms do not require installing anything on your desktop, they are easy to manage. Fotor is a great online photo editor featuring exceptional services for enhancing photos. It allows you to make all appropriate edits by including effects, transitions, and other photo enhancements. You can also find its designer for improving your Fortnite thumbnails.
Steps to Add Motion Blur on Fortnite Thumbnail with Fotor
For those who want to know how to create the Fortnite thumbnail motion blur effect with Fotor. The following steps are proper directions for them to follow:
Step1 Open Fotor on the Web
You must open the Fotor Photo Editor on your web browser. Then, proceed to import the thumbnail template that you want to edit.

Step2 Add Motion Blur on Photo
In the “Adjust” tab, look for the “Blur” option for including motion blur within the photo. You can select “Circular” or “Linear” blur, per the requirements.

Step3 Manage Intensity and Download
Continue to set the “Blur Intensity” and make changes by clicking “Apply.” If you wish to blur your background, consider using the “Background Blur” option in the list. Once the editing completes, click “Download” to export the Fortnite thumbnail.

Way 3: Make Motion Blur Fortnite Thumbnail with Photoshop (Desktop)
Adobe Photoshop stands among one of the best and most professional tools designed to enhance the quality of your photos. Although it is based on users who are professionals in editing, it gives a detailed set of options to make the most creative idea out of a photo. While adjusting the blur effect, it offers multiple settings for highlighting the image’s objects and colors.
Steps to Implement Motion Blur Effect on Fortnite Thumbnail with Photoshop
You might have come to know much about Photoshop. We will now see a guide explaining how to add a Fortnite motion blur thumbnail using Photoshop:
Step1 Start Adobe Photoshop and Add Thumbnail
You must start Adobe Photoshop on your desktop after downloading and installing it. Proceed to import the thumbnail that you wish to edit. Make the initial adjustments on the photo to continue adding motion blur.

Step2 Create a Separate Object Layer
To start with the process, right-click and create a duplicate layer by selecting the respective option from the drop-down menu. Use the “Polygonal Lasso” tool to mark the object you want to exempt from the motion blur. Once done, use the “Layer Mask” button to isolate the object.

Step3 Add Motion Blur to Object
Create another duplicate layer and proceed to the “Filter” tab. Look for “Blur Gallery” in the options and select “Motion Blur” from the following menu. You must set the “Angle,” “Distance,” and other appropriate settings to continue. Once done, save the Fortnite thumbnail with the added motion blur.

Last Words
Many tools can be used to add motion blur within photos and videos. As you create a thumbnail for Fortnite, you will need a proper tool to help you add motion blur. We have discussed several tools in this article for adding motion blur.
Also, these applications serve their purpose for a respective device or platform. This is why they can be considered the best way to add a Fortnite motion blur thumbnail. You can select any option to add the respective effect for perfect results.
Also read:
- Updated 2024 Approved Unraveling How the Slow Motion Guys Have Revolutionized The Slow Motion Game
- Guide To Creating the Best Video Collages for 2024
- New The Best Wedding LUTs for Premiere Pro
- New 2024 Approved Learn How to Create Inspiring Motivational Videos Using AI. Explore Tools Like Midjourney, Runway Gen2, Chat-GPT, and Filmora AI for Seamless Content Creation. Start Your Journey
- Updated 2024 Approved Ways to Learn Discord Game Bots – Even if Youre Just Starting Out
- Updated In 2024, How To Change Font In Premiere Pro
- Updated Detailed Guide to Merge Videos in VLC Media Player for 2024
- New Do You Know that You Can Apply Different LUTs and Create Your Own? There Are Many LUT Online and Offline Generators that You Can Use to Create Your LUT
- New How to Make a Gaming Montage - Guide & Tips
- Lets Learn How to Convert a Normal Video Into a Film Shot in the 1920S with Wondershare Filmora
- New How to Vlog? A Ultimate Guide for Beginners for 2024
- New List of Supported Whatsapp Video Format You May Want to Know for 2024
- New How To Add Fade In Windows Video Editor for 2024
- New Step by Step to Rotate Video in Google Photos for 2024
- In 2024, Things You Need to Know About Transparent PNG Remove and Convert
- 2024 Approved How to Achieve GoPro Slow Motion With Quality
- New 2024 Approved Best 10 Options Slow Down Video Online with Perfection
- In 2024, How to Download Windows Movie Maker 2012 Version
- How Can Nokia C12Mirror Share to PC? | Dr.fone
- How to recover deleted pictures from Honor X50i+.
- In 2024, Top 7 Phone Number Locators To Track Vivo S18 Location | Dr.fone
- Best Ways on How to Unlock/Bypass/Swipe/Remove Nokia C12 Pro Fingerprint Lock
- In 2024, 9 Best Phone Monitoring Apps for Lenovo ThinkPhone | Dr.fone
- In 2024, Everything You Need To Know About Unlocked iPhone 14 Plus
- In 2024, Top 10 AirPlay Apps in Itel P55 for Streaming | Dr.fone
- Hard Resetting an Poco C55 Device Made Easy | Dr.fone
- How can I get more stardust in pokemon go On Samsung Galaxy F34 5G? | Dr.fone
- How to Bypass Android Lock Screen Using Emergency Call On Nokia C12 Pro?
- In 2024, How to Unlock iCloud lock on your Apple iPhone 6 and iPad?
- Title: Discover How to Create Professional Foggy Text Reflection Effects in the Filmora Video Editor
- Author: Morgan
- Created at : 2024-05-19 05:11:41
- Updated at : 2024-05-20 05:11:41
- Link: https://ai-video-editing.techidaily.com/discover-how-to-create-professional-foggy-text-reflection-effects-in-the-filmora-video-editor/
- License: This work is licensed under CC BY-NC-SA 4.0.

