
:max_bytes(150000):strip_icc():format(webp)/the-10-best-password-managers-of-2022-6543213-7650bf3ab2eb41a08dbee8713ce811e3.jpg)
Do You Know Anything About the Video Format Supported by WhatsApp? If Not, Then This Is the Right Time to Learn About WhatsApp-Supported Video Formats
Do You Know Anything About the Video Format Supported by WhatsApp? If Not, Then This Is the Right Time to Learn About WhatsApp-Supported Video Formats
Among the different communication platforms, WhatsApp is very famous. The application lets you communicate with your loved ones living far away via messages, audio, and video calls. Unlike other platforms, WhatsApp has a lot of happy users.
With WhatsApp, you can not only communicate but also offers media file sharing. You can share your favorite meme, funny videos, and other things through WhatsApp. If you want to share a video but can’t, the WhatsApp video format is not supported. To learn about WhatsApp-supported video formats, keep reading the article.
In this article
01 Introduction About WhatsApp Supported Video Formats
02 Tips About How to Convert Video for WhatsApp
03 Tricks About How to Edit Video for WhatsApp
Part 1. Introduction About WhatsApp Supported Video Formats
Are you facing trouble with WhatsApp videos and sharing them? It might be because of the video format WhatsApp as WhatsApp supports certain video formats. You should have the video in the supported format for using videos on WhatsApp and sharing them.

WhatsApp supports a maximum file size of 16MB is approximately a video of 90 seconds to 3 minutes. Whereas if we talk about WhatsApp status, it allows 30 seconds duration for the video. WhatsApp supports and MPEG-4 codec for videos and audio, and AC3.
Moving on, the WhatsApp-supported video formats include MP4, MKV, AVI, MOV, and also 3GP. Do you want to know more about these formats? Let’s help you.
MP4
This is the most commonly used format for both video and audio files. Other than this, MP4 also stores data like subtitles, still images, etc. Interesting, it also allows streaming.
MKV
MKV is an open container, free format. The format can hold videos, pictures, audio, and also an unlimited number of subtitles. Additionally, the format is universally used to store multimedia content like your favorite TV show or movies.
AVI
Audio Video Interleave is another video format supported by WhatsApp. Do you know that the AVI format supports synchronous audio-with-video playback? The file format stores both video and audio data in a file container.
MOV
Apple developed a MOV file format that can hold a wide range of media content like your audio, video, and even text. It stores data in the same file but on different tracks. The file format is commonly used in video editing software.
3GP
3GP is Third Generation Partnership Project (3GPP), a multimedia container for multimedia services. The format works great on 3G mobile phones, but it can also be used on 2G and 4G phones. 3GP is also a video format supported by WhatsApp.
Part 2. Tips About How to Convert Video for WhatsApp
Now that you know about video formats supported by WhatsApp, shall we introduce tips to convert the file format? In case you have a video that is not supported by WhatsApp, the following section of this article will assist as we are about to introduce Wondershare UniConverter . The video converter software is GPU accelerated, and it promises to maintain the original video quality.
UniConverter offers 90x faster conversion speed. You can convert video from and to different formats and also for different devices. Moreover, with UniConverter, you can convert multiple media files at once. Do you know what else UniConverter has to offer? The software is not just a video converter; it’s much more than that; you can use its Background Remover, Subtitle Editor, Smart Trimmer, etc.
Apart from converting your videos to WhatsApp video format, with UniConverter, you can also convert them into various popular web formats like Facebook, Instagram, Vimeo, YouTube, Amazon, and also eBay. Do you know an exciting thing about UniConverter? Well, it also supports various 4K and 3D files. If you are impressed with UniConverter, let’s move on and share the steps to use the software:
Step 1: To start, launch Wondershare UniConverter on your device and make sure that you have selected the ‘Converter’ option from the left menu. After this, from the right window, import the video files that you plan to work with.

Step 2: Now, head to the bottom of the main screen and look for the ‘Output Format’ option. Open it and go to the ‘Video’ section. There, from the list of various file formats, select the supported video format for WhatsApp from the left and the right, select a resolution.

Step 3: UniConverter is famous for its speedy conversion; for this, hit on the ‘High-Speed Conversion’ from the top right corner. Next, select your desired location to save the file from the bottom by using the ‘File Location’ field. Once done, hit the ‘Convert’ button to get the video format converted.

Part 3. Tricks About How to Edit Video for WhatsApp
Do you plan to edit your WhatsApp videos? If you do, then we have a little treat for you; let us introduce Wondershare Filmora Video Editor . The software can change your editing game with its phenomenal features and amazing editing elements.
Do you want to know what features and elements we are talking about? Let’s tell you. Wondershare Filmora offers high-quality effects and transitions that can transform your video. Along with this, you get a wide variety of titles and other editing elements that could be used.
Filmora has a clean and straight interface; users can understand the software very quickly and work with it. Moreover, the video editor lets you select your preferred output format and then export the file. You get various cool features like green screen background, split-screen, join video, and a lot more.
For Win 7 or later (64-bit)
For macOS 10.12 or later
Interestingly, the software offers elements according to the latest trends and events around, like Christmas, Valentine’s, birthday, etc. Do you want to use Filmora to edit your WhatsApp video? For guidance, follow the steps shared below:
Step 1: For editing, launch Wondershare Filmora on your device and import the video file by heading to the ‘File’ tab. After that, hover on to the ‘Import Media’ option and select the ‘Import Media Files’ option.

Step 2: After locating your desired file, import it. Once successfully imported, then drag the file from the ‘Project Media’ section to the ‘Timeline’ so that you can start the editing.

Step 3: Let the fun begins! You can edit and transform your video file by adding various sound effects to it that Filmora offers you. Users can access the effects from the ‘Audio’ tab.

Step 4: Are you worried about titles? Don’t worry because Filmora offers a wide range of title templates that you can select from and customize too. Just head to the ‘Titles’ tab from the top menu bar and enjoy.

Step 5: What is editing without cool transitions and effects? Filmora comes with unique and distinct video effects and transitions that you can use by accessing the ‘Effects’ and ‘Transitions’ tabs.

Step 6: Once you are satisfied with all the editing, it’s time to export the video file. Hit on the ‘Export’ button and select WhatsApp-supported video format to save the file.

Wrapping Up
If you have been struggling with WhatsApp videos, this article is for you. We have discussed in detail WhatsApp-supported video formats. Not just this, we also talked about a video converter that could be used to convert video formats. Moreover, we shared a video editor to edit your WhatsApp videos. Are you ready for a bit of surprise?
Let’s talk about Wondershare Filmora Video Editor, the editing king to drastically change your videos and make them shine. The software is not an ordinary editor; it lets you trim, cut, join, split your video along with other editing options.
Do you know any good software for motion tracking? Wondershare Filmora offers many brilliant features like Key Framing, Silence Detection, Green Screen, Color Match, and whatnot. If you want to create exciting videos with exciting effects and features, then Filmora is a must-try.
Wondershare Filmora
Get started easily with Filmora’s powerful performance, intuitive interface, and countless effects!
Try It Free Try It Free Try It Free Learn More >

02 Tips About How to Convert Video for WhatsApp
03 Tricks About How to Edit Video for WhatsApp
Part 1. Introduction About WhatsApp Supported Video Formats
Are you facing trouble with WhatsApp videos and sharing them? It might be because of the video format WhatsApp as WhatsApp supports certain video formats. You should have the video in the supported format for using videos on WhatsApp and sharing them.
WhatsApp supports a maximum file size of 16MB is approximately a video of 90 seconds to 3 minutes. Whereas if we talk about WhatsApp status, it allows 30 seconds duration for the video. WhatsApp supports and MPEG-4 codec for videos and audio, and AC3.
Moving on, the WhatsApp-supported video formats include MP4, MKV, AVI, MOV, and also 3GP. Do you want to know more about these formats? Let’s help you.
MP4
This is the most commonly used format for both video and audio files. Other than this, MP4 also stores data like subtitles, still images, etc. Interesting, it also allows streaming.
MKV
MKV is an open container, free format. The format can hold videos, pictures, audio, and also an unlimited number of subtitles. Additionally, the format is universally used to store multimedia content like your favorite TV show or movies.
AVI
Audio Video Interleave is another video format supported by WhatsApp. Do you know that the AVI format supports synchronous audio-with-video playback? The file format stores both video and audio data in a file container.
MOV
Apple developed a MOV file format that can hold a wide range of media content like your audio, video, and even text. It stores data in the same file but on different tracks. The file format is commonly used in video editing software.
3GP
3GP is Third Generation Partnership Project (3GPP), a multimedia container for multimedia services. The format works great on 3G mobile phones, but it can also be used on 2G and 4G phones. 3GP is also a video format supported by WhatsApp.
Part 2. Tips About How to Convert Video for WhatsApp
Now that you know about video formats supported by WhatsApp, shall we introduce tips to convert the file format? In case you have a video that is not supported by WhatsApp, the following section of this article will assist as we are about to introduce Wondershare UniConverter . The video converter software is GPU accelerated, and it promises to maintain the original video quality.
UniConverter offers 90x faster conversion speed. You can convert video from and to different formats and also for different devices. Moreover, with UniConverter, you can convert multiple media files at once. Do you know what else UniConverter has to offer? The software is not just a video converter; it’s much more than that; you can use its Background Remover, Subtitle Editor, Smart Trimmer, etc.
Apart from converting your videos to WhatsApp video format, with UniConverter, you can also convert them into various popular web formats like Facebook, Instagram, Vimeo, YouTube, Amazon, and also eBay. Do you know an exciting thing about UniConverter? Well, it also supports various 4K and 3D files. If you are impressed with UniConverter, let’s move on and share the steps to use the software:
Step 1: To start, launch Wondershare UniConverter on your device and make sure that you have selected the ‘Converter’ option from the left menu. After this, from the right window, import the video files that you plan to work with.
Step 2: Now, head to the bottom of the main screen and look for the ‘Output Format’ option. Open it and go to the ‘Video’ section. There, from the list of various file formats, select the supported video format for WhatsApp from the left and the right, select a resolution.
Step 3: UniConverter is famous for its speedy conversion; for this, hit on the ‘High-Speed Conversion’ from the top right corner. Next, select your desired location to save the file from the bottom by using the ‘File Location’ field. Once done, hit the ‘Convert’ button to get the video format converted.
Part 3. Tricks About How to Edit Video for WhatsApp
Do you plan to edit your WhatsApp videos? If you do, then we have a little treat for you; let us introduce Wondershare Filmora Video Editor . The software can change your editing game with its phenomenal features and amazing editing elements.
Do you want to know what features and elements we are talking about? Let’s tell you. Wondershare Filmora offers high-quality effects and transitions that can transform your video. Along with this, you get a wide variety of titles and other editing elements that could be used.
Filmora has a clean and straight interface; users can understand the software very quickly and work with it. Moreover, the video editor lets you select your preferred output format and then export the file. You get various cool features like green screen background, split-screen, join video, and a lot more.
For Win 7 or later (64-bit)
For macOS 10.12 or later
Interestingly, the software offers elements according to the latest trends and events around, like Christmas, Valentine’s, birthday, etc. Do you want to use Filmora to edit your WhatsApp video? For guidance, follow the steps shared below:
Step 1: For editing, launch Wondershare Filmora on your device and import the video file by heading to the ‘File’ tab. After that, hover on to the ‘Import Media’ option and select the ‘Import Media Files’ option.
Step 2: After locating your desired file, import it. Once successfully imported, then drag the file from the ‘Project Media’ section to the ‘Timeline’ so that you can start the editing.
Step 3: Let the fun begins! You can edit and transform your video file by adding various sound effects to it that Filmora offers you. Users can access the effects from the ‘Audio’ tab.
Step 4: Are you worried about titles? Don’t worry because Filmora offers a wide range of title templates that you can select from and customize too. Just head to the ‘Titles’ tab from the top menu bar and enjoy.
Step 5: What is editing without cool transitions and effects? Filmora comes with unique and distinct video effects and transitions that you can use by accessing the ‘Effects’ and ‘Transitions’ tabs.
Step 6: Once you are satisfied with all the editing, it’s time to export the video file. Hit on the ‘Export’ button and select WhatsApp-supported video format to save the file.
Wrapping Up
If you have been struggling with WhatsApp videos, this article is for you. We have discussed in detail WhatsApp-supported video formats. Not just this, we also talked about a video converter that could be used to convert video formats. Moreover, we shared a video editor to edit your WhatsApp videos. Are you ready for a bit of surprise?
Let’s talk about Wondershare Filmora Video Editor, the editing king to drastically change your videos and make them shine. The software is not an ordinary editor; it lets you trim, cut, join, split your video along with other editing options.
Do you know any good software for motion tracking? Wondershare Filmora offers many brilliant features like Key Framing, Silence Detection, Green Screen, Color Match, and whatnot. If you want to create exciting videos with exciting effects and features, then Filmora is a must-try.
Wondershare Filmora
Get started easily with Filmora’s powerful performance, intuitive interface, and countless effects!
Try It Free Try It Free Try It Free Learn More >
Creating Motivational Videos with AI: Comprehensive Guide 2024
In the buzzing realm of social media, motivational videos have risen as a beacon of hope and inspiration for millions. Scrolling through your feeds, you’ve likely encountered a motivational video status that tugged at your heartstrings or ignited a spark of ambition. But why are these videos so compelling?
The answer lies in the innate human desire for encouragement. These videos often blend heartwarming visuals with potent words of wisdom, creating an emotional cocktail that resonates deeply with viewers. As the dawn of 2023 approaches, the ease with which we can produce these motivational status videos is becoming unparalleled, thanks to the advancements in artificial intelligence.
- Part 2: Use Runway Gen2 to convert pictures to videos
- Part 3: Use Chat-GPT to generate motivational quotes
- Part 4: Quick solution: Filmora AI Editing tool
- Part 5: Summary
Part 1: Use Midjourney to generate motivation status images
Enter Midjourney is a cutting-edge platform that harnesses AI to generate enchanting images that capture the essence of motivation. Whether you’re looking to convey an athlete’s grit or a scholar’s determination, Midjourney has an array of templates to cater to your needs.
To begin, simply navigate to the Midjourney homepage. From here, choose a theme or emotion you want to convey. You can input keywords like “determination,” “strength,” or any word that resonates with your desired sentiment. The platform will then utilize its AI algorithms to generate images that align with your keyword, giving you a wealth of visuals.
Remember the importance of keeping the motivation status video download feature in mind. Users love to save and share these videos, and starting with a captivating image ensures your video gets the traction it deserves.
Part 2: Use Runway Gen2 to convert pictures to videos
With your motivation status image, it’s time to bring it to life! That’s where Runway Gen2 steps in. This platform is designed to seamlessly convert static images into dynamic videos, enriching the user experience.
Start by uploading your chosen image from Midjourney. The intuitive interface of Runway Gen2 will guide you through the process. You can choose the movement or animation you want to infuse into your image. Whether it’s a subtle breeze causing ripples in a flag on Republic Day status videos or the emphatic beat of a heart symbolizing passion – the possibilities are endless.
The beauty of Runway Gen2 is that it does all the heavy lifting. Within moments, your static image evolves into a mesmerizing video clip. Perfect for those looking to create motivational status videos that inspire and captivate the viewer’s attention.
By harnessing AI tools like Midjourney and Runway Gen2, anyone can now become a creator of powerful motivational content.
Part 3: Use Chat-GPT to generate motivational quotes
Now that we have the visual backbone for our motivational video, the next step is to infuse it with words that resonate, inspire, and motivate. And who better to turn to than Chat-GPT, the AI writing virtuoso?
Chat-GPT’s prowess lies in producing human-like text that strikes a chord. It’s not just about churning out words; it’s about curating sentiments that align with the intended emotion.
To get started with Chat-GPT for your motivation status video:
- Navigate to the Chat-GPT portal.
- In the prompt box, specify the kind of quote you’re seeking. For instance, “Generate a motivational quote about perseverance.”
- You’ll receive a tailor-made quote for your video’s theme within moments.
Imagine having the capability to request specific quotes on themes like “overcoming challenges” or “embracing change” and receiving phrases that could potentially go viral on social media! With Chat-GPT, you have a personal quote-generator at your fingertips.
But what if you’re targeting events? For those creating Republic Day status videos, you can request patriotic quotes that ignite national pride or reflect upon the nation’s journey.
Part 4: Quick solution: Filmora AI Editing tool
For those in a hurry or those who might not incline to traverse through various platforms, there’s a one-stop solution: Filmora AI Editing tool. This all-encompassing tool streamlines the process of creating compelling motivational videos.
Create AI Captions For Win 7 or later(64-bit)
Create AI Captions For macOS 10.14 or later
Step 1: Use AI writing tools to generate motivational quotes
Begin with Filmora’s in-built AI writing tool. Like Chat-GPT, this tool provides many quotes based on the emotion or theme you’re targeting. Simply input a keyword and watch as the AI curates a list of quotes suitable for motivation status video download.
Step 2: Search for motivational footage in stock media
Filmora comes equipped with a rich library of stock media. Whether you’re hunting for serene landscapes, bustling cityscapes, or intimate close-ups, there’s a high chance you’ll find the perfect clip that complements your quote. These visuals are curated keeping in mind the trends and preferences of viewers in 2024, ensuring your video remains relevant and engaging.
Step 3: One-click generation using templates
For those who are not seasoned video editors, Filmora offers a range of templates designed specifically for motivational content. By selecting a template, the AI takes over, meshing together the quote and the footage to create a cohesive and professional video. The one-click generation feature is a godsend for those seeking a quick turnaround without compromising quality.
With the tools and techniques available in 2024, creating motivational videos has never been more accessible. Whether you’re a seasoned creator or a novice dipping your toes into the world of content creation, the AI-driven platforms mentioned above ensure that your motivation status video stands out and leaves an indelible mark on your audience.
Part 5: Summary
AI-driven tools have democratized motivational content creation. No longer exclusive to professionals, crafting inspiring motivational videos status is now accessible to all. These AI-enhanced videos serve as beacons of hope and encouragement, resonating deeply across various audience demographics.
In this digital era, harnessing AI simplifies content creation and amplifies its impact, making every message more poignant and every story more compelling. Embrace this AI revolution and let your creativity shine in 2024.
Can You Enhance Your Drone Footage with Cinematic Drone LUTs? This Article Discusses Top Drone LUTs Recommendations to Simplify Video Editing
Drone footage is an aerial recording of an event, occasion, or entire town. The quality of these drone recordings may not be good enough. This is why users need to pursue video editing to enhance video quality. Meanwhile, editing videos from scratch can be time-consuming. Utilizing free drone LUTs is ideal for upscaling video quality to optimized standards. In this article, you will find top recommendations for using drone LUTs.
- Part 2: How Can LUTs be Used in Drone Footage Editing?
- Part 3: Best Drone LUTs To Discover In 2024
- Bonus Part: Learn More About Video Editing Through LUTs with Wondershare Filmora
Part 1: What Do You Know About LUTs?
LUTS, or Lookup Tables, do exist in small files. These files have sources to enhance color grading and optimize color correction within videos and images. The sources are special color presets that transform color schemas. The use cases of LUTs typically fall within the video and film industries. Individuals can also use these video-enhancing tools to better visualize their content.
Within LUTs, you will find a range of preset filters that can be applied. Meanwhile, the color grading is executed with more consistency. This way, the colors are accurately applied to all frames of visual content. The colors are mapped into the original footage using pre-determined color options. So, you don’t need to adjust or manually customize individual colors.
Part 2: How Can LUTs be Used in Drone Footage Editing?
Drone technology is a new revolution in this modern world. After all, it allows us to capture aerial photos and videos with greater proximity. While the quality of this footage may not be good, LUTs can help. Here is how you can use LUTs in drone footage editing and make your work easier:
- Color Grading: You can use LUTs for creative color grading solutions. After all, there are different filter presets with unique color styling. This provides new and interesting looks to your visual media.
- Match Colors: If you use different cameras to record drone footage, colors may differ. That’s where LUTs can be useful. They can match colors in all frames with dedicated filter presets.
- Color Correction: Drone footage often faces lighting issues that damage color gradients. When using drone LUTs pack-free, you can correct color schemas with consistency. The color imbalances will rectify.
- Saves Resources: With LUTs, you can save time and money. So, you don’t need to waste long hours on video editing. You don’t even have to spend money on good editing software. Color grading becomes more straightforward with LUTs.
Part 3: Best Drone LUTs To Discover In 2024
Aerial technology in this modern world is evolving, which includes drone usage. In contrast, you may need to upscale video colors using special drone LUTs. Here you’ll find the list of the best drone LUTs to make video upscaling smarter:
1.Moody DJI Drone LUTs
Provide moody styles to your recorded drone footage with this DJI drone LUTs pack free download. There are 15 LUTs preset filters that you can use to upscale video colors. All filters are unique, with different color gradients, contrast, and compositions. You have to import these filters to use them, and they require no extra plugin. The drone LUTs pack is compatible with both Windows and Mac.

2.DJI Drone LUTs Color Preset
Transfrom your aerial video shoot in wildlife, sports, or traveling with this LUTs pack. After all, this DJI Mavic 2 Pro LUTs works with drones, including the DJI Mavic Pro line. There are, in total, 120 color presets that are available in different gradients. The quality for these LUTs is 8K, and they work with LOG and Rec .709.

3.DB - Cinematic Drone LUTs
Enhance aerial videography using color grading using this cinematic drone LUTs-free pack. In this LUTs pack, you’ll find 10 premium LUTs to get started. Each LUTs possesses a special color preset to provide new looks within aerial videos. Meanwhile, this DJI drone LUTs pack free download is ideal for DJI drones. The LUTs work well on types of camera footage.

4. CINEMATIC DRONE LUTS
Apply professional color gradients to your all-important drone visual content. You can transform videos’ visual quality by using these free LUTs for drone footage. In total, you receive 25 color presets in different color schemas and textures. This way, you can blend cinematic touch into your aerial shoot. You can even set a reference point or increase the speed of color grading.

5. JHL Drone LUTs
Aerial videography can be upscaled in a simpler way using JHL drone LUTs. After all, this LUTs pack contains 18 distinctive LUTs preset filters. In general, you can use these LUTs on all software editing platforms. Meanwhile, the LUTs have been tested for DJI drone clips, so expect outstanding results. The LUTs are special because they provide solutions in all weather and light ranges.

6. Drone LUTs
Make your aerial project more enchanting with this drone LUTs pack free. You will get 20 diverse drone LUTs preset filters. In contrast, these filters suit all lighting, weather, and environment. The color gradients of your visual content are optimized with stunning color grading. These LUTs work with any resolution. You need to drag and drop these elements into your content.

7. B&W
Black and white color schemes are always special. Adding them to your aerial videos or photos can enlighten your content’s visualization. By using these B&W LUTs for drones, turn aerial shoots into appealing black-and-white contrasts. This will make your visual content more aesthetic with improved engagement. Using this LUTs pack is very convenient and straightforward.

Bonus Part: Learn More About Video Editing Through LUTs with Wondershare Filmora
Video editing is a way to optimize the quality of videos with perfection. Meanwhile, using LUTs can convincingly simplify video editing. For using cinematic drone LUTs free, you need a good and reliable tool. Wondershare Filmora is the trusted solution in this regard. This is a video editing software that allows video upscaling from broader perspectives.
There are more than 200 LUTs that you can use, and every LUTs is unique. The availability of titles, stickers, transitions, effects, and audio makes this tool special. Meanwhile, Filmora comes with a user-friendly interface to get started.

Key Features of Wondershare Filmora
Regarding video editing, Wondershare Filmora takes the lead over its competitors. There are several functions and various tools to learn about, which can be seen in the critical features of Filmora described below:
1. Instant Mode
Filmora’s instant mode allows you to create videos without requiring editing skills. You have to add your respective media items, and Filmora transforms them into videos. There are more than 115 templates that you can use. The AI algorithm works fast and efficiently.
2. Batch Text Editing
Using batch text editing, you can add subtitles to your video. There are three ways to batch edit the text. First, select all texts in the timeline to edit them at the same time. Second, multiple text styles in the Filmora player. Third, changing fonts in bulk quantity within advanced editing.
3. Screen Recorder
Record your screenplay using the Filmora screen recording facility. So, you can record videos from different areas of a webcam or PC screen. You can also customize the ratio and screen sizes of your videos. Meanwhile, audio is recorded by microphone and system.
4. Adjustment layer
Filmora can also help add general effects to your videos at once. Through the adjustment layer, the same effects could be applied across timeline videos. This improves video editing efficiency as a whole. In addition, the adjustment layer can hold unlimited effects.
Add LUTs on Video For Win 7 or later(64-bit)
Add LUTs on Video For macOS 10.14 or later


Conclusion
Drone technology is evolving modern videography and photography with aerial views. Meanwhile, using a camera may affect the quality of recorded videos. This is why using DJI mini 2 LUTs free is essential. This article discussed 7 drone LUTs pack free help get started with color upscaling. Moreover, you also learned about Wondershare Filmora, which is a best-in-class video editing software.
- Part 3: Best Drone LUTs To Discover In 2024
- Bonus Part: Learn More About Video Editing Through LUTs with Wondershare Filmora
Part 1: What Do You Know About LUTs?
LUTS, or Lookup Tables, do exist in small files. These files have sources to enhance color grading and optimize color correction within videos and images. The sources are special color presets that transform color schemas. The use cases of LUTs typically fall within the video and film industries. Individuals can also use these video-enhancing tools to better visualize their content.
Within LUTs, you will find a range of preset filters that can be applied. Meanwhile, the color grading is executed with more consistency. This way, the colors are accurately applied to all frames of visual content. The colors are mapped into the original footage using pre-determined color options. So, you don’t need to adjust or manually customize individual colors.
Part 2: How Can LUTs be Used in Drone Footage Editing?
Drone technology is a new revolution in this modern world. After all, it allows us to capture aerial photos and videos with greater proximity. While the quality of this footage may not be good, LUTs can help. Here is how you can use LUTs in drone footage editing and make your work easier:
- Color Grading: You can use LUTs for creative color grading solutions. After all, there are different filter presets with unique color styling. This provides new and interesting looks to your visual media.
- Match Colors: If you use different cameras to record drone footage, colors may differ. That’s where LUTs can be useful. They can match colors in all frames with dedicated filter presets.
- Color Correction: Drone footage often faces lighting issues that damage color gradients. When using drone LUTs pack-free, you can correct color schemas with consistency. The color imbalances will rectify.
- Saves Resources: With LUTs, you can save time and money. So, you don’t need to waste long hours on video editing. You don’t even have to spend money on good editing software. Color grading becomes more straightforward with LUTs.
Part 3: Best Drone LUTs To Discover In 2024
Aerial technology in this modern world is evolving, which includes drone usage. In contrast, you may need to upscale video colors using special drone LUTs. Here you’ll find the list of the best drone LUTs to make video upscaling smarter:
1.Moody DJI Drone LUTs
Provide moody styles to your recorded drone footage with this DJI drone LUTs pack free download. There are 15 LUTs preset filters that you can use to upscale video colors. All filters are unique, with different color gradients, contrast, and compositions. You have to import these filters to use them, and they require no extra plugin. The drone LUTs pack is compatible with both Windows and Mac.
2.DJI Drone LUTs Color Preset
Transfrom your aerial video shoot in wildlife, sports, or traveling with this LUTs pack. After all, this DJI Mavic 2 Pro LUTs works with drones, including the DJI Mavic Pro line. There are, in total, 120 color presets that are available in different gradients. The quality for these LUTs is 8K, and they work with LOG and Rec .709.
3.DB - Cinematic Drone LUTs
Enhance aerial videography using color grading using this cinematic drone LUTs-free pack. In this LUTs pack, you’ll find 10 premium LUTs to get started. Each LUTs possesses a special color preset to provide new looks within aerial videos. Meanwhile, this DJI drone LUTs pack free download is ideal for DJI drones. The LUTs work well on types of camera footage.
4. CINEMATIC DRONE LUTS
Apply professional color gradients to your all-important drone visual content. You can transform videos’ visual quality by using these free LUTs for drone footage. In total, you receive 25 color presets in different color schemas and textures. This way, you can blend cinematic touch into your aerial shoot. You can even set a reference point or increase the speed of color grading.
5. JHL Drone LUTs
Aerial videography can be upscaled in a simpler way using JHL drone LUTs. After all, this LUTs pack contains 18 distinctive LUTs preset filters. In general, you can use these LUTs on all software editing platforms. Meanwhile, the LUTs have been tested for DJI drone clips, so expect outstanding results. The LUTs are special because they provide solutions in all weather and light ranges.
6. Drone LUTs
Make your aerial project more enchanting with this drone LUTs pack free. You will get 20 diverse drone LUTs preset filters. In contrast, these filters suit all lighting, weather, and environment. The color gradients of your visual content are optimized with stunning color grading. These LUTs work with any resolution. You need to drag and drop these elements into your content.
7. B&W
Black and white color schemes are always special. Adding them to your aerial videos or photos can enlighten your content’s visualization. By using these B&W LUTs for drones, turn aerial shoots into appealing black-and-white contrasts. This will make your visual content more aesthetic with improved engagement. Using this LUTs pack is very convenient and straightforward.
Bonus Part: Learn More About Video Editing Through LUTs with Wondershare Filmora
Video editing is a way to optimize the quality of videos with perfection. Meanwhile, using LUTs can convincingly simplify video editing. For using cinematic drone LUTs free, you need a good and reliable tool. Wondershare Filmora is the trusted solution in this regard. This is a video editing software that allows video upscaling from broader perspectives.
There are more than 200 LUTs that you can use, and every LUTs is unique. The availability of titles, stickers, transitions, effects, and audio makes this tool special. Meanwhile, Filmora comes with a user-friendly interface to get started.
Key Features of Wondershare Filmora
Regarding video editing, Wondershare Filmora takes the lead over its competitors. There are several functions and various tools to learn about, which can be seen in the critical features of Filmora described below:
1. Instant Mode
Filmora’s instant mode allows you to create videos without requiring editing skills. You have to add your respective media items, and Filmora transforms them into videos. There are more than 115 templates that you can use. The AI algorithm works fast and efficiently.
2. Batch Text Editing
Using batch text editing, you can add subtitles to your video. There are three ways to batch edit the text. First, select all texts in the timeline to edit them at the same time. Second, multiple text styles in the Filmora player. Third, changing fonts in bulk quantity within advanced editing.
3. Screen Recorder
Record your screenplay using the Filmora screen recording facility. So, you can record videos from different areas of a webcam or PC screen. You can also customize the ratio and screen sizes of your videos. Meanwhile, audio is recorded by microphone and system.
4. Adjustment layer
Filmora can also help add general effects to your videos at once. Through the adjustment layer, the same effects could be applied across timeline videos. This improves video editing efficiency as a whole. In addition, the adjustment layer can hold unlimited effects.
Add LUTs on Video For Win 7 or later(64-bit)
Add LUTs on Video For macOS 10.14 or later
Conclusion
Drone technology is evolving modern videography and photography with aerial views. Meanwhile, using a camera may affect the quality of recorded videos. This is why using DJI mini 2 LUTs free is essential. This article discussed 7 drone LUTs pack free help get started with color upscaling. Moreover, you also learned about Wondershare Filmora, which is a best-in-class video editing software.
How to Zoom Webcam on PC
Making certain our digital presence is the best it can be pays dividends as more and more of what we do online; similar is the case with how to zoom out webcam windows 10. The majority of experts advise against using the built-in camera that comes with your laptop or computer and instead advocate getting a webcam or an HD camera. These, however, may be hard to come by and pricy if you locate a nice one. If the built-in camera on your laptop doesn’t perform effectively during Zoom meetings, you may want to consider about investing in a separate, better webcam. Webcams offer automatic settings that are intended to function with the largest variety of lighting situations possible. This suggests that they average out a great number of responses to the content of the frame. Because of this, we have incorporated basic PC webcam zooming settings. These answers may be found in the portions that follow.
It’s vital to know how to zoom in on a webcam before visiting there. The camera wasn’t always as vital as it is today, and only very large corporations could afford to employ it as a convenience. But today, nearly everyone, from huge organizations to little firms, acknowledges its value. Everybody needs a webcam that works properly. The camera control software you are using determines the zoom function. The resolution of your picture window and the capabilities of the application dictate how far you can zoom in on the webcam’s video image. You can zoom in and out on camera photos using tools like YouCam and Windows Live Messenger. The most critical camera capabilities for the ideal video conferencing experience are zoom in and zoom out, which at first look may appear trivial. Here, we’ll walk you through each step, in detail. Continue reading, and we’ll check your understanding of webcam zoom in and zoom out skills!
Way 1: Zoom with Windows Live Messenger
When utilizing a camera for video conferencing, you may zoom in on a user’s face to get rid of the background. Webcam settings are not accessible by default in Microsoft Windows. However, camera zoom settings may be changed in instant chat systems. Through an instant messaging tool, such as Windows Live Messenger, you may simply access these options. This application provides private offline chat, video messaging, image and video sharing, and video chatting.
Step1Start Windows Live Messenger on your PC or laptop first. Enter your login name and password by clicking the “Sign In” button.

Step2On the top menu bar, pick “Tools.” And then select the “Audio and Video Setup”. Drag the slider next to “Speaker” to modify the speaker volume. Drag the slider next to “Microphone” to modify the microphone sensitivity. Press “Next.”

Step3From the drop-down list, pick the webcam. The “Camera Control” option is situated on the top; pick “Webcam Settings” after that.
Step4Now, to alter the zoom settings, drag the “Zoom” slider. To zoom in or out, drag the slider to the left or right. Press “OK.”
Way 2: Use Windows 10 Camera App
Wondering how to zoom your camera in the Windows 10 Camera app? The Camera app enables you to zoom in or out on your webcam in both image and video modes. To accomplish so, click or push the Magnification button, and then use the slider to modify the webcam’s zoom level. To operate the zoom feature manually, pick “Manual Zoom.” In the preview window, a square appears when you pick this option. To zoom in on a specific region of the capture window, drag the square there. To expand the image that was acquired by the webcam, slide the slider bar. In simply, The Camera app enables you zoom in or out of photographs and movies shot with your webcam. To do this, click on the “Zoom” button and drag the slider to the left or right as appropriate on your Windows 10 camera. the following steps:
Step1To open the “Start Menu,” make a right-click on “Start.” Now, to access the Camera app, type “Camera App” into the start menu’s search box.

Step2Tap the Camera Control icon when you start or join a meeting. To zoom and pan the camera to the appropriate spot, utilize the icons on the Camera Control panel.
![]()
Step3To exit the Camera Control window and return to the Meeting Controls, touch outside of it.
Way 3: Zoom with YouCam
Unfortunately, the default cameras or webcams bundled with the majority of Windows laptops and desktops don’t have an automatic zoom option. In fact, the only method to adjust their crop is to switch from “Standard” to “Widescreen,” which does slightly zoom in on you but not in the manner we’d want. This makes it inescapable that the only method to manually alter a webcam’s magnification is to acquire one separately and apply its software settings. , like YouCam. YouCam provides video calling, streaming, and broadcasting. includes an integrated app. To employ Zoom with YouCam, refer to the methods given below:
Step1Launch the YouCam camera program and activate the webcam.

Step2In the camera preview window, pick Settings. Then, select “Enable Video Zoom” from the menu.
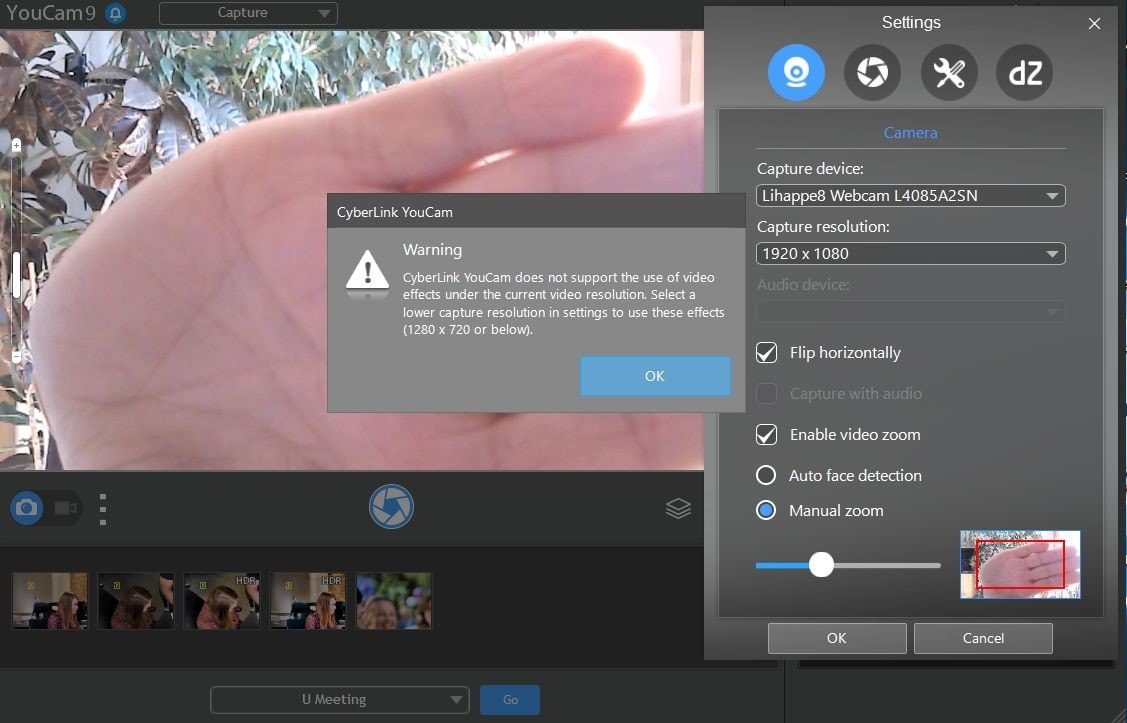
Step3Select “Automatic Face Detection” from the menu. As you wander about in the capture window, the camera watches your face and automatically zooms in on your photo as shown above.
Step4To handle the zoom feature manually, pick “Manual Zoom.” In the preview window, a square appears when you pick this option. To zoom in on a specific region of the capture window, drag the square there. To expand the image that was acquired by the webcam, slide the slider bar.

Way 4: Use iGlasses on Mac
For the perfect webcam look on a MAC, install the Chrome plugin iGlasses for video effects and style tweaks. Your videos will appear better on Zoom as a consequence. You may instantly enhance the appearance of your video interactions by utilizing the digital zoom on your iGlasses. Digital pan, tilt, and zoom are all possible with easy controls. For Macs that support it, an Apple Remote may be used to operate. iGlasses will become an option in Zoom’s video settings when it has been installed. You may improve your camera by altering the settings in iGlasses. You may experiment with a range of amusing effects, like 3-D distortions, using the virtual camera. Let’s learn how to utilize iGlasses on a Mac:
Step1Installing Ecamm’s iGlasses on a MacBook in the first step.
Step2To activate the camera, go to your video settings and pick iGlasses.
Step3Choose the Zoom window and execute the appropriate operations using the Zoom and Flip options. You may now zoom in and out using the camera on your MacBook as you like.

Conclusion
In conclusion, so many people currently take part in online conferences and virtual meetings. You want to create a lasting impression, don’t you? Not or whether you are the host of an online meeting or event, you must now maintain a professional image to prevent turning off attendees. You have discovered how to utilize the tools at your disposal to boost the zoom in and out quality of your camera in this post. However, as will be explained in the sections ahead, you may do it without the third-party plugins. With just one quick plugin, you can significantly transform how you look on a camera. Hence, try out the easy method from the above enlisted ones to get hold on your PC webcam to zoom in or out purposes.
Making certain our digital presence is the best it can be pays dividends as more and more of what we do online; similar is the case with how to zoom out webcam windows 10. The majority of experts advise against using the built-in camera that comes with your laptop or computer and instead advocate getting a webcam or an HD camera. These, however, may be hard to come by and pricy if you locate a nice one. If the built-in camera on your laptop doesn’t perform effectively during Zoom meetings, you may want to consider about investing in a separate, better webcam. Webcams offer automatic settings that are intended to function with the largest variety of lighting situations possible. This suggests that they average out a great number of responses to the content of the frame. Because of this, we have incorporated basic PC webcam zooming settings. These answers may be found in the portions that follow.
It’s vital to know how to zoom in on a webcam before visiting there. The camera wasn’t always as vital as it is today, and only very large corporations could afford to employ it as a convenience. But today, nearly everyone, from huge organizations to little firms, acknowledges its value. Everybody needs a webcam that works properly. The camera control software you are using determines the zoom function. The resolution of your picture window and the capabilities of the application dictate how far you can zoom in on the webcam’s video image. You can zoom in and out on camera photos using tools like YouCam and Windows Live Messenger. The most critical camera capabilities for the ideal video conferencing experience are zoom in and zoom out, which at first look may appear trivial. Here, we’ll walk you through each step, in detail. Continue reading, and we’ll check your understanding of webcam zoom in and zoom out skills!
Way 1: Zoom with Windows Live Messenger
When utilizing a camera for video conferencing, you may zoom in on a user’s face to get rid of the background. Webcam settings are not accessible by default in Microsoft Windows. However, camera zoom settings may be changed in instant chat systems. Through an instant messaging tool, such as Windows Live Messenger, you may simply access these options. This application provides private offline chat, video messaging, image and video sharing, and video chatting.
Step1Start Windows Live Messenger on your PC or laptop first. Enter your login name and password by clicking the “Sign In” button.
Step2On the top menu bar, pick “Tools.” And then select the “Audio and Video Setup”. Drag the slider next to “Speaker” to modify the speaker volume. Drag the slider next to “Microphone” to modify the microphone sensitivity. Press “Next.”
Step3From the drop-down list, pick the webcam. The “Camera Control” option is situated on the top; pick “Webcam Settings” after that.
Step4Now, to alter the zoom settings, drag the “Zoom” slider. To zoom in or out, drag the slider to the left or right. Press “OK.”
Way 2: Use Windows 10 Camera App
Wondering how to zoom your camera in the Windows 10 Camera app? The Camera app enables you to zoom in or out on your webcam in both image and video modes. To accomplish so, click or push the Magnification button, and then use the slider to modify the webcam’s zoom level. To operate the zoom feature manually, pick “Manual Zoom.” In the preview window, a square appears when you pick this option. To zoom in on a specific region of the capture window, drag the square there. To expand the image that was acquired by the webcam, slide the slider bar. In simply, The Camera app enables you zoom in or out of photographs and movies shot with your webcam. To do this, click on the “Zoom” button and drag the slider to the left or right as appropriate on your Windows 10 camera. the following steps:
Step1To open the “Start Menu,” make a right-click on “Start.” Now, to access the Camera app, type “Camera App” into the start menu’s search box.
Step2Tap the Camera Control icon when you start or join a meeting. To zoom and pan the camera to the appropriate spot, utilize the icons on the Camera Control panel.
![]()
Step3To exit the Camera Control window and return to the Meeting Controls, touch outside of it.
Way 3: Zoom with YouCam
Unfortunately, the default cameras or webcams bundled with the majority of Windows laptops and desktops don’t have an automatic zoom option. In fact, the only method to adjust their crop is to switch from “Standard” to “Widescreen,” which does slightly zoom in on you but not in the manner we’d want. This makes it inescapable that the only method to manually alter a webcam’s magnification is to acquire one separately and apply its software settings. , like YouCam. YouCam provides video calling, streaming, and broadcasting. includes an integrated app. To employ Zoom with YouCam, refer to the methods given below:
Step1Launch the YouCam camera program and activate the webcam.
Step2In the camera preview window, pick Settings. Then, select “Enable Video Zoom” from the menu.
Step3Select “Automatic Face Detection” from the menu. As you wander about in the capture window, the camera watches your face and automatically zooms in on your photo as shown above.
Step4To handle the zoom feature manually, pick “Manual Zoom.” In the preview window, a square appears when you pick this option. To zoom in on a specific region of the capture window, drag the square there. To expand the image that was acquired by the webcam, slide the slider bar.
Way 4: Use iGlasses on Mac
For the perfect webcam look on a MAC, install the Chrome plugin iGlasses for video effects and style tweaks. Your videos will appear better on Zoom as a consequence. You may instantly enhance the appearance of your video interactions by utilizing the digital zoom on your iGlasses. Digital pan, tilt, and zoom are all possible with easy controls. For Macs that support it, an Apple Remote may be used to operate. iGlasses will become an option in Zoom’s video settings when it has been installed. You may improve your camera by altering the settings in iGlasses. You may experiment with a range of amusing effects, like 3-D distortions, using the virtual camera. Let’s learn how to utilize iGlasses on a Mac:
Step1Installing Ecamm’s iGlasses on a MacBook in the first step.
Step2To activate the camera, go to your video settings and pick iGlasses.
Step3Choose the Zoom window and execute the appropriate operations using the Zoom and Flip options. You may now zoom in and out using the camera on your MacBook as you like.
Conclusion
In conclusion, so many people currently take part in online conferences and virtual meetings. You want to create a lasting impression, don’t you? Not or whether you are the host of an online meeting or event, you must now maintain a professional image to prevent turning off attendees. You have discovered how to utilize the tools at your disposal to boost the zoom in and out quality of your camera in this post. However, as will be explained in the sections ahead, you may do it without the third-party plugins. With just one quick plugin, you can significantly transform how you look on a camera. Hence, try out the easy method from the above enlisted ones to get hold on your PC webcam to zoom in or out purposes.
Also read:
- New 2024 Approved How to Create Liquid Water Reveal Intro?
- Updated 2024 Approved Are You Also Facing a Problem with the Snapchat Camera Zoomed In? Find Out the Easiest Methods to Fix This Error without Installing a Third-Party Tool
- New 2024 Approved How To Be A Successful YouTuber
- New Video Editors Use Transitions to Tie Their Shots and Clips Together Into a Cohesive, Polished Program. Learn the Best Method to Create a Smooth Cut Transition Effect
- New Top 10 Best Slideshow Makers with Music
- In 2024, Denoise a Video in Adobe Premiere Pro – Audio and Video Noise Removal
- New 2024 Approved Ever Wondered About the Similarity You Bear with an Anime Character? If You Have Not yet Looked Into This Exciting Aspect of Motion Graphic Design, You Can Very Well Break the Ice Here
- New Timeline Template Is a Visual Representation Showing the Passage of Time. It Includes Text, Diagrams, Images and Icons. They Are Perfect for Telling Stories, Events Etc
- Updated 2024 Approved Templates Take Your Music Video From Drab to Fab and Add some Spice to the Catchy Song. Here Are some Templates You Could Use to Make Your Music Video Popular
- Updated IMovie Review – Is It The Best Video Editor for Mac Users?
- In 2024, What Are the Best 15 Slideshow Presentation Examples Your Audience Will Love
- New 2024 Approved Do You Want to Know How to Convert YouTube SBV Subtitles to SRT Format? Here Is an Ultimate Guide About It
- Updated How To Create Quiz Videos Detailed Guide
- 3 Ways to Combine 2 or 3 Videos Into 1
- Updated In 2024, 4 Ways to Merge MP4 and MP3
- Updated How to Change Frame Rate in Premiere Pro
- Wondering How to Edit a Video to Slow Motion on iPhone and Android Devices? Find Out How to Use Wondershare Filmora to Create and Edit Slo Mo Videos in a Few Clicks for 2024
- In 2024, Want to Play a Video on Loop on Vimeo so that It Plays Again and Again? Here Are All the Different Ways to Loop a Video on Vimeo in Simple Steps
- Updated Adobe Premiere Pro Rec 709 LUTs Finding The Best Choices for 2024
- In 2024, How to Make Custom Lower Thirds with Filmora
- In 2024, Using Slow Motion in Adobe After Effects A Step-by-Step Procession
- Updated In 2024, Stop Worrying if Your Adobe Premiere Playback Slows Down. This Guide Will Show You the Best Solutions to Resolve This Issue and a Perfect Alternative
- Create Your Own Subscribe Channel Graphics for 2024
- New Guide on VHS Technology and Its Influence on Video Editing
- How to Achieve GoPro Slow Motion With Quality
- Updated Color Lut Is an Easy and Powerful Tool to Make Your Video Stands Out From the Crowd. Check This Article to Learn the Details About Color Lut for 2024
- 2024 Approved If Youre Trying to Create a Countdown Effect, but Youre Not Sure Where to Start, Then This Post Is Going to Show You some Ways to Create a Countdown Animation for Your Videos
- Updated How to Use LUTs in VN Editor – Complete Guide and Best LUTs Download for 2024
- 2024 Approved Creating Collages on Canva Is Simple and Quick. The Tool Lets You Create some Amazing Customized Collages as Needed. So, Get Ready to Explore the World of Canva Collages
- In 2024, Looking for Efficient Ways to Create a Slow-Motion Video? Read the Article for Reliable Solutions that Provide Excellent Results
- Updated In 2024, Do You Want to Apply BRAW LUTs to Your Pictures and Video Footage? Here We Will Discuss some of the Best Options Available to Help You Choose the Right One
- Updated 2024 Approved How to Remove Background Noise From Video Sony Vegas
- In 2024, How to Create a Light Sweep (Shine) Effect
- New In 2024, Time Lapse Video Is Very Interesting and Creative, Which Usually Attracts More Attention. This Article Will Show You How to Make a Time Lapse Video with Adobe After Effects
- New 2024 Approved An Intro Video Describing You and Your Content Is the First and the Foremost Thing Which a Viewer Sees. Thinking of How to Make an Interesting Intro Video, This Blog Is Surely a Supportive Guide for You. Learn More Here
- Top 12 AI Video Generators to Pick
- How to Create Motion Text Effects for Your Video for 2024
- Basic Knowledge About WMV Format and Best WMV Video Editor for 2024
- Updated How to Perfectly Use Canva Color Match, In 2024
- New In 2024, With This Article, We Will Be Looking at Steps to Rotate a Video in Cyberlink PowerDirector to Help You when Required. We Have Also Mentioned the Steps You Will Need to Follow in Wondershare Filmora
- Updated How to Add a Spooky Shadow Effect for 2024
- New Free Titles For Final Cut Pro
- Updated In 2024, To Add SRT to MP4 Is Not as Hard as You Might Think. All You Just Need Is the Right Tool to Help You Get the Job Done. Read This Article and Learn the 8 Latest Methods to Merge SRT with MP4 Effortlessly
- New 2024 Approved Top 5 Best Video Denoisers
- Updated 2024 Approved Are You a Vlogger Looking for Good Color Correction and Video Grading Presets? Here Youll Find Different Vlog LUTs that You Can Use for Your Videos
- Updated Srt File Creator for 2024
- New Are You Surfing for some Way to Make Your Animated Emoji Discord Using Videos, GIFs, Images, or Text? Read Through This Article as Well Guide You Through the Process
- Updated 2024 Approved A Guide to Create Your Own LOL Montage Video
- Updated This Article Talks in Detail About Why People Look for a Free Title Maker, and 8 Options that Will Benefit Their Work. It Includes Tools Like SEMrush Title Generator, Hubspot Title Generator, and More. Check Out
- New 2024 Approved 4 Ways for Rotating Your GoPro Videos Professionally
- How to Get and Use Pokemon Go Promo Codes On Samsung Galaxy F04 | Dr.fone
- How do I play MKV movies on Samsung Galaxy F54 5G?
- In 2024, Top 4 SIM Location Trackers To Easily Find Your Lost Samsung Device
- Repair damaged, unplayable video files of Redmi K70 Pro on Windows
- In 2024, Downloading SamFw FRP Tool 3.0 for Samsung
- In 2024, Pattern Locks Are Unsafe Secure Your Motorola Moto G34 5G Phone Now with These Tips
- In 2024, How to Change Your Xiaomi Redmi 13C 5G Location on life360 Without Anyone Knowing? | Dr.fone
- In 2024, How Can Oppo Reno 10 Pro 5GMirror Share to PC? | Dr.fone
- In 2024, What Pokémon Evolve with A Dawn Stone For Nokia 130 Music? | Dr.fone
- How to Unlock Xiaomi Redmi Note 12 5G Bootloader Easily
- How to Access Your Apple iPhone 15 Plus When You Forget the Passcode?
- Top 15 Apps To Hack WiFi Password On Xiaomi Redmi Note 12 Pro 5G
- In 2024, Things You Should Know When Unlocking Total Wireless Of Apple iPhone 8
- Simple Solutions to Fix Android SystemUI Has Stopped Error For Vivo X Flip | Dr.fone
- How Can I Catch the Regional Pokémon without Traveling On Oppo Find X7 | Dr.fone
- In 2024, How to Change Huawei Nova Y91 Location on Skout | Dr.fone
- How to Come up With the Best Pokemon Team On Apple iPhone 7? | Dr.fone
- Top 5 Car Locator Apps for Apple iPhone 11 Pro | Dr.fone
- Why Does My Itel A60 Keep Turning Off By Itself? 6 Fixes Are Here | Dr.fone
- Additional Tips About Sinnoh Stone For Itel A60 | Dr.fone
- Is Your Apple iPhone 14 Pro Max in Security Lockout? Proper Ways To Unlock
- In 2024, Hassle-Free Ways to Remove FRP Lock from Samsung Galaxy S21 FE 5G (2023) Phones with/without a PC
- How to Transfer Photos from Oppo Find X7 Ultra to Laptop Without USB | Dr.fone
- How to Downgrade Apple iPhone 7 without Losing Anything? | Dr.fone
- Title: Do You Know Anything About the Video Format Supported by WhatsApp? If Not, Then This Is the Right Time to Learn About WhatsApp-Supported Video Formats
- Author: Morgan
- Created at : 2024-05-19 05:11:37
- Updated at : 2024-05-20 05:11:37
- Link: https://ai-video-editing.techidaily.com/do-you-know-anything-about-the-video-format-supported-by-whatsapp-if-not-then-this-is-the-right-time-to-learn-about-whatsapp-supported-video-formats/
- License: This work is licensed under CC BY-NC-SA 4.0.
