
Do You Want to Create Adjustment Layers in Final Cut Pro? This Article Will Discuss a Simple yet Efficient Method to Generate Adjustment Layers in Final Cut Pro

Do You Want to Create Adjustment Layers in Final Cut Pro? This Article Will Discuss a Simple yet Efficient Method to Generate Adjustment Layers in Final Cut Pro
Final Cut Pro is an advanced editing software that is available for Mac users exclusively. Using this high-end software, you can create compelling storytelling in your video clips. It offers different features through which you can effortlessly add audio and motion graphics to your videos. You can also add cinematic effects to your videos using Final Cut Pro to modify their focus points.
You can also add adjustment layers in Final Cut Pro to efficiently add the effects in video clips. By reading this article, you will learn how to add an adjustment layer in Final Cut Pro.

Part 1: What is Adjustment Layer in Final Cut Pro?
The adjustment layer in video editing can provide you with great ease as you can apply effects to multiple videos using this particular layer. Using the adjustment layer, you can apply effects and color grading to your video clips that come beneath this layer. So, apart from adding effects and executing color correction to individual clips, you can use an adjustment layer to generate quicker results.
After creating an adjustment layer in any video editor, you can easily cut and extend it like any other clip. You can also remove it anytime from your timeline with a single tap. In Final Cut Pro, you cannot insert adjustment layers in its timeline directly, like in Premiere Pro or After Effects.
To do so, you have to use third-party tools to create adjustment layers from scratch in Final Cut Pro. The process of creating an adjustment layer in Final Cut Pro is a little bit longer compared to other editors. To learn more about the adjustment layer in FCPX, continue reading this article.

Part 2: How to Add an Adjustment Layer in Final Cut Pro?
Are you eager to know how to add adjustment layers in Final Cut Pro? In this section, you can find simple instructions to generate an adjustment layer in Final Cut Pro without hassle.
Step1 First, click on this link to download the adjustment layer in your MacBook. Once done, copy your “Adjustment Layer” folder to the “User” folder. Afterward, move it to “Movies” and then “Motion Templates.” Once done, copy it to the “Titles” folder eventually.

Step2 Now open Final Cut Pro and locate the “Adjustment Layer” under the “Titles” section. After locating it, drag and drop it into the timeline. This adjustment layer was created as a title layer in Apple Motion that got published in Final Cut Pro using the built-in publishing tools.

Step3 Once you have created the adjustment layer, you can apply any sort of effects to the video clips. However, you should make sure to place the adjustment layer above in the layers stack.

Bonus Tips – How to Use Adjustment Layers in the Best Alternative to FCPX?
If you want to use an alternative to Final Cut Pro for creating the adjustment layer, you can try Wondershare Filmora 12 . You can edit your videos in an advanced and secure environment using this tool. It supports all multiple platforms, such as Windows, Mac, Android, and iOS. You can do color correction in your videos to manage the saturation, brightness, contrast, exposure, and other factors in Filmora.
Free Download For Win 7 or later(64-bit)
Free Download For macOS 10.14 or later
Moreover, you can also create 3D animated titles in Filmora to give your project a unique look. It also provides a wide range of keyboard shortcut presets through which you can make your editing easier and faster. Apart from editing and modifying your videos, you can also increase their vibrancy by using Filmora effects. You can explore and select a diverse range of visual effects in Filmora to give a new dimension to your video clips.
Key Features of Filmora
- Filmora offers cloud services that allow you to collaborate with your team members effectively. On its workspace cloud platform, you can share and review the edited video clips with your team members in a comfortable environment.
- It offers a pen tool through which you can draw complex mask shapes, such as straight lines or curves around the objects.
- Using the AI Smart Cutout feature, you can use advanced technology to select people or objects in the video effectively.
- Are you annoyed by the background noises in your video clips? You can try the AI Denoise feature of Filmora that can help you to eradicate background noises from the video clips precisely.
How to Add an Adjustment Layer Using Filmora
To create and use the adjustment layer in Wondershare Filmora 12, you can proceed to the following steps:
Step1 Import the Video Clip
Launch Filmora and click on the “New Project” button. Afterward, upload the video file on the project media and then drag and drop it into the timeline.

Step2 Add the Adjustment Layer
Now head to the “Media” section on the left side, where you can find the option of the “Adjustment Layer.” Next, drag and drop the adjustment layer into the timeline. You can double-click on it to change its settings effectively.

Step3 Add Multiple Presets to Adjustment Layer
From the settings, you can change blending mode, rotation, position, and opacity easily. Moreover, you can add different presets to the adjustment layer for more modifications. You can use the color match tool to adjust the colors in your video clip. With this tool, you can also add a border across the video clips using the adjustment layer. Also, you can color code the adjustment layer to create a more attractive look in the video clip.

Conclusion
Adjustment layers can make your editing process easy and fast. If you want to pursue video editing as your profession, you should know how to use the adjustment layer in famous tools like Final Cut Pro. After reading this article, you have learned how to create an adjustment layer in Final Cut Pro without complications.
However, if you want a more compatible and easier-to-use tool to generate adjustment layers, you can try Wondershare Filmora. It’s a powerful video editor that you can use to perform professional editing using adjustment layers.
Free Download For macOS 10.14 or later
Moreover, you can also create 3D animated titles in Filmora to give your project a unique look. It also provides a wide range of keyboard shortcut presets through which you can make your editing easier and faster. Apart from editing and modifying your videos, you can also increase their vibrancy by using Filmora effects. You can explore and select a diverse range of visual effects in Filmora to give a new dimension to your video clips.
Key Features of Filmora
- Filmora offers cloud services that allow you to collaborate with your team members effectively. On its workspace cloud platform, you can share and review the edited video clips with your team members in a comfortable environment.
- It offers a pen tool through which you can draw complex mask shapes, such as straight lines or curves around the objects.
- Using the AI Smart Cutout feature, you can use advanced technology to select people or objects in the video effectively.
- Are you annoyed by the background noises in your video clips? You can try the AI Denoise feature of Filmora that can help you to eradicate background noises from the video clips precisely.
How to Add an Adjustment Layer Using Filmora
To create and use the adjustment layer in Wondershare Filmora 12, you can proceed to the following steps:
Step1 Import the Video Clip
Launch Filmora and click on the “New Project” button. Afterward, upload the video file on the project media and then drag and drop it into the timeline.

Step2 Add the Adjustment Layer
Now head to the “Media” section on the left side, where you can find the option of the “Adjustment Layer.” Next, drag and drop the adjustment layer into the timeline. You can double-click on it to change its settings effectively.

Step3 Add Multiple Presets to Adjustment Layer
From the settings, you can change blending mode, rotation, position, and opacity easily. Moreover, you can add different presets to the adjustment layer for more modifications. You can use the color match tool to adjust the colors in your video clip. With this tool, you can also add a border across the video clips using the adjustment layer. Also, you can color code the adjustment layer to create a more attractive look in the video clip.

Conclusion
Adjustment layers can make your editing process easy and fast. If you want to pursue video editing as your profession, you should know how to use the adjustment layer in famous tools like Final Cut Pro. After reading this article, you have learned how to create an adjustment layer in Final Cut Pro without complications.
However, if you want a more compatible and easier-to-use tool to generate adjustment layers, you can try Wondershare Filmora. It’s a powerful video editor that you can use to perform professional editing using adjustment layers.
How to Add Miniature Effect in Video with Filmora
Want to add selective blur to make everything look smaller? Don’t have any idea how to focus on specific mini-things? Then don’t worry! In this article, you’ll get a step-by-step process to add miniature effects to your video. At the end of the process, you’ll have cinematic shots. Then start with us now! Scroll more to get pro tips!
What Is a Miniature Effect?

But first, let’s learn the logic of making the miniature effect. As many video editing pros present on Tiktok, the miniature effect is a fun way to brighten up your photography or video shots. For example, when taking a video or a time-lapse of a landscape, we always have a bigger depth of field, so most objects in the frame are in focus.
However, when we film a miniature model, the depth of field is shallow. So, we only see some objects in focus, and the rest is blurry. This visual trick makes our brain believe that the big landscape we’re seeing is actually a tiny model.
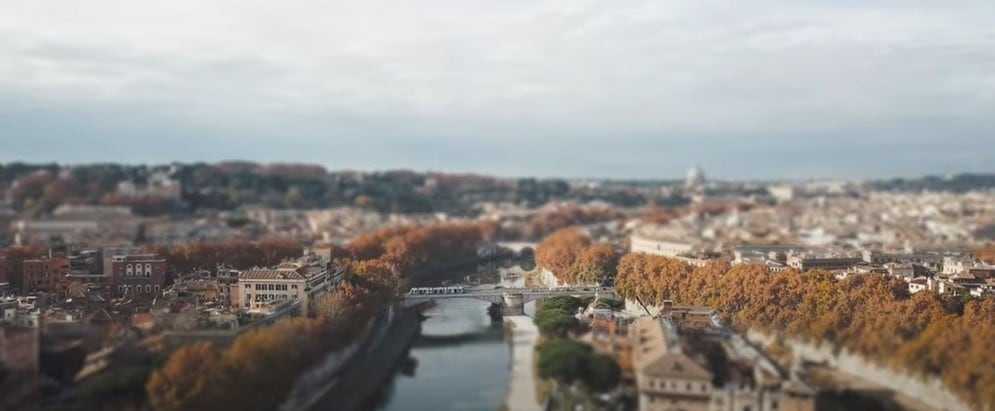
To create a miniature look, we can use specific effects to fake a shallow depth of field, and then the landscape view will look like a tiny model. While some keys to notice before making the miniature effect are:
- It utilizes selective blur to make things appear like small
- The miniature effect works best for footage filmed from a high angle.
- The tiny effect is usually used in drone footage, time lapses, or landscape photography.
Are you all set to add miniature effects to your video and make film-like shots? Then scroll more and get the step-by-step process.
How to Make a Miniature effect?
You are excited to add a miniature effect, and enjoy the rest! Without any further delay, follow the below instructions and get results!
Step1 Download the Wondershare Filmora
- First of all, you have to download the Wondershare Filmora .
- It’s packed with new features and effects plugins that make editing more filmy and fun!
![]()
Note: filmora has a unique “stock media” option that enables us to use all these elements and more to boost our videos!
Step2 Choose any stock footage
If you don’t have good-quality footage, but want to boost your video, here is how. You can get the miniature effect without a big format view camera or specialized lens.
- Open Filmora and select any stock footage in Wondershare Filmora.
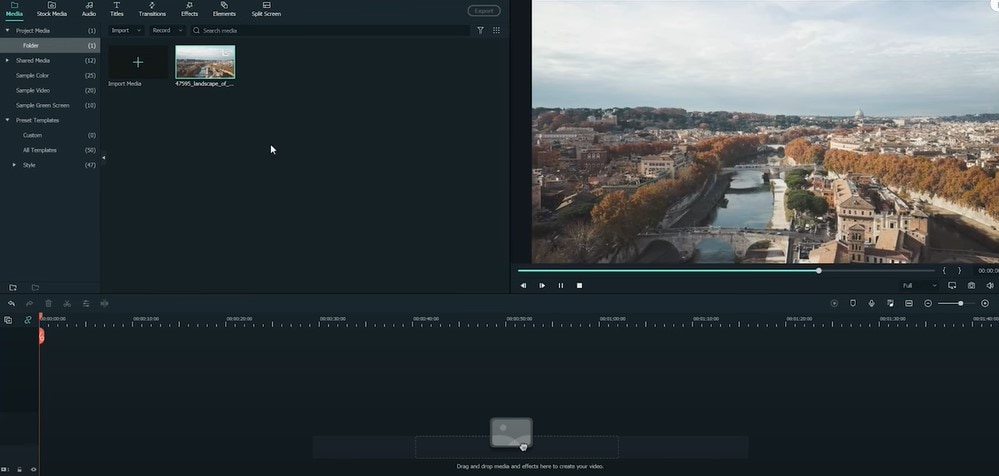
Move to the stock media folder on the above bar in the Wondershare Filmora. Or you can look towards the left window, where you will see the sample videos tab.
- Click on the sample videos tab, and a new window will appear on the library screen.
Here you will see almost more than 20 videos. So, instead of using the actual recorded footage, we’ll make do with what we have by default. After selecting and adding the stock footage of your choice. Then you have to follow the below process:
- First, hold the Stock Footage as shown in the folder section.
- Then Drag and Drop it to the timeline section for further editing.
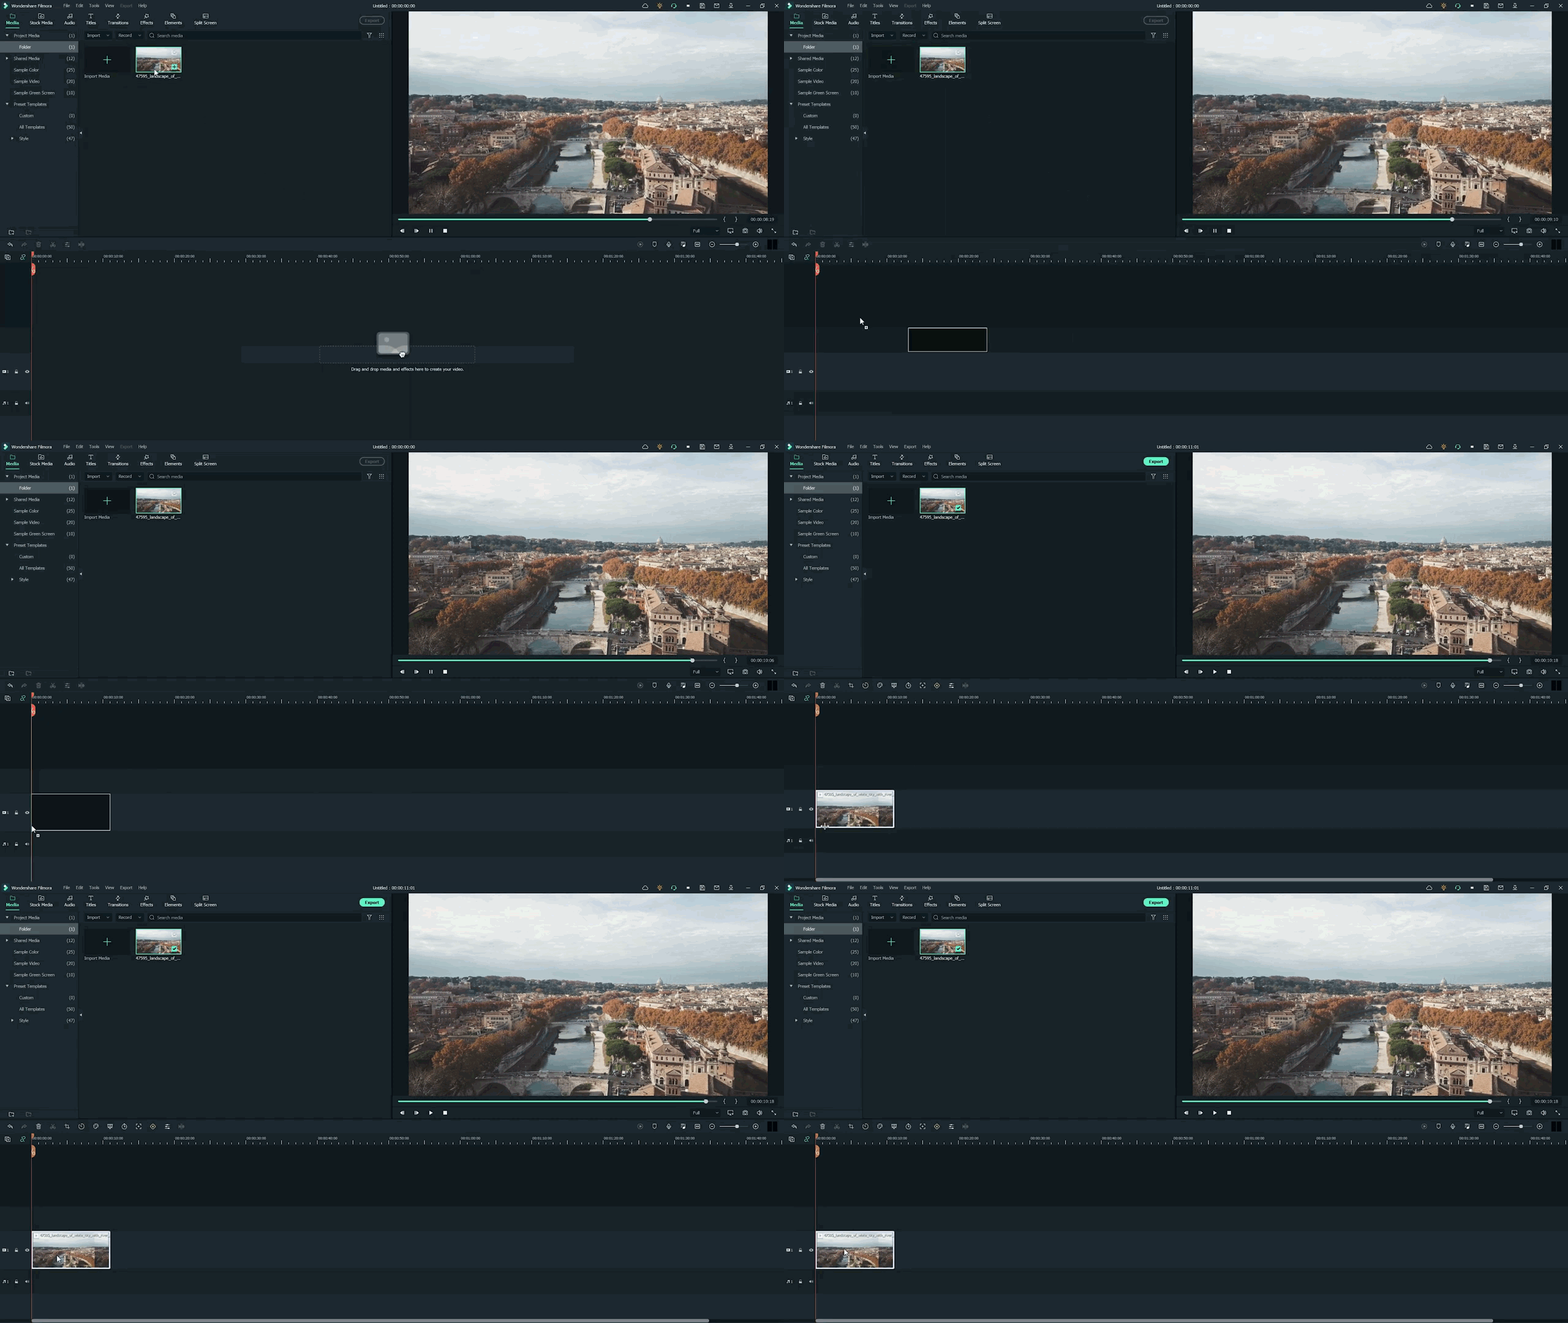
Who will get Stock Media?
Want to get stock media? You can only have access to the stock media library if you already buy the license of Wondershare Filmora.
- The latest version has an unlimited stock library.
- After purchasing any plan, you can access Stock Media (Unsplash, Giphy, Pixabay, Pixel).
Step3 Head to the effect panel
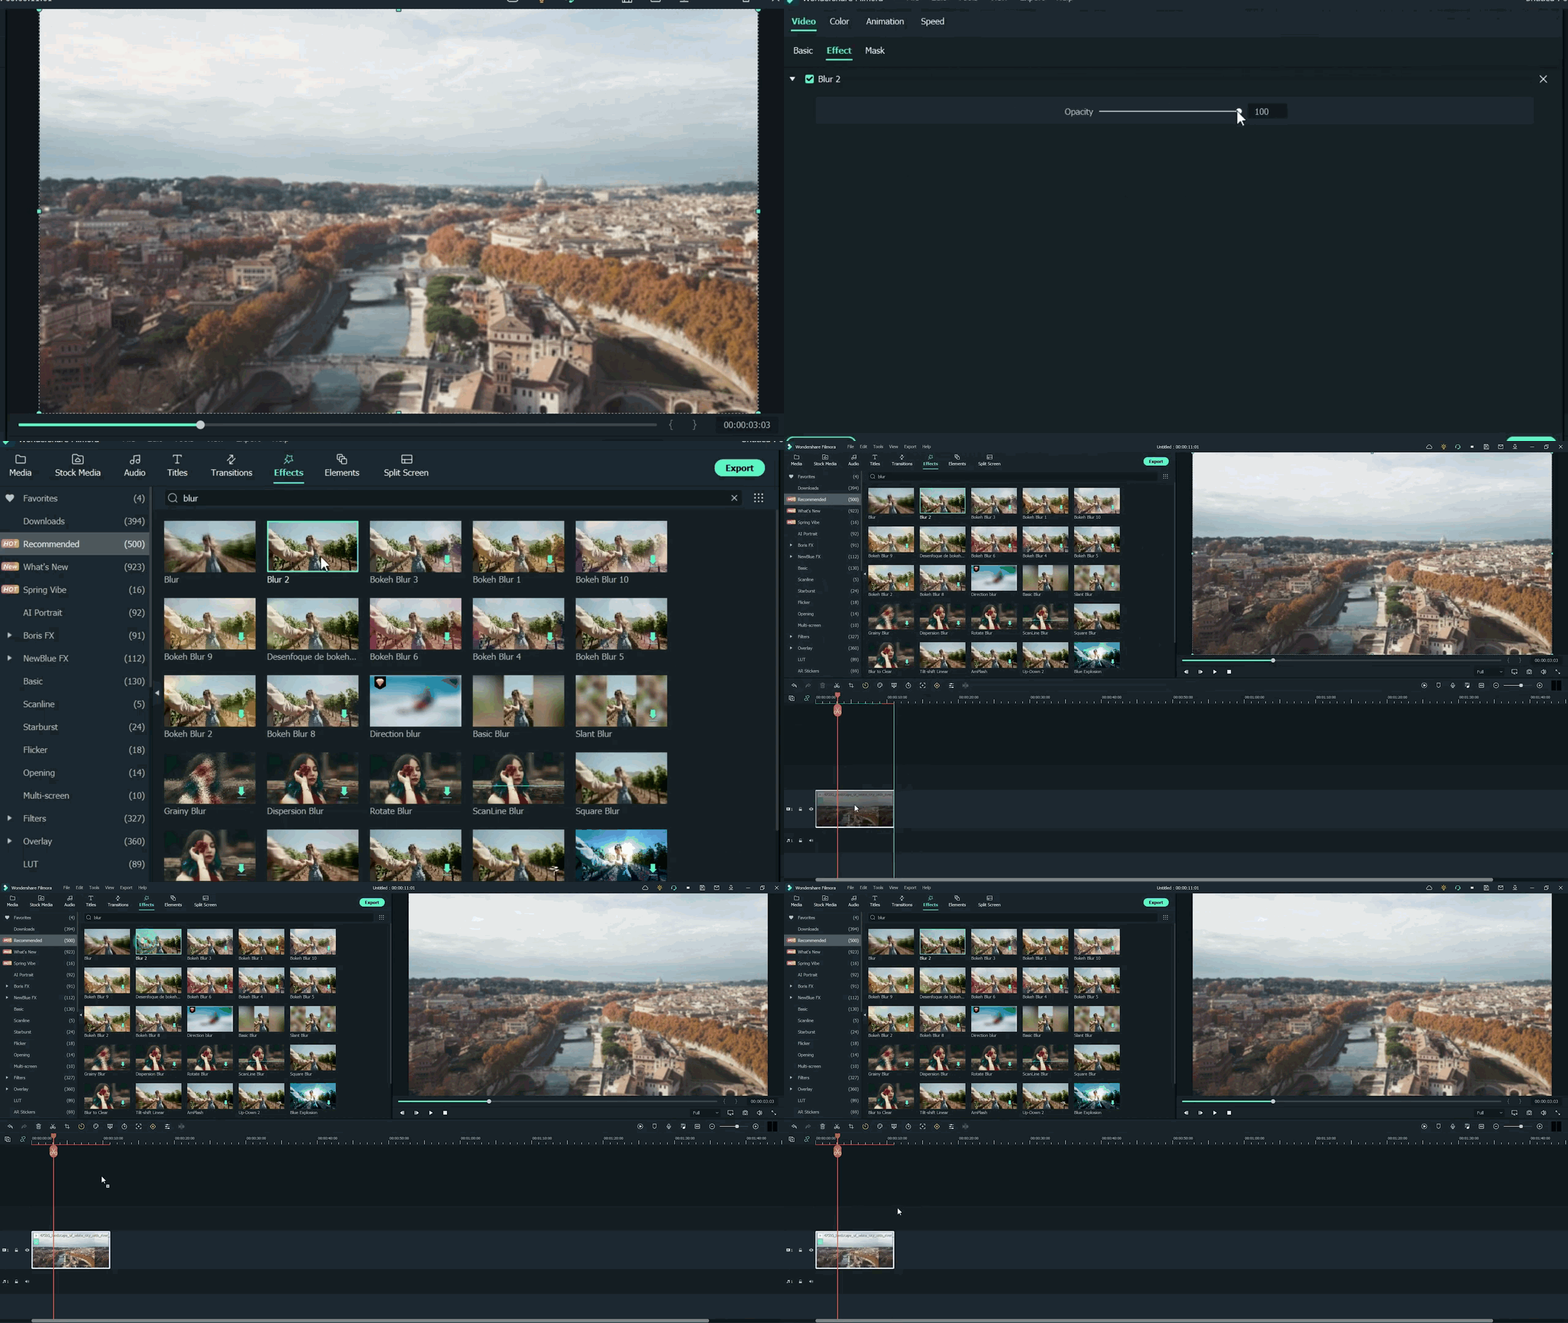
As we are working on miniature effects, what do we need first? First, we ensure that we have a Blur effect on the video.
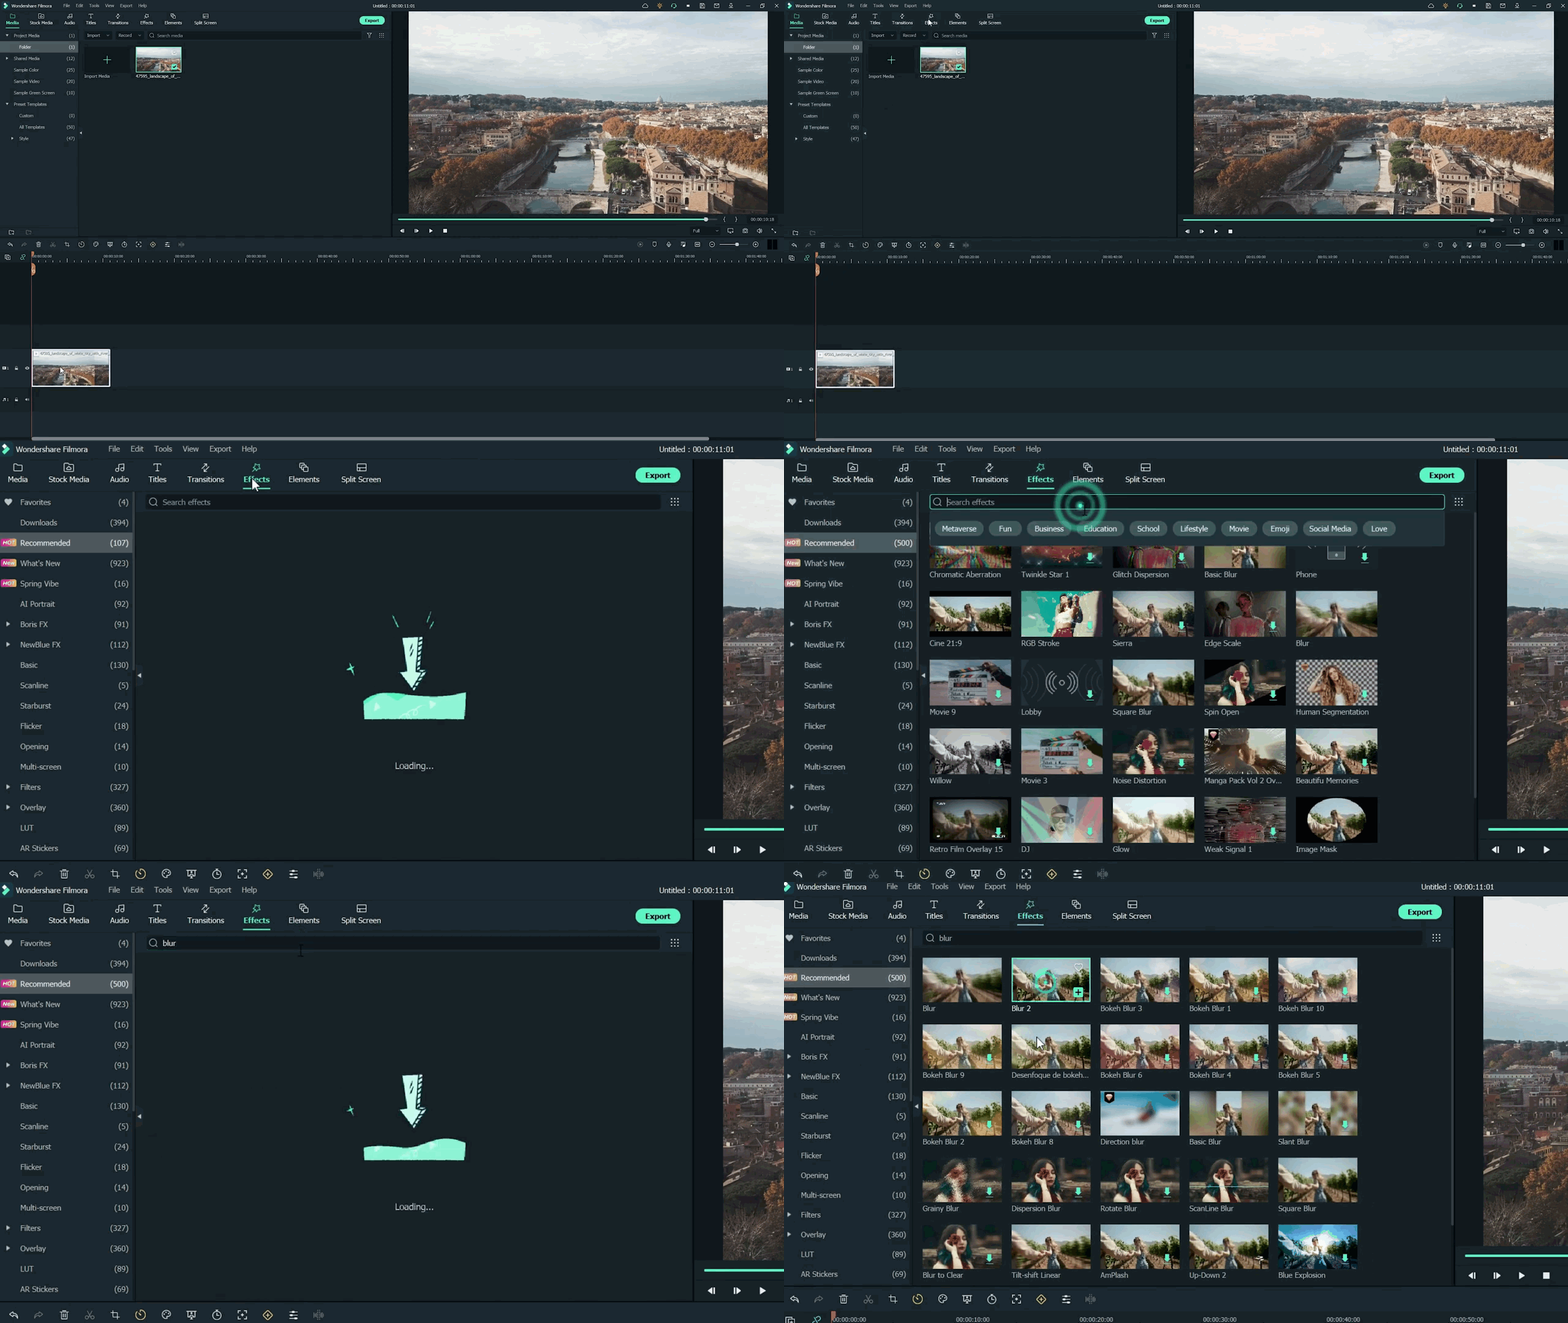
To add a blur effect from the panel, follow the below-mentioned steps:
- First of all, move toward the above tabs.
- Then click on the 5th section, which is Effect
- After selecting the effect tab, a new window will pop up.
- In this section, we have 500+ different effects.
- Then, click on the search bar.
- Search for the Blur effect.
- After that, click on the Blur 2
- Then Download this effect if you haven’t done this already.
Step4 Add the blur effect to the video
After selecting and downloading the blur effect, it’s time to add it to the video. Again, see how precise it turned out. To add effect, follow below steps:
- First, drag and Drop the effect toward the timeline.
- Then, make sure to release the effect on the video to give it a lens blur appearance.
Step5 Add the effect multiple times
Want to get an ideal blur level? If you need more blur level in your video and make it more cinematic, then follow the below steps:
- First, ensure that the opacity of the blur effect is 100%.
- Then, if you still want more blurriness, add Blur 2 effect multiple times on the video.
- Finally, add effect by just the Drag and Drop
Step6 Drop the same video clip
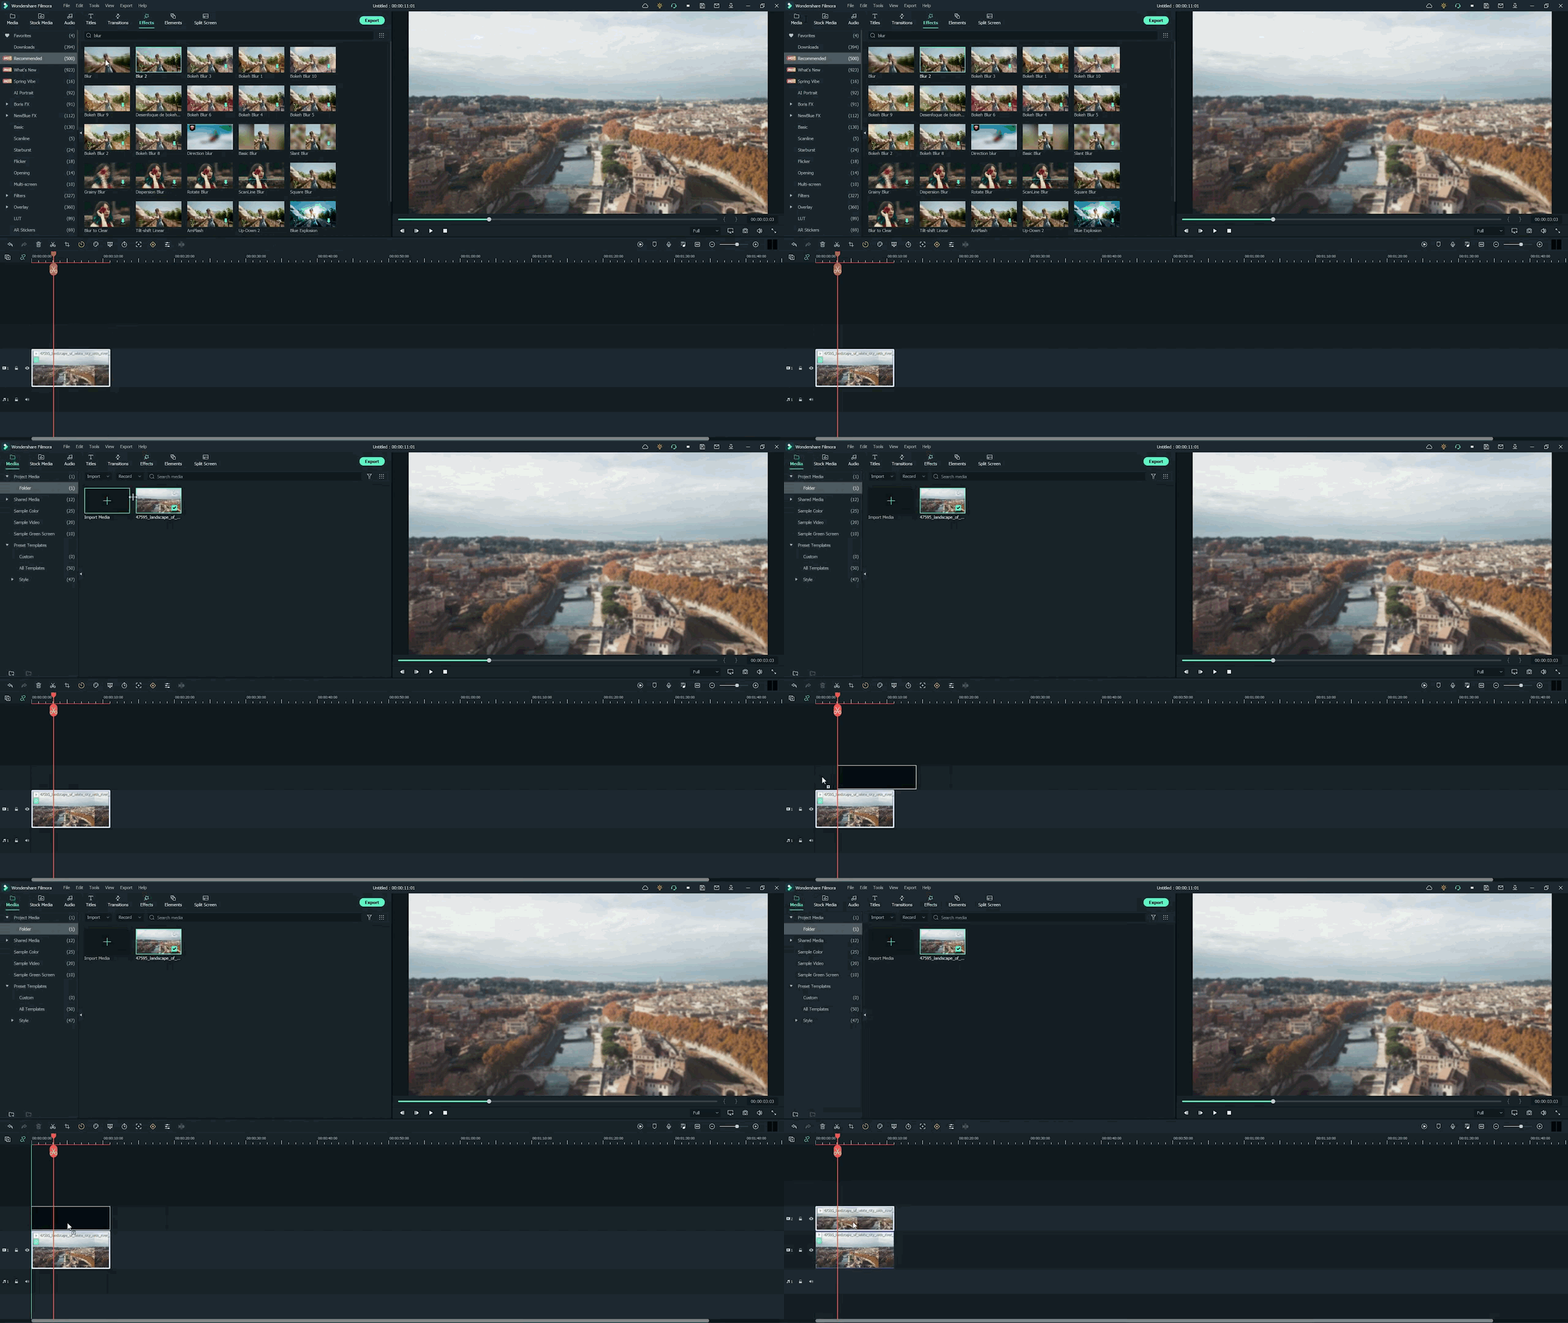
- Add the same video clip 2nd time on the timeline.
- Add it by just the Drag and Drop
- Make sure you add it to 2nd video track in the timeline above the first one.
Step7 Add masks on the Video
Now, it’s time to select a specific video portion and add a mask. Due to this, we will have a selective blur portion. For this, follow the below guidelines:
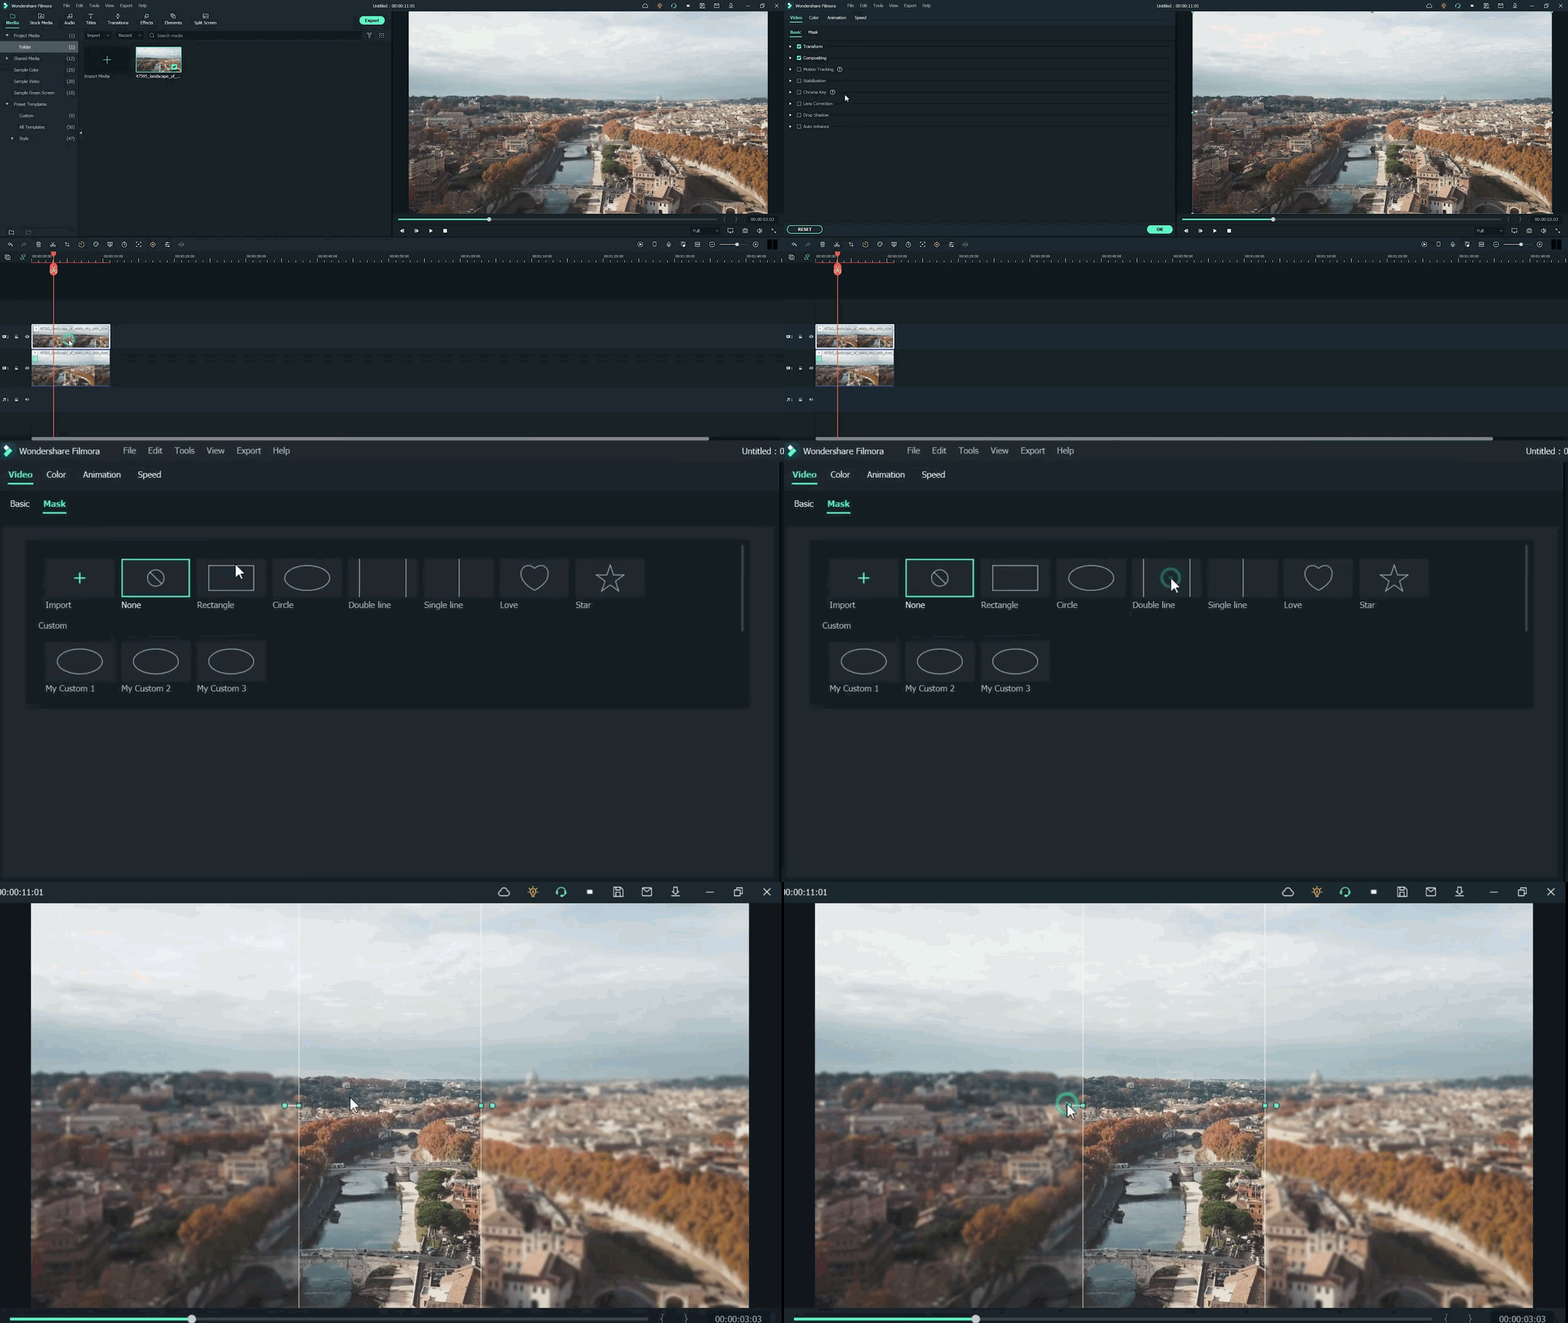
- Double-click on the video present in 2nd track.
- The settings tab will be open in the top left section.
- Then find the Mask section and click on it.
- After this, click on the Double-line.
- Set the mask on video according to your style and choice.
![]()
Note: you can adjust the mask size and position by rotating and changing its shape.
Watch the rotating and adjusting actions as shown below!
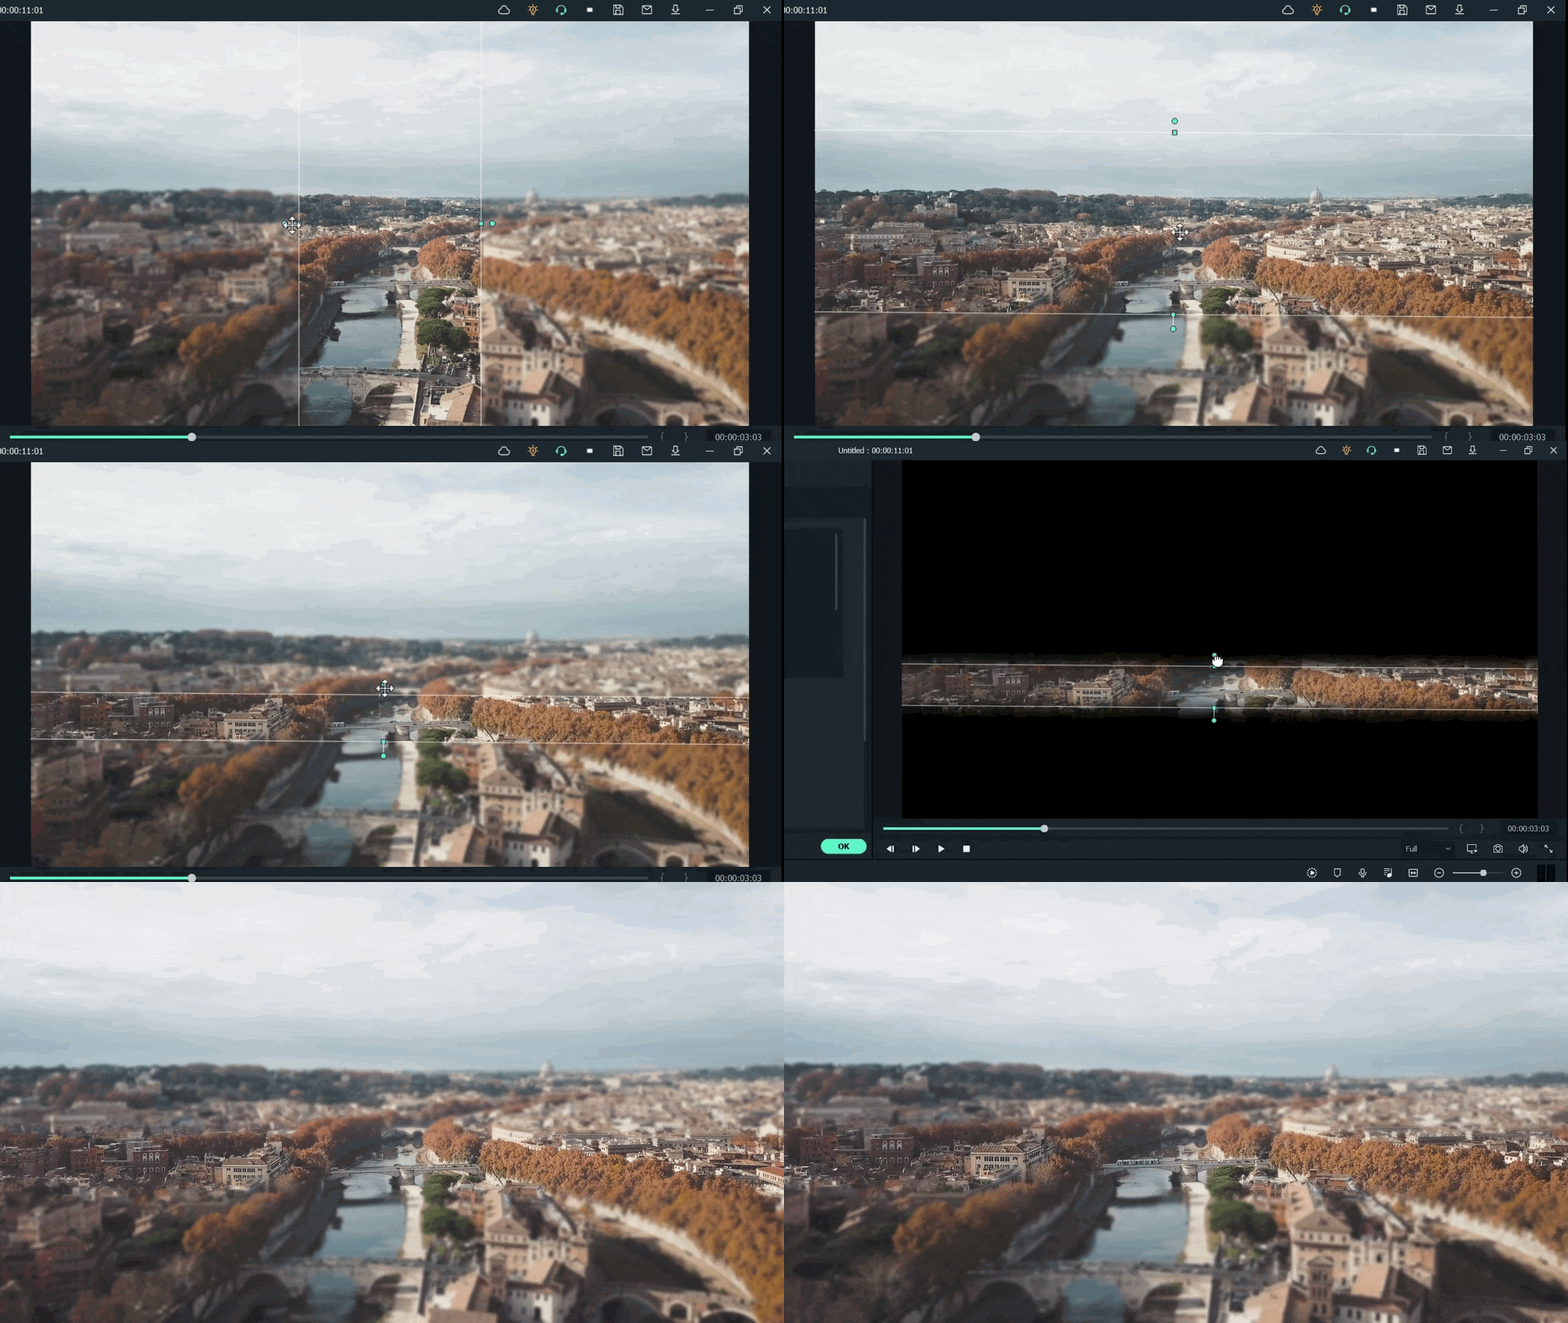
For example, when we add a mask in the below time-lapse video, follow the above mask adjustments. Unfortunately, we can’t get good results. Therefore, we will apply another way to add a mask by changing shape and position. Follow the instructions for modifications:
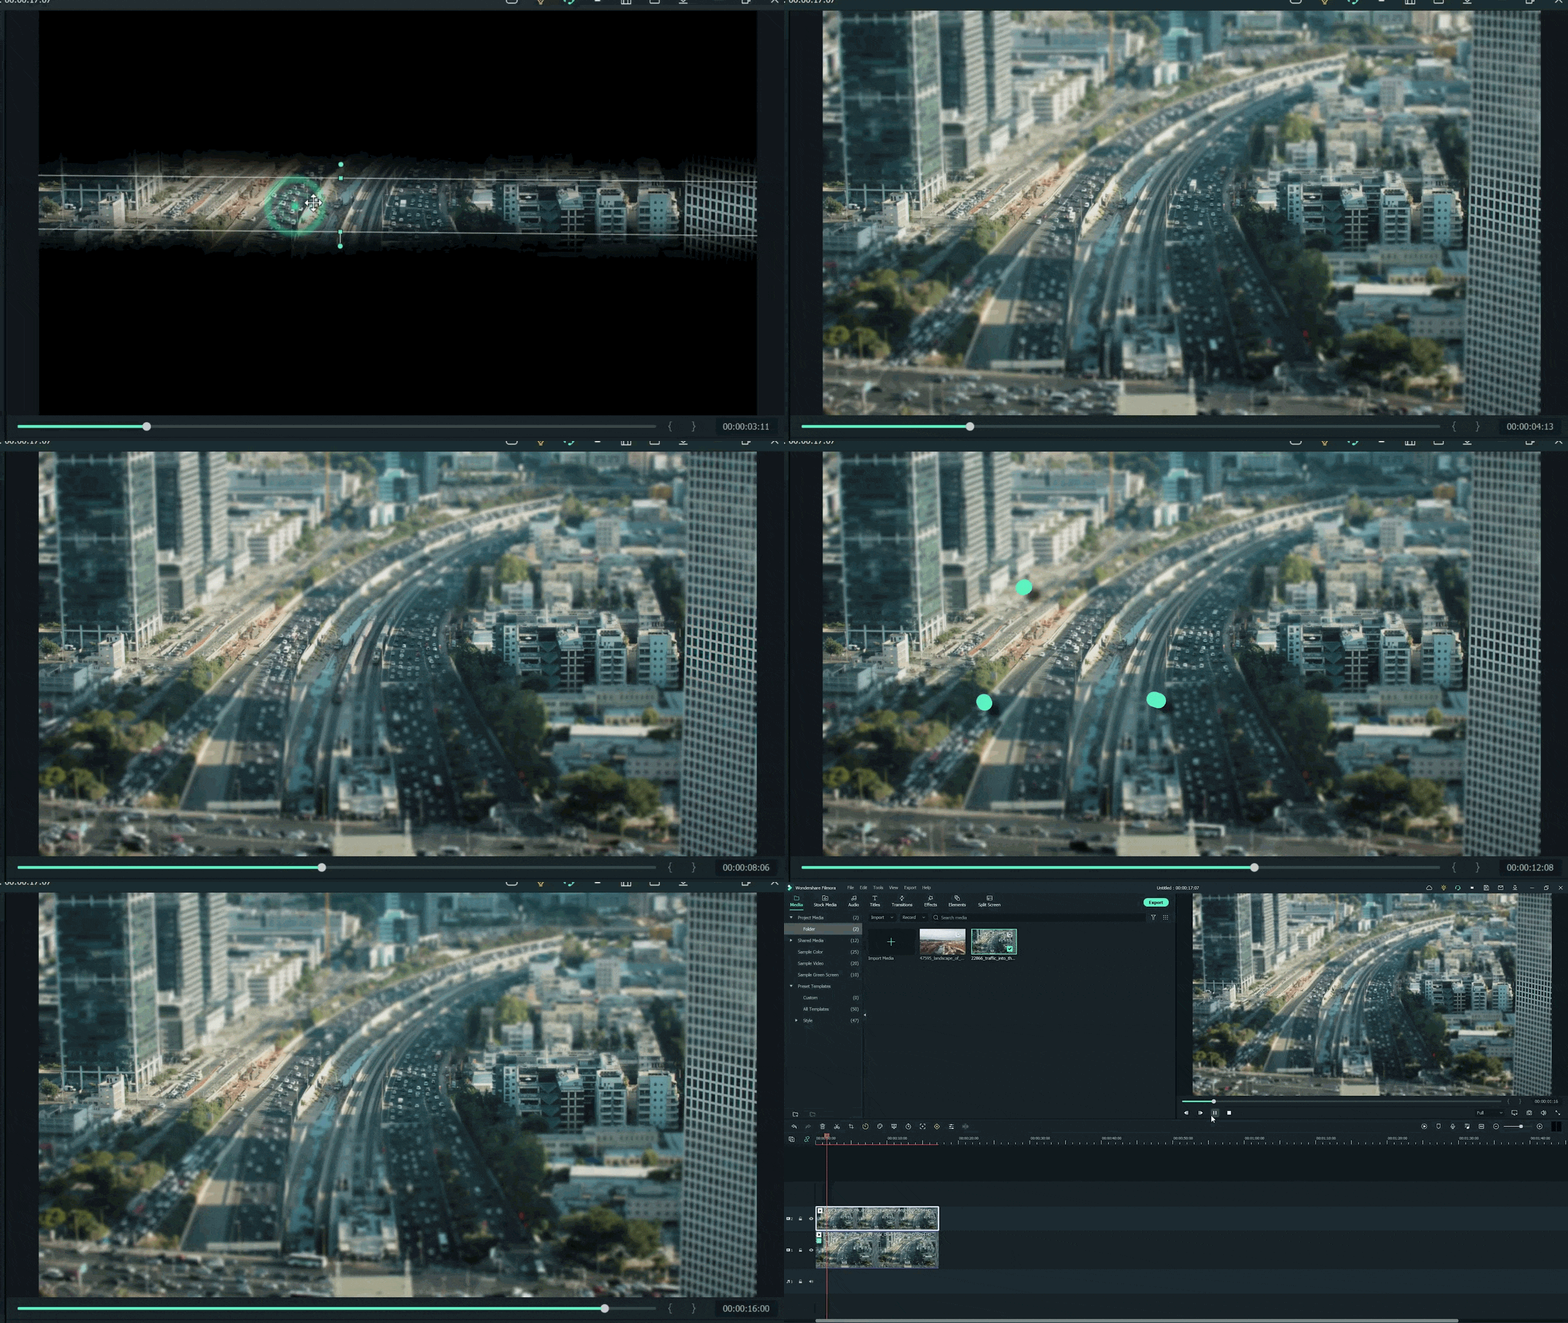
- Make a building or any object Blurry near the camera because it is not present within the depth of field.
- While the object is far from the camera, it is focused because it is in the depth of the field.
- Then adjust the mask, as per your choice.
Want to change the shape of the mask? Then follow the below steps:
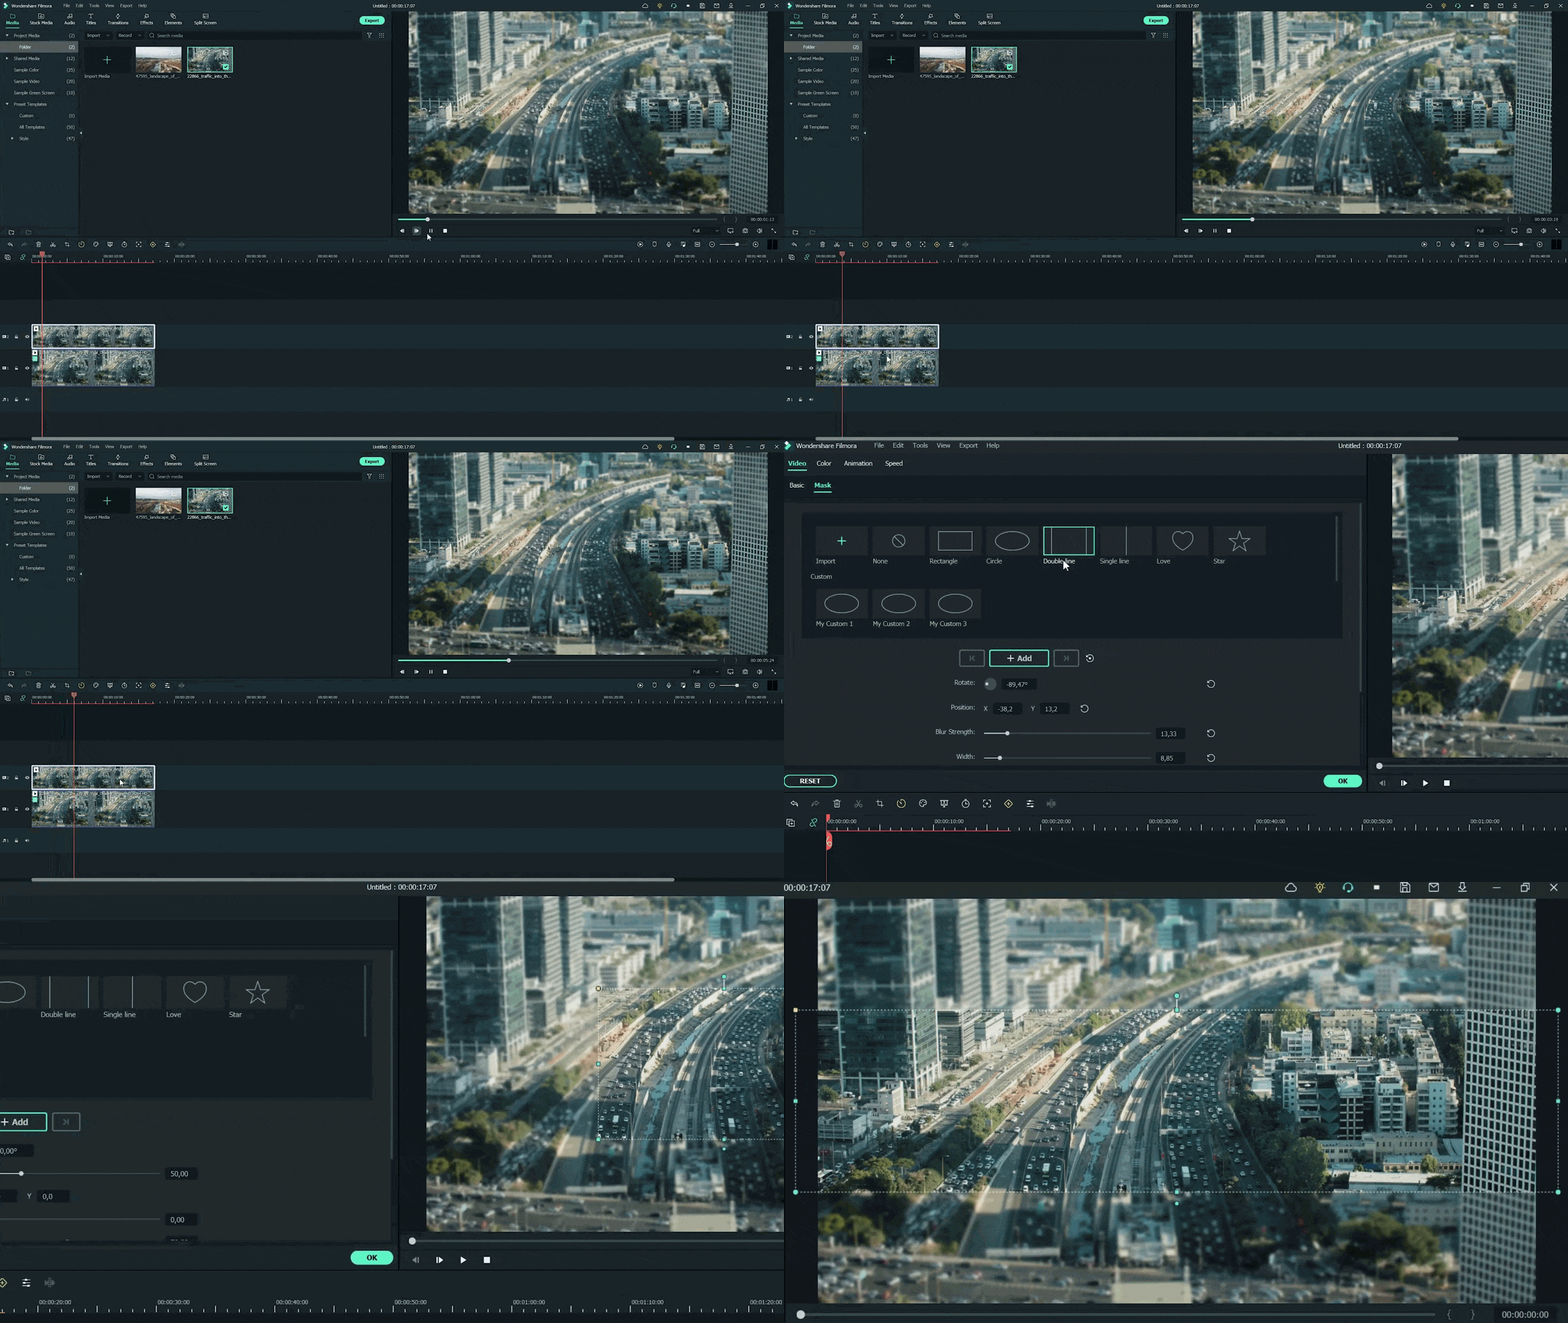
- Double-click on the video present in 2nd video track.
- Settings will activate on the top left side.
- Then click on the Mask tab to open it.
- Select the Rectangular mask from the list and apply it.
![]()
Note: make sure you are masking the same extent and excluding the object you want to be out of focus.
Now, it’s time to mask the whole object, which is far, but we want to make it in focus! For this, follow these steps:
- Add the same stock video clip a third time on the third video track of the timeline.
- Then add a mask in a Rectangle shape on the building.
- Don’t blur the edge of this mask.
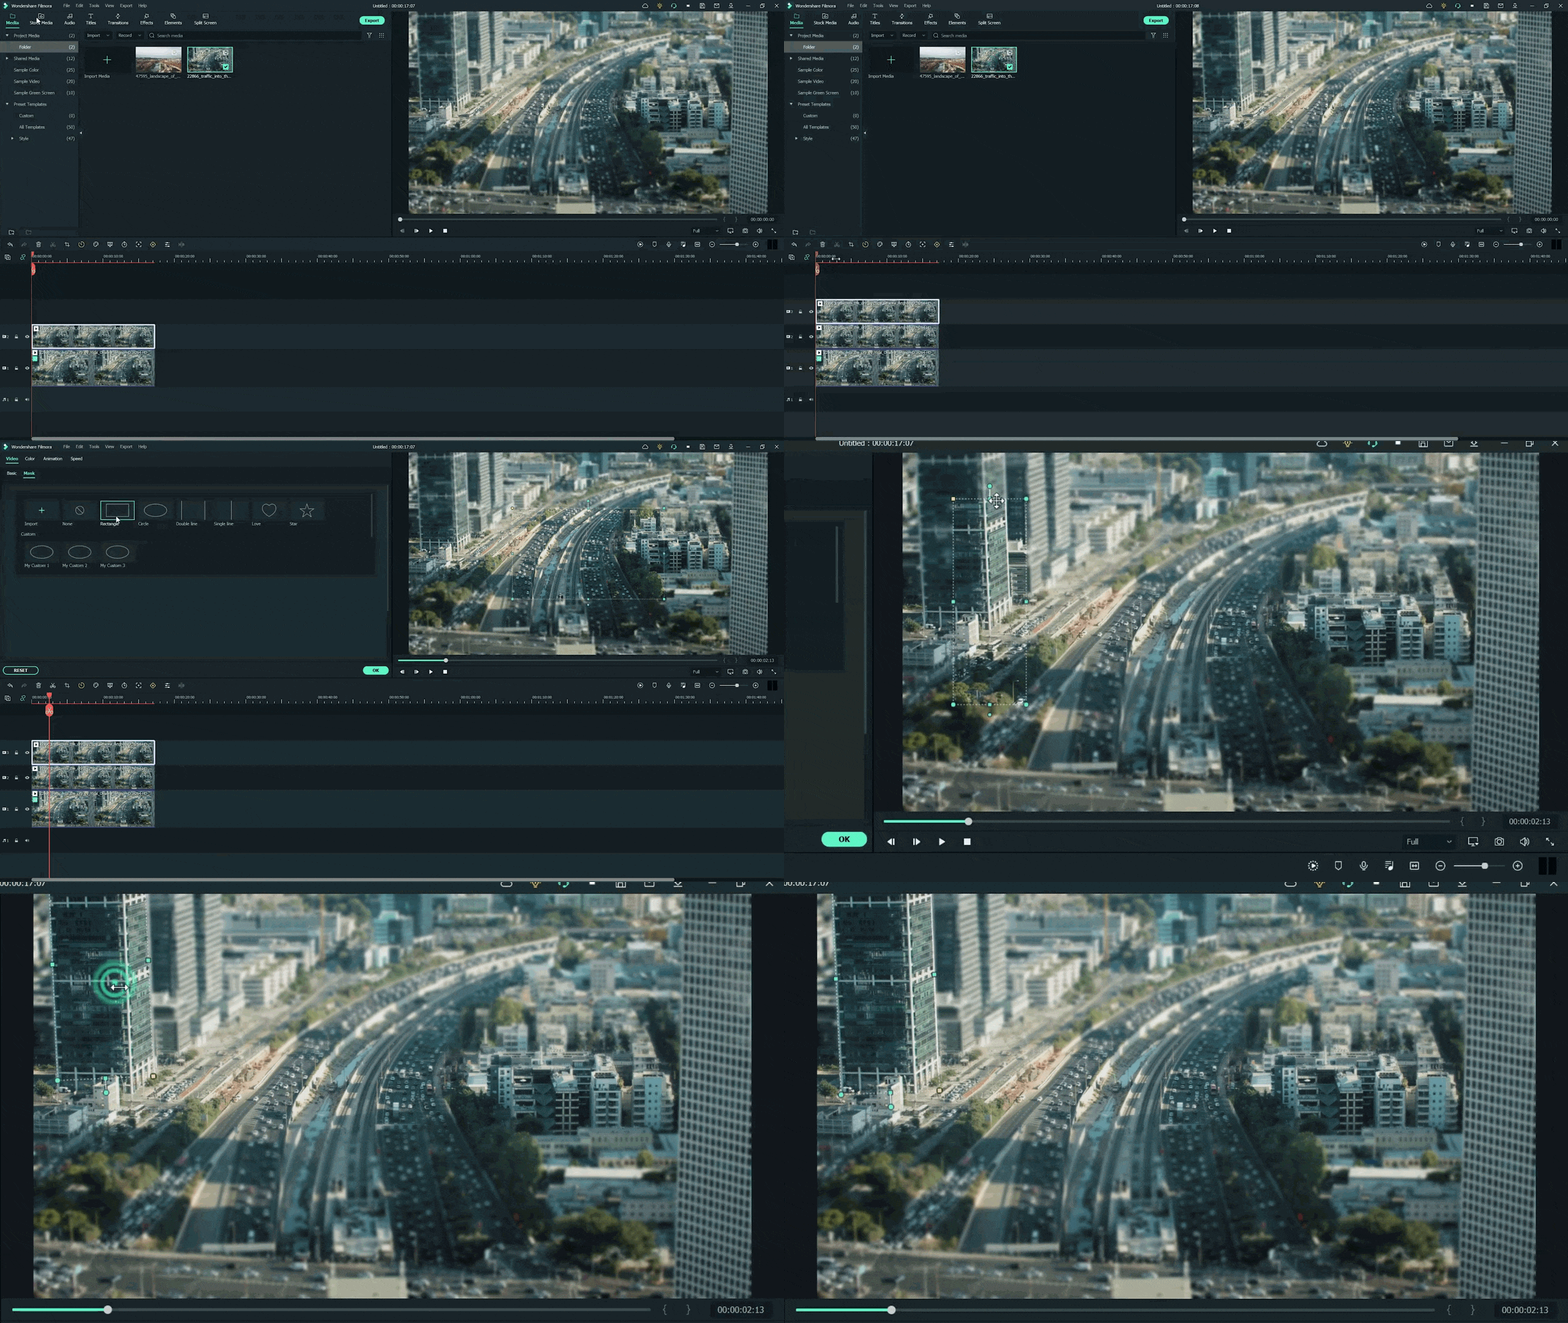
Step8 Final Look
You are excited now to see the final look of your miniature effect! Finally, it’s in front of you! Just modify it more if you want to make it more precise.
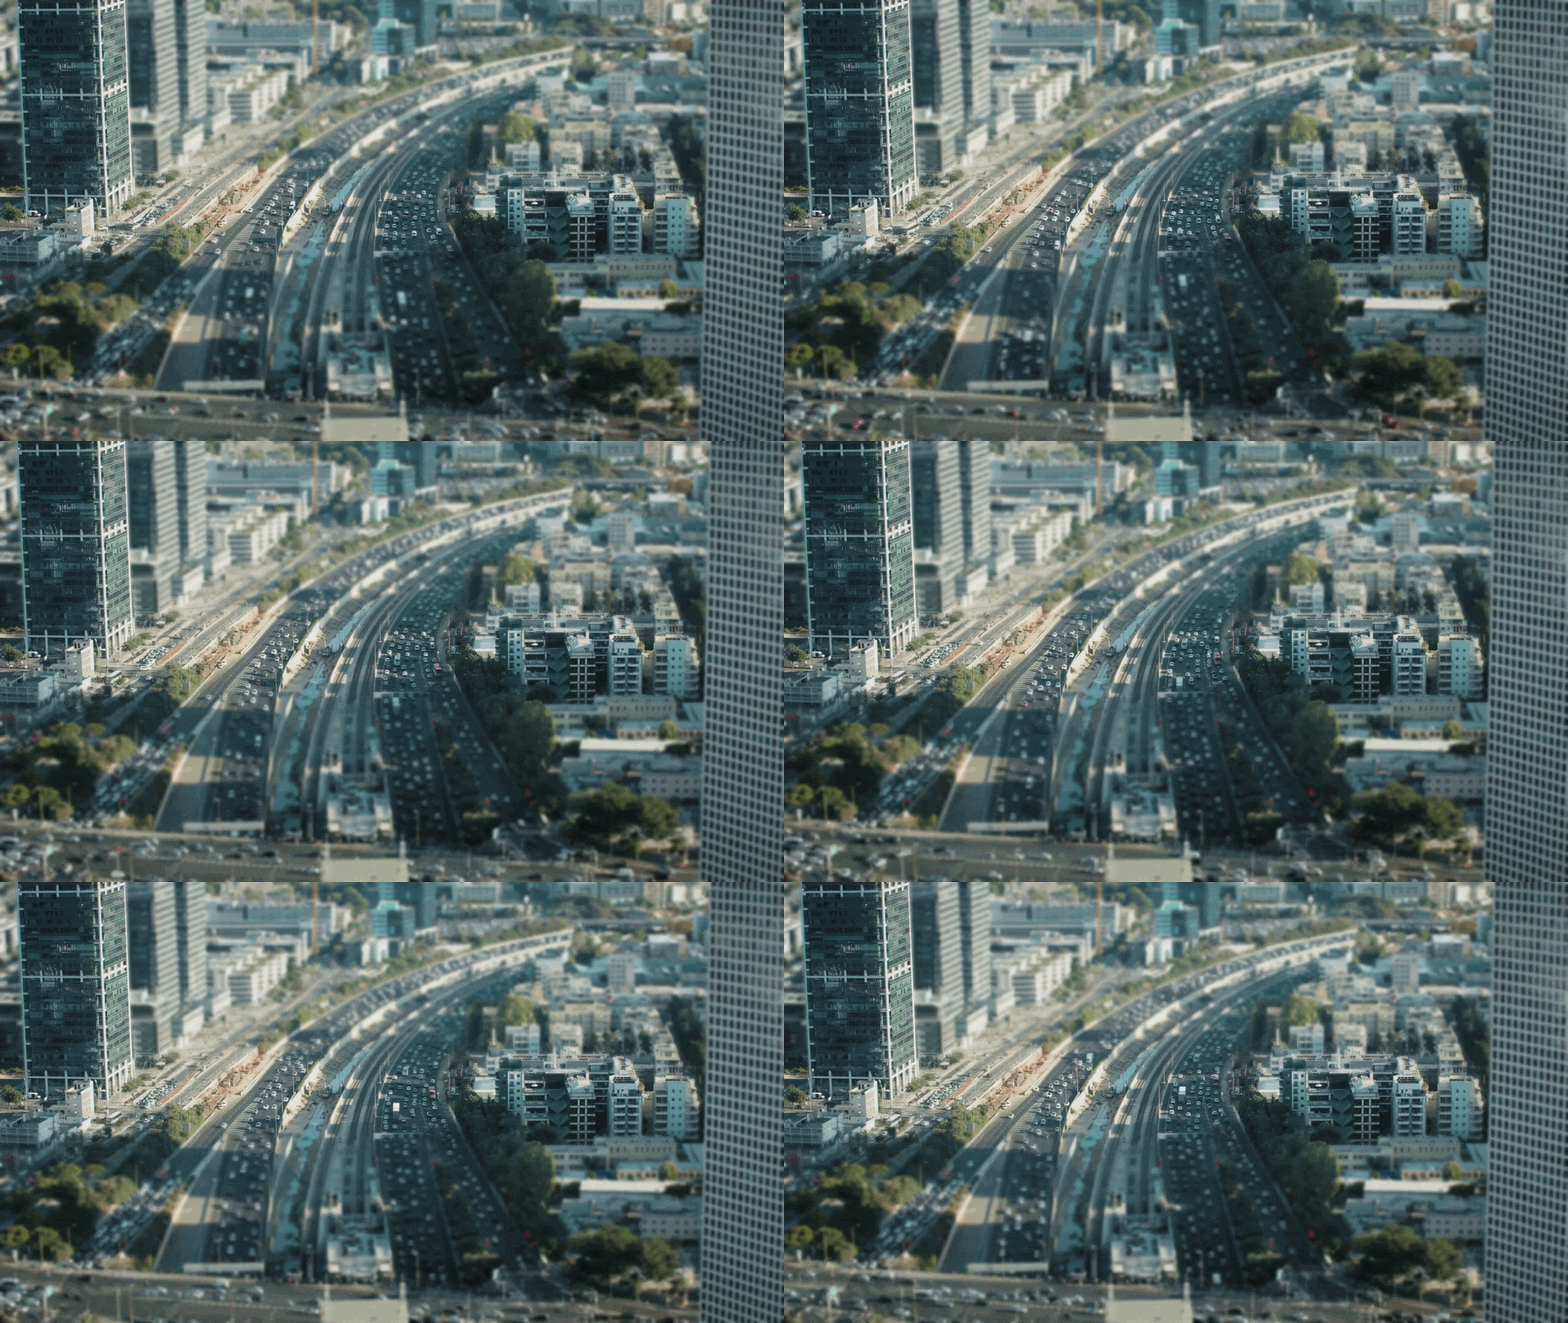
Have you tried to add a miniature effect before? If yes, then share your experience with us! Try with more mask shapes and add more blur effects. Make sure that you are using Wondershare Filmora to make more filmy shots. Feel free to try out different effects and enjoy the following results!
Free Download For Win 7 or later(64-bit)
Free Download For macOS 10.14 or later
Step2 Choose any stock footage
If you don’t have good-quality footage, but want to boost your video, here is how. You can get the miniature effect without a big format view camera or specialized lens.
- Open Filmora and select any stock footage in Wondershare Filmora.

Move to the stock media folder on the above bar in the Wondershare Filmora. Or you can look towards the left window, where you will see the sample videos tab.
- Click on the sample videos tab, and a new window will appear on the library screen.
Here you will see almost more than 20 videos. So, instead of using the actual recorded footage, we’ll make do with what we have by default. After selecting and adding the stock footage of your choice. Then you have to follow the below process:
- First, hold the Stock Footage as shown in the folder section.
- Then Drag and Drop it to the timeline section for further editing.

Who will get Stock Media?
Want to get stock media? You can only have access to the stock media library if you already buy the license of Wondershare Filmora.
- The latest version has an unlimited stock library.
- After purchasing any plan, you can access Stock Media (Unsplash, Giphy, Pixabay, Pixel).
Step3 Head to the effect panel
As we are working on miniature effects, what do we need first? First, we ensure that we have a Blur effect on the video.

To add a blur effect from the panel, follow the below-mentioned steps:
- First of all, move toward the above tabs.
- Then click on the 5th section, which is Effect
- After selecting the effect tab, a new window will pop up.
- In this section, we have 500+ different effects.
- Then, click on the search bar.
- Search for the Blur effect.
- After that, click on the Blur 2
- Then Download this effect if you haven’t done this already.
Step4 Add the blur effect to the video
After selecting and downloading the blur effect, it’s time to add it to the video. Again, see how precise it turned out. To add effect, follow below steps:
- First, drag and Drop the effect toward the timeline.
- Then, make sure to release the effect on the video to give it a lens blur appearance.

Step5 Add the effect multiple times
Want to get an ideal blur level? If you need more blur level in your video and make it more cinematic, then follow the below steps:
- First, ensure that the opacity of the blur effect is 100%.
- Then, if you still want more blurriness, add Blur 2 effect multiple times on the video.
- Finally, add effect by just the Drag and Drop

Step6 Drop the same video clip
- Add the same video clip 2nd time on the timeline.
- Add it by just the Drag and Drop
- Make sure you add it to 2nd video track in the timeline above the first one.

Step7 Add masks on the Video
Now, it’s time to select a specific video portion and add a mask. Due to this, we will have a selective blur portion. For this, follow the below guidelines:
- Double-click on the video present in 2nd track.
- The settings tab will be open in the top left section.
- Then find the Mask section and click on it.
- After this, click on the Double-line.
- Set the mask on video according to your style and choice.

![]()
Note: you can adjust the mask size and position by rotating and changing its shape.
Watch the rotating and adjusting actions as shown below!

For example, when we add a mask in the below time-lapse video, follow the above mask adjustments. Unfortunately, we can’t get good results. Therefore, we will apply another way to add a mask by changing shape and position. Follow the instructions for modifications:

- Make a building or any object Blurry near the camera because it is not present within the depth of field.
- While the object is far from the camera, it is focused because it is in the depth of the field.
- Then adjust the mask, as per your choice.
Want to change the shape of the mask? Then follow the below steps:

- Double-click on the video present in 2nd video track.
- Settings will activate on the top left side.
- Then click on the Mask tab to open it.
- Select the Rectangular mask from the list and apply it.
![]()
Note: make sure you are masking the same extent and excluding the object you want to be out of focus.
Now, it’s time to mask the whole object, which is far, but we want to make it in focus! For this, follow these steps:
- Add the same stock video clip a third time on the third video track of the timeline.
- Then add a mask in a Rectangle shape on the building.
- Don’t blur the edge of this mask.

Step8 Final Look
You are excited now to see the final look of your miniature effect! Finally, it’s in front of you! Just modify it more if you want to make it more precise.

Have you tried to add a miniature effect before? If yes, then share your experience with us! Try with more mask shapes and add more blur effects. Make sure that you are using Wondershare Filmora to make more filmy shots. Feel free to try out different effects and enjoy the following results!
Free Download For Win 7 or later(64-bit)
Free Download For macOS 10.14 or later
Make A Tattoo Disappear Like A Magic
Do you have any tattoos that you don’t like anymore? Have you ever wished you had the superpower to make unwanted tattoos vanish? Then, keep reading this article since this article will provide you with how to use masking and colour correction to make a tattoo disappear in Filmora .
Part 1: What You’ll Need to Getting ready
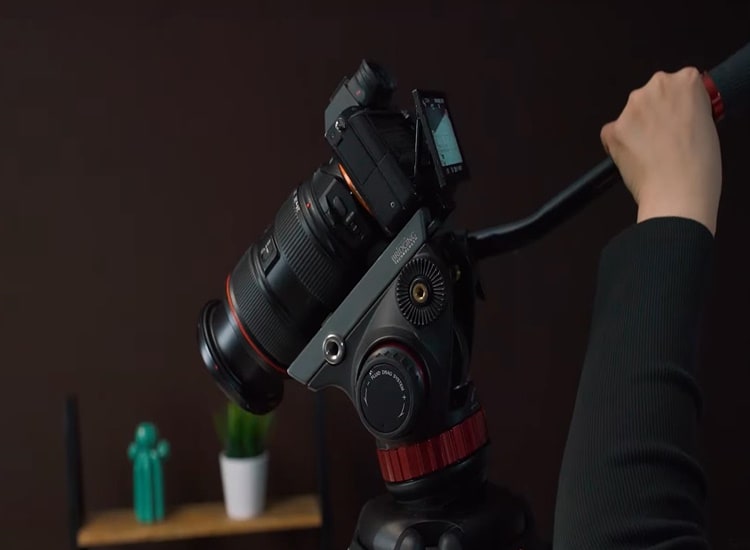
Step1 The first thing you need is a video clip of your arm. Next, place the camera on a tripod, and tilt down to show the table from the top.
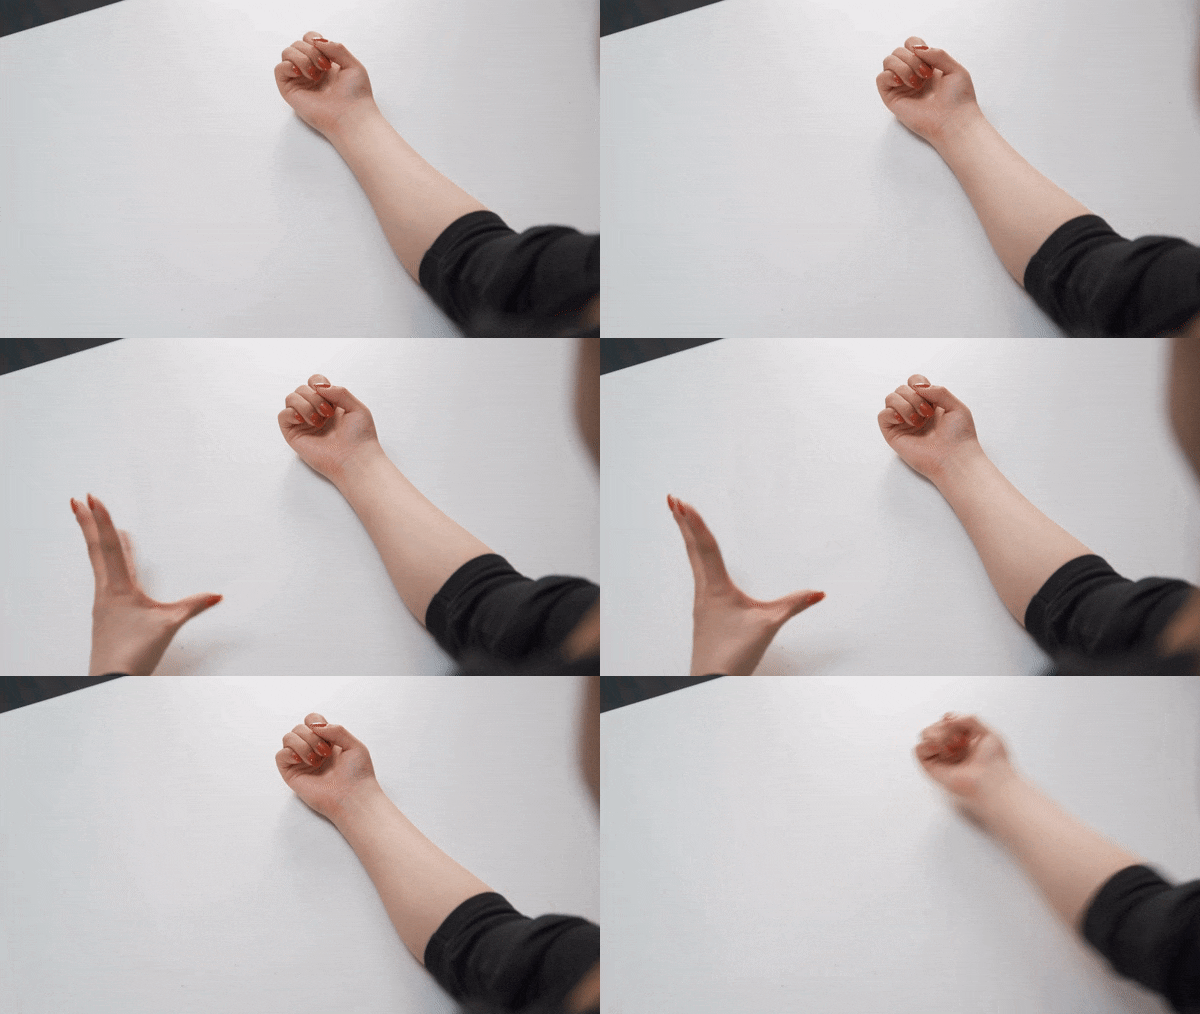
Step2 After that, put the arm on the tableand keep it still while filming. Meanwhile, have another hand perform on the other side of the frame and pretend to use magic to remove the tattoo.
Step3 Next, you need a picture of a tattoo. Indeed, it would be better to have the tattoo in the same position on the arm so it can match the video clip we just filmed.
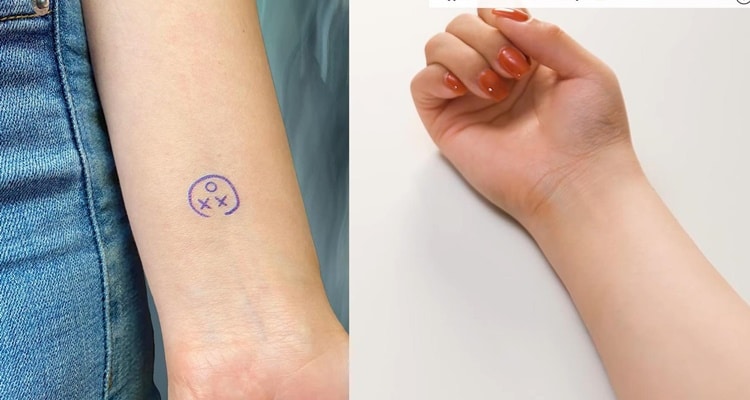
After preparing everything, you need to go to Filmora 11 and start editing. If you haven’t downloaded Filmora already, you can visit filmora.wondershare.com.
Part 2: Editing Tutorial
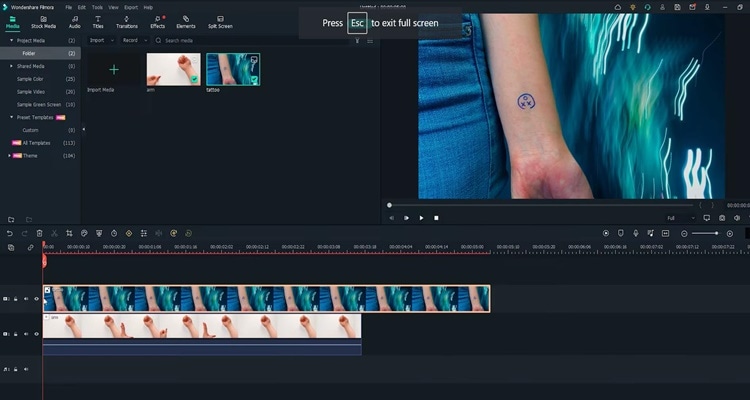
Step1 First, drag and drop the arm video clip onto the first video track and the tattoo picture on the second video track.
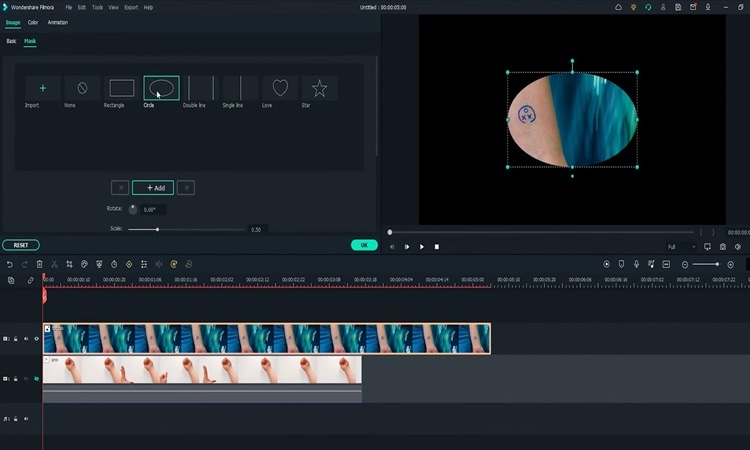
Step2 Add a mask around the tattoo part from the picture. You must hide the first video track to see the mask clearly.Then, double-click on the picture on the timeline and go to the setting window on the top left. Find the Mask Section and select the circle shape. Now you can see the mask is applied.
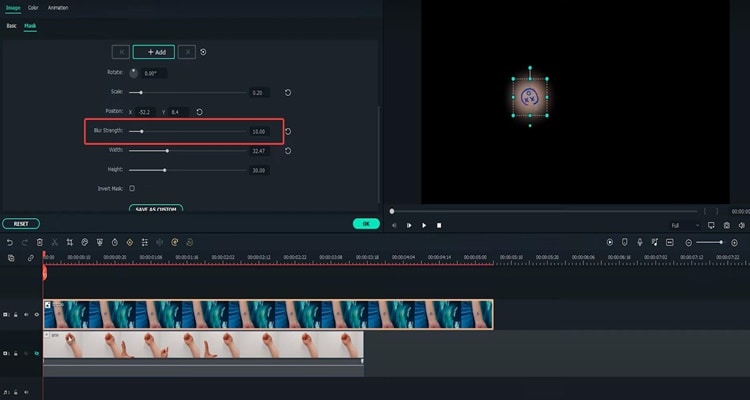
Step3 Adjust the position and size of the mask to reveal only the tattoo part. Then you must change the “Blur Strength” to add more blur to the edge of the mask.
Step4 With the mask finalized,unhide the first video track with the arm video clip. Next, adjust the position and size of the tattoo and make it fit the arm clip.
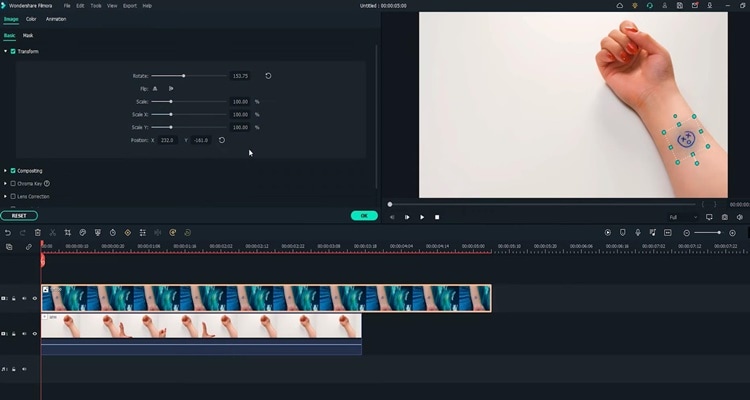
Step5 Go to do colour correction on the tattoo image so that it matches better with the arm skin. Double-click on the tattoo on the timeline and go to the setting window on the top left. Find the “Color” Section and open the “Tone” menu. First, you have to adjust the brightness first.
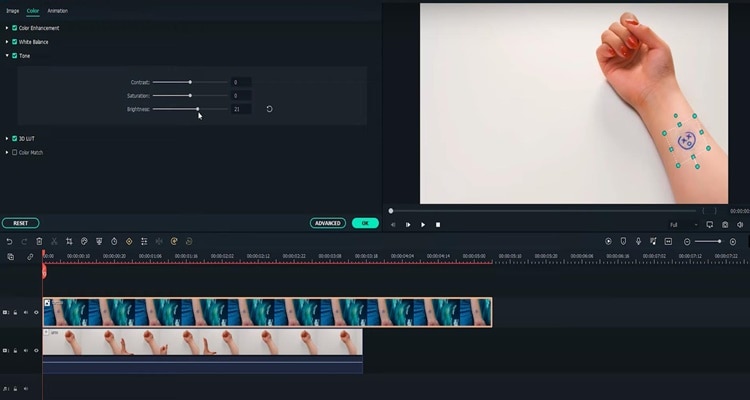
Step6 Afterwards, open the “White Balance”menu and adjust the temperature. Indeed, you can also adjust the contrast and saturation if needed. Once done, click “OK.” The tattoo should look like it blends into the arm video.
Part 3: Make the tattoo disappear
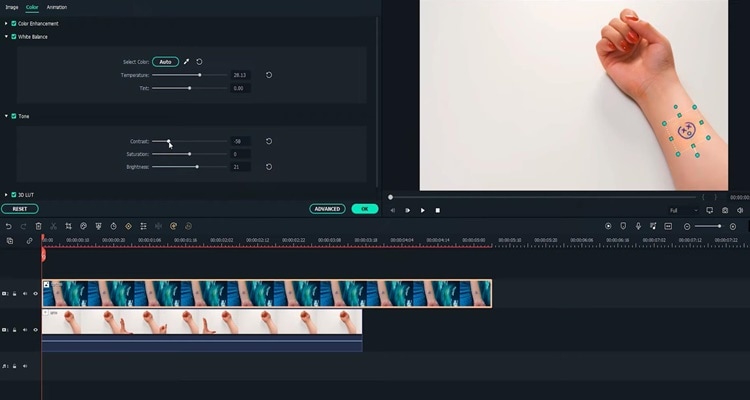
Step1 Move the play head to where you want the tattoo fades, and adjust the length of the tattoo picture there.
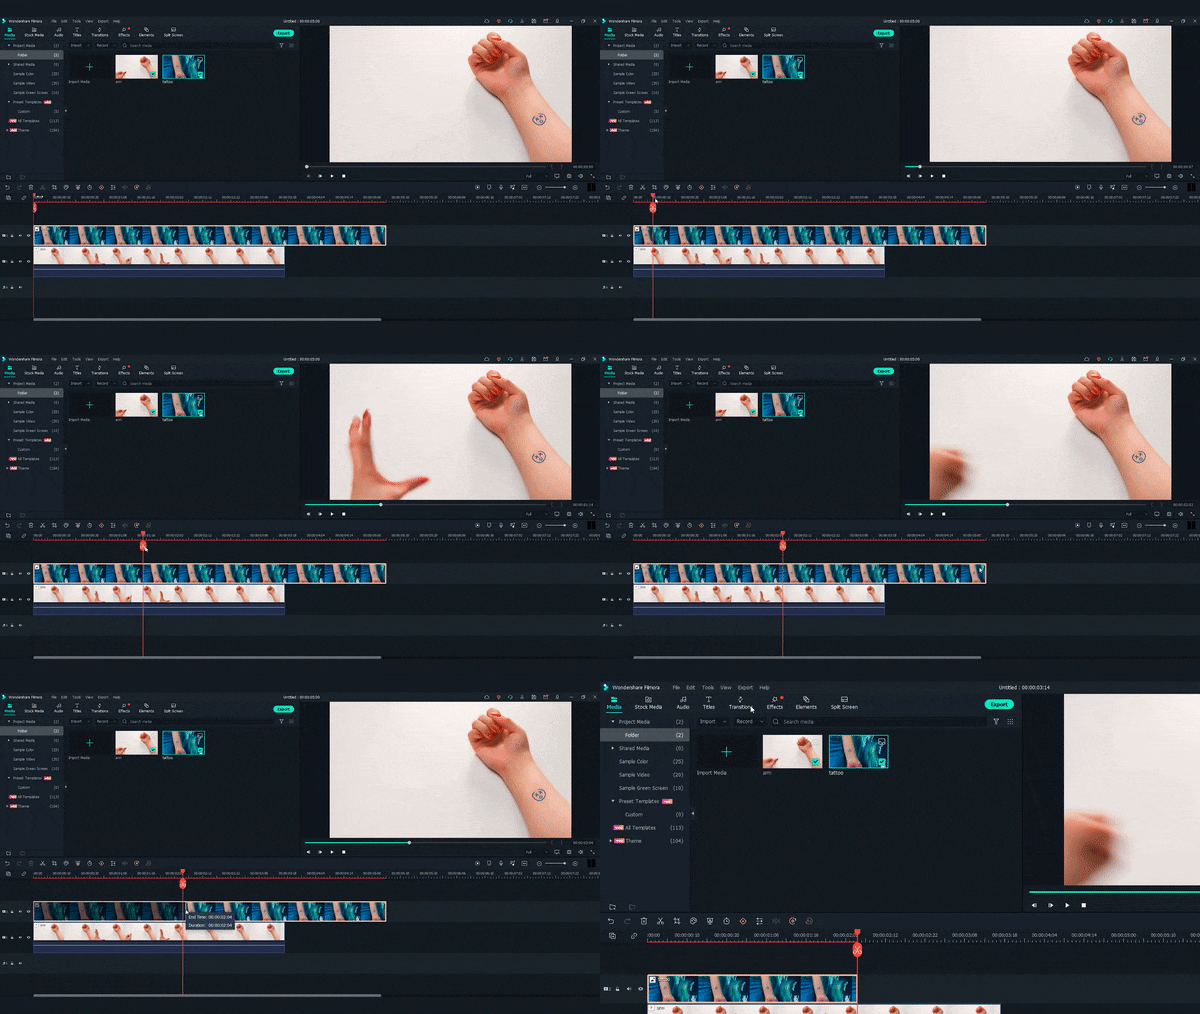
Step2 Next, find the “Evaporate 1” from the “Transitions” window. Drag and drop it to the end of the tattoo clip.
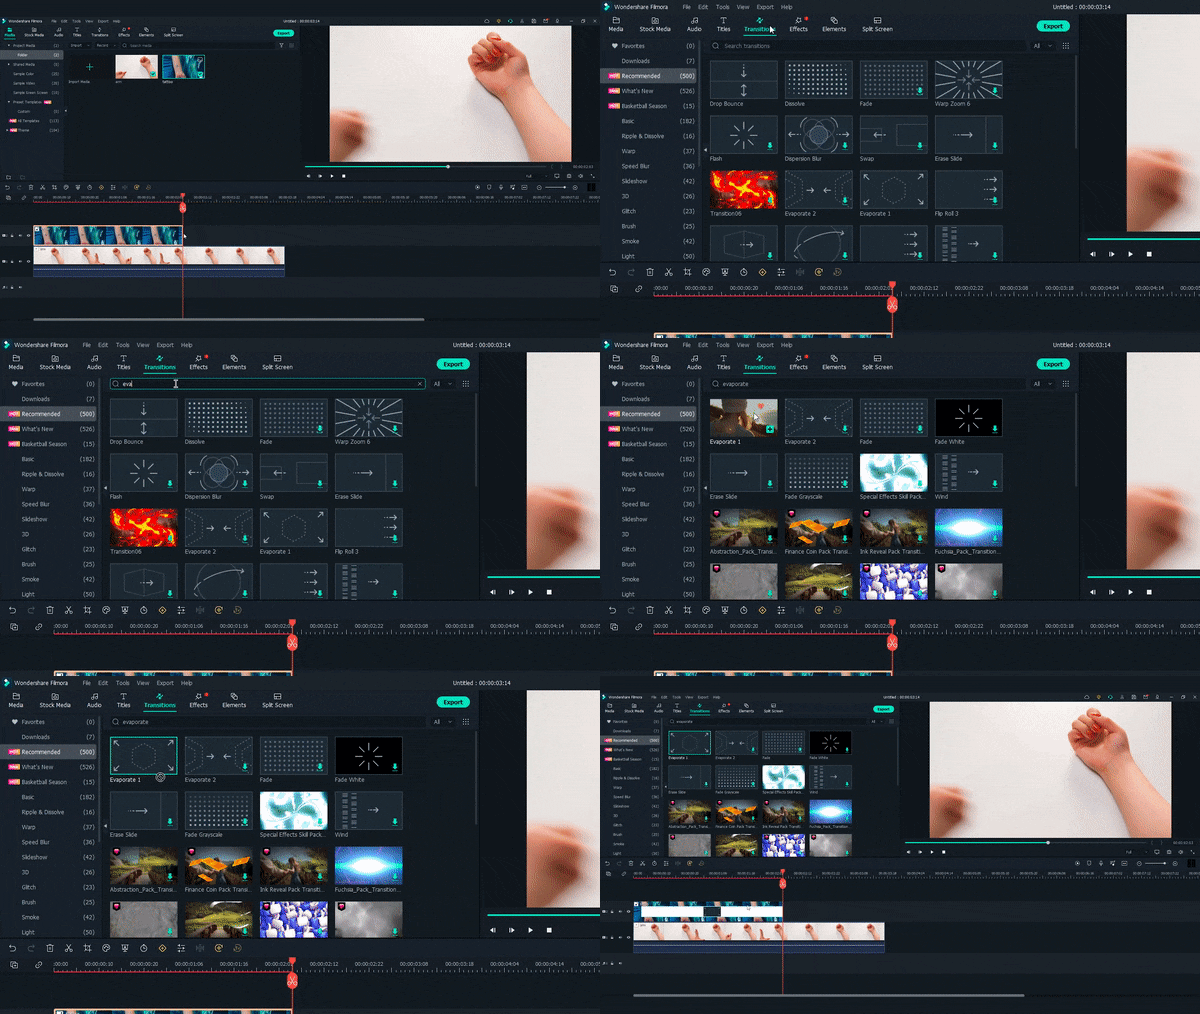
Step3 Adjust the length if needed. Finally, Let’s playback and see how it looks!
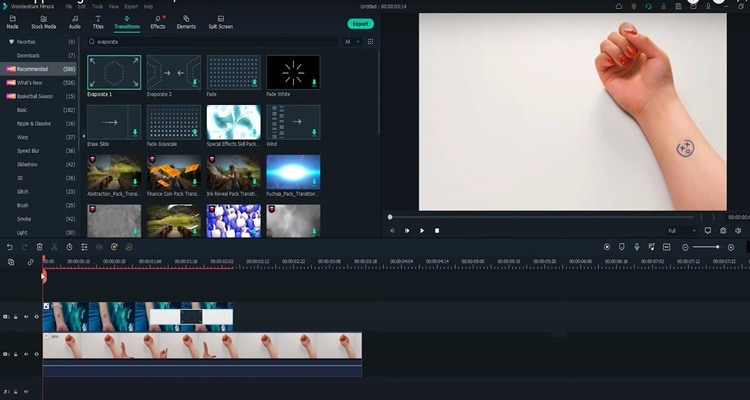
Summary
That’s how to make a tattoo disappear in Filmora 11. With Filmora 11, you can get as many new tattoos as possible. Indeed, you can follow all the steps above carefully to get the perfect result.
Free Download For Win 7 or later(64-bit)
Free Download For macOS 10.14 or later
Free Download For macOS 10.14 or later
An Ultimate Guide to Edit a Music Video: Aspect Ratio and First Cut
Are you planning to edit your music video? Do you need on out how to edit your first music video draft? Editing a music video is a creative task but can be challenging.
One of the key elements of this process is selecting the aspect ratio and making the first cut. In this blog, we will explore these steps in detail, providing important tips and tricks. Whether you’re a beginner or an experienced editor, get ready to take your music video to the next level. Let’s get started.
Which software will you need?
As we have a lot of software in the market, we must select the right software for high-quality editing. Wondershare Filmora is an amazing video editing software. It offers a ton of video editing tools. You can add special effects, transitions, and more to make your music video captivating.
Free Download For Win 7 or later(64-bit)
Free Download For macOS 10.14 or later
![]()
Note: Before you start editing your project, make sure that you have a backup. You can copy the project to an external USB or hard drive for a backup.
Adjust the aspect ratio
The aspect ratio is known as the size of the video frame. For example, the most common aspect ratios are 16:9 and 4:3. The first number represents the width, and the second represents the height.
You should always ask your cinematographer about the aspect ratio. There are chances when cameras won’t shoot at the intended aspect ratio they were framed for. In that case, you’ll need to crop or letterbox them when editing.

How to find the width/height of the frame?
Most of the frames that are being shot on the camera are 3424 pixels wide, which is a little under 4k. If you have a measurement of one side of the frame, you can find the other by using some math. Let’s suppose your frame is 3424 pixels wide. You can use this formula to find the height.
Formula: 3424 pixels wide x 1 high / 2.35 wide (or whatever your aspect ratio)

Now you can cancel out the width from the multiplier and the denominator.
= 3424 pixels wide x 1 high / 2.35 wide

Now you are left with the equation:
= 3424 pixels high / 2.35
After solving this equation, you will get the answer which is: 1457 pixels high. Let’s adjust it on the music video as well, follow the steps given below:
Free Download For Win 7 or later(64-bit)
Free Download For macOS 10.14 or later
Step1Open the aspect ratio setting tab
Open your music video project in Filmora and click on the screen icon, as shown in the picture.
![]()
Then select the Change Project Aspect Ratio.

Step2Add values
Now set the project Width to 3424 pixels and its Height to 1457 pixels. You can also adjust the frame rate by selecting the one in which you shot the video. Then click OK.

Assembly
The next step is assembly. You will arrange the shots, clips, and elements in this process and get everything in order. It can be daunting and inspiring for you, as it’s a blank canvas you are going to start with. Before editing, you can also get some guidance from your art director.
If your music video has shots of the band performing, drop them off first and sync them with the audio. On the contrary, if you are doing a narrative style, you can arrange the shots according to the story you want to portray.

Step1Drop the media
You can start by dragging and dropping the music onto the audio timeline. Then you can add the shots of your music video.

Step2Arrange the shots
Arrange the shots according to the storyboard you created and sync them with the audio.

Step3Add the title
Once you arrange all shots in order, you can add the title of your music video. Click on the Titles, then choose your desired style and add the name of your music video in the title box. You can also change the text’s size, font, and color.

Step4Flip the clip
One last thing is, if you shot any scene in mirror-image format, you can flip it. Click on the clip you want to flip and select the flip icon in the video properties.

Send your first draft
The first draft is the video in which you added audio and re-ordered the shots. You decided on the pace and flow of the video to create a basic structure. You made changes to make it interesting and captivating.
Before you put too much effort into editing your video, send it to your director, producer, or client for review. It will help ensure that any big changes can be made before you invest too much time in the edit.
For first drafts, you don’t need anything fancy. A lower-resolution and more compressed file can make sending it to a director or client much easier. You can also add a timer on the music video, so the person reviewing it can give you accurate timing on where he wants any revision.
How to add the timer in the music video?
- Click on Effects and search for Timecode in the search bar.
- Choose the timer style you like and drop it onto the new timeline.
- Extend the timer to the end of the video.
- Adjust the position and add the duration of your music video.

Now you are all set to export the first draft of your music video. You can also adjust the video format on the export option, but MP4 is recommended.
Conclusion
We hope this blog has helped you edit the initials of your music video. By adjusting the aspect ratio to fit the desired screen size and properly planning the first cut, you can lay a solid foundation for the rest of the editing process.
These two steps can greatly impact the overall look and feel of the final product. Remember to communicate with your director, producer, or client throughout the process to ensure that the final product meets their expectations.
Free Download For macOS 10.14 or later
![]()
Note: Before you start editing your project, make sure that you have a backup. You can copy the project to an external USB or hard drive for a backup.
Adjust the aspect ratio
The aspect ratio is known as the size of the video frame. For example, the most common aspect ratios are 16:9 and 4:3. The first number represents the width, and the second represents the height.
You should always ask your cinematographer about the aspect ratio. There are chances when cameras won’t shoot at the intended aspect ratio they were framed for. In that case, you’ll need to crop or letterbox them when editing.

How to find the width/height of the frame?
Most of the frames that are being shot on the camera are 3424 pixels wide, which is a little under 4k. If you have a measurement of one side of the frame, you can find the other by using some math. Let’s suppose your frame is 3424 pixels wide. You can use this formula to find the height.
Formula: 3424 pixels wide x 1 high / 2.35 wide (or whatever your aspect ratio)

Now you can cancel out the width from the multiplier and the denominator.
= 3424 pixels wide x 1 high / 2.35 wide

Now you are left with the equation:
= 3424 pixels high / 2.35
After solving this equation, you will get the answer which is: 1457 pixels high. Let’s adjust it on the music video as well, follow the steps given below:
Free Download For Win 7 or later(64-bit)
Free Download For macOS 10.14 or later
Step1Open the aspect ratio setting tab
Open your music video project in Filmora and click on the screen icon, as shown in the picture.
![]()
Then select the Change Project Aspect Ratio.

Step2Add values
Now set the project Width to 3424 pixels and its Height to 1457 pixels. You can also adjust the frame rate by selecting the one in which you shot the video. Then click OK.

Assembly
The next step is assembly. You will arrange the shots, clips, and elements in this process and get everything in order. It can be daunting and inspiring for you, as it’s a blank canvas you are going to start with. Before editing, you can also get some guidance from your art director.
If your music video has shots of the band performing, drop them off first and sync them with the audio. On the contrary, if you are doing a narrative style, you can arrange the shots according to the story you want to portray.

Step1Drop the media
You can start by dragging and dropping the music onto the audio timeline. Then you can add the shots of your music video.

Step2Arrange the shots
Arrange the shots according to the storyboard you created and sync them with the audio.

Step3Add the title
Once you arrange all shots in order, you can add the title of your music video. Click on the Titles, then choose your desired style and add the name of your music video in the title box. You can also change the text’s size, font, and color.

Step4Flip the clip
One last thing is, if you shot any scene in mirror-image format, you can flip it. Click on the clip you want to flip and select the flip icon in the video properties.

Send your first draft
The first draft is the video in which you added audio and re-ordered the shots. You decided on the pace and flow of the video to create a basic structure. You made changes to make it interesting and captivating.
Before you put too much effort into editing your video, send it to your director, producer, or client for review. It will help ensure that any big changes can be made before you invest too much time in the edit.
For first drafts, you don’t need anything fancy. A lower-resolution and more compressed file can make sending it to a director or client much easier. You can also add a timer on the music video, so the person reviewing it can give you accurate timing on where he wants any revision.
How to add the timer in the music video?
- Click on Effects and search for Timecode in the search bar.
- Choose the timer style you like and drop it onto the new timeline.
- Extend the timer to the end of the video.
- Adjust the position and add the duration of your music video.

Now you are all set to export the first draft of your music video. You can also adjust the video format on the export option, but MP4 is recommended.
Conclusion
We hope this blog has helped you edit the initials of your music video. By adjusting the aspect ratio to fit the desired screen size and properly planning the first cut, you can lay a solid foundation for the rest of the editing process.
These two steps can greatly impact the overall look and feel of the final product. Remember to communicate with your director, producer, or client throughout the process to ensure that the final product meets their expectations.
Also read:
- [New] Channel Ownership & Revenue with 2024 YTP Plan
- [New] In 2024, Mastering Audio Transitions in Premiere Pro
- [Updated] In 2024, From Copycat to Originalist Crafting Funny, Relatable Memes
- [Updated] In 2024, Mastering the Art of Digital Recording for GoToMeet Sessions
- [Updated] In 2024, Voice Log Retrieval, Content Scrutiny
- [Updated] Low-Investment, High Rewards Channel Size Doesn't Deter Sponsorship for 2024
- [Updated] Which Video Sharing Platform Prevails? Analyzing IGTV Vs. YouTube
- A Guide To Adopting Lumetri Color Presets in Effective Color Grading
- Harness Free Methods to Download Vimeo Videos with Ease for 2024
- In 2024, Slowly Quieting Tracks with FL Studio
- New 2024 Approved Do You Want to Be Aware of VHSs Meaning? There Is Nothing to Be Worried About because We Will Guide You in This Article
- New How to Record Video Streams With FFmpeg on Windows and Mac for 2024
- Updated 2024 Approved Looking for the Best Quiz-Making Tools? Read Our Full Review to Find Out the 10 Best Video Quiz Makers Available
- Updated 2024 Approved Top 10 Sound Extractors to Extract Sound From Video 2023
- Updated In 2024, Do You Want to Print Designs Onto Your Garments or Other Fashion Accessories? Find Out How to Create a Screen Print Effect in Photoshop to Give Your Text or Graphics a Vintage or Retro Look
- Updated In 2024, Fixing The Slow Playback Issues in DaVinci Resolve
- Updated Steps to Add Subtitles in Canva for 2024
- Title: Do You Want to Create Adjustment Layers in Final Cut Pro? This Article Will Discuss a Simple yet Efficient Method to Generate Adjustment Layers in Final Cut Pro
- Author: Morgan
- Created at : 2024-10-03 06:18:07
- Updated at : 2024-10-05 17:36:30
- Link: https://ai-video-editing.techidaily.com/do-you-want-to-create-adjustment-layers-in-final-cut-pro-this-article-will-discuss-a-simple-yet-efficient-method-to-generate-adjustment-layers-in-final-cut-/
- License: This work is licensed under CC BY-NC-SA 4.0.