
:max_bytes(150000):strip_icc():format(webp)/samsung-un65nu7100fxza-aaa-5b3bf3f1c9e77c00370afe54.jpg)
Do You Want Your Photos and Videos to Give an Old and Vintage Feel? Here Are some Vintage LUTs Premiere Pro Free and Paid Options Available to Download for 2024
Do You Want Your Photos and Videos to Give an Old and Vintage Feel? Here Are some Vintage LUTs Premiere Pro Free and Paid Options Available to Download
Whether it is an image or video footage, LUTs can change the look and feel of your content. You can add a new color scheme, change the contrast, or create a new digital media look. Although there are many LUTs options, vintage LUTs are some of the most popular ones. These LUTs can add a nostalgic and warm feeling to your content and are perfect for creating a vintage or retro look.
Vintage LUTs are a great way to add a classic feel to your photos or videos, and they work especially well for old-school-themed projects. Using free vintage LUTs, you can easily add a vintage look to your content without spending too much time editing.
- Part 2: Best Free Vintage LUTs That Can Be Found in The Market
- Part 3: The Best Video Editor to Integrate LUTs - Wondershare Filmora
Part 1: What Are the Diverse Use Cases of LUTs?
LUTs are an array of numbers that helps you to change colors from one color space to another. You can use LUTs for color grading, color correction, or to change the color tone. The section below will highlight where you can use these LUTs.
- Color Grading: LUTs can be used for color grading to adjust the colors of an image to create a specific look or mood. Additionally, you can tweak an entire image’s colors or target specific colors or tones using LUTs.
- Color Correction: Another way is you can use LUTs to color-correct any image or video. It is the process of adjusting the colors of an image to make it look more natural. This technique is often used to correct color temperature, adjust contrast, and fix color imbalances.
- Film Emulation: It can emulate the look of different film stocks, such as Kodak or Fuji. This technique is commonly used in filmmaking to achieve a specific aesthetic or match older films’ looks.
- Special Effects: LUTs can create a wide range of special effects. For instance, a LUT can create the look of a night vision camera or infrared vision. This technique is often used in action movies and video games to create a more 3D experience.
- Still Photography: Furthermore, LUTs can also be used in still photography to adjust the color and tone of an image. It applies a color film that looks like a filter or an effect making the content look more creative.
- 3D Rendering: LUTs are used in 3D rendering to convert colors from one color space to another. Moreover, it can adjust the color and tone of rendered images. This technique can help in animated movies, video games, and visual effects for film and TV.
Free Download For Win 7 or later(64-bit)
Free Download For macOS 10.14 or later
Part 2: Best Free Vintage LUTs That Can Be Found in The Market
We know that LUTs change the perspective and mood of your story. There are many different LUTs to download, but vintage LUTs add more depth to your content. You can choose from different vintage look LUT packs, but here are some of the best.
1. Vintage Looks
Vintage Looks is a LUT pack that offers 10 vintage-style LUTs that can be used to give your media files a classic, old-school look. These LUTs highlight tropical colors, such as shades of blue and yellow. These shades create an old and vintage atmosphere for your photos and videos. You can apply one of the LUTs to your footage and watch your media files transform.

2.Vintage LUTs
Vintage LUTs is a pack of LUTs that can transform your media into a different vintage look. Your results look like they are taken from old Kodak or Fuji films. Moreover, use its monochromatic or B&W LUTs to give your media files the old vintage feel. You can set a different tone by applying these LUTs to your videos and photos for a retro look.

3.50 Vintage Wedding LUTs Pack
The 50 Vintage Wedding LUTs Pack is a collection of 50 high-quality LUTs. These LUTs can add a beautiful vintage-style effect to your photos and videos. Additionally, these LUTs are designed to bring your media a warm, sepia-like tone. It creates a tone giving it a classic, timeless look that is perfect for weddings. Moreover, you can create old-fashioned-themed photos and videos using these LUTs.

4. Vintage Color Grading Video Editing LUTs
It is a pack of 20 LUTs to color-grade your digital media in a vintage feel. Vintage Color Grading Video Editing LUTs overexpose your video to fade its colors. Furthermore, it highlights orange and tan shades to warm your digital files. It will create an overexposed, rich contrast, old classic Hollywood movie feel. It has different styled vintage LUTs that you apply to your videos.

5. Vintage Film LUTs
Another amazing LUT pack that creates an old retro feel to your content is Vintage Film LUTs. Achieve a cinematic style with a vintage feel with multiple vintage presets. These LUTs are designed to replicate the look of the Black Magic Pocket Cinema Camera. Similarly, you can add a classic and timeless look to your photos and videos with this vintage pack.

Empower your videos with a new mood using different LUTs. Filmora now offers 800+ top-quality 3D LUTs cover a broad range of scenarios. Transform your videos with Filmora’s powerful 3D LUTs.
Apply LUT on Videos Apply LUT on Videos Learn More


6. 50 Vintage Cinematic Lightroom Presets and LUTs
50 Vintage Cinematic Lightroom Presets and LUTs is a pack designed to give your digital media an old look. This pack contains 50 different LUTs, each with a different vintage look. It overexposes your footage and increases the contrast to achieve a retro feel. Furthermore, these LUTs add a brown shade to your media, enhancing its vintage feel.

7. Retro Film LUTs
Retro Film LUTs is a vintage LUTs pack that will give your photos and videos an old, rusty look. These LUTs highlight colors like orange and brown to create nostalgia. Furthermore, these LUTs add film grains to your media to create a better vintage look. This pack is perfect for content creators and enthusiasts who want to create something different.

8. Vibrance Colors
Yet another great vintage-style pack for your images and video footage is Vibrance Colors. It focuses on enhancing colors to give an old-school feel. This LUT adds vibrance to your photos and videos to bring the natural feel out of your content. Additionally, increasing vibrance in your content adds the late 80s and early 90s touch to your digital media files.

9. Free LUTs Retro Color
Another vintage LUT free pack is Free LUTs Retro Color. This vintage retro LUT adds warmth and nostalgia to your media. These LUTs modify your footage by fading colors and increasing the muddiness to create a classic retro look. Moreover, you can create a music video, short film, or personal video by adding depth and character to your work.

10. Green Harmony
Last but not least, Green Harmony is a free vintage LUT. This LUT adds a greenish tint to your digital files, giving your content an old sci-fi movie feel. By applying this LUT, your content will resemble The Matrix movie’s iconic color grading. Using this LUT pack, you can take your footage back to the days of old-school sci-fi movies.

Part 3: The Best Video Editor to Integrate LUTs - Wondershare Filmora
Wondershare Filmora is a great video editor that allows you to integrate LUTs into your projects. It offers over 800+ LUTs for download, which can be used for your videos. With its extensive library, choose from cinematic to vintage LUTs that fit your style. You can choose from cinematic or vintage LUTs free download and more to give your content the desired feel.
Add Vintage LUTs on Video For Win 7 or later(64-bit)
Add Vintage LUTs on Video For macOS 10.14 or later
Additionally, you can adjust the intensity of your LUTs with the latest update. The new update gives you more control over color grading and correction. In addition, Filmora comes equipped with a color wheel that enables you to adjust the color scheme of your video content. This helps you create and edit your digital content professionally using this software.

Conclusion
In conclusion, Look-Up Tables are an essential component in video editing. It enables creators to achieve the desired look and feel for their footage. Vintage LUTs, in particular, can add a unique perspective to your story by adding emotions and moods. However, Wondershare Filmora can help to integrate your favorite free vintage LUTs into your content.
Part 1: What Are the Diverse Use Cases of LUTs?
LUTs are an array of numbers that helps you to change colors from one color space to another. You can use LUTs for color grading, color correction, or to change the color tone. The section below will highlight where you can use these LUTs.
- Color Grading: LUTs can be used for color grading to adjust the colors of an image to create a specific look or mood. Additionally, you can tweak an entire image’s colors or target specific colors or tones using LUTs.
- Color Correction: Another way is you can use LUTs to color-correct any image or video. It is the process of adjusting the colors of an image to make it look more natural. This technique is often used to correct color temperature, adjust contrast, and fix color imbalances.
- Film Emulation: It can emulate the look of different film stocks, such as Kodak or Fuji. This technique is commonly used in filmmaking to achieve a specific aesthetic or match older films’ looks.
- Special Effects: LUTs can create a wide range of special effects. For instance, a LUT can create the look of a night vision camera or infrared vision. This technique is often used in action movies and video games to create a more 3D experience.
- Still Photography: Furthermore, LUTs can also be used in still photography to adjust the color and tone of an image. It applies a color film that looks like a filter or an effect making the content look more creative.
- 3D Rendering: LUTs are used in 3D rendering to convert colors from one color space to another. Moreover, it can adjust the color and tone of rendered images. This technique can help in animated movies, video games, and visual effects for film and TV.
Free Download For Win 7 or later(64-bit)
Free Download For macOS 10.14 or later
Part 2: Best Free Vintage LUTs That Can Be Found in The Market
We know that LUTs change the perspective and mood of your story. There are many different LUTs to download, but vintage LUTs add more depth to your content. You can choose from different vintage look LUT packs, but here are some of the best.
1. Vintage Looks
Vintage Looks is a LUT pack that offers 10 vintage-style LUTs that can be used to give your media files a classic, old-school look. These LUTs highlight tropical colors, such as shades of blue and yellow. These shades create an old and vintage atmosphere for your photos and videos. You can apply one of the LUTs to your footage and watch your media files transform.
2.Vintage LUTs
Vintage LUTs is a pack of LUTs that can transform your media into a different vintage look. Your results look like they are taken from old Kodak or Fuji films. Moreover, use its monochromatic or B&W LUTs to give your media files the old vintage feel. You can set a different tone by applying these LUTs to your videos and photos for a retro look.
3.50 Vintage Wedding LUTs Pack
The 50 Vintage Wedding LUTs Pack is a collection of 50 high-quality LUTs. These LUTs can add a beautiful vintage-style effect to your photos and videos. Additionally, these LUTs are designed to bring your media a warm, sepia-like tone. It creates a tone giving it a classic, timeless look that is perfect for weddings. Moreover, you can create old-fashioned-themed photos and videos using these LUTs.
4. Vintage Color Grading Video Editing LUTs
It is a pack of 20 LUTs to color-grade your digital media in a vintage feel. Vintage Color Grading Video Editing LUTs overexpose your video to fade its colors. Furthermore, it highlights orange and tan shades to warm your digital files. It will create an overexposed, rich contrast, old classic Hollywood movie feel. It has different styled vintage LUTs that you apply to your videos.
5. Vintage Film LUTs
Another amazing LUT pack that creates an old retro feel to your content is Vintage Film LUTs. Achieve a cinematic style with a vintage feel with multiple vintage presets. These LUTs are designed to replicate the look of the Black Magic Pocket Cinema Camera. Similarly, you can add a classic and timeless look to your photos and videos with this vintage pack.
Empower your videos with a new mood using different LUTs. Filmora now offers 800+ top-quality 3D LUTs cover a broad range of scenarios. Transform your videos with Filmora’s powerful 3D LUTs.
Apply LUT on Videos Apply LUT on Videos Learn More
6. 50 Vintage Cinematic Lightroom Presets and LUTs
50 Vintage Cinematic Lightroom Presets and LUTs is a pack designed to give your digital media an old look. This pack contains 50 different LUTs, each with a different vintage look. It overexposes your footage and increases the contrast to achieve a retro feel. Furthermore, these LUTs add a brown shade to your media, enhancing its vintage feel.
7. Retro Film LUTs
Retro Film LUTs is a vintage LUTs pack that will give your photos and videos an old, rusty look. These LUTs highlight colors like orange and brown to create nostalgia. Furthermore, these LUTs add film grains to your media to create a better vintage look. This pack is perfect for content creators and enthusiasts who want to create something different.
8. Vibrance Colors
Yet another great vintage-style pack for your images and video footage is Vibrance Colors. It focuses on enhancing colors to give an old-school feel. This LUT adds vibrance to your photos and videos to bring the natural feel out of your content. Additionally, increasing vibrance in your content adds the late 80s and early 90s touch to your digital media files.
9. Free LUTs Retro Color
Another vintage LUT free pack is Free LUTs Retro Color. This vintage retro LUT adds warmth and nostalgia to your media. These LUTs modify your footage by fading colors and increasing the muddiness to create a classic retro look. Moreover, you can create a music video, short film, or personal video by adding depth and character to your work.
10. Green Harmony
Last but not least, Green Harmony is a free vintage LUT. This LUT adds a greenish tint to your digital files, giving your content an old sci-fi movie feel. By applying this LUT, your content will resemble The Matrix movie’s iconic color grading. Using this LUT pack, you can take your footage back to the days of old-school sci-fi movies.
Part 3: The Best Video Editor to Integrate LUTs - Wondershare Filmora
Wondershare Filmora is a great video editor that allows you to integrate LUTs into your projects. It offers over 800+ LUTs for download, which can be used for your videos. With its extensive library, choose from cinematic to vintage LUTs that fit your style. You can choose from cinematic or vintage LUTs free download and more to give your content the desired feel.
Add Vintage LUTs on Video For Win 7 or later(64-bit)
Add Vintage LUTs on Video For macOS 10.14 or later
Additionally, you can adjust the intensity of your LUTs with the latest update. The new update gives you more control over color grading and correction. In addition, Filmora comes equipped with a color wheel that enables you to adjust the color scheme of your video content. This helps you create and edit your digital content professionally using this software.
Conclusion
In conclusion, Look-Up Tables are an essential component in video editing. It enables creators to achieve the desired look and feel for their footage. Vintage LUTs, in particular, can add a unique perspective to your story by adding emotions and moods. However, Wondershare Filmora can help to integrate your favorite free vintage LUTs into your content.
Want to Make a Funny Vlog on TikTok? Trying to Find the Right Topic for It? This Article Presents some Impressive Options for Making a Funny Vlog for TikTok
TikTok has been among the few social media platforms that have gained an exponential following in a truly short time. Regardless of this stunted digital environment, the platform made its statement of becoming part of the all-time greats.
TikTok became known as a short-video platform that influenced the making of funny vlogs. If you are interested in making a funny vlog, you are at the right place.
In this article
01 Ideas for Creating A Funny Vlog for TikTok
02 5 Popular Funny Vloggers on TikTok
Part 1: Ideas for Creating A Funny Vlog for TikTok
When creating a funny vlog across TikTok, there are numerous ideas that one can think of. However, since TikTok videos are of small lengths, achieving diversity is difficult yet possible. You’ll surely get your break if you understand the following ideas for creating a funny vlog.

React to Other Videos
While it may seem the most mainstream style of creating funny content across TikTok, it is also the most effective way of making people laugh while watching your video. This will also bring recurring viewers across your channel.
Display Failure Videos
It is always great to see people trying and doing something funny across the video. Failure videos are believed to be the other way of creating content for a funny vlog on your TikTok, which shall make people laugh hard.
Use Goofy and Peculiar Voices
Unrealistic and weird voices can make your short video seem funny. If you consider talking about something in a silly voice, it will make people burst out of laughter.
Trolling Family Members
One of the best ways to make something good out of TikTok is creating candid moments. This can always be done if you troll or prank your family members out of nowhere. Just keep reminding that you have to ensure no one gets injured due to it.
Impersonations
Making impersonated videos of major celebrities is another way of showing funny content to the viewers on TikTok. If you consider some funny examples for this, it will surely bring you effective results.
Make Puns and Funny Statements
Another great way to create a funny vlog for your TikTok is to be good at making puns. This is purely hilarious content and needs someone to be highly great in it.
Physical Challenges
This can be a bit risky, but it can become quite fun to make and show to the world if executed with care. However, this can be conducted individually or in a group of people, as you find it appropriate.
Use Effects of TikTok
TikTok makes sure to provide something funny in effects to its users. The use of effects for TikTok is an excellent technique to make funny vlogs; however, it can get funny if the elements used across it have a dubious meaning.
Run Everything in Reverse
One of the most straightforward techniques to make a funny vlog is to run everything in reverse order. The simplest thing of a video becomes the funniest to watch.
Part 2: 5 Popular Funny Vloggers on TikTok
This part will provide some popular examples of TikTokers who have made a considerate performance in providing funny content to people across the platform.
Khaby Lame
This is, without a doubt, the first-choice in TikTok accounts that would always come while relating to funny content. Khaby started his journey as a TikToker with a remarkably simple motive of pointing out the simplicity in different tasks, which were displayed to be difficult. Although it sounds pretty basic, the technique taken by Khaby has been so considerate it brought him millions of followers for creating funny content.

Sarah Cooper
Want to see a great impersonation of Donald Trump? It is undoubtedly great to see every time. With Sarah Cooper, it just becomes an entirely different story. Her impersonation has been so perfect that she has been referred to as one of the best funny vloggers on TikTok. Her likes across the platform may not be that great, but she has shown some stature in presenting funny content in a great way.

Dobre Twins
This twin duo is known across many social media platforms for its funny content. As the twins started using TikTok, they started creating good funny vlogs, which gained quite the traction for them. Their unique ideas to present different things have presented the following worth 23 million likes across TikTok, which is quite commendable. However, Lucas and Marcus are only known to operate this TikTok account.

Image alt: dobre twins funny tiktoker
Brittany Broski
Quite a few TikTokers actually make funny videos with impressive comedy. Brittany Broski is a celebrity in this genre, where she has taken great use of her comedy skills to present great vlogs with different and unique topics. Her take on comedy is entirely different, which makes her funny vlog unique and better than others.

Cole LeBrant
This TikToker makes a good collection of funny vlogs across his account with his family. The variety and variability in his videos make him a different version of fun compared to other TikTokers. He has built a great reach across the account, which makes him an impressive choice.

Part 3: How to Make a Funny Vlog?
Funny vlogs are a fabulous way to interact with people of different tastes. It can be something that cherishes the moods of the viewers, regardless of their current emotions. To make this happen, you need a good platform that helps you create a video for your viewers to watch. Wondershare Filmora fulfills the needs of a video editor by providing you with the perfect options while editing the video for TikTok.
For Win 7 or later (64-bit)
For macOS 10.12 or later
If you are looking forward to understanding how to create a funny vlog for your TikTok using Filmora, you need to follow a set of simple steps. These are shown as follows:
Step 1: Launch and Import Video
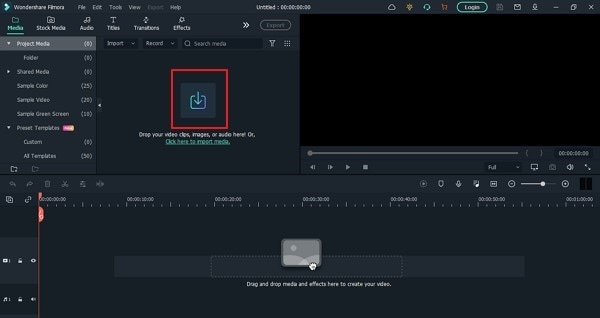
To start, you need to have Wondershare Filmora installed across your device. Launch the tool and click on “New Project” to start from scratch. Once the screen opens up, you need to click on the “Arrow Head” icon across the ‘Media’ Tab to import the audio you wish to amend for TikTok.
Step 2: Perform Basic Editing
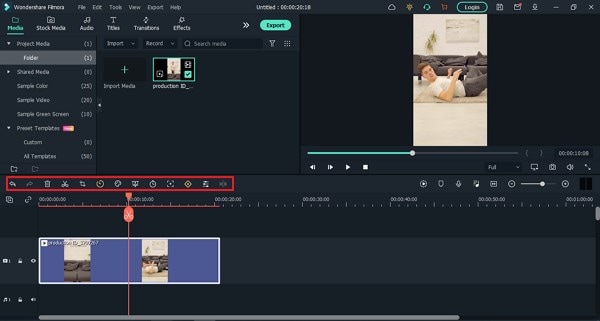
Wondershare Filmora provides users with multiple options for editing their files. At first, drag the file onto the timeline. Following this, you can merge different videos or enhance the video by trimming it. Along with that, you can also consider splitting the image or changing its playback speed for different results.
Step 3: Add Effects and Transitions
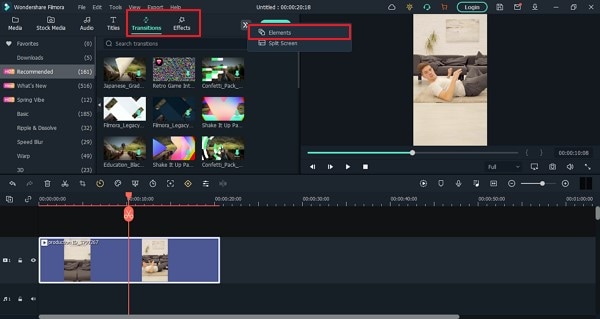
After you are done with some basic editing, you can add different effects from the “Effects” section. To make the video look exclusive, you can also include “Transitions” across it. Use the “Elements” tab to include stickers and emojis to enhance your TikTok video.
Step 4: Manage the Audio
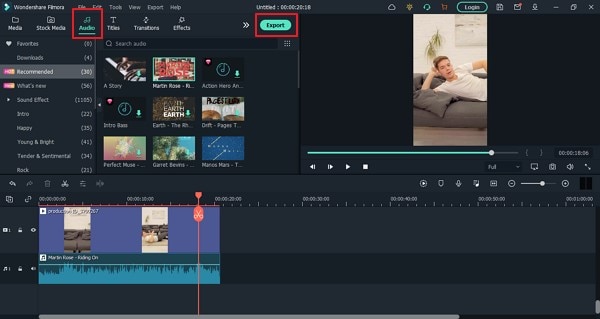
For managing the audio of your video, you can make several changes across it. You can detach audio and change the audio with another soundtrack. Filmora also allows you to add audio from the “Audio” section, which contains royalty-free music to add. Once you are done, click on the “Export” button to set the settings of the video before exporting it back onto the device.
Closing Words
This article has presented some of the finest tips that can be utilized for creating funny vlogs on your TikTok. If you coherently use these tips, you can get significant results across your account in the name of the followers. Along with that, you can also use Filmora for making the best funny vlog with different editing tools.
Wondershare Filmora
Get started easily with Filmora’s powerful performance, intuitive interface, and countless effects!
Try It Free Try It Free Try It Free Learn More >

02 5 Popular Funny Vloggers on TikTok
Part 1: Ideas for Creating A Funny Vlog for TikTok
When creating a funny vlog across TikTok, there are numerous ideas that one can think of. However, since TikTok videos are of small lengths, achieving diversity is difficult yet possible. You’ll surely get your break if you understand the following ideas for creating a funny vlog.
React to Other Videos
While it may seem the most mainstream style of creating funny content across TikTok, it is also the most effective way of making people laugh while watching your video. This will also bring recurring viewers across your channel.
Display Failure Videos
It is always great to see people trying and doing something funny across the video. Failure videos are believed to be the other way of creating content for a funny vlog on your TikTok, which shall make people laugh hard.
Use Goofy and Peculiar Voices
Unrealistic and weird voices can make your short video seem funny. If you consider talking about something in a silly voice, it will make people burst out of laughter.
Trolling Family Members
One of the best ways to make something good out of TikTok is creating candid moments. This can always be done if you troll or prank your family members out of nowhere. Just keep reminding that you have to ensure no one gets injured due to it.
Impersonations
Making impersonated videos of major celebrities is another way of showing funny content to the viewers on TikTok. If you consider some funny examples for this, it will surely bring you effective results.
Make Puns and Funny Statements
Another great way to create a funny vlog for your TikTok is to be good at making puns. This is purely hilarious content and needs someone to be highly great in it.
Physical Challenges
This can be a bit risky, but it can become quite fun to make and show to the world if executed with care. However, this can be conducted individually or in a group of people, as you find it appropriate.
Use Effects of TikTok
TikTok makes sure to provide something funny in effects to its users. The use of effects for TikTok is an excellent technique to make funny vlogs; however, it can get funny if the elements used across it have a dubious meaning.
Run Everything in Reverse
One of the most straightforward techniques to make a funny vlog is to run everything in reverse order. The simplest thing of a video becomes the funniest to watch.
Part 2: 5 Popular Funny Vloggers on TikTok
This part will provide some popular examples of TikTokers who have made a considerate performance in providing funny content to people across the platform.
Khaby Lame
This is, without a doubt, the first-choice in TikTok accounts that would always come while relating to funny content. Khaby started his journey as a TikToker with a remarkably simple motive of pointing out the simplicity in different tasks, which were displayed to be difficult. Although it sounds pretty basic, the technique taken by Khaby has been so considerate it brought him millions of followers for creating funny content.
Sarah Cooper
Want to see a great impersonation of Donald Trump? It is undoubtedly great to see every time. With Sarah Cooper, it just becomes an entirely different story. Her impersonation has been so perfect that she has been referred to as one of the best funny vloggers on TikTok. Her likes across the platform may not be that great, but she has shown some stature in presenting funny content in a great way.
Dobre Twins
This twin duo is known across many social media platforms for its funny content. As the twins started using TikTok, they started creating good funny vlogs, which gained quite the traction for them. Their unique ideas to present different things have presented the following worth 23 million likes across TikTok, which is quite commendable. However, Lucas and Marcus are only known to operate this TikTok account.
Image alt: dobre twins funny tiktoker
Brittany Broski
Quite a few TikTokers actually make funny videos with impressive comedy. Brittany Broski is a celebrity in this genre, where she has taken great use of her comedy skills to present great vlogs with different and unique topics. Her take on comedy is entirely different, which makes her funny vlog unique and better than others.
Cole LeBrant
This TikToker makes a good collection of funny vlogs across his account with his family. The variety and variability in his videos make him a different version of fun compared to other TikTokers. He has built a great reach across the account, which makes him an impressive choice.
Part 3: How to Make a Funny Vlog?
Funny vlogs are a fabulous way to interact with people of different tastes. It can be something that cherishes the moods of the viewers, regardless of their current emotions. To make this happen, you need a good platform that helps you create a video for your viewers to watch. Wondershare Filmora fulfills the needs of a video editor by providing you with the perfect options while editing the video for TikTok.
For Win 7 or later (64-bit)
For macOS 10.12 or later
If you are looking forward to understanding how to create a funny vlog for your TikTok using Filmora, you need to follow a set of simple steps. These are shown as follows:
Step 1: Launch and Import Video
To start, you need to have Wondershare Filmora installed across your device. Launch the tool and click on “New Project” to start from scratch. Once the screen opens up, you need to click on the “Arrow Head” icon across the ‘Media’ Tab to import the audio you wish to amend for TikTok.
Step 2: Perform Basic Editing
Wondershare Filmora provides users with multiple options for editing their files. At first, drag the file onto the timeline. Following this, you can merge different videos or enhance the video by trimming it. Along with that, you can also consider splitting the image or changing its playback speed for different results.
Step 3: Add Effects and Transitions
After you are done with some basic editing, you can add different effects from the “Effects” section. To make the video look exclusive, you can also include “Transitions” across it. Use the “Elements” tab to include stickers and emojis to enhance your TikTok video.
Step 4: Manage the Audio
For managing the audio of your video, you can make several changes across it. You can detach audio and change the audio with another soundtrack. Filmora also allows you to add audio from the “Audio” section, which contains royalty-free music to add. Once you are done, click on the “Export” button to set the settings of the video before exporting it back onto the device.
Closing Words
This article has presented some of the finest tips that can be utilized for creating funny vlogs on your TikTok. If you coherently use these tips, you can get significant results across your account in the name of the followers. Along with that, you can also use Filmora for making the best funny vlog with different editing tools.
Wondershare Filmora
Get started easily with Filmora’s powerful performance, intuitive interface, and countless effects!
Try It Free Try It Free Try It Free Learn More >
Tutorial | How to Make a Smooth Speed Ramping in Premiere Pro?
Versatile Video Editor - Wondershare Filmora
An easy and powerful editor
Numerous effects to choose from
Detailed tutorials are provided by the official channel
Speed ramping is a popular Premiere Pro effect for good reason: it looks fantastic! When utilized simultaneously to spice up a video clip, slow motion and quick motion may both be great aesthetic choices. This practice may save you time by enabling you to show more about what you want to see in your edit without using harsh jump cuts.

This effect may be used for a number of reasons, including clip transitions, speeding up a clip to make it shorter, and slowing down a clip to make it longer. Speed ramping may be used with a number of various effects.
According to the business, Adobe Premiere Pro is one of the most widely used video editing products on the market today. The ability to alter the speed of individual clips is one of Premiere Pro’s most important capabilities. While speed ramping is often used in sports highlights, changing the speed of video may be useful for a number of other types of material.
You’ll learn how to construct a spectacular speed ramp in Adobe Premiere Pro, beginning with capturing the proper kind of video and moving to advanced tips and methods. Following that, we’ll go through some ideas and inspiration for when to use a speed ramp in your circumstance.
What is Speed Ramping?
A speed ramp is used to gradually increase the speed of a video clip as it accelerates or decelerates. It is guaranteed that a smooth transition between two separate speeds will take place. The method is crucial in changing the tempo of the film and, as a consequence, creating a dramatic impression. The film’s required velocity is achieved by the employment of super-fast visual effects.
A speed ramp, as opposed to a rapid shift in speed, provides for a more smooth transition between two drastically differing speeds. This method is used to focus attention on certain parts of your video, which has a huge impact on your editing. It provides just the right amount of zing to keep your audience interested and excited about your presentation.
Examples of Speed Ramping
It works especially well when utilized to focus the viewer’s attention on a certain moment or action in your videos, such as a tough jump or an impending bullet. Another name for this approach speeds ramping (sometimes known as time remapping). It may also be used to create a visually pleasing transition between two clips or pictures inside a single movie.
You may also use Speed Ramping to alter the runtime of your video to fit the time limits of other social media sites, such as Instagram and Vine. If you just have 30 seconds to deliver your video, the following are the two most common places where people apply speed ramping techniques:
Assume you are shooting a person walking and want the clip to play in slow motion so that viewers can clearly see the person’s face. In this scenario, speed ramping is precisely what you need since it enables you to do precisely that.
Do you remember the famous movie “The Matrix” scene, when Neo dodges the bullets? It’s not some typical scene; it’s a pretty good example of speed ramping.
How to Create Speed Ramping/Time Remapping in Premiere Pro?
Speed Ramping premiere pro is an excellent tool for speeding up video clips. ‘ In order to speed up or slow down the speed of a video clip, this effect may be employed. In this article, you’ll learn how to make the most of this fantastic tool in Adobe Premiere Pro.

While using Premiere Pro, the ability to change a clip’s speed without altering its pitch is a very useful feature. An example of how this feature comes in helpful is when you have a clip that shows someone or something moving from left to right or vice versa.
Advanced Premiere Pro Time Remapping
The fact that this effect is so simple to use is its main benefit. By moving handles around on the clip, you may quickly choose different regions of the clip to be influenced by the adjustment when you apply it. This makes achieving the required result extremely quick and easy.

If you want to go deep into the game, Speed Ramp offers some more advanced options that give you even more control over your speed modifications. The properties section allows you to designate which portions of the timeline are affected by the ramp, as well as change factors like the curve type and bias.
Steps To Use Speed Ramping In Premiere Pro
Follow the below-mentioned steps to learn how to use speed ramping in premiere pro:
- Download and install Adobe Premiere Pro. Once installed, launch the application.
- Create a new project in Premiere by clicking the New Project button. After that, import the film that you want to speed ramp. It is the simplest and most straightforward method of importing film into Premiere to just click and drag the clip into the project window.
- Before commencing any work with speed, click and drag the video track in the timeline to make it taller by increasing the height of the track. This will guarantee that you can see the speed ramp as you go to the next stages.
- To create a sequence if you don’t already have one, drag a clip into the timeline and drop it where you want it to appear. Using the clip’s parameters, Premiere will automatically generate a sequence with the necessary settings.
- Decide when you want to apply the speed ramp and mark the spot on the screen where you will do so. The key to a pleasant speed ramp is movement, so choose a time when the environment is very active. You can specify in and out points, cut the clip with “Command+K,” or divide the clip into parts using the razor blade tool (which is accessible through the “Command+K” shortcut).
- Keyframes will be created at this point. It’s first and foremost important that the keyframes be clearly visible. Access the proper view by selecting “Show Clip Keyframes” from the context menu when you right-click on your clip.
- Another drop-down option will appear, from which you’ll choose “Time Remapping” and then press the “Enter” key.
- Select “Speed” from the drop-down menu.
- To create a keyframe, choose the pen from the toolbar (or just use the “P” key on your keyboard) and click on the white line running across the video track. If you wish to make a speed ramp, you’ll need at least two keyframes: one to indicate where the speed ramp should begin and another to indicate where it should terminate.
- If you wish to create more sophisticated speed ramps, you may do so by including more keyframes in your animation.
- Switch back to the selection tool when you’ve finished placing your keyframes. “V” is the shortcut key for this.
- Now comes the critical moment: it’s time to change the speed. This is a task that Premiere Pro makes rather simple. The only thing you have to do now is click on the white line between the keyframes you have created and drag it either up or down, depending on your preference for speed or slowness.
- It’s not finished yet; we still need to smooth it out a little more. With the selection tool selected, click and drag one of the keyframe markers to the other side of the screen. The number of frames across which the speed shift will occur will be stretched out as a result of this. The longer and more gradual the speed ramp will be, the greater the distance between the two sides of the keyframe indication is separated.
- Complete the process with the other keyframe, and your speed ramp will be complete!
Techniques to Make Speed Ramping Smooth
In this section, we will be viewing some advanced time remapping features of Adobe Premiere Pro, which are as follows.
Keyframe Interpolation
When creating a speed ramp, keyframes are used to indicate the beginning and finishing points of the speed shift. However, there are a number of methods in which Premiere may transport the clip from point A to point B.
In the video industry, filling in the data between the two locations is known as keyframe interpolation.
- Simply dragging to divide a keyframe, like in the previous example, results in an equitable speed increase between the keyframes in the animation. Linear interpolation is the term used to describe this process.
- Instead of using Bezier Interpolation, you may utilize it to produce a smoother, more natural speed ramp. With Bezier Interpolation, the pace at which the speed increases will likewise accelerate, giving the effect of a more pronounced ramp.
- To build an S-curve shape, choose a keyframe and drag the Bezier handles to the desired position. Make adjustments until you are satisfied with the outcome.
Speed Ramp Transition
Speed ramp transitions are easy to make and may be utilized to add visual interest to a wide range of video genres. This effect is achieved by boosting the clip speed at the end of a clip before transitioning into a cut.
- In the second clip, the tempo is abruptly boosted and subsequently decreased to provide a smooth transition between situations. It may symbolize the passage of time, a character’s perplexity, or simply add flair to a commercial film.
- Using Premiere Pro, create a ramp-up at the end of your first clip and a ramp-down at the start of your second clip. The speed rubber band will be curved like a bell curve across the two clips when finished.
Adding speed ramps to films in Premiere Pro may improve the usefulness and looks of a variety of movies, from narrative features to social media posts. In Premiere, you may easily create and adjust speed duration directly in the timeline to meet any needs.
Speed Ramping In Wondershare Filmora
We understood how to do speed ramping in Premiere Pro. You can also get the same results using a much easier software that is “Wondershare Filmora”.
What is Wondershare Filmora?
Filmora is a video editor that is best suited for social video editors, vloggers, home movies, and other video projects. In addition, it may be used on both Macs and PCs. To begin using Filmora, you just need to pay a one-time registration fee of $0! You’ll notice a watermark when you export from the free version. For $59.99, Filmora’s latest version is a one-time purchase that doesn’t need a subscription!
Amazing Features
Filmora is an award-winning video editing program, that allows users to create visually stunning videos without the need for complex editing techniques.
Video playback in Filmora’s latest version may be accelerated by the graphics card (GPU). It’s accelerating at an alarming rate right now. It’s also possible to lower the resolution of a 4K or higher video for quicker playing. Cuts and splits are a snap using Filmora. Make a cut by dragging your play head to the location where you want to split the footage. Then, to remove the additional clip from the clip, use the delete key.
Even those with the most basic PC hardware may use this video editing software to create high-quality movies. Moreover, the most anticipated features that Filmora’s latest version offers are as follows:
- Motion Tracking
- Keyframing Animations
- Audio Ducking
- Split Screen
- Video Transitions
- Speed Control
- Color Grading
- Filmstock Effects
- Multiple Formats Exporting
Users may utilize the color tuning option to change the white balance and dynamic range of their video clip, among other things. You may alter the audio levels of each track using the audio mixer tool. The advanced Text Editor function allows you to adjust the color, size, font, and even the motion of text. The screen recording tool enables you to capture your computer’s screen as well as your webcam in excellent quality. The video stabilization feature lowers or eliminates the effect of camera shake on video.
Speed Ramping In Filmora
The method is crucial in changing the tempo of the film and, as a consequence, creating a dramatic impression. The film’s required speed is achieved by the employment of super-fast visual effects.
When using a camera with a much higher frame rate, the speed ramping approach may provide excellent effects. It aids in the production of the most dramatic impression.
Speed ramping effects are available in six presets, which include Montage, Hero Moment, Bullet Time, Jumper, and Flash In, all of which will add a theatrical element to your movie that will leave your viewers in awe.

Creative pros can swiftly and effectively speed up a movie with Wondershare Filmora. However, in order to get the intended results, it is essential to completely understand and adhere to the approach.
Wondershare Filmora 11 has a variety of tools and features to help you create a visually stunning film in a short period of time. Its Instant Mode allows you to produce a video creation from start to finish in less than 5 minutes.
Steps
- Download and Install Filmora. Launch the application on your system.

- Navigate to the chosen video and open it in the program to speed up and lengthen it. You may also add the movie to the interface by dragging and dropping it there.

- When the video appears in the timeline, right-click it to begin playback. As a consequence, a context menu is displayed.

- Select Speed from the pop-up editing window, and then select Speed Ramping from the drop-down menu.

- Alternatively, right-click on the video or audio clip, choose Speed from the drop-down menu, and select Speed Ramping.

- In the Speed Ramping panel, you may adjust the speed or choose from a number of presets, including Montage, Hero Moment, Bullet Time, Jumper, Flash in, and Flash out, to use as templates. You have the option of using the Preset speed ramps. Alternatively, you may personalize your own innovative ones.

- Move the play head to the point where you wish to increase or decrease the speed of the video or audio. Then, to add speed keyframes, choose the Add icon from the toolbar. The video or audio clips will be marked as Speed Ramping when the speed ramp has been added by Filmora.

- If you want to delete a keyframe, you can do so by selecting that particular keyframe and selecting the delete button like in the image:

- As we go on to the video keyframe speed adjustment, just slide the keyframe dot upward or downward to alter the point speed of the movie. Aside from that, you can keep the audio pitch constant regardless of how fast or slow the video is moving.

- The settings will be saved if you are pleased with them after you make the necessary modifications. In any other case, you may use the Reset button to return to the original configuration.
- When you’ve finished your work, go to the “File” panel and choose “Save Project” from the list of options that display. Change the name of the project and then click “Save.”
- Additionally, the movie may be exported using Filmora’s “Export” feature; just choose “Export” and then specify a new name for the file. The video may be exported to a device, a system, or even YouTube. After that, choose “Export.”

Speed Ramping Tips
- High Frame Rate: The frame rate is an important consideration when it comes to speed ramping. If you wish to slow down the video after it’s been recorded, shoot it at a frame rate higher than 60 frames per second. When a video is slowed down, there should be enough frames to guarantee that the video passes the 24 frames per second threshold frame rate.
- Choose The Appropriate Frame Resolution: Another possibility is to modify your video’s frame resolution. The tip has the ability to edit the clip’s properties from the Slowing down the video is achieved by changing the frame rate in the clip’s parameters from 120 to 24 frames per second. As a consequence, the frames will be expanded to the proper frame rate. As a consequence, the video is slowed down but not jerked.
- Purposeful Time Remapping: Instead of keeping the same pace throughout the film, a deliberate speed ramp should be implemented. A video has emotional, mysterious, exciting, and slow-motion Why is this the case? The usage of the same video speed throughout the film may have a negative influence on the watching experience. As a result, it is critical that videos be separated into genres and that the tempo of the videos is modified accordingly.
Conclusion
The use of the ideal cinematic effect at the right time boosts the audience and engagement with the material. This respective article explored speed ramping in-depth and oughts to teach creative pros how to slow down a video and speed up a movie. It covers speed raming in premiere pro and then moves toward Wondershare Filmora which seems a bit easier. Wondershare Filmora is a good choice for completing the task as quickly as possible. You will have access to all of the effects and tools mentioned, as well as the ability to keep the audio pitch consistent throughout the effect, which is critical while altering the video speed.
Speed ramping is a popular Premiere Pro effect for good reason: it looks fantastic! When utilized simultaneously to spice up a video clip, slow motion and quick motion may both be great aesthetic choices. This practice may save you time by enabling you to show more about what you want to see in your edit without using harsh jump cuts.
This effect may be used for a number of reasons, including clip transitions, speeding up a clip to make it shorter, and slowing down a clip to make it longer. Speed ramping may be used with a number of various effects.
According to the business, Adobe Premiere Pro is one of the most widely used video editing products on the market today. The ability to alter the speed of individual clips is one of Premiere Pro’s most important capabilities. While speed ramping is often used in sports highlights, changing the speed of video may be useful for a number of other types of material.
You’ll learn how to construct a spectacular speed ramp in Adobe Premiere Pro, beginning with capturing the proper kind of video and moving to advanced tips and methods. Following that, we’ll go through some ideas and inspiration for when to use a speed ramp in your circumstance.
What is Speed Ramping?
A speed ramp is used to gradually increase the speed of a video clip as it accelerates or decelerates. It is guaranteed that a smooth transition between two separate speeds will take place. The method is crucial in changing the tempo of the film and, as a consequence, creating a dramatic impression. The film’s required velocity is achieved by the employment of super-fast visual effects.
A speed ramp, as opposed to a rapid shift in speed, provides for a more smooth transition between two drastically differing speeds. This method is used to focus attention on certain parts of your video, which has a huge impact on your editing. It provides just the right amount of zing to keep your audience interested and excited about your presentation.
Examples of Speed Ramping
It works especially well when utilized to focus the viewer’s attention on a certain moment or action in your videos, such as a tough jump or an impending bullet. Another name for this approach speeds ramping (sometimes known as time remapping). It may also be used to create a visually pleasing transition between two clips or pictures inside a single movie.
You may also use Speed Ramping to alter the runtime of your video to fit the time limits of other social media sites, such as Instagram and Vine. If you just have 30 seconds to deliver your video, the following are the two most common places where people apply speed ramping techniques:
Assume you are shooting a person walking and want the clip to play in slow motion so that viewers can clearly see the person’s face. In this scenario, speed ramping is precisely what you need since it enables you to do precisely that.
Do you remember the famous movie “The Matrix” scene, when Neo dodges the bullets? It’s not some typical scene; it’s a pretty good example of speed ramping.
How to Create Speed Ramping/Time Remapping in Premiere Pro?
Speed Ramping premiere pro is an excellent tool for speeding up video clips. ‘ In order to speed up or slow down the speed of a video clip, this effect may be employed. In this article, you’ll learn how to make the most of this fantastic tool in Adobe Premiere Pro.
While using Premiere Pro, the ability to change a clip’s speed without altering its pitch is a very useful feature. An example of how this feature comes in helpful is when you have a clip that shows someone or something moving from left to right or vice versa.
Advanced Premiere Pro Time Remapping
The fact that this effect is so simple to use is its main benefit. By moving handles around on the clip, you may quickly choose different regions of the clip to be influenced by the adjustment when you apply it. This makes achieving the required result extremely quick and easy.
If you want to go deep into the game, Speed Ramp offers some more advanced options that give you even more control over your speed modifications. The properties section allows you to designate which portions of the timeline are affected by the ramp, as well as change factors like the curve type and bias.
Steps To Use Speed Ramping In Premiere Pro
Follow the below-mentioned steps to learn how to use speed ramping in premiere pro:
- Download and install Adobe Premiere Pro. Once installed, launch the application.
- Create a new project in Premiere by clicking the New Project button. After that, import the film that you want to speed ramp. It is the simplest and most straightforward method of importing film into Premiere to just click and drag the clip into the project window.
- Before commencing any work with speed, click and drag the video track in the timeline to make it taller by increasing the height of the track. This will guarantee that you can see the speed ramp as you go to the next stages.
- To create a sequence if you don’t already have one, drag a clip into the timeline and drop it where you want it to appear. Using the clip’s parameters, Premiere will automatically generate a sequence with the necessary settings.
- Decide when you want to apply the speed ramp and mark the spot on the screen where you will do so. The key to a pleasant speed ramp is movement, so choose a time when the environment is very active. You can specify in and out points, cut the clip with “Command+K,” or divide the clip into parts using the razor blade tool (which is accessible through the “Command+K” shortcut).
- Keyframes will be created at this point. It’s first and foremost important that the keyframes be clearly visible. Access the proper view by selecting “Show Clip Keyframes” from the context menu when you right-click on your clip.
- Another drop-down option will appear, from which you’ll choose “Time Remapping” and then press the “Enter” key.
- Select “Speed” from the drop-down menu.
- To create a keyframe, choose the pen from the toolbar (or just use the “P” key on your keyboard) and click on the white line running across the video track. If you wish to make a speed ramp, you’ll need at least two keyframes: one to indicate where the speed ramp should begin and another to indicate where it should terminate.
- If you wish to create more sophisticated speed ramps, you may do so by including more keyframes in your animation.
- Switch back to the selection tool when you’ve finished placing your keyframes. “V” is the shortcut key for this.
- Now comes the critical moment: it’s time to change the speed. This is a task that Premiere Pro makes rather simple. The only thing you have to do now is click on the white line between the keyframes you have created and drag it either up or down, depending on your preference for speed or slowness.
- It’s not finished yet; we still need to smooth it out a little more. With the selection tool selected, click and drag one of the keyframe markers to the other side of the screen. The number of frames across which the speed shift will occur will be stretched out as a result of this. The longer and more gradual the speed ramp will be, the greater the distance between the two sides of the keyframe indication is separated.
- Complete the process with the other keyframe, and your speed ramp will be complete!
Techniques to Make Speed Ramping Smooth
In this section, we will be viewing some advanced time remapping features of Adobe Premiere Pro, which are as follows.
Keyframe Interpolation
When creating a speed ramp, keyframes are used to indicate the beginning and finishing points of the speed shift. However, there are a number of methods in which Premiere may transport the clip from point A to point B.
In the video industry, filling in the data between the two locations is known as keyframe interpolation.
- Simply dragging to divide a keyframe, like in the previous example, results in an equitable speed increase between the keyframes in the animation. Linear interpolation is the term used to describe this process.
- Instead of using Bezier Interpolation, you may utilize it to produce a smoother, more natural speed ramp. With Bezier Interpolation, the pace at which the speed increases will likewise accelerate, giving the effect of a more pronounced ramp.
- To build an S-curve shape, choose a keyframe and drag the Bezier handles to the desired position. Make adjustments until you are satisfied with the outcome.
Speed Ramp Transition
Speed ramp transitions are easy to make and may be utilized to add visual interest to a wide range of video genres. This effect is achieved by boosting the clip speed at the end of a clip before transitioning into a cut.
- In the second clip, the tempo is abruptly boosted and subsequently decreased to provide a smooth transition between situations. It may symbolize the passage of time, a character’s perplexity, or simply add flair to a commercial film.
- Using Premiere Pro, create a ramp-up at the end of your first clip and a ramp-down at the start of your second clip. The speed rubber band will be curved like a bell curve across the two clips when finished.
Adding speed ramps to films in Premiere Pro may improve the usefulness and looks of a variety of movies, from narrative features to social media posts. In Premiere, you may easily create and adjust speed duration directly in the timeline to meet any needs.
Speed Ramping In Wondershare Filmora
We understood how to do speed ramping in Premiere Pro. You can also get the same results using a much easier software that is “Wondershare Filmora”.
What is Wondershare Filmora?
Filmora is a video editor that is best suited for social video editors, vloggers, home movies, and other video projects. In addition, it may be used on both Macs and PCs. To begin using Filmora, you just need to pay a one-time registration fee of $0! You’ll notice a watermark when you export from the free version. For $59.99, Filmora’s latest version is a one-time purchase that doesn’t need a subscription!
Amazing Features
Filmora is an award-winning video editing program, that allows users to create visually stunning videos without the need for complex editing techniques.
Video playback in Filmora’s latest version may be accelerated by the graphics card (GPU). It’s accelerating at an alarming rate right now. It’s also possible to lower the resolution of a 4K or higher video for quicker playing. Cuts and splits are a snap using Filmora. Make a cut by dragging your play head to the location where you want to split the footage. Then, to remove the additional clip from the clip, use the delete key.
Even those with the most basic PC hardware may use this video editing software to create high-quality movies. Moreover, the most anticipated features that Filmora’s latest version offers are as follows:
- Motion Tracking
- Keyframing Animations
- Audio Ducking
- Split Screen
- Video Transitions
- Speed Control
- Color Grading
- Filmstock Effects
- Multiple Formats Exporting
Users may utilize the color tuning option to change the white balance and dynamic range of their video clip, among other things. You may alter the audio levels of each track using the audio mixer tool. The advanced Text Editor function allows you to adjust the color, size, font, and even the motion of text. The screen recording tool enables you to capture your computer’s screen as well as your webcam in excellent quality. The video stabilization feature lowers or eliminates the effect of camera shake on video.
Speed Ramping In Filmora
The method is crucial in changing the tempo of the film and, as a consequence, creating a dramatic impression. The film’s required speed is achieved by the employment of super-fast visual effects.
When using a camera with a much higher frame rate, the speed ramping approach may provide excellent effects. It aids in the production of the most dramatic impression.
Speed ramping effects are available in six presets, which include Montage, Hero Moment, Bullet Time, Jumper, and Flash In, all of which will add a theatrical element to your movie that will leave your viewers in awe.
Creative pros can swiftly and effectively speed up a movie with Wondershare Filmora. However, in order to get the intended results, it is essential to completely understand and adhere to the approach.
Wondershare Filmora 11 has a variety of tools and features to help you create a visually stunning film in a short period of time. Its Instant Mode allows you to produce a video creation from start to finish in less than 5 minutes.
Steps
- Download and Install Filmora. Launch the application on your system.
- Navigate to the chosen video and open it in the program to speed up and lengthen it. You may also add the movie to the interface by dragging and dropping it there.
- When the video appears in the timeline, right-click it to begin playback. As a consequence, a context menu is displayed.
- Select Speed from the pop-up editing window, and then select Speed Ramping from the drop-down menu.
- Alternatively, right-click on the video or audio clip, choose Speed from the drop-down menu, and select Speed Ramping.
- In the Speed Ramping panel, you may adjust the speed or choose from a number of presets, including Montage, Hero Moment, Bullet Time, Jumper, Flash in, and Flash out, to use as templates. You have the option of using the Preset speed ramps. Alternatively, you may personalize your own innovative ones.
- Move the play head to the point where you wish to increase or decrease the speed of the video or audio. Then, to add speed keyframes, choose the Add icon from the toolbar. The video or audio clips will be marked as Speed Ramping when the speed ramp has been added by Filmora.
- If you want to delete a keyframe, you can do so by selecting that particular keyframe and selecting the delete button like in the image:
- As we go on to the video keyframe speed adjustment, just slide the keyframe dot upward or downward to alter the point speed of the movie. Aside from that, you can keep the audio pitch constant regardless of how fast or slow the video is moving.
- The settings will be saved if you are pleased with them after you make the necessary modifications. In any other case, you may use the Reset button to return to the original configuration.
- When you’ve finished your work, go to the “File” panel and choose “Save Project” from the list of options that display. Change the name of the project and then click “Save.”
- Additionally, the movie may be exported using Filmora’s “Export” feature; just choose “Export” and then specify a new name for the file. The video may be exported to a device, a system, or even YouTube. After that, choose “Export.”
Speed Ramping Tips
- High Frame Rate: The frame rate is an important consideration when it comes to speed ramping. If you wish to slow down the video after it’s been recorded, shoot it at a frame rate higher than 60 frames per second. When a video is slowed down, there should be enough frames to guarantee that the video passes the 24 frames per second threshold frame rate.
- Choose The Appropriate Frame Resolution: Another possibility is to modify your video’s frame resolution. The tip has the ability to edit the clip’s properties from the Slowing down the video is achieved by changing the frame rate in the clip’s parameters from 120 to 24 frames per second. As a consequence, the frames will be expanded to the proper frame rate. As a consequence, the video is slowed down but not jerked.
- Purposeful Time Remapping: Instead of keeping the same pace throughout the film, a deliberate speed ramp should be implemented. A video has emotional, mysterious, exciting, and slow-motion Why is this the case? The usage of the same video speed throughout the film may have a negative influence on the watching experience. As a result, it is critical that videos be separated into genres and that the tempo of the videos is modified accordingly.
Conclusion
The use of the ideal cinematic effect at the right time boosts the audience and engagement with the material. This respective article explored speed ramping in-depth and oughts to teach creative pros how to slow down a video and speed up a movie. It covers speed raming in premiere pro and then moves toward Wondershare Filmora which seems a bit easier. Wondershare Filmora is a good choice for completing the task as quickly as possible. You will have access to all of the effects and tools mentioned, as well as the ability to keep the audio pitch consistent throughout the effect, which is critical while altering the video speed.
How to Create a Clideo Slideshow
How to Create a Clideo Slideshow
An easy yet powerful editor
Numerous effects to choose from
Detailed tutorials provided by the official channel
A clideo slideshow is an interesting trend of precise content delivery. Stay here to understand the working essentials of creating Clideo presentations with utmost ease!
In this article
01 [How Do You Make a Slideshow on Clideo?](#Part 1)
02 [Best 5 Tip to Make a Slideshow with Music](#Part 2)
03 [How to Make a Photo Slideshow on Mac?](#Part 3)
Part 1 How Do You Make a Slideshow on Clideo?
Deciding to create slideshow presentations for a graphic design oriented personal or professional concern lands you across a plethora of choices in the IT market in the shape of high end application software program and tools. No doubt, these are leaders in their task; however, the online slideshow makers available across the web are no less.
Paying attention to the same, let us focus our discussion on how does the Clideo slideshow maker tool work to adhere the aforesaid concern. Talking a bit about the credibility of the online program, the tool grants you the flexibility of creating amazing slideshow movies and presentations from images, video clips and recordings, while allowing you to complement the same with the most upbeat and suitable background music.
Additional appeals of the online include the latter’s free availability and extensive device compatibility to work affordably well with all your Windows and MacOS supported desktops, laptops and PCs, along with Android and iOS compatible smartphones and tablets. All you need is an internet connection to launch the tool in your favorite web browser and that’s how you can step into the creation process right away.
Let us now look through the process of creating slideshows in the Clideo tool using a set of still images in the following section:
Step 1: Launch the Tool
Start with navigating to the official Clideo website in any of your preferred web browsers and launch the online slideshow maker tool in your device.

Step 2: Upload Image Files
The tool’s launch screen displays the ‘Choose Files’ tab in blue, which you can click on to upload the desired image files to the Clideo timeline while selecting them from your device gallery. To select and upload images from your Dropbox or Google Drive accounts, click on the ‘Upside Arrow’ in the ‘Choose Files’ tab.

The tool supports a decent variety of image formats to work with, like, JPG, JPEG, PNG, GIF, TIFF, etc., thus letting you escape the notch of sticking to a specific file format. You can also choose to either upload the image files all at once, or add them at a later stage, as per your requirement.
Step 3: Let’s Get Creating!
Once the selected images get uploaded on the editor timeline of the tool, you can preview them in the editor workspace. You can change the sequence of appearance of the images by dragging and dropping their thumbnails at respective places within the editor timeline or delete them by selecting the image and clicking the ‘X’ symbol.
You can additionally, choose to add extra clips by tapping the ‘Add More Videos’ option in the timeline. As an alternative, navigate to the panel at the right and hit the ‘Add More Files’ button at the top.

Step 4: Crop the Media Files
Below the ‘Add More Files’ option in the right panel, you can see the ‘Crop Options’ tab. You can work with the crop tool to adjust the size of the added videos and images so that they fit in the borders of the media frames. You are further allowed to select a suitable aspect ratio and zoom the media files in and out to obtain the affordable screen size. This would come handy when you proceed to share your slideshow across various media platforms, like, Instagram, Facebook, YouTube, etc., each of which has a different screen resolution and size.

Step 5: Time Your Slides
You can decide play duration for your media files by navigating to the same right panel and hitting the ‘Image Duration’ tab and setting the required parameters in the dropdown list that appears next. Here, you can adjust the time settings of the images in your slideshow presentations, however, the video play durations are preset and you are not allowed to change them. If you wish to have a smooth play of the presentation slides, do not forget to tick the ‘Crossfade’ checkbox.

Step 6: Add a Suitable Background Music
The last one in the right panel is the ‘Add Audio’ option which you can use to supplement your presentation with the coolest and the most suitable background music. All you need to do is, hit the aforesaid tab and browse through your device’s media gallery to select an audio file of your choice. To add a music file that’s belongs to your online storage, click on the ‘Upside Arrow’ in the tab and proceed to make a selection or add a link of the desired audio file.

Once you have added the track, you are permitted to trim, adjust volume settings and loop the track if required under the ‘Audio Options’ tab.

Step 7: Duration, Size and Format Adjustments
Navigate to the left side ‘Options Panel’ at the bottom of the editor workspace, where you can set the different parameters of your slideshow size and run time. You can also choose to generate the output presentation in a specific file format if required, using the ‘Format Picker’ tool. When you are satisfied with everything, reach to and hit the ‘Export’ button at the extreme right.

Step 8: Save Your Creation
Completion of Step 7 will take you to the ‘Slideshow Save’ interface of the video editor tool. Here, you can preview your slideshow and save it to your device if everything seems fine. To save your output file, click on the ‘Download’ tab. If however, you need to make any further changes to the presentation, hit the ‘Edit’ tab to get directed back to the editor workspace.

Part 2 Best 5 Tip to Make a Slideshow with Music
While the visual elements count to be the major attractions of a slideshow presentation, subtle background music can work to bind the audience with the rhythm and flow of the presentation. Having learnt about the fundamentals of creating over the top slideshows with Clideo, let us move ahead with working on some of the best tips to complement your already awesome graphic slideshow artwork with the most appealing audio in the following section:
01Select a Royalty Free Music Plan
Adding suitable background music can uplift the appeal of your slideshow presentation to greater extents. While most of the slideshow creator programs available today are equipped with extensive varieties of inbuilt audio for visibly any presentation setting, you can also opt to choose your own music plan in case you don’t get anything specific.
However, you do need to take care of certain factors when deciding on your music plan, most importantly, the pricing concerns. Go for selecting a royalty free, unlimited audio license via an affordable paid subscription from recognized and leading music hubs and online audio websites.
02Browse the Recommended Audio Choices
When looking through the diversity of music options available on any audio website, do not forget to pay attention to the user and website recommended playlists and music categories. These tend to have a collection of the most preferred audio choices and there are high chances of you getting your exact music piece from within these playlists.
You can further, refine your search within these categories by setting filters of genre and style, in case you have a clear idea of what you exactly need, thus rescuing you from the hustle of browsing through a never ending list of audio files.

03Synchronize the Slideshow Music and the Contents
The credibility of your background audio lies in adding additional spark and integrity to the stills and videos of the presentation. When selecting the music elements for your slideshow, make sure that your choices are well in accordance with the content and mood of your creation. The most important aspect here is that the music you choose to add should complement the story being depicted, while captivating the viewer’s attention.
Avoid choosing a random audio just because you have heard a buzz of the same on popular platforms or a peer recommendation, lest the contents and background score of your presentation may take opposite paths and disrupt the information flow, while resulting in a distracted audience. To escape the hustle, you may seek help from the diversity of stock audio websites for a keyword and category oriented music search.
If you are interested in adding depth to your background audio, consider using the stem files of a selected song to obtain the latter’s instrumental note recordings. This will help to add a unique layer to the song, while uplifting its mood to a different level.

04Curate and Test
When you are done with creating the perfect soundtrack for your presentation with the choicest of music, proceed to narrow down your list to a finer selection via curating the elements of the soundtrack. All you need to do is, add each track to the presentation elements, while taking care that every inclusion matches with the content it is supposed to complement.
Take care to restrict your choices in line with the length of the slideshow; else you may end up stuffing the footage with too many music pieces, leading to a miscoordinated arrangement. Check if you need just a single song or a complete soundtrack.

● Sound Proof the Final Selection
When you are happy with your work, move ahead with running a mock slideshow to have an assurance of everything being at its respective place. Take note of the music flow to be in cohesion with the other elements of the presentation, check the audio quality, resolution, etc., properties and make changes where necessary. When all seems well, you are ready to share your Clideo slideshow with friends and family on social media handles and communities.
Part 3 How to Make a Photo Slideshow on Mac?
Creating a slideshow is among the most recent trends of infotainment and content sharing. Talking of the creation tools, while most of them turn to be platform specific, others tend to have limitless device compatibility. The Clideo Slideshow maker online tool is one such utility that allows you to design slideshow presentations on any device of your exclusive preference.
Having said that, let us try hands at understanding the slideshow creation process of the aforesaid tool on a MacOs supported device in the following section:
Step 1: Launch the Clideo Online Tool
In any of your preferred Mac supported device, navigate to the home site of the Clideo slideshow maker tool using your desired web browser and move ahead with launching the same in your system.

Step 2: Upload Your Media
In the aforesaid slideshow maker’s opening interface, click on the ‘Choose Files’ tab to select and add the required media files from your Mac device’s local gallery. You can also opt for a ‘Drag and Drop’ of the desired files from your system to the tool’s editor workspace. However, if you wish to make an upload from your online storage accounts like that of Google Drive or Dropbox, hover to the ‘Upside Arrow within the ‘Choose Files’ tab.

Step 3: Adding Extra Files
If you want to add some more media files to the slideshow, navigate to the ‘Options Panel’ to the right of the editing workspace and click on ‘Add More Files’ at the top. Repeat Step 1 here to upload the image and video files in a similar way. Once finished, you can proceed to change the file sequence, delete any unwanted selection or click on ‘Add More Videos’ in the timeline to directly add more video files to your presentation.

Step 4: Crop Your Selections
The left side ‘Options Panel’ further consists of ‘Crop Options’ from where you can adjust the size of your images and videos to a particular aspect ratio, or fit them to a custom screen size using the ‘Crop and Zoom’ option. To add borders to the sides of your slideshow images, click on the ‘Fit With Border’ option.

Step 5: Play Duration Adjustments
Below the ‘Crop Options’, lies the ‘Image Duration’ tab, which you can click on to set the time frames of at will be applicable to all the media files. Also, click within the ‘Crossfade’ checkbox to ensure a seamless transition between successive slides.

Step 6: Add a Background Audio
Once again, navigate to the left side ‘Options Panel’ and tap the ‘Add Audio’ tab at the bottom to upload the desired audio files from your system to the editor timeline. You can also add music files from your online storage accounts, such as, Dropbox, Google Drive, etc.

To extract a piece of the audio for slideshow inclusion, click on the ‘Trim Audio’ tab under ‘Audio Options’. You can now select the desired audio fragment either by adjusting the yellow markers at the ends of the music clip, or specify the time stamps of the required fragment in the respective fields. The volume adjustments for both audio as well as video tracks can be made using the ‘Volume Bars’ icon.

Step 7: Output Format Selection and Export
Navigate to the format options beneath the editor timeline to select a desired output format for your slideshow. You can choose from MOV, API, MKV, MP4, WMV, and a number of other file formats. When you are happy with your work, navigate to and tap the ‘Export’ button at the extreme right corner of the editor workspace.

Step 8: Preview and Download Your Presentation
When you are done with everything, move ahead to watch a preview of your work to ascertain that all the aspects of the slideshow are just perfect. If you need to add further changes, hit the ‘Edit’ tab to head back to the editing workspace. In an otherwsise case, proceed to tap the ‘Download’ button for saving the slideshow either to your device gallery or an online storage account.

Designing Stunning Slideshow Presentataions in Filmora
When browsing through reliable software alternatiaves ez start your slideshow creation streak, picking any member of the Wondershare Filmora Video Editor franchise would indeed be a smart choice, owing tso the fact that, the aforesaid program promises to adhere to the most specificuser needs and the large scale disverity in creator preferences.
For Win 7 or later (64-bit)
For macOS 10.12 or later
Diving into the feature rich library of the software, you get to access a plethora of preset and custsomizable audio-visual effects, transitions, filters, background themes and templates; and a huge storehouse of additional elements, that are all set to add the jaw dropping spark to your otherwise customary slideshows.
The later versions of the editor program are upgraged to include a divserity of high end editing effects, like the Green Screen and AI based transitions that wosrk towards delivering a high quality professional slideshow output to enure an auadience appraisal that is simply wow!
● Ending Thoughts →
● The Clideo slideshow maker tool is anexcellent choice to design over the top slideshow presentations on an online platform.
●> Using Clideo, you can choose to create slideshows on any of your preferred devices, like, Mac, Windows, etc.
● If you are interested in looking for additional alternatives of slideshow creator software, the Wondershare Filmora franchise is something to count upon.
A clideo slideshow is an interesting trend of precise content delivery. Stay here to understand the working essentials of creating Clideo presentations with utmost ease!
In this article
01 [How Do You Make a Slideshow on Clideo?](#Part 1)
02 [Best 5 Tip to Make a Slideshow with Music](#Part 2)
03 [How to Make a Photo Slideshow on Mac?](#Part 3)
Part 1 How Do You Make a Slideshow on Clideo?
Deciding to create slideshow presentations for a graphic design oriented personal or professional concern lands you across a plethora of choices in the IT market in the shape of high end application software program and tools. No doubt, these are leaders in their task; however, the online slideshow makers available across the web are no less.
Paying attention to the same, let us focus our discussion on how does the Clideo slideshow maker tool work to adhere the aforesaid concern. Talking a bit about the credibility of the online program, the tool grants you the flexibility of creating amazing slideshow movies and presentations from images, video clips and recordings, while allowing you to complement the same with the most upbeat and suitable background music.
Additional appeals of the online include the latter’s free availability and extensive device compatibility to work affordably well with all your Windows and MacOS supported desktops, laptops and PCs, along with Android and iOS compatible smartphones and tablets. All you need is an internet connection to launch the tool in your favorite web browser and that’s how you can step into the creation process right away.
Let us now look through the process of creating slideshows in the Clideo tool using a set of still images in the following section:
Step 1: Launch the Tool
Start with navigating to the official Clideo website in any of your preferred web browsers and launch the online slideshow maker tool in your device.
Step 2: Upload Image Files
The tool’s launch screen displays the ‘Choose Files’ tab in blue, which you can click on to upload the desired image files to the Clideo timeline while selecting them from your device gallery. To select and upload images from your Dropbox or Google Drive accounts, click on the ‘Upside Arrow’ in the ‘Choose Files’ tab.
The tool supports a decent variety of image formats to work with, like, JPG, JPEG, PNG, GIF, TIFF, etc., thus letting you escape the notch of sticking to a specific file format. You can also choose to either upload the image files all at once, or add them at a later stage, as per your requirement.
Step 3: Let’s Get Creating!
Once the selected images get uploaded on the editor timeline of the tool, you can preview them in the editor workspace. You can change the sequence of appearance of the images by dragging and dropping their thumbnails at respective places within the editor timeline or delete them by selecting the image and clicking the ‘X’ symbol.
You can additionally, choose to add extra clips by tapping the ‘Add More Videos’ option in the timeline. As an alternative, navigate to the panel at the right and hit the ‘Add More Files’ button at the top.
Step 4: Crop the Media Files
Below the ‘Add More Files’ option in the right panel, you can see the ‘Crop Options’ tab. You can work with the crop tool to adjust the size of the added videos and images so that they fit in the borders of the media frames. You are further allowed to select a suitable aspect ratio and zoom the media files in and out to obtain the affordable screen size. This would come handy when you proceed to share your slideshow across various media platforms, like, Instagram, Facebook, YouTube, etc., each of which has a different screen resolution and size.
Step 5: Time Your Slides
You can decide play duration for your media files by navigating to the same right panel and hitting the ‘Image Duration’ tab and setting the required parameters in the dropdown list that appears next. Here, you can adjust the time settings of the images in your slideshow presentations, however, the video play durations are preset and you are not allowed to change them. If you wish to have a smooth play of the presentation slides, do not forget to tick the ‘Crossfade’ checkbox.
Step 6: Add a Suitable Background Music
The last one in the right panel is the ‘Add Audio’ option which you can use to supplement your presentation with the coolest and the most suitable background music. All you need to do is, hit the aforesaid tab and browse through your device’s media gallery to select an audio file of your choice. To add a music file that’s belongs to your online storage, click on the ‘Upside Arrow’ in the tab and proceed to make a selection or add a link of the desired audio file.
Once you have added the track, you are permitted to trim, adjust volume settings and loop the track if required under the ‘Audio Options’ tab.
Step 7: Duration, Size and Format Adjustments
Navigate to the left side ‘Options Panel’ at the bottom of the editor workspace, where you can set the different parameters of your slideshow size and run time. You can also choose to generate the output presentation in a specific file format if required, using the ‘Format Picker’ tool. When you are satisfied with everything, reach to and hit the ‘Export’ button at the extreme right.
Step 8: Save Your Creation
Completion of Step 7 will take you to the ‘Slideshow Save’ interface of the video editor tool. Here, you can preview your slideshow and save it to your device if everything seems fine. To save your output file, click on the ‘Download’ tab. If however, you need to make any further changes to the presentation, hit the ‘Edit’ tab to get directed back to the editor workspace.
Part 2 Best 5 Tip to Make a Slideshow with Music
While the visual elements count to be the major attractions of a slideshow presentation, subtle background music can work to bind the audience with the rhythm and flow of the presentation. Having learnt about the fundamentals of creating over the top slideshows with Clideo, let us move ahead with working on some of the best tips to complement your already awesome graphic slideshow artwork with the most appealing audio in the following section:
01Select a Royalty Free Music Plan
Adding suitable background music can uplift the appeal of your slideshow presentation to greater extents. While most of the slideshow creator programs available today are equipped with extensive varieties of inbuilt audio for visibly any presentation setting, you can also opt to choose your own music plan in case you don’t get anything specific.
However, you do need to take care of certain factors when deciding on your music plan, most importantly, the pricing concerns. Go for selecting a royalty free, unlimited audio license via an affordable paid subscription from recognized and leading music hubs and online audio websites.
02Browse the Recommended Audio Choices
When looking through the diversity of music options available on any audio website, do not forget to pay attention to the user and website recommended playlists and music categories. These tend to have a collection of the most preferred audio choices and there are high chances of you getting your exact music piece from within these playlists.
You can further, refine your search within these categories by setting filters of genre and style, in case you have a clear idea of what you exactly need, thus rescuing you from the hustle of browsing through a never ending list of audio files.
03Synchronize the Slideshow Music and the Contents
The credibility of your background audio lies in adding additional spark and integrity to the stills and videos of the presentation. When selecting the music elements for your slideshow, make sure that your choices are well in accordance with the content and mood of your creation. The most important aspect here is that the music you choose to add should complement the story being depicted, while captivating the viewer’s attention.
Avoid choosing a random audio just because you have heard a buzz of the same on popular platforms or a peer recommendation, lest the contents and background score of your presentation may take opposite paths and disrupt the information flow, while resulting in a distracted audience. To escape the hustle, you may seek help from the diversity of stock audio websites for a keyword and category oriented music search.
If you are interested in adding depth to your background audio, consider using the stem files of a selected song to obtain the latter’s instrumental note recordings. This will help to add a unique layer to the song, while uplifting its mood to a different level.
04Curate and Test
When you are done with creating the perfect soundtrack for your presentation with the choicest of music, proceed to narrow down your list to a finer selection via curating the elements of the soundtrack. All you need to do is, add each track to the presentation elements, while taking care that every inclusion matches with the content it is supposed to complement.
Take care to restrict your choices in line with the length of the slideshow; else you may end up stuffing the footage with too many music pieces, leading to a miscoordinated arrangement. Check if you need just a single song or a complete soundtrack.
● Sound Proof the Final Selection
When you are happy with your work, move ahead with running a mock slideshow to have an assurance of everything being at its respective place. Take note of the music flow to be in cohesion with the other elements of the presentation, check the audio quality, resolution, etc., properties and make changes where necessary. When all seems well, you are ready to share your Clideo slideshow with friends and family on social media handles and communities.
Part 3 How to Make a Photo Slideshow on Mac?
Creating a slideshow is among the most recent trends of infotainment and content sharing. Talking of the creation tools, while most of them turn to be platform specific, others tend to have limitless device compatibility. The Clideo Slideshow maker online tool is one such utility that allows you to design slideshow presentations on any device of your exclusive preference.
Having said that, let us try hands at understanding the slideshow creation process of the aforesaid tool on a MacOs supported device in the following section:
Step 1: Launch the Clideo Online Tool
In any of your preferred Mac supported device, navigate to the home site of the Clideo slideshow maker tool using your desired web browser and move ahead with launching the same in your system.
Step 2: Upload Your Media
In the aforesaid slideshow maker’s opening interface, click on the ‘Choose Files’ tab to select and add the required media files from your Mac device’s local gallery. You can also opt for a ‘Drag and Drop’ of the desired files from your system to the tool’s editor workspace. However, if you wish to make an upload from your online storage accounts like that of Google Drive or Dropbox, hover to the ‘Upside Arrow within the ‘Choose Files’ tab.
Step 3: Adding Extra Files
If you want to add some more media files to the slideshow, navigate to the ‘Options Panel’ to the right of the editing workspace and click on ‘Add More Files’ at the top. Repeat Step 1 here to upload the image and video files in a similar way. Once finished, you can proceed to change the file sequence, delete any unwanted selection or click on ‘Add More Videos’ in the timeline to directly add more video files to your presentation.
Step 4: Crop Your Selections
The left side ‘Options Panel’ further consists of ‘Crop Options’ from where you can adjust the size of your images and videos to a particular aspect ratio, or fit them to a custom screen size using the ‘Crop and Zoom’ option. To add borders to the sides of your slideshow images, click on the ‘Fit With Border’ option.
Step 5: Play Duration Adjustments
Below the ‘Crop Options’, lies the ‘Image Duration’ tab, which you can click on to set the time frames of at will be applicable to all the media files. Also, click within the ‘Crossfade’ checkbox to ensure a seamless transition between successive slides.
Step 6: Add a Background Audio
Once again, navigate to the left side ‘Options Panel’ and tap the ‘Add Audio’ tab at the bottom to upload the desired audio files from your system to the editor timeline. You can also add music files from your online storage accounts, such as, Dropbox, Google Drive, etc.
To extract a piece of the audio for slideshow inclusion, click on the ‘Trim Audio’ tab under ‘Audio Options’. You can now select the desired audio fragment either by adjusting the yellow markers at the ends of the music clip, or specify the time stamps of the required fragment in the respective fields. The volume adjustments for both audio as well as video tracks can be made using the ‘Volume Bars’ icon.
Step 7: Output Format Selection and Export
Navigate to the format options beneath the editor timeline to select a desired output format for your slideshow. You can choose from MOV, API, MKV, MP4, WMV, and a number of other file formats. When you are happy with your work, navigate to and tap the ‘Export’ button at the extreme right corner of the editor workspace.
Step 8: Preview and Download Your Presentation
When you are done with everything, move ahead to watch a preview of your work to ascertain that all the aspects of the slideshow are just perfect. If you need to add further changes, hit the ‘Edit’ tab to head back to the editing workspace. In an otherwsise case, proceed to tap the ‘Download’ button for saving the slideshow either to your device gallery or an online storage account.
Designing Stunning Slideshow Presentataions in Filmora
When browsing through reliable software alternatiaves ez start your slideshow creation streak, picking any member of the Wondershare Filmora Video Editor franchise would indeed be a smart choice, owing tso the fact that, the aforesaid program promises to adhere to the most specificuser needs and the large scale disverity in creator preferences.
For Win 7 or later (64-bit)
For macOS 10.12 or later
Diving into the feature rich library of the software, you get to access a plethora of preset and custsomizable audio-visual effects, transitions, filters, background themes and templates; and a huge storehouse of additional elements, that are all set to add the jaw dropping spark to your otherwise customary slideshows.
The later versions of the editor program are upgraged to include a divserity of high end editing effects, like the Green Screen and AI based transitions that wosrk towards delivering a high quality professional slideshow output to enure an auadience appraisal that is simply wow!
● Ending Thoughts →
● The Clideo slideshow maker tool is anexcellent choice to design over the top slideshow presentations on an online platform.
●> Using Clideo, you can choose to create slideshows on any of your preferred devices, like, Mac, Windows, etc.
● If you are interested in looking for additional alternatives of slideshow creator software, the Wondershare Filmora franchise is something to count upon.
Also read:
- Updated Minecraft Pixel Art A Complete Guide for Die-Hard Fans for 2024
- 2024 Approved Online Calculate and Change Video Aspect Ratio
- New Minecraft Pixel Art Is a Trending Subject, and They Simply Consist of In-Game Pixel Artworks, Besides the Minecraft Houses, Farms, or Cities. Lets Explore the Fantastic World of Minecraft Pixel Art for 2024
- New In 2024, Tutorial Guides for Video Maker with Song
- New Ultimate Guide on How To Plan and Storyboard a Music Video
- Updated Do You Know You Dont Need a PC or Mac to Apply LUTs on Your Media? You Can Use Many Smartphone Apps to Apply LUTs, Such as 3DLUT Mobile App
- Updated Best Software or Website to Convert Video Format
- 2024 Approved Cropping Video in VLC Step by Step
- Updated One of the Latest Tools for Editing Video and Images Is AI Composite Video App Which Is Popular Among Users. Learn All About This Tool and Its Functioning
- Updated How To Create 3D Text In Video for 2024
- New In 2024, Do You Know What Is Motion Blur in Fortnite? Read This Article to Find Out How to Apply Motion Blur in Fortnite Efficiently and with Ease
- New How to Enable and Use OBS Zoom Camera for 2024
- Updated Step by Step to Crop a Video Using Lightworks
- Updated 2024 Approved Using Montage In Movies | Learn to Use Montage With Movies
- Introduction to The Best Cinematic LUTs in The Market for 2024
- New 2024 Approved Learn 4 Proven Methods for Creating Engaging and Memorable Recap Videos. Elevate Your Event Coverage and Engage Your Audience with These Tips and Tricks
- Updated In 2024, How to Create the Stranger Things Upside Down Effect
- Being a Content Creator Means Creating a Slow-Mo at some Point. Study This Piece to Learn How to Play a Video in Slow Motion on iPhone
- In 2024, List of Supported Whatsapp Video Format You May Want to Know
- Updated 4 Solutions to Crop a Video on Android Easily for 2024
- In 2024, The Complete Guide to Make a Text Collage
- Updated Separate Audio From Video in DaVinci Resolve Step by Step for 2024
- New In 2024, Being a Content Creator Means Creating a Slow-Mo at some Point. Study This Piece to Learn How to Play a Video in Slow Motion on iPhone
- Updated Top 10 3D Slideshow Software Review
- Read This Review to Learn Everything You Need to Know About Leeming LUT Pro and How to Apply Pro LUTs Using Different Video Editors for 2024
- Updated Final Cut Pro - How to Download and Install It
- How Important It Is to Perform Color Correction to Your Video? Here Is a Solution with After Effects Color Correction with Illustrative Videos for 2024
- If You Want to Color Grading Your Video, Adobe Lightroom Will Be the Right Choice. This Article Will Teach You How to Use Lightroom to Apply Color Grading to Videos with Ease for 2024
- New Do You Use Premiere Pro and Want to Learn How to Change a Videos Frame Rate Using the Tool? Here Are the Steps that You Need to Follow
- How to Make Video Fade to Black in Movie Maker Easily for 2024
- Do You Want Your Photos and Videos to Give an Old and Vintage Feel? Here Are some Vintage LUTs Premiere Pro Free and Paid Options Available to Download
- New Top List of Best VHS Video Effect Makers for 2024
- New How to Zoom Picture in Picture Easy Solution
- Updated How to Enable and Use OBS Zoom Camera for 2024
- New If You Do Not Know How to QuickTime Trim Video Clips, You Are in the Right Place. We Have Provided Information that Will Help You Trim Videos with This Application and Make Them Engaging for Viewers
- Ways to Learn Discord Game Bots – Even if Youre Just Starting Out 20
- New Easy Ways to Create Procreate GIFs for 2024
- What is Fake GPS Location Pro and Is It Good On Vivo V29 Pro? | Dr.fone
- Top 10 Vivo T2 Pro 5G Android SIM Unlock APK
- In 2024, iPogo will be the new iSpoofer On Realme 11X 5G? | Dr.fone
- In 2024, AddROM Bypass An Android Tool to Unlock FRP Lock Screen For your Infinix Note 30i
- New 2024 Approved A Guide to Unlock Descript Text-to-Speech Features in Detail
- In 2024, A Step-by-Step Guide on Using ADB and Fastboot to Remove FRP Lock on your Xiaomi Civi 3
- 6 Solutions to Fix Error 505 in Google Play Store on Infinix Smart 8 HD | Dr.fone
- Top 10 Best Spy Watches For your Realme 10T 5G | Dr.fone
- 3uTools Virtual Location Not Working On Oppo Reno 11 Pro 5G? Fix Now | Dr.fone
- Authentication Error Occurred on Vivo Y100i? Here Are 10 Proven Fixes | Dr.fone
- Title: Do You Want Your Photos and Videos to Give an Old and Vintage Feel? Here Are some Vintage LUTs Premiere Pro Free and Paid Options Available to Download for 2024
- Author: Morgan
- Created at : 2024-05-19 05:12:34
- Updated at : 2024-05-20 05:12:34
- Link: https://ai-video-editing.techidaily.com/do-you-want-your-photos-and-videos-to-give-an-old-and-vintage-feel-here-are-some-vintage-luts-premiere-pro-free-and-paid-options-available-to-download-for-2/
- License: This work is licensed under CC BY-NC-SA 4.0.
