:max_bytes(150000):strip_icc():format(webp)/001_best-lgbt-movies-on-netflix-right-now-5069913-92c9bcd3792548908be32c420bc4fa27.jpg)
Easy Guide to Apply Slow Zoom Effects to Videos

Easy Guide to Apply Slow Zoom Effects to Videos
A raw video without any effect will fall flat on its face when it comes to engagement and watch time. Nobody likes watching videos without effects as there is no entertainment value, and the video is not soothing and pleasing to the eyes. That is why effects in videos are extremely important especially when it is a video you are posting on social media to get everyone’s attention. You should definitely consider adding slow zoom effect in your video to make it stand out.
The slow zoom effect is one of the most common but widely loved video effects that work for any video. Human eyes love when there is slow motion effect of panning and zooming into the central or specific portion of a video. The slow zoom in effect is extremely popular among TikTok videos. We will illustrate how to apply slow zoom effect to your video on your smartphone as well as on your computer.
Part 1. How to create slow zoom-in effect in Filmora
If you want to add slow zoom to any recorded video on your computer, you will need a dedicated video editor. There are many popular video editors available where slow zoom effect is not available. We recommend Wondershare Filmora which is a professional video editor that is available for Windows and Mac users. You will need to combine slow motion and keyframe to achieve the desired slow zoom effect. Here are the steps on how to create slow zoom in effect for your videos.
Free Download For Win 7 or later(64-bit)
Free Download For macOS 10.14 or later
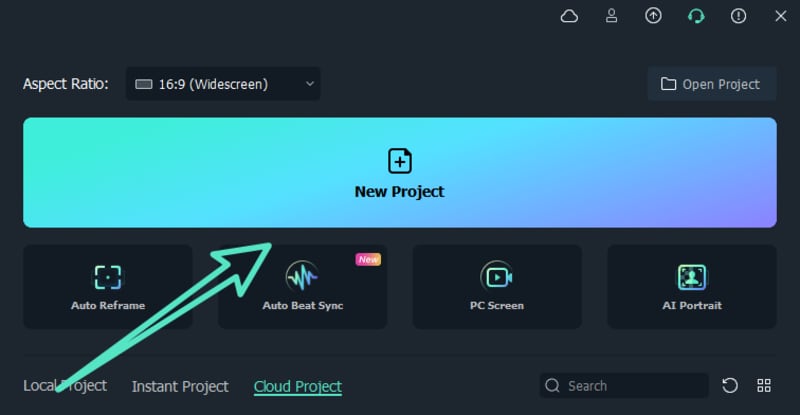
Step1 Download and install Wondershare Filmora . Launch the application and click on New Project option from the welcome screen.
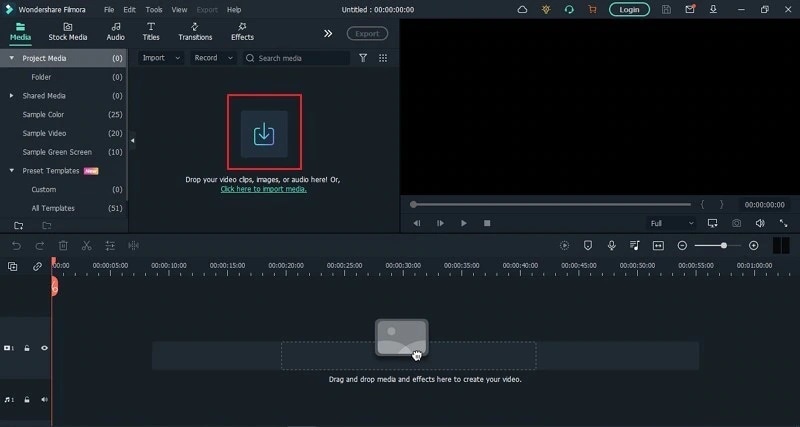
Step2 Drag and drop your video in Project Media folder. Thereafter, drag and drop the video into the Timeline.
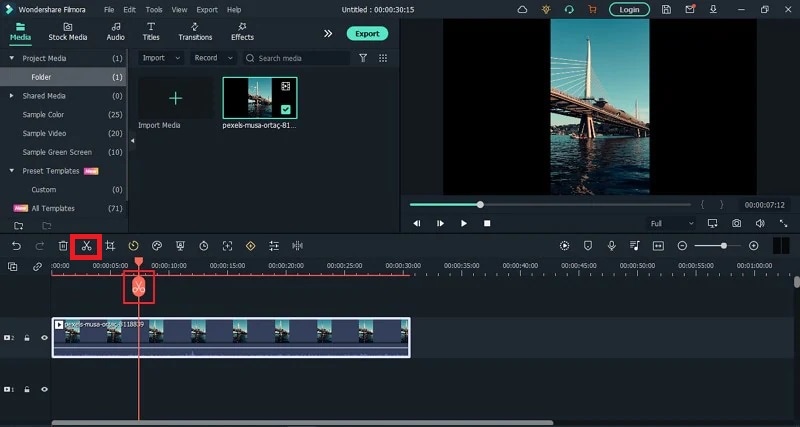
Step3 Put the red header on the beginning part of the clip that you want to cut off and click on Cut(Scissor) icon. Then put the red header on the end part of the clip and click on Cut icon again. You should now have the separated clip for applying slow zoom effect.
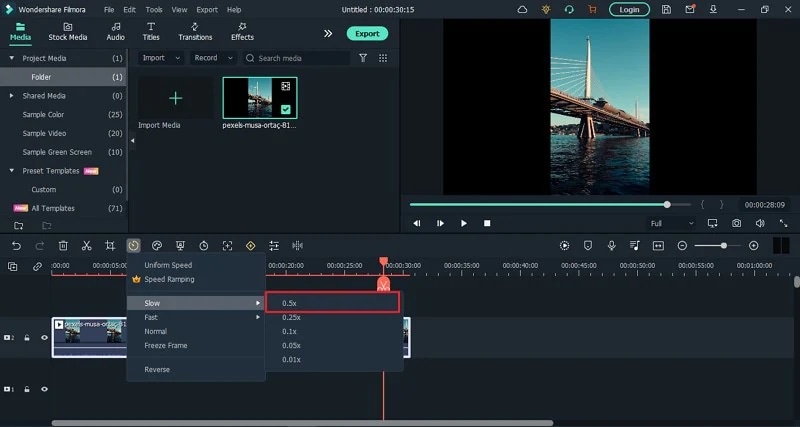
Step4 Select the separated clip and click on Speed icon. Go to Slow option and select the speed according to the slowness of zooming you want.
Step5 Now you have to add multiple keyframes so that the slow zoom effect is smooth and soothing. Right-click on the clip, go to Animation and click on Add Animation. Go to Animation tab and then to Customization section.
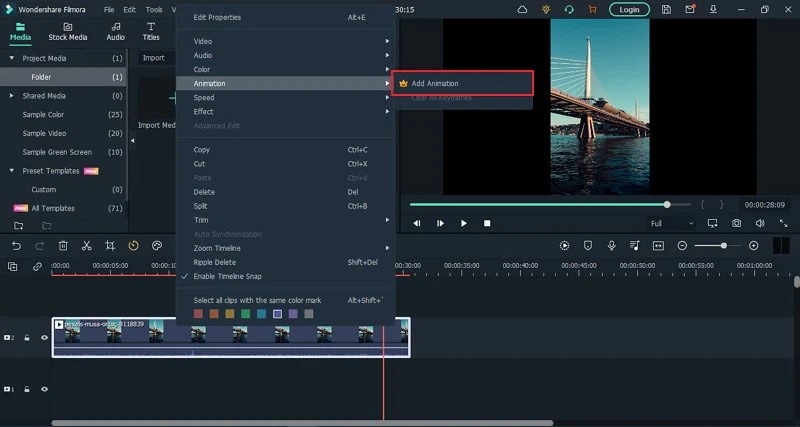
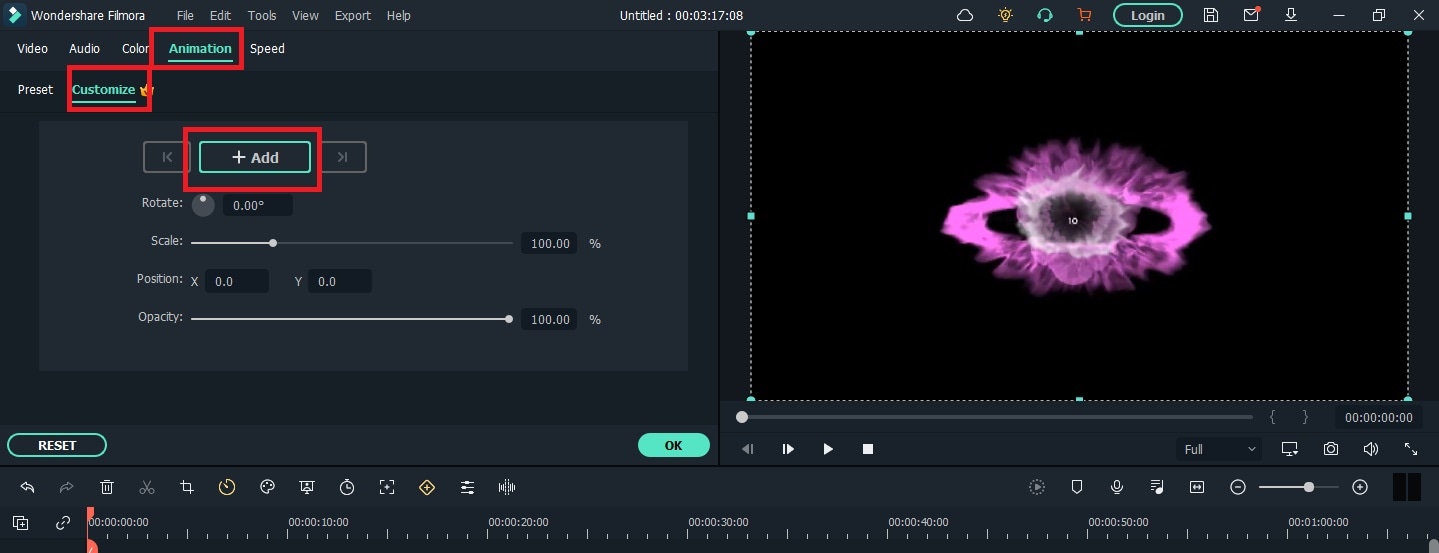
Move the red header to the point where you want a keyframe and click on Add option. Similarly, move the red header slightly farther and add another keyframe. Keep adding like that till you reach the end point.
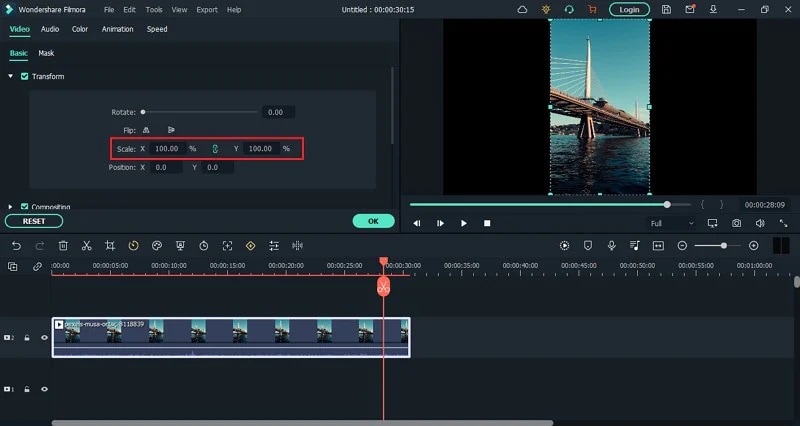
Step6 Double-click on the clip and go to Video> Basic> Transform. Select keyframes and slowly increase the scale slider for each keyframe to apply the zoom effect. Therefore, for every keyframe, zooming will increase gradually and you have already applied slow speed for complete slow zoom effect.
Part 2. How to do the slow zoom in effect on TikTok?
TikTok is one of the most popular short-video sharing platforms among teenagers and young adults. The slow zoom effect has been popularized by TikTokers as they use the effect quite regularly. Naturally, adding slow zoom in effect on your video on TikTok is the easiest. Here are the steps to follow one by one.
Step1 Launch TikTok app and you can shoot your video directly from TikTok. If you have already recorded the video, tap on “+” icon located at the bottom of the app screen and select the video.
Step2 After adding the video, go to Effects> Time. Under Time section, tap on “Slo-Mo” option to add slow-motion effect on your video.
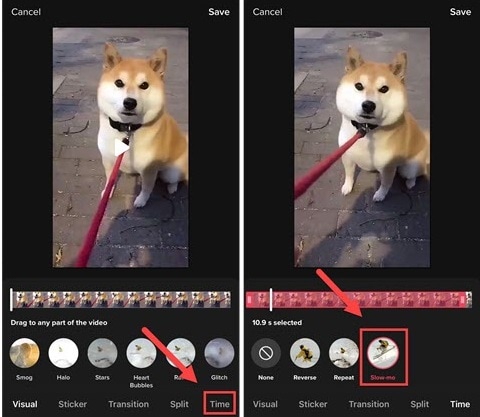
Step3 Go to Visuals and you will find Zoom option. Place the header on the part of the video where you want to place the slow zoom effect. Thereafter, tap and hold Zoom effect so that the effect applies on the video clip. Release the effect where the desired section is covered.
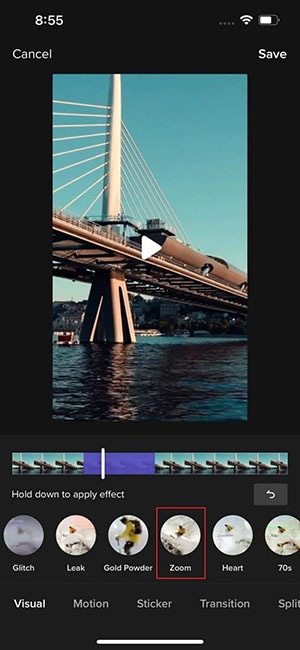
Step4 Tap on Save option and play the video to see slow zoom effect. Tap on Next button and you can share the video on social media platforms as well.

There is another way you can apply slow zoom effect on TikTok. Here are the steps to find and apply slow zoom effect.
Step1 Launch TikTok app and tap on Discover option located at the bottom.

Step2 On the next screen, type “Slow Zoom” on the search bar and tap on Search option.
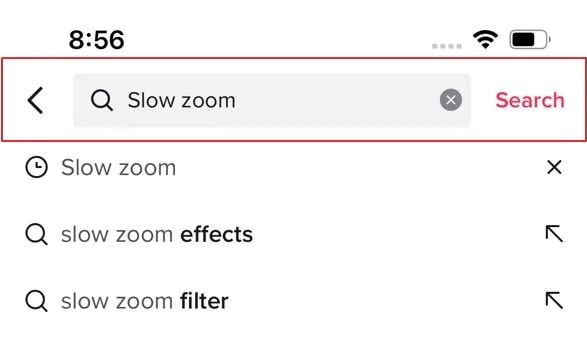
Step3 Now you will see the videos where different TikTok users have already applied slow zoom effect. Tap on Effects Slow Motion to apply the same effect to your video.

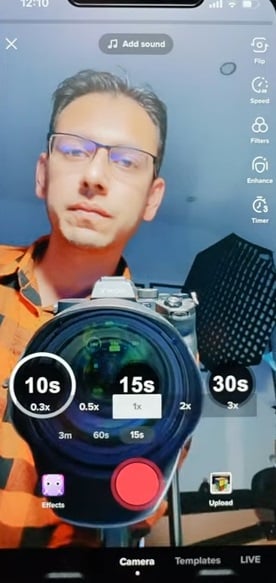
Step4 On the next screen, tap on Try This Effect button. You can select the duration of the zooming of the video you are about to shoot as well the zooming magnification.

Step5 Finally, tap on Record button to capture your video and apply slow zoom effect on the video automatically.
Conclusion
The slow zoom effect is one of the most viral and trending video effects on social media platforms. If you want to add slow zoom effect to your video for a certain portion, you can do the same from your smartphone as well as computer. For Windows and Mac users, we recommend you use Wondershare Filmora .
Free Download For macOS 10.14 or later
Step1 Download and install Wondershare Filmora . Launch the application and click on New Project option from the welcome screen.

Step2 Drag and drop your video in Project Media folder. Thereafter, drag and drop the video into the Timeline.

Step3 Put the red header on the beginning part of the clip that you want to cut off and click on Cut(Scissor) icon. Then put the red header on the end part of the clip and click on Cut icon again. You should now have the separated clip for applying slow zoom effect.

Step4 Select the separated clip and click on Speed icon. Go to Slow option and select the speed according to the slowness of zooming you want.

Step5 Now you have to add multiple keyframes so that the slow zoom effect is smooth and soothing. Right-click on the clip, go to Animation and click on Add Animation. Go to Animation tab and then to Customization section.

Move the red header to the point where you want a keyframe and click on Add option. Similarly, move the red header slightly farther and add another keyframe. Keep adding like that till you reach the end point.

Step6 Double-click on the clip and go to Video> Basic> Transform. Select keyframes and slowly increase the scale slider for each keyframe to apply the zoom effect. Therefore, for every keyframe, zooming will increase gradually and you have already applied slow speed for complete slow zoom effect.

Part 2. How to do the slow zoom in effect on TikTok?
TikTok is one of the most popular short-video sharing platforms among teenagers and young adults. The slow zoom effect has been popularized by TikTokers as they use the effect quite regularly. Naturally, adding slow zoom in effect on your video on TikTok is the easiest. Here are the steps to follow one by one.
Step1 Launch TikTok app and you can shoot your video directly from TikTok. If you have already recorded the video, tap on “+” icon located at the bottom of the app screen and select the video.
Step2 After adding the video, go to Effects> Time. Under Time section, tap on “Slo-Mo” option to add slow-motion effect on your video.

Step3 Go to Visuals and you will find Zoom option. Place the header on the part of the video where you want to place the slow zoom effect. Thereafter, tap and hold Zoom effect so that the effect applies on the video clip. Release the effect where the desired section is covered.

Step4 Tap on Save option and play the video to see slow zoom effect. Tap on Next button and you can share the video on social media platforms as well.

There is another way you can apply slow zoom effect on TikTok. Here are the steps to find and apply slow zoom effect.
Step1 Launch TikTok app and tap on Discover option located at the bottom.

Step2 On the next screen, type “Slow Zoom” on the search bar and tap on Search option.

Step3 Now you will see the videos where different TikTok users have already applied slow zoom effect. Tap on Effects Slow Motion to apply the same effect to your video.

Step4 On the next screen, tap on Try This Effect button. You can select the duration of the zooming of the video you are about to shoot as well the zooming magnification.

Step5 Finally, tap on Record button to capture your video and apply slow zoom effect on the video automatically.

Conclusion
The slow zoom effect is one of the most viral and trending video effects on social media platforms. If you want to add slow zoom effect to your video for a certain portion, you can do the same from your smartphone as well as computer. For Windows and Mac users, we recommend you use Wondershare Filmora .
Need to Learn About Halftone Effects? Learn How to Quickly Create a Halftone Effect in Adobe Photoshop with Simple, Easy-to-Follow Instructions
Halftone is a technique that uses dots to create a deliberate screen-like image and textured effect. In recent years, it has become trendy in digital design.
This effect is often used in magazines, newspapers, and other printed materials. When applied correctly, it can add depth and dimension to an image, resulting in a softer, more pleasing, and appealing look.
So, if you have ever wanted to add interesting effects and textures to your images, but weren’t sure where to start, then keep on reading to discover and learn everything you need to know regarding creating the halftone printing effect in Photoshop.
Without further ado, let’s get started!
What Are Halftone Effects?
Before we know how to create a halftone effect in Photoshop, let’s have a basic understanding of it first.
In the 19th century, William Henry Fox Talbot introduced the halftone screen printing effect to create the illusion of tones in black and white images.
The halftone originated from printers who previously only worked with cyan, magenta, yellow, and black (CMYK ). The solid colors were tiny dots placed together closely with continuous tones that remained unchanged. From the mixing and matching of these four colors, a wide range of colors emerged.
The effect is usually created by putting dots of ink on paper in different sizes and positions. This illusion uses optical bleeding to make the desired impression on the human eye. These color dots act like analog pixels that result in a recognizable image.
For instance, when you look at a pixelated picture and zoom it, you will see missing details. When you zoom out, the photo gets more minor and back to its original form.
Modern Definition and Usage
In the 21st century, the halftone is a static-visual technique applied in print and digital images to create continuous tone imagery using dots that vary in spacing and size to create a gradient effect.
Halftone produces a deliberate screen-like image distortion in different fields, such as pop art, graphic designing, and screen printing, to create nostalgic or vintage effects and make the images more captivating.
How To Use Photoshop To Create Halftone Printing Effect
Below we’ve provided detailed step-by-step guidance on creating a color halftone effect as well as black and white halftone printing effects in Photoshop:
1. How to Create Color Halftone Effect
If you want to create a color halftone effect in Photoshop, do the following steps in a sequence:
Step1 Launch the Photoshop software on your laptop/desktop, and drag and drop the image file on which you want to apply the Halftone effect.
Step2 Click “Filters” in the top toolbar and select the “Pixelate” option from the drop-down menu.
Step3 Click the “Color Halftone” option from the menu. On the new pop-up window, adjust the radius and channel to configure the appearance of the effect.
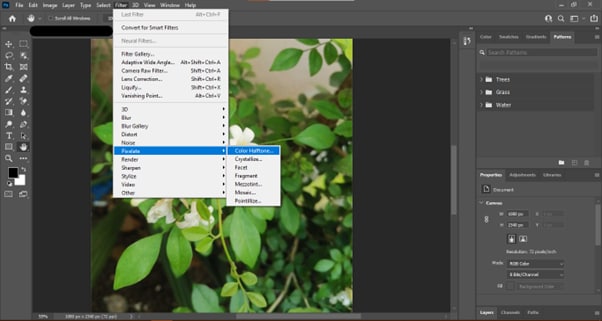
That’s about it! You have successfully created the color halftone effect in Photoshop.
2. How to Create Black and White Halftone Effect
Follow these steps to create black and white halftone printing effect:
Step1 Open your image in Adobe Photoshop and click the “Image” option from the top taskbar.
Step2 Now, click the “Mode” option from the drop-down menu and select “Greyscale” to convert your RGB image.
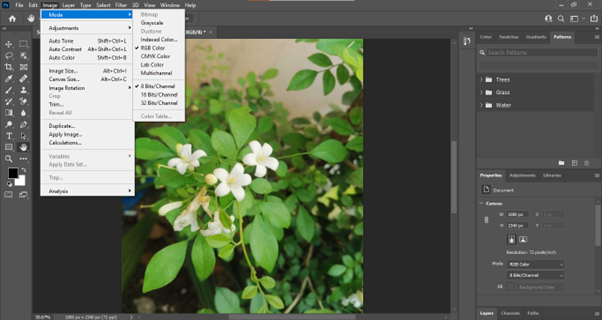
Step3 Again, open the image menu and click the “Mode” option. From the drop-down options, click “Bitmap…”
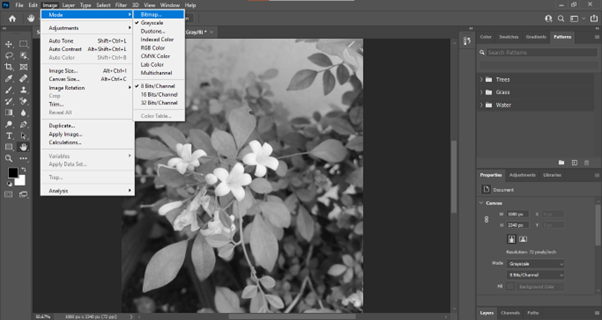
Step4 A dialogue box will open. Set the resolution to 1000, 1,500, or 2,000ppi to create smooth edges on your halftone. Next, click “Halftone Screen…” under the “Method” header and click “OK” to proceed further.
Now, you can adjust the frequency (Lines/Inch), angle (Degrees), and shape (Circle, Line, Cross, etc.) to determine how big your halftone dots are at the maximum diameter and their direction.
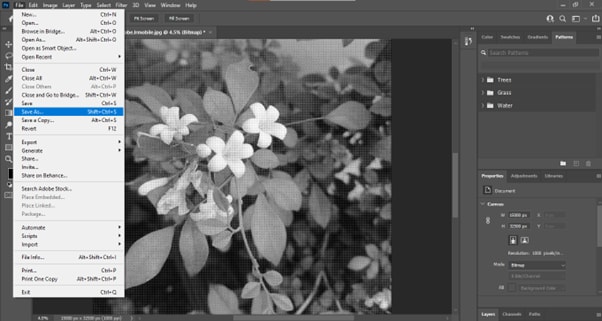
Step5 Finally, click “Files” from the top taskbar, scroll down, and select “Save As…” Save your file as PSD or TIFF and import it to InDesign to apply color.
Video Tutorial - How To Create Halftone Effect | Photoshop 2022
To help you better put the guidance into practice, we have prepared a video tutorial to deepen your understanding.
Two Concepts You Should Know In Creating Halftone Effect
Apart from the practical guidance, there are two important concepts you need to be aware of: radius and channels. Below, we’ve discussed both of them in detail to make things more understandable to you:
1. Radius
Radius refers to the size of the dots that make up the halftone image and is an important factor in determining the overall look of the photo.
You can adjust the sizes of the dots to change the gradient, spacing in between, and blur of the color and image. However, if you want a more subtle effect, you will need to use a smaller radius. For a more dramatic effect, like vintage comics, old ads, or DIY grunge zines., you will need to use a larger radius.
2. Channel
Channel refers to the number of values that are used to create the image. The more values you use, the more details will be visible.
The Channel setting of halftone effects affects how the dots are positioned and overlap. Each Channel is governed by a Screen Angle setting, which is listed in degrees. Changing the value modifies the angle at which Cyan, Magenta, Yellow, and Black dots are added to the pattern. When the dots overlap, a new color is created depending on the combination of the primary colors and black.
Conclusion
In this comprehensive guide, we’ve explored the halftone effect, how it originated and discussed its modern definition and usage. We’ve also provided step-by-step processes to help you create the halftone effect in Photoshop, both colored and black and white.
Furthermore, we discussed two important concepts (radius and channel) of the halftone screen printing effect to help you understand the technique in detail.
Hopefully, you’ve found this article helpful and can now add a new level of creativity to your images using the halftone effect in Adobe Photoshop.
Free Download For Win 7 or later(64-bit)
Free Download For macOS 10.14 or later
How To Add Motion Blur Effect To Photos in GIMP
GIMP is a cross-platform image editing software that you can use to edit photos and create graphics. The software is available for Linux, Windows, and macOS and can add a motion blur effect (A sense of movement in the photo), making your pictures look more realistic and professional.
So to help you tone your skills, we’ve written a comprehensive guide on how to apply the GIMP motion blur effect to your photos!
Part I. What Is GIMP?
GIMP software, a GNU Image Manipulation Program, is an open-source raster graphics editor used for image editing and retouching, converting between different image formats, free-form drawing, and more.
GIMP is frequently used as a Photoshop alternative. The software boasts a wide range of features, including support for layers, masks, color management, and third-party plugins.
Key Features
Here are some key features of the GIMP software:
- Quickly hide panels and menus to let you switch to a full-screen mode to preview pictures
- Fixes distorted images
- Available for Windows, Linux, Mac OS, and other operating systems
- Automatic image enhancement tool
- Lets you remove all the panels and tools from the workflow except the one you are working with.
- Released under a license called GNU General Public License v3 and later, which makes it free to use and distribute
- Add overlays and crop or resize an image
- Wide range of file formats that it can read and write, making it a versatile tool for working with images
Part II. How To Add The Motion Blur Effect To Your Photos in GIMP?
Below we’ve provided the step-by-step tutorial to add a motion blur effect to your photos in GIMP:
Step1 In the first step, launch a browser on your device, head to the GIMP website , and download the installation file according to your operating system. Now, click the downloaded installer, install the software on your system and launch it.

Step2 In the next step, click “File” on the GIMP dashboard, and select “Open” to access the Open Image window. Select your image file from your system and click “Open” to import the file.
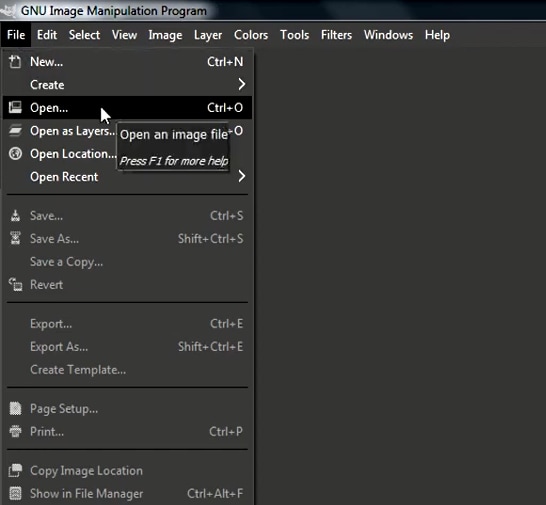
Step3 Next, click the “Filters” option from the top toolbar, select “Blur,” and choose “Motion Blur” from the drop-down menu. A dialogue box will now open where you can preview the effect and adjust the settings, including Blur Type, Blur Center, and Blur Parameters.
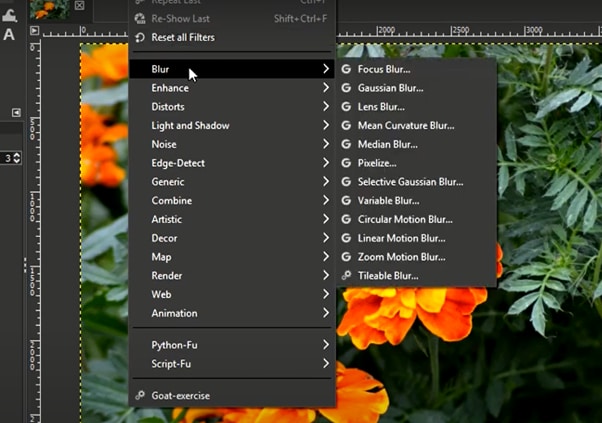
Step4 Once you are satisfied with your changes, click “OK” to apply the effect to the image, and make some other edits if needed. Finally, click “File” from the top toolbar, choose “Export As,” click “File Type” to select the format, and select the “Export” option to save your file.
Bonus Tips – The Alternative To GIMP To Create Motion Blur Effect
GIMP is a popular image editor that you can use to create motion blur effects. However, some users find it difficult to use the software for this purpose.
To simplify the process, we recommend usingWondershare Filmora an all-in-one editing software that offers multiple advanced features to help you quickly enhance your project.
Free Download For Win 7 or later(64-bit)
Free Download For macOS 10.14 or later
Here’s why Filmora is the best alternative to GIMP for creating motion blur effects:
- A user-friendly interface where you can quickly create the motion blur effect without spending hours learning the process
- Advanced video editing tools, such as keyframing, speed ramping, green screen, title editing, motion tracking, screen recorder, and preset templates
- Royalty-free music library where you can access millions of music and soundtracks
- Adds the motion blur effect to your videos as well as images
- Comes with multiple parameters to adjust the effect on your clip or image
To add the radial blur effect to images using Filmora, here are the quick and easy-to-follow steps:
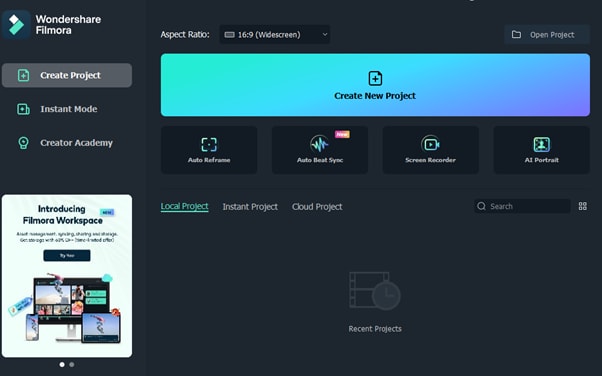
Step1 Download the Filmora software on your PC, launch it, and click “Create New Project” on the main panel. Use the “Click Here to Import your Media File” option to import your photo and drag and drop it into the timeline.
Step2 Now, head to the “Effects” tab from the taskbar. Use the search option to find the Blur effect. Afterward, drag & drop it in the timeline and adjust it on your selected clip.
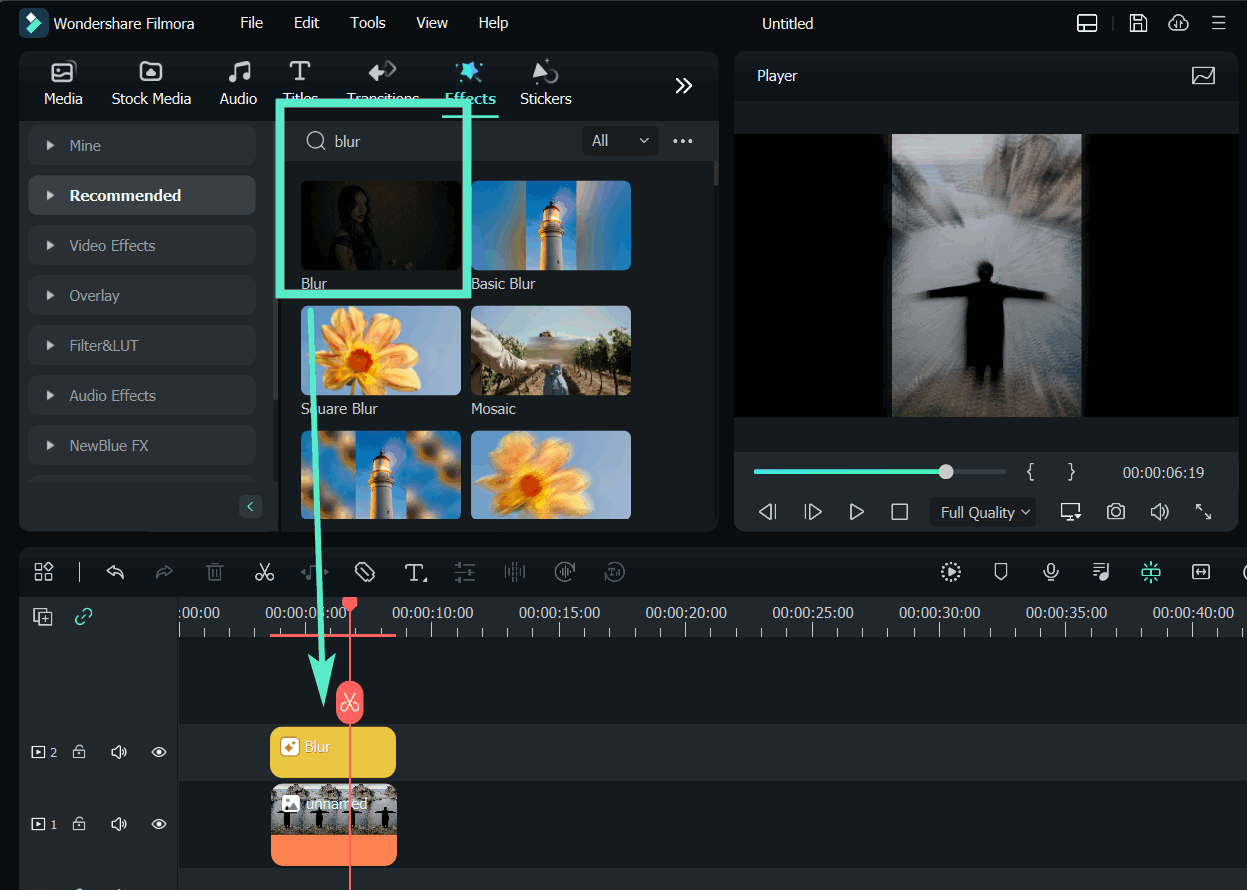
Step3 Please note that motion blur is now a dynamic effect on the image. That means you can add multiple photos and make them into a slideshow with a blur effect transition. Or, press the “Play” icon to preview your photo and pause the clip where you think motion blur works best.
Step4 Click the effect in the timeline to open its settings. Now, play your clip to preview and adjust the parameters as you want to smooth down the motion effect.
Step5 Once satisfied with the outcome, click the “Export” option, go to the “Local” tab, select a file format to save the images, and click “Export” again to save your project.
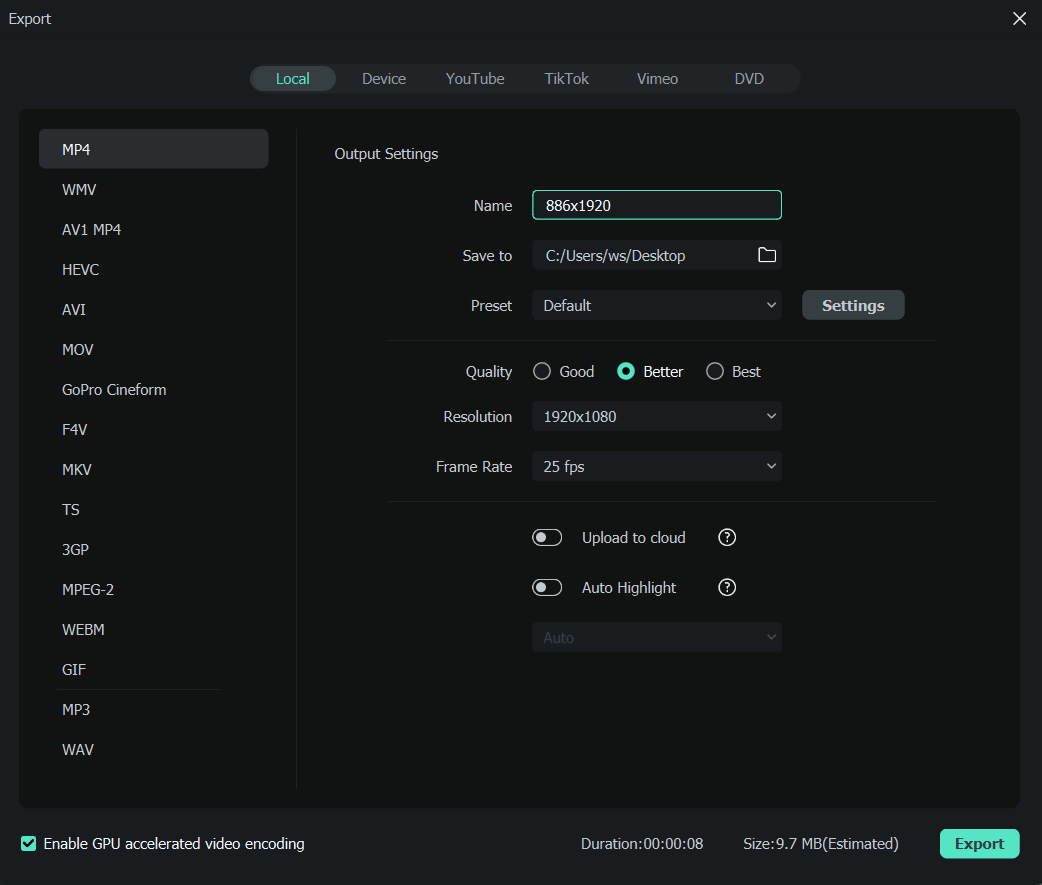
Filmora offers many export options, such as your device, YouTube, Vimeo, and DVD, with just a few clicks.
Last Words
In this detailed tutorial, we’ve discussed what GIMP is and its key features. We’ve provided a step-by-step guide to walk you through the process of creating the motion blur effect using the GIMP software.
In addition, we’ve provided a bonus tip to recommend Filmora as the best alternative to GIMP for creating the motion blur effect.
Hopefully, you found this article helpful in resolving your queries, and you can now add a smooth motion blur effect to your images.
Free Download For macOS 10.14 or later
Here’s why Filmora is the best alternative to GIMP for creating motion blur effects:
- A user-friendly interface where you can quickly create the motion blur effect without spending hours learning the process
- Advanced video editing tools, such as keyframing, speed ramping, green screen, title editing, motion tracking, screen recorder, and preset templates
- Royalty-free music library where you can access millions of music and soundtracks
- Adds the motion blur effect to your videos as well as images
- Comes with multiple parameters to adjust the effect on your clip or image
To add the radial blur effect to images using Filmora, here are the quick and easy-to-follow steps:
Step1 Download the Filmora software on your PC, launch it, and click “Create New Project” on the main panel. Use the “Click Here to Import your Media File” option to import your photo and drag and drop it into the timeline.

Step2 Now, head to the “Effects” tab from the taskbar. Use the search option to find the Blur effect. Afterward, drag & drop it in the timeline and adjust it on your selected clip.

Step3 Please note that motion blur is now a dynamic effect on the image. That means you can add multiple photos and make them into a slideshow with a blur effect transition. Or, press the “Play” icon to preview your photo and pause the clip where you think motion blur works best.
Step4 Click the effect in the timeline to open its settings. Now, play your clip to preview and adjust the parameters as you want to smooth down the motion effect.
Step5 Once satisfied with the outcome, click the “Export” option, go to the “Local” tab, select a file format to save the images, and click “Export” again to save your project.

Filmora offers many export options, such as your device, YouTube, Vimeo, and DVD, with just a few clicks.
Last Words
In this detailed tutorial, we’ve discussed what GIMP is and its key features. We’ve provided a step-by-step guide to walk you through the process of creating the motion blur effect using the GIMP software.
In addition, we’ve provided a bonus tip to recommend Filmora as the best alternative to GIMP for creating the motion blur effect.
Hopefully, you found this article helpful in resolving your queries, and you can now add a smooth motion blur effect to your images.
How to Perfect Quick and Efficient Video Editing | Keyboard Shortcuts in Filmora
To get rid of mistakes in the videos and to make them more visually appealing, people prefer to edit videos. You can also shape the video in a storytelling way to express and present the cohesive story to the world. Nowadays, video editing is a demanded skill, and every person wishes to master it. In these scenarios, the built-in keyboard shortcuts will help you a lot.
The best tool that provides built-in keyboard shortcuts and can help you experience the best video editing experience is Wondershare Filmora. By the end of this article, you will be aware of the checkpoints along with the keyboard shortcuts of Filmora. We will also provide keyboard shortcuts in this article to encourage shortcut video editing.
Wondershare Filmora12 A cross-platform helping you make quick and efficient video editing!
Free Download Free Download Learn More

Part 1: Major Checkpoints in Quick Video Editing
While doing video editing, it is very important to focus on efficiency and speed. It is essential to focus on the speed and efficiency of a video editing tool. Moreover, there are some checkpoints that you have to consider before getting into video editing. Some of them are:
01of 05Preparing Footage
Before anything else, you have to arrange and prepare your footage. It helps optimize the editing procedure, and you can label the files properly. Besides this, it also saves you time searching for specific files and footage.
02of 05Timeline Setting
You have to set up your timelines in the desired and recognizable resolutions. Moreover, adjusting frame rates and duration of videos and creating customized templates before anything else.
03of 05Selection of moments
Make sure you watch your video in a proper manner so you don’t have to waste time finding a specific moment. By this, you will be able to select a moment without wasting additional time.
04of 05Transitions and Adjustments
While editing the videos, you need to add the basic transitions to add consistency. Furthermore, you can adjust the audio metrics of videos and sync them with the length of videos.
05of 05Preview and Export
After editing the videos, you also have to preview them to check and fix the mistakes. Above all, always select the tool through which you can preview the videos and export them in the desired output format.
Part 2: An Introduction to Wondershare Filmora and Its Video Editing Intuition
Wondershare Filmora can be referred to as a feature-packed, cost-effective, all-in-one, easy-to-use video editing software. This tool has the capability to create professional-grade videos. You can also take assistance from this tool for creating advanced-level content for your social media platforms. It is also known to be the best choice when it comes to editing videos.
In Filmora, you can find diversified video editing tools as it comprehends timeline-based editing, so you can also use it to edit your memories. Several video formats are compatible with Filmora, so you will not face restrictions in this part.
Free Download For Win 7 or later(64-bit)
Free Download For macOS 10.14 or later
Key Features of Wondershare Filmora
- The AI Smart Cutout feature of Filmora lets you highlight and edit diversified unrequired objects, persons, or pets from the background.
- One of the best things about Filmora is it supports the AI Image feature through which you can turn descriptive text into illustrative images.
- It also shows the integrations with ChatGPT, through which you can generate AI text during video editing. This is perfect for YouTube descriptions and titles.
- You can also adjust the speed of the video while controlling the keyframes to make cinematic-grade edits in simple videos.
- The title editing feature lets you create artistic features with modernized word art, illustrations, and animations.
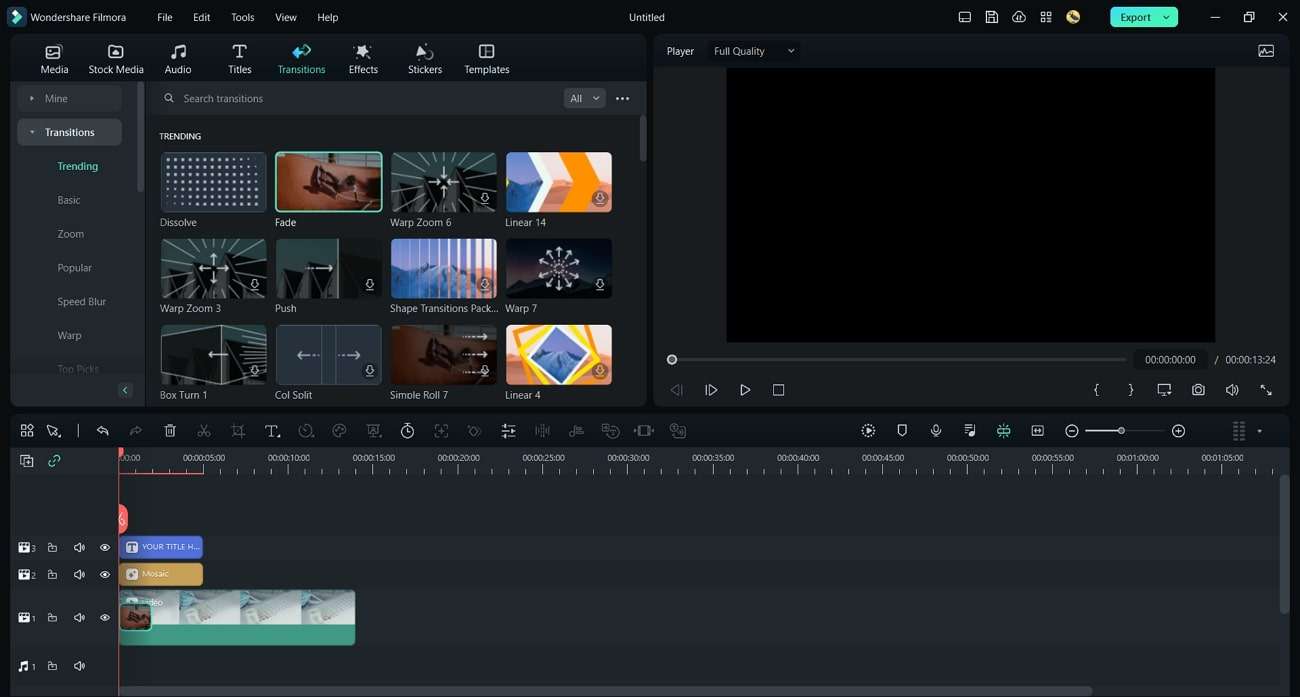
Part 3: Learning All Keyboard Shorts for Quick and Efficient Video Editing
To maximize productivity and workflow efficiency, you can take assistance from the keyboard shortcuts. Luckily, the industry-standard tool named Filmora offers effective keyboard shortcuts. Do you wish to know the keyboard shortcuts integrated with Wondershare Filmora? There is nothing to worry about because in this part, you will find the effective and implementable easy edit video shortcuts:
| Function | Shortcut |
|---|---|
| Preference | Ctrl+Shift+, |
| Keyboard Shortcut | Ctrl+Alt+K |
| Exit | Alt+F |
| New Project | Ctrl+N |
| Open Project | Ctrl+O |
| Save Project | Ctrl+S |
| Save Project As | Ctrl+Shift+S |
| Archive Project | Ctrl+Shift+A |
| Import Media Files | Ctrl+I |
| Record Voice-Over | Alt+R |
| Add a New Folder | +Alt+N |
| Undo | Ctrl+Z |
| Redo | Ctrl+Y |
| Cut | Ctrl+X |
| Copy | Ctrl+C |
| Paste | Ctrl+V |
| Duplicate | Ctrl+D |
| Delete | Del |
| Ripple Delete | Shift+Del |
| Close Gap | Alt+Del |
| Select All | +A |
| Copy Effects | Ctrl+Alt+C |
| Paste Effects | Ctrl+Alt+V |
| Select Clip Range | X |
| Cancel the Selected Range | Shift+X |
| Nudge Left | Alt+Left |
| Nudge Right | Alt+Right |
| Nudge Up | Alt+Up |
| Edit Properties | Alt+E |
| Split | Ctrl+B |
| Trim Start to Playhead | Alt+[ |
| Trim End to Playhead | Alt+] |
| Crop to Fit | Ctrl+F |
| Crop and Zoom | Alt+C |
| Rotate 90CW | Ctrl+Alt+Right |
| Rotate CCW | Ctrl+Alt+Left |
| Group | Ctrl+G |
| UnGroup | Ctrl+Alt+G |
| Uniform Speed | Ctrl+R |
| Add Freeze Frame | Alt+F |
| Detach Audio | Ctrl+Alt+D |
| Mute | Ctrl+Shift+M |
| Stabilization | Alt+S |
| Chroma Key | Ctrl+Shift+G |
| Red Marker | Alt+1 |
| Orange Marker | Alt+2 |
| Yellow Marker | Alt+3 |
| Green Marker | Alt+4 |
| Cyan Marker | Alt+5 |
| Blue Marker | Alt+6 |
| Purple Marker | Alt+7 |
| Grey Marker | Alt+8 |
| Select All Clips With the Same Color Mark | Alt+Shift+ |
| Render Preview | Enter |
| Add Audio/Video Keyframes | Alt+Left Click |
| Previous Keyframes | [ |
| Next Keyframes | ] |
| Motion Tracking | Alt+X |
| Color Match | Alt+M |
| Insert | Shift+QI |
| Overwrite | Shift_+O |
| Replace | Alt+Mouse Drag |
| Rename | F2 |
| Reveal in Explorer | Ctrl+Shift+R |
| Apply | Alt+A |
| Quick Split Mode | C |
| Select | V |
| Open Audio Stretch | S |
| Exit Audio Stretch | Shift+S |
| Add to Favorites | Shift+F |
| Adjust the Bezier Curve | Alt+Mouse Drag |
| Split 9 Edited State0 | Shift+Enter |
| Merge Up (Cursor at the beginning of the sentence0 | Backspace |
| Merge down subtitles 9radio or edited state) | Alt+Q |
| Merge selected subtitles (multi-select state | Alt+Q |
| Play/Pause | Space |
| Stop | Ctrl +/ |
| Full Screen/Restore Snapshot | Ctrl+Alt+S |
| Previous Frame /Move Left | Left |
| Next Frame/ More Right | Right |
| Previous Edit Point / Move Up | Up |
| Next Edit Point/ Move Down | Down |
| Go To Next Second | Shift+Right |
| Go to Previous Marker | Shift+Up |
| Go to Next Marker | Shift+Down |
| Go to Project Beginning | Home |
| Go to Project End | End |
| Go to Selected Clip Start | Shift+Home |
| Go to Selected Clip End | Shift+End |
| Zoom In | Ctrl+= |
| Zoom Out | Ctrl+_ |
| Zoom to Fit Timeline | Shift+Z |
| Select Previous | Ctrl+Left |
| Select Next | Ctrl+Right |
| Horizontal Scroll (Timeline) | Alt+Scroll Up/Down |
| Vertical Scroll (Timeline) | Scroll Up/Down |
| Mark In | I |
| Mark Out | O |
| Clear In And Out | Ctrl+Shift+X |
| Add Marker | M |
| Edit Marker | Shift+M |
| Help | F |
| Export | Ctrl+ E |
Conclusion
In the article, you have discovered crucial information about video editing in Filmora. There are some checkpoints that you need to keep in mind before getting into editing. Integrating these checkpoints, there is a consistent need to understand keyboard shortcuts in video editing. This procedure, in particular, helps much in effective video editing.
With the help of the Filmora shortcut video editor, you can make cinematic-level edits to the video. It also integrates several features such as AI Smart Cutout, AI Copywriting, and more. To know more about these useful keyboard shortcuts, this article has surely been of great help.
Free Download Free Download Learn More

Part 1: Major Checkpoints in Quick Video Editing
While doing video editing, it is very important to focus on efficiency and speed. It is essential to focus on the speed and efficiency of a video editing tool. Moreover, there are some checkpoints that you have to consider before getting into video editing. Some of them are:
01of 05Preparing Footage
Before anything else, you have to arrange and prepare your footage. It helps optimize the editing procedure, and you can label the files properly. Besides this, it also saves you time searching for specific files and footage.
02of 05Timeline Setting
You have to set up your timelines in the desired and recognizable resolutions. Moreover, adjusting frame rates and duration of videos and creating customized templates before anything else.
03of 05Selection of moments
Make sure you watch your video in a proper manner so you don’t have to waste time finding a specific moment. By this, you will be able to select a moment without wasting additional time.
04of 05Transitions and Adjustments
While editing the videos, you need to add the basic transitions to add consistency. Furthermore, you can adjust the audio metrics of videos and sync them with the length of videos.
05of 05Preview and Export
After editing the videos, you also have to preview them to check and fix the mistakes. Above all, always select the tool through which you can preview the videos and export them in the desired output format.
Part 2: An Introduction to Wondershare Filmora and Its Video Editing Intuition
Wondershare Filmora can be referred to as a feature-packed, cost-effective, all-in-one, easy-to-use video editing software. This tool has the capability to create professional-grade videos. You can also take assistance from this tool for creating advanced-level content for your social media platforms. It is also known to be the best choice when it comes to editing videos.
In Filmora, you can find diversified video editing tools as it comprehends timeline-based editing, so you can also use it to edit your memories. Several video formats are compatible with Filmora, so you will not face restrictions in this part.
Free Download For Win 7 or later(64-bit)
Free Download For macOS 10.14 or later
Key Features of Wondershare Filmora
- The AI Smart Cutout feature of Filmora lets you highlight and edit diversified unrequired objects, persons, or pets from the background.
- One of the best things about Filmora is it supports the AI Image feature through which you can turn descriptive text into illustrative images.
- It also shows the integrations with ChatGPT, through which you can generate AI text during video editing. This is perfect for YouTube descriptions and titles.
- You can also adjust the speed of the video while controlling the keyframes to make cinematic-grade edits in simple videos.
- The title editing feature lets you create artistic features with modernized word art, illustrations, and animations.

Part 3: Learning All Keyboard Shorts for Quick and Efficient Video Editing
To maximize productivity and workflow efficiency, you can take assistance from the keyboard shortcuts. Luckily, the industry-standard tool named Filmora offers effective keyboard shortcuts. Do you wish to know the keyboard shortcuts integrated with Wondershare Filmora? There is nothing to worry about because in this part, you will find the effective and implementable easy edit video shortcuts:
| Function | Shortcut |
|---|---|
| Preference | Ctrl+Shift+, |
| Keyboard Shortcut | Ctrl+Alt+K |
| Exit | Alt+F |
| New Project | Ctrl+N |
| Open Project | Ctrl+O |
| Save Project | Ctrl+S |
| Save Project As | Ctrl+Shift+S |
| Archive Project | Ctrl+Shift+A |
| Import Media Files | Ctrl+I |
| Record Voice-Over | Alt+R |
| Add a New Folder | +Alt+N |
| Undo | Ctrl+Z |
| Redo | Ctrl+Y |
| Cut | Ctrl+X |
| Copy | Ctrl+C |
| Paste | Ctrl+V |
| Duplicate | Ctrl+D |
| Delete | Del |
| Ripple Delete | Shift+Del |
| Close Gap | Alt+Del |
| Select All | +A |
| Copy Effects | Ctrl+Alt+C |
| Paste Effects | Ctrl+Alt+V |
| Select Clip Range | X |
| Cancel the Selected Range | Shift+X |
| Nudge Left | Alt+Left |
| Nudge Right | Alt+Right |
| Nudge Up | Alt+Up |
| Edit Properties | Alt+E |
| Split | Ctrl+B |
| Trim Start to Playhead | Alt+[ |
| Trim End to Playhead | Alt+] |
| Crop to Fit | Ctrl+F |
| Crop and Zoom | Alt+C |
| Rotate 90CW | Ctrl+Alt+Right |
| Rotate CCW | Ctrl+Alt+Left |
| Group | Ctrl+G |
| UnGroup | Ctrl+Alt+G |
| Uniform Speed | Ctrl+R |
| Add Freeze Frame | Alt+F |
| Detach Audio | Ctrl+Alt+D |
| Mute | Ctrl+Shift+M |
| Stabilization | Alt+S |
| Chroma Key | Ctrl+Shift+G |
| Red Marker | Alt+1 |
| Orange Marker | Alt+2 |
| Yellow Marker | Alt+3 |
| Green Marker | Alt+4 |
| Cyan Marker | Alt+5 |
| Blue Marker | Alt+6 |
| Purple Marker | Alt+7 |
| Grey Marker | Alt+8 |
| Select All Clips With the Same Color Mark | Alt+Shift+ |
| Render Preview | Enter |
| Add Audio/Video Keyframes | Alt+Left Click |
| Previous Keyframes | [ |
| Next Keyframes | ] |
| Motion Tracking | Alt+X |
| Color Match | Alt+M |
| Insert | Shift+QI |
| Overwrite | Shift_+O |
| Replace | Alt+Mouse Drag |
| Rename | F2 |
| Reveal in Explorer | Ctrl+Shift+R |
| Apply | Alt+A |
| Quick Split Mode | C |
| Select | V |
| Open Audio Stretch | S |
| Exit Audio Stretch | Shift+S |
| Add to Favorites | Shift+F |
| Adjust the Bezier Curve | Alt+Mouse Drag |
| Split 9 Edited State0 | Shift+Enter |
| Merge Up (Cursor at the beginning of the sentence0 | Backspace |
| Merge down subtitles 9radio or edited state) | Alt+Q |
| Merge selected subtitles (multi-select state | Alt+Q |
| Play/Pause | Space |
| Stop | Ctrl +/ |
| Full Screen/Restore Snapshot | Ctrl+Alt+S |
| Previous Frame /Move Left | Left |
| Next Frame/ More Right | Right |
| Previous Edit Point / Move Up | Up |
| Next Edit Point/ Move Down | Down |
| Go To Next Second | Shift+Right |
| Go to Previous Marker | Shift+Up |
| Go to Next Marker | Shift+Down |
| Go to Project Beginning | Home |
| Go to Project End | End |
| Go to Selected Clip Start | Shift+Home |
| Go to Selected Clip End | Shift+End |
| Zoom In | Ctrl+= |
| Zoom Out | Ctrl+_ |
| Zoom to Fit Timeline | Shift+Z |
| Select Previous | Ctrl+Left |
| Select Next | Ctrl+Right |
| Horizontal Scroll (Timeline) | Alt+Scroll Up/Down |
| Vertical Scroll (Timeline) | Scroll Up/Down |
| Mark In | I |
| Mark Out | O |
| Clear In And Out | Ctrl+Shift+X |
| Add Marker | M |
| Edit Marker | Shift+M |
| Help | F |
| Export | Ctrl+ E |
Conclusion
In the article, you have discovered crucial information about video editing in Filmora. There are some checkpoints that you need to keep in mind before getting into editing. Integrating these checkpoints, there is a consistent need to understand keyboard shortcuts in video editing. This procedure, in particular, helps much in effective video editing.
With the help of the Filmora shortcut video editor, you can make cinematic-level edits to the video. It also integrates several features such as AI Smart Cutout, AI Copywriting, and more. To know more about these useful keyboard shortcuts, this article has surely been of great help.
Also read:
- New In 2024, Top Free LUTs To Use in Shotcut An Overview
- Updated How to Animate Text in A Video for 2024
- New A Complete Guide to the Best Brand Story Videos |2023|
- Updated 2024 Approved Know How You Can Get some Cool Discord Animated Icons Through some Simple Steps. Presenting the Latest Tool to Get Animated PFP and Logos Instantly for Discord
- New In 2024, Do You Want to Apply LUTs Using Open Broadcaster Software? You Can Download Free LUTs for OBS and Apply Them to Your Files. There Are Many LUTs Available
- Updated In 2024, How To Cut Videos For Instagram On Mac
- Updated Do You Want to Know About the Photo Video Maker with Song? Are You Ready to Discover It in Detail? This Article Will Give You Valuable Insights on This Topic for 2024
- 2024 Approved How to Make A Tattoo Disappear Like A Magic
- Updated 2024 Approved Are You Searching for the Best Cinematic LUTs for Premiere Pro? You Are in the Right Place because This Article Is Dedicated to LUTs
- Updated How to Make Strobe Light Text Effect, In 2024
- Updated In 2024, Are You Looking for a Video Format Converter Free? We Will Introduce the 5 Best Online Converters and Also the 5 Best Video Format Converters for PC
- New Best 8 Augmented Reality Video Games for 2024
- Updated What Is the Top Filmora Slideshow Templates? Experts Choice for 2024
- New This Article Aims to Show You How to Export Videos in Filmora for 2024
- Updated Recording Slow-Motion Videos Is Not More Difficult Using a Smartphone. Learn Everything From How to Record Slow-Motion Video and Edit a Video to Slow Down It for 2024
- If You Are Looking for an Open-Source, Cross-Platform Video Editor, Shotcut Is a Great Choice, In 2024 But Is It Truly the Best Video Editor or Is There a Better Alternative Available?
- Updated The Complete Guide to Make a Text Collage for 2024
- Updated In 2024, Free Titles For Final Cut Pro
- New Best GIF to AVI Converters (Online + Software Solutions) for 2024
- Updated 2024 Approved Create Chroma Key Written Text Effects in Filmora
- Updated In 2024, What Are AR Emoji Stickers & How to Add Them to Your Video
- New How To Make Split Screen Videos in Filmora for 2024
- New 2024 Approved Do You Want to Use a Video Editor for Your iOS Device? This Article Introduces LumaFusion, a Perfect Multi-Track Video Editor Designed to Cater to Your Needs
- Updated 2024 Approved Want to Know the Simplest Way to Match the Colors of Your Photos in Photoshop? The Following Discussion Will Help Match Color in Photoshop, Almost Effortlessly
- In 2024, Step-by-Step Guide to Speed Up and Slow Down a Video
- Ways To Find Unlocking Codes For Motorola Edge 40 Pro Phones
- In 2024, How to Change/Add Location Filters on Snapchat For your Apple iPhone 15 Pro Max | Dr.fone
- In 2024, How to Send and Fake Live Location on Facebook Messenger Of your Oppo Reno 8T 5G | Dr.fone
- Top 6 Apps/Services to Trace Any Apple iPhone 6 Location By Mobile Number | Dr.fone
- Motorola Edge 40 Neo won’t play MP4 files
- How to Restore iPhone 13 without Backup | Stellar
- 10 Fake GPS Location Apps on Android Of your Tecno Spark 20 | Dr.fone
- Top 10 Password Cracking Tools For Xiaomi
- In 2024, Top 7 Phone Number Locators To Track Xiaomi Redmi 13C Location | Dr.fone
- 9 Mind-Blowing Tricks to Hatch Eggs in Pokemon Go Without Walking On Realme C67 4G | Dr.fone
- Looking For A Location Changer On Xiaomi Redmi Note 13 5G? Look No Further | Dr.fone
- 10 Best Fake GPS Location Spoofers for Apple iPhone 13 mini | Dr.fone
- In 2024, How to Change Google Play Location On OnePlus Ace 2 | Dr.fone
- 4 Feasible Ways to Fake Location on Facebook For your Honor 90 Lite | Dr.fone
- How to play an MP4 on Samsung Galaxy A25 5G?
- Apple iPhone 15 Plus Asking for Passcode after iOS 17/14 Update, What to Do? | Dr.fone
- 3 Facts You Need to Know about Screen Mirroring Samsung Galaxy S23 Ultra | Dr.fone
- In 2024, How to Get and Use Pokemon Go Promo Codes On Realme Note 50 | Dr.fone
- Easy Guide How To Bypass Lenovo FRP Android 10/11/12/13
- Updated In 2024, Best Hatsune Miku AI Voice Generators for All Times
- How to Reset a Locked Infinix Hot 30i Phone
- Fix Unfortunately Settings Has Stopped on Honor Magic 6 Quickly | Dr.fone
- Title: Easy Guide to Apply Slow Zoom Effects to Videos
- Author: Morgan
- Created at : 2024-05-19 05:11:35
- Updated at : 2024-05-20 05:11:35
- Link: https://ai-video-editing.techidaily.com/easy-guide-to-apply-slow-zoom-effects-to-videos/
- License: This work is licensed under CC BY-NC-SA 4.0.

