:max_bytes(150000):strip_icc():format(webp)/dormroomentfeatured-5b5e9dd3c9e77c004f28632e.jpg)
Find Out How to Create Your Own Custom Motion Graphics in Filmora. Add Unique Objects, Manipulate Text, and Animate Anything You Want

Find Out How to Create Your Own Custom Motion Graphics in Filmora. Add Unique Objects, Manipulate Text, and Animate Anything You Want
Preparation
What you need to prepare:
- A computer (Windows or macOS)
- Your video materials.
- Filmora video editor
Step 1
Visit the filmora.wondershare.com website and download Filmora . Install the program and wait for it to Run. Then, click on New Project.
Step 2
Go to File → Project Settings and set the FPS to 60. Also, ensure that the project is in Full Resolution (1920x1080). Click OK.

Step 3
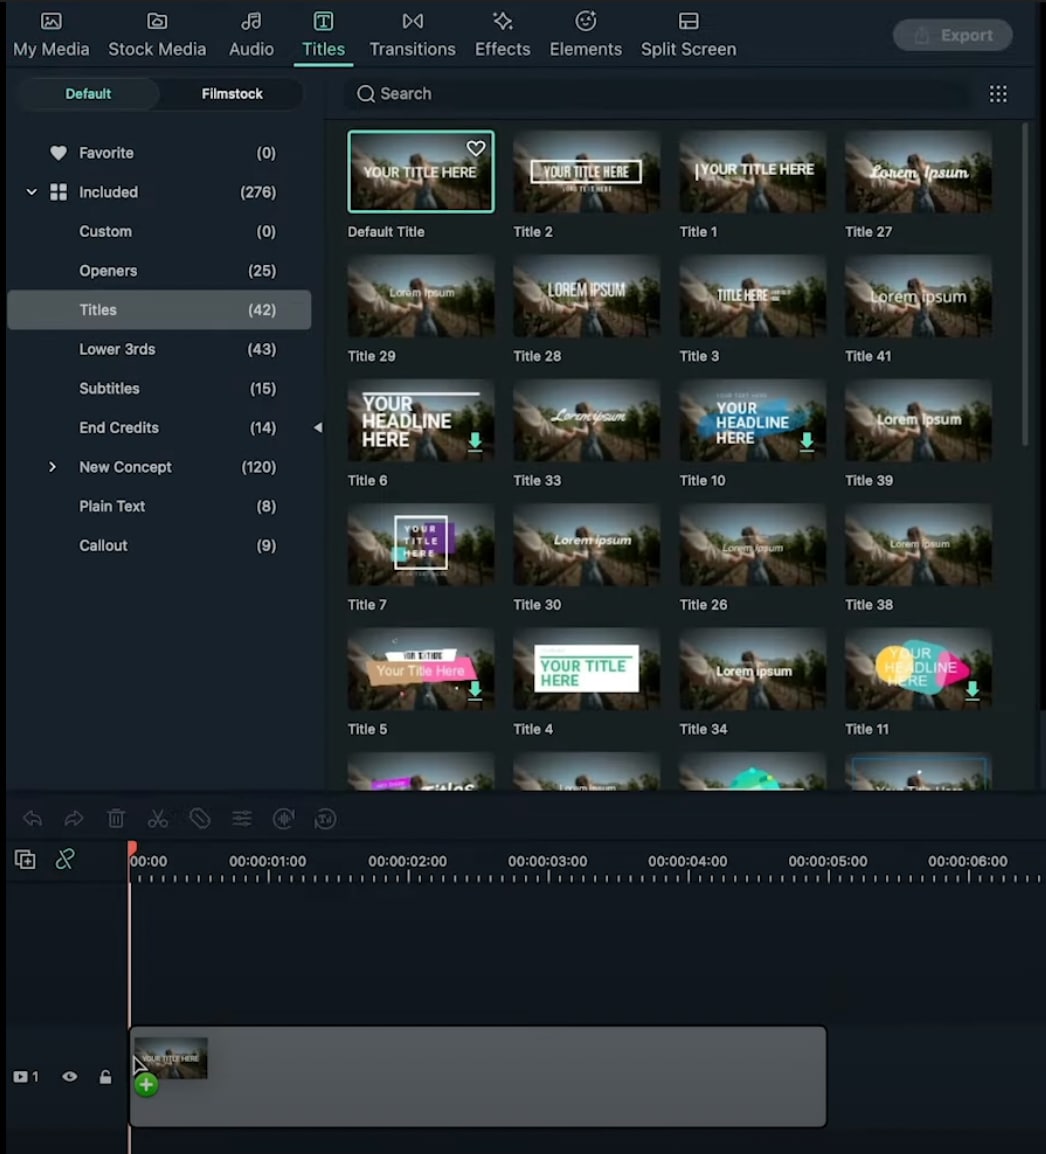
Open the Titles tab and drag the Default Title to the Timeline. Then, double-click on the Default Title and click on ADVANCED.
Step 4
From the Advanced settings panel, delete the existing text and add a Rectangle shape.

Step 5
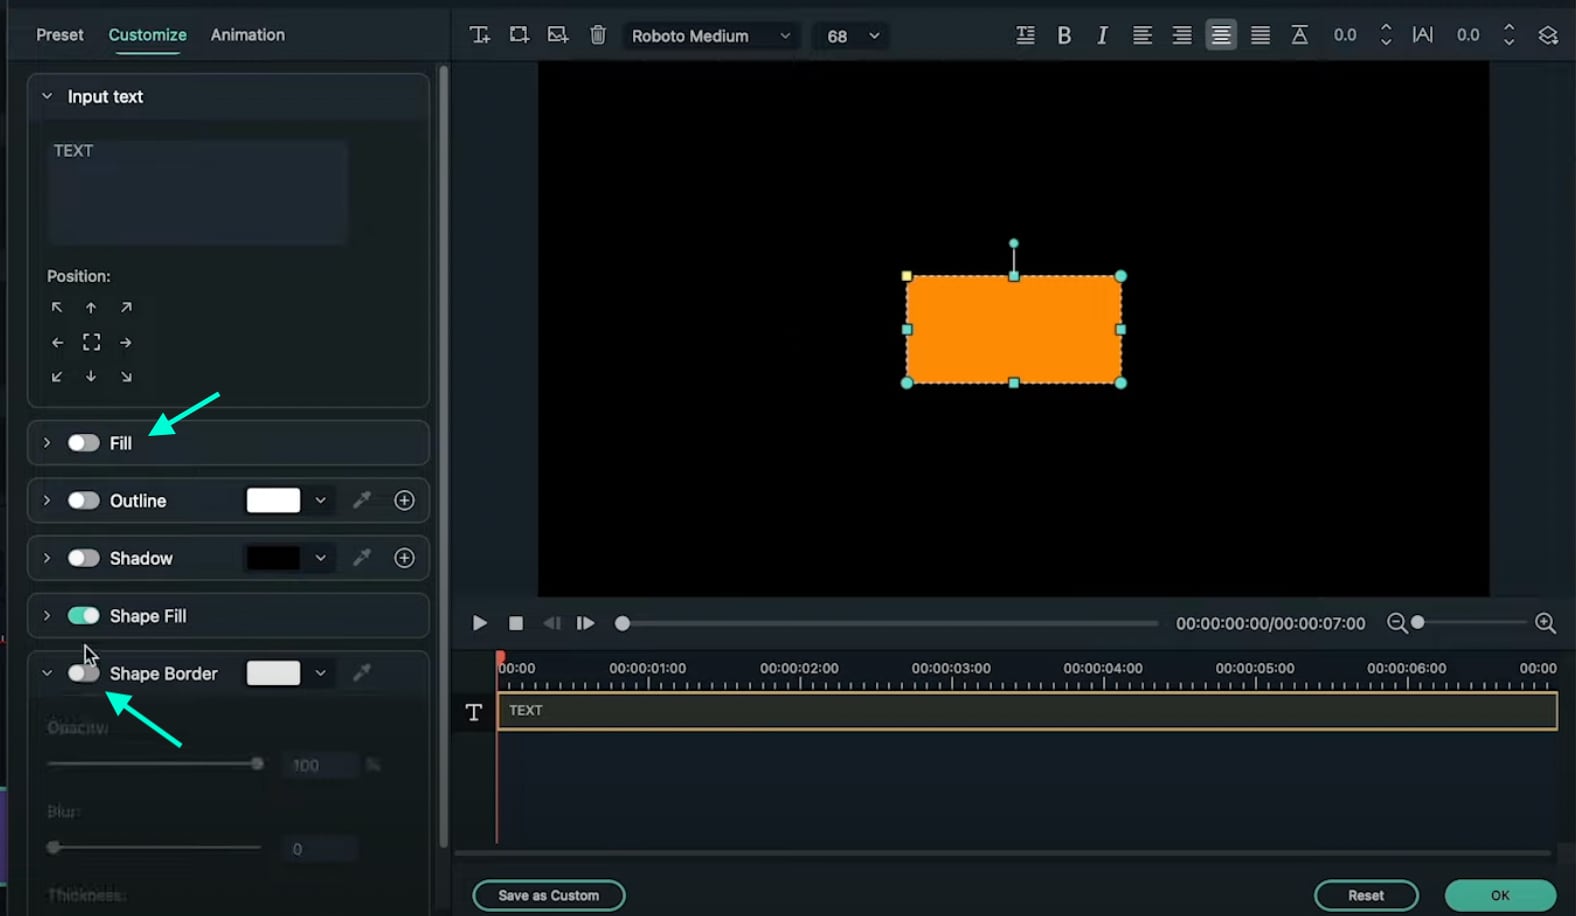
Disable the Text Fill and the Shape Border options from the panel on the left side.
Step 6
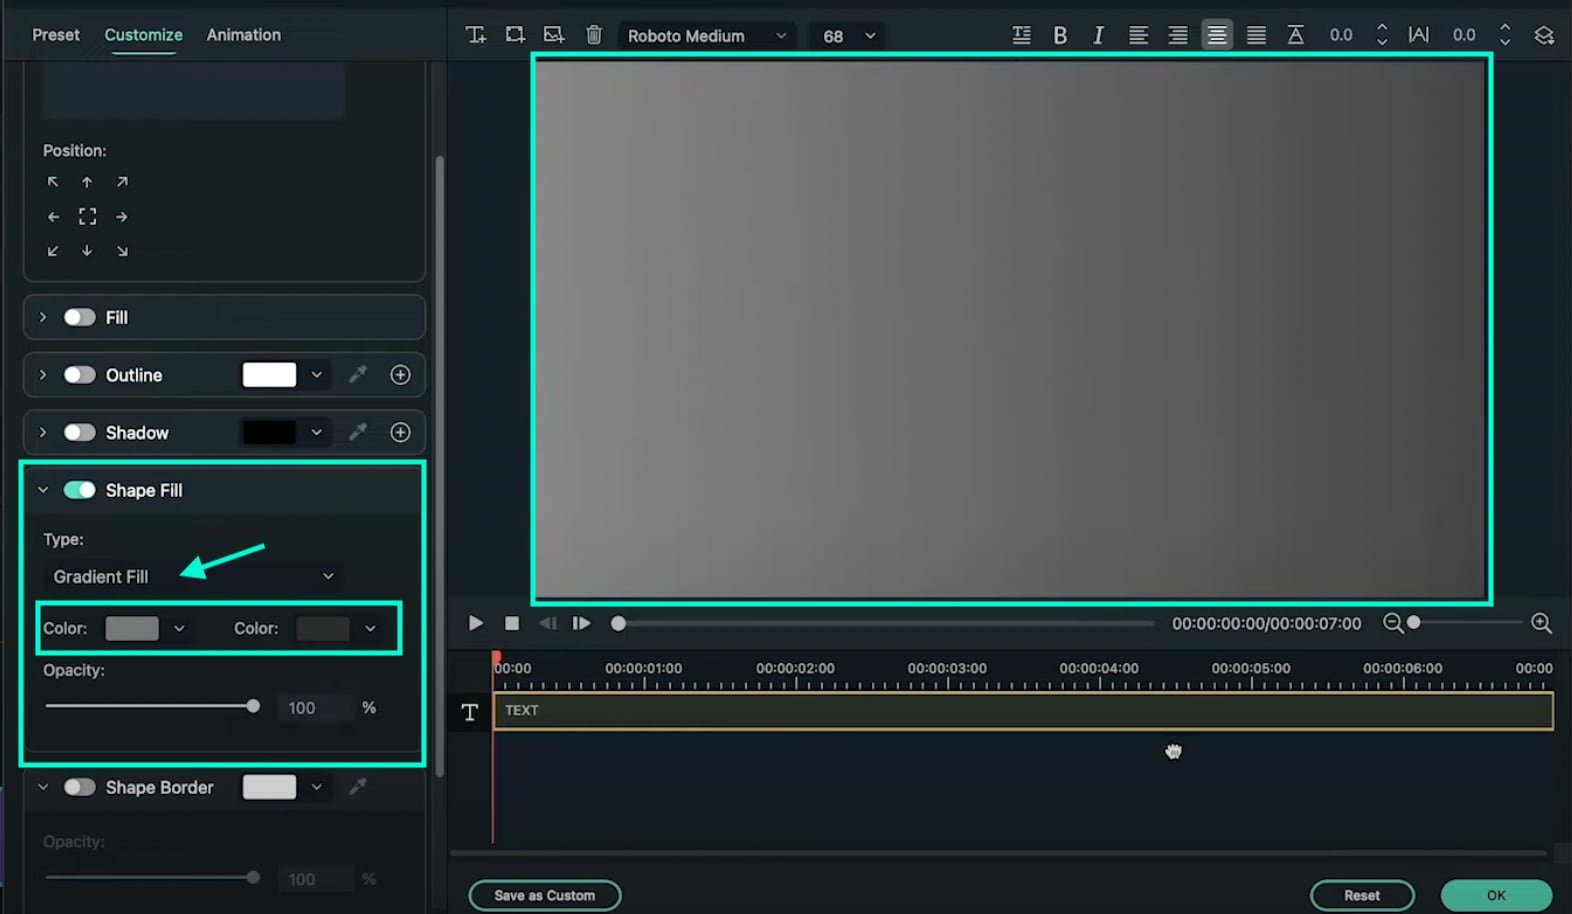
Click the drop-down arrow on the Shape Fill option and change the Type to Gradient Fill. Then, adjust the two color pallets from lighter to darker to create a gradient effect. Finally, adjust the rectangle to fit the entire screen. Click OK.
Step 7
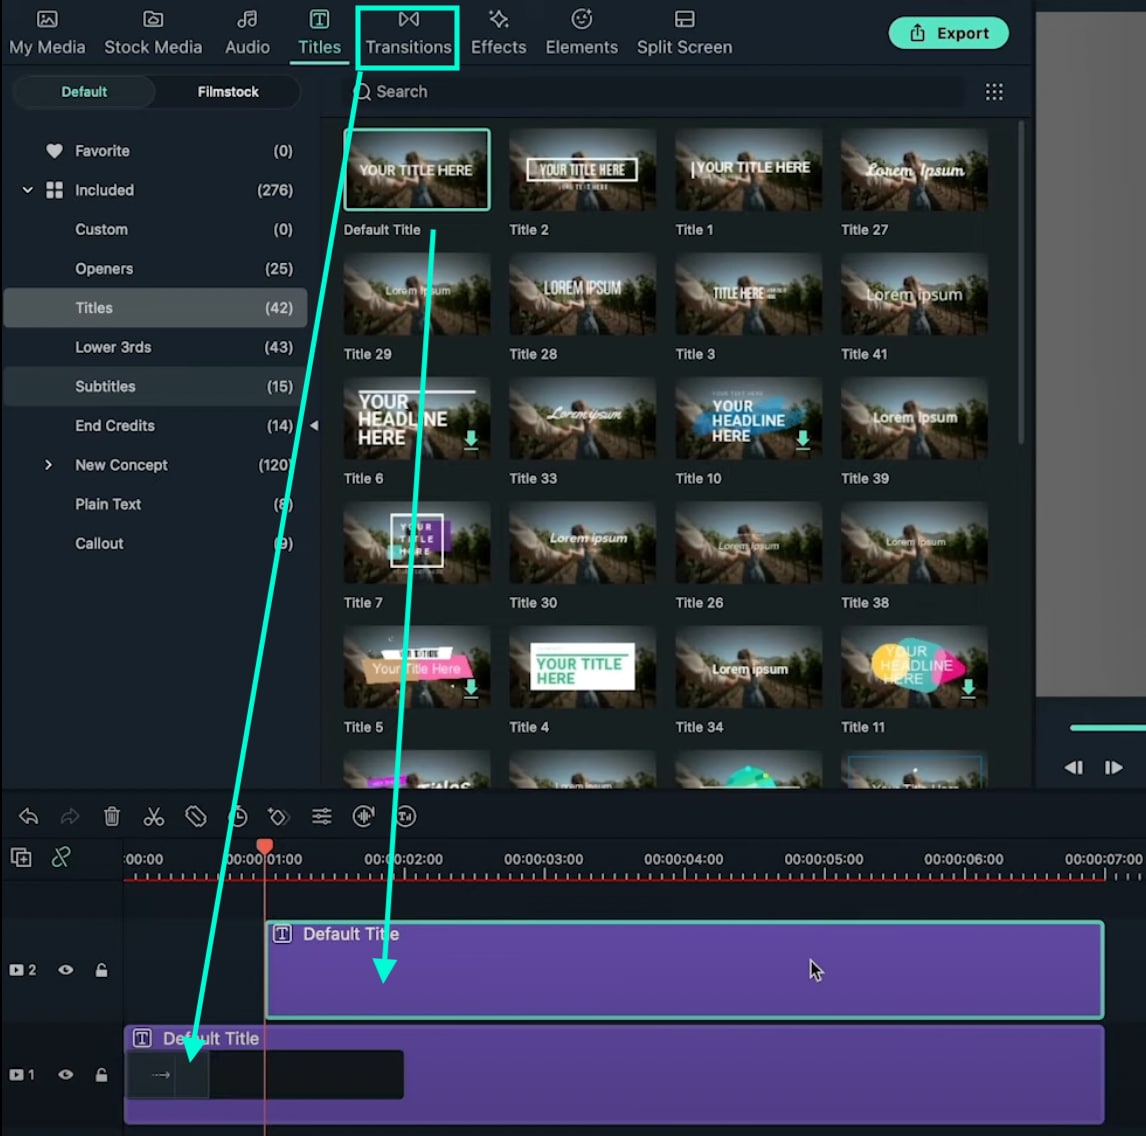
Go to the Transitions tab → search for “Push” → drag the Push transition to the Default Title in the Timeline. Then, move the Playhead to the 1-second marker and drag another Default Title to that point from the Titles tab.
Step 8
Double-click on the new Default Title → go to Advanced. Delete the default text and add a Circle shape this time instead of a Rectangle. Disable the Text Fill and Shape Fill options this time.
Step 9
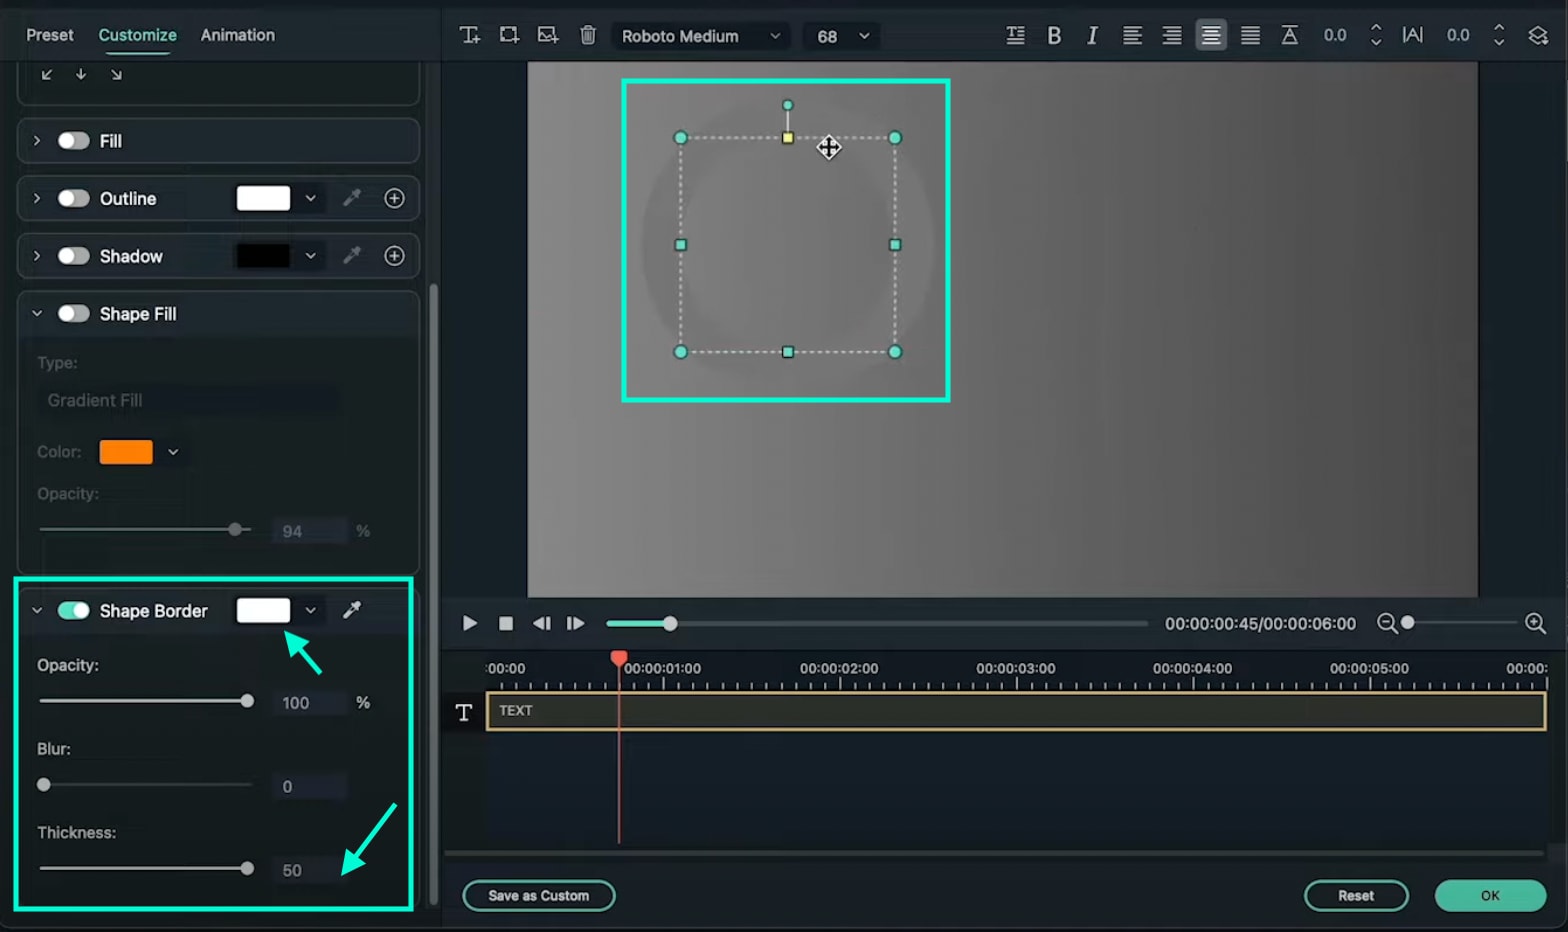
Scroll down to Shape Border and increase the Thickness bar all the way up. Then, change the circle’s color to match your background as closely as possible. Click OK.
Step 10
Copy the Title you just edited and paste it into the above layer. Then, double-click on the copied Title and go to its Advanced settings panel.

Step 11
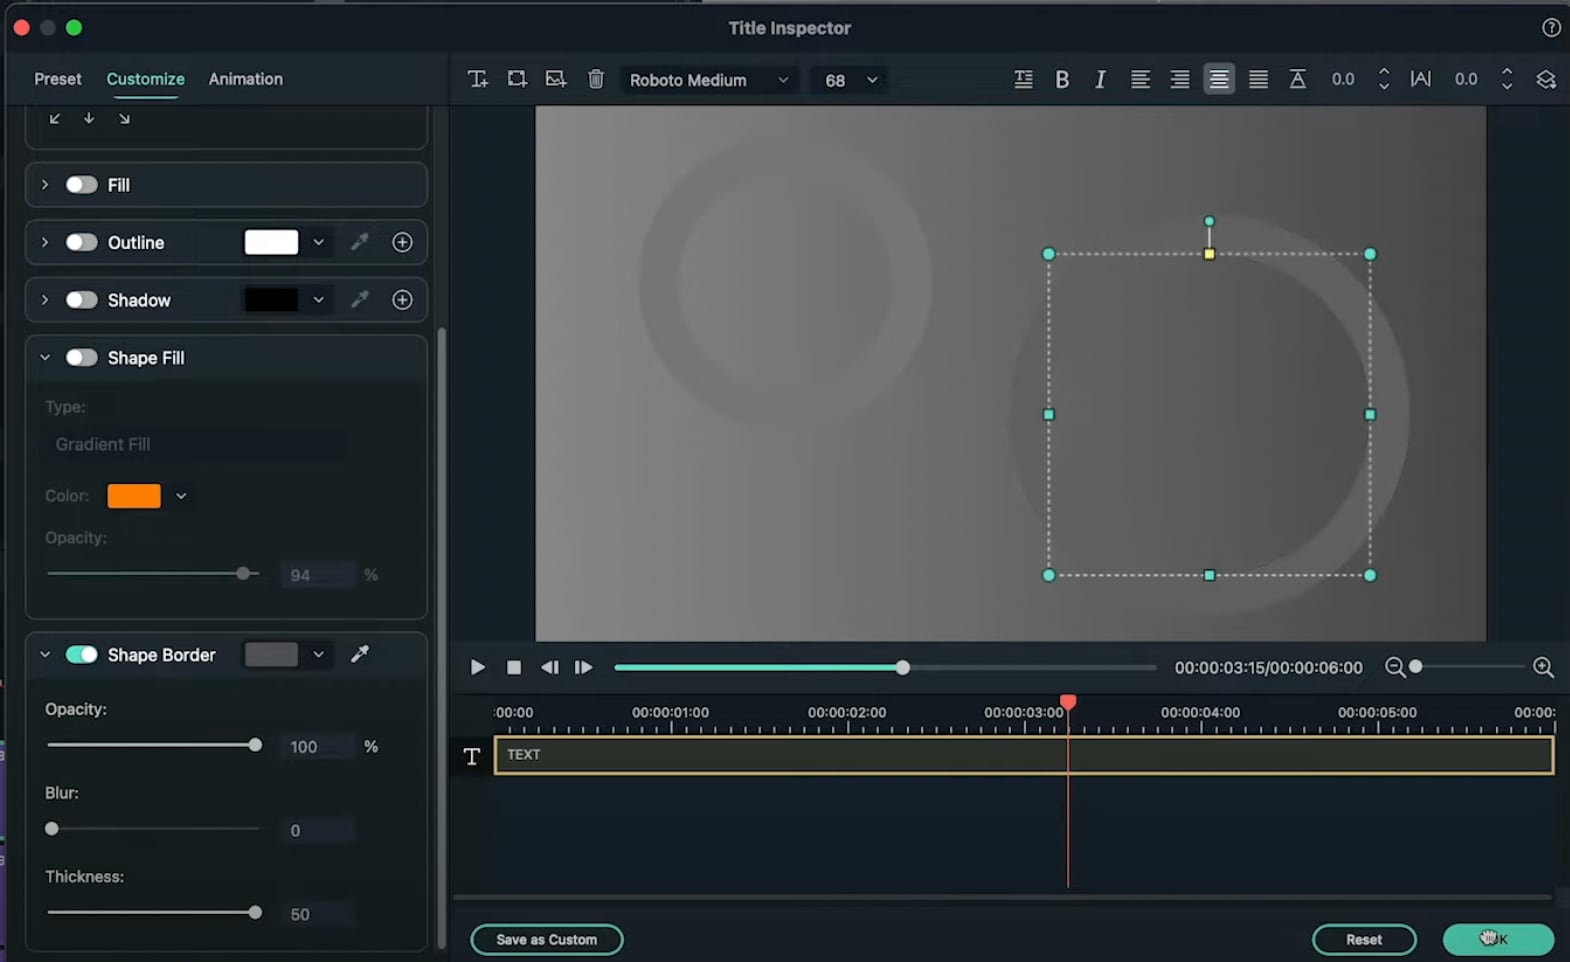
In the Advanced panel, copy the circle and paste it somewhere else on the screen. Change its size if you want, and change the shade of its color to match the background once more. You can add as many new copies of the Default Titles and copy as many circles as you want. Click OK.
Step 12
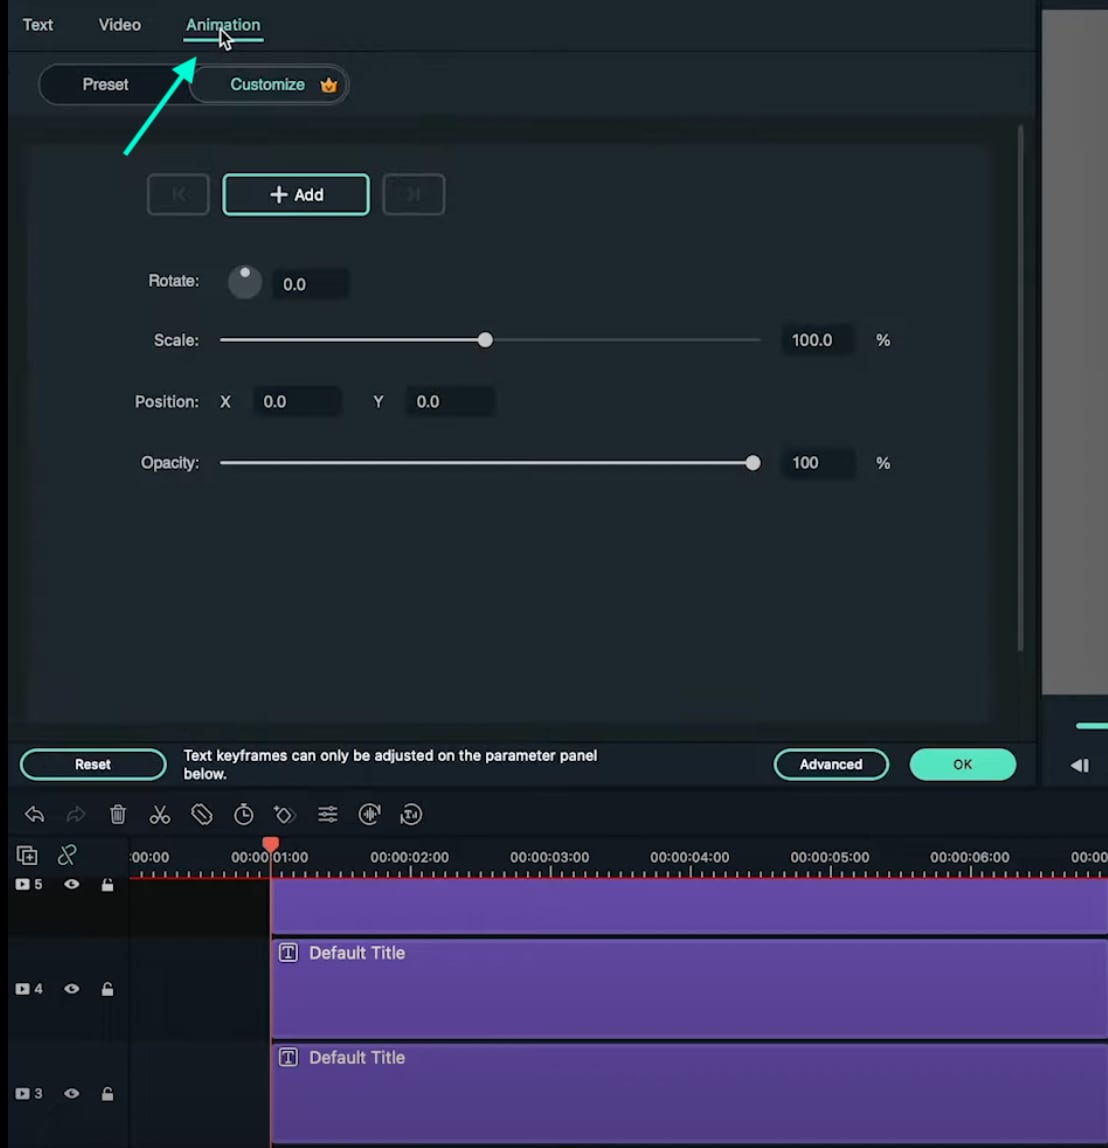
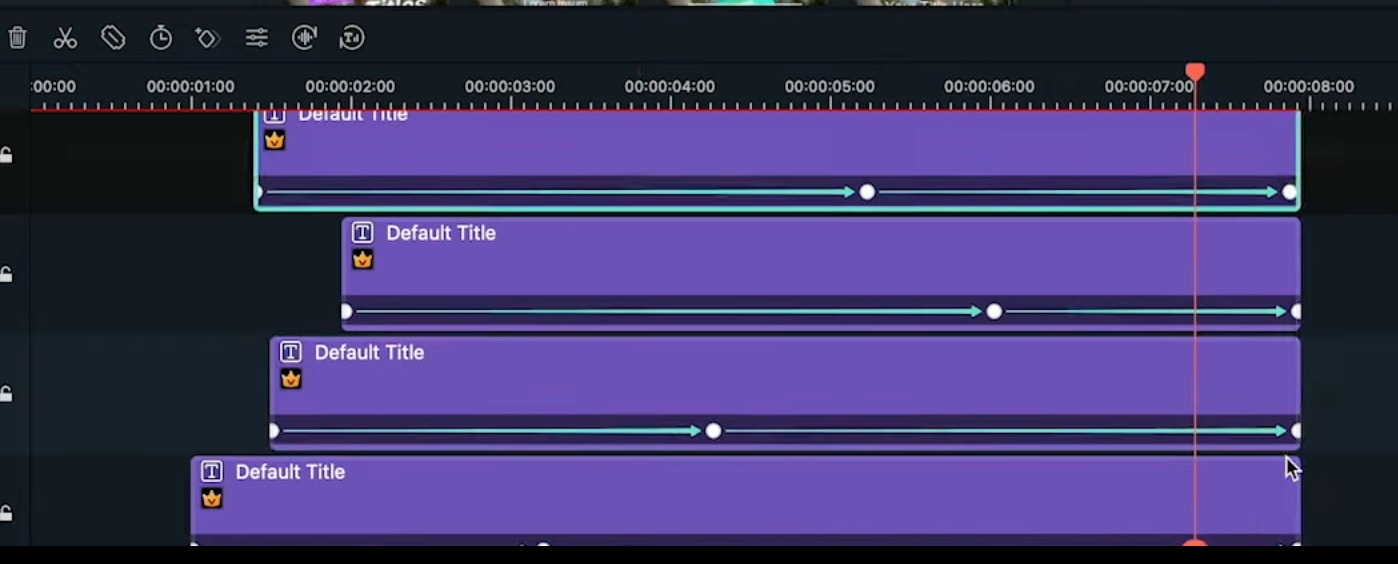
After you’re done copying and pasting more Default Titles with more Circles inside, you can start animating them. Start with the first one. Double-click on the first Default Title with the Circle inside. Make sure you place the Playhead at the beginning of that clip. Then, go to the Animation tab.
Step 13
You need to add 3 keyframes. Add the first one right now. Just click on the “**+Add” button. Then, move the Playhead somewhere in the middle and click “+Add” again. Last, move the Playhead at the end of the clip, and click “+Add**” again to add the third keyframe.

Step 14
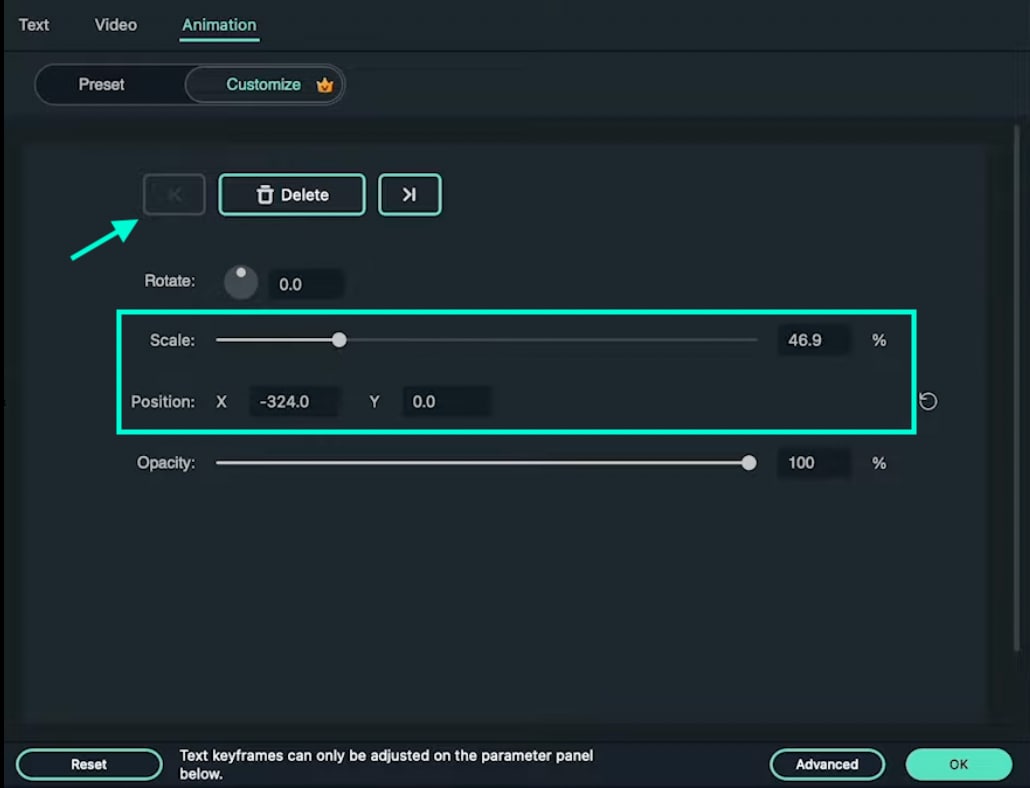
Now, go back to the first keyframe to edit its settings. Click the arrows to move between keyframes. Once you’re at the first one, start decreasing the Scale and the Position values as you move the Playhead toward the second keyframe. There are no rules here. Move each value based on how it looks best to you.
For the second keyframe, just increase the Scale and adjust the Position value based on how it looks on the screen.
Step 15
Now, apply the same method as in Step 14 to all the other circles in your video. Then, adjust the keyframe positions for all layers to create more unique movement throughout the video.
Step 16
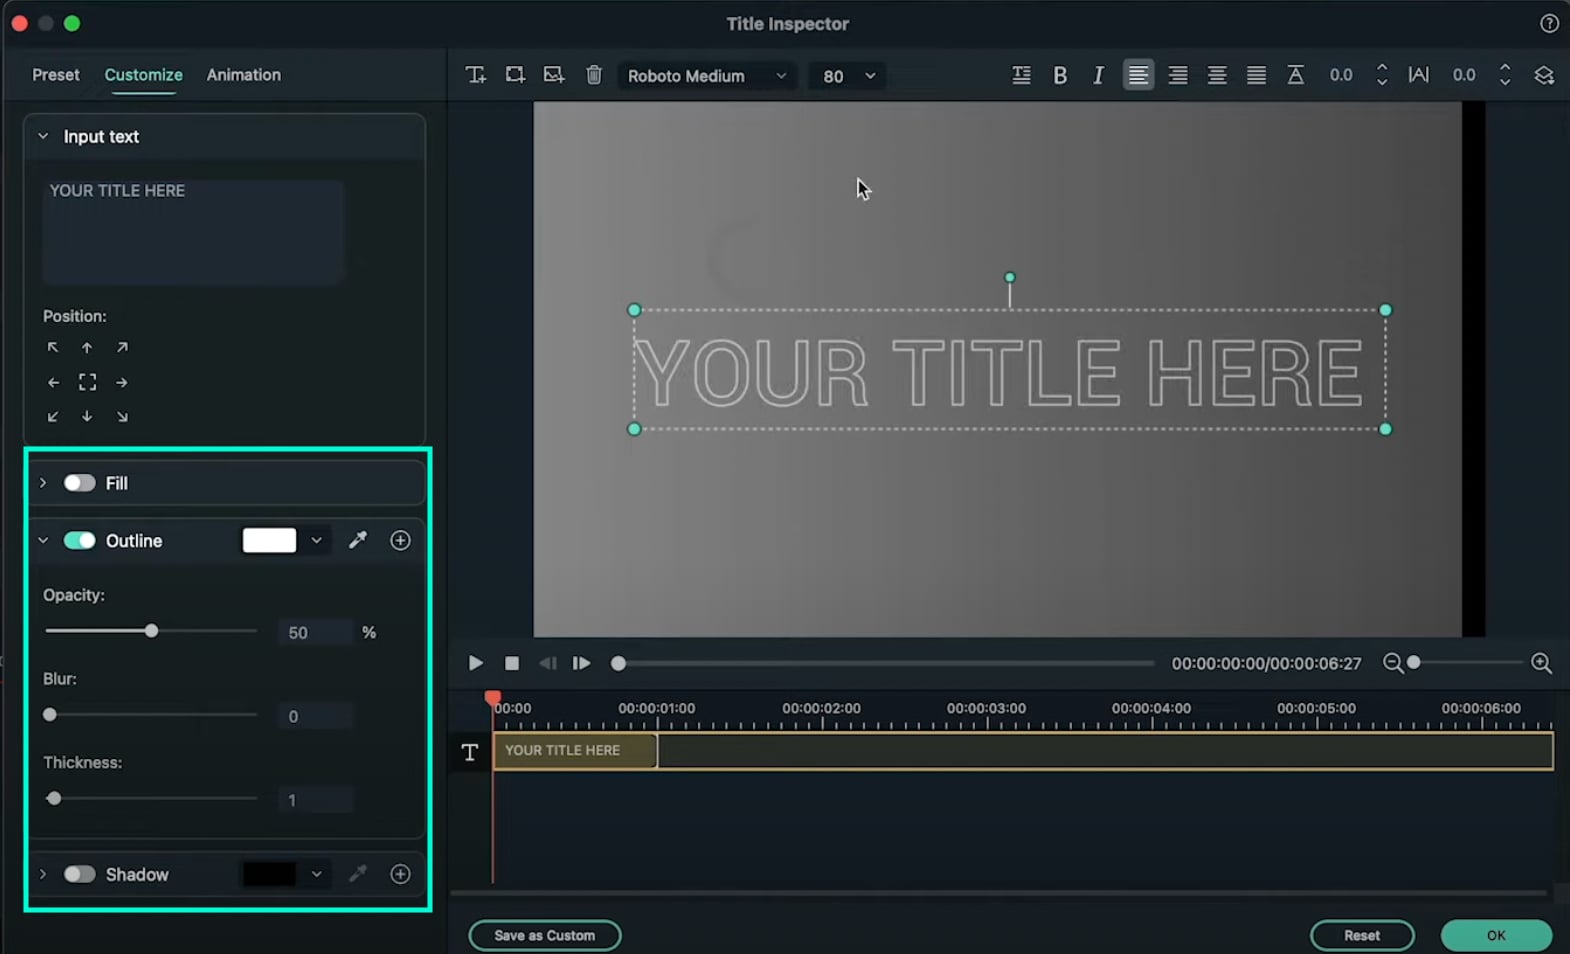
Move the Playhead to 1 second and 30 frames. Then, add a new Default Title in the Timeline and go to its Advanced settings panel. From there, Enable the Outline option and Disable the Fill option. In the Outline option, change the color to White, set Opacity to 50%, and decrease Thickness to 1.
Step 17
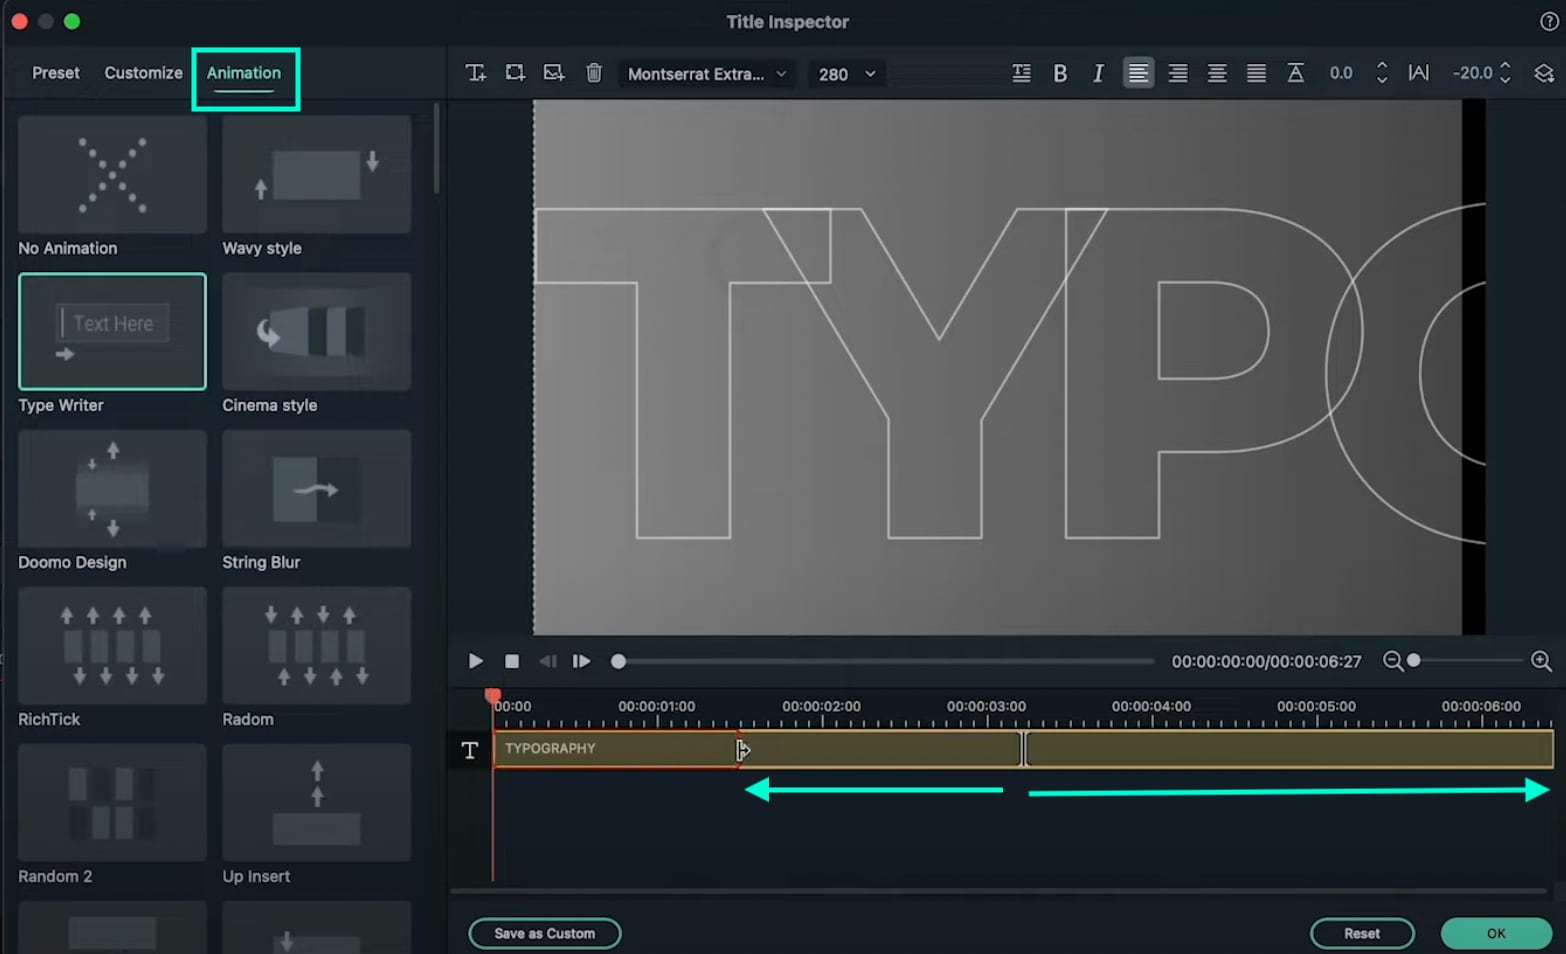
Next, choose your favorite font and type in your text inside the textbox. Then, change the value you see highlighted in this image to “-20”. Finally, increase the text size to almost fit the entire screen. Don’t worry about the fact that you can’t see all of it on the screen.

Step 18
Go to the Animation tab and apply the “Type Writer” animation. Then, drag the yellow lines below just like you see in the image here. The arrows show you the length to which you need to drag these lines. Click OK.
Step 19
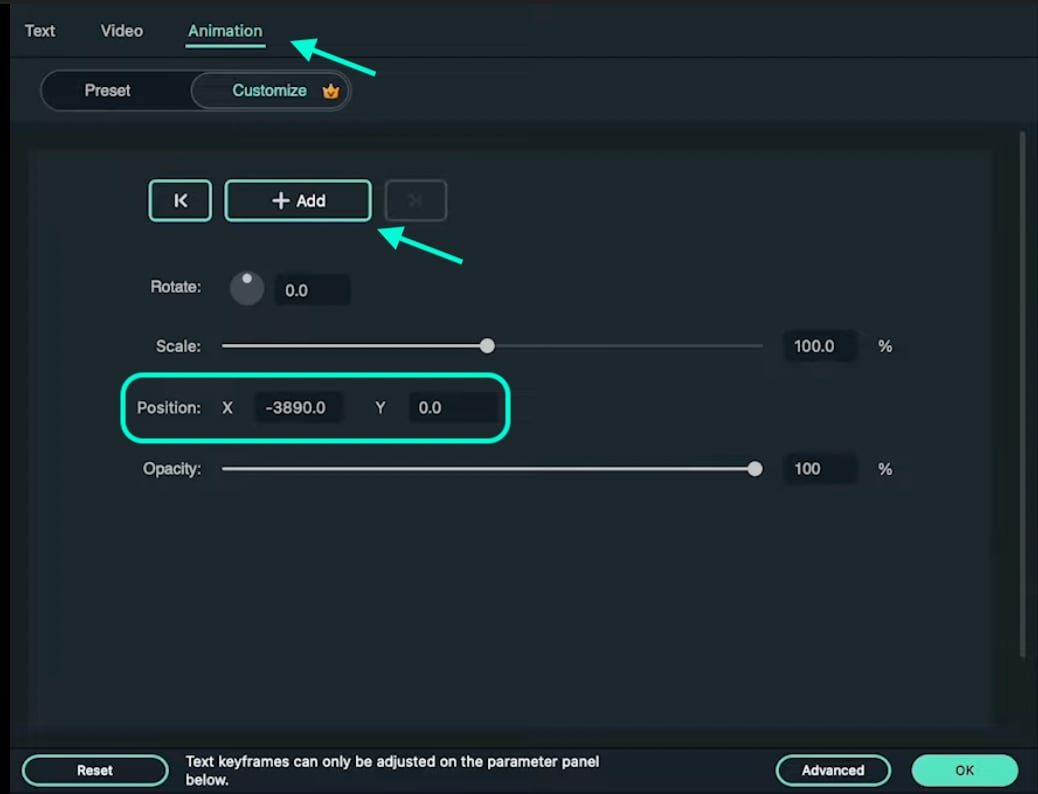
Set the Playhead to 1 second and 40 frames. Now, double-click on the last Default Title we just created and go to its Animation settings. NOTE: Don’t open its Advanced settings this time. Next, add a keyframe. Then, move the Playhead near the end of this clip in the Timeline. Now, drag the X position to the left until you see the last letter of your text appear on the screen. Click OK.
Step 20
Now, add another Default Title to the Timeline. Open its Advanced settings and type in your main text. Then, go to its Animation tab and apply the “Random 2” animation. Change its starting and end times according to your preference. Click OK.

Step 21
That’s it. You’re done! Feel free to preview the video and Render it. Congratulations on creating unique motion graphics in Filmora.
Summary
What you’ve learned:
- How to create custom motion graphics in Filmora
- How to edit and add animations to titles in Filmora
- Customize text and shapes in Filmora
What you need to prepare:
- A computer (Windows or macOS)
- Your video materials.
- Filmora video editor
Step 1
Visit the filmora.wondershare.com website and download Filmora . Install the program and wait for it to Run. Then, click on New Project.
Step 2
Go to File → Project Settings and set the FPS to 60. Also, ensure that the project is in Full Resolution (1920x1080). Click OK.

Step 3
Open the Titles tab and drag the Default Title to the Timeline. Then, double-click on the Default Title and click on ADVANCED.

Step 4
From the Advanced settings panel, delete the existing text and add a Rectangle shape.

Step 5
Disable the Text Fill and the Shape Border options from the panel on the left side.

Step 6
Click the drop-down arrow on the Shape Fill option and change the Type to Gradient Fill. Then, adjust the two color pallets from lighter to darker to create a gradient effect. Finally, adjust the rectangle to fit the entire screen. Click OK.

Step 7
Go to the Transitions tab → search for “Push” → drag the Push transition to the Default Title in the Timeline. Then, move the Playhead to the 1-second marker and drag another Default Title to that point from the Titles tab.

Step 8
Double-click on the new Default Title → go to Advanced. Delete the default text and add a Circle shape this time instead of a Rectangle. Disable the Text Fill and Shape Fill options this time.
Step 9
Scroll down to Shape Border and increase the Thickness bar all the way up. Then, change the circle’s color to match your background as closely as possible. Click OK.

Step 10
Copy the Title you just edited and paste it into the above layer. Then, double-click on the copied Title and go to its Advanced settings panel.

Step 11
In the Advanced panel, copy the circle and paste it somewhere else on the screen. Change its size if you want, and change the shade of its color to match the background once more. You can add as many new copies of the Default Titles and copy as many circles as you want. Click OK.

Step 12
After you’re done copying and pasting more Default Titles with more Circles inside, you can start animating them. Start with the first one. Double-click on the first Default Title with the Circle inside. Make sure you place the Playhead at the beginning of that clip. Then, go to the Animation tab.

Step 13
You need to add 3 keyframes. Add the first one right now. Just click on the “**+Add” button. Then, move the Playhead somewhere in the middle and click “+Add” again. Last, move the Playhead at the end of the clip, and click “+Add**” again to add the third keyframe.

Step 14
Now, go back to the first keyframe to edit its settings. Click the arrows to move between keyframes. Once you’re at the first one, start decreasing the Scale and the Position values as you move the Playhead toward the second keyframe. There are no rules here. Move each value based on how it looks best to you.
For the second keyframe, just increase the Scale and adjust the Position value based on how it looks on the screen.

Step 15
Now, apply the same method as in Step 14 to all the other circles in your video. Then, adjust the keyframe positions for all layers to create more unique movement throughout the video.

Step 16
Move the Playhead to 1 second and 30 frames. Then, add a new Default Title in the Timeline and go to its Advanced settings panel. From there, Enable the Outline option and Disable the Fill option. In the Outline option, change the color to White, set Opacity to 50%, and decrease Thickness to 1.

Step 17
Next, choose your favorite font and type in your text inside the textbox. Then, change the value you see highlighted in this image to “-20”. Finally, increase the text size to almost fit the entire screen. Don’t worry about the fact that you can’t see all of it on the screen.

Step 18
Go to the Animation tab and apply the “Type Writer” animation. Then, drag the yellow lines below just like you see in the image here. The arrows show you the length to which you need to drag these lines. Click OK.

Step 19
Set the Playhead to 1 second and 40 frames. Now, double-click on the last Default Title we just created and go to its Animation settings. NOTE: Don’t open its Advanced settings this time. Next, add a keyframe. Then, move the Playhead near the end of this clip in the Timeline. Now, drag the X position to the left until you see the last letter of your text appear on the screen. Click OK.

Step 20
Now, add another Default Title to the Timeline. Open its Advanced settings and type in your main text. Then, go to its Animation tab and apply the “Random 2” animation. Change its starting and end times according to your preference. Click OK.

Step 21
That’s it. You’re done! Feel free to preview the video and Render it. Congratulations on creating unique motion graphics in Filmora.
Summary
What you’ve learned:
- How to create custom motion graphics in Filmora
- How to edit and add animations to titles in Filmora
- Customize text and shapes in Filmora
What you need to prepare:
- A computer (Windows or macOS)
- Your video materials.
- Filmora video editor
Step 1
Visit the filmora.wondershare.com website and download Filmora . Install the program and wait for it to Run. Then, click on New Project.
Step 2
Go to File → Project Settings and set the FPS to 60. Also, ensure that the project is in Full Resolution (1920x1080). Click OK.

Step 3
Open the Titles tab and drag the Default Title to the Timeline. Then, double-click on the Default Title and click on ADVANCED.

Step 4
From the Advanced settings panel, delete the existing text and add a Rectangle shape.

Step 5
Disable the Text Fill and the Shape Border options from the panel on the left side.

Step 6
Click the drop-down arrow on the Shape Fill option and change the Type to Gradient Fill. Then, adjust the two color pallets from lighter to darker to create a gradient effect. Finally, adjust the rectangle to fit the entire screen. Click OK.

Step 7
Go to the Transitions tab → search for “Push” → drag the Push transition to the Default Title in the Timeline. Then, move the Playhead to the 1-second marker and drag another Default Title to that point from the Titles tab.

Step 8
Double-click on the new Default Title → go to Advanced. Delete the default text and add a Circle shape this time instead of a Rectangle. Disable the Text Fill and Shape Fill options this time.
Step 9
Scroll down to Shape Border and increase the Thickness bar all the way up. Then, change the circle’s color to match your background as closely as possible. Click OK.

Step 10
Copy the Title you just edited and paste it into the above layer. Then, double-click on the copied Title and go to its Advanced settings panel.

Step 11
In the Advanced panel, copy the circle and paste it somewhere else on the screen. Change its size if you want, and change the shade of its color to match the background once more. You can add as many new copies of the Default Titles and copy as many circles as you want. Click OK.

Step 12
After you’re done copying and pasting more Default Titles with more Circles inside, you can start animating them. Start with the first one. Double-click on the first Default Title with the Circle inside. Make sure you place the Playhead at the beginning of that clip. Then, go to the Animation tab.

Step 13
You need to add 3 keyframes. Add the first one right now. Just click on the “**+Add” button. Then, move the Playhead somewhere in the middle and click “+Add” again. Last, move the Playhead at the end of the clip, and click “+Add**” again to add the third keyframe.

Step 14
Now, go back to the first keyframe to edit its settings. Click the arrows to move between keyframes. Once you’re at the first one, start decreasing the Scale and the Position values as you move the Playhead toward the second keyframe. There are no rules here. Move each value based on how it looks best to you.
For the second keyframe, just increase the Scale and adjust the Position value based on how it looks on the screen.

Step 15
Now, apply the same method as in Step 14 to all the other circles in your video. Then, adjust the keyframe positions for all layers to create more unique movement throughout the video.

Step 16
Move the Playhead to 1 second and 30 frames. Then, add a new Default Title in the Timeline and go to its Advanced settings panel. From there, Enable the Outline option and Disable the Fill option. In the Outline option, change the color to White, set Opacity to 50%, and decrease Thickness to 1.

Step 17
Next, choose your favorite font and type in your text inside the textbox. Then, change the value you see highlighted in this image to “-20”. Finally, increase the text size to almost fit the entire screen. Don’t worry about the fact that you can’t see all of it on the screen.

Step 18
Go to the Animation tab and apply the “Type Writer” animation. Then, drag the yellow lines below just like you see in the image here. The arrows show you the length to which you need to drag these lines. Click OK.

Step 19
Set the Playhead to 1 second and 40 frames. Now, double-click on the last Default Title we just created and go to its Animation settings. NOTE: Don’t open its Advanced settings this time. Next, add a keyframe. Then, move the Playhead near the end of this clip in the Timeline. Now, drag the X position to the left until you see the last letter of your text appear on the screen. Click OK.

Step 20
Now, add another Default Title to the Timeline. Open its Advanced settings and type in your main text. Then, go to its Animation tab and apply the “Random 2” animation. Change its starting and end times according to your preference. Click OK.

Step 21
That’s it. You’re done! Feel free to preview the video and Render it. Congratulations on creating unique motion graphics in Filmora.
Summary
What you’ve learned:
- How to create custom motion graphics in Filmora
- How to edit and add animations to titles in Filmora
- Customize text and shapes in Filmora
What you need to prepare:
- A computer (Windows or macOS)
- Your video materials.
- Filmora video editor
Step 1
Visit the filmora.wondershare.com website and download Filmora . Install the program and wait for it to Run. Then, click on New Project.
Step 2
Go to File → Project Settings and set the FPS to 60. Also, ensure that the project is in Full Resolution (1920x1080). Click OK.

Step 3
Open the Titles tab and drag the Default Title to the Timeline. Then, double-click on the Default Title and click on ADVANCED.

Step 4
From the Advanced settings panel, delete the existing text and add a Rectangle shape.

Step 5
Disable the Text Fill and the Shape Border options from the panel on the left side.

Step 6
Click the drop-down arrow on the Shape Fill option and change the Type to Gradient Fill. Then, adjust the two color pallets from lighter to darker to create a gradient effect. Finally, adjust the rectangle to fit the entire screen. Click OK.

Step 7
Go to the Transitions tab → search for “Push” → drag the Push transition to the Default Title in the Timeline. Then, move the Playhead to the 1-second marker and drag another Default Title to that point from the Titles tab.

Step 8
Double-click on the new Default Title → go to Advanced. Delete the default text and add a Circle shape this time instead of a Rectangle. Disable the Text Fill and Shape Fill options this time.
Step 9
Scroll down to Shape Border and increase the Thickness bar all the way up. Then, change the circle’s color to match your background as closely as possible. Click OK.

Step 10
Copy the Title you just edited and paste it into the above layer. Then, double-click on the copied Title and go to its Advanced settings panel.

Step 11
In the Advanced panel, copy the circle and paste it somewhere else on the screen. Change its size if you want, and change the shade of its color to match the background once more. You can add as many new copies of the Default Titles and copy as many circles as you want. Click OK.

Step 12
After you’re done copying and pasting more Default Titles with more Circles inside, you can start animating them. Start with the first one. Double-click on the first Default Title with the Circle inside. Make sure you place the Playhead at the beginning of that clip. Then, go to the Animation tab.

Step 13
You need to add 3 keyframes. Add the first one right now. Just click on the “**+Add” button. Then, move the Playhead somewhere in the middle and click “+Add” again. Last, move the Playhead at the end of the clip, and click “+Add**” again to add the third keyframe.

Step 14
Now, go back to the first keyframe to edit its settings. Click the arrows to move between keyframes. Once you’re at the first one, start decreasing the Scale and the Position values as you move the Playhead toward the second keyframe. There are no rules here. Move each value based on how it looks best to you.
For the second keyframe, just increase the Scale and adjust the Position value based on how it looks on the screen.

Step 15
Now, apply the same method as in Step 14 to all the other circles in your video. Then, adjust the keyframe positions for all layers to create more unique movement throughout the video.

Step 16
Move the Playhead to 1 second and 30 frames. Then, add a new Default Title in the Timeline and go to its Advanced settings panel. From there, Enable the Outline option and Disable the Fill option. In the Outline option, change the color to White, set Opacity to 50%, and decrease Thickness to 1.

Step 17
Next, choose your favorite font and type in your text inside the textbox. Then, change the value you see highlighted in this image to “-20”. Finally, increase the text size to almost fit the entire screen. Don’t worry about the fact that you can’t see all of it on the screen.

Step 18
Go to the Animation tab and apply the “Type Writer” animation. Then, drag the yellow lines below just like you see in the image here. The arrows show you the length to which you need to drag these lines. Click OK.

Step 19
Set the Playhead to 1 second and 40 frames. Now, double-click on the last Default Title we just created and go to its Animation settings. NOTE: Don’t open its Advanced settings this time. Next, add a keyframe. Then, move the Playhead near the end of this clip in the Timeline. Now, drag the X position to the left until you see the last letter of your text appear on the screen. Click OK.

Step 20
Now, add another Default Title to the Timeline. Open its Advanced settings and type in your main text. Then, go to its Animation tab and apply the “Random 2” animation. Change its starting and end times according to your preference. Click OK.

Step 21
That’s it. You’re done! Feel free to preview the video and Render it. Congratulations on creating unique motion graphics in Filmora.
Summary
What you’ve learned:
- How to create custom motion graphics in Filmora
- How to edit and add animations to titles in Filmora
- Customize text and shapes in Filmora
Best Frame Rate for 4K Video
People in the videography ad filmmaking world use complicated terminology like Ultra High Def to describe 4K videos. Even though you are not a complete stranger to the term 4K, you might still be unaware of what it means.
In a nutshell, 4K is the highest resolution you can watch your movies and videos. The details are incredibly crisp, meaning you can see pimples or the pores on an actor’s face through the screen. However, the frame rate will significantly affect how you enjoy a 4K video. Therefore, it would be wise to learn how to choose the ideal frame rate to suit your needs.
Keep reading this article to learn more about frame rates and which is suitable for a 4K video.

How Do Frame Rates Affect Video Viewing?
The motion will appear smoother if your video contains more frames per second. Even though your viewers are not tech-savvy, they will definitely notice the difference.
Consider a video of a duck drinking water from a pond. If you film and playback the same video in 24, 30, and 60fps, you will see a noticeable difference, assuming your shutter speed is set according to the 180-degree shutter rule.
If you are filming quicker motions of wildlife and birds, you are better off sticking to higher resolutions to give the viewer a pleasant experience and ensure the motion is fluid.
On the other hand, lower frame rates like 24fps are ideal for human movements, which are not as smooth as wildlife. Suppose you used 60fps for a cinematic film or a TV show. The video would look a bit odd because that is not how we see things in the natural world. In addition, your viewers aren’t used to such smoothness.
Viewing Requirements of 4K Videos
You may have heard about 4K videos and wondered what people mean by that term. In simple terms, a 4K video is a high-resolution video that is four times the usual 1080p HD video. When it comes to 4K videos, there are two standard resolutions. One of them is the standard for Digital Cinema which is 4096*2160 pixels. The other is for television and is 3840*2160 pixels.
To stream 4K content, you need a bandwidth between 10 and 20 Mbps. On the other hand, streaming platforms like Netflix require higher bandwidths of not less than 15 Mbps. In addition to the bandwidth we mentioned earlier, you need a 4KTV or 4K monitor.
This specification was brought up at the UHD Alliance, a union of more than 50 tech companies working together to support 4K content. Tech companies ought to ensure the devices they produce are compatible with 4K videos, which are becoming increasingly popular.
Below is a list of requirements any electronic device should fulfill before being termed a 4KTV or 4K monitor.
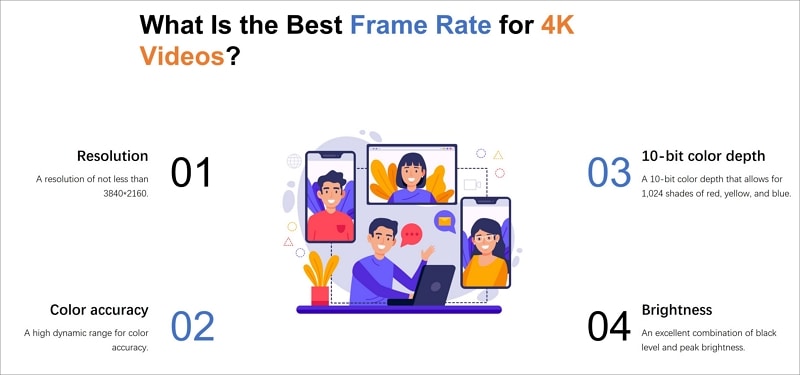
- A resolution of not less than 3840*2160.
- A 10-bit color depth that allows for 1,024 shades of red, yellow, and blue.
- A high dynamic range for color accuracy.
- An excellent combination of black level and peak brightness. The peak brightness should not exceed 1,000 nits, and the black level shouldn’t go below 0.5 nits. Alternatively, the peak brightness shouldn’t exceed 540 nits; neither should the black level plummet below 0.0005 nits.
Best Frame Rate for 4K Video
We all know that the frame rate you choose for your video will significantly impact the viewer’s experience and the overall style of your video. The frame rate will also affect how the video looks. For instance, a frame rate lower than 24fps will make your video look unprofessional and of poor quality. The content will also flicker because there aren’t many still images per second.
On the other hand, a lower FPS causes the file size to be smaller, causing it to consume a lower bandwidth. The vice versa is also true. Now that you understand these facts, you might wonder which frame rate would be best for your 4K videos.
Research reveals that the most acceptable frame rate is 30fps and 60fps. This is because the motion will appear natural to the human eye without being too fast or unrealistic.
If you are wondering what is the best frame rate for 4k videos, we urge you to select 60fps because it contains more detail. The higher frame rate also makes the motion look very smooth and crisp. Perhaps you want to shoot a slow-motion video. In that case, an even higher frame rate of 120fps would be ideal.
How To Choose The Base Frame Rates for Your Next Video
Choosing a frame rate for your videos is not complicated. However, it is not a straightforward process either. There are numerous moving parts that ought to work harmoniously for your video to turn out perfect and guarantee your audience will have a pleasant viewing experience. Before we dive into choosing the best frame rate for your 4K videos, let’s help you understand the filmmaking process.
Most filmmakers and videographers see it fit to shoot videos in 120p or 4K. This step makes their work easier during the editing process. If the raw footage is in 4K, they can de-emphasize or retain specific plot points that would look great in the final video. However, not everyone is shooting a video for Hollywood. Therefore, shooting in 4K on your laptop for your YouTube channel might be difficult.
Below are some factors you should consider when choosing the best frame rate for a 4k video.
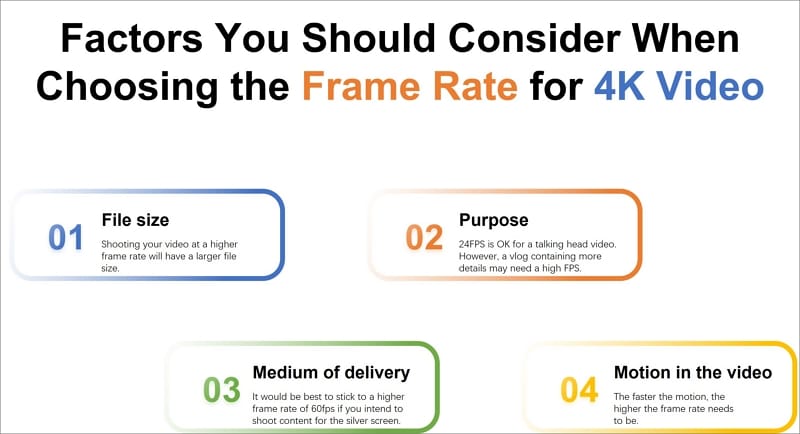
File size
Shooting your video at a higher frame rate means more still images are packed into a single second of the video. Therefore, you will end up with a larger file size. If you want to shoot a video for your YouTube channel, it would be wise to stick to a smaller frame rate.
Purpose
It wouldn’t make sense to shoot a talking head video at more than 24fps. However, a higher frame rate would be ideal for a travel vlog, where the details need to be crisp.
Medium of delivery
The standard frame rate for television is 24fps. On the other hand, it would be best to stick to a higher frame rate of 60fps if you intend to shoot content for the silver screen.
Motion in the video
Lastly, the movement within the video will play a massive role in the frame rate you choose. The faster the motion, the higher the frame rate needs to be. For instance, action movies don’t do well in frame rates of less than 60 fps.
How To Set the Frame Rate of Your Editing Tools
Even though you didn’t use the ideal frame rate for 4k video during filming, you could use an editing tool to tweak the frame rate to where you need it to be. In our opinion, Wondershare Filmora is an excellent editing tool to set the ideal frame rate and take your videos to the next level.
Wondershare Filmora is a feature-rich platform that takes the tedium out of editing your videos and makes the outcome look spectacular. People won’t believe you when you say you edited the video yourself!
The platform is user-friendly, eliminating the need for a learning curve. You also don’t need to be an experienced editor or graphic designer to use this platform. Here is a list of nifty features you might find helpful on this platform.
- GIF support
- Audio equalizer
- Advanced text editing
- Noise removal
- Scene detection
- Audio mixer
- Color tuning
Out of all the wonderful features mentioned above, we will zero in on 4K editing support for now. You can use this feature to edit and export videos up to 4K without breaking a sweat.
Free Download For Win 7 or later(64-bit)
Free Download For macOS 10.14 or later
Wondershare Filmora allows you to customize your 4K videos by zooming in on a particular scene, tilting the video, or incorporating panning to give it a serene effect. We guarantee you will have fun using this platform and will get better at creating exquisite 4K content for your channel.
Below is a simple guide on using Wondershare Filmora to set the 4k video frame rate.
Step1 Launch the platform on your device and select the “File” tab. After a drop-down menu appears, select “Project Settings.”

Step2 In the dialogue box, select “Frame Rate” and choose the frame rate you think is ideal for your video.

Step3 Click “OK” and edit the videos as you like.
Conclusion
4K is the trend of the era, and it would be a shame if you got left behind. The viewer’s expectations are rising steadily, and they would rather skip your video to watch another if the quality is not up to par. In addition to giving you a competitive edge, 4K videos are very crisp and allow you to enjoy deep, vibrant colors.
You can also capture still photos from the video without compromising on quality. We can go on and on about the benefits of adopting 4K resolution in your videos. Therefore, it would be wise to increase your knowledge base and learn everything there is to know about 4K videos and how to set the best frame rates.
Free Download For macOS 10.14 or later
Wondershare Filmora allows you to customize your 4K videos by zooming in on a particular scene, tilting the video, or incorporating panning to give it a serene effect. We guarantee you will have fun using this platform and will get better at creating exquisite 4K content for your channel.
Below is a simple guide on using Wondershare Filmora to set the 4k video frame rate.
Step1 Launch the platform on your device and select the “File” tab. After a drop-down menu appears, select “Project Settings.”

Step2 In the dialogue box, select “Frame Rate” and choose the frame rate you think is ideal for your video.

Step3 Click “OK” and edit the videos as you like.
Conclusion
4K is the trend of the era, and it would be a shame if you got left behind. The viewer’s expectations are rising steadily, and they would rather skip your video to watch another if the quality is not up to par. In addition to giving you a competitive edge, 4K videos are very crisp and allow you to enjoy deep, vibrant colors.
You can also capture still photos from the video without compromising on quality. We can go on and on about the benefits of adopting 4K resolution in your videos. Therefore, it would be wise to increase your knowledge base and learn everything there is to know about 4K videos and how to set the best frame rates.
[Easiest Fix Included!] Top 5 Ways to Convert HDR to SDR Videos
HDR or the High Dynamic Range Images points out the brightest and the darkest spots on an image, while an SDR has fewer details and colors. In comparison, HDR has a resolution four times as excellent as an SDR video. With a higher contrast ratio and color information, HDR videos are more vivid and pleasing.
Then why is there a need to convert HDR to SDR? An HDR file is huge and is currently incompatible with many old and some new devices. To view HDR videos, you need to lower the resolution and change the size of the file tidbit to convert it to 1080 SDR without compromising on the quality.
Plenty of HDR converters can perform the task, but only a few have the benefit of retaining the 4K quality of the original video. This article will walk you through the five easiest ways of converting videos from HDR to SDR format. So without further ado, let’s begin.
Easiest Fix - Edit and Convert HDR Videos in Wondershare Filmora [PC & Mac]
You must be living under a rock if you are still unaware of Wondershare Filmora . Filmora is an excellent app to make and edit your videos with the finesse of a professional. Wondershare Filmora comes with professional video editing tools packaged perfectly for beginners.
Filmora is especially a blessing for content creators looking to create unique and exciting videos in any resolution, video quality, and format they want. Apart from its usual video editing tools, a perk of having Wondershare Filmora is that you can easily change the videos from one format to another. For example, you can convert an HDR video to SDR in Filmora so that users with older devices incompatible with HDR can also view the video without burning their eyes.
It does not matter if you have iPhone 12 HDR videos or an HDR clip shot with a professional camera; Filmora can handle it all. The best part of converting the video is that Filmora supports efficient transferring of HDR files from your phone to your PC. So, without further ado, let us start with how you can convert an HDR video to SDR in Filmora.
Free Download For Win 7 or later(64-bit)
Free Download For macOS 10.14 or later
How to Convert an HDR video to SDR without data loss in Filmora
To convert your video to SDR, start by downloading Wondershare Filmora if you do not already have it downloaded.
Download the Application
Download Wondershare Filmora according to your PC type, i.e., Mac or Windows. Install it and run it. Launch the application to get working.
Import Your Videos
- Next, import your HDR video file. To import, click on the Import button in the primary window. From there, select the video file you want to convert to SDR.
- Once imported, drag the file to the timeline. You can tweak or edit it too before converting. You may trim it or cut an unwanted section.
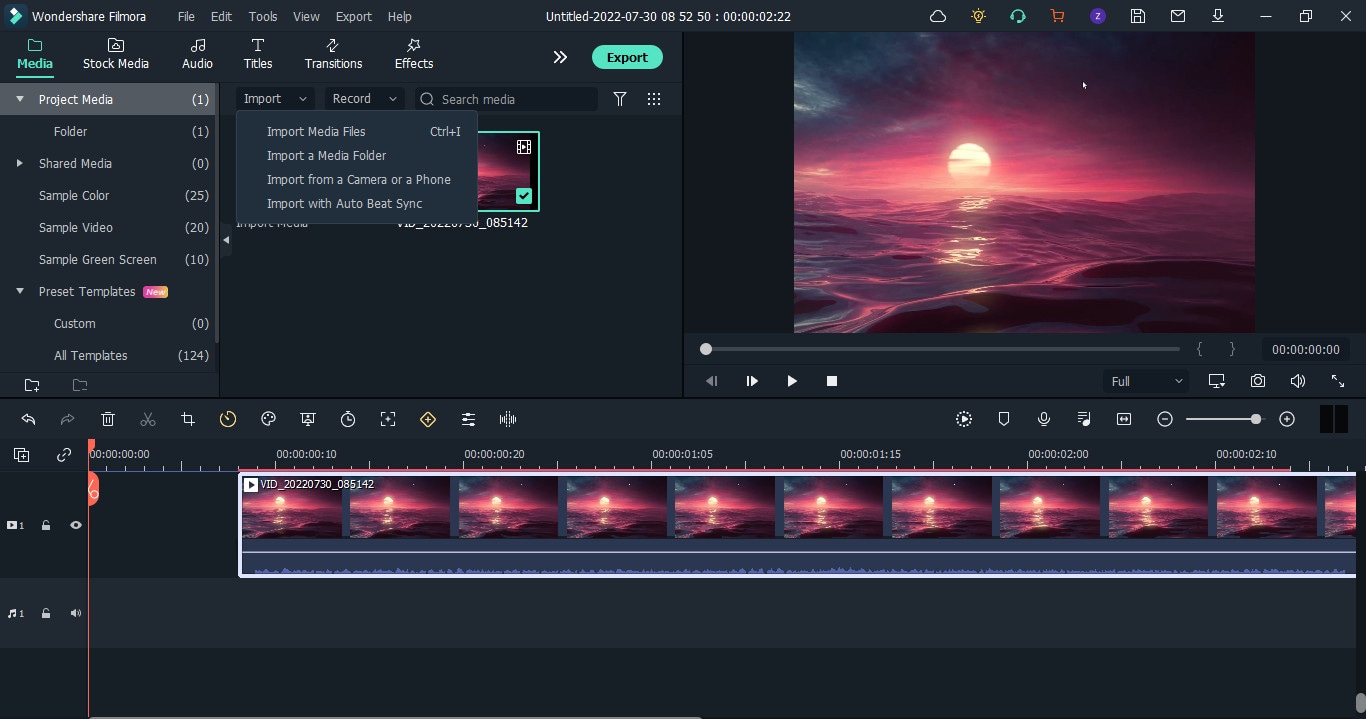
- If you want to change to SDR while editing the project, click the File button and select Project Settings. From the settings, go to Colour space and select the SDR-Rec709 option.
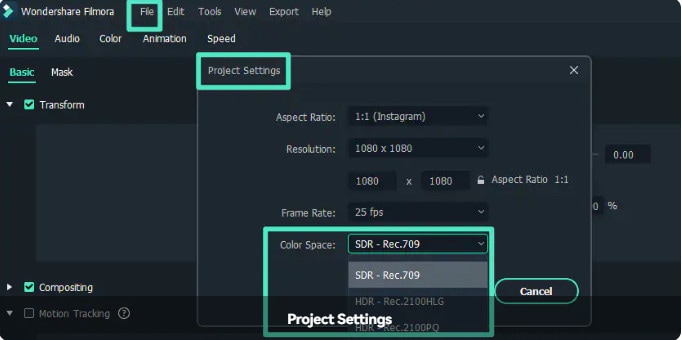
Exporting the File
- If you want to only change the color space setting for the exported file, go to Export and then click on Settings.
- From settings, click on the Colour Space option, and from the drop-down menu, select SDR-Rec709.
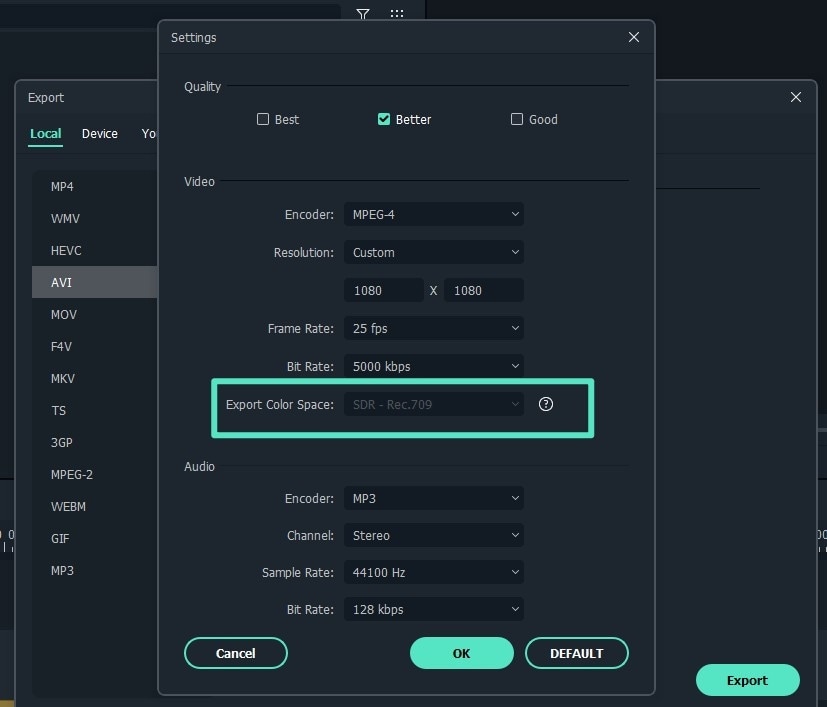
- Press Ok to save the changes and export the file in your desired format.
- If you want to adjust the resolution according to the device like iPhone, Samsung, Playstation, or Xbox you can also do that directly with Filmora by clicking the Device tab in the Export Confirm the settings and press Ok.
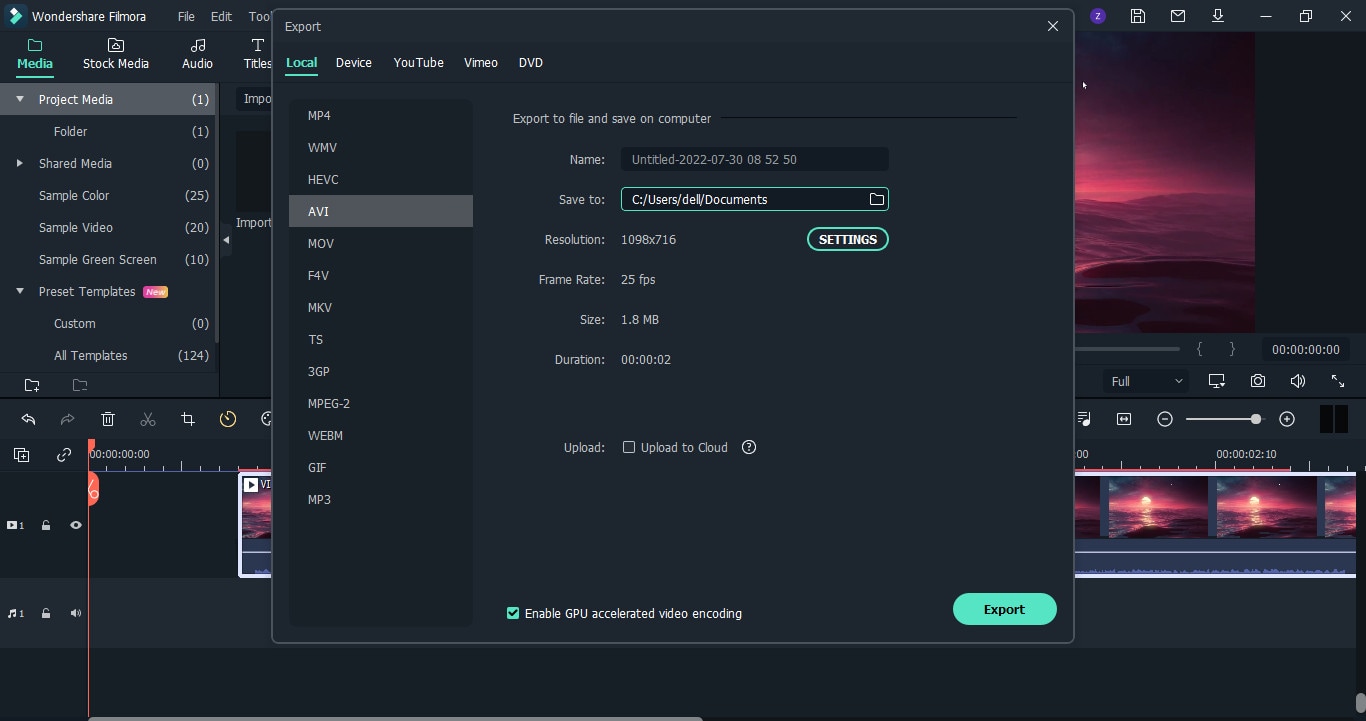
This is the easiest and cleanest way to get an SDR copy of an HDR file. Filmora does it effortlessly, allowing you to get an SDR video out of an HDR one.
Decode Video from HDR to SDR with a Video Converter
If you have ever worked with converting videos, then you are probably familiar with Handbrake. Handbrake is a household name for video converting, especially when it comes to 4KHDR to SDR video conversions. It has a free open source feature that allows you to convert to SDR videos with an MP4 or MKV format.
Steps of Decoding HDR Video to SDR with Handbrake
Before converting your HDR video to SDR, make sure you have downloaded Handbrake on your computer.
- Open the Handbrake app.
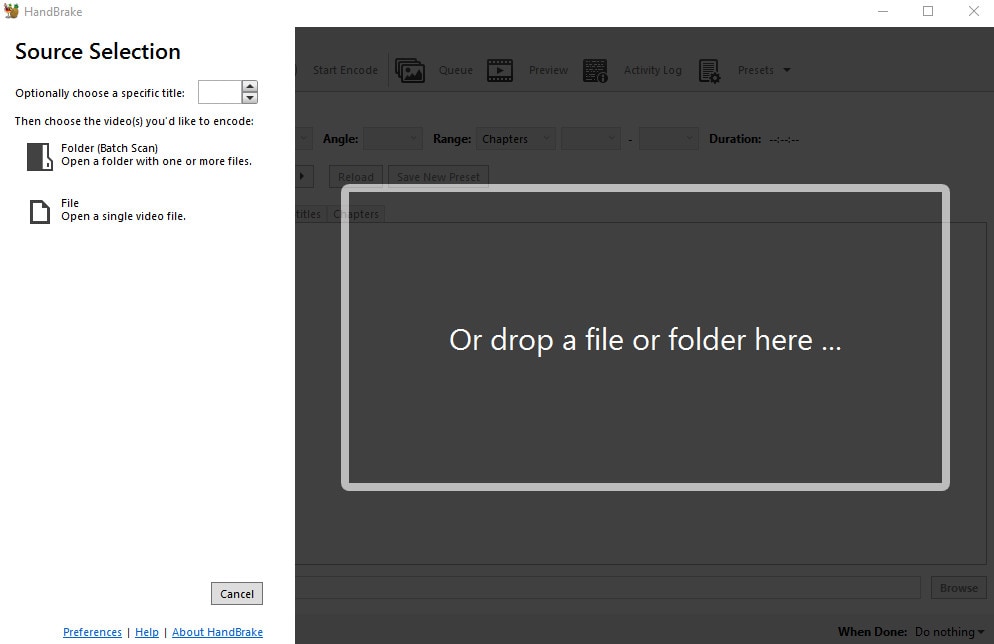
- To import your video to Handbrake, click on File, then Source Selection. You can also drag and drop the video to scan it. Next, wait for Handbrake to scan the title. Once the video scan is complete, all the information will be displayed in the source section.
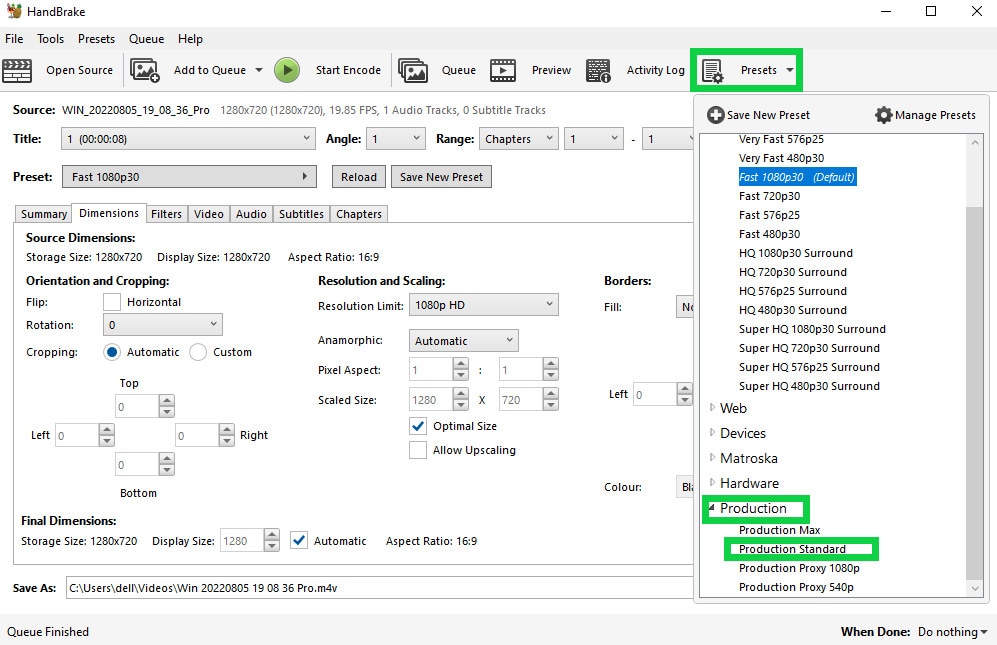
- Once the file is imported, you can now select the output format from the right panel under General. The default format already specified in Handbrake is Fast 1080p30; you can change that if you are looking for a different form.
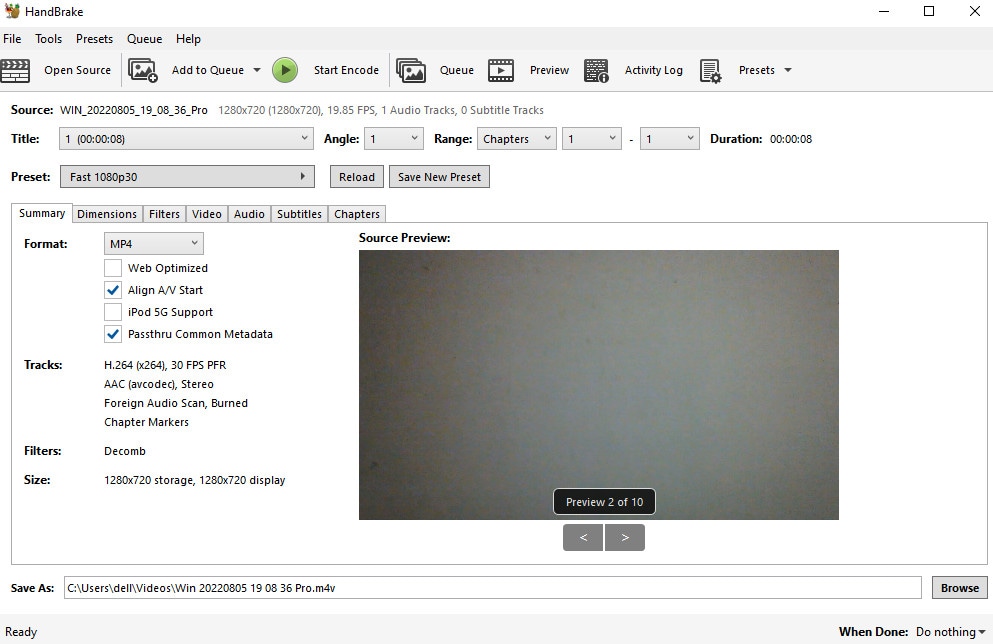
- You can also change the format depending on the device type in Handbrake.
- Lastly, go to Presets, click Production, and select Production Standard to convert 4K HDR video to 4K SDR. You can also do that by going to General Profile under the Legacy column.
- Now, select format, quality, resolution, and video codec.
- Lastly, select the destination for the file from the Browse button and press encode to start the conversion.
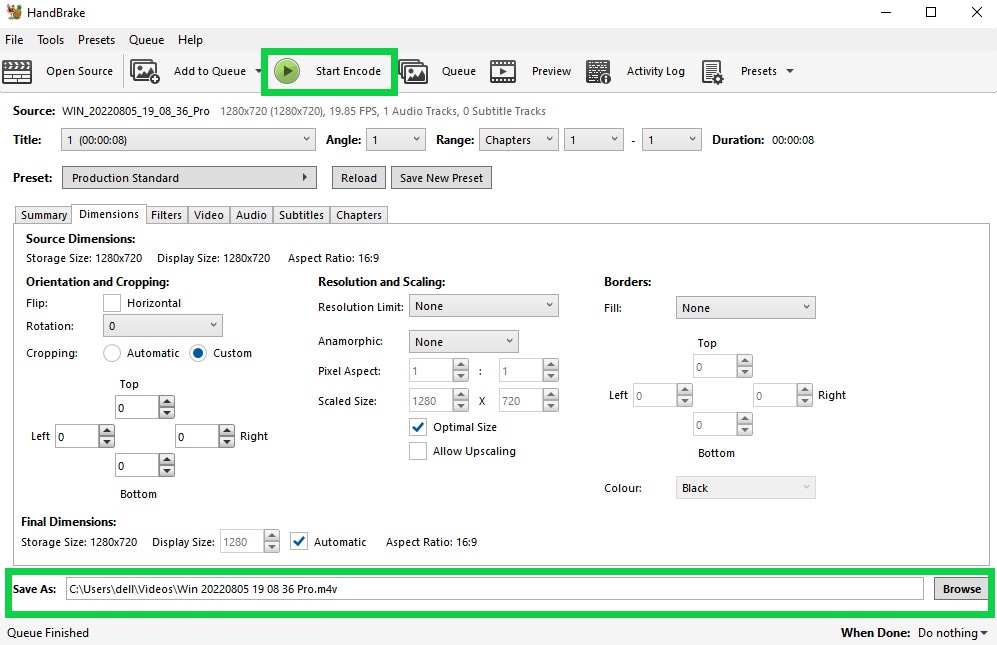
With a few simple clicks, your HDR file can easily be converted to SDR using Handbrake.
Transcode Video from HDR to SDR by Image Editing [Samsung only]
If you own the latest Samsung S22 phone, you are probably aware of its feature that allows you to record in an HDR10 view. But, what do you do if you want to send the video to someone whose phone is incompatible with HDR? The video will appear too bright and washed out.
By converting the video to SDR, you can send them the video without burning their retinas. This method to convert HDR videos to SDR is especially for Samsung Galaxy phones. The gallery app initially used to have a built-in option to do that, but it’s not there anymore. While the original option is removed, you can still use the method below to convert an HDR video to SDR with just a few taps.
- To convert HDR10+ video to SDR on a Samsung Galaxy phone, you can directly proceed with it on your phone.
- Head to and open Gallery, choose your HDR10+ video and tap three dots in the bottom right corner.
- From the pop-up menu, select Open in Video Player.
- Once the video opens in the video player, click on another three dots in the top right corner.
- From there, tap on the Editor
- In the editor, tap again on three dots on the bottom right and now select Size and Format.
- From this menu, you can change the resolution of the video as well as its format. From the format drop-down, you can select SDR to convert your video to SDR.
- Make sure you do not tap on Save; instead, click on the three dots again and tap on Save as Copy. This will leave your original HDR video untouched and save a copy for the SDR video.
Convert HDR 4K Video to SDR with YouTube [Untested]
HDR videos on Youtube show higher color dynamics and contrast ratios than an SDR video. Viewers with HDR-compatible devices will see ‘HDR’ after every video quality option in the video settings (1080p HDR).
However, the videos uploaded as HDR on youtube can be viewed on HDR unsupported devices too. This happens because youtube automatically converts all HDR videos to SDR to be viewed on non-HDR devices. Here is a brief introduction to the steps of converting HDR to SDR on Youtube:
- Record the metadata by exporting it from an HDR-supported application like Wondershare Filmora . The metadata should be in a codec or container to be played by Youtube correctly.
- Grade your HDR properly as Rec. 2020 with PQ or HLG. Ensure the videos are graded correctly using an HDR transfer function to retain the quality. If you are unsure about the videos graded as HDR, you should not use this method because it can distort the video.
- rectly using an HDR transfer function to retain the quality. If you are not sure about the videos graded as HDR, you should not use this method because it can distort the video.
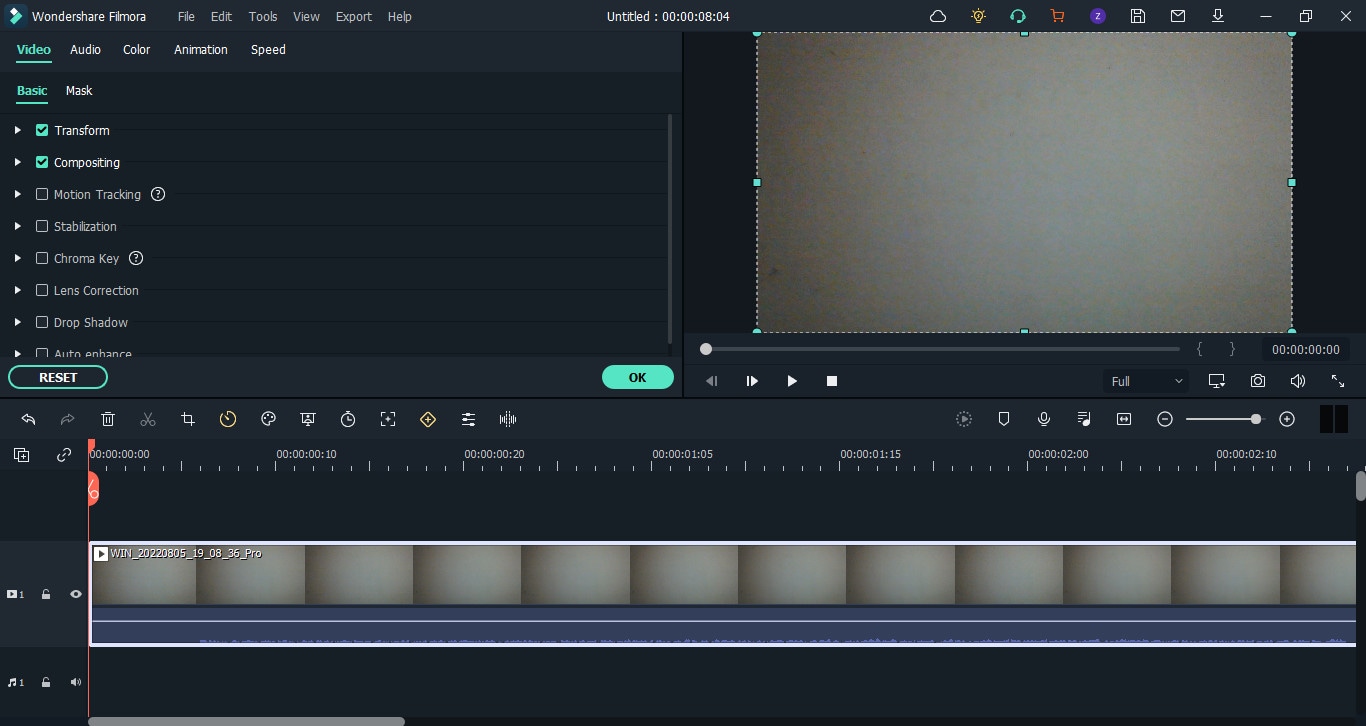
- Once done, upload it on Youtube. If it detects HDR metadata during the upload, Youtube automatically produces an SDR conversion for non-HDR compatible devices.
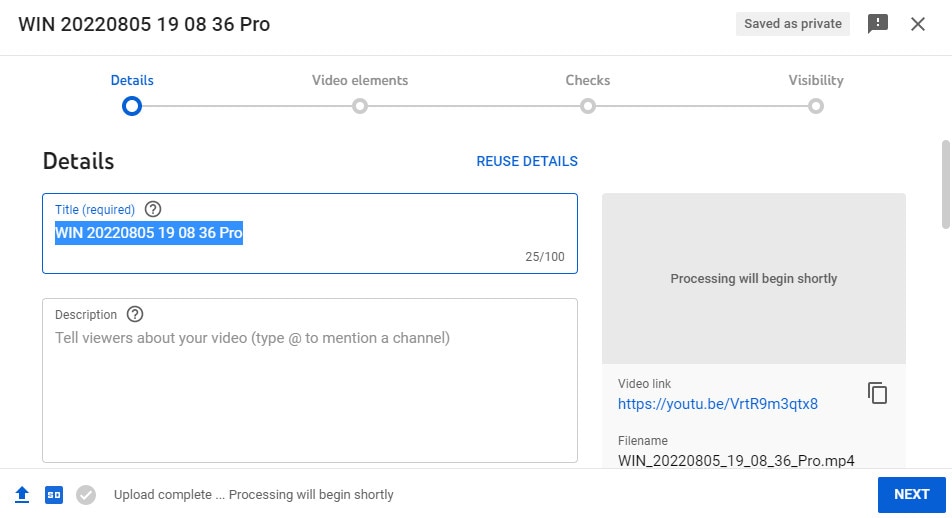
- Downloading the video from HDR unsupported devices will save an SDR video.
This method seems easy but has greater risks involved such as distortion of video if improper HDR grading is done.
Get Real-time Video HDR to SDR Conversion by Video Content Providers
With gaming becoming almost a sport, online streaming has grown immensely popular. These streaming services allow you to stream in 4K HDR format. However, a significant downside of this is that many devices are still incompatible with HDR video.
We have listed multiple methods to convert your HDR video clips to SDR, but what about a live stream? We highly recommend checking out the Intel official blog post for converting your HDR videos to SDR in real-time. The blog post describes how you can convert your live stream to SDR with different methods. You can give it a read if you are interested in that.
Hot FAQs on How to Convert HDR to SDR
1. Is SDR better than HDR?
SDR is Standard Dynamic Range, while HDR stands for High Dynamic Range. HDR is the latest technology concerning quality, clear and detailed images. HDR is perfect for videos that require high contrast, shadows, and mixed light.
HDR is definitely better than SDR because the “High” definition takes everything to the next level. However, SDR is frequently used as most devices are not compatible with HDR.
2. Why is HDR smaller than SDR?
Undoubtedly, HDR provides better image quality, colors, and clarity than SDR, but why is the file size smaller then? The answer is quite simple. HDR10 files are equipped with HVAC. HVAC is a very efficient file compressor that compresses the file while keeping its quality intact. SDR files are not compressed with SDR; hence the file size is much bigger.
3. Why does HDR look washed out?
An HDR video might look too bright or washed out if your device is incompatible with HDR color space. Unlike the iPhone 12 or Samsung Galaxy S22, phones have a built-in HDR recording feature. However, older versions may not be able to enjoy the clarity and colors offered by an HDR recording. Hence when an HDR video is sent to someone with an older phone, it looks as if the video is washed out.
Final Words
While HDR might be a superior color space, SDR is frequently used for video clips so maximum people can enjoy the video despite what their devices are compatible with. You can easily convert an HDR video to SDR using Wondershare Filmora or any other methods listed above.
An important point to note is that HDR videos converted to SDR might look a little off sometimes with darker shadows and sharpness. It might be a better idea to record in SDR rather than convert it to SDR later. However, converting is still a popular way to go with an HDR video; you will also have a beautiful high-quality video and an SDR copy.
Free Download For macOS 10.14 or later
How to Convert an HDR video to SDR without data loss in Filmora
To convert your video to SDR, start by downloading Wondershare Filmora if you do not already have it downloaded.
Download the Application
Download Wondershare Filmora according to your PC type, i.e., Mac or Windows. Install it and run it. Launch the application to get working.
Import Your Videos
- Next, import your HDR video file. To import, click on the Import button in the primary window. From there, select the video file you want to convert to SDR.
- Once imported, drag the file to the timeline. You can tweak or edit it too before converting. You may trim it or cut an unwanted section.

- If you want to change to SDR while editing the project, click the File button and select Project Settings. From the settings, go to Colour space and select the SDR-Rec709 option.

Exporting the File
- If you want to only change the color space setting for the exported file, go to Export and then click on Settings.
- From settings, click on the Colour Space option, and from the drop-down menu, select SDR-Rec709.

- Press Ok to save the changes and export the file in your desired format.
- If you want to adjust the resolution according to the device like iPhone, Samsung, Playstation, or Xbox you can also do that directly with Filmora by clicking the Device tab in the Export Confirm the settings and press Ok.

This is the easiest and cleanest way to get an SDR copy of an HDR file. Filmora does it effortlessly, allowing you to get an SDR video out of an HDR one.
Decode Video from HDR to SDR with a Video Converter
If you have ever worked with converting videos, then you are probably familiar with Handbrake. Handbrake is a household name for video converting, especially when it comes to 4KHDR to SDR video conversions. It has a free open source feature that allows you to convert to SDR videos with an MP4 or MKV format.
Steps of Decoding HDR Video to SDR with Handbrake
Before converting your HDR video to SDR, make sure you have downloaded Handbrake on your computer.
- Open the Handbrake app.
- To import your video to Handbrake, click on File, then Source Selection. You can also drag and drop the video to scan it. Next, wait for Handbrake to scan the title. Once the video scan is complete, all the information will be displayed in the source section.

- Once the file is imported, you can now select the output format from the right panel under General. The default format already specified in Handbrake is Fast 1080p30; you can change that if you are looking for a different form.

- You can also change the format depending on the device type in Handbrake.
- Lastly, go to Presets, click Production, and select Production Standard to convert 4K HDR video to 4K SDR. You can also do that by going to General Profile under the Legacy column.

- Now, select format, quality, resolution, and video codec.
- Lastly, select the destination for the file from the Browse button and press encode to start the conversion.

With a few simple clicks, your HDR file can easily be converted to SDR using Handbrake.
Transcode Video from HDR to SDR by Image Editing [Samsung only]
If you own the latest Samsung S22 phone, you are probably aware of its feature that allows you to record in an HDR10 view. But, what do you do if you want to send the video to someone whose phone is incompatible with HDR? The video will appear too bright and washed out.
By converting the video to SDR, you can send them the video without burning their retinas. This method to convert HDR videos to SDR is especially for Samsung Galaxy phones. The gallery app initially used to have a built-in option to do that, but it’s not there anymore. While the original option is removed, you can still use the method below to convert an HDR video to SDR with just a few taps.
- To convert HDR10+ video to SDR on a Samsung Galaxy phone, you can directly proceed with it on your phone.
- Head to and open Gallery, choose your HDR10+ video and tap three dots in the bottom right corner.
- From the pop-up menu, select Open in Video Player.
- Once the video opens in the video player, click on another three dots in the top right corner.
- From there, tap on the Editor
- In the editor, tap again on three dots on the bottom right and now select Size and Format.
- From this menu, you can change the resolution of the video as well as its format. From the format drop-down, you can select SDR to convert your video to SDR.
- Make sure you do not tap on Save; instead, click on the three dots again and tap on Save as Copy. This will leave your original HDR video untouched and save a copy for the SDR video.
Convert HDR 4K Video to SDR with YouTube [Untested]
HDR videos on Youtube show higher color dynamics and contrast ratios than an SDR video. Viewers with HDR-compatible devices will see ‘HDR’ after every video quality option in the video settings (1080p HDR).
However, the videos uploaded as HDR on youtube can be viewed on HDR unsupported devices too. This happens because youtube automatically converts all HDR videos to SDR to be viewed on non-HDR devices. Here is a brief introduction to the steps of converting HDR to SDR on Youtube:
- Record the metadata by exporting it from an HDR-supported application like Wondershare Filmora . The metadata should be in a codec or container to be played by Youtube correctly.
- Grade your HDR properly as Rec. 2020 with PQ or HLG. Ensure the videos are graded correctly using an HDR transfer function to retain the quality. If you are unsure about the videos graded as HDR, you should not use this method because it can distort the video.
- rectly using an HDR transfer function to retain the quality. If you are not sure about the videos graded as HDR, you should not use this method because it can distort the video.

- Once done, upload it on Youtube. If it detects HDR metadata during the upload, Youtube automatically produces an SDR conversion for non-HDR compatible devices.

- Downloading the video from HDR unsupported devices will save an SDR video.
This method seems easy but has greater risks involved such as distortion of video if improper HDR grading is done.
Get Real-time Video HDR to SDR Conversion by Video Content Providers
With gaming becoming almost a sport, online streaming has grown immensely popular. These streaming services allow you to stream in 4K HDR format. However, a significant downside of this is that many devices are still incompatible with HDR video.
We have listed multiple methods to convert your HDR video clips to SDR, but what about a live stream? We highly recommend checking out the Intel official blog post for converting your HDR videos to SDR in real-time. The blog post describes how you can convert your live stream to SDR with different methods. You can give it a read if you are interested in that.
Hot FAQs on How to Convert HDR to SDR
1. Is SDR better than HDR?
SDR is Standard Dynamic Range, while HDR stands for High Dynamic Range. HDR is the latest technology concerning quality, clear and detailed images. HDR is perfect for videos that require high contrast, shadows, and mixed light.
HDR is definitely better than SDR because the “High” definition takes everything to the next level. However, SDR is frequently used as most devices are not compatible with HDR.
2. Why is HDR smaller than SDR?
Undoubtedly, HDR provides better image quality, colors, and clarity than SDR, but why is the file size smaller then? The answer is quite simple. HDR10 files are equipped with HVAC. HVAC is a very efficient file compressor that compresses the file while keeping its quality intact. SDR files are not compressed with SDR; hence the file size is much bigger.
3. Why does HDR look washed out?
An HDR video might look too bright or washed out if your device is incompatible with HDR color space. Unlike the iPhone 12 or Samsung Galaxy S22, phones have a built-in HDR recording feature. However, older versions may not be able to enjoy the clarity and colors offered by an HDR recording. Hence when an HDR video is sent to someone with an older phone, it looks as if the video is washed out.
Final Words
While HDR might be a superior color space, SDR is frequently used for video clips so maximum people can enjoy the video despite what their devices are compatible with. You can easily convert an HDR video to SDR using Wondershare Filmora or any other methods listed above.
An important point to note is that HDR videos converted to SDR might look a little off sometimes with darker shadows and sharpness. It might be a better idea to record in SDR rather than convert it to SDR later. However, converting is still a popular way to go with an HDR video; you will also have a beautiful high-quality video and an SDR copy.
The Way to Quick and Efficient Editing | Keyboard Shortcuts in Filmora
To get rid of mistakes in the videos and to make them more visually appealing, people prefer to edit videos. You can also shape the video in a storytelling way to express and present the cohesive story to the world. Nowadays, video editing is a demanded skill, and every person wishes to master it. In these scenarios, the built-in keyboard shortcuts will help you a lot.
The best tool that provides built-in keyboard shortcuts and can help you experience the best video editing experience is Wondershare Filmora. By the end of this article, you will be aware of the checkpoints along with the keyboard shortcuts of Filmora. We will also provide keyboard shortcuts in this article to encourage shortcut video editing.
Wondershare Filmora12 A cross-platform helping you make quick and efficient video editing!
Free Download Free Download Learn More

Part 1: Major Checkpoints in Quick Video Editing
While doing video editing, it is very important to focus on efficiency and speed. It is essential to focus on the speed and efficiency of a video editing tool. Moreover, there are some checkpoints that you have to consider before getting into video editing. Some of them are:
01of 05Preparing Footage
Before anything else, you have to arrange and prepare your footage. It helps optimize the editing procedure, and you can label the files properly. Besides this, it also saves you time searching for specific files and footage.
02of 05Timeline Setting
You have to set up your timelines in the desired and recognizable resolutions. Moreover, adjusting frame rates and duration of videos and creating customized templates before anything else.
03of 05Selection of moments
Make sure you watch your video in a proper manner so you don’t have to waste time finding a specific moment. By this, you will be able to select a moment without wasting additional time.
04of 05Transitions and Adjustments
While editing the videos, you need to add the basic transitions to add consistency. Furthermore, you can adjust the audio metrics of videos and sync them with the length of videos.
05of 05Preview and Export
After editing the videos, you also have to preview them to check and fix the mistakes. Above all, always select the tool through which you can preview the videos and export them in the desired output format.
Part 2: An Introduction to Wondershare Filmora and Its Video Editing Intuition
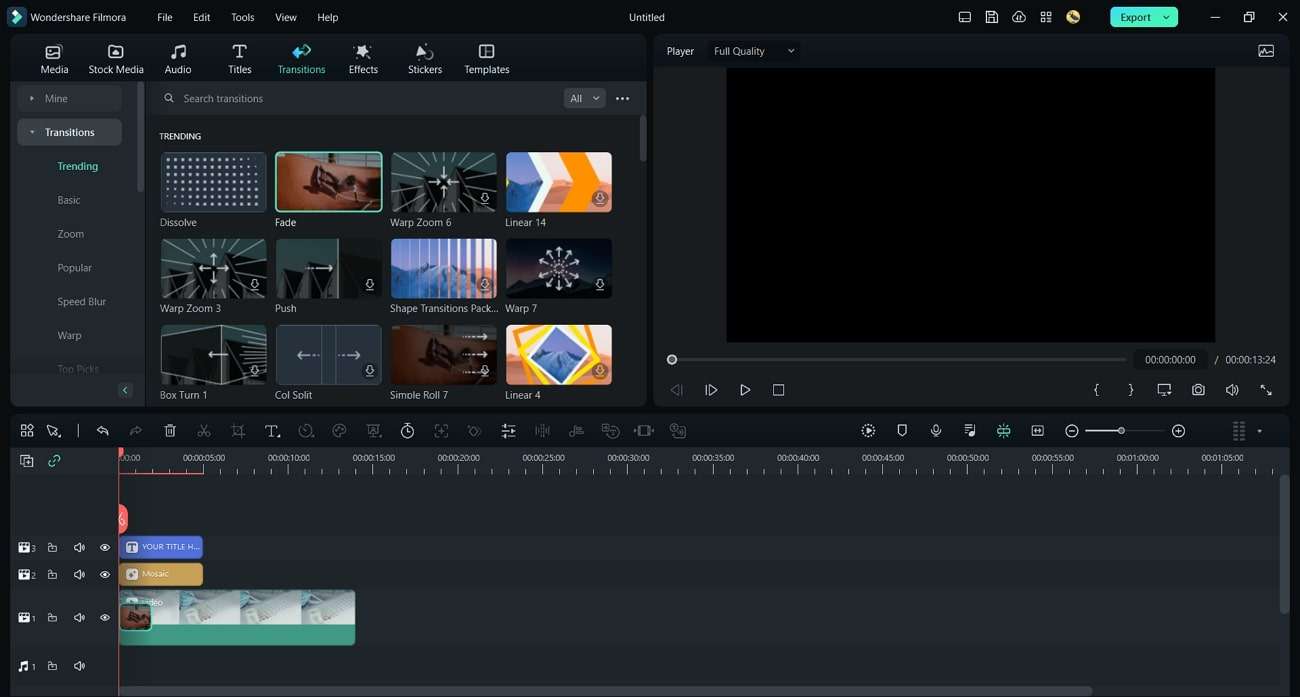
Wondershare Filmora can be referred to as a feature-packed, cost-effective, all-in-one, easy-to-use video editing software. This tool has the capability to create professional-grade videos. You can also take assistance from this tool for creating advanced-level content for your social media platforms. It is also known to be the best choice when it comes to editing videos.
In Filmora, you can find diversified video editing tools as it comprehends timeline-based editing, so you can also use it to edit your memories. Several video formats are compatible with Filmora, so you will not face restrictions in this part.
Free Download For Win 7 or later(64-bit)
Free Download For macOS 10.14 or later
Key Features of Wondershare Filmora
- The AI Smart Cutout feature of Filmora lets you highlight and edit diversified unrequired objects, persons, or pets from the background.
- One of the best things about Filmora is it supports the AI Image feature through which you can turn descriptive text into illustrative images.
- It also shows the integrations with ChatGPT, through which you can generate AI text during video editing. This is perfect for YouTube descriptions and titles.
- You can also adjust the speed of the video while controlling the keyframes to make cinematic-grade edits in simple videos.
- The title editing feature lets you create artistic features with modernized word art, illustrations, and animations.
Part 3: Learning All Keyboard Shorts for Quick and Efficient Video Editing
To maximize productivity and workflow efficiency, you can take assistance from the keyboard shortcuts. Luckily, the industry-standard tool named Filmora offers effective keyboard shortcuts. Do you wish to know the keyboard shortcuts integrated with Wondershare Filmora? There is nothing to worry about because in this part, you will find the effective and implementable easy edit video shortcuts:
| Function | Shortcut |
|---|---|
| Preference | Ctrl+Shift+, |
| Keyboard Shortcut | Ctrl+Alt+K |
| Exit | Alt+F |
| New Project | Ctrl+N |
| Open Project | Ctrl+O |
| Save Project | Ctrl+S |
| Save Project As | Ctrl+Shift+S |
| Archive Project | Ctrl+Shift+A |
| Import Media Files | Ctrl+I |
| Record Voice-Over | Alt+R |
| Add a New Folder | +Alt+N |
| Undo | Ctrl+Z |
| Redo | Ctrl+Y |
| Cut | Ctrl+X |
| Copy | Ctrl+C |
| Paste | Ctrl+V |
| Duplicate | Ctrl+D |
| Delete | Del |
| Ripple Delete | Shift+Del |
| Close Gap | Alt+Del |
| Select All | +A |
| Copy Effects | Ctrl+Alt+C |
| Paste Effects | Ctrl+Alt+V |
| Select Clip Range | X |
| Cancel the Selected Range | Shift+X |
| Nudge Left | Alt+Left |
| Nudge Right | Alt+Right |
| Nudge Up | Alt+Up |
| Edit Properties | Alt+E |
| Split | Ctrl+B |
| Trim Start to Playhead | Alt+[ |
| Trim End to Playhead | Alt+] |
| Crop to Fit | Ctrl+F |
| Crop and Zoom | Alt+C |
| Rotate 90CW | Ctrl+Alt+Right |
| Rotate CCW | Ctrl+Alt+Left |
| Group | Ctrl+G |
| UnGroup | Ctrl+Alt+G |
| Uniform Speed | Ctrl+R |
| Add Freeze Frame | Alt+F |
| Detach Audio | Ctrl+Alt+D |
| Mute | Ctrl+Shift+M |
| Stabilization | Alt+S |
| Chroma Key | Ctrl+Shift+G |
| Red Marker | Alt+1 |
| Orange Marker | Alt+2 |
| Yellow Marker | Alt+3 |
| Green Marker | Alt+4 |
| Cyan Marker | Alt+5 |
| Blue Marker | Alt+6 |
| Purple Marker | Alt+7 |
| Grey Marker | Alt+8 |
| Select All Clips With the Same Color Mark | Alt+Shift+ |
| Render Preview | Enter |
| Add Audio/Video Keyframes | Alt+Left Click |
| Previous Keyframes | [ |
| Next Keyframes | ] |
| Motion Tracking | Alt+X |
| Color Match | Alt+M |
| Insert | Shift+QI |
| Overwrite | Shift_+O |
| Replace | Alt+Mouse Drag |
| Rename | F2 |
| Reveal in Explorer | Ctrl+Shift+R |
| Apply | Alt+A |
| Quick Split Mode | C |
| Select | V |
| Open Audio Stretch | S |
| Exit Audio Stretch | Shift+S |
| Add to Favorites | Shift+F |
| Adjust the Bezier Curve | Alt+Mouse Drag |
| Split 9 Edited State0 | Shift+Enter |
| Merge Up (Cursor at the beginning of the sentence0 | Backspace |
| Merge down subtitles 9radio or edited state) | Alt+Q |
| Merge selected subtitles (multi-select state | Alt+Q |
| Play/Pause | Space |
| Stop | Ctrl +/ |
| Full Screen/Restore Snapshot | Ctrl+Alt+S |
| Previous Frame /Move Left | Left |
| Next Frame/ More Right | Right |
| Previous Edit Point / Move Up | Up |
| Next Edit Point/ Move Down | Down |
| Go To Next Second | Shift+Right |
| Go to Previous Marker | Shift+Up |
| Go to Next Marker | Shift+Down |
| Go to Project Beginning | Home |
| Go to Project End | End |
| Go to Selected Clip Start | Shift+Home |
| Go to Selected Clip End | Shift+End |
| Zoom In | Ctrl+= |
| Zoom Out | Ctrl+_ |
| Zoom to Fit Timeline | Shift+Z |
| Select Previous | Ctrl+Left |
| Select Next | Ctrl+Right |
| Horizontal Scroll (Timeline) | Alt+Scroll Up/Down |
| Vertical Scroll (Timeline) | Scroll Up/Down |
| Mark In | I |
| Mark Out | O |
| Clear In And Out | Ctrl+Shift+X |
| Add Marker | M |
| Edit Marker | Shift+M |
| Help | F |
| Export | Ctrl+ E |
Conclusion
In the article, you have discovered crucial information about video editing in Filmora. There are some checkpoints that you need to keep in mind before getting into editing. Integrating these checkpoints, there is a consistent need to understand keyboard shortcuts in video editing. This procedure, in particular, helps much in effective video editing.
With the help of the Filmora shortcut video editor, you can make cinematic-level edits to the video. It also integrates several features such as AI Smart Cutout, AI Copywriting, and more. To know more about these useful keyboard shortcuts, this article has surely been of great help.
Free Download Free Download Learn More

Part 1: Major Checkpoints in Quick Video Editing
While doing video editing, it is very important to focus on efficiency and speed. It is essential to focus on the speed and efficiency of a video editing tool. Moreover, there are some checkpoints that you have to consider before getting into video editing. Some of them are:
01of 05Preparing Footage
Before anything else, you have to arrange and prepare your footage. It helps optimize the editing procedure, and you can label the files properly. Besides this, it also saves you time searching for specific files and footage.
02of 05Timeline Setting
You have to set up your timelines in the desired and recognizable resolutions. Moreover, adjusting frame rates and duration of videos and creating customized templates before anything else.
03of 05Selection of moments
Make sure you watch your video in a proper manner so you don’t have to waste time finding a specific moment. By this, you will be able to select a moment without wasting additional time.
04of 05Transitions and Adjustments
While editing the videos, you need to add the basic transitions to add consistency. Furthermore, you can adjust the audio metrics of videos and sync them with the length of videos.
05of 05Preview and Export
After editing the videos, you also have to preview them to check and fix the mistakes. Above all, always select the tool through which you can preview the videos and export them in the desired output format.
Part 2: An Introduction to Wondershare Filmora and Its Video Editing Intuition
Wondershare Filmora can be referred to as a feature-packed, cost-effective, all-in-one, easy-to-use video editing software. This tool has the capability to create professional-grade videos. You can also take assistance from this tool for creating advanced-level content for your social media platforms. It is also known to be the best choice when it comes to editing videos.
In Filmora, you can find diversified video editing tools as it comprehends timeline-based editing, so you can also use it to edit your memories. Several video formats are compatible with Filmora, so you will not face restrictions in this part.
Free Download For Win 7 or later(64-bit)
Free Download For macOS 10.14 or later
Key Features of Wondershare Filmora
- The AI Smart Cutout feature of Filmora lets you highlight and edit diversified unrequired objects, persons, or pets from the background.
- One of the best things about Filmora is it supports the AI Image feature through which you can turn descriptive text into illustrative images.
- It also shows the integrations with ChatGPT, through which you can generate AI text during video editing. This is perfect for YouTube descriptions and titles.
- You can also adjust the speed of the video while controlling the keyframes to make cinematic-grade edits in simple videos.
- The title editing feature lets you create artistic features with modernized word art, illustrations, and animations.

Part 3: Learning All Keyboard Shorts for Quick and Efficient Video Editing
To maximize productivity and workflow efficiency, you can take assistance from the keyboard shortcuts. Luckily, the industry-standard tool named Filmora offers effective keyboard shortcuts. Do you wish to know the keyboard shortcuts integrated with Wondershare Filmora? There is nothing to worry about because in this part, you will find the effective and implementable easy edit video shortcuts:
| Function | Shortcut |
|---|---|
| Preference | Ctrl+Shift+, |
| Keyboard Shortcut | Ctrl+Alt+K |
| Exit | Alt+F |
| New Project | Ctrl+N |
| Open Project | Ctrl+O |
| Save Project | Ctrl+S |
| Save Project As | Ctrl+Shift+S |
| Archive Project | Ctrl+Shift+A |
| Import Media Files | Ctrl+I |
| Record Voice-Over | Alt+R |
| Add a New Folder | +Alt+N |
| Undo | Ctrl+Z |
| Redo | Ctrl+Y |
| Cut | Ctrl+X |
| Copy | Ctrl+C |
| Paste | Ctrl+V |
| Duplicate | Ctrl+D |
| Delete | Del |
| Ripple Delete | Shift+Del |
| Close Gap | Alt+Del |
| Select All | +A |
| Copy Effects | Ctrl+Alt+C |
| Paste Effects | Ctrl+Alt+V |
| Select Clip Range | X |
| Cancel the Selected Range | Shift+X |
| Nudge Left | Alt+Left |
| Nudge Right | Alt+Right |
| Nudge Up | Alt+Up |
| Edit Properties | Alt+E |
| Split | Ctrl+B |
| Trim Start to Playhead | Alt+[ |
| Trim End to Playhead | Alt+] |
| Crop to Fit | Ctrl+F |
| Crop and Zoom | Alt+C |
| Rotate 90CW | Ctrl+Alt+Right |
| Rotate CCW | Ctrl+Alt+Left |
| Group | Ctrl+G |
| UnGroup | Ctrl+Alt+G |
| Uniform Speed | Ctrl+R |
| Add Freeze Frame | Alt+F |
| Detach Audio | Ctrl+Alt+D |
| Mute | Ctrl+Shift+M |
| Stabilization | Alt+S |
| Chroma Key | Ctrl+Shift+G |
| Red Marker | Alt+1 |
| Orange Marker | Alt+2 |
| Yellow Marker | Alt+3 |
| Green Marker | Alt+4 |
| Cyan Marker | Alt+5 |
| Blue Marker | Alt+6 |
| Purple Marker | Alt+7 |
| Grey Marker | Alt+8 |
| Select All Clips With the Same Color Mark | Alt+Shift+ |
| Render Preview | Enter |
| Add Audio/Video Keyframes | Alt+Left Click |
| Previous Keyframes | [ |
| Next Keyframes | ] |
| Motion Tracking | Alt+X |
| Color Match | Alt+M |
| Insert | Shift+QI |
| Overwrite | Shift_+O |
| Replace | Alt+Mouse Drag |
| Rename | F2 |
| Reveal in Explorer | Ctrl+Shift+R |
| Apply | Alt+A |
| Quick Split Mode | C |
| Select | V |
| Open Audio Stretch | S |
| Exit Audio Stretch | Shift+S |
| Add to Favorites | Shift+F |
| Adjust the Bezier Curve | Alt+Mouse Drag |
| Split 9 Edited State0 | Shift+Enter |
| Merge Up (Cursor at the beginning of the sentence0 | Backspace |
| Merge down subtitles 9radio or edited state) | Alt+Q |
| Merge selected subtitles (multi-select state | Alt+Q |
| Play/Pause | Space |
| Stop | Ctrl +/ |
| Full Screen/Restore Snapshot | Ctrl+Alt+S |
| Previous Frame /Move Left | Left |
| Next Frame/ More Right | Right |
| Previous Edit Point / Move Up | Up |
| Next Edit Point/ Move Down | Down |
| Go To Next Second | Shift+Right |
| Go to Previous Marker | Shift+Up |
| Go to Next Marker | Shift+Down |
| Go to Project Beginning | Home |
| Go to Project End | End |
| Go to Selected Clip Start | Shift+Home |
| Go to Selected Clip End | Shift+End |
| Zoom In | Ctrl+= |
| Zoom Out | Ctrl+_ |
| Zoom to Fit Timeline | Shift+Z |
| Select Previous | Ctrl+Left |
| Select Next | Ctrl+Right |
| Horizontal Scroll (Timeline) | Alt+Scroll Up/Down |
| Vertical Scroll (Timeline) | Scroll Up/Down |
| Mark In | I |
| Mark Out | O |
| Clear In And Out | Ctrl+Shift+X |
| Add Marker | M |
| Edit Marker | Shift+M |
| Help | F |
| Export | Ctrl+ E |
Conclusion
In the article, you have discovered crucial information about video editing in Filmora. There are some checkpoints that you need to keep in mind before getting into editing. Integrating these checkpoints, there is a consistent need to understand keyboard shortcuts in video editing. This procedure, in particular, helps much in effective video editing.
With the help of the Filmora shortcut video editor, you can make cinematic-level edits to the video. It also integrates several features such as AI Smart Cutout, AI Copywriting, and more. To know more about these useful keyboard shortcuts, this article has surely been of great help.
Also read:
- Updated 2024 Approved Backup and Organize Your Footage in Minutes
- New 2024 Approved 15 Best Vloggers That You Should Follow for Travel
- In 2024, Do You Want to Use a Video Editor for Your iOS Device? This Article Introduces LumaFusion, a Perfect Multi-Track Video Editor Designed to Cater to Your Needs
- New In 2024, How to Remove Audio From Videos with FFmpeg?
- How to Make Your CSGO Montage Impressive
- Updated 2024 Approved A Complete Guide to the Best Brand Story Videos
- 2024 Approved VSDC Free Video Editor Review
- Updated 2024 Approved Are You a Videographer or Video Content Creator? Is Enhancing Your Videography Skills Your Priority? Do You Want to Learn the Basics of LumaFusion Color Grading? Read on to Find All the Information You Need
- In 2024, Have You a Desire to Imbibe Your PowerPoint Presentations with Custom Effects and Tools? Be There to Learn All About Creating Custom Slideshows in PowerPoint with Utmost Ease
- New In 2024, The Best Peter McKinnon LUTs Recommendation
- New 2024 Approved Make Time-Lapse Video on MacBook Complete Guide
- Updated In 2024, 12 Top Picks of Video Enhancer Software
- Updated In 2024, Looking for Final Cut Pro Alternative App for Your Android Smartphone or iPhone? Here Is the List of the Best FCP Alternative Apps for Android and iOS Users
- New 2024 Approved Deep Learning of AI Video Recognition - Guide
- Wondering How to Rotate a Video in Windows at Any Desired Angle and Save It Permanently? Find Out All the Different Ways to Rotate Videos Temporarily as Well as Permanently
- How to Create Cinematic Style Videos for 2024
- Updated In 2024, Reversing Time Lapse Videos on iPhone Using Top Applications
- Want to Make a Slide Show Video? Heres How
- New In 2024, Are You Thinking of Learning Video Editing in the Final Cut Pro Software? In This Article, You Will Learn Different Ways of Splitting and Merging Multiple Videos at Once as a New Skill to Get Your Business to a New Level
- Easily Unlock Your Nokia G22 Device SIM
- 11 Best Location Changers for Motorola Moto G13 | Dr.fone
- How to recover deleted photos on Honor 90 Lite
- How To Transfer Data From Apple iPhone X To Other iPhone 12 Pro Max devices? | Dr.fone
- In 2024, How to Transfer Apps from Infinix Hot 30i to Another | Dr.fone
- In 2024, Reasons why Pokémon GPS does not Work On Samsung Galaxy S24 Ultra? | Dr.fone
- How Do You Get Sun Stone Evolutions in Pokémon For Huawei Nova Y71? | Dr.fone
- In 2024, Your Account Has Been Disabled in the App Store and iTunes From Apple iPhone 13?
- How to Rescue Lost Messages from OnePlus Ace 2V
- In 2024, How to Track WhatsApp Messages on Lava Yuva 2 Pro Without Them Knowing? | Dr.fone
- Title: Find Out How to Create Your Own Custom Motion Graphics in Filmora. Add Unique Objects, Manipulate Text, and Animate Anything You Want
- Author: Morgan
- Created at : 2024-05-19 05:11:41
- Updated at : 2024-05-20 05:11:41
- Link: https://ai-video-editing.techidaily.com/find-out-how-to-create-your-own-custom-motion-graphics-in-filmora-add-unique-objects-manipulate-text-and-animate-anything-you-want/
- License: This work is licensed under CC BY-NC-SA 4.0.

