
:max_bytes(150000):strip_icc():format(webp)/mothersday_NataliaCampbell_Getty-5a4baef6c7822d00371e56cd.jpg)
Finding LUTs Made by Danny Gevirtz
Finding LUTs Made by Danny Gevirtz
Danny Gevirtz is a talented video editor known for his creative skills that bring videos to life. His unique approach to video editing sets him apart. One factor that makes Danny’s content so amazing is his mastery of color grading. Through his expert use of color, he can transform ordinary videos into extraordinary ones. You can even download Danny Gevirtz LUTs for your work.
In this way, you can apply his signature style to your videos to make them look great. Moreover, you can achieve a cinematic-style look for your media content. There are so many Danny Gevirtz-influenced LUTs available, both paid and free. You can download any one of them to replicate the color grading style of your favorite video editor.
Part 1: Introducing the Basics of LUTs in Video Editing
LUTs are like magic formulas that make your videos and images look better. They tweak the colors and tones in your footage to create a new visual experience. Following are the basic details of using and applying LUTs in basic video editing operations.
Types of LUTs
- Technical LUTs: These are for technical stuff like adjusting color spaces or correcting gamma. They ensure your colors and tones stay consistent across different devices and platforms.
- Creative LUTs: This type is a fun type of LUT. Creative LUTs help you achieve specific looks or styles. They can make your videos look like they were shot on film or create different moods and visual effects.
Apply LUTs with the Correct LUT Format
You can apply LUTs using different video editing software. For instance, there is Adobe Premiere Pro, DaVinci Resolve, Final Cut Pro, and others to apply LUT. Just load the LUT and apply it to your video clips or the whole project. Moreover, you can make adjustments to the LUT according to your preference.
In addition, LUTs come in different file formats, such as .cube, .3dl, .look, or .icc. The most common one is .cube. Furthermore, different video editing tools support different formats. Moreover, choose the right format for your editing software and the colors you want.
Customizing LUTs and Non-Destructive Editing
You don’t have to stick with pre-made LUTs. Additionally, you can create your own or modify existing ones to match your needs and style. Advanced color grading software lets you tweak individual colors, contrast, saturation, and more. Save these adjustments as custom LUTs for future use.
The great thing about LUTs is that they don’t mess with your original video file. They’re like a layer that sits on top, making real-time changes during playback or rendering. Moreover, you can always return to the original footage or make further adjustments without losing data.
Empower your videos with a new mood using different LUTs. Filmora now offers 100+ top-quality 3D LUTs cover a broad range of scenarios. Transform your videos with Filmora’s powerful 3D LUTs.
Apply LUT on Videos Apply LUT on Videos Learn More


Part 2: What are the Benefits and Drawbacks of Having LUTs in Video Editing?
LUTs are an amazing tool in video editing to improve the color scheme of your videos. However, Look-up Tables also have advantages and disadvantages, which are to be discussed as follows.
Advantages of LUTs in Video Editing
1. Time Efficiency: LUTs save time by quickly applying color grading adjustments. Furthermore, it streamlines the editing process, especially for large volumes of media files.
2. Consistent Look: Using the same LUT across multiple clips ensures consistent color and tone. Moreover, even working with different cameras or lighting conditions throughout your video.
3. Creative Flexibility: LUTs offer a wide range of creative options. It allows you to achieve specific moods and styles or emulate film aesthetics. Similarly, you can enhance your storytelling with correct color grading.
4. Real-Time Preview: Moreover, LUTs provide a real-time preview of the final look. It enables you to make informed, creative decisions. Additionally, you can experiment with different looks during the editing process.
Disadvantages of LUTs in Video Editing
1. Generic Look: Pre-made LUTs may not perfectly match your creative vision. Similarly, it results in a generic or overused appearance that lacks uniqueness or creativity.
2. Limited Control: LUTs offer overall color and tone adjustments, but limitations exist. They may not provide precise control over individual color parameters. It limits the customization options for each clip.
3. Compatibility Issues: Not all LUTs are compatible with every editing software or color space. Furthermore, it potentially leads to below-par results. Moreover, it can also lead to compatibility problems with specific file formats.
Part 3: Danny Gevirtz LUTs: An Iconic List of LUTs Available for Effective Video Editing
Does the work of Danny Gevirtz inspire you? Here are some of the most popular Danny Gevirtz-style LUTs you can use for your content.
1. Creative Filmmaking LUTs
The creative Filmmaking LUT pack consists of 7 unique LUTs designed to enhance your videos. Each LUT offers a unique look, from vintage vibes to the iconic Nolan Blue. Inspired by Christopher Nolan’s film “Dunkirk,” the Nolan Blue LUT gives you a similar color grading. Moreover, you can achieve the perfect sunset color grading with the Warm Nostalgia LUT. There are so many more to explore in this pack that you can use.

2. Sellfy Danny Gevirtz Filmmaker LUT Pack
Danny Gevirtz’s color grading inspires this LUT pack. It provides a collection of 8 unique LUTs designed to give your content a different look. Furthermore, this LUT pack has LUTs from moody and cinematic to basic skin tone LUTs. This pack’s Teal and Orange LUT are designed to enhance skin tones in a video or photo. Moreover, this pack also offers LUT for outdoor scenery and nature footage.

Conclusion
To conclude, LUTs that are inspired capture the essence of a particular style of color grading. Choose your favorite content creator by exploring the world of LUTs and color grading. In addition, many influencers have their LUTs available on the internet. One such content creator is Danny Gevirtz, with some amazing color-grading skills. You can search for Danny Gevirtz LUTs free download to download yours.
Apply LUT on Videos Apply LUT on Videos Learn More
Part 2: What are the Benefits and Drawbacks of Having LUTs in Video Editing?
LUTs are an amazing tool in video editing to improve the color scheme of your videos. However, Look-up Tables also have advantages and disadvantages, which are to be discussed as follows.
Advantages of LUTs in Video Editing
1. Time Efficiency: LUTs save time by quickly applying color grading adjustments. Furthermore, it streamlines the editing process, especially for large volumes of media files.
2. Consistent Look: Using the same LUT across multiple clips ensures consistent color and tone. Moreover, even working with different cameras or lighting conditions throughout your video.
3. Creative Flexibility: LUTs offer a wide range of creative options. It allows you to achieve specific moods and styles or emulate film aesthetics. Similarly, you can enhance your storytelling with correct color grading.
4. Real-Time Preview: Moreover, LUTs provide a real-time preview of the final look. It enables you to make informed, creative decisions. Additionally, you can experiment with different looks during the editing process.
Disadvantages of LUTs in Video Editing
1. Generic Look: Pre-made LUTs may not perfectly match your creative vision. Similarly, it results in a generic or overused appearance that lacks uniqueness or creativity.
2. Limited Control: LUTs offer overall color and tone adjustments, but limitations exist. They may not provide precise control over individual color parameters. It limits the customization options for each clip.
3. Compatibility Issues: Not all LUTs are compatible with every editing software or color space. Furthermore, it potentially leads to below-par results. Moreover, it can also lead to compatibility problems with specific file formats.
Part 3: Danny Gevirtz LUTs: An Iconic List of LUTs Available for Effective Video Editing
Does the work of Danny Gevirtz inspire you? Here are some of the most popular Danny Gevirtz-style LUTs you can use for your content.
1. Creative Filmmaking LUTs
The creative Filmmaking LUT pack consists of 7 unique LUTs designed to enhance your videos. Each LUT offers a unique look, from vintage vibes to the iconic Nolan Blue. Inspired by Christopher Nolan’s film “Dunkirk,” the Nolan Blue LUT gives you a similar color grading. Moreover, you can achieve the perfect sunset color grading with the Warm Nostalgia LUT. There are so many more to explore in this pack that you can use.
2. Sellfy Danny Gevirtz Filmmaker LUT Pack
Danny Gevirtz’s color grading inspires this LUT pack. It provides a collection of 8 unique LUTs designed to give your content a different look. Furthermore, this LUT pack has LUTs from moody and cinematic to basic skin tone LUTs. This pack’s Teal and Orange LUT are designed to enhance skin tones in a video or photo. Moreover, this pack also offers LUT for outdoor scenery and nature footage.
Conclusion
To conclude, LUTs that are inspired capture the essence of a particular style of color grading. Choose your favorite content creator by exploring the world of LUTs and color grading. In addition, many influencers have their LUTs available on the internet. One such content creator is Danny Gevirtz, with some amazing color-grading skills. You can search for Danny Gevirtz LUTs free download to download yours.
Add Green Screen Effects in Final Cut Pro
No matter the type of video you are shooting, the background of the video plays a major play. The background determines how eye-pleasing the frame of the entire video looks. A beautiful background enhances the video content while a distracting background can deteriorate the video outlook. You do not need to be in exotic locations or have eye-catching backgrounds in reality while shooting a video thanks to the use of the green screen effect.
Once you shoot a video with green screen background, you can replace the green screen with anything you want. You will need a video editor to replace the green screen, and Final Cut Pro is the most widely used video editor among Mac Users. We will illustrate how to add green screen in Final Cut Pro and get any background for your recorded video. We will also recommend an alternative watt to add green screen effect to your video.
Part 1. How to add green screen on Final Cut Pro
Final Cut Pro is the most popular professional video editor among Mac users. The learning curve is slightly steep, but once you get used to Final Cut Pro, you can take your recorded video to the next level with profound editing. The most important part of adding green screen effect to a video is shooting the video with a proper green screen in the background. Once you have successfully recorded your video, here are the steps on how to add background to green screen Final Cut Pro.
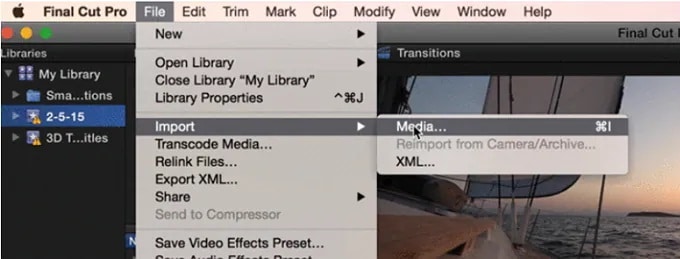
Step1 Launch Final Cut Pro and go to File> Import> Media. Select the video file with green screen background from your storage to import the file into FCP. Similarly, you should import the video or photo with which you want to replace the green screen.
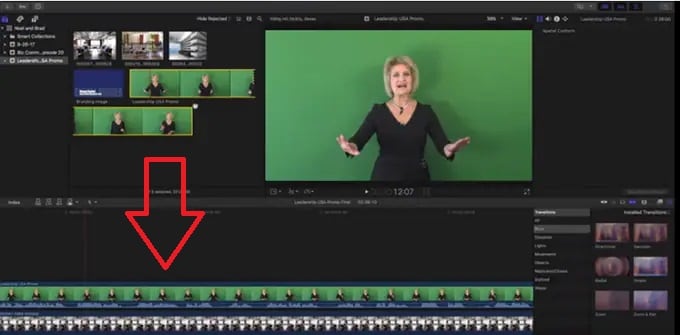
Step2 Drag the video clip with green screen background (called foreground clip) to Timeline and place it to Primary Storyline. Drag the replacement video (called background clip) below the foreground clip in Timeline.
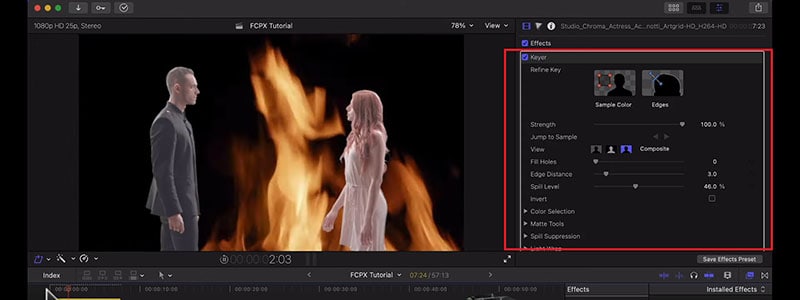
Step3 Select the foreground clip and click on Effects button present at the extreme top-right corner of the Timeline.
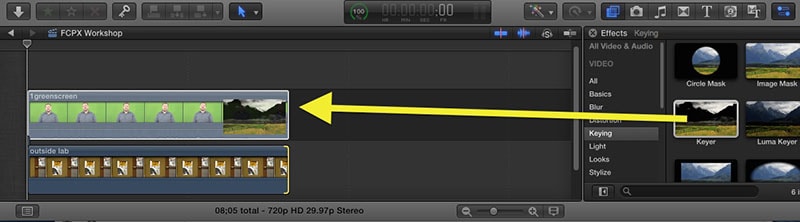
Step4 From the Effects options, select Keyer effect. If you cannot spot it immediately, you can search for it from the search field.
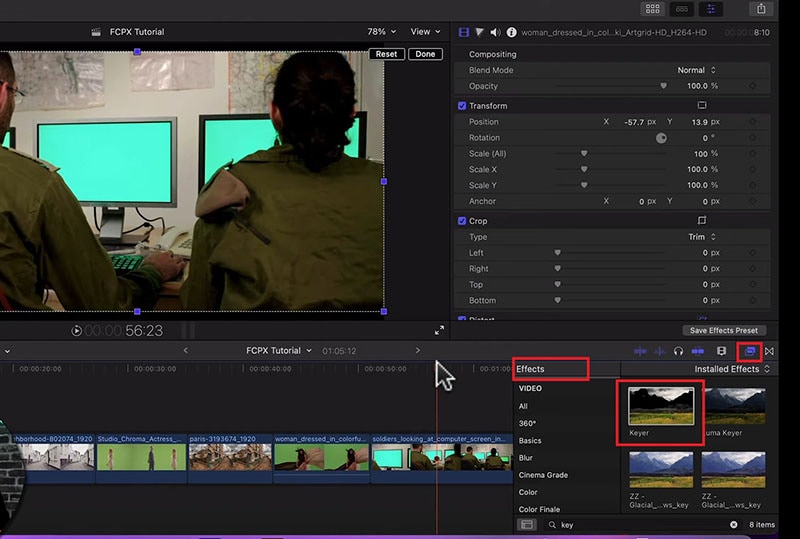
Step5 Drag and drop Keyer effect to the foreground clip. The effect detects the green screen and replaces it with the available background clip.
Step6 You might have to adjust the Keyer effect settings to get the green screen effect perfectly. Go to Inspector Window and click on Sample color and fine-tune the available settings to get it correct.
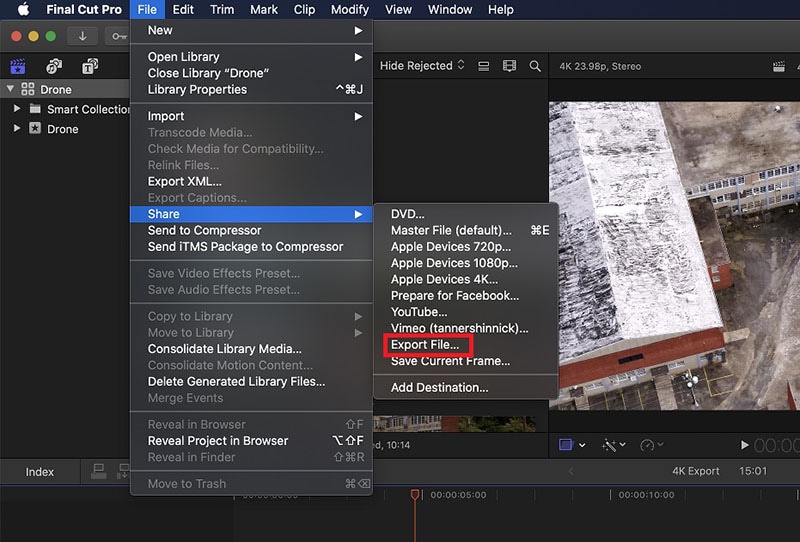
Step7 Once you are satisfied with the effect, go to File> Share> Export File and save the modified video.
Part 2. Alternative Way to Add Green Screen to Videos
Final Cut Pro is a professional but highly expensive video editor. The learning curve is not very suitable for amateur video editors. That is why if you are looking for a better alternative way to add green screen to videos, we recommend Wondershare Filmora . Filmora is a popular video editor that is available for Mac and Windows users. The user interface is extremely intuitive, and adding green screen effect is super easy. Here are the steps on how to add background to green screen effect.
Free Download For Win 7 or later(64-bit)
Free Download For macOS 10.14 or later
Step1 Download and install Filmora on your computer. Launch Filmora and click on New Projects.
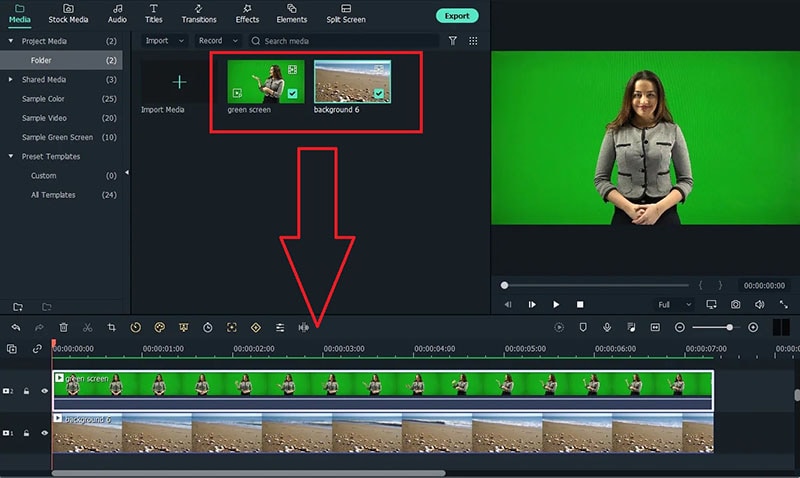
Step2 Under Project Media folder, Drag and drop the video clip with green screen background as well as the photo or video with which you want to replace the green screen.
Step3 Drag and drop the video clips on the Timeline. The video with green screen should be at the top while the replacement video or photo should be below it.
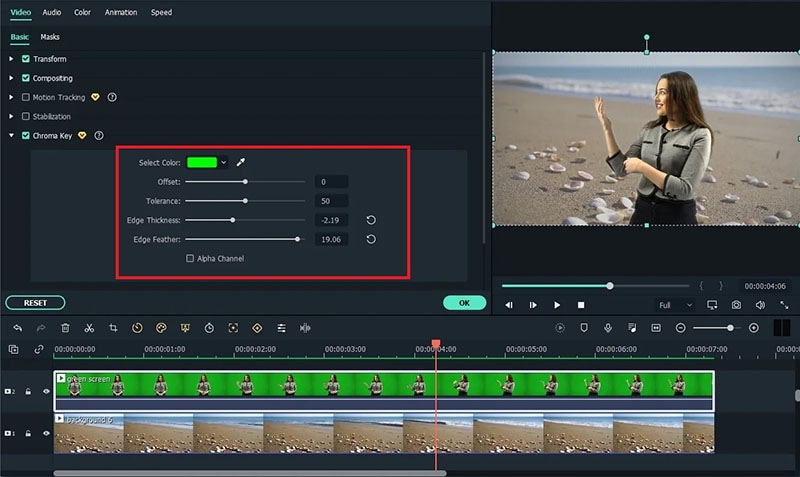
Step4 Double-click on the green screen video clip on Timeline. Go to Video>Basic and turn on Chroma key option.
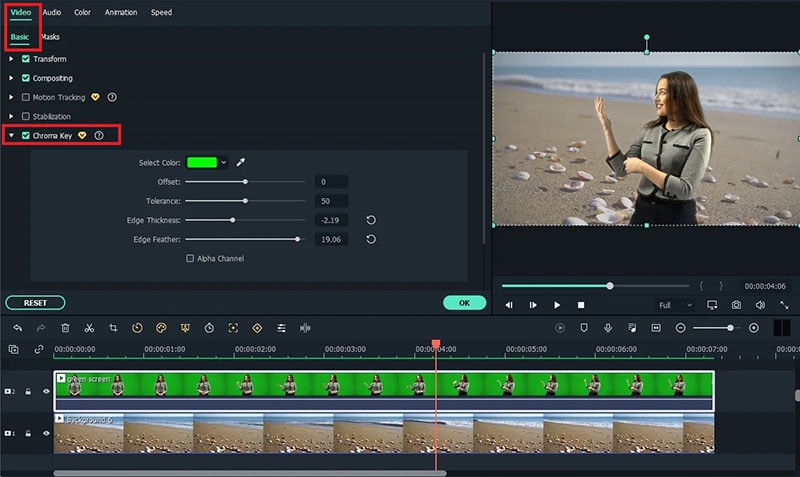
Step5 Adjust the different parameters such as offset to get the effect perfect and click on Ok button.
Step6 Play the video and if you are satisfied with the result, click on Export button to save the modified video file.
Part 3. Green Screen Video Tips to Use
We have already stated that replacing green screen in your video with an eye-catching background is the easiest part. On the contrary, shooting the green screen video is the most important part. If you shoot the video perfectly, replacing the background accurately in the video editor becomes super easy. Here are some important tips to use while shooting green screen video.
Distance – There should be enough distance between the subject and the green screen background so that the subject does not cast a shadow on the green screen. This distance is also important to place lights in between so that the green screen is perfectly lit for a great video shooting session.
Quality – You should opt for a high-quality green screen cloth for the background. This means the green screen should have a solid color instead of light and dark patches here and there. Besides, you should ensure that there are no wrinkles on the green screen.
Otherwise, when you will apply green screen effect through the video editor, the transformation will be uneven. You have to spend a lot of time adjusting the parameters to cover up uneven patches in the background.
Lighting – The way you set up your lights plays a major role in shooting green screen video perfectly. The light falling on the green screen will light up the screen evenly so that there are no light and dark patches. Transforming the green screen in the video editor will become that much easier.
You should focus on soft and even lighting for the entire green screen, and you should check through your camera to ensure the lighting is perfect. Sometimes, you can place lights behind the subject if the subject is staying stationary throughout the video. Otherwise, you can place the light above the subject for even distribution.
Aperture – The settings of your camera are equally important to smoothen out the green screen in the background and focus on the subject sharply. That is where aperture comes into the scene, and you need to use low aperture while shooting green screen videos. Low aperture opens up the camera lens, and the green screen turns softer in the background. The subject stands out while the background turns uniformly green.
Shutter Speed – While shooting a green screen video, you should keep a high shutter speed to prevent motion blur and uneven background. If the subject stays fixed throughout, the shutter speed should be double the frame rate. If the subject is moving throughout, the shutter speed should be around 4 times the frame rate such as 1/100.
ISO – The last thing you want in a green screen video is grainy footage. Your life will turn upside down editing the video and getting the green screen effect perfectly in any video editor. ISO determines the sensitivity and thereby, the grainy effect in your video. When the ISO is too high, the chance of getting grains in the video is high. It is better to use a native ISO for green screen effect, but you need to check with a sample recording and adjust if required.
Conclusion
We have answered how to add background to green screen Final Cut Pro. You can replace any green screen in your video with any video or photo for the background of the video. If you do not have Final Cut Pro or you find the steps slightly complicated, we recommend you to use Wondershare Filmora for instant green screen effect and quick adjustments for the best outcome.
Free Download For macOS 10.14 or later
Step1 Download and install Filmora on your computer. Launch Filmora and click on New Projects.
Step2 Under Project Media folder, Drag and drop the video clip with green screen background as well as the photo or video with which you want to replace the green screen.
Step3 Drag and drop the video clips on the Timeline. The video with green screen should be at the top while the replacement video or photo should be below it.
Step4 Double-click on the green screen video clip on Timeline. Go to Video>Basic and turn on Chroma key option.
Step5 Adjust the different parameters such as offset to get the effect perfect and click on Ok button.
Step6 Play the video and if you are satisfied with the result, click on Export button to save the modified video file.
Part 3. Green Screen Video Tips to Use
We have already stated that replacing green screen in your video with an eye-catching background is the easiest part. On the contrary, shooting the green screen video is the most important part. If you shoot the video perfectly, replacing the background accurately in the video editor becomes super easy. Here are some important tips to use while shooting green screen video.
Distance – There should be enough distance between the subject and the green screen background so that the subject does not cast a shadow on the green screen. This distance is also important to place lights in between so that the green screen is perfectly lit for a great video shooting session.
Quality – You should opt for a high-quality green screen cloth for the background. This means the green screen should have a solid color instead of light and dark patches here and there. Besides, you should ensure that there are no wrinkles on the green screen.
Otherwise, when you will apply green screen effect through the video editor, the transformation will be uneven. You have to spend a lot of time adjusting the parameters to cover up uneven patches in the background.
Lighting – The way you set up your lights plays a major role in shooting green screen video perfectly. The light falling on the green screen will light up the screen evenly so that there are no light and dark patches. Transforming the green screen in the video editor will become that much easier.
You should focus on soft and even lighting for the entire green screen, and you should check through your camera to ensure the lighting is perfect. Sometimes, you can place lights behind the subject if the subject is staying stationary throughout the video. Otherwise, you can place the light above the subject for even distribution.
Aperture – The settings of your camera are equally important to smoothen out the green screen in the background and focus on the subject sharply. That is where aperture comes into the scene, and you need to use low aperture while shooting green screen videos. Low aperture opens up the camera lens, and the green screen turns softer in the background. The subject stands out while the background turns uniformly green.
Shutter Speed – While shooting a green screen video, you should keep a high shutter speed to prevent motion blur and uneven background. If the subject stays fixed throughout, the shutter speed should be double the frame rate. If the subject is moving throughout, the shutter speed should be around 4 times the frame rate such as 1/100.
ISO – The last thing you want in a green screen video is grainy footage. Your life will turn upside down editing the video and getting the green screen effect perfectly in any video editor. ISO determines the sensitivity and thereby, the grainy effect in your video. When the ISO is too high, the chance of getting grains in the video is high. It is better to use a native ISO for green screen effect, but you need to check with a sample recording and adjust if required.
Conclusion
We have answered how to add background to green screen Final Cut Pro. You can replace any green screen in your video with any video or photo for the background of the video. If you do not have Final Cut Pro or you find the steps slightly complicated, we recommend you to use Wondershare Filmora for instant green screen effect and quick adjustments for the best outcome.
Are You Wondering How to Slow Down Videos or Speed Them up, Here Are Three Ways to Do It. Speed up or Slow Down Your Videos on PC, Online, and Phone
Have you ever wondered how to slow down the video to make it more surreal? You may want add an extra flair or revamp educational content in the video. You may want to slow down a product demo or glide through a lengthy instructional video. Adjusting the speed of the video can be beneficial in many ways. Let’s explore how to slow down videos or speed them up for various reasons. In this article, you will learn three ways on how to speed up a slow mo video or slow a fast motoon one.
Speed Ramping Video Maker Slow down or speed up your videos with better control of your keyframes to create unique cinematic effects!
Make A Slow Motion Video Make A Speed Ramping Video More Features
Part 1. Slowing Down or Speeding Up Videos on PC: Windows and Mac Guide
The most effective way to adjust the speed of a video on a PC is to use video editing software. With Wondershare Filmora, you get the tools and features to adjust the speed of your videos. The AI Co-piloy feature is particularly useful in guiding you through the steps of editing your videos. The versatile video editing software helps you adjust the speed with just a few clicks. The approach is similar for both Windows and Mac devices, making Filmora a user-friendly and effective software for editors at all experience levels. So, how do you make a video fast-motion?
Free Download For Win 7 or later(64-bit)
Free Download For macOS 10.14 or later
Step 1: Launch Filmora and Import Video Files
Once you start Filmora on your PC, click on New Project. Then select the Import icon to choose the files you want to import from your computer library. Another way is to drag and drop the files from your computer into Filmora.

Step 2: Add the Clips to the Timeline
After importing the video files, drag and drop them onto the timeline. This prepares the clips for speed adjustment.

Step 3: Open the Speed Adjustment Panel
The Filmora feature that allows you to adjust the speed of your video clips is the speed adjustment panel or Uniform Speed. To open the Uniform Speed Panel, double-click the video clip in the timeline. Find the Uniform Speed option in the pop-up column that appears and click on it. Make adjustments using the speed control.

Step 4: Adjust the Speed Slider
In the speed control panel, clikd the speed adjuster slider. Adjust the slider to the rate of speed you want for your clips between 0.5 (slowest) to 2.00 (fastest).

Step 5: Detach the Audio
Once you adjust the speed of your video, the audio will be affected. It can be a great idea to detach the audio to further edit the video. Right-click the video clip on the timeline, and select the Detach Audio option from the pop-up column. Once the audio has detached, you can further adjust it with fade and other available options.

Step 6: Export Video
Once satisfied with your video adjustments, export it to the desired format. For this step, click the Export button. Select the directory and video format and other preferences, then click ok.

Part 2. How to Quickly Adjust Video Speed Using Online Tool
Are you wondering how to speed up slow mo video or slow a video without installing a special video editor on your computer, using an online tool is the best choice. A free online tool like Fastreel helps you change the speed of short videos, which are smaller than 500 MB with just a few steps. However, this online tool oonly works with MP4 format. When working with other video formats, you will have to convert them first.
Here’s how to speed up a slo mo video using Fastreel
Step 1
Go to the Fastreel website . Upload the video you want to slow down or speed up. Click the Add Your File button to choose and upload the clips.

Step 2
Set the Appropriate Speed. Select the speed you want for your video onVideo Speed section. The results will be displayed in the preview window. Save Processed Video. Mute the video by clicking the corresponding icon if necessary. Then, save the video by selecting the Export Results button.

Part 3. A Guide to Slowing Down or Speeding Up Videos on Android and iPhone
How to speed up slow mo video on phone is a normal concern for many people. Luckily, there are many apps available to do that. In most cases, making a mobile video bit slower or faster will make it seem better. You may want to reduce the duration of your video or check out the details in a specific scene. You may want to speed watch or speed listen to the content. Let’s have a look at how you can achieve this on your Android or Apple device.
1. How to Change the Speed of Your Video on Android
When someone asks how do I slow down a video? The first response that comes to mind is using their phone. This is the device they always have with them. And most people, consider editng easier on theior phones than compiters. For someonw with an Android phone, the Gallery app makes it easier to adjust the speed of a video. Find out how to make fast motion video or slow mo with Android phone. Follow these few steps:
Step 1Launch the Gallery app
Open the video you want to edit. Then, tap on the Edit icon at the bottom to open the video editor.

Step 2Find the Speed Icon
Scroll through the list of the icons at the bottom. Then tap on the Speed icon to start making the adjustments

Step 3Adjust the Speed of the Video
The default speed of the video is 1x. Tap on 2x to seep it up or 1/2x to slow down the video. Then press the Play icon to preview the view with these speed settings.

Step 4Save the Video
Once satisfied with the speed of the video, tap the save button.

2. How to Change the Speed of Your Video on iPhone
The iMovie app offers an easy and effective way of speeding up or slowing down videos on your iPhone. How do you make a video fast motion? The free video editing app from Apple is available for iOS and and can also be used on iPads:
Step 1Launch iMovie App
Once you have installed and opened the iMovie app on your phone, tap on the Create Projects (+) button.

Step 2Select Movie
The app will prompt you to select the kind of project you want between Movie and Trailer.

Step 3Create Movie
Tap on the video that you want to adjust speed. Then, tap on the Create Movie button.

Step 4Adjust the Speed of the Video
On the editing screen, tap on the video clip. The video editing tools will appear at the bottom, allowing you to make the adjustments of your choise. Tap on the Speed icon that looks like a speedometer and drag the slider until you attain the speed you want.

Step 5Preview and Safe
After adjusting the speed, play the video to preview it with the new speed. Then tap on the Done button at the top to save the project. Hit the Share icon, and the Save the Video.

Conclusion
When it comes to creating slow motion videos, Wondershare Filmora stands out as a great software to use. Filmora V13 allows you to speed up or slow down videos with only a few clicks. The versatile video editing software can be used on Windows and Mac PC while producing the same quality of videos. Be sure to check out the range of AI features available in the software. These are helpful in automating most of the tasks and doing a lot more with your editing tasks.
Make A Slow Motion Video Make A Speed Ramping Video More Features
Part 1. Slowing Down or Speeding Up Videos on PC: Windows and Mac Guide
The most effective way to adjust the speed of a video on a PC is to use video editing software. With Wondershare Filmora, you get the tools and features to adjust the speed of your videos. The AI Co-piloy feature is particularly useful in guiding you through the steps of editing your videos. The versatile video editing software helps you adjust the speed with just a few clicks. The approach is similar for both Windows and Mac devices, making Filmora a user-friendly and effective software for editors at all experience levels. So, how do you make a video fast-motion?
Free Download For Win 7 or later(64-bit)
Free Download For macOS 10.14 or later
Step 1: Launch Filmora and Import Video Files
Once you start Filmora on your PC, click on New Project. Then select the Import icon to choose the files you want to import from your computer library. Another way is to drag and drop the files from your computer into Filmora.
Step 2: Add the Clips to the Timeline
After importing the video files, drag and drop them onto the timeline. This prepares the clips for speed adjustment.
Step 3: Open the Speed Adjustment Panel
The Filmora feature that allows you to adjust the speed of your video clips is the speed adjustment panel or Uniform Speed. To open the Uniform Speed Panel, double-click the video clip in the timeline. Find the Uniform Speed option in the pop-up column that appears and click on it. Make adjustments using the speed control.
Step 4: Adjust the Speed Slider
In the speed control panel, clikd the speed adjuster slider. Adjust the slider to the rate of speed you want for your clips between 0.5 (slowest) to 2.00 (fastest).
Step 5: Detach the Audio
Once you adjust the speed of your video, the audio will be affected. It can be a great idea to detach the audio to further edit the video. Right-click the video clip on the timeline, and select the Detach Audio option from the pop-up column. Once the audio has detached, you can further adjust it with fade and other available options.
Step 6: Export Video
Once satisfied with your video adjustments, export it to the desired format. For this step, click the Export button. Select the directory and video format and other preferences, then click ok.
Part 2. How to Quickly Adjust Video Speed Using Online Tool
Are you wondering how to speed up slow mo video or slow a video without installing a special video editor on your computer, using an online tool is the best choice. A free online tool like Fastreel helps you change the speed of short videos, which are smaller than 500 MB with just a few steps. However, this online tool oonly works with MP4 format. When working with other video formats, you will have to convert them first.
Here’s how to speed up a slo mo video using Fastreel
Step 1
Go to the Fastreel website . Upload the video you want to slow down or speed up. Click the Add Your File button to choose and upload the clips.
Step 2
Set the Appropriate Speed. Select the speed you want for your video onVideo Speed section. The results will be displayed in the preview window. Save Processed Video. Mute the video by clicking the corresponding icon if necessary. Then, save the video by selecting the Export Results button.
Part 3. A Guide to Slowing Down or Speeding Up Videos on Android and iPhone
How to speed up slow mo video on phone is a normal concern for many people. Luckily, there are many apps available to do that. In most cases, making a mobile video bit slower or faster will make it seem better. You may want to reduce the duration of your video or check out the details in a specific scene. You may want to speed watch or speed listen to the content. Let’s have a look at how you can achieve this on your Android or Apple device.
1. How to Change the Speed of Your Video on Android
When someone asks how do I slow down a video? The first response that comes to mind is using their phone. This is the device they always have with them. And most people, consider editng easier on theior phones than compiters. For someonw with an Android phone, the Gallery app makes it easier to adjust the speed of a video. Find out how to make fast motion video or slow mo with Android phone. Follow these few steps:
Step 1Launch the Gallery app
Open the video you want to edit. Then, tap on the Edit icon at the bottom to open the video editor.
Step 2Find the Speed Icon
Scroll through the list of the icons at the bottom. Then tap on the Speed icon to start making the adjustments
Step 3Adjust the Speed of the Video
The default speed of the video is 1x. Tap on 2x to seep it up or 1/2x to slow down the video. Then press the Play icon to preview the view with these speed settings.
Step 4Save the Video
Once satisfied with the speed of the video, tap the save button.
2. How to Change the Speed of Your Video on iPhone
The iMovie app offers an easy and effective way of speeding up or slowing down videos on your iPhone. How do you make a video fast motion? The free video editing app from Apple is available for iOS and and can also be used on iPads:
Step 1Launch iMovie App
Once you have installed and opened the iMovie app on your phone, tap on the Create Projects (+) button.
Step 2Select Movie
The app will prompt you to select the kind of project you want between Movie and Trailer.
Step 3Create Movie
Tap on the video that you want to adjust speed. Then, tap on the Create Movie button.
Step 4Adjust the Speed of the Video
On the editing screen, tap on the video clip. The video editing tools will appear at the bottom, allowing you to make the adjustments of your choise. Tap on the Speed icon that looks like a speedometer and drag the slider until you attain the speed you want.
Step 5Preview and Safe
After adjusting the speed, play the video to preview it with the new speed. Then tap on the Done button at the top to save the project. Hit the Share icon, and the Save the Video.
Conclusion
When it comes to creating slow motion videos, Wondershare Filmora stands out as a great software to use. Filmora V13 allows you to speed up or slow down videos with only a few clicks. The versatile video editing software can be used on Windows and Mac PC while producing the same quality of videos. Be sure to check out the range of AI features available in the software. These are helpful in automating most of the tasks and doing a lot more with your editing tasks.
Learn How to Change Aspect Ratio in iMovie on Mac, iPad, and iPhone in This Guide. And You Can Also Use iMovie Alternatives Like Wondershare Filmora to Edit Your Videos
How to Change Aspect Ratio in iMovie

Liza Brown
Nov 07, 2023• Proven solutions
The ratio between the height and width of the screen or an image is called the aspect ratio. Different video posting platforms require different aspect ratios. For example, for YouTube, the commonly used aspect ratio is 16:9, which is a standard for almost all videos. However, for TikTok, the required aspect ratio is 9:16.
The video’s original aspect ratio is based on the default settings of the recording device. Some phones and tablets provide the option of changing your video’s aspect ratio before you start recording. But it can also be changed afterward with the help of editing software.
Social media apps and websites require you post images and videos of a specific size. And if you post your content in its original dimensions it most probably be will get cropped in the wrong places and will diminish the quality of your video or image.
To post that perfect video, it is better to resize it before posting it online. Several online editing tools are available on the market that you can use to change the dimensions of your content. iMovie has to be one of the most popular editing software used worldwide. So, if you use iMovie for editing videos, and you want to know how you can change the aspect ratio of your content, read on to find it out.
In this article
01 How to Change Aspect Ratio in iMovie on Mac?
02 How to Easily Change Aspect Ratio on Mac with Wondershare Filmora? [Recommend: Auto Resize]
03 How to Change Aspect Ratio in iMovie on iPhone?
04 How to Change Aspect Ratio in iMovie on iPad?
05 FAQs About Changing Aspect Ratio in iMovie
For Win 7 or later (64-bit)
For macOS 10.12 or later
 Secure Download
How to Change Aspect Ratio in iMovie on Mac?
Learn to change the aspect ratio of videos in iMovie on Mac by following these simple steps:
Step 1. Open a pre-existing project in iMovie or create a new one. It is better to adjust the video size before starting any other editing procedures. Changing the dimensions of videos afterward may affect the editing procedures and effects applied to the video.
Step 2. To resize the video, click on “File” and then click on “Project Properties” on the drop-down list, a pop-up window will appear.
Step 3. On the popping-up dialog, you will see several options regarding aspect ratio.
Step 4. Choose the settings that are suitable for your video, and you’re done. Your video will now appear in your chosen dimensions.
How to Easily Change Aspect Ratio on Mac with Wondershare Filmora?
Wondershare Filmora is one of the best alternatives to iMovie. You can use Filmora to change the aspect ratio of your videos with a few simple steps:
For Win 7 or later (64-bit)
For macOS 10.12 or later
Secure Download
Step 1. Open the Wondershare Filmora application on Mac.
Step 2. Open the video you want to edit in the app by clicking on “Import” on the menu bar. You can also drag and drop the video on your timeline, and your file will open in the Filmora app.
Step 3. To adjust the aspect ratio of your video, click on the “Crop and Zoom” option and a pop-up will appear on your screen. Now, you have two options to consider, you can either choose presets having aspects ratios of 16:9, 4:3, 1:1, and 9:16, or you can choose custom settings. For custom dimensions, click on Custom and type in your desired ratio.
Step 4. When you are satisfied with the settings, click OK and the aspect ratio of your video will be changed.

How to Change Aspect Ratio in iMovie on iPhone?
Here’s how you can aspect ratio of your videos in iPhone using iMovie:
Step 1. Open the video you want to edit in iMovie. You can either choose a pre-existing project or create a whole new one.
Step 2. To change the aspect ratio, tap on the “Zoom” option that you will see in the top right corner of your iPhone screen.
Step 3. You can also use your fingers to resize the video by zooming in or out as required.
Step 4. Tap “Done” and the aspect ratio of your video will be changed.
How to Change Aspect Ratio in iMovie on iPad?
The procedure of changing the aspect ratio on the iPad is quite similar to that of the iPhone. The following steps will help you change the aspect ratio of your videos on iPad using iMovie:
Step 1. Open the iMovie app on your iPad. Import a pre-existing project on your timeline or start a new one.
Step 2. Resize your video by tapping on the “zoom” option.
Step 3. Readjust the video size using your two fingers.
Step 4. Tap “Done” when you are happy with the selected size.

Filmora Video Editor
Wondershare Filmora - Auto Resize Video
• Auto reframe video in 16:9, 1:1, 9:16, 4:3 or 21:9
• Offers cool video effects and filters to make your video become professional
• Cross-platform supported - (Windows, Mac, iOS, Android)
Try It Free Try It Free Try It Free Learn More >
FAQs About Changing Aspect Ratio in iMovie
1. What is the standard aspect ratio for YouTube Videos?
On a computer, the standard aspect ratio for videos on YouTube is 16:9. If your video has a different aspect ratio, YouTube will change it automatically to a size that is suitable for the website. But, it may ruin the quality of the video, or black bars might appear on the sides of the aspect ratio that is too small.
2. What resolution does iMovie support?
The resolution of the first film or video clip that you add to your timeline will define the resolution of your entire iMovie project. The latest versions of iMovie can support 4K and videos with frame rates higher than 30 frames per second.
3. Can I crop a video in iMovie?
Of course, you can crop a video in iMovie. To do so, open a project in iMovie and click on the “Crop to Fill” button. The video will appear in an adjustable frame. Now you can drag the frame and set it to the size you want.
4. How do I change movie dimensions in iMovie 10?
You can only change the size of your movie/video when you share/export your project. Go to the “size” option after clicking on “File” to change the dimensions of your movie.
5. How do I compress videos in iMovie?
Click on the “share” option after clicking on “File”. The video can be compressed for Facebook, Email, Vimeo, and more. Select the option for which you want to compress the file. You may have to make small changes for large videos.
Final Word
Aspect ratio is simply defined as the relationship between the width and height of an image, video, or screen. Various video posting platforms have a standard aspect ratio for videos. So. Before posting your video creation, you have to make sure that the aspect ratio of your video aligns with the website standards.
To tweak the aspect ratio of your videos, you can use iMovie, which is a powerful video editor for Mac and iOS devices. You can also use Wondershare Filmora which is the best alternative to iMovie and is highly compatible with both Mac and Windows devices.
For Win 7 or later (64-bit)
For macOS 10.12 or later
Secure Download
Liza Brown
Liza Brown is a writer and a lover of all things video.
Follow @Liza Brown
Liza Brown
Nov 07, 2023• Proven solutions
The ratio between the height and width of the screen or an image is called the aspect ratio. Different video posting platforms require different aspect ratios. For example, for YouTube, the commonly used aspect ratio is 16:9, which is a standard for almost all videos. However, for TikTok, the required aspect ratio is 9:16.
The video’s original aspect ratio is based on the default settings of the recording device. Some phones and tablets provide the option of changing your video’s aspect ratio before you start recording. But it can also be changed afterward with the help of editing software.
Social media apps and websites require you post images and videos of a specific size. And if you post your content in its original dimensions it most probably be will get cropped in the wrong places and will diminish the quality of your video or image.
To post that perfect video, it is better to resize it before posting it online. Several online editing tools are available on the market that you can use to change the dimensions of your content. iMovie has to be one of the most popular editing software used worldwide. So, if you use iMovie for editing videos, and you want to know how you can change the aspect ratio of your content, read on to find it out.
In this article
01 How to Change Aspect Ratio in iMovie on Mac?
02 How to Easily Change Aspect Ratio on Mac with Wondershare Filmora? [Recommend: Auto Resize]
03 How to Change Aspect Ratio in iMovie on iPhone?
04 How to Change Aspect Ratio in iMovie on iPad?
05 FAQs About Changing Aspect Ratio in iMovie
For Win 7 or later (64-bit)
For macOS 10.12 or later
Secure Download
How to Change Aspect Ratio in iMovie on Mac?
Learn to change the aspect ratio of videos in iMovie on Mac by following these simple steps:
Step 1. Open a pre-existing project in iMovie or create a new one. It is better to adjust the video size before starting any other editing procedures. Changing the dimensions of videos afterward may affect the editing procedures and effects applied to the video.
Step 2. To resize the video, click on “File” and then click on “Project Properties” on the drop-down list, a pop-up window will appear.
Step 3. On the popping-up dialog, you will see several options regarding aspect ratio.
Step 4. Choose the settings that are suitable for your video, and you’re done. Your video will now appear in your chosen dimensions.
How to Easily Change Aspect Ratio on Mac with Wondershare Filmora?
Wondershare Filmora is one of the best alternatives to iMovie. You can use Filmora to change the aspect ratio of your videos with a few simple steps:
For Win 7 or later (64-bit)
For macOS 10.12 or later
Secure Download
Step 1. Open the Wondershare Filmora application on Mac.
Step 2. Open the video you want to edit in the app by clicking on “Import” on the menu bar. You can also drag and drop the video on your timeline, and your file will open in the Filmora app.
Step 3. To adjust the aspect ratio of your video, click on the “Crop and Zoom” option and a pop-up will appear on your screen. Now, you have two options to consider, you can either choose presets having aspects ratios of 16:9, 4:3, 1:1, and 9:16, or you can choose custom settings. For custom dimensions, click on Custom and type in your desired ratio.
Step 4. When you are satisfied with the settings, click OK and the aspect ratio of your video will be changed.
How to Change Aspect Ratio in iMovie on iPhone?
Here’s how you can aspect ratio of your videos in iPhone using iMovie:
Step 1. Open the video you want to edit in iMovie. You can either choose a pre-existing project or create a whole new one.
Step 2. To change the aspect ratio, tap on the “Zoom” option that you will see in the top right corner of your iPhone screen.
Step 3. You can also use your fingers to resize the video by zooming in or out as required.
Step 4. Tap “Done” and the aspect ratio of your video will be changed.
How to Change Aspect Ratio in iMovie on iPad?
The procedure of changing the aspect ratio on the iPad is quite similar to that of the iPhone. The following steps will help you change the aspect ratio of your videos on iPad using iMovie:
Step 1. Open the iMovie app on your iPad. Import a pre-existing project on your timeline or start a new one.
Step 2. Resize your video by tapping on the “zoom” option.
Step 3. Readjust the video size using your two fingers.
Step 4. Tap “Done” when you are happy with the selected size.
Filmora Video Editor
Wondershare Filmora - Auto Resize Video
• Auto reframe video in 16:9, 1:1, 9:16, 4:3 or 21:9
• Offers cool video effects and filters to make your video become professional
• Cross-platform supported - (Windows, Mac, iOS, Android)
Try It Free Try It Free Try It Free Learn More >
FAQs About Changing Aspect Ratio in iMovie
1. What is the standard aspect ratio for YouTube Videos?
On a computer, the standard aspect ratio for videos on YouTube is 16:9. If your video has a different aspect ratio, YouTube will change it automatically to a size that is suitable for the website. But, it may ruin the quality of the video, or black bars might appear on the sides of the aspect ratio that is too small.
2. What resolution does iMovie support?
The resolution of the first film or video clip that you add to your timeline will define the resolution of your entire iMovie project. The latest versions of iMovie can support 4K and videos with frame rates higher than 30 frames per second.
3. Can I crop a video in iMovie?
Of course, you can crop a video in iMovie. To do so, open a project in iMovie and click on the “Crop to Fill” button. The video will appear in an adjustable frame. Now you can drag the frame and set it to the size you want.
4. How do I change movie dimensions in iMovie 10?
You can only change the size of your movie/video when you share/export your project. Go to the “size” option after clicking on “File” to change the dimensions of your movie.
5. How do I compress videos in iMovie?
Click on the “share” option after clicking on “File”. The video can be compressed for Facebook, Email, Vimeo, and more. Select the option for which you want to compress the file. You may have to make small changes for large videos.
Final Word
Aspect ratio is simply defined as the relationship between the width and height of an image, video, or screen. Various video posting platforms have a standard aspect ratio for videos. So. Before posting your video creation, you have to make sure that the aspect ratio of your video aligns with the website standards.
To tweak the aspect ratio of your videos, you can use iMovie, which is a powerful video editor for Mac and iOS devices. You can also use Wondershare Filmora which is the best alternative to iMovie and is highly compatible with both Mac and Windows devices.
For Win 7 or later (64-bit)
For macOS 10.12 or later
Secure Download
Liza Brown
Liza Brown is a writer and a lover of all things video.
Follow @Liza Brown
Also read:
- 2024 Approved Do You Know CapCut Has some Amazing Slow-Motion Templates You Can Utilize? Read This Article to Access the Slow-Motion CapCut Templates Link
- Using One of the Best Converter Tools to Turn GIFs Into PNG or JPG. Here, Learn About the Ten Best Ones for Different Operating Systems, with Details on Features, Prices, and More for 2024
- 2024 Approved Wondering How to Stand Out with Your Adobe Slideshow Presentation? Follow the Given Discussion to Learn All About the Easiest Ways of Making a Slideshow at Adobe
- Updated Best 10 Tools To Make Quiz Videos
- How To Quickly Create A Screen Print Effect In Photoshop Detailed Gui for 2024
- Updated 3 Actionable Ways to Create Countdown Animation for Videos
- New AI Has Influenced All Video Editors to Speed up Editing. This Article Discusses the Significance of AI Slow Motion and the Tools that Offer It
- Updated Do You Seek to Blur Out Your Video and Photo to Display some Motion Blur? This Article Provides a List of the Best Motion Blur Apps for Videos and Photos for 2024
- New Top 6 Drones for Videography for 2024
- Updated A Vlog Has Many Elements to Answer. While Setting up Ideas for It, There Are Several Things Into Which You Should Look. This Article Presents a Picture of How a Vlog Video Is Made Perfectly
- New 2024 Approved Top 10 Movie Trailer Voice Generators Windows, Mac, Android, iPhone
- How Long Does It Take To Edit A Video for 2024
- In 2024, How to Make a Video Loop in QuickTime
- 2024 Approved Best Jump Cut Editing Tricks
- Updated In 2024, The Ultimate Guide to Slideshow Maker with Music
- Updated What Is the Best FPS for YouTube Videos for 2024
- New 10 Best Free Text to Speech Software Windows, Mac,Android, iPhone & Online
- Updated Replacing the Sky in Adobe After Effects An Extensive Guide
- New In 2024, Easiest Fix Included! Top 5 Ways to Convert HDR to SDR Videos
- Updated So, without Wasting Time, Let Me Show You How to Mask a Video in Wondershare Filmora. Lets Get Started for 2024
- New Looking for a Full Guide on Removing the Background From PNG Images? Do You Want to Transform JPG to PNG Transparent? If so, Take some Time to Read This Article for 2024
- 2024 Approved A Detailed Guide to Do Color Correction in OBS
- Updated Step by Step to Cut Videos in Adobe Premiere Pro for 2024
- Updated Fast and Easy Method to Match Color in Photoshop
- New Zoom In and Zoom Out on YouTube for 2024
- In 2024, Are You Surfing for some Way to Make Your Animated Emoji Discord Using Videos, GIFs, Images, or Text? Read Through This Article as Well Guide You Through the Process
- Updated Adding Text to Your Collage Not only Makes It Look Sophisticated but Also Versatile. So, if You Too Are Looking for Ways to Create a Collage Text, Check Out Our Article
- Making Slow Motion Videos in Premiere Pro A Review on The Best Methods for 2024
- New In 2024, 10 Best Camera for YouTube Beginners
- In 2024, How to Add Transitions in Adobe Premiere Pro
- 2024 Approved How to Make Video Slow Motion? Complete Guide
- Updated Top Tips for Camtasia Freeze-Frame
- Updated Looking for Ways to Enhance Overall Look for Your Contents Professionally? Then Coming up with These Cool PowerPoint Templates Can Help You a Lot for 2024
- Do You Seek to Blur Out Your Video and Photo to Display some Motion Blur? This Article Provides a List of the Best Motion Blur Apps for Videos and Photos
- In This Article, You Will Learn Easy Ways to Edit Videos Using a Mouse in Wondershare Filmora. You Can Do Video Editing without a Keyboard After Reading This Article for 2024
- How to Add the Popular Video Text Effects to Your Video, In 2024
- New 2024 Approved Best Shortcut Towards Timeline Template
- How to Create a Freeze Frame Sequence Effect
- In 2024, Where Is the Best Place to Catch Dratini On Samsung Galaxy A34 5G | Dr.fone
- In 2024, Process of Screen Sharing Poco C51 to PC- Detailed Steps | Dr.fone
- Simple ways to get lost music back from HTC U23
- In 2024, How PGSharp Save You from Ban While Spoofing Pokemon Go On Samsung Galaxy M34? | Dr.fone
- How to Screen Mirroring Vivo X100 Pro to PC? | Dr.fone
- In 2024, 5 Easy Ways to Copy Contacts from Xiaomi Civi 3 Disney 100th Anniversary Edition to iPhone 14 and 15 | Dr.fone
- How to Exit Android Factory Mode On Poco F5 5G? | Dr.fone
- Tips and Tricks for Setting Up your Poco M6 Pro 5G Phone Pattern Lock
- In 2024, How to Check Distance and Radius on Google Maps For your Oppo Reno 10 Pro+ 5G | Dr.fone
- In 2024, Things You Must Know for Screen Mirroring Apple iPhone SE (2022) | Dr.fone
- In 2024, How to Remove a Previously Synced Google Account from Your Samsung Galaxy S23+
- In 2024, A Guide Vivo T2 Pro 5G Wireless and Wired Screen Mirroring | Dr.fone
- In 2024, Ultimate Guide from Lenovo ThinkPhone FRP Bypass
- In 2024, Disabled iPhone 14 Pro How to Unlock a Disabled iPhone 14 Pro?
- In 2024, How to Use Google Assistant on Your Lock Screen Of Infinix Note 30 Phone
- How to Cast Apple iPhone 14 Pro Max to Chromecast? | Dr.fone
- How to use Snapchat Location Spoofer to Protect Your Privacy On Honor X8b? | Dr.fone
- Title: Finding LUTs Made by Danny Gevirtz
- Author: Morgan
- Created at : 2024-05-19 05:11:37
- Updated at : 2024-05-20 05:11:37
- Link: https://ai-video-editing.techidaily.com/finding-luts-made-by-danny-gevirtz/
- License: This work is licensed under CC BY-NC-SA 4.0.
