:max_bytes(150000):strip_icc():format(webp)/iOS-wwdc-7d655ca37a3b43b99fd9dac09bec13c4.jpg)
Frame Rates, Speed, and Wondershare Filmora

Frame Rates, Speed, and Wondershare Filmora
Ensuring smoother playback along with enhanced fluidity is a crucial part of boosting the engagement of videos. You also need to add the slow-motion effect at some points in videos. Along with this, syncing audio to video is also essential. Thus, you can take assistance from frame rates and speed to ensure you have these key features in the videos.
There is no need to be concerned about what video editor to choose because Wondershare Filmora can help you with this issue. In this article, you will find basic information about Filmora and the uses of frame rate and speed ramping. We will also provide the procedure for changing video frame rates with Filmora.
- Part 1: What is Frame Rate and How Important It Is In Videos?
- Part 2: What Are The Different Uses of Speed Ramping in Video Editing?
- Part 3: Perform Basic Speed Adjustments and Speed Ramping on Wondershare Filmora
- Part 4: [Basic] How to Change The Frame Rate in Wondershare Filmora?
- Conclusion
Part 1: What is Frame Rate and How Important It Is In Videos?
One of the most important metrics in videos is the frame rate. This term refers to the individual frames present in the video. While the frame represents a single second, this defines the frequency of the video. This is the display of consecutive frames every second, which brings up the illusion of motion for the viewers. In this way, the entire frame rate is explained as terminology to users new to video editing.
Importance of Frame Rate in Videos
We will highlight some prominent points explaining the importance of video frame rates. Continuing with these points, this will help users understand how essential video frame rate is:
01of 04Defines Smoothness in Videos
Having a higher frame rate in a video is equivalent to a smooth video. Users who consider having smoothness in their videos always consider the frame rates. Higher frame rates have better transitions and seamless motion.
02of 04The detail in the Video
If you have a low frame rate in your video, you cannot observe the details in the fast-moving objects. In such a scenario, you need to have a video with a good frame rate. This will help display the explicit details of the video, which cannot be viewed under every frame rate quality.
03of 04Realistic Effects
Old videos never had the kick that made them feel real. Videos with higher frame rates have changed the dynamics in the current system. Realism and immersive video experience are prominent getaways achieved with better frame rates.
04of 04Realistic Effects
The use of better frame rates gives the option of improving the effects of the video. Videos that did not have impressive frame rates are not able to display the mood or atmosphere. Better frame rates help display the environment better, thus explaining the importance.
Changing Video Frame Rates And Speed Editor A wonderful video editor - Wondershare Filmora providing frame rate and speed ramping features for all creators.
Free Download Free Download Learn More

Part 2: What Are The Different Uses of Speed Ramping in Video Editing?
Speed ramping and video frame rate are one of the most known techniques which are widely used in video editing. You must be wondering why paying attention to speed ramping is so important. Nothing to worry about because this part will give you the most implementable uses of speed ramping in video editing. Have a look below to discover further information about this:
Highlighting Actions and Dramas
You can use speed ramping to emphasize the actional and dramatic sequences. It also helps you draw the audience’s attention and make the essential factors more notable. Above all, the speed ramping also integrates the useable effects which can add a drastic touch of drama to your videos,
Transitions and Motion Tracking
With the good use of speed ramping, you can achieve a smooth transition in videos. It also helps you add seamless transitions in the videos to add a sense of consistency. One of the best things is adding slow-motion and motion-tracking effects in simple videos.
Syncing Audios
Syncing the audio beats with videos is crucial to enhance the user experience. Speed ramping offers capabilities through which you can easily sync the audio to the length of videos. As it never compromises the content or layout of videos, you don’t have to worry about anything.
Emphasized Storytelling
If you need to induce a sense of storytelling and optimize the video quality, consider speed ramping. You can control the overall speed of actions and dramas and convey a particular narrative to add depth to videos. It also helps to increase the frame rate of video.
Part 3: Perform Basic Speed Adjustments and Speed Ramping on Wondershare Filmora
Wondershare Filmora is a great video editor providing exquisite features and details to users. It embeds simple video editing tools and AI functionalities to provide a quick editing experience. However, the focus on the details is not lacking in this tool. Filmora provides a comprehensive set of effects, transitions, and elements to induce in videos.
Free Download For Win 7 or later(64-bit)
Free Download For macOS 10.14 or later
Along with that, it also includes multiple functionalities which cannot be observed in many video editors. However, since we are putting our focus on discussing the speed adjustments in Filmora, let’s look at the comprehensive steps explained below:
Method 1: Uniform Speed Adjustments in Videos
Step 1Import Video on Filmora for Speed Adjustments
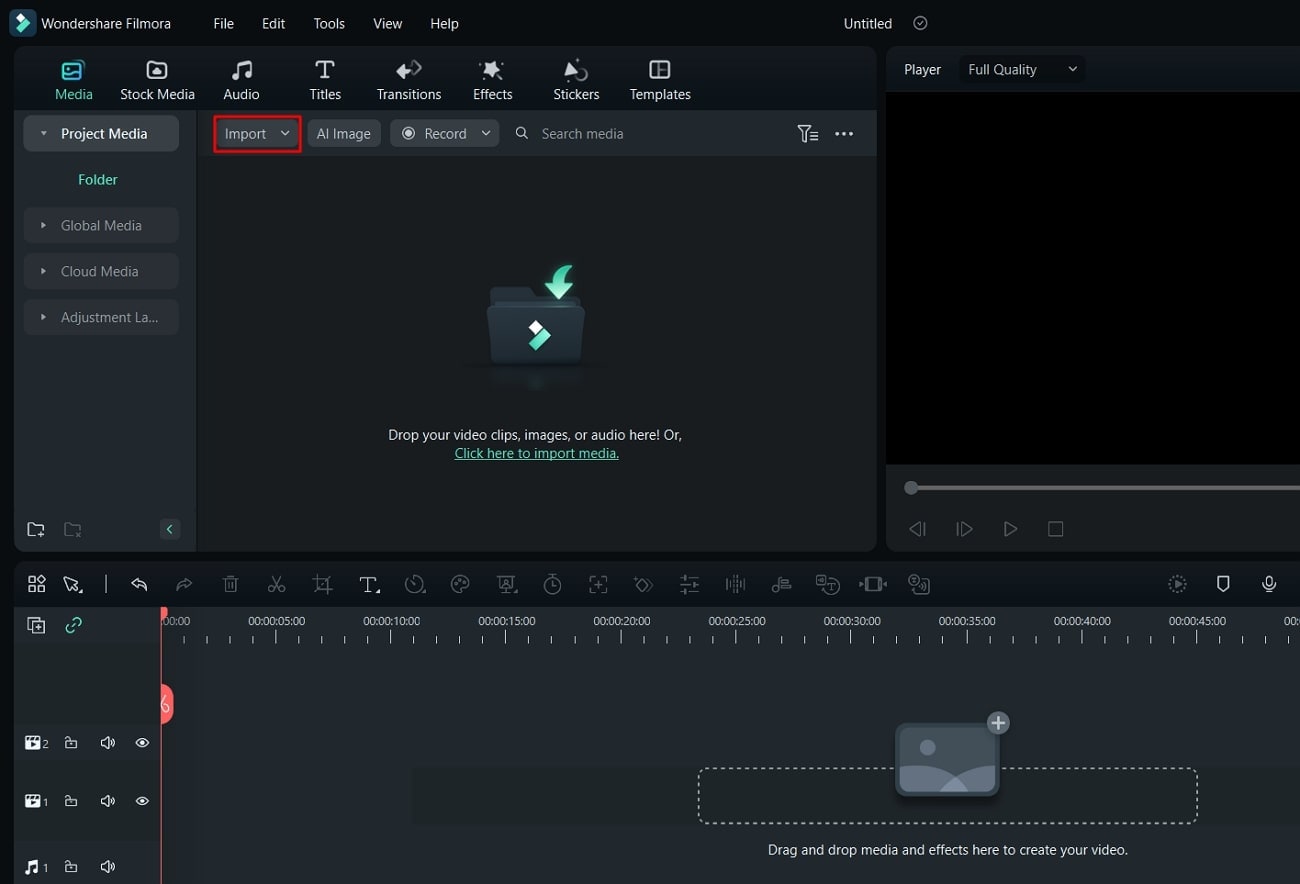
Firstly, launch Wondershare Filmora on your computer and continue to open a new project. Once a window enters the display, lead into the “Import” section for importing the media files that need adjustment.
Step 2Select the Speed Option
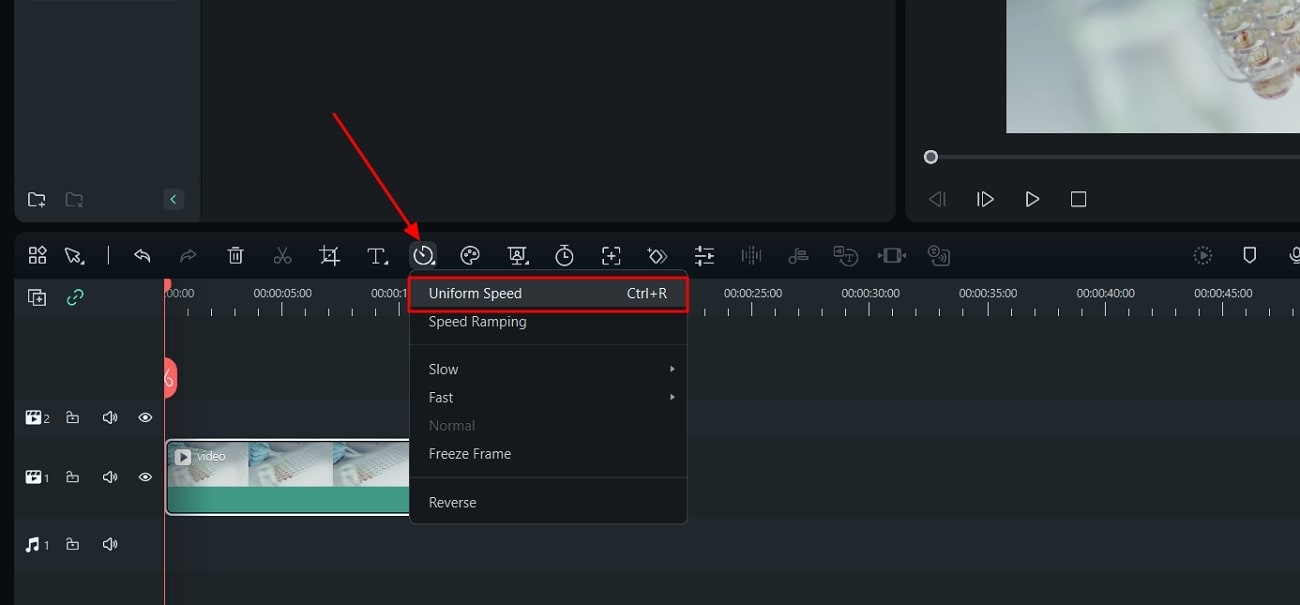
After adding the videos and dragging them to the timeline, continue to locate the “Speed “ option in the bar above the timeline. This opens a drop-down menu where you have to select “Uniform Speed” or use “Ctrl + R.”
Step 3Manage Speed Uniformly
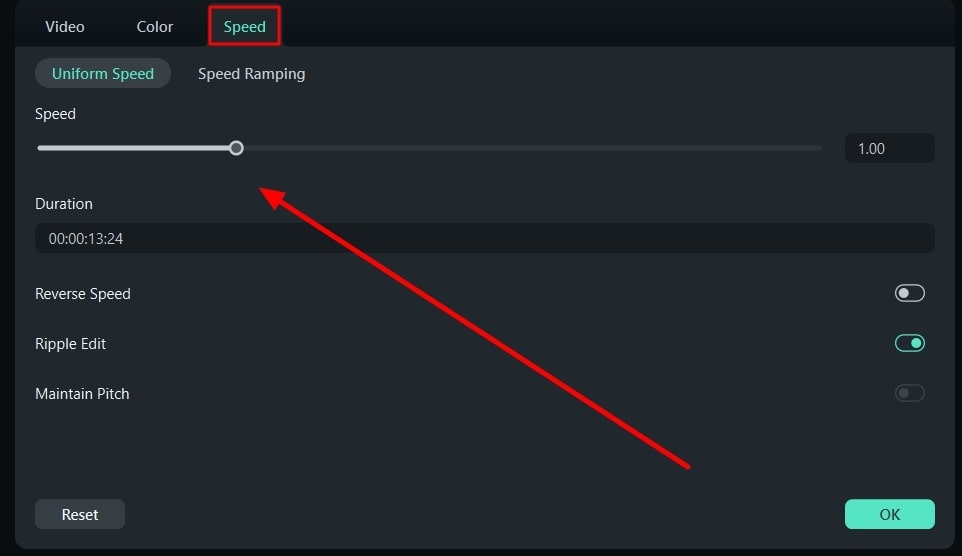
A new section opens on the video editor where you can define the speed using the slider. Also, you can activate options like “Reverse Speed,” “Ripple Edit,” and “Maintain Pitch,” if needed.
Method 2: Utilize the Option of Speed Ramping
Step 1Access Speed Ramping Option
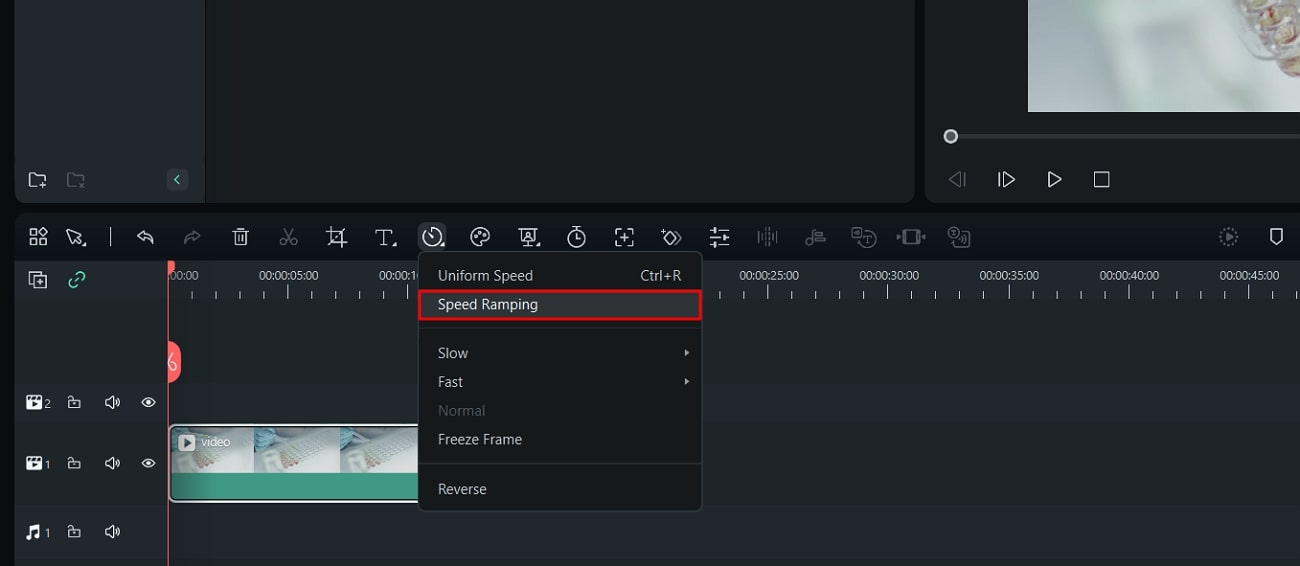
Once you have opened Filmora and imported a video on the timeline, lead to the “Speed” button again. Select the option of “Speed Ramping ” in the drop-down to continue.
Step 2Manage Speed Ramping of Video
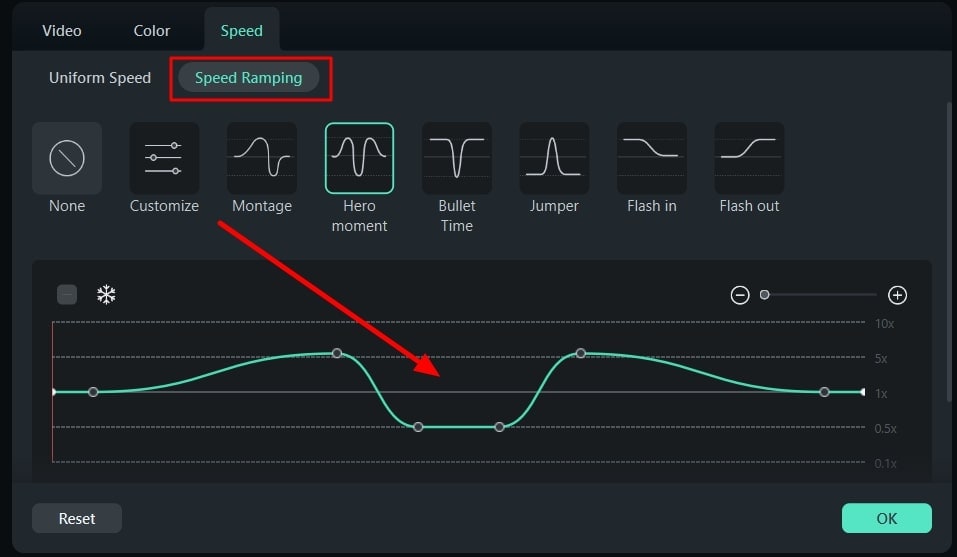
As you find a new screen on your front, select the type of Speed Ramping you want to perform. Adjust the speed ramp on the line graph that comes in display and click “OK” to conclude.
Step 3Export the Final Video
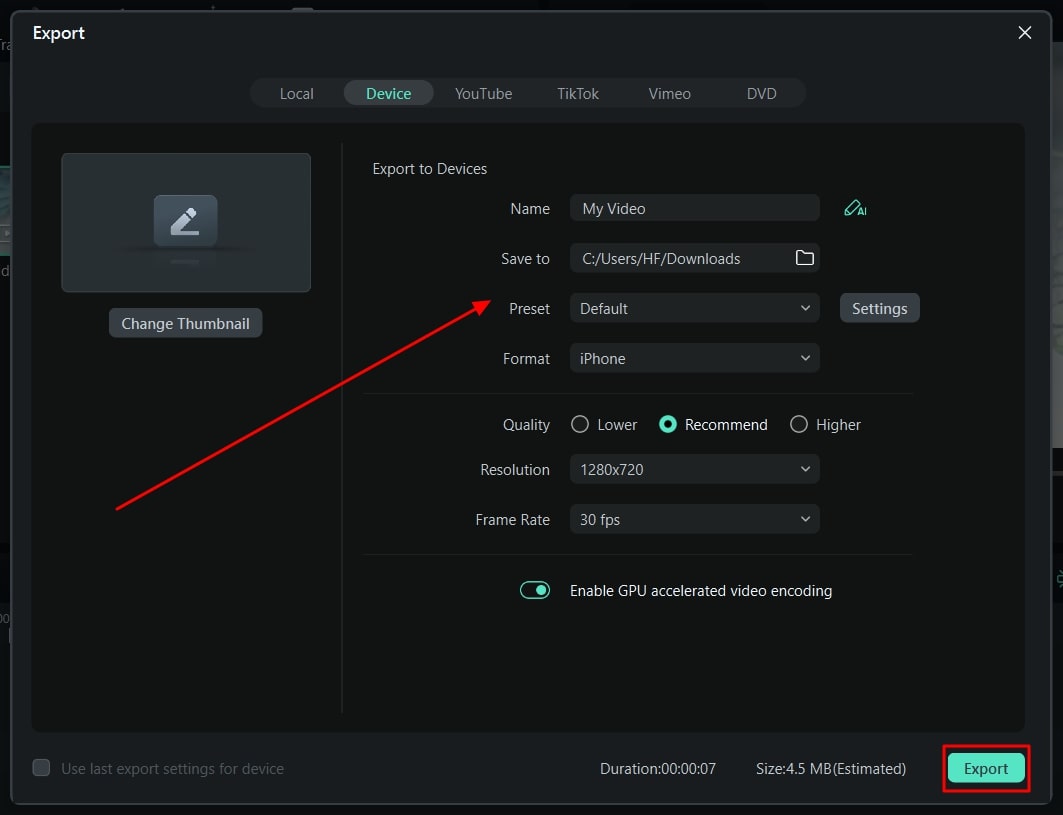
Once you are done editing your videos, lead to the “Export” button to save the videos on the device.
Part 4: [Basic] How to Change The Frame Rate in Wondershare Filmora?
While you find out the ways to change the speed of your videos, you can also change their frame rate. Filmora offers dedicated options on its platform to its users, which can be understood in the steps below:
Free Download For Win 7 or later(64-bit)
Free Download For macOS 10.14 or later
Step 1Open Settings For Changing Frame Rate
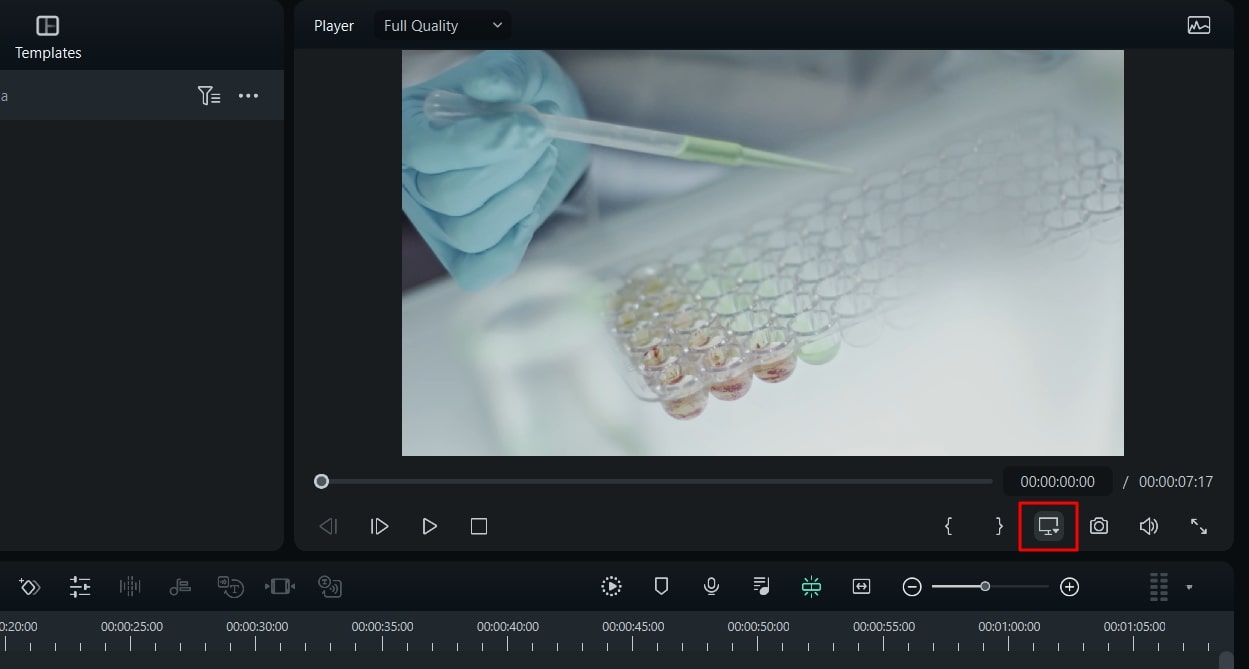
As you open Filmora and import a video, drag it to the timeline. Once the video is imported, lead to the “Preview quality and display settings” button on the right side of the screen.
Step 2Manage Speed Ramping of Video
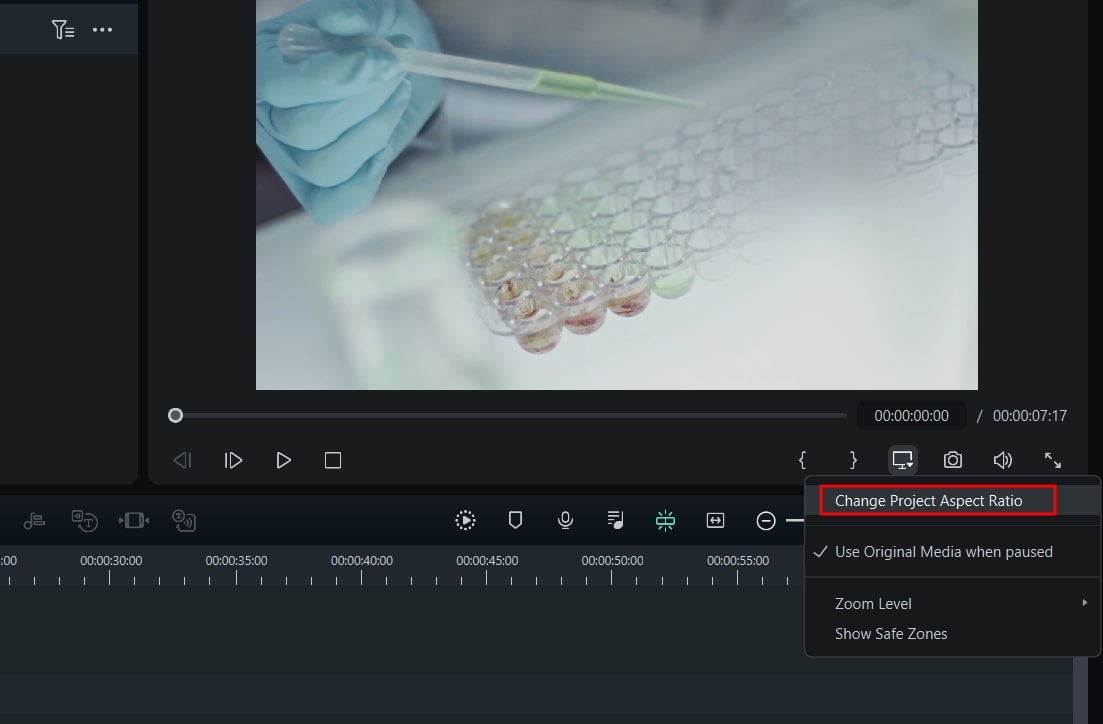
This opens a drop-down menu where you have to select the option “Change Project Aspect Ratio.”
Step 3Change Frame Rate Successfully
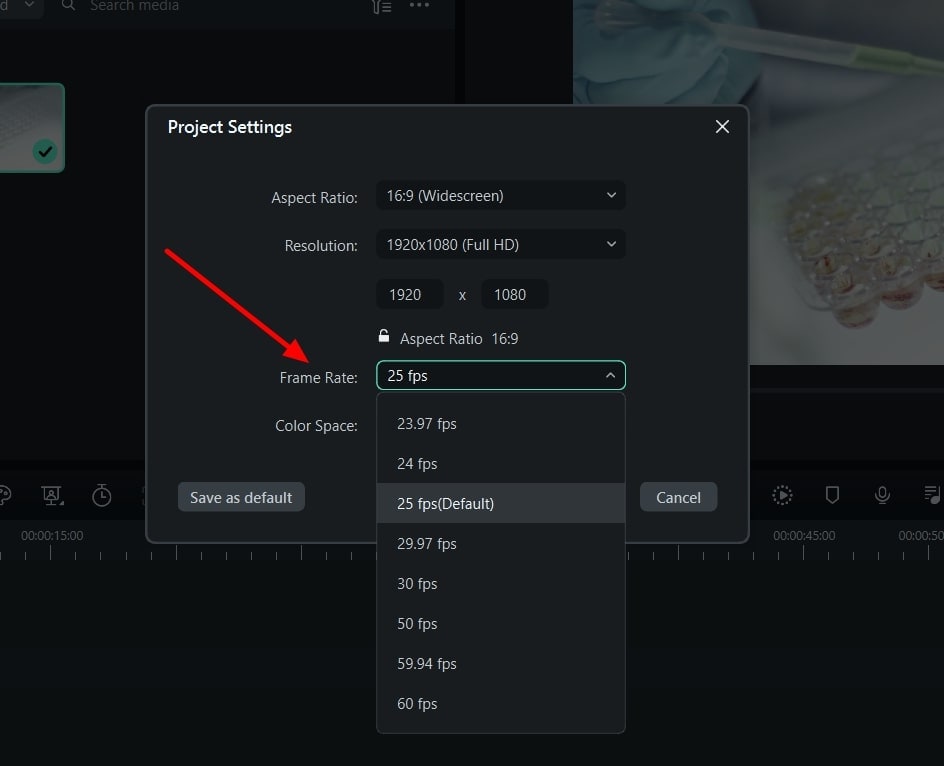
You will be led to a new screen where you can find the option of “Frame Rate” in the list. Change the frame rate according to the requirements and options available and click “OK.” The frame rate of your video will be changed using Filmora.
Conclusion
This article has displayed a conspicuous detail of what the frame rate in the video is and how it implicates video editing. Wondershare Filmora has been observed as the perfect way to manage the speeds of videos. Video frame rates can also be managed using the exquisite video editor. Those who wish to manage such features of the videos should consider using this tool.
Part 1: What is Frame Rate and How Important It Is In Videos?
One of the most important metrics in videos is the frame rate. This term refers to the individual frames present in the video. While the frame represents a single second, this defines the frequency of the video. This is the display of consecutive frames every second, which brings up the illusion of motion for the viewers. In this way, the entire frame rate is explained as terminology to users new to video editing.
Importance of Frame Rate in Videos
We will highlight some prominent points explaining the importance of video frame rates. Continuing with these points, this will help users understand how essential video frame rate is:
01of 04Defines Smoothness in Videos
Having a higher frame rate in a video is equivalent to a smooth video. Users who consider having smoothness in their videos always consider the frame rates. Higher frame rates have better transitions and seamless motion.
02of 04The detail in the Video
If you have a low frame rate in your video, you cannot observe the details in the fast-moving objects. In such a scenario, you need to have a video with a good frame rate. This will help display the explicit details of the video, which cannot be viewed under every frame rate quality.
03of 04Realistic Effects
Old videos never had the kick that made them feel real. Videos with higher frame rates have changed the dynamics in the current system. Realism and immersive video experience are prominent getaways achieved with better frame rates.
04of 04Realistic Effects
The use of better frame rates gives the option of improving the effects of the video. Videos that did not have impressive frame rates are not able to display the mood or atmosphere. Better frame rates help display the environment better, thus explaining the importance.
Changing Video Frame Rates And Speed Editor A wonderful video editor - Wondershare Filmora providing frame rate and speed ramping features for all creators.
Free Download Free Download Learn More

Part 2: What Are The Different Uses of Speed Ramping in Video Editing?
Speed ramping and video frame rate are one of the most known techniques which are widely used in video editing. You must be wondering why paying attention to speed ramping is so important. Nothing to worry about because this part will give you the most implementable uses of speed ramping in video editing. Have a look below to discover further information about this:
Highlighting Actions and Dramas
You can use speed ramping to emphasize the actional and dramatic sequences. It also helps you draw the audience’s attention and make the essential factors more notable. Above all, the speed ramping also integrates the useable effects which can add a drastic touch of drama to your videos,
Transitions and Motion Tracking
With the good use of speed ramping, you can achieve a smooth transition in videos. It also helps you add seamless transitions in the videos to add a sense of consistency. One of the best things is adding slow-motion and motion-tracking effects in simple videos.
Syncing Audios
Syncing the audio beats with videos is crucial to enhance the user experience. Speed ramping offers capabilities through which you can easily sync the audio to the length of videos. As it never compromises the content or layout of videos, you don’t have to worry about anything.
Emphasized Storytelling
If you need to induce a sense of storytelling and optimize the video quality, consider speed ramping. You can control the overall speed of actions and dramas and convey a particular narrative to add depth to videos. It also helps to increase the frame rate of video.
Part 3: Perform Basic Speed Adjustments and Speed Ramping on Wondershare Filmora
Wondershare Filmora is a great video editor providing exquisite features and details to users. It embeds simple video editing tools and AI functionalities to provide a quick editing experience. However, the focus on the details is not lacking in this tool. Filmora provides a comprehensive set of effects, transitions, and elements to induce in videos.
Free Download For Win 7 or later(64-bit)
Free Download For macOS 10.14 or later
Along with that, it also includes multiple functionalities which cannot be observed in many video editors. However, since we are putting our focus on discussing the speed adjustments in Filmora, let’s look at the comprehensive steps explained below:
Method 1: Uniform Speed Adjustments in Videos
Step 1Import Video on Filmora for Speed Adjustments
Firstly, launch Wondershare Filmora on your computer and continue to open a new project. Once a window enters the display, lead into the “Import” section for importing the media files that need adjustment.

Step 2Select the Speed Option
After adding the videos and dragging them to the timeline, continue to locate the “Speed “ option in the bar above the timeline. This opens a drop-down menu where you have to select “Uniform Speed” or use “Ctrl + R.”

Step 3Manage Speed Uniformly
A new section opens on the video editor where you can define the speed using the slider. Also, you can activate options like “Reverse Speed,” “Ripple Edit,” and “Maintain Pitch,” if needed.

Method 2: Utilize the Option of Speed Ramping
Step 1Access Speed Ramping Option
Once you have opened Filmora and imported a video on the timeline, lead to the “Speed” button again. Select the option of “Speed Ramping ” in the drop-down to continue.

Step 2Manage Speed Ramping of Video
As you find a new screen on your front, select the type of Speed Ramping you want to perform. Adjust the speed ramp on the line graph that comes in display and click “OK” to conclude.

Step 3Export the Final Video
Once you are done editing your videos, lead to the “Export” button to save the videos on the device.

Part 4: [Basic] How to Change The Frame Rate in Wondershare Filmora?
While you find out the ways to change the speed of your videos, you can also change their frame rate. Filmora offers dedicated options on its platform to its users, which can be understood in the steps below:
Free Download For Win 7 or later(64-bit)
Free Download For macOS 10.14 or later
Step 1Open Settings For Changing Frame Rate
As you open Filmora and import a video, drag it to the timeline. Once the video is imported, lead to the “Preview quality and display settings” button on the right side of the screen.

Step 2Manage Speed Ramping of Video
This opens a drop-down menu where you have to select the option “Change Project Aspect Ratio.”

Step 3Change Frame Rate Successfully
You will be led to a new screen where you can find the option of “Frame Rate” in the list. Change the frame rate according to the requirements and options available and click “OK.” The frame rate of your video will be changed using Filmora.

Conclusion
This article has displayed a conspicuous detail of what the frame rate in the video is and how it implicates video editing. Wondershare Filmora has been observed as the perfect way to manage the speeds of videos. Video frame rates can also be managed using the exquisite video editor. Those who wish to manage such features of the videos should consider using this tool.
Part 1: What is Frame Rate and How Important It Is In Videos?
One of the most important metrics in videos is the frame rate. This term refers to the individual frames present in the video. While the frame represents a single second, this defines the frequency of the video. This is the display of consecutive frames every second, which brings up the illusion of motion for the viewers. In this way, the entire frame rate is explained as terminology to users new to video editing.
Importance of Frame Rate in Videos
We will highlight some prominent points explaining the importance of video frame rates. Continuing with these points, this will help users understand how essential video frame rate is:
01of 04Defines Smoothness in Videos
Having a higher frame rate in a video is equivalent to a smooth video. Users who consider having smoothness in their videos always consider the frame rates. Higher frame rates have better transitions and seamless motion.
02of 04The detail in the Video
If you have a low frame rate in your video, you cannot observe the details in the fast-moving objects. In such a scenario, you need to have a video with a good frame rate. This will help display the explicit details of the video, which cannot be viewed under every frame rate quality.
03of 04Realistic Effects
Old videos never had the kick that made them feel real. Videos with higher frame rates have changed the dynamics in the current system. Realism and immersive video experience are prominent getaways achieved with better frame rates.
04of 04Realistic Effects
The use of better frame rates gives the option of improving the effects of the video. Videos that did not have impressive frame rates are not able to display the mood or atmosphere. Better frame rates help display the environment better, thus explaining the importance.
Changing Video Frame Rates And Speed Editor A wonderful video editor - Wondershare Filmora providing frame rate and speed ramping features for all creators.
Free Download Free Download Learn More

Part 2: What Are The Different Uses of Speed Ramping in Video Editing?
Speed ramping and video frame rate are one of the most known techniques which are widely used in video editing. You must be wondering why paying attention to speed ramping is so important. Nothing to worry about because this part will give you the most implementable uses of speed ramping in video editing. Have a look below to discover further information about this:
Highlighting Actions and Dramas
You can use speed ramping to emphasize the actional and dramatic sequences. It also helps you draw the audience’s attention and make the essential factors more notable. Above all, the speed ramping also integrates the useable effects which can add a drastic touch of drama to your videos,
Transitions and Motion Tracking
With the good use of speed ramping, you can achieve a smooth transition in videos. It also helps you add seamless transitions in the videos to add a sense of consistency. One of the best things is adding slow-motion and motion-tracking effects in simple videos.
Syncing Audios
Syncing the audio beats with videos is crucial to enhance the user experience. Speed ramping offers capabilities through which you can easily sync the audio to the length of videos. As it never compromises the content or layout of videos, you don’t have to worry about anything.
Emphasized Storytelling
If you need to induce a sense of storytelling and optimize the video quality, consider speed ramping. You can control the overall speed of actions and dramas and convey a particular narrative to add depth to videos. It also helps to increase the frame rate of video.
Part 3: Perform Basic Speed Adjustments and Speed Ramping on Wondershare Filmora
Wondershare Filmora is a great video editor providing exquisite features and details to users. It embeds simple video editing tools and AI functionalities to provide a quick editing experience. However, the focus on the details is not lacking in this tool. Filmora provides a comprehensive set of effects, transitions, and elements to induce in videos.
Free Download For Win 7 or later(64-bit)
Free Download For macOS 10.14 or later
Along with that, it also includes multiple functionalities which cannot be observed in many video editors. However, since we are putting our focus on discussing the speed adjustments in Filmora, let’s look at the comprehensive steps explained below:
Method 1: Uniform Speed Adjustments in Videos
Step 1Import Video on Filmora for Speed Adjustments
Firstly, launch Wondershare Filmora on your computer and continue to open a new project. Once a window enters the display, lead into the “Import” section for importing the media files that need adjustment.

Step 2Select the Speed Option
After adding the videos and dragging them to the timeline, continue to locate the “Speed “ option in the bar above the timeline. This opens a drop-down menu where you have to select “Uniform Speed” or use “Ctrl + R.”

Step 3Manage Speed Uniformly
A new section opens on the video editor where you can define the speed using the slider. Also, you can activate options like “Reverse Speed,” “Ripple Edit,” and “Maintain Pitch,” if needed.

Method 2: Utilize the Option of Speed Ramping
Step 1Access Speed Ramping Option
Once you have opened Filmora and imported a video on the timeline, lead to the “Speed” button again. Select the option of “Speed Ramping ” in the drop-down to continue.

Step 2Manage Speed Ramping of Video
As you find a new screen on your front, select the type of Speed Ramping you want to perform. Adjust the speed ramp on the line graph that comes in display and click “OK” to conclude.

Step 3Export the Final Video
Once you are done editing your videos, lead to the “Export” button to save the videos on the device.

Part 4: [Basic] How to Change The Frame Rate in Wondershare Filmora?
While you find out the ways to change the speed of your videos, you can also change their frame rate. Filmora offers dedicated options on its platform to its users, which can be understood in the steps below:
Free Download For Win 7 or later(64-bit)
Free Download For macOS 10.14 or later
Step 1Open Settings For Changing Frame Rate
As you open Filmora and import a video, drag it to the timeline. Once the video is imported, lead to the “Preview quality and display settings” button on the right side of the screen.

Step 2Manage Speed Ramping of Video
This opens a drop-down menu where you have to select the option “Change Project Aspect Ratio.”

Step 3Change Frame Rate Successfully
You will be led to a new screen where you can find the option of “Frame Rate” in the list. Change the frame rate according to the requirements and options available and click “OK.” The frame rate of your video will be changed using Filmora.

Conclusion
This article has displayed a conspicuous detail of what the frame rate in the video is and how it implicates video editing. Wondershare Filmora has been observed as the perfect way to manage the speeds of videos. Video frame rates can also be managed using the exquisite video editor. Those who wish to manage such features of the videos should consider using this tool.
Part 1: What is Frame Rate and How Important It Is In Videos?
One of the most important metrics in videos is the frame rate. This term refers to the individual frames present in the video. While the frame represents a single second, this defines the frequency of the video. This is the display of consecutive frames every second, which brings up the illusion of motion for the viewers. In this way, the entire frame rate is explained as terminology to users new to video editing.
Importance of Frame Rate in Videos
We will highlight some prominent points explaining the importance of video frame rates. Continuing with these points, this will help users understand how essential video frame rate is:
01of 04Defines Smoothness in Videos
Having a higher frame rate in a video is equivalent to a smooth video. Users who consider having smoothness in their videos always consider the frame rates. Higher frame rates have better transitions and seamless motion.
02of 04The detail in the Video
If you have a low frame rate in your video, you cannot observe the details in the fast-moving objects. In such a scenario, you need to have a video with a good frame rate. This will help display the explicit details of the video, which cannot be viewed under every frame rate quality.
03of 04Realistic Effects
Old videos never had the kick that made them feel real. Videos with higher frame rates have changed the dynamics in the current system. Realism and immersive video experience are prominent getaways achieved with better frame rates.
04of 04Realistic Effects
The use of better frame rates gives the option of improving the effects of the video. Videos that did not have impressive frame rates are not able to display the mood or atmosphere. Better frame rates help display the environment better, thus explaining the importance.
Changing Video Frame Rates And Speed Editor A wonderful video editor - Wondershare Filmora providing frame rate and speed ramping features for all creators.
Free Download Free Download Learn More

Part 2: What Are The Different Uses of Speed Ramping in Video Editing?
Speed ramping and video frame rate are one of the most known techniques which are widely used in video editing. You must be wondering why paying attention to speed ramping is so important. Nothing to worry about because this part will give you the most implementable uses of speed ramping in video editing. Have a look below to discover further information about this:
Highlighting Actions and Dramas
You can use speed ramping to emphasize the actional and dramatic sequences. It also helps you draw the audience’s attention and make the essential factors more notable. Above all, the speed ramping also integrates the useable effects which can add a drastic touch of drama to your videos,
Transitions and Motion Tracking
With the good use of speed ramping, you can achieve a smooth transition in videos. It also helps you add seamless transitions in the videos to add a sense of consistency. One of the best things is adding slow-motion and motion-tracking effects in simple videos.
Syncing Audios
Syncing the audio beats with videos is crucial to enhance the user experience. Speed ramping offers capabilities through which you can easily sync the audio to the length of videos. As it never compromises the content or layout of videos, you don’t have to worry about anything.
Emphasized Storytelling
If you need to induce a sense of storytelling and optimize the video quality, consider speed ramping. You can control the overall speed of actions and dramas and convey a particular narrative to add depth to videos. It also helps to increase the frame rate of video.
Part 3: Perform Basic Speed Adjustments and Speed Ramping on Wondershare Filmora
Wondershare Filmora is a great video editor providing exquisite features and details to users. It embeds simple video editing tools and AI functionalities to provide a quick editing experience. However, the focus on the details is not lacking in this tool. Filmora provides a comprehensive set of effects, transitions, and elements to induce in videos.
Free Download For Win 7 or later(64-bit)
Free Download For macOS 10.14 or later
Along with that, it also includes multiple functionalities which cannot be observed in many video editors. However, since we are putting our focus on discussing the speed adjustments in Filmora, let’s look at the comprehensive steps explained below:
Method 1: Uniform Speed Adjustments in Videos
Step 1Import Video on Filmora for Speed Adjustments
Firstly, launch Wondershare Filmora on your computer and continue to open a new project. Once a window enters the display, lead into the “Import” section for importing the media files that need adjustment.

Step 2Select the Speed Option
After adding the videos and dragging them to the timeline, continue to locate the “Speed “ option in the bar above the timeline. This opens a drop-down menu where you have to select “Uniform Speed” or use “Ctrl + R.”

Step 3Manage Speed Uniformly
A new section opens on the video editor where you can define the speed using the slider. Also, you can activate options like “Reverse Speed,” “Ripple Edit,” and “Maintain Pitch,” if needed.

Method 2: Utilize the Option of Speed Ramping
Step 1Access Speed Ramping Option
Once you have opened Filmora and imported a video on the timeline, lead to the “Speed” button again. Select the option of “Speed Ramping ” in the drop-down to continue.

Step 2Manage Speed Ramping of Video
As you find a new screen on your front, select the type of Speed Ramping you want to perform. Adjust the speed ramp on the line graph that comes in display and click “OK” to conclude.

Step 3Export the Final Video
Once you are done editing your videos, lead to the “Export” button to save the videos on the device.

Part 4: [Basic] How to Change The Frame Rate in Wondershare Filmora?
While you find out the ways to change the speed of your videos, you can also change their frame rate. Filmora offers dedicated options on its platform to its users, which can be understood in the steps below:
Free Download For Win 7 or later(64-bit)
Free Download For macOS 10.14 or later
Step 1Open Settings For Changing Frame Rate
As you open Filmora and import a video, drag it to the timeline. Once the video is imported, lead to the “Preview quality and display settings” button on the right side of the screen.

Step 2Manage Speed Ramping of Video
This opens a drop-down menu where you have to select the option “Change Project Aspect Ratio.”

Step 3Change Frame Rate Successfully
You will be led to a new screen where you can find the option of “Frame Rate” in the list. Change the frame rate according to the requirements and options available and click “OK.” The frame rate of your video will be changed using Filmora.

Conclusion
This article has displayed a conspicuous detail of what the frame rate in the video is and how it implicates video editing. Wondershare Filmora has been observed as the perfect way to manage the speeds of videos. Video frame rates can also be managed using the exquisite video editor. Those who wish to manage such features of the videos should consider using this tool.
IMovie Review – Is It The Best Video Editor for Mac Users
If you are a Mac user and you are getting started in video editing, it is better if you start with a free video editing software. There is no need to download any external free video editor when you are a Mac user. This is because Mac comes with a pre-installed free video editor called iMovie editor. iMovie is a video editing app from Apple where you will get all the standard and some advanced features.
iMovie is extremely popular among Mac users for video editing because it is completely free and easy to use. In fact, iMovie is also available for iPhone and iPad users. You can start your video editing on your iPhone and transfer the same work to Mac to continue editing on your Mac. But the most important question is if iMovie editor is the best video editor for Mac users. Read our iMovie review and find out a better alternative.
Part 1. Key Features of iMovie
Even iMovie is completely free to use, it competes with several premium video editors in terms of features. There are only a handful of free video editors available that lets you edit 4K videos, and iMovie is one of them. Similarly, there are only a few premium video editors available that support editing the same video project on different devices like iMovie. Here are all the key features of iMovie that you should know.
Templates and Themes – iMovie comes with different templates and themes for creating different types of videos including cinematic videos. There are classy and trending themes available to create trailers and short films. These themes and templates have limited customization options so that you can adjust as per your requirements.
Basic Editing – iMovie lets you combine video clips, split a large video file, trim video parts, crop and rotate video. Besides, you get to zoom videos as well as resize them as you need. You can add texts and titles as well as apply different transitions wherever you want to.
Advanced Editing – You can change speed and turn your video clips into slow-motion videos. You can correct the color as well as stabilize them. Besides, you can apply green screen effect and split screen effect. Moreover, you can reverse video as well as put overlays on videos. iMovie is also capable of recording video and audio if you want to record your screen or webcam video.
Audio Editing – iMovie lets you edit audio as well which is an essential requirement in video editing. You can increase and decrease volume, change speed and add beat markers to a video if required. Coming to audio effects, you can apply fade-in and fade-out effects. You can mute the audio in your recorded video and add a background music instead. Moreover, you can add voiceover and choose royalty-free audio clips.
Transitions and Effects – Even though there are limited visual effects, there are unique and eye-catchy. iMovie keeps on adding new and trending effects with every update so that the users have enough options to make their videos stand out. iMovie also provides different backgrounds that you can use on your video to enhance its quality. Apart from visual effects, there are several standard audio effects available.
User Interface – iMovie comes with a simple and intuitive user interface that lets everyone edit videos instantly without prior experience. This is exactly why some users never go for premium video editors. The user interface is clean, and all options are readily available. You can upload media files on Media Library, and they are automatically categorized from where you can access them instantly.
Part 2. How to Edit Videos with iMovie?
iMovie comes pre-installed on Mac, and hence, there is no need to download and install the application. Coming to how to use iMovie, there are three types of projects you can choose on iMovie. They are Media, Projects, and Theater. Media is where your footages reside, Projects represent the main workspace, and Theater is where your finished projects reside. Here are the steps regarding iMovie edit video.
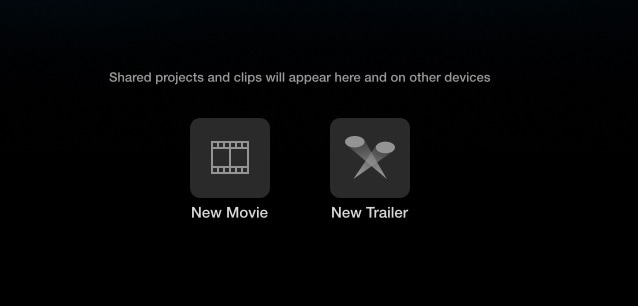
Step 1: Open iMovie and click on Projects. You will see two options Movie and Trailer. Click on Movie to edit your videos.
Step 2: Click on My Movie under Project Media and go to My Media. Import your video clips and audio files under My Media.
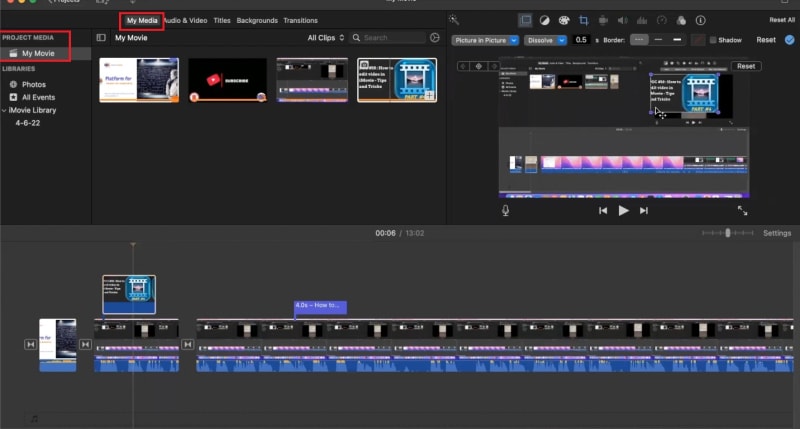
Step 3: Drag and drop the video clips and audio clips on the timeline in proper order. You can go for iMovie edit audio and video such as trimming as required.
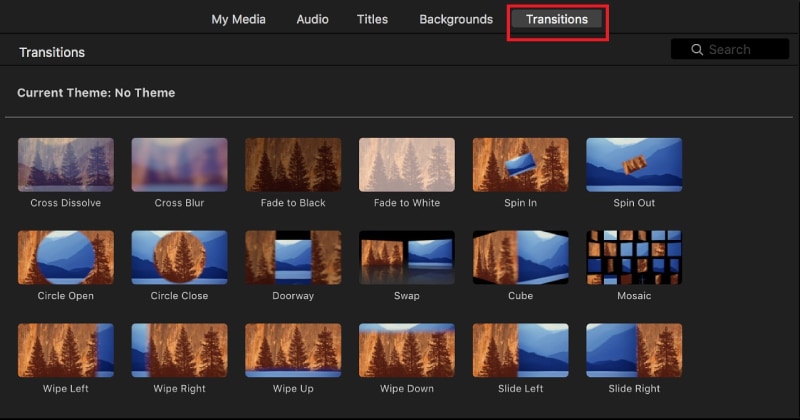
Step 4: Go to Transitions located at the top bar beside My Media and place the desired transitions in between the video clips.
Step 5: Similarly, go to Titles located at the top bar beside Transitions and place them on the timeline wherever appropriate.
Step 6: Finally, check your edited video on the canvas and then go to the top-right corner and click on Export. You will have to option to save it in Theater and share on social media as well as through email and iTunes.

Part 3. Alternative to Edit Videos - Filmora
In spite of iMovie being a good video editor, Mac users search for a better alternative. This is because there are limited transitions and effects available. You can have two video tracks only on the timeline and there is lack of customization. Besides, the advanced features of video editing such as motion tracking are not available. Moreover, there are limited file formats supported for importing and exporting.
Wondershare Filmora is the best alternative to iMovie for Mac users. Filmora is a premium video editor where all the shortcomings of iMovie are taken care of. Filmora supports almost all file formats for media files. There is a wide range of transitions, effects, elements as well as animations available. Besides, there are different styles of texts and titles available along with stock media library. Here are the steps to edit videos with iMovie.
For Win 7 or later (64-bit)
For macOS 10.12 or later
Step 1: Download and install Filmora on your Mac. Launch Filmora and click on New Project.
Step 2: Drag and drop your video clips and audio files Project Media folder. Drag and place the video clips on the timeline and arrange per perfectly. Place audio files on the timeline on a different track.

Step 3: If you want to apply transitions, go to Transitions at the top bar and drag any transition in between video clips on the timeline. You can also insert texts from Titles and objects from Elements from the top bar.

Step 4: Play the video to see the changes you have made, and click on Export button to save the video when you are satisfied.

Part 4. FAQs about iMovie
Is iMovie good for video editing?
Yes, iMovie is good for basic video editing. You can edit 4K videos, and iMovie is available on macOS and iOS. If you are a beginner, iMovie is perfect for you. If you want advanced editing features, we recommend Wondershare Filmora.
What’s better Premiere Pro or iMovie?
In terms of features and functionalities, Premiere Pro is far better than iMovie. However, Premiere Pro is more for advanced video editing while iMovie is more for beginners. iMovie is simpler to use than Premiere Pro, and hence, beginners will love it.
Can I make YouTube videos with iMovie?
Yes, you can make YouTube videos with iMovie as it has all the required tools and options. Import your video clips and audio files on the timeline, go for iMovie edit clip like trim and crop as required, add transitions, texts, and effects as applicable and publish your finished video on YouTube.
For macOS 10.12 or later
Step 1: Download and install Filmora on your Mac. Launch Filmora and click on New Project.
Step 2: Drag and drop your video clips and audio files Project Media folder. Drag and place the video clips on the timeline and arrange per perfectly. Place audio files on the timeline on a different track.

Step 3: If you want to apply transitions, go to Transitions at the top bar and drag any transition in between video clips on the timeline. You can also insert texts from Titles and objects from Elements from the top bar.

Step 4: Play the video to see the changes you have made, and click on Export button to save the video when you are satisfied.

Part 4. FAQs about iMovie
Is iMovie good for video editing?
Yes, iMovie is good for basic video editing. You can edit 4K videos, and iMovie is available on macOS and iOS. If you are a beginner, iMovie is perfect for you. If you want advanced editing features, we recommend Wondershare Filmora.
What’s better Premiere Pro or iMovie?
In terms of features and functionalities, Premiere Pro is far better than iMovie. However, Premiere Pro is more for advanced video editing while iMovie is more for beginners. iMovie is simpler to use than Premiere Pro, and hence, beginners will love it.
Can I make YouTube videos with iMovie?
Yes, you can make YouTube videos with iMovie as it has all the required tools and options. Import your video clips and audio files on the timeline, go for iMovie edit clip like trim and crop as required, add transitions, texts, and effects as applicable and publish your finished video on YouTube.
For macOS 10.12 or later
Step 1: Download and install Filmora on your Mac. Launch Filmora and click on New Project.
Step 2: Drag and drop your video clips and audio files Project Media folder. Drag and place the video clips on the timeline and arrange per perfectly. Place audio files on the timeline on a different track.

Step 3: If you want to apply transitions, go to Transitions at the top bar and drag any transition in between video clips on the timeline. You can also insert texts from Titles and objects from Elements from the top bar.

Step 4: Play the video to see the changes you have made, and click on Export button to save the video when you are satisfied.

Part 4. FAQs about iMovie
Is iMovie good for video editing?
Yes, iMovie is good for basic video editing. You can edit 4K videos, and iMovie is available on macOS and iOS. If you are a beginner, iMovie is perfect for you. If you want advanced editing features, we recommend Wondershare Filmora.
What’s better Premiere Pro or iMovie?
In terms of features and functionalities, Premiere Pro is far better than iMovie. However, Premiere Pro is more for advanced video editing while iMovie is more for beginners. iMovie is simpler to use than Premiere Pro, and hence, beginners will love it.
Can I make YouTube videos with iMovie?
Yes, you can make YouTube videos with iMovie as it has all the required tools and options. Import your video clips and audio files on the timeline, go for iMovie edit clip like trim and crop as required, add transitions, texts, and effects as applicable and publish your finished video on YouTube.
For macOS 10.12 or later
Step 1: Download and install Filmora on your Mac. Launch Filmora and click on New Project.
Step 2: Drag and drop your video clips and audio files Project Media folder. Drag and place the video clips on the timeline and arrange per perfectly. Place audio files on the timeline on a different track.

Step 3: If you want to apply transitions, go to Transitions at the top bar and drag any transition in between video clips on the timeline. You can also insert texts from Titles and objects from Elements from the top bar.

Step 4: Play the video to see the changes you have made, and click on Export button to save the video when you are satisfied.

Part 4. FAQs about iMovie
Is iMovie good for video editing?
Yes, iMovie is good for basic video editing. You can edit 4K videos, and iMovie is available on macOS and iOS. If you are a beginner, iMovie is perfect for you. If you want advanced editing features, we recommend Wondershare Filmora.
What’s better Premiere Pro or iMovie?
In terms of features and functionalities, Premiere Pro is far better than iMovie. However, Premiere Pro is more for advanced video editing while iMovie is more for beginners. iMovie is simpler to use than Premiere Pro, and hence, beginners will love it.
Can I make YouTube videos with iMovie?
Yes, you can make YouTube videos with iMovie as it has all the required tools and options. Import your video clips and audio files on the timeline, go for iMovie edit clip like trim and crop as required, add transitions, texts, and effects as applicable and publish your finished video on YouTube.
Steps to Rotate Videos in Lightworks
Lightworks is a professional non-linear video editing software application developed by EditShare. It supports Windows and Linux, and macOS.
Lightworks has a very simple and intuitive user interface. The basic workflow is: import your media files into the project, then edit them using the various tools available. When you’re finished, export your project as a video file.
Lightworks can be used for a variety of purposes, including creating videos for social media, corporate videos, documentaries, and more. It’s also been used to edit some major Hollywood films, such as The Wolf of Wall Street and The King’s Speech.
In this article, we will discuss how to rotate videos in the Lightworks application. Below is a way to rotate videos in Lightworks manually, here, we will use the Z-axis rotation.
Step-by-step on how to rotate videos in Lightworks
How to Manually Rotate a Video in Lightworks
To manually rotate a video in Lightworks, follow these steps:
Step 1: Import your video into the project.
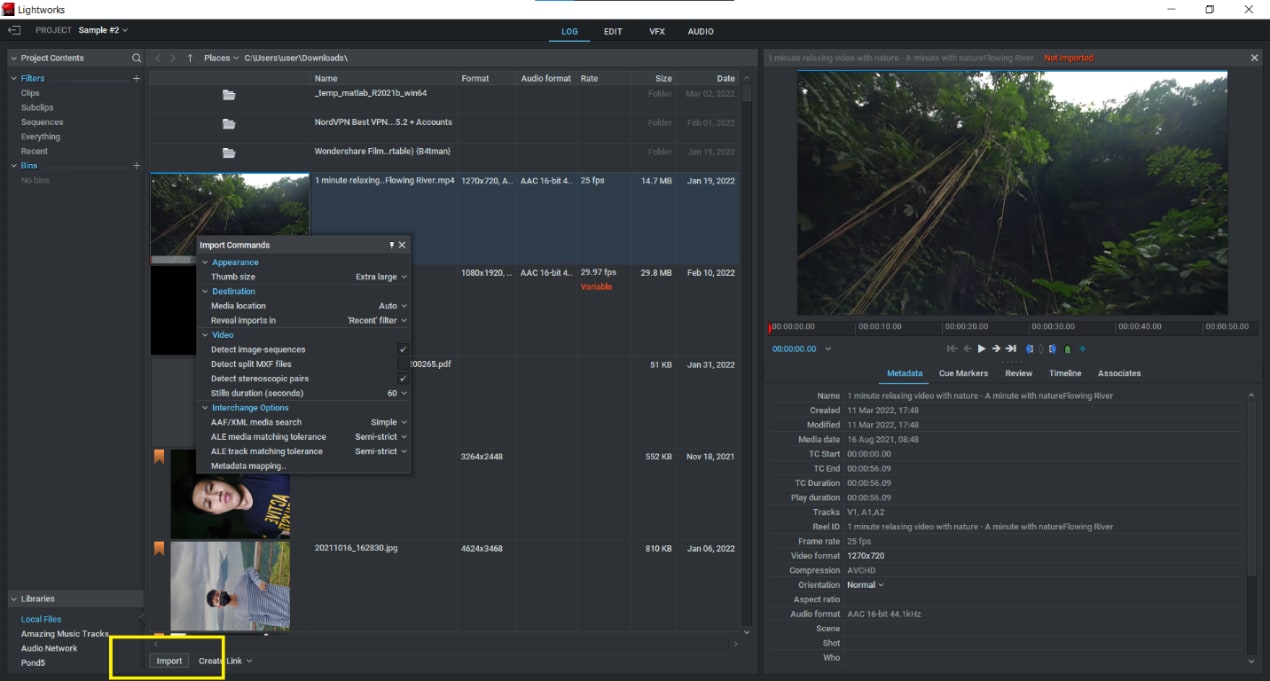
Step 2: Choose the portion of the video you want to rotate; if you want to rotate the entire movie, simply choose the entire video instead of a specific portion.

Step 3: Click on the “VFX” tab and go to the “3D DVE” section.
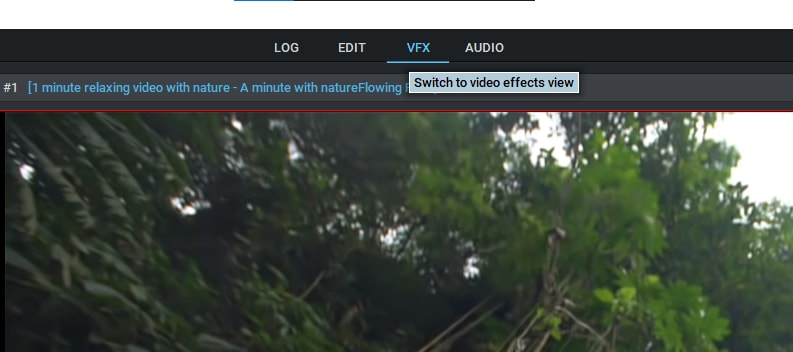
Step 4: Choose the Z axis and rotate the video to the desired degree. You can also modify the orientation of the video by entering a value in the box provided in front of the Z-axis.

Step 5: Click on the Enter in the keyboard button.
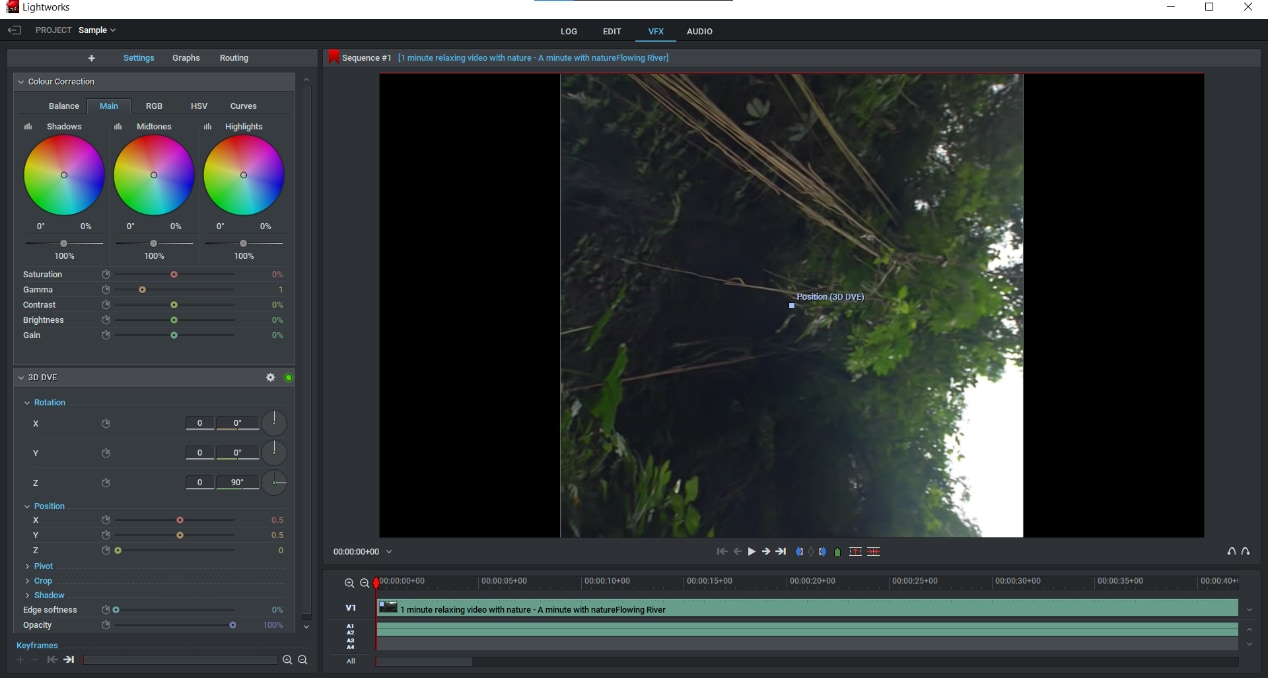
Your video will now be rotated by the selected number of degrees.
How to Rotate Videos in Filmora
On the other hand, Lightworks has an alternative video editing tool which is Filmora Video Editor . If you are looking for a lightweight video editor with an easy-to-use interface, then Filmora is the best option for you. It offers powerful features such as motion graphics, text editing, and audio editing, while still being very easy to use.
You can try it for free by downloading the trial version from the Filmora website. Filmora also offers a wide range of export options, so you can easily share your videos with others. You can export your video as an MP4 or MOV file, or upload it directly to YouTube or Facebook.
For Win 7 or later (64-bit)
For macOS 10.14 or later
Step-by-step on how to rotate videos in Filmora
How to Manually Rotate a Video in Filmora
To rotate videos in Filmora manually…
Step 1: Import your video into the project.
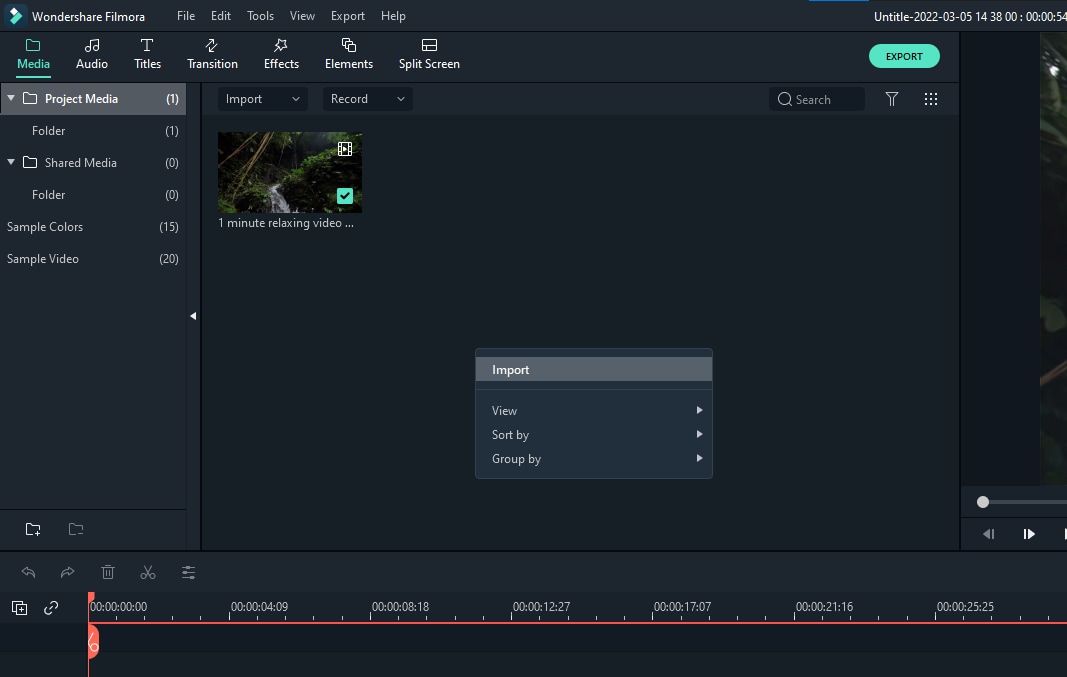
Step 2: Click the video clip you want to rotate.
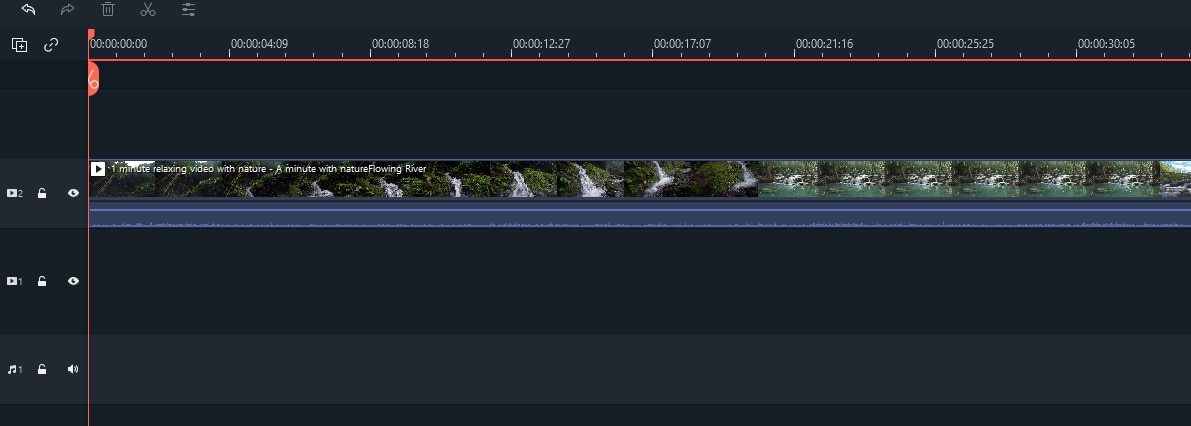
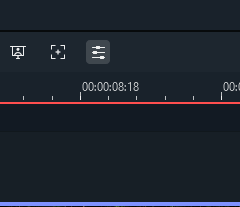
Step 3: Click on the “Edit” tool above the timeline and go to the “Transform” section. Then, select the “Rotate” option.
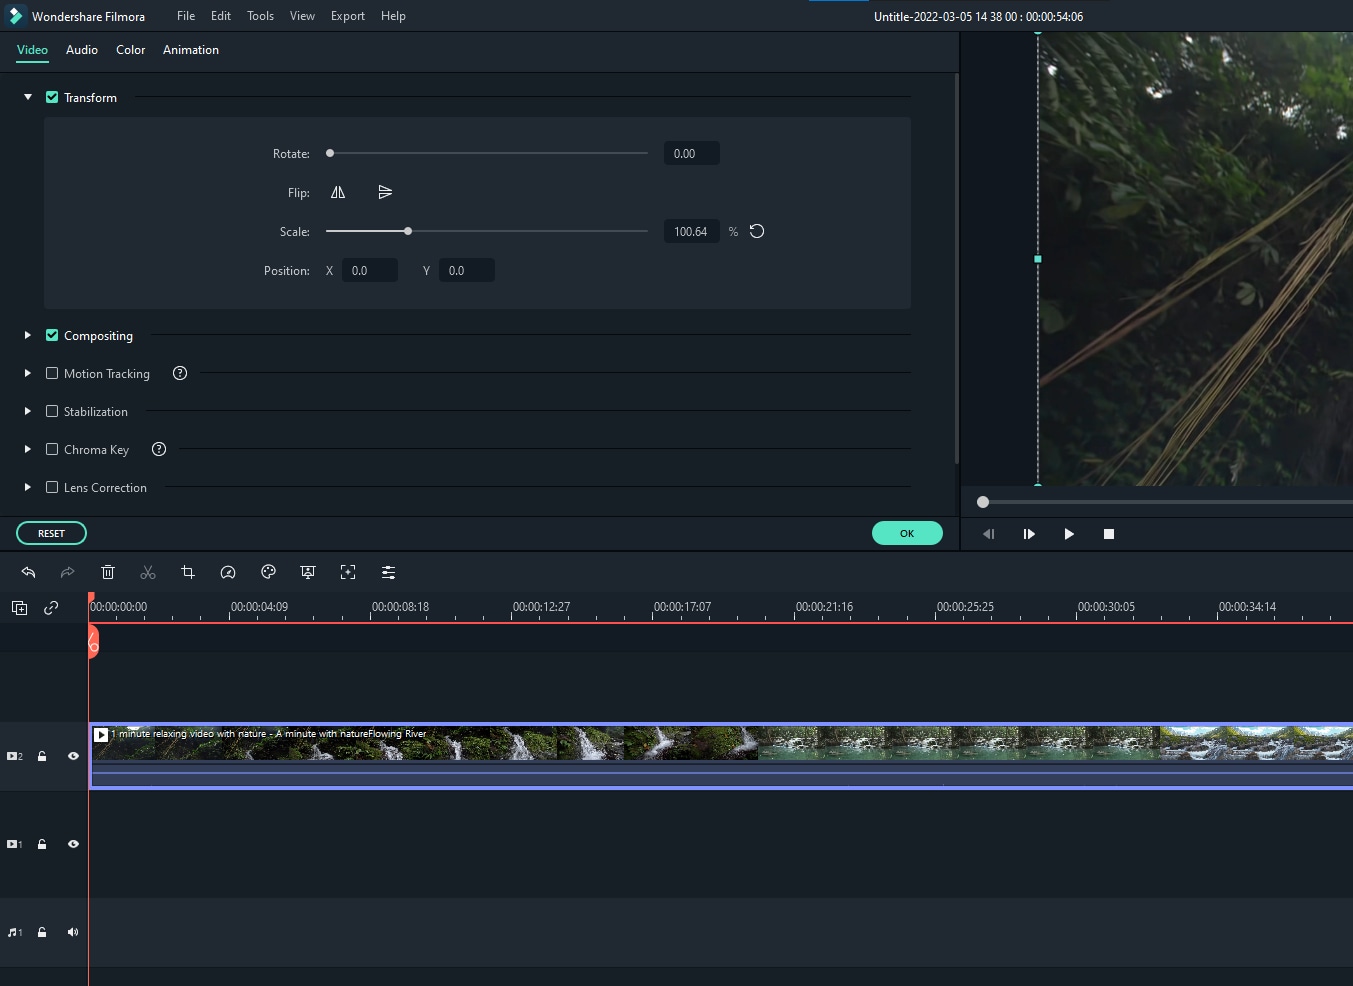
Step 4: Select the desired rotation option.

Step 5: Click on the “Ok” button.
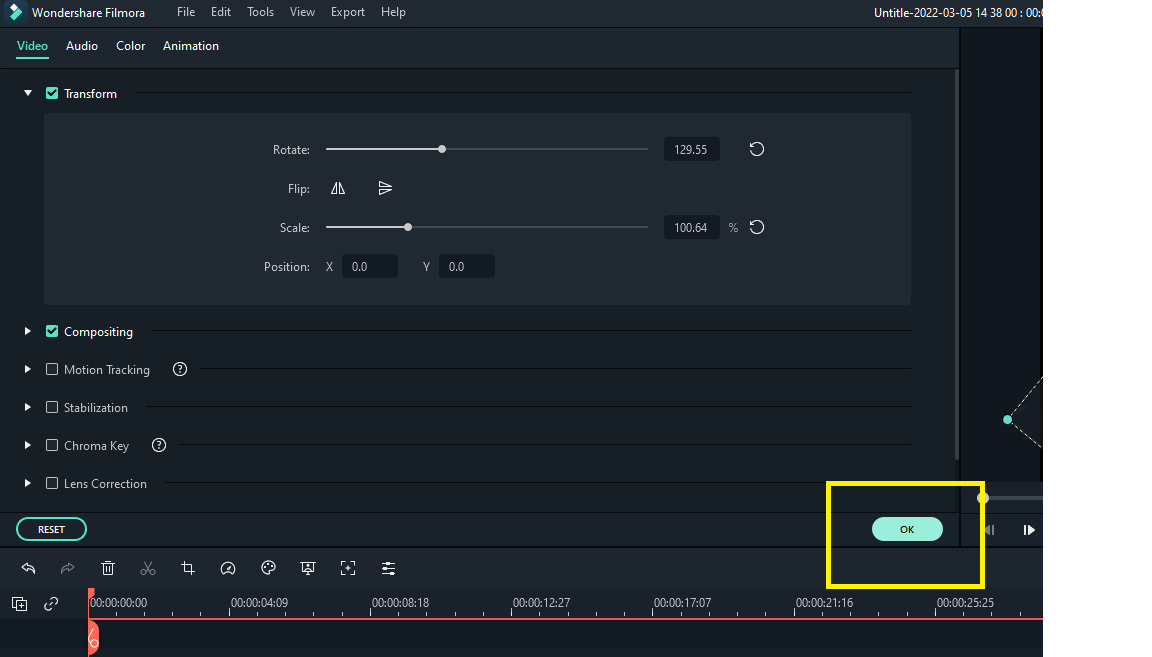
Your video will now be rotated by the selected number of degrees.
In conclusion, Lightworks is a powerful video editing application that offers a lot of features and options. If you’re looking for something with all the features you need, then it’s a great choice. However, if you’re on a tight budget, there are other applications available that may be more suitable for your needs.
Filmora is a lightweight video editor that is easy to use and offers powerful features such as motion graphics, text editing, and audio editing. You can try it for free by downloading the trial version from the Filmora website.
Step 2: Choose the portion of the video you want to rotate; if you want to rotate the entire movie, simply choose the entire video instead of a specific portion.

Step 3: Click on the “VFX” tab and go to the “3D DVE” section.

Step 4: Choose the Z axis and rotate the video to the desired degree. You can also modify the orientation of the video by entering a value in the box provided in front of the Z-axis.

Step 5: Click on the Enter in the keyboard button.

Your video will now be rotated by the selected number of degrees.
How to Rotate Videos in Filmora
On the other hand, Lightworks has an alternative video editing tool which is Filmora Video Editor . If you are looking for a lightweight video editor with an easy-to-use interface, then Filmora is the best option for you. It offers powerful features such as motion graphics, text editing, and audio editing, while still being very easy to use.
You can try it for free by downloading the trial version from the Filmora website. Filmora also offers a wide range of export options, so you can easily share your videos with others. You can export your video as an MP4 or MOV file, or upload it directly to YouTube or Facebook.
For Win 7 or later (64-bit)
For macOS 10.14 or later
Step-by-step on how to rotate videos in Filmora
How to Manually Rotate a Video in Filmora
To rotate videos in Filmora manually…
Step 1: Import your video into the project.

Step 2: Click the video clip you want to rotate.

Step 3: Click on the “Edit” tool above the timeline and go to the “Transform” section. Then, select the “Rotate” option.


Step 4: Select the desired rotation option.

Step 5: Click on the “Ok” button.

Your video will now be rotated by the selected number of degrees.
In conclusion, Lightworks is a powerful video editing application that offers a lot of features and options. If you’re looking for something with all the features you need, then it’s a great choice. However, if you’re on a tight budget, there are other applications available that may be more suitable for your needs.
Filmora is a lightweight video editor that is easy to use and offers powerful features such as motion graphics, text editing, and audio editing. You can try it for free by downloading the trial version from the Filmora website.
Step 2: Choose the portion of the video you want to rotate; if you want to rotate the entire movie, simply choose the entire video instead of a specific portion.

Step 3: Click on the “VFX” tab and go to the “3D DVE” section.

Step 4: Choose the Z axis and rotate the video to the desired degree. You can also modify the orientation of the video by entering a value in the box provided in front of the Z-axis.

Step 5: Click on the Enter in the keyboard button.

Your video will now be rotated by the selected number of degrees.
How to Rotate Videos in Filmora
On the other hand, Lightworks has an alternative video editing tool which is Filmora Video Editor . If you are looking for a lightweight video editor with an easy-to-use interface, then Filmora is the best option for you. It offers powerful features such as motion graphics, text editing, and audio editing, while still being very easy to use.
You can try it for free by downloading the trial version from the Filmora website. Filmora also offers a wide range of export options, so you can easily share your videos with others. You can export your video as an MP4 or MOV file, or upload it directly to YouTube or Facebook.
For Win 7 or later (64-bit)
For macOS 10.14 or later
Step-by-step on how to rotate videos in Filmora
How to Manually Rotate a Video in Filmora
To rotate videos in Filmora manually…
Step 1: Import your video into the project.

Step 2: Click the video clip you want to rotate.

Step 3: Click on the “Edit” tool above the timeline and go to the “Transform” section. Then, select the “Rotate” option.


Step 4: Select the desired rotation option.

Step 5: Click on the “Ok” button.

Your video will now be rotated by the selected number of degrees.
In conclusion, Lightworks is a powerful video editing application that offers a lot of features and options. If you’re looking for something with all the features you need, then it’s a great choice. However, if you’re on a tight budget, there are other applications available that may be more suitable for your needs.
Filmora is a lightweight video editor that is easy to use and offers powerful features such as motion graphics, text editing, and audio editing. You can try it for free by downloading the trial version from the Filmora website.
Step 2: Choose the portion of the video you want to rotate; if you want to rotate the entire movie, simply choose the entire video instead of a specific portion.

Step 3: Click on the “VFX” tab and go to the “3D DVE” section.

Step 4: Choose the Z axis and rotate the video to the desired degree. You can also modify the orientation of the video by entering a value in the box provided in front of the Z-axis.

Step 5: Click on the Enter in the keyboard button.

Your video will now be rotated by the selected number of degrees.
How to Rotate Videos in Filmora
On the other hand, Lightworks has an alternative video editing tool which is Filmora Video Editor . If you are looking for a lightweight video editor with an easy-to-use interface, then Filmora is the best option for you. It offers powerful features such as motion graphics, text editing, and audio editing, while still being very easy to use.
You can try it for free by downloading the trial version from the Filmora website. Filmora also offers a wide range of export options, so you can easily share your videos with others. You can export your video as an MP4 or MOV file, or upload it directly to YouTube or Facebook.
For Win 7 or later (64-bit)
For macOS 10.14 or later
Step-by-step on how to rotate videos in Filmora
How to Manually Rotate a Video in Filmora
To rotate videos in Filmora manually…
Step 1: Import your video into the project.

Step 2: Click the video clip you want to rotate.

Step 3: Click on the “Edit” tool above the timeline and go to the “Transform” section. Then, select the “Rotate” option.


Step 4: Select the desired rotation option.

Step 5: Click on the “Ok” button.

Your video will now be rotated by the selected number of degrees.
In conclusion, Lightworks is a powerful video editing application that offers a lot of features and options. If you’re looking for something with all the features you need, then it’s a great choice. However, if you’re on a tight budget, there are other applications available that may be more suitable for your needs.
Filmora is a lightweight video editor that is easy to use and offers powerful features such as motion graphics, text editing, and audio editing. You can try it for free by downloading the trial version from the Filmora website.
Some Facts About GIF Background You Didn’t Know
Some Facts About GIF Background You Didn’t Know
An easy yet powerful editor
Numerous effects to choose from
Detailed tutorials provided by the official channel
Once you start using GIFs in your everyday conversations, there’s no going back. GIFs make the conversation more immersive and enjoyable and add a sense of emotion that is not possible with ordinary text. You probably loved some gifs more than others, or there were moments when you wanted to turn them into gifs and wished you could use them as a gif background on your device or presentation but couldn’t figure out how to do it. But, now you don’t have to bury your wish any longer. During this article, you will learn everything there is to know about all the different ways you can use gifs as your background and many more. In addition, you will learn how to use them as your background and how to create them.
In this article
01 [How to Use a GIF as Your Desktop Background on Windows](#Part 1)
02 [How to Make GIF Background on Windows/Mac/Android/iPhone](#Part 2)
03 [How to Make GIF Powerpoint Background](#Part 3)
04 [How to Make GIF Without Background - Free & Efficiently?](#Part 4)
Part 1 How to Use a GIF as Your Desktop Background on Windows?
Although Windows doesn’t have native support to keep animated gif backgrounds, you can use third-party services to keep gifs as background images.
Using Plastuer or BioniX wallpaper changer as a 3rd party software is the best way to use animated gifs for your desktop.
As a starting point, we’ll cover plastuer, which uses WebGL and chromium-browser to make gifs as your background.
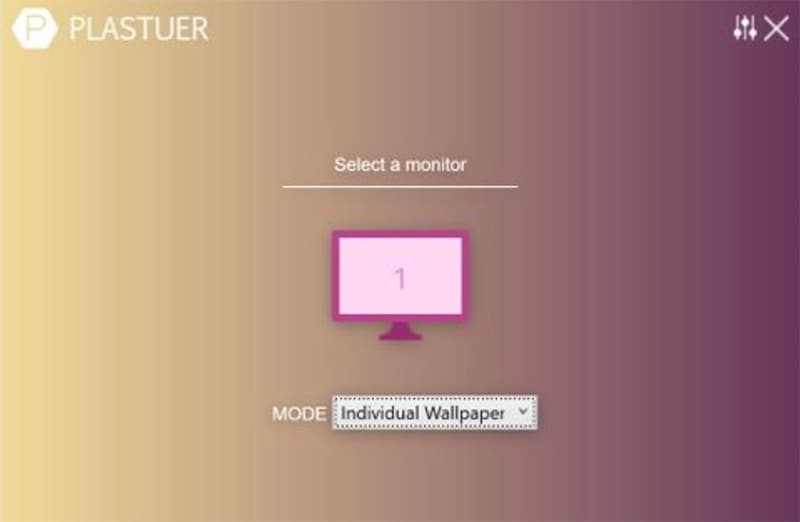
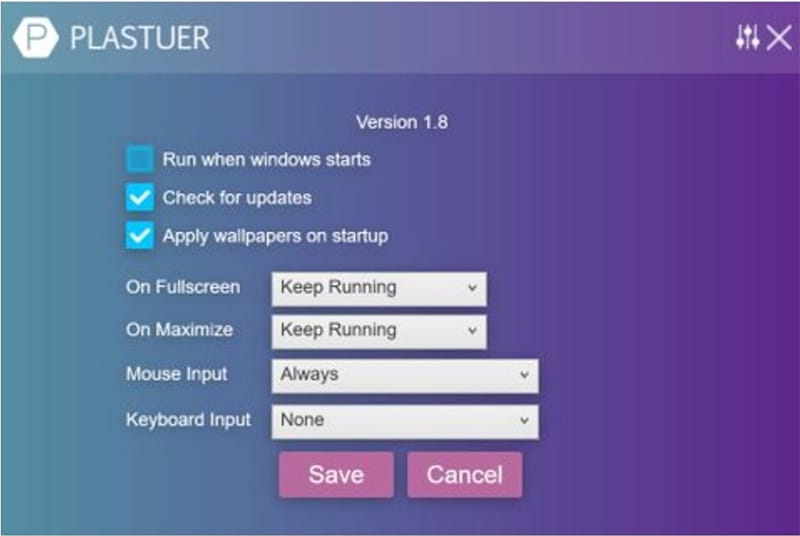
The software includes selecting different screens where you want the wallpaper to appear, making it possible to apply it to different screens at once.
To select the gif you want:
● You can paste the URL of the gif you want to use.
● You can also use the “create playlist” field to add multiple gifs as your background.
● You can select a file from your device using the “select file” option.
● Or you can choose from hundreds of gifs present in the plastuer library.
● You can disable the wallpaper whenever you wish by clicking on the “disable wallpaper” option.
How to use the bioniX wallpaper changer?
BioniX comes with several options that one may need to apply to their Windows device’s background, and animated gif backgrounds are one of them.
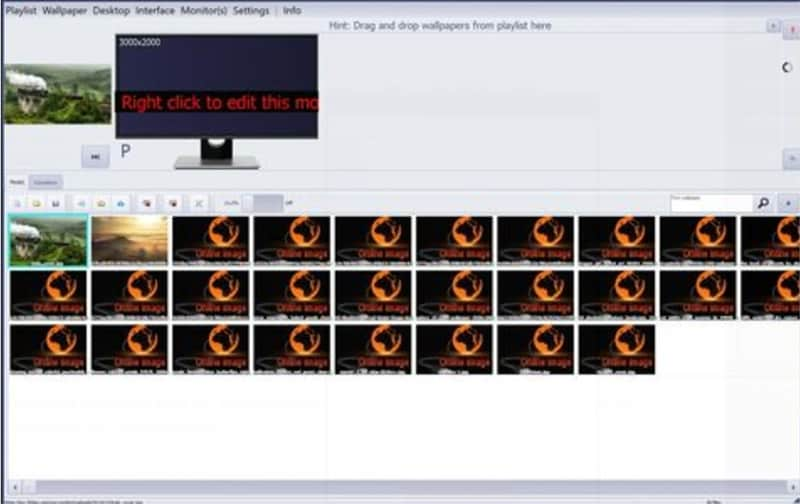
You will need to download the software and once it is installed, launch it on your PC to apply cool gif backgrounds. To choose files from the device itself, you will have to use the shortcut command “CTRL+F”, or you can also choose to insert the URL of the gif you want to use as your background.
Once your image gets uploaded into the software, double click on it to set it as your windows wallpaper. You can also choose a launch of gifs, create a playlist, and select the timer to change wallpaper regularly.
Part 2 How to Make GIF Background on Windows/Mac/Android/iPhone?
So, how can you create moving background gifs on your different devices like Windows/Mac/Android/iPhone?
In case you thought that was hard, you were entirely mistaken. Now, you can easily create or customize cool background gifs for your computer, tablet, phone, or other devices that you own. The best part is that you don’t need any technical skills to use different tools.
You can create gifs with the help of many tools such as Giphy and share them with your family, friends, and coworkers.
01Giphy
Giphy is a one-stop destination for all of your gifs needs. You can create or choose from thousands of gifs present in their library. Furthermore, one can make personalized gifs with all the tools they provide and add custom stickers, texts or different filters. There is also a live wallpaper section present in giphy, from where you can download hundreds of cool gif backgrounds and make your old machine look fabulous again.

02Pinterest
It’s no secret that Pinterest has a lot of great images, but did you know you can also find gif backgrounds here in various genres that you like and then download them?
It’s straightforward to use, and you can also find anime gif backgrounds on Pinterest if you are an anime fan.

03Tenor
This site offers online gif backgrounds. One may choose from a wide selection of wallpapers and backgrounds available on this site. Online Library is filled up with all sorts of aesthetic gif backgrounds and other types of background that people like.
A few more tools fit the need, but most of them are not reliable, and the tools mentioned above are currently the best ones available for you to use.

Part 3 How to Make a GIF Powerpoint Background?
If you make PowerPoint presentations, you can use various tools to modify your presentation. But did you know that you can also include an aesthetic gif background as part of your presentation?
The steps to creating a gif PowerPoint background are very simple, and below you will find all the steps you need to follow:
● You’ll need to choose the PPTx file that you want to use the GIF background on to get started. Then you can choose the specific slide.
● Navigate to the “design” tab, then to the “background” section. You will see a “background styles” option where you will have to select “format background” to complete the process.
● Select “fill” in the left-hand side panel of the appeared window. Now, select “picture or texture fill” and choose the “file” button, which will lead to another window.
● In the “look in” menu, find the folder or file where the required gif is present. Go on to select the “ok” option. You can either select “close” to apply the gif to a particular slide or “apply to all” to use the gif background in the whole presentation.
Part 4 How to Make GIF Without Background - Free & Efficiently?
One may also look for transparent gif maker websites that will help them make gifs without background and use them on different devices they own.
Here are a few websites that are best for this job; they won’t only help you make transparent gifs but also edit various features like delay time, animation speed etc.
01Using EzGif
Using EzGif is probably one of the best options available in the market at the moment. You can go to their website and create a transparent gif background of high resolution.
Doing that is easy; you need to upload PNG type images that don’t have a background or combine transparent background to form a gif. You can choose up to 2000 images with a maximum file size of 100 MB for all images combined.
To create a gif, go on their site, then to the “gif maker” section to upload the images, and click on “make a gif” to make a transparent gif from the selected images. Once the gif is created, you can use it as a moving gif background and share it with friends or family.
02Use animizer.net to create a gif without background
It is effortless to use software to create transparent gifs by uploading multiple transparent PNG images and combining them to form a gif.
You can use unlimited images for your gif and animated gif background. It also lets you adjust various settings for your transparent gifs like loops, animation speed and much more.
03Use filmora for making gifs without background easily
Wondershare Filmora Video Editor is an all in one tool that will help you create all sorts of gifs, including transparent gifs. You can take advantage of their easy to use tools that are fir for people who have no technical skills at all.
You can easily upload the images and remove their background in the software itself and later use it in the gif you are willing to create.

Wondershare Filmora - Best Video Editor for Mac/Windows
5,481,435 people have downloaded it.
Build unique custom animations without breaking a sweat.
Focus on creating epic stories and leave the details to Filmora’s auto features.
Start a creative adventure with drag & drop effects and endless possibilities.
Filmora simplifies advanced features to save you time and effort.
Filmora cuts out repetition so you can move on to your next creative breakthrough.
This is probably one of the best options if you are looking for an all in one tool for all your needs.
● Ending Thoughts →
● The techniques that we have talked about in this guide may help you discover things about gif backgrounds you have not known before.
● They are incredible and can help you utilize gifs in ways you hadn’t even considered.
● Create a moving gif background and apply it to any device easily.
● Of course, a simple background won’t provide the same type of effect as a moving gif. With this guide, you’ll learn about every tool that you may use and how to apply or create a cool gif background on your own.
Once you start using GIFs in your everyday conversations, there’s no going back. GIFs make the conversation more immersive and enjoyable and add a sense of emotion that is not possible with ordinary text. You probably loved some gifs more than others, or there were moments when you wanted to turn them into gifs and wished you could use them as a gif background on your device or presentation but couldn’t figure out how to do it. But, now you don’t have to bury your wish any longer. During this article, you will learn everything there is to know about all the different ways you can use gifs as your background and many more. In addition, you will learn how to use them as your background and how to create them.
In this article
01 [How to Use a GIF as Your Desktop Background on Windows](#Part 1)
02 [How to Make GIF Background on Windows/Mac/Android/iPhone](#Part 2)
03 [How to Make GIF Powerpoint Background](#Part 3)
04 [How to Make GIF Without Background - Free & Efficiently?](#Part 4)
Part 1 How to Use a GIF as Your Desktop Background on Windows?
Although Windows doesn’t have native support to keep animated gif backgrounds, you can use third-party services to keep gifs as background images.
Using Plastuer or BioniX wallpaper changer as a 3rd party software is the best way to use animated gifs for your desktop.
As a starting point, we’ll cover plastuer, which uses WebGL and chromium-browser to make gifs as your background.

The software includes selecting different screens where you want the wallpaper to appear, making it possible to apply it to different screens at once.
To select the gif you want:
● You can paste the URL of the gif you want to use.
● You can also use the “create playlist” field to add multiple gifs as your background.
● You can select a file from your device using the “select file” option.
● Or you can choose from hundreds of gifs present in the plastuer library.
● You can disable the wallpaper whenever you wish by clicking on the “disable wallpaper” option.

How to use the bioniX wallpaper changer?
BioniX comes with several options that one may need to apply to their Windows device’s background, and animated gif backgrounds are one of them.

You will need to download the software and once it is installed, launch it on your PC to apply cool gif backgrounds. To choose files from the device itself, you will have to use the shortcut command “CTRL+F”, or you can also choose to insert the URL of the gif you want to use as your background.
Once your image gets uploaded into the software, double click on it to set it as your windows wallpaper. You can also choose a launch of gifs, create a playlist, and select the timer to change wallpaper regularly.
Part 2 How to Make GIF Background on Windows/Mac/Android/iPhone?
So, how can you create moving background gifs on your different devices like Windows/Mac/Android/iPhone?
In case you thought that was hard, you were entirely mistaken. Now, you can easily create or customize cool background gifs for your computer, tablet, phone, or other devices that you own. The best part is that you don’t need any technical skills to use different tools.
You can create gifs with the help of many tools such as Giphy and share them with your family, friends, and coworkers.
01Giphy
Giphy is a one-stop destination for all of your gifs needs. You can create or choose from thousands of gifs present in their library. Furthermore, one can make personalized gifs with all the tools they provide and add custom stickers, texts or different filters. There is also a live wallpaper section present in giphy, from where you can download hundreds of cool gif backgrounds and make your old machine look fabulous again.

02Pinterest
It’s no secret that Pinterest has a lot of great images, but did you know you can also find gif backgrounds here in various genres that you like and then download them?
It’s straightforward to use, and you can also find anime gif backgrounds on Pinterest if you are an anime fan.

03Tenor
This site offers online gif backgrounds. One may choose from a wide selection of wallpapers and backgrounds available on this site. Online Library is filled up with all sorts of aesthetic gif backgrounds and other types of background that people like.
A few more tools fit the need, but most of them are not reliable, and the tools mentioned above are currently the best ones available for you to use.

Part 3 How to Make a GIF Powerpoint Background?
If you make PowerPoint presentations, you can use various tools to modify your presentation. But did you know that you can also include an aesthetic gif background as part of your presentation?
The steps to creating a gif PowerPoint background are very simple, and below you will find all the steps you need to follow:
● You’ll need to choose the PPTx file that you want to use the GIF background on to get started. Then you can choose the specific slide.
● Navigate to the “design” tab, then to the “background” section. You will see a “background styles” option where you will have to select “format background” to complete the process.
● Select “fill” in the left-hand side panel of the appeared window. Now, select “picture or texture fill” and choose the “file” button, which will lead to another window.
● In the “look in” menu, find the folder or file where the required gif is present. Go on to select the “ok” option. You can either select “close” to apply the gif to a particular slide or “apply to all” to use the gif background in the whole presentation.
Part 4 How to Make GIF Without Background - Free & Efficiently?
One may also look for transparent gif maker websites that will help them make gifs without background and use them on different devices they own.
Here are a few websites that are best for this job; they won’t only help you make transparent gifs but also edit various features like delay time, animation speed etc.
01Using EzGif
Using EzGif is probably one of the best options available in the market at the moment. You can go to their website and create a transparent gif background of high resolution.
Doing that is easy; you need to upload PNG type images that don’t have a background or combine transparent background to form a gif. You can choose up to 2000 images with a maximum file size of 100 MB for all images combined.
To create a gif, go on their site, then to the “gif maker” section to upload the images, and click on “make a gif” to make a transparent gif from the selected images. Once the gif is created, you can use it as a moving gif background and share it with friends or family.
02Use animizer.net to create a gif without background
It is effortless to use software to create transparent gifs by uploading multiple transparent PNG images and combining them to form a gif.
You can use unlimited images for your gif and animated gif background. It also lets you adjust various settings for your transparent gifs like loops, animation speed and much more.
03Use filmora for making gifs without background easily
Wondershare Filmora Video Editor is an all in one tool that will help you create all sorts of gifs, including transparent gifs. You can take advantage of their easy to use tools that are fir for people who have no technical skills at all.
You can easily upload the images and remove their background in the software itself and later use it in the gif you are willing to create.

Wondershare Filmora - Best Video Editor for Mac/Windows
5,481,435 people have downloaded it.
Build unique custom animations without breaking a sweat.
Focus on creating epic stories and leave the details to Filmora’s auto features.
Start a creative adventure with drag & drop effects and endless possibilities.
Filmora simplifies advanced features to save you time and effort.
Filmora cuts out repetition so you can move on to your next creative breakthrough.
This is probably one of the best options if you are looking for an all in one tool for all your needs.
● Ending Thoughts →
● The techniques that we have talked about in this guide may help you discover things about gif backgrounds you have not known before.
● They are incredible and can help you utilize gifs in ways you hadn’t even considered.
● Create a moving gif background and apply it to any device easily.
● Of course, a simple background won’t provide the same type of effect as a moving gif. With this guide, you’ll learn about every tool that you may use and how to apply or create a cool gif background on your own.
Once you start using GIFs in your everyday conversations, there’s no going back. GIFs make the conversation more immersive and enjoyable and add a sense of emotion that is not possible with ordinary text. You probably loved some gifs more than others, or there were moments when you wanted to turn them into gifs and wished you could use them as a gif background on your device or presentation but couldn’t figure out how to do it. But, now you don’t have to bury your wish any longer. During this article, you will learn everything there is to know about all the different ways you can use gifs as your background and many more. In addition, you will learn how to use them as your background and how to create them.
In this article
01 [How to Use a GIF as Your Desktop Background on Windows](#Part 1)
02 [How to Make GIF Background on Windows/Mac/Android/iPhone](#Part 2)
03 [How to Make GIF Powerpoint Background](#Part 3)
04 [How to Make GIF Without Background - Free & Efficiently?](#Part 4)
Part 1 How to Use a GIF as Your Desktop Background on Windows?
Although Windows doesn’t have native support to keep animated gif backgrounds, you can use third-party services to keep gifs as background images.
Using Plastuer or BioniX wallpaper changer as a 3rd party software is the best way to use animated gifs for your desktop.
As a starting point, we’ll cover plastuer, which uses WebGL and chromium-browser to make gifs as your background.

The software includes selecting different screens where you want the wallpaper to appear, making it possible to apply it to different screens at once.
To select the gif you want:
● You can paste the URL of the gif you want to use.
● You can also use the “create playlist” field to add multiple gifs as your background.
● You can select a file from your device using the “select file” option.
● Or you can choose from hundreds of gifs present in the plastuer library.
● You can disable the wallpaper whenever you wish by clicking on the “disable wallpaper” option.

How to use the bioniX wallpaper changer?
BioniX comes with several options that one may need to apply to their Windows device’s background, and animated gif backgrounds are one of them.

You will need to download the software and once it is installed, launch it on your PC to apply cool gif backgrounds. To choose files from the device itself, you will have to use the shortcut command “CTRL+F”, or you can also choose to insert the URL of the gif you want to use as your background.
Once your image gets uploaded into the software, double click on it to set it as your windows wallpaper. You can also choose a launch of gifs, create a playlist, and select the timer to change wallpaper regularly.
Part 2 How to Make GIF Background on Windows/Mac/Android/iPhone?
So, how can you create moving background gifs on your different devices like Windows/Mac/Android/iPhone?
In case you thought that was hard, you were entirely mistaken. Now, you can easily create or customize cool background gifs for your computer, tablet, phone, or other devices that you own. The best part is that you don’t need any technical skills to use different tools.
You can create gifs with the help of many tools such as Giphy and share them with your family, friends, and coworkers.
01Giphy
Giphy is a one-stop destination for all of your gifs needs. You can create or choose from thousands of gifs present in their library. Furthermore, one can make personalized gifs with all the tools they provide and add custom stickers, texts or different filters. There is also a live wallpaper section present in giphy, from where you can download hundreds of cool gif backgrounds and make your old machine look fabulous again.

02Pinterest
It’s no secret that Pinterest has a lot of great images, but did you know you can also find gif backgrounds here in various genres that you like and then download them?
It’s straightforward to use, and you can also find anime gif backgrounds on Pinterest if you are an anime fan.

03Tenor
This site offers online gif backgrounds. One may choose from a wide selection of wallpapers and backgrounds available on this site. Online Library is filled up with all sorts of aesthetic gif backgrounds and other types of background that people like.
A few more tools fit the need, but most of them are not reliable, and the tools mentioned above are currently the best ones available for you to use.

Part 3 How to Make a GIF Powerpoint Background?
If you make PowerPoint presentations, you can use various tools to modify your presentation. But did you know that you can also include an aesthetic gif background as part of your presentation?
The steps to creating a gif PowerPoint background are very simple, and below you will find all the steps you need to follow:
● You’ll need to choose the PPTx file that you want to use the GIF background on to get started. Then you can choose the specific slide.
● Navigate to the “design” tab, then to the “background” section. You will see a “background styles” option where you will have to select “format background” to complete the process.
● Select “fill” in the left-hand side panel of the appeared window. Now, select “picture or texture fill” and choose the “file” button, which will lead to another window.
● In the “look in” menu, find the folder or file where the required gif is present. Go on to select the “ok” option. You can either select “close” to apply the gif to a particular slide or “apply to all” to use the gif background in the whole presentation.
Part 4 How to Make GIF Without Background - Free & Efficiently?
One may also look for transparent gif maker websites that will help them make gifs without background and use them on different devices they own.
Here are a few websites that are best for this job; they won’t only help you make transparent gifs but also edit various features like delay time, animation speed etc.
01Using EzGif
Using EzGif is probably one of the best options available in the market at the moment. You can go to their website and create a transparent gif background of high resolution.
Doing that is easy; you need to upload PNG type images that don’t have a background or combine transparent background to form a gif. You can choose up to 2000 images with a maximum file size of 100 MB for all images combined.
To create a gif, go on their site, then to the “gif maker” section to upload the images, and click on “make a gif” to make a transparent gif from the selected images. Once the gif is created, you can use it as a moving gif background and share it with friends or family.
02Use animizer.net to create a gif without background
It is effortless to use software to create transparent gifs by uploading multiple transparent PNG images and combining them to form a gif.
You can use unlimited images for your gif and animated gif background. It also lets you adjust various settings for your transparent gifs like loops, animation speed and much more.
03Use filmora for making gifs without background easily
Wondershare Filmora Video Editor is an all in one tool that will help you create all sorts of gifs, including transparent gifs. You can take advantage of their easy to use tools that are fir for people who have no technical skills at all.
You can easily upload the images and remove their background in the software itself and later use it in the gif you are willing to create.

Wondershare Filmora - Best Video Editor for Mac/Windows
5,481,435 people have downloaded it.
Build unique custom animations without breaking a sweat.
Focus on creating epic stories and leave the details to Filmora’s auto features.
Start a creative adventure with drag & drop effects and endless possibilities.
Filmora simplifies advanced features to save you time and effort.
Filmora cuts out repetition so you can move on to your next creative breakthrough.
This is probably one of the best options if you are looking for an all in one tool for all your needs.
● Ending Thoughts →
● The techniques that we have talked about in this guide may help you discover things about gif backgrounds you have not known before.
● They are incredible and can help you utilize gifs in ways you hadn’t even considered.
● Create a moving gif background and apply it to any device easily.
● Of course, a simple background won’t provide the same type of effect as a moving gif. With this guide, you’ll learn about every tool that you may use and how to apply or create a cool gif background on your own.
Once you start using GIFs in your everyday conversations, there’s no going back. GIFs make the conversation more immersive and enjoyable and add a sense of emotion that is not possible with ordinary text. You probably loved some gifs more than others, or there were moments when you wanted to turn them into gifs and wished you could use them as a gif background on your device or presentation but couldn’t figure out how to do it. But, now you don’t have to bury your wish any longer. During this article, you will learn everything there is to know about all the different ways you can use gifs as your background and many more. In addition, you will learn how to use them as your background and how to create them.
In this article
01 [How to Use a GIF as Your Desktop Background on Windows](#Part 1)
02 [How to Make GIF Background on Windows/Mac/Android/iPhone](#Part 2)
03 [How to Make GIF Powerpoint Background](#Part 3)
04 [How to Make GIF Without Background - Free & Efficiently?](#Part 4)
Part 1 How to Use a GIF as Your Desktop Background on Windows?
Although Windows doesn’t have native support to keep animated gif backgrounds, you can use third-party services to keep gifs as background images.
Using Plastuer or BioniX wallpaper changer as a 3rd party software is the best way to use animated gifs for your desktop.
As a starting point, we’ll cover plastuer, which uses WebGL and chromium-browser to make gifs as your background.

The software includes selecting different screens where you want the wallpaper to appear, making it possible to apply it to different screens at once.
To select the gif you want:
● You can paste the URL of the gif you want to use.
● You can also use the “create playlist” field to add multiple gifs as your background.
● You can select a file from your device using the “select file” option.
● Or you can choose from hundreds of gifs present in the plastuer library.
● You can disable the wallpaper whenever you wish by clicking on the “disable wallpaper” option.

How to use the bioniX wallpaper changer?
BioniX comes with several options that one may need to apply to their Windows device’s background, and animated gif backgrounds are one of them.

You will need to download the software and once it is installed, launch it on your PC to apply cool gif backgrounds. To choose files from the device itself, you will have to use the shortcut command “CTRL+F”, or you can also choose to insert the URL of the gif you want to use as your background.
Once your image gets uploaded into the software, double click on it to set it as your windows wallpaper. You can also choose a launch of gifs, create a playlist, and select the timer to change wallpaper regularly.
Part 2 How to Make GIF Background on Windows/Mac/Android/iPhone?
So, how can you create moving background gifs on your different devices like Windows/Mac/Android/iPhone?
In case you thought that was hard, you were entirely mistaken. Now, you can easily create or customize cool background gifs for your computer, tablet, phone, or other devices that you own. The best part is that you don’t need any technical skills to use different tools.
You can create gifs with the help of many tools such as Giphy and share them with your family, friends, and coworkers.
01Giphy
Giphy is a one-stop destination for all of your gifs needs. You can create or choose from thousands of gifs present in their library. Furthermore, one can make personalized gifs with all the tools they provide and add custom stickers, texts or different filters. There is also a live wallpaper section present in giphy, from where you can download hundreds of cool gif backgrounds and make your old machine look fabulous again.

02Pinterest
It’s no secret that Pinterest has a lot of great images, but did you know you can also find gif backgrounds here in various genres that you like and then download them?
It’s straightforward to use, and you can also find anime gif backgrounds on Pinterest if you are an anime fan.

03Tenor
This site offers online gif backgrounds. One may choose from a wide selection of wallpapers and backgrounds available on this site. Online Library is filled up with all sorts of aesthetic gif backgrounds and other types of background that people like.
A few more tools fit the need, but most of them are not reliable, and the tools mentioned above are currently the best ones available for you to use.

Part 3 How to Make a GIF Powerpoint Background?
If you make PowerPoint presentations, you can use various tools to modify your presentation. But did you know that you can also include an aesthetic gif background as part of your presentation?
The steps to creating a gif PowerPoint background are very simple, and below you will find all the steps you need to follow:
● You’ll need to choose the PPTx file that you want to use the GIF background on to get started. Then you can choose the specific slide.
● Navigate to the “design” tab, then to the “background” section. You will see a “background styles” option where you will have to select “format background” to complete the process.
● Select “fill” in the left-hand side panel of the appeared window. Now, select “picture or texture fill” and choose the “file” button, which will lead to another window.
● In the “look in” menu, find the folder or file where the required gif is present. Go on to select the “ok” option. You can either select “close” to apply the gif to a particular slide or “apply to all” to use the gif background in the whole presentation.
Part 4 How to Make GIF Without Background - Free & Efficiently?
One may also look for transparent gif maker websites that will help them make gifs without background and use them on different devices they own.
Here are a few websites that are best for this job; they won’t only help you make transparent gifs but also edit various features like delay time, animation speed etc.
01Using EzGif
Using EzGif is probably one of the best options available in the market at the moment. You can go to their website and create a transparent gif background of high resolution.
Doing that is easy; you need to upload PNG type images that don’t have a background or combine transparent background to form a gif. You can choose up to 2000 images with a maximum file size of 100 MB for all images combined.
To create a gif, go on their site, then to the “gif maker” section to upload the images, and click on “make a gif” to make a transparent gif from the selected images. Once the gif is created, you can use it as a moving gif background and share it with friends or family.
02Use animizer.net to create a gif without background
It is effortless to use software to create transparent gifs by uploading multiple transparent PNG images and combining them to form a gif.
You can use unlimited images for your gif and animated gif background. It also lets you adjust various settings for your transparent gifs like loops, animation speed and much more.
03Use filmora for making gifs without background easily
Wondershare Filmora Video Editor is an all in one tool that will help you create all sorts of gifs, including transparent gifs. You can take advantage of their easy to use tools that are fir for people who have no technical skills at all.
You can easily upload the images and remove their background in the software itself and later use it in the gif you are willing to create.

Wondershare Filmora - Best Video Editor for Mac/Windows
5,481,435 people have downloaded it.
Build unique custom animations without breaking a sweat.
Focus on creating epic stories and leave the details to Filmora’s auto features.
Start a creative adventure with drag & drop effects and endless possibilities.
Filmora simplifies advanced features to save you time and effort.
Filmora cuts out repetition so you can move on to your next creative breakthrough.
This is probably one of the best options if you are looking for an all in one tool for all your needs.
● Ending Thoughts →
● The techniques that we have talked about in this guide may help you discover things about gif backgrounds you have not known before.
● They are incredible and can help you utilize gifs in ways you hadn’t even considered.
● Create a moving gif background and apply it to any device easily.
● Of course, a simple background won’t provide the same type of effect as a moving gif. With this guide, you’ll learn about every tool that you may use and how to apply or create a cool gif background on your own.
Also read:
- The Ultimate Guide to Countdown Animation in Videos
- 2024 Approved Enhance Social Media Posts with Transparent GIFs that Leave Your Peers in Awe
- Updated OBS Studio Is a Free and Open-Source App for Screen-Casting and Live Streaming
- New 2024 Approved How to Use Twixtor Effect to Create Super Slow-Motion Video?
- New The Best Peter McKinnon LUTs for Perfect Video Editing for 2024
- New Do You Want Your Videos to Look Like Danny Gevirtz? You Can Use some Inspired Presets. There Are Different Danny Gevirtz LUTs that You Can Download and Use
- Updated 2024 Approved Have You Ever Tried Using the Premiere Pro Motion Blur Plugin? Read This Article to Learn How to Efficiently Use the ReelSmart Motion Blur Plugin in Premiere Pro
- Updated In 2024, In This Guidepost, Youll Learn What an HDRI Photo Is and How to Use the Best Free HDRI Program to Edit Photos. Youll Also Know the Difference Between HDR and HDRI
- Updated In 2024, Learn Eight Simple Steps that Will Allow You to Create a Stunning Text Reveal Animation in Filmora. Simple yet Very Professional
- New Logo Intro Videos Are the Hottest Trend in Town and Are Gaining Popularity Quickly. Keep Reading This Article to Learn Their Importance and How to Design One for 2024
- New Comprehensive Guide to Add LUTs in Premiere Pro with Ease for 2024
- Top 12 Best Freeze Frame Video Editing Examples for 2024
- New What Slideshow Templates Teach You About Aesthetic for 2024
- New 2024 Approved How to Create Liquid Water Reveal Intro?
- 2024 Approved Do You Know How to Create a Lol Montage Video? Had You Ever Tried that Video Type Before? Connect with This Article to Study the Tips and Tricks Associated with the Making of Montage Videos
- New Guide to Making Cinematography for Music Video for 2024
- New Best Shortcut Towards Timeline Template
- Updated In 2024, Replacing Sky Background Using Adobe Photoshop A Comprehensive Guide
- Updated In 2024, Top 10 Secret Tips & Tricks to Use in Wondershare Filmora
- In 2024, How to Create a Bokeh Effect
- Are You Finding It Difficult to Freeze-Frame in After Effects? Note that Freeze-Frame Takes only a Few Seconds, and, in This Tutorial, We Will Guide You on How to Create and Add Frame Hold in After Effects for 2024
- In 2024, What Are the Best 15 Slideshow Presentation Examples Your Audience Will Love
- New In 2024, How to Create a Clideo Slideshow Simply
- New How to Make Simple Slideshow Word
- In 2024, Are You Also a Fan of the Slow Mo Guys? Well! Who Isnt? Learn How You Can Create Compelling Slow-Mo Videos Like the Slow Mo Guys Here
- New Are You Interested in the Best LUTs ? Do You Want to Enhance Your Photos and Images with High-End Quality? Then, Quickly Step Into This Article for Mind-Blowing Facts on It
- New In 2024, AI Has Influenced All Video Editors to Speed up Editing. This Article Discusses the Significance of AI Slow Motion and the Tools that Offer It
- Life360 Learn How Everything Works On Vivo S18 | Dr.fone
- Different Methods for Resetting Infinix Hot 40 Pro Phones with Screen Locked and Not | Dr.fone
- How to play MOV files on Xiaomi Redmi 13C 5G ?
- PassFab iPhone 6s Backup Unlocker Top 4 Alternatives | Dr.fone
- How To Enable USB Debugging on a Locked Xiaomi 13T Pro Phone
- In 2024, How to Hide/Fake Snapchat Location on Your Samsung Galaxy A14 5G | Dr.fone
- Best Android Data Recovery - Undelete Lost Messages from Gionee F3 Pro
- How to Fake GPS on Android without Mock Location For your Samsung Galaxy A15 5G | Dr.fone
- In 2024, Where Is the Best Place to Catch Dratini On Poco X5 Pro | Dr.fone
- In 2024, Full Guide on Mirroring Your Honor X9a to Your PC/Mac | Dr.fone
- Remove P40 unlock screen
- How Can We Unlock Our Realme Narzo 60x 5G Phone Screen?
- In 2024, How to Bypass Activation Lock from Apple iPhone 12 Pro or iPad?
- In 2024, The Complete Guide to Vivo Y100t FRP Bypass Everything You Need to Know
- In 2024, Ultimate guide to get the meltan box pokemon go For Vivo V29e | Dr.fone
- 15 Best Strongest Pokémon To Use in Pokémon GO PvP Leagues For Apple iPhone 8 Plus | Dr.fone
- Title: Frame Rates, Speed, and Wondershare Filmora
- Author: Morgan
- Created at : 2024-05-19 05:11:38
- Updated at : 2024-05-20 05:11:38
- Link: https://ai-video-editing.techidaily.com/frame-rates-speed-and-wondershare-filmora/
- License: This work is licensed under CC BY-NC-SA 4.0.

