:max_bytes(150000):strip_icc():format(webp)/AnneParkShedloskytvOS-2d4178dd6b7d46a08c34ab8b750fe23e.jpg)
Full Guide to Funcall Voice Changer and Its Alternatives

Full Guide to Funcall Voice Changer and Its Alternatives
Do you want to prank your friends? Everyone can agree that receiving a prank call is one of the world’s most annoying experiences. Still, you must admit that coming up with a great prank is a flex. If you want to make the next big prank film for TikTok or are just looking for something to do during a sleepover with your friends, you’ll need to have a plan before you pick up the phone. In this article, we will tell you how you can make prank calls easily with Funcall apps:
Try AI Voice Changer For Win 7 or later(64-bit)
Try AI Voice Changer For macOS 10.14 or later
Part 1: What’s Funcall App, and how to use it?
Making successful prank calls is very challenging. The Funcall - Voice Changer makes it incredibly easy to change your voice on a call and prank your family members and friends. You can call them and get their funny reactions.
You must input the target’s phone number and select whether you want the voice to be feminine, helium balloon, frightening, male, or regular sound. Funcall app also allows you to make international calls in over 150 countries on cell phones and landlines.

After installing the app, you will only have 30 seconds to play the prank. You can install other applications, view advertisements, or buy time directly through the app to get additional time. You are free to phone whatever number you like and speak in an artificial voice as long as you have the time. Additionally, you can include humorous sound effects like barking, farts, or gunfire. This voice-changing app is compatible with both Android and iPhone devices.
Follow these easy steps to use the Funcall app:
Step1Download
Go to the official website of Funcall apps and download it on your mobile device. To start the Funcall app, tap on the icon.
Step2Dial the Number
Dial the number of your friend or relative you want to prank and select the country.
Step3Select a Voice
At this point, pick the voice-altering sound you want to use. You can also add a background effect.
Step4Change Voice in Real Time
The call’s recipient will hear your customized voice rather than the original. To make the call more thrilling, you can add sound effects in addition to your altered voice.

Part 2: How to use the app for free?
Funcall is a premium software, and to use it, you must purchase one of its membership plans, which are reasonably priced. The first call on this app is free. You can earn more free minutes for prank calls by completing activities like watching advertising and downloading software.
Another option is to use Funcall MOD APK. It can be your best option if you’re seeking its free version, which allows you to enjoy an infinite number of minutes and an ad-free experience. You can use its hacked version to have free access to all of its paid features.
Part 3: Best alternatives to Funcall Voice Changer
Prank Dial
If you are looking for the best alternative to the Funcall app, you can use Prank Dial. With the help of the Prank Dial app, users can have fun while spending their free time making up to three random prank calls to friends and coworkers each day. You can press a call scenario to hear it and tap the heart to put it in your favourites so you can use it later.

The array of situations is sorted by category in the Prank Dial app, including “celebrities,” “angry,” “love,” “family prank calls,” etc. The history area displays all recent calls, including call date, caller id, scenario name, etc.
Fake Caller ID
If you want to make prank calls, make false caller ID, and have a good time, download this Fake Caller ID software. It has a very straightforward user interface that is free of any complications. You can easily prank or make fun of your friends by changing your voice pitch and caller ID.

This app gives two free calls each day and allows you to adjust your caller ID before you make the call, alter your voice while on the call, and record calls to listen to them later for fun.
MagicCall
For both Android and iOS, MagicCall is a fantastic tool to use as a voice-changing app when on the phone. It is an excellent app for making prank calls to pals and applying various effects. With multiple voice modifications and appended background effects, Magic Call is straightforward to use.

You can choose between Male, Robot, Female, Elderly Male, and Kid voices in the Voices area.
Prank Caller
With the help of the features in the Prank Caller app, you can access a massive library of prank call scripts directly from your smartphone’s screen and entertain your loved ones by using a different voice.

To try a new prank daily, you can browse the top prank call scripts and a list of all the available prank situations ranked by popularity.
FAQs
Can I use the Funcall app to make international calls?
You can use the Funcall app to make international calls in over 150 countries, including Asian, European, African, Middle Eastern regions, etc.
Can I use the Funcalls app while playing games?
No, you can’t use the Funcalls app while playing games. You can only use this app to change your voice during calls.
Can I change my voice during a call?
Yes, you can change your voice during calls. You can use Funcall apps or any alternatives to change your voice. However, we recommend you use the Funcall app because it is compatible with Android and iPhone.
What are the available voices on the Funcall app?
You can use a feminine, male, scary, helium, or a regular voice. This app also allows you to use various background sounds and effects.
Free Download For Win 7 or later(64-bit)
Free Download For macOS 10.14 or later
Try AI Voice Changer For Win 7 or later(64-bit)
Try AI Voice Changer For macOS 10.14 or later
Part 1: What’s Funcall App, and how to use it?
Making successful prank calls is very challenging. The Funcall - Voice Changer makes it incredibly easy to change your voice on a call and prank your family members and friends. You can call them and get their funny reactions.
You must input the target’s phone number and select whether you want the voice to be feminine, helium balloon, frightening, male, or regular sound. Funcall app also allows you to make international calls in over 150 countries on cell phones and landlines.

After installing the app, you will only have 30 seconds to play the prank. You can install other applications, view advertisements, or buy time directly through the app to get additional time. You are free to phone whatever number you like and speak in an artificial voice as long as you have the time. Additionally, you can include humorous sound effects like barking, farts, or gunfire. This voice-changing app is compatible with both Android and iPhone devices.
Follow these easy steps to use the Funcall app:
Step1Download
Go to the official website of Funcall apps and download it on your mobile device. To start the Funcall app, tap on the icon.
Step2Dial the Number
Dial the number of your friend or relative you want to prank and select the country.
Step3Select a Voice
At this point, pick the voice-altering sound you want to use. You can also add a background effect.
Step4Change Voice in Real Time
The call’s recipient will hear your customized voice rather than the original. To make the call more thrilling, you can add sound effects in addition to your altered voice.

Part 2: How to use the app for free?
Funcall is a premium software, and to use it, you must purchase one of its membership plans, which are reasonably priced. The first call on this app is free. You can earn more free minutes for prank calls by completing activities like watching advertising and downloading software.
Another option is to use Funcall MOD APK. It can be your best option if you’re seeking its free version, which allows you to enjoy an infinite number of minutes and an ad-free experience. You can use its hacked version to have free access to all of its paid features.
Part 3: Best alternatives to Funcall Voice Changer
Prank Dial
If you are looking for the best alternative to the Funcall app, you can use Prank Dial. With the help of the Prank Dial app, users can have fun while spending their free time making up to three random prank calls to friends and coworkers each day. You can press a call scenario to hear it and tap the heart to put it in your favourites so you can use it later.

The array of situations is sorted by category in the Prank Dial app, including “celebrities,” “angry,” “love,” “family prank calls,” etc. The history area displays all recent calls, including call date, caller id, scenario name, etc.
Fake Caller ID
If you want to make prank calls, make false caller ID, and have a good time, download this Fake Caller ID software. It has a very straightforward user interface that is free of any complications. You can easily prank or make fun of your friends by changing your voice pitch and caller ID.

This app gives two free calls each day and allows you to adjust your caller ID before you make the call, alter your voice while on the call, and record calls to listen to them later for fun.
MagicCall
For both Android and iOS, MagicCall is a fantastic tool to use as a voice-changing app when on the phone. It is an excellent app for making prank calls to pals and applying various effects. With multiple voice modifications and appended background effects, Magic Call is straightforward to use.

You can choose between Male, Robot, Female, Elderly Male, and Kid voices in the Voices area.
Prank Caller
With the help of the features in the Prank Caller app, you can access a massive library of prank call scripts directly from your smartphone’s screen and entertain your loved ones by using a different voice.

To try a new prank daily, you can browse the top prank call scripts and a list of all the available prank situations ranked by popularity.
FAQs
Can I use the Funcall app to make international calls?
You can use the Funcall app to make international calls in over 150 countries, including Asian, European, African, Middle Eastern regions, etc.
Can I use the Funcalls app while playing games?
No, you can’t use the Funcalls app while playing games. You can only use this app to change your voice during calls.
Can I change my voice during a call?
Yes, you can change your voice during calls. You can use Funcall apps or any alternatives to change your voice. However, we recommend you use the Funcall app because it is compatible with Android and iPhone.
What are the available voices on the Funcall app?
You can use a feminine, male, scary, helium, or a regular voice. This app also allows you to use various background sounds and effects.
Free Download For Win 7 or later(64-bit)
Free Download For macOS 10.14 or later
5 Simple Tools to Merge Video and Audio Online
When it comes to creating multimedia content, merging videos and audio can be a tricky task. But with the right tools, it can be a breeze. In this article, we will share the top 5 online tools for merging videos and audio quickly and easily.
These tools will streamline your editing process and help you create seamless multimedia content that will captivate your audience. Whether you are a professional video editor or just someone looking to create a personal video, these tools will come in handy. These tools have something for everyone, from basic editing features to advanced ones. So, let’s dive in and look at the best tools to merge videos and audio online.
- Merge Audio and Video Online Using Media.io for FREE
- Merge Audio and Video Online Without Watermark in 123APPS
- Mix Audio With Video Online in Clideo
- Veed.io Video Audio Merger Online
- Combine Video and Audio Online With FlexClip
- Join Video and Audio Online or Offline? Which To Choose?
- [Bonus] Merge Audio and Video Offline With Wondershare Filmora
5 Tools To Merge Video and Audio Online
There are a plethora of online tools available for merging videos and audio. However, not all tools are created equal. We have rounded up the top 5 online tools that are user-friendly, reliable, and efficient.
These tools will make it easy to merge your videos and audio and offer a range of features to help you create professional-looking multimedia content. Whether you are a beginner or an experienced video editor, these tools will help you finish the job in no time. So, without further ado, let’s look at the top 5 online tools for merging videos and audio online.
1. Merge Audio and Video Online Using Media.io for FREE

Ratings from G2: 4.5 out of 5
Pricing:
- Free - $0
- Basic - $3.95 / monthly
- Pro - $6.66 / annually
Sound is crucial in videos as it can enhance engagement, replace poor narration, and promote music videos. Use Media.io Online Video Editor to add music to videos for free easily. It’s a user-friendly program with multitrack timeline editing for all formats, allowing for adjustments such as trimming, splitting, fade effects, texts, elements, and picture overlays. Importantly, it doesn’t leave watermarks on your videos.
Pros
- Fast compression speeds
- No file limits
- No watermarks
- Smart output settings
Cons
- Lacks some advanced functionality
Here’s how to merge audio and video using Media.io:
Step1 Begin by opening Media.io Online Video Editor and uploading your video and audio files.

Step2 Improve the background audio by editing it with options such as trimming, splitting, copying, and deleting.
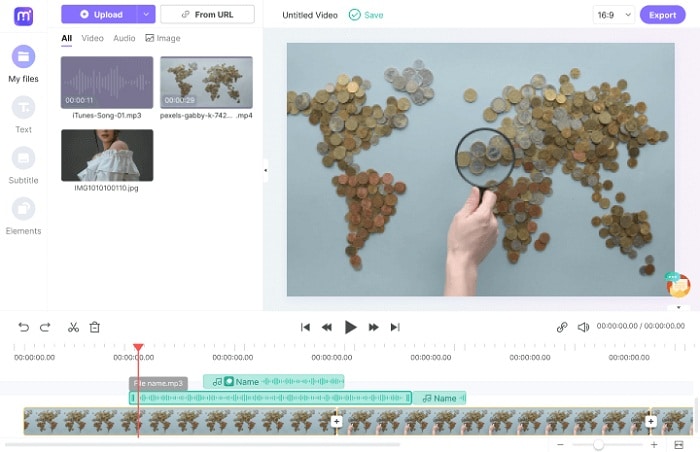
Step3 Adjust the aspect ratio, export the video, name the file, choose the resolution quality, then it’s finished.

You can learn more details about how to add audio to a video and how to edit videos using Media.io with the video below:
2. Merge Audio and Video Online Without Watermark in 123APPS

Ratings from G2: No rating yet
Pricing:
- Free
Add music to videos and easily edit using this powerful video editing platform. Publish videos with background audio of your choice, free and high-quality, without the need for downloads, software, or browser extensions. User-friendly interface, no learning curve, and works on any device, including Mac, PC, and mobile. The platform supports various file formats, including MP4, MOV, AVI, and WMV for video and MP3, WAV, and OGG for audio.
Pros
- Free and easy to use
- Multiple functions provided
Cons
- Lacks some advanced functionality
- Too basic for video cutting
Here’s how to merge audio and video using 123APPS:
Step1 Go to 123APPS and select “Video Tools“ > “Add Audio to Video.”
Step2 Upload the video and audio
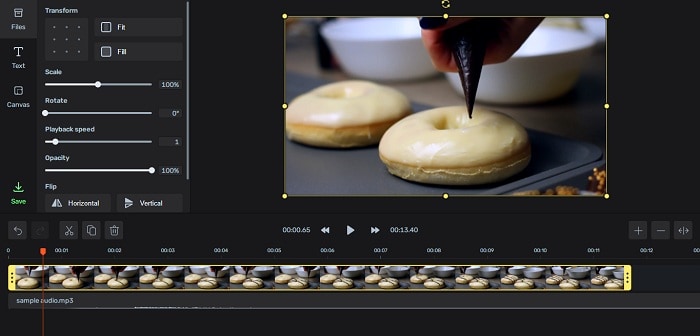
Step3 Use the “Sound“ option to crop and adjust the audio volume
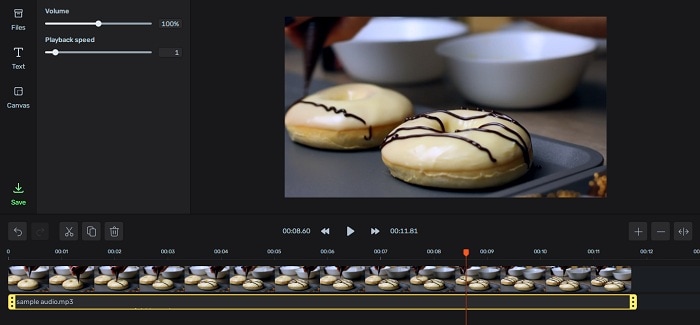
Step4 Select the output video format and download the final video with audio included.
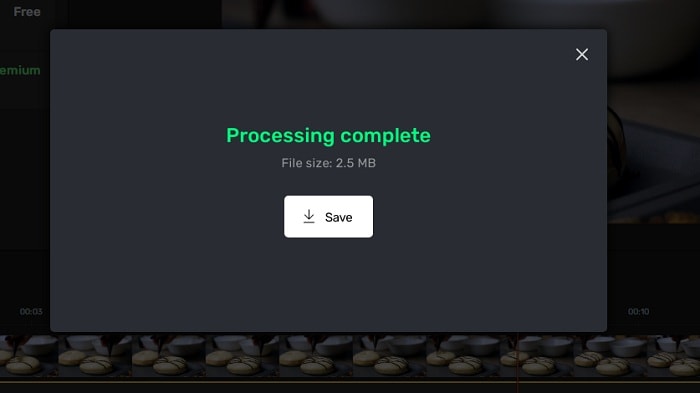
3. Mix Audio With Video Online in Clideo
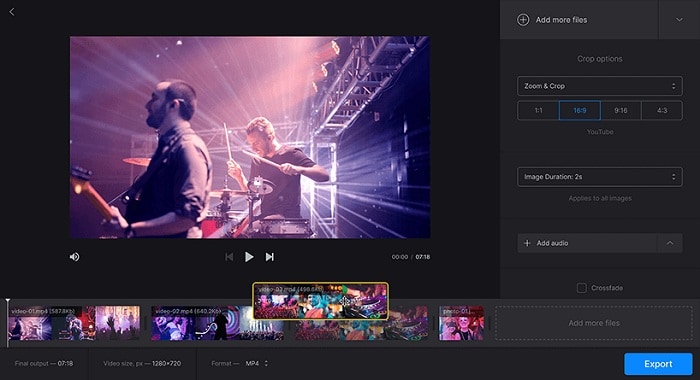
Ratings from G2: 4.8 out of 5
Pricing:
- Free - $0 with a watermark
- Monthly - $9.00
Clideo is a free, easy-to-use, browser-based video merging tool by Softo. It supports almost all video formats and allows you to add borders, choose aspect ratio templates or crop the video, apply transition effects, and add music. You can import multiple videos and arrange them in your desired order with drag and drop.
Pros
- Free to use with unlimited videos
- Easy to use
- Supports multiple video formats
Cons
- Lack of themes and design elements
Here’s how to merge audio and video using Clideo:
Step1 Go to Clideo’s page to add music to videos.
Step2 Drag and drop a video from your computer to access the editor.
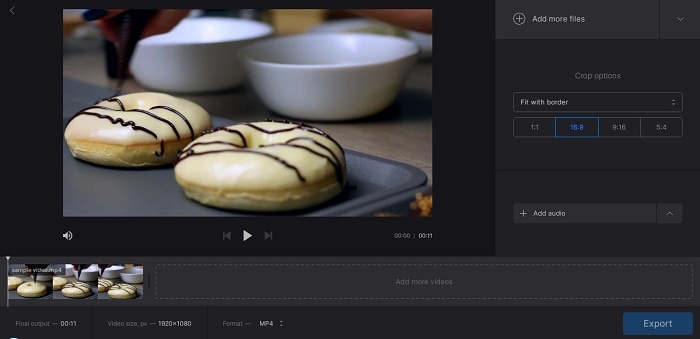
Step3 Add the audio file and sync it with the video.
Step4 Select “Export“ and wait for it to finish, then download the final video.

4. Veed.io Video Audio Merger Online

Ratings from G2: 4.2 out of 5
Pricing:
- Free - $0
- Monthly - $12.00
VEED is a versatile video editor that makes it simple to merge, join, and combine various media files online. Whether using a Windows, Mac, or mobile device, you can easily cut, trim, and arrange multiple video clips into one file on a user-friendly timeline. You can also add audio, image files, and subtitles with a single click.
Compatible with all browsers and versions, VEED supports all file formats and allows you to upload multiple file types, arrange your video tracks, and export as one file. With VEED, you can easily create a seamless Instagram Story or YouTube Ad and even resize your clips in one click.
Pros
- Attractive and well-organized layout
- Compatible with all devices, including smartphones
- Simple and easy to begin using
Cons
- Cannot specify precise starting and ending times for video cuts
- The free version includes watermarks on output videos
- Limited to videos shorter than 10 minutes and 250 MB in size
Here’s how to merge audio and video using VEED:
Step1 Go to VEED’s website and upload your video files and audio.
Step2 Use the cutter/splitter tool to trim any file ends as needed.
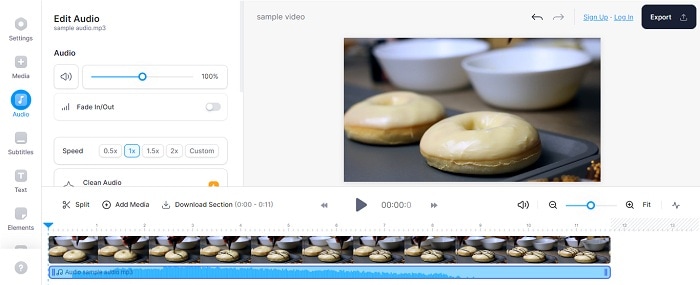
Step3 Click the “Export“ button to merge the files into a single video. Download the newly created merged video file.

5. Combine Video and Audio Online With FlexClip

Ratings from G2: 4.0 out of 5
Pricing:
- Free - $0
- Basic - $9.99 per month
- Plus - $19.99 per month
- Business - $29.99 per month
FlexClip’s online audio and video merger is a simple solution for combining audio and video files. The process is as easy as uploading your video and audio files and then syncing them by adjusting the slider. The entire process takes just a few minutes, and there is no loss in video or audio quality, nor will a watermark be added to the output.
Once you have successfully merged your audio and video, you can easily share the video to YouTube or download it to your computer with just one click. It’s an efficient and effective way to merge audio and video.
Pros
- The stock library is royalty-free and allows for the monetization of projects without copyright restrictions
- The user interface is simple and easy to navigate
- The pricing is reasonable compared to other professional video editors
Cons
- The features are more basic compared to other professional video editors
- The video converter has limited output format options
Here’s how to merge audio and video using FlexClip:
Step1 Open the FlexClip website and drag and drop your video clip into the Media section. Add it to the timeline.
Step2 Upload your audio file from your computer to the Media section.

Step3 Adjust the audio and video on the timeline by dragging the slider.

Step4 Finish editing or select a resolution to download the merged video.
Join Video and Audio Online or Offline? Which To Choose?
Merging audio and video can be done either online or offline. Each method has its advantages and disadvantages.
Online video and audio merging join audio and video files using an online tool. The main advantage of this method is that it is easily accessible and requires no software installation. Many online tools are also free to use and offer various editing options. Additionally, online tools are often compatible with many file formats, making working with different audio and video files easy.
On the other hand, offline video and audio merging requires video editing software installed on a computer. The main advantage of this method is that it offers more advanced editing options and greater control over the final output. Offline tools also typically offer a wider range of output options and higher-quality output. However, offline tools can be more expensive and require a certain level of technical expertise to use effectively.
[Bonus] Merge Audio and Video Offline With Wondershare Filmora
Free Download For Win 7 or later(64-bit)
Free Download For macOS 10.14 or later
Merging audio and video offline with Filmora is a great option for those who want more advanced editing capabilities and are okay with downloading software to their computer. This powerful video editing software allows you to easily merge, trim, and edit multiple video and audio files, while also providing a wide range of creative tools, including effects, filters, and animations. With Filmora, you can create professional-quality videos with minimal effort.
Filmora is a powerful video editing software that allows users to merge audio and video offline easily. The software boasts a user-friendly interface that makes it easy for users to navigate and access the various features, including adding audio to video and syncing them together.
With Filmora, users can import audio and video files and use the software’s timeline to arrange and sync them. It also provides a wide range of options for editing, such as trimming, cutting, and adjusting the volume of audio tracks. Filmora also offers a variety of export options, including a choice of resolutions and file formats, making it a great choice for those looking to merge audio and video offline.
Here’s how to merge audio and video using Filmora:
Step1 Drag and drop or use the “Import Media“ button to add audio and video files to Filmora.

Step2 Arrange the media files on the timeline and sync the video with the audio.

Step3 Right-click the video, select “Detach Audio,“ delete the original audio, and replace it with new audio.

Step4 Choose a format and click “Export“ to save the final video.

Conclusion
There are many ways to merge audio and video, whether online or offline. Each method has its own set of advantages and disadvantages. It ultimately depends on your needs and preferences. Filmora is a great offline option for those looking for a professional video editor with a user-friendly interface, while online options offer a quick and easy solution for basic editing needs.
5 Tools To Merge Video and Audio Online
There are a plethora of online tools available for merging videos and audio. However, not all tools are created equal. We have rounded up the top 5 online tools that are user-friendly, reliable, and efficient.
These tools will make it easy to merge your videos and audio and offer a range of features to help you create professional-looking multimedia content. Whether you are a beginner or an experienced video editor, these tools will help you finish the job in no time. So, without further ado, let’s look at the top 5 online tools for merging videos and audio online.
1. Merge Audio and Video Online Using Media.io for FREE

Ratings from G2: 4.5 out of 5
Pricing:
- Free - $0
- Basic - $3.95 / monthly
- Pro - $6.66 / annually
Sound is crucial in videos as it can enhance engagement, replace poor narration, and promote music videos. Use Media.io Online Video Editor to add music to videos for free easily. It’s a user-friendly program with multitrack timeline editing for all formats, allowing for adjustments such as trimming, splitting, fade effects, texts, elements, and picture overlays. Importantly, it doesn’t leave watermarks on your videos.
Pros
- Fast compression speeds
- No file limits
- No watermarks
- Smart output settings
Cons
- Lacks some advanced functionality
Here’s how to merge audio and video using Media.io:
Step1 Begin by opening Media.io Online Video Editor and uploading your video and audio files.

Step2 Improve the background audio by editing it with options such as trimming, splitting, copying, and deleting.

Step3 Adjust the aspect ratio, export the video, name the file, choose the resolution quality, then it’s finished.

You can learn more details about how to add audio to a video and how to edit videos using Media.io with the video below:
2. Merge Audio and Video Online Without Watermark in 123APPS

Ratings from G2: No rating yet
Pricing:
- Free
Add music to videos and easily edit using this powerful video editing platform. Publish videos with background audio of your choice, free and high-quality, without the need for downloads, software, or browser extensions. User-friendly interface, no learning curve, and works on any device, including Mac, PC, and mobile. The platform supports various file formats, including MP4, MOV, AVI, and WMV for video and MP3, WAV, and OGG for audio.
Pros
- Free and easy to use
- Multiple functions provided
Cons
- Lacks some advanced functionality
- Too basic for video cutting
Here’s how to merge audio and video using 123APPS:
Step1 Go to 123APPS and select “Video Tools“ > “Add Audio to Video.”
Step2 Upload the video and audio

Step3 Use the “Sound“ option to crop and adjust the audio volume

Step4 Select the output video format and download the final video with audio included.

3. Mix Audio With Video Online in Clideo

Ratings from G2: 4.8 out of 5
Pricing:
- Free - $0 with a watermark
- Monthly - $9.00
Clideo is a free, easy-to-use, browser-based video merging tool by Softo. It supports almost all video formats and allows you to add borders, choose aspect ratio templates or crop the video, apply transition effects, and add music. You can import multiple videos and arrange them in your desired order with drag and drop.
Pros
- Free to use with unlimited videos
- Easy to use
- Supports multiple video formats
Cons
- Lack of themes and design elements
Here’s how to merge audio and video using Clideo:
Step1 Go to Clideo’s page to add music to videos.
Step2 Drag and drop a video from your computer to access the editor.

Step3 Add the audio file and sync it with the video.
Step4 Select “Export“ and wait for it to finish, then download the final video.

4. Veed.io Video Audio Merger Online

Ratings from G2: 4.2 out of 5
Pricing:
- Free - $0
- Monthly - $12.00
VEED is a versatile video editor that makes it simple to merge, join, and combine various media files online. Whether using a Windows, Mac, or mobile device, you can easily cut, trim, and arrange multiple video clips into one file on a user-friendly timeline. You can also add audio, image files, and subtitles with a single click.
Compatible with all browsers and versions, VEED supports all file formats and allows you to upload multiple file types, arrange your video tracks, and export as one file. With VEED, you can easily create a seamless Instagram Story or YouTube Ad and even resize your clips in one click.
Pros
- Attractive and well-organized layout
- Compatible with all devices, including smartphones
- Simple and easy to begin using
Cons
- Cannot specify precise starting and ending times for video cuts
- The free version includes watermarks on output videos
- Limited to videos shorter than 10 minutes and 250 MB in size
Here’s how to merge audio and video using VEED:
Step1 Go to VEED’s website and upload your video files and audio.
Step2 Use the cutter/splitter tool to trim any file ends as needed.

Step3 Click the “Export“ button to merge the files into a single video. Download the newly created merged video file.

5. Combine Video and Audio Online With FlexClip

Ratings from G2: 4.0 out of 5
Pricing:
- Free - $0
- Basic - $9.99 per month
- Plus - $19.99 per month
- Business - $29.99 per month
FlexClip’s online audio and video merger is a simple solution for combining audio and video files. The process is as easy as uploading your video and audio files and then syncing them by adjusting the slider. The entire process takes just a few minutes, and there is no loss in video or audio quality, nor will a watermark be added to the output.
Once you have successfully merged your audio and video, you can easily share the video to YouTube or download it to your computer with just one click. It’s an efficient and effective way to merge audio and video.
Pros
- The stock library is royalty-free and allows for the monetization of projects without copyright restrictions
- The user interface is simple and easy to navigate
- The pricing is reasonable compared to other professional video editors
Cons
- The features are more basic compared to other professional video editors
- The video converter has limited output format options
Here’s how to merge audio and video using FlexClip:
Step1 Open the FlexClip website and drag and drop your video clip into the Media section. Add it to the timeline.
Step2 Upload your audio file from your computer to the Media section.

Step3 Adjust the audio and video on the timeline by dragging the slider.

Step4 Finish editing or select a resolution to download the merged video.
Join Video and Audio Online or Offline? Which To Choose?
Merging audio and video can be done either online or offline. Each method has its advantages and disadvantages.
Online video and audio merging join audio and video files using an online tool. The main advantage of this method is that it is easily accessible and requires no software installation. Many online tools are also free to use and offer various editing options. Additionally, online tools are often compatible with many file formats, making working with different audio and video files easy.
On the other hand, offline video and audio merging requires video editing software installed on a computer. The main advantage of this method is that it offers more advanced editing options and greater control over the final output. Offline tools also typically offer a wider range of output options and higher-quality output. However, offline tools can be more expensive and require a certain level of technical expertise to use effectively.
[Bonus] Merge Audio and Video Offline With Wondershare Filmora
Free Download For Win 7 or later(64-bit)
Free Download For macOS 10.14 or later
Merging audio and video offline with Filmora is a great option for those who want more advanced editing capabilities and are okay with downloading software to their computer. This powerful video editing software allows you to easily merge, trim, and edit multiple video and audio files, while also providing a wide range of creative tools, including effects, filters, and animations. With Filmora, you can create professional-quality videos with minimal effort.
Filmora is a powerful video editing software that allows users to merge audio and video offline easily. The software boasts a user-friendly interface that makes it easy for users to navigate and access the various features, including adding audio to video and syncing them together.
With Filmora, users can import audio and video files and use the software’s timeline to arrange and sync them. It also provides a wide range of options for editing, such as trimming, cutting, and adjusting the volume of audio tracks. Filmora also offers a variety of export options, including a choice of resolutions and file formats, making it a great choice for those looking to merge audio and video offline.
Here’s how to merge audio and video using Filmora:
Step1 Drag and drop or use the “Import Media“ button to add audio and video files to Filmora.

Step2 Arrange the media files on the timeline and sync the video with the audio.

Step3 Right-click the video, select “Detach Audio,“ delete the original audio, and replace it with new audio.

Step4 Choose a format and click “Export“ to save the final video.

Conclusion
There are many ways to merge audio and video, whether online or offline. Each method has its own set of advantages and disadvantages. It ultimately depends on your needs and preferences. Filmora is a great offline option for those looking for a professional video editor with a user-friendly interface, while online options offer a quick and easy solution for basic editing needs.
8 Frame Rate Video Converters for a Professional Finish
One important aspect to consider when creating high-quality videos is the frame rate. The frame rate, measured in frames per second (fps), determines the smoothness and fluidity of your video. If the frame rate is too low, your video may appear choppy or stutter. On the other hand, a higher frame rate can provide a more cinematic experience.
However, not all cameras or devices record videos at the same frame rate. That’s where frame rate video converters come in. These tools allow you to change the frame rate of your videos so they can be played back on different devices or platforms. With so many options available, it can be overwhelming to know which frame rate converters to use.
In this article, we’ll look at 8 of the best frame rate video converters you must try. These tools will help you achieve the perfect frame rate for your videos, from free online options to paid software.
Unknown Facts About Converting Frame Rates
When converting frame rates, there are a few things to keep in mind that you may need to be made aware of.

1. The Web Doesn’t Care About Frame Rates
First, it’s important to note that the web doesn’t care about frame rates. Most online platforms, such as YouTube and Vimeo, automatically adjust the frame rate of videos to match the viewer’s device or internet connection. This means that even if you have a video with a high frame rate, it may be automatically downgraded when it’s uploaded to the web.
2. Converting Frame Rates in Exact Multiples Is Easy
Another thing to remember is that converting frame rates in exact multiples is relatively easy.
For example, if you have a video recorded at 30 fps and want to convert it to 60 fps, it’s a simple process as it is a 2x multiple. However, if you want to convert your video to a frame rate that is not a multiple of the original, such as 29.97 fps, the process can be more complex and may result in some loss of quality.
3. Frame Rate Is Not “Cinematic”
Lastly, it’s important to note that frame rate is not “cinematic” because a higher frame rate does not automatically make your video look more cinematic. While a higher frame rate can provide a more smooth and more fluid video, it’s just one aspect of creating a cinematic experience. Other elements, such as lighting, composition, and sound design, also play a crucial role in creating a cinematic look.
5 Frame Rate Video Converters for Win/Mac
Many options are available for both Windows and Mac users when converting frame rates. Here are 5 of the best frame rate video converters for both platforms:
1. Wondershare Filmora Video Editor and Frame Rate Converter for Win/Mac
Free Download For Win 7 or later(64-bit)
Free Download For macOS 10.14 or later
Filmora Video Editor and Frame Rate Converter is a versatile tool for Windows and Mac users that allows you to edit and convert your videos easily. It has a user-friendly interface and provides a wide range of video editing functions, such as trimming, cropping, splitting, and merging.
It also allows you to change the frame rate of your videos with a few simple clicks. You can easily adjust the frame rate to match the output device or platform, such as 30fps for YouTube or 60fps for Vimeo. Moreover, it also provides various video effects, transitions, and text/title templates to enhance your video quality. With Filmora, you can easily turn your home videos into professional-looking films.
How To Convert Video Frame Rate With Filmora
Here’s the step-by-step process of converting video frame rate using Filmora:
Step1 Create a new project, then import the video. Right click the video, and click “Properties.”

Step2 Check the current frame rate of the video

Step3 Add the video to the timeline, then click the “Export“ button
Step4 Change the frame rate and then click “Export.”

2. VideoPad Video Editor and Frame Rate Converter for Win/Mac
VideoPad Video Editor, created by NCH Software, is a user-friendly video editing software suitable for professionals and beginners. It offers various editing tools, video transitions and effects, customizable templates, and audio editing options.
One of its key features is the ability to convert the frame rate of your videos during the exporting process, making it a versatile tool for adjusting video playback smoothness. It supports multiple video formats for input and output; a free version is available for non-commercial use only.
Here’s the step-by-step process of converting video frame rate using VideoPad:
Step1 Open VideoPad and import your video to the timeline
Step2 Edit the video as desired, then navigate to “Export Video“ > “Video File.”
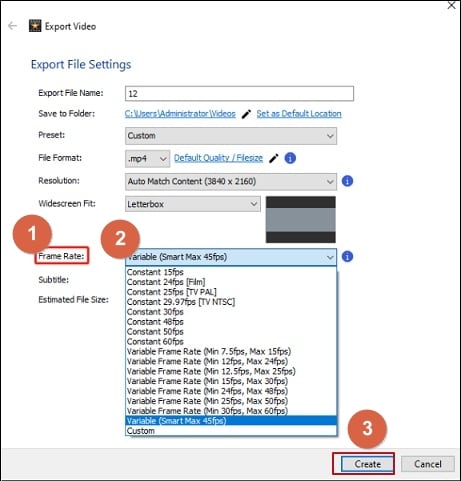
Step3 In the “Export File Settings“ window, select the desired frame rate, edit the file name, and choose the output folder, format, and resolution. Click “Create“ to export the video.
3. Frame Rate Converter - MiniTool Video Converter (Windows)
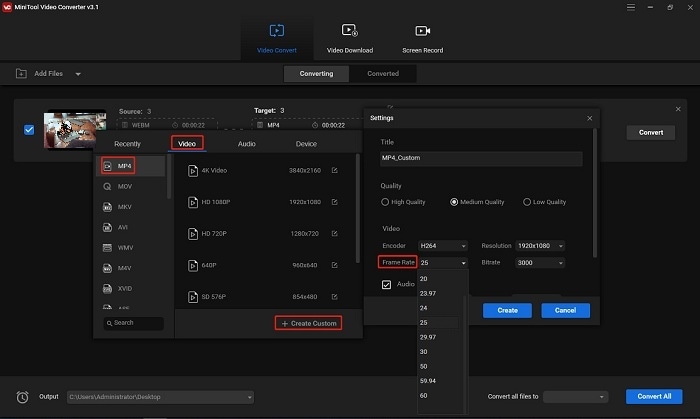
MiniTool Video Converter is a free and versatile tool for converting the frame rate of your videos. It offers multiple FPS options, such as 12, 15, 20, 23.97, 30, 50, and 60, which vary depending on your chosen video format. Not only can it change the frame rate, but it can also convert the video format, allowing you to import a video and then simultaneously change the format and frame rate.
Additionally, MiniTool offers options for video resolution, quality, encoder, and more. Furthermore, this video FPS converter allows you to record your computer screen in various formats, such as MP4, WMV, MKV, AVI, MOV, FLV, and TS in 15, 20, 25, and 30 fps. It also enables you to download videos and audio from YouTube.
Here’s the step-by-step process of converting video frame rate using MiniTool Video Converter:
Step1 Open MiniTool Video Converter, and upload the video you wish to convert by clicking “Add“ or dragging the file into the conversion area.
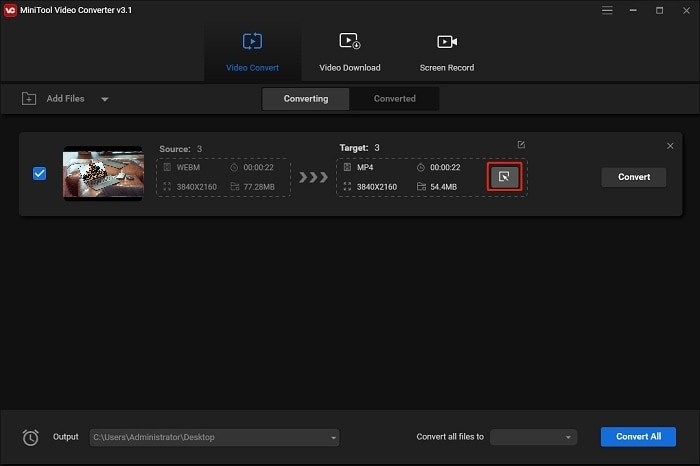
Step2 Under the Video tab in the new pop-up, select a format and click “Create Custom“ to open the settings window. Choose the desired frame rate.
Step3 Click “Convert,” and once completed, locate the converted video in the “Converted“ tab by clicking “Show in Folder.”
4. VLC Converter Frame Rate Conversion Software
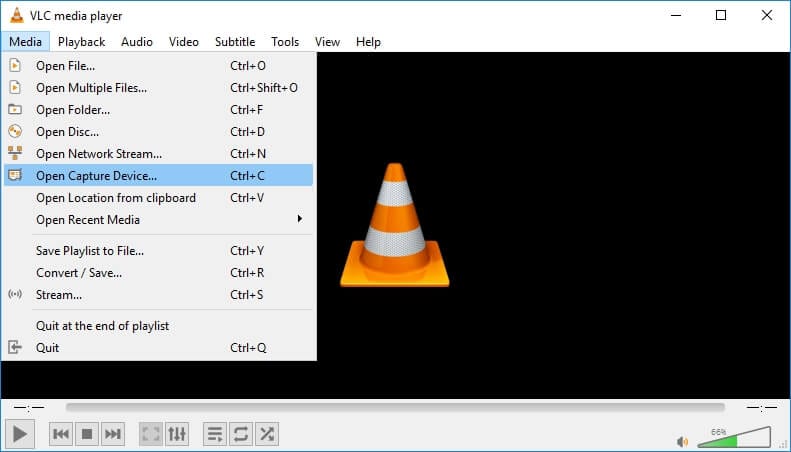
The VLC media player is a well-known free tool for converting frame rates. It’s a versatile player that supports various audio-visual formats, including AVI, MPEG, WMV, DVD, and CD.
VLC also includes additional features such as cropping and de-interlacing, allowing you to configure and edit your files. VLC media players can also remove DRM protection and convert multiple videos in batches. It’s a great option for a free frame rate converter.
Here’s how to change the frame rate of a video using VLC Media Player:
Step1 Open the VLC media player and click on “Media“ > “Capture Device.”
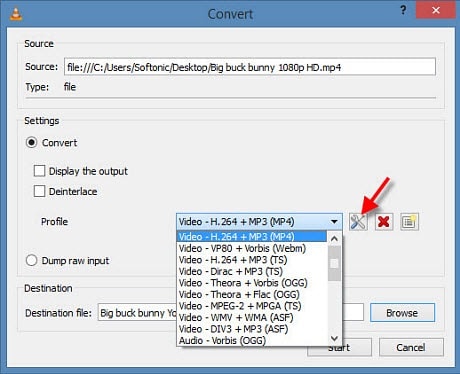
Step2 Select “Convert/Save“ and browse for the video you want to change the frame rate
Step3 Select the desired frame rate in the “Convert/Save“ dialog box and click “Start.”
Step4 Wait for the conversion to finish and click “Convert/Save“ to find the new video with the adjusted frame rate.
5. HandBrake: Open Source Frame Rate Converter
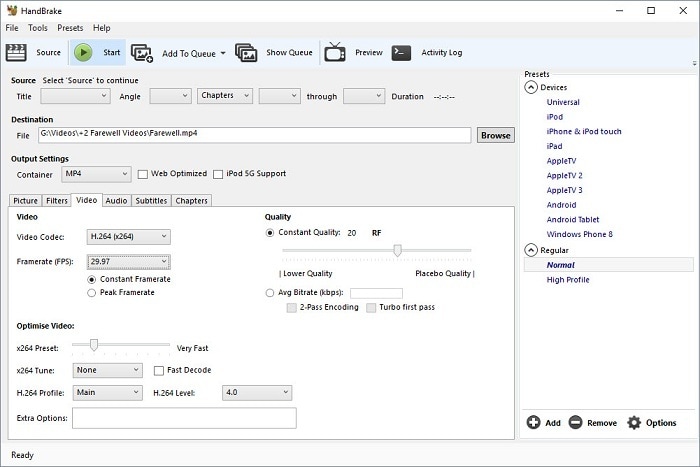
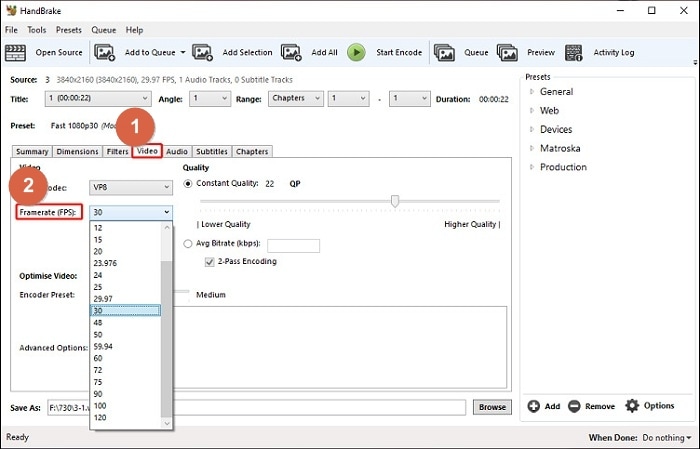
Handbrake is a versatile, open-source video converter that can change the frame rate of a video from nearly any format to MP4, WebM, or MKV. It offers a wide range of frame rate options, from 5 to 120 FPS, making it a great tool for video production needs.
In addition to frame rate conversion, Handbrake also features various filters to enhance video quality, such as reducing noise, sharpening, rotating, flipping videos, adding subtitles, and more. With Handbrake, you can easily change the frame rate of your videos to your desired settings.
Here’s how to change the frame rate of a video using HandBrake:
Step1 Open Handbrake and add your video.
Step2 Select a format, change the frame rate, and choose the output folder.
Step3 Click “Start Encode“ to convert the video frame rate.
3 Video FPS Converters Online
In addition to software-based video frame rate converters, a variety of online video FPS converters can be used for quick and easy frame rate conversions.
These online tools are often user-friendly and require no installation, making them accessible from any device with an internet connection. These tools allow for easy uploading of videos and the ability to select the desired frame rate for conversion. They also offer a variety of output formats and options for video quality, resolution, and more.
1. VEED.IO Video FPS Converter Online
VEED’s online frame rate converter is a simple tool to increase or decrease your video’s frame rate without leaving your browser. It supports popular frame rates such as 16fps, 24fps, 30fps, 60fps, and more.
Lower the frame rate to create a stop-motion video or GIF, or increase it to make the video appear smoother. The tool can upload videos in any format and render them in seconds without installing converter apps or software. It works on Windows 10, Mac, Linux, and mobile devices.
Here’s how to change the video frame rate using Veed.io:
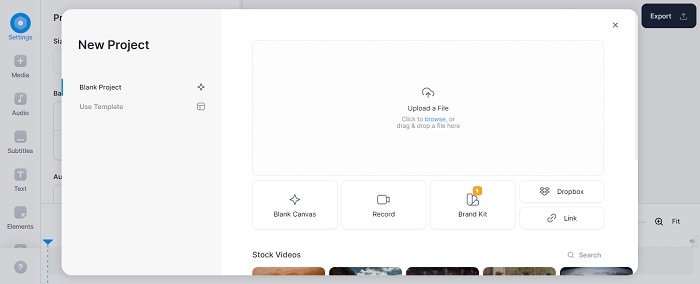
Step1 Import your video, or you can drag and drop your video.
Step2 Click “Export,” then click “switch to advanced settings“ to access frame rate settings. Adjust the frame rate using the framerate limit tool.
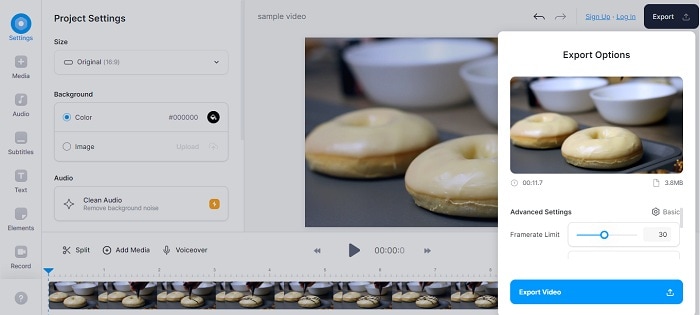
Step3 Click “Export Video,” and your video will render in seconds.

2. Video2Edit Video Frame Rate Converter Online Free

Video2Edit is an all-in-one online video solution that offers a variety of editing options such as conversion, rotation, cutting, merging, and audio compression and normalization. Additionally, it is also a highly efficient online video frame rate converter. With Video2edit, you can easily change the frame rate of your videos to match your specific needs.
This tool makes it simple whether you want to increase or decrease the frame rate. It supports a wide range of frame rates, from 16 to 60 fps, and can convert your video to any format you need. With this powerful and versatile tool, you can ensure that your videos look smooth and professional and have the right frame rate for your desired output.
Here’s how to change the video frame rate using Video2Edit:
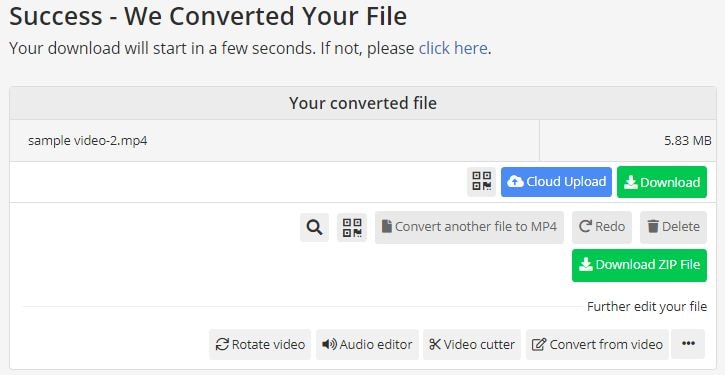
Step1 On Video2Edit’s website, select “Convert from video“ and upload your file.
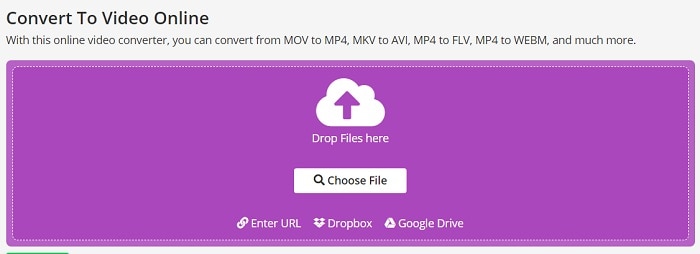
Step2 Select an output format and enter a new frame rate (1-120) in the “Change frame rate“ box.
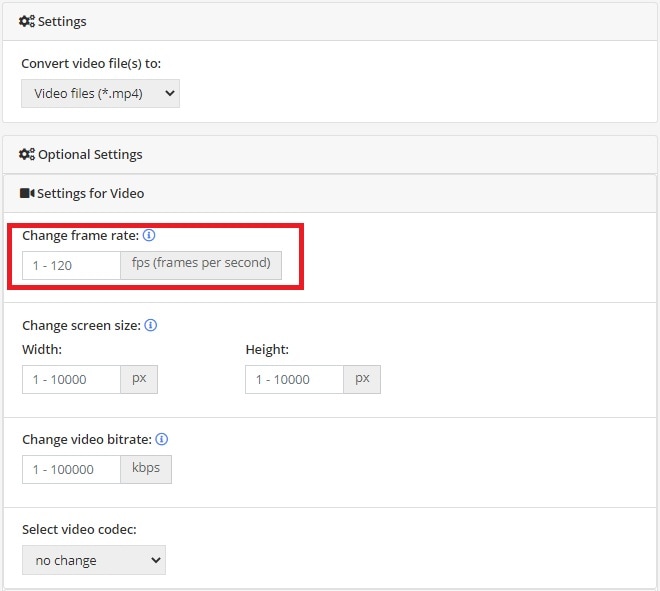
Step3 Click “START“ to begin the conversion process.
3. AConvert Free Video Frame Rate Converter
With AConvert, you can quickly change the frame rate of your video to fit your needs. This online tool offers various frame rates, including 20fps, 24fps, 30fps, 50fps, and more, giving you the flexibility to find the right setting for your video.
Additionally, AConvert offers a range of video editing options, including cutting, merging, rotating, and cropping, allowing you to enhance your video in multiple ways. The process of converting frame rate with AConvert is simple.
Here’s how to change the video frame rate using AConvert:
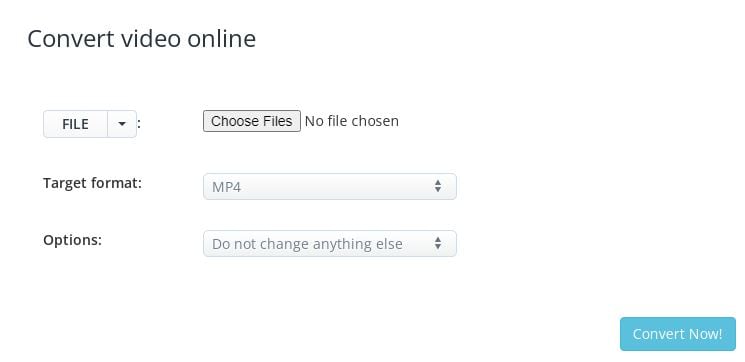
Step1 Visit the AConvert website, select Video, and upload your video.
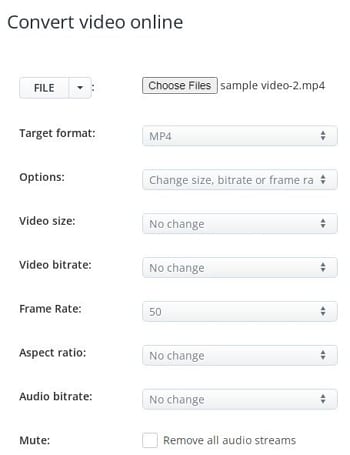
Step2 Choose “Change size, bitrate, or frame rate“ and select “Frame Rate“ in the drop-down menu.
Step3 Select a frame rate and click “Convert Now!“ to start the conversion process.
Conclusion
Converting video frame rates can significantly impact your video’s quality and viewing experience. Whether you’re looking to increase or decrease the frame rate, the above options provide easy and efficient ways. Regardless of the tool or software, the process is straightforward, allowing you to change the frame rate with just a few clicks. So go ahead and try out one of these options to improve your video’s frame rate today!
Free Download For macOS 10.14 or later
Filmora Video Editor and Frame Rate Converter is a versatile tool for Windows and Mac users that allows you to edit and convert your videos easily. It has a user-friendly interface and provides a wide range of video editing functions, such as trimming, cropping, splitting, and merging.
It also allows you to change the frame rate of your videos with a few simple clicks. You can easily adjust the frame rate to match the output device or platform, such as 30fps for YouTube or 60fps for Vimeo. Moreover, it also provides various video effects, transitions, and text/title templates to enhance your video quality. With Filmora, you can easily turn your home videos into professional-looking films.
How To Convert Video Frame Rate With Filmora
Here’s the step-by-step process of converting video frame rate using Filmora:
Step1 Create a new project, then import the video. Right click the video, and click “Properties.”

Step2 Check the current frame rate of the video

Step3 Add the video to the timeline, then click the “Export“ button
Step4 Change the frame rate and then click “Export.”

2. VideoPad Video Editor and Frame Rate Converter for Win/Mac
VideoPad Video Editor, created by NCH Software, is a user-friendly video editing software suitable for professionals and beginners. It offers various editing tools, video transitions and effects, customizable templates, and audio editing options.
One of its key features is the ability to convert the frame rate of your videos during the exporting process, making it a versatile tool for adjusting video playback smoothness. It supports multiple video formats for input and output; a free version is available for non-commercial use only.
Here’s the step-by-step process of converting video frame rate using VideoPad:
Step1 Open VideoPad and import your video to the timeline
Step2 Edit the video as desired, then navigate to “Export Video“ > “Video File.”
Step3 In the “Export File Settings“ window, select the desired frame rate, edit the file name, and choose the output folder, format, and resolution. Click “Create“ to export the video.

3. Frame Rate Converter - MiniTool Video Converter (Windows)

MiniTool Video Converter is a free and versatile tool for converting the frame rate of your videos. It offers multiple FPS options, such as 12, 15, 20, 23.97, 30, 50, and 60, which vary depending on your chosen video format. Not only can it change the frame rate, but it can also convert the video format, allowing you to import a video and then simultaneously change the format and frame rate.
Additionally, MiniTool offers options for video resolution, quality, encoder, and more. Furthermore, this video FPS converter allows you to record your computer screen in various formats, such as MP4, WMV, MKV, AVI, MOV, FLV, and TS in 15, 20, 25, and 30 fps. It also enables you to download videos and audio from YouTube.
Here’s the step-by-step process of converting video frame rate using MiniTool Video Converter:
Step1 Open MiniTool Video Converter, and upload the video you wish to convert by clicking “Add“ or dragging the file into the conversion area.

Step2 Under the Video tab in the new pop-up, select a format and click “Create Custom“ to open the settings window. Choose the desired frame rate.
Step3 Click “Convert,” and once completed, locate the converted video in the “Converted“ tab by clicking “Show in Folder.”

4. VLC Converter Frame Rate Conversion Software

The VLC media player is a well-known free tool for converting frame rates. It’s a versatile player that supports various audio-visual formats, including AVI, MPEG, WMV, DVD, and CD.
VLC also includes additional features such as cropping and de-interlacing, allowing you to configure and edit your files. VLC media players can also remove DRM protection and convert multiple videos in batches. It’s a great option for a free frame rate converter.
Here’s how to change the frame rate of a video using VLC Media Player:
Step1 Open the VLC media player and click on “Media“ > “Capture Device.”
Step2 Select “Convert/Save“ and browse for the video you want to change the frame rate
Step3 Select the desired frame rate in the “Convert/Save“ dialog box and click “Start.”
Step4 Wait for the conversion to finish and click “Convert/Save“ to find the new video with the adjusted frame rate.

5. HandBrake: Open Source Frame Rate Converter

Handbrake is a versatile, open-source video converter that can change the frame rate of a video from nearly any format to MP4, WebM, or MKV. It offers a wide range of frame rate options, from 5 to 120 FPS, making it a great tool for video production needs.
In addition to frame rate conversion, Handbrake also features various filters to enhance video quality, such as reducing noise, sharpening, rotating, flipping videos, adding subtitles, and more. With Handbrake, you can easily change the frame rate of your videos to your desired settings.
Here’s how to change the frame rate of a video using HandBrake:
Step1 Open Handbrake and add your video.
Step2 Select a format, change the frame rate, and choose the output folder.
Step3 Click “Start Encode“ to convert the video frame rate.

3 Video FPS Converters Online
In addition to software-based video frame rate converters, a variety of online video FPS converters can be used for quick and easy frame rate conversions.
These online tools are often user-friendly and require no installation, making them accessible from any device with an internet connection. These tools allow for easy uploading of videos and the ability to select the desired frame rate for conversion. They also offer a variety of output formats and options for video quality, resolution, and more.
1. VEED.IO Video FPS Converter Online
VEED’s online frame rate converter is a simple tool to increase or decrease your video’s frame rate without leaving your browser. It supports popular frame rates such as 16fps, 24fps, 30fps, 60fps, and more.
Lower the frame rate to create a stop-motion video or GIF, or increase it to make the video appear smoother. The tool can upload videos in any format and render them in seconds without installing converter apps or software. It works on Windows 10, Mac, Linux, and mobile devices.
Here’s how to change the video frame rate using Veed.io:
Step1 Import your video, or you can drag and drop your video.

Step2 Click “Export,” then click “switch to advanced settings“ to access frame rate settings. Adjust the frame rate using the framerate limit tool.

Step3 Click “Export Video,” and your video will render in seconds.

2. Video2Edit Video Frame Rate Converter Online Free

Video2Edit is an all-in-one online video solution that offers a variety of editing options such as conversion, rotation, cutting, merging, and audio compression and normalization. Additionally, it is also a highly efficient online video frame rate converter. With Video2edit, you can easily change the frame rate of your videos to match your specific needs.
This tool makes it simple whether you want to increase or decrease the frame rate. It supports a wide range of frame rates, from 16 to 60 fps, and can convert your video to any format you need. With this powerful and versatile tool, you can ensure that your videos look smooth and professional and have the right frame rate for your desired output.
Here’s how to change the video frame rate using Video2Edit:
Step1 On Video2Edit’s website, select “Convert from video“ and upload your file.

Step2 Select an output format and enter a new frame rate (1-120) in the “Change frame rate“ box.

Step3 Click “START“ to begin the conversion process.
3. AConvert Free Video Frame Rate Converter
With AConvert, you can quickly change the frame rate of your video to fit your needs. This online tool offers various frame rates, including 20fps, 24fps, 30fps, 50fps, and more, giving you the flexibility to find the right setting for your video.
Additionally, AConvert offers a range of video editing options, including cutting, merging, rotating, and cropping, allowing you to enhance your video in multiple ways. The process of converting frame rate with AConvert is simple.
Here’s how to change the video frame rate using AConvert:
Step1 Visit the AConvert website, select Video, and upload your video.
Step2 Choose “Change size, bitrate, or frame rate“ and select “Frame Rate“ in the drop-down menu.
Step3 Select a frame rate and click “Convert Now!“ to start the conversion process.
Conclusion
Converting video frame rates can significantly impact your video’s quality and viewing experience. Whether you’re looking to increase or decrease the frame rate, the above options provide easy and efficient ways. Regardless of the tool or software, the process is straightforward, allowing you to change the frame rate with just a few clicks. So go ahead and try out one of these options to improve your video’s frame rate today!
Best Method to Split Video Into Parts Online
Apart from offline editing software, online video splitters are also available with the evolution of technology nowadays. VEED is one of them. It helps you in splitting the video into different parts. The splitter tool is available for deleting a specific part of the video. Even you can save these parts separately. The whole video editor is extremely user-friendly.
Along with the split and trimming of the videos, VEED also offers several tools for editing and adding effects to the images. It is suitable for training video makers and social media managers to demonstrate the products, business presentations, and HR videos. There are camera filters present, including sepia, night vision, fish eye, and many others. This article is actually the guide regarding editing the videos through VEED. As a substitute, Wondershare Filmora is also under discussion that is also available for the same purpose.
How can you split the video clips online from VEED?
VEED also supports different formats such as WMV, AVI, MPEG and others. While editing the videos in VEED, it converts into MP4, which is compatible with most media players. This is the most suitable format for sharing videos on social networking sites. This splitter tool also helps create a GIF file with animation. Even there is also a possibility of creating GIFs from various software. No matter the duration is of the video, VEED can split the video. It is freely available, and you can use it easily from your browser. You don’t need purchasing of premium software for splitting the videos.
Step 1: Select the video and upload it on the VEED. Simply drag and drop your video file in the editor when you click on “Choose video”. After the selection, split or trim on the timeline and drag towards the left side corner to make the clips shorter.

Step 2: Click on where you are looking to split the video or keep moving the slider on the timeline. Now, you need to press the “S” key on the keyboard or click on the button “Split”. It is easy to delete the clips you don’t need anymore.
Step 3: Click on the option of “Export”, and this is the time for saving the new file as the MP4 video file. Simply export them as a single video file. It is the simplest option to use, and you can do all the steps in a few clicks.

An easier way to split the video into parts
An online tool is available for instant tasks and increases efficiency. But unfortunately, it becomes time-consuming whenever the size of your file is a large or unstable internet connection. Here emerges the usage of Filmora Video Editor . It is an incredible tool for creating and editing your images and videos. This also helps maintain the quality of the videos without any concern about their size. All the options of splitting, rotating, resizing, and trimming the videos are also available offline.
For Win 7 or later (64-bit)
For macOS 10.14 or later
Features:
- Cloning of the effects
- Magical effects
- Motion graphics and addition of animation as well
- Splitting of the screen and video clips
- Matching of the colour
- Controls available for adjusting the audios and videos
There is a number of options available for a variety of users. There is Wondershare Filmora Pro for the experts and solutions for the business owners. The whole business plan of Wondershare Filmora is for showcasing your brand. Support centres are available for helping you whenever you face any hurdle. All the new features are updated in the latest version of it. User guides are also available on its official site. For splitting the videos and extracting your favourite scenes, below steps are how to split the videos in Wondershare Filmora:
Step 1. To split the videos in Wondershare Filmora, the feature of scene detection is very helpful for this purpose. It automatically makes the parts of the videos depending on the changes of the scene. To enable this feature, right-click on your video clip in your library folder and choose the “scene detection” option for its window.

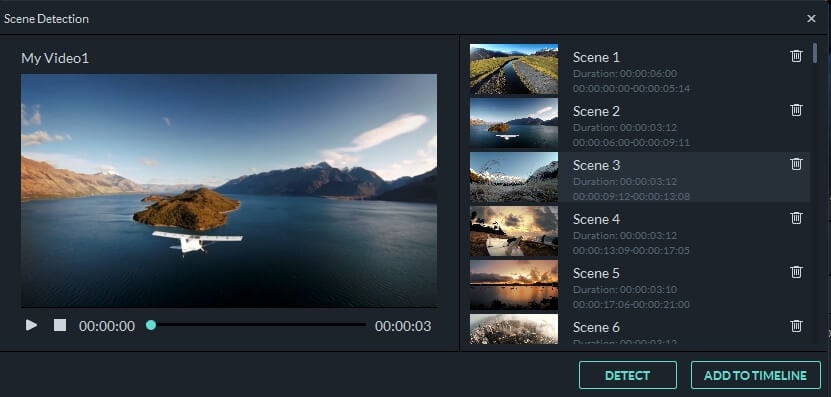
Step 2. Click on “Detect”, and Wondershare Filmora starts dividing the videos into the number of clips depending on changing of the scenes. Click on every small clip for it is easy for you to preview the outcome for its addition on the timeline.
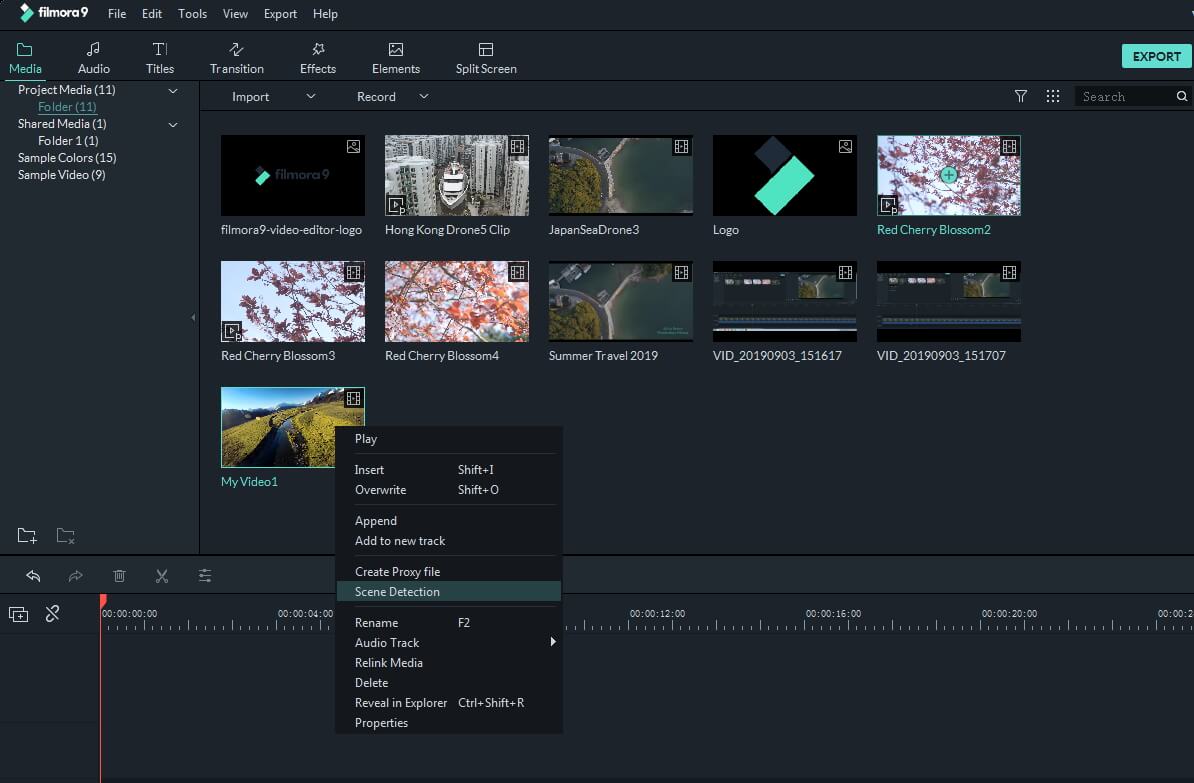
Step 3. For deleting the specific part of the video, its selection is essential and click on the trash icon. Click on “Add on the timeline” for separating the clips and edit them later. The clips you have split can be imported on the timeline, just like in the picture below.
Step 4. After splitting the video files, there are many options to apply to them like rotation, merger, cropping and recording the voice-over. Join the number of segments and add the background music to make the new video.
Wondershare Filmora is on the top ranking in the list of video editing software. Without facing any issues, you can simply create videos as well as edit them as well. You can get quickly a video editor of a professional level in just a smaller number of days of using it. All the tools are just on your timeline, and the simple interface makes it more enjoyable to use.
It is possible for the user to apply every feature in many ways, so Wondershare Filmora is very simple in handling all the functionalities. The whole software is full of fun. It guarantees to deliver highly professional results. Whether online or offline, Wondershare Filmora is also available to bring your imagination into reality. Even you can join the certification program of Wondershare Filmora. Start using it now as you will feel the difference in using it apart from other video editing software.
Step 2: Click on where you are looking to split the video or keep moving the slider on the timeline. Now, you need to press the “S” key on the keyboard or click on the button “Split”. It is easy to delete the clips you don’t need anymore.
Step 3: Click on the option of “Export”, and this is the time for saving the new file as the MP4 video file. Simply export them as a single video file. It is the simplest option to use, and you can do all the steps in a few clicks.

An easier way to split the video into parts
An online tool is available for instant tasks and increases efficiency. But unfortunately, it becomes time-consuming whenever the size of your file is a large or unstable internet connection. Here emerges the usage of Filmora Video Editor . It is an incredible tool for creating and editing your images and videos. This also helps maintain the quality of the videos without any concern about their size. All the options of splitting, rotating, resizing, and trimming the videos are also available offline.
For Win 7 or later (64-bit)
For macOS 10.14 or later
Features:
- Cloning of the effects
- Magical effects
- Motion graphics and addition of animation as well
- Splitting of the screen and video clips
- Matching of the colour
- Controls available for adjusting the audios and videos
There is a number of options available for a variety of users. There is Wondershare Filmora Pro for the experts and solutions for the business owners. The whole business plan of Wondershare Filmora is for showcasing your brand. Support centres are available for helping you whenever you face any hurdle. All the new features are updated in the latest version of it. User guides are also available on its official site. For splitting the videos and extracting your favourite scenes, below steps are how to split the videos in Wondershare Filmora:
Step 1. To split the videos in Wondershare Filmora, the feature of scene detection is very helpful for this purpose. It automatically makes the parts of the videos depending on the changes of the scene. To enable this feature, right-click on your video clip in your library folder and choose the “scene detection” option for its window.

Step 2. Click on “Detect”, and Wondershare Filmora starts dividing the videos into the number of clips depending on changing of the scenes. Click on every small clip for it is easy for you to preview the outcome for its addition on the timeline.

Step 3. For deleting the specific part of the video, its selection is essential and click on the trash icon. Click on “Add on the timeline” for separating the clips and edit them later. The clips you have split can be imported on the timeline, just like in the picture below.

Step 4. After splitting the video files, there are many options to apply to them like rotation, merger, cropping and recording the voice-over. Join the number of segments and add the background music to make the new video.
Wondershare Filmora is on the top ranking in the list of video editing software. Without facing any issues, you can simply create videos as well as edit them as well. You can get quickly a video editor of a professional level in just a smaller number of days of using it. All the tools are just on your timeline, and the simple interface makes it more enjoyable to use.
It is possible for the user to apply every feature in many ways, so Wondershare Filmora is very simple in handling all the functionalities. The whole software is full of fun. It guarantees to deliver highly professional results. Whether online or offline, Wondershare Filmora is also available to bring your imagination into reality. Even you can join the certification program of Wondershare Filmora. Start using it now as you will feel the difference in using it apart from other video editing software.
Step 2: Click on where you are looking to split the video or keep moving the slider on the timeline. Now, you need to press the “S” key on the keyboard or click on the button “Split”. It is easy to delete the clips you don’t need anymore.
Step 3: Click on the option of “Export”, and this is the time for saving the new file as the MP4 video file. Simply export them as a single video file. It is the simplest option to use, and you can do all the steps in a few clicks.

An easier way to split the video into parts
An online tool is available for instant tasks and increases efficiency. But unfortunately, it becomes time-consuming whenever the size of your file is a large or unstable internet connection. Here emerges the usage of Filmora Video Editor . It is an incredible tool for creating and editing your images and videos. This also helps maintain the quality of the videos without any concern about their size. All the options of splitting, rotating, resizing, and trimming the videos are also available offline.
For Win 7 or later (64-bit)
For macOS 10.14 or later
Features:
- Cloning of the effects
- Magical effects
- Motion graphics and addition of animation as well
- Splitting of the screen and video clips
- Matching of the colour
- Controls available for adjusting the audios and videos
There is a number of options available for a variety of users. There is Wondershare Filmora Pro for the experts and solutions for the business owners. The whole business plan of Wondershare Filmora is for showcasing your brand. Support centres are available for helping you whenever you face any hurdle. All the new features are updated in the latest version of it. User guides are also available on its official site. For splitting the videos and extracting your favourite scenes, below steps are how to split the videos in Wondershare Filmora:
Step 1. To split the videos in Wondershare Filmora, the feature of scene detection is very helpful for this purpose. It automatically makes the parts of the videos depending on the changes of the scene. To enable this feature, right-click on your video clip in your library folder and choose the “scene detection” option for its window.

Step 2. Click on “Detect”, and Wondershare Filmora starts dividing the videos into the number of clips depending on changing of the scenes. Click on every small clip for it is easy for you to preview the outcome for its addition on the timeline.

Step 3. For deleting the specific part of the video, its selection is essential and click on the trash icon. Click on “Add on the timeline” for separating the clips and edit them later. The clips you have split can be imported on the timeline, just like in the picture below.

Step 4. After splitting the video files, there are many options to apply to them like rotation, merger, cropping and recording the voice-over. Join the number of segments and add the background music to make the new video.
Wondershare Filmora is on the top ranking in the list of video editing software. Without facing any issues, you can simply create videos as well as edit them as well. You can get quickly a video editor of a professional level in just a smaller number of days of using it. All the tools are just on your timeline, and the simple interface makes it more enjoyable to use.
It is possible for the user to apply every feature in many ways, so Wondershare Filmora is very simple in handling all the functionalities. The whole software is full of fun. It guarantees to deliver highly professional results. Whether online or offline, Wondershare Filmora is also available to bring your imagination into reality. Even you can join the certification program of Wondershare Filmora. Start using it now as you will feel the difference in using it apart from other video editing software.
Step 2: Click on where you are looking to split the video or keep moving the slider on the timeline. Now, you need to press the “S” key on the keyboard or click on the button “Split”. It is easy to delete the clips you don’t need anymore.
Step 3: Click on the option of “Export”, and this is the time for saving the new file as the MP4 video file. Simply export them as a single video file. It is the simplest option to use, and you can do all the steps in a few clicks.

An easier way to split the video into parts
An online tool is available for instant tasks and increases efficiency. But unfortunately, it becomes time-consuming whenever the size of your file is a large or unstable internet connection. Here emerges the usage of Filmora Video Editor . It is an incredible tool for creating and editing your images and videos. This also helps maintain the quality of the videos without any concern about their size. All the options of splitting, rotating, resizing, and trimming the videos are also available offline.
For Win 7 or later (64-bit)
For macOS 10.14 or later
Features:
- Cloning of the effects
- Magical effects
- Motion graphics and addition of animation as well
- Splitting of the screen and video clips
- Matching of the colour
- Controls available for adjusting the audios and videos
There is a number of options available for a variety of users. There is Wondershare Filmora Pro for the experts and solutions for the business owners. The whole business plan of Wondershare Filmora is for showcasing your brand. Support centres are available for helping you whenever you face any hurdle. All the new features are updated in the latest version of it. User guides are also available on its official site. For splitting the videos and extracting your favourite scenes, below steps are how to split the videos in Wondershare Filmora:
Step 1. To split the videos in Wondershare Filmora, the feature of scene detection is very helpful for this purpose. It automatically makes the parts of the videos depending on the changes of the scene. To enable this feature, right-click on your video clip in your library folder and choose the “scene detection” option for its window.

Step 2. Click on “Detect”, and Wondershare Filmora starts dividing the videos into the number of clips depending on changing of the scenes. Click on every small clip for it is easy for you to preview the outcome for its addition on the timeline.

Step 3. For deleting the specific part of the video, its selection is essential and click on the trash icon. Click on “Add on the timeline” for separating the clips and edit them later. The clips you have split can be imported on the timeline, just like in the picture below.

Step 4. After splitting the video files, there are many options to apply to them like rotation, merger, cropping and recording the voice-over. Join the number of segments and add the background music to make the new video.
Wondershare Filmora is on the top ranking in the list of video editing software. Without facing any issues, you can simply create videos as well as edit them as well. You can get quickly a video editor of a professional level in just a smaller number of days of using it. All the tools are just on your timeline, and the simple interface makes it more enjoyable to use.
It is possible for the user to apply every feature in many ways, so Wondershare Filmora is very simple in handling all the functionalities. The whole software is full of fun. It guarantees to deliver highly professional results. Whether online or offline, Wondershare Filmora is also available to bring your imagination into reality. Even you can join the certification program of Wondershare Filmora. Start using it now as you will feel the difference in using it apart from other video editing software.
Also read:
- In 2024, Do You Want to Know How to Convert YouTube SBV Subtitles to SRT Format? Here Is an Ultimate Guide About It
- How to Zoom Video in VLC Media Player
- Updated Learn How to Use Face Tracking in After Effects to Quickly Mask Out Faces, Animate Objects on Faces, and More for 2024
- Hitfilm Express Video Editor Review
- Updated In 2024, How to Add Text to Video
- Updated How to Add Font Effects to Videos for 2024
- Updated Are You Looking to Find Out How to Loop YouTube Videos on iPhone? Learn How to Loop Your Favorite YouTube Video on Your iPhone, so You Can Play that Part over and Over for 2024
- Updated In 2024, Quickly Turn Any Video Into a Paper Rip Effect
- New 2024 Approved How to Animate Text in A Video
- New 5 Best Video Denoisers for 2024
- New In 2024, How to Create Text Animation for Videos
- Video Inspiration for Birthday Slideshow
- How to Change Aspect Ratio in iMovie for 2024
- Updated How to Zoom Video in VLC Media Player for 2024
- New 7 Solutions to Cut Video on Mac without Using FFmpeg?
- Updated 2024 Approved Learn How to Perform Velocity Edits on Your PC
- New | Best 8 Online GIF to APNG Converters for 2024
- Updated Dollar-Store DIY Hacks to Use for Filmmaking for 2024
- Updated To Find the Best Tool Out of Hundreds of Online and Offline GIF to Video Converters, You Need to Check These Specifications. Read This Review and Get the Best Out of the Best
- Updated 2024 Approved Sync Audio With Video With Filmora
- New 2 Effective Ways to Add Text Behind Objects
- In 2024, How To Edit Youtube Videos In Easy Steps
- Updated Sometimes It May Happen to You that You Are Watching a Video that Has Very Low Graphics or, in Other Words, Low Visual Quality. You Might Wish to Change, Instead Improve the Video Quality. Here, AI Upscaling Video Comes to Use for 2024
- 2024 Approved This Article Will Help You Understand How to Create Video Contents that Convert Sales
- In 2024, How I Got Free After Effects Templates Slideshow with Simple Trick
- Updated Are You Finding It Challenging to Upload and Create a Link for Your Video? Well, This Detailed Upload Video to Link Guide Will Help You with This. Check It Out Now for 2024
- New Fast Method to Match Color in Photoshop for 2024
- New Are You Eager to Discover the Method of Video Scaling in Filmora? You Are in the Right Place because This Discussion Will Cover the Content on This Matter
- Updated 10+ Best Unlimited FCPX Slideshow Templates for 2024
- Updated How to Add Subtitles in Canva?
- New Top 10 Picks for Flawless Slow Motion Video Generation for 2024
- Updated Are You Trying to Make Slow-Mo Videos on Instagram? In This Article, We Will Discuss Top-Rated Ways to Produce Perfect Slow-Motion Videos for Instagram
- Updated 15 Best CapCut Templates for Slow Motion Editing for 2024
- New In 2024, If You Do Not Know How to QuickTime Trim Video Clips, You Are in the Right Place. We Have Provided Information that Will Help You Trim Videos with This Application and Make Them Engaging for Viewers
- Updated In 2024, Hitfilm Express - A Guide to Download, Install, Key Features
- Updated 2024 Approved 6 Free Tools To Radial Blur Photos Online
- In 2024, Live Stream on YouTube Using Zoom
- Updated Whatsapp Video converterKeywords Convert Video for Whatsapp 6600; Video Converter for Whatsapp 6600; Reduce Video Size for Whatsapp 1600; Whatsapp Supported Video Formats 720; Convert Video to Whatsapp Format 590 for 2024
- 2024 Approved The Ultimate Guide to Using Shotcut To Rotate Videos
- Updated In 2024, 10 Best Websites to Discover Free Premiere Pro Video Templates
- Updated 2024 Approved Guide to Create an Intro Video with Filmora
- Have You Ever Heard Hyperlapse and Tume Lapse Videos? Do You Know the Differences Between Them? This Article Will Introduce the Concepts, Features and Differnces of Them for 2024
- Techniques You Never Heard of for Learning YouTube AI Marketing for 2024
- New Efficient Ways to Change Slow Motion Video to Normal on iPhone for 2024
- Updated In 2024, Best 5 Solutions on How to Add Emojis to iPhone
- New In 2024, Best Filmic Pro LUTs For Video Editing
- In 2024, Top 10 Telegram Spy Tools On Realme V30T for Parents | Dr.fone
- How to Remove Activation Lock On the iPhone 14 Pro Without Previous Owner?
- New In 2024, 12 Best Stop Motion Studios Worth Recommending
- Thinking About Changing Your Netflix Region Without a VPN On Infinix Smart 8 HD? | Dr.fone
- Why Is My Poco C50 Offline? Troubleshooting Guide | Dr.fone
- Cellular Network Not Available for Voice Calls On Vivo Y27 5G | Dr.fone
- How to add digital signature to a PDF v1.5 document
- Fixing Foneazy MockGo Not Working On HTC U23 | Dr.fone
- In 2024, Proven Ways in How To Hide Location on Life360 For Motorola Moto G14 | Dr.fone
- Can I use iTools gpx file to catch the rare Pokemon On Oppo Reno 11F 5G | Dr.fone
- Bricked Your Nokia C22? Heres A Full Solution | Dr.fone
- What To Do When Nokia C12 Plus Has Black Screen of Death? | Dr.fone
- In 2024, Network Locked SIM Card Inserted On Your Motorola Moto G24 Phone? Unlock It Now
- The Magnificent Art of Pokemon Go Streaming On Lava Yuva 3 Pro? | Dr.fone
- What Is an AI Headshot Generator, In 2024
- In 2024, 4 Ways to Transfer Music from Vivo V27 Pro to iPhone | Dr.fone
- Play Store Not Working On Vivo V29? 8 Solutions Inside | Dr.fone
- Title: Full Guide to Funcall Voice Changer and Its Alternatives
- Author: Morgan
- Created at : 2024-05-19 05:11:38
- Updated at : 2024-05-20 05:11:38
- Link: https://ai-video-editing.techidaily.com/full-guide-to-funcall-voice-changer-and-its-alternatives/
- License: This work is licensed under CC BY-NC-SA 4.0.


