
Guide to Add Transition Effects in Premiere Pro for 2024

Guide to Add Transition Effects in Premiere Pro
Shooting a video is a job half done and editing the video is equally important. The way you edit your recorded video determines how good your video will look in the end. When it comes to professional video editing, Adobe Premiere Pro is the most preferred premium video editor. Premiere Pro comes with a wide range of transitions to apply in your videos and make jump-cuts smooth for the eyes.
Premiere Pro is not the most user-friendly video editor, and the learning curve is rather steep. That is why you need to know how to add transitions in Premiere accurately so that the cuts in your videos look eye-soothing. You also need to learn about how to edit the transition effects in Premier Pro to suit your requirements and preferences. We have illustrated how to add and edit transitions in Premium Pro as well as mentioned an alternative way to add video transitions easily.
Part 1. How to add transitions in Premiere
Adding transitions to videos is very common in video editing. Premiere Pro is popular for its variety of video transition effects. Applying video transition effects in Premiere Pro is very easy. You get access to transitions from Effects panel that is located at the topmost bar. Here are the steps on how to add transition effects in Premiere Pro.
Step1 Open Adobe Premiere Pro and go to File> Import. Select a video clip from your hard drive and click on Open button.

Step2 Drag the video clip from the Project panel and drop it to Timeline for adding transitions.
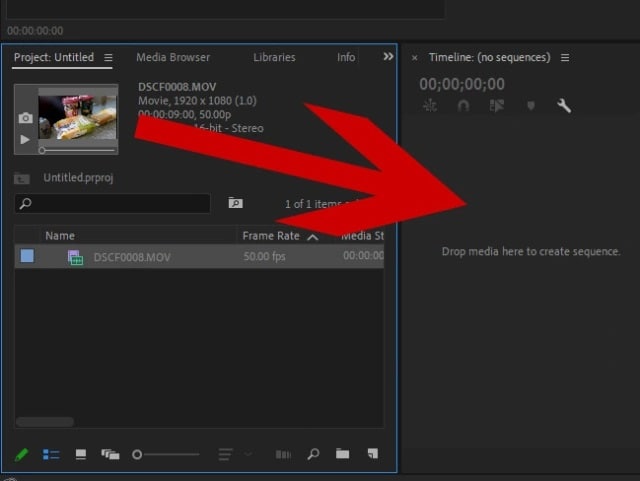
Step3 Go to Effects tab located at the top and click on Video transitions option.
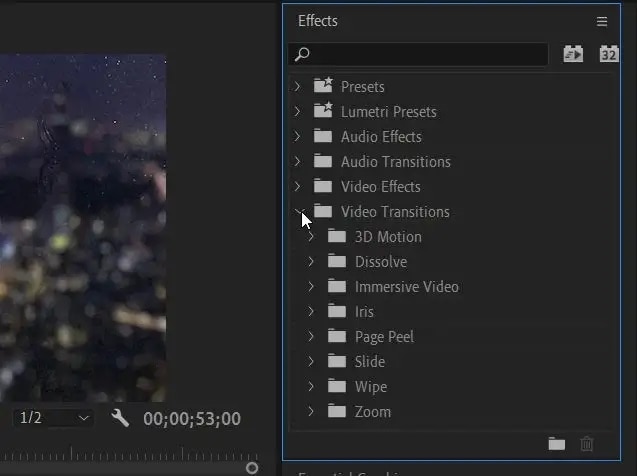
Step4 You will see different categories of video transitions and select your desired transition.
Step5 Click and drag the selected transition and drop it to the Timeline and place it anywhere on the clip where you want the transition to play.
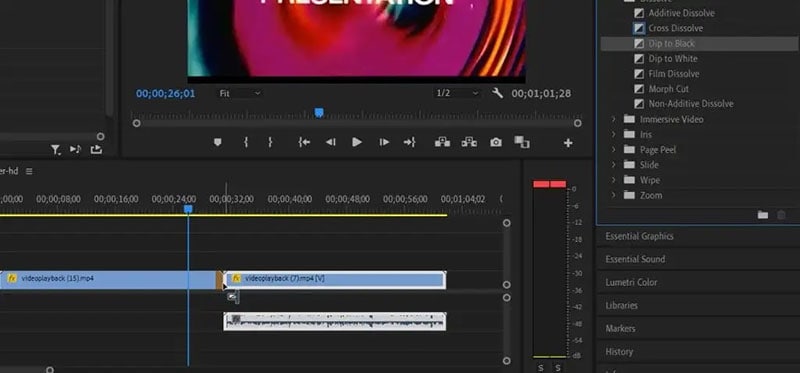
Generally, a video transition is placed in between two video clips so that jumping from one clip to another is seamless. After placing the transition, play the video to check out how it looks.
Part 2. How to edit transitions in Premiere
Now that you know how to add transition Premiere Pro, you should also know how to edit the transitions after applying them. This is because when you drag and drop the transition on the Timeline, the transition comes with default duration. You can edit the duration as per your video requirements. Besides, Premiere Pro lets you edit different settings of the video transitions for customization. Here are the steps on how to edit transitions in Premiere.
Step1 Click on the transition you have applied on the Timeline.
Step2 Go to Effect Controls tab located at the top by the side of Effects tab.
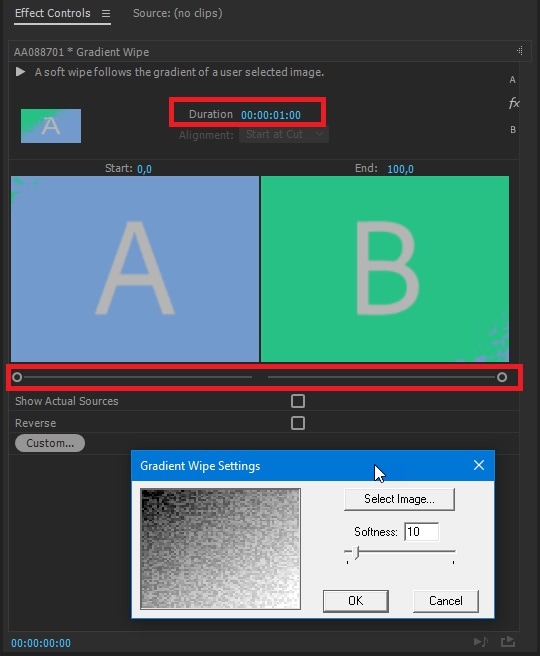
Step3 You will see a mini timeline under Effect Controls and labels A and B denoting the start and end time.
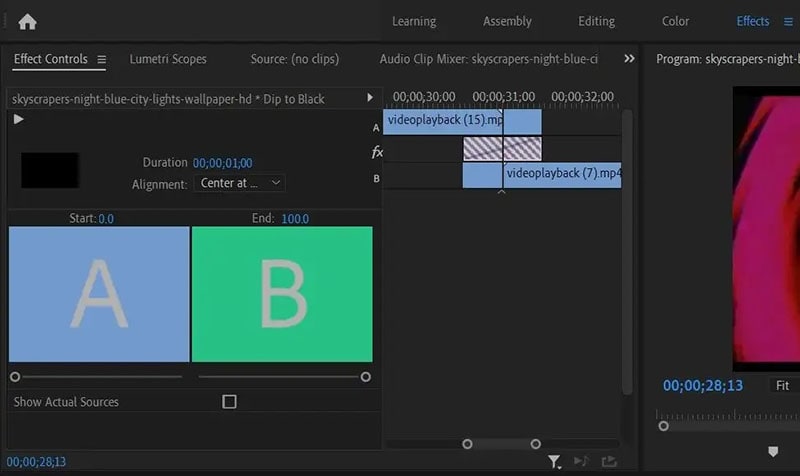
Step4 You can adjust the slider below A label to change the start time of the transition. Similarly, you can change the slider below B label to change the end time of the transition.
Step5 Instead of setting the start and end time of the transition, you can set the duration of the transition as a whole. Go to Duration option located above A and B labels and drag right and left to change the duration.
Step6 You can also change the Alignment to place the transition as a Center at cut, Star at Cut, and End at cut of video clips.
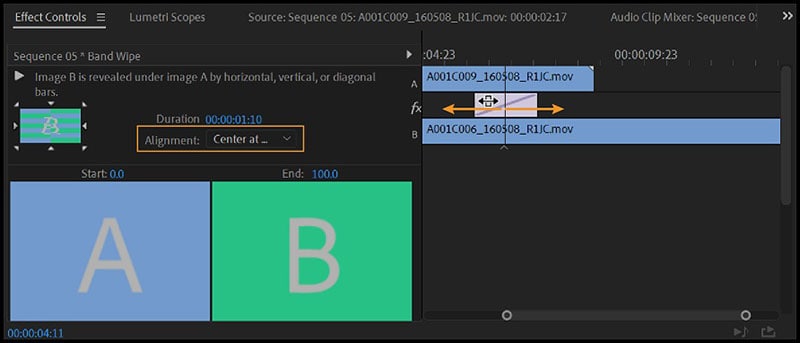
You can play the video and watch the changes you make to the transitions in real-time. Different transitions will have different options under Effect Controls tab.
Part 3. Premiere alternative way to add video transitions
There could be multiple reasons why you are looking for a Premiere alternative ways to add video transitions. You might be finding Premiere Pro difficult to learn. Besides, you may not be satisfied with the collection of video transitions in Premiere Pro. We recommend Wondershare Filmora as the best Premiere alternative to add video transitions to your video clips.
Filmora is a professional video editor like Premiere Pro but there are more transition effects available. Filmora team keeps on adding latest and trending transitions from time to time and you can download them easily. In fact, Filmora is a more user-friendly video editor in comparison to Premiere Pro. That is why Filmora is equally popular among beginners and professionals in video editing. Here is how to add video transitions in Filmora .
Free Download For Win 7 or later(64-bit)
Free Download For macOS 10.14 or later
Step1 Open Filmora and click on New Project. Drag and drop your video clips under Project Media folder.

Step2 Drag and drop the video clips on Timeline. If it is one video clip, you can cut it into multiple clips to add transitions in between them.

Step3 There are different categories of transition effects and drag and drop your desired transition on the Timeline.

Step4 Place the transitions in between video clips and drag the transition as per the duration requirements. Play the video and once you are satisfied, click on Export button to save the video.

Part 4. Related FAQs about Premiere Transitions
How do I add transitions to all clips in Premiere?
Import all the video clips to Timeline in Premiere. Go to Effects> Video Transitions and drag and drop the video transitions of your choice to Timeline. You should place the transitions in between the video clips and adjust their duration as per your requirements for smoother transition for jump cuts.
Where are the transitions in Premiere Pro?
The transitions are present under Effects tab located at the topmost bar. There are different types of video transitions as well as audio transitions available. If you are looking for how to add text transitions in Premiere Pro, you can type the text and add effects from Graphics tab.
How to add transitions to photos in Premiere Pro?
Adding transitions to photos in Premiere Pro is the same as videos. Therefore, you should import photos to Project panel and drag and drop them to Timeline. Go to Effects> Video Transitions and drop the selected transitions in between the photos.
Conclusion
We have illustrated how to add a transition in Premiere in simple steps. Besides, we have also explained how to edit the transitions in Premiere to fit in your video clips perfectly. If you are looking for an alternative to Premiere Pro for adding video transitions, we recommend Wondershare Filmora where there are more transitions, and the user interface is super easy and intuitive.
Free Download For macOS 10.14 or later
Step1 Open Filmora and click on New Project. Drag and drop your video clips under Project Media folder.

Step2 Drag and drop the video clips on Timeline. If it is one video clip, you can cut it into multiple clips to add transitions in between them.

Step3 There are different categories of transition effects and drag and drop your desired transition on the Timeline.

Step4 Place the transitions in between video clips and drag the transition as per the duration requirements. Play the video and once you are satisfied, click on Export button to save the video.

Part 4. Related FAQs about Premiere Transitions
How do I add transitions to all clips in Premiere?
Import all the video clips to Timeline in Premiere. Go to Effects> Video Transitions and drag and drop the video transitions of your choice to Timeline. You should place the transitions in between the video clips and adjust their duration as per your requirements for smoother transition for jump cuts.
Where are the transitions in Premiere Pro?
The transitions are present under Effects tab located at the topmost bar. There are different types of video transitions as well as audio transitions available. If you are looking for how to add text transitions in Premiere Pro, you can type the text and add effects from Graphics tab.
How to add transitions to photos in Premiere Pro?
Adding transitions to photos in Premiere Pro is the same as videos. Therefore, you should import photos to Project panel and drag and drop them to Timeline. Go to Effects> Video Transitions and drop the selected transitions in between the photos.
Conclusion
We have illustrated how to add a transition in Premiere in simple steps. Besides, we have also explained how to edit the transitions in Premiere to fit in your video clips perfectly. If you are looking for an alternative to Premiere Pro for adding video transitions, we recommend Wondershare Filmora where there are more transitions, and the user interface is super easy and intuitive.
Green Screen YouTube Videos
This is a large green backdrop that is placed in the background of a shot to allow for digital effects later on. A majority of popular YouTube vloggers use green to enhance interesting background views to their videos. Screen replaces the background and adds depth and visually interesting patterns that ends up keeping the viewer captivated.
Why use Green Screen
1. Creativity
There are several effects that can be applied to green screen video editing in the editing process, it gives one a chance to explore their imagination. A good editor can really customize the video to make the production really stand out from those of the competitors.
2. Flexibility
There are portable green screens that can be taken to any location of choice for video shooting. Location allows one endless possibilities without having to spend time and resources doing assembling of different sets and backgrounds. The desired feel to the video can be simply achieved by an image.
3. Budget
Filming YouTube using green screen is a cost effective way of producing professional video content on a small budget. This is a great idea for upcoming YouTube vloggers as expenses catering for travel and location are eliminated.
4. Consistency
At some point in YouTube green screen use, you may be affected by the weather and worse pf all, natural lighting may end up being problematic while you are on location doing your video shots. However, with YouTube Video green screen technology, ambient lighting is blocked out and the screen can be lit the same way every time. This brings consistency over a number of videos the user applies green screen on.
5. Clarity
Youtube video green screen allows for an additional visual ellements and diagrams such as graphics, this can be added on to the video to illustrate what the speaker is saying. This green screen effect helps the viewer to gain a better understanding of any concepts or complex illustrations mentioned by the presenter.
6. Branding
YouTube green screen logo and branding colors can be easily added into the video, this can easily make the viewers to identify the video with your business. Apart from standing out from other competitors, you will also have a professional, high quality and reliable video to use anytime you please.
Best Places to find Green Screen Effects
Filmstock
Filmstock features a massive library full of royalty-free stock video, video effects, sound effects, video templates, and so much more. There are resources on the platform for all kinds of creators, including video editors, content creators, social media influencers, and marketers. You get unlimited access to all these resources for a single price when you subscribe to Filmstock. While there are other marketplaces that offer similar options, Filmstock does things differently.
Green Screen Effects
1. Balance Beam
Ever wanted to walk across a small beam way high up in the air? Me neither, but you can make a cool effect that looks like you did. Throwing a green screen on the ground and then building a balance beam over top of it you can start recording the main shot. Strap a GoPro to your head and look down while walking across the beam.
2. Shrink Effect
Okay this one is really easy. Take some footage of a person walking in front of a green screen, ideally looking at something to be featured in the main shot to sell the effect. Then take a close up of a small object. Key out the green behind the person, take the footage and drop it over your close up, and then scale it to match. Duplicate it, mirror it horizontally to act as a reflection and then drop the opacity and add some blur to make it look more realistic. It’s a fun little trick.
3. Floating Object
This is a simple one, making an object appear to be floating. This is another two clip shot. First, take a shot with the object hanging in front of a blue screen. Then on the same location, take another shot but while pretending to levitate the hammer. Masking around the hammer will get rid of the string for hanging, key out the blue, and then dropping it on top of the other clip is all you need.
Best Green Screen Video Editor for YouTube
Filmora
If you’re just starting out with video editing, or just want a simple program that works, Wondershare Filmora might be what you’re looking for. It has the essential tools, and anyone can learn to use it easily.
Wondershare Filmora is the one of best video editing software with cool features that compares to other competing video editing Softwares. Many video editing programs claim to offer professional results; Filmora is one of a few consumer-level tools that actually delivers.
For Win 7 or later (64-bit)
For macOS 10.12 or later
Installation Steps
- Click the icon in the center of the Media Library to add files directly.
- Go File > Import Media > Import Media Files.
- Drag and drop to the Media Library directly.
While importing a media file, Wondershar Filmora may ask you if you wish to create a proxy file to accelerate the editing process. Select “Yes” to have a fast video editing experience.
You can also import video clips using your Touch Bar controls if your computer has Touch Bar.
Record a media file
Apart from the videos shot by your digital devices, you can also directly import media files by recording video from your webcam, capturing the computer screen, or recording a voice-over.
Find green screen effects: Now you can select the different types of green screen effects.

Apply green screen: drag the effects to the timeline to apply it to your videos.

Save and Export: Then you can save or export the video.
A green screen is a green surface used as a background when filming so that any image can replace the screen behind the actor or presenter. Shooting with a green screen involves filming a person or adding visual effects in front of a solid color. Then, by digitally removing or “keying out” that color, you can drop that scene onto the background of your choice in post-production. Removing the colored background is also referred to as “chroma keying.”
Steps with Images
The first step is to record footage in front of a green screen so that you can import it into WeVideo as a media file. To capture footage that is optimal for the Green Screen effect, please ensure the following:
- There is ample lighting distributed evenly around you with no shadows.
- You are in front of a solid background with no creases. Green or blue is the recommended color for your background.
- The quality of your camera is high enough so that the footage is not pixelated or grainy. 720p HD footage or above is recommended.
Step 2) Add media to the Timeline
Once you’ve captured the footage you want to use for the Green Screen effect, import that media file and add it to the Timeline. Remember to place the green screen footage in the Video 2 track and the clip you would like to use as the background in the Video 1 track.
If you are using more than two video tracks, place the green screen footage in the track above whichever track holds the background footage to ensure proper layering techniques are used.
Step 3) Open the clip editor
Double click on the green screen clip in the Timeline to open the clip editor. In the clip editor, navigate to the Color Keying tab.
Step 4) Use the color picker tool
Select the color picker tool and then click anywhere on the green screen footage to apply the effect.
Step 5) _(optional) Adjust the color settings
The Green Screen effect should automatically apply without the need to adjust the color settings. However, if you would like to make these additional modifications, you can use the scroll bars to make the following adjustments:
- **Show- You can select Mask to reveal a black and white representation of the mask you are applying using the color keying tool. Notice that the black area represents transparent sections of your video, while the white area represents opaque sections.
- **Color Balance- This adjusts how selective the effect is. The further right you scroll, the wider the range of tints and shades are removed.
- **Color Sensitivity- This smooths out any pixelation and rough edges of color that remain.
- **Defringe- This helps reduce color bleeding at the edges of your mask. The left and right sliders control the level of white and black respectively to help match the edges of the mask with your new background color.
For macOS 10.12 or later
Installation Steps
- Click the icon in the center of the Media Library to add files directly.
- Go File > Import Media > Import Media Files.
- Drag and drop to the Media Library directly.
While importing a media file, Wondershar Filmora may ask you if you wish to create a proxy file to accelerate the editing process. Select “Yes” to have a fast video editing experience.
You can also import video clips using your Touch Bar controls if your computer has Touch Bar.
Record a media file
Apart from the videos shot by your digital devices, you can also directly import media files by recording video from your webcam, capturing the computer screen, or recording a voice-over.
Find green screen effects: Now you can select the different types of green screen effects.

Apply green screen: drag the effects to the timeline to apply it to your videos.

Save and Export: Then you can save or export the video.
A green screen is a green surface used as a background when filming so that any image can replace the screen behind the actor or presenter. Shooting with a green screen involves filming a person or adding visual effects in front of a solid color. Then, by digitally removing or “keying out” that color, you can drop that scene onto the background of your choice in post-production. Removing the colored background is also referred to as “chroma keying.”
Steps with Images
The first step is to record footage in front of a green screen so that you can import it into WeVideo as a media file. To capture footage that is optimal for the Green Screen effect, please ensure the following:
- There is ample lighting distributed evenly around you with no shadows.
- You are in front of a solid background with no creases. Green or blue is the recommended color for your background.
- The quality of your camera is high enough so that the footage is not pixelated or grainy. 720p HD footage or above is recommended.
Step 2) Add media to the Timeline
Once you’ve captured the footage you want to use for the Green Screen effect, import that media file and add it to the Timeline. Remember to place the green screen footage in the Video 2 track and the clip you would like to use as the background in the Video 1 track.
If you are using more than two video tracks, place the green screen footage in the track above whichever track holds the background footage to ensure proper layering techniques are used.
Step 3) Open the clip editor
Double click on the green screen clip in the Timeline to open the clip editor. In the clip editor, navigate to the Color Keying tab.
Step 4) Use the color picker tool
Select the color picker tool and then click anywhere on the green screen footage to apply the effect.
Step 5) _(optional) Adjust the color settings
The Green Screen effect should automatically apply without the need to adjust the color settings. However, if you would like to make these additional modifications, you can use the scroll bars to make the following adjustments:
- **Show- You can select Mask to reveal a black and white representation of the mask you are applying using the color keying tool. Notice that the black area represents transparent sections of your video, while the white area represents opaque sections.
- **Color Balance- This adjusts how selective the effect is. The further right you scroll, the wider the range of tints and shades are removed.
- **Color Sensitivity- This smooths out any pixelation and rough edges of color that remain.
- **Defringe- This helps reduce color bleeding at the edges of your mask. The left and right sliders control the level of white and black respectively to help match the edges of the mask with your new background color.
For macOS 10.12 or later
Installation Steps
- Click the icon in the center of the Media Library to add files directly.
- Go File > Import Media > Import Media Files.
- Drag and drop to the Media Library directly.
While importing a media file, Wondershar Filmora may ask you if you wish to create a proxy file to accelerate the editing process. Select “Yes” to have a fast video editing experience.
You can also import video clips using your Touch Bar controls if your computer has Touch Bar.
Record a media file
Apart from the videos shot by your digital devices, you can also directly import media files by recording video from your webcam, capturing the computer screen, or recording a voice-over.
Find green screen effects: Now you can select the different types of green screen effects.

Apply green screen: drag the effects to the timeline to apply it to your videos.

Save and Export: Then you can save or export the video.
A green screen is a green surface used as a background when filming so that any image can replace the screen behind the actor or presenter. Shooting with a green screen involves filming a person or adding visual effects in front of a solid color. Then, by digitally removing or “keying out” that color, you can drop that scene onto the background of your choice in post-production. Removing the colored background is also referred to as “chroma keying.”
Steps with Images
The first step is to record footage in front of a green screen so that you can import it into WeVideo as a media file. To capture footage that is optimal for the Green Screen effect, please ensure the following:
- There is ample lighting distributed evenly around you with no shadows.
- You are in front of a solid background with no creases. Green or blue is the recommended color for your background.
- The quality of your camera is high enough so that the footage is not pixelated or grainy. 720p HD footage or above is recommended.
Step 2) Add media to the Timeline
Once you’ve captured the footage you want to use for the Green Screen effect, import that media file and add it to the Timeline. Remember to place the green screen footage in the Video 2 track and the clip you would like to use as the background in the Video 1 track.
If you are using more than two video tracks, place the green screen footage in the track above whichever track holds the background footage to ensure proper layering techniques are used.
Step 3) Open the clip editor
Double click on the green screen clip in the Timeline to open the clip editor. In the clip editor, navigate to the Color Keying tab.
Step 4) Use the color picker tool
Select the color picker tool and then click anywhere on the green screen footage to apply the effect.
Step 5) _(optional) Adjust the color settings
The Green Screen effect should automatically apply without the need to adjust the color settings. However, if you would like to make these additional modifications, you can use the scroll bars to make the following adjustments:
- **Show- You can select Mask to reveal a black and white representation of the mask you are applying using the color keying tool. Notice that the black area represents transparent sections of your video, while the white area represents opaque sections.
- **Color Balance- This adjusts how selective the effect is. The further right you scroll, the wider the range of tints and shades are removed.
- **Color Sensitivity- This smooths out any pixelation and rough edges of color that remain.
- **Defringe- This helps reduce color bleeding at the edges of your mask. The left and right sliders control the level of white and black respectively to help match the edges of the mask with your new background color.
For macOS 10.12 or later
Installation Steps
- Click the icon in the center of the Media Library to add files directly.
- Go File > Import Media > Import Media Files.
- Drag and drop to the Media Library directly.
While importing a media file, Wondershar Filmora may ask you if you wish to create a proxy file to accelerate the editing process. Select “Yes” to have a fast video editing experience.
You can also import video clips using your Touch Bar controls if your computer has Touch Bar.
Record a media file
Apart from the videos shot by your digital devices, you can also directly import media files by recording video from your webcam, capturing the computer screen, or recording a voice-over.
Find green screen effects: Now you can select the different types of green screen effects.

Apply green screen: drag the effects to the timeline to apply it to your videos.

Save and Export: Then you can save or export the video.
A green screen is a green surface used as a background when filming so that any image can replace the screen behind the actor or presenter. Shooting with a green screen involves filming a person or adding visual effects in front of a solid color. Then, by digitally removing or “keying out” that color, you can drop that scene onto the background of your choice in post-production. Removing the colored background is also referred to as “chroma keying.”
Steps with Images
The first step is to record footage in front of a green screen so that you can import it into WeVideo as a media file. To capture footage that is optimal for the Green Screen effect, please ensure the following:
- There is ample lighting distributed evenly around you with no shadows.
- You are in front of a solid background with no creases. Green or blue is the recommended color for your background.
- The quality of your camera is high enough so that the footage is not pixelated or grainy. 720p HD footage or above is recommended.
Step 2) Add media to the Timeline
Once you’ve captured the footage you want to use for the Green Screen effect, import that media file and add it to the Timeline. Remember to place the green screen footage in the Video 2 track and the clip you would like to use as the background in the Video 1 track.
If you are using more than two video tracks, place the green screen footage in the track above whichever track holds the background footage to ensure proper layering techniques are used.
Step 3) Open the clip editor
Double click on the green screen clip in the Timeline to open the clip editor. In the clip editor, navigate to the Color Keying tab.
Step 4) Use the color picker tool
Select the color picker tool and then click anywhere on the green screen footage to apply the effect.
Step 5) _(optional) Adjust the color settings
The Green Screen effect should automatically apply without the need to adjust the color settings. However, if you would like to make these additional modifications, you can use the scroll bars to make the following adjustments:
- **Show- You can select Mask to reveal a black and white representation of the mask you are applying using the color keying tool. Notice that the black area represents transparent sections of your video, while the white area represents opaque sections.
- **Color Balance- This adjusts how selective the effect is. The further right you scroll, the wider the range of tints and shades are removed.
- **Color Sensitivity- This smooths out any pixelation and rough edges of color that remain.
- **Defringe- This helps reduce color bleeding at the edges of your mask. The left and right sliders control the level of white and black respectively to help match the edges of the mask with your new background color.
How to Download Windows Movie Maker 2012 Version
Suppose you are looking for professionals who can edit videos for you and halt your search. It is because, with the help of windows movie maker 2012, you can now fulfill your basic video editing needs for free. There is no need to pay extra to create the videos of your choice. You can do so sitting in the comfort of your house as windows movie maker has some of the best video editing tools that are user-friendly and simple. You will be amazed to make videos with a professional touch.
One of the best features of a movie maker is that you can encapsulate images, sound, and videos into a single frame. With the help of its exciting features, you can edit your videos according to your choice and upload them on social media. Since Windows movie maker 2012 is available online for free, you can easily download the program and launch it on your PC for a perfect video editing journey.
Part 1. Key Features of Windows Movie Maker 2012
Windows movie maker has some of the most exciting features that can help you create professional videos of your choice. Following are some of the key features:
1. Create your movie with photos and images
Windows movie maker enables you to create your personalized movie with the help of photos and videos of your choice. Since it supports files of various formats, you can easily add them to the storyboard to create a viable sequence.
2. Import videos and audio
Windows movie maker allows you to import audio and video from your computer’s hard drive and fix them according to your convenience. You can even edit them with exciting editing tools.
Moreover, you also have the option to download music of your choice online and add it to your storyboard.
3. Record live video and audio
One of the exciting features of Windows movie maker 12 is that you can do live recording from your webcam and use the microphone to add narration to your video. Once you have completed the process, you have the option to edit it at your convenience.
4. Modify the sequence of the videos
Once you have inserted all the video clips on the storyboard, you can modify and change the sequence to make it look like a story. The timeline feature of windows movie maker allows you to drag and drop the video clips according to your choice.
5. Add image effects and transitions
Windows movie maker has some fantastic image effects and transitions. You can choose the effects you can apply to the raw images and give them a professional look.
Moreover, with the help of the transition features, you can make exuberant effects between the video clips.
6. Integrate opening and closing credits
Windows movie maker allows you to give a natural movie effect to your videos. It has the option of incorporating opening and closing credits to your video so that it gives a feel of a real movie.
Part 2. Download and Install Windows Movie Maker 2012
In the present era, you may find it challenging to get the download option of windows movie maker 2012. It is because it does not exist as a standalone application, and you will get it with windows essentials movie maker. Moreover, if you visit the official site of Microsoft, you may find a link for downloading the movie maker. You do not need any tech support to download the software. The most exciting part is that you can download the full version free of cost.
Steps to download windows movie maker 2012
- Download windows live essential by visiting the official website and clicking on the download option.
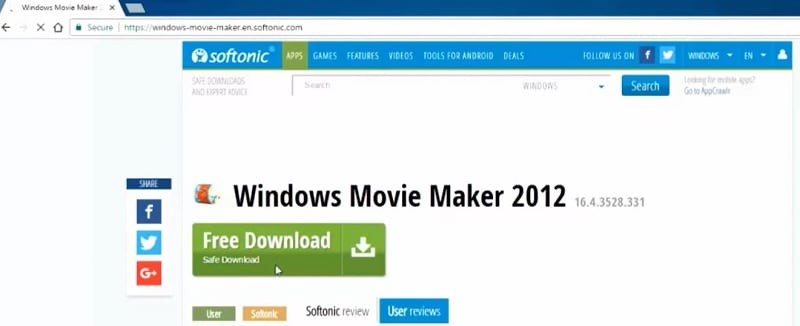
- Click to open the setup file from the download folder of your computer.
- Now, at this point, opt to click on run to start the installation process of windows essentials.
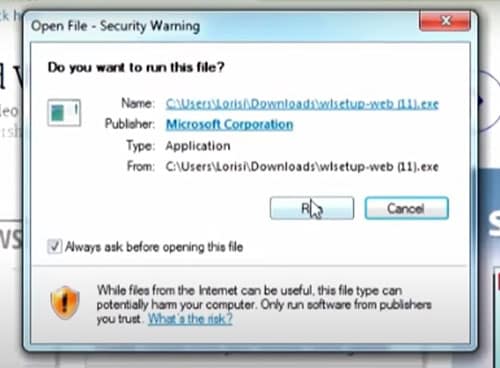
- Click on ‘Install all windows essential.
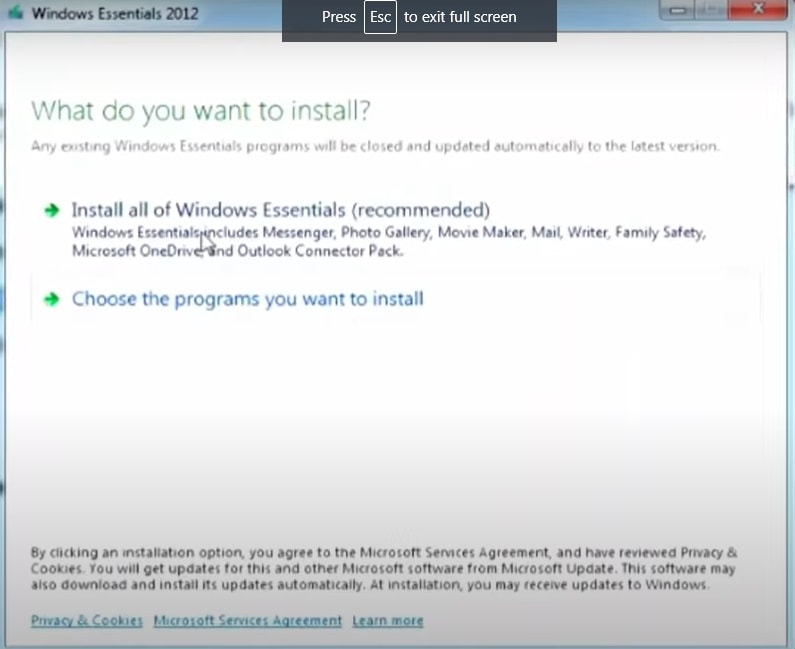
- The windows movie maker 2012 will start installing on your computer.
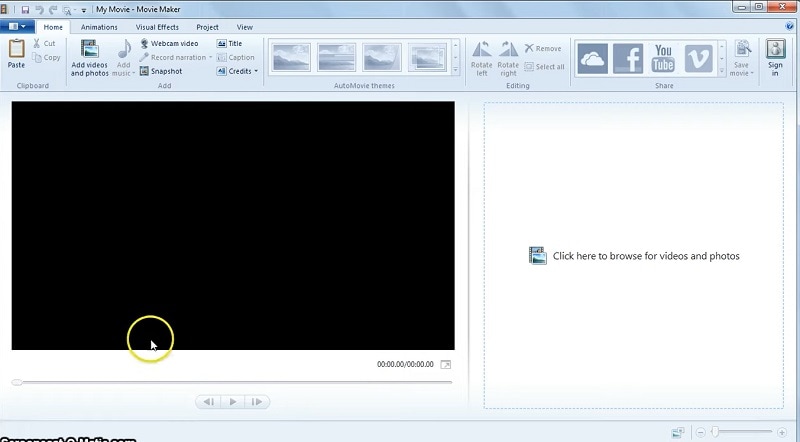
- Once the installation is complete, you can click on the windows movie maker 2012 icon to open the application.
Part 3. How to use Windows Movie Maker 2012?
Though windows movie maker 2012 is a free application, it is professional video editing software. With the help of the software, you can easily create amazing videos and publish them over the net and on social media. It has some of the best editing tools to help you create amazing videos.
Steps to edit a video with windows movie maker
Windows movie maker has some of the best editing tools with which you will be able to enhance your videos easily. Following are the steps to edit a video:
- Drag the video clips from your hard drive to the storyboard of the windows movie maker.
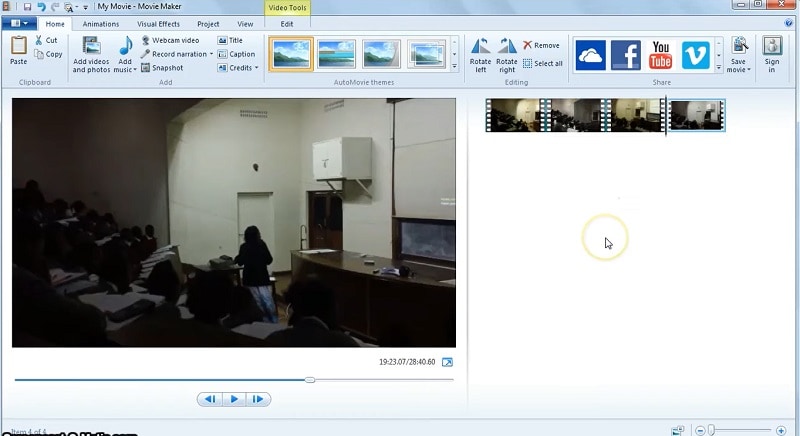
- The software has a trimming tool with which you can easily edit unwanted areas.
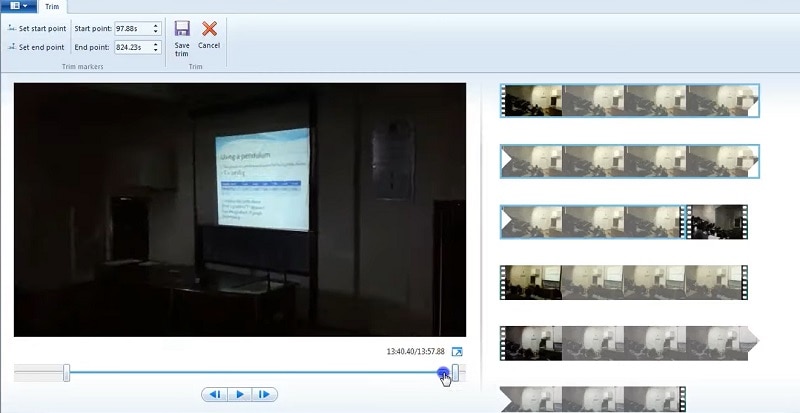
- Click on the area that you want to trim and then opt to click on ‘Set Start Point’ and ‘Set End Point.’ You can also split a particular video clip according to your convenience or add effects as per need.
- Click on the preview to watch the edited video.
Part 4. Alternative Way to Create Videos on Windows PC
One of the best alternatives for windows movie maker 2012 is Filmora . It is a powerful yet easy-to-use software with which you can create beautiful videos. You can add multiple video clips and audio to create a professional video. One of the most delicate features of Filmora is that you can sync the audio with the video, thus making the sound much clearer. You can download Filmora easily over the net as it is free. You need to follow the links to install the software on your personal computer or laptop finally.

Free Download For Win 7 or later(64-bit)
Free Download For macOS 10.14 or later
Following are some simple steps to edit a video with Filmora .
- Before you start to edit your video, you must plan the sequence of the video clips.
- Drag and drop the video clips to the timeline.
- Use the trim option to trim and edit the videos so that there is a smooth transition from one video clip to another.
- Fiora has a valuable collection of different transitions that you can use to give a professional touch to your video. You can add the transitions while trimming the video clips.
- Add titles to your video to give it a movie-like feel to the audience.
- The best part of the editing features of Filmora is the image effects tool. However, it would be best if you spent some time using the effects in your video clips so that it looks perfect.
- You can also add sound to your video to make it more attractive.
After you finish with the editing, output your project and save it.
Conclusion
Therefore, it is time you explore your creativity with the help of windows live movie maker 2012. It has some of the best and easy-to-use editing tools with which you can create high-quality videos. Moreover, since the software is simple and easy to use, one does not have to know photo editing thoroughly. It is because you can quickly identify the tools without much difficulty. So, if you are looking for a simple video editor that is free as well as has professional features, then you must go for windows movie maker 2012. You will get the best experience of your life in video editing.
Using AI to Replace Skies: Finding the Right Methods
Digital imagery has seen some ground-breaking revolutions in previous years. The latest AI trends have transformed how we edit and see images. Many creative tools now have integrated features to let users manipulate images as they wish. One of the applications of these AI integrated tools is their ability to replace sky.
You can now use AI to replace the sky in an image, change the background, add or remove elements, and whatnot. If you want to read more about sky replacement and how to do it in photos, the following read is at your service. Discover the leading tools to help you with sky replacement with a bonus tip for this task.
Sky Replacement A cross-platform works like magic for background removal or sky replacement photos

Part 1: AI Sky Replacement with BeFunky: Looking into the Step-by-Step Overview
If you are looking for a smart tool to replace a sky online, you can try BeFunky . BeFunky is a notable image editor and graphic design tool. It offers an all-in-one creative platform to help you easily edit photos, create graphic designs, make collages, and more.
BeFunky previously offered a background remover tool to replace skies. But now, it has a dedicated sky replacement feature that can easily detect the sky and foreground of your image. This allows for precise adjustments and accurate replacements.
Steps for BeFunky’s AI Sky Replacer
Step 1: Open the Sky Replacer feature of BeFunky on your web browser. Tap the “Open” button or drop the images into the interface for sky replacement.

Step 2: Select the “Change Sky” button once you have uploaded your image.

Step 3: You can now select a new sky from the stock images provided or choose an image from your device. You can also manually adjust the contrast, saturation, and other aspects of the sky or the foreground. Tap on the “Save” button to save the image to your device.

Part 2: Fotor AI: Performing Sky Replacement with Perfection
Another remarkable AI tool that can be used to change the sky from the background is Fotor . It is a free online photo editor that can help enhance images. Fotor is quite useful for bulk-editing images. You can also use it to transform text into images.
Fotor features a free sky replacement option that can be used to swap skies from images. You can easily add starry, sunny, gloomy, cloudy, and rainy skies to your images. The AI sky replacement of Fotor can help personalize skies in no time.
Steps for Sky Replacement in Fotor AI
Step 1: Launch Fotor on your browser and open the “Background Remover” tool. Upload your image to Fotor, and it will automatically remove the image background.

Step 2: From the toolbar at the right, tap “Backgrounds.” Here, you can find lots of sky images that you can use in your picture. You can also generate a custom sky by writing prompts in the built-in AI background generator. Now, replace the sky and download the image to your device.

Part 3: Changing Skies with Autoenhance.ai: A Review
Autoenhance.ai is a web-based photo editor integrated with AI power. It offers fast and automatic processing to enhance your workflow. Autoenhance.ai offers perspective correction to fix wonky angles in images. It also offers image relighting and HDR merging for better results.
This online platform lets users create the perfect sky effect in their images. Its comprehensive sky packs cover a range of seasons and vibrant views. The tool caters well to business and professional needs. Using this sky replacement online, you can add a vibrant yet natural touch to your images.
Step 1: Go to Autoenhance.ai and toggle the switch next to the “Sky Replacement” option to turn it on. Now, use the dropdown menu below the option to choose a sky preference for your image. Then, upload the images to change the sky online.

Step 2: Based on your chosen sky pack, Autoenhance.ai will replace the sky in your image. You can then download your image with the replaced sky.

Part 4: SnapEdit: Online AI Sky Replacement Made Easy
For a simple and clean online editor to replace a sky, you can try SnapEdit . It is an easy-to-use photo editor with AI technology to bring the best out of your photos. You can use SnapEdit to remove unwanted objects from photos. The tool can also remove watermarks and text from images.
For efficient sky change online, SnapEdit offers an effective solution. Its sky replacement feature can change the sky’s color, feel, and gradient in the background. While changing the sky, SnapEdit automatically adjusts the photo’s overall color for better results.
Steps to Replace Sky Using SnapEdit
Step 1: Open the Sky Changer feature of SnapEdit on your device. Tap the “Upload Image” button or paste the image whose background you wish to remove.

Step 2: SnapEdit will offer a range of sky options you can choose to swap with the original. You can tap the “More Sky” option and find further options to choose from. The slider next to the “Color Set” option is available to help blend the image with the background. Once you are satisfied with the results, tap the “Download” button to save your image.

Bonus Part: Make Composed AI Background Replacements with Wondershare Filmora
The above-mentioned tools are wonderful options to help you change sky online. However, online tools require constant internet stability and can crash due to heavy site traffic. To avoid these issues, it is better to choose offline tools that can make the editing process easier. For AI editing, there is no better software solution than Wondershare Filmora .
Filmora is a video editing software designed for professional use. It is an intuitive solution that can create powerful results in no time. With a wide range of resourceful toolsets, Filmora contains everything your videos might need. This multi-platform tool can help users bring the best out of their videos in no time. You can use Filmora to enhance your videos and boost your productivity.
Free Download For Win 7 or later(64-bit)
Free Download For macOS 10.14 or later
Key Features of Wondershare Filmora
Filmora offers a wide range of useful features for videos. It is the perfect one-stop solution for video editing. Some of the features offered by Filmora include:
- Motion Tracking: Filmora lets users track the movement of an object in a video. This helps to pin graphics and media files to follow the motion. You can add text, mosaic, or other elements that move smoothly with the object using Filmora.

- Preset Templates: To help you start your video editing journey, Filmora offers built-in templates. More than 1000 preset templates are available to give your videos a head-start. You can also create and share your own templates in Filmora.

- Screen Recorder: Filmora acts as an efficient screen recorder. You can record your screen and webcam at the same time for video. You can thus record high-quality gameplay, tutorials, lectures, and other videos.

- AI Copywriting: Using Filmora, you can now create AI scripts for your videos. The tool uses ChatGPT integration to help you create custom content for videos. This also helps generate creative video titles and descriptions.

- Auto Reframe: You can resize your videos automatically using Filmora. The tool enables users to convert horizontal videos to portrait versions. Filmora can also help users adjust the frame ratios manually. Its built-in size templates can help you create videos for all major platforms.

Step-by-Step Guide to Replace Background of Videos using Filmora
Filmora offers a quick and simple process for AI sky replacement. Here is the step-by-step guide to help you replace the background of videos using AI on Filmora:
Step 1Add Tracks in Filmora
Install and launch Wondershare Filmora on your device. From the main interface, tap the “Add” button to import the video whose background you wish to change. Also, add the track with the background you wish to swap with the original one.

Step 2Replace Background From Media
While keeping the layer with the original video selected, go to the “Video” tab from the right panel and tap “AI Tools”. Toggle the switch next to the “Chroma Key” option if your video features a monochromatic background. If you want to replace a more complex background, enable the “AI Portrait” option. As soon as you toggle the switch, Filmora will automatically replace the background.

Step 3Export Video After Sky Replacement
Once you are done with the AI sky swapping, tap the “Export” button from the top. In the pop-up window, you can rename your project and select other preferences, such as the resolution and frame rate. Choose a pathway and tap “Export” to save your video with the replaced background.

Free Download For Win 7 or later(64-bit)
Free Download For macOS 10.14 or later
Conclusion
The power of AI has now made it easy to enhance and edit images. Sky replacement is one of the wonders bestowed by AI tools. You can use the wonderful editors mentioned above for AI sky replacement online. If you want a thorough offline solution, you can try Wondershare Filmora. Its remarkable toolset and powerful features make it one of the best tools for replacing skies in images.
Free Download Free Download Learn More

Part 1: AI Sky Replacement with BeFunky: Looking into the Step-by-Step Overview
If you are looking for a smart tool to replace a sky online, you can try BeFunky . BeFunky is a notable image editor and graphic design tool. It offers an all-in-one creative platform to help you easily edit photos, create graphic designs, make collages, and more.
BeFunky previously offered a background remover tool to replace skies. But now, it has a dedicated sky replacement feature that can easily detect the sky and foreground of your image. This allows for precise adjustments and accurate replacements.
Steps for BeFunky’s AI Sky Replacer
Step 1: Open the Sky Replacer feature of BeFunky on your web browser. Tap the “Open” button or drop the images into the interface for sky replacement.

Step 2: Select the “Change Sky” button once you have uploaded your image.

Step 3: You can now select a new sky from the stock images provided or choose an image from your device. You can also manually adjust the contrast, saturation, and other aspects of the sky or the foreground. Tap on the “Save” button to save the image to your device.

Part 2: Fotor AI: Performing Sky Replacement with Perfection
Another remarkable AI tool that can be used to change the sky from the background is Fotor . It is a free online photo editor that can help enhance images. Fotor is quite useful for bulk-editing images. You can also use it to transform text into images.
Fotor features a free sky replacement option that can be used to swap skies from images. You can easily add starry, sunny, gloomy, cloudy, and rainy skies to your images. The AI sky replacement of Fotor can help personalize skies in no time.
Steps for Sky Replacement in Fotor AI
Step 1: Launch Fotor on your browser and open the “Background Remover” tool. Upload your image to Fotor, and it will automatically remove the image background.

Step 2: From the toolbar at the right, tap “Backgrounds.” Here, you can find lots of sky images that you can use in your picture. You can also generate a custom sky by writing prompts in the built-in AI background generator. Now, replace the sky and download the image to your device.

Part 3: Changing Skies with Autoenhance.ai: A Review
Autoenhance.ai is a web-based photo editor integrated with AI power. It offers fast and automatic processing to enhance your workflow. Autoenhance.ai offers perspective correction to fix wonky angles in images. It also offers image relighting and HDR merging for better results.
This online platform lets users create the perfect sky effect in their images. Its comprehensive sky packs cover a range of seasons and vibrant views. The tool caters well to business and professional needs. Using this sky replacement online, you can add a vibrant yet natural touch to your images.
Step 1: Go to Autoenhance.ai and toggle the switch next to the “Sky Replacement” option to turn it on. Now, use the dropdown menu below the option to choose a sky preference for your image. Then, upload the images to change the sky online.

Step 2: Based on your chosen sky pack, Autoenhance.ai will replace the sky in your image. You can then download your image with the replaced sky.

Part 4: SnapEdit: Online AI Sky Replacement Made Easy
For a simple and clean online editor to replace a sky, you can try SnapEdit . It is an easy-to-use photo editor with AI technology to bring the best out of your photos. You can use SnapEdit to remove unwanted objects from photos. The tool can also remove watermarks and text from images.
For efficient sky change online, SnapEdit offers an effective solution. Its sky replacement feature can change the sky’s color, feel, and gradient in the background. While changing the sky, SnapEdit automatically adjusts the photo’s overall color for better results.
Steps to Replace Sky Using SnapEdit
Step 1: Open the Sky Changer feature of SnapEdit on your device. Tap the “Upload Image” button or paste the image whose background you wish to remove.

Step 2: SnapEdit will offer a range of sky options you can choose to swap with the original. You can tap the “More Sky” option and find further options to choose from. The slider next to the “Color Set” option is available to help blend the image with the background. Once you are satisfied with the results, tap the “Download” button to save your image.

Bonus Part: Make Composed AI Background Replacements with Wondershare Filmora
The above-mentioned tools are wonderful options to help you change sky online. However, online tools require constant internet stability and can crash due to heavy site traffic. To avoid these issues, it is better to choose offline tools that can make the editing process easier. For AI editing, there is no better software solution than Wondershare Filmora .
Filmora is a video editing software designed for professional use. It is an intuitive solution that can create powerful results in no time. With a wide range of resourceful toolsets, Filmora contains everything your videos might need. This multi-platform tool can help users bring the best out of their videos in no time. You can use Filmora to enhance your videos and boost your productivity.
Free Download For Win 7 or later(64-bit)
Free Download For macOS 10.14 or later
Key Features of Wondershare Filmora
Filmora offers a wide range of useful features for videos. It is the perfect one-stop solution for video editing. Some of the features offered by Filmora include:
- Motion Tracking: Filmora lets users track the movement of an object in a video. This helps to pin graphics and media files to follow the motion. You can add text, mosaic, or other elements that move smoothly with the object using Filmora.

- Preset Templates: To help you start your video editing journey, Filmora offers built-in templates. More than 1000 preset templates are available to give your videos a head-start. You can also create and share your own templates in Filmora.

- Screen Recorder: Filmora acts as an efficient screen recorder. You can record your screen and webcam at the same time for video. You can thus record high-quality gameplay, tutorials, lectures, and other videos.

- AI Copywriting: Using Filmora, you can now create AI scripts for your videos. The tool uses ChatGPT integration to help you create custom content for videos. This also helps generate creative video titles and descriptions.

- Auto Reframe: You can resize your videos automatically using Filmora. The tool enables users to convert horizontal videos to portrait versions. Filmora can also help users adjust the frame ratios manually. Its built-in size templates can help you create videos for all major platforms.

Step-by-Step Guide to Replace Background of Videos using Filmora
Filmora offers a quick and simple process for AI sky replacement. Here is the step-by-step guide to help you replace the background of videos using AI on Filmora:
Step 1Add Tracks in Filmora
Install and launch Wondershare Filmora on your device. From the main interface, tap the “Add” button to import the video whose background you wish to change. Also, add the track with the background you wish to swap with the original one.

Step 2Replace Background From Media
While keeping the layer with the original video selected, go to the “Video” tab from the right panel and tap “AI Tools”. Toggle the switch next to the “Chroma Key” option if your video features a monochromatic background. If you want to replace a more complex background, enable the “AI Portrait” option. As soon as you toggle the switch, Filmora will automatically replace the background.

Step 3Export Video After Sky Replacement
Once you are done with the AI sky swapping, tap the “Export” button from the top. In the pop-up window, you can rename your project and select other preferences, such as the resolution and frame rate. Choose a pathway and tap “Export” to save your video with the replaced background.

Free Download For Win 7 or later(64-bit)
Free Download For macOS 10.14 or later
Conclusion
The power of AI has now made it easy to enhance and edit images. Sky replacement is one of the wonders bestowed by AI tools. You can use the wonderful editors mentioned above for AI sky replacement online. If you want a thorough offline solution, you can try Wondershare Filmora. Its remarkable toolset and powerful features make it one of the best tools for replacing skies in images.
Also read:
- Best 10 Tools To Make Quiz Videos for 2024
- Updated How to Select and Use The Best BRAW LUTs
- Updated Discover How to Download Mobile Phone Green Screen Videos and Pictures for Free. Elevate Your Content with HD Quality Green Screen Frames for 2024
- New Logo Intro Videos Are the Hottest Trend in Town and Are Gaining Popularity Quickly. Keep Reading This Article to Learn Their Importance and How to Design One for 2024
- Figuring Out Proper Ways to Play a Video in Slow Motion on iPhone for 2024
- Updated How to Make Falling Text Effect in Filmora, In 2024
- Updated Are You Tired of Spending Too Much Time on Video Editing? Learn the Most Effective Ways to Manage Your Timeline and Streamline Your Video Editing Process
- Updated 2024 Approved Have You Ever Heard Hyperlapse and Tume Lapse Videos? Do You Know the Differences Between Them? This Article Will Introduce the Concepts, Features and Differnces of Them
- New In 2024, 8 Free Photo Collage with Music Video Maker
- Updated 2024 Approved Tips for Choosing Location & Scheduling Music Video
- Top 5 Video Filter Software Enhance Your Videos for 2024
- 2024 Approved Why Your Transparent GIF Is Hard to Remove
- New This Article Will Help You Understand How to Create Flying Objects Using Editing Tools Such as Wondershare Filmora for 2024
- Updated Have You Ever Wanted to Stop Your Video and Hold on to a Single Frame to Draw Attention to a Point or for Dramatic Flair? Good News! VEGAS Pro Makes It Easy to Do Just That. In This Tutorial, Well Look at How to Make Sony Vegas Freeze Frame
- Updated Spooky Halloween Best 15+ Halloween Countdown Video Clips
- How to Reduce the Size of Video Files Online? In This Article, Well Share the Top 10 Free Online Video Compressors that You Can Use Anywhere at Any Time and on Any Device
- New How to Make Dynamic Video Collages?
- Updated In 2024, How To Add Scrolling Text Effect
- Updated Are You in a Funny Chat with a Friend and Want to Send a GIF but Couldnt Find One? Here We Will Provide You with the Top Image for GIF Converters. So, Let Us See How to Turn Images Into GIFs Very Quickly
- Updated Have You Tried Using a Craig Bot on Discord to Record Audio? Do You Have an Idea of Using a Discord Craig Bot Is Safe? Get Answers to These Questions and More From This Article as You Continue Reading
- Updated Confused as to How to Add Subtitles to a Video on iPhone? No Worries as We Bring You the Best Solution to Get the Task Done
- 2024 Approved Looking for a Legitimate Tutorial to Create and Add Text Effects in Adobe Premiere Pro? Here Are the Simple Steps for Premiere Pro Text Effects and Find an Alternative Way
- New 2024 Approved Back up and Organize Your Files to Protect Any Misfortune Befalling Them. The Article Will Guide You on How to Back up and Manage Your Footage
- Updated In 2024, It Is Crucial to Introduce Your Kids to the Different Colors and Practice the Color Matching Game. So, Here Are the Various Factors Related to Color Matching for Your Child with a Tool to Help You in It Ideally
- 2024 Approved How to Record Super Slow Motion Videos on Your Phone?
- In 2024, Efficient Ways to Manage Your Timeline
- 2024 Approved Tactics to Create Transparent Image in Minimal Steps
- Updated In 2024, 10 Best Free GIF Background Remover for PC and Online
- Making Slow Motion Videos in Premiere Pro A Review on The Best Methods for 2024
- Updated In 2024, This Article Introduce You the Best Video Trimmers to Use on Different Devices, Check Them Out and Choose Your Favoriate One
- Updated How Does the YouTube AI Algorithm Work - AI EXPLAINED
- 10+ Royalty-Free 5 Second Countdown Footage HD & 4K Clips Included
- New In 2024, Here, You Will Learn How to Add a Realistic Fire Effect Using Wondershare Filmora. That Will Help to Boost Your Channel and Decorate Your YouTube Channel with Creative and Unique Effects
- New 20 Must-Have Graduation Songs
- 2024 Approved Want to Make a Slide Show Video? Heres How
- In 2024, Storyboards Are Amazing Way if You Want to Present Your Story in a Visual Way, Like Explaining Any Process or Giving Any Information. It Is a Graphic Layout to Tell You a Story
- New 2024 Approved Do You Want Your Photo and Video Edits to Look Like Peter McKinnons? Color-Grade Your Media Files with Peter McKinnon LUTs to Make Your Content Stand Out
- Updated 2024 Approved How to Add the Popular Video Text Effects to Your Video?
- Updated In 2024, Are You Looking for a Video Format Converter Free? We Will Introduce the 5 Best Online Converters and Also the 5 Best Video Format Converters for PC
- Updated Are You Excited to Find Out the Top-Class VHS Video Effects Maker? Put Your Worries at Rest because This Article Will Provide the Best VHS Effect Makers for 2024
- 2024 Approved Are You Searching for the Best Canon LUT Download? This Article Provides the Best Recommendations for Creating the Best Professional Videos
- Wondering How to Make a Perfect Love Video to Express Your Love for Your Special One and Share with the World? Here Are the Best Love Video Makers with Music for 2024
- New How to Create Realistic Fire Effects
- Updated Bandicut Video Editor Review for 2024
- New 2024 Approved How to Select and Use The Best BRAW LUTs
- Updated Back up and Organize Your Files to Protect Any Misfortune Befalling Them. The Article Will Guide You on How to Back up and Manage Your Footage for 2024
- In 2024, 5 Ways to Track Xiaomi Redmi 12 without App | Dr.fone
- 3 Ways to Change Location on Facebook Marketplace for Apple iPhone XR | Dr.fone
- How to install hardware device drivers manually in Windows 10
- In 2024, How to Mirror PC Screen to Vivo V30 Lite 5G Phones? | Dr.fone
- How To Repair System of Apple iPhone 11? | Dr.fone
- How To Transfer WhatsApp From iPhone 6s to other iPhone 13 devices? | Dr.fone
- In 2024, How to Change Location On Facebook Dating for your OnePlus Ace 2V | Dr.fone
- Top Apps and Online Tools To Track Vivo X Flip Phone With/Without IMEI Number
- In 2024, How I Transferred Messages from OnePlus Nord CE 3 5G to iPhone 12/XS (Max) in Seconds | Dr.fone
- Dose Life360 Notify Me When Someone Checks My Location On Apple iPhone 13 mini? | Dr.fone
- Disable screen lock on Y78t
- How do you play MKV files on Xperia 1 V?
- Top 10 Password Cracking Tools For Samsung Galaxy S24 Ultra
- What Does Jailbreaking Apple iPhone 6s i Do? Get Answers here | Dr.fone
- Title: Guide to Add Transition Effects in Premiere Pro for 2024
- Author: Morgan
- Created at : 2024-06-24 01:30:34
- Updated at : 2024-06-25 01:30:34
- Link: https://ai-video-editing.techidaily.com/guide-to-add-transition-effects-in-premiere-pro-for-2024/
- License: This work is licensed under CC BY-NC-SA 4.0.

