:max_bytes(150000):strip_icc():format(webp)/how-to-check-ram-in-android-5192499-8e8b91b6d94b4ab98c3bfa9ba41a4f66.jpg)
Guide to Create a Timelapse Video in After Effects

Guide to Create a Timelapse Video in After Effects
Time-Lapse movies are great for a variety of projects; you can use them as establishing shots in sitcoms, corporate marketing videos, and they can make lovely backgrounds for animated slideshows. A time-lapse video is essentially a series of photographs taken at regular intervals to depict how the environment changes gradually over a shorter period of time. In this article, we’ll demonstrate how you may quickly and easily build an After Effects time-lapse effect.
With that said, let’s start!
Step 1. Create a new composition
Calculating your composition length to accommodate the frame rate and number of images is the first step in generating a time-lapse video.
- Verify the number of images you have for your Sequence.
- New Composition Creation. Selecting a frame rate: A time lapse film produced at 30 frames per second will flow smoothly, but you can select any frame rate you like.
- To determine the duration of your composition, divide the number of photographs you have by the frame rate you’ve chosen. For instance, if you use 600 photos at 30 frames per second, your composition will last 20 seconds.
Step 2. Import your images
You are prepared to make a time-lapse sequence if all of your photographs are saved to the same folder and are in the same order. If you are working directly from your Camera, you will likely have Camera Raw files, although this procedure works with PNG and JPEG sequences.
- Press Command/Control I on your keyboard or select File > Import. Find the folder holding your image sequence.
- To begin, select the first picture in the sequence. If all of your images have accurate names, After Effects will be able to identify a sequence of images.
- Make sure the Force Alphabetical Order and Camera Raw Sequence checkboxes are selected. Your Time-Lapse Sequence will display in the Project Browser Panel after you click Import.
- Once you’ve watched how it plays, you can adjust the Frame Rate by right-clicking the Sequence in the Project Browser and selecting Interpret Footage > Main.
- To update your time-lapse, modify the Frame Rate setting and click OK.

Step 3. Create movements
- After Effects’ Time-Lapse Sequence can be used just like any other standalone clip. This implies that you may give your time-lapse clip movement by adding Keyframes and Effects.
- Place your Playhead at the beginning of the clip after choosing the Image Sequence. Make a keyframe for the scale or position.
- To generate a second Keyframe for the value of your choice, move to the end of the clip. Make any necessary Clip modifications.
- Right-click on the timeline, choose New > Adjustment Layer, then add your effects to the Adjustment Layer to add effects like noise and grain.
Step 4. Create slow motion from a video
You can import your video after you’ve shot it to prepare it for editing. The same steps, including naming your photos in order, must be taken for the Time Lapse sequence. It may be advantageous to entirely rename both your Image Sequence and Performer clip.
- Drag the finished Time Lapse sequence to your Timeline after completing it as previously explained.
- Over the Time Lapse, add the Performer Clip to the Timeline.
- Choose Time>Time Stretch by performing a right-click on the performer clip.
- You can alter the Stretch Factor or Duration in the dialogue box. When you alter one parameter, the other will reflect the new Stretch Factor or Duration for you.
Step 5. Make an overlay
You can alter the Stretch Factor or Duration in the dialogue box. When you alter one parameter, the other will reflect the new Stretch Factor or Duration for you.
- Find Luma Key in the Effect Control Panel and drag it to your clip.
- Change the Key Type setting in the Effect Control Panel to Key Out Brighter.
- The Threshold, Tolerance, and Edge settings should be adjusted until only the silhouette is visible.
- Use the Pen or Mask Tool to create a circle around the parts you want to delete if you discover any corners of your clip that are still visible.
- Add any Effects, such as Light Leaks, to your Adjustment Layer by choosing “Right-click > New > Adjustment layer.”

After Effects CC must be opened, a new project must be created, the Import File menu option must be selected, and the appropriate folder containing the altered still images must be located and selected before the time-lapse photos can be turned into a film. You need to make sure that the JPEG Series box is checked, as well as the Force Alphabetical Order box.
Once you have clicked on the first image in the sequence. The time-lapse video that you uploaded appears in the project library. After performing a right-click on the filename, select “New Comp from Selection” from the context menu.
Step 6. Exporting your video
After getting our sequence to perform some kind of slow, understated animation so that it appears as though the camera is moving dramatically, we will need to export a video file. Go to File > Export > Add to Render Queue, then open the Render Queue dialog box by going to Window > Render Queue. From there, you can choose the Output Module and change the settings in the options dialog box. Finally, choose the Output To option and select the location on your computer where you would like to save the video clip that we are currently rendering and exporting.

Conclusion
No matter how you make your time lapse videos, After Effects has a ton of features you can use to modify and enhance the way they look. Now that you are familiar with the fundamentals, you can play with the Frame Rates and Composition options. Check out this helpful manual for more information on Time Stretching and Remapping in After Effects.
Free Download For Win 7 or later(64-bit)
Free Download For macOS 10.14 or later
Free Download For macOS 10.14 or later
Some Facts That Few People Know on How to Make Transparent Background in Canva
Some Facts That Few People Know on How to Make Transparent Background in Canva
An easy yet powerful editor
Numerous effects to choose from
Detailed tutorials provided by the official channel
Canva is a very well-known website that enables you to do your entire image editing work online. If you are regularly working with the editing of images then you may know about the Canva. If you still don’t know about it then we are going to share the information about it in this article with you. You can also learn about how Canva makes a background transparent in this article.
In this article
01 [Why Would You Need a Graphic to Have a Transparent Background](#Part 1)
02 [How to Remove the Background of Images in Canva](#Part 2)
03 [How to Change the Transparency of an Object in Canva](#Part 3)
04 [Get a Transparent Background for Free](#Part 4)
Part 2 How to Remove the Background of Images in Canva
Canva website allows users to turn their imagination into reality for free of cost. It offers you a free version that helps you to design mostly anything you want and there are many templates offered to make designs for free of cost. But, if you are looking for transparent background on Canva then you have to spend for it because this feature is not offered for free. If you already have paid versions then let’s see the steps for Canva background transparent.
● Step 1:
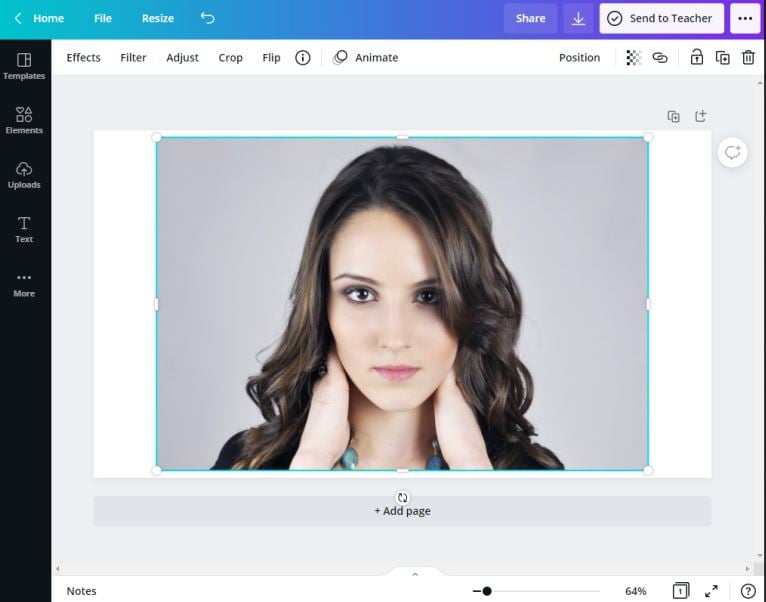
Firstly, sign in to your Canva account and select the image which you want to make a transparent background in Canva.
● Step 2:
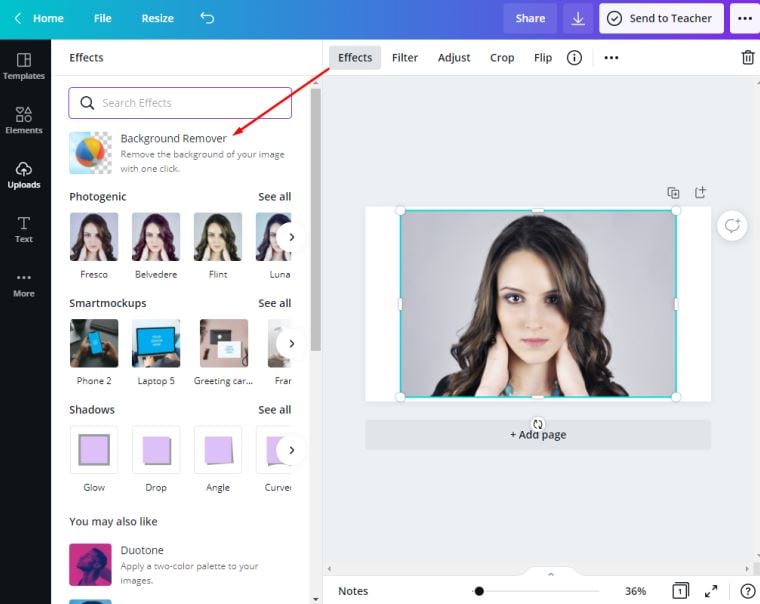
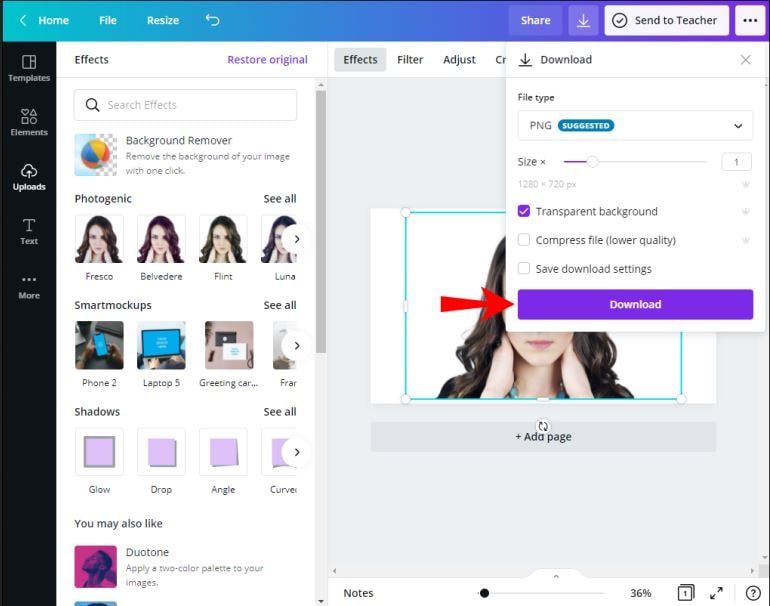
After adding the image first of all you have to color the background layer of the image you have added. Click the “Effect” available at the top corner of the Canva interfaces toolbar. From here select the “Background remover”. Now, the background of the image will be removed and you are ready to make it transparent.
● Step 3:
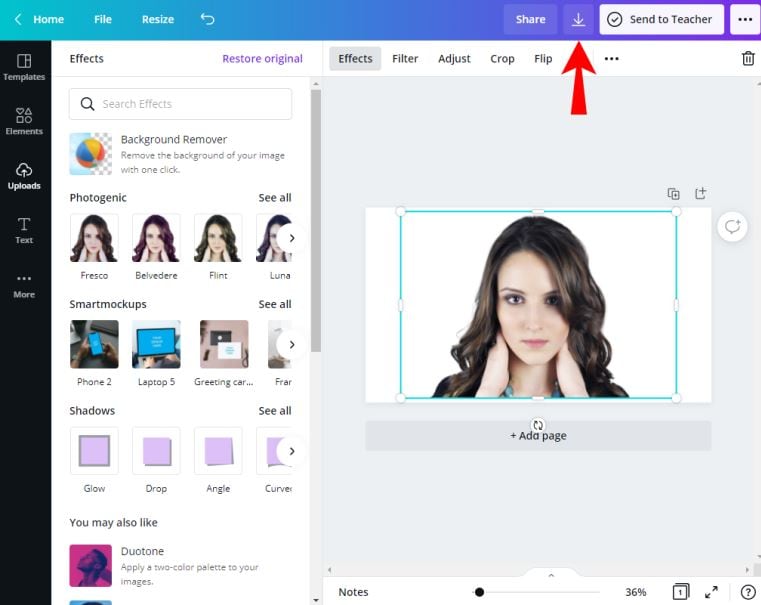
Once the image background is removed click the “Download” icon available at the top of the interface.
● Step 4:
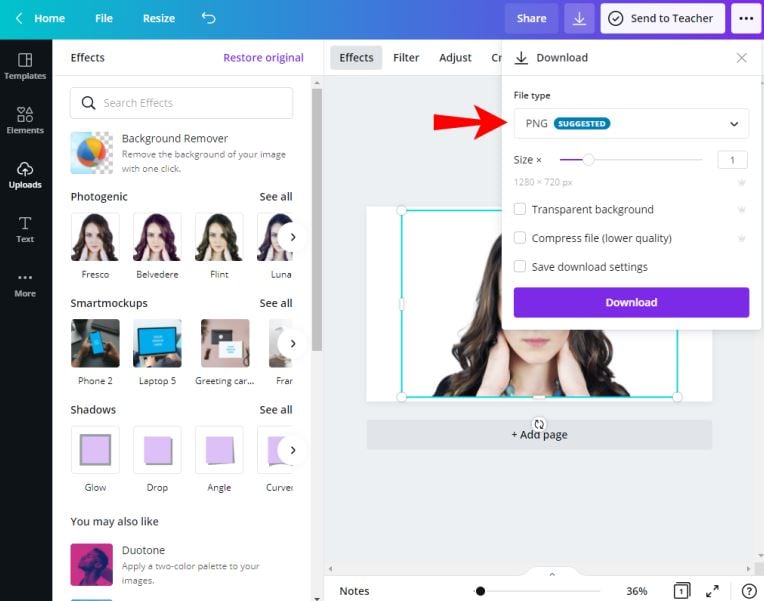
When you click the download button you will see a dialog box where you have to select the “PNG” format to download the image. Make sure to keep it PNG otherwise background will be not transparent.
● Step 5:
Now, under the options in the pop-up box you have to select check the “Transparent Background” option then click the “Download” button. Now the Canva background transparent is finished and the image will be saved on your system with a transparent background.
Part 3 How to Change the Transparency of an Object in Canva
While adding a text box on the images or if you want to merge several images in the one then you have to make at least one image transparent which will help you to get a better effect. Please follow the below steps to know about how you can do this.
● Step 1:
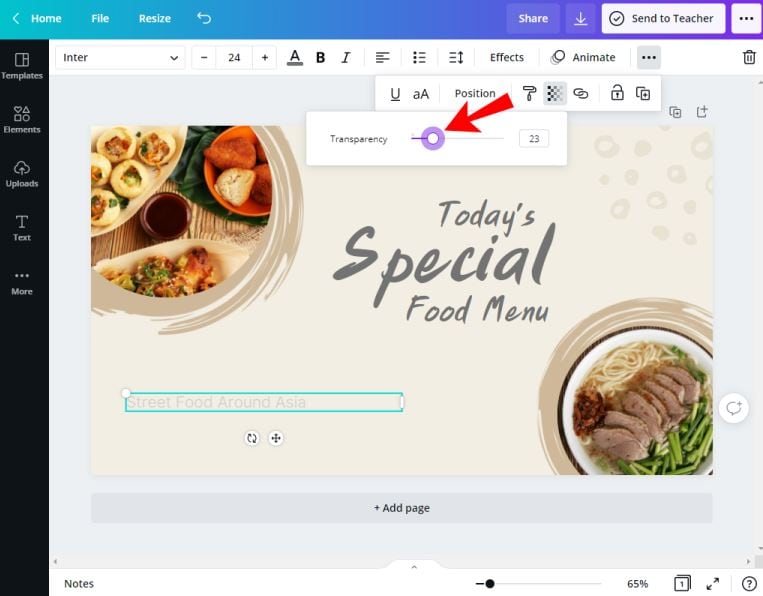
Firstly, select the text box or the image that you need to make transparent. After selecting the image the Canva interface will show you a pop-up box on the top side and then click the 4 dots on the right side of the popup. After clicking on it you will several other options. From this menu click the “Transparency”.

● Step 2:
On the screen you will see a slider. Use this slider to adjust the transparency of the text. This is the way to change the object transparency in the Canva. You can now download your image or continue working on it.
Part 4 Get a Transparent Background for Free
If you want your Canva design to make a transparent background without spending or paying anything to the Canva then you have several options to do that. Here we are going to tell you 2 options. The first option is that you can simply use the free 30 days trial version of the Canva to do that or you can also use the other website which is Kapwing. This website offers you options to remove the background of the image for free of cost without spending anything. Let’s see how you can do it with the help of Kapwing.
● Step 1:
Firstly, you have to download your Canva design in PNG format. After downloading the image you can browse the below URL of kapwing background remover.
● Step 2:
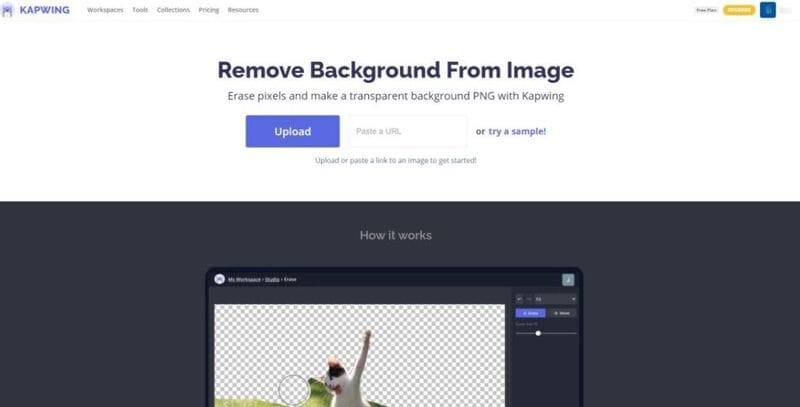
Now click the “Upload” button and select the PNG file from your computer. Now you have to hit the “Magic Wand” option and then hit the image background. Now, press the “Remove Pixels” option which is available at the right side menu.

● Step 3:
By following the previous step the image background will be removed but still if you see any part of the background on image then you may have to repeat the step again until the all parts of the background are not removed. Once you are satisfied with the final results then simply click the “Done” button.

● Step 4:
After clicking the “Done” button you will be redirected to the page where you can download your image on your computer with a transparent background. This is the process to for Canva no background for free of cost.

Editing the Videos While making Photos:
Sometimes while editing the photos for your projects if you need to make a video then you may also need to a video editor to make the best videos. You can use the photos you have created directly in the video you are going to make. In this case there is a product Wondershare Filmora Video Editor is available which really helps you a lot in making the best videos or edits the videos according to your project requirement. Wondershare Filmora is offered by the developers for the windows as well as the Mac operating system computers. This software offers you best options for making or editing the videos. Some of the features of the software are available below.
For Win 7 or later (64-bit)
For macOS 10.12 or later
Key Features:
● The program offers you cool video editing features such as split screen, motion tracking, keyframing, speed ramping, instant mode, auto beat sync etc.
● You can apply several effects such as green screen, AI Portrait, green screen and video effects.
● In the audio features it helps you to detect silence, audio synchronization and audio ducking.
● Wondershare Filmora offers you feature of correcting the colors of videos and match the color as well.

● Ending Thoughts →
● We hope now you know about how to make transparent background in Canva with the help of Canva website without doing much effort. Well, if you like to make a video with the help of images created using Canva then you can also try the Wondershare Filmora. It’s really perfect video editor software that enables you to create the best videos.
Canva is a very well-known website that enables you to do your entire image editing work online. If you are regularly working with the editing of images then you may know about the Canva. If you still don’t know about it then we are going to share the information about it in this article with you. You can also learn about how Canva makes a background transparent in this article.
In this article
01 [Why Would You Need a Graphic to Have a Transparent Background](#Part 1)
02 [How to Remove the Background of Images in Canva](#Part 2)
03 [How to Change the Transparency of an Object in Canva](#Part 3)
04 [Get a Transparent Background for Free](#Part 4)
Part 2 How to Remove the Background of Images in Canva
Canva website allows users to turn their imagination into reality for free of cost. It offers you a free version that helps you to design mostly anything you want and there are many templates offered to make designs for free of cost. But, if you are looking for transparent background on Canva then you have to spend for it because this feature is not offered for free. If you already have paid versions then let’s see the steps for Canva background transparent.
● Step 1:
Firstly, sign in to your Canva account and select the image which you want to make a transparent background in Canva.

● Step 2:
After adding the image first of all you have to color the background layer of the image you have added. Click the “Effect” available at the top corner of the Canva interfaces toolbar. From here select the “Background remover”. Now, the background of the image will be removed and you are ready to make it transparent.

● Step 3:
Once the image background is removed click the “Download” icon available at the top of the interface.

● Step 4:
When you click the download button you will see a dialog box where you have to select the “PNG” format to download the image. Make sure to keep it PNG otherwise background will be not transparent.

● Step 5:
Now, under the options in the pop-up box you have to select check the “Transparent Background” option then click the “Download” button. Now the Canva background transparent is finished and the image will be saved on your system with a transparent background.

Part 3 How to Change the Transparency of an Object in Canva
While adding a text box on the images or if you want to merge several images in the one then you have to make at least one image transparent which will help you to get a better effect. Please follow the below steps to know about how you can do this.
● Step 1:
Firstly, select the text box or the image that you need to make transparent. After selecting the image the Canva interface will show you a pop-up box on the top side and then click the 4 dots on the right side of the popup. After clicking on it you will several other options. From this menu click the “Transparency”.

● Step 2:
On the screen you will see a slider. Use this slider to adjust the transparency of the text. This is the way to change the object transparency in the Canva. You can now download your image or continue working on it.

Part 4 Get a Transparent Background for Free
If you want your Canva design to make a transparent background without spending or paying anything to the Canva then you have several options to do that. Here we are going to tell you 2 options. The first option is that you can simply use the free 30 days trial version of the Canva to do that or you can also use the other website which is Kapwing. This website offers you options to remove the background of the image for free of cost without spending anything. Let’s see how you can do it with the help of Kapwing.
● Step 1:
Firstly, you have to download your Canva design in PNG format. After downloading the image you can browse the below URL of kapwing background remover.

● Step 2:
Now click the “Upload” button and select the PNG file from your computer. Now you have to hit the “Magic Wand” option and then hit the image background. Now, press the “Remove Pixels” option which is available at the right side menu.

● Step 3:
By following the previous step the image background will be removed but still if you see any part of the background on image then you may have to repeat the step again until the all parts of the background are not removed. Once you are satisfied with the final results then simply click the “Done” button.

● Step 4:
After clicking the “Done” button you will be redirected to the page where you can download your image on your computer with a transparent background. This is the process to for Canva no background for free of cost.

Editing the Videos While making Photos:
Sometimes while editing the photos for your projects if you need to make a video then you may also need to a video editor to make the best videos. You can use the photos you have created directly in the video you are going to make. In this case there is a product Wondershare Filmora Video Editor is available which really helps you a lot in making the best videos or edits the videos according to your project requirement. Wondershare Filmora is offered by the developers for the windows as well as the Mac operating system computers. This software offers you best options for making or editing the videos. Some of the features of the software are available below.
For Win 7 or later (64-bit)
For macOS 10.12 or later
Key Features:
● The program offers you cool video editing features such as split screen, motion tracking, keyframing, speed ramping, instant mode, auto beat sync etc.
● You can apply several effects such as green screen, AI Portrait, green screen and video effects.
● In the audio features it helps you to detect silence, audio synchronization and audio ducking.
● Wondershare Filmora offers you feature of correcting the colors of videos and match the color as well.

● Ending Thoughts →
● We hope now you know about how to make transparent background in Canva with the help of Canva website without doing much effort. Well, if you like to make a video with the help of images created using Canva then you can also try the Wondershare Filmora. It’s really perfect video editor software that enables you to create the best videos.
Canva is a very well-known website that enables you to do your entire image editing work online. If you are regularly working with the editing of images then you may know about the Canva. If you still don’t know about it then we are going to share the information about it in this article with you. You can also learn about how Canva makes a background transparent in this article.
In this article
01 [Why Would You Need a Graphic to Have a Transparent Background](#Part 1)
02 [How to Remove the Background of Images in Canva](#Part 2)
03 [How to Change the Transparency of an Object in Canva](#Part 3)
04 [Get a Transparent Background for Free](#Part 4)
Part 2 How to Remove the Background of Images in Canva
Canva website allows users to turn their imagination into reality for free of cost. It offers you a free version that helps you to design mostly anything you want and there are many templates offered to make designs for free of cost. But, if you are looking for transparent background on Canva then you have to spend for it because this feature is not offered for free. If you already have paid versions then let’s see the steps for Canva background transparent.
● Step 1:
Firstly, sign in to your Canva account and select the image which you want to make a transparent background in Canva.

● Step 2:
After adding the image first of all you have to color the background layer of the image you have added. Click the “Effect” available at the top corner of the Canva interfaces toolbar. From here select the “Background remover”. Now, the background of the image will be removed and you are ready to make it transparent.

● Step 3:
Once the image background is removed click the “Download” icon available at the top of the interface.

● Step 4:
When you click the download button you will see a dialog box where you have to select the “PNG” format to download the image. Make sure to keep it PNG otherwise background will be not transparent.

● Step 5:
Now, under the options in the pop-up box you have to select check the “Transparent Background” option then click the “Download” button. Now the Canva background transparent is finished and the image will be saved on your system with a transparent background.

Part 3 How to Change the Transparency of an Object in Canva
While adding a text box on the images or if you want to merge several images in the one then you have to make at least one image transparent which will help you to get a better effect. Please follow the below steps to know about how you can do this.
● Step 1:
Firstly, select the text box or the image that you need to make transparent. After selecting the image the Canva interface will show you a pop-up box on the top side and then click the 4 dots on the right side of the popup. After clicking on it you will several other options. From this menu click the “Transparency”.

● Step 2:
On the screen you will see a slider. Use this slider to adjust the transparency of the text. This is the way to change the object transparency in the Canva. You can now download your image or continue working on it.

Part 4 Get a Transparent Background for Free
If you want your Canva design to make a transparent background without spending or paying anything to the Canva then you have several options to do that. Here we are going to tell you 2 options. The first option is that you can simply use the free 30 days trial version of the Canva to do that or you can also use the other website which is Kapwing. This website offers you options to remove the background of the image for free of cost without spending anything. Let’s see how you can do it with the help of Kapwing.
● Step 1:
Firstly, you have to download your Canva design in PNG format. After downloading the image you can browse the below URL of kapwing background remover.

● Step 2:
Now click the “Upload” button and select the PNG file from your computer. Now you have to hit the “Magic Wand” option and then hit the image background. Now, press the “Remove Pixels” option which is available at the right side menu.

● Step 3:
By following the previous step the image background will be removed but still if you see any part of the background on image then you may have to repeat the step again until the all parts of the background are not removed. Once you are satisfied with the final results then simply click the “Done” button.

● Step 4:
After clicking the “Done” button you will be redirected to the page where you can download your image on your computer with a transparent background. This is the process to for Canva no background for free of cost.

Editing the Videos While making Photos:
Sometimes while editing the photos for your projects if you need to make a video then you may also need to a video editor to make the best videos. You can use the photos you have created directly in the video you are going to make. In this case there is a product Wondershare Filmora Video Editor is available which really helps you a lot in making the best videos or edits the videos according to your project requirement. Wondershare Filmora is offered by the developers for the windows as well as the Mac operating system computers. This software offers you best options for making or editing the videos. Some of the features of the software are available below.
For Win 7 or later (64-bit)
For macOS 10.12 or later
Key Features:
● The program offers you cool video editing features such as split screen, motion tracking, keyframing, speed ramping, instant mode, auto beat sync etc.
● You can apply several effects such as green screen, AI Portrait, green screen and video effects.
● In the audio features it helps you to detect silence, audio synchronization and audio ducking.
● Wondershare Filmora offers you feature of correcting the colors of videos and match the color as well.

● Ending Thoughts →
● We hope now you know about how to make transparent background in Canva with the help of Canva website without doing much effort. Well, if you like to make a video with the help of images created using Canva then you can also try the Wondershare Filmora. It’s really perfect video editor software that enables you to create the best videos.
Canva is a very well-known website that enables you to do your entire image editing work online. If you are regularly working with the editing of images then you may know about the Canva. If you still don’t know about it then we are going to share the information about it in this article with you. You can also learn about how Canva makes a background transparent in this article.
In this article
01 [Why Would You Need a Graphic to Have a Transparent Background](#Part 1)
02 [How to Remove the Background of Images in Canva](#Part 2)
03 [How to Change the Transparency of an Object in Canva](#Part 3)
04 [Get a Transparent Background for Free](#Part 4)
Part 2 How to Remove the Background of Images in Canva
Canva website allows users to turn their imagination into reality for free of cost. It offers you a free version that helps you to design mostly anything you want and there are many templates offered to make designs for free of cost. But, if you are looking for transparent background on Canva then you have to spend for it because this feature is not offered for free. If you already have paid versions then let’s see the steps for Canva background transparent.
● Step 1:
Firstly, sign in to your Canva account and select the image which you want to make a transparent background in Canva.

● Step 2:
After adding the image first of all you have to color the background layer of the image you have added. Click the “Effect” available at the top corner of the Canva interfaces toolbar. From here select the “Background remover”. Now, the background of the image will be removed and you are ready to make it transparent.

● Step 3:
Once the image background is removed click the “Download” icon available at the top of the interface.

● Step 4:
When you click the download button you will see a dialog box where you have to select the “PNG” format to download the image. Make sure to keep it PNG otherwise background will be not transparent.

● Step 5:
Now, under the options in the pop-up box you have to select check the “Transparent Background” option then click the “Download” button. Now the Canva background transparent is finished and the image will be saved on your system with a transparent background.

Part 3 How to Change the Transparency of an Object in Canva
While adding a text box on the images or if you want to merge several images in the one then you have to make at least one image transparent which will help you to get a better effect. Please follow the below steps to know about how you can do this.
● Step 1:
Firstly, select the text box or the image that you need to make transparent. After selecting the image the Canva interface will show you a pop-up box on the top side and then click the 4 dots on the right side of the popup. After clicking on it you will several other options. From this menu click the “Transparency”.

● Step 2:
On the screen you will see a slider. Use this slider to adjust the transparency of the text. This is the way to change the object transparency in the Canva. You can now download your image or continue working on it.

Part 4 Get a Transparent Background for Free
If you want your Canva design to make a transparent background without spending or paying anything to the Canva then you have several options to do that. Here we are going to tell you 2 options. The first option is that you can simply use the free 30 days trial version of the Canva to do that or you can also use the other website which is Kapwing. This website offers you options to remove the background of the image for free of cost without spending anything. Let’s see how you can do it with the help of Kapwing.
● Step 1:
Firstly, you have to download your Canva design in PNG format. After downloading the image you can browse the below URL of kapwing background remover.

● Step 2:
Now click the “Upload” button and select the PNG file from your computer. Now you have to hit the “Magic Wand” option and then hit the image background. Now, press the “Remove Pixels” option which is available at the right side menu.

● Step 3:
By following the previous step the image background will be removed but still if you see any part of the background on image then you may have to repeat the step again until the all parts of the background are not removed. Once you are satisfied with the final results then simply click the “Done” button.

● Step 4:
After clicking the “Done” button you will be redirected to the page where you can download your image on your computer with a transparent background. This is the process to for Canva no background for free of cost.

Editing the Videos While making Photos:
Sometimes while editing the photos for your projects if you need to make a video then you may also need to a video editor to make the best videos. You can use the photos you have created directly in the video you are going to make. In this case there is a product Wondershare Filmora Video Editor is available which really helps you a lot in making the best videos or edits the videos according to your project requirement. Wondershare Filmora is offered by the developers for the windows as well as the Mac operating system computers. This software offers you best options for making or editing the videos. Some of the features of the software are available below.
For Win 7 or later (64-bit)
For macOS 10.12 or later
Key Features:
● The program offers you cool video editing features such as split screen, motion tracking, keyframing, speed ramping, instant mode, auto beat sync etc.
● You can apply several effects such as green screen, AI Portrait, green screen and video effects.
● In the audio features it helps you to detect silence, audio synchronization and audio ducking.
● Wondershare Filmora offers you feature of correcting the colors of videos and match the color as well.

● Ending Thoughts →
● We hope now you know about how to make transparent background in Canva with the help of Canva website without doing much effort. Well, if you like to make a video with the help of images created using Canva then you can also try the Wondershare Filmora. It’s really perfect video editor software that enables you to create the best videos.
Have the Desire to Create a Stylish Glitch Effect to a Text on Your Video? Use Filmora for the Editing, Following the Given Steps Explained in Detail
Have you noticed the glitching effect that appears when you play a video or in games, creating a sporadic shaky effect on video edges? While this usually signifies a systematic software issue in these cases, the effect itself can work to create a dynamic visual style for different objects when done intentionally.
In fact, many video editors today use the glitch effect on elements in their videos, like the introductory title in movies or trailers. It creates a futuristic look to the text, which highly appeals to viewers who engage more in the video itself.
Suppose you are looking to add a similar effect to the title of your video project or other text-based content that you will add to your video, use a good tool for that. Wondershare Filmora , in particular, makes adding this effect very simple. Let’s learn how.
1. Launch the Filmora software
Free Download For Win 7 or later(64-bit)
Free Download For macOS 10.14 or later
The first step in preparing a customized glitch text effect is getting your software ready.
Visit the official website of Wondershare Filmora and tap on the Download button at the top to get the free software. The features necessary to create this effect are available under the free version, so you can avoid the plan upgradation process at this point.
After clicking the free download icon, the software’s installer version will save into your device automatically. Double-click on and agree with the related Terms and Conditions prompt. Then, tap on the Install button, and the software will take a few seconds to complete the installation process fully.
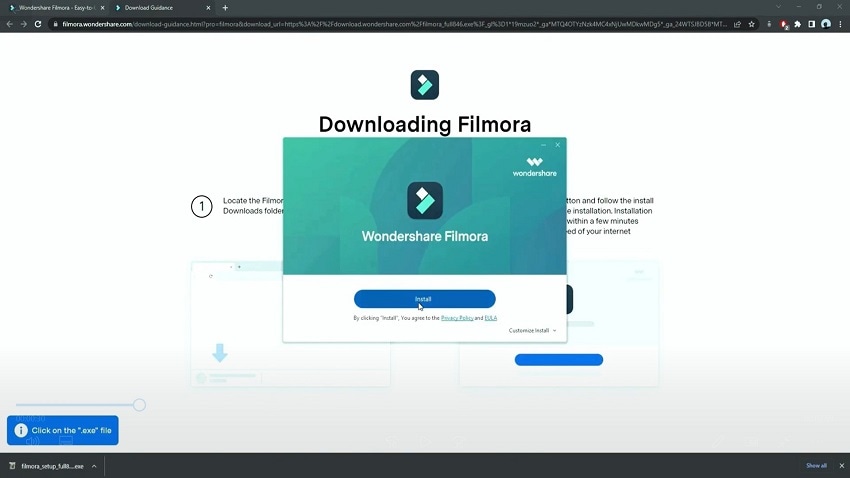
After that, click on the Start Now button to launch the software on your Mac or Windows computer that you are using. Filmora will open on its homepage.
2. Add the default title to timeline
Next, click the Create New Project button on the main page to access the editor section. Then, you have to click on the Titles tab and choose the Default Title option from the menu.
Drag it down from the media library section to the timeline and drop it in the Track 2 row. After that, move the play head with your cursor to the 1-second and the 10th frame on the timeline. Then, hold and move this clip until the end part of the clip is at this mark.

3. Adjust the font of the title
Next, double-click on this clip on the editor timeline to open the text editing window. Here, under the Preset section, change the title font to what to want to first word of your title to be.
Change the font style to a bigger bold option like Impact and increase the font size to 100. Then, scroll a little downward and tap on the Text Spacing option. Increase this value by 5 and press the OK button when you are done.

4. Add and copy all of the word clips
After adjusting the text font, tap on this clip on the timeline and copy it. Then, paste it just after the first clip ends, reducing its duration to around 1 second.
Then, double-click on the copied clip to open the text editing window. Click on the section where you can add the text and change it to the second word of your title. Again, copy this clip and paste it next to it, adjust it to be one second long, double-click on it to adjust the text to read the third word, and so on.

Continue until all of your intro’s words are added in these clip forms.
5. Create and add the snapshots
Following the previous step, click on the My Media section. Then, tap on the first clip in the collection and tap on the Snapshot icon at the end of the editing toolbar right above the timeline. Repeat this step for all the clips you have added until a snapshot of each of the words is stored in the media library.
Next, you have to grab hold of the first snapshot that you click and move it to the Track 1 of the timeline. Use the cursor to hold it and reduce the size of the clip to the same amount as the first clip on Track 1. To be sure, you can place the playhead at this point to see that the ending time for both clips is aligned.

6. Adjust the text effect for the first word
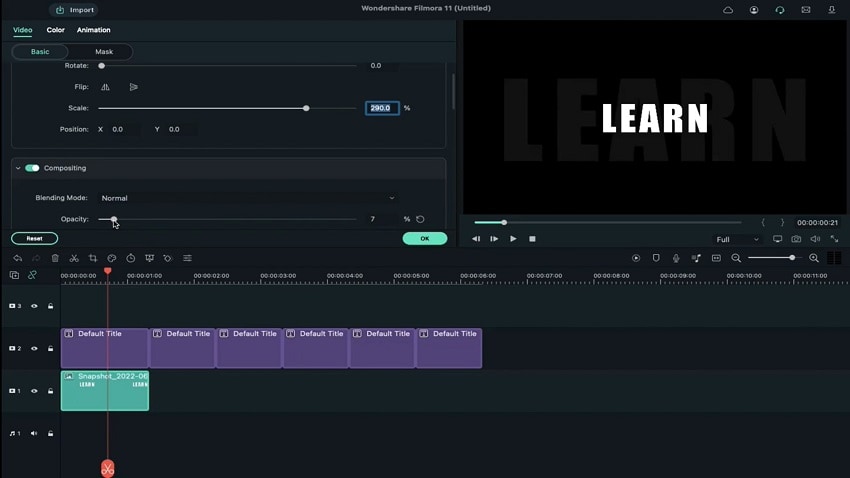
You have to click on the first-word snapshot in Track 1 of the Filmora editing timeline and double-click on it. Next, when the text editing window opens, you must change the Scale section to display the value of 290%. Following that, click on the slider in the Opacity parameter and decrease it to the 7% mark. Then, press the OK button.
On the timeline, right-click on this edited clip and choose the “Copy Effects” option from the drop-down menu.
7. Edit the snapshots for all words
After making changes to the first word, you must take hold of the second word’s snapshot from the media library. Drag and then drop it onto Track 1 of the editing timeline right next to the first clip. Then, hold the edge of this clip and reduce its size to fit the same duration as the second clip adjacent to it on Track 2.
Following that, you must choose this clip on Track 1 and right-click on top of it. Click on the “Paste Effects” option from the next drop-down menu, and the same adjustments will apply to this clip.

Repeat this step with all of the next snapshots of the following words.
8. Add the first effect layer
Next, you have to add stylish effects to your text. For that, you must tap on the Effects tab from the top toolbar of Filmora- a list of many effects collections will appear on the left panel.
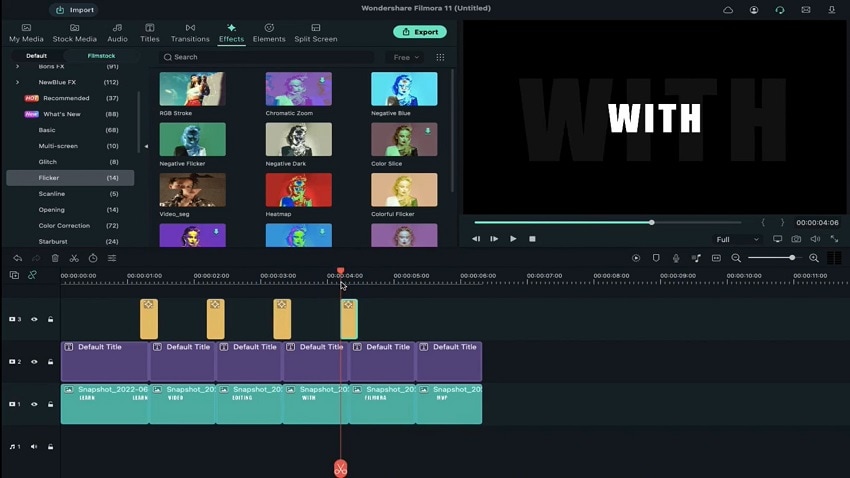
Scroll down until you reach the Filmstock option. You must click on it and find the Flicker option from the list. Under this collection, there are many options available. You must choose the Video_seg effect and drag it to the editing timeline above Track 2.

At this point, ensure the effect falls right above the first and second clip parts in the track below. Tap on the edges of this clip to reduce the size of the video effect, taking careful note to keep the clip 8 frames long overall.
Then, copy the cut-down effect from Track 3 and paste it at every intersectional point between the separated word-based clips in Track 2.
9. Zoom in to edit the first effect layer
Following this, you must zoom into the timeline for a better view and editing control for the next part.
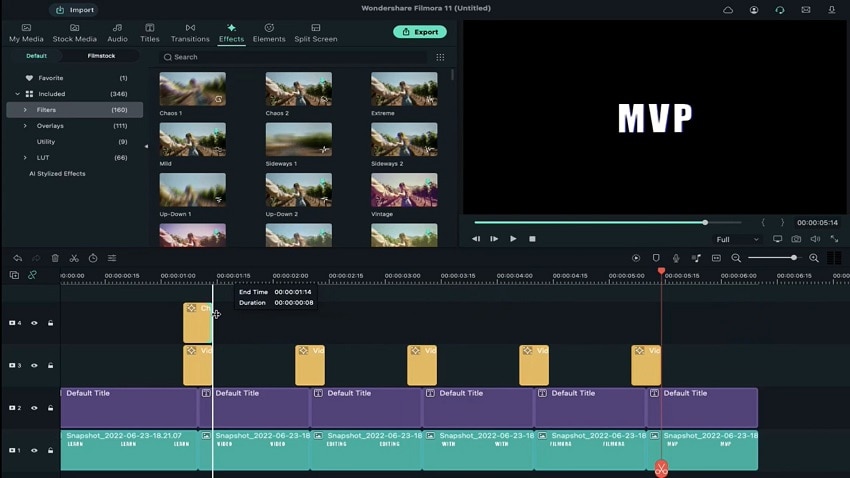
Go to the Effects tab at the top and choose the Filters collection next. Under it, choose the Chaos 1 effect option, drag it down to the timeline, and place it above the previous clip on Track 4. Adjust the starting edge of this clip to have the same starting point as the Video_seg effect on Track 3 with an overall 8-frame duration.
10. Edit the Effect
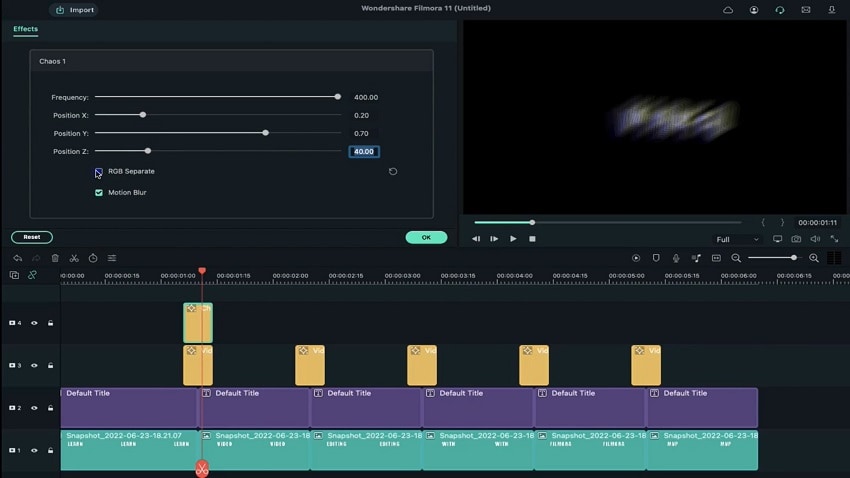
Next, you have to double-click on this clip to open the editing window for this effect. In this section, go to the Frequency parameter and increase the slider to 400. Following that, click on the Position X parameter and move the slider to the 0.20 point. Next, do the same for the Position Y parameter, but to the 0.70 point.
Change the Position Z parameter by typing the value 40 and disable the RGB Separate setting. Then, press the OK button and go to the timeline again.
11. Adjust the Glitch effects
Click on the effect clip on Track 4 and copy it. Please do the same as you did for the effect in Track 3 and paste it at the same locations between the clips in this track.
Afterward, go to the Effects tab again and choose the Filmstock tab. Among the collections here, you have to choose the Glitch option and select Glitch Stripe 1 from the collection. For an easier searching experience, you can directly type the effect in the search bar under the Effects tab.

Then, drag and drop it on Track 5 of the timeline right above the previous effect and reduce its duration to the same level as the first two effects. Copy it and then paste the clip again for each clip-to-clip intersection.
After this part, drag the Glitch Dispersion effect down to the timeline. Place it above the previous effect and adjust the clip’s size to the same length. Again, copy the effect and repeat the steps again. Next, repeat the same whole process with the Negative Flicker effect from the Flicker collection on Track 7.
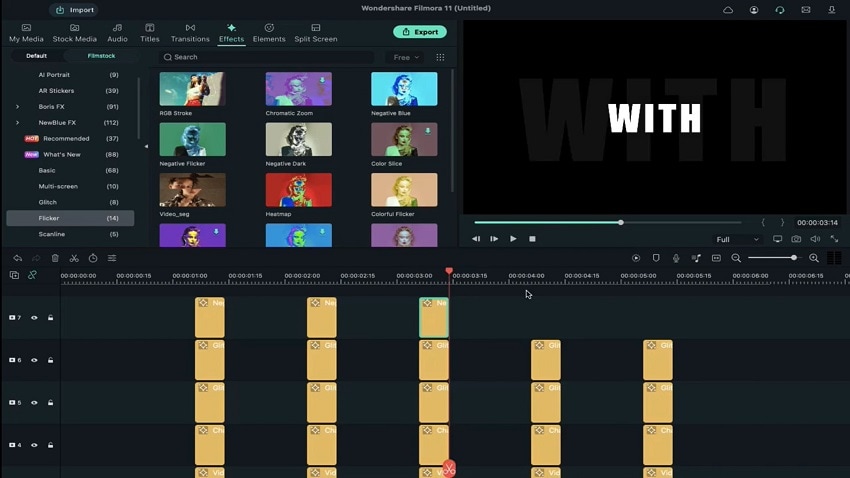
12. See the preview and save the file
Finally, you are done adding all the effects, and you have to click on the Render Preview icon in the toolbar above the timeline. Then, press the Play button on the Preview window to see the full glitch text effect play out properly.

Conclusion
Now, you are done with creating a visually exciting and dynamic look for your introductory or ending title in the video using the glitch effect. For the best results, you should practice this process sometimes to get used to it and even make certain preferential changes to the font style. Ultimately, with the help of this software, you can expect a high-quality title look and use it for further video editing work.
Free Download For macOS 10.14 or later
The first step in preparing a customized glitch text effect is getting your software ready.
Visit the official website of Wondershare Filmora and tap on the Download button at the top to get the free software. The features necessary to create this effect are available under the free version, so you can avoid the plan upgradation process at this point.
After clicking the free download icon, the software’s installer version will save into your device automatically. Double-click on and agree with the related Terms and Conditions prompt. Then, tap on the Install button, and the software will take a few seconds to complete the installation process fully.

After that, click on the Start Now button to launch the software on your Mac or Windows computer that you are using. Filmora will open on its homepage.
2. Add the default title to timeline
Next, click the Create New Project button on the main page to access the editor section. Then, you have to click on the Titles tab and choose the Default Title option from the menu.
Drag it down from the media library section to the timeline and drop it in the Track 2 row. After that, move the play head with your cursor to the 1-second and the 10th frame on the timeline. Then, hold and move this clip until the end part of the clip is at this mark.

3. Adjust the font of the title
Next, double-click on this clip on the editor timeline to open the text editing window. Here, under the Preset section, change the title font to what to want to first word of your title to be.
Change the font style to a bigger bold option like Impact and increase the font size to 100. Then, scroll a little downward and tap on the Text Spacing option. Increase this value by 5 and press the OK button when you are done.

4. Add and copy all of the word clips
After adjusting the text font, tap on this clip on the timeline and copy it. Then, paste it just after the first clip ends, reducing its duration to around 1 second.
Then, double-click on the copied clip to open the text editing window. Click on the section where you can add the text and change it to the second word of your title. Again, copy this clip and paste it next to it, adjust it to be one second long, double-click on it to adjust the text to read the third word, and so on.

Continue until all of your intro’s words are added in these clip forms.
5. Create and add the snapshots
Following the previous step, click on the My Media section. Then, tap on the first clip in the collection and tap on the Snapshot icon at the end of the editing toolbar right above the timeline. Repeat this step for all the clips you have added until a snapshot of each of the words is stored in the media library.
Next, you have to grab hold of the first snapshot that you click and move it to the Track 1 of the timeline. Use the cursor to hold it and reduce the size of the clip to the same amount as the first clip on Track 1. To be sure, you can place the playhead at this point to see that the ending time for both clips is aligned.

6. Adjust the text effect for the first word
You have to click on the first-word snapshot in Track 1 of the Filmora editing timeline and double-click on it. Next, when the text editing window opens, you must change the Scale section to display the value of 290%. Following that, click on the slider in the Opacity parameter and decrease it to the 7% mark. Then, press the OK button.
On the timeline, right-click on this edited clip and choose the “Copy Effects” option from the drop-down menu.

7. Edit the snapshots for all words
After making changes to the first word, you must take hold of the second word’s snapshot from the media library. Drag and then drop it onto Track 1 of the editing timeline right next to the first clip. Then, hold the edge of this clip and reduce its size to fit the same duration as the second clip adjacent to it on Track 2.
Following that, you must choose this clip on Track 1 and right-click on top of it. Click on the “Paste Effects” option from the next drop-down menu, and the same adjustments will apply to this clip.

Repeat this step with all of the next snapshots of the following words.
8. Add the first effect layer
Next, you have to add stylish effects to your text. For that, you must tap on the Effects tab from the top toolbar of Filmora- a list of many effects collections will appear on the left panel.
Scroll down until you reach the Filmstock option. You must click on it and find the Flicker option from the list. Under this collection, there are many options available. You must choose the Video_seg effect and drag it to the editing timeline above Track 2.

At this point, ensure the effect falls right above the first and second clip parts in the track below. Tap on the edges of this clip to reduce the size of the video effect, taking careful note to keep the clip 8 frames long overall.
Then, copy the cut-down effect from Track 3 and paste it at every intersectional point between the separated word-based clips in Track 2.

9. Zoom in to edit the first effect layer
Following this, you must zoom into the timeline for a better view and editing control for the next part.
Go to the Effects tab at the top and choose the Filters collection next. Under it, choose the Chaos 1 effect option, drag it down to the timeline, and place it above the previous clip on Track 4. Adjust the starting edge of this clip to have the same starting point as the Video_seg effect on Track 3 with an overall 8-frame duration.

10. Edit the Effect
Next, you have to double-click on this clip to open the editing window for this effect. In this section, go to the Frequency parameter and increase the slider to 400. Following that, click on the Position X parameter and move the slider to the 0.20 point. Next, do the same for the Position Y parameter, but to the 0.70 point.
Change the Position Z parameter by typing the value 40 and disable the RGB Separate setting. Then, press the OK button and go to the timeline again.

11. Adjust the Glitch effects
Click on the effect clip on Track 4 and copy it. Please do the same as you did for the effect in Track 3 and paste it at the same locations between the clips in this track.
Afterward, go to the Effects tab again and choose the Filmstock tab. Among the collections here, you have to choose the Glitch option and select Glitch Stripe 1 from the collection. For an easier searching experience, you can directly type the effect in the search bar under the Effects tab.

Then, drag and drop it on Track 5 of the timeline right above the previous effect and reduce its duration to the same level as the first two effects. Copy it and then paste the clip again for each clip-to-clip intersection.
After this part, drag the Glitch Dispersion effect down to the timeline. Place it above the previous effect and adjust the clip’s size to the same length. Again, copy the effect and repeat the steps again. Next, repeat the same whole process with the Negative Flicker effect from the Flicker collection on Track 7.

12. See the preview and save the file
Finally, you are done adding all the effects, and you have to click on the Render Preview icon in the toolbar above the timeline. Then, press the Play button on the Preview window to see the full glitch text effect play out properly.

Conclusion
Now, you are done with creating a visually exciting and dynamic look for your introductory or ending title in the video using the glitch effect. For the best results, you should practice this process sometimes to get used to it and even make certain preferential changes to the font style. Ultimately, with the help of this software, you can expect a high-quality title look and use it for further video editing work.
How to Color-Correct an S-Log Footage
S-Log is a gamma curve optimized for digital cameras to maximize the image sensor’s performance. Although these videos may look flat and washed out, they contain lots of color information. Even better, video creators can use color correction to edit the S-Log videos and make them look as natural as possible. That’s what this article is all about.
How to Color-Correct an S-Log Footage
This tutorial assumes that you already have an S-Log footage. If not, you can record S-Log footage using most Canon, Sony, and Panasonic cameras.

Let’s get to the steps!
Step1 Adjust the color settings
Start by adding your video to the timeline on Wondershare Filmora and then double-click the video track. Then, click on the Color tab before tapping Advanced.
Free Download For Win 7 or later(64-bit)
Free Download For macOS 10.14 or later

Step2 Read and study the histogram
Now you’ll see the Advanced Color Correction pop-up window. Here, you’ll see a histogram with the brightest point on the right and the darkest point on the left. From our example, you can see that the video has more dark pixels than bright ones. Horizontally, the histogram shows you how many pixels are in a certain range of brightness.

Step3 Adjust the image colors
Once you’ve understood the histogram, look for pure black and white parts on the video clip. For example, in this video, you can see that the roofs are pure black and the boat at the bottom-right corner is pure white.

After finding the white and black parts in the video, go to the Light section, then adjust the Highlights to see if you can get a pure white on the boat. If the boat or any other image of your choice doesn’t look pure white, increase the Whites slide to make it whiter.

Now adjust the Shadows settings to reduce the effect and make the roofs look closer to pure black. If you want the roofs to look darker, drag the Blacks slider to the left.
Pro tip: Ensure that the darkest and brightest points don’t cross the broken lines on the edge, or the video will start losing details.
Step4 Adjust the color saturation
Does your video still look a little flat? Probably yes! In that case, click the Color section and adjust the Saturation slider to the right to make the video less flat. Saturation simply means how colorful a video clip is to the viewer. Apart from the color saturation, you can also adjust the Vibrance to make your video objects look more colorful.

Step5 Preview and compare the video
Now it’s time to check and compare the results. To make it easier, click the Eye icon at the top-right corner to switch between the original S-Log video and the color-corrected clip. You can also tap the AB icon and choose Split View-Left/Right to view the clips in the side-by-side mode.

Summary
I guess that was easy, right? Up to this juncture, you should be able to perform basic color correction on your video using Wondershare Filmora. Remember, this video editor packs many other editing tools to bring out your creativity. Give it a try!
Free Download For macOS 10.14 or later

Step2 Read and study the histogram
Now you’ll see the Advanced Color Correction pop-up window. Here, you’ll see a histogram with the brightest point on the right and the darkest point on the left. From our example, you can see that the video has more dark pixels than bright ones. Horizontally, the histogram shows you how many pixels are in a certain range of brightness.

Step3 Adjust the image colors
Once you’ve understood the histogram, look for pure black and white parts on the video clip. For example, in this video, you can see that the roofs are pure black and the boat at the bottom-right corner is pure white.

After finding the white and black parts in the video, go to the Light section, then adjust the Highlights to see if you can get a pure white on the boat. If the boat or any other image of your choice doesn’t look pure white, increase the Whites slide to make it whiter.

Now adjust the Shadows settings to reduce the effect and make the roofs look closer to pure black. If you want the roofs to look darker, drag the Blacks slider to the left.
Pro tip: Ensure that the darkest and brightest points don’t cross the broken lines on the edge, or the video will start losing details.
Step4 Adjust the color saturation
Does your video still look a little flat? Probably yes! In that case, click the Color section and adjust the Saturation slider to the right to make the video less flat. Saturation simply means how colorful a video clip is to the viewer. Apart from the color saturation, you can also adjust the Vibrance to make your video objects look more colorful.

Step5 Preview and compare the video
Now it’s time to check and compare the results. To make it easier, click the Eye icon at the top-right corner to switch between the original S-Log video and the color-corrected clip. You can also tap the AB icon and choose Split View-Left/Right to view the clips in the side-by-side mode.

Summary
I guess that was easy, right? Up to this juncture, you should be able to perform basic color correction on your video using Wondershare Filmora. Remember, this video editor packs many other editing tools to bring out your creativity. Give it a try!
Free Download For macOS 10.14 or later

Step2 Read and study the histogram
Now you’ll see the Advanced Color Correction pop-up window. Here, you’ll see a histogram with the brightest point on the right and the darkest point on the left. From our example, you can see that the video has more dark pixels than bright ones. Horizontally, the histogram shows you how many pixels are in a certain range of brightness.

Step3 Adjust the image colors
Once you’ve understood the histogram, look for pure black and white parts on the video clip. For example, in this video, you can see that the roofs are pure black and the boat at the bottom-right corner is pure white.

After finding the white and black parts in the video, go to the Light section, then adjust the Highlights to see if you can get a pure white on the boat. If the boat or any other image of your choice doesn’t look pure white, increase the Whites slide to make it whiter.

Now adjust the Shadows settings to reduce the effect and make the roofs look closer to pure black. If you want the roofs to look darker, drag the Blacks slider to the left.
Pro tip: Ensure that the darkest and brightest points don’t cross the broken lines on the edge, or the video will start losing details.
Step4 Adjust the color saturation
Does your video still look a little flat? Probably yes! In that case, click the Color section and adjust the Saturation slider to the right to make the video less flat. Saturation simply means how colorful a video clip is to the viewer. Apart from the color saturation, you can also adjust the Vibrance to make your video objects look more colorful.

Step5 Preview and compare the video
Now it’s time to check and compare the results. To make it easier, click the Eye icon at the top-right corner to switch between the original S-Log video and the color-corrected clip. You can also tap the AB icon and choose Split View-Left/Right to view the clips in the side-by-side mode.

Summary
I guess that was easy, right? Up to this juncture, you should be able to perform basic color correction on your video using Wondershare Filmora. Remember, this video editor packs many other editing tools to bring out your creativity. Give it a try!
Free Download For macOS 10.14 or later

Step2 Read and study the histogram
Now you’ll see the Advanced Color Correction pop-up window. Here, you’ll see a histogram with the brightest point on the right and the darkest point on the left. From our example, you can see that the video has more dark pixels than bright ones. Horizontally, the histogram shows you how many pixels are in a certain range of brightness.

Step3 Adjust the image colors
Once you’ve understood the histogram, look for pure black and white parts on the video clip. For example, in this video, you can see that the roofs are pure black and the boat at the bottom-right corner is pure white.

After finding the white and black parts in the video, go to the Light section, then adjust the Highlights to see if you can get a pure white on the boat. If the boat or any other image of your choice doesn’t look pure white, increase the Whites slide to make it whiter.

Now adjust the Shadows settings to reduce the effect and make the roofs look closer to pure black. If you want the roofs to look darker, drag the Blacks slider to the left.
Pro tip: Ensure that the darkest and brightest points don’t cross the broken lines on the edge, or the video will start losing details.
Step4 Adjust the color saturation
Does your video still look a little flat? Probably yes! In that case, click the Color section and adjust the Saturation slider to the right to make the video less flat. Saturation simply means how colorful a video clip is to the viewer. Apart from the color saturation, you can also adjust the Vibrance to make your video objects look more colorful.

Step5 Preview and compare the video
Now it’s time to check and compare the results. To make it easier, click the Eye icon at the top-right corner to switch between the original S-Log video and the color-corrected clip. You can also tap the AB icon and choose Split View-Left/Right to view the clips in the side-by-side mode.

Summary
I guess that was easy, right? Up to this juncture, you should be able to perform basic color correction on your video using Wondershare Filmora. Remember, this video editor packs many other editing tools to bring out your creativity. Give it a try!
Also read:
- New 2024 Approved How to Apply Gaussian Blur Effect to Videos In Premiere Pro?
- New Did You Know Cameras Have a Built-In Feature to Shoot Slow-Motion Clips? This Article Is About Using Sony S&Q to Capture Slow-Motion Scenes
- New Easy Ways to Make Procreate GIFs
- New 2024 Approved How to Create a Clideo Slideshow
- Updated Step-by-Step Guide to Speed Up and Slow Down a Video
- New How to Export iMovie, In 2024
- 3GP Video Format What Is 3GP Format And How To Open It for 2024
- Updated Do You Want to Add Subtitles to Your MKV Files Easily? This Article Will Introduce 7 Simple Ways Through Which You Can Add Subtitles to MKV on Different Devices for 2024
- Updated In 2024, Learn How to Use 3D Camera Tracking in Adobe After Effects and Take Your Skills to the Next Level
- In 2024, The Way to Make Dynamic Video Collages?
- How to Split a Clip in DaVinci Resolve Step by Step
- In 2024, Recording Video in Slow Motion Some Considerable Points
- New In 2024, Do You Want to Know How to Convert YouTube SBV Subtitles to SRT Format? Here Is an Ultimate Guide About It
- New In 2024, How to Add Zoom Blur Effect In Photoshop
- In 2024, How to Rotate a Video in Windows 10
- New If You Are Looking for Reliable Solutions to Export Your Musical Slideshow Through a DVD Burning Process, Take a Breath, You Have Landed at the Right Place for 2024
- Are You a Vlogger Looking for Good Color Correction and Video Grading Presets? Here Youll Find Different Vlog LUTs that You Can Use for Your Videos
- New Do You Want to Experiment with Various Sky Backgrounds for Your Footage? Learn About Sky Replacement After Effects in This Article with a Step-by-Step Guide
- Updated HOW to Add Fade to Black on Premiere Pro for 2024
- New In 2024, How To Blur Background in Adobe Premiere Pro Detailed Guide
- New How to Find Free Online Slideshow Maker with No Watermark
- New 2024 Approved How to Make Random Letter Reveal Intro?
- Updated How to Create a Glitch Text Effect?
- Do You Know that You Can Apply Different LUTs and Create Your Own? There Are Many LUT Online and Offline Generators that You Can Use to Create Your LUT
- New 2024 Approved Shotcut Video Editor Review
- How to Add Motion Blur in After Effects
- New In 2024, 10 Best Innovative AR Video Effects to Check Out
- How To Make A Video Longer for 2024
- What Is First Impression Review Video
- New 2024 Approved 11 Ways To Speed Up A Video On iPhone
- In 2024, How to Perform Mask Tracking Discovering the Best Methods
- 2024 Approved How to Comment on YouTube Live Chat
- Updated 2024 Approved Camtasia Vs Captivate - Which to Choose?
- New Camtasia Review – Is It The Best Video Editor?
- Updated This Article Talks in Detail About How to Export iMovie Video From iPhone, Mac, Etc. It Also Covers the Process of Using iMovie Alternative to Edit Videos on Mac. Check Out Now
- Updated In 2024, AI Has Influenced All Video Editors to Speed up Editing. This Article Discusses the Significance of AI Slow Motion and the Tools that Offer It
- Updated Best Phantom Slow-Mo Camera For Recording Slow Motion Videos for 2024
- In 2024, How to Merge Audio and Video Using FFmpeg
- Updated 2024 Approved 7 Best MP4 Video Editors on Mac Edit MP4 Videos Easily
- New Making a Countdown Timer Video Like a Pro Isnt a Problem Anymore. Follow the Steps Mentioned in This Guide and Create an Impressive Countdown Timer for Your Videos for 2024
- In 2024, 3 Methods to Mirror Oppo Reno 10 Pro+ 5G to Roku | Dr.fone
- Android Safe Mode - How to Turn off Safe Mode on Samsung Galaxy A14 4G? | Dr.fone
- Ultimate Guide to Catch the Regional-Located Pokemon For Apple iPhone 12 Pro | Dr.fone
- In 2024, How to Screen Mirroring OnePlus Ace 3 to PC? | Dr.fone
- Easy steps to recover deleted music from Infinix Note 30i
- In 2024, The Best Android SIM Unlock Code Generators Unlock Your Vivo X Flip Phone Hassle-Free
- In 2024, How to use Snapchat Location Spoofer to Protect Your Privacy On Realme GT 5? | Dr.fone
- How do i sign a word document electronically
- New The Best AI Video Makers From Photos to Create Captivating Videos with Pictures
- How To Deal With the Itel P55 Screen Black But Still Works? | Dr.fone
- In 2024, How To Bypass the Required Apple Store Verification For Apple iPhone 11 Pro Max | Dr.fone
- How To Unlock SIM Cards Of Vivo Y77t Without PUK Codes
- In 2024, How to Reset Apple ID and Apple Password From iPhone 13 mini
- Is it Possible to Use Miracast with Apple iPhone XS? | Dr.fone
- Updated Top Voice Cloning Apps for Android & iOS Devices
- Bypassing Google Account With vnROM Bypass For Realme 11 5G
- In 2024, 4 Feasible Ways to Fake Location on Facebook For your Vivo Y36 | Dr.fone
- In 2024, How to Bypass Google FRP Lock on Nokia C300 Devices
- 4 Feasible Ways to Fake Location on Facebook For your Honor Magic 5 Pro | Dr.fone
- How to Transfer Videos from OnePlus Nord N30 5G to iPad | Dr.fone
- How to Rescue Lost Videos from Nubia Z50S Pro
- The Most Useful Tips for Pokemon Go Ultra League On Motorola G24 Power | Dr.fone
- Updated 2024 Approved In-Depth Review of Ivona Text to Speech by NextUp Technologies
- Top 10 Best Spy Watches For your Realme GT 5 Pro | Dr.fone
- Top 10 Best Spy Watches For your Nokia G22 | Dr.fone
- In 2024, 9 Best Phone Monitoring Apps for Poco M6 Pro 4G | Dr.fone
- In 2024, How To Change Your Apple ID Password On your iPhone 13 Pro
- In 2024, How PGSharp Save You from Ban While Spoofing Pokemon Go On Samsung Galaxy F04? | Dr.fone
- Set Your Preferred Job Location on LinkedIn App of your HTC U23 | Dr.fone
- In 2024, The Best Android Unlock Software For Oppo Reno 8T 5G Device Top 5 Picks to Remove Android Locks
- How To Remove Screen Lock PIN On Nokia C32 Like A Pro 5 Easy Ways
- In 2024, Downloading SamFw FRP Tool 3.0 for Samsung Galaxy A14 5G
- 4 Ways to Transfer Music from Xiaomi Redmi A2+ to iPhone | Dr.fone
- Complete Guide on Unlocking iPhone XR with a Broken Screen? | Dr.fone
- In 2024, How To Change Country on App Store for iPhone 14 Plus With 7 Methods | Dr.fone
- In 2024, Why Your WhatsApp Live Location is Not Updating and How to Fix on your Realme Narzo 60 5G | Dr.fone
- How to Bypass Android Lock Screen Using Emergency Call On Samsung Galaxy A14 4G?
- In 2024, 3 Methods to Mirror Poco C50 to Roku | Dr.fone
- Title: Guide to Create a Timelapse Video in After Effects
- Author: Morgan
- Created at : 2024-05-19 05:11:38
- Updated at : 2024-05-20 05:11:38
- Link: https://ai-video-editing.techidaily.com/guide-to-create-a-timelapse-video-in-after-effects/
- License: This work is licensed under CC BY-NC-SA 4.0.

