:max_bytes(150000):strip_icc():format(webp)/asian-woman-talking-into-microphone-722208887-5b2a989730371300373a0447.jpg)
Guide to Create Intro Video with KineMaster for 2024

Guide to Create Intro Video with KineMaster
The intro is considered to be the most important part of a video. The intro comes first in a video and the first impression is crucial in retaining the viewers. If the intro is gripping and engaging, the viewers are likely to check the rest of the video. In order to create a stunning video, you need to have the best video editor. If you are a smartphone user, KineMaster intro maker should be your first choice.
You must have seen videos with stunning intro having KineMaster watermark on social media and video streaming platforms. Starting from beginners to professional video creators, KineMaster is an easy choice for them to make video intro. KineMaster is a powerful intro maker where you will find several templates, effects, and modes to create stunning intros for your videos. We will illustrate the steps to create intro video with KineMaster Intro Maker.
Part 1. Steps to Create Intro Video with KineMaster
KineMaster video editor is one of the most intuitive apps and that is why creating amazing intro videos is super easy. KineMaster app is available for both Android and iOS users. There are awesome assets, amazing templates, and useful blending modes available to design your desired intro video. You can create 4K intro videos at 60 FPS comfortably. Here are the steps to create intro KineMaster video.
Step 1: Go for KineMaster intro download as per your smartphone OS. Launch KineMaster app and tap on Create New icon on the home screen.
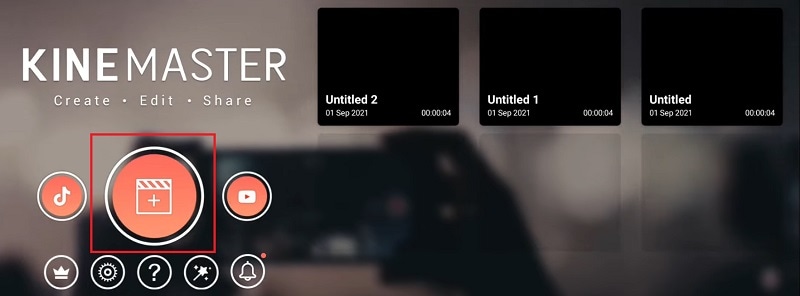
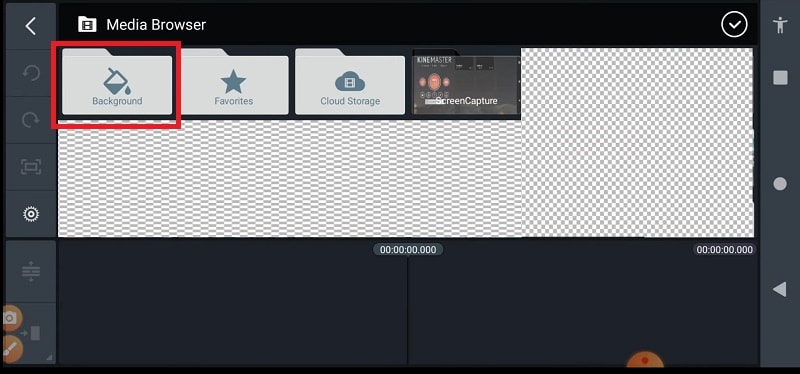
Step 2: Select an aspect ratio such as 16:9 or 9:16 or 1:1 as per your requirements. On the next screen, tap on Background and select a background as per your preference.
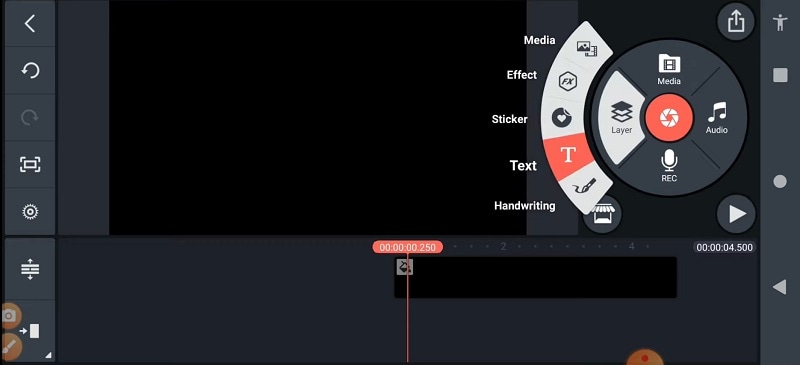
Step 3: On the layer at the bottom and select Text option. Type in your text that you want to show in the intro and tap on Ok button. You can change the font and style from the right panel.
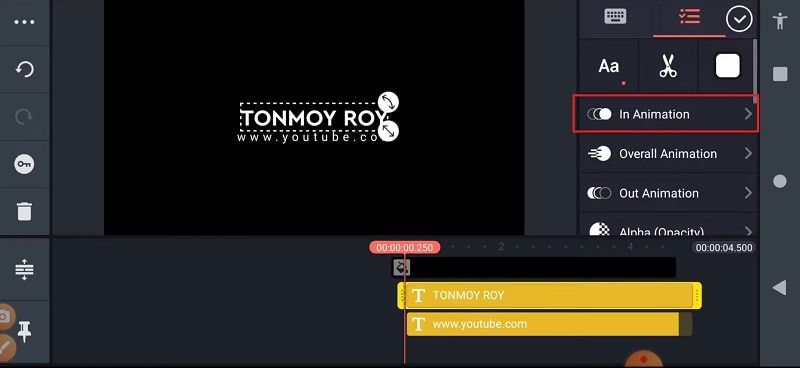
Step 4: Select the text layer and from the right panel, tap on In Animation option to animate the text. Select a desired animation template that you think is appropriate.
Step 5: Tap on the text layer again and tap on Effect option to add a text effect. Choose any desired Effect from the list. You can also tap on Get More to check out more effect templates.
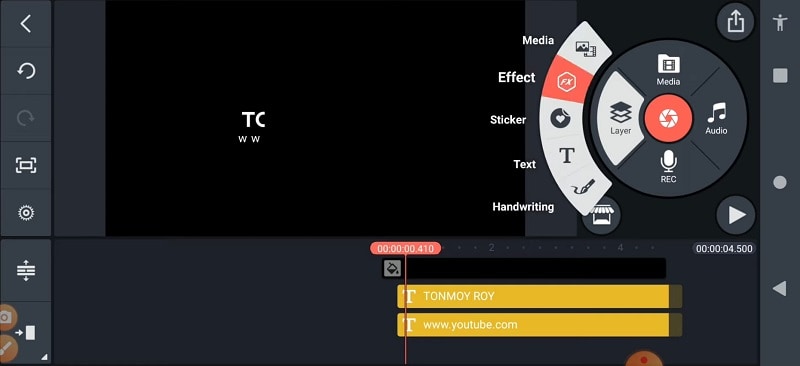
After you apply an effect, select the Effect layer from the timeline and go to Settings to make any adjustment. You can play and watch the intro video. Besides, you can add background photo or video and add graphical elements to enhance the intro animation.
Part 2. How to Create 3D Intro with KineMaster
We have illustrated how to create a text intro video and you can try out different animations and effects and come up with creative intro video. There is a viral trend in showing 3D intro to get more traction. You can use KineMaster to create amazing 3D intro videos easily that can go along with your video content. Here are the simple steps on how you can create 3D video with KineMaster.
Step 1: Install KineMaster from Play Store or App Store as per your smartphone OS. Launch KineMaster app after installation and tap on Create New icon.
Step 2: Select an aspect ratio and tap on Background option. Select a background color as per your preference. Otherwise, you can tap on Media Browser if you want to add a pre-decided photo or video as a background. We recommend a background video to amplify the 3D effect.
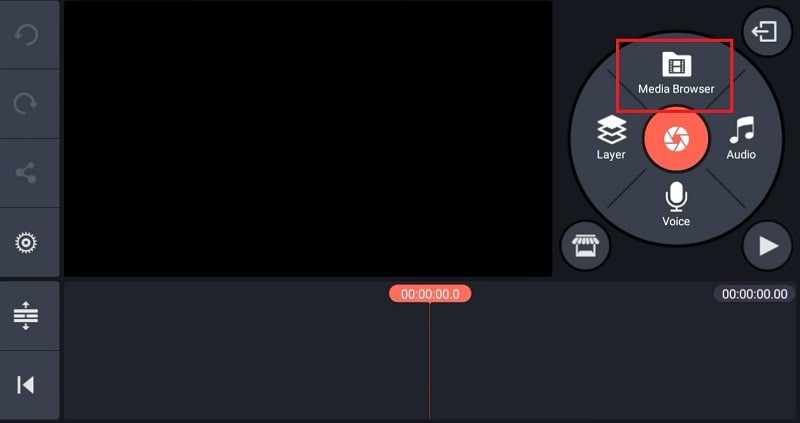
Step 3: It is time to add a 3D title. You can tap on Layer icon and Text icon to type in any title that you can turn into 3D with text effect or style. You can also tap on Media icon to select a ready-made 3D text with a transparent background. After adding the text, you can stretch it to increase the size as per your preference.
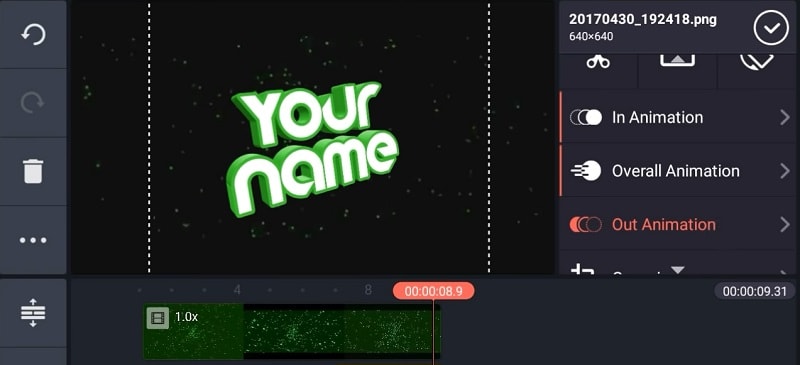
Step 4: From the right panel, tap on In Animation option and select a desired animation template. Similarly, tap on Out Animation option and select any animation whichever you think it is fit.
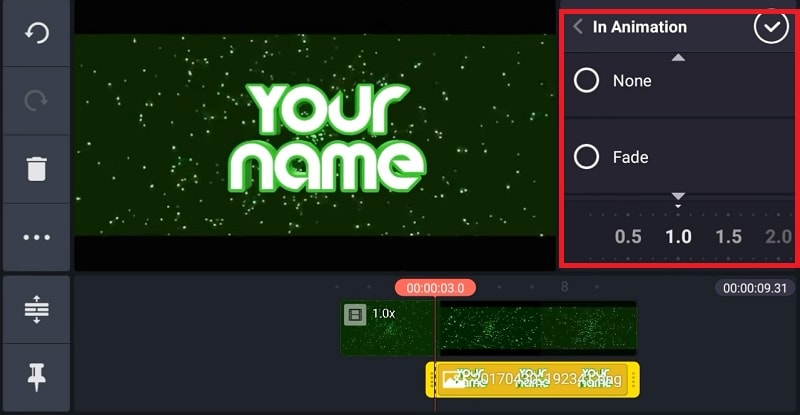
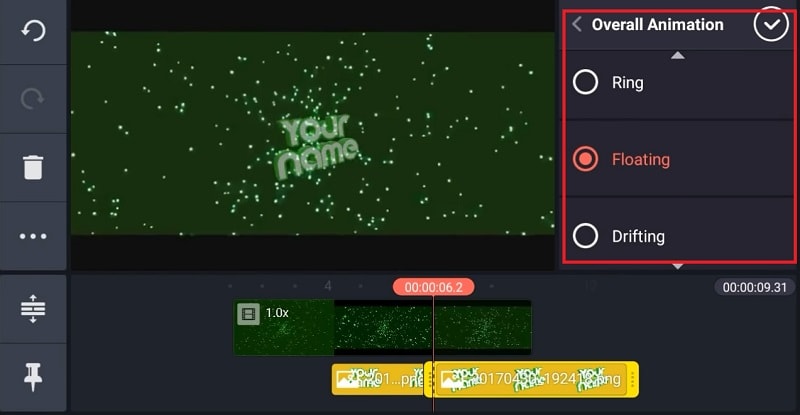
Step 5: From the right panel, tap on Overall Animation, select an animation template such as floating to enhance the 3D effect.
Part 3. Related FAQs of KineMaster Intro Video
What app most YouTubers use to make intros?
Apart from KineMaster, most YouTubers use Wondershare Filmora to make amazing videos. Filmora has a wider range of video effects, animations, and stock photos and videos. On top of that, the text animation and effect templates are tailor-made for intro videos.
Is KineMaster good for making YouTube videos?
Yes, KineMaster is good for creating engaging YouTube videos. You can create amazing intro and outro for your YouTube video on your smartphone. You can blend your photos and videos together and create amazing YouTube videos and stunning texts and titles. Besides, you can use chroma keys, transitions, reverse timing, and multi-layer features.
Can KineMaster handle 4K?
Yes, KineMaster is perfect for editing 4K video taken with high-end cameras. After editing the videos, you can export them in 4K resolution up to 60 FPS. However, you will need a high-end smartphone for KineMaster to handle 4K video editing smoothl
The intro is considered to be the most important part of a video. The intro comes first in a video and the first impression is crucial in retaining the viewers. If the intro is gripping and engaging, the viewers are likely to check the rest of the video. In order to create a stunning video, you need to have the best video editor. If you are a smartphone user, KineMaster intro maker should be your first choice.
You must have seen videos with stunning intro having KineMaster watermark on social media and video streaming platforms. Starting from beginners to professional video creators, KineMaster is an easy choice for them to make video intro. KineMaster is a powerful intro maker where you will find several templates, effects, and modes to create stunning intros for your videos. We will illustrate the steps to create intro video with KineMaster Intro Maker.
Part 1. Steps to Create Intro Video with KineMaster
KineMaster video editor is one of the most intuitive apps and that is why creating amazing intro videos is super easy. KineMaster app is available for both Android and iOS users. There are awesome assets, amazing templates, and useful blending modes available to design your desired intro video. You can create 4K intro videos at 60 FPS comfortably. Here are the steps to create intro KineMaster video.
Step 1: Go for KineMaster intro download as per your smartphone OS. Launch KineMaster app and tap on Create New icon on the home screen.

Step 2: Select an aspect ratio such as 16:9 or 9:16 or 1:1 as per your requirements. On the next screen, tap on Background and select a background as per your preference.

Step 3: On the layer at the bottom and select Text option. Type in your text that you want to show in the intro and tap on Ok button. You can change the font and style from the right panel.

Step 4: Select the text layer and from the right panel, tap on In Animation option to animate the text. Select a desired animation template that you think is appropriate.

Step 5: Tap on the text layer again and tap on Effect option to add a text effect. Choose any desired Effect from the list. You can also tap on Get More to check out more effect templates.

After you apply an effect, select the Effect layer from the timeline and go to Settings to make any adjustment. You can play and watch the intro video. Besides, you can add background photo or video and add graphical elements to enhance the intro animation.
Part 2. How to Create 3D Intro with KineMaster
We have illustrated how to create a text intro video and you can try out different animations and effects and come up with creative intro video. There is a viral trend in showing 3D intro to get more traction. You can use KineMaster to create amazing 3D intro videos easily that can go along with your video content. Here are the simple steps on how you can create 3D video with KineMaster.
Step 1: Install KineMaster from Play Store or App Store as per your smartphone OS. Launch KineMaster app after installation and tap on Create New icon.
Step 2: Select an aspect ratio and tap on Background option. Select a background color as per your preference. Otherwise, you can tap on Media Browser if you want to add a pre-decided photo or video as a background. We recommend a background video to amplify the 3D effect.

Step 3: It is time to add a 3D title. You can tap on Layer icon and Text icon to type in any title that you can turn into 3D with text effect or style. You can also tap on Media icon to select a ready-made 3D text with a transparent background. After adding the text, you can stretch it to increase the size as per your preference.

Step 4: From the right panel, tap on In Animation option and select a desired animation template. Similarly, tap on Out Animation option and select any animation whichever you think it is fit.

Step 5: From the right panel, tap on Overall Animation, select an animation template such as floating to enhance the 3D effect.

Part 3. Related FAQs of KineMaster Intro Video
What app most YouTubers use to make intros?
Apart from KineMaster, most YouTubers use Wondershare Filmora to make amazing videos. Filmora has a wider range of video effects, animations, and stock photos and videos. On top of that, the text animation and effect templates are tailor-made for intro videos.
Is KineMaster good for making YouTube videos?
Yes, KineMaster is good for creating engaging YouTube videos. You can create amazing intro and outro for your YouTube video on your smartphone. You can blend your photos and videos together and create amazing YouTube videos and stunning texts and titles. Besides, you can use chroma keys, transitions, reverse timing, and multi-layer features.
Can KineMaster handle 4K?
Yes, KineMaster is perfect for editing 4K video taken with high-end cameras. After editing the videos, you can export them in 4K resolution up to 60 FPS. However, you will need a high-end smartphone for KineMaster to handle 4K video editing smoothl
The intro is considered to be the most important part of a video. The intro comes first in a video and the first impression is crucial in retaining the viewers. If the intro is gripping and engaging, the viewers are likely to check the rest of the video. In order to create a stunning video, you need to have the best video editor. If you are a smartphone user, KineMaster intro maker should be your first choice.
You must have seen videos with stunning intro having KineMaster watermark on social media and video streaming platforms. Starting from beginners to professional video creators, KineMaster is an easy choice for them to make video intro. KineMaster is a powerful intro maker where you will find several templates, effects, and modes to create stunning intros for your videos. We will illustrate the steps to create intro video with KineMaster Intro Maker.
Part 1. Steps to Create Intro Video with KineMaster
KineMaster video editor is one of the most intuitive apps and that is why creating amazing intro videos is super easy. KineMaster app is available for both Android and iOS users. There are awesome assets, amazing templates, and useful blending modes available to design your desired intro video. You can create 4K intro videos at 60 FPS comfortably. Here are the steps to create intro KineMaster video.
Step 1: Go for KineMaster intro download as per your smartphone OS. Launch KineMaster app and tap on Create New icon on the home screen.

Step 2: Select an aspect ratio such as 16:9 or 9:16 or 1:1 as per your requirements. On the next screen, tap on Background and select a background as per your preference.

Step 3: On the layer at the bottom and select Text option. Type in your text that you want to show in the intro and tap on Ok button. You can change the font and style from the right panel.

Step 4: Select the text layer and from the right panel, tap on In Animation option to animate the text. Select a desired animation template that you think is appropriate.

Step 5: Tap on the text layer again and tap on Effect option to add a text effect. Choose any desired Effect from the list. You can also tap on Get More to check out more effect templates.

After you apply an effect, select the Effect layer from the timeline and go to Settings to make any adjustment. You can play and watch the intro video. Besides, you can add background photo or video and add graphical elements to enhance the intro animation.
Part 2. How to Create 3D Intro with KineMaster
We have illustrated how to create a text intro video and you can try out different animations and effects and come up with creative intro video. There is a viral trend in showing 3D intro to get more traction. You can use KineMaster to create amazing 3D intro videos easily that can go along with your video content. Here are the simple steps on how you can create 3D video with KineMaster.
Step 1: Install KineMaster from Play Store or App Store as per your smartphone OS. Launch KineMaster app after installation and tap on Create New icon.
Step 2: Select an aspect ratio and tap on Background option. Select a background color as per your preference. Otherwise, you can tap on Media Browser if you want to add a pre-decided photo or video as a background. We recommend a background video to amplify the 3D effect.

Step 3: It is time to add a 3D title. You can tap on Layer icon and Text icon to type in any title that you can turn into 3D with text effect or style. You can also tap on Media icon to select a ready-made 3D text with a transparent background. After adding the text, you can stretch it to increase the size as per your preference.

Step 4: From the right panel, tap on In Animation option and select a desired animation template. Similarly, tap on Out Animation option and select any animation whichever you think it is fit.

Step 5: From the right panel, tap on Overall Animation, select an animation template such as floating to enhance the 3D effect.

Part 3. Related FAQs of KineMaster Intro Video
What app most YouTubers use to make intros?
Apart from KineMaster, most YouTubers use Wondershare Filmora to make amazing videos. Filmora has a wider range of video effects, animations, and stock photos and videos. On top of that, the text animation and effect templates are tailor-made for intro videos.
Is KineMaster good for making YouTube videos?
Yes, KineMaster is good for creating engaging YouTube videos. You can create amazing intro and outro for your YouTube video on your smartphone. You can blend your photos and videos together and create amazing YouTube videos and stunning texts and titles. Besides, you can use chroma keys, transitions, reverse timing, and multi-layer features.
Can KineMaster handle 4K?
Yes, KineMaster is perfect for editing 4K video taken with high-end cameras. After editing the videos, you can export them in 4K resolution up to 60 FPS. However, you will need a high-end smartphone for KineMaster to handle 4K video editing smoothl
The intro is considered to be the most important part of a video. The intro comes first in a video and the first impression is crucial in retaining the viewers. If the intro is gripping and engaging, the viewers are likely to check the rest of the video. In order to create a stunning video, you need to have the best video editor. If you are a smartphone user, KineMaster intro maker should be your first choice.
You must have seen videos with stunning intro having KineMaster watermark on social media and video streaming platforms. Starting from beginners to professional video creators, KineMaster is an easy choice for them to make video intro. KineMaster is a powerful intro maker where you will find several templates, effects, and modes to create stunning intros for your videos. We will illustrate the steps to create intro video with KineMaster Intro Maker.
Part 1. Steps to Create Intro Video with KineMaster
KineMaster video editor is one of the most intuitive apps and that is why creating amazing intro videos is super easy. KineMaster app is available for both Android and iOS users. There are awesome assets, amazing templates, and useful blending modes available to design your desired intro video. You can create 4K intro videos at 60 FPS comfortably. Here are the steps to create intro KineMaster video.
Step 1: Go for KineMaster intro download as per your smartphone OS. Launch KineMaster app and tap on Create New icon on the home screen.

Step 2: Select an aspect ratio such as 16:9 or 9:16 or 1:1 as per your requirements. On the next screen, tap on Background and select a background as per your preference.

Step 3: On the layer at the bottom and select Text option. Type in your text that you want to show in the intro and tap on Ok button. You can change the font and style from the right panel.

Step 4: Select the text layer and from the right panel, tap on In Animation option to animate the text. Select a desired animation template that you think is appropriate.

Step 5: Tap on the text layer again and tap on Effect option to add a text effect. Choose any desired Effect from the list. You can also tap on Get More to check out more effect templates.

After you apply an effect, select the Effect layer from the timeline and go to Settings to make any adjustment. You can play and watch the intro video. Besides, you can add background photo or video and add graphical elements to enhance the intro animation.
Part 2. How to Create 3D Intro with KineMaster
We have illustrated how to create a text intro video and you can try out different animations and effects and come up with creative intro video. There is a viral trend in showing 3D intro to get more traction. You can use KineMaster to create amazing 3D intro videos easily that can go along with your video content. Here are the simple steps on how you can create 3D video with KineMaster.
Step 1: Install KineMaster from Play Store or App Store as per your smartphone OS. Launch KineMaster app after installation and tap on Create New icon.
Step 2: Select an aspect ratio and tap on Background option. Select a background color as per your preference. Otherwise, you can tap on Media Browser if you want to add a pre-decided photo or video as a background. We recommend a background video to amplify the 3D effect.

Step 3: It is time to add a 3D title. You can tap on Layer icon and Text icon to type in any title that you can turn into 3D with text effect or style. You can also tap on Media icon to select a ready-made 3D text with a transparent background. After adding the text, you can stretch it to increase the size as per your preference.

Step 4: From the right panel, tap on In Animation option and select a desired animation template. Similarly, tap on Out Animation option and select any animation whichever you think it is fit.

Step 5: From the right panel, tap on Overall Animation, select an animation template such as floating to enhance the 3D effect.

Part 3. Related FAQs of KineMaster Intro Video
What app most YouTubers use to make intros?
Apart from KineMaster, most YouTubers use Wondershare Filmora to make amazing videos. Filmora has a wider range of video effects, animations, and stock photos and videos. On top of that, the text animation and effect templates are tailor-made for intro videos.
Is KineMaster good for making YouTube videos?
Yes, KineMaster is good for creating engaging YouTube videos. You can create amazing intro and outro for your YouTube video on your smartphone. You can blend your photos and videos together and create amazing YouTube videos and stunning texts and titles. Besides, you can use chroma keys, transitions, reverse timing, and multi-layer features.
Can KineMaster handle 4K?
Yes, KineMaster is perfect for editing 4K video taken with high-end cameras. After editing the videos, you can export them in 4K resolution up to 60 FPS. However, you will need a high-end smartphone for KineMaster to handle 4K video editing smoothl
Are You Looking to Make Subscribe Channel Graphics? Here Is a Complete Guide on How to Make One on Your Own
Professional video creators earn billions from YouTube, Tick Tock, and such platforms today. That strongly encourages newcomers to create their video content. But is it that easy? Of course not. To create a successful video and catch people’s attention, subscribe channel graphics are essential.
We have introduced how to create a simple custom subscribe button animation for beginners. We are here to give a more advanced and fully animated graphic that will provide your video with a professional look. Let’s start with knowing what a Subscription channel graphic is.
What Is a Subscribe Channel Graphic?
We here give a simple explanation for those new to a subscribe channel graphic. Have you ever watched videos on a platform like YouTube? If yes, you must have noticed some unique pictures encouraging viewers to subscribe to the channel. That is exactly what a subscribe channel graphic is. It looks like as below.
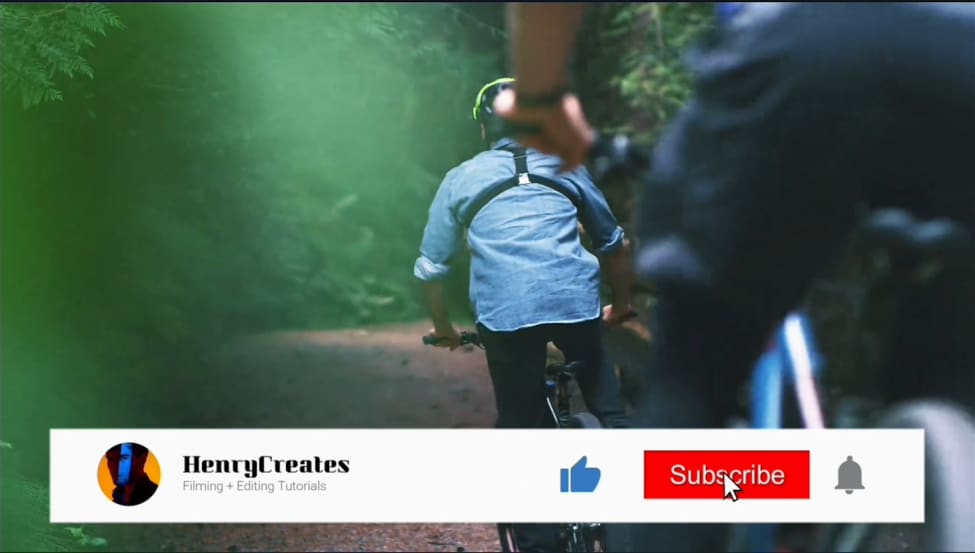
Every video crater incorporates such graphics on their videos before posting them. However, the hardest part is how to create one. We are now moving forward to see how we can make some outstanding subscribe button graphics using Wondershare Filmora.
Create Advanced Subscription Channel Graphics With Wondershare Filmora
Before we dive into our step-by-step guide, let’s first have an overview of our video editor. Wondershare Filmora is an incredible video editor with robust editing features. These features will transform your video into a stunning one within minutes. It also comes with a powerful screen recorder and a large filmstock of templates.
So using these templates, icons, and other features, here are the steps you need to follow to make an advanced subscribe channel graphic.
Free Download For Win 7 or later(64-bit)
Free Download For macOS 10.14 or later
Step1 Download and install Wondershare Filmora
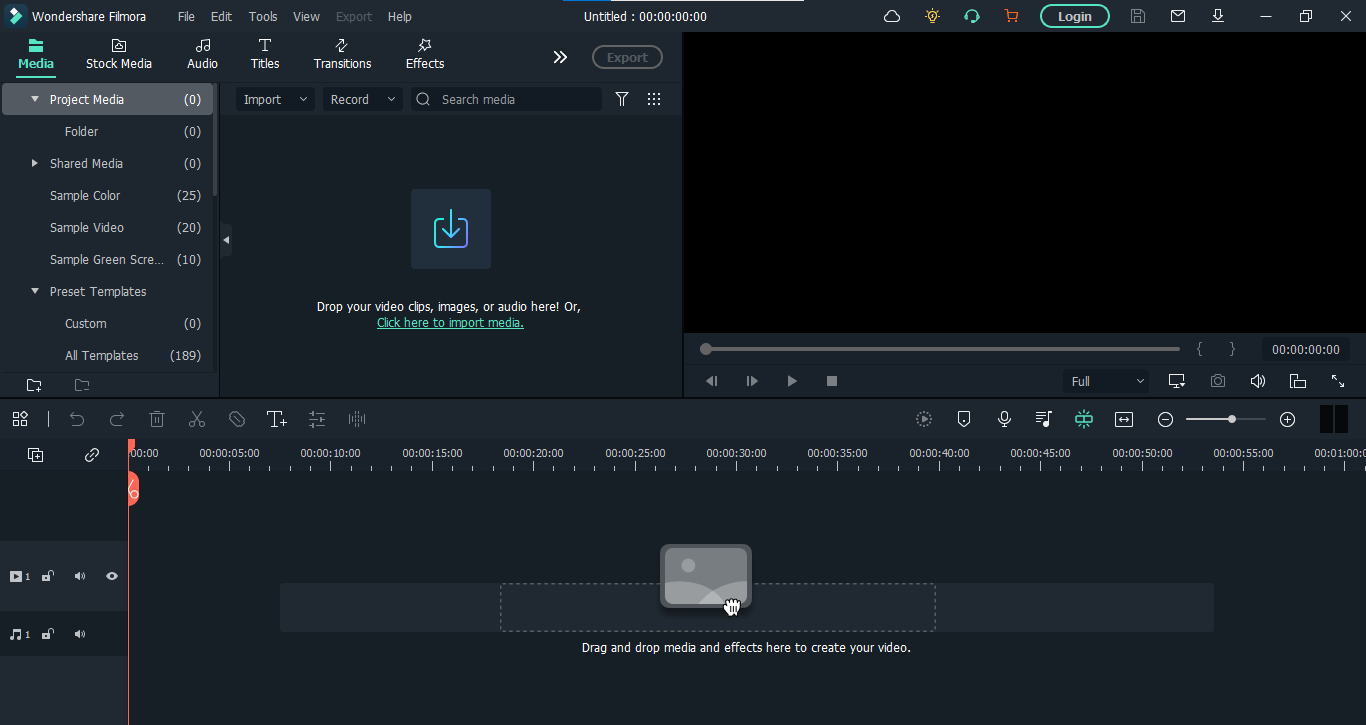
First, you need to download and install the video editor, Filmora. If you’ve already done that, then launch the software right away. But if you haven’t, then download it below. Once the download finishes, install the software on your computer.
When you launch the Filmora, click on “New Project.”
Step2 Make the structure of your graphics
For creating anything, we first need a flawless structure. Here, we can make the structure of Subscribe channel graphics using different colors, icons, texts, and channel photos. We’ll start by adding color layers.
1. Add color layers
- Go to the “Media” on the top left corner of the interface and Click on “Sample Color.” Here find the Green color and add it in the panel below as the first video layer by the drag-n-drop function.
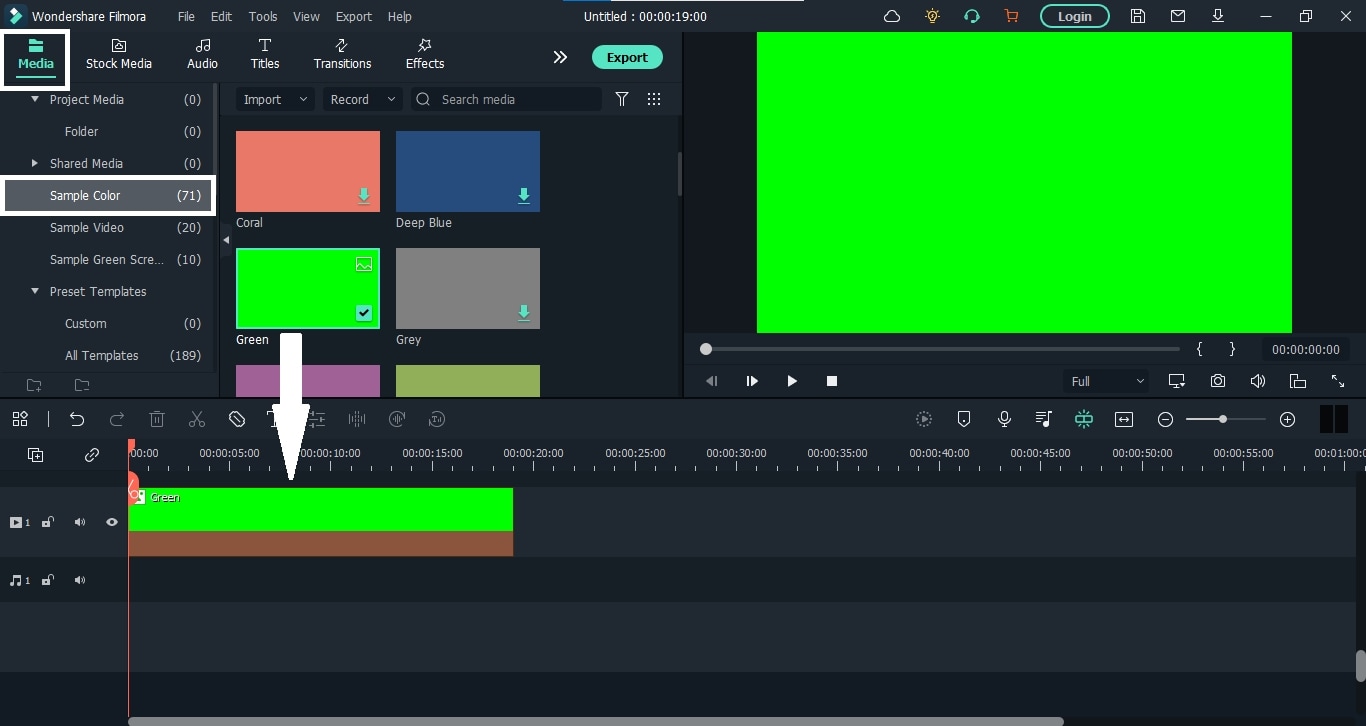
- We will key this layer at the end, so make sure not to use any other green graphics for your animation.
- Let’s lock this layer because we will no longer use it. For this, click on the “Lock” icon on the layer’s left side.
- Add white and red colors and stack them on top of the green color layer.
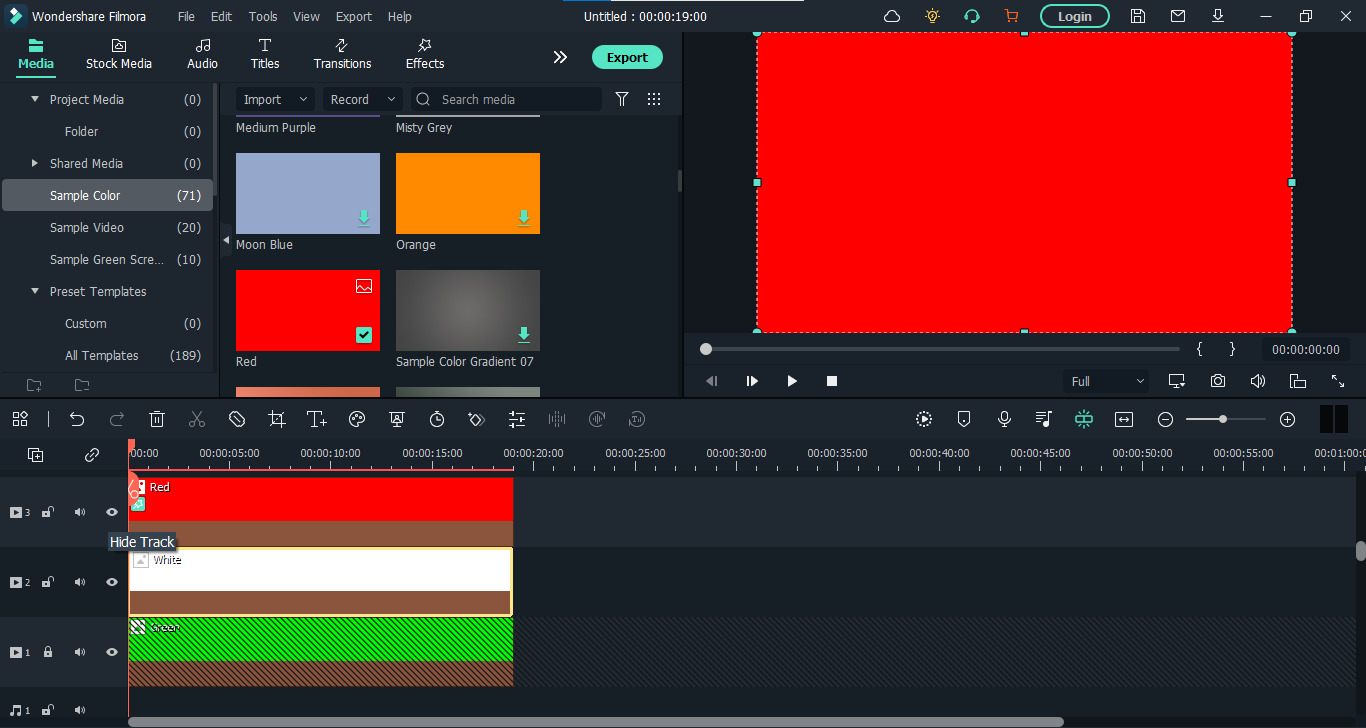
After adding all three color layers, it’s time to crop these layers to make the structure of our graphic.
Crop the Color Layers
- Go to the “Effects” tab from the top bar and search for the “Crop” effect. Then drag the effect and add it to the white and red layers on the panel.
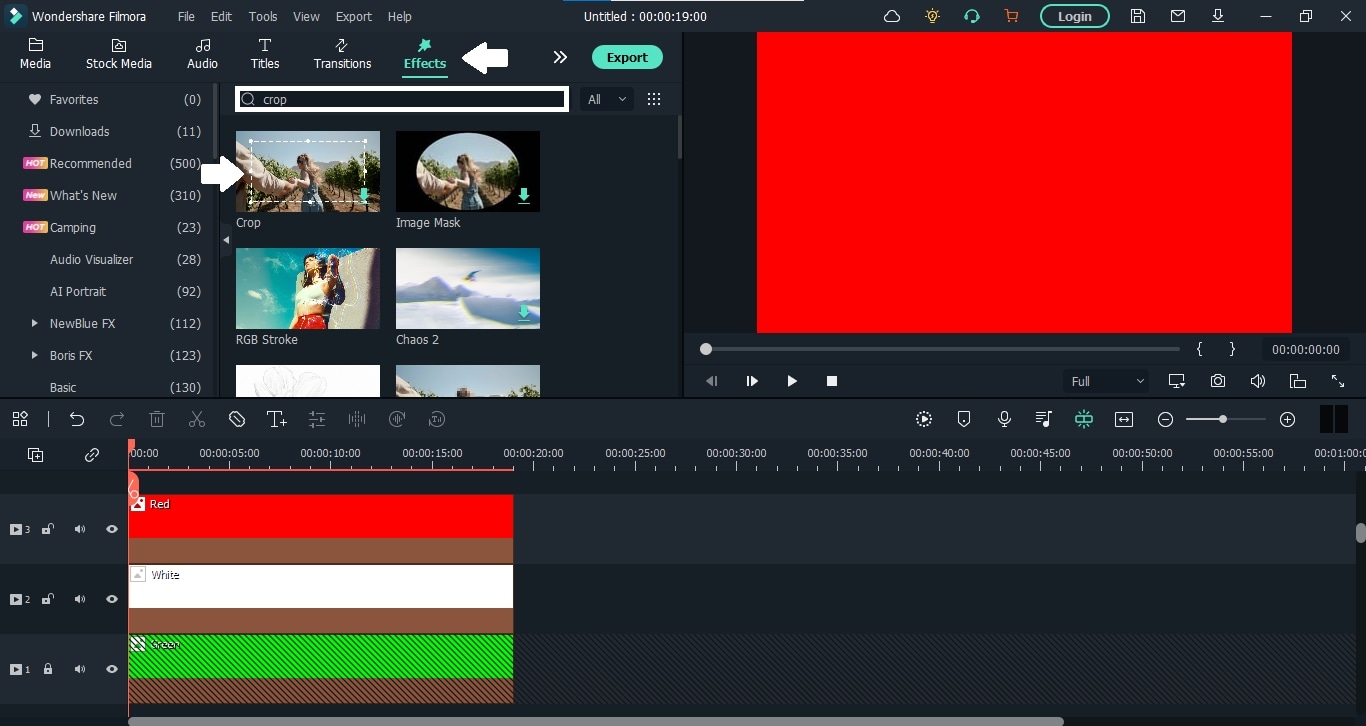
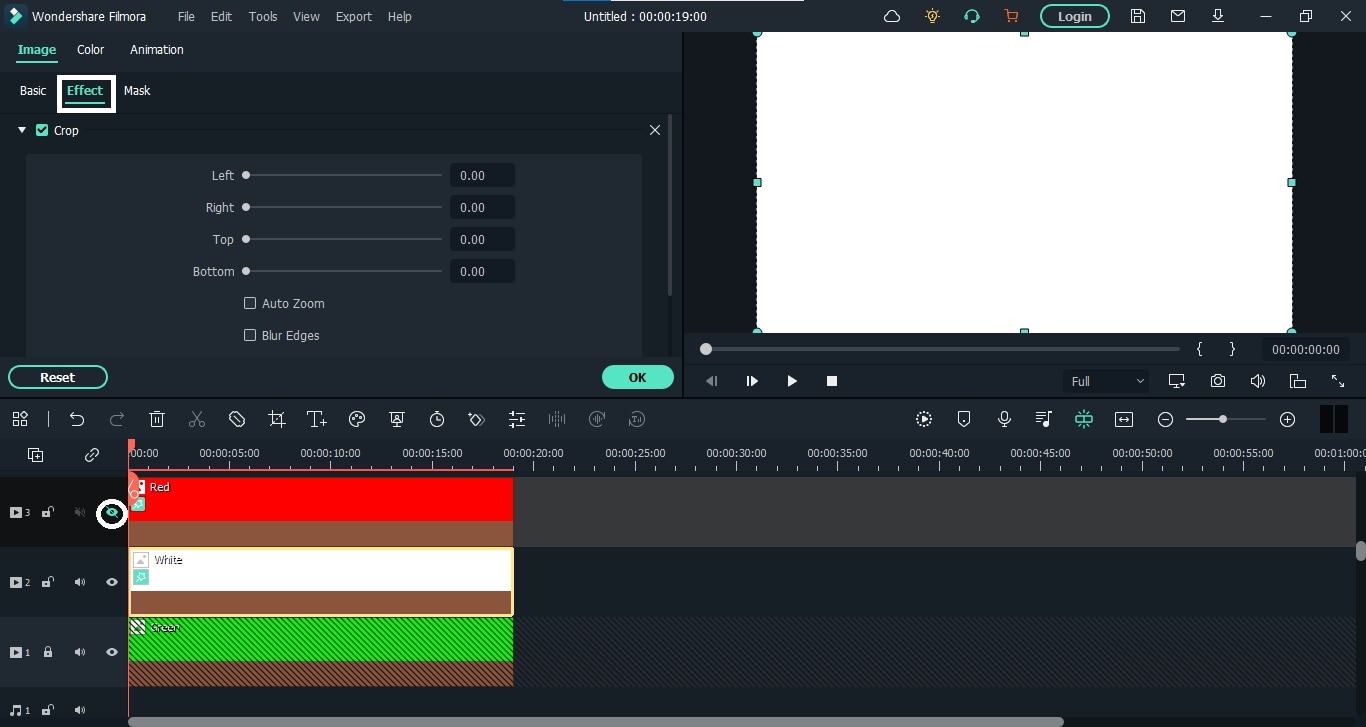
- First, click on the “Eye” icon beside the red color layer to hide it. Then double-click the white layer to see its properties. When the properties appear, select “Effects” from there.
- You can also enable the safe zones from the display settings on the right side of the panel. After that, crop the white layer first, then show the red layer and crop it too. It will look like this.
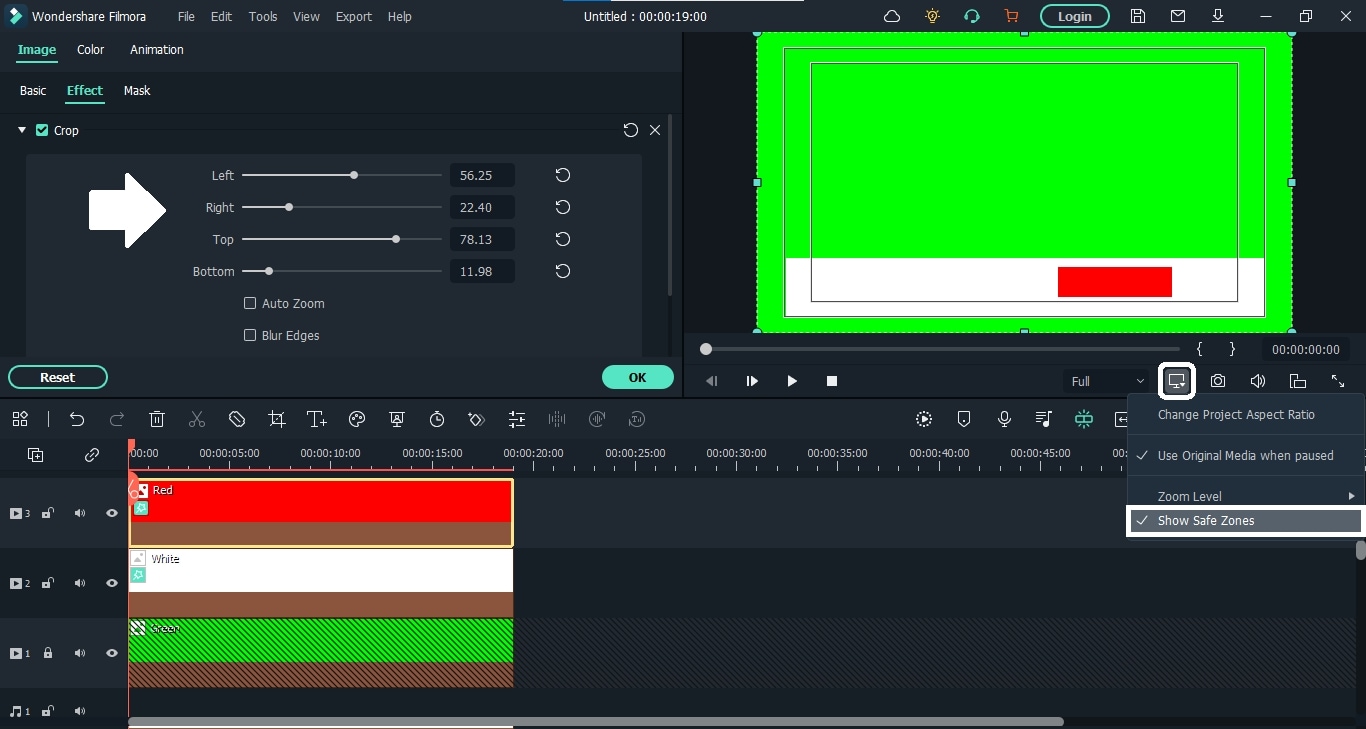
That’s it, folks. Our color backgrounds are here. Now we have to add our channel photo to this. So let’s move on to see how to do it.
2. Add a channel photo
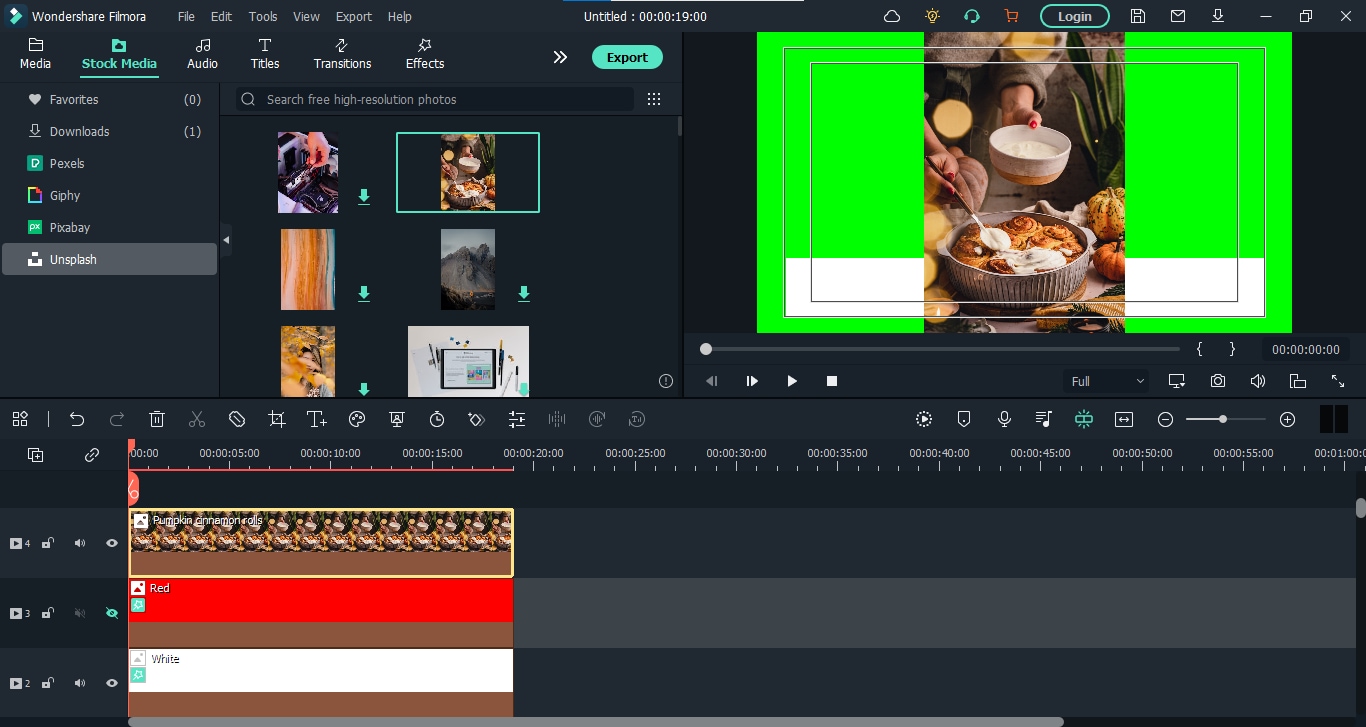
- To add the channel photo, you can upload the image. Here we are going to use some images from the stock media. No matter the image, drop it down on the panel above the red color layer.
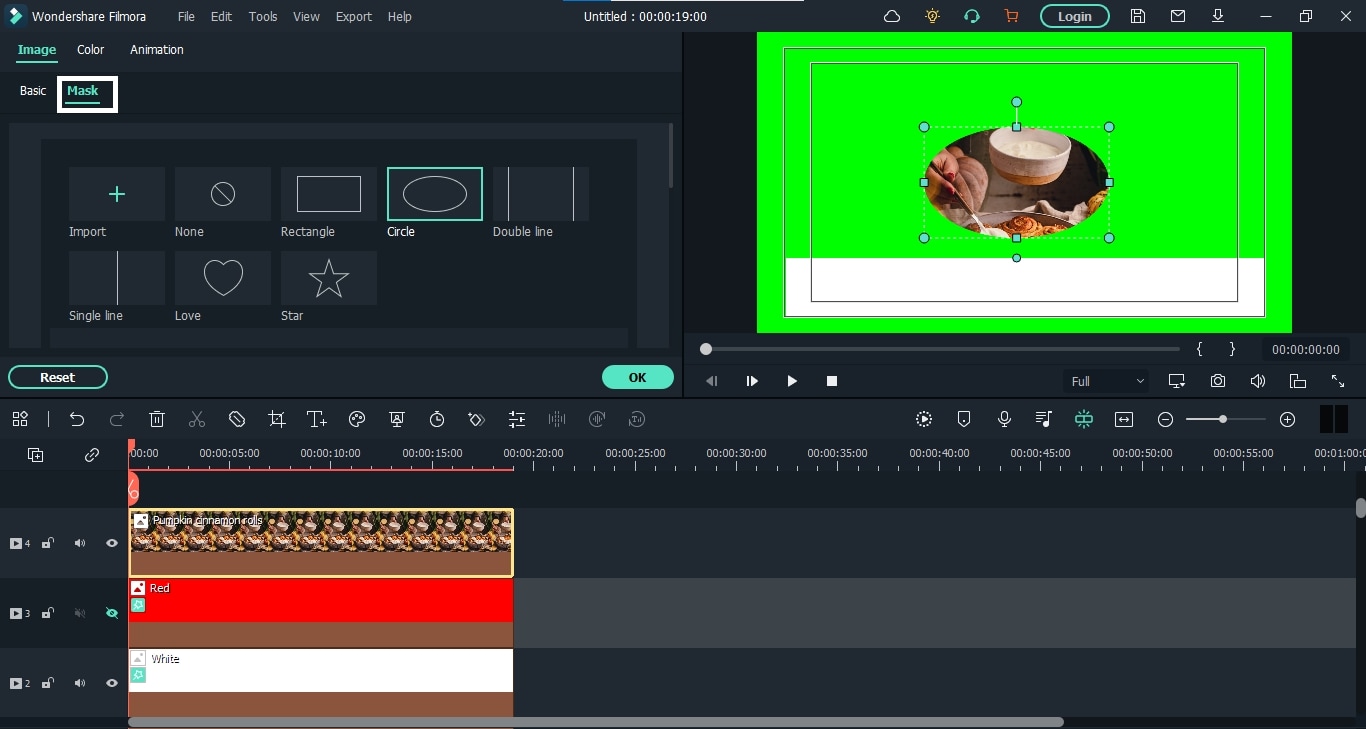
- Now double-click on the image layer, and from the properties, go to the “Mask” option and select the circle. You can also select any other shape you like.
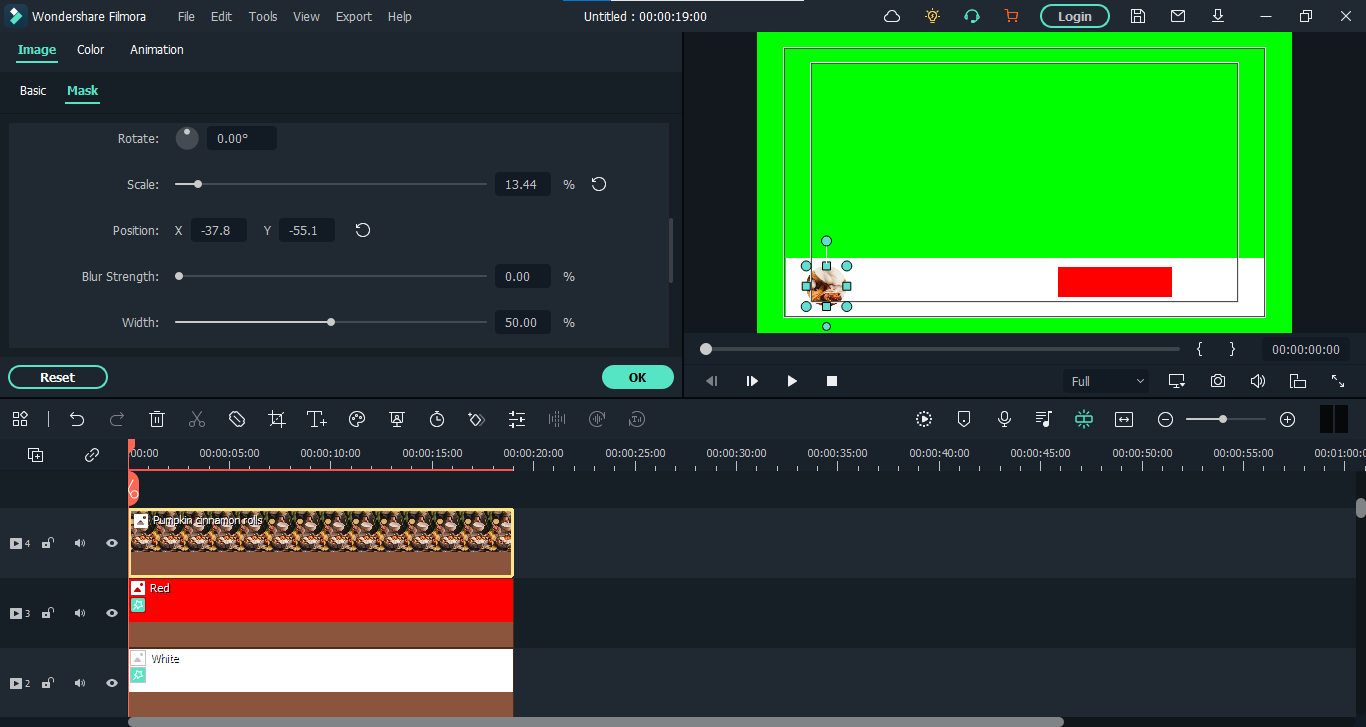
- After that, scroll down and make the circle even by matching all numbers. Then scale it down and place it on the left corner of the white layer.
It’s done. Let’s add our channel text now.
3. Add texts
- For adding text, go to the “Titles” from the top bar and add the title you like to the panel.
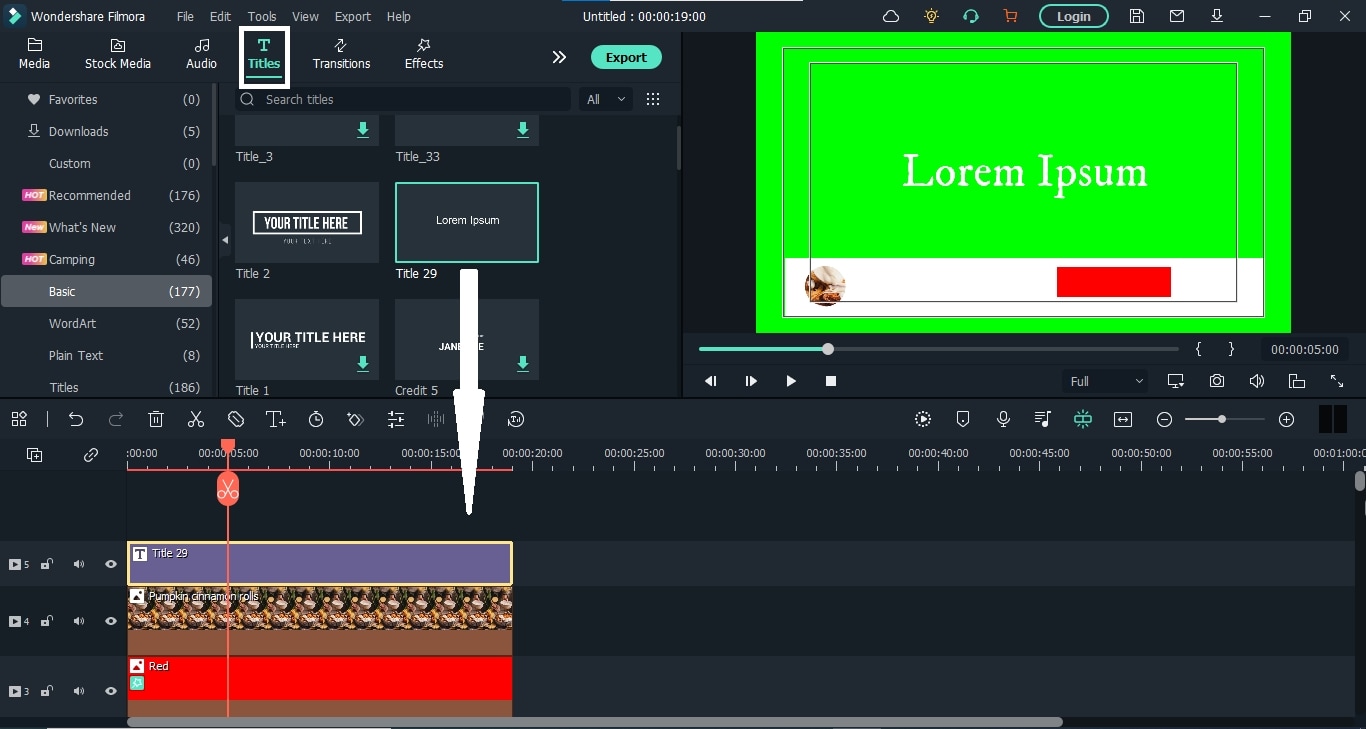
- Now double-click this layer and add the text you want. You can also change the color of the text, scale it down and place it where ever you want.
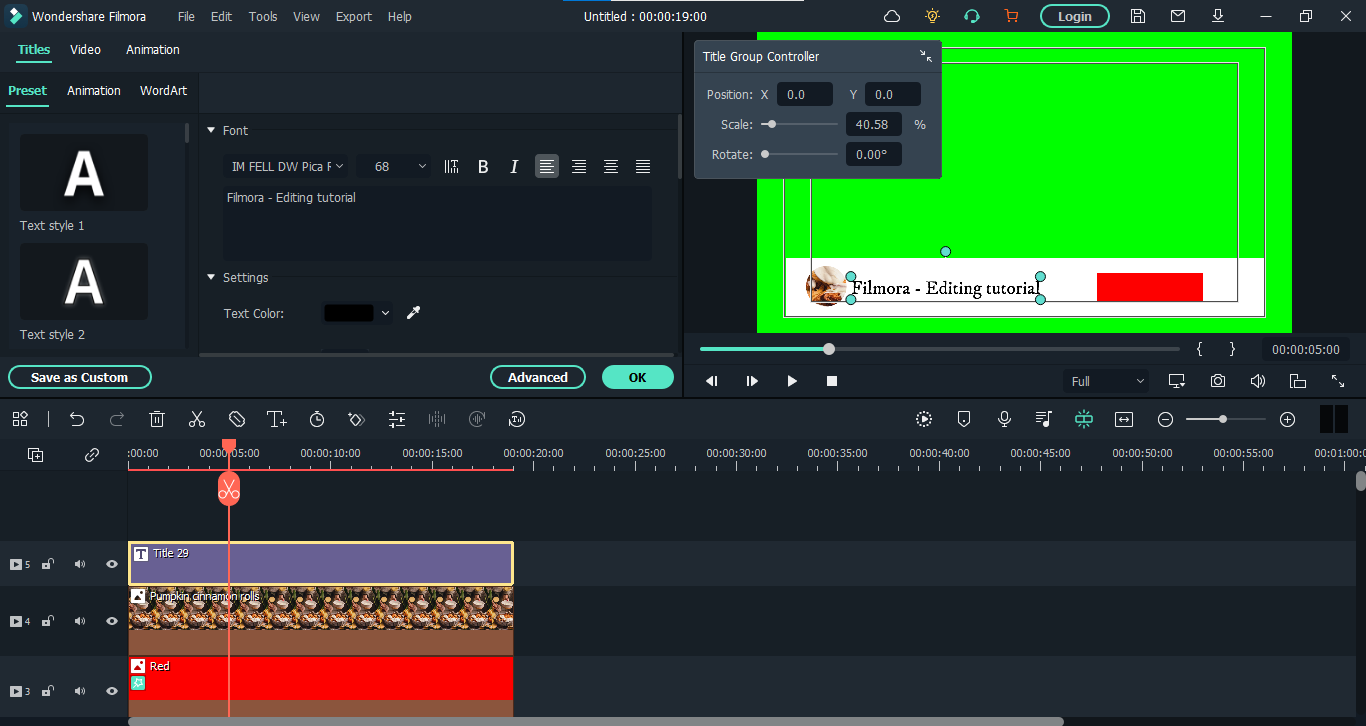
- Now, let’s add another title for the subscribe button. You have to place it on the red layer.
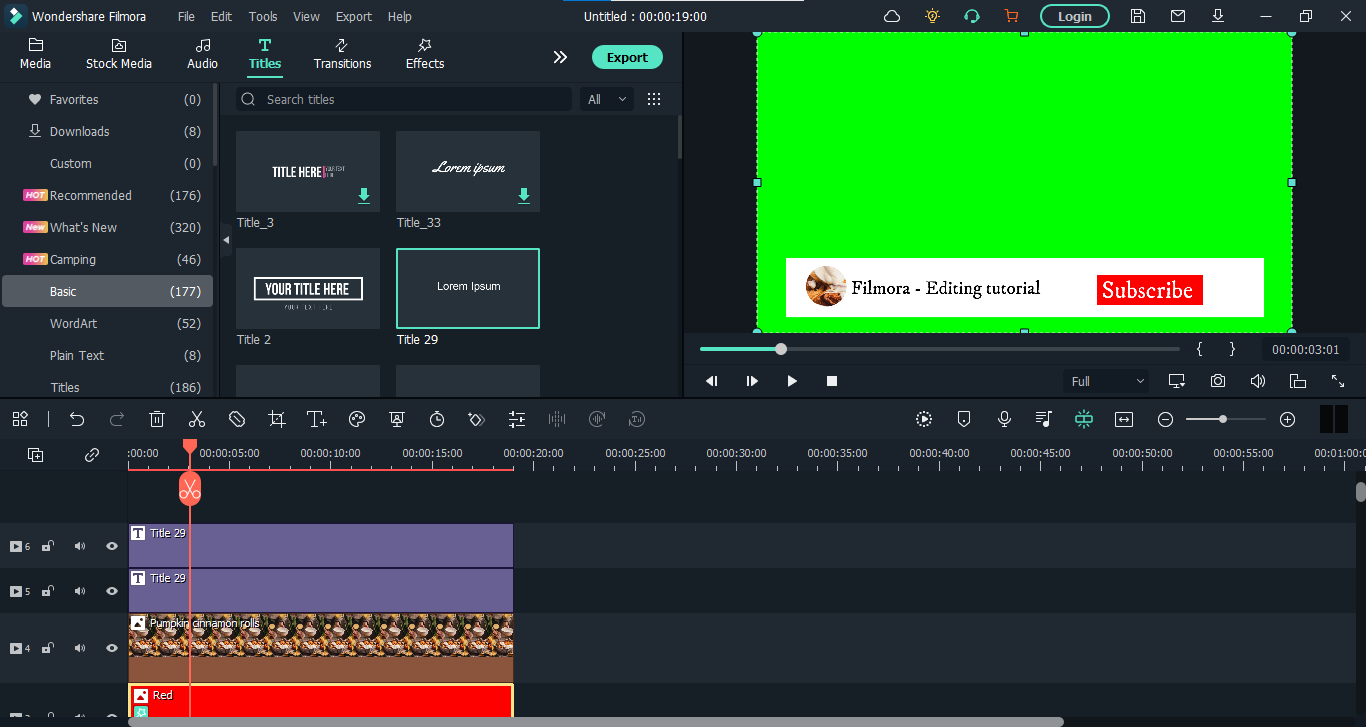
We can’t finish our structure without icons, can we? So let’s move on to them.
4. Add icons
- Hit the “Element” from the top bar and search for the “Bell” icon. You will find the short animations of the bell. Add the suitable one to the panel.
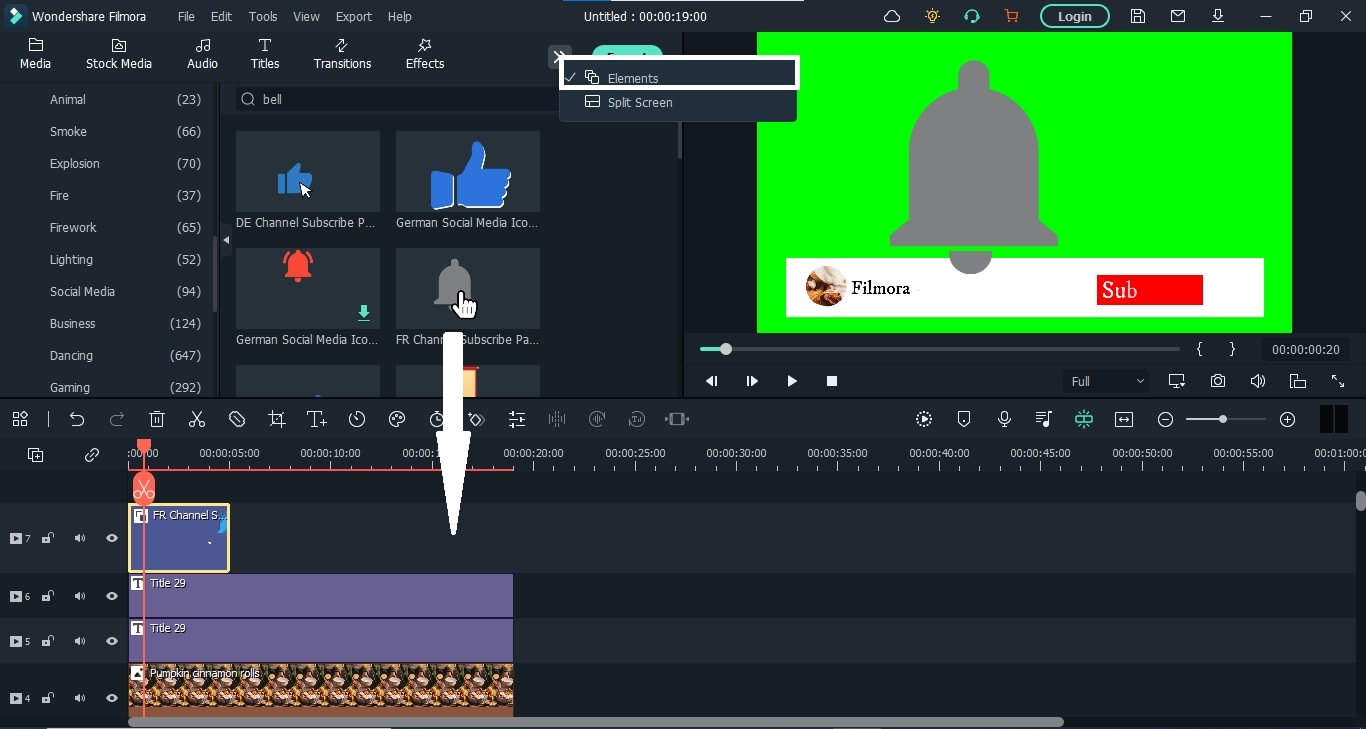
- Now find a suitable place in the animation, stop it at that point, right-click on the element layer and add a freeze frame.
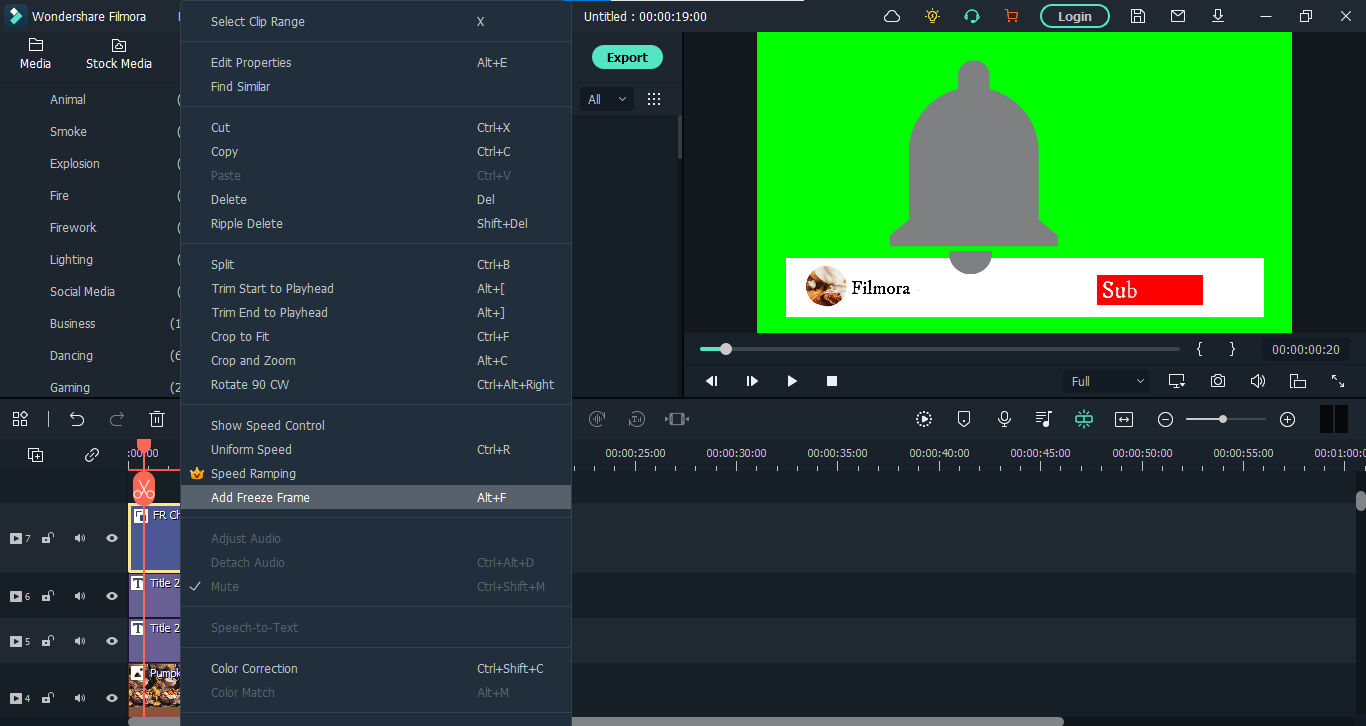
- You can also extend the freeze frame and remove the other parts. Then reduce its size and place it beside the “Subscribe” text.
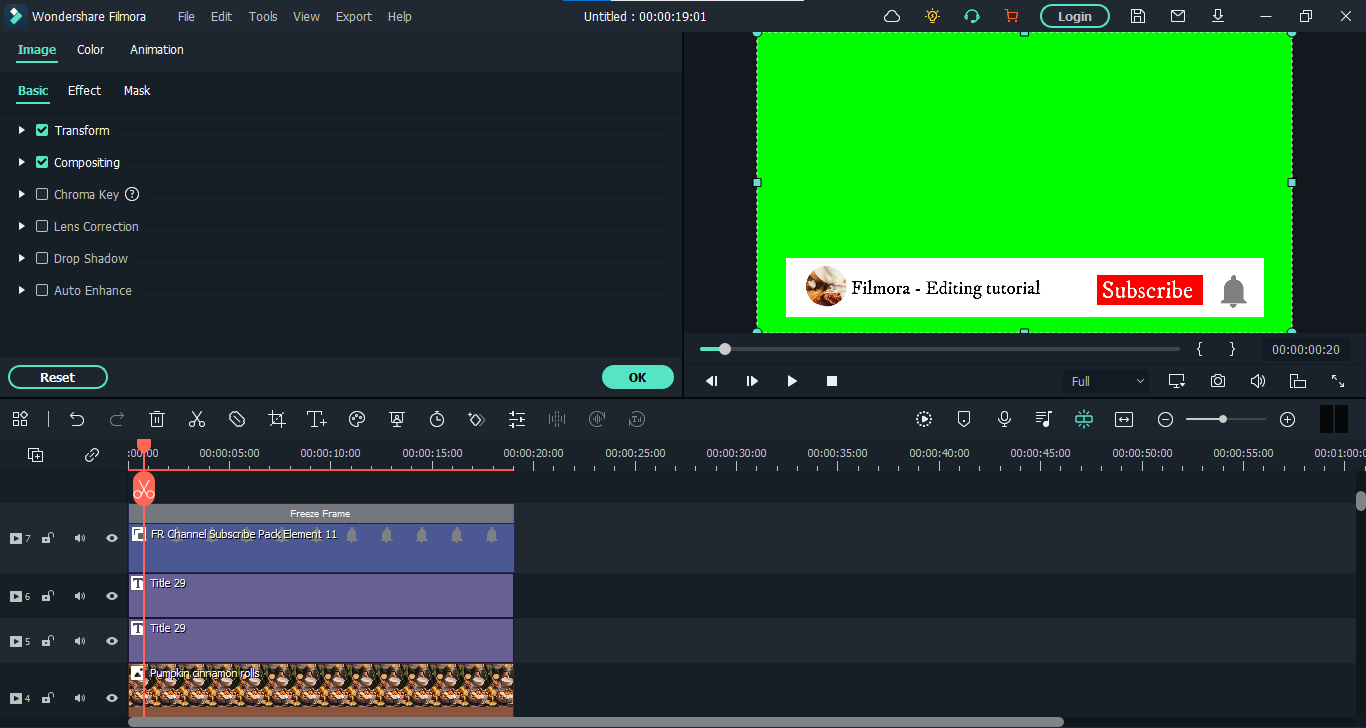
- Similarly, add “Thumbs Up” and “Mouse Cursor” icons on the panel.
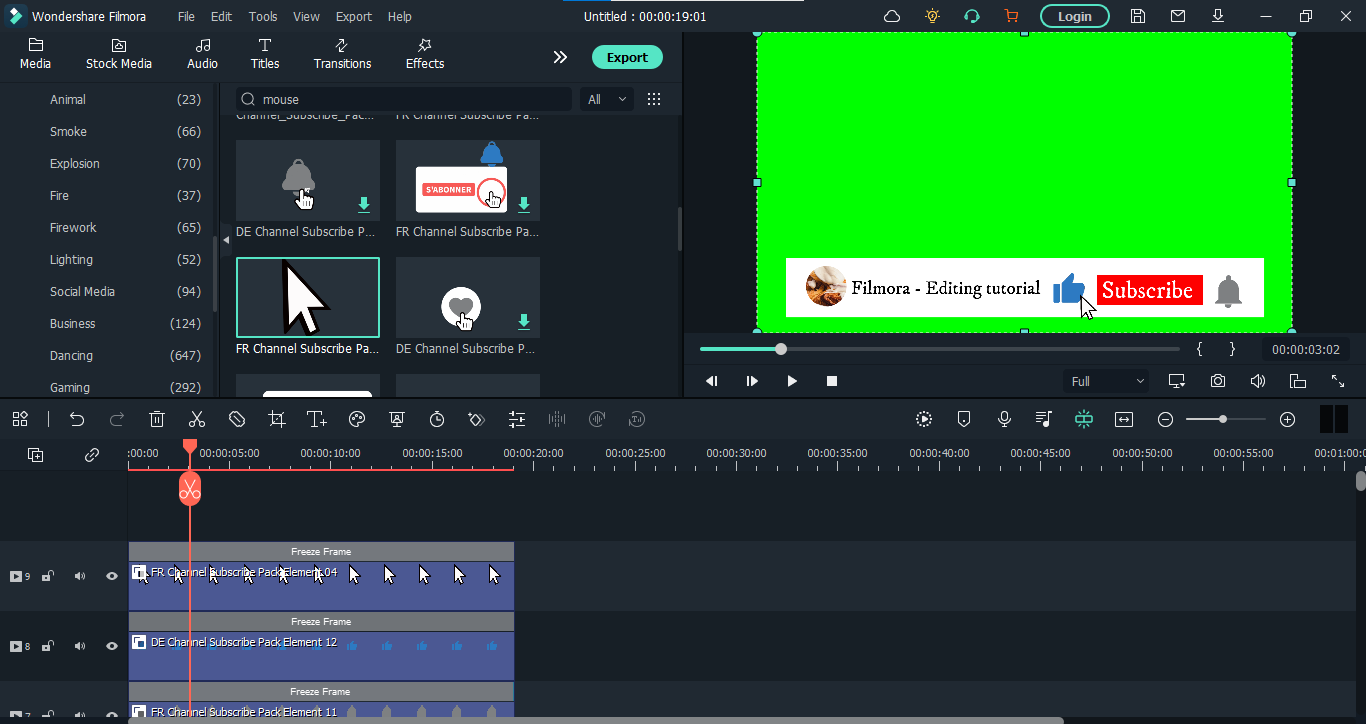
Finally, our structure is finished. Now let’s start animating.
Step3 Animate the graphics
First, we’ll make it so that all these graphics come in from below the view.
- Go to the white layer first and double-click on it. Then hit the “Animation” option and scroll down. Here add a new keyframe by clicking “Add.” Now move the playhead to the beginning and place the white color layer out of the frame.
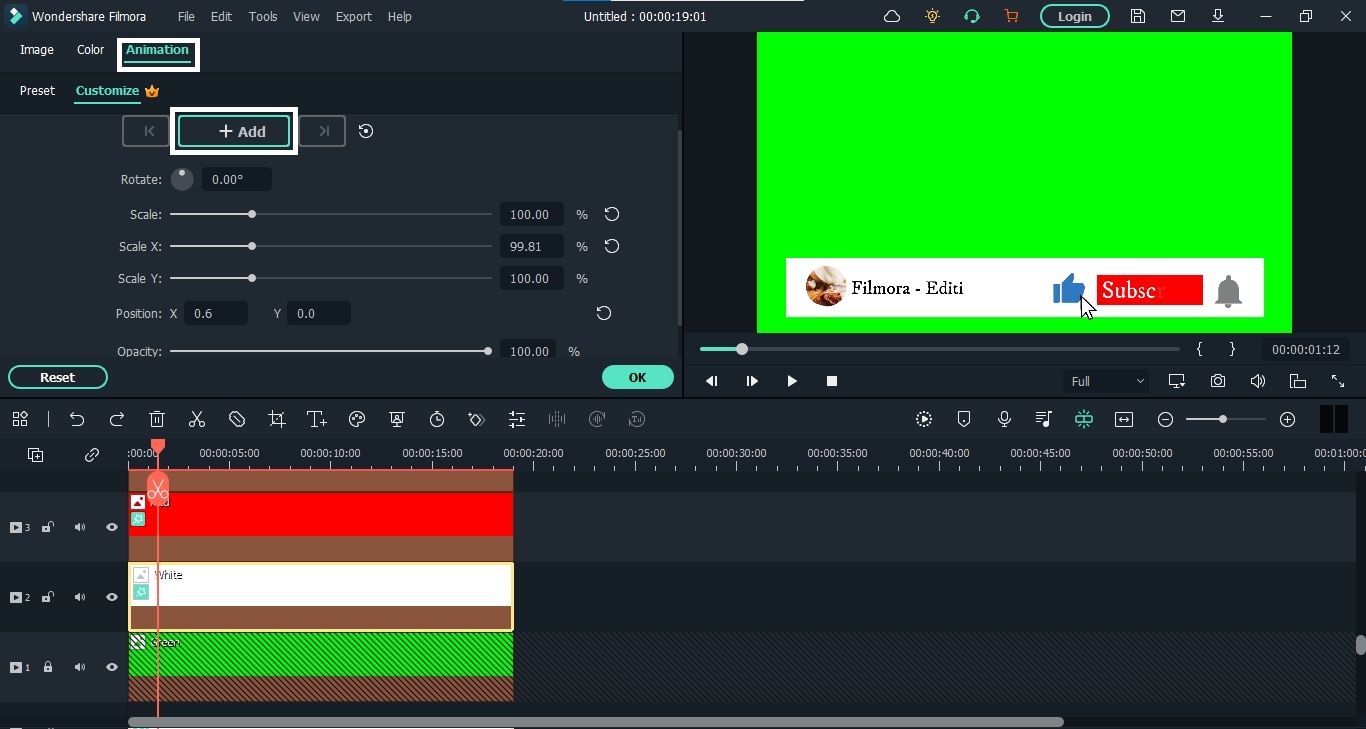
- Now, do the same for channel photos and icons. The whole animation will look like this.
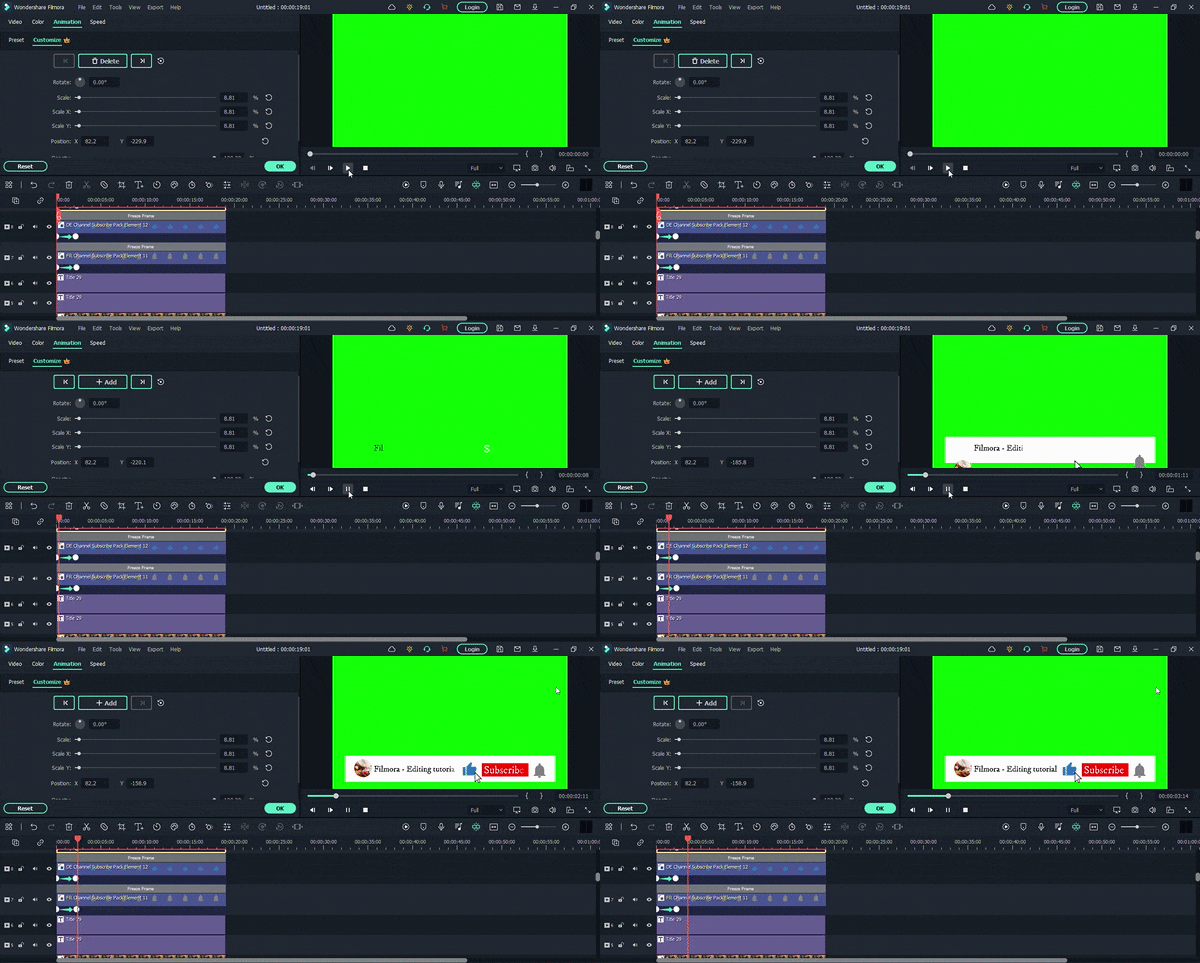
- As you can see, the text appears before the color layers. Let’s correct it. Double-click the text layer. Select the” Type Writer’ form and hit the “Advanced option.
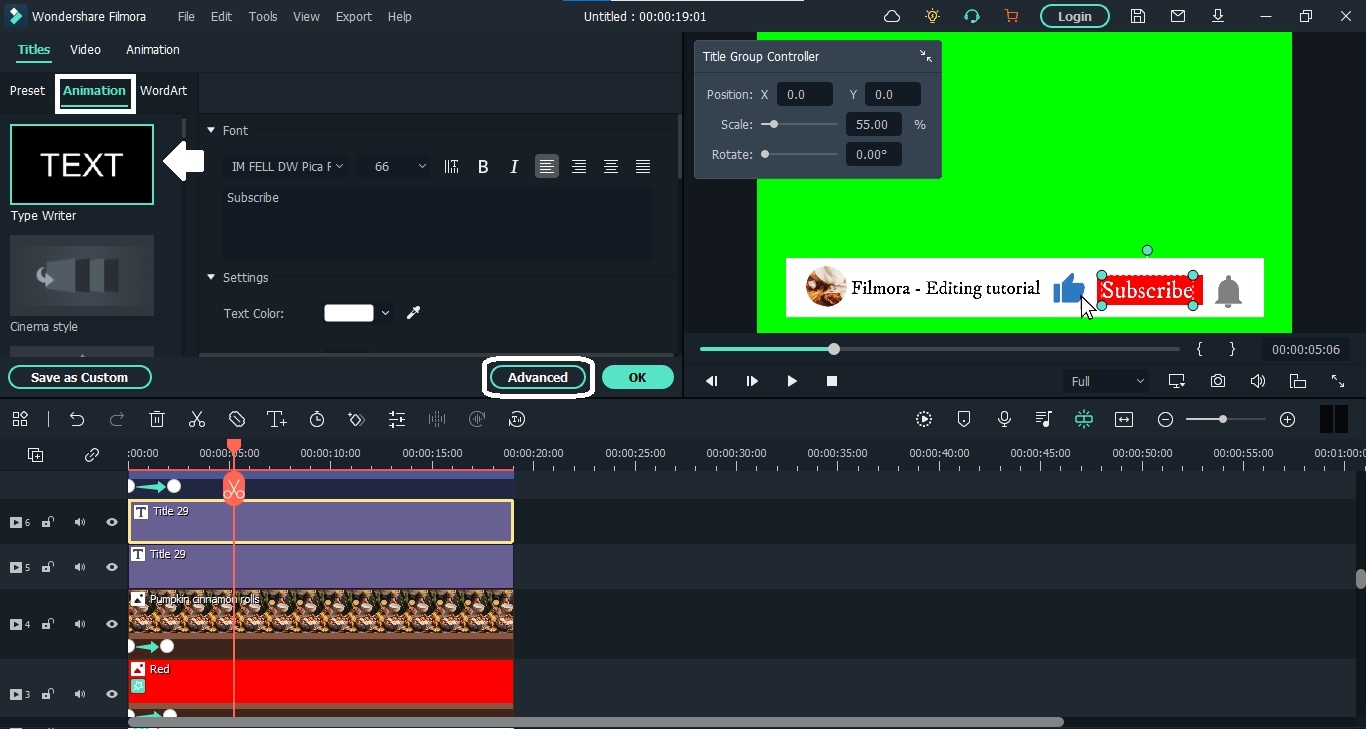
- Here, you can adjust the text with the color layers.
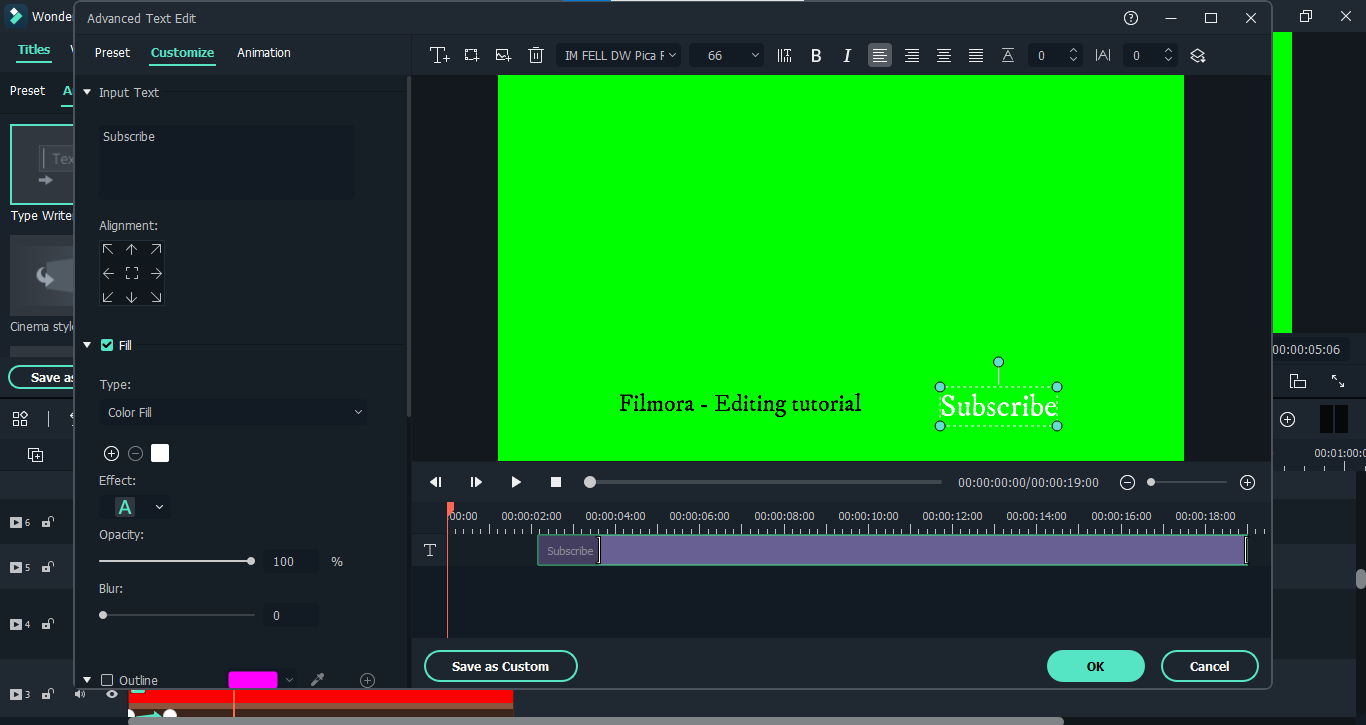
- After adjusting both the channel name and subscribe button texts, your animation will appear like this.
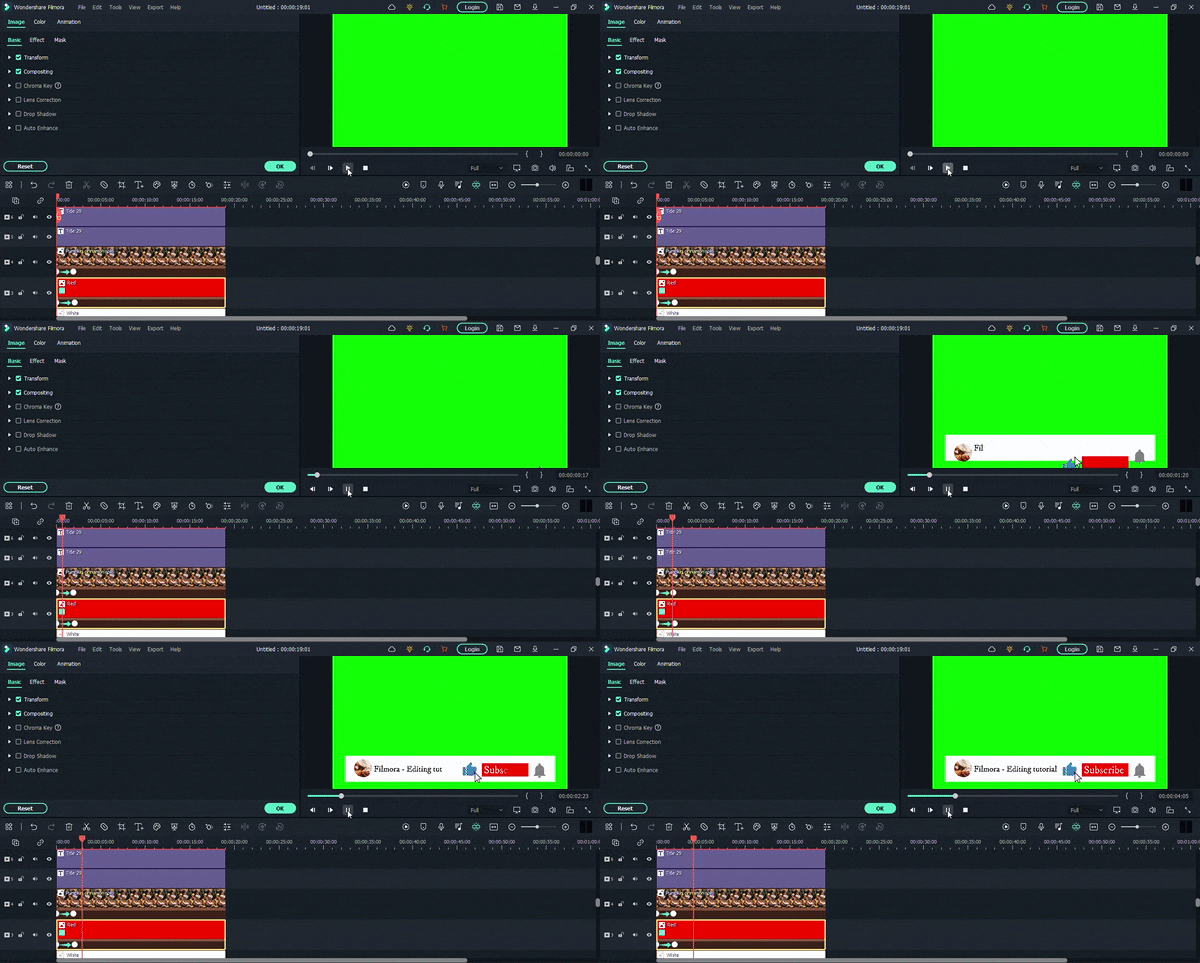
If you’ve managed so far, then that’s great. We have done most of the work. Now we need to animate the graphics of the mouse cursor so that it clicks on the bell icon, thumb icon, and our subscribe button. The process is somewhat similar because we will need to add different keyframes. But still, let’s see it in detail.
Step4 Animate the mouse cursor
- Go to the “Mouse Cursor” icon layer and double-click on it. First, place the icon on the “Thumbs Up” so that when it animates in, it goes directly to the said icon. Then you have to add another keyframe after some time. And when you add a third one, place the “Mouse Cursor” icon on the subscribe button text.
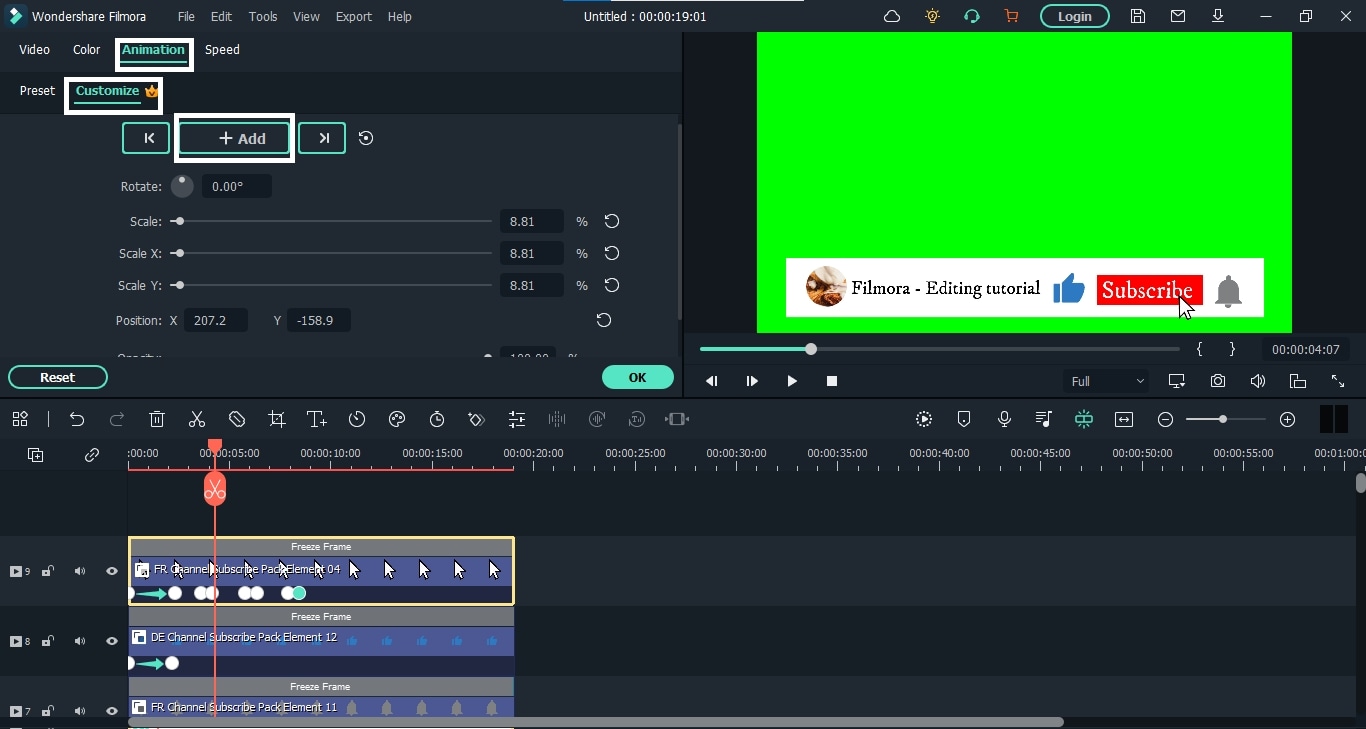
- Then add a similar pair of keyframes with some space from the last one and place the “Mouse Cursor” icon on the “Bell” icon.
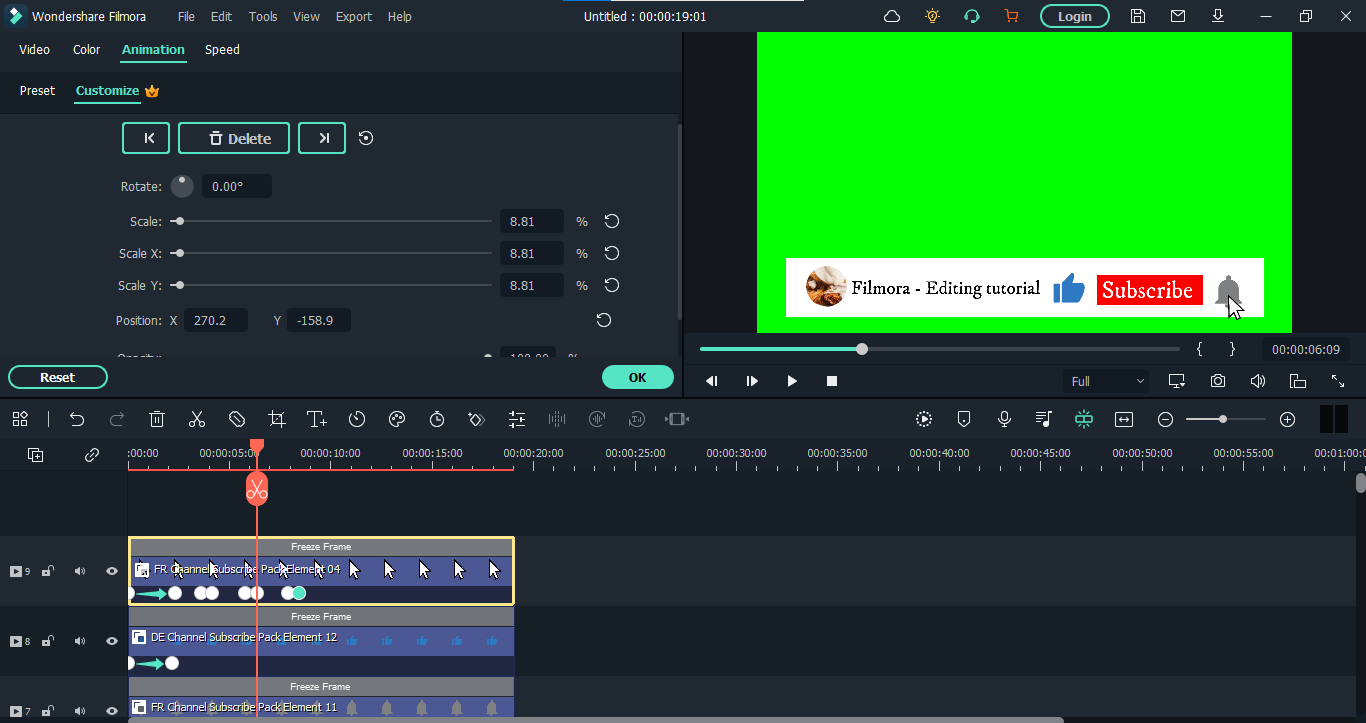
- The last keyframe we have to add will place this “Mouse Cursor” icon out of our view. After that, you need to adjust these keyframes to set the speed of the moving “Mouse Cursor’ icon according to your taste.
The final product up till now will be like this.
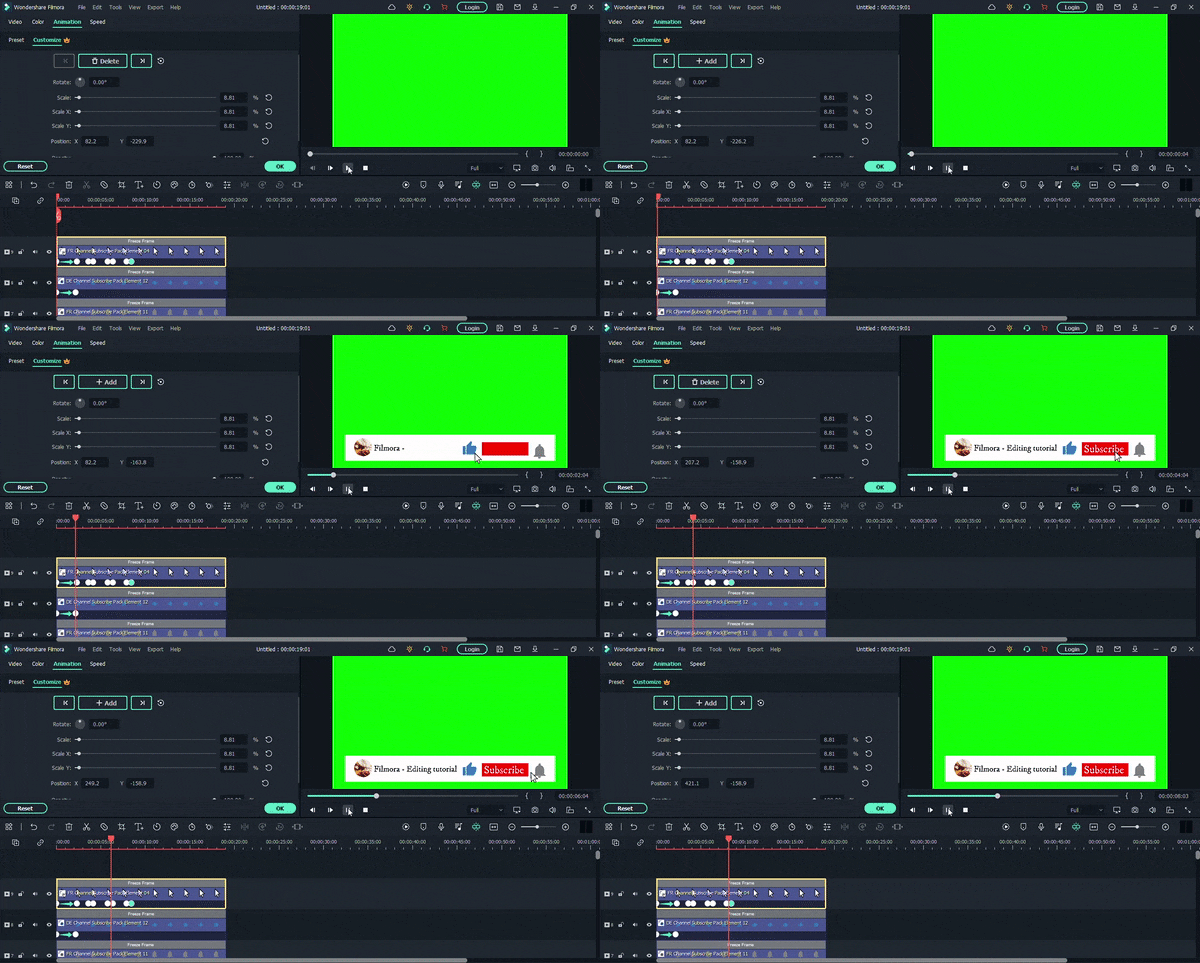
We are nearing our end, guys. Now we just need to make the graphics animate out of our view, and our work will be done. So let’s dive right into it.
Step5 Animate the graphics out
The process of animating out your graphics is like how we animated in our video. We just need to reverse those steps. So here’s how it’s done.
- Go to the white color layer and double-click on it to open its properties.
- Now, from the “Animation” option, add a new keyframe a little before the end of the video.
- After that, you have to add another keyframe at the end of your video. But in this keyframe, place the white color layer out of your view. Like this,
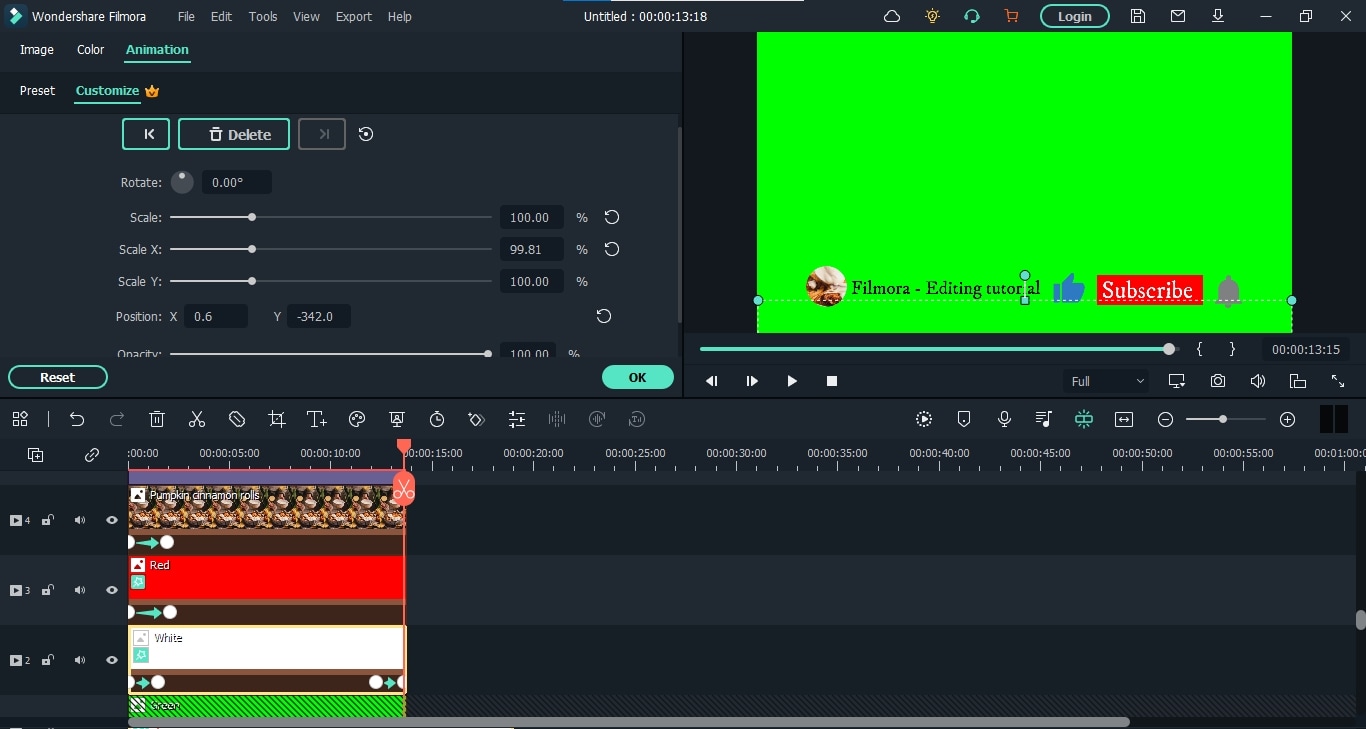
- Repeat the same steps for the red color layer, channel image layer, and icons layer.
- After it’s done, the whole graphics will look like this.
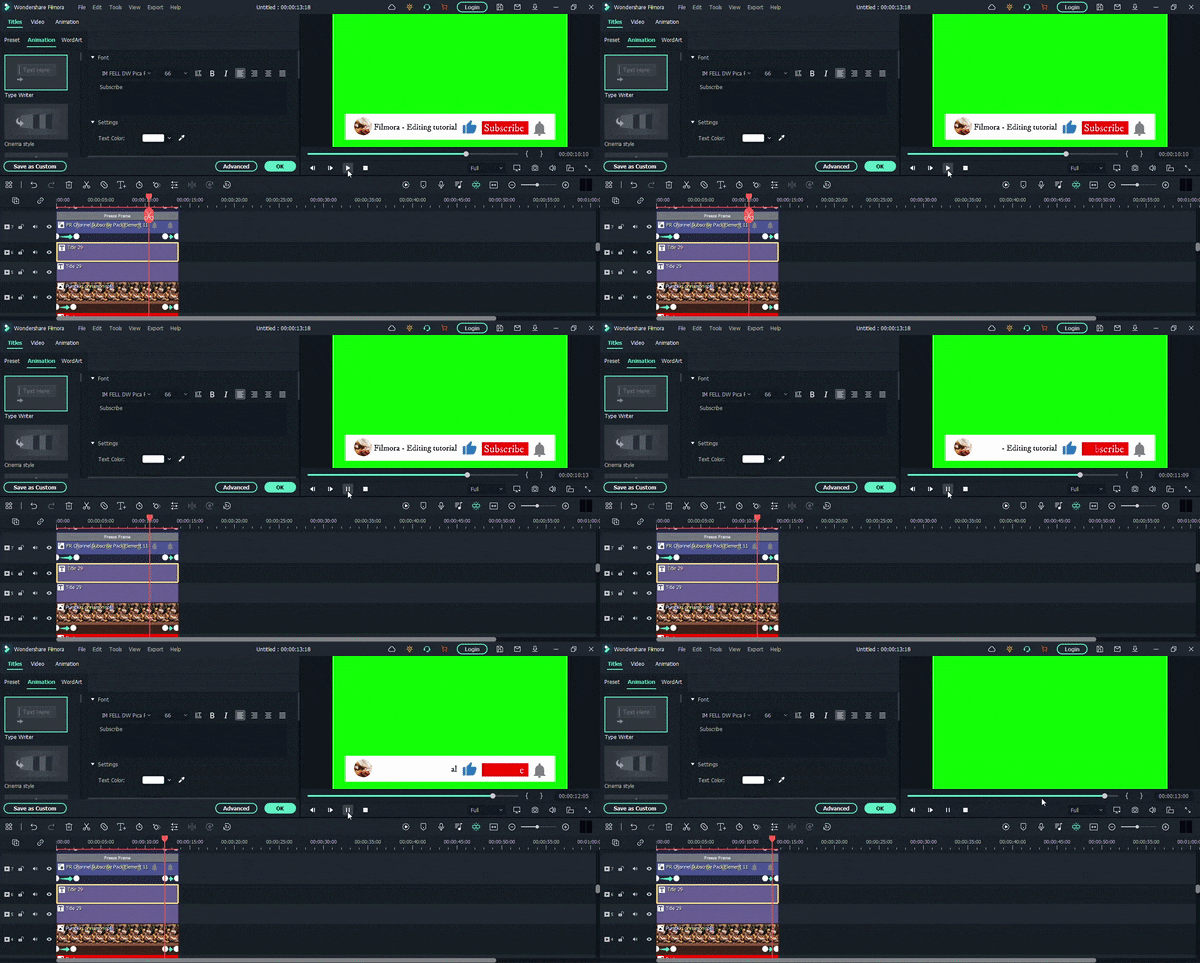
- The only thing that remains is to fix the text layers. For this, double-click on the channel text layer and go to the “Advanced” settings, just like before.
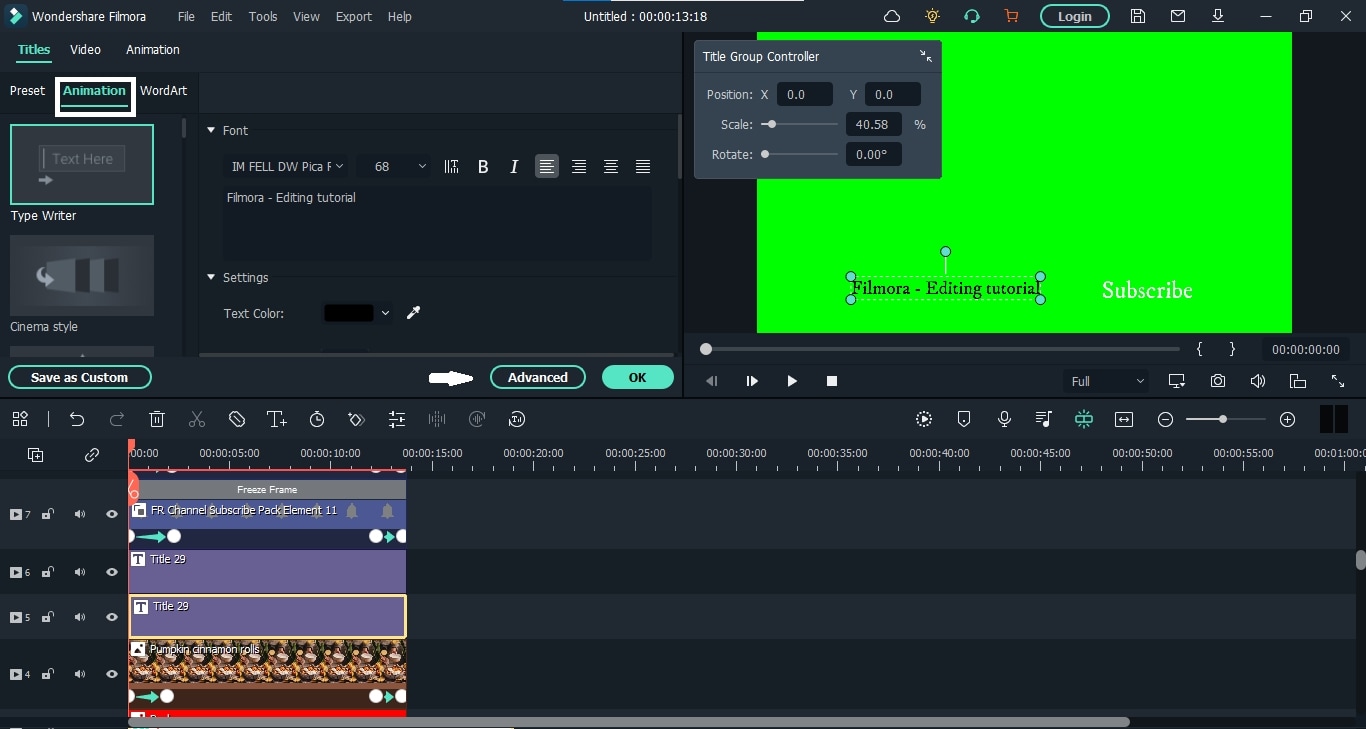
- From here, fix the text speed and end with your other graphic elements. After it’s done, we will do the same for the “Subscribe” button text.
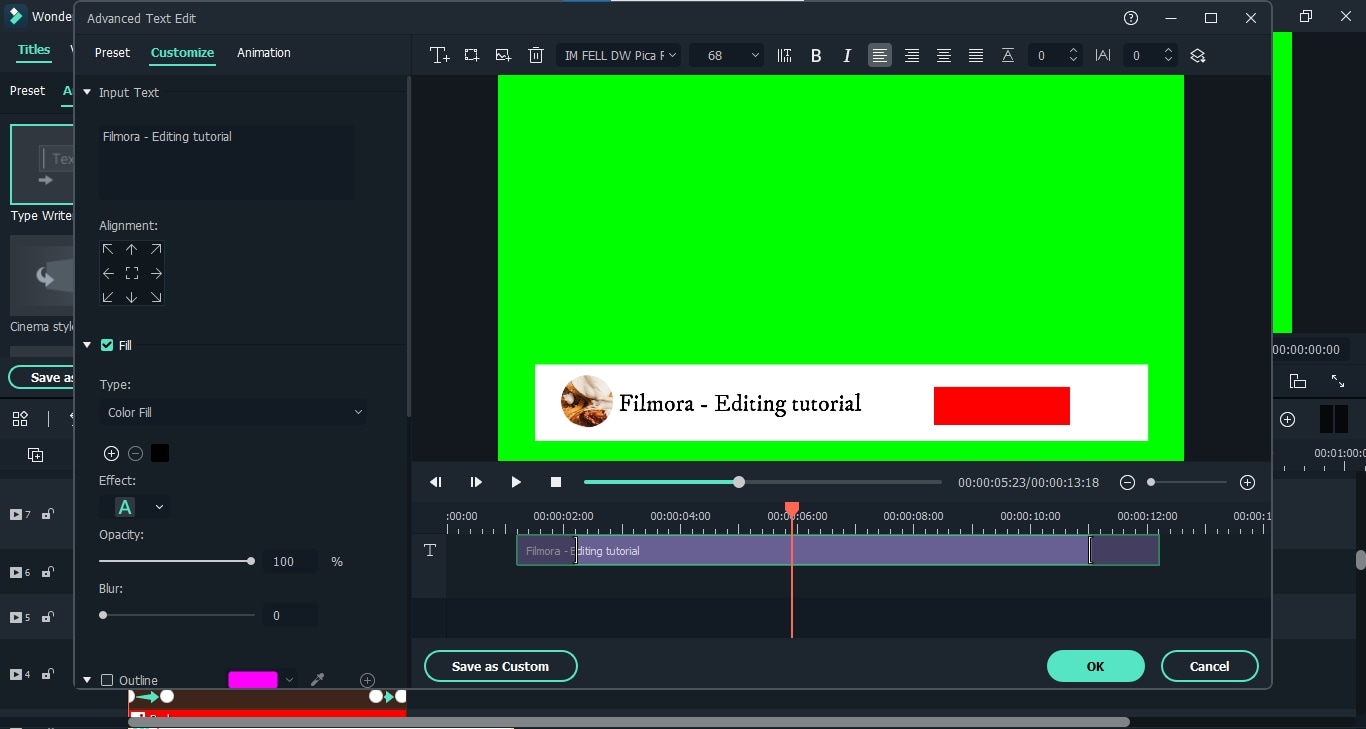
Finally, our graphic is completed. “Export” it from the software to your computer.

Whenever you want to use this graphic on your video, you have to import it first and enable the “Green Screen” option. It will remove the green background color. Then you can upload your video and place this graphic on it to add to the video. And that’s all.
Conclusion
Creating the Subscribe channel graphics is like picking stars from the sky for any video creator, especially if you are a beginner. However, now you don’t need to go for the professionals anymore. Wondershare Filmora has got you covered. So follow this detailed guide and create excellent subscribe channel graphics for your videos.
Free Download For macOS 10.14 or later
Step1 Download and install Wondershare Filmora
First, you need to download and install the video editor, Filmora. If you’ve already done that, then launch the software right away. But if you haven’t, then download it below. Once the download finishes, install the software on your computer.
When you launch the Filmora, click on “New Project.”

Step2 Make the structure of your graphics
For creating anything, we first need a flawless structure. Here, we can make the structure of Subscribe channel graphics using different colors, icons, texts, and channel photos. We’ll start by adding color layers.
1. Add color layers
- Go to the “Media” on the top left corner of the interface and Click on “Sample Color.” Here find the Green color and add it in the panel below as the first video layer by the drag-n-drop function.

- We will key this layer at the end, so make sure not to use any other green graphics for your animation.
- Let’s lock this layer because we will no longer use it. For this, click on the “Lock” icon on the layer’s left side.
- Add white and red colors and stack them on top of the green color layer.

After adding all three color layers, it’s time to crop these layers to make the structure of our graphic.
Crop the Color Layers
- Go to the “Effects” tab from the top bar and search for the “Crop” effect. Then drag the effect and add it to the white and red layers on the panel.

- First, click on the “Eye” icon beside the red color layer to hide it. Then double-click the white layer to see its properties. When the properties appear, select “Effects” from there.

- You can also enable the safe zones from the display settings on the right side of the panel. After that, crop the white layer first, then show the red layer and crop it too. It will look like this.

That’s it, folks. Our color backgrounds are here. Now we have to add our channel photo to this. So let’s move on to see how to do it.
2. Add a channel photo
- To add the channel photo, you can upload the image. Here we are going to use some images from the stock media. No matter the image, drop it down on the panel above the red color layer.

- Now double-click on the image layer, and from the properties, go to the “Mask” option and select the circle. You can also select any other shape you like.

- After that, scroll down and make the circle even by matching all numbers. Then scale it down and place it on the left corner of the white layer.

It’s done. Let’s add our channel text now.
3. Add texts
- For adding text, go to the “Titles” from the top bar and add the title you like to the panel.

- Now double-click this layer and add the text you want. You can also change the color of the text, scale it down and place it where ever you want.

- Now, let’s add another title for the subscribe button. You have to place it on the red layer.

We can’t finish our structure without icons, can we? So let’s move on to them.
4. Add icons
- Hit the “Element” from the top bar and search for the “Bell” icon. You will find the short animations of the bell. Add the suitable one to the panel.

- Now find a suitable place in the animation, stop it at that point, right-click on the element layer and add a freeze frame.

- You can also extend the freeze frame and remove the other parts. Then reduce its size and place it beside the “Subscribe” text.

- Similarly, add “Thumbs Up” and “Mouse Cursor” icons on the panel.

Finally, our structure is finished. Now let’s start animating.
Step3 Animate the graphics
First, we’ll make it so that all these graphics come in from below the view.
- Go to the white layer first and double-click on it. Then hit the “Animation” option and scroll down. Here add a new keyframe by clicking “Add.” Now move the playhead to the beginning and place the white color layer out of the frame.

- Now, do the same for channel photos and icons. The whole animation will look like this.

- As you can see, the text appears before the color layers. Let’s correct it. Double-click the text layer. Select the” Type Writer’ form and hit the “Advanced option.

- Here, you can adjust the text with the color layers.

- After adjusting both the channel name and subscribe button texts, your animation will appear like this.

If you’ve managed so far, then that’s great. We have done most of the work. Now we need to animate the graphics of the mouse cursor so that it clicks on the bell icon, thumb icon, and our subscribe button. The process is somewhat similar because we will need to add different keyframes. But still, let’s see it in detail.
Step4 Animate the mouse cursor
- Go to the “Mouse Cursor” icon layer and double-click on it. First, place the icon on the “Thumbs Up” so that when it animates in, it goes directly to the said icon. Then you have to add another keyframe after some time. And when you add a third one, place the “Mouse Cursor” icon on the subscribe button text.

- Then add a similar pair of keyframes with some space from the last one and place the “Mouse Cursor” icon on the “Bell” icon.

- The last keyframe we have to add will place this “Mouse Cursor” icon out of our view. After that, you need to adjust these keyframes to set the speed of the moving “Mouse Cursor’ icon according to your taste.
The final product up till now will be like this.

We are nearing our end, guys. Now we just need to make the graphics animate out of our view, and our work will be done. So let’s dive right into it.
Step5 Animate the graphics out
The process of animating out your graphics is like how we animated in our video. We just need to reverse those steps. So here’s how it’s done.
- Go to the white color layer and double-click on it to open its properties.
- Now, from the “Animation” option, add a new keyframe a little before the end of the video.
- After that, you have to add another keyframe at the end of your video. But in this keyframe, place the white color layer out of your view. Like this,

- Repeat the same steps for the red color layer, channel image layer, and icons layer.
- After it’s done, the whole graphics will look like this.

- The only thing that remains is to fix the text layers. For this, double-click on the channel text layer and go to the “Advanced” settings, just like before.

- From here, fix the text speed and end with your other graphic elements. After it’s done, we will do the same for the “Subscribe” button text.

Finally, our graphic is completed. “Export” it from the software to your computer.

Whenever you want to use this graphic on your video, you have to import it first and enable the “Green Screen” option. It will remove the green background color. Then you can upload your video and place this graphic on it to add to the video. And that’s all.
Conclusion
Creating the Subscribe channel graphics is like picking stars from the sky for any video creator, especially if you are a beginner. However, now you don’t need to go for the professionals anymore. Wondershare Filmora has got you covered. So follow this detailed guide and create excellent subscribe channel graphics for your videos.
How to Edit a TikTok Video After Posting
If you are planning to start your own business but have limited marketing resources, use TikTok. Your marketing expense will be minimized, and you will reach a large audience quickly. You can easily create the product video on TikTok and save it in a draft for later use. Many thinks adding TikTok back to the feed from the draft is complicated, but it is not.
Additionally, you can make as many videos on TikTok as you want and share them across the globe. It is also possible to make changes in the posted TikTok videos to enhance engagement. This article will help you learn how to edit a TikTok video after posting.

Part 1: Editing Your TikTok Posted Video
Sometimes you want to make changes to the uploaded TikTok videos because they are not gaining more likes. You don’t have to make it again from scratch because it is possible to edit TikTok videos even after uploading. You can then follow the underneath steps to learn how to edit a TikTok video after posting:
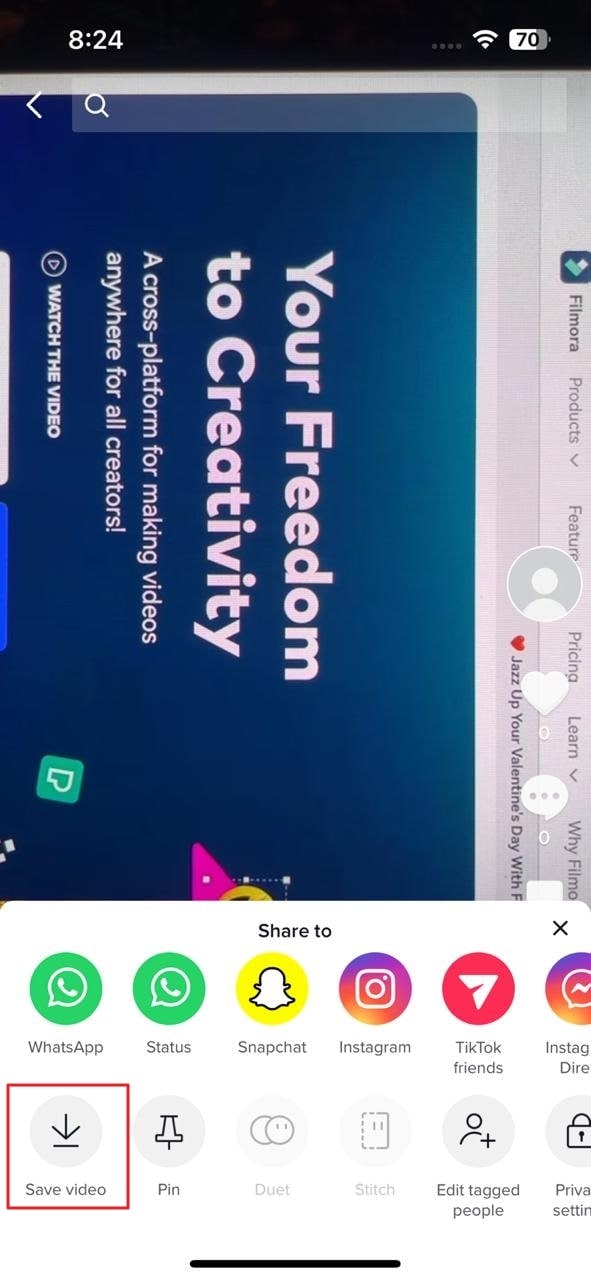
Step 1: Open your TikTok profile and select the video you want to edit. Tap the “Three Dots” icon present in the right panel. Press the “Save Video” icon. After successfully saving the video, locate and select the “Delete” option to remove the video from your profile.
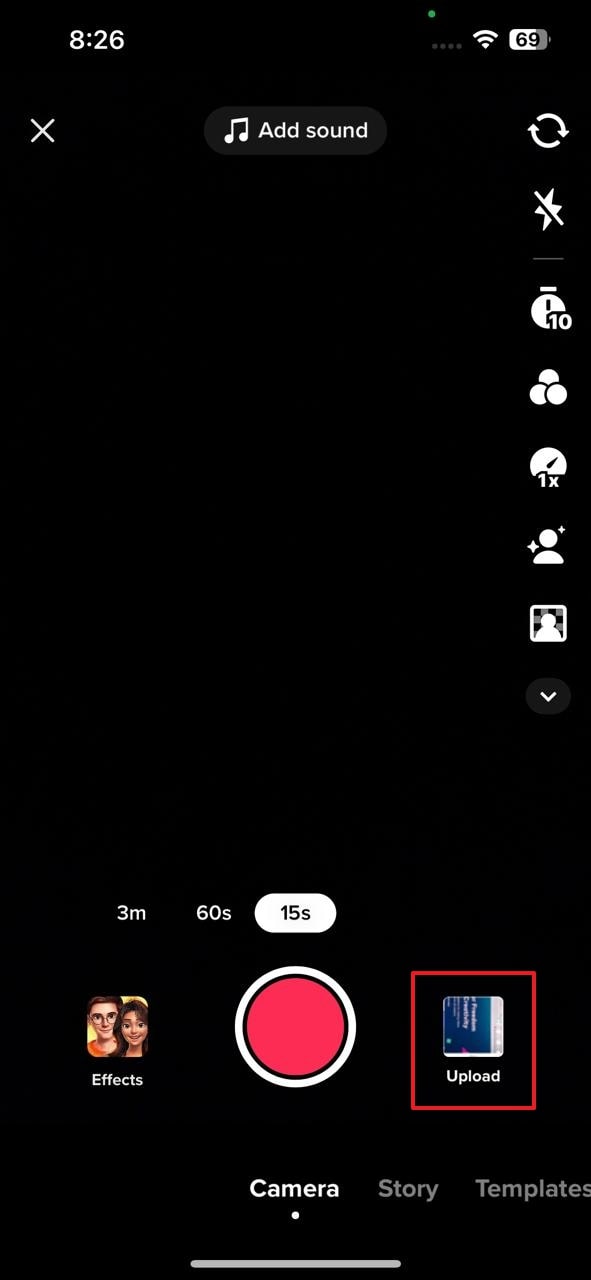
Step 2: Now tap on the “Plus” sign and select the “Upload” option. Choose the video which you have recently saved and then click the “Next” button.
Step 3: Select the “Edit” icon in the right panel to start editing. Tap on the timeline video to enable editing options like split, speed, volume, rotate and delete. More editing options, such as sound, text, overlay, and effect, will appear when you unselect the timeline video.
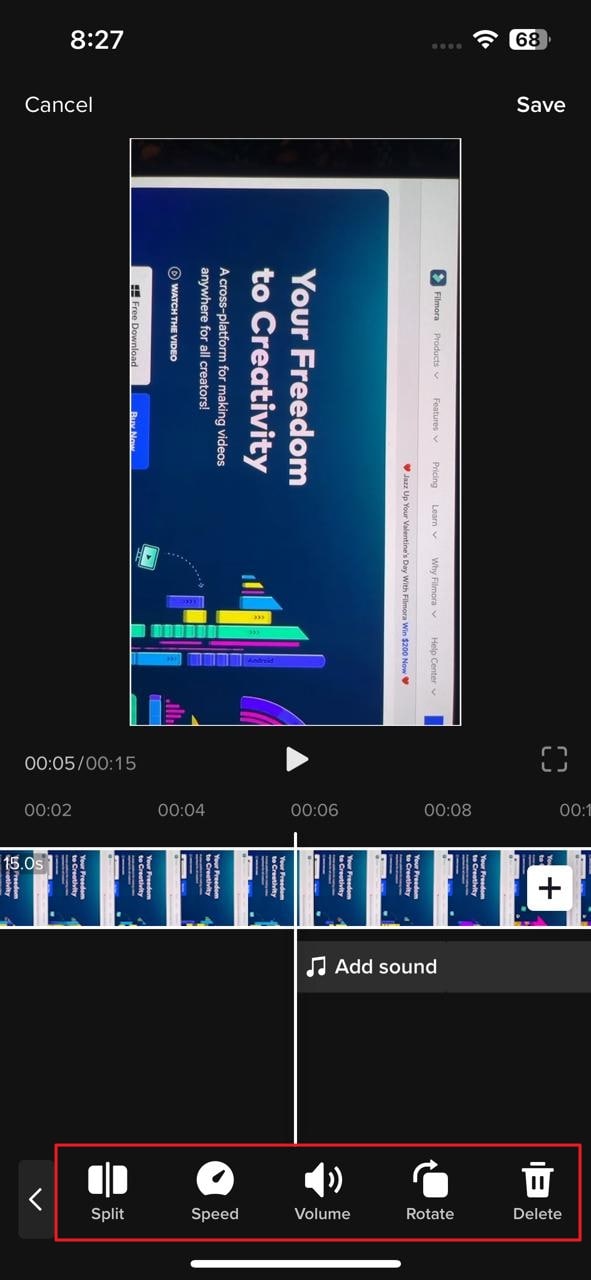
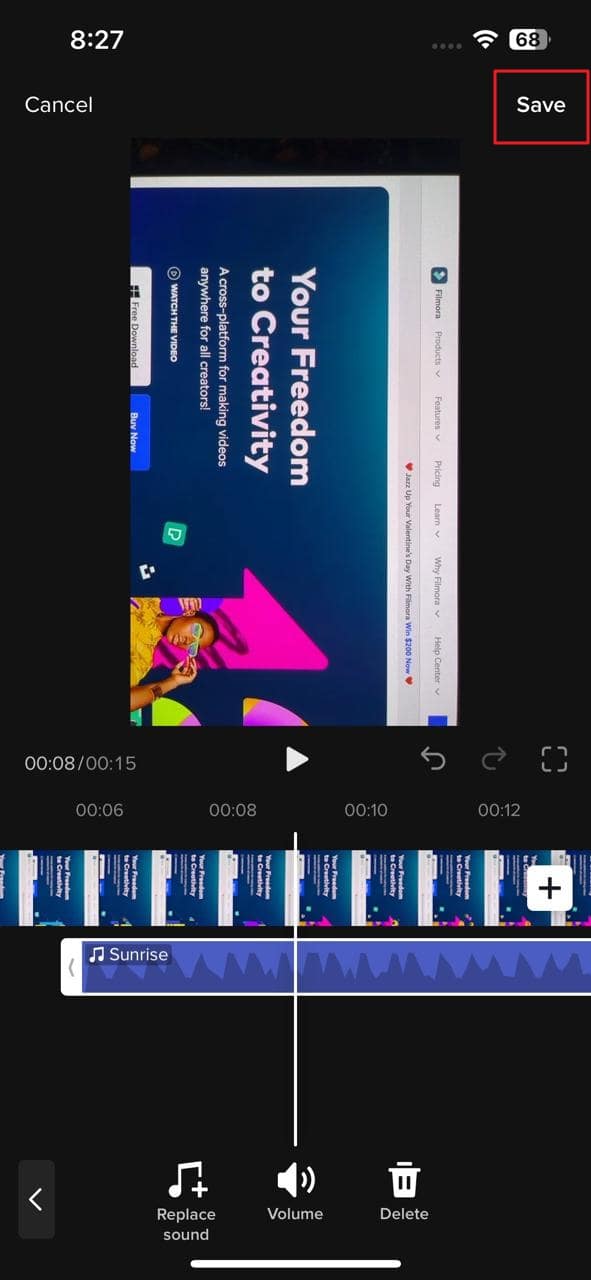
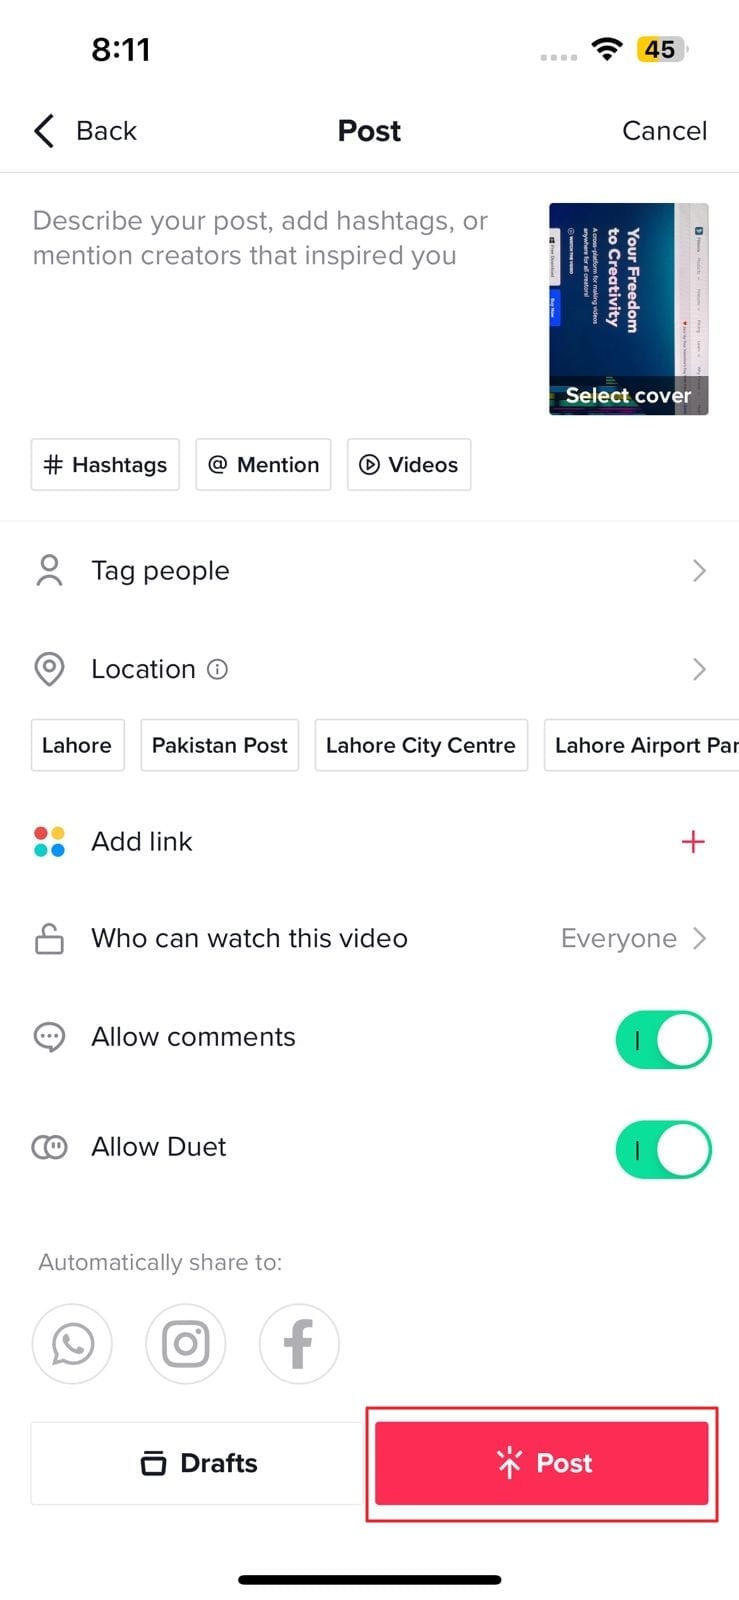
Step 4: After editing the video, save the changes using the “Save” option present at the top. Now hit the “Next” button to add desired hashtags and use the “Post” button to publish your video.
Part 2: Editing a Draft
From the above part, it is clear how you can edit videos in different ways by using the TikTok app. If you don’t want to publicize your video, it is possible to store the video as a draft. TikTok doesn’t require you to make your videos public. Moreover, it is possible to edit videos stored in the TikTok drafts.
You don’t have to worry about how to put a TikTok back from the draft because it is a simple procedure, and anyone can perform it in no time. We have provided simple steps for editing a draft using the TikTok app:
Step 1: Launch TikTok mobile app on your smartphone and open your “Profile.” Afterward, select the draft you want to edit from the “Drafts” menu.

Step 2: Press the “Edit” icon to edit the draft. Different editing options will appear when you select the draft video present in the timeline. Adjust the speed, volume, and orientation of the draft video through the features available in the bottom toolbar.
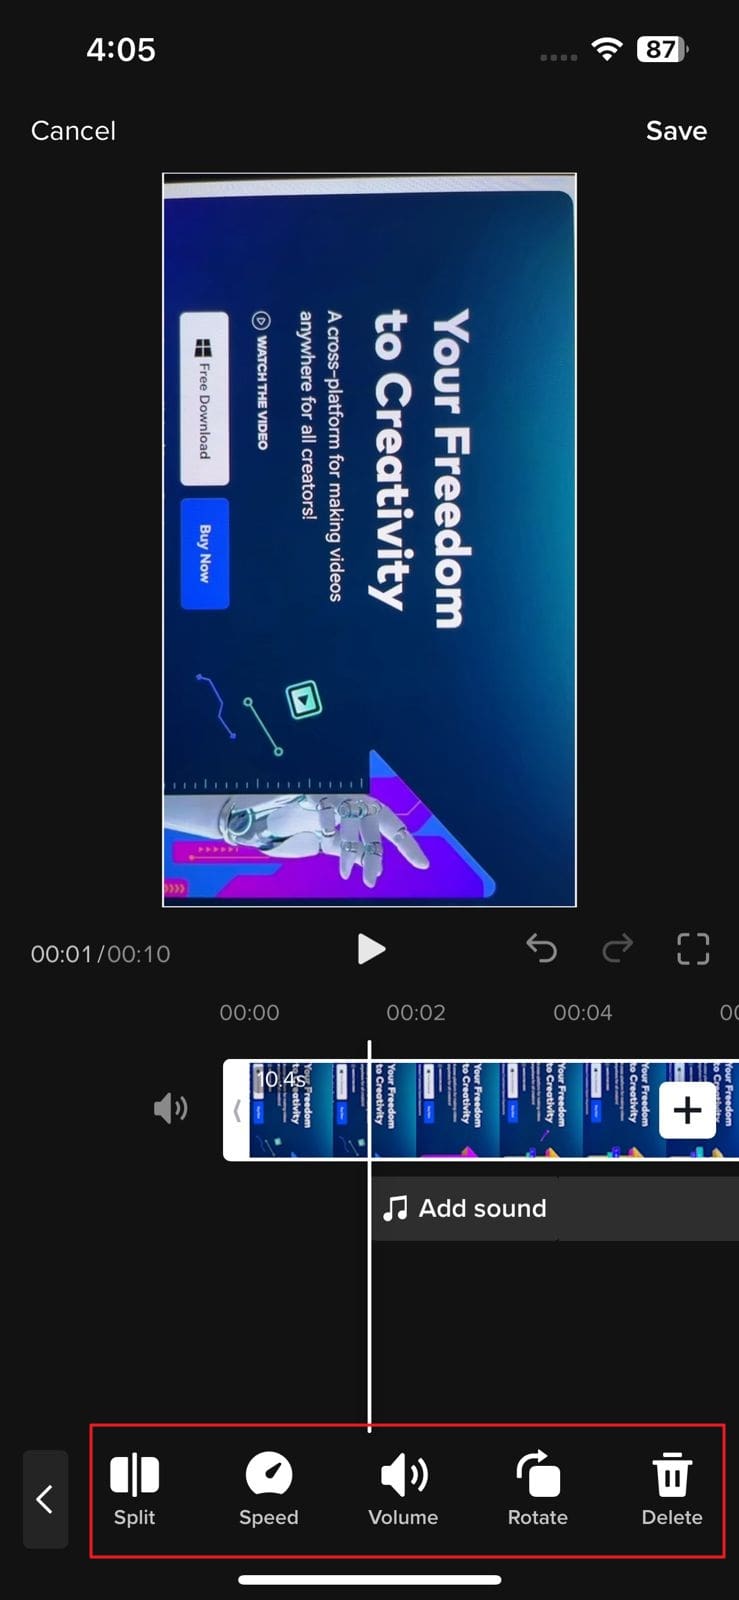
Step 3: Now tap again to unselect the draft. A wide range of options will appear that can be used for adding sound, text, and effects to the video. Use them according to your requirement.
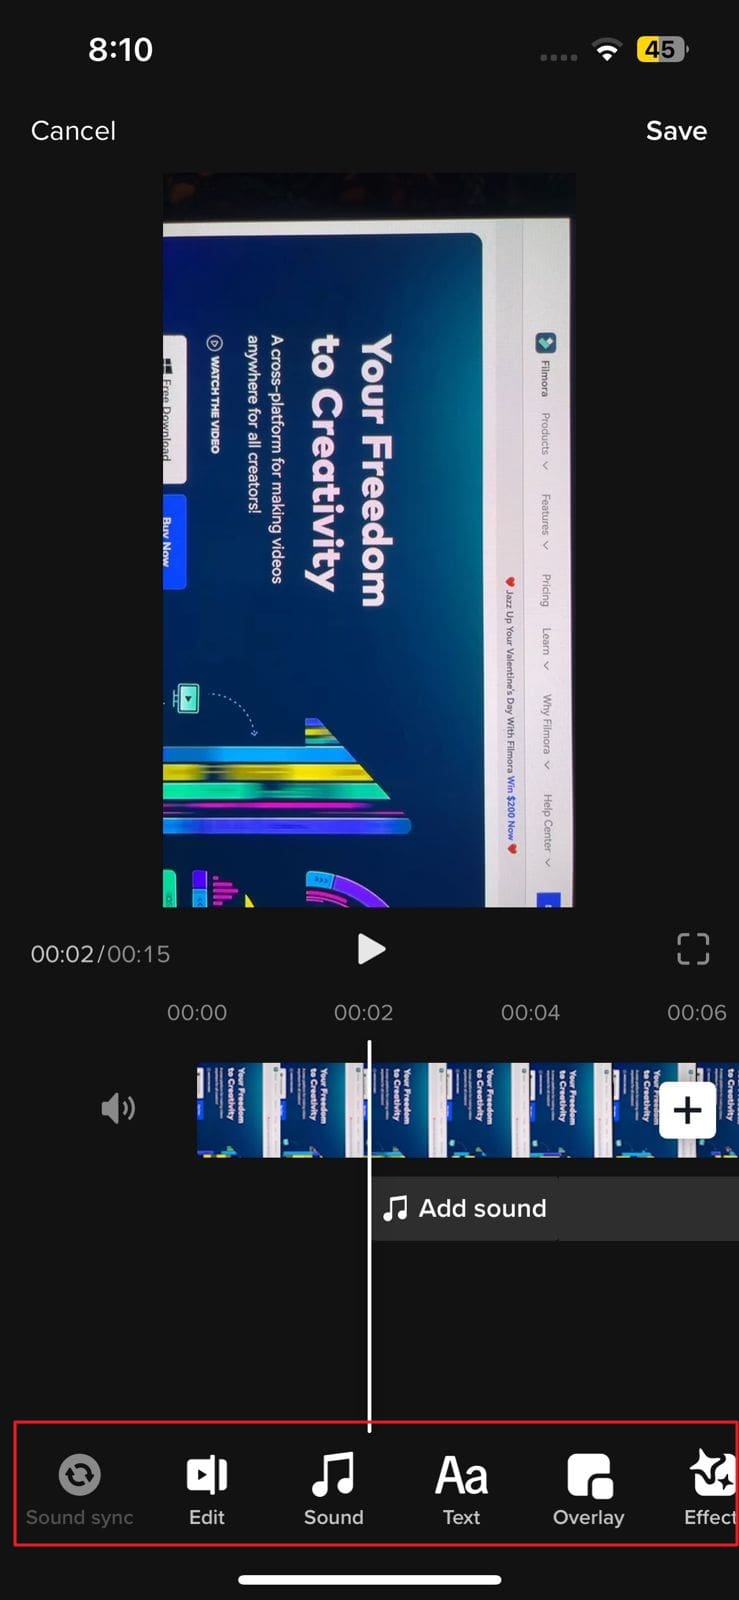
Step 4: After making changes to the draft, tap the “Save” option and hit the “Next” button. Write a description of the post if you want and press the “Post” button.
Part 3: Using a Third-Party Video Editor to Make a New Video or Edit an Old One
Although TikTok provides the option of editing, however, they are very few tools to make the required changes to the video. You can go for the Wondershare Filmora mobile app, as it gives more advanced editing options.
Filmora is a powerful application used by more than 100 million users for making trending videos for social media accounts. This award-winner video editor can make surprising changes in your clips through its filters, effects, and transitions.
download filmora app for ios ](https://app.adjust.com/b0k9hf2%5F4bsu85t ) download filmora app for android ](https://app.adjust.com/b0k9hf2%5F4bsu85t )
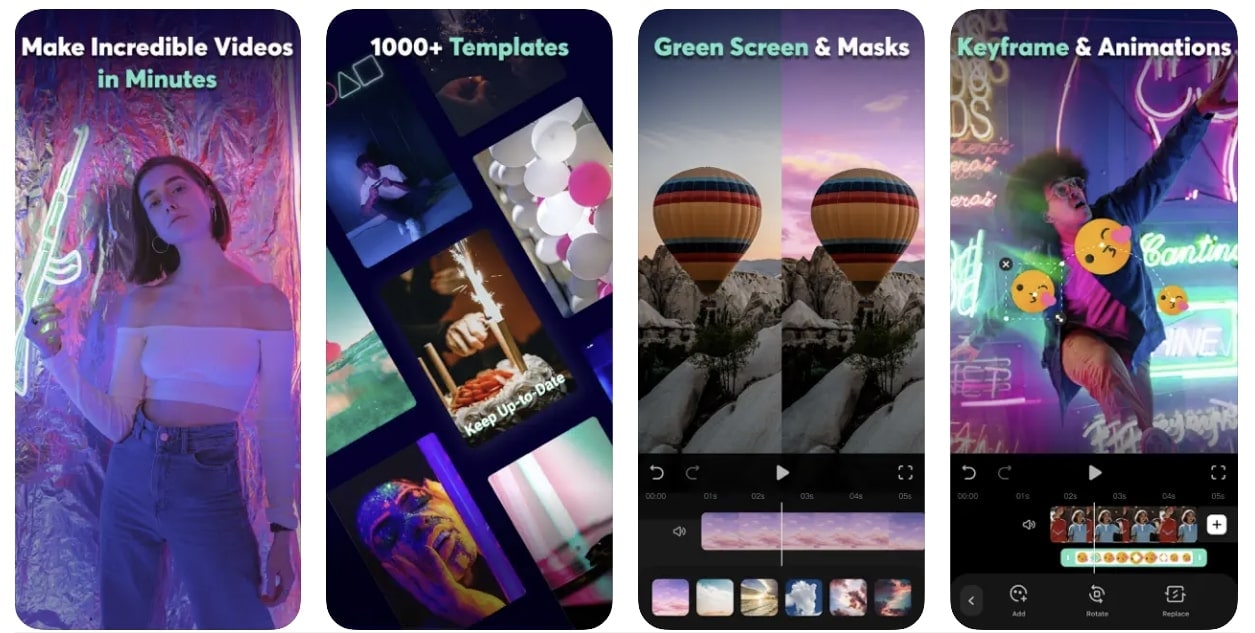
Amazing Features of Filmora
If you are confused about why you should use Filmora to edit a TikTok after posting, read these fantastic features of Filmora that are discussed below:
1. Speed Ramping
TikTok videos can be made more cinematic by adjusting their speed. Filmora presents speed ramping options such as Bullet, Montage, or Jump Cut to professionally adjust the speed of the video. You can also create your speed ramping effect and save it for later use. Don’t worry about the audio pitch during speed ramping because Filmora automatically adjusts the pitch of video sound.
2. Title Editing
You can add up to the mark titles to your TikTok videos to convey your main theme. These titles can be added in the form of text or animations, each having different colors and styles. Its title feature is loaded with varying styles of text that can be used to catch viewers’ attention.
3. Stickers and Effects
Multiple effects options are available on the Filmora video editor to give the video an exclusive look. These effects help you to enhance your video beauty and make you more confident on TikTok. You can also use the stickers option to beautify your TikTok video. Those people who make TikTok can engage children by adding GIFs or emojis in videos with this app.
4. Music Library
Filmora also allows its users to add music to the video. You can use its royal-free music library or add your voice. The volume of the soundtrack can easily be adjusted through its volume adjustment feature. You can also extract the music from a video and split the audio to eliminate the unnecessary part. Moreover, its beat detection feature is highly advanced and adjusts the beat according to the video.
Steps to Use Filmora Mobile App to Edit TikTok Videos
Are you interested in making further edits to your TikTok video? Simply follow the underneath steps to avail the editing features of this app to edit a TikTok after posting:
Step 1: Download Wondershare Filmora
Download Wondershare Filmora and launch it on your smartphone. While doing so, make sure you have a strong internet connection.
Step 2: Import the Video
Go to the “New Project” tab present at the top and then select the “Video” button. All the videos on your device will appear; just choose the one you want to edit for TikTok. Following this, press the “Import” button.

Step 3: Edit the TikTok Video
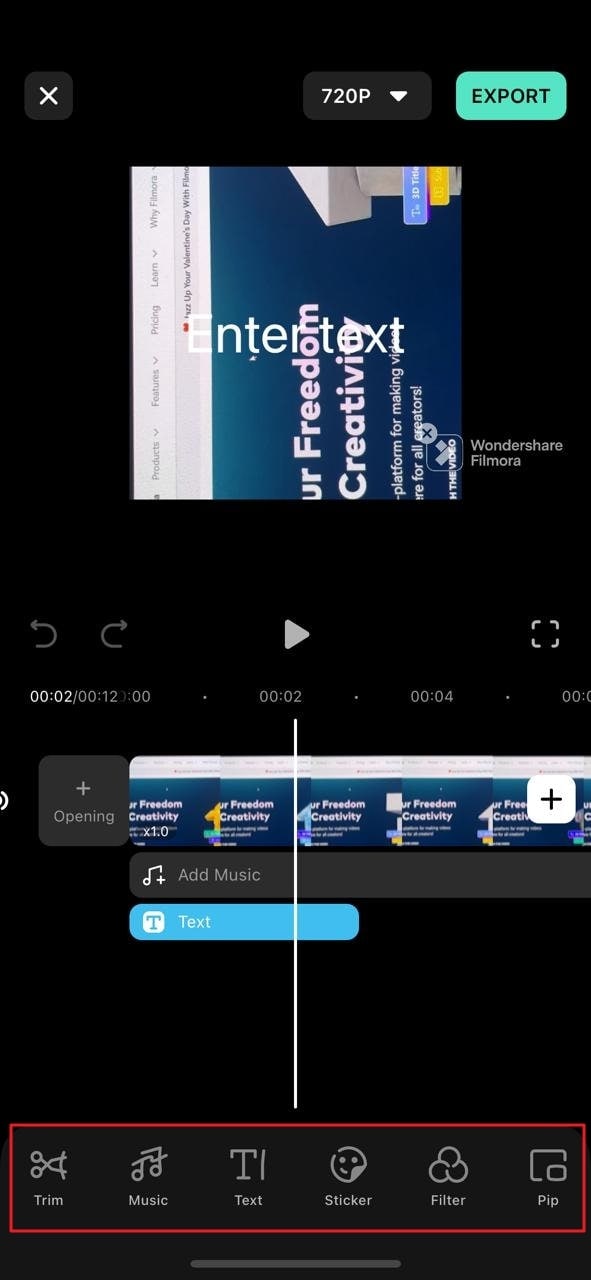
After importing process completes, multiple options for editing will appear. You can add music, text, or stickers to the video. Different filters and effects can also be used to make the video more trending.
Step 4: Use More Editing Options
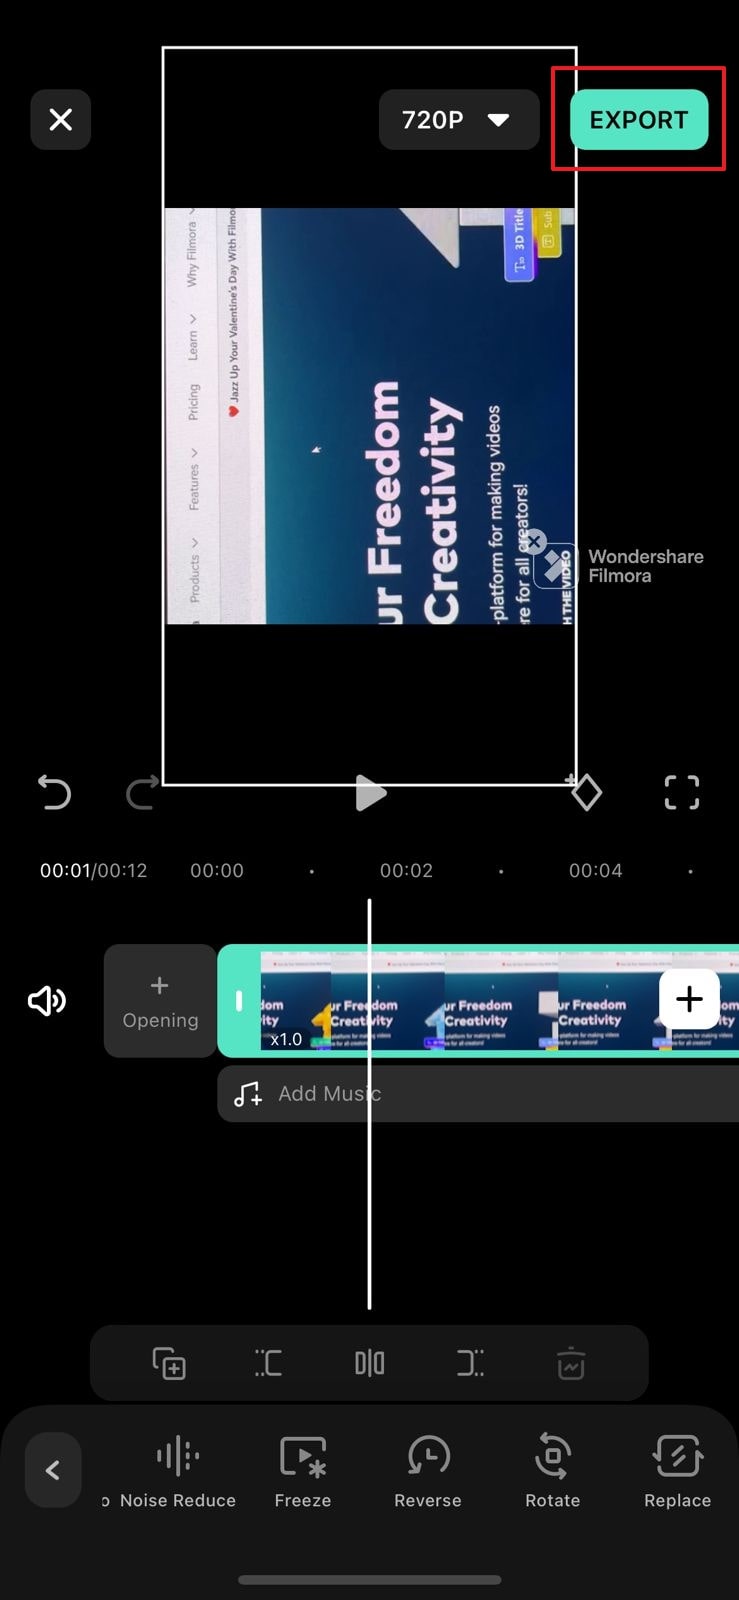
Now, select the video clip from the timeline to find more editing options like crop, precut, mask, adjust, and many more. The tool also provides fade-in and fade-out options to give an artistic touch to the video. Once all the changes have been made, select the video resolution and export the TikTok video.
Conclusion
This article has answered all the queries related to “can you edit a posted TikTok.” To cut a long story short, Filmora is the best video editing tool that can be used for making amazing videos for TikTok. Anyone can create breathtaking video clips from this innovative video editing mobile app in no time. So, folks, increase your TikTok following by editing videos through Filmora.

Amazing Features of Filmora
If you are confused about why you should use Filmora to edit a TikTok after posting, read these fantastic features of Filmora that are discussed below:
1. Speed Ramping
TikTok videos can be made more cinematic by adjusting their speed. Filmora presents speed ramping options such as Bullet, Montage, or Jump Cut to professionally adjust the speed of the video. You can also create your speed ramping effect and save it for later use. Don’t worry about the audio pitch during speed ramping because Filmora automatically adjusts the pitch of video sound.
2. Title Editing
You can add up to the mark titles to your TikTok videos to convey your main theme. These titles can be added in the form of text or animations, each having different colors and styles. Its title feature is loaded with varying styles of text that can be used to catch viewers’ attention.
3. Stickers and Effects
Multiple effects options are available on the Filmora video editor to give the video an exclusive look. These effects help you to enhance your video beauty and make you more confident on TikTok. You can also use the stickers option to beautify your TikTok video. Those people who make TikTok can engage children by adding GIFs or emojis in videos with this app.
4. Music Library
Filmora also allows its users to add music to the video. You can use its royal-free music library or add your voice. The volume of the soundtrack can easily be adjusted through its volume adjustment feature. You can also extract the music from a video and split the audio to eliminate the unnecessary part. Moreover, its beat detection feature is highly advanced and adjusts the beat according to the video.
Steps to Use Filmora Mobile App to Edit TikTok Videos
Are you interested in making further edits to your TikTok video? Simply follow the underneath steps to avail the editing features of this app to edit a TikTok after posting:
Step 1: Download Wondershare Filmora
Download Wondershare Filmora and launch it on your smartphone. While doing so, make sure you have a strong internet connection.

Step 2: Import the Video
Go to the “New Project” tab present at the top and then select the “Video” button. All the videos on your device will appear; just choose the one you want to edit for TikTok. Following this, press the “Import” button.

Step 3: Edit the TikTok Video
After importing process completes, multiple options for editing will appear. You can add music, text, or stickers to the video. Different filters and effects can also be used to make the video more trending.

Step 4: Use More Editing Options
Now, select the video clip from the timeline to find more editing options like crop, precut, mask, adjust, and many more. The tool also provides fade-in and fade-out options to give an artistic touch to the video. Once all the changes have been made, select the video resolution and export the TikTok video.

Conclusion
This article has answered all the queries related to “can you edit a posted TikTok.” To cut a long story short, Filmora is the best video editing tool that can be used for making amazing videos for TikTok. Anyone can create breathtaking video clips from this innovative video editing mobile app in no time. So, folks, increase your TikTok following by editing videos through Filmora.
How to Make a Slideshow with Icecream Slideshow Maker
How to Make a Slideshow with Icecream Slideshow Maker
An easy yet powerful editor
Numerous effects to choose from
Detailed tutorials provided by the official channel
The Icecream slideshow creator software is a known name in the domain of graphic design applications. Keep reading ahead to learn the knowhow of creating Icecream presentations!
In this article
01 [What is Icecream Slideshow Maker?](#Part 1)
02 [How to Use an Ice Cream Slideshow Maker?](#Part 2)
03 [How Do You Add Music to an Icecream Slideshow?](#Part 3)
Part 1 What is Icecream Slideshow Maker?
Slideshows are interesting content presentation tools that have the potential to deliver even the most customary information in a manner that is engaging enough to hold your audience captive. Browsing across the web or the IT market, you can easily encounter a cluster of slideshow builder software and tools that are ready to cater to your requirement of making top quality slideshow presentations that suit a diversity of personal and professional needs.
Moving ahead with the discussion, let us have a talk about the Icecream slide show maker program, which can definitely be a great choice to design graphic artworks of professional excellence, thanks to the latter’s upgraded features and graphic editing utilities. You can pick the tool to create fun-filled slideshows of cherished personal events, or craft elusive and explanatory business presentations to deliver the most precise company and product information to your clients.
Let us now dive deeper into the program specifications and proceed to take a look at the distinguishing features of the Icecream slideshow maker program in the following section:
● The software grants you the liberty to adjust the screen time and the transition play duration of each of the slide contents.
● You can uplift the feel of your presentations with an upbeat background audio, while choosing the same from the editor’s preset media library in a preferred file format.
● You are allowed to customize the presentation slides with matching text annotations and adjust its font, size, orientation, color and animation.
● Working with the program lets you ensure a seamless presentation flow with a diverse range of inbuilt transition effects.
● Before you set into the final creation process, the software facilitates you with a preview of your work, with all the applied effects, element inclusions and parameter variations introduced. You can thus, observe and modify the presentation if required.
● You can save the slideshows midway of the creation process and resume whenever you like, and prefer to sort the presentation slides in a definite or random sequence.
● The software allows you to create and export high resolution 4K slideshows by burning them to CDs and DVDs.
● The created slideshows can be uploaded to online storage accounts and shared across a variety of social media platforms, in almost any common output file format.
● The software is a Windows exclusive program and works effectively well with the Windows XP, Vista, 7, 8, 8.1 and 10 operating system versions.
Part 2 How to Use an Ice Cream Slideshow Maker?
By now, you must have become quite familiar with the credibility of designing slideshow presentations with the Icecream slideshow creator software. However, the real essence lies in taking a practical experience of working with the program to comprehensively understand the slideshow design process in detail.
Adhering to the aforesaid concern, let us try hands at having an in depth understanding of different aspects of working on a slideshow presentation within the program interface through the following stepwise tutorial guide:
User’s Guide to Work With the Icecream Slideshow Maker Program
Step 1: Download and Install Icecream Slideshow Creator
To begin with, visit the official website of the program to download the same in your Windows device. Once the download is successful, you will need to save and run the program’s installation files sin your system. Having done that, you will be directed to the software’s ‘Installation Wizard’ to initiate a quick an easy installation process.
Step 2: Import Media Files
Post a successful installation, proceed to launch the program and wait for the latter’s welcome screen to appear. In the launch screen, navigate to and tap any one of the ‘Add Photo’ or ‘Add Folder’ buttons at the top left corner to import either a single media file, or an entire media folder to the program’s editing workspace.
Instead of using the ‘Add Folder’ option at the top left, you can also select multiple files by pressing and holding the ‘Ctrl’ key son your system’s keyboard and import them to the editor timeline, all at once. You can alternatively, click on the ‘Add Files to Start Your Photostory’ tab in the center of the software’s welcome screen to import the required media files.
Clicking on any of the aforesaid buttons or tabs will direct you to a ‘File Explorer’ window, where you can make the desired media selections. Your choices are however; filtered according to their respective file formats and only those in line with the formats supported by the Icecream Slideshow creator program are imported to the timeline.
Step 3: Configure the Presentation Settings
As soon as you finish the media import process, the editing workspace bifurcates to present the ‘Queue’ window at the left and ‘Preview and Settings’ window at the right side of the screen. This is the space where you can proceed to configure your presentation settings.
● File Sorting
To sort the arrangement of a media file, navigate to the ‘File Queue Panel’ at the left and click on the desired file, while using the ‘Arrow Keys’ at the right to change the latter’s position in the queue, or choose to delete it from the queue by tapping the ‘Recycle Bin’ icon beside the file.
● Duration and Transition Adjustments
Proceeding further, you can try hands at customizing the duration and transition effects for each of the added media files within the queue. All you need to do is, navigate to and click on the respective tabs within the window. Hit the ‘Time’ button to adjust the screen time of the slides or click on the ‘Transitions’ tab to include suitable animation effects between successive slides for a smooth presentation flow.
You can even stick with a random transition effect to add to the slides, or choose to add no transition effect at all. The inbuilt slideshow player the right side of the editor workspace automatically plays the preview of the applied transition effects. The ‘Transition’ and ‘Time’ settings are the sole customizations that you can apply individually to the slides, the rest of the effects being universally applicable to all the presentation slides together.
If you are interested to apply a particular transition and play duration to all the slides, navigate to and click within the gray bar at the bottom of the file queue to apply the same transition and time characteristics to all the slides of the presentation. You can even opt to delete all the added media files at the same time by tapping the ‘Clear List’ button.
● Media Resolution
Working with the Icecream slideshow creator program, you are allowed to adjust the output resolution of your slideshow in the preview window at the right side of the editor timeline. The resolution range lies between 640 x 480 to 1600 x 1200 pixels. Moving further, you can set common play duration for all the transition effects within different slides of the presentation that you have included within the queue.
● Aspect Ratio
You can choose to either keep the actual aspect ratio of the media files or customize the same to fit into the screen size. To go with the former choice, click within the ‘Scale to Fit’ checkbox. In case you wish to stick to the latter option, click inside the ‘Original Ratio’ checkbox. To learn more about working with any of the aforesaid settings, navigate to and click on the ‘Question Mark’ icon alongside each setting.
● Audio Settings
To add upbeat background music to your presentation, navigate to and tap the ‘Add Audio’ button at the bottom left corner of the ‘Preview’ window. You can choose a desired audio track from your system and use the same as the background sound of the slideshow.
You are additionally, permitted to configure the added music track in line with your specific preferences using the ‘Fade’ and ‘Offset’ settings at the right side of the selected music file. To play the audio track immediately with a time shift, choose to set a negative offset value. Likewise, enter a positive offset value to start playing the track after the lapse of a specified time period.
When you are done with adjusting all the settings and adding the desired effects, proceed to watch a preview of the same in the right side ‘Preview Pane’ of the editor workspace and move ahead with creating the slideshow presentation.
Step 4: Create Your Slideshow
If the slideshow preview ensures that everything is at the right place, navigate to the bottom right corner of the editing timeline and click on the ‘Create’ button start building your presentation. You can tap on the ‘Pause/Resume’ and ‘Cancel’ buttons at the bottom of the screen at any time throughout the project creation process. A pop up window will notify you the completion of the design process, while asking you to click on the ‘Open Folder’ button to view your creation in the latter’s destination folder.
Part 3 How Do You Add Music to an Icecream Slideshow?
Supplementing your slideshow presentations with appealing background music adds that extra spark to your creation, while making them stand out of the crowd. A cohesive audio works to create a perfect sync between the contents and mood of your presentation. Having said that, let us look through the process to add suitable background music to your Icecream slideshow in the following section:
User’s Guide for Adding Music to an Icecream Slideshow
Step 1: Download and Install the Program
Navigate to the home website of the Icecream Slideshow maker program to initiate a free download of the software into your system and proceed to install the same to start the slideshow creation process.
Icecream Slideshow Maker Official Download Link:
https://icecreamapps.com/Download-Slideshow-Maker/
Step 2: Import Media Files
Begin with importing the selected media files to the editor workspace of the program in either of the following ways:
● Add the images directly from your system to the editor timeline through the conventional ‘Drag and Drop’ method.
● Navigate to and hit the ‘Add Photo’ button at the top left corner of the program’s main workspace to browse for the media files in the ‘Windows Explorer’.
● Click on the ‘Add Folder’ button to import all the media files within a selected folder.
Step 3: Sort the Imported Files
Once you are done with importing all the media files, you can see them appear within the ‘File Queue’ at the left window of the slideshow creator program. Use the ‘Up/Down’ arrow keys to sort the media files in your preferred order, for example, arranging them according to their specific file names. The file sorting options are available at the right side of the ‘File Queue’.
Step 4: Include Text Customizations
Navigate to the ‘Text Column’ of the ‘File Queue’ and tap the ‘Add Text’ button to include text annotations within each slide of your presentation. A ‘Text Panel’ will pop up, where you can choose to add color, position and font customizations to the included text, followed by previewing the effect on every slide within the ‘Text Panel’ itself.
Step 5: Add a Desired Background Music
The Icecream Slideshow maker pro allows you to include a background music track within your presentation. For working towards the inclusion process, you will have to import the desired audio files to the program’s editor timeline. The software works well with the WAV, WMA, FLAC, M4A, MP3 and OGG audio file formats. Navigate to and hit the ‘Add Audio’ button in the editor workspace to ‘Drag and Drop’ the desired music files within the software’s timeline.
There is an option to create a playlist of the selected audio tracks, along with dragging the files to set them in a preferred sequence within the playlist. You are also granted the liberty to try hands at looping the audio playback and uplift the tracks with fade and offset effects within the playlist pane.
Step 6: Tweak Some Extra Settings
If you are keen towards making your presentation more impressive, try experimenting with including transition effects within the slides. Though the Icecream slideshow maker full version supports the application of default random transitions, you are allowed to add and customize the same as per your will, both, separately for each slide, as well as to the entre presentation as a whole.
You can even choose to add no transition effect at all, or set the same transition value for all the media files within the queue, by navigating to and clicking on the ‘Common Image Settings in the ’File Queue’ window.
Step 7: Output Resolution
Set a preferable output resolution to generate a premium quality slideshow presentation. To do this, navigate to the bottom left corner of the ‘Preview’ window at the right side of the editor workspace and choose a desired resolution for the slideshow from a range of values, such as, 1280 x 1024, 2560 x 1440, 1920 x 1080, etc., in the ‘Resolution’ tab.
Step 8: Format Selection
The next thing you need to do is, select a convenient output file format for your presentation. You can pick anyone from the available AVI, WebM, MP4, MOV file formats. To make your choice, navigate to the bottom of the ‘File Queue’ window at the left and click on the ‘File Format’ dropdown arrow at the right. A list of the output formats supported by the program appears next, and you are free to pick the one you like.
Step 9: Create Your Icecream Slideshow
When you have finalized all the arrangements and settings, navigate to and hit the ‘Preview’ button at the bottom right corner of the ‘Preview’ window to initiate a mock run of your slideshow in the software’s inbuilt slideshow player. If everything seems fine, proceed to start the slideshow creation process by clicking on the ‘Create’ button.
The process may require you to wait for a few moments before the final presentation output is generated. Nonetheless, you can always keep a track of the creation process through the elapsed and remaining duration in the ‘Progress Bar’ at the bottom of the program’s editing workspace. A completion prompt will pop up as soon as the slideshow is ready.
Creating Music Slideshows in Filmora
When searching for an Icecream slideshow maker alternative to craft your slideshow presentations, you can move ahead with picking the Wondershare Filmora Video Editor slideshow creator program for high end and professional quality results. While the aforementioned software is an all in one package for almost any of your most diverse editing needs, music slideshows are a specialty of the same on account of the following reasons:
For Win 7 or later (64-bit)
For macOS 10.12 or later
● Within by the Filmora slideshow creator program.
● Working on your music presentation in the software, you are allowed to cut and trim the music files automatically as well as manually to ward off undesired portions from the included audio.
● You can pick the most suitable soundtrack from the hundreds of choices available within Filmora’s preset audio library and uplift them with a variety of audio effects.
● Using the software, you can proceed with recording your voiceover, followed by applying fade in and fade out effects to the same.
● The software allows you to design professional slideshows for personal media sharing across various platforms, along with catering to product marketing needs and company business concerns.
● Ending Thoughts →
● Icecream slideshow maker review claims that the latter is an effective slideshow creator and graphic editor program.
● Working with the program, you can easily create high quality photo, video and music slideshow presentations in a quick time span.
● Mentioning about the alternatives to the aforesaid program, you can comfortably choose the Wondershare Filmora slideshow maker software to address the concern.
Also read:
- Updated Are You Looking for Dark LUTs Premiere Pro Free? This Article Discusses the Dark Moody LUTs with Top Recommendations for Beginning Visual Editing
- New In 2024, What Slideshow Templates Can Teach You About Aesthetic
- New 2024 Approved Adobe Premiere Pro Download and Use Guide
- 2024 Approved Do You Wish to Create High-Quality Videos and Experience Effective Videos with Editing? No Problem at All because the Keyboard Shortcuts Listed Here Will Assist You
- 2024 Approved Splitting Video in VSDC Step by Step
- Updated Want to Buy a Drone for Better Videography Creating? This Article Will Review 6 of the Best Drones on the Market for You to Consider
- Updated The Latest 100+ Best TikTok Captions to Improve Your Next Post
- Updated 2024 Approved 4 Simple Methods for Making a High-Quality Recap Video
- Updated Learn How to Create Your Own Custom Animated Text Intro in the Filmora Video Editor. Follow a Few Simple Steps to Create Something that Looks Incredible for 2024
- Updated Confused as to How to Add Subtitles to a Video on iPhone? No Worries as We Bring You the Best Solution to Get the Task Done for 2024
- New Video Course and Online Learning Are Very Popular Nowadays. Here We Are Going to Recommend some of the Best Video Websites for Teachers to Use for 2024
- Steps to Rotate Videos in Lightworks for 2024
- Updated Do You Want to Know How to Remove Audio From a Video without a Watermark? Keep Reading This Article Since We Have the Answers for You. Complete with the Guide on How to Do It for 2024
- Updated 2024 Approved Best 8 Srt File Creators
- New 2024 Approved Ultimate Guidelines to Help You Use VLC Media Player Better
- New Making Slow Motion Videos in Final Cut Pro The Best Methods
- Updated In 2024, How to Make a Super Easy Rotating Video Effect
- New 8 Free Title Makers to Use for 2024
- Updated In 2024, Reversing Time Lapse Videos on iPhone Using Top Applications
- Updated 2024 Approved An Introduction to LUTs | Their Overview and Benefits
- New 2024 Approved This Article Discusses What Is Adobe Premiere Pro, How to Download, Install and Use It, and Its Key Features. It Further Discusses Its Alternative for Editing Your Videos and More. Check Out Now
- New Finding The Best Ways To Replace Sky in Lightroom
- Updated In 2024, How to Use Deep Fried Meme Maker
- How To Create Transparent Background On Picsart for 2024
- New In 2024, How to Convert a GIF to a Video for Instagram
- Updated Want to Find some Creative, Entertaining Ways to Preserve Precious Memories& Pass Them On-To Upcoming Generations? Well, Surely You Can Do It for 2024
- New Unravel the Creative Potential of Adobe After Effects for Precise Motion Synchronization. Learn How to Use Track Matte and Tracking with a Simple Alternative
- Updated Best Ai Generated Memes
- New 6 Instant Mp4 to GIF Online Tools for You
- Updated 2024 Approved How to Create Intro with Legend Intro Maker
- New How to Get Motion Blur in Roblox, In 2024
- How to Add Filter to Video in Premiere Pro for 2024
- Updated How To Use Speed Ramping to Create an Intense Action Footage
- New Premiere Pro Is a Powerful Video Editing Software. In This Article, You Will Learn About How to Use, Save and Export LUTs in Adobe Premiere Pro
- New 2024 Approved How to Easily Convert SRT to VTT
- Updated 22 Free Video Editing Software to Save Your Money and Time for 2024
- New In 2024, The Best 10 GIF to JPGPNG Converters
- How to Create the Stranger Things Upside Down Effect
- New 2024 Approved How To Use Voicemod On Discord Desktop+Mobile
- How to Edit A Time Lapse Video on iPhone, In 2024
- New In 2024, Guide to Add Transition Effects in Premiere Pro
- Updated In 2024, Learn How to Create a Unique Repeated Text Animation in the Filmora Video Editor. Follow the Simple Step-by-Step Instructions
- 2024 Approved Looking for Ways to Compress Your Videos for Instagram? Keep Reading to Know About some of the Best Video Compressors for Instagram
- New 2024 Approved Top Best Free LUTs For Premiere Pro
- Creating Motivational Videos with AI Comprehensive Guide 2024
- Back up and Organize Your Files to Protect Any Misfortune Befalling Them. The Article Will Guide You on How to Back up and Manage Your Footage
- Updated Best Cinematic LUTs For Premiere Pro Recommendation
- Updated Have You Ever Used the Path Blur Effect in Your Photos? This Article Will Address How to Use Path Blur in Photoshop to Generate Appealing Results Accurately
- New In 2024, Easy Way to Add Transitions to Videos
- Splitting the Clips in Adobe After Effects Step by Step for 2024
- Pokemon Go No GPS Signal? Heres Every Possible Solution On Motorola Moto E13 | Dr.fone
- New In 2024, Top 10 AI Subtitle Translators for Content Creators
- Fix App Not Available in Your Country Play Store Problem on Infinix Note 30 Pro | Dr.fone
- Everything You Need to Know about Lock Screen Settings on your Tecno Spark 20C
- How to recover deleted photos on Itel S23
- Undelete lost contacts from 150 (2023).
- How to Transfer Data from Motorola Moto G84 5G to BlackBerry | Dr.fone
- Fixing Persistent Pandora Crashes on Poco M6 Pro 5G | Dr.fone
- In 2024, Here Are Some Reliable Ways to Get Pokemon Go Friend Codes For OnePlus 12 | Dr.fone
- 4 solution to get rid of pokemon fail to detect location On Nokia G310 | Dr.fone
- New 2024 Approved Translate Video Speech to Text with Speech-to-Text Converters
- In 2024, Top 15 Augmented Reality Games Like Pokémon GO To Play On Realme 11 Pro+ | Dr.fone
- Complete Tutorial for Tecno Spark 20C Hard Reset | Dr.fone
- In 2024, A Guide Lava Blaze Curve 5G Wireless and Wired Screen Mirroring | Dr.fone
- How to Update Apple iPhone 6s Plus without Losing Data? | Dr.fone
- In 2024, How to Transfer Contacts from Poco F5 5G to iPhone XS/11 | Dr.fone
- Title: Guide to Create Intro Video with KineMaster for 2024
- Author: Morgan
- Created at : 2024-05-19 05:11:59
- Updated at : 2024-05-20 05:11:59
- Link: https://ai-video-editing.techidaily.com/guide-to-create-intro-video-with-kinemaster-for-2024/
- License: This work is licensed under CC BY-NC-SA 4.0.


