:max_bytes(150000):strip_icc():format(webp)/GettyImages-966273172-fbc5e7e0e68a48f69a1a5ddc0d6df827.jpg)
Guide To Creating The Perfect VHS Effect Look in Premiere Pro

Guide To Creating The Perfect VHS Effect Look in Premiere Pro
Adobe Premiere Pro is an excellent tool for video editing. It is a tool that can edit, create effects and filters, and do much more. In addition to this, you can even add different effects, such as VHS. The VHS effect in recent years has become significantly important due to its usage. This effect creates an old and jittery look to your video.
VHS effect has characteristics of old video tapes with lines and scales. It also adds distortion, noise, and color shifting to your videos. There are many filters and overlays that you can apply to get the VHS look. However, if you are using a PC tool, such as Premiere Pro, then you have to learn how to apply it. You can easily create a VHS effect Premiere look once you learn to add the effect to your video.
Part 1: What Are The Benefits of Using VHS Effects in Video?
Using VHS effects in your videos can bring several benefits. You can easily use multiple VHS effects in Premiere Pro. However, firstly, explore why incorporating VHS effects can be advantageous:
- Nostalgic Appeal: VHS effects can take your audience back to the era of VHS tapes. It creates a feeling of nostalgia and familiarity. Such effects also take you back to the 90s era by creating a similar look.
- Authenticity: Applying such effects mimics the characteristics of old tapes by adding imperfections. These effects also add color bleeding, distortion, and noise to your videos. It creates a sense of authenticity, looking like the video was recorded on genuine VHS tapes.
- Creative Style: These effects offer a unique style in terms of the video’s appeal. It further enhances the storytelling and allows for artistic expression. They can set a particular mood, add decay, and contribute to specific genres like retro.
- Enhancing Period Settings: If your video is set in a specific time period, then these effects can help. By using VHS effects, you can make the video more authentic. Additionally, this reinforces the historical context of the narrative.
- Attention-Grabbing: In a world of crisp and high-definition visuals, uniqueness matters. Intentionally using VHS effects for your video, you can make your video stand out. The distinct and unconventional look captures viewers’ attention.
- Cost-Effective Solution: You can use such effects to cut down your cost. Instead of investing in expensive props, VHS effects offer a more cost-effective solution. Digital software and plugins can apply these effects, eliminating the need for physical equipment.
Add VHS Effect to Video
Simply add video effects on Video with Filmora Video Effect Editor ! Experience the magic of cool yet outstanding video effects, where your videos come to life in beautiful visuals.
Apply VHS Effect Apply VHS Effect Learn More >

Part 2: How To Add VHS Effect in Premiere Pro: An Overview
Do you know how you can add the VHS effect in Premiere Pro? Don’t worry because this guideline will provide you with the required information. These simple steps will let you add your favorite VHS look to your video using Premiere Pro.
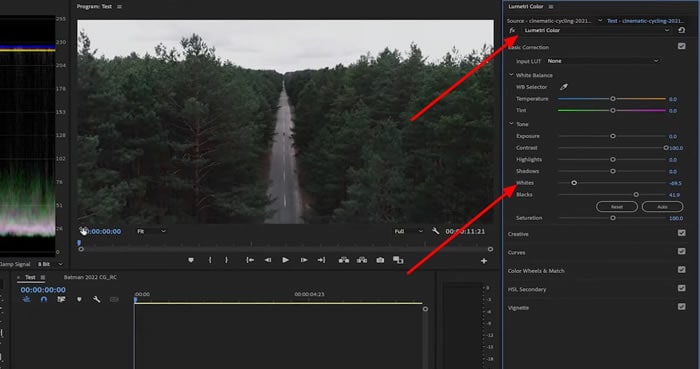
Step 1: Import your video into Adobe Premiere Pro. Open the “Lumetri Color” panel by clicking “Color” in the main toolbar. Further, choose “Lumetri Scopes” to access the graph window. Then, adjust the basic settings in the “Lumetri Color” panel. Continue to decrease the value of “Whites,” increase the “Contrast,” and set the “Blacks” to 10 on the graph.
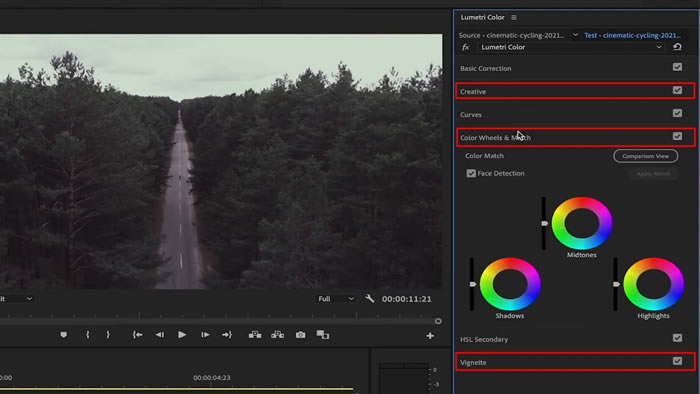
Step 2: Navigate to the “Creative” tab in the “Lumetri Color” panel. Increase the “Faded Film” and decrease the “Sharpness,” “Saturation,” and “Vibrance” to your liking. Use the color wheels in the “Color Wheels & Match” section to give the right tone. Further, proceed to increase the “Vignette” value from the same tab.
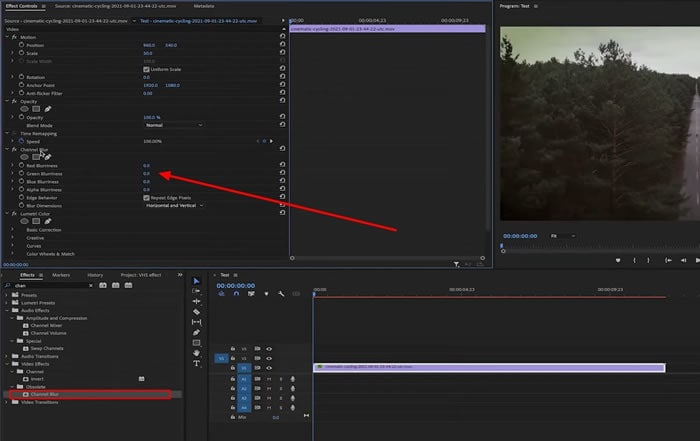
Step 3: Enable editing mode by selecting “Editing” in the main bar. Choose “Edit” from the lower section and search for the “Channel Blur” effect. Apply the effect by dragging and dropping it onto your video clip. Place the effect above previous adjustments and effects.
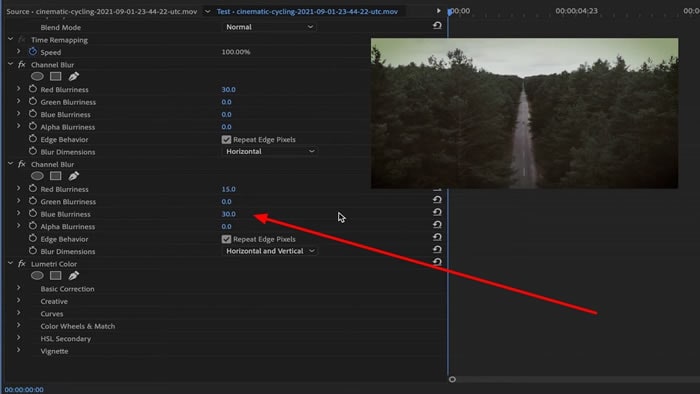
Step 4: In the “Channel Blur” effect tab, enable “Repeat Edge Pixel” and increase “Red Blurriness” to 30. Repeat the same step but this time increase “Blue Blurriness” to 30 and “Red Blurriness” to 15 and change “Blur Dimensions” to “Vertical.”
Step 5: Continue to add the “Unsharp Mask” and “Color Emboss” effects from the “Effect” tab. Proceed and change “Amount” and “Radius” for “Unsharp Mask” to 85 and 20, respectively. Slightly increase the “Relief” values for the “Color Emboss” effect.
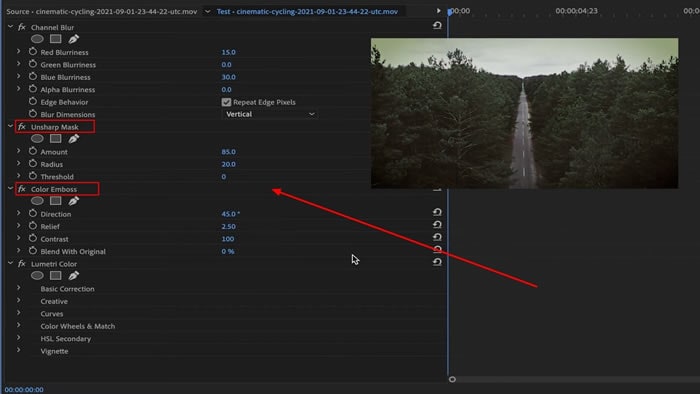
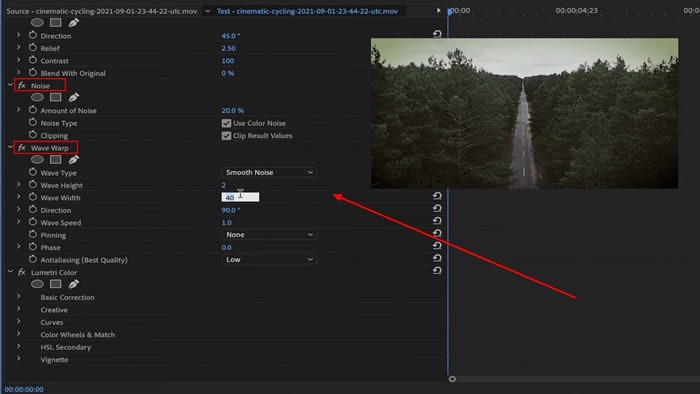
Proceed to apply the “Noise” effect from the “Noise & Grain” section and further adjust the “Amount of Noise” to your preference. Induce the “Wave Warp” effect and set the parameters of “Wave Height” to 2 and “Wave Width” to 1000. Change “Direction” to 0 and “Pinning” to “Horizontal Edges.”
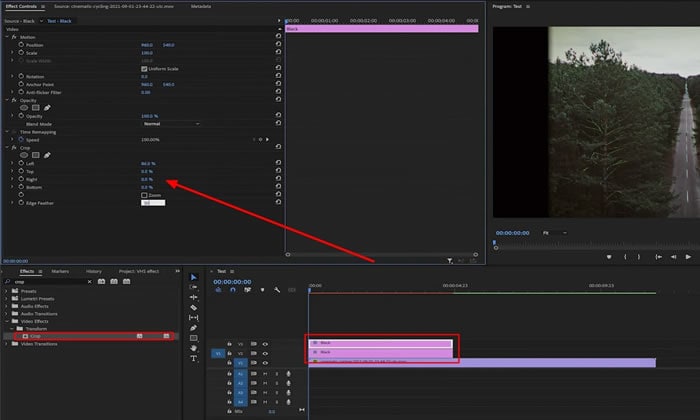
Step 6: You can crop your video to a 4:3 aspect ratio to give your video more authenticity. To do this, create two “Color Matte” layers using the “New Item” icon. Name and place them over the video clip. Apply the “Crop” effect to both layers. Set the “Left” option to 86 for the first layer and the “Right” option to 86 for the second layer. Set the “Edge Feather” to 30 for both layers.
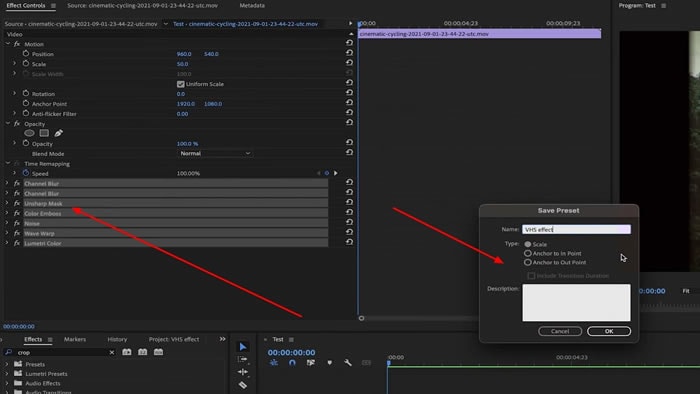
Make sure to save your VHS effect as a preset for future use by right-clicking and selecting “Save Preset.” Finally, export your VHS effect Premiere Pro video to your desired format.
Part 3: Using Wondershare Filmora to Add The Perfect VHS Effect in No Time
Wondershare has provided us with so many tools and applications for different purposes. It has provided an amazing video editing tool called Filmora. Wondershare Filmora Video Editor provides easy editing options for the user. You can create highly professional videos with impressive results using Filmora. This tool offers multiple overlays, video effects , and filters to use.
Add VHS Effect For Win 7 or later(64-bit)
Add VHS Effect For macOS 10.14 or later
If you want to add VHS effect Vegas Pro overlays using Filmora, you can. In order to apply such effects to your videos, you need to follow the guide. There are 4 simple steps to add the perfect VHS look to your video in no time.
Step 1xxx
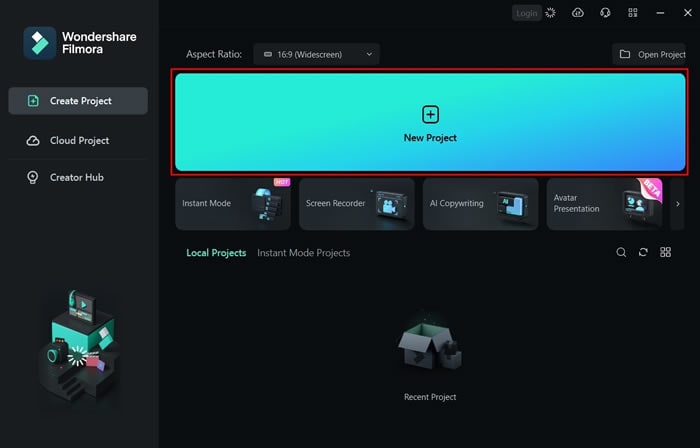
To apply a similar VHS overlay Premiere effect to your video, first access Wondershare Filmora on your computer. Then, click on the “New Project” tab in the main interface, which will take you to a new window.
Step 2Import and Arrange Your Video
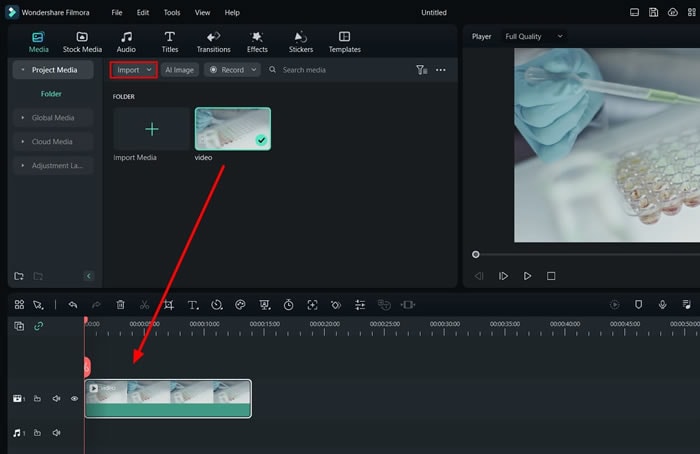
Next, import your video by either dragging and dropping it into the software or using the import media option. Once imported, drag and drop your video into the timeline area to begin working with it.
Step 3Apply VHS Effects
Access the “Effects” option from the top bar of the software. Search for “VHS” in the Effects panel to explore the various VHS effects available. Choose the desired effect that fits your style, then drag and drop your video on top of the timeline.
Step 4Adjust Opacity and Export
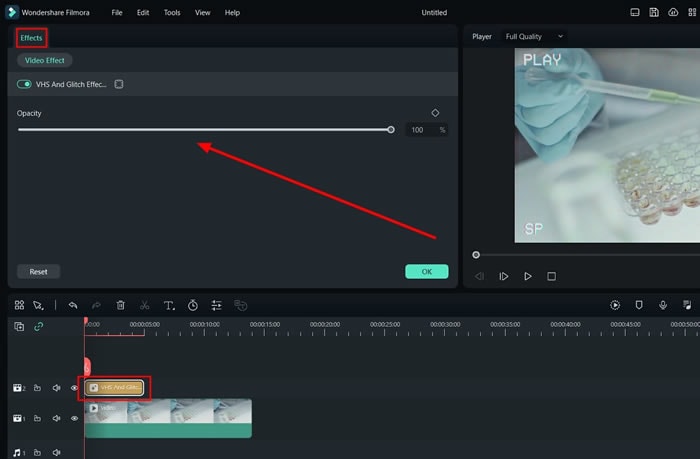
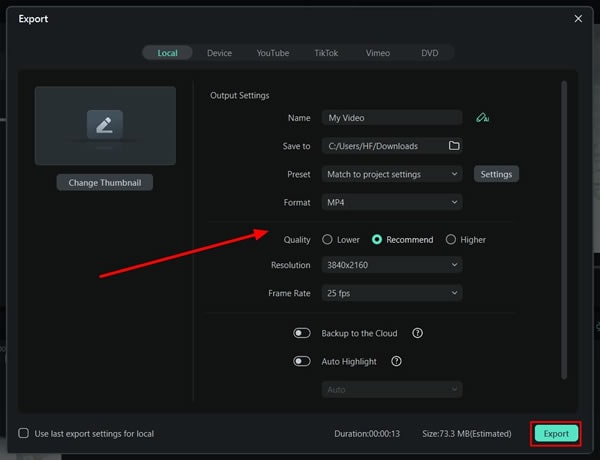
To refine the intensity of the VHS effect, go to the “Effects” tab located on the right side of the screen. From there, you can adjust the effect’s opacity by changing its transparency. Then, click “Export” at the top left of the screen to save your video with the applied VHS effects.
Conclusion
To conclude, there are many different overlays, effects, and filters that you can use. However, VHS effects are some of the most popular ones. People use different VHS filters in Premiere Pro to give their content a distinctive look. You can add these effects using different online and offline tools. One of the most popular tools is Wondershare Filmora which helps you add the VHS look to your video.
Apply VHS Effect Apply VHS Effect Learn More >

Part 2: How To Add VHS Effect in Premiere Pro: An Overview
Do you know how you can add the VHS effect in Premiere Pro? Don’t worry because this guideline will provide you with the required information. These simple steps will let you add your favorite VHS look to your video using Premiere Pro.
Step 1: Import your video into Adobe Premiere Pro. Open the “Lumetri Color” panel by clicking “Color” in the main toolbar. Further, choose “Lumetri Scopes” to access the graph window. Then, adjust the basic settings in the “Lumetri Color” panel. Continue to decrease the value of “Whites,” increase the “Contrast,” and set the “Blacks” to 10 on the graph.

Step 2: Navigate to the “Creative” tab in the “Lumetri Color” panel. Increase the “Faded Film” and decrease the “Sharpness,” “Saturation,” and “Vibrance” to your liking. Use the color wheels in the “Color Wheels & Match” section to give the right tone. Further, proceed to increase the “Vignette” value from the same tab.

Step 3: Enable editing mode by selecting “Editing” in the main bar. Choose “Edit” from the lower section and search for the “Channel Blur” effect. Apply the effect by dragging and dropping it onto your video clip. Place the effect above previous adjustments and effects.

Step 4: In the “Channel Blur” effect tab, enable “Repeat Edge Pixel” and increase “Red Blurriness” to 30. Repeat the same step but this time increase “Blue Blurriness” to 30 and “Red Blurriness” to 15 and change “Blur Dimensions” to “Vertical.”

Step 5: Continue to add the “Unsharp Mask” and “Color Emboss” effects from the “Effect” tab. Proceed and change “Amount” and “Radius” for “Unsharp Mask” to 85 and 20, respectively. Slightly increase the “Relief” values for the “Color Emboss” effect.

Proceed to apply the “Noise” effect from the “Noise & Grain” section and further adjust the “Amount of Noise” to your preference. Induce the “Wave Warp” effect and set the parameters of “Wave Height” to 2 and “Wave Width” to 1000. Change “Direction” to 0 and “Pinning” to “Horizontal Edges.”

Step 6: You can crop your video to a 4:3 aspect ratio to give your video more authenticity. To do this, create two “Color Matte” layers using the “New Item” icon. Name and place them over the video clip. Apply the “Crop” effect to both layers. Set the “Left” option to 86 for the first layer and the “Right” option to 86 for the second layer. Set the “Edge Feather” to 30 for both layers.

Make sure to save your VHS effect as a preset for future use by right-clicking and selecting “Save Preset.” Finally, export your VHS effect Premiere Pro video to your desired format.

Part 3: Using Wondershare Filmora to Add The Perfect VHS Effect in No Time
Wondershare has provided us with so many tools and applications for different purposes. It has provided an amazing video editing tool called Filmora. Wondershare Filmora Video Editor provides easy editing options for the user. You can create highly professional videos with impressive results using Filmora. This tool offers multiple overlays, video effects , and filters to use.
Add VHS Effect For Win 7 or later(64-bit)
Add VHS Effect For macOS 10.14 or later
If you want to add VHS effect Vegas Pro overlays using Filmora, you can. In order to apply such effects to your videos, you need to follow the guide. There are 4 simple steps to add the perfect VHS look to your video in no time.
Step 1xxx
To apply a similar VHS overlay Premiere effect to your video, first access Wondershare Filmora on your computer. Then, click on the “New Project” tab in the main interface, which will take you to a new window.

Step 2Import and Arrange Your Video
Next, import your video by either dragging and dropping it into the software or using the import media option. Once imported, drag and drop your video into the timeline area to begin working with it.

Step 3Apply VHS Effects
Access the “Effects” option from the top bar of the software. Search for “VHS” in the Effects panel to explore the various VHS effects available. Choose the desired effect that fits your style, then drag and drop your video on top of the timeline.

Step 4Adjust Opacity and Export
To refine the intensity of the VHS effect, go to the “Effects” tab located on the right side of the screen. From there, you can adjust the effect’s opacity by changing its transparency. Then, click “Export” at the top left of the screen to save your video with the applied VHS effects.

Conclusion
To conclude, there are many different overlays, effects, and filters that you can use. However, VHS effects are some of the most popular ones. People use different VHS filters in Premiere Pro to give their content a distinctive look. You can add these effects using different online and offline tools. One of the most popular tools is Wondershare Filmora which helps you add the VHS look to your video.
The Craziest 10 AI Editors You’ve Seen
The Craziest 10 AI Editors You’ve Ever Seen
An easy yet powerful editor
Numerous effects to choose from
Detailed tutorials provided by the official channel
Technological advancements in the field of video editing have opened new opportunities and possibilities for the editors to unleash their creativity and AI-based video editors are a major contribution to the field. With these intelligent tools, the cumbersome process of video editing has not only become quick but also hassle-free and results in excellent pro videos. So, if you too have been looking for one such artificial intelligence videos editing tools, you are reading on the right page.
In this article
01 [What is AI video editing tools?](#Part 1)
02 [Things To Consider While Selecting An Ai Editing Tool](#Part 2)
03 [Top 10 AI Video Editors](#Part 3)
Part 1 What is AI video editing tools?
In simplest terms, the software that uses artificial intelligence for editing videos is termed AI editing tools. These programs make use of AI algorithms to perform advanced editing tasks for creating visually appealing and interesting videos. The AI tools have not only helped in accelerating the video editing tools but also assists in taking care of complex functions with ease. A good AI editing tool can perform multiple tasks like determining the shots, applying filters, adding transitions, proposing changes, color correction, face detection, and more.
Part 2 Things to consider while selecting an AI editing tool
An array of AI editing tools is available and selecting one can be a confusing task. So, while choosing one of these programs, several criteria can be considered and some of these are listed below.
● Allows editing videos in a hassle-free manner.
● Quick use and processing.
● User-friendly interface.
● Capability to process all types of videos in high resolution.
● Comes with all the needed features.
● The learning curve is not very steep.
Part 3 Top 10 AI Video Editors
After reviewing several AI-based editing software, we have selected the top 10 in the category. Check out the list below.
01Magisto
This is a powerful video editing tool that is simple and quick to use. You simply need to add the content file and select the styling type as needed along with audio and other content after which everything will be taken care by the software. The program is also capable of optimizing the video to reach the maximum number of people and this is done based on real-time analytics. This is a paid tool and is apt for creating marketing videos.

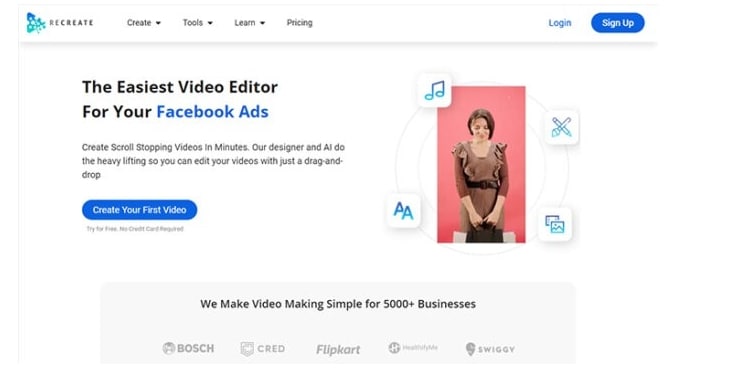
02Recreate
For creating and editing interesting videos for social media platforms, this is an apt tool that allows video customization through fonts, transitions, colors, overlays, and several other elements. Using this software, your written content can be converted into videos as the AI technology finds music as well as visuals automatically to match your requirements. Additionally, the program also supports features like recording voice-overs, removing the background, generating AI voices, and more.
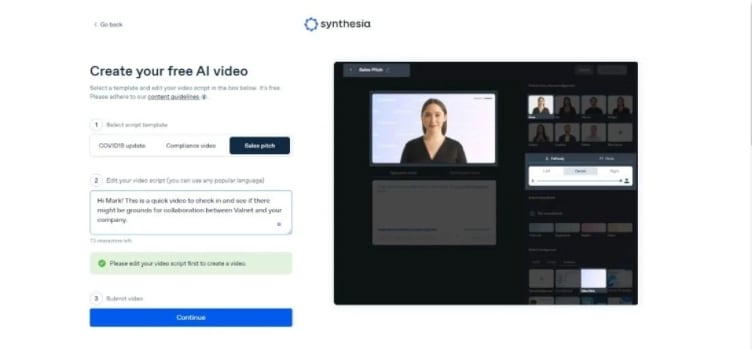
03Synthesia
This is an excellent video editing tool that is AI-based that can be used for digital marketing, training, communication, and several other tasks. The tool allows creating of interesting videos from the scripts and these footages can be up to 30 minutes long. Support for around 40 languages makes the program apt for all types of users. Some other key features of the software include duplicating the video, multi-sliding videos, customization options for voice, and more. The interface is simple and the process is also hassle-free.
04RawShorts
This is an online AI-based tool that can help convert the texts and the articles into videos for social media platforms and others. The technology of the tool will analyze your text content to know the main idea on which your video is to based. Then it automatically looks for the content needed including the voice and creates as well as edits the footage. A free trial version of the program is also available though it comes with several limitations. The drag and drop interface of the tool further makes it user-friendly.

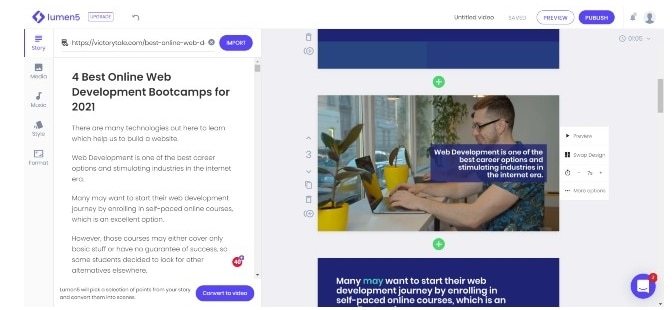
05Lumen5
For bulk editing of videos quickly, this is a good tool to consider. The interface is simple which along with the drag and drop feature makes the tool apt even for beginners. An array of video templates is available to match your theme requirements and the tool after identifying your requirements will lookout for the perfect music, content, layout, and other elements. There is also a library in the software from where you can find the desired collection of videos, images, and other media files.
06Kamua
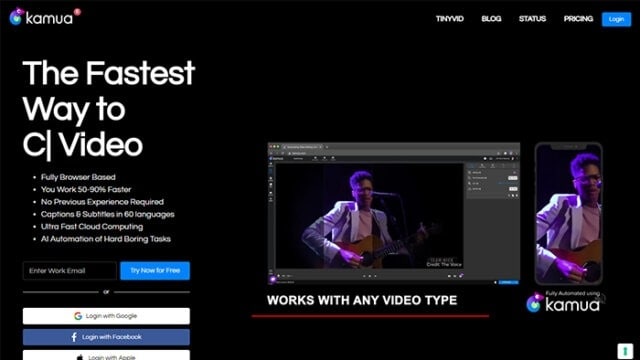
For simple and quick editing of your videos, Kamua is a great tool to use. This is a browser-based program that supports all basic functions like resizing, captioning, and more. With its cloud computing feature, a large number of files can be processed quickly and the tool supports adding the subtitles automatically to your project and that too in more than 60 languages. The tool also has a free version for the users who first wish to test before buying the subscription.
07InVideo
This is another widely used online tool supporting advanced video editing functions. The AI-based technology of the software will let you convert your text into the desired videos effortlessly. The Intelligent Video Assistant of the software will also check for any hidden mistakes in your videos and will also correct them. You can add multiple effects to your videos using the tool to create eye-catchy footage.

08QuickStories
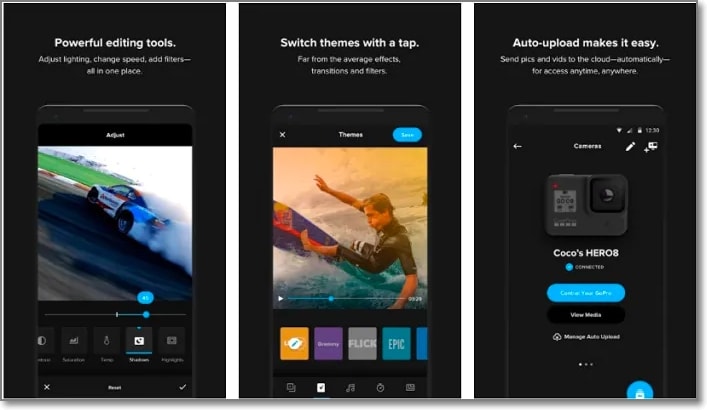
Using this AI-based editing tool, your video footage captured through a camera, GoPro as well as other devices can be edited like a pro to take them to an all-new level. The software support functions like intelligent tagging, night colors, white balancing, color rendering, and much more.
09Designs.ai
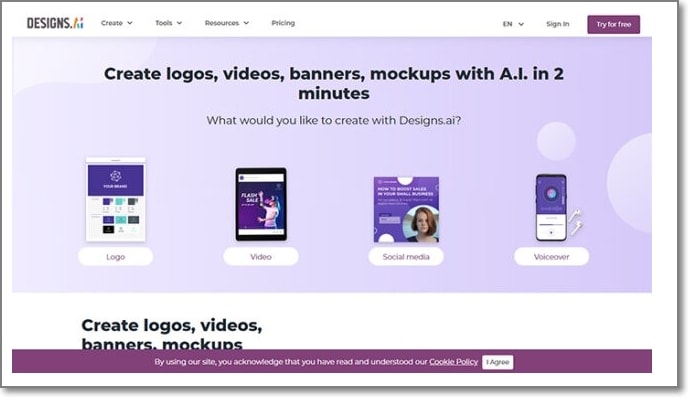
Using this online AI-based designing tool you can create posters, logos, banners, and several other videos with ease and in high quality. Text to video technology is supported by the program and you can even add voiceovers. Supporting more than 20 languages, the program also comes with a collection of images, clips, as well as audio files that can be used as needed. Transitions, animations, and other effects and elements can be added to improve the overall video look.
10**Wondershare Filmora Video Editor **
When it comes to video editing tools, the list remains incomplete without mentioning a versatile tool called Wondershare Filmora, This Windows and Mac-based software is easy and quick to install after which it is all set to create excellent videos using its extensive range of features. Using the tool, you can add transitions, effects, rotate, split, merge, and perform a host of other functions as well. Audio-based functions like audio compression, noise reduction, automatic audio syncing, and others are also supported. The interface of the tool is simple and the process of editing is hassle-free.
For Win 7 or later (64-bit)
For macOS 10.12 or later
● Ending Thoughts →
● AI-based video editing tools are intelligent programs that help in customizing the videos automatically.
● A number of these desktop and online tools are available to help you edit the footage.
● Depending on your files, editing, and other functions required, the selection of an appropriate tool can be done.
Technological advancements in the field of video editing have opened new opportunities and possibilities for the editors to unleash their creativity and AI-based video editors are a major contribution to the field. With these intelligent tools, the cumbersome process of video editing has not only become quick but also hassle-free and results in excellent pro videos. So, if you too have been looking for one such artificial intelligence videos editing tools, you are reading on the right page.

In this article
01 [What is AI video editing tools?](#Part 1)
02 [Things To Consider While Selecting An Ai Editing Tool](#Part 2)
03 [Top 10 AI Video Editors](#Part 3)
Part 1 What is AI video editing tools?
In simplest terms, the software that uses artificial intelligence for editing videos is termed AI editing tools. These programs make use of AI algorithms to perform advanced editing tasks for creating visually appealing and interesting videos. The AI tools have not only helped in accelerating the video editing tools but also assists in taking care of complex functions with ease. A good AI editing tool can perform multiple tasks like determining the shots, applying filters, adding transitions, proposing changes, color correction, face detection, and more.
Part 2 Things to consider while selecting an AI editing tool
An array of AI editing tools is available and selecting one can be a confusing task. So, while choosing one of these programs, several criteria can be considered and some of these are listed below.
● Allows editing videos in a hassle-free manner.
● Quick use and processing.
● User-friendly interface.
● Capability to process all types of videos in high resolution.
● Comes with all the needed features.
● The learning curve is not very steep.
Part 3 Top 10 AI Video Editors
After reviewing several AI-based editing software, we have selected the top 10 in the category. Check out the list below.
01Magisto
This is a powerful video editing tool that is simple and quick to use. You simply need to add the content file and select the styling type as needed along with audio and other content after which everything will be taken care by the software. The program is also capable of optimizing the video to reach the maximum number of people and this is done based on real-time analytics. This is a paid tool and is apt for creating marketing videos.

02Recreate
For creating and editing interesting videos for social media platforms, this is an apt tool that allows video customization through fonts, transitions, colors, overlays, and several other elements. Using this software, your written content can be converted into videos as the AI technology finds music as well as visuals automatically to match your requirements. Additionally, the program also supports features like recording voice-overs, removing the background, generating AI voices, and more.

03Synthesia
This is an excellent video editing tool that is AI-based that can be used for digital marketing, training, communication, and several other tasks. The tool allows creating of interesting videos from the scripts and these footages can be up to 30 minutes long. Support for around 40 languages makes the program apt for all types of users. Some other key features of the software include duplicating the video, multi-sliding videos, customization options for voice, and more. The interface is simple and the process is also hassle-free.

04RawShorts
This is an online AI-based tool that can help convert the texts and the articles into videos for social media platforms and others. The technology of the tool will analyze your text content to know the main idea on which your video is to based. Then it automatically looks for the content needed including the voice and creates as well as edits the footage. A free trial version of the program is also available though it comes with several limitations. The drag and drop interface of the tool further makes it user-friendly.

05Lumen5
For bulk editing of videos quickly, this is a good tool to consider. The interface is simple which along with the drag and drop feature makes the tool apt even for beginners. An array of video templates is available to match your theme requirements and the tool after identifying your requirements will lookout for the perfect music, content, layout, and other elements. There is also a library in the software from where you can find the desired collection of videos, images, and other media files.

06Kamua
For simple and quick editing of your videos, Kamua is a great tool to use. This is a browser-based program that supports all basic functions like resizing, captioning, and more. With its cloud computing feature, a large number of files can be processed quickly and the tool supports adding the subtitles automatically to your project and that too in more than 60 languages. The tool also has a free version for the users who first wish to test before buying the subscription.

07InVideo
This is another widely used online tool supporting advanced video editing functions. The AI-based technology of the software will let you convert your text into the desired videos effortlessly. The Intelligent Video Assistant of the software will also check for any hidden mistakes in your videos and will also correct them. You can add multiple effects to your videos using the tool to create eye-catchy footage.

08QuickStories
Using this AI-based editing tool, your video footage captured through a camera, GoPro as well as other devices can be edited like a pro to take them to an all-new level. The software support functions like intelligent tagging, night colors, white balancing, color rendering, and much more.

09Designs.ai
Using this online AI-based designing tool you can create posters, logos, banners, and several other videos with ease and in high quality. Text to video technology is supported by the program and you can even add voiceovers. Supporting more than 20 languages, the program also comes with a collection of images, clips, as well as audio files that can be used as needed. Transitions, animations, and other effects and elements can be added to improve the overall video look.

10**Wondershare Filmora Video Editor **
When it comes to video editing tools, the list remains incomplete without mentioning a versatile tool called Wondershare Filmora, This Windows and Mac-based software is easy and quick to install after which it is all set to create excellent videos using its extensive range of features. Using the tool, you can add transitions, effects, rotate, split, merge, and perform a host of other functions as well. Audio-based functions like audio compression, noise reduction, automatic audio syncing, and others are also supported. The interface of the tool is simple and the process of editing is hassle-free.
For Win 7 or later (64-bit)
For macOS 10.12 or later
● Ending Thoughts →
● AI-based video editing tools are intelligent programs that help in customizing the videos automatically.
● A number of these desktop and online tools are available to help you edit the footage.
● Depending on your files, editing, and other functions required, the selection of an appropriate tool can be done.
Technological advancements in the field of video editing have opened new opportunities and possibilities for the editors to unleash their creativity and AI-based video editors are a major contribution to the field. With these intelligent tools, the cumbersome process of video editing has not only become quick but also hassle-free and results in excellent pro videos. So, if you too have been looking for one such artificial intelligence videos editing tools, you are reading on the right page.

In this article
01 [What is AI video editing tools?](#Part 1)
02 [Things To Consider While Selecting An Ai Editing Tool](#Part 2)
03 [Top 10 AI Video Editors](#Part 3)
Part 1 What is AI video editing tools?
In simplest terms, the software that uses artificial intelligence for editing videos is termed AI editing tools. These programs make use of AI algorithms to perform advanced editing tasks for creating visually appealing and interesting videos. The AI tools have not only helped in accelerating the video editing tools but also assists in taking care of complex functions with ease. A good AI editing tool can perform multiple tasks like determining the shots, applying filters, adding transitions, proposing changes, color correction, face detection, and more.
Part 2 Things to consider while selecting an AI editing tool
An array of AI editing tools is available and selecting one can be a confusing task. So, while choosing one of these programs, several criteria can be considered and some of these are listed below.
● Allows editing videos in a hassle-free manner.
● Quick use and processing.
● User-friendly interface.
● Capability to process all types of videos in high resolution.
● Comes with all the needed features.
● The learning curve is not very steep.
Part 3 Top 10 AI Video Editors
After reviewing several AI-based editing software, we have selected the top 10 in the category. Check out the list below.
01Magisto
This is a powerful video editing tool that is simple and quick to use. You simply need to add the content file and select the styling type as needed along with audio and other content after which everything will be taken care by the software. The program is also capable of optimizing the video to reach the maximum number of people and this is done based on real-time analytics. This is a paid tool and is apt for creating marketing videos.

02Recreate
For creating and editing interesting videos for social media platforms, this is an apt tool that allows video customization through fonts, transitions, colors, overlays, and several other elements. Using this software, your written content can be converted into videos as the AI technology finds music as well as visuals automatically to match your requirements. Additionally, the program also supports features like recording voice-overs, removing the background, generating AI voices, and more.

03Synthesia
This is an excellent video editing tool that is AI-based that can be used for digital marketing, training, communication, and several other tasks. The tool allows creating of interesting videos from the scripts and these footages can be up to 30 minutes long. Support for around 40 languages makes the program apt for all types of users. Some other key features of the software include duplicating the video, multi-sliding videos, customization options for voice, and more. The interface is simple and the process is also hassle-free.

04RawShorts
This is an online AI-based tool that can help convert the texts and the articles into videos for social media platforms and others. The technology of the tool will analyze your text content to know the main idea on which your video is to based. Then it automatically looks for the content needed including the voice and creates as well as edits the footage. A free trial version of the program is also available though it comes with several limitations. The drag and drop interface of the tool further makes it user-friendly.

05Lumen5
For bulk editing of videos quickly, this is a good tool to consider. The interface is simple which along with the drag and drop feature makes the tool apt even for beginners. An array of video templates is available to match your theme requirements and the tool after identifying your requirements will lookout for the perfect music, content, layout, and other elements. There is also a library in the software from where you can find the desired collection of videos, images, and other media files.

06Kamua
For simple and quick editing of your videos, Kamua is a great tool to use. This is a browser-based program that supports all basic functions like resizing, captioning, and more. With its cloud computing feature, a large number of files can be processed quickly and the tool supports adding the subtitles automatically to your project and that too in more than 60 languages. The tool also has a free version for the users who first wish to test before buying the subscription.

07InVideo
This is another widely used online tool supporting advanced video editing functions. The AI-based technology of the software will let you convert your text into the desired videos effortlessly. The Intelligent Video Assistant of the software will also check for any hidden mistakes in your videos and will also correct them. You can add multiple effects to your videos using the tool to create eye-catchy footage.

08QuickStories
Using this AI-based editing tool, your video footage captured through a camera, GoPro as well as other devices can be edited like a pro to take them to an all-new level. The software support functions like intelligent tagging, night colors, white balancing, color rendering, and much more.

09Designs.ai
Using this online AI-based designing tool you can create posters, logos, banners, and several other videos with ease and in high quality. Text to video technology is supported by the program and you can even add voiceovers. Supporting more than 20 languages, the program also comes with a collection of images, clips, as well as audio files that can be used as needed. Transitions, animations, and other effects and elements can be added to improve the overall video look.

10**Wondershare Filmora Video Editor **
When it comes to video editing tools, the list remains incomplete without mentioning a versatile tool called Wondershare Filmora, This Windows and Mac-based software is easy and quick to install after which it is all set to create excellent videos using its extensive range of features. Using the tool, you can add transitions, effects, rotate, split, merge, and perform a host of other functions as well. Audio-based functions like audio compression, noise reduction, automatic audio syncing, and others are also supported. The interface of the tool is simple and the process of editing is hassle-free.
For Win 7 or later (64-bit)
For macOS 10.12 or later
● Ending Thoughts →
● AI-based video editing tools are intelligent programs that help in customizing the videos automatically.
● A number of these desktop and online tools are available to help you edit the footage.
● Depending on your files, editing, and other functions required, the selection of an appropriate tool can be done.
Technological advancements in the field of video editing have opened new opportunities and possibilities for the editors to unleash their creativity and AI-based video editors are a major contribution to the field. With these intelligent tools, the cumbersome process of video editing has not only become quick but also hassle-free and results in excellent pro videos. So, if you too have been looking for one such artificial intelligence videos editing tools, you are reading on the right page.

In this article
01 [What is AI video editing tools?](#Part 1)
02 [Things To Consider While Selecting An Ai Editing Tool](#Part 2)
03 [Top 10 AI Video Editors](#Part 3)
Part 1 What is AI video editing tools?
In simplest terms, the software that uses artificial intelligence for editing videos is termed AI editing tools. These programs make use of AI algorithms to perform advanced editing tasks for creating visually appealing and interesting videos. The AI tools have not only helped in accelerating the video editing tools but also assists in taking care of complex functions with ease. A good AI editing tool can perform multiple tasks like determining the shots, applying filters, adding transitions, proposing changes, color correction, face detection, and more.
Part 2 Things to consider while selecting an AI editing tool
An array of AI editing tools is available and selecting one can be a confusing task. So, while choosing one of these programs, several criteria can be considered and some of these are listed below.
● Allows editing videos in a hassle-free manner.
● Quick use and processing.
● User-friendly interface.
● Capability to process all types of videos in high resolution.
● Comes with all the needed features.
● The learning curve is not very steep.
Part 3 Top 10 AI Video Editors
After reviewing several AI-based editing software, we have selected the top 10 in the category. Check out the list below.
01Magisto
This is a powerful video editing tool that is simple and quick to use. You simply need to add the content file and select the styling type as needed along with audio and other content after which everything will be taken care by the software. The program is also capable of optimizing the video to reach the maximum number of people and this is done based on real-time analytics. This is a paid tool and is apt for creating marketing videos.

02Recreate
For creating and editing interesting videos for social media platforms, this is an apt tool that allows video customization through fonts, transitions, colors, overlays, and several other elements. Using this software, your written content can be converted into videos as the AI technology finds music as well as visuals automatically to match your requirements. Additionally, the program also supports features like recording voice-overs, removing the background, generating AI voices, and more.

03Synthesia
This is an excellent video editing tool that is AI-based that can be used for digital marketing, training, communication, and several other tasks. The tool allows creating of interesting videos from the scripts and these footages can be up to 30 minutes long. Support for around 40 languages makes the program apt for all types of users. Some other key features of the software include duplicating the video, multi-sliding videos, customization options for voice, and more. The interface is simple and the process is also hassle-free.

04RawShorts
This is an online AI-based tool that can help convert the texts and the articles into videos for social media platforms and others. The technology of the tool will analyze your text content to know the main idea on which your video is to based. Then it automatically looks for the content needed including the voice and creates as well as edits the footage. A free trial version of the program is also available though it comes with several limitations. The drag and drop interface of the tool further makes it user-friendly.

05Lumen5
For bulk editing of videos quickly, this is a good tool to consider. The interface is simple which along with the drag and drop feature makes the tool apt even for beginners. An array of video templates is available to match your theme requirements and the tool after identifying your requirements will lookout for the perfect music, content, layout, and other elements. There is also a library in the software from where you can find the desired collection of videos, images, and other media files.

06Kamua
For simple and quick editing of your videos, Kamua is a great tool to use. This is a browser-based program that supports all basic functions like resizing, captioning, and more. With its cloud computing feature, a large number of files can be processed quickly and the tool supports adding the subtitles automatically to your project and that too in more than 60 languages. The tool also has a free version for the users who first wish to test before buying the subscription.

07InVideo
This is another widely used online tool supporting advanced video editing functions. The AI-based technology of the software will let you convert your text into the desired videos effortlessly. The Intelligent Video Assistant of the software will also check for any hidden mistakes in your videos and will also correct them. You can add multiple effects to your videos using the tool to create eye-catchy footage.

08QuickStories
Using this AI-based editing tool, your video footage captured through a camera, GoPro as well as other devices can be edited like a pro to take them to an all-new level. The software support functions like intelligent tagging, night colors, white balancing, color rendering, and much more.

09Designs.ai
Using this online AI-based designing tool you can create posters, logos, banners, and several other videos with ease and in high quality. Text to video technology is supported by the program and you can even add voiceovers. Supporting more than 20 languages, the program also comes with a collection of images, clips, as well as audio files that can be used as needed. Transitions, animations, and other effects and elements can be added to improve the overall video look.

10**Wondershare Filmora Video Editor **
When it comes to video editing tools, the list remains incomplete without mentioning a versatile tool called Wondershare Filmora, This Windows and Mac-based software is easy and quick to install after which it is all set to create excellent videos using its extensive range of features. Using the tool, you can add transitions, effects, rotate, split, merge, and perform a host of other functions as well. Audio-based functions like audio compression, noise reduction, automatic audio syncing, and others are also supported. The interface of the tool is simple and the process of editing is hassle-free.
For Win 7 or later (64-bit)
For macOS 10.12 or later
● Ending Thoughts →
● AI-based video editing tools are intelligent programs that help in customizing the videos automatically.
● A number of these desktop and online tools are available to help you edit the footage.
● Depending on your files, editing, and other functions required, the selection of an appropriate tool can be done.
How to Create a Custom Slide Show in PowerPoint
How to Create a Custom Slide Shows in Powerpoint
An easy yet powerful editor
Numerous effects to choose from
Detailed tutorials provided by the official channel
Designing custom slideshows in PowerPoint is an absolute fun to do activity for infotainment and information sharing needs. Stay here to get an insight into creating the same, all in a wink!
In this article
01 [How to Create a Custom Slide Show in PowerPoint?](#Part 1)
02 [How to Show a Custom Show in PowerPoint?](#Part 2)
03 [How to Hide Slides in PowerPoint?](#Part 3)
Part 1 How to Create a Custom Slide Show in PowerPoint?
PowerPoint presentations are an already elusive and captivating media of information delivery and content sharing, be it a personal entertainment need or a high end professional requirement, PowerPoint presentations can do it all! Responding to the day to day IT upgrades of modern times, the aforesaid MS Office utility program has introduced its custom slideshow feature, which you can work upon to expand your creative skills in graphic design.
Custom slideshows are a convenient means of abstracting a required set of contents from a rather detailed slideshow presentation to address the needs of a specific audience, instead of distracting them with showcasing the entire content, most of which turns irrelevant to their exclusive requirements.
Talking about the knowhow to work with the feature, the following section encompasses a comprehensive understanding of the custom slide show creation process with the finest details:
User’s Guide to Create Custom Slideshows in PowerPoint
Step 1: Launch the PowerPoint Tool
Start the custom slide show PowerPoint creation process with launching the PowerPoint tool in any of your preferred devices. It would be better to work on a desktop or a PC. Proceed to open the presentation that you wish to create a custom slideshow from.
Step 2: Custom Slide Show Option
In the welcome interface of PowerPoint, navigate to the ribbon at the top and hit the ‘Slide Show’ tab, followed by clicking on the ‘Custom Slide Show’ button from the ‘Options Panel’ that appears. As you tap the aforesaid button, a dropdown menu follows next, from where you need to choose the ‘Custom Shows…’ option.
Step 3: Custom Shows Dialog Box
The completion of Step 2 brings up the ‘Custom Shows’ dialog box, with a blank area at the left, indicating the absence of any custom slide show as yet. To create one, navigate to and click on the ‘New’ button at the right side within the dialog box.
Step 4: Define Custom Show Dialog Box
As you tap the ‘New’ button, the ‘Define Custom Shows’ dialog box pops up with a display of the following fields and buttons:
● Slide Show Name Box
Use this field to assign a name to your custom slideshow. In case you don’t add a name of your choice, PowerPoint will assign the name ‘Custom Show 1’ to your custom presentation.
● Slides in Presentation
Below the ‘Slide Show Name’ box, appears a list of slides in the chosen presentation which you can use to create the custom slide show. To add slides to the same, click on the respective slide names.
● Add Button
The ‘Add’ button in the middle of the ‘Define Custom Show’ dialog box is used to include selected slides from the main list explained above to the ‘Slides in Custom Show’ list at the right. The ‘Add’ button however, remains disabled until you make a selection from the main slides list to include within the custom slides list. Take note that you can choose to repeat the slides within the custom list.
● Remove Button
You can use this button to select and delete specific slides from the ‘Slides in Custom Show’ list. The button however, remains disabled till you make a slide selection to be removed.
● Slides in Custom Show
This is a list of slides that you have selected from the main slides list to include in the custom slideshow.
● Re-Order Buttons
These are ‘Up’ and ‘Down’ arrows at the right side of the ‘Define Custom Show’ dialog box, which are active only if the ‘Slides in Custom Show’ list has more than one slide to its credit. In such a case, you can use these arrows to change the sequence of appearance of the slides within the custom presentation.
Step 5: Back to Custom Shows Dialog Box
When you have finished making all the required entries in the aforesaid fields, click on ‘OK’ to create your custom slideshow, which is visible in the ‘Custom Shows’ dialog box. You can preview the just created custom presentation by selecting the slideshow in the ‘Custom Shows’ list, followed by clicking on the ‘Show’ button at the bottom right of the dialog box.
The ‘Custom Shows’ dialog box has an additional list of buttons, which are explained as follows:
● The ‘New’ button, which you can click on to continue creating as many custom slideshows as you like.
● The ‘Edit’ button, which allows you to make changes to a specific custom slideshow.
● The ‘Remove’ button, which you can use to select and delete an existing custom presentation.
● The ‘Copy’ button, that lets you create multiple copies of a selected slideshow. This utility comes handy when you need to work on creating similar custom presentations with an affordably small number of differential elements.
When you are satisfied with your work, navigate to and hit the ‘Close’ button to finalize and save the custom presentation within your device.
Part 2 How to Show a Custom Show in PowerPoint?
When working to share any kind of information through slideshow presentations, creating a custom show is just half the job, with the significant part of a flawless content presentation remains still under the line. Having understood the process of creating a custom slide show in PowerPoint in enough detail, let us now move ahead with learning how to show the same in PowerPoint in the following section:
User’s Guide to Play a Custom Slideshow in PowerPoint
Step 1: Launch the Parent Presentation
In any suitable device of your preference, proceed with opening the presentation in which you have worked on creating the custom slideshow, followed by hitting the ‘Slide Show’ tab in the PowerPoint ribbon at the top. From the list of options that appears next, click on the ‘Custom Slide Show’ button.
Step 2: Custom Slideshow Dropdown Menu
Clicking on the ‘Custom Slide Show’ button in step 2 causes the latter’s dropdown menu to get displayed, with a list of all the created custom shows within the currently accessed parent slideshow presentation. Navigate to and click on the name of the custom presentation that you wish to play.
How to Set a Custom Show as the Default Slideshow?
If you are interested in playing the custom show as a default presentation, see through the following stepwise tutorial guide to go ahead with the process:
Step 1: Set Up Slideshow Button
After you have launched the parent presentation, navigate to and click on the ‘Slide Show’ tab within the topmost PowerPoint ribbon and tap the ‘Set Up Slide Show’ button from the list of options that follows.
Step 2: Set Up Show Dialog Box
Clicking on the aforesaid button makes the ‘Set Up Show’ dialog box to appear, where you are required to hit the ‘Custom Show’ radio button. You can now click on the dropdown arrow below the radio buttons to select your specific one from the list of custom shows that pops down. Hit ‘OK’ at the bottom right corner of the dialog box when you have made your choice.
The custom show is now your default slideshow. In your future launches of ‘Slide Show View’, only the selected custom show slides will appear to be used as a presentation.
Part 3 How to Hide Slides in PowerPoint?
In case you have worked on a detailed slideshow presentation in the PowerPoint tool, that consists of selective contents for different audience groups, all within the main presentation, it is a wise step to hide the content slides that are not useful to particular audiences, lest your viewers might get distracted with the irrelevant content.
By far, you must have developed a significant understanding of the custom slideshow PowerPoint creation and presentation procedure in much detail. Moving further into our discussion, let us now work on hiding slides within a PowerPoint presentation through the following step by step guide:
How to Hide or Unhide a Slide in PowerPoint?
Step 1: Launch the PowerPoint Presentation
Start with opening a desired PowerPoint Presentation in your preferred device.
Step 2: Make Your Selection
Visit the slide navigation pane at the left to select slide you wish to delete. Your selections will be highlighted as you tap on them. You can either delete the slides one at a time, or make multiple selections to delete them all at once.
Step 3: Hide Slide Option
When you have made the required selections, right click on the same, followed by choosing the ‘Hide Slide’ option from the dropdown menu that appears next. The selected slides will now be hidden and you can recognize them in the ‘Presenter View’ with lighter thumbnails as compared to the included slides, in the slide navigation pane.
Step 4: Unhiding the Presentation Slides
If you wish to unhide a previously hidden presentation slide, reach to the slide navigation pane in the left and right click on the hidden slide thumbnail. The dropdown menu in Step 3 pops up again, and you need to tap on the ‘Hide Slide’ option. The selected slide will now be included in the presentation.
An alternative to show a hidden slide within a running presentation, while remaining in the ‘Presenter View’, make a random right click anywhere within the currently running slide. The ‘Options Panel’ pops up, and you are required to choose the ‘See All Slides’ option.
All the slides of your presentation will now get displayed in the slide navigation pane, with the hidden ones being grayed out with a crossed slide number. Click on the thumbnail of the respective hidden slides that you want to present before the audience.
asterpieces crea
Creating PowerPoint Presentation Slides in Filmora
The Wondershare Filmora Video Editor franchise of graphic editor software is a pioneer in creating stunning masterpieces of content presentation alternatives. Talking of slideshow presentations, you can work with the software program to create and edit slideshow presentations in high end professional quality. The inbuilt library of the program is a vast trunk of features, effects and tools that allow you to explore your graphic creation abilities to your heart’s content and design top quality slideshows.
For Win 7 or later (64-bit)
For macOS 10.12 or later
Apart from creating slideshow presentations, you can use the software program to convert the same into video edits and customize them to suit your needs. As an example, you can work with removing the slideshow background, overlaying the slide contents; add tons of audio-visual effects and transitions to the slides and supplement them with pleasing background music.
Additional advantages of the application are a welcoming and user cohesive interface, high speed output response characteristics, high end, professional quality slideshow output and an extensive device compatibility. The bottom line is, the Filmora graphic editor package is an all in one solution to your most diverse and specific slideshow creation needs.
● Ending Thoughts →
● Custom slideshows are an important part of PowerPoint presentations, especially when you need to showcase selective contents of a detailed project.
● Apart from creating, you also get to play the custom slideshow, make it your default presentation and hide the latter’s slides using the PowerPoint tool.
● If you are searching for a PowerPoint alternative to create custom slideshows, picking the Wondershare Filmora slideshow creator tool is indeed a smart choice.
How to Create an URL for Your Video?
A well-personalized video is an effective way to get your way around the viewers easily. Besides, you can also easily impress them with your products or services by uniquely pressing them.

Now, imagine if you have an easier way to share your videos with audiences on different platforms! Well, this way you will save a lot of time. For this, you need to upload the video to the link, and then you can share the URL link on various platforms. Keep reading to understand the entire process.
Part 1: Method1: Upload videos to a video hosting platform
The method to upload the video to the link will vary based on the video-sharing platform you are using. Let’s understand this with an example. If you are using YouTube, then you need to follow the below-given steps to upload and generate a link for your video.
- First of all, you need to log into your YouTube channel or account.
- Now, you need to click on the video icon. You can find it on the right-hand side of the screen.
- Then, click on the Upload a Video option.
- Click on the Select Files option and choose the video that you want to upload. You can also drag and drop the video to upload it.
- Once done, click on Publish option to complete the process.
Now, to complete your YouTube video upload share, you need to find the link to your video. For this, you need to click on the pause button and then right-click on the video. Now choose the Copy video URL. Now, you can share that video on other platforms just by pasting the video link.
How To Make Video Private and Public?
- Sign in to your YouTube account.
- Choose the Videos option.
- Now choose the video that you want to update.
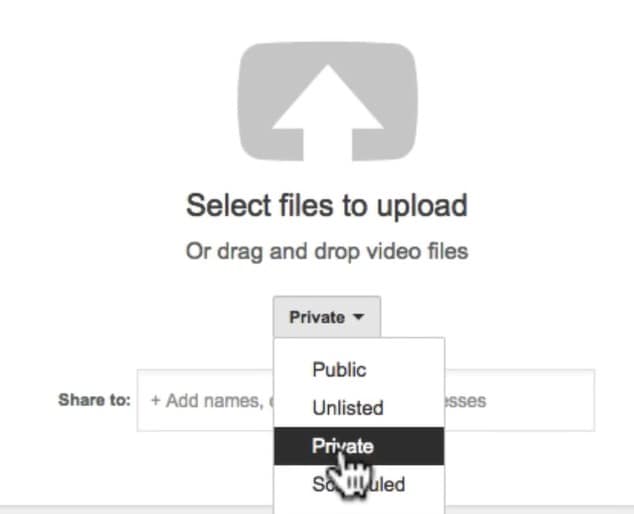
- Then you need to click on the down arrow located under Visibility and select Private or Public based on your preference and then click on the Save option.
Different Video Hosting Platforms that You can Use
1. Vimeo
One of the best alternatives to YouTube is Vimeo. This platform allows the user to create, manage and enjoy an easy video upload share process. This platform has more than 250 million active users. It offers different subscription plans, and for unlimited upload limits, webinars, live streaming and more, you can go for its premium package. Some of the impressive features of this platform are:
- Custom CTAs- Calls to Actions
- Support video hosting in 8K quality.
- Easy access to different video editing templates
- CRM- Customer Relationship Management integrations
- Supports content analytics
- video upload share option for social media
2. Streamable

Speaking about Streamable, this is a video editing as well as sharing tool that will allow you to stream videos in 4K quality, and you can even embed the videos. You will have the freedom to upload your videos in different formats and can also resize them in vertical, landscape and square formats. Some unique features of Streamable are:
- Content management tool
- Brand overlay
- Easy-to-customize templates
- Content Library
- Audio capture
- Faster data export and import and more
3. Uscreen
This is an excellent all-in-one platform that helps video creators to sell, manage and market their content while expanding their business. Besides, the platform also helps the users to create mobile and TV apps and offers tools to market the videos. Some features for Uscreen to consider are:
- Different membership options.
- Support offline viewing of content, including videos.
- A professional video player
- You will enjoy full ownership of your audience’s data
- Supports different retention and marketing tools.
- Supports more than 150 hours of video storage and more.
4. Dailymotion

This platform is also called “the home for videos that matter”. Dailymotion is used by many well-known clients such as MLB, CNN and more to host video content. If you are a creator, you can easily upload your videos on this platform for free. Creators can utilize different features available on the platform, such as:
- Easily embeddable and shareable videos
- Easy video sharing using your video link on social media platforms
- You can upload videos of up to 4K quality.
- Password-protected videos
Part 2: Upload your videos to a cloud disk and share to others
As per some studies, more than 85 percent of businesses utilize videos for marketing strategy. Video content is entertaining, easy to understand and can offer better ROI as you can reuse it. However, with the huge volume of these files, it has become more challenging to find a good storage option.

This is where cloud storage comes to play. There are different cloud disk or storage platforms where you can upload video to link and share your videos with others. For example, Google storage or Google Drive. So, let’s know the process of uploading a video to Google Drive.
- First, visit your Google Drive Account and then click on the new option.
- Now, you need to click on File Upload and then select the video that you want to upload.
- You can now see the selected video uploading in the screen’s lower left corner. It will take some time.
- Once done, Google Drive will begin processing the video.
- Once your video is available on Google Drive, you can move it to different folders or change the name.
Now, let’s talk about how to generate a link to your video and share that link with others.
- Open your Google Drive account.
- Choose the video that you want to share and right-click on it.
- Now, you need to click on the Get Link option.
- Then, choose the Anyone with the Link option from the viewer option.
- Now, click on the Copy Link option, and you can now share that link with anyone you want.
There are different reasons that make cloud storage options a perfect choice for video creators or other users. For example:
- You don’t have to worry about data loss.
- Cloud storage is highly scalable.
- There will be no space or storage limit
- The users can enjoy real-time video content updates
- One can access and share videos using any device.
However, some of the cloud storage platforms are not free to use. You will get up to 10GB to 20GB for free. For more storage limits, you will have to buy a subscription plan. For example, if you are using Dropbox, then you will have to pay around USD 20 per month to get up to 3TB of storage.
Besides, there are some content restrictions that you will have to consider. You are not allowed to upload videos that support malicious attacks, hate speech, graphic violence, predatory behavior or videos that promote any dangerous behavior. Besides, the platforms support certain types of video formats, such as OGG, WebM files, WMV, MTS, AVI, and WMV. FLV, 3GPP, MPEG 4, MOV and other file formats.
If you are looking for some free cloud storage platforms, then you can give Google Drive, Dropbox, Box, NeXT cloud, pCloud, Amazon Cloud Drive and OneDrive a try.
Part 3: How to Make Videos That Go Viral?
To make your videos go viral, you will have to make stunning videos by adding some unique special effects. And for this, you can use the Filmora tool. This is a creative video editing tool for a video creator. The platform offers some great features to vloggers, gamers and others. For example, it supports 4K editing, noise removal, advanced text editor, GIF support, video stabilization, equalizer and more. Now, let’s talk about how to use this platform to make or edit a video.
- Open Filmora and choose the desired aspect ratio. Now, click on the New Project option and import the video.
- Then you need to choose the frame rate and resolution for the video.
- Once done, you can go on and transition music between your video clips, or you can use different visual effects.
- Once you are done with editing, you can then explore the videos and then share the videos on different platforms directly from Filmora.
Free Download For Win 7 or later(64-bit)
Free Download For macOS 10.14 or later
FAQs
Why Create a Video Link?
The first reason to consider here is when upload video to link, you can easily share the videos in various formats. Besides, you can share it without worrying about the video size. The video can be shared on multiple platforms and social media channels. It is a faster way to share your video content.
How To Locate the URL of Your Video?
To locate your video URL, you can open the video online. The link that you will see in the browser’s address bar will be the URL of your video. You can then copy the URL and paste it or share it on other platforms. It also applies to YouTube and other video-sharing platforms.
How Do I Get My YouTube Channel’s URL?
You need to sign in to your YouTube Studio. Then from the left Menu, choose Customization and then choose the Basic info. Under the Channel URL option, you can see the URL of your YouTube channel. Now you can copy the Channel URL and share it with others.
Also read:
- New In 2024, Repeated Text Animation Tutorial in Filmora
- Updated 2024 Approved How to Loop a Video in Canva Editor
- In 2024, How to Use OBS Chroma Key With/Without Green Screen Easy Solutions
- 2024 Approved Powerpoint Supported Video Format and Advanced User Tips
- 2024 Approved This Is the Method Employed During Every Evening Weather Broadcast The Newscaster Is Standing in Front of a Blank Screen, but the Viewers at Home See a Weather Map
- Updated Easy Ways to Create Procreate GIFs for 2024
- How Can You DIY VHS Overlay in After Effects?
- All You Need to Know About Transparent Logos and How You Can Make Them. Top Transparent Logos You Can Take Inspiration From for 2024
- Updated In 2024, Fixing The Slow Playback Issues in DaVinci Resolve
- 12 Top Marketing Slideshow Templates for 2024
- New 10 Best Voice Over Generators Windows, Mac, Android, iPhone, and Online for 2024
- 2024 Approved How to Add Subtitles to MKV Videos on All Platforms
- Updated 2024 Approved Best Voice Changers for WhatsApp Free Included
- In 2024, Ideas That Will Help You Out in Making Transparent Image
- New In 2024, How to Create a Custom Sequence Preset in Premiere Pro
- New In 2024, Do You Also Use Android to Create and Edit Videos? Read About the Efectum Video Effects Editor, Which Is Available in Your App Stores for Seamless Editing
- New In 2024, How to Speed Up Video with Canva Online Tool?
- New 2024 Approved Add Emoji to Linkedin Post – 5 Tips You Need to Know
- Updated In This Article I Will Share to You My Tips and Experiences on How to Become a YouTube Vlogger and Things You Need to Consider Being a Vlogger
- Updated In 2024, Learn How to Create Inspiring Motivational Videos Using AI. Explore Tools Like Midjourney, Runway Gen2, Chat-GPT, and Filmora AI for Seamless Content Creation. Start Your Journey
- In 2024, Do You Want to Blur Faces in Your Videos? Read This Article to Find Out the Easiest Way to Blur the Faces in Videos Using Adobe Premiere Pro
- Updated Sometimes It May Happen to You that You Are Watching a Video that Has Very Low Graphics or, in Other Words, Low Visual Quality. You Might Wish to Change, Instead Improve the Video Quality. Here, AI Upscaling Video Comes to Use for 2024
- Updated In 2024, Are You Looking to Vlog Across Your Next Stop at the Café? Get Aware of the Significant Elements that Make up the Café Vlog
- 2024 Approved How to Windows Online Movie Maker Complete Guide
- 2024 Approved Why You Should Master Slideshows In Lightroom, Fresh Insight?
- Updated In 2024, Create a Movie with Windows Movie Maker
- Updated In 2024, Top 20 Slideshow Makers for Win/Mac/Online Review
- Updated In 2024, The Complete Guide to Converting GIF to SVG With Ease
- New How to Create Emoji on Mac That Take Less Than 10 Mins
- 2024 Approved Kdenlive Is a Free, Open-Source Video Editing Software Application. Kdenlive Is a Powerful Video Editor that Can Be Used to Create Professional-Quality Videos
- New In 2024, Do You Seek to Blur Out Your Video and Photo to Display some Motion Blur? This Article Provides a List of the Best Motion Blur Apps for Videos and Photos
- New How to Edit Recorded Video
- Updated Whats the Best 10 Photo Animator Templates That Bring Your Images to Life, In 2024
- How To Restore Missing Contacts Files from Poco C51.
- 3 Ways to Fake GPS Without Root On Oppo Reno 10 Pro 5G | Dr.fone
- How to retrieve erased music from Reno 9A
- How To Transfer WhatsApp From Apple iPhone 12 Pro to other iPhone 14 Pro Max devices? | Dr.fone
- In 2024, How to Mirror Vivo S17 to Mac? | Dr.fone
- 11 Proven Solutions to Fix Google Play Store Not Working Issue on Motorola Razr 40 Ultra | Dr.fone
- In 2024, Top 10 Password Cracking Tools For Vivo G2
- Forgot Pattern Lock? Heres How You Can Unlock Honor X9a Pattern Lock Screen
- Apple ID Unlock On Apple iPhone 15 Pro Max? How to Fix it?
- How to Change Netflix Location to Get More Country Version On Infinix Note 30 VIP Racing Edition | Dr.fone
- How to Screen Mirroring Realme Narzo 60 Pro 5G? | Dr.fone
- In 2024, How to Mirror PC Screen to Infinix Zero 30 5G Phones? | Dr.fone
- In 2024, Best Itel S23 Pattern Lock Removal Tools Remove Android Pattern Lock Without Losing Data
- In 2024, How to Lock Apps on Xiaomi 14 Ultra to Protect Your Individual Information
- How to Unlock Apple iPhone 15 with a Mask On | Dr.fone
- In 2024, How I Transferred Messages from Samsung Galaxy A14 5G to iPhone 12/XS (Max) in Seconds | Dr.fone
- In 2024, Unova Stone Pokémon Go Evolution List and How Catch Them For Vivo S18 Pro | Dr.fone
- How to Unlock Infinix Smart 7 Phone without PIN
- Use Device Manager to reinstall your drivers in Windows 11
- Here are Some of the Best Pokemon Discord Servers to Join On Google Pixel Fold | Dr.fone
- How to Use Face ID to Pay for Apple Music on iPhone 8
- How to Upgrade Apple iPhone 12 to the Latest iOS Version? | Dr.fone
- 5 Tutorials on How to Transfer Photos From Apple iPhone 6 to New iPhone | Dr.fone
- How to Cast Vivo V30 Pro Screen to PC Using WiFi | Dr.fone
- 5 Ways to Track Oppo Reno 11F 5G without App | Dr.fone
- Undelete lost call logs from Samsung Galaxy S23 FE
- Process of Screen Sharing Honor X50 to PC- Detailed Steps | Dr.fone
- 3 Ways to Unlock iPhone 6s without Passcode or Face ID
- Apply These Techniques to Improve How to Detect Fake GPS Location On Oppo A18 | Dr.fone
- Title: Guide To Creating The Perfect VHS Effect Look in Premiere Pro
- Author: Morgan
- Created at : 2024-05-19 05:11:35
- Updated at : 2024-05-20 05:11:35
- Link: https://ai-video-editing.techidaily.com/guide-to-creating-the-perfect-vhs-effect-look-in-premiere-pro/
- License: This work is licensed under CC BY-NC-SA 4.0.


