
How to Add a Green Screen to Zoom

How to Add a Green Screen to Zoom
If you are a regular user of Zoom app because you have to attend meetings and video conferences every now and then, you should know how to create a green screen for Zoom calls. There are going to be times when you would not want to show what is in your background because it might look distracting. Besides, changing the background from time to time breaks the monotony of your Zoom calls.
Zoom app allows you to change your background and set any available virtual background. However, the effect of virtual background may not be accurate and smooth unless you have a uniform background color. If you use green screen background for Zoom, you can replace it with any virtual background that will look very realistic to your audiences. We will illustrate how to create a green screen background for Zoom.
Part 1. How to add green screen to Zoom on computer?
Regular Zoom users prefer arranging and attending video conferences from their computers. Zoom desktop app makes it more convenient to attend Zoom conference with a wider screen and better visibility. Make sure you have a uniform green screen in your background before attending Zoom call so that you can replace it with any available virtual background on Zoom. Here are the steps on how to create a green screen for Zoom app on your computer.
Step1Open Zoom app and make sure you are logged into your account. Adjust the webcam so that only you and your green screen should be visible in the frame.
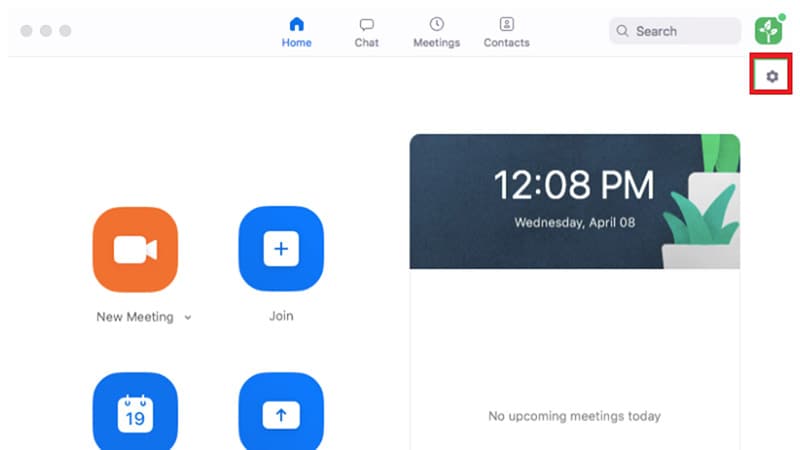
Step2Click on Settings (gear icon) located in the top-right corner.
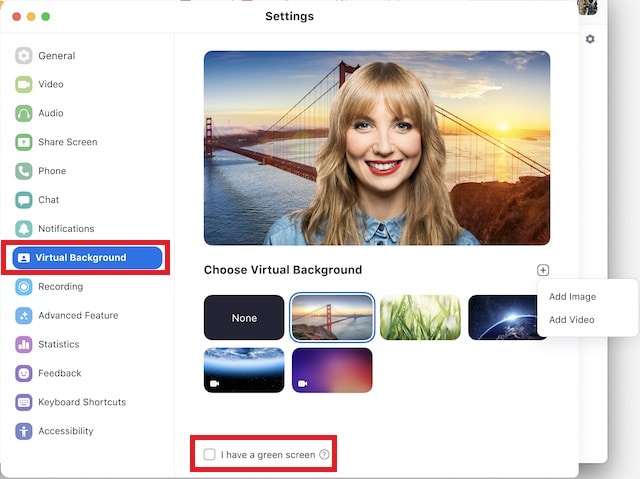
Step3Once Settings window opens, click on Virtual background option on the left panel.
Step4Turn on the option “I have a green screen” located at the bottom. Thereafter, choose a virtual background with which you want to replace the green screen in your video.
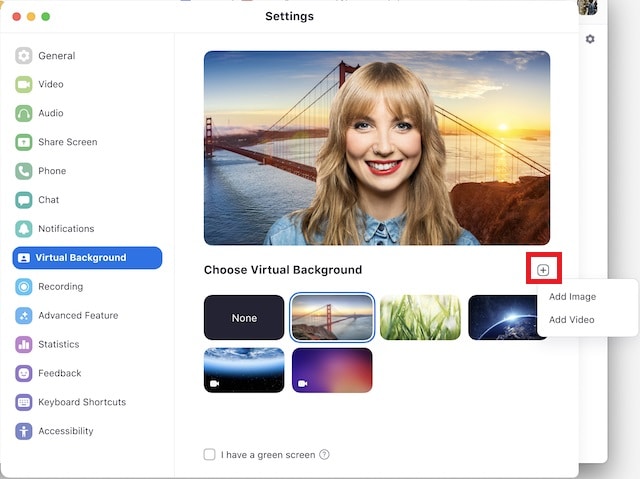
Step5Apart from the present virtual background, you can add photo or video to replace green screen background.
Step6Close Settings window and you will see that your green screen is replaced by your selected virtual background.
Part 2. How to add green screen to Zoom on mobile?
If you are an occasional Zoom user, you are more likely to use your smartphone to attend Zoom conferences. If you want green screen effect on your Zoom call, make sure you have a sizeable green screen in your background. This is because even if you happen to move your phone during the meeting, green screen background should come in the video frame all the time.
It is recommended to use a tripod to keep your smartphone fixed in one spot for better and consistent green screen effect. Here are the steps to answer your question how do you add a green screen to Zoom app on your mobile phone. The steps are the same for Android and iOS users.
Step1Open Zoom app on your smartphone and make sure you are signed into your account.
Step2Start a Zoom meeting and tap on More option located in the bottom-right corner.

Step3Tap on Virtual background and you can select any preset virtual background.
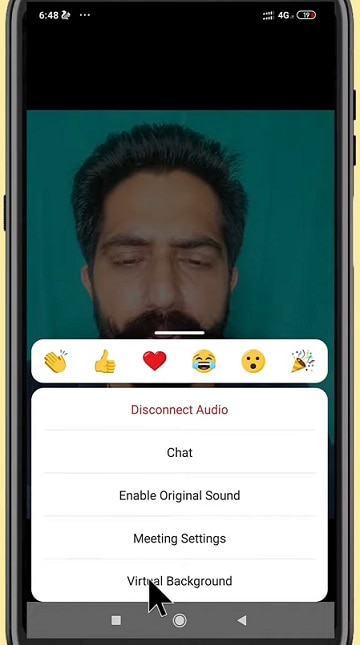
Step4If you want to replace green screen with a customized background, tap on “+” icon and select any photo or video from your phone.
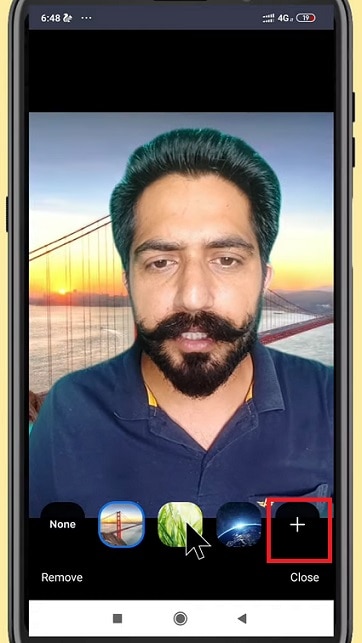
Step5Tap on Close option and the selected virtual background will be applied to your Zoom video.
Part 3. Tips to use green screen on Zoom video
Here are some important tips to use green screen on Zoom video for a better outcome.
Buy Large Green Screen - Since you are going to invest in buying green screen, you should buy a large green screen instead of buying two. Firstly, when you have one large green screen, you can set it up without any wrinkles or overlaps.
Secondly, a large green screen means greater surface area, and even when you slightly change the angle of your camera, your background will still have green screen instead of the exterior wall showing up and ruining virtual background effect.
Buy Green Screen Stand - Along with green screen, you should buy a sizeable green screen stand. A regular green screen stand contains two vertical supports at both ends and one horizontal support where you hand the green screen.
You can buy it according to the size of green screen you have bought. And you need to buy stand because you cannot fix the green screen on the wall properly. If you use any other means, there are going to be wrinkles and uneven virtual background effect.
Green Screen Quality - You can purchase any shade of green screen, but we recommend you opt for vibrant green color for a better outcome. Most importantly, the color should be even across the surface, and there should not be light and dark patches to dampen the virtual background effect and make it look unrealistic. That is why you should not compromise with quality.
Avoid Green Objects - You should not wear anything green. If your green screen has a lighter shade, you can wear deep color dresses and vice versa. Most importantly, you should not keep anything that is green while attending Zoom attending as it will disturb the green screen effect and it will look embarrassing. If you need to keep any green objects in your Zoom meetings, you should have blue screen instead of green screen.
Focus On Lighting - Lighting is extremely important when you want to use green screen. You should place the light so that it spreads evenly across the green screen. Otherwise, there are going to be light and dark patches, and the effect can get disturbed. Make sure you do not cast any shadow on the green screen by positioning the green screen accordingly.
Select A Proper Background - Last but not least, when you change your green screen to any virtual background photo or video, make sure you keep your audiences in mind. If you are attending a meeting, you should keep a professional-looking background. The background should not be distracting and match the theme of your meeting.
Conclusion
We have answered your question, “How do you add a green screen to zoom?” You can use green screen on your Zoom desktop app as well as smartphone app. This will help you to make your usual background cover up with green screen and replace green screen with any virtual background. Keep in mind all the tips we have provided you so that the green screen effect is perfect.
Free Download For Win 7 or later(64-bit)
Free Download For macOS 10.14 or later
How To Fix Slow Playback Issues in DaVinci Resolve: Finding the Best Solutions
Davinci Resolve is a well-known video editing software with an intuitive interface. This all-in-all program combines editing, color correction, motion graphics, and visual effects. Video editors don’t need to switch to many apps when DaVinci Resolve can do different tasks. High-quality editing of original camera images can only be done through this tool.
Hollywood films and series use this software to streamline the show. Overall, it’s incredible software, but sometimes DaVinci Resolve slow playback issues arise. To fix this issue, you can read this guide for effective and guaranteed solutions. There, you will also find a trustworthy alternative to avoid DaVinci Resolve slow-down playback.
Slow Motion Video Maker Slow your video’s speed with better control of your keyframes to create unique cinematic effects!
Make A Slow Motion Video Make A Slow Motion Video More Features

Part 1: Finding the Best Resolution for DaVinci Resolve Slow Playback Issue
As Highlighted, DaVinci Resolve is a good video editor for all kinds of use cases. Although it’s a powerful tool, it still shows some errors like choppy and slow playback. Modern problems require modern solutions. Thus, read the given fixes to make DaVinci Resolve faster playback. All the methods are easy and helpful for a smooth playback experience on Windows and macOS.
- Solution 1: Lower Playback Resolution
- Solution 2: Change Timeline Resolution
- Solution 3: Enable Render Cache
- Solution 4: Disable the Live Save Feature
- Solution 5: Use Proxy Media Files
- Solution 6: Disable Color Grades
Solution 1: Lower Playback Resolution
In DaVinci Resolve, full timeline proxy resolution is set by default. To enjoy a smooth playback while editing, you should reduce the playback resolution. Open your project in DaVinci Resolve and press the “Playback” menu from the top. Then, select “Timeline Proxy Resolution” and pick one either “Half” or “Quarter” options. It will reduce the playback resolution and speed up the playback.

Solution 2: Change Timeline Resolution
DaVinci Resolve can work on 4K high-resolution footage that might disrupt the playback. So, cutting down the resolution to speed up your playback is suggested. To do so, click the “Settings” icon from the bottom right side and enter the “Project Settings” window. Expand the “Time Resolution” menu and choose 1920x1080 HD if working on 4K or high resolutions. Now, apply the changes by hitting on “Save.”
Adjust the timeline resolution and right-click on the timeline in the Media Pool. Choose “Timeline” and then “Timeline Settings.” Lastly, check the “Use Project Settings” option and decide a resolution to click on “OK.”

Solution 3: Enable Render Cache
It’s another solution to fix the DaVinci resolve slow playback. Render cache is a file that stores the rendered frames and makes the rendering faster. Start by hitting the “Playback” option and choose “Render Cache.” Then, you’ll see 3 options: None, Smart, and User. You should select “Smart” and let DaVinci Resolve pick one clip to be cached.

Solution 4: Disable the Live Save Feature
Every change you make gets saved with the Live Save option in DaVinci Resolve. If your remote drive is linked, this feature can drag the playback speed down. You can disable it for a DaVinci resolve faster playback.
Look for the “User Preference” menu and click on the top left side button of DaVinci Resolve. Go to the “Preferences” under the user tab. From the “Project Save and load,” check the “Disable Live Save” option. Now, you should remember to manually save your projects after editing.

Solution 5: Use Proxy Media Files
Another solution is to use proxy media during the project editing. Proxy files are small copy files transcoded from a larger, original video file. Get the proxy file to increase the playback and go to your “Media Pool” in DaVinci Resolve. Right-click on the intended file and choose “Generate Proxy Media” from the list.

Solution 6: Disable Color Grades
If you are still failing to resolve the slow playback issue on Davinci Resolve, try this fix. Disable color grades and other effects in the first place. To do so, head to the DaVinci Resolve Edit Page. After getting there, press the “Bypass Color Grades and Fusion Effects” button from the top right side. This way, you can surely solve the DaVinci Resolve slow-down playback error.

Part 2: What Makes a Slow-Motion Video Good?
After resolving the DaVinci Resolve slow playback, let’s continue further editing. Create a slow-motion video to emphasize certain information in the video. It involves technical and creative elements for a good-quality video. You can read this section to understand the points that contribute to a good Slow-motion video.
- Frame Rate: Keep the frame rate higher for a good slow-motion video. In this regard, you can use common frame rates such as 60fps, 120fps, and 140fps. Moreover, you should pick video clips that are originally captured in a high frame rate.
- Shutter Speed: Minimize the motion blur in footage and use a faster shutter speed. It is important when you are shooting fast-moving objects. Adjusting the shutter speed can enhance the look of slow-motion videos.
- Resolution: A good slow motion is only possible when it is captured in high-quality resolution. Better image quality allows more detail in such footage. Moreover, you can optimize the camera settings for the desired resolution.
- Editing and Timing: Thoughtfully chosen clips, timings, and editing can set the stage. Thus, maintain a cohesive flow and pay more attention to the video pacing. Edit all segments in a way that fits seamlessly to contribute a good slow-motion video.
Part 3: Making Slow Playback Issues Go Away with Perfect Alternative: Wondershare Filmora
Sometimes, issues like DaVinci Resolve slow down playback do not go easily. Resolving them requires a lot of effort that might prove frustrating beyond limits. So, it seems better there to switch towards a better option. In this regard, Wondershare Filmora is the most effective solution in video editing. Professionals can rely on Filmora, which offers AI-integrated features for easy video-making.
Users can use its AI Copilot Editing for assistance if they are new to video editing. Moreover, Filmora can generate AI music, images, and scripts. It can ensure your workflow with the quickest editing. Discover more features of this application to unlock your creativity.
Free Download For Win 7 or later(64-bit)
Free Download For macOS 10.14 or later
How to Make a Slow-motion video with Optical Flow
Slow-motion videos with high resolution are not easy to create. Without any playback lagging, this tool can provide you with slow-motion video. Following are those steps that can lead you to easily create such videos:
Step 1Install Filmora and Import Your Project
Launch Filmora’s latest version in your system. Open it and choose the “New Project” option from its main interface. After getting into the editing screen, press the “Ctrl + I” keys to bring the media to Filmora. Drag and drop the file in the timeline section to start editing.

Step 2Explore the Speed Option and Use Optical Flow Feature
In the Timeline, right-click on the video and choose the “Uniform Speed” option. An extended menu will appear on the right side. Now, turn the video into slow motion with the “Speed” slider. Afterward, head down and extend the “AI Frame Interpolation” menu. From the list, select the “Optical Flow” option for slow but high-quality speed.

Step 3Continue Editing or Export as Desired
Now, you can extend your editing and work on “Reverse Speed” and “Ripple Edit.” If you have nothing to edit more, look for the “Export” option from the top-right corner. Click on it and export with customized parameters.

Conclusion
In short, there are several ways to fix DaVinci Resolve’s slow playback error. As explained earlier, you can use any solution for a smooth playback experience. If you don’t want to waste time resolving such issues, switch to Wondershare Filmora. It is a reliable, all-in-all tool for video editors that doesn’t cause any playback lagging. So, start creating slow-motion videos with optical flow.
Make A Slow Motion Video Make A Slow Motion Video More Features

Part 1: Finding the Best Resolution for DaVinci Resolve Slow Playback Issue
As Highlighted, DaVinci Resolve is a good video editor for all kinds of use cases. Although it’s a powerful tool, it still shows some errors like choppy and slow playback. Modern problems require modern solutions. Thus, read the given fixes to make DaVinci Resolve faster playback. All the methods are easy and helpful for a smooth playback experience on Windows and macOS.
- Solution 1: Lower Playback Resolution
- Solution 2: Change Timeline Resolution
- Solution 3: Enable Render Cache
- Solution 4: Disable the Live Save Feature
- Solution 5: Use Proxy Media Files
- Solution 6: Disable Color Grades
Solution 1: Lower Playback Resolution
In DaVinci Resolve, full timeline proxy resolution is set by default. To enjoy a smooth playback while editing, you should reduce the playback resolution. Open your project in DaVinci Resolve and press the “Playback” menu from the top. Then, select “Timeline Proxy Resolution” and pick one either “Half” or “Quarter” options. It will reduce the playback resolution and speed up the playback.

Solution 2: Change Timeline Resolution
DaVinci Resolve can work on 4K high-resolution footage that might disrupt the playback. So, cutting down the resolution to speed up your playback is suggested. To do so, click the “Settings” icon from the bottom right side and enter the “Project Settings” window. Expand the “Time Resolution” menu and choose 1920x1080 HD if working on 4K or high resolutions. Now, apply the changes by hitting on “Save.”
Adjust the timeline resolution and right-click on the timeline in the Media Pool. Choose “Timeline” and then “Timeline Settings.” Lastly, check the “Use Project Settings” option and decide a resolution to click on “OK.”

Solution 3: Enable Render Cache
It’s another solution to fix the DaVinci resolve slow playback. Render cache is a file that stores the rendered frames and makes the rendering faster. Start by hitting the “Playback” option and choose “Render Cache.” Then, you’ll see 3 options: None, Smart, and User. You should select “Smart” and let DaVinci Resolve pick one clip to be cached.

Solution 4: Disable the Live Save Feature
Every change you make gets saved with the Live Save option in DaVinci Resolve. If your remote drive is linked, this feature can drag the playback speed down. You can disable it for a DaVinci resolve faster playback.
Look for the “User Preference” menu and click on the top left side button of DaVinci Resolve. Go to the “Preferences” under the user tab. From the “Project Save and load,” check the “Disable Live Save” option. Now, you should remember to manually save your projects after editing.

Solution 5: Use Proxy Media Files
Another solution is to use proxy media during the project editing. Proxy files are small copy files transcoded from a larger, original video file. Get the proxy file to increase the playback and go to your “Media Pool” in DaVinci Resolve. Right-click on the intended file and choose “Generate Proxy Media” from the list.

Solution 6: Disable Color Grades
If you are still failing to resolve the slow playback issue on Davinci Resolve, try this fix. Disable color grades and other effects in the first place. To do so, head to the DaVinci Resolve Edit Page. After getting there, press the “Bypass Color Grades and Fusion Effects” button from the top right side. This way, you can surely solve the DaVinci Resolve slow-down playback error.

Part 2: What Makes a Slow-Motion Video Good?
After resolving the DaVinci Resolve slow playback, let’s continue further editing. Create a slow-motion video to emphasize certain information in the video. It involves technical and creative elements for a good-quality video. You can read this section to understand the points that contribute to a good Slow-motion video.
- Frame Rate: Keep the frame rate higher for a good slow-motion video. In this regard, you can use common frame rates such as 60fps, 120fps, and 140fps. Moreover, you should pick video clips that are originally captured in a high frame rate.
- Shutter Speed: Minimize the motion blur in footage and use a faster shutter speed. It is important when you are shooting fast-moving objects. Adjusting the shutter speed can enhance the look of slow-motion videos.
- Resolution: A good slow motion is only possible when it is captured in high-quality resolution. Better image quality allows more detail in such footage. Moreover, you can optimize the camera settings for the desired resolution.
- Editing and Timing: Thoughtfully chosen clips, timings, and editing can set the stage. Thus, maintain a cohesive flow and pay more attention to the video pacing. Edit all segments in a way that fits seamlessly to contribute a good slow-motion video.
Part 3: Making Slow Playback Issues Go Away with Perfect Alternative: Wondershare Filmora
Sometimes, issues like DaVinci Resolve slow down playback do not go easily. Resolving them requires a lot of effort that might prove frustrating beyond limits. So, it seems better there to switch towards a better option. In this regard, Wondershare Filmora is the most effective solution in video editing. Professionals can rely on Filmora, which offers AI-integrated features for easy video-making.
Users can use its AI Copilot Editing for assistance if they are new to video editing. Moreover, Filmora can generate AI music, images, and scripts. It can ensure your workflow with the quickest editing. Discover more features of this application to unlock your creativity.
Free Download For Win 7 or later(64-bit)
Free Download For macOS 10.14 or later
How to Make a Slow-motion video with Optical Flow
Slow-motion videos with high resolution are not easy to create. Without any playback lagging, this tool can provide you with slow-motion video. Following are those steps that can lead you to easily create such videos:
Step 1Install Filmora and Import Your Project
Launch Filmora’s latest version in your system. Open it and choose the “New Project” option from its main interface. After getting into the editing screen, press the “Ctrl + I” keys to bring the media to Filmora. Drag and drop the file in the timeline section to start editing.

Step 2Explore the Speed Option and Use Optical Flow Feature
In the Timeline, right-click on the video and choose the “Uniform Speed” option. An extended menu will appear on the right side. Now, turn the video into slow motion with the “Speed” slider. Afterward, head down and extend the “AI Frame Interpolation” menu. From the list, select the “Optical Flow” option for slow but high-quality speed.

Step 3Continue Editing or Export as Desired
Now, you can extend your editing and work on “Reverse Speed” and “Ripple Edit.” If you have nothing to edit more, look for the “Export” option from the top-right corner. Click on it and export with customized parameters.

Conclusion
In short, there are several ways to fix DaVinci Resolve’s slow playback error. As explained earlier, you can use any solution for a smooth playback experience. If you don’t want to waste time resolving such issues, switch to Wondershare Filmora. It is a reliable, all-in-all tool for video editors that doesn’t cause any playback lagging. So, start creating slow-motion videos with optical flow.
Applying the Effect of Camera Shake in Video Creation
Camera shake effects in videos showcase the instability effect. Capturing real-time camera shake videos is not an easy thing. Even professional photographers need to give more input to get beneficial output. However, you can easily find ready-made camera shake effects in this content to drive the world.
Don’t panic if you don’t know the tools to accomplish this task because Wondershare Filmora got you covered in this scenario. By the end of this article, you will learn how to add camera shake effects in videos with Filmora and another impressive editor named Premiere Pro.
Part 1: Why Should You Involve Effects in Your Videos During Video Creation?
Do you know that you can create more engaging and appealing video content by adding effects to it? Here are some benefits of using effects in your video content which you should know:
1. Quality Visuals
Your content’s visual quality can be increased using different appealing effects. These effects can make your content more eye-catching and engaging. You can use many effects in your visual content. This includes transitions and remarkable filters that can grab the viewer’s attention.
2. Innovative Presentation
If you want to express creativity in your content, using effects is a good option. This is because effects allow you to add uniqueness to your content. You can reflect your style and creativity with the help of these effects. Experimenting with different effects can help you to create unique content.
3. Emotional Resonance
With the help of different effects, you can grab the attention of your viewers. This way, you can easily convey your story or message to them effectively. Effects help you to create an atmosphere that helps to convey emotions beautifully.
4. Showcase of Professionalism
Effects give your videos a very professional look that can engage your audience. Using effects in the right way can help you showcase your production value. This can leave a very positive impact on your audience’s mind. So you can establish a good connection with them as a content creator.
5. Audience Retention
Well-placed effects can help you keep your audience interested in your visual content. They can make your video look more enjoyable and maintain good engagement with your viewers. Eventually, this will also improve your audience retention.
Part 2: Wondershare Filmora: An Epitome of Perfection in Video Editing
Do you wish to make professional-level edits in videos and want to add the smoothest camera shake effects? Nothing to be worried about because you can accomplish this goal with Wondershare Filmora . This video editor helps you make captivating edits and reinforce executive effects.
Camera Shake Effect Editor Add camera shake effects in videos with Wondershare Filmora and Premiere Pro to make cool and unique videos.
Free Download Free Download Learn More

Camera shake videos are not easy to make, and you must invest maximum time and effort to finish the work. Yet, this can be easy if you intend to utilize the feature-rich tool named Wondershare Filmora. This video editor offers timeline-based editing along with a non-destructive procedure.
You also get the fullest control over the video metrics, such as format, dimension, and length. Other than this, you can also select multiple stock media assets. As it has integrations with Giphy, Unsplash, Pexels, and other third-party media libraries, you will not face any issues.
Key Features of Wondershare Filmora
01of 04
Filmora supports integrations with ChatGPT which enhance the usage of the AI Copywriting feature . Through this, you can get inspiring AI-generated content to express better in a limited time.
02of 04
Unrequired silenced intervals in videos impact the video quality in a bad way. To cater to this, Filmora offers you to use its Silence Detection feature to get rid of silenced intervals from videos.
03of 04
You can break the monotony and correct all the colors in the color-disruptive videos. Over 40+ color presets are present in Filmora, which can make videos more outclass.
04of 04
There are more than 70 AI portraits and sticker effects added in Filmora. By this, you can remove the background from videos without affecting humans in videos.
Part 3: Create a Camera Shake Effect Using Premiere Pro
Premiere Pro stands in the top video editing platform in today’s digital market. The video editing intuition helps users develop professional videos that are of the highest quality. It integrates some of the finest functions, making it easy for users to create camera shake effect videos. To know how it is created through Premiere Pro, follow the camera shake effect Premiere Pro steps:
Step 1
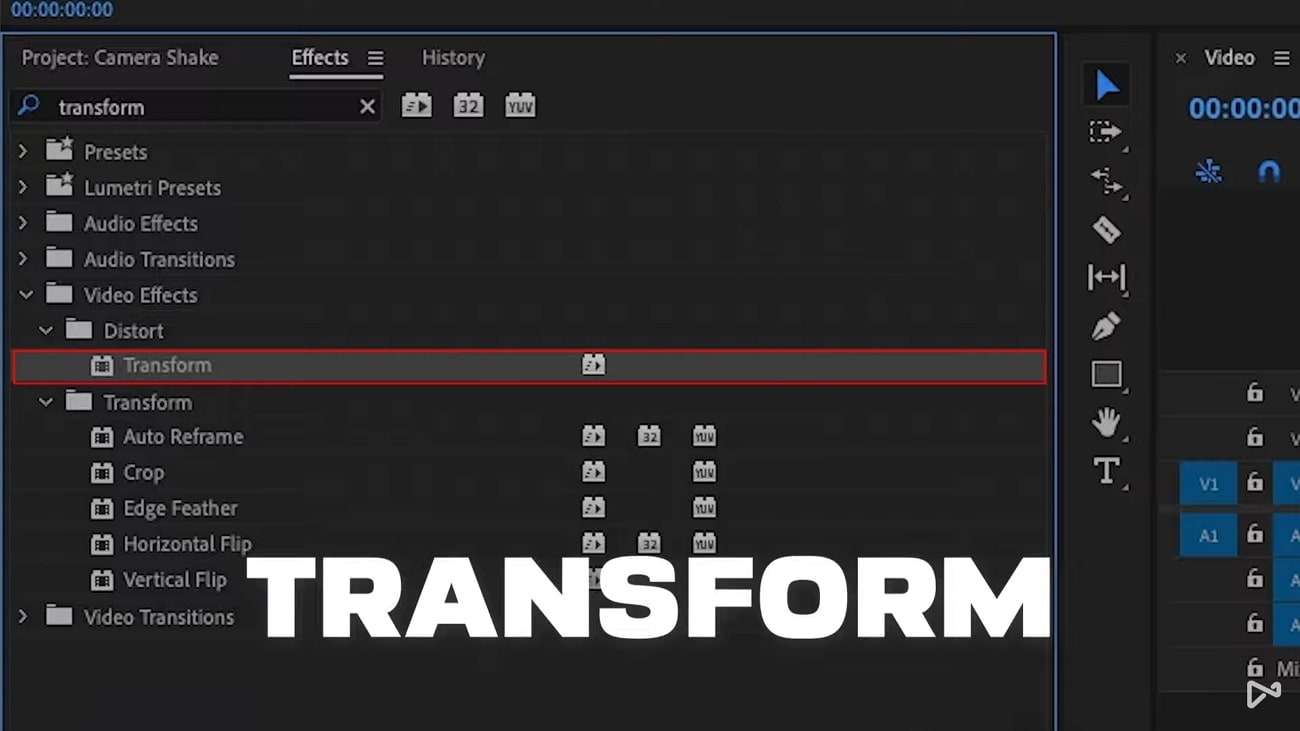
In the “Effects” section on the bottom-left of the screen, look for the “Transform” effect and drag it onto the imported video.
Step 2
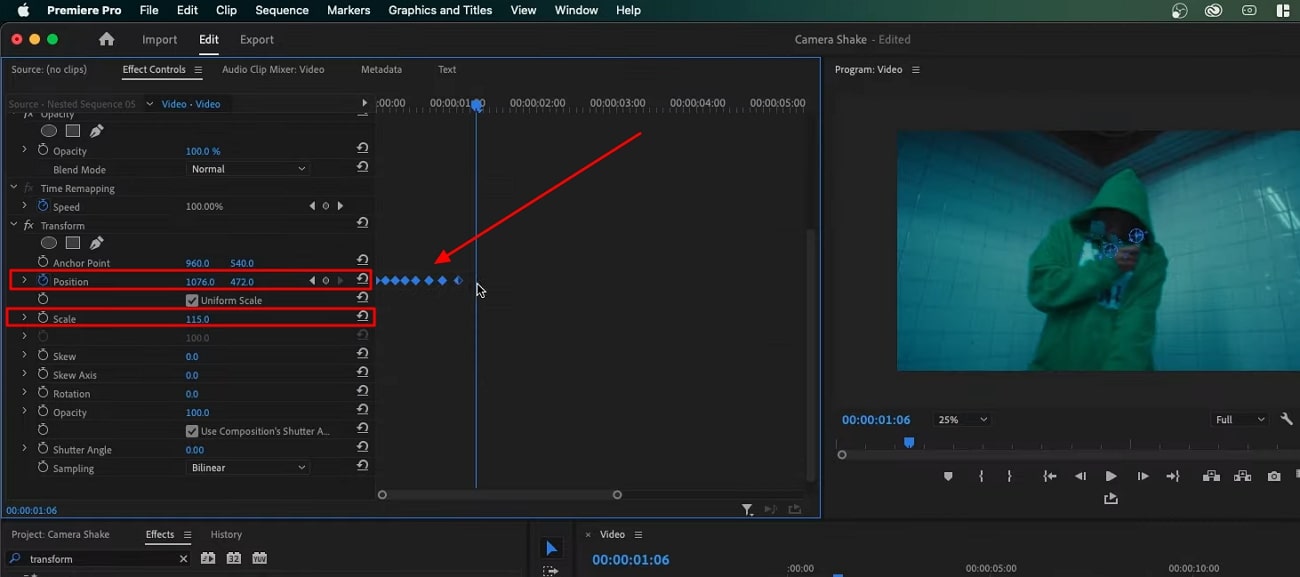
Continue to the effects settings that open on the top-left section of the Premiere Pro screen. Change the “Scale” and set the “Position” keyframes on the left and right side of the video frames. Do this for the frames throughout the video in Premiere Pro.
Step 3
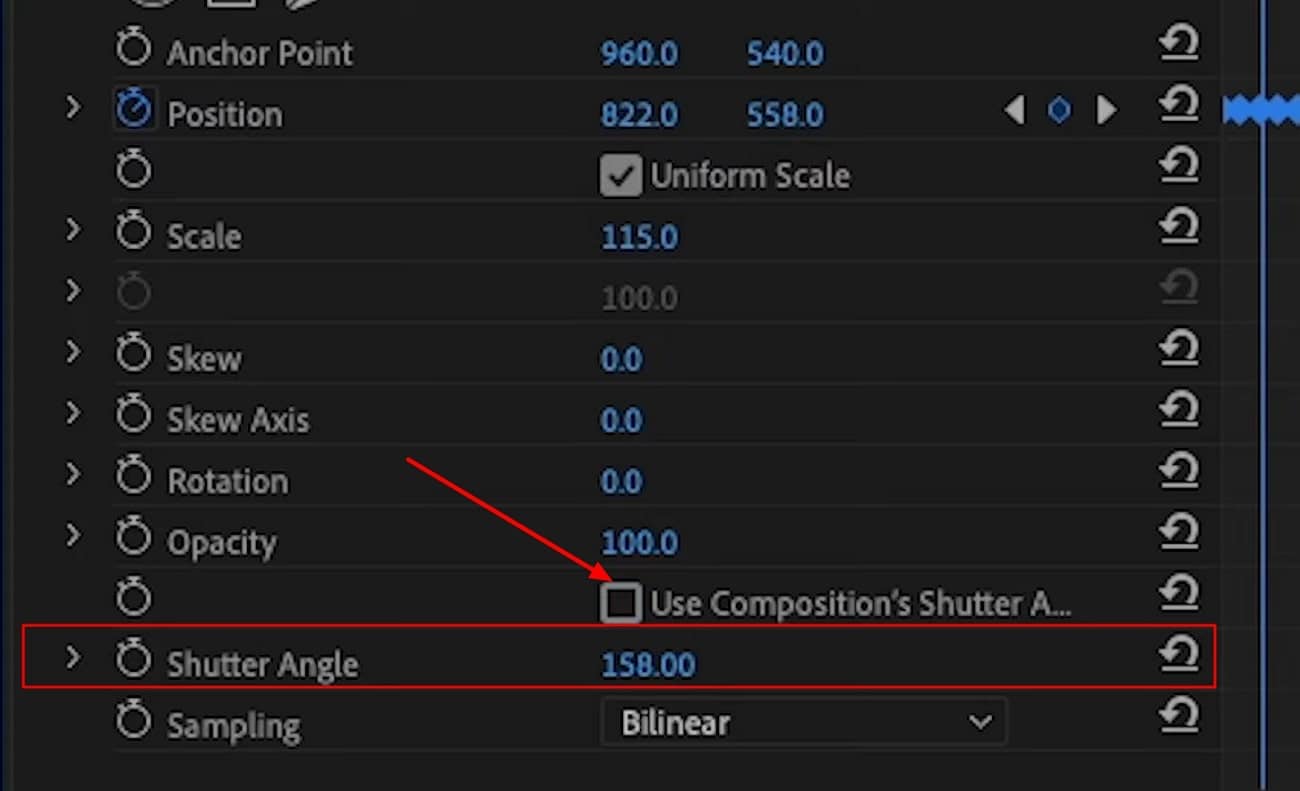
For adding motion blur in your camera shake effect video, uncheck the “Use Composition’s Shutter Angle” and set it to “360” degrees. This completes the camera shake, which can be easily exported to the computer.
Part 4: A Step-by-Step Understanding of How To Create a Camera Shake Effect with Filmora
Now that you know the outclass capabilities of Filmora, you must be wondering about the procedure of adding a camera shake effect in videos . The instructions to make the camera shake video with Filmora are discussed here for you:
Filmora Tutorial - How to Add CAMERA SHAKE Effects to Your Videos
Free Download For Win 7 or later(64-bit)
Free Download For macOS 10.14 or later
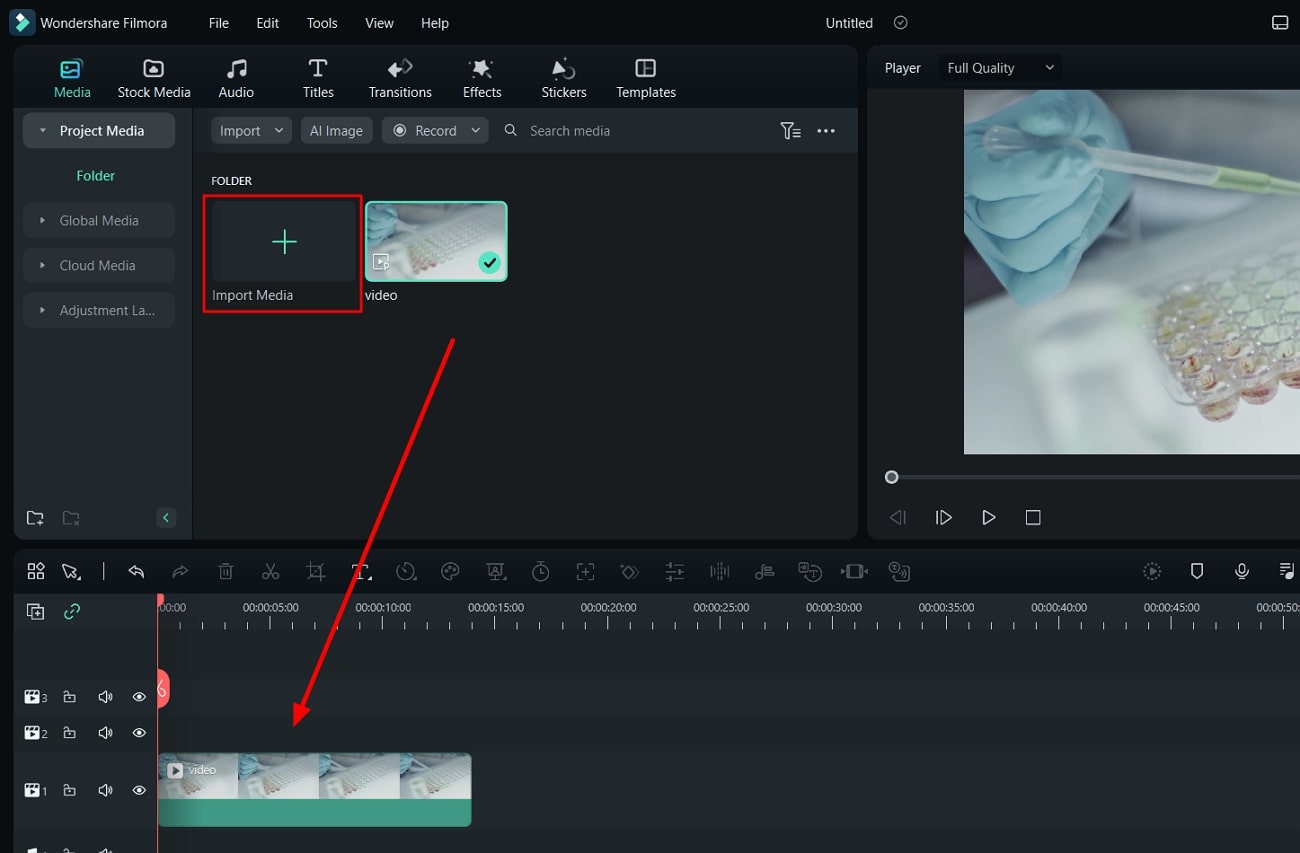
Step 1Add Video File in Filmora
To make the camera shake video with Filmora, install and open Wondershare Filmora on your device and hit the “New Project” option. Next, tap the “Click here to import media” button and then locate the video in which you want to add the camera shake effect. After importing the video, drag it to the “Timeline” to enable editing.
Step 2Add Camera Shake Effect
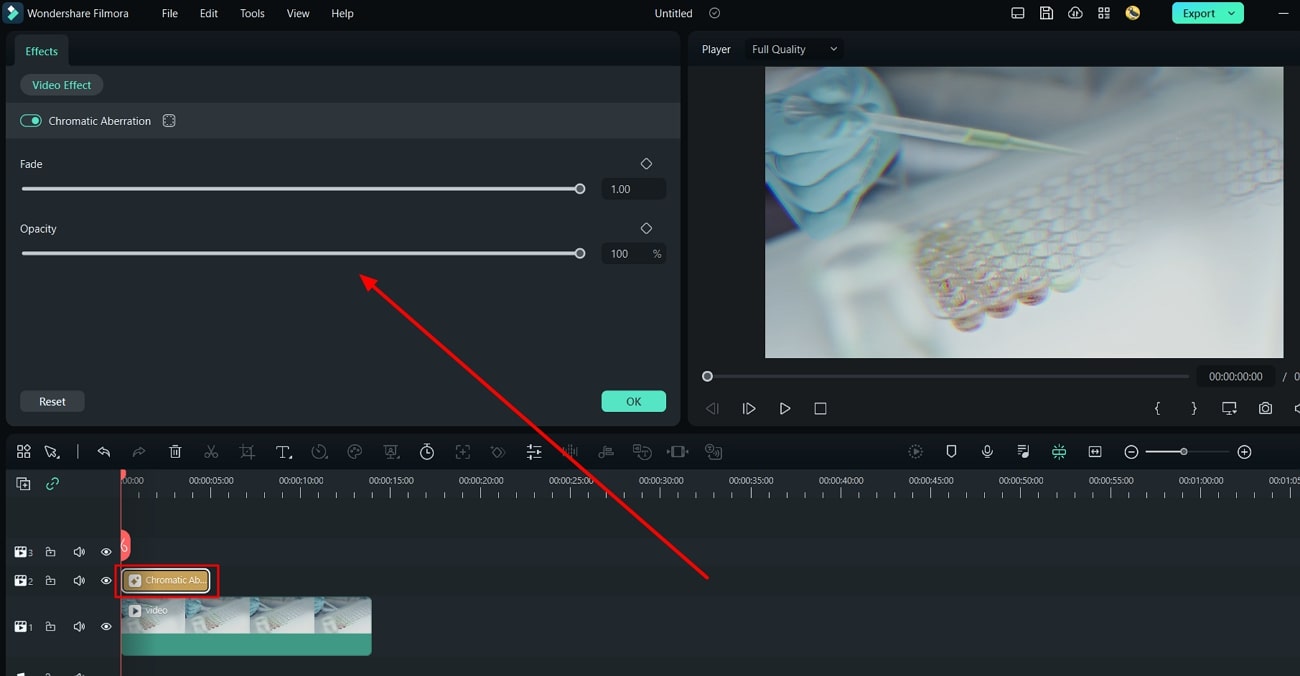
To add a camera shake effect, go to the “Effects” tab and click “Search Bar.” Next, search for an appropriate camera shake effect and hit the “Download” icon on the effect of your choice. Once the effect is downloaded, drag it on the video in the timeline and customize it as needed.
Step 3Export Camera Shake Video
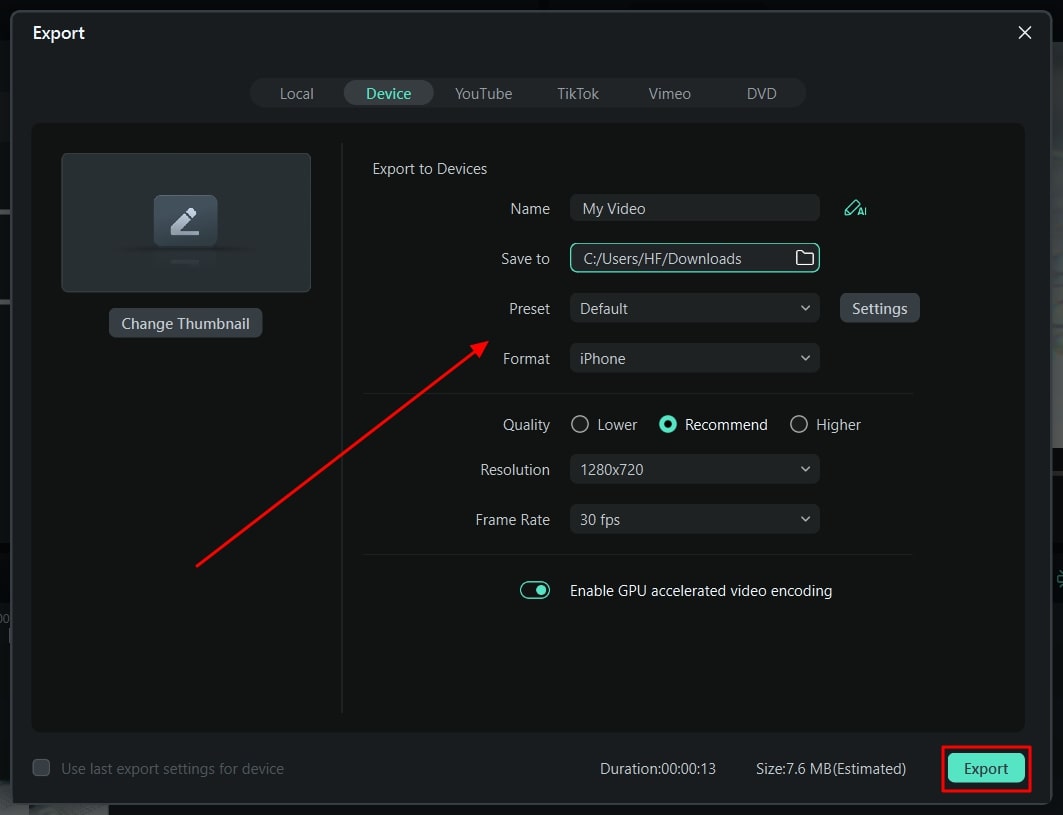
Finally, go to “Export” and manage “Format,” “Preset,” “Frame Rate,” and other parameters of the video. Next, hit the “Export” button to save the video on your computer.
Conclusion
As discussed in this article, you can add a camera shake effect in videos to make them cinematic standards. Several reasons tell us why adding effects in videos is essential, and you can find some of the most relatable reasons above.
Moreover, Filmora can add exquisite level camera shake effects in videos, and you can also find the procedure for accomplishing this task from the above discussion. You have also worked on a method showing how to make a camera shake effect in Premiere Pro.
Free Download Free Download Learn More

Camera shake videos are not easy to make, and you must invest maximum time and effort to finish the work. Yet, this can be easy if you intend to utilize the feature-rich tool named Wondershare Filmora. This video editor offers timeline-based editing along with a non-destructive procedure.
You also get the fullest control over the video metrics, such as format, dimension, and length. Other than this, you can also select multiple stock media assets. As it has integrations with Giphy, Unsplash, Pexels, and other third-party media libraries, you will not face any issues.
Key Features of Wondershare Filmora
01of 04
Filmora supports integrations with ChatGPT which enhance the usage of the AI Copywriting feature . Through this, you can get inspiring AI-generated content to express better in a limited time.
02of 04
Unrequired silenced intervals in videos impact the video quality in a bad way. To cater to this, Filmora offers you to use its Silence Detection feature to get rid of silenced intervals from videos.
03of 04
You can break the monotony and correct all the colors in the color-disruptive videos. Over 40+ color presets are present in Filmora, which can make videos more outclass.
04of 04
There are more than 70 AI portraits and sticker effects added in Filmora. By this, you can remove the background from videos without affecting humans in videos.
Part 3: Create a Camera Shake Effect Using Premiere Pro
Premiere Pro stands in the top video editing platform in today’s digital market. The video editing intuition helps users develop professional videos that are of the highest quality. It integrates some of the finest functions, making it easy for users to create camera shake effect videos. To know how it is created through Premiere Pro, follow the camera shake effect Premiere Pro steps:
Step 1
In the “Effects” section on the bottom-left of the screen, look for the “Transform” effect and drag it onto the imported video.

Step 2
Continue to the effects settings that open on the top-left section of the Premiere Pro screen. Change the “Scale” and set the “Position” keyframes on the left and right side of the video frames. Do this for the frames throughout the video in Premiere Pro.

Step 3
For adding motion blur in your camera shake effect video, uncheck the “Use Composition’s Shutter Angle” and set it to “360” degrees. This completes the camera shake, which can be easily exported to the computer.

Part 4: A Step-by-Step Understanding of How To Create a Camera Shake Effect with Filmora
Now that you know the outclass capabilities of Filmora, you must be wondering about the procedure of adding a camera shake effect in videos . The instructions to make the camera shake video with Filmora are discussed here for you:
Filmora Tutorial - How to Add CAMERA SHAKE Effects to Your Videos
Free Download For Win 7 or later(64-bit)
Free Download For macOS 10.14 or later
Step 1Add Video File in Filmora
To make the camera shake video with Filmora, install and open Wondershare Filmora on your device and hit the “New Project” option. Next, tap the “Click here to import media” button and then locate the video in which you want to add the camera shake effect. After importing the video, drag it to the “Timeline” to enable editing.

Step 2Add Camera Shake Effect
To add a camera shake effect, go to the “Effects” tab and click “Search Bar.” Next, search for an appropriate camera shake effect and hit the “Download” icon on the effect of your choice. Once the effect is downloaded, drag it on the video in the timeline and customize it as needed.

Step 3Export Camera Shake Video
Finally, go to “Export” and manage “Format,” “Preset,” “Frame Rate,” and other parameters of the video. Next, hit the “Export” button to save the video on your computer.

Conclusion
As discussed in this article, you can add a camera shake effect in videos to make them cinematic standards. Several reasons tell us why adding effects in videos is essential, and you can find some of the most relatable reasons above.
Moreover, Filmora can add exquisite level camera shake effects in videos, and you can also find the procedure for accomplishing this task from the above discussion. You have also worked on a method showing how to make a camera shake effect in Premiere Pro.
Learn How to Convert MP4 Videos to 60 FPS GIFs with This Easy-to-Follow Tutorial. Get Smooth and Crisp Motion in Your GIFs in Just a Few Simple Steps
GIFs have become a popular way to share short and engaging videos online. They are widely used on social media platforms and messaging apps, making it easy to share moments, reactions, and emotions with friends and family. But not all GIFs are created equal. Some GIFs can look choppy and low-quality, detracting from the viewing experience.
To improve the quality of your GIFs, you can convert your MP4 videos to 60 FPS (frames per second). This will give your GIFs a smooth, fluid motion that looks professional and visually appealing. In this article, we’ll go over the steps you need to follow to convert your MP4 videos to 60 FPS GIFs and create high-quality GIFs that are perfect for sharing online.
Why Convert MP4 to 60-FPS GIF?
GIFs are a great way to share short, eye-catching videos online, but not all are made the same. GIFs with low frame rates tend to look choppy, and the motion could be smoother, making the video look unprofessional and detracting from the overall viewing experience. On the other hand, GIFs with higher frame rates look smoother, and the motion is more fluid, making the video more visually appealing.
Converting your MP4 videos to GIFs has several benefits:
- Smoother Motion: By converting MP4s to GIFs, you increase the frame rate of your GIFs, giving them a smoother and more fluid motion.
- Increased Detail: Higher frame rates allow for more detail and clarity in fast-moving scenes, making the video more engaging and easier to watch.
- Reduced Ghosting: A higher frame rate reduces the “ghosting” effect in low-frame rate GIFs, making the video clearer and reducing distractions.
- High-Quality Videos: Converting MP4s to GIFs eliminates the ghosting effect and creates high-quality GIFs that are perfect for sharing online.
- Increased Engagement: High-quality GIFs will engage and entertain your audience, making them more likely to share and interact with your content.
Converting MP4s to GIFs is a great way to improve the overall quality of your GIFs and create visually appealing videos that are perfect for sharing online. Whether you’re sharing a reaction, a moment, or an emotion, a high-quality GIF will engage and entertain your audience.
Can I Get a 60 FPS GIF?
While it’s true that many people search for 60 FPS GIFs, it’s important to understand that there is no such thing as a true 60 FPS GIF.
GIFs are an image format designed to display simple animations. GIF files store delay time between frames which is defined as multiples of 1/100th of a second. Value 1 would give you 100 FPS; value 2 would already have half of 100 FPS, that is, 50 FPS; value 3 would give you 33.3 FPS GIF, etc. So there are 20 FPS GIFs, 33.3 FPS GIFs, 50 FPS GIFs, and 100 FPS GIFs.
In addition, many websites or programs (including Google Chrome) ignore value 1 (100 FPS GIFs) and default to a much slower animation speed when viewing GIF files. Therefore, 100 FPS GIFs are technically possible but are rarely used. Value 2 (50 FPS) is the most you can get.
If you want to create high-quality animations, consider using MP4s or alternative image formats better suited for high frame rates and detailed animations.
That being said, some websites may have a “60 FPS GIFs” category, but it’s important to understand that most of the content in these categories is not 60 FPS. Instead, it’s likely to be either an MP4 video or a GIF with a lower frame rate, like 50 FPS, labeled as “60 FPS” for marketing purposes.
Is There Any 60 FPS GIF Maker?
Unfortunately, there is no such thing as a 60 FPS GIF maker. As mentioned before, there is no 60 FPS GIF, so it is impossible to create a 60 FPS GIF using traditional methods. However, many excellent video-to-GIF converters in the market allow you to set the GIF frame rate.
These video-to-GIF converters allow you to convert MP4 videos to GIFs with a higher frame rate, which can give your GIFs a smoother and more fluid motion. While these GIFs may not be 60 FPS, they can still provide a significant quality improvement compared to traditional GIFs.
How To Convert Video to GIF and Set Its FPS on Desktop
Converting videos to GIFs is a simple process that can be done using various tools, including desktop software such as Wondershare Filmora . Filmora is a powerful and user-friendly video editor that makes it easy to convert videos to GIFs and set their frame rate.
Free Download For Win 7 or later(64-bit)
Free Download For macOS 10.14 or later

Not only does it allow you to easily convert your videos to GIFs, but it also allows you to customize the frame rate and other settings to get the perfect results. With its user-friendly interface and powerful features, Filmora makes it simple for anyone to create high-quality GIFs that are perfect for sharing on social media or other platforms.
Here’s how to convert MP4 to GIF using Filmora:
Step1 Open the Filmora software and create a new project

Step2 Import your video to the timeline

Step3 Export the video

Step4 In the export window, select “GIF“ and set the frame rate of the GIF.

How To Convert MP4 to GIF Online for Free
Converting MP4 videos to GIFs online is a quick and convenient way to create animations without needing specialized software. One of the best online tools for this purpose is Media.io . Its simple and user-friendly interface, Media.io, makes it easy to convert MP4 videos to GIFs in just a few clicks.
With Media.io, you can customize the frame rate, duration, and other settings to get the perfect results. Whether you’re looking to create simple animations or more complex and detailed videos, Media.io has everything you need to get started.
Best of all, Media.io is free to use, making it an excellent choice for anyone who wants to convert MP4 and other videos to GIFs without spending a dime. So if you’re looking for a fast, convenient, and reliable way to convert your videos to GIFs, look no further than Media.io.
Follow these steps to convert MP4 to GIF online using Media.io:
Step1 Upload a video from your computer or drag and drop it onto the page.
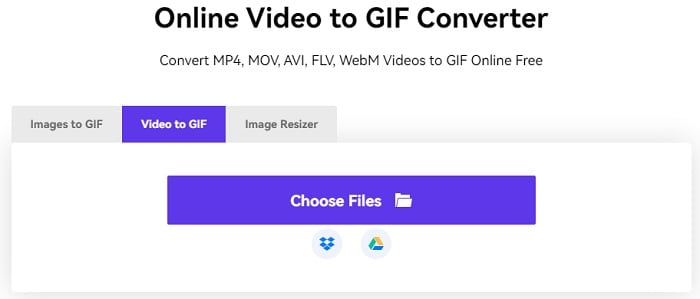
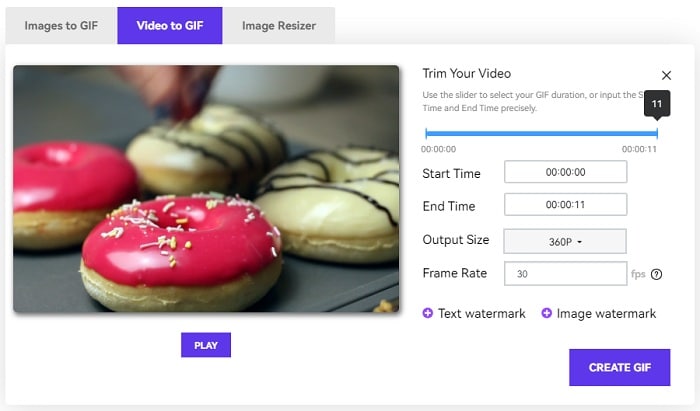
Step2 Customize the output size, frame rate, and length, and add text before creating your GIF.
Step3 Download the resulting GIF file or save it for later.

People Also Ask
Here are some of the most frequently asked questions about converting MP4 to GIF and other related topics:
Q1. Can a GIF be 30 FPS?
It is impossible to get an exact 30 FPS GIF. Frame rate refers to the number of images (frames) displayed per second in a video or animation. That frame rate is stored as an integer (n) that defines n/100ths of a second. So you can specify a frame of 1/100 second (100 FPS), 2/100 second (50 FPS), 3/100 second (33.33 FPS), 4/100 second (25 FPS), etc. but not something like 3.3333…/100 second (30 FPS).
Q2. How Do I Get the FPS of a GIF?
To determine the speed or frame rate of a GIF, you can use online tools that show the delay time between its frames in milliseconds. The frame rate of a GIF is calculated by counting how many delays fit in 1 second of animation. The delay time determines the playback speed and can be adjusted to increase or decrease the frame rate. These tools also allow you to preview the speed changes and compare the input and output GIFs.
Q3. What FPS Should a GIF Be?
GIF files store delay time between frames in whole hundredths of a second. They typically run between 10 and 100 frames per second (FPS). The common frame rate for a GIF is 10 FPS, 20 FPS, 12.5 FPS, 25 FPS, and 50 FPS. With online tools, it’s possible to determine and change the speed of a GIF.
Q4. What Is the Max FPS for a GIF?
The maximum fps for a GIF is 100 FPS, but browsers or consumer screens do not support it. The browser-engine image decoders will automatically reduce the framerate to 10 fps, playing it ten times slower. If a GIF appears slow, the browser has reset the speed to 10 fps. Some software and devices may support higher frame rates.
Conclusion
GIF is a popular format for short animations and videos. The frame rate of a GIF determines its playback speed, which is usually set at 10, 20, 12.5, 25, and 50 per second. However, the highest possible frame rate that can be represented in the GIF format is 100 FPS, but most browsers and consumer screens cannot display it accurately.
There are various tools available, both online and desktop-based, that can convert videos to GIFs and adjust their frame rate as desired. With these tools, you can create high-quality, personalized GIFs that fit your specific needs and preferences.
Free Download For macOS 10.14 or later

Not only does it allow you to easily convert your videos to GIFs, but it also allows you to customize the frame rate and other settings to get the perfect results. With its user-friendly interface and powerful features, Filmora makes it simple for anyone to create high-quality GIFs that are perfect for sharing on social media or other platforms.
Here’s how to convert MP4 to GIF using Filmora:
Step1 Open the Filmora software and create a new project

Step2 Import your video to the timeline

Step3 Export the video

Step4 In the export window, select “GIF“ and set the frame rate of the GIF.

How To Convert MP4 to GIF Online for Free
Converting MP4 videos to GIFs online is a quick and convenient way to create animations without needing specialized software. One of the best online tools for this purpose is Media.io . Its simple and user-friendly interface, Media.io, makes it easy to convert MP4 videos to GIFs in just a few clicks.
With Media.io, you can customize the frame rate, duration, and other settings to get the perfect results. Whether you’re looking to create simple animations or more complex and detailed videos, Media.io has everything you need to get started.
Best of all, Media.io is free to use, making it an excellent choice for anyone who wants to convert MP4 and other videos to GIFs without spending a dime. So if you’re looking for a fast, convenient, and reliable way to convert your videos to GIFs, look no further than Media.io.
Follow these steps to convert MP4 to GIF online using Media.io:
Step1 Upload a video from your computer or drag and drop it onto the page.

Step2 Customize the output size, frame rate, and length, and add text before creating your GIF.

Step3 Download the resulting GIF file or save it for later.

People Also Ask
Here are some of the most frequently asked questions about converting MP4 to GIF and other related topics:
Q1. Can a GIF be 30 FPS?
It is impossible to get an exact 30 FPS GIF. Frame rate refers to the number of images (frames) displayed per second in a video or animation. That frame rate is stored as an integer (n) that defines n/100ths of a second. So you can specify a frame of 1/100 second (100 FPS), 2/100 second (50 FPS), 3/100 second (33.33 FPS), 4/100 second (25 FPS), etc. but not something like 3.3333…/100 second (30 FPS).
Q2. How Do I Get the FPS of a GIF?
To determine the speed or frame rate of a GIF, you can use online tools that show the delay time between its frames in milliseconds. The frame rate of a GIF is calculated by counting how many delays fit in 1 second of animation. The delay time determines the playback speed and can be adjusted to increase or decrease the frame rate. These tools also allow you to preview the speed changes and compare the input and output GIFs.
Q3. What FPS Should a GIF Be?
GIF files store delay time between frames in whole hundredths of a second. They typically run between 10 and 100 frames per second (FPS). The common frame rate for a GIF is 10 FPS, 20 FPS, 12.5 FPS, 25 FPS, and 50 FPS. With online tools, it’s possible to determine and change the speed of a GIF.
Q4. What Is the Max FPS for a GIF?
The maximum fps for a GIF is 100 FPS, but browsers or consumer screens do not support it. The browser-engine image decoders will automatically reduce the framerate to 10 fps, playing it ten times slower. If a GIF appears slow, the browser has reset the speed to 10 fps. Some software and devices may support higher frame rates.
Conclusion
GIF is a popular format for short animations and videos. The frame rate of a GIF determines its playback speed, which is usually set at 10, 20, 12.5, 25, and 50 per second. However, the highest possible frame rate that can be represented in the GIF format is 100 FPS, but most browsers and consumer screens cannot display it accurately.
There are various tools available, both online and desktop-based, that can convert videos to GIFs and adjust their frame rate as desired. With these tools, you can create high-quality, personalized GIFs that fit your specific needs and preferences.
Also read:
- [New] Accessing Premium Facebook Videos Offline
- [New] Audio Amplified Today's Hits Backdropping YT Shorts for 2024
- [New] In 2024, Breaking Free From TikTok's Hidden Bans A Roadmap
- [New] In 2024, Secrets to High-Quality Sims 4 Gameplay Recordings
- [Updated] Audience Hooks Writing Captivating Podcast Descriptions
- 如何在Mac上将任意DVD数字化并传输到各型号iPad设备:专业转移软件解析
- New 2024 Approved Do You Often Feel Fascinated to Try Hands at Anime Character Design to Spark up Your Editing Skills, or Just for a Fun-Filled Activity? Stay Here for the Best Inspirations You Can Ever Get
- New 2024 Approved Steps to Make a Neon Dance Effect With Filmora
- Unveiling the Future of 3D Printing at Rapid + TCT 2024 – Discover New Tech, Filaments & More
- Updated 2024 Approved Slowing Down GIF With The Best Available Methods
- Updated In 2024, Do You Want to Show Your Mood in Your Digital Media Content but Dont Know How To? There Are Many Moody LUTs Available that Highlight Your Mood in Your Content
- Title: How to Add a Green Screen to Zoom
- Author: Morgan
- Created at : 2024-10-04 20:10:00
- Updated at : 2024-10-06 03:05:06
- Link: https://ai-video-editing.techidaily.com/how-to-add-a-green-screen-to-zoom/
- License: This work is licensed under CC BY-NC-SA 4.0.
