:max_bytes(150000):strip_icc():format(webp)/how-to-choose-a-wireless-charger-5191283-cb27ceee3fea4547b5720b4934713a93.jpg)
How to Add Adjustment Layer in Premiere Pro

How to Add Adjustment Layer in Premiere Pro
Are you using Premiere Pro frequently? Adobe Premiere Pro is considered advanced software for editing video clips proficiently. You can find a diverse range of features in Premiere Pro that allows you to transform your videos immensely.
If you want to be a professional video editor, you must know the basic techniques of executing video editing. In Premiere Pro, there are various options and features that can help you in enhancing your productivity. For instance, the use of adjustment layers in video editing can make a huge difference. By reading this article, you can come to know about the Premiere Pro adjustment layer efficiently.
Part 1: What is Adjustment Layer in Premiere Pro?
In Premiere Pro, you can save time efficiently by editing each layer individually. To do so, you can find the feature of the adjustment layer in Premiere Pro that enables you to apply the same effect to multiple clips instantly. This will eventually save you time and manual effort. However, you must ensure that the adjustment layer has been placed on top of the layers stack section.
In an adjustment layer in Premiere Pro, you can add multiple effects to create a captivating illustration in your video clips. Moreover, you can also create multiple adjustment layers in Premiere Pro to handle and apply the effects in your clips proficiently. Also, you can easily move, remove, or cut the Premiere Pro adjustment layer anytime within a few clicks.

Furthermore, you can also remove the adjustment layer from your timeline easily without modifying the composition settings of your video. If you get a basic understanding of creating and managing the adjustment layer in Premiere Pro, you can efficiently enhance the visual appeal of your videos. To learn more about the Premiere Pro adjustment layer, continue reading.
Part 2: How to Add an Adjustment Layer in Premiere Pro?
In this section, we will briefly address how to add an adjustment layer in Premiere Pro in a simpler manner.
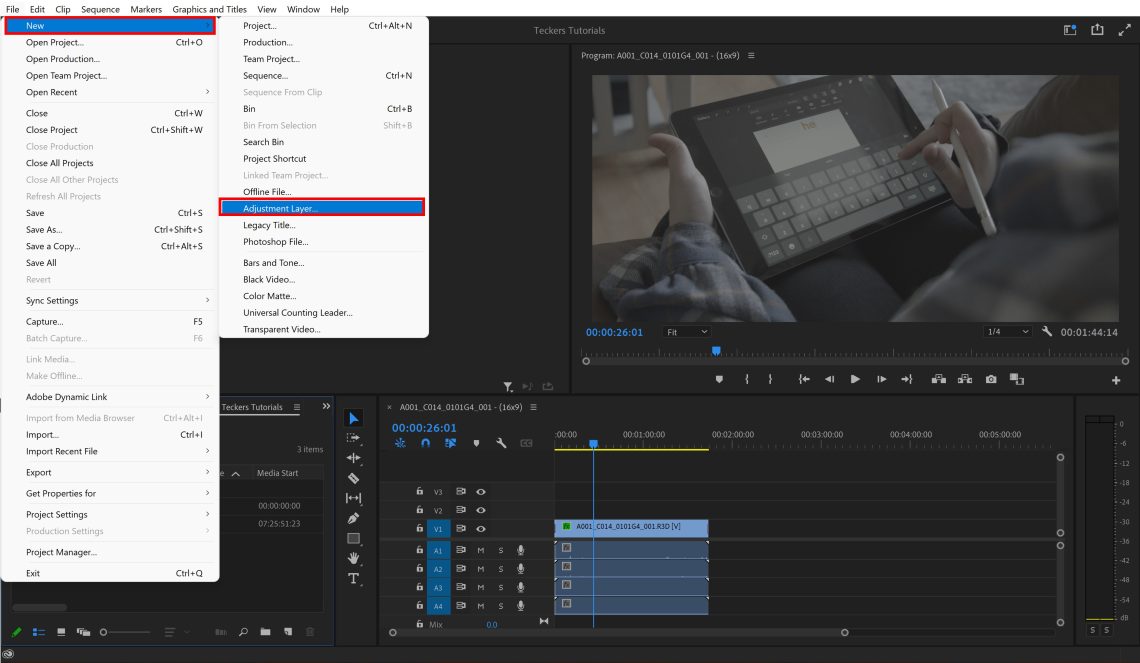
Step1 Once you have uploaded your project in Premiere Pro, go to the “File” tab and select the “New” option. Afterward, tap on “Adjustment Layer.”
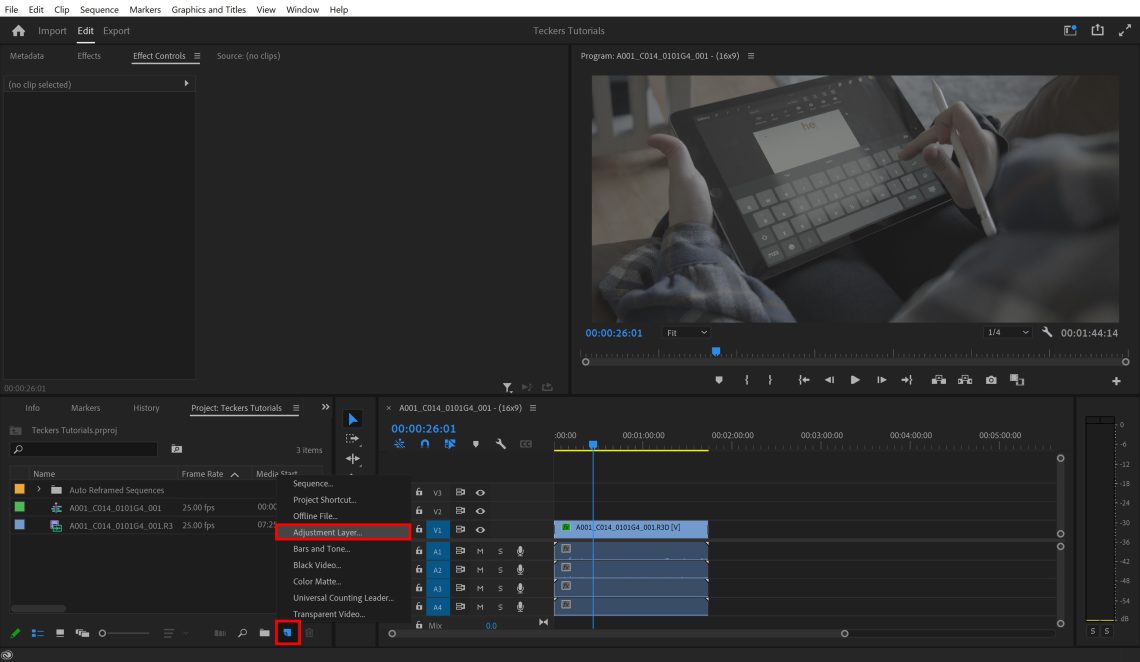
Step2 You can also go to the bottom of your project’s panel and tap on the “New Item” icon. After clicking on this icon, you can click on the “Adjustment layer” option. Afterward, you can modify the video settings to change the settings of the adjustment layer. Once done, hit the “OK” button.
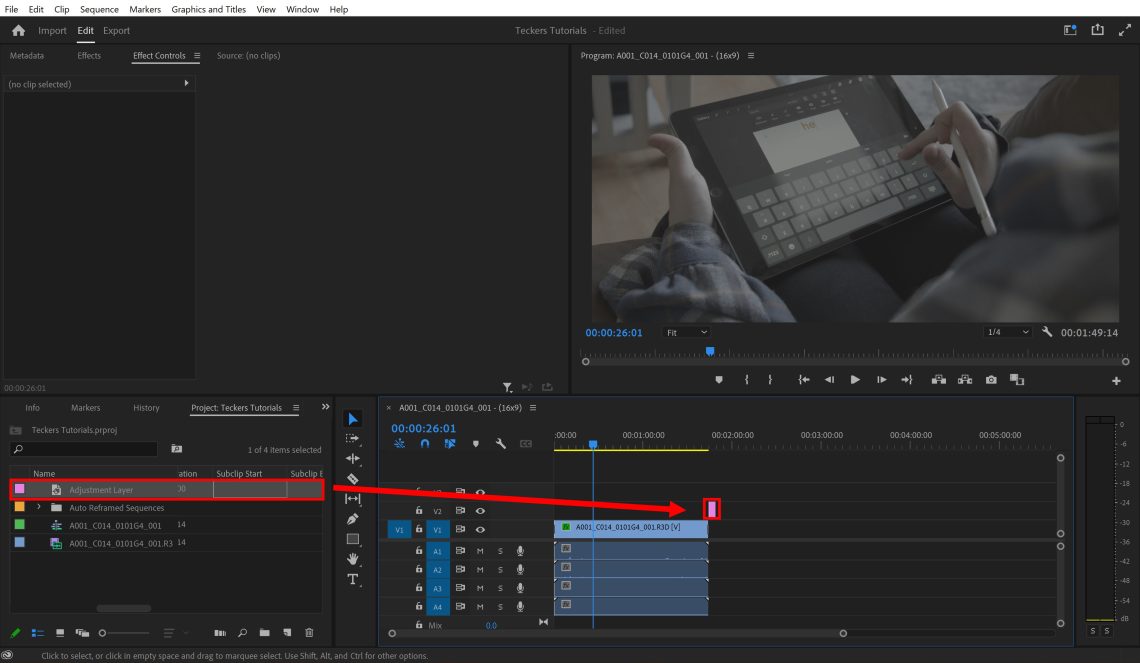
Step3 Once the adjustment layer has been created, you can drag and drop it into the timeline. To change its name, you can right-click on it.
Part 3: Three Ways to Use Adjustment Layer in Premiere Pro
Do you want to use the Premiere Pro adjustment layer significantly? In this section, we will highlight three ways through which you can use the adjustment layer in Premiere Pro to edit your videos.
1. Color Grading
Color grading in Premiere Pro can help you to adjust the balance and tone of your video. You can use the color grading effects and tools to set the exposure, brightness, saturation, and light according to your preference. It will also let you redefine the colors in your video efficiently. To use the adjustment layer for color grading, you can read the below instructions:
Step1 After uploading the video clip in Premiere Pro, create a new adjustment layer in the timeline. Drag and adjust it according to the duration of your video clip. Once done, go to the “Effects” tab and search for “FilmConvert Nitrate.”
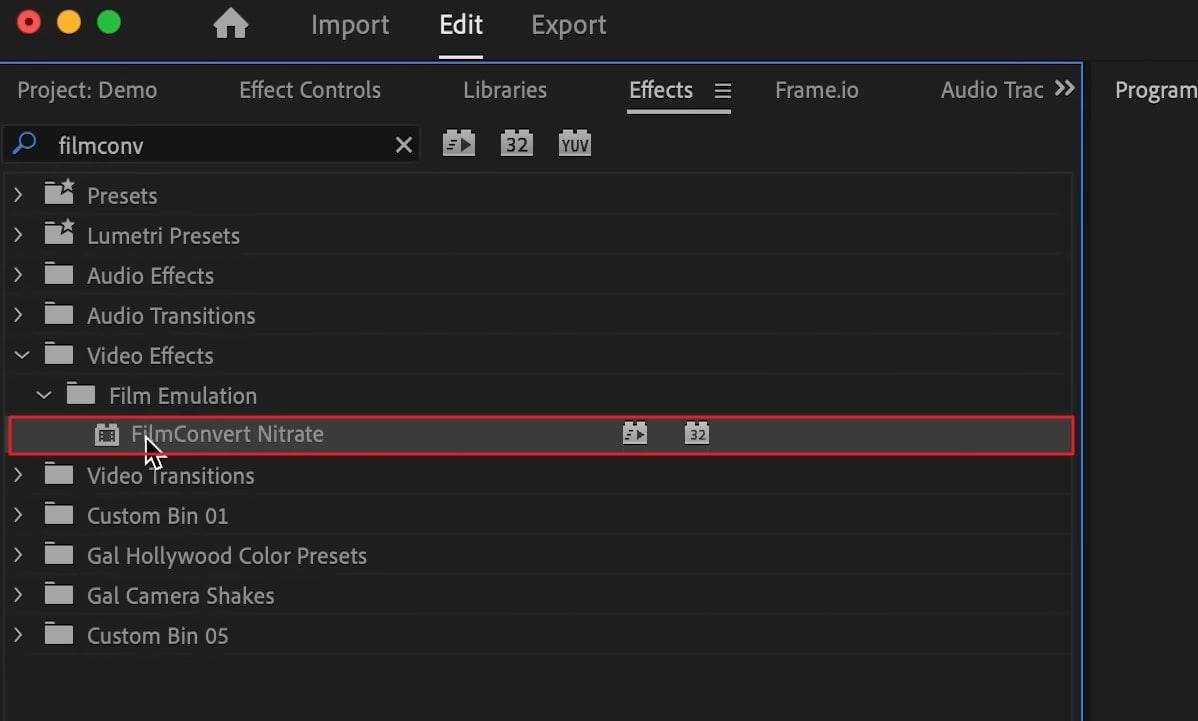
Step2 Apply this effect to the adjustment layer and choose your camera to match the color profile. Afterward, you can adjust the saturation, exposure filmstock, and curves according to your choice. You can also increase the vibrancy and hue saturation curves for more enhancement. You can also navigate to the basic correction section to modify the contrast value accordingly.
2. Transition
To merge multiple video clips smoothly and efficiently, transitional effects can assist you. By adding a suitable transition effect, you can make your whole video look clean and cinematic. Moreover, you can use adjustment layers in Premiere Pro to add transition effects to your effect professionally. To do the transition effect, you can proceed to the following instructions:
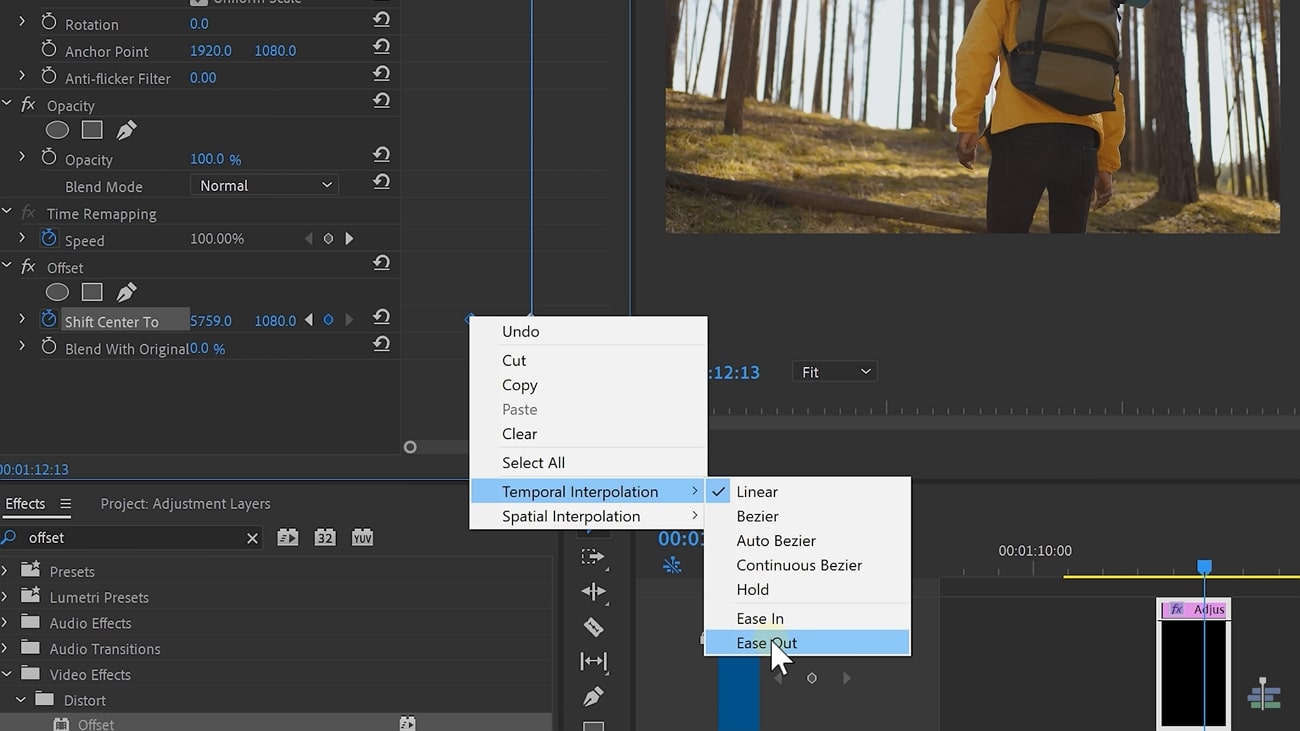
Step1 First, drag and drop your video clips into the timeline. Once done, create the adjustment layer and apply it above the layers of video clips. Once done, search the “Offset” effect and apply it to the adjustment layer.
Step2 Now add the keyframe to the position where you want to start and end the transition effect. Afterward, right-click on the first keyframe and select “Temporal Interpolation.” From there, choose “Ease Out.” Repeat the same process with the last keyframe. Once done, add the “Directional blur” effect to the adjustment layer for a smoother look.
3. Mask
By using masks in Premiere Pro, you can efficiently blur, highlight, or add an effect to a specific area of your video clip. With this tool, you can draw different mask shapes, such as ellipses, rectangles, etc. Thus, it’s a great way to edit any particular part of the video clip effortlessly. Here are the simple steps to add masks to the video clips using the adjustment layer:
Step1 Add the adjustment layer to the timeline and head to the “Effects” library to locate the “Crop” effect. Add this effect to the adjustment layer and then head to the Effects control.
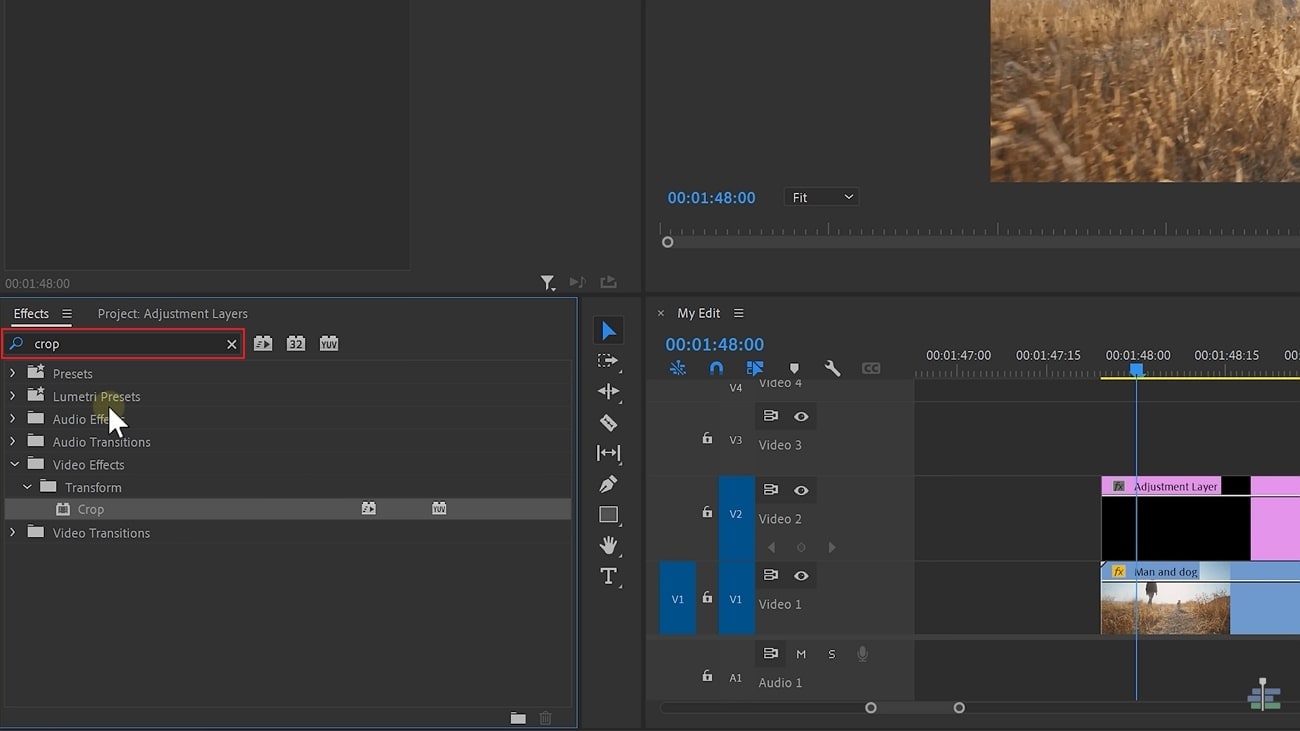
Step2 Now enhance the top and bottom properties to 15%. You can also adjust the headspace of the person accordingly. Also, you can animate the black bars to produce a more cinematic look in your video.
Part 4: FAQ about Adjustment Layers in Premiere Pro
If you have some questions or concerns about using the adjustment layer in Premiere Pro, we have discussed the commonly asked question below.
Why is the adjustment layer greyed out in my Premiere Pro?
To fix grayed adjustment layer in Premiere Pro, there are two methods that you can follow:
Method 1: At the bottom of your project panel, click on the “New Item” icon and select “Adjustment Layer.” Once done, adjust the settings and press the “OK” button. Now you can drag and drop the adjustment layer in the timeline.
Method 2: Click on your “Project Panel” and then navigate to the “File” tab. From there, select “New” and then click on “Adjustment Layer.” Once done, you can drag and drop the adjustment layer at the timeline.
Conclusion
Premiere Pro is a famous video editing software that lets you enhance your videos proficiently. In this tool, using adjustment layers can help you in making your editing process quicker and easier. That’s why, in this article, we have focused on how to add an adjustment layer in Premiere Pro. Moreover, we have also shed light on how to use the adjustment layer precisely with various effects to enhance your videos.
Are you using Premiere Pro frequently? Adobe Premiere Pro is considered advanced software for editing video clips proficiently. You can find a diverse range of features in Premiere Pro that allows you to transform your videos immensely.
If you want to be a professional video editor, you must know the basic techniques of executing video editing. In Premiere Pro, there are various options and features that can help you in enhancing your productivity. For instance, the use of adjustment layers in video editing can make a huge difference. By reading this article, you can come to know about the Premiere Pro adjustment layer efficiently.

Part 1: What is Adjustment Layer in Premiere Pro?
In Premiere Pro, you can save time efficiently by editing each layer individually. To do so, you can find the feature of the adjustment layer in Premiere Pro that enables you to apply the same effect to multiple clips instantly. This will eventually save you time and manual effort. However, you must ensure that the adjustment layer has been placed on top of the layers stack section.
In an adjustment layer in Premiere Pro, you can add multiple effects to create a captivating illustration in your video clips. Moreover, you can also create multiple adjustment layers in Premiere Pro to handle and apply the effects in your clips proficiently. Also, you can easily move, remove, or cut the Premiere Pro adjustment layer anytime within a few clicks.

Furthermore, you can also remove the adjustment layer from your timeline easily without modifying the composition settings of your video. If you get a basic understanding of creating and managing the adjustment layer in Premiere Pro, you can efficiently enhance the visual appeal of your videos. To learn more about the Premiere Pro adjustment layer, continue reading.
Part 2: How to Add an Adjustment Layer in Premiere Pro?
In this section, we will briefly address how to add an adjustment layer in Premiere Pro in a simpler manner.
Step1 Once you have uploaded your project in Premiere Pro, go to the “File” tab and select the “New” option. Afterward, tap on “Adjustment Layer.”

Step2 You can also go to the bottom of your project’s panel and tap on the “New Item” icon. After clicking on this icon, you can click on the “Adjustment layer” option. Afterward, you can modify the video settings to change the settings of the adjustment layer. Once done, hit the “OK” button.

Step3 Once the adjustment layer has been created, you can drag and drop it into the timeline. To change its name, you can right-click on it.

Part 3: Three Ways to Use Adjustment Layer in Premiere Pro
Do you want to use the Premiere Pro adjustment layer significantly? In this section, we will highlight three ways through which you can use the adjustment layer in Premiere Pro to edit your videos.
1. Color Grading
Color grading in Premiere Pro can help you to adjust the balance and tone of your video. You can use the color grading effects and tools to set the exposure, brightness, saturation, and light according to your preference. It will also let you redefine the colors in your video efficiently. To use the adjustment layer for color grading, you can read the below instructions:
Step1 After uploading the video clip in Premiere Pro, create a new adjustment layer in the timeline. Drag and adjust it according to the duration of your video clip. Once done, go to the “Effects” tab and search for “FilmConvert Nitrate.”

Step2 Apply this effect to the adjustment layer and choose your camera to match the color profile. Afterward, you can adjust the saturation, exposure filmstock, and curves according to your choice. You can also increase the vibrancy and hue saturation curves for more enhancement. You can also navigate to the basic correction section to modify the contrast value accordingly.
2. Transition
To merge multiple video clips smoothly and efficiently, transitional effects can assist you. By adding a suitable transition effect, you can make your whole video look clean and cinematic. Moreover, you can use adjustment layers in Premiere Pro to add transition effects to your effect professionally. To do the transition effect, you can proceed to the following instructions:
Step1 First, drag and drop your video clips into the timeline. Once done, create the adjustment layer and apply it above the layers of video clips. Once done, search the “Offset” effect and apply it to the adjustment layer.
Step2 Now add the keyframe to the position where you want to start and end the transition effect. Afterward, right-click on the first keyframe and select “Temporal Interpolation.” From there, choose “Ease Out.” Repeat the same process with the last keyframe. Once done, add the “Directional blur” effect to the adjustment layer for a smoother look.

3. Mask
By using masks in Premiere Pro, you can efficiently blur, highlight, or add an effect to a specific area of your video clip. With this tool, you can draw different mask shapes, such as ellipses, rectangles, etc. Thus, it’s a great way to edit any particular part of the video clip effortlessly. Here are the simple steps to add masks to the video clips using the adjustment layer:
Step1 Add the adjustment layer to the timeline and head to the “Effects” library to locate the “Crop” effect. Add this effect to the adjustment layer and then head to the Effects control.

Step2 Now enhance the top and bottom properties to 15%. You can also adjust the headspace of the person accordingly. Also, you can animate the black bars to produce a more cinematic look in your video.
Part 4: FAQ about Adjustment Layers in Premiere Pro
If you have some questions or concerns about using the adjustment layer in Premiere Pro, we have discussed the commonly asked question below.
Why is the adjustment layer greyed out in my Premiere Pro?
To fix grayed adjustment layer in Premiere Pro, there are two methods that you can follow:
Method 1: At the bottom of your project panel, click on the “New Item” icon and select “Adjustment Layer.” Once done, adjust the settings and press the “OK” button. Now you can drag and drop the adjustment layer in the timeline.
Method 2: Click on your “Project Panel” and then navigate to the “File” tab. From there, select “New” and then click on “Adjustment Layer.” Once done, you can drag and drop the adjustment layer at the timeline.
Conclusion
Premiere Pro is a famous video editing software that lets you enhance your videos proficiently. In this tool, using adjustment layers can help you in making your editing process quicker and easier. That’s why, in this article, we have focused on how to add an adjustment layer in Premiere Pro. Moreover, we have also shed light on how to use the adjustment layer precisely with various effects to enhance your videos.
[Learn] Top Best Free LUTs For Premiere Pro
Videos and images are essential digital media for storing memories, moments, and special occasions. Hence, you cannot compromise on the quality of your visual content. So, it’s necessary to use free LUTs Premiere Pro that upgrades content visual quality. In this article, you will find 15 different types of LUT effects . So, start making your videos and photos attractive again.
Part 1: What Are LUTs? What Are They Used For?
LUTs, known as Look-Up Tables, enhance the quality of photos and videos. Meanwhile, LUTs are involved in color grading, computer graphics, and image processing. In color grading, you can use Premiere Pro LUTs for color correction and enhancement. Within computer graphics, LUTs have been used within color hue, saturation, and brightness. In image processing, you can use LUTs for color thresholding and inversion.
Uses of LUT Premiere Pro
- Color Enhancement: With available color wheels, LUTs allow for enhancing the colors of photos and videos. This way, users can highlight the shadows, highlights, and mid-tones. For vlogs or landscape films, color wheels are essential in enhancing visual quality.
- Effects & Filters: By using special effects and filters, add a new touch to your visual content. Hence, your video or photo will be improved with appropriate reflections, lighting, and colors. With a unique appearance, make your visual content more enchanting.
- Adjust Intensity: LUTs allow customizing intensity within applied filters and color gradients. So, users can adjust hue, brightness, and saturation within the 0 – 100% range. Thus, as a user, you can set a darker or lighter tone for your visual media.
- Theme Personalization: Apply visualized LUTs themes within different resources in high-quality color schemas. Hence, you can make your photo or video look blurry, colorful, retro, sharpening, etc.
Empower your videos with a new mood using different LUTs. Filmora now offers 800+ top-quality 3D LUTs cover a broad range of scenarios. Transform your videos with Filmora’s powerful 3D LUTs.
Apply LUT on Videos Apply LUT on Videos Learn More

Part 2: LUTs are Good for Which Profession and Why?
With the advancement of digital technology, the need for enhanced graphical media is rising. Meanwhile, LUT Adobe Premiere Pro is great for upscaling photo and video quality. Hence, LUTs can be an ideal solution for optimizing work in different professions, including:
1. Video Production
Within film industries, video and film production is common. Thereafter, using LUTs Adobe Premiere Pro is a perfect option for color grading. Hence, film directors can correct, adjust, or enhance colors across scenes. This saves time during the video editing process.
2. Advertising
LUTs are a great source of visual enhancement for the advertising industry. Since they allow adjusting colors of advertising content like clips, posters, and brochures. When marketing content is appealing, there will be more audience engagement and sales.
3. Photography
Photographers can use LUTs to add special styles and effects to their photographs. This way, they can increase their photography standards with more enchanting looks. With improved color vision, correction, and grading, LUTs are great for photography.
4. Broadcasting
The broadcasters are required to adjust the colors of their live shows or streaming. Thus, using LUTs can save time from deep video editing. Using LUTs, they can apply filters to improve the visual quality of live videos.
Part 3: Best Free LUTs For Premiere Pro That Can Be Used
The internet has many options when choosing the best free LUTs for Premiere Pro. Similarly, you can get confused as a user. After all, selecting suitable LUTs can be difficult. Thus, here you’ll find 15 top colors preset Premiere Pro LUTs:
1. Custom Styled LUTs
If you have log footage with flat looks, these custom-styled LUTs are a great solution. There’re 13 different LUT profiles in this LUT Premiere Pro free pack. Meanwhile, you can easily customize video color gradients. The color presets are unique with their standard color curve. By tweaking settings and adjusting intensity, you can customize LUTs.

2. Cinematic LUTs for Premiere Pro
Improvise your video colors with Cinematic LUTs for Premiere Pro. This LUTs Premiere Pro pack comes with unique cinematic effects. This means you can improve your video engagement with cinematic style and color. There are 8 special filters that are very easy to implement into your videos. So even if you’re a beginner, you can use this LUT pack.

3. Free Vintage LUT for Premiere Pro
This Premiere Pro-free LUTs pack is a perfect solution for video styling. So you can enhance your videos with special colors and unique gradients. This way, you can add natural looks to your video with personalized saturation. With a range of color filters, this LUT pack can offer enhanced video upscaling.

4. Fashion LUTs
If you’re inspired by fashion, blend fashionable looks into your videos. Hence, your videos will look more professional with these Fashion LUTs. There are 15 Premiere LUTs presets for extending video color grading. This way, your videos will look more cinematic with extended styling. Meanwhile, it’s easy to download LUTs for Premiere Pro on your device.

5. Free Reign Sample LUT
Blend creativity into your videos with Free Reign Sample LUT. This LUT color preset Premiere Pro pack has multiple color presets. With each preset, there comes a unique filter with a different color gradient. So you can style your videos in appealing textures, teal, and saturation. For photography or videography, this LUT pack is an ideal solution.

6. Carbon Sample LUT
Add carbon contrast to your videos using the carbon Premiere Pro LUTs free pack. There are special carbon effects that utilize advanced color grading. This way, you can make your videos more interesting and engaging. The availability of different color arts ensures cinematic looks with specialized saturation. This LUT can be integrated into any video type.

7. Grecian Ideal LUTs
With 9 different color gradients, upgrade your videos using this LUTs pack. Meanwhile, you can use these LUTs in Adobe Premiere Pro or any program. By using these LUTs, you’ll experience unique color styling in your videos. If you are a photographer, these LUTs will help enhance your pictures and snaps. After all, there are special filters in this LUT pack Premiere Pro.

8. Instagram LUTs Color Filters Preset
Instagram is a popular video and image-sharing platform. Thus, it’s essential to transform your visual media with specialized Instagram LUTs. After all, these LUTs transform your content with special filters in unique colors. In total, there are 12 filters, and all of them are unique. So you can choose any filter preset in this free LUTs premiere pack.
9. Lutify Me 7 Free LUTs
Add life to your visual content with the Lutify LUTs pack. There are 7 different LUTs for upscaling color schemas in your photos and videos. All these LUTs utilize unique and enticing cinematography with extended color grading. Thus, you can adjust tone and contrast as needed. Meanwhile, you will not face any problems using this free premiere LUTs pack.

10. IWLTBAP 10 Free LUTs
Experience ultimate cinematic effects with IWLTBAP Free LUTs. There are 10 free LUTs, and more than 290 color presets. Thus, you can easily enhance the visual quality of your photos and videos. This LUTs for Premiere Pro free download pack is an ideal choice for color grading. Meanwhile, all the color elements are based on providing cinematic touch.

11. Free Edgy LUT Pack
Edge your favorite visual content with enchanting looks. This free-edge LUT pack comprises 5 different LUTs to make your videos special. With unique color correction, these LUTs have magical gradients in them. Thus, the quality of your pictures and videos will improve. The color schemas will also improve using this LUTs Premiere Pro pack.

12. Sports LUTs
Lift your sports enthusiasm with a special sports LUTs pack. By using these free LUTs for Premiere Pro, add sports-like filters to videos. After all, there are special filters with color presets to enhance visual quality. This way, your videos will start looking more attractive with retouching colors. Even your darker videos will appear more transparent.

13. Universal LUTs Pack
Make your video starting more visually appealing with Universal LUTs Pack. After all, there are a bunch of filters presets that offer color correction and enhancement. Hence, your videos will be transformed into special art. Meanwhile, your videography could get a huge boost with scintillating colors. Using this LUT color preset Premiere Pro is simple and convenient.

14. SB Wedding LUTs Pack
Weddings are momentous occasions, and they involve both videography and photography. By using the SB Wedding LUTs pack, now add different color elements to wedding visuals. There are unique romantic tones, color schemas, and 12 video LUTs. All these video LUTs are unique, with special color presets in different styles. Making weddings memorable is what this free LUTs premiere pack achieves.

15. 8 Movie Look LUTs
Movies are entertaining and unique because of cinematic color styles. With this movie LUTs pack, experience 8 different movie color presets. The identification of LUTs is taken from movies. Thus, they can turn your simple videos into ultimate movies. Meanwhile, this LUTs Adobe Premiere Pro pack can upscale video colors in multiple schemas.

Bonus Part: Finding the Best Free LUTs in Wondershare Filmora
Video editing is a way to enhance the quality of videos in an optimal way. Wondershare Filmora is a perfect video editor that provides instant solutions to upscale video. There are different elements, effects, stickers, and other filters to upgrade your video’s visual look. Meanwhile, the availability of LUTs allows users to extend the color patterns and textures of their videos.
Add LUTs on Video For Win 7 or later(64-bit)
Add LUTs on Video For macOS 10.14 or later
Wondershare Filmora contained more than 800 LUTs in different styles and tones. However, the exquisite video editing software has added more, taking its number above 800+ LUTs for optimizing color enhancement in your videos.

Key Features of Wondershare Filmora
- Color Sharpening: Filmora allows you to adjust the color sharpness of videos. It’s done by setting color blur and base as required. The feature is ideal if you want to record events or broadcast videos.
- Cover Optimization: You can create and optimize your video covers with Wondershare Filmora. Enhancing video covers with special LUTs, elements, text styles, and other effects is simpler.
- Effect Mask: There is also an option to use masking effects. You can use video overlays to modify, duplicate, hide, or reveal footage. The objects in the video can be covered using different shapes.
Conclusion
Colors are unique pieces of elements that gain attention at a glance. Similarly, adding colors to videos can make them more impressive and appealing. By using LUTs, you can optimize the color styling of your videos. After all, LUTs can enhance color saturation, brightness, lightning, and tone. Meanwhile, Wondershare Filmora equips the best LUTs for Premiere Pro in many gradients.
Apply LUT on Videos Apply LUT on Videos Learn More

Part 2: LUTs are Good for Which Profession and Why?
With the advancement of digital technology, the need for enhanced graphical media is rising. Meanwhile, LUT Adobe Premiere Pro is great for upscaling photo and video quality. Hence, LUTs can be an ideal solution for optimizing work in different professions, including:
1. Video Production
Within film industries, video and film production is common. Thereafter, using LUTs Adobe Premiere Pro is a perfect option for color grading. Hence, film directors can correct, adjust, or enhance colors across scenes. This saves time during the video editing process.
2. Advertising
LUTs are a great source of visual enhancement for the advertising industry. Since they allow adjusting colors of advertising content like clips, posters, and brochures. When marketing content is appealing, there will be more audience engagement and sales.
3. Photography
Photographers can use LUTs to add special styles and effects to their photographs. This way, they can increase their photography standards with more enchanting looks. With improved color vision, correction, and grading, LUTs are great for photography.
4. Broadcasting
The broadcasters are required to adjust the colors of their live shows or streaming. Thus, using LUTs can save time from deep video editing. Using LUTs, they can apply filters to improve the visual quality of live videos.
Part 3: Best Free LUTs For Premiere Pro That Can Be Used
The internet has many options when choosing the best free LUTs for Premiere Pro. Similarly, you can get confused as a user. After all, selecting suitable LUTs can be difficult. Thus, here you’ll find 15 top colors preset Premiere Pro LUTs:
1. Custom Styled LUTs
If you have log footage with flat looks, these custom-styled LUTs are a great solution. There’re 13 different LUT profiles in this LUT Premiere Pro free pack. Meanwhile, you can easily customize video color gradients. The color presets are unique with their standard color curve. By tweaking settings and adjusting intensity, you can customize LUTs.

2. Cinematic LUTs for Premiere Pro
Improvise your video colors with Cinematic LUTs for Premiere Pro. This LUTs Premiere Pro pack comes with unique cinematic effects. This means you can improve your video engagement with cinematic style and color. There are 8 special filters that are very easy to implement into your videos. So even if you’re a beginner, you can use this LUT pack.

3. Free Vintage LUT for Premiere Pro
This Premiere Pro-free LUTs pack is a perfect solution for video styling. So you can enhance your videos with special colors and unique gradients. This way, you can add natural looks to your video with personalized saturation. With a range of color filters, this LUT pack can offer enhanced video upscaling.

4. Fashion LUTs
If you’re inspired by fashion, blend fashionable looks into your videos. Hence, your videos will look more professional with these Fashion LUTs. There are 15 Premiere LUTs presets for extending video color grading. This way, your videos will look more cinematic with extended styling. Meanwhile, it’s easy to download LUTs for Premiere Pro on your device.

5. Free Reign Sample LUT
Blend creativity into your videos with Free Reign Sample LUT. This LUT color preset Premiere Pro pack has multiple color presets. With each preset, there comes a unique filter with a different color gradient. So you can style your videos in appealing textures, teal, and saturation. For photography or videography, this LUT pack is an ideal solution.

6. Carbon Sample LUT
Add carbon contrast to your videos using the carbon Premiere Pro LUTs free pack. There are special carbon effects that utilize advanced color grading. This way, you can make your videos more interesting and engaging. The availability of different color arts ensures cinematic looks with specialized saturation. This LUT can be integrated into any video type.

7. Grecian Ideal LUTs
With 9 different color gradients, upgrade your videos using this LUTs pack. Meanwhile, you can use these LUTs in Adobe Premiere Pro or any program. By using these LUTs, you’ll experience unique color styling in your videos. If you are a photographer, these LUTs will help enhance your pictures and snaps. After all, there are special filters in this LUT pack Premiere Pro.

8. Instagram LUTs Color Filters Preset
Instagram is a popular video and image-sharing platform. Thus, it’s essential to transform your visual media with specialized Instagram LUTs. After all, these LUTs transform your content with special filters in unique colors. In total, there are 12 filters, and all of them are unique. So you can choose any filter preset in this free LUTs premiere pack.

9. Lutify Me 7 Free LUTs
Add life to your visual content with the Lutify LUTs pack. There are 7 different LUTs for upscaling color schemas in your photos and videos. All these LUTs utilize unique and enticing cinematography with extended color grading. Thus, you can adjust tone and contrast as needed. Meanwhile, you will not face any problems using this free premiere LUTs pack.

10. IWLTBAP 10 Free LUTs
Experience ultimate cinematic effects with IWLTBAP Free LUTs. There are 10 free LUTs, and more than 290 color presets. Thus, you can easily enhance the visual quality of your photos and videos. This LUTs for Premiere Pro free download pack is an ideal choice for color grading. Meanwhile, all the color elements are based on providing cinematic touch.

11. Free Edgy LUT Pack
Edge your favorite visual content with enchanting looks. This free-edge LUT pack comprises 5 different LUTs to make your videos special. With unique color correction, these LUTs have magical gradients in them. Thus, the quality of your pictures and videos will improve. The color schemas will also improve using this LUTs Premiere Pro pack.

12. Sports LUTs
Lift your sports enthusiasm with a special sports LUTs pack. By using these free LUTs for Premiere Pro, add sports-like filters to videos. After all, there are special filters with color presets to enhance visual quality. This way, your videos will start looking more attractive with retouching colors. Even your darker videos will appear more transparent.

13. Universal LUTs Pack
Make your video starting more visually appealing with Universal LUTs Pack. After all, there are a bunch of filters presets that offer color correction and enhancement. Hence, your videos will be transformed into special art. Meanwhile, your videography could get a huge boost with scintillating colors. Using this LUT color preset Premiere Pro is simple and convenient.

14. SB Wedding LUTs Pack
Weddings are momentous occasions, and they involve both videography and photography. By using the SB Wedding LUTs pack, now add different color elements to wedding visuals. There are unique romantic tones, color schemas, and 12 video LUTs. All these video LUTs are unique, with special color presets in different styles. Making weddings memorable is what this free LUTs premiere pack achieves.

15. 8 Movie Look LUTs
Movies are entertaining and unique because of cinematic color styles. With this movie LUTs pack, experience 8 different movie color presets. The identification of LUTs is taken from movies. Thus, they can turn your simple videos into ultimate movies. Meanwhile, this LUTs Adobe Premiere Pro pack can upscale video colors in multiple schemas.

Bonus Part: Finding the Best Free LUTs in Wondershare Filmora
Video editing is a way to enhance the quality of videos in an optimal way. Wondershare Filmora is a perfect video editor that provides instant solutions to upscale video. There are different elements, effects, stickers, and other filters to upgrade your video’s visual look. Meanwhile, the availability of LUTs allows users to extend the color patterns and textures of their videos.
Add LUTs on Video For Win 7 or later(64-bit)
Add LUTs on Video For macOS 10.14 or later
Wondershare Filmora contained more than 800 LUTs in different styles and tones. However, the exquisite video editing software has added more, taking its number above 800+ LUTs for optimizing color enhancement in your videos.

Key Features of Wondershare Filmora
- Color Sharpening: Filmora allows you to adjust the color sharpness of videos. It’s done by setting color blur and base as required. The feature is ideal if you want to record events or broadcast videos.
- Cover Optimization: You can create and optimize your video covers with Wondershare Filmora. Enhancing video covers with special LUTs, elements, text styles, and other effects is simpler.
- Effect Mask: There is also an option to use masking effects. You can use video overlays to modify, duplicate, hide, or reveal footage. The objects in the video can be covered using different shapes.
Conclusion
Colors are unique pieces of elements that gain attention at a glance. Similarly, adding colors to videos can make them more impressive and appealing. By using LUTs, you can optimize the color styling of your videos. After all, LUTs can enhance color saturation, brightness, lightning, and tone. Meanwhile, Wondershare Filmora equips the best LUTs for Premiere Pro in many gradients.
How to Make a YouTube Intro by Filmora
You are starting a YouTube channel and looking to create a video intro. Then, this article will allow you to experience the magic of Wondershare Filmora in creating a YouTube intro. Wondershare Filmora allows you to access the range of opener templates you can edit to create engaging YouTube intros. This will help to hook up your audience till the end.
But before we learn how to create a YouTube intro, let’s understand what makes an Intro creative and exciting.
Part 1. What Is a Creative YouTube Intro?
A good intro is a crucial feature of a good YouTube video. Whenever a viewer or a subscriber clicks on your video, the YouTube intro is the first thing they see. And a successful channel’s secret is to captivate the viewer from the start.
What Goes Into a Creative YouTube Intro?
A good YouTube intro consists of the following qualities:
- Graphic: The intro text will be written on the graphics template.
- Text: This text will be your channel’s name. Or, if it’s a Vlog, it could be its number. Such as i.e., Vlog #2.
- Images: If you use plain templates, you can add pictures behind them to make them pop up even more.
- Catchy music: To spice up the video and make it more pleasing, the music will be added to hook the audience in the intro section.
You must have an engaging YouTube intro. You will need a few things to create a YouTube intro.
Part 2. What Do You Need to Make a Creative YouTube Intro?
You are all set to engage the audience, then you need the following essentials to create an exemplary YouTube intro:
Requirement 1. Wondershare Filmora
Free Download For Win 7 or later(64-bit)
Free Download For macOS 10.14 or later
First, you will need to have a good video editor. Wondershare Filmora is the best for editing your videos. It enables you to make creative and appealing videos.
It has a very engaging system UI that allows even novices to quickly get the hang of it. Also, it has a wide range of stock media. Thus, it allows you to access the intro templates and customise features.

Requirement 2. Footage for Intro
When creating content for your YouTube videos, remember that you will also need some footage for your intro. Intros need to be as captivating as possible.
So to hook the audience from the start, you will need an entertaining start. These video clips can be the exciting moments that you cut before the climax or landscapes of the scenery. The choice is yours.
Part 3. Step-by-Step Guide to Creating a YouTube Intro
You can create a YouTube intro in two ways.
- Create a YouTube intro with an opener template.
- By using video clips from your library.
To use both of these methods, you will need Wondershare Filmora. For this, read below to get your hands on it!
Create a YouTube Intro with an opener template
Opener templates are full of fancy graphics and animations that you can change according to your style. The library provides you with the most vibrant and simplest form of opener templates.
Step1 Download Wondershare Filmora
Before all, you need to have access to Filmora. If you don’t have then follow the below actions:
- First, download and install the Wondershare Filmora.
- Then, on your PC or Mac, run this application.
Step2 Preview The Intro Template
After downloading the Wondershare Filmora, you must select an intro template. To perform this action, you will need to preview it first as:
- Click on the Title icon above the Import window.
- On the left column, scroll down to Titles > Openers.
- Double-click on any intro template to preview it.
After previewing the opener, we need to insert it into the timeline. Simply click on an intro you like and place it in the timeline below. Here you can edit the Opener.
Step3 Edit The Text
After adding the opener to the timeline, your goal is to type in your text. This text will appear in the intro. To perform this action, follow the steps mentioned below:
- Double-click on the opener added to the timeline.
- This will open the settings menu in the import window.
- Type in the text box your channel’s or vlog’s name.

- Then change the font of text if you want.
- You can also edit the sub-heading. Here you can write a short description of your video.
- Once you are done typing the text, click on OK to confirm your changes.
After you have typed in the text for your opener, it is time to add some music to it.
Step4 Add Music into Clip
Music will spice up your intro video and give more pleasing effect. To proceed it further, follow the following steps:
- Click on the Audio icon above the import window and Audio library will pop up.
- Here, you can see the variety of Royalty-free music available.
- Browse through the library and choose whatever you like.
- After you have selected the music for your video, click to drop it below your opener in the timeline.
- Trim the music to the length of the opener.
- Play the opener from the start to confirm your changes.

This is how you can create an opener intro for your YouTube videos. Choose the graphics that most suit your video’s vibe.
Now that we have learned how to make an opener by template, let’s look at how to create an intro using clips in your library.
Create an Intro with Video Clips in Your Library
Wondershare Filmora also allows you to edit your videos to turn them into openers. This will enable your intros to be more personal and unique, giving you the edge of creativity.
Creating an intro by using video clips is an easy task. You just need suitable video clips to use as an intro, and you are good to go.
Follow the steps as mentioned to create an intro using Video clips:
Step1 Import the Video Clips
After downloading Wondershare Filmora, your next step is to import your video clips. To perform this, follow the steps as mentioned below:
- On the Filmora Home Interface, find the Import icon on the top left side and select it.
- This will direct you to your PC library.
- Select the photos and videos you want to edit and click OK.

Step2 Add The Video Clips to the Timeline
Once you have imported clips in the Import window, your next step is simply to add them to the timeline. For this, follow the steps mentioned below:
- Drag and select the clips in the import window.
- Then, drop them in the timeline.

Once in the timeline, your video is ready to go into editing mode. But before we insert the template of our intro, we need another step as shown!
Step3 Trim The Video Clips
As it’s the intro, we need to trim the video clips, so they are concise. You may have recorded longer video clips, but we need clips that are no longer than 5 seconds.
To trim the video clips, follow the steps mentioned:
- Move the playhead on the video clip to where you want to trim.
- Click on the scissors icon on the Playhead.
This will split your video clip into two parts. Now, you can delete whatever part you like and keep the other one.
![]()
Note: To measure the time of the video clip, keep an eye on the Time map above the Playhead.

When you have trimmed your video clips to your liking, it’s time to add the Title text that will act as an intro to your video!
Step4 Add The Title Text
You will need a title template to add text to your video clips. For this,perform the following actions:
- First, click on the Title icon above the import window.
- On the left column explore and browse the animated title as you want.
- Double-click on a title template to preview it.
- Once you have selected the Title template, drag it above the start of your timeline above the video clip and it’ll all set.
After you have added the title, the next step is to add your intro text.
Step5 Type The Intro Text
For specifications of the video and ongoing content, you have to tell the audience before starting. For this, you need to type the intro text as shown:
- Double-click on the title template.
- Type in the text you want in the text box.

Play the video clip from the beginning to confirm your changes. Now that we have created a graphic text, it’s time to add the audio.
Step6 Add Music
To give more pleasing look and effect, you must add the music into it. Follow the steps below to proceed it further:
- First select the Audio icon above the import window. This will direct you to Filmora’s Audio library.
- Browse the library and pick whatever royalty-free music you want.
- After you’ve chosen the music for your video, drag it to the timeline below the video clip.
- Cut the music to match the length of the intro and it’s all done.

Once you are done adding the music, hit the play button to ensure everything is according to your need.

Step7 Export The Video
Its time to export the video and share it with your audience. For this, check below steps:
- Click on the export icon on the top right of the import window.
- This will pop-up another window of settings.
- Select the settings your want your video to be exported in.
![]()
Note: You can also change the name of your intro.
- When you are done, click on Export.
- Wait till Filmora finishes exporting your video.

Congratulations! You have successfully created a YouTube intro. Now you can use them freely in your YouTube videos and please your audience.
Conclusion
YouTube intros are a great way to attract the viewer at first glance. The more creative the YouTube Intro is, the more the chances of your video getting views.
By following the steps mentioned in the article above, you can easily create YouTube intros by Wondershare Filmora. Try with new features and stock media to make your video more exemplary!
Free Download For macOS 10.14 or later
First, you will need to have a good video editor. Wondershare Filmora is the best for editing your videos. It enables you to make creative and appealing videos.
It has a very engaging system UI that allows even novices to quickly get the hang of it. Also, it has a wide range of stock media. Thus, it allows you to access the intro templates and customise features.

Requirement 2. Footage for Intro
When creating content for your YouTube videos, remember that you will also need some footage for your intro. Intros need to be as captivating as possible.
So to hook the audience from the start, you will need an entertaining start. These video clips can be the exciting moments that you cut before the climax or landscapes of the scenery. The choice is yours.
Part 3. Step-by-Step Guide to Creating a YouTube Intro
You can create a YouTube intro in two ways.
- Create a YouTube intro with an opener template.
- By using video clips from your library.
To use both of these methods, you will need Wondershare Filmora. For this, read below to get your hands on it!
Create a YouTube Intro with an opener template
Opener templates are full of fancy graphics and animations that you can change according to your style. The library provides you with the most vibrant and simplest form of opener templates.
Step1 Download Wondershare Filmora
Before all, you need to have access to Filmora. If you don’t have then follow the below actions:
- First, download and install the Wondershare Filmora.
- Then, on your PC or Mac, run this application.
Step2 Preview The Intro Template
After downloading the Wondershare Filmora, you must select an intro template. To perform this action, you will need to preview it first as:
- Click on the Title icon above the Import window.
- On the left column, scroll down to Titles > Openers.
- Double-click on any intro template to preview it.
After previewing the opener, we need to insert it into the timeline. Simply click on an intro you like and place it in the timeline below. Here you can edit the Opener.
Step3 Edit The Text
After adding the opener to the timeline, your goal is to type in your text. This text will appear in the intro. To perform this action, follow the steps mentioned below:
- Double-click on the opener added to the timeline.
- This will open the settings menu in the import window.
- Type in the text box your channel’s or vlog’s name.

- Then change the font of text if you want.
- You can also edit the sub-heading. Here you can write a short description of your video.
- Once you are done typing the text, click on OK to confirm your changes.
After you have typed in the text for your opener, it is time to add some music to it.
Step4 Add Music into Clip
Music will spice up your intro video and give more pleasing effect. To proceed it further, follow the following steps:
- Click on the Audio icon above the import window and Audio library will pop up.
- Here, you can see the variety of Royalty-free music available.
- Browse through the library and choose whatever you like.
- After you have selected the music for your video, click to drop it below your opener in the timeline.
- Trim the music to the length of the opener.
- Play the opener from the start to confirm your changes.

This is how you can create an opener intro for your YouTube videos. Choose the graphics that most suit your video’s vibe.
Now that we have learned how to make an opener by template, let’s look at how to create an intro using clips in your library.
Create an Intro with Video Clips in Your Library
Wondershare Filmora also allows you to edit your videos to turn them into openers. This will enable your intros to be more personal and unique, giving you the edge of creativity.
Creating an intro by using video clips is an easy task. You just need suitable video clips to use as an intro, and you are good to go.
Follow the steps as mentioned to create an intro using Video clips:
Step1 Import the Video Clips
After downloading Wondershare Filmora, your next step is to import your video clips. To perform this, follow the steps as mentioned below:
- On the Filmora Home Interface, find the Import icon on the top left side and select it.
- This will direct you to your PC library.
- Select the photos and videos you want to edit and click OK.

Step2 Add The Video Clips to the Timeline
Once you have imported clips in the Import window, your next step is simply to add them to the timeline. For this, follow the steps mentioned below:
- Drag and select the clips in the import window.
- Then, drop them in the timeline.

Once in the timeline, your video is ready to go into editing mode. But before we insert the template of our intro, we need another step as shown!
Step3 Trim The Video Clips
As it’s the intro, we need to trim the video clips, so they are concise. You may have recorded longer video clips, but we need clips that are no longer than 5 seconds.
To trim the video clips, follow the steps mentioned:
- Move the playhead on the video clip to where you want to trim.
- Click on the scissors icon on the Playhead.
This will split your video clip into two parts. Now, you can delete whatever part you like and keep the other one.
![]()
Note: To measure the time of the video clip, keep an eye on the Time map above the Playhead.

When you have trimmed your video clips to your liking, it’s time to add the Title text that will act as an intro to your video!
Step4 Add The Title Text
You will need a title template to add text to your video clips. For this,perform the following actions:
- First, click on the Title icon above the import window.
- On the left column explore and browse the animated title as you want.
- Double-click on a title template to preview it.
- Once you have selected the Title template, drag it above the start of your timeline above the video clip and it’ll all set.
After you have added the title, the next step is to add your intro text.
Step5 Type The Intro Text
For specifications of the video and ongoing content, you have to tell the audience before starting. For this, you need to type the intro text as shown:
- Double-click on the title template.
- Type in the text you want in the text box.

Play the video clip from the beginning to confirm your changes. Now that we have created a graphic text, it’s time to add the audio.
Step6 Add Music
To give more pleasing look and effect, you must add the music into it. Follow the steps below to proceed it further:
- First select the Audio icon above the import window. This will direct you to Filmora’s Audio library.
- Browse the library and pick whatever royalty-free music you want.
- After you’ve chosen the music for your video, drag it to the timeline below the video clip.
- Cut the music to match the length of the intro and it’s all done.

Once you are done adding the music, hit the play button to ensure everything is according to your need.

Step7 Export The Video
Its time to export the video and share it with your audience. For this, check below steps:
- Click on the export icon on the top right of the import window.
- This will pop-up another window of settings.
- Select the settings your want your video to be exported in.
![]()
Note: You can also change the name of your intro.
- When you are done, click on Export.
- Wait till Filmora finishes exporting your video.

Congratulations! You have successfully created a YouTube intro. Now you can use them freely in your YouTube videos and please your audience.
Conclusion
YouTube intros are a great way to attract the viewer at first glance. The more creative the YouTube Intro is, the more the chances of your video getting views.
By following the steps mentioned in the article above, you can easily create YouTube intros by Wondershare Filmora. Try with new features and stock media to make your video more exemplary!
Looking for Simple Steps to Apply Fade in Effect to Your Text in Premiere Pro? Here Are Two Different Methods Along with an Alternative Way to Fade Text in Videos
Every video is unappealing until you edit the video properly. Editing videos not only means trimming out unnecessary parts but also adding effects and animations. There are certain effects and transitions that are commonly used in most videos. Fade in effect is widely used in texts, objects, as well as clips. Fade in effect is very eye-soothing that does not distract the audience from the overall video content.
Fade in effect is available in all video editors. Among video editors, Adobe Premiere Pro is one of the best professional video editors. However, the learning curve of Premiere Pro is steep and hence, you have to know the exact steps to add fade in text Premiere Pro. We will illustrate how to apply fade in text effect Pro as well as add fade in and fade out transition effects in Premiere Pro. We will also state an alternative way to fade in texts in your videos.
Part 1. Fade in text in Premiere Pro with Opacity option
If you have added any text or any graphical object in your video on Premiere Pro, you can apply fade in effect to your text and object easily. When you add fade in effect to your text or object, they slowly appear on the screen which is very soothing to watch instead of sudden and abrupt appearance. Here are the steps on how to fade text in Premiere Pro.
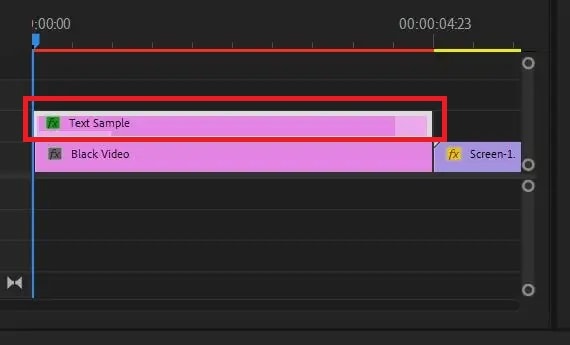
Step1 You must have your video clip as well as text clip on the Timeline of Premiere Pro. Make sure that you add text from Essential Graphics panel. Select the text clip from the Timeline to proceed.
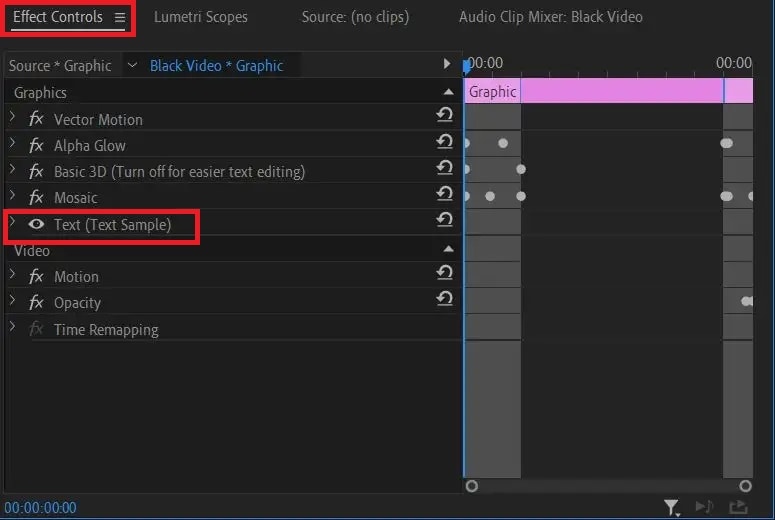
Step2 Go to Effect Controls and click on Text option to expand it. Click on Opacity option from the dropdown menu.
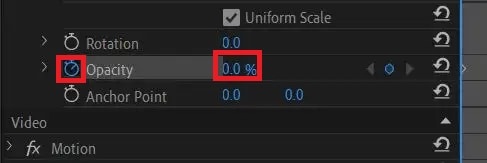
Step3 Put the timeline cursor at the beginning of the selected text clip. Thereafter, make the Opacity value to zero. Click on Stopwatch icon beside Opacity to add a keyframe.
Step4 Put the timeline cursor at that point in the clip where you want the text to appear completely. Now make the Opacity value to 100. Click on Stopwatch to add a keyframe here.

Step5 Play the video to watch the fade in effect on your selected text. You can move the keyframes to speed up or slow down fade in effect.
Part 2. Make fade in or out with transition effects
If you have multiple video clips or scenes, you should add fade in and fade out transition effects so that the transition from one clip to another or one scene to another is smooth. The fade in or fade out effect for video clips look similar to fade text Premiere Pro. In fact, you can use the steps of how to fade in text in Premiere Pro to get the job done. But there is an easier way available with Video Transitions option. Here are the steps on how to apply fade in or out effect on your video clips in Premiere Pro.
Step1 You should have multiple video clips added to Timeline. Select the video clip to which you want to apply Fade in effect.
Step2 Go to Effects panel and click on Video Transitions option.
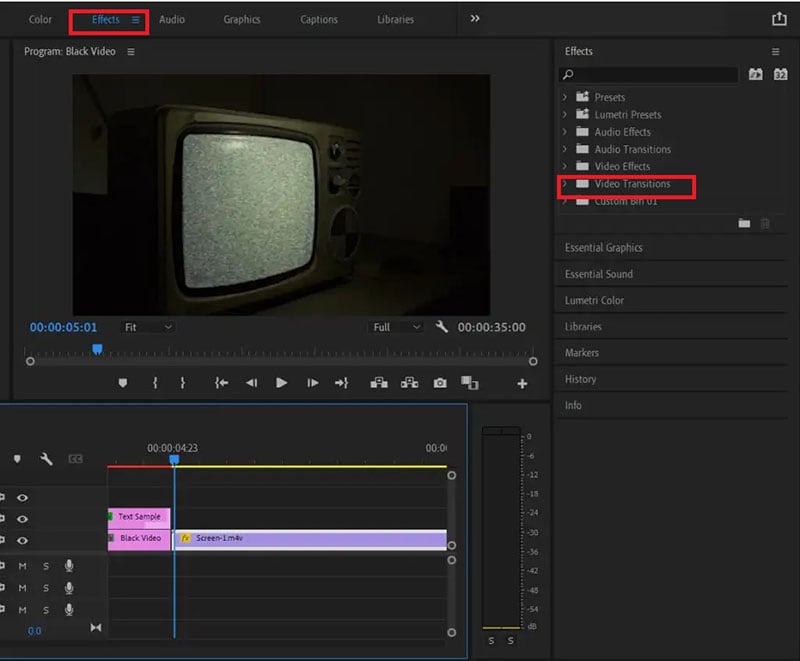
Step3 Click on Dissolve and from the dropdown list, drag and drop Film Dissolve to the beginning of the selected video clip for fade in effect.
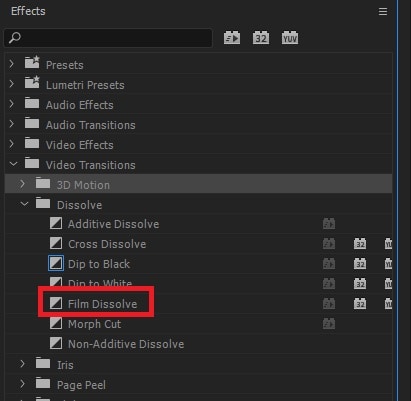
Step4 Click on the added effect on Timeline to adjust speed, duration, and alignment of the effect.

Step5 Play the video to ensure that the effect looks perfect. Therefore, go to File> Share> Export File to save the video.
You can place the transition at the end of the video for fading out effect. Instead of Film Dissolve, you can use Crossfade or Dip to Black effect for fade in and fade out effect on video clips.
Part 3. Alternative way to fade in text in videos
If you do not have Adobe Premiere Pro or you find the steps difficult to fade in text in videos using Premiere Pro, we recommend Wondershare Filmora . Filmora is a professional video editor that is available for Windows as well as Mac users. There is a wide range of video effects available in Filmora in comparison to Premiere Pro. Most importantly, Filmora is super easy and intuitive to use, and even amateur users can use it comfortably. Here are the steps to fade in text in videos using Filmora.
Free Download For Win 7 or later(64-bit)
Free Download For macOS 10.14 or later
Step1 Download and install Filmora . Launch Filmora and click on New Project option.

Step2 Import the video clip under Project Media folder. Drag and drop the video clip to Timeline.

Step3 Go to Titles located at the top and drag and drop any title style on Timeline. Double-click on the Title clip on Timeline and type in your required text in the Viewer. You can stretch the Title clip to extend its duration as per your requirement.

Step4 Double-click on Title clip again on the Timeline and go to Text> Animation tab located at the top-left corner. Scroll down to go to Fade1 option and double-click Fade1 to apply it to your text.
Step5 You can go to settings by clicking on Advanced button and adjust parameters such as speed and duration of the fade effect for better visibility.
Step6 Once you are done, play the video and thereafter, click on Export to save the video on your hard drive.
Conclusion
We have stated the steps on how to fade text in Premiere Pro. You can use the same steps to apply the effect to graphical objects. We have also illustrated how to apply fade in and fade out effects between video clips and scenes using transition effects. If you are looking for an alternative and easier way to fade in texts in your videos, we recommend Wondershare Filmora .
Free Download For macOS 10.14 or later
Step1 Download and install Filmora . Launch Filmora and click on New Project option.

Step2 Import the video clip under Project Media folder. Drag and drop the video clip to Timeline.

Step3 Go to Titles located at the top and drag and drop any title style on Timeline. Double-click on the Title clip on Timeline and type in your required text in the Viewer. You can stretch the Title clip to extend its duration as per your requirement.

Step4 Double-click on Title clip again on the Timeline and go to Text> Animation tab located at the top-left corner. Scroll down to go to Fade1 option and double-click Fade1 to apply it to your text.
Step5 You can go to settings by clicking on Advanced button and adjust parameters such as speed and duration of the fade effect for better visibility.
Step6 Once you are done, play the video and thereafter, click on Export to save the video on your hard drive.
Conclusion
We have stated the steps on how to fade text in Premiere Pro. You can use the same steps to apply the effect to graphical objects. We have also illustrated how to apply fade in and fade out effects between video clips and scenes using transition effects. If you are looking for an alternative and easier way to fade in texts in your videos, we recommend Wondershare Filmora .
Also read:
- 8 Best Free Photo Collage with Music Video Maker
- New 15 Stunning GIF Splitter Examples You Need to Bookmark for 2024
- How Long Does It Take To Edit Videos
- New In 2024, Learn How to Seamlessly Merge Audio and Video in VLC Media Player with This Easy-to-Follow Guide. Step-by-Step Instructions Are Included
- Updated Hyperlapse VS Timelapse Videos
- Updated Are You Convincingly Fascinated by the Whole Idea of Augmented Reality and Want to Level up Your Marketing Skills with an AR Integration? Rest Assured, Youve Found the Right Place
- Updated The Ultimate Guide to Slideshow Maker with Music for 2024
- Updated How to Livestream Zoom on Facebook for 2024
- 2024 Approved Mastering FFmpeg How to Merge Audio and Video with Ease
- New Cropping Videos in VLC Step by Step for 2024
- Best 31 Video Trimmers for Computer, Phone and Online for 2024
- Detailed Steps to Rotate Videos Using Kdenlive for 2024
- How to Change Aspect Ratio of Video?
- New Exploring the Best Slow-Motion App
- 2024 Approved 30+ Amazing Templates for VN Video Editor
- Updated In 2024, Top Fixes to Resolve Issues with Premiere Pro Slow Playback
- In 2024, How to Make Cool COD Warzone Thumbnail
- 2024 Approved The Top 10 AI Video Analytics Companies at a Glance
- Updated How to Create a Slideshow on iPhone for 2024
- In 2024, How to Add Background to Video With/Without a Green Screen
- This Article Provides Helpful Tips for Creating Better Film Footage in Public Places. Learn How to Choose the Right Angle and Re-Record the Audio with Filmora for 2024
- Updated In 2024, How to Use Zoom in Google
- In 2024, This Article Introduces How Sheila Become a Youtuber and How She Started Video Editing
- 2024 Approved Top Animated Title Makers
- In 2024, Best Frame Rate for 4K Video
- Ultimate Guide to Free PPTP VPN For Beginners On Xiaomi Redmi A2 | Dr.fone
- In 2024, How to Bypass Apple iPhone 6s Passcode Easily Video Inside | Dr.fone
- 7 Fixes to No GPS - Showing Approximate Location on Apple iPhone SE (2022) Waze | Dr.fone
- How to Fix It Vivo V29 Pro Wont Turn On | Dr.fone
- Top 5 Meizu 21 Bypass FRP Tools for PC That Actually Work
- The Most Effective Ways to Bypass Apple iPhone 12 Activation Lock
- Easy steps to recover deleted videos from Samsung
- What Legendaries Are In Pokemon Platinum On Motorola Edge+ (2023)? | Dr.fone
- How To Bypass Itel S23 FRP In 3 Different Ways
- In 2024, 4 Feasible Ways to Fake Location on Facebook For your Samsung Galaxy S24 | Dr.fone
- Best Ways to Bypass iCloud Activation Lock from Apple iPhone SE/iPad/iPod
- Does Airplane Mode Turn off GPS Location On Vivo X90S? | Dr.fone
- How to Cast Poco X5 Pro to Computer for iPhone and Android? | Dr.fone
- Proven Ways to Fix There Was A Problem Parsing the Package on Honor Magic V2 | Dr.fone
- How to Remove Activation Lock From the Apple iPhone 11 Without Previous Owner?
- In 2024, Top 10 Lava Android SIM Unlock APK
- Title: How to Add Adjustment Layer in Premiere Pro
- Author: Morgan
- Created at : 2024-05-19 05:11:33
- Updated at : 2024-05-20 05:11:33
- Link: https://ai-video-editing.techidaily.com/how-to-add-adjustment-layer-in-premiere-pro/
- License: This work is licensed under CC BY-NC-SA 4.0.


