:max_bytes(150000):strip_icc():format(webp)/GettyImages-585151372-a659baf0c7b441b9b7e7896716b12784.jpg)
How to Add Camera Shake to Video in Adobe After Effects

How to Add Camera Shake to Video in Adobe After Effects
Create High-Quality Video - Wondershare Filmora
An easy and powerful YouTube video editor
Numerous video and audio effects to choose from
Detailed tutorials are provided by the official channel
So you’ve shot your video with good camera technique and shot it on a good camera; how can you make it look like you shot it on an old PXL 2000? Well, the answer is to add a little camera shake to the footage. If you’ve ever been to a theme park, then you’ve likely seen the effect of camera shake. Video camera shake can be a powerful tool for telling a story and creating an impactful scene. It helps to build suspense and make the video more realistic. This article will show you how to add camera shake to your videos using Adobe After Effects.
In this article
01 Why Do We Need To Add A Camera Shake Effect To The Video?
02 How to add camera shake to video in After Effects
03 Bonus! Camera Shake Presets for After Effects
Why Do We Need To Add A Camera Shake Effect To The Video?
Have you ever tried to add a simple camera shake effect to your videos? You know, those cool shake effects that you may have seen on an amateur or professional video on the web? Well, if you have, then you probably thought it was impossible. The camera shake effect is a technique applied to the clips where shaky camera movements cause the image to appear more cinematic and real. Applying a camera shake effect is to hide your flaws when shooting a video.
Camera shake is often mistaken for poor cinematography. It can enhance your video. For instance, if you’re filming something like a car chase or any other scene where there’s lots of movement and action, the inclusion of a camera shake can help make it more realistic.
A camera shake effect can be an excellent way of adding a sense of realism to your videos. Whether you’re making a video that’s meant to be taken as a real scene, such as one depicting a robbery, or one that’s supposed to be shot in a documentary style, such as making a movie, you can use this as an effective tool. You can consider adding camera shakes to your videos due to the following reasons:
- This camera shake effect makes your video more creative. If you want to make, your video different from those other businesses produce, adding this effect will be a good idea.
- Your audience will be able to relate better to your video if they’ve seen similar videos before.
- Adding a camera shake to your video will make it more interesting and engaging for your viewers.
- It’s a great way to mask any mistakes you might have made during the video production. After all, we aren’t perfect humans, so we can’t make perfect videos every time!”
- You can use camera shakes to simulate the feeling of being in an environment that is free from control (such as being on a boat).
- You can use them to create a sense of urgency for the viewer/audience by adding motion blur to the sequence.
How to add camera shake to video in After Effects
When it comes to video editing, knowing how to make a layer shake in After Effects is a very useful skill. Using it correctly can add subtle motion to a static frame, emphasize an important object, and even make a character quiver in fear! In this tutorial, you will learn how to effectively use the wiggle expression to affect a layer throughout the Composition.
Step 1. Select the layer you want to shake from your After Effects file
Suppose you have an image or video of an object and want to apply it to shake effect, then it is quite easy. Just follow the steps described below.

Step 2. Press the alt/option key, then click the stopwatch next to “position.”
You are adding an “expression” to the timeline when the position text turns red, and you begin typing. Using a coding language adapted from javascript, you can apply complex motion to layers.
By pressing the alt/option again on the stopwatch, you can edit your expression anytime-or by clicking the arrow beside “position” and then double-clicking the text in the timeline.

Step 3. Enter “Wiggle (3,8)” and adjust the settings accordingly
In this expression, the first number indicates the frequency of Wiggle – basically, how quickly it appears to tremble. Its amplitude is the second number, which indicates how far it moves. The numbers are adjustable as you wish. Layers will shake dramatically but slowly when they use Wiggle (2,40). The “Wiggle (10,3)” command makes a layer move quickly without too much movement in one direction.
Step 4. Adjust the frame rate of your Composition
In order to make the overall effect more “choppy,” you can reduce the frame rate of the video by going to Composition> Composition settings. After Effects uses a frame rate of 24.5, you can go as low as “8” if you want a choppy feel.

Your entire Composition will become choppier if you reduce the frame rate, so it might not be worth it if you have other moving elements in your Composition. Only adjust the frame rate of the layer containing the wiggling object if you want it to affect that layer.
Bonus! Camera Shake Presets for After Effects
Working with After Effects, you will have to shoot a movie that uses a camera shake. It is important to read the manual completely to take control of the camera. After Effects provides us with ready-made presets that we can quickly and easily. Here is a set of 5 camera shake presets that will help you create motion effects.
Normal Light 1
This preset gives you a light camera shake like a normal lens.
Resolution: 2K (2048x1080) and 4K (4096x2160)
Frame Rate: 29.97fps
Earthquake 1
This preset gives you a feel of camera shake, just like from an earthquake.
Resolution: 2K (2048x1080) and 4K (4096x2160)
Frame Rate: 29.97fps
Normal Heavy 1
This preset provides you with a feel of a heavy camera shake from a normal lens.
Resolution: 2K (2048x1080) and 4K (4096x2160)
Frame Rate: 29.97fps
Telephoto Light 1
This preset gives you an effect of light camera shake from a telephoto lens.
Resolution: 2K (2048x1080) and 4K (4096x2160)
Frame Rate: 29.97fp
Wide Heavy 1
You get a heavy camera shake from a wide lens with this preset.
Resolution: 2K (2048x1080) and 4K (4096x2160)
Frame Rate: 29.97fp
Conclusion
● We hope that this tutorial gave you some new ideas for making your videos more interesting for your audience. It’s easy to add camera shake to your videos in Adobe After Effects. It’s a matter of getting all the right details right—that means it’s a matter of knowing all the right settings and controls, which we detail above. With this information and a little practice, you’ll be able to add that cinematic flair to your video footage in no time.
So you’ve shot your video with good camera technique and shot it on a good camera; how can you make it look like you shot it on an old PXL 2000? Well, the answer is to add a little camera shake to the footage. If you’ve ever been to a theme park, then you’ve likely seen the effect of camera shake. Video camera shake can be a powerful tool for telling a story and creating an impactful scene. It helps to build suspense and make the video more realistic. This article will show you how to add camera shake to your videos using Adobe After Effects.
In this article
01 Why Do We Need To Add A Camera Shake Effect To The Video?
02 How to add camera shake to video in After Effects
03 Bonus! Camera Shake Presets for After Effects
Why Do We Need To Add A Camera Shake Effect To The Video?
Have you ever tried to add a simple camera shake effect to your videos? You know, those cool shake effects that you may have seen on an amateur or professional video on the web? Well, if you have, then you probably thought it was impossible. The camera shake effect is a technique applied to the clips where shaky camera movements cause the image to appear more cinematic and real. Applying a camera shake effect is to hide your flaws when shooting a video.
Camera shake is often mistaken for poor cinematography. It can enhance your video. For instance, if you’re filming something like a car chase or any other scene where there’s lots of movement and action, the inclusion of a camera shake can help make it more realistic.
A camera shake effect can be an excellent way of adding a sense of realism to your videos. Whether you’re making a video that’s meant to be taken as a real scene, such as one depicting a robbery, or one that’s supposed to be shot in a documentary style, such as making a movie, you can use this as an effective tool. You can consider adding camera shakes to your videos due to the following reasons:
- This camera shake effect makes your video more creative. If you want to make, your video different from those other businesses produce, adding this effect will be a good idea.
- Your audience will be able to relate better to your video if they’ve seen similar videos before.
- Adding a camera shake to your video will make it more interesting and engaging for your viewers.
- It’s a great way to mask any mistakes you might have made during the video production. After all, we aren’t perfect humans, so we can’t make perfect videos every time!”
- You can use camera shakes to simulate the feeling of being in an environment that is free from control (such as being on a boat).
- You can use them to create a sense of urgency for the viewer/audience by adding motion blur to the sequence.
How to add camera shake to video in After Effects
When it comes to video editing, knowing how to make a layer shake in After Effects is a very useful skill. Using it correctly can add subtle motion to a static frame, emphasize an important object, and even make a character quiver in fear! In this tutorial, you will learn how to effectively use the wiggle expression to affect a layer throughout the Composition.
Step 1. Select the layer you want to shake from your After Effects file
Suppose you have an image or video of an object and want to apply it to shake effect, then it is quite easy. Just follow the steps described below.

Step 2. Press the alt/option key, then click the stopwatch next to “position.”
You are adding an “expression” to the timeline when the position text turns red, and you begin typing. Using a coding language adapted from javascript, you can apply complex motion to layers.
By pressing the alt/option again on the stopwatch, you can edit your expression anytime-or by clicking the arrow beside “position” and then double-clicking the text in the timeline.

Step 3. Enter “Wiggle (3,8)” and adjust the settings accordingly
In this expression, the first number indicates the frequency of Wiggle – basically, how quickly it appears to tremble. Its amplitude is the second number, which indicates how far it moves. The numbers are adjustable as you wish. Layers will shake dramatically but slowly when they use Wiggle (2,40). The “Wiggle (10,3)” command makes a layer move quickly without too much movement in one direction.
Step 4. Adjust the frame rate of your Composition
In order to make the overall effect more “choppy,” you can reduce the frame rate of the video by going to Composition> Composition settings. After Effects uses a frame rate of 24.5, you can go as low as “8” if you want a choppy feel.

Your entire Composition will become choppier if you reduce the frame rate, so it might not be worth it if you have other moving elements in your Composition. Only adjust the frame rate of the layer containing the wiggling object if you want it to affect that layer.
Bonus! Camera Shake Presets for After Effects
Working with After Effects, you will have to shoot a movie that uses a camera shake. It is important to read the manual completely to take control of the camera. After Effects provides us with ready-made presets that we can quickly and easily. Here is a set of 5 camera shake presets that will help you create motion effects.
Normal Light 1
This preset gives you a light camera shake like a normal lens.
Resolution: 2K (2048x1080) and 4K (4096x2160)
Frame Rate: 29.97fps
Earthquake 1
This preset gives you a feel of camera shake, just like from an earthquake.
Resolution: 2K (2048x1080) and 4K (4096x2160)
Frame Rate: 29.97fps
Normal Heavy 1
This preset provides you with a feel of a heavy camera shake from a normal lens.
Resolution: 2K (2048x1080) and 4K (4096x2160)
Frame Rate: 29.97fps
Telephoto Light 1
This preset gives you an effect of light camera shake from a telephoto lens.
Resolution: 2K (2048x1080) and 4K (4096x2160)
Frame Rate: 29.97fp
Wide Heavy 1
You get a heavy camera shake from a wide lens with this preset.
Resolution: 2K (2048x1080) and 4K (4096x2160)
Frame Rate: 29.97fp
Conclusion
● We hope that this tutorial gave you some new ideas for making your videos more interesting for your audience. It’s easy to add camera shake to your videos in Adobe After Effects. It’s a matter of getting all the right details right—that means it’s a matter of knowing all the right settings and controls, which we detail above. With this information and a little practice, you’ll be able to add that cinematic flair to your video footage in no time.
So you’ve shot your video with good camera technique and shot it on a good camera; how can you make it look like you shot it on an old PXL 2000? Well, the answer is to add a little camera shake to the footage. If you’ve ever been to a theme park, then you’ve likely seen the effect of camera shake. Video camera shake can be a powerful tool for telling a story and creating an impactful scene. It helps to build suspense and make the video more realistic. This article will show you how to add camera shake to your videos using Adobe After Effects.
In this article
01 Why Do We Need To Add A Camera Shake Effect To The Video?
02 How to add camera shake to video in After Effects
03 Bonus! Camera Shake Presets for After Effects
Why Do We Need To Add A Camera Shake Effect To The Video?
Have you ever tried to add a simple camera shake effect to your videos? You know, those cool shake effects that you may have seen on an amateur or professional video on the web? Well, if you have, then you probably thought it was impossible. The camera shake effect is a technique applied to the clips where shaky camera movements cause the image to appear more cinematic and real. Applying a camera shake effect is to hide your flaws when shooting a video.
Camera shake is often mistaken for poor cinematography. It can enhance your video. For instance, if you’re filming something like a car chase or any other scene where there’s lots of movement and action, the inclusion of a camera shake can help make it more realistic.
A camera shake effect can be an excellent way of adding a sense of realism to your videos. Whether you’re making a video that’s meant to be taken as a real scene, such as one depicting a robbery, or one that’s supposed to be shot in a documentary style, such as making a movie, you can use this as an effective tool. You can consider adding camera shakes to your videos due to the following reasons:
- This camera shake effect makes your video more creative. If you want to make, your video different from those other businesses produce, adding this effect will be a good idea.
- Your audience will be able to relate better to your video if they’ve seen similar videos before.
- Adding a camera shake to your video will make it more interesting and engaging for your viewers.
- It’s a great way to mask any mistakes you might have made during the video production. After all, we aren’t perfect humans, so we can’t make perfect videos every time!”
- You can use camera shakes to simulate the feeling of being in an environment that is free from control (such as being on a boat).
- You can use them to create a sense of urgency for the viewer/audience by adding motion blur to the sequence.
How to add camera shake to video in After Effects
When it comes to video editing, knowing how to make a layer shake in After Effects is a very useful skill. Using it correctly can add subtle motion to a static frame, emphasize an important object, and even make a character quiver in fear! In this tutorial, you will learn how to effectively use the wiggle expression to affect a layer throughout the Composition.
Step 1. Select the layer you want to shake from your After Effects file
Suppose you have an image or video of an object and want to apply it to shake effect, then it is quite easy. Just follow the steps described below.

Step 2. Press the alt/option key, then click the stopwatch next to “position.”
You are adding an “expression” to the timeline when the position text turns red, and you begin typing. Using a coding language adapted from javascript, you can apply complex motion to layers.
By pressing the alt/option again on the stopwatch, you can edit your expression anytime-or by clicking the arrow beside “position” and then double-clicking the text in the timeline.

Step 3. Enter “Wiggle (3,8)” and adjust the settings accordingly
In this expression, the first number indicates the frequency of Wiggle – basically, how quickly it appears to tremble. Its amplitude is the second number, which indicates how far it moves. The numbers are adjustable as you wish. Layers will shake dramatically but slowly when they use Wiggle (2,40). The “Wiggle (10,3)” command makes a layer move quickly without too much movement in one direction.
Step 4. Adjust the frame rate of your Composition
In order to make the overall effect more “choppy,” you can reduce the frame rate of the video by going to Composition> Composition settings. After Effects uses a frame rate of 24.5, you can go as low as “8” if you want a choppy feel.

Your entire Composition will become choppier if you reduce the frame rate, so it might not be worth it if you have other moving elements in your Composition. Only adjust the frame rate of the layer containing the wiggling object if you want it to affect that layer.
Bonus! Camera Shake Presets for After Effects
Working with After Effects, you will have to shoot a movie that uses a camera shake. It is important to read the manual completely to take control of the camera. After Effects provides us with ready-made presets that we can quickly and easily. Here is a set of 5 camera shake presets that will help you create motion effects.
Normal Light 1
This preset gives you a light camera shake like a normal lens.
Resolution: 2K (2048x1080) and 4K (4096x2160)
Frame Rate: 29.97fps
Earthquake 1
This preset gives you a feel of camera shake, just like from an earthquake.
Resolution: 2K (2048x1080) and 4K (4096x2160)
Frame Rate: 29.97fps
Normal Heavy 1
This preset provides you with a feel of a heavy camera shake from a normal lens.
Resolution: 2K (2048x1080) and 4K (4096x2160)
Frame Rate: 29.97fps
Telephoto Light 1
This preset gives you an effect of light camera shake from a telephoto lens.
Resolution: 2K (2048x1080) and 4K (4096x2160)
Frame Rate: 29.97fp
Wide Heavy 1
You get a heavy camera shake from a wide lens with this preset.
Resolution: 2K (2048x1080) and 4K (4096x2160)
Frame Rate: 29.97fp
Conclusion
● We hope that this tutorial gave you some new ideas for making your videos more interesting for your audience. It’s easy to add camera shake to your videos in Adobe After Effects. It’s a matter of getting all the right details right—that means it’s a matter of knowing all the right settings and controls, which we detail above. With this information and a little practice, you’ll be able to add that cinematic flair to your video footage in no time.
So you’ve shot your video with good camera technique and shot it on a good camera; how can you make it look like you shot it on an old PXL 2000? Well, the answer is to add a little camera shake to the footage. If you’ve ever been to a theme park, then you’ve likely seen the effect of camera shake. Video camera shake can be a powerful tool for telling a story and creating an impactful scene. It helps to build suspense and make the video more realistic. This article will show you how to add camera shake to your videos using Adobe After Effects.
In this article
01 Why Do We Need To Add A Camera Shake Effect To The Video?
02 How to add camera shake to video in After Effects
03 Bonus! Camera Shake Presets for After Effects
Why Do We Need To Add A Camera Shake Effect To The Video?
Have you ever tried to add a simple camera shake effect to your videos? You know, those cool shake effects that you may have seen on an amateur or professional video on the web? Well, if you have, then you probably thought it was impossible. The camera shake effect is a technique applied to the clips where shaky camera movements cause the image to appear more cinematic and real. Applying a camera shake effect is to hide your flaws when shooting a video.
Camera shake is often mistaken for poor cinematography. It can enhance your video. For instance, if you’re filming something like a car chase or any other scene where there’s lots of movement and action, the inclusion of a camera shake can help make it more realistic.
A camera shake effect can be an excellent way of adding a sense of realism to your videos. Whether you’re making a video that’s meant to be taken as a real scene, such as one depicting a robbery, or one that’s supposed to be shot in a documentary style, such as making a movie, you can use this as an effective tool. You can consider adding camera shakes to your videos due to the following reasons:
- This camera shake effect makes your video more creative. If you want to make, your video different from those other businesses produce, adding this effect will be a good idea.
- Your audience will be able to relate better to your video if they’ve seen similar videos before.
- Adding a camera shake to your video will make it more interesting and engaging for your viewers.
- It’s a great way to mask any mistakes you might have made during the video production. After all, we aren’t perfect humans, so we can’t make perfect videos every time!”
- You can use camera shakes to simulate the feeling of being in an environment that is free from control (such as being on a boat).
- You can use them to create a sense of urgency for the viewer/audience by adding motion blur to the sequence.
How to add camera shake to video in After Effects
When it comes to video editing, knowing how to make a layer shake in After Effects is a very useful skill. Using it correctly can add subtle motion to a static frame, emphasize an important object, and even make a character quiver in fear! In this tutorial, you will learn how to effectively use the wiggle expression to affect a layer throughout the Composition.
Step 1. Select the layer you want to shake from your After Effects file
Suppose you have an image or video of an object and want to apply it to shake effect, then it is quite easy. Just follow the steps described below.

Step 2. Press the alt/option key, then click the stopwatch next to “position.”
You are adding an “expression” to the timeline when the position text turns red, and you begin typing. Using a coding language adapted from javascript, you can apply complex motion to layers.
By pressing the alt/option again on the stopwatch, you can edit your expression anytime-or by clicking the arrow beside “position” and then double-clicking the text in the timeline.

Step 3. Enter “Wiggle (3,8)” and adjust the settings accordingly
In this expression, the first number indicates the frequency of Wiggle – basically, how quickly it appears to tremble. Its amplitude is the second number, which indicates how far it moves. The numbers are adjustable as you wish. Layers will shake dramatically but slowly when they use Wiggle (2,40). The “Wiggle (10,3)” command makes a layer move quickly without too much movement in one direction.
Step 4. Adjust the frame rate of your Composition
In order to make the overall effect more “choppy,” you can reduce the frame rate of the video by going to Composition> Composition settings. After Effects uses a frame rate of 24.5, you can go as low as “8” if you want a choppy feel.

Your entire Composition will become choppier if you reduce the frame rate, so it might not be worth it if you have other moving elements in your Composition. Only adjust the frame rate of the layer containing the wiggling object if you want it to affect that layer.
Bonus! Camera Shake Presets for After Effects
Working with After Effects, you will have to shoot a movie that uses a camera shake. It is important to read the manual completely to take control of the camera. After Effects provides us with ready-made presets that we can quickly and easily. Here is a set of 5 camera shake presets that will help you create motion effects.
Normal Light 1
This preset gives you a light camera shake like a normal lens.
Resolution: 2K (2048x1080) and 4K (4096x2160)
Frame Rate: 29.97fps
Earthquake 1
This preset gives you a feel of camera shake, just like from an earthquake.
Resolution: 2K (2048x1080) and 4K (4096x2160)
Frame Rate: 29.97fps
Normal Heavy 1
This preset provides you with a feel of a heavy camera shake from a normal lens.
Resolution: 2K (2048x1080) and 4K (4096x2160)
Frame Rate: 29.97fps
Telephoto Light 1
This preset gives you an effect of light camera shake from a telephoto lens.
Resolution: 2K (2048x1080) and 4K (4096x2160)
Frame Rate: 29.97fp
Wide Heavy 1
You get a heavy camera shake from a wide lens with this preset.
Resolution: 2K (2048x1080) and 4K (4096x2160)
Frame Rate: 29.97fp
Conclusion
● We hope that this tutorial gave you some new ideas for making your videos more interesting for your audience. It’s easy to add camera shake to your videos in Adobe After Effects. It’s a matter of getting all the right details right—that means it’s a matter of knowing all the right settings and controls, which we detail above. With this information and a little practice, you’ll be able to add that cinematic flair to your video footage in no time.
Looking for the Best Quiz-Making Tools? Read Our Full Review to Find Out the 10 Best Video Quiz Makers Available
Nowadays, quiz videos are frequently used in different scenarios, such as business education, academic research, and social media, as they play an essential role in teaching, presenting, and covering many other aspects.
But how to make quiz videos for YouTube? To answer this, we’ve provided a list of the 10 best YouTube video quiz makers.
Let’s get started with our review without any further delay!
Part I. 4 Tips To Make A Quiz Video
Here are three tips to help you make a quiz video that will engage your audience and get them to participate.
1. The Order Of Quiz Questions
The first tip is to make sure you order your quiz questions correctly. You don’t want to start with the easy ones and then gradually get harder - this will make your quiz too easy and boring.
Instead, start with the most challenging questions and then work your way down to keep your audience engaged and challenged throughout the video.
2. Valid bases for questions
Make sure you have a valid basis for your questions. This means researching and ensuring that they are based on factual information.
3. Clear questions and answers
Keep your questions short, to the point, clear, and grammatically correct. Also, avoid jargon, slang, or “trick” questions in your quiz designed to trip up your viewers. This will help ensure that your audience understands them and can answer correctly.
4. Check out the final work
Always ensure that you check your final work before posting it on YouTube. Avoid misspelled characters or confusing sentences, and add an element of fun to make your quiz interesting.
Part II. Best 3 Quiz Video Makers On Desktops
Here are the 3 best YouTube video quiz makers available for desktops that can help you make exciting quizzes every time:
1.Camtasia
Price: US$299.99 per user.
Support System: Windows and macOS
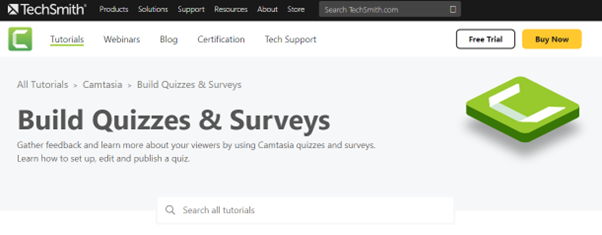
Camtasia is an all-in-one video editor and screen recorder that can enable you to create fun and engaging quizzes on your Windows or Mac system. You can use this software to test viewer knowledge, gauge interest in a topic, or collect grades using unlimited surveys, true/false, or other types of content.
Pros
- Offers 30 answers per question
- Provides quiz scores through Camtasia Quiz Service
- Supports grading or upgrading the quiz
- Unlimited surveys, fill-in-the-blanks, and questions
- Easy to use
Cons
- Extremely expensive
2.Kaltura
Price: Free trial and quote-based pricing plan
Support System: Chrome, Safari, iOS, and Android
With Kaltura, founded by Ron Yekutiel, you can enhance your educational videos by adding a quiz to improve the learning experience. The platform also allows you to measure the participants’ understanding/interest and assess their comprehension through grade book integration.

Pros
- Easy-to-use creator interface
- Enable you to create quizzes in multiple formats, including true/false, MCQs, and reflection points
- Features mobile playback
- Can record from PowerPoint and webcam simultaneously
- Integrated with the Kaltura video player
- Supports unlimited questions
Cons
- Customer support is not up to the par
3.iSpring QuizMaker
Price: 14 days free trial and $370/year
Support System: Windows
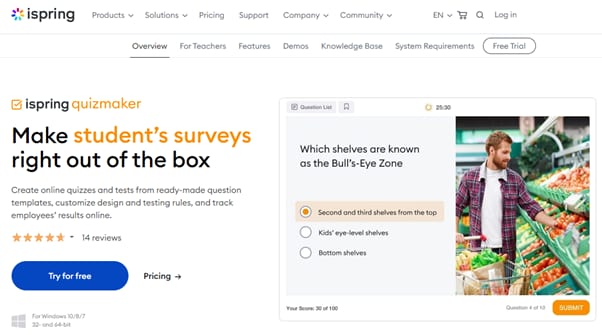
iSpring QuizMaker is a powerful and easy-to-use desktop video quiz maker that lets you quickly design graded quizzes and surveys. With its intuitive interface, both professionals and newbies can create assessments with multiple question types, add multimedia, and randomize questions that can be published to LMS or the web.
Pros
- Lets you add media files to the quiz
- Excellent UI and easy-to-use
- Can publish to mobile-ready HTML5 content
- Compatible with most LMS systems
- Works with PowerPoint interface
Cons
- Only available for Windows
Part III. Best 7 Online Quiz Video Makers
Compared with desktop software programs, online quiz video makers are more convenient and can be accessed on multiple devices such as Windows PC, Mac System, iOS, and Android devices.
Therefore, we’ve compiled a list of the 7 best online video quiz makers to help you pick one that best suits your questioning requirements.
1. Drimify
Price: $119/per application and $179 per month
Priced at $119 per application, Drimify is an interactive HTML5 content-creation platform offering robust video quiz-making capabilities. The tool is super easy-to-use and helps you create, integrate, and share quizzes within minutes.

Pros
- Offers all forms of interactive formats to create quizzes, surveys, and personality tests
- Lets you analyze your quiz stats
- Supports data export
- Rated as 4.9 on Capterra
- Free demos are available
Cons
- Not much customizable
2.EducaPlay
Price: Free and 4.00 ERU per month
EducaPlay - a free educational games-generating web platform where you can quickly design quizzes with multiple choice, true/false, and fill-in-the-blank questions. You can also add images, videos, and audio to your assessments to make them more engaging.

Pros
- Free to use
- Can create educational games
- Supports map quizzes, video quizzes, and riddles
- Affordable pricing plan
- Easy integration with Google Classroom, Microsoft Team, and Canvas
Cons
- Some features are limited in their use
3.Flexclip
Price: Free
Flexclip is a robust online video editor that offers a free video quiz maker, having stylish fonts, text overlays, royalty-free stock images, backgrounds, and preset video quiz templates for you to use.
To create a quiz, you only need to follow three main steps: Add a media file, customize the content, and finally, export your file in various formats or share it online directly.

Pros
- Free to use
- Intuitive user interface
- Quick file export and sharing feature
- Extensive media library and preset templates
- Text animations and overlays
Cons
- Offers only basic editing tools
4.Edpuzzle
Price: 100% free for students and teachers
Making quizzes was never as simple and easy before as with the Edpuzzle platform. This free assessment-centered web tool lets you create interactive video quizzes that can be quickly integrated into the LMS or shared online.

Pros
- Free to use
- Quickly integrates with LMS
- Flexible and self-paced
- Data-driven and provides instant feedback on responses
Cons
- Experiences glitches while integrating with Canvas
5.Panopto
Price: Free and $14.99/month
Panopto is trusted by several universities and other educational institutes for designing educational content. This online tool offers video content management, visual classrooms, video accessibility, screen recording, video editing, and interactive online video quiz-making capabilities.

Pros
- Interactive and flexible quizzes
- Lets you create MCQs, true/false, and checkboxes
- Has an excellent online video editor
- Quick and simple configuration
- Instant assessment feedback
Cons
- Confusing interface for beginners
6.Canva
Price: Free
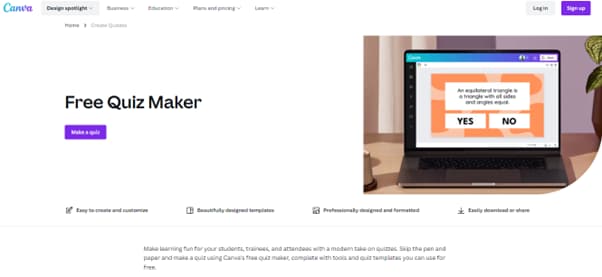
Creating quizzes with Canva is simple and easy because the platform offers a wide range of templates, simple customization tools, royalty-free images, and other media files, as well as various text styles and fonts. Furthermore, you can quickly export and share your quiz file in different formats.
Pros
- Free and easy-to-use
- Professionally designed templates
- Highly customizable
- Royalty-free media files, stickers, and graphics
- Available for desktop and smartphones
Cons
- Adds a watermark to some files
7.Flexiquiz
Price: Free, paid plans start from $180/year
FlexiQuiz is a cloud-based solution for creating, sharing, and grading quizzes in one app. The platform offers auto-grading, test scheduling, powerful reports, timed test, and many more robust features.

Pros
- Real-time powerful results and live analytics
- Automatically quiz assign completion certificate
- Access from anywhere
- Offers public and private tests
- Comes with advanced configuration options
Cons
- Some features are limited in the free version
Bonus Tips: How To Make A General Knowledge Quiz Video In Filmora?
Do you want to add a little extra excitement to your quiz videos with more effects and animations? We’ll recommend using Wondershare Filmora to enhance your content.
Free Download For Win 7 or later(64-bit)
Free Download For macOS 10.14 or later
Here’s a complete step-by-step guide to using Filmora to make a general knowledge quiz video:
Step1 Upload Your Materials
Gather your quiz questions and answers and launch the Filmora software on your PC/laptop. Click “Create New Project,” upload your video and drop it in the timeline.

Step2 Make An Intro
Now, to create an intro, select the template you want from the “Media” tab and drop it in the timeline. Go to the “Titles” tab, select and drop the text style in the timeline.
Click the titles track in the timeline, add the intro text telling the audience your quiz’s topic, and set the text color and font. Click “OK” to apply the changes.
Step3 Add A Quiz To The Timeline
Next, use the “Titles” tab to start adding questions and answers to the quiz background video, and make sure to adjust the display time.

Step4 Increase Interactivity In Your Quiz Video
Head to the “Transition” tab and add an effect to your video for a smooth transition. You can also add animations, effects, and countdown elements to make your quiz more engaging.
Step5 Repeat The Process And Export Your Final Video
Repeat the process until you complete creating your quiz and click the “Export” icon. You can save the file on your device or export it directly to your YouTube channel.
Conclusion
In this guide, we’ve provided a comprehensive review of the 3 best desktop video quiz makers and the 7 best online quiz tools. We’ve discussed what they are, their prices, pros, and cons to assist you in selecting the best one.
We’ve also recommended Filmora to enhance your quiz videos and add an extra flair to keep your audience interested until the end.
Hopefully, you’ve enjoyed reading this review and can now decide which software program or online tool to create interactive quiz videos.
- Drimify
- EducaPlay
- Flexclip
- Edpuzzle
- Panopto
- Canva
- Flexiquiz
- Bonus Tips: How To Make A General Knowledge Quiz Video In Filmora?
Part I. 4 Tips To Make A Quiz Video
Here are three tips to help you make a quiz video that will engage your audience and get them to participate.
1. The Order Of Quiz Questions
The first tip is to make sure you order your quiz questions correctly. You don’t want to start with the easy ones and then gradually get harder - this will make your quiz too easy and boring.
Instead, start with the most challenging questions and then work your way down to keep your audience engaged and challenged throughout the video.
2. Valid bases for questions
Make sure you have a valid basis for your questions. This means researching and ensuring that they are based on factual information.
3. Clear questions and answers
Keep your questions short, to the point, clear, and grammatically correct. Also, avoid jargon, slang, or “trick” questions in your quiz designed to trip up your viewers. This will help ensure that your audience understands them and can answer correctly.
4. Check out the final work
Always ensure that you check your final work before posting it on YouTube. Avoid misspelled characters or confusing sentences, and add an element of fun to make your quiz interesting.
Part II. Best 3 Quiz Video Makers On Desktops
Here are the 3 best YouTube video quiz makers available for desktops that can help you make exciting quizzes every time:
1.Camtasia
Price: US$299.99 per user.
Support System: Windows and macOS
Camtasia is an all-in-one video editor and screen recorder that can enable you to create fun and engaging quizzes on your Windows or Mac system. You can use this software to test viewer knowledge, gauge interest in a topic, or collect grades using unlimited surveys, true/false, or other types of content.

Pros
- Offers 30 answers per question
- Provides quiz scores through Camtasia Quiz Service
- Supports grading or upgrading the quiz
- Unlimited surveys, fill-in-the-blanks, and questions
- Easy to use
Cons
- Extremely expensive
2.Kaltura
Price: Free trial and quote-based pricing plan
Support System: Chrome, Safari, iOS, and Android
With Kaltura, founded by Ron Yekutiel, you can enhance your educational videos by adding a quiz to improve the learning experience. The platform also allows you to measure the participants’ understanding/interest and assess their comprehension through grade book integration.

Pros
- Easy-to-use creator interface
- Enable you to create quizzes in multiple formats, including true/false, MCQs, and reflection points
- Features mobile playback
- Can record from PowerPoint and webcam simultaneously
- Integrated with the Kaltura video player
- Supports unlimited questions
Cons
- Customer support is not up to the par
3.iSpring QuizMaker
Price: 14 days free trial and $370/year
Support System: Windows
iSpring QuizMaker is a powerful and easy-to-use desktop video quiz maker that lets you quickly design graded quizzes and surveys. With its intuitive interface, both professionals and newbies can create assessments with multiple question types, add multimedia, and randomize questions that can be published to LMS or the web.

Pros
- Lets you add media files to the quiz
- Excellent UI and easy-to-use
- Can publish to mobile-ready HTML5 content
- Compatible with most LMS systems
- Works with PowerPoint interface
Cons
- Only available for Windows
Part III. Best 7 Online Quiz Video Makers
Compared with desktop software programs, online quiz video makers are more convenient and can be accessed on multiple devices such as Windows PC, Mac System, iOS, and Android devices.
Therefore, we’ve compiled a list of the 7 best online video quiz makers to help you pick one that best suits your questioning requirements.
1. Drimify
Price: $119/per application and $179 per month
Priced at $119 per application, Drimify is an interactive HTML5 content-creation platform offering robust video quiz-making capabilities. The tool is super easy-to-use and helps you create, integrate, and share quizzes within minutes.

Pros
- Offers all forms of interactive formats to create quizzes, surveys, and personality tests
- Lets you analyze your quiz stats
- Supports data export
- Rated as 4.9 on Capterra
- Free demos are available
Cons
- Not much customizable
2.EducaPlay
Price: Free and 4.00 ERU per month
EducaPlay - a free educational games-generating web platform where you can quickly design quizzes with multiple choice, true/false, and fill-in-the-blank questions. You can also add images, videos, and audio to your assessments to make them more engaging.

Pros
- Free to use
- Can create educational games
- Supports map quizzes, video quizzes, and riddles
- Affordable pricing plan
- Easy integration with Google Classroom, Microsoft Team, and Canvas
Cons
- Some features are limited in their use
3.Flexclip
Price: Free
Flexclip is a robust online video editor that offers a free video quiz maker, having stylish fonts, text overlays, royalty-free stock images, backgrounds, and preset video quiz templates for you to use.
To create a quiz, you only need to follow three main steps: Add a media file, customize the content, and finally, export your file in various formats or share it online directly.

Pros
- Free to use
- Intuitive user interface
- Quick file export and sharing feature
- Extensive media library and preset templates
- Text animations and overlays
Cons
- Offers only basic editing tools
4.Edpuzzle
Price: 100% free for students and teachers
Making quizzes was never as simple and easy before as with the Edpuzzle platform. This free assessment-centered web tool lets you create interactive video quizzes that can be quickly integrated into the LMS or shared online.

Pros
- Free to use
- Quickly integrates with LMS
- Flexible and self-paced
- Data-driven and provides instant feedback on responses
Cons
- Experiences glitches while integrating with Canvas
5.Panopto
Price: Free and $14.99/month
Panopto is trusted by several universities and other educational institutes for designing educational content. This online tool offers video content management, visual classrooms, video accessibility, screen recording, video editing, and interactive online video quiz-making capabilities.

Pros
- Interactive and flexible quizzes
- Lets you create MCQs, true/false, and checkboxes
- Has an excellent online video editor
- Quick and simple configuration
- Instant assessment feedback
Cons
- Confusing interface for beginners
6.Canva
Price: Free
Creating quizzes with Canva is simple and easy because the platform offers a wide range of templates, simple customization tools, royalty-free images, and other media files, as well as various text styles and fonts. Furthermore, you can quickly export and share your quiz file in different formats.

Pros
- Free and easy-to-use
- Professionally designed templates
- Highly customizable
- Royalty-free media files, stickers, and graphics
- Available for desktop and smartphones
Cons
- Adds a watermark to some files
7.Flexiquiz
Price: Free, paid plans start from $180/year
FlexiQuiz is a cloud-based solution for creating, sharing, and grading quizzes in one app. The platform offers auto-grading, test scheduling, powerful reports, timed test, and many more robust features.

Pros
- Real-time powerful results and live analytics
- Automatically quiz assign completion certificate
- Access from anywhere
- Offers public and private tests
- Comes with advanced configuration options
Cons
- Some features are limited in the free version
Bonus Tips: How To Make A General Knowledge Quiz Video In Filmora?
Do you want to add a little extra excitement to your quiz videos with more effects and animations? We’ll recommend using Wondershare Filmora to enhance your content.
Free Download For Win 7 or later(64-bit)
Free Download For macOS 10.14 or later
Here’s a complete step-by-step guide to using Filmora to make a general knowledge quiz video:
Step1 Upload Your Materials
Gather your quiz questions and answers and launch the Filmora software on your PC/laptop. Click “Create New Project,” upload your video and drop it in the timeline.

Step2 Make An Intro
Now, to create an intro, select the template you want from the “Media” tab and drop it in the timeline. Go to the “Titles” tab, select and drop the text style in the timeline.
Click the titles track in the timeline, add the intro text telling the audience your quiz’s topic, and set the text color and font. Click “OK” to apply the changes.
Step3 Add A Quiz To The Timeline
Next, use the “Titles” tab to start adding questions and answers to the quiz background video, and make sure to adjust the display time.

Step4 Increase Interactivity In Your Quiz Video
Head to the “Transition” tab and add an effect to your video for a smooth transition. You can also add animations, effects, and countdown elements to make your quiz more engaging.
Step5 Repeat The Process And Export Your Final Video
Repeat the process until you complete creating your quiz and click the “Export” icon. You can save the file on your device or export it directly to your YouTube channel.
Conclusion
In this guide, we’ve provided a comprehensive review of the 3 best desktop video quiz makers and the 7 best online quiz tools. We’ve discussed what they are, their prices, pros, and cons to assist you in selecting the best one.
We’ve also recommended Filmora to enhance your quiz videos and add an extra flair to keep your audience interested until the end.
Hopefully, you’ve enjoyed reading this review and can now decide which software program or online tool to create interactive quiz videos.
How to Make a Super Easy Rotating Video Effect
Controlling camera direction to the subject’s hands and filming is trending nowadays. Create this effect by using easy film hacks, as shown in this article.
Many users make rotating illusion videos for TikTok or any branding video. The foremost items to record are explained in this article with detailed instructions. The best editing tool is also clarified below for instant results. So keep reading to get a hand with filming and editing a professional rotating transition video!
Part 1. What is a Rotating Video Illusion/Effect
Rotating transition video is a trending feature used by models and influencers. The brands also use this style to record the model’s videos in advertisements. It could be any makeup transition or clothing transition video.

It helps to indulge the audience with your content and show the after and before transitions. You can try this with any object or any character. But first, let’s figure out the requirements for rotating effects.
Part 2. Prerequisites to Make a Rotating Video Effect
You will need a few items to create a rotating transition video. First, look at the fundamental priorities for creating this feature.
The Subject Matters
To record a successful rotating video, you need a person or a subject to perform in front of the camera. It can be a model hired by a brand, a social influencer, or maybe it’s you. Keep in mind the following things before recording:
- The person should get two different costumes.
- All the actions need to be rehearsed before shooting
- Show affinity and control of the camera.

Shotting Equipment
To record a professional video, you need a good camera. You can use a smartphone to record this footage. There is no need to have a tripod stand or any gear to hold the camera because the camera will be in a rotating position, the same as the subject’s hand.
For this, you need a filmmaker or any person living with you. Just give instructions as shown below to him to record a perfect video for yourself:
- Record the whole video in just one direction.
- Don’t shake the camera because it gives blurry footage.
- Ensure to focus on the subject during recording.
- Don’t zoom in or out while recording the video.
- Keep the subject in the middle of the frame during the recording process.
- The hand rotation timing is the same as the camera’s rotation.
![]()
Note: Ensure to record one footage multiple times so that you can choose the perfect one later for editing.

Filming of the First Footage
To make the footage for the rotating video illusion, we have to record it at least twice to get crystal clear and high-resolution results. Therefore, ensure that we have camera movement in the same direction during all recording times.
![]()
Note: You can film the video either in the vertical format of the camera or in horizontal format. It all depends upon your script!
Follow the below-mentioned steps to record the first footage for the video:
- Hold the camera in a perfect format, whatever you choose.
- Let the subject stand or sit in the middle of the frame.
- The filmmaker can rotate the camera when the subject’s hand rotates.
- Try your best to rotate the camera 180 degrees.
- Ensure that the camera lens faces the ground at the end of the rotation.

After filming the first footage for the video, it’s time to record the second footage to transition between the two.
Filming of the Second Footage
To create a second shot, you have to remember that the costume and location of the filming are different from the first footage. Follow the below steps to record it:
- The first step is to hold the camera in the same direction as the first footage.
- When editing, make sure the subject’s position matches the first footage.
- Make sure the subject’s hand movement is in the opposite direction from the first shot.

Now you have both scenes and footage ready. Next, you have to edit them by inserting them into editing software. Follow the step guides below to perform this action!
Part 3. Step-by-Step Guide to Edit on Filmora
To create a professional rotating video illusion, Wondershare Filmora is an ideal tool. Even beginners can quickly get the hang of it due to its highly engaging system user interface (UI). You will discover how to create a rotating video effect in a few clicks.
Free Download For Win 7 or later(64-bit)
Free Download For macOS 10.14 or later

Step1 Download Wondershare Filmora
To edit your video like a pro, download the most recent version of Wondershare Filmora.
- Download and open Wondershare Filmora on your PC or Mac.
Step2 Import the Footage
Import recorded footage to start the editing process. It is better to have all your footage in one folder before importing all the clips. The main import window locates in the upper left corner when it is first launched.
- Click on the Import icon in the import window’s center.
- Wondershare Filmora will then immediately point you toward your PC
- Navigate to the location where your preferred Videos and Photos are kept.
- Choose every footage you wish to import.
- Once you click Open, the files will import.

It’s time to prepare the footage for editing after inserting it into the Filmora. Follow the next steps to do this!
Step3 Add Footage to the Timeline
The videos you’ve imported will be added to the timeline after that. You can import both footages at once and put them all at once into the timeline.
Alternatively, you can add them one at a time as needed. Follow the procedures as shown to add an item to your timeline.
- To choose a photo or movie, use the right-click
- Holding the Right-click, and move it to the timeline from the bottom.

Your images and videos have been imported into the timeline; now it’s time to trim them according to requirements.
Step4 Trim the Clips
To insert transition effects, you must trim the clip at a specific point and speed up the clip at the required duration. For this, follow the next actions as shown below:
- Playback clips and stop the playhead where you want by pressing the Space button from the Keyboard.
- Then, click on the Split icon present on the playhead.
- It will trim the clip from that point and separate it from its former one.

After splitting or trimming the clips, you now have to adjust the speed of the clips, as shown below!
Step5 Adjust Speed and Duration
There is a need to increase the speed of some scenes where the transition starts or ends. For this, follow the below actions:
- Find the section which needs to speed up, such as in the last half of each rotation.
- Right-click on the section of the clip in the timeline.
- Then, select the Speed option as shown in the icon of the timer present on the upper tab of the timeline.
- Select the Fast option, and if you want to lower the speed, select the Slow option**.**
- Choose the speed range according to your requirement.
- Select that required option and play it back to check if it is correct.

The video is all set; give it the final touches by following the last step, as shown below!
Step6 Playback the Video
After adding and adjusting all the features, double-check the video by playback. If you find any duration issue, review it and adjust it according to your requirement.
You can playback the video by clicking on the Play button. Perform this a few more times to ensure the speed looks okay and adjust if it is too slow or too fast.

You can also view it in full screen by selecting the last option on the tab. If there is no problem, you can export it locally or directly share it on TikTok or anywhere you want to gain views and attract an audience. You can also use it as a magic trick to inspire other people or as a transition for videos!
Conclusion
Keep creating and experimenting with other features on Wondershare Filmora. For example, you can use different effects, try on stock media, and then create or film your own. In this way, you’ll get professional results.
If you are showing new strategies daily to your viewers, they will hook up with you, and it’ll assist in the algorithm working by your side. That’s why keep doing it and enjoying the rest!

Filming of the First Footage
To make the footage for the rotating video illusion, we have to record it at least twice to get crystal clear and high-resolution results. Therefore, ensure that we have camera movement in the same direction during all recording times.
![]()
Note: You can film the video either in the vertical format of the camera or in horizontal format. It all depends upon your script!
Follow the below-mentioned steps to record the first footage for the video:
- Hold the camera in a perfect format, whatever you choose.
- Let the subject stand or sit in the middle of the frame.
- The filmmaker can rotate the camera when the subject’s hand rotates.
- Try your best to rotate the camera 180 degrees.
- Ensure that the camera lens faces the ground at the end of the rotation.

After filming the first footage for the video, it’s time to record the second footage to transition between the two.
Filming of the Second Footage
To create a second shot, you have to remember that the costume and location of the filming are different from the first footage. Follow the below steps to record it:
- The first step is to hold the camera in the same direction as the first footage.
- When editing, make sure the subject’s position matches the first footage.
- Make sure the subject’s hand movement is in the opposite direction from the first shot.

Now you have both scenes and footage ready. Next, you have to edit them by inserting them into editing software. Follow the step guides below to perform this action!
Part 3. Step-by-Step Guide to Edit on Filmora
To create a professional rotating video illusion, Wondershare Filmora is an ideal tool. Even beginners can quickly get the hang of it due to its highly engaging system user interface (UI). You will discover how to create a rotating video effect in a few clicks.
Free Download For Win 7 or later(64-bit)
Free Download For macOS 10.14 or later

Step1 Download Wondershare Filmora
To edit your video like a pro, download the most recent version of Wondershare Filmora.
- Download and open Wondershare Filmora on your PC or Mac.
Step2 Import the Footage
Import recorded footage to start the editing process. It is better to have all your footage in one folder before importing all the clips. The main import window locates in the upper left corner when it is first launched.
- Click on the Import icon in the import window’s center.
- Wondershare Filmora will then immediately point you toward your PC
- Navigate to the location where your preferred Videos and Photos are kept.
- Choose every footage you wish to import.
- Once you click Open, the files will import.

It’s time to prepare the footage for editing after inserting it into the Filmora. Follow the next steps to do this!
Step3 Add Footage to the Timeline
The videos you’ve imported will be added to the timeline after that. You can import both footages at once and put them all at once into the timeline.
Alternatively, you can add them one at a time as needed. Follow the procedures as shown to add an item to your timeline.
- To choose a photo or movie, use the right-click
- Holding the Right-click, and move it to the timeline from the bottom.

Your images and videos have been imported into the timeline; now it’s time to trim them according to requirements.
Step4 Trim the Clips
To insert transition effects, you must trim the clip at a specific point and speed up the clip at the required duration. For this, follow the next actions as shown below:
- Playback clips and stop the playhead where you want by pressing the Space button from the Keyboard.
- Then, click on the Split icon present on the playhead.
- It will trim the clip from that point and separate it from its former one.

After splitting or trimming the clips, you now have to adjust the speed of the clips, as shown below!
Step5 Adjust Speed and Duration
There is a need to increase the speed of some scenes where the transition starts or ends. For this, follow the below actions:
- Find the section which needs to speed up, such as in the last half of each rotation.
- Right-click on the section of the clip in the timeline.
- Then, select the Speed option as shown in the icon of the timer present on the upper tab of the timeline.
- Select the Fast option, and if you want to lower the speed, select the Slow option**.**
- Choose the speed range according to your requirement.
- Select that required option and play it back to check if it is correct.

The video is all set; give it the final touches by following the last step, as shown below!
Step6 Playback the Video
After adding and adjusting all the features, double-check the video by playback. If you find any duration issue, review it and adjust it according to your requirement.
You can playback the video by clicking on the Play button. Perform this a few more times to ensure the speed looks okay and adjust if it is too slow or too fast.

You can also view it in full screen by selecting the last option on the tab. If there is no problem, you can export it locally or directly share it on TikTok or anywhere you want to gain views and attract an audience. You can also use it as a magic trick to inspire other people or as a transition for videos!
Conclusion
Keep creating and experimenting with other features on Wondershare Filmora. For example, you can use different effects, try on stock media, and then create or film your own. In this way, you’ll get professional results.
If you are showing new strategies daily to your viewers, they will hook up with you, and it’ll assist in the algorithm working by your side. That’s why keep doing it and enjoying the rest!
Unlock Your Video Editing Potential With Filmora From Wondershare
Are you looking to make a cool, fun video for a special occasion? Look no further than Wondershare Filmora.
With a range of video editing tools and effects, you can easily create stunning visuals and captivating stories. Whether you are making a video for a special occasion or a social media post, Filmora has the features to help you create the perfect video.
In this article, we will discuss the benefits of using Filmora and look further into some of its main features such as split screens, LUTs, keyframes, and more. So, let your creative juices flow and start making awesome videos with Wondershare Filmora today!
Why Choose Wondershare Filmora?
Wondershare Filmora is one of the most affordable video editors available in the market, with features that are usually very expensive to use. This tool is not only available for desktops but also for mobiles. So, you can also create content on the go!

Free Download For Win 7 or later(64-bit)
Free Download For macOS 10.14 or later
Let’s dig a little deeper to see how Filmora can benefit you.
Benefits of Using Filmora
Filmora, as compared to its contestants, has much more to offer. From a range of tools and effects to an easy-to-use interface to affordability, Filmora has it all!
1.Variety of Video Editing Tools and Effects
Wondershare Filmora has a variety of video editing tools and effects. Some of the advanced editing features to spice up your videos are available such as cropping, trimming, and adjusting the audio, as well as adding motion graphics, motion tracking, and more.
Furthermore, users can also access a library of royalty-free video clips, overlays, and sound effects to add the perfect touch to their videos.
2.Easy-to-Use Interface
Whether you are a beginner or a pro, Filmora’s easy-to-use interface will be your favorite! It is simple, plain, and easy to understand.
With its intuitive interface, you can also quickly and easily customize your videos with an array of special effects, including transitions, text, and music.
3.Affordable
Last but not least, the greatest catch of Wondershare Filmora is its affordability. With the wide variety of features that it offers, it has reasonable prices to offer.
With packages starting at just $49.99 per year to $79.99 perpetual, you can avail a multitude of features that update regularly and with every new version of Filmora. With these packages, you can get around 1GB of Filmora cloud storage.
So, what are you waiting for? Download Filmora now. And don’t worry; we have got you covered with some great tips to begin your Filmora journey.
Some Stunning Features in Filmora
Although Filmora is easy to use, and you can explore it on your own, it never hurts to know a few features before you dive in.
1.Split Screen Presets
Starting with split screens that are a great way of enhancing your videos. You can show multiple videos side by side, which gives a very chic look to your overall video. Here’s how to do it in Filmora.
Free Download For Win 7 or later(64-bit)
Free Download For macOS 10.14 or later
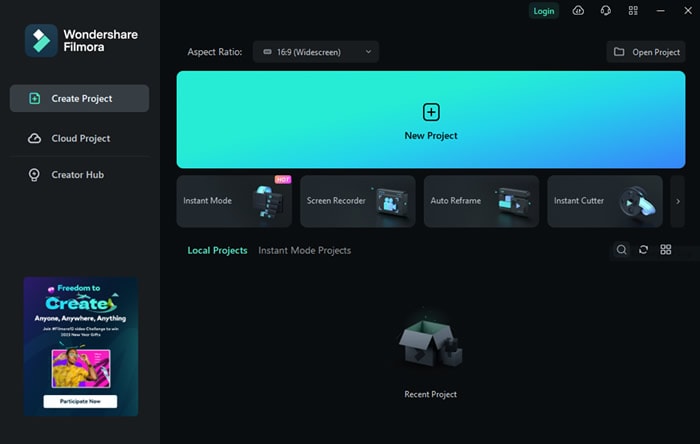
Step1Start a new project
Launch Filmora and click on “New Project.”
Step2Choose a split screen preset
On the top, go to “Templates” and then “Split Screen.”
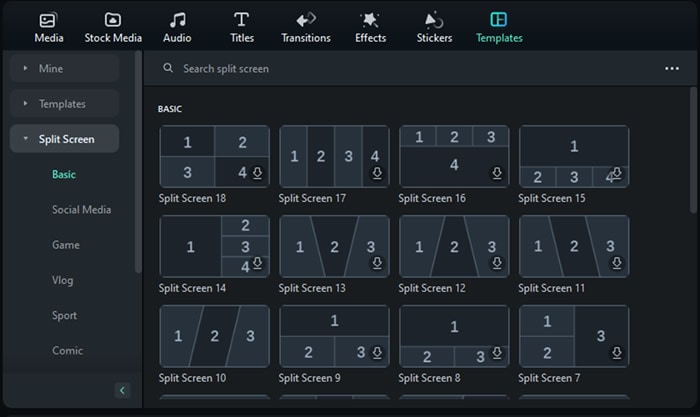
Choose the preset that you need. You can also preview the layout.
Step3Add to timeline
Add the chosen preset to the timeline track.
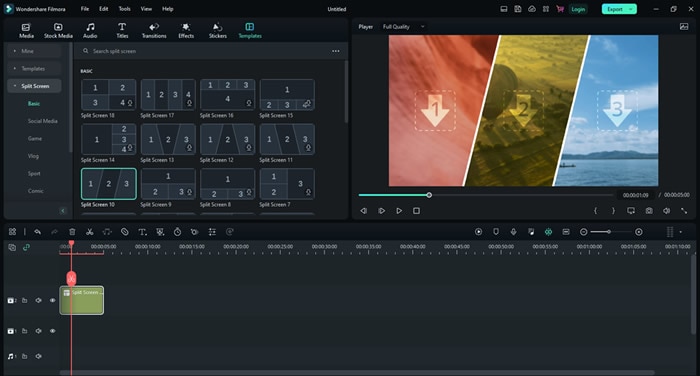
Step4Add videos to the layout
Import media from your library or use stock media to add videos to your layout. Drag and drop your media on the layout.
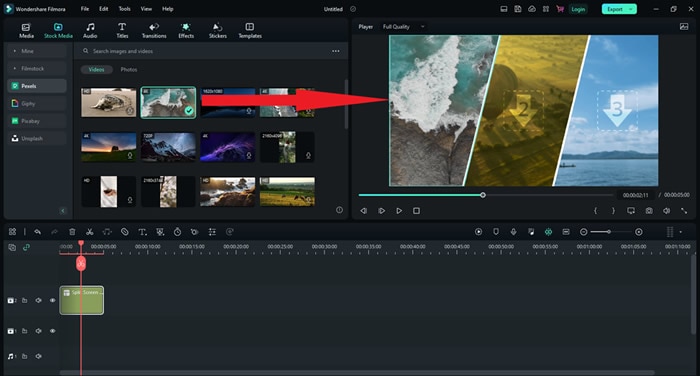
Step5Edit the split screen
Once you have all the videos added to the layout, double-click on the split screen in the timeline panel. The edit options will appear on the left.
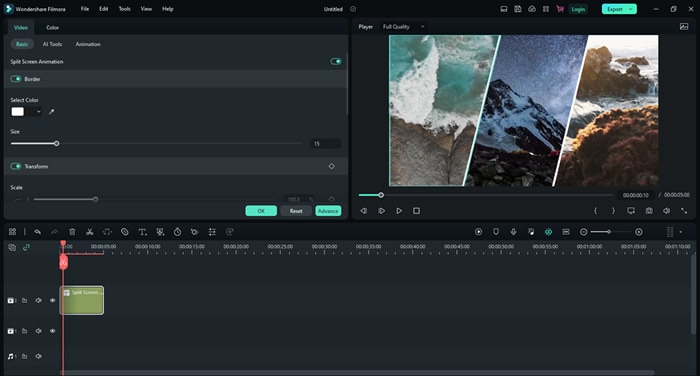
Choose how you want to edit your video and then save it.
2.Filters and LUTs
Another cool feature that Filmora offers is Filters and LUTs. In order to do so, follow these simple steps.
Free Download For Win 7 or later(64-bit)
Free Download For macOS 10.14 or later
Step1Add media
Import all the video or audio files that you want to edit to the media section.
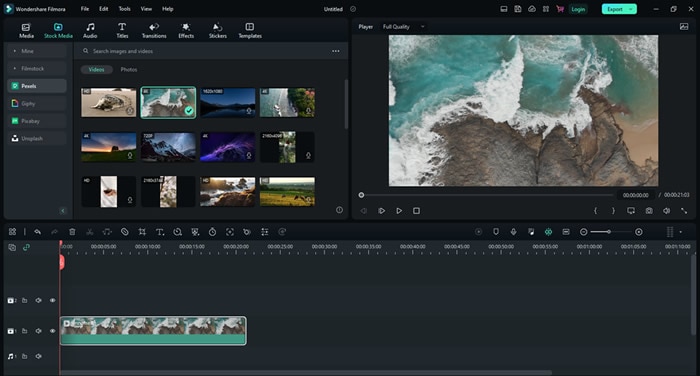
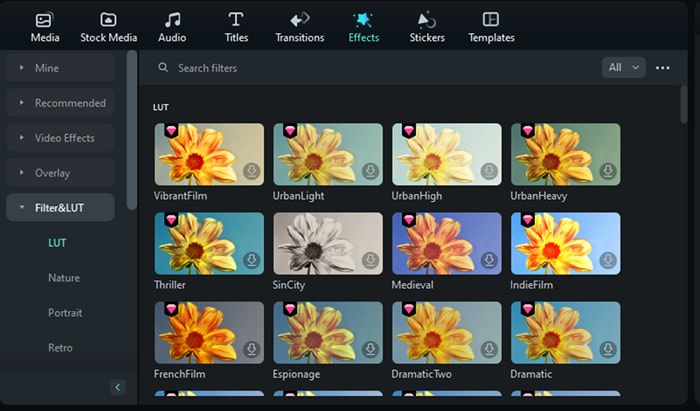
Step2Go to “Filter & LUT”
Under the “Effects” tab, go to “Filter & LUT.” Choose the LUT that you want to add to your video.
Step3Add the LUT to your video
Add the LUT to your timeline by drag-n-drop.
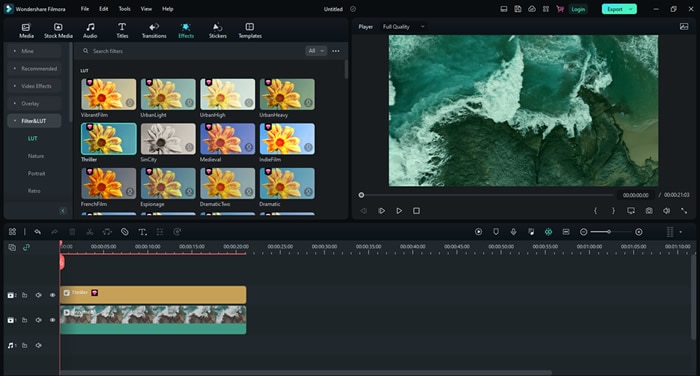
Drag it to adjust it according to your video. In order to adjust the strength of the LUT, double-click on it.
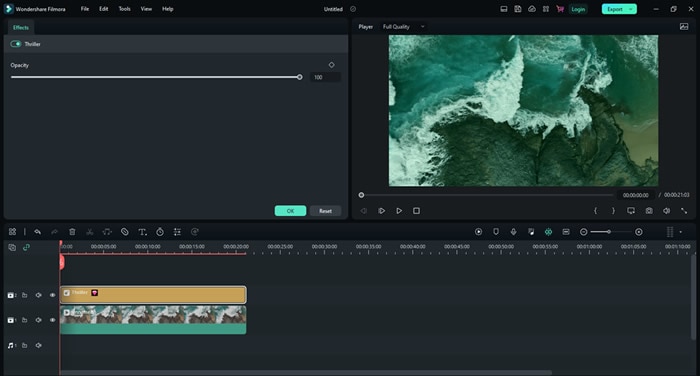
You can adjust the opacity of the LUT according to your preference. You can make it as soft or as strong as you want.
3.Animated Keyframes
Moving on, another one of the cool Filmora features is keyframing. Filmora allows you to add animated keyframes in your videos to add moving text or such effects. Follow the steps below to do so.
Free Download For Win 7 or later(64-bit)
Free Download For macOS 10.14 or later
Step1Add videos to the timeline
Add a video to your timeline and double-click on it to open up the editing options. Go to the “Animation” tab.
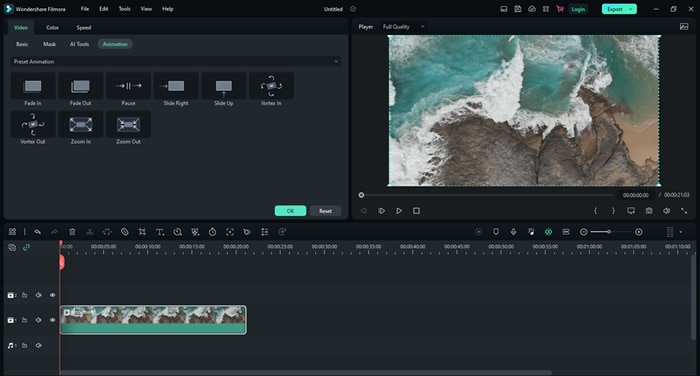
Here, you have different preset animations that you can use for your video.
Step2Add a keyframe
Add your chosen preset and hit play. You will see how that keyframe works. You can also add multiple keyframes to your video to make it look cooler.
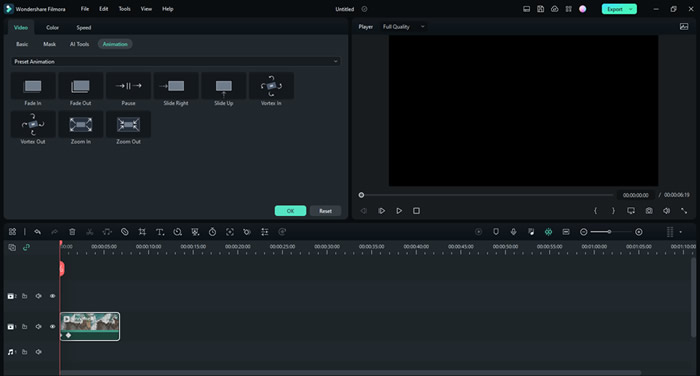
Once you play the video, it will look like this.
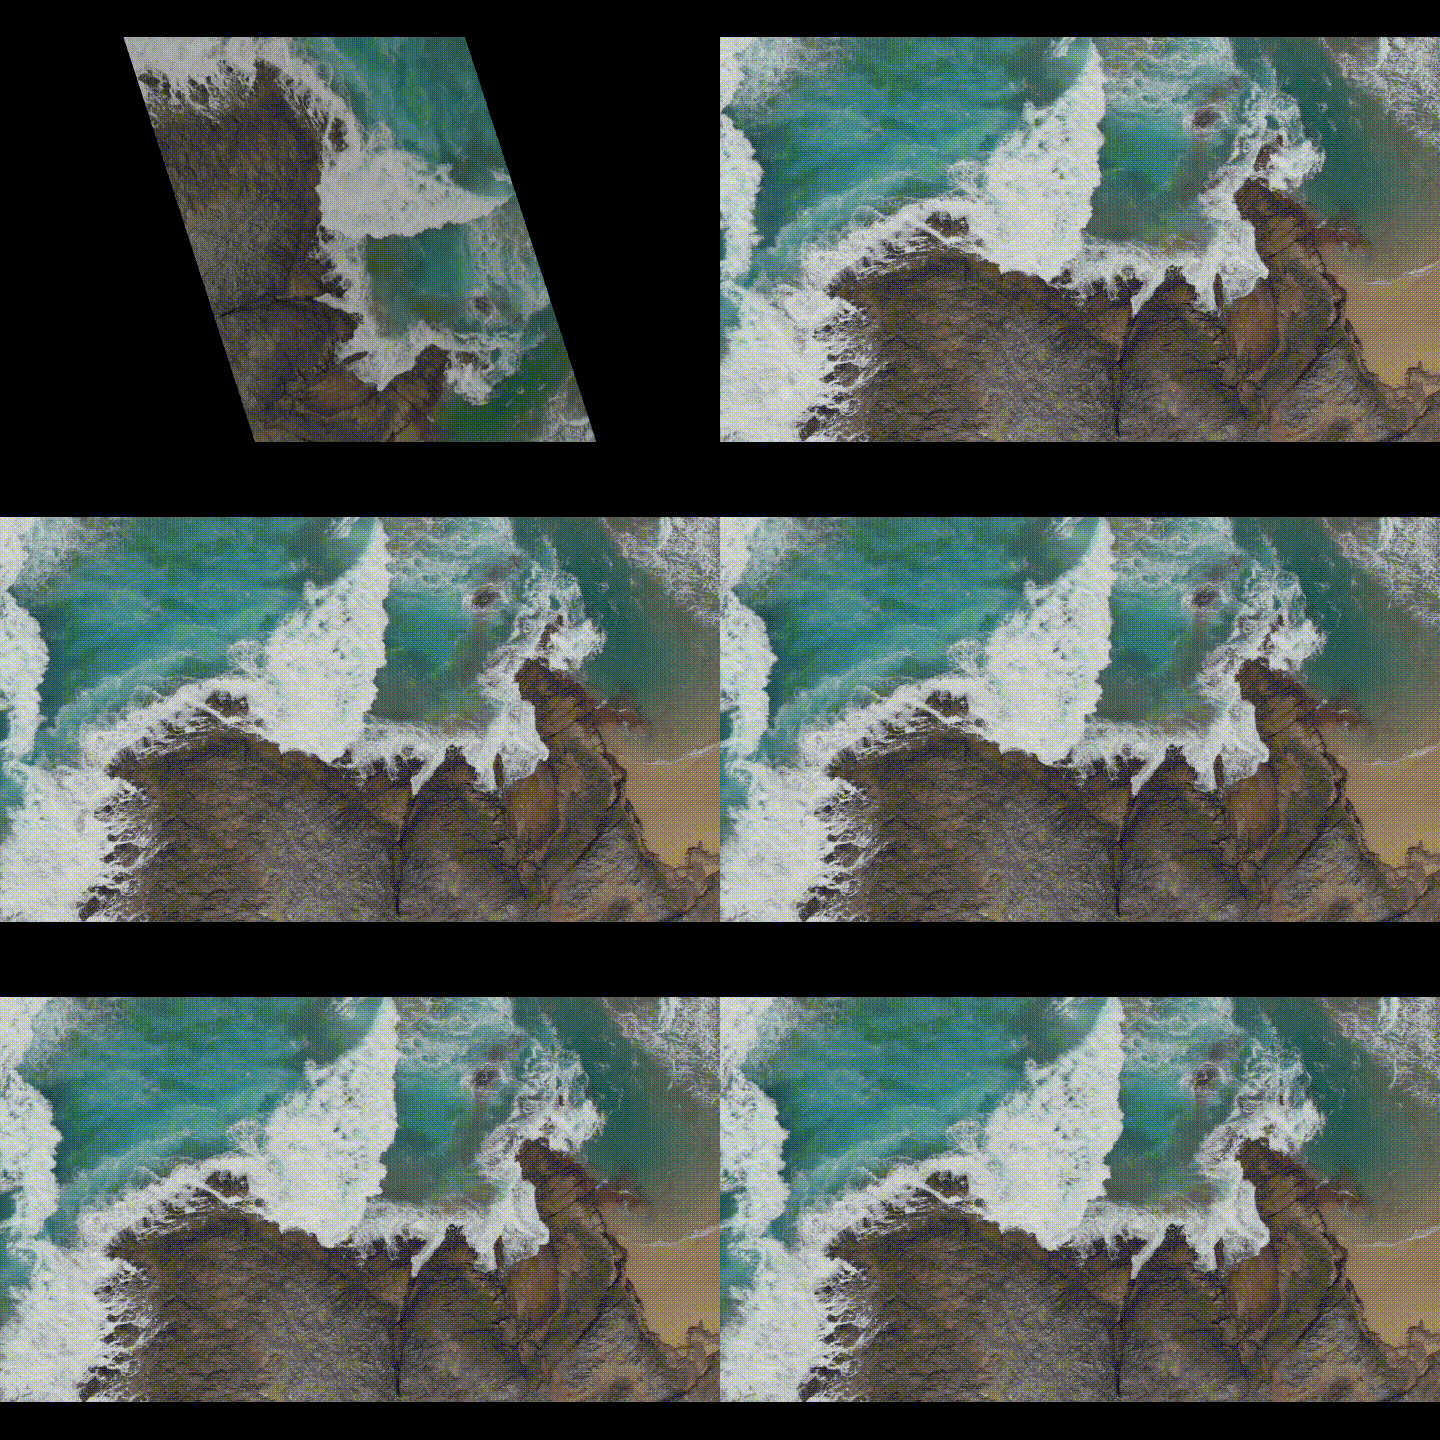
This is an easy way of making intros or outros of your videos.
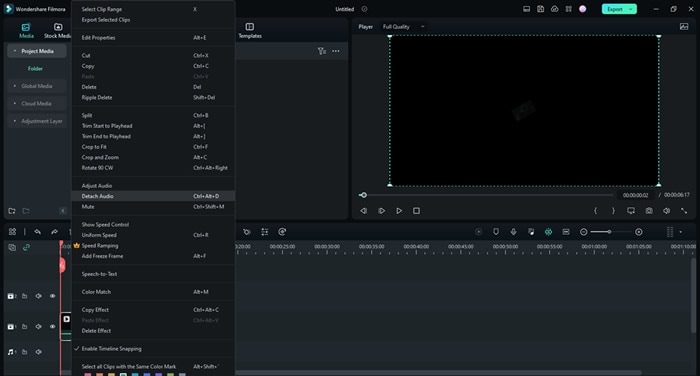
4.Detach Audio
Suppose you have a video where you like the audio and want to use it for another video. How would you separate the audio? This is where the Detach Audio feature comes in.
Free Download For Win 7 or later(64-bit)
Free Download For macOS 10.14 or later
Step1Add video to the timeline
Drag and drop the video on the timeline.
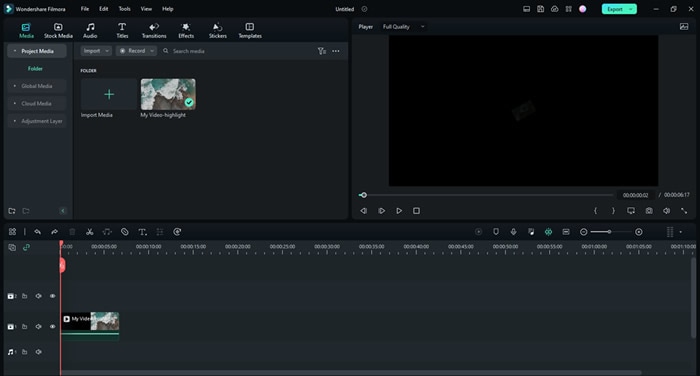
Step2Detach audio
To separate the audio, right-click on the video and choose “Detach Audio.” The audio track will appear separately in the timeline. You can then use it as you wish.
5.Blur Effects
Next up, we have the feature of blurring your video or the background in your video. To do so, follow these simple steps.
Free Download For Win 7 or later(64-bit)
Free Download For macOS 10.14 or later
Step1Go to the effects tab
After adding the video to your timeline, go to the Effects tab on top.
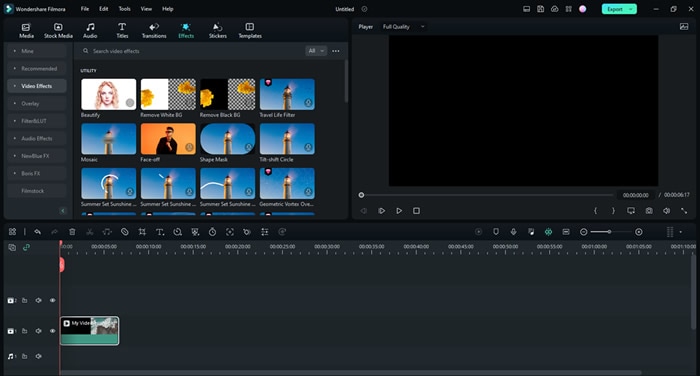
Step2Search for blur effects
In the search bar, type “blur.” You will see several blur effects. Choose any effect and see a preview of it.

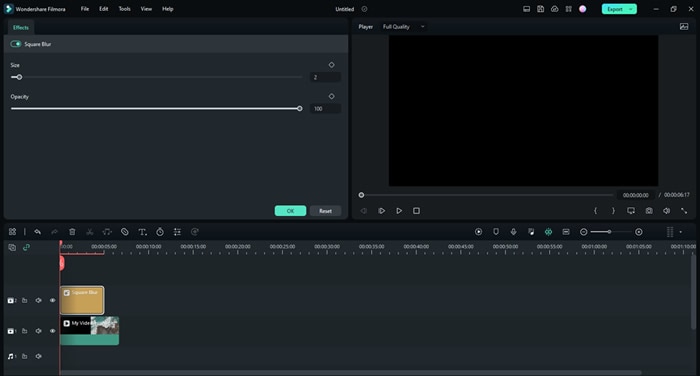
Step3Add effects to videos
Add the chosen effect to your video. Then adjust its position accordingly. Double-click on the blur effect in the timeline panel to change its size and opacity.
These are some of the most amazing features that we have listed here. FYI, this is just the brink of the iceberg. There is a whole lot more that Filmora has to offer.
Final Words
If you’re looking for a simple and intuitive video editing platform to help you create stunning videos, look no further than Filmora. It is packed with powerful features that let you turn your raw footage into captivating movies in no time.
With its user-friendly design, you can easily access all the tools you need to make amazing videos, no matter your skill level. Try Filmora today and create unforgettable videos that will leave viewers in awe.
Free Download For macOS 10.14 or later
Let’s dig a little deeper to see how Filmora can benefit you.
Benefits of Using Filmora
Filmora, as compared to its contestants, has much more to offer. From a range of tools and effects to an easy-to-use interface to affordability, Filmora has it all!
1.Variety of Video Editing Tools and Effects
Wondershare Filmora has a variety of video editing tools and effects. Some of the advanced editing features to spice up your videos are available such as cropping, trimming, and adjusting the audio, as well as adding motion graphics, motion tracking, and more.
Furthermore, users can also access a library of royalty-free video clips, overlays, and sound effects to add the perfect touch to their videos.
2.Easy-to-Use Interface
Whether you are a beginner or a pro, Filmora’s easy-to-use interface will be your favorite! It is simple, plain, and easy to understand.
With its intuitive interface, you can also quickly and easily customize your videos with an array of special effects, including transitions, text, and music.
3.Affordable
Last but not least, the greatest catch of Wondershare Filmora is its affordability. With the wide variety of features that it offers, it has reasonable prices to offer.
With packages starting at just $49.99 per year to $79.99 perpetual, you can avail a multitude of features that update regularly and with every new version of Filmora. With these packages, you can get around 1GB of Filmora cloud storage.
So, what are you waiting for? Download Filmora now. And don’t worry; we have got you covered with some great tips to begin your Filmora journey.
Some Stunning Features in Filmora
Although Filmora is easy to use, and you can explore it on your own, it never hurts to know a few features before you dive in.
1.Split Screen Presets
Starting with split screens that are a great way of enhancing your videos. You can show multiple videos side by side, which gives a very chic look to your overall video. Here’s how to do it in Filmora.
Free Download For Win 7 or later(64-bit)
Free Download For macOS 10.14 or later
Step1Start a new project
Launch Filmora and click on “New Project.”

Step2Choose a split screen preset
On the top, go to “Templates” and then “Split Screen.”

Choose the preset that you need. You can also preview the layout.
Step3Add to timeline
Add the chosen preset to the timeline track.

Step4Add videos to the layout
Import media from your library or use stock media to add videos to your layout. Drag and drop your media on the layout.

Step5Edit the split screen
Once you have all the videos added to the layout, double-click on the split screen in the timeline panel. The edit options will appear on the left.

Choose how you want to edit your video and then save it.
2.Filters and LUTs
Another cool feature that Filmora offers is Filters and LUTs. In order to do so, follow these simple steps.
Free Download For Win 7 or later(64-bit)
Free Download For macOS 10.14 or later
Step1Add media
Import all the video or audio files that you want to edit to the media section.

Step2Go to “Filter & LUT”
Under the “Effects” tab, go to “Filter & LUT.” Choose the LUT that you want to add to your video.

Step3Add the LUT to your video
Add the LUT to your timeline by drag-n-drop.

Drag it to adjust it according to your video. In order to adjust the strength of the LUT, double-click on it.

You can adjust the opacity of the LUT according to your preference. You can make it as soft or as strong as you want.
3.Animated Keyframes
Moving on, another one of the cool Filmora features is keyframing. Filmora allows you to add animated keyframes in your videos to add moving text or such effects. Follow the steps below to do so.
Free Download For Win 7 or later(64-bit)
Free Download For macOS 10.14 or later
Step1Add videos to the timeline
Add a video to your timeline and double-click on it to open up the editing options. Go to the “Animation” tab.

Here, you have different preset animations that you can use for your video.
Step2Add a keyframe
Add your chosen preset and hit play. You will see how that keyframe works. You can also add multiple keyframes to your video to make it look cooler.

Once you play the video, it will look like this.

This is an easy way of making intros or outros of your videos.
4.Detach Audio
Suppose you have a video where you like the audio and want to use it for another video. How would you separate the audio? This is where the Detach Audio feature comes in.
Free Download For Win 7 or later(64-bit)
Free Download For macOS 10.14 or later
Step1Add video to the timeline
Drag and drop the video on the timeline.

Step2Detach audio
To separate the audio, right-click on the video and choose “Detach Audio.” The audio track will appear separately in the timeline. You can then use it as you wish.

5.Blur Effects
Next up, we have the feature of blurring your video or the background in your video. To do so, follow these simple steps.
Free Download For Win 7 or later(64-bit)
Free Download For macOS 10.14 or later
Step1Go to the effects tab
After adding the video to your timeline, go to the Effects tab on top.

Step2Search for blur effects
In the search bar, type “blur.” You will see several blur effects. Choose any effect and see a preview of it.

Step3Add effects to videos
Add the chosen effect to your video. Then adjust its position accordingly. Double-click on the blur effect in the timeline panel to change its size and opacity.

These are some of the most amazing features that we have listed here. FYI, this is just the brink of the iceberg. There is a whole lot more that Filmora has to offer.
Final Words
If you’re looking for a simple and intuitive video editing platform to help you create stunning videos, look no further than Filmora. It is packed with powerful features that let you turn your raw footage into captivating movies in no time.
With its user-friendly design, you can easily access all the tools you need to make amazing videos, no matter your skill level. Try Filmora today and create unforgettable videos that will leave viewers in awe.
Also read:
- New 2024 Approved Ways to Make Sure Your Recording Slideshow in Powerpoint Is Not Wrong
- In 2024, What Is the Best Voice Changer for WhatsApp? Discover the Seven (7) Best Voice Changers for WhatsApp Here in This Post
- New Want to Make Your Slideshows More Fun and Exciting? Follow the Given Discussion to Know How to Make a Slideshow Gif, Thereby Making Your Slideshow More Enjoyable than Ever
- New Guide To Scaling and Setting Videos in Filmora | Tutorial for 2024
- Do You Know About some Efficient Slow-Motion Video Editors? Read This Article to Find Out the Best Slow-Motion Video Editing Tools that You Can Try for 2024
- Updated Everything That You Need to Know About Video Montages- Ideas, Techniqu for 2024
- Updated In 2024, A Full Guide to Funcall Voice Changer and Its Alternatives
- Learn How to Create Animated Titles and Text in the Filmora Video Editor. This Is a Simple Step-by-Step Tutorial for Any Skill Level for 2024
- Updated How to Create an Adobe Slideshow the Easy Way for 2024
- Updated If Youre Looking to Create a Brand Video that Makes Your Business Pop Out, We Have Put Together some Video Editing Tips and Tricks that Work for 2024
- Updated If You Are Looking for Reliable Solutions to Export Your Musical Slideshow Through a DVD Burning Process, Take a Breath, You Have Landed at the Right Place
- Elevate Your Designs with Feather Shapes in After Effects
- In 2024, Do You Want to Rotate Your TikTok Video to Stylize It More? This Article Will Provide Simple Methods of Rotating TikTok Videos to Improve the Audience Viewing Experience
- New In 2024, How to Use Lumetri Color in Adobe After Effects
- Updated In 2024, Movavi Slideshow Maker Is a Powerful Video Editing Tool that Can Be Used to Add Rich Effects to Videos Easily. This Guide Will Introduce the Features and Show You How to Apply Effects to Videos with This Tool
- In 2024, You Can Learn How to Color Grade Your Picture in Lightroom Effectively. By Understanding the Process of Color Grading in Lightroom, You Can Create Unique Works, and Improve Your Abilities
- Updated Detailed Tutorial to Rotate Videos in Cyberlink PowerDirector for 2024
- 2024 Approved Do You Want to Make TikTok Videos More Elemental by Using Countdown but Dont Know How to Do This? Here We Will Thoroughly Guide You About This
- Hey! Are You Looking for Video Reverse Effects in Your Videos? Then, You Are at the Right Place. This Article Will Guide You in Creating a Video Reverse Effect for 2024
- Updated In 2024, Have You Ever Wanted to Speed up or Slow Down a Video? Maybe It Was Too Long, or You Wanted to Draw Out an Exciting Part of the Video without Having to Watch the Boring Parts
- 12 Top Picks of Video Enhancer Software for 2024
- Updated Are You Looking for Ways to Add Background to Green Screen Video Online? Worry Not, as in This Article; We Shall Discuss Using a Green Screen Background Adder in Filmora for 2024
- 2024 Approved Looking for the Best Way to Create Stunning Video Animations? Here, We Look at some of the Best Animated Video Maker Solutions to Use
- 2024 Approved Are You Looking to Freeze-Frame in FCP? If Yes, Read One, as Here Is a Guide About How to Freeze-Frame in Final Cut Pro (FCP) with Ease
- New In 2024, Can You Get Free After Effects Templates Slideshow? Yes, You Definitely Can! Follow the Given Discussion to Learn About a Simple Trick and More About Getting Free Effects Template for Slideshows
- Updated 2024 Approved Are You Looking to Find Out How to Loop YouTube Videos on iPhone? Learn How to Loop Your Favorite YouTube Video on Your iPhone, so You Can Play that Part over and Over
- New In 2024, Top 10 Transparent Image Online Tools That Help You A Lot
- Updated In 2024, AI Has Influenced All Video Editors to Speed up Editing. This Article Discusses the Significance of AI Slow Motion and the Tools that Offer It
- New How to Make a Movie with Windows Movie Maker, In 2024
- 2024 Approved How to Rotate Videos With Media Player Classic
- Updated How to Get VHS Filter and Glitch Filter to Your Images or Videos, In 2024
- 2024 Approved Using One of the Best Converter Tools to Turn GIFs Into PNG or JPG. Here, Learn About the Ten Best Ones for Different Operating Systems, with Details on Features, Prices, and More
- Updated In 2024, If You Are a Marketer Who Want to Create Facebook Ads to Boost Your Business, You Are Coming to the Right Place. Well Share You some Useful Tips to Start Your First FB Ads Campaign
- 2024 Approved Finest Approach to Slow Down a Video CapCut All-in-One Video Editor
- Updated 2024 Approved 3 In-Camera Transitions Tricks To Make Videos
- How to Be a Good Podcast Host
- Best Honor Magic 5 Pattern Lock Removal Tools Remove Android Pattern Lock Without Losing Data
- New 2024 Approved What Is Talking Avatar? | Wondershare Virbo Glossary
- In 2024, How to Remove iPhone 14 Pro Activation Lock
- Unlock Your Samsung Galaxy S23 Tactical Editions Potential The Top 20 Lock Screen Apps You Need to Try
- In 2024, How to Move Custom Ringtones from Apple iPhone 11 Pro to Android? | Dr.fone
- In 2024, Easy Ways to Manage Your Itel P40+ Location Settings | Dr.fone
- In 2024, Why Your WhatsApp Live Location is Not Updating and How to Fix on your Motorola Razr 40 | Dr.fone
- In 2024, Hassle-Free Ways to Remove FRP Lock on Itel A60with/without a PC
- How to Downgrade Apple iPhone 11 Pro Max to an Older iOS System Version? | Dr.fone
- In 2024, How to Transfer Data from Motorola Moto G73 5G to BlackBerry | Dr.fone
- New In 2024, How to Make an Animation With 7 Steps
- iSpoofer is not working On Itel A70? Fixed | Dr.fone
- In 2024, How to Migrate Android Data From Xiaomi Redmi Note 13 Pro+ 5G to New Android Phone? | Dr.fone
- In 2024, Your Account Has Been Disabled in the App Store and iTunes On Apple iPhone 6s Plus?
- Best Android Data Recovery - Retrieve Lost Photos from Nubia Z50S Pro.
- How to Mirror Motorola Razr 40 to Mac? | Dr.fone
- New 2024 Approved What Is AI Voice Text to Speech?
- Title: How to Add Camera Shake to Video in Adobe After Effects
- Author: Morgan
- Created at : 2024-05-19 05:11:35
- Updated at : 2024-05-20 05:11:35
- Link: https://ai-video-editing.techidaily.com/how-to-add-camera-shake-to-video-in-adobe-after-effects/
- License: This work is licensed under CC BY-NC-SA 4.0.

