
How to Add Filter to Video in Premiere Pro, In 2024

How to Add Filter to Video in Premiere Pro?
When it comes to editing recorded videos like professionals, Adobe Premiere Pro is the most preferred video editor. Editing a video consists of trimming video clips, merging them, adding transitions and video effects, as well as inserting texts and overlays. Another important aspect of video editing is adding filters to your video to enhance the video quality.
Video filters are widely used in the editing phase to correct the color and light imbalances and set the mood for a particular scene so that the audience can reach the desired state of emotion. Premiere Pro has a wide range of preset filters that you can add to your videos to enhance them like never before. We will illustrate how to add filters on Premiere Pro and suggest an alternative way to add video filters for Windows and Mac users.
Part 1. Steps to Add Filter in Premiere Pro?
Premiere Pro comes with a wide range of present filters so that you can adjust the color grading for different scenes in your video. If you are new to using Premiere Pro and you are not a professional video editor, you could find its learning curve on the steeper side. However, you can add video filters in Premiere Pro instantly. Here are the steps on how to add a filter in Premiere Pro.
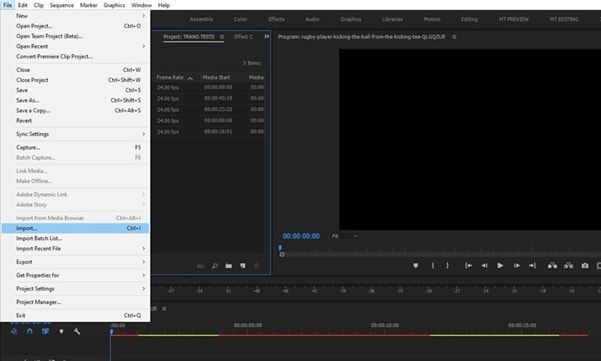
Step1Launch Premiere Pro on your computer. Go to File> Import to bring in the video clip that you want to edit. Move the video clip from Project panel into Timeline.
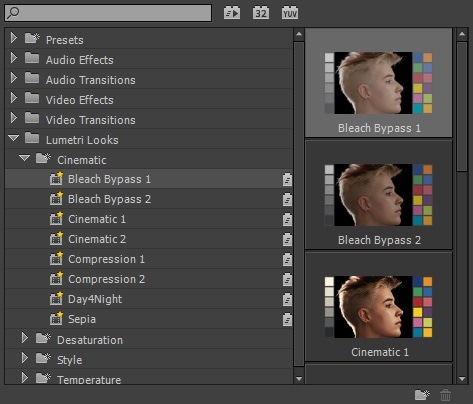
Step2Go to Effects tab from the top and open Lumetri Presets folder. You will find different categories of filters and effects such Cinematic, Desaturation, Style, Temperature and much more. Open up these categories and drag and drop any desired filter into the Timeline. The video filter will get applied to your video automatically.
Step3If you are looking for color grading, go to Color tab from the top. Go to Lumetri Color on the right side, go to Creative> Look > select any Preset filter present.
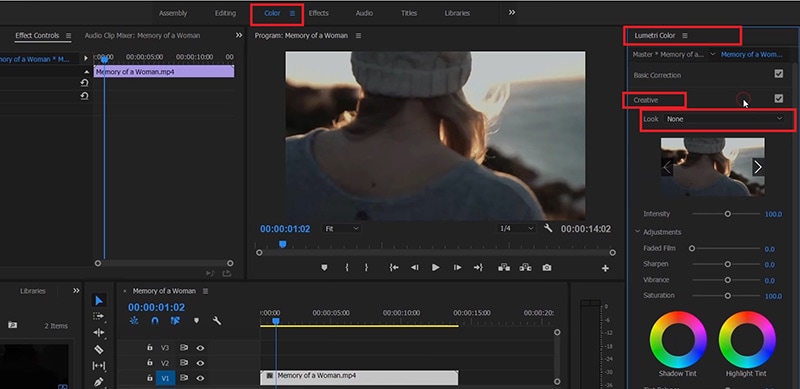
Step4Thereafter, you can adjust certain parameters like intensity, saturation, sharpen as per requirements. You can also go for Basic correction which acts like applying a filter to your videos.
Part 2. Alternative Way to Add Video Filters
If you find the steps on how to add colour filter in Premiere Pro difficult or the filters are not appealing to you, you can opt for an alternative. We recommend Wondershare Filmora as the best alternative to Premiere Pro to add video filters. Filmora comes with a super easy and intuitive and applying filter to your videos cannot get any easier.
The wide range of filters available on Filmora outshines Premiere Pro. Most importantly, trending filters are also available to make your videos follow the current trend on social media and video streaming sites. You can add multiple video filters to one video clip as per your preference. Here are the steps on how to add video filters on Filmora.
Step1Download and install Wondershare Filmora which is available for Windows and Mac users. Launch Filmora and click on New Project option.

Step2Drag and drop your video into Project Media folder and thereafter, into Timeline.

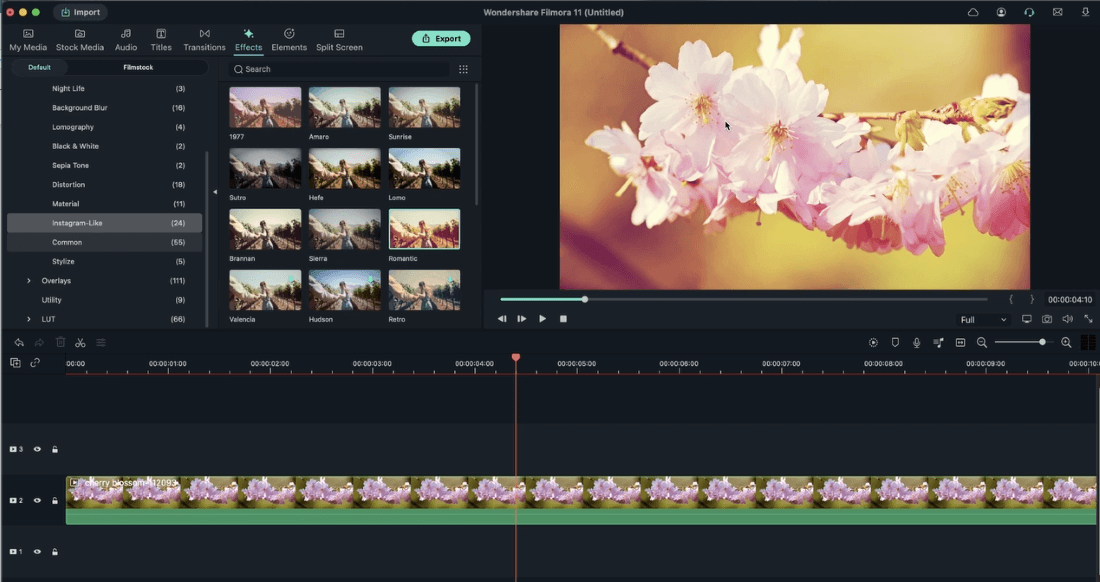
Step3Go Effects located at the top and go to Filters option from the left panel.
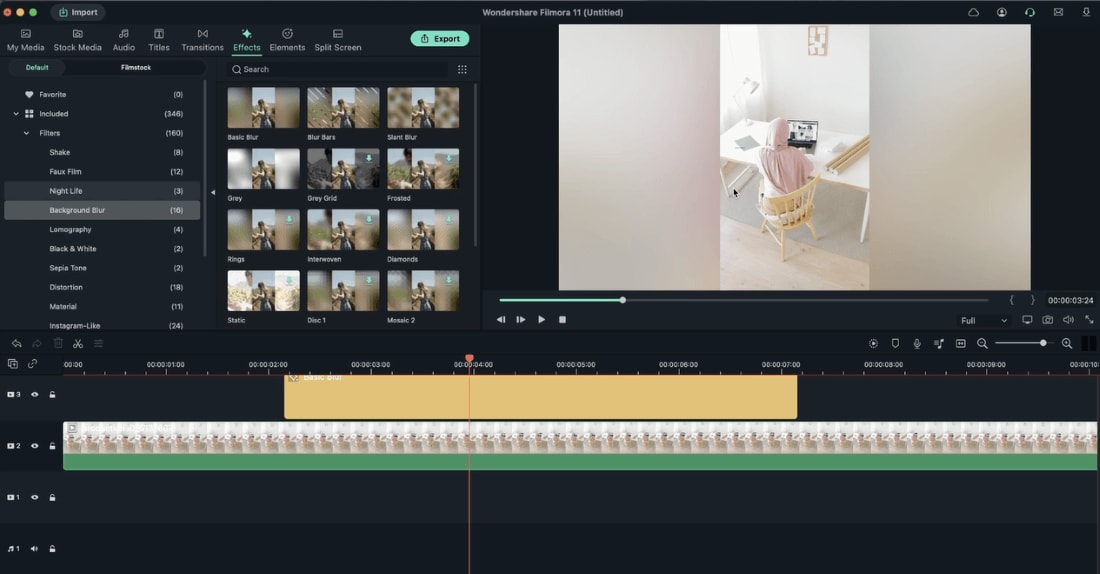
Step4Drag the desired filter into Timeline to apply to your video. You can set the duration of the video filter as per your preference. Play the video and click on Export button to save the edited video.
Part 3. Free Premiere Filter Presets to Use
Adobe Premiere Pro comes with a handful of video filters. However, you can add various free Premiere Pro filter presets and apply them to your video. Here is the list of the free Premiere Pro filter presets to use on your video.
Retro Preset Pack -
There is a craze to have retro filters on the video so that the video looks different and takes the audience back to the golden old days. This is a collection of filter presets where you can get different old-school styles. Starting from VHS filter effect to RGB split, there are ample filter presets to make your video look retro.
Cinematic LUT Pack -
There is no doubt that cinematic videos always look class apart from the rest of the videos and this is the perfect collection of video filters you need. Use these filters to deepen and sharpen colors and cut down brightness so that the video becomes eye-catching and eye-soothing. This is a must-have video filter you should have in Premiere Pro so that you can make regular videos look extraordinary.
Panoramic Transitions Pack -
Transitions are a part of video filters in Premiere Pro and if you want something different in transition effects, you should opt for Panoramic transitions. Starting from fish-eye effect to spinning effect, you can apply them when you move from one scene to another or one clip to another.
Free Animated Text Preset Pack -
Text is an important part of any video and you need video filter presets to apply to the textual part. Instead of the regular text filters, the animated text presets are extremely eye-catching. Starting from shake animations to bounce animations, 13 free animation titles can transform your video especially the part where texts are the main highlights.
Glitch Effects Pack -
If you make videos for social media or you make informational videos, glitch effects must be in your videos. You can get quick attention of your audience with glitch effects, make scene transitions, and add some comedy scenes. Your video will have some extra kick and look more interesting to watch.
Conclusion
If you are using Adobe Premiere Pro to edit your videos, adding filters to your videos could be quite common. We have illustrated how to add filter to video in Premiere Pro to enhance your video quality and outlook. We have also listed the must-have free Premiere Pro filter presents. If you are looking for an alternative to add video filters, we recommend Wondershare Filmora.
Free Download For Win 7 or later(64-bit)
Free Download For macOS 10.14 or later
Free Download For macOS 10.14 or later
How to Make a Time-Lapse Video Online
If you’re looking for a way to create a time-lapse video online, you have come to the right place. There are different reasons why people use online time-lapse video makers. Let us take an example, if you want to make a time-lapse video of someone holding a phone in their hand then this would be pretty easy to do with the help of an online time-lapse maker.
Why do people use an online time-lapse maker because they want to get some good quality videos without spending much money on them? That’s something that many people who are just starting their business can do easily since it can be done by anyone who knows how to use online time-lapse makers properly! Let’s have a look at some online tools on which you can make time-lapse videos online.
1. Clideo Timelapse Video Tool
A video timelapse video is a type of video that shows the progression of time. It allows you to create an engaging experience for your viewers, and it can also be used to promote your business. Whether you’re a content creator, brand manager, or just a fan of videos, creating a time-lapse video is one of the most popular and effective ways to produce impressive content.
With Clideo Time-lapse Video Tool you can create incredible videos with ease. You can choose from dozens of beautiful templates, music tracks, transitions, and more. You can also add your photos or video clips and make your unique time-lapse video. By using this tool, you can:
- Capture your events in real-time and save them for later. Once captured, you can use the timeline function to move backward or forwards through the events of your day.
- Add filters and effects such as blur or freeze frame.
- Share your videos on social media with ease!
Steps to make a time-lapse video on Clideo:
Step1 Open Clideo and Create an account
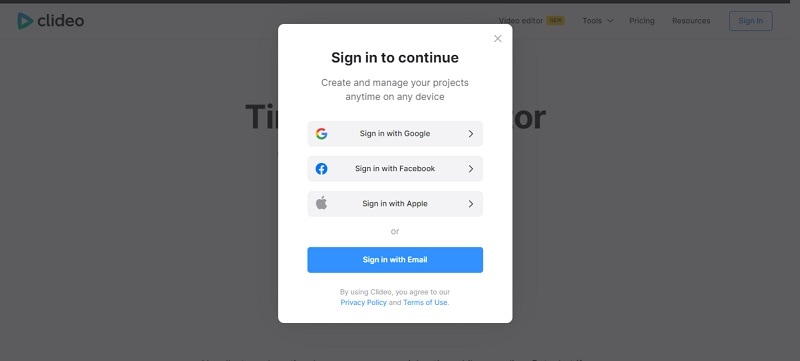
You can use this online time-lapse maker from any browser e.g Google Chrome, Mozilla Firefox, Internet Explorer, etc. After that you don’t have an account on it then you have to create it first. You can Sign in by using different platforms like Google, Facebook, apple, etc.
Step2 Create a project and select a tool
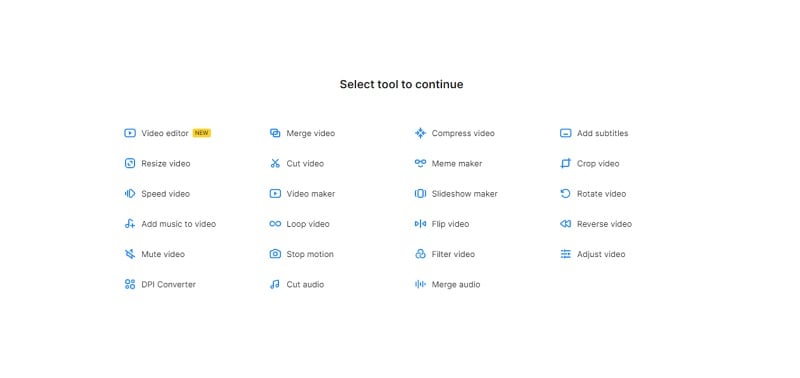
When you create an account on Clideo, a page appears where you will get the option of creating a project. A list of several features will be provided by this online time-lapse video maker. You will get to add subtitles, compress videos, resize the video, and many more features in it.
Step3 Create a video on Clideo
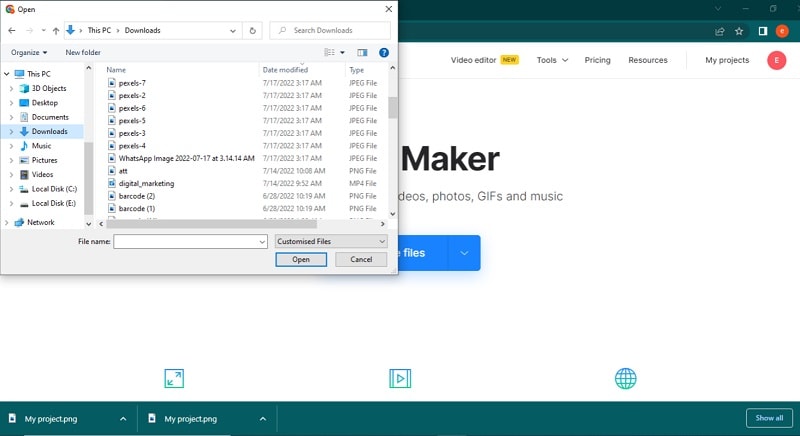
If you want to create a video then click on video maker and after that choose a file whether it is an image, video, gif, or music.
Step4 Edit the video and export
With Clideo, you can make amazing videos with just one click. You can choose the length of your video, as well as the format, and save it to your computer’s hard drive.
You can also adjust the duration of your video and add music to make it more interesting. This way you can make sure that your video is the right length for the content you’re putting in it.
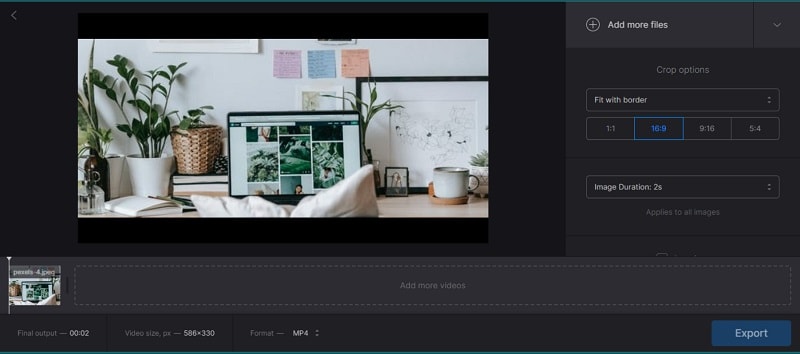
2. Flixier Timelapse Video Maker
Flixier Timelapse Video Maker is the easiest way to create beautiful timelapse videos. You can create beautiful, high-quality videos with ease. What’s more, you don’t have to know any programming languages! You’ll be able to export your videos in just one step.
The program’s intuitive user interface makes it easy for beginners to get started while still providing advanced features that professionals will love. The program supports drag-and-drop editing and has an intuitive layout designed for maximum efficiency.
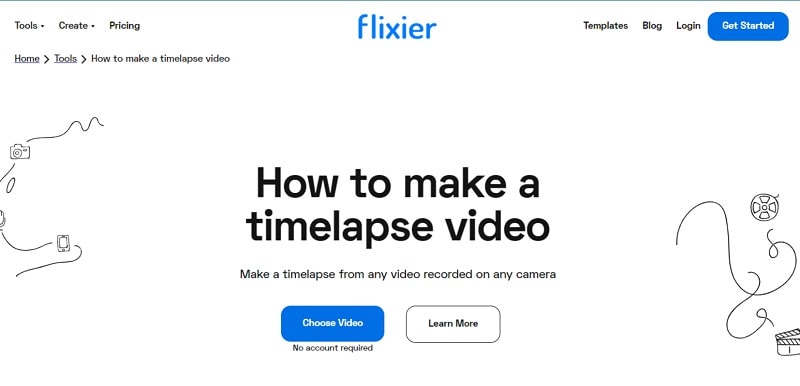
Step1 Create a video without having an account
Flixier Timelapse Video Maker is a powerful video editing tool that allows you to create beautiful, high-quality timelapse videos. The best thing about Flixier is it does not require any account. You can easily click on Get Started and move on to the next step.
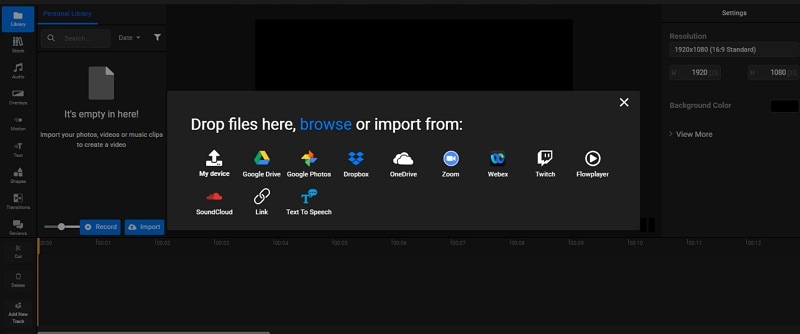
Step2 Drop and Browse any file
The Flixier Timelapse Video Maker is a new and exciting way to create HD videos from your favorite photos. It makes it easy for you to choose the photo you want to use, and then attach it to your video.
Flixier works with all of your favorite services: Google Drive, Google Photos, Dropbox, Flowplayer, and more! Flixier has a massive library of videos that you can use as inspiration for your project. There are thousands of them, some of which are free.
Step3 Edit the video and save it
This online time-lapse maker is easy to use, and it allows you to edit your videos in a few simple steps. You can add text, motion, position, and scale to your videos in just a few clicks. After that, you can export it to your hard drive.
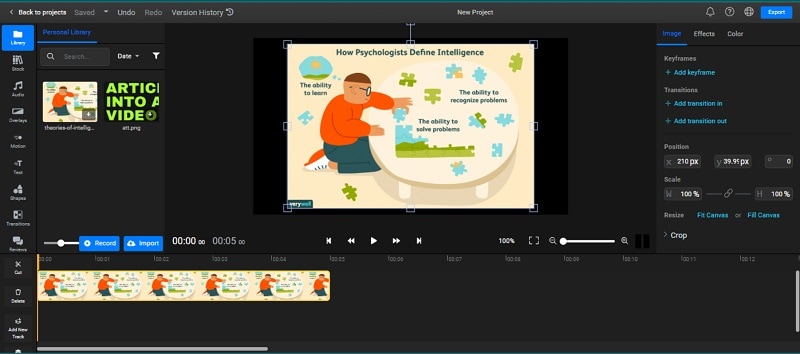
Flixier has tons of useful features for creating content for social media marketing. You can upload multiple clips at once and easily customize the length and format of each clip. You can also add music to your videos and adjust the volume levels for each clip individually so that they blend seamlessly when viewed as a whole.
3. Kapwing
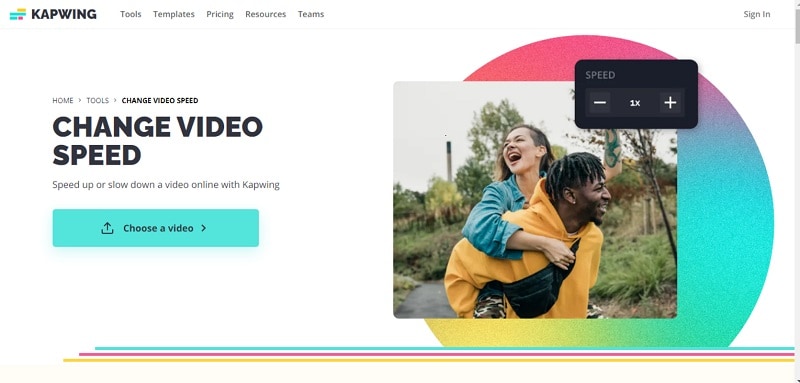
Are you looking for a way to speed up and down your video without having to rewind and fast-forward? Kapwing is the tool that can help you do just that. With Kapwing, you can change the speed of your video from 1x to 10x faster. And because it’s easy to use and can be used on any device, you can take your videos anywhere!
There’s nothing worse than having your video slowdown in the middle of a high-speed chase. That’s why, this tool can speed up and down your videos as much as you want, whenever you want it. Now move to steps that how can we use it:
Step1 Sign in and export the file
If you’re looking for a way to speed up your video editing process, look no further. Kapwing Video Speed Changer is here to help!
With Kapwing, you have to create an account, add media like pictures and videos, and then easily tweak the speed of your video without ever having to create a new one.
Step2 Create video and change speed
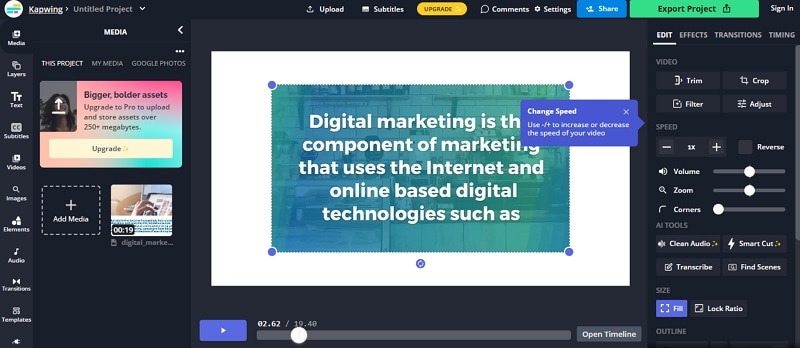
Kapwing is a video editing software that lets you create videos as well as control the speed according to your needs. This feature makes it easy for you to create videos with different features. You can create videos with size, transitions, layers, and fonts. You can add text to your video as well as record audio from your computer’s microphone.
The software also includes other tools such as watermarking and adding subtitles to your video.
Step3 Export the video
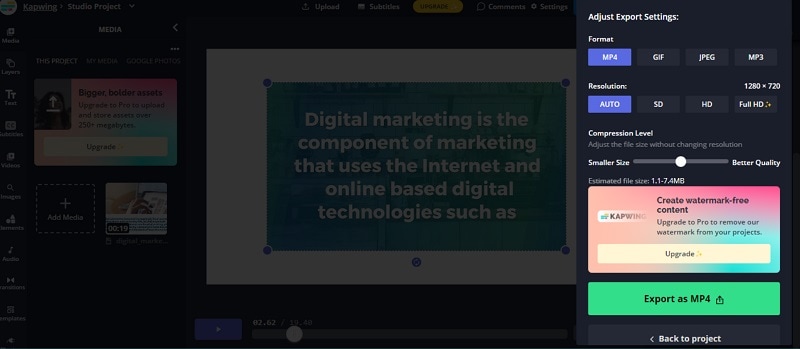
This online tool provides you with different formats to export your video like mp4, mp3, GIF, and JPEG. You can download or export your video in full HD form. It provides you full resolution video.
4. Veed.io Video Speed Controller
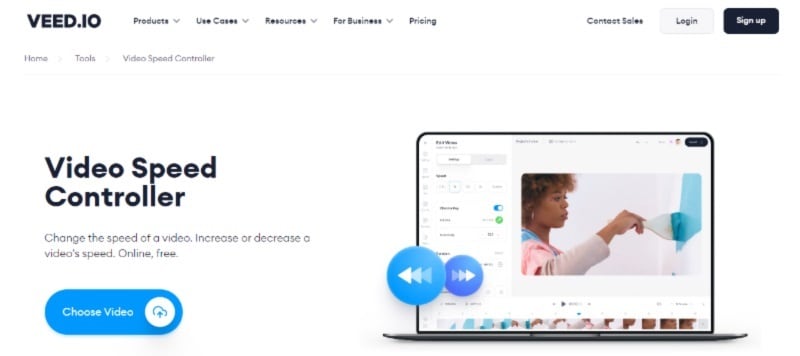
Are you looking to speed up or slow down your videos? We’ve got you covered. With Veed.io, you can easily adjust the speed of your video to your liking. You can also use a slider to control the speed of the video itself, which allows for more flexibility and control.
To use this tool, all you have to do is enter the URL of your video and select how fast you want it to be played back. And if you need even more flexibility, go ahead and add buttons so that you can easily change between faster and slower speeds without having to pause or rewind your video at all!
How can we control the speed on Veed.io let’s have a look at some steps:
Step1 Open the tool and create an account
Check out Veed.io Video Speed Controller, a new tool that allows you to control the speed of your videos. It’s super easy to use and can be accessed from any browser. Just create an account and you’ll be able to adjust the speed of your video on the go!
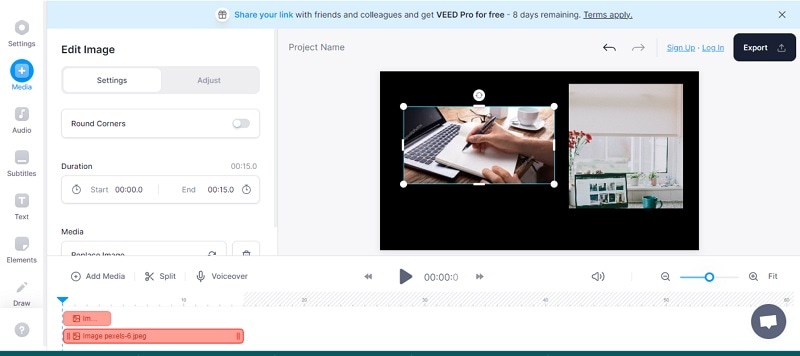
Step2 Create, edit the video and add subtitles
Veed.io is a video speed controller that allows you to create videos, edit your footage, and add voice-over in one simple app.
This is perfect for content creators who want to create more engaging videos and increase their profits by selling subscriptions or advertising within their content. With Veed.io, you can use the built-in editor to easily add text overlays, adjust the speed of your video, and add voice-over effects to create professional videos that people will love watching!
Step3 Add elements, and emojis in the video
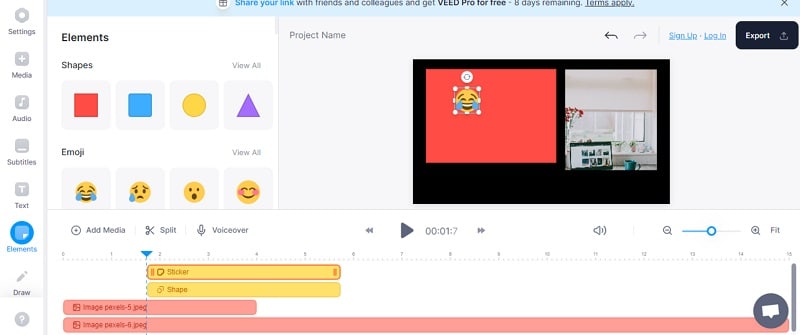
Are you tired of your videos just being boring? Worried that they’re not engaging enough? Don’t worry, Veed.io has a solution for that.
With this editor, you can add elements to your videos to increase engagement and make them more interesting. You can also select the size and color of each element, so you can customize the look of your video to stand out from the crowd!
Step4 Export video without the watermark
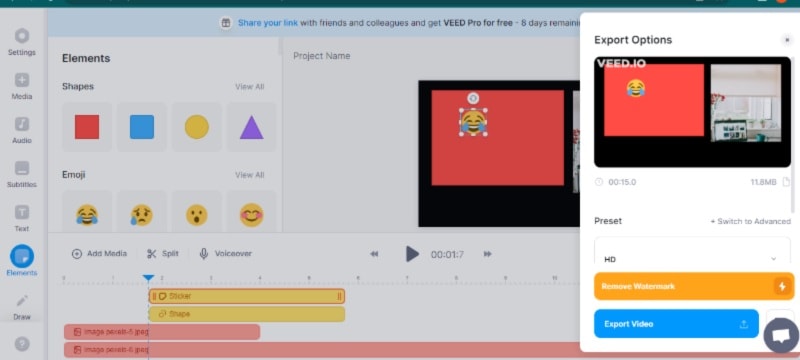
After all the editing you can export or download the video without watermarks. The resolution of the video will be HD.
5. Typito Time Lapse Maker
Typito Time Lapse Maker is a tool that allows you to create videos with a timelapse effect. It is easy to use, and the interface is extremely simple. The first step is to select your video source and output format. You can choose from several different video formats, including MP4, MOV, and AVI.
Next, you’ll be prompted to select what you want your video to do. You have the option of creating a looping video or not it’s up to you! Once you’ve made your choices, you will be taken to the final step: entering text into the text editor for your video. This is where you can add captions or text overlays to spice up your video’s storyline.
Move to steps to create a lapse video online:
Step1 Create an account and make a video
Firstly, create an account on Typito and once you are done with the creation of the account click on the “Create Video” button in the middle of the screen. The video creation tool will begin loading, so please be patient!
Step2 Add media, title, elements, music
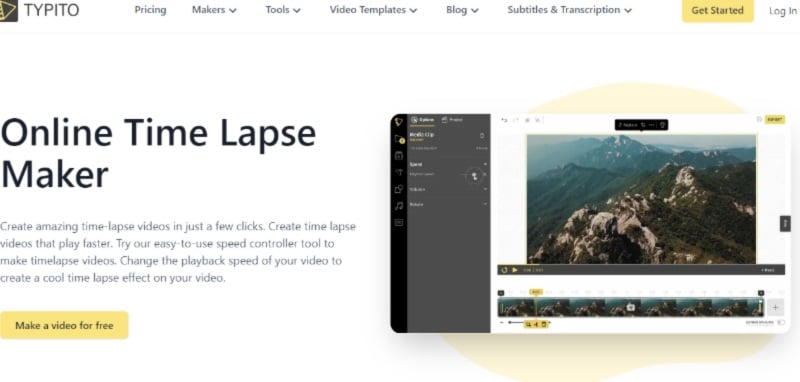
Time-lapse is a great way to create visual content. But how do you do it without spending a fortune? Typito Time Lapse Maker can help you make your time-lapse videos with the click of a button!
Just select media, add titles, elements, and anything else you want, and we’ll handle the rest—whether you’re using your music or not. You can add music according to your taste.
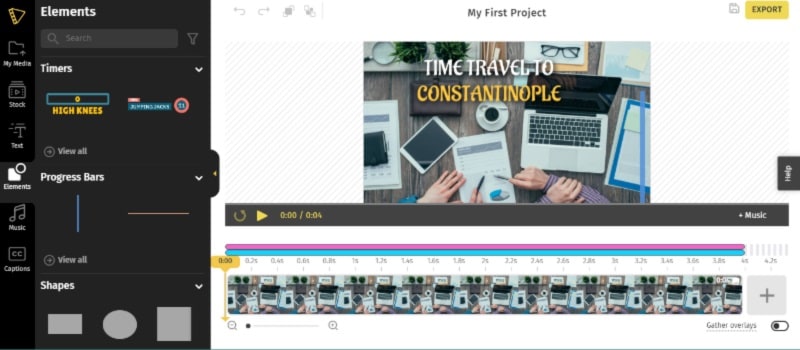
Step3 Export video and re-edit
When you are done with the video export it. And the great thing is video can be re-edited again and again. You can apply changes many times.

Conclusion
We hope that these ideas can motivate you to make timelapse videos. If you want to create a time-lapse video but don’t want to use a big and expensive camera just set up your online time-lapse. Moreover, there are lots of excellent platforms out there to share the finished product. Refer to the above recommendations to choose your favorite one.
Free Download For Win 7 or later(64-bit)
Free Download For macOS 10.14 or later
Free Download For macOS 10.14 or later
4 Ways to Rotate Videos on Windows PC
There are times where you may need to rotate a video into landscape if the video is shot in portrait. This is because watching a video in portrait orientation on a computer is horrible as the video screen size is compressed and the two sides have black screen. Instead, you can rotate video Windows into landscape, you can watch the same video comfortably. Besides, there are times when the entire video is shot at a certain angle as the video device was not properly aligned.
If you are a Windows user, rotating a video in Windows through Windows Media Player is not possible. However, Windows 10 comes with Photos app that contains a video editor to rotate a video and save it permanently. If you use VLC Media Player, you can rotate any video temporarily as well permanently at any desired angle. You can also rotate a video online without installing any software. In this article, we will illustrate how to rotate a video in Windows.
Way 1. Use Photos App
If you are a Windows 10, you can use the pre-installed Photos app to rotate a video and save it permanently. Photos app comes with an inbuilt video editor where rotating a video in Windows 10 is so easy. If you are using an older version of Windows, you can relate Photos app with Windows Movie Maker. Anyway, here are the steps to rotate any video on Photos app.
Step 1: From Start menu, search for “Photos” and open Photos app.

Step 2: Select Video Editor option which is available at the top of the screen. Once, Video Editor opens, click on New Video Project button.

Step 3: Put a name for the project and click on Ok. Thereafter, click on Add button and select the video file from your hard drive that you want to rotate.

Step 4: Drag and drop the video file into Timeline. Thereafter, Click on Rotate icon to turn the video by 90 degrees. You can click again to rotate the video further by 90 degrees again.

Step 5: Once done, click on Finish Video option and save the video file in the destination folder.
Way 2. Use Filmora
The best software on how to rotate a video in Windows 10 to Windows 7 is Wondershare Filmora . It is a professional video editor and there are loads of features to edit the video including rotation. You can make a video more attractive and crisp to publish on professional platforms like YouTube. Here are the steps to rotate a video on Filmora.
Step 1: Download and install Filmora. Open the software and import the video file that you want to rotate. Then drag and drop it on Timeline.
For Win 7 or later (64-bit)
For macOS 10.12 or later
Step 2: From Video Editing panel, expand Transform option and use the slider on Rotate option to rotate the video at any angle. Once done, click on OK button.

Step 3: Go to Export option and click on Export button. The new video files with its new rotation will be saved in the destination folder.

Way 3. Use VLC Media Player
Most Windows users generally install VLC Media Player to watch movies. This is because Windows Media Player supports only limited file formats. Most movie files that you download online are supported by VLC but not on Windows Media Player. Here are the steps on how to rotate a video in Windows temporarily using VLC Media Player.
Step 1: Open VLC Media Player. Go to Media menu and click on Open File option. Select the video file from your hard drive that you want to rotate.
Step 2: Once the video opens, go to Tools menu and click on Effects and Filters option.

Step 3: On Adjustments and Effects window, click on Video Effects tab.
Step 4: Under Video Effects tab, click on Geometry tab.
Step 5: Turn of Transform checkbox and click on drop-down menu to select the required option. You can rotate the video by 90 degrees, 180 degrees and 270 degrees.

Step 6: To rotate the video at any desired angle, turn on Rotate checkbox and select the desired angle.

Step 7: Finally, click on Save and then Close button.

Please note that when you rotate a video temporarily, it is for a one-time watch only. When you open the video again in any other media player, it will have the original orientation.
Way 4. Use EZGIF Online Tool
If you have short video files and you want to upload them on social media platforms, you can convert them into GIF files. You can convert any video file to EZGIF. Therefore, instead of video files, if you want to rotate GIF files, EZGIF is highly useful as an online tool. In fact, you can also convert GIF files into MP4 files. Here are the steps to follow to rotate short video files using EZGIF online tool.
Step 1: Open your web browser and open Ezgif.com.
Step 2: Click on Video to GIF option.
Step 3: Click on Choose File button and select the short video file from your hard drive.

Step 4: Click on Upload Video button and wait for the conversion. Thereafter, download the GIF file.
Step 5: To rotate the GIF file, go to Rotate option. Click on Choose File button.

Step 6: Select the GIF file and click on Upload.
Step 7: You can select from provided rotation options or mention rotation angle explicitly and click on Apply Rotation button.

Wait for the rotation effect and download the file on your hard drive.
FAQs about Rotate Video in Windows 10
1. How do I rotate a video in Windows 10?
To rotate a video in Windows 10, you can use the built-in Photos app. Open the app and select the video you want to rotate. Click on the Edit & Create button at the top of the screen and select Rotate left or Rotate right to adjust the video orientation.
2. Can I rotate a video in Windows Media Player?
No, you can’t rotate a video in Windows Media Player. This feature is only available in the Photos app. However, you can use a third-party video editing software to rotate your videos.
3. How do I save the rotated video?
After rotating the video in the Photos app, click on the Save a copy button at the top of the screen. You can then choose the destination folder and file name for the newly rotated video.
4. What should I do if the video is upside down after rotating it?
If the video is upside down after rotating it, you may have rotated it in the wrong direction. Try rotating it in the opposite direction and see if that fixes the issue. If not, you may need to use a third-party video editing software to rotate the video.
5. Can I rotate a video without losing quality?
Rotating a video can sometimes result in a loss of quality, especially if the video is compressed or low-resolution. However, using a good video editing software can help minimize the loss of quality. Make sure to save the rotated video in the same format and resolution as the original file to avoid further loss of quality.
Conclusion
We have provided you all the possible ways to rotate video Windows. If you want to rotate with pre-installed software, you have Photos app. If you have VLC Media Player installed, you can do the rotation temporarily and permanently. You can also use Ezgif online tool to rotate animated files without installing any
For macOS 10.12 or later
Step 2: From Video Editing panel, expand Transform option and use the slider on Rotate option to rotate the video at any angle. Once done, click on OK button.

Step 3: Go to Export option and click on Export button. The new video files with its new rotation will be saved in the destination folder.

Way 3. Use VLC Media Player
Most Windows users generally install VLC Media Player to watch movies. This is because Windows Media Player supports only limited file formats. Most movie files that you download online are supported by VLC but not on Windows Media Player. Here are the steps on how to rotate a video in Windows temporarily using VLC Media Player.
Step 1: Open VLC Media Player. Go to Media menu and click on Open File option. Select the video file from your hard drive that you want to rotate.
Step 2: Once the video opens, go to Tools menu and click on Effects and Filters option.

Step 3: On Adjustments and Effects window, click on Video Effects tab.
Step 4: Under Video Effects tab, click on Geometry tab.
Step 5: Turn of Transform checkbox and click on drop-down menu to select the required option. You can rotate the video by 90 degrees, 180 degrees and 270 degrees.

Step 6: To rotate the video at any desired angle, turn on Rotate checkbox and select the desired angle.

Step 7: Finally, click on Save and then Close button.

Please note that when you rotate a video temporarily, it is for a one-time watch only. When you open the video again in any other media player, it will have the original orientation.
Way 4. Use EZGIF Online Tool
If you have short video files and you want to upload them on social media platforms, you can convert them into GIF files. You can convert any video file to EZGIF. Therefore, instead of video files, if you want to rotate GIF files, EZGIF is highly useful as an online tool. In fact, you can also convert GIF files into MP4 files. Here are the steps to follow to rotate short video files using EZGIF online tool.
Step 1: Open your web browser and open Ezgif.com.
Step 2: Click on Video to GIF option.
Step 3: Click on Choose File button and select the short video file from your hard drive.

Step 4: Click on Upload Video button and wait for the conversion. Thereafter, download the GIF file.
Step 5: To rotate the GIF file, go to Rotate option. Click on Choose File button.

Step 6: Select the GIF file and click on Upload.
Step 7: You can select from provided rotation options or mention rotation angle explicitly and click on Apply Rotation button.

Wait for the rotation effect and download the file on your hard drive.
FAQs about Rotate Video in Windows 10
1. How do I rotate a video in Windows 10?
To rotate a video in Windows 10, you can use the built-in Photos app. Open the app and select the video you want to rotate. Click on the Edit & Create button at the top of the screen and select Rotate left or Rotate right to adjust the video orientation.
2. Can I rotate a video in Windows Media Player?
No, you can’t rotate a video in Windows Media Player. This feature is only available in the Photos app. However, you can use a third-party video editing software to rotate your videos.
3. How do I save the rotated video?
After rotating the video in the Photos app, click on the Save a copy button at the top of the screen. You can then choose the destination folder and file name for the newly rotated video.
4. What should I do if the video is upside down after rotating it?
If the video is upside down after rotating it, you may have rotated it in the wrong direction. Try rotating it in the opposite direction and see if that fixes the issue. If not, you may need to use a third-party video editing software to rotate the video.
5. Can I rotate a video without losing quality?
Rotating a video can sometimes result in a loss of quality, especially if the video is compressed or low-resolution. However, using a good video editing software can help minimize the loss of quality. Make sure to save the rotated video in the same format and resolution as the original file to avoid further loss of quality.
Conclusion
We have provided you all the possible ways to rotate video Windows. If you want to rotate with pre-installed software, you have Photos app. If you have VLC Media Player installed, you can do the rotation temporarily and permanently. You can also use Ezgif online tool to rotate animated files without installing any
For macOS 10.12 or later
Step 2: From Video Editing panel, expand Transform option and use the slider on Rotate option to rotate the video at any angle. Once done, click on OK button.

Step 3: Go to Export option and click on Export button. The new video files with its new rotation will be saved in the destination folder.

Way 3. Use VLC Media Player
Most Windows users generally install VLC Media Player to watch movies. This is because Windows Media Player supports only limited file formats. Most movie files that you download online are supported by VLC but not on Windows Media Player. Here are the steps on how to rotate a video in Windows temporarily using VLC Media Player.
Step 1: Open VLC Media Player. Go to Media menu and click on Open File option. Select the video file from your hard drive that you want to rotate.
Step 2: Once the video opens, go to Tools menu and click on Effects and Filters option.

Step 3: On Adjustments and Effects window, click on Video Effects tab.
Step 4: Under Video Effects tab, click on Geometry tab.
Step 5: Turn of Transform checkbox and click on drop-down menu to select the required option. You can rotate the video by 90 degrees, 180 degrees and 270 degrees.

Step 6: To rotate the video at any desired angle, turn on Rotate checkbox and select the desired angle.

Step 7: Finally, click on Save and then Close button.

Please note that when you rotate a video temporarily, it is for a one-time watch only. When you open the video again in any other media player, it will have the original orientation.
Way 4. Use EZGIF Online Tool
If you have short video files and you want to upload them on social media platforms, you can convert them into GIF files. You can convert any video file to EZGIF. Therefore, instead of video files, if you want to rotate GIF files, EZGIF is highly useful as an online tool. In fact, you can also convert GIF files into MP4 files. Here are the steps to follow to rotate short video files using EZGIF online tool.
Step 1: Open your web browser and open Ezgif.com.
Step 2: Click on Video to GIF option.
Step 3: Click on Choose File button and select the short video file from your hard drive.

Step 4: Click on Upload Video button and wait for the conversion. Thereafter, download the GIF file.
Step 5: To rotate the GIF file, go to Rotate option. Click on Choose File button.

Step 6: Select the GIF file and click on Upload.
Step 7: You can select from provided rotation options or mention rotation angle explicitly and click on Apply Rotation button.

Wait for the rotation effect and download the file on your hard drive.
FAQs about Rotate Video in Windows 10
1. How do I rotate a video in Windows 10?
To rotate a video in Windows 10, you can use the built-in Photos app. Open the app and select the video you want to rotate. Click on the Edit & Create button at the top of the screen and select Rotate left or Rotate right to adjust the video orientation.
2. Can I rotate a video in Windows Media Player?
No, you can’t rotate a video in Windows Media Player. This feature is only available in the Photos app. However, you can use a third-party video editing software to rotate your videos.
3. How do I save the rotated video?
After rotating the video in the Photos app, click on the Save a copy button at the top of the screen. You can then choose the destination folder and file name for the newly rotated video.
4. What should I do if the video is upside down after rotating it?
If the video is upside down after rotating it, you may have rotated it in the wrong direction. Try rotating it in the opposite direction and see if that fixes the issue. If not, you may need to use a third-party video editing software to rotate the video.
5. Can I rotate a video without losing quality?
Rotating a video can sometimes result in a loss of quality, especially if the video is compressed or low-resolution. However, using a good video editing software can help minimize the loss of quality. Make sure to save the rotated video in the same format and resolution as the original file to avoid further loss of quality.
Conclusion
We have provided you all the possible ways to rotate video Windows. If you want to rotate with pre-installed software, you have Photos app. If you have VLC Media Player installed, you can do the rotation temporarily and permanently. You can also use Ezgif online tool to rotate animated files without installing any
For macOS 10.12 or later
Step 2: From Video Editing panel, expand Transform option and use the slider on Rotate option to rotate the video at any angle. Once done, click on OK button.

Step 3: Go to Export option and click on Export button. The new video files with its new rotation will be saved in the destination folder.

Way 3. Use VLC Media Player
Most Windows users generally install VLC Media Player to watch movies. This is because Windows Media Player supports only limited file formats. Most movie files that you download online are supported by VLC but not on Windows Media Player. Here are the steps on how to rotate a video in Windows temporarily using VLC Media Player.
Step 1: Open VLC Media Player. Go to Media menu and click on Open File option. Select the video file from your hard drive that you want to rotate.
Step 2: Once the video opens, go to Tools menu and click on Effects and Filters option.

Step 3: On Adjustments and Effects window, click on Video Effects tab.
Step 4: Under Video Effects tab, click on Geometry tab.
Step 5: Turn of Transform checkbox and click on drop-down menu to select the required option. You can rotate the video by 90 degrees, 180 degrees and 270 degrees.

Step 6: To rotate the video at any desired angle, turn on Rotate checkbox and select the desired angle.

Step 7: Finally, click on Save and then Close button.

Please note that when you rotate a video temporarily, it is for a one-time watch only. When you open the video again in any other media player, it will have the original orientation.
Way 4. Use EZGIF Online Tool
If you have short video files and you want to upload them on social media platforms, you can convert them into GIF files. You can convert any video file to EZGIF. Therefore, instead of video files, if you want to rotate GIF files, EZGIF is highly useful as an online tool. In fact, you can also convert GIF files into MP4 files. Here are the steps to follow to rotate short video files using EZGIF online tool.
Step 1: Open your web browser and open Ezgif.com.
Step 2: Click on Video to GIF option.
Step 3: Click on Choose File button and select the short video file from your hard drive.

Step 4: Click on Upload Video button and wait for the conversion. Thereafter, download the GIF file.
Step 5: To rotate the GIF file, go to Rotate option. Click on Choose File button.

Step 6: Select the GIF file and click on Upload.
Step 7: You can select from provided rotation options or mention rotation angle explicitly and click on Apply Rotation button.

Wait for the rotation effect and download the file on your hard drive.
FAQs about Rotate Video in Windows 10
1. How do I rotate a video in Windows 10?
To rotate a video in Windows 10, you can use the built-in Photos app. Open the app and select the video you want to rotate. Click on the Edit & Create button at the top of the screen and select Rotate left or Rotate right to adjust the video orientation.
2. Can I rotate a video in Windows Media Player?
No, you can’t rotate a video in Windows Media Player. This feature is only available in the Photos app. However, you can use a third-party video editing software to rotate your videos.
3. How do I save the rotated video?
After rotating the video in the Photos app, click on the Save a copy button at the top of the screen. You can then choose the destination folder and file name for the newly rotated video.
4. What should I do if the video is upside down after rotating it?
If the video is upside down after rotating it, you may have rotated it in the wrong direction. Try rotating it in the opposite direction and see if that fixes the issue. If not, you may need to use a third-party video editing software to rotate the video.
5. Can I rotate a video without losing quality?
Rotating a video can sometimes result in a loss of quality, especially if the video is compressed or low-resolution. However, using a good video editing software can help minimize the loss of quality. Make sure to save the rotated video in the same format and resolution as the original file to avoid further loss of quality.
Conclusion
We have provided you all the possible ways to rotate video Windows. If you want to rotate with pre-installed software, you have Photos app. If you have VLC Media Player installed, you can do the rotation temporarily and permanently. You can also use Ezgif online tool to rotate animated files without installing any
Steps to Make a Neon Dance Effect With Filmora
Neon colors in videos are constantly attracting and compelling the scenes. So how it looks if dancing videos have this feature? For sure, it’ll be dreamier and more classy.
After moving toward, the following steps of processing neon effects, you will find different effects to make your video filmier. Wondershare Filmora provides all types of products on one platform. Then try it out and enjoy the rest. Scroll more to learn about the neon effect before editing your video!
Neon Dance Effects in Wondershare Filmora
You often watch viral dance videos or commercials in which a neon highlight of a person dances aside from them in the video. Yes! You can also make that just in a few minutes.
In this case, Wondershare Filmora is considered to be your partner. Filmora is a fantastic tool that you can have at your disposal to edit a range of videos. There are tons of neon effects in Filmora, including neon frames, neon swings, or even multiple neon overlays.
Free Download For Win 7 or later(64-bit)
Free Download For macOS 10.14 or later

Steps to Make a Neon Dance Effect With Filmora
The public is tired now of seeing old video graphics in dancing videos. It’s time to add neon colors to give a fascinating look. Follow the step-by-step guide mentioned below, and let’s get going!
Step1 Import Clips into the Timeline
Before we begin to edit our video, make sure you download Wondershare Filmora. First, you need to create a timeline to edit our dancing clips. For this, take a look at the below steps!
- Click on the Import icon in the main window when you open Wondershare Filmora.
- Then, import the video clips you want to edit.
- Now, drag the Video and drop it in the editing timeline below.

Step2 Add the Same Video again
We aim to create a black background for the original video we imported above. To do so, follow the steps mentioned below.
- Drag and drop the same video on the timeline.
- Make sure to drag and drop it above the original video.

Step3 Go into the Compositing Mode
After adding the same video, now convert BG into a black screen. For this, follow the given steps:
- Double-Click on the video we added later.
- A video editing panel will open up in the Import
- Scroll down till you see the compositing tab.
- Here will have to change the Blending mode.
- Click on the tab ahead that is labeled “Norma“
- A drop-down option will open up.
- In this drop-down option, scroll below to “Difference“.

- As soon as you click on the Difference option, you will notice a change in the main play window; it will all turn to a black screen.
Step4 Add the Pixelated Edges effect
Our target is to outline the individual in the video, so we can move on to create the Neon Highlight effect. To do so, follow these steps!
- First, go into the effects option that you can select from the tab above the import window.
- In the effects panel, search for the Pixelated edges
- You will notice a search bar in the top right corner. Type “Pixelated edges,“ and you will see some effects pop up in the import window.

- Select the Pixelated edges effect. Then, click and drag it below the video that we turned to black using the Difference
- The edges of the individual dancing in the video will be outlined.

Step5 Change the outline color
You may not like the default color with the Pixelated edges effect. But no worries, you can change that to whatever color you desire by following these steps:
- Double-Click on the video in which you added the effect.
- An editing panel will pop up.
- Click on the Effect option below the Video
- Here, you can see the color option.
- Click on the color and select whatever suits you the best.

Step6 Create Multiple Outlines
It would help if you created multiple outlines to achieve the Neon Dance effect. These multiple outlines will be produced by exporting them multiple times with the color you want. Follow the below points to get it instantly!
- When you have selected the color for your outline, export the video by clicking on the Export icon in the top right corner.

- When you have exported the video, move back to the timeline to edit again.
- As we had selected the Blue color for reference, now choose another color you wish.
- After changing the video, export it again.
![]()
Note: Export as many times as you want with the color of your choice. E.g., 5 colors = 5 exports.
Step7 Import the exported videos
- Now you have to import the videos that you exported.
- Before doing that, first, delete the video in track 2. (The video on which we applied the Difference)
- Now select all the exports from your library and import them onto the import window.
- Please select all of them and drag them on the timeline.
![]()
Note: You don’t want all the outlines to play simultaneously. Otherwise, the outlines will not appear to be separate.
- To do so, stack the videos on each other on different tracks.
Tip: The trick here will be to offset the video by a few seconds so that each video plays a little later than the other.

To efficiently blend the outlines with the green screen, you can change the blending mode of each of the exported videos to “Lighten.”
- Double-click on each video.
- In the editing panel, choose compositing.
- From there, select the “Lighten“ option.

Step8 Add the Glow effect
To make the outlines glow like Neon lights, we will need to add another effect from the effects library.
- Go to the effects tab and search for “Glow.”
- Click and drag the glow effect to each of the exported videos.

You can make it more fun by going one step further!
- Double-click on each of the glow effects that you added.
- In effect, the editing panel goes to the video effects.
- Here, you can change the radius of the Glow effect you added.
- Similarly, you can do it in all the other videos.
Step9 Apply the Green screen effect
We will change our green screen for the final part. Follow the last steps, and then enjoy!
- Move the green screen footage below them all to the top track.
- Double-click the video to enter the editing panel.
- Go to the chroma key (Green Screen) in the editing panel**.**
- Click on the arrow aside from the tab.
You will immediately see changes to your video in the main play window. Play the video from the start and notice the changes.

Congratulations! You have successfully created Neon Dance effects by using the user-friendly Wondershare Filmora.
Conclusion
Wondershare Filmora offers a variety of editing features that you can use to create very innovative videos. You can quickly create Neon effects in your dance videos next time by following the above steps! Add more creativity to attract more audience. Have fun and explore more effects to get unique results

Steps to Make a Neon Dance Effect With Filmora
The public is tired now of seeing old video graphics in dancing videos. It’s time to add neon colors to give a fascinating look. Follow the step-by-step guide mentioned below, and let’s get going!
Step1 Import Clips into the Timeline
Before we begin to edit our video, make sure you download Wondershare Filmora. First, you need to create a timeline to edit our dancing clips. For this, take a look at the below steps!
- Click on the Import icon in the main window when you open Wondershare Filmora.
- Then, import the video clips you want to edit.
- Now, drag the Video and drop it in the editing timeline below.

Step2 Add the Same Video again
We aim to create a black background for the original video we imported above. To do so, follow the steps mentioned below.
- Drag and drop the same video on the timeline.
- Make sure to drag and drop it above the original video.

Step3 Go into the Compositing Mode
After adding the same video, now convert BG into a black screen. For this, follow the given steps:
- Double-Click on the video we added later.
- A video editing panel will open up in the Import
- Scroll down till you see the compositing tab.
- Here will have to change the Blending mode.
- Click on the tab ahead that is labeled “Norma“
- A drop-down option will open up.
- In this drop-down option, scroll below to “Difference“.

- As soon as you click on the Difference option, you will notice a change in the main play window; it will all turn to a black screen.
Step4 Add the Pixelated Edges effect
Our target is to outline the individual in the video, so we can move on to create the Neon Highlight effect. To do so, follow these steps!
- First, go into the effects option that you can select from the tab above the import window.
- In the effects panel, search for the Pixelated edges
- You will notice a search bar in the top right corner. Type “Pixelated edges,“ and you will see some effects pop up in the import window.

- Select the Pixelated edges effect. Then, click and drag it below the video that we turned to black using the Difference
- The edges of the individual dancing in the video will be outlined.

Step5 Change the outline color
You may not like the default color with the Pixelated edges effect. But no worries, you can change that to whatever color you desire by following these steps:
- Double-Click on the video in which you added the effect.
- An editing panel will pop up.
- Click on the Effect option below the Video
- Here, you can see the color option.
- Click on the color and select whatever suits you the best.

Step6 Create Multiple Outlines
It would help if you created multiple outlines to achieve the Neon Dance effect. These multiple outlines will be produced by exporting them multiple times with the color you want. Follow the below points to get it instantly!
- When you have selected the color for your outline, export the video by clicking on the Export icon in the top right corner.

- When you have exported the video, move back to the timeline to edit again.
- As we had selected the Blue color for reference, now choose another color you wish.
- After changing the video, export it again.
![]()
Note: Export as many times as you want with the color of your choice. E.g., 5 colors = 5 exports.
Step7 Import the exported videos
- Now you have to import the videos that you exported.
- Before doing that, first, delete the video in track 2. (The video on which we applied the Difference)
- Now select all the exports from your library and import them onto the import window.
- Please select all of them and drag them on the timeline.
![]()
Note: You don’t want all the outlines to play simultaneously. Otherwise, the outlines will not appear to be separate.
- To do so, stack the videos on each other on different tracks.
Tip: The trick here will be to offset the video by a few seconds so that each video plays a little later than the other.

To efficiently blend the outlines with the green screen, you can change the blending mode of each of the exported videos to “Lighten.”
- Double-click on each video.
- In the editing panel, choose compositing.
- From there, select the “Lighten“ option.

Step8 Add the Glow effect
To make the outlines glow like Neon lights, we will need to add another effect from the effects library.
- Go to the effects tab and search for “Glow.”
- Click and drag the glow effect to each of the exported videos.

You can make it more fun by going one step further!
- Double-click on each of the glow effects that you added.
- In effect, the editing panel goes to the video effects.
- Here, you can change the radius of the Glow effect you added.
- Similarly, you can do it in all the other videos.
Step9 Apply the Green screen effect
We will change our green screen for the final part. Follow the last steps, and then enjoy!
- Move the green screen footage below them all to the top track.
- Double-click the video to enter the editing panel.
- Go to the chroma key (Green Screen) in the editing panel**.**
- Click on the arrow aside from the tab.
You will immediately see changes to your video in the main play window. Play the video from the start and notice the changes.

Congratulations! You have successfully created Neon Dance effects by using the user-friendly Wondershare Filmora.
Conclusion
Wondershare Filmora offers a variety of editing features that you can use to create very innovative videos. You can quickly create Neon effects in your dance videos next time by following the above steps! Add more creativity to attract more audience. Have fun and explore more effects to get unique results!
Also read:
- Updated Do You Want to Rotate Your TikTok Video to Stylize It More? This Article Will Provide Simple Methods of Rotating TikTok Videos to Improve the Audience Viewing Experience
- If You Dont Know How to Blur a Part of a Video, Youre in the Right Place. We Have Provided All the Details You Need to Help You Blur a Still or Moving Portion of Your Video
- New 2024 Approved The Best Peter McKinnon LUTs Recommendation
- Updated In 2024, Thousands Already Know Ezgif and So Can You
- New 2024 Approved Have You Ever Wondered How to Add Camera Shake to Video in Adobe After Effects? Let Us Share with You some Tips and Tricks on How to Do Just That
- How to Select and Use The Best BRAW LUTs for 2024
- In 2024, Hyperlapse VS Timelapse Videos
- New In 2024, Using Adobe After Effects as a Pro-Level Editing Platforms Demands You to Add Expressions in After Effects. If Youre Looking for the Solutions on After Effects How to Add Expressions Then Weve Got You Covered. Learn More Here
- Updated Learn How to Effectively Use Masking in After Effects with This Comprehensive Guide. Includes Step-by-Step Instructions and an Alternative Masking Technique
- New Discover the Best Video Frame Rate Converters for Smooth Playback, Including Online and Offline Options. Learn How to Convert Frame Rates for Free and Elevate Your Video Quality with These Top 8 Tools
- Updated In 2024, How to Make Blender Render Transparent Background
- Updated 2024 Approved Are You a Videographer or Video Content Creator? Is Enhancing Your Videography Skills Your Priority? Do You Want to Learn the Basics of LumaFusion Color Grading? Read on to Find All the Information You Need
- Updated How to Create Cooking Video Intro and End Screen for YouTube Channel?
- New Top 10 Picks for Flawless Slow Motion Video Generation
- How to Apply Gaussian Blur Effect to Videos In Premiere Pro?
- New 2024 Approved Interested in Adding a Cinematic Strobe Light Effect to Your Movie or Video Title? Follow the Steps Explained in Detail Here
- New How to Make Tutorial Video with Filmora for 2024
- In 2024, Steps To Fade Audio In Premier Pro
- New 2024 Approved Best 5 Tools to Help You Know More Freeze-Frame Video Editing Skills
- New In 2024, Best 12 Sony Vegas Slideshow Templates for Free Download
- New 2024 Approved How to Got Free After Effects Templates Slideshow with Simple Trick
- New In 2024, How to Use LUTS to Color Grade on Your iPhone
- 2024 Approved Fascinated About Exploring Your Graphic Creativity by Experimenting with Designing Slideshow Presentations on a Variety of Software Programs? Stay Here to Get the Know-How of Using Clideo
- 7 Best MP4 Editors on Mac Edit MP4 in Mac for 2024
- 11 Ways to Fix it When My Vivo Y78 5G Wont Charge | Dr.fone
- Protecting Your Privacy How To Remove Apple ID From iPhone 15 Pro Max
- How to Fake Snapchat Location on Vivo S17 | Dr.fone
- How To Upgrade or Downgrade iPhone 8 Without Data Loss? | Dr.fone
- How to Mirror PC Screen to Tecno Spark 20 Pro+ Phones? | Dr.fone
- How to Cast Vivo T2 5G to Computer for iPhone and Android? | Dr.fone
- In 2024, How Vivo Y36 Mirror Screen to PC? | Dr.fone
- Complete Tutorial to Use VPNa to Fake GPS Location On Vivo Y36i | Dr.fone
- How to Remove Activation Lock On the iPhone 11 Pro Without Previous Owner?
- My Videos Arent Playing on Honor X50i – What Can I Do? | Dr.fone
- In 2024, Why does the pokemon go battle league not available On Apple iPhone 6s | Dr.fone
- How to Bypass Apple iPhone 13 Passcode Easily Video Inside
- Title: How to Add Filter to Video in Premiere Pro, In 2024
- Author: Morgan
- Created at : 2024-06-24 01:30:37
- Updated at : 2024-06-25 01:30:37
- Link: https://ai-video-editing.techidaily.com/how-to-add-filter-to-video-in-premiere-pro-in-2024/
- License: This work is licensed under CC BY-NC-SA 4.0.

