:max_bytes(150000):strip_icc():format(webp)/GettyImages-1139785112-76d1d0f975934233883a19f33b8cd813.jpg)
How to Add Freeze Frame to Your Video From Any Device, In 2024

How to Add Freeze Frame to Your Video From Any Device?
Adding effects is an essential part of video editing to make a regular video look extraordinary. There are literally unlimited video effects available in popular video editors. You need to apply a video effect as per the trend and requirements of your video. Freeze frame effect has become extremely popular among video creators in today’s world of social media. Use freeze frame effect to freeze a specific scene in your video so that you can draw the attention of your viewers to that particular moment.
For example, in a match highlight video, you freeze the frame moment before a goal to show the positioning of the players or strikers. Owing to the popularity of freeze frame effect, you will find the video effect in almost all popular video editor apps for computers and smartphones. In fact, even popular online video editors have included the effect in their video effects. We will illustrate how to add freeze frame effect to your video on any device.
Part 1. How to Add Freeze Frame Video Effect on PC
If you are a computer user and you are looking for a video editor to add freeze frame effect to your video, we recommend Wondershare Filmora. Filmora is extremely popular among video creators for its wide range of video effects as well as its intuitive user interface. Adding freeze frame effect is super easy in Filmora and here are the steps to follow.
Step1Download and install Filmora for Windows PC. Launch Filmora and click on New Project button.
Step2Import your video clip under Project Media and then drop it into Timeline.
Step3Play the video and pause it where you want to freeze frame. Click on Snapshot icon to take photo of the frame. You will find the photo you have taken just now under Media library. In the meantime, you should split the video clip where you paused it to make space for the still image to get added and stay frozen.
Drag and drop the image on Timeline and stretch it to the duration up to which you want the frame to stay frozen. This image should be on top of the video clip in Timeline. You should place the image exactly where you paused the video.
Step4Double-click on the image in Timeline and adjust parameters as required. Play the video to notice the freeze frame effect. Click on Export button to save the video.
Part 2. How to Add Freeze Frame Video Effect on Mac
If you are a Mac user, the best video editor you can use to edit your video is Final Cut Pro. FCP is widely used by professional video creators and editors to edit their videos as per requirements. There are different categories of video effects available on FCP including freeze frame effect. Make sure your video is recorded with high frame rate and resolution for better outcomes. Here are the steps on how to add freeze frame in Final Cut Pro.
Step1Launch Final Cut Pro on your Mac. Go to File> Import> Files and select your video clip from the storage device. Drag it into the Timeline.

Step2Grab and move the Playhead to the point where you want to freeze the frame. Click on the video clip in the Timeline.
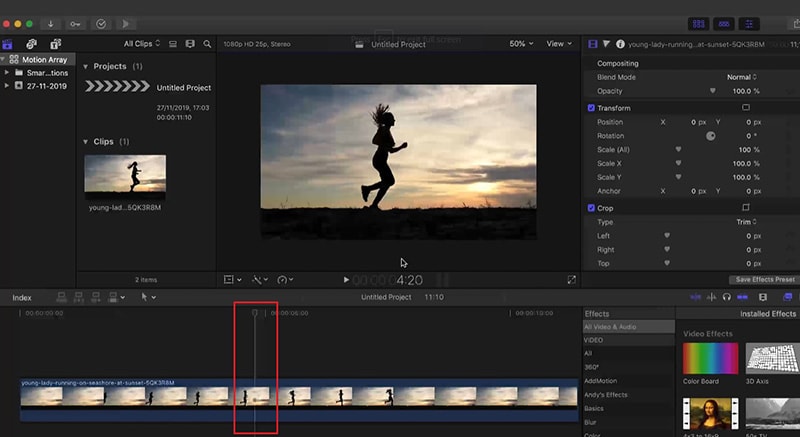
Step3Go to Edit menu and click on Add Freeze Frame. This will split your video clip and add frozen frame where you have placed the Playhead.
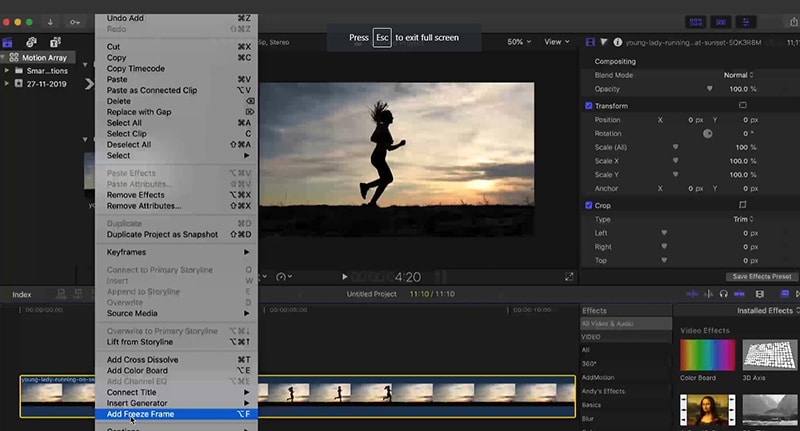
The default duration of the frozen freeze is four seconds. You can stretch it as per your requirements.
Just for information, both Windows and Mac users can also Premiere Pro add freeze frame effect if they already have Premiere Pro installed on their computers. The freeze frame feature in Premiere Pro is referred to as Add Frame Hold effect.
Part 3. How to Add Freeze Frame Video Effects Online
If you do not want to download and install a dedicated video editor on your computer, you can apply freeze frame effect to your video online as well. This will save your space as well as put less pressure on your CPU resource. We recommend Kapwing online video editor to use freeze frame effect on the go from any device directly from web browser. Here are the steps to add freeze frame effect to your video online.
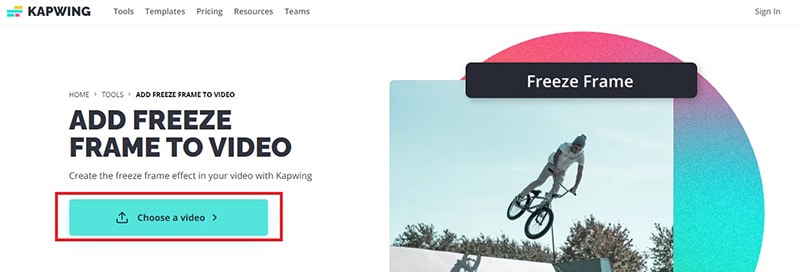
Step1Open web browser on your device and visit “kapwing.com/tools/freeze-frame”. Click on Choose a video button.
Step2Drop your video file into Timeline and click on the video clip. Move the Playhead to the point where you want to add freeze frame effect.
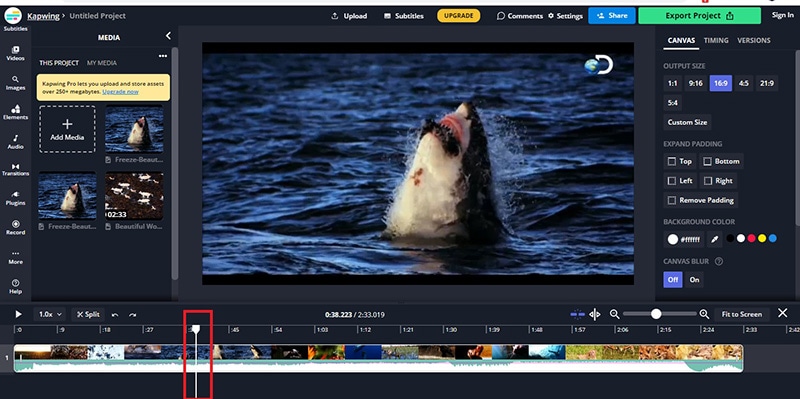
Step3Go to Timing tab located in the top-right corner. Click on Freeze Frame button to add still image of the scene in the video. You can click multiple times to add more still images of the same scene. The more still images, the greater its duration will be.
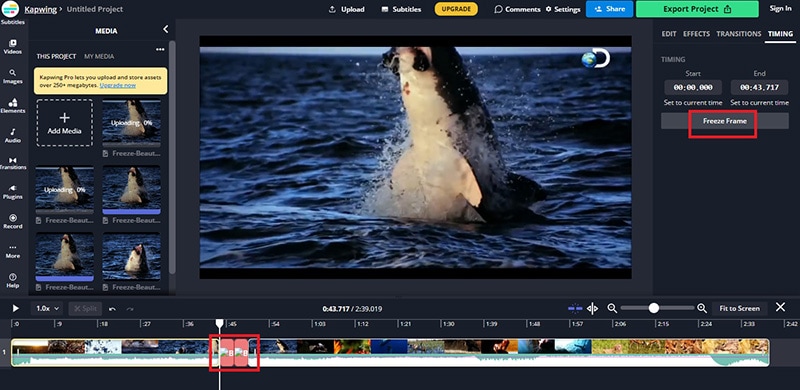
Step4Play the video and you can have multiple freeze frame effects in the video clip.
This is undoubtedly the easiest way to add freeze frame effects for beginners.
Part 4. How to Add Freeze Frame Video Effects on Mobile
If you are using an Android smartphone or iPhone, you can apply freeze frame effect directly on your mobile instantly. In today’s world, people capture videos through their smartphones thanks to high-quality phone camera. You can use CapCut video editor app on both Android and iOS devices to add freeze frame effects. Here are the steps you need to follow.
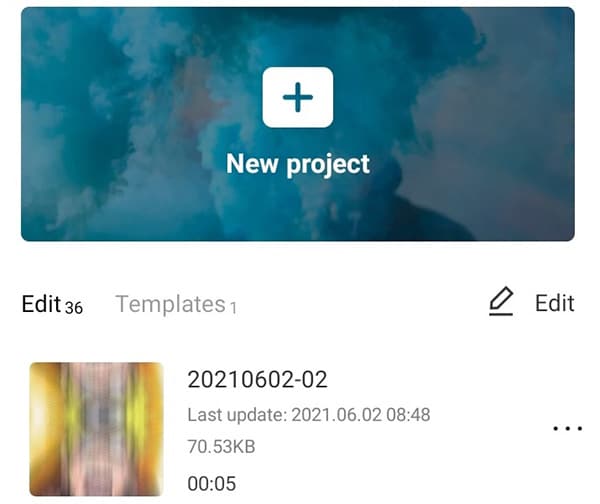
Step1Install CapCut app on your phone. Launch the app and tap on New Project.
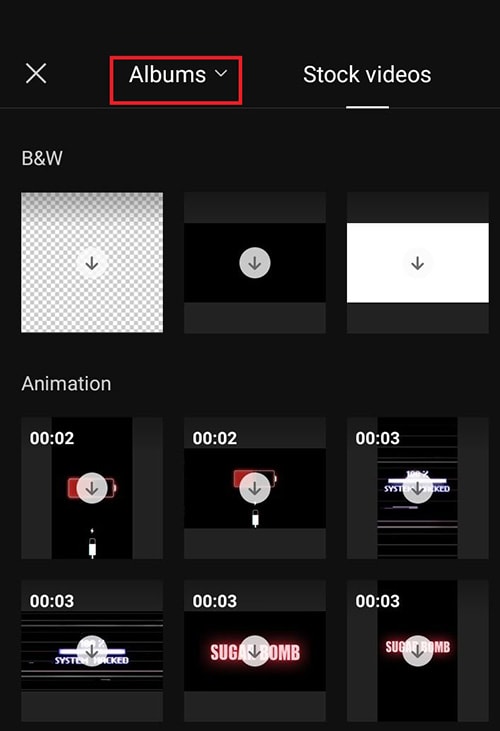
Step2Go to Albums and select the video to which you want to add the frame freeze effect.
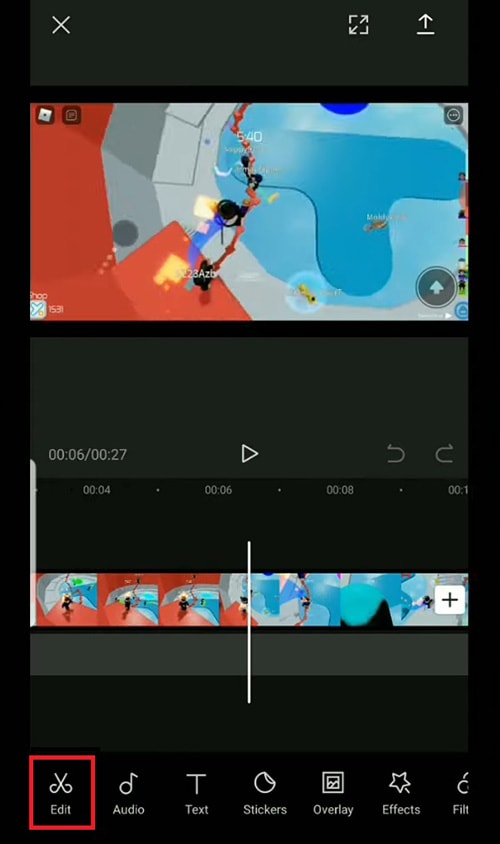
Step3Put the Playhead to the point where you want to add the effect. Tap on Edit option.
Step4Search for Freeze option located at the bottom and tap on it to insert still image of the scene in Timeline.
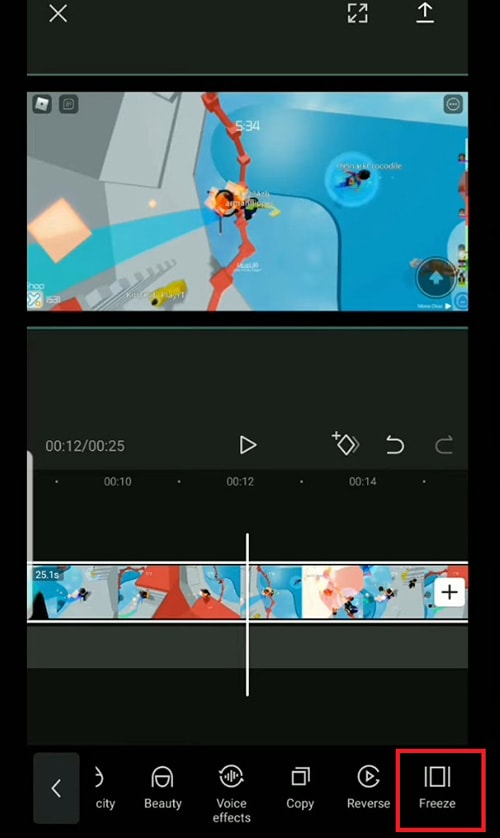
Step5You can drag the duration of the frame freeze effect as per your requirement.
The Bottom Line
Adding freeze frame to your videos before and during impactful moments can enhance your video content. We have illustrated how to add a freeze frame in Final Cut Pro for Mac users. You can also add it to your video online using Kapwing video editor. You can use CapCut app to use the effect in your video on your smartphone. We recommend Filmora to add the effect quickly and conveniently on your PC.
Free Download For Win 7 or later(64-bit)
Free Download For macOS 10.14 or later
Free Download For macOS 10.14 or later
How to Create a Dynamic Text Animation in Filmora — Step-By-Step
Preparation
What you need to prepare:
- A computer (Windows or macOS)
- Your video materials.
- Filmora video editor
Step 1
Download and install the Filmora video editor . Just click the link, hit “Download”, and it will start automatically. Then, open a New Project.
Step 2
Click on the “Titles” tab and drag a Default Title to Track 2 on your Timeline.

Step 3
Double-click on it and change the font to anything you like. Then, enter the text in the box in front of you. While you’re here, you can also edit the text spacing and other features.

Step 4
Now, take a snapshot of the text. Then, double-click on the default title again and change the text to a single letter I. Once again, take a snapshot of this text and then delete the default title from the timeline.

You should have two snapshots in My Media now. One of them should say “FILMORA” and one with the letter “I”.

Step 5
Drag the “FILMORA” snapshot to track 2 and the “I” snapshot to track 3. Then, click on the “Zoom” button and set this to 50%.

Step 6
Double-click on the “I” snapshot from the timeline. Then, input these settings when the window pops up. After that, drag the Playhead 1 second and 15 frames further down the timeline. Then, double-click on the “I” snapshot again, and change the Y-axis value to 0.

Step 7
Copy the “I” snapshot track from the timeline. Then, paste it on Track 4. Next, double-click on this one and change the X-axis position to whichever letter you want. In this case, it’s the letter “M”. As for the Y-Axis, you can change it any way that suits you.

Step 8
Copy this process as often and with as many letters as you want. Then, when you’re done, export the title animation to your computer.

Step 9
Open a new project in Filmora and import the title animation we just created.
Step 10
Drag the custom title animation to Track 2 and drag any video background you have on Track 1.

Step 11
Double-click on the title track, go to the Video tab, and select “Lighten” from the Blending Mode tab.

Step 12
Shift the title clip from Track 2 to Track 3. Then, go to the Effects tab and drag the Dark Film effect to Track 1 on the timeline.

Step 13
Search for the “Blur” effect in the Effects tab. Then, drag “Square Blur” to Track 2 in the timeline.

Step 14
Select the “Cinema” effect from the Effects tab and drag it to Track 4. Double-click on it and change the border height to 0.10.

Step 15
Now, all left is to render the clip and review the final result.

Summary
What you’ve learned:
- Create a professional-level animated text in Filmora in 15 simple steps
- How to add a video background and cinematic effects to your animated title
- Adjust the settings of clips in the Filmora timeline
What you need to prepare:
- A computer (Windows or macOS)
- Your video materials.
- Filmora video editor
Step 1
Download and install the Filmora video editor . Just click the link, hit “Download”, and it will start automatically. Then, open a New Project.
Step 2
Click on the “Titles” tab and drag a Default Title to Track 2 on your Timeline.

Step 3
Double-click on it and change the font to anything you like. Then, enter the text in the box in front of you. While you’re here, you can also edit the text spacing and other features.

Step 4
Now, take a snapshot of the text. Then, double-click on the default title again and change the text to a single letter I. Once again, take a snapshot of this text and then delete the default title from the timeline.

You should have two snapshots in My Media now. One of them should say “FILMORA” and one with the letter “I”.

Step 5
Drag the “FILMORA” snapshot to track 2 and the “I” snapshot to track 3. Then, click on the “Zoom” button and set this to 50%.

Step 6
Double-click on the “I” snapshot from the timeline. Then, input these settings when the window pops up. After that, drag the Playhead 1 second and 15 frames further down the timeline. Then, double-click on the “I” snapshot again, and change the Y-axis value to 0.

Step 7
Copy the “I” snapshot track from the timeline. Then, paste it on Track 4. Next, double-click on this one and change the X-axis position to whichever letter you want. In this case, it’s the letter “M”. As for the Y-Axis, you can change it any way that suits you.

Step 8
Copy this process as often and with as many letters as you want. Then, when you’re done, export the title animation to your computer.

Step 9
Open a new project in Filmora and import the title animation we just created.
Step 10
Drag the custom title animation to Track 2 and drag any video background you have on Track 1.

Step 11
Double-click on the title track, go to the Video tab, and select “Lighten” from the Blending Mode tab.

Step 12
Shift the title clip from Track 2 to Track 3. Then, go to the Effects tab and drag the Dark Film effect to Track 1 on the timeline.

Step 13
Search for the “Blur” effect in the Effects tab. Then, drag “Square Blur” to Track 2 in the timeline.

Step 14
Select the “Cinema” effect from the Effects tab and drag it to Track 4. Double-click on it and change the border height to 0.10.

Step 15
Now, all left is to render the clip and review the final result.

Summary
What you’ve learned:
- Create a professional-level animated text in Filmora in 15 simple steps
- How to add a video background and cinematic effects to your animated title
- Adjust the settings of clips in the Filmora timeline
What you need to prepare:
- A computer (Windows or macOS)
- Your video materials.
- Filmora video editor
Step 1
Download and install the Filmora video editor . Just click the link, hit “Download”, and it will start automatically. Then, open a New Project.
Step 2
Click on the “Titles” tab and drag a Default Title to Track 2 on your Timeline.

Step 3
Double-click on it and change the font to anything you like. Then, enter the text in the box in front of you. While you’re here, you can also edit the text spacing and other features.

Step 4
Now, take a snapshot of the text. Then, double-click on the default title again and change the text to a single letter I. Once again, take a snapshot of this text and then delete the default title from the timeline.

You should have two snapshots in My Media now. One of them should say “FILMORA” and one with the letter “I”.

Step 5
Drag the “FILMORA” snapshot to track 2 and the “I” snapshot to track 3. Then, click on the “Zoom” button and set this to 50%.

Step 6
Double-click on the “I” snapshot from the timeline. Then, input these settings when the window pops up. After that, drag the Playhead 1 second and 15 frames further down the timeline. Then, double-click on the “I” snapshot again, and change the Y-axis value to 0.

Step 7
Copy the “I” snapshot track from the timeline. Then, paste it on Track 4. Next, double-click on this one and change the X-axis position to whichever letter you want. In this case, it’s the letter “M”. As for the Y-Axis, you can change it any way that suits you.

Step 8
Copy this process as often and with as many letters as you want. Then, when you’re done, export the title animation to your computer.

Step 9
Open a new project in Filmora and import the title animation we just created.
Step 10
Drag the custom title animation to Track 2 and drag any video background you have on Track 1.

Step 11
Double-click on the title track, go to the Video tab, and select “Lighten” from the Blending Mode tab.

Step 12
Shift the title clip from Track 2 to Track 3. Then, go to the Effects tab and drag the Dark Film effect to Track 1 on the timeline.

Step 13
Search for the “Blur” effect in the Effects tab. Then, drag “Square Blur” to Track 2 in the timeline.

Step 14
Select the “Cinema” effect from the Effects tab and drag it to Track 4. Double-click on it and change the border height to 0.10.

Step 15
Now, all left is to render the clip and review the final result.

Summary
What you’ve learned:
- Create a professional-level animated text in Filmora in 15 simple steps
- How to add a video background and cinematic effects to your animated title
- Adjust the settings of clips in the Filmora timeline
What you need to prepare:
- A computer (Windows or macOS)
- Your video materials.
- Filmora video editor
Step 1
Download and install the Filmora video editor . Just click the link, hit “Download”, and it will start automatically. Then, open a New Project.
Step 2
Click on the “Titles” tab and drag a Default Title to Track 2 on your Timeline.

Step 3
Double-click on it and change the font to anything you like. Then, enter the text in the box in front of you. While you’re here, you can also edit the text spacing and other features.

Step 4
Now, take a snapshot of the text. Then, double-click on the default title again and change the text to a single letter I. Once again, take a snapshot of this text and then delete the default title from the timeline.

You should have two snapshots in My Media now. One of them should say “FILMORA” and one with the letter “I”.

Step 5
Drag the “FILMORA” snapshot to track 2 and the “I” snapshot to track 3. Then, click on the “Zoom” button and set this to 50%.

Step 6
Double-click on the “I” snapshot from the timeline. Then, input these settings when the window pops up. After that, drag the Playhead 1 second and 15 frames further down the timeline. Then, double-click on the “I” snapshot again, and change the Y-axis value to 0.

Step 7
Copy the “I” snapshot track from the timeline. Then, paste it on Track 4. Next, double-click on this one and change the X-axis position to whichever letter you want. In this case, it’s the letter “M”. As for the Y-Axis, you can change it any way that suits you.

Step 8
Copy this process as often and with as many letters as you want. Then, when you’re done, export the title animation to your computer.

Step 9
Open a new project in Filmora and import the title animation we just created.
Step 10
Drag the custom title animation to Track 2 and drag any video background you have on Track 1.

Step 11
Double-click on the title track, go to the Video tab, and select “Lighten” from the Blending Mode tab.

Step 12
Shift the title clip from Track 2 to Track 3. Then, go to the Effects tab and drag the Dark Film effect to Track 1 on the timeline.

Step 13
Search for the “Blur” effect in the Effects tab. Then, drag “Square Blur” to Track 2 in the timeline.

Step 14
Select the “Cinema” effect from the Effects tab and drag it to Track 4. Double-click on it and change the border height to 0.10.

Step 15
Now, all left is to render the clip and review the final result.

Summary
What you’ve learned:
- Create a professional-level animated text in Filmora in 15 simple steps
- How to add a video background and cinematic effects to your animated title
- Adjust the settings of clips in the Filmora timeline
IMovie Review – Is It The Best Video Editor for Mac Users?
If you are a Mac user and you are getting started in video editing, it is better if you start with a free video editing software. There is no need to download any external free video editor when you are a Mac user. This is because Mac comes with a pre-installed free video editor called iMovie editor. iMovie is a video editing app from Apple where you will get all the standard and some advanced features.
iMovie is extremely popular among Mac users for video editing because it is completely free and easy to use. In fact, iMovie is also available for iPhone and iPad users. You can start your video editing on your iPhone and transfer the same work to Mac to continue editing on your Mac. But the most important question is if iMovie editor is the best video editor for Mac users. Read our iMovie review and find out a better alternative.
Part 1. Key Features of iMovie
Even iMovie is completely free to use, it competes with several premium video editors in terms of features. There are only a handful of free video editors available that lets you edit 4K videos, and iMovie is one of them. Similarly, there are only a few premium video editors available that support editing the same video project on different devices like iMovie. Here are all the key features of iMovie that you should know.
Templates and Themes – iMovie comes with different templates and themes for creating different types of videos including cinematic videos. There are classy and trending themes available to create trailers and short films. These themes and templates have limited customization options so that you can adjust as per your requirements.
Basic Editing – iMovie lets you combine video clips, split a large video file, trim video parts, crop and rotate video. Besides, you get to zoom videos as well as resize them as you need. You can add texts and titles as well as apply different transitions wherever you want to.
Advanced Editing – You can change speed and turn your video clips into slow-motion videos. You can correct the color as well as stabilize them. Besides, you can apply green screen effect and split screen effect. Moreover, you can reverse video as well as put overlays on videos. iMovie is also capable of recording video and audio if you want to record your screen or webcam video.
Audio Editing – iMovie lets you edit audio as well which is an essential requirement in video editing. You can increase and decrease volume, change speed and add beat markers to a video if required. Coming to audio effects, you can apply fade-in and fade-out effects. You can mute the audio in your recorded video and add a background music instead. Moreover, you can add voiceover and choose royalty-free audio clips.
Transitions and Effects – Even though there are limited visual effects, there are unique and eye-catchy. iMovie keeps on adding new and trending effects with every update so that the users have enough options to make their videos stand out. iMovie also provides different backgrounds that you can use on your video to enhance its quality. Apart from visual effects, there are several standard audio effects available.
User Interface – iMovie comes with a simple and intuitive user interface that lets everyone edit videos instantly without prior experience. This is exactly why some users never go for premium video editors. The user interface is clean, and all options are readily available. You can upload media files on Media Library, and they are automatically categorized from where you can access them instantly.
Part 2. How to Edit Videos with iMovie?
iMovie comes pre-installed on Mac, and hence, there is no need to download and install the application. Coming to how to use iMovie, there are three types of projects you can choose on iMovie. They are Media, Projects, and Theater. Media is where your footages reside, Projects represent the main workspace, and Theater is where your finished projects reside. Here are the steps regarding iMovie edit video.
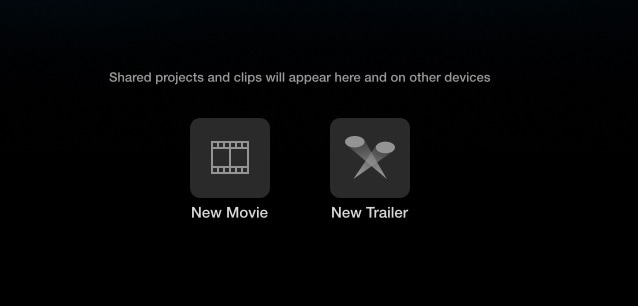
Step 1: Open iMovie and click on Projects. You will see two options Movie and Trailer. Click on Movie to edit your videos.
Step 2: Click on My Movie under Project Media and go to My Media. Import your video clips and audio files under My Media.
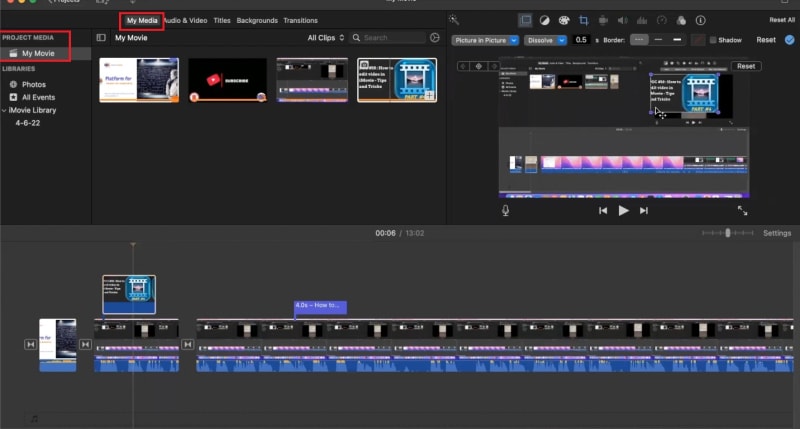
Step 3: Drag and drop the video clips and audio clips on the timeline in proper order. You can go for iMovie edit audio and video such as trimming as required.
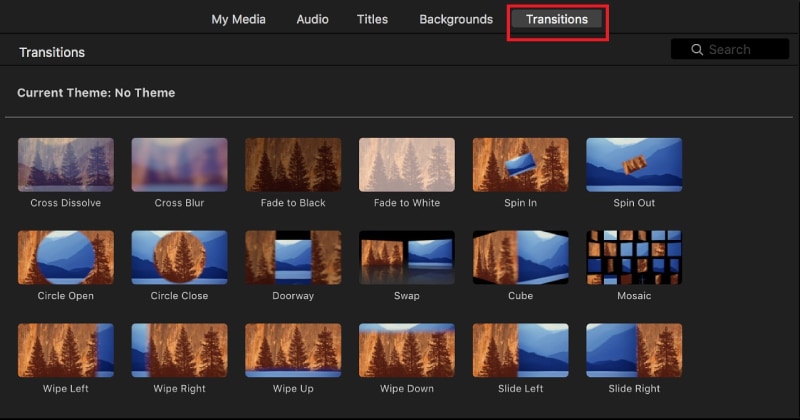
Step 4: Go to Transitions located at the top bar beside My Media and place the desired transitions in between the video clips.
Step 5: Similarly, go to Titles located at the top bar beside Transitions and place them on the timeline wherever appropriate.
Step 6: Finally, check your edited video on the canvas and then go to the top-right corner and click on Export. You will have to option to save it in Theater and share on social media as well as through email and iTunes.

Part 3. Alternative to Edit Videos - Filmora
In spite of iMovie being a good video editor, Mac users search for a better alternative. This is because there are limited transitions and effects available. You can have two video tracks only on the timeline and there is lack of customization. Besides, the advanced features of video editing such as motion tracking are not available. Moreover, there are limited file formats supported for importing and exporting.
Wondershare Filmora is the best alternative to iMovie for Mac users. Filmora is a premium video editor where all the shortcomings of iMovie are taken care of. Filmora supports almost all file formats for media files. There is a wide range of transitions, effects, elements as well as animations available. Besides, there are different styles of texts and titles available along with stock media library. Here are the steps to edit videos with iMovie.
For Win 7 or later (64-bit)
For macOS 10.12 or later
Step 1: Download and install Filmora on your Mac. Launch Filmora and click on New Project.
Step 2: Drag and drop your video clips and audio files Project Media folder. Drag and place the video clips on the timeline and arrange per perfectly. Place audio files on the timeline on a different track.

Step 3: If you want to apply transitions, go to Transitions at the top bar and drag any transition in between video clips on the timeline. You can also insert texts from Titles and objects from Elements from the top bar.

Step 4: Play the video to see the changes you have made, and click on Export button to save the video when you are satisfied.

Part 4. FAQs about iMovie
Is iMovie good for video editing?
Yes, iMovie is good for basic video editing. You can edit 4K videos, and iMovie is available on macOS and iOS. If you are a beginner, iMovie is perfect for you. If you want advanced editing features, we recommend Wondershare Filmora.
What’s better Premiere Pro or iMovie?
In terms of features and functionalities, Premiere Pro is far better than iMovie. However, Premiere Pro is more for advanced video editing while iMovie is more for beginners. iMovie is simpler to use than Premiere Pro, and hence, beginners will love it.
Can I make YouTube videos with iMovie?
Yes, you can make YouTube videos with iMovie as it has all the required tools and options. Import your video clips and audio files on the timeline, go for iMovie edit clip like trim and crop as required, add transitions, texts, and effects as applicable and publish your finished video on YouTube.
For macOS 10.12 or later
Step 1: Download and install Filmora on your Mac. Launch Filmora and click on New Project.
Step 2: Drag and drop your video clips and audio files Project Media folder. Drag and place the video clips on the timeline and arrange per perfectly. Place audio files on the timeline on a different track.

Step 3: If you want to apply transitions, go to Transitions at the top bar and drag any transition in between video clips on the timeline. You can also insert texts from Titles and objects from Elements from the top bar.

Step 4: Play the video to see the changes you have made, and click on Export button to save the video when you are satisfied.

Part 4. FAQs about iMovie
Is iMovie good for video editing?
Yes, iMovie is good for basic video editing. You can edit 4K videos, and iMovie is available on macOS and iOS. If you are a beginner, iMovie is perfect for you. If you want advanced editing features, we recommend Wondershare Filmora.
What’s better Premiere Pro or iMovie?
In terms of features and functionalities, Premiere Pro is far better than iMovie. However, Premiere Pro is more for advanced video editing while iMovie is more for beginners. iMovie is simpler to use than Premiere Pro, and hence, beginners will love it.
Can I make YouTube videos with iMovie?
Yes, you can make YouTube videos with iMovie as it has all the required tools and options. Import your video clips and audio files on the timeline, go for iMovie edit clip like trim and crop as required, add transitions, texts, and effects as applicable and publish your finished video on YouTube.
For macOS 10.12 or later
Step 1: Download and install Filmora on your Mac. Launch Filmora and click on New Project.
Step 2: Drag and drop your video clips and audio files Project Media folder. Drag and place the video clips on the timeline and arrange per perfectly. Place audio files on the timeline on a different track.

Step 3: If you want to apply transitions, go to Transitions at the top bar and drag any transition in between video clips on the timeline. You can also insert texts from Titles and objects from Elements from the top bar.

Step 4: Play the video to see the changes you have made, and click on Export button to save the video when you are satisfied.

Part 4. FAQs about iMovie
Is iMovie good for video editing?
Yes, iMovie is good for basic video editing. You can edit 4K videos, and iMovie is available on macOS and iOS. If you are a beginner, iMovie is perfect for you. If you want advanced editing features, we recommend Wondershare Filmora.
What’s better Premiere Pro or iMovie?
In terms of features and functionalities, Premiere Pro is far better than iMovie. However, Premiere Pro is more for advanced video editing while iMovie is more for beginners. iMovie is simpler to use than Premiere Pro, and hence, beginners will love it.
Can I make YouTube videos with iMovie?
Yes, you can make YouTube videos with iMovie as it has all the required tools and options. Import your video clips and audio files on the timeline, go for iMovie edit clip like trim and crop as required, add transitions, texts, and effects as applicable and publish your finished video on YouTube.
For macOS 10.12 or later
Step 1: Download and install Filmora on your Mac. Launch Filmora and click on New Project.
Step 2: Drag and drop your video clips and audio files Project Media folder. Drag and place the video clips on the timeline and arrange per perfectly. Place audio files on the timeline on a different track.

Step 3: If you want to apply transitions, go to Transitions at the top bar and drag any transition in between video clips on the timeline. You can also insert texts from Titles and objects from Elements from the top bar.

Step 4: Play the video to see the changes you have made, and click on Export button to save the video when you are satisfied.

Part 4. FAQs about iMovie
Is iMovie good for video editing?
Yes, iMovie is good for basic video editing. You can edit 4K videos, and iMovie is available on macOS and iOS. If you are a beginner, iMovie is perfect for you. If you want advanced editing features, we recommend Wondershare Filmora.
What’s better Premiere Pro or iMovie?
In terms of features and functionalities, Premiere Pro is far better than iMovie. However, Premiere Pro is more for advanced video editing while iMovie is more for beginners. iMovie is simpler to use than Premiere Pro, and hence, beginners will love it.
Can I make YouTube videos with iMovie?
Yes, you can make YouTube videos with iMovie as it has all the required tools and options. Import your video clips and audio files on the timeline, go for iMovie edit clip like trim and crop as required, add transitions, texts, and effects as applicable and publish your finished video on YouTube.
Figuring Out Proper Ways to Play a Video in Slow Motion on iPhone
Before we dive into how to play a video in slow motion on iPhone, let’s see what they are. In slow motion, the video frame rate is usually manipulated. In manual or automated editing, frame rates increase to add extra seconds to the video. For instance, in normal videos, playback speed is 24, 30, or 60 fps. However, this frame rate can be increased up to 124 or 240 fps in slow motions.
These are the standard values and help achieve accurate and precise slow-motion effects. In this article, the discussion leans toward the making and playing slow-mo. Users will learn how to play videos in slow motion on iPhone. It will introduce tools to create a slow-mo effect and a guide to achieve it.
Part 1:Adding Slow Motion to Video on iPhone (Before & After)
Now that you have an insight into the significance of slow-motion videos, let’s move forward. This section involves a guide on how to play a video in slow motion on iPhone. Here is a guide to adding slow motion in your video before and after recording:
1. Making a Slow Motion Before Recording
This method involves recording a video in slow-motion mode from the start. Apple has already launched this feature in its iPhones and iPads. Here is a step-by-step guide to creating such videos:
Step 1
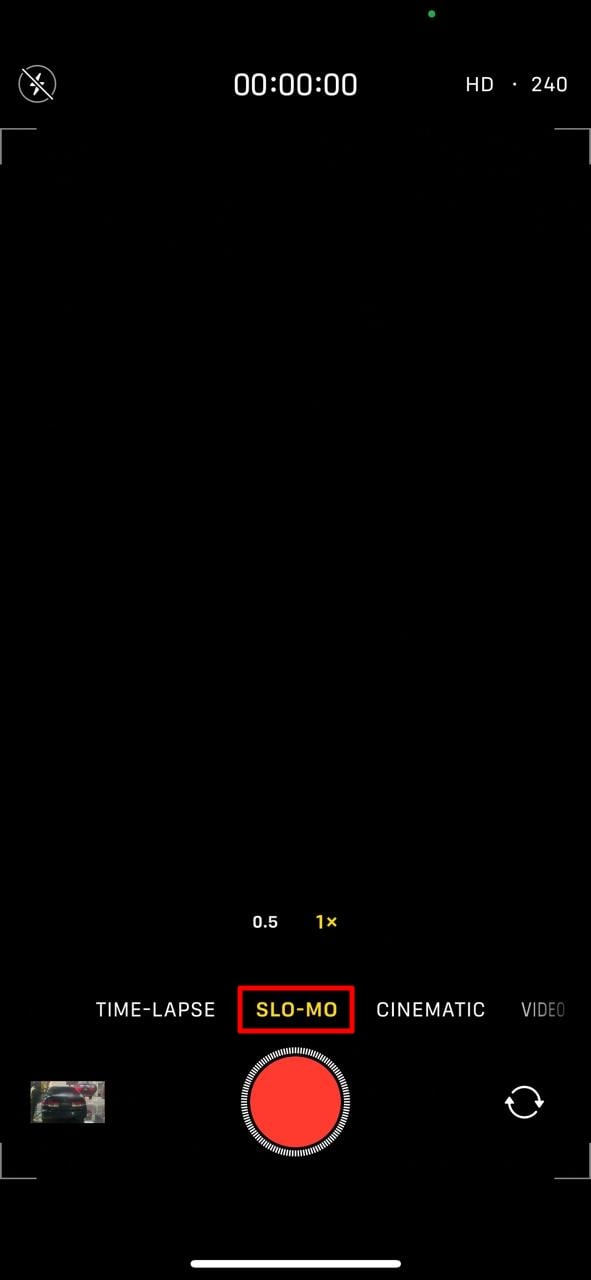
Open your iPhone and click on the “Camera” application. Once you access it, select “SLO-MO” mode from the bottom.
Step 2
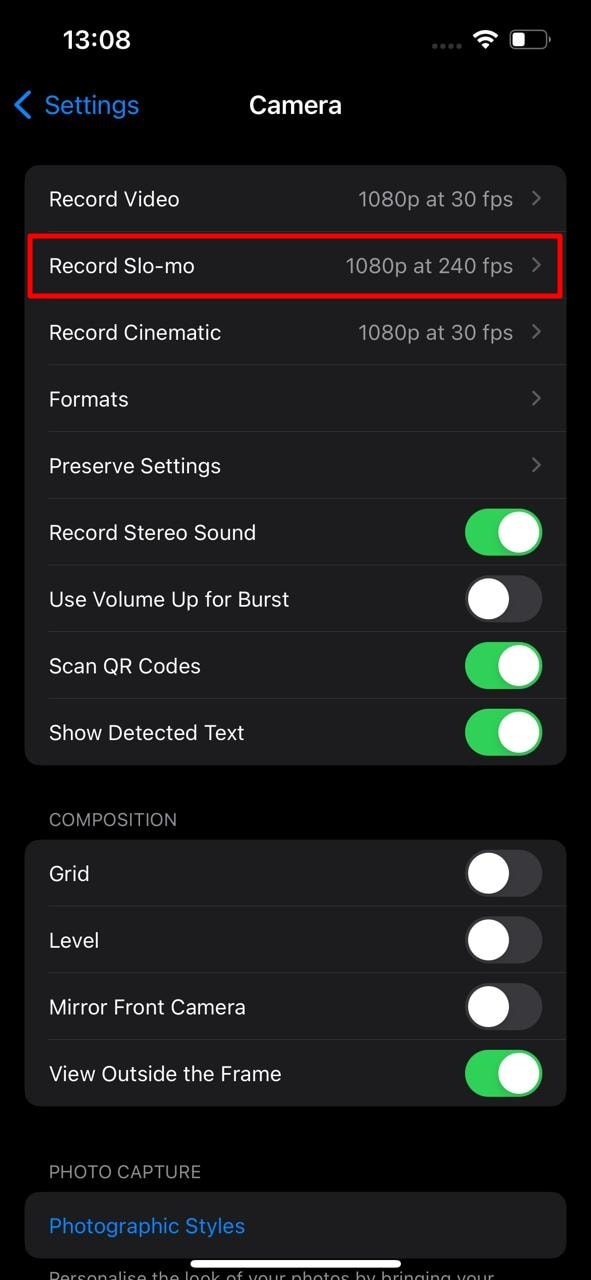
Go back and open the “Settings” and select the “Camera” section. In camera settings, select the “Record Slo-mo 1080p at 240 fps.”
2. Making a Slow Motion After Recording
The first method will record your overall video in slow motion. However, you can use the other method to add a slow-mo effect to a specific part. Follow the given instructions to learn how to operate it:
Step 1
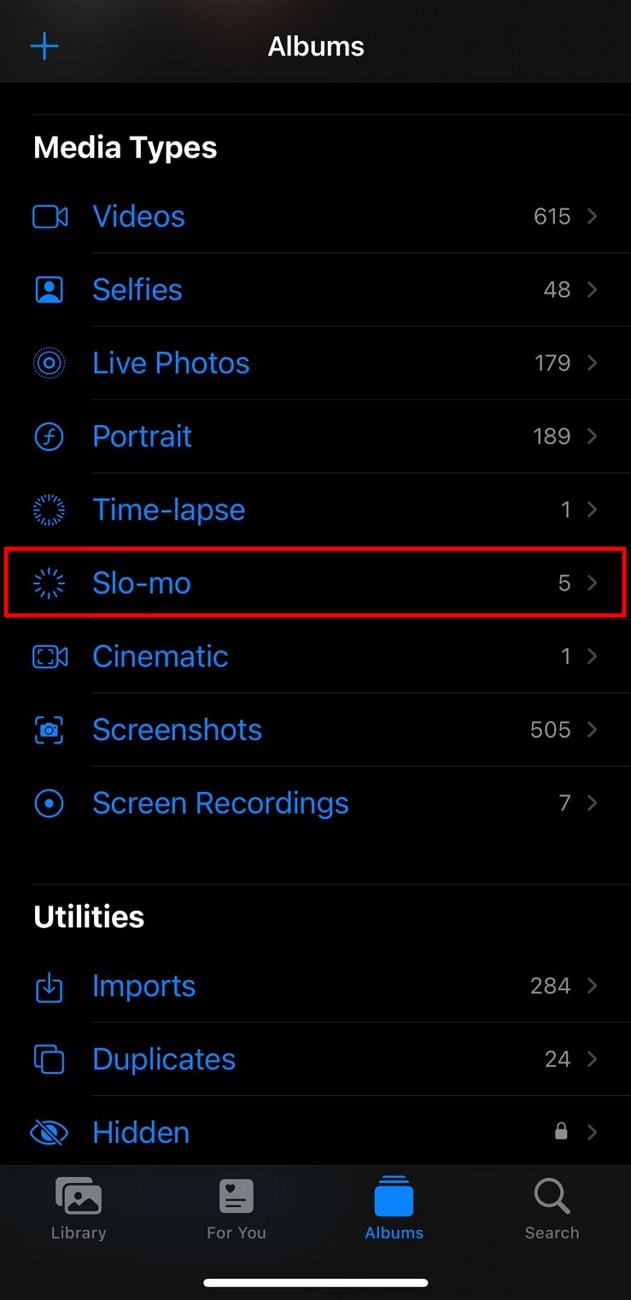
Open the “Photos” application from your home screen and click “Albums.” From the featured slider, select the “Slow-mo” option.
Step 2
Choose a video from this album and go to the “Edit” option at the top right corner.

Step 3
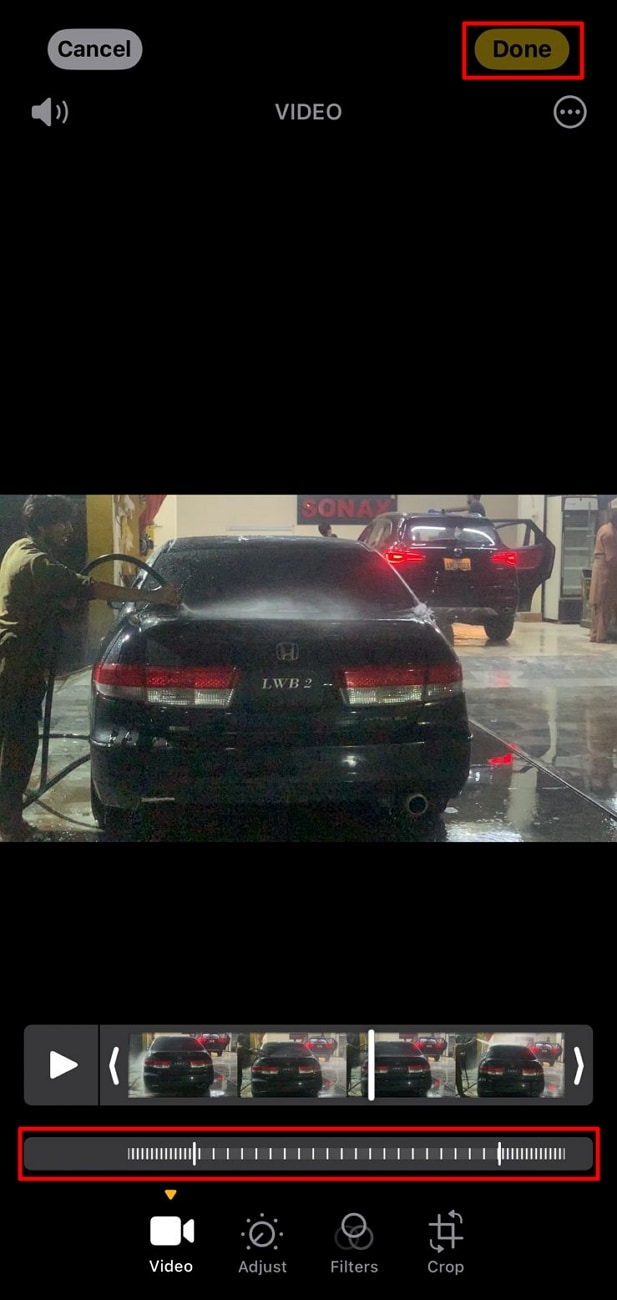
Navigate towards the bottom and access the timeline. Choose the specific area for adding the effect and drag the sliders on the vertical lines below. Once satisfied with the slow-motion effect, click the “Done” button.
Part 2: Some Prominent Third-party Apps Available to Play Video in Slow-Motion
Slow-mo effects enhance the creativity of your videos and let the audience experience new things. Do you still want to learn how to play a video in slow motion on iPhone? Here is a comprehensive guide to creating slow motions:
- Video Speed: Fast, Slow Motion
- Slo Mo – Speed Up Video Editor
- Slow Mo and Fast Motion
- Video Speed Changer – Editor
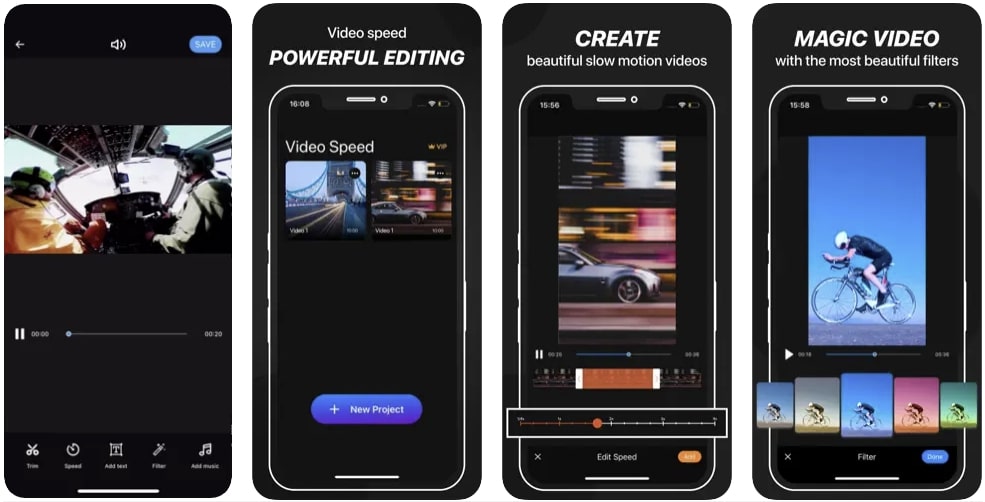
1. Video Speed: Fast, Slow Motion
This is it if you are looking for an application with advanced features and manual editing. The application offers many video playback options for a suitable slow motion. You can add slow motion to a whole video or a part through timeline editing. The application offers multiple subscriptions with a trial period before use.
Key Features
- After editing a video in this application, you can integrate music and text.
- The speed manipulation doesn’t result in slow-mo but also offers fast speed options.
- It has an insightful and easy user interface; you can apply color filters after editing.
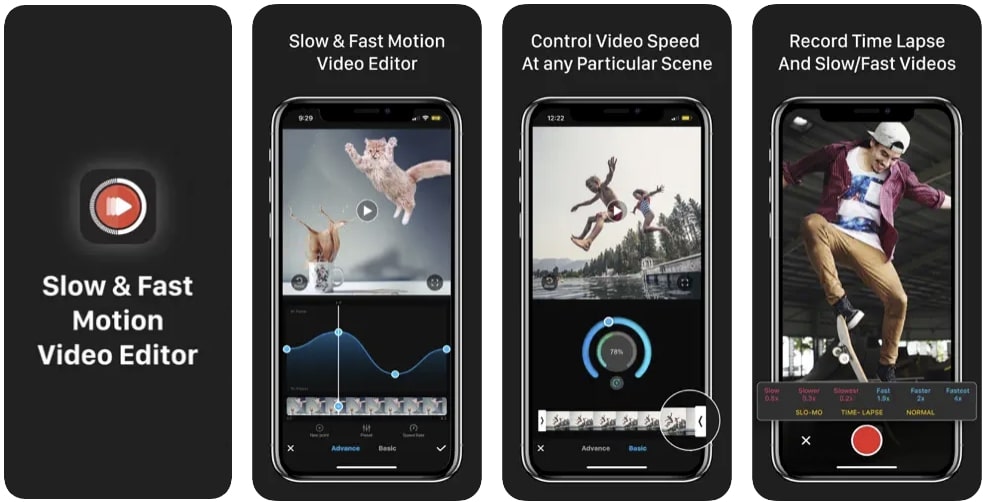
2. Slo Mo – Speed Up Video Editor
Finding answers about how to play videos in slow motion on iPhone? This is an intuitive application to create slow-mo with a high processing rate. To slow down a video using this application, you can manipulate the video frame to 240 fps. The speed modification is available to apply on specific video parts.
Key Features
- Direct video share options to Instagram, YouTube, Twitter, and Facebook.
- The premium version has 170+ music tracks to insert in your edited video.
- Users can record a live video using this application and apply speed options.
3. Slow Mo & Fast Motion
This video editor is specifically designed for those looking to modify video speed. It enables you to change the whole video speed or the marked area. Whether you want to slow an existing video or record a new one through it, the choice is yours. The video control options are not technical, and anyone can understand them.

Key Features
- The tool offers cutting options, and the timeline editing makes it more precise.
- You can use this application’s built-in features to enhance the visual outlook of video.
- The application shows support for multiple languages, including Spanish, French, and more.
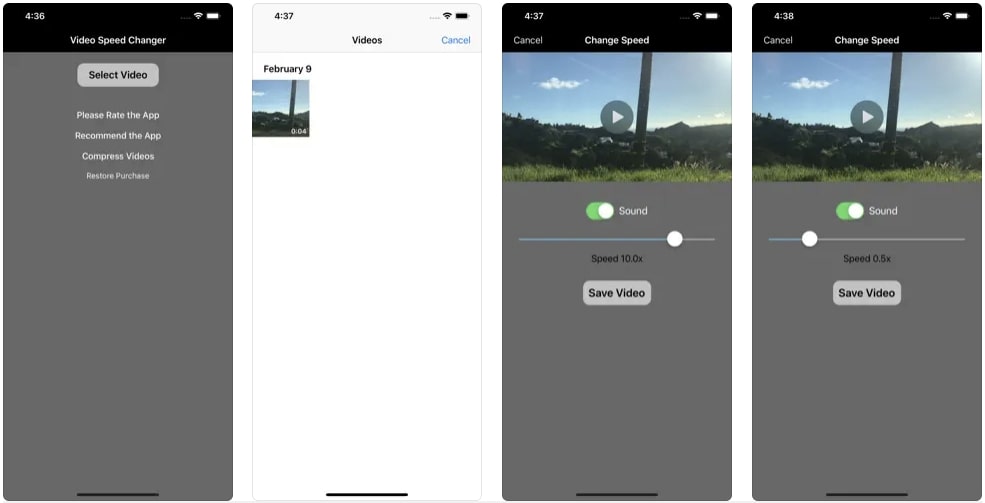
4. Video Speed Changer – Editor
Whether it’s about changing speed or doing other types of speed edits, this app fits the best. It resolves your how to play videos in slow motion on iPhone problems. It allows you to change the video playback speed via a simple process. Just upload your video and drag the speed slider backward to create a slow-mo.
Key Features
- The tool offers to import or record media through its built-in recorder option.
- You can also add fast-motion elements like time-lapse, time warp, or hyper-lapse.
- The user interface is straightforward and leaves no room for confusion.
Bonus Part: Make and Play Your Video in Slow Motion: Use Wondershare Filmora
You might wonder if something is missing if you see a slow-motion video using these applications. This is where you need a professional editor for a smooth slow-mo. Wondershare Filmora is one of the editors that offers frame interpolation. With its optical flow option and high-resolution export settings, you can rely on it.
This AI video editor has two methods of creating a low-motion effect. One method involves uniform speed, and the other is speed ramping. The uniform speed option allows you to manipulate video playback speed using a slider. Meanwhile, speed ramping is a more precise method of modifying video parts.
Free Download For Win 7 or later(64-bit)
Free Download For macOS 10.14 or later
Playing and Adding Slow Motion Effect to Video Using Filmora
After hearing about this amazing software, you might want to create a slow-mo. You might wonder how to play videos in slow motion on iPhone using Filmora. Read the step-by-step guide to find your answer:
Step 1Create a New Project and Access Speed Options
Once you have downloaded this software, access the “New Project” button. Then, use the “Command + I” keys to import media and bring it to the timeline. Select the media clip in the timeline and go to the settings panel. Under the “Speed” tab, choose “Uniform Speed” and drag the slider for speed change.
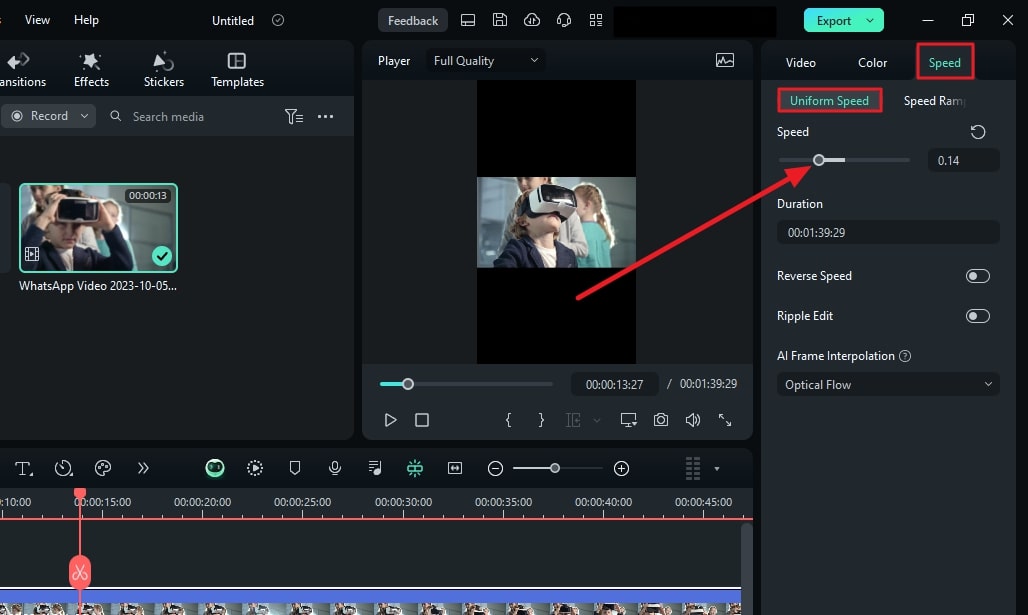
Step 2Activate AI Frame Interpolation Option
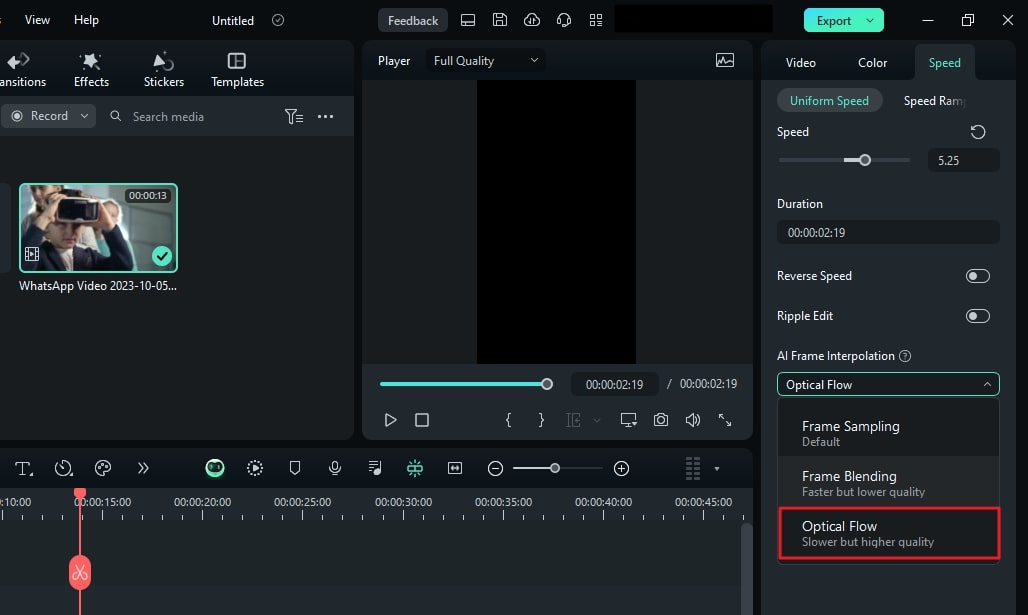
Once you finish the speed settings, there is a tip to enhance the slow-mo effect. Find the “AI Frame Interpolation” option in the same section and expand it. Select the “Optical Flow” option at the third to smoothen the video.
Step 3Rendering and Exporting
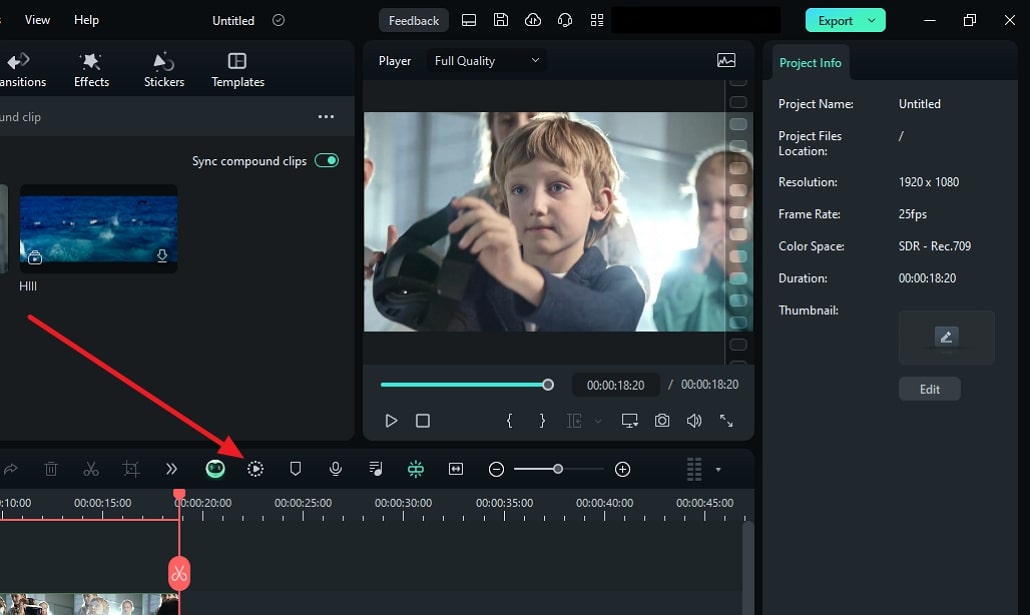
Once you have activated the optical flow, render it to see the results. For this, navigate towards the timeline toolbar and select the “Render Preview” option. It looks like a player with a doted circle around it. Preview the results, readjust if needed, and select the “Export” option to save the video.
Key Features of Wondershare Filmora
Along with speed modification, Filmora features unlimited features in its interface. The methods of accessing them are easy as accessibility is the concept it was built on. Here are some of the game-changing features for amateurs and professionals:
1. Compound Clip
We need to add a similar effect or filter to all videos in multiple situations. Instead of applying effects one by one, you can do it at once. This feature merges all videos into one and speeds up the workflow. It simplifies the complex sequences between clips and gives smooth results.
2. Green Screen
Running low on a budget for a film but want to shoot at beautiful locations. Use Filmora’s green screen or Chroma Key feature to replace backgrounds in an accurate manner. You can do this by shooting before a green screen and applying the chroma key later. Afterward, import the clip or picture you want in the background to add.
3. Motion Tracking
Do you want to blur out a whole person or apply an effect throughout the video? With Filmora’s motion tracking option, you can do these types of edits. You can insert motion graphics, animations, filters, and effects via it. Just select the object or person you want to track and activate the motion track.
4. Screen Recorder
Screen recording is important to content creation, especially in tutorial channels. In addition, the reaction or roasting channels and their owners also use this. Filmora offers an extensive screen recording option, including microphone and camera recording. You can manipulate the screen resolution, system settings, and more.
Conclusion
This article aimed to increase readers’ knowledge to effectively add slow-mo effect. Not only did we answer how to play videos in slow motion on iPhone, but we also guided to it. The article discussed some of the leading applications for slowing down video on iPhone. For precise and flawless slow-mo creation, we recommended Wondershare Filmora.
Step 2
Go back and open the “Settings” and select the “Camera” section. In camera settings, select the “Record Slo-mo 1080p at 240 fps.”

2. Making a Slow Motion After Recording
The first method will record your overall video in slow motion. However, you can use the other method to add a slow-mo effect to a specific part. Follow the given instructions to learn how to operate it:
Step 1
Open the “Photos” application from your home screen and click “Albums.” From the featured slider, select the “Slow-mo” option.

Step 2
Choose a video from this album and go to the “Edit” option at the top right corner.

Step 3
Navigate towards the bottom and access the timeline. Choose the specific area for adding the effect and drag the sliders on the vertical lines below. Once satisfied with the slow-motion effect, click the “Done” button.

Part 2: Some Prominent Third-party Apps Available to Play Video in Slow-Motion
Slow-mo effects enhance the creativity of your videos and let the audience experience new things. Do you still want to learn how to play a video in slow motion on iPhone? Here is a comprehensive guide to creating slow motions:
- Video Speed: Fast, Slow Motion
- Slo Mo – Speed Up Video Editor
- Slow Mo and Fast Motion
- Video Speed Changer – Editor
1. Video Speed: Fast, Slow Motion
This is it if you are looking for an application with advanced features and manual editing. The application offers many video playback options for a suitable slow motion. You can add slow motion to a whole video or a part through timeline editing. The application offers multiple subscriptions with a trial period before use.

Key Features
- After editing a video in this application, you can integrate music and text.
- The speed manipulation doesn’t result in slow-mo but also offers fast speed options.
- It has an insightful and easy user interface; you can apply color filters after editing.
2. Slo Mo – Speed Up Video Editor
Finding answers about how to play videos in slow motion on iPhone? This is an intuitive application to create slow-mo with a high processing rate. To slow down a video using this application, you can manipulate the video frame to 240 fps. The speed modification is available to apply on specific video parts.

Key Features
- Direct video share options to Instagram, YouTube, Twitter, and Facebook.
- The premium version has 170+ music tracks to insert in your edited video.
- Users can record a live video using this application and apply speed options.
3. Slow Mo & Fast Motion
This video editor is specifically designed for those looking to modify video speed. It enables you to change the whole video speed or the marked area. Whether you want to slow an existing video or record a new one through it, the choice is yours. The video control options are not technical, and anyone can understand them.

Key Features
- The tool offers cutting options, and the timeline editing makes it more precise.
- You can use this application’s built-in features to enhance the visual outlook of video.
- The application shows support for multiple languages, including Spanish, French, and more.
4. Video Speed Changer – Editor
Whether it’s about changing speed or doing other types of speed edits, this app fits the best. It resolves your how to play videos in slow motion on iPhone problems. It allows you to change the video playback speed via a simple process. Just upload your video and drag the speed slider backward to create a slow-mo.

Key Features
- The tool offers to import or record media through its built-in recorder option.
- You can also add fast-motion elements like time-lapse, time warp, or hyper-lapse.
- The user interface is straightforward and leaves no room for confusion.
Bonus Part: Make and Play Your Video in Slow Motion: Use Wondershare Filmora
You might wonder if something is missing if you see a slow-motion video using these applications. This is where you need a professional editor for a smooth slow-mo. Wondershare Filmora is one of the editors that offers frame interpolation. With its optical flow option and high-resolution export settings, you can rely on it.
This AI video editor has two methods of creating a low-motion effect. One method involves uniform speed, and the other is speed ramping. The uniform speed option allows you to manipulate video playback speed using a slider. Meanwhile, speed ramping is a more precise method of modifying video parts.
Free Download For Win 7 or later(64-bit)
Free Download For macOS 10.14 or later
Playing and Adding Slow Motion Effect to Video Using Filmora
After hearing about this amazing software, you might want to create a slow-mo. You might wonder how to play videos in slow motion on iPhone using Filmora. Read the step-by-step guide to find your answer:
Step 1Create a New Project and Access Speed Options
Once you have downloaded this software, access the “New Project” button. Then, use the “Command + I” keys to import media and bring it to the timeline. Select the media clip in the timeline and go to the settings panel. Under the “Speed” tab, choose “Uniform Speed” and drag the slider for speed change.

Step 2Activate AI Frame Interpolation Option
Once you finish the speed settings, there is a tip to enhance the slow-mo effect. Find the “AI Frame Interpolation” option in the same section and expand it. Select the “Optical Flow” option at the third to smoothen the video.

Step 3Rendering and Exporting
Once you have activated the optical flow, render it to see the results. For this, navigate towards the timeline toolbar and select the “Render Preview” option. It looks like a player with a doted circle around it. Preview the results, readjust if needed, and select the “Export” option to save the video.

Key Features of Wondershare Filmora
Along with speed modification, Filmora features unlimited features in its interface. The methods of accessing them are easy as accessibility is the concept it was built on. Here are some of the game-changing features for amateurs and professionals:
1. Compound Clip
We need to add a similar effect or filter to all videos in multiple situations. Instead of applying effects one by one, you can do it at once. This feature merges all videos into one and speeds up the workflow. It simplifies the complex sequences between clips and gives smooth results.
2. Green Screen
Running low on a budget for a film but want to shoot at beautiful locations. Use Filmora’s green screen or Chroma Key feature to replace backgrounds in an accurate manner. You can do this by shooting before a green screen and applying the chroma key later. Afterward, import the clip or picture you want in the background to add.
3. Motion Tracking
Do you want to blur out a whole person or apply an effect throughout the video? With Filmora’s motion tracking option, you can do these types of edits. You can insert motion graphics, animations, filters, and effects via it. Just select the object or person you want to track and activate the motion track.
4. Screen Recorder
Screen recording is important to content creation, especially in tutorial channels. In addition, the reaction or roasting channels and their owners also use this. Filmora offers an extensive screen recording option, including microphone and camera recording. You can manipulate the screen resolution, system settings, and more.
Conclusion
This article aimed to increase readers’ knowledge to effectively add slow-mo effect. Not only did we answer how to play videos in slow motion on iPhone, but we also guided to it. The article discussed some of the leading applications for slowing down video on iPhone. For precise and flawless slow-mo creation, we recommended Wondershare Filmora.
Also read:
- Updated 2024 Approved 7 Tips to Create Teaching Videos
- Updated In 2024, With Looping Videos, People Stay on Your Site Longer, Boosting Engagement. With Video Being Watched on Mobile over 3X More than Any Other Content, Its an Essential Part of Mobile Advertising
- New In 2024, Best Audio Waveform Generator
- New 2024 Approved Do You Wish to Convert GIF to Animated PNG? Then, You Need to Know About Using a GIF to APNG Converter to Help You Carry This Process Out in No Time. Read On
- New 2024 Approved What Is the Selective Color Effect, and How Can You Add This Effect to Your Videos Using Wondershare Filmora? A Complete Guide for Beginners
- Updated Top 10 Sony LUT for Different Purposes
- Updated How to Stabilize Videos with Google Photos App for Free
- New | Change Speed of a Video on iPhone for 2024
- Updated 2024 Approved Ways to Make Sure Your Video Editing Course Is Worthing to Watch
- New Finding Best GIF Websites Is Easy as Pie — Heres What You Should Know
- Updated Have You Ever Heard Bokeh Effects for Videos? Do You Know that You Can Make Your Own Bokeh Video Easily with some Software. This Article Will Introduce You How to Make a Bokeh Effect Video with Steps
- Updated How to Create Vintage Film Effect 1920S
- New Phone Aspect Ratio Vertical Definition, Types and Tips for 2024
- New In 2024, How D AI Video Games Act More Human Than Human?
- Discover the Best Game Recording Software for Your PC in This Developing Industry. Record Your Gameplay in Real Time and Enjoy the Benefits that Come with It for 2024
- In 2024, 20 Best Text To Speech Software Windows, Mac, Android, iPhone & O
- In 2024, Secret Tips & Tricks to Use in Filmora
- 10 Matching Color Combination That Works Together for 2024
- Updated In 2024, 4 Ways to Merge MP4 and MP3
- What Are The Stages Of Film Production - 2023
- New In 2024, Best Ways to Convert Video Frame Rate to 60FPS Software and Online Choices
- Updated 2024 Approved Looking for a Great Way to Make Your Own Anime Music Video? The Following Are the Top AMV Makers to Choose From
- How To Create a Polaroid Collage for 2024
- In 2024, How to Perform Mask Tracking Discovering the Best Methods
- New Kdenlive Review – Is It The Best Video Editor for 2024
- In 2024, Do You Want to Print Designs Onto Your Garments or Other Fashion Accessories? Find Out How to Create a Screen Print Effect in Photoshop to Give Your Text or Graphics a Vintage or Retro Look
- New In 2024, Cropping Videos in VLC Step by Step
- New Movavi Video Editor Plus Review for 2024
- Discover the Top 6 Online Video Speed Controllers Compatible with Chrome, Safari, Firefox for Enhanced Video Playback and Viewing Experience
- Which 10 Best Video Editing Online Makers Is Worth Your Attention for 2024
- In 2024, Are You Planning to Make a Product Review Video but Wondering How to Set up Your Background? If so, Then Youre in the Right Place. This Post Will Show You How to Adjust the Background to Black for Your Product Review Video
- New Top 15 LUTS to Buy
- Best iOS Slow Motion Apps To Work With for 2024
- Updated Best Movie Title Maker
- Updated Steps to Create Gold Text Effects After Effects
- New How to Loop a Video on Vimeo, In 2024
- 10 Catchy Pixel Art Wallpapers and How to Custom Your Own for 2024
- New 2024 Approved Fast Method to Match Color in Photoshop
- Updated In 2024, What Can Be Better than Converting Apple Video Format Into Other Formats so that You Can Use the Files Easily. We Have a Few Options that You Can Use for This Purpose
- 2024 Approved The Best Peter McKinnon LUTs for Perfect Video Editing
- Updated How to Create a Slideshow GIF?
- Want to Create a Stunning Intro Video on Your Smartphone? Legend Intro Maker Is a Popular Choice. Learn the Steps to Design Intro Video Legend Intro Maker
- New 2024 Approved Easy Steps to Loop YouTube Videos on iPhone
- New How to Create Sony Vegas Freeze Frame
- New In 2024, Learn How to Create a Unique Repeated Text Animation in the Filmora Video Editor. Follow the Simple Step-by-Step Instructions
- Updated In 2024, 10 Best Meme Text to Speech Tools Windows, Mac, Android, iPhone
- New Final Cut Pro for iPad- Is It Available for 2024
- Updated Merge MP4 Online? Its Easy With These 5 Tools
- Want to Loop a Video to Extend Its Duration? You Can Use iMovie to Loop a Video on Your Mac and iPhone and We Will Illustrate How to Loop a Video in iMovie
- In 2024, How to Share/Fake Location on WhatsApp for Apple iPhone 14 Plus | Dr.fone
- 3 Facts You Need to Know about Screen Mirroring Poco X6 | Dr.fone
- How To Upgrade or Downgrade iPhone 12 Without iTunes? | Dr.fone
- Updated In 2024, What Is Emoji and What Does It Mean?
- The Ultimate Guide to Generating Speech in Different Languages With the Best Tools
- 10 Easy-to-Use FRP Bypass Tools for Unlocking Google Accounts On Infinix Hot 40i
- In 2024, How to Use Google Assistant on Your Lock Screen Of Realme 12+ 5G Phone
- How to Use Pokémon Emerald Master Ball Cheat On Nokia C32 | Dr.fone
- 4 Solutions to Fix Unfortunately Your App Has Stopped Error on Infinix Note 30 5G | Dr.fone
- How Do I Stop Someone From Tracking My Apple iPhone 15 Pro Max? | Dr.fone
- In 2024, How to Reset your Vivo Y77t Lock Screen Password
- New AI Avatars | Online for 2024
- How to share/fake gps on Uber for Apple iPhone 8 | Dr.fone
- In 2024, How Many Attempts To Unlock iPhone 11
- In 2024, Guide on How To Remove Apple ID From Apple iPhone 15 Plus
- How to Unlock Apple ID Activation Lock From Apple iPhone 6s?
- In 2024, Overview of the Best Realme C53 Screen Mirroring App | Dr.fone
- 3 Ways to Track Samsung Galaxy Z Fold 5 without Them Knowing | Dr.fone
- How to turn off the screen lock on my Infinix Smart 7 HD
- In 2024, iSpoofer is not working On Vivo T2x 5G? Fixed | Dr.fone
- Remove FRP Lock on Itel S23+
- What Legendaries Are In Pokemon Platinum On Samsung Galaxy A34 5G? | Dr.fone
- How To Unlock Any Samsung Galaxy M14 4G Phone Password Using Emergency Call
- In 2024, Easy Tutorial for Activating iCloud on iPhone 6s Safe and Legal
- How To Change Your Apple ID on iPhone 8 With or Without Password
- 5 Hassle-Free Solutions to Fake Location on Find My Friends Of OnePlus Ace 2 | Dr.fone
- Apple iPhone 14 Backup Password Never Set But Still Asking? Heres the Fix | Dr.fone
- In 2024, How to Mirror Vivo S17 to Mac? | Dr.fone
- Unlock Apple ID without Phone Number On Apple iPhone 12
- Top 10 AirPlay Apps in Tecno Phantom V Flip for Streaming | Dr.fone
- In 2024, How to Transfer Apps from Poco M6 5G to Another | Dr.fone
- How to Unlock iCloud Activation Lock and iCloud Account From Apple iPhone 6s?
- In 2024, Network Locked SIM Card Inserted On Your Oppo Reno 11F 5G Phone? Unlock It Now
- In 2024, How I Transferred Messages from Samsung Galaxy F14 5G to iPhone 12/XS (Max) in Seconds | Dr.fone
- Reasons why Pokémon GPS does not Work On Lava Yuva 3? | Dr.fone
- Bypassing Google Account With vnROM Bypass For Nubia Red Magic 9 Pro
- Best 10 Mock Location Apps Worth Trying On Samsung Galaxy Z Flip 5 | Dr.fone
- How To Update or Downgrade iPhone XS Without iTunes? | Dr.fone
- How To Remove or Bypass Knox Enrollment Service On Nubia Z50 Ultra
- Top 9 Vivo Y78t Monitoring Apps for Parental Controls | Dr.fone
- In 2024, Ultimate Guide from iPhone 13 Pro Max iCloud Activation Lock Bypass
- In 2024, A Working Guide For Pachirisu Pokemon Go Map On Honor X9a | Dr.fone
- Can I use iTools gpx file to catch the rare Pokemon On Itel P55 5G | Dr.fone
- How to Fix the Soft Bricked Tecno Spark 10 4G? | Dr.fone
- In 2024, How To Bypass Activation Lock On Apple Watch Or iPhone 15 Pro Max?
- Edit and Send Fake Location on Telegram For your Vivo Y100i in 3 Ways | Dr.fone
- In 2024, How To Remove or Bypass Knox Enrollment Service On Infinix Note 30 5G
- In 2024, How to Unlock a Network Locked Infinix Smart 8 Phone?
- Title: How to Add Freeze Frame to Your Video From Any Device, In 2024
- Author: Morgan
- Created at : 2024-05-19 05:11:51
- Updated at : 2024-05-20 05:11:51
- Link: https://ai-video-editing.techidaily.com/how-to-add-freeze-frame-to-your-video-from-any-device-in-2024/
- License: This work is licensed under CC BY-NC-SA 4.0.

