
:max_bytes(150000):strip_icc():format(webp)/nintendo-switch-vs-nintendo-switch-lite-01-61592395e9e44fc78403c7e99105de84.jpg)
How to Add Motion Titles
How to Add Motion Titles
Do you want to make your videos eye-catching instantly? Looking for some cool title animations to make your texts stand out? You should definitely opt for motion title templates that are widely available in popular video editors. Motion title templates come preloaded with animated texts, engaging graphic elements, and even background effects.
You can add them directly to your video and customize them as per you requirements so that your video looks exactly the way you desire. Different video editors have different motion titles, and therefore, you should check them out one by one to find out the templates you are looking for. We will illustrate title motion graphics in all the leading video editors.
Part 1. Add Motion Title with Filmora
The easiest way to add motion title to your video on your computer is through Wondershare Filmora . Filmora is a professional video editor that is available for Windows and Mac users. Filmora has the best collection of motion title templates, and the user interface is super intuitive and anyone can use without any prior experience. Here are the steps to add motion title with Filmora.
Step1Install and launch Wondershare Filmora on your computer. Click on New Project option on the welcome screen or go to File menu and click on New Project option.

Step2Go to File menu and Import Media option to import your video file. Otherwise, you can simply drop the video file into Project Media folder.
Step3Drag the video file from Project Media folder and drop it into the Timeline.

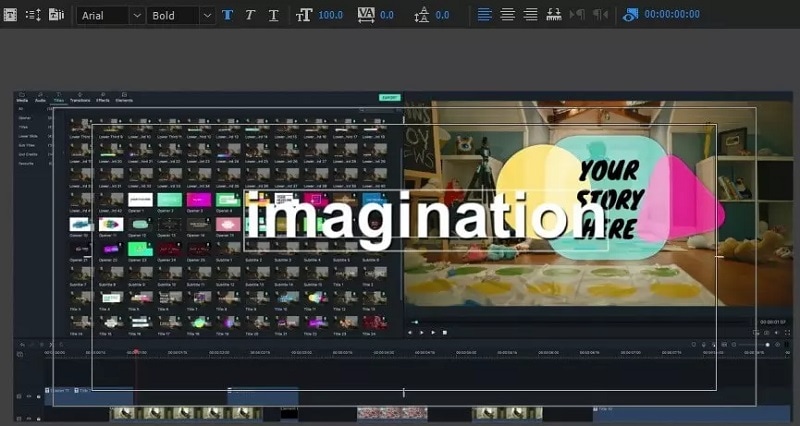
Step4Go to Titles at the top and go to the left panel. You can different categories of motion title templates. Select any desired text effect and drop into the Timeline above the video layer wherever you want.
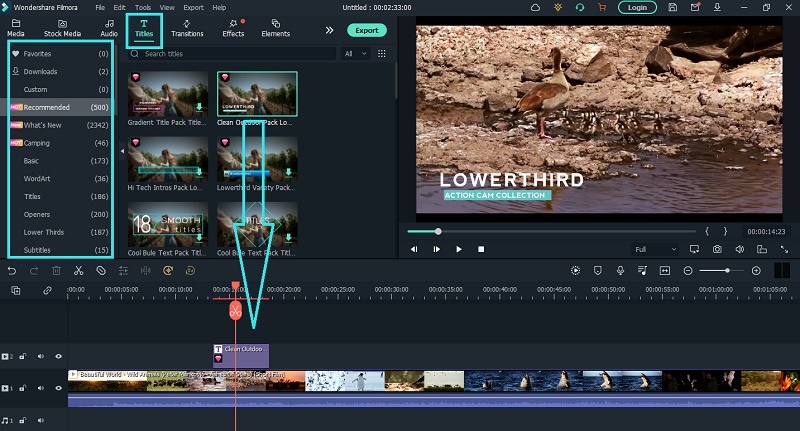
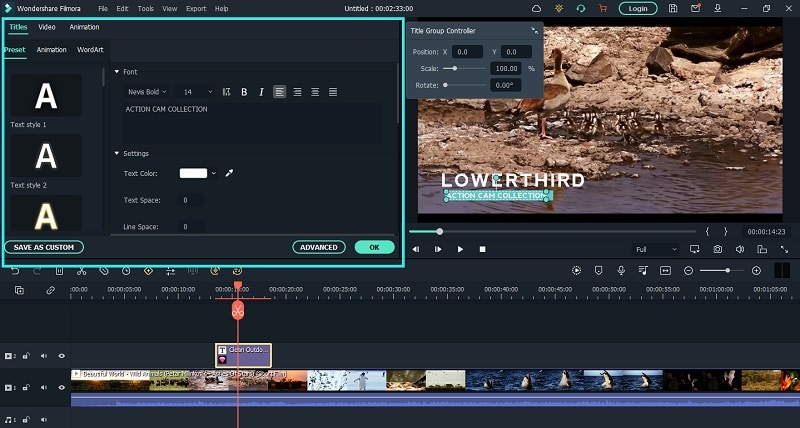
Step5Double clicking on the text layer on Timeline to edit the text and change the styles. Under Preset tab, you can change font, size, and color. Finally, click on OK button to save the edits done.
Part 2. Add Motion Title with Premiere Pro
Adobe Premiere Pro is a renowned video editor that is mostly used by professionals to edit videos and add effects and animations. Even though Premiere Pro has a steep learning curve, you can create motion title in simple steps. You can write any text on the video and select from different effects and animations to create motion title graphics. Here are the steps to add title motion graphics Premiere Pro free.
Step1Launch Premiere Pro and go to New> Project option. Import the video file and drop it into Timeline.
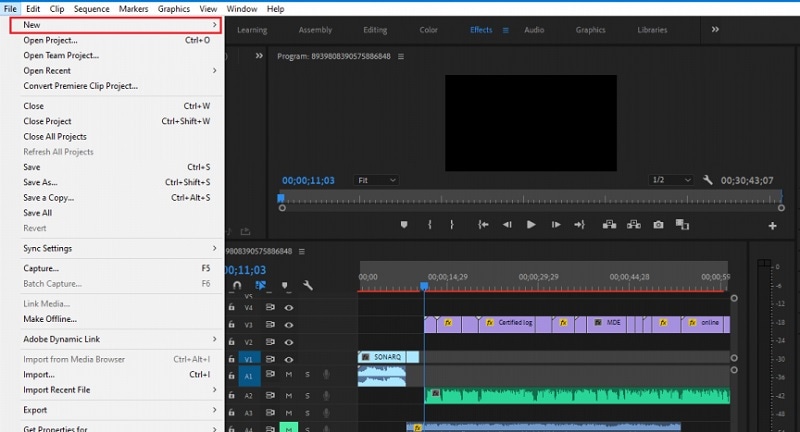
Step2Go to Title> New Title> Default Still option and follow the on-screen instructions.

Step3You will see different types of title styles and designs to choose from as you feel.

Step4Click on Type Tool option and click on the area on the video where you want the text to appear. You can customize them from the right panel from Title Styles, Title Properties, Tools and Title Actions.
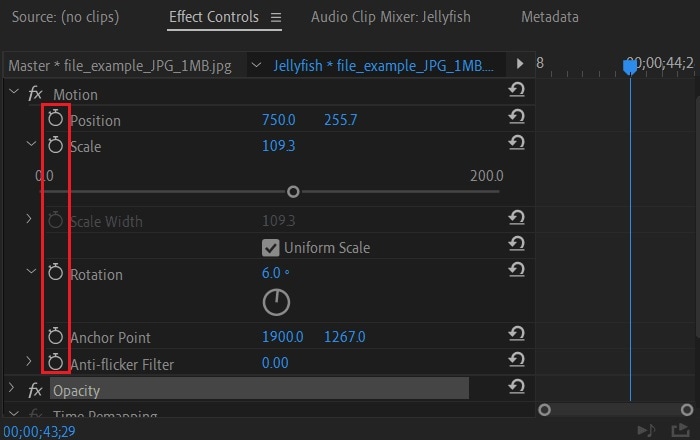
Step5To add motion to the title, click on Effects Control window. Click on any desired animation and turn to Stopwatch icon to apply the effect to the text. There is a dedicated Motion option available.
Part 3. Make motion title with Studio
Studio is a popular video editing software where you can not only apply motion title presets but also create motion title presets from scratch. The reason why video editors choose Studio is because it allows users to customize everything and create different templates and animations for personalization. Here are the steps to create title motion graphics in Studio as per your requirements.
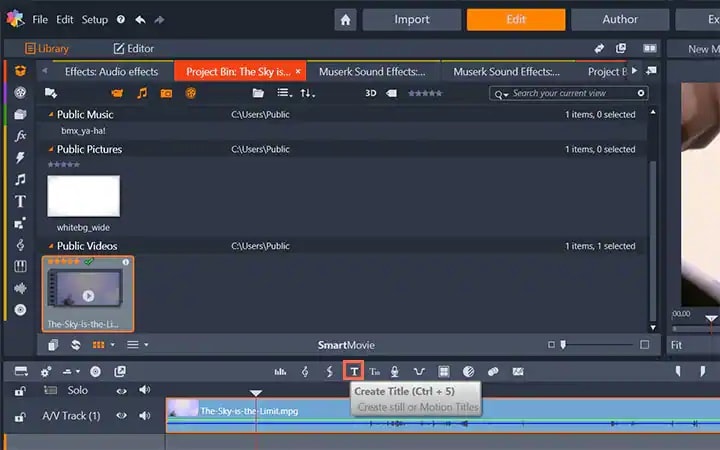
Step1Launch Studio. Import your video file, and you can import single frames such as images from a live video for stop motion titles. Once you have imported, go to the header bar above the Timeline. Click on Create Title option to open Title Editor to create title motion.
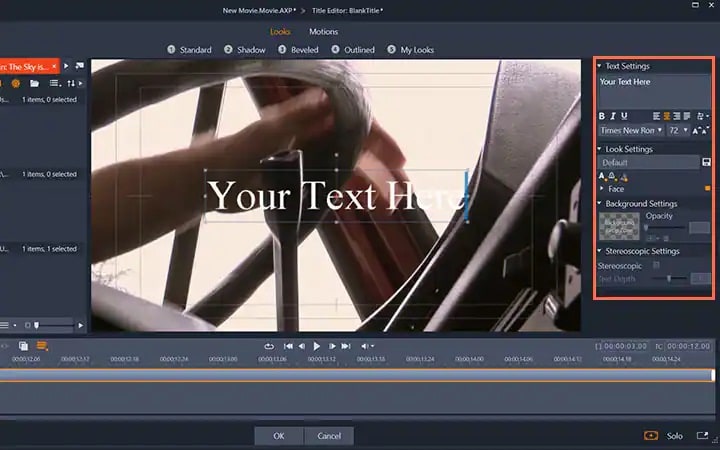
Step2Add your preferred text under Title Editor and adjust font, size, and style as you feel. Go to the right side to make changes to Look, Background, and Stereoscopic Settings to get the perfect text style from the wide range of choices available.
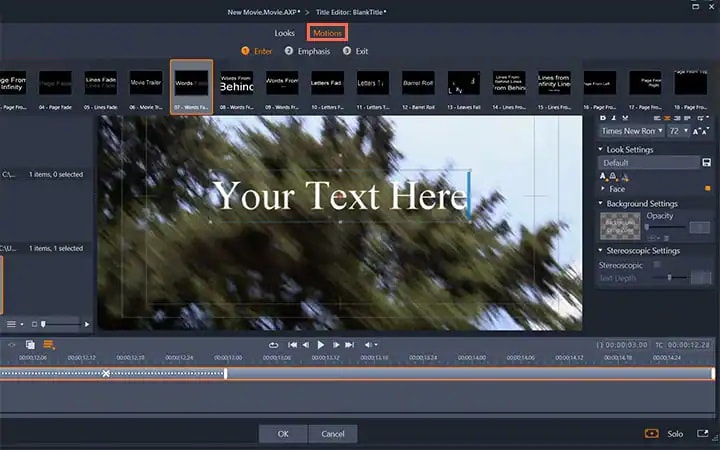
Step3Click on Motion option at the top to add motion to the text. Choose from the different motion title templates as per your preference.
Step4You can adjust the duration of the motion effect from the right panel and click on Ok button.

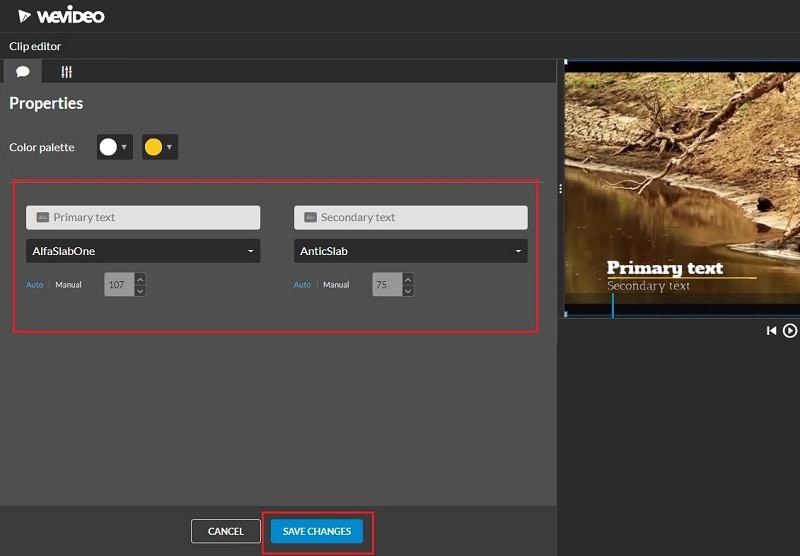
Part 4. Add Motion Title with WeVideo
WeVideo is a popular online video editor that you can use to add title motion graphics Premiere Pro free. You can find many motion titles on WeVideo for free like you get in Premiere Pro and there are many exclusive motion text templates available. You need to create a free account with WeVideo to get started. You can create your video from scratch by selecting from the available video templates. You can even import your recorded video and add motion texts and animations as per your preference. Here are the steps to add motion title with WeVideo.
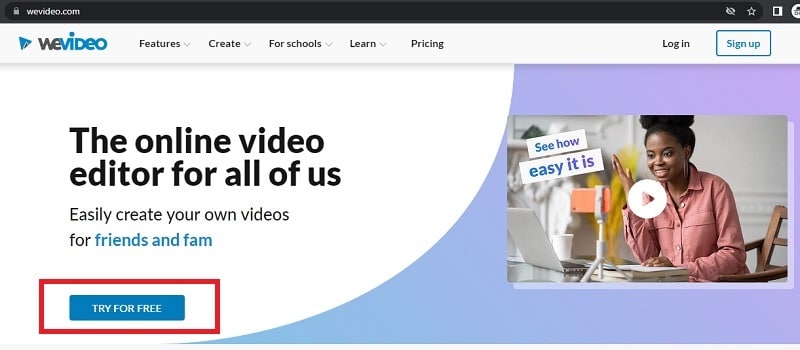
Step1Open your web browser and visit “wevideo.com”. Click on Try For Free button. Sign up for free and go to WeVideo video editor.
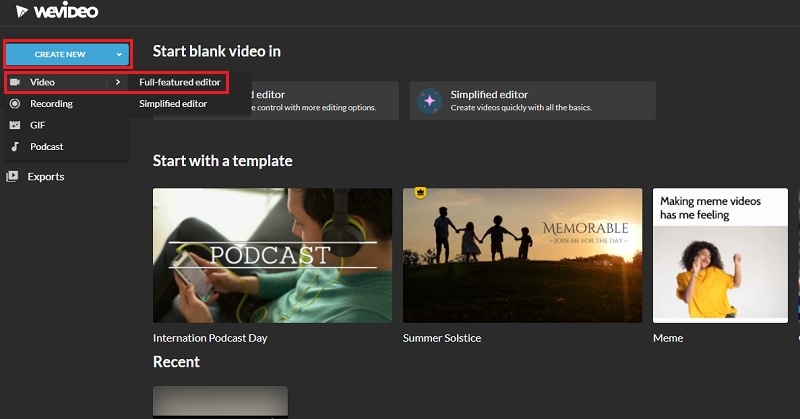
Step2Click on Create New button and select Video option. Click on Full-featured editor option.
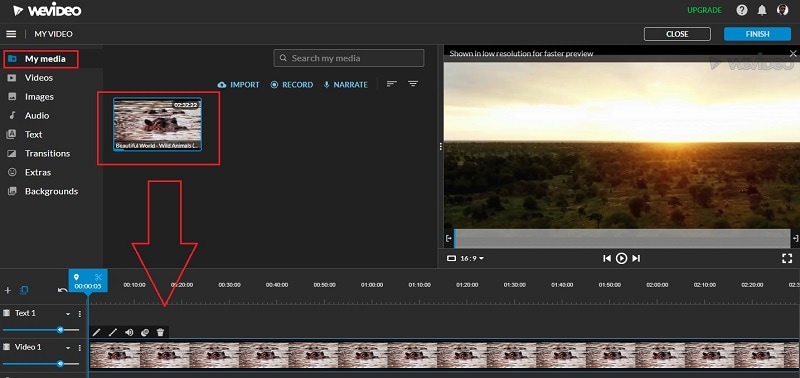
Step3Drag and drop your video file into My Media folder and bring it to Timeline.
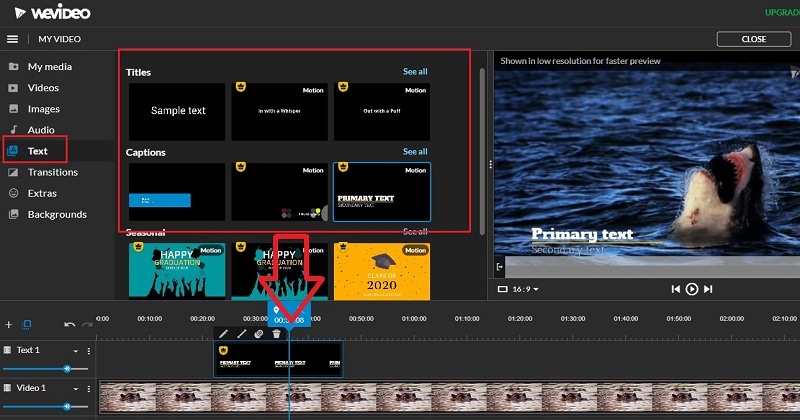
Step4Go to Text tab and you will see all the motion animated titles under Titles section. Click on them to check out their previews in Viewer. If you have selected anyone, drag and drop it into Timeline.
Step5Adjust the position where you want the title to appear on the video and stretch the duration as required. Double-click on the title to edit and customize it as per your preference. Finally, click on Save Changes button.
The Bottom Line
Motion titles are extremely important for any video because they bring in a variety to your video. They make the video eye-catching and help in getting the message across by grabbing the attention of the viewers. We have illustrated how to add motion titles Premiere Pro and Studio. You can also use WeVideo online video editor. We recommend Wondershare Filmora for its extensive collection of motion title templates to choose from and apply to your text.
Free Download For Win 7 or later(64-bit)
Free Download For macOS 10.14 or later
How to Change Video Thumbnail on Google Drive
What is a Google drive?
“Google drive is a self-hosted cloud-based site that provides free space to store your files and pictures to share them with your friends and family”.
Google Drive is also used to promote businesses or websites. You can upload a video to Google Drive and embed the file in your blog or any other website.
What is a Thumbnail?
“A Thumbnail is a still image that acts as
a preview image of your video.”
A thumbnail is the first thing seen by the viewers while watching videos. It is the only thing that forces the viewer either to watch the video or not because it previews the video content. It is also shown in the search results. A thumbnail is just like the cover or title of a book. You will read a book by its cover. In the same way, a video is viewed by its thumbnail.
Google drive is also used for the promotion of websites and businesses. It does not offer to add a thumbnail or cover image like YouTube has the option to set and can change the thumbnail of the video. As we all know Google drive is not a streaming platform and has its own boundaries.
Normally, the google drive can generate a thumbnail from the video and uses the generated thumbnail ignoring the one you have uploaded. But on the other hand, if it cannot generate a thumbnail the uploaded thumbnail will be displayed. Usually, the default thumbnail may have weird facial expressions or may not be attractive for the viewers to open the video.
Here we are discussing a few alternatives to change the thumbnail of the video in Google drive.
Select a separate image to be housed in a separate column to set as a thumbnail image and then go into the details, title, and Image settings.

How to Add Thumbnails to the Video Using Wonder Share Filmora 11
Wonder Share Filmora 11 is an all-in-one video editing platform that provides powerful, creative, and simple interphase to edit videos and images in a few clicks. It has a ton of amazing features that make your videos, images, and audio stands out. You can edit your videos and images in a great cinematic form using its effects, transitions, overlays, text, and a lot more. Do not wait, go and download Filmora 11 and there are more tools for you to discover.
I am going to show you how to create a thumbnail of the video in Filmora11.
Let us get started!
- Open Wonder Share Filmora 11 and click on New Project.

- Drag the image of your choice into the timeline.

- Drag the image of your choice into the timeline.
- Click on the AI-Portrait option from the Effects
- Drag the Human Segmentation effect over the clip into the timeline.
Now you see that the subject of the video thumbnail is selected and the background has been removed.
The AI-Portrait is a very useful effect, it allows you to quickly remove the background through artificial intelligence.

Now you can see the subject has been selected and the background has been removed.
- Now Scale up the photo to be visible on the screen.
- You can set the border settings here to make it more smooth and attractive.

I have dragged my image to the left as I want my text to the right side.
- Let’s drag the desired background into the timeline. ( I got this background from Pexel.com)

- Click on sample colors under the media option to add the gradient overlay.
- Drag your favorite Gradient and drop it below the background layer.

- Now select the Overlay option under the Effects tab and then Hit Frames.
- Add your desired frame between a photo layer and a background layer to show depth in your thumbnail.

So, I choose cinema 21.9 frames to add two black bars behind our subject.
Let’s choose your desired Title from the Library. Here are tons of title packs, you can choose from.
- Select the Titles option under the Titles tab then select your desired Title.
- Drag and locate the title in the place of your taste and then write the text you want.
- Adjust your text accordingly, you can change the font size, color, style, and much more

- Now simply click the snapshot button below the preview screen and the snapshot will be saved in default directory and automatically imported to the medium room.
- Right-click on the snapshot in the media pool and click on Reveal in explorer.
- Your thumbnail will be saved in the folder, you can upload it on the Google drive.

Unfortunately, there is no way to change the thumbnail of the video on Google drive. But we can take help from other websites to customize the thumbnail image and then upload it to Google drive. Let us discuss a few free websites used for the thumbnail of a video on Google drive.
Here are the best possible ways to change the thumbnail of the video stored in the Google drive.
1. Change the Thumbnails of Google drive using the Wix.
The Wix editor is a platform that is used to edit and make your own website. It provides easy interphase to customize the site using its amazing features. There are hundreds of features to build your own site or image by adding customizing elements and choosing color and text theme.

You can use the Wix to set or change your thumbnail to make your video attractive and eye-catching. The cover image can be by uploading and a frame can be selected from the video.
Let’s get started!
- Open the Wix editor from the browser.
- Select a video from your video library.
- Hit the Edit icon at the video

- Click on change cover under the cover image.

- Select the desired frame from the list, or you can upload your own by clicking the “+”
- Click on the Set as Cover

- Now upload the video on Google drive.

- If the file fails to upload, clear your cache and cookies and check your internet connection.
2. Change the Thumbnails of Google drive using Canvas.
Canvas is an online graphic design platform that allows and provides you with user-friendly interphase to make eye-catching logos, thumbnails, posters, and a ton of other visual content. You need not download any application and moreover, it is free to use. It saves your previous tasks and has hundreds of frames, and designs to select according to your taste or you can make your own design by editing.
So let’s start!
- Select a template of your choice from the library.
- Canvas provides you with more than 2 million images in the library but you can also upload your own image for Thumbnail.
- Click on the placeholder text to write your own text.
- You can change your image fonts, color, size, and
- You can easily customize your video thumbnail and upload it on Google drive.
- Download the video thumbnail.
- Now upload the Thumbnail on Google Drive.

3. Change the Thumbnails of Google drive using VLC Media Player.
VLC Media Player is a free and open-source media player that plays wide range of media files like images, video files as well as audio and DVDs. It is 100% free software and safe from viruses.

Here are the steps used to change the cover photo of your video using the VLC Media Player.
Let’s dive in…
- Go to the tools and select information from the drop-down list.
- The Current Media Information tab will be shown.
- There will be a picture or VLC icon at the bottom-right corner.
- Right-click on that picture or icon and select the download cover art or add cover art from file.
- Download cover art; if you want to add pictures from the album from the internet.
- Add cover art from file; if you want to put your own thumbnail image and browse from the storage.

The information will be saved automatically and the thumbnail will be changed when you open the file.
Important points.
You can use any other video editor to change the thumbnail of the video but keep a few points in mind.
- Thumbnails should be added at the start of the video.
- The Thumbnail should be a few seconds long so that google drive considers it as a cover image.
- It works for short videos but it can be applied for long videos.
- Use a high-quality HD image for the thumbnail so that Google Drive can accept it as valuable for the thumbnail image.
- Thumbnails should be uploaded in PNG, GIF, or JPG
- The image ratio should be 16:9 and resolution of 1920x1080 pixels for PNG and JPG and 960x480 pixels for GIFs.
- The maximum file size should be
- The minimum width should be 220 pixels.

Even after keeping an eye on these important points, google drive sometimes does not show the thumbnail as a cover photo.
Conclusion.
In the above article, I have discussed a couple of different ways to add a thumbnail of the video and upload it on Google drive. I personally recommend Wonder Share Filmora 11 to make and change thumbnail image of the video as it is a very powerful as well as simple tool.
How to Add Thumbnails to the Video Using Wonder Share Filmora 11
Wonder Share Filmora 11 is an all-in-one video editing platform that provides powerful, creative, and simple interphase to edit videos and images in a few clicks. It has a ton of amazing features that make your videos, images, and audio stands out. You can edit your videos and images in a great cinematic form using its effects, transitions, overlays, text, and a lot more. Do not wait, go and download Filmora 11 and there are more tools for you to discover.
I am going to show you how to create a thumbnail of the video in Filmora11.
Let us get started!
- Open Wonder Share Filmora 11 and click on New Project.
- Drag the image of your choice into the timeline.
- Drag the image of your choice into the timeline.
- Click on the AI-Portrait option from the Effects
- Drag the Human Segmentation effect over the clip into the timeline.
Now you see that the subject of the video thumbnail is selected and the background has been removed.
The AI-Portrait is a very useful effect, it allows you to quickly remove the background through artificial intelligence.
Now you can see the subject has been selected and the background has been removed.
- Now Scale up the photo to be visible on the screen.
- You can set the border settings here to make it more smooth and attractive.
I have dragged my image to the left as I want my text to the right side.
- Let’s drag the desired background into the timeline. ( I got this background from Pexel.com)
- Click on sample colors under the media option to add the gradient overlay.
- Drag your favorite Gradient and drop it below the background layer.
- Now select the Overlay option under the Effects tab and then Hit Frames.
- Add your desired frame between a photo layer and a background layer to show depth in your thumbnail.
So, I choose cinema 21.9 frames to add two black bars behind our subject.
Let’s choose your desired Title from the Library. Here are tons of title packs, you can choose from.
- Select the Titles option under the Titles tab then select your desired Title.
- Drag and locate the title in the place of your taste and then write the text you want.
- Adjust your text accordingly, you can change the font size, color, style, and much more
- Now simply click the snapshot button below the preview screen and the snapshot will be saved in default directory and automatically imported to the medium room.
- Right-click on the snapshot in the media pool and click on Reveal in explorer.
- Your thumbnail will be saved in the folder, you can upload it on the Google drive.
Unfortunately, there is no way to change the thumbnail of the video on Google drive. But we can take help from other websites to customize the thumbnail image and then upload it to Google drive. Let us discuss a few free websites used for the thumbnail of a video on Google drive.
Here are the best possible ways to change the thumbnail of the video stored in the Google drive.
1. Change the Thumbnails of Google drive using the Wix.
The Wix editor is a platform that is used to edit and make your own website. It provides easy interphase to customize the site using its amazing features. There are hundreds of features to build your own site or image by adding customizing elements and choosing color and text theme.
You can use the Wix to set or change your thumbnail to make your video attractive and eye-catching. The cover image can be by uploading and a frame can be selected from the video.
Let’s get started!
- Open the Wix editor from the browser.
- Select a video from your video library.
- Hit the Edit icon at the video
- Click on change cover under the cover image.
- Select the desired frame from the list, or you can upload your own by clicking the “+”
- Click on the Set as Cover
- Now upload the video on Google drive.
- If the file fails to upload, clear your cache and cookies and check your internet connection.
2. Change the Thumbnails of Google drive using Canvas.
Canvas is an online graphic design platform that allows and provides you with user-friendly interphase to make eye-catching logos, thumbnails, posters, and a ton of other visual content. You need not download any application and moreover, it is free to use. It saves your previous tasks and has hundreds of frames, and designs to select according to your taste or you can make your own design by editing.
So let’s start!
- Select a template of your choice from the library.
- Canvas provides you with more than 2 million images in the library but you can also upload your own image for Thumbnail.
- Click on the placeholder text to write your own text.
- You can change your image fonts, color, size, and
- You can easily customize your video thumbnail and upload it on Google drive.
- Download the video thumbnail.
- Now upload the Thumbnail on Google Drive.
3. Change the Thumbnails of Google drive using VLC Media Player.
VLC Media Player is a free and open-source media player that plays wide range of media files like images, video files as well as audio and DVDs. It is 100% free software and safe from viruses.
Here are the steps used to change the cover photo of your video using the VLC Media Player.
Let’s dive in…
- Go to the tools and select information from the drop-down list.
- The Current Media Information tab will be shown.
- There will be a picture or VLC icon at the bottom-right corner.
- Right-click on that picture or icon and select the download cover art or add cover art from file.
- Download cover art; if you want to add pictures from the album from the internet.
- Add cover art from file; if you want to put your own thumbnail image and browse from the storage.
The information will be saved automatically and the thumbnail will be changed when you open the file.
Important points.
You can use any other video editor to change the thumbnail of the video but keep a few points in mind.
- Thumbnails should be added at the start of the video.
- The Thumbnail should be a few seconds long so that google drive considers it as a cover image.
- It works for short videos but it can be applied for long videos.
- Use a high-quality HD image for the thumbnail so that Google Drive can accept it as valuable for the thumbnail image.
- Thumbnails should be uploaded in PNG, GIF, or JPG
- The image ratio should be 16:9 and resolution of 1920x1080 pixels for PNG and JPG and 960x480 pixels for GIFs.
- The maximum file size should be
- The minimum width should be 220 pixels.
Even after keeping an eye on these important points, google drive sometimes does not show the thumbnail as a cover photo.
Conclusion.
In the above article, I have discussed a couple of different ways to add a thumbnail of the video and upload it on Google drive. I personally recommend Wonder Share Filmora 11 to make and change thumbnail image of the video as it is a very powerful as well as simple tool.
How to Zoom Desktop Screen
A video port that enables the connection of an external display to a modern laptop is often included in these devices; however, this might require you to learn how to un-zoom desktop. You could wish to use a laptop with a big display as a business professional to present data, images, or other media to users or coworkers during a meeting. However, if sat far away from the display, some individuals could find it difficult to read text or distinguish items on the screen. To better visibility, you may adjust the screen magnification as necessary. Users of the most recent versions of Windows and its programs may zoom in on the screen to expand any areas that are difficult for them to view, hence, learning how to zoom in on desktop is a necessary choice to make. You may zoom out to return to the regular screen after you’ve determined what is in the particular location.
There are methods and keyboard shortcuts that enable users to zoom in on the screen to expand anything that may be tough for certain users to read in Windows or even in various programs. Here are a few ways to zoom in Desktop or out the screen, if you unintentionally zoom on a Windows desktop screen or in an app like a web browser, depending on the circumstance. Have you ever had a zoomed-in screen? Your screen’s text, graphics, and icons all suddenly enlarge dramatically. You may need to zoom out at this point. Both PC and Mac users may change the magnification and resolution of a screen. If you notice bigger text or icons, you can be confused between these two. For further advice on how to zoom desktop screen, keep reading. In conclusion, there are several methods for doing this. We’ll go through the top 5 techniques with you.
- Method 1: Using a Keyboard
- Method 2: Touchscreen Method
- Method 3: Use Keyboard and Mouse Commands
- Method 4: Use the Desktop Magnifier Feature
- Method 5: Web Browser Method
Part 1: The Need to Zoom Computer Screen
You’ve been looking at your screen nonstop, but you can’t figure out what it says. You could find the answer you’re searching for by zooming in on your computer. On your computer screen, reading small type might be too difficult at times. There are several fast and simple methods to magnify your whole screen or zoom in on a specific area, whether you’re using a MacBook or a Windows 10 PC.
Many users who are utilizing the Windows desktop, reading text, or surfing the web claim that the screen suddenly becomes stuck on zoom. Having such huge icons, graphics, and text on your windows computer is annoying. You must zoom out on Windows in order to resolve this problem. Microsoft offers options for customizing desktop display settings, whether you want to keep the zoomed-in desktop or change the display settings. This might alter the settings for Windows’ Magnifier magnification, desktop icon size, or screen resolution.
Additionally, depending on the programs and utilities you have open, your computer’s desktop may sometimes resemble a broad landscape. Its size and expanse provide you a bird’s-eye perspective of the landscape. It may become a little challenging to read what’s on it, particularly if your vision isn’t as good as it once was. Popular desktop operating systems like Windows 10 and macOS include features that enable you to swiftly and eagle-like zoom in on just what you need.
Similar to this, if you aren’t careful and cautious while using your computer, you could accidentally activate a feature like its zoom function. If you’re using a shared computer, another user may utilize the zoom feature to make it easier for them to see tiny type on the screen. In any event, learning how to zoom out once more will allow you to utilize your computer anyway you see fit. Tools that zoom in on the desktop and make icons seem bigger than normal include screen resolution, icon views, and Windows Magnifier. These tools provide the greatest personalized settings to optimize display since they are made to enhance monitor display by making images and text understandable.
Part 2: How to Zoom in/out PC screen
Here are the top 5 methods to know how to zoom out on desktop or subsequently, how to zoom desktop screen. Use the easiest method for you from the guide below:
Method 1: Using a Keyboard
To zoom out or in on a webpage or document, hold down the Ctrl key while pressing the - (minus) or + (plus) key. You may utilize the - and + keys on the numeric keypad as well as those adjacent to the backspace key.
Step1Using the handy keyboard keys listed below is one of the most common methods to zoom in or out just in a certain window, website, or program.
- Ctrl + (+) to zoom in.
- Ctrl + (-) will zoom out.
Step2You may keep holding down the Command key while pressing the - or + keys to zoom as much as you like. Go ahead and try it.
Method 2: Touchscreen Method
You have access to yet another fantastic single window zooming option if you’re using a laptop with a trackpad. Simply squeeze two fingers together or spread them apart on your trackpad to zoom in or out. The Touch Bar at the bottom of your screen may be made bigger and simpler to read by choosing “Enable Touch Bar Zoom.” To try it out, all you have to do is touch and hold the Touch Bar.
Step1You may use a “reverse-pinch” motion on a laptop with a touch screen or trackpad to zoom in or out in a variety of programs as well as on the desktop. This is really simple and will work in most applications (including Microsoft Office apps).

However, this motion may not be supported by all applications. This functionality won’t work if you’ve turned off gestures on your trackpad or touchscreen.
Step2Put two fingers together on the touchscreen or trackpad. On the trackpad, you should place two fingers closely apart (they may even be touching).
Step3Put your fingers together directly over the region you wish to zoom out on while using a touchscreen display to focus in on a certain area.
Step4On the trackpad, spread your two fingers widely apart. The chosen website or app will zoom out to show more content when your two fingers separate from one another on the trackpad or touchscreen.
Method 3: Use Keyboard and Mouse Commands
Using the keyboard and Mouse shortcuts is the easiest method to zoom in and out desktop screen on computers. Follow the steps below to learn this technique hassle-free.
Steps to Use Keyboard and Mouse Method:
Step1To zoom in, scroll your mouse wheel up while holding down the Ctrl key. You may already use this to zoom in on your browser, for instance.

Step2Now for the Zoom out, hold the Ctrl key on the Keyboard and move the mouse wheel down to zoom out to the desired extent as shown here:
Method 4: Use the Desktop Magnifier Feature
The magnifier tool allows you to temporarily increase the size of a specific area of the screen. It is a built-in function of the Windows family. The user may enlarge the screen with the use of the magnifying tool. This function is highly beneficial for those who have hazy vision as well as for enlarging the specific picture shown to viewers through projectors. The magnifier app’s default view, Full Screen, may enlarge the whole screen. However, the user is unable to see the complete screen at once since a section of it enlarges and moves with your mouse pointer. By selecting the “Options” option, the user may modify the Magnifier app’s settings and access a variety of additional capabilities. Anyway, let’s get started to learn the processes.
Steps to Use Magnifier to Zoom Desktop Screen:
Step1Open the Windows search (a magnifier icon or a long search box on the taskbar). To launch Magnifier, enter “magnifier” into Windows search and then click the first result.
Step2The Windows 10 Magnifier window will appear. Then, at any moment, you may zoom in on your app, your web browser, or a few other applications by pressing the + button.

Step3Press the Windows logo key and + to enlarge the view (plus). or use the Magnifier controls’ + (plus) button.
Step4Press the Windows key and - to zoom out (minus). Or use the Magnifier controls’ - (minus) button.
Step5Press Windows logo key + Esc to close the Magnifier. In the top-right corner of the Magnifier controls, click the X (close) button.
Method 5: Web Browser Method
You may enhance your web browser reading experience in a number of different ways. One method is to zoom in on the online sites you wish to read and enlarge the text, photos, and icons. It’s possible that you need to do this since your eyes are weary or the screen’s quality isn’t the best. To restore items to their original state, you may need to reset the zoom level or zoom out at some point. On Windows 10, you may zoom in for a clearer view of the screen if you can’t read the text or the pictures on your computer screen.
Steps to Use Web Browser Method to Zoom Desktop Screen:
You may use the zoom in shortcut on any web browser to increase the browser’s zoom level. In other words, you may zoom in on your web browser using the keyboard.
Step1Launch a web browser. To zoom in on your web browser, hold down the Ctrl key while pressing the “+” key on your keyboard.

Step2Now, within the browser, hit the 3-dot menu at the right top corner. (This is available in every browser).
Step3To enlarge the view in your web browser, click the + sign next to Zoom. Clicking the minus button on your web browser will let you to un-zoom or zoom out.
Conclusion
Numerous features on modern computers are intended to simplify user tasks. The ability to zoom in and out on the screen is one feature that might make using a computer easier. Learning how to zoom in and out may be helpful if you have trouble seeing little text or pictures on your computer or if you need more screen real estate to view many things at once. You can see from reading this that using your computer to zoom in and out is fairly simple. You may simply choose one approach based on your needs to assist you. The zoom settings in Windows may be the cause of the abnormally huge graphics on the desktop.
Part 1: The Need to Zoom Computer Screen
You’ve been looking at your screen nonstop, but you can’t figure out what it says. You could find the answer you’re searching for by zooming in on your computer. On your computer screen, reading small type might be too difficult at times. There are several fast and simple methods to magnify your whole screen or zoom in on a specific area, whether you’re using a MacBook or a Windows 10 PC.
Many users who are utilizing the Windows desktop, reading text, or surfing the web claim that the screen suddenly becomes stuck on zoom. Having such huge icons, graphics, and text on your windows computer is annoying. You must zoom out on Windows in order to resolve this problem. Microsoft offers options for customizing desktop display settings, whether you want to keep the zoomed-in desktop or change the display settings. This might alter the settings for Windows’ Magnifier magnification, desktop icon size, or screen resolution.
Additionally, depending on the programs and utilities you have open, your computer’s desktop may sometimes resemble a broad landscape. Its size and expanse provide you a bird’s-eye perspective of the landscape. It may become a little challenging to read what’s on it, particularly if your vision isn’t as good as it once was. Popular desktop operating systems like Windows 10 and macOS include features that enable you to swiftly and eagle-like zoom in on just what you need.
Similar to this, if you aren’t careful and cautious while using your computer, you could accidentally activate a feature like its zoom function. If you’re using a shared computer, another user may utilize the zoom feature to make it easier for them to see tiny type on the screen. In any event, learning how to zoom out once more will allow you to utilize your computer anyway you see fit. Tools that zoom in on the desktop and make icons seem bigger than normal include screen resolution, icon views, and Windows Magnifier. These tools provide the greatest personalized settings to optimize display since they are made to enhance monitor display by making images and text understandable.
Part 2: How to Zoom in/out PC screen
Here are the top 5 methods to know how to zoom out on desktop or subsequently, how to zoom desktop screen. Use the easiest method for you from the guide below:
Method 1: Using a Keyboard
To zoom out or in on a webpage or document, hold down the Ctrl key while pressing the - (minus) or + (plus) key. You may utilize the - and + keys on the numeric keypad as well as those adjacent to the backspace key.
Step1Using the handy keyboard keys listed below is one of the most common methods to zoom in or out just in a certain window, website, or program.
- Ctrl + (+) to zoom in.
- Ctrl + (-) will zoom out.
Step2You may keep holding down the Command key while pressing the - or + keys to zoom as much as you like. Go ahead and try it.
Method 2: Touchscreen Method
You have access to yet another fantastic single window zooming option if you’re using a laptop with a trackpad. Simply squeeze two fingers together or spread them apart on your trackpad to zoom in or out. The Touch Bar at the bottom of your screen may be made bigger and simpler to read by choosing “Enable Touch Bar Zoom.” To try it out, all you have to do is touch and hold the Touch Bar.
Step1You may use a “reverse-pinch” motion on a laptop with a touch screen or trackpad to zoom in or out in a variety of programs as well as on the desktop. This is really simple and will work in most applications (including Microsoft Office apps).
However, this motion may not be supported by all applications. This functionality won’t work if you’ve turned off gestures on your trackpad or touchscreen.
Step2Put two fingers together on the touchscreen or trackpad. On the trackpad, you should place two fingers closely apart (they may even be touching).
Step3Put your fingers together directly over the region you wish to zoom out on while using a touchscreen display to focus in on a certain area.
Step4On the trackpad, spread your two fingers widely apart. The chosen website or app will zoom out to show more content when your two fingers separate from one another on the trackpad or touchscreen.
Method 3: Use Keyboard and Mouse Commands
Using the keyboard and Mouse shortcuts is the easiest method to zoom in and out desktop screen on computers. Follow the steps below to learn this technique hassle-free.
Steps to Use Keyboard and Mouse Method:
Step1To zoom in, scroll your mouse wheel up while holding down the Ctrl key. You may already use this to zoom in on your browser, for instance.
Step2Now for the Zoom out, hold the Ctrl key on the Keyboard and move the mouse wheel down to zoom out to the desired extent as shown here:
Method 4: Use the Desktop Magnifier Feature
The magnifier tool allows you to temporarily increase the size of a specific area of the screen. It is a built-in function of the Windows family. The user may enlarge the screen with the use of the magnifying tool. This function is highly beneficial for those who have hazy vision as well as for enlarging the specific picture shown to viewers through projectors. The magnifier app’s default view, Full Screen, may enlarge the whole screen. However, the user is unable to see the complete screen at once since a section of it enlarges and moves with your mouse pointer. By selecting the “Options” option, the user may modify the Magnifier app’s settings and access a variety of additional capabilities. Anyway, let’s get started to learn the processes.
Steps to Use Magnifier to Zoom Desktop Screen:
Step1Open the Windows search (a magnifier icon or a long search box on the taskbar). To launch Magnifier, enter “magnifier” into Windows search and then click the first result.
Step2The Windows 10 Magnifier window will appear. Then, at any moment, you may zoom in on your app, your web browser, or a few other applications by pressing the + button.
Step3Press the Windows logo key and + to enlarge the view (plus). or use the Magnifier controls’ + (plus) button.
Step4Press the Windows key and - to zoom out (minus). Or use the Magnifier controls’ - (minus) button.
Step5Press Windows logo key + Esc to close the Magnifier. In the top-right corner of the Magnifier controls, click the X (close) button.
Method 5: Web Browser Method
You may enhance your web browser reading experience in a number of different ways. One method is to zoom in on the online sites you wish to read and enlarge the text, photos, and icons. It’s possible that you need to do this since your eyes are weary or the screen’s quality isn’t the best. To restore items to their original state, you may need to reset the zoom level or zoom out at some point. On Windows 10, you may zoom in for a clearer view of the screen if you can’t read the text or the pictures on your computer screen.
Steps to Use Web Browser Method to Zoom Desktop Screen:
You may use the zoom in shortcut on any web browser to increase the browser’s zoom level. In other words, you may zoom in on your web browser using the keyboard.
Step1Launch a web browser. To zoom in on your web browser, hold down the Ctrl key while pressing the “+” key on your keyboard.
Step2Now, within the browser, hit the 3-dot menu at the right top corner. (This is available in every browser).
Step3To enlarge the view in your web browser, click the + sign next to Zoom. Clicking the minus button on your web browser will let you to un-zoom or zoom out.
Conclusion
Numerous features on modern computers are intended to simplify user tasks. The ability to zoom in and out on the screen is one feature that might make using a computer easier. Learning how to zoom in and out may be helpful if you have trouble seeing little text or pictures on your computer or if you need more screen real estate to view many things at once. You can see from reading this that using your computer to zoom in and out is fairly simple. You may simply choose one approach based on your needs to assist you. The zoom settings in Windows may be the cause of the abnormally huge graphics on the desktop.
Guide: Adding Audio in Wondershare Filmora
Audios are the most important part of videos in today’s world. Even if your video quality is not cinematic, audio lets you engage multiple users, even on low-quality video. To ensure the maximum number of customers on your videos, you need to add optimized quality audio to them. And it’s okay if you don’t know how to add audio to videos because you are about to.
Wondershare Filmora will let you accomplish your task in a matter of seconds. Along with providing details on adding and adjusting audio, we will also introduce the premium quality features of Filmora to present it as a powerful tool. By the end of this discussion, you will get familiar with the procedure of how to adjust TikTok audio through this video editing tool.
Part 1: Discussing The Audio Features of Wondershare Filmora in Detail
The key features of Wondershare Filmora are itself a full fledge example of innovation and modernization. You can maximize the productivity of your videos by adding soothing and studio-quality audio. Not only does it serve as a good audio adjustor, but it also makes processing easier.
Filmora is not only used for adding audio to videos, but also for modifications of audio. The AI audio-related key features of Wondershare Filmora through which you can boost your audio quality and overall video quality are presented here:
1. Audio Ducking
Integrating two soundtracks into the videos means you have to dominate one of them. With the Audio Ducking feature of Filmora, you can lower the sound of one of the two tracks presented in the videos. This is very helpful when working on YouTube videos, podcasts, and Vlogs. This tool also automatically detects soundtracks, so you don’t have to face hassles.
2. Text-to-Speech (TTS)
In this busy world, everyone looks for reliable shortcuts and ways to accomplish their task in a limited time. Filmora offers you the ability to convert text files into realistic and outclass voiceovers. You can also write lengthy blogs, share them with the site and make voiceover videos with state of art accuracy
3. Silence Detection
Do you wish to detect the silent moments in the videos and remove them without impacting the video quality? No need to worry because the Silence Detection feature of Filmora will assist you with this problem. You can also customize the Volume Threshold, Minimum Duration, and Softening Butter. Moreover, you can remove the silenced parts with a few taps.
4. Audio Visualizer
The Audio Visualizer of Filmora can add new life to your lifeless videos and match them with your videos. In addition to this, it can also add dynamic effects to videos. Not only simple, but you also have the option to add podcasts and cinematic music videos. Filmora comprises more than 25 visualizer effects for the ease of the users.
5. Audio Synchronization
Matching audio with the length of the videos without any complication is like a dream to some users. However, it can be true if you are utilizing assistive tools such as Filmora. It supports the feature of Auto Sync, through which you can synchronize the audio with video irrespective of length and format. You can also select royalty-free music from Filmora, add it to the video and sync it automatically .
6. AI Audio Stretch
To fit the duration of your audio with audio, you can retime the audio in real-time with Filmora. This feature encompasses AI powers, so you don’t have to adjust everything manually. There is no need to add fading effects or cut unnecessary parts. Along with this, you can also preview the music track to match it with the length of the videos.
7. AI Audio Denoise
Background noises in videos cause a distraction for the users and impact the engagement of users in a bad way. From removing electrical noises to the removal of pet noises, this tool can help you with everything. As it supports a wide array of audio file formats, you will not face restrictions in this part.
8. Speech-to-Text (STT)
Transcribing long videos without errors and mistakes is one of the specialties in Filmora. It also integrates several plug-ins through which you can optimize the speech-to-text in a limited time. One of the best things is it can also work on SRT files.
Part 2: How to Add and Detach Audio in Wondershare Filmora?
Integrating audio in the video somehow depends upon the user’s preferences. Yet, a reliable video editor will let you add or detach the audio from videos without any issue. The best tool through which you can accomplish this task is Wondershare Filmora. You can also discover the procedure of addition and detaching videos in the below-given information:
How to Add Audio to Video with Wondershare Filmora?
As stated above, Filmora is an industry-standard tool that offers a straightforward procedure for modifying multimedia content. The procedure for adding audio in videos with Wondershare Filmora free audio editor is listed here:
Add Audio to Video For Win 7 or later(64-bit)
Add Audio to Video For macOS 10.14 or later


Step 1Import Video and Select Audio
Initially, import the video in Filmora and drag it to “Timeline.” Next, go to the “Audio” section and select the audio of your choice. You can also click the “Learn More” icon to get more information about the audio. You can also import the customized audio from your device.

Step 2Add Audio to Video
Following this, drag your selected audio in the video in “Timeline” and “Double Click” on the audio. Next, manage the “Volume,” “Sound Balance,” “Pitch,” “Audio Ducking,” and other parameters of audio from the right panel. After this, click the “Export” button, change settings, and again hit the “Export” button to save the video on the device.

How to Detach Audio From Video with Wondershare Filmora
The procedure of audio detaching is also very smooth. Feel free to follow the steps instructed here to accomplish this task:
Detach Audio From Video For Win 7 or later(64-bit)
Detach Audio From Video For macOS 10.14 or later
Step 1Drag Video to Timeline
To get started, launch Filmora and import the video by clicking on the “Click here to import media” button. To continue, drag the imported video to the “Timeline.”

Step 2Detach Audio from Video
Once done, right-click on the video in the timeline and locate the “Detach Audio” button. Following this, hit “Detach Audio” to separate the audio from the video and continue to save it on the device.

Part 3: How to Adjust the Parameters of Audios in Filmora?
Every person wishes to customize the audio in the video so they can share their creativity with the world without any complications. To adjust the audio parameters, you need to use a reliable tool that offers versatile audio editing features.
Adjust Audio Now For Win 7 or later(64-bit)
Adjust Audio Now For macOS 10.14 or later
Luckily, Wondershare Filmora can help you a lot in modifying and customizing the audio parameters. To change the audio parameters in this audio adjuster, follow the instructions listed here:
Step 1Access Filmora and Import Video
To change the audio parameters, access Wondershare Filmora on your device and click “New Project.” Following this, hit the “Click here to import media” button to import a video and drag it to the “Timeline.”
Step 2 Change Audio Parameters in the Video
Once the video is in the timeline, double-click on the audio in the timeline. After this, the audio parameter window will be opened in the right section. From here, you can change “Sound Balance,” “Fade In,” and “Fade Out” in a customized way. Moreover, you can also toggle the “Auto-Normalization” option and optimize “Volume.”

Step 3Saving the Adjusted Video to the Device
Saving the Adjusted Video to the Device

Conclusion
In a nutshell, this discussion has guided you about the addition and adjustment of Wondershare Filmora. With Filmora, you can optimize the quality of audio in videos in no time. Moreover, it also integrates several useful features such as Audio Ducking, AI Audio Denoise, Audio Visualizer, and more.
You can discover more information about its features from the above-given discussion. This article also discusses the steps to add and detach audio from video. In addition to this, you can also adjust multiple audio parameters with Filmora’s explicit toolkit.
How to Add Audio to Video with Wondershare Filmora?
As stated above, Filmora is an industry-standard tool that offers a straightforward procedure for modifying multimedia content. The procedure for adding audio in videos with Wondershare Filmora free audio editor is listed here:
Add Audio to Video For Win 7 or later(64-bit)
Add Audio to Video For macOS 10.14 or later
Step 1Import Video and Select Audio
Initially, import the video in Filmora and drag it to “Timeline.” Next, go to the “Audio” section and select the audio of your choice. You can also click the “Learn More” icon to get more information about the audio. You can also import the customized audio from your device.
Step 2Add Audio to Video
Following this, drag your selected audio in the video in “Timeline” and “Double Click” on the audio. Next, manage the “Volume,” “Sound Balance,” “Pitch,” “Audio Ducking,” and other parameters of audio from the right panel. After this, click the “Export” button, change settings, and again hit the “Export” button to save the video on the device.
How to Detach Audio From Video with Wondershare Filmora
The procedure of audio detaching is also very smooth. Feel free to follow the steps instructed here to accomplish this task:
Detach Audio From Video For Win 7 or later(64-bit)
Detach Audio From Video For macOS 10.14 or later
Step 1Drag Video to Timeline
To get started, launch Filmora and import the video by clicking on the “Click here to import media” button. To continue, drag the imported video to the “Timeline.”
Step 2Detach Audio from Video
Once done, right-click on the video in the timeline and locate the “Detach Audio” button. Following this, hit “Detach Audio” to separate the audio from the video and continue to save it on the device.
Part 3: How to Adjust the Parameters of Audios in Filmora?
Every person wishes to customize the audio in the video so they can share their creativity with the world without any complications. To adjust the audio parameters, you need to use a reliable tool that offers versatile audio editing features.
Adjust Audio Now For Win 7 or later(64-bit)
Adjust Audio Now For macOS 10.14 or later
Luckily, Wondershare Filmora can help you a lot in modifying and customizing the audio parameters. To change the audio parameters in this audio adjuster, follow the instructions listed here:
Step 1Access Filmora and Import Video
To change the audio parameters, access Wondershare Filmora on your device and click “New Project.” Following this, hit the “Click here to import media” button to import a video and drag it to the “Timeline.”
Step 2 Change Audio Parameters in the Video
Once the video is in the timeline, double-click on the audio in the timeline. After this, the audio parameter window will be opened in the right section. From here, you can change “Sound Balance,” “Fade In,” and “Fade Out” in a customized way. Moreover, you can also toggle the “Auto-Normalization” option and optimize “Volume.”
Step 3Saving the Adjusted Video to the Device
Saving the Adjusted Video to the Device
Conclusion
In a nutshell, this discussion has guided you about the addition and adjustment of Wondershare Filmora. With Filmora, you can optimize the quality of audio in videos in no time. Moreover, it also integrates several useful features such as Audio Ducking, AI Audio Denoise, Audio Visualizer, and more.
You can discover more information about its features from the above-given discussion. This article also discusses the steps to add and detach audio from video. In addition to this, you can also adjust multiple audio parameters with Filmora’s explicit toolkit.
Also read:
- New What Is MOV Format and How to Edit MOV Video Better for 2024
- New How to Make A Jaw-Dropping Time Lapse Video? Full Guide
- Updated | Top GIF to MP4 Converters
- New 2024 Approved How To Make a Video by Mouse in Filmora?
- New In 2024, Want to Know How to Slow Down a Video on iPhone or Speed It Up? This Guide Provides Step by Step Method to Do so Using Simple Techniques. Find Out More About It
- Updated 2024 Approved 3 Best Effects to Appear on Camera
- Updated In 2024, Have You Been Looking for Online YouTube Video Trimmer? You Will Be Introduced to Different Ways to Trim YouTube Videos as Introduced by YouTube Itself and some Online and Desktop Software to Help You Learn Video Trimming in This Article
- Find Out What Ray Tracing Is in After Effects, How It Works, and Learn About Ray-Traced 3D Settings with Simple Instructions
- New Best GIF to AVI Converters
- New In 2024, How to Animate Your Designs With Canva GIF
- Updated 2024 Approved Do You Want to Apply Professional-Looking Color Grading on Your iPhones Photos and Videos? You Can Use Different iPhone LUTs for Your Pictures and Videos
- Updated | Live Stream on YouTube Using Zoom for 2024
- New Do You Seek a Guide to Add Motion in Blender? This Article Explains the Blender Motion Blur Effect in Detail and Helps You Master It
- New 2024 Approved Find The Best LUTs for Lightroom
- Updated 2024 Approved What Is a Memoji and How to Make a Memoji? You Can Learn Top 8 Memoji Makers for PC, Android, or iOS, and the Steps to Make a Memoji
- DVD Slideshow Builder Review and Tutorial
- Updated 2024 Approved How to Combine Several Xvid Files Into One Windows, Mac,Android, iPhone & Online
- New How to Use Rules of Thirds for 2024
- New 2024 Approved Have You Ever Used the Path Blur Effect in Your Photos? This Article Will Address How to Use Path Blur in Photoshop to Generate Appealing Results Accurately
- In 2024, Discover How to Change Sky Background with The Best Applications? A Review
- How to Add Text in Adobe Rush
- Adobe Premiere Pro Download and Use Guide In Depth for 2024
- How to Fake Snapchat Location without Jailbreak On Realme Narzo 60x 5G | Dr.fone
- In 2024, 9 Best Phone Monitoring Apps for OnePlus Ace 2V | Dr.fone
- How do you play .mov files on Xiaomi Redmi 13C ?
- In 2024, How To Change Your Apple ID Password On your iPhone 11 | Dr.fone
- List of Pokémon Go Joysticks On Samsung Galaxy A54 5G | Dr.fone
- In 2024, Overview of the Best OnePlus 11R Screen Mirroring App | Dr.fone
- New How to Make Your Own GIF on WhatsApp in Simple Ways
- In 2024, How to Unlock iCloud lock on your iPhone 6s Plus and iPad?
- In 2024, Overview of the Best Vivo T2 5G Screen Mirroring App | Dr.fone
- Remove Google FRP lock on OnePlus Nord N30 SE
- In 2024, How to Bypass Android Lock Screen Using Emergency Call On Vivo S17 Pro?
- Ways to stop parent tracking your Samsung Galaxy S23 FE | Dr.fone
- All About Factory Reset, What Is It and What It Does to Your Samsung Galaxy S23 Tactical Edition? | Dr.fone
- 3 Ways to Fake GPS Without Root On Realme C67 4G | Dr.fone
- Title: How to Add Motion Titles
- Author: Morgan
- Created at : 2024-05-19 05:11:33
- Updated at : 2024-05-20 05:11:33
- Link: https://ai-video-editing.techidaily.com/how-to-add-motion-titles/
- License: This work is licensed under CC BY-NC-SA 4.0.
