
How To Create A Green Screen Video In After Effects

How To Create A Green Screen Video In After Effects
You’ll probably get the finest results in After Effects out of all the editing programs. Working with green screen footage in After Effects can be done in a variety of ways. Utilizing a built-in preset that combines three effects is advised by Adobe. Due to its ability to deliver speedy (and typically excellent) outcomes, this strategy is great for both beginners and specialists. We’ll demonstrate how to do easily for you.
Let’s start off!
1. Importing your footage
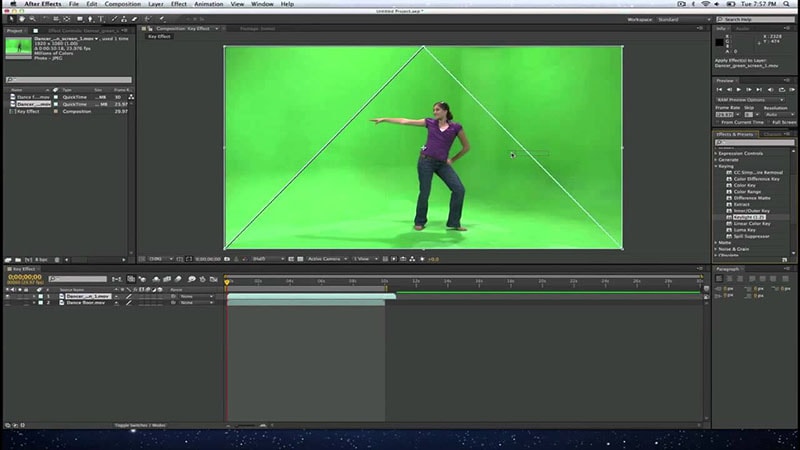
After you have imported your material into the After Effects project, you should next create a new composition using the footage. In the following stage, you have the option of either adding each plugin one at a time or doing it all at once. You may find them grouped together as Keylight, Key Cleaner, and Advanced Spill Suppressor in the Animation Presets box, which is located under the “Image Utilities” heading.
2. Remove the green color
After Effects users can get rid of a green screen by going to the “Animation Presets” window, searching for the “Keylight” preset, dragging, and dropping it over the clip, and then shifting their focus to the “Effects Controls” window. Make sure the Screen Colour is set to the color of your screen’s background (which, in this case, is green). You may do this with the color selector.
3. Clean up the shot
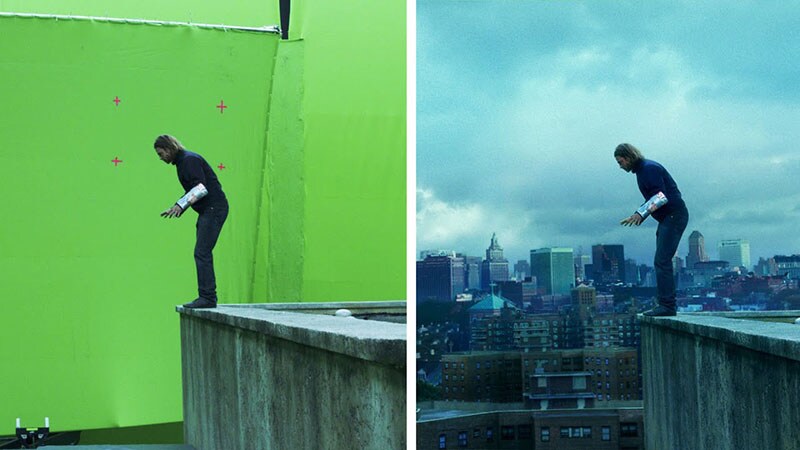
You have no doubt observed that some of the remaining parts do not have the correct keying installed in them. In order to get rid of them, you need to put the view into the Combined Matte mode and turn the Screen Gain up a notch.
Because everything that is not transparent is turned white by Combined Matte, any remaining debris can be seen very clearly after it has been applied. After you have finished cleaning the frame, you should change the view to Intermediate Result. Your footage may become contaminated with artifacts if the Final Result view is inadvertently switched on.
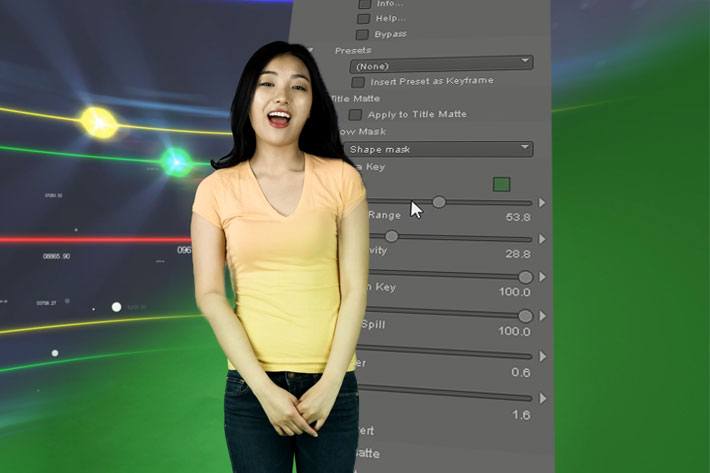
You can go to the “Screen Matte” area if you feel like the frame still needs more tweaking after you’ve applied the previous ones. You can accomplish that with the assistance of Clip Black and Clip White. Feel free to turn the Clip Black dial all the way to the right and turn the Clip White dial to the left. You can also adjust the other settings, if necessary, but based on my observations, everything should be working properly at this point.
The Bottom Line
After completing this lesson, you should have a better understanding of what a chroma key is, how to get rid of a green screen in After Effects, and how to adjust some settings if something goes wrong. Keep in mind that if the footage is not captured properly, you will not be able to successfully key out the green screen in the final video. Extra caution should be taken with the lights, and spills should be avoided at all costs!
Free Download For Win 7 or later(64-bit)
Free Download For macOS 10.14 or later
Free Download For macOS 10.14 or later
Steps to Create Gold Text Effects After Effects
Have you always wanted to create the gold text effect in After effects but you don’t know how? This polished effect can make your video’s title stand out and is one of the best ways to create a stunning title for YouTube and Instagram clips. In this article, we will be looking at how to create the gold text using After Effects.
Steps to Create Gold Text Effects After Effects
Follow these steps to create a gold text effect in your After Effects video project;
Step1Start by creating an environment. To do that just right-click and choose “New Comp” and click “OK” to create one.
Step2Then we need to add fractal noise. To do that, click on “Effects and Presets” and type in “fractal” to choose “Fractal Noise.” You can double-click on it or drag it to the comp.
Step3Once this is done, you will need to do a little bit of housekeeping on the contrast and brightness. Increase the “Contrast” and reduce the “Brightness.”
Then go to the “Sub Settings” and reduce the “Sub Influence” down to zero.
Go to “Transform Option” and decrease the scale just a little bit. Then increase the “Scale Height” just a little.
Step4The next step is to add color to the scene. To do that, right-click on the layer and choose “New > Solid.” Select the gold color and click “OK.” Do the same with the second layer.
Step5Now you want to blend both colors by choosing a blending mode. Hold the “Shift” key and “hyphen” or “=” sign on the keyboard and choose “Overlay.”
Step6To make the color stronger, go to “Layer > Solid Settings” and choose a color.
Step7Go back to “Comp 3.” Right-click on it and select “New > Light” to add a new point of light.
Step8Go back to the project panel to click on “Comp 4” to add the environment. Right-click on the Comp 4 layer and make it an environment layer.
Step9In the options that appear, set “Appears in Reflections” to “Only” and you can then increase and decrease the color saturation until you have the desired result.
Free Gold Text Effects Template to Use
As you can see from the steps above, creating your gold text effects can be quite difficult. The good news is that you can download pre-made titles that you can simply edit. The following are some of the best to choose from;
- Christmas Title Template
Link: https://mixkit.co/free-after-effects-templates/christmas-title-template-819/
Despite the name, this is an ideal title for elegant projects or when you want your title to stand out. The typography is beautiful and elegant making it the most ideal template for fashion-themed videos. The template is easily customizable in After Effects and you can even change the color you want.

- Fashion Instagram Story
Link: https://mixkit.co/free-after-effects-templates/fashion-instagram-story-551/
This is the most ideal template to choose if you want a gold text effect that is accompanied by an image. Again, this is a very elegant theme that is ideal for YouTube and Instagram videos in the fashion and entertainment genres. It is also fully customizable in After Effects, allowing you to change the color, text, and image.

- Wedding Invitation Opener
Link: https://mixkit.co/free-after-effects-templates/wedding-invitation-opener-803/
This free gold text template is also completely customizable and comes with various text effects that you can include in the text. It is elegant and includes shadow effects that make the text stands out more. But you can remove the shadow effects if they don’t suit your project.

- Golden Luxury Titles
Link: https://motionarray.com/after-effects-templates/golden-luxury-titles-116934/
If you are looking for a gold text title that stands out in terms of design, animation, and color, consider Golden Luxury Titles. It comes with 9 editable layers that you can use to modify the title in any way. It is the most ideal title for movies, teasers, TV shows, and more.

- Emotional Awards Opener
Link: https://motionarray.com/after-effects-templates/emotional-awards-opener-356434/
This is a sparkling and glistering stylish design that can be very useful for movies and TV shows. This attention-grabbing title template has over 18 editable text layers to allow you to customize the title in various ways.

Alternative Way to Create Video Gold
Adobe After Effects is a very good video editor, but one of the things that can make it inaccessible to many users is that it can be very difficult to use. Thankfully, there is another very effective video editor that you can use to create gold text that is much easier to use.
This is the Wondershare Filmora , one of the best video editors in the market. Before we look at how you can use Filmora to create the perfect gold metal texture on your text, let’s first look at some of its main features;
- You can use Filmora to edit videos at a very high resolution including 4K videos
- It can be used to remove the background and noise from the video very easily
- You can edit both video and audio in the same project
- Up to 5 text tracks and 10 music tracks can be added to the same timeline and the same project
- It is very easy to use with a simple and intuitive user interface
Here’s how to use Filmora to create a gold metal texture for your text;
Step1Install Wondershare Filmora on your Computer
Download the Filmora setup file to your computer and double-click on it to start installing the program to your computer.
Open the program once the installation is complete.
Step2Create a New Project
If you are starting from the beginning, you may need to create a new project.
To do that, click on “File > New Project” in the menu bar to start a new project.
If there was a project that you were already working on, click on “Open Project” on the main window and then click “File > Open Project” or “File > Open Recent” in the menu bar.
Step3Add A Title to the Timeline
To add a gold texture effect to a title on your video, we will first of all need to add a title to the project.
To do that, go click on the “Titles” tab at the top and drag one of the default titles to the timeline.
Once it is in the timeline, double-click on the title and edit it. Type in anything you want to appear in the title.

Select the font that you want to use and choose a specific font size to use. These are all your preferences and will depend on your project.
Move the title to the second track in the timeline as you get ready to begin adding the colors.
Step4Start Adding Colors
Go to “Media” at the top and click on “Sample Colors.” Drag the black color image to the track directly below the title timeline.

Then take a snapshot of this newly created image by clicking on the “camera” icon next to the playhead.
Change the Font of the Title to something else more elegant like “Montez” and take another snapshot by clicking on the same camera icon.

Step5Add the Gold Effect
Delete everything from the timeline. Don’t worry you took a photo of all the text layers and the effects added to each.
You will then need to find an image of a gold background. You can find these on any good background image site. Download a good clear image and upload it into Filmora.
Now drag and drop the gold background image to the second track in the timeline. Double click on the background image.
Select “Compositing” and then in the “Blending Mode” drop-down menu, choose “Darken.” Click OK.”

Hide the first layer in the timeline and select the gold background image layer. Click on “Animation” and then select “Customize.”
To create the customized effect that we need, click on the image and drag it from the right to the left side.

Move the playhead to the end of the image to insert another keyframe and then click on the restore icon to restore the size of the image.

Click “OK” and show the track above the timeline. You will now see that the gold texture effect has been applied to your title. You can also add the second snapshot with the varying font for further effect.
Step6Save the Project
Once you are done, you can go ahead and save the project or continue working on other aspects of the video as desired.
Free Download For Win 7 or later(64-bit)
Free Download For macOS 10.14 or later
4 Methods to Resize a WebM File
People resize videos for many reasons, the most common one being to reduce file size. Others might be to meet a specification, or for compatibility. When you resize a video file, you reduce its file size considerably- making it load faster on devices, reduce processing time, and save a lot of space. Most people prefer watching videos that are smaller in size compared to larger ones, that’s why some social media sites like Instagram, Tiktok, etc have preferred video resolutions, so if you are a user on these sites you might want to resize your video to fit.
The biggest concern most people have about resizing videos is whether it will retain its quality, another concern is that you don’t want to crop out your video while resizing. If the format of the video is mp4, wmv, avi, etc which usually have very large size, resizing it might be a bit of a problem because the video quality will reduce a lot, but if it’s a WebM video file, you can still achieve a good video quality even after multiple compression or changing its resolution, that’s because its codecs- VP8 and VP9 were designed specifically for that, and it’s supported by all browsers.
In the course of this article, we’re assuming you already have a WebM video and you want to resize it, and still maintain its quality so you can upload on your favourite websites without any hassles. We have handpicked some proven methods to help you with that, let’s see them:
Method 1: Resize WebM file with Wondershare Filmora
Wondershare Filmora Video Editor is a great video editing software that comes with a lot of features. You can easily perform basic editing techniques in a few minutes. It also comes with lots of filters to make your videos pop.
For video resizing, Filmora offers you a couple of options: First you have an option of changing the resolution just before you export your video; you also have the option of cropping your videos to your preferred size and cutting out redundant parts of your videos to save space; but the third option is what we’ll show you in this guide, because we imagine you already have your video exported and you just want to resize. You can easily do that by changing the aspect ratio and we’ll show you in a few steps:
For Win 7 or later (64-bit)
For macOS 10.14 or later
Step 1: Go to the official Wondershare Filmora website and download the software.
Step 2: Install Wondershare Filmora on your PC and double click to launch.
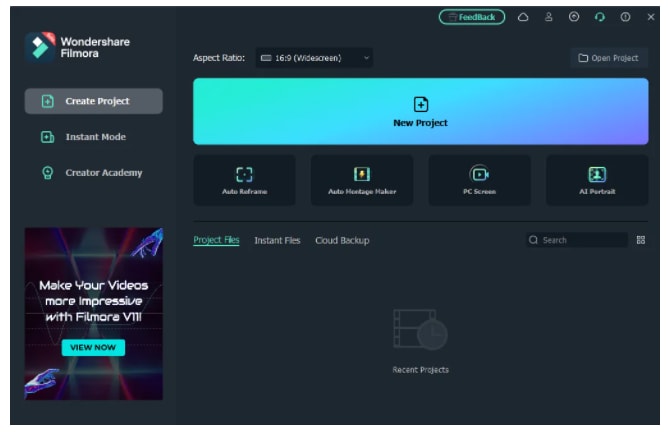
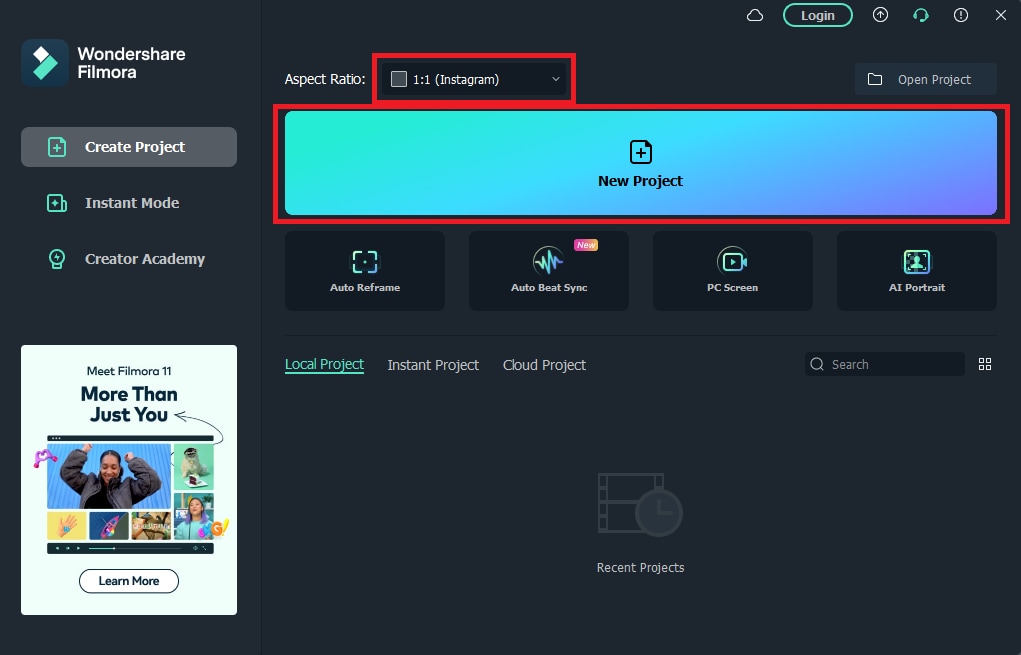
Step 3: Change your aspect ratio. When you launch Filmora, you’re allowed to choose your preferred aspect ratio on the start page.
Select your preferred aspect ratio from the list of options- 16:9 (widescreen), 4:3 (standard), 1:1 (Instagram), 9:16 (portrait). For example, if you import a 16:9 video file into Filmora, and set it to 1:1 aspect ratio then, the final output file will be 1:1, which is the perfect aspect ratio for Instagram posts.
You’ll see below that I selected 1:1 for instagram. After you are done selecting your preferred aspect ratio, hit ‘New Project’.
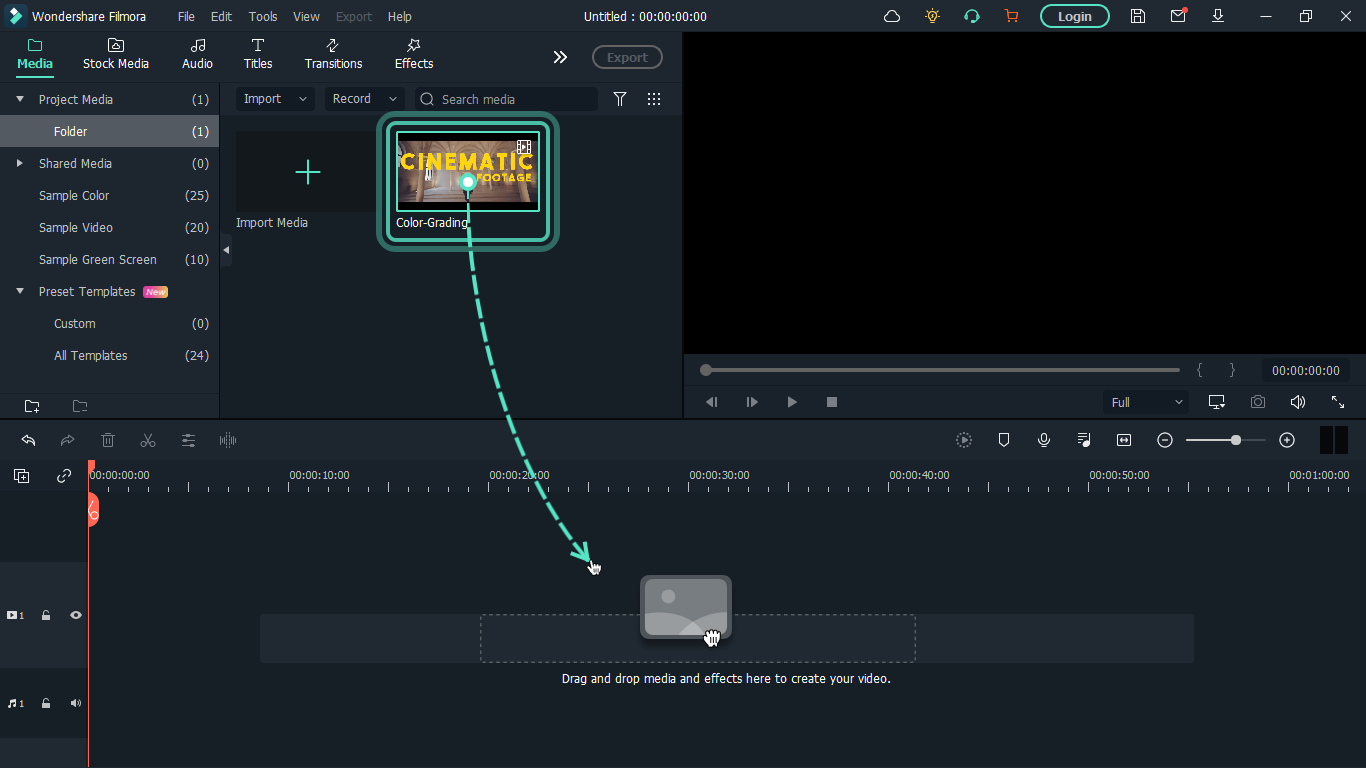
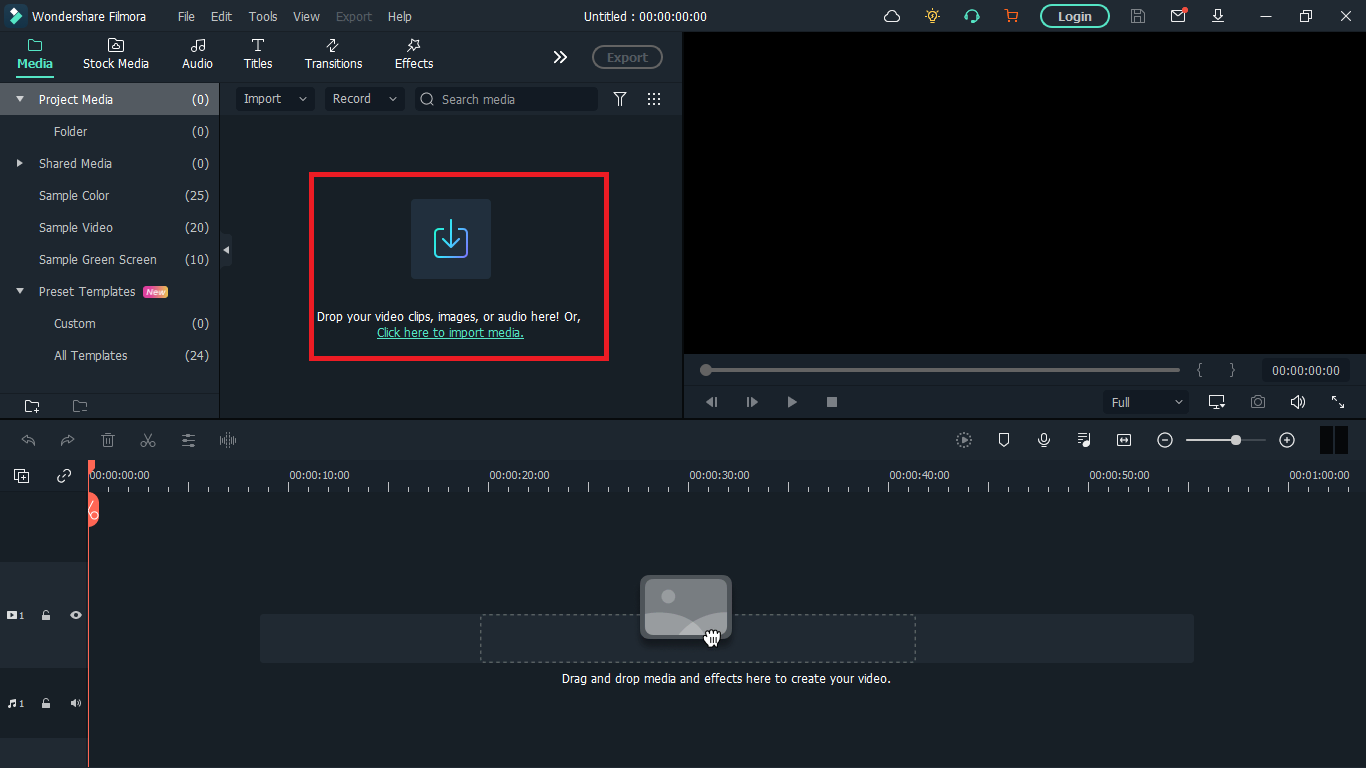
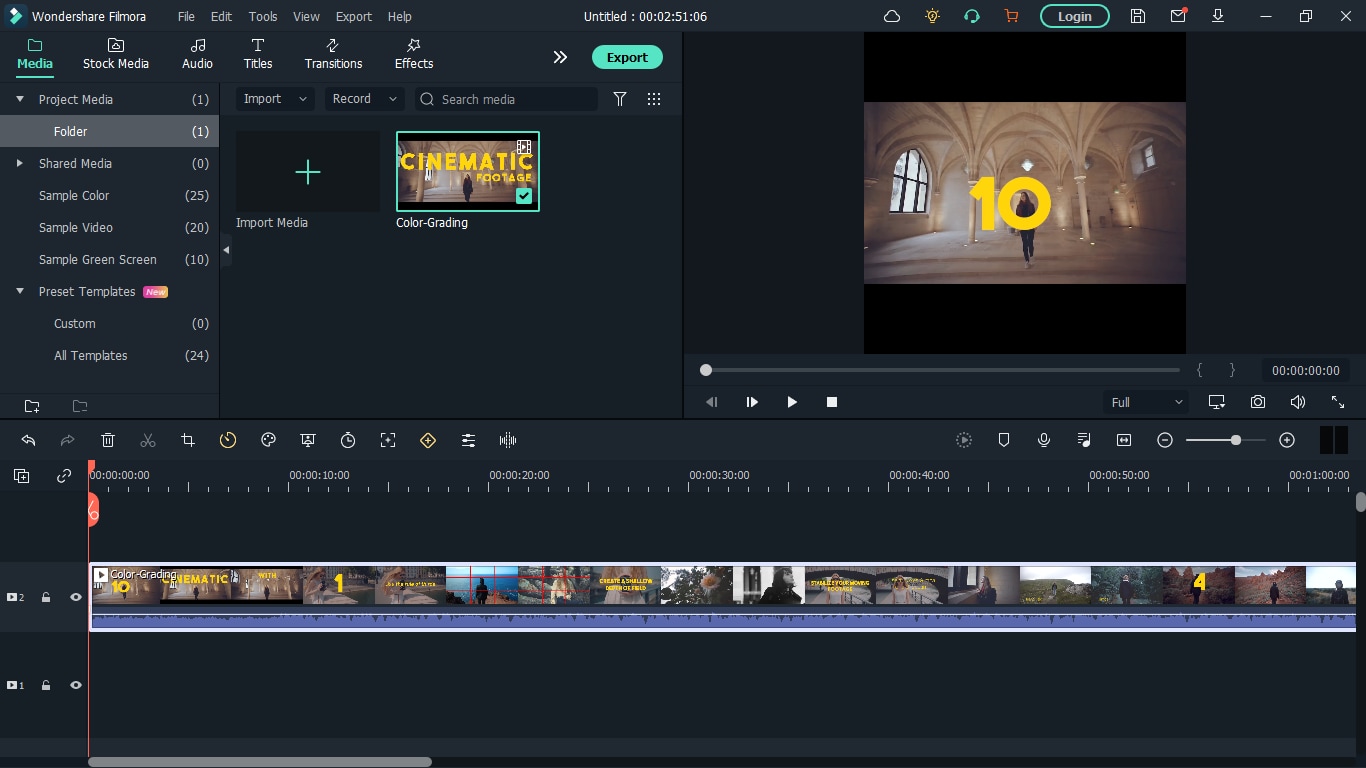
Step 4: Import your WebM video. After you must have selected your preferred aspect ratio, the next step is to import the video you want to resize; you can do this by clicking on the import icon shown below. Once done, drag the video to the timeline also shown below.
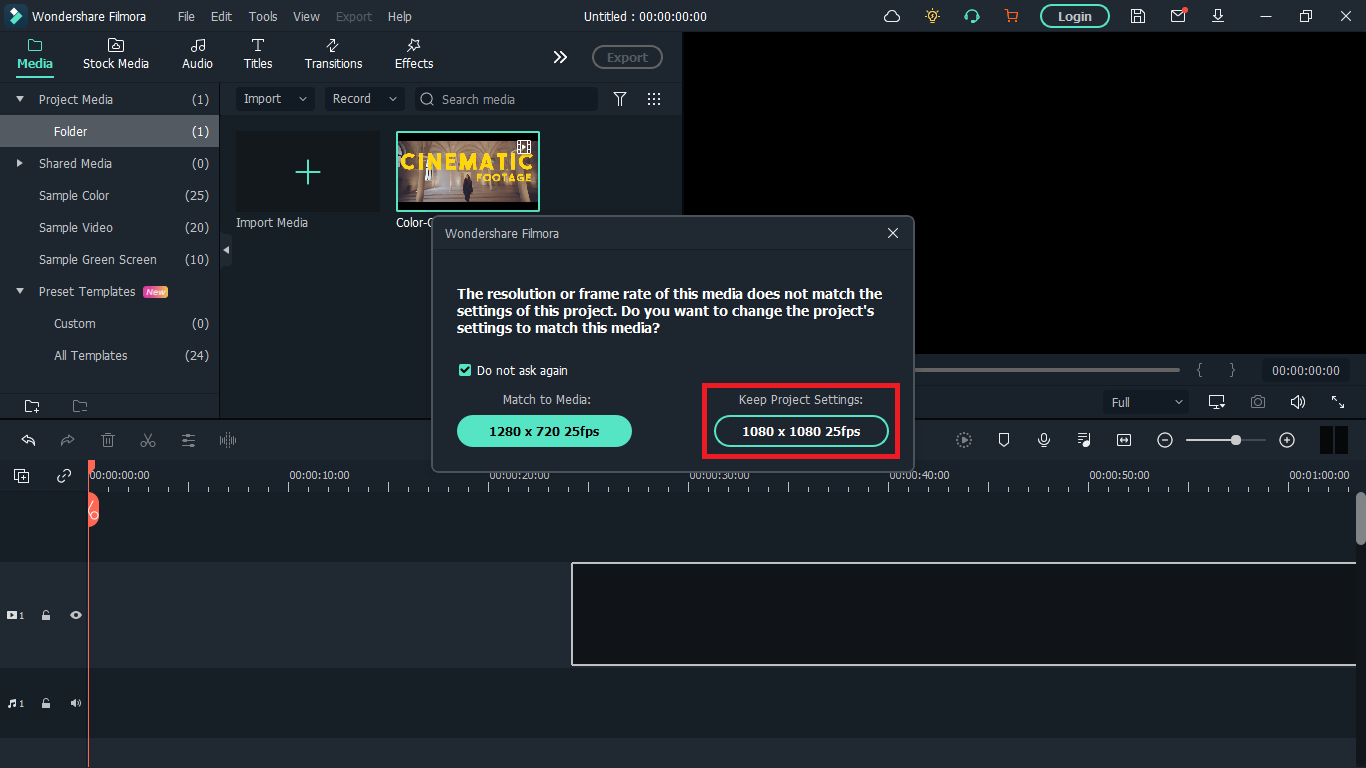
A floating window will appear and you’ll be asked to change project settings to match the media. Click on ‘Keep project settings’. Filmora will change the aspect ratio of the original video you imported to your preferred aspect ratio.
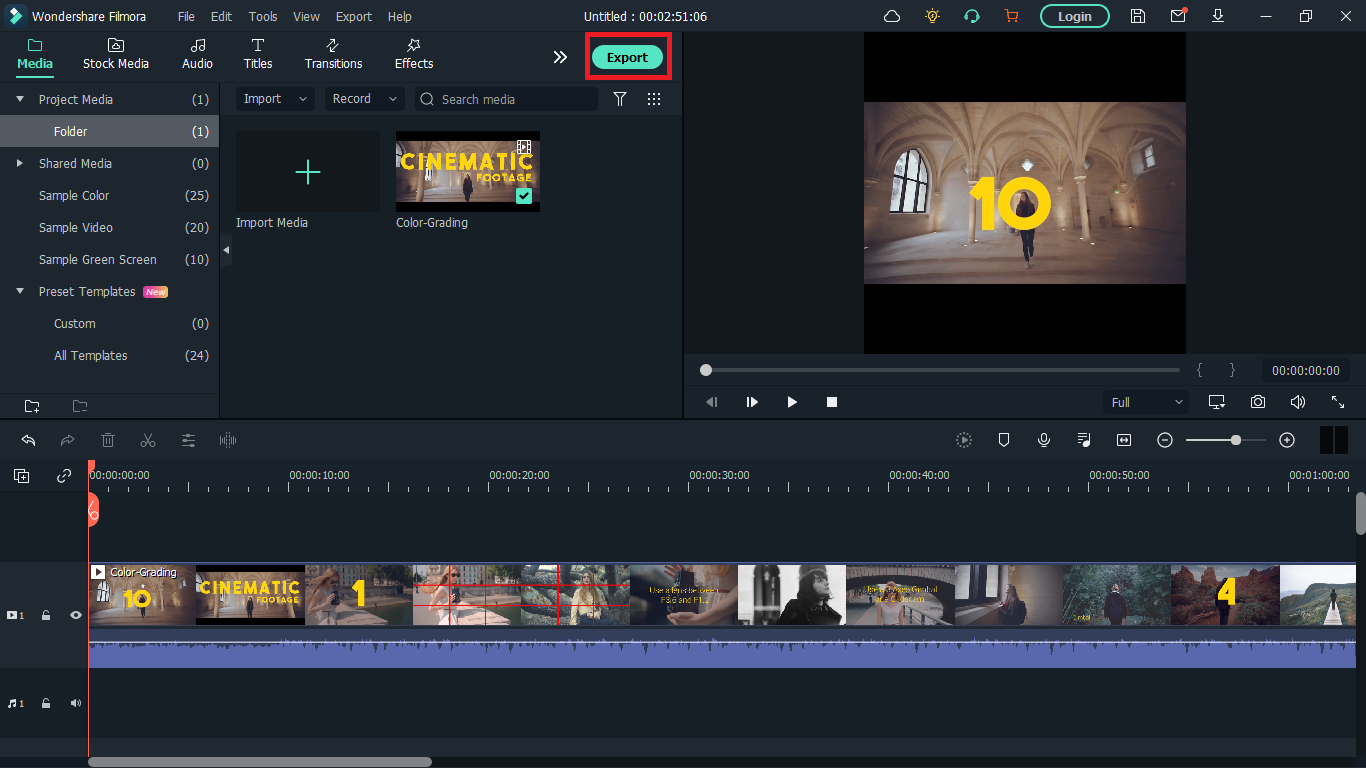
Step 5: Save your video. Once the video is now properly placed in the timeline, next thing is hit ‘export’ to save your video. You can go to the ‘format tab’ to change the video output format to WebM or whatever format you choose then hit ‘Export’.
Method 2: How to resize WebM file with VLC
VLC is a free and open source multimedia player. It is arguably the best media player out there and that’s for a reason- it can play almost everything without the need for any external codecs.
The playback feature is amazing but that’s not the only thing it can do. VLC outshines most other media players because of some extra features it possesses. It resizes and converts media files, downloads and adds subtitles, records screen, as well as is customizable in settings and expandable via plugins.
What we want to use in this guide is its media resizing feature, so let’s show you how you can use it in these steps:
Step 1: Download VLC Media player from the official VLC page and install it on your windows or Mac PC.
Step 2: Launch VLC after installing by double-clicking on the software.
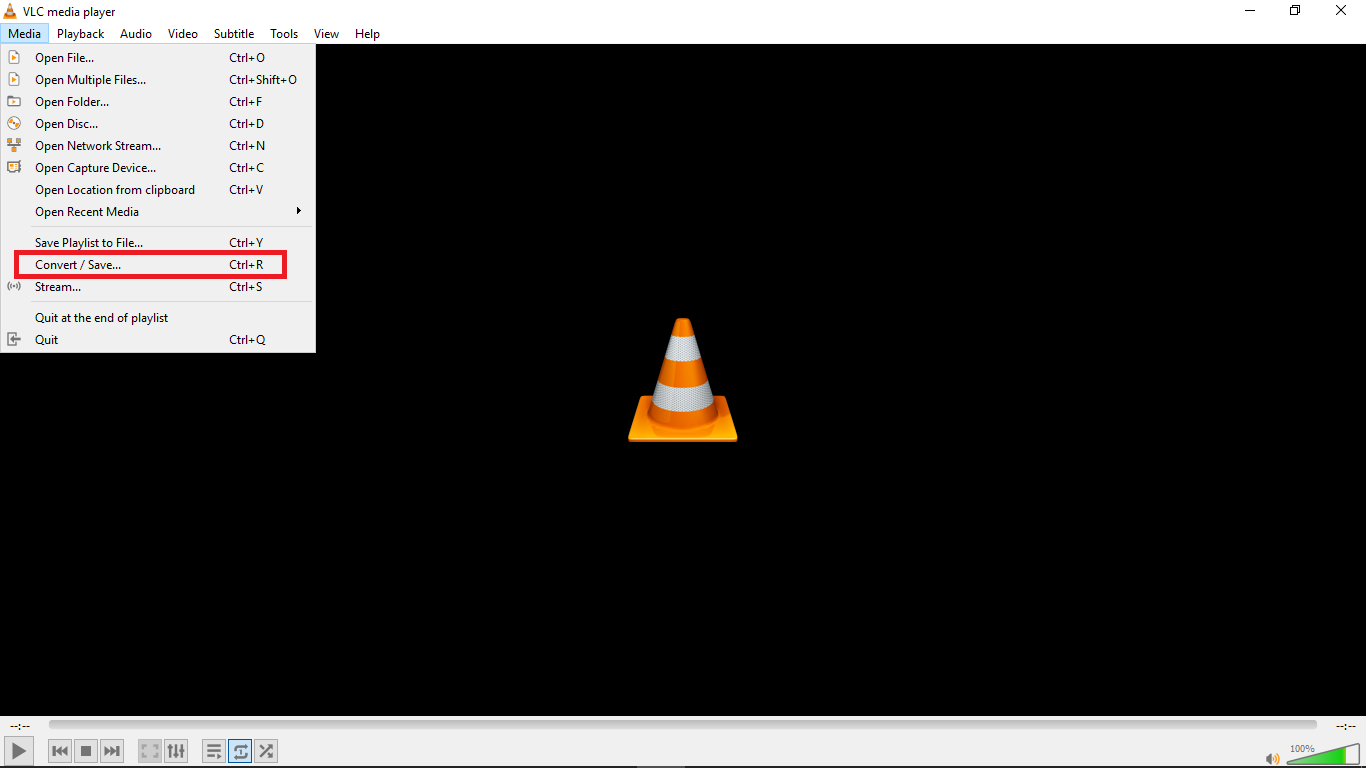
Step 3: Click “Media” in the toolbar.
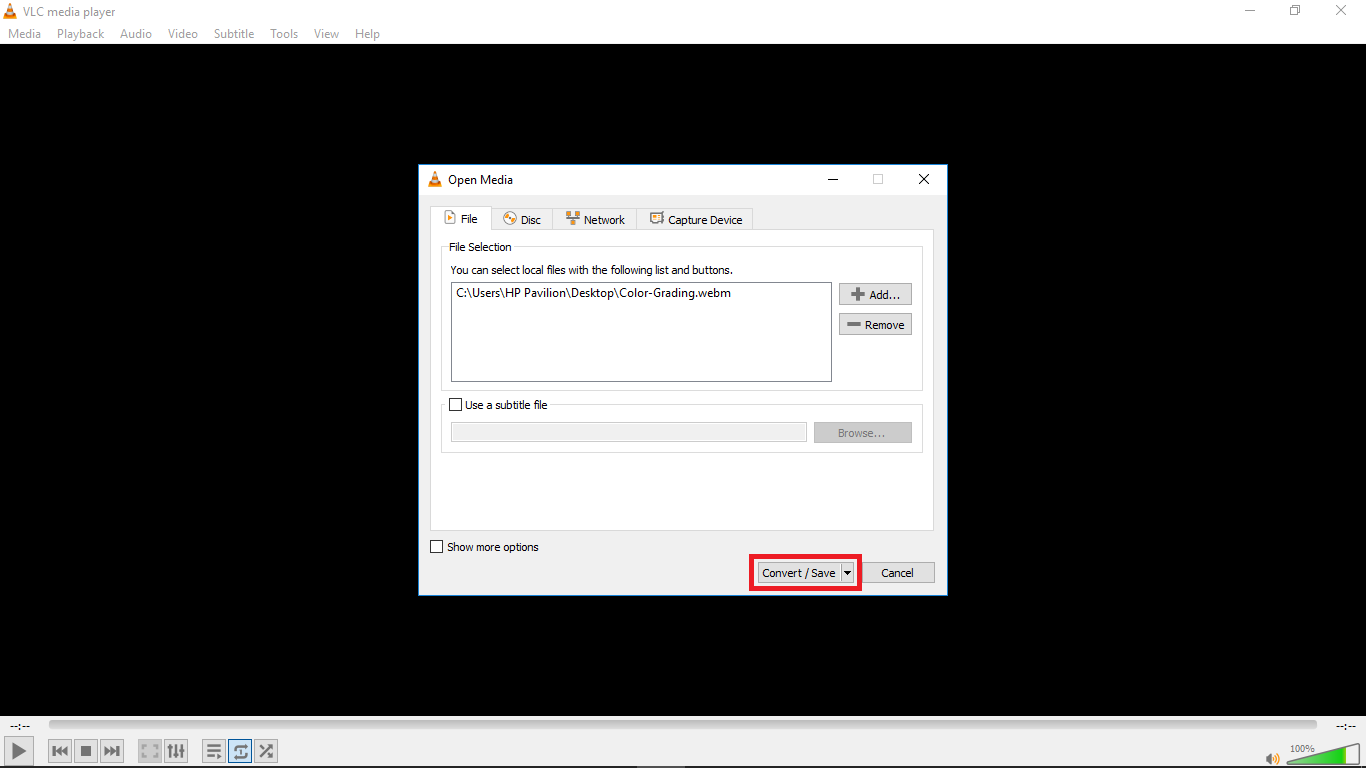
Step 4: Select “Convert / Save”. You can also tap shortcut keys Ctrl + R to quickly open a new window.
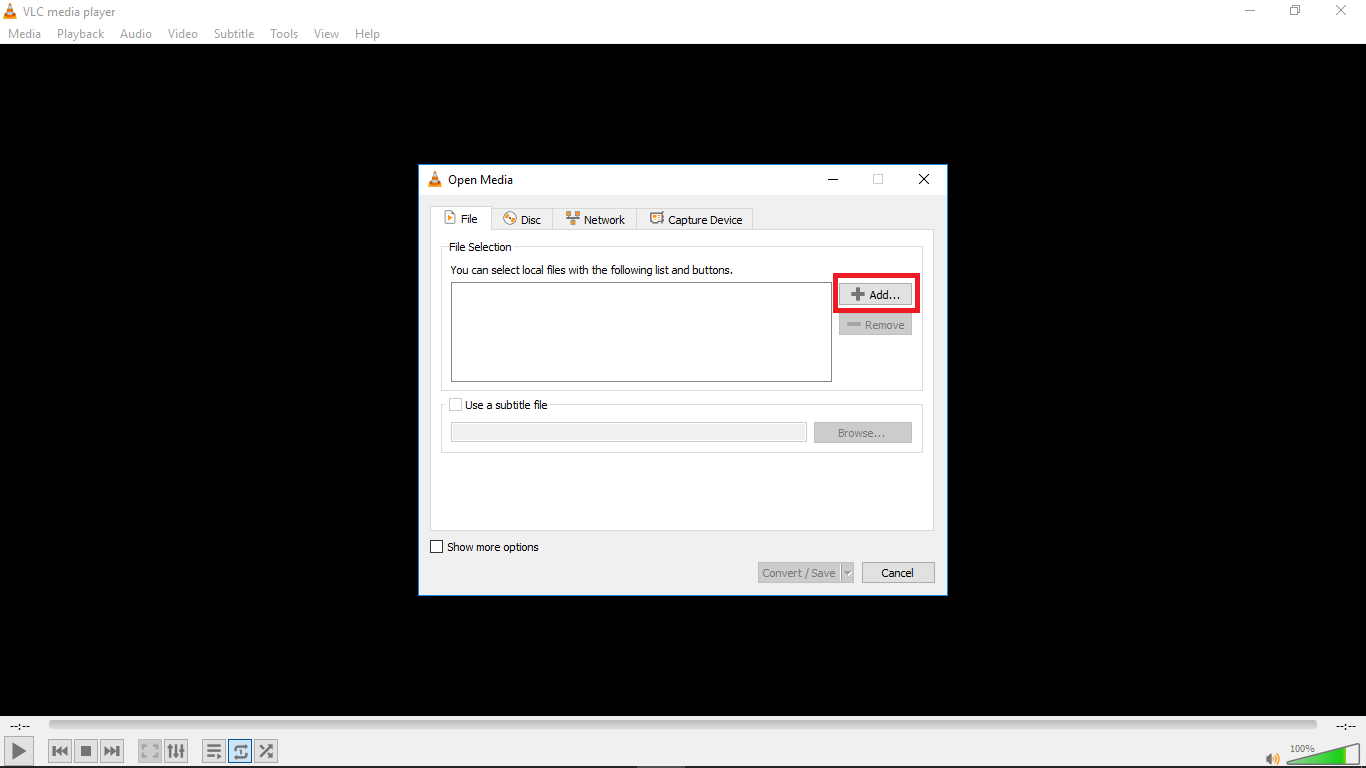
Step 5: Click “Add”. You can load one or more video files. Here, I’ll choose a colour grading video on my desktop. You can see it has the extension ‘.webm’. After loading the video file you want to resize, click “Convert / Save” again.
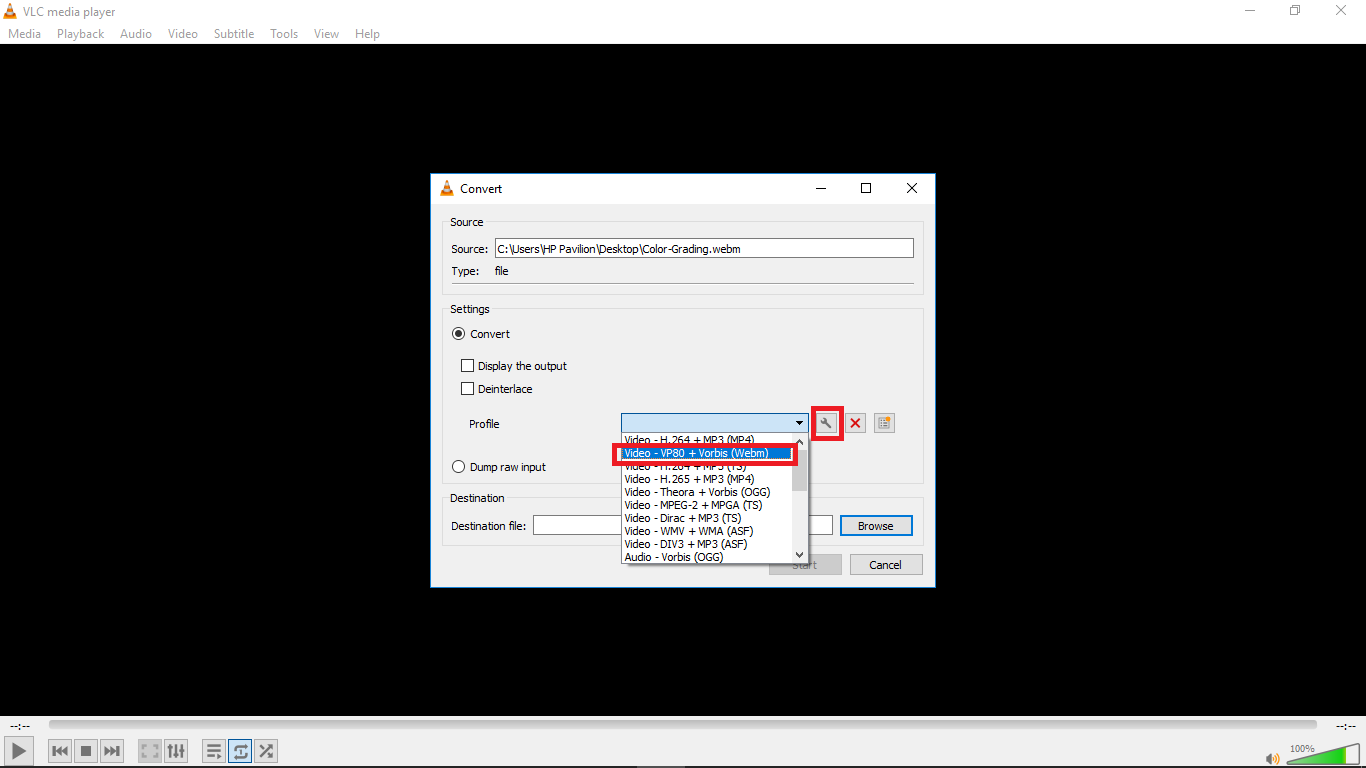
Step 6: Choose your desired output profile type. With VLC, you can resize video to MP4, WebM, TS, and other formats.
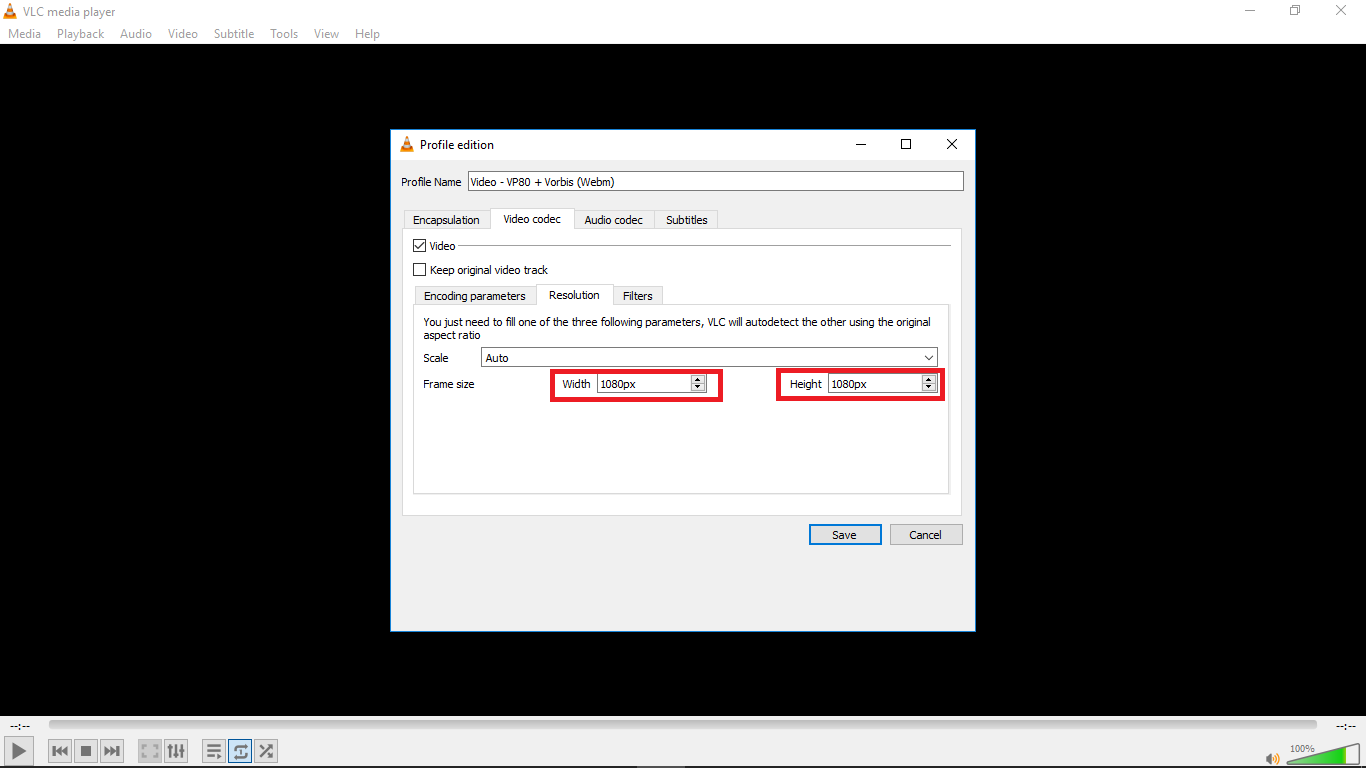
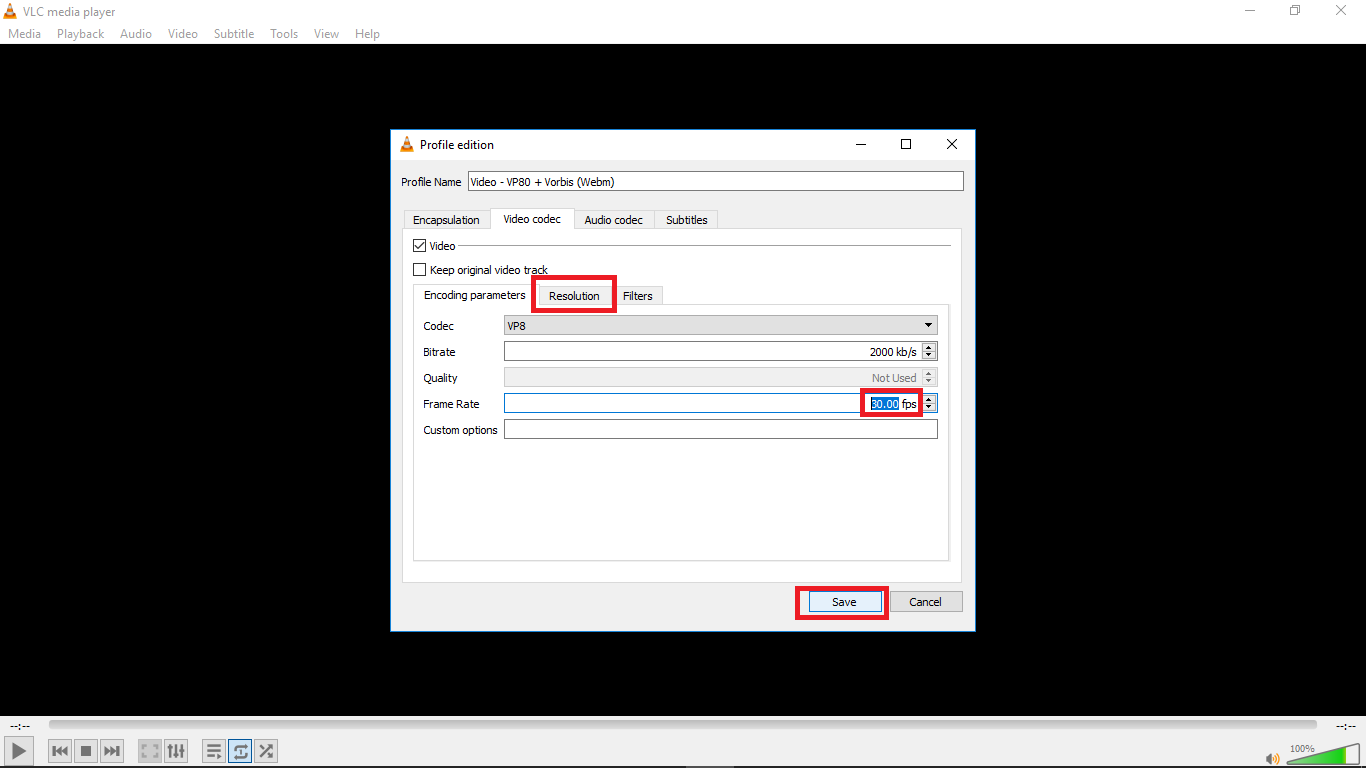
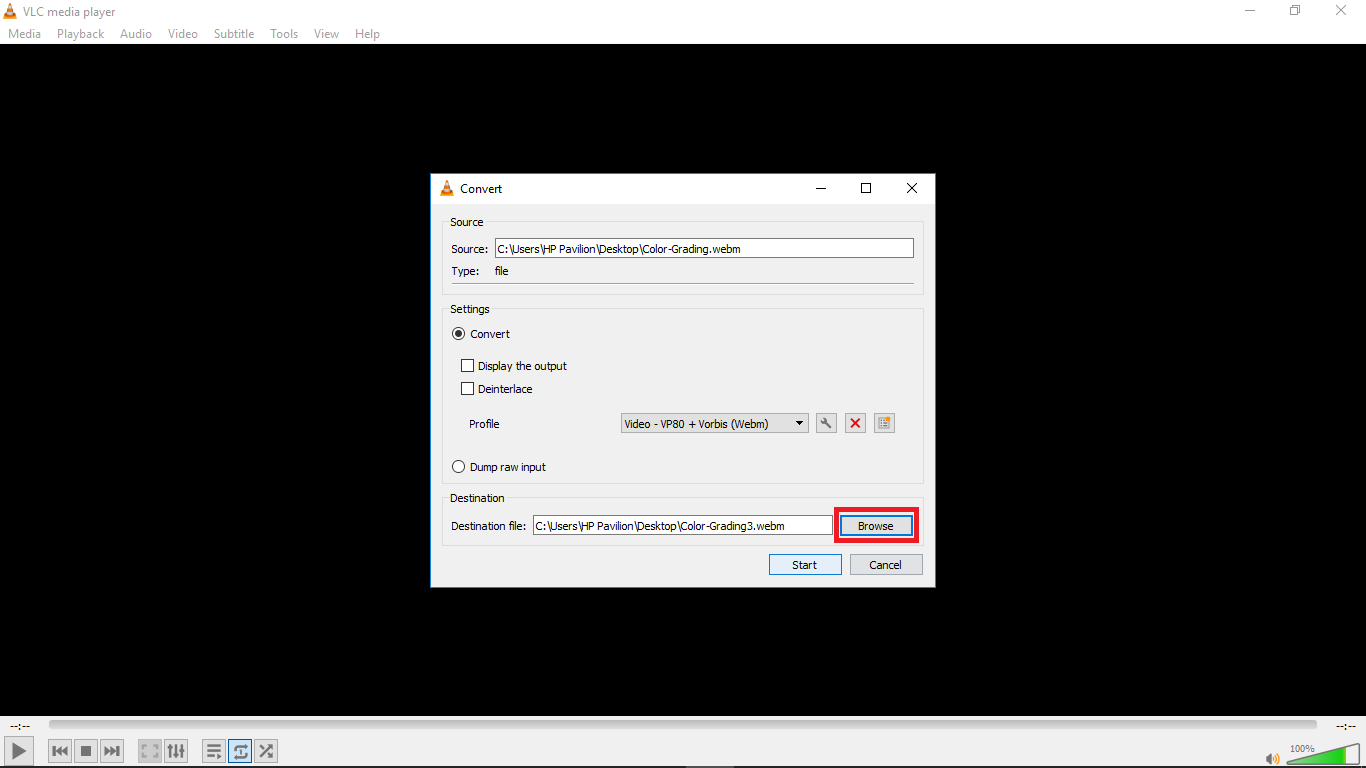
Step 8: Click the settings icon to access the settings window and select the video codec where you can adjust parameters like frame rate, bitrate, resolution, etc to change video file size. I changed the frame rate of my video to 30fps which is ideal for high quality videos. Also click the resolution tab and set your desired resolution then click save.
Step 9: Select the destination folder and click start. VLC will resize the video and retain most of its quality.
Method 3: Resize Videos With Ezgif
An alternative way to resize videos is by using Ezgif Video Resizer. If you are looking for a quick way to resize your WebM videos, this is a great tool. Ezgif is a free online video resizer with a very simple interface that can aid easy navigation for new users. The whole video resizing operation is pretty quick so you don’t have to worry about wasting so much time.
Ezgif supports various video formats like MP4, MOV, FLV, WEBM, MPEG, 3GP and more. Aside from the basic size change, it also allows you to rotate, crop, cut, mute, speed, reverse and add subtitles.
Here’s how you can resize your WebM video with Ezgif in a few steps:
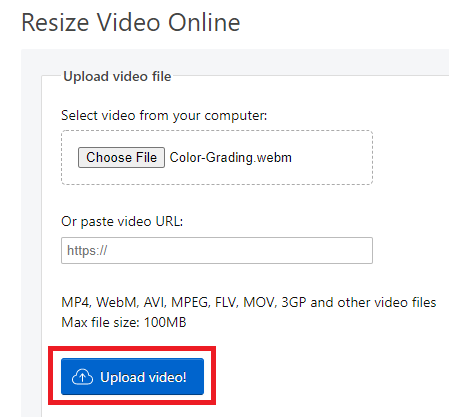
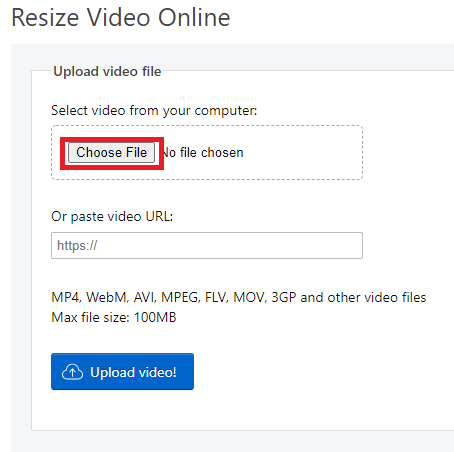
Step 1: Go to Ezgif Resize Video on your web browser and add your WebM file by clicking “Choose File” or pasting the video URL.
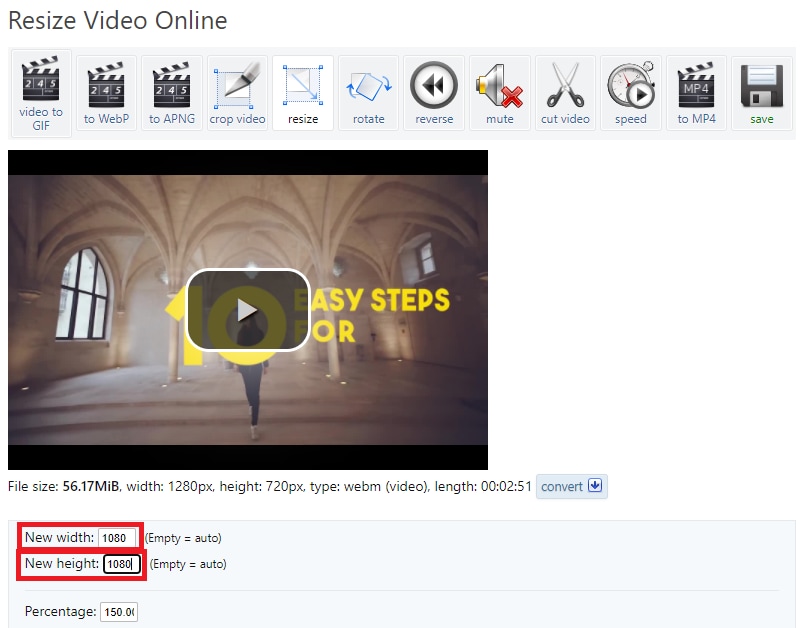
Step 2: Click “Upload Video”. You’ll see that I chose a colour grading video with the .webm extension which I want to resize. After clicking ‘Upload Video’, a floating window will appear with the video details displayed.
Step 3: Type in specific “New width” and “New height” to confirm a new size.
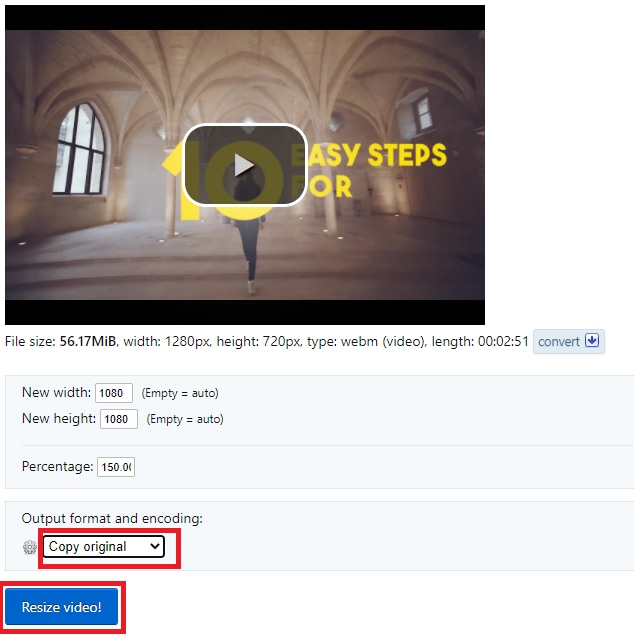
Step 4: Check “output format and encoding” and press “Resize video!” to save your WebM file.
Whether you are a content creator or a social media influencer, resizing videos is one thing you’ll be doing regularly and these tools will come in handy. Maybe you are a video editor and your client wants a different video format after you are done exporting, these tools will definitely save you all the stress of readjusting and hours or re-exporting.
For macOS 10.14 or later
Step 1: Go to the official Wondershare Filmora website and download the software.
Step 2: Install Wondershare Filmora on your PC and double click to launch.
Step 3: Change your aspect ratio. When you launch Filmora, you’re allowed to choose your preferred aspect ratio on the start page.

Select your preferred aspect ratio from the list of options- 16:9 (widescreen), 4:3 (standard), 1:1 (Instagram), 9:16 (portrait). For example, if you import a 16:9 video file into Filmora, and set it to 1:1 aspect ratio then, the final output file will be 1:1, which is the perfect aspect ratio for Instagram posts.
You’ll see below that I selected 1:1 for instagram. After you are done selecting your preferred aspect ratio, hit ‘New Project’.

Step 4: Import your WebM video. After you must have selected your preferred aspect ratio, the next step is to import the video you want to resize; you can do this by clicking on the import icon shown below. Once done, drag the video to the timeline also shown below.


A floating window will appear and you’ll be asked to change project settings to match the media. Click on ‘Keep project settings’. Filmora will change the aspect ratio of the original video you imported to your preferred aspect ratio.


Step 5: Save your video. Once the video is now properly placed in the timeline, next thing is hit ‘export’ to save your video. You can go to the ‘format tab’ to change the video output format to WebM or whatever format you choose then hit ‘Export’.

Method 2: How to resize WebM file with VLC
VLC is a free and open source multimedia player. It is arguably the best media player out there and that’s for a reason- it can play almost everything without the need for any external codecs.
The playback feature is amazing but that’s not the only thing it can do. VLC outshines most other media players because of some extra features it possesses. It resizes and converts media files, downloads and adds subtitles, records screen, as well as is customizable in settings and expandable via plugins.
What we want to use in this guide is its media resizing feature, so let’s show you how you can use it in these steps:
Step 1: Download VLC Media player from the official VLC page and install it on your windows or Mac PC.
Step 2: Launch VLC after installing by double-clicking on the software.
Step 3: Click “Media” in the toolbar.
Step 4: Select “Convert / Save”. You can also tap shortcut keys Ctrl + R to quickly open a new window.

Step 5: Click “Add”. You can load one or more video files. Here, I’ll choose a colour grading video on my desktop. You can see it has the extension ‘.webm’. After loading the video file you want to resize, click “Convert / Save” again.


Step 6: Choose your desired output profile type. With VLC, you can resize video to MP4, WebM, TS, and other formats.
Step 8: Click the settings icon to access the settings window and select the video codec where you can adjust parameters like frame rate, bitrate, resolution, etc to change video file size. I changed the frame rate of my video to 30fps which is ideal for high quality videos. Also click the resolution tab and set your desired resolution then click save.


Step 9: Select the destination folder and click start. VLC will resize the video and retain most of its quality.

Method 3: Resize Videos With Ezgif
An alternative way to resize videos is by using Ezgif Video Resizer. If you are looking for a quick way to resize your WebM videos, this is a great tool. Ezgif is a free online video resizer with a very simple interface that can aid easy navigation for new users. The whole video resizing operation is pretty quick so you don’t have to worry about wasting so much time.
Ezgif supports various video formats like MP4, MOV, FLV, WEBM, MPEG, 3GP and more. Aside from the basic size change, it also allows you to rotate, crop, cut, mute, speed, reverse and add subtitles.
Here’s how you can resize your WebM video with Ezgif in a few steps:
Step 1: Go to Ezgif Resize Video on your web browser and add your WebM file by clicking “Choose File” or pasting the video URL.

Step 2: Click “Upload Video”. You’ll see that I chose a colour grading video with the .webm extension which I want to resize. After clicking ‘Upload Video’, a floating window will appear with the video details displayed.

Step 3: Type in specific “New width” and “New height” to confirm a new size.

Step 4: Check “output format and encoding” and press “Resize video!” to save your WebM file.

Whether you are a content creator or a social media influencer, resizing videos is one thing you’ll be doing regularly and these tools will come in handy. Maybe you are a video editor and your client wants a different video format after you are done exporting, these tools will definitely save you all the stress of readjusting and hours or re-exporting.
For macOS 10.14 or later
Step 1: Go to the official Wondershare Filmora website and download the software.
Step 2: Install Wondershare Filmora on your PC and double click to launch.
Step 3: Change your aspect ratio. When you launch Filmora, you’re allowed to choose your preferred aspect ratio on the start page.

Select your preferred aspect ratio from the list of options- 16:9 (widescreen), 4:3 (standard), 1:1 (Instagram), 9:16 (portrait). For example, if you import a 16:9 video file into Filmora, and set it to 1:1 aspect ratio then, the final output file will be 1:1, which is the perfect aspect ratio for Instagram posts.
You’ll see below that I selected 1:1 for instagram. After you are done selecting your preferred aspect ratio, hit ‘New Project’.

Step 4: Import your WebM video. After you must have selected your preferred aspect ratio, the next step is to import the video you want to resize; you can do this by clicking on the import icon shown below. Once done, drag the video to the timeline also shown below.


A floating window will appear and you’ll be asked to change project settings to match the media. Click on ‘Keep project settings’. Filmora will change the aspect ratio of the original video you imported to your preferred aspect ratio.


Step 5: Save your video. Once the video is now properly placed in the timeline, next thing is hit ‘export’ to save your video. You can go to the ‘format tab’ to change the video output format to WebM or whatever format you choose then hit ‘Export’.

Method 2: How to resize WebM file with VLC
VLC is a free and open source multimedia player. It is arguably the best media player out there and that’s for a reason- it can play almost everything without the need for any external codecs.
The playback feature is amazing but that’s not the only thing it can do. VLC outshines most other media players because of some extra features it possesses. It resizes and converts media files, downloads and adds subtitles, records screen, as well as is customizable in settings and expandable via plugins.
What we want to use in this guide is its media resizing feature, so let’s show you how you can use it in these steps:
Step 1: Download VLC Media player from the official VLC page and install it on your windows or Mac PC.
Step 2: Launch VLC after installing by double-clicking on the software.
Step 3: Click “Media” in the toolbar.
Step 4: Select “Convert / Save”. You can also tap shortcut keys Ctrl + R to quickly open a new window.

Step 5: Click “Add”. You can load one or more video files. Here, I’ll choose a colour grading video on my desktop. You can see it has the extension ‘.webm’. After loading the video file you want to resize, click “Convert / Save” again.


Step 6: Choose your desired output profile type. With VLC, you can resize video to MP4, WebM, TS, and other formats.
Step 8: Click the settings icon to access the settings window and select the video codec where you can adjust parameters like frame rate, bitrate, resolution, etc to change video file size. I changed the frame rate of my video to 30fps which is ideal for high quality videos. Also click the resolution tab and set your desired resolution then click save.


Step 9: Select the destination folder and click start. VLC will resize the video and retain most of its quality.

Method 3: Resize Videos With Ezgif
An alternative way to resize videos is by using Ezgif Video Resizer. If you are looking for a quick way to resize your WebM videos, this is a great tool. Ezgif is a free online video resizer with a very simple interface that can aid easy navigation for new users. The whole video resizing operation is pretty quick so you don’t have to worry about wasting so much time.
Ezgif supports various video formats like MP4, MOV, FLV, WEBM, MPEG, 3GP and more. Aside from the basic size change, it also allows you to rotate, crop, cut, mute, speed, reverse and add subtitles.
Here’s how you can resize your WebM video with Ezgif in a few steps:
Step 1: Go to Ezgif Resize Video on your web browser and add your WebM file by clicking “Choose File” or pasting the video URL.

Step 2: Click “Upload Video”. You’ll see that I chose a colour grading video with the .webm extension which I want to resize. After clicking ‘Upload Video’, a floating window will appear with the video details displayed.

Step 3: Type in specific “New width” and “New height” to confirm a new size.

Step 4: Check “output format and encoding” and press “Resize video!” to save your WebM file.

Whether you are a content creator or a social media influencer, resizing videos is one thing you’ll be doing regularly and these tools will come in handy. Maybe you are a video editor and your client wants a different video format after you are done exporting, these tools will definitely save you all the stress of readjusting and hours or re-exporting.
For macOS 10.14 or later
Step 1: Go to the official Wondershare Filmora website and download the software.
Step 2: Install Wondershare Filmora on your PC and double click to launch.
Step 3: Change your aspect ratio. When you launch Filmora, you’re allowed to choose your preferred aspect ratio on the start page.

Select your preferred aspect ratio from the list of options- 16:9 (widescreen), 4:3 (standard), 1:1 (Instagram), 9:16 (portrait). For example, if you import a 16:9 video file into Filmora, and set it to 1:1 aspect ratio then, the final output file will be 1:1, which is the perfect aspect ratio for Instagram posts.
You’ll see below that I selected 1:1 for instagram. After you are done selecting your preferred aspect ratio, hit ‘New Project’.

Step 4: Import your WebM video. After you must have selected your preferred aspect ratio, the next step is to import the video you want to resize; you can do this by clicking on the import icon shown below. Once done, drag the video to the timeline also shown below.


A floating window will appear and you’ll be asked to change project settings to match the media. Click on ‘Keep project settings’. Filmora will change the aspect ratio of the original video you imported to your preferred aspect ratio.


Step 5: Save your video. Once the video is now properly placed in the timeline, next thing is hit ‘export’ to save your video. You can go to the ‘format tab’ to change the video output format to WebM or whatever format you choose then hit ‘Export’.

Method 2: How to resize WebM file with VLC
VLC is a free and open source multimedia player. It is arguably the best media player out there and that’s for a reason- it can play almost everything without the need for any external codecs.
The playback feature is amazing but that’s not the only thing it can do. VLC outshines most other media players because of some extra features it possesses. It resizes and converts media files, downloads and adds subtitles, records screen, as well as is customizable in settings and expandable via plugins.
What we want to use in this guide is its media resizing feature, so let’s show you how you can use it in these steps:
Step 1: Download VLC Media player from the official VLC page and install it on your windows or Mac PC.
Step 2: Launch VLC after installing by double-clicking on the software.
Step 3: Click “Media” in the toolbar.
Step 4: Select “Convert / Save”. You can also tap shortcut keys Ctrl + R to quickly open a new window.

Step 5: Click “Add”. You can load one or more video files. Here, I’ll choose a colour grading video on my desktop. You can see it has the extension ‘.webm’. After loading the video file you want to resize, click “Convert / Save” again.


Step 6: Choose your desired output profile type. With VLC, you can resize video to MP4, WebM, TS, and other formats.
Step 8: Click the settings icon to access the settings window and select the video codec where you can adjust parameters like frame rate, bitrate, resolution, etc to change video file size. I changed the frame rate of my video to 30fps which is ideal for high quality videos. Also click the resolution tab and set your desired resolution then click save.


Step 9: Select the destination folder and click start. VLC will resize the video and retain most of its quality.

Method 3: Resize Videos With Ezgif
An alternative way to resize videos is by using Ezgif Video Resizer. If you are looking for a quick way to resize your WebM videos, this is a great tool. Ezgif is a free online video resizer with a very simple interface that can aid easy navigation for new users. The whole video resizing operation is pretty quick so you don’t have to worry about wasting so much time.
Ezgif supports various video formats like MP4, MOV, FLV, WEBM, MPEG, 3GP and more. Aside from the basic size change, it also allows you to rotate, crop, cut, mute, speed, reverse and add subtitles.
Here’s how you can resize your WebM video with Ezgif in a few steps:
Step 1: Go to Ezgif Resize Video on your web browser and add your WebM file by clicking “Choose File” or pasting the video URL.

Step 2: Click “Upload Video”. You’ll see that I chose a colour grading video with the .webm extension which I want to resize. After clicking ‘Upload Video’, a floating window will appear with the video details displayed.

Step 3: Type in specific “New width” and “New height” to confirm a new size.

Step 4: Check “output format and encoding” and press “Resize video!” to save your WebM file.

Whether you are a content creator or a social media influencer, resizing videos is one thing you’ll be doing regularly and these tools will come in handy. Maybe you are a video editor and your client wants a different video format after you are done exporting, these tools will definitely save you all the stress of readjusting and hours or re-exporting.
How to Add Adjustment Layer in Premiere Pro
Are you using Premiere Pro frequently? Adobe Premiere Pro is considered advanced software for editing video clips proficiently. You can find a diverse range of features in Premiere Pro that allows you to transform your videos immensely.
If you want to be a professional video editor, you must know the basic techniques of executing video editing. In Premiere Pro, there are various options and features that can help you in enhancing your productivity. For instance, the use of adjustment layers in video editing can make a huge difference. By reading this article, you can come to know about the Premiere Pro adjustment layer efficiently.
Part 1: What is Adjustment Layer in Premiere Pro?
In Premiere Pro, you can save time efficiently by editing each layer individually. To do so, you can find the feature of the adjustment layer in Premiere Pro that enables you to apply the same effect to multiple clips instantly. This will eventually save you time and manual effort. However, you must ensure that the adjustment layer has been placed on top of the layers stack section.
In an adjustment layer in Premiere Pro, you can add multiple effects to create a captivating illustration in your video clips. Moreover, you can also create multiple adjustment layers in Premiere Pro to handle and apply the effects in your clips proficiently. Also, you can easily move, remove, or cut the Premiere Pro adjustment layer anytime within a few clicks.

Furthermore, you can also remove the adjustment layer from your timeline easily without modifying the composition settings of your video. If you get a basic understanding of creating and managing the adjustment layer in Premiere Pro, you can efficiently enhance the visual appeal of your videos. To learn more about the Premiere Pro adjustment layer, continue reading.
Part 2: How to Add an Adjustment Layer in Premiere Pro?
In this section, we will briefly address how to add an adjustment layer in Premiere Pro in a simpler manner.
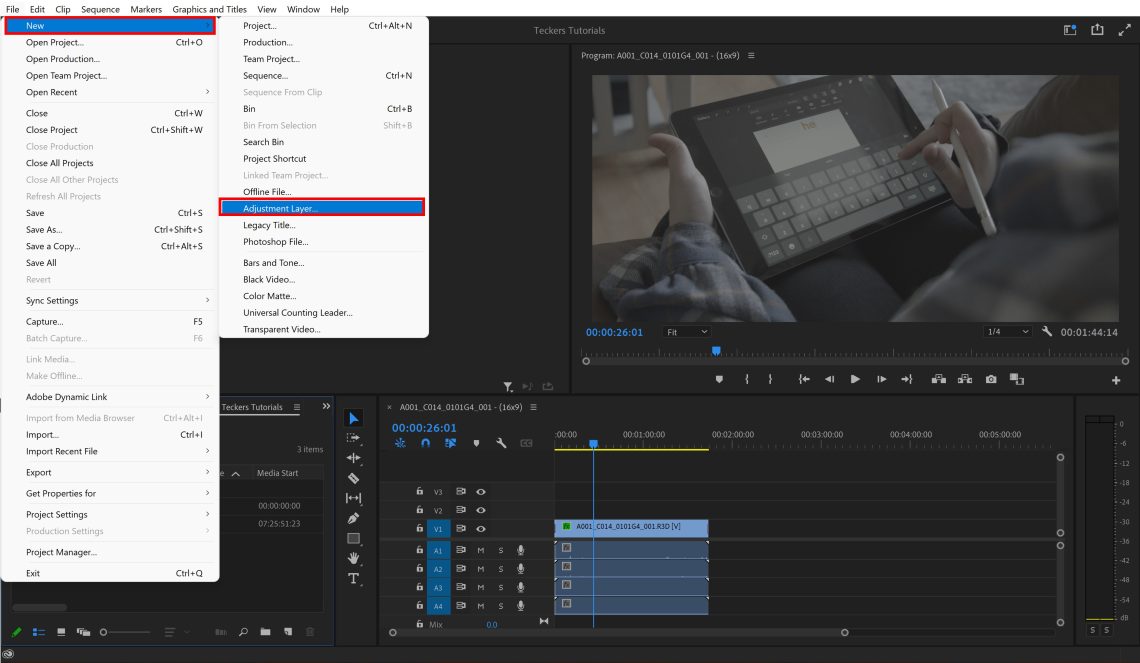
Step1 Once you have uploaded your project in Premiere Pro, go to the “File” tab and select the “New” option. Afterward, tap on “Adjustment Layer.”
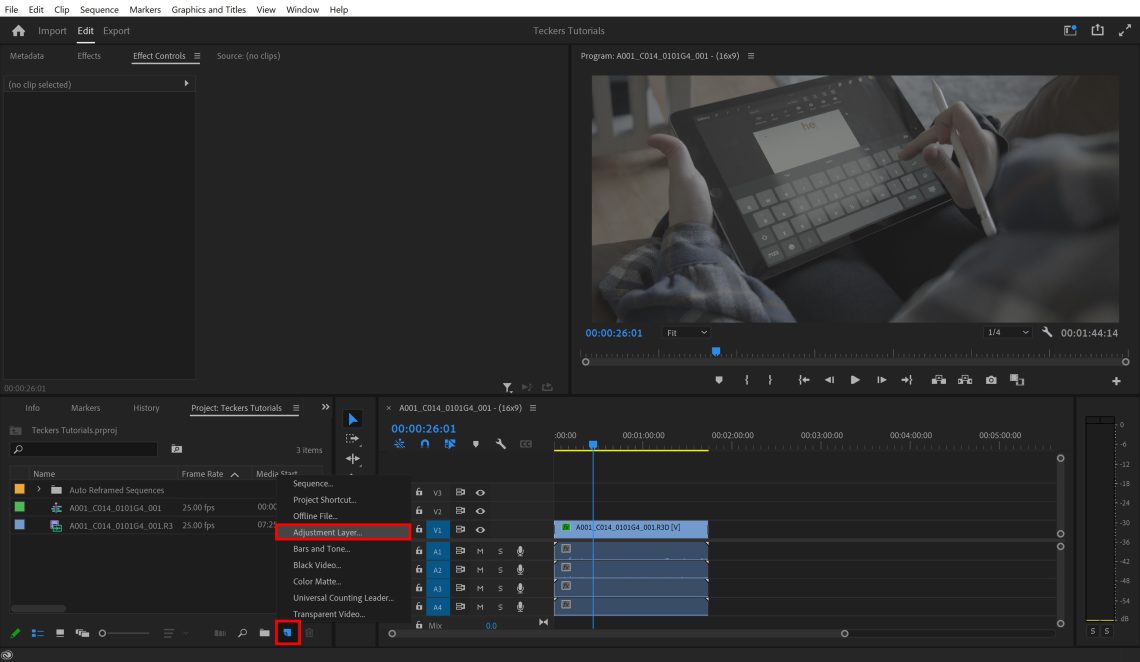
Step2 You can also go to the bottom of your project’s panel and tap on the “New Item” icon. After clicking on this icon, you can click on the “Adjustment layer” option. Afterward, you can modify the video settings to change the settings of the adjustment layer. Once done, hit the “OK” button.
Step3 Once the adjustment layer has been created, you can drag and drop it into the timeline. To change its name, you can right-click on it.
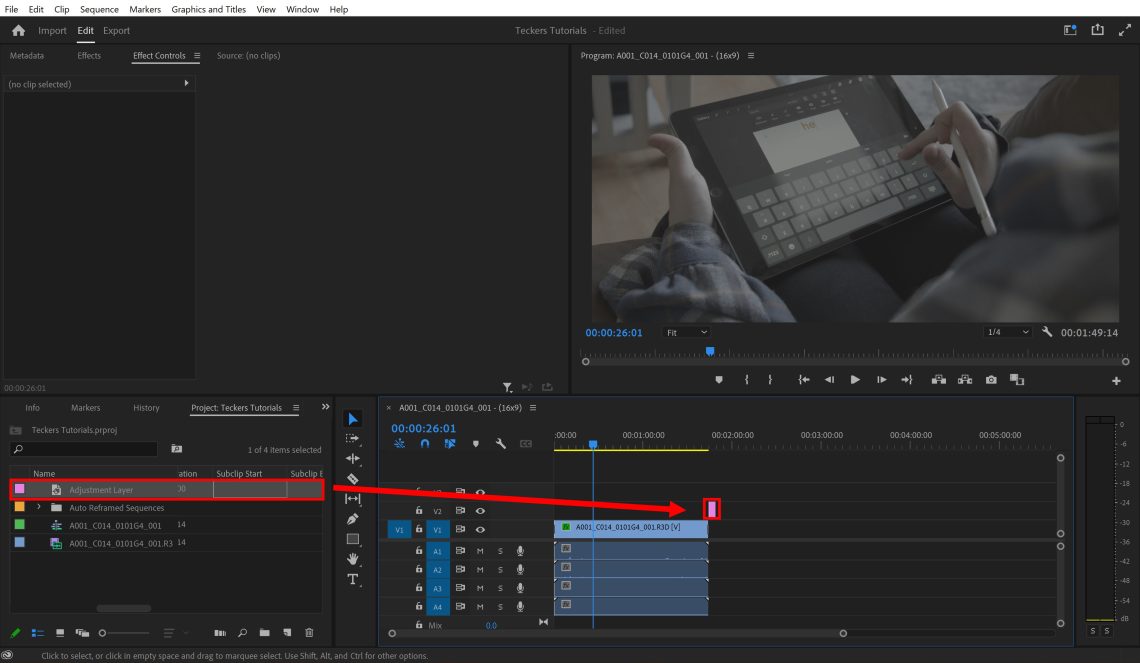
Part 3: Three Ways to Use Adjustment Layer in Premiere Pro
Do you want to use the Premiere Pro adjustment layer significantly? In this section, we will highlight three ways through which you can use the adjustment layer in Premiere Pro to edit your videos.
1. Color Grading
Color grading in Premiere Pro can help you to adjust the balance and tone of your video. You can use the color grading effects and tools to set the exposure, brightness, saturation, and light according to your preference. It will also let you redefine the colors in your video efficiently. To use the adjustment layer for color grading, you can read the below instructions:
Step1 After uploading the video clip in Premiere Pro, create a new adjustment layer in the timeline. Drag and adjust it according to the duration of your video clip. Once done, go to the “Effects” tab and search for “FilmConvert Nitrate.”
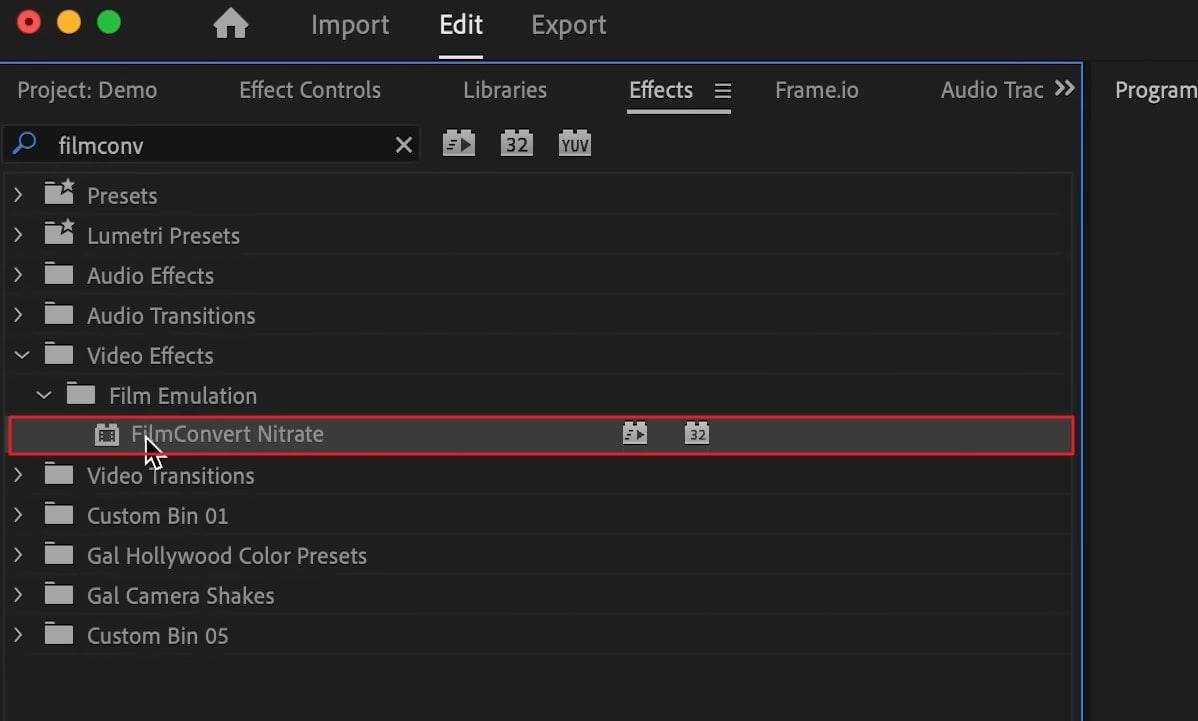
Step2 Apply this effect to the adjustment layer and choose your camera to match the color profile. Afterward, you can adjust the saturation, exposure filmstock, and curves according to your choice. You can also increase the vibrancy and hue saturation curves for more enhancement. You can also navigate to the basic correction section to modify the contrast value accordingly.
2. Transition
To merge multiple video clips smoothly and efficiently, transitional effects can assist you. By adding a suitable transition effect, you can make your whole video look clean and cinematic. Moreover, you can use adjustment layers in Premiere Pro to add transition effects to your effect professionally. To do the transition effect, you can proceed to the following instructions:
Step1 First, drag and drop your video clips into the timeline. Once done, create the adjustment layer and apply it above the layers of video clips. Once done, search the “Offset” effect and apply it to the adjustment layer.
Step2 Now add the keyframe to the position where you want to start and end the transition effect. Afterward, right-click on the first keyframe and select “Temporal Interpolation.” From there, choose “Ease Out.” Repeat the same process with the last keyframe. Once done, add the “Directional blur” effect to the adjustment layer for a smoother look.
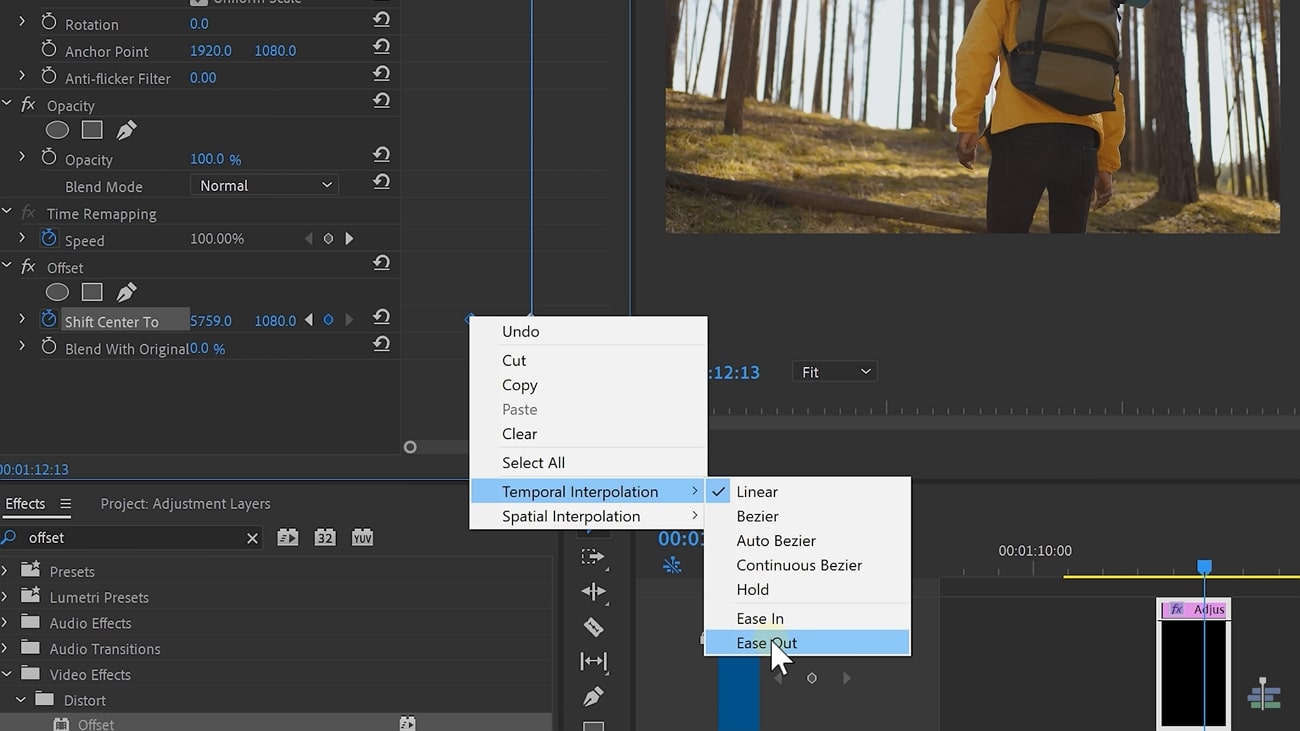
3. Mask
By using masks in Premiere Pro, you can efficiently blur, highlight, or add an effect to a specific area of your video clip. With this tool, you can draw different mask shapes, such as ellipses, rectangles, etc. Thus, it’s a great way to edit any particular part of the video clip effortlessly. Here are the simple steps to add masks to the video clips using the adjustment layer:
Step1 Add the adjustment layer to the timeline and head to the “Effects” library to locate the “Crop” effect. Add this effect to the adjustment layer and then head to the Effects control.
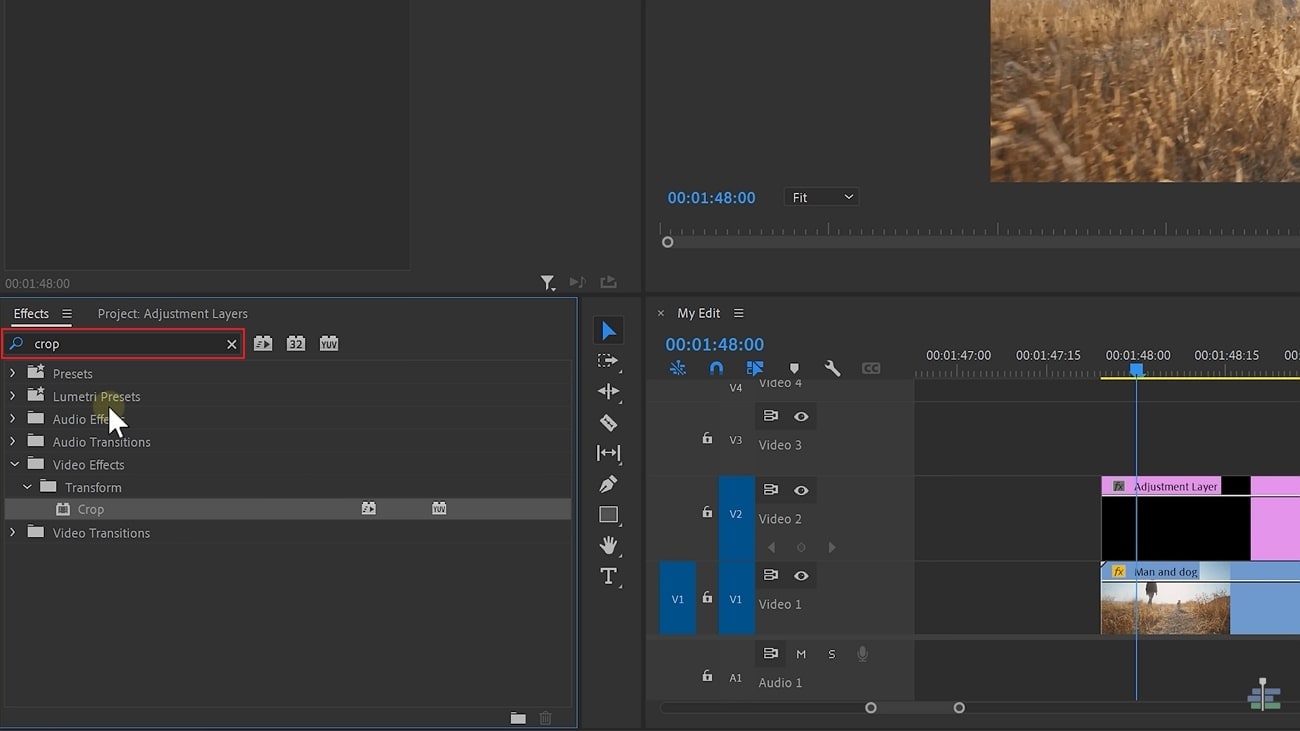
Step2 Now enhance the top and bottom properties to 15%. You can also adjust the headspace of the person accordingly. Also, you can animate the black bars to produce a more cinematic look in your video.
Part 4: FAQ about Adjustment Layers in Premiere Pro
If you have some questions or concerns about using the adjustment layer in Premiere Pro, we have discussed the commonly asked question below.
Why is the adjustment layer greyed out in my Premiere Pro?
To fix grayed adjustment layer in Premiere Pro, there are two methods that you can follow:
Method 1: At the bottom of your project panel, click on the “New Item” icon and select “Adjustment Layer.” Once done, adjust the settings and press the “OK” button. Now you can drag and drop the adjustment layer in the timeline.
Method 2: Click on your “Project Panel” and then navigate to the “File” tab. From there, select “New” and then click on “Adjustment Layer.” Once done, you can drag and drop the adjustment layer at the timeline.
Conclusion
Premiere Pro is a famous video editing software that lets you enhance your videos proficiently. In this tool, using adjustment layers can help you in making your editing process quicker and easier. That’s why, in this article, we have focused on how to add an adjustment layer in Premiere Pro. Moreover, we have also shed light on how to use the adjustment layer precisely with various effects to enhance your videos.
Are you using Premiere Pro frequently? Adobe Premiere Pro is considered advanced software for editing video clips proficiently. You can find a diverse range of features in Premiere Pro that allows you to transform your videos immensely.
If you want to be a professional video editor, you must know the basic techniques of executing video editing. In Premiere Pro, there are various options and features that can help you in enhancing your productivity. For instance, the use of adjustment layers in video editing can make a huge difference. By reading this article, you can come to know about the Premiere Pro adjustment layer efficiently.

Part 1: What is Adjustment Layer in Premiere Pro?
In Premiere Pro, you can save time efficiently by editing each layer individually. To do so, you can find the feature of the adjustment layer in Premiere Pro that enables you to apply the same effect to multiple clips instantly. This will eventually save you time and manual effort. However, you must ensure that the adjustment layer has been placed on top of the layers stack section.
In an adjustment layer in Premiere Pro, you can add multiple effects to create a captivating illustration in your video clips. Moreover, you can also create multiple adjustment layers in Premiere Pro to handle and apply the effects in your clips proficiently. Also, you can easily move, remove, or cut the Premiere Pro adjustment layer anytime within a few clicks.

Furthermore, you can also remove the adjustment layer from your timeline easily without modifying the composition settings of your video. If you get a basic understanding of creating and managing the adjustment layer in Premiere Pro, you can efficiently enhance the visual appeal of your videos. To learn more about the Premiere Pro adjustment layer, continue reading.
Part 2: How to Add an Adjustment Layer in Premiere Pro?
In this section, we will briefly address how to add an adjustment layer in Premiere Pro in a simpler manner.
Step1 Once you have uploaded your project in Premiere Pro, go to the “File” tab and select the “New” option. Afterward, tap on “Adjustment Layer.”

Step2 You can also go to the bottom of your project’s panel and tap on the “New Item” icon. After clicking on this icon, you can click on the “Adjustment layer” option. Afterward, you can modify the video settings to change the settings of the adjustment layer. Once done, hit the “OK” button.

Step3 Once the adjustment layer has been created, you can drag and drop it into the timeline. To change its name, you can right-click on it.

Part 3: Three Ways to Use Adjustment Layer in Premiere Pro
Do you want to use the Premiere Pro adjustment layer significantly? In this section, we will highlight three ways through which you can use the adjustment layer in Premiere Pro to edit your videos.
1. Color Grading
Color grading in Premiere Pro can help you to adjust the balance and tone of your video. You can use the color grading effects and tools to set the exposure, brightness, saturation, and light according to your preference. It will also let you redefine the colors in your video efficiently. To use the adjustment layer for color grading, you can read the below instructions:
Step1 After uploading the video clip in Premiere Pro, create a new adjustment layer in the timeline. Drag and adjust it according to the duration of your video clip. Once done, go to the “Effects” tab and search for “FilmConvert Nitrate.”

Step2 Apply this effect to the adjustment layer and choose your camera to match the color profile. Afterward, you can adjust the saturation, exposure filmstock, and curves according to your choice. You can also increase the vibrancy and hue saturation curves for more enhancement. You can also navigate to the basic correction section to modify the contrast value accordingly.
2. Transition
To merge multiple video clips smoothly and efficiently, transitional effects can assist you. By adding a suitable transition effect, you can make your whole video look clean and cinematic. Moreover, you can use adjustment layers in Premiere Pro to add transition effects to your effect professionally. To do the transition effect, you can proceed to the following instructions:
Step1 First, drag and drop your video clips into the timeline. Once done, create the adjustment layer and apply it above the layers of video clips. Once done, search the “Offset” effect and apply it to the adjustment layer.
Step2 Now add the keyframe to the position where you want to start and end the transition effect. Afterward, right-click on the first keyframe and select “Temporal Interpolation.” From there, choose “Ease Out.” Repeat the same process with the last keyframe. Once done, add the “Directional blur” effect to the adjustment layer for a smoother look.

3. Mask
By using masks in Premiere Pro, you can efficiently blur, highlight, or add an effect to a specific area of your video clip. With this tool, you can draw different mask shapes, such as ellipses, rectangles, etc. Thus, it’s a great way to edit any particular part of the video clip effortlessly. Here are the simple steps to add masks to the video clips using the adjustment layer:
Step1 Add the adjustment layer to the timeline and head to the “Effects” library to locate the “Crop” effect. Add this effect to the adjustment layer and then head to the Effects control.

Step2 Now enhance the top and bottom properties to 15%. You can also adjust the headspace of the person accordingly. Also, you can animate the black bars to produce a more cinematic look in your video.
Part 4: FAQ about Adjustment Layers in Premiere Pro
If you have some questions or concerns about using the adjustment layer in Premiere Pro, we have discussed the commonly asked question below.
Why is the adjustment layer greyed out in my Premiere Pro?
To fix grayed adjustment layer in Premiere Pro, there are two methods that you can follow:
Method 1: At the bottom of your project panel, click on the “New Item” icon and select “Adjustment Layer.” Once done, adjust the settings and press the “OK” button. Now you can drag and drop the adjustment layer in the timeline.
Method 2: Click on your “Project Panel” and then navigate to the “File” tab. From there, select “New” and then click on “Adjustment Layer.” Once done, you can drag and drop the adjustment layer at the timeline.
Conclusion
Premiere Pro is a famous video editing software that lets you enhance your videos proficiently. In this tool, using adjustment layers can help you in making your editing process quicker and easier. That’s why, in this article, we have focused on how to add an adjustment layer in Premiere Pro. Moreover, we have also shed light on how to use the adjustment layer precisely with various effects to enhance your videos.
Also read:
- [Updated] 2024 Approved The Complete Guide to CD Conversion & Burning with WMP
- [Updated] Enhancing Video Discoverability Through Youtube Images for 2024
- 2024 Approved Easy, Effective Strategy Immediate Clearance of Unwanted YouTube Comments
- 2024 Approved Nine More Great Top HexaCopters
- Download the Latest Intel Iris Graphics + HD 655 Drivers for Windows 11 Systems
- How To Use Slow Zoom Effect in Your Video, In 2024
- If You Are a Marketer Who Want to Create Facebook Ads to Boost Your Business, You Are Coming to the Right Place. Well Share You some Useful Tips to Start Your First FB Ads Campaign for 2024
- In 2024, Do You Want to Add a Motion Blur Effect in Valorant? Read This Guide to Find Out How to Create a Motion Blur Effect in Valorant without Any Hassle
- In 2024, Which is the Best Fake GPS Joystick App On Tecno Pop 7 Pro? | Dr.fone
- Mastering Image Borders in Instagram Photography for 2024
- New All Things About Adding Effects In Kinemaster
- Resolving the msvbvm50.dll File Missing/Not Detected Issue: A Comprehensive Guide
- The Video Game Chronicler’s Essential Checklist for 2024
- Updated 2024 Approved Easy Steps to Export Video in Filmora
- Updated How to Create Vintage Film Effect 1920S for 2024
- Updated In 2024, How to Add Text in Adobe Rush
- Updated In 2024, If You Want to Know What to Prepare and How to Make the Wedding Video Perfect for Videographers, Check Out This Menu Here
- Want to Uninstall Google Play Service from Vivo V30 Pro? Here is How | Dr.fone
- YouTube Lives Are Very Popular Nowadays and People Can Interact with the Anchor at Real Time. If You Want to Comment on a YouTube Live Chat, You Can Follow the Guide Below
- Title: How To Create A Green Screen Video In After Effects
- Author: Morgan
- Created at : 2024-10-04 00:50:29
- Updated at : 2024-10-06 02:09:59
- Link: https://ai-video-editing.techidaily.com/how-to-create-a-green-screen-video-in-after-effects/
- License: This work is licensed under CC BY-NC-SA 4.0.