:max_bytes(150000):strip_icc():format(webp)/GettyImages-850120538-4d2af54c23a641c8a5f2e00ef7a9aa37.jpg)
How to Create a Light Sweep (Shine) Effect with Filmora for 2024

How to Create a Light Sweep (Shine) Effect with Filmora
Preparation
What you need to prepare:
- A computer (Windows or macOS)
- Your video materials.
- Filmora video editor
Step 1
If you haven’t already, go ahead and download the Filmora video editor . Install it and run the application on your computer.
Step 2
Create a New Project by clicking on the big blue button. Immediately after, go to File → Project Settings. Here, make sure the project is in full resolution and 60 fps.

Step 3
Select the Titles tab and drag the Default Title to the Timeline.

Step 4
Double-click on the Default Title inside the Timeline and go to Advanced. Here, you can change the text, pick a new font, change its size, and so on. Make sure you change the Color Type to Gradient Fill. Choose a color of your own liking. When you’re done customizing it, click on OK.

Step 5
Right-click on the Default Title clip and select Copy. Then, right-click anywhere on the Timeline and select Paste. After this, drag the copy of that clip on the Track above it.

Step 6
Double-click on the copied Title, go to Advanced, and change the Color Type to Color Fill. Click OK.

Step 7
Next, take a snapshot of the new title. Then, delete the copied Title clip from your Timeline. After this, drag the snapshot into the Timeline.

Step 8
Double-click on the Snapshot clip and go to the Mask tab. From here, select the Rectangle mask. Then, rotate it as you see in the image below. Don’t click on OK yet.

Step 9
Now, look at the settings panel on the left and scroll down. First, change its Rotation to 40. Then, drag the Blur bar to 15. Finally, move the Rectangle mask to the left side like in the image below. Don’t click OK yet.

Step 10
Now, move the Playhead to the starting position on the Timeline. Then, click on the “**+Add**” button to add a keyframe. Next, move the Playhead a few seconds forward and move the Rectangle mask all the way to the right side of the text. Click OK.

Step 11
You are finally done. You can review, Render, and Export the video now to use it as you wish. Congratulations on creating a light sweep effect in Filmora.
Summary
What you’ve learned:
- How to create a modern light sweep effect in the Filmora video editor
- How to use Masks in Filmora
- Edit titles like a pro
What you need to prepare:
- A computer (Windows or macOS)
- Your video materials.
- Filmora video editor
Step 1
If you haven’t already, go ahead and download the Filmora video editor . Install it and run the application on your computer.
Step 2
Create a New Project by clicking on the big blue button. Immediately after, go to File → Project Settings. Here, make sure the project is in full resolution and 60 fps.

Step 3
Select the Titles tab and drag the Default Title to the Timeline.

Step 4
Double-click on the Default Title inside the Timeline and go to Advanced. Here, you can change the text, pick a new font, change its size, and so on. Make sure you change the Color Type to Gradient Fill. Choose a color of your own liking. When you’re done customizing it, click on OK.

Step 5
Right-click on the Default Title clip and select Copy. Then, right-click anywhere on the Timeline and select Paste. After this, drag the copy of that clip on the Track above it.

Step 6
Double-click on the copied Title, go to Advanced, and change the Color Type to Color Fill. Click OK.

Step 7
Next, take a snapshot of the new title. Then, delete the copied Title clip from your Timeline. After this, drag the snapshot into the Timeline.

Step 8
Double-click on the Snapshot clip and go to the Mask tab. From here, select the Rectangle mask. Then, rotate it as you see in the image below. Don’t click on OK yet.

Step 9
Now, look at the settings panel on the left and scroll down. First, change its Rotation to 40. Then, drag the Blur bar to 15. Finally, move the Rectangle mask to the left side like in the image below. Don’t click OK yet.

Step 10
Now, move the Playhead to the starting position on the Timeline. Then, click on the “**+Add**” button to add a keyframe. Next, move the Playhead a few seconds forward and move the Rectangle mask all the way to the right side of the text. Click OK.

Step 11
You are finally done. You can review, Render, and Export the video now to use it as you wish. Congratulations on creating a light sweep effect in Filmora.
Summary
What you’ve learned:
- How to create a modern light sweep effect in the Filmora video editor
- How to use Masks in Filmora
- Edit titles like a pro
What you need to prepare:
- A computer (Windows or macOS)
- Your video materials.
- Filmora video editor
Step 1
If you haven’t already, go ahead and download the Filmora video editor . Install it and run the application on your computer.
Step 2
Create a New Project by clicking on the big blue button. Immediately after, go to File → Project Settings. Here, make sure the project is in full resolution and 60 fps.

Step 3
Select the Titles tab and drag the Default Title to the Timeline.

Step 4
Double-click on the Default Title inside the Timeline and go to Advanced. Here, you can change the text, pick a new font, change its size, and so on. Make sure you change the Color Type to Gradient Fill. Choose a color of your own liking. When you’re done customizing it, click on OK.

Step 5
Right-click on the Default Title clip and select Copy. Then, right-click anywhere on the Timeline and select Paste. After this, drag the copy of that clip on the Track above it.

Step 6
Double-click on the copied Title, go to Advanced, and change the Color Type to Color Fill. Click OK.

Step 7
Next, take a snapshot of the new title. Then, delete the copied Title clip from your Timeline. After this, drag the snapshot into the Timeline.

Step 8
Double-click on the Snapshot clip and go to the Mask tab. From here, select the Rectangle mask. Then, rotate it as you see in the image below. Don’t click on OK yet.

Step 9
Now, look at the settings panel on the left and scroll down. First, change its Rotation to 40. Then, drag the Blur bar to 15. Finally, move the Rectangle mask to the left side like in the image below. Don’t click OK yet.

Step 10
Now, move the Playhead to the starting position on the Timeline. Then, click on the “**+Add**” button to add a keyframe. Next, move the Playhead a few seconds forward and move the Rectangle mask all the way to the right side of the text. Click OK.

Step 11
You are finally done. You can review, Render, and Export the video now to use it as you wish. Congratulations on creating a light sweep effect in Filmora.
Summary
What you’ve learned:
- How to create a modern light sweep effect in the Filmora video editor
- How to use Masks in Filmora
- Edit titles like a pro
What you need to prepare:
- A computer (Windows or macOS)
- Your video materials.
- Filmora video editor
Step 1
If you haven’t already, go ahead and download the Filmora video editor . Install it and run the application on your computer.
Step 2
Create a New Project by clicking on the big blue button. Immediately after, go to File → Project Settings. Here, make sure the project is in full resolution and 60 fps.

Step 3
Select the Titles tab and drag the Default Title to the Timeline.

Step 4
Double-click on the Default Title inside the Timeline and go to Advanced. Here, you can change the text, pick a new font, change its size, and so on. Make sure you change the Color Type to Gradient Fill. Choose a color of your own liking. When you’re done customizing it, click on OK.

Step 5
Right-click on the Default Title clip and select Copy. Then, right-click anywhere on the Timeline and select Paste. After this, drag the copy of that clip on the Track above it.

Step 6
Double-click on the copied Title, go to Advanced, and change the Color Type to Color Fill. Click OK.

Step 7
Next, take a snapshot of the new title. Then, delete the copied Title clip from your Timeline. After this, drag the snapshot into the Timeline.

Step 8
Double-click on the Snapshot clip and go to the Mask tab. From here, select the Rectangle mask. Then, rotate it as you see in the image below. Don’t click on OK yet.

Step 9
Now, look at the settings panel on the left and scroll down. First, change its Rotation to 40. Then, drag the Blur bar to 15. Finally, move the Rectangle mask to the left side like in the image below. Don’t click OK yet.

Step 10
Now, move the Playhead to the starting position on the Timeline. Then, click on the “**+Add**” button to add a keyframe. Next, move the Playhead a few seconds forward and move the Rectangle mask all the way to the right side of the text. Click OK.

Step 11
You are finally done. You can review, Render, and Export the video now to use it as you wish. Congratulations on creating a light sweep effect in Filmora.
Summary
What you’ve learned:
- How to create a modern light sweep effect in the Filmora video editor
- How to use Masks in Filmora
- Edit titles like a pro
How to Edit Recorded Video
The most critical component of post-production for a video marketer is editing. Your video will seem unfinished and repel your viewers if you cannot effortlessly weave your images together or get your cut to reach the proper frame. Learning to edit a video may soon become a never-ending task. While each project you work on will have somewhat different editing needs, the principles of video editing remain basically the same. You don’t need to spend a lot on costly equipment to have a professional appearance; if you pay attention to a few important things, you can produce excellent movies with whatever you have right now.
Content producers, entrepreneurs, and influencers can have much too much material to include into a single YouTube video. You may not be able to buy video editing software if you’re on a tight budget. So, what does a video marketer do if they don’t have editing software? To assist you with the process of video editing, we’ve put up this thorough tutorial that covers everything you’ll need to know to make stunning films, even if you’ve never done it before. We’ll also demonstrate how to utilize the super-intuitive and user-friendly editor to create a video.
Part 1. Edit Recorded Video in OBS
OBS is a video streaming and recording application. It’s open source, free, and works on Macs, Windows, and Linux. It is a strong and adaptable screencast video creation tool when paired with competent audio and video editing tools. Unfortunately, OBS doesn’t support editing feature and hence, we’re enlisting the recording steps so you can edit them by using a third-party toolkit mentioned in the guide.
Step 1. Download and Install OBS
Install OBS according to the instructions for your operating system by downloading it from the link below.
Step 2. Setup Screen Recording
The window is divided into separate parts called “docks” when you initially launch the app. Every dock has a distinct function. Scenes, Sources, Mixer, and Controls are the areas to pay attention to. OBS employs a Scenes and Sources system, which will be discussed in more depth in a later lesson. These two tools operate in tandem to help you keep track of your video, audio, and other production materials. When you first start OBS, you’ll see that a scene is already loaded, which you can locate in the bottom left corner of the interface.
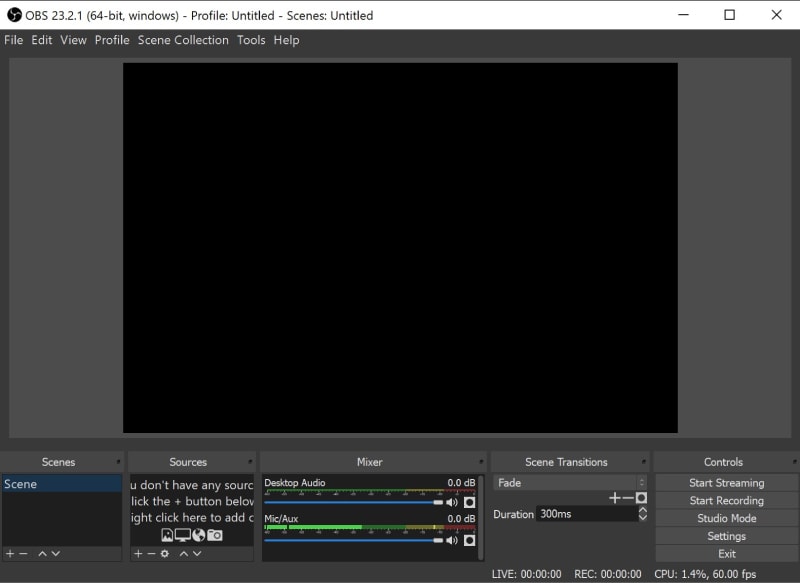
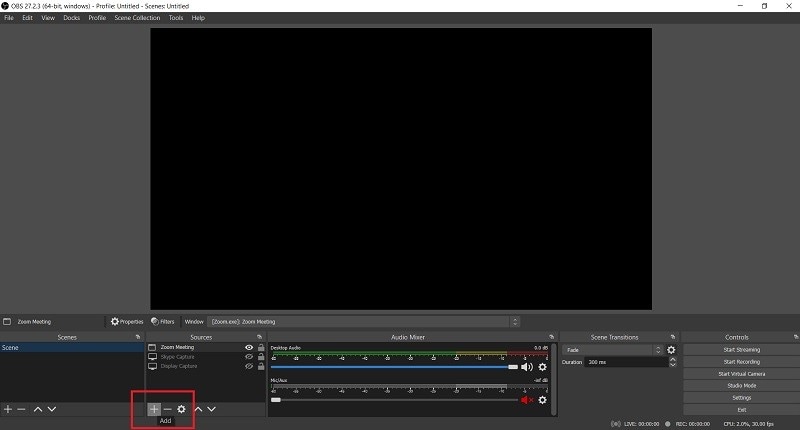
You’ll also need to add a source to this scene before you can begin recording. Click the Add button at the bottom of the Sources panel, then pick Screen Capture on Linux or Display Capture on Mac and Windows with the default Scene chosen (it will be highlighted).
Step 3. Customize the Recording Source
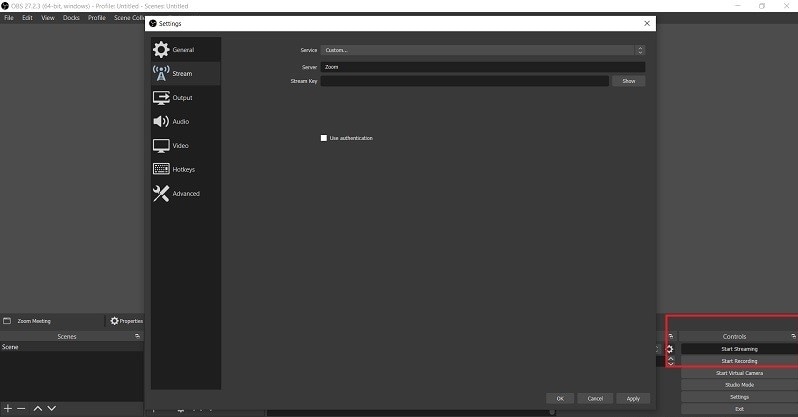
You’ll need to create a new source before you can begin recording your desktop screen. Select “Display Capture” by clicking the “+” icon on the Sources dock. You will be prompted to name the Display source in a popup window. Click “OK”. At the bottom right of the screen, click the Settings icon. Take note of the Recording Path field under the Output tab. This is where your recorded video will be kept on your computer.
Step 4. Start/Stop Recording
You’ll be able to choose the computer screen display you wish to capture in the following window. If you just have one monitor, make that the default. OBS Studios should show you the screen in the window after a valid display has been chosen. We need to change your graphics settings if OBS is unable to successfully load the screen video. Click the Start Recording button in the bottom right corner when you’re ready to begin recording. When you’re finished, click Stop Recording, and a movie will be saved to the folder you chose in the preferences.
Part 2. Edit Recorded Video in Filmora
Wondershare Filmora is a powerful screen recording application that includes a video editing suite, screen sketching tools, AI face recognition, built-in video effect packs, customizable branding watermark, and more. It may not only make recording movies simpler, but it may also provide you more possibilities for making your films more professional, creative, and attractive. Filmora is a great tool for beginners who want to make high-quality explainer films, training videos, demo videos, and more quickly. Because of the excellent video templates, screen recording is more appealing. To highlight important information, people might utilize annotation tools like as callouts, arrows, and drawing motions.
Steps to Record and Edit with Filmora
Step 1: Install Filmora on your laptop
To begin, you must first download this software program to your system from the following links:
For Win 7 or later (64-bit)
For macOS 10.12 or later
After you’ve finished downloading it, you’ll need to install it on your computer so that you can start using it with your laptop.
Step 2: Launch the Program and Begin Customizing It
The next step is to launch the software application and start recording your screen. Simply click the New Recording button in the start-up box to start recording. You may totally alter your screen recordings using the tools included in Filmora. You may also incorporate your laptop’s Webcam or a microphone as an audio source in your recordings.

Step 3: Start/Stop Screen Recording
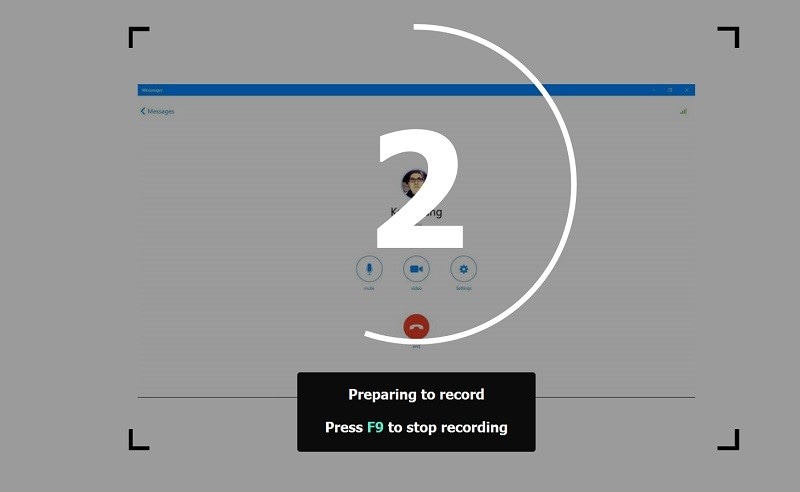
Now is the time to begin recording your audio, which you can accomplish by hitting the red circular recording button. Press the Square-shaped button on your laptop’s screen to end the recording.
Step 4: Edit the Recordings and Save Them
Finally, you may adjust your audio recordings with entirely configurable editing tools. To do so, use Filmora’s editor and utilize easy to complicated editing ways to edit your recorded audio files. Filmora’s Editor lets you add Animated Titles, amazing effects, Audio Enhancements, and more to your recorded video to make it more polished.

Step 5: Add Special Effects to Your Video
Wondershare Filmora was designed specifically to provide a professional touch to your videos. It includes a number of eye-catching and adaptable effects that you can use to make your video projects stand out from the crowd. We’ve gone through some of the greatest effects for giving life to your drab and amateurish videos in this section.

Step 6: Save or Share the Videos
Finally, after you’ve finished editing the recorded video, you may utilize the Filmora editor in its entirety, as described before. Click the Export option and select the platform where you wish to share your video clip to post your work of art immediately to YouTube or another well-known website. You may even alter the movie before sharing it if you desire.

Part 3. Edit Recorded Video with Zoom
Trimming and editing Zoom recordings is a necessary for digging out value-packed nuggets from captured footage. But although you already know this, you’re probably putting off doing so as you’re anticipating you’ll need to learn a ton of new tools to edit Zoom recordings.
Steps to Record Videos with Zoom
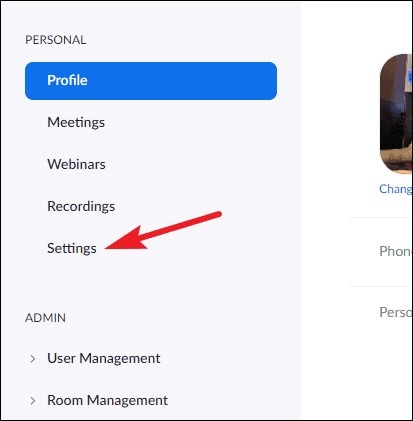
Step 1For the cloud recordings, go to zoom.us and log in to your account. Then, navigate to ‘Settings’ from the navigation menu on the left.
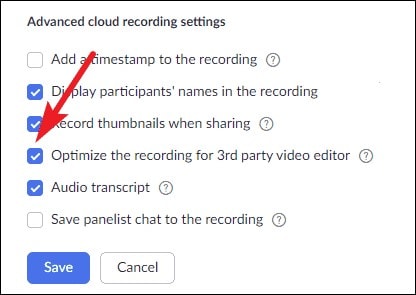
Step 2 Under Advanced cloud recording options, tick the option for ‘Optimize the recording for 3rd party video editor’ and click ‘Save’.
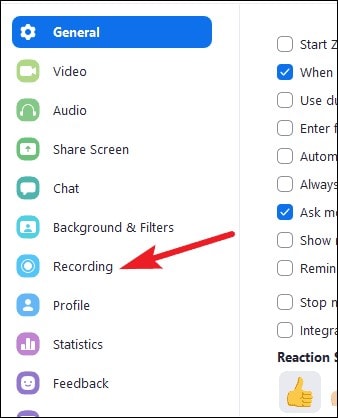
Step 3Then, navigate to ‘Recording’ from the navigation menu on the left. Check the option for ‘Optimize for 3rd party video editor.
Step 4To really edit a Zoom recording, whether it’s stored on your PC or Zoom cloud, you need to utilize third-party video editing software. But no worries, you don’t need any sophisticated equipment or software here.
Part 4. Edit Recorded Video in Teams
Teams gives the opportunity to record your online meetings. This may be especially beneficial for sharing meeting recordings with individuals unable to attend live, to preserve instructional material for future use, or to enable participants to revisit prior meeting topics. At the top of the meeting window, a message will appear stating that the recording has begun, which alerts participants that their interactions in the meeting may be recorded by the recording. You will also notice a recording sign and the duration of the recording in the top-left corner of the meeting window.
Steps to Record Videos with Teams
Step 1 Open Microsoft Teams on Windows and Mac.
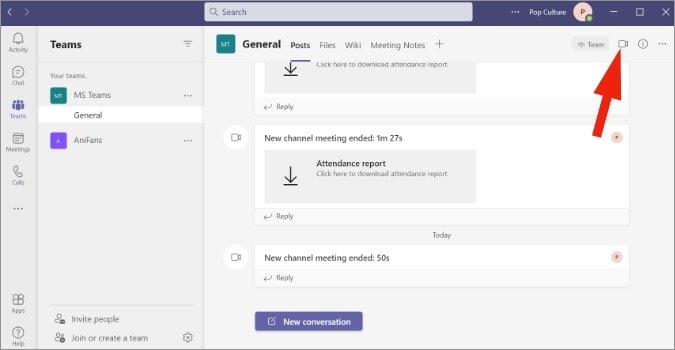
Step 2 Go to appropriate Teams or Channel and click on the Video button at the top to create a video call.
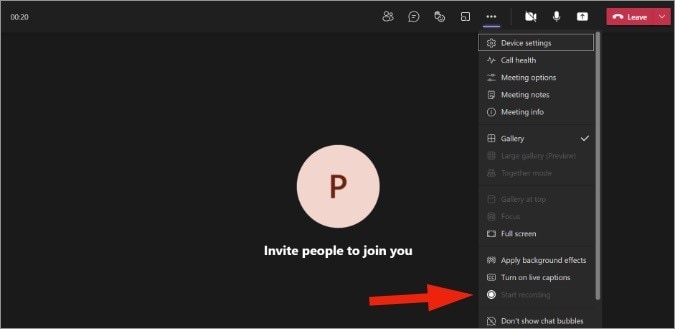
Step 3Invite people and organize a meeting. Whenever you feel you need to record any significant point, click on the three-dot menu at the top.

Step 4 Click on Start recording and Microsoft Teams will start recording the video/voice call. As soon as you start recording, every participant will be told about it.
At any moment, you may stop recording from the same. Once the meeting as concluded, your recording will display in the Chat panel in the main Teams window. Please note that depending on the length of the recording it might take some time for the recording to complete and display in the meeting chat. To find the recording, pick the Chat panel, open the correct meeting from the chat list and the recording will display in the chat window once processed.
Part 5. Edit Recorded Video in Google Meet
With more individuals working from home these days, services like Google Meet are rising in popularity. You may have an online video conference, see everyone’s face, communicate, and take care of business. As with in-office meetings, notes with action items and summaries for online meetings are just as crucial. Unfortunately, it doesn’t always happen. To have formal documentation for your meeting or share it with people who couldn’t attend, try recording your Google Meet.
Steps to Record and Edit Videos by Meet
Step 1. Launch Meet
Visit Google Meet and sign in to join or start your meeting.
Step 2. Start Recording
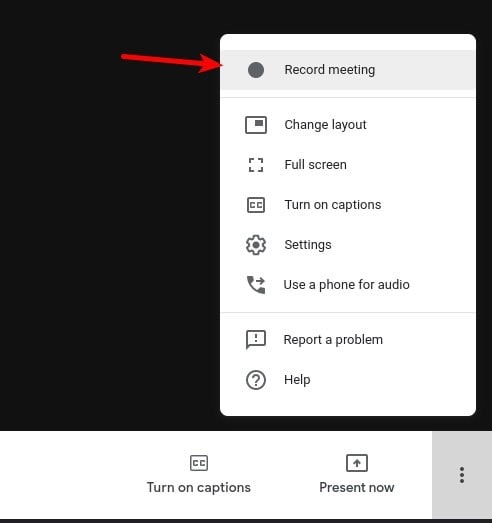
Select the Activities symbol on the bottom right and pick Recording when you’re ready to start recording.
Step 3. Stop/Save Recording
Visit Google Drive and login in if required. Navigate to My Drive on the left and search for the Meet Recordings folder on the right. It may take several minutes for the recording to show. If you do not already have a Meet Recordings folder, Google Drive will create one. You’ll notice the recording named with the meeting identifier along with the date and hour. If Chat took occurred during the meeting, you’d view this as a distinct text file.
To get a preview of your recording or chat transcript, just double-click the file in the Meet Recordings folder on Google Drive. You may download, distribute, or acquire a link to the recording (or chat) file from the Meet Recordings folder or the File Preview. In the folder, right-click the file and pick an action from the menu. Notice you may execute further options such as Rename, Make a copy, and Open with.

Step 4. Use WeVideo to Edit Videos
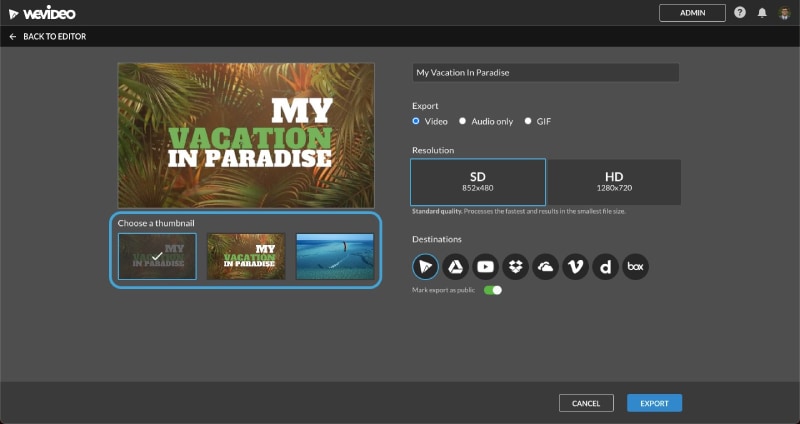
WeVideo is the cloud-based video production tool that supports student creativity, narrative, engagement and multimodal learning. Video projects develop deep knowledge about a subject through creating abilities like teamwork, communication and critical thinking. Log in and click Create New. Choose what you want to make (video, recording, etc.) and a format. Upload your media or search the Stock media repository. Make any extra modifications and preview your movie one final time. All done? Click Finish to export, download and share your video!
Part 6: Related FAQs
1. How do I edit video recordings?
Most individuals have the tools they need to film and edit small videos. With a smartphone or tablet and access to a computer, you can get the job done without even checking out equipment, much less employing a key grip. A laptop isn’t the finest equipment to film a movie–that would be extremely uncomfortable. Smartphone or tablet is easy to use. This topic is for those with access to an iPhone and a PC. Android, iPad, and Mac users will have a distinct process. Smartphones and tablets often default to recording video at a very high-Quality level, which takes up a lot of memory and results in big file sizes. Most likely you will want to lessen the resolution that you photograph.
Can you edit an already uploaded video?
If you have found yourself in this circumstance, your initial instinct could be to worry and assume you must repair the issue, delete the uploaded video, and re-upload the new one. However, this procedure will make your prior video URL dead, and any embeds of your video will display the following graphic to visitors. Nevertheless, these aforementioned sites recognizes that artists occasionally make small honest errors, or someone included in the uploaded video may demand that they be removed from it. So, to permit that, makers may chop away sections from their film without resetting a video’s metrics.
How to edit recorded video on iPhone?
If you have iOS 13 or later, you can edit films in the built-in Photos app… much as you edit your images. You may cut, crop, and straighten your films. And you may make your film more attractive by altering brightness, color, or even making it black and white. Filming films on iPhone has gotten more popular as iPhone camera lenses have progressed over the years. Many iPhone filmmakers desire the capacity to edit their video directly from their phone for simple social sharing. Using a video editing software for iPhone is a terrific method to effortlessly produce and upload videos. just open the video you want to modify, then press Edit at the upper right to get it done.
Conclusion:
If you routinely use Google Meet or Zoom, it can be a good idea to record your conferences so you can still return to them at a later period. Recording these conversations and meetings may be a big assistance when it’s time for later evaluations, updates, and enabling absent team members catch up on the meeting topic. For instance, do you wish to share meeting minutes or information with people missing in this meeting? Essentially the call recording is for other co-workers to view afterwards. Instead, you may use the recommended screen recorders to capture every moment and then use a specialist video editor like Filmora to make the required edits before sharing it with others.
For macOS 10.12 or later
After you’ve finished downloading it, you’ll need to install it on your computer so that you can start using it with your laptop.
Step 2: Launch the Program and Begin Customizing It
The next step is to launch the software application and start recording your screen. Simply click the New Recording button in the start-up box to start recording. You may totally alter your screen recordings using the tools included in Filmora. You may also incorporate your laptop’s Webcam or a microphone as an audio source in your recordings.

Step 3: Start/Stop Screen Recording
Now is the time to begin recording your audio, which you can accomplish by hitting the red circular recording button. Press the Square-shaped button on your laptop’s screen to end the recording.

Step 4: Edit the Recordings and Save Them
Finally, you may adjust your audio recordings with entirely configurable editing tools. To do so, use Filmora’s editor and utilize easy to complicated editing ways to edit your recorded audio files. Filmora’s Editor lets you add Animated Titles, amazing effects, Audio Enhancements, and more to your recorded video to make it more polished.

Step 5: Add Special Effects to Your Video
Wondershare Filmora was designed specifically to provide a professional touch to your videos. It includes a number of eye-catching and adaptable effects that you can use to make your video projects stand out from the crowd. We’ve gone through some of the greatest effects for giving life to your drab and amateurish videos in this section.

Step 6: Save or Share the Videos
Finally, after you’ve finished editing the recorded video, you may utilize the Filmora editor in its entirety, as described before. Click the Export option and select the platform where you wish to share your video clip to post your work of art immediately to YouTube or another well-known website. You may even alter the movie before sharing it if you desire.

Part 3. Edit Recorded Video with Zoom
Trimming and editing Zoom recordings is a necessary for digging out value-packed nuggets from captured footage. But although you already know this, you’re probably putting off doing so as you’re anticipating you’ll need to learn a ton of new tools to edit Zoom recordings.
Steps to Record Videos with Zoom
Step 1For the cloud recordings, go to zoom.us and log in to your account. Then, navigate to ‘Settings’ from the navigation menu on the left.

Step 2 Under Advanced cloud recording options, tick the option for ‘Optimize the recording for 3rd party video editor’ and click ‘Save’.

Step 3Then, navigate to ‘Recording’ from the navigation menu on the left. Check the option for ‘Optimize for 3rd party video editor.

Step 4To really edit a Zoom recording, whether it’s stored on your PC or Zoom cloud, you need to utilize third-party video editing software. But no worries, you don’t need any sophisticated equipment or software here.
Part 4. Edit Recorded Video in Teams
Teams gives the opportunity to record your online meetings. This may be especially beneficial for sharing meeting recordings with individuals unable to attend live, to preserve instructional material for future use, or to enable participants to revisit prior meeting topics. At the top of the meeting window, a message will appear stating that the recording has begun, which alerts participants that their interactions in the meeting may be recorded by the recording. You will also notice a recording sign and the duration of the recording in the top-left corner of the meeting window.
Steps to Record Videos with Teams
Step 1 Open Microsoft Teams on Windows and Mac.
Step 2 Go to appropriate Teams or Channel and click on the Video button at the top to create a video call.

Step 3Invite people and organize a meeting. Whenever you feel you need to record any significant point, click on the three-dot menu at the top.

Step 4 Click on Start recording and Microsoft Teams will start recording the video/voice call. As soon as you start recording, every participant will be told about it.
At any moment, you may stop recording from the same. Once the meeting as concluded, your recording will display in the Chat panel in the main Teams window. Please note that depending on the length of the recording it might take some time for the recording to complete and display in the meeting chat. To find the recording, pick the Chat panel, open the correct meeting from the chat list and the recording will display in the chat window once processed.

Part 5. Edit Recorded Video in Google Meet
With more individuals working from home these days, services like Google Meet are rising in popularity. You may have an online video conference, see everyone’s face, communicate, and take care of business. As with in-office meetings, notes with action items and summaries for online meetings are just as crucial. Unfortunately, it doesn’t always happen. To have formal documentation for your meeting or share it with people who couldn’t attend, try recording your Google Meet.
Steps to Record and Edit Videos by Meet
Step 1. Launch Meet
Visit Google Meet and sign in to join or start your meeting.
Step 2. Start Recording
Select the Activities symbol on the bottom right and pick Recording when you’re ready to start recording.

Step 3. Stop/Save Recording
Visit Google Drive and login in if required. Navigate to My Drive on the left and search for the Meet Recordings folder on the right. It may take several minutes for the recording to show. If you do not already have a Meet Recordings folder, Google Drive will create one. You’ll notice the recording named with the meeting identifier along with the date and hour. If Chat took occurred during the meeting, you’d view this as a distinct text file.
To get a preview of your recording or chat transcript, just double-click the file in the Meet Recordings folder on Google Drive. You may download, distribute, or acquire a link to the recording (or chat) file from the Meet Recordings folder or the File Preview. In the folder, right-click the file and pick an action from the menu. Notice you may execute further options such as Rename, Make a copy, and Open with.

Step 4. Use WeVideo to Edit Videos
WeVideo is the cloud-based video production tool that supports student creativity, narrative, engagement and multimodal learning. Video projects develop deep knowledge about a subject through creating abilities like teamwork, communication and critical thinking. Log in and click Create New. Choose what you want to make (video, recording, etc.) and a format. Upload your media or search the Stock media repository. Make any extra modifications and preview your movie one final time. All done? Click Finish to export, download and share your video!

Part 6: Related FAQs
1. How do I edit video recordings?
Most individuals have the tools they need to film and edit small videos. With a smartphone or tablet and access to a computer, you can get the job done without even checking out equipment, much less employing a key grip. A laptop isn’t the finest equipment to film a movie–that would be extremely uncomfortable. Smartphone or tablet is easy to use. This topic is for those with access to an iPhone and a PC. Android, iPad, and Mac users will have a distinct process. Smartphones and tablets often default to recording video at a very high-Quality level, which takes up a lot of memory and results in big file sizes. Most likely you will want to lessen the resolution that you photograph.
Can you edit an already uploaded video?
If you have found yourself in this circumstance, your initial instinct could be to worry and assume you must repair the issue, delete the uploaded video, and re-upload the new one. However, this procedure will make your prior video URL dead, and any embeds of your video will display the following graphic to visitors. Nevertheless, these aforementioned sites recognizes that artists occasionally make small honest errors, or someone included in the uploaded video may demand that they be removed from it. So, to permit that, makers may chop away sections from their film without resetting a video’s metrics.
How to edit recorded video on iPhone?
If you have iOS 13 or later, you can edit films in the built-in Photos app… much as you edit your images. You may cut, crop, and straighten your films. And you may make your film more attractive by altering brightness, color, or even making it black and white. Filming films on iPhone has gotten more popular as iPhone camera lenses have progressed over the years. Many iPhone filmmakers desire the capacity to edit their video directly from their phone for simple social sharing. Using a video editing software for iPhone is a terrific method to effortlessly produce and upload videos. just open the video you want to modify, then press Edit at the upper right to get it done.
Conclusion:
If you routinely use Google Meet or Zoom, it can be a good idea to record your conferences so you can still return to them at a later period. Recording these conversations and meetings may be a big assistance when it’s time for later evaluations, updates, and enabling absent team members catch up on the meeting topic. For instance, do you wish to share meeting minutes or information with people missing in this meeting? Essentially the call recording is for other co-workers to view afterwards. Instead, you may use the recommended screen recorders to capture every moment and then use a specialist video editor like Filmora to make the required edits before sharing it with others.
For macOS 10.12 or later
After you’ve finished downloading it, you’ll need to install it on your computer so that you can start using it with your laptop.
Step 2: Launch the Program and Begin Customizing It
The next step is to launch the software application and start recording your screen. Simply click the New Recording button in the start-up box to start recording. You may totally alter your screen recordings using the tools included in Filmora. You may also incorporate your laptop’s Webcam or a microphone as an audio source in your recordings.

Step 3: Start/Stop Screen Recording
Now is the time to begin recording your audio, which you can accomplish by hitting the red circular recording button. Press the Square-shaped button on your laptop’s screen to end the recording.

Step 4: Edit the Recordings and Save Them
Finally, you may adjust your audio recordings with entirely configurable editing tools. To do so, use Filmora’s editor and utilize easy to complicated editing ways to edit your recorded audio files. Filmora’s Editor lets you add Animated Titles, amazing effects, Audio Enhancements, and more to your recorded video to make it more polished.

Step 5: Add Special Effects to Your Video
Wondershare Filmora was designed specifically to provide a professional touch to your videos. It includes a number of eye-catching and adaptable effects that you can use to make your video projects stand out from the crowd. We’ve gone through some of the greatest effects for giving life to your drab and amateurish videos in this section.

Step 6: Save or Share the Videos
Finally, after you’ve finished editing the recorded video, you may utilize the Filmora editor in its entirety, as described before. Click the Export option and select the platform where you wish to share your video clip to post your work of art immediately to YouTube or another well-known website. You may even alter the movie before sharing it if you desire.

Part 3. Edit Recorded Video with Zoom
Trimming and editing Zoom recordings is a necessary for digging out value-packed nuggets from captured footage. But although you already know this, you’re probably putting off doing so as you’re anticipating you’ll need to learn a ton of new tools to edit Zoom recordings.
Steps to Record Videos with Zoom
Step 1For the cloud recordings, go to zoom.us and log in to your account. Then, navigate to ‘Settings’ from the navigation menu on the left.

Step 2 Under Advanced cloud recording options, tick the option for ‘Optimize the recording for 3rd party video editor’ and click ‘Save’.

Step 3Then, navigate to ‘Recording’ from the navigation menu on the left. Check the option for ‘Optimize for 3rd party video editor.

Step 4To really edit a Zoom recording, whether it’s stored on your PC or Zoom cloud, you need to utilize third-party video editing software. But no worries, you don’t need any sophisticated equipment or software here.
Part 4. Edit Recorded Video in Teams
Teams gives the opportunity to record your online meetings. This may be especially beneficial for sharing meeting recordings with individuals unable to attend live, to preserve instructional material for future use, or to enable participants to revisit prior meeting topics. At the top of the meeting window, a message will appear stating that the recording has begun, which alerts participants that their interactions in the meeting may be recorded by the recording. You will also notice a recording sign and the duration of the recording in the top-left corner of the meeting window.
Steps to Record Videos with Teams
Step 1 Open Microsoft Teams on Windows and Mac.
Step 2 Go to appropriate Teams or Channel and click on the Video button at the top to create a video call.

Step 3Invite people and organize a meeting. Whenever you feel you need to record any significant point, click on the three-dot menu at the top.

Step 4 Click on Start recording and Microsoft Teams will start recording the video/voice call. As soon as you start recording, every participant will be told about it.
At any moment, you may stop recording from the same. Once the meeting as concluded, your recording will display in the Chat panel in the main Teams window. Please note that depending on the length of the recording it might take some time for the recording to complete and display in the meeting chat. To find the recording, pick the Chat panel, open the correct meeting from the chat list and the recording will display in the chat window once processed.

Part 5. Edit Recorded Video in Google Meet
With more individuals working from home these days, services like Google Meet are rising in popularity. You may have an online video conference, see everyone’s face, communicate, and take care of business. As with in-office meetings, notes with action items and summaries for online meetings are just as crucial. Unfortunately, it doesn’t always happen. To have formal documentation for your meeting or share it with people who couldn’t attend, try recording your Google Meet.
Steps to Record and Edit Videos by Meet
Step 1. Launch Meet
Visit Google Meet and sign in to join or start your meeting.
Step 2. Start Recording
Select the Activities symbol on the bottom right and pick Recording when you’re ready to start recording.

Step 3. Stop/Save Recording
Visit Google Drive and login in if required. Navigate to My Drive on the left and search for the Meet Recordings folder on the right. It may take several minutes for the recording to show. If you do not already have a Meet Recordings folder, Google Drive will create one. You’ll notice the recording named with the meeting identifier along with the date and hour. If Chat took occurred during the meeting, you’d view this as a distinct text file.
To get a preview of your recording or chat transcript, just double-click the file in the Meet Recordings folder on Google Drive. You may download, distribute, or acquire a link to the recording (or chat) file from the Meet Recordings folder or the File Preview. In the folder, right-click the file and pick an action from the menu. Notice you may execute further options such as Rename, Make a copy, and Open with.

Step 4. Use WeVideo to Edit Videos
WeVideo is the cloud-based video production tool that supports student creativity, narrative, engagement and multimodal learning. Video projects develop deep knowledge about a subject through creating abilities like teamwork, communication and critical thinking. Log in and click Create New. Choose what you want to make (video, recording, etc.) and a format. Upload your media or search the Stock media repository. Make any extra modifications and preview your movie one final time. All done? Click Finish to export, download and share your video!

Part 6: Related FAQs
1. How do I edit video recordings?
Most individuals have the tools they need to film and edit small videos. With a smartphone or tablet and access to a computer, you can get the job done without even checking out equipment, much less employing a key grip. A laptop isn’t the finest equipment to film a movie–that would be extremely uncomfortable. Smartphone or tablet is easy to use. This topic is for those with access to an iPhone and a PC. Android, iPad, and Mac users will have a distinct process. Smartphones and tablets often default to recording video at a very high-Quality level, which takes up a lot of memory and results in big file sizes. Most likely you will want to lessen the resolution that you photograph.
Can you edit an already uploaded video?
If you have found yourself in this circumstance, your initial instinct could be to worry and assume you must repair the issue, delete the uploaded video, and re-upload the new one. However, this procedure will make your prior video URL dead, and any embeds of your video will display the following graphic to visitors. Nevertheless, these aforementioned sites recognizes that artists occasionally make small honest errors, or someone included in the uploaded video may demand that they be removed from it. So, to permit that, makers may chop away sections from their film without resetting a video’s metrics.
How to edit recorded video on iPhone?
If you have iOS 13 or later, you can edit films in the built-in Photos app… much as you edit your images. You may cut, crop, and straighten your films. And you may make your film more attractive by altering brightness, color, or even making it black and white. Filming films on iPhone has gotten more popular as iPhone camera lenses have progressed over the years. Many iPhone filmmakers desire the capacity to edit their video directly from their phone for simple social sharing. Using a video editing software for iPhone is a terrific method to effortlessly produce and upload videos. just open the video you want to modify, then press Edit at the upper right to get it done.
Conclusion:
If you routinely use Google Meet or Zoom, it can be a good idea to record your conferences so you can still return to them at a later period. Recording these conversations and meetings may be a big assistance when it’s time for later evaluations, updates, and enabling absent team members catch up on the meeting topic. For instance, do you wish to share meeting minutes or information with people missing in this meeting? Essentially the call recording is for other co-workers to view afterwards. Instead, you may use the recommended screen recorders to capture every moment and then use a specialist video editor like Filmora to make the required edits before sharing it with others.
For macOS 10.12 or later
After you’ve finished downloading it, you’ll need to install it on your computer so that you can start using it with your laptop.
Step 2: Launch the Program and Begin Customizing It
The next step is to launch the software application and start recording your screen. Simply click the New Recording button in the start-up box to start recording. You may totally alter your screen recordings using the tools included in Filmora. You may also incorporate your laptop’s Webcam or a microphone as an audio source in your recordings.

Step 3: Start/Stop Screen Recording
Now is the time to begin recording your audio, which you can accomplish by hitting the red circular recording button. Press the Square-shaped button on your laptop’s screen to end the recording.

Step 4: Edit the Recordings and Save Them
Finally, you may adjust your audio recordings with entirely configurable editing tools. To do so, use Filmora’s editor and utilize easy to complicated editing ways to edit your recorded audio files. Filmora’s Editor lets you add Animated Titles, amazing effects, Audio Enhancements, and more to your recorded video to make it more polished.

Step 5: Add Special Effects to Your Video
Wondershare Filmora was designed specifically to provide a professional touch to your videos. It includes a number of eye-catching and adaptable effects that you can use to make your video projects stand out from the crowd. We’ve gone through some of the greatest effects for giving life to your drab and amateurish videos in this section.

Step 6: Save or Share the Videos
Finally, after you’ve finished editing the recorded video, you may utilize the Filmora editor in its entirety, as described before. Click the Export option and select the platform where you wish to share your video clip to post your work of art immediately to YouTube or another well-known website. You may even alter the movie before sharing it if you desire.

Part 3. Edit Recorded Video with Zoom
Trimming and editing Zoom recordings is a necessary for digging out value-packed nuggets from captured footage. But although you already know this, you’re probably putting off doing so as you’re anticipating you’ll need to learn a ton of new tools to edit Zoom recordings.
Steps to Record Videos with Zoom
Step 1For the cloud recordings, go to zoom.us and log in to your account. Then, navigate to ‘Settings’ from the navigation menu on the left.

Step 2 Under Advanced cloud recording options, tick the option for ‘Optimize the recording for 3rd party video editor’ and click ‘Save’.

Step 3Then, navigate to ‘Recording’ from the navigation menu on the left. Check the option for ‘Optimize for 3rd party video editor.

Step 4To really edit a Zoom recording, whether it’s stored on your PC or Zoom cloud, you need to utilize third-party video editing software. But no worries, you don’t need any sophisticated equipment or software here.
Part 4. Edit Recorded Video in Teams
Teams gives the opportunity to record your online meetings. This may be especially beneficial for sharing meeting recordings with individuals unable to attend live, to preserve instructional material for future use, or to enable participants to revisit prior meeting topics. At the top of the meeting window, a message will appear stating that the recording has begun, which alerts participants that their interactions in the meeting may be recorded by the recording. You will also notice a recording sign and the duration of the recording in the top-left corner of the meeting window.
Steps to Record Videos with Teams
Step 1 Open Microsoft Teams on Windows and Mac.
Step 2 Go to appropriate Teams or Channel and click on the Video button at the top to create a video call.

Step 3Invite people and organize a meeting. Whenever you feel you need to record any significant point, click on the three-dot menu at the top.

Step 4 Click on Start recording and Microsoft Teams will start recording the video/voice call. As soon as you start recording, every participant will be told about it.
At any moment, you may stop recording from the same. Once the meeting as concluded, your recording will display in the Chat panel in the main Teams window. Please note that depending on the length of the recording it might take some time for the recording to complete and display in the meeting chat. To find the recording, pick the Chat panel, open the correct meeting from the chat list and the recording will display in the chat window once processed.

Part 5. Edit Recorded Video in Google Meet
With more individuals working from home these days, services like Google Meet are rising in popularity. You may have an online video conference, see everyone’s face, communicate, and take care of business. As with in-office meetings, notes with action items and summaries for online meetings are just as crucial. Unfortunately, it doesn’t always happen. To have formal documentation for your meeting or share it with people who couldn’t attend, try recording your Google Meet.
Steps to Record and Edit Videos by Meet
Step 1. Launch Meet
Visit Google Meet and sign in to join or start your meeting.
Step 2. Start Recording
Select the Activities symbol on the bottom right and pick Recording when you’re ready to start recording.

Step 3. Stop/Save Recording
Visit Google Drive and login in if required. Navigate to My Drive on the left and search for the Meet Recordings folder on the right. It may take several minutes for the recording to show. If you do not already have a Meet Recordings folder, Google Drive will create one. You’ll notice the recording named with the meeting identifier along with the date and hour. If Chat took occurred during the meeting, you’d view this as a distinct text file.
To get a preview of your recording or chat transcript, just double-click the file in the Meet Recordings folder on Google Drive. You may download, distribute, or acquire a link to the recording (or chat) file from the Meet Recordings folder or the File Preview. In the folder, right-click the file and pick an action from the menu. Notice you may execute further options such as Rename, Make a copy, and Open with.

Step 4. Use WeVideo to Edit Videos
WeVideo is the cloud-based video production tool that supports student creativity, narrative, engagement and multimodal learning. Video projects develop deep knowledge about a subject through creating abilities like teamwork, communication and critical thinking. Log in and click Create New. Choose what you want to make (video, recording, etc.) and a format. Upload your media or search the Stock media repository. Make any extra modifications and preview your movie one final time. All done? Click Finish to export, download and share your video!

Part 6: Related FAQs
1. How do I edit video recordings?
Most individuals have the tools they need to film and edit small videos. With a smartphone or tablet and access to a computer, you can get the job done without even checking out equipment, much less employing a key grip. A laptop isn’t the finest equipment to film a movie–that would be extremely uncomfortable. Smartphone or tablet is easy to use. This topic is for those with access to an iPhone and a PC. Android, iPad, and Mac users will have a distinct process. Smartphones and tablets often default to recording video at a very high-Quality level, which takes up a lot of memory and results in big file sizes. Most likely you will want to lessen the resolution that you photograph.
Can you edit an already uploaded video?
If you have found yourself in this circumstance, your initial instinct could be to worry and assume you must repair the issue, delete the uploaded video, and re-upload the new one. However, this procedure will make your prior video URL dead, and any embeds of your video will display the following graphic to visitors. Nevertheless, these aforementioned sites recognizes that artists occasionally make small honest errors, or someone included in the uploaded video may demand that they be removed from it. So, to permit that, makers may chop away sections from their film without resetting a video’s metrics.
How to edit recorded video on iPhone?
If you have iOS 13 or later, you can edit films in the built-in Photos app… much as you edit your images. You may cut, crop, and straighten your films. And you may make your film more attractive by altering brightness, color, or even making it black and white. Filming films on iPhone has gotten more popular as iPhone camera lenses have progressed over the years. Many iPhone filmmakers desire the capacity to edit their video directly from their phone for simple social sharing. Using a video editing software for iPhone is a terrific method to effortlessly produce and upload videos. just open the video you want to modify, then press Edit at the upper right to get it done.
Conclusion:
If you routinely use Google Meet or Zoom, it can be a good idea to record your conferences so you can still return to them at a later period. Recording these conversations and meetings may be a big assistance when it’s time for later evaluations, updates, and enabling absent team members catch up on the meeting topic. For instance, do you wish to share meeting minutes or information with people missing in this meeting? Essentially the call recording is for other co-workers to view afterwards. Instead, you may use the recommended screen recorders to capture every moment and then use a specialist video editor like Filmora to make the required edits before sharing it with others.
Create a Brand Video to Make Your Business Shine
Brand Video Maker - Wondershare Filmora
Provide abundant video effects - A creative video editor
Powerful color correction and grading
Detailed tutorials provided by the official channel
Create a Brand Video to Make Your Business Shine
Did you know that 8 out of 10 people go ahead and purchase a product just by watching brand videos?
I’m sure you are looking for similar success when it comes to your brand video.
But you can’t just compel the audience by making any video!
- It has to be entertaining and inspirational.
- It has to be innovative.
- It needs to have something that grabs the audience’s attention.
And, with all this, it should also successfully share your brand’s core values.
So, how do you create such a video?
It’s not about simply whipping out a camera and pressing the record button. A lot of thought is involved in creating a brand video, but most importantly, you need a high-quality video editor to refine your video and make it more fun, entertaining, and innovative - A video editor like Wondershare Filmora.
And that’s what this article is about - How to use the various basic and advanced editing tools in Filmora to create a brand video that makes a difference!
But first, let’s have a look at…
Wondershare Filmora’s Brand Video
What’s so special about it, you ask?
For starters, it fits right into the criteria we mentioned above. It’s innovative, entertaining, vibrant, and fun and showcases all the features of Filmora 11.
Here, see for yourself…
From all the new effects to the AR sticker themes and other video editing features like speed ramping, masking, and green screen effect, the video successfully lets the audience know how creative they can get with Filmora.
But did you see that they didn’t put the features out there just like that! They actually used all the basic and advanced video editing features in the video to give us an idea of what it looks like when put in action.
And the video quality, the content, and the flow of the video speak for themselves.
I mean, I watched the video all the way to the end without getting bored for even a single second. And, being a video editor, I might as well get Filmora 11 after watching the highly compelling video!
Now, if you’re also wow-ed by the video and would like to create a similar one, here are some tips on making a successful brand video using Wondershare Filmora.
Tips to Make a Compelling Brand Video
Like I said earlier, making a video is not simply about getting out your camera and starting recording. Many aspects need to be considered for your video to make the desired impact.
Therefore, here are some tips that might come in handy when making your brand video:
1. Define Your Objective and Audience
The very first thing that you need to think about before starting work on your brand video is its objective and audience.

What are you trying to achieve from the video? Do you want to create brand awareness, or do you wish to promote a certain product?
Secondly, who’s your target audience? Is your video projected toward people who have no idea who you and your company are? Or are you addressing an existing customer base? Also, are the audience kids or adults? Because you certainly can’t make a video with cartoon characters for an audience who’s looking for something calm and relaxing, and vice versa.
Once you have your objective and audience sorted, it’s time to get busy!
2. Video Scripting
Based on what you’re trying to achieve from your brand video and the target audience, you can decide on the video’s script. This includes the content, the length, and the editing requirements.

Let’s take your video’s content, for instance:
- If you’re creating a video for an audience that doesn’t know you, you’ll have to start from the basics, explaining who you are, what you do, and the services you offer.
- If you’re trying to create a video that tells your brand’s story, you can either keep it inspirational or you could create fun content that will be remembered for years to come!
- If you’re creating something for the kids, you need to keep it short yet interesting, with many effects that help in grabbing their attention.
Once you have decided what to add to the video, how long it will be, and what its content will be like, you can finally record your video!
3. Video Recording
Now, for many people, recording simply means hitting the record button.
Yes, that might work for vlogs, but when it comes to making a brand video, you need to really put in effort when recording.

For instance, you should have all the video clips and images you want to include in the video at hand. And they should resonate with your brand voice and match with each other as well.
If we take Wondershare Filmora’s brand video as an example, you can see that the whole video has a vibrant and warm feel to it, which can be seen throughout. It’s not that one clip is darker and the other is lighter; the whole thing sort of blends into each other.
That’s what you should take care of when recording your video. Make sure the background, hues, and overall feel of the video clips and images match each other.
4. Using Your Brand Colors and Logo
Another thing that you should keep in mind when recording is to incorporate your brand colors in the video and throw in your logo. For instance, if your brand colors are red and green, make sure to use them in the text in the video. However, if you’re not using text, you can use the colors in the video frame by having a wall or something in the background of the same colors.

As for the logo, it can be placed anywhere in the video so that the audience learns to recognize it.
But why is using your brand colors and logo so important?
Because your brand colors and logo represent your brand and become its identity in the long run. For example, yellow and red are McDonald’s brand colors and its logo, the yellow ‘M’ in arch form, is recognizable even from a distance.
5. Video Editing
Now comes the most important part of making a brand video: The editing! The part where you refine your video and add final touches to it. If you’ve got a stellar video editing software like Wondershare Filmora, it can do wonders for your video.
Wondershare Filmora at a Glance

Wondershare Filmora has plenty of basic and advanced video editing features to add that wow factor to your video. It can turn a plain boring video into something fun, exciting, and watch-worthy.
For example, the motion tracking feature lets you add an object that follows a certain movement in the video. Then we have the AR stickers that help enhance emotions and add personality to your video. Also, the green screen feature lets you add amazing background to your video to give the desired effect.
Filmora also has many video effects, templates, speed ramping, masking, auto beat sync, voice recording, and other features that can really take your brand video to the next level.
I’m sure you now have the hang of how to make a brand video that makes your business pop. But, you still might be confused about how to make the most of these features using Wondershare Filmora.
Therefore, here are some helpful tips on using these features to make an effective brand video that creates brand awareness and drives sales!
Creative Ideas to Make Brand Videos Using Filmora
If you’re up for making a video just like the video we shared earlier, you’ll need to download Wondershare Filmora from the website. And, once you’re through with this guide, nothing can stop you from making a brand video that sells!
With that sorted, here are some valuable tips and ideas to help you along the way:
1. Level Up Your Motion Tracking
As we mentioned earlier, motion tracking means tracking the movement of an object in the video and then applying the same movement to a newly added object, like text, image, logo, or any clipart.
But that’s quite a common practice, right? I mean, every video editor out there is doing it!
However, there are some ways in which you can get creative with the motion tracking feature using Filmora.
Like…
Using Motion-Tracked Texts
While the text in a video looks pretty good itself, you can make it even more impressive by motion tracking it.
For example:
- Attach a piece of text to your introductory title. If there’s a logo or brand name in the introduction, you can add a tagline, a website address, or your Instagram or Twitter handle to it.
- If you want to create a context for the audience, add motion-tracked captions in your brand video. This means the captions move with the movement of the subject. It looks stylish, gives relevant information, and helps tell your brand’s story without any narration.
This Fitbit commercial would be an excellent example of motion-tracked captions:
- If your video has an introductory scene where the frame is moving from one side to the other, you can motion-track the credits so that they move along with the scene and disappear gradually instead of dedicating a single clip to the credits.
- Highlighting important aspects in a video, like places or names of objects with motion-tracked text, can make your video truly amazing and fun to watch. This would be quite essential if you’re making a video for the real estate or travel business.
Here’s an example:
Hence, when working with Filmora, you can do plenty with the motion tracking feature to make a truly amazing video.
2. Add a Fun Factor with AR Stickers
Now that you know how to use the motion tracking feature in Filmora, let me tell you a secret!
If you incorporate face-tracking AR stickers into your video, you can succeed in creating a brand video that will have the audience glued to the screen!
The purpose of adding AR stickers to your videos is to emphasize reactions, portray enhanced emotions, and add an element of fun. This feature works best if you’re creating a brand video projected toward kids.

So, how can you make the most of these AR stickers?
Create Multiple Characters
If you don’t have people to play different characters, don’t fret! With the AR sticker effect, you can create multiple characters for your video.
For example:
If your video has 3 animal characters, you can use AR stickers depicting a panda, cat, and bunny to show the different characters. Similarly, you can add the sticker with glasses to show a nerdy character. Or, if you’re really getting into the story-telling mode, you can use the pirate sticker to show a pirate.
Magnify Emotions
Sometimes it gets challenging to portray a certain emotion in your video. This is where AR stickers come to the rescue!
If you want to show someone in love, you can use the heart-eyes effect. Or, if you want to show that someone is being good, you can use the angel sticker to put a halo on their head.
There are many options! You just have to use your creative cells and conjure up something that’s unique and stands out from the rest.
3. Ace Your Shoot with the Green Screen Effect
A green-screen effect is quite important when it comes to making an exceptional brand video. It has been used in almost all blockbuster movies, and if you’re looking to make a video of a similar level, we’ve got some tried and tested tips to use the green screen effect to its fullest!
Make Sure the Lighting is Even
When it comes to a green screen, the lighting plays an important part. Make sure the green screen is one shade of green, and the lighting on the screen is even. If parts of the green screen are darker than the rest, the chroma key effect won’t be able to distinguish the different shades.
Contrasting Colors
Make sure the subject in the video isn’t wearing any green clothing, or there aren’t many green objects around, as they might disappear when you apply the green screen effect.
Prevent Motion Blur with High Shutter Speed
When shooting with a green screen background, make sure you keep the shutter speed high to avoid motion blur. Ideally, it should be 2x your frame rate for optimum results. But, at the same time, it shouldn’t be too high, as it can lead to a change in video exposure.
If you keep these tips in mind when shooting a video, you can easily use the chroma key effect in Wondershare Filmora to add your desired background and create an outstanding video.
4. Be Innovative with Effects
A video without effects is as bland as water! So, make your video innovative with the impressive variety of effects available in Wondershare Filmora.
But you can’t just add effects to your video like that! You need to understand when and where to use a certain effect properly.
For example:
Tell Your Story With Split Screen Effect
If you’re telling your brand story from the perspective of different individuals, using the split-screen effect is recommended. You can also use this effect to showcase how one thing is related to another in a cause-and-effect way.
Take this Lexus commercial, for example:
It shows the view from inside the car and from a viewer’s perspective.
Emphasize with Pan and Zoom Effect
As the topic of concern of this article is brand videos, the pan and zoom is an ideal effect for it.
You can easily emphasize its importance and give off an emotional storytelling vibe by zooming in on a person’s face or any other object in the frame. You can also use pan and zoom to add a transition to your video. Here’s an example:
Add Thrill with Transitions
To move from one shot to another, it’s important to add a transition effect in between. You can add different transition styles to link the shots with one another, for instance, the match cut transition to match scenes that are not otherwise linked visually. Or the whip pan transition, which involves a quick rotation of the camera’s axis to give the impression that the scene was shot in one take, although it is two separate clips.
Take Wondershare Filmora’s brand video, for example. You can see how seamlessly it moves from one effect to another. It adds value and makes the video fun to watch.
With the variety of transitions in Filmora’s library, you can add all the effects discussed above to your video for stunning results.
You’ve added motion tracking, used AR stickers, created a mystical background with the green screen effect, and gone innovative with effects. Now, it’s time to wrap up this article with…
5. Energize Your Videos with Speed Ramping
Did you know that speed ramping can actually improve your videos tenfold? Speeding up and slowing down the footage at certain points can have a significant impact. For example, the bullet dodge scene in “Matrix” wouldn’t have been so famous if it wasn’t for the slo-mo effect!

You can’t just randomly add speed ramps to your video. There has to be a purpose behind it! Do you want to emphasize something? Do you want to show a transition? Regardless, you need to time your speed ramping properly.
And here are a few tips for it!
Use Slo-Mo For Action Sequences
If your video has an amazing action scene in it, slow down the speed at that point to emphasize the action and movement. For example, a karate kick in slow motion very clearly shows us how the move is actually performed.
Don’t Use Slo-Mo For Too Long
Another tip is to use the slow-mo only for a few seconds to emphasize something. If you prolong it, it won’t have the desired impact and might even cause the audience to lose focus.
Speed Up Footage for Long Processes
If your video shows a long process, like a time-lapse, it is the perfect time to speed up the footage. Not only do long shots lose the viewer’s attention, but they can also get boring too. A sped up footage on the other hand makes your video aesthetically pleasing and entertaining.
Add Music
Using music in videos is quite a common practice; however, it becomes quite exciting if you speed ramp your video according to the music. For example, time the slo-mo effect with the more silent or riverbed parts of the music, and speed it up when the crescendo comes.
You can do this easily with the auto beat-sync feature in Filmora that matches the music with the footage.

How’s that for a thrilling video?
Speed Ramp for Transitions
Here’s a bonus tip! Use speed ramping at the end of one clip and the beginning of the next one to create a seamless flow between the two. It’ll also give a transition effect and make your brand video look professional.
So you see, you have ample options to add a touch of creativity to your brand videos. The key is to use a good video editor and the right video editing tools.
Wrapping Up
Shooting a brand video is easy, and it’s even easier to edit it. All you need is to let your creativity flow!
With Wondershare Filmora 11’s new and advanced editing features, making watch-worthy brand videos that give out the desired message and compel the audience to take some action has never been easier!
And, with the useful video editing tips that we have shared, you are just a click away from taking your business to new heights!
So, if you also want to create a video successfully, just like Filmora’s brand video, follow our tips, use the tricks, and edit away!
Create a Brand Video to Make Your Business Shine
Did you know that 8 out of 10 people go ahead and purchase a product just by watching brand videos?
I’m sure you are looking for similar success when it comes to your brand video.
But you can’t just compel the audience by making any video!
- It has to be entertaining and inspirational.
- It has to be innovative.
- It needs to have something that grabs the audience’s attention.
And, with all this, it should also successfully share your brand’s core values.
So, how do you create such a video?
It’s not about simply whipping out a camera and pressing the record button. A lot of thought is involved in creating a brand video, but most importantly, you need a high-quality video editor to refine your video and make it more fun, entertaining, and innovative - A video editor like Wondershare Filmora.
And that’s what this article is about - How to use the various basic and advanced editing tools in Filmora to create a brand video that makes a difference!
But first, let’s have a look at…
Wondershare Filmora’s Brand Video
What’s so special about it, you ask?
For starters, it fits right into the criteria we mentioned above. It’s innovative, entertaining, vibrant, and fun and showcases all the features of Filmora 11.
Here, see for yourself…
From all the new effects to the AR sticker themes and other video editing features like speed ramping, masking, and green screen effect, the video successfully lets the audience know how creative they can get with Filmora.
But did you see that they didn’t put the features out there just like that! They actually used all the basic and advanced video editing features in the video to give us an idea of what it looks like when put in action.
And the video quality, the content, and the flow of the video speak for themselves.
I mean, I watched the video all the way to the end without getting bored for even a single second. And, being a video editor, I might as well get Filmora 11 after watching the highly compelling video!
Now, if you’re also wow-ed by the video and would like to create a similar one, here are some tips on making a successful brand video using Wondershare Filmora.
Tips to Make a Compelling Brand Video
Like I said earlier, making a video is not simply about getting out your camera and starting recording. Many aspects need to be considered for your video to make the desired impact.
Therefore, here are some tips that might come in handy when making your brand video:
1. Define Your Objective and Audience
The very first thing that you need to think about before starting work on your brand video is its objective and audience.

What are you trying to achieve from the video? Do you want to create brand awareness, or do you wish to promote a certain product?
Secondly, who’s your target audience? Is your video projected toward people who have no idea who you and your company are? Or are you addressing an existing customer base? Also, are the audience kids or adults? Because you certainly can’t make a video with cartoon characters for an audience who’s looking for something calm and relaxing, and vice versa.
Once you have your objective and audience sorted, it’s time to get busy!
2. Video Scripting
Based on what you’re trying to achieve from your brand video and the target audience, you can decide on the video’s script. This includes the content, the length, and the editing requirements.

Let’s take your video’s content, for instance:
- If you’re creating a video for an audience that doesn’t know you, you’ll have to start from the basics, explaining who you are, what you do, and the services you offer.
- If you’re trying to create a video that tells your brand’s story, you can either keep it inspirational or you could create fun content that will be remembered for years to come!
- If you’re creating something for the kids, you need to keep it short yet interesting, with many effects that help in grabbing their attention.
Once you have decided what to add to the video, how long it will be, and what its content will be like, you can finally record your video!
3. Video Recording
Now, for many people, recording simply means hitting the record button.
Yes, that might work for vlogs, but when it comes to making a brand video, you need to really put in effort when recording.

For instance, you should have all the video clips and images you want to include in the video at hand. And they should resonate with your brand voice and match with each other as well.
If we take Wondershare Filmora’s brand video as an example, you can see that the whole video has a vibrant and warm feel to it, which can be seen throughout. It’s not that one clip is darker and the other is lighter; the whole thing sort of blends into each other.
That’s what you should take care of when recording your video. Make sure the background, hues, and overall feel of the video clips and images match each other.
4. Using Your Brand Colors and Logo
Another thing that you should keep in mind when recording is to incorporate your brand colors in the video and throw in your logo. For instance, if your brand colors are red and green, make sure to use them in the text in the video. However, if you’re not using text, you can use the colors in the video frame by having a wall or something in the background of the same colors.

As for the logo, it can be placed anywhere in the video so that the audience learns to recognize it.
But why is using your brand colors and logo so important?
Because your brand colors and logo represent your brand and become its identity in the long run. For example, yellow and red are McDonald’s brand colors and its logo, the yellow ‘M’ in arch form, is recognizable even from a distance.
5. Video Editing
Now comes the most important part of making a brand video: The editing! The part where you refine your video and add final touches to it. If you’ve got a stellar video editing software like Wondershare Filmora, it can do wonders for your video.
Wondershare Filmora at a Glance

Wondershare Filmora has plenty of basic and advanced video editing features to add that wow factor to your video. It can turn a plain boring video into something fun, exciting, and watch-worthy.
For example, the motion tracking feature lets you add an object that follows a certain movement in the video. Then we have the AR stickers that help enhance emotions and add personality to your video. Also, the green screen feature lets you add amazing background to your video to give the desired effect.
Filmora also has many video effects, templates, speed ramping, masking, auto beat sync, voice recording, and other features that can really take your brand video to the next level.
I’m sure you now have the hang of how to make a brand video that makes your business pop. But, you still might be confused about how to make the most of these features using Wondershare Filmora.
Therefore, here are some helpful tips on using these features to make an effective brand video that creates brand awareness and drives sales!
Creative Ideas to Make Brand Videos Using Filmora
If you’re up for making a video just like the video we shared earlier, you’ll need to download Wondershare Filmora from the website. And, once you’re through with this guide, nothing can stop you from making a brand video that sells!
With that sorted, here are some valuable tips and ideas to help you along the way:
1. Level Up Your Motion Tracking
As we mentioned earlier, motion tracking means tracking the movement of an object in the video and then applying the same movement to a newly added object, like text, image, logo, or any clipart.
But that’s quite a common practice, right? I mean, every video editor out there is doing it!
However, there are some ways in which you can get creative with the motion tracking feature using Filmora.
Like…
Using Motion-Tracked Texts
While the text in a video looks pretty good itself, you can make it even more impressive by motion tracking it.
For example:
- Attach a piece of text to your introductory title. If there’s a logo or brand name in the introduction, you can add a tagline, a website address, or your Instagram or Twitter handle to it.
- If you want to create a context for the audience, add motion-tracked captions in your brand video. This means the captions move with the movement of the subject. It looks stylish, gives relevant information, and helps tell your brand’s story without any narration.
This Fitbit commercial would be an excellent example of motion-tracked captions:
- If your video has an introductory scene where the frame is moving from one side to the other, you can motion-track the credits so that they move along with the scene and disappear gradually instead of dedicating a single clip to the credits.
- Highlighting important aspects in a video, like places or names of objects with motion-tracked text, can make your video truly amazing and fun to watch. This would be quite essential if you’re making a video for the real estate or travel business.
Here’s an example:
Hence, when working with Filmora, you can do plenty with the motion tracking feature to make a truly amazing video.
2. Add a Fun Factor with AR Stickers
Now that you know how to use the motion tracking feature in Filmora, let me tell you a secret!
If you incorporate face-tracking AR stickers into your video, you can succeed in creating a brand video that will have the audience glued to the screen!
The purpose of adding AR stickers to your videos is to emphasize reactions, portray enhanced emotions, and add an element of fun. This feature works best if you’re creating a brand video projected toward kids.

So, how can you make the most of these AR stickers?
Create Multiple Characters
If you don’t have people to play different characters, don’t fret! With the AR sticker effect, you can create multiple characters for your video.
For example:
If your video has 3 animal characters, you can use AR stickers depicting a panda, cat, and bunny to show the different characters. Similarly, you can add the sticker with glasses to show a nerdy character. Or, if you’re really getting into the story-telling mode, you can use the pirate sticker to show a pirate.
Magnify Emotions
Sometimes it gets challenging to portray a certain emotion in your video. This is where AR stickers come to the rescue!
If you want to show someone in love, you can use the heart-eyes effect. Or, if you want to show that someone is being good, you can use the angel sticker to put a halo on their head.
There are many options! You just have to use your creative cells and conjure up something that’s unique and stands out from the rest.
3. Ace Your Shoot with the Green Screen Effect
A green-screen effect is quite important when it comes to making an exceptional brand video. It has been used in almost all blockbuster movies, and if you’re looking to make a video of a similar level, we’ve got some tried and tested tips to use the green screen effect to its fullest!
Make Sure the Lighting is Even
When it comes to a green screen, the lighting plays an important part. Make sure the green screen is one shade of green, and the lighting on the screen is even. If parts of the green screen are darker than the rest, the chroma key effect won’t be able to distinguish the different shades.
Contrasting Colors
Make sure the subject in the video isn’t wearing any green clothing, or there aren’t many green objects around, as they might disappear when you apply the green screen effect.
Prevent Motion Blur with High Shutter Speed
When shooting with a green screen background, make sure you keep the shutter speed high to avoid motion blur. Ideally, it should be 2x your frame rate for optimum results. But, at the same time, it shouldn’t be too high, as it can lead to a change in video exposure.
If you keep these tips in mind when shooting a video, you can easily use the chroma key effect in Wondershare Filmora to add your desired background and create an outstanding video.
4. Be Innovative with Effects
A video without effects is as bland as water! So, make your video innovative with the impressive variety of effects available in Wondershare Filmora.
But you can’t just add effects to your video like that! You need to understand when and where to use a certain effect properly.
For example:
Tell Your Story With Split Screen Effect
If you’re telling your brand story from the perspective of different individuals, using the split-screen effect is recommended. You can also use this effect to showcase how one thing is related to another in a cause-and-effect way.
Take this Lexus commercial, for example:
It shows the view from inside the car and from a viewer’s perspective.
Emphasize with Pan and Zoom Effect
As the topic of concern of this article is brand videos, the pan and zoom is an ideal effect for it.
You can easily emphasize its importance and give off an emotional storytelling vibe by zooming in on a person’s face or any other object in the frame. You can also use pan and zoom to add a transition to your video. Here’s an example:
Add Thrill with Transitions
To move from one shot to another, it’s important to add a transition effect in between. You can add different transition styles to link the shots with one another, for instance, the match cut transition to match scenes that are not otherwise linked visually. Or the whip pan transition, which involves a quick rotation of the camera’s axis to give the impression that the scene was shot in one take, although it is two separate clips.
Take Wondershare Filmora’s brand video, for example. You can see how seamlessly it moves from one effect to another. It adds value and makes the video fun to watch.
With the variety of transitions in Filmora’s library, you can add all the effects discussed above to your video for stunning results.
You’ve added motion tracking, used AR stickers, created a mystical background with the green screen effect, and gone innovative with effects. Now, it’s time to wrap up this article with…
5. Energize Your Videos with Speed Ramping
Did you know that speed ramping can actually improve your videos tenfold? Speeding up and slowing down the footage at certain points can have a significant impact. For example, the bullet dodge scene in “Matrix” wouldn’t have been so famous if it wasn’t for the slo-mo effect!

You can’t just randomly add speed ramps to your video. There has to be a purpose behind it! Do you want to emphasize something? Do you want to show a transition? Regardless, you need to time your speed ramping properly.
And here are a few tips for it!
Use Slo-Mo For Action Sequences
If your video has an amazing action scene in it, slow down the speed at that point to emphasize the action and movement. For example, a karate kick in slow motion very clearly shows us how the move is actually performed.
Don’t Use Slo-Mo For Too Long
Another tip is to use the slow-mo only for a few seconds to emphasize something. If you prolong it, it won’t have the desired impact and might even cause the audience to lose focus.
Speed Up Footage for Long Processes
If your video shows a long process, like a time-lapse, it is the perfect time to speed up the footage. Not only do long shots lose the viewer’s attention, but they can also get boring too. A sped up footage on the other hand makes your video aesthetically pleasing and entertaining.
Add Music
Using music in videos is quite a common practice; however, it becomes quite exciting if you speed ramp your video according to the music. For example, time the slo-mo effect with the more silent or riverbed parts of the music, and speed it up when the crescendo comes.
You can do this easily with the auto beat-sync feature in Filmora that matches the music with the footage.

How’s that for a thrilling video?
Speed Ramp for Transitions
Here’s a bonus tip! Use speed ramping at the end of one clip and the beginning of the next one to create a seamless flow between the two. It’ll also give a transition effect and make your brand video look professional.
So you see, you have ample options to add a touch of creativity to your brand videos. The key is to use a good video editor and the right video editing tools.
Wrapping Up
Shooting a brand video is easy, and it’s even easier to edit it. All you need is to let your creativity flow!
With Wondershare Filmora 11’s new and advanced editing features, making watch-worthy brand videos that give out the desired message and compel the audience to take some action has never been easier!
And, with the useful video editing tips that we have shared, you are just a click away from taking your business to new heights!
So, if you also want to create a video successfully, just like Filmora’s brand video, follow our tips, use the tricks, and edit away!
Create a Brand Video to Make Your Business Shine
Did you know that 8 out of 10 people go ahead and purchase a product just by watching brand videos?
I’m sure you are looking for similar success when it comes to your brand video.
But you can’t just compel the audience by making any video!
- It has to be entertaining and inspirational.
- It has to be innovative.
- It needs to have something that grabs the audience’s attention.
And, with all this, it should also successfully share your brand’s core values.
So, how do you create such a video?
It’s not about simply whipping out a camera and pressing the record button. A lot of thought is involved in creating a brand video, but most importantly, you need a high-quality video editor to refine your video and make it more fun, entertaining, and innovative - A video editor like Wondershare Filmora.
And that’s what this article is about - How to use the various basic and advanced editing tools in Filmora to create a brand video that makes a difference!
But first, let’s have a look at…
Wondershare Filmora’s Brand Video
What’s so special about it, you ask?
For starters, it fits right into the criteria we mentioned above. It’s innovative, entertaining, vibrant, and fun and showcases all the features of Filmora 11.
Here, see for yourself…
From all the new effects to the AR sticker themes and other video editing features like speed ramping, masking, and green screen effect, the video successfully lets the audience know how creative they can get with Filmora.
But did you see that they didn’t put the features out there just like that! They actually used all the basic and advanced video editing features in the video to give us an idea of what it looks like when put in action.
And the video quality, the content, and the flow of the video speak for themselves.
I mean, I watched the video all the way to the end without getting bored for even a single second. And, being a video editor, I might as well get Filmora 11 after watching the highly compelling video!
Now, if you’re also wow-ed by the video and would like to create a similar one, here are some tips on making a successful brand video using Wondershare Filmora.
Tips to Make a Compelling Brand Video
Like I said earlier, making a video is not simply about getting out your camera and starting recording. Many aspects need to be considered for your video to make the desired impact.
Therefore, here are some tips that might come in handy when making your brand video:
1. Define Your Objective and Audience
The very first thing that you need to think about before starting work on your brand video is its objective and audience.

What are you trying to achieve from the video? Do you want to create brand awareness, or do you wish to promote a certain product?
Secondly, who’s your target audience? Is your video projected toward people who have no idea who you and your company are? Or are you addressing an existing customer base? Also, are the audience kids or adults? Because you certainly can’t make a video with cartoon characters for an audience who’s looking for something calm and relaxing, and vice versa.
Once you have your objective and audience sorted, it’s time to get busy!
2. Video Scripting
Based on what you’re trying to achieve from your brand video and the target audience, you can decide on the video’s script. This includes the content, the length, and the editing requirements.

Let’s take your video’s content, for instance:
- If you’re creating a video for an audience that doesn’t know you, you’ll have to start from the basics, explaining who you are, what you do, and the services you offer.
- If you’re trying to create a video that tells your brand’s story, you can either keep it inspirational or you could create fun content that will be remembered for years to come!
- If you’re creating something for the kids, you need to keep it short yet interesting, with many effects that help in grabbing their attention.
Once you have decided what to add to the video, how long it will be, and what its content will be like, you can finally record your video!
3. Video Recording
Now, for many people, recording simply means hitting the record button.
Yes, that might work for vlogs, but when it comes to making a brand video, you need to really put in effort when recording.

For instance, you should have all the video clips and images you want to include in the video at hand. And they should resonate with your brand voice and match with each other as well.
If we take Wondershare Filmora’s brand video as an example, you can see that the whole video has a vibrant and warm feel to it, which can be seen throughout. It’s not that one clip is darker and the other is lighter; the whole thing sort of blends into each other.
That’s what you should take care of when recording your video. Make sure the background, hues, and overall feel of the video clips and images match each other.
4. Using Your Brand Colors and Logo
Another thing that you should keep in mind when recording is to incorporate your brand colors in the video and throw in your logo. For instance, if your brand colors are red and green, make sure to use them in the text in the video. However, if you’re not using text, you can use the colors in the video frame by having a wall or something in the background of the same colors.

As for the logo, it can be placed anywhere in the video so that the audience learns to recognize it.
But why is using your brand colors and logo so important?
Because your brand colors and logo represent your brand and become its identity in the long run. For example, yellow and red are McDonald’s brand colors and its logo, the yellow ‘M’ in arch form, is recognizable even from a distance.
5. Video Editing
Now comes the most important part of making a brand video: The editing! The part where you refine your video and add final touches to it. If you’ve got a stellar video editing software like Wondershare Filmora, it can do wonders for your video.
Wondershare Filmora at a Glance

Wondershare Filmora has plenty of basic and advanced video editing features to add that wow factor to your video. It can turn a plain boring video into something fun, exciting, and watch-worthy.
For example, the motion tracking feature lets you add an object that follows a certain movement in the video. Then we have the AR stickers that help enhance emotions and add personality to your video. Also, the green screen feature lets you add amazing background to your video to give the desired effect.
Filmora also has many video effects, templates, speed ramping, masking, auto beat sync, voice recording, and other features that can really take your brand video to the next level.
I’m sure you now have the hang of how to make a brand video that makes your business pop. But, you still might be confused about how to make the most of these features using Wondershare Filmora.
Therefore, here are some helpful tips on using these features to make an effective brand video that creates brand awareness and drives sales!
Creative Ideas to Make Brand Videos Using Filmora
If you’re up for making a video just like the video we shared earlier, you’ll need to download Wondershare Filmora from the website. And, once you’re through with this guide, nothing can stop you from making a brand video that sells!
With that sorted, here are some valuable tips and ideas to help you along the way:
1. Level Up Your Motion Tracking
As we mentioned earlier, motion tracking means tracking the movement of an object in the video and then applying the same movement to a newly added object, like text, image, logo, or any clipart.
But that’s quite a common practice, right? I mean, every video editor out there is doing it!
However, there are some ways in which you can get creative with the motion tracking feature using Filmora.
Like…
Using Motion-Tracked Texts
While the text in a video looks pretty good itself, you can make it even more impressive by motion tracking it.
For example:
- Attach a piece of text to your introductory title. If there’s a logo or brand name in the introduction, you can add a tagline, a website address, or your Instagram or Twitter handle to it.
- If you want to create a context for the audience, add motion-tracked captions in your brand video. This means the captions move with the movement of the subject. It looks stylish, gives relevant information, and helps tell your brand’s story without any narration.
This Fitbit commercial would be an excellent example of motion-tracked captions:
- If your video has an introductory scene where the frame is moving from one side to the other, you can motion-track the credits so that they move along with the scene and disappear gradually instead of dedicating a single clip to the credits.
- Highlighting important aspects in a video, like places or names of objects with motion-tracked text, can make your video truly amazing and fun to watch. This would be quite essential if you’re making a video for the real estate or travel business.
Here’s an example:
Hence, when working with Filmora, you can do plenty with the motion tracking feature to make a truly amazing video.
2. Add a Fun Factor with AR Stickers
Now that you know how to use the motion tracking feature in Filmora, let me tell you a secret!
If you incorporate face-tracking AR stickers into your video, you can succeed in creating a brand video that will have the audience glued to the screen!
The purpose of adding AR stickers to your videos is to emphasize reactions, portray enhanced emotions, and add an element of fun. This feature works best if you’re creating a brand video projected toward kids.

So, how can you make the most of these AR stickers?
Create Multiple Characters
If you don’t have people to play different characters, don’t fret! With the AR sticker effect, you can create multiple characters for your video.
For example:
If your video has 3 animal characters, you can use AR stickers depicting a panda, cat, and bunny to show the different characters. Similarly, you can add the sticker with glasses to show a nerdy character. Or, if you’re really getting into the story-telling mode, you can use the pirate sticker to show a pirate.
Magnify Emotions
Sometimes it gets challenging to portray a certain emotion in your video. This is where AR stickers come to the rescue!
If you want to show someone in love, you can use the heart-eyes effect. Or, if you want to show that someone is being good, you can use the angel sticker to put a halo on their head.
There are many options! You just have to use your creative cells and conjure up something that’s unique and stands out from the rest.
3. Ace Your Shoot with the Green Screen Effect
A green-screen effect is quite important when it comes to making an exceptional brand video. It has been used in almost all blockbuster movies, and if you’re looking to make a video of a similar level, we’ve got some tried and tested tips to use the green screen effect to its fullest!
Make Sure the Lighting is Even
When it comes to a green screen, the lighting plays an important part. Make sure the green screen is one shade of green, and the lighting on the screen is even. If parts of the green screen are darker than the rest, the chroma key effect won’t be able to distinguish the different shades.
Contrasting Colors
Make sure the subject in the video isn’t wearing any green clothing, or there aren’t many green objects around, as they might disappear when you apply the green screen effect.
Prevent Motion Blur with High Shutter Speed
When shooting with a green screen background, make sure you keep the shutter speed high to avoid motion blur. Ideally, it should be 2x your frame rate for optimum results. But, at the same time, it shouldn’t be too high, as it can lead to a change in video exposure.
If you keep these tips in mind when shooting a video, you can easily use the chroma key effect in Wondershare Filmora to add your desired background and create an outstanding video.
4. Be Innovative with Effects
A video without effects is as bland as water! So, make your video innovative with the impressive variety of effects available in Wondershare Filmora.
But you can’t just add effects to your video like that! You need to understand when and where to use a certain effect properly.
For example:
Tell Your Story With Split Screen Effect
If you’re telling your brand story from the perspective of different individuals, using the split-screen effect is recommended. You can also use this effect to showcase how one thing is related to another in a cause-and-effect way.
Take this Lexus commercial, for example:
It shows the view from inside the car and from a viewer’s perspective.
Emphasize with Pan and Zoom Effect
As the topic of concern of this article is brand videos, the pan and zoom is an ideal effect for it.
You can easily emphasize its importance and give off an emotional storytelling vibe by zooming in on a person’s face or any other object in the frame. You can also use pan and zoom to add a transition to your video. Here’s an example:
Add Thrill with Transitions
To move from one shot to another, it’s important to add a transition effect in between. You can add different transition styles to link the shots with one another, for instance, the match cut transition to match scenes that are not otherwise linked visually. Or the whip pan transition, which involves a quick rotation of the camera’s axis to give the impression that the scene was shot in one take, although it is two separate clips.
Take Wondershare Filmora’s brand video, for example. You can see how seamlessly it moves from one effect to another. It adds value and makes the video fun to watch.
With the variety of transitions in Filmora’s library, you can add all the effects discussed above to your video for stunning results.
You’ve added motion tracking, used AR stickers, created a mystical background with the green screen effect, and gone innovative with effects. Now, it’s time to wrap up this article with…
5. Energize Your Videos with Speed Ramping
Did you know that speed ramping can actually improve your videos tenfold? Speeding up and slowing down the footage at certain points can have a significant impact. For example, the bullet dodge scene in “Matrix” wouldn’t have been so famous if it wasn’t for the slo-mo effect!

You can’t just randomly add speed ramps to your video. There has to be a purpose behind it! Do you want to emphasize something? Do you want to show a transition? Regardless, you need to time your speed ramping properly.
And here are a few tips for it!
Use Slo-Mo For Action Sequences
If your video has an amazing action scene in it, slow down the speed at that point to emphasize the action and movement. For example, a karate kick in slow motion very clearly shows us how the move is actually performed.
Don’t Use Slo-Mo For Too Long
Another tip is to use the slow-mo only for a few seconds to emphasize something. If you prolong it, it won’t have the desired impact and might even cause the audience to lose focus.
Speed Up Footage for Long Processes
If your video shows a long process, like a time-lapse, it is the perfect time to speed up the footage. Not only do long shots lose the viewer’s attention, but they can also get boring too. A sped up footage on the other hand makes your video aesthetically pleasing and entertaining.
Add Music
Using music in videos is quite a common practice; however, it becomes quite exciting if you speed ramp your video according to the music. For example, time the slo-mo effect with the more silent or riverbed parts of the music, and speed it up when the crescendo comes.
You can do this easily with the auto beat-sync feature in Filmora that matches the music with the footage.

How’s that for a thrilling video?
Speed Ramp for Transitions
Here’s a bonus tip! Use speed ramping at the end of one clip and the beginning of the next one to create a seamless flow between the two. It’ll also give a transition effect and make your brand video look professional.
So you see, you have ample options to add a touch of creativity to your brand videos. The key is to use a good video editor and the right video editing tools.
Wrapping Up
Shooting a brand video is easy, and it’s even easier to edit it. All you need is to let your creativity flow!
With Wondershare Filmora 11’s new and advanced editing features, making watch-worthy brand videos that give out the desired message and compel the audience to take some action has never been easier!
And, with the useful video editing tips that we have shared, you are just a click away from taking your business to new heights!
So, if you also want to create a video successfully, just like Filmora’s brand video, follow our tips, use the tricks, and edit away!
Create a Brand Video to Make Your Business Shine
Did you know that 8 out of 10 people go ahead and purchase a product just by watching brand videos?
I’m sure you are looking for similar success when it comes to your brand video.
But you can’t just compel the audience by making any video!
- It has to be entertaining and inspirational.
- It has to be innovative.
- It needs to have something that grabs the audience’s attention.
And, with all this, it should also successfully share your brand’s core values.
So, how do you create such a video?
It’s not about simply whipping out a camera and pressing the record button. A lot of thought is involved in creating a brand video, but most importantly, you need a high-quality video editor to refine your video and make it more fun, entertaining, and innovative - A video editor like Wondershare Filmora.
And that’s what this article is about - How to use the various basic and advanced editing tools in Filmora to create a brand video that makes a difference!
But first, let’s have a look at…
Wondershare Filmora’s Brand Video
What’s so special about it, you ask?
For starters, it fits right into the criteria we mentioned above. It’s innovative, entertaining, vibrant, and fun and showcases all the features of Filmora 11.
Here, see for yourself…
From all the new effects to the AR sticker themes and other video editing features like speed ramping, masking, and green screen effect, the video successfully lets the audience know how creative they can get with Filmora.
But did you see that they didn’t put the features out there just like that! They actually used all the basic and advanced video editing features in the video to give us an idea of what it looks like when put in action.
And the video quality, the content, and the flow of the video speak for themselves.
I mean, I watched the video all the way to the end without getting bored for even a single second. And, being a video editor, I might as well get Filmora 11 after watching the highly compelling video!
Now, if you’re also wow-ed by the video and would like to create a similar one, here are some tips on making a successful brand video using Wondershare Filmora.
Tips to Make a Compelling Brand Video
Like I said earlier, making a video is not simply about getting out your camera and starting recording. Many aspects need to be considered for your video to make the desired impact.
Therefore, here are some tips that might come in handy when making your brand video:
1. Define Your Objective and Audience
The very first thing that you need to think about before starting work on your brand video is its objective and audience.

What are you trying to achieve from the video? Do you want to create brand awareness, or do you wish to promote a certain product?
Secondly, who’s your target audience? Is your video projected toward people who have no idea who you and your company are? Or are you addressing an existing customer base? Also, are the audience kids or adults? Because you certainly can’t make a video with cartoon characters for an audience who’s looking for something calm and relaxing, and vice versa.
Once you have your objective and audience sorted, it’s time to get busy!
2. Video Scripting
Based on what you’re trying to achieve from your brand video and the target audience, you can decide on the video’s script. This includes the content, the length, and the editing requirements.

Let’s take your video’s content, for instance:
- If you’re creating a video for an audience that doesn’t know you, you’ll have to start from the basics, explaining who you are, what you do, and the services you offer.
- If you’re trying to create a video that tells your brand’s story, you can either keep it inspirational or you could create fun content that will be remembered for years to come!
- If you’re creating something for the kids, you need to keep it short yet interesting, with many effects that help in grabbing their attention.
Once you have decided what to add to the video, how long it will be, and what its content will be like, you can finally record your video!
3. Video Recording
Now, for many people, recording simply means hitting the record button.
Yes, that might work for vlogs, but when it comes to making a brand video, you need to really put in effort when recording.

For instance, you should have all the video clips and images you want to include in the video at hand. And they should resonate with your brand voice and match with each other as well.
If we take Wondershare Filmora’s brand video as an example, you can see that the whole video has a vibrant and warm feel to it, which can be seen throughout. It’s not that one clip is darker and the other is lighter; the whole thing sort of blends into each other.
That’s what you should take care of when recording your video. Make sure the background, hues, and overall feel of the video clips and images match each other.
4. Using Your Brand Colors and Logo
Another thing that you should keep in mind when recording is to incorporate your brand colors in the video and throw in your logo. For instance, if your brand colors are red and green, make sure to use them in the text in the video. However, if you’re not using text, you can use the colors in the video frame by having a wall or something in the background of the same colors.

As for the logo, it can be placed anywhere in the video so that the audience learns to recognize it.
But why is using your brand colors and logo so important?
Because your brand colors and logo represent your brand and become its identity in the long run. For example, yellow and red are McDonald’s brand colors and its logo, the yellow ‘M’ in arch form, is recognizable even from a distance.
5. Video Editing
Now comes the most important part of making a brand video: The editing! The part where you refine your video and add final touches to it. If you’ve got a stellar video editing software like Wondershare Filmora, it can do wonders for your video.
Wondershare Filmora at a Glance

Wondershare Filmora has plenty of basic and advanced video editing features to add that wow factor to your video. It can turn a plain boring video into something fun, exciting, and watch-worthy.
For example, the motion tracking feature lets you add an object that follows a certain movement in the video. Then we have the AR stickers that help enhance emotions and add personality to your video. Also, the green screen feature lets you add amazing background to your video to give the desired effect.
Filmora also has many video effects, templates, speed ramping, masking, auto beat sync, voice recording, and other features that can really take your brand video to the next level.
I’m sure you now have the hang of how to make a brand video that makes your business pop. But, you still might be confused about how to make the most of these features using Wondershare Filmora.
Therefore, here are some helpful tips on using these features to make an effective brand video that creates brand awareness and drives sales!
Creative Ideas to Make Brand Videos Using Filmora
If you’re up for making a video just like the video we shared earlier, you’ll need to download Wondershare Filmora from the website. And, once you’re through with this guide, nothing can stop you from making a brand video that sells!
With that sorted, here are some valuable tips and ideas to help you along the way:
1. Level Up Your Motion Tracking
As we mentioned earlier, motion tracking means tracking the movement of an object in the video and then applying the same movement to a newly added object, like text, image, logo, or any clipart.
But that’s quite a common practice, right? I mean, every video editor out there is doing it!
However, there are some ways in which you can get creative with the motion tracking feature using Filmora.
Like…
Using Motion-Tracked Texts
While the text in a video looks pretty good itself, you can make it even more impressive by motion tracking it.
For example:
- Attach a piece of text to your introductory title. If there’s a logo or brand name in the introduction, you can add a tagline, a website address, or your Instagram or Twitter handle to it.
- If you want to create a context for the audience, add motion-tracked captions in your brand video. This means the captions move with the movement of the subject. It looks stylish, gives relevant information, and helps tell your brand’s story without any narration.
This Fitbit commercial would be an excellent example of motion-tracked captions:
- If your video has an introductory scene where the frame is moving from one side to the other, you can motion-track the credits so that they move along with the scene and disappear gradually instead of dedicating a single clip to the credits.
- Highlighting important aspects in a video, like places or names of objects with motion-tracked text, can make your video truly amazing and fun to watch. This would be quite essential if you’re making a video for the real estate or travel business.
Here’s an example:
Hence, when working with Filmora, you can do plenty with the motion tracking feature to make a truly amazing video.
2. Add a Fun Factor with AR Stickers
Now that you know how to use the motion tracking feature in Filmora, let me tell you a secret!
If you incorporate face-tracking AR stickers into your video, you can succeed in creating a brand video that will have the audience glued to the screen!
The purpose of adding AR stickers to your videos is to emphasize reactions, portray enhanced emotions, and add an element of fun. This feature works best if you’re creating a brand video projected toward kids.

So, how can you make the most of these AR stickers?
Create Multiple Characters
If you don’t have people to play different characters, don’t fret! With the AR sticker effect, you can create multiple characters for your video.
For example:
If your video has 3 animal characters, you can use AR stickers depicting a panda, cat, and bunny to show the different characters. Similarly, you can add the sticker with glasses to show a nerdy character. Or, if you’re really getting into the story-telling mode, you can use the pirate sticker to show a pirate.
Magnify Emotions
Sometimes it gets challenging to portray a certain emotion in your video. This is where AR stickers come to the rescue!
If you want to show someone in love, you can use the heart-eyes effect. Or, if you want to show that someone is being good, you can use the angel sticker to put a halo on their head.
There are many options! You just have to use your creative cells and conjure up something that’s unique and stands out from the rest.
3. Ace Your Shoot with the Green Screen Effect
A green-screen effect is quite important when it comes to making an exceptional brand video. It has been used in almost all blockbuster movies, and if you’re looking to make a video of a similar level, we’ve got some tried and tested tips to use the green screen effect to its fullest!
Make Sure the Lighting is Even
When it comes to a green screen, the lighting plays an important part. Make sure the green screen is one shade of green, and the lighting on the screen is even. If parts of the green screen are darker than the rest, the chroma key effect won’t be able to distinguish the different shades.
Contrasting Colors
Make sure the subject in the video isn’t wearing any green clothing, or there aren’t many green objects around, as they might disappear when you apply the green screen effect.
Prevent Motion Blur with High Shutter Speed
When shooting with a green screen background, make sure you keep the shutter speed high to avoid motion blur. Ideally, it should be 2x your frame rate for optimum results. But, at the same time, it shouldn’t be too high, as it can lead to a change in video exposure.
If you keep these tips in mind when shooting a video, you can easily use the chroma key effect in Wondershare Filmora to add your desired background and create an outstanding video.
4. Be Innovative with Effects
A video without effects is as bland as water! So, make your video innovative with the impressive variety of effects available in Wondershare Filmora.
But you can’t just add effects to your video like that! You need to understand when and where to use a certain effect properly.
For example:
Tell Your Story With Split Screen Effect
If you’re telling your brand story from the perspective of different individuals, using the split-screen effect is recommended. You can also use this effect to showcase how one thing is related to another in a cause-and-effect way.
Take this Lexus commercial, for example:
It shows the view from inside the car and from a viewer’s perspective.
Emphasize with Pan and Zoom Effect
As the topic of concern of this article is brand videos, the pan and zoom is an ideal effect for it.
You can easily emphasize its importance and give off an emotional storytelling vibe by zooming in on a person’s face or any other object in the frame. You can also use pan and zoom to add a transition to your video. Here’s an example:
Add Thrill with Transitions
To move from one shot to another, it’s important to add a transition effect in between. You can add different transition styles to link the shots with one another, for instance, the match cut transition to match scenes that are not otherwise linked visually. Or the whip pan transition, which involves a quick rotation of the camera’s axis to give the impression that the scene was shot in one take, although it is two separate clips.
Take Wondershare Filmora’s brand video, for example. You can see how seamlessly it moves from one effect to another. It adds value and makes the video fun to watch.
With the variety of transitions in Filmora’s library, you can add all the effects discussed above to your video for stunning results.
You’ve added motion tracking, used AR stickers, created a mystical background with the green screen effect, and gone innovative with effects. Now, it’s time to wrap up this article with…
5. Energize Your Videos with Speed Ramping
Did you know that speed ramping can actually improve your videos tenfold? Speeding up and slowing down the footage at certain points can have a significant impact. For example, the bullet dodge scene in “Matrix” wouldn’t have been so famous if it wasn’t for the slo-mo effect!

You can’t just randomly add speed ramps to your video. There has to be a purpose behind it! Do you want to emphasize something? Do you want to show a transition? Regardless, you need to time your speed ramping properly.
And here are a few tips for it!
Use Slo-Mo For Action Sequences
If your video has an amazing action scene in it, slow down the speed at that point to emphasize the action and movement. For example, a karate kick in slow motion very clearly shows us how the move is actually performed.
Don’t Use Slo-Mo For Too Long
Another tip is to use the slow-mo only for a few seconds to emphasize something. If you prolong it, it won’t have the desired impact and might even cause the audience to lose focus.
Speed Up Footage for Long Processes
If your video shows a long process, like a time-lapse, it is the perfect time to speed up the footage. Not only do long shots lose the viewer’s attention, but they can also get boring too. A sped up footage on the other hand makes your video aesthetically pleasing and entertaining.
Add Music
Using music in videos is quite a common practice; however, it becomes quite exciting if you speed ramp your video according to the music. For example, time the slo-mo effect with the more silent or riverbed parts of the music, and speed it up when the crescendo comes.
You can do this easily with the auto beat-sync feature in Filmora that matches the music with the footage.

How’s that for a thrilling video?
Speed Ramp for Transitions
Here’s a bonus tip! Use speed ramping at the end of one clip and the beginning of the next one to create a seamless flow between the two. It’ll also give a transition effect and make your brand video look professional.
So you see, you have ample options to add a touch of creativity to your brand videos. The key is to use a good video editor and the right video editing tools.
Wrapping Up
Shooting a brand video is easy, and it’s even easier to edit it. All you need is to let your creativity flow!
With Wondershare Filmora 11’s new and advanced editing features, making watch-worthy brand videos that give out the desired message and compel the audience to take some action has never been easier!
And, with the useful video editing tips that we have shared, you are just a click away from taking your business to new heights!
So, if you also want to create a video successfully, just like Filmora’s brand video, follow our tips, use the tricks, and edit away!
3 Ways to Create Motion Text Effects for Your Video
When you think about text effects, you generally refer to the amazing static text styles that will make any text look stunning. But when you talk about any text or title in a video, static text effects do not draw a scratch in the minds of the beholders. You have to get your text in motion and that is where text animations come into the scene.
Motion text effects refer to the text being in motion so that it can go well with any video in the background as well as look visually appealing. Creating text motion graphics is easy these days if you have the right video editor. There are amazing motion text animation templates available that you can apply to the texts and titles in your video and amaze your viewers. We will illustrate the simple steps to create motion text graphics in popular video editors.
Part 1. Create Motion Text Effect with Filmora
Wondershare Filmora is undoubtedly the easiest video editor to create amazing motion text effects thanks to its intuitive user interface. There are different categories of motion text effects available to suit your requirements perfectly as per your video projects. Filmora has the latest collection of text effects that you can use in your video and outshine your competitors.
Apart from text animations, you get different elements to enhance your text effects. You can have animated backgrounds and you can customize the animation in your text minutely to get the desired result. Filmora is available for both Windows and Mac users and you can try out its free trial before purchasing the license. Here are the steps to create Alight Motion text effect using Filmora.
Free Download For Win 7 or later(64-bit)
Free Download For macOS 10.14 or later
Step1 Download and install Wondershare Filmora on your computer. Click on New Project on the welcome screen. You can drag and drop your video clip for the background on Project Media folder.

Step2 Drop the video clip onto timeline. If you do not have any background video, you can select background from Stock Media> pexels/Pixabay> Video and drop animated background onto the timeline.
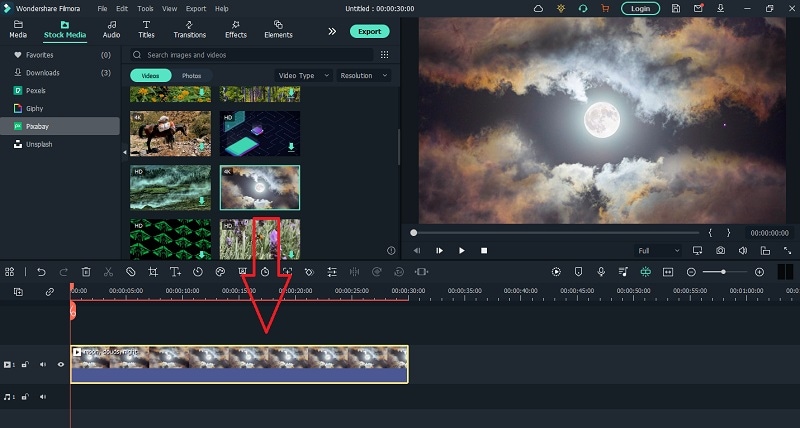
Step3 Go to Titles and search for “animation” and you will get all the motion text effect and animation templates. Select any one of them and drop onto the timeline above the background layer.
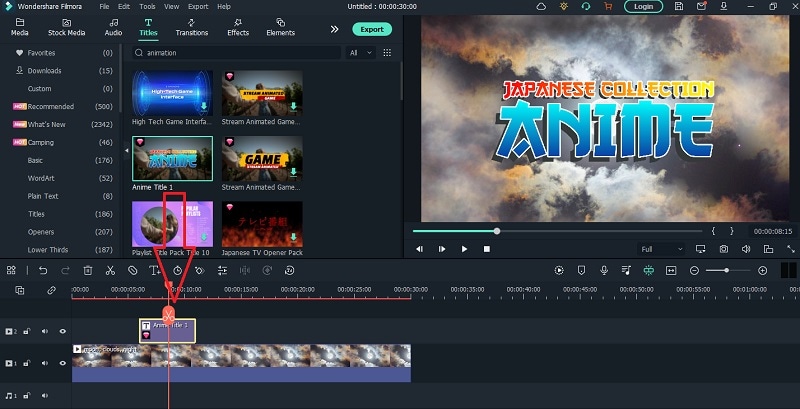
Step4 Double-click on the text layer to type in your desired text. Reposition the text layer on the timeline and on the video from Viewer.
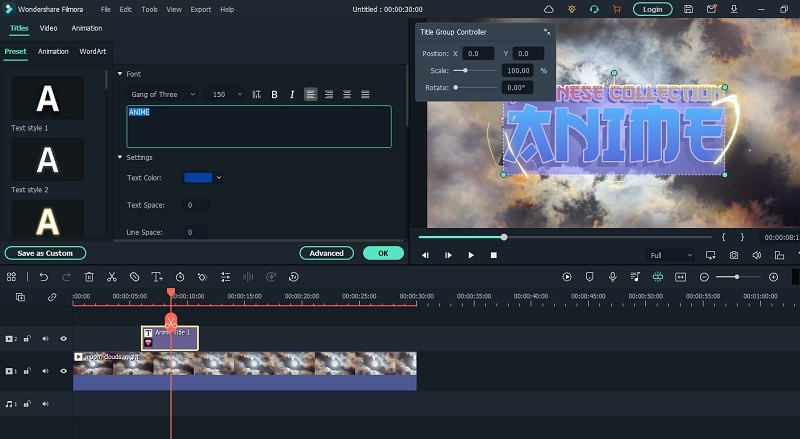
Part 2. Use Premiere Pro to Make Motion Text
Adobe Premiere Pro is one of the most preferred video editors among professionals. Even though Premiere Pro does not come with a vast set of motion text effects, you can download them online and import them to use for the texts in your video. Here are the steps to create text motion graphics on Premiere Pro.
Step1 Go to Graphics> Essential Graphics and select a motion text effect template as per your preference. Drag and drop it into your timeline above your video or background clip.
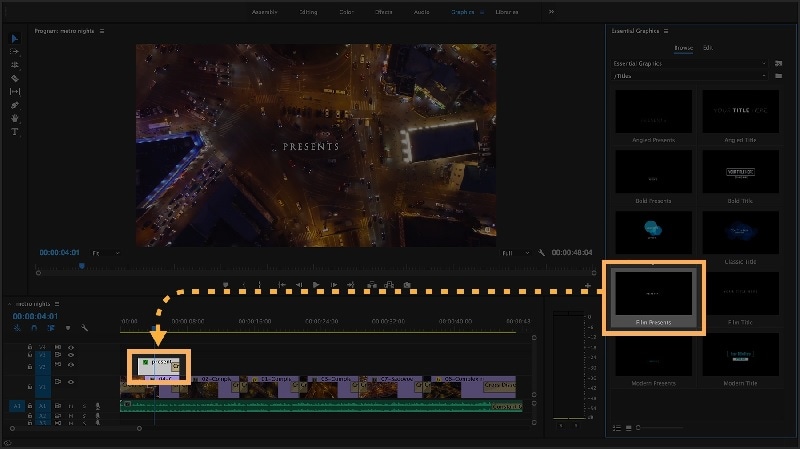
Step2 Double-click on the text to edit the words and type in your text. Go to Essential Graphics panel to customize the text effect parameters as per your requirements.
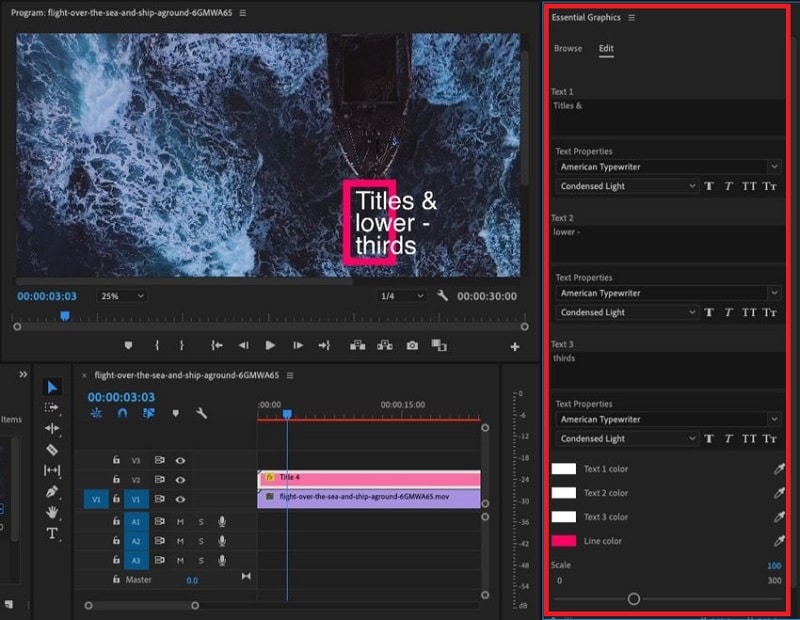
Step3 If you want to edit the animation, select the text layer and go to Effects Control panel. Open up Keyframe box by dragging it to the right. Adjust the keyframe as per your animation requirements.

Bring the keyframes closer or spread them apart to speed up or slow down. Tweak parameters like? Velocity Controls under different text properties to edit the animation effectively.
Part 3. How to Make Motion Text in After Effects
After Effects is the most popular video editor when it comes to motion text effects. This is because there are different categories of motion text animation templates and presets available like Filmora. Even though the user interface is slightly complicated like Premiere Pro, most professionals use the tool for video editing and adding text effects. Here are the steps to add motion text effect Alight Motion like using After Effects.
Step1 From Tool panel, click on Type tool and click on Composition panel to type in your text. From Characters and Paragraph section, adjust the text styles and textures.
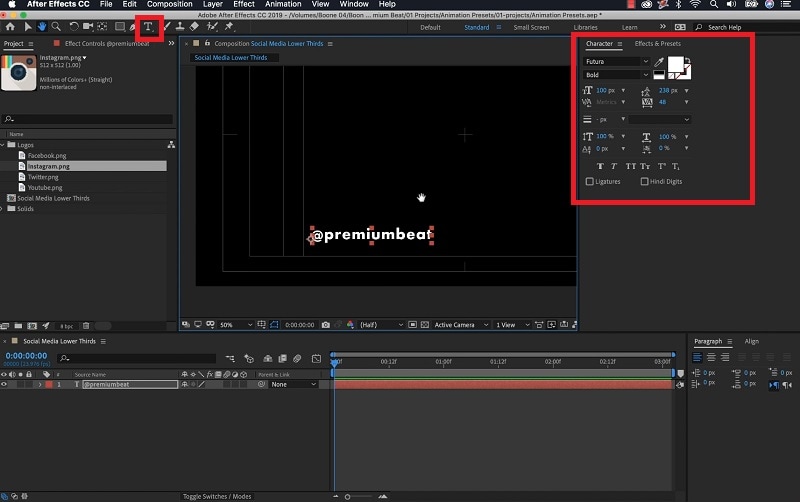
Step2 Go to Effects and Presets panel, go through and search for the desired motion text effect preset. Drag and drop the selected preset on the text layer directly.
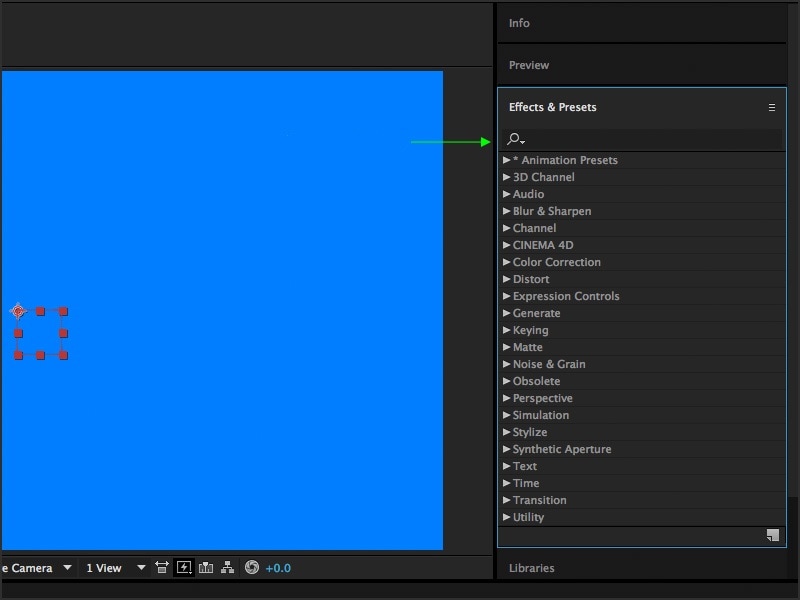
Step3 From Current Time Indicator, slide the keyframes to adjust the animation. Click on the text layer to expand it and adjust different parameters to get the desired text animation.
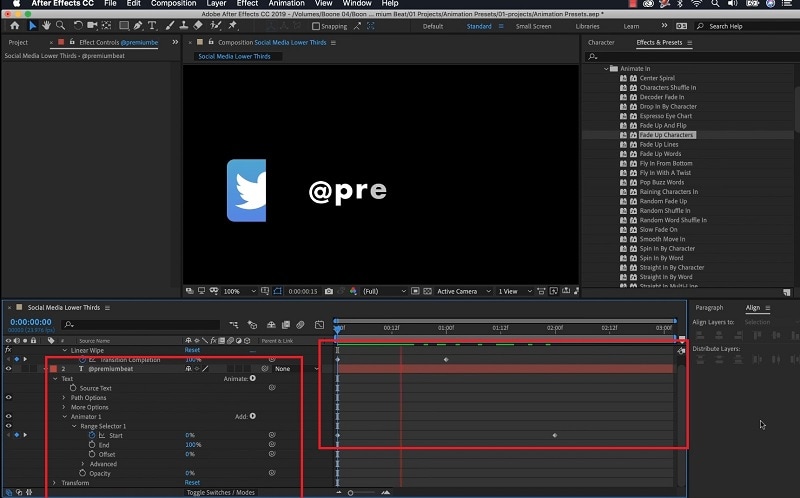
Part 4. Best Motion Effects Ideas to Try
There are several text motions effects available that make your text look stunning and grab the attention of the viewers instantly. If you are confused which text motion effects you should try out, there are some of the best text motion effects you can try out on After Effects and Filmora.
Data Stream – You get the motion effect on After Effects where the characters come on the screen in a scrambled fashion. Thereafter, the characters organize them to form meaning words and sentences. Then the words disperse in a scrambled fashion before the next words and sentences follow the same pattern.
Abstract Motion Intro – You can get the motion effect on Filmora where there are multiple animations are put together in one effect. There are 3d effect, slide in motion as well as zoom in effect to display the desired texts and titles colourfully.
Random Spike Tumble – This is another motion effect on After Effects where the characters appear on the screen with spike in size along with blur effect and flipping animation. Finally, they settle on the screen and the meaning word or sentence appears perfectly. The effect helps to hold the attention of the viewers throughout.
Comic and Life Effect – You get this motion effect on Filmora where the large texts are shown and they have a comical typography. The words keep on zooming in and out to add to the comical factor.
Corporate Title Effect – This comes as a pack on After Effects whereby you get amazing text motion effects that you mostly see in professional videos. Starting from oblique stripe and emerge effect to slide in and out with modern touches and objects, you get stunning text motion to enhance your video content.?
The Bottom Line
If there are texts and titles in your video, you have to use motion text effect to make your video content interesting. We have illustrated the simple steps to create and edit motion text effects. We recommend Wondershare Filmora as the best video editor for creating motion text effects as the user interface is intuitive and there are unlimited motion text effects to choose from.
Free Download For macOS 10.14 or later
Step1 Download and install Wondershare Filmora on your computer. Click on New Project on the welcome screen. You can drag and drop your video clip for the background on Project Media folder.

Step2 Drop the video clip onto timeline. If you do not have any background video, you can select background from Stock Media> pexels/Pixabay> Video and drop animated background onto the timeline.

Step3 Go to Titles and search for “animation” and you will get all the motion text effect and animation templates. Select any one of them and drop onto the timeline above the background layer.

Step4 Double-click on the text layer to type in your desired text. Reposition the text layer on the timeline and on the video from Viewer.

Part 2. Use Premiere Pro to Make Motion Text
Adobe Premiere Pro is one of the most preferred video editors among professionals. Even though Premiere Pro does not come with a vast set of motion text effects, you can download them online and import them to use for the texts in your video. Here are the steps to create text motion graphics on Premiere Pro.
Step1 Go to Graphics> Essential Graphics and select a motion text effect template as per your preference. Drag and drop it into your timeline above your video or background clip.

Step2 Double-click on the text to edit the words and type in your text. Go to Essential Graphics panel to customize the text effect parameters as per your requirements.

Step3 If you want to edit the animation, select the text layer and go to Effects Control panel. Open up Keyframe box by dragging it to the right. Adjust the keyframe as per your animation requirements.

Bring the keyframes closer or spread them apart to speed up or slow down. Tweak parameters like? Velocity Controls under different text properties to edit the animation effectively.
Part 3. How to Make Motion Text in After Effects
After Effects is the most popular video editor when it comes to motion text effects. This is because there are different categories of motion text animation templates and presets available like Filmora. Even though the user interface is slightly complicated like Premiere Pro, most professionals use the tool for video editing and adding text effects. Here are the steps to add motion text effect Alight Motion like using After Effects.
Step1 From Tool panel, click on Type tool and click on Composition panel to type in your text. From Characters and Paragraph section, adjust the text styles and textures.

Step2 Go to Effects and Presets panel, go through and search for the desired motion text effect preset. Drag and drop the selected preset on the text layer directly.

Step3 From Current Time Indicator, slide the keyframes to adjust the animation. Click on the text layer to expand it and adjust different parameters to get the desired text animation.

Part 4. Best Motion Effects Ideas to Try
There are several text motions effects available that make your text look stunning and grab the attention of the viewers instantly. If you are confused which text motion effects you should try out, there are some of the best text motion effects you can try out on After Effects and Filmora.
Data Stream – You get the motion effect on After Effects where the characters come on the screen in a scrambled fashion. Thereafter, the characters organize them to form meaning words and sentences. Then the words disperse in a scrambled fashion before the next words and sentences follow the same pattern.
Abstract Motion Intro – You can get the motion effect on Filmora where there are multiple animations are put together in one effect. There are 3d effect, slide in motion as well as zoom in effect to display the desired texts and titles colourfully.
Random Spike Tumble – This is another motion effect on After Effects where the characters appear on the screen with spike in size along with blur effect and flipping animation. Finally, they settle on the screen and the meaning word or sentence appears perfectly. The effect helps to hold the attention of the viewers throughout.
Comic and Life Effect – You get this motion effect on Filmora where the large texts are shown and they have a comical typography. The words keep on zooming in and out to add to the comical factor.
Corporate Title Effect – This comes as a pack on After Effects whereby you get amazing text motion effects that you mostly see in professional videos. Starting from oblique stripe and emerge effect to slide in and out with modern touches and objects, you get stunning text motion to enhance your video content.?
The Bottom Line
If there are texts and titles in your video, you have to use motion text effect to make your video content interesting. We have illustrated the simple steps to create and edit motion text effects. We recommend Wondershare Filmora as the best video editor for creating motion text effects as the user interface is intuitive and there are unlimited motion text effects to choose from.
Also read:
- 2024 Approved Video Maker with Song
- Updated In 2024, How to Add a Lower Third to Your Video
- New In 2024, Want to Know How to Slow Down a Video on iPhone or Speed It Up? This Guide Provides Step by Step Method to Do so Using Simple Techniques. Find Out More About It
- How to Use Rule of Thirds in Video
- New In 2024, How to Make Censor Effects with Filmora
- New How Long Does It Take To Edit A Video for 2024
- Ways to Learn Discord Game Bots – Even if Youre Just Starting Out 20
- Are You Convincingly Fascinated by the Whole Idea of Augmented Reality and Want to Level up Your Marketing Skills with an AR Integration? Rest Assured, Youve Found the Right Place
- 2024 Approved How to Create An Eye-Catching Intro Videos with InVideo
- 2024 Approved Good Slideshow Makers Sometimes Cost High and Free Slideshow Makers Provide Slideshows with the Watermark. How to Cope with This Problem? This Article Gives Solutions
- In 2024, Mask Tracking Is Believed to Be a Helpful Procedure for Marking Proper Areas in Videos. Learn How to Perform Premiere Pro Mask Tracking in This Guide
- New How to Time-Lapse a Video on iMovie for 2024
- If You Are Looking for an Open-Source, Cross-Platform Video Editor, Shotcut Is a Great Choice, In 2024 But Is It Truly the Best Video Editor or Is There a Better Alternative Available?
- New Overview About Supported iPhone Video Formats and Best iPhone Video Editor & Converter
- Attaining Slow Motion Video Trend Finding The Best CapCut Templates for 2024
- New How to Make a Video Slideshow in iMovie for 2024
- New Best 8 Srt File Creators for 2024
- Updated In 2024, Ultimate Guide on How To Plan and Storyboard a Music Video
- Updated 10 Matching Color Combination That Works Together Greatly for 2024
- How to Crop a Video in Windows Media Player for 2024
- New In 2024, How to Change the Speed of Video in DaVinci Resolve?
- New How To Synchronize Your Audio And Videos Properly?
- 2024 Approved Learn How to Use and Download KineMaster Templates Like a Pro. Discover Alternative Video Templates to Elevate Your Video Creation
- How to Make a Slideshow GIF for 2024
- Slowing Down GIF With The Best Available Methods
- New 2024 Approved How to Edit Facebook eCommerce Video Ads
- New Learning How to Slow Down a Video on iPhone Properly for 2024
- Updated 2024 Approved How to Remove Background Noise From Video Sony Vegas
- New 2024 Approved Have You Ever Watched a Movie Where You Felt the Filmmakers Left You Hanging? Yea, Thats What Freeze Frame Does. Here We Will Enlighten You on What It Is, Freeze Frame Examples Where It Has Been Helpful to Drive Our Point Home
- Updated 2024 Approved How to Add Custom Subtitles to Netflix
- Updated Top Applications That Can Help Apply The Best VHS Camera Effect
- New Want to Speed up or Slow Down a Video to Make It Look Different? Here Are the Simple Steps to Change Video Speed in Lightworks Video Editor
- In 2024, How To Bypass iCloud Activation Lock On iPod and Apple iPhone 15 Pro The Right Way
- In 2024, The Ultimate Guide to Generating Speech in Different Languages With the Best Tools
- In 2024, A Step-by-Step Guide to Finding Your Apple ID On Your iPhone 13 mini
- The 10 Best Tools to Bypass iCloud Activation Lock From iPhone 14 You Should Try Out
- How To Bypass Google FRP on Tecno Spark 20 Pro+
- In 2024, How Can We Bypass Samsung Galaxy Z Flip 5 FRP?
- In 2024, CatchEmAll Celebrate National Pokémon Day with Virtual Location On Motorola Razr 40 | Dr.fone
- Oppo A18 Messages Recovery - Recover Deleted Messages from Oppo A18
- Solutions to Spy on HTC U23 Pro with and without jailbreak | Dr.fone
- In 2024, How Can We Bypass Infinix Smart 8 Plus FRP?
- 11 Best Location Changers for Honor 90 | Dr.fone
- How to Change Your Location on Apple iPhone 7 | Dr.fone
- Title: How to Create a Light Sweep (Shine) Effect with Filmora for 2024
- Author: Morgan
- Created at : 2024-05-19 05:12:16
- Updated at : 2024-05-20 05:12:16
- Link: https://ai-video-editing.techidaily.com/how-to-create-a-light-sweep-shine-effect-with-filmora-for-2024/
- License: This work is licensed under CC BY-NC-SA 4.0.

