:max_bytes(150000):strip_icc():format(webp)/GettyImages-1168002788-1bccccf67a1f4988bd355c09748383ab.jpg)
How To Create Quiz Videos Detailed Guide

How To Create Quiz Videos: Detailed Guide
Quiz videos are becoming popular on YouTube but creating good content takes work. You’ll have to spend time on it, find the right questions and spend resources on powerful video editing software. In this guide, we’ll show you what a quiz video is, its advantages, and how you can use Filmora to make interactive video quizzes.
So, what are you waiting for? Read on to learn how to create quiz videos for Youtube!
Part 1. What Is A Quiz Video?
A quiz video is a type of content that provides viewers with a series of questions that are typically about a particular topic or subject matter and may also provide additional information about the topic. You can use the video for various purposes, including educational, entertainment, and marketing.

To make an appealing video quiz, you have to look at it from various angles, such as its purpose, type, and relevancy.
Moreover, a well-made quiz video will demand the viewer’s attention and encourage them to take action without being intrusive or annoying. One of the best ways is to provide visual captions that can explain the point being made in an engaging, fast-paced, and entertaining way.
Part 2. What Are The Advantages Of A Quiz And How To Use It?
Quizzing is a great way to engage your audience and encourage them to interact with your content. They can be used to create thought-provoking content, impart knowledge, and improve learning outcomes.
When used correctly, a quiz can be a powerful learning tool. But how do you use it effectively? And what are some of the advantages?
To answer these questions, we’ve provided some advantages of creating video quizzes and some scenarios where you can use them.
Advantages
Here are some advantages of video quizzes:
Draw Attention
A quiz can draw the viewer’s attention to the topic under discussion. Specifically, if you are a teacher, you can use GK question videos in your classroom to emphasize the content you are teaching and can better assess your students’ knowledge.
Increase Interactivity
Quizzes are a great way to increase engagement and interaction with your audience. By incorporating video into your questions, you can add an element of excitement and increase the likelihood that people will want to participate.

A Good Way To Introduce A Topic
Quizzes are an excellent way to introduce a new topic or subject matter. They can help you provide context and background information to help people understand the concepts you’re trying to teach or introduce.
Increase One’s Impressions Of Your Content
By adding a quiz, you can increase the time that someone spends on your page or channel as they work to answer the questions. This is valuable because it allows you to introduce a new topic in a fun and interactive way, along with getting more impressions on your content.
Scene
Here are some scenes where you can use the quizzes:
Educational
You can use quizzes in any educational setting, such as a classroom, online course, or YouTube video, to provide knowledge to others and assess their understanding.
Speech
Quizzes can also be used in speeches to add interest and engagement. For instance, a motivational speaker can play a quiz during their talks to the audience to help them understand his point better and get their response.
Presentation
Adding a fun quiz to your presentation can help to break the monotony and keep your audience engaged throughout the session.
Social media
Quizzes can aid in generating engagement on your social media page. For example, you can use them to drive traffic to your website or blog or simply to get people talking about your brand.
Part 3. How To Make An Interactive Quiz Video In Filmora?
Suppose the above advantages have compelled you to create an interactive quiz video to engage your audience and get them involved in your content. In that case, you can use Filmora software which makes it easy to make quiz videos with its built-in interactive video editing tools.
Here’s how you can make an interactive quiz video using Filmora :
Free Download For Win 7 or later(64-bit)
Free Download For macOS 10.14 or later
Step1 Upload Your Materials
In the first step, it is essential that you complete in-depth research and find reliable information for your quiz video. Afterward, go to the Filmora website and download the software that is compatible with your system. Install the program on your PC/laptop and launch it.
On the homepage, select the “Create New Project” option, and choose “Click here to upload a media file” to upload your video. Alternatively, you can drag and drop the background video from your system to the Filmora interface.
Finally, drag and drop the background video into the timeline.

Step2 Make An Intro
Now, start by creating an introduction. You can do this by opening the “Media” tab, selecting a template, and dropping it in the timeline once it is downloaded.
Then, go to the “Titles” tab, choose a text style you like, and drop it in the timeline. Finally, align both the template and your video file.
To add text to your intro, click on the text track in the timeline. Enter the intro text, ideally the quiz topic, then customize the text color and style as desired. The Advanced option also lets you animate your text. Save the changes by clicking “OK.”
Step3 Add A Quiz To The Timeline
Next, add the GK questions and answers to your video using the “Titles” tab. You should adjust the display time and text on the timeline as needed.

Step4 Increase Interactivity In Your Quiz Video
To make your video more engaging, go to the “Transition” tab and add an interesting transition effect. You can also add effects or countdown elements between questions or reveal the answer.
Step5 Repeat The Process And Export Your Final Video
After completing the previous steps, you can now create the entire quiz video by repeating the above steps.
Once you are done, click the “Play” icon to preview your work, and select the “Export” icon to either save the clip to your device or upload it directly to your YouTube channel.
Conclusion
In this detailed guide, we’ve explored what a video quiz is, its advantages, and scenes where you can use them. We’ve also walked you through the step-by-step process of making an interactive video quiz using the Wondershare Filmora software.
Hopefully, you’ve enjoyed reading this article and can now create quiz videos for your presentation, classroom, or YouTube videos.
Free Download For macOS 10.14 or later
Step1 Upload Your Materials
In the first step, it is essential that you complete in-depth research and find reliable information for your quiz video. Afterward, go to the Filmora website and download the software that is compatible with your system. Install the program on your PC/laptop and launch it.
On the homepage, select the “Create New Project” option, and choose “Click here to upload a media file” to upload your video. Alternatively, you can drag and drop the background video from your system to the Filmora interface.
Finally, drag and drop the background video into the timeline.

Step2 Make An Intro
Now, start by creating an introduction. You can do this by opening the “Media” tab, selecting a template, and dropping it in the timeline once it is downloaded.
Then, go to the “Titles” tab, choose a text style you like, and drop it in the timeline. Finally, align both the template and your video file.
To add text to your intro, click on the text track in the timeline. Enter the intro text, ideally the quiz topic, then customize the text color and style as desired. The Advanced option also lets you animate your text. Save the changes by clicking “OK.”
Step3 Add A Quiz To The Timeline
Next, add the GK questions and answers to your video using the “Titles” tab. You should adjust the display time and text on the timeline as needed.

Step4 Increase Interactivity In Your Quiz Video
To make your video more engaging, go to the “Transition” tab and add an interesting transition effect. You can also add effects or countdown elements between questions or reveal the answer.
Step5 Repeat The Process And Export Your Final Video
After completing the previous steps, you can now create the entire quiz video by repeating the above steps.
Once you are done, click the “Play” icon to preview your work, and select the “Export” icon to either save the clip to your device or upload it directly to your YouTube channel.
Conclusion
In this detailed guide, we’ve explored what a video quiz is, its advantages, and scenes where you can use them. We’ve also walked you through the step-by-step process of making an interactive video quiz using the Wondershare Filmora software.
Hopefully, you’ve enjoyed reading this article and can now create quiz videos for your presentation, classroom, or YouTube videos.
Best 8 AR Apps for Android and iOS | Help You See the World of AR
Top 8 AR Apps for Android and Ios Help You See the World of AR
An easy yet powerful editor
Numerous effects to choose from
Detailed tutorials provided by the official channel
Suppose you want to buy a pair of eyeglasses and don’t know which pair would suit your look. Now you might wish to look at how your face would look on different frames. Here you can use AR and see which pair of glasses would fit you using AR. AR can be used to share and receive various kinds of tacit knowledge. Augmented Reality is often synonymously used for “Computed-mediated reality” and “Mixed- Reality.”
Despite such an exceptional concept, many users raised questions about the privacy issues of this app. AR technology constantly needs to record the real environment, which involves real human beings. Recording their movement breaches their privacy which can cause legal trouble for the user. If the videos are recorded with consent, they will not harm anyone.
In this article
01 [What Is Augmented Reality?](#Part 1)
02 [The 4 Best Augmented Reality Apps for iPhone](#Part 2)
03 [The 4 Best Augmented Reality Apps for Android](#Part 3)
Part 1 What Is Augmented Reality?
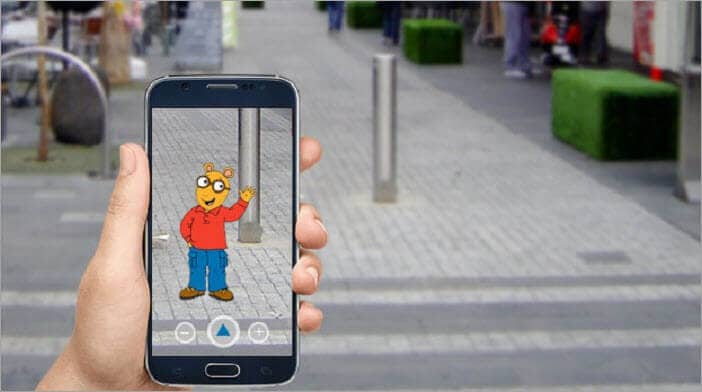
Augmented Reality is a technology that uses the real-world environment where virtual objects reside. This process involves an experience where the real or physical world interweaves with virtually created objects. It interweaves so perfectly that the artificial seems a part of the natural. This is an artificial experience, and it adds to the real environment. AR gained popularity in the fields of entertainment and video games.
You might think that AR (Augmented Reality) is the same as VR (Virtual Reality). They are not the same. When someone looks through a VR, everything, including the object’s environment, is virtual or an illusion. When AR is used, the object is virtual, but the environment is real. Suppose you want to buy an item of furniture and you do not know whether it would match your home décor; here, you can use AR to see whether the furniture would fit your décor or not.
Part 2 The 4 Best Augmented Reality Apps for iPhone
Have you ever wondered how it would be to purchase furniture sitting in your bedroom? How would it be like to not worry about which color would fit the home décor o which position would be the best for the product? You can experience these exciting features using this Augmented Reality or AR powered apps. These four apps will give you the best iPhone ar video experience.
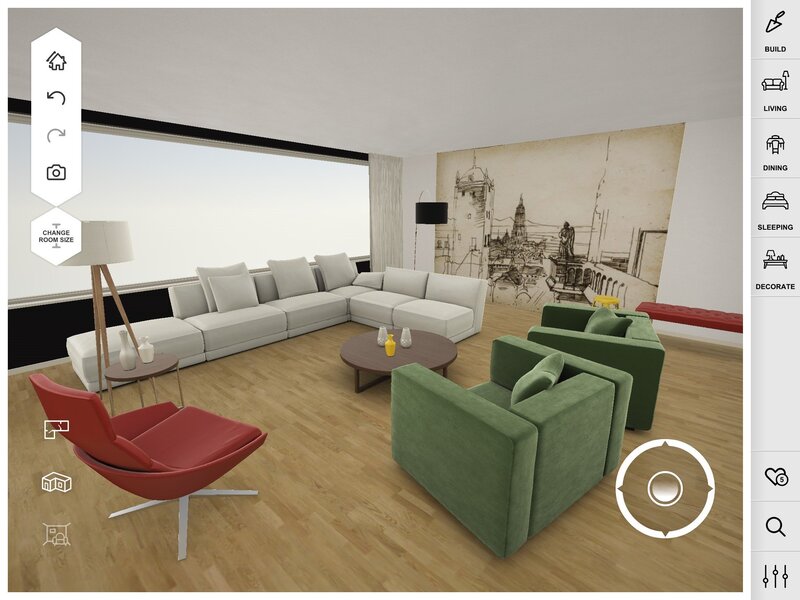
01Amikasa
Amikasa is basically a home furnishing AR app. It is exclusive to iOS users only. You can use this app to view products from different brands and websites. This app will improve your shopping experience without going to different stores to get the right product for your room. You can just walk around your house and find the best-fitted product for your house using AR models of the products. Since there are no boundaries to websites and brands, it gives you more opportunity to choose your product wisely. The most interesting part about this app is that you can make your purchases without exiting from this app.
02Wanna Kicks
Wanna Kicks is a fashion-based AR app. To be precise, this app focuses on footwear. This app is also exclusive to iOS users only. You can look into different brands and websites and choose the best footwear for yourself. You can virtually look at how a pair of shoes would look on you when you wear them. You do not browse around to find the most suitable footwear and do it sitting on your bed. These interesting features of this app have gained people’s attention from various countries. This app can push your apple ar video experience to a different level.

03Augment
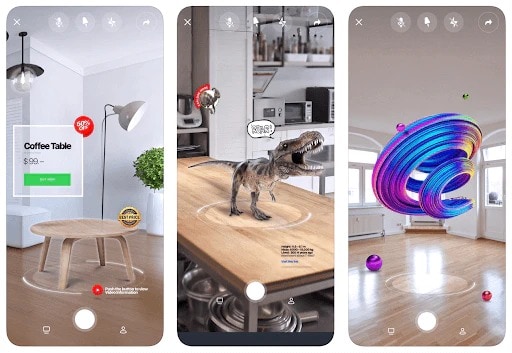
Augment is a home furnishing goods-based AR app. The app needs to be purchased at $10/month for corporate uses. This app mainly targets e-commerce store owners to make their selling process smooth by creating AR pictures of their products. The seller creates 3D images or models of products that the customers can use to find the best fit for their house. The images created by this app are uploaded for common people’s Augmented Reality experience through mobile apps, websites, or some other source. It comes to great use when the products are sold in the field like event sales, pop-up shops, e-commerce markets, etc.
04Roar
Roar is another AR technology-based app that needs to be purchased at $49 by the creators or hosts. This app aims at business owners. Business owners can use this app in many ways possible, like creating an online store using AR technology using which the consumers can scan the product packages from their homes, using AR technology in advertisements, and many other ways possible.
This app can be used by car sellers to show 3D models or AR images of different cars. Roar is a very popular app used by educators to make educational videos more game-like and make the process of learning fun by including animations and models for teaching.
Part 3 The 4 Best Augmented Reality Apps for Android
Augmented Reality or AR is a very interesting technology, and anybody would want to have this feature in their phone. So here are some apps mentioned below which will help you get ar video app android experience. These four apps top the list of best AR videos for android.
01Google Lens
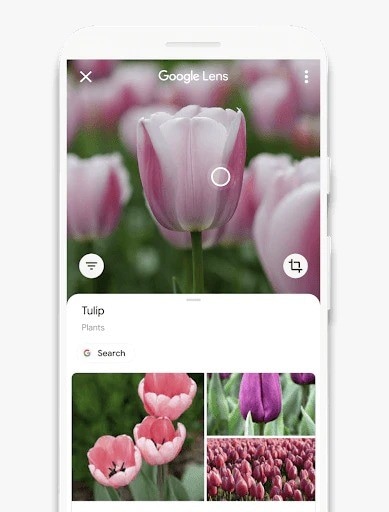
Google Lens is an image-recognizing application based on AR technology developed by Google, which can be used for free. This app top the list of best Augmented Reality apps. This app can be used to identify objects, texts, images, landmarks, and so much more. Instead of typing your query, you can just scan the product you want to know about.
If you want to buy a product you searched for, the app will provide you with websites selling that particular product. The object needs to be placed in front of the mobile’s camera, and the app uses its Augmented Reality technology to recognize the object and gives appropriate results. You can access Google Lenses by downloading the app or the Google Photos app itself.
02Snapchat
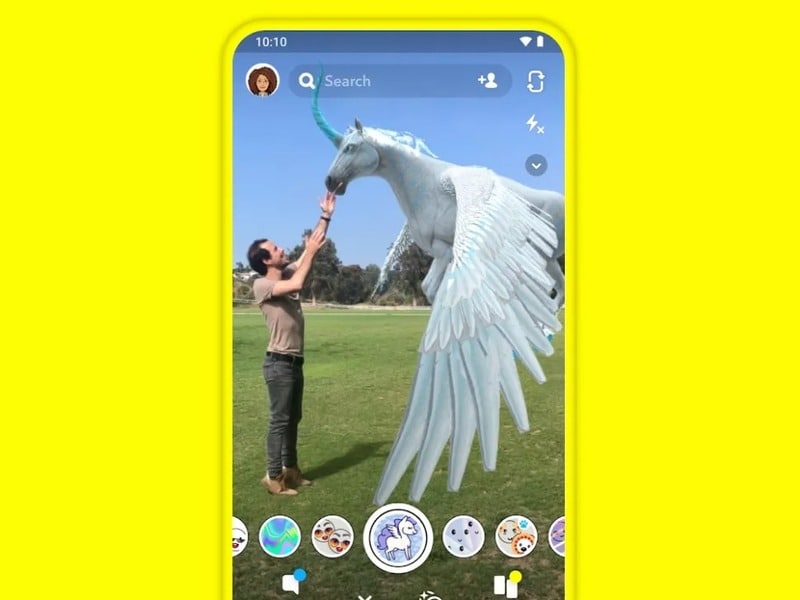
Snapchat is a very popular app, especially among the youngsters. Snapchat is a free app with very minimum system requirements and thus can be accessed by anyone. It has some cool features like fun image effects and exciting texting features. This app offers quirky face filters where the Augmented Reality technology comes to use.
You can transform into anything like a cat, dog, or even another person using this app’s appropriate filter. You can also send funny videos of yourself using those quirky filters through this app. This app gives you a fun and silly experience with taking pictures of yourself or taking a selfie, as popularly known.
03IKEA Place
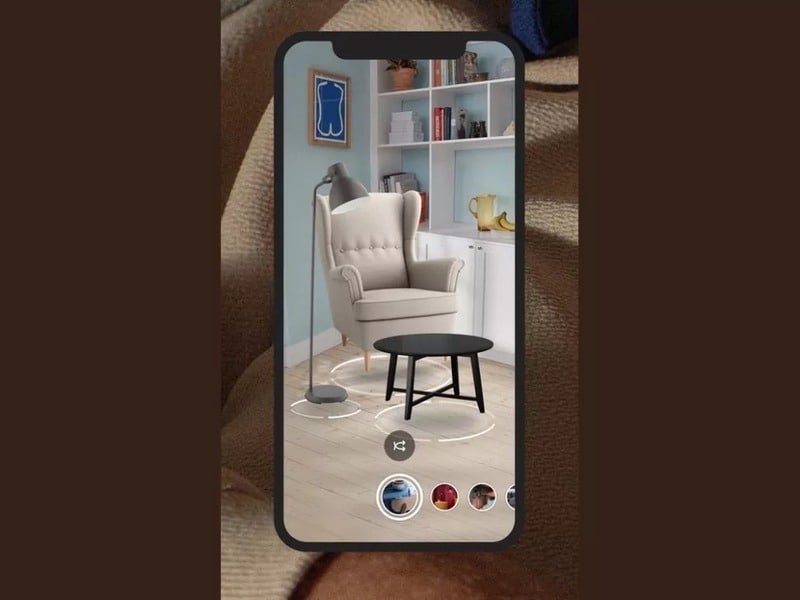
IKEA Place is a free home décor-based Augmented Reality app. This app is a bridge between Swedish furniture retailers and shoppers. The shoppers or the consumers get the opportunity to place or put out the furniture in their house and decide whether it is suitable for the room or the house. The app considers the whole area and shows the product concerning the space of the area of the room where the product is to be kept. This “drag-and-drop” function helps the users select colors according to the place where they want to keep the product. These features make the shoppers’ experience smooth and hustle-free. This app is one of the best apps for ar video app android users.
04Houzz
Houzz is a home furnishing goods or furniture selling app that uses Augmented Reality for advertising its goods. This app can be used to do interior planning to decide on designs, positions, or layouts of the products. You can view products of different brands and buy the products without exiting the app because of its e-commerce functionality.
This app has an interesting feature: the “View in My Room,” an Augmented Reality powered feature. You can decide the product’s position by virtually placing it in your room. You might not get the most accurate result, but you can get a slight idea of the product and how it would look in your house.
For Win 7 or later (64-bit)
For macOS 10.12 or later
● Ending Thoughts →
● I hope now you know what Augmented Reality is and in which fields it is used.
● It has gained popularity in the marketing industry because it gives a multi-dimensional opportunity to buy and sell products.
● Most importantly, you know how Augmented Reality is different from Virtual Reality.
● This article also highlights the best apple ar video apps and ar video apps android. The apps mentioned in this article are very easy to use. These apps can give you a smooth AR using experience and take it to a different level.
Suppose you want to buy a pair of eyeglasses and don’t know which pair would suit your look. Now you might wish to look at how your face would look on different frames. Here you can use AR and see which pair of glasses would fit you using AR. AR can be used to share and receive various kinds of tacit knowledge. Augmented Reality is often synonymously used for “Computed-mediated reality” and “Mixed- Reality.”
Despite such an exceptional concept, many users raised questions about the privacy issues of this app. AR technology constantly needs to record the real environment, which involves real human beings. Recording their movement breaches their privacy which can cause legal trouble for the user. If the videos are recorded with consent, they will not harm anyone.
In this article
01 [What Is Augmented Reality?](#Part 1)
02 [The 4 Best Augmented Reality Apps for iPhone](#Part 2)
03 [The 4 Best Augmented Reality Apps for Android](#Part 3)
Part 1 What Is Augmented Reality?
Augmented Reality is a technology that uses the real-world environment where virtual objects reside. This process involves an experience where the real or physical world interweaves with virtually created objects. It interweaves so perfectly that the artificial seems a part of the natural. This is an artificial experience, and it adds to the real environment. AR gained popularity in the fields of entertainment and video games.
You might think that AR (Augmented Reality) is the same as VR (Virtual Reality). They are not the same. When someone looks through a VR, everything, including the object’s environment, is virtual or an illusion. When AR is used, the object is virtual, but the environment is real. Suppose you want to buy an item of furniture and you do not know whether it would match your home décor; here, you can use AR to see whether the furniture would fit your décor or not.
Part 2 The 4 Best Augmented Reality Apps for iPhone
Have you ever wondered how it would be to purchase furniture sitting in your bedroom? How would it be like to not worry about which color would fit the home décor o which position would be the best for the product? You can experience these exciting features using this Augmented Reality or AR powered apps. These four apps will give you the best iPhone ar video experience.
01Amikasa
Amikasa is basically a home furnishing AR app. It is exclusive to iOS users only. You can use this app to view products from different brands and websites. This app will improve your shopping experience without going to different stores to get the right product for your room. You can just walk around your house and find the best-fitted product for your house using AR models of the products. Since there are no boundaries to websites and brands, it gives you more opportunity to choose your product wisely. The most interesting part about this app is that you can make your purchases without exiting from this app.

02Wanna Kicks
Wanna Kicks is a fashion-based AR app. To be precise, this app focuses on footwear. This app is also exclusive to iOS users only. You can look into different brands and websites and choose the best footwear for yourself. You can virtually look at how a pair of shoes would look on you when you wear them. You do not browse around to find the most suitable footwear and do it sitting on your bed. These interesting features of this app have gained people’s attention from various countries. This app can push your apple ar video experience to a different level.

03Augment
Augment is a home furnishing goods-based AR app. The app needs to be purchased at $10/month for corporate uses. This app mainly targets e-commerce store owners to make their selling process smooth by creating AR pictures of their products. The seller creates 3D images or models of products that the customers can use to find the best fit for their house. The images created by this app are uploaded for common people’s Augmented Reality experience through mobile apps, websites, or some other source. It comes to great use when the products are sold in the field like event sales, pop-up shops, e-commerce markets, etc.

04Roar
Roar is another AR technology-based app that needs to be purchased at $49 by the creators or hosts. This app aims at business owners. Business owners can use this app in many ways possible, like creating an online store using AR technology using which the consumers can scan the product packages from their homes, using AR technology in advertisements, and many other ways possible.
This app can be used by car sellers to show 3D models or AR images of different cars. Roar is a very popular app used by educators to make educational videos more game-like and make the process of learning fun by including animations and models for teaching.

Part 3 The 4 Best Augmented Reality Apps for Android
Augmented Reality or AR is a very interesting technology, and anybody would want to have this feature in their phone. So here are some apps mentioned below which will help you get ar video app android experience. These four apps top the list of best AR videos for android.
01Google Lens
Google Lens is an image-recognizing application based on AR technology developed by Google, which can be used for free. This app top the list of best Augmented Reality apps. This app can be used to identify objects, texts, images, landmarks, and so much more. Instead of typing your query, you can just scan the product you want to know about.
If you want to buy a product you searched for, the app will provide you with websites selling that particular product. The object needs to be placed in front of the mobile’s camera, and the app uses its Augmented Reality technology to recognize the object and gives appropriate results. You can access Google Lenses by downloading the app or the Google Photos app itself.

02Snapchat
Snapchat is a very popular app, especially among the youngsters. Snapchat is a free app with very minimum system requirements and thus can be accessed by anyone. It has some cool features like fun image effects and exciting texting features. This app offers quirky face filters where the Augmented Reality technology comes to use.
You can transform into anything like a cat, dog, or even another person using this app’s appropriate filter. You can also send funny videos of yourself using those quirky filters through this app. This app gives you a fun and silly experience with taking pictures of yourself or taking a selfie, as popularly known.

03IKEA Place
IKEA Place is a free home décor-based Augmented Reality app. This app is a bridge between Swedish furniture retailers and shoppers. The shoppers or the consumers get the opportunity to place or put out the furniture in their house and decide whether it is suitable for the room or the house. The app considers the whole area and shows the product concerning the space of the area of the room where the product is to be kept. This “drag-and-drop” function helps the users select colors according to the place where they want to keep the product. These features make the shoppers’ experience smooth and hustle-free. This app is one of the best apps for ar video app android users.

04Houzz
Houzz is a home furnishing goods or furniture selling app that uses Augmented Reality for advertising its goods. This app can be used to do interior planning to decide on designs, positions, or layouts of the products. You can view products of different brands and buy the products without exiting the app because of its e-commerce functionality.
This app has an interesting feature: the “View in My Room,” an Augmented Reality powered feature. You can decide the product’s position by virtually placing it in your room. You might not get the most accurate result, but you can get a slight idea of the product and how it would look in your house.
For Win 7 or later (64-bit)
For macOS 10.12 or later
● Ending Thoughts →
● I hope now you know what Augmented Reality is and in which fields it is used.
● It has gained popularity in the marketing industry because it gives a multi-dimensional opportunity to buy and sell products.
● Most importantly, you know how Augmented Reality is different from Virtual Reality.
● This article also highlights the best apple ar video apps and ar video apps android. The apps mentioned in this article are very easy to use. These apps can give you a smooth AR using experience and take it to a different level.
Suppose you want to buy a pair of eyeglasses and don’t know which pair would suit your look. Now you might wish to look at how your face would look on different frames. Here you can use AR and see which pair of glasses would fit you using AR. AR can be used to share and receive various kinds of tacit knowledge. Augmented Reality is often synonymously used for “Computed-mediated reality” and “Mixed- Reality.”
Despite such an exceptional concept, many users raised questions about the privacy issues of this app. AR technology constantly needs to record the real environment, which involves real human beings. Recording their movement breaches their privacy which can cause legal trouble for the user. If the videos are recorded with consent, they will not harm anyone.
In this article
01 [What Is Augmented Reality?](#Part 1)
02 [The 4 Best Augmented Reality Apps for iPhone](#Part 2)
03 [The 4 Best Augmented Reality Apps for Android](#Part 3)
Part 1 What Is Augmented Reality?
Augmented Reality is a technology that uses the real-world environment where virtual objects reside. This process involves an experience where the real or physical world interweaves with virtually created objects. It interweaves so perfectly that the artificial seems a part of the natural. This is an artificial experience, and it adds to the real environment. AR gained popularity in the fields of entertainment and video games.
You might think that AR (Augmented Reality) is the same as VR (Virtual Reality). They are not the same. When someone looks through a VR, everything, including the object’s environment, is virtual or an illusion. When AR is used, the object is virtual, but the environment is real. Suppose you want to buy an item of furniture and you do not know whether it would match your home décor; here, you can use AR to see whether the furniture would fit your décor or not.
Part 2 The 4 Best Augmented Reality Apps for iPhone
Have you ever wondered how it would be to purchase furniture sitting in your bedroom? How would it be like to not worry about which color would fit the home décor o which position would be the best for the product? You can experience these exciting features using this Augmented Reality or AR powered apps. These four apps will give you the best iPhone ar video experience.
01Amikasa
Amikasa is basically a home furnishing AR app. It is exclusive to iOS users only. You can use this app to view products from different brands and websites. This app will improve your shopping experience without going to different stores to get the right product for your room. You can just walk around your house and find the best-fitted product for your house using AR models of the products. Since there are no boundaries to websites and brands, it gives you more opportunity to choose your product wisely. The most interesting part about this app is that you can make your purchases without exiting from this app.

02Wanna Kicks
Wanna Kicks is a fashion-based AR app. To be precise, this app focuses on footwear. This app is also exclusive to iOS users only. You can look into different brands and websites and choose the best footwear for yourself. You can virtually look at how a pair of shoes would look on you when you wear them. You do not browse around to find the most suitable footwear and do it sitting on your bed. These interesting features of this app have gained people’s attention from various countries. This app can push your apple ar video experience to a different level.

03Augment
Augment is a home furnishing goods-based AR app. The app needs to be purchased at $10/month for corporate uses. This app mainly targets e-commerce store owners to make their selling process smooth by creating AR pictures of their products. The seller creates 3D images or models of products that the customers can use to find the best fit for their house. The images created by this app are uploaded for common people’s Augmented Reality experience through mobile apps, websites, or some other source. It comes to great use when the products are sold in the field like event sales, pop-up shops, e-commerce markets, etc.

04Roar
Roar is another AR technology-based app that needs to be purchased at $49 by the creators or hosts. This app aims at business owners. Business owners can use this app in many ways possible, like creating an online store using AR technology using which the consumers can scan the product packages from their homes, using AR technology in advertisements, and many other ways possible.
This app can be used by car sellers to show 3D models or AR images of different cars. Roar is a very popular app used by educators to make educational videos more game-like and make the process of learning fun by including animations and models for teaching.

Part 3 The 4 Best Augmented Reality Apps for Android
Augmented Reality or AR is a very interesting technology, and anybody would want to have this feature in their phone. So here are some apps mentioned below which will help you get ar video app android experience. These four apps top the list of best AR videos for android.
01Google Lens
Google Lens is an image-recognizing application based on AR technology developed by Google, which can be used for free. This app top the list of best Augmented Reality apps. This app can be used to identify objects, texts, images, landmarks, and so much more. Instead of typing your query, you can just scan the product you want to know about.
If you want to buy a product you searched for, the app will provide you with websites selling that particular product. The object needs to be placed in front of the mobile’s camera, and the app uses its Augmented Reality technology to recognize the object and gives appropriate results. You can access Google Lenses by downloading the app or the Google Photos app itself.

02Snapchat
Snapchat is a very popular app, especially among the youngsters. Snapchat is a free app with very minimum system requirements and thus can be accessed by anyone. It has some cool features like fun image effects and exciting texting features. This app offers quirky face filters where the Augmented Reality technology comes to use.
You can transform into anything like a cat, dog, or even another person using this app’s appropriate filter. You can also send funny videos of yourself using those quirky filters through this app. This app gives you a fun and silly experience with taking pictures of yourself or taking a selfie, as popularly known.

03IKEA Place
IKEA Place is a free home décor-based Augmented Reality app. This app is a bridge between Swedish furniture retailers and shoppers. The shoppers or the consumers get the opportunity to place or put out the furniture in their house and decide whether it is suitable for the room or the house. The app considers the whole area and shows the product concerning the space of the area of the room where the product is to be kept. This “drag-and-drop” function helps the users select colors according to the place where they want to keep the product. These features make the shoppers’ experience smooth and hustle-free. This app is one of the best apps for ar video app android users.

04Houzz
Houzz is a home furnishing goods or furniture selling app that uses Augmented Reality for advertising its goods. This app can be used to do interior planning to decide on designs, positions, or layouts of the products. You can view products of different brands and buy the products without exiting the app because of its e-commerce functionality.
This app has an interesting feature: the “View in My Room,” an Augmented Reality powered feature. You can decide the product’s position by virtually placing it in your room. You might not get the most accurate result, but you can get a slight idea of the product and how it would look in your house.
For Win 7 or later (64-bit)
For macOS 10.12 or later
● Ending Thoughts →
● I hope now you know what Augmented Reality is and in which fields it is used.
● It has gained popularity in the marketing industry because it gives a multi-dimensional opportunity to buy and sell products.
● Most importantly, you know how Augmented Reality is different from Virtual Reality.
● This article also highlights the best apple ar video apps and ar video apps android. The apps mentioned in this article are very easy to use. These apps can give you a smooth AR using experience and take it to a different level.
Suppose you want to buy a pair of eyeglasses and don’t know which pair would suit your look. Now you might wish to look at how your face would look on different frames. Here you can use AR and see which pair of glasses would fit you using AR. AR can be used to share and receive various kinds of tacit knowledge. Augmented Reality is often synonymously used for “Computed-mediated reality” and “Mixed- Reality.”
Despite such an exceptional concept, many users raised questions about the privacy issues of this app. AR technology constantly needs to record the real environment, which involves real human beings. Recording their movement breaches their privacy which can cause legal trouble for the user. If the videos are recorded with consent, they will not harm anyone.
In this article
01 [What Is Augmented Reality?](#Part 1)
02 [The 4 Best Augmented Reality Apps for iPhone](#Part 2)
03 [The 4 Best Augmented Reality Apps for Android](#Part 3)
Part 1 What Is Augmented Reality?
Augmented Reality is a technology that uses the real-world environment where virtual objects reside. This process involves an experience where the real or physical world interweaves with virtually created objects. It interweaves so perfectly that the artificial seems a part of the natural. This is an artificial experience, and it adds to the real environment. AR gained popularity in the fields of entertainment and video games.
You might think that AR (Augmented Reality) is the same as VR (Virtual Reality). They are not the same. When someone looks through a VR, everything, including the object’s environment, is virtual or an illusion. When AR is used, the object is virtual, but the environment is real. Suppose you want to buy an item of furniture and you do not know whether it would match your home décor; here, you can use AR to see whether the furniture would fit your décor or not.
Part 2 The 4 Best Augmented Reality Apps for iPhone
Have you ever wondered how it would be to purchase furniture sitting in your bedroom? How would it be like to not worry about which color would fit the home décor o which position would be the best for the product? You can experience these exciting features using this Augmented Reality or AR powered apps. These four apps will give you the best iPhone ar video experience.
01Amikasa
Amikasa is basically a home furnishing AR app. It is exclusive to iOS users only. You can use this app to view products from different brands and websites. This app will improve your shopping experience without going to different stores to get the right product for your room. You can just walk around your house and find the best-fitted product for your house using AR models of the products. Since there are no boundaries to websites and brands, it gives you more opportunity to choose your product wisely. The most interesting part about this app is that you can make your purchases without exiting from this app.

02Wanna Kicks
Wanna Kicks is a fashion-based AR app. To be precise, this app focuses on footwear. This app is also exclusive to iOS users only. You can look into different brands and websites and choose the best footwear for yourself. You can virtually look at how a pair of shoes would look on you when you wear them. You do not browse around to find the most suitable footwear and do it sitting on your bed. These interesting features of this app have gained people’s attention from various countries. This app can push your apple ar video experience to a different level.

03Augment
Augment is a home furnishing goods-based AR app. The app needs to be purchased at $10/month for corporate uses. This app mainly targets e-commerce store owners to make their selling process smooth by creating AR pictures of their products. The seller creates 3D images or models of products that the customers can use to find the best fit for their house. The images created by this app are uploaded for common people’s Augmented Reality experience through mobile apps, websites, or some other source. It comes to great use when the products are sold in the field like event sales, pop-up shops, e-commerce markets, etc.

04Roar
Roar is another AR technology-based app that needs to be purchased at $49 by the creators or hosts. This app aims at business owners. Business owners can use this app in many ways possible, like creating an online store using AR technology using which the consumers can scan the product packages from their homes, using AR technology in advertisements, and many other ways possible.
This app can be used by car sellers to show 3D models or AR images of different cars. Roar is a very popular app used by educators to make educational videos more game-like and make the process of learning fun by including animations and models for teaching.

Part 3 The 4 Best Augmented Reality Apps for Android
Augmented Reality or AR is a very interesting technology, and anybody would want to have this feature in their phone. So here are some apps mentioned below which will help you get ar video app android experience. These four apps top the list of best AR videos for android.
01Google Lens
Google Lens is an image-recognizing application based on AR technology developed by Google, which can be used for free. This app top the list of best Augmented Reality apps. This app can be used to identify objects, texts, images, landmarks, and so much more. Instead of typing your query, you can just scan the product you want to know about.
If you want to buy a product you searched for, the app will provide you with websites selling that particular product. The object needs to be placed in front of the mobile’s camera, and the app uses its Augmented Reality technology to recognize the object and gives appropriate results. You can access Google Lenses by downloading the app or the Google Photos app itself.

02Snapchat
Snapchat is a very popular app, especially among the youngsters. Snapchat is a free app with very minimum system requirements and thus can be accessed by anyone. It has some cool features like fun image effects and exciting texting features. This app offers quirky face filters where the Augmented Reality technology comes to use.
You can transform into anything like a cat, dog, or even another person using this app’s appropriate filter. You can also send funny videos of yourself using those quirky filters through this app. This app gives you a fun and silly experience with taking pictures of yourself or taking a selfie, as popularly known.

03IKEA Place
IKEA Place is a free home décor-based Augmented Reality app. This app is a bridge between Swedish furniture retailers and shoppers. The shoppers or the consumers get the opportunity to place or put out the furniture in their house and decide whether it is suitable for the room or the house. The app considers the whole area and shows the product concerning the space of the area of the room where the product is to be kept. This “drag-and-drop” function helps the users select colors according to the place where they want to keep the product. These features make the shoppers’ experience smooth and hustle-free. This app is one of the best apps for ar video app android users.

04Houzz
Houzz is a home furnishing goods or furniture selling app that uses Augmented Reality for advertising its goods. This app can be used to do interior planning to decide on designs, positions, or layouts of the products. You can view products of different brands and buy the products without exiting the app because of its e-commerce functionality.
This app has an interesting feature: the “View in My Room,” an Augmented Reality powered feature. You can decide the product’s position by virtually placing it in your room. You might not get the most accurate result, but you can get a slight idea of the product and how it would look in your house.
For Win 7 or later (64-bit)
For macOS 10.12 or later
● Ending Thoughts →
● I hope now you know what Augmented Reality is and in which fields it is used.
● It has gained popularity in the marketing industry because it gives a multi-dimensional opportunity to buy and sell products.
● Most importantly, you know how Augmented Reality is different from Virtual Reality.
● This article also highlights the best apple ar video apps and ar video apps android. The apps mentioned in this article are very easy to use. These apps can give you a smooth AR using experience and take it to a different level.
Create Kinetice Typography Text Effect in Filmora
Preparation
What you need to prepare:
- A computer (Windows or macOS)
- Your video materials.
- Filmora video editor
Step 1
Go ahead and download the Filmora video editor before all else. The program will install and start automatically. Just hit “Download” and then “Install”.
Step 2
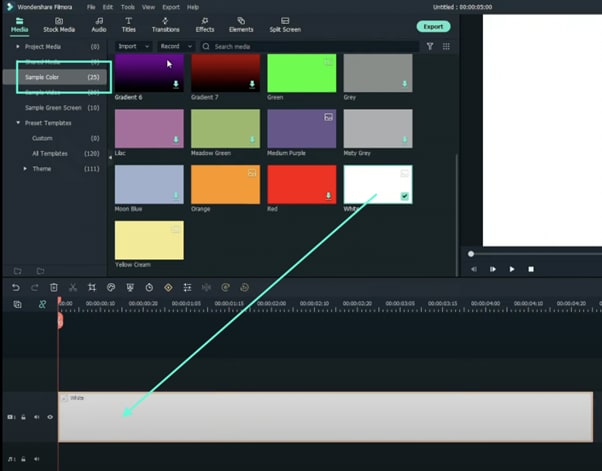
Once the program starts, open a New Project. Then, go to “Sample Color” and drag any color you want to the Timeline.
Step 3
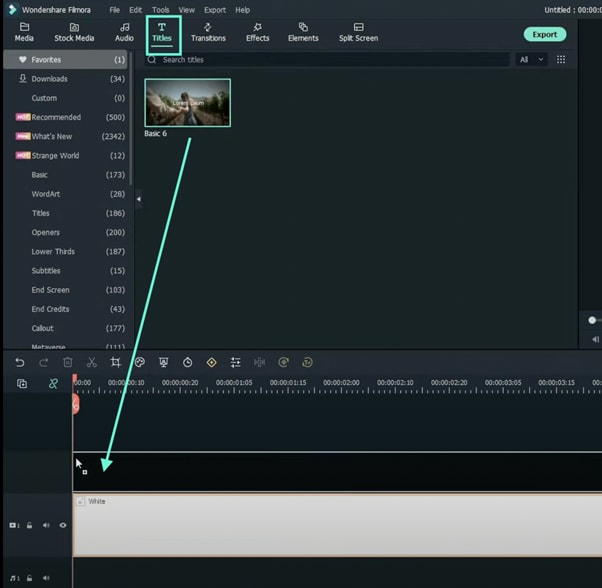
Now, head over to the “Titles” tab and drag the Basic Title to the Timeline. Place it above the Sample Color clip.
Step 4
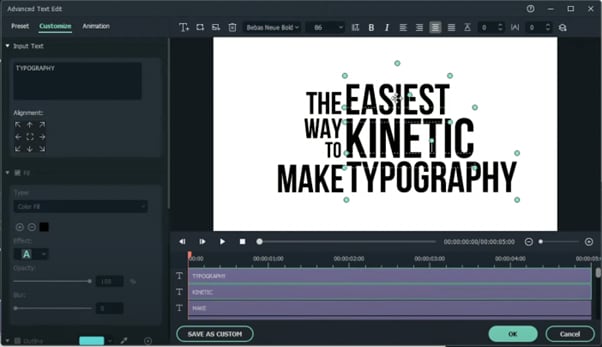
Right-click on the Title clip in the Timeline and select Edit Properties from the menu. From there, click on “ADVANCED” to open the advanced settings. Here, you can change the font, adjust the text size, and place your titles wherever you want on the screen.
Step 5
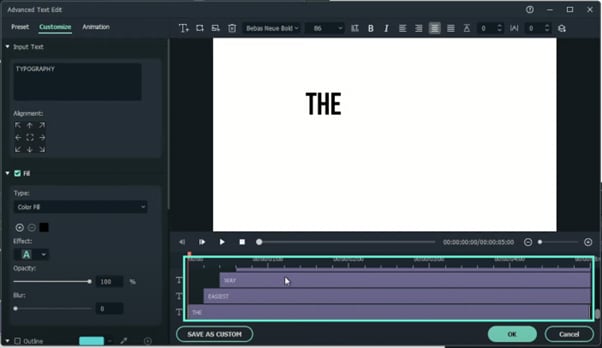
Now, start with the second text layer from the bottom and move it 5 frames forward. Move each text layer above 5 layers forward from the previous layer. This will display each word a few milliseconds after the previous one.
When you’re done, click OK.
Step 6
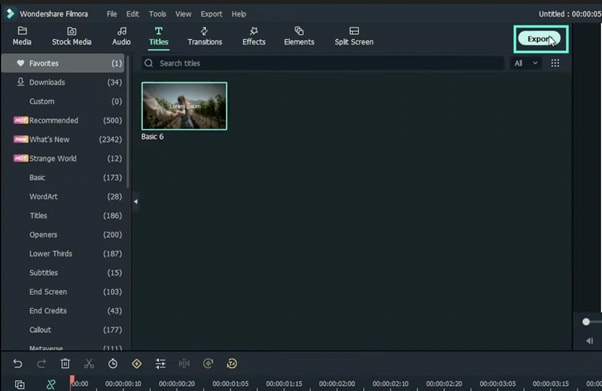
Export the Timeline to save your text animation as a new clip.
Step 7
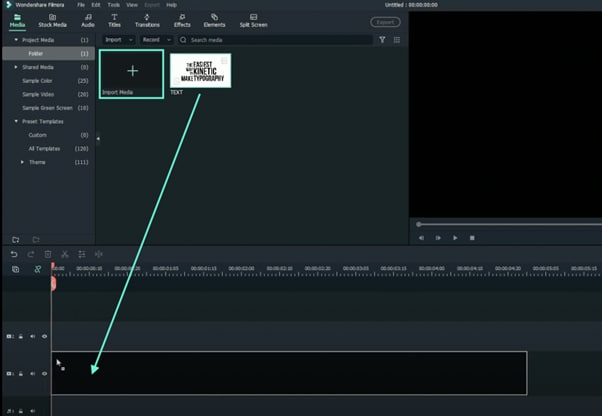
Now, delete all the clips from the Timeline and import the text video you just exported. Drag it to the Timeline.
Step 8
Right-click on the clip in the Timeline and go to Edit Properties.
Step 9
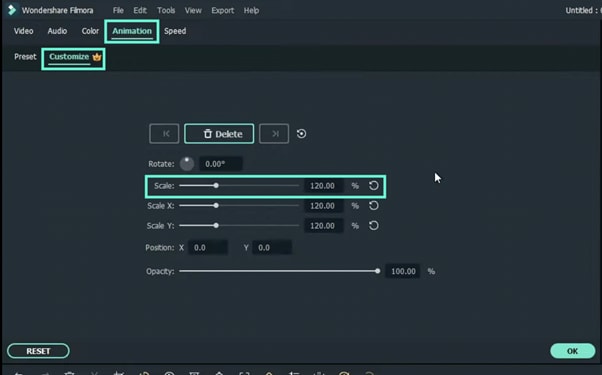
Click on the Animation tab. Then, go to the Customize tab. Here, change the Scale setting to 120%.
Step 10
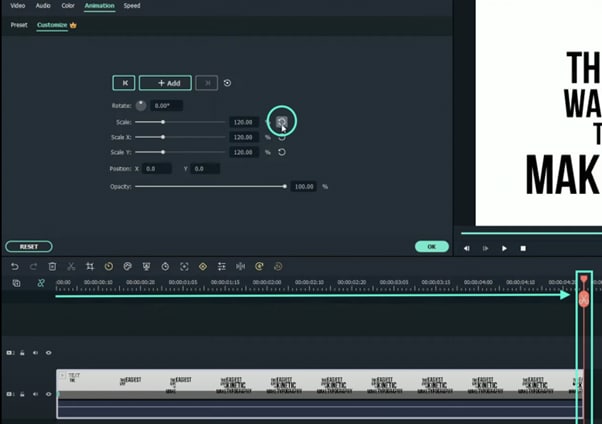
Next, move the Playhead to the end of the clip in the timeline. Then, reset the Scale and click OK.
Step 11
Watch the final preview. Then, Render and Export the video and you’re done. Congratulations.
Summary
What you’ve learned:
- How to create a kinetic movement effect on text in Filmora
- How to adjust the scale of a video in Filmora
- Adjust and manipulate text layers
What you need to prepare:
- A computer (Windows or macOS)
- Your video materials.
- Filmora video editor
Step 1
Go ahead and download the Filmora video editor before all else. The program will install and start automatically. Just hit “Download” and then “Install”.
Step 2
Once the program starts, open a New Project. Then, go to “Sample Color” and drag any color you want to the Timeline.

Step 3
Now, head over to the “Titles” tab and drag the Basic Title to the Timeline. Place it above the Sample Color clip.

Step 4
Right-click on the Title clip in the Timeline and select Edit Properties from the menu. From there, click on “ADVANCED” to open the advanced settings. Here, you can change the font, adjust the text size, and place your titles wherever you want on the screen.

Step 5
Now, start with the second text layer from the bottom and move it 5 frames forward. Move each text layer above 5 layers forward from the previous layer. This will display each word a few milliseconds after the previous one.
When you’re done, click OK.

Step 6
Export the Timeline to save your text animation as a new clip.

Step 7
Now, delete all the clips from the Timeline and import the text video you just exported. Drag it to the Timeline.

Step 8
Right-click on the clip in the Timeline and go to Edit Properties.
Step 9
Click on the Animation tab. Then, go to the Customize tab. Here, change the Scale setting to 120%.

Step 10
Next, move the Playhead to the end of the clip in the timeline. Then, reset the Scale and click OK.

Step 11
Watch the final preview. Then, Render and Export the video and you’re done. Congratulations.
Summary
What you’ve learned:
- How to create a kinetic movement effect on text in Filmora
- How to adjust the scale of a video in Filmora
- Adjust and manipulate text layers
What you need to prepare:
- A computer (Windows or macOS)
- Your video materials.
- Filmora video editor
Step 1
Go ahead and download the Filmora video editor before all else. The program will install and start automatically. Just hit “Download” and then “Install”.
Step 2
Once the program starts, open a New Project. Then, go to “Sample Color” and drag any color you want to the Timeline.

Step 3
Now, head over to the “Titles” tab and drag the Basic Title to the Timeline. Place it above the Sample Color clip.

Step 4
Right-click on the Title clip in the Timeline and select Edit Properties from the menu. From there, click on “ADVANCED” to open the advanced settings. Here, you can change the font, adjust the text size, and place your titles wherever you want on the screen.

Step 5
Now, start with the second text layer from the bottom and move it 5 frames forward. Move each text layer above 5 layers forward from the previous layer. This will display each word a few milliseconds after the previous one.
When you’re done, click OK.

Step 6
Export the Timeline to save your text animation as a new clip.

Step 7
Now, delete all the clips from the Timeline and import the text video you just exported. Drag it to the Timeline.

Step 8
Right-click on the clip in the Timeline and go to Edit Properties.
Step 9
Click on the Animation tab. Then, go to the Customize tab. Here, change the Scale setting to 120%.

Step 10
Next, move the Playhead to the end of the clip in the timeline. Then, reset the Scale and click OK.

Step 11
Watch the final preview. Then, Render and Export the video and you’re done. Congratulations.
Summary
What you’ve learned:
- How to create a kinetic movement effect on text in Filmora
- How to adjust the scale of a video in Filmora
- Adjust and manipulate text layers
What you need to prepare:
- A computer (Windows or macOS)
- Your video materials.
- Filmora video editor
Step 1
Go ahead and download the Filmora video editor before all else. The program will install and start automatically. Just hit “Download” and then “Install”.
Step 2
Once the program starts, open a New Project. Then, go to “Sample Color” and drag any color you want to the Timeline.

Step 3
Now, head over to the “Titles” tab and drag the Basic Title to the Timeline. Place it above the Sample Color clip.

Step 4
Right-click on the Title clip in the Timeline and select Edit Properties from the menu. From there, click on “ADVANCED” to open the advanced settings. Here, you can change the font, adjust the text size, and place your titles wherever you want on the screen.

Step 5
Now, start with the second text layer from the bottom and move it 5 frames forward. Move each text layer above 5 layers forward from the previous layer. This will display each word a few milliseconds after the previous one.
When you’re done, click OK.

Step 6
Export the Timeline to save your text animation as a new clip.

Step 7
Now, delete all the clips from the Timeline and import the text video you just exported. Drag it to the Timeline.

Step 8
Right-click on the clip in the Timeline and go to Edit Properties.
Step 9
Click on the Animation tab. Then, go to the Customize tab. Here, change the Scale setting to 120%.

Step 10
Next, move the Playhead to the end of the clip in the timeline. Then, reset the Scale and click OK.

Step 11
Watch the final preview. Then, Render and Export the video and you’re done. Congratulations.
Summary
What you’ve learned:
- How to create a kinetic movement effect on text in Filmora
- How to adjust the scale of a video in Filmora
- Adjust and manipulate text layers
Splice App for Android - Guide to Download & Use
Create High-Quality Video - Wondershare Filmora
An easy and powerful YouTube video editor
Numerous video and audio effects to choose from
Detailed tutorials provided by the official channel
The ease of use and ready availability push most people to choose Android phones. Likewise, they are compatible with many devices, needing just a simple plug-and-play action. Besides, you can perform various actions with your Android device, like taking photos, capturing videos, and sharing them with friends.
You may also wish to combine your videos and compile a beautiful story. You also need to make your videos stand out and engage your viewers. Well, several apps are available to splice Android and make an interesting single video. Find how to use various apps in this article to splice your videos on Android.
In this article
01 Is Splice available on Android?
02 How to Use Splice for Android Video Editing
03Additional Video Splice Apps for Android
Is Splice available on Android?
Yes! The Android operating system can facilitate the splicing of videos. Even though it may not be available on some older versions by default, you can incorporate and install apps to use for Android splicing. By this, you’ll be able to add various effects to your videos, such as incorporating music, adding text, including titles, and other effects. You can also crop and trim your clip to a desirable play level. Nonetheless, you can use online methods to splice your videos instantly without installing any app.
This article proves that apart from using Splice video editor for Android, you can use other engaging apps to merge your videos. And it doesn’t end there!
Easily share your spliced clips on other platforms. To do this, ensure you set the output format and other settings to suit specific platforms like YouTube, WhatsApp, and Twitter. Check out the steps to follow to splice Android with various apps.
How to Use Splice for Android Video Editing
The Splice Video Editor is a powerful tool that is also easy to use. It suits on-the-go editing action, enabling you to capture and edit your videos without the need to transfer them to a computer. It also brings you various simple editing features like cropping, muting, adding audio, reversing video, merging, blurring, fast and slow motion, among many other effects.
More so, it will effectively convert your video into several output formats like MP3 and GIF. It works pretty fast, and you have a perfect chance to directly share your edited videos on media sites like Facebook, WhatsApp, Instagram, Twitter, and many others.
Step-by-step instructions for using the Splice app on Android to splice videos together
The Splice video editor for Android is at your reach to merge several videos in simple steps. And with the escalating rate of technology usage, Splice has just got you covered. You can use it for free with limited features. Follow these steps to splice the apk.
Step 1: Begin a new project
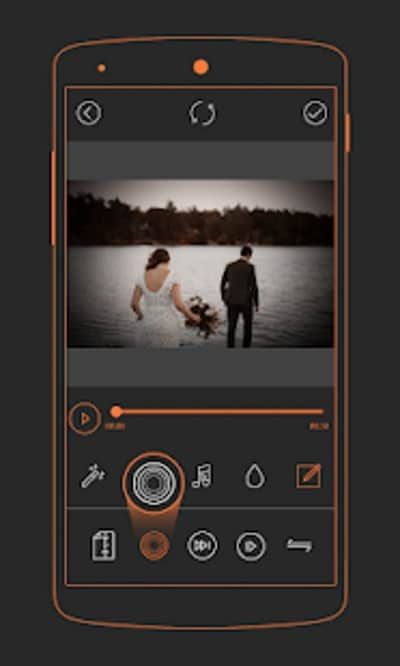
Ensure you have installed the Splice app for Android on your device. Once launched, go to the app screen and press the “+” button. You can then give your project a name before you continue with some other settings of the project. These include the transition selection, the orientation of the project, border options, etc. Next, click on the “Done” button to confirm your selections.
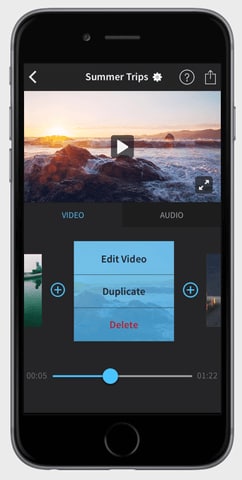
Step 2: Begin your project
Begin the creation of your project and choose the purpose of your video. Enter the title of your project, then continue to set room for your photos or videos. You can also set the text and zoom options.
Step 3: Insert your videos
Next, add the “+” button to the title’s right side. Likewise, add the video button to enable you to include the videos for splicing. You should notice the album screen opening up. Now, select the videos you wish to add to the project from the album screen. Ensure you put them in the order you want them to appear once sliced. Next, indicate the transition to be applied to your videos and wait for the chosen videos to be uploaded into the project. The Spice app allows you to view your project before exporting it.
Step 4. Edit and export
Most importantly, you should edit your video and make it splendid for your viewers. To do so, click on the “Pencil” button to unleash other editing options. Among the edits you can make include cropping, adjusting speed, trimming, and much more. Likewise, utilize the slider points to edit the start and endpoints of your video. You can also edit the audio and adjust the volumes where necessary.
Additional Video Splice Apps for Android
You can’t run out of options when it comes to splicing video. Here are some useful video splice apps for Android at your reach.
• Filmora
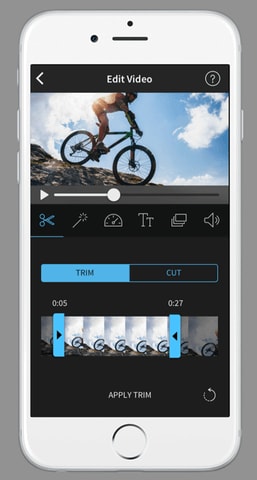
Filmora is suitable for mobile phone editing. It is rich in editing features to record, select a theme, apply effects, and easily share your video on other platforms. With this app, you can add animated text, adjust video color and brightness, customize watermarks, and much more. It is, however, slow and often crashes when dealing with larger files. Follow these steps to splice Android.
Step 1. Once successfully downloaded and installed, launch the app on your Android phone and select a built-in template to use.
Step 2. Then go to your Android gallery and choose the videos you wish to splice. Remember, you can add several clips for merging. Remember to load your videos in the order you wish them to appear in the spliced video.
Step 3. Merge the videos and then start to edit your video clips. You can trim, add filters, overlays, music, and much more. It is also important to add some background music to make your video engaging and attractive to your audience.
Step 4. The final step is to click on the “Export” tab to save your spliced video and share it on social media platforms. You can directly share your videos on YouTube, Facebook, and Twitter, among others.
• Vimeo Create
Vimeo supports mobile applications and can be used to splice Android. Sign up for the app on your Android, and launch it. Then follow these steps to merge the video.
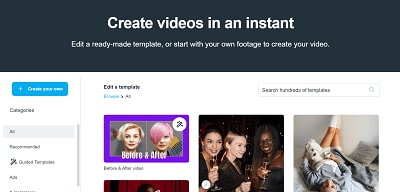
Step 1. To begin splicing your video, select the “Start” button, then compose the main interface. Then go to the “Storyboard” and begin to choose the videos you wish to combine.
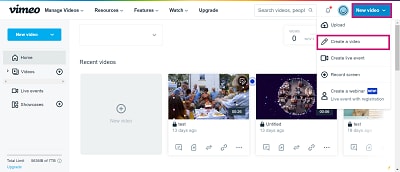
Step 2. Head on over to the “Style” area and choose one to use, then click on the “Next” button.
Step 3. Additionally, you can easily add background music to make it more engaging. Vimeo doesn’t allow you to add music from other sites. However, it brings you a rich catalog from which to choose any kind of music.
Step 4. Preview and export your video. You can see what your video looks like before sharing it. Use the “Preview” feature to check if your video is good enough or needs amendments. Next, select the “Save” option to save and share your video.
Conclusion
● It is worthwhile to produce quality and engaging videos for your audience. One aspect always stands out – combining the best videos for a detailed message. You have learned about the best splice video editor for Android to compose any kind of video. Besides, these apps let you edit your video by adding quality precepts, transitions, and other effects for a professional-looking piece./p>
The ease of use and ready availability push most people to choose Android phones. Likewise, they are compatible with many devices, needing just a simple plug-and-play action. Besides, you can perform various actions with your Android device, like taking photos, capturing videos, and sharing them with friends.
You may also wish to combine your videos and compile a beautiful story. You also need to make your videos stand out and engage your viewers. Well, several apps are available to splice Android and make an interesting single video. Find how to use various apps in this article to splice your videos on Android.

In this article
01 Is Splice available on Android?
02 How to Use Splice for Android Video Editing
03Additional Video Splice Apps for Android
Is Splice available on Android?
Yes! The Android operating system can facilitate the splicing of videos. Even though it may not be available on some older versions by default, you can incorporate and install apps to use for Android splicing. By this, you’ll be able to add various effects to your videos, such as incorporating music, adding text, including titles, and other effects. You can also crop and trim your clip to a desirable play level. Nonetheless, you can use online methods to splice your videos instantly without installing any app.
This article proves that apart from using Splice video editor for Android, you can use other engaging apps to merge your videos. And it doesn’t end there!
Easily share your spliced clips on other platforms. To do this, ensure you set the output format and other settings to suit specific platforms like YouTube, WhatsApp, and Twitter. Check out the steps to follow to splice Android with various apps.
How to Use Splice for Android Video Editing
The Splice Video Editor is a powerful tool that is also easy to use. It suits on-the-go editing action, enabling you to capture and edit your videos without the need to transfer them to a computer. It also brings you various simple editing features like cropping, muting, adding audio, reversing video, merging, blurring, fast and slow motion, among many other effects.
More so, it will effectively convert your video into several output formats like MP3 and GIF. It works pretty fast, and you have a perfect chance to directly share your edited videos on media sites like Facebook, WhatsApp, Instagram, Twitter, and many others.
Step-by-step instructions for using the Splice app on Android to splice videos together
The Splice video editor for Android is at your reach to merge several videos in simple steps. And with the escalating rate of technology usage, Splice has just got you covered. You can use it for free with limited features. Follow these steps to splice the apk.
Step 1: Begin a new project
Ensure you have installed the Splice app for Android on your device. Once launched, go to the app screen and press the “+” button. You can then give your project a name before you continue with some other settings of the project. These include the transition selection, the orientation of the project, border options, etc. Next, click on the “Done” button to confirm your selections.

Step 2: Begin your project
Begin the creation of your project and choose the purpose of your video. Enter the title of your project, then continue to set room for your photos or videos. You can also set the text and zoom options.
Step 3: Insert your videos
Next, add the “+” button to the title’s right side. Likewise, add the video button to enable you to include the videos for splicing. You should notice the album screen opening up. Now, select the videos you wish to add to the project from the album screen. Ensure you put them in the order you want them to appear once sliced. Next, indicate the transition to be applied to your videos and wait for the chosen videos to be uploaded into the project. The Spice app allows you to view your project before exporting it.
Step 4. Edit and export
Most importantly, you should edit your video and make it splendid for your viewers. To do so, click on the “Pencil” button to unleash other editing options. Among the edits you can make include cropping, adjusting speed, trimming, and much more. Likewise, utilize the slider points to edit the start and endpoints of your video. You can also edit the audio and adjust the volumes where necessary.

Additional Video Splice Apps for Android
You can’t run out of options when it comes to splicing video. Here are some useful video splice apps for Android at your reach.
• Filmora
Filmora is suitable for mobile phone editing. It is rich in editing features to record, select a theme, apply effects, and easily share your video on other platforms. With this app, you can add animated text, adjust video color and brightness, customize watermarks, and much more. It is, however, slow and often crashes when dealing with larger files. Follow these steps to splice Android.
Step 1. Once successfully downloaded and installed, launch the app on your Android phone and select a built-in template to use.
Step 2. Then go to your Android gallery and choose the videos you wish to splice. Remember, you can add several clips for merging. Remember to load your videos in the order you wish them to appear in the spliced video.

Step 3. Merge the videos and then start to edit your video clips. You can trim, add filters, overlays, music, and much more. It is also important to add some background music to make your video engaging and attractive to your audience.
Step 4. The final step is to click on the “Export” tab to save your spliced video and share it on social media platforms. You can directly share your videos on YouTube, Facebook, and Twitter, among others.
• Vimeo Create
Vimeo supports mobile applications and can be used to splice Android. Sign up for the app on your Android, and launch it. Then follow these steps to merge the video.
Step 1. To begin splicing your video, select the “Start” button, then compose the main interface. Then go to the “Storyboard” and begin to choose the videos you wish to combine.

Step 2. Head on over to the “Style” area and choose one to use, then click on the “Next” button.
Step 3. Additionally, you can easily add background music to make it more engaging. Vimeo doesn’t allow you to add music from other sites. However, it brings you a rich catalog from which to choose any kind of music.

Step 4. Preview and export your video. You can see what your video looks like before sharing it. Use the “Preview” feature to check if your video is good enough or needs amendments. Next, select the “Save” option to save and share your video.
Conclusion
● It is worthwhile to produce quality and engaging videos for your audience. One aspect always stands out – combining the best videos for a detailed message. You have learned about the best splice video editor for Android to compose any kind of video. Besides, these apps let you edit your video by adding quality precepts, transitions, and other effects for a professional-looking piece./p>
The ease of use and ready availability push most people to choose Android phones. Likewise, they are compatible with many devices, needing just a simple plug-and-play action. Besides, you can perform various actions with your Android device, like taking photos, capturing videos, and sharing them with friends.
You may also wish to combine your videos and compile a beautiful story. You also need to make your videos stand out and engage your viewers. Well, several apps are available to splice Android and make an interesting single video. Find how to use various apps in this article to splice your videos on Android.

In this article
01 Is Splice available on Android?
02 How to Use Splice for Android Video Editing
03Additional Video Splice Apps for Android
Is Splice available on Android?
Yes! The Android operating system can facilitate the splicing of videos. Even though it may not be available on some older versions by default, you can incorporate and install apps to use for Android splicing. By this, you’ll be able to add various effects to your videos, such as incorporating music, adding text, including titles, and other effects. You can also crop and trim your clip to a desirable play level. Nonetheless, you can use online methods to splice your videos instantly without installing any app.
This article proves that apart from using Splice video editor for Android, you can use other engaging apps to merge your videos. And it doesn’t end there!
Easily share your spliced clips on other platforms. To do this, ensure you set the output format and other settings to suit specific platforms like YouTube, WhatsApp, and Twitter. Check out the steps to follow to splice Android with various apps.
How to Use Splice for Android Video Editing
The Splice Video Editor is a powerful tool that is also easy to use. It suits on-the-go editing action, enabling you to capture and edit your videos without the need to transfer them to a computer. It also brings you various simple editing features like cropping, muting, adding audio, reversing video, merging, blurring, fast and slow motion, among many other effects.
More so, it will effectively convert your video into several output formats like MP3 and GIF. It works pretty fast, and you have a perfect chance to directly share your edited videos on media sites like Facebook, WhatsApp, Instagram, Twitter, and many others.
Step-by-step instructions for using the Splice app on Android to splice videos together
The Splice video editor for Android is at your reach to merge several videos in simple steps. And with the escalating rate of technology usage, Splice has just got you covered. You can use it for free with limited features. Follow these steps to splice the apk.
Step 1: Begin a new project
Ensure you have installed the Splice app for Android on your device. Once launched, go to the app screen and press the “+” button. You can then give your project a name before you continue with some other settings of the project. These include the transition selection, the orientation of the project, border options, etc. Next, click on the “Done” button to confirm your selections.

Step 2: Begin your project
Begin the creation of your project and choose the purpose of your video. Enter the title of your project, then continue to set room for your photos or videos. You can also set the text and zoom options.
Step 3: Insert your videos
Next, add the “+” button to the title’s right side. Likewise, add the video button to enable you to include the videos for splicing. You should notice the album screen opening up. Now, select the videos you wish to add to the project from the album screen. Ensure you put them in the order you want them to appear once sliced. Next, indicate the transition to be applied to your videos and wait for the chosen videos to be uploaded into the project. The Spice app allows you to view your project before exporting it.
Step 4. Edit and export
Most importantly, you should edit your video and make it splendid for your viewers. To do so, click on the “Pencil” button to unleash other editing options. Among the edits you can make include cropping, adjusting speed, trimming, and much more. Likewise, utilize the slider points to edit the start and endpoints of your video. You can also edit the audio and adjust the volumes where necessary.

Additional Video Splice Apps for Android
You can’t run out of options when it comes to splicing video. Here are some useful video splice apps for Android at your reach.
• Filmora
Filmora is suitable for mobile phone editing. It is rich in editing features to record, select a theme, apply effects, and easily share your video on other platforms. With this app, you can add animated text, adjust video color and brightness, customize watermarks, and much more. It is, however, slow and often crashes when dealing with larger files. Follow these steps to splice Android.
Step 1. Once successfully downloaded and installed, launch the app on your Android phone and select a built-in template to use.
Step 2. Then go to your Android gallery and choose the videos you wish to splice. Remember, you can add several clips for merging. Remember to load your videos in the order you wish them to appear in the spliced video.

Step 3. Merge the videos and then start to edit your video clips. You can trim, add filters, overlays, music, and much more. It is also important to add some background music to make your video engaging and attractive to your audience.
Step 4. The final step is to click on the “Export” tab to save your spliced video and share it on social media platforms. You can directly share your videos on YouTube, Facebook, and Twitter, among others.
• Vimeo Create
Vimeo supports mobile applications and can be used to splice Android. Sign up for the app on your Android, and launch it. Then follow these steps to merge the video.
Step 1. To begin splicing your video, select the “Start” button, then compose the main interface. Then go to the “Storyboard” and begin to choose the videos you wish to combine.

Step 2. Head on over to the “Style” area and choose one to use, then click on the “Next” button.
Step 3. Additionally, you can easily add background music to make it more engaging. Vimeo doesn’t allow you to add music from other sites. However, it brings you a rich catalog from which to choose any kind of music.

Step 4. Preview and export your video. You can see what your video looks like before sharing it. Use the “Preview” feature to check if your video is good enough or needs amendments. Next, select the “Save” option to save and share your video.
Conclusion
● It is worthwhile to produce quality and engaging videos for your audience. One aspect always stands out – combining the best videos for a detailed message. You have learned about the best splice video editor for Android to compose any kind of video. Besides, these apps let you edit your video by adding quality precepts, transitions, and other effects for a professional-looking piece./p>
The ease of use and ready availability push most people to choose Android phones. Likewise, they are compatible with many devices, needing just a simple plug-and-play action. Besides, you can perform various actions with your Android device, like taking photos, capturing videos, and sharing them with friends.
You may also wish to combine your videos and compile a beautiful story. You also need to make your videos stand out and engage your viewers. Well, several apps are available to splice Android and make an interesting single video. Find how to use various apps in this article to splice your videos on Android.

In this article
01 Is Splice available on Android?
02 How to Use Splice for Android Video Editing
03Additional Video Splice Apps for Android
Is Splice available on Android?
Yes! The Android operating system can facilitate the splicing of videos. Even though it may not be available on some older versions by default, you can incorporate and install apps to use for Android splicing. By this, you’ll be able to add various effects to your videos, such as incorporating music, adding text, including titles, and other effects. You can also crop and trim your clip to a desirable play level. Nonetheless, you can use online methods to splice your videos instantly without installing any app.
This article proves that apart from using Splice video editor for Android, you can use other engaging apps to merge your videos. And it doesn’t end there!
Easily share your spliced clips on other platforms. To do this, ensure you set the output format and other settings to suit specific platforms like YouTube, WhatsApp, and Twitter. Check out the steps to follow to splice Android with various apps.
How to Use Splice for Android Video Editing
The Splice Video Editor is a powerful tool that is also easy to use. It suits on-the-go editing action, enabling you to capture and edit your videos without the need to transfer them to a computer. It also brings you various simple editing features like cropping, muting, adding audio, reversing video, merging, blurring, fast and slow motion, among many other effects.
More so, it will effectively convert your video into several output formats like MP3 and GIF. It works pretty fast, and you have a perfect chance to directly share your edited videos on media sites like Facebook, WhatsApp, Instagram, Twitter, and many others.
Step-by-step instructions for using the Splice app on Android to splice videos together
The Splice video editor for Android is at your reach to merge several videos in simple steps. And with the escalating rate of technology usage, Splice has just got you covered. You can use it for free with limited features. Follow these steps to splice the apk.
Step 1: Begin a new project
Ensure you have installed the Splice app for Android on your device. Once launched, go to the app screen and press the “+” button. You can then give your project a name before you continue with some other settings of the project. These include the transition selection, the orientation of the project, border options, etc. Next, click on the “Done” button to confirm your selections.

Step 2: Begin your project
Begin the creation of your project and choose the purpose of your video. Enter the title of your project, then continue to set room for your photos or videos. You can also set the text and zoom options.
Step 3: Insert your videos
Next, add the “+” button to the title’s right side. Likewise, add the video button to enable you to include the videos for splicing. You should notice the album screen opening up. Now, select the videos you wish to add to the project from the album screen. Ensure you put them in the order you want them to appear once sliced. Next, indicate the transition to be applied to your videos and wait for the chosen videos to be uploaded into the project. The Spice app allows you to view your project before exporting it.
Step 4. Edit and export
Most importantly, you should edit your video and make it splendid for your viewers. To do so, click on the “Pencil” button to unleash other editing options. Among the edits you can make include cropping, adjusting speed, trimming, and much more. Likewise, utilize the slider points to edit the start and endpoints of your video. You can also edit the audio and adjust the volumes where necessary.

Additional Video Splice Apps for Android
You can’t run out of options when it comes to splicing video. Here are some useful video splice apps for Android at your reach.
• Filmora
Filmora is suitable for mobile phone editing. It is rich in editing features to record, select a theme, apply effects, and easily share your video on other platforms. With this app, you can add animated text, adjust video color and brightness, customize watermarks, and much more. It is, however, slow and often crashes when dealing with larger files. Follow these steps to splice Android.
Step 1. Once successfully downloaded and installed, launch the app on your Android phone and select a built-in template to use.
Step 2. Then go to your Android gallery and choose the videos you wish to splice. Remember, you can add several clips for merging. Remember to load your videos in the order you wish them to appear in the spliced video.

Step 3. Merge the videos and then start to edit your video clips. You can trim, add filters, overlays, music, and much more. It is also important to add some background music to make your video engaging and attractive to your audience.
Step 4. The final step is to click on the “Export” tab to save your spliced video and share it on social media platforms. You can directly share your videos on YouTube, Facebook, and Twitter, among others.
• Vimeo Create
Vimeo supports mobile applications and can be used to splice Android. Sign up for the app on your Android, and launch it. Then follow these steps to merge the video.
Step 1. To begin splicing your video, select the “Start” button, then compose the main interface. Then go to the “Storyboard” and begin to choose the videos you wish to combine.

Step 2. Head on over to the “Style” area and choose one to use, then click on the “Next” button.
Step 3. Additionally, you can easily add background music to make it more engaging. Vimeo doesn’t allow you to add music from other sites. However, it brings you a rich catalog from which to choose any kind of music.

Step 4. Preview and export your video. You can see what your video looks like before sharing it. Use the “Preview” feature to check if your video is good enough or needs amendments. Next, select the “Save” option to save and share your video.
Conclusion
● It is worthwhile to produce quality and engaging videos for your audience. One aspect always stands out – combining the best videos for a detailed message. You have learned about the best splice video editor for Android to compose any kind of video. Besides, these apps let you edit your video by adding quality precepts, transitions, and other effects for a professional-looking piece./p>
Also read:
- In 2024, Best 10 Crazy-Cool Examples of AR Video
- Updated 2024 Approved Learn to Create Custom Sequence Presets in Premiere Pro for Efficient Video Editing. Ensure Consistency and Speed up Your Workflow with Personalized Settings
- New 2024 Approved Learn to Merge Clips in DaVinci Resolve Simple Steps
- How to Add Filter to Video Online
- New 2024 Approved Best GIF to Video Converters
- Best iPhone LUTs App to Use
- New 10 Best Free Text to Speech Software Windows, Mac,Android, iPhone & Online
- New In 2024, 11 Best Video Editing Apps for iPhone
- New How to Add Font Effects to Videos for 2024
- How to Concatenate Videos Using FFmpeg for 2024
- New Do You Know that Google Photos App Can Be Used to Edit and Stabilize Shaky Videos? In This Article, I Will Show You a Step by Step Tutorial About How to Use Google Photos to Stabilize Videos
- New 2024 Approved Can You Get Free After Effects Templates Slideshow? Yes, You Definitely Can! Follow the Given Discussion to Learn About a Simple Trick and More About Getting Free Effects Template for Slideshows
- Updated 2024 Approved 10+ Best Unlimited FCPX Slideshow Templates
- Updated 2024 Approved How To Remove Audio From Video
- New In 2024, An Intro Video Describing You and Your Content Is the First and the Foremost Thing Which a Viewer Sees. Thinking of How to Make an Interesting Intro Video, This Blog Is Surely a Supportive Guide for You. Learn More Here
- New Do You Want to Excel at Using Adobe Premiere Pro Software for Splitting Videos and Audio? Learn About Splitting a Video and Audio Using Different Tools and Add a New Skill to Your Skillset with a Step-by-Step Guide in This Article for 2024
- Updated VSCO Slow Motion
- New In 2024, List of Supported Whatsapp Video Format You May Want to Know
- New 7 Tips to Create Teaching Videos for 2024
- How to Loop Video in Canva
- New How To Unlink Audio and Video in DaVinci Resolve
- 2024 Approved Learning Unique Ways to Slow Down Time Lapse on iPhone
- New Are You Finding It Difficult to Freeze-Frame in After Effects? Note that Freeze-Frame Takes only a Few Seconds, and, in This Tutorial, We Will Guide You on How to Create and Add Frame Hold in After Effects for 2024
- New In 2024, Top 10 Movie Trailer Voice Generators Windows, Mac, Android, iPhone
- 2024 Approved 10 Best Old Film Overlays to Make Your Videos Look Vintage
- Updated Fascinated About Exploring Your Graphic Creativity by Experimenting with Designing Slideshow Presentations on a Variety of Software Programs? Stay Here to Get the Know-How of Using Clideo
- New 2024 Approved When Struggling to Find a Suitable Game Recorder for Your PC, You Might Come Across Many Options. Explore the Best Game Recorders for Sharing Game Highlights
- Do You Want to Give Your Videos and Photos a Cinematic Look but Couldnt Find How? Here Are Different Cinematic LUTs Discussed that You Can Try and Use
- How To Use Motion Blur On Video Star?
- Updated 2024 Approved A Wedding Is One of the Exciting Parts that Will Happen in Your Life. Its Not that Easy to Plan a Wedding, Theres a Lot to Be Consider Like Wedding Dress, Food, Venue, Videographer Etc
- How to Delete White Background in Photoshop. How to Create a Transparent Background in Photoshop? Steps to Get Rid of White Background in Photoshop for 2024
- Are You Looking to Vlog Across Your Next Stop at the Café? Get Aware of the Significant Elements that Make up the Café Vlog
- Easy Guide How To Bypass Honor Magic 5 Pro FRP Android 10/11/12/13
- In 2024, How To Fix Auto Lock Greyed Out on Apple iPhone XS Max | Dr.fone
- In 2024, How to Fake GPS on Android without Mock Location For your Samsung Galaxy S24 Ultra | Dr.fone
- In 2024, 3 Ways for Android Pokemon Go Spoofing On Vivo V29 | Dr.fone
- A Guide Infinix Smart 8 Plus Wireless and Wired Screen Mirroring | Dr.fone
- In 2024, Best Pokemons for PVP Matches in Pokemon Go For HTC U23 | Dr.fone
- How To Remove Phone Number From Your Apple ID from Your Apple iPhone 14 Plus?
- In 2024, 8 Safe and Effective Methods to Unlock Your Apple iPhone SE (2022) Without a Passcode | Dr.fone
- In 2024, Forgotten The Voicemail Password Of Nokia C12 Plus? Try These Fixes
- 3 Things You Must Know about Fake Snapchat Location On Itel P55+ | Dr.fone
- In 2024, How to use Snapchat Location Spoofer to Protect Your Privacy On OnePlus Nord N30 SE? | Dr.fone
- Everything You Need to Know about Lock Screen Settings on your Oppo Find X7 Ultra
- Possible solutions to restore deleted music from OnePlus Nord CE 3 Lite 5G
- In 2024, How To Use Allshare Cast To Turn On Screen Mirroring On Infinix Hot 40 Pro | Dr.fone
- Process of Screen Sharing Oppo Reno 11 5G to PC- Detailed Steps | Dr.fone
- Simple and Effective Ways to Change Your Country on YouTube App Of your Oppo Reno 11F 5G | Dr.fone
- How to Track Realme 12 5G Location by Number | Dr.fone
- In 2024, Top 4 SIM Location Trackers To Easily Find Your Lost Vivo Y100 5G Device
- In 2024, Full Guide to Catch 100 IV Pokémon Using a Map On Honor 100 Pro | Dr.fone
- How To Change Country on App Store for Apple iPhone 15 Plus With 7 Methods
- In 2024, How to Use Pokémon Emerald Master Ball Cheat On Vivo T2x 5G | Dr.fone
- Top 10 Telegram Spy Tools On Vivo Y78 5G for Parents | Dr.fone
- In 2024, Best 3 Software to Transfer Files to/from Your Nokia 105 Classic via a USB Cable | Dr.fone
- New Kya Aap Video Call Kar Sakty Ho Translate Any Hindi Video Into English for 2024
- How to Simulate GPS Movement in AR games On Apple iPhone 8 Plus? | Dr.fone
- Turning Off Two Factor Authentication On iPhone 8 Plus? 5 Tips You Must Know
- The Updated Method to Bypass Itel P55+ FRP
- In 2024, Remove Device Supervision From your Apple iPhone 15 Plus
- Guide to Mirror Your Xiaomi Redmi Note 12 4G to Other Android devices | Dr.fone
- Everything You Want To Know About Kapwing Video Translation
- What Legendaries Are In Pokemon Platinum On Apple iPhone 12 mini? | Dr.fone
- Title: How To Create Quiz Videos Detailed Guide
- Author: Morgan
- Created at : 2024-05-19 05:11:35
- Updated at : 2024-05-20 05:11:35
- Link: https://ai-video-editing.techidaily.com/how-to-create-quiz-videos-detailed-guide/
- License: This work is licensed under CC BY-NC-SA 4.0.

