:max_bytes(150000):strip_icc():format(webp)/E-reader-57b936e05f9b58cdfd3e07e1.jpg)
How to Do Datamoshing Effect in After Effects?

How to Do Datamoshing Effect in After Effects?
Experimenting with new effects and filters has become part and parcel of life, especially for creative professionals. Datamoshing is a similar effect that displays errors and flaws in the video clips to leave an impression on the audience. In most terms, the datamoshing effect shares similarities with the glitch effect.
Henceforth, the write-up shall focus on the introduction of this effect along with its workability. The procedure to create datamosh After Effects would also be covered. So, let us begin!
In this article
01 What is the Datamoshing Effect?
02 How Does Datamoshing Effect Work?
03 Step by Step to Create Datamoshing Effect in After Effects (Without Plugin)
04 How to Do Datamoshing Effect with Datamosh Plugin in After Effects
Part 1: What is the Datamoshing Effect?
Before going into the depths of workability and operation of the datamoshing effect in After Effects, let us understand the effect in detail. The datamoshing effect plays with the video compression to corrupt the pixels of the footage.
In this effect, the pixels glitch and appear to melt, duplicate, and create a projection organically. Also known as databending, it is a complicated technique in which movement of one layer is introduced to another layer of the video clip.
Lossy compression and removed frames help develop a psychedelic result effortlessly. Presently, datamosh After Effects has gained popularity as it helps bring change to the video and engages the audience.
Part 2: How Does Datamoshing Effect Work?
The sub-section informs the content creators and creative professionals regarding the workability of the datamoshing effect in video clips. Hence, let us commence this.
Datamoshing eliminates the new picture frame and keeps those frames that control the movement of the pixels. It leads to the picture pixels going into different directions instead of the usual one, thus, creating a glitch effect. These glitch effects are used in unique mediums to create a classy yet ancient vibe.
The datamoshing effect can be noticed between the cuts and motion. It is the process of corrupting the imagery in which the I-frames are replaced and P-frames are applied in the wrong picture. Let us dive right into two types of datamoshing.
The first type of datamoshing is created when the I-frame of the video is removed. In this scenario, the pixels from the previous scene are projected into the next scene smoothly. It gives the impression that the pixels have been tracked into the next shot.
The second kind of datamoshing, known to humankind, is when the d-frame of the video is duplicated. It leads the footage to show images and colors being bloomed together as the pixels are equivalent, coming through the same motion path.
Part 3: Step by Step to Create Datamoshing Effect in After Effects (Without Plugin)
Understanding the datamosh After Effects is one thing, and incorporating it in your footage is another. The section shall walk you through the step-by-step guide to create the After Effects’ datamoshing effect without a plugin. So, let’s go, shall we?
Step 1: Preliminary Process
The first step is easy. Open After Effects from your system. Import the targeted video that needs the datamosh effect. After that, head to the “Content-Aware Fill” to begin the process.

Step 2: Creating the Reference Frame
Use the playhead where you wish to create the effect, and then click on “Create Reference Frame.” The picture frame opens in Photoshop, and the user is expected to save it. Now, go back to the After Effects.

Step 3: Smearing Process
Now, hide the top layer so that the smearing can occur. Turn the Masks to “None” so that you can perform the masking. Split the second layer to duplicate the layer as we make changes to it. Set the “Masks” to “Subtract and then add a refine soft matte.

Step 4: Pre-composing the Clip
It is important to pre-compose the clip, so right-click on the timeline and hit “Pre-compose” to the menu list that appears. Tick mark “Move all attributes into the new composition” and rename the clip afterward. Hit “OK.”

Step 5: Rendering Queue
Double-click on the timeline, hold shift and drag it until the clip snaps. Press “B” on your keyboard and “N” on the other side to snap the work area. Navigate to “File” and “Export” and then click on “Render Queue.”

Step 6: Generating Fill Layer
Import the file when it is done rendering and drag it to the timeline. Trim the work area again using B and N buttons from the keyboard. Ensure that the fill method is “Surface,” and the range is “Work Area.” Click on “Generate Fill Layer” to start the analyzing process.

Step 7: Creating the Transition
The user is expected to create a transition between the two shots. Use the track matte to make solid and fractal noise. In the “Noise and Grain” section, click on “Fractal noise” and then switch the fractal type to “Basic.” Now, keyframe the “Brightness” and simultaneously turn its level to black and white to create a transition.

Step 8: Achieving a Glitchy Effect
To give the glitchy effect, head to the “Effects and Presets” and hit “Posterize,” and reduce its level to a couple of integers. Pull the transition down to the fill layer and set it to “Luma Matte.” It will showcase the halo sign that we masked around the image.

Step 9: Have a Finer Imprint
To eliminate it, use the “Set Matte” channel and alter its layer to the one we pre-composed. Now, invert the matte. Moving on, navigate to the “Simple Choker” and reduce it to one pixel. For perfection, duplicate it and get a finer imprint.

Step 10: Final Process
Duplicate the grey solid and then extend the second clip to our fill. In the last step, change the layer of the second clip to “Luma Matte” and save the video. You are done with the process.

Part 4: How to Do Datamoshing Effect with Datamosh Plugin in After Effects
With its plugin, this sub-section revolves around creating the datamosh effect in After Effects. So, let us begin!
Step 1: Rendering the Work Area
Open After Effects and click on the (+) sign to set the in and out points. Click on the “Datamosh” to render the work area. The timeline will showcase the clip. Click on “Remove Frames” from the left panel and add a new mosh marker by pressing the (+) button beside “Remove Frames.”

Step 2: I-Frame Removal
The new remove frame marker will be on the timeline. Drag it to the new scene and then hit “Datamosh.” The I-frame removal effect can be shown on the screen. Again, click on (+) to add a new mosh module. Press “Multiply” and then “Average” from the menus that appear. Hit “Average previous 3” afterward.

Step 3: Using the Hold Frames Function
Set the in and out points of this mosh marker and again hit “Datamosh.” The work area will be rendered. Now, open the mosh module and toggle on the “Hold Frames” feature. Also, toggle on the previous render. Press the “Datamosh” again.

Step 4: Injecting the Frames
Toggle the “Inject Frames” on and press use previous render. Hit “Datamosh” afterward. In this way, the clip will hold the frames and inject them into the transition. Enhance the intensity of the moshing algorithm and eliminate “Remove Frames” and “Inject Frames.” Use the previous render and again hit “Datamosh.”

Step 5: Playing with the Acceleration
Increase the acceleration and bring the intensity back to what it was. Again, use the previous render and click “Datamosh.” Now, improve the intensity and set the acceleration back to 0. Alter the “Blend” as much you need to mix the original and present motion of the transition. Press the “Datamosh.”

Step 6: Changing the Threshold
Moving on to the threshold feature, this function is a gatekeeper and decides if a pixel will be moshed. Inverse the intensity of the clip, change the blend to be 0, and set the threshold to be a small integer to find out the impact first. It can be enhanced later on. Uncheck the previous render if you are using the new clip for threshold. Hit “Datamosh” again. Now, export the video, and you are done with the datamoshing.

Conclusion
YouTubers and content creators use the Datamoshing effect to offer magic to the workplace. The article offered an extensive guide to effortlessly adding this effect in After Effects. The foundation and workability of the datamosh effect were also the cruces of the article. It is recommended that the user properly know the software before getting into the process.
02 How Does Datamoshing Effect Work?
03 Step by Step to Create Datamoshing Effect in After Effects (Without Plugin)
04 How to Do Datamoshing Effect with Datamosh Plugin in After Effects
Part 1: What is the Datamoshing Effect?
Before going into the depths of workability and operation of the datamoshing effect in After Effects, let us understand the effect in detail. The datamoshing effect plays with the video compression to corrupt the pixels of the footage.
In this effect, the pixels glitch and appear to melt, duplicate, and create a projection organically. Also known as databending, it is a complicated technique in which movement of one layer is introduced to another layer of the video clip.
Lossy compression and removed frames help develop a psychedelic result effortlessly. Presently, datamosh After Effects has gained popularity as it helps bring change to the video and engages the audience.
Part 2: How Does Datamoshing Effect Work?
The sub-section informs the content creators and creative professionals regarding the workability of the datamoshing effect in video clips. Hence, let us commence this.
Datamoshing eliminates the new picture frame and keeps those frames that control the movement of the pixels. It leads to the picture pixels going into different directions instead of the usual one, thus, creating a glitch effect. These glitch effects are used in unique mediums to create a classy yet ancient vibe.
The datamoshing effect can be noticed between the cuts and motion. It is the process of corrupting the imagery in which the I-frames are replaced and P-frames are applied in the wrong picture. Let us dive right into two types of datamoshing.
The first type of datamoshing is created when the I-frame of the video is removed. In this scenario, the pixels from the previous scene are projected into the next scene smoothly. It gives the impression that the pixels have been tracked into the next shot.
The second kind of datamoshing, known to humankind, is when the d-frame of the video is duplicated. It leads the footage to show images and colors being bloomed together as the pixels are equivalent, coming through the same motion path.
Part 3: Step by Step to Create Datamoshing Effect in After Effects (Without Plugin)
Understanding the datamosh After Effects is one thing, and incorporating it in your footage is another. The section shall walk you through the step-by-step guide to create the After Effects’ datamoshing effect without a plugin. So, let’s go, shall we?
Step 1: Preliminary Process
The first step is easy. Open After Effects from your system. Import the targeted video that needs the datamosh effect. After that, head to the “Content-Aware Fill” to begin the process.

Step 2: Creating the Reference Frame
Use the playhead where you wish to create the effect, and then click on “Create Reference Frame.” The picture frame opens in Photoshop, and the user is expected to save it. Now, go back to the After Effects.

Step 3: Smearing Process
Now, hide the top layer so that the smearing can occur. Turn the Masks to “None” so that you can perform the masking. Split the second layer to duplicate the layer as we make changes to it. Set the “Masks” to “Subtract and then add a refine soft matte.

Step 4: Pre-composing the Clip
It is important to pre-compose the clip, so right-click on the timeline and hit “Pre-compose” to the menu list that appears. Tick mark “Move all attributes into the new composition” and rename the clip afterward. Hit “OK.”

Step 5: Rendering Queue
Double-click on the timeline, hold shift and drag it until the clip snaps. Press “B” on your keyboard and “N” on the other side to snap the work area. Navigate to “File” and “Export” and then click on “Render Queue.”

Step 6: Generating Fill Layer
Import the file when it is done rendering and drag it to the timeline. Trim the work area again using B and N buttons from the keyboard. Ensure that the fill method is “Surface,” and the range is “Work Area.” Click on “Generate Fill Layer” to start the analyzing process.

Step 7: Creating the Transition
The user is expected to create a transition between the two shots. Use the track matte to make solid and fractal noise. In the “Noise and Grain” section, click on “Fractal noise” and then switch the fractal type to “Basic.” Now, keyframe the “Brightness” and simultaneously turn its level to black and white to create a transition.

Step 8: Achieving a Glitchy Effect
To give the glitchy effect, head to the “Effects and Presets” and hit “Posterize,” and reduce its level to a couple of integers. Pull the transition down to the fill layer and set it to “Luma Matte.” It will showcase the halo sign that we masked around the image.

Step 9: Have a Finer Imprint
To eliminate it, use the “Set Matte” channel and alter its layer to the one we pre-composed. Now, invert the matte. Moving on, navigate to the “Simple Choker” and reduce it to one pixel. For perfection, duplicate it and get a finer imprint.

Step 10: Final Process
Duplicate the grey solid and then extend the second clip to our fill. In the last step, change the layer of the second clip to “Luma Matte” and save the video. You are done with the process.

Part 4: How to Do Datamoshing Effect with Datamosh Plugin in After Effects
With its plugin, this sub-section revolves around creating the datamosh effect in After Effects. So, let us begin!
Step 1: Rendering the Work Area
Open After Effects and click on the (+) sign to set the in and out points. Click on the “Datamosh” to render the work area. The timeline will showcase the clip. Click on “Remove Frames” from the left panel and add a new mosh marker by pressing the (+) button beside “Remove Frames.”

Step 2: I-Frame Removal
The new remove frame marker will be on the timeline. Drag it to the new scene and then hit “Datamosh.” The I-frame removal effect can be shown on the screen. Again, click on (+) to add a new mosh module. Press “Multiply” and then “Average” from the menus that appear. Hit “Average previous 3” afterward.

Step 3: Using the Hold Frames Function
Set the in and out points of this mosh marker and again hit “Datamosh.” The work area will be rendered. Now, open the mosh module and toggle on the “Hold Frames” feature. Also, toggle on the previous render. Press the “Datamosh” again.

Step 4: Injecting the Frames
Toggle the “Inject Frames” on and press use previous render. Hit “Datamosh” afterward. In this way, the clip will hold the frames and inject them into the transition. Enhance the intensity of the moshing algorithm and eliminate “Remove Frames” and “Inject Frames.” Use the previous render and again hit “Datamosh.”

Step 5: Playing with the Acceleration
Increase the acceleration and bring the intensity back to what it was. Again, use the previous render and click “Datamosh.” Now, improve the intensity and set the acceleration back to 0. Alter the “Blend” as much you need to mix the original and present motion of the transition. Press the “Datamosh.”

Step 6: Changing the Threshold
Moving on to the threshold feature, this function is a gatekeeper and decides if a pixel will be moshed. Inverse the intensity of the clip, change the blend to be 0, and set the threshold to be a small integer to find out the impact first. It can be enhanced later on. Uncheck the previous render if you are using the new clip for threshold. Hit “Datamosh” again. Now, export the video, and you are done with the datamoshing.

Conclusion
YouTubers and content creators use the Datamoshing effect to offer magic to the workplace. The article offered an extensive guide to effortlessly adding this effect in After Effects. The foundation and workability of the datamosh effect were also the cruces of the article. It is recommended that the user properly know the software before getting into the process.
02 How Does Datamoshing Effect Work?
03 Step by Step to Create Datamoshing Effect in After Effects (Without Plugin)
04 How to Do Datamoshing Effect with Datamosh Plugin in After Effects
Part 1: What is the Datamoshing Effect?
Before going into the depths of workability and operation of the datamoshing effect in After Effects, let us understand the effect in detail. The datamoshing effect plays with the video compression to corrupt the pixels of the footage.
In this effect, the pixels glitch and appear to melt, duplicate, and create a projection organically. Also known as databending, it is a complicated technique in which movement of one layer is introduced to another layer of the video clip.
Lossy compression and removed frames help develop a psychedelic result effortlessly. Presently, datamosh After Effects has gained popularity as it helps bring change to the video and engages the audience.
Part 2: How Does Datamoshing Effect Work?
The sub-section informs the content creators and creative professionals regarding the workability of the datamoshing effect in video clips. Hence, let us commence this.
Datamoshing eliminates the new picture frame and keeps those frames that control the movement of the pixels. It leads to the picture pixels going into different directions instead of the usual one, thus, creating a glitch effect. These glitch effects are used in unique mediums to create a classy yet ancient vibe.
The datamoshing effect can be noticed between the cuts and motion. It is the process of corrupting the imagery in which the I-frames are replaced and P-frames are applied in the wrong picture. Let us dive right into two types of datamoshing.
The first type of datamoshing is created when the I-frame of the video is removed. In this scenario, the pixels from the previous scene are projected into the next scene smoothly. It gives the impression that the pixels have been tracked into the next shot.
The second kind of datamoshing, known to humankind, is when the d-frame of the video is duplicated. It leads the footage to show images and colors being bloomed together as the pixels are equivalent, coming through the same motion path.
Part 3: Step by Step to Create Datamoshing Effect in After Effects (Without Plugin)
Understanding the datamosh After Effects is one thing, and incorporating it in your footage is another. The section shall walk you through the step-by-step guide to create the After Effects’ datamoshing effect without a plugin. So, let’s go, shall we?
Step 1: Preliminary Process
The first step is easy. Open After Effects from your system. Import the targeted video that needs the datamosh effect. After that, head to the “Content-Aware Fill” to begin the process.

Step 2: Creating the Reference Frame
Use the playhead where you wish to create the effect, and then click on “Create Reference Frame.” The picture frame opens in Photoshop, and the user is expected to save it. Now, go back to the After Effects.

Step 3: Smearing Process
Now, hide the top layer so that the smearing can occur. Turn the Masks to “None” so that you can perform the masking. Split the second layer to duplicate the layer as we make changes to it. Set the “Masks” to “Subtract and then add a refine soft matte.

Step 4: Pre-composing the Clip
It is important to pre-compose the clip, so right-click on the timeline and hit “Pre-compose” to the menu list that appears. Tick mark “Move all attributes into the new composition” and rename the clip afterward. Hit “OK.”

Step 5: Rendering Queue
Double-click on the timeline, hold shift and drag it until the clip snaps. Press “B” on your keyboard and “N” on the other side to snap the work area. Navigate to “File” and “Export” and then click on “Render Queue.”

Step 6: Generating Fill Layer
Import the file when it is done rendering and drag it to the timeline. Trim the work area again using B and N buttons from the keyboard. Ensure that the fill method is “Surface,” and the range is “Work Area.” Click on “Generate Fill Layer” to start the analyzing process.

Step 7: Creating the Transition
The user is expected to create a transition between the two shots. Use the track matte to make solid and fractal noise. In the “Noise and Grain” section, click on “Fractal noise” and then switch the fractal type to “Basic.” Now, keyframe the “Brightness” and simultaneously turn its level to black and white to create a transition.

Step 8: Achieving a Glitchy Effect
To give the glitchy effect, head to the “Effects and Presets” and hit “Posterize,” and reduce its level to a couple of integers. Pull the transition down to the fill layer and set it to “Luma Matte.” It will showcase the halo sign that we masked around the image.

Step 9: Have a Finer Imprint
To eliminate it, use the “Set Matte” channel and alter its layer to the one we pre-composed. Now, invert the matte. Moving on, navigate to the “Simple Choker” and reduce it to one pixel. For perfection, duplicate it and get a finer imprint.

Step 10: Final Process
Duplicate the grey solid and then extend the second clip to our fill. In the last step, change the layer of the second clip to “Luma Matte” and save the video. You are done with the process.

Part 4: How to Do Datamoshing Effect with Datamosh Plugin in After Effects
With its plugin, this sub-section revolves around creating the datamosh effect in After Effects. So, let us begin!
Step 1: Rendering the Work Area
Open After Effects and click on the (+) sign to set the in and out points. Click on the “Datamosh” to render the work area. The timeline will showcase the clip. Click on “Remove Frames” from the left panel and add a new mosh marker by pressing the (+) button beside “Remove Frames.”

Step 2: I-Frame Removal
The new remove frame marker will be on the timeline. Drag it to the new scene and then hit “Datamosh.” The I-frame removal effect can be shown on the screen. Again, click on (+) to add a new mosh module. Press “Multiply” and then “Average” from the menus that appear. Hit “Average previous 3” afterward.

Step 3: Using the Hold Frames Function
Set the in and out points of this mosh marker and again hit “Datamosh.” The work area will be rendered. Now, open the mosh module and toggle on the “Hold Frames” feature. Also, toggle on the previous render. Press the “Datamosh” again.

Step 4: Injecting the Frames
Toggle the “Inject Frames” on and press use previous render. Hit “Datamosh” afterward. In this way, the clip will hold the frames and inject them into the transition. Enhance the intensity of the moshing algorithm and eliminate “Remove Frames” and “Inject Frames.” Use the previous render and again hit “Datamosh.”

Step 5: Playing with the Acceleration
Increase the acceleration and bring the intensity back to what it was. Again, use the previous render and click “Datamosh.” Now, improve the intensity and set the acceleration back to 0. Alter the “Blend” as much you need to mix the original and present motion of the transition. Press the “Datamosh.”

Step 6: Changing the Threshold
Moving on to the threshold feature, this function is a gatekeeper and decides if a pixel will be moshed. Inverse the intensity of the clip, change the blend to be 0, and set the threshold to be a small integer to find out the impact first. It can be enhanced later on. Uncheck the previous render if you are using the new clip for threshold. Hit “Datamosh” again. Now, export the video, and you are done with the datamoshing.

Conclusion
YouTubers and content creators use the Datamoshing effect to offer magic to the workplace. The article offered an extensive guide to effortlessly adding this effect in After Effects. The foundation and workability of the datamosh effect were also the cruces of the article. It is recommended that the user properly know the software before getting into the process.
02 How Does Datamoshing Effect Work?
03 Step by Step to Create Datamoshing Effect in After Effects (Without Plugin)
04 How to Do Datamoshing Effect with Datamosh Plugin in After Effects
Part 1: What is the Datamoshing Effect?
Before going into the depths of workability and operation of the datamoshing effect in After Effects, let us understand the effect in detail. The datamoshing effect plays with the video compression to corrupt the pixels of the footage.
In this effect, the pixels glitch and appear to melt, duplicate, and create a projection organically. Also known as databending, it is a complicated technique in which movement of one layer is introduced to another layer of the video clip.
Lossy compression and removed frames help develop a psychedelic result effortlessly. Presently, datamosh After Effects has gained popularity as it helps bring change to the video and engages the audience.
Part 2: How Does Datamoshing Effect Work?
The sub-section informs the content creators and creative professionals regarding the workability of the datamoshing effect in video clips. Hence, let us commence this.
Datamoshing eliminates the new picture frame and keeps those frames that control the movement of the pixels. It leads to the picture pixels going into different directions instead of the usual one, thus, creating a glitch effect. These glitch effects are used in unique mediums to create a classy yet ancient vibe.
The datamoshing effect can be noticed between the cuts and motion. It is the process of corrupting the imagery in which the I-frames are replaced and P-frames are applied in the wrong picture. Let us dive right into two types of datamoshing.
The first type of datamoshing is created when the I-frame of the video is removed. In this scenario, the pixels from the previous scene are projected into the next scene smoothly. It gives the impression that the pixels have been tracked into the next shot.
The second kind of datamoshing, known to humankind, is when the d-frame of the video is duplicated. It leads the footage to show images and colors being bloomed together as the pixels are equivalent, coming through the same motion path.
Part 3: Step by Step to Create Datamoshing Effect in After Effects (Without Plugin)
Understanding the datamosh After Effects is one thing, and incorporating it in your footage is another. The section shall walk you through the step-by-step guide to create the After Effects’ datamoshing effect without a plugin. So, let’s go, shall we?
Step 1: Preliminary Process
The first step is easy. Open After Effects from your system. Import the targeted video that needs the datamosh effect. After that, head to the “Content-Aware Fill” to begin the process.

Step 2: Creating the Reference Frame
Use the playhead where you wish to create the effect, and then click on “Create Reference Frame.” The picture frame opens in Photoshop, and the user is expected to save it. Now, go back to the After Effects.

Step 3: Smearing Process
Now, hide the top layer so that the smearing can occur. Turn the Masks to “None” so that you can perform the masking. Split the second layer to duplicate the layer as we make changes to it. Set the “Masks” to “Subtract and then add a refine soft matte.

Step 4: Pre-composing the Clip
It is important to pre-compose the clip, so right-click on the timeline and hit “Pre-compose” to the menu list that appears. Tick mark “Move all attributes into the new composition” and rename the clip afterward. Hit “OK.”

Step 5: Rendering Queue
Double-click on the timeline, hold shift and drag it until the clip snaps. Press “B” on your keyboard and “N” on the other side to snap the work area. Navigate to “File” and “Export” and then click on “Render Queue.”

Step 6: Generating Fill Layer
Import the file when it is done rendering and drag it to the timeline. Trim the work area again using B and N buttons from the keyboard. Ensure that the fill method is “Surface,” and the range is “Work Area.” Click on “Generate Fill Layer” to start the analyzing process.

Step 7: Creating the Transition
The user is expected to create a transition between the two shots. Use the track matte to make solid and fractal noise. In the “Noise and Grain” section, click on “Fractal noise” and then switch the fractal type to “Basic.” Now, keyframe the “Brightness” and simultaneously turn its level to black and white to create a transition.

Step 8: Achieving a Glitchy Effect
To give the glitchy effect, head to the “Effects and Presets” and hit “Posterize,” and reduce its level to a couple of integers. Pull the transition down to the fill layer and set it to “Luma Matte.” It will showcase the halo sign that we masked around the image.

Step 9: Have a Finer Imprint
To eliminate it, use the “Set Matte” channel and alter its layer to the one we pre-composed. Now, invert the matte. Moving on, navigate to the “Simple Choker” and reduce it to one pixel. For perfection, duplicate it and get a finer imprint.

Step 10: Final Process
Duplicate the grey solid and then extend the second clip to our fill. In the last step, change the layer of the second clip to “Luma Matte” and save the video. You are done with the process.

Part 4: How to Do Datamoshing Effect with Datamosh Plugin in After Effects
With its plugin, this sub-section revolves around creating the datamosh effect in After Effects. So, let us begin!
Step 1: Rendering the Work Area
Open After Effects and click on the (+) sign to set the in and out points. Click on the “Datamosh” to render the work area. The timeline will showcase the clip. Click on “Remove Frames” from the left panel and add a new mosh marker by pressing the (+) button beside “Remove Frames.”

Step 2: I-Frame Removal
The new remove frame marker will be on the timeline. Drag it to the new scene and then hit “Datamosh.” The I-frame removal effect can be shown on the screen. Again, click on (+) to add a new mosh module. Press “Multiply” and then “Average” from the menus that appear. Hit “Average previous 3” afterward.

Step 3: Using the Hold Frames Function
Set the in and out points of this mosh marker and again hit “Datamosh.” The work area will be rendered. Now, open the mosh module and toggle on the “Hold Frames” feature. Also, toggle on the previous render. Press the “Datamosh” again.

Step 4: Injecting the Frames
Toggle the “Inject Frames” on and press use previous render. Hit “Datamosh” afterward. In this way, the clip will hold the frames and inject them into the transition. Enhance the intensity of the moshing algorithm and eliminate “Remove Frames” and “Inject Frames.” Use the previous render and again hit “Datamosh.”

Step 5: Playing with the Acceleration
Increase the acceleration and bring the intensity back to what it was. Again, use the previous render and click “Datamosh.” Now, improve the intensity and set the acceleration back to 0. Alter the “Blend” as much you need to mix the original and present motion of the transition. Press the “Datamosh.”

Step 6: Changing the Threshold
Moving on to the threshold feature, this function is a gatekeeper and decides if a pixel will be moshed. Inverse the intensity of the clip, change the blend to be 0, and set the threshold to be a small integer to find out the impact first. It can be enhanced later on. Uncheck the previous render if you are using the new clip for threshold. Hit “Datamosh” again. Now, export the video, and you are done with the datamoshing.

Conclusion
YouTubers and content creators use the Datamoshing effect to offer magic to the workplace. The article offered an extensive guide to effortlessly adding this effect in After Effects. The foundation and workability of the datamosh effect were also the cruces of the article. It is recommended that the user properly know the software before getting into the process.
Best Online YouTube Video Trimmer 2024
Since the shift in interest from on-site jobs to content creators and exploring opportunities to take advantage of better and improved career growth opportunities, YouTube is one of the most popular social media platforms to get started.
But how do people face difficulties in finding an affordable and quick online YouTube video trimmer? Are you also facing issues with trimming your video before uploading it to get more views?
This is an ultimate guide on online YouTube video trimmer software and how you can trim your YouTube videos in no time.
Part 1. What is a YouTube trimmer?
Before diving into any details, it is important to introduce you to what is a YouTube trimmer and why it is important to trim your video. A YouTube trimmer is an easy and fast video editing tool that allows you to trim, crop, and share your favorite video parts online. You can also create custom links to YouTube Crops to embed on your website.
There are two popular online YouTube trimmers available; one only allows you to edit the YouTube link, which means you can only view the edited video online, while the other allows you to do related operations on the video file and download and save it as an mp4 or other file type for offline viewing.
Part 2. How to online trim YouTube videos?
1. Online YouTube trimmer (no edit and download)
Using these two websites, you can easily find the YouTube video clip you want to keep, but there is no way to download the video or add more editing to the clip. However, it works well for sharing links online or adding them to your website and using them to describe the part that best fits the topic.
The straightforward interface has just one function. Enter the start and end times in the box after entering the right YouTube link, then click “Crop!” to create a string of links.

The video’s beginning and ending times are selected in the same way as on the previous website. However, this website offers some basic code that you may copy and paste into your web pages to suit your demands in order to add YouTube videos.

Once you are done trimming your videos, you can download or export your videos in different formats, depending on your preference. It can be in mp4, mp3, or any other supported format.
2. Online YouTube trimmer (edit and download)
The websites that are listed after that combine an online YouTube downloader with a video editor, allowing you to make a variety of further edits to the selected video clip before downloading it locally.
- Veed.io :
Anyone can make powerful videos and expand their audiences thanks to the online video editing application Veed. It has some useful capabilities, such as the capacity to cut videos and filter them using different aesthetics. Users can crop, add text, make drawings, and even add photos to the movies. In addition, Veed serves as a tool for producing social media films that may be customized for each channel where they will be shared.
Additionally, they are free to play with various tools like rotate, trim, add photos, stickers, emojis, and more. Through the program, users may even create video memes online by uploading a target movie, modifying it using a variety of features, and downloading the altered video after a brief rendering.
Step1Launch veed.io on your web browser. Click on ‘Upload Your Video‘ to upload the video file you want to edit.
Step2You will notice a button to upload your media file once you are taken to the editing page.

Step3You can trim your video section by dragging the mark after you’ve uploaded the media file.

Step4Now, delete the unwanted video segment and click on ‘Export’ to save the trimmed video.
- Kapwing :
An effective, non-linear editing workflow is supported by the online video editor Kapwing. Upload your audio, video, and image files, then edit everything in one location. Since Kapwing is entirely online, content creators may access and edit their work from any computer or mobile device.
Step1Launch Kapwing.com on your web browser. If you are not directed to the trim video section, then go to the ‘Tools‘ menu and select ‘Trim Video‘. Now, click on ‘Choose a Video.’
Step2From the main page, click ‘Click to upload’ to upload the media file.

Step3After uploading the media file, Click on ‘Trim’ from the editing section on the right side of the screen.

Step4A pop-up screen will appear on your screen labeled as Trim Video. Trim the parts of the video as per your requirement and Click ‘Trim’ to finish.

Step5Once you have completed editing, click on ‘Export’ to save the video to your device.
Part 3. How to trim YouTube videos on a desktop?
Using an online video trimmer has been one of the last options that anyone would consider, but due to the expensive software, they have turned out to be a friendly and easy approach to editing videos. But the online video trimmers still rank at the bottom of the list because they’re unstable, and you can’t save the project at any time. If the online program breaks down, all your effort will be wasted. But desktop programs such as Filmora will never make you encounter such problems unless you experience a technical glitch.
With the help of a variety of strong editing tools and Wondershare Filmora , users may quickly and easily make outstanding videos. With Wondershare Filmora, anyone can learn how to be an excellent video editor, thanks to its wonderfully simple design.
You can follow these easy steps to trim your video:
Step1Click “Import” on the main windows and then select the desired video files from your computer to add video files to the Timeline for cutting. Movies can also be dropped directly into the Media Library.

Step2By moving the playhead over the unwanted section and choosing the trash can icon, you can delete it.

Step3When you’re through trimming, click “Export”, then select a location to store the edited video.
Conclusion
Depending on the comparison of how different software work, it is justifiable to conclude that Filmora is the best video editing software by all means. It offers a wide range of editing tools and ensures that progress has not been lost. If you are looking forward to trimming a video, download Filmora on your device to get started.
Free Download For Win 7 or later(64-bit)
Free Download For macOS 10.14 or later
Free Download For macOS 10.14 or later
Want to Create an Impressive Video Collage but Clueless About the Best Tools? No Worries as We Are Here and Will Help You to Learn About the Best Video Collage Maker PC Tools
10 Mind-Blowing Video Collage Maker for PC
An easy yet powerful editor
Numerous effects to choose from
Detailed tutorials provided by the official channel
Video collages are a great way to play multiple short videos at the same time. These collages can be used for different purposes and platforms like social media platforms, online video sharing sites, brand promotion, announcing an event or a service, and similar others.

Whatever may be the situation, you would need a good and feature-packed tool for creating such a collage so that videos look perfect in a frame, background audio can be added, and other customizations can be done. Keep reading below to learn about the best video collage maker for PC.
In this article
01 [Top 10 Video Collage Makers for Pc](#Part 1)
02 [Alternatives to Video Collage Maker for Pc](#Part 2)
Part 1 Top 10 video collage makers for PC
Among the long list of tools available, below we have shortlisted the top 10 PC tools that can be used for creating a video collage.
01**Wondershare Filmora Video Editor **
This Windows and Mac-based software is the best choice when it comes to creating a simple video collage in an effortless manner.
Key features
● Create a video collage using the split-screen feature of the software.
● Excellent video editing tool supporting advanced features for creating professional-looking videos.
● Support customizable animation options along with precise editing functions.
● Support to multiple audio-related features like automatic audio sync, audio compression, audio transitions, and more.
● Offers of stock collection of images, and other media files.
● Windows and Mac support.
For Win 7 or later (64-bit)
For macOS 10.12 or later
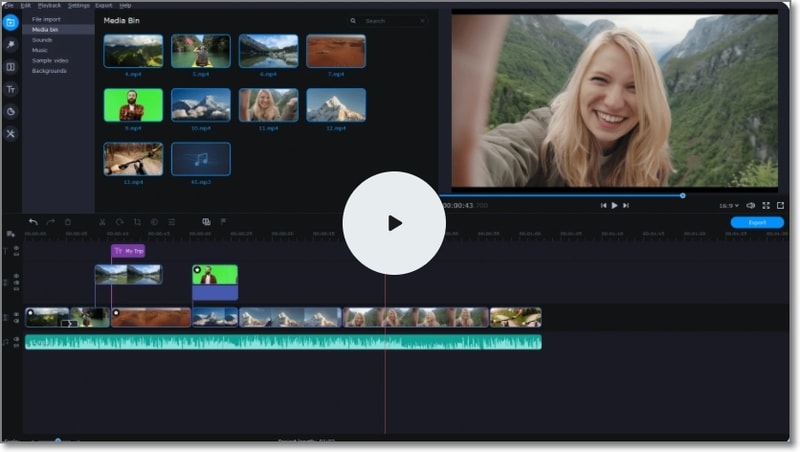
04Movavi Video Editor Plus
Unleash your creativity and make stunning videos including video collages using this excellent software.
Key features:
● Create stunning video collages with multiple video customization options.
● Allows adding titles, transitions, stickers, and filters.
● Option to apply chroma-key for changing the background.
● Option for creating automatic video collages.
● User-friendly interface.
● Windows and Mac support.
05Aiseesoft Video Converter Ultimate
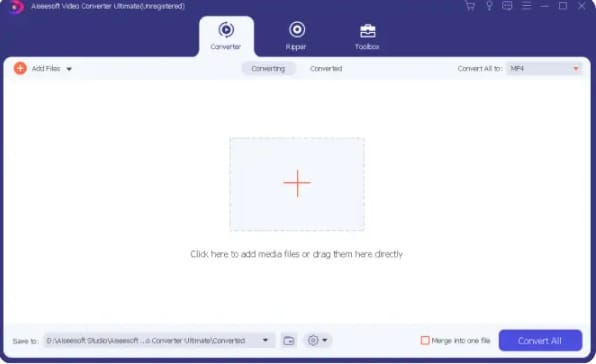
Though the name suggests the software to be a video conversion tool, it is a multi-tasking software that can perform a variety of functions including video collage making and thus can be considered as a decent video collage app for PC.
Key features
● A feature-rich program that can also be used for creating a video collage.
● Allows performing a variety of features like video conversion, editing, compression, and more.
● Option for editing the video effects and also editing ID3 info.
● Create interesting GIF animations.
● Simple and easy-to-understand layout.
● Windows and Mac support.
06Cidade Video Collage Studio
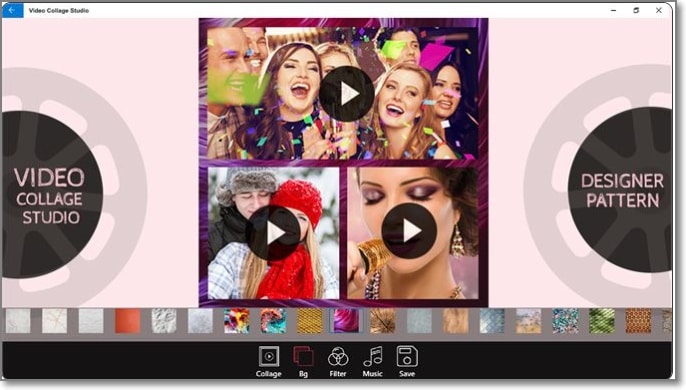
Using this intuitive tool, you can quickly create a video collage by combining all your favorite videos in one place.
Key features
● Create a video collage by combining multiple videos or creating a video grid.
● Intuitive and user-friendly interface.
● Multiple-grid options to choose from.
● Allows applying effects like Sepia, Lomo, and others.
● Background audio or music files can be added.
● Option to change the background color and also preview the video.
07Blu-ray Master Video Converter Ultimate
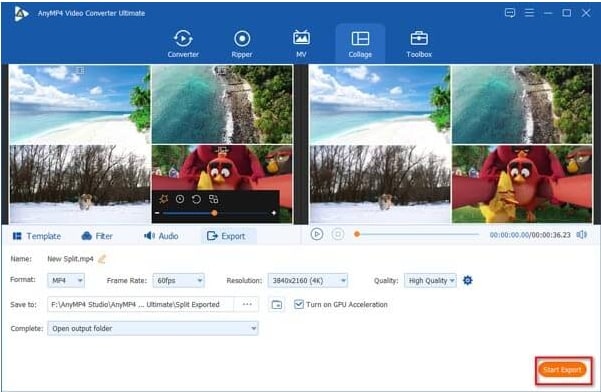
This is a video toolbox supporting multiple functions that also include creating a video collage.
Key feature
● Create a video collage using high-quality videos.
● Support customizing and editing videos using several built-in tools.
● Video conversion to over 500 formats supported.
● Multiple layouts and templates for video collage are available.
● Almost all video, image, and audio formats are supported.
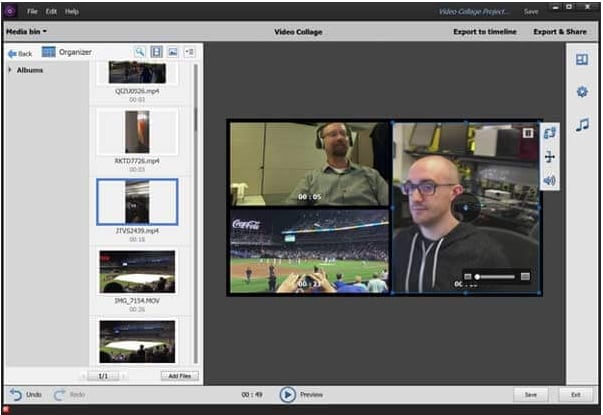
08Adobe Premiere Elements
If you are looking for an advanced and professional tool for creating a video collage and for other video editing needs, this is the right choice.
Key features:
● Create professional-looking collages using high-quality video files.
● The interface is clean with support for advanced functions.
● Option for adding multiple video effects.
● Comes with help documents and guides to help you with the software functions.
● Windows and Mac support.
09Collage Maker
For creating a simple video collage on your Windows system this is a good tool to consider.
Key features
● Simple and basic collage-making tool.
● Comes with customizable and adjustable layout options.
● Option to add stickers ad text to the collage.
● Allows mixing videos, and images along with the music file.

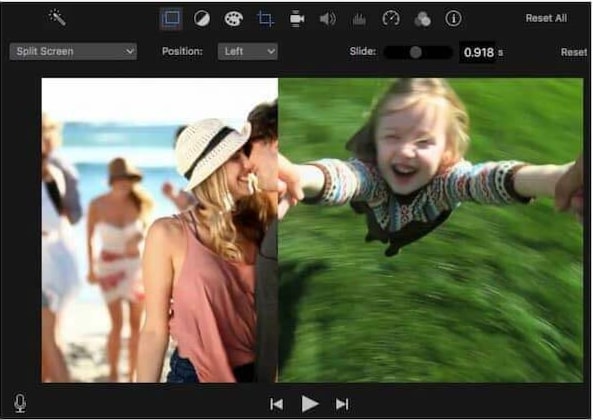
1010. iMovie
For Mac users, iMovie is the default video editing tool that is pre-installed on the system. Besides editing functions, the tool can also perform other tasks like creating a video collage.
Key features:
● Allows to quickly create a video collage.
● Intuitive interface.
● Comes pre-installed with Mac systems.
● Transitions and other effects can be added.
Part 2 Alternatives to video collage maker for PC
If you do not want to download any additional software on your PC for creating a video collage, there are alternatives available in form of online tools and phone-based apps. The online tools are free and simple to use supporting all basic and needed functions. Some of the popular names in the category include FastReels, Typito, Kapwing, and more.
Apps are a great option when you want to create a collage on your mobile phone. Multiple apps for the task are available on the Google play store and Apple Store. Some of the widely used ones are PicStich, PicPlayPost Movie Video Editor, Mojo, and others.
● Ending Thoughts →
● Video collages are an interesting way to combine and play short multiple videos or play them in a grid.
● There are several PC-based video collage maker tools available like Wondershare Filmora, and others.
● As alternatives, you can use online tools or phone-based apps for creating a video collage.
Video collages are a great way to play multiple short videos at the same time. These collages can be used for different purposes and platforms like social media platforms, online video sharing sites, brand promotion, announcing an event or a service, and similar others.

Whatever may be the situation, you would need a good and feature-packed tool for creating such a collage so that videos look perfect in a frame, background audio can be added, and other customizations can be done. Keep reading below to learn about the best video collage maker for PC.
In this article
01 [Top 10 Video Collage Makers for Pc](#Part 1)
02 [Alternatives to Video Collage Maker for Pc](#Part 2)
Part 1 Top 10 video collage makers for PC
Among the long list of tools available, below we have shortlisted the top 10 PC tools that can be used for creating a video collage.
01**Wondershare Filmora Video Editor **
This Windows and Mac-based software is the best choice when it comes to creating a simple video collage in an effortless manner.
Key features
● Create a video collage using the split-screen feature of the software.
● Excellent video editing tool supporting advanced features for creating professional-looking videos.
● Support customizable animation options along with precise editing functions.
● Support to multiple audio-related features like automatic audio sync, audio compression, audio transitions, and more.
● Offers of stock collection of images, and other media files.
● Windows and Mac support.
For Win 7 or later (64-bit)
For macOS 10.12 or later
04Movavi Video Editor Plus
Unleash your creativity and make stunning videos including video collages using this excellent software.
Key features:
● Create stunning video collages with multiple video customization options.
● Allows adding titles, transitions, stickers, and filters.
● Option to apply chroma-key for changing the background.
● Option for creating automatic video collages.
● User-friendly interface.
● Windows and Mac support.

05Aiseesoft Video Converter Ultimate
Though the name suggests the software to be a video conversion tool, it is a multi-tasking software that can perform a variety of functions including video collage making and thus can be considered as a decent video collage app for PC.
Key features
● A feature-rich program that can also be used for creating a video collage.
● Allows performing a variety of features like video conversion, editing, compression, and more.
● Option for editing the video effects and also editing ID3 info.
● Create interesting GIF animations.
● Simple and easy-to-understand layout.
● Windows and Mac support.

06Cidade Video Collage Studio
Using this intuitive tool, you can quickly create a video collage by combining all your favorite videos in one place.
Key features
● Create a video collage by combining multiple videos or creating a video grid.
● Intuitive and user-friendly interface.
● Multiple-grid options to choose from.
● Allows applying effects like Sepia, Lomo, and others.
● Background audio or music files can be added.
● Option to change the background color and also preview the video.

07Blu-ray Master Video Converter Ultimate
This is a video toolbox supporting multiple functions that also include creating a video collage.
Key feature
● Create a video collage using high-quality videos.
● Support customizing and editing videos using several built-in tools.
● Video conversion to over 500 formats supported.
● Multiple layouts and templates for video collage are available.
● Almost all video, image, and audio formats are supported.

08Adobe Premiere Elements
If you are looking for an advanced and professional tool for creating a video collage and for other video editing needs, this is the right choice.
Key features:
● Create professional-looking collages using high-quality video files.
● The interface is clean with support for advanced functions.
● Option for adding multiple video effects.
● Comes with help documents and guides to help you with the software functions.
● Windows and Mac support.

09Collage Maker
For creating a simple video collage on your Windows system this is a good tool to consider.
Key features
● Simple and basic collage-making tool.
● Comes with customizable and adjustable layout options.
● Option to add stickers ad text to the collage.
● Allows mixing videos, and images along with the music file.

1010. iMovie
For Mac users, iMovie is the default video editing tool that is pre-installed on the system. Besides editing functions, the tool can also perform other tasks like creating a video collage.
Key features:
● Allows to quickly create a video collage.
● Intuitive interface.
● Comes pre-installed with Mac systems.
● Transitions and other effects can be added.

Part 2 Alternatives to video collage maker for PC
If you do not want to download any additional software on your PC for creating a video collage, there are alternatives available in form of online tools and phone-based apps. The online tools are free and simple to use supporting all basic and needed functions. Some of the popular names in the category include FastReels, Typito, Kapwing, and more.
Apps are a great option when you want to create a collage on your mobile phone. Multiple apps for the task are available on the Google play store and Apple Store. Some of the widely used ones are PicStich, PicPlayPost Movie Video Editor, Mojo, and others.
● Ending Thoughts →
● Video collages are an interesting way to combine and play short multiple videos or play them in a grid.
● There are several PC-based video collage maker tools available like Wondershare Filmora, and others.
● As alternatives, you can use online tools or phone-based apps for creating a video collage.
Video collages are a great way to play multiple short videos at the same time. These collages can be used for different purposes and platforms like social media platforms, online video sharing sites, brand promotion, announcing an event or a service, and similar others.

Whatever may be the situation, you would need a good and feature-packed tool for creating such a collage so that videos look perfect in a frame, background audio can be added, and other customizations can be done. Keep reading below to learn about the best video collage maker for PC.
In this article
01 [Top 10 Video Collage Makers for Pc](#Part 1)
02 [Alternatives to Video Collage Maker for Pc](#Part 2)
Part 1 Top 10 video collage makers for PC
Among the long list of tools available, below we have shortlisted the top 10 PC tools that can be used for creating a video collage.
01**Wondershare Filmora Video Editor **
This Windows and Mac-based software is the best choice when it comes to creating a simple video collage in an effortless manner.
Key features
● Create a video collage using the split-screen feature of the software.
● Excellent video editing tool supporting advanced features for creating professional-looking videos.
● Support customizable animation options along with precise editing functions.
● Support to multiple audio-related features like automatic audio sync, audio compression, audio transitions, and more.
● Offers of stock collection of images, and other media files.
● Windows and Mac support.
For Win 7 or later (64-bit)
For macOS 10.12 or later
04Movavi Video Editor Plus
Unleash your creativity and make stunning videos including video collages using this excellent software.
Key features:
● Create stunning video collages with multiple video customization options.
● Allows adding titles, transitions, stickers, and filters.
● Option to apply chroma-key for changing the background.
● Option for creating automatic video collages.
● User-friendly interface.
● Windows and Mac support.

05Aiseesoft Video Converter Ultimate
Though the name suggests the software to be a video conversion tool, it is a multi-tasking software that can perform a variety of functions including video collage making and thus can be considered as a decent video collage app for PC.
Key features
● A feature-rich program that can also be used for creating a video collage.
● Allows performing a variety of features like video conversion, editing, compression, and more.
● Option for editing the video effects and also editing ID3 info.
● Create interesting GIF animations.
● Simple and easy-to-understand layout.
● Windows and Mac support.

06Cidade Video Collage Studio
Using this intuitive tool, you can quickly create a video collage by combining all your favorite videos in one place.
Key features
● Create a video collage by combining multiple videos or creating a video grid.
● Intuitive and user-friendly interface.
● Multiple-grid options to choose from.
● Allows applying effects like Sepia, Lomo, and others.
● Background audio or music files can be added.
● Option to change the background color and also preview the video.

07Blu-ray Master Video Converter Ultimate
This is a video toolbox supporting multiple functions that also include creating a video collage.
Key feature
● Create a video collage using high-quality videos.
● Support customizing and editing videos using several built-in tools.
● Video conversion to over 500 formats supported.
● Multiple layouts and templates for video collage are available.
● Almost all video, image, and audio formats are supported.

08Adobe Premiere Elements
If you are looking for an advanced and professional tool for creating a video collage and for other video editing needs, this is the right choice.
Key features:
● Create professional-looking collages using high-quality video files.
● The interface is clean with support for advanced functions.
● Option for adding multiple video effects.
● Comes with help documents and guides to help you with the software functions.
● Windows and Mac support.

09Collage Maker
For creating a simple video collage on your Windows system this is a good tool to consider.
Key features
● Simple and basic collage-making tool.
● Comes with customizable and adjustable layout options.
● Option to add stickers ad text to the collage.
● Allows mixing videos, and images along with the music file.

1010. iMovie
For Mac users, iMovie is the default video editing tool that is pre-installed on the system. Besides editing functions, the tool can also perform other tasks like creating a video collage.
Key features:
● Allows to quickly create a video collage.
● Intuitive interface.
● Comes pre-installed with Mac systems.
● Transitions and other effects can be added.

Part 2 Alternatives to video collage maker for PC
If you do not want to download any additional software on your PC for creating a video collage, there are alternatives available in form of online tools and phone-based apps. The online tools are free and simple to use supporting all basic and needed functions. Some of the popular names in the category include FastReels, Typito, Kapwing, and more.
Apps are a great option when you want to create a collage on your mobile phone. Multiple apps for the task are available on the Google play store and Apple Store. Some of the widely used ones are PicStich, PicPlayPost Movie Video Editor, Mojo, and others.
● Ending Thoughts →
● Video collages are an interesting way to combine and play short multiple videos or play them in a grid.
● There are several PC-based video collage maker tools available like Wondershare Filmora, and others.
● As alternatives, you can use online tools or phone-based apps for creating a video collage.
Video collages are a great way to play multiple short videos at the same time. These collages can be used for different purposes and platforms like social media platforms, online video sharing sites, brand promotion, announcing an event or a service, and similar others.

Whatever may be the situation, you would need a good and feature-packed tool for creating such a collage so that videos look perfect in a frame, background audio can be added, and other customizations can be done. Keep reading below to learn about the best video collage maker for PC.
In this article
01 [Top 10 Video Collage Makers for Pc](#Part 1)
02 [Alternatives to Video Collage Maker for Pc](#Part 2)
Part 1 Top 10 video collage makers for PC
Among the long list of tools available, below we have shortlisted the top 10 PC tools that can be used for creating a video collage.
01**Wondershare Filmora Video Editor **
This Windows and Mac-based software is the best choice when it comes to creating a simple video collage in an effortless manner.
Key features
● Create a video collage using the split-screen feature of the software.
● Excellent video editing tool supporting advanced features for creating professional-looking videos.
● Support customizable animation options along with precise editing functions.
● Support to multiple audio-related features like automatic audio sync, audio compression, audio transitions, and more.
● Offers of stock collection of images, and other media files.
● Windows and Mac support.
For Win 7 or later (64-bit)
For macOS 10.12 or later
04Movavi Video Editor Plus
Unleash your creativity and make stunning videos including video collages using this excellent software.
Key features:
● Create stunning video collages with multiple video customization options.
● Allows adding titles, transitions, stickers, and filters.
● Option to apply chroma-key for changing the background.
● Option for creating automatic video collages.
● User-friendly interface.
● Windows and Mac support.

05Aiseesoft Video Converter Ultimate
Though the name suggests the software to be a video conversion tool, it is a multi-tasking software that can perform a variety of functions including video collage making and thus can be considered as a decent video collage app for PC.
Key features
● A feature-rich program that can also be used for creating a video collage.
● Allows performing a variety of features like video conversion, editing, compression, and more.
● Option for editing the video effects and also editing ID3 info.
● Create interesting GIF animations.
● Simple and easy-to-understand layout.
● Windows and Mac support.

06Cidade Video Collage Studio
Using this intuitive tool, you can quickly create a video collage by combining all your favorite videos in one place.
Key features
● Create a video collage by combining multiple videos or creating a video grid.
● Intuitive and user-friendly interface.
● Multiple-grid options to choose from.
● Allows applying effects like Sepia, Lomo, and others.
● Background audio or music files can be added.
● Option to change the background color and also preview the video.

07Blu-ray Master Video Converter Ultimate
This is a video toolbox supporting multiple functions that also include creating a video collage.
Key feature
● Create a video collage using high-quality videos.
● Support customizing and editing videos using several built-in tools.
● Video conversion to over 500 formats supported.
● Multiple layouts and templates for video collage are available.
● Almost all video, image, and audio formats are supported.

08Adobe Premiere Elements
If you are looking for an advanced and professional tool for creating a video collage and for other video editing needs, this is the right choice.
Key features:
● Create professional-looking collages using high-quality video files.
● The interface is clean with support for advanced functions.
● Option for adding multiple video effects.
● Comes with help documents and guides to help you with the software functions.
● Windows and Mac support.

09Collage Maker
For creating a simple video collage on your Windows system this is a good tool to consider.
Key features
● Simple and basic collage-making tool.
● Comes with customizable and adjustable layout options.
● Option to add stickers ad text to the collage.
● Allows mixing videos, and images along with the music file.

1010. iMovie
For Mac users, iMovie is the default video editing tool that is pre-installed on the system. Besides editing functions, the tool can also perform other tasks like creating a video collage.
Key features:
● Allows to quickly create a video collage.
● Intuitive interface.
● Comes pre-installed with Mac systems.
● Transitions and other effects can be added.

Part 2 Alternatives to video collage maker for PC
If you do not want to download any additional software on your PC for creating a video collage, there are alternatives available in form of online tools and phone-based apps. The online tools are free and simple to use supporting all basic and needed functions. Some of the popular names in the category include FastReels, Typito, Kapwing, and more.
Apps are a great option when you want to create a collage on your mobile phone. Multiple apps for the task are available on the Google play store and Apple Store. Some of the widely used ones are PicStich, PicPlayPost Movie Video Editor, Mojo, and others.
● Ending Thoughts →
● Video collages are an interesting way to combine and play short multiple videos or play them in a grid.
● There are several PC-based video collage maker tools available like Wondershare Filmora, and others.
● As alternatives, you can use online tools or phone-based apps for creating a video collage.
How to Slow-Mo YouTube Videos
Everyone loves slow-mo scenes, dance videos, and content in related genres. Creativity is embedded in slow-motion videos to elevate your content. Not only do they refine the quality of your videos, but they also improve comprehension. YouTube is one of the well-known sources for gaining information. To understand a practical procedure, it offers a YouTube slow-motion option.
This option involves adjusting the playback speed of video for YouTube slo-mo. This article sheds light on how to slow down a YouTube video . There will be a detailed discussion on reducing YouTube video speed. In addition, we will introduce a high-performance video editor to perform this task. Keep reading this article to expand your creative horizons about slow YouTube videos.
Slow Motion Video Maker Slow your video’s speed with better control of your keyframes to create unique cinematic effects!
Make A Slow Motion Video Make A Slow Motion Video More Features

Part 1: How to Slow Down Videos in YouTube?
If you watch YouTube videos often, you must have been aware of the YouTube slow-down feature. The playback adjustment option on YouTube helps with that. By enabling that option, the whole YouTube video slows down. For adding slow-motion effects at specific durations, you can use Wondershare Filmora . In this part, we’ll explore both methods of slowing down a YouTube video:
Method 1. Direct Method
If you have the YouTube application, you can commence this action straight. If not, you can also open YouTube on your browser. Given below are the steps to play YouTube in slow motion:
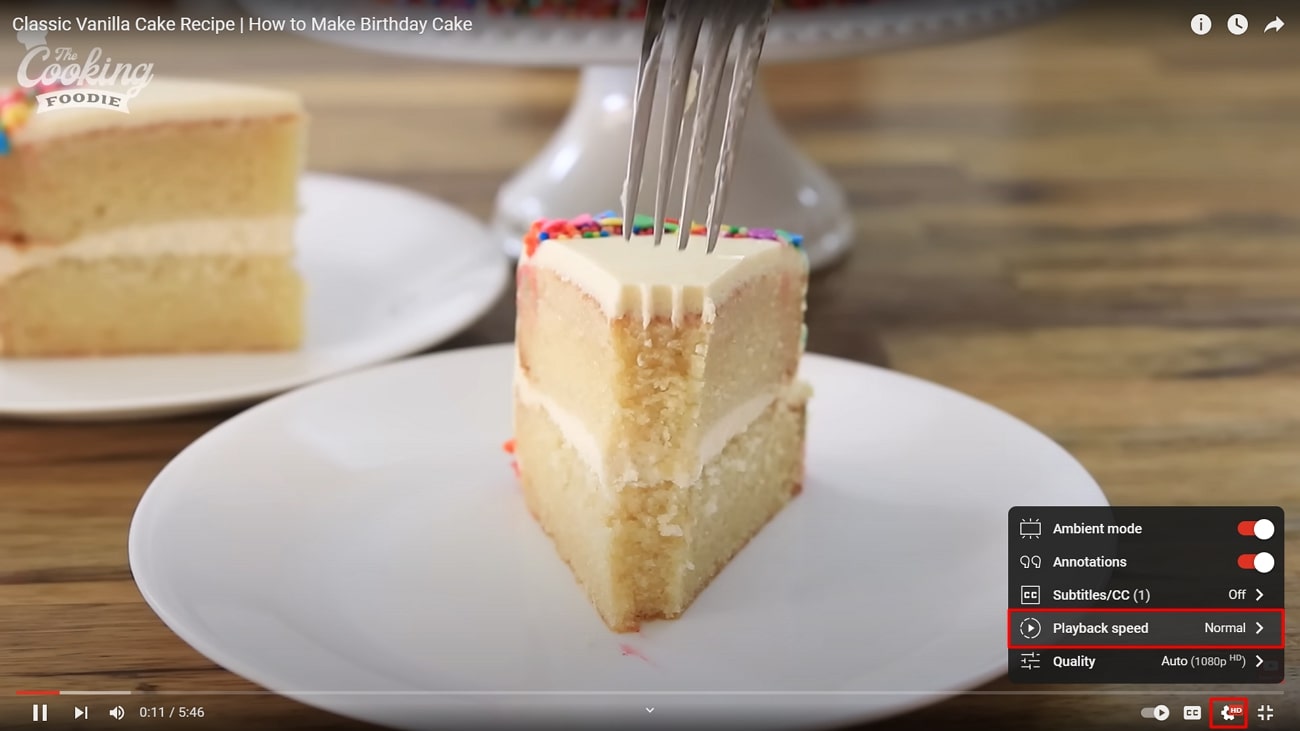
Step 1
Once you play a YouTube video, navigate towards the bottom of this video. Afterward, click on the “Settings” option and select the “Playback speed” option.
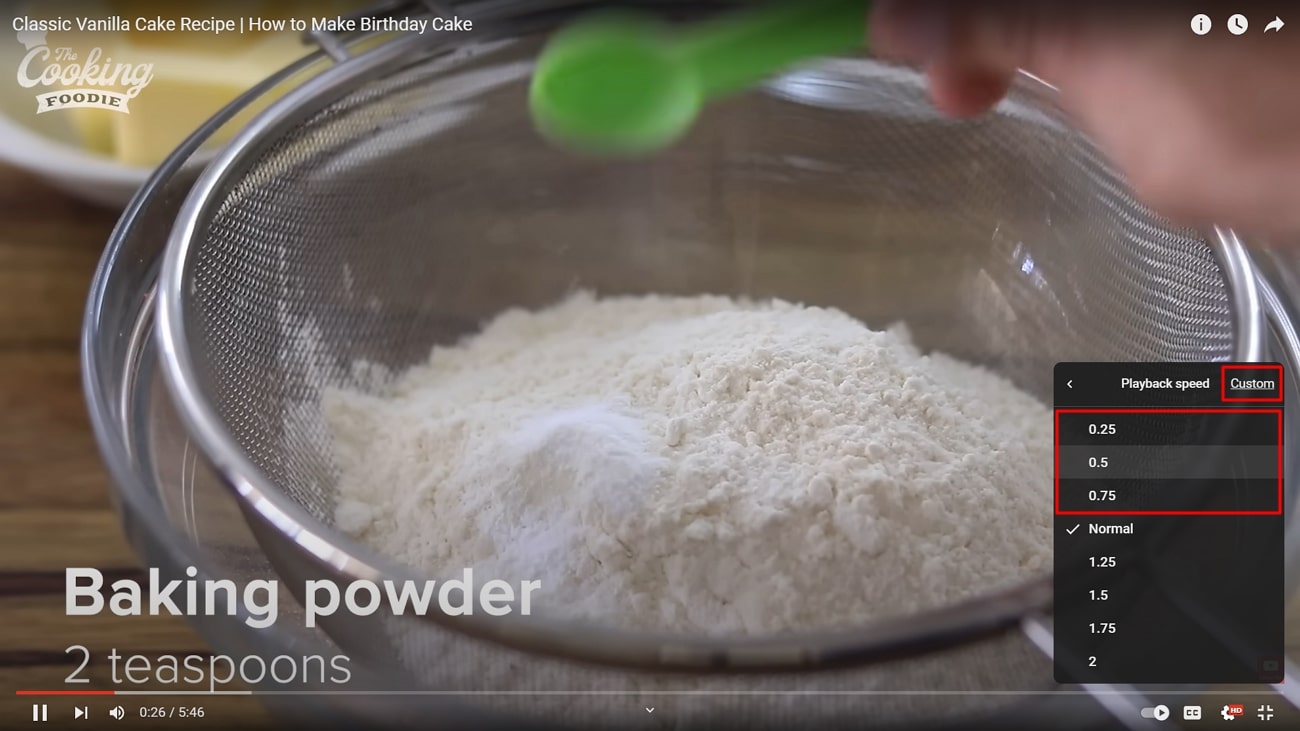
Step 2
From the expansion menu, select a playback speed option as per preferences. You can select a speed between 0.75, 0.5, and 0.25. Afterward, play your video and see if the speed is right. This is the simplest method for YouTube video slow motion.
Method 2. Using Wondershare Filmora
In Wondershare Filmora, there are two methods to slow down YouTube videos. You can either use the Uniform Speed option or the Speed Ramping option. Moreover, you can add the Optical Flow effect to ensure a smooth, slow motion. In this section, we will first familiarize you with downloading a YouTube video. Here are the three major steps to create slow-motion in Filmora:
Free Download For Win 7 or later(64-bit)
Free Download For macOS 10.14 or later
Step 1Downloading a YouTube Video
YouTube doesn’t allow users to download a YouTube video on their devices. Hence, you will need third-party support to do so. Many sites offer YouTube video download services. We are using the y2mate.com , and here are the steps for it:
1. Copy the YouTube Video Link
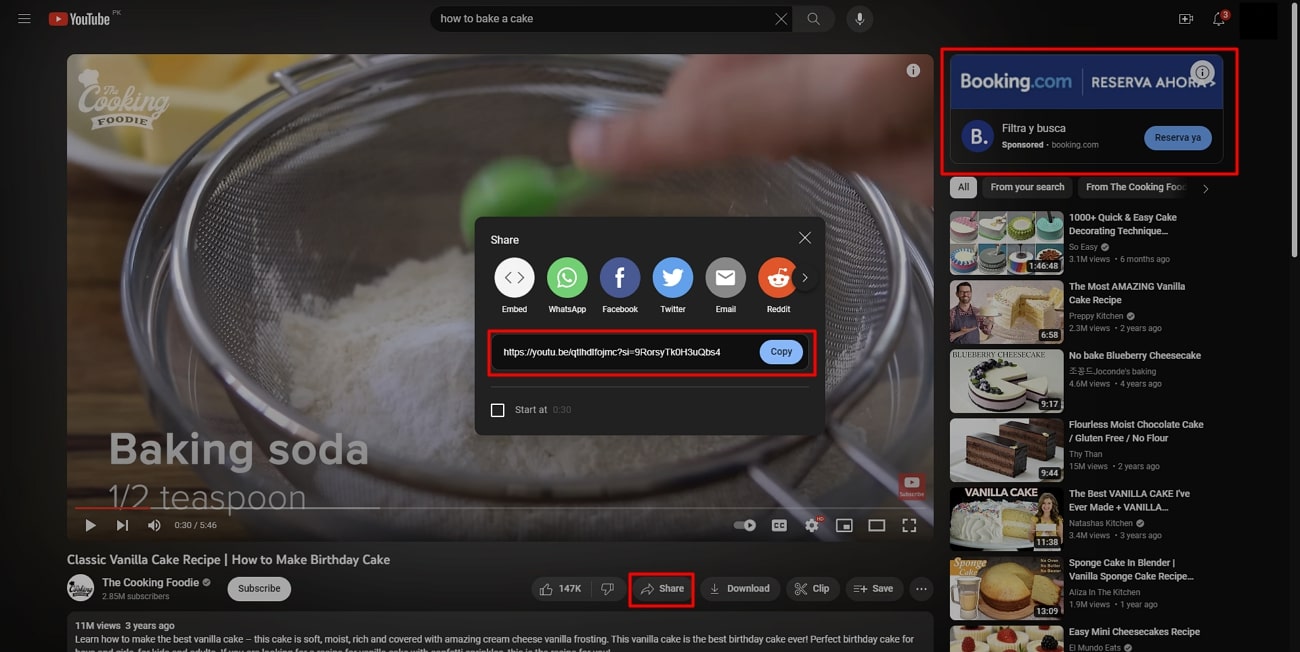
First, access the respective video that you want to download from YouTube. Locate the “Share” option at the bottom of this video and select it. Then click the “Copy” option to copy your video’s link.
2. Access the Site
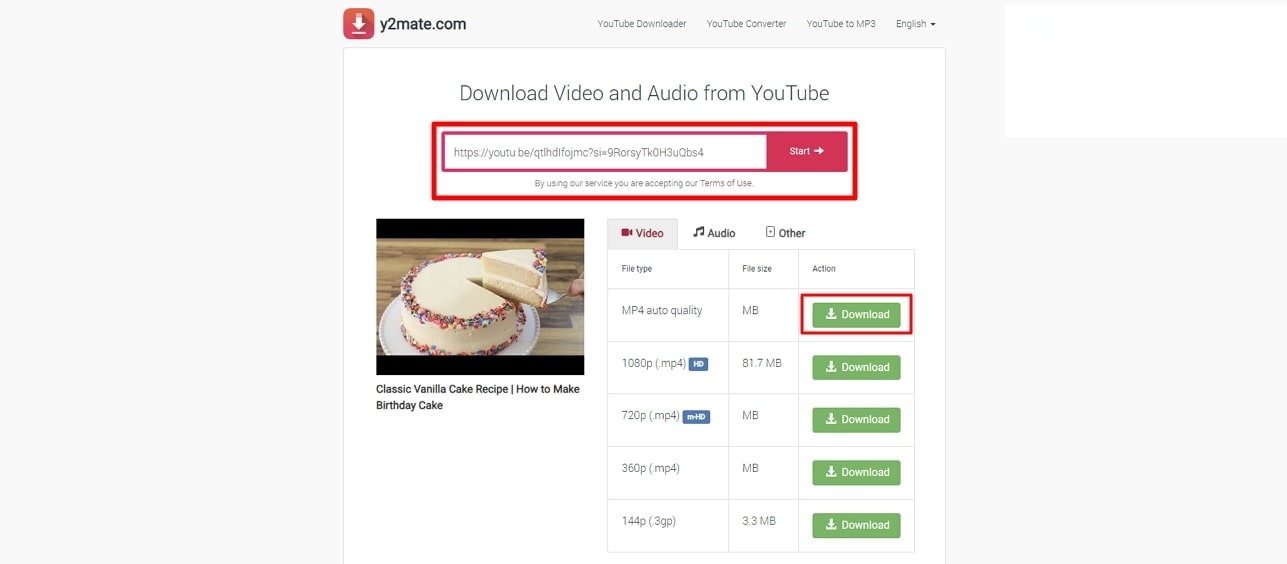
After copying the video’s link, access the site using your web browser. In the “Search or paste link here” box, paste the video link and click “Start.” From the download options appearing at the bottom, select a suitable option. Click on the “Download” button adjacent to your option.
Step 2Slow Down YouTube Video in Filmora
Once you have downloaded the video on your device, it is time to slow down the YouTube video. Filmora offers a plain and simple method to slow down a video. Here is a step-by-step guide to help you create video slow-mo in Filmora:
1. Import the YouTube Video
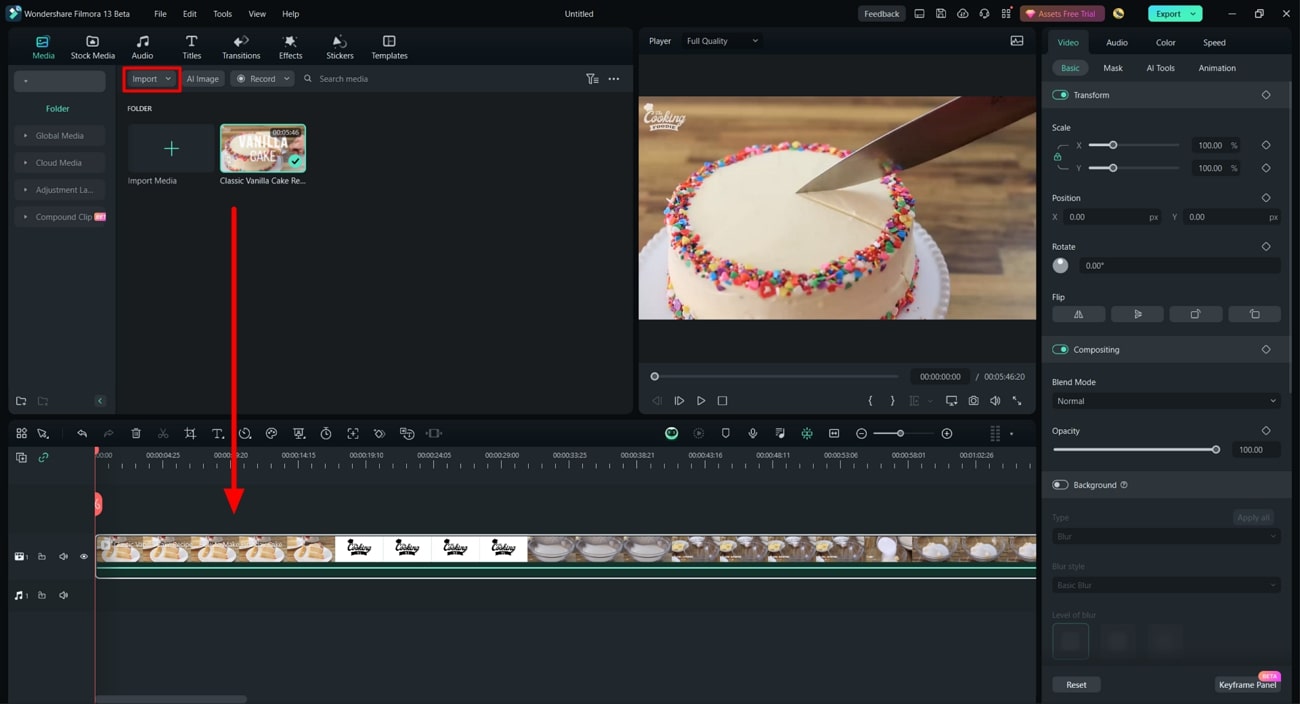
Since Wondershare Filmora is a desktop tool, you must download it first. Initiate it and click the “New Project” option to reach its editing interface. Click on the “Import” option to import the video you downloaded. Afterward, bring this video to the timeline using the drag-and-drop technique.
2. Access Uniform Speed
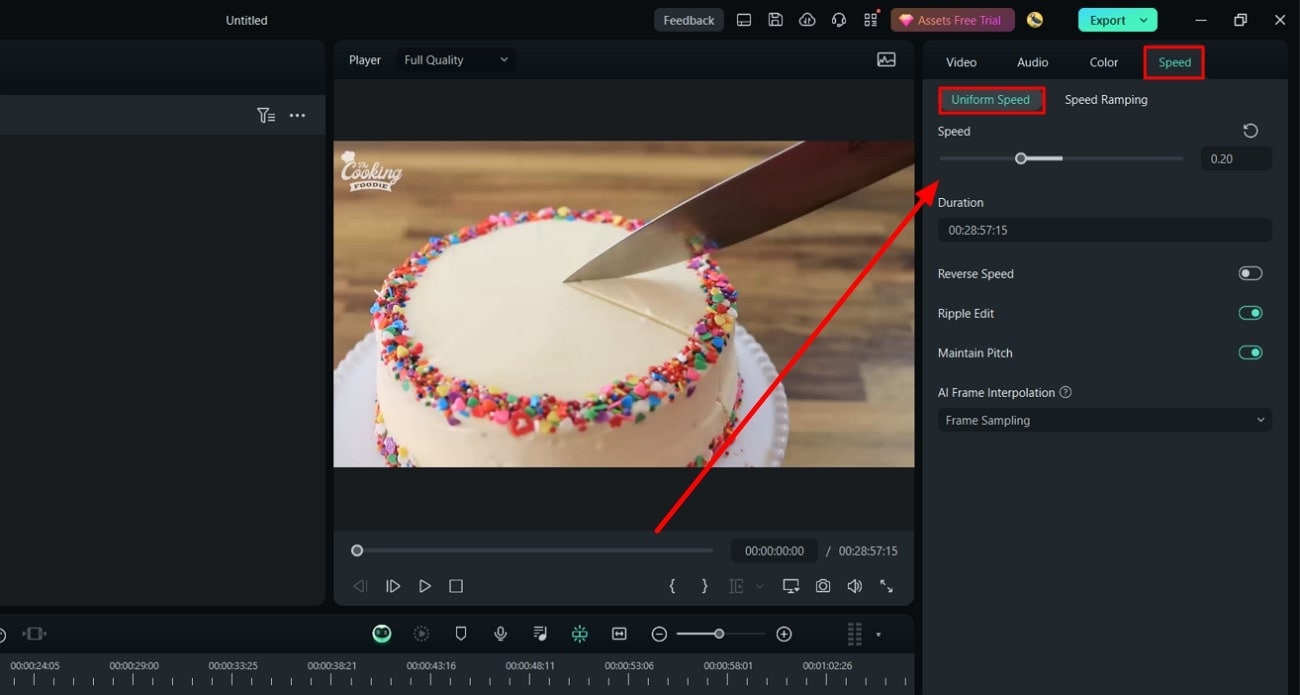
Select the video in the timeline and direct it toward the settings panel appearing on the right side. From the given tabs, go to the “Speed” tab and select “Uniform Speed.” Further, adjust the “Speed” slider or its value in the given box. This will slow down your video, and you can preview it to adjust further.
Step 3Smoothing Out the YouTube Slow-Mo
Upon previewing the YouTube slo-mo, you might notice some roughness in it. For creating a smooth slow-mo, use the Optical Flow option. Here are the steps to enable this option in Filmora:
1. Enable the Optical Flow Option
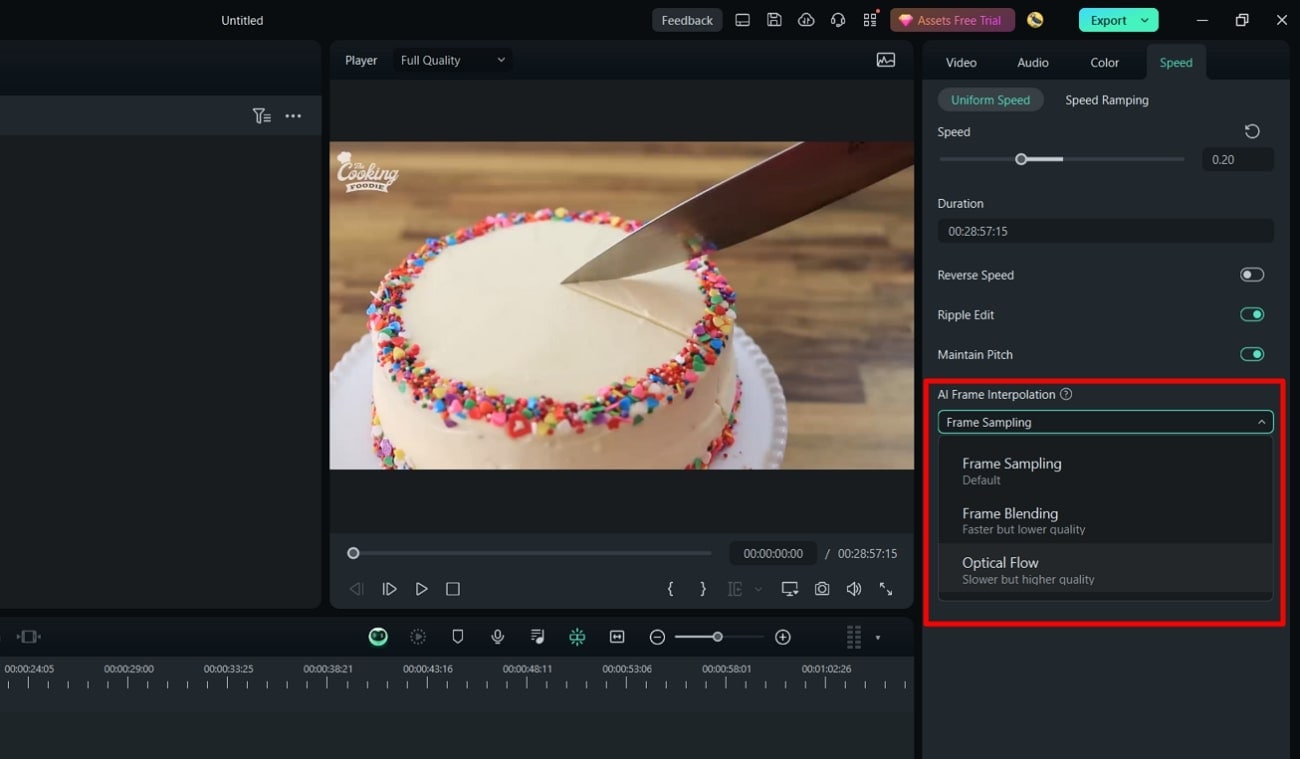
Navigate toward the “AI Frame Interpolation” section. You can find it at the bottom of the Uniform Speed tab. Afterward, expand this section and select the “Optical Flow” option.
2. Render the YouTube Slow-Mo
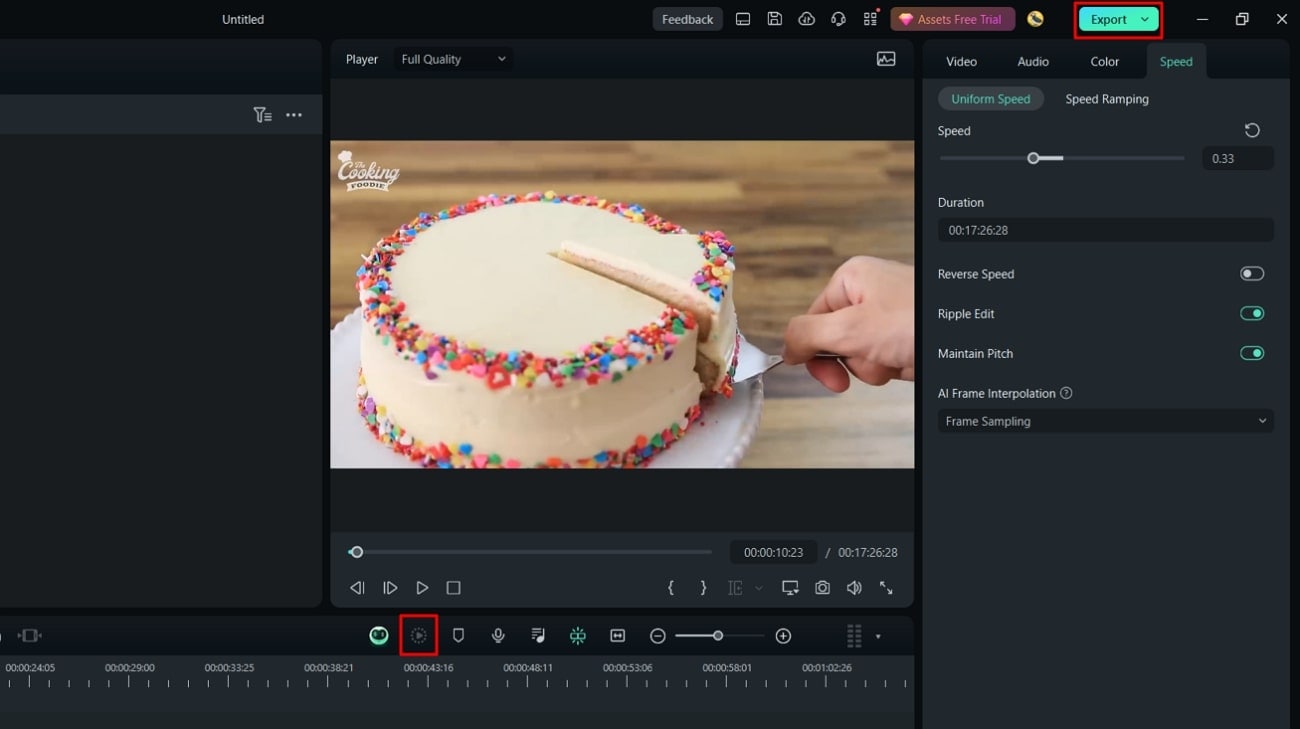
Once you have enabled optical flow, direct it toward the timeline tool panel. Select the “Render Preview” option from there and see your video afterward. You’ll have a professional-level slow YouTube slow-motion video.
Part 2: Other Features Offered by Wondershare Filmora
Wondershare Filmora is a professional video editor that offers AI editing options. You can bring so much creativity to your videos with its effects and colors. It offers AI Chroma Key or AI Background Remover features to change backgrounds. Moreover, it runs on a timeline editing interface that helps with precise cut and trim.
You can slow down a video and increase its speed to save time. Wondershare Filmora is all about video editing, and there is no limit to its creativity. Let’s dive into this section to learn about some of those AI features below:
1. AI Thumbnail Creator
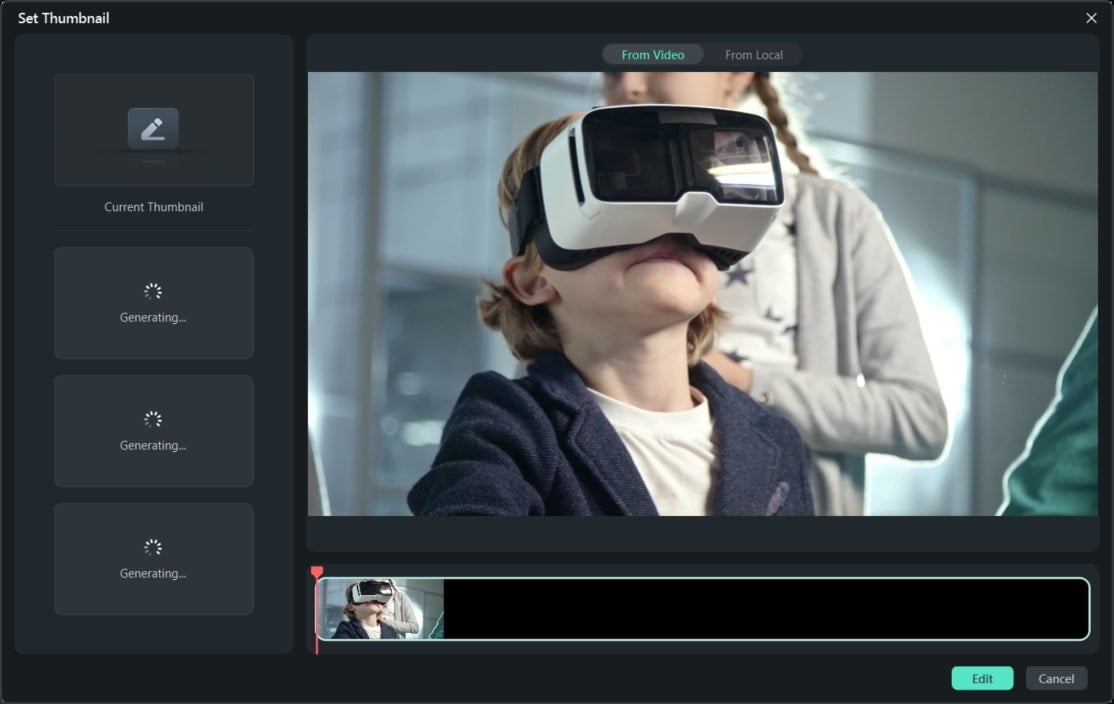
When creating a YouTube video for your channel, thumbnails play an important role. Filmora allows you to generate creative thumbnails for your videos. Through the support of AI, it opts for the finest frame out of your video as a thumbnail. Afterward, it offers you built-in templates that fit many content categories.
2. Speed Ramping
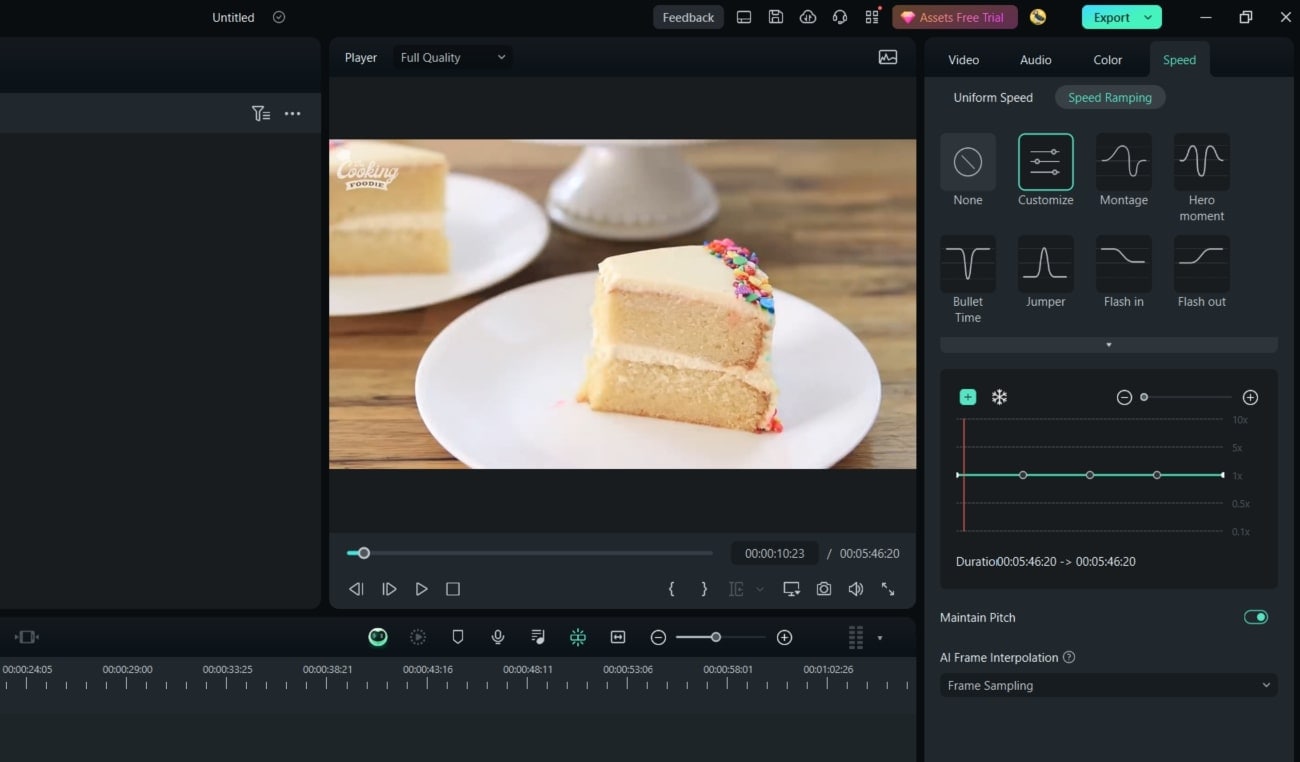
This function also allows you to slow down YouTube videos precisely. Using this feature, you can slow down specific parts of a video. It offers pre-designed speed options; however, you can also customize it. Montage, Hero moment, Bullet Time, Jumper, and other options exist as presets. Afterward, you can manipulate the frame speed option for a smooth outlook.
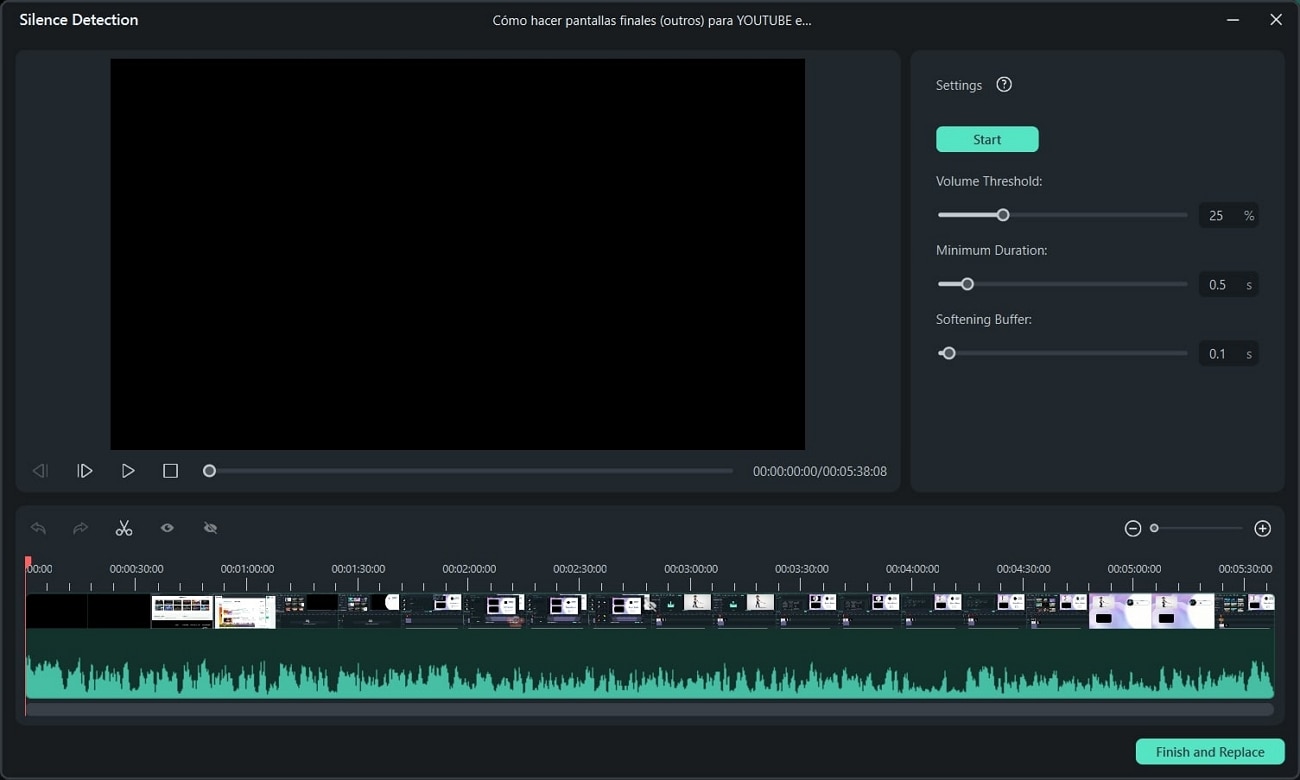
3. Silence Detection
Silent pauses or loud breath noise in videos is often disturbing. Such elements decrease the audio and overall quality of a video clip or audio track. To avoid this, Filmora offers a Silence Detection feature backed by AI. It robotically spots the silent pauses, hums, and breaths in audio and eliminates them. This will save you from audience backlash and maintain content quality.
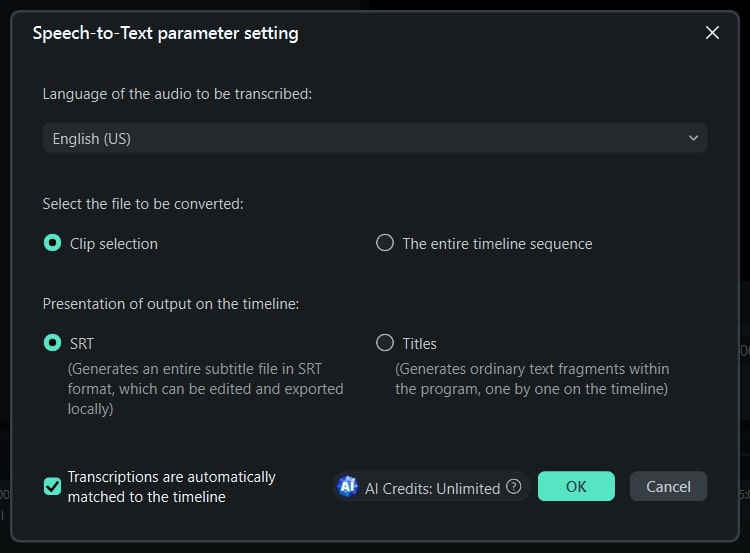
4. Speech-to-Text
This feature belongs in the text editing category of Wondershare Filmora. The STT tool of Filmora has many applications in the field of filmmaking. It uses AI technology and NLP systems to analyze speech and convert it to text. You can use this text to create captions and subtitles for YouTube videos. In addition, you can use this feature for text-based editing in Filmora or other tools.
Conclusion
After reading this article, users have a comprehensive knowledge of YouTube slow motion. We discussed certain advantages of slowing down videos. The article also discussed how to slow down a YouTube video with precision. It was explained using a professional-grade video editor with a detailed guide. If you want to create a perfect YouTube slow-mo or slow down a specific part, use Filmora.
Make A Slow Motion Video Make A Slow Motion Video More Features

Part 1: How to Slow Down Videos in YouTube?
If you watch YouTube videos often, you must have been aware of the YouTube slow-down feature. The playback adjustment option on YouTube helps with that. By enabling that option, the whole YouTube video slows down. For adding slow-motion effects at specific durations, you can use Wondershare Filmora . In this part, we’ll explore both methods of slowing down a YouTube video:
Method 1. Direct Method
If you have the YouTube application, you can commence this action straight. If not, you can also open YouTube on your browser. Given below are the steps to play YouTube in slow motion:
Step 1
Once you play a YouTube video, navigate towards the bottom of this video. Afterward, click on the “Settings” option and select the “Playback speed” option.

Step 2
From the expansion menu, select a playback speed option as per preferences. You can select a speed between 0.75, 0.5, and 0.25. Afterward, play your video and see if the speed is right. This is the simplest method for YouTube video slow motion.

Method 2. Using Wondershare Filmora
In Wondershare Filmora, there are two methods to slow down YouTube videos. You can either use the Uniform Speed option or the Speed Ramping option. Moreover, you can add the Optical Flow effect to ensure a smooth, slow motion. In this section, we will first familiarize you with downloading a YouTube video. Here are the three major steps to create slow-motion in Filmora:
Free Download For Win 7 or later(64-bit)
Free Download For macOS 10.14 or later
Step 1Downloading a YouTube Video
YouTube doesn’t allow users to download a YouTube video on their devices. Hence, you will need third-party support to do so. Many sites offer YouTube video download services. We are using the y2mate.com , and here are the steps for it:
1. Copy the YouTube Video Link
First, access the respective video that you want to download from YouTube. Locate the “Share” option at the bottom of this video and select it. Then click the “Copy” option to copy your video’s link.

2. Access the Site
After copying the video’s link, access the site using your web browser. In the “Search or paste link here” box, paste the video link and click “Start.” From the download options appearing at the bottom, select a suitable option. Click on the “Download” button adjacent to your option.

Step 2Slow Down YouTube Video in Filmora
Once you have downloaded the video on your device, it is time to slow down the YouTube video. Filmora offers a plain and simple method to slow down a video. Here is a step-by-step guide to help you create video slow-mo in Filmora:
1. Import the YouTube Video
Since Wondershare Filmora is a desktop tool, you must download it first. Initiate it and click the “New Project” option to reach its editing interface. Click on the “Import” option to import the video you downloaded. Afterward, bring this video to the timeline using the drag-and-drop technique.

2. Access Uniform Speed
Select the video in the timeline and direct it toward the settings panel appearing on the right side. From the given tabs, go to the “Speed” tab and select “Uniform Speed.” Further, adjust the “Speed” slider or its value in the given box. This will slow down your video, and you can preview it to adjust further.

Step 3Smoothing Out the YouTube Slow-Mo
Upon previewing the YouTube slo-mo, you might notice some roughness in it. For creating a smooth slow-mo, use the Optical Flow option. Here are the steps to enable this option in Filmora:
1. Enable the Optical Flow Option
Navigate toward the “AI Frame Interpolation” section. You can find it at the bottom of the Uniform Speed tab. Afterward, expand this section and select the “Optical Flow” option.

2. Render the YouTube Slow-Mo
Once you have enabled optical flow, direct it toward the timeline tool panel. Select the “Render Preview” option from there and see your video afterward. You’ll have a professional-level slow YouTube slow-motion video.

Part 2: Other Features Offered by Wondershare Filmora
Wondershare Filmora is a professional video editor that offers AI editing options. You can bring so much creativity to your videos with its effects and colors. It offers AI Chroma Key or AI Background Remover features to change backgrounds. Moreover, it runs on a timeline editing interface that helps with precise cut and trim.
You can slow down a video and increase its speed to save time. Wondershare Filmora is all about video editing, and there is no limit to its creativity. Let’s dive into this section to learn about some of those AI features below:
1. AI Thumbnail Creator
When creating a YouTube video for your channel, thumbnails play an important role. Filmora allows you to generate creative thumbnails for your videos. Through the support of AI, it opts for the finest frame out of your video as a thumbnail. Afterward, it offers you built-in templates that fit many content categories.

2. Speed Ramping
This function also allows you to slow down YouTube videos precisely. Using this feature, you can slow down specific parts of a video. It offers pre-designed speed options; however, you can also customize it. Montage, Hero moment, Bullet Time, Jumper, and other options exist as presets. Afterward, you can manipulate the frame speed option for a smooth outlook.

3. Silence Detection
Silent pauses or loud breath noise in videos is often disturbing. Such elements decrease the audio and overall quality of a video clip or audio track. To avoid this, Filmora offers a Silence Detection feature backed by AI. It robotically spots the silent pauses, hums, and breaths in audio and eliminates them. This will save you from audience backlash and maintain content quality.

4. Speech-to-Text
This feature belongs in the text editing category of Wondershare Filmora. The STT tool of Filmora has many applications in the field of filmmaking. It uses AI technology and NLP systems to analyze speech and convert it to text. You can use this text to create captions and subtitles for YouTube videos. In addition, you can use this feature for text-based editing in Filmora or other tools.

Conclusion
After reading this article, users have a comprehensive knowledge of YouTube slow motion. We discussed certain advantages of slowing down videos. The article also discussed how to slow down a YouTube video with precision. It was explained using a professional-grade video editor with a detailed guide. If you want to create a perfect YouTube slow-mo or slow down a specific part, use Filmora.
Also read:
- New If Youre Looking to Create a Brand Video that Makes Your Business Pop Out, We Have Put Together some Video Editing Tips and Tricks that Work for 2024
- New In 2024, Do You Want to Know How to Convert YouTube SBV Subtitles to SRT Format? Here Is an Ultimate Guide About It
- New How to Make Video Slow Motion? Complete Guide
- 10 Amazing Anime Character Designs to Inspire You
- Hard to Remove Black Background in After Effects? Heres the Best Way to Deal With It for 2024
- Updated In 2024, Learn 4 Proven Methods for Creating Engaging and Memorable Recap Videos. Elevate Your Event Coverage and Engage Your Audience with These Tips and Tricks
- In 2024, Looking for Ways to Enhance Overall Look for Your Contents Professionally? Then Coming up with These Cool PowerPoint Templates Can Help You a Lot
- Updated How to Convert Time-Lapse to Normal Video for 2024
- 2024 Approved Discover the Various Techniques of Video Framing, Which Involve Capturing the Essence of a Subject While Eliminating Distractions in the Background, Andlearn How to Apply Them Skillfully to Achieve Desired Results
- 2024 Approved How Have Game Recording Software Improved Their Stature in the Market? An Overview
- New Dollar-Store DIY Hacks to Use for Filmmaking for 2024
- New In 2024, Confused About Deciding the Next Destination for Your Trip? This Article Features some of the Best Vloggers You Can Find for Gaining Inspiration for Traveling
- New 2024 Approved The Audio You Produce Will Inevitably Be Flawed Throughout the Production Process. So, Learn How Adobe Audition Removes Echo to Sound Better Instead of Throwing It Away
- New In 2024, How to Make Random Letter Reveal Intro?
- New What Is the Best FPS for YouTube Videos for 2024
- 2024 Approved How to Make a Transparent Background in Paint. How 3D Paint Transparent Background Can Be Made. How to Save an Image with Transparent Background?
- New In 2024, Looking for Ways to Enhance Overall Look for Your Contents Professionally? Then Coming up with These Cool PowerPoint Templates Can Help You a Lot
- Updated How to Make Vintage Film Effect 1950S
- Updated Time Lapse Video Is Very Interesting and Creative, Which Usually Attracts More Attention. This Article Will Show You How to Make a Time Lapse Video with Adobe After Effects
- New Denoise Video in Adobe Premiere Pro – Audio and Video Noise Removal for 2024
- Updated Creating Flawless Slow-Motion Videos Is Every Content Creators Dream. Learn About DaVinci Resolve Slow-Motion Video Creation, Amongst Other Tools for 2024
- Updated 2024 Approved Read on to Learn About OpenCV Object Tracking, What It Is, and How to Implement It in Python, and OpenCV
- New 2024 Approved Splice Video Editor Online - Get Your Videos Splice
- New Best Free LUTs To Use in Shotcut for 2024
- Updated How to Export iMovie?
- Video Course and Online Learning Are Very Popular Nowadays. Here We Are Going to Recommend some of the Best Video Websites for Teachers to Use for 2024
- Updated 12 Impressive AI Video Ideas for Creating Engaging Video Content
- Updated 2024 Approved Speed Control Is Frequently Used in Video Editing. By Speed up or Slow Down the Video Speed, You Can Achieve Different Visual Results. This Article Will Show You How to Control the Speed of a Video
- How to Unlock Xiaomi Civi 3 Phone with Broken Screen
- How to Unlock Samsung Galaxy F14 5G Phone with Broken Screen
- Gmail Not Working on Xiaomi Redmi Note 12R 7 Common Problems & Fixes | Dr.fone
- Life360 Circle Everything You Need to Know On Samsung Galaxy Z Fold 5 | Dr.fone
- In 2024, Easy Guide to Google FRP Bypass With Best Methods
- In 2024, Solutions to Spy on Apple iPhone XR with and without jailbreak | Dr.fone
- Google Play Services Wont Update? 12 Fixes are Here on Honor X7b | Dr.fone
- Pattern Locks Are Unsafe Secure Your Xiaomi Redmi 12 Phone Now with These Tips
- In 2024, How to Unlock Verizon Apple iPhone 8 Plus
- Find My App Troubleshooting No Location Found vs. Location Not Available & How to Fix Them On Apple iPhone XS | Dr.fone
- Updated In 2024, Revolutionize Creative Tasks With Proficiency AI Voice Cloning
- In 2024, How to Unlock Disabled iPhone SE (2020)/iPad Without Computer
- How to turn off the screen lock on my Poco M6 Pro 5G
- In 2024, How to Sign Out of Apple ID From Apple iPhone 6s Plus without Password?
- In 2024, 4 solution to get rid of pokemon fail to detect location On Oppo Reno 10 Pro+ 5G | Dr.fone
- In 2024, How to Transfer Contacts from Samsung Galaxy A34 5G to Outlook | Dr.fone
- How to Transfer Photos from Oppo A58 4G to New Android? | Dr.fone
- Title: How to Do Datamoshing Effect in After Effects?
- Author: Morgan
- Created at : 2024-05-19 05:11:38
- Updated at : 2024-05-20 05:11:38
- Link: https://ai-video-editing.techidaily.com/how-to-do-datamoshing-effect-in-after-effects/
- License: This work is licensed under CC BY-NC-SA 4.0.

