
How to Fade in Text in Adobe Premiere Pro

How to Fade in Text in Adobe Premiere Pro
Every video is unappealing until you edit the video properly. Editing videos not only means trimming out unnecessary parts but also adding effects and animations. There are certain effects and transitions that are commonly used in most videos. Fade in effect is widely used in texts, objects, as well as clips. Fade in effect is very eye-soothing that does not distract the audience from the overall video content.
Fade in effect is available in all video editors. Among video editors, Adobe Premiere Pro is one of the best professional video editors. However, the learning curve of Premiere Pro is steep and hence, you have to know the exact steps to add fade in text Premiere Pro. We will illustrate how to apply fade in text effect Pro as well as add fade in and fade out transition effects in Premiere Pro. We will also state an alternative way to fade in texts in your videos.
Part 1. Fade in text in Premiere Pro with Opacity option
If you have added any text or any graphical object in your video on Premiere Pro, you can apply fade in effect to your text and object easily. When you add fade in effect to your text or object, they slowly appear on the screen which is very soothing to watch instead of sudden and abrupt appearance. Here are the steps on how to fade text in Premiere Pro.
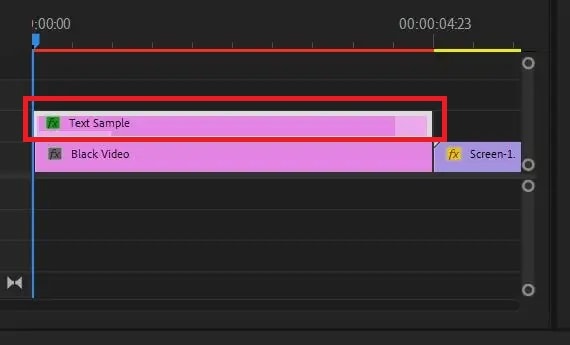
Step1 You must have your video clip as well as text clip on the Timeline of Premiere Pro. Make sure that you add text from Essential Graphics panel. Select the text clip from the Timeline to proceed.
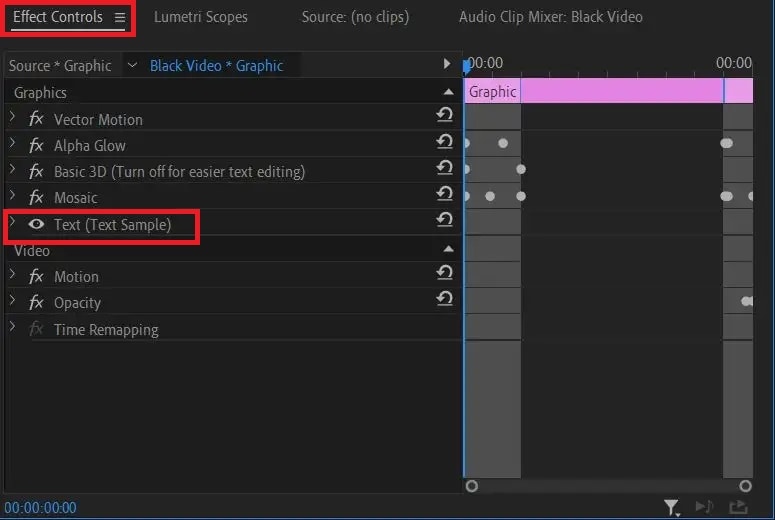
Step2 Go to Effect Controls and click on Text option to expand it. Click on Opacity option from the dropdown menu.
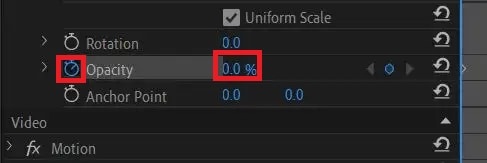
Step3 Put the timeline cursor at the beginning of the selected text clip. Thereafter, make the Opacity value to zero. Click on Stopwatch icon beside Opacity to add a keyframe.
Step4 Put the timeline cursor at that point in the clip where you want the text to appear completely. Now make the Opacity value to 100. Click on Stopwatch to add a keyframe here.

Step5 Play the video to watch the fade in effect on your selected text. You can move the keyframes to speed up or slow down fade in effect.
Part 2. Make fade in or out with transition effects
If you have multiple video clips or scenes, you should add fade in and fade out transition effects so that the transition from one clip to another or one scene to another is smooth. The fade in or fade out effect for video clips look similar to fade text Premiere Pro. In fact, you can use the steps of how to fade in text in Premiere Pro to get the job done. But there is an easier way available with Video Transitions option. Here are the steps on how to apply fade in or out effect on your video clips in Premiere Pro.
Step1 You should have multiple video clips added to Timeline. Select the video clip to which you want to apply Fade in effect.
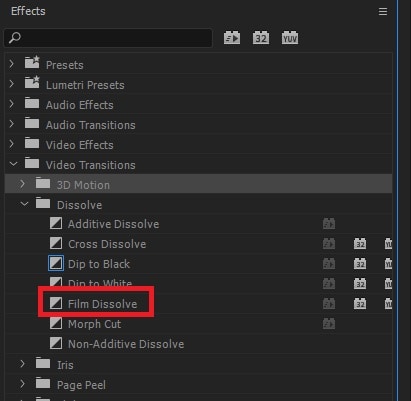
Step2 Go to Effects panel and click on Video Transitions option.
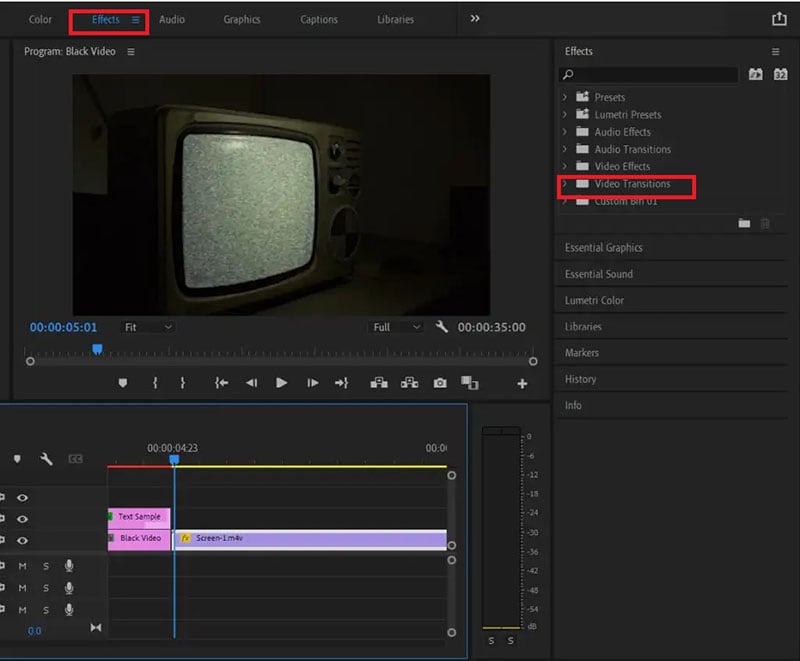
Step3 Click on Dissolve and from the dropdown list, drag and drop Film Dissolve to the beginning of the selected video clip for fade in effect.
Step4 Click on the added effect on Timeline to adjust speed, duration, and alignment of the effect.

Step5 Play the video to ensure that the effect looks perfect. Therefore, go to File> Share> Export File to save the video.
You can place the transition at the end of the video for fading out effect. Instead of Film Dissolve, you can use Crossfade or Dip to Black effect for fade in and fade out effect on video clips.
Part 3. Alternative way to fade in text in videos
If you do not have Adobe Premiere Pro or you find the steps difficult to fade in text in videos using Premiere Pro, we recommend Wondershare Filmora . Filmora is a professional video editor that is available for Windows as well as Mac users. There is a wide range of video effects available in Filmora in comparison to Premiere Pro. Most importantly, Filmora is super easy and intuitive to use, and even amateur users can use it comfortably. Here are the steps to fade in text in videos using Filmora.
Free Download For Win 7 or later(64-bit)
Free Download For macOS 10.14 or later
Step1 Download and install Filmora . Launch Filmora and click on New Project option.

Step2 Import the video clip under Project Media folder. Drag and drop the video clip to Timeline.

Step3 Go to Titles located at the top and drag and drop any title style on Timeline. Double-click on the Title clip on Timeline and type in your required text in the Viewer. You can stretch the Title clip to extend its duration as per your requirement.

Step4 Double-click on Title clip again on the Timeline and go to Text> Animation tab located at the top-left corner. Scroll down to go to Fade1 option and double-click Fade1 to apply it to your text.
Step5 You can go to settings by clicking on Advanced button and adjust parameters such as speed and duration of the fade effect for better visibility.
Step6 Once you are done, play the video and thereafter, click on Export to save the video on your hard drive.
Conclusion
We have stated the steps on how to fade text in Premiere Pro. You can use the same steps to apply the effect to graphical objects. We have also illustrated how to apply fade in and fade out effects between video clips and scenes using transition effects. If you are looking for an alternative and easier way to fade in texts in your videos, we recommend Wondershare Filmora .
Free Download For macOS 10.14 or later
Step1 Download and install Filmora . Launch Filmora and click on New Project option.

Step2 Import the video clip under Project Media folder. Drag and drop the video clip to Timeline.

Step3 Go to Titles located at the top and drag and drop any title style on Timeline. Double-click on the Title clip on Timeline and type in your required text in the Viewer. You can stretch the Title clip to extend its duration as per your requirement.

Step4 Double-click on Title clip again on the Timeline and go to Text> Animation tab located at the top-left corner. Scroll down to go to Fade1 option and double-click Fade1 to apply it to your text.
Step5 You can go to settings by clicking on Advanced button and adjust parameters such as speed and duration of the fade effect for better visibility.
Step6 Once you are done, play the video and thereafter, click on Export to save the video on your hard drive.
Conclusion
We have stated the steps on how to fade text in Premiere Pro. You can use the same steps to apply the effect to graphical objects. We have also illustrated how to apply fade in and fade out effects between video clips and scenes using transition effects. If you are looking for an alternative and easier way to fade in texts in your videos, we recommend Wondershare Filmora .
Create Intro Video with Flixpress
Are you tired of finding the right tool to create intro videos for your YouTube channel? Fret not. Your search might end here.
No doubt, intro videos have the potential to make a first impression on viewers, and you know how they say that the first impression is the last impression. Keeping that in mind, you wouldn’t want to ruin the first impression of your videos now, would you?
Making intro videos can be an actual hassle, especially if you don’t have the right video editing tool at your disposal. What if we told you that Flixpress is the key to unlocking new doors for your YouTube channel and taking it to the next level?
So, without further ado, let’s dive in and look at the features that make Flixpress an excellent tool for creating intro videos.
The 6 Key Features of Flixpress
Listed below are the features that make Flixpress stand out among the competitors.
1. HD Downloads
It is an established fact that the quality of the video is the first factor for the audience to judge, and having a bad quality video uploaded to a YouTube channel that you wish to grow is not really a wise choice.
Flixpress offers you high-definition downloads that are perfect for viewing your video on the web and broadcasting it on television.
2. Customizable Templates
Having templates that can be customized as per your needs really makes the task easier. Flixpress offers a variety of templates that give you the option to enter text in some fields. This text is then beautifully rendered out in the final edited video.
3. Audio Tools
Adding the right audio can leave a significant impact on the overall aesthetic and impression of the video. It is perhaps one of the prime factors that decides whether the audio is edited well or not.
That said, Flixpress allows you to incorporate any custom audio file into the video. You will just be required to upload that audio in mp3 format, and that’s all. Other than that, you can add several sound elements as well.
4. Multiple Formats
If you’re someone who owns a Mac operating system and wishes to export the video in a MOV format, let us tell you that Flixpress can transcode the video to match your needs. However, along with the MOV format, you also have the option to export the video in the standard MP4 format or a WMV format as well.
5. Stock Video Library
Yes, you read that right. Flixpress is dedicated to offering you a comprehensive and affordable video product solution by providing a stock video library which means you can bid farewell to expensive stock footage sites.
It is to be noted that the team at Flixpress is fully committed to growing the Copyright-Free footage and background library, and the size of the library grows with the passing time.
6. Preview
Being one of the spotlight features of Flixpress, this one really makes it stand out. With this feature, you won’t have to wonder what your video would look like as you can render a free watermarked preview. If you’re working for someone, you can send this preview to your client or boss for approval and tweak data before the final render.
Other than that, these previews can also be used as templates if you wish to duplicate the same video with variable data.
How to Make Intro Video With Flixpress?
Creating intro videos with Flixpress is a pretty straightforward job, and the steps listed below aim to streamline the Flixpress intro making process for you.
Step1 Open the Webpage
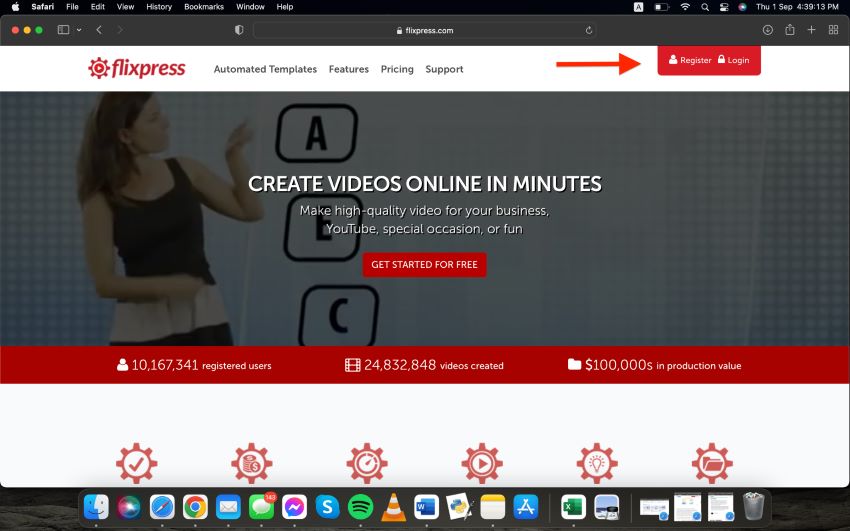
Start off by opening the web browser on your PC or laptop and accessing the homepage of Flixpress by following the link below.
Once you’re at the homepage, you need to register your account by clicking on the Register button.
Step2 Signup
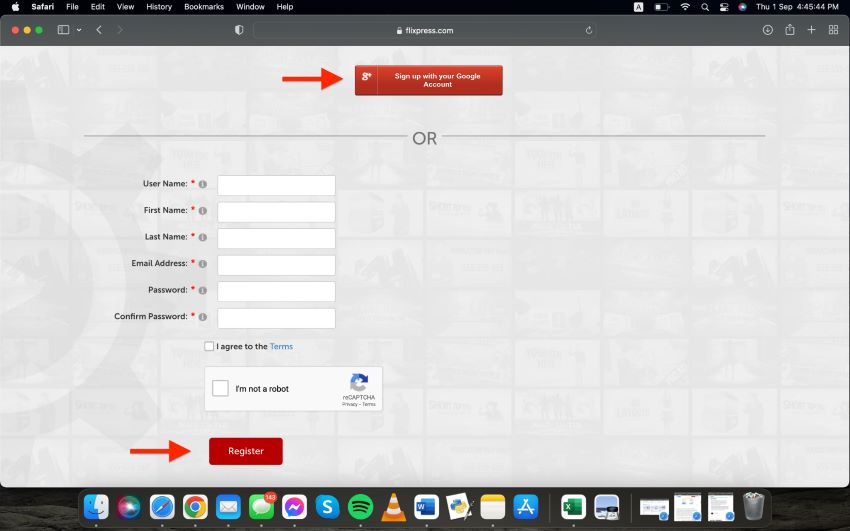
Upon clicking on the register button, you will be redirected to another page that will provide you with two options to signup on flixpress online video maker.
The first option allows you to sign up with your Google account, and if you opt for it, your Flixpress account will be linked to your Google account, and the credentials will be filled out automatically.
However, the second option asks for manual entry of your personal information that includes your first name, last name, email address, and password.
You can select either of them and then press the Register button below.
Step3 Knowing the Subscription Plans
After the successful completion of the registration process, you will get to the main page of Flixpress, where all the templates will be visible to you, and the type of your plan will also be visible.
Initially, it will be a free plan, and you will be allowed to edit a 2 min video in it. However, you have the option to upgrade to a paid plan where a lot of other features will be unlocked, and you can edit more videos of greater lengths as well.
Step4 Sorting and Filtering the Templates
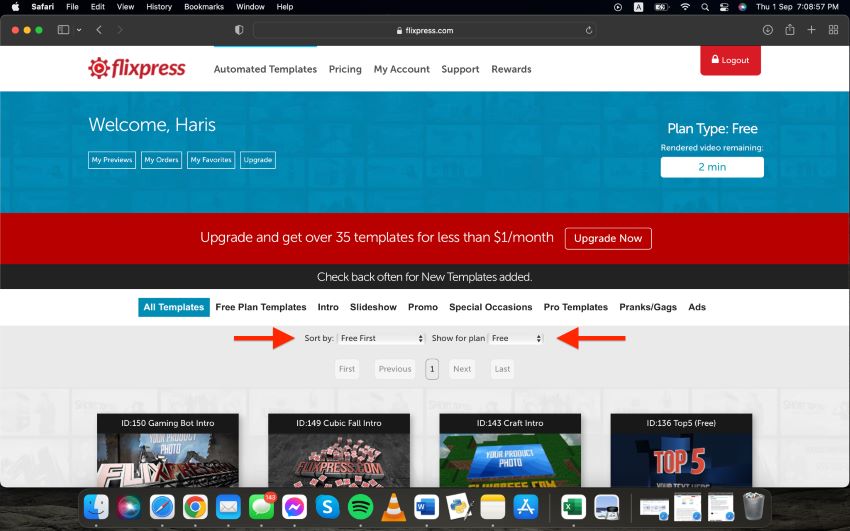
When you’re on the main page, all the templates will be visible to you, and these will include paid ones. If you’ve not bought a paid subscription, you will have to sort out the flixpress free templates, which can be done in two ways.
- Click on the “Sort by” drop-down and choose the option that says “Free First”. This will put all the free templates at the top.
- Click on the “Show for plan” drop-down and select the “Free” option to only view the free templates.
Step5 Customize the Template
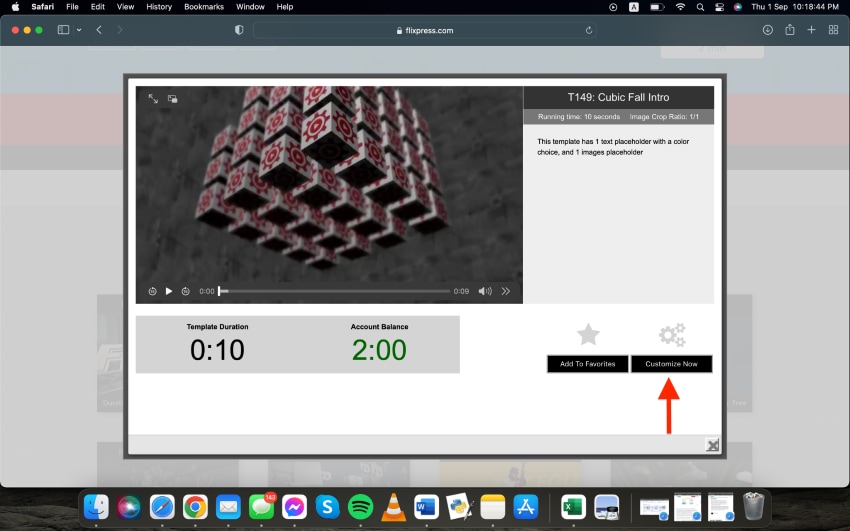
Once all the free templates are visible to you, you can select a template that you like. Then, you’re required to click the “Customize Now” button to customize the video.
Step6 Upload Image
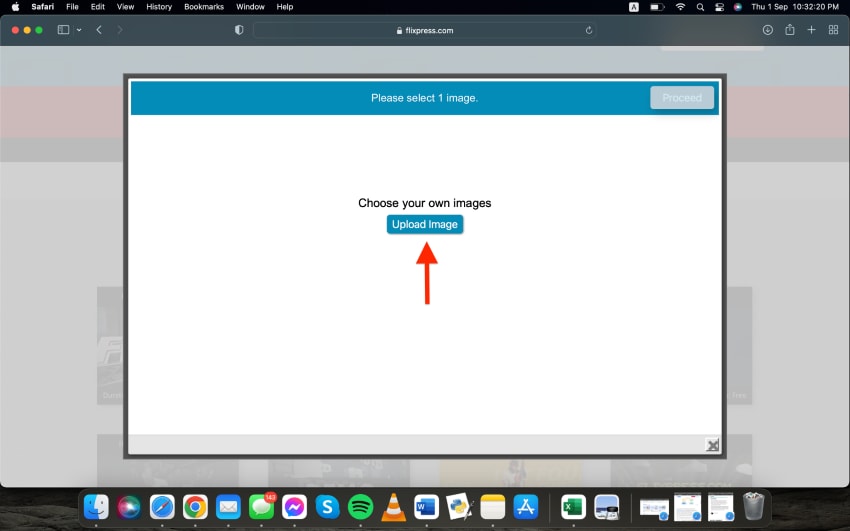
Now, you will be prompted to upload an image from your PC or laptop so click the “Upload Image” button and choose the image you want to upload.
Once you’ve uploaded the image, click on “Proceed” button and crop the image to fit the subtitles.
Step7 Customize Text, Add Audio, Change Resolution & Create Preview
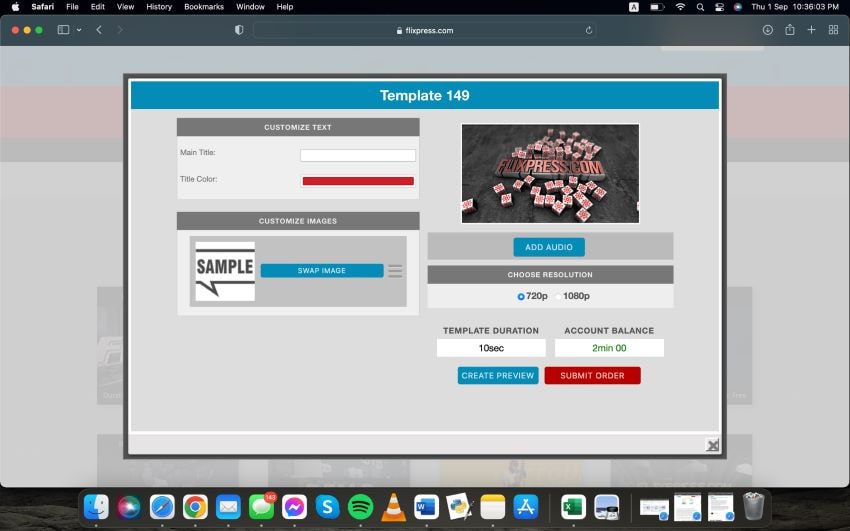
Even though the image subtitle will be made, you will still have the option to swap the image if you change your mind. Other than that, select the main title of the intro video and the color of the text as well.
Moreover, you can add audio as per your need and preference, and you can choose a resolution for the intro video too.
Once everything is done, create the preview to have a final look before rendering it.
What are the downsides of Flixpress?
While the Flixpress intro maker is a great choice for making intro videos, it may miss out on a few features. Other than that, individuals who have used Flixpress complained about the bad customer service that they offered, even to those who had signed up for the membership. Now, that can be quite frustrating, right?
We found a few major missing in Flixpress.
- The number of templates is limited.
- The content is rarely updated.
- The customer service they offered is poor. People can’t get help with their problems, especially when those who sign up for membership want to cancel their subscription.
What if we were to tell you that there is an even better and professional tool that Flixpress?
Filmora – An Alternative to Flixpress for Computer
As it turns out, Filmora happens to be one of the best video editing applications that allows you to make top-level and professional videos. It tends to have an intuitive interface and a great variety of advanced editing features, providing extended accessibility and ease for the users.
While there are limited templates on Flixpress, Filmora offers nearly 400 templates, therefore, providing the users with a wide range of option. That isn’t where the list of pros end as unlike Flixpress,
Filmora continuously introduces new sets of features and templates, taking the user experience to a whole new level. The filmora team is committed to solving inconveniences for users, only to bring a better experience.
Let’s move forward and look at how you can make intro videos with Filmora.
How To Make Intro Video With Filmora?
Below are the steps that you need to follow to make an intro video with Filmora.
Free Download For Win 7 or later(64-bit)
Free Download For macOS 10.14 or later
Step1 Launch Filmora and Add Background
The first step is to launch Filmora and head to the Media tab at the top. Then, select the Sample Colors category and add any color you wish to use in the background of your video.
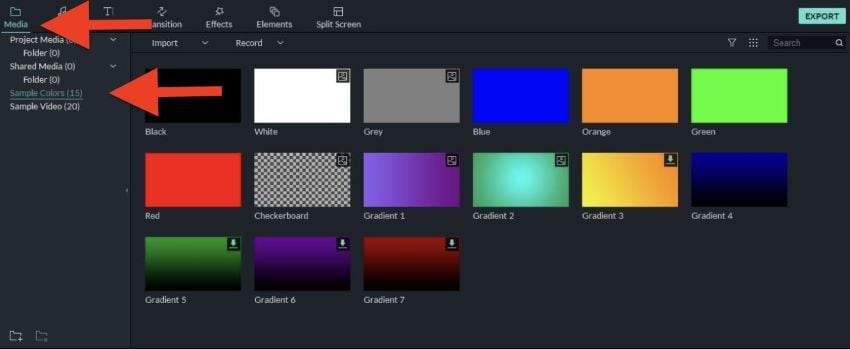
You can upload any background image or video clip of your choice by selecting the Project Media category as well.
Step2 Add Audio
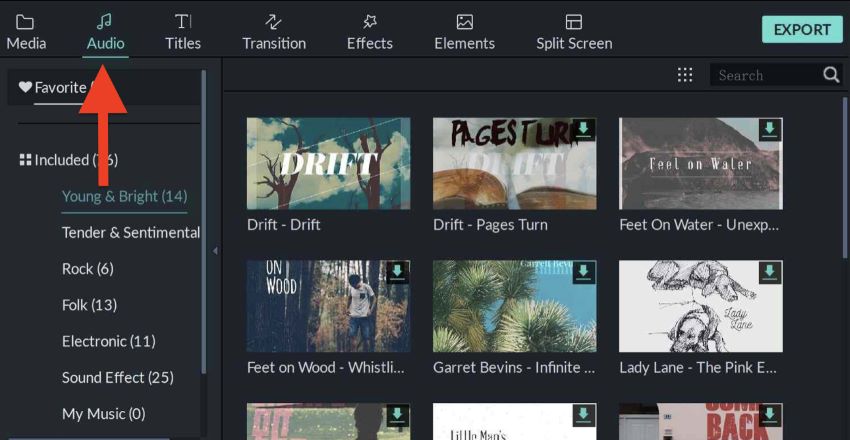
When you’ve added the background, it will be time to add audio to the intro video. For that, can you use the inbuilt audio library of Filmora and select any audio you find suitable for that matter. However, it is essential to keep the background and audio at the same duration.
Step3 Add Effects
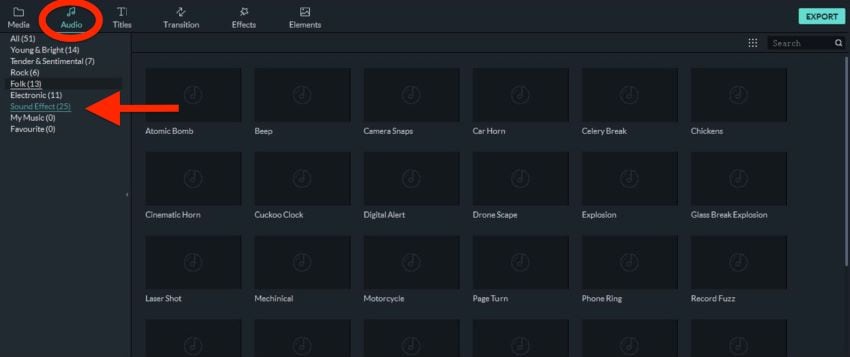
Filmora offers you an Effects library from which you can choose any effect to add to your video as well. The playback duration can be adjusted using the right handle of the track in the timeline, and the Effects track can be double-clicked to customize the appearance as needed too.
Step4 Export
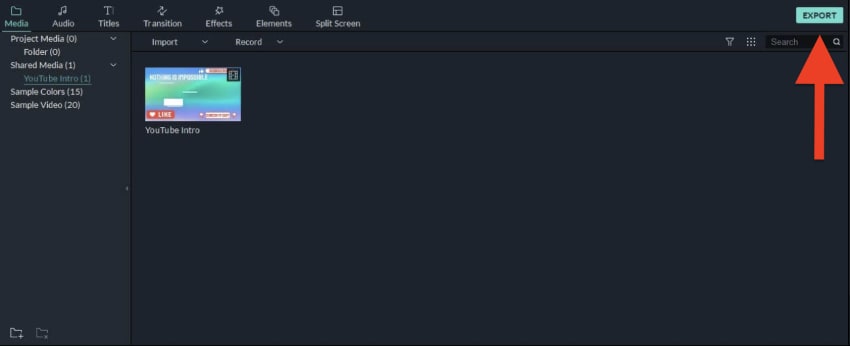
Finally, when you’re done with the editing phase, it will be time to export the video. For that, click Export from the top-centre area of the interface, opt for your preferred format and adjust other preferences such as framerate, destination location, resolution etc.
Frequently Asked Questions
Below are the FAQs related to YouTube intro videos.
1. What Is The Best Free Intro Maker?
To create an intro that impresses your audience, you will have to use the best intro maker as well. It isn’t vital for this intro maker to be paid as there are many free intro makers out there that do the job efficiently. Considering the flexibility and features that it offers, Filmora is perhaps the best intro maker out there.
2. How Can I Make a Professional Video Intro?
Making a professional video intro doesn’t require you to have top-level editing skills, as it can be made using custom templates offered by several video editing tools as well. In fact, Filmora offers a variety of templates to its users, and these templates can be customized as well.
3. How Much Does a YouTube Intro Cost?
Fortunately, a YouTube intro doesn’t cost a dime and can be made without paying anything using tools like Flixpress and Filmora.
Summing Up
All in all, intro videos play a vital part when it comes to impressing the audience and leaving an impact on them. Therefore, these videos shouldn’t be compromised and should only be made with the best tools out there. Flixpress and Filmora happen to be the best ones, and to offer you ease, we’ve listed the steps that you can follow to make your own perfect intro videos.
Free Download For Win 7 or later(64-bit)
Free Download For macOS 10.14 or later
- Filmora – An Alternative to Flixpress for Computer
- How To Make Intro Video With Filmora?
- Frequently Asked Questions
The 6 Key Features of Flixpress
Listed below are the features that make Flixpress stand out among the competitors.
1. HD Downloads
It is an established fact that the quality of the video is the first factor for the audience to judge, and having a bad quality video uploaded to a YouTube channel that you wish to grow is not really a wise choice.
Flixpress offers you high-definition downloads that are perfect for viewing your video on the web and broadcasting it on television.
2. Customizable Templates
Having templates that can be customized as per your needs really makes the task easier. Flixpress offers a variety of templates that give you the option to enter text in some fields. This text is then beautifully rendered out in the final edited video.
3. Audio Tools
Adding the right audio can leave a significant impact on the overall aesthetic and impression of the video. It is perhaps one of the prime factors that decides whether the audio is edited well or not.
That said, Flixpress allows you to incorporate any custom audio file into the video. You will just be required to upload that audio in mp3 format, and that’s all. Other than that, you can add several sound elements as well.
4. Multiple Formats
If you’re someone who owns a Mac operating system and wishes to export the video in a MOV format, let us tell you that Flixpress can transcode the video to match your needs. However, along with the MOV format, you also have the option to export the video in the standard MP4 format or a WMV format as well.
5. Stock Video Library
Yes, you read that right. Flixpress is dedicated to offering you a comprehensive and affordable video product solution by providing a stock video library which means you can bid farewell to expensive stock footage sites.
It is to be noted that the team at Flixpress is fully committed to growing the Copyright-Free footage and background library, and the size of the library grows with the passing time.
6. Preview
Being one of the spotlight features of Flixpress, this one really makes it stand out. With this feature, you won’t have to wonder what your video would look like as you can render a free watermarked preview. If you’re working for someone, you can send this preview to your client or boss for approval and tweak data before the final render.
Other than that, these previews can also be used as templates if you wish to duplicate the same video with variable data.
How to Make Intro Video With Flixpress?
Creating intro videos with Flixpress is a pretty straightforward job, and the steps listed below aim to streamline the Flixpress intro making process for you.
Step1 Open the Webpage
Start off by opening the web browser on your PC or laptop and accessing the homepage of Flixpress by following the link below.
Once you’re at the homepage, you need to register your account by clicking on the Register button.

Step2 Signup
Upon clicking on the register button, you will be redirected to another page that will provide you with two options to signup on flixpress online video maker.
The first option allows you to sign up with your Google account, and if you opt for it, your Flixpress account will be linked to your Google account, and the credentials will be filled out automatically.
However, the second option asks for manual entry of your personal information that includes your first name, last name, email address, and password.
You can select either of them and then press the Register button below.

Step3 Knowing the Subscription Plans
After the successful completion of the registration process, you will get to the main page of Flixpress, where all the templates will be visible to you, and the type of your plan will also be visible.
Initially, it will be a free plan, and you will be allowed to edit a 2 min video in it. However, you have the option to upgrade to a paid plan where a lot of other features will be unlocked, and you can edit more videos of greater lengths as well.
Step4 Sorting and Filtering the Templates
When you’re on the main page, all the templates will be visible to you, and these will include paid ones. If you’ve not bought a paid subscription, you will have to sort out the flixpress free templates, which can be done in two ways.
- Click on the “Sort by” drop-down and choose the option that says “Free First”. This will put all the free templates at the top.
- Click on the “Show for plan” drop-down and select the “Free” option to only view the free templates.

Step5 Customize the Template
Once all the free templates are visible to you, you can select a template that you like. Then, you’re required to click the “Customize Now” button to customize the video.

Step6 Upload Image
Now, you will be prompted to upload an image from your PC or laptop so click the “Upload Image” button and choose the image you want to upload.
Once you’ve uploaded the image, click on “Proceed” button and crop the image to fit the subtitles.

Step7 Customize Text, Add Audio, Change Resolution & Create Preview
Even though the image subtitle will be made, you will still have the option to swap the image if you change your mind. Other than that, select the main title of the intro video and the color of the text as well.
Moreover, you can add audio as per your need and preference, and you can choose a resolution for the intro video too.
Once everything is done, create the preview to have a final look before rendering it.

What are the downsides of Flixpress?
While the Flixpress intro maker is a great choice for making intro videos, it may miss out on a few features. Other than that, individuals who have used Flixpress complained about the bad customer service that they offered, even to those who had signed up for the membership. Now, that can be quite frustrating, right?
We found a few major missing in Flixpress.
- The number of templates is limited.
- The content is rarely updated.
- The customer service they offered is poor. People can’t get help with their problems, especially when those who sign up for membership want to cancel their subscription.
What if we were to tell you that there is an even better and professional tool that Flixpress?
Filmora – An Alternative to Flixpress for Computer
As it turns out, Filmora happens to be one of the best video editing applications that allows you to make top-level and professional videos. It tends to have an intuitive interface and a great variety of advanced editing features, providing extended accessibility and ease for the users.
While there are limited templates on Flixpress, Filmora offers nearly 400 templates, therefore, providing the users with a wide range of option. That isn’t where the list of pros end as unlike Flixpress,
Filmora continuously introduces new sets of features and templates, taking the user experience to a whole new level. The filmora team is committed to solving inconveniences for users, only to bring a better experience.
Let’s move forward and look at how you can make intro videos with Filmora.
How To Make Intro Video With Filmora?
Below are the steps that you need to follow to make an intro video with Filmora.
Free Download For Win 7 or later(64-bit)
Free Download For macOS 10.14 or later
Step1 Launch Filmora and Add Background
The first step is to launch Filmora and head to the Media tab at the top. Then, select the Sample Colors category and add any color you wish to use in the background of your video.

You can upload any background image or video clip of your choice by selecting the Project Media category as well.
Step2 Add Audio
When you’ve added the background, it will be time to add audio to the intro video. For that, can you use the inbuilt audio library of Filmora and select any audio you find suitable for that matter. However, it is essential to keep the background and audio at the same duration.

Step3 Add Effects
Filmora offers you an Effects library from which you can choose any effect to add to your video as well. The playback duration can be adjusted using the right handle of the track in the timeline, and the Effects track can be double-clicked to customize the appearance as needed too.

Step4 Export
Finally, when you’re done with the editing phase, it will be time to export the video. For that, click Export from the top-centre area of the interface, opt for your preferred format and adjust other preferences such as framerate, destination location, resolution etc.

Frequently Asked Questions
Below are the FAQs related to YouTube intro videos.
1. What Is The Best Free Intro Maker?
To create an intro that impresses your audience, you will have to use the best intro maker as well. It isn’t vital for this intro maker to be paid as there are many free intro makers out there that do the job efficiently. Considering the flexibility and features that it offers, Filmora is perhaps the best intro maker out there.
2. How Can I Make a Professional Video Intro?
Making a professional video intro doesn’t require you to have top-level editing skills, as it can be made using custom templates offered by several video editing tools as well. In fact, Filmora offers a variety of templates to its users, and these templates can be customized as well.
3. How Much Does a YouTube Intro Cost?
Fortunately, a YouTube intro doesn’t cost a dime and can be made without paying anything using tools like Flixpress and Filmora.
Summing Up
All in all, intro videos play a vital part when it comes to impressing the audience and leaving an impact on them. Therefore, these videos shouldn’t be compromised and should only be made with the best tools out there. Flixpress and Filmora happen to be the best ones, and to offer you ease, we’ve listed the steps that you can follow to make your own perfect intro videos.
Free Download For Win 7 or later(64-bit)
Free Download For macOS 10.14 or later
Steps to Create Green Screen Videos in After Effects
You’ll probably get the finest results in After Effects out of all the editing programs. Working with green screen footage in After Effects can be done in a variety of ways. Utilizing a built-in preset that combines three effects is advised by Adobe. Due to its ability to deliver speedy (and typically excellent) outcomes, this strategy is great for both beginners and specialists. We’ll demonstrate how to do easily for you.
Let’s start off!
1. Importing your footage
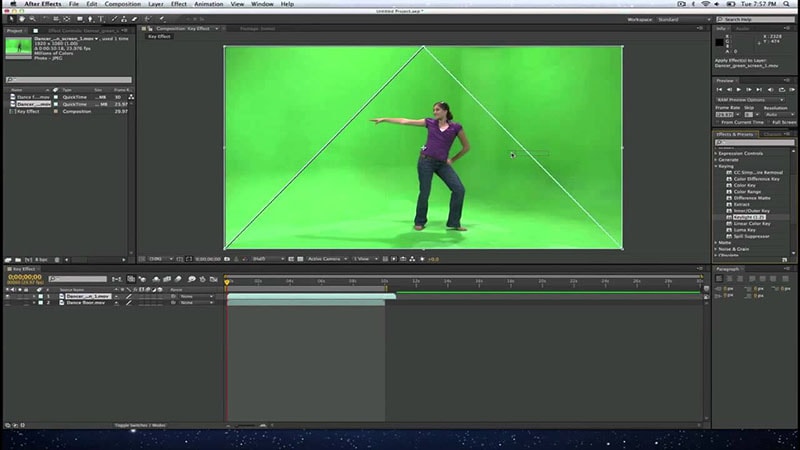
After you have imported your material into the After Effects project, you should next create a new composition using the footage. In the following stage, you have the option of either adding each plugin one at a time or doing it all at once. You may find them grouped together as Keylight, Key Cleaner, and Advanced Spill Suppressor in the Animation Presets box, which is located under the “Image Utilities” heading.
2. Remove the green color
After Effects users can get rid of a green screen by going to the “Animation Presets” window, searching for the “Keylight” preset, dragging, and dropping it over the clip, and then shifting their focus to the “Effects Controls” window. Make sure the Screen Colour is set to the color of your screen’s background (which, in this case, is green). You may do this with the color selector.

3. Clean up the shot
You have no doubt observed that some of the remaining parts do not have the correct keying installed in them. In order to get rid of them, you need to put the view into the Combined Matte mode and turn the Screen Gain up a notch.
Because everything that is not transparent is turned white by Combined Matte, any remaining debris can be seen very clearly after it has been applied. After you have finished cleaning the frame, you should change the view to Intermediate Result. Your footage may become contaminated with artifacts if the Final Result view is inadvertently switched on.
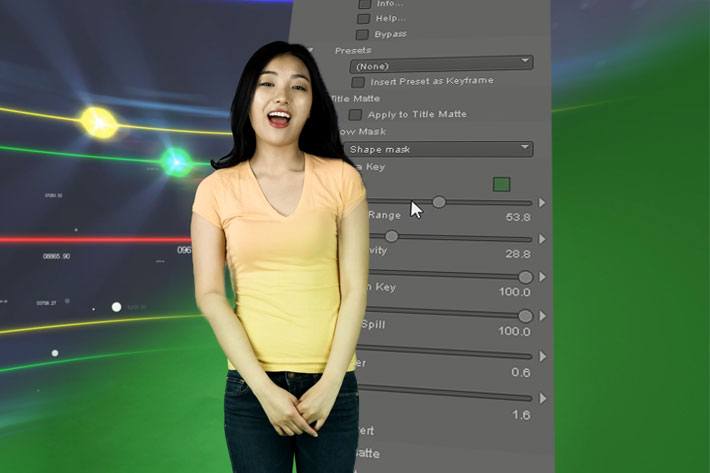
You can go to the “Screen Matte” area if you feel like the frame still needs more tweaking after you’ve applied the previous ones. You can accomplish that with the assistance of Clip Black and Clip White. Feel free to turn the Clip Black dial all the way to the right and turn the Clip White dial to the left. You can also adjust the other settings, if necessary, but based on my observations, everything should be working properly at this point.
The Bottom Line
After completing this lesson, you should have a better understanding of what a chroma key is, how to get rid of a green screen in After Effects, and how to adjust some settings if something goes wrong. Keep in mind that if the footage is not captured properly, you will not be able to successfully key out the green screen in the final video. Extra caution should be taken with the lights, and spills should be avoided at all costs!
Free Download For Win 7 or later(64-bit)
Free Download For macOS 10.14 or later
Free Download For macOS 10.14 or later
What You Should Know About Speech-to-Text Technology
Speech-to-text technology (STT) improves communication, especially in a multi-language setting. One of the ways we practice multilingualism is via speech-to-text technology: speakers input a language, and viewers read another language. Other advantages include converting oral speech into a document, real-time compatibility, and offline usage. This article explains how you can utilize speech-to-text assistance technology for optimal productivity.
Part 1: What is speech-to-text technology?
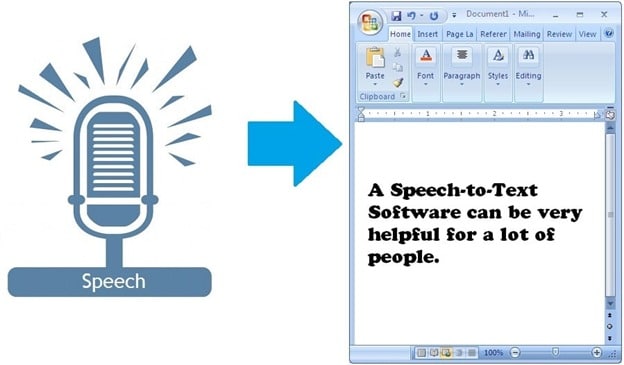
Speech-to-text technology (STT) identifies oral pronunciation and converts them into computer codes: electronic words. The computer electro-communication requires a medium of conversion: receiver and interpreter. Therefore, speech-to-text technology contains both the receiver and interpreter, which exist electronically. The medium or receiver can be software installed on a device; it must have a receiver and a screen. The computer serves a good purpose, although other devices can receive words without displaying them.
A speech-to-text technology does not necessarily have to contain displaying screen: a sound interpreter may replace the screen. Thus, speech-to-text can be oral words - electronic recognition - word encoding - display, or recitation. Oral wordings are the human’s contribution to speech-to-text technology, although all communication (especially speech) may be generated from a computer. Inter-device communication is another advancement of speech-to-text technology. For example, combining one or more devices allow you to use speech-to-text assistance technology in different languages.
Communication is the paramount importance in speech-to-text technology. Still, some advantages include easy data conversion, documentation, workflow flexibility, and easy access to data. For example, documentation is incomplete if every human cannot access the file. All humans cannot read; improvising data into oral documents reduces the percentage of people who cannot access the file. Speech-to-text increases the channel for less privileged individuals. For instance, the deaf who cannot listen to a recorded file can read the file via speech-to-text technology.
Speech-to-text technology incorporates many advantages. Learning to use the technology is the first step in familiarizing and getting yourself equipped.
Part 2: What are the stages for the technology?
STT gives so many stages and applications for a daily and smooth organization. Some include:
1. Education
Education and the love to study other languages increase with speech-to-text technology. The educative application is not limited to four corners of the room; it extends to all daily learning activities. Communication is educative if you learn new things via communication.
STT improves all processes associated with less privileged education. For example, everyone easily pours their mind into a computer screen page when they speak, especially in the language they understand using STT. Time and submission date are important factors in the educational system; STT improves time, submission, accuracy, and authentication.
2. Video Subtitles
Videography and filmmaking carry a large percentage of today’s media. Data input and integration in the video-making process weigh a lot, and the concept of STT reduces the load on the data specialist. Instead of long hours of typing, oral communication is applicable. Processing time is a factor of productivity; STTs do not only affect the time of production but also maintain accuracy.
3. Chatbots
Chatbots are available on websites. Users have different preferences: some can type while others like to communicate via speech. The chatbots attend to users’ needs; you can do more with STT if installed on the website. STT promotes freedom of communication and increases user interaction on your website. STT may be incorporated into mobile applications too. There is more to STT, and the advantage is unlimited if you add it to your chatbots.

4. Translation
Translation is the interconversion of languages. The main reason translation is important is because communication is essential; without communication, production will be static. STT is among the tool that elevates productivity via communication. For example, STT improves communication in a situation where more than one language combines as one.
Part 3: What are the best STT Technology provider
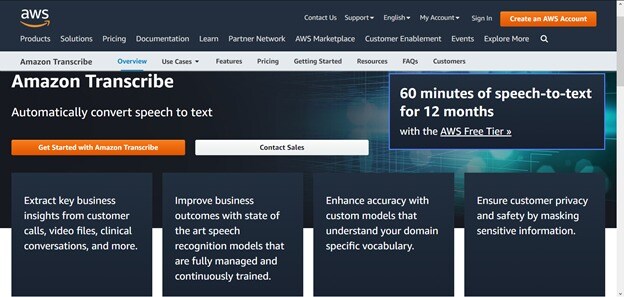
1. Amazon web services
STT is one of the services in the Amazon web services. The STT is available for all users who subscribe to one or more Amazon services. Some features include unlimited conversion, easy download, and availability in multiple formats. To get started, you need to sign up for a free AWS account and begin to enjoy the offer. Although the services are available for all users, limitations, and upgrades come a few times when you must pay for certain premium services.
2. Google docs voice typing
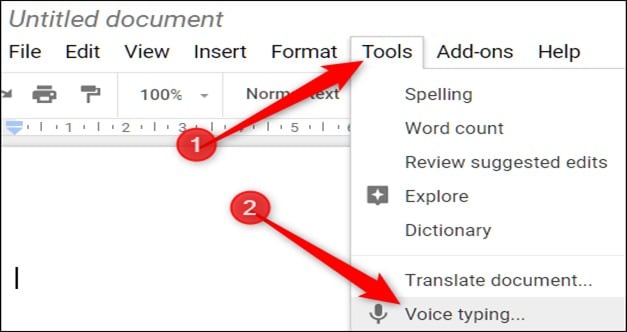
Google docs voice typing is available for all Google users. You can access the Google docs voice typing provided you are on a service by Google. The service is available on the Google docs application - one of the services created by Google. Google docs are free for download and available for desktop and mobile users.
3. Wondershare Filmora
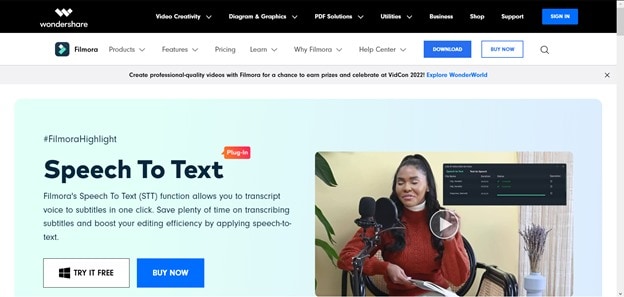
Wondershare Filmora STT is quite different with other STT service providers. Other STT platforms/stages require you to use the application to convert speech-to-text, save, and export into other third-party software. However, Wondershare Filmora allows you to directly convert your speech-to-text on an ongoing production. For example, you can convert speech into subtitles during a video production on Wondershare Filmora.
4. Microsoft dictate
The Microsoft dictate shows to have the same build-up as the Microsoft Cortana Virtual Assistant. It gives free access to all users who convert speech-to-text without subscribing to any platform. The Microsoft dictate is a default option for many Microsoft devices and partners’ software. Microsoft dictates accuracy is appreciable; it is likewise easy to use.

Conclusion
How much do you know about speech to text technology now? It’s convenient indeed and do choose the service that suits you the best!
Free Download For Win 7 or later(64-bit)
Free Download For macOS 10.14 or later
Free Download For macOS 10.14 or later
Also read:
- [New] 2024 Approved Perfect Group Photos with iPhone's Burst Shot
- [New] In 2024, Decoding the Language of Auditory Cues in Movie Previews
- [New] In 2024, Explore Top 10 Premium-Free iOS/Android Live Video Platforms
- [Updated] In 2024, The Art of Title Design in After Effects
- 2024 Approved 10 Best Websites to Discover Free Premiere Pro Video Templates
- 2024 Approved Create Kinetice Typography Text Effect in Filmora
- 2024 Approved TOP 6 Online Video Speed Controller for Chrome, Safari, Firefox
- Do You Know that You Can Apply Different LUTs and Create Your Own? There Are Many LUT Online and Offline Generators that You Can Use to Create Your LUT for 2024
- Guide to Fix 'Xlive.dll' Not Found - Steps and Strategies for a Quick Solution
- In 2024, How to Transfer Contacts from Samsung Galaxy XCover 6 Pro Tactical Edition to Other Android Devices Devices? | Dr.fone
- In 2024, This Article Will Show You How to Make a Tattoo Disappear on Your Body Magically
- Instagram Mastery The Top 10 Steps to Optimize Engagement
- Mastering Computer Components with Tom's Hardware Guides
- New 2024 Approved How to Add Font Effects to Videos
- New Learn the Step-by-Step Process of Slowing Down Time-Lapse Videos on Your iPhone
- Updated How To Quickly Create A Screen Print Effect In Photoshop Detailed Gui for 2024
- Zuck's Farming Ventures: Crypto-Inspired Goat Name Revealed
- Title: How to Fade in Text in Adobe Premiere Pro
- Author: Morgan
- Created at : 2024-10-02 21:02:18
- Updated at : 2024-10-05 23:43:20
- Link: https://ai-video-editing.techidaily.com/how-to-fade-in-text-in-adobe-premiere-pro/
- License: This work is licensed under CC BY-NC-SA 4.0.