:max_bytes(150000):strip_icc():format(webp)/free-disk-partition-software-tools-2624950-fad3ccc557d34ed89d53eff7538f5fdb.png)
How to Make a Neon Dance Effect With Filmora

How to Make a Neon Dance Effect With Filmora
Neon colors in videos are constantly attracting and compelling the scenes. So how it looks if dancing videos have this feature? For sure, it’ll be dreamier and more classy.
After moving toward, the following steps of processing neon effects, you will find different effects to make your video filmier. Wondershare Filmora provides all types of products on one platform. Then try it out and enjoy the rest. Scroll more to learn about the neon effect before editing your video!
Neon Dance Effects in Wondershare Filmora
You often watch viral dance videos or commercials in which a neon highlight of a person dances aside from them in the video. Yes! You can also make that just in a few minutes.
In this case, Wondershare Filmora is considered to be your partner. Filmora is a fantastic tool that you can have at your disposal to edit a range of videos. There are tons of neon effects in Filmora, including neon frames, neon swings, or even multiple neon overlays.
Free Download For Win 7 or later(64-bit)
Free Download For macOS 10.14 or later

Steps to Make a Neon Dance Effect With Filmora
The public is tired now of seeing old video graphics in dancing videos. It’s time to add neon colors to give a fascinating look. Follow the step-by-step guide mentioned below, and let’s get going!
Step1 Import Clips into the Timeline
Before we begin to edit our video, make sure you download Wondershare Filmora. First, you need to create a timeline to edit our dancing clips. For this, take a look at the below steps!
- Click on the Import icon in the main window when you open Wondershare Filmora.
- Then, import the video clips you want to edit.
- Now, drag the Video and drop it in the editing timeline below.

Step2 Add the Same Video again
We aim to create a black background for the original video we imported above. To do so, follow the steps mentioned below.
- Drag and drop the same video on the timeline.
- Make sure to drag and drop it above the original video.

Step3 Go into the Compositing Mode
After adding the same video, now convert BG into a black screen. For this, follow the given steps:
- Double-Click on the video we added later.
- A video editing panel will open up in the Import
- Scroll down till you see the compositing tab.
- Here will have to change the Blending mode.
- Click on the tab ahead that is labeled “Norma“
- A drop-down option will open up.
- In this drop-down option, scroll below to “Difference“.

- As soon as you click on the Difference option, you will notice a change in the main play window; it will all turn to a black screen.
Step4 Add the Pixelated Edges effect
Our target is to outline the individual in the video, so we can move on to create the Neon Highlight effect. To do so, follow these steps!
- First, go into the effects option that you can select from the tab above the import window.
- In the effects panel, search for the Pixelated edges
- You will notice a search bar in the top right corner. Type “Pixelated edges,“ and you will see some effects pop up in the import window.

- Select the Pixelated edges effect. Then, click and drag it below the video that we turned to black using the Difference
- The edges of the individual dancing in the video will be outlined.

Step5 Change the outline color
You may not like the default color with the Pixelated edges effect. But no worries, you can change that to whatever color you desire by following these steps:
- Double-Click on the video in which you added the effect.
- An editing panel will pop up.
- Click on the Effect option below the Video
- Here, you can see the color option.
- Click on the color and select whatever suits you the best.

Step6 Create Multiple Outlines
It would help if you created multiple outlines to achieve the Neon Dance effect. These multiple outlines will be produced by exporting them multiple times with the color you want. Follow the below points to get it instantly!
- When you have selected the color for your outline, export the video by clicking on the Export icon in the top right corner.

- When you have exported the video, move back to the timeline to edit again.
- As we had selected the Blue color for reference, now choose another color you wish.
- After changing the video, export it again.
![]()
Note: Export as many times as you want with the color of your choice. E.g., 5 colors = 5 exports.
Step7 Import the exported videos
- Now you have to import the videos that you exported.
- Before doing that, first, delete the video in track 2. (The video on which we applied the Difference)
- Now select all the exports from your library and import them onto the import window.
- Please select all of them and drag them on the timeline.
![]()
Note: You don’t want all the outlines to play simultaneously. Otherwise, the outlines will not appear to be separate.
- To do so, stack the videos on each other on different tracks.
Tip: The trick here will be to offset the video by a few seconds so that each video plays a little later than the other.

To efficiently blend the outlines with the green screen, you can change the blending mode of each of the exported videos to “Lighten.”
- Double-click on each video.
- In the editing panel, choose compositing.
- From there, select the “Lighten“ option.

Step8 Add the Glow effect
To make the outlines glow like Neon lights, we will need to add another effect from the effects library.
- Go to the effects tab and search for “Glow.”
- Click and drag the glow effect to each of the exported videos.

You can make it more fun by going one step further!
- Double-click on each of the glow effects that you added.
- In effect, the editing panel goes to the video effects.
- Here, you can change the radius of the Glow effect you added.
- Similarly, you can do it in all the other videos.
Step9 Apply the Green screen effect
We will change our green screen for the final part. Follow the last steps, and then enjoy!
- Move the green screen footage below them all to the top track.
- Double-click the video to enter the editing panel.
- Go to the chroma key (Green Screen) in the editing panel**.**
- Click on the arrow aside from the tab.
You will immediately see changes to your video in the main play window. Play the video from the start and notice the changes.

Congratulations! You have successfully created Neon Dance effects by using the user-friendly Wondershare Filmora.
Conclusion
Wondershare Filmora offers a variety of editing features that you can use to create very innovative videos. You can quickly create Neon effects in your dance videos next time by following the above steps! Add more creativity to attract more audience. Have fun and explore more effects to get unique results!
Free Download For macOS 10.14 or later

Steps to Make a Neon Dance Effect With Filmora
The public is tired now of seeing old video graphics in dancing videos. It’s time to add neon colors to give a fascinating look. Follow the step-by-step guide mentioned below, and let’s get going!
Step1 Import Clips into the Timeline
Before we begin to edit our video, make sure you download Wondershare Filmora. First, you need to create a timeline to edit our dancing clips. For this, take a look at the below steps!
- Click on the Import icon in the main window when you open Wondershare Filmora.
- Then, import the video clips you want to edit.
- Now, drag the Video and drop it in the editing timeline below.

Step2 Add the Same Video again
We aim to create a black background for the original video we imported above. To do so, follow the steps mentioned below.
- Drag and drop the same video on the timeline.
- Make sure to drag and drop it above the original video.

Step3 Go into the Compositing Mode
After adding the same video, now convert BG into a black screen. For this, follow the given steps:
- Double-Click on the video we added later.
- A video editing panel will open up in the Import
- Scroll down till you see the compositing tab.
- Here will have to change the Blending mode.
- Click on the tab ahead that is labeled “Norma“
- A drop-down option will open up.
- In this drop-down option, scroll below to “Difference“.

- As soon as you click on the Difference option, you will notice a change in the main play window; it will all turn to a black screen.
Step4 Add the Pixelated Edges effect
Our target is to outline the individual in the video, so we can move on to create the Neon Highlight effect. To do so, follow these steps!
- First, go into the effects option that you can select from the tab above the import window.
- In the effects panel, search for the Pixelated edges
- You will notice a search bar in the top right corner. Type “Pixelated edges,“ and you will see some effects pop up in the import window.

- Select the Pixelated edges effect. Then, click and drag it below the video that we turned to black using the Difference
- The edges of the individual dancing in the video will be outlined.

Step5 Change the outline color
You may not like the default color with the Pixelated edges effect. But no worries, you can change that to whatever color you desire by following these steps:
- Double-Click on the video in which you added the effect.
- An editing panel will pop up.
- Click on the Effect option below the Video
- Here, you can see the color option.
- Click on the color and select whatever suits you the best.

Step6 Create Multiple Outlines
It would help if you created multiple outlines to achieve the Neon Dance effect. These multiple outlines will be produced by exporting them multiple times with the color you want. Follow the below points to get it instantly!
- When you have selected the color for your outline, export the video by clicking on the Export icon in the top right corner.

- When you have exported the video, move back to the timeline to edit again.
- As we had selected the Blue color for reference, now choose another color you wish.
- After changing the video, export it again.
![]()
Note: Export as many times as you want with the color of your choice. E.g., 5 colors = 5 exports.
Step7 Import the exported videos
- Now you have to import the videos that you exported.
- Before doing that, first, delete the video in track 2. (The video on which we applied the Difference)
- Now select all the exports from your library and import them onto the import window.
- Please select all of them and drag them on the timeline.
![]()
Note: You don’t want all the outlines to play simultaneously. Otherwise, the outlines will not appear to be separate.
- To do so, stack the videos on each other on different tracks.
Tip: The trick here will be to offset the video by a few seconds so that each video plays a little later than the other.

To efficiently blend the outlines with the green screen, you can change the blending mode of each of the exported videos to “Lighten.”
- Double-click on each video.
- In the editing panel, choose compositing.
- From there, select the “Lighten“ option.

Step8 Add the Glow effect
To make the outlines glow like Neon lights, we will need to add another effect from the effects library.
- Go to the effects tab and search for “Glow.”
- Click and drag the glow effect to each of the exported videos.

You can make it more fun by going one step further!
- Double-click on each of the glow effects that you added.
- In effect, the editing panel goes to the video effects.
- Here, you can change the radius of the Glow effect you added.
- Similarly, you can do it in all the other videos.
Step9 Apply the Green screen effect
We will change our green screen for the final part. Follow the last steps, and then enjoy!
- Move the green screen footage below them all to the top track.
- Double-click the video to enter the editing panel.
- Go to the chroma key (Green Screen) in the editing panel**.**
- Click on the arrow aside from the tab.
You will immediately see changes to your video in the main play window. Play the video from the start and notice the changes.

Congratulations! You have successfully created Neon Dance effects by using the user-friendly Wondershare Filmora.
Conclusion
Wondershare Filmora offers a variety of editing features that you can use to create very innovative videos. You can quickly create Neon effects in your dance videos next time by following the above steps! Add more creativity to attract more audience. Have fun and explore more effects to get unique results!
6 Free Tools To Radial Blur Photos Online
Radial blur is commonly used in photography and graphics to create a sense of movement or dynamism and help you simulate several different effects, such as a spinning wheel or a moving car. It’s also often used to create a dream-like or ethereal effect. Regardless of how you add it, radial blur can give a lot of visual interest to your otherwise static photos.
Therefore, if you’re looking for a way to add some dynamics to your photos, read on to learn about 6 free tools to create radial blur effects online!
What Is Radial Blur?
Radial blur is a blurring effect that starts from one point in an image and blurs outwards (or inwards) from (or to) that point. The word ‘radial’ means “arranged like rays that come from or go to a common center,” which is precisely how radial blur works.
Here are some common uses of the Radial motion blur effect:
- Create a sense of movement
- Add depth to a photo
- Simulate camera movement
- Create an interesting background
Best 6 Free Online Radial Blur Image Tools
If you want to create a radial blur effect on your photos but don’t have the required resources like storage space, budget, or the right software, we recommend you try using the following tools:
1.Pine Tools
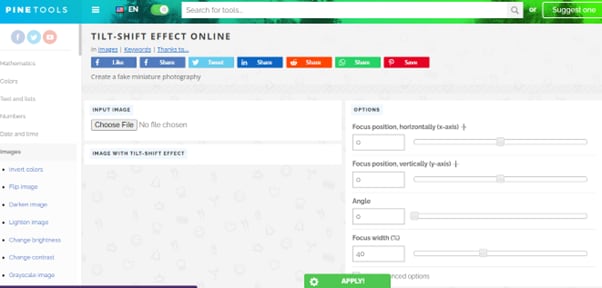
Pine Tools is a terrific online program with many image editing features, such as invert color, blur, special filters, effects, crop images, and more.
Using its radial blur feature, you can quickly add depth to your images and apply the motion blur effect. To do so, visit the Pine Tools website, choose “Blur” from the left panel, and upload your image. Then, under the “Options” header, select “Radial Blur” and click “Apply.” The best thing about this online tool is that you can set different parameters before creating the effect.
Key Features:
- Numerous image editing tools
- Various parameters for creating radial blur effects, such as size, strongness, and axis (x, y)
- No editing knowledge is required to use the program
Pros
- Drag and drop interface
- Free to use
- No sign up required
Cons
- Takes time to finish the process
- UI is a bit old
2.Mass-images.pro
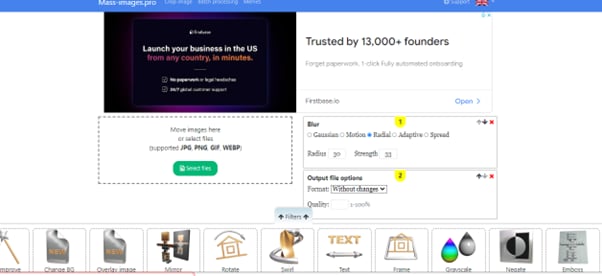
With Mass-images.pro tool, you can crop your images, do batch processing, or create memes in no time. Moreover, the program offers multiple image editing features to help you quickly apply basic changes to your pictures. These include Change BG, Auto Improve, Overlay image, Rotate, Swirl, Radial Blur, Text, Pixelization, and many more filters.
To create the radial motion blur effect on your images using the Mass-images.pro tool, you have to simply upload your file, set the radius and strength, and click “Download.” You can also configure the format and quality of your picture before downloading it.
Key features:
- Offers multiple format options for uploading and downloading your images
- Can change the radius of blur and intensity effects
- Can process multiple photos at once
Pros
- Free to use
- Many input and output formats
- Simple and straightforward to use
- Image quality option
Cons
- No advanced image editing features
3. Font Meme
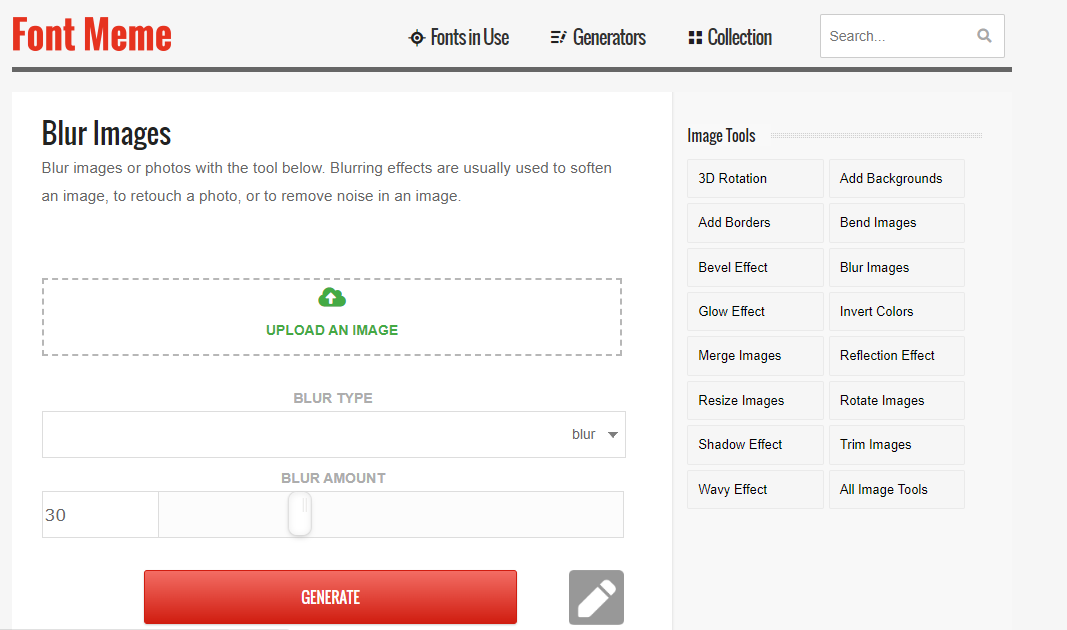
Font Meme is an online resource for fonts and typography. Still, it offers other image editing features, such as 3D Rotation, Bevel Effect, Glow Effect, Invert Colors, Blend Images, and Add Background, to help you create memes instantly.
You can also use the Font Meme to create a radial blur image by uploading the image and selecting the “Blur Type” from the drop-down menu. Next, set the blur amount and click “Generate.”
Key Features:
- Instantly creates the radial blur effect on images
- Offers multiple image editing options
- A Complete resource for font and typography
Pros
- Available for free
- Quick and easy to use
- Intuitive UI
Cons
- No advanced image editing features
4.IMGonline.com.ua
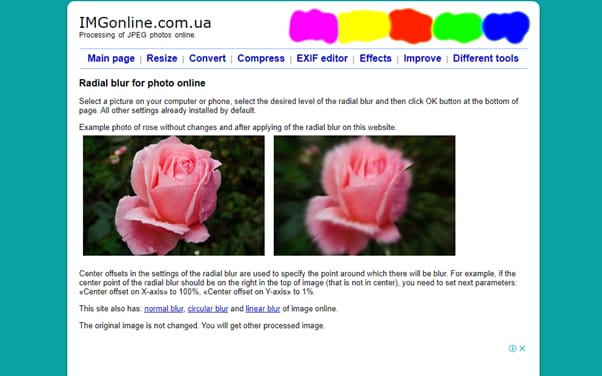
IMGonline is another free online tool that offers image resizing, converting, compression, EXIF editor, effects, and other tools.
IMGonline can also help you create beautiful radial blur images in the nick of time. It’s a great and easy platform to add an extra effect to your photos. Simply upload your picture, choose the amount of blur you want, click “OK,” and download the results.
Key Features:
- Also has circular blur, usual blur, and linear blur features
- Does not change the original image during the process
- Multiple radial blur settings
- Offers JPEG and PNG as output formats
Pros
- Simple user interface
- Quick processing time
- Free
- Multiple image input formats
Cons
- Cannot process large image files
5.Pop Art Studio
Pop Art Studio is an effective online tool that allows you to create pop art images and offers numerous options for users to choose from, including different colors, fonts, and layouts. You can also upload your photos to the tool to convert them into pop art.
To use Pop Art Studio, simply upload an image to the website or paste the URL and then adjust the opacity and radius of the radial blur. Once you’re happy with the results, download the image.
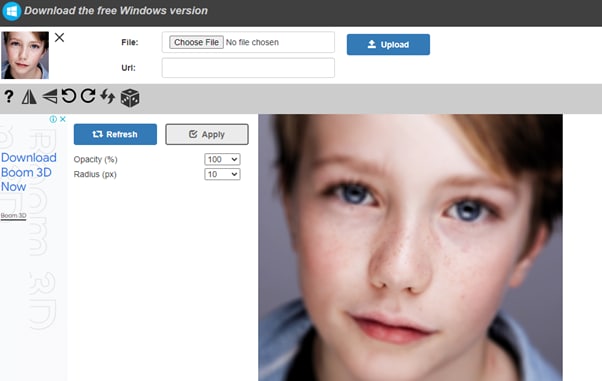
Key Features:
- Lets you paste the URL of the image
- Can configure the opacity and radius of the blur
- Instant process of the image
Pros
- Useful for creating and editing artwork
- Available for free
- Available as software
Cons
- Applies watermark to your images
6.Photokako
Photokako is a Japanese photo editor that creates radial motion blur effects in your images with just a few clicks by uploading them from your system or pulling the image from a URL.
Besides that, this tool offers several other advanced image editing features, including Transform, Illustrate, Reduce Colors, Parallel Universe, Retro, Ilusion, Frame, and Mood.
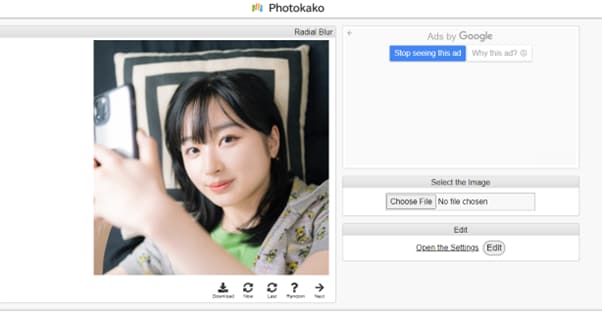
Key Features:
- Option to adjust blur smoothness and opacity
- Comes with Basic Settings to edit the image further
- Multiple output formats, including JPG, PNG-24, BMP, TIFF-24, TIFF-48, GIF, PNG-8, and PNG-32.
Pros
- Sophisticated online tool
- Multiple ways to upload a picture
- Free and easy to use
Cons
- The user interface is less intuitive
Bonus Tips – How To Add Radial Blur Effect To Images In Filmora
The programs mentioned above work only online and do not offer advanced features to add more customization options to the level of radial blurring or change its position on the images. Therefore, we recommend using the desktop software - Filmora.
Free Download For Win 7 or later(64-bit)
Free Download For macOS 10.14 or later
Filmora is a free and premium video editing software recommended by many content creators and professionals. With this software, you can create stunning radial effects on your images or memes with more customization options available.
Here’s how you can add the radial blur effect to images in Filmora by following three simple steps:
Step1 In the first step, go to the Filmora website, download the file, and install the software. Launch it and click the “Create New Project” option. Then drag & drop your file or click the “Click here to add Media file” to import it.
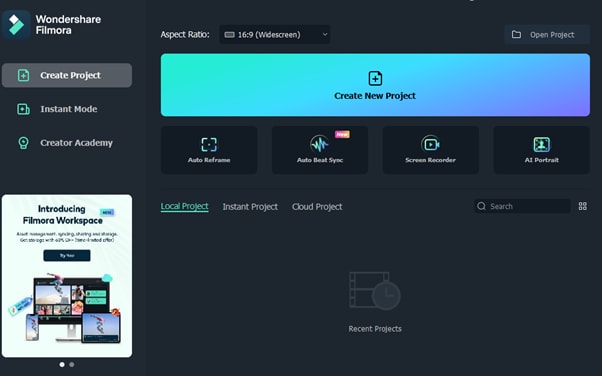
Step2 In the second step, go to the “Effects” tab, choose the Tilt-shift Circle for the radial blur effect, and add it to the timeline.
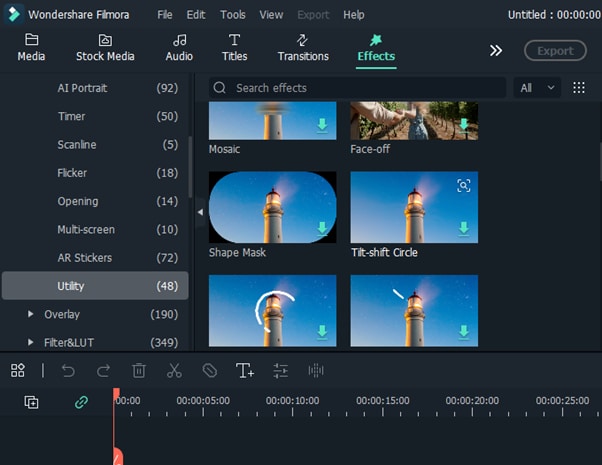
Step3 Finally, configure the size, X-axis, Y-axis, and intensity of the effect by double-clicking it in the timeline. You’re all set! Export your file by clicking on the “Export” button.
Last Words
In this article, we’ve provided the 6 best tools to create radial blur effects online for free and discussed their key features, pros, and cons to help you choose the right program.
In the end, we’ve provided a bonus tip to show you how to add the radial blur effect to images using the Wondershare Filmora software.
Hopefully, you’ve found this article helpful and can now quickly apply the radial motion effect to your pictures.
What Is Radial Blur?
Radial blur is a blurring effect that starts from one point in an image and blurs outwards (or inwards) from (or to) that point. The word ‘radial’ means “arranged like rays that come from or go to a common center,” which is precisely how radial blur works.
Here are some common uses of the Radial motion blur effect:
- Create a sense of movement
- Add depth to a photo
- Simulate camera movement
- Create an interesting background
Best 6 Free Online Radial Blur Image Tools
If you want to create a radial blur effect on your photos but don’t have the required resources like storage space, budget, or the right software, we recommend you try using the following tools:
1.Pine Tools
Pine Tools is a terrific online program with many image editing features, such as invert color, blur, special filters, effects, crop images, and more.
Using its radial blur feature, you can quickly add depth to your images and apply the motion blur effect. To do so, visit the Pine Tools website, choose “Blur” from the left panel, and upload your image. Then, under the “Options” header, select “Radial Blur” and click “Apply.” The best thing about this online tool is that you can set different parameters before creating the effect.

Key Features:
- Numerous image editing tools
- Various parameters for creating radial blur effects, such as size, strongness, and axis (x, y)
- No editing knowledge is required to use the program
Pros
- Drag and drop interface
- Free to use
- No sign up required
Cons
- Takes time to finish the process
- UI is a bit old
2.Mass-images.pro
With Mass-images.pro tool, you can crop your images, do batch processing, or create memes in no time. Moreover, the program offers multiple image editing features to help you quickly apply basic changes to your pictures. These include Change BG, Auto Improve, Overlay image, Rotate, Swirl, Radial Blur, Text, Pixelization, and many more filters.
To create the radial motion blur effect on your images using the Mass-images.pro tool, you have to simply upload your file, set the radius and strength, and click “Download.” You can also configure the format and quality of your picture before downloading it.

Key features:
- Offers multiple format options for uploading and downloading your images
- Can change the radius of blur and intensity effects
- Can process multiple photos at once
Pros
- Free to use
- Many input and output formats
- Simple and straightforward to use
- Image quality option
Cons
- No advanced image editing features
3. Font Meme
Font Meme is an online resource for fonts and typography. Still, it offers other image editing features, such as 3D Rotation, Bevel Effect, Glow Effect, Invert Colors, Blend Images, and Add Background, to help you create memes instantly.
You can also use the Font Meme to create a radial blur image by uploading the image and selecting the “Blur Type” from the drop-down menu. Next, set the blur amount and click “Generate.”

Key Features:
- Instantly creates the radial blur effect on images
- Offers multiple image editing options
- A Complete resource for font and typography
Pros
- Available for free
- Quick and easy to use
- Intuitive UI
Cons
- No advanced image editing features
4.IMGonline.com.ua
IMGonline is another free online tool that offers image resizing, converting, compression, EXIF editor, effects, and other tools.
IMGonline can also help you create beautiful radial blur images in the nick of time. It’s a great and easy platform to add an extra effect to your photos. Simply upload your picture, choose the amount of blur you want, click “OK,” and download the results.

Key Features:
- Also has circular blur, usual blur, and linear blur features
- Does not change the original image during the process
- Multiple radial blur settings
- Offers JPEG and PNG as output formats
Pros
- Simple user interface
- Quick processing time
- Free
- Multiple image input formats
Cons
- Cannot process large image files
5.Pop Art Studio
Pop Art Studio is an effective online tool that allows you to create pop art images and offers numerous options for users to choose from, including different colors, fonts, and layouts. You can also upload your photos to the tool to convert them into pop art.
To use Pop Art Studio, simply upload an image to the website or paste the URL and then adjust the opacity and radius of the radial blur. Once you’re happy with the results, download the image.

Key Features:
- Lets you paste the URL of the image
- Can configure the opacity and radius of the blur
- Instant process of the image
Pros
- Useful for creating and editing artwork
- Available for free
- Available as software
Cons
- Applies watermark to your images
6.Photokako
Photokako is a Japanese photo editor that creates radial motion blur effects in your images with just a few clicks by uploading them from your system or pulling the image from a URL.
Besides that, this tool offers several other advanced image editing features, including Transform, Illustrate, Reduce Colors, Parallel Universe, Retro, Ilusion, Frame, and Mood.

Key Features:
- Option to adjust blur smoothness and opacity
- Comes with Basic Settings to edit the image further
- Multiple output formats, including JPG, PNG-24, BMP, TIFF-24, TIFF-48, GIF, PNG-8, and PNG-32.
Pros
- Sophisticated online tool
- Multiple ways to upload a picture
- Free and easy to use
Cons
- The user interface is less intuitive
Bonus Tips – How To Add Radial Blur Effect To Images In Filmora
The programs mentioned above work only online and do not offer advanced features to add more customization options to the level of radial blurring or change its position on the images. Therefore, we recommend using the desktop software - Filmora.
Free Download For Win 7 or later(64-bit)
Free Download For macOS 10.14 or later
Filmora is a free and premium video editing software recommended by many content creators and professionals. With this software, you can create stunning radial effects on your images or memes with more customization options available.
Here’s how you can add the radial blur effect to images in Filmora by following three simple steps:
Step1 In the first step, go to the Filmora website, download the file, and install the software. Launch it and click the “Create New Project” option. Then drag & drop your file or click the “Click here to add Media file” to import it.

Step2 In the second step, go to the “Effects” tab, choose the Tilt-shift Circle for the radial blur effect, and add it to the timeline.

Step3 Finally, configure the size, X-axis, Y-axis, and intensity of the effect by double-clicking it in the timeline. You’re all set! Export your file by clicking on the “Export” button.
Last Words
In this article, we’ve provided the 6 best tools to create radial blur effects online for free and discussed their key features, pros, and cons to help you choose the right program.
In the end, we’ve provided a bonus tip to show you how to add the radial blur effect to images using the Wondershare Filmora software.
Hopefully, you’ve found this article helpful and can now quickly apply the radial motion effect to your pictures.
This Article Discusses the Splitting of the Video Clips in DaVinci Resolve Explicitly. There Is Also a Brief Description of Its Best Alternative, Wondershare Filmora. This Is Also Practically Relevant and Reasonable as Well
The DaVinci resolve is an amazing video editing software that attracts professionals and beginners to work on it. You can also fulfil your wish to edit or split the video clips in it without facing any difficulty.
But, some of them are looking for guidance to work on DaVinci resolve correctly. This article discusses the splitting of the video clips in DaVinci Resolve explicitly. There is also a brief description of its best alternative, Wondershare Filmora. This is also practically relevant and reasonable as well.
How you can split the video clips in DaVinci resolve
DaVinci resolve is a comprehensive program that allows you to deliver different solutions. It can be related to editing the videos, correcting the colours, and producing the videos and audio. Just follow the simple steps below for splitting the videos in the DaVinci resolve:
Part 1 - Splitting of one clip:
Step 1: After installing the DaVinci resolve, launch it in your system.
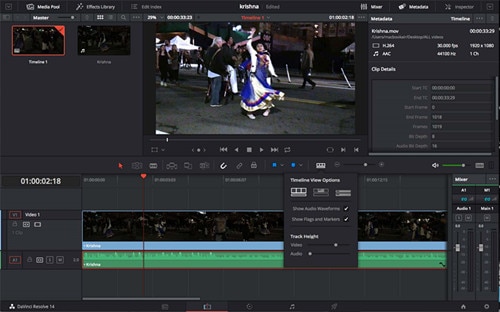
Step 2: Import and place the media file on the timeline from the library. This is the clip you want to split. Select the blade tool from where you want to split the clip. Use the timeline from the menu and go to Split Clip. Shortcut keys are also available that are Ctrl+\ or Cmd+\ or Cmd+B. Now the split clip is easily visible to you. You can use this clip wherever you want to use it.
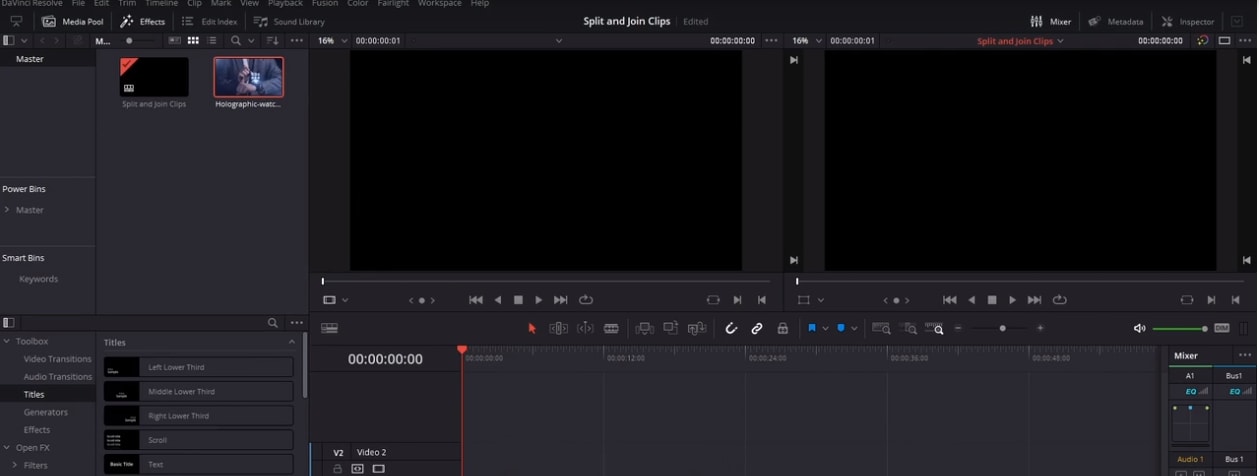
Part 2- Splitting of more than one clip on various tracks:
You can also split the number of video and audio clips at the exact timings in DaVinci resolve.
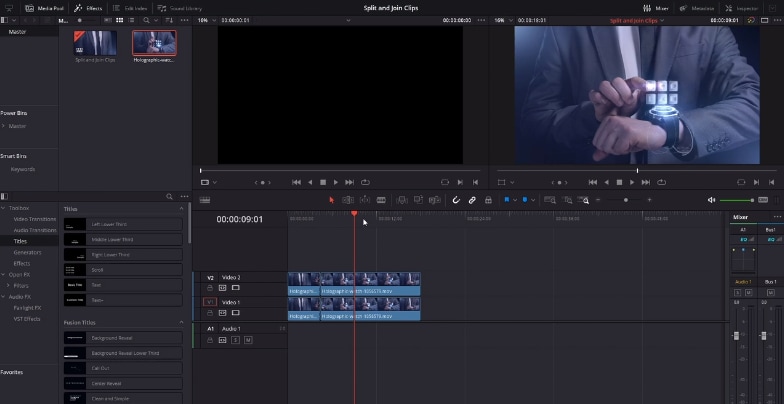
Step 1: When there are piles of clips one after the other, the selection of both of the clips is essential, which have to be split. Keep moving the playhead to the exact area where there is a requirement for the changes.
Step 2: Just keep pressing Command or Control + \ keys, or click on timeline> Split Clip. The selected clips of audio and video get split together now. No more slitting of the clips individually. This option is more appropriate for you when creating and managing different parts of massive projects.
An easier way to split the video clips
Without any doubt, DaVinci resolve is an advanced level software for video editing at the professional level. Moreover, the pricing of DaVinci resolve is $299, and it shows that it is quite expensive for many people. Due to this, you need an economical solution that is Filmora Video Editor .
Most graphic designers and video editors recommend Wondershare Fimora because it is lighter for the systems. All the tools are simplified in using like trimming or splitting the clips. You can convert split video clips into other formats in Wondershare Filmora. Add and apply all the special effects on your videos and export them wherever you want.
For Win 7 or later (64-bit)
For macOS 10.14 or later
Features:
- Splitting or trimming of the video clips
- Removing the noise
- Addition of the transition effects
- Availability of controls for the audio, sound and video
- Separating the audio from the video
Part 1 - Splitting the clips in Wondershare Filmora
If you want to split the clips or trim some parts of the videos, Wondershare Filmora is the right choice. Below are detailed steps for trimming the videos quickly and easily.
Step :1
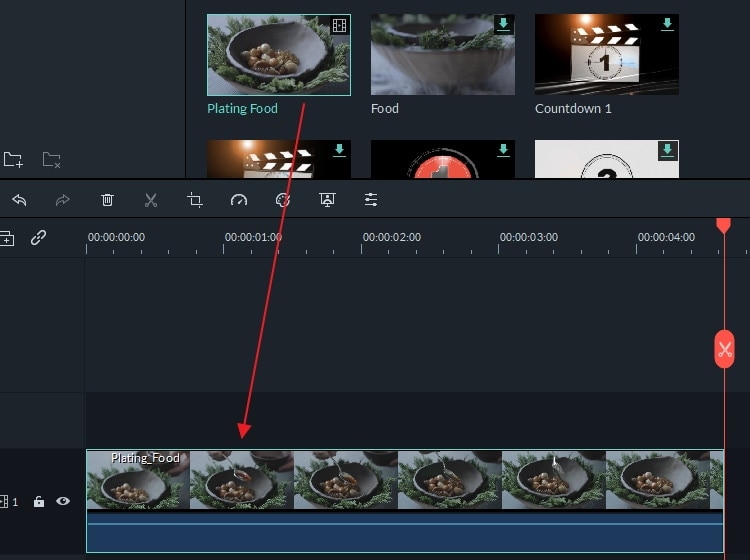
Drag or drop the files from Media Library or Click on “Import” after selecting the video clips to make the clip visible on the timeline. No need to worry regarding the formats as Wondershare Filmora is highly supportive towards it/
Step:2
Keep hanging the mouse on the corner of the video until and unless the trimming icon appears. So, you can drag ahead or in a backward direction at the endpoints of the video you want to trim.
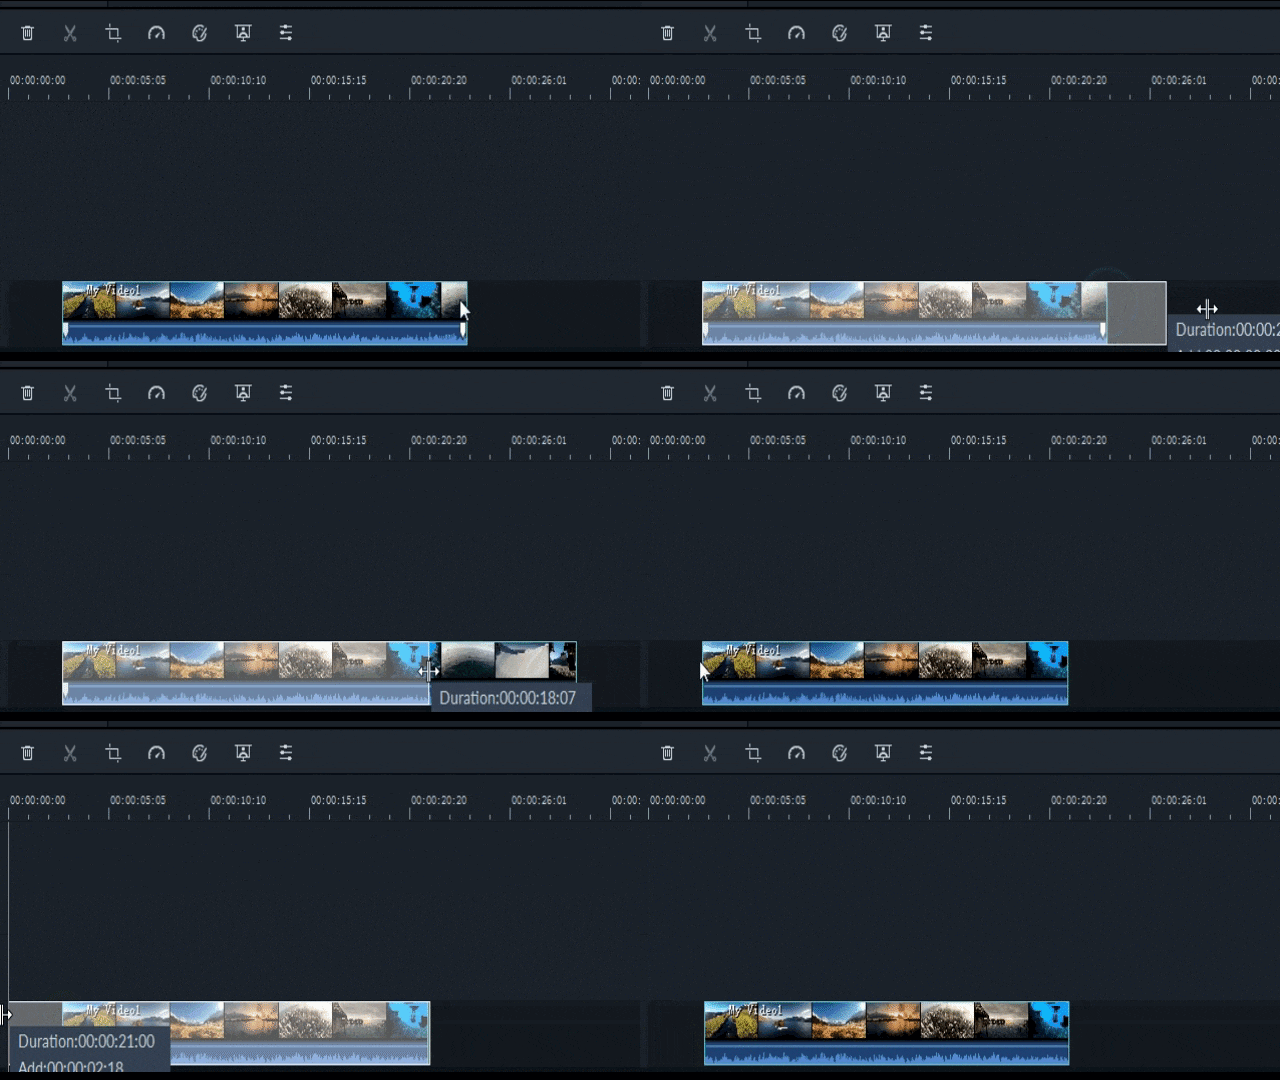
Step: 3
You don’t want the video parts in the centre of the video clips. First, split the video and delete it. For splitting the video, click on the icon of the scissor.
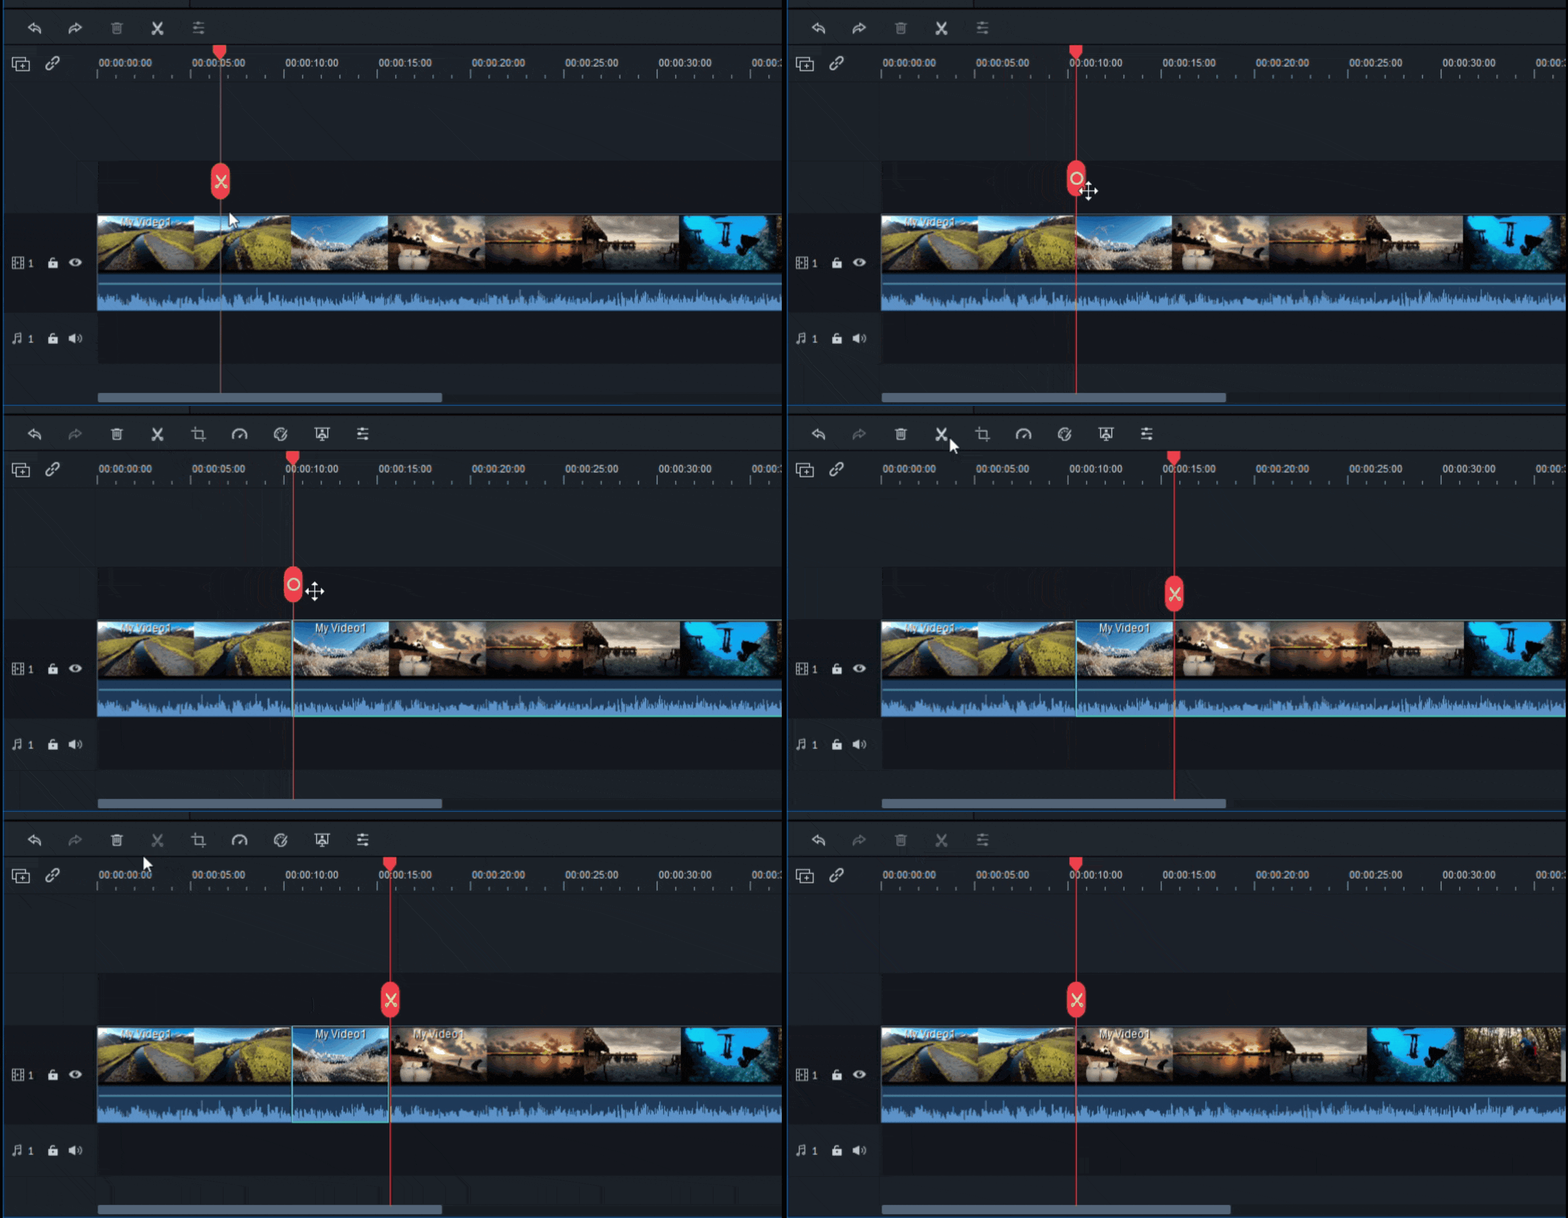
Step: 4
For deleting the part of the undesired part of the video, click on the dustbin icon. If there is any deletion by mistake, there is no need to worry about it. Click on the undo icon to make the video appear on the timeline again.
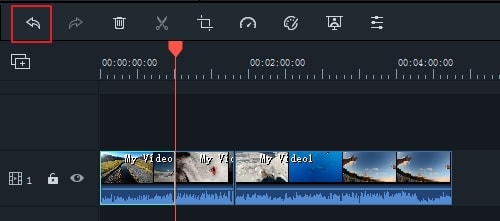
Part 2 - Splitting and trimming the clips in Wondershare Filmora:
Apart from the above steps for trimming and splitting the videos in Wondershare Filmora, the position of the video has to be in the place head of the frame that you are willing to trim. Right-click on the clip and select the option of “Trim Start to Playhead or Trim End to Playhead “ for deleting the content of the video ahead or back of it.
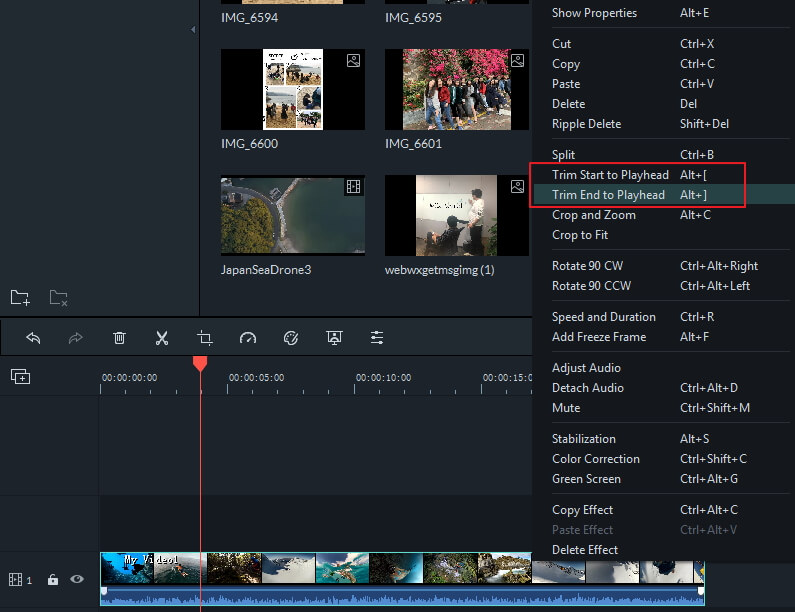
In the latest version of the Wondershare Filmora, you can even trim the video without adding it to the timeline. A similar video can easily split multiple times and load only the required one. Go through the following steps to split the clips in a faster way:
- You can easily preview the video first from the library of your media files.
- Select the clip which you want to split or trim by selecting from the beginning till the end
- After dragging, you can view the trim section
- Keep repeating the steps mentioned above for splitting the videos

Although various editing software is available, Wondershare Filmora has to be on the top. It is the best choice to bring your imagination into reality, whether it is transitioning, applying the effects or importing/exporting the videos. All the options are suitable in front and visible on your timeline. Wondershare Filmora supports different operating systems as well. Even no proper training is required, so start using Wondershare Filmora today to get your editing done.
Step 2: Import and place the media file on the timeline from the library. This is the clip you want to split. Select the blade tool from where you want to split the clip. Use the timeline from the menu and go to Split Clip. Shortcut keys are also available that are Ctrl+\ or Cmd+\ or Cmd+B. Now the split clip is easily visible to you. You can use this clip wherever you want to use it.

Part 2- Splitting of more than one clip on various tracks:
You can also split the number of video and audio clips at the exact timings in DaVinci resolve.
Step 1: When there are piles of clips one after the other, the selection of both of the clips is essential, which have to be split. Keep moving the playhead to the exact area where there is a requirement for the changes.
Step 2: Just keep pressing Command or Control + \ keys, or click on timeline> Split Clip. The selected clips of audio and video get split together now. No more slitting of the clips individually. This option is more appropriate for you when creating and managing different parts of massive projects.

An easier way to split the video clips
Without any doubt, DaVinci resolve is an advanced level software for video editing at the professional level. Moreover, the pricing of DaVinci resolve is $299, and it shows that it is quite expensive for many people. Due to this, you need an economical solution that is Filmora Video Editor .
Most graphic designers and video editors recommend Wondershare Fimora because it is lighter for the systems. All the tools are simplified in using like trimming or splitting the clips. You can convert split video clips into other formats in Wondershare Filmora. Add and apply all the special effects on your videos and export them wherever you want.
For Win 7 or later (64-bit)
For macOS 10.14 or later
Features:
- Splitting or trimming of the video clips
- Removing the noise
- Addition of the transition effects
- Availability of controls for the audio, sound and video
- Separating the audio from the video
Part 1 - Splitting the clips in Wondershare Filmora
If you want to split the clips or trim some parts of the videos, Wondershare Filmora is the right choice. Below are detailed steps for trimming the videos quickly and easily.
Step :1
Drag or drop the files from Media Library or Click on “Import” after selecting the video clips to make the clip visible on the timeline. No need to worry regarding the formats as Wondershare Filmora is highly supportive towards it/

Step:2
Keep hanging the mouse on the corner of the video until and unless the trimming icon appears. So, you can drag ahead or in a backward direction at the endpoints of the video you want to trim.

Step: 3
You don’t want the video parts in the centre of the video clips. First, split the video and delete it. For splitting the video, click on the icon of the scissor.

Step: 4
For deleting the part of the undesired part of the video, click on the dustbin icon. If there is any deletion by mistake, there is no need to worry about it. Click on the undo icon to make the video appear on the timeline again.

Part 2 - Splitting and trimming the clips in Wondershare Filmora:
Apart from the above steps for trimming and splitting the videos in Wondershare Filmora, the position of the video has to be in the place head of the frame that you are willing to trim. Right-click on the clip and select the option of “Trim Start to Playhead or Trim End to Playhead “ for deleting the content of the video ahead or back of it.

In the latest version of the Wondershare Filmora, you can even trim the video without adding it to the timeline. A similar video can easily split multiple times and load only the required one. Go through the following steps to split the clips in a faster way:
- You can easily preview the video first from the library of your media files.
- Select the clip which you want to split or trim by selecting from the beginning till the end
- After dragging, you can view the trim section
- Keep repeating the steps mentioned above for splitting the videos

Although various editing software is available, Wondershare Filmora has to be on the top. It is the best choice to bring your imagination into reality, whether it is transitioning, applying the effects or importing/exporting the videos. All the options are suitable in front and visible on your timeline. Wondershare Filmora supports different operating systems as well. Even no proper training is required, so start using Wondershare Filmora today to get your editing done.
Step 2: Import and place the media file on the timeline from the library. This is the clip you want to split. Select the blade tool from where you want to split the clip. Use the timeline from the menu and go to Split Clip. Shortcut keys are also available that are Ctrl+\ or Cmd+\ or Cmd+B. Now the split clip is easily visible to you. You can use this clip wherever you want to use it.

Part 2- Splitting of more than one clip on various tracks:
You can also split the number of video and audio clips at the exact timings in DaVinci resolve.
Step 1: When there are piles of clips one after the other, the selection of both of the clips is essential, which have to be split. Keep moving the playhead to the exact area where there is a requirement for the changes.
Step 2: Just keep pressing Command or Control + \ keys, or click on timeline> Split Clip. The selected clips of audio and video get split together now. No more slitting of the clips individually. This option is more appropriate for you when creating and managing different parts of massive projects.

An easier way to split the video clips
Without any doubt, DaVinci resolve is an advanced level software for video editing at the professional level. Moreover, the pricing of DaVinci resolve is $299, and it shows that it is quite expensive for many people. Due to this, you need an economical solution that is Filmora Video Editor .
Most graphic designers and video editors recommend Wondershare Fimora because it is lighter for the systems. All the tools are simplified in using like trimming or splitting the clips. You can convert split video clips into other formats in Wondershare Filmora. Add and apply all the special effects on your videos and export them wherever you want.
For Win 7 or later (64-bit)
For macOS 10.14 or later
Features:
- Splitting or trimming of the video clips
- Removing the noise
- Addition of the transition effects
- Availability of controls for the audio, sound and video
- Separating the audio from the video
Part 1 - Splitting the clips in Wondershare Filmora
If you want to split the clips or trim some parts of the videos, Wondershare Filmora is the right choice. Below are detailed steps for trimming the videos quickly and easily.
Step :1
Drag or drop the files from Media Library or Click on “Import” after selecting the video clips to make the clip visible on the timeline. No need to worry regarding the formats as Wondershare Filmora is highly supportive towards it/

Step:2
Keep hanging the mouse on the corner of the video until and unless the trimming icon appears. So, you can drag ahead or in a backward direction at the endpoints of the video you want to trim.

Step: 3
You don’t want the video parts in the centre of the video clips. First, split the video and delete it. For splitting the video, click on the icon of the scissor.

Step: 4
For deleting the part of the undesired part of the video, click on the dustbin icon. If there is any deletion by mistake, there is no need to worry about it. Click on the undo icon to make the video appear on the timeline again.

Part 2 - Splitting and trimming the clips in Wondershare Filmora:
Apart from the above steps for trimming and splitting the videos in Wondershare Filmora, the position of the video has to be in the place head of the frame that you are willing to trim. Right-click on the clip and select the option of “Trim Start to Playhead or Trim End to Playhead “ for deleting the content of the video ahead or back of it.

In the latest version of the Wondershare Filmora, you can even trim the video without adding it to the timeline. A similar video can easily split multiple times and load only the required one. Go through the following steps to split the clips in a faster way:
- You can easily preview the video first from the library of your media files.
- Select the clip which you want to split or trim by selecting from the beginning till the end
- After dragging, you can view the trim section
- Keep repeating the steps mentioned above for splitting the videos

Although various editing software is available, Wondershare Filmora has to be on the top. It is the best choice to bring your imagination into reality, whether it is transitioning, applying the effects or importing/exporting the videos. All the options are suitable in front and visible on your timeline. Wondershare Filmora supports different operating systems as well. Even no proper training is required, so start using Wondershare Filmora today to get your editing done.
Step 2: Import and place the media file on the timeline from the library. This is the clip you want to split. Select the blade tool from where you want to split the clip. Use the timeline from the menu and go to Split Clip. Shortcut keys are also available that are Ctrl+\ or Cmd+\ or Cmd+B. Now the split clip is easily visible to you. You can use this clip wherever you want to use it.

Part 2- Splitting of more than one clip on various tracks:
You can also split the number of video and audio clips at the exact timings in DaVinci resolve.
Step 1: When there are piles of clips one after the other, the selection of both of the clips is essential, which have to be split. Keep moving the playhead to the exact area where there is a requirement for the changes.
Step 2: Just keep pressing Command or Control + \ keys, or click on timeline> Split Clip. The selected clips of audio and video get split together now. No more slitting of the clips individually. This option is more appropriate for you when creating and managing different parts of massive projects.

An easier way to split the video clips
Without any doubt, DaVinci resolve is an advanced level software for video editing at the professional level. Moreover, the pricing of DaVinci resolve is $299, and it shows that it is quite expensive for many people. Due to this, you need an economical solution that is Filmora Video Editor .
Most graphic designers and video editors recommend Wondershare Fimora because it is lighter for the systems. All the tools are simplified in using like trimming or splitting the clips. You can convert split video clips into other formats in Wondershare Filmora. Add and apply all the special effects on your videos and export them wherever you want.
For Win 7 or later (64-bit)
For macOS 10.14 or later
Features:
- Splitting or trimming of the video clips
- Removing the noise
- Addition of the transition effects
- Availability of controls for the audio, sound and video
- Separating the audio from the video
Part 1 - Splitting the clips in Wondershare Filmora
If you want to split the clips or trim some parts of the videos, Wondershare Filmora is the right choice. Below are detailed steps for trimming the videos quickly and easily.
Step :1
Drag or drop the files from Media Library or Click on “Import” after selecting the video clips to make the clip visible on the timeline. No need to worry regarding the formats as Wondershare Filmora is highly supportive towards it/

Step:2
Keep hanging the mouse on the corner of the video until and unless the trimming icon appears. So, you can drag ahead or in a backward direction at the endpoints of the video you want to trim.

Step: 3
You don’t want the video parts in the centre of the video clips. First, split the video and delete it. For splitting the video, click on the icon of the scissor.

Step: 4
For deleting the part of the undesired part of the video, click on the dustbin icon. If there is any deletion by mistake, there is no need to worry about it. Click on the undo icon to make the video appear on the timeline again.

Part 2 - Splitting and trimming the clips in Wondershare Filmora:
Apart from the above steps for trimming and splitting the videos in Wondershare Filmora, the position of the video has to be in the place head of the frame that you are willing to trim. Right-click on the clip and select the option of “Trim Start to Playhead or Trim End to Playhead “ for deleting the content of the video ahead or back of it.

In the latest version of the Wondershare Filmora, you can even trim the video without adding it to the timeline. A similar video can easily split multiple times and load only the required one. Go through the following steps to split the clips in a faster way:
- You can easily preview the video first from the library of your media files.
- Select the clip which you want to split or trim by selecting from the beginning till the end
- After dragging, you can view the trim section
- Keep repeating the steps mentioned above for splitting the videos

Although various editing software is available, Wondershare Filmora has to be on the top. It is the best choice to bring your imagination into reality, whether it is transitioning, applying the effects or importing/exporting the videos. All the options are suitable in front and visible on your timeline. Wondershare Filmora supports different operating systems as well. Even no proper training is required, so start using Wondershare Filmora today to get your editing done.
How to Zoom Desktop Screen
A video port that enables the connection of an external display to a modern laptop is often included in these devices; however, this might require you to learn how to un-zoom desktop. You could wish to use a laptop with a big display as a business professional to present data, images, or other media to users or coworkers during a meeting. However, if sat far away from the display, some individuals could find it difficult to read text or distinguish items on the screen. To better visibility, you may adjust the screen magnification as necessary. Users of the most recent versions of Windows and its programs may zoom in on the screen to expand any areas that are difficult for them to view, hence, learning how to zoom in on desktop is a necessary choice to make. You may zoom out to return to the regular screen after you’ve determined what is in the particular location.
There are methods and keyboard shortcuts that enable users to zoom in on the screen to expand anything that may be tough for certain users to read in Windows or even in various programs. Here are a few ways to zoom in Desktop or out the screen, if you unintentionally zoom on a Windows desktop screen or in an app like a web browser, depending on the circumstance. Have you ever had a zoomed-in screen? Your screen’s text, graphics, and icons all suddenly enlarge dramatically. You may need to zoom out at this point. Both PC and Mac users may change the magnification and resolution of a screen. If you notice bigger text or icons, you can be confused between these two. For further advice on how to zoom desktop screen, keep reading. In conclusion, there are several methods for doing this. We’ll go through the top 5 techniques with you.
- Method 1: Using a Keyboard
- Method 2: Touchscreen Method
- Method 3: Use Keyboard and Mouse Commands
- Method 4: Use the Desktop Magnifier Feature
- Method 5: Web Browser Method
Part 1: The Need to Zoom Computer Screen
You’ve been looking at your screen nonstop, but you can’t figure out what it says. You could find the answer you’re searching for by zooming in on your computer. On your computer screen, reading small type might be too difficult at times. There are several fast and simple methods to magnify your whole screen or zoom in on a specific area, whether you’re using a MacBook or a Windows 10 PC.
Many users who are utilizing the Windows desktop, reading text, or surfing the web claim that the screen suddenly becomes stuck on zoom. Having such huge icons, graphics, and text on your windows computer is annoying. You must zoom out on Windows in order to resolve this problem. Microsoft offers options for customizing desktop display settings, whether you want to keep the zoomed-in desktop or change the display settings. This might alter the settings for Windows’ Magnifier magnification, desktop icon size, or screen resolution.
Additionally, depending on the programs and utilities you have open, your computer’s desktop may sometimes resemble a broad landscape. Its size and expanse provide you a bird’s-eye perspective of the landscape. It may become a little challenging to read what’s on it, particularly if your vision isn’t as good as it once was. Popular desktop operating systems like Windows 10 and macOS include features that enable you to swiftly and eagle-like zoom in on just what you need.
Similar to this, if you aren’t careful and cautious while using your computer, you could accidentally activate a feature like its zoom function. If you’re using a shared computer, another user may utilize the zoom feature to make it easier for them to see tiny type on the screen. In any event, learning how to zoom out once more will allow you to utilize your computer anyway you see fit. Tools that zoom in on the desktop and make icons seem bigger than normal include screen resolution, icon views, and Windows Magnifier. These tools provide the greatest personalized settings to optimize display since they are made to enhance monitor display by making images and text understandable.
Part 2: How to Zoom in/out PC screen
Here are the top 5 methods to know how to zoom out on desktop or subsequently, how to zoom desktop screen. Use the easiest method for you from the guide below:
Method 1: Using a Keyboard
To zoom out or in on a webpage or document, hold down the Ctrl key while pressing the - (minus) or + (plus) key. You may utilize the - and + keys on the numeric keypad as well as those adjacent to the backspace key.
Step1Using the handy keyboard keys listed below is one of the most common methods to zoom in or out just in a certain window, website, or program.
- Ctrl + (+) to zoom in.
- Ctrl + (-) will zoom out.
Step2You may keep holding down the Command key while pressing the - or + keys to zoom as much as you like. Go ahead and try it.
Method 2: Touchscreen Method
You have access to yet another fantastic single window zooming option if you’re using a laptop with a trackpad. Simply squeeze two fingers together or spread them apart on your trackpad to zoom in or out. The Touch Bar at the bottom of your screen may be made bigger and simpler to read by choosing “Enable Touch Bar Zoom.” To try it out, all you have to do is touch and hold the Touch Bar.
Step1You may use a “reverse-pinch” motion on a laptop with a touch screen or trackpad to zoom in or out in a variety of programs as well as on the desktop. This is really simple and will work in most applications (including Microsoft Office apps).
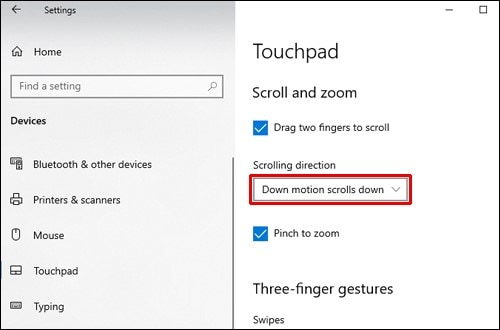
However, this motion may not be supported by all applications. This functionality won’t work if you’ve turned off gestures on your trackpad or touchscreen.
Step2Put two fingers together on the touchscreen or trackpad. On the trackpad, you should place two fingers closely apart (they may even be touching).
Step3Put your fingers together directly over the region you wish to zoom out on while using a touchscreen display to focus in on a certain area.
Step4On the trackpad, spread your two fingers widely apart. The chosen website or app will zoom out to show more content when your two fingers separate from one another on the trackpad or touchscreen.
Method 3: Use Keyboard and Mouse Commands
Using the keyboard and Mouse shortcuts is the easiest method to zoom in and out desktop screen on computers. Follow the steps below to learn this technique hassle-free.
Steps to Use Keyboard and Mouse Method:
Step1To zoom in, scroll your mouse wheel up while holding down the Ctrl key. You may already use this to zoom in on your browser, for instance.
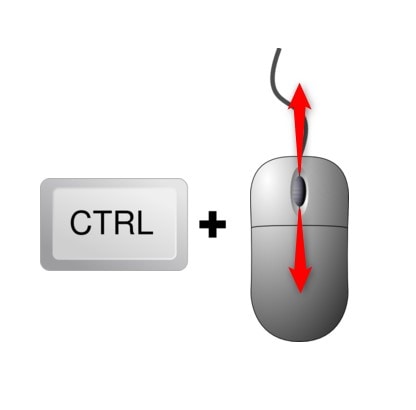
Step2Now for the Zoom out, hold the Ctrl key on the Keyboard and move the mouse wheel down to zoom out to the desired extent as shown here:
Method 4: Use the Desktop Magnifier Feature
The magnifier tool allows you to temporarily increase the size of a specific area of the screen. It is a built-in function of the Windows family. The user may enlarge the screen with the use of the magnifying tool. This function is highly beneficial for those who have hazy vision as well as for enlarging the specific picture shown to viewers through projectors. The magnifier app’s default view, Full Screen, may enlarge the whole screen. However, the user is unable to see the complete screen at once since a section of it enlarges and moves with your mouse pointer. By selecting the “Options” option, the user may modify the Magnifier app’s settings and access a variety of additional capabilities. Anyway, let’s get started to learn the processes.
Steps to Use Magnifier to Zoom Desktop Screen:
Step1Open the Windows search (a magnifier icon or a long search box on the taskbar). To launch Magnifier, enter “magnifier” into Windows search and then click the first result.
Step2The Windows 10 Magnifier window will appear. Then, at any moment, you may zoom in on your app, your web browser, or a few other applications by pressing the + button.

Step3Press the Windows logo key and + to enlarge the view (plus). or use the Magnifier controls’ + (plus) button.
Step4Press the Windows key and - to zoom out (minus). Or use the Magnifier controls’ - (minus) button.
Step5Press Windows logo key + Esc to close the Magnifier. In the top-right corner of the Magnifier controls, click the X (close) button.
Method 5: Web Browser Method
You may enhance your web browser reading experience in a number of different ways. One method is to zoom in on the online sites you wish to read and enlarge the text, photos, and icons. It’s possible that you need to do this since your eyes are weary or the screen’s quality isn’t the best. To restore items to their original state, you may need to reset the zoom level or zoom out at some point. On Windows 10, you may zoom in for a clearer view of the screen if you can’t read the text or the pictures on your computer screen.
Steps to Use Web Browser Method to Zoom Desktop Screen:
You may use the zoom in shortcut on any web browser to increase the browser’s zoom level. In other words, you may zoom in on your web browser using the keyboard.
Step1Launch a web browser. To zoom in on your web browser, hold down the Ctrl key while pressing the “+” key on your keyboard.
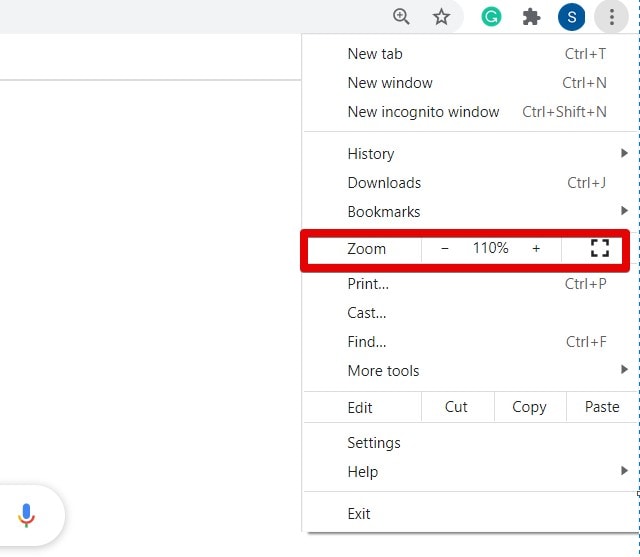
Step2Now, within the browser, hit the 3-dot menu at the right top corner. (This is available in every browser).
Step3To enlarge the view in your web browser, click the + sign next to Zoom. Clicking the minus button on your web browser will let you to un-zoom or zoom out.
Conclusion
Numerous features on modern computers are intended to simplify user tasks. The ability to zoom in and out on the screen is one feature that might make using a computer easier. Learning how to zoom in and out may be helpful if you have trouble seeing little text or pictures on your computer or if you need more screen real estate to view many things at once. You can see from reading this that using your computer to zoom in and out is fairly simple. You may simply choose one approach based on your needs to assist you. The zoom settings in Windows may be the cause of the abnormally huge graphics on the desktop.
Part 1: The Need to Zoom Computer Screen
You’ve been looking at your screen nonstop, but you can’t figure out what it says. You could find the answer you’re searching for by zooming in on your computer. On your computer screen, reading small type might be too difficult at times. There are several fast and simple methods to magnify your whole screen or zoom in on a specific area, whether you’re using a MacBook or a Windows 10 PC.
Many users who are utilizing the Windows desktop, reading text, or surfing the web claim that the screen suddenly becomes stuck on zoom. Having such huge icons, graphics, and text on your windows computer is annoying. You must zoom out on Windows in order to resolve this problem. Microsoft offers options for customizing desktop display settings, whether you want to keep the zoomed-in desktop or change the display settings. This might alter the settings for Windows’ Magnifier magnification, desktop icon size, or screen resolution.
Additionally, depending on the programs and utilities you have open, your computer’s desktop may sometimes resemble a broad landscape. Its size and expanse provide you a bird’s-eye perspective of the landscape. It may become a little challenging to read what’s on it, particularly if your vision isn’t as good as it once was. Popular desktop operating systems like Windows 10 and macOS include features that enable you to swiftly and eagle-like zoom in on just what you need.
Similar to this, if you aren’t careful and cautious while using your computer, you could accidentally activate a feature like its zoom function. If you’re using a shared computer, another user may utilize the zoom feature to make it easier for them to see tiny type on the screen. In any event, learning how to zoom out once more will allow you to utilize your computer anyway you see fit. Tools that zoom in on the desktop and make icons seem bigger than normal include screen resolution, icon views, and Windows Magnifier. These tools provide the greatest personalized settings to optimize display since they are made to enhance monitor display by making images and text understandable.
Part 2: How to Zoom in/out PC screen
Here are the top 5 methods to know how to zoom out on desktop or subsequently, how to zoom desktop screen. Use the easiest method for you from the guide below:
Method 1: Using a Keyboard
To zoom out or in on a webpage or document, hold down the Ctrl key while pressing the - (minus) or + (plus) key. You may utilize the - and + keys on the numeric keypad as well as those adjacent to the backspace key.
Step1Using the handy keyboard keys listed below is one of the most common methods to zoom in or out just in a certain window, website, or program.
- Ctrl + (+) to zoom in.
- Ctrl + (-) will zoom out.
Step2You may keep holding down the Command key while pressing the - or + keys to zoom as much as you like. Go ahead and try it.
Method 2: Touchscreen Method
You have access to yet another fantastic single window zooming option if you’re using a laptop with a trackpad. Simply squeeze two fingers together or spread them apart on your trackpad to zoom in or out. The Touch Bar at the bottom of your screen may be made bigger and simpler to read by choosing “Enable Touch Bar Zoom.” To try it out, all you have to do is touch and hold the Touch Bar.
Step1You may use a “reverse-pinch” motion on a laptop with a touch screen or trackpad to zoom in or out in a variety of programs as well as on the desktop. This is really simple and will work in most applications (including Microsoft Office apps).

However, this motion may not be supported by all applications. This functionality won’t work if you’ve turned off gestures on your trackpad or touchscreen.
Step2Put two fingers together on the touchscreen or trackpad. On the trackpad, you should place two fingers closely apart (they may even be touching).
Step3Put your fingers together directly over the region you wish to zoom out on while using a touchscreen display to focus in on a certain area.
Step4On the trackpad, spread your two fingers widely apart. The chosen website or app will zoom out to show more content when your two fingers separate from one another on the trackpad or touchscreen.
Method 3: Use Keyboard and Mouse Commands
Using the keyboard and Mouse shortcuts is the easiest method to zoom in and out desktop screen on computers. Follow the steps below to learn this technique hassle-free.
Steps to Use Keyboard and Mouse Method:
Step1To zoom in, scroll your mouse wheel up while holding down the Ctrl key. You may already use this to zoom in on your browser, for instance.

Step2Now for the Zoom out, hold the Ctrl key on the Keyboard and move the mouse wheel down to zoom out to the desired extent as shown here:
Method 4: Use the Desktop Magnifier Feature
The magnifier tool allows you to temporarily increase the size of a specific area of the screen. It is a built-in function of the Windows family. The user may enlarge the screen with the use of the magnifying tool. This function is highly beneficial for those who have hazy vision as well as for enlarging the specific picture shown to viewers through projectors. The magnifier app’s default view, Full Screen, may enlarge the whole screen. However, the user is unable to see the complete screen at once since a section of it enlarges and moves with your mouse pointer. By selecting the “Options” option, the user may modify the Magnifier app’s settings and access a variety of additional capabilities. Anyway, let’s get started to learn the processes.
Steps to Use Magnifier to Zoom Desktop Screen:
Step1Open the Windows search (a magnifier icon or a long search box on the taskbar). To launch Magnifier, enter “magnifier” into Windows search and then click the first result.
Step2The Windows 10 Magnifier window will appear. Then, at any moment, you may zoom in on your app, your web browser, or a few other applications by pressing the + button.

Step3Press the Windows logo key and + to enlarge the view (plus). or use the Magnifier controls’ + (plus) button.
Step4Press the Windows key and - to zoom out (minus). Or use the Magnifier controls’ - (minus) button.
Step5Press Windows logo key + Esc to close the Magnifier. In the top-right corner of the Magnifier controls, click the X (close) button.
Method 5: Web Browser Method
You may enhance your web browser reading experience in a number of different ways. One method is to zoom in on the online sites you wish to read and enlarge the text, photos, and icons. It’s possible that you need to do this since your eyes are weary or the screen’s quality isn’t the best. To restore items to their original state, you may need to reset the zoom level or zoom out at some point. On Windows 10, you may zoom in for a clearer view of the screen if you can’t read the text or the pictures on your computer screen.
Steps to Use Web Browser Method to Zoom Desktop Screen:
You may use the zoom in shortcut on any web browser to increase the browser’s zoom level. In other words, you may zoom in on your web browser using the keyboard.
Step1Launch a web browser. To zoom in on your web browser, hold down the Ctrl key while pressing the “+” key on your keyboard.

Step2Now, within the browser, hit the 3-dot menu at the right top corner. (This is available in every browser).
Step3To enlarge the view in your web browser, click the + sign next to Zoom. Clicking the minus button on your web browser will let you to un-zoom or zoom out.
Conclusion
Numerous features on modern computers are intended to simplify user tasks. The ability to zoom in and out on the screen is one feature that might make using a computer easier. Learning how to zoom in and out may be helpful if you have trouble seeing little text or pictures on your computer or if you need more screen real estate to view many things at once. You can see from reading this that using your computer to zoom in and out is fairly simple. You may simply choose one approach based on your needs to assist you. The zoom settings in Windows may be the cause of the abnormally huge graphics on the desktop.
Also read:
- New How to Remove Background Noise From Video Sony Vegas for 2024
- New 2024 Approved This Article Aim to Teach You How to Make a Night to Day Effect Video with Filmora. Follow the Steps to Figure It Out
- In 2024, Learn How to Make Your CSGO Montage Impressive
- In 2024, Are You Looking for Funny Discord Emojis to Massively Improve Your Discord Experience? Using some Fun Bots for Discord Is an Excellent Way of Doing That! Thus, We Compiled a List of 10 Fun Discord Bots You Need
- Updated In 2024, Try These 10 Music Video Templates To Make Your Work Easy
- New In 2024, Do You Want to Know How to Edit a Time Lapse Video on iPhone, Interesting Ideas, and some Tips and Pointers for Shooting a Professional Time Lapse Video? Find Out Everything in This Guide
- Updated 3 Best Effects to Appear on Camera Made with Filmora for 2024
- Updated In 2024, 4 Solutions to Add White Border to Video on Mobile and Desktop
- New In 2024, Do You Often Feel Fascinated to Try Hands at Anime Character Design to Spark up Your Editing Skills, or Just for a Fun-Filled Activity? Stay Here for the Best Inspirations You Can Ever Get
- 2024 Approved This Article Will Explore in Detail How You Can Use the Features Available in Wondershare Filmora to Export the Video by Changing the Resolution of the Footage
- New In 2024, Whatsapp Video converterKeywords Convert Video for Whatsapp 6600; Video Converter for Whatsapp 6600; Reduce Video Size for Whatsapp 1600; Whatsapp Supported Video Formats 720; Convert Video to Whatsapp Format 590
- Updated Record Slow Motion Videos With Phantom Slow-Mo Camera for 2024
- New Modern Silence Detection Tools Are Changing the Face of Video Editing. Use Them to Improve the Quality of Your Video Clips. Learn How These Tools Let You Detect Silence with Pinpoint Accuracy for 2024
- In 2024, Learn How to Slow Down Time-Lapse Videos on Your iPhone to Make Detailed Slow-Motion Effects in Your Time-Lapse Captures
- New How to Use Lumetri Color in Adobe After Effects
- Updated In 2024, How to Trim Video in Quicktime Player on Mac
- New Hitfilm Express Video Editor Review
- Updated Quick Answer Why Did Filmora AI Portrait Attract People for 2024
- Updated In 2024, Best Ways to Add Photos to Tik Tok Video
- How to Make a Video Loop in QuickTime for 2024
- How to Create Sports Intro and Outro for YouTube Video?
- New 2024 Approved A Guide to Effective Video Marketing
- New Add Effects to Video Online
- New 2024 Approved Easy Guide to Use a Stabilization Tool in Filmora
- Finest Approach to Slow Down a Video CapCut All-in-One Video Editor for 2024
- Ideas That Help You Out in Converting AVI to GIF
- In 2024, Top 8 Augmented Reality Video Games
- Updated Explore the List of the Top Six Online Video Speed Controllers for Chrome, Safari, and Firefox
- New In 2024, How to Choose A Nice GoPro for Vlogging?
- Updated 2024 Approved Best Online YouTube Video Trimmer
- New 11 Tools To Create Radial Blur Photo Mobile And Desktop for 2024
- 12 Top Marketing Slideshow Templates for 2024
- Do You Know that You Can Apply Different LUTs and Create Your Own? There Are Many LUT Online and Offline Generators that You Can Use to Create Your LUT
- Do You Want to Know All About Video Frame Rates and Speed? Wondershare Filmora Will Help You to Get More Information on This Matter for 2024
- Updated Deleting White Background in Photoshop Is Hard? No for 2024
- New In 2024, Ways to Learn Discord Game Bots – Even if Youre Just Starting Out
- Updated Most-Used 3 Ways to Compress Video for Instagram Story, Feed, and IGTV
- New Making Slow Motion Videos in Premiere Pro A Review on The Best Methods
- New 2024 Approved Read This Article to Learn How to Convert Your Slow-Motion Videos Into Normal-Speed Videos in a Few Simple Steps and Methods. So, Stick to the End
- Things About Transparent PNG Remove and Convert for 2024
- Updated 2024 Approved 7 Best MP4 Video Editors on Mac Edit MP4 Videos Easily
- New What Is the Best MP4 Cutters for YouTubers on Mac?
- Updated In 2024, Want to Feather Shapes in After Effects? Read This
- New 2024 Approved Why Your Transparent GIF Is Hard to Remove and How to Do With It
- New Unlocking the Power of DaVinci Resolve Scopes Enhance Your Color Grad
- New In 2024, Wondering if You Can Make DIY Green Screen Video for Streaming? Learn the Easy Steps to Setup DIY Green Screen, Shoot the Video and Edit It Out to Add Green Screen Effects
- Updated The Background in Your Footage Might Be Bland or Unpleasant. This Article Will Discuss Video Background Templates You Can Use to Spice Things up and Make Your Videos Go Viral for 2024
- Updated In 2024, Discover the Top 5 Online Tools for Merging MP4 Files Easily and Quickly. Streamline Your Video Editing Process and Create Seamless Videos with These User-Friendly Tools
- In 2024, How to Mirror PC Screen to Xiaomi 13T Pro Phones? | Dr.fone
- Complete guide for recovering music files on Redmi 12 5G
- Complete Tutorial to Use GPS Joystick to Fake GPS Location On Xiaomi 14 Pro | Dr.fone
- Life360 Learn How Everything Works On Apple iPhone SE | Dr.fone
- Motorola Moto G24 Camera Not Working Unexpected Error? Fix It Now | Dr.fone
- Refurbished Apple iPhone 6s Plus Everything You Need to Know | Dr.fone
- In 2024, How to Migrate Android Data From OnePlus Nord N30 5G to New Android Phone? | Dr.fone
- In 2024, How Can We Bypass Oppo Reno 8T FRP?
- How To Recover Lost Data from Apple iPhone 12 mini? | Dr.fone
- Is pgsharp legal when you are playing pokemon On Xiaomi 13T? | Dr.fone
- How To Change Realme C67 4G Lock Screen Clock in Seconds
- In 2024, How to Bypass Google FRP Lock from Motorola Moto G34 5G Devices
- How to recover old call logs from your Moto G14?
- In 2024, How to jailbreak iCloud locked iPhone 13
- Full Guide to Bypass Vivo V27e FRP
- In 2024, 10 Fake GPS Location Apps on Android Of your Samsung Galaxy A15 4G | Dr.fone
- In 2024, Does Airplane Mode Turn off GPS Location On Vivo V27 Pro? | Dr.fone
- How To Change Your SIM PIN Code on Your Poco X6 Phone
- Remove Honor unlock screen
- Google Play Services Wont Update? 12 Fixes are Here on Samsung Galaxy XCover 6 Pro Tactical Edition | Dr.fone
- 3 Effective Ways to Bypass Activation Lock from iPhone 13 mini
- Everything You Need to Know about Lock Screen Settings on your Honor Play 40C
- In 2024, Best 3 Nokia 150 (2023) Emulator for Mac to Run Your Wanted Android Apps | Dr.fone
- 2 Ways to Monitor Lava Blaze Curve 5G Activity | Dr.fone
- Title: How to Make a Neon Dance Effect With Filmora
- Author: Morgan
- Created at : 2024-05-19 05:11:36
- Updated at : 2024-05-20 05:11:36
- Link: https://ai-video-editing.techidaily.com/how-to-make-a-neon-dance-effect-with-filmora/
- License: This work is licensed under CC BY-NC-SA 4.0.

