:max_bytes(150000):strip_icc():format(webp)/how-to-see-who-shared-your-tiktok-5271091-8fc5445938ed433d830a2b5275079c62.jpg)
How to Make a Video Loop in QuickTime for 2024

How to Make a Video Loop in QuickTime
If you are a Mac user, QuickTime Player is where you play and watch videos. QuickTime by Apple comes pre-installed on every Mac. It happens to be the default video player for macOS users. Under normal circumstances, QuickTime plays a video only once. However, there are times when you want to watch a video repeatedly in a loop.
When you have a short video clip, it is usual that you want to watch it in a loop. The same is applicable to music videos. You may want to listen to the song repeatedly in the background while you work on your Mac. You may also want to show a demonstration video endlessly on the display screen. In all such scenarios, you have to play a loop video on QuickTime. We will illustrate how to play a video in a loop on QuickTime.
Part 1. Steps to Loop Video with QuickTime Player
You can play any video on your Mac via QuickTime Player. But the video player plays the video only once by default. If you want to watch the video again, you have to play it again. Instead of manually playing it over and over again, you can put the video in a loop. Here are the steps on how to loop QuickTime video.
Step 1: Play the video of your choice on QuickTime Player.
Step 2: Click on the View menu from the top menu bar.
Step 3: Click on the Loop option located at the bottom of the View menu. Alternatively, you can press the Option + Command + L shortcut keys to loop the video.

Thereafter, the video you are playing won’t stop at its end mark. It will restart again and again until your pause or close the QuickTime player.
Part 2. QuickTime Alternatives to Loop Video
QuickTime Player is where you can play videos in a loop. However, if you want to loop videos for your video project, you will need a video editor. If you are looking for QuickTime Player alternatives to loop video on your Mac, we have the following options.
1. iMovie
iMovie by Apple comes pre-installed on Mac as well. iMovie is a video editing application. You can import videos on your Mac and extend the video durations by looping. This is useful when you want to play a video clips in your video project multiple times. Here are the steps on how to loop video via iMovie similar to QuickTime loop video.
Step 1: Launch the iMovie app on your Mac. Once iMovie opens, click on Create New option. Thereafter, click on the Movie option to get started.

Step 2: Go to the File menu and click on the Import Media option. Select the desired video from your Mac. Alternatively, select any media file from All Events or Photos under the Libraries section.
Step 3: Drop the video on the timeline. You can drag and drop the video clip multiple times on the timeline. This will loop the video and extend the video duration. There should be no gap between the clips on the timeline.

Step 4: Once you have looped the desired video, go to File> Share> File option to save the video file.
2. Filmora for Mac
You already know how to loop video in QuickTime Player. But you cannot extend the video duration by looping permanently in QuickTime Player. You can do that on iMovie, but iMovie has limitations as it is a free app. If you are looking for a premium QuickTime Player alternative, Wondershare Filmora is for you.
Filmora is a premium video editor with a wide range of video editing features. It has a user-friendly interface so that everyone can operate it easily. You can trim a video and add transitions between the loops. Here are the steps on how to loop a video on Filmora for Mac.
Step 1: Download and install Wondershare Filmora. Open Filmora and click on New Project.

Free Download For Win 7 or later(64-bit)
Free Download For macOS 10.14 or later
Step 2: Drag and drop the desired video file from your device into the Project Media folder. Thereafter, drag and drop the video file into the timeline.

Step 3: Drag and drop the video clip into the timeline again. Place it by the side of the first video clip. There should not be any gap and they should be in the same channel on the timeline. Alternative, you can also copy and paste the video clip for looping.

Step 4: Play the video and watch it in a loop through the Viewer on Filmora. If you are satisfied, click on the Export button to save the video in any file format as per your preference.
Part 3. Related FAQs
How do I make my video player loop?
If you are a Mac user, the default video player is QuickTime Player. Go to View> Loop to make your Mac video player loop a video. If you are using any other video player like VLC Media Player, you can look at the View menu. Alternatively, you can look for a Loop icon to repeatedly play the video.
How to loop YouTube video on Mac?
On your Mac, open the video on YouTube that you want to put in a loop. Once you are on the watch screen of the video, right-click on the video. Choose the Loop option to play the video repeatedly.
Can QuickTime player loop audio?
Yes, you can loop any audio file on QuickTime Player. The steps are the same for looping a video. You need to play the audio and go to View> Loop option to play the audio file repeatedly. However, some have complained that looping audio may leave a gap at the beginning of the audio track.
Conclusion
Looping a video that we like to the highest degree is quite common. If you are playing any desired video on QuickTime Player, we have illustrated how to go for it. We have also provided you with a free and a premium QuickTime Player alternative. You can choose any of them as per your requirements to loop a video.
Free Download For macOS 10.14 or later
Step 2: Drag and drop the desired video file from your device into the Project Media folder. Thereafter, drag and drop the video file into the timeline.

Step 3: Drag and drop the video clip into the timeline again. Place it by the side of the first video clip. There should not be any gap and they should be in the same channel on the timeline. Alternative, you can also copy and paste the video clip for looping.

Step 4: Play the video and watch it in a loop through the Viewer on Filmora. If you are satisfied, click on the Export button to save the video in any file format as per your preference.
Part 3. Related FAQs
How do I make my video player loop?
If you are a Mac user, the default video player is QuickTime Player. Go to View> Loop to make your Mac video player loop a video. If you are using any other video player like VLC Media Player, you can look at the View menu. Alternatively, you can look for a Loop icon to repeatedly play the video.
How to loop YouTube video on Mac?
On your Mac, open the video on YouTube that you want to put in a loop. Once you are on the watch screen of the video, right-click on the video. Choose the Loop option to play the video repeatedly.
Can QuickTime player loop audio?
Yes, you can loop any audio file on QuickTime Player. The steps are the same for looping a video. You need to play the audio and go to View> Loop option to play the audio file repeatedly. However, some have complained that looping audio may leave a gap at the beginning of the audio track.
Conclusion
Looping a video that we like to the highest degree is quite common. If you are playing any desired video on QuickTime Player, we have illustrated how to go for it. We have also provided you with a free and a premium QuickTime Player alternative. You can choose any of them as per your requirements to loop a video.
Free Download For macOS 10.14 or later
Step 2: Drag and drop the desired video file from your device into the Project Media folder. Thereafter, drag and drop the video file into the timeline.

Step 3: Drag and drop the video clip into the timeline again. Place it by the side of the first video clip. There should not be any gap and they should be in the same channel on the timeline. Alternative, you can also copy and paste the video clip for looping.

Step 4: Play the video and watch it in a loop through the Viewer on Filmora. If you are satisfied, click on the Export button to save the video in any file format as per your preference.
Part 3. Related FAQs
How do I make my video player loop?
If you are a Mac user, the default video player is QuickTime Player. Go to View> Loop to make your Mac video player loop a video. If you are using any other video player like VLC Media Player, you can look at the View menu. Alternatively, you can look for a Loop icon to repeatedly play the video.
How to loop YouTube video on Mac?
On your Mac, open the video on YouTube that you want to put in a loop. Once you are on the watch screen of the video, right-click on the video. Choose the Loop option to play the video repeatedly.
Can QuickTime player loop audio?
Yes, you can loop any audio file on QuickTime Player. The steps are the same for looping a video. You need to play the audio and go to View> Loop option to play the audio file repeatedly. However, some have complained that looping audio may leave a gap at the beginning of the audio track.
Conclusion
Looping a video that we like to the highest degree is quite common. If you are playing any desired video on QuickTime Player, we have illustrated how to go for it. We have also provided you with a free and a premium QuickTime Player alternative. You can choose any of them as per your requirements to loop a video.
Free Download For macOS 10.14 or later
Step 2: Drag and drop the desired video file from your device into the Project Media folder. Thereafter, drag and drop the video file into the timeline.

Step 3: Drag and drop the video clip into the timeline again. Place it by the side of the first video clip. There should not be any gap and they should be in the same channel on the timeline. Alternative, you can also copy and paste the video clip for looping.

Step 4: Play the video and watch it in a loop through the Viewer on Filmora. If you are satisfied, click on the Export button to save the video in any file format as per your preference.
Part 3. Related FAQs
How do I make my video player loop?
If you are a Mac user, the default video player is QuickTime Player. Go to View> Loop to make your Mac video player loop a video. If you are using any other video player like VLC Media Player, you can look at the View menu. Alternatively, you can look for a Loop icon to repeatedly play the video.
How to loop YouTube video on Mac?
On your Mac, open the video on YouTube that you want to put in a loop. Once you are on the watch screen of the video, right-click on the video. Choose the Loop option to play the video repeatedly.
Can QuickTime player loop audio?
Yes, you can loop any audio file on QuickTime Player. The steps are the same for looping a video. You need to play the audio and go to View> Loop option to play the audio file repeatedly. However, some have complained that looping audio may leave a gap at the beginning of the audio track.
Conclusion
Looping a video that we like to the highest degree is quite common. If you are playing any desired video on QuickTime Player, we have illustrated how to go for it. We have also provided you with a free and a premium QuickTime Player alternative. You can choose any of them as per your requirements to loop a video.
Add some Sci-Fi Touch to Your Next Video Content Using Wondershare Filmora Editing Tools to Create an Alternate Reality Effect
Ditch boring one-dimensional videos and create a mesmerizing video with this alternative reality effect you can easily create using Wondershare Filmora.
This cool effect enables you to show a dream-like scene where two mirrored footages appear within the same frame using the Masking feature. But why stop there?
Keep reading to find out how you can use this style of effect to spice up your daily vlog bumper intro or even for your upcoming sci-fi content.
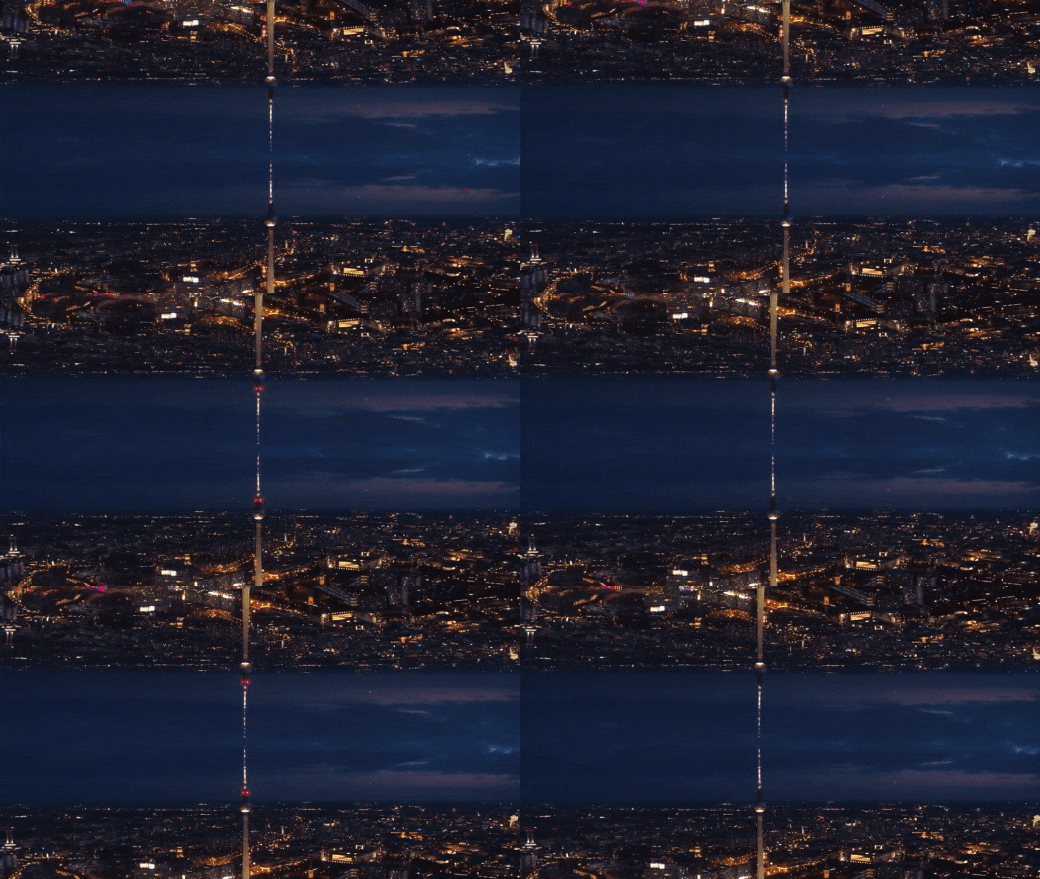
Preparing the footage
There are not many restrictions on preparing the footage for this effect. However, depending on the results you’re aiming for, you might need to consider a few things.
First, a wider view and some camera panning, or tilting will deliver a better result as it provides angle variations. This will later enhance the dynamic of the scene, making it feels even more uncanny.
Then, while you’re at it, you need to also figure out the purpose of the video itself. If you want to upload it to certain platforms where vertical videos are more popular, you will want to work on that as well. When you’re shooting your footage, make sure that you’re taking it at the correct angle that would fit the ratio you’re aiming for.
Last but not least, consider the length of the footage. If you’re planning to make a bumper video, you might want a quick yet comprehensive shot of the objects you want to highlight. You can always trim and adjust the timing later, but it is better to also plan it early.
Editing the video
If you have your footage or stock video ready, then you can start editing. Follow this simple step-by-step guide to create your own alternate reality using Filmora .
Free Download For Win 7 or later(64-bit)
Free Download For macOS 10.14 or later
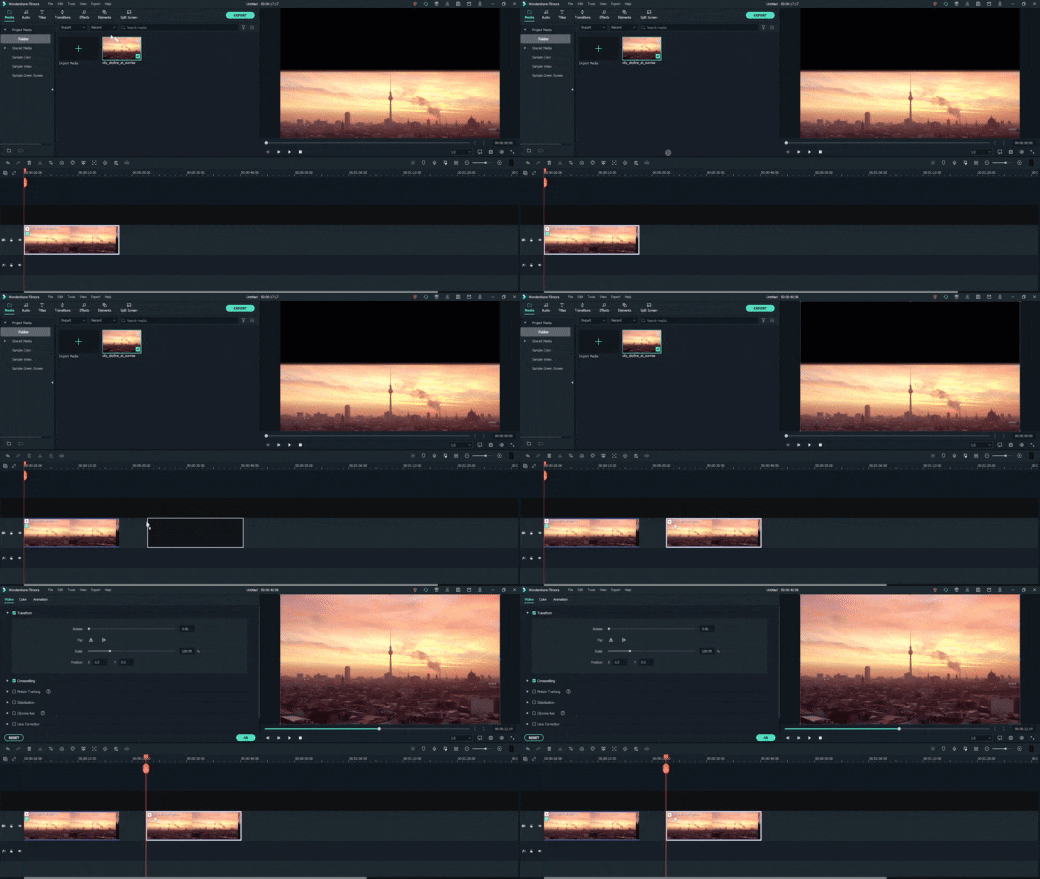
Step 1: Drag and drop the video footage into the timeline - this will be the bottom part of the scene. Go to Effect > Utility > Image Mask. Drag and drop it onto the video footage.
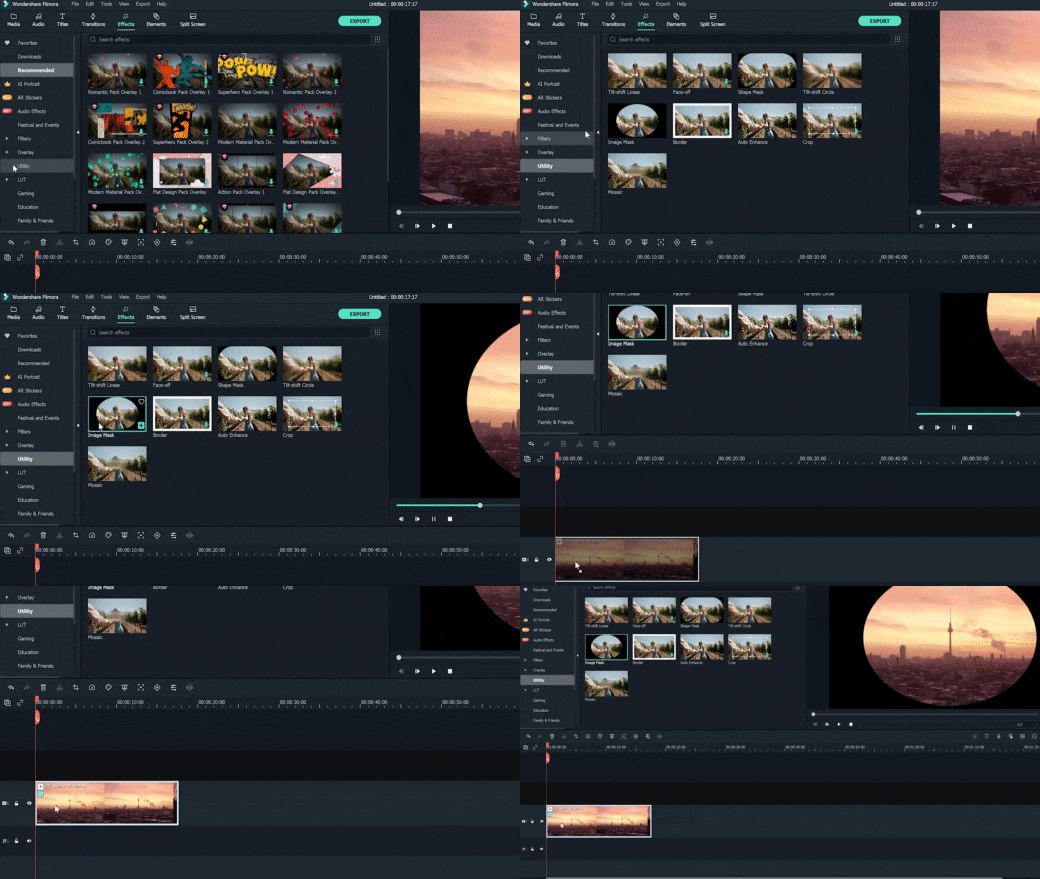
Step 2: Adjust the mask by double-clicking the video footage. Go to Setting > Mask Setting and choose any shape you like. Set the feather number to 100.
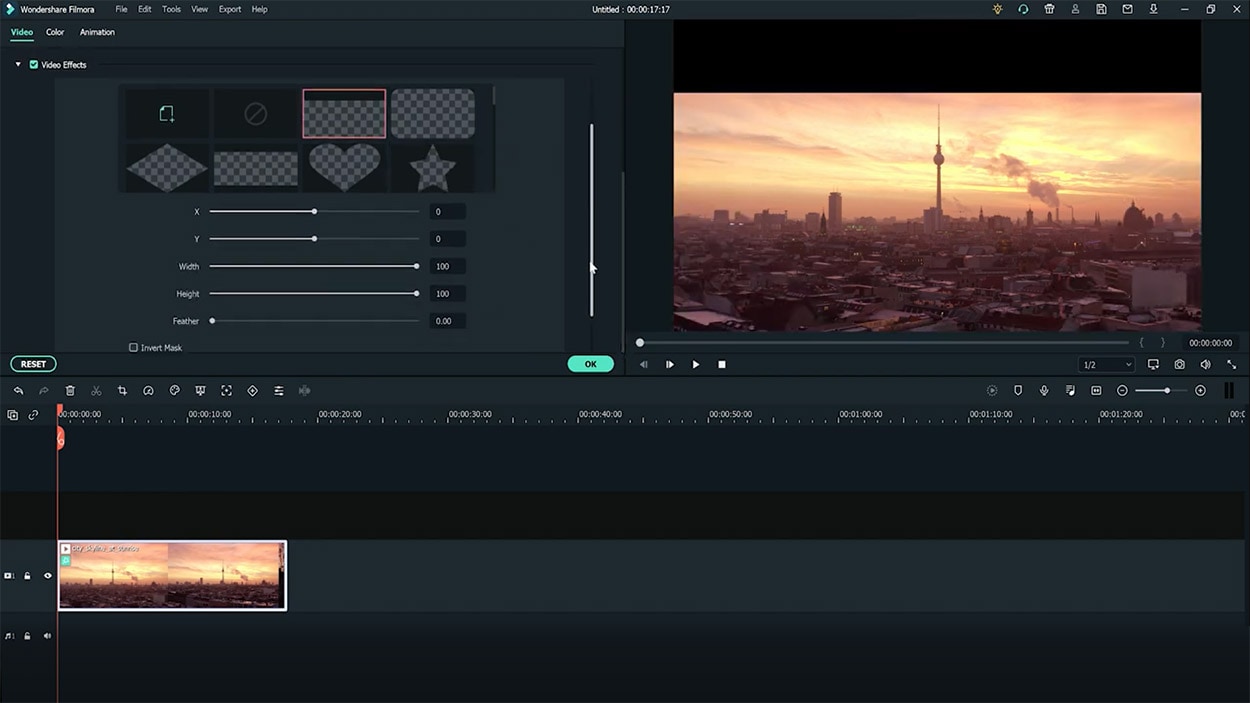
Step 3: Scroll up the Setting > Transform. Adjust the position of the video footage on the x and y-axis to ensure that the mask shows the bottom of the landscape view. Click Ok.
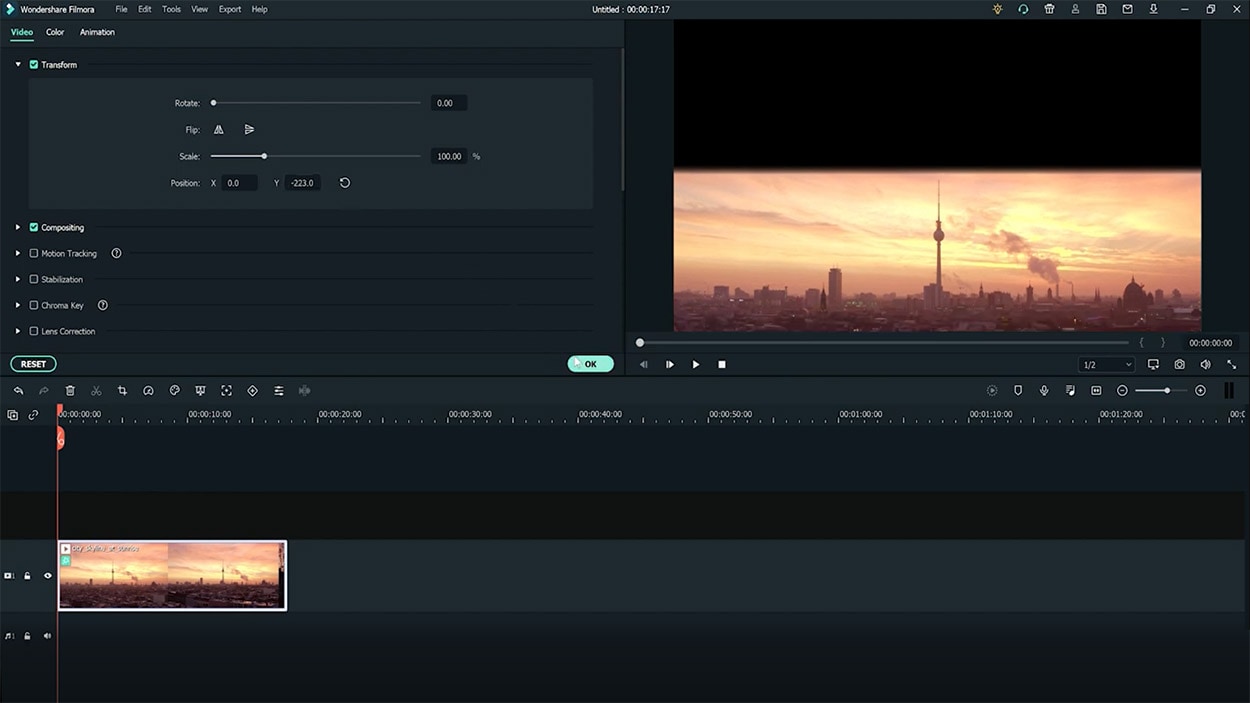
Step 4: Drag and drop the same video footage onto the timeline next to the first video footage. Place an Image Mask as well on this footage. This will be the upper part of the scene.
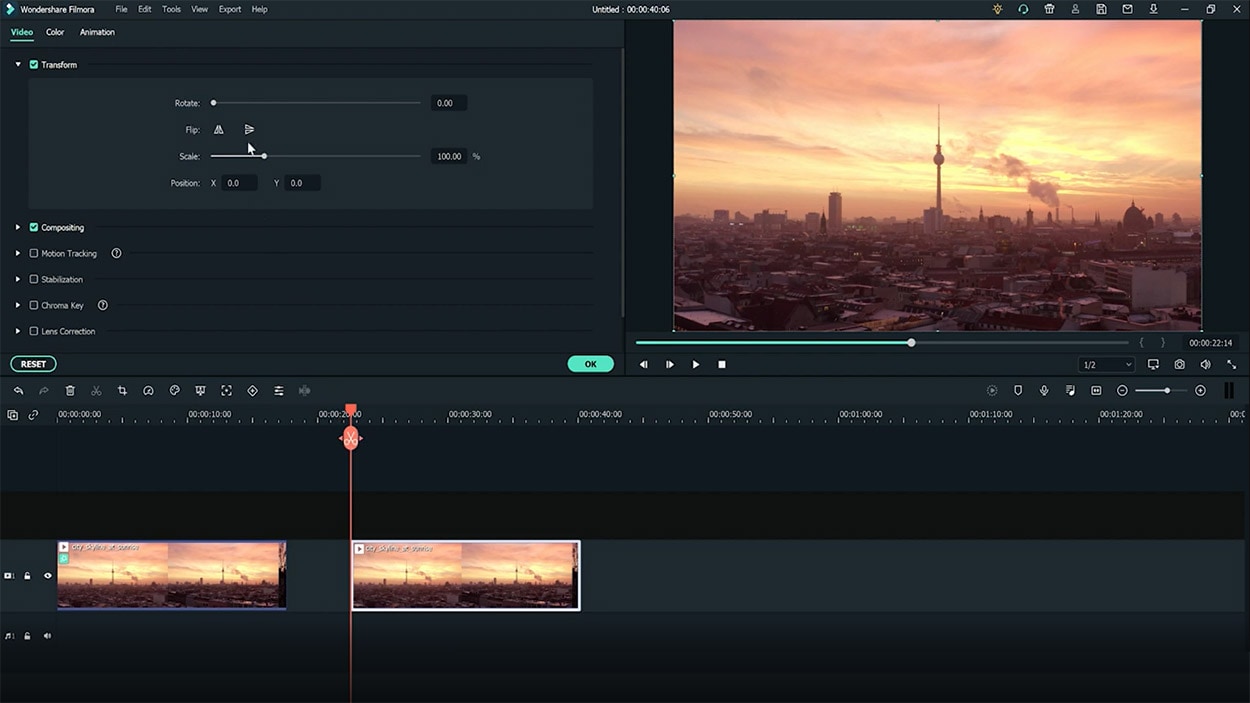
Step 5: Double-click the second footage to open the Setting menu on the top left. Choose Transform > Vertical Flip.
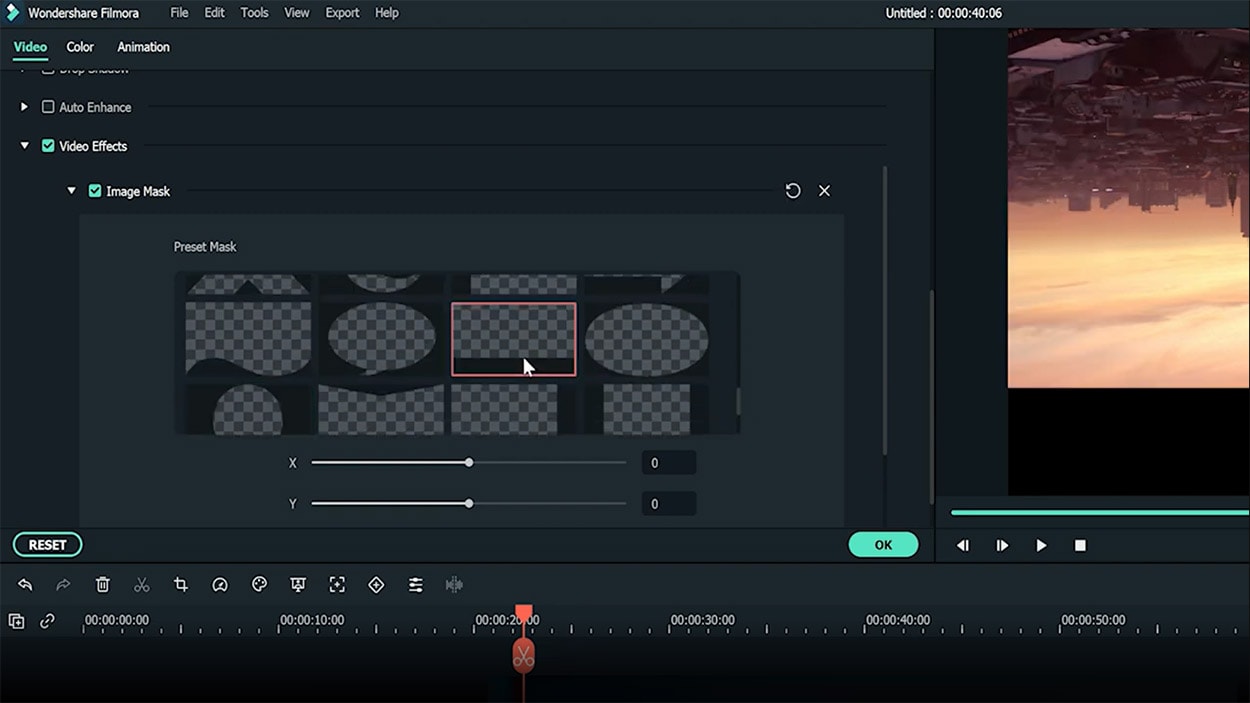
Step 6: Scroll down the Setting menu to find the mask settings. Choose an opposing mask shape for this second footage then set the feather number to 100 as well.
Step 7: Adjust the video footage position by dragging the second footage to the second video track and aligning it with the first video footage.
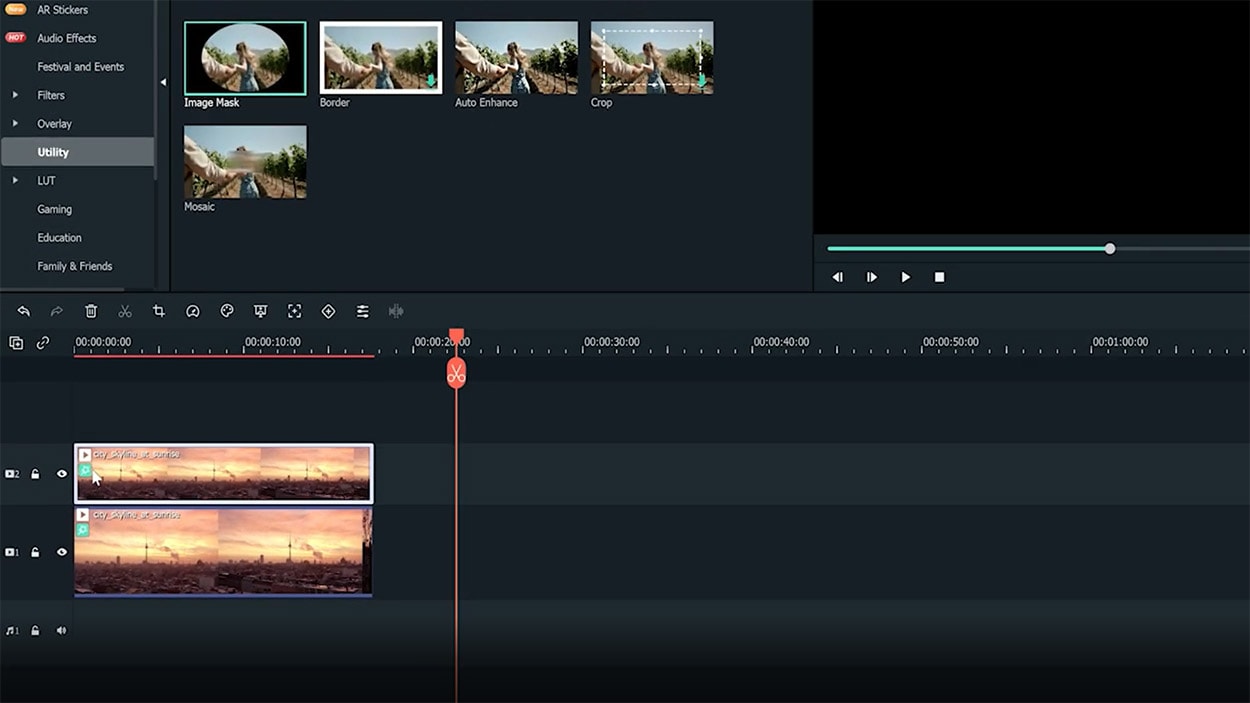
Step 8: Double-click to open the Setting > Transform, then, adjust the x and y-axis numbers to ensure that the mask reveals only the top half of the landscape. Click Ok.
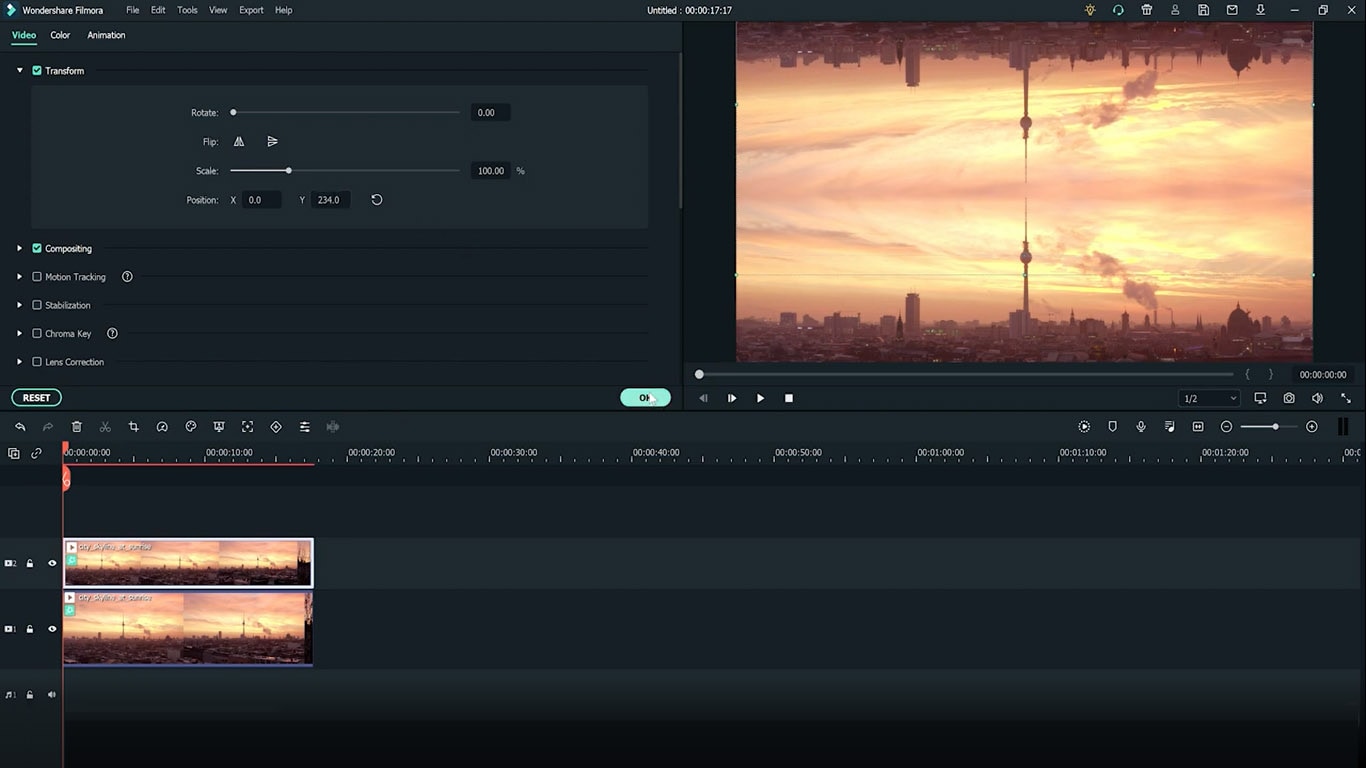
You can recheck the preview at this stage and just save it as it is if you’re already satisfied with the result. However, if you want a more dynamic alternate reality scene, continue reading to see advanced tips you can follow to make your video looks even more otherworldly.
Enhancing the effect with rotation keyframes
If you’re using stock videos or encountering limitations when making your footage, chances are your alternate reality is not looking as dynamic as you want it to be. Go all out by adding the rotation keyframes to the video footage so that the alternate reality looks more unreal.
Step 1: Double-click the video footage on the first video track to open the Animation Settings > Customize.
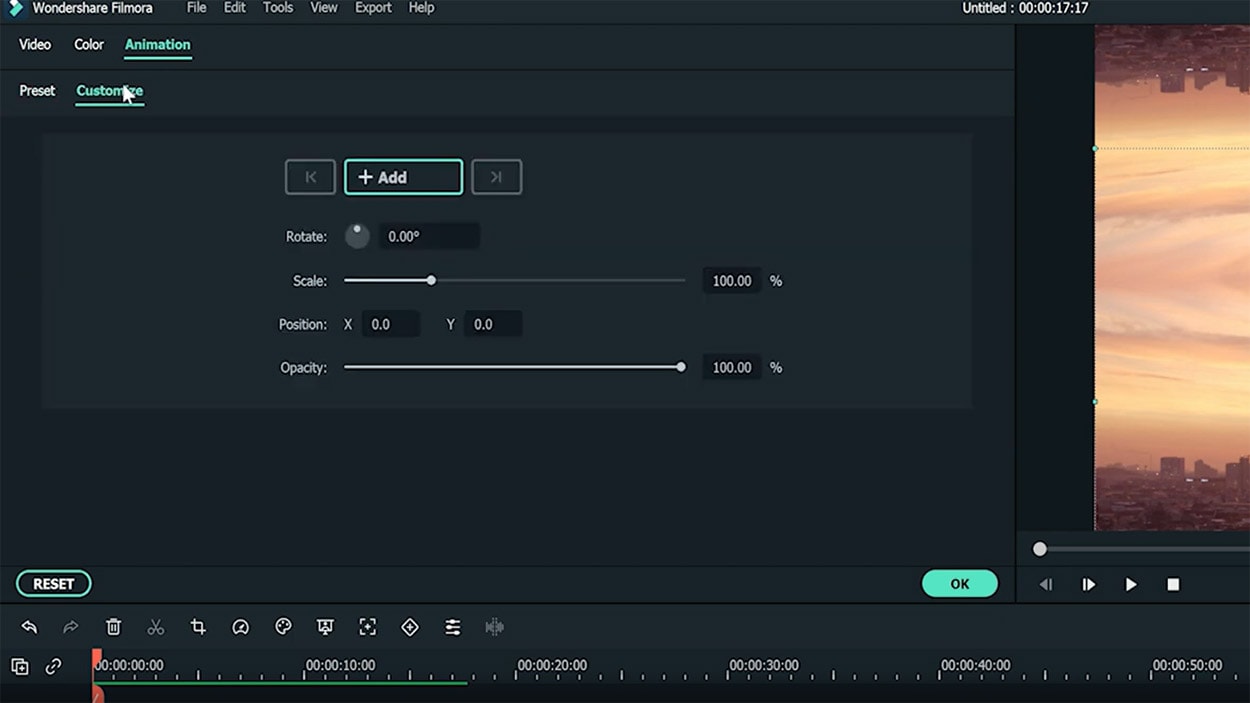
Step 2: Move the playhead to the beginning of the first video footage and add a keyframe by clicking on the Add button. Set the rotation of this keyframe at 0 and the scale at 100.
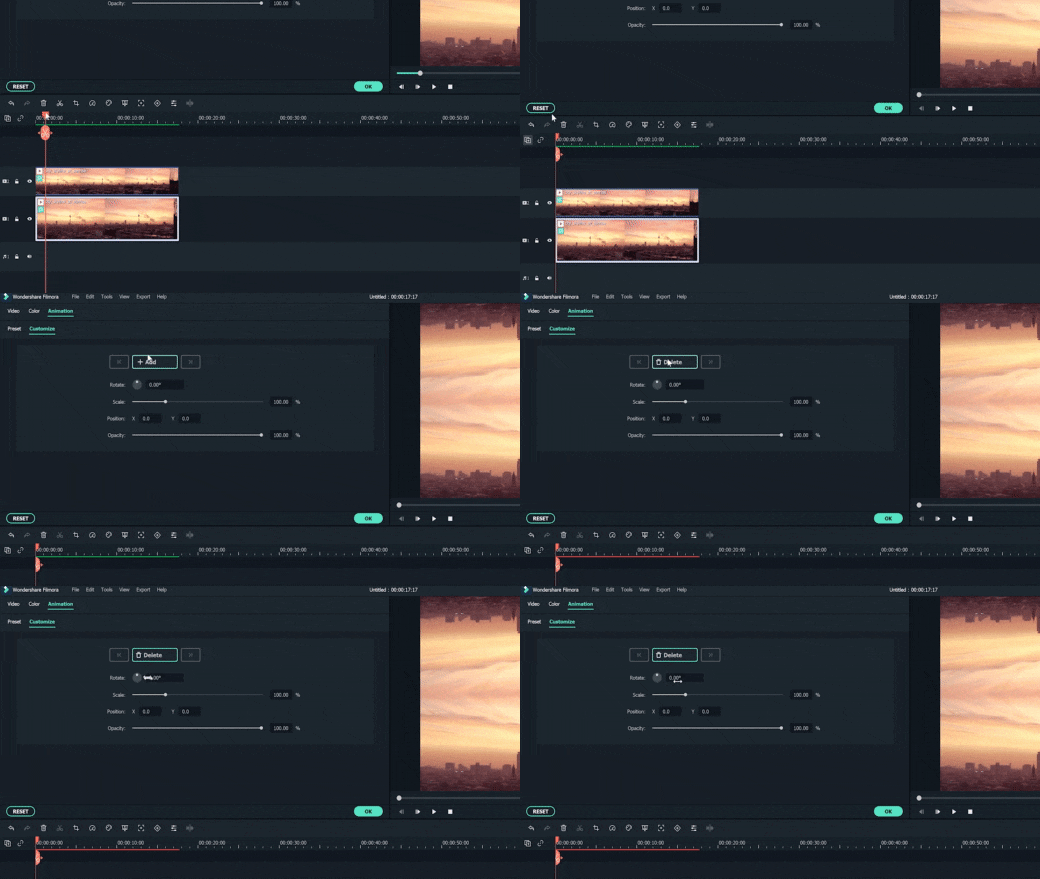
Step 3: Now move the playhead to the end of the video footage and add another keyframe. This time, set the rotation to 20 and adjust the scale number to 115.
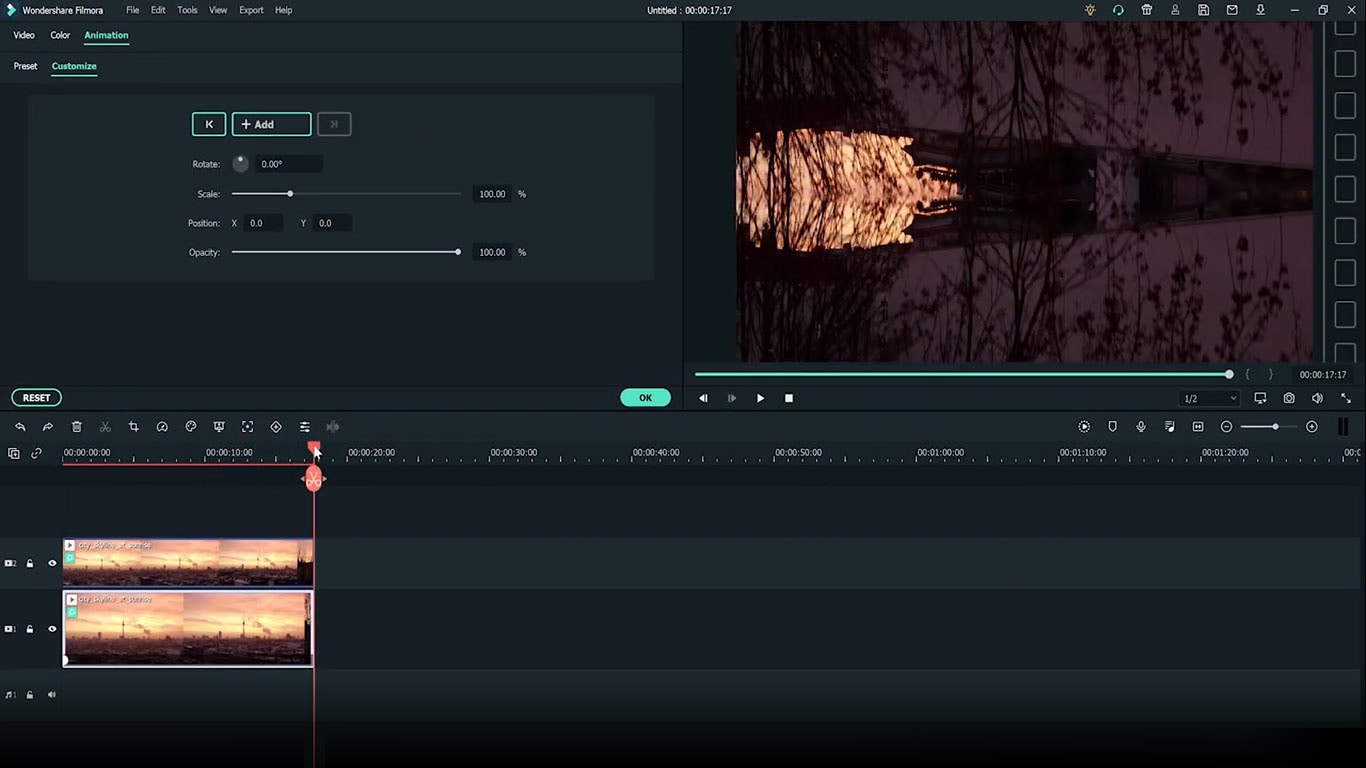
Step 4: Do Steps 1 to 3 to the second video footage. Don’t forget to preview the result to see if both footages are rotated properly.
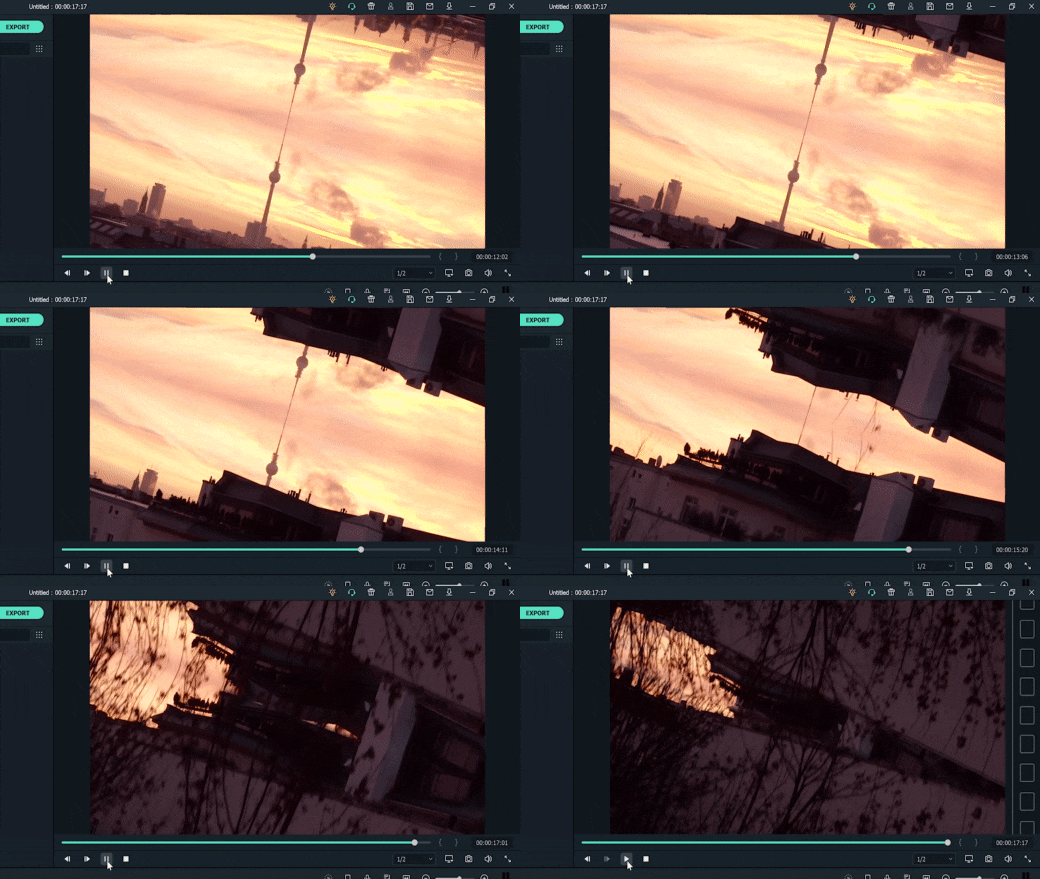
Your alternate reality is now more dynamic with more movement. You can also add more filters or effects to further enhance the sci-fi ambiance. Once you’re satisfied, you can export the file to a format that is compatible with your destination platform.
Conclusion
Wondershare Filmora aims to empower your inner video creator with its robust yet easy-to-use editing suite. You can easily mimic the scenes from the latest blockbuster superhero movies with some simple clicks.
Not only it offers a strapping video editing menu with simple visual effects plug-ins and beginner-friendly smart templates, but you can also access its rich royalty-free stock media library. You can operate the program on both Windows and Mac. Install the program and let it do wonders to your content.
Free Download For macOS 10.14 or later
Step 1: Drag and drop the video footage into the timeline - this will be the bottom part of the scene. Go to Effect > Utility > Image Mask. Drag and drop it onto the video footage.

Step 2: Adjust the mask by double-clicking the video footage. Go to Setting > Mask Setting and choose any shape you like. Set the feather number to 100.

Step 3: Scroll up the Setting > Transform. Adjust the position of the video footage on the x and y-axis to ensure that the mask shows the bottom of the landscape view. Click Ok.

Step 4: Drag and drop the same video footage onto the timeline next to the first video footage. Place an Image Mask as well on this footage. This will be the upper part of the scene.

Step 5: Double-click the second footage to open the Setting menu on the top left. Choose Transform > Vertical Flip.

Step 6: Scroll down the Setting menu to find the mask settings. Choose an opposing mask shape for this second footage then set the feather number to 100 as well.

Step 7: Adjust the video footage position by dragging the second footage to the second video track and aligning it with the first video footage.

Step 8: Double-click to open the Setting > Transform, then, adjust the x and y-axis numbers to ensure that the mask reveals only the top half of the landscape. Click Ok.

You can recheck the preview at this stage and just save it as it is if you’re already satisfied with the result. However, if you want a more dynamic alternate reality scene, continue reading to see advanced tips you can follow to make your video looks even more otherworldly.
Enhancing the effect with rotation keyframes
If you’re using stock videos or encountering limitations when making your footage, chances are your alternate reality is not looking as dynamic as you want it to be. Go all out by adding the rotation keyframes to the video footage so that the alternate reality looks more unreal.
Step 1: Double-click the video footage on the first video track to open the Animation Settings > Customize.

Step 2: Move the playhead to the beginning of the first video footage and add a keyframe by clicking on the Add button. Set the rotation of this keyframe at 0 and the scale at 100.

Step 3: Now move the playhead to the end of the video footage and add another keyframe. This time, set the rotation to 20 and adjust the scale number to 115.

Step 4: Do Steps 1 to 3 to the second video footage. Don’t forget to preview the result to see if both footages are rotated properly.

Your alternate reality is now more dynamic with more movement. You can also add more filters or effects to further enhance the sci-fi ambiance. Once you’re satisfied, you can export the file to a format that is compatible with your destination platform.
Conclusion
Wondershare Filmora aims to empower your inner video creator with its robust yet easy-to-use editing suite. You can easily mimic the scenes from the latest blockbuster superhero movies with some simple clicks.
Not only it offers a strapping video editing menu with simple visual effects plug-ins and beginner-friendly smart templates, but you can also access its rich royalty-free stock media library. You can operate the program on both Windows and Mac. Install the program and let it do wonders to your content.
Best Free LUTs To Use in Shotcut
In this content-driven age, people love to express their emotions through high-quality videos and photos. You can also share your experiences of a trip with other people in the form of videos. Yet to make that video higher quality and engaging, you need vibrant colors. There is no better way to make videos more captivating than to use Shotcut LUTs.
Here on these pages, you will find detailed information about LUTs for Shotcut. Other than we will also guide you about applying LUTs on the videos without any complications.
Part 1: What Do You Know About LUTs in General? What are Their Use Cases
LUTs are the shorter term for Lookup Tables and are used for image processing and video editing. LUTs are mathematical algorithms or tables that can set the color values of the media content to make it more engaging. There are diversified ways through which you can control and customize several metrics of your videos, such as color, brightness, and more.
In addition, LUTs offer a wide array of formats, including 1D, 3D and other LUTs. If you are working on a professional-grade video, you can use the 3D LUTs. However, the 1D LUTs have enough capabilities to make your videos more engaging. You can also use DaVinci Resolve, Shotcut, Adobe Photoshop, or other software to apply LUTs to the videos.
Use Cases of the LUTs
Here are several cases in which you can use the Shotcut LUTs:
- Color Grading and Film Emulation: With LUTs, you can emulate the look of any video in a limited time. Above all, LUTs can also help in color grading, enhancing the video’s overall look. Other than this, you can also control the color metrics, which can lead to a customized look of shots.
- Cinematic Looks and Correction: By using the latest LUTs, you can employ a natural cinematic look in the videos. Above all, they also have the capability to add an aesthetic look to the videos, which can create consistency. Moreover, you can also fix the color problems with LUTs.
- Color Processing and VFX: Along with adding visual effects in videos, you can also streamline your workflow efficiency with it. Moreover, you can also discriminate the color processing and fix all the color issues.
- Calibration and Stimulation: To ensure accurate color representation, you need to adjust the colors and gamma response. Luckily, LUTs can help you to do this without issue. You can also utilize it to enhance important scenes and conditions.
Empower your videos with a new mood using different LUTs. Filmora now offers 100+ top-quality 3D LUTs cover a broad range of scenarios. Transform your videos with Filmora’s powerful 3D LUTs.
Apply LUT on Videos Apply LUT on Videos Learn More

Part 2: Finding the Best LUTs for Using in Shotcut
If you are new in the field of video editing, you must be looking for LUTs that can enhance your Shotcut videos. You can put your concerns to rest as we are going to introduce the LUTs Shotcut in this section. By using the LUTs discussed here, you can upgrade the coloring metrics of your videos in no time:
1. Cinematic LUTs
If you need to make the videos more captivating and attractive, cinematic LUT is the option of recommendation. With these LUTs, you can add stunning effects to the videos. Moreover, it is equipped with modernized colors, so you don’t have to worry about making extra efforts to make your video rank. The dimensions of this LUT are 1920x1080 (HD), so you can make videos of higher quality.

2. Indie Film LUTs
With Indie Film LUTs, you can add the filmy touch to simple videos. It can also be used to convert low-quality videos into the highest-quality films. This adds to you make your videos blockbuster and has optimized file size capability. Furthermore, it can work on video captured with any camera, so there is no restriction on device compatibility.

3. Moody LUTs Pack
Moody LUTs can add the most savage feelings in your simplest videos and photos. It not only changes the colors in the video but also presents the video with a moody feel. Moreover, you can use this LUT for both personal and professional use. It also enhances the details in the videos, which makes the characters more notable.

4. Urban LUTs
If you are an age-town girl in the city and want to present your videos in city style, Urban LUTs can aid you. It can add a realistic look to the videos and work with RAW and LOG. It can also give an aesthetic look to the videos and add consistency. You can also use it for inspiration and references.

5. Portrait LUTs
If you love to create portrait-oriented videos, these LUTs can help you a lot. You can implement your creativity and imagination into the videos and present it to the audience. Above all, it can work with several video editing software, which also makes it a better choice. It also has the capability to add a filmy, lush, grainy, and warm look to the videos.

6. Luxury Grey LUTs
As the name indicates, you can give the most luxurious outlook to the video with it. This LUT can also work on any video without facing any restrictions. Moreover, it is perfect for promoting a product to gain more marketing value. You can add it to marketing ads for several products, such as watches, glasses, and more.

7. Nature LUTs
When working with landscapes or nature videos, sunlight or other lightening issues can impact the video quality. To cater to this, you can take assistance from Nature LUTs. It can add nutty, alive, bamboo, hazel, or many other effects to the videos. The quality of this LUT is also a term to discuss, which plays an essential role in making it unique.

8. Bright Food LUTs for Photo & Video
Food bloggers can never be satisfied with the quality of their food videos. Thus, you can rest easy because this LUT can handle the quality issues of your videos. You can use it to make the food look more delightful and tasty in the videos. It can also be used to add the Bon Appetite effects, which can escalate the engagement ratio of the videos.

Part 3: How to Apply LUTs in Shotcut: A Guide
Is your video extra bright, and now you wish to optimize its color quality? Worry no more because you can take assistance from free LUTs Shotcut to get through this. However, many of you don’t know the procedure to apply LUTs to the videos with Shotcut.
The instructions given below are specifically designed to help you with applying LUTs on video. Follow the steps here to get the work done:
Step 1: First and foremost, find the LUTs that suit the theme of the videos and download it. Following this, go to “Downloads” and right-click “LUTs Files.” Hit the “Extract Here” option to extract the LUTs.

Step 2: Open Shotcut on your computer and import the video. Once the video is opened with Shotcut, click on the “Add a Filter” icon and select “LUT (3D)” while you are in the “Videos” section. Again, select “LUT (3D)” and tap on the “Open” button.

Step 3: To proceed, select the “LUT” from the prompt window and click “Open.” Once the LUT is added, mark the “Checkbox” to enable it. You can also notice the difference in the video before and after adding the LUTs. If you are working on multiple small clips and wish to apply the same LUT on them, select the “Copy” icon.
After this, tap on the clip and select the “Paste” icon. Again, mark the “Checkbox” to apply LUT on the entire video. In case you want to apply the different LUT, choose the clip in “Timeline” and again follow the above procedure to add LUTs.

Conclusion
To sum up everything, you can use the Shotcut LUTs to escalate the quality of your video in no time. Moreover, it can also fix all the color grading issues from the videos and photos. You can also use them for professional purposes, as the LUTs never impact the overlays and content of the video.
There are uncountable LUTs on the web, and you can find some of the commonly used ones above. Moreover, the procedure to apply LUTs to the videos using Shotcut is also discussed above for your ease. You can follow the steps above to maximize your video’s attractiveness in no time.
You can try another video editor - Filmora to add LUTs on videos.
Add LUTs on Video For Win 7 or later(64-bit)
Add LUTs on Video For macOS 10.14 or later
Apply LUT on Videos Apply LUT on Videos Learn More

Part 2: Finding the Best LUTs for Using in Shotcut
If you are new in the field of video editing, you must be looking for LUTs that can enhance your Shotcut videos. You can put your concerns to rest as we are going to introduce the LUTs Shotcut in this section. By using the LUTs discussed here, you can upgrade the coloring metrics of your videos in no time:
1. Cinematic LUTs
If you need to make the videos more captivating and attractive, cinematic LUT is the option of recommendation. With these LUTs, you can add stunning effects to the videos. Moreover, it is equipped with modernized colors, so you don’t have to worry about making extra efforts to make your video rank. The dimensions of this LUT are 1920x1080 (HD), so you can make videos of higher quality.

2. Indie Film LUTs
With Indie Film LUTs, you can add the filmy touch to simple videos. It can also be used to convert low-quality videos into the highest-quality films. This adds to you make your videos blockbuster and has optimized file size capability. Furthermore, it can work on video captured with any camera, so there is no restriction on device compatibility.

3. Moody LUTs Pack
Moody LUTs can add the most savage feelings in your simplest videos and photos. It not only changes the colors in the video but also presents the video with a moody feel. Moreover, you can use this LUT for both personal and professional use. It also enhances the details in the videos, which makes the characters more notable.

4. Urban LUTs
If you are an age-town girl in the city and want to present your videos in city style, Urban LUTs can aid you. It can add a realistic look to the videos and work with RAW and LOG. It can also give an aesthetic look to the videos and add consistency. You can also use it for inspiration and references.

5. Portrait LUTs
If you love to create portrait-oriented videos, these LUTs can help you a lot. You can implement your creativity and imagination into the videos and present it to the audience. Above all, it can work with several video editing software, which also makes it a better choice. It also has the capability to add a filmy, lush, grainy, and warm look to the videos.

6. Luxury Grey LUTs
As the name indicates, you can give the most luxurious outlook to the video with it. This LUT can also work on any video without facing any restrictions. Moreover, it is perfect for promoting a product to gain more marketing value. You can add it to marketing ads for several products, such as watches, glasses, and more.

7. Nature LUTs
When working with landscapes or nature videos, sunlight or other lightening issues can impact the video quality. To cater to this, you can take assistance from Nature LUTs. It can add nutty, alive, bamboo, hazel, or many other effects to the videos. The quality of this LUT is also a term to discuss, which plays an essential role in making it unique.

8. Bright Food LUTs for Photo & Video
Food bloggers can never be satisfied with the quality of their food videos. Thus, you can rest easy because this LUT can handle the quality issues of your videos. You can use it to make the food look more delightful and tasty in the videos. It can also be used to add the Bon Appetite effects, which can escalate the engagement ratio of the videos.

Part 3: How to Apply LUTs in Shotcut: A Guide
Is your video extra bright, and now you wish to optimize its color quality? Worry no more because you can take assistance from free LUTs Shotcut to get through this. However, many of you don’t know the procedure to apply LUTs to the videos with Shotcut.
The instructions given below are specifically designed to help you with applying LUTs on video. Follow the steps here to get the work done:
Step 1: First and foremost, find the LUTs that suit the theme of the videos and download it. Following this, go to “Downloads” and right-click “LUTs Files.” Hit the “Extract Here” option to extract the LUTs.

Step 2: Open Shotcut on your computer and import the video. Once the video is opened with Shotcut, click on the “Add a Filter” icon and select “LUT (3D)” while you are in the “Videos” section. Again, select “LUT (3D)” and tap on the “Open” button.

Step 3: To proceed, select the “LUT” from the prompt window and click “Open.” Once the LUT is added, mark the “Checkbox” to enable it. You can also notice the difference in the video before and after adding the LUTs. If you are working on multiple small clips and wish to apply the same LUT on them, select the “Copy” icon.
After this, tap on the clip and select the “Paste” icon. Again, mark the “Checkbox” to apply LUT on the entire video. In case you want to apply the different LUT, choose the clip in “Timeline” and again follow the above procedure to add LUTs.

Conclusion
To sum up everything, you can use the Shotcut LUTs to escalate the quality of your video in no time. Moreover, it can also fix all the color grading issues from the videos and photos. You can also use them for professional purposes, as the LUTs never impact the overlays and content of the video.
There are uncountable LUTs on the web, and you can find some of the commonly used ones above. Moreover, the procedure to apply LUTs to the videos using Shotcut is also discussed above for your ease. You can follow the steps above to maximize your video’s attractiveness in no time.
You can try another video editor - Filmora to add LUTs on videos.
Add LUTs on Video For Win 7 or later(64-bit)
Add LUTs on Video For macOS 10.14 or later
How to Make Your CSGO Montage Impressive
CSGO (Counter-Strike: Global Offensive) is a popular objective-based multiplayer FPS (first-person shooter) released in 2012. The developers of this game are Hidden Path Entertainment and Valve. It’s one of the world’s most popular global eSports video games remains one of the most popular global esports, with millions of people playing it. Many people also love watching other skilled gamers play CSGO as montage videos.
With that in mind, we’ll explain how you can make CSGO montage videos and add effects to make them stand out and engaging.
How to Make Your CSGO Montage
If you are wondering: How can I create a CSGO montage video? Follow these steps:
Step1Record Your CSGO Gameplay
CSGO is compatible with Linux, PlayStation 3, Xbox 360, macOS, and Windows. You can record the CSGO demo by going to the top menu. The application will ask you to select the Capture option. Here, you can define the area you want to record and the audio settings. Specify a location where you want to save your recorded file.
You can also use a screen capture tool, such as Wondershare DemoCreator, to record your CSGO gameplay. The software saves the video clips you have captured on your PC’s hard drive.
To record your CSGO gameplay using DemoCreator, follow the steps below:
- Open the software and click “Capture.” You can set various specifications, including the audio settings for your recording and the recorded area.

Record Screen with Democreator
- Specify the location where you would like to save your recorded file.
- Press F10 or click the start capturing option to start the recording. By indicating you’re recording a game, you’ll be able to increase the frame rate.
- Click on F10 to stop the recording. The program will save the file on your PC.
Step2Choose Background Music that Fits Your CSGO Montage
The capability of music conveying emotions, authentic interactions, and a sense of realism is crucial to the viewers’ watching experience. It holds the attention of viewers and makes them want to continue watching your gaming montage.
Make sure the music you choose fits the theme of your CSGO montage video. The right music will provide a constant through-line that ties numerous CSGO gameplay clips together. What’s more? It can lend your montage a level of professionalism while giving it a polish.
Only use royalty-free music in your montage video, as this means you won’t pay any ongoing royalties when you use the music track. There are loads of royalty-free music libraries online, where you can find non-copyrighted montage music. These include StoryBlocks, FreeSound, and SoundCloud.
Once you’ve found the music you like, download it and use it in your CSGO montage video.
Step3Download Video Editing Software
You’ll need video editing software to put your series of CSGO gameplay clips together and make a montage video. While you’ll find numerous desktop-based video editing programs available, choose the best one.
A reliable video editing software should be user-friendly. The last thing you want is to get a video editing program that will make you spend months trying to learn how to edit your first montage video.
Pick a program with video editing templates; this will allow you to create CSGO montage videos swiftly because you only have to substitute the existing placeholder media with the content you are making. It should also have special effects and music.
If you’re tired of the plain and common video editing effects, check out Filmora. This video editing software has tons of cool effects that you can add to your CSGO montage videos.
Why We Need to Add Effects to Our CSGO Montage
Adding effects to your CSGO montage is crucial because of various reasons. They produce powerful entertainment for viewers. Special effects provide a creative way to spice up your gaming montage views. You can use them to captivate your audience and make them feel like your video is realistic.
Effects also help you add emotions and personality to your CSGO montage videos. You can also use them to set the tone and ensure your audience enjoys an exhilarating viewing experience.
Additionally, effects help you set the stage for your next scene, convey a mood, and move the story along. You can use them to emphasize the action occurring in the video and make viewers focus on it.
Useful Effects in Filmora that Can Make Your CSGO Video Impressive
We’ll now explore some of the effects Filmora offers on their video editing software. You can use them to make epic CSGO montage videos. Let’s dive in.
1. Split Screen Effect
Also known as video overlaying or picture-in-picture effect, Filmora’s split-screen effect allows you to display two or more video clips simultaneously in up-down style or side by side. You can use it to tell your story creatively by showing multiple viewpoints.
Filmora offers a range of animated split-screen layouts that you can use in your gaming montage video. You can also add multiple split screens.

Split Screen
2. Pan and Zoom
Also known as the Ken Burns effect, Fimora’s Pan and Zoom effect allows users to focus on specific parts of their CSGO montage video. You can use this feature to zoom in on an object or scenery to create movement or evoke emotional storytelling experiences in the video.
3. Fast Motion
Filmora’s time-lapse or fast motion effect makes your video clip play faster. The software allows you to increase the speed of your montage video by dragging the speed slider or the duration you need.
4. Transitions
Transitions improve the flow of your montage video and help you capture the viewers’ attention, as they make it look professional and cinematic. Filmora has loads of transitions that you can add between video clips to add interest and improve the flow of your montage video.
5. Overlays
Filmora has tons of overlays that you can apply to your CSGO montage videos. You can overlay a video clip on a video and an image or photo on your video. You can also size and mask the video overlay, adjust the position of the overlay, and add elements and animation to your video overlay.
6. Filters
The software allows you to add as many filters as you want to your montage video. These filters can dramatically change the feel and look of your gaming montage in a couple of clicks. You can add glitch effects, make your video shake or black and white, and much more.
Wondershare Filmora11 Express Better
Achieve More
Grow Together
Free Download Free Download Learn More

Step-By-Step Guide to Adding Effects to Your CSGO Montage Using Filmora
Applying transitions, overlays, filters, and transitions is a breeze. Just follow the steps below.
- Launch Filmora and import your video file. You can do this by pressing Ctrl+I. A window will then pop up and allow you to find your video.
- Select the video and click on the Open button to import it to Filmora’s media library.
- Drag your CSGO montage and drop it to the timeline.

Import Media
- To add transitions, head to the Transition tab. Here, you will find tons of transitions that you can use.

Add Transition
- Choose the transition you want, then drag it to the beginning or end of the gaming montage in your timeline.
- To add an overlay to your montage video, go to Effects>Overlay. You’ll find several categories here; click on one subcategory to check the available overlays. To add the effect, drag the overlay you like to your timeline. You can also take your mouse on the overlay effect, then click the plus icon to add the effect to your video.

Add Overlays
- To add a filter effect to your montage, go to Effects and select the Filters option on your left side menu. Here, you’ll find several categories of filters. Choose the one you like and drag it to the video on your timeline. Double-click on the effect if you want to make changes to the filter.

Add Filters
- To pan and zoom your video, right-click on your video in the timeline, then select the Video option and click on Crop and Zoom. Now select the Pan & Zoom option. You’ll see frames marked blue and orange over the video clip viewer. Click the Start frame, then modify the pan and zoom with the resizer and dragger to get the desired results before clicking the End frame.

Pan & Zoom
- To add the Fast Motion effect, right-click on your montage video on the timeline and select Speed. Click on the Uniform Speed option. Now, drag the speed slider to the right side to increase the speed of your video.

Fast Motion
Once you have made all the changes in your CSGO montage, click Export. This option allows you to export and save your video on your computer.
Closing Thoughts:
You can make an impressive CSGO montage video that will capture the attention of viewers and get lots of views. Use Filmora to add effects that will make your gaming montage stand out and keep viewers watching until the end of the video.
Free Download Free Download Learn More

Step-By-Step Guide to Adding Effects to Your CSGO Montage Using Filmora
Applying transitions, overlays, filters, and transitions is a breeze. Just follow the steps below.
- Launch Filmora and import your video file. You can do this by pressing Ctrl+I. A window will then pop up and allow you to find your video.
- Select the video and click on the Open button to import it to Filmora’s media library.
- Drag your CSGO montage and drop it to the timeline.

Import Media
- To add transitions, head to the Transition tab. Here, you will find tons of transitions that you can use.

Add Transition
- Choose the transition you want, then drag it to the beginning or end of the gaming montage in your timeline.
- To add an overlay to your montage video, go to Effects>Overlay. You’ll find several categories here; click on one subcategory to check the available overlays. To add the effect, drag the overlay you like to your timeline. You can also take your mouse on the overlay effect, then click the plus icon to add the effect to your video.

Add Overlays
- To add a filter effect to your montage, go to Effects and select the Filters option on your left side menu. Here, you’ll find several categories of filters. Choose the one you like and drag it to the video on your timeline. Double-click on the effect if you want to make changes to the filter.

Add Filters
- To pan and zoom your video, right-click on your video in the timeline, then select the Video option and click on Crop and Zoom. Now select the Pan & Zoom option. You’ll see frames marked blue and orange over the video clip viewer. Click the Start frame, then modify the pan and zoom with the resizer and dragger to get the desired results before clicking the End frame.

Pan & Zoom
- To add the Fast Motion effect, right-click on your montage video on the timeline and select Speed. Click on the Uniform Speed option. Now, drag the speed slider to the right side to increase the speed of your video.

Fast Motion
Once you have made all the changes in your CSGO montage, click Export. This option allows you to export and save your video on your computer.
Closing Thoughts:
You can make an impressive CSGO montage video that will capture the attention of viewers and get lots of views. Use Filmora to add effects that will make your gaming montage stand out and keep viewers watching until the end of the video.
Also read:
- New 2024 Approved What Is First Impression Review Video
- How to Make a Slow Motion Video Complete Guide
- In 2024, How to Make A Jaw-Dropping Time Lapse Video? Full Guide
- New In 2024, Add Amazing Filters and Effects for Fun to Watch GIFs Using Adobe After Effects. Read on to Discover an Easy-to-Learn After Effects Alternative
- Updated How to Splice Videos Together on iPhone
- In 2024, Basic Introduction for LumaFusion Color Grading
- Updated In 2024, Methods to Make Sure Your Recording Slideshow in Powerpoint Is Not Wro
- In 2024, Quick Answer Why Did Filmora AI Portrait Attract People?
- In 2024, Are You Seeking Free Lumetri Presets to Enhance Your Videos? Find Out All About Lumetri Color Presets and How to Use Them in Presenting Proper Color Grading
- Updated In 2024, How to Create Your Own Subscribe Channel Graphics
- New Simple Step by Step Tutorial on Creating a Lightroom Collage for 2024
- An Ultimate Guide on the Significance of Music in Videos and How to Choose the Right Music for Your Videos with Wondershare Filmora
- In 2024, How to Stabilize Videos for Free with Google Photos App
- In 2024, Add Motion Blur in After Effects
- Updated Motion Tracking Using The Best Video Editors
- Change Background Color in After Effects for 2024
- Have You Ever Watched YouTube Live Streams? In Fact, You Can Also Start a Live Streaming on YouTube if You Want. Here Well Share some Tips to Live Stream on YouTube for 2024
- Repeated Text Animation Tutorial for 2024
- In 2024, 11 Apps To Speed Up A Video On iPhone
- Have You Ever Played Roblox Games? Read This Article to Find Out How to Get Motion Blur in Roblox Using Simple and Efficient Ways
- Updated 2024 Approved How to Add the Popular Video Text Effects to Your Video?
- 2024 Approved A Complete Overview of VSCO Video Editor
- New 2024 Approved Video Inspiration for Birthday Slideshow
- Updated In 2024, If You Are a Free Video Editor Being a Windows User, VSDC Free Video Editor Is a Great Choice. But Is It the Best Video Editor You Should Use? Find Out From Our VSDC Free Video Editor Review
- New 10 Best Meme Text to Speech Tools Windows, Mac, Android, iPhone
- Detailed Guide to the Best Convertors for Turning GIF Into PDF Files. Know Their Features, Pros, Cons, and More for 2024
- 2024 Approved You Must Be Wondering Which the Best Online Transparent Image-Maker Is! Well, There Is No Need to Get Confused as Here; You Will Get a Curated List for the Same
- In 2024, You Can Use It to Fix Videos that Are Not Aligned Properly or that Have Been Filmed Upside Down. A Handbrake Is a Popular Tool because It Is Easy to Use and It Has a Variety of Features
- Updated In 2024, Tutorial Guides for Video Maker with Song
- Blender Is a 3D Animation Software that Can Be Used to Create Stunning 3D Models and Videos for 2024
- New How to Do Masking in After Effects Alternative Provided for 2024
- New How to Create Simple Slideshow Word
- Updated In 2024, Attaining Slow Motion Video Trend Finding The Best CapCut Templates
- New Video Course and Online Learning Are Very Popular Nowadays. Here We Are Going to Recommend some of the Best Video Websites for Teachers to Use for 2024
- 2024 Approved How to Add Slideshow in PowerPoint
- As an Online Marketer, It Is Important to Know the Algorithm of YouTube Platform. Ill Share You the History of Algorithm of YouTube and the New Changes in This Year
- Final Cut Pro - How to Download and Install It
- In 2024, A Quick Guide to Gionee F3 Pro FRP Bypass Instantly
- Pokemon Go No GPS Signal? Heres Every Possible Solution On Honor Magic 6 Lite | Dr.fone
- In 2024, How to Unlock Vivo T2 5G Phone Password Without Factory Reset?
- List of Pokémon Go Joysticks On Google Pixel 8 Pro | Dr.fone
- Hassle-Free Ways to Remove FRP Lock on Samsung Galaxy F14 5Gwith/without a PC
- In 2024, The Easy Way to Remove an Apple ID from Your MacBook For your Apple iPhone 15 Pro
- 10 Best Fake GPS Location Spoofers for Vivo V30 | Dr.fone
- How to fix iCloud lock on your Apple iPhone XS and iPad
- In 2024, Rootjunky APK To Bypass Google FRP Lock For Xiaomi Redmi A2
- In 2024, Why is iPogo not working On Motorola Moto G14? Fixed | Dr.fone
- Complete Guide For iPhone SE (2020) Lock Screen
- In 2024, Top 15 Augmented Reality Games Like Pokémon GO To Play On Tecno Phantom V Fold | Dr.fone
- In 2024, 3 Facts You Need to Know about Screen Mirroring Nokia C110 | Dr.fone
- In 2024, Latest Guide on iPad 2/3 and Apple iPhone 11 Pro iCloud Activation Lock Bypass
- How To Upgrade or Downgrade Apple iPhone 6 Without Losing Anything? | Dr.fone
- Title: How to Make a Video Loop in QuickTime for 2024
- Author: Morgan
- Created at : 2024-05-19 05:12:18
- Updated at : 2024-05-20 05:12:18
- Link: https://ai-video-editing.techidaily.com/how-to-make-a-video-loop-in-quicktime-for-2024/
- License: This work is licensed under CC BY-NC-SA 4.0.


