
How to Make Boring Videos Look Cool By B Rolls

How to Make Boring Videos Look Cool By B Rolls
Everyone is bored after watching a simple recorded video in which a character explains or tells a story. No one will watch it for more than 4 minutes!
After looking through this article, you will make your video more fascinating and get more views instantly. It’s all just due to B-roll, which will act as a ninja feature in your video. In this regard, Wondershare Filmora will handle everything.
Scroll more to discover two different types of B-roll videos and get an idea of how to make fascinating B-roll videos.
Part 1. What Is a B-roll?
B-roll is alternative or supplementary video footage that editors can use to intercut in between their main video. In that way, B-roll can add more information to a scene.
An additional footage
It is added as a supplementary video to interact with viewers more closely. This feature helps to give more details of a scene.
Visual representation
When the main explanatory video is too boring, you can add a b-roll to represent the movie’s story visually. It can also add to spice up and beat the energy of the narrative.
Without sound
The B-roll shots are mostly without audio or with little background sound. In most cases, the sound of the primary video is continued while the B-roll footage is just shown.
Act as a filler
The criteria for the B-roll is to provide the situation of the storyline. Additionally, it could be utilized as filler in between scenes in a movie or television program. B-roll may be found almost anywhere!
In this article, you will learn about two main kinds of B-rolls and the steps to edit them on Wondershare Filmora . Stick with us to the end!
Free Download For Win 7 or later(64-bit)
Free Download For macOS 10.14 or later
Part 2. Two Types of B-rolls: Explanation Video B-rolls
When recording any explanatory video, the audience may leave it in the middle of a video if a character explains without any visual representation. When explaining something new, showing the object in B-roll can be more effective than just verbally explaining what the audience is seeing.
Let’s take the video we made about microphones as an example. Instead of just verbally introduce the various mics, we inserted B-roll footage to display what they look like and how they can be used. The combination of the visual footage and the background voiceover presents the mic in a more vivid way. Also, it keeps the audience’s attention.

Goal of the explanation B-roll video
The main goal of this type of B-roll is to show your audience what you are talking about instead of just telling them in a dull way.
Part 3. How to Edit Explanation B-roll Footage on Filmora?
After getting the footage and recording shots for B-roll videos, you need to edit it on the Wondershare Filmora. For this, follow the below-mentioned steps:
Step1Download the Wondershare Filmora
There is no need to do any complex process for editing on any platform. Because we have one platform on which every tool is available.
- First of all, you have to download the Wondershare Filmora .
- Then get access to the entire features.
The premium version has new features and effects plugins that make editing more filmy and fun!
Step2Stock media in Filmora
After downloading, it’s time to edit the B-roll video. If you can’t film your own B-roll, you can use stock footage but make sure you have the license to use them.
Filmora has a unique “stock media” option that enables us to use all these elements and more to boost our videos! To add stock media, follow the below steps:
- Open the app or window of Filmora, which you have installed.
- Head towards the tab on the top right side.
- Then click on the Stock Media option and open it.
- A long list of stock videos and images will pop up.
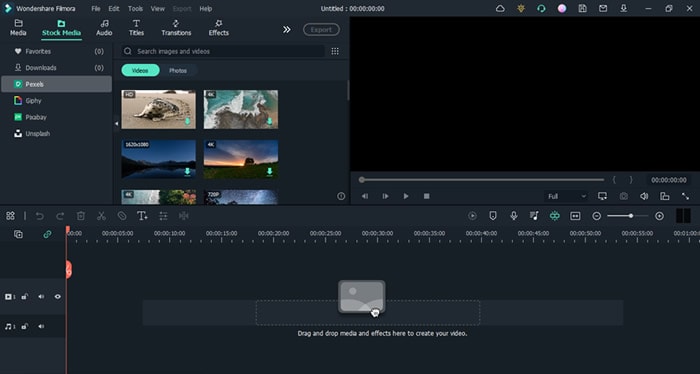
- Select whatever you want, and download it.
- Then drag and drop it in the timeline and insert it between your video.
![]()
Note: Only premium customers will get access to the stock media of the Wondershare Filmora.
Step3Add B-roll in between the main video
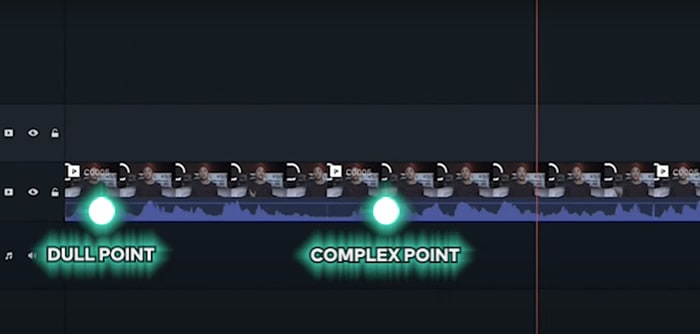
The most difficult and frequent asking situation is how you know when to cut to B-roll. To get to know when to insert B-roll, follow the following steps:
- Watch your edits back and check out where you need.
- Sense about the dull and complex points and cut the main video from there.
- The points can be easily fixed with visual aids.
Part 4. Two Types of B-rolls: Storytelling Video B-rolls
During the creation of short films or any storytelling videos, if a person sits and speaks without showing any character or anything else, it will turn boring. Due to this, you have more chances to lose your audience and viewers.
In visual storytelling, if you will insert more clips with close shots, it will make the environment cool. The crazy thing is that you can make mimic shots easily at home by utilizing household objects. Let’s check out one of the examples.
Example 1. Film B-roll footage with food
So let’s add some b-roll to give it more context even if you have a master shot of yourself looking off frame alone.
Step1Write a script
Before making any video, the first step is to write a script for the whole video. If you will have more than two characters, then make dialogues for everyone and practice it again and again to give a fascinating look.
Then speak to your audience, make sure that what you are speaking is vivid and make everything simple and crystal clear.
Step2Shot a primary video
First of all, make a primary video according to your script by implementing a camera at one side, or you can also change the angle of the camera lens during shooting to have a look from all sides.

As you can see that it’s kind of boring for the audience, but we will make it more unique by implementing closer shots. For this, follow the last step:
Step3Make B-roll shots
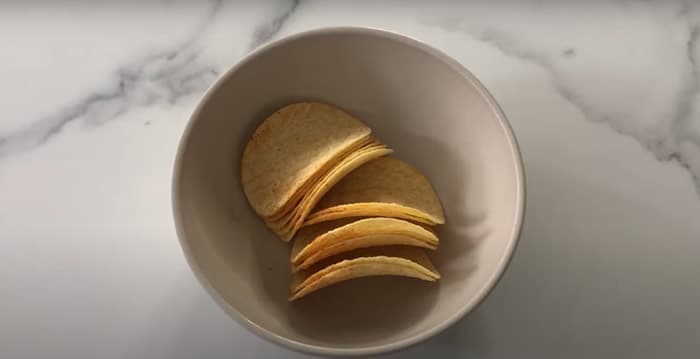
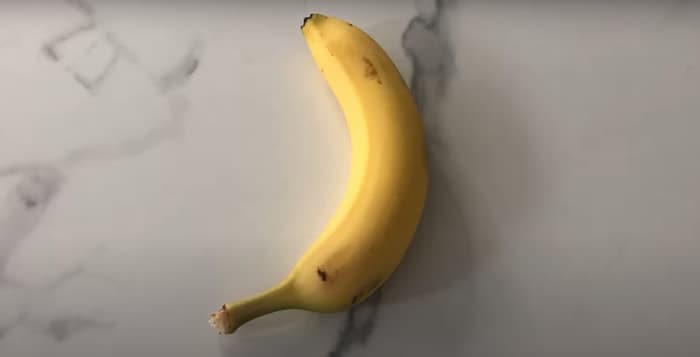
Make closer shots of things which the character have to select and pick up. Check out two B-roll shots for the main video:
- First, make a closer shot of the object (Snacks) that the character is noticing prior.
- Second, create more intimate footage of the second object (Banana) which the character will select and grab.
Step4Edit both B-roll footages in Main Video
Now, in the last, insert the B-roll footage in between the primary video from the Filmora and get your results. Enjoy it with your viewers!

Now experiment at home with more daily life activities and create all on Filmora. Check out one more example to create B-roll footage!
Example 2. Make B-roll shots with a cardboard
Try using readily accessible cardboard to create light effects in different shapes and give the film a fantastical place. These methods frequently produce artistic videos that transmit unique moods to viewers.
Only experienced photographers and videographers understand how to use these fundamental tricks to gain viewers into the photos.
The intriguing thing is that if the light is more shaped, it will more accurately reflect the image’s background, setting, and context. Try it out!
Step1Cut the cardboard
You may shape the cardboard any way you desire. We’ll experiment with this by cutting cardboard into the shape of window shades.

Step2Make B-roll footage
Create B-roll footage by moving the cardboard around the light source after giving it shape. The person appears to be seated close to the window and conveys aesthetic vibrancy.

Now, use this B-roll footage in your video and give it a more professional look. The more creative you are, the more audience will attract to you.
Conclusion
Making B-roll shots is creative and fun! You can make all the footage at home by following easy steps. Try out different ones to make your video viral and boost the target audience!
You can easily use Wondershare Filmora during editing and their stock media to save your time in video making. Share your hacks with your audience to get more experience!
Free Download For macOS 10.14 or later
Part 2. Two Types of B-rolls: Explanation Video B-rolls
When recording any explanatory video, the audience may leave it in the middle of a video if a character explains without any visual representation. When explaining something new, showing the object in B-roll can be more effective than just verbally explaining what the audience is seeing.
Let’s take the video we made about microphones as an example. Instead of just verbally introduce the various mics, we inserted B-roll footage to display what they look like and how they can be used. The combination of the visual footage and the background voiceover presents the mic in a more vivid way. Also, it keeps the audience’s attention.

Goal of the explanation B-roll video
The main goal of this type of B-roll is to show your audience what you are talking about instead of just telling them in a dull way.
Part 3. How to Edit Explanation B-roll Footage on Filmora?
After getting the footage and recording shots for B-roll videos, you need to edit it on the Wondershare Filmora. For this, follow the below-mentioned steps:
Step1Download the Wondershare Filmora
There is no need to do any complex process for editing on any platform. Because we have one platform on which every tool is available.
- First of all, you have to download the Wondershare Filmora .
- Then get access to the entire features.
The premium version has new features and effects plugins that make editing more filmy and fun!
Step2Stock media in Filmora
After downloading, it’s time to edit the B-roll video. If you can’t film your own B-roll, you can use stock footage but make sure you have the license to use them.
Filmora has a unique “stock media” option that enables us to use all these elements and more to boost our videos! To add stock media, follow the below steps:
- Open the app or window of Filmora, which you have installed.
- Head towards the tab on the top right side.
- Then click on the Stock Media option and open it.
- A long list of stock videos and images will pop up.

- Select whatever you want, and download it.
- Then drag and drop it in the timeline and insert it between your video.
![]()
Note: Only premium customers will get access to the stock media of the Wondershare Filmora.
Step3Add B-roll in between the main video
The most difficult and frequent asking situation is how you know when to cut to B-roll. To get to know when to insert B-roll, follow the following steps:
- Watch your edits back and check out where you need.
- Sense about the dull and complex points and cut the main video from there.
- The points can be easily fixed with visual aids.

Part 4. Two Types of B-rolls: Storytelling Video B-rolls
During the creation of short films or any storytelling videos, if a person sits and speaks without showing any character or anything else, it will turn boring. Due to this, you have more chances to lose your audience and viewers.
In visual storytelling, if you will insert more clips with close shots, it will make the environment cool. The crazy thing is that you can make mimic shots easily at home by utilizing household objects. Let’s check out one of the examples.
Example 1. Film B-roll footage with food
So let’s add some b-roll to give it more context even if you have a master shot of yourself looking off frame alone.
Step1Write a script
Before making any video, the first step is to write a script for the whole video. If you will have more than two characters, then make dialogues for everyone and practice it again and again to give a fascinating look.
Then speak to your audience, make sure that what you are speaking is vivid and make everything simple and crystal clear.
Step2Shot a primary video
First of all, make a primary video according to your script by implementing a camera at one side, or you can also change the angle of the camera lens during shooting to have a look from all sides.

As you can see that it’s kind of boring for the audience, but we will make it more unique by implementing closer shots. For this, follow the last step:
Step3Make B-roll shots
Make closer shots of things which the character have to select and pick up. Check out two B-roll shots for the main video:
- First, make a closer shot of the object (Snacks) that the character is noticing prior.

- Second, create more intimate footage of the second object (Banana) which the character will select and grab.

Step4Edit both B-roll footages in Main Video
Now, in the last, insert the B-roll footage in between the primary video from the Filmora and get your results. Enjoy it with your viewers!

Now experiment at home with more daily life activities and create all on Filmora. Check out one more example to create B-roll footage!
Example 2. Make B-roll shots with a cardboard
Try using readily accessible cardboard to create light effects in different shapes and give the film a fantastical place. These methods frequently produce artistic videos that transmit unique moods to viewers.
Only experienced photographers and videographers understand how to use these fundamental tricks to gain viewers into the photos.
The intriguing thing is that if the light is more shaped, it will more accurately reflect the image’s background, setting, and context. Try it out!
Step1Cut the cardboard
You may shape the cardboard any way you desire. We’ll experiment with this by cutting cardboard into the shape of window shades.

Step2Make B-roll footage
Create B-roll footage by moving the cardboard around the light source after giving it shape. The person appears to be seated close to the window and conveys aesthetic vibrancy.

Now, use this B-roll footage in your video and give it a more professional look. The more creative you are, the more audience will attract to you.
Conclusion
Making B-roll shots is creative and fun! You can make all the footage at home by following easy steps. Try out different ones to make your video viral and boost the target audience!
You can easily use Wondershare Filmora during editing and their stock media to save your time in video making. Share your hacks with your audience to get more experience!
Do You Want to Know All About Video Frame Rates and Speed? Wondershare Filmora Will Help You to Get More Information on This Matter
Ensuring smoother playback along with enhanced fluidity is a crucial part of boosting the engagement of videos. You also need to add the slow-motion effect at some points in videos. Along with this, syncing audio to video is also essential. Thus, you can take assistance from frame rates and speed to ensure you have these key features in the videos.
There is no need to be concerned about what video editor to choose because Wondershare Filmora can help you with this issue. In this article, you will find basic information about Filmora and the uses of frame rate and speed ramping. We will also provide the procedure for changing video frame rates with Filmora.
- Part 1: What is Frame Rate and How Important It Is In Videos?
- Part 2: What Are The Different Uses of Speed Ramping in Video Editing?
- Part 3: Perform Basic Speed Adjustments and Speed Ramping on Wondershare Filmora
- Part 4: [Basic] How to Change The Frame Rate in Wondershare Filmora?
- Conclusion
Part 1: What is Frame Rate and How Important It Is In Videos?
One of the most important metrics in videos is the frame rate. This term refers to the individual frames present in the video. While the frame represents a single second, this defines the frequency of the video. This is the display of consecutive frames every second, which brings up the illusion of motion for the viewers. In this way, the entire frame rate is explained as terminology to users new to video editing.
Importance of Frame Rate in Videos
We will highlight some prominent points explaining the importance of video frame rates. Continuing with these points, this will help users understand how essential video frame rate is:
01of 04Defines Smoothness in Videos
Having a higher frame rate in a video is equivalent to a smooth video. Users who consider having smoothness in their videos always consider the frame rates. Higher frame rates have better transitions and seamless motion.
02of 04The detail in the Video
If you have a low frame rate in your video, you cannot observe the details in the fast-moving objects. In such a scenario, you need to have a video with a good frame rate. This will help display the explicit details of the video, which cannot be viewed under every frame rate quality.
03of 04Realistic Effects
Old videos never had the kick that made them feel real. Videos with higher frame rates have changed the dynamics in the current system. Realism and immersive video experience are prominent getaways achieved with better frame rates.
04of 04Realistic Effects
The use of better frame rates gives the option of improving the effects of the video. Videos that did not have impressive frame rates are not able to display the mood or atmosphere. Better frame rates help display the environment better, thus explaining the importance.
Changing Video Frame Rates And Speed Editor A wonderful video editor - Wondershare Filmora providing frame rate and speed ramping features for all creators.
Free Download Free Download Learn More

Part 2: What Are The Different Uses of Speed Ramping in Video Editing?
Speed ramping and video frame rate are one of the most known techniques which are widely used in video editing. You must be wondering why paying attention to speed ramping is so important. Nothing to worry about because this part will give you the most implementable uses of speed ramping in video editing. Have a look below to discover further information about this:
Highlighting Actions and Dramas
You can use speed ramping to emphasize the actional and dramatic sequences. It also helps you draw the audience’s attention and make the essential factors more notable. Above all, the speed ramping also integrates the useable effects which can add a drastic touch of drama to your videos,
Transitions and Motion Tracking
With the good use of speed ramping, you can achieve a smooth transition in videos. It also helps you add seamless transitions in the videos to add a sense of consistency. One of the best things is adding slow-motion and motion-tracking effects in simple videos.
Syncing Audios
Syncing the audio beats with videos is crucial to enhance the user experience. Speed ramping offers capabilities through which you can easily sync the audio to the length of videos. As it never compromises the content or layout of videos, you don’t have to worry about anything.
Emphasized Storytelling
If you need to induce a sense of storytelling and optimize the video quality, consider speed ramping. You can control the overall speed of actions and dramas and convey a particular narrative to add depth to videos. It also helps to increase the frame rate of video.
Part 3: Perform Basic Speed Adjustments and Speed Ramping on Wondershare Filmora
Wondershare Filmora is a great video editor providing exquisite features and details to users. It embeds simple video editing tools and AI functionalities to provide a quick editing experience. However, the focus on the details is not lacking in this tool. Filmora provides a comprehensive set of effects, transitions, and elements to induce in videos.
Free Download For Win 7 or later(64-bit)
Free Download For macOS 10.14 or later
Along with that, it also includes multiple functionalities which cannot be observed in many video editors. However, since we are putting our focus on discussing the speed adjustments in Filmora, let’s look at the comprehensive steps explained below:
Method 1: Uniform Speed Adjustments in Videos
Step 1Import Video on Filmora for Speed Adjustments
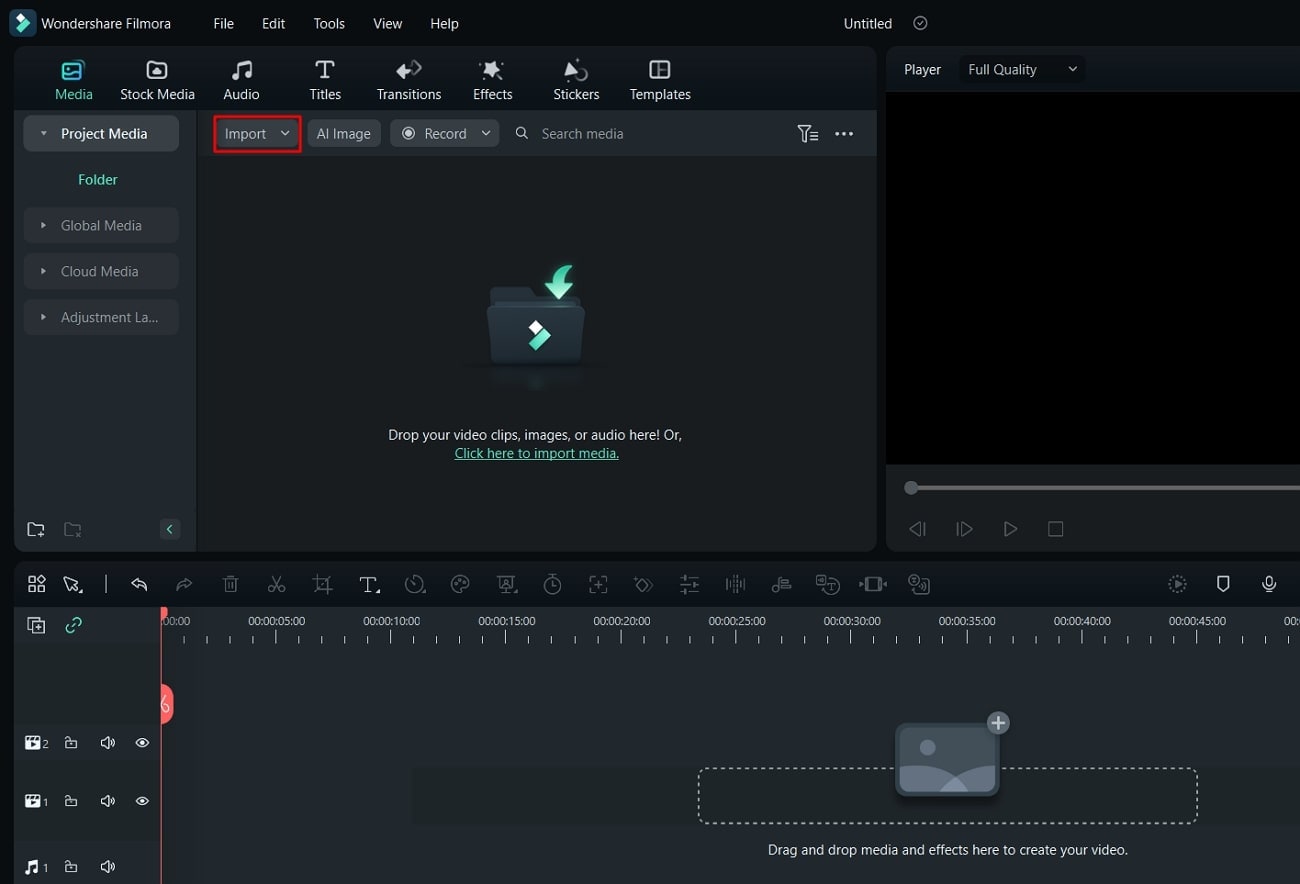
Firstly, launch Wondershare Filmora on your computer and continue to open a new project. Once a window enters the display, lead into the “Import” section for importing the media files that need adjustment.
Step 2Select the Speed Option
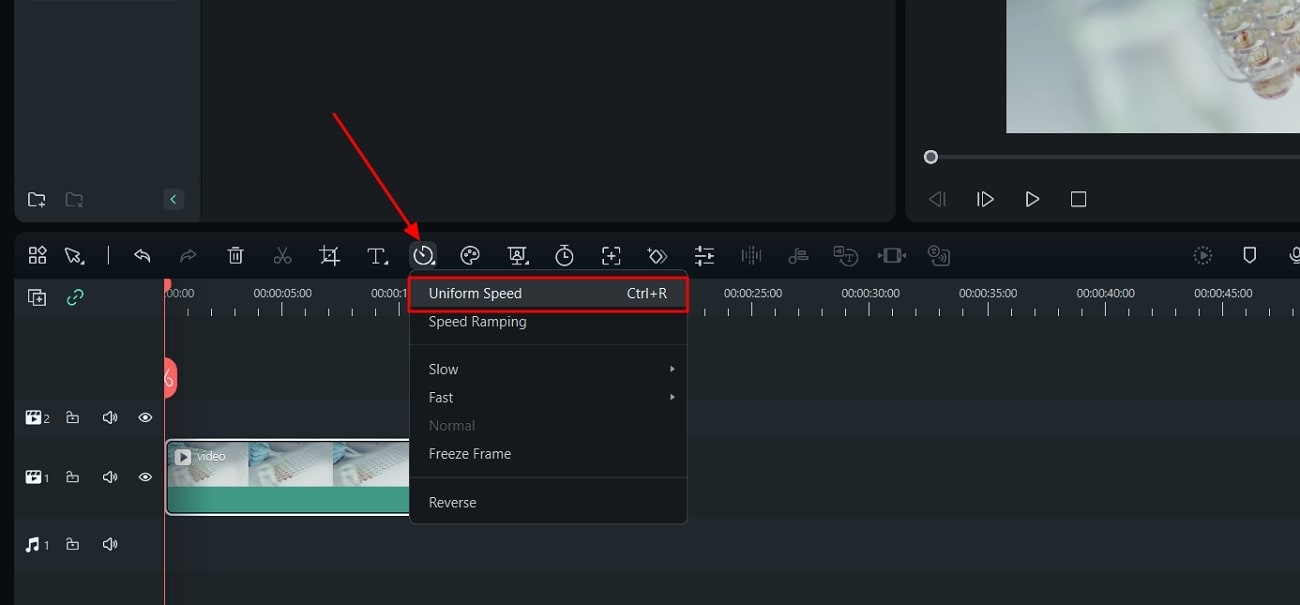
After adding the videos and dragging them to the timeline, continue to locate the “Speed “ option in the bar above the timeline. This opens a drop-down menu where you have to select “Uniform Speed” or use “Ctrl + R.”
Step 3Manage Speed Uniformly
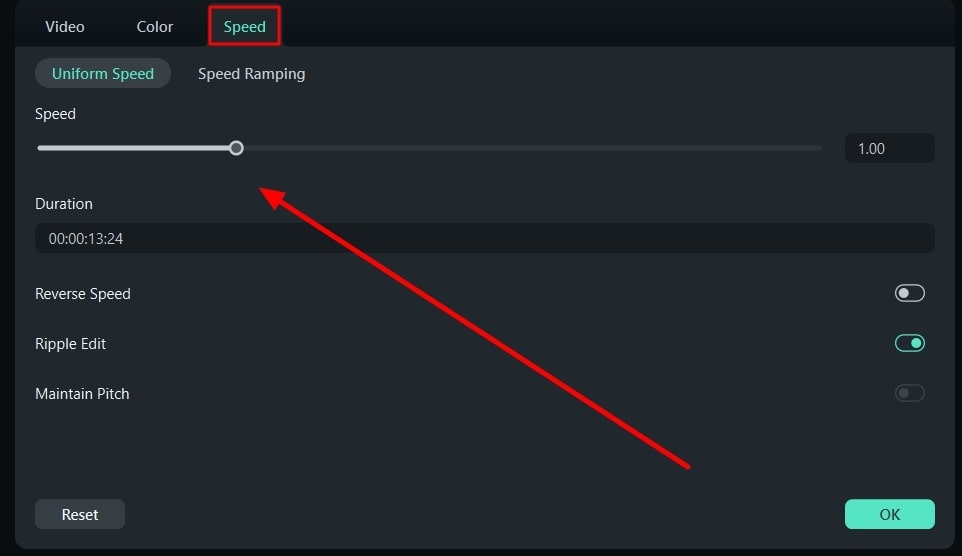
A new section opens on the video editor where you can define the speed using the slider. Also, you can activate options like “Reverse Speed,” “Ripple Edit,” and “Maintain Pitch,” if needed.
Method 2: Utilize the Option of Speed Ramping
Step 1Access Speed Ramping Option
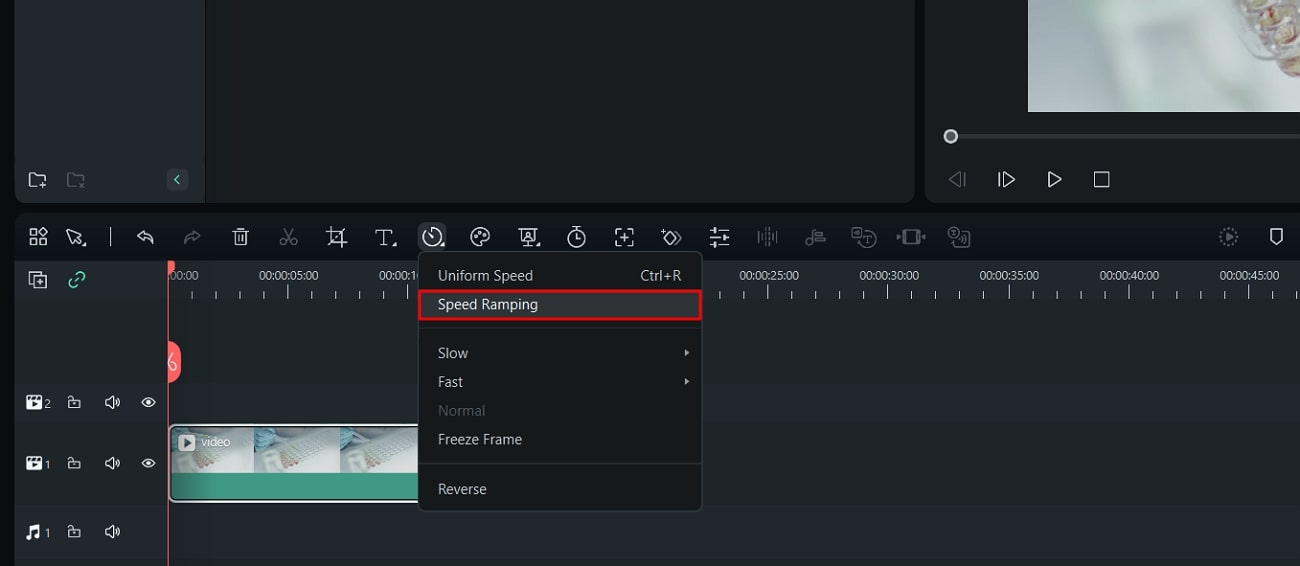
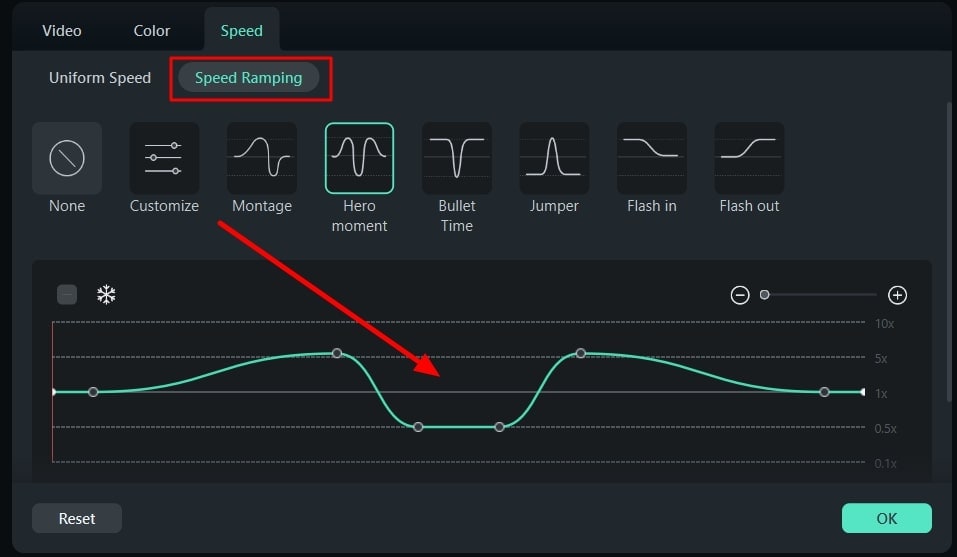
Once you have opened Filmora and imported a video on the timeline, lead to the “Speed” button again. Select the option of “Speed Ramping ” in the drop-down to continue.
Step 2Manage Speed Ramping of Video
As you find a new screen on your front, select the type of Speed Ramping you want to perform. Adjust the speed ramp on the line graph that comes in display and click “OK” to conclude.
Step 3Export the Final Video
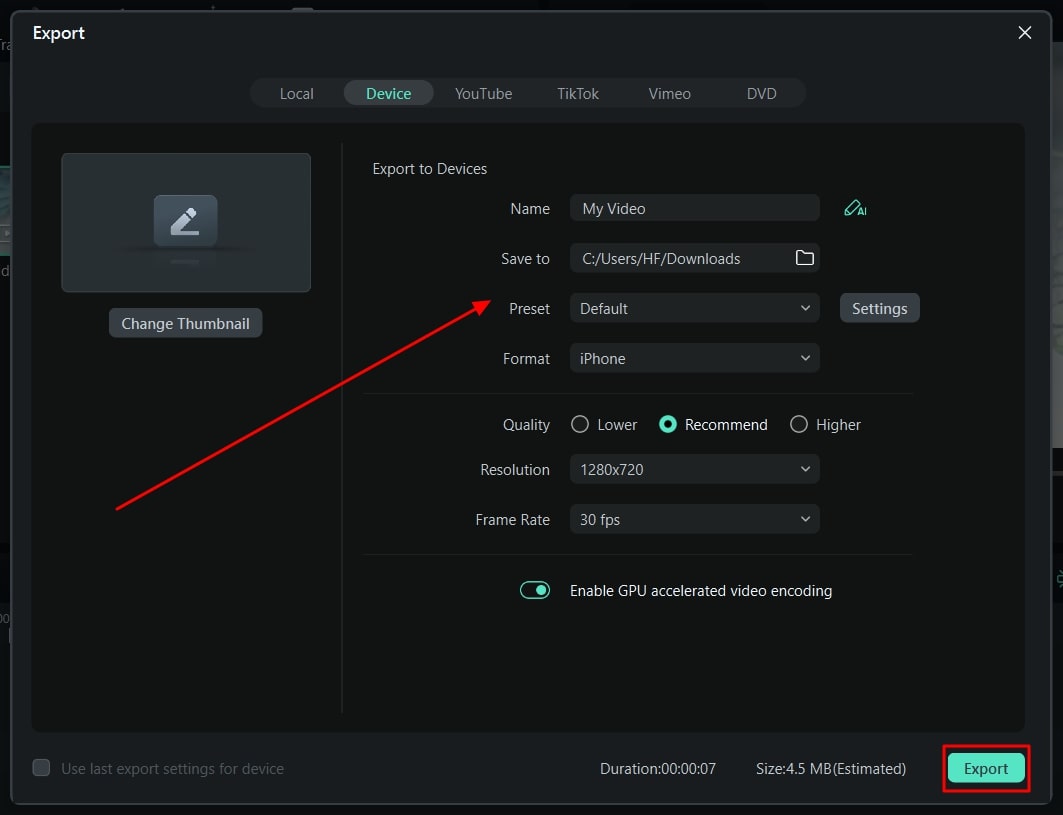
Once you are done editing your videos, lead to the “Export” button to save the videos on the device.
Part 4: [Basic] How to Change The Frame Rate in Wondershare Filmora?
While you find out the ways to change the speed of your videos, you can also change their frame rate. Filmora offers dedicated options on its platform to its users, which can be understood in the steps below:
Free Download For Win 7 or later(64-bit)
Free Download For macOS 10.14 or later
Step 1Open Settings For Changing Frame Rate
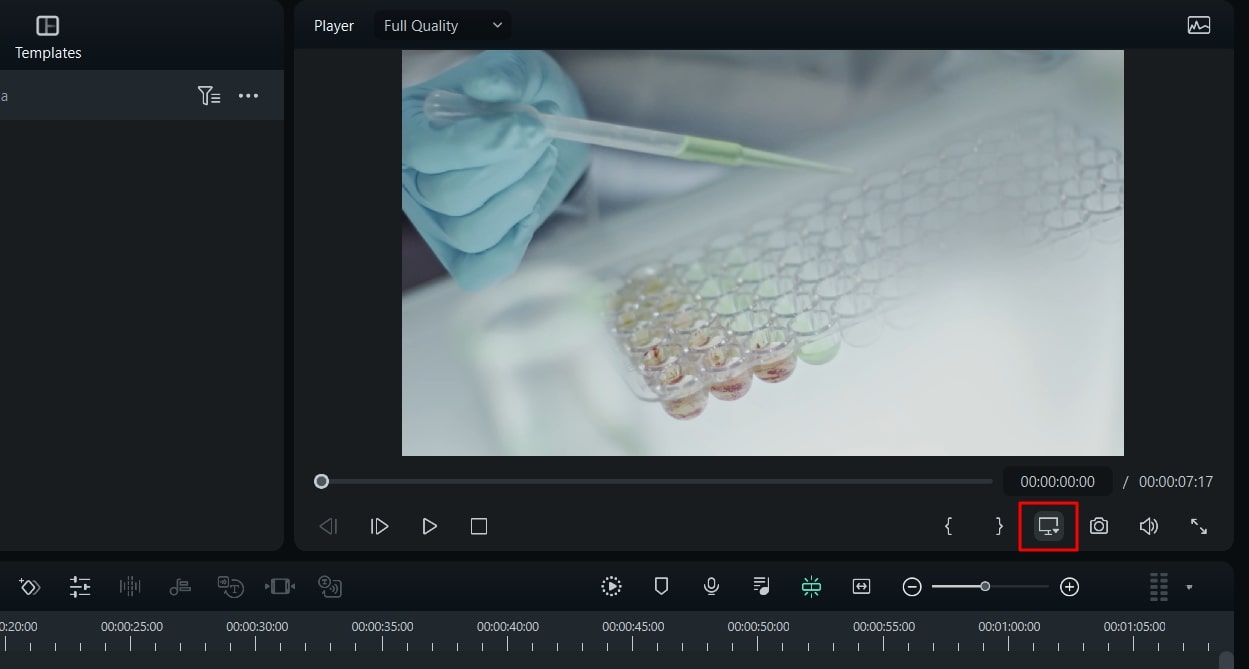
As you open Filmora and import a video, drag it to the timeline. Once the video is imported, lead to the “Preview quality and display settings” button on the right side of the screen.
Step 2Manage Speed Ramping of Video
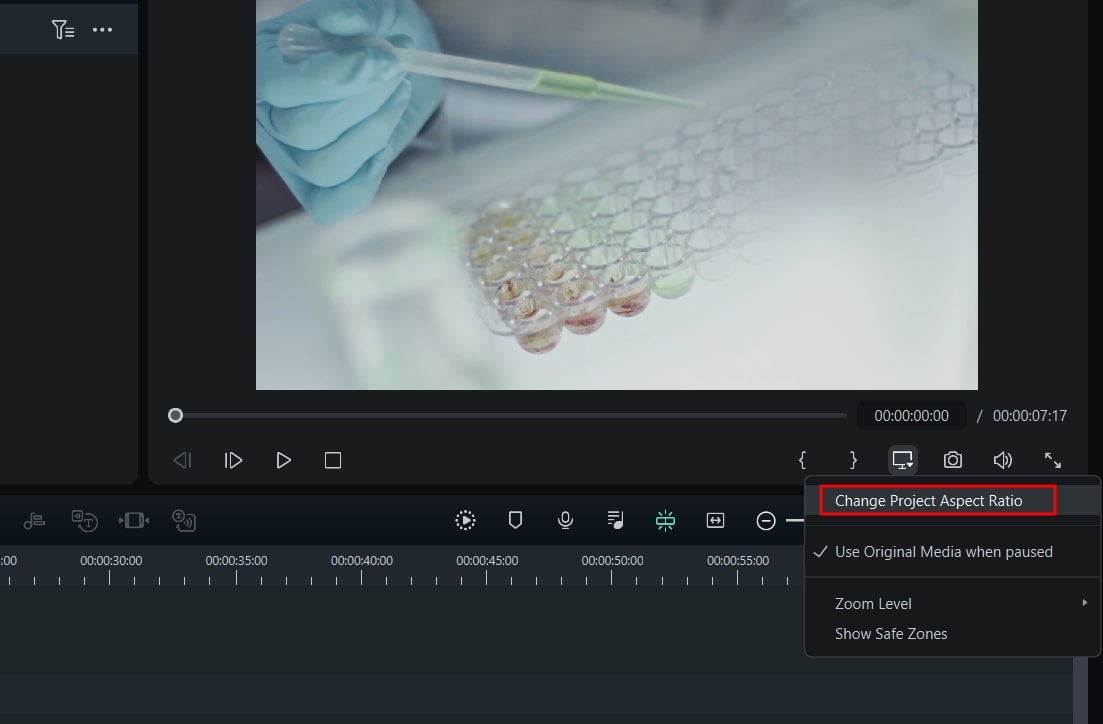
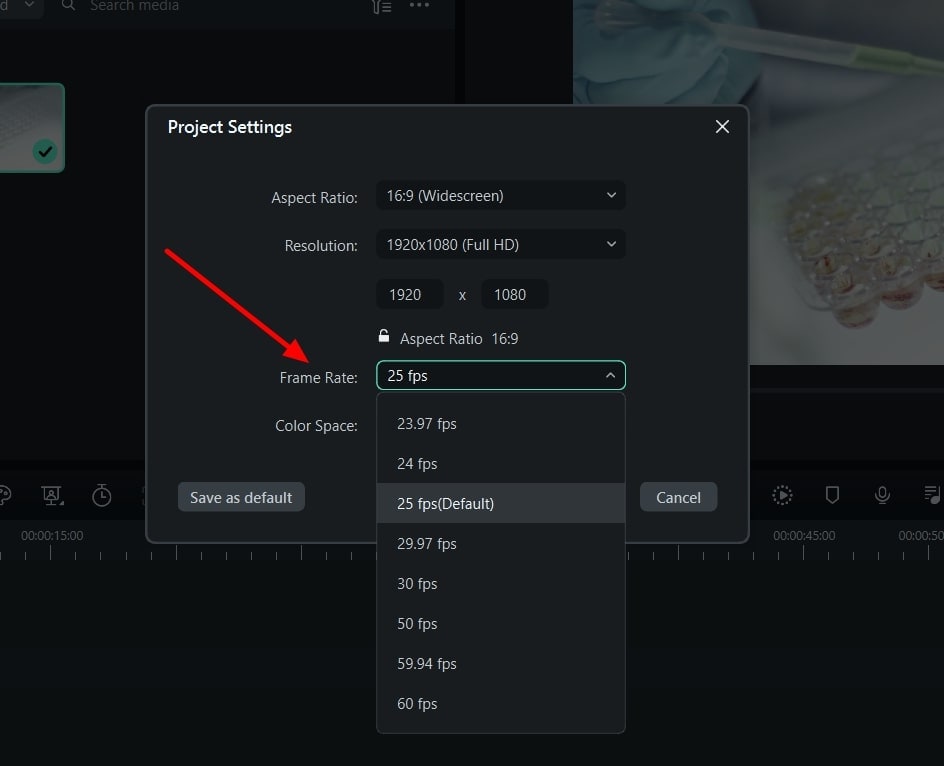
This opens a drop-down menu where you have to select the option “Change Project Aspect Ratio.”
Step 3Change Frame Rate Successfully
You will be led to a new screen where you can find the option of “Frame Rate” in the list. Change the frame rate according to the requirements and options available and click “OK.” The frame rate of your video will be changed using Filmora.
Conclusion
This article has displayed a conspicuous detail of what the frame rate in the video is and how it implicates video editing. Wondershare Filmora has been observed as the perfect way to manage the speeds of videos. Video frame rates can also be managed using the exquisite video editor. Those who wish to manage such features of the videos should consider using this tool.
Part 1: What is Frame Rate and How Important It Is In Videos?
One of the most important metrics in videos is the frame rate. This term refers to the individual frames present in the video. While the frame represents a single second, this defines the frequency of the video. This is the display of consecutive frames every second, which brings up the illusion of motion for the viewers. In this way, the entire frame rate is explained as terminology to users new to video editing.
Importance of Frame Rate in Videos
We will highlight some prominent points explaining the importance of video frame rates. Continuing with these points, this will help users understand how essential video frame rate is:
01of 04Defines Smoothness in Videos
Having a higher frame rate in a video is equivalent to a smooth video. Users who consider having smoothness in their videos always consider the frame rates. Higher frame rates have better transitions and seamless motion.
02of 04The detail in the Video
If you have a low frame rate in your video, you cannot observe the details in the fast-moving objects. In such a scenario, you need to have a video with a good frame rate. This will help display the explicit details of the video, which cannot be viewed under every frame rate quality.
03of 04Realistic Effects
Old videos never had the kick that made them feel real. Videos with higher frame rates have changed the dynamics in the current system. Realism and immersive video experience are prominent getaways achieved with better frame rates.
04of 04Realistic Effects
The use of better frame rates gives the option of improving the effects of the video. Videos that did not have impressive frame rates are not able to display the mood or atmosphere. Better frame rates help display the environment better, thus explaining the importance.
Changing Video Frame Rates And Speed Editor A wonderful video editor - Wondershare Filmora providing frame rate and speed ramping features for all creators.
Free Download Free Download Learn More

Part 2: What Are The Different Uses of Speed Ramping in Video Editing?
Speed ramping and video frame rate are one of the most known techniques which are widely used in video editing. You must be wondering why paying attention to speed ramping is so important. Nothing to worry about because this part will give you the most implementable uses of speed ramping in video editing. Have a look below to discover further information about this:
Highlighting Actions and Dramas
You can use speed ramping to emphasize the actional and dramatic sequences. It also helps you draw the audience’s attention and make the essential factors more notable. Above all, the speed ramping also integrates the useable effects which can add a drastic touch of drama to your videos,
Transitions and Motion Tracking
With the good use of speed ramping, you can achieve a smooth transition in videos. It also helps you add seamless transitions in the videos to add a sense of consistency. One of the best things is adding slow-motion and motion-tracking effects in simple videos.
Syncing Audios
Syncing the audio beats with videos is crucial to enhance the user experience. Speed ramping offers capabilities through which you can easily sync the audio to the length of videos. As it never compromises the content or layout of videos, you don’t have to worry about anything.
Emphasized Storytelling
If you need to induce a sense of storytelling and optimize the video quality, consider speed ramping. You can control the overall speed of actions and dramas and convey a particular narrative to add depth to videos. It also helps to increase the frame rate of video.
Part 3: Perform Basic Speed Adjustments and Speed Ramping on Wondershare Filmora
Wondershare Filmora is a great video editor providing exquisite features and details to users. It embeds simple video editing tools and AI functionalities to provide a quick editing experience. However, the focus on the details is not lacking in this tool. Filmora provides a comprehensive set of effects, transitions, and elements to induce in videos.
Free Download For Win 7 or later(64-bit)
Free Download For macOS 10.14 or later
Along with that, it also includes multiple functionalities which cannot be observed in many video editors. However, since we are putting our focus on discussing the speed adjustments in Filmora, let’s look at the comprehensive steps explained below:
Method 1: Uniform Speed Adjustments in Videos
Step 1Import Video on Filmora for Speed Adjustments
Firstly, launch Wondershare Filmora on your computer and continue to open a new project. Once a window enters the display, lead into the “Import” section for importing the media files that need adjustment.

Step 2Select the Speed Option
After adding the videos and dragging them to the timeline, continue to locate the “Speed “ option in the bar above the timeline. This opens a drop-down menu where you have to select “Uniform Speed” or use “Ctrl + R.”

Step 3Manage Speed Uniformly
A new section opens on the video editor where you can define the speed using the slider. Also, you can activate options like “Reverse Speed,” “Ripple Edit,” and “Maintain Pitch,” if needed.

Method 2: Utilize the Option of Speed Ramping
Step 1Access Speed Ramping Option
Once you have opened Filmora and imported a video on the timeline, lead to the “Speed” button again. Select the option of “Speed Ramping ” in the drop-down to continue.

Step 2Manage Speed Ramping of Video
As you find a new screen on your front, select the type of Speed Ramping you want to perform. Adjust the speed ramp on the line graph that comes in display and click “OK” to conclude.

Step 3Export the Final Video
Once you are done editing your videos, lead to the “Export” button to save the videos on the device.

Part 4: [Basic] How to Change The Frame Rate in Wondershare Filmora?
While you find out the ways to change the speed of your videos, you can also change their frame rate. Filmora offers dedicated options on its platform to its users, which can be understood in the steps below:
Free Download For Win 7 or later(64-bit)
Free Download For macOS 10.14 or later
Step 1Open Settings For Changing Frame Rate
As you open Filmora and import a video, drag it to the timeline. Once the video is imported, lead to the “Preview quality and display settings” button on the right side of the screen.

Step 2Manage Speed Ramping of Video
This opens a drop-down menu where you have to select the option “Change Project Aspect Ratio.”

Step 3Change Frame Rate Successfully
You will be led to a new screen where you can find the option of “Frame Rate” in the list. Change the frame rate according to the requirements and options available and click “OK.” The frame rate of your video will be changed using Filmora.

Conclusion
This article has displayed a conspicuous detail of what the frame rate in the video is and how it implicates video editing. Wondershare Filmora has been observed as the perfect way to manage the speeds of videos. Video frame rates can also be managed using the exquisite video editor. Those who wish to manage such features of the videos should consider using this tool.
Part 1: What is Frame Rate and How Important It Is In Videos?
One of the most important metrics in videos is the frame rate. This term refers to the individual frames present in the video. While the frame represents a single second, this defines the frequency of the video. This is the display of consecutive frames every second, which brings up the illusion of motion for the viewers. In this way, the entire frame rate is explained as terminology to users new to video editing.
Importance of Frame Rate in Videos
We will highlight some prominent points explaining the importance of video frame rates. Continuing with these points, this will help users understand how essential video frame rate is:
01of 04Defines Smoothness in Videos
Having a higher frame rate in a video is equivalent to a smooth video. Users who consider having smoothness in their videos always consider the frame rates. Higher frame rates have better transitions and seamless motion.
02of 04The detail in the Video
If you have a low frame rate in your video, you cannot observe the details in the fast-moving objects. In such a scenario, you need to have a video with a good frame rate. This will help display the explicit details of the video, which cannot be viewed under every frame rate quality.
03of 04Realistic Effects
Old videos never had the kick that made them feel real. Videos with higher frame rates have changed the dynamics in the current system. Realism and immersive video experience are prominent getaways achieved with better frame rates.
04of 04Realistic Effects
The use of better frame rates gives the option of improving the effects of the video. Videos that did not have impressive frame rates are not able to display the mood or atmosphere. Better frame rates help display the environment better, thus explaining the importance.
Changing Video Frame Rates And Speed Editor A wonderful video editor - Wondershare Filmora providing frame rate and speed ramping features for all creators.
Free Download Free Download Learn More

Part 2: What Are The Different Uses of Speed Ramping in Video Editing?
Speed ramping and video frame rate are one of the most known techniques which are widely used in video editing. You must be wondering why paying attention to speed ramping is so important. Nothing to worry about because this part will give you the most implementable uses of speed ramping in video editing. Have a look below to discover further information about this:
Highlighting Actions and Dramas
You can use speed ramping to emphasize the actional and dramatic sequences. It also helps you draw the audience’s attention and make the essential factors more notable. Above all, the speed ramping also integrates the useable effects which can add a drastic touch of drama to your videos,
Transitions and Motion Tracking
With the good use of speed ramping, you can achieve a smooth transition in videos. It also helps you add seamless transitions in the videos to add a sense of consistency. One of the best things is adding slow-motion and motion-tracking effects in simple videos.
Syncing Audios
Syncing the audio beats with videos is crucial to enhance the user experience. Speed ramping offers capabilities through which you can easily sync the audio to the length of videos. As it never compromises the content or layout of videos, you don’t have to worry about anything.
Emphasized Storytelling
If you need to induce a sense of storytelling and optimize the video quality, consider speed ramping. You can control the overall speed of actions and dramas and convey a particular narrative to add depth to videos. It also helps to increase the frame rate of video.
Part 3: Perform Basic Speed Adjustments and Speed Ramping on Wondershare Filmora
Wondershare Filmora is a great video editor providing exquisite features and details to users. It embeds simple video editing tools and AI functionalities to provide a quick editing experience. However, the focus on the details is not lacking in this tool. Filmora provides a comprehensive set of effects, transitions, and elements to induce in videos.
Free Download For Win 7 or later(64-bit)
Free Download For macOS 10.14 or later
Along with that, it also includes multiple functionalities which cannot be observed in many video editors. However, since we are putting our focus on discussing the speed adjustments in Filmora, let’s look at the comprehensive steps explained below:
Method 1: Uniform Speed Adjustments in Videos
Step 1Import Video on Filmora for Speed Adjustments
Firstly, launch Wondershare Filmora on your computer and continue to open a new project. Once a window enters the display, lead into the “Import” section for importing the media files that need adjustment.

Step 2Select the Speed Option
After adding the videos and dragging them to the timeline, continue to locate the “Speed “ option in the bar above the timeline. This opens a drop-down menu where you have to select “Uniform Speed” or use “Ctrl + R.”

Step 3Manage Speed Uniformly
A new section opens on the video editor where you can define the speed using the slider. Also, you can activate options like “Reverse Speed,” “Ripple Edit,” and “Maintain Pitch,” if needed.

Method 2: Utilize the Option of Speed Ramping
Step 1Access Speed Ramping Option
Once you have opened Filmora and imported a video on the timeline, lead to the “Speed” button again. Select the option of “Speed Ramping ” in the drop-down to continue.

Step 2Manage Speed Ramping of Video
As you find a new screen on your front, select the type of Speed Ramping you want to perform. Adjust the speed ramp on the line graph that comes in display and click “OK” to conclude.

Step 3Export the Final Video
Once you are done editing your videos, lead to the “Export” button to save the videos on the device.

Part 4: [Basic] How to Change The Frame Rate in Wondershare Filmora?
While you find out the ways to change the speed of your videos, you can also change their frame rate. Filmora offers dedicated options on its platform to its users, which can be understood in the steps below:
Free Download For Win 7 or later(64-bit)
Free Download For macOS 10.14 or later
Step 1Open Settings For Changing Frame Rate
As you open Filmora and import a video, drag it to the timeline. Once the video is imported, lead to the “Preview quality and display settings” button on the right side of the screen.

Step 2Manage Speed Ramping of Video
This opens a drop-down menu where you have to select the option “Change Project Aspect Ratio.”

Step 3Change Frame Rate Successfully
You will be led to a new screen where you can find the option of “Frame Rate” in the list. Change the frame rate according to the requirements and options available and click “OK.” The frame rate of your video will be changed using Filmora.

Conclusion
This article has displayed a conspicuous detail of what the frame rate in the video is and how it implicates video editing. Wondershare Filmora has been observed as the perfect way to manage the speeds of videos. Video frame rates can also be managed using the exquisite video editor. Those who wish to manage such features of the videos should consider using this tool.
Part 1: What is Frame Rate and How Important It Is In Videos?
One of the most important metrics in videos is the frame rate. This term refers to the individual frames present in the video. While the frame represents a single second, this defines the frequency of the video. This is the display of consecutive frames every second, which brings up the illusion of motion for the viewers. In this way, the entire frame rate is explained as terminology to users new to video editing.
Importance of Frame Rate in Videos
We will highlight some prominent points explaining the importance of video frame rates. Continuing with these points, this will help users understand how essential video frame rate is:
01of 04Defines Smoothness in Videos
Having a higher frame rate in a video is equivalent to a smooth video. Users who consider having smoothness in their videos always consider the frame rates. Higher frame rates have better transitions and seamless motion.
02of 04The detail in the Video
If you have a low frame rate in your video, you cannot observe the details in the fast-moving objects. In such a scenario, you need to have a video with a good frame rate. This will help display the explicit details of the video, which cannot be viewed under every frame rate quality.
03of 04Realistic Effects
Old videos never had the kick that made them feel real. Videos with higher frame rates have changed the dynamics in the current system. Realism and immersive video experience are prominent getaways achieved with better frame rates.
04of 04Realistic Effects
The use of better frame rates gives the option of improving the effects of the video. Videos that did not have impressive frame rates are not able to display the mood or atmosphere. Better frame rates help display the environment better, thus explaining the importance.
Changing Video Frame Rates And Speed Editor A wonderful video editor - Wondershare Filmora providing frame rate and speed ramping features for all creators.
Free Download Free Download Learn More

Part 2: What Are The Different Uses of Speed Ramping in Video Editing?
Speed ramping and video frame rate are one of the most known techniques which are widely used in video editing. You must be wondering why paying attention to speed ramping is so important. Nothing to worry about because this part will give you the most implementable uses of speed ramping in video editing. Have a look below to discover further information about this:
Highlighting Actions and Dramas
You can use speed ramping to emphasize the actional and dramatic sequences. It also helps you draw the audience’s attention and make the essential factors more notable. Above all, the speed ramping also integrates the useable effects which can add a drastic touch of drama to your videos,
Transitions and Motion Tracking
With the good use of speed ramping, you can achieve a smooth transition in videos. It also helps you add seamless transitions in the videos to add a sense of consistency. One of the best things is adding slow-motion and motion-tracking effects in simple videos.
Syncing Audios
Syncing the audio beats with videos is crucial to enhance the user experience. Speed ramping offers capabilities through which you can easily sync the audio to the length of videos. As it never compromises the content or layout of videos, you don’t have to worry about anything.
Emphasized Storytelling
If you need to induce a sense of storytelling and optimize the video quality, consider speed ramping. You can control the overall speed of actions and dramas and convey a particular narrative to add depth to videos. It also helps to increase the frame rate of video.
Part 3: Perform Basic Speed Adjustments and Speed Ramping on Wondershare Filmora
Wondershare Filmora is a great video editor providing exquisite features and details to users. It embeds simple video editing tools and AI functionalities to provide a quick editing experience. However, the focus on the details is not lacking in this tool. Filmora provides a comprehensive set of effects, transitions, and elements to induce in videos.
Free Download For Win 7 or later(64-bit)
Free Download For macOS 10.14 or later
Along with that, it also includes multiple functionalities which cannot be observed in many video editors. However, since we are putting our focus on discussing the speed adjustments in Filmora, let’s look at the comprehensive steps explained below:
Method 1: Uniform Speed Adjustments in Videos
Step 1Import Video on Filmora for Speed Adjustments
Firstly, launch Wondershare Filmora on your computer and continue to open a new project. Once a window enters the display, lead into the “Import” section for importing the media files that need adjustment.

Step 2Select the Speed Option
After adding the videos and dragging them to the timeline, continue to locate the “Speed “ option in the bar above the timeline. This opens a drop-down menu where you have to select “Uniform Speed” or use “Ctrl + R.”

Step 3Manage Speed Uniformly
A new section opens on the video editor where you can define the speed using the slider. Also, you can activate options like “Reverse Speed,” “Ripple Edit,” and “Maintain Pitch,” if needed.

Method 2: Utilize the Option of Speed Ramping
Step 1Access Speed Ramping Option
Once you have opened Filmora and imported a video on the timeline, lead to the “Speed” button again. Select the option of “Speed Ramping ” in the drop-down to continue.

Step 2Manage Speed Ramping of Video
As you find a new screen on your front, select the type of Speed Ramping you want to perform. Adjust the speed ramp on the line graph that comes in display and click “OK” to conclude.

Step 3Export the Final Video
Once you are done editing your videos, lead to the “Export” button to save the videos on the device.

Part 4: [Basic] How to Change The Frame Rate in Wondershare Filmora?
While you find out the ways to change the speed of your videos, you can also change their frame rate. Filmora offers dedicated options on its platform to its users, which can be understood in the steps below:
Free Download For Win 7 or later(64-bit)
Free Download For macOS 10.14 or later
Step 1Open Settings For Changing Frame Rate
As you open Filmora and import a video, drag it to the timeline. Once the video is imported, lead to the “Preview quality and display settings” button on the right side of the screen.

Step 2Manage Speed Ramping of Video
This opens a drop-down menu where you have to select the option “Change Project Aspect Ratio.”

Step 3Change Frame Rate Successfully
You will be led to a new screen where you can find the option of “Frame Rate” in the list. Change the frame rate according to the requirements and options available and click “OK.” The frame rate of your video will be changed using Filmora.

Conclusion
This article has displayed a conspicuous detail of what the frame rate in the video is and how it implicates video editing. Wondershare Filmora has been observed as the perfect way to manage the speeds of videos. Video frame rates can also be managed using the exquisite video editor. Those who wish to manage such features of the videos should consider using this tool.
Looking For The Best Slow Motion Effect in Premiere Pro
Adobe Premiere Pro is a famous video editing program in the media industry. It includes professional-quality features that enable advanced video editing. Due to its impressive performance, many content creators use this tool to add slow-motion effects to the videos. If you are at a beginner stage of video editing, you may not know how to operate Premiere Pro slow-motion effects. Thus, this guide will provide you with basic yet accurate instructions.
To create slow-motion effects in Premiere Pro, the guide will describe the instructions in a simple way. We will also highlight the templates of this tool providing slow-motion effects in Premiere Pro for videos. Hence, keep discovering this guide to learn more details.
Slow Motion Video Maker Slow your video’s speed with better control of your keyframes to create unique cinematic effects!
Make A Slow Motion Video Make A Slow Motion Video More Features

Part 1: How To Perform Slow Motion on Adobe Premiere Pro?
Adobe Premiere Pro offers an advanced user interface to perform complex functions. It contains a wide range of features supporting non-destructive video editing. Its auto-correct feature lets you adjust the color patterns of the video in a smart way. Moreover, it contains a comparison view to analyze the before and after visual effects. You can also add adjustment layers in the timeline to change many clips at once.
On Premiere Pro, you can also connect third-party plugins for more features. It also supports many professional-grade formats to offer flexibility for video editors. Among other features, it can also apply slow-motion effects to the video. To make Premiere Pro slow-motion effects, you can use the following steps:
Step 1: On Premiere Pro, upload the video in which you want to create a slow-motion effect. To proceed, drag it to the timeline with your cursor. At the start of the timeline, right-click on the small icon saying FX on the left side. From there, select “Time Remapping” and then “Speed.”

Step 2: Now, add the keyframe where you want to begin and end the slow-motion effect. To do so, press “CTRL + Click” on the timeline. To add a ramp, click on the added keyframes and drag them a little to the right side.

Step 3: To proceed, move to the central part of the two added keyframes. Afterward, click on the central part and drag it downwards. By doing so, you can see the reduced percentage number on the timeline. To add a more slow-motion effect, pull down the central part of the timeline. For more adjustments in the length within the keyframes, you can go to the effects control. By doing so, you can determine how smoothly you want to create a slow-motion effect.

Part 2:Leading Templates Offering Quick Slow Motion Effect in Premiere Pro
In this section, you can find popular slow-motion effect Premiere Pro templates. After accessing the templates, you can customize them as per your needs. Hence, let’s dig into the details below:
This template is perfect for use in the intros of videos, presentations, slideshows, etc. It contains 9 different scenes of outdoor areas. Moreover, it offers 16 media placeholders and 7 text placeholders to add custom content. You can promote your brand by using its 2 placeholder logos. Hence, it’s a perfect slow-motion video template with HD-quality resolution.

The slow-motion explosion logo opener is an attractive template featuring vibrant colors. It contains a hand-drawn animated logo with suitable backgrounds. Along with the logo reveal, it includes background music that matches the theme of the video. It also offers media and text placeholders to let you introduce your brand.

Do you want to create a modern video on Premiere Pro? Well, this slow-motion template features freeze frames to offer viewers a unique look. The template gives a glimpse of urban life with energetic background music. It’s available in full HD resolution with eye-catching urban locations. Hence, try this template for demos, fashion, and action videos.

Dynamic Sport is one of the famous slow-motion Premiere Pro templates. With a modern outlook, it includes simple text animation. Moreover, it uses many transitioning effects to produce a stunning video. You can insert extra content with its 8 editable text placeholders. Thus, download this template and customize it in Premiere Pro.

This planet-themed template introduces cinematic spinning planets. With 8 text placeholders, you can write content related to your shows, movies, and events. It contains intriguing background music that can grasp the attention of your audience. In full HD resolution, this template can help you produce cinematic slow-motion videos with minimal effort.

Part 3: Tutorial: Perform Slow Motion in Filmora Video Editing
Are you ready to perform slow-motion effects in Premiere Pro in Filmora? Check the directions below to add a slow-motion effect to your video .
Free Download For Win 7 or later(64-bit)
Free Download For macOS 10.14 or later
Step 1Browse and Import the File
After the launch of Filmora, click on the “New Project” button. Click on the “Import Media” section to browse the video file. Once done, drag the video to the timeline to start the editing process.

Step 2Open Speed Ramping Settings
Go to the right panel of the screen to open the settings. From there, go to the “Speed” tab and select “Speed Ramping”. It will display the speed ramping settings below.

Step 3Adjust the Video Speed
The presets are available for speed ramping in the above section. Choose “Customize” and then proceed to the small graph given below. Here, you can move the points to adjust the video’s speed. By pulling down the points, you can reduce the video’s speed. Continue the process until you achieve your desired speed.

Step 4Render the Video
Expand the option of “AI Frame Interpolation” and choose “Optical Flow.” Once done, click on “Render Preview” from the timeline’s toolbar to see the highest-quality results.

Conclusion
Slow-motion effect Premiere Pro can produce high-end results for professionals. Yet, this tool is not ideal for every kind of user. In contrast, Filmora is the most flexible tool due to its friendly user interface. Without extensive manual efforts, you can produce slow-motion videos within a few clicks. Moreover, it features many AI options to let you increase your productivity.
Make A Slow Motion Video Make A Slow Motion Video More Features

Part 1: How To Perform Slow Motion on Adobe Premiere Pro?
Adobe Premiere Pro offers an advanced user interface to perform complex functions. It contains a wide range of features supporting non-destructive video editing. Its auto-correct feature lets you adjust the color patterns of the video in a smart way. Moreover, it contains a comparison view to analyze the before and after visual effects. You can also add adjustment layers in the timeline to change many clips at once.
On Premiere Pro, you can also connect third-party plugins for more features. It also supports many professional-grade formats to offer flexibility for video editors. Among other features, it can also apply slow-motion effects to the video. To make Premiere Pro slow-motion effects, you can use the following steps:
Step 1: On Premiere Pro, upload the video in which you want to create a slow-motion effect. To proceed, drag it to the timeline with your cursor. At the start of the timeline, right-click on the small icon saying FX on the left side. From there, select “Time Remapping” and then “Speed.”

Step 2: Now, add the keyframe where you want to begin and end the slow-motion effect. To do so, press “CTRL + Click” on the timeline. To add a ramp, click on the added keyframes and drag them a little to the right side.

Step 3: To proceed, move to the central part of the two added keyframes. Afterward, click on the central part and drag it downwards. By doing so, you can see the reduced percentage number on the timeline. To add a more slow-motion effect, pull down the central part of the timeline. For more adjustments in the length within the keyframes, you can go to the effects control. By doing so, you can determine how smoothly you want to create a slow-motion effect.

Part 2:Leading Templates Offering Quick Slow Motion Effect in Premiere Pro
In this section, you can find popular slow-motion effect Premiere Pro templates. After accessing the templates, you can customize them as per your needs. Hence, let’s dig into the details below:
This template is perfect for use in the intros of videos, presentations, slideshows, etc. It contains 9 different scenes of outdoor areas. Moreover, it offers 16 media placeholders and 7 text placeholders to add custom content. You can promote your brand by using its 2 placeholder logos. Hence, it’s a perfect slow-motion video template with HD-quality resolution.

The slow-motion explosion logo opener is an attractive template featuring vibrant colors. It contains a hand-drawn animated logo with suitable backgrounds. Along with the logo reveal, it includes background music that matches the theme of the video. It also offers media and text placeholders to let you introduce your brand.

Do you want to create a modern video on Premiere Pro? Well, this slow-motion template features freeze frames to offer viewers a unique look. The template gives a glimpse of urban life with energetic background music. It’s available in full HD resolution with eye-catching urban locations. Hence, try this template for demos, fashion, and action videos.

Dynamic Sport is one of the famous slow-motion Premiere Pro templates. With a modern outlook, it includes simple text animation. Moreover, it uses many transitioning effects to produce a stunning video. You can insert extra content with its 8 editable text placeholders. Thus, download this template and customize it in Premiere Pro.

This planet-themed template introduces cinematic spinning planets. With 8 text placeholders, you can write content related to your shows, movies, and events. It contains intriguing background music that can grasp the attention of your audience. In full HD resolution, this template can help you produce cinematic slow-motion videos with minimal effort.

Part 3: Tutorial: Perform Slow Motion in Filmora Video Editing
Are you ready to perform slow-motion effects in Premiere Pro in Filmora? Check the directions below to add a slow-motion effect to your video .
Free Download For Win 7 or later(64-bit)
Free Download For macOS 10.14 or later
Step 1Browse and Import the File
After the launch of Filmora, click on the “New Project” button. Click on the “Import Media” section to browse the video file. Once done, drag the video to the timeline to start the editing process.

Step 2Open Speed Ramping Settings
Go to the right panel of the screen to open the settings. From there, go to the “Speed” tab and select “Speed Ramping”. It will display the speed ramping settings below.

Step 3Adjust the Video Speed
The presets are available for speed ramping in the above section. Choose “Customize” and then proceed to the small graph given below. Here, you can move the points to adjust the video’s speed. By pulling down the points, you can reduce the video’s speed. Continue the process until you achieve your desired speed.

Step 4Render the Video
Expand the option of “AI Frame Interpolation” and choose “Optical Flow.” Once done, click on “Render Preview” from the timeline’s toolbar to see the highest-quality results.

Conclusion
Slow-motion effect Premiere Pro can produce high-end results for professionals. Yet, this tool is not ideal for every kind of user. In contrast, Filmora is the most flexible tool due to its friendly user interface. Without extensive manual efforts, you can produce slow-motion videos within a few clicks. Moreover, it features many AI options to let you increase your productivity.
Create Your Own Subscribe Channel Graphics
Professional video creators earn billions from YouTube, Tick Tock, and such platforms today. That strongly encourages newcomers to create their video content. But is it that easy? Of course not. To create a successful video and catch people’s attention, subscribe channel graphics are essential.
We have introduced how to create a simple custom subscribe button animation for beginners. We are here to give a more advanced and fully animated graphic that will provide your video with a professional look. Let’s start with knowing what a Subscription channel graphic is.
What Is a Subscribe Channel Graphic?
We here give a simple explanation for those new to a subscribe channel graphic. Have you ever watched videos on a platform like YouTube? If yes, you must have noticed some unique pictures encouraging viewers to subscribe to the channel. That is exactly what a subscribe channel graphic is. It looks like as below.
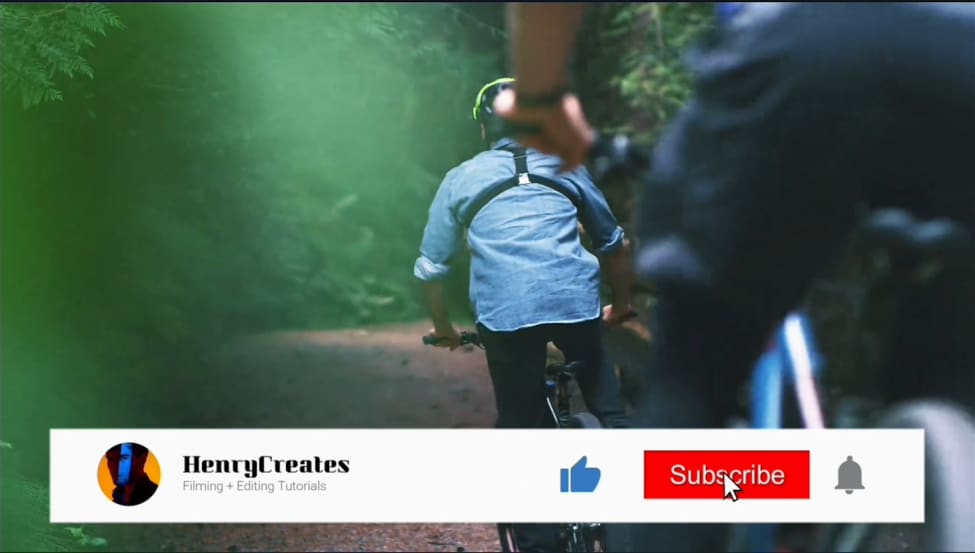
Every video crater incorporates such graphics on their videos before posting them. However, the hardest part is how to create one. We are now moving forward to see how we can make some outstanding subscribe button graphics using Wondershare Filmora.
Create Advanced Subscription Channel Graphics With Wondershare Filmora
Before we dive into our step-by-step guide, let’s first have an overview of our video editor. Wondershare Filmora is an incredible video editor with robust editing features. These features will transform your video into a stunning one within minutes. It also comes with a powerful screen recorder and a large filmstock of templates.
So using these templates, icons, and other features, here are the steps you need to follow to make an advanced subscribe channel graphic.
Free Download For Win 7 or later(64-bit)
Free Download For macOS 10.14 or later
Step1 Download and install Wondershare Filmora
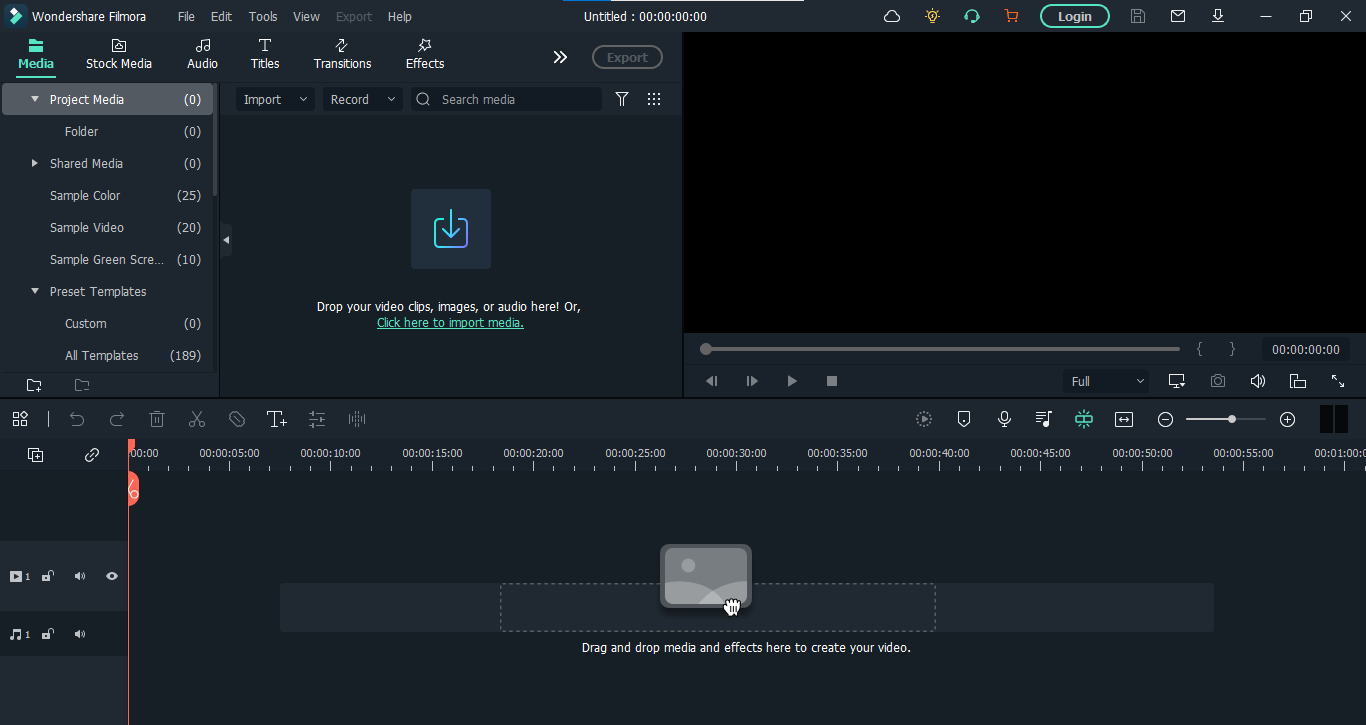
First, you need to download and install the video editor, Filmora. If you’ve already done that, then launch the software right away. But if you haven’t, then download it below. Once the download finishes, install the software on your computer.
When you launch the Filmora, click on “New Project.”
Step2 Make the structure of your graphics
For creating anything, we first need a flawless structure. Here, we can make the structure of Subscribe channel graphics using different colors, icons, texts, and channel photos. We’ll start by adding color layers.
1. Add color layers
- Go to the “Media” on the top left corner of the interface and Click on “Sample Color.” Here find the Green color and add it in the panel below as the first video layer by the drag-n-drop function.
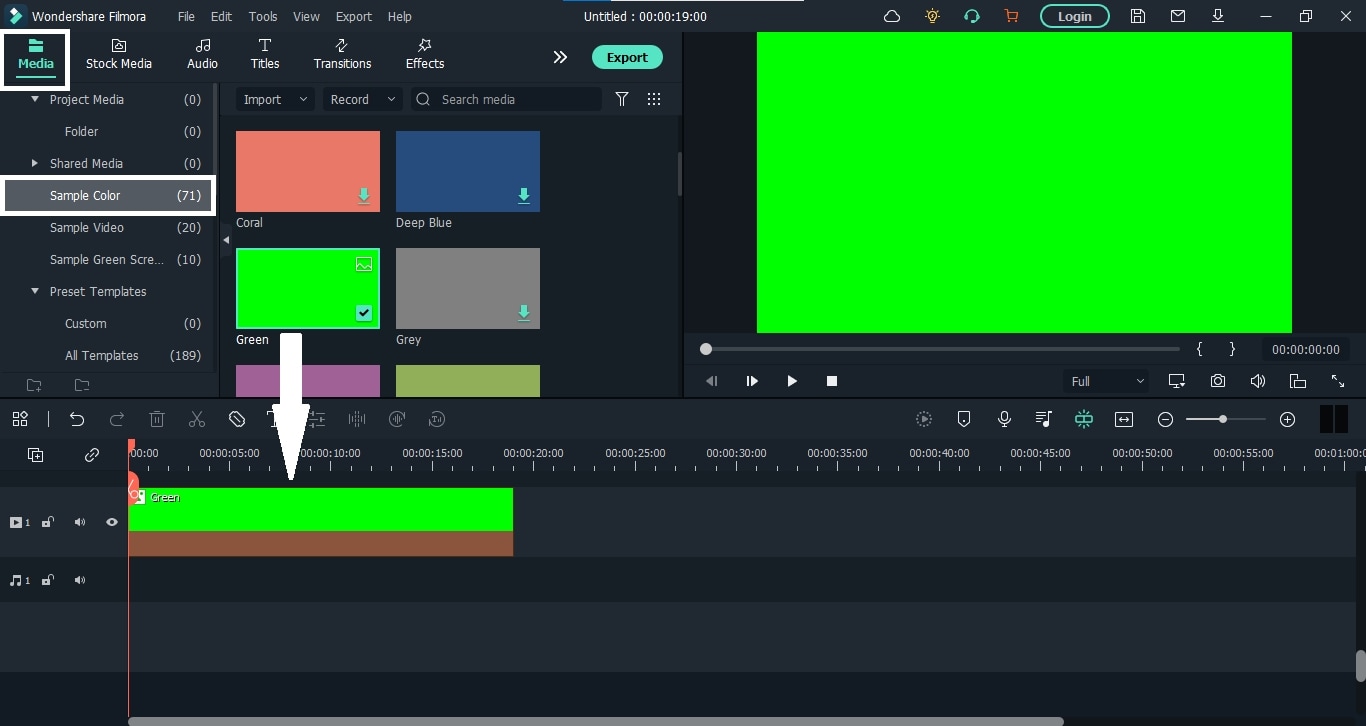
- We will key this layer at the end, so make sure not to use any other green graphics for your animation.
- Let’s lock this layer because we will no longer use it. For this, click on the “Lock” icon on the layer’s left side.
- Add white and red colors and stack them on top of the green color layer.
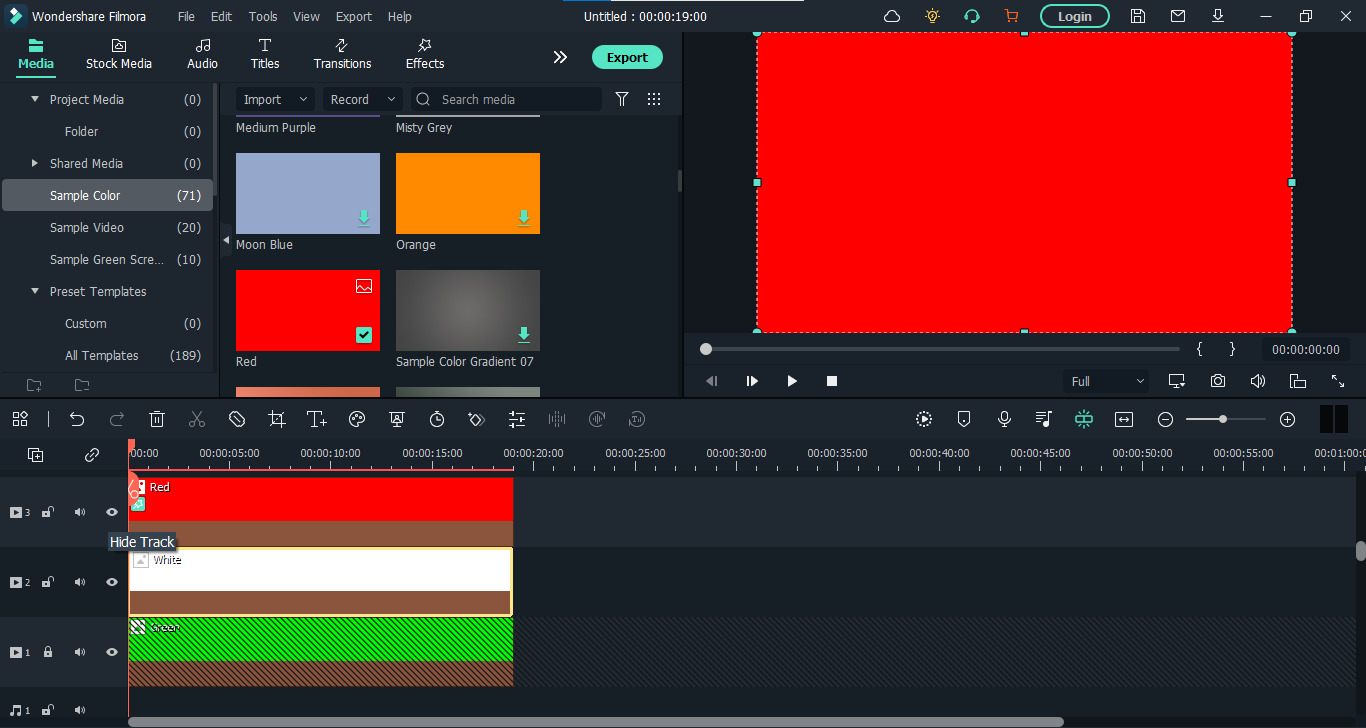
After adding all three color layers, it’s time to crop these layers to make the structure of our graphic.
Crop the Color Layers
- Go to the “Effects” tab from the top bar and search for the “Crop” effect. Then drag the effect and add it to the white and red layers on the panel.
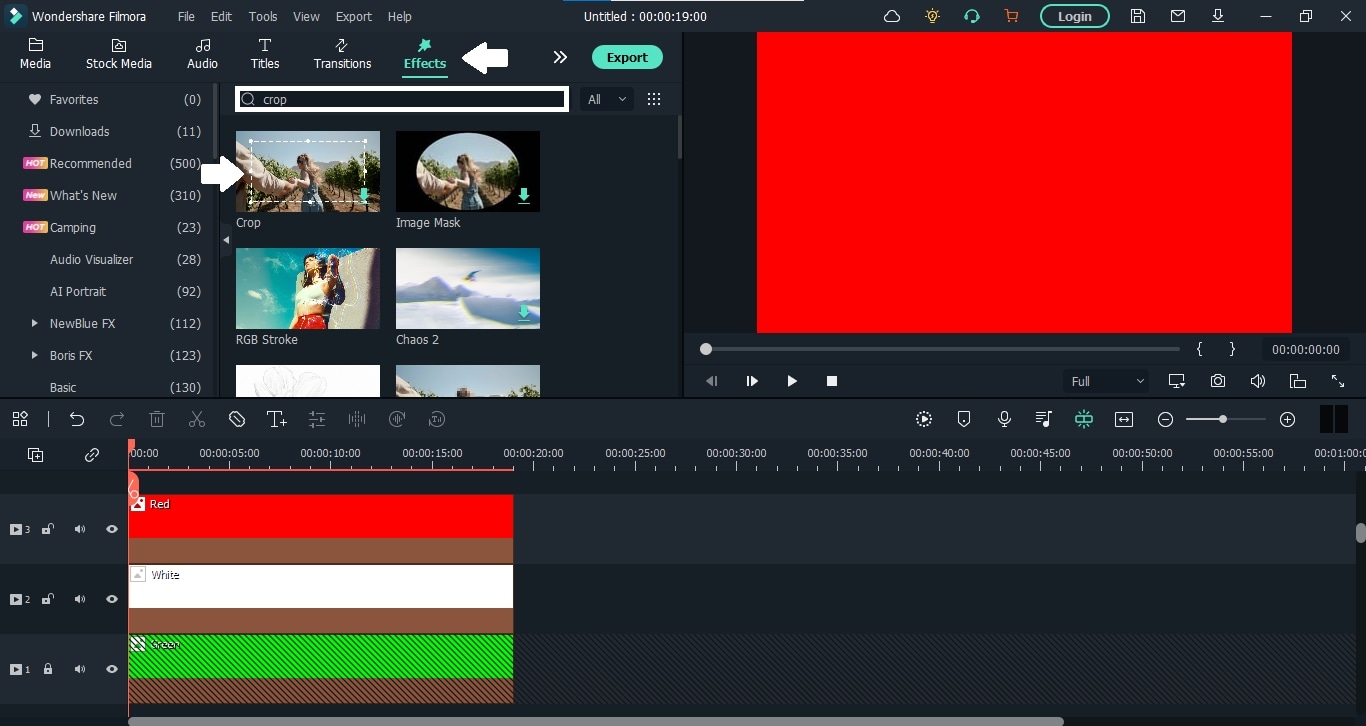
- First, click on the “Eye” icon beside the red color layer to hide it. Then double-click the white layer to see its properties. When the properties appear, select “Effects” from there.
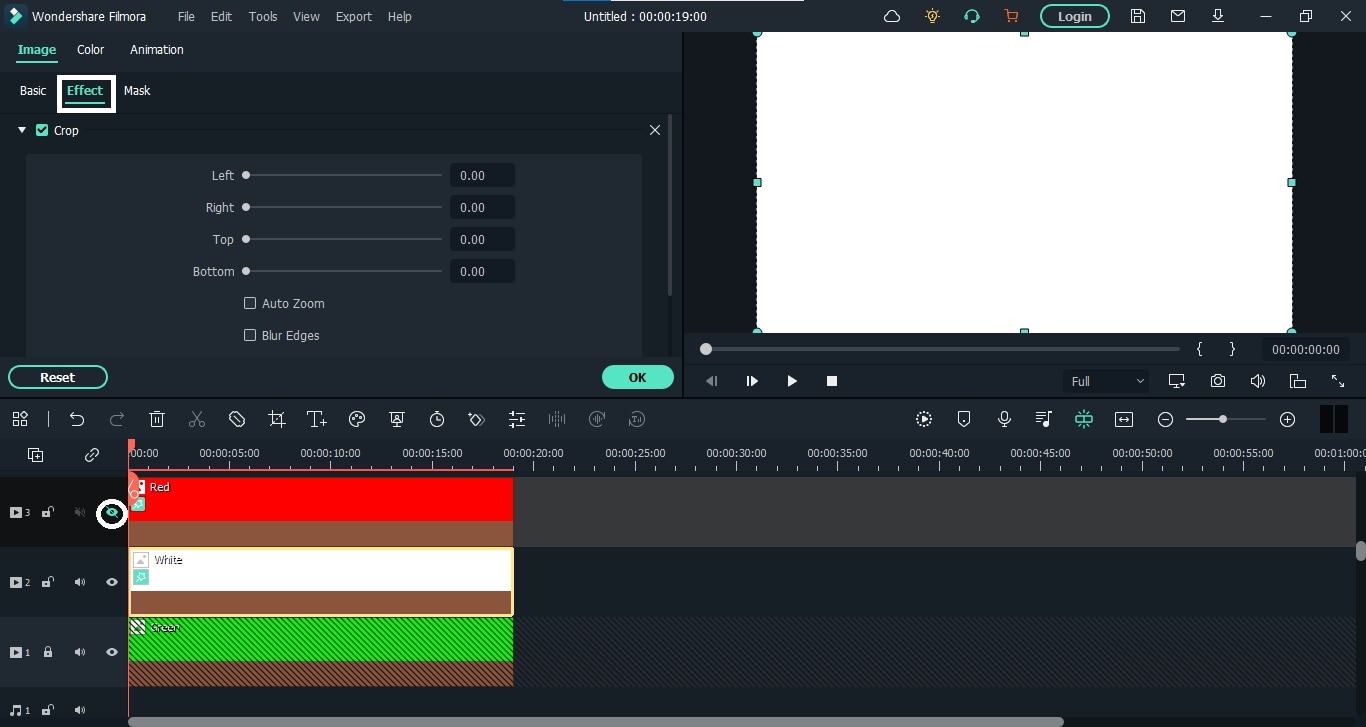
- You can also enable the safe zones from the display settings on the right side of the panel. After that, crop the white layer first, then show the red layer and crop it too. It will look like this.
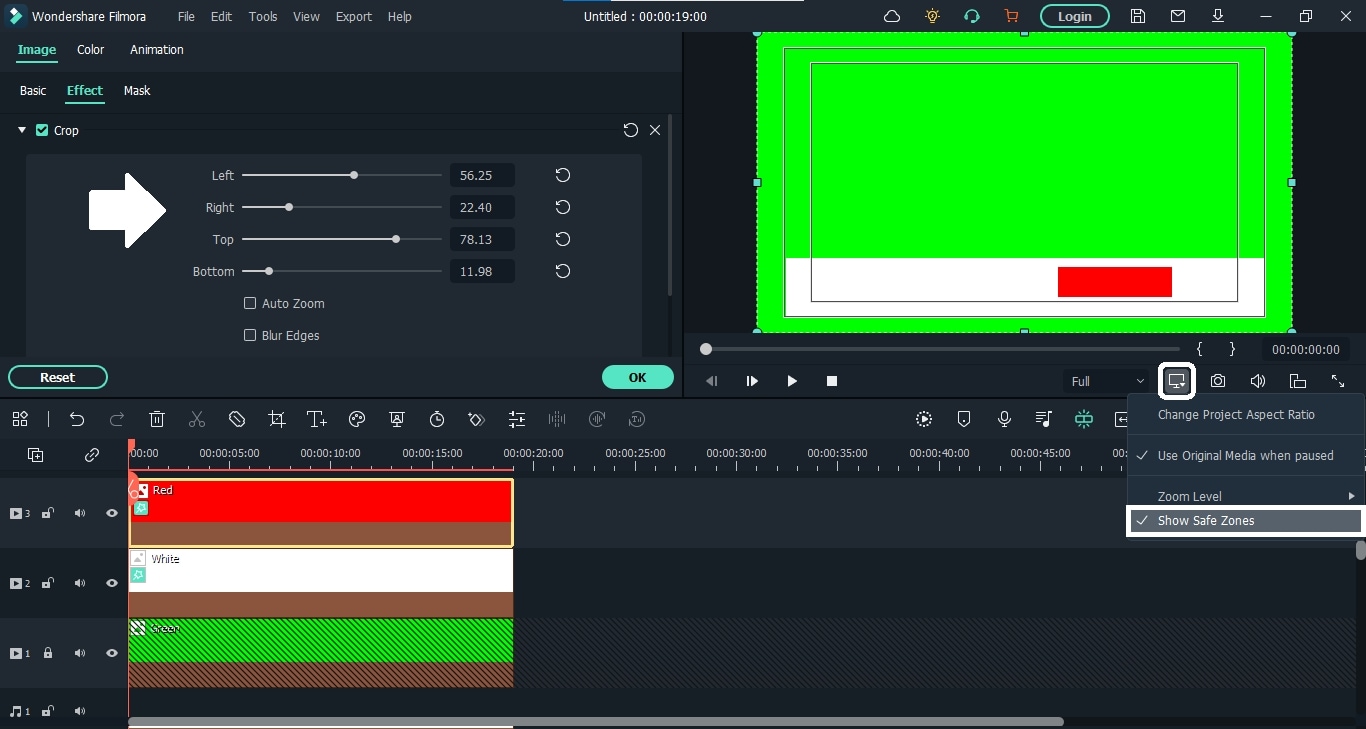
That’s it, folks. Our color backgrounds are here. Now we have to add our channel photo to this. So let’s move on to see how to do it.
2. Add a channel photo
- To add the channel photo, you can upload the image. Here we are going to use some images from the stock media. No matter the image, drop it down on the panel above the red color layer.
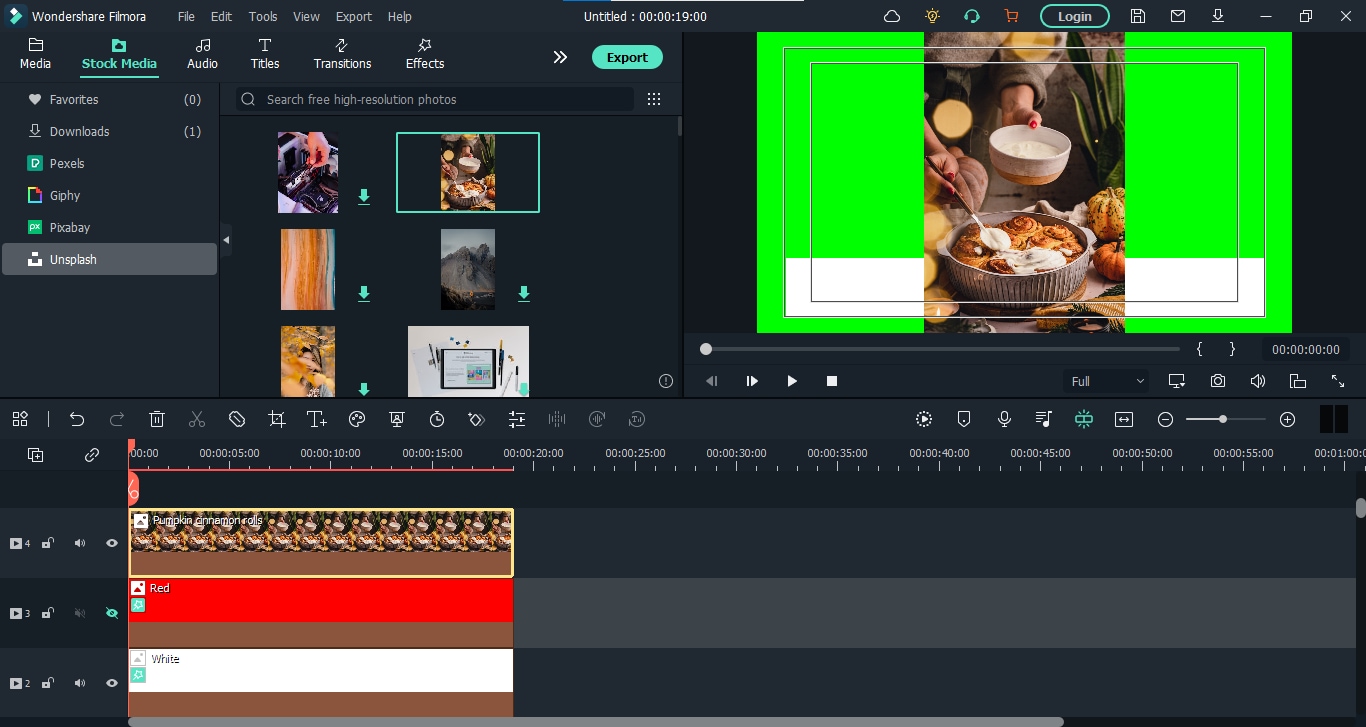
- Now double-click on the image layer, and from the properties, go to the “Mask” option and select the circle. You can also select any other shape you like.
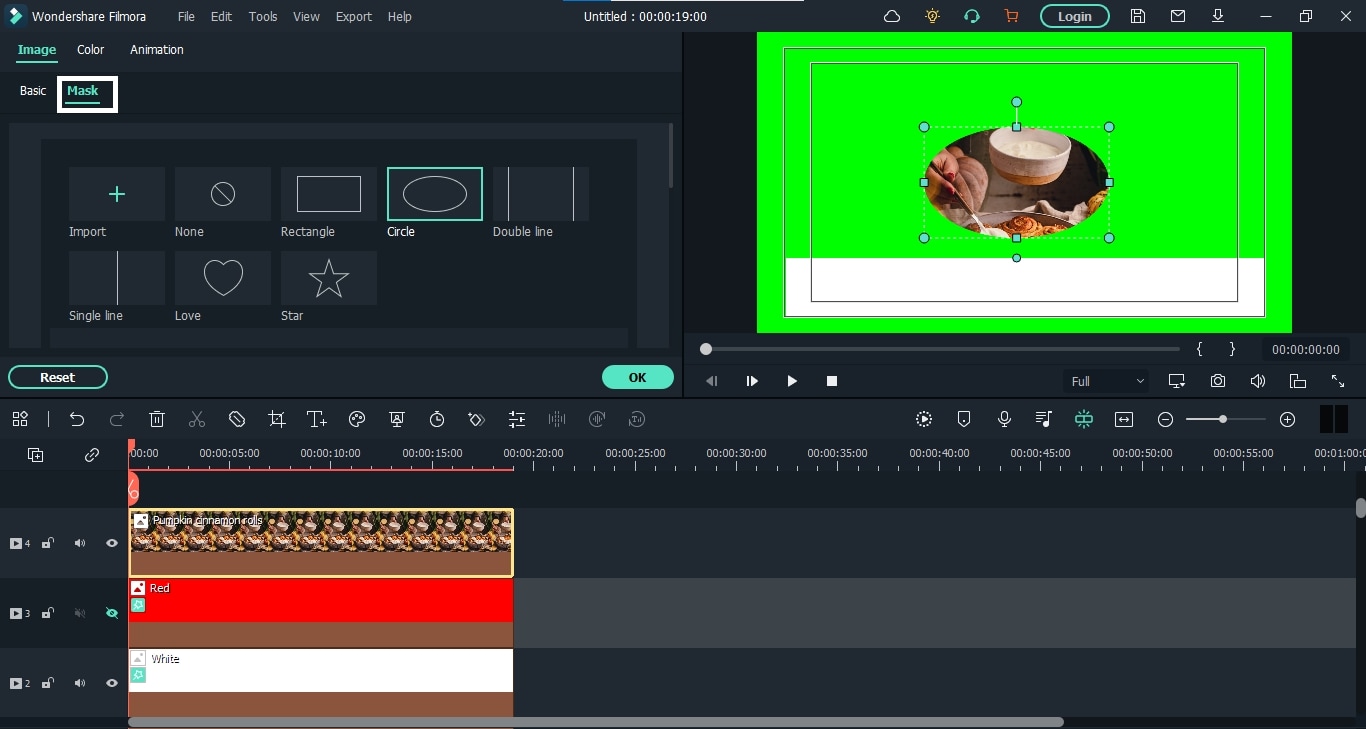
- After that, scroll down and make the circle even by matching all numbers. Then scale it down and place it on the left corner of the white layer.
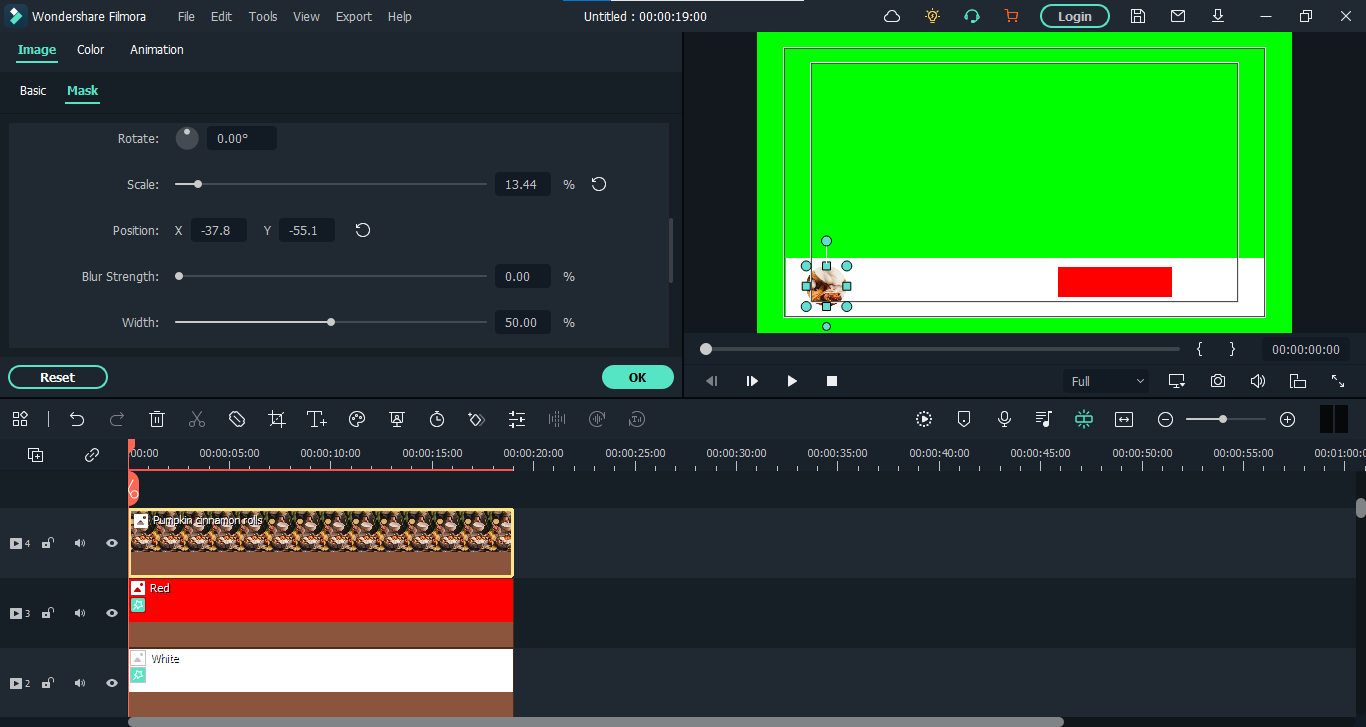
It’s done. Let’s add our channel text now.
3. Add texts
- For adding text, go to the “Titles” from the top bar and add the title you like to the panel.
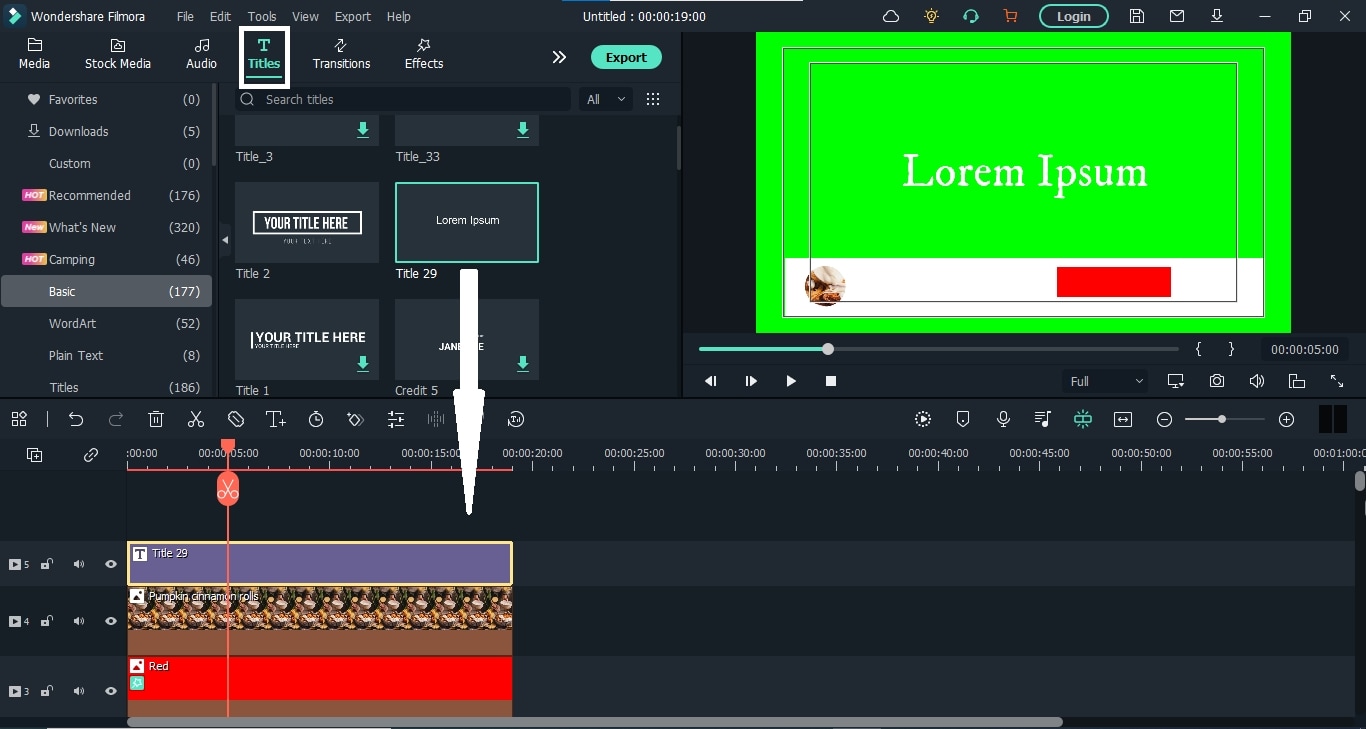
- Now double-click this layer and add the text you want. You can also change the color of the text, scale it down and place it where ever you want.
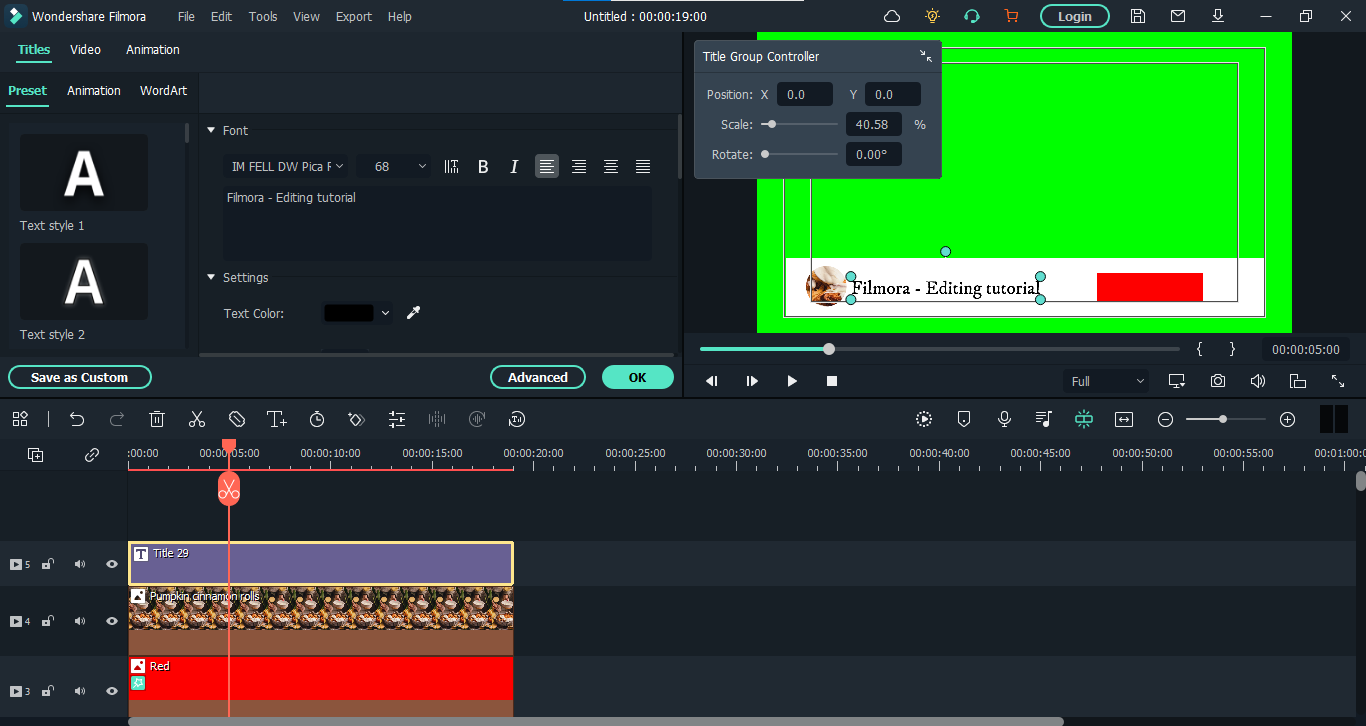
- Now, let’s add another title for the subscribe button. You have to place it on the red layer.
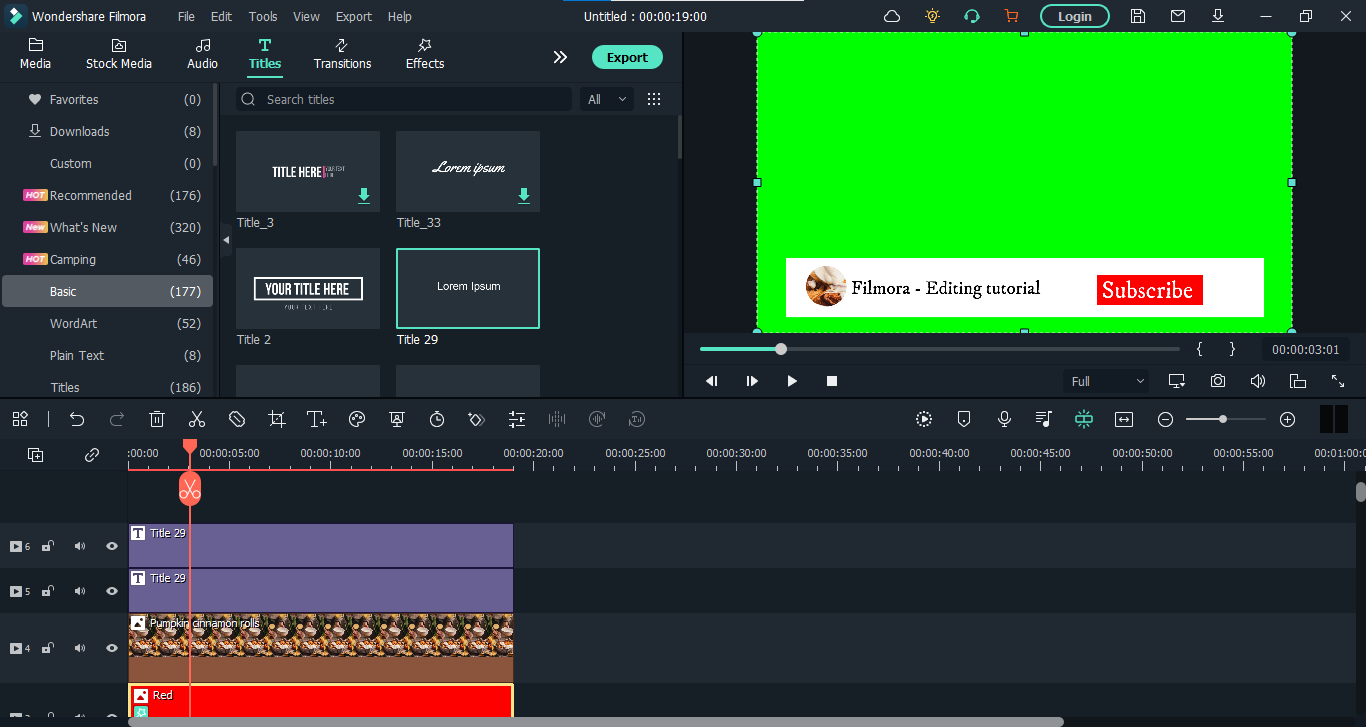
We can’t finish our structure without icons, can we? So let’s move on to them.
4. Add icons
- Hit the “Element” from the top bar and search for the “Bell” icon. You will find the short animations of the bell. Add the suitable one to the panel.
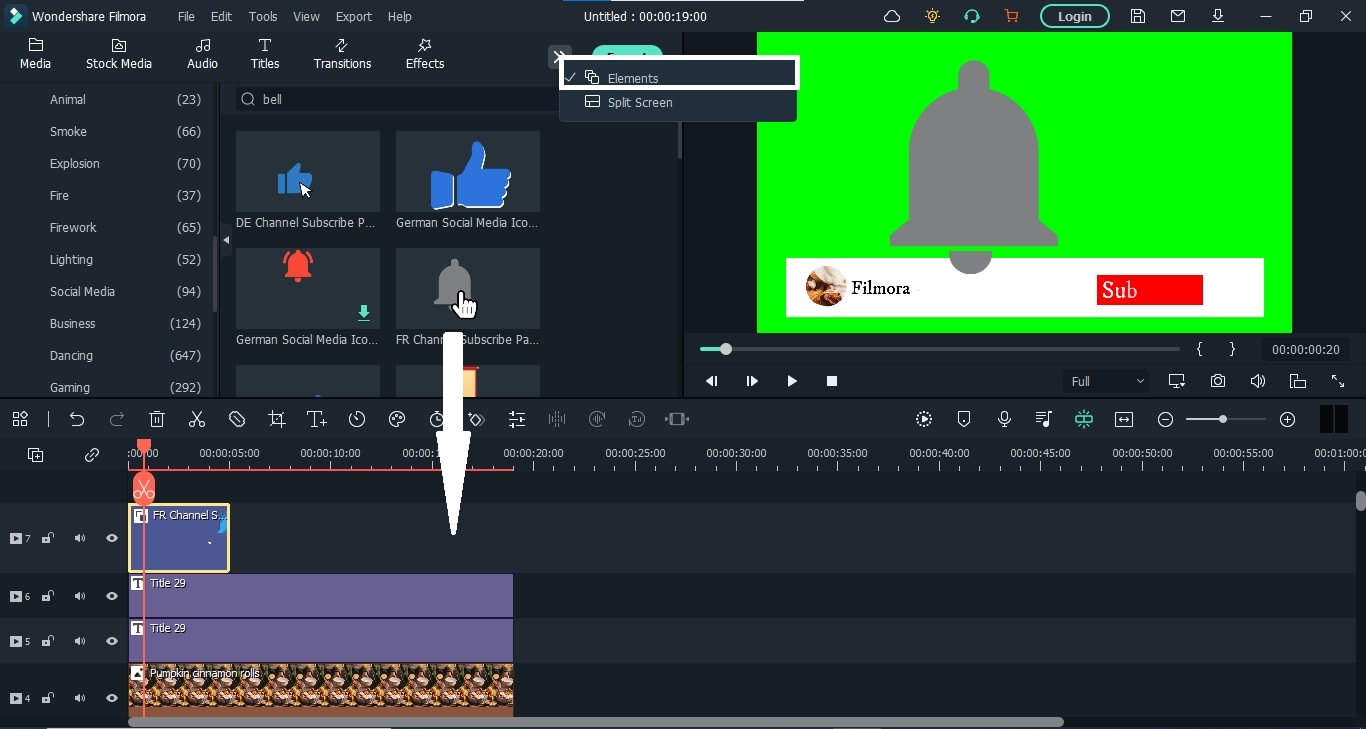
- Now find a suitable place in the animation, stop it at that point, right-click on the element layer and add a freeze frame.
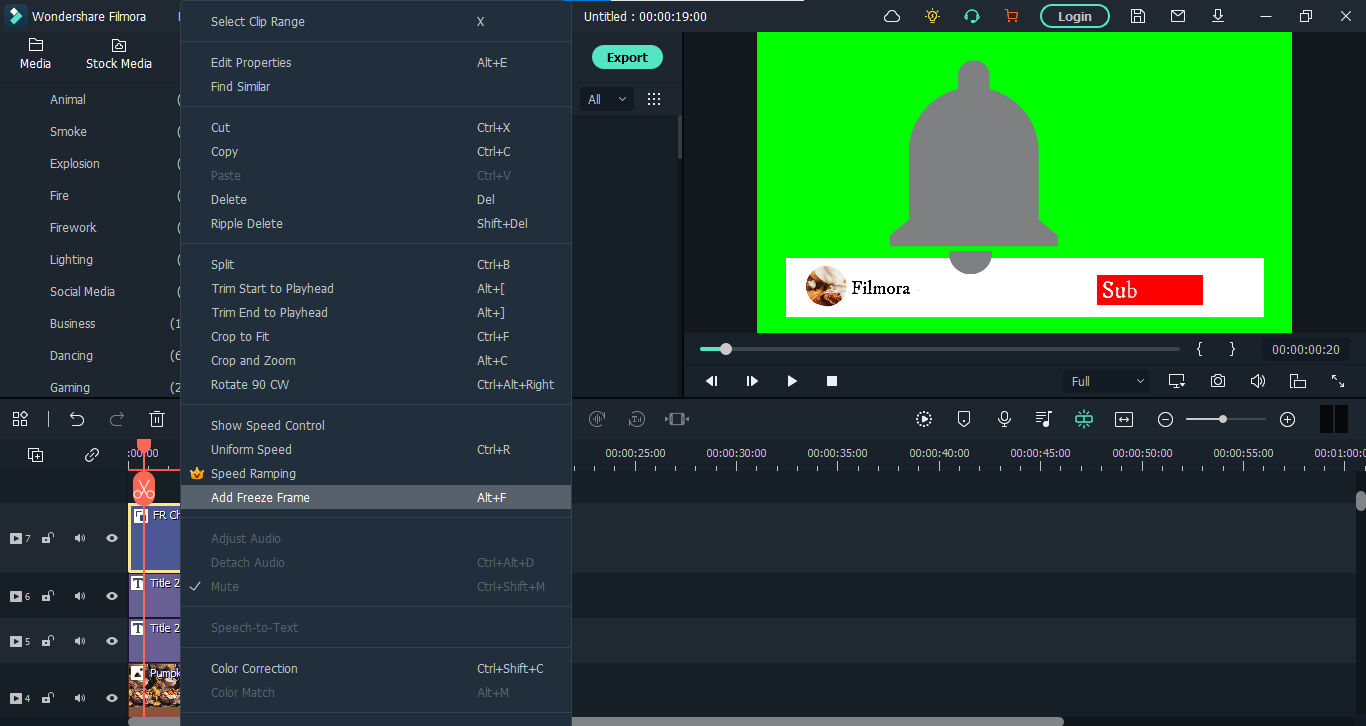
- You can also extend the freeze frame and remove the other parts. Then reduce its size and place it beside the “Subscribe” text.
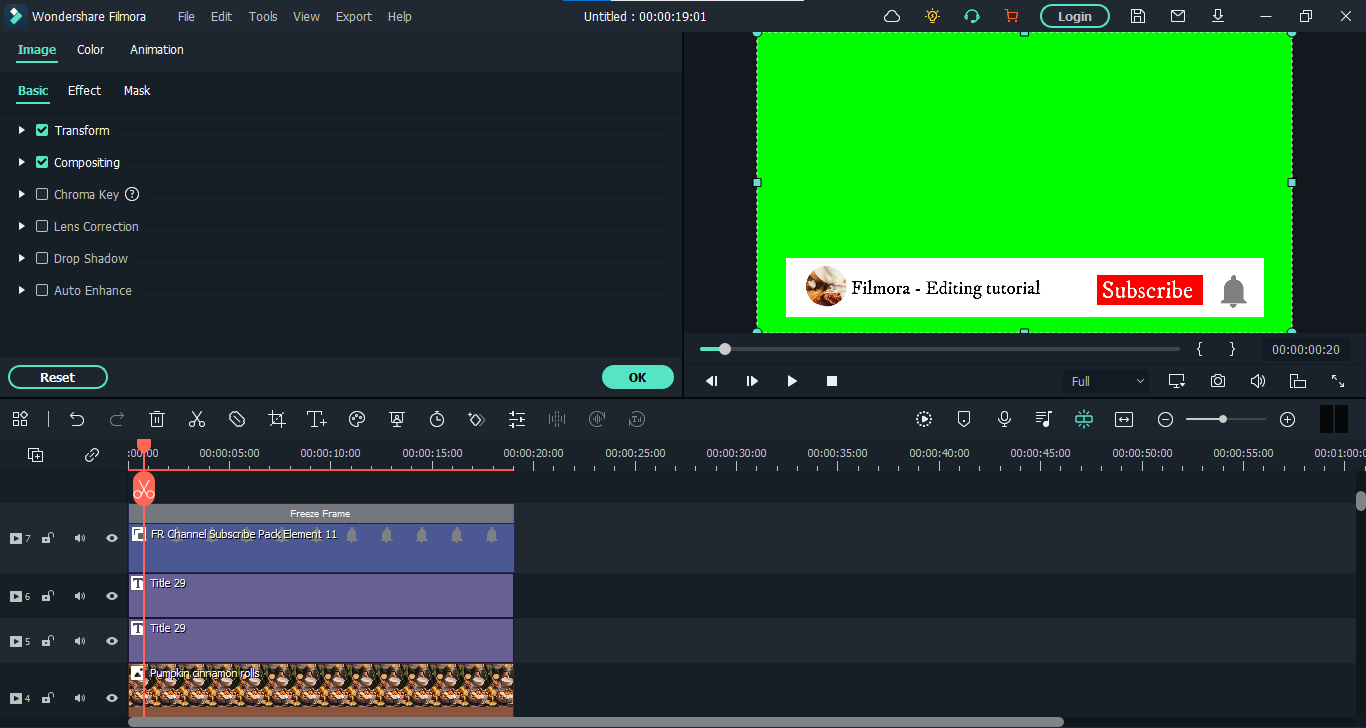
- Similarly, add “Thumbs Up” and “Mouse Cursor” icons on the panel.
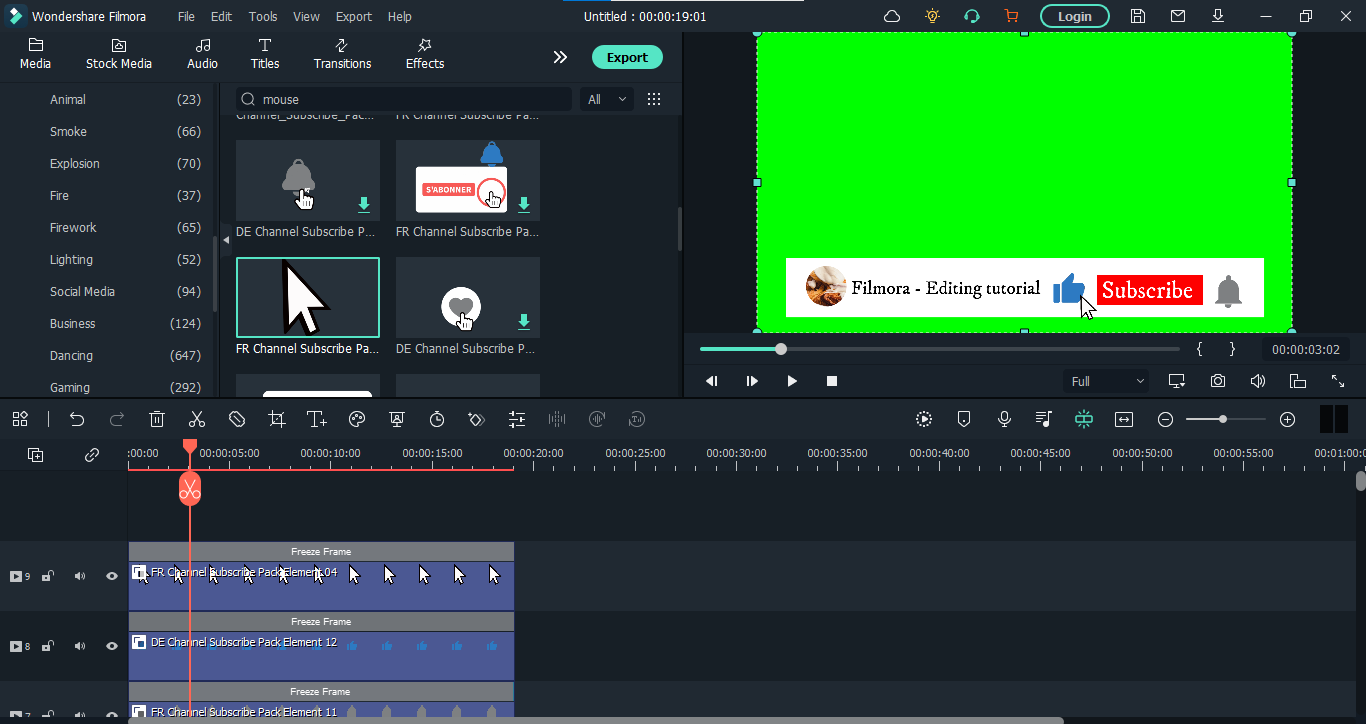
Finally, our structure is finished. Now let’s start animating.
Step3 Animate the graphics
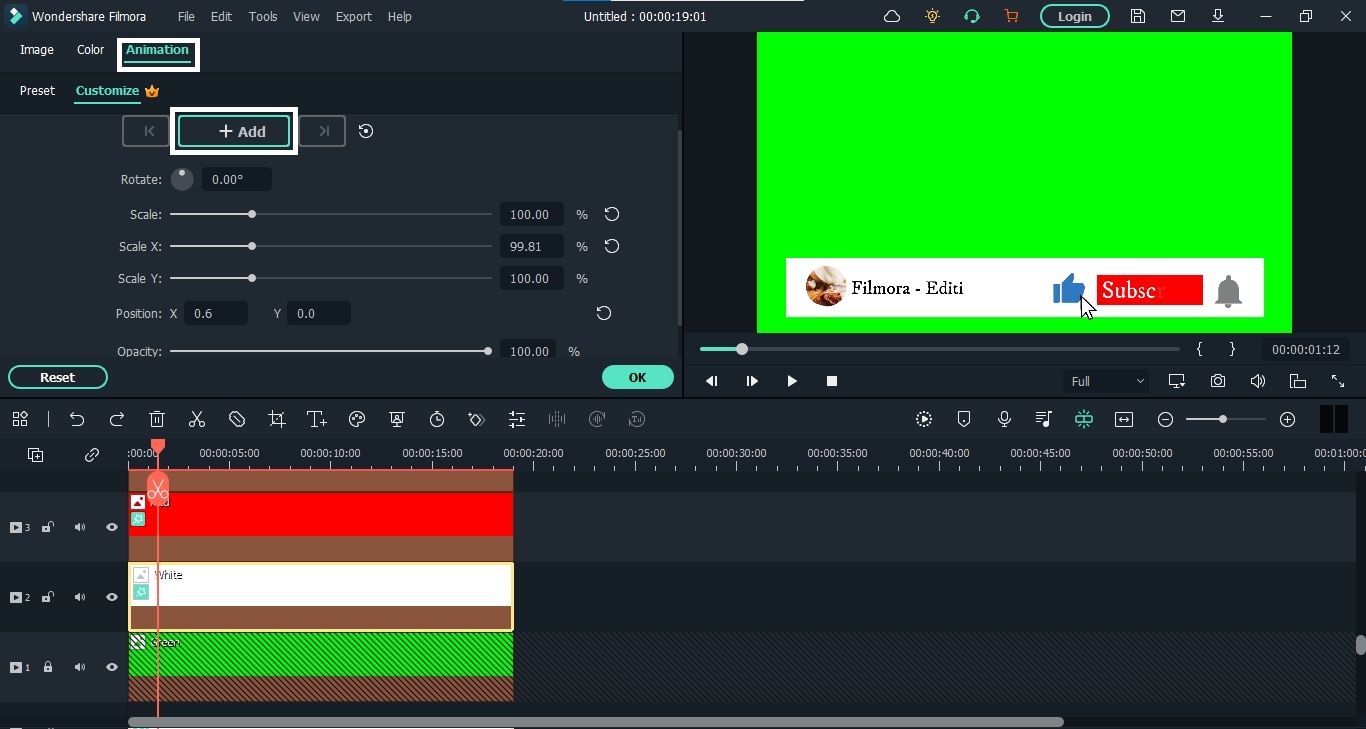
First, we’ll make it so that all these graphics come in from below the view.
- Go to the white layer first and double-click on it. Then hit the “Animation” option and scroll down. Here add a new keyframe by clicking “Add.” Now move the playhead to the beginning and place the white color layer out of the frame.
- Now, do the same for channel photos and icons. The whole animation will look like this.
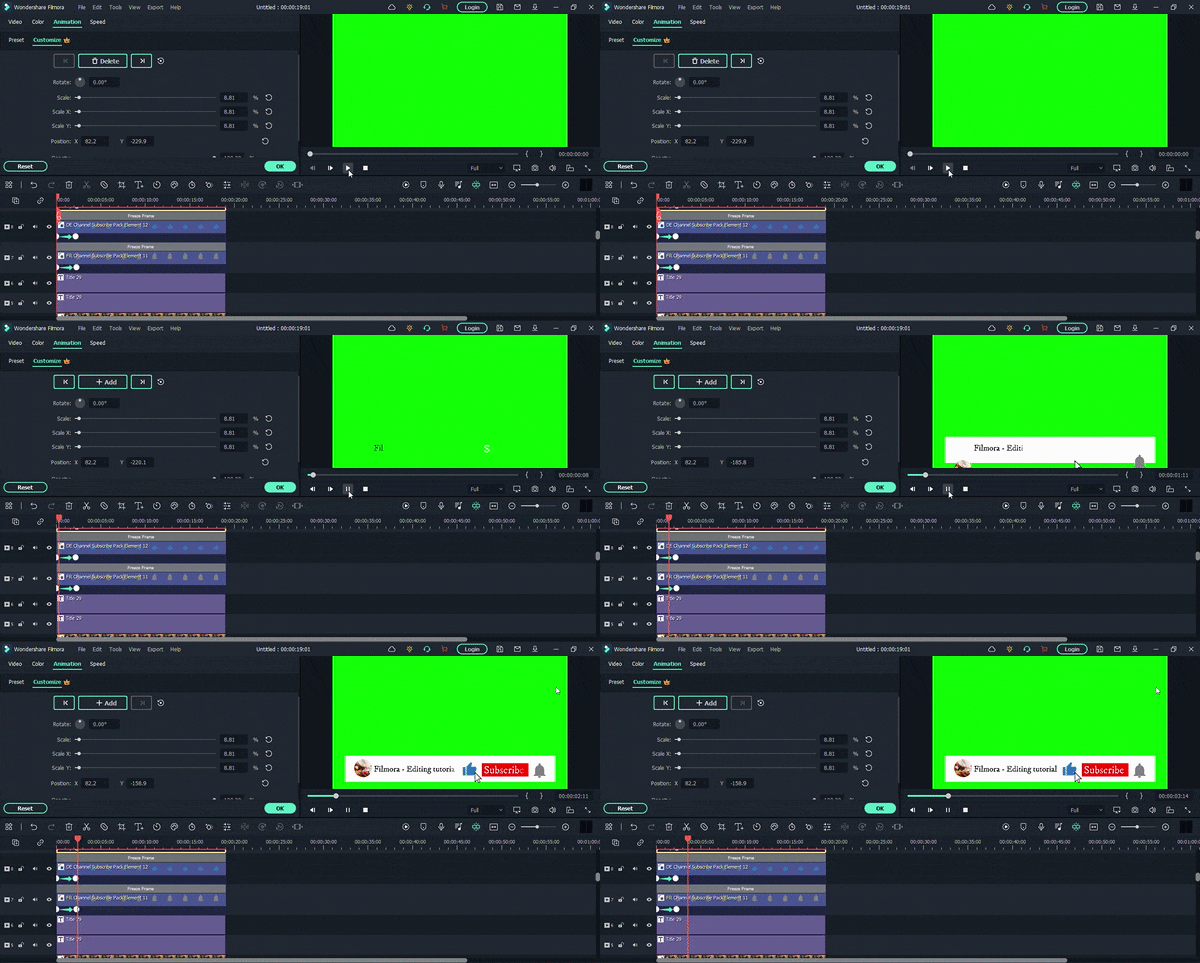
- As you can see, the text appears before the color layers. Let’s correct it. Double-click the text layer. Select the” Type Writer’ form and hit the “Advanced option.
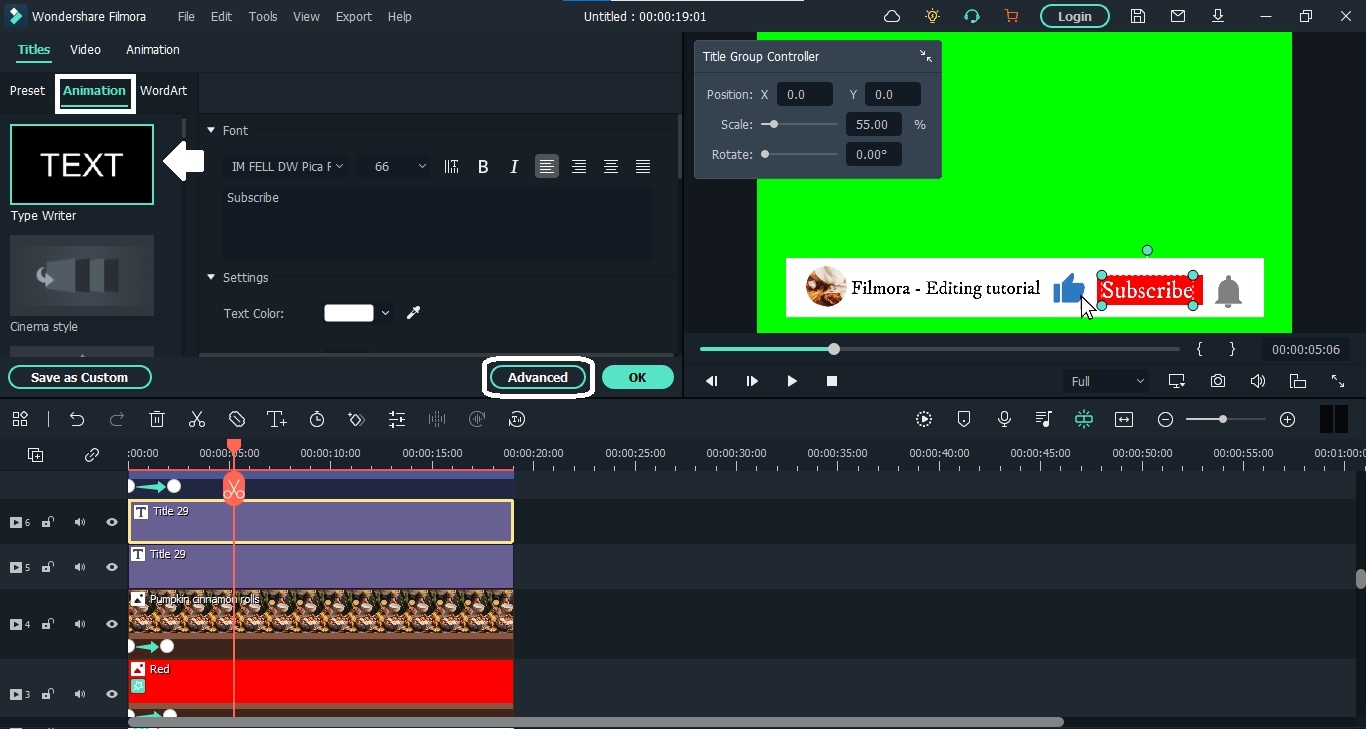
- Here, you can adjust the text with the color layers.
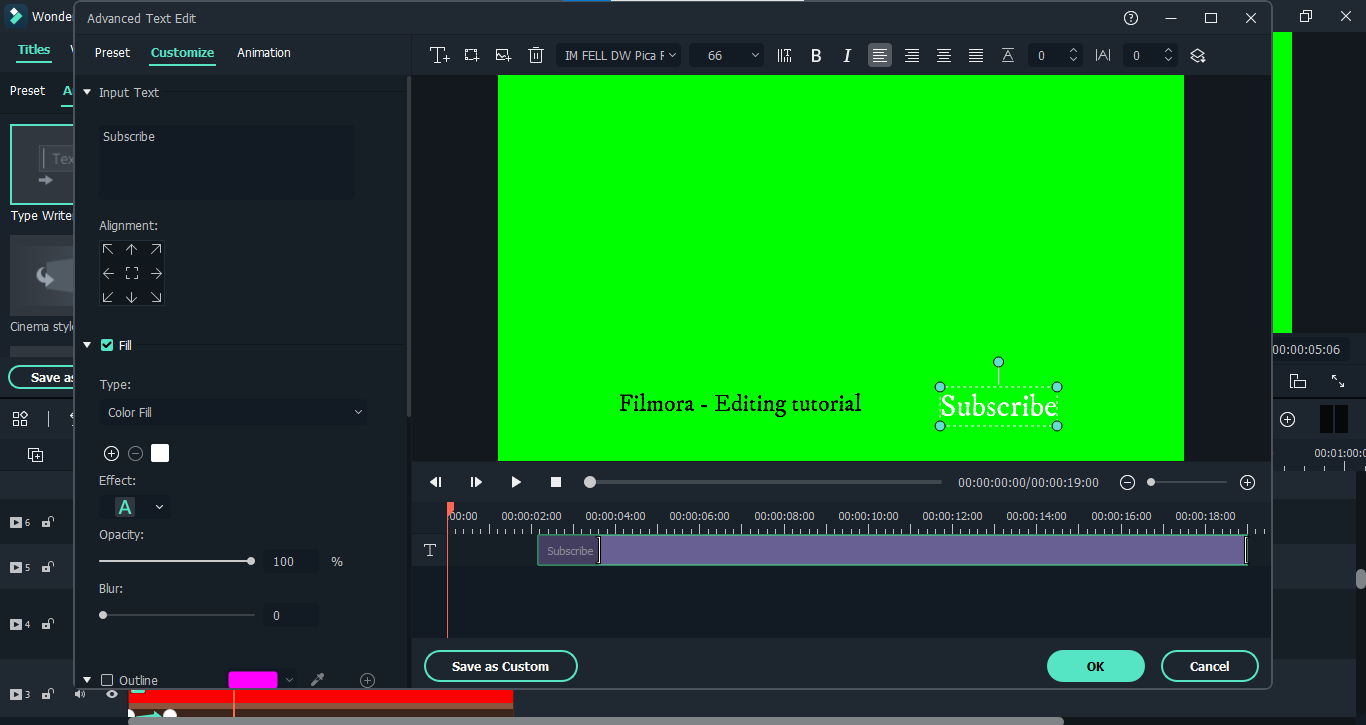
- After adjusting both the channel name and subscribe button texts, your animation will appear like this.
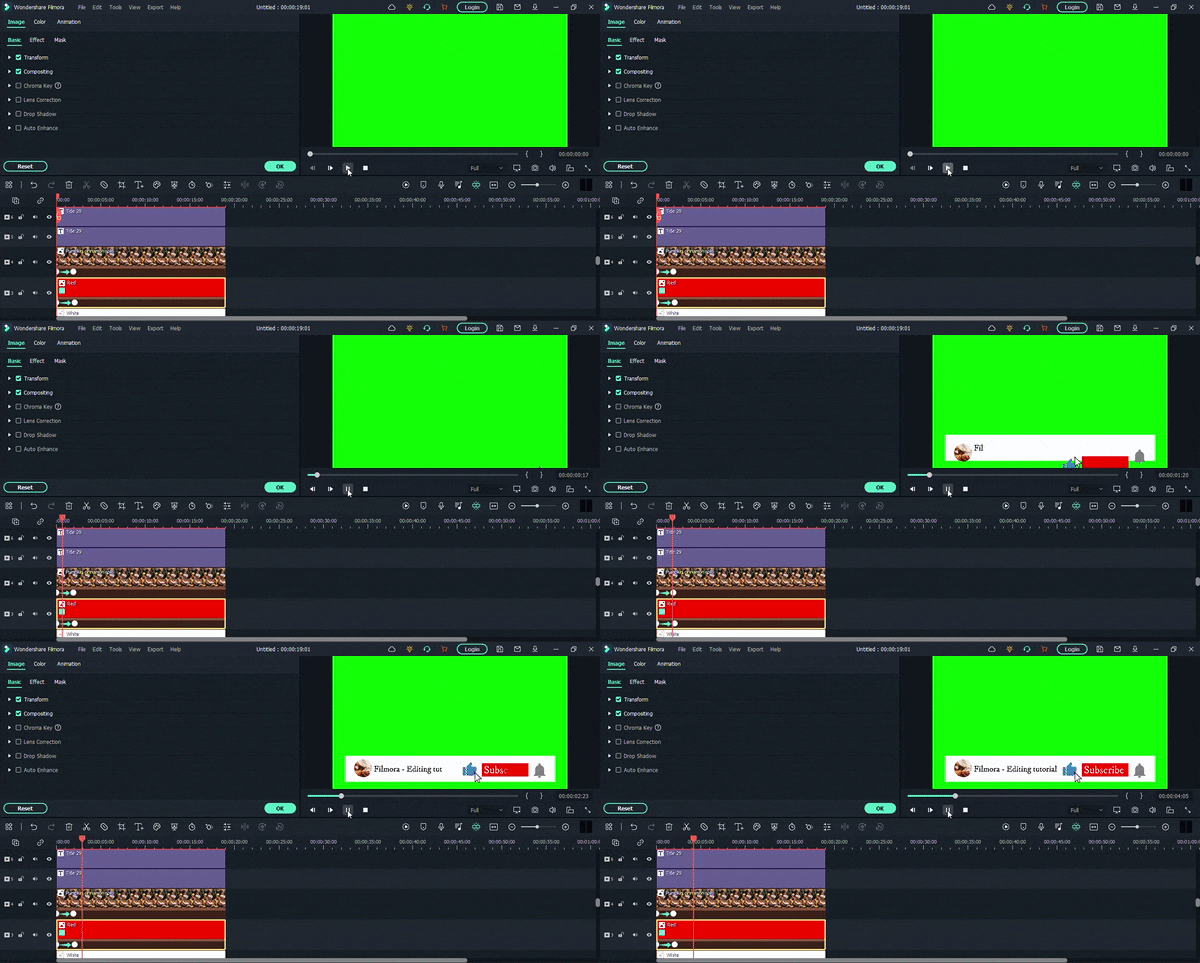
If you’ve managed so far, then that’s great. We have done most of the work. Now we need to animate the graphics of the mouse cursor so that it clicks on the bell icon, thumb icon, and our subscribe button. The process is somewhat similar because we will need to add different keyframes. But still, let’s see it in detail.
Step4 Animate the mouse cursor
- Go to the “Mouse Cursor” icon layer and double-click on it. First, place the icon on the “Thumbs Up” so that when it animates in, it goes directly to the said icon. Then you have to add another keyframe after some time. And when you add a third one, place the “Mouse Cursor” icon on the subscribe button text.
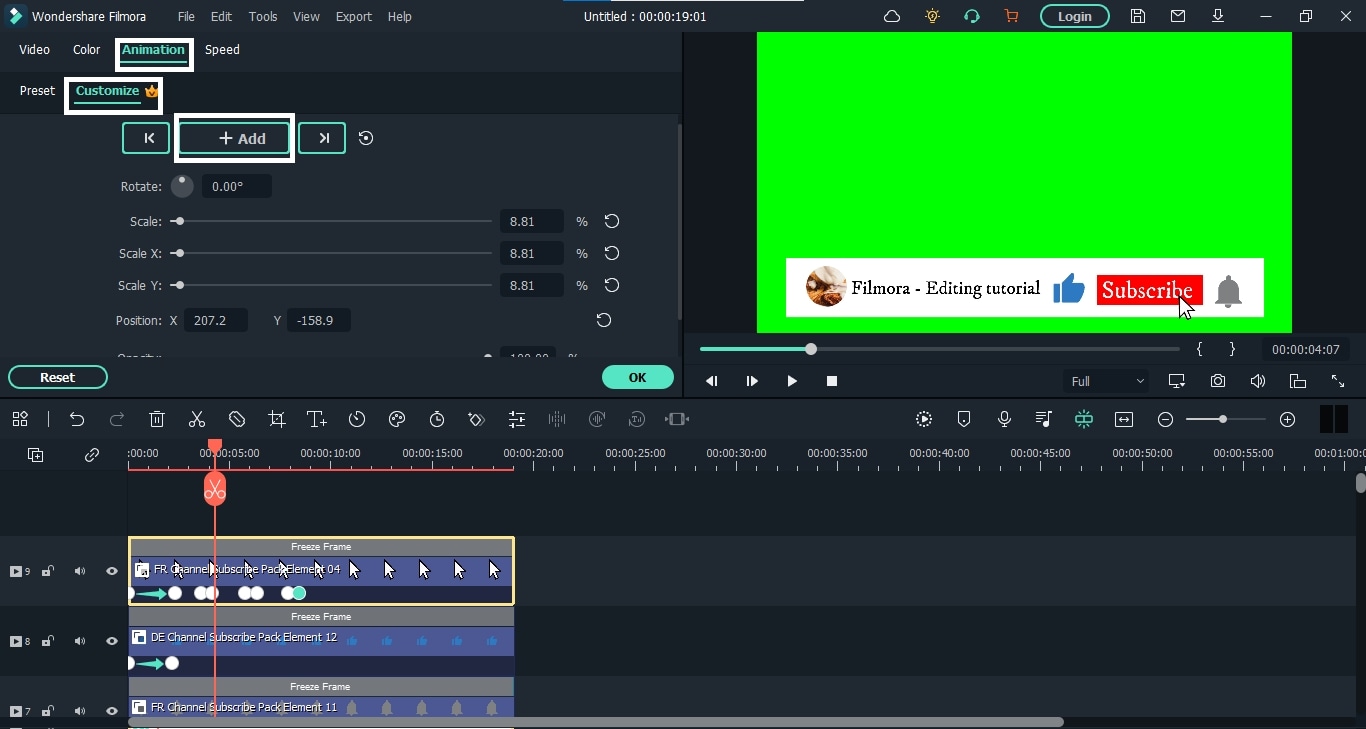
- Then add a similar pair of keyframes with some space from the last one and place the “Mouse Cursor” icon on the “Bell” icon.
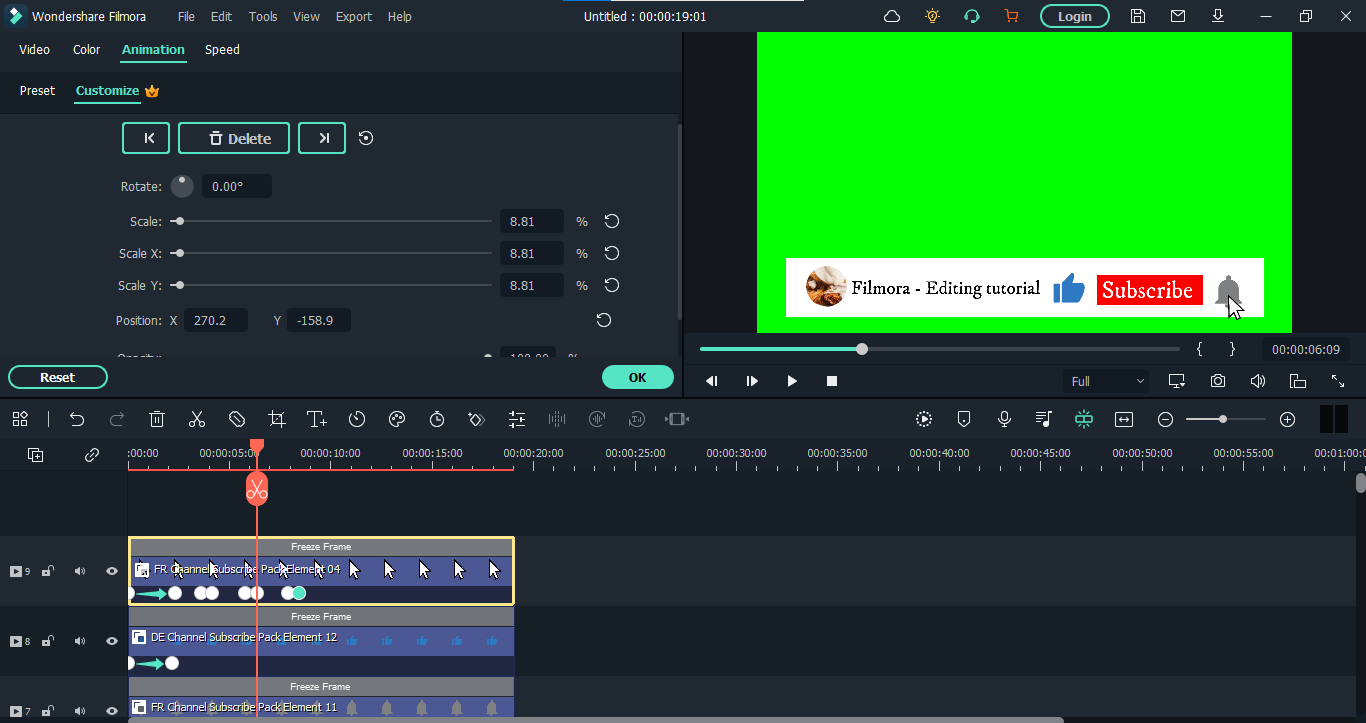
- The last keyframe we have to add will place this “Mouse Cursor” icon out of our view. After that, you need to adjust these keyframes to set the speed of the moving “Mouse Cursor’ icon according to your taste.
The final product up till now will be like this.
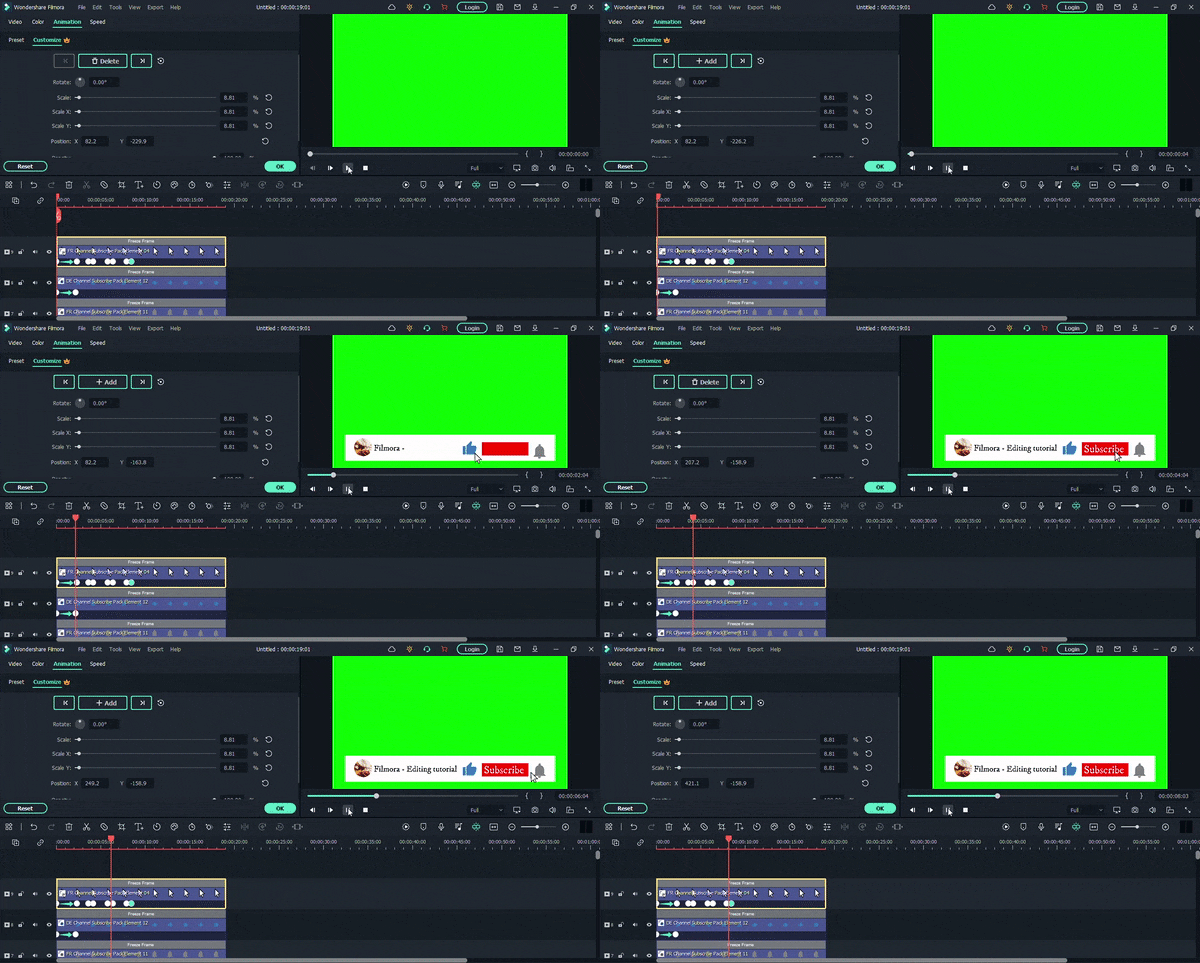
We are nearing our end, guys. Now we just need to make the graphics animate out of our view, and our work will be done. So let’s dive right into it.
Step5 Animate the graphics out
The process of animating out your graphics is like how we animated in our video. We just need to reverse those steps. So here’s how it’s done.
- Go to the white color layer and double-click on it to open its properties.
- Now, from the “Animation” option, add a new keyframe a little before the end of the video.
- After that, you have to add another keyframe at the end of your video. But in this keyframe, place the white color layer out of your view. Like this,
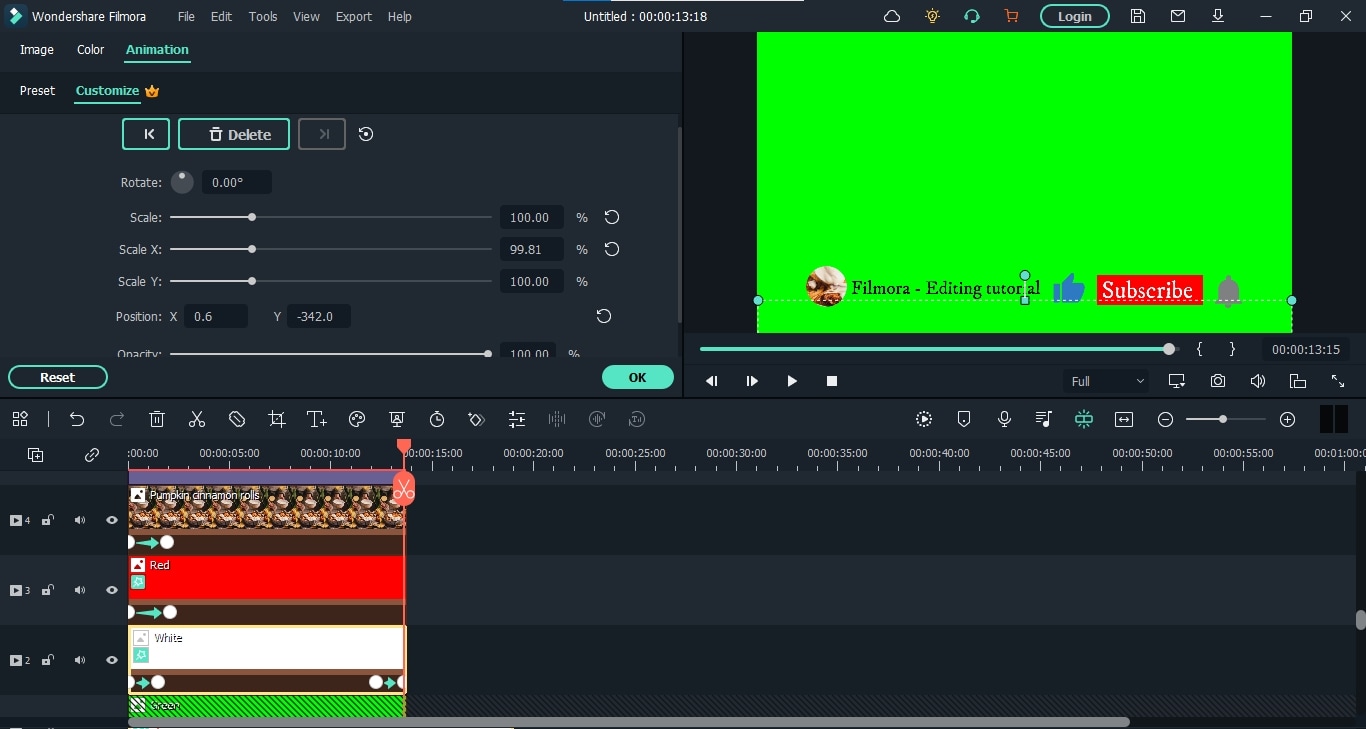
- Repeat the same steps for the red color layer, channel image layer, and icons layer.
- After it’s done, the whole graphics will look like this.
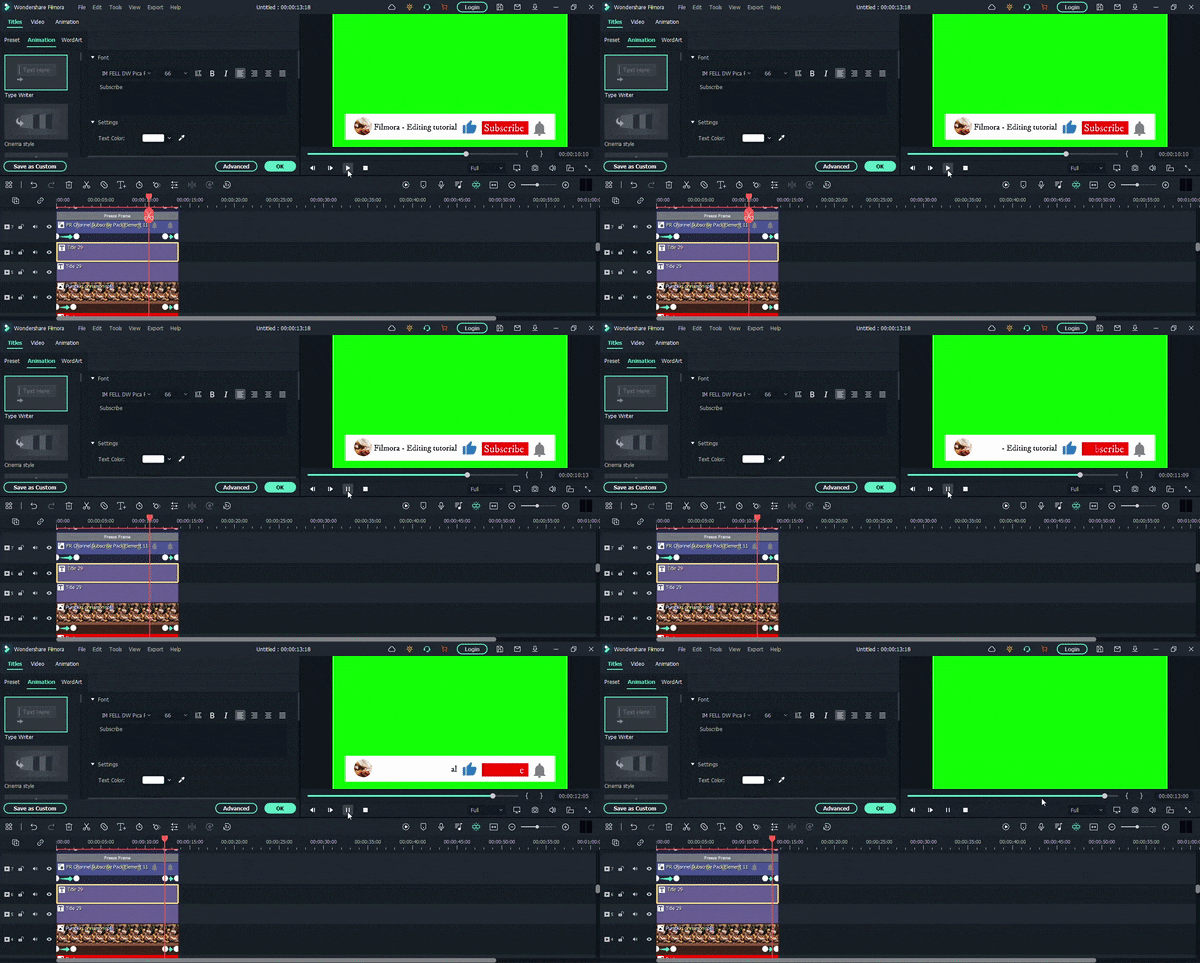
- The only thing that remains is to fix the text layers. For this, double-click on the channel text layer and go to the “Advanced” settings, just like before.
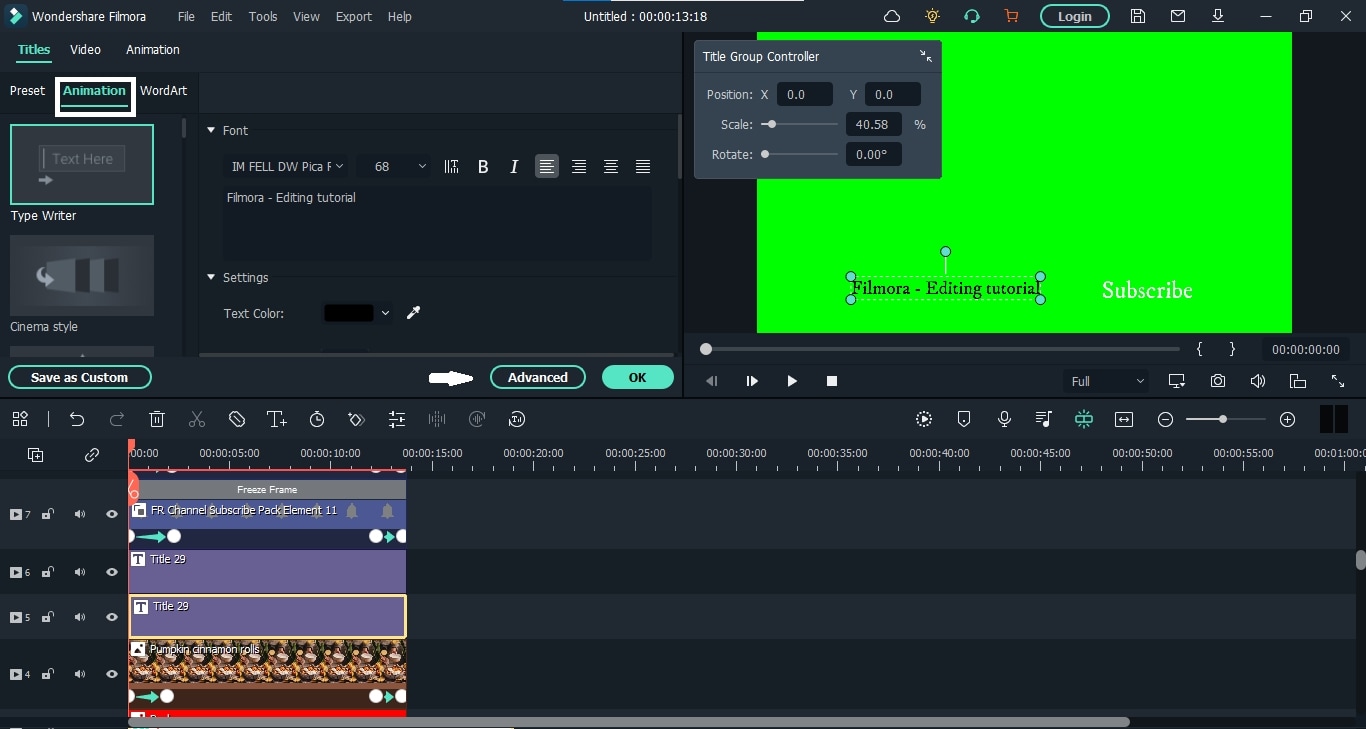
- From here, fix the text speed and end with your other graphic elements. After it’s done, we will do the same for the “Subscribe” button text.
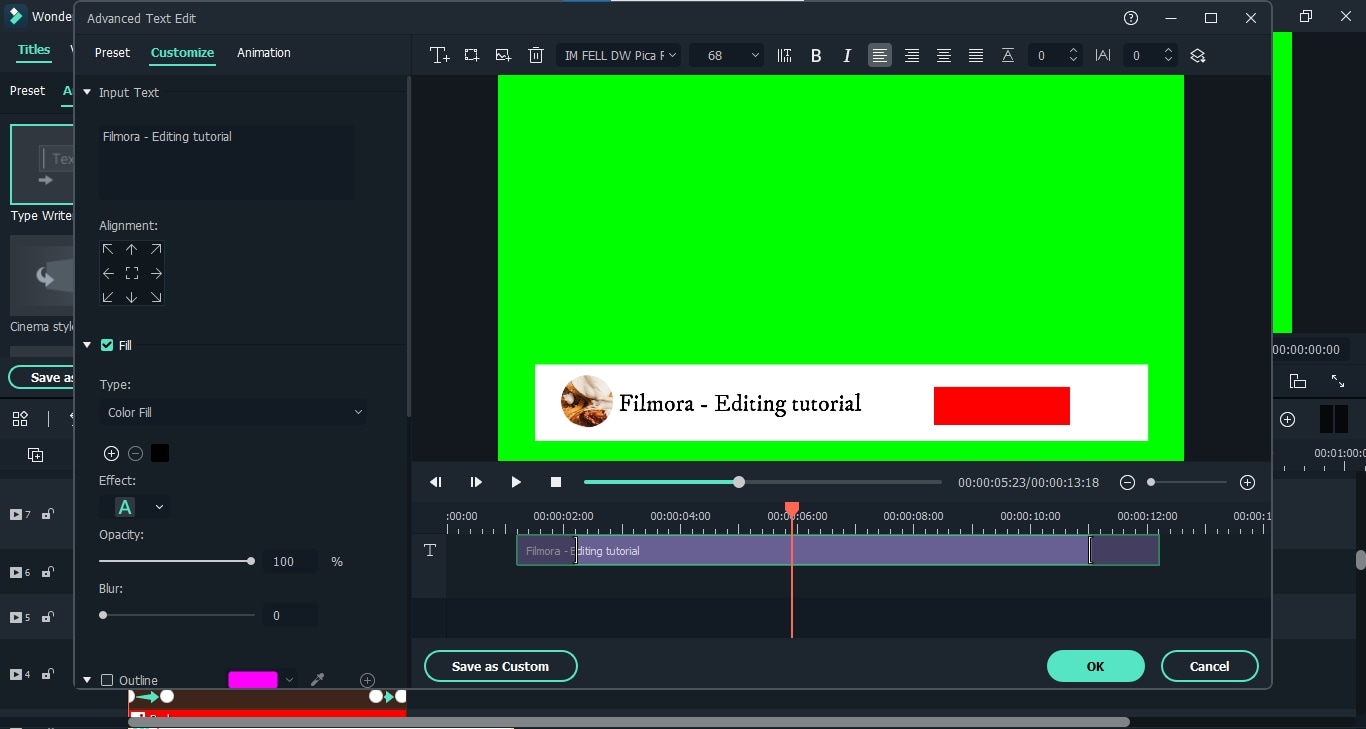
Finally, our graphic is completed. “Export” it from the software to your computer.

Whenever you want to use this graphic on your video, you have to import it first and enable the “Green Screen” option. It will remove the green background color. Then you can upload your video and place this graphic on it to add to the video. And that’s all.
Conclusion
Creating the Subscribe channel graphics is like picking stars from the sky for any video creator, especially if you are a beginner. However, now you don’t need to go for the professionals anymore. Wondershare Filmora has got you covered. So follow this detailed guide and create excellent subscribe channel graphics for your videos.
Free Download For macOS 10.14 or later
Step1 Download and install Wondershare Filmora
First, you need to download and install the video editor, Filmora. If you’ve already done that, then launch the software right away. But if you haven’t, then download it below. Once the download finishes, install the software on your computer.
When you launch the Filmora, click on “New Project.”

Step2 Make the structure of your graphics
For creating anything, we first need a flawless structure. Here, we can make the structure of Subscribe channel graphics using different colors, icons, texts, and channel photos. We’ll start by adding color layers.
1. Add color layers
- Go to the “Media” on the top left corner of the interface and Click on “Sample Color.” Here find the Green color and add it in the panel below as the first video layer by the drag-n-drop function.

- We will key this layer at the end, so make sure not to use any other green graphics for your animation.
- Let’s lock this layer because we will no longer use it. For this, click on the “Lock” icon on the layer’s left side.
- Add white and red colors and stack them on top of the green color layer.

After adding all three color layers, it’s time to crop these layers to make the structure of our graphic.
Crop the Color Layers
- Go to the “Effects” tab from the top bar and search for the “Crop” effect. Then drag the effect and add it to the white and red layers on the panel.

- First, click on the “Eye” icon beside the red color layer to hide it. Then double-click the white layer to see its properties. When the properties appear, select “Effects” from there.

- You can also enable the safe zones from the display settings on the right side of the panel. After that, crop the white layer first, then show the red layer and crop it too. It will look like this.

That’s it, folks. Our color backgrounds are here. Now we have to add our channel photo to this. So let’s move on to see how to do it.
2. Add a channel photo
- To add the channel photo, you can upload the image. Here we are going to use some images from the stock media. No matter the image, drop it down on the panel above the red color layer.

- Now double-click on the image layer, and from the properties, go to the “Mask” option and select the circle. You can also select any other shape you like.

- After that, scroll down and make the circle even by matching all numbers. Then scale it down and place it on the left corner of the white layer.

It’s done. Let’s add our channel text now.
3. Add texts
- For adding text, go to the “Titles” from the top bar and add the title you like to the panel.

- Now double-click this layer and add the text you want. You can also change the color of the text, scale it down and place it where ever you want.

- Now, let’s add another title for the subscribe button. You have to place it on the red layer.

We can’t finish our structure without icons, can we? So let’s move on to them.
4. Add icons
- Hit the “Element” from the top bar and search for the “Bell” icon. You will find the short animations of the bell. Add the suitable one to the panel.

- Now find a suitable place in the animation, stop it at that point, right-click on the element layer and add a freeze frame.

- You can also extend the freeze frame and remove the other parts. Then reduce its size and place it beside the “Subscribe” text.

- Similarly, add “Thumbs Up” and “Mouse Cursor” icons on the panel.

Finally, our structure is finished. Now let’s start animating.
Step3 Animate the graphics
First, we’ll make it so that all these graphics come in from below the view.
- Go to the white layer first and double-click on it. Then hit the “Animation” option and scroll down. Here add a new keyframe by clicking “Add.” Now move the playhead to the beginning and place the white color layer out of the frame.

- Now, do the same for channel photos and icons. The whole animation will look like this.

- As you can see, the text appears before the color layers. Let’s correct it. Double-click the text layer. Select the” Type Writer’ form and hit the “Advanced option.

- Here, you can adjust the text with the color layers.

- After adjusting both the channel name and subscribe button texts, your animation will appear like this.

If you’ve managed so far, then that’s great. We have done most of the work. Now we need to animate the graphics of the mouse cursor so that it clicks on the bell icon, thumb icon, and our subscribe button. The process is somewhat similar because we will need to add different keyframes. But still, let’s see it in detail.
Step4 Animate the mouse cursor
- Go to the “Mouse Cursor” icon layer and double-click on it. First, place the icon on the “Thumbs Up” so that when it animates in, it goes directly to the said icon. Then you have to add another keyframe after some time. And when you add a third one, place the “Mouse Cursor” icon on the subscribe button text.

- Then add a similar pair of keyframes with some space from the last one and place the “Mouse Cursor” icon on the “Bell” icon.

- The last keyframe we have to add will place this “Mouse Cursor” icon out of our view. After that, you need to adjust these keyframes to set the speed of the moving “Mouse Cursor’ icon according to your taste.
The final product up till now will be like this.

We are nearing our end, guys. Now we just need to make the graphics animate out of our view, and our work will be done. So let’s dive right into it.
Step5 Animate the graphics out
The process of animating out your graphics is like how we animated in our video. We just need to reverse those steps. So here’s how it’s done.
- Go to the white color layer and double-click on it to open its properties.
- Now, from the “Animation” option, add a new keyframe a little before the end of the video.
- After that, you have to add another keyframe at the end of your video. But in this keyframe, place the white color layer out of your view. Like this,

- Repeat the same steps for the red color layer, channel image layer, and icons layer.
- After it’s done, the whole graphics will look like this.

- The only thing that remains is to fix the text layers. For this, double-click on the channel text layer and go to the “Advanced” settings, just like before.

- From here, fix the text speed and end with your other graphic elements. After it’s done, we will do the same for the “Subscribe” button text.

Finally, our graphic is completed. “Export” it from the software to your computer.

Whenever you want to use this graphic on your video, you have to import it first and enable the “Green Screen” option. It will remove the green background color. Then you can upload your video and place this graphic on it to add to the video. And that’s all.
Conclusion
Creating the Subscribe channel graphics is like picking stars from the sky for any video creator, especially if you are a beginner. However, now you don’t need to go for the professionals anymore. Wondershare Filmora has got you covered. So follow this detailed guide and create excellent subscribe channel graphics for your videos.
Also read:
- Updated In 2024, Customize PowerPoint Slideshow Icon in 8 Simple Ways
- Updated In 2024, Learn How to Blur Faces in Your Video on iPhone
- Updated In 2024, Is Augmented Reality Conferencing the Future of Workplace Collaboration?
- Best iOS Slow Motion Apps To Work With
- Updated Do You Want to Know About Efficient Motion Blur Plugins for Adobe Effects? Read This Article to Find Out How to Use Motion Blur Plugins for Enhanced Results
- In 2024, 10 BEST TEXT TO SPEECH VIDEO MAKERS
- New 2024 Approved Kdenlive Video Editor Review
- New You May Want to Change the Speed of Certain Portions of Your Video. This Article Enlightens You on How to Splice and Speed up the Video in Simple Ways for 2024
- 2024 Approved Best 5 GIF to Video Converters You Cant-Miss
- How to Be a YouTube Vlogger for 2024
- New In 2024, It Is Crucial to Introduce Your Kids to the Different Colors and Practice the Color Matching Game. So, Here Are the Various Factors Related to Color Matching for Your Child with a Tool to Help You in It Ideally
- Updated In 2024, You Can Learn How to Color Grade Your Picture in Lightroom Effectively. By Understanding the Process of Color Grading in Lightroom, You Can Create Unique Works, and Improve Your Abilities
- New Master Premiere Pro Custom Sequence Presets
- Updated How to Make Discord Logo GIF
- Updated This Article Talks About Pixel Art Wallpapers. It Gives Examples of Different Pixel Art to Show You How to Customize Your Own Pixel Art Wallpapers, and How to Make a Pixel Art Gif on Filmora
- Updated In 2024, 3 Best Motion Blur Plugins for Adobe After Effects
- Updated 8 Ways to Merge SRT with MP4
- In 2024, Perfect Guide for Beginners to Make a TikTok with Multiple Clips
- In 2024, How to Unlock Nubia Z50S Pro Phone without Any Data Loss
- 3 Things You Must Know about Fake Snapchat Location On Honor X9a | Dr.fone
- In 2024, Full Tutorial to Bypass Your Samsung Galaxy A14 4G Face Lock?
- For People Wanting to Mock GPS on Itel A60 Devices | Dr.fone
- In 2024, How to Fix Locked Apple ID from iPhone 6 Plus
- In 2024, 2 Ways to Monitor Realme GT 3 Activity | Dr.fone
- Ultimate Guide to Catch the Regional-Located Pokemon For Vivo S17 | Dr.fone
- In 2024, Top 10 AirPlay Apps in Xiaomi Redmi K70E for Streaming | Dr.fone
- How To Remove or Bypass Knox Enrollment Service On Samsung Galaxy S23
- In 2024, How to Transfer Contacts from Xiaomi Redmi Note 13 5G to iPhone XS/11 | Dr.fone
- Title: How to Make Boring Videos Look Cool By B Rolls
- Author: Morgan
- Created at : 2024-06-15 18:56:21
- Updated at : 2024-06-16 18:56:21
- Link: https://ai-video-editing.techidaily.com/how-to-make-boring-videos-look-cool-by-b-rolls/
- License: This work is licensed under CC BY-NC-SA 4.0.

