
:max_bytes(150000):strip_icc():format(webp)/GettyImages-970157966-65f3dd434f3e4dc98e28a635b8cacc87.jpg)
How to Make Coin Magic With Filmora
How to Make Coin Magic With Filmora
Do you want to become a magician in your videos? Now, everyone can look like a magician with the magic of editing. This article will show you how to do a cool coin trick in Filmora 11 .
Part 1: What is the filmmaking technique “Cutting on action”
Cutting on action is a technique the editors use to cut in the middle of an action to another shot that matches the first shot’s action. Typically, the subject starts an action in one shot and continues the action in another, creating a smooth transition. For example, when you make the coin trick video, you need to cut on the tapping so it can trick the eyes, and the cut won’t be noticeable.

Part 2: Things You Need to Prepare for The Coin Magic Trick
- Glass and two coins

- Set the phone on a tripod. Because utilizing a tripod can significantly improve the recording’s stability.

Part 3: Start Filming
Step1 Firstly, you must show the coin and the bottom of the glass.

Step2 After that, you need to hold the coin with the fingers part of one hand and tap down on the coin. Make sure it looks like the coin is going through straight to the glass.

Step3 You need someone else to drop the other coin from the top. Meanwhile, you are pretending to tap a coin on the glass. You don’t need to worry about someone else hand in the frame. Since you can remove it easily with the masking feature in Filmora.

Step4 It would help if you had a second shot for a clean plate of the background. You can record background for 20 seconds.

Part 4: Bring the clips into Filmora 11
Step1 If you have not downloaded Filmora, you can visit filmora.wondershare.com to download Filmora’s new version.

Step2 Drag and drop the clip onto the first track of the timeline.Afterward, move the playhead to the right and find the spot where you tapped the coin last time before your friend drops the other coin. Additionally, make sure it is in the middle of the tapping action and cut.

Step3 Then move the playhead to the right and find the spot where your friend drops the coin while you tap without the coin in your hand. Make sure it is in the middle of the tapping action, and the position of your hand roughly matches that in the last cut and make a cut.

Step4 Now you need to delete the middle part and play it back. Indeed, cutting on action is the key to creating the illusion that the action is continued without editing.

Step5 Next, you must remove your friend’s hand in the frame with the Filmora masking feature. Afterwards. drag and drop the clean plate video onto the second track of the timeline.

Step6 Next, double-click the clip to open the setting video. Find the Mask Section and select the single line.

Step7 Here you can see the mask is applied.First, adjust the angle and position of the mask to only show the top part of the frame. Then you have to change the Blur Strength to add more blur to the edge of the mask.

Step8 With the mask finalized, unhide the first video track and adjust the length of the clip on the timeline. Finally, playback the video and see how it looks.

Summary
That’s how to make a coin move through a glass-like MAGIC with the cutting on action editing technique. You can pay close attention to the steps above and follow each step for perfect results.
Free Download For Win 7 or later(64-bit)
Free Download For macOS 10.14 or later
Free Download For macOS 10.14 or later
How To Split Screen On Tiktok
TikTok is probably the most popular video-sharing app in the world right now. Many TikTokers have become famous for making videos that have a significant impact and encourage creativity and new ideas. One of the most popular TikTok trends is the split-screen effect. You’ve probably seen a lot of TikTok split-screen videos with cool effects that made you wonder how the user split their screen. Becoming skilled in using TikTok effects is not as difficult as it might look. It only requires a significant amount of practice. Read on as we show you how to make a TikTok split-screen video.
Using CapCut To Split Screen
CapCut is the official free TikTok Video Maker and Video Editor with Music for TikTok that is multifunctional. Its interface is quite similar and easy to use.
CapCut includes free advanced capabilities such as keyframe animation, stabilization, and Picture-in-Picture (PIP). These are in addition to its fundamental functions, such as video editing, adding stickers, text, and music.
Steps to Split Screen Video with CapCut On Android and IOS Devices
- To use the app, you need to install it first. iPhone and Android users can download CapCut. Navigate to the appropriate app store of your choice and download CapCut.
- After installation, launch the app.
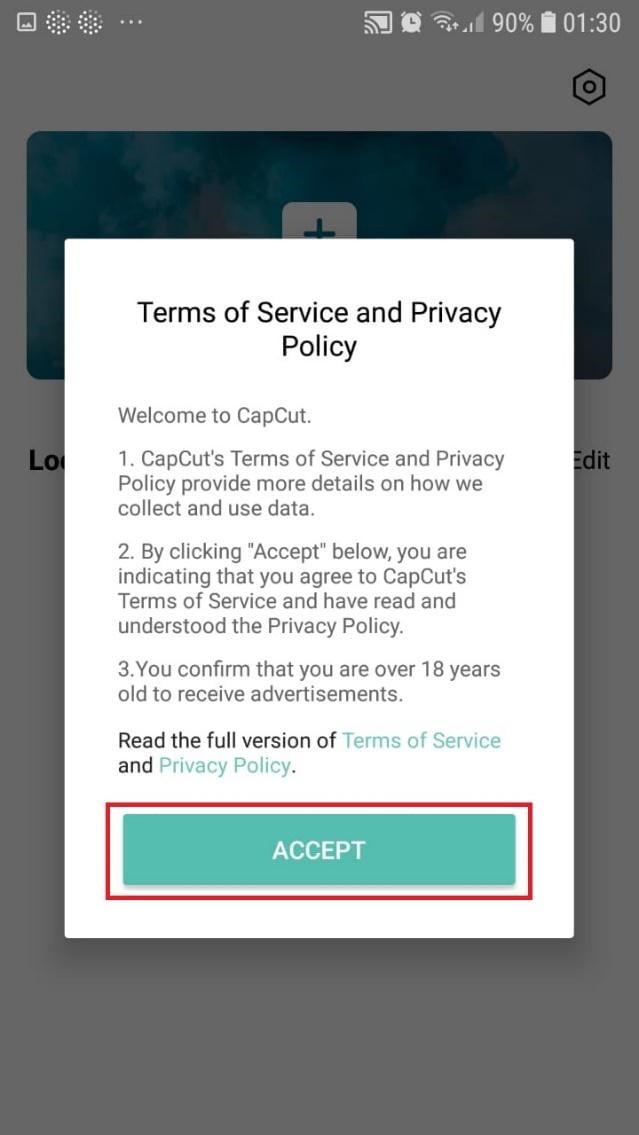
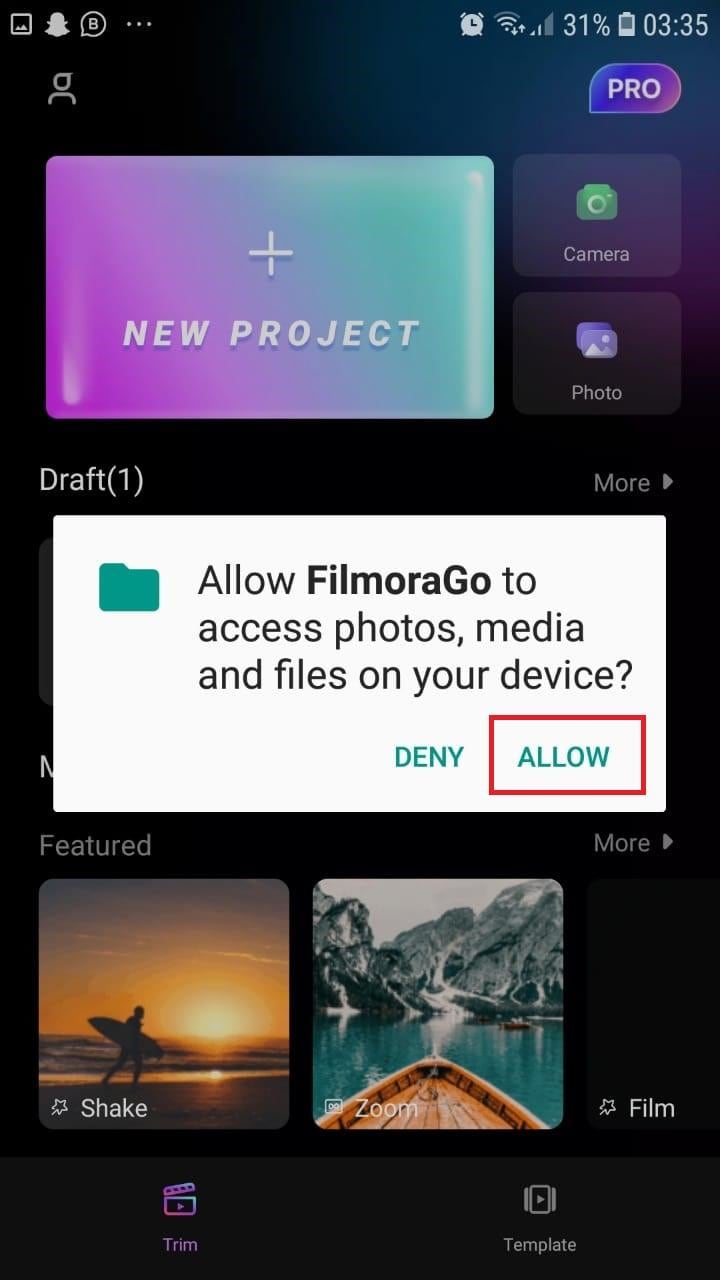
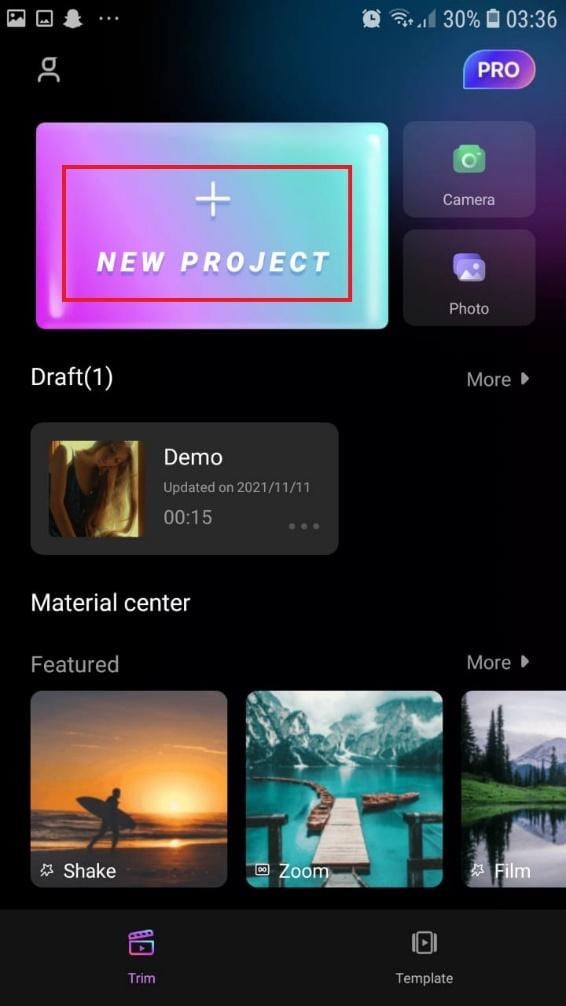
- Then go ahead and grant CapCut permission to view your camera roll. Incorporating video clips into your project has never been easier. Go to the app’s main screen and select “New Project“ from the drop-down menu.
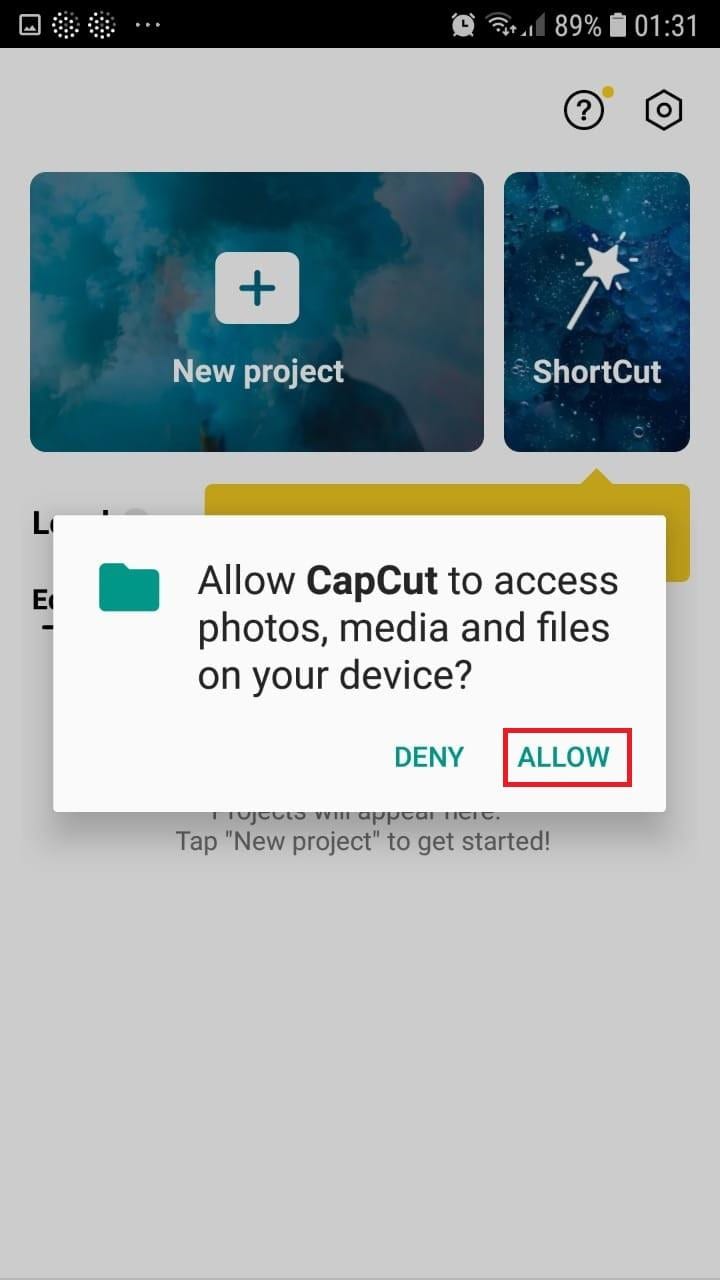
- To confirm your selection, click the green Accept This confirms that CapCut requires access to your photographs to function correctly. Tap on the button on the following pop-up window to gain access to all the photos. This is a one-time process that must be carried out the first time you launch the application.
- Begin a New Project. After opening the app, press the “New Project“ icon to bring up a new screen showing your device’s videos.

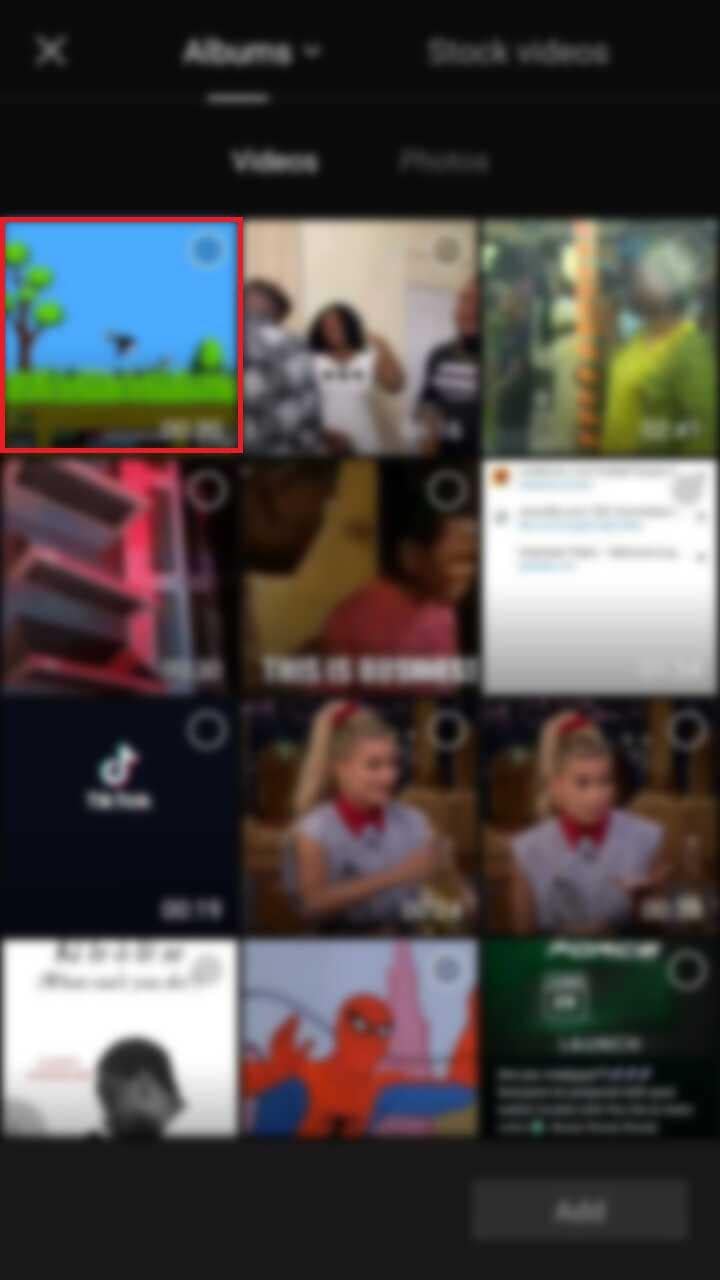
- Choose a video clip. Locate the desired video clip for your project by scrolling through the pages displaying your camera roll. Tap the video’s thumbnail and then tap the “Add“ icon in the screen’s lower part.
- Get familiar with your workspace. Upon uploading your first clip, CapCut leads you to the primary workspace. This is where you will spend most of your time within the app. The preview panel, the timeline, and the toolbar are in order from top to bottom.
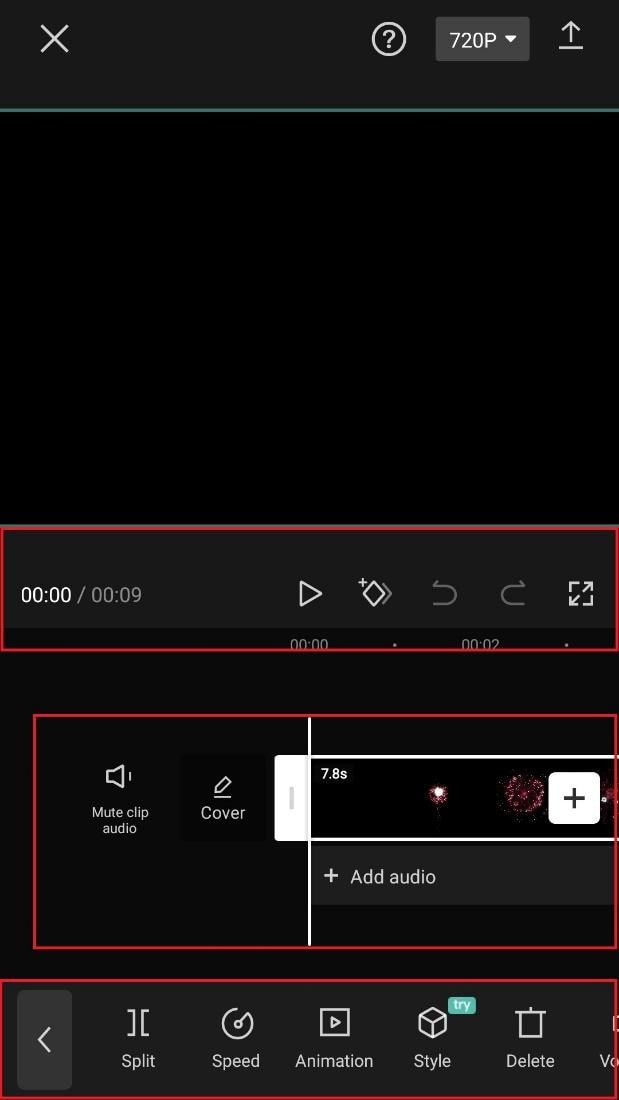
- View the toolbar and timeline. They represent your screen’s bottom half. The timeline, located below the preview panel, is where you’ll make all your adjustments. You can access all your video editing tools, including split, text, audio, effects, stickers, and more, on the toolbar at the bottom of your screen.
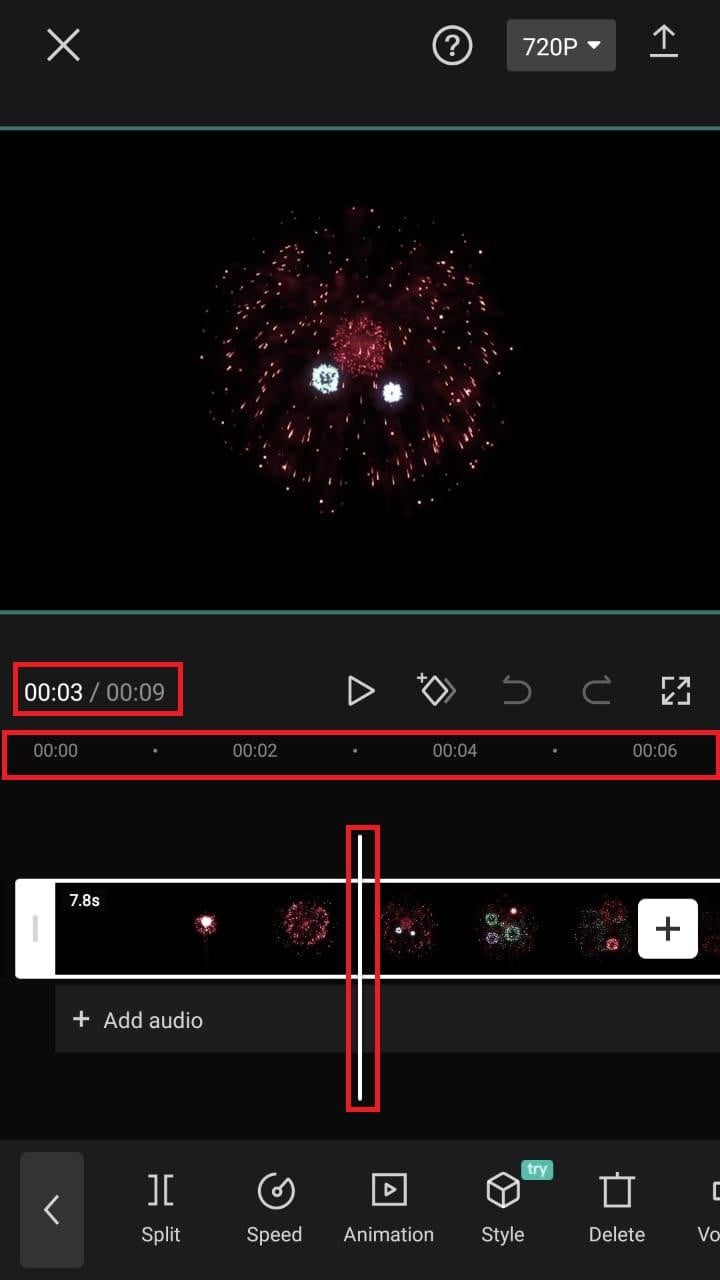
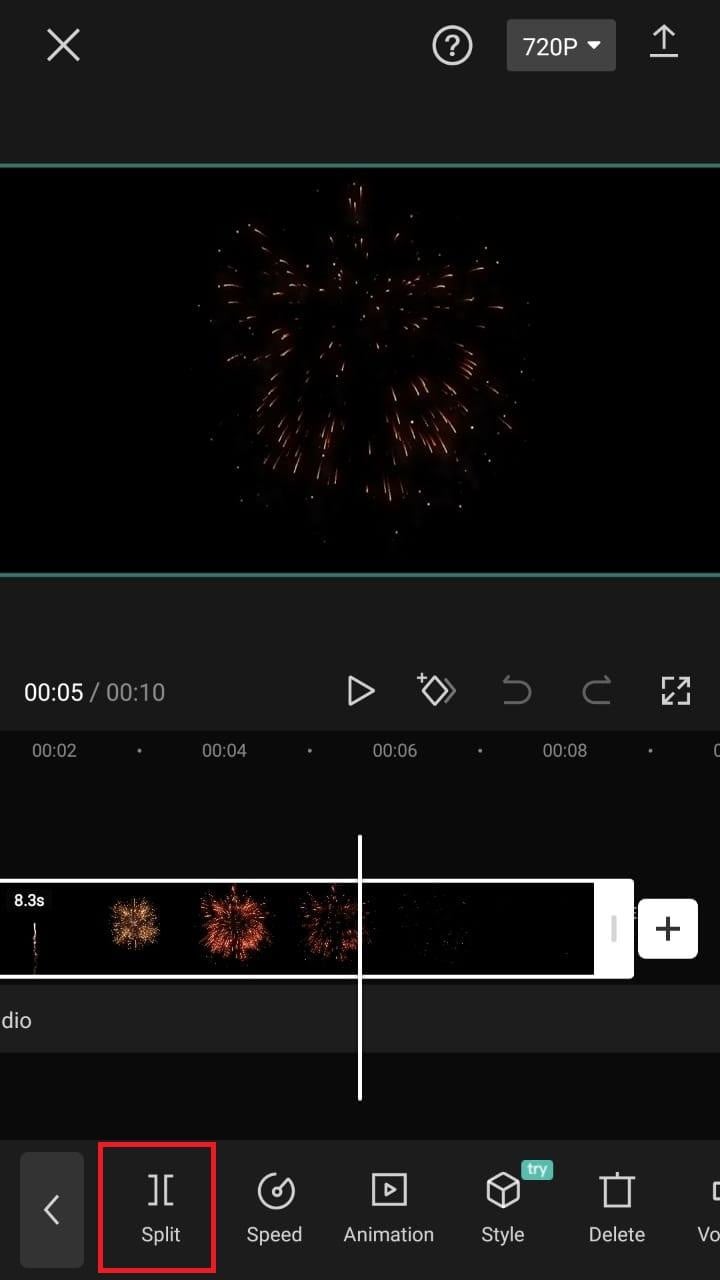
- Split video clips. To split a video clip in half, move the play head to the desired location on the timeline. Tap on your clip, then press the “Split“ toolbar icon. Your result now shows two different clips, not just one.
A Better Split-Screen Effect Video Editor
Filmora is one of the best free HD video makers and video editors with several functionalities, including text, backgrounds, filters, special effects, emoji, audio, and special effects.
Filmora is a feature-packed video editor which has a variety of tools to work with. With this video editor, producing memes, videos with images, pictures, music, stickers, and sound effects and editing videos for YouTube, Twitter, WhatsApp, Facebook, TikTok, and Instagram is simple and entertaining.
Free Download For Win 7 or later(64-bit)
Free Download For macOS 10.14 or later
Steps to Split Screen Video with Filmora
- Download Filmora from the App store
- After installation, launch it.
- Click on “Continue” to continue to use the app.

- Click on Allow to grant Filmora access to your photos and videos.
- You can now tap on “New Project” with the + Symbol.
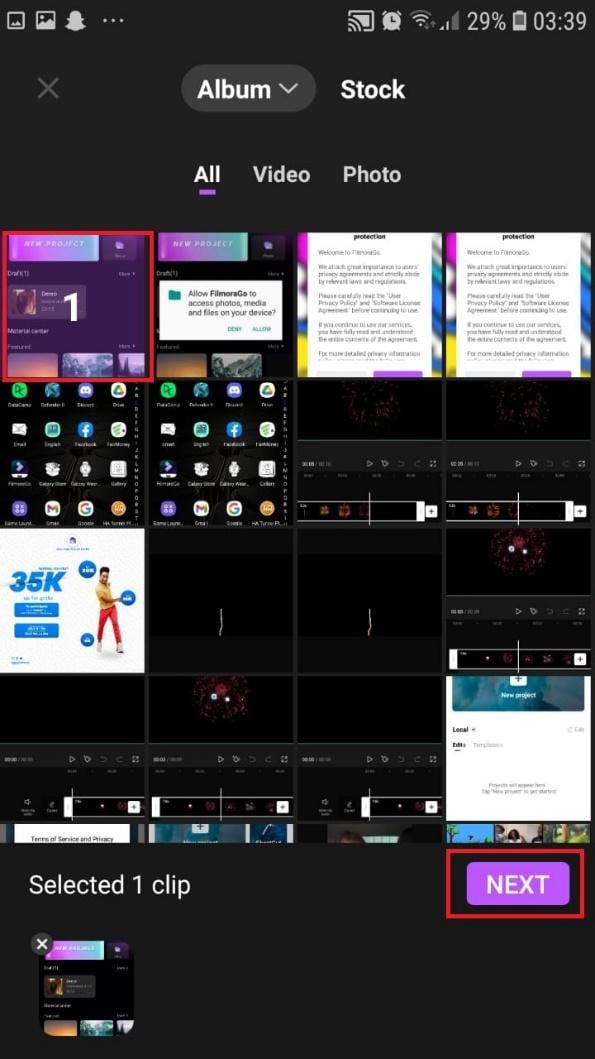
- Select your desired video and tap on “Next” at the bottom right of your screen
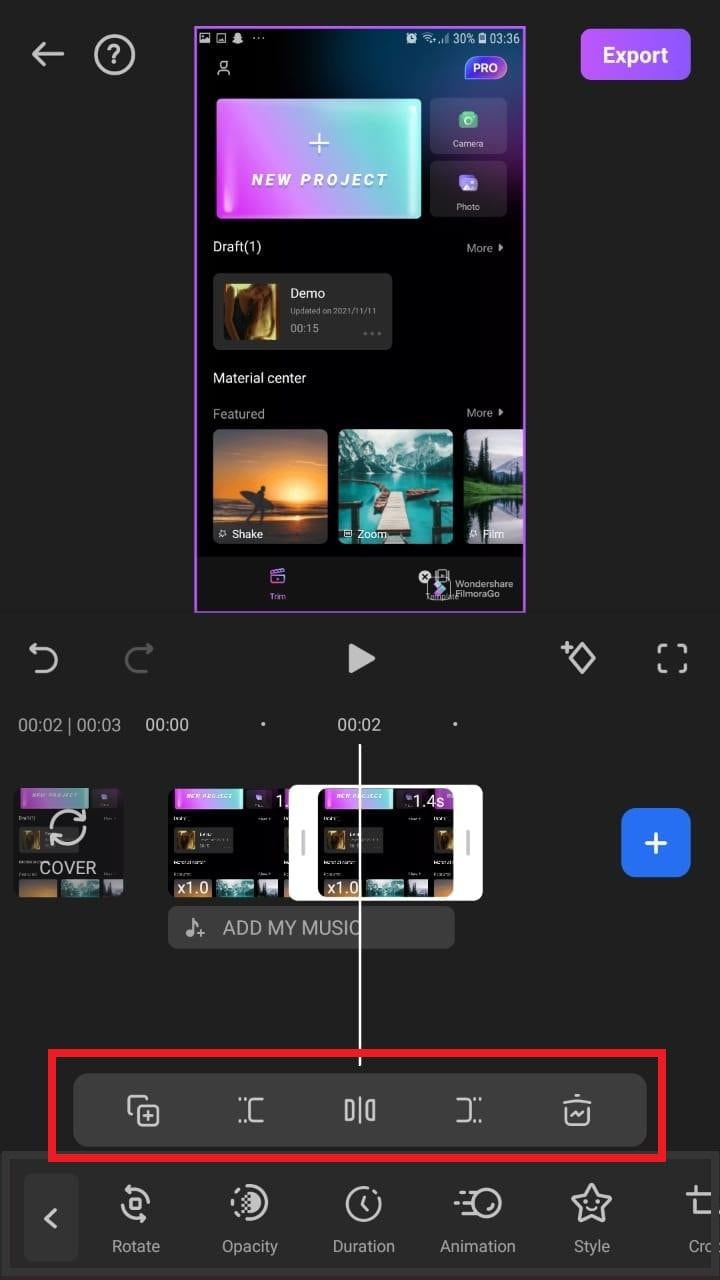
- You can select various options from the bottom of your screen to edit the selected video the way you like.

- Click on trim, and then you will see the different split-screen and collage feature options. Pick any that appeals to you.
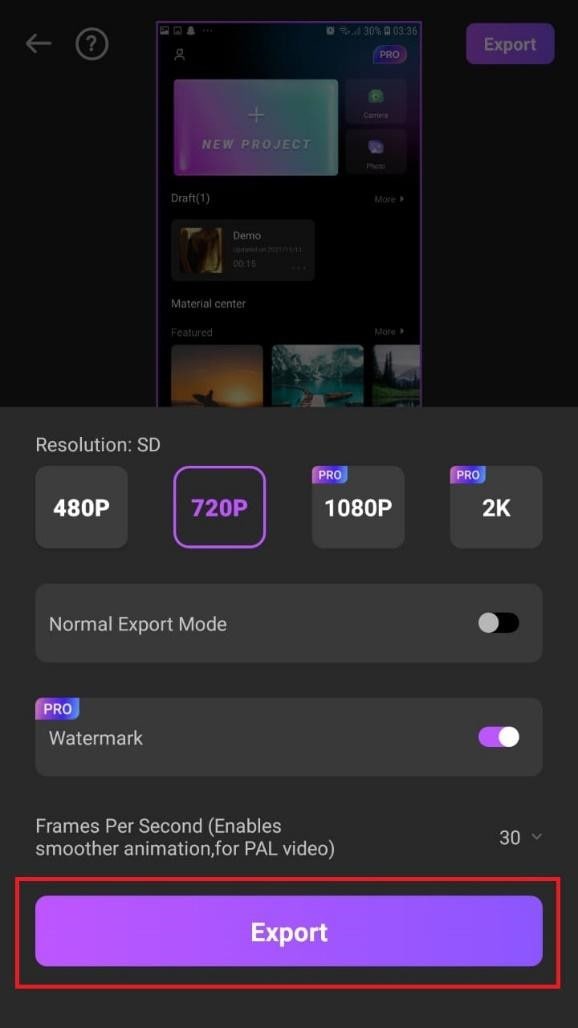
- When you are done with the editing, tap on “Export” at the top right of your screen.

- Go ahead and tap on “Export” on the next screen. Your video will be successfully exported and saved to your camera roll.
Using Filmora is very efficient in splitting your videos and making collage features for TikTok. It is a very simplified app available on both the Google Play Store and Apple Appstore.
Conclusion
TikTok is a platform that users use worldwide to create and share content. It could be pictures, videos, reels, or any other media type. Some people create videos for their audience on TikTok to educate them, while others do it to entertain them.
In any case, the goal is to build a more significant following on TikTok and garner greater attention from its users. You could even make money off the app.
One of the methods to impress your fans and explore multiple possibilities to build unique reels is to use the TikTok split-screen and collage feature effect available on TikTok. Although there are a few different ways to create a Split Screen on TikTok, the steps highlighted in this article are the most straightforward.
Free Download For macOS 10.14 or later
Steps to Split Screen Video with Filmora
- Download Filmora from the App store
- After installation, launch it.
- Click on “Continue” to continue to use the app.
- Click on Allow to grant Filmora access to your photos and videos.
- You can now tap on “New Project” with the + Symbol.
- Select your desired video and tap on “Next” at the bottom right of your screen
- You can select various options from the bottom of your screen to edit the selected video the way you like.
- Click on trim, and then you will see the different split-screen and collage feature options. Pick any that appeals to you.
- When you are done with the editing, tap on “Export” at the top right of your screen.
- Go ahead and tap on “Export” on the next screen. Your video will be successfully exported and saved to your camera roll.
Using Filmora is very efficient in splitting your videos and making collage features for TikTok. It is a very simplified app available on both the Google Play Store and Apple Appstore.
Conclusion
TikTok is a platform that users use worldwide to create and share content. It could be pictures, videos, reels, or any other media type. Some people create videos for their audience on TikTok to educate them, while others do it to entertain them.
In any case, the goal is to build a more significant following on TikTok and garner greater attention from its users. You could even make money off the app.
One of the methods to impress your fans and explore multiple possibilities to build unique reels is to use the TikTok split-screen and collage feature effect available on TikTok. Although there are a few different ways to create a Split Screen on TikTok, the steps highlighted in this article are the most straightforward.
100+ Best TikTok Captions: Enhance Your Content
- Part 2: Creative Stimulation: A Comprehensive Inventory of Popular Titles on TikTok in 2024
- Part 3: Automatically Generate TikTok Captions using Filmora’s AI Copywriting Feature
- Part 4: Summary
Part 1: Why Videos Posted on TikTok Need a Catchy Title
Every TikTok creator, from amateur to influencer, will tell you that a caption isn’t just a few characters beneath your video; it’s the cherry on top of your content sundae. Let’s break down why:
- First Impressions Count: TikTok videos autoplay, but captions immediately catch the eye. A clever, concise caption can convince viewers to stay, engage, or share.
- Sets the Mood: Your video might be enigmatic or ambiguous. A caption gives it context. Whether you’re aiming for humor, poignancy, or sheer absurdity, the caption anchors your content.
- Boosts Discoverability: Strategic keywords in captions can make your videos more discoverable, especially as users search for specific content on TikTok.
- It’s Your Brand’s Voice: Established TikTokers have a recognizable style. Your captions can become a part of your brand’s unique voice, making you distinguishable in a sea of creators.
Part 2: Creative Stimulation: A Comprehensive Inventory of Popular Titles on TikTok in 2024
Captions aren’t just about information but about flair, wit, and personality. As TikTok evolves, so do the trends in captions. Let’s dive into some categories that are making waves this year:
TikTok Captions for Couples
- “With you, every moment is a duet 🎶”
- “Couple goals or just today’s blooper reel?”
- “He’s my favorite notification ❤️”
- “Love’s newest trendsetters 👫”
- “Two peas, one viral pod.”
- We found our perfect harmony on TikTok 🎵”
- “Dance partners for life, one TikTok at a time 💃🕺”
- “Our love story in 15-second clips 💖”
- “Capturing our love, one TikTok at a time 📸”
- “Making memories in the form of TikToks 📽️”
- “From duets to ‘I do.’ TikTok brought us together 💍”
- “Living for the trending dances and loving each other 💃❤️🕺”
- “Swipe right for our love story on TikTok ❤️”
- “Our love’s playlist: viral TikToks and sweet moments 🎥”
- “Our love shines brighter than any filter on TikTok ✨”
- “They say love is a dance. Ours is a TikTok routine 💃🕺”
- “Can’t stop the beat of our love on TikTok 🎶”
- “We’re the stars of our own TikTok romance 🌟”
- “Our hearts sync better than our choreography on TikTok 💖”
- “He’s my favorite co-star in this TikTok love story 🌟”
TikTok Captions for Friends
- “Real friends don’t let you do TikToks alone.”
- “Duo trouble. Double the fun 🎉”
- “Friendship goals, one TikTok at a time.”
- “Partners in crime and rhyme!”
- “Viral together, pals forever.”
- “Making TikToks with your bestie: 100% certified fun 🌟”
- “Double trouble, twice the laughter 😂✌️”
- “When life gives you friends, make TikToks 🎥”
- “Tag your partner in TikTok crime! 👯♂️👯♀️”
- “Filling TikTok with friendship vibes and good times 🌈”
- “Our friendship is the trending challenge we never want to end 💫”
- “Friendship + TikTok = Unstoppable duo 💥”
- “Creating TikToks that define #FriendshipGoals 🙌”
- “Friendship blooms, one TikTok dance move at a time 💃👭”
- “When the beat drops, we groove together! 🎶💃”
- “Our friendship is the real TikTok algorithm: always in sync 🔄”
- “Making memories, one TikTok dance at a time 🕺💖”
- “Friends who TikTok together, stick together 🤝”
- “Our friendship is the filter that makes life look better on TikTok ✨”
- “Shenanigans and dances with my favorite TikTok buddy! 🤪🕺”
Cool TikTok Captions
- Coolness level: Expert TikToker 😏”
- “Dropping coolness like beats in a TikTok track 🎶”
- “Living the TikTok dream, one swipe at a time 👻”
- “Chillin’ on TikTok like it’s second nature 🕶️”
- “Ice-cold moves in a world set ablaze 🔥”
- “TikTok vibes: Ice-cold, no melting allowed ❄️”
- “Cooler than the flip side of the TikTok pillow 😎”
- “Defying gravity with my TikTok cool factor 🚀”
- “When in doubt, TikTok it out with style 😏”
- “Raising the coolness quotient with every TikTok move 💯”
- “Cool kids make cool TikToks, and that’s a fact 🌟”
- “In a world of TikToks, be the coolest creator 🌍”
- “Cool, calm, and TikTok-collected 🎥✌️”
- “Living the TikTok life, one cool video at a time 🎬”
- “Keeping it cool and classy in the TikTok universe 🎩👌”
- “Cooler than a cucumber, even when the camera’s rolling 🥒”
- “TikTok: Where coolness finds its true stage 🌠”
- “Cool moves, hot content. TikTok game strong 🔥”
- “Embrace the coolness, TikTok is our canvas 🎨”
- “Coolness is an attitude, and my attitude is TikTok-fueled 😎”
Funny TikTok Captions
- “My dance moves: better than my cooking skills. Sorry, not sorry. 💃🍳”
- “Attempting to TikTok, but mostly just tripping over my own feet. 🙈”
- “I’m not clumsy, just testing gravity… a lot. 😂🌍”
- “Dancing like nobody’s watching, especially because I kicked the tripod. 🕺💥”
- “My TikToks are 10% talent, 90% pretending I know what I’m doing. 🤷♂️”
- “Making TikToks: Because embarrassing myself in person isn’t enough. 😜”
- “When life gives you lemons, make a funny TikTok. 🍋😂”
- “Dancing like nobody’s business, except TikTok’s. 🕺💼”
- “Overthinking my TikTok dances like they’re complex math problems. 🤔📚”
- “Pro tip: If in doubt, do the floss dance. It solves everything. 🦷💃”
- “Just a TikToker trapped in a human body. Send help! 🆘🤖”
- “My TikToks are like life: a mix of chaos and laughter. 🤪🎉”
- “Making faces in the mirror like I’m preparing for a TikTok masterpiece. 🤪😜”
- “Dancing to the beat of my own awkwardness. 🎶💃”
- “TikToking: The only time my ‘cool moves’ meet reality. 😎🤦”
- “Trying to dance like a TikTok star, ending up like a TikTok blooper reel. 🌟🙈”
- “Caution: May spontaneously burst into dance at any given moment. 🚀💃”
- “When TikTok dances look easier than they are… and I prove it. 🙌🕺”
- “If, at first, you don’t succeed on TikTok, laugh at yourself and try again. 😂🔄”
- “TikTok: Where ‘trending’ and ‘tripping’ have the same starting letter for a reason. 🤣🚶♂️”
Captions are more than just add-ons. They’re a part of the content’s DNA, influencing virality and engagement. The above lists are just a teaser. With so much potential, the right caption can be the difference between a few views and a few million. Stay tuned as we explore more on this topic!
Part 3: Automatically Generate TikTok Captions using Filmora’s AI Copywriting Feature
In the ever-evolving world of content creation, tech tools can be a creator’s best friend. With the overwhelming demand for frequent and catchy content, wouldn’t it be a game-changer if an AI could whip up the perfect TikTok caption for you? Enter Filmora’s AI Copywriting feature!
Create AI Captions For Win 7 or later(64-bit)
Create AI Captions For macOS 10.14 or later
Step 1: Download Filmora and Find the AI Copywriting Feature
Filmora, widely recognized for its video editing prowess, has now integrated an AI-powered copywriting feature. After downloading Filmora, navigate to the ‘Tools’ menu. Among the list, you’ll find the “AI Copywriting” option. It’s user-friendly and intuitive, making it perfect for both beginners and seasoned TikTokers.
Step 2: Enter Your Video Information
Filmora’s AI requires a bit of information to generate a caption that resonates with your content and audience:
- Select the Type of Headlines and Language: Whether you want something witty, poignant, or a mix of both, there’s an option for every mood. Plus, with multi-language support, you can cater to global audiences.
- Enter Your Video Content Topic: Give the AI a brief description of your video. It could be as simple as “a dog chasing its tail” or more abstract like “the feeling of nostalgia at a childhood park.”
After inputting the required details, Filmora’s AI will churn out multiple caption suggestions. Choose the one that best fits or use them as inspiration to craft your unique spin.
Part 4: Summary
TikTok has transformed the world of short video content, and behind each viral video is a captivating caption that perfectly captures the moment’s essence. While understanding the importance of catchy titles is crucial, having the tools and insights to generate them consistently can set you apart from the crowd.
Whether you’re brainstorming creatively or seeking assistance from innovative tools like Filmora’s AI Copywriting feature, remember that your caption is the gateway to engagement. Harness its power, and watch your TikTok presence soar!
How to Make A Slideshow Video (+Filmora Techniques)
You have taken photos and videos all over your trip. Showing them to your friends and family can be a hassle if you have a lot of pictures. Viewing them all at once is possible by creating a slideshow video.
The slideshow video combines all the memories in one place. To make one on your own, we prefer just one best UI editing tools, Wondershare Filmora.
Before we create a slideshow, ensure to learn the basics of the slideshow video. Then, scroll below to get more!
Part 1. What Is a Slideshow Video?
A slideshow video is a video that combines your photos and videos to create a montage. This slideshow can be used as a collection of memories you can watch whenever you like.
You might have a photo album lying around somewhere in your house. A slideshow video can act like a modern-day photo album. But instead of photos, you can also add videos and create a monument of your precious memories.
Modern-day content creators on Youtube and other platforms can use a slideshow method to create short recap videos of their travels.
Part 2. What Are Some of the Uses of Slideshow Videos?
A slideshow video can be a great way to summarize all the moments of a marriage ceremony, graduation event, etc. And the list goes on and on.
- A wedding ceremony
- Anniversary recording
- A graduation ceremony
- A birthday party
- Your pet
- Your friends
- Your family
- A trip that you went on
Part 3. What Are the Benefits of a Slideshow?
There are many benefits to creating a slideshow video.
A long-lasting memory
Creating a slideshow video can be a digital reminiscent, allowing you to hold a precious video with your friends and family. Apart from physical portraits, a slideshow video will be a digital backup for your memories that you can watch in the future.
Easy to save and share
Since a video slideshow is a digital content, typically with an extension .mp4, .mov, etc., you can watch it whenever and wherever you want. Moreover, you can conveniently send it to the person who spent the time and shares the same memories with you.
Part 4. What Will You Need To Make a Slideshow?
To create an attractive slideshow video, you must fulfill the following requirements.
1. Good Quality Photos
To create a good slideshow, you must have good-quality photos with good resolution. Always take pictures with a good-quality camera or a mobile phone whenever you want to create a slideshow. Using filters in the editing software can disrupt the quality of your slideshow.
2. Video Clips
The slideshow is always combined with videos and photos. After taking good-quality images, remember always to record short video clips you can add between your pictures.
3. A Good Video Editor - Wondershare Filmora
To edit a slideshow video, you will need editing software. There’s no better tool to do the job than Wondershare Filmora . Wondershare Filmora enables you to make creative and appealing videos. It has a very engaging system UI that allows even novice users to get the hang of it quickly. You will learn how to make a slideshow in a few simple steps.
Free Download For Win 7 or later(64-bit)
Free Download For macOS 10.14 or later

Let’s start with the step-by-step instructions for making a slideshow video now that you know the requirements for generating a slideshow.
Part 5. Step-by-Step Guide to Creating a Slideshow Video
Utilizing filmora will reduce your workload while producing quality work. Follow the below step-by-step guide to make your slideshow video instantly!
Step1 Download Wondershare Filmora
Wondershare Filmora will provide the working platform. Follow the below steps to download it:
- First, install the Wondershare Filmora.
- Then, launch this application on your PC or Mac
Let’s proceed to edit our video after downloading the Wondershare Filmora software. Continue reading to find out how to begin the editing process.
Step2 Import your Photos and Videos
Importing your videos and pictures to Filmora’s media panel is best to have them all in one folder. Therefore, when you open Wondershare Filmora, you will notice the main import window in the top left corner.
- Click in the center of the import window upon the import icon.
- Browse from the PC library to where your target Videos and Photos are stored.
- Please select the required videos and photos and Open

Your next step will be to add the imported videos and images to the timeline.
Step3 Add your Photos and Videos to the Timeline
When you have multiple videos and photos, you can add all of them simultaneously. Or you can also add them one by one wherever you need. Follow the steps mentioned:
- Right-click on the photo or video you want.
- Keep holding the Right-click and drag it down to the timeline.

Now that we have imported your photos and videos into the timeline, it is time to align and add text.
Step4 Add the Title
To create an attractive slideshow, you will need to add a title before the start of the video. Doing so will allow you to gain more viewers and audiences.
Add a Black Screen
The black screen will eventually act like a canvas to give your title a good look. To add a black screen, follow the steps mentioned:
- Click on the media icon from the bar above the import window.
- You will notice many tabs on the left-hand side under a drop-down bar.
- Scroll below to find the sample media
- Download the black color if it is not downloaded already.
- Click and drag it down below to the start of your video.

Add a Title Tile
Now that we have our canvas, we will now add the title. Above the import media library, there will be a Title icon.
- Click on the title icon, and select the title that you want for your video by browsing and scrolling down.
- For this purpose, we will use a simple title tile called “Title 29.”
![]()
Note: You can find the same title by scrolling, browsing, or searching in the search bar above the import library.
- Click and drag the title onto the black screen that we added.
- Double-click the title to open its settings.
- Here you can type in the text that you want.

You can also change its font. When you click on the font bar, a drop-down option will pop up, and you choose whichever you like.
- Change the animation of the text title from the top left corner animation
Change The Timing of The Title
You can also adjust the timing of the title by below steps:
- Click on the advanced option in the bottom right corner, and settings will pop up.
- Find the title bar and drag it to the right side to increase the timing of the title.

After adding the title, it’s time to go with fading effect as shown below!
Step5 Add a Fade effect
You can also add a fade transition to the start of your video. It will blend the title with the first clip. Follow the steps mentioned to add the transition effects:
- Search the Fade option from the Transitions tab above the import window
![]()
Note: A fade transition will allow your title to fade into the first clip creating a visually pleasing effect.
- Download the Fade transition and drag it between the Black screen and the first clip.

Now that we have added a transition, it is time to move on to our music!
Step6 Add The Music
You can add your music to the slideshow from your PC library, but make sure you have the music rights. It is better to use stock audio by following the steps:
- Click on the Audio icon on the bar above the import window, and the list will pop up.
- Please browse the library to find music that best suits your video and download it.
- Then add it to the timeline’s audio track.
Add Beat Detection
To match your video clips properly with the music, so it remains in sync, you can adjust it with the beat of the music. To add beat detection, follow the steps mentioned:
- Right-Click on the audio that you selected in the audio library.
- You will see a pop-up list, and in the options, you will see Beat detection.
- Click on Beat detection.

- Then click on the audio and drag it below on the timeline.
Match The Video With The Audio Markers
To have the full advantage of beat detection, you must adjust your videos and photos to the markers. Follow the steps mentioned below to do so:

- Check that the video clips are in sync with the marker on the audio.
- For this, drag one video end to a marker or as many videos as you want.
- Ultimately, you will create a timeline in which your videos sync with the audio beat.

After syncing your videos and photos to the audio, it is time to move on to the scaling and background blur.
Step7 Scale and Blur The Background
Now, some of the pictures you have added must-have black borders. It usually means that your image is shorter than the aspect ratio.
If you leave the picture/photo as it is, the black borders will make it look shorter and out of proportion. As a result, it gives a generally poor look, as shown below.

To counter this problem, follow some easy steps:
- Double-click on the picture with black borders, and it will open the settings list.
- Go into the Transform Here you can see multiple settings.
- Increase the size of your photo to match the aspect ratio.

Add a Background Blur Effect
In some cases where you have taken a portrait photo where the picture is vertical, it ultimately stays out of proportion to the aspect ratio.
![]()
Note: Simply scaling the image to match the aspect ratio size is not sensible in this case. Doing so will hide the many pretty features of a portrait.

To counter this problem, you can add a blur effect. This effect will turn your background blur, matching the aspect ratio. Follow the steps mentioned below:
- Click on the Effects tab above the import window and search for Blur.
- Download the blur effect that suits you best and then drag the blur effect above your photo in the timeline.
You will notice the background turn to a blur in the main play screen.

Step8 Add a Transition
You can also add a transition effect to spice up things. It can get bland when your video or photo changes from one to another. To create a good slideshow video, you can add a transition effect by following the steps mentioned below:
- Click on the Transition icon above the import window.
- Browse the library until you find a transition you like, then download one.
- Click on the transition and drag it between the clips.

Adjust The Duration and Placement of The Transition
Now it’s time to adjust the duration and placement of the transition. For this, you can follow the steps mentioned below:
- Double-click on the transition effect, and it will open the settings list.
- You can adjust the duration by setting the timer as per your requirement.
![]()
Note: If other transitions are added to the timeline, you can adjust them by clicking Apply to all.

When you have adjusted the slideshow transitions, it is time to move on to the effects and filters.
Step9 Add the Effects and Filters
If you create a slideshow video of your trip to a historical place. You can add a Vintage filter to your video to give it that vintage tint. Follow the steps mentioned below:
- Head over to the Effects tab, where the effects library will open up
- Select any effect and download
- Click on the effect and drag it to drop in the timeline.

Combining a vintage effect with a dreamy glow will make your video pop up even more. To add a nostalgic glow to your video, follow the steps:
- Click on the effects and search for Glow in the search bar.
- Click and drag the glow effect above the timeline and ensure the effect is in the separate video timeline.
- Ensure the effect is applied to every photo and video.
- Double-click on the effect, and settings will open in the import window.
- Then, you can adjust the radius and opacity of the video. Adjust as you desire.

We are almost done. Let us now move toward our outro!
Step10 Create an Outro
The steps we will do will be similar to the ones we did initially. As we are creating, we will again need a canvas. Follow the steps mentioned below:
- Head to the media icon on the bar and scroll until you see the sample media tab.
- In the sample color option, drag and drop the black color at the end of your video.
Add an Outro Transition
To finalize things, add a transition effect at the end of the clip by these steps:
- In the Transition tab, search for the Fade effect.
- Drag and drop the Fade effect between your last video clip and the Black screen.

Fade out The Audio
If the audio suddenly ends at the end of your slideshow, it will create a bitter effect. Therefore, you should always fade out audio at the end of the video. To do this, follow the steps mentioned:
- Double-click on the audio in the timeline, and the settings list will pop up.
- On the top section of the import window, you will notice fade options.
- In the fade-out bar, drag it to the side to set your fade-out timer.
You can show your friends and family the slideshow or upload it to Youtube. Play the Slideshow Video from the beginning to see the changes.

Conclusion
By the steps mentioned above, you can create a slideshow video. Give every moment a chance to align everything on one side! The slideshow will also save your device space by aligning everything in one video.
Free Download For macOS 10.14 or later
Let’s start with the step-by-step instructions for making a slideshow video now that you know the requirements for generating a slideshow.
Part 5. Step-by-Step Guide to Creating a Slideshow Video
Utilizing filmora will reduce your workload while producing quality work. Follow the below step-by-step guide to make your slideshow video instantly!
Step1 Download Wondershare Filmora
Wondershare Filmora will provide the working platform. Follow the below steps to download it:
- First, install the Wondershare Filmora.
- Then, launch this application on your PC or Mac
Let’s proceed to edit our video after downloading the Wondershare Filmora software. Continue reading to find out how to begin the editing process.
Step2 Import your Photos and Videos
Importing your videos and pictures to Filmora’s media panel is best to have them all in one folder. Therefore, when you open Wondershare Filmora, you will notice the main import window in the top left corner.
- Click in the center of the import window upon the import icon.
- Browse from the PC library to where your target Videos and Photos are stored.
- Please select the required videos and photos and Open
Your next step will be to add the imported videos and images to the timeline.
Step3 Add your Photos and Videos to the Timeline
When you have multiple videos and photos, you can add all of them simultaneously. Or you can also add them one by one wherever you need. Follow the steps mentioned:
- Right-click on the photo or video you want.
- Keep holding the Right-click and drag it down to the timeline.
Now that we have imported your photos and videos into the timeline, it is time to align and add text.
Step4 Add the Title
To create an attractive slideshow, you will need to add a title before the start of the video. Doing so will allow you to gain more viewers and audiences.
Add a Black Screen
The black screen will eventually act like a canvas to give your title a good look. To add a black screen, follow the steps mentioned:
- Click on the media icon from the bar above the import window.
- You will notice many tabs on the left-hand side under a drop-down bar.
- Scroll below to find the sample media
- Download the black color if it is not downloaded already.
- Click and drag it down below to the start of your video.
Add a Title Tile
Now that we have our canvas, we will now add the title. Above the import media library, there will be a Title icon.
- Click on the title icon, and select the title that you want for your video by browsing and scrolling down.
- For this purpose, we will use a simple title tile called “Title 29.”
![]()
Note: You can find the same title by scrolling, browsing, or searching in the search bar above the import library.
- Click and drag the title onto the black screen that we added.
- Double-click the title to open its settings.
- Here you can type in the text that you want.
You can also change its font. When you click on the font bar, a drop-down option will pop up, and you choose whichever you like.
- Change the animation of the text title from the top left corner animation
Change The Timing of The Title
You can also adjust the timing of the title by below steps:
- Click on the advanced option in the bottom right corner, and settings will pop up.
- Find the title bar and drag it to the right side to increase the timing of the title.
After adding the title, it’s time to go with fading effect as shown below!
Step5 Add a Fade effect
You can also add a fade transition to the start of your video. It will blend the title with the first clip. Follow the steps mentioned to add the transition effects:
- Search the Fade option from the Transitions tab above the import window
![]()
Note: A fade transition will allow your title to fade into the first clip creating a visually pleasing effect.
- Download the Fade transition and drag it between the Black screen and the first clip.
Now that we have added a transition, it is time to move on to our music!
Step6 Add The Music
You can add your music to the slideshow from your PC library, but make sure you have the music rights. It is better to use stock audio by following the steps:
- Click on the Audio icon on the bar above the import window, and the list will pop up.
- Please browse the library to find music that best suits your video and download it.
- Then add it to the timeline’s audio track.
Add Beat Detection
To match your video clips properly with the music, so it remains in sync, you can adjust it with the beat of the music. To add beat detection, follow the steps mentioned:
- Right-Click on the audio that you selected in the audio library.
- You will see a pop-up list, and in the options, you will see Beat detection.
- Click on Beat detection.
- Then click on the audio and drag it below on the timeline.
Match The Video With The Audio Markers
To have the full advantage of beat detection, you must adjust your videos and photos to the markers. Follow the steps mentioned below to do so:
- Check that the video clips are in sync with the marker on the audio.
- For this, drag one video end to a marker or as many videos as you want.
- Ultimately, you will create a timeline in which your videos sync with the audio beat.
After syncing your videos and photos to the audio, it is time to move on to the scaling and background blur.
Step7 Scale and Blur The Background
Now, some of the pictures you have added must-have black borders. It usually means that your image is shorter than the aspect ratio.
If you leave the picture/photo as it is, the black borders will make it look shorter and out of proportion. As a result, it gives a generally poor look, as shown below.
To counter this problem, follow some easy steps:
- Double-click on the picture with black borders, and it will open the settings list.
- Go into the Transform Here you can see multiple settings.
- Increase the size of your photo to match the aspect ratio.
Add a Background Blur Effect
In some cases where you have taken a portrait photo where the picture is vertical, it ultimately stays out of proportion to the aspect ratio.
![]()
Note: Simply scaling the image to match the aspect ratio size is not sensible in this case. Doing so will hide the many pretty features of a portrait.
To counter this problem, you can add a blur effect. This effect will turn your background blur, matching the aspect ratio. Follow the steps mentioned below:
- Click on the Effects tab above the import window and search for Blur.
- Download the blur effect that suits you best and then drag the blur effect above your photo in the timeline.
You will notice the background turn to a blur in the main play screen.
Step8 Add a Transition
You can also add a transition effect to spice up things. It can get bland when your video or photo changes from one to another. To create a good slideshow video, you can add a transition effect by following the steps mentioned below:
- Click on the Transition icon above the import window.
- Browse the library until you find a transition you like, then download one.
- Click on the transition and drag it between the clips.
Adjust The Duration and Placement of The Transition
Now it’s time to adjust the duration and placement of the transition. For this, you can follow the steps mentioned below:
- Double-click on the transition effect, and it will open the settings list.
- You can adjust the duration by setting the timer as per your requirement.
![]()
Note: If other transitions are added to the timeline, you can adjust them by clicking Apply to all.
When you have adjusted the slideshow transitions, it is time to move on to the effects and filters.
Step9 Add the Effects and Filters
If you create a slideshow video of your trip to a historical place. You can add a Vintage filter to your video to give it that vintage tint. Follow the steps mentioned below:
- Head over to the Effects tab, where the effects library will open up
- Select any effect and download
- Click on the effect and drag it to drop in the timeline.
Combining a vintage effect with a dreamy glow will make your video pop up even more. To add a nostalgic glow to your video, follow the steps:
- Click on the effects and search for Glow in the search bar.
- Click and drag the glow effect above the timeline and ensure the effect is in the separate video timeline.
- Ensure the effect is applied to every photo and video.
- Double-click on the effect, and settings will open in the import window.
- Then, you can adjust the radius and opacity of the video. Adjust as you desire.
We are almost done. Let us now move toward our outro!
Step10 Create an Outro
The steps we will do will be similar to the ones we did initially. As we are creating, we will again need a canvas. Follow the steps mentioned below:
- Head to the media icon on the bar and scroll until you see the sample media tab.
- In the sample color option, drag and drop the black color at the end of your video.
Add an Outro Transition
To finalize things, add a transition effect at the end of the clip by these steps:
- In the Transition tab, search for the Fade effect.
- Drag and drop the Fade effect between your last video clip and the Black screen.
Fade out The Audio
If the audio suddenly ends at the end of your slideshow, it will create a bitter effect. Therefore, you should always fade out audio at the end of the video. To do this, follow the steps mentioned:
- Double-click on the audio in the timeline, and the settings list will pop up.
- On the top section of the import window, you will notice fade options.
- In the fade-out bar, drag it to the side to set your fade-out timer.
You can show your friends and family the slideshow or upload it to Youtube. Play the Slideshow Video from the beginning to see the changes.
Conclusion
By the steps mentioned above, you can create a slideshow video. Give every moment a chance to align everything on one side! The slideshow will also save your device space by aligning everything in one video.
Also read:
- New In 2024, 10 Best Text to Robot Voice Generators Windows, Mac, Android, iPhone & Online
- Updated In 2024, Useful Guide to Speed Up/Down Videos in VLC
- New Adobe Premiere Pro Guide to Slow-Down Video for 2024
- Updated Step by Step to Resize Video in Davinci Resolve
- Step by Step to Split Clips in VLC for 2024
- Updated In 2024, Video Editors Use the Loading Text Effect to Create Impressive and Descriptive Videos. Let Us Understand the Detailed Steps to Customize the Loading Text Effect in Wondershare Filmora
- New In 2024, How to Change Aspect Ratio of Video?
- Updated In 2024, Do You Still Waste Time Making Transparent Background in Paint
- New Quick Answer What Is a Transparent Logo and Why Do You Need It
- Updated Looking For The Best Slow Motion Effect in Premiere Pro
- New AI Features of Filmora - Silence Detection in Videos
- 2024 Approved How to Blur a Still or Moving Part of Video
- 2024 Approved Denoise Video in Adobe Premiere Pro – Audio and Video Noise Removal
- New How to Blur Faces in Your Video on iPhone
- New 2024 Approved This Article Will Reveal the Secrets of Choosing a Location to Shoot Your Viral Music Video. As Well as Tips to Make an Energetic Schedule for Shooting Days
- New In 2024, Top 22 Free Video Editing Software
- New Detailed Tutorial to Crop Video in KineMaster for 2024
- In 2024, Best 31 Video Trimmers for Computer, Phone and Online
- Updated Before & After Editing Trick - Filmora for 2024
- Updated 2024 Approved Progressive Solutions to Adding VHS Effects to Video with Ease
- Recording Video in Slow Motion Some Considerable Points
- Tiktok Video Aspect Ratio for 2024
- New You Must Be Wondering Which the Best Online Transparent Image-Maker Is! Well, There Is No Need to Get Confused as Here; You Will Get a Curated List for the Same
- Additional Tips About Sinnoh Stone For Xiaomi 14 Ultra | Dr.fone
- Recover your messages after Oppo Reno 10 Pro 5G has been deleted
- How to Transfer Data from Poco X6 Pro to Other Android Devices? | Dr.fone
- How to Change Location On Facebook Dating for your Asus ROG Phone 7 Ultimate | Dr.fone
- In 2024, How to Fix Pokemon Go Route Not Working On Realme C53? | Dr.fone
- In 2024, Full Guide to Bypass Asus ROG Phone 7 Ultimate FRP
- How to Cast Lava Agni 2 5G Screen to PC Using WiFi | Dr.fone
- New Demystifying AI Game Generators | Wondershare Virbo Glossary for 2024
- 8 Solutions to Solve YouTube App Crashing on Xiaomi Redmi Note 12 Pro 4G | Dr.fone
- In 2024, Delete Gmail Account With/Without Password On Samsung Galaxy XCover 7
- How to convert AVCHD .mts files for G24 Power?
- How can I get more stardust in pokemon go On Poco C51? | Dr.fone
- Top 7 Phone Number Locators To Track Samsung Galaxy M14 5G Location | Dr.fone
- How and Where to Find a Shiny Stone Pokémon For Tecno Spark 20 Pro+? | Dr.fone
- Title: How to Make Coin Magic With Filmora
- Author: Morgan
- Created at : 2024-05-19 05:11:38
- Updated at : 2024-05-20 05:11:38
- Link: https://ai-video-editing.techidaily.com/how-to-make-coin-magic-with-filmora/
- License: This work is licensed under CC BY-NC-SA 4.0.
