:max_bytes(150000):strip_icc():format(webp)/GettyImages-81522363-5683a5573df78ccc15cabf56.jpg)
How to Make Custom Lower Thirds with Filmora

How to Make Custom Lower Thirds with Filmora
As a video creator, there are times when you need to use Lower Thirds. Although many lower-third presets are available, making unique and personalized ones can ensure your video stands out.
So, to empower your inner video creator, this article will show you how to make your own Lower Thirds in Filmora.
Part 1: What is Lower Third
A Lower Third is a mix of motion graphic design and texts that are placed in the lower area of the screen. It provides additional information, such as a person’s name or other relevant information, without distracting the audience from the main content.
Lower Thirds can be used in various settings, such as news broadcasts or interviews, to help provide viewers with additional context.
Part 2: How to Make Your Own Lower Thirds in Filmora
Free Download For Win 7 or later(64-bit)
Free Download For macOS 10.14 or later
(1) A simple line and texts

Step1 Create a simple line
Go to the Media library > Sample Media folder > choose a color sample. For this tutorial, we will select the white color. Then, drag and drop this sample color onto the upper video track.

Double-click the white sample clip to open the settings and scale it to 30%. Then, reposition the white bar to your desired place.

Step2 Mask the white sample
Since we want to create a thin horizontal shape, you need to make some adjustments to the white sample by using an image mask. So, go to the Effect window > Utility > Image Mask. Then, drag and drop the “Image Mask” onto the white color sample.

After that, double-click the white sample on the timeline and find the Image Mask setting. Choose the shape that works best for your needs. For this tutorial, we are going to use this one. Then, adjust the X and Y-axis scale numbers until it becomes a thin white line. Click OK.

Step3 Add a text for your lower thirds
Go to Titles > Plain Text > Basic 6 and drop it onto the second video track above the white line clip. Don’t worry about the exact position yet. We can adjust it later.

Double-click on the text clip to open the settings, then type some text there and adjust the size and font.

Step4 Add animation to the text
Click Advanced > Animation > Up Down 1 animation. Adjust the animation length by dragging the two brackets on the timeline on the right side. Click Ok.

Step5 Add keyframes to the white line clip when entering
Double-click on the white line clip on the timeline to show the animation keyframe setting window. Then, playback the animation of the text, find a position before the text animation starts and move the play head there. Make sure it is close enough to when the texts show up so the white line enters the keyframe right before the text enters.

Click to add a keyframe, double-check to make sure it is the final position you want, and the opacity should be 100 at this point.
After that, move the play head to the left for a few frames and click add again. To make sure the white line is out of the frame before entering, you need to change the Y-axis number. Change the opacity to 0 as the white line starts in transparent color.

These two keyframes will create an effect of the line entering the frame while turning from transparent to white. Playback the animation and adjust the keyframes marks by dragging them to the left or right until you feel the timing looks good.
Step6 Add keyframes to the white line clip when exiting
Playback again to find where the texts disappear, then move the play head to a position after it. Also, make sure it’s close enough to where the texts disappear so you can ensure the white line exits right after the texts disappear. Then, add the keyframe.

You don’t need to change the setting this time because this keyframe is used to keep the position and opacity unchanged.
Instead, move the play head again to the right for a few frames and add another keyframe. Move the texts out of the frame by changing the y-axis number, then change the opacity to 0. This keyframe is used to create the white line animation exiting the frame and turning back to transparent in the meantime.

Playback the video and see how it looks.
(2) A name card with a solid background

Sometimes you might want to create a name card with a solid background like the sample above. To create it, we can use the same method. Here’s how to do it:
Step1 Make the lower third background
Select the white color sample from the sample color folder and drop it onto the upper video track of the video.

Change the scale to 30%, then reposition the white sample to your desired place. Click OK.

Step2 Create an image mask for the lower third background
Drag and drop the Image Mask onto the white sample clip on the timeline.

Double-click on the white sample clip to activate the video setting window and find the Image Mask settings. Then, choose the mask shape you need. You can also adjust its size by changing the X or Y-axis.

Step3 Add some text
Once the background card is in place, go to Titles > Plain Text > ‘Basic 6’ and drop it onto the third video track.

Now, type in the texts as needed. Reposition and scale the texts to make sure they are on top of the background shape.

Step4 Add animation to the text
Click Advanced > Animation > Push. Then, adjust the animation length accordingly. Click Ok.

Double-click on the background clip to show the animation tab setting. Then, playback the text animation and find a position earlier than the start and add a keyframe.

Similar to the tutorial before, move the play head again a few frames earlier to the left and add another keyframe. If you want to have the name card flying in from the left while expanding, you can change the X-axis and scale of the background card to 0. Change the opacity to 0 to create a color change from transparent to white.

To let the background card exit the frame, add two more keyframes to the background card. Add a keyframe with no changes to settings. Move the play head to the right for a few frames and add another keyframe.

If you want the name card to exit to the bottom, change the Y-axis number until it exits. Change the scale and opacity to 0. Then, playback and adjust the keyframes.
Finally, you can add a Subscribe button from the new default Filmora element pack “Social Media.”

Wrapping up
These are two ways you can create your own Lower Thirds in FIlmora. You can also change the keyframe settings to customize your lower thirds even more. Now, it’s time to try it yourself, and let us know what you think!
Free Download For macOS 10.14 or later
(1) A simple line and texts

Step1 Create a simple line
Go to the Media library > Sample Media folder > choose a color sample. For this tutorial, we will select the white color. Then, drag and drop this sample color onto the upper video track.

Double-click the white sample clip to open the settings and scale it to 30%. Then, reposition the white bar to your desired place.

Step2 Mask the white sample
Since we want to create a thin horizontal shape, you need to make some adjustments to the white sample by using an image mask. So, go to the Effect window > Utility > Image Mask. Then, drag and drop the “Image Mask” onto the white color sample.

After that, double-click the white sample on the timeline and find the Image Mask setting. Choose the shape that works best for your needs. For this tutorial, we are going to use this one. Then, adjust the X and Y-axis scale numbers until it becomes a thin white line. Click OK.

Step3 Add a text for your lower thirds
Go to Titles > Plain Text > Basic 6 and drop it onto the second video track above the white line clip. Don’t worry about the exact position yet. We can adjust it later.

Double-click on the text clip to open the settings, then type some text there and adjust the size and font.

Step4 Add animation to the text
Click Advanced > Animation > Up Down 1 animation. Adjust the animation length by dragging the two brackets on the timeline on the right side. Click Ok.

Step5 Add keyframes to the white line clip when entering
Double-click on the white line clip on the timeline to show the animation keyframe setting window. Then, playback the animation of the text, find a position before the text animation starts and move the play head there. Make sure it is close enough to when the texts show up so the white line enters the keyframe right before the text enters.

Click to add a keyframe, double-check to make sure it is the final position you want, and the opacity should be 100 at this point.
After that, move the play head to the left for a few frames and click add again. To make sure the white line is out of the frame before entering, you need to change the Y-axis number. Change the opacity to 0 as the white line starts in transparent color.

These two keyframes will create an effect of the line entering the frame while turning from transparent to white. Playback the animation and adjust the keyframes marks by dragging them to the left or right until you feel the timing looks good.
Step6 Add keyframes to the white line clip when exiting
Playback again to find where the texts disappear, then move the play head to a position after it. Also, make sure it’s close enough to where the texts disappear so you can ensure the white line exits right after the texts disappear. Then, add the keyframe.

You don’t need to change the setting this time because this keyframe is used to keep the position and opacity unchanged.
Instead, move the play head again to the right for a few frames and add another keyframe. Move the texts out of the frame by changing the y-axis number, then change the opacity to 0. This keyframe is used to create the white line animation exiting the frame and turning back to transparent in the meantime.

Playback the video and see how it looks.
(2) A name card with a solid background

Sometimes you might want to create a name card with a solid background like the sample above. To create it, we can use the same method. Here’s how to do it:
Step1 Make the lower third background
Select the white color sample from the sample color folder and drop it onto the upper video track of the video.

Change the scale to 30%, then reposition the white sample to your desired place. Click OK.

Step2 Create an image mask for the lower third background
Drag and drop the Image Mask onto the white sample clip on the timeline.

Double-click on the white sample clip to activate the video setting window and find the Image Mask settings. Then, choose the mask shape you need. You can also adjust its size by changing the X or Y-axis.

Step3 Add some text
Once the background card is in place, go to Titles > Plain Text > ‘Basic 6’ and drop it onto the third video track.

Now, type in the texts as needed. Reposition and scale the texts to make sure they are on top of the background shape.

Step4 Add animation to the text
Click Advanced > Animation > Push. Then, adjust the animation length accordingly. Click Ok.

Double-click on the background clip to show the animation tab setting. Then, playback the text animation and find a position earlier than the start and add a keyframe.

Similar to the tutorial before, move the play head again a few frames earlier to the left and add another keyframe. If you want to have the name card flying in from the left while expanding, you can change the X-axis and scale of the background card to 0. Change the opacity to 0 to create a color change from transparent to white.

To let the background card exit the frame, add two more keyframes to the background card. Add a keyframe with no changes to settings. Move the play head to the right for a few frames and add another keyframe.

If you want the name card to exit to the bottom, change the Y-axis number until it exits. Change the scale and opacity to 0. Then, playback and adjust the keyframes.
Finally, you can add a Subscribe button from the new default Filmora element pack “Social Media.”

Wrapping up
These are two ways you can create your own Lower Thirds in FIlmora. You can also change the keyframe settings to customize your lower thirds even more. Now, it’s time to try it yourself, and let us know what you think!
Adobe Premiere Pro Rec 709 LUTs: Finding The Best Choices
Different styles of LUTs exist because each style serves a specific purpose in color correction and grading. LUTs are designed to replicate various cinematic styles and to change lighting conditions. By using different styles of LUTs, you can effortlessly achieve the desired color grading for your media. There are many types of LUTs to download, each with unique color composition.
However, Rec 709 LUT is a type of LUT commonly used in video editing software like Premiere Pro. Additionally, this LUT ensures that your video appears accurate and consistent on various HD screens. Moreover, it helps maintain the right balance of colors, contrast, and brightness. Furthermore, Rec 709 LUT Premiere Pro is suitable for broadcast, web streaming, or other HD content platforms.
Part 1: What are the Benefits of Using Premiere Pro Rec 709 LUTs in Video Editing?
Do you know the advantages of using Rec 709 Premiere Pro LUTs? Using Rec 709 LUTs in video editing with software like Adobe Premiere Pro can offer several benefits:
Color Accuracy
Rec 709 is the color space standard used for broadcast and video production. Furthermore, applying Rec 709 LUTs ensures accurate color representation of your media. Additionally, it maintains consistency and accuracy across different devices and platforms. It helps to achieve a standardized color look that conforms to industry standards.
Efficient Color Correction
Rec 709 LUTs streamline your color correction process. They provide a starting point for adjusting your videos’ color balance, contrast, and saturation. Moreover, if you apply this LUT at the start of your project, you can bring your video within the acceptable color range. Eventually, it will save you time and effort in the editing process.
Previewing Final Look
When you apply these LUTs, you can preview how your footage will look after color grading. Similarly, it helps you visualize your content to make changes for further adjustments. In addition, it also allows you to assess the tone and mood of the video in real-time.
Consistency and Compatibility
Such LUTs promote consistency across different cameras, lighting conditions, and sources. When working with multiple sources, you can apply this LUT for a consistent look. Furthermore, these LUTs also ensure compatibility with various display devices and platforms. It makes this tool compatible with different platforms and software.
Creative Control
Furthermore, these LUTs also serve as a starting point for further creative grading. You can layer additional adjustments on top of the LUT. In this way, you can achieve a specific artistic style to create a unique look for your project. Additionally, Rec 709 LUT creates a foundation for you to color-grade your content creatively.
Speeding Up Workflow
By using Rec 709 LUTs as a starting point, you can speed up your editing workflow. Using these LUTs, you don’t need to adjust each clip individually manually. In addition, you can apply a LUT to multiple clips simultaneously to color-correct your media files. Moreover, it saves you time when working on larger video projects.
Empower your videos with a new mood using different LUTs. Filmora now offers 100+ top-quality 3D LUTs cover a broad range of scenarios. Transform your videos with Filmora’s powerful 3D LUTs.
Apply LUT on Videos Apply LUT on Videos Learn More

Part 2: How to Use LUTs in Premiere Pro: A Guide
You can apply your Rec 709 LUT for Premiere Pro without needing any prior experience. All you have to do is to follow these simple steps to apply your favorite LUT.
Step 1: To apply a LUT using Adobe Premiere Pro, import your video by clicking the “File” button and selecting the “Import” option. You can also click on “Import media to start” in the Project Tab. Once your file is imported, drag the clip onto the timeline and move into the “Color” workspace.
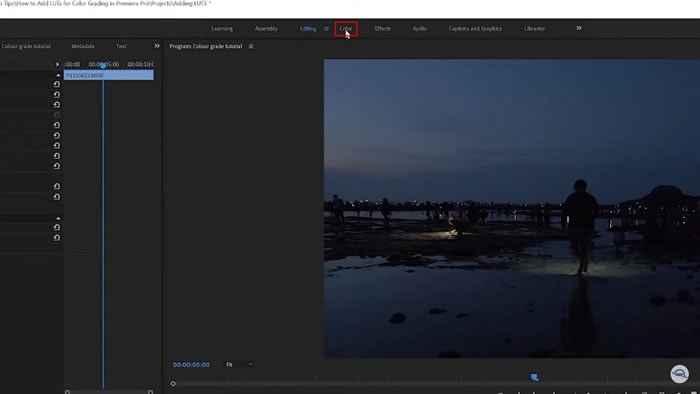
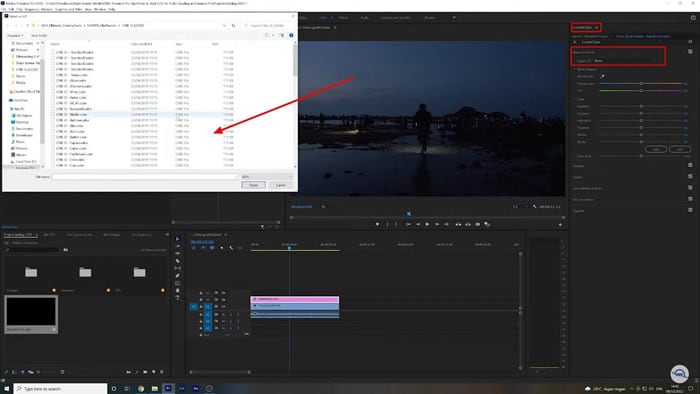
Step 2: In continuation, click the “Adjustment Layer” button in the Project tab. Select your adjustment layer and drop it on top of your video clip in the timeline. Click on the layer and go to the “Video Effects” in the Effects option in the Project window. Then, navigate to “Color Correction” and select “Lumetri Color.”

Step 3: In the new window that appears, find the “Input LUT” option under the Basic Correction tab. Browse the LUT you want to apply to your video. Additionally, you can explore more creative LUTs by going to the “Creative” tab in the Lumetri Color window. In the “Look” section, browse for different creative LUTs for your video. You can adjust the intensity of the selected LUT using the slider.
Part 3: The Top Notch Premiere Pro LUTs Rec 709
There are many Premiere Pro Rec 709 LUTs available that you can download and purchase. In the list below are some of the best Rec 709 LUTs you can use.
1. LOOK Creative LUT Pack
The LOOK Creative LUT Pack is a collection of 10 creative LUTs. It includes a range of LUTs, including some popular ones like teal and orange and old noir. These LUTs provide a quick and easy way to add a specific color tone or mood to your footage. In addition to the basic LUTs, it also offers unique and creative options. For example, you’ll find LUTs like Subtle Sci-Fi, Grunge Green, and others.

2. Cinematic LUTs V2
Cinematic LUTs V2 is a pack of modern cinematic-style LUTs. This incredible LUTs pack is designed to give your videos a cinematic touch. With this pack, you get access to 10 different cinematic LUTs to color grade your videos. Furthermore, you can use these LUTs for your LOG footage as well. Additionally, with these LUTs, you can add richness and depth to your videos.

3. NATURAL Rec709
The NATURAL Rec709 LUT pack offers 17 different styles of LUTs. It includes ones inspired by Tobacco, Crunchy Gold, and Black & White filters. These LUTs can enhance the colors and tones in your videos, providing a natural look. Furthermore, you can customize the intensity of the LUTs. Moreover, each LUT in this pack offers a unique color scheme for your videos.

4. 35 Free LUTs for Color Grading Videos
It is an amazing LUT pack that offers you a variety of 35 different styles of LUTs. With these LUTs, you can achieve a vintage look or a cinematic vibe for your videos. These LUTs can work perfectly with Rec 709 footage with accurate and vibrant colors. Furthermore, this pack is compatible with different software, including Premiere Pro.

5. S-Log 3 to Rec.709 LUT
The S-Log3 to Rec.709 LUT pack is designed to enhance your footage by adding vibrance. Applying this LUT boosts saturation, giving your video a more natural and realistic look. Additionally, you can bring out the full potential of your videos captured in S-Log3 gamma. Moreover, this LUT amplifies the colors and is compatible with the Rec.709 color space.

6. DJI OSMO POCKET Creative LUTs Pack
The DJI Osmo Pocket Creative LUTs Pack offers a collection of various creative LUTs. You can choose from different styles and color overlays for your media files. Moreover, you can use this LUT pack for both pictures and videos. In addition to this, it is also compatible with popular editing software. Furthermore, this tool pack supports both .3dl and .cube formats.

7. Blockbuster HLG And Standard LUTs
Another amazing pack of LUTs that you can use is Blockbuster HLG and Standard LUTs. This pack includes 21 Rec 709 LUTs with unique color toning and style. Furthermore, applying these LUTs will make your color grading more professional. Additionally, you can get rich and deep tones for your digital medial files. Similarly, you can change the feel of your content in a more professional style.

Conclusion
In conclusion, LUTs are perfect tools to enhance your media by altering its colors and tones. Different styles of LUTs cater to various creative needs. Furthermore, LUTs allow you to achieve specific looks and moods for your digital content. Moreover, the Rec 709 LUT Premiere Pro ensures your video appears accurate and consistent on HD displays. Additionally, you can achieve professional-grade results as well.
To add more LUTs on video, you can try Wondershare Filmora !
Add LUTs on Video For Win 7 or later(64-bit)
Add LUTs on Video For macOS 10.14 or later
Apply LUT on Videos Apply LUT on Videos Learn More

Part 2: How to Use LUTs in Premiere Pro: A Guide
You can apply your Rec 709 LUT for Premiere Pro without needing any prior experience. All you have to do is to follow these simple steps to apply your favorite LUT.
Step 1: To apply a LUT using Adobe Premiere Pro, import your video by clicking the “File” button and selecting the “Import” option. You can also click on “Import media to start” in the Project Tab. Once your file is imported, drag the clip onto the timeline and move into the “Color” workspace.

Step 2: In continuation, click the “Adjustment Layer” button in the Project tab. Select your adjustment layer and drop it on top of your video clip in the timeline. Click on the layer and go to the “Video Effects” in the Effects option in the Project window. Then, navigate to “Color Correction” and select “Lumetri Color.”

Step 3: In the new window that appears, find the “Input LUT” option under the Basic Correction tab. Browse the LUT you want to apply to your video. Additionally, you can explore more creative LUTs by going to the “Creative” tab in the Lumetri Color window. In the “Look” section, browse for different creative LUTs for your video. You can adjust the intensity of the selected LUT using the slider.

Part 3: The Top Notch Premiere Pro LUTs Rec 709
There are many Premiere Pro Rec 709 LUTs available that you can download and purchase. In the list below are some of the best Rec 709 LUTs you can use.
1. LOOK Creative LUT Pack
The LOOK Creative LUT Pack is a collection of 10 creative LUTs. It includes a range of LUTs, including some popular ones like teal and orange and old noir. These LUTs provide a quick and easy way to add a specific color tone or mood to your footage. In addition to the basic LUTs, it also offers unique and creative options. For example, you’ll find LUTs like Subtle Sci-Fi, Grunge Green, and others.

2. Cinematic LUTs V2
Cinematic LUTs V2 is a pack of modern cinematic-style LUTs. This incredible LUTs pack is designed to give your videos a cinematic touch. With this pack, you get access to 10 different cinematic LUTs to color grade your videos. Furthermore, you can use these LUTs for your LOG footage as well. Additionally, with these LUTs, you can add richness and depth to your videos.

3. NATURAL Rec709
The NATURAL Rec709 LUT pack offers 17 different styles of LUTs. It includes ones inspired by Tobacco, Crunchy Gold, and Black & White filters. These LUTs can enhance the colors and tones in your videos, providing a natural look. Furthermore, you can customize the intensity of the LUTs. Moreover, each LUT in this pack offers a unique color scheme for your videos.

4. 35 Free LUTs for Color Grading Videos
It is an amazing LUT pack that offers you a variety of 35 different styles of LUTs. With these LUTs, you can achieve a vintage look or a cinematic vibe for your videos. These LUTs can work perfectly with Rec 709 footage with accurate and vibrant colors. Furthermore, this pack is compatible with different software, including Premiere Pro.

5. S-Log 3 to Rec.709 LUT
The S-Log3 to Rec.709 LUT pack is designed to enhance your footage by adding vibrance. Applying this LUT boosts saturation, giving your video a more natural and realistic look. Additionally, you can bring out the full potential of your videos captured in S-Log3 gamma. Moreover, this LUT amplifies the colors and is compatible with the Rec.709 color space.

6. DJI OSMO POCKET Creative LUTs Pack
The DJI Osmo Pocket Creative LUTs Pack offers a collection of various creative LUTs. You can choose from different styles and color overlays for your media files. Moreover, you can use this LUT pack for both pictures and videos. In addition to this, it is also compatible with popular editing software. Furthermore, this tool pack supports both .3dl and .cube formats.

7. Blockbuster HLG And Standard LUTs
Another amazing pack of LUTs that you can use is Blockbuster HLG and Standard LUTs. This pack includes 21 Rec 709 LUTs with unique color toning and style. Furthermore, applying these LUTs will make your color grading more professional. Additionally, you can get rich and deep tones for your digital medial files. Similarly, you can change the feel of your content in a more professional style.

Conclusion
In conclusion, LUTs are perfect tools to enhance your media by altering its colors and tones. Different styles of LUTs cater to various creative needs. Furthermore, LUTs allow you to achieve specific looks and moods for your digital content. Moreover, the Rec 709 LUT Premiere Pro ensures your video appears accurate and consistent on HD displays. Additionally, you can achieve professional-grade results as well.
To add more LUTs on video, you can try Wondershare Filmora !
Add LUTs on Video For Win 7 or later(64-bit)
Add LUTs on Video For macOS 10.14 or later
10 Best Free Video Player for Windows 11
Whether it’s work or entertainment, you come across videos of different file formats almost daily. It is so annoying that you play a video on your device, and it displays some errors. This is because not every video player is good and up to the mark.
Do you know what way to go in this scenario? Let us guide you. The article below will walk you through the 10 best and free all format video players for PC, which are a must to know in 2024. Let’s begin!
For Win 7 or later (64-bit)
For macOS 10.14 or later
download filmora app for ios ](https://app.adjust.com/b0k9hf2%5F4bsu85t ) download filmora app for android ](https://app.adjust.com/b0k9hf2%5F4bsu85t )
Click here to get Filmora for PC by email
List of 10 Best Free Video Players for Win 11
Not every Windows 11 video player supports all file formats, but certain amazing video players are free to use, and additionally, they support a wide range of formats. Let’s discuss them one by one.
| 1 - Windows 11 Media Player | 2 - VLC Media Player |
|---|---|
| 3 - PotPlayer | 4 - GOM Player |
| 5 - 5KPlayer | 6 - MPV Player |
| 7 - DivX Player | 8 - PowerDVD |
| 9 - MediaMonkey | 10 - Kodi Player |
1. Windows 11 Media Player
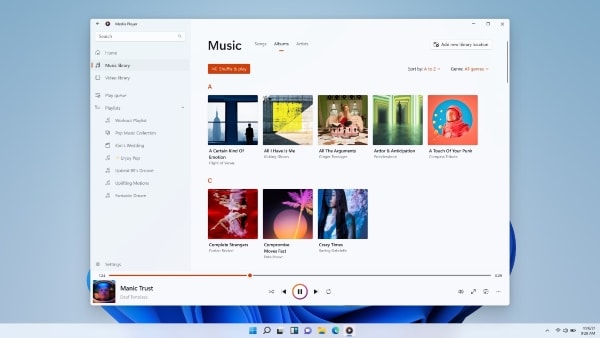
For all Windows 11 users, this video player is great news for you because Microsoft has finally released a media player app for Windows 11. With this, the struggle of using a third-party video player will now come to an end.
The user interface for this media player app is sleek, clean, and minimal. The video player for Windows 11 offers a dark mode, semi-transparent materials, accent colors, and other options. Windows 11 Media Player is great and made it to the top 10 because it is an all-format video player for PC, for instance, AVI , WAV, MPG, WMV , MP3, and others.
Find a Useful Video Editor to Make Video on Windows 11? Try This Out!
Filmora Video Editor is an expert in creating and editing videoson Windows 11. You can add cool visual effects and popular emojis to decorate your video. Plus, there is a vast media library to add audio and filter! You can edit video with high quality and play with the below video players at anytime!
Free Edit Videos on Windows 11 Free Edit Videos on Windows 11 Free Edit Videos on Windows 11 Learn More >
2. VLC Media Player
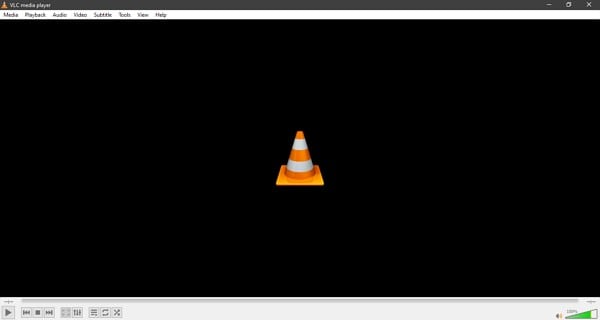
Do you know about any open-source media players? VLC Media Player is not only an open-source but also a cross-platform multimedia player. This Windows 11 video player supports video compression. Users can play any video files from webcams, discs, and even streams with this video player.
VLC Media Player is famous because it supports almost all file formats and supports codecs like , WMV, MPEG-2, MPEG-4, etc. The media player does not contain ads, user tracking, or spyware. Moreover, the software also offers a video filtration feature. VLC Media Player can also decode videos, and it is highly trusted and widely used.
3. PotPlayer
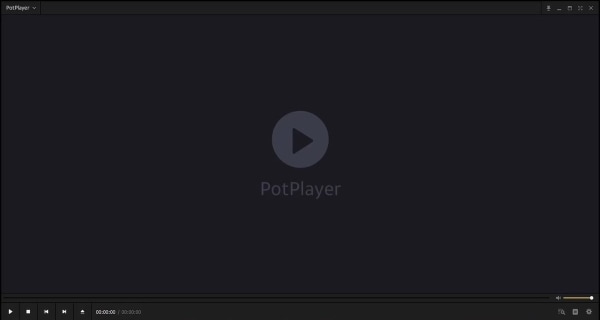
Are you ready to learn about a media player that can play 360-degree video and 3D videos? We are talking about PotPlayer, a media player developed by a South Korean Internet Company. As the media player supports 3D videos, it also supports various types of 3D glasses for a better experience.
Do you know what else it has? Overlay support and also Direct3D9 Ex Flip Mode. The video player for Windows 11 is compatible with various devices like TV, HDTV, DVD. Along with all this, PotPlayer also supports many subtitle formats like DVD, Blu-Ray, SRT & SMI.
4. GOM Player
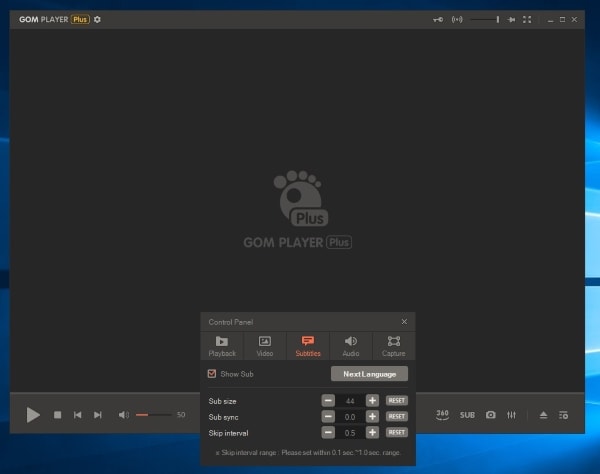
Let’s share another worth trying video player for Windows 11, GOM Player. The media player offers great features like speed control, screen capture, video/audio effects, A-B repeat, etc. Moreover, GOM Player supports a massive list of file formats like MP4 , AVI, MKV , MPG, MOV , and others.
The video player is a practical codec finder with a clean and simple interface. Additionally, the free-to-use video player also supports 360-degree video views. The design of the software is very minimal, with countless features.
Best Windows 11 Video Editor
Help you create and edit videos like a pro on Windows 11. Start your creation.
Edit Video Free Edit Video Free Edit Video Free Learn More >
5. 5KPlayer
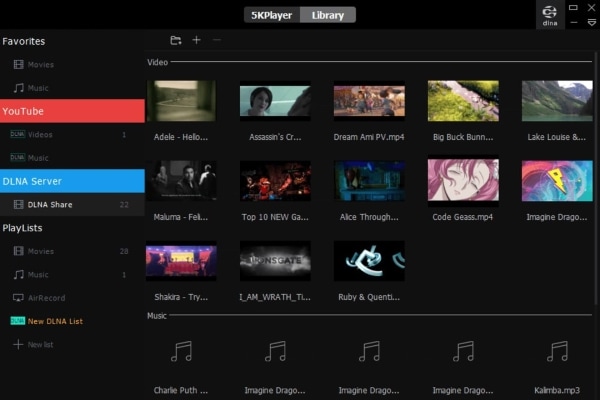
Do you know any media player that has a built-in video codec library? Well, 5KPlayer does have a codec library that supports different video formats, DVDs, etc. The media player is GPU accelerated and is very powerful. Moreover, it is an HD and 4K video player.
This Windows 11 video player supports a lot of video formats like WEBM, MPEG, WMV, FLV, MP4, and it is free to use. With 5KPlayer, you can easily stream media files as it supports DNLA wireless and AirPlay. The media player can even play ultra-high-definition clips easily.
6. MPV Player
MPV Player is a top-notch video player for Windows 11. It is free and open-source software. It is famous for its wide range of supported media formats, like DXVA2 and VAAPI too. MPV Player does not have a good interface but still provides basic video controls.
MPV Player is simple and effective at the same time. You won’t find a Windows 11 video player that does not consume a large number of system resources. MPV Player supports scripting like JavaScript and Lua Script, unlike normal media players.

7. DivX Player
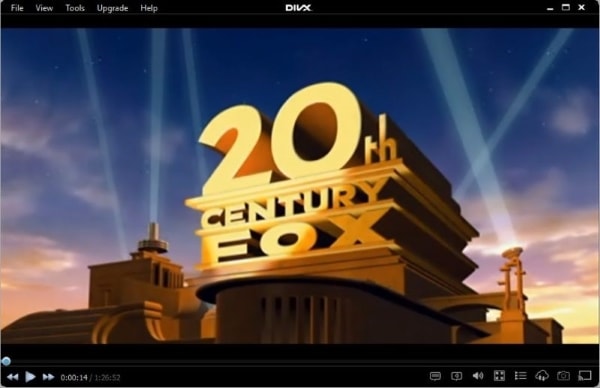
DivX Player is considered the best Windows 11 video player. This software allows playing advanced codecs like HECV, MKV, and AVI. You can play media up to 4K resolution. DivX Player is free software that allows you to stream on DLNA (Digital Living Network Alliance).
The interface for DivX Player might be simple, but they have not compromised on the features provided. DivX Player is the first media player that is offering free playback. It has a built-in media library from which you can keep track of your videos.
A cross-platform for making videos anywhere for all creators

Why your video editing isn’t good enough? How about some creative inspo?
- 100 Million+ Users
- 150+ Countries and Regions
- 4 Million+ Social Media Followers
- 5 Million+ Stock Media for Use
* Secure Download

8. PowerDVD
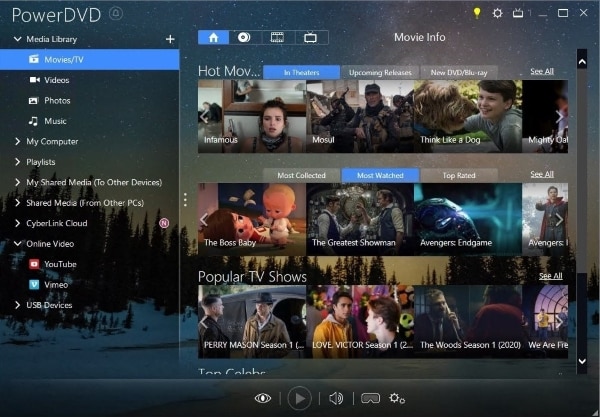
PowerDVD is media-playing software that is compatible with Android, iOS, and Windows. It allows you to watch up to 8K resolution media content while providing an amazing cinema-style audio experience. It allows the downloading of videos for offline usage. PowerDVD is of its kind video player for Windows 11.
PowerDVD allows you to share media through the software. It also has cloud storage that is capable of saving 40 HD movies. You can use formats like and AVC along with XAVC-S. XAVC-S is high-definition video playback. You can manage your library, including photos, videos, music, and even DVD movies can be managed through the application.
9. MediaMonkey
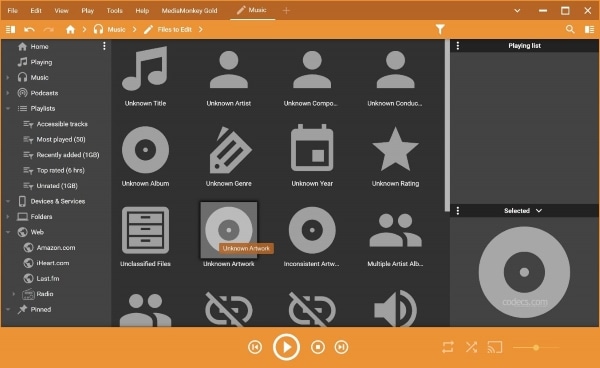
MediaMonkey is a digital video player for Windows 11; it allows the users to record and download movies and podcasts. MediaMonkey supports plug-ins for user advantage. Along with using MediaMonkey on Windows, also use it on Android and iOS devices. You can play high-quality audio on your TV, home stereo, or any other device.
Most collectors use MediaMonkey. It allows you to manage 100,000+ audio and media files. You can organize the media you have and keep it in a representable way. MediaMonkey will enable you to share media files between Windows, Android, and Apple devices. It can change audio and video formats as per consumer demand.
10. Kodi Player
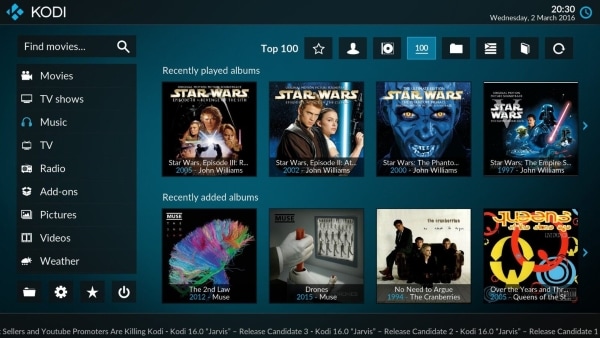
Kodi Player is a well-known video player for Windows 11. It is free software to use. Does free mean low quality? Not in Kodi Player’s case. Kodi player allows live sports streams. It is efficient and has a wide range of compatibility. Kodi Player is open-source software for home theatre.
Does Kodi support different file formats? Yes, the Kodi player allows multiple file formats. These formats include MIDI, and WavPack for audio and MP4 and real-time for videos. Kodi Player is not only used as a Window 11 video player; it can play games and record live TV too. You can also do browsing using the Kodi Player.
Conclusion
We discussed 10 top and free all format video players for PC as we committed. This article will provide great help whenever file-formats bother you. Moving on to a little surprise, let’s share a brilliant video editor, Wondershare Filmora .
The software offers chroma key background, green-screen effect, split-screen effect, and a lot more than this. Filmora is a full-fledged video editor with endless features and limitless editing opportunities. You can add cool and crazy effects, transitions, and titles to your video. Moreover, it has advanced AI portrait features, cut, trim, join, and many more facilities.
For Win 7 or later (64-bit)
For macOS 10.12 or later
For Win 7 or later (64-bit)
For macOS 10.14 or later
download filmora app for ios ](https://app.adjust.com/b0k9hf2%5F4bsu85t ) download filmora app for android ](https://app.adjust.com/b0k9hf2%5F4bsu85t )
Click here to get Filmora for PC by email
List of 10 Best Free Video Players for Win 11
Not every Windows 11 video player supports all file formats, but certain amazing video players are free to use, and additionally, they support a wide range of formats. Let’s discuss them one by one.
| 1 - Windows 11 Media Player | 2 - VLC Media Player |
|---|---|
| 3 - PotPlayer | 4 - GOM Player |
| 5 - 5KPlayer | 6 - MPV Player |
| 7 - DivX Player | 8 - PowerDVD |
| 9 - MediaMonkey | 10 - Kodi Player |
1. Windows 11 Media Player
For all Windows 11 users, this video player is great news for you because Microsoft has finally released a media player app for Windows 11. With this, the struggle of using a third-party video player will now come to an end.
The user interface for this media player app is sleek, clean, and minimal. The video player for Windows 11 offers a dark mode, semi-transparent materials, accent colors, and other options. Windows 11 Media Player is great and made it to the top 10 because it is an all-format video player for PC, for instance, AVI , WAV, MPG, WMV , MP3, and others.

Find a Useful Video Editor to Make Video on Windows 11? Try This Out!
Filmora Video Editor is an expert in creating and editing videoson Windows 11. You can add cool visual effects and popular emojis to decorate your video. Plus, there is a vast media library to add audio and filter! You can edit video with high quality and play with the below video players at anytime!
Free Edit Videos on Windows 11 Free Edit Videos on Windows 11 Free Edit Videos on Windows 11 Learn More >
2. VLC Media Player
Do you know about any open-source media players? VLC Media Player is not only an open-source but also a cross-platform multimedia player. This Windows 11 video player supports video compression. Users can play any video files from webcams, discs, and even streams with this video player.
VLC Media Player is famous because it supports almost all file formats and supports codecs like , WMV, MPEG-2, MPEG-4, etc. The media player does not contain ads, user tracking, or spyware. Moreover, the software also offers a video filtration feature. VLC Media Player can also decode videos, and it is highly trusted and widely used.

3. PotPlayer
Are you ready to learn about a media player that can play 360-degree video and 3D videos? We are talking about PotPlayer, a media player developed by a South Korean Internet Company. As the media player supports 3D videos, it also supports various types of 3D glasses for a better experience.
Do you know what else it has? Overlay support and also Direct3D9 Ex Flip Mode. The video player for Windows 11 is compatible with various devices like TV, HDTV, DVD. Along with all this, PotPlayer also supports many subtitle formats like DVD, Blu-Ray, SRT & SMI.

4. GOM Player
Let’s share another worth trying video player for Windows 11, GOM Player. The media player offers great features like speed control, screen capture, video/audio effects, A-B repeat, etc. Moreover, GOM Player supports a massive list of file formats like MP4 , AVI, MKV , MPG, MOV , and others.
The video player is a practical codec finder with a clean and simple interface. Additionally, the free-to-use video player also supports 360-degree video views. The design of the software is very minimal, with countless features.

Best Windows 11 Video Editor
Help you create and edit videos like a pro on Windows 11. Start your creation.
Edit Video Free Edit Video Free Edit Video Free Learn More >
5. 5KPlayer
Do you know any media player that has a built-in video codec library? Well, 5KPlayer does have a codec library that supports different video formats, DVDs, etc. The media player is GPU accelerated and is very powerful. Moreover, it is an HD and 4K video player.
This Windows 11 video player supports a lot of video formats like WEBM, MPEG, WMV, FLV, MP4, and it is free to use. With 5KPlayer, you can easily stream media files as it supports DNLA wireless and AirPlay. The media player can even play ultra-high-definition clips easily.

6. MPV Player
MPV Player is a top-notch video player for Windows 11. It is free and open-source software. It is famous for its wide range of supported media formats, like DXVA2 and VAAPI too. MPV Player does not have a good interface but still provides basic video controls.
MPV Player is simple and effective at the same time. You won’t find a Windows 11 video player that does not consume a large number of system resources. MPV Player supports scripting like JavaScript and Lua Script, unlike normal media players.

7. DivX Player
DivX Player is considered the best Windows 11 video player. This software allows playing advanced codecs like HECV, MKV, and AVI. You can play media up to 4K resolution. DivX Player is free software that allows you to stream on DLNA (Digital Living Network Alliance).
The interface for DivX Player might be simple, but they have not compromised on the features provided. DivX Player is the first media player that is offering free playback. It has a built-in media library from which you can keep track of your videos.
A cross-platform for making videos anywhere for all creators

Why your video editing isn’t good enough? How about some creative inspo?
- 100 Million+ Users
- 150+ Countries and Regions
- 4 Million+ Social Media Followers
- 5 Million+ Stock Media for Use
* Secure Download


8. PowerDVD
PowerDVD is media-playing software that is compatible with Android, iOS, and Windows. It allows you to watch up to 8K resolution media content while providing an amazing cinema-style audio experience. It allows the downloading of videos for offline usage. PowerDVD is of its kind video player for Windows 11.
PowerDVD allows you to share media through the software. It also has cloud storage that is capable of saving 40 HD movies. You can use formats like and AVC along with XAVC-S. XAVC-S is high-definition video playback. You can manage your library, including photos, videos, music, and even DVD movies can be managed through the application.

9. MediaMonkey
MediaMonkey is a digital video player for Windows 11; it allows the users to record and download movies and podcasts. MediaMonkey supports plug-ins for user advantage. Along with using MediaMonkey on Windows, also use it on Android and iOS devices. You can play high-quality audio on your TV, home stereo, or any other device.
Most collectors use MediaMonkey. It allows you to manage 100,000+ audio and media files. You can organize the media you have and keep it in a representable way. MediaMonkey will enable you to share media files between Windows, Android, and Apple devices. It can change audio and video formats as per consumer demand.

10. Kodi Player
Kodi Player is a well-known video player for Windows 11. It is free software to use. Does free mean low quality? Not in Kodi Player’s case. Kodi player allows live sports streams. It is efficient and has a wide range of compatibility. Kodi Player is open-source software for home theatre.
Does Kodi support different file formats? Yes, the Kodi player allows multiple file formats. These formats include MIDI, and WavPack for audio and MP4 and real-time for videos. Kodi Player is not only used as a Window 11 video player; it can play games and record live TV too. You can also do browsing using the Kodi Player.

Conclusion
We discussed 10 top and free all format video players for PC as we committed. This article will provide great help whenever file-formats bother you. Moving on to a little surprise, let’s share a brilliant video editor, Wondershare Filmora .
The software offers chroma key background, green-screen effect, split-screen effect, and a lot more than this. Filmora is a full-fledged video editor with endless features and limitless editing opportunities. You can add cool and crazy effects, transitions, and titles to your video. Moreover, it has advanced AI portrait features, cut, trim, join, and many more facilities.
For Win 7 or later (64-bit)
For macOS 10.12 or later
For Win 7 or later (64-bit)
For macOS 10.14 or later
download filmora app for ios ](https://app.adjust.com/b0k9hf2%5F4bsu85t ) download filmora app for android ](https://app.adjust.com/b0k9hf2%5F4bsu85t )
Click here to get Filmora for PC by email
List of 10 Best Free Video Players for Win 11
Not every Windows 11 video player supports all file formats, but certain amazing video players are free to use, and additionally, they support a wide range of formats. Let’s discuss them one by one.
| 1 - Windows 11 Media Player | 2 - VLC Media Player |
|---|---|
| 3 - PotPlayer | 4 - GOM Player |
| 5 - 5KPlayer | 6 - MPV Player |
| 7 - DivX Player | 8 - PowerDVD |
| 9 - MediaMonkey | 10 - Kodi Player |
1. Windows 11 Media Player
For all Windows 11 users, this video player is great news for you because Microsoft has finally released a media player app for Windows 11. With this, the struggle of using a third-party video player will now come to an end.
The user interface for this media player app is sleek, clean, and minimal. The video player for Windows 11 offers a dark mode, semi-transparent materials, accent colors, and other options. Windows 11 Media Player is great and made it to the top 10 because it is an all-format video player for PC, for instance, AVI , WAV, MPG, WMV , MP3, and others.

Find a Useful Video Editor to Make Video on Windows 11? Try This Out!
Filmora Video Editor is an expert in creating and editing videoson Windows 11. You can add cool visual effects and popular emojis to decorate your video. Plus, there is a vast media library to add audio and filter! You can edit video with high quality and play with the below video players at anytime!
Free Edit Videos on Windows 11 Free Edit Videos on Windows 11 Free Edit Videos on Windows 11 Learn More >
2. VLC Media Player
Do you know about any open-source media players? VLC Media Player is not only an open-source but also a cross-platform multimedia player. This Windows 11 video player supports video compression. Users can play any video files from webcams, discs, and even streams with this video player.
VLC Media Player is famous because it supports almost all file formats and supports codecs like , WMV, MPEG-2, MPEG-4, etc. The media player does not contain ads, user tracking, or spyware. Moreover, the software also offers a video filtration feature. VLC Media Player can also decode videos, and it is highly trusted and widely used.

3. PotPlayer
Are you ready to learn about a media player that can play 360-degree video and 3D videos? We are talking about PotPlayer, a media player developed by a South Korean Internet Company. As the media player supports 3D videos, it also supports various types of 3D glasses for a better experience.
Do you know what else it has? Overlay support and also Direct3D9 Ex Flip Mode. The video player for Windows 11 is compatible with various devices like TV, HDTV, DVD. Along with all this, PotPlayer also supports many subtitle formats like DVD, Blu-Ray, SRT & SMI.

4. GOM Player
Let’s share another worth trying video player for Windows 11, GOM Player. The media player offers great features like speed control, screen capture, video/audio effects, A-B repeat, etc. Moreover, GOM Player supports a massive list of file formats like MP4 , AVI, MKV , MPG, MOV , and others.
The video player is a practical codec finder with a clean and simple interface. Additionally, the free-to-use video player also supports 360-degree video views. The design of the software is very minimal, with countless features.

Best Windows 11 Video Editor
Help you create and edit videos like a pro on Windows 11. Start your creation.
Edit Video Free Edit Video Free Edit Video Free Learn More >
5. 5KPlayer
Do you know any media player that has a built-in video codec library? Well, 5KPlayer does have a codec library that supports different video formats, DVDs, etc. The media player is GPU accelerated and is very powerful. Moreover, it is an HD and 4K video player.
This Windows 11 video player supports a lot of video formats like WEBM, MPEG, WMV, FLV, MP4, and it is free to use. With 5KPlayer, you can easily stream media files as it supports DNLA wireless and AirPlay. The media player can even play ultra-high-definition clips easily.

6. MPV Player
MPV Player is a top-notch video player for Windows 11. It is free and open-source software. It is famous for its wide range of supported media formats, like DXVA2 and VAAPI too. MPV Player does not have a good interface but still provides basic video controls.
MPV Player is simple and effective at the same time. You won’t find a Windows 11 video player that does not consume a large number of system resources. MPV Player supports scripting like JavaScript and Lua Script, unlike normal media players.

7. DivX Player
DivX Player is considered the best Windows 11 video player. This software allows playing advanced codecs like HECV, MKV, and AVI. You can play media up to 4K resolution. DivX Player is free software that allows you to stream on DLNA (Digital Living Network Alliance).
The interface for DivX Player might be simple, but they have not compromised on the features provided. DivX Player is the first media player that is offering free playback. It has a built-in media library from which you can keep track of your videos.
A cross-platform for making videos anywhere for all creators

Why your video editing isn’t good enough? How about some creative inspo?
- 100 Million+ Users
- 150+ Countries and Regions
- 4 Million+ Social Media Followers
- 5 Million+ Stock Media for Use
* Secure Download


8. PowerDVD
PowerDVD is media-playing software that is compatible with Android, iOS, and Windows. It allows you to watch up to 8K resolution media content while providing an amazing cinema-style audio experience. It allows the downloading of videos for offline usage. PowerDVD is of its kind video player for Windows 11.
PowerDVD allows you to share media through the software. It also has cloud storage that is capable of saving 40 HD movies. You can use formats like and AVC along with XAVC-S. XAVC-S is high-definition video playback. You can manage your library, including photos, videos, music, and even DVD movies can be managed through the application.

9. MediaMonkey
MediaMonkey is a digital video player for Windows 11; it allows the users to record and download movies and podcasts. MediaMonkey supports plug-ins for user advantage. Along with using MediaMonkey on Windows, also use it on Android and iOS devices. You can play high-quality audio on your TV, home stereo, or any other device.
Most collectors use MediaMonkey. It allows you to manage 100,000+ audio and media files. You can organize the media you have and keep it in a representable way. MediaMonkey will enable you to share media files between Windows, Android, and Apple devices. It can change audio and video formats as per consumer demand.

10. Kodi Player
Kodi Player is a well-known video player for Windows 11. It is free software to use. Does free mean low quality? Not in Kodi Player’s case. Kodi player allows live sports streams. It is efficient and has a wide range of compatibility. Kodi Player is open-source software for home theatre.
Does Kodi support different file formats? Yes, the Kodi player allows multiple file formats. These formats include MIDI, and WavPack for audio and MP4 and real-time for videos. Kodi Player is not only used as a Window 11 video player; it can play games and record live TV too. You can also do browsing using the Kodi Player.

Conclusion
We discussed 10 top and free all format video players for PC as we committed. This article will provide great help whenever file-formats bother you. Moving on to a little surprise, let’s share a brilliant video editor, Wondershare Filmora .
The software offers chroma key background, green-screen effect, split-screen effect, and a lot more than this. Filmora is a full-fledged video editor with endless features and limitless editing opportunities. You can add cool and crazy effects, transitions, and titles to your video. Moreover, it has advanced AI portrait features, cut, trim, join, and many more facilities.
For Win 7 or later (64-bit)
For macOS 10.12 or later
For Win 7 or later (64-bit)
For macOS 10.14 or later
download filmora app for ios ](https://app.adjust.com/b0k9hf2%5F4bsu85t ) download filmora app for android ](https://app.adjust.com/b0k9hf2%5F4bsu85t )
Click here to get Filmora for PC by email
List of 10 Best Free Video Players for Win 11
Not every Windows 11 video player supports all file formats, but certain amazing video players are free to use, and additionally, they support a wide range of formats. Let’s discuss them one by one.
| 1 - Windows 11 Media Player | 2 - VLC Media Player |
|---|---|
| 3 - PotPlayer | 4 - GOM Player |
| 5 - 5KPlayer | 6 - MPV Player |
| 7 - DivX Player | 8 - PowerDVD |
| 9 - MediaMonkey | 10 - Kodi Player |
1. Windows 11 Media Player
For all Windows 11 users, this video player is great news for you because Microsoft has finally released a media player app for Windows 11. With this, the struggle of using a third-party video player will now come to an end.
The user interface for this media player app is sleek, clean, and minimal. The video player for Windows 11 offers a dark mode, semi-transparent materials, accent colors, and other options. Windows 11 Media Player is great and made it to the top 10 because it is an all-format video player for PC, for instance, AVI , WAV, MPG, WMV , MP3, and others.

Find a Useful Video Editor to Make Video on Windows 11? Try This Out!
Filmora Video Editor is an expert in creating and editing videoson Windows 11. You can add cool visual effects and popular emojis to decorate your video. Plus, there is a vast media library to add audio and filter! You can edit video with high quality and play with the below video players at anytime!
Free Edit Videos on Windows 11 Free Edit Videos on Windows 11 Free Edit Videos on Windows 11 Learn More >
2. VLC Media Player
Do you know about any open-source media players? VLC Media Player is not only an open-source but also a cross-platform multimedia player. This Windows 11 video player supports video compression. Users can play any video files from webcams, discs, and even streams with this video player.
VLC Media Player is famous because it supports almost all file formats and supports codecs like , WMV, MPEG-2, MPEG-4, etc. The media player does not contain ads, user tracking, or spyware. Moreover, the software also offers a video filtration feature. VLC Media Player can also decode videos, and it is highly trusted and widely used.

3. PotPlayer
Are you ready to learn about a media player that can play 360-degree video and 3D videos? We are talking about PotPlayer, a media player developed by a South Korean Internet Company. As the media player supports 3D videos, it also supports various types of 3D glasses for a better experience.
Do you know what else it has? Overlay support and also Direct3D9 Ex Flip Mode. The video player for Windows 11 is compatible with various devices like TV, HDTV, DVD. Along with all this, PotPlayer also supports many subtitle formats like DVD, Blu-Ray, SRT & SMI.

4. GOM Player
Let’s share another worth trying video player for Windows 11, GOM Player. The media player offers great features like speed control, screen capture, video/audio effects, A-B repeat, etc. Moreover, GOM Player supports a massive list of file formats like MP4 , AVI, MKV , MPG, MOV , and others.
The video player is a practical codec finder with a clean and simple interface. Additionally, the free-to-use video player also supports 360-degree video views. The design of the software is very minimal, with countless features.

Best Windows 11 Video Editor
Help you create and edit videos like a pro on Windows 11. Start your creation.
Edit Video Free Edit Video Free Edit Video Free Learn More >
5. 5KPlayer
Do you know any media player that has a built-in video codec library? Well, 5KPlayer does have a codec library that supports different video formats, DVDs, etc. The media player is GPU accelerated and is very powerful. Moreover, it is an HD and 4K video player.
This Windows 11 video player supports a lot of video formats like WEBM, MPEG, WMV, FLV, MP4, and it is free to use. With 5KPlayer, you can easily stream media files as it supports DNLA wireless and AirPlay. The media player can even play ultra-high-definition clips easily.

6. MPV Player
MPV Player is a top-notch video player for Windows 11. It is free and open-source software. It is famous for its wide range of supported media formats, like DXVA2 and VAAPI too. MPV Player does not have a good interface but still provides basic video controls.
MPV Player is simple and effective at the same time. You won’t find a Windows 11 video player that does not consume a large number of system resources. MPV Player supports scripting like JavaScript and Lua Script, unlike normal media players.

7. DivX Player
DivX Player is considered the best Windows 11 video player. This software allows playing advanced codecs like HECV, MKV, and AVI. You can play media up to 4K resolution. DivX Player is free software that allows you to stream on DLNA (Digital Living Network Alliance).
The interface for DivX Player might be simple, but they have not compromised on the features provided. DivX Player is the first media player that is offering free playback. It has a built-in media library from which you can keep track of your videos.
A cross-platform for making videos anywhere for all creators

Why your video editing isn’t good enough? How about some creative inspo?
- 100 Million+ Users
- 150+ Countries and Regions
- 4 Million+ Social Media Followers
- 5 Million+ Stock Media for Use
* Secure Download


8. PowerDVD
PowerDVD is media-playing software that is compatible with Android, iOS, and Windows. It allows you to watch up to 8K resolution media content while providing an amazing cinema-style audio experience. It allows the downloading of videos for offline usage. PowerDVD is of its kind video player for Windows 11.
PowerDVD allows you to share media through the software. It also has cloud storage that is capable of saving 40 HD movies. You can use formats like and AVC along with XAVC-S. XAVC-S is high-definition video playback. You can manage your library, including photos, videos, music, and even DVD movies can be managed through the application.

9. MediaMonkey
MediaMonkey is a digital video player for Windows 11; it allows the users to record and download movies and podcasts. MediaMonkey supports plug-ins for user advantage. Along with using MediaMonkey on Windows, also use it on Android and iOS devices. You can play high-quality audio on your TV, home stereo, or any other device.
Most collectors use MediaMonkey. It allows you to manage 100,000+ audio and media files. You can organize the media you have and keep it in a representable way. MediaMonkey will enable you to share media files between Windows, Android, and Apple devices. It can change audio and video formats as per consumer demand.

10. Kodi Player
Kodi Player is a well-known video player for Windows 11. It is free software to use. Does free mean low quality? Not in Kodi Player’s case. Kodi player allows live sports streams. It is efficient and has a wide range of compatibility. Kodi Player is open-source software for home theatre.
Does Kodi support different file formats? Yes, the Kodi player allows multiple file formats. These formats include MIDI, and WavPack for audio and MP4 and real-time for videos. Kodi Player is not only used as a Window 11 video player; it can play games and record live TV too. You can also do browsing using the Kodi Player.

Conclusion
We discussed 10 top and free all format video players for PC as we committed. This article will provide great help whenever file-formats bother you. Moving on to a little surprise, let’s share a brilliant video editor, Wondershare Filmora .
The software offers chroma key background, green-screen effect, split-screen effect, and a lot more than this. Filmora is a full-fledged video editor with endless features and limitless editing opportunities. You can add cool and crazy effects, transitions, and titles to your video. Moreover, it has advanced AI portrait features, cut, trim, join, and many more facilities.
For Win 7 or later (64-bit)
For macOS 10.12 or later
How to Combine Multiple Videos Into One on Instagram
Instagram is your favorite social media platform, and even if you use it frequently, there are still some features you’d like to master. You’d like to post a series of films on the stories, but you’re unsure how to put them together.
Suppose things are exactly like this, and you’re wondering how to combine numerous videos in Instagram stories. In that case, you’ll be happy to know that I’ll show you how to do it using the native capability built into the Instagram app for smartphones. I’ll also give you some pointers on accomplishing similar tasks utilizing well-known third-party software.
Combine many clips into a single video and share it on Instagram.
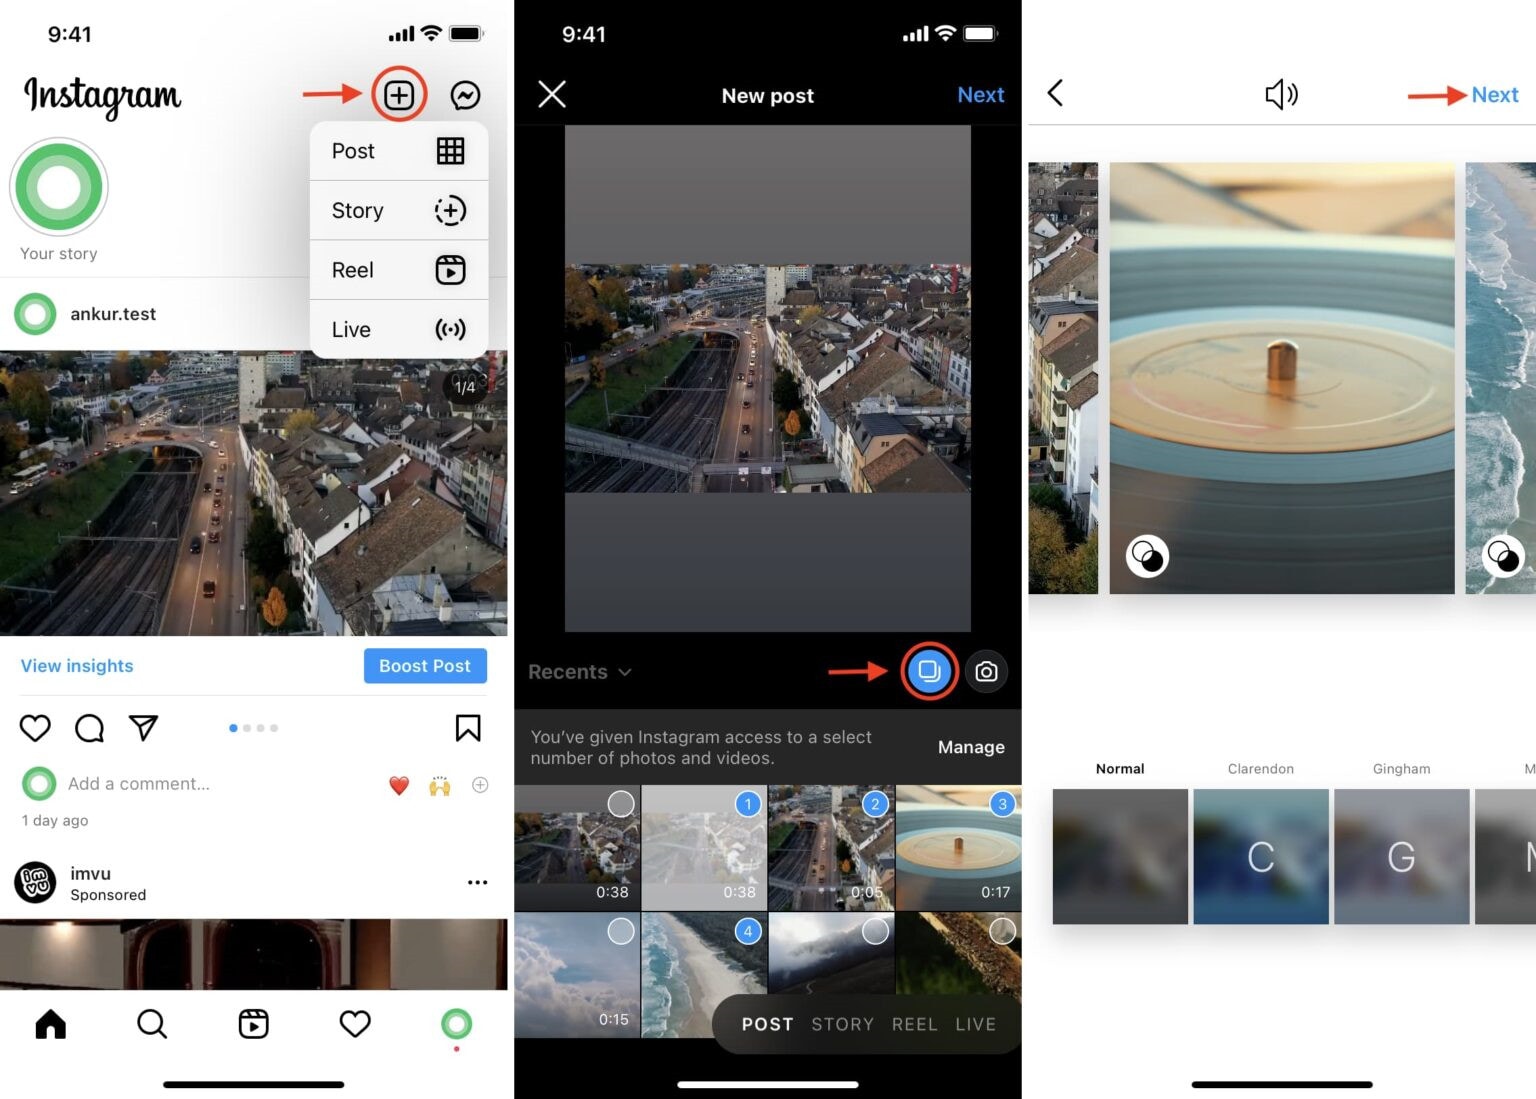
Here are a few simple methods for combining two or more videos into one and posting them on Instagram (IG).
Using the Instagram official app
There is no simple way to combine many videos into one on Instagram. You can, however, utilize the Story technique.
Create an Instagram Story with two or more videos. You can add stickers, text, and other elements if you like.
Tap the three dots icon on your Instagram Tale > Save > Save story. Your current Instagram Stories films and photos will be saved to the Photos app as a single video file.
Upload the resulting Video to Instagram!
Tools To Use to Combine videos for Instagram.
- Wondershare Filmora is an easy-to-use video merger.
Before I detail online video joiners, I’d like to mention Wondershare Filmora, which can automatically merge video files without or with transitions. It merges video files with the same or various file extensions in 1:1 quality (.mp4, .mov, .mkv, .avi, etc). Continue reading to learn more about this simple video merging and how to merge videos.
Part 2: Using Filmora to combine, merge, and join clips
To join videos, first, import them.
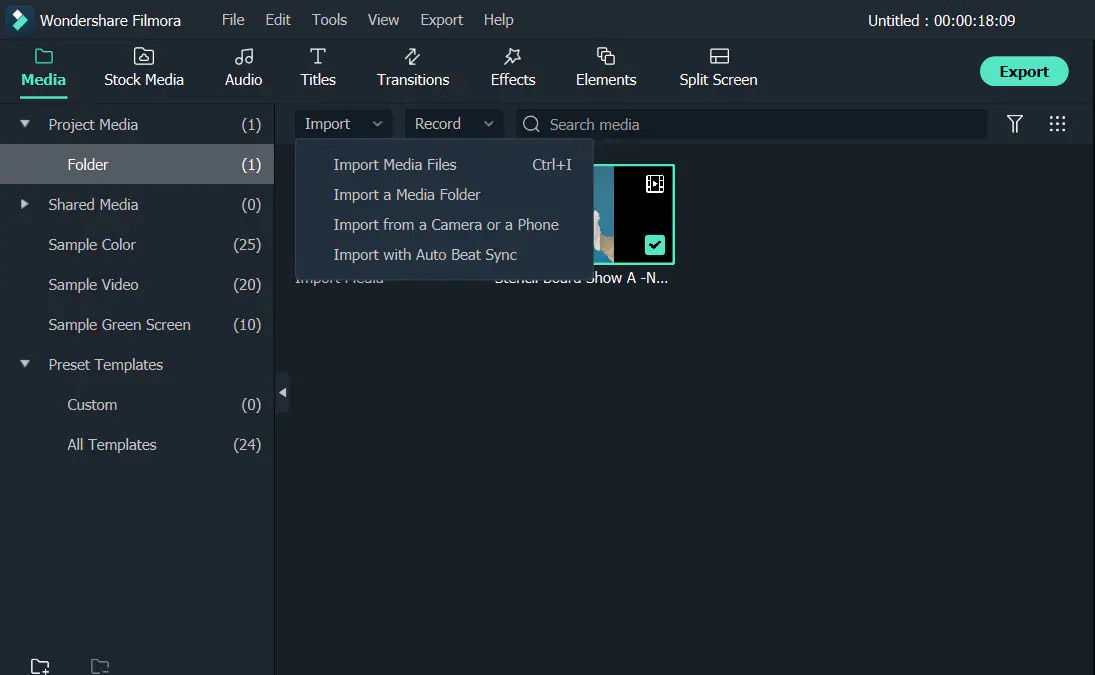
You can drag the files from Windows File Explorer to the User’s Album or click the “Import” button on the window and choose files from your computer. All imported files will appear in thumbnail format in the User’s Album. To preview a file in the right-hand preview window, double-click it.
- To merge video files, drag & drop them.
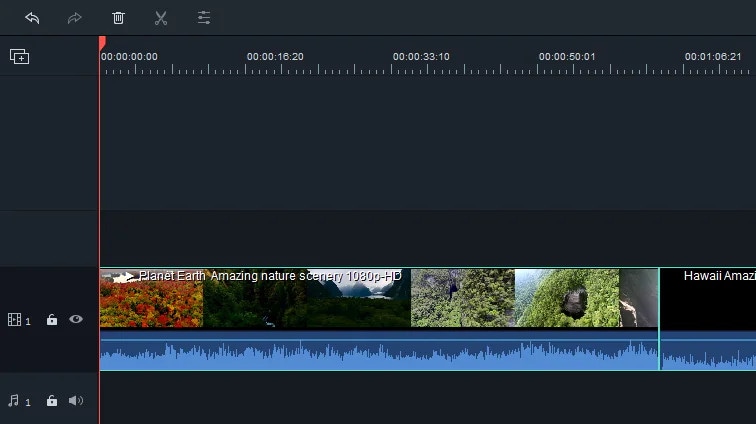
Move videos from the User’s Album to the video track on the Timeline after that. All video files will be combined into a single video with no transition. However, you can use the following method to add transitions between video clips.
- Add transitions in the third step (optional)
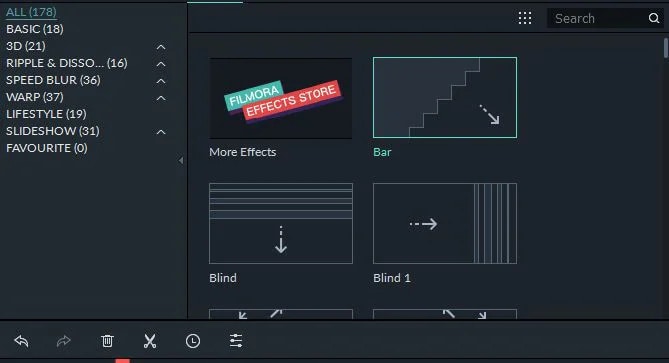
Add transitions between clips for a smooth transition from one to the next to make the linked videos look like a complete movie. Go to the Transition tab and drag the desired change to the intersection of two clips. You can also right-click any transition to bring up a menu with choices such as “Apply to All” and “Random to All” for your convenience.
Step 4: Combine video files into a single file.
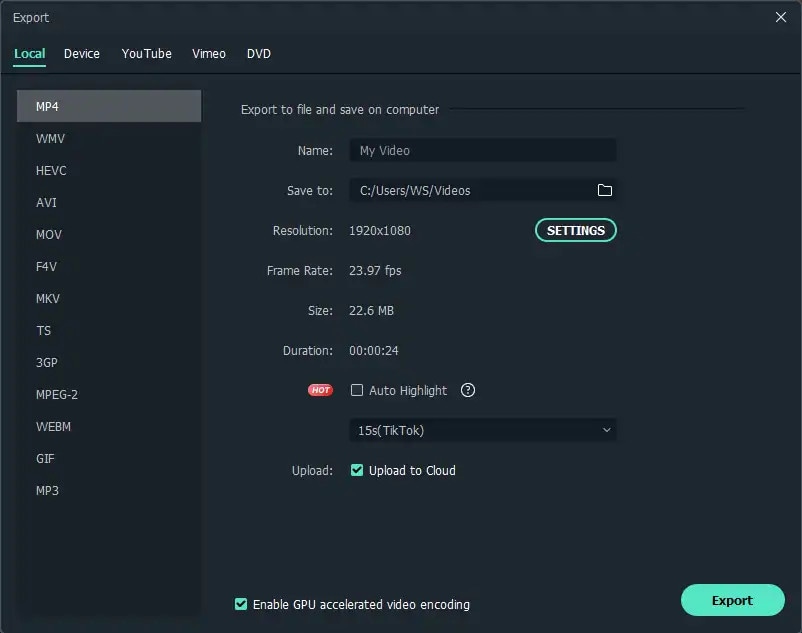
Now that you’ve seen the merged Movie click the “Export” option to save the several video segments to a single file. Select any format from the list under the Format tab. All of the most common video formats are supported. Choose “Device” and choose the thumbnail of your device to play the combined video file on iPod, iPhone, or iPad. You may also publish the combined Video on YouTube or burn it to DVDs to watch on television.
Other Online Video Mergers
- Androvid
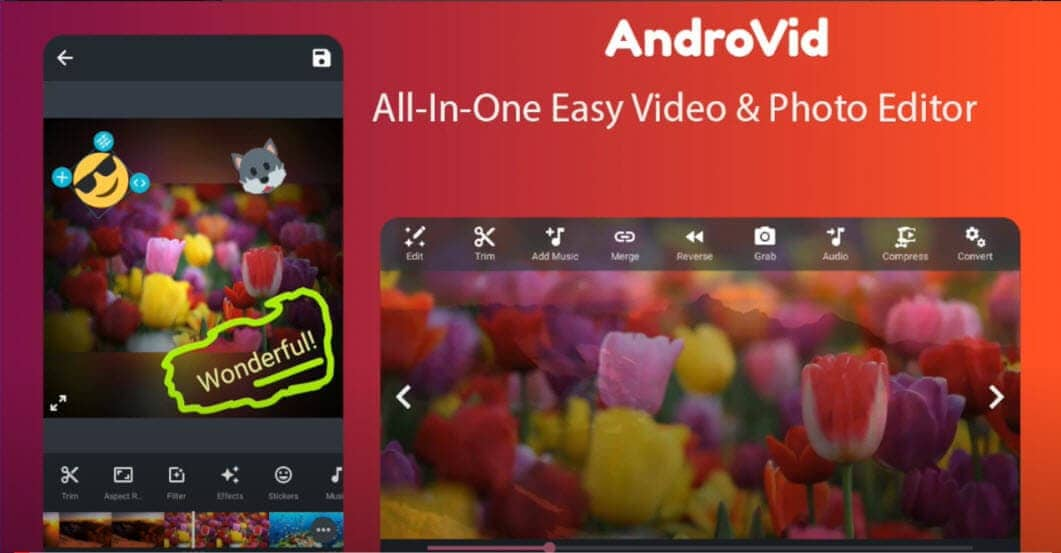
Androvid is a video joiner and video editor in one. Multiple files can be easily combined into a single video. This tool also allows you to divide videos, apply effects, convert videos, and do a lot more. Use this program to effortlessly merge video files in MPEG, 3GP, MP4, AVI, and more formats.
- Video Toolbox
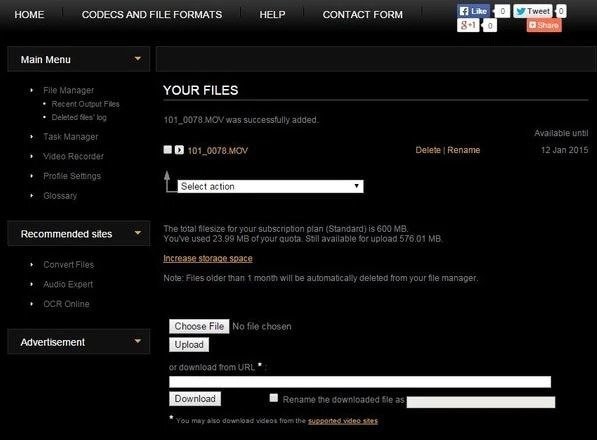
Users can merge and unite videos up to 600MB in size using this fantastic video editing tool. This platform is popular among professionals due to its comprehensive cutting, cropping, combining, and effects editing services. More significantly, joining videos is completely free.
- Inshot
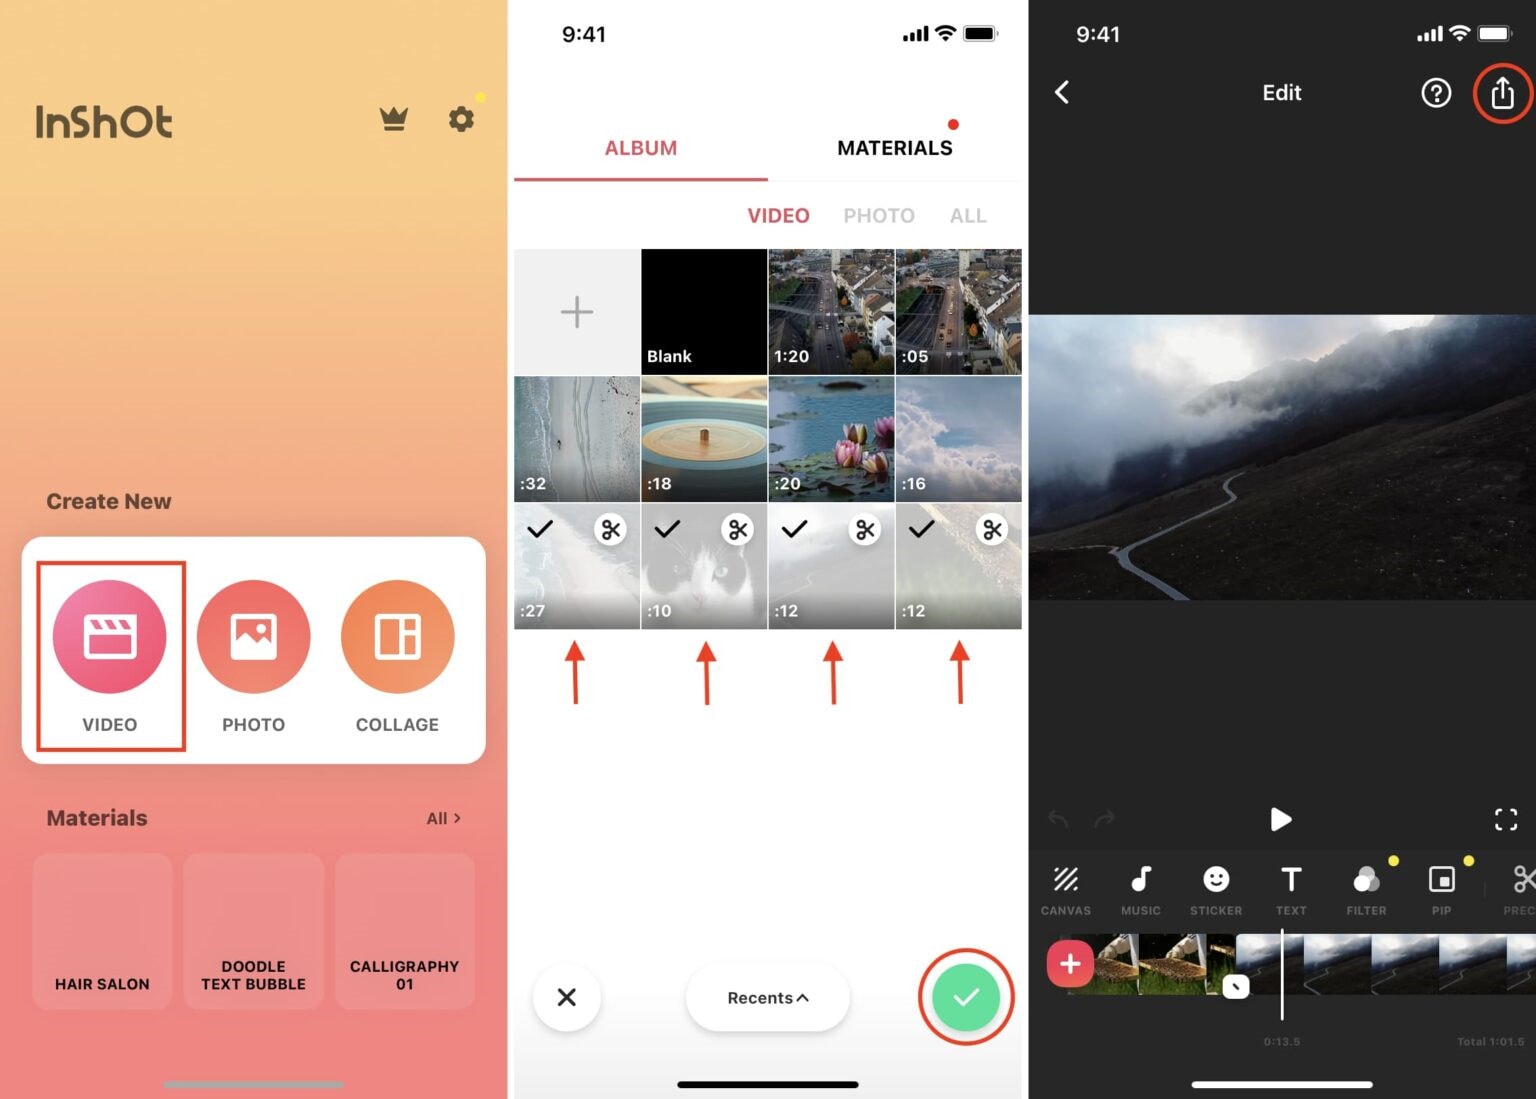
This is a free video editing app that allows you to merge multiple videos into a single file. This is how:
Install and run Inshot.
Select Video.
Tap the check button after selecting multiple videos.
Optional: Here is where you can edit the videos. Select the 16:9 comprehensive video layout or another option by tapping Canvas.
- With iMovie
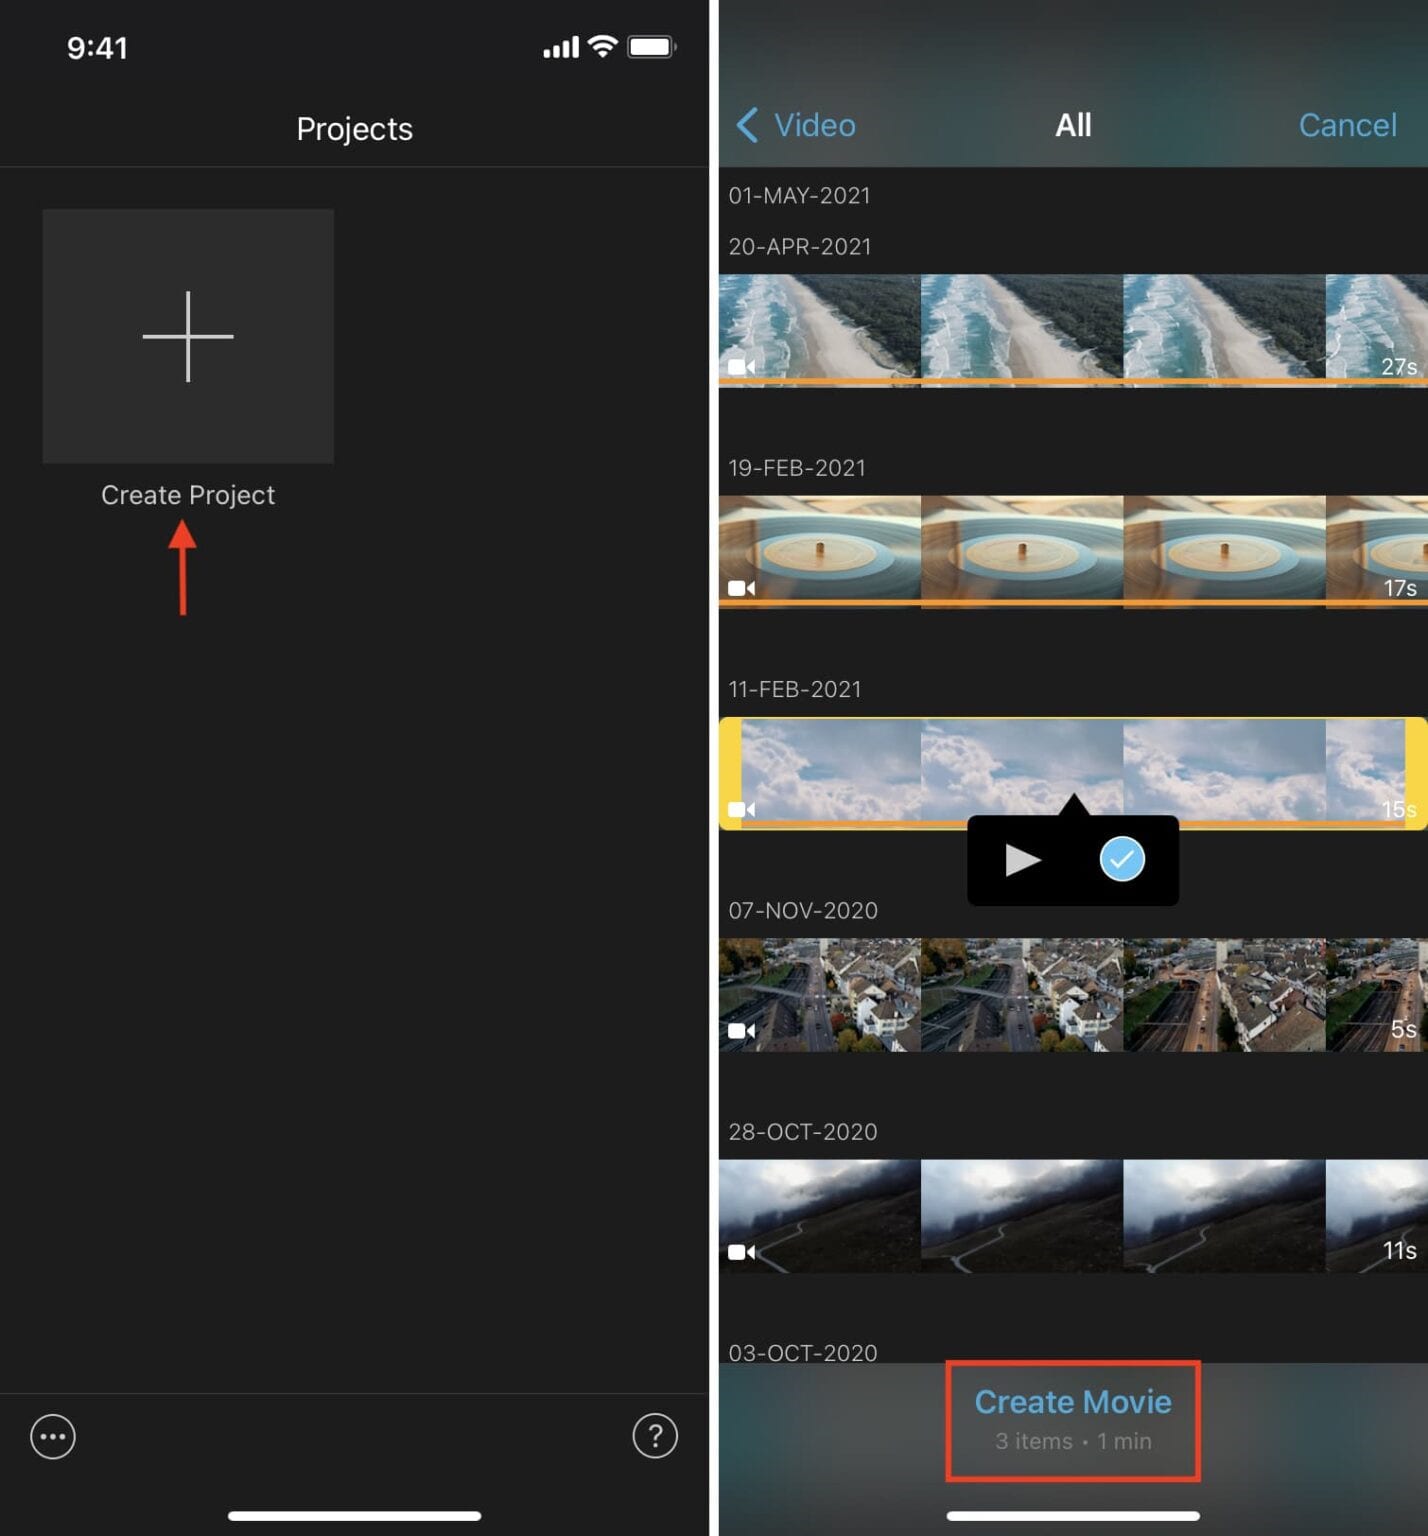
Apple’s iMovie app is available for free on iPhones, iPad, and Mac. Here’s how to combine two or more videos for an Instagram post:
Get iMovie and open it on your iPhone.
Select Movie from the Create Project menu.
Choose your movies. To see only the clips, go to the top left and tap Media, then Video. Choose a video and press the check button.
Tap Create Movie after selecting two or more video clips.
Swipe horizontally to the point where one video clip ends and another begins if desired. You can edit or remove the transition effect between videos by tapping the two triangle icon.
Optional: You can also experiment with other iMovie features such as adding music, text, and video speed changes. You can tap a video clip, tap the tiny plus icon, and zoom in and out with two fingers.
When you’re done, tap Done in the top left corner.
From the bottom, tap the share button and select Save Video.
Your iPhone’s Photos app now contains the merged clip. Open Instagram and make an individual post with the final combined Video.
This is how you can combine multiple clips into one Instagram video. I hope you found this quick tutorial helpful. Of course, you can merge two or more clips into one single video file using any other video editing app besides the ones listed above.
Here are a few simple methods for combining two or more videos into one and posting them on Instagram (IG).
Using the Instagram official app
There is no simple way to combine many videos into one on Instagram. You can, however, utilize the Story technique.
Create an Instagram Story with two or more videos. You can add stickers, text, and other elements if you like.
Tap the three dots icon on your Instagram Tale > Save > Save story. Your current Instagram Stories films and photos will be saved to the Photos app as a single video file.
Upload the resulting Video to Instagram!
Tools To Use to Combine videos for Instagram.
- Wondershare Filmora is an easy-to-use video merger.
Before I detail online video joiners, I’d like to mention Wondershare Filmora, which can automatically merge video files without or with transitions. It merges video files with the same or various file extensions in 1:1 quality (.mp4, .mov, .mkv, .avi, etc). Continue reading to learn more about this simple video merging and how to merge videos.
Part 2: Using Filmora to combine, merge, and join clips
To join videos, first, import them.

You can drag the files from Windows File Explorer to the User’s Album or click the “Import” button on the window and choose files from your computer. All imported files will appear in thumbnail format in the User’s Album. To preview a file in the right-hand preview window, double-click it.
- To merge video files, drag & drop them.

Move videos from the User’s Album to the video track on the Timeline after that. All video files will be combined into a single video with no transition. However, you can use the following method to add transitions between video clips.
- Add transitions in the third step (optional)

Add transitions between clips for a smooth transition from one to the next to make the linked videos look like a complete movie. Go to the Transition tab and drag the desired change to the intersection of two clips. You can also right-click any transition to bring up a menu with choices such as “Apply to All” and “Random to All” for your convenience.
Step 4: Combine video files into a single file.

Now that you’ve seen the merged Movie click the “Export” option to save the several video segments to a single file. Select any format from the list under the Format tab. All of the most common video formats are supported. Choose “Device” and choose the thumbnail of your device to play the combined video file on iPod, iPhone, or iPad. You may also publish the combined Video on YouTube or burn it to DVDs to watch on television.
Other Online Video Mergers
- Androvid

Androvid is a video joiner and video editor in one. Multiple files can be easily combined into a single video. This tool also allows you to divide videos, apply effects, convert videos, and do a lot more. Use this program to effortlessly merge video files in MPEG, 3GP, MP4, AVI, and more formats.
- Video Toolbox

Users can merge and unite videos up to 600MB in size using this fantastic video editing tool. This platform is popular among professionals due to its comprehensive cutting, cropping, combining, and effects editing services. More significantly, joining videos is completely free.
- Inshot

This is a free video editing app that allows you to merge multiple videos into a single file. This is how:
Install and run Inshot.
Select Video.
Tap the check button after selecting multiple videos.
Optional: Here is where you can edit the videos. Select the 16:9 comprehensive video layout or another option by tapping Canvas.
- With iMovie

Apple’s iMovie app is available for free on iPhones, iPad, and Mac. Here’s how to combine two or more videos for an Instagram post:
Get iMovie and open it on your iPhone.
Select Movie from the Create Project menu.
Choose your movies. To see only the clips, go to the top left and tap Media, then Video. Choose a video and press the check button.
Tap Create Movie after selecting two or more video clips.
Swipe horizontally to the point where one video clip ends and another begins if desired. You can edit or remove the transition effect between videos by tapping the two triangle icon.
Optional: You can also experiment with other iMovie features such as adding music, text, and video speed changes. You can tap a video clip, tap the tiny plus icon, and zoom in and out with two fingers.
When you’re done, tap Done in the top left corner.
From the bottom, tap the share button and select Save Video.
Your iPhone’s Photos app now contains the merged clip. Open Instagram and make an individual post with the final combined Video.
This is how you can combine multiple clips into one Instagram video. I hope you found this quick tutorial helpful. Of course, you can merge two or more clips into one single video file using any other video editing app besides the ones listed above.
Here are a few simple methods for combining two or more videos into one and posting them on Instagram (IG).
Using the Instagram official app
There is no simple way to combine many videos into one on Instagram. You can, however, utilize the Story technique.
Create an Instagram Story with two or more videos. You can add stickers, text, and other elements if you like.
Tap the three dots icon on your Instagram Tale > Save > Save story. Your current Instagram Stories films and photos will be saved to the Photos app as a single video file.
Upload the resulting Video to Instagram!
Tools To Use to Combine videos for Instagram.
- Wondershare Filmora is an easy-to-use video merger.
Before I detail online video joiners, I’d like to mention Wondershare Filmora, which can automatically merge video files without or with transitions. It merges video files with the same or various file extensions in 1:1 quality (.mp4, .mov, .mkv, .avi, etc). Continue reading to learn more about this simple video merging and how to merge videos.
Part 2: Using Filmora to combine, merge, and join clips
To join videos, first, import them.

You can drag the files from Windows File Explorer to the User’s Album or click the “Import” button on the window and choose files from your computer. All imported files will appear in thumbnail format in the User’s Album. To preview a file in the right-hand preview window, double-click it.
- To merge video files, drag & drop them.

Move videos from the User’s Album to the video track on the Timeline after that. All video files will be combined into a single video with no transition. However, you can use the following method to add transitions between video clips.
- Add transitions in the third step (optional)

Add transitions between clips for a smooth transition from one to the next to make the linked videos look like a complete movie. Go to the Transition tab and drag the desired change to the intersection of two clips. You can also right-click any transition to bring up a menu with choices such as “Apply to All” and “Random to All” for your convenience.
Step 4: Combine video files into a single file.

Now that you’ve seen the merged Movie click the “Export” option to save the several video segments to a single file. Select any format from the list under the Format tab. All of the most common video formats are supported. Choose “Device” and choose the thumbnail of your device to play the combined video file on iPod, iPhone, or iPad. You may also publish the combined Video on YouTube or burn it to DVDs to watch on television.
Other Online Video Mergers
- Androvid

Androvid is a video joiner and video editor in one. Multiple files can be easily combined into a single video. This tool also allows you to divide videos, apply effects, convert videos, and do a lot more. Use this program to effortlessly merge video files in MPEG, 3GP, MP4, AVI, and more formats.
- Video Toolbox

Users can merge and unite videos up to 600MB in size using this fantastic video editing tool. This platform is popular among professionals due to its comprehensive cutting, cropping, combining, and effects editing services. More significantly, joining videos is completely free.
- Inshot

This is a free video editing app that allows you to merge multiple videos into a single file. This is how:
Install and run Inshot.
Select Video.
Tap the check button after selecting multiple videos.
Optional: Here is where you can edit the videos. Select the 16:9 comprehensive video layout or another option by tapping Canvas.
- With iMovie

Apple’s iMovie app is available for free on iPhones, iPad, and Mac. Here’s how to combine two or more videos for an Instagram post:
Get iMovie and open it on your iPhone.
Select Movie from the Create Project menu.
Choose your movies. To see only the clips, go to the top left and tap Media, then Video. Choose a video and press the check button.
Tap Create Movie after selecting two or more video clips.
Swipe horizontally to the point where one video clip ends and another begins if desired. You can edit or remove the transition effect between videos by tapping the two triangle icon.
Optional: You can also experiment with other iMovie features such as adding music, text, and video speed changes. You can tap a video clip, tap the tiny plus icon, and zoom in and out with two fingers.
When you’re done, tap Done in the top left corner.
From the bottom, tap the share button and select Save Video.
Your iPhone’s Photos app now contains the merged clip. Open Instagram and make an individual post with the final combined Video.
This is how you can combine multiple clips into one Instagram video. I hope you found this quick tutorial helpful. Of course, you can merge two or more clips into one single video file using any other video editing app besides the ones listed above.
Here are a few simple methods for combining two or more videos into one and posting them on Instagram (IG).
Using the Instagram official app
There is no simple way to combine many videos into one on Instagram. You can, however, utilize the Story technique.
Create an Instagram Story with two or more videos. You can add stickers, text, and other elements if you like.
Tap the three dots icon on your Instagram Tale > Save > Save story. Your current Instagram Stories films and photos will be saved to the Photos app as a single video file.
Upload the resulting Video to Instagram!
Tools To Use to Combine videos for Instagram.
- Wondershare Filmora is an easy-to-use video merger.
Before I detail online video joiners, I’d like to mention Wondershare Filmora, which can automatically merge video files without or with transitions. It merges video files with the same or various file extensions in 1:1 quality (.mp4, .mov, .mkv, .avi, etc). Continue reading to learn more about this simple video merging and how to merge videos.
Part 2: Using Filmora to combine, merge, and join clips
To join videos, first, import them.

You can drag the files from Windows File Explorer to the User’s Album or click the “Import” button on the window and choose files from your computer. All imported files will appear in thumbnail format in the User’s Album. To preview a file in the right-hand preview window, double-click it.
- To merge video files, drag & drop them.

Move videos from the User’s Album to the video track on the Timeline after that. All video files will be combined into a single video with no transition. However, you can use the following method to add transitions between video clips.
- Add transitions in the third step (optional)

Add transitions between clips for a smooth transition from one to the next to make the linked videos look like a complete movie. Go to the Transition tab and drag the desired change to the intersection of two clips. You can also right-click any transition to bring up a menu with choices such as “Apply to All” and “Random to All” for your convenience.
Step 4: Combine video files into a single file.

Now that you’ve seen the merged Movie click the “Export” option to save the several video segments to a single file. Select any format from the list under the Format tab. All of the most common video formats are supported. Choose “Device” and choose the thumbnail of your device to play the combined video file on iPod, iPhone, or iPad. You may also publish the combined Video on YouTube or burn it to DVDs to watch on television.
Other Online Video Mergers
- Androvid

Androvid is a video joiner and video editor in one. Multiple files can be easily combined into a single video. This tool also allows you to divide videos, apply effects, convert videos, and do a lot more. Use this program to effortlessly merge video files in MPEG, 3GP, MP4, AVI, and more formats.
- Video Toolbox

Users can merge and unite videos up to 600MB in size using this fantastic video editing tool. This platform is popular among professionals due to its comprehensive cutting, cropping, combining, and effects editing services. More significantly, joining videos is completely free.
- Inshot

This is a free video editing app that allows you to merge multiple videos into a single file. This is how:
Install and run Inshot.
Select Video.
Tap the check button after selecting multiple videos.
Optional: Here is where you can edit the videos. Select the 16:9 comprehensive video layout or another option by tapping Canvas.
- With iMovie

Apple’s iMovie app is available for free on iPhones, iPad, and Mac. Here’s how to combine two or more videos for an Instagram post:
Get iMovie and open it on your iPhone.
Select Movie from the Create Project menu.
Choose your movies. To see only the clips, go to the top left and tap Media, then Video. Choose a video and press the check button.
Tap Create Movie after selecting two or more video clips.
Swipe horizontally to the point where one video clip ends and another begins if desired. You can edit or remove the transition effect between videos by tapping the two triangle icon.
Optional: You can also experiment with other iMovie features such as adding music, text, and video speed changes. You can tap a video clip, tap the tiny plus icon, and zoom in and out with two fingers.
When you’re done, tap Done in the top left corner.
From the bottom, tap the share button and select Save Video.
Your iPhone’s Photos app now contains the merged clip. Open Instagram and make an individual post with the final combined Video.
This is how you can combine multiple clips into one Instagram video. I hope you found this quick tutorial helpful. Of course, you can merge two or more clips into one single video file using any other video editing app besides the ones listed above.
Also read:
- Top Tricks for Learning Photo Slideshow for 2024
- Updated Blender Is an Open-Source Cross-Platform 3D Graphics Program, but This Doesnt Mean Its a Low-Rent Option for 2024
- Do You Need to Make Your Video More Immersive? You Can Make It 60 FPS to Achieve That. And Here Are the 5 Best Tools that You Can Use
- Keyframes Interval Everything You Need To Know | Filmora for 2024
- New In 2024, Making Slow Motion Videos in Final Cut Pro The Best Methods
- Updated 2024 Approved Do You Want to Know How to Add Captivating Audio in Simple Videos? Nothing to Be Concerned About because This Article Will Help You in This Matter
- Updated In 2024, Detailed Guide to Merge Videos in VLC Media Player
- Updated Get to Know How Excellent Sparkle Video Effects Can Significantly Impact Different Projects. Its Miraculous. Read Below to Learn More and Add Sparkle Effect to Your Videos for 2024
- Updated Ultimate Guide to Countdown Animation in Videos for 2024
- Updated In 2024, Speed Control Is Frequently Used in Video Editing. By Speed up or Slow Down the Video Speed, You Can Achieve Different Visual Results. This Article Will Show You How to Control the Speed of a Video
- Updated Best 8 Srt File Creators for 2024
- New Do You Know About some Efficient Slow-Motion Video Editors? Read This Article to Find Out the Best Slow-Motion Video Editing Tools that You Can Try
- How to Put a Background on A Green Screen for 2024
- New Top 10 Best Free Video Compressors for 2024
- New In 2024, Looking for a Way to Learn How to Merge Videos in HandBrake? Theres a Better Solution Waiting for You Inside
- New What You Should Know About Speech-to-Text Technology for 2024
- Learn to Merge Clips in DaVinci Resolve with Simple Steps
- Updated Cropping Videos in Final Cut Pro Step by Step
- Updated How to Cut Videos on Mac without Using FFmpeg?
- New 2024 Approved Guide To Scaling and Setting Videos in Filmora | Tutorial
- Polish and Enshrine Your Music Videos with the Best Editing Software, Filmora. Add Cuts to Your Beat, Light Leaks, and Much More
- Updated How to Add Custom Subtitles to Netflix
- New Top 6 Best Alternatives to Clownfish Voice Changer for 2024
- In 2024, Detailed Steps to Resize Video in Davinci Resolve
- Updated How to Make a Movie with Windows Movie Maker?
- Updated Top 8 Memoji Makers to Make a Memoji on PC, Android & iPhone
- The Ultimate Guide How to Bypass Swipe Screen to Unlock on Nokia C12 Pro Device
- In 2024, How Can I Catch the Regional Pokémon without Traveling On Motorola Edge 40 | Dr.fone
- Troubleshooting Error Connecting to the Apple ID Server From iPhone SE (2022)
- How to Change Netflix Location to Get More Country Version On Google Pixel 7a | Dr.fone
- How To Fix OEM Unlock Missing on Itel A70?
- Disabled iPhone XR How to Unlock a Disabled iPhone XR?
- How to recover old call logs from your Samsung Galaxy A15 4G?
- Complete guide for recovering video files on Vivo T2x 5G
- In 2024, Detailed Review of doctorSIM Unlock Service For Apple iPhone 14 Pro
- Full Guide How To Fix Connection Is Not Private on Xiaomi Redmi Note 12 Pro+ 5G | Dr.fone
- In 2024, How to Fix Pokemon Go Route Not Working On Motorola Defy 2? | Dr.fone
- MP4 won't play on my Galaxy F14 5G
- In 2024, How to Delete iCloud Account with or without Password from your Apple iPhone 14/Windows/Mac
- The Most Useful Tips for Pokemon Go Ultra League On Honor V Purse | Dr.fone
- Top 4 Android System Repair Software for Tecno Spark Go (2023) Bricked Devices | Dr.fone
- In 2024, How to Remove Forgotten PIN Of Your Poco M6 5G
- How to Fix Android App Not Installed Error on Nokia G22 Quickly? | Dr.fone
- Easy Ways to Manage Your Samsung Galaxy S24+ Location Settings | Dr.fone
- In 2024, What Does Enter PUK Code Mean And Why Did The Sim Get PUK Blocked On Samsung Galaxy A05s Device
- How To Fix Unresponsive Phone Touchscreen Of Realme 11 Pro+ | Dr.fone
- 3uTools Virtual Location Not Working On Honor V Purse? Fix Now | Dr.fone
- 4 Methods to Turn off Life 360 On Oppo F23 5G without Anyone Knowing | Dr.fone
- Title: How to Make Custom Lower Thirds with Filmora
- Author: Morgan
- Created at : 2024-05-19 05:11:38
- Updated at : 2024-05-20 05:11:38
- Link: https://ai-video-editing.techidaily.com/how-to-make-custom-lower-thirds-with-filmora/
- License: This work is licensed under CC BY-NC-SA 4.0.


