
How to Make Split Screen Videos in Filmora

How to Make Split Screen Videos in Filmora
To show the interactions and exchanges of things between the characters are widely seen in movies. It seems they are close to each other, but they aren’t.
In this article, we will go with the video editor, Wondershare Filmora, to make split-screen videos instantly. Let’s move forward to check what you need to make these videos!
Part 1. Prerequisites To Make Split Screen Video To Interact
There is no need to make complex videos. Because nowadays, only short videos get viral and are more trending. The interaction videos should be as simple as passing props or playing with someone!
Split-screen videos are widely used in movies and films because it is a visual way to describe any story. The actions will be based on real-time interactions between the characters. The essential things you are required to make these videos are described as follows:
1. Storyboard
First of all, you have to create a story with your friends and family, with whomever you want to create a video. For this, follow the below steps:
- Make a script of a story by coordination, such as writing all dialogues and actions so that there will be no difficulty during a performance on screen.
- Practice those actions again and again to get a professional look.
- The storyboard should be based on the split screen templates available on Wondershare Filmora , or you can create your customized too.

Free Download For Win 7 or later(64-bit)
Free Download For macOS 10.14 or later
2. Characters on the screen
The friends with whom you are interacting should be on the screen and have assets to record a video wherever they are. It will be one person on one split screen or two persons on one. It all depends upon your story and script.
3. Prop to interact
A prop will be any particular thing used to show interaction and should be present in the homes of both characters.
![]()
Note: The prop can be any object like a tissue roll, mobile phone, or anything seen as a passing object from one character to another.

4. A helper at home
There will be one person at home during video shooting to pretend a friend’s or family’s hand reaching to the other character from off-camera.
For example, while performing a high-five action, insert the hand of any member with whom you are living in the scene, showing as the character adjacent to you. After setting up everything in a row, it’s time to record scenes for the video.

5. Record different takes
To give a professional look to the video, you have to record different takes for each person from different angles. After recording, everyone has to send footage to only one person to edit on Filmora.
After getting things and recording, it’s time to edit it on Wondershare Filmora. For this, follow the lines below!
Part 2. Steps To Edit Split Screen Video in Filmora
Split-screen video editing is as simple as throwing a prop toward someone. Wondershare Filmora with a premium domain will get your back!
Filmora is a more creative and instant platform to edit any video or to give birth to new ideas. One of the prominent features is having ready-to-use templates for editing split-screen video. Meanwhile, you can also do a manual setup for editing. Follow the steps mentioned below to edit a video by using split-screen effects.
Split Screen Effect With Templates
Step1Import footage to Filmora
After picking up the best footage of every character, download the Wondershare Filmora (if you have not already). Then to import the clips, perform the following steps:
Free Download For Win 7 or later(64-bit)
Free Download For macOS 10.14 or later
- First, click on the “Click here to Import Media” button, as shown below.

- Then, select the clips you want to edit from your PC, and then they’ll be shown in the media section of Filmora.
Step2Add split screen effect to the timeline
Before adding the clips to the timeline, add the split screen effect to the timeline by following the below-mentioned steps:
- Click on the two-headed arrow at the upper tab.
- Then the drop-down list of two options will pop up, as shown below.

- Click on the Split Screen option, and it will show many split screen effects.

- Select the effect, whatever suits you, and download it then.
- After downloading, drag and drop the effect on the timeline section.

Step3Add clips to the effect
After adding the effect to the timeline, it’s time to implement it on the clips or footage. For this, follow the below-mentioned steps:
- Drag and drop the clips based on your storyboard in the required section.
- Then import the takes wherever and however you want, according to the storyboard.

If you don’t want any templates to be used in your video, then you can manually make a screen split layout. To do this, check the below section.
Manual Split Screen Layout
If the storyboard is organized in such a way that you can’t find out any of the templates suitable, then you can easily create a customized one for your video. In a customized split screen, you can set the duration and adjust the frame rate according to your choice.
Step1Import the clips
First, you must create a timeline to edit your split-screen video. To do this, take a look at the below steps!
- Click on the Import icon in the main preview when you open Wondershare Filmora.
- Then, import all the clips or footage you want to edit.

Step2Add all footages to the timeline
After importing all the clips of interaction videos into Filmora, our next step is to add our videos to the timeline.
- Simply click on the imported clips present in the project media section.
- Then drag it to the timeline below and drop it in the required track of videos.
Do the above-mentioned steps with all the clips present in the project media block.

Doing so will create a working timeline you can view and edit as you go along the editing process.
Step3Adjust the frame rate of all clips
It is all set that your storyboard is customized, for this you have to resize all the clips manually. To arrange clips according to the size, follow the below-mentioned steps:
- First, double-click on the clip you want to edit in the timeline.
- The Basic settings of the video will open in which you have a lot of options to edit.
- Click on the Transform option, and its setting will pop up on the top left side.
- Find out the Scale option from the settings and check out its range.

Adjust the scale rate according to your choice by sliding from its section.

![]()
Note: Repeat this process with all other clips present in the timeline to adjust them in such a way so that the hands moving from frame to frame will line up.

Step4Adjust the timing of clips
After adjusting the frame, you now have to adjust the timing of the clips. To perform this action, follow the below steps:
- Arrange and move around the clips on the timeline so that the timing of the scene lines up between each shot.
- Drag the edge of the clip to the right side if you want to increase the timing and duration.
- While dragging the edge of the clip to the left side, if you want to decrease the timing of the clip.
![]()
Note: The most important part is the first time a hand is supposed to move from one frame to another.
What to do if there is any lag in the preview?
If you’re experiencing lag during the preview, click on the “render” button on the top right of the timeline. It will help to render for a smooth preview.

Step5Splitting the clips
If the timing in your scene starts to fall out of sync, then do the following steps:
- First, try splitting all of the clips.
- Ensure to split before they start to fall out of sync.

![]()
Note: Splitting the clip before one person’s dialogue is preferred.
Step6Full-screen moment
After splitting the clips according to adjustments and storyboard, you can now make one of the characters’ videos in full screen. For this, follow the below steps:
- First, make another cut in the clips before the next hand-crossing action.
- Take one of the characters’ videos from clips in-between moment and make them full screen.

![]()
Note: You can quickly do full screen by double-clicking on the clip and unchecking the “transform“ heading in the top left window.

Final Results
You’re now free to re-adjust your clips in the next part back into sync. If you still want to make any adjustments in duration or cutting or sizing, you can do it easily. Because it’s a customizable effect. Give a pat on your Back! You did a great job and accomplish the results!

Free Download For Win 7 or later(64-bit)
Free Download For macOS 10.14 or later
Conclusion
An instant way to make split screen video and edit it is hidden in Wondershare Filmora . You can unwrap it by following the above-mentioned steps and giving a new life to your interaction videos.
Enjoy new and creative ideas with your family and friends and make your video trendy by Filmora. If you are an influencer, you can interact with other bloggers and influencers and make split-screen videos. It will be a great treat for you and your social media followers!
Free Download For macOS 10.14 or later
2. Characters on the screen
The friends with whom you are interacting should be on the screen and have assets to record a video wherever they are. It will be one person on one split screen or two persons on one. It all depends upon your story and script.
3. Prop to interact
A prop will be any particular thing used to show interaction and should be present in the homes of both characters.
![]()
Note: The prop can be any object like a tissue roll, mobile phone, or anything seen as a passing object from one character to another.

4. A helper at home
There will be one person at home during video shooting to pretend a friend’s or family’s hand reaching to the other character from off-camera.
For example, while performing a high-five action, insert the hand of any member with whom you are living in the scene, showing as the character adjacent to you. After setting up everything in a row, it’s time to record scenes for the video.

5. Record different takes
To give a professional look to the video, you have to record different takes for each person from different angles. After recording, everyone has to send footage to only one person to edit on Filmora.
After getting things and recording, it’s time to edit it on Wondershare Filmora. For this, follow the lines below!
Part 2. Steps To Edit Split Screen Video in Filmora
Split-screen video editing is as simple as throwing a prop toward someone. Wondershare Filmora with a premium domain will get your back!
Filmora is a more creative and instant platform to edit any video or to give birth to new ideas. One of the prominent features is having ready-to-use templates for editing split-screen video. Meanwhile, you can also do a manual setup for editing. Follow the steps mentioned below to edit a video by using split-screen effects.
Split Screen Effect With Templates
Step1Import footage to Filmora
After picking up the best footage of every character, download the Wondershare Filmora (if you have not already). Then to import the clips, perform the following steps:
Free Download For Win 7 or later(64-bit)
Free Download For macOS 10.14 or later
- First, click on the “Click here to Import Media” button, as shown below.

- Then, select the clips you want to edit from your PC, and then they’ll be shown in the media section of Filmora.
Step2Add split screen effect to the timeline
Before adding the clips to the timeline, add the split screen effect to the timeline by following the below-mentioned steps:
- Click on the two-headed arrow at the upper tab.
- Then the drop-down list of two options will pop up, as shown below.

- Click on the Split Screen option, and it will show many split screen effects.

- Select the effect, whatever suits you, and download it then.
- After downloading, drag and drop the effect on the timeline section.

Step3Add clips to the effect
After adding the effect to the timeline, it’s time to implement it on the clips or footage. For this, follow the below-mentioned steps:
- Drag and drop the clips based on your storyboard in the required section.
- Then import the takes wherever and however you want, according to the storyboard.

If you don’t want any templates to be used in your video, then you can manually make a screen split layout. To do this, check the below section.
Manual Split Screen Layout
If the storyboard is organized in such a way that you can’t find out any of the templates suitable, then you can easily create a customized one for your video. In a customized split screen, you can set the duration and adjust the frame rate according to your choice.
Step1Import the clips
First, you must create a timeline to edit your split-screen video. To do this, take a look at the below steps!
- Click on the Import icon in the main preview when you open Wondershare Filmora.
- Then, import all the clips or footage you want to edit.

Step2Add all footages to the timeline
After importing all the clips of interaction videos into Filmora, our next step is to add our videos to the timeline.
- Simply click on the imported clips present in the project media section.
- Then drag it to the timeline below and drop it in the required track of videos.
Do the above-mentioned steps with all the clips present in the project media block.

Doing so will create a working timeline you can view and edit as you go along the editing process.
Step3Adjust the frame rate of all clips
It is all set that your storyboard is customized, for this you have to resize all the clips manually. To arrange clips according to the size, follow the below-mentioned steps:
- First, double-click on the clip you want to edit in the timeline.
- The Basic settings of the video will open in which you have a lot of options to edit.
- Click on the Transform option, and its setting will pop up on the top left side.
- Find out the Scale option from the settings and check out its range.

Adjust the scale rate according to your choice by sliding from its section.

![]()
Note: Repeat this process with all other clips present in the timeline to adjust them in such a way so that the hands moving from frame to frame will line up.

Step4Adjust the timing of clips
After adjusting the frame, you now have to adjust the timing of the clips. To perform this action, follow the below steps:
- Arrange and move around the clips on the timeline so that the timing of the scene lines up between each shot.
- Drag the edge of the clip to the right side if you want to increase the timing and duration.
- While dragging the edge of the clip to the left side, if you want to decrease the timing of the clip.
![]()
Note: The most important part is the first time a hand is supposed to move from one frame to another.
What to do if there is any lag in the preview?
If you’re experiencing lag during the preview, click on the “render” button on the top right of the timeline. It will help to render for a smooth preview.

Step5Splitting the clips
If the timing in your scene starts to fall out of sync, then do the following steps:
- First, try splitting all of the clips.
- Ensure to split before they start to fall out of sync.

![]()
Note: Splitting the clip before one person’s dialogue is preferred.
Step6Full-screen moment
After splitting the clips according to adjustments and storyboard, you can now make one of the characters’ videos in full screen. For this, follow the below steps:
- First, make another cut in the clips before the next hand-crossing action.
- Take one of the characters’ videos from clips in-between moment and make them full screen.

![]()
Note: You can quickly do full screen by double-clicking on the clip and unchecking the “transform“ heading in the top left window.

Final Results
You’re now free to re-adjust your clips in the next part back into sync. If you still want to make any adjustments in duration or cutting or sizing, you can do it easily. Because it’s a customizable effect. Give a pat on your Back! You did a great job and accomplish the results!

Free Download For Win 7 or later(64-bit)
Free Download For macOS 10.14 or later
Conclusion
An instant way to make split screen video and edit it is hidden in Wondershare Filmora . You can unwrap it by following the above-mentioned steps and giving a new life to your interaction videos.
Enjoy new and creative ideas with your family and friends and make your video trendy by Filmora. If you are an influencer, you can interact with other bloggers and influencers and make split-screen videos. It will be a great treat for you and your social media followers!
How to Use LUTs in Adobe Premiere Pro
Create High-Quality Video - Wondershare Filmora
An easy and powerful YouTube video editor
Numerous video and audio effects to choose from
Detailed tutorials provided by the official channel
Do you wonder how some pictures or videos look so stunning? As you keep reading you will discover the secrets of achieving similar quality for your content. You need a video or photo-editing software such as Adobe Premiere Pro and LUTS. Premier Pro luts are file types that you use to make color corrections to your content. They are available in different formats, each with varying capabilities. Below is everything you need to improve your editing skills using Adobe’s software and premiere luts.

In this article
01 How does Premiere Pro Classify LUTS?
02 How to use Luts in Adobe Premiere Pro?
03 How to save and export your LUTS?
How does Premiere Pro Classify LUTS?
A premiere pro lut can fall into two categories depending on its core function. These are:
• Looks
These are premiere luts you use to make changes to your video or photo’s appearance and color scheme. They are available as presets under the Lumetri Color Panel and offer quick fixes to your content.
• Input Lut
You use these premiere pro luts to interpret log footage. Additionally, they are the first step of your color correcting process and work best on DSLR footage. However, keep reading to discover how to use luts in Adobe Premiere Pro.
How to use Luts in Adobe Premiere Pro?
Now that you are aware of how the program classifies the Luts, here is how you can correct your footage.
1. Get the latest version of the program
You can purchase and download the program from your region’s Adobe Website. The program is available for both macOS and Windows. However, it is quite heavy on the system. According to reports, the below requirements are sufficient.
- You need a processer with 8 cores and clock speeds upwards of 3.2GHz.
- 16 GB of Ram is ideal for macOS. However, you do require upwards of 32GB if you are running Windows.
- Graphics cards from Nvidia and AMD are best if you also want to improve the program’s performance. You request one that can handle the Adobe Premiere Pro from your supplier.
- Furthermore, invest in a high-capacity storage device to save your projects since some outputs can be very large after color correction. The program allows you to render 4K files which are the largest.
- Finally, the above requirements are sufficient to run the following versions OF Adobe Premiere Pro:
i. Adobe Premiere Pro 22.2
ii. Adobe Premiere Pro 22.1.2
iii. Adobe Premiere Pro 22.1.1
iv. Adobe Premiere Pro 22.0
2. Select the video you want and put it on the timeline

3. Premiere luts are accessible from two sections of the program
Input luts are available under the Basic Correction tab from the Lumetri Panel as above.
Alternatively, you can get them by accessing the Basic Correction tab from the Lumetri Section of the Effects Control Panel.
4. Then, open the Input LUT dropdown menu and choose the premiere lut you want
Adobe Premiere Pro has preset input LUTs. However, you can also add your own by clicking browse. Doing so opens your computer’s File Explorer and you can locate your custom premiere luts. The software applies the premiere lut, after which you can use the tools to make adjustments.
Additionally, Adobe Premiere Pro allows you to install custom LUT files to use. Below is the process for macOS users.
- Create these target directories in your Adobe Premiere Installation files. • For shared devices
/Library/Application Support/Adobe/Common/LUTs/Creative
/Library/Application Support/Adobe/Common/LUTs/Technical
• You need to create these files if you have administrator access.
/Users//Library/Application Support/Adobe/Common/LUTs/Creative
/Users//Library/Application Support/Adobe/Common/LUTs/Technical - Copy your custom LUT files to each of the folders.
- These will be available in your Lumetri Panel next time you launch Adobe Premiere Pro.
The process is the same for Windows Users. However, the target directories are different.
- For shared devices:
C:\ Program Files\ Adobe\Common\LUTs\Creative
C:\ Program Files\ Adobe\Common\LUTs\Creative - You need to create these files if you have administrator access.
C:\Users\yourusername\AppData\Roaming\Adobe\Common\LUTs\Creative
C:\Users\yourusername\AppData\Roaming\Adobe\Common\LUTs\Technical
Adobe Premiere Pro accepts .look and .cube file types, allowing you more creative freedom. Additionally, you can save and export any custom premiere luts to use in other projects. The next section offers a step-by-step guide on how to do that.
Finally, Looks allow you to make quick adjustments to your videos using the presets available on the Lumetri Panel. You can access these from the Effects Panel. Furthermore, it also allows you to preview the result. The intensity of the look can vary depending on where the slider is on the effects panel.
How to save and export your LUTS?
Most filmmakers prefer to save their premier luts for later use. Here is how to do it:
- Follow the above process through to step 5.
- Once you finish your editing, click on the Lumetri Pop Up menu and choose Save Preset.
- Fill the respective fields with your custom information and click OK. The program will then save the clip to the location you specify.
- You can save custom luts in the following ways:
Scale only applies the new lut to the video. As such, all other luts you use are deleted. Therefore, if your video is one hour, your custom settings will run through the clip’s entire length.
Anchor To In Point only saves the section of the clip where your custom settings are active. Additionally, the software will add all pre-existing luts to the section without scaling. - Additionally, you can repeat the process and export your LUTs in the following formats:
.look exports the LUT as an Adobe Premiere Pro file to a location on your device.
.cube saves the Lumetri preset you can use on other color grading software. For example, you can use your .cube custom lut with Filmora.

For Win 7 or later (64-bit)
For macOS 10.12 or later
Finally, the above procedures only apply to certain versions of Adobe Premiere Pro. They may differ across devices. This is because Adobe releases new updates regularly to fix bugs and offer new functionality. So, keep checking regularly for any changes.
Conclusion
●Adobe Premiere Pro offers you fun luts to enhance the quality of your video. Additionally, the option to render videos in 4K quality allows you to output creations of the highest quality. Additionally, the option to save and export your LUTS to use with other programs like Filmora, means there is no limit to what you can create. Here is a link to some LUTs you can try on your next edit.
Do you wonder how some pictures or videos look so stunning? As you keep reading you will discover the secrets of achieving similar quality for your content. You need a video or photo-editing software such as Adobe Premiere Pro and LUTS. Premier Pro luts are file types that you use to make color corrections to your content. They are available in different formats, each with varying capabilities. Below is everything you need to improve your editing skills using Adobe’s software and premiere luts.

In this article
01 How does Premiere Pro Classify LUTS?
02 How to use Luts in Adobe Premiere Pro?
03 How to save and export your LUTS?
How does Premiere Pro Classify LUTS?
A premiere pro lut can fall into two categories depending on its core function. These are:
• Looks
These are premiere luts you use to make changes to your video or photo’s appearance and color scheme. They are available as presets under the Lumetri Color Panel and offer quick fixes to your content.
• Input Lut
You use these premiere pro luts to interpret log footage. Additionally, they are the first step of your color correcting process and work best on DSLR footage. However, keep reading to discover how to use luts in Adobe Premiere Pro.
How to use Luts in Adobe Premiere Pro?
Now that you are aware of how the program classifies the Luts, here is how you can correct your footage.
1. Get the latest version of the program
You can purchase and download the program from your region’s Adobe Website. The program is available for both macOS and Windows. However, it is quite heavy on the system. According to reports, the below requirements are sufficient.
- You need a processer with 8 cores and clock speeds upwards of 3.2GHz.
- 16 GB of Ram is ideal for macOS. However, you do require upwards of 32GB if you are running Windows.
- Graphics cards from Nvidia and AMD are best if you also want to improve the program’s performance. You request one that can handle the Adobe Premiere Pro from your supplier.
- Furthermore, invest in a high-capacity storage device to save your projects since some outputs can be very large after color correction. The program allows you to render 4K files which are the largest.
- Finally, the above requirements are sufficient to run the following versions OF Adobe Premiere Pro:
i. Adobe Premiere Pro 22.2
ii. Adobe Premiere Pro 22.1.2
iii. Adobe Premiere Pro 22.1.1
iv. Adobe Premiere Pro 22.0
2. Select the video you want and put it on the timeline

3. Premiere luts are accessible from two sections of the program
Input luts are available under the Basic Correction tab from the Lumetri Panel as above.
Alternatively, you can get them by accessing the Basic Correction tab from the Lumetri Section of the Effects Control Panel.
4. Then, open the Input LUT dropdown menu and choose the premiere lut you want
Adobe Premiere Pro has preset input LUTs. However, you can also add your own by clicking browse. Doing so opens your computer’s File Explorer and you can locate your custom premiere luts. The software applies the premiere lut, after which you can use the tools to make adjustments.
Additionally, Adobe Premiere Pro allows you to install custom LUT files to use. Below is the process for macOS users.
- Create these target directories in your Adobe Premiere Installation files. • For shared devices
/Library/Application Support/Adobe/Common/LUTs/Creative
/Library/Application Support/Adobe/Common/LUTs/Technical
• You need to create these files if you have administrator access.
/Users//Library/Application Support/Adobe/Common/LUTs/Creative
/Users//Library/Application Support/Adobe/Common/LUTs/Technical - Copy your custom LUT files to each of the folders.
- These will be available in your Lumetri Panel next time you launch Adobe Premiere Pro.
The process is the same for Windows Users. However, the target directories are different.
- For shared devices:
C:\ Program Files\ Adobe\Common\LUTs\Creative
C:\ Program Files\ Adobe\Common\LUTs\Creative - You need to create these files if you have administrator access.
C:\Users\yourusername\AppData\Roaming\Adobe\Common\LUTs\Creative
C:\Users\yourusername\AppData\Roaming\Adobe\Common\LUTs\Technical
Adobe Premiere Pro accepts .look and .cube file types, allowing you more creative freedom. Additionally, you can save and export any custom premiere luts to use in other projects. The next section offers a step-by-step guide on how to do that.
Finally, Looks allow you to make quick adjustments to your videos using the presets available on the Lumetri Panel. You can access these from the Effects Panel. Furthermore, it also allows you to preview the result. The intensity of the look can vary depending on where the slider is on the effects panel.
How to save and export your LUTS?
Most filmmakers prefer to save their premier luts for later use. Here is how to do it:
- Follow the above process through to step 5.
- Once you finish your editing, click on the Lumetri Pop Up menu and choose Save Preset.
- Fill the respective fields with your custom information and click OK. The program will then save the clip to the location you specify.
- You can save custom luts in the following ways:
Scale only applies the new lut to the video. As such, all other luts you use are deleted. Therefore, if your video is one hour, your custom settings will run through the clip’s entire length.
Anchor To In Point only saves the section of the clip where your custom settings are active. Additionally, the software will add all pre-existing luts to the section without scaling. - Additionally, you can repeat the process and export your LUTs in the following formats:
.look exports the LUT as an Adobe Premiere Pro file to a location on your device.
.cube saves the Lumetri preset you can use on other color grading software. For example, you can use your .cube custom lut with Filmora.

For Win 7 or later (64-bit)
For macOS 10.12 or later
Finally, the above procedures only apply to certain versions of Adobe Premiere Pro. They may differ across devices. This is because Adobe releases new updates regularly to fix bugs and offer new functionality. So, keep checking regularly for any changes.
Conclusion
●Adobe Premiere Pro offers you fun luts to enhance the quality of your video. Additionally, the option to render videos in 4K quality allows you to output creations of the highest quality. Additionally, the option to save and export your LUTS to use with other programs like Filmora, means there is no limit to what you can create. Here is a link to some LUTs you can try on your next edit.
Do you wonder how some pictures or videos look so stunning? As you keep reading you will discover the secrets of achieving similar quality for your content. You need a video or photo-editing software such as Adobe Premiere Pro and LUTS. Premier Pro luts are file types that you use to make color corrections to your content. They are available in different formats, each with varying capabilities. Below is everything you need to improve your editing skills using Adobe’s software and premiere luts.

In this article
01 How does Premiere Pro Classify LUTS?
02 How to use Luts in Adobe Premiere Pro?
03 How to save and export your LUTS?
How does Premiere Pro Classify LUTS?
A premiere pro lut can fall into two categories depending on its core function. These are:
• Looks
These are premiere luts you use to make changes to your video or photo’s appearance and color scheme. They are available as presets under the Lumetri Color Panel and offer quick fixes to your content.
• Input Lut
You use these premiere pro luts to interpret log footage. Additionally, they are the first step of your color correcting process and work best on DSLR footage. However, keep reading to discover how to use luts in Adobe Premiere Pro.
How to use Luts in Adobe Premiere Pro?
Now that you are aware of how the program classifies the Luts, here is how you can correct your footage.
1. Get the latest version of the program
You can purchase and download the program from your region’s Adobe Website. The program is available for both macOS and Windows. However, it is quite heavy on the system. According to reports, the below requirements are sufficient.
- You need a processer with 8 cores and clock speeds upwards of 3.2GHz.
- 16 GB of Ram is ideal for macOS. However, you do require upwards of 32GB if you are running Windows.
- Graphics cards from Nvidia and AMD are best if you also want to improve the program’s performance. You request one that can handle the Adobe Premiere Pro from your supplier.
- Furthermore, invest in a high-capacity storage device to save your projects since some outputs can be very large after color correction. The program allows you to render 4K files which are the largest.
- Finally, the above requirements are sufficient to run the following versions OF Adobe Premiere Pro:
i. Adobe Premiere Pro 22.2
ii. Adobe Premiere Pro 22.1.2
iii. Adobe Premiere Pro 22.1.1
iv. Adobe Premiere Pro 22.0
2. Select the video you want and put it on the timeline

3. Premiere luts are accessible from two sections of the program
Input luts are available under the Basic Correction tab from the Lumetri Panel as above.
Alternatively, you can get them by accessing the Basic Correction tab from the Lumetri Section of the Effects Control Panel.
4. Then, open the Input LUT dropdown menu and choose the premiere lut you want
Adobe Premiere Pro has preset input LUTs. However, you can also add your own by clicking browse. Doing so opens your computer’s File Explorer and you can locate your custom premiere luts. The software applies the premiere lut, after which you can use the tools to make adjustments.
Additionally, Adobe Premiere Pro allows you to install custom LUT files to use. Below is the process for macOS users.
- Create these target directories in your Adobe Premiere Installation files. • For shared devices
/Library/Application Support/Adobe/Common/LUTs/Creative
/Library/Application Support/Adobe/Common/LUTs/Technical
• You need to create these files if you have administrator access.
/Users//Library/Application Support/Adobe/Common/LUTs/Creative
/Users//Library/Application Support/Adobe/Common/LUTs/Technical - Copy your custom LUT files to each of the folders.
- These will be available in your Lumetri Panel next time you launch Adobe Premiere Pro.
The process is the same for Windows Users. However, the target directories are different.
- For shared devices:
C:\ Program Files\ Adobe\Common\LUTs\Creative
C:\ Program Files\ Adobe\Common\LUTs\Creative - You need to create these files if you have administrator access.
C:\Users\yourusername\AppData\Roaming\Adobe\Common\LUTs\Creative
C:\Users\yourusername\AppData\Roaming\Adobe\Common\LUTs\Technical
Adobe Premiere Pro accepts .look and .cube file types, allowing you more creative freedom. Additionally, you can save and export any custom premiere luts to use in other projects. The next section offers a step-by-step guide on how to do that.
Finally, Looks allow you to make quick adjustments to your videos using the presets available on the Lumetri Panel. You can access these from the Effects Panel. Furthermore, it also allows you to preview the result. The intensity of the look can vary depending on where the slider is on the effects panel.
How to save and export your LUTS?
Most filmmakers prefer to save their premier luts for later use. Here is how to do it:
- Follow the above process through to step 5.
- Once you finish your editing, click on the Lumetri Pop Up menu and choose Save Preset.
- Fill the respective fields with your custom information and click OK. The program will then save the clip to the location you specify.
- You can save custom luts in the following ways:
Scale only applies the new lut to the video. As such, all other luts you use are deleted. Therefore, if your video is one hour, your custom settings will run through the clip’s entire length.
Anchor To In Point only saves the section of the clip where your custom settings are active. Additionally, the software will add all pre-existing luts to the section without scaling. - Additionally, you can repeat the process and export your LUTs in the following formats:
.look exports the LUT as an Adobe Premiere Pro file to a location on your device.
.cube saves the Lumetri preset you can use on other color grading software. For example, you can use your .cube custom lut with Filmora.

For Win 7 or later (64-bit)
For macOS 10.12 or later
Finally, the above procedures only apply to certain versions of Adobe Premiere Pro. They may differ across devices. This is because Adobe releases new updates regularly to fix bugs and offer new functionality. So, keep checking regularly for any changes.
Conclusion
●Adobe Premiere Pro offers you fun luts to enhance the quality of your video. Additionally, the option to render videos in 4K quality allows you to output creations of the highest quality. Additionally, the option to save and export your LUTS to use with other programs like Filmora, means there is no limit to what you can create. Here is a link to some LUTs you can try on your next edit.
Do you wonder how some pictures or videos look so stunning? As you keep reading you will discover the secrets of achieving similar quality for your content. You need a video or photo-editing software such as Adobe Premiere Pro and LUTS. Premier Pro luts are file types that you use to make color corrections to your content. They are available in different formats, each with varying capabilities. Below is everything you need to improve your editing skills using Adobe’s software and premiere luts.

In this article
01 How does Premiere Pro Classify LUTS?
02 How to use Luts in Adobe Premiere Pro?
03 How to save and export your LUTS?
How does Premiere Pro Classify LUTS?
A premiere pro lut can fall into two categories depending on its core function. These are:
• Looks
These are premiere luts you use to make changes to your video or photo’s appearance and color scheme. They are available as presets under the Lumetri Color Panel and offer quick fixes to your content.
• Input Lut
You use these premiere pro luts to interpret log footage. Additionally, they are the first step of your color correcting process and work best on DSLR footage. However, keep reading to discover how to use luts in Adobe Premiere Pro.
How to use Luts in Adobe Premiere Pro?
Now that you are aware of how the program classifies the Luts, here is how you can correct your footage.
1. Get the latest version of the program
You can purchase and download the program from your region’s Adobe Website. The program is available for both macOS and Windows. However, it is quite heavy on the system. According to reports, the below requirements are sufficient.
- You need a processer with 8 cores and clock speeds upwards of 3.2GHz.
- 16 GB of Ram is ideal for macOS. However, you do require upwards of 32GB if you are running Windows.
- Graphics cards from Nvidia and AMD are best if you also want to improve the program’s performance. You request one that can handle the Adobe Premiere Pro from your supplier.
- Furthermore, invest in a high-capacity storage device to save your projects since some outputs can be very large after color correction. The program allows you to render 4K files which are the largest.
- Finally, the above requirements are sufficient to run the following versions OF Adobe Premiere Pro:
i. Adobe Premiere Pro 22.2
ii. Adobe Premiere Pro 22.1.2
iii. Adobe Premiere Pro 22.1.1
iv. Adobe Premiere Pro 22.0
2. Select the video you want and put it on the timeline

3. Premiere luts are accessible from two sections of the program
Input luts are available under the Basic Correction tab from the Lumetri Panel as above.
Alternatively, you can get them by accessing the Basic Correction tab from the Lumetri Section of the Effects Control Panel.
4. Then, open the Input LUT dropdown menu and choose the premiere lut you want
Adobe Premiere Pro has preset input LUTs. However, you can also add your own by clicking browse. Doing so opens your computer’s File Explorer and you can locate your custom premiere luts. The software applies the premiere lut, after which you can use the tools to make adjustments.
Additionally, Adobe Premiere Pro allows you to install custom LUT files to use. Below is the process for macOS users.
- Create these target directories in your Adobe Premiere Installation files. • For shared devices
/Library/Application Support/Adobe/Common/LUTs/Creative
/Library/Application Support/Adobe/Common/LUTs/Technical
• You need to create these files if you have administrator access.
/Users//Library/Application Support/Adobe/Common/LUTs/Creative
/Users//Library/Application Support/Adobe/Common/LUTs/Technical - Copy your custom LUT files to each of the folders.
- These will be available in your Lumetri Panel next time you launch Adobe Premiere Pro.
The process is the same for Windows Users. However, the target directories are different.
- For shared devices:
C:\ Program Files\ Adobe\Common\LUTs\Creative
C:\ Program Files\ Adobe\Common\LUTs\Creative - You need to create these files if you have administrator access.
C:\Users\yourusername\AppData\Roaming\Adobe\Common\LUTs\Creative
C:\Users\yourusername\AppData\Roaming\Adobe\Common\LUTs\Technical
Adobe Premiere Pro accepts .look and .cube file types, allowing you more creative freedom. Additionally, you can save and export any custom premiere luts to use in other projects. The next section offers a step-by-step guide on how to do that.
Finally, Looks allow you to make quick adjustments to your videos using the presets available on the Lumetri Panel. You can access these from the Effects Panel. Furthermore, it also allows you to preview the result. The intensity of the look can vary depending on where the slider is on the effects panel.
How to save and export your LUTS?
Most filmmakers prefer to save their premier luts for later use. Here is how to do it:
- Follow the above process through to step 5.
- Once you finish your editing, click on the Lumetri Pop Up menu and choose Save Preset.
- Fill the respective fields with your custom information and click OK. The program will then save the clip to the location you specify.
- You can save custom luts in the following ways:
Scale only applies the new lut to the video. As such, all other luts you use are deleted. Therefore, if your video is one hour, your custom settings will run through the clip’s entire length.
Anchor To In Point only saves the section of the clip where your custom settings are active. Additionally, the software will add all pre-existing luts to the section without scaling. - Additionally, you can repeat the process and export your LUTs in the following formats:
.look exports the LUT as an Adobe Premiere Pro file to a location on your device.
.cube saves the Lumetri preset you can use on other color grading software. For example, you can use your .cube custom lut with Filmora.

For Win 7 or later (64-bit)
For macOS 10.12 or later
Finally, the above procedures only apply to certain versions of Adobe Premiere Pro. They may differ across devices. This is because Adobe releases new updates regularly to fix bugs and offer new functionality. So, keep checking regularly for any changes.
Conclusion
●Adobe Premiere Pro offers you fun luts to enhance the quality of your video. Additionally, the option to render videos in 4K quality allows you to output creations of the highest quality. Additionally, the option to save and export your LUTS to use with other programs like Filmora, means there is no limit to what you can create. Here is a link to some LUTs you can try on your next edit.
General Information That You Need To Know About MKV Format
MKV file format is a popularly adopted format. The format is easily accessible digital, and self-documented. The only problem people face with different formats is their compatibility. If you are trying to play an MKV video but facing problems, read the article below.
We will discuss the MKV video format, how it works, the way to play it, and other things you need to know. Stay with us; we are about to begin.
In this article
03 How to Play MKV Video Files on VLC Media Player?
04 How Can You Edit Video Files with Filmora Video Editor?
05 Which One Is Better? MKV or MOV?
Part 1: What is MKV format?
The MKV format, known as Matroska, was developed in 2002. This is an open standard video format. Different media files have different encoding, yet MKV stores various multimedia files as it is a container. Do you know what the format is widely used for? Well, the MKV file format is popularly used for online video streaming and also HD videos.

Typically, the format is used to store video clips, movies, and also TV shows. Among the list of audio and video codecs that MKV support, a few are VobSub subtitles, .SRT, .SSA, and .USF. The MKV container file format is famous in the anime fansubbing world. Many users create subtitles with this as the MKV video format supports various audio and subtitle tracks in one same file.
Part 2. How Does A MKV Video Work?
What do you know about the working of the MKV file? If you don’t have much knowledge, let’s share everything you need to know. The MKV format supports 3D objects and also subtitles. The file format is capable of running on both Windows and Mac. Interestingly, the MKV format supports all video and audio coding formats.
Let us clarify something, MKV file format is not an audio-video compression codec; it is a container format used to store subtitles, audio, video in a single file. Surprisingly, the MKV video format is also great for storing complete movies or CDs.
Do you know one amazing thing about MKV? It’s error-resilient; this means if your file is corrupted, it can recover the playback. The open-source format is great for describing technical information and commercial groups.
Part 3. How to Play MKV Video Files on VLC Media Player?
Different platforms support different formats like this MKV file format supported by Microsoft Movies & TV, VLC Media Player, and MPlayer. We will share how you can play MKV video files on VLC Media Player for the current article. If you don’t know, VLC is a cross-platform media player that supports most of the file formats, streaming protocols, DVDs, VCDs, Audio CDs, etc.
Interestingly, the media players work on all platforms like Windows, Mac, Linux, iOS, Android, etc. Do you know that the media playing software is free? Well, it is. It has no spyware and no user tracking. If you are interested in learning about how to play MKV video format on VLC, follow the steps below:
Step 1: Start by installing VLC Media Player on your respective device. It is possible you might have already installed VLC; what to do now? If this is the case, then open VLC and head over to the ‘Help’ option. There select the ‘Check for Updates’ option to update your VLC to the latest version for better performance.
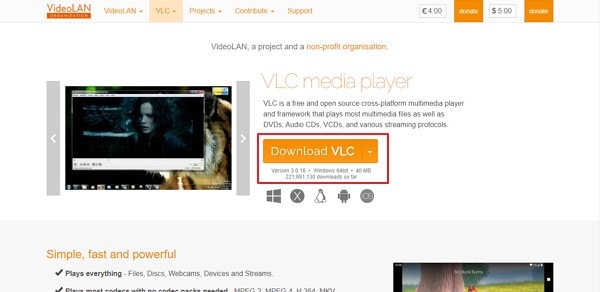
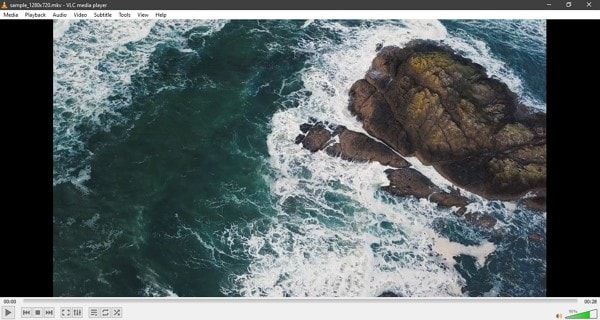
Step 2: After you have either installed or updated VLC Media Player, launch it and move to the ‘Media’ option from the top bar. Next, select the ‘Open File’ option from the menu list and look for the MKV format video in your device to add to the media player. You can also add files to VLC by directly dragging them to the media player.

Step 3: Have you successfully imported the MKV file? If yes, then your video will start playing, and you can enjoy watching your videos with VLC.
Part 4. How Can You Edit Video Files with Filmora Video Editor?
You must have heard about Wondershare Filmora , as a great video editor. The software is used everywhere, by professionals, beginners, everyone. Do you not know much about it? Let us tell you! Whenever you plan to edit your MKV video format files, make sure you try Filmora. The video editor comes with uncountable features and offers limitless editing capabilities.
For Win 7 or later (64-bit)
For macOS 10.12 or later
While editing with Filmora, you never have to worry about video effects, transitions, titles, or anything. Do you know why? This is because Filmora provides every editing element. Let’s talk more about its features:
Audio Section
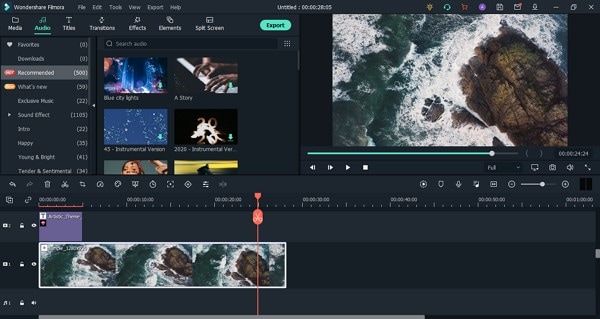
From the top menu bar on Filmora, you get an Audio section. This section can do wonders for your MVK format video. If you are looking for suitable audio to add to your video, try the audio collection from the audio section. You get sound effects of various types like Jazz, Rock, Happy, etc. You also get a wide variety of musical sounds, human sounds, etc.
Audio Editing Capacity
We must have mentioned above that apart from video editing; you get options for Audio Editing. Do you know what you can do? Start by accessing the Audio Editor by double-clicking on the audio file now, and you can do whatever you like.
For instance, the software offers features like Detach Audio from video, Mute video. Or even the advanced features offer Silence Detection, which automatically detects silence and crops the part.

Add Transitions and Titles
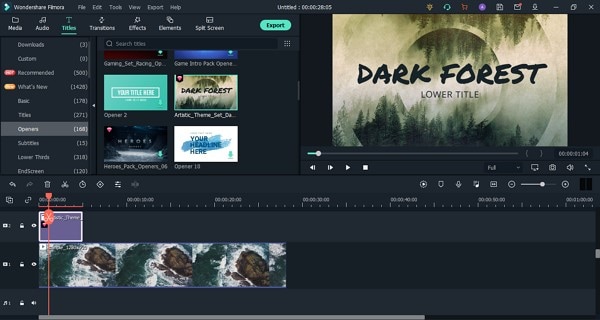
Like we said earlier, you don’t have to worry about transitions and titles with Filmora; this is because an independent section has been given to both the categories that are loaded with wide crazy options. Like if you head to the Transitions tab, you will get options like Speed Blur, Basic, Ripple & Dissolve, and others.
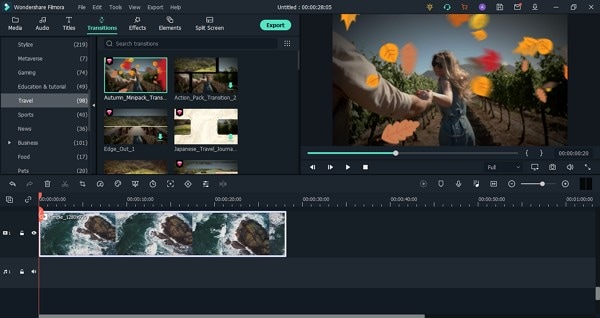
Whereas, if you open the Titles section, you will get various templates. The software offers Lower Thirds, Subtitles, Openers, etc. With Filmora, you get Titles and Transitions according to recent events and occasions.
Cool Elements
For video editing, effects and transitions are not everything. Although they play a vital role in setting and making a good video but do, you know what else matters? Let’s guide you. To make creative and eye-catching content, you need to add elements.
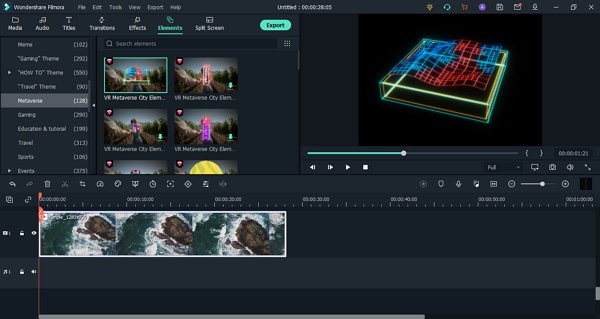
With Filmora, you get tons of great elements that can sustain your viewer’s interest. You can select between the various options like Subscribe Chanel, Share, Count Down, Metaverse, and much more than this. You can also get your hands-on Background Elements, Social Media Elements, etc.
Part 5. Which One Is Better? MKV or MOV?
MKV file format is not as commonly used as MOV because of its poor compatibility when it comes to mobile devices. If we talk about the file size, MKV tends to have a larger file size as compared to other used formats. MOV is a container file format that can store multiple media files of different tracks. Whereas MKV is an envelope format, even supporting to store complete movies with subtitles.
MKV format was developed by Matroska, whereas Apple developed the MOV file format. MKV format is good for storing HD videos, and MOV format is great for saving movies.
Last Words
MKV format is a container format that can store different files with different encodings. The article above has discussed the file format in detail. We talked about how you can use the format, play MKV video format, and also how to edit MKV videos. We will conclude the article by suggesting a great video editor, Wondershare Filmora.
Features like Keyframing, Motion Tracking are offered by the software. Along with this, some advanced-level features are also provided, like Advanced Color Tuning, Green Screen, Video Snapshot, and many others. So, for creating a nice video with great editing elements, Wondershare Filmora is a must.
For Win 7 or later (64-bit)
For macOS 10.12 or later
03 How to Play MKV Video Files on VLC Media Player?
04 How Can You Edit Video Files with Filmora Video Editor?
05 Which One Is Better? MKV or MOV?
Part 1: What is MKV format?
The MKV format, known as Matroska, was developed in 2002. This is an open standard video format. Different media files have different encoding, yet MKV stores various multimedia files as it is a container. Do you know what the format is widely used for? Well, the MKV file format is popularly used for online video streaming and also HD videos.

Typically, the format is used to store video clips, movies, and also TV shows. Among the list of audio and video codecs that MKV support, a few are VobSub subtitles, .SRT, .SSA, and .USF. The MKV container file format is famous in the anime fansubbing world. Many users create subtitles with this as the MKV video format supports various audio and subtitle tracks in one same file.
Part 2. How Does A MKV Video Work?
What do you know about the working of the MKV file? If you don’t have much knowledge, let’s share everything you need to know. The MKV format supports 3D objects and also subtitles. The file format is capable of running on both Windows and Mac. Interestingly, the MKV format supports all video and audio coding formats.
Let us clarify something, MKV file format is not an audio-video compression codec; it is a container format used to store subtitles, audio, video in a single file. Surprisingly, the MKV video format is also great for storing complete movies or CDs.
Do you know one amazing thing about MKV? It’s error-resilient; this means if your file is corrupted, it can recover the playback. The open-source format is great for describing technical information and commercial groups.
Part 3. How to Play MKV Video Files on VLC Media Player?
Different platforms support different formats like this MKV file format supported by Microsoft Movies & TV, VLC Media Player, and MPlayer. We will share how you can play MKV video files on VLC Media Player for the current article. If you don’t know, VLC is a cross-platform media player that supports most of the file formats, streaming protocols, DVDs, VCDs, Audio CDs, etc.
Interestingly, the media players work on all platforms like Windows, Mac, Linux, iOS, Android, etc. Do you know that the media playing software is free? Well, it is. It has no spyware and no user tracking. If you are interested in learning about how to play MKV video format on VLC, follow the steps below:
Step 1: Start by installing VLC Media Player on your respective device. It is possible you might have already installed VLC; what to do now? If this is the case, then open VLC and head over to the ‘Help’ option. There select the ‘Check for Updates’ option to update your VLC to the latest version for better performance.

Step 2: After you have either installed or updated VLC Media Player, launch it and move to the ‘Media’ option from the top bar. Next, select the ‘Open File’ option from the menu list and look for the MKV format video in your device to add to the media player. You can also add files to VLC by directly dragging them to the media player.

Step 3: Have you successfully imported the MKV file? If yes, then your video will start playing, and you can enjoy watching your videos with VLC.

Part 4. How Can You Edit Video Files with Filmora Video Editor?
You must have heard about Wondershare Filmora , as a great video editor. The software is used everywhere, by professionals, beginners, everyone. Do you not know much about it? Let us tell you! Whenever you plan to edit your MKV video format files, make sure you try Filmora. The video editor comes with uncountable features and offers limitless editing capabilities.
For Win 7 or later (64-bit)
For macOS 10.12 or later
While editing with Filmora, you never have to worry about video effects, transitions, titles, or anything. Do you know why? This is because Filmora provides every editing element. Let’s talk more about its features:
Audio Section
From the top menu bar on Filmora, you get an Audio section. This section can do wonders for your MVK format video. If you are looking for suitable audio to add to your video, try the audio collection from the audio section. You get sound effects of various types like Jazz, Rock, Happy, etc. You also get a wide variety of musical sounds, human sounds, etc.

Audio Editing Capacity
We must have mentioned above that apart from video editing; you get options for Audio Editing. Do you know what you can do? Start by accessing the Audio Editor by double-clicking on the audio file now, and you can do whatever you like.
For instance, the software offers features like Detach Audio from video, Mute video. Or even the advanced features offer Silence Detection, which automatically detects silence and crops the part.

Add Transitions and Titles
Like we said earlier, you don’t have to worry about transitions and titles with Filmora; this is because an independent section has been given to both the categories that are loaded with wide crazy options. Like if you head to the Transitions tab, you will get options like Speed Blur, Basic, Ripple & Dissolve, and others.

Whereas, if you open the Titles section, you will get various templates. The software offers Lower Thirds, Subtitles, Openers, etc. With Filmora, you get Titles and Transitions according to recent events and occasions.

Cool Elements
For video editing, effects and transitions are not everything. Although they play a vital role in setting and making a good video but do, you know what else matters? Let’s guide you. To make creative and eye-catching content, you need to add elements.

With Filmora, you get tons of great elements that can sustain your viewer’s interest. You can select between the various options like Subscribe Chanel, Share, Count Down, Metaverse, and much more than this. You can also get your hands-on Background Elements, Social Media Elements, etc.
Part 5. Which One Is Better? MKV or MOV?
MKV file format is not as commonly used as MOV because of its poor compatibility when it comes to mobile devices. If we talk about the file size, MKV tends to have a larger file size as compared to other used formats. MOV is a container file format that can store multiple media files of different tracks. Whereas MKV is an envelope format, even supporting to store complete movies with subtitles.
MKV format was developed by Matroska, whereas Apple developed the MOV file format. MKV format is good for storing HD videos, and MOV format is great for saving movies.
Last Words
MKV format is a container format that can store different files with different encodings. The article above has discussed the file format in detail. We talked about how you can use the format, play MKV video format, and also how to edit MKV videos. We will conclude the article by suggesting a great video editor, Wondershare Filmora.
Features like Keyframing, Motion Tracking are offered by the software. Along with this, some advanced-level features are also provided, like Advanced Color Tuning, Green Screen, Video Snapshot, and many others. So, for creating a nice video with great editing elements, Wondershare Filmora is a must.
For Win 7 or later (64-bit)
For macOS 10.12 or later
03 How to Play MKV Video Files on VLC Media Player?
04 How Can You Edit Video Files with Filmora Video Editor?
05 Which One Is Better? MKV or MOV?
Part 1: What is MKV format?
The MKV format, known as Matroska, was developed in 2002. This is an open standard video format. Different media files have different encoding, yet MKV stores various multimedia files as it is a container. Do you know what the format is widely used for? Well, the MKV file format is popularly used for online video streaming and also HD videos.

Typically, the format is used to store video clips, movies, and also TV shows. Among the list of audio and video codecs that MKV support, a few are VobSub subtitles, .SRT, .SSA, and .USF. The MKV container file format is famous in the anime fansubbing world. Many users create subtitles with this as the MKV video format supports various audio and subtitle tracks in one same file.
Part 2. How Does A MKV Video Work?
What do you know about the working of the MKV file? If you don’t have much knowledge, let’s share everything you need to know. The MKV format supports 3D objects and also subtitles. The file format is capable of running on both Windows and Mac. Interestingly, the MKV format supports all video and audio coding formats.
Let us clarify something, MKV file format is not an audio-video compression codec; it is a container format used to store subtitles, audio, video in a single file. Surprisingly, the MKV video format is also great for storing complete movies or CDs.
Do you know one amazing thing about MKV? It’s error-resilient; this means if your file is corrupted, it can recover the playback. The open-source format is great for describing technical information and commercial groups.
Part 3. How to Play MKV Video Files on VLC Media Player?
Different platforms support different formats like this MKV file format supported by Microsoft Movies & TV, VLC Media Player, and MPlayer. We will share how you can play MKV video files on VLC Media Player for the current article. If you don’t know, VLC is a cross-platform media player that supports most of the file formats, streaming protocols, DVDs, VCDs, Audio CDs, etc.
Interestingly, the media players work on all platforms like Windows, Mac, Linux, iOS, Android, etc. Do you know that the media playing software is free? Well, it is. It has no spyware and no user tracking. If you are interested in learning about how to play MKV video format on VLC, follow the steps below:
Step 1: Start by installing VLC Media Player on your respective device. It is possible you might have already installed VLC; what to do now? If this is the case, then open VLC and head over to the ‘Help’ option. There select the ‘Check for Updates’ option to update your VLC to the latest version for better performance.

Step 2: After you have either installed or updated VLC Media Player, launch it and move to the ‘Media’ option from the top bar. Next, select the ‘Open File’ option from the menu list and look for the MKV format video in your device to add to the media player. You can also add files to VLC by directly dragging them to the media player.

Step 3: Have you successfully imported the MKV file? If yes, then your video will start playing, and you can enjoy watching your videos with VLC.

Part 4. How Can You Edit Video Files with Filmora Video Editor?
You must have heard about Wondershare Filmora , as a great video editor. The software is used everywhere, by professionals, beginners, everyone. Do you not know much about it? Let us tell you! Whenever you plan to edit your MKV video format files, make sure you try Filmora. The video editor comes with uncountable features and offers limitless editing capabilities.
For Win 7 or later (64-bit)
For macOS 10.12 or later
While editing with Filmora, you never have to worry about video effects, transitions, titles, or anything. Do you know why? This is because Filmora provides every editing element. Let’s talk more about its features:
Audio Section
From the top menu bar on Filmora, you get an Audio section. This section can do wonders for your MVK format video. If you are looking for suitable audio to add to your video, try the audio collection from the audio section. You get sound effects of various types like Jazz, Rock, Happy, etc. You also get a wide variety of musical sounds, human sounds, etc.

Audio Editing Capacity
We must have mentioned above that apart from video editing; you get options for Audio Editing. Do you know what you can do? Start by accessing the Audio Editor by double-clicking on the audio file now, and you can do whatever you like.
For instance, the software offers features like Detach Audio from video, Mute video. Or even the advanced features offer Silence Detection, which automatically detects silence and crops the part.

Add Transitions and Titles
Like we said earlier, you don’t have to worry about transitions and titles with Filmora; this is because an independent section has been given to both the categories that are loaded with wide crazy options. Like if you head to the Transitions tab, you will get options like Speed Blur, Basic, Ripple & Dissolve, and others.

Whereas, if you open the Titles section, you will get various templates. The software offers Lower Thirds, Subtitles, Openers, etc. With Filmora, you get Titles and Transitions according to recent events and occasions.

Cool Elements
For video editing, effects and transitions are not everything. Although they play a vital role in setting and making a good video but do, you know what else matters? Let’s guide you. To make creative and eye-catching content, you need to add elements.

With Filmora, you get tons of great elements that can sustain your viewer’s interest. You can select between the various options like Subscribe Chanel, Share, Count Down, Metaverse, and much more than this. You can also get your hands-on Background Elements, Social Media Elements, etc.
Part 5. Which One Is Better? MKV or MOV?
MKV file format is not as commonly used as MOV because of its poor compatibility when it comes to mobile devices. If we talk about the file size, MKV tends to have a larger file size as compared to other used formats. MOV is a container file format that can store multiple media files of different tracks. Whereas MKV is an envelope format, even supporting to store complete movies with subtitles.
MKV format was developed by Matroska, whereas Apple developed the MOV file format. MKV format is good for storing HD videos, and MOV format is great for saving movies.
Last Words
MKV format is a container format that can store different files with different encodings. The article above has discussed the file format in detail. We talked about how you can use the format, play MKV video format, and also how to edit MKV videos. We will conclude the article by suggesting a great video editor, Wondershare Filmora.
Features like Keyframing, Motion Tracking are offered by the software. Along with this, some advanced-level features are also provided, like Advanced Color Tuning, Green Screen, Video Snapshot, and many others. So, for creating a nice video with great editing elements, Wondershare Filmora is a must.
For Win 7 or later (64-bit)
For macOS 10.12 or later
03 How to Play MKV Video Files on VLC Media Player?
04 How Can You Edit Video Files with Filmora Video Editor?
05 Which One Is Better? MKV or MOV?
Part 1: What is MKV format?
The MKV format, known as Matroska, was developed in 2002. This is an open standard video format. Different media files have different encoding, yet MKV stores various multimedia files as it is a container. Do you know what the format is widely used for? Well, the MKV file format is popularly used for online video streaming and also HD videos.

Typically, the format is used to store video clips, movies, and also TV shows. Among the list of audio and video codecs that MKV support, a few are VobSub subtitles, .SRT, .SSA, and .USF. The MKV container file format is famous in the anime fansubbing world. Many users create subtitles with this as the MKV video format supports various audio and subtitle tracks in one same file.
Part 2. How Does A MKV Video Work?
What do you know about the working of the MKV file? If you don’t have much knowledge, let’s share everything you need to know. The MKV format supports 3D objects and also subtitles. The file format is capable of running on both Windows and Mac. Interestingly, the MKV format supports all video and audio coding formats.
Let us clarify something, MKV file format is not an audio-video compression codec; it is a container format used to store subtitles, audio, video in a single file. Surprisingly, the MKV video format is also great for storing complete movies or CDs.
Do you know one amazing thing about MKV? It’s error-resilient; this means if your file is corrupted, it can recover the playback. The open-source format is great for describing technical information and commercial groups.
Part 3. How to Play MKV Video Files on VLC Media Player?
Different platforms support different formats like this MKV file format supported by Microsoft Movies & TV, VLC Media Player, and MPlayer. We will share how you can play MKV video files on VLC Media Player for the current article. If you don’t know, VLC is a cross-platform media player that supports most of the file formats, streaming protocols, DVDs, VCDs, Audio CDs, etc.
Interestingly, the media players work on all platforms like Windows, Mac, Linux, iOS, Android, etc. Do you know that the media playing software is free? Well, it is. It has no spyware and no user tracking. If you are interested in learning about how to play MKV video format on VLC, follow the steps below:
Step 1: Start by installing VLC Media Player on your respective device. It is possible you might have already installed VLC; what to do now? If this is the case, then open VLC and head over to the ‘Help’ option. There select the ‘Check for Updates’ option to update your VLC to the latest version for better performance.

Step 2: After you have either installed or updated VLC Media Player, launch it and move to the ‘Media’ option from the top bar. Next, select the ‘Open File’ option from the menu list and look for the MKV format video in your device to add to the media player. You can also add files to VLC by directly dragging them to the media player.

Step 3: Have you successfully imported the MKV file? If yes, then your video will start playing, and you can enjoy watching your videos with VLC.

Part 4. How Can You Edit Video Files with Filmora Video Editor?
You must have heard about Wondershare Filmora , as a great video editor. The software is used everywhere, by professionals, beginners, everyone. Do you not know much about it? Let us tell you! Whenever you plan to edit your MKV video format files, make sure you try Filmora. The video editor comes with uncountable features and offers limitless editing capabilities.
For Win 7 or later (64-bit)
For macOS 10.12 or later
While editing with Filmora, you never have to worry about video effects, transitions, titles, or anything. Do you know why? This is because Filmora provides every editing element. Let’s talk more about its features:
Audio Section
From the top menu bar on Filmora, you get an Audio section. This section can do wonders for your MVK format video. If you are looking for suitable audio to add to your video, try the audio collection from the audio section. You get sound effects of various types like Jazz, Rock, Happy, etc. You also get a wide variety of musical sounds, human sounds, etc.

Audio Editing Capacity
We must have mentioned above that apart from video editing; you get options for Audio Editing. Do you know what you can do? Start by accessing the Audio Editor by double-clicking on the audio file now, and you can do whatever you like.
For instance, the software offers features like Detach Audio from video, Mute video. Or even the advanced features offer Silence Detection, which automatically detects silence and crops the part.

Add Transitions and Titles
Like we said earlier, you don’t have to worry about transitions and titles with Filmora; this is because an independent section has been given to both the categories that are loaded with wide crazy options. Like if you head to the Transitions tab, you will get options like Speed Blur, Basic, Ripple & Dissolve, and others.

Whereas, if you open the Titles section, you will get various templates. The software offers Lower Thirds, Subtitles, Openers, etc. With Filmora, you get Titles and Transitions according to recent events and occasions.

Cool Elements
For video editing, effects and transitions are not everything. Although they play a vital role in setting and making a good video but do, you know what else matters? Let’s guide you. To make creative and eye-catching content, you need to add elements.

With Filmora, you get tons of great elements that can sustain your viewer’s interest. You can select between the various options like Subscribe Chanel, Share, Count Down, Metaverse, and much more than this. You can also get your hands-on Background Elements, Social Media Elements, etc.
Part 5. Which One Is Better? MKV or MOV?
MKV file format is not as commonly used as MOV because of its poor compatibility when it comes to mobile devices. If we talk about the file size, MKV tends to have a larger file size as compared to other used formats. MOV is a container file format that can store multiple media files of different tracks. Whereas MKV is an envelope format, even supporting to store complete movies with subtitles.
MKV format was developed by Matroska, whereas Apple developed the MOV file format. MKV format is good for storing HD videos, and MOV format is great for saving movies.
Last Words
MKV format is a container format that can store different files with different encodings. The article above has discussed the file format in detail. We talked about how you can use the format, play MKV video format, and also how to edit MKV videos. We will conclude the article by suggesting a great video editor, Wondershare Filmora.
Features like Keyframing, Motion Tracking are offered by the software. Along with this, some advanced-level features are also provided, like Advanced Color Tuning, Green Screen, Video Snapshot, and many others. So, for creating a nice video with great editing elements, Wondershare Filmora is a must.
For Win 7 or later (64-bit)
For macOS 10.12 or later
Do You Know You Can Use Mobile Apps to Apply Camera Effects to Your Videos? Many Smartphone Applications Allow You to Apply Camcorder Effects
Nowadays, tools available on the internet make it easy to apply effects and overlays. These effects can give your videos a whole new look and feel. It wasn’t easy to apply effects in the past, but it has become much simpler with the advancements. Each video effect offers a unique style and can completely transform the video.
Even if you want to create a vintage look or add glitches, these tools can do it for you. There are many popular video filters that you use today. One such popular filter is the camcorder effect that you can apply to your video. This effect creates an old VCR video look with noise and distortion. You can try many apps, which are mentioned in this article, to use such effects.
Part 1: How Can the VHS Effect Be Beneficial in the Current Film Industry?
VHS camcorder overlay is not just a filter to apply to your videos for fun. There are many advantages of VHS effects that are discussed in the portion below.
1. Retro Aesthetics
The VHS effect taps into nostalgia and retro aesthetics. This effect captures the interest of viewers who have a fondness for the past. It creates a sense of familiarity and nostalgia in your video. Such effects further add emotions by connecting with audiences on an emotional level.
2. Differentiation and Uniqueness
In a crowded media landscape, the VHS look helps films and videos stand out. Its distinct visual style catches the eye and makes content more memorable. Furthermore, it increases the likelihood of being noticed and shared by people on the internet.
3. Genre-Specific Atmosphere
These effects are closely associated with specific genres like horror and retro. By using these effects, you can enhance the atmosphere and mood of the video. Additionally, improving the overall storytelling and engagement in the intended genre experience.
4. Historical Context
When films are set in specific time periods, this effect mimics the visual aesthetics of that era. It helps establish and reinforce the historical context of your video. Moreover, it provides an authentic representation that enhances the audience’s engagement.
5. Budget-Friendly
The VHS camera effect offers a budget-friendly way to achieve a vintage look. Additionally, without requiring post-production resources, you can achieve the look. It is particularly valuable for independent filmmakers and artists with limited budgets. These effects allow them to create visually appealing content within their budget.
6. Experimental and Creative
VHS effects provide a unique canvas for artistic expression and creativity. Filmmakers and video artists can distort reality and challenge traditional aesthetics. Moreover, enthusiasts can go creative and experiment with these effects in a new way.
Part 2: Some Top Applications For Creating The Best VHS Camera Effect
You don’t have to worry, as there are many apps that can apply your favorite effects to your video. Moreover, if you are specifically looking to apply a camcorder vintage effect, try one of these.
- 1 - Camcorder - Record VHS Home Videos [iOS]
- 2 - True VHS - 90s Vintage Camera [iOS]
- 3 - Vaporgram Glitch Photo Editor [Android]
- 4 - Film Cam -Vintage Roll Camera [Android]
- 5 - Rarevision VHS Lite - 80s Cam [Android | iOS]
- 6 - Glitch Video Effect - Live VHS [iOS]
- 7 - VHS Video Editor, Vintage Cam [iOS]
1. Camcorder - Record VHS Home Videos [iOS ]
Camcorder – Record VHS Home Videos is a camcorder video maker app, as its name suggests. You can upload your video and give it the old 80s feel. It gives your videos the authentic camcorder feel by adding the date and other details in your video. The good part about this app is that it is free for a while, which means there are no annoying ads. You can apply your favorite VHS camera effects to your videos ad-free.
Compatibility: iOS 7.0 and newer

2. True VHS - 90s Vintage Camera [iOS ]
True VHS is an application to give your videos the early 90s look. It is a vintage camera app replicating the old footage and creating a similar ambiance. This app adds distortion and RGB effects to your videos. Moreover, it adds PLAY SP to give more authenticity to your video clips. True VHS also offers different effects and aspect ratios that you can choose for your edits.
Compatibility: iOS 11.0 and newer

3. Vaporgram Glitch Photo Editor [Android ]
Another amazing tool that gives you the original feel of VHS footage is Vaporgram. This Android app adds glitch effects and RGB to your media files. To create a more original VHS look of your video, this tool also adds scanlines and distorted 3D effects. It is a fun app with multiple textures and filters to add to your media. This app will surely take you back to the 20th century.
Compatibility: Android 5.0 and newer

4. Film Cam -Vintage Roll Camera [Android ]
Do you want to give your videos the old vintage camera film look? Film Cam gives your videos a retro Kodak or Fujifilm look, making it a unique feature of this application. Editing your videos using this app will give your clips the exact feel of an old film look. People will surely be surprised when they know edited videos are not captured using a Kodak camera.
Compatibility: Android 6.0 and newer

5. Rarevision VHS Lite - 80s Cam [Android | iOS ]
If you wish to hold a camcorder and record a video, thinking it’s the 80s, you’re in luck. This app is for you, as Rarevision offers you the same thing you want. It will let you imagine you are in the last quarter of the 20th century. Your videos look jittery, with glitches and lines in them. Furthermore, the colors of your videos will be distorted with decreased saturation.
Compatibility: Android 5.0 and newer, iOS 9.0 and newer

6. Glitch Video Effect - Live VHS [iOS ]
You are in the right place because this is an amazing VHS camera overlay editor. Glitch Video Effect is an app available on iOS that creates a perfect retro look. This app is loaded with over 100 VHS overlays and glitch effects that you can apply to your videos. It has everything from distortion, noise, and faded colors to create a perfect VHS look. Take back your videos to the old school and create a vintage feel.
Compatibility: iOS 12.0 and newer

7. VHS Video Editor, Vintage Cam [iOS ]
Don’t confuse yourself with retro, 90s, VHS, and vintage looks. All these looks are different from each other, and this iOS app has it all. From light leaks to the original VHS look, you can add any effect to your video. With over 100 effects and overlay options, VHS Video Editor has much to offer. Your videos will look dusty, with grains and increased noise, creating an old vintage look.
Compatibility: iOS 13.0 and newer

Part 3: Introducing Wondershare Filmora: An Explicit Solution To Easy VHS Camera Filters
Wondershare Filmora Video Editor , like always, brings newer and better features to the user. This powerful tool lets you edit, adjust, and correct your video. Nevertheless, this tool can do much more than you expect. You can create your overlays, effects, and filters using this tool. It is a solution for professionals and beginners both. You can apply the existing presets to your video using Wondershare Filmora.
Apply VHS Camera Effect For Win 7 or later(64-bit)
Apply VHS Camera Effect For macOS 10.14 or later
As discussed, Filmora lets you easily open the doors of creative expression. If you think creating an overlay is difficult, apply an effect from the library. You will find many effects and overlays in the built-in library, including a VHS camera filter. You can find these specific filters in good numbers, which exceed more than 100 effects. To apply this filter to your video, you can follow the guided instructions provided.
Step 1 Create a New Project
To begin, open Wondershare Filmora on your system and click on the “New Project” tab in the main interface. This will lead you to a new window where you can start your project.

Step 2 Import and Arrange Your Video
Import your file from the system using the import media option. Next, drag and drop your video into the timeline area to organize and prepare it for editing.

Step 3 Apply VHS Overlay
Now, it’s time to apply the VHS effects to your video. Locate the “Effects” option in the top bar of the software and click on it. In the Effects panel, search for “VHS” to find a range of VHS overlays to choose from. Select the effect that suits your style and drag it onto the timeline, placing it over your video.

Step 4 Adjust the Overlay
Change the intensity of the VHS overlay by adjusting its opacity. Go to the “Effects” tab on the right side of the screen and find the effect you applied. From there, modify its transparency to achieve the desired look. Once you’re satisfied, click on the “Export” button located at the top left of the screen to save your video with the applied VHS effects.

Conclusion
In conclusion, the internet offers many video effects that can enhance the look of your videos. With the help of such tools, you can easily apply these effects and overlays to your videos. However, if you want to apply a specific effect like the VHS camera effect, you can. Wondershare Filmora is a platform where you can edit and apply different effects to your video.
1. Camcorder - Record VHS Home Videos [iOS ]
Camcorder – Record VHS Home Videos is a camcorder video maker app, as its name suggests. You can upload your video and give it the old 80s feel. It gives your videos the authentic camcorder feel by adding the date and other details in your video. The good part about this app is that it is free for a while, which means there are no annoying ads. You can apply your favorite VHS camera effects to your videos ad-free.
Compatibility: iOS 7.0 and newer

2. True VHS - 90s Vintage Camera [iOS ]
True VHS is an application to give your videos the early 90s look. It is a vintage camera app replicating the old footage and creating a similar ambiance. This app adds distortion and RGB effects to your videos. Moreover, it adds PLAY SP to give more authenticity to your video clips. True VHS also offers different effects and aspect ratios that you can choose for your edits.
Compatibility: iOS 11.0 and newer

3. Vaporgram Glitch Photo Editor [Android ]
Another amazing tool that gives you the original feel of VHS footage is Vaporgram. This Android app adds glitch effects and RGB to your media files. To create a more original VHS look of your video, this tool also adds scanlines and distorted 3D effects. It is a fun app with multiple textures and filters to add to your media. This app will surely take you back to the 20th century.
Compatibility: Android 5.0 and newer

4. Film Cam -Vintage Roll Camera [Android ]
Do you want to give your videos the old vintage camera film look? Film Cam gives your videos a retro Kodak or Fujifilm look, making it a unique feature of this application. Editing your videos using this app will give your clips the exact feel of an old film look. People will surely be surprised when they know edited videos are not captured using a Kodak camera.
Compatibility: Android 6.0 and newer

5. Rarevision VHS Lite - 80s Cam [Android | iOS ]
If you wish to hold a camcorder and record a video, thinking it’s the 80s, you’re in luck. This app is for you, as Rarevision offers you the same thing you want. It will let you imagine you are in the last quarter of the 20th century. Your videos look jittery, with glitches and lines in them. Furthermore, the colors of your videos will be distorted with decreased saturation.
Compatibility: Android 5.0 and newer, iOS 9.0 and newer

6. Glitch Video Effect - Live VHS [iOS ]
You are in the right place because this is an amazing VHS camera overlay editor. Glitch Video Effect is an app available on iOS that creates a perfect retro look. This app is loaded with over 100 VHS overlays and glitch effects that you can apply to your videos. It has everything from distortion, noise, and faded colors to create a perfect VHS look. Take back your videos to the old school and create a vintage feel.
Compatibility: iOS 12.0 and newer

7. VHS Video Editor, Vintage Cam [iOS ]
Don’t confuse yourself with retro, 90s, VHS, and vintage looks. All these looks are different from each other, and this iOS app has it all. From light leaks to the original VHS look, you can add any effect to your video. With over 100 effects and overlay options, VHS Video Editor has much to offer. Your videos will look dusty, with grains and increased noise, creating an old vintage look.
Compatibility: iOS 13.0 and newer

Part 3: Introducing Wondershare Filmora: An Explicit Solution To Easy VHS Camera Filters
Wondershare Filmora Video Editor , like always, brings newer and better features to the user. This powerful tool lets you edit, adjust, and correct your video. Nevertheless, this tool can do much more than you expect. You can create your overlays, effects, and filters using this tool. It is a solution for professionals and beginners both. You can apply the existing presets to your video using Wondershare Filmora.
Apply VHS Camera Effect For Win 7 or later(64-bit)
Apply VHS Camera Effect For macOS 10.14 or later
As discussed, Filmora lets you easily open the doors of creative expression. If you think creating an overlay is difficult, apply an effect from the library. You will find many effects and overlays in the built-in library, including a VHS camera filter. You can find these specific filters in good numbers, which exceed more than 100 effects. To apply this filter to your video, you can follow the guided instructions provided.
Step 1 Create a New Project
To begin, open Wondershare Filmora on your system and click on the “New Project” tab in the main interface. This will lead you to a new window where you can start your project.

Step 2 Import and Arrange Your Video
Import your file from the system using the import media option. Next, drag and drop your video into the timeline area to organize and prepare it for editing.

Step 3 Apply VHS Overlay
Now, it’s time to apply the VHS effects to your video. Locate the “Effects” option in the top bar of the software and click on it. In the Effects panel, search for “VHS” to find a range of VHS overlays to choose from. Select the effect that suits your style and drag it onto the timeline, placing it over your video.

Step 4 Adjust the Overlay
Change the intensity of the VHS overlay by adjusting its opacity. Go to the “Effects” tab on the right side of the screen and find the effect you applied. From there, modify its transparency to achieve the desired look. Once you’re satisfied, click on the “Export” button located at the top left of the screen to save your video with the applied VHS effects.

Conclusion
In conclusion, the internet offers many video effects that can enhance the look of your videos. With the help of such tools, you can easily apply these effects and overlays to your videos. However, if you want to apply a specific effect like the VHS camera effect, you can. Wondershare Filmora is a platform where you can edit and apply different effects to your video.
Also read:
- Updated 2024 Approved Top 5 AI Music Video Examples and Makers to Make Them
- Updated 4 Ways to Merge MP4 and MP3
- New 2024 Approved Do You Want to Give Your Videos and Photos a Cinematic Look but Couldnt Find How? Here Are Different Cinematic LUTs Discussed that You Can Try and Use
- In 2024, A Comprehensive Review of LUTs Finding LUTs Made by Danny Gevirtz
- Updated Do You Want to Know About the DaVinci Resolve Adjustment Layer? Read This Article to Learn How to Use an Adjustment Layer (Clip) in DaVinci Resolve to Edit Videos for 2024
- How to Clone Yourself in Videos with Filmora?
- New Guide To Using Luts Perfectly in Final Cut Pro
- New In 2024, AVI Editor for Windows 11/10/8.1/8/7 Easily Edit AVI Files on PC
- New In 2024, A Guide to Color Grade Your Picture in LightRoom
- In 2024, How to Do Censor Effects with Filmora
- Updated In 2024, Reversing Time Lapse Videos on iPhone Using Top Applications
- New Create a Stunning Light Sweep Effect in Filmora. Use Simple and Easy Steps to Export a High-Quality Video that Will Impress Even Pro Video Editors for 2024
- Updated In 2024, Top 12 Best Freeze Frame Video Editing Examples
- In 2024, Best 31 Video Trimmers for Computer, Phone and Online
- New 2024 Approved The Craziest 10 AI Editors Youve Ever Seen
- Updated 2024 Approved You Can Splice Video on the iPhone Using Various Applications. This Article Will Guide You Through the Steps Necessary to Splice Your Videos
- New In 2024, Want to Make a Fun and Cinematic Video with an Introductory Text Title? Learn the Stages of Editing with Filmora for This Effect Here
- 2024 Approved This Article Introduce You the Best Video Trimmers to Use on Different Devices, Check Them Out and Choose Your Favoriate One
- New In 2024, How Can You Create Outstanding Educational Teaching Videos?
- New In 2024, 10 Top Suggestions for AI Video Interviews
- Your Complete Guide To Reset Nokia G22 | Dr.fone
- In 2024, Here are Some Pro Tips for Pokemon Go PvP Battles On Xiaomi Redmi Note 12 Pro+ 5G | Dr.fone
- How to Come up With the Best Pokemon Team On Tecno Camon 20 Premier 5G? | Dr.fone
- In 2024, 7 Top Ways To Resolve Apple ID Not Active Issue For Apple iPhone X
- Life360 Circle Everything You Need to Know On Poco M6 Pro 4G | Dr.fone
- 7 Solutions to Fix Chrome Crashes or Wont Open on Infinix Note 30 | Dr.fone
- Different Methods for Resetting Vivo S18e Phones with Screen Locked and Not | Dr.fone
- How To Unlock SIM Cards Of Samsung Galaxy M14 5G Without PUK Codes
- How To Track IMEI Number Of Oppo A38 Through Google Earth?
- In 2024, Unova Stone Pokémon Go Evolution List and How Catch Them For Realme Narzo 60x 5G | Dr.fone
- In 2024, A Step-by-Step Guide on Using ADB and Fastboot to Remove FRP Lock on your Itel P55+
- What Is AI Influencer?
- In 2024, Top 5 Tecno Spark 20 Pro Bypass FRP Tools for PC That Actually Work
- In 2024, How To Use Special Features - Virtual Location On Xiaomi Redmi 12 5G? | Dr.fone
- Title: How to Make Split Screen Videos in Filmora
- Author: Morgan
- Created at : 2024-06-08 08:36:49
- Updated at : 2024-06-09 08:36:49
- Link: https://ai-video-editing.techidaily.com/how-to-make-split-screen-videos-in-filmora/
- License: This work is licensed under CC BY-NC-SA 4.0.


