:max_bytes(150000):strip_icc():format(webp)/GettyImages-454939687-56cac7b03df78cfb37988474.jpg)
How to Merge Audio and Video in VLC Media Player

How to Merge Audio and Video in VLC Media Player
Merging audio and video is a common task for many content creators, whether you’re making a YouTube video, a podcast, or a movie. One of the most popular ways to do this is using VLC Media Player. It is a powerful media player with a built-in feature that allows you to merge audio and video files. This guide will show you how to easily use VLC Media Player to merge audio and video files.
VLC Media Player is a free, open-source program that can play various media formats. It’s available for Windows, Mac, and Linux and is widely used by content creators, media enthusiasts, and casual users. In addition to playing media files, VLC Media Player has several advanced features, including the ability to convert, record, and merge files. This guide will focus on how to merge audio and video in VLC Media Player.
How To Merge Audio and Video in VLC (VideoLan Media Player)
In addition to playing media files, VLC has a built-in feature that allows you to merge audio and video files into a single file. This guide will walk you through merging audio and video files in VLC, making it easy to create your videos, podcasts, or movies with a professional touch.
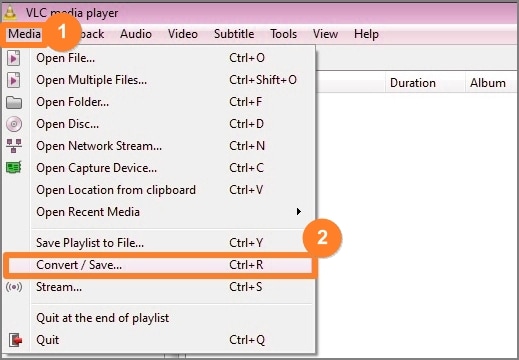
- Open VLC. Click on “Media” > “Convert / Save” from the dropdown menu.
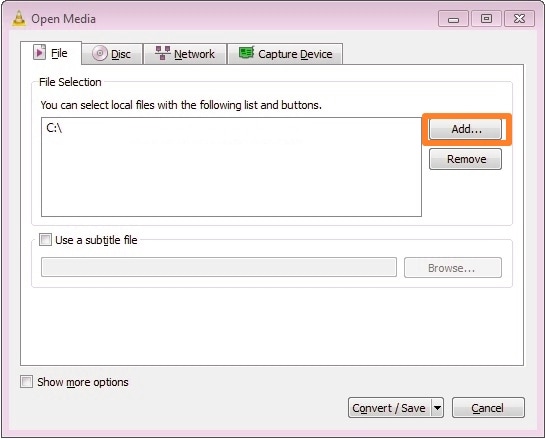
- Under the “File” tab, click on the “Add…” button to import the videos you want to merge.
- Tick the “Show more options” checkbox at the bottom.
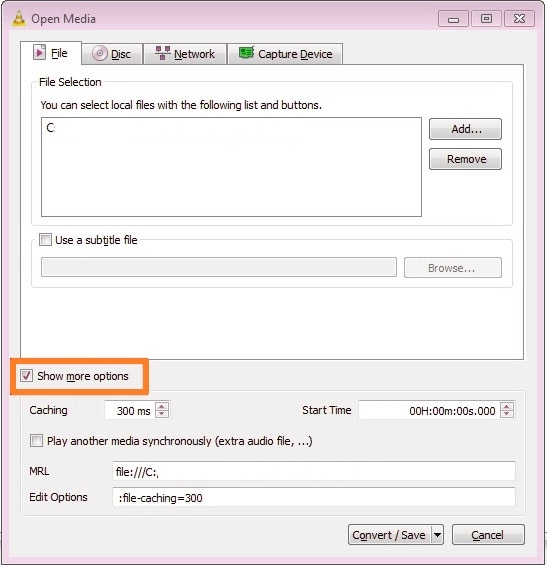
- Tick the “Play another media synchronously” to add the audio file.
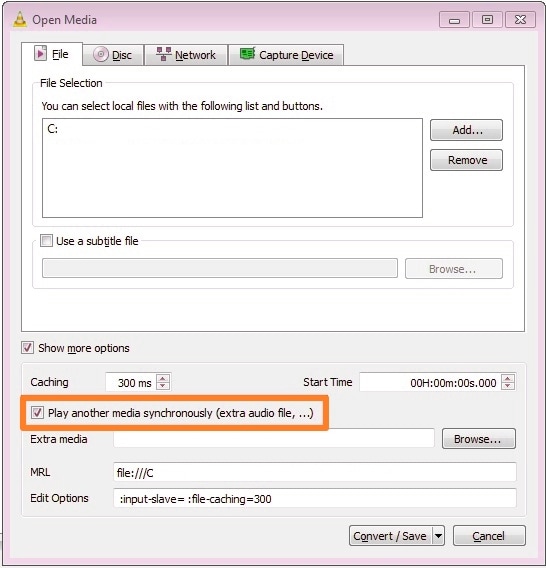
- Click on the “Browse” button and select the audio on your computer.

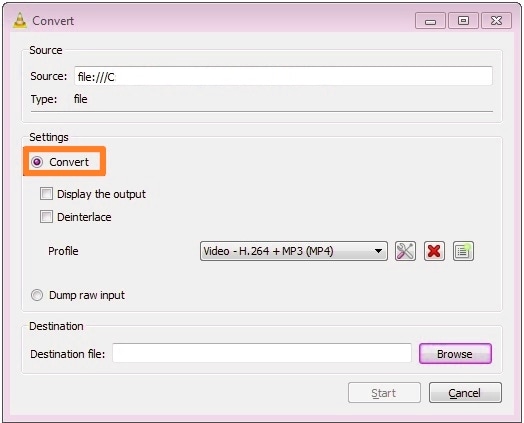
- Select the “Convert” radio button.
- Click on the “Browse” button and select a location on your computer to save the video.
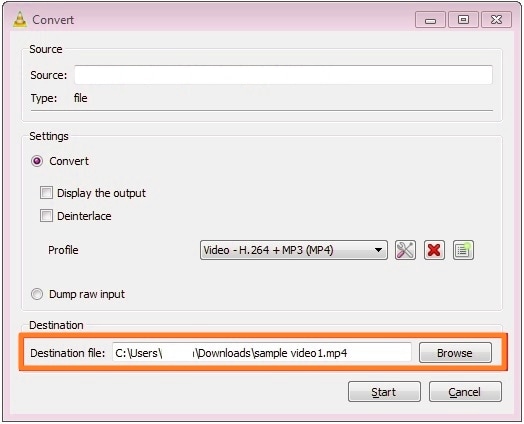
- Click on the “Start” button to save the video.

[Bonus] Filmora – Best Alternative to VLC to Combine Audio and Video
VLC is a great tool. But other tools may be better for people serious about making videos. VLC is more of an entry-level video editing software. It is good. But if it’s no longer enough for you, you should try its alternatives. Among the best ones is Wondershare Filmora . It has more advanced tools that answer the needs of video editing experts.
Free Download For Win 7 or later(64-bit)
Free Download For macOS 10.14 or later
Wondershare Filmore Features
Wondershare Filmora is a good alternative to VLC. To paint a picture, let’s look at its features. Filmora has:
- A library of carefully curated music.
- Speed controls that let you match your timing to a beat.
- Filters and effects to help you enhance the video.
- Transition effects to add more flare to the video.
- Integration with Instagram, YouTube, TikTok, or Vimeo, which allows you to publish with one tap.
Step-By-Step Guide To Merging Audio and Video With Filmora
So how to merge audio and video with Wondershare Filmora? Follow these steps to do so.
- Import the audio and videos that you want to merge into Filmora. You can do this through drag-and-drop or by clicking the link that says, “Click here to import media.”

- Drag the media files into the timeline. Adjust the video to align with the audio.

- Optionally, if you want to replace the video’s original audio, do this. Right-click on the video file. Select “Detach Audio.” The original audio will be separated from the video and put in the audio track. Delete it and replace it with the new audio.
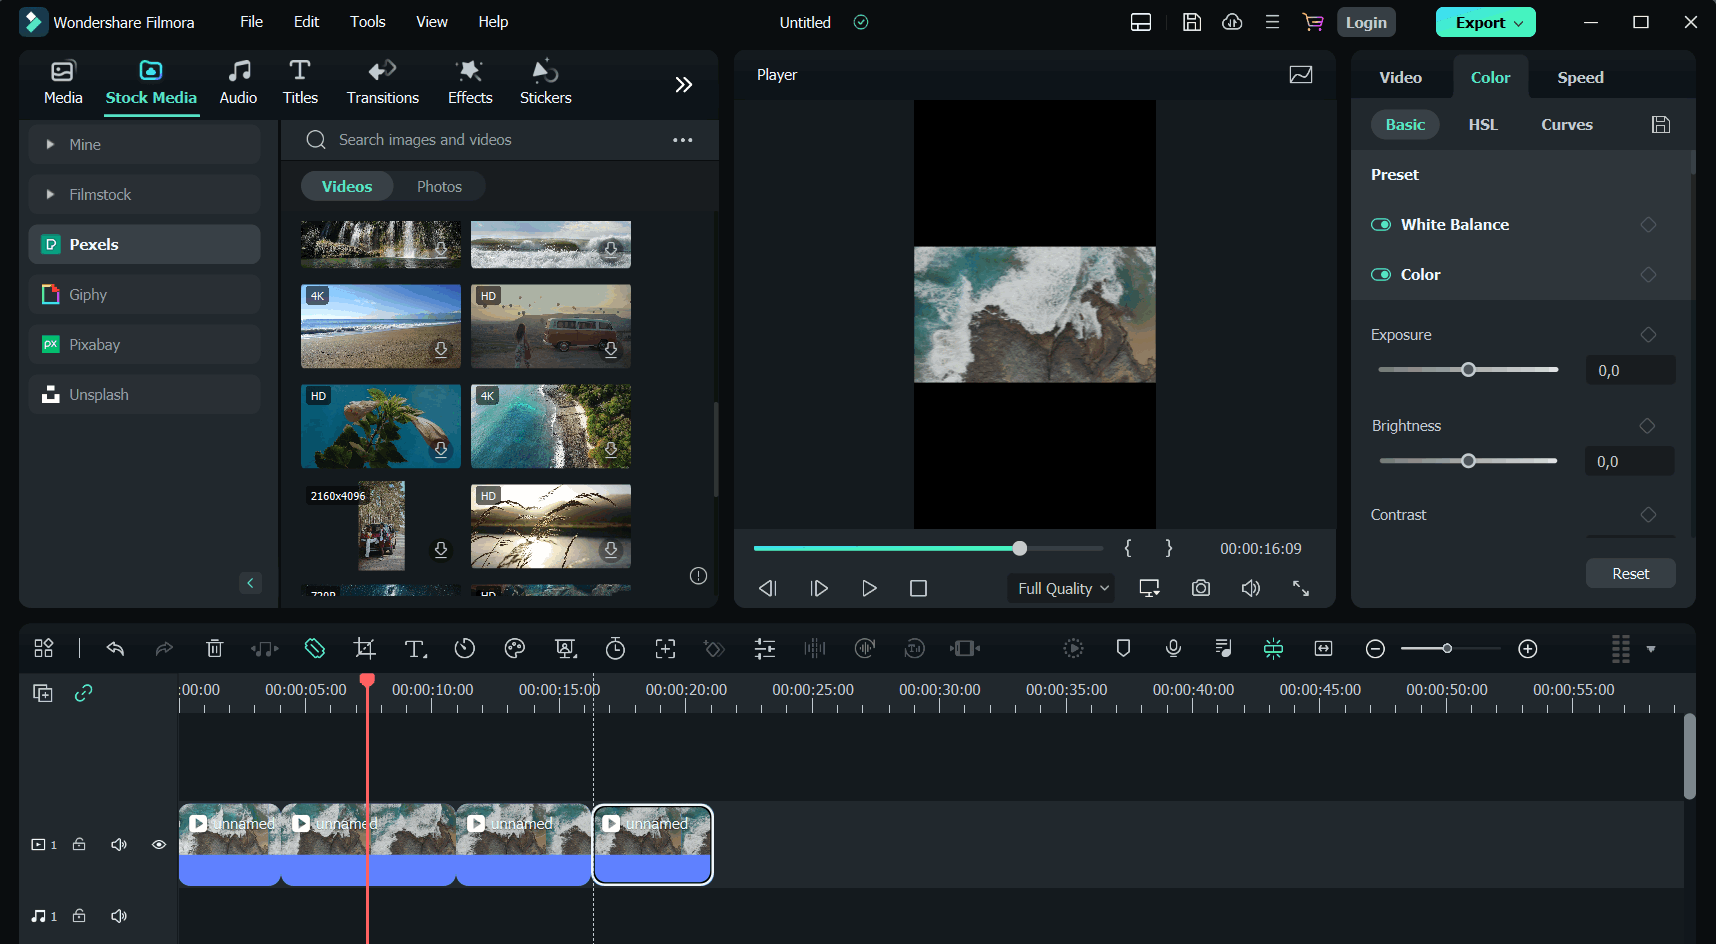
- Click “Export.” Select the format that you like, and click “Export” again. Alternatively, you can publish directly to YouTube or burn the video into a DVD.

You can watch this video to learn more about how to add audio to a video:
Combine Audio & Video? VLC or Filmora
Do you find it difficult to choose between VLC and Filmora for merging audio and video? Here’s a direct comparison between the two. It should help you decide.
| | VLC | Filmora | |
| —————————- | ———————————————————————————————————————————————————————————————————————————————————————————————————————— | ———————————————————————————————————————————————————————————————————————————————————————————————————————————————- |
| Customer Reviews from G2 | One G2 Validated Reviewer wrote that VideoLan is an “awesome all-in-one media player” that fulfills all their needs. It helps them play all audio and video media files without installing an external codec pack. The reviewer gave VLC 5 stars out of 5 stars. | A Validated Reviewer on G2 commented about Filmora’s audio editing. They said the most helpful feature is the ability to detach or mute the video. With that, you can add your own recordings or music to the video. This reviewer gave Wondershare Filmora 5 stars out of 5 stars. |
| Operating Systems | Windows; macOS; Linux; Android; iOS | Windows; macOS; Android; iOS |
| Pricing | ● VLC is an open-source program. Meaning it is completely free. | ● Wondershare Filmora’s annual plan for individual users costs $49.99.● The cross-platform plan costs $59.99 per year.● The perpetual plan costs $79.99. |
| Features | ● Plays all video and audio formats● Subtitle synchronization● Audio and video filters● Screen record without watermark | ● Split-screen● Speed ramping● Keyframing● Templates● Auto beat sync● Audio ducking● Silence detection● Audio synchronization● Video effects, filters, and transitions |
The main difference is that VLC is more of a media player. People use it to watch movies or play songs. Yes, it also lets you merge audio and video, convert videos, and screen record. But that’s about it; it does not give you features that challenge your creativity.
On the other hand, Wondershare Filmora is a video editor. It gives you tools that enable you to create original videos and enhance them. Therefore, it is the better option if you want to be a YouTuber or renowned video maker.
That said, the best use case for VLC is using it to play videos and music. It’s also a great free media converter. Meanwhile, Wondershare Filmora is better suited for video content creation. The tools it provides you with allow the creation of videos that are sure to captivate your audience.
Conclusion
Merging audio and video is easy. VLC and Wondershare Filmora are fantastic tools that can help you with that task. Suppose you want to do more than just merge audio and video. The latter is the better option. It includes powerful video editing tools that help you create amazing videos. Aside from merging, Filmora also offers audio synchronization, auto beat sync, audio detaching, and more. These features ensure the output file will be of high quality.
Free Download For macOS 10.14 or later
Wondershare Filmore Features
Wondershare Filmora is a good alternative to VLC. To paint a picture, let’s look at its features. Filmora has:
- A library of carefully curated music.
- Speed controls that let you match your timing to a beat.
- Filters and effects to help you enhance the video.
- Transition effects to add more flare to the video.
- Integration with Instagram, YouTube, TikTok, or Vimeo, which allows you to publish with one tap.
Step-By-Step Guide To Merging Audio and Video With Filmora
So how to merge audio and video with Wondershare Filmora? Follow these steps to do so.
- Import the audio and videos that you want to merge into Filmora. You can do this through drag-and-drop or by clicking the link that says, “Click here to import media.”

- Drag the media files into the timeline. Adjust the video to align with the audio.

- Optionally, if you want to replace the video’s original audio, do this. Right-click on the video file. Select “Detach Audio.” The original audio will be separated from the video and put in the audio track. Delete it and replace it with the new audio.

- Click “Export.” Select the format that you like, and click “Export” again. Alternatively, you can publish directly to YouTube or burn the video into a DVD.

You can watch this video to learn more about how to add audio to a video:
Combine Audio & Video? VLC or Filmora
Do you find it difficult to choose between VLC and Filmora for merging audio and video? Here’s a direct comparison between the two. It should help you decide.
| | VLC | Filmora | |
| —————————- | ———————————————————————————————————————————————————————————————————————————————————————————————————————— | ———————————————————————————————————————————————————————————————————————————————————————————————————————————————- |
| Customer Reviews from G2 | One G2 Validated Reviewer wrote that VideoLan is an “awesome all-in-one media player” that fulfills all their needs. It helps them play all audio and video media files without installing an external codec pack. The reviewer gave VLC 5 stars out of 5 stars. | A Validated Reviewer on G2 commented about Filmora’s audio editing. They said the most helpful feature is the ability to detach or mute the video. With that, you can add your own recordings or music to the video. This reviewer gave Wondershare Filmora 5 stars out of 5 stars. |
| Operating Systems | Windows; macOS; Linux; Android; iOS | Windows; macOS; Android; iOS |
| Pricing | ● VLC is an open-source program. Meaning it is completely free. | ● Wondershare Filmora’s annual plan for individual users costs $49.99.● The cross-platform plan costs $59.99 per year.● The perpetual plan costs $79.99. |
| Features | ● Plays all video and audio formats● Subtitle synchronization● Audio and video filters● Screen record without watermark | ● Split-screen● Speed ramping● Keyframing● Templates● Auto beat sync● Audio ducking● Silence detection● Audio synchronization● Video effects, filters, and transitions |
The main difference is that VLC is more of a media player. People use it to watch movies or play songs. Yes, it also lets you merge audio and video, convert videos, and screen record. But that’s about it; it does not give you features that challenge your creativity.
On the other hand, Wondershare Filmora is a video editor. It gives you tools that enable you to create original videos and enhance them. Therefore, it is the better option if you want to be a YouTuber or renowned video maker.
That said, the best use case for VLC is using it to play videos and music. It’s also a great free media converter. Meanwhile, Wondershare Filmora is better suited for video content creation. The tools it provides you with allow the creation of videos that are sure to captivate your audience.
Conclusion
Merging audio and video is easy. VLC and Wondershare Filmora are fantastic tools that can help you with that task. Suppose you want to do more than just merge audio and video. The latter is the better option. It includes powerful video editing tools that help you create amazing videos. Aside from merging, Filmora also offers audio synchronization, auto beat sync, audio detaching, and more. These features ensure the output file will be of high quality.
Your Recorded Video Footage Has some Visible Grains Making Your Video Noisy and Thus Hampering the Overall Viewing Experience. No Worries, as There AI Video Denoiser and Other Software Available to Correct the Issue
Best 8 AI Video Denoise Software
An easy yet powerful editor
Numerous effects to choose from
Detailed tutorials provided by the official channel
Several times the two same videos captured from the same phone or a camera may appear different. One video may appear to be perfectly clean and sharp while the other one looks a little blurred or grainy? Do you wonder why? This is because of the noise in the video which makes it look grainy.
So, if you too have videos with disturbing noise, there is AI-based software available that can help correct the issue. The following parts of the topic will help you learn about such tools.
In this article
01 [What’s AI Video Denoise?](#Part 1)
02 [Top AI Video Denoise Software](#Part 2)
03 [Other Effective Denoise software](#Part 3)
Part 1 What’s AI Video Denoise?
An AI video denoise tool is an AI-based software that helps to correct and remove the noise in the videos. Many times, when you shoot a video using your DSLR or a phone, a lot of noise is present and this mainly happens when there are low light conditions, higher ISO settings, and similar other situations.
The common noise type in your videos can be internal noise or interference noise which can be further divided into different types like fixed-pattern noise, salt & pepper noise, anisotropic noise, and more.
Whatever may be the noise type of a situation you would need a good noise reduction tool to enhance the video watching experience. Several AI-based and non -AI denoise software are
available and depending on what are your requirements, you can choose the best one.
Part 2 Top AI Video Denoise Software
AI Video Denoise software are the tools that use AI technology to detect and remove the noise from your videos. These programs automatically remove the noise for improving the video quality.
Below listed are the top tools in the category.
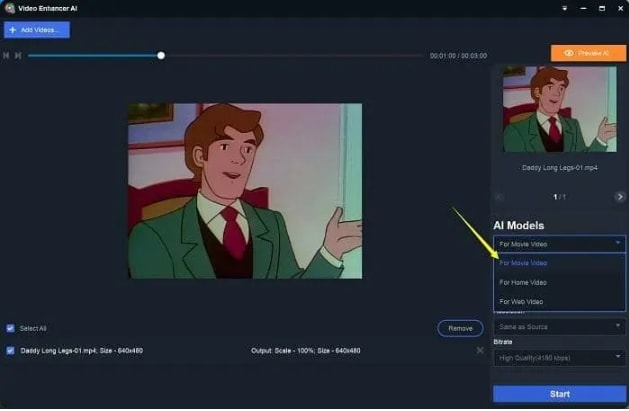
01DVDFab Video Enhancer
This is one of the widely used AI Denoise software that uses the latest artificial intelligence technology and algorithms for identifying and removing the noise from your videos. All types of noise can be automatically removed using the software. Other key features include the capability to upscale the low-resolution videos up to high 4K quality, comes with neural networks infilled, allows removing the blurs and noise along with color corrections, facilitates improvement and upscaling, improves video brightness, saturation, and other quality parameters.
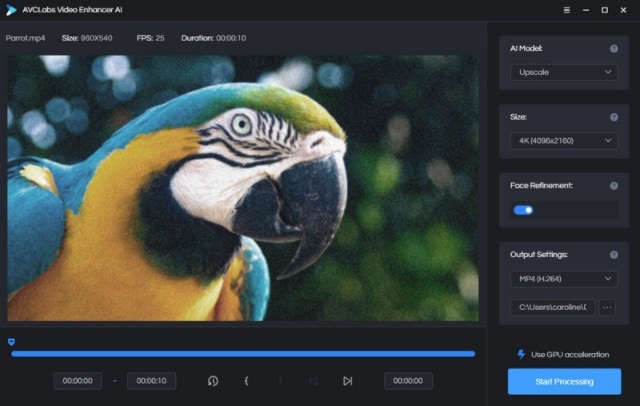
02AVCLabs Video Enhancer AI
This Windows and Mac-based tool use AI technology for enhancing and improving the overall look of your video and this also includes denoise the footage along with other functions. Using the software, you can deblur your video frame by frame and also upscale the files from 480p to 1080p, 4K, and 8K quality. The low-resolution videos can be upscaled without compromising on the quality and you can even retouch the faces in your videos. The powerful features of the software are easy and quick to use.
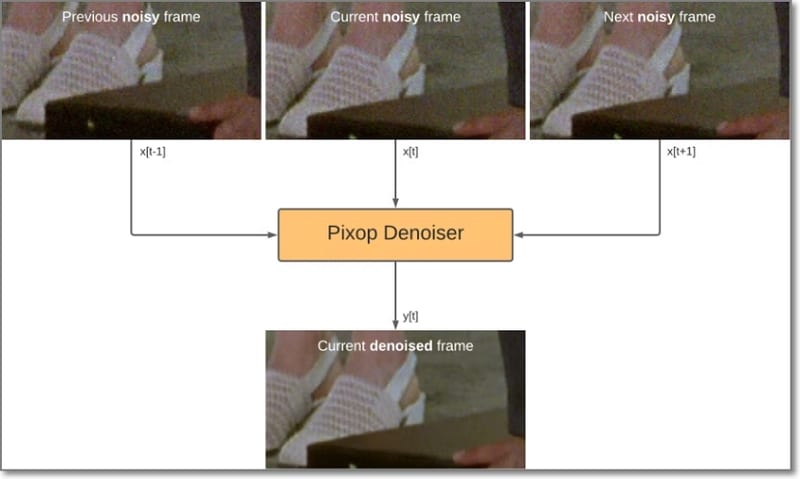
03Pixop Denoiser
This is an excellent software for reducing and removing the digital noise which will make the videos crystal clear and sharp. The software is capable of removing the Gaussian noise, aliasing artifacts, jittering, and others for enhancing overall video quality. The program can denoise the files up to UHD 4K and everything is done automatically thanks to the AI technology. No manual tweaks or settings are required.
Part 3 Other Effective Denoise software
In addition to AI tools, several other denoise software are available as well. Check out the list as below.
01****Wondershare Filmora Video Editor **
Wondershare Filmora is an excellent video editing tool that supports multiple functions that also included denoising. Its video denoise feature will let you remove all the unwanted noise from a video that too while maintaining the video quality. Further the program support advanced features like automatic audio sync, audio compression, audio transitions, adding filters, motion tracking, adding animations, masking, and much more. The software can be quickly downloaded on your Windows and Mac systems and help you process the files in a user-friendly manner.
For Win 7 or later (64-bit)
For macOS 10.12 or later
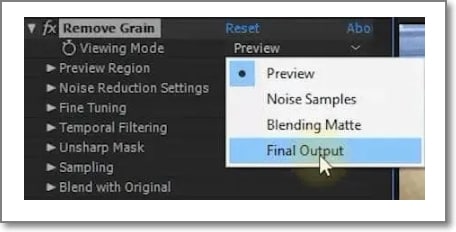
02Adobe After Effects
When it comes to video editing, Adobe After Effects is the most widely used tool as it comes packed in with all needed features. Using the software’s Remove Grain feature, the variables of the video can be changed for fixing the noise and the grain. Though the software smooths out the noise artifacts, the downside is that it also leads to blurring of the footage along with reduced sharpness. Using the right variables may help to maintain the details and the quality of the footage.
03Final Cut Pro X
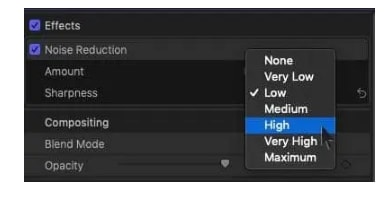
If you are editing your videos on a Mac system, Final Cut Pro X is the best tool. The program supports multiple professional functions including video denoising. The Noise Reduction filter is added from the 10.4.4 version of the program and the process of getting the task done is also simple and quick. The tool gives you the option to select the amount of noise that you want to remove from the footage.
04DaVinci Resolve Studio
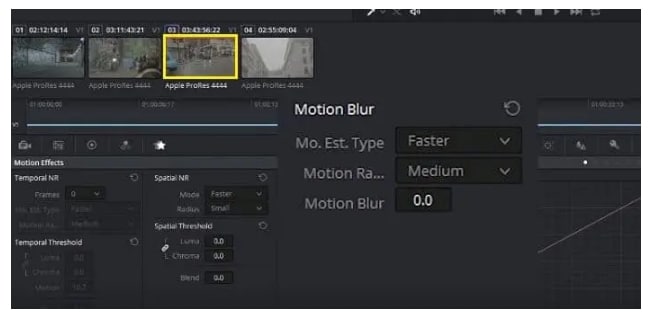
Another editing tool that can be used for removing the noise and for other tasks is DaVinci Resolve Studio. The paid version of the program supports the feature where you can control the Temporal NR and Spatial NR which will help reduce the noise.
05Neat Video Plugin
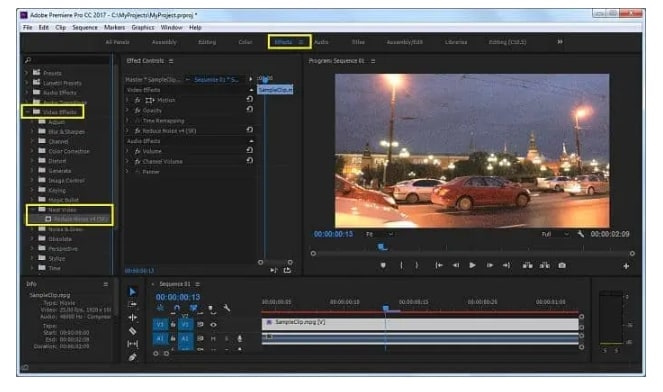
Neat Video is available as a plugin for popular tools like Final Cut Pro(X), Adobe Premiere, After Effects, and more. This special filter helps in removing the grains and the noise from the video footage that are captured using the TV Tuners, VHS, DSLRs as well as digital video cameras.
● Ending Thoughts →
● When light conditions are not appropriate, one of the common issues that you may encounter is grainy and noisy footage.
● To help you correct and resolve this, several AI and other denoising software and programs are available.
● The AI-based denoising software works automatically to remove the noise while with the others you need to tweak and make the adjustments to remove the grains and the noise.
Several times the two same videos captured from the same phone or a camera may appear different. One video may appear to be perfectly clean and sharp while the other one looks a little blurred or grainy? Do you wonder why? This is because of the noise in the video which makes it look grainy.
So, if you too have videos with disturbing noise, there is AI-based software available that can help correct the issue. The following parts of the topic will help you learn about such tools.
In this article
01 [What’s AI Video Denoise?](#Part 1)
02 [Top AI Video Denoise Software](#Part 2)
03 [Other Effective Denoise software](#Part 3)
Part 1 What’s AI Video Denoise?
An AI video denoise tool is an AI-based software that helps to correct and remove the noise in the videos. Many times, when you shoot a video using your DSLR or a phone, a lot of noise is present and this mainly happens when there are low light conditions, higher ISO settings, and similar other situations.
The common noise type in your videos can be internal noise or interference noise which can be further divided into different types like fixed-pattern noise, salt & pepper noise, anisotropic noise, and more.
Whatever may be the noise type of a situation you would need a good noise reduction tool to enhance the video watching experience. Several AI-based and non -AI denoise software are
available and depending on what are your requirements, you can choose the best one.
Part 2 Top AI Video Denoise Software
AI Video Denoise software are the tools that use AI technology to detect and remove the noise from your videos. These programs automatically remove the noise for improving the video quality.
Below listed are the top tools in the category.
01DVDFab Video Enhancer
This is one of the widely used AI Denoise software that uses the latest artificial intelligence technology and algorithms for identifying and removing the noise from your videos. All types of noise can be automatically removed using the software. Other key features include the capability to upscale the low-resolution videos up to high 4K quality, comes with neural networks infilled, allows removing the blurs and noise along with color corrections, facilitates improvement and upscaling, improves video brightness, saturation, and other quality parameters.

02AVCLabs Video Enhancer AI
This Windows and Mac-based tool use AI technology for enhancing and improving the overall look of your video and this also includes denoise the footage along with other functions. Using the software, you can deblur your video frame by frame and also upscale the files from 480p to 1080p, 4K, and 8K quality. The low-resolution videos can be upscaled without compromising on the quality and you can even retouch the faces in your videos. The powerful features of the software are easy and quick to use.

03Pixop Denoiser
This is an excellent software for reducing and removing the digital noise which will make the videos crystal clear and sharp. The software is capable of removing the Gaussian noise, aliasing artifacts, jittering, and others for enhancing overall video quality. The program can denoise the files up to UHD 4K and everything is done automatically thanks to the AI technology. No manual tweaks or settings are required.

Part 3 Other Effective Denoise software
In addition to AI tools, several other denoise software are available as well. Check out the list as below.
01****Wondershare Filmora Video Editor **
Wondershare Filmora is an excellent video editing tool that supports multiple functions that also included denoising. Its video denoise feature will let you remove all the unwanted noise from a video that too while maintaining the video quality. Further the program support advanced features like automatic audio sync, audio compression, audio transitions, adding filters, motion tracking, adding animations, masking, and much more. The software can be quickly downloaded on your Windows and Mac systems and help you process the files in a user-friendly manner.
For Win 7 or later (64-bit)
For macOS 10.12 or later
02Adobe After Effects
When it comes to video editing, Adobe After Effects is the most widely used tool as it comes packed in with all needed features. Using the software’s Remove Grain feature, the variables of the video can be changed for fixing the noise and the grain. Though the software smooths out the noise artifacts, the downside is that it also leads to blurring of the footage along with reduced sharpness. Using the right variables may help to maintain the details and the quality of the footage.

03Final Cut Pro X
If you are editing your videos on a Mac system, Final Cut Pro X is the best tool. The program supports multiple professional functions including video denoising. The Noise Reduction filter is added from the 10.4.4 version of the program and the process of getting the task done is also simple and quick. The tool gives you the option to select the amount of noise that you want to remove from the footage.

04DaVinci Resolve Studio
Another editing tool that can be used for removing the noise and for other tasks is DaVinci Resolve Studio. The paid version of the program supports the feature where you can control the Temporal NR and Spatial NR which will help reduce the noise.

05Neat Video Plugin
Neat Video is available as a plugin for popular tools like Final Cut Pro(X), Adobe Premiere, After Effects, and more. This special filter helps in removing the grains and the noise from the video footage that are captured using the TV Tuners, VHS, DSLRs as well as digital video cameras.

● Ending Thoughts →
● When light conditions are not appropriate, one of the common issues that you may encounter is grainy and noisy footage.
● To help you correct and resolve this, several AI and other denoising software and programs are available.
● The AI-based denoising software works automatically to remove the noise while with the others you need to tweak and make the adjustments to remove the grains and the noise.
Several times the two same videos captured from the same phone or a camera may appear different. One video may appear to be perfectly clean and sharp while the other one looks a little blurred or grainy? Do you wonder why? This is because of the noise in the video which makes it look grainy.
So, if you too have videos with disturbing noise, there is AI-based software available that can help correct the issue. The following parts of the topic will help you learn about such tools.
In this article
01 [What’s AI Video Denoise?](#Part 1)
02 [Top AI Video Denoise Software](#Part 2)
03 [Other Effective Denoise software](#Part 3)
Part 1 What’s AI Video Denoise?
An AI video denoise tool is an AI-based software that helps to correct and remove the noise in the videos. Many times, when you shoot a video using your DSLR or a phone, a lot of noise is present and this mainly happens when there are low light conditions, higher ISO settings, and similar other situations.
The common noise type in your videos can be internal noise or interference noise which can be further divided into different types like fixed-pattern noise, salt & pepper noise, anisotropic noise, and more.
Whatever may be the noise type of a situation you would need a good noise reduction tool to enhance the video watching experience. Several AI-based and non -AI denoise software are
available and depending on what are your requirements, you can choose the best one.
Part 2 Top AI Video Denoise Software
AI Video Denoise software are the tools that use AI technology to detect and remove the noise from your videos. These programs automatically remove the noise for improving the video quality.
Below listed are the top tools in the category.
01DVDFab Video Enhancer
This is one of the widely used AI Denoise software that uses the latest artificial intelligence technology and algorithms for identifying and removing the noise from your videos. All types of noise can be automatically removed using the software. Other key features include the capability to upscale the low-resolution videos up to high 4K quality, comes with neural networks infilled, allows removing the blurs and noise along with color corrections, facilitates improvement and upscaling, improves video brightness, saturation, and other quality parameters.

02AVCLabs Video Enhancer AI
This Windows and Mac-based tool use AI technology for enhancing and improving the overall look of your video and this also includes denoise the footage along with other functions. Using the software, you can deblur your video frame by frame and also upscale the files from 480p to 1080p, 4K, and 8K quality. The low-resolution videos can be upscaled without compromising on the quality and you can even retouch the faces in your videos. The powerful features of the software are easy and quick to use.

03Pixop Denoiser
This is an excellent software for reducing and removing the digital noise which will make the videos crystal clear and sharp. The software is capable of removing the Gaussian noise, aliasing artifacts, jittering, and others for enhancing overall video quality. The program can denoise the files up to UHD 4K and everything is done automatically thanks to the AI technology. No manual tweaks or settings are required.

Part 3 Other Effective Denoise software
In addition to AI tools, several other denoise software are available as well. Check out the list as below.
01****Wondershare Filmora Video Editor **
Wondershare Filmora is an excellent video editing tool that supports multiple functions that also included denoising. Its video denoise feature will let you remove all the unwanted noise from a video that too while maintaining the video quality. Further the program support advanced features like automatic audio sync, audio compression, audio transitions, adding filters, motion tracking, adding animations, masking, and much more. The software can be quickly downloaded on your Windows and Mac systems and help you process the files in a user-friendly manner.
For Win 7 or later (64-bit)
For macOS 10.12 or later
02Adobe After Effects
When it comes to video editing, Adobe After Effects is the most widely used tool as it comes packed in with all needed features. Using the software’s Remove Grain feature, the variables of the video can be changed for fixing the noise and the grain. Though the software smooths out the noise artifacts, the downside is that it also leads to blurring of the footage along with reduced sharpness. Using the right variables may help to maintain the details and the quality of the footage.

03Final Cut Pro X
If you are editing your videos on a Mac system, Final Cut Pro X is the best tool. The program supports multiple professional functions including video denoising. The Noise Reduction filter is added from the 10.4.4 version of the program and the process of getting the task done is also simple and quick. The tool gives you the option to select the amount of noise that you want to remove from the footage.

04DaVinci Resolve Studio
Another editing tool that can be used for removing the noise and for other tasks is DaVinci Resolve Studio. The paid version of the program supports the feature where you can control the Temporal NR and Spatial NR which will help reduce the noise.

05Neat Video Plugin
Neat Video is available as a plugin for popular tools like Final Cut Pro(X), Adobe Premiere, After Effects, and more. This special filter helps in removing the grains and the noise from the video footage that are captured using the TV Tuners, VHS, DSLRs as well as digital video cameras.

● Ending Thoughts →
● When light conditions are not appropriate, one of the common issues that you may encounter is grainy and noisy footage.
● To help you correct and resolve this, several AI and other denoising software and programs are available.
● The AI-based denoising software works automatically to remove the noise while with the others you need to tweak and make the adjustments to remove the grains and the noise.
Several times the two same videos captured from the same phone or a camera may appear different. One video may appear to be perfectly clean and sharp while the other one looks a little blurred or grainy? Do you wonder why? This is because of the noise in the video which makes it look grainy.
So, if you too have videos with disturbing noise, there is AI-based software available that can help correct the issue. The following parts of the topic will help you learn about such tools.
In this article
01 [What’s AI Video Denoise?](#Part 1)
02 [Top AI Video Denoise Software](#Part 2)
03 [Other Effective Denoise software](#Part 3)
Part 1 What’s AI Video Denoise?
An AI video denoise tool is an AI-based software that helps to correct and remove the noise in the videos. Many times, when you shoot a video using your DSLR or a phone, a lot of noise is present and this mainly happens when there are low light conditions, higher ISO settings, and similar other situations.
The common noise type in your videos can be internal noise or interference noise which can be further divided into different types like fixed-pattern noise, salt & pepper noise, anisotropic noise, and more.
Whatever may be the noise type of a situation you would need a good noise reduction tool to enhance the video watching experience. Several AI-based and non -AI denoise software are
available and depending on what are your requirements, you can choose the best one.
Part 2 Top AI Video Denoise Software
AI Video Denoise software are the tools that use AI technology to detect and remove the noise from your videos. These programs automatically remove the noise for improving the video quality.
Below listed are the top tools in the category.
01DVDFab Video Enhancer
This is one of the widely used AI Denoise software that uses the latest artificial intelligence technology and algorithms for identifying and removing the noise from your videos. All types of noise can be automatically removed using the software. Other key features include the capability to upscale the low-resolution videos up to high 4K quality, comes with neural networks infilled, allows removing the blurs and noise along with color corrections, facilitates improvement and upscaling, improves video brightness, saturation, and other quality parameters.

02AVCLabs Video Enhancer AI
This Windows and Mac-based tool use AI technology for enhancing and improving the overall look of your video and this also includes denoise the footage along with other functions. Using the software, you can deblur your video frame by frame and also upscale the files from 480p to 1080p, 4K, and 8K quality. The low-resolution videos can be upscaled without compromising on the quality and you can even retouch the faces in your videos. The powerful features of the software are easy and quick to use.

03Pixop Denoiser
This is an excellent software for reducing and removing the digital noise which will make the videos crystal clear and sharp. The software is capable of removing the Gaussian noise, aliasing artifacts, jittering, and others for enhancing overall video quality. The program can denoise the files up to UHD 4K and everything is done automatically thanks to the AI technology. No manual tweaks or settings are required.

Part 3 Other Effective Denoise software
In addition to AI tools, several other denoise software are available as well. Check out the list as below.
01****Wondershare Filmora Video Editor **
Wondershare Filmora is an excellent video editing tool that supports multiple functions that also included denoising. Its video denoise feature will let you remove all the unwanted noise from a video that too while maintaining the video quality. Further the program support advanced features like automatic audio sync, audio compression, audio transitions, adding filters, motion tracking, adding animations, masking, and much more. The software can be quickly downloaded on your Windows and Mac systems and help you process the files in a user-friendly manner.
For Win 7 or later (64-bit)
For macOS 10.12 or later
02Adobe After Effects
When it comes to video editing, Adobe After Effects is the most widely used tool as it comes packed in with all needed features. Using the software’s Remove Grain feature, the variables of the video can be changed for fixing the noise and the grain. Though the software smooths out the noise artifacts, the downside is that it also leads to blurring of the footage along with reduced sharpness. Using the right variables may help to maintain the details and the quality of the footage.

03Final Cut Pro X
If you are editing your videos on a Mac system, Final Cut Pro X is the best tool. The program supports multiple professional functions including video denoising. The Noise Reduction filter is added from the 10.4.4 version of the program and the process of getting the task done is also simple and quick. The tool gives you the option to select the amount of noise that you want to remove from the footage.

04DaVinci Resolve Studio
Another editing tool that can be used for removing the noise and for other tasks is DaVinci Resolve Studio. The paid version of the program supports the feature where you can control the Temporal NR and Spatial NR which will help reduce the noise.

05Neat Video Plugin
Neat Video is available as a plugin for popular tools like Final Cut Pro(X), Adobe Premiere, After Effects, and more. This special filter helps in removing the grains and the noise from the video footage that are captured using the TV Tuners, VHS, DSLRs as well as digital video cameras.

● Ending Thoughts →
● When light conditions are not appropriate, one of the common issues that you may encounter is grainy and noisy footage.
● To help you correct and resolve this, several AI and other denoising software and programs are available.
● The AI-based denoising software works automatically to remove the noise while with the others you need to tweak and make the adjustments to remove the grains and the noise.
Top 7 Best GoPro Video Editors for Mac
Have you ever used or seen small box-type cameras for recording videos? Well, those are called action cameras. Action cameras are compact go. They were basically made to shoot sports or any other activities videos. They are mountable on many surfaces so you can record freely during any activity. Many of them provide 4K videos at 60 fps or higher to provide crisp video quality or low resolution at 120 or 240 fps to record smooth slow-mo videos. Most of them are waterproof and have good video stabilization so you can record any sports hassle-free.
There are many action camera companies out there in the market but the one ruling the market at the moment is GoPro. It has some best action camera models with dozens of amazing features. It can also record in RAW format and GoPro max can also shoot 360 videos.
GoPro gives amazing results but sometimes videos aren’t up to your expectations and need a little bit of refinement. From sharpening to speed ramping there are many ways to enhance your GoPro videos. And for this purpose, you need a good video editing software which has all these features plus it also supports RAW and 360 video files. Here we have mentioned some noteworthy video editing softwares for you.
Wondershare - Filmora :
It is available for both Windows and Mac.
If you are looking for professional and easy-to-use software to edit your GoPro videos then Filmora Video Editor can be the right choice for you. It has many cool features to enhance your action cam footage. From stabilization to color grading to fish eye effect all can be done in this software. It has a simple and attractive UI.
It has hundreds of effects and cool transitions. It is a paid video editor which also provides a free version to check and practice your skills on. But the main disadvantage of the free version is that it leaves a watermark on export. If you don’t want to invest money in the beginning, till then you can practice on the free version and once you are satisfied with your skills then you can upgrade to a pro version.
Pricing: Wondershare Filmora offers three different plans. Monthly one at $9.99/a month, Yearly one at $69.99, and perpetual license for $79.99 where you can own the software’s specific version for perpetual. It also provides an educational plan for students and teachers.
For Win 7 or later (64-bit)
For macOS 10.14 or later
~ Features:
- It supports 4K files and a wide range of file formats.
- It has a simple UI that is suitable for beginners.
- It Supports 360 video files (in equirectangular format).
- Supports industry-standard plugins like Boris fx.
- Have features like standard motion tracking, masking, chroma key, e.t.c.
- The paid version has more features like Speed ramping, Auto-sync, keyframing, and animation.
- Have vast stock library.
~ Cons:
- The free version leaves a watermark on export.
- Have playback issues with 4k videos.
- Lacks some standard editing features.
~ Steps:
Import: Open “Filmora” then select the desired aspect ratio and click “New Project’ to start editing. Click on the “Import panel” to import media files.

Edit: Drag and drop the clips to add them to the timeline. Drop the clips above or below to add them in layers. Click the top-left icon of the timeline to add layers. Select a clip and you will see a bunch of tools appear on the top bar of the timeline, use them to perform basic editing tasks like split, crop, speed ramping, keyframing, e.t.c.
Double-click on a clip to open its properties. . Click the blue “Ok” button to move back to the previous window.
Select the “Video” icon to transform the clip or to do motion tracking, stabilization, chroma-key, Masking, e.t.c.
Select the “Audio” icon to apply effects and enhance your audio.
Select the “Color” icon to do color correction and grading.
Select the “3D LUT” option to import a new customized lut.
Select the “Animation” icon to add preset animations or make custom animations by using keyframes.
Select the “Speed” icon to adjust the speed of the clip or to do speed ramping.

Click the blue “OK” button below to go back to the previous window.
Effects: On the horizontal bar at the top-left corner of the screen, all the effects, transitions, title present, and stock library are located. Drag and drop to apply them.

Export: Click the blue “Export” button to open export window, choose the desired settings than click “Export”. and don’t forget to save the project if you want to edit it again.
Free GoPro Video Editors for Mac:
If you are tight on budget but still want a professional video editor to edit your GoPro videos then here I have mentioned some free but powerful video editors. Whether you are a beginner or a professional content creator, these free softwares can get your job done.
Blackmagic - Davinchi Resolve:
It is available for both Windows and Mac.
Whether you are a freelance video editor or an industry-level filmmaker, if you want to step up your game and stand out from your competition then you need a powerful video editor to help you out and Davinchi Resolve can be the right choice for you. From sports vlogging using action cams to Hollywood filmmaking using Red cinema cameras, Davinchi Resolve can handle and edit all this footage easily and smoothly. It is even used in the making of several Hollywood projects including Marvels’s feature films.
It is one of the best color grading software available in the market. It has advanced color grading tools that can help color grade your GoPro raw videos easily as raw videos look dull but provide greater flexibility. It is a timeline-based editor but its Fusion and Color grading panel provides a Node-based editing system which is hard to use but provides great flexibility once mastered.
Resolve has 6 different pages to deal with different editing parts:
“Edit” and “Cut” pages to deal with simple editing tasks. Its “Fusion” page allows users to do VFX and 3D compositing. The “Color Grading” page has all the professional grading tools. While the “Fairlight” page is designed to edit and enhance audio. And the “Deliver” page to export your files.
All these features are available for free without even giving a watermark. Although it has a studio version that provides some additional features to get more out of this amazing software.

- Davinchi Resolve Studio:
The free version has almost everything a professional video editor needs. but you can purchase the Studio version to get some really juicy features to enhance your video editing experience. It includes the Davinci neural engine, stereoscopic 3D tools, Dolby atmos audio mastering,e.t.c.
Pricing: Studio version is available at $ 295 for a lifetime license and with free updates.
~ Features:
- It supports a 4K resolution at 60fps. (while the Studio version supports up to 32K resolution at 120 fps.)
- It is a multi-feature software that provides editing, color grading, VFX, 3D compositing, and audio editing all in one place.
- It has the most advanced and powerful Node-based color grading system, which is also used by Hollywood film studios.
- Supports Raw and 360 videos from GoPro or other action cameras.
- Supports multi-cam editing up to 16 camera angles.
- Can make Compound clips and add adjustment layers.
- Fairlight panel has professional audio production tools like waveform editing, audio ducking, and Channel mapping. (Dolby Vision mastering and 3D spatial Panning [audio editing in 3D space] are available in the Studio version.)
- Supports third-party plugins.
- Has a 3D workspace and provides a virtual set extension for 3D modeling and compositing.
~ Cons:
- Its node-based editing style is quite difficult for beginners.
- Requires a high-end workstation to run smoothly otherwise will often crash during editing.
- Its node-based editing system is hard to learn.
~ Steps:
Import: Open “Davinci Resolve’. Select a previously saved project or press “New project” to start a new one. Click “File” >> “Import” >> “Media” to import files or press “CTRL + I”.
Edit: Drag and drop files to add them to the timeline Use the tools present above the timeline to trim, cut or move your clips. Click the “Inspector” icon on the top-right corner of the window to open the Inspector tab. Here you will find the properties of all the clips, audio, transitions, effects, e.t.c. There are different editing tabs at the bottom of the window.
In the “Fusion” window, click “Nodes” to open the Node screen. Import a clip or use it from the editor timeline. Usually, a clip will have two nodes connected through a line. Above the nodes panel, different types of nodes are available. Drag any node in the panel and connect it through lines. or add a “merge” node to connect nodes.
Its color grading panel also has Node based editing system.

Effects: Click “Effects Library” then select any effect and drop it in the timeline to apply it. You can change its properties in the “Inspector” panel.
Click the diamond icon on the right side of the property to start keyframing then change the value of that property to add keyframes at desired time period.

Export: Open the “Deliver” window, choose the desired settings then click “Add to Render Queue” to start exporting.

FXhome - Hitfilm Express:
It is available on Windows, Mac and Linux also.
If you are looking for a free but powerful video editor to edit your GoPro clips then Hitfilm Express can be the right choice for you. It is a free timeline-based editing software with professional-grade VFX tools. It is a timeline-based editor where you can add dozens of audio, videos, and text layers.
It has a composite shot sequence where you can do complex editing like editing 3D videos and elements, lights e.t.c. It has physic-base behaviors and effects also to enhance 3D compositing. For professional-level editing almost most of the effects and properties have keyframing options. It has different workspace modes to suit your editing needs.
It can also edit 360 videos recorded from your GoPro max. It has a “GoPro Lens Reframe” effect to adjust your 360 clips, but some 360 toolkits can only be available when you purchase Hitfilm pro or buy a 360 toolkit add-on. Similarly, you can purchase more add-ons according to your editing needs or you can purchase Hitfilm Pro to gain access to all add-ons and features. But can use these pro features for free but without exporting as exporting with a paid effect can give a watermark.
Hitfilm Pro:
Although Hitfilm express doesn’t give a watermark on export, but to use more features like 3D composition, LUTs, e.t.c you need to purchase add-ons, there are over 30+ add-ons available to purchase which you can purchase depending on your needs, but if you want to get all the features than its better to get your hands on Hitfilm Pro.
Pricing: Available for purchase at £ 309 or $ 388 for a lifetime license. With 12 months of free updates. It has 3 seat license which means It can run on 3 PCs simultaneously.
~ Features:
- It is a free editing software with no watermark.
- It can edit 3D videos and it can also import and edit 3D models and tracking data.
- It can edit 360 videos also.
- You can add effects and color grades as layers in the timeline also.
- Can add adjustment layers and create nested clips within nested clips to make complex editing easier.
- It has a motion track and locked-on stabilization features.
- Can do smooth keyframing and animation with the help of value graphs.
- It supports multi-cam editing also.
- Keyboard shortcuts make workflow quite easy and quick.
~ Cons:
- It has some playback issues while using 4K videos.
- It crashes sometimes, so it’s better to save the project frequently during editing.
- Hitfilm express doesn’t have a dark mode.
- Some common features are only available on the Pro version or add-ons.
~ Steps:
Import: Open “Hitfilm”, Select “New Project” to open a blank project then click “open” to open an existing file or click “new” to create a new project. Then set project settings on pop-up then and click “ok”.
Then click the “Media” tab on the top-left corner of the screen. Then select the “Import” button to import videos, images, audio, or 3d models. You can also import previously made composite shots.
Edit: Drag and drop media files from the media tab to the timeline. or click the “New” tab to create a “Composite shot” or a solid plane layer. Right-click on the left side of the timeline to insert or delete layers. On the left side of the timeline, you will find some basic tools located on the vertical bar to do simple tasks.
In the “Viewer” tab, on the left side of the playback screen, you can find tools for masking and adding text.
In the “Controls” tab, you can adjust the properties of clips and other features related to the clip like masking, track, blend, transform, e.t.c.
Create a “Composite shot” to do complex editing like 3D compositing. Or select multiple layers then right-click and select “make Composite shot” to combine them for easy editing. Double-click the composite shot to open its contents.

Effects: From the “Effects” tab drag and drop effects on the clip to add them. Some effects can be added as layers which can affect all the layers beneath it. Properties of these effects can be adjusted in the “Control” tab.
To do keyframing, Click the circle icon on the left side of the property to start keyframing then change the values of that property to add keyframes at desired time period.
Export: Click the “Export” icon then “Export now” located at the top right side of the timeline to open the export window. The export will start automatically.
Shotcut:
It is available on Windows, Mac and Linux.
If you are making videos from your GoPro or mobile phone just for fun that doesn’t require much editing then you can look for a free and simple video editor and “Shotcut” can be the right choice for this purpose.
It is a free and open-source video editor with many cool features to get your hands on. It doesn’t have any pro version. It is simple and easy to use but takes some time to understand. It supports multi-track timeline editing. It has a basic timeline design but you can customize your timeline to meet your editing needs. It has some good color grading options, you can also import your color luts. It has many cool features and effects. It supports 360 video editing and also has a few 360 video filters. It has audio effects also.
~ Features:
- All its features are for free and it doesn’t leave any watermark.
- It supports 4K resolution and a wide range of file formats.
- It also supports 360 video files.
- Has keyframing and chroma kry features.
- It has advanced color grading features.
- It provides standard animation and keyframing features.
~ Cons:
- It is a basic video editor and lacks some professional editing features.
- Have playback issues with 4K videos.
- It does have proper text editing tools.
- It is difficult to understand as its UI is different from other familiar video editors.
~ Steps:
Import: Open “Shot Cut” then click the “Open Files” button on the top-left corner of the window to import files.
Edit: Drag and drop clips on an empty timeline panel to add tracks and drag the clip from corners to trim them. Right-click on the left side of the timeline to add a video or an audio track. You will find a bunch of tools above the timeline to do some basic tasks.
You can choose from 6 different workspace designs (available in the top-right corner of the window) to suit your editing styles.

On top of the window, you will see a bunch of icons like Timeline, filter, project, and properties. e.t.c. In the properties tab, you can change the aspect ratio and speed of the clip.
Effects: Click the “Filters” icon on top of the window to open the filters menu, Click “+” above it to add filters. Double click a filter to add it to the selected clip, then click the filter to open its properties menu. You can also add text from here.
Click the “Keyframes” icon on top of the window to open the Keyframes window. Select the “clock” icon on the filters to start keyframing then change the values at a specific time to add keyframes. Click the “Timeline” icon to go back to the previous window.

Export: Click the “Export” button on the top of the screen. Select a preset or click the “Advanced” button to change export settings then click “Export File”.

Paid GoPro Video Editor for Mac:
If you are a professional athlete or a vlogger using GoPro for all of your contents and want to invest some money on paid video editors to improve your content. Then here we have mentioned some paid video editors worthy of your investment.
Apple - Final Cut Pro:
It is available for Mac only.
If you are an Apple enthusiastic person and want everything Apple, then why look for any other video editor when you can have a powerful video editor “Final cut pro” made by Apple. It is a paid but professional software that can raise your GoPro videos to the next level. Whether it’s a 360 video or a RAW file recorded from your GoPro or from the RED cinema camera, all can be edited smoothly inside Final Cut Pro. It has dozens of useful features that a professional video editor looks for like 3D tracking, Motion Graphics, Color Grading, Audio Mixing, Multi-cam editing e.t.c.
Pricing: It is a one-time purchase software available at $ 299.9 for a lifetime license and all its future updates can be downloaded free of cost.
~ Features:
- It supports up to 8K resolution.
- Support 360 and RAW video files.
- Edit videos in complete 360 and 3D spaces.
- Supports third-party video and audio plugins.
- Supports Multi-cam editing.
- Have professional color grading tools with HDR support.
- Its UI is easy to use.
~ Cons:
- It is designed for Apple devices only.
- Requires a powerful PC.
- Its UI is a bit different from other common video editors in the market.
- ~ Steps:
Import: Open “Final Cut Pro” then click the “Files” button on the top-left corner of the screen, then select “Project” to create a new project. In the “Files” menu, click “import” then “media” to import your media files. Here most of the work is done with Keyboard commands.
Edit: Drag and Drop clips on the timeline. In the viewer panel, press “I” and “O” to add input and output points then drag the clip to add only a specific part of the clip. Press “Cmd + B” to split the clip at the desired location. Or add the clips above to add the layer.
Click the “Text” icon on the top-left corner of the screen to open the text page. Choose from presets or import your own Text presets and drag them to the timeline. Click the text to open “Text Editor” on the left side of the screen.
Select multiple clips then Right-click and select “New Compound Clip” to combine them. Double-click the compound clip to edit its components.
Effects: Click 2 icons on the top-right side of the timeline to open the effects and transition panel. Drag and drop on the clip to use them. You can change their properties in the “Effects editor” tab located in the same place as “Text Editor”.
In the editor tab, click the diamond icon beside any property to start keyframing, then change its property to add keyframes at the desired time.
Press “Cmd + 6” to open the Color Grading tab, here you can color grade your clips.
Export: To export the edited video. Click “File” >> “Share” >> “Master file” to open export window. Choose the desired settings then click “Next” then “Save” to export the video.
Adobe - Premiere Pro:
It is available for both Windows and Mac.
Whether you are a content creator or not, if you use a DSLR or an action camera for the first time, then maybe the output wouldn’t meet your expectations. In order to make it good, you need a video editor. And if you will ask your gathering about a good video editor, most of them will recommend you Adobe Premiere Pro, because it is such a versatile and well-known software available in the market. It is a subscription-based video editor.
It is an industry-level software with many professional and advanced features. From beginner video editing to film compositing, all can be done in this software. Whether you have a 360 video or a 4K video in Raw format recorded from your GoPro, just import it into premiere pro and start editing. It has a downloadable “GoPro FX Reframe” plugin to edit your 360 videos. It has different panels designed to deal with specific parts of post-production such as the Effects panel, Graphics panel, Sound panel, Colour Grading panel, e.t.c.
~ Features:
- It supports up to 8K resolution.
- Have different panels to enhance different segments of post-production.
- Have an essential Effects panel to create motion effects and animations using keyframes.
- Supports hundreds of third-party extensions.
- Have useful features like warp stabilizer and denoiser.
- You can import or create your color LUTs.
- Have a creative cloud with 100 Gb of storage.
- The bundle also includes a mobile video editor and a stock library.
~ Cons:
- Real-time rendering. It will take some time to render before exporting if you work on a mid-range PC.
- Freezes or crashes sometimes.
- Cache data fill-up quickly and eats a lot of storage. (It’s better to clear it after every project)
Pricing: It is cloud-based software, therefore it can’t be purchased one time. It has a monthly subscription starting at $ 20.99/month. It includes “premiere rush” mobile video editor and 100 GB of cloud storage within the plan. It also has a “Creative cloud All apps” plan that includes all 30+ Softwares + 100Gb cloud storage along with premiere pro for $ 54.99 only. All plans also include Behance (adobe creative community), Adobe Fonts, and Adobe stock assets for free. Adobe also provides educational access at a much discounted price.
~ Steps:
Import: Open “Premiere Pro”. Click “New Project” to start with then Click the “Files” button on the top-left corner of the window then select the “Import files” button to import files. Or press “CTRL + I” to import files or drag your files from their location to premiere pro.

Edit: Drag and Drop the files to add them to the timeline. Drop a file above a clip to add as a layer. or drop over a clip to overwrite it. On the right side of the timeline, you can find a bunch of tools to do basic edits like trimming, splitting, speed ramping, masking, or adding text.
In the “Effects Control” tab you can transform the selected clip or change its properties.
Select multiple clips then right-click and select “make Nested clip” to combine them into a single clip for easy editing.

Slide between 8 different workspace styles designed for specific post-production tasks by clicking the buttons available on the top of the window.
Effects: Go to the “Effects” panel on the bottom-left window to apply an effect or transitions. Here you can find all audio, video, 2D, and 3D effects. Drag and Drop on a clip to apply it. Change the properties of these effects in the “Effects Control” panel.
To color grade, your clips move to the “Color” workspace. Here you will find all the color grading features: correction, curves, color wheels, creative tab, e.t.c. To import a LUT click the “creative tab” then click “Browse” to import a LUT.
Export: To Export go to the “Files” tab on top of the screen then select the “Export” button to open the export tab. Select the desired settings then click “Export”.
Power Director 365 :
It is available for both Windows and Mac.
If you are looking for a budget-friendly video editor that is powerful enough to edit your GoPro videos like a content creator then Power director can be the right choice for you. It has many unique and useful features. It has different plugins and design centers to do specific post-production tasks like Ad designer, Multicam editor, AI style plugins, e.t.c.
It also has a separate action cam center to fix or enhance action cam videos. IT also has chapter and subtitle rooms to add subtitles and chapters for your Youtube videos or films. It also has a vast stock and preset library to speed up your project.
Pricing: It has a subscription plan which is available at $69/year. It is now available at 30% off till 22nd May,2022.
~ Features:
- It supports 4K videos and a wide range of import formats.
- Have many built-in plugins and design centers.
- Supports Multi-cam editing.
- Have an action cam center to deal with action cam footage.
- Have separate aspect ratio mode for 360 videos.
- Also, have a chapter and subtitle room. many recording aspects of the video.
- Have a content-aware editing feature that detects the recording aspects.
- Can import presets and color LUTs.
- Have a vast stock library.
~ Cons:
- Have some playback issues with 4K videos. (create shadow files to overcome this issue to an extent).
- Its UI is a little bit complicated for beginners.
- Not ideal for fast pace editing.
~ Steps:
Import: Open Power director and a pop-up will appear, select desired aspect ratio then click “Full mode” to open the software. Or select 360 aspect ratio if you want to edit 360 videos.

Click the “Import Media” icon below the Files tab in the top-left corner of the window to import files or press “CTRL + Q” to import files.
Edit: Drag and drop files to add them to any desired layer in the timeline. Click the icon on the top left corner of the timeline to add layers. When you select a clip in the timeline, some tools appear on the top timeline. Select any specific tool to edit your selected clip. Or click the “Plugins” button on the top-left of the window to open a specific designer tab.
Double-click on the clip to open ‘PIP designer”. Here you will find all the editing tools to edit or animate your clip.

After selecting a clip, in the “Plugins” menu click the “Action Camera Center” button to open an edit tab, Here you can fix your GoPro videos.

Effects: On the top-left corner of the window in a vertical bar you will find all the effects material lile Project library, titles, effects, transitions, overlays, e.t.c. Simply just drag and drop them on the timeline to use them. Here you can also do audio mixing and add subtitles and chapters.
Double click a clip or an overlay element to open the designer window. Here you can customize the clips and overlays to enhance your project.
Export: Click the blue “Produce” button on top of the screen to export your edited file. Select the desired mode and file format and add an export destination, then click “Start” to start exporting.
Which One Should I Choose Free or Paid GoPro Video Editor?
You can choose free or paid softwares depending on your requirements and budget. If a free software meets your requirements then stay on it otherwise move towards a paid alternative. If you have a GoPro and you make videos just for fun then use a free and simple video editor. Even if you are an experienced video editor, I would recommend you to go for free video editors which I have mentioned above as they are quite powerful and professional software but if you are harvesting a good amount of money from this field then you can upgrade to pro versions of these free softwares or get a paid software from start. As almost all of these softwares are professional and can get your job done, so it’s better to choose one, which is comfortable for you to work on.
FAQs about GoPro Video Editing:
- Q) Does GoPro has its own video editor?
Yes, GoPro has its own video editor “Quik”. It is available on mobile phones and desktops both. It is simple and easy to use. It provides basic features to edit your video. But the main disadvantage of this desktop software is that it supports only GoPro videos, you can’t import files from other devices. Although this isn’t the issue with Quik mobile app, here you can import videos from other devices also.
- Q) Can I make videos for social media with a GoPro?
It was basically made for recording sports and action videos. But as the market is revolutionized and new models are released it has covered a wide range of the video industry like vlogging, travel and cooking videos e.t.c. As new models of GoPros are waterproof, you can get some amazing underwater shots for your Instagram.
- Q) What is GoPro media format?
GoPro export files in popular file format MP4. MP4 is the most common file format and is supported by almost all the video editors. While it is efficient and takes less storage but isn’t supported in many devices.
- Q) How do I transfer files from my GoPro to Mac?
You can transfer your GoPro files through 3 methods:
- Eject the SD card from your GoPro and connect it to your Mac using a SD card adapter to transfer files.
- Connect your GoPro to Mac through USB connector and use “iphoto” or any other photo importer to import files.
For macOS 10.14 or later
~ Features:
- It supports 4K files and a wide range of file formats.
- It has a simple UI that is suitable for beginners.
- It Supports 360 video files (in equirectangular format).
- Supports industry-standard plugins like Boris fx.
- Have features like standard motion tracking, masking, chroma key, e.t.c.
- The paid version has more features like Speed ramping, Auto-sync, keyframing, and animation.
- Have vast stock library.
~ Cons:
- The free version leaves a watermark on export.
- Have playback issues with 4k videos.
- Lacks some standard editing features.
~ Steps:
Import: Open “Filmora” then select the desired aspect ratio and click “New Project’ to start editing. Click on the “Import panel” to import media files.

Edit: Drag and drop the clips to add them to the timeline. Drop the clips above or below to add them in layers. Click the top-left icon of the timeline to add layers. Select a clip and you will see a bunch of tools appear on the top bar of the timeline, use them to perform basic editing tasks like split, crop, speed ramping, keyframing, e.t.c.
Double-click on a clip to open its properties. . Click the blue “Ok” button to move back to the previous window.
Select the “Video” icon to transform the clip or to do motion tracking, stabilization, chroma-key, Masking, e.t.c.
Select the “Audio” icon to apply effects and enhance your audio.
Select the “Color” icon to do color correction and grading.
Select the “3D LUT” option to import a new customized lut.
Select the “Animation” icon to add preset animations or make custom animations by using keyframes.
Select the “Speed” icon to adjust the speed of the clip or to do speed ramping.

Click the blue “OK” button below to go back to the previous window.
Effects: On the horizontal bar at the top-left corner of the screen, all the effects, transitions, title present, and stock library are located. Drag and drop to apply them.

Export: Click the blue “Export” button to open export window, choose the desired settings than click “Export”. and don’t forget to save the project if you want to edit it again.
Free GoPro Video Editors for Mac:
If you are tight on budget but still want a professional video editor to edit your GoPro videos then here I have mentioned some free but powerful video editors. Whether you are a beginner or a professional content creator, these free softwares can get your job done.
Blackmagic - Davinchi Resolve:
It is available for both Windows and Mac.
Whether you are a freelance video editor or an industry-level filmmaker, if you want to step up your game and stand out from your competition then you need a powerful video editor to help you out and Davinchi Resolve can be the right choice for you. From sports vlogging using action cams to Hollywood filmmaking using Red cinema cameras, Davinchi Resolve can handle and edit all this footage easily and smoothly. It is even used in the making of several Hollywood projects including Marvels’s feature films.
It is one of the best color grading software available in the market. It has advanced color grading tools that can help color grade your GoPro raw videos easily as raw videos look dull but provide greater flexibility. It is a timeline-based editor but its Fusion and Color grading panel provides a Node-based editing system which is hard to use but provides great flexibility once mastered.
Resolve has 6 different pages to deal with different editing parts:
“Edit” and “Cut” pages to deal with simple editing tasks. Its “Fusion” page allows users to do VFX and 3D compositing. The “Color Grading” page has all the professional grading tools. While the “Fairlight” page is designed to edit and enhance audio. And the “Deliver” page to export your files.
All these features are available for free without even giving a watermark. Although it has a studio version that provides some additional features to get more out of this amazing software.

- Davinchi Resolve Studio:
The free version has almost everything a professional video editor needs. but you can purchase the Studio version to get some really juicy features to enhance your video editing experience. It includes the Davinci neural engine, stereoscopic 3D tools, Dolby atmos audio mastering,e.t.c.
Pricing: Studio version is available at $ 295 for a lifetime license and with free updates.
~ Features:
- It supports a 4K resolution at 60fps. (while the Studio version supports up to 32K resolution at 120 fps.)
- It is a multi-feature software that provides editing, color grading, VFX, 3D compositing, and audio editing all in one place.
- It has the most advanced and powerful Node-based color grading system, which is also used by Hollywood film studios.
- Supports Raw and 360 videos from GoPro or other action cameras.
- Supports multi-cam editing up to 16 camera angles.
- Can make Compound clips and add adjustment layers.
- Fairlight panel has professional audio production tools like waveform editing, audio ducking, and Channel mapping. (Dolby Vision mastering and 3D spatial Panning [audio editing in 3D space] are available in the Studio version.)
- Supports third-party plugins.
- Has a 3D workspace and provides a virtual set extension for 3D modeling and compositing.
~ Cons:
- Its node-based editing style is quite difficult for beginners.
- Requires a high-end workstation to run smoothly otherwise will often crash during editing.
- Its node-based editing system is hard to learn.
~ Steps:
Import: Open “Davinci Resolve’. Select a previously saved project or press “New project” to start a new one. Click “File” >> “Import” >> “Media” to import files or press “CTRL + I”.
Edit: Drag and drop files to add them to the timeline Use the tools present above the timeline to trim, cut or move your clips. Click the “Inspector” icon on the top-right corner of the window to open the Inspector tab. Here you will find the properties of all the clips, audio, transitions, effects, e.t.c. There are different editing tabs at the bottom of the window.
In the “Fusion” window, click “Nodes” to open the Node screen. Import a clip or use it from the editor timeline. Usually, a clip will have two nodes connected through a line. Above the nodes panel, different types of nodes are available. Drag any node in the panel and connect it through lines. or add a “merge” node to connect nodes.
Its color grading panel also has Node based editing system.

Effects: Click “Effects Library” then select any effect and drop it in the timeline to apply it. You can change its properties in the “Inspector” panel.
Click the diamond icon on the right side of the property to start keyframing then change the value of that property to add keyframes at desired time period.

Export: Open the “Deliver” window, choose the desired settings then click “Add to Render Queue” to start exporting.

FXhome - Hitfilm Express:
It is available on Windows, Mac and Linux also.
If you are looking for a free but powerful video editor to edit your GoPro clips then Hitfilm Express can be the right choice for you. It is a free timeline-based editing software with professional-grade VFX tools. It is a timeline-based editor where you can add dozens of audio, videos, and text layers.
It has a composite shot sequence where you can do complex editing like editing 3D videos and elements, lights e.t.c. It has physic-base behaviors and effects also to enhance 3D compositing. For professional-level editing almost most of the effects and properties have keyframing options. It has different workspace modes to suit your editing needs.
It can also edit 360 videos recorded from your GoPro max. It has a “GoPro Lens Reframe” effect to adjust your 360 clips, but some 360 toolkits can only be available when you purchase Hitfilm pro or buy a 360 toolkit add-on. Similarly, you can purchase more add-ons according to your editing needs or you can purchase Hitfilm Pro to gain access to all add-ons and features. But can use these pro features for free but without exporting as exporting with a paid effect can give a watermark.
Hitfilm Pro:
Although Hitfilm express doesn’t give a watermark on export, but to use more features like 3D composition, LUTs, e.t.c you need to purchase add-ons, there are over 30+ add-ons available to purchase which you can purchase depending on your needs, but if you want to get all the features than its better to get your hands on Hitfilm Pro.
Pricing: Available for purchase at £ 309 or $ 388 for a lifetime license. With 12 months of free updates. It has 3 seat license which means It can run on 3 PCs simultaneously.
~ Features:
- It is a free editing software with no watermark.
- It can edit 3D videos and it can also import and edit 3D models and tracking data.
- It can edit 360 videos also.
- You can add effects and color grades as layers in the timeline also.
- Can add adjustment layers and create nested clips within nested clips to make complex editing easier.
- It has a motion track and locked-on stabilization features.
- Can do smooth keyframing and animation with the help of value graphs.
- It supports multi-cam editing also.
- Keyboard shortcuts make workflow quite easy and quick.
~ Cons:
- It has some playback issues while using 4K videos.
- It crashes sometimes, so it’s better to save the project frequently during editing.
- Hitfilm express doesn’t have a dark mode.
- Some common features are only available on the Pro version or add-ons.
~ Steps:
Import: Open “Hitfilm”, Select “New Project” to open a blank project then click “open” to open an existing file or click “new” to create a new project. Then set project settings on pop-up then and click “ok”.
Then click the “Media” tab on the top-left corner of the screen. Then select the “Import” button to import videos, images, audio, or 3d models. You can also import previously made composite shots.
Edit: Drag and drop media files from the media tab to the timeline. or click the “New” tab to create a “Composite shot” or a solid plane layer. Right-click on the left side of the timeline to insert or delete layers. On the left side of the timeline, you will find some basic tools located on the vertical bar to do simple tasks.
In the “Viewer” tab, on the left side of the playback screen, you can find tools for masking and adding text.
In the “Controls” tab, you can adjust the properties of clips and other features related to the clip like masking, track, blend, transform, e.t.c.
Create a “Composite shot” to do complex editing like 3D compositing. Or select multiple layers then right-click and select “make Composite shot” to combine them for easy editing. Double-click the composite shot to open its contents.

Effects: From the “Effects” tab drag and drop effects on the clip to add them. Some effects can be added as layers which can affect all the layers beneath it. Properties of these effects can be adjusted in the “Control” tab.
To do keyframing, Click the circle icon on the left side of the property to start keyframing then change the values of that property to add keyframes at desired time period.
Export: Click the “Export” icon then “Export now” located at the top right side of the timeline to open the export window. The export will start automatically.
Shotcut:
It is available on Windows, Mac and Linux.
If you are making videos from your GoPro or mobile phone just for fun that doesn’t require much editing then you can look for a free and simple video editor and “Shotcut” can be the right choice for this purpose.
It is a free and open-source video editor with many cool features to get your hands on. It doesn’t have any pro version. It is simple and easy to use but takes some time to understand. It supports multi-track timeline editing. It has a basic timeline design but you can customize your timeline to meet your editing needs. It has some good color grading options, you can also import your color luts. It has many cool features and effects. It supports 360 video editing and also has a few 360 video filters. It has audio effects also.
~ Features:
- All its features are for free and it doesn’t leave any watermark.
- It supports 4K resolution and a wide range of file formats.
- It also supports 360 video files.
- Has keyframing and chroma kry features.
- It has advanced color grading features.
- It provides standard animation and keyframing features.
~ Cons:
- It is a basic video editor and lacks some professional editing features.
- Have playback issues with 4K videos.
- It does have proper text editing tools.
- It is difficult to understand as its UI is different from other familiar video editors.
~ Steps:
Import: Open “Shot Cut” then click the “Open Files” button on the top-left corner of the window to import files.
Edit: Drag and drop clips on an empty timeline panel to add tracks and drag the clip from corners to trim them. Right-click on the left side of the timeline to add a video or an audio track. You will find a bunch of tools above the timeline to do some basic tasks.
You can choose from 6 different workspace designs (available in the top-right corner of the window) to suit your editing styles.

On top of the window, you will see a bunch of icons like Timeline, filter, project, and properties. e.t.c. In the properties tab, you can change the aspect ratio and speed of the clip.
Effects: Click the “Filters” icon on top of the window to open the filters menu, Click “+” above it to add filters. Double click a filter to add it to the selected clip, then click the filter to open its properties menu. You can also add text from here.
Click the “Keyframes” icon on top of the window to open the Keyframes window. Select the “clock” icon on the filters to start keyframing then change the values at a specific time to add keyframes. Click the “Timeline” icon to go back to the previous window.

Export: Click the “Export” button on the top of the screen. Select a preset or click the “Advanced” button to change export settings then click “Export File”.

Paid GoPro Video Editor for Mac:
If you are a professional athlete or a vlogger using GoPro for all of your contents and want to invest some money on paid video editors to improve your content. Then here we have mentioned some paid video editors worthy of your investment.
Apple - Final Cut Pro:
It is available for Mac only.
If you are an Apple enthusiastic person and want everything Apple, then why look for any other video editor when you can have a powerful video editor “Final cut pro” made by Apple. It is a paid but professional software that can raise your GoPro videos to the next level. Whether it’s a 360 video or a RAW file recorded from your GoPro or from the RED cinema camera, all can be edited smoothly inside Final Cut Pro. It has dozens of useful features that a professional video editor looks for like 3D tracking, Motion Graphics, Color Grading, Audio Mixing, Multi-cam editing e.t.c.
Pricing: It is a one-time purchase software available at $ 299.9 for a lifetime license and all its future updates can be downloaded free of cost.
~ Features:
- It supports up to 8K resolution.
- Support 360 and RAW video files.
- Edit videos in complete 360 and 3D spaces.
- Supports third-party video and audio plugins.
- Supports Multi-cam editing.
- Have professional color grading tools with HDR support.
- Its UI is easy to use.
~ Cons:
- It is designed for Apple devices only.
- Requires a powerful PC.
- Its UI is a bit different from other common video editors in the market.
- ~ Steps:
Import: Open “Final Cut Pro” then click the “Files” button on the top-left corner of the screen, then select “Project” to create a new project. In the “Files” menu, click “import” then “media” to import your media files. Here most of the work is done with Keyboard commands.
Edit: Drag and Drop clips on the timeline. In the viewer panel, press “I” and “O” to add input and output points then drag the clip to add only a specific part of the clip. Press “Cmd + B” to split the clip at the desired location. Or add the clips above to add the layer.
Click the “Text” icon on the top-left corner of the screen to open the text page. Choose from presets or import your own Text presets and drag them to the timeline. Click the text to open “Text Editor” on the left side of the screen.
Select multiple clips then Right-click and select “New Compound Clip” to combine them. Double-click the compound clip to edit its components.
Effects: Click 2 icons on the top-right side of the timeline to open the effects and transition panel. Drag and drop on the clip to use them. You can change their properties in the “Effects editor” tab located in the same place as “Text Editor”.
In the editor tab, click the diamond icon beside any property to start keyframing, then change its property to add keyframes at the desired time.
Press “Cmd + 6” to open the Color Grading tab, here you can color grade your clips.
Export: To export the edited video. Click “File” >> “Share” >> “Master file” to open export window. Choose the desired settings then click “Next” then “Save” to export the video.
Adobe - Premiere Pro:
It is available for both Windows and Mac.
Whether you are a content creator or not, if you use a DSLR or an action camera for the first time, then maybe the output wouldn’t meet your expectations. In order to make it good, you need a video editor. And if you will ask your gathering about a good video editor, most of them will recommend you Adobe Premiere Pro, because it is such a versatile and well-known software available in the market. It is a subscription-based video editor.
It is an industry-level software with many professional and advanced features. From beginner video editing to film compositing, all can be done in this software. Whether you have a 360 video or a 4K video in Raw format recorded from your GoPro, just import it into premiere pro and start editing. It has a downloadable “GoPro FX Reframe” plugin to edit your 360 videos. It has different panels designed to deal with specific parts of post-production such as the Effects panel, Graphics panel, Sound panel, Colour Grading panel, e.t.c.
~ Features:
- It supports up to 8K resolution.
- Have different panels to enhance different segments of post-production.
- Have an essential Effects panel to create motion effects and animations using keyframes.
- Supports hundreds of third-party extensions.
- Have useful features like warp stabilizer and denoiser.
- You can import or create your color LUTs.
- Have a creative cloud with 100 Gb of storage.
- The bundle also includes a mobile video editor and a stock library.
~ Cons:
- Real-time rendering. It will take some time to render before exporting if you work on a mid-range PC.
- Freezes or crashes sometimes.
- Cache data fill-up quickly and eats a lot of storage. (It’s better to clear it after every project)
Pricing: It is cloud-based software, therefore it can’t be purchased one time. It has a monthly subscription starting at $ 20.99/month. It includes “premiere rush” mobile video editor and 100 GB of cloud storage within the plan. It also has a “Creative cloud All apps” plan that includes all 30+ Softwares + 100Gb cloud storage along with premiere pro for $ 54.99 only. All plans also include Behance (adobe creative community), Adobe Fonts, and Adobe stock assets for free. Adobe also provides educational access at a much discounted price.
~ Steps:
Import: Open “Premiere Pro”. Click “New Project” to start with then Click the “Files” button on the top-left corner of the window then select the “Import files” button to import files. Or press “CTRL + I” to import files or drag your files from their location to premiere pro.

Edit: Drag and Drop the files to add them to the timeline. Drop a file above a clip to add as a layer. or drop over a clip to overwrite it. On the right side of the timeline, you can find a bunch of tools to do basic edits like trimming, splitting, speed ramping, masking, or adding text.
In the “Effects Control” tab you can transform the selected clip or change its properties.
Select multiple clips then right-click and select “make Nested clip” to combine them into a single clip for easy editing.

Slide between 8 different workspace styles designed for specific post-production tasks by clicking the buttons available on the top of the window.
Effects: Go to the “Effects” panel on the bottom-left window to apply an effect or transitions. Here you can find all audio, video, 2D, and 3D effects. Drag and Drop on a clip to apply it. Change the properties of these effects in the “Effects Control” panel.
To color grade, your clips move to the “Color” workspace. Here you will find all the color grading features: correction, curves, color wheels, creative tab, e.t.c. To import a LUT click the “creative tab” then click “Browse” to import a LUT.
Export: To Export go to the “Files” tab on top of the screen then select the “Export” button to open the export tab. Select the desired settings then click “Export”.
Power Director 365 :
It is available for both Windows and Mac.
If you are looking for a budget-friendly video editor that is powerful enough to edit your GoPro videos like a content creator then Power director can be the right choice for you. It has many unique and useful features. It has different plugins and design centers to do specific post-production tasks like Ad designer, Multicam editor, AI style plugins, e.t.c.
It also has a separate action cam center to fix or enhance action cam videos. IT also has chapter and subtitle rooms to add subtitles and chapters for your Youtube videos or films. It also has a vast stock and preset library to speed up your project.
Pricing: It has a subscription plan which is available at $69/year. It is now available at 30% off till 22nd May,2022.
~ Features:
- It supports 4K videos and a wide range of import formats.
- Have many built-in plugins and design centers.
- Supports Multi-cam editing.
- Have an action cam center to deal with action cam footage.
- Have separate aspect ratio mode for 360 videos.
- Also, have a chapter and subtitle room. many recording aspects of the video.
- Have a content-aware editing feature that detects the recording aspects.
- Can import presets and color LUTs.
- Have a vast stock library.
~ Cons:
- Have some playback issues with 4K videos. (create shadow files to overcome this issue to an extent).
- Its UI is a little bit complicated for beginners.
- Not ideal for fast pace editing.
~ Steps:
Import: Open Power director and a pop-up will appear, select desired aspect ratio then click “Full mode” to open the software. Or select 360 aspect ratio if you want to edit 360 videos.

Click the “Import Media” icon below the Files tab in the top-left corner of the window to import files or press “CTRL + Q” to import files.
Edit: Drag and drop files to add them to any desired layer in the timeline. Click the icon on the top left corner of the timeline to add layers. When you select a clip in the timeline, some tools appear on the top timeline. Select any specific tool to edit your selected clip. Or click the “Plugins” button on the top-left of the window to open a specific designer tab.
Double-click on the clip to open ‘PIP designer”. Here you will find all the editing tools to edit or animate your clip.

After selecting a clip, in the “Plugins” menu click the “Action Camera Center” button to open an edit tab, Here you can fix your GoPro videos.

Effects: On the top-left corner of the window in a vertical bar you will find all the effects material lile Project library, titles, effects, transitions, overlays, e.t.c. Simply just drag and drop them on the timeline to use them. Here you can also do audio mixing and add subtitles and chapters.
Double click a clip or an overlay element to open the designer window. Here you can customize the clips and overlays to enhance your project.
Export: Click the blue “Produce” button on top of the screen to export your edited file. Select the desired mode and file format and add an export destination, then click “Start” to start exporting.
Which One Should I Choose Free or Paid GoPro Video Editor?
You can choose free or paid softwares depending on your requirements and budget. If a free software meets your requirements then stay on it otherwise move towards a paid alternative. If you have a GoPro and you make videos just for fun then use a free and simple video editor. Even if you are an experienced video editor, I would recommend you to go for free video editors which I have mentioned above as they are quite powerful and professional software but if you are harvesting a good amount of money from this field then you can upgrade to pro versions of these free softwares or get a paid software from start. As almost all of these softwares are professional and can get your job done, so it’s better to choose one, which is comfortable for you to work on.
FAQs about GoPro Video Editing:
- Q) Does GoPro has its own video editor?
Yes, GoPro has its own video editor “Quik”. It is available on mobile phones and desktops both. It is simple and easy to use. It provides basic features to edit your video. But the main disadvantage of this desktop software is that it supports only GoPro videos, you can’t import files from other devices. Although this isn’t the issue with Quik mobile app, here you can import videos from other devices also.
- Q) Can I make videos for social media with a GoPro?
It was basically made for recording sports and action videos. But as the market is revolutionized and new models are released it has covered a wide range of the video industry like vlogging, travel and cooking videos e.t.c. As new models of GoPros are waterproof, you can get some amazing underwater shots for your Instagram.
- Q) What is GoPro media format?
GoPro export files in popular file format MP4. MP4 is the most common file format and is supported by almost all the video editors. While it is efficient and takes less storage but isn’t supported in many devices.
- Q) How do I transfer files from my GoPro to Mac?
You can transfer your GoPro files through 3 methods:
- Eject the SD card from your GoPro and connect it to your Mac using a SD card adapter to transfer files.
- Connect your GoPro to Mac through USB connector and use “iphoto” or any other photo importer to import files.
For macOS 10.14 or later
~ Features:
- It supports 4K files and a wide range of file formats.
- It has a simple UI that is suitable for beginners.
- It Supports 360 video files (in equirectangular format).
- Supports industry-standard plugins like Boris fx.
- Have features like standard motion tracking, masking, chroma key, e.t.c.
- The paid version has more features like Speed ramping, Auto-sync, keyframing, and animation.
- Have vast stock library.
~ Cons:
- The free version leaves a watermark on export.
- Have playback issues with 4k videos.
- Lacks some standard editing features.
~ Steps:
Import: Open “Filmora” then select the desired aspect ratio and click “New Project’ to start editing. Click on the “Import panel” to import media files.

Edit: Drag and drop the clips to add them to the timeline. Drop the clips above or below to add them in layers. Click the top-left icon of the timeline to add layers. Select a clip and you will see a bunch of tools appear on the top bar of the timeline, use them to perform basic editing tasks like split, crop, speed ramping, keyframing, e.t.c.
Double-click on a clip to open its properties. . Click the blue “Ok” button to move back to the previous window.
Select the “Video” icon to transform the clip or to do motion tracking, stabilization, chroma-key, Masking, e.t.c.
Select the “Audio” icon to apply effects and enhance your audio.
Select the “Color” icon to do color correction and grading.
Select the “3D LUT” option to import a new customized lut.
Select the “Animation” icon to add preset animations or make custom animations by using keyframes.
Select the “Speed” icon to adjust the speed of the clip or to do speed ramping.

Click the blue “OK” button below to go back to the previous window.
Effects: On the horizontal bar at the top-left corner of the screen, all the effects, transitions, title present, and stock library are located. Drag and drop to apply them.

Export: Click the blue “Export” button to open export window, choose the desired settings than click “Export”. and don’t forget to save the project if you want to edit it again.
Free GoPro Video Editors for Mac:
If you are tight on budget but still want a professional video editor to edit your GoPro videos then here I have mentioned some free but powerful video editors. Whether you are a beginner or a professional content creator, these free softwares can get your job done.
Blackmagic - Davinchi Resolve:
It is available for both Windows and Mac.
Whether you are a freelance video editor or an industry-level filmmaker, if you want to step up your game and stand out from your competition then you need a powerful video editor to help you out and Davinchi Resolve can be the right choice for you. From sports vlogging using action cams to Hollywood filmmaking using Red cinema cameras, Davinchi Resolve can handle and edit all this footage easily and smoothly. It is even used in the making of several Hollywood projects including Marvels’s feature films.
It is one of the best color grading software available in the market. It has advanced color grading tools that can help color grade your GoPro raw videos easily as raw videos look dull but provide greater flexibility. It is a timeline-based editor but its Fusion and Color grading panel provides a Node-based editing system which is hard to use but provides great flexibility once mastered.
Resolve has 6 different pages to deal with different editing parts:
“Edit” and “Cut” pages to deal with simple editing tasks. Its “Fusion” page allows users to do VFX and 3D compositing. The “Color Grading” page has all the professional grading tools. While the “Fairlight” page is designed to edit and enhance audio. And the “Deliver” page to export your files.
All these features are available for free without even giving a watermark. Although it has a studio version that provides some additional features to get more out of this amazing software.

- Davinchi Resolve Studio:
The free version has almost everything a professional video editor needs. but you can purchase the Studio version to get some really juicy features to enhance your video editing experience. It includes the Davinci neural engine, stereoscopic 3D tools, Dolby atmos audio mastering,e.t.c.
Pricing: Studio version is available at $ 295 for a lifetime license and with free updates.
~ Features:
- It supports a 4K resolution at 60fps. (while the Studio version supports up to 32K resolution at 120 fps.)
- It is a multi-feature software that provides editing, color grading, VFX, 3D compositing, and audio editing all in one place.
- It has the most advanced and powerful Node-based color grading system, which is also used by Hollywood film studios.
- Supports Raw and 360 videos from GoPro or other action cameras.
- Supports multi-cam editing up to 16 camera angles.
- Can make Compound clips and add adjustment layers.
- Fairlight panel has professional audio production tools like waveform editing, audio ducking, and Channel mapping. (Dolby Vision mastering and 3D spatial Panning [audio editing in 3D space] are available in the Studio version.)
- Supports third-party plugins.
- Has a 3D workspace and provides a virtual set extension for 3D modeling and compositing.
~ Cons:
- Its node-based editing style is quite difficult for beginners.
- Requires a high-end workstation to run smoothly otherwise will often crash during editing.
- Its node-based editing system is hard to learn.
~ Steps:
Import: Open “Davinci Resolve’. Select a previously saved project or press “New project” to start a new one. Click “File” >> “Import” >> “Media” to import files or press “CTRL + I”.
Edit: Drag and drop files to add them to the timeline Use the tools present above the timeline to trim, cut or move your clips. Click the “Inspector” icon on the top-right corner of the window to open the Inspector tab. Here you will find the properties of all the clips, audio, transitions, effects, e.t.c. There are different editing tabs at the bottom of the window.
In the “Fusion” window, click “Nodes” to open the Node screen. Import a clip or use it from the editor timeline. Usually, a clip will have two nodes connected through a line. Above the nodes panel, different types of nodes are available. Drag any node in the panel and connect it through lines. or add a “merge” node to connect nodes.
Its color grading panel also has Node based editing system.

Effects: Click “Effects Library” then select any effect and drop it in the timeline to apply it. You can change its properties in the “Inspector” panel.
Click the diamond icon on the right side of the property to start keyframing then change the value of that property to add keyframes at desired time period.

Export: Open the “Deliver” window, choose the desired settings then click “Add to Render Queue” to start exporting.

FXhome - Hitfilm Express:
It is available on Windows, Mac and Linux also.
If you are looking for a free but powerful video editor to edit your GoPro clips then Hitfilm Express can be the right choice for you. It is a free timeline-based editing software with professional-grade VFX tools. It is a timeline-based editor where you can add dozens of audio, videos, and text layers.
It has a composite shot sequence where you can do complex editing like editing 3D videos and elements, lights e.t.c. It has physic-base behaviors and effects also to enhance 3D compositing. For professional-level editing almost most of the effects and properties have keyframing options. It has different workspace modes to suit your editing needs.
It can also edit 360 videos recorded from your GoPro max. It has a “GoPro Lens Reframe” effect to adjust your 360 clips, but some 360 toolkits can only be available when you purchase Hitfilm pro or buy a 360 toolkit add-on. Similarly, you can purchase more add-ons according to your editing needs or you can purchase Hitfilm Pro to gain access to all add-ons and features. But can use these pro features for free but without exporting as exporting with a paid effect can give a watermark.
Hitfilm Pro:
Although Hitfilm express doesn’t give a watermark on export, but to use more features like 3D composition, LUTs, e.t.c you need to purchase add-ons, there are over 30+ add-ons available to purchase which you can purchase depending on your needs, but if you want to get all the features than its better to get your hands on Hitfilm Pro.
Pricing: Available for purchase at £ 309 or $ 388 for a lifetime license. With 12 months of free updates. It has 3 seat license which means It can run on 3 PCs simultaneously.
~ Features:
- It is a free editing software with no watermark.
- It can edit 3D videos and it can also import and edit 3D models and tracking data.
- It can edit 360 videos also.
- You can add effects and color grades as layers in the timeline also.
- Can add adjustment layers and create nested clips within nested clips to make complex editing easier.
- It has a motion track and locked-on stabilization features.
- Can do smooth keyframing and animation with the help of value graphs.
- It supports multi-cam editing also.
- Keyboard shortcuts make workflow quite easy and quick.
~ Cons:
- It has some playback issues while using 4K videos.
- It crashes sometimes, so it’s better to save the project frequently during editing.
- Hitfilm express doesn’t have a dark mode.
- Some common features are only available on the Pro version or add-ons.
~ Steps:
Import: Open “Hitfilm”, Select “New Project” to open a blank project then click “open” to open an existing file or click “new” to create a new project. Then set project settings on pop-up then and click “ok”.
Then click the “Media” tab on the top-left corner of the screen. Then select the “Import” button to import videos, images, audio, or 3d models. You can also import previously made composite shots.
Edit: Drag and drop media files from the media tab to the timeline. or click the “New” tab to create a “Composite shot” or a solid plane layer. Right-click on the left side of the timeline to insert or delete layers. On the left side of the timeline, you will find some basic tools located on the vertical bar to do simple tasks.
In the “Viewer” tab, on the left side of the playback screen, you can find tools for masking and adding text.
In the “Controls” tab, you can adjust the properties of clips and other features related to the clip like masking, track, blend, transform, e.t.c.
Create a “Composite shot” to do complex editing like 3D compositing. Or select multiple layers then right-click and select “make Composite shot” to combine them for easy editing. Double-click the composite shot to open its contents.

Effects: From the “Effects” tab drag and drop effects on the clip to add them. Some effects can be added as layers which can affect all the layers beneath it. Properties of these effects can be adjusted in the “Control” tab.
To do keyframing, Click the circle icon on the left side of the property to start keyframing then change the values of that property to add keyframes at desired time period.
Export: Click the “Export” icon then “Export now” located at the top right side of the timeline to open the export window. The export will start automatically.
Shotcut:
It is available on Windows, Mac and Linux.
If you are making videos from your GoPro or mobile phone just for fun that doesn’t require much editing then you can look for a free and simple video editor and “Shotcut” can be the right choice for this purpose.
It is a free and open-source video editor with many cool features to get your hands on. It doesn’t have any pro version. It is simple and easy to use but takes some time to understand. It supports multi-track timeline editing. It has a basic timeline design but you can customize your timeline to meet your editing needs. It has some good color grading options, you can also import your color luts. It has many cool features and effects. It supports 360 video editing and also has a few 360 video filters. It has audio effects also.
~ Features:
- All its features are for free and it doesn’t leave any watermark.
- It supports 4K resolution and a wide range of file formats.
- It also supports 360 video files.
- Has keyframing and chroma kry features.
- It has advanced color grading features.
- It provides standard animation and keyframing features.
~ Cons:
- It is a basic video editor and lacks some professional editing features.
- Have playback issues with 4K videos.
- It does have proper text editing tools.
- It is difficult to understand as its UI is different from other familiar video editors.
~ Steps:
Import: Open “Shot Cut” then click the “Open Files” button on the top-left corner of the window to import files.
Edit: Drag and drop clips on an empty timeline panel to add tracks and drag the clip from corners to trim them. Right-click on the left side of the timeline to add a video or an audio track. You will find a bunch of tools above the timeline to do some basic tasks.
You can choose from 6 different workspace designs (available in the top-right corner of the window) to suit your editing styles.

On top of the window, you will see a bunch of icons like Timeline, filter, project, and properties. e.t.c. In the properties tab, you can change the aspect ratio and speed of the clip.
Effects: Click the “Filters” icon on top of the window to open the filters menu, Click “+” above it to add filters. Double click a filter to add it to the selected clip, then click the filter to open its properties menu. You can also add text from here.
Click the “Keyframes” icon on top of the window to open the Keyframes window. Select the “clock” icon on the filters to start keyframing then change the values at a specific time to add keyframes. Click the “Timeline” icon to go back to the previous window.

Export: Click the “Export” button on the top of the screen. Select a preset or click the “Advanced” button to change export settings then click “Export File”.

Paid GoPro Video Editor for Mac:
If you are a professional athlete or a vlogger using GoPro for all of your contents and want to invest some money on paid video editors to improve your content. Then here we have mentioned some paid video editors worthy of your investment.
Apple - Final Cut Pro:
It is available for Mac only.
If you are an Apple enthusiastic person and want everything Apple, then why look for any other video editor when you can have a powerful video editor “Final cut pro” made by Apple. It is a paid but professional software that can raise your GoPro videos to the next level. Whether it’s a 360 video or a RAW file recorded from your GoPro or from the RED cinema camera, all can be edited smoothly inside Final Cut Pro. It has dozens of useful features that a professional video editor looks for like 3D tracking, Motion Graphics, Color Grading, Audio Mixing, Multi-cam editing e.t.c.
Pricing: It is a one-time purchase software available at $ 299.9 for a lifetime license and all its future updates can be downloaded free of cost.
~ Features:
- It supports up to 8K resolution.
- Support 360 and RAW video files.
- Edit videos in complete 360 and 3D spaces.
- Supports third-party video and audio plugins.
- Supports Multi-cam editing.
- Have professional color grading tools with HDR support.
- Its UI is easy to use.
~ Cons:
- It is designed for Apple devices only.
- Requires a powerful PC.
- Its UI is a bit different from other common video editors in the market.
- ~ Steps:
Import: Open “Final Cut Pro” then click the “Files” button on the top-left corner of the screen, then select “Project” to create a new project. In the “Files” menu, click “import” then “media” to import your media files. Here most of the work is done with Keyboard commands.
Edit: Drag and Drop clips on the timeline. In the viewer panel, press “I” and “O” to add input and output points then drag the clip to add only a specific part of the clip. Press “Cmd + B” to split the clip at the desired location. Or add the clips above to add the layer.
Click the “Text” icon on the top-left corner of the screen to open the text page. Choose from presets or import your own Text presets and drag them to the timeline. Click the text to open “Text Editor” on the left side of the screen.
Select multiple clips then Right-click and select “New Compound Clip” to combine them. Double-click the compound clip to edit its components.
Effects: Click 2 icons on the top-right side of the timeline to open the effects and transition panel. Drag and drop on the clip to use them. You can change their properties in the “Effects editor” tab located in the same place as “Text Editor”.
In the editor tab, click the diamond icon beside any property to start keyframing, then change its property to add keyframes at the desired time.
Press “Cmd + 6” to open the Color Grading tab, here you can color grade your clips.
Export: To export the edited video. Click “File” >> “Share” >> “Master file” to open export window. Choose the desired settings then click “Next” then “Save” to export the video.
Adobe - Premiere Pro:
It is available for both Windows and Mac.
Whether you are a content creator or not, if you use a DSLR or an action camera for the first time, then maybe the output wouldn’t meet your expectations. In order to make it good, you need a video editor. And if you will ask your gathering about a good video editor, most of them will recommend you Adobe Premiere Pro, because it is such a versatile and well-known software available in the market. It is a subscription-based video editor.
It is an industry-level software with many professional and advanced features. From beginner video editing to film compositing, all can be done in this software. Whether you have a 360 video or a 4K video in Raw format recorded from your GoPro, just import it into premiere pro and start editing. It has a downloadable “GoPro FX Reframe” plugin to edit your 360 videos. It has different panels designed to deal with specific parts of post-production such as the Effects panel, Graphics panel, Sound panel, Colour Grading panel, e.t.c.
~ Features:
- It supports up to 8K resolution.
- Have different panels to enhance different segments of post-production.
- Have an essential Effects panel to create motion effects and animations using keyframes.
- Supports hundreds of third-party extensions.
- Have useful features like warp stabilizer and denoiser.
- You can import or create your color LUTs.
- Have a creative cloud with 100 Gb of storage.
- The bundle also includes a mobile video editor and a stock library.
~ Cons:
- Real-time rendering. It will take some time to render before exporting if you work on a mid-range PC.
- Freezes or crashes sometimes.
- Cache data fill-up quickly and eats a lot of storage. (It’s better to clear it after every project)
Pricing: It is cloud-based software, therefore it can’t be purchased one time. It has a monthly subscription starting at $ 20.99/month. It includes “premiere rush” mobile video editor and 100 GB of cloud storage within the plan. It also has a “Creative cloud All apps” plan that includes all 30+ Softwares + 100Gb cloud storage along with premiere pro for $ 54.99 only. All plans also include Behance (adobe creative community), Adobe Fonts, and Adobe stock assets for free. Adobe also provides educational access at a much discounted price.
~ Steps:
Import: Open “Premiere Pro”. Click “New Project” to start with then Click the “Files” button on the top-left corner of the window then select the “Import files” button to import files. Or press “CTRL + I” to import files or drag your files from their location to premiere pro.

Edit: Drag and Drop the files to add them to the timeline. Drop a file above a clip to add as a layer. or drop over a clip to overwrite it. On the right side of the timeline, you can find a bunch of tools to do basic edits like trimming, splitting, speed ramping, masking, or adding text.
In the “Effects Control” tab you can transform the selected clip or change its properties.
Select multiple clips then right-click and select “make Nested clip” to combine them into a single clip for easy editing.

Slide between 8 different workspace styles designed for specific post-production tasks by clicking the buttons available on the top of the window.
Effects: Go to the “Effects” panel on the bottom-left window to apply an effect or transitions. Here you can find all audio, video, 2D, and 3D effects. Drag and Drop on a clip to apply it. Change the properties of these effects in the “Effects Control” panel.
To color grade, your clips move to the “Color” workspace. Here you will find all the color grading features: correction, curves, color wheels, creative tab, e.t.c. To import a LUT click the “creative tab” then click “Browse” to import a LUT.
Export: To Export go to the “Files” tab on top of the screen then select the “Export” button to open the export tab. Select the desired settings then click “Export”.
Power Director 365 :
It is available for both Windows and Mac.
If you are looking for a budget-friendly video editor that is powerful enough to edit your GoPro videos like a content creator then Power director can be the right choice for you. It has many unique and useful features. It has different plugins and design centers to do specific post-production tasks like Ad designer, Multicam editor, AI style plugins, e.t.c.
It also has a separate action cam center to fix or enhance action cam videos. IT also has chapter and subtitle rooms to add subtitles and chapters for your Youtube videos or films. It also has a vast stock and preset library to speed up your project.
Pricing: It has a subscription plan which is available at $69/year. It is now available at 30% off till 22nd May,2022.
~ Features:
- It supports 4K videos and a wide range of import formats.
- Have many built-in plugins and design centers.
- Supports Multi-cam editing.
- Have an action cam center to deal with action cam footage.
- Have separate aspect ratio mode for 360 videos.
- Also, have a chapter and subtitle room. many recording aspects of the video.
- Have a content-aware editing feature that detects the recording aspects.
- Can import presets and color LUTs.
- Have a vast stock library.
~ Cons:
- Have some playback issues with 4K videos. (create shadow files to overcome this issue to an extent).
- Its UI is a little bit complicated for beginners.
- Not ideal for fast pace editing.
~ Steps:
Import: Open Power director and a pop-up will appear, select desired aspect ratio then click “Full mode” to open the software. Or select 360 aspect ratio if you want to edit 360 videos.

Click the “Import Media” icon below the Files tab in the top-left corner of the window to import files or press “CTRL + Q” to import files.
Edit: Drag and drop files to add them to any desired layer in the timeline. Click the icon on the top left corner of the timeline to add layers. When you select a clip in the timeline, some tools appear on the top timeline. Select any specific tool to edit your selected clip. Or click the “Plugins” button on the top-left of the window to open a specific designer tab.
Double-click on the clip to open ‘PIP designer”. Here you will find all the editing tools to edit or animate your clip.

After selecting a clip, in the “Plugins” menu click the “Action Camera Center” button to open an edit tab, Here you can fix your GoPro videos.

Effects: On the top-left corner of the window in a vertical bar you will find all the effects material lile Project library, titles, effects, transitions, overlays, e.t.c. Simply just drag and drop them on the timeline to use them. Here you can also do audio mixing and add subtitles and chapters.
Double click a clip or an overlay element to open the designer window. Here you can customize the clips and overlays to enhance your project.
Export: Click the blue “Produce” button on top of the screen to export your edited file. Select the desired mode and file format and add an export destination, then click “Start” to start exporting.
Which One Should I Choose Free or Paid GoPro Video Editor?
You can choose free or paid softwares depending on your requirements and budget. If a free software meets your requirements then stay on it otherwise move towards a paid alternative. If you have a GoPro and you make videos just for fun then use a free and simple video editor. Even if you are an experienced video editor, I would recommend you to go for free video editors which I have mentioned above as they are quite powerful and professional software but if you are harvesting a good amount of money from this field then you can upgrade to pro versions of these free softwares or get a paid software from start. As almost all of these softwares are professional and can get your job done, so it’s better to choose one, which is comfortable for you to work on.
FAQs about GoPro Video Editing:
- Q) Does GoPro has its own video editor?
Yes, GoPro has its own video editor “Quik”. It is available on mobile phones and desktops both. It is simple and easy to use. It provides basic features to edit your video. But the main disadvantage of this desktop software is that it supports only GoPro videos, you can’t import files from other devices. Although this isn’t the issue with Quik mobile app, here you can import videos from other devices also.
- Q) Can I make videos for social media with a GoPro?
It was basically made for recording sports and action videos. But as the market is revolutionized and new models are released it has covered a wide range of the video industry like vlogging, travel and cooking videos e.t.c. As new models of GoPros are waterproof, you can get some amazing underwater shots for your Instagram.
- Q) What is GoPro media format?
GoPro export files in popular file format MP4. MP4 is the most common file format and is supported by almost all the video editors. While it is efficient and takes less storage but isn’t supported in many devices.
- Q) How do I transfer files from my GoPro to Mac?
You can transfer your GoPro files through 3 methods:
- Eject the SD card from your GoPro and connect it to your Mac using a SD card adapter to transfer files.
- Connect your GoPro to Mac through USB connector and use “iphoto” or any other photo importer to import files.
For macOS 10.14 or later
~ Features:
- It supports 4K files and a wide range of file formats.
- It has a simple UI that is suitable for beginners.
- It Supports 360 video files (in equirectangular format).
- Supports industry-standard plugins like Boris fx.
- Have features like standard motion tracking, masking, chroma key, e.t.c.
- The paid version has more features like Speed ramping, Auto-sync, keyframing, and animation.
- Have vast stock library.
~ Cons:
- The free version leaves a watermark on export.
- Have playback issues with 4k videos.
- Lacks some standard editing features.
~ Steps:
Import: Open “Filmora” then select the desired aspect ratio and click “New Project’ to start editing. Click on the “Import panel” to import media files.

Edit: Drag and drop the clips to add them to the timeline. Drop the clips above or below to add them in layers. Click the top-left icon of the timeline to add layers. Select a clip and you will see a bunch of tools appear on the top bar of the timeline, use them to perform basic editing tasks like split, crop, speed ramping, keyframing, e.t.c.
Double-click on a clip to open its properties. . Click the blue “Ok” button to move back to the previous window.
Select the “Video” icon to transform the clip or to do motion tracking, stabilization, chroma-key, Masking, e.t.c.
Select the “Audio” icon to apply effects and enhance your audio.
Select the “Color” icon to do color correction and grading.
Select the “3D LUT” option to import a new customized lut.
Select the “Animation” icon to add preset animations or make custom animations by using keyframes.
Select the “Speed” icon to adjust the speed of the clip or to do speed ramping.

Click the blue “OK” button below to go back to the previous window.
Effects: On the horizontal bar at the top-left corner of the screen, all the effects, transitions, title present, and stock library are located. Drag and drop to apply them.

Export: Click the blue “Export” button to open export window, choose the desired settings than click “Export”. and don’t forget to save the project if you want to edit it again.
Free GoPro Video Editors for Mac:
If you are tight on budget but still want a professional video editor to edit your GoPro videos then here I have mentioned some free but powerful video editors. Whether you are a beginner or a professional content creator, these free softwares can get your job done.
Blackmagic - Davinchi Resolve:
It is available for both Windows and Mac.
Whether you are a freelance video editor or an industry-level filmmaker, if you want to step up your game and stand out from your competition then you need a powerful video editor to help you out and Davinchi Resolve can be the right choice for you. From sports vlogging using action cams to Hollywood filmmaking using Red cinema cameras, Davinchi Resolve can handle and edit all this footage easily and smoothly. It is even used in the making of several Hollywood projects including Marvels’s feature films.
It is one of the best color grading software available in the market. It has advanced color grading tools that can help color grade your GoPro raw videos easily as raw videos look dull but provide greater flexibility. It is a timeline-based editor but its Fusion and Color grading panel provides a Node-based editing system which is hard to use but provides great flexibility once mastered.
Resolve has 6 different pages to deal with different editing parts:
“Edit” and “Cut” pages to deal with simple editing tasks. Its “Fusion” page allows users to do VFX and 3D compositing. The “Color Grading” page has all the professional grading tools. While the “Fairlight” page is designed to edit and enhance audio. And the “Deliver” page to export your files.
All these features are available for free without even giving a watermark. Although it has a studio version that provides some additional features to get more out of this amazing software.

- Davinchi Resolve Studio:
The free version has almost everything a professional video editor needs. but you can purchase the Studio version to get some really juicy features to enhance your video editing experience. It includes the Davinci neural engine, stereoscopic 3D tools, Dolby atmos audio mastering,e.t.c.
Pricing: Studio version is available at $ 295 for a lifetime license and with free updates.
~ Features:
- It supports a 4K resolution at 60fps. (while the Studio version supports up to 32K resolution at 120 fps.)
- It is a multi-feature software that provides editing, color grading, VFX, 3D compositing, and audio editing all in one place.
- It has the most advanced and powerful Node-based color grading system, which is also used by Hollywood film studios.
- Supports Raw and 360 videos from GoPro or other action cameras.
- Supports multi-cam editing up to 16 camera angles.
- Can make Compound clips and add adjustment layers.
- Fairlight panel has professional audio production tools like waveform editing, audio ducking, and Channel mapping. (Dolby Vision mastering and 3D spatial Panning [audio editing in 3D space] are available in the Studio version.)
- Supports third-party plugins.
- Has a 3D workspace and provides a virtual set extension for 3D modeling and compositing.
~ Cons:
- Its node-based editing style is quite difficult for beginners.
- Requires a high-end workstation to run smoothly otherwise will often crash during editing.
- Its node-based editing system is hard to learn.
~ Steps:
Import: Open “Davinci Resolve’. Select a previously saved project or press “New project” to start a new one. Click “File” >> “Import” >> “Media” to import files or press “CTRL + I”.
Edit: Drag and drop files to add them to the timeline Use the tools present above the timeline to trim, cut or move your clips. Click the “Inspector” icon on the top-right corner of the window to open the Inspector tab. Here you will find the properties of all the clips, audio, transitions, effects, e.t.c. There are different editing tabs at the bottom of the window.
In the “Fusion” window, click “Nodes” to open the Node screen. Import a clip or use it from the editor timeline. Usually, a clip will have two nodes connected through a line. Above the nodes panel, different types of nodes are available. Drag any node in the panel and connect it through lines. or add a “merge” node to connect nodes.
Its color grading panel also has Node based editing system.

Effects: Click “Effects Library” then select any effect and drop it in the timeline to apply it. You can change its properties in the “Inspector” panel.
Click the diamond icon on the right side of the property to start keyframing then change the value of that property to add keyframes at desired time period.

Export: Open the “Deliver” window, choose the desired settings then click “Add to Render Queue” to start exporting.

FXhome - Hitfilm Express:
It is available on Windows, Mac and Linux also.
If you are looking for a free but powerful video editor to edit your GoPro clips then Hitfilm Express can be the right choice for you. It is a free timeline-based editing software with professional-grade VFX tools. It is a timeline-based editor where you can add dozens of audio, videos, and text layers.
It has a composite shot sequence where you can do complex editing like editing 3D videos and elements, lights e.t.c. It has physic-base behaviors and effects also to enhance 3D compositing. For professional-level editing almost most of the effects and properties have keyframing options. It has different workspace modes to suit your editing needs.
It can also edit 360 videos recorded from your GoPro max. It has a “GoPro Lens Reframe” effect to adjust your 360 clips, but some 360 toolkits can only be available when you purchase Hitfilm pro or buy a 360 toolkit add-on. Similarly, you can purchase more add-ons according to your editing needs or you can purchase Hitfilm Pro to gain access to all add-ons and features. But can use these pro features for free but without exporting as exporting with a paid effect can give a watermark.
Hitfilm Pro:
Although Hitfilm express doesn’t give a watermark on export, but to use more features like 3D composition, LUTs, e.t.c you need to purchase add-ons, there are over 30+ add-ons available to purchase which you can purchase depending on your needs, but if you want to get all the features than its better to get your hands on Hitfilm Pro.
Pricing: Available for purchase at £ 309 or $ 388 for a lifetime license. With 12 months of free updates. It has 3 seat license which means It can run on 3 PCs simultaneously.
~ Features:
- It is a free editing software with no watermark.
- It can edit 3D videos and it can also import and edit 3D models and tracking data.
- It can edit 360 videos also.
- You can add effects and color grades as layers in the timeline also.
- Can add adjustment layers and create nested clips within nested clips to make complex editing easier.
- It has a motion track and locked-on stabilization features.
- Can do smooth keyframing and animation with the help of value graphs.
- It supports multi-cam editing also.
- Keyboard shortcuts make workflow quite easy and quick.
~ Cons:
- It has some playback issues while using 4K videos.
- It crashes sometimes, so it’s better to save the project frequently during editing.
- Hitfilm express doesn’t have a dark mode.
- Some common features are only available on the Pro version or add-ons.
~ Steps:
Import: Open “Hitfilm”, Select “New Project” to open a blank project then click “open” to open an existing file or click “new” to create a new project. Then set project settings on pop-up then and click “ok”.
Then click the “Media” tab on the top-left corner of the screen. Then select the “Import” button to import videos, images, audio, or 3d models. You can also import previously made composite shots.
Edit: Drag and drop media files from the media tab to the timeline. or click the “New” tab to create a “Composite shot” or a solid plane layer. Right-click on the left side of the timeline to insert or delete layers. On the left side of the timeline, you will find some basic tools located on the vertical bar to do simple tasks.
In the “Viewer” tab, on the left side of the playback screen, you can find tools for masking and adding text.
In the “Controls” tab, you can adjust the properties of clips and other features related to the clip like masking, track, blend, transform, e.t.c.
Create a “Composite shot” to do complex editing like 3D compositing. Or select multiple layers then right-click and select “make Composite shot” to combine them for easy editing. Double-click the composite shot to open its contents.

Effects: From the “Effects” tab drag and drop effects on the clip to add them. Some effects can be added as layers which can affect all the layers beneath it. Properties of these effects can be adjusted in the “Control” tab.
To do keyframing, Click the circle icon on the left side of the property to start keyframing then change the values of that property to add keyframes at desired time period.
Export: Click the “Export” icon then “Export now” located at the top right side of the timeline to open the export window. The export will start automatically.
Shotcut:
It is available on Windows, Mac and Linux.
If you are making videos from your GoPro or mobile phone just for fun that doesn’t require much editing then you can look for a free and simple video editor and “Shotcut” can be the right choice for this purpose.
It is a free and open-source video editor with many cool features to get your hands on. It doesn’t have any pro version. It is simple and easy to use but takes some time to understand. It supports multi-track timeline editing. It has a basic timeline design but you can customize your timeline to meet your editing needs. It has some good color grading options, you can also import your color luts. It has many cool features and effects. It supports 360 video editing and also has a few 360 video filters. It has audio effects also.
~ Features:
- All its features are for free and it doesn’t leave any watermark.
- It supports 4K resolution and a wide range of file formats.
- It also supports 360 video files.
- Has keyframing and chroma kry features.
- It has advanced color grading features.
- It provides standard animation and keyframing features.
~ Cons:
- It is a basic video editor and lacks some professional editing features.
- Have playback issues with 4K videos.
- It does have proper text editing tools.
- It is difficult to understand as its UI is different from other familiar video editors.
~ Steps:
Import: Open “Shot Cut” then click the “Open Files” button on the top-left corner of the window to import files.
Edit: Drag and drop clips on an empty timeline panel to add tracks and drag the clip from corners to trim them. Right-click on the left side of the timeline to add a video or an audio track. You will find a bunch of tools above the timeline to do some basic tasks.
You can choose from 6 different workspace designs (available in the top-right corner of the window) to suit your editing styles.

On top of the window, you will see a bunch of icons like Timeline, filter, project, and properties. e.t.c. In the properties tab, you can change the aspect ratio and speed of the clip.
Effects: Click the “Filters” icon on top of the window to open the filters menu, Click “+” above it to add filters. Double click a filter to add it to the selected clip, then click the filter to open its properties menu. You can also add text from here.
Click the “Keyframes” icon on top of the window to open the Keyframes window. Select the “clock” icon on the filters to start keyframing then change the values at a specific time to add keyframes. Click the “Timeline” icon to go back to the previous window.

Export: Click the “Export” button on the top of the screen. Select a preset or click the “Advanced” button to change export settings then click “Export File”.

Paid GoPro Video Editor for Mac:
If you are a professional athlete or a vlogger using GoPro for all of your contents and want to invest some money on paid video editors to improve your content. Then here we have mentioned some paid video editors worthy of your investment.
Apple - Final Cut Pro:
It is available for Mac only.
If you are an Apple enthusiastic person and want everything Apple, then why look for any other video editor when you can have a powerful video editor “Final cut pro” made by Apple. It is a paid but professional software that can raise your GoPro videos to the next level. Whether it’s a 360 video or a RAW file recorded from your GoPro or from the RED cinema camera, all can be edited smoothly inside Final Cut Pro. It has dozens of useful features that a professional video editor looks for like 3D tracking, Motion Graphics, Color Grading, Audio Mixing, Multi-cam editing e.t.c.
Pricing: It is a one-time purchase software available at $ 299.9 for a lifetime license and all its future updates can be downloaded free of cost.
~ Features:
- It supports up to 8K resolution.
- Support 360 and RAW video files.
- Edit videos in complete 360 and 3D spaces.
- Supports third-party video and audio plugins.
- Supports Multi-cam editing.
- Have professional color grading tools with HDR support.
- Its UI is easy to use.
~ Cons:
- It is designed for Apple devices only.
- Requires a powerful PC.
- Its UI is a bit different from other common video editors in the market.
- ~ Steps:
Import: Open “Final Cut Pro” then click the “Files” button on the top-left corner of the screen, then select “Project” to create a new project. In the “Files” menu, click “import” then “media” to import your media files. Here most of the work is done with Keyboard commands.
Edit: Drag and Drop clips on the timeline. In the viewer panel, press “I” and “O” to add input and output points then drag the clip to add only a specific part of the clip. Press “Cmd + B” to split the clip at the desired location. Or add the clips above to add the layer.
Click the “Text” icon on the top-left corner of the screen to open the text page. Choose from presets or import your own Text presets and drag them to the timeline. Click the text to open “Text Editor” on the left side of the screen.
Select multiple clips then Right-click and select “New Compound Clip” to combine them. Double-click the compound clip to edit its components.
Effects: Click 2 icons on the top-right side of the timeline to open the effects and transition panel. Drag and drop on the clip to use them. You can change their properties in the “Effects editor” tab located in the same place as “Text Editor”.
In the editor tab, click the diamond icon beside any property to start keyframing, then change its property to add keyframes at the desired time.
Press “Cmd + 6” to open the Color Grading tab, here you can color grade your clips.
Export: To export the edited video. Click “File” >> “Share” >> “Master file” to open export window. Choose the desired settings then click “Next” then “Save” to export the video.
Adobe - Premiere Pro:
It is available for both Windows and Mac.
Whether you are a content creator or not, if you use a DSLR or an action camera for the first time, then maybe the output wouldn’t meet your expectations. In order to make it good, you need a video editor. And if you will ask your gathering about a good video editor, most of them will recommend you Adobe Premiere Pro, because it is such a versatile and well-known software available in the market. It is a subscription-based video editor.
It is an industry-level software with many professional and advanced features. From beginner video editing to film compositing, all can be done in this software. Whether you have a 360 video or a 4K video in Raw format recorded from your GoPro, just import it into premiere pro and start editing. It has a downloadable “GoPro FX Reframe” plugin to edit your 360 videos. It has different panels designed to deal with specific parts of post-production such as the Effects panel, Graphics panel, Sound panel, Colour Grading panel, e.t.c.
~ Features:
- It supports up to 8K resolution.
- Have different panels to enhance different segments of post-production.
- Have an essential Effects panel to create motion effects and animations using keyframes.
- Supports hundreds of third-party extensions.
- Have useful features like warp stabilizer and denoiser.
- You can import or create your color LUTs.
- Have a creative cloud with 100 Gb of storage.
- The bundle also includes a mobile video editor and a stock library.
~ Cons:
- Real-time rendering. It will take some time to render before exporting if you work on a mid-range PC.
- Freezes or crashes sometimes.
- Cache data fill-up quickly and eats a lot of storage. (It’s better to clear it after every project)
Pricing: It is cloud-based software, therefore it can’t be purchased one time. It has a monthly subscription starting at $ 20.99/month. It includes “premiere rush” mobile video editor and 100 GB of cloud storage within the plan. It also has a “Creative cloud All apps” plan that includes all 30+ Softwares + 100Gb cloud storage along with premiere pro for $ 54.99 only. All plans also include Behance (adobe creative community), Adobe Fonts, and Adobe stock assets for free. Adobe also provides educational access at a much discounted price.
~ Steps:
Import: Open “Premiere Pro”. Click “New Project” to start with then Click the “Files” button on the top-left corner of the window then select the “Import files” button to import files. Or press “CTRL + I” to import files or drag your files from their location to premiere pro.

Edit: Drag and Drop the files to add them to the timeline. Drop a file above a clip to add as a layer. or drop over a clip to overwrite it. On the right side of the timeline, you can find a bunch of tools to do basic edits like trimming, splitting, speed ramping, masking, or adding text.
In the “Effects Control” tab you can transform the selected clip or change its properties.
Select multiple clips then right-click and select “make Nested clip” to combine them into a single clip for easy editing.

Slide between 8 different workspace styles designed for specific post-production tasks by clicking the buttons available on the top of the window.
Effects: Go to the “Effects” panel on the bottom-left window to apply an effect or transitions. Here you can find all audio, video, 2D, and 3D effects. Drag and Drop on a clip to apply it. Change the properties of these effects in the “Effects Control” panel.
To color grade, your clips move to the “Color” workspace. Here you will find all the color grading features: correction, curves, color wheels, creative tab, e.t.c. To import a LUT click the “creative tab” then click “Browse” to import a LUT.
Export: To Export go to the “Files” tab on top of the screen then select the “Export” button to open the export tab. Select the desired settings then click “Export”.
Power Director 365 :
It is available for both Windows and Mac.
If you are looking for a budget-friendly video editor that is powerful enough to edit your GoPro videos like a content creator then Power director can be the right choice for you. It has many unique and useful features. It has different plugins and design centers to do specific post-production tasks like Ad designer, Multicam editor, AI style plugins, e.t.c.
It also has a separate action cam center to fix or enhance action cam videos. IT also has chapter and subtitle rooms to add subtitles and chapters for your Youtube videos or films. It also has a vast stock and preset library to speed up your project.
Pricing: It has a subscription plan which is available at $69/year. It is now available at 30% off till 22nd May,2022.
~ Features:
- It supports 4K videos and a wide range of import formats.
- Have many built-in plugins and design centers.
- Supports Multi-cam editing.
- Have an action cam center to deal with action cam footage.
- Have separate aspect ratio mode for 360 videos.
- Also, have a chapter and subtitle room. many recording aspects of the video.
- Have a content-aware editing feature that detects the recording aspects.
- Can import presets and color LUTs.
- Have a vast stock library.
~ Cons:
- Have some playback issues with 4K videos. (create shadow files to overcome this issue to an extent).
- Its UI is a little bit complicated for beginners.
- Not ideal for fast pace editing.
~ Steps:
Import: Open Power director and a pop-up will appear, select desired aspect ratio then click “Full mode” to open the software. Or select 360 aspect ratio if you want to edit 360 videos.

Click the “Import Media” icon below the Files tab in the top-left corner of the window to import files or press “CTRL + Q” to import files.
Edit: Drag and drop files to add them to any desired layer in the timeline. Click the icon on the top left corner of the timeline to add layers. When you select a clip in the timeline, some tools appear on the top timeline. Select any specific tool to edit your selected clip. Or click the “Plugins” button on the top-left of the window to open a specific designer tab.
Double-click on the clip to open ‘PIP designer”. Here you will find all the editing tools to edit or animate your clip.

After selecting a clip, in the “Plugins” menu click the “Action Camera Center” button to open an edit tab, Here you can fix your GoPro videos.

Effects: On the top-left corner of the window in a vertical bar you will find all the effects material lile Project library, titles, effects, transitions, overlays, e.t.c. Simply just drag and drop them on the timeline to use them. Here you can also do audio mixing and add subtitles and chapters.
Double click a clip or an overlay element to open the designer window. Here you can customize the clips and overlays to enhance your project.
Export: Click the blue “Produce” button on top of the screen to export your edited file. Select the desired mode and file format and add an export destination, then click “Start” to start exporting.
Which One Should I Choose Free or Paid GoPro Video Editor?
You can choose free or paid softwares depending on your requirements and budget. If a free software meets your requirements then stay on it otherwise move towards a paid alternative. If you have a GoPro and you make videos just for fun then use a free and simple video editor. Even if you are an experienced video editor, I would recommend you to go for free video editors which I have mentioned above as they are quite powerful and professional software but if you are harvesting a good amount of money from this field then you can upgrade to pro versions of these free softwares or get a paid software from start. As almost all of these softwares are professional and can get your job done, so it’s better to choose one, which is comfortable for you to work on.
FAQs about GoPro Video Editing:
- Q) Does GoPro has its own video editor?
Yes, GoPro has its own video editor “Quik”. It is available on mobile phones and desktops both. It is simple and easy to use. It provides basic features to edit your video. But the main disadvantage of this desktop software is that it supports only GoPro videos, you can’t import files from other devices. Although this isn’t the issue with Quik mobile app, here you can import videos from other devices also.
- Q) Can I make videos for social media with a GoPro?
It was basically made for recording sports and action videos. But as the market is revolutionized and new models are released it has covered a wide range of the video industry like vlogging, travel and cooking videos e.t.c. As new models of GoPros are waterproof, you can get some amazing underwater shots for your Instagram.
- Q) What is GoPro media format?
GoPro export files in popular file format MP4. MP4 is the most common file format and is supported by almost all the video editors. While it is efficient and takes less storage but isn’t supported in many devices.
- Q) How do I transfer files from my GoPro to Mac?
You can transfer your GoPro files through 3 methods:
- Eject the SD card from your GoPro and connect it to your Mac using a SD card adapter to transfer files.
- Connect your GoPro to Mac through USB connector and use “iphoto” or any other photo importer to import files.
A Normal Video Brings More Editing Opportunities than a Slow-Motion One. This Text Explores How to Convert Slow Motion Video to Normal on iPhone
Slow-motion videos bring your videos to life by highlighting the emotions and details of a story. However, transforming a slow motion into a normal video has its benefits. For instance, you can make boomerangs or GIFs with normal videos. In addition, you can introduce limitless transitions and animations to them. Thus, are you also finding how to change slow-motion video to a normal iPhone?
This article is the perfect stop for you as it covers all your slow-motion queries from here. It will focus on how to unslow-mo a video on an iPhone and related tools. We will discuss the iPhone’s pre-built feature and some tools to achieve this. There will be a bonus tip on how to change slow-mo video to normal on iPhone.
Slow Motion Video Maker Slow your video’s speed with better control of your keyframes to create unique cinematic effects!
Make A Slow Motion Video Make A Slow Motion Video More Features

Part 1: Direct Method: Changing Slow Motion Video to Normal on iPhone
You might not be aware of this feature if you are a previous user or have just started using an iPhone. This is Apple’s built-in feature, found in iPhones and iPads. In this section, we have tailored a step-by-step guide to doing this. Here is a brief overview of how to convert a slow-motion video to a normal iPhone:
Step 1
Move to its bottom after opening the “Photos” application on your iPhone. From there, select the “Albums” option and scroll down to the “Slo-mo” option in “Media Types.”

Step 2
In the slow-mo section, find a video you want to reverse and select it to open. Navigate towards the top right corner of this video and click the “Edit” option.

Step 3
An editing panel will appear at the bottom of this video. If you’d notice, a vertical lined bar is under the video timeline. This indicates slow-mo duration, which you can change by repositioning sliders. Afterward, click the “Done” button at the right bottom of this screen to finalize.

Part 2: Top Applications That Can Be Used to Change Slow Motion Video to Normal
The iPhone’s built-in feature is equally effective for reversing a slow-mo back to normal. However, sometimes, one requires a tool for detailed editing. In such cases, we recommend you use a third party to help you achieve the desired results. We have assembled some tools on how to take slow-mo off a video on iPhone below:
- SpeedPro Slow Speed Video Edit
- Slow-Fast Motion Video Editor
- Slow Motion Video Fx Editor
- Reverse Cam – Slow Motion Video
- Slow Motion Video Editor
1. SpeedPro Slow Speed Video Edit
This is a versatile application designed explicitly to resolve the slow speed queries on iPhone. Users can effortlessly manipulate the speed of video during editing. The best part about this editor is that you can select a specific video section. It is up to you to reverse a complete slow-mo video or a part of it.

Key Features
- Facilitates both professionals and amateurs with its reachable user interface.
- After editing a video as super slow or super-fast, you can incorporate music.
- The application offers direct sharing options to vast applications like Instagram or YouTube.
2. Slow-Fast Motion Video Editor
If how to convert slow motion video to normal on an iPhone was a bet, this application would be worth your money. Many content creators have used it, and everyone has positively reviewed it. You can transform a slow-mo into a normal video using its speed option. The highest speed option is 2x, and the slowest speed option is 1/4th. There is no limitation on the video’s length or resolution for conversion.
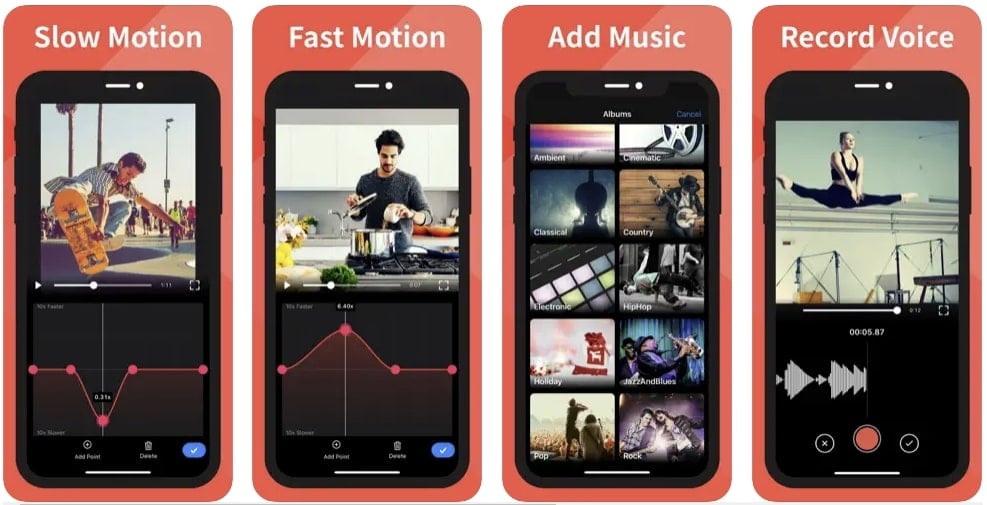
Key Features
- You can apply different time transitions (fast or slow) to distinct video segments.
- The application doesn’t export with a Watermark addition to maintain professionalism.
- Upon converting a video or reversing it, you can adjust the audio pitch to align with it.
3. SloMo Slow Motion Video Editor
With technological advancements, the editing industry has taken up a notch. This application uses modern algorithms to create or reverse a slow with customizations. To reverse a slow-mo, you just need to upload it and increase the video’s speed. It offers three sorts of speed editing, including slow-mo, time-lapse, and stop-motion. The video speed is adjustable up to 240fps and 12x with quick processing.
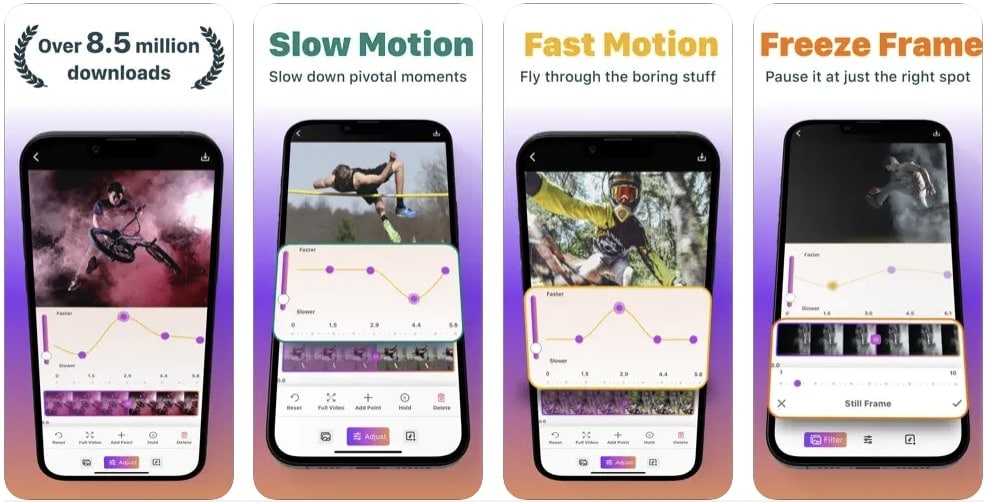
Key Features
- With its independent frame manipulation, you can edit specific parts of a video.
- You can incorporate music behind your tracks out of 170+ pre-built music tracks.
- This iPhone editor retains the natural resolution of video to maintain its quality.
4. Reverse Cam – Slow Motion Video
Surfing through the internet to find how to unslow-mo a video on an iPhone? This application assists you in controlling or reversing video speed. You just need to import a previously created slow-mo into the application. In addition to reversing a video, you can also reverse audio tracks with it. There are multiple speed options like 0.25, 0.5x, and more.
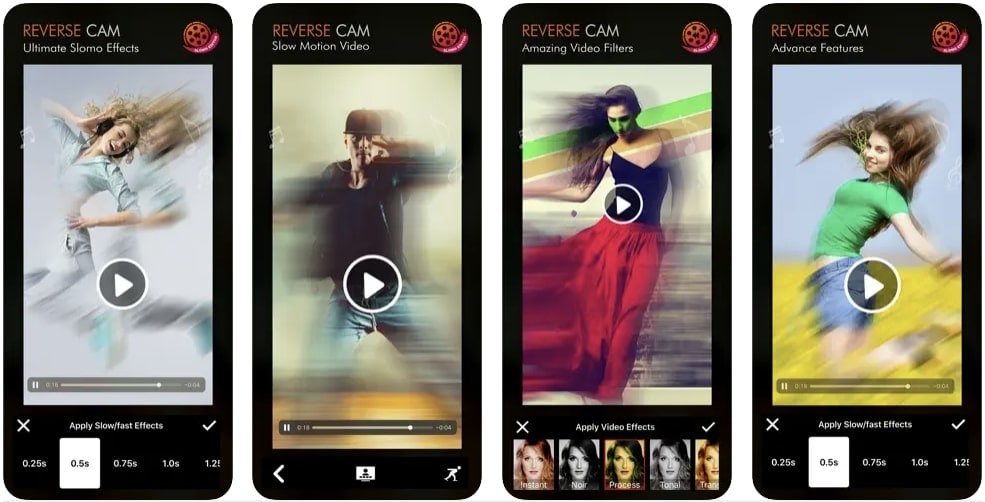
Key Features
- After modifying the video speed, you can apply multiple effects to it.
- The application is compatible with iOS 9.0 or newer versions.
- It has a built-in library that users can use to save the edited videos and share them directly.
5. Slow Motion’ Video Editor
Solve all your queries related to how to change slo-mo video to normal on iPhone here. Designed to give your videos a perfect slow-motion or high-speed effect. To convert a slow-mo video into a normal one, it offers speed increase options. You can have complete control over your videos with this application.
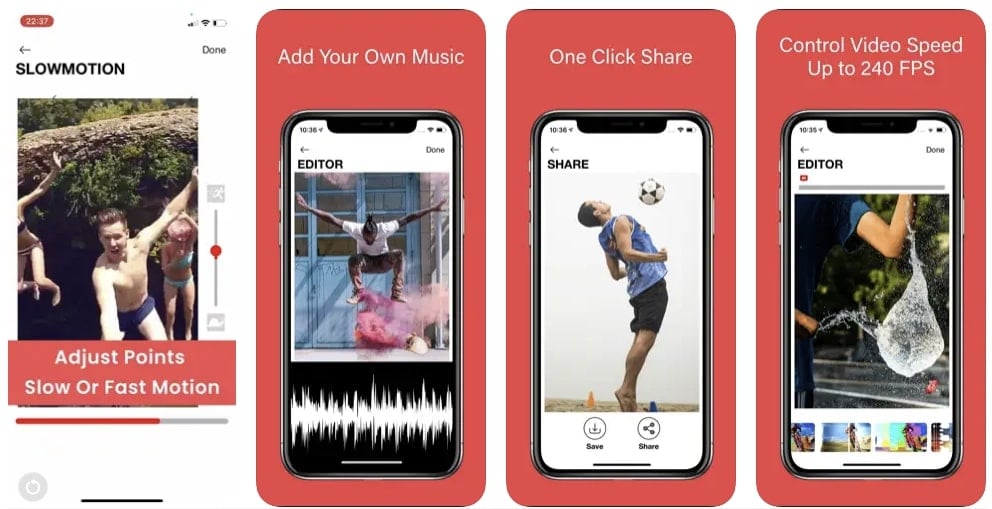
Key Features
- It has an accessible and intuitive editing interface for user comprehension.
- It allows you to manipulate the speed of your video from 60 to 240 frames.
- It has multiple subscription options, weekly, monthly, or yearly, that you can avail accordingly.
Bonus Part: Speed Up Your iPhone Video on Desktop Using Wondershare Filmora
All these methods of transforming a slow-mo to normal are accurate and efficient. However, when it comes to perfection, one software stands tall than the others.Wondershare Filmora is a premium video editing software for precise editing. There are two methods of manipulating a slow-motion video to normal in it.
The speed ramping involves slow-mo reverse action from specific video frames. On the other hand, uniform speed modifies the complete video speed. You can add specific values for manipulating the frame rate or change the sliders. In addition, you can also add multiple effects to your video afterward. Moreover, you can also export the video in high resolution and desired format.
Free Download For Win 7 or later(64-bit)
Free Download For macOS 10.14 or later
Step-by-Step Guide to Shift Your Slow-Motion Video to Normal with Filmora
This segment involves a step-by-step guide to reverse a slow-mo. Let’s see how to change slo-mo video to normal on iPhone with Filmora below:
Step 1Import Media Files from iPhone
First, connect your iPhone to the source device you are using Filmora on. Once you have connected the devices, navigate towards the “Import” button. Expand this option, and from the dropdown menu, select “Import from a Camera or Phone.” Select the name of your iPhone in the “Import from” section and click “OK.” Once imported, place the clip in the timeline.

Step 2Access Uniform Speed Option
Then, select the clip in the timeline and navigate towards the settings panel. Afterward, go to the “Speed” tab under “Uniform Speed” set values. Drag the Speed slider towards the right to increase the video speed.

Step 3Export the Edited Video
Hit the “Play” button from the preview window to preview your video. Afterward, navigate towards the “Export” button at the top right corner. You can also set the framerate in the Export window according to preference. Further, hit the “Export” button in the Export window to save the file on the device.
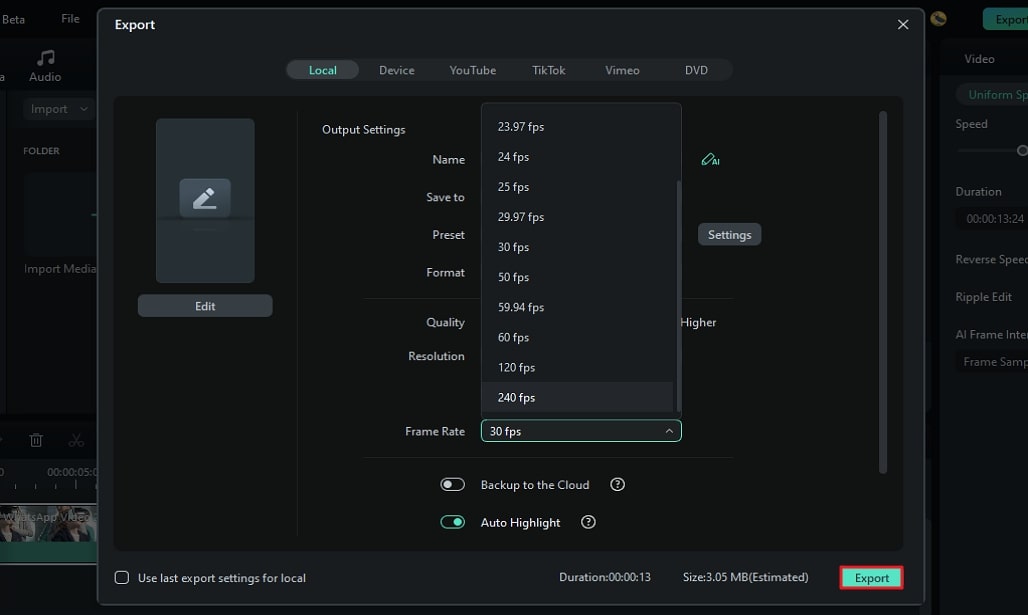
Top Features to Note About Wondershare Filmora
There is more to Filmora than how to unslow-mo a video on an iPhone. The tool shows support with multiple devices like Windows, iOS, Linux, and more. Following are some of the top-notch AI features of Filmora:
1. AI Text-to-Video
Use this tool to craft creative and graphic-based videos along with voice integration. With its generative AI, it allows you to tailor videos in different contexts. It uses text-based instructions to analyze demands and follow them.
2. AI Text-Based Editing
Cutting and Trimming videos in a timeline might be difficult for some people. It requires proper skills; however, there is an alternate option. The text-based editing AI uses voice recognition to convert speech to text. Once the video has been converted, you can eliminate the parts you want.
3. AI Music Generator
If you want to generate music based on your video’s mood or context, use this AI. It asks for a few directions like theme, mood, and language to curate music. The song is efficient in what it is designed for and generates results in seconds.
4. AI Vocal Remover
Background noises always decline the quality of an audio track or overall video. With Filmora, you can separate vocals from background noise and delete the track. Both tracks are shown in the timeline and are easy to remove. Afterward, you can apply effects or introduce music before export.
Conclusion
After reaching a conclusion, one should have fully understood the merits of how to change slow-motion video to a normal iPhone. It provided insights into several useful applications for achieving this effect. Wondershare Filmora emerged as a worthy AI-driven desktop application tailored for crafting such videos. It is recommended to help you with your creative endeavors in this domain.
Make A Slow Motion Video Make A Slow Motion Video More Features

Part 1: Direct Method: Changing Slow Motion Video to Normal on iPhone
You might not be aware of this feature if you are a previous user or have just started using an iPhone. This is Apple’s built-in feature, found in iPhones and iPads. In this section, we have tailored a step-by-step guide to doing this. Here is a brief overview of how to convert a slow-motion video to a normal iPhone:
Step 1
Move to its bottom after opening the “Photos” application on your iPhone. From there, select the “Albums” option and scroll down to the “Slo-mo” option in “Media Types.”

Step 2
In the slow-mo section, find a video you want to reverse and select it to open. Navigate towards the top right corner of this video and click the “Edit” option.

Step 3
An editing panel will appear at the bottom of this video. If you’d notice, a vertical lined bar is under the video timeline. This indicates slow-mo duration, which you can change by repositioning sliders. Afterward, click the “Done” button at the right bottom of this screen to finalize.

Part 2: Top Applications That Can Be Used to Change Slow Motion Video to Normal
The iPhone’s built-in feature is equally effective for reversing a slow-mo back to normal. However, sometimes, one requires a tool for detailed editing. In such cases, we recommend you use a third party to help you achieve the desired results. We have assembled some tools on how to take slow-mo off a video on iPhone below:
- SpeedPro Slow Speed Video Edit
- Slow-Fast Motion Video Editor
- Slow Motion Video Fx Editor
- Reverse Cam – Slow Motion Video
- Slow Motion Video Editor
1. SpeedPro Slow Speed Video Edit
This is a versatile application designed explicitly to resolve the slow speed queries on iPhone. Users can effortlessly manipulate the speed of video during editing. The best part about this editor is that you can select a specific video section. It is up to you to reverse a complete slow-mo video or a part of it.

Key Features
- Facilitates both professionals and amateurs with its reachable user interface.
- After editing a video as super slow or super-fast, you can incorporate music.
- The application offers direct sharing options to vast applications like Instagram or YouTube.
2. Slow-Fast Motion Video Editor
If how to convert slow motion video to normal on an iPhone was a bet, this application would be worth your money. Many content creators have used it, and everyone has positively reviewed it. You can transform a slow-mo into a normal video using its speed option. The highest speed option is 2x, and the slowest speed option is 1/4th. There is no limitation on the video’s length or resolution for conversion.

Key Features
- You can apply different time transitions (fast or slow) to distinct video segments.
- The application doesn’t export with a Watermark addition to maintain professionalism.
- Upon converting a video or reversing it, you can adjust the audio pitch to align with it.
3. SloMo Slow Motion Video Editor
With technological advancements, the editing industry has taken up a notch. This application uses modern algorithms to create or reverse a slow with customizations. To reverse a slow-mo, you just need to upload it and increase the video’s speed. It offers three sorts of speed editing, including slow-mo, time-lapse, and stop-motion. The video speed is adjustable up to 240fps and 12x with quick processing.

Key Features
- With its independent frame manipulation, you can edit specific parts of a video.
- You can incorporate music behind your tracks out of 170+ pre-built music tracks.
- This iPhone editor retains the natural resolution of video to maintain its quality.
4. Reverse Cam – Slow Motion Video
Surfing through the internet to find how to unslow-mo a video on an iPhone? This application assists you in controlling or reversing video speed. You just need to import a previously created slow-mo into the application. In addition to reversing a video, you can also reverse audio tracks with it. There are multiple speed options like 0.25, 0.5x, and more.

Key Features
- After modifying the video speed, you can apply multiple effects to it.
- The application is compatible with iOS 9.0 or newer versions.
- It has a built-in library that users can use to save the edited videos and share them directly.
5. Slow Motion’ Video Editor
Solve all your queries related to how to change slo-mo video to normal on iPhone here. Designed to give your videos a perfect slow-motion or high-speed effect. To convert a slow-mo video into a normal one, it offers speed increase options. You can have complete control over your videos with this application.

Key Features
- It has an accessible and intuitive editing interface for user comprehension.
- It allows you to manipulate the speed of your video from 60 to 240 frames.
- It has multiple subscription options, weekly, monthly, or yearly, that you can avail accordingly.
Bonus Part: Speed Up Your iPhone Video on Desktop Using Wondershare Filmora
All these methods of transforming a slow-mo to normal are accurate and efficient. However, when it comes to perfection, one software stands tall than the others.Wondershare Filmora is a premium video editing software for precise editing. There are two methods of manipulating a slow-motion video to normal in it.
The speed ramping involves slow-mo reverse action from specific video frames. On the other hand, uniform speed modifies the complete video speed. You can add specific values for manipulating the frame rate or change the sliders. In addition, you can also add multiple effects to your video afterward. Moreover, you can also export the video in high resolution and desired format.
Free Download For Win 7 or later(64-bit)
Free Download For macOS 10.14 or later
Step-by-Step Guide to Shift Your Slow-Motion Video to Normal with Filmora
This segment involves a step-by-step guide to reverse a slow-mo. Let’s see how to change slo-mo video to normal on iPhone with Filmora below:
Step 1Import Media Files from iPhone
First, connect your iPhone to the source device you are using Filmora on. Once you have connected the devices, navigate towards the “Import” button. Expand this option, and from the dropdown menu, select “Import from a Camera or Phone.” Select the name of your iPhone in the “Import from” section and click “OK.” Once imported, place the clip in the timeline.

Step 2Access Uniform Speed Option
Then, select the clip in the timeline and navigate towards the settings panel. Afterward, go to the “Speed” tab under “Uniform Speed” set values. Drag the Speed slider towards the right to increase the video speed.

Step 3Export the Edited Video
Hit the “Play” button from the preview window to preview your video. Afterward, navigate towards the “Export” button at the top right corner. You can also set the framerate in the Export window according to preference. Further, hit the “Export” button in the Export window to save the file on the device.

Top Features to Note About Wondershare Filmora
There is more to Filmora than how to unslow-mo a video on an iPhone. The tool shows support with multiple devices like Windows, iOS, Linux, and more. Following are some of the top-notch AI features of Filmora:
1. AI Text-to-Video
Use this tool to craft creative and graphic-based videos along with voice integration. With its generative AI, it allows you to tailor videos in different contexts. It uses text-based instructions to analyze demands and follow them.
2. AI Text-Based Editing
Cutting and Trimming videos in a timeline might be difficult for some people. It requires proper skills; however, there is an alternate option. The text-based editing AI uses voice recognition to convert speech to text. Once the video has been converted, you can eliminate the parts you want.
3. AI Music Generator
If you want to generate music based on your video’s mood or context, use this AI. It asks for a few directions like theme, mood, and language to curate music. The song is efficient in what it is designed for and generates results in seconds.
4. AI Vocal Remover
Background noises always decline the quality of an audio track or overall video. With Filmora, you can separate vocals from background noise and delete the track. Both tracks are shown in the timeline and are easy to remove. Afterward, you can apply effects or introduce music before export.
Conclusion
After reaching a conclusion, one should have fully understood the merits of how to change slow-motion video to a normal iPhone. It provided insights into several useful applications for achieving this effect. Wondershare Filmora emerged as a worthy AI-driven desktop application tailored for crafting such videos. It is recommended to help you with your creative endeavors in this domain.
Also read:
- 2024 Approved Benefits of Live Streaming on YouTube
- Updated In 2024, In Todays Article, We Are Going to Show You How Adding a Simple Lower Third to Your Video Can Add a Degree of Professionalism and Polish to Your Videos While Giving It a Higher Perceived Value
- Wondering About How to Easily Create a Slideshow on Your iPhone? Well, Take Note of some of the Finest Apps to Turn Your Vision Into Reality for 2024
- 2024 Approved VSCO Slow Motion
- Updated In 2024, How to Make Blender Render Transparent Background
- Updated Free Ways to Download Mobile Phone Green Screen Videos and Pictures No Copyright
- Updated How to Make a Neon Dance Effect With Filmora
- Updated In 2024, The Article Is a Guide About the Split of the Videos in VLC. There Is Also a Particular Description of Its Alternative Wondershare Filmora. It Is Suitable as Well as Reasonable
- New In 2024, Do You Wish to Create High-Quality Videos and Experience Effective Videos with Editing? No Problem at All because the Keyboard Shortcuts Listed Here Will Assist You
- New Top Free LUTs To Use in Shotcut An Overview
- Have You Ever Used Premiere Pro to Create Slow-Motion Effects? This Article Will Provide a Guide on Producing Slow-Motion Effects by Using Adobe Premiere Pro for 2024
- New The Craziest 10 AI Editors Youve Ever Seen
- In 2024, 10 Matching Color Combination That Works Together
- Updated How to Make a Countdown Video
- Updated Do You Know You Can Add LUTs for Cinematic Color Grading on Your Smartphones? With VN Editor You Can, You Can Add LUTs. Choose the Option VN LUTs Free Download for 2024
- Updated HOW to Add Fade to Black on Premiere Pro for 2024
- Updated A Guide to Understanding Efectum App and Some Top Alternatives
- Updated Adjust Background to Black for Your Product Review Video for 2024
- Updated 2024 Approved Looking for the Simple Steps to Add Transition Effects in Your Video? We Will Illustrate How to Add Transition in Filmora and Mention Tips and Tricks for Video Transition Effects
- 2024 Approved Best 12 Best Freeze Frame Video Editing Examples
- New How to Merge Videos in HandBrake? Expectation Vs. Reality for 2024
- In 2024, Time Bending Brilliance The Ultimate Slow Motion Video Makers
- Backup and Organize Your Tons of Footage in Minutes
- New The Glitch Filter Is Similar to an Error or a Distorted Effect in the Video. The Article Enables the Users to Get the VHS Filter in One of Their Travel Videos and Instagram Accounts for 2024
- Updated In 2024, 4 Ways to Merge MP4 and MP3
- In 2024, Color Matching Is the Trickiest Part of Graphic Designing. Learn in Detail About Using Canva Color Match Ideally While Working on Your Pins, Social Media Posts, and Other Designs
- Updated In 2024, Magic Effects Video Making How To
- Updated 2024 Approved Applying and Creating Gif Background on Your Devices and Presentations Is Not Hard. Read Below to Learn How to Apply a GIF Background on All Devices
- Updated 2024 Approved 10 Best Old Film Overlays to Make Your Videos Look Vintage
- How to Cast Tecno Spark 20 Pro Screen to PC Using WiFi | Dr.fone
- How To Remove Screen Lock PIN On Vivo Y200e 5G Like A Pro 5 Easy Ways
- Step-by-Step Tutorial How To Bypass Xiaomi Redmi Note 12 Pro 5G FRP
- How to Reset Samsung Galaxy M54 5G without Losing Data | Dr.fone
- In 2024, Disabled Apple iPhone SE (2022) How to Unlock a Disabled Apple iPhone SE (2022)?
- In 2024, 3 Ways to Unlock Your Apple iPhone 6s for Free
- In 2024, Top 5 Car Locator Apps for Xiaomi Redmi Note 12 5G | Dr.fone
- In 2024, Easy Guide to Tecno Spark 20 Pro FRP Bypass With Best Methods
- 4 Easy Ways for Your Itel A70 Hard Reset | Dr.fone
- Unlocking iPhone 8 Plus Passcode without a Computer
- In 2024, Remove Device Supervision From your Apple iPhone 14 Pro
- 11 Proven Solutions to Fix Google Play Store Not Working Issue on Realme V30T | Dr.fone
- In 2024, How to Fix Pokemon Go Route Not Working On Samsung Galaxy A24? | Dr.fone
- Title: How to Merge Audio and Video in VLC Media Player
- Author: Morgan
- Created at : 2024-05-19 05:11:36
- Updated at : 2024-05-20 05:11:36
- Link: https://ai-video-editing.techidaily.com/how-to-merge-audio-and-video-in-vlc-media-player/
- License: This work is licensed under CC BY-NC-SA 4.0.

