
How to Remove Audio From Video on Mac? Free and Official Solutions

How to Remove Audio From Video on Mac? Free and Official Solutions
Videography is getting into a trend nowadays. Everyone is recording videos for different reasons. However, when shooting outside, background sounds and noise reduce video quality.
You can remove audio from your video on Mac devices using different software. For instance, you can go for iMovie to remove sound from video on Mac. Filmora also allows you to remove audio from video on Mac.
Method 1: Use online and free solutions to mute audio in videos
1. Canva
Canva is a free design platform for anyone. It has both web and app versions. A very user-friendly graphic design tool that is easy to use, even for those with no design experience.
Canva offers a wide selection of templates and over 1 million templates. A library of over 2 million stock photos and illustrations for free. It also has a paid option at an affordable price.
An Ultimate Guide to How to remove audio from video in Canva?
To remove audio from your video in Canva, you can do so by following these simple steps:
Step1 Open the video in Canva.
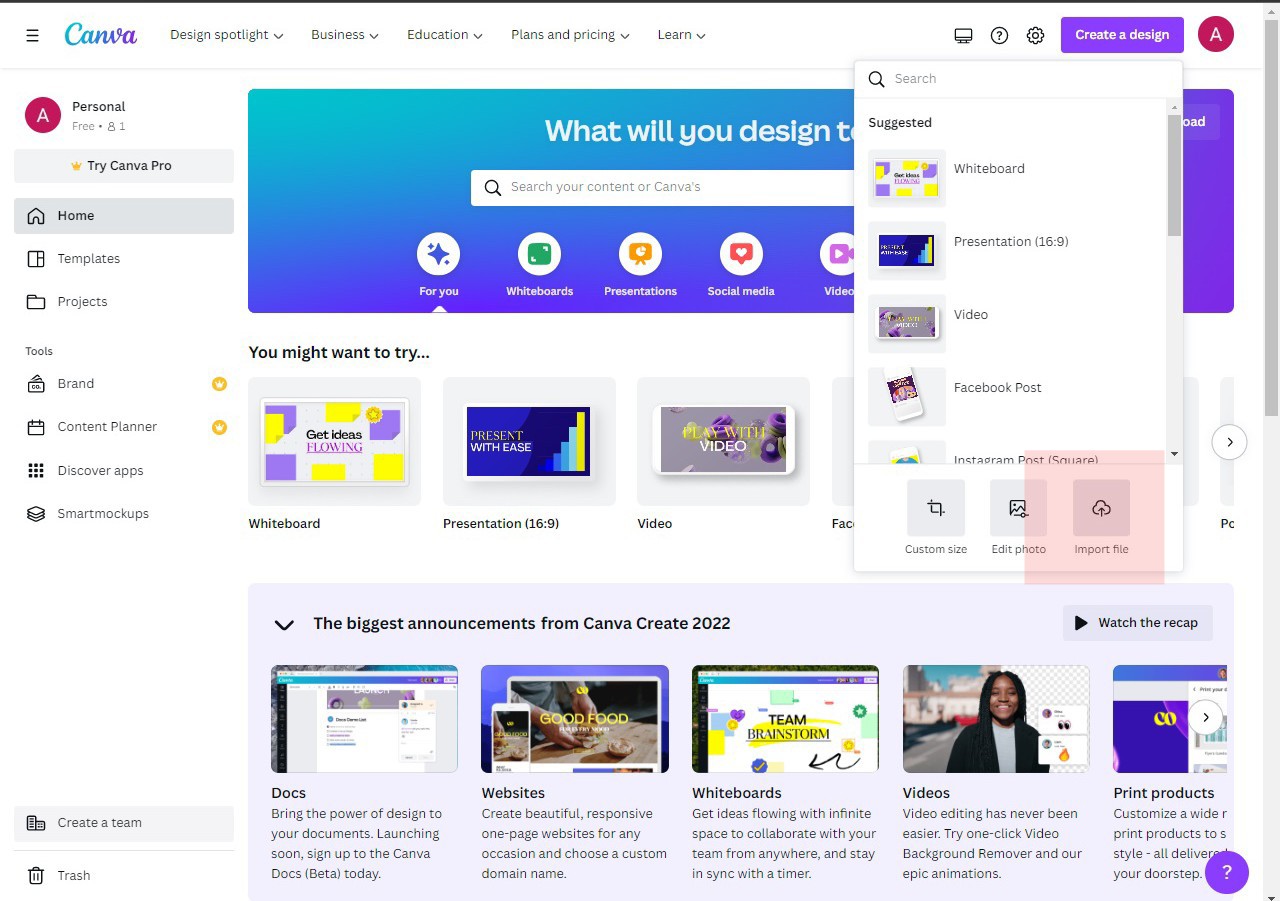
Step2 Click on the “Audio” tab in the toolbar and remove the audio.
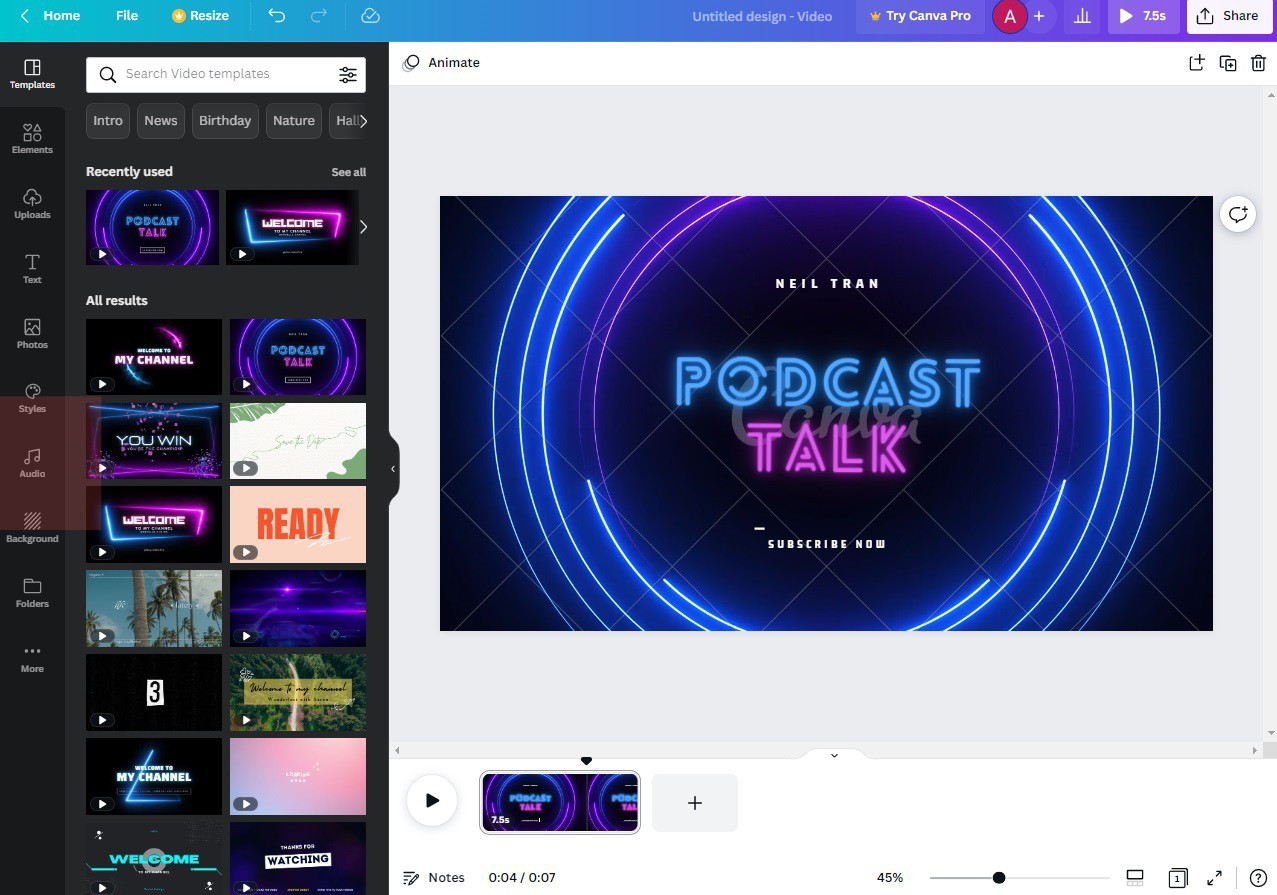
Step3 Save the video in desired option.
2. Clideo
Clideo is a cloud-based video editing tool that offers a simple yet powerful way to edit videos. With Cleo, you can trim, crop, merge, and audio or text to their videos.
Its user-friendly interface makes it easy to edit videos. Clideo offers a variety of effects and transitions that let you create videos that look unique. It supports a wide range of video formats, making it easy to export your videos.
An Ultimate Guide to How to remove audio from video in Clideo?
This online video editor offers a straightforward way to remove audio from any video file.
Here’s how you can do it:
Step1 Go to clideo.com and upload the video from which you want to remove the audio. You can either drag and drop the file into the designated area or click the “Choose file” button.

Step2 Once the video is uploaded, select the “Mute” option from the toolbar above the video player.
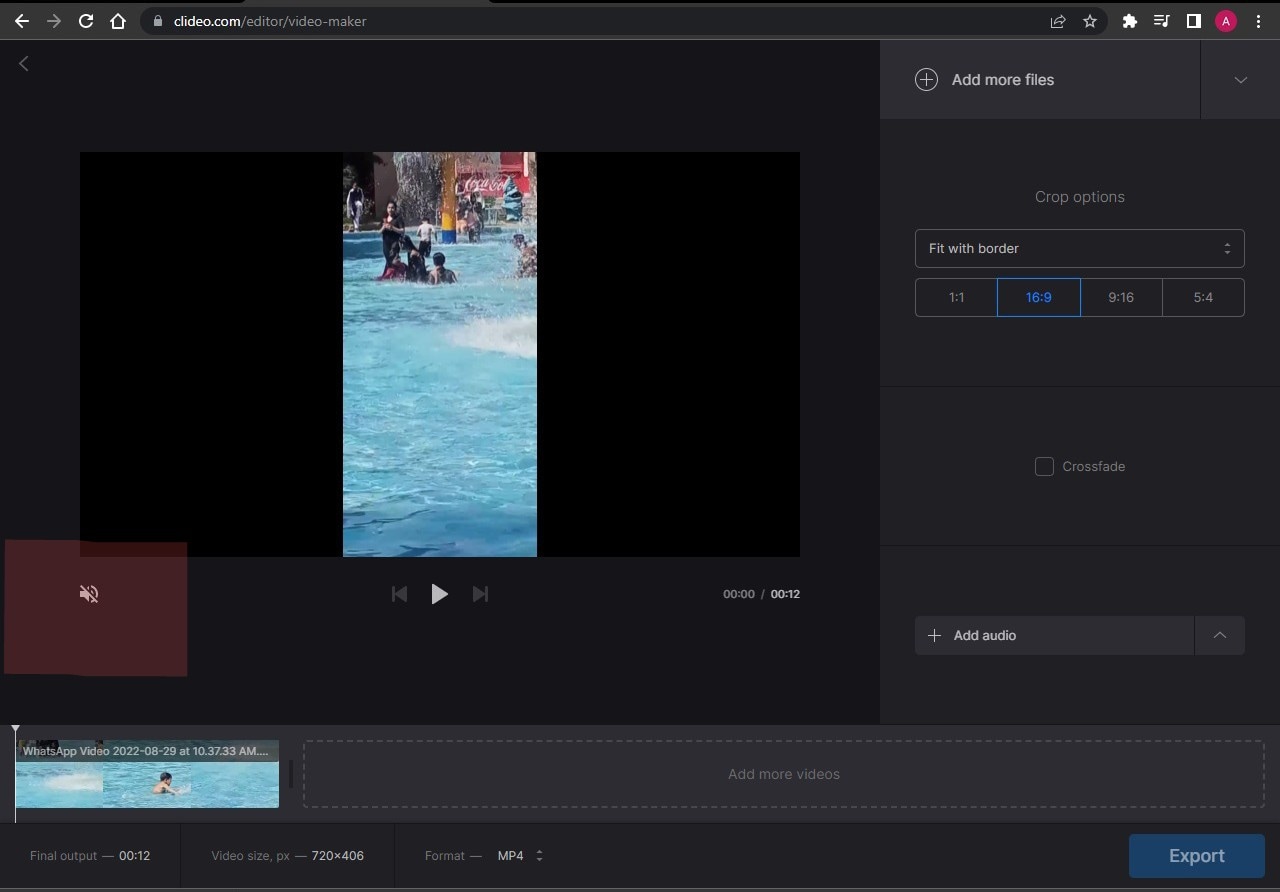
Step3 Click on “Export” to save the video without audio.
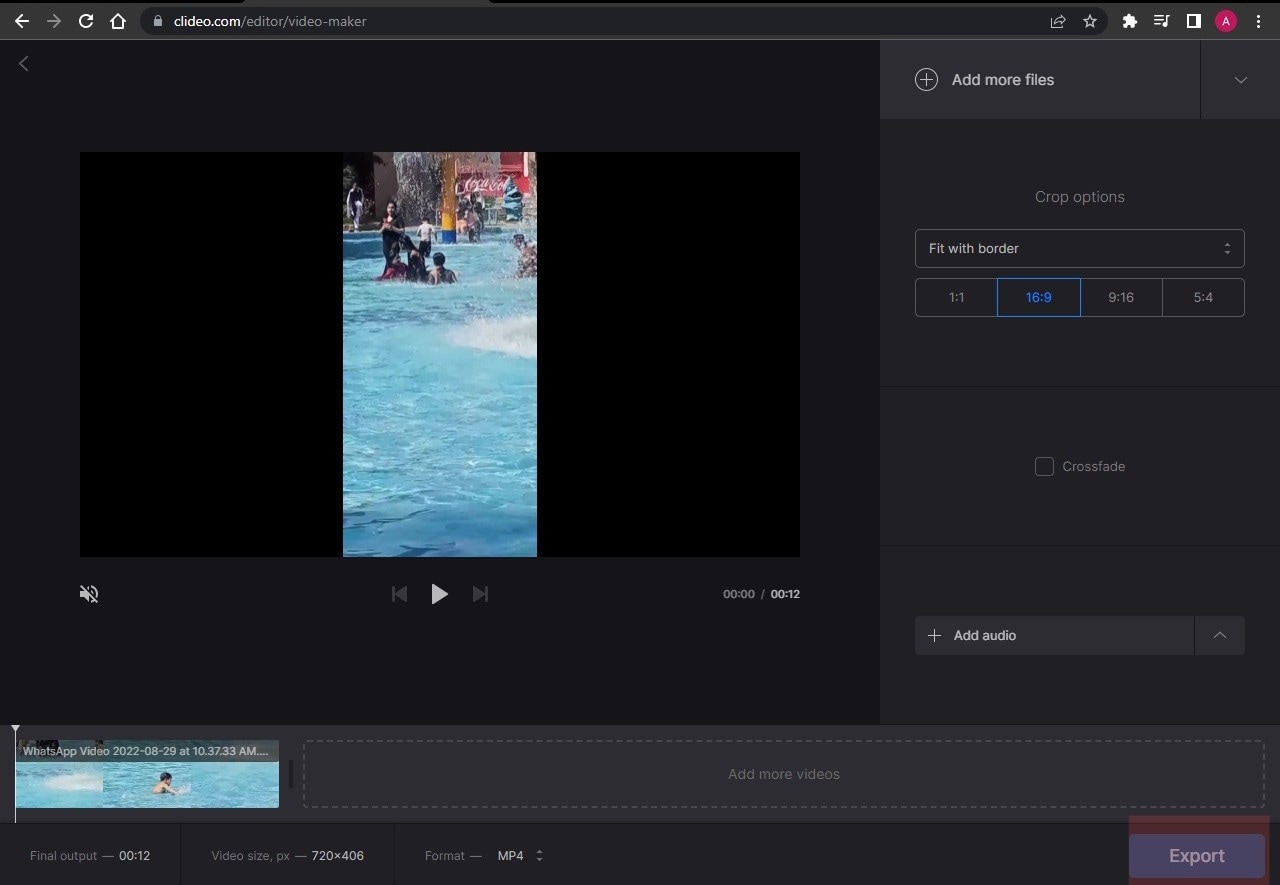
3. Ezgif
Ezgif.com is a great online resource for creating and editing GIF images. This online software has a user-friendly interface.
You can upload images or video files from your computer or a URL, and Ezgif will create a GIF for you. It lets you edit your GIFs before you download them. You can crop, resize, rotate, and reverse your GIFs and add text, filters, audio, and other effects.
How to remove audio from video in Ezgif?
To remove audio from a video using Ezgif, follow the steps below;
Step1 Upload the video to the website.

Step2 Once the video is uploaded, select the “Audio” tab and click on the “Remove audio” button.

Step3 It will remove the audio from the video, and you can download the new video file.
Method2: Use Apple official tools to remove audio from videos
1.QuickTime
QuickTime is a video editor that comes installed on all Mac computers. It is easy to use yet packed with features that allow you to create, edit, and share your work.
QuickTime includes a basic set of video editing features perfect for simple tasks like trimming a clip or adding a title. You can export your video in various formats or upload it directly to YouTube.
An Ultimate Guide to How to remove audio from video in QuickTime?
You can remove and mute the audio from video in Quicktime as follows:
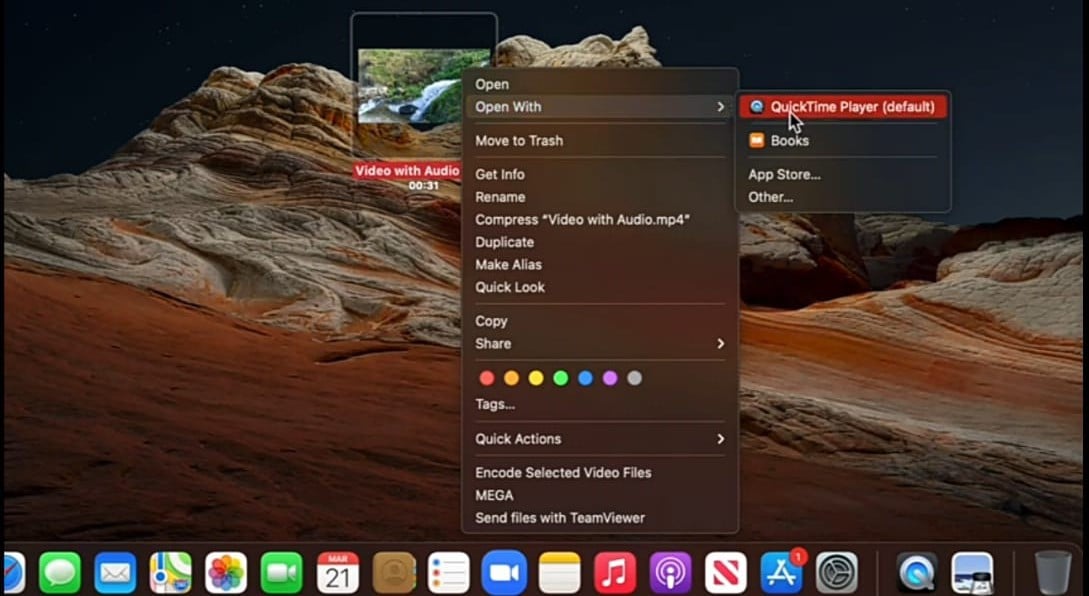
Step1 Open the video with “QuickTime Player,” from which you want to remove the audio.
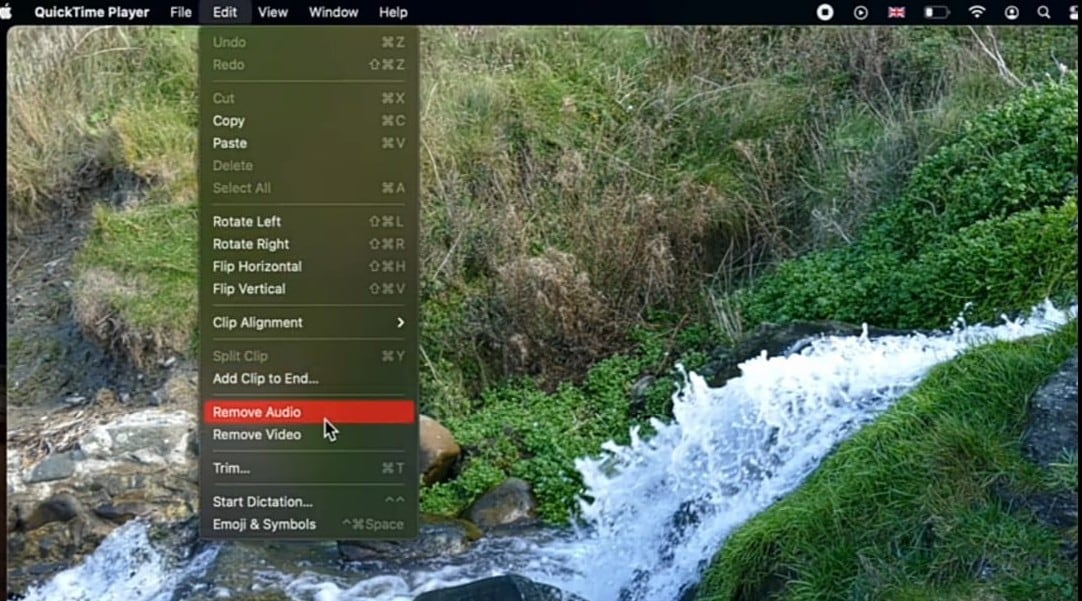
Step2 Select “Edit” from the taskbar and click “Remove Audio.”
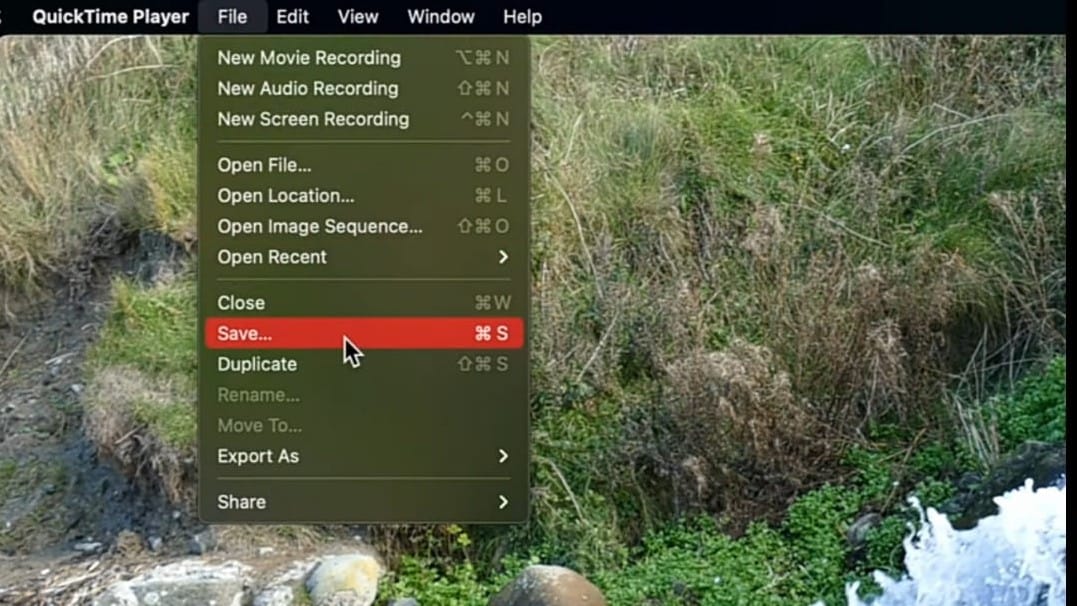
Step3 Now select ‘File” and then click “Save.” It will save the muted video.
2. iMovie:
iMovie is a video editing software application by Apple Inc. It was released in 1999 as a Mac OS. iMovie is a cross-platform application with the Mac OS X operating system and iOS.
It is easy to use and free. You can use iMovie to make movies from your photos and video clips. You can add titles, transitions, filters, text, background music, audio, color correction, animations, and video effects.
How to remove audio from video in iMovie?
There are a few different ways that you can remove audio from video in iMovie.
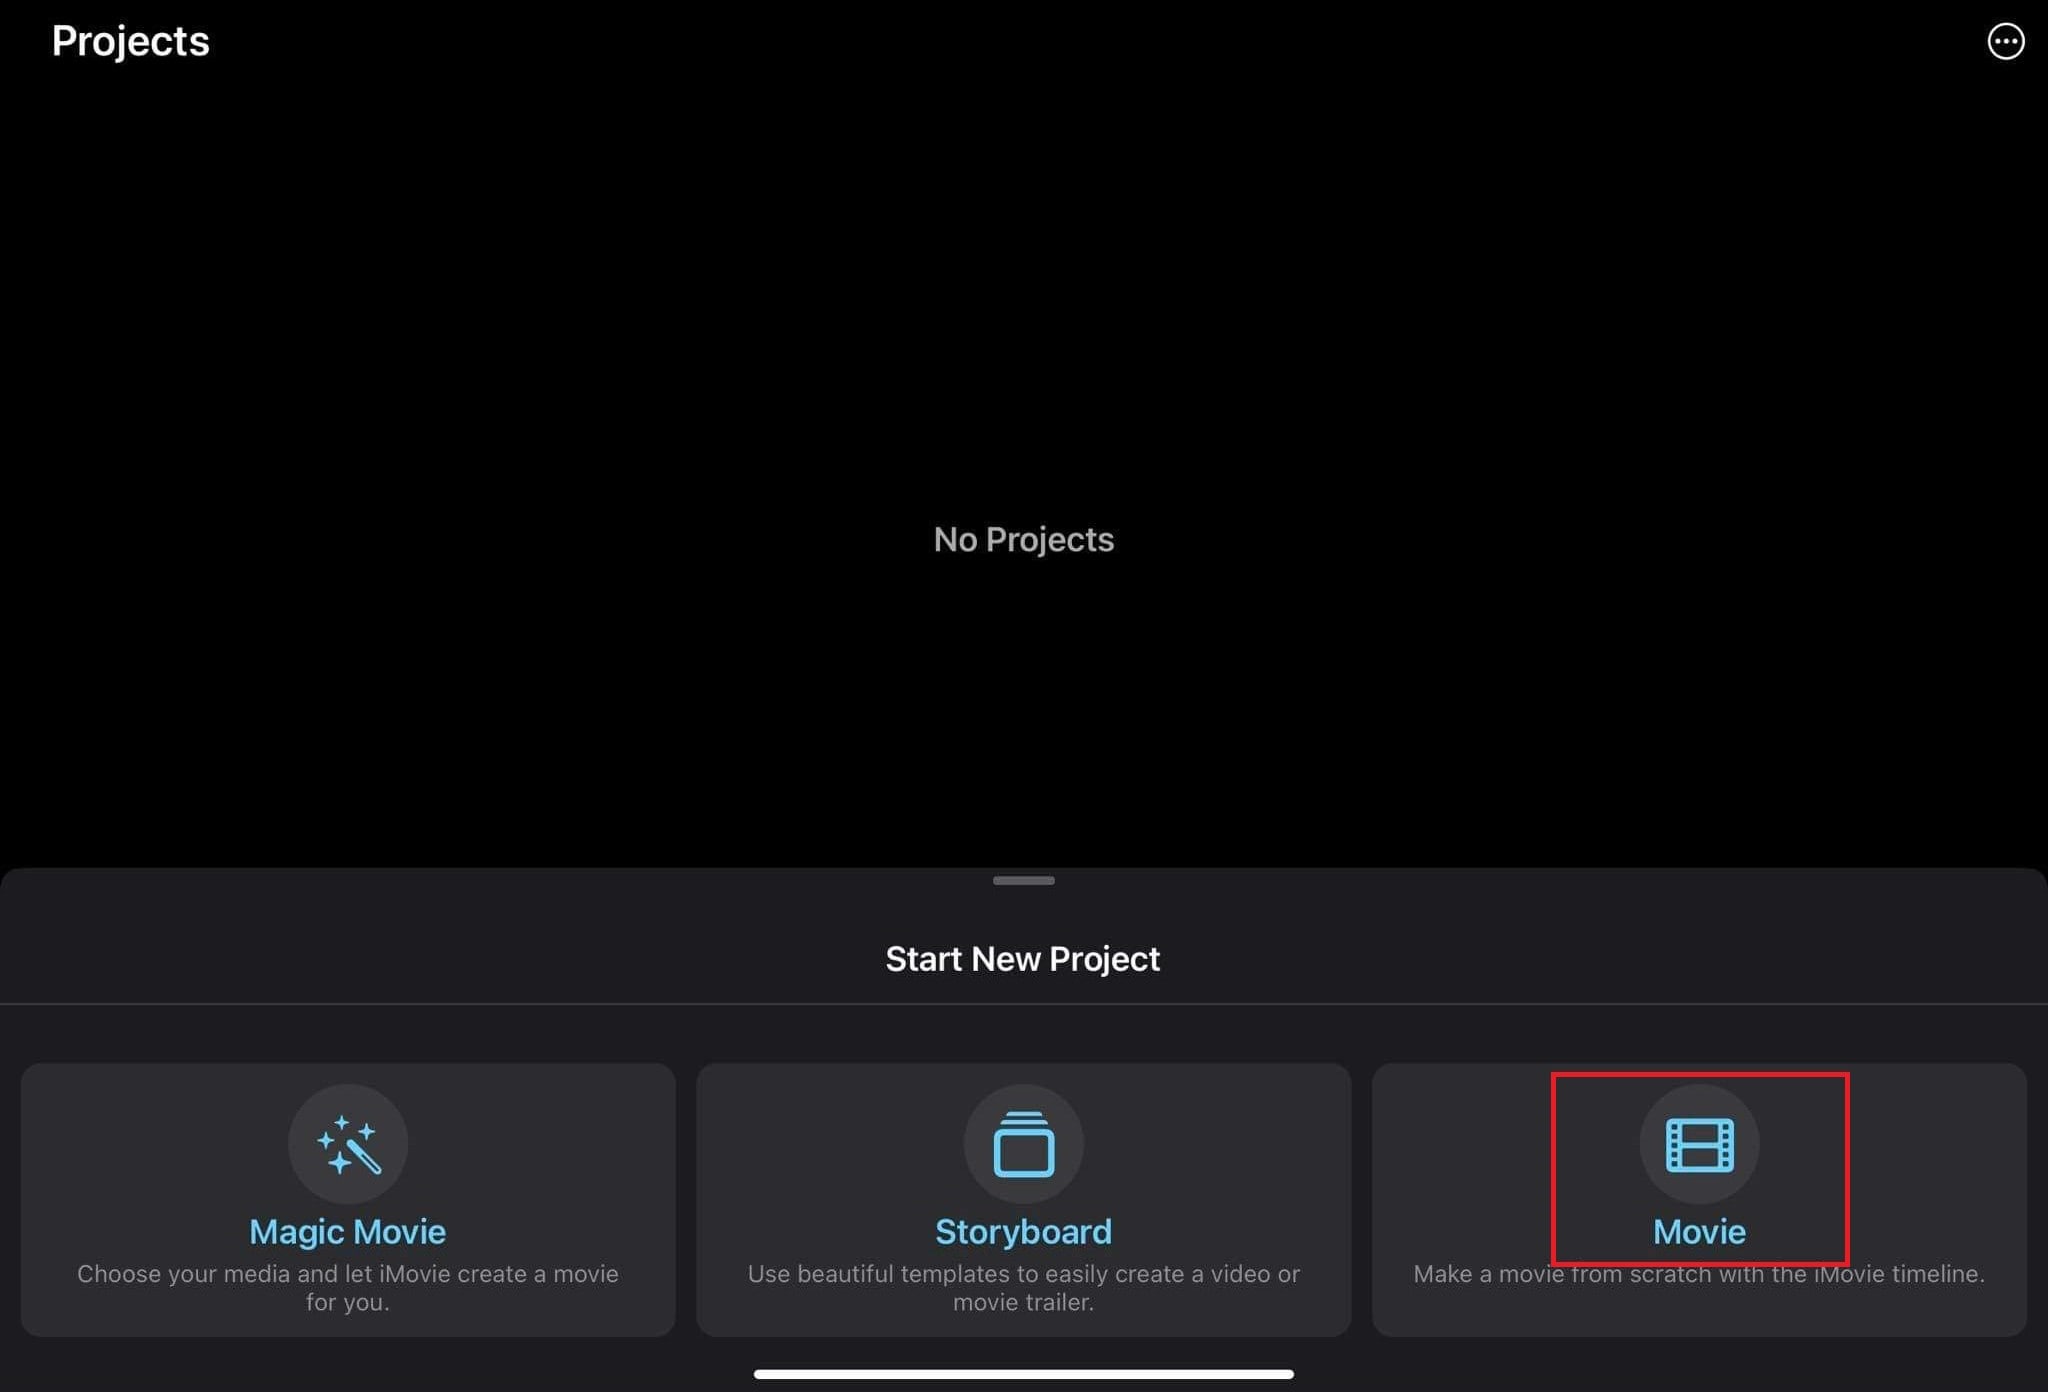
Step1 Click on the “Movie” button. Select the video whose audio is to be removed.
Step2 Now press and hold the timeline. Some options will appear. Click on the “Volume” button.

Step3 Mute the audio.
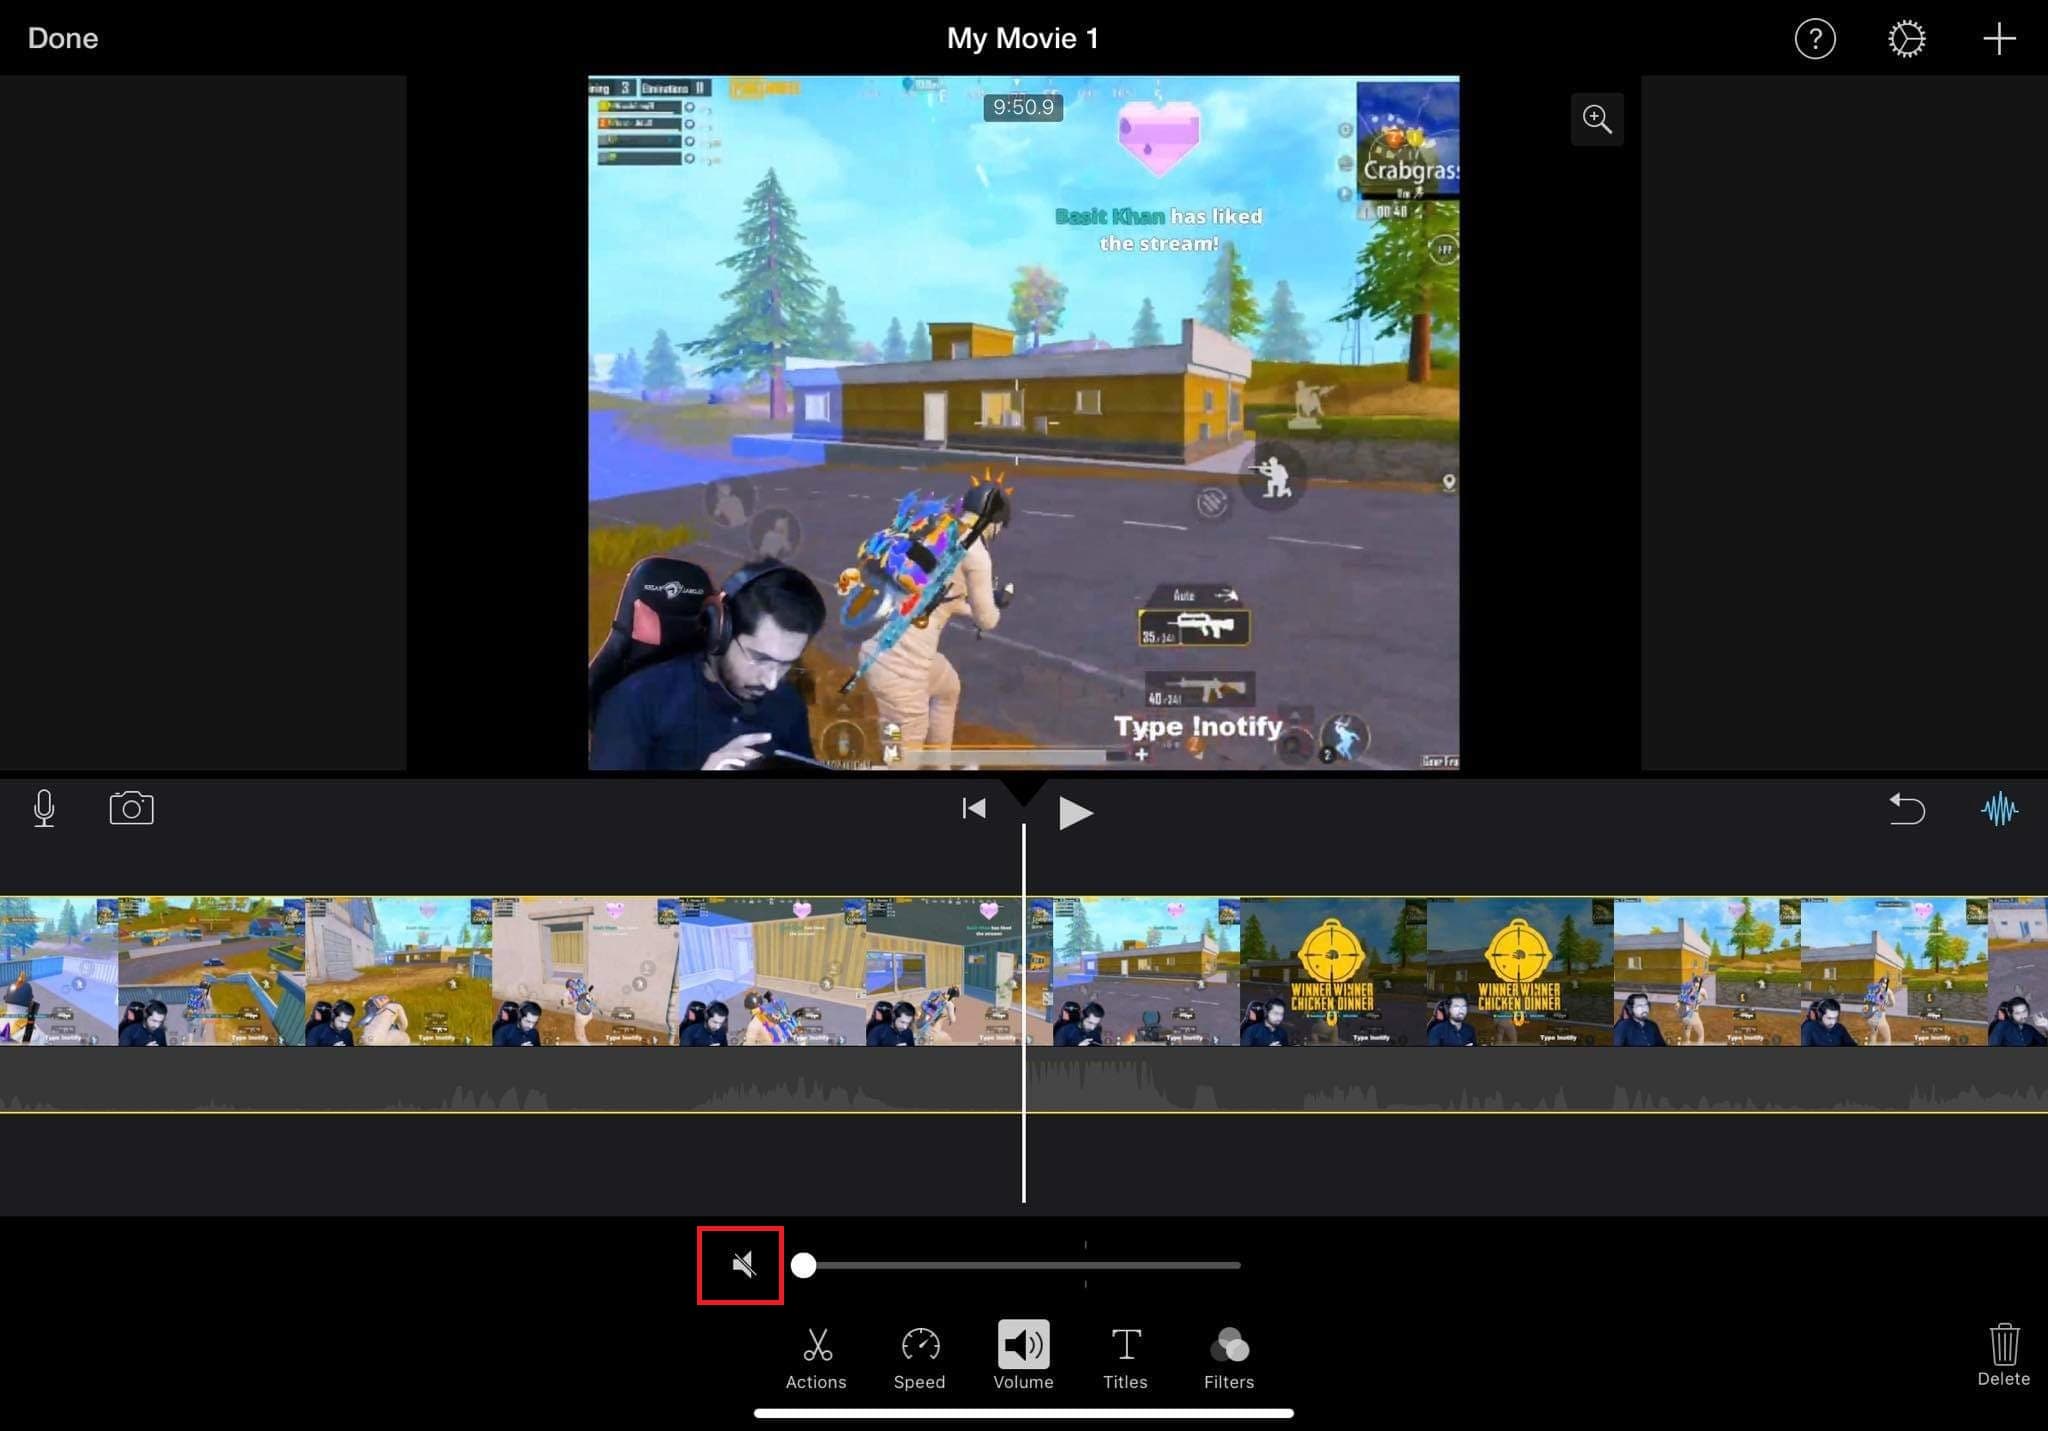
Step4 Now release the timeline and click the “arrow “button.
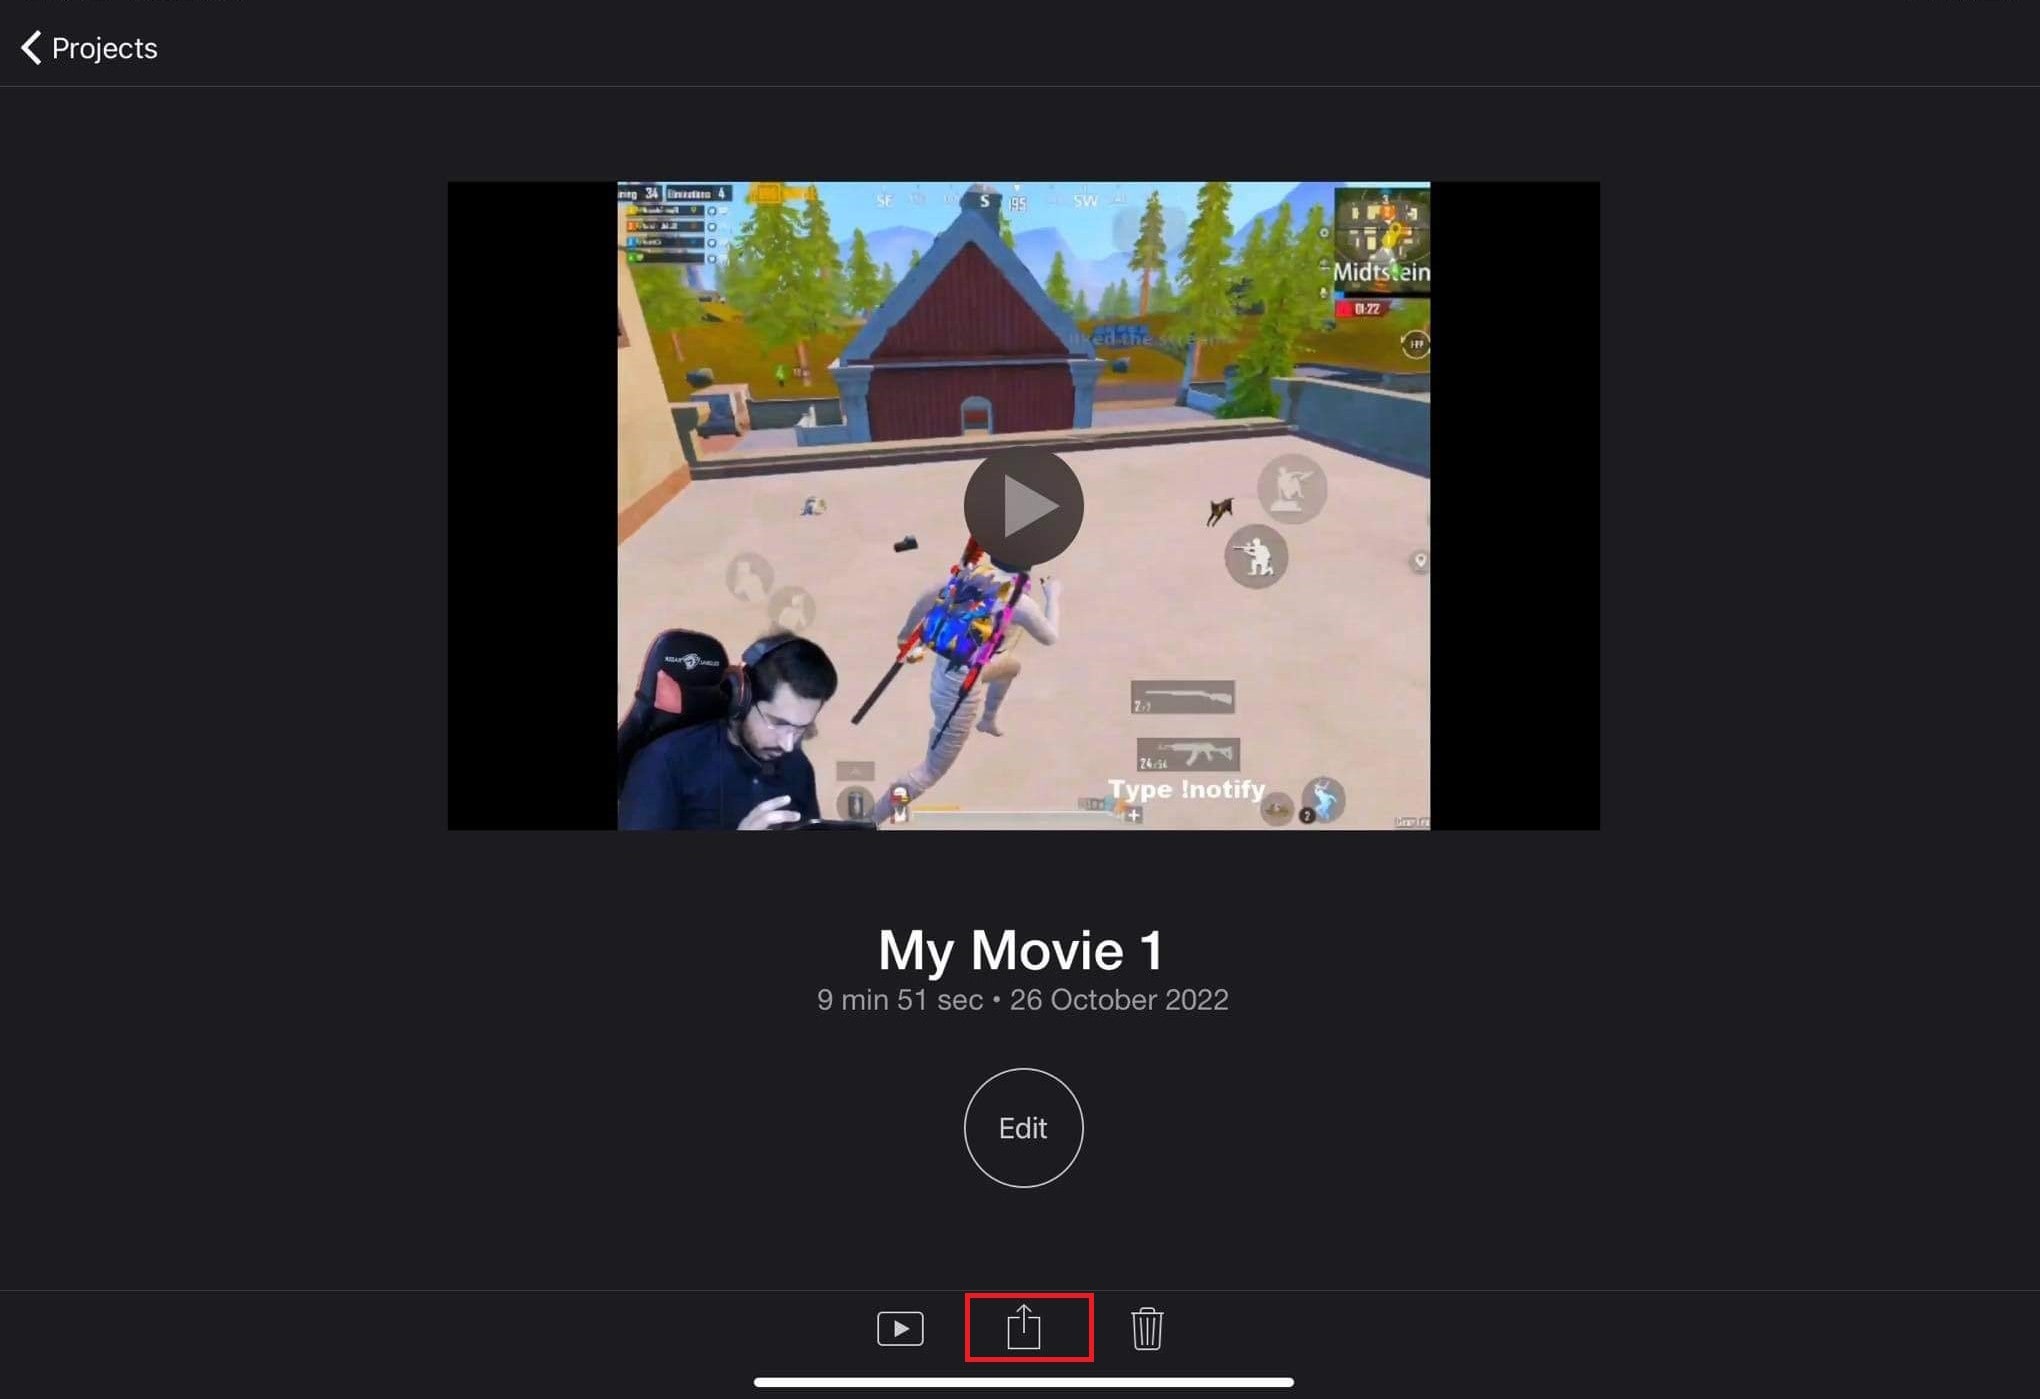
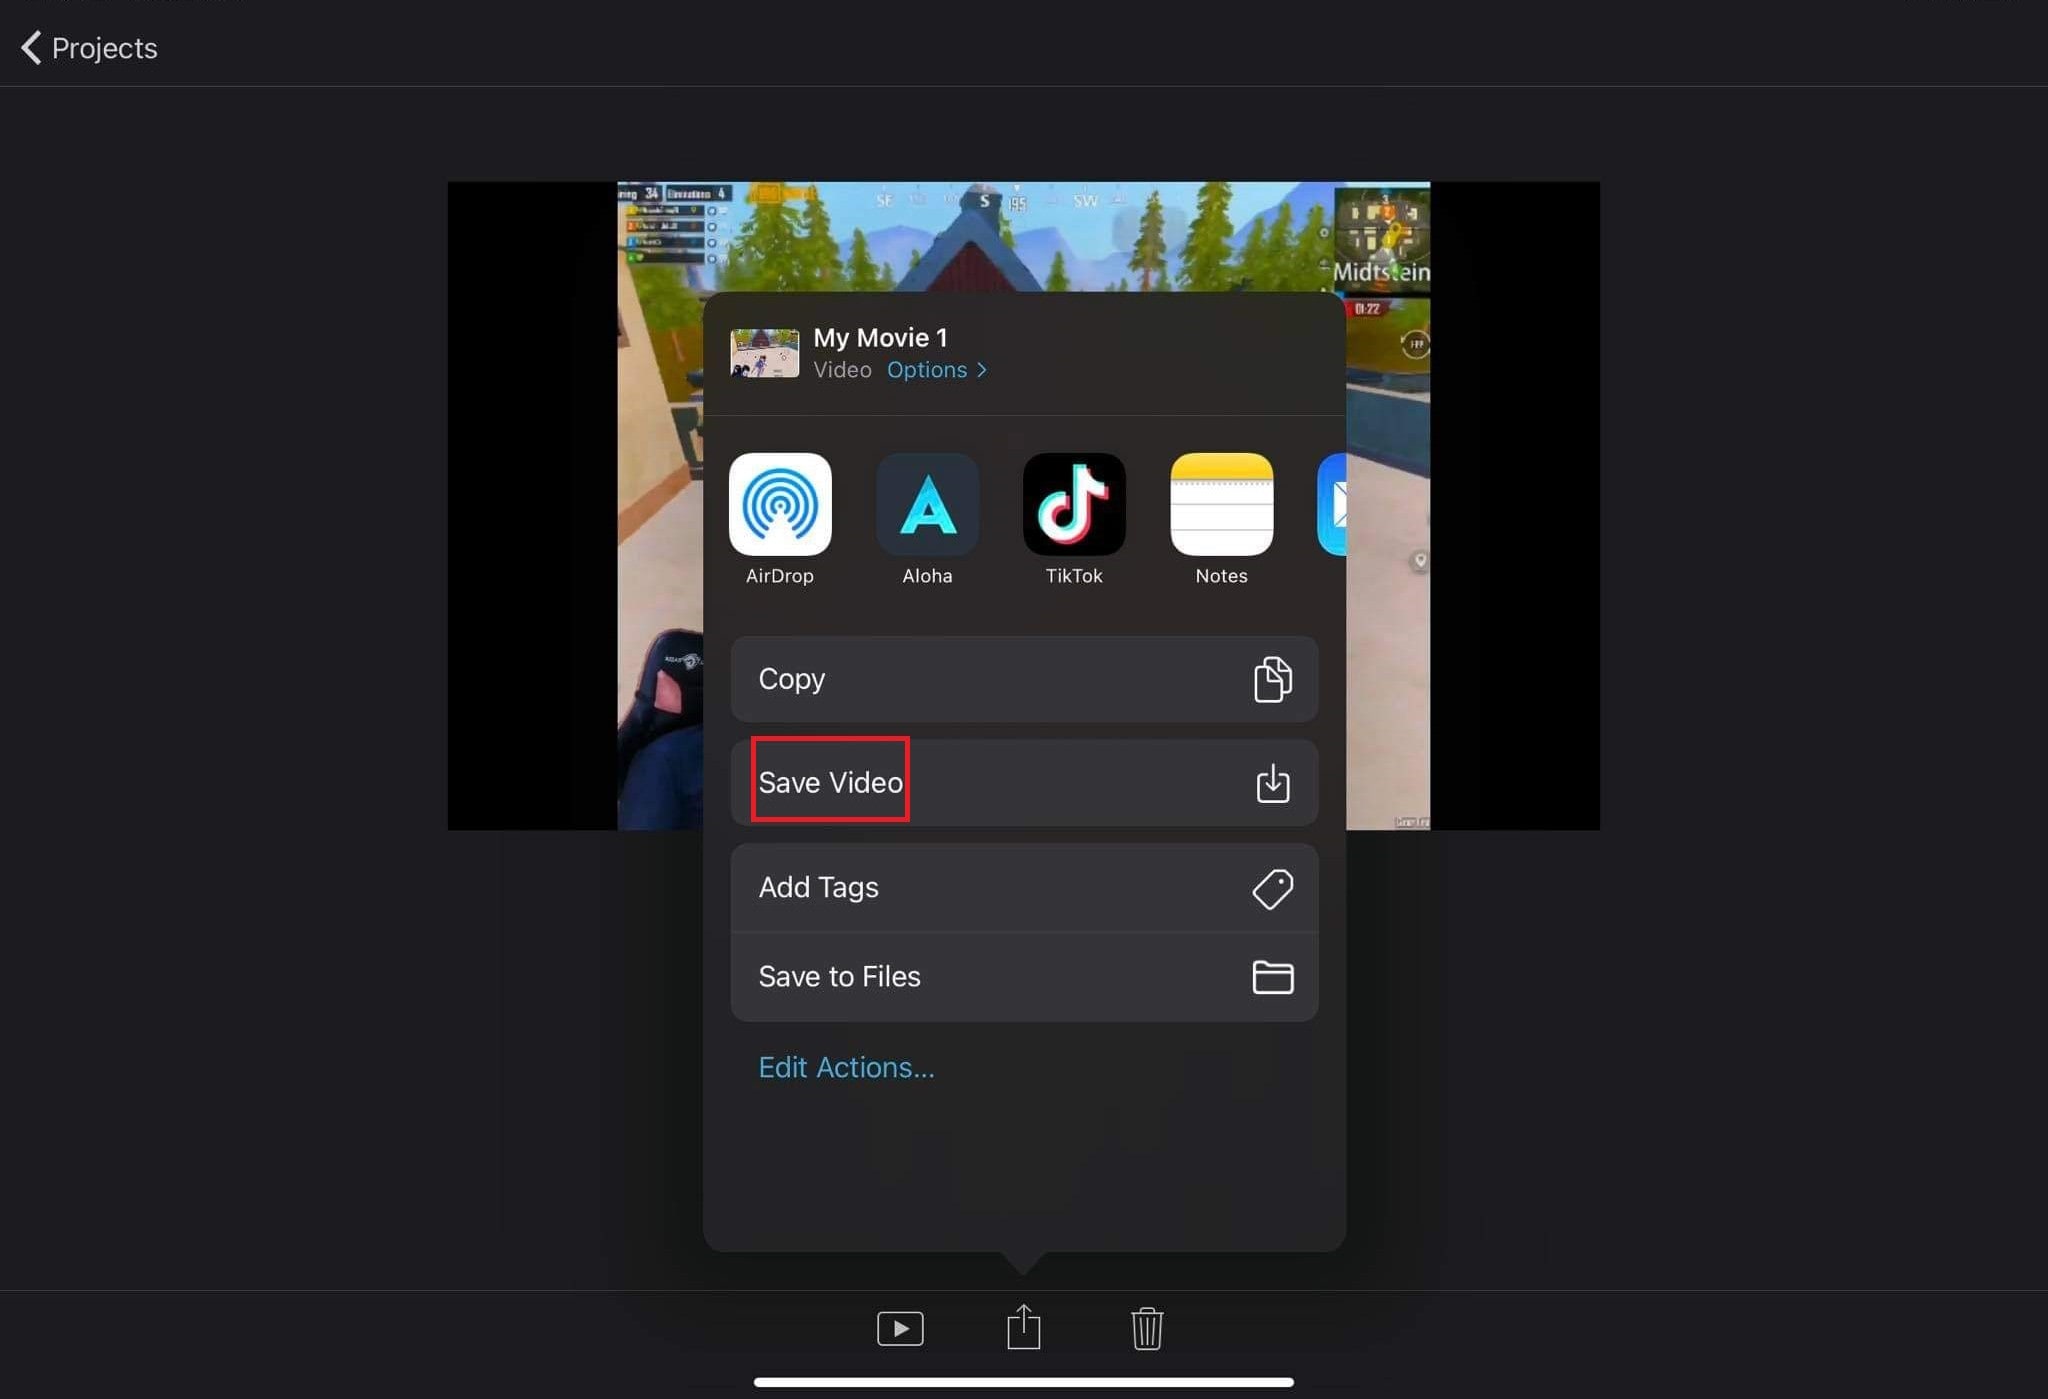
Step5 Save the muted file on your Mac by clicking “Save.”
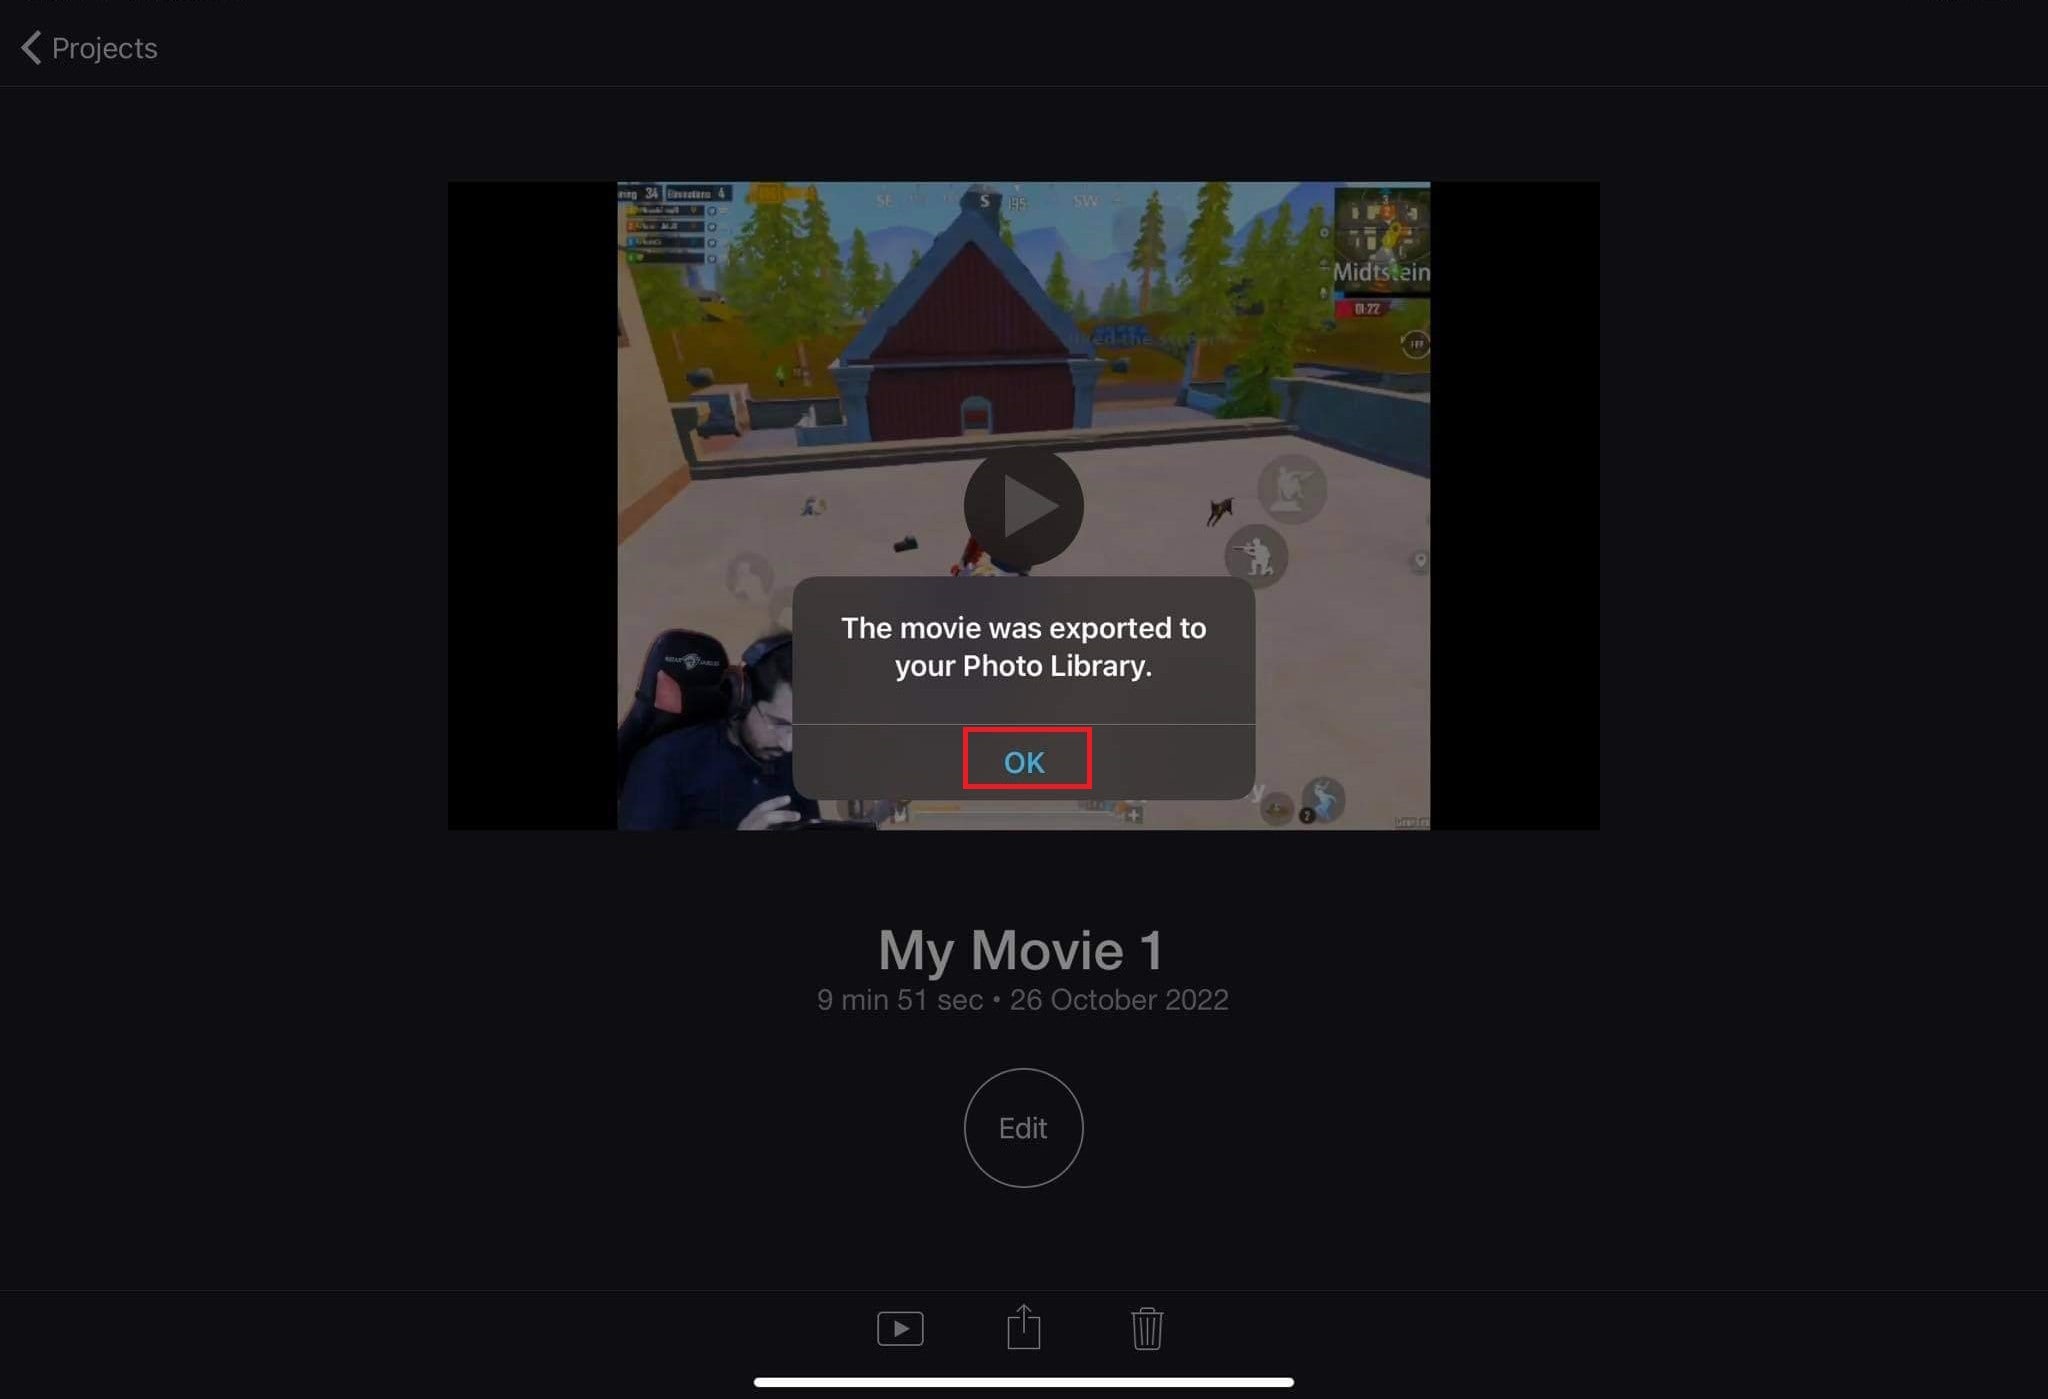
Step6 Muted videos will get exported to your library.
3. Final Cut Pro
Final Cut Pro is a powerful video editor that allows users to create professional-quality videos. With its intuitive design and wide range of features, Final Cut Pro is the perfect tool for anyone looking to create videos for personal or professional use.
Final Cut Pro is a professional-grade video editing software for some of the biggest Hollywood movies. It’s also become a favorite among YouTubers and filmmakers.
How to remove audio from video in Final Cut Pro?
You can remove audio from your video in either of two ways.
Step1 Open the video from which the audio is to be removed.
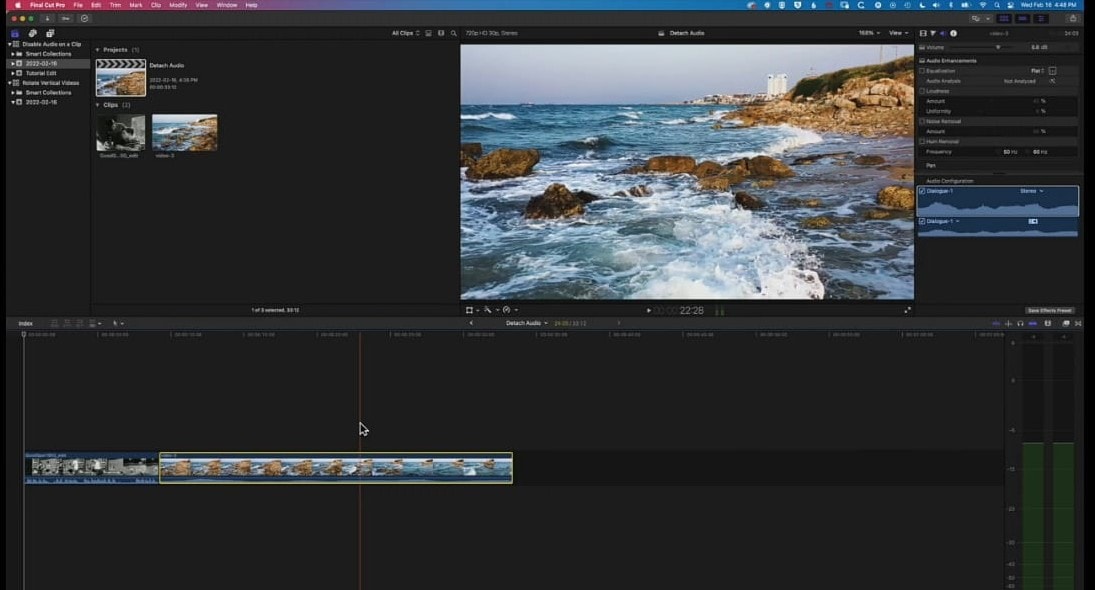
Step2 Now select the timeline.
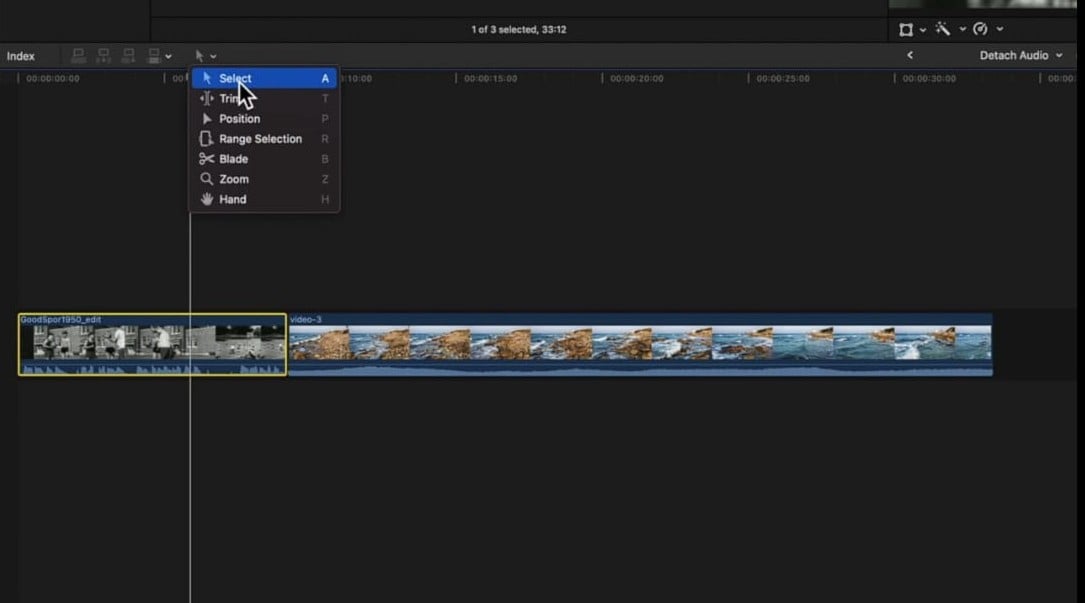
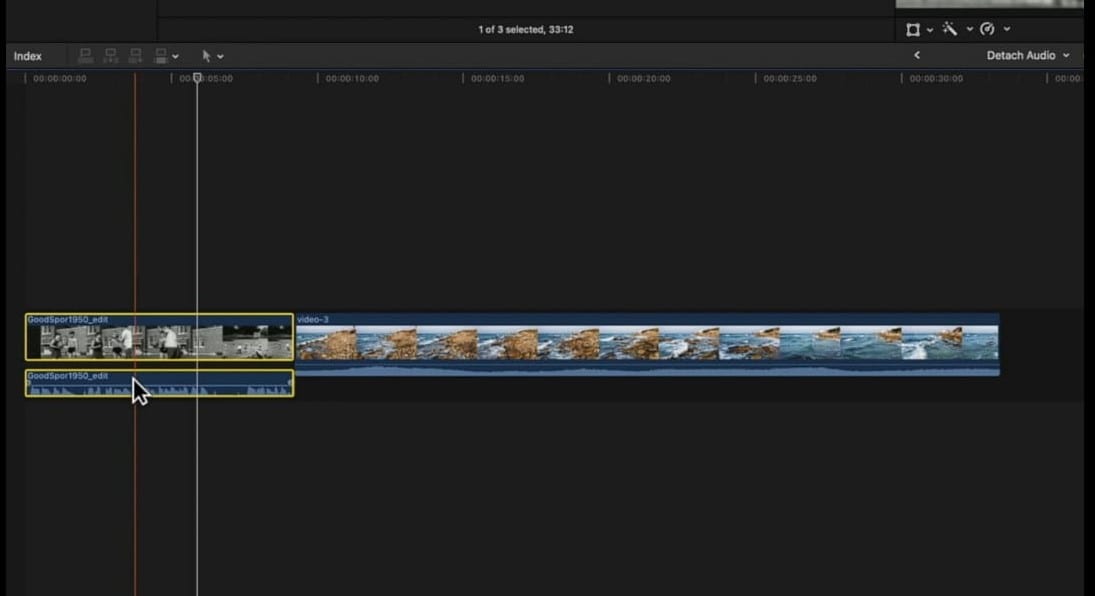
Step3 Double-click on the timeline. It will detach the audio from the video.
Now press the “Delete key” on the keyboard. The audio will get removed.
Method 3: Use Filmora to remove audio from the video
Filmora
If you’re looking for easy-to-use video editing software, Filmora is a great option. It’s simple to use yet still offers a wide range of features. Plus, it’s affordable and supports both Windows and Mac computers.
Free Download For Win 7 or later(64-bit)
Free Download For macOS 10.14 or later
An Ultimate Guide to How to remove audio from video in Filmora?
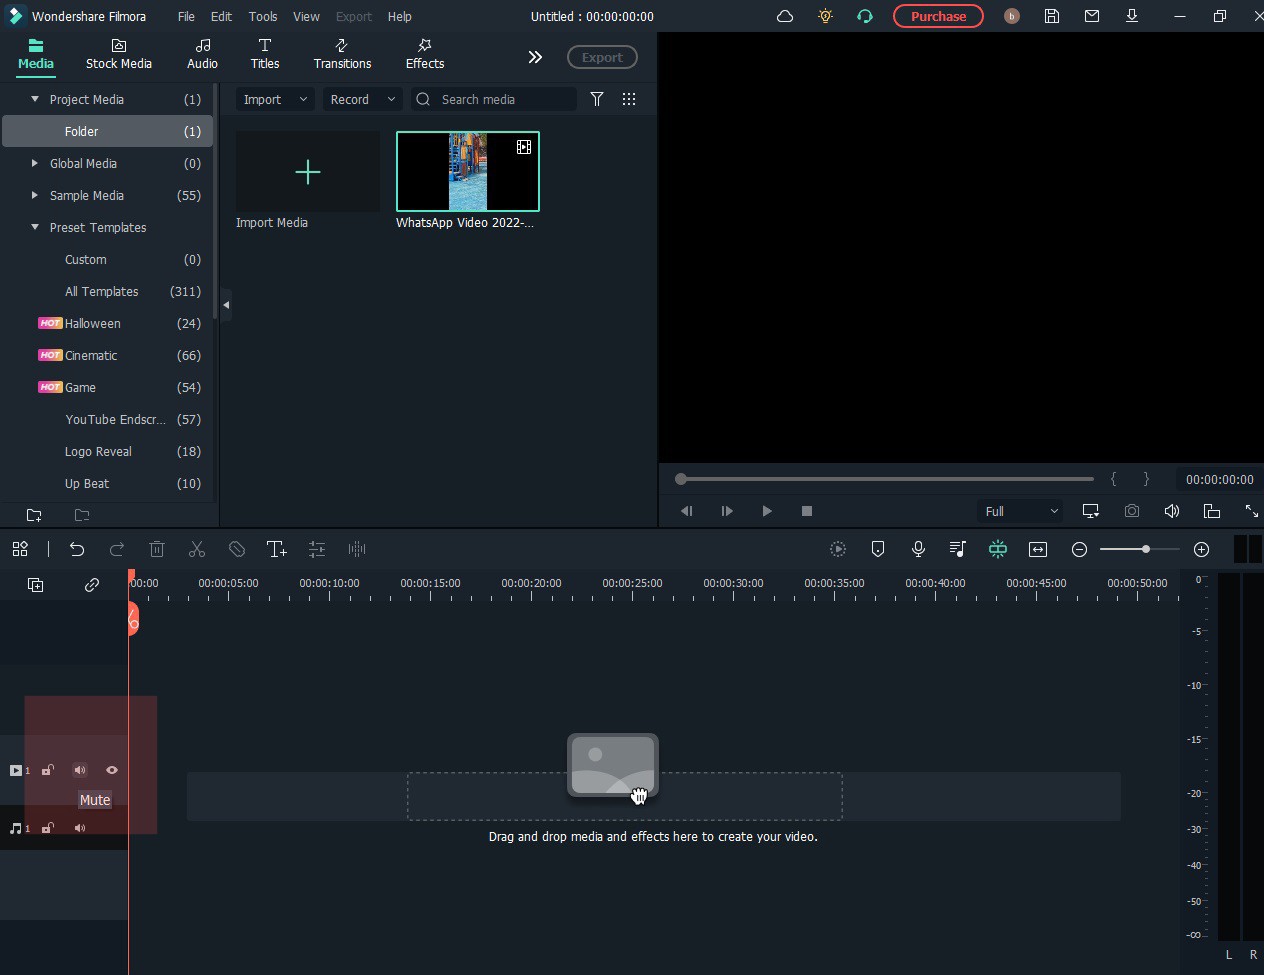
One way is to mute the audio track. To do this, follow the given steps.
Step1 Open a new project in Filmora.

Step2 Click on the audio track in the timeline.
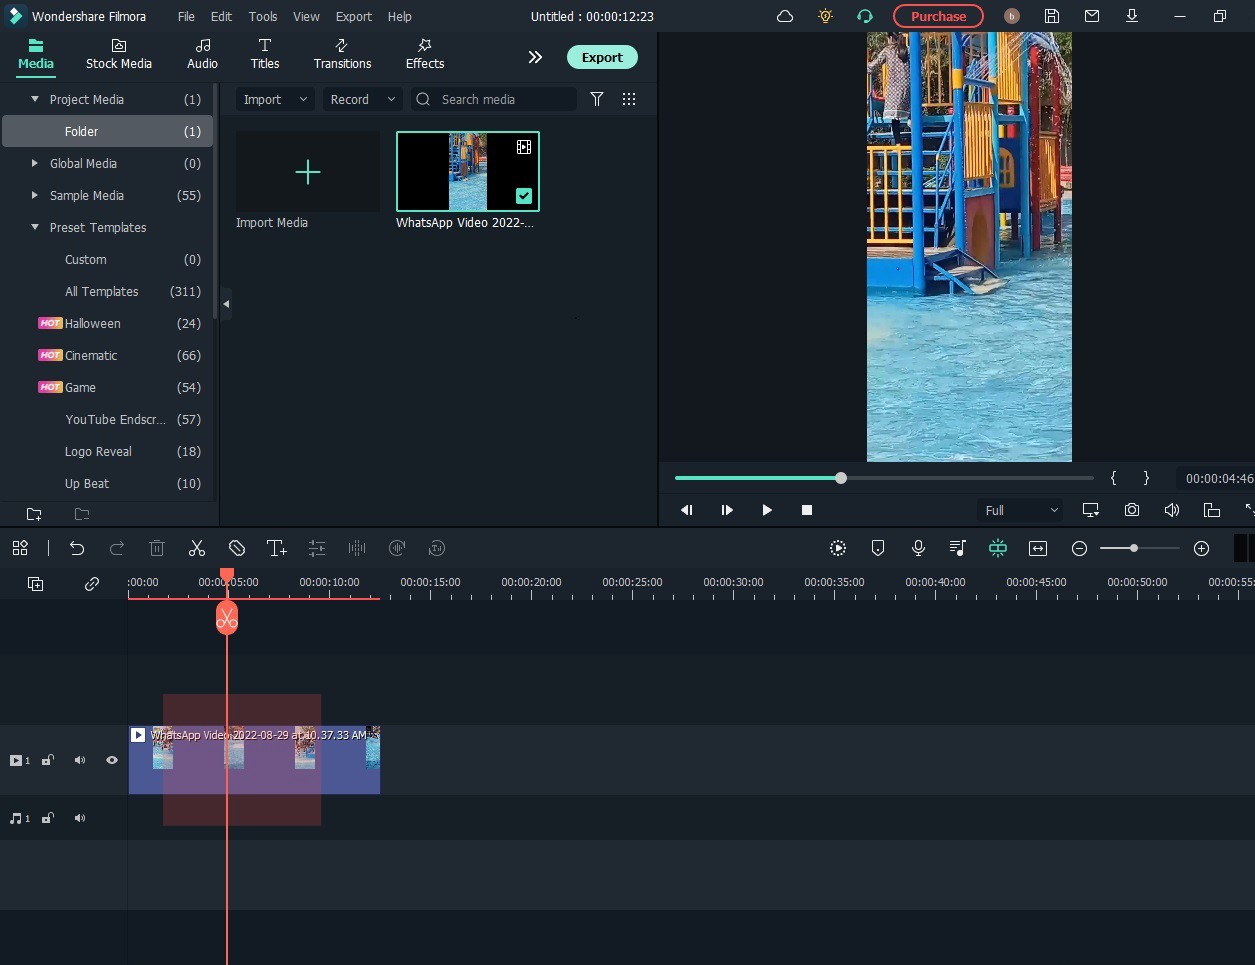
Step3 Now, click the mute button.
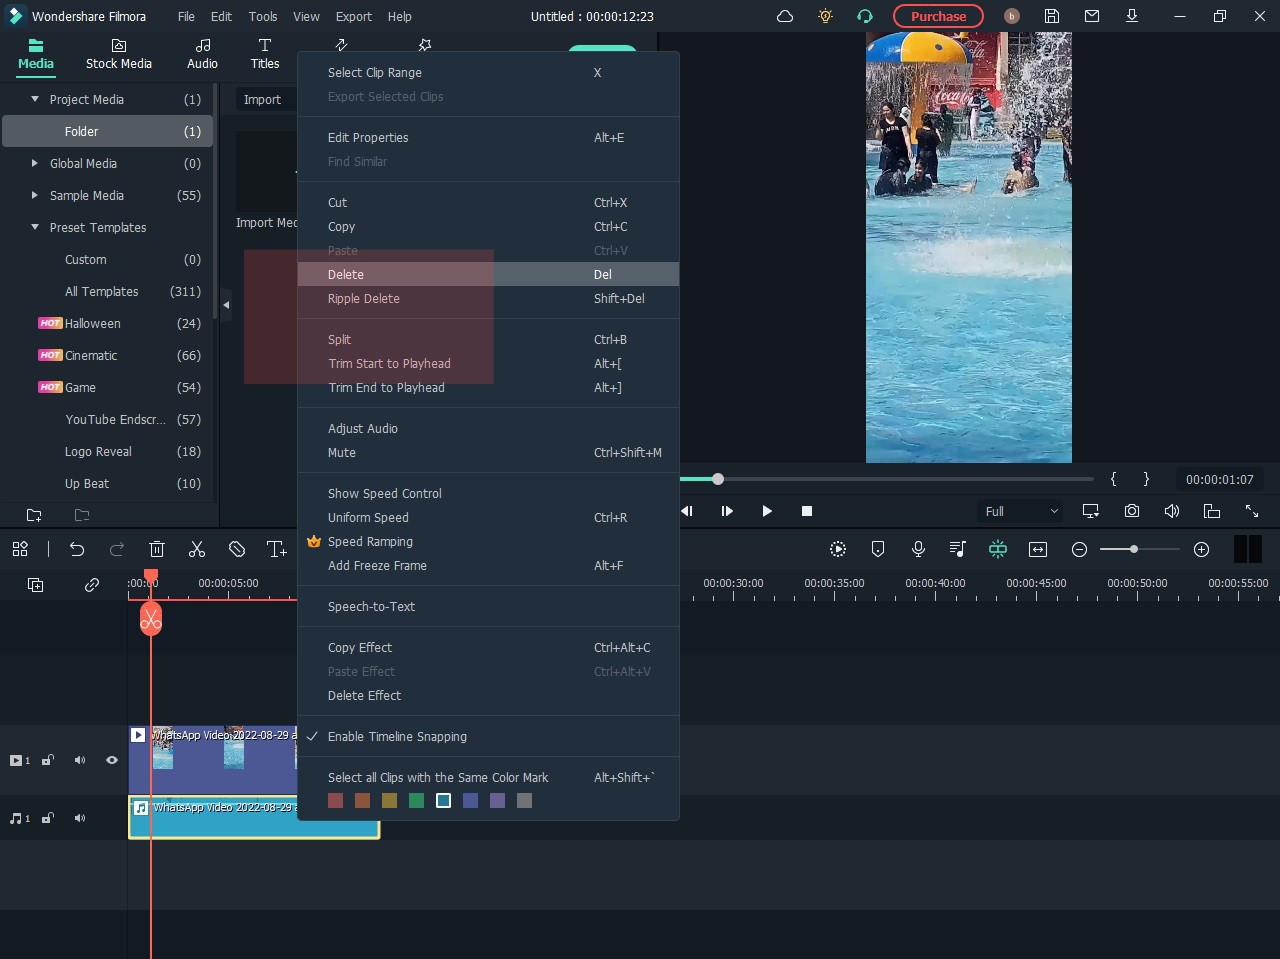
Another way to remove the audio from a video is to delete the audio track. To do this:
Step1 Click on the audio track in the timeline
Step2 Press the delete key on your keyboard.
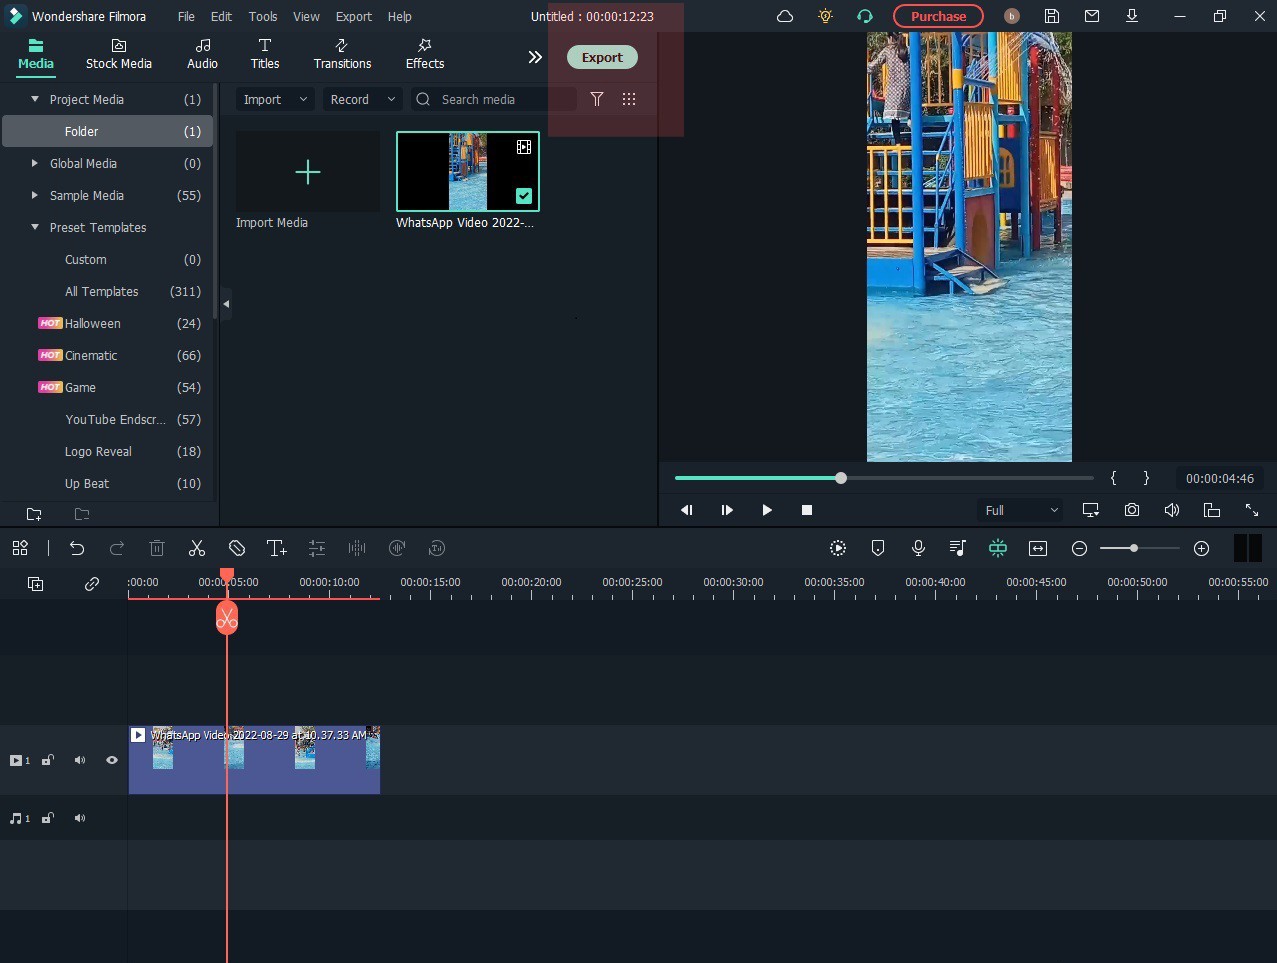
Step3 Click on the export button.
Special Features:
#Silent Detection
With silence detection, you can quickly and easily find the silent moments in your footage. It is great for finding those perfect moments of silence that can impact your film much.
#Audio Ducking
Audio Ducking is a feature in Filmora that automatically lowers the volume of an audio track when another audio track is getting played. It can help ensure that dialog is always audible, even when other sounds are playing in the background.
#TTS and STT
TTS and STT are two features in Filmora that you can use to create subtitles for your video.
TTS stands for text-to-speech, meaning you can create subtitles by typing in the text you want to speak in the video.
STT stands for speech-to-text, meaning you can create subtitles by recording your voice and having Filmora transcribe the text.
Conclusion
Here you go, the best solutions to remove audio from video on Mac. You may choose anyone as per your need.
However, Wondershare Filmora is recommended due to its cross-platform nature and unlimited features.
Free Download For macOS 10.14 or later
An Ultimate Guide to How to remove audio from video in Filmora?
One way is to mute the audio track. To do this, follow the given steps.
Step1 Open a new project in Filmora.

Step2 Click on the audio track in the timeline.

Step3 Now, click the mute button.

Another way to remove the audio from a video is to delete the audio track. To do this:
Step1 Click on the audio track in the timeline
Step2 Press the delete key on your keyboard.

Step3 Click on the export button.

Special Features:
#Silent Detection
With silence detection, you can quickly and easily find the silent moments in your footage. It is great for finding those perfect moments of silence that can impact your film much.
#Audio Ducking
Audio Ducking is a feature in Filmora that automatically lowers the volume of an audio track when another audio track is getting played. It can help ensure that dialog is always audible, even when other sounds are playing in the background.
#TTS and STT
TTS and STT are two features in Filmora that you can use to create subtitles for your video.
TTS stands for text-to-speech, meaning you can create subtitles by typing in the text you want to speak in the video.
STT stands for speech-to-text, meaning you can create subtitles by recording your voice and having Filmora transcribe the text.
Conclusion
Here you go, the best solutions to remove audio from video on Mac. You may choose anyone as per your need.
However, Wondershare Filmora is recommended due to its cross-platform nature and unlimited features.
How To Slow Down GIF: Building an Understanding
Graphic interchange format, mostly known as GIF, is extensively used to convey information. GIF is a communication tool in bitmap image format that clearly conveys your online content. When sharing GIF images, playback speed is the most important thing to count. If the playback speed of the GIF is faster than usual, viewers may skip their focus essential data.
As a solution, you must learn how to adjust slow motion GIF’s speed. This article will teach you the stepwise methods to achieve a slow-motion GIF. Before heading towards the methods, learn about some GIF video platforms. By the end, you will be able to make a matchless slow-mo GIF through a desktop solution.
Slow Motion Video Maker Slow your video’s speed with better control of your keyframes to create unique cinematic effects

Part 1: Where Can I Get Impressive Slow-Motion GIFs for Myself?
Slowing down GIFs brings viewers’ attention to specific actions in video content. It exaggerates facial expressions or movements in the videos, leading to humorous results. Creators choose to slow down GIFs to convey particular moods and styles. Different contexts require different slow-mo GIF videos; below are some platforms to cater to all of them.
1. Giphy
One of the famous platforms for GIFs is Giphy, which offers an extensive collection of GIFs. If you want a GIF that can add humor to your content, pick the entertainment category from Giphy. It provides different domains of GIFs for your ease of selection. Some of its categories include sports, gaming, animals, and cartoons.

Key Features
- Using this platform, you can not only get a GIF but also upload one. Graphics designers or GIF creators can use this place to publish their work globally.
- After selecting one GIF, you can share it on any platform. It allows you to embed the GIF directly on websites or share it through links.
- Every GIF on Giphy provides in-depth details like size, frame, and source. This way, you can instantly choose one that matches your project’s requirements.
2. Tenor
Another popular platform to get high-quality GIFs is Tenor. It supports multiple languages in its interface so international users can better comprehend it. Apart from that, there are many categories in the trending searches of GIFs. It shows which domain of GIFs is ranking the most. Some trending tenors include cars, snow, happy holidays, good nights, and GIFs.

Key Features
- When you pick one GIF, you can change its format before downloading. In this regard, you can choose HD, MP4, and SD quality options.
- This platform detects your selection and suggests relevant GIFs afterward. For instance, if you pick a cat GIF, then you will find a cat GIF when scrolling down.
- Tenor provides GIF specification details under each. Besides, you can share the selected GIF image through the URL and embedded link.
Part 2: What to Do If You Want to Slow Down GIFs: The Best Tools
Knowing platforms, as mentioned above, makes it easier for you to avail the desired GIF. After grabbing one of your choices, you can make it a slow-motion GIF, if required. To do so, there are several tools in the market. Some of them are explained below, along with step-by-step instructions on how to use them.
List of Best Tools to Slow Down GIFs
1. Ezgif.com
This tool is primarily responsible for online GIF making and image editing. Besides, it can convert your video into GIF, resize, cut, crop, and optimize them. Moreover, you can add effects and text to your videos or GIFs to make them appealing. GIF animation speed changers are the real game changers among online solutions:
Step 1
Browse the official site of Ezgif.com and tap on the “Effects” section. Afterward, choose the “Adjust GIF Speed” section to proceed to further options. There, click the “Choose File” white button and look for the file you want to slow down. Optionally, paste the URL link in the given section and tap “Upload” to continue.

Step 2
Scroll down the window and insert the digits on which percentage you want to slow down the speed. Afterward, click the “Change Speed” button and find a slow-motion GIF in the output image.

2. VEED.io
VEED.io is a preferred choice by many creators for professional or high-quality videos. It offers screen recording, video editing, and subtitle translation services. Apart from that, it can fix GIF speed with the GIF speed changer feature. After changing speed, you can add transitions and animation effects in Veed.io. For now, let’s just stick to the slow-mo GIF in the following steps:
Step 1
Access the “GIF Speed Changer” in VEED.io, start by tapping “Choose GIF File” and enter the editing screen.

Step 2
From the next screen, you will get a pop-up menu first. You have to hit the “Upload a File” option and select a GIF file to import into VEED.io. Under the video preview, click on the “Speed” icon next to the “Sound” symbol. Then, choose “0.5x” and get a slow-down GIF preview in front of you.

3. Canva
Students must be aware of this platform as a presentation template provider. Canva is a tool that provides stunning templates to customize with its cloud storage system. Gradually, it’s turning more into a video editing platform. Regarding slow-motion GIFs, it can change the GIF speed online. After slowing down the GIF, you can convert it into MP4 or enhance it by adding graphics.
Step 1
Reach out to the GIF Speed Changer feature of Canva’s video editing. Then, tap the “Change GIF Speed” button to access the editing screen.

Step 2
Navigate towards the left-side panel and hit the “Upload Files.” Now, search and select your GIF to import in Canva’s editing window. Afterward, go to the “Playback” option at the top left and then direct to the left panel. Move the “Video Speed” slider to the left for a Slow-mo GIF. Click on the video for a preview, or look for any other playback adjustments.

Part 3: Make Impressive Slow Mo GIFs Using Desktop Solution
Are you getting customized speed adjustment options using any of the above tools? The answer is quite clear: no online tools do not offer personalization for slow-motion GIFs. That’s where you need Wondershare Filmora as a better alternative. It is currently the best video editor that transforms your videos into art pieces.
With more than 10 billion stock media, you don’t have to browse different sites. Filmora is an all-in-all platform that can not only edit your video but also aims to polish it to the next level. Besides, editors can use Filmora anywhere with just a password.
Free Download For Win 7 or later(64-bit)
Free Download For macOS 10.14 or later
How to Make Slow-motion GIF with Filmora
After discovering the top-notch features of Filmora, it’s time to use it. Although it’s very simple to operate, this step-by-step guide will help you process faster:
Step 1Launch Filmora and Import GIF to the Timeline
Download Wondershare Filmora from its official site. After a successful launch, you will enter its main screen. Look for the “New Project” option from the main interface. Tapping on the New Project, you will find the editing screen. Import your GIF in the media panel and drag it into the timeline section to begin the process.

Step 2Slow Down the GIF with Optical Flow
Right-click on the video and pick the “Uniform Speed” option from the list. This way, you will find an editing panel on the right side. Now, you can move the “Speed” slider towards the left. You can press the space bar and get the slow-motion GIF preview. Direct downward and choose the “Optical Flow” option from the extended menu of “AI Interpolation.”

Step 3Continue to Edit or Head to Export the Media
Finally, you will get a slow but high-quality GIF. Now, it’s up to you to continue exploring other features of Filmora or head to save the file. To save the file, go to the top right corner and press the “Export” button.

Key Features Marking Filmora’s Greatness
Filmora is proven to be the easiest software with the most powerful editing features. As proof, you can read the main features of Filmora to comprehend its functionalities better.
1. Speed Ramping
Create a unique cinematic effect in your video by adjusting keyframes. Filmora offers speed ramping features to bring a smooth transition in slow-motion or fast motions. In speed ramping, you get 6 templates, such as bullet time, montage, and jumper. Using those templates, you don’t need to manually adjust keyframes for speed ramping. Also, you can retain the original pitch of the audio after changing the speed.
2. AI Copilot Editing
To boost productivity, Filmora provides an AI Copilot editor option. It saves time that could be wasted searching for some feature or making the editing perfect. Users can ask anything to copilot in natural language. They can take help from an already existing question in the copilot editors. This feature will guide you toward practical actions through navigation buttons.
3. AI Music Generator
Who else is fed up with finding the perfect music for Vlog? Commonly, you didn’t find a video of exact length and mood. Thus, Filmora enables you to generate a soundtrack according to your mood and video length. Using it, you just have to prompt with the number of tracks, mood, and length. The AI-generated music will not require copyrights, so you can use it freely anywhere.
4. AI Image
Have you ever heard that any video editor can convert your text prompts into images? Filmora is offering this option, especially for people who are struggling to get their desired image. For this purpose, they need to describe images in simple language. Afterward, they are required to pick one style for accurate results.
5. AI Copywriting
Do you have a deadline for script submission, but it is not ready yet? Leave this headache to Filmora’s AI copywriting feature, which aims to produce engaging scripts. With ChatGPT integration, it can generate YouTube titles and descriptions. Furthermore, you can ask AI to convert your script into an appealing video.
Conclusion
To summarize, slowing down is the ultimate solution to retain the viewer’s attention. In this article, you have seen the top-notch platforms for slow-motion GIFs. They are not enough for remarkable videos because of the limited speed adjustment options. So, using Filmora remains the best option in providing easier ways to customize the speed of GIFs.
Make A Slow Motion Video Make A Slow Motion Video More Features

Part 1: Where Can I Get Impressive Slow-Motion GIFs for Myself?
Slowing down GIFs brings viewers’ attention to specific actions in video content. It exaggerates facial expressions or movements in the videos, leading to humorous results. Creators choose to slow down GIFs to convey particular moods and styles. Different contexts require different slow-mo GIF videos; below are some platforms to cater to all of them.
1. Giphy
One of the famous platforms for GIFs is Giphy, which offers an extensive collection of GIFs. If you want a GIF that can add humor to your content, pick the entertainment category from Giphy. It provides different domains of GIFs for your ease of selection. Some of its categories include sports, gaming, animals, and cartoons.

Key Features
- Using this platform, you can not only get a GIF but also upload one. Graphics designers or GIF creators can use this place to publish their work globally.
- After selecting one GIF, you can share it on any platform. It allows you to embed the GIF directly on websites or share it through links.
- Every GIF on Giphy provides in-depth details like size, frame, and source. This way, you can instantly choose one that matches your project’s requirements.
2. Tenor
Another popular platform to get high-quality GIFs is Tenor. It supports multiple languages in its interface so international users can better comprehend it. Apart from that, there are many categories in the trending searches of GIFs. It shows which domain of GIFs is ranking the most. Some trending tenors include cars, snow, happy holidays, good nights, and GIFs.

Key Features
- When you pick one GIF, you can change its format before downloading. In this regard, you can choose HD, MP4, and SD quality options.
- This platform detects your selection and suggests relevant GIFs afterward. For instance, if you pick a cat GIF, then you will find a cat GIF when scrolling down.
- Tenor provides GIF specification details under each. Besides, you can share the selected GIF image through the URL and embedded link.
Part 2: What to Do If You Want to Slow Down GIFs: The Best Tools
Knowing platforms, as mentioned above, makes it easier for you to avail the desired GIF. After grabbing one of your choices, you can make it a slow-motion GIF, if required. To do so, there are several tools in the market. Some of them are explained below, along with step-by-step instructions on how to use them.
List of Best Tools to Slow Down GIFs
1. Ezgif.com
This tool is primarily responsible for online GIF making and image editing. Besides, it can convert your video into GIF, resize, cut, crop, and optimize them. Moreover, you can add effects and text to your videos or GIFs to make them appealing. GIF animation speed changers are the real game changers among online solutions:
Step 1
Browse the official site of Ezgif.com and tap on the “Effects” section. Afterward, choose the “Adjust GIF Speed” section to proceed to further options. There, click the “Choose File” white button and look for the file you want to slow down. Optionally, paste the URL link in the given section and tap “Upload” to continue.

Step 2
Scroll down the window and insert the digits on which percentage you want to slow down the speed. Afterward, click the “Change Speed” button and find a slow-motion GIF in the output image.

2. VEED.io
VEED.io is a preferred choice by many creators for professional or high-quality videos. It offers screen recording, video editing, and subtitle translation services. Apart from that, it can fix GIF speed with the GIF speed changer feature. After changing speed, you can add transitions and animation effects in Veed.io. For now, let’s just stick to the slow-mo GIF in the following steps:
Step 1
Access the “GIF Speed Changer” in VEED.io, start by tapping “Choose GIF File” and enter the editing screen.

Step 2
From the next screen, you will get a pop-up menu first. You have to hit the “Upload a File” option and select a GIF file to import into VEED.io. Under the video preview, click on the “Speed” icon next to the “Sound” symbol. Then, choose “0.5x” and get a slow-down GIF preview in front of you.

3. Canva
Students must be aware of this platform as a presentation template provider. Canva is a tool that provides stunning templates to customize with its cloud storage system. Gradually, it’s turning more into a video editing platform. Regarding slow-motion GIFs, it can change the GIF speed online. After slowing down the GIF, you can convert it into MP4 or enhance it by adding graphics.
Step 1
Reach out to the GIF Speed Changer feature of Canva’s video editing. Then, tap the “Change GIF Speed” button to access the editing screen.

Step 2
Navigate towards the left-side panel and hit the “Upload Files.” Now, search and select your GIF to import in Canva’s editing window. Afterward, go to the “Playback” option at the top left and then direct to the left panel. Move the “Video Speed” slider to the left for a Slow-mo GIF. Click on the video for a preview, or look for any other playback adjustments.

Part 3: Make Impressive Slow Mo GIFs Using Desktop Solution
Are you getting customized speed adjustment options using any of the above tools? The answer is quite clear: no online tools do not offer personalization for slow-motion GIFs. That’s where you need Wondershare Filmora as a better alternative. It is currently the best video editor that transforms your videos into art pieces.
With more than 10 billion stock media, you don’t have to browse different sites. Filmora is an all-in-all platform that can not only edit your video but also aims to polish it to the next level. Besides, editors can use Filmora anywhere with just a password.
Free Download For Win 7 or later(64-bit)
Free Download For macOS 10.14 or later
How to Make Slow-motion GIF with Filmora
After discovering the top-notch features of Filmora, it’s time to use it. Although it’s very simple to operate, this step-by-step guide will help you process faster:
Step 1Launch Filmora and Import GIF to the Timeline
Download Wondershare Filmora from its official site. After a successful launch, you will enter its main screen. Look for the “New Project” option from the main interface. Tapping on the New Project, you will find the editing screen. Import your GIF in the media panel and drag it into the timeline section to begin the process.

Step 2Slow Down the GIF with Optical Flow
Right-click on the video and pick the “Uniform Speed” option from the list. This way, you will find an editing panel on the right side. Now, you can move the “Speed” slider towards the left. You can press the space bar and get the slow-motion GIF preview. Direct downward and choose the “Optical Flow” option from the extended menu of “AI Interpolation.”

Step 3Continue to Edit or Head to Export the Media
Finally, you will get a slow but high-quality GIF. Now, it’s up to you to continue exploring other features of Filmora or head to save the file. To save the file, go to the top right corner and press the “Export” button.

Key Features Marking Filmora’s Greatness
Filmora is proven to be the easiest software with the most powerful editing features. As proof, you can read the main features of Filmora to comprehend its functionalities better.
1. Speed Ramping
Create a unique cinematic effect in your video by adjusting keyframes. Filmora offers speed ramping features to bring a smooth transition in slow-motion or fast motions. In speed ramping, you get 6 templates, such as bullet time, montage, and jumper. Using those templates, you don’t need to manually adjust keyframes for speed ramping. Also, you can retain the original pitch of the audio after changing the speed.
2. AI Copilot Editing
To boost productivity, Filmora provides an AI Copilot editor option. It saves time that could be wasted searching for some feature or making the editing perfect. Users can ask anything to copilot in natural language. They can take help from an already existing question in the copilot editors. This feature will guide you toward practical actions through navigation buttons.
3. AI Music Generator
Who else is fed up with finding the perfect music for Vlog? Commonly, you didn’t find a video of exact length and mood. Thus, Filmora enables you to generate a soundtrack according to your mood and video length. Using it, you just have to prompt with the number of tracks, mood, and length. The AI-generated music will not require copyrights, so you can use it freely anywhere.
4. AI Image
Have you ever heard that any video editor can convert your text prompts into images? Filmora is offering this option, especially for people who are struggling to get their desired image. For this purpose, they need to describe images in simple language. Afterward, they are required to pick one style for accurate results.
5. AI Copywriting
Do you have a deadline for script submission, but it is not ready yet? Leave this headache to Filmora’s AI copywriting feature, which aims to produce engaging scripts. With ChatGPT integration, it can generate YouTube titles and descriptions. Furthermore, you can ask AI to convert your script into an appealing video.
Conclusion
To summarize, slowing down is the ultimate solution to retain the viewer’s attention. In this article, you have seen the top-notch platforms for slow-motion GIFs. They are not enough for remarkable videos because of the limited speed adjustment options. So, using Filmora remains the best option in providing easier ways to customize the speed of GIFs.
Complete Guide to Make an Intro Video
You scroll through different social media platforms which lead you to different bloggers and content creators who introduce themselves through the precise intro videos. It the point where a viewer either turns towards or turns away from a person presenting a brand or a business. Intro videos are a must, particularly when you are new in business and promotions. Bringing your story to life in your intro video requires a propaganda to ensure that it evokes feelings of trust, confidence, and curiosity among your target viewers.
The pillar on which a striking intro videos stands is not just a monotonous visualization with poor graphics and music. It requires expertise and moreover, it requires a ‘point’. Your boring intro video would be purposeless for the people who’re watching it. Each second, you express something new, yet filled with intricate details about your work and brand. Let’s dig in a little deeper to know how exactly your introduction video will generate leads and connects you with your target audience.
Part 1: Why Intro Video is Important
An intro video, just like it sounds, is an introduction of your brand, your content or anything that you’re promoting. It appears as soon as the viewers are all set to explore your content and brand. To make the viewer’s first glimpse of your work worthwhile, it is crucial that you explain your value preposition through a precise and appealing intro video. It is through the intro videos that your work is noticed and promoted. It is important to create a story highlight for your viewers while you’re setting the decorum of your business, brand or other content.
Additionally, your video must fulfill components of a striking intro video. Whatever you are trying to say should be clear in your video. Besides being clear enough, your intro video must be short, precise and goal-oriented. You are attracting viewers so make their view purposeful with your intro video which should tell your story. The intro video, if presented flawlessly, can captivate the visitors to interact with you and can even inspire them to add into the growth of your business/content. In a nutshell, an intro video brings your business to life, increase your boost and grabs your visitors’ attention.
Part 2: When to Use Intro Video
Apart from a variety of benefits it offers, the intro video basically forms the balusters of your brand or content. Intro videos are commonly used in the following domains:
Boost Sales : Incorporating a precise piece of work in the form of an intro video can help you boost sales magically. It is far the most effective strategy you company or brand can adopt. Your brief intro video can tell your story and convey your message in an emotional and dramatic way, which consequently attracts more viewers and ultimately, results in the boost of your sales. It is just as similar to you playing with the minds of your audience. A higher audience engagement due to your intro video can definitely prove that intro video is an asset which you can offer in addition to your marketing strategies.

More Social Shares: Social media is undoubtedly far the most highly competitive space for your brands and businesses to work like magic. It is insane how brands and businesses are promoted on the tip of your fingers by sharing the gist of your work. That gist, is of course what we are talking about here in this article. Intro videos are brief and appealing which can easily by shared over multiple platforms. The more the social shares of your intro video, the more you receive the nectar of your input.

Build Personality: If you’re socially awkward or on the contrary, a social freak; the intro video covers you all. Whoever you are and whatever you do, is most creatively presented through a precise intro video. The intricately woven description of your work in an intro video definitely does wonders. People see you through your work and they see your work and you simultaneously through an intro video, then why risk creating it conventionally?

Increase Brand Awareness: Creating a brand awareness video which narrates your story in a presentable manner is like wining the internet’s mode of lottery. A thoroughly considered and precise piece of your intro video can go viral at an unbelievable pace and before you even know, your marketing has done wonders all over the digital media. What is your brand, what it offers, how it benefits you and who is the target audience; all these queries are explained through a short intro video which would ultimately result in your brand recognition and thus the growth.

Part 3: Best Intro Video Maker
Out there, the market is jam-packed with people witnessing millions of videos on different media platforms every day. This only leads to crowded digital market but only your intro video can stand out and flaunt your work charmingly. Filmora is one best choice to professionally craft your intro video which can give your brand a head start in no time.
Wondershare Filmora is a time effective and easy to use video editing software that enable the users to create variety of videos by choosing among some great presets and powerful editing tools. Maintaining and improving the quality of videos, Filmora enables the users to choose across a variety of different video editing features. This video editing software is developed by Wondershare and it includes features for a range of users from beginner to intermediate levels.

For a composition of your intro video, Filmora is the best go-to software so why wait another minute? Currently, Filmora is compatible with Windows and macOS computers. Some of the features offered by Filmora include the following:
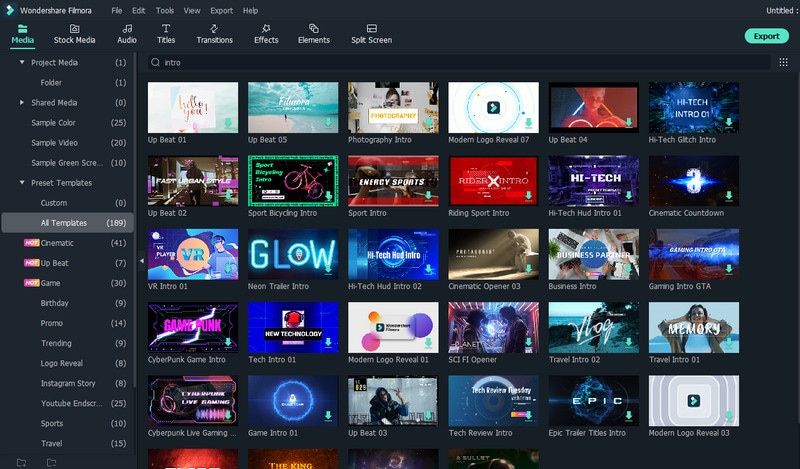
Rich Intro Templates
A wide variety of professionally crafted templates are available on your fingertips so instead of conventionally editing your videos, get your hands on the stunning templates offered by Filmora. Filmora is equipped with multiple templates which provide the users a plethora of options when it comes to customizing videos. These templates are easy to use and your intro videos can turn into a magic movie with presets offered by Filmora so grab your setup today and enjoy the affordable software now.
Numerous Video Effects
Importing media and editing it on the timeline to create a compelling tale is the first step in a video editor’s post-production process. Following those foundational steps, an editor applies various effects to the video in order to fix issues, improve mood, intensify suspense, and add magic to the video. Filmora offers a great variety of customizable filters, effects, transitions and the best part? You don’t even have to be a pro to use these effects.

Title Editing
Filmora enables the intro video makers to adorn the titles of their videos by selecting among multiple text editing options. Both short videos and full-length movies must have opening titles and closing credits. You may catch the audience’s attention from the first frame of your video by coming up with inventive methods to employ text which precisely conveys the tale of your film. You may utilize more than a hundred text settings in Filmora’s Titles tab to add text to the video.

Text to Speech/STT
Speaking in your videos may increase engagement and make it simpler for viewers to grasp what you’re saying. But how can you add audio without first recording it? Are you considering hiring a voice actor? Don’t worry! Filmora got your back by offering Text to Speech (TTS) function, which enables the users to add voice to your video. Filmora automatically transcripts your text files into speech on the click of a button.

Audio Editing
Filmora additionally offers an audio panel where the software helps to manipulate audio added to your intro videos. The audio editing feature of Filmora enables users to improve the quality of the audio, to remove unwanted noises, balance pitch or change the length of a particular audio file.

Part 4: How to Create Intro Videos
To maintain consistency and to provide your brand with a unique identity, it is essential to carefully craft an intro video. Following is a step-by-step guide through which you can get your hands on this effective video editing software:
Free Download For Win 7 or later(64-bit)
Free Download For macOS 10.14 or later
Step1Download and Install the Software
The first step in creating an intro video requires the user to download and install the Filmora software in Windows or MacOS computers. To download the setup, go to https://filmora.wondershare.com/ and click ‘Download’. Afterwards, when the setup is downloaded, run the setup and install Filmora on your computer:

Step2Add Color Templates
After installing, wait until the installation is finished. Launch Wondershare Filmora and go to MEDIA tab at the top left of the interface and select the best suitable background color for your intro video from the dropdown menu in the MEDIA tab. Drag your cursor over the tile of the color you wish to use as a background and click to add the icon that appears in the center to add it to the timeline.

Additionally, if you don’t prefer the preset backgrounds and colors, Filmora lets you use your own background image or video clip. For this, select PROJECT MEDIA > click anywhere inside the media window > import media file of your choice. After importing the file, click on the imported file to add it to the timeline.
Step3Select and add audio effect to your Intro Video
Your video automatically grasps a lot of viewers’ attention with a spice of some music/audio in the background. To adorn your intro video further, you can add audio/music effect to your intro video using the inbuilt music and sound effects from the library. If you want to listen to a track from the inbuilt library collection of audio and music, double click on the thumbnail.

Click the AUDIO tab. Choose from Recommended audio files or import your own audio. Once, you find your desired audio/music file, drag and drop it to the audio track below the video.
Step4Add Text/Logo to your Intro Video
Click the ‘TITLE’ tab. To customize, choose title options from Recommended or add your own custom design. To change, format, and animate the text as needed, click on your desired preset or custom title and double click or drag it to the bottom area of the main library to insert a title.

Also, you need to adjust the position and duration of the title to get a better view. In the intro video, it is recommended to add your logo or slogan as well. To add your logo, drag and drop it to the track above the video, and adjust its position and size.
Step5Add Effects to your Intro Video
Go to ‘EFFECTS’ tab, choose a category from the top-left pane, and click and drag your preferred effect from the Effects library to the timeline. Adjust the playback duration by dragging the right handle of the track in the timeline as explained above. Optionally, double-click the Effects track to customize the appearance as needed.
Step6Export the Intro and Add to Shared Media
Once you’re done making your intro video, click on the ‘EXPORT’ tab in the center > go to LOCAL tab on export box > choose your preferred output format (e.g., MP4) > adjust other preferences such as destination location, resolution etc. from the right pane of the box > Click EXPORT.

Free Download For macOS 10.14 or later
Step1Download and Install the Software
The first step in creating an intro video requires the user to download and install the Filmora software in Windows or MacOS computers. To download the setup, go to https://filmora.wondershare.com/ and click ‘Download’. Afterwards, when the setup is downloaded, run the setup and install Filmora on your computer:

Step2Add Color Templates
After installing, wait until the installation is finished. Launch Wondershare Filmora and go to MEDIA tab at the top left of the interface and select the best suitable background color for your intro video from the dropdown menu in the MEDIA tab. Drag your cursor over the tile of the color you wish to use as a background and click to add the icon that appears in the center to add it to the timeline.

Additionally, if you don’t prefer the preset backgrounds and colors, Filmora lets you use your own background image or video clip. For this, select PROJECT MEDIA > click anywhere inside the media window > import media file of your choice. After importing the file, click on the imported file to add it to the timeline.
Step3Select and add audio effect to your Intro Video
Your video automatically grasps a lot of viewers’ attention with a spice of some music/audio in the background. To adorn your intro video further, you can add audio/music effect to your intro video using the inbuilt music and sound effects from the library. If you want to listen to a track from the inbuilt library collection of audio and music, double click on the thumbnail.

Click the AUDIO tab. Choose from Recommended audio files or import your own audio. Once, you find your desired audio/music file, drag and drop it to the audio track below the video.
Step4Add Text/Logo to your Intro Video
Click the ‘TITLE’ tab. To customize, choose title options from Recommended or add your own custom design. To change, format, and animate the text as needed, click on your desired preset or custom title and double click or drag it to the bottom area of the main library to insert a title.

Also, you need to adjust the position and duration of the title to get a better view. In the intro video, it is recommended to add your logo or slogan as well. To add your logo, drag and drop it to the track above the video, and adjust its position and size.
Step5Add Effects to your Intro Video
Go to ‘EFFECTS’ tab, choose a category from the top-left pane, and click and drag your preferred effect from the Effects library to the timeline. Adjust the playback duration by dragging the right handle of the track in the timeline as explained above. Optionally, double-click the Effects track to customize the appearance as needed.
Step6Export the Intro and Add to Shared Media
Once you’re done making your intro video, click on the ‘EXPORT’ tab in the center > go to LOCAL tab on export box > choose your preferred output format (e.g., MP4) > adjust other preferences such as destination location, resolution etc. from the right pane of the box > Click EXPORT.

Free Download For macOS 10.14 or later
Step1Download and Install the Software
The first step in creating an intro video requires the user to download and install the Filmora software in Windows or MacOS computers. To download the setup, go to https://filmora.wondershare.com/ and click ‘Download’. Afterwards, when the setup is downloaded, run the setup and install Filmora on your computer:

Step2Add Color Templates
After installing, wait until the installation is finished. Launch Wondershare Filmora and go to MEDIA tab at the top left of the interface and select the best suitable background color for your intro video from the dropdown menu in the MEDIA tab. Drag your cursor over the tile of the color you wish to use as a background and click to add the icon that appears in the center to add it to the timeline.

Additionally, if you don’t prefer the preset backgrounds and colors, Filmora lets you use your own background image or video clip. For this, select PROJECT MEDIA > click anywhere inside the media window > import media file of your choice. After importing the file, click on the imported file to add it to the timeline.
Step3Select and add audio effect to your Intro Video
Your video automatically grasps a lot of viewers’ attention with a spice of some music/audio in the background. To adorn your intro video further, you can add audio/music effect to your intro video using the inbuilt music and sound effects from the library. If you want to listen to a track from the inbuilt library collection of audio and music, double click on the thumbnail.

Click the AUDIO tab. Choose from Recommended audio files or import your own audio. Once, you find your desired audio/music file, drag and drop it to the audio track below the video.
Step4Add Text/Logo to your Intro Video
Click the ‘TITLE’ tab. To customize, choose title options from Recommended or add your own custom design. To change, format, and animate the text as needed, click on your desired preset or custom title and double click or drag it to the bottom area of the main library to insert a title.

Also, you need to adjust the position and duration of the title to get a better view. In the intro video, it is recommended to add your logo or slogan as well. To add your logo, drag and drop it to the track above the video, and adjust its position and size.
Step5Add Effects to your Intro Video
Go to ‘EFFECTS’ tab, choose a category from the top-left pane, and click and drag your preferred effect from the Effects library to the timeline. Adjust the playback duration by dragging the right handle of the track in the timeline as explained above. Optionally, double-click the Effects track to customize the appearance as needed.
Step6Export the Intro and Add to Shared Media
Once you’re done making your intro video, click on the ‘EXPORT’ tab in the center > go to LOCAL tab on export box > choose your preferred output format (e.g., MP4) > adjust other preferences such as destination location, resolution etc. from the right pane of the box > Click EXPORT.

Free Download For macOS 10.14 or later
Step1Download and Install the Software
The first step in creating an intro video requires the user to download and install the Filmora software in Windows or MacOS computers. To download the setup, go to https://filmora.wondershare.com/ and click ‘Download’. Afterwards, when the setup is downloaded, run the setup and install Filmora on your computer:

Step2Add Color Templates
After installing, wait until the installation is finished. Launch Wondershare Filmora and go to MEDIA tab at the top left of the interface and select the best suitable background color for your intro video from the dropdown menu in the MEDIA tab. Drag your cursor over the tile of the color you wish to use as a background and click to add the icon that appears in the center to add it to the timeline.

Additionally, if you don’t prefer the preset backgrounds and colors, Filmora lets you use your own background image or video clip. For this, select PROJECT MEDIA > click anywhere inside the media window > import media file of your choice. After importing the file, click on the imported file to add it to the timeline.
Step3Select and add audio effect to your Intro Video
Your video automatically grasps a lot of viewers’ attention with a spice of some music/audio in the background. To adorn your intro video further, you can add audio/music effect to your intro video using the inbuilt music and sound effects from the library. If you want to listen to a track from the inbuilt library collection of audio and music, double click on the thumbnail.

Click the AUDIO tab. Choose from Recommended audio files or import your own audio. Once, you find your desired audio/music file, drag and drop it to the audio track below the video.
Step4Add Text/Logo to your Intro Video
Click the ‘TITLE’ tab. To customize, choose title options from Recommended or add your own custom design. To change, format, and animate the text as needed, click on your desired preset or custom title and double click or drag it to the bottom area of the main library to insert a title.

Also, you need to adjust the position and duration of the title to get a better view. In the intro video, it is recommended to add your logo or slogan as well. To add your logo, drag and drop it to the track above the video, and adjust its position and size.
Step5Add Effects to your Intro Video
Go to ‘EFFECTS’ tab, choose a category from the top-left pane, and click and drag your preferred effect from the Effects library to the timeline. Adjust the playback duration by dragging the right handle of the track in the timeline as explained above. Optionally, double-click the Effects track to customize the appearance as needed.
Step6Export the Intro and Add to Shared Media
Once you’re done making your intro video, click on the ‘EXPORT’ tab in the center > go to LOCAL tab on export box > choose your preferred output format (e.g., MP4) > adjust other preferences such as destination location, resolution etc. from the right pane of the box > Click EXPORT.

Detailed Guide to Rotate Videos in Blender
Blender is a 3D animation software that can be used to create stunning 3D models and videos. It is free and open source, which means that it is available to anyone who wants to use it. Blender is also very versatile, and can be used to create anything from simple 3D models to full-blown 3D movies.
One of the biggest benefits of Blender is that it is easy to learn. The interface is intuitive and user-friendly, and there are plenty of tutorials available online that can help you get started. Blender also has a very active community, so if you ever get stuck, there is likely someone out there who can help you. It is a complex software, but there are many online tutorials like this article that can help you get started.
To download Blender, go to https://www.blender.org/download/ . Click on the link that says “Download Blender” and then select the version that you want to download. After you have downloaded Blender, install it on your computer.
Step-by-Step on how to rotate videos in Blender
The first way to rotate a video in Blender is by using the Strip option.
Step 1: To do this, open the video that you want to rotate in Blender.

Step 2: Then, click on the “Strip” menu and select “Transform.”

Step 3: In the Transform Properties window, you will see a list of different tools for the video. Scroll down until you see the “Rotation” property. This is where you can manually rotate the video.

Step 4: Click on Enter to save the rotation of the video.
The second way to rotate a video in Blender is by using the Transform Properties window. To do this…
Step 1: Open the video that you want to rotate in Blender.

Step 2: Next, go to ‘Transform’ in the Active Tool portion of the screen.
Figure 5
Step 3: Go to the ‘Transform’ option in the properties window and adjust based on the rotational angle that you want.

Step 4: Click on ‘Enter’ to apply it to the video.
In this tutorial, we have shown you two different ways to rotate a video in Blender. The first way is by using the Transform Properties window, and the second way is by using the 3D Viewport.
Which method you use is up to you. However, we recommend using the 3D Viewport method, as it is more accurate.
Rotating a video in Blender can be used for other purposes than just rotating it.
Here are some other things that you can do with a rotated video:
- Scale the video up or down
- Flip the video horizontally or vertically
- Change the position of the video in the 3D Viewport
How to rotate videos in Filmora
Meanwhile, you can also use Filmora Video Editor to rotate a video without any watermark. Filmora is a video editing software that lets you rotate videos easily. It is simple to use, and has many powerful features that let you edit your videos like a pro. It also has a built-in video converter that lets you convert your videos to different formats, so they can be played on any device. You can also export your videos in 4K resolution, so they look great no matter what device you are watching them on.
For Win 7 or later (64-bit)
For macOS 10.14 or later
There are two main ways to rotate video in Filmora: through the use of keyframes or by using the Transform Tool.
Step-by-step on how to rotate videos in Filmora
To rotate a video clip using keyframes…
Step 1: Import the video clip you want to rotate to your project.

Step 2: In the timeline, place the playhead at the beginning of the clip.

Step 3: With the playhead still at the beginning of the clip, drag the rotation handle in the preview window to rotate the video.

Step 4: Move the playhead to the end of the clip and drag the rotation handle again to rotate it further.

To rotate a video clip using the Transform Tool…
Select the “Edit” tool from the toolbar.

Go to the “Transform” selection, then select the rotate option.

Adjust the rotation angle using the tool.

Both methods are fairly straightforward and easy to use. Experiment with each to see which works best for your project.
Step 2: Then, click on the “Strip” menu and select “Transform.”

Step 3: In the Transform Properties window, you will see a list of different tools for the video. Scroll down until you see the “Rotation” property. This is where you can manually rotate the video.

Step 4: Click on Enter to save the rotation of the video.
The second way to rotate a video in Blender is by using the Transform Properties window. To do this…
Step 1: Open the video that you want to rotate in Blender.

Step 2: Next, go to ‘Transform’ in the Active Tool portion of the screen.
Figure 5
Step 3: Go to the ‘Transform’ option in the properties window and adjust based on the rotational angle that you want.

Step 4: Click on ‘Enter’ to apply it to the video.
In this tutorial, we have shown you two different ways to rotate a video in Blender. The first way is by using the Transform Properties window, and the second way is by using the 3D Viewport.
Which method you use is up to you. However, we recommend using the 3D Viewport method, as it is more accurate.
Rotating a video in Blender can be used for other purposes than just rotating it.
Here are some other things that you can do with a rotated video:
- Scale the video up or down
- Flip the video horizontally or vertically
- Change the position of the video in the 3D Viewport
How to rotate videos in Filmora
Meanwhile, you can also use Filmora Video Editor to rotate a video without any watermark. Filmora is a video editing software that lets you rotate videos easily. It is simple to use, and has many powerful features that let you edit your videos like a pro. It also has a built-in video converter that lets you convert your videos to different formats, so they can be played on any device. You can also export your videos in 4K resolution, so they look great no matter what device you are watching them on.
For Win 7 or later (64-bit)
For macOS 10.14 or later
There are two main ways to rotate video in Filmora: through the use of keyframes or by using the Transform Tool.
Step-by-step on how to rotate videos in Filmora
To rotate a video clip using keyframes…
Step 1: Import the video clip you want to rotate to your project.

Step 2: In the timeline, place the playhead at the beginning of the clip.

Step 3: With the playhead still at the beginning of the clip, drag the rotation handle in the preview window to rotate the video.

Step 4: Move the playhead to the end of the clip and drag the rotation handle again to rotate it further.

To rotate a video clip using the Transform Tool…
Select the “Edit” tool from the toolbar.

Go to the “Transform” selection, then select the rotate option.

Adjust the rotation angle using the tool.

Both methods are fairly straightforward and easy to use. Experiment with each to see which works best for your project.
Step 2: Then, click on the “Strip” menu and select “Transform.”

Step 3: In the Transform Properties window, you will see a list of different tools for the video. Scroll down until you see the “Rotation” property. This is where you can manually rotate the video.

Step 4: Click on Enter to save the rotation of the video.
The second way to rotate a video in Blender is by using the Transform Properties window. To do this…
Step 1: Open the video that you want to rotate in Blender.

Step 2: Next, go to ‘Transform’ in the Active Tool portion of the screen.
Figure 5
Step 3: Go to the ‘Transform’ option in the properties window and adjust based on the rotational angle that you want.

Step 4: Click on ‘Enter’ to apply it to the video.
In this tutorial, we have shown you two different ways to rotate a video in Blender. The first way is by using the Transform Properties window, and the second way is by using the 3D Viewport.
Which method you use is up to you. However, we recommend using the 3D Viewport method, as it is more accurate.
Rotating a video in Blender can be used for other purposes than just rotating it.
Here are some other things that you can do with a rotated video:
- Scale the video up or down
- Flip the video horizontally or vertically
- Change the position of the video in the 3D Viewport
How to rotate videos in Filmora
Meanwhile, you can also use Filmora Video Editor to rotate a video without any watermark. Filmora is a video editing software that lets you rotate videos easily. It is simple to use, and has many powerful features that let you edit your videos like a pro. It also has a built-in video converter that lets you convert your videos to different formats, so they can be played on any device. You can also export your videos in 4K resolution, so they look great no matter what device you are watching them on.
For Win 7 or later (64-bit)
For macOS 10.14 or later
There are two main ways to rotate video in Filmora: through the use of keyframes or by using the Transform Tool.
Step-by-step on how to rotate videos in Filmora
To rotate a video clip using keyframes…
Step 1: Import the video clip you want to rotate to your project.

Step 2: In the timeline, place the playhead at the beginning of the clip.

Step 3: With the playhead still at the beginning of the clip, drag the rotation handle in the preview window to rotate the video.

Step 4: Move the playhead to the end of the clip and drag the rotation handle again to rotate it further.

To rotate a video clip using the Transform Tool…
Select the “Edit” tool from the toolbar.

Go to the “Transform” selection, then select the rotate option.

Adjust the rotation angle using the tool.

Both methods are fairly straightforward and easy to use. Experiment with each to see which works best for your project.
Step 2: Then, click on the “Strip” menu and select “Transform.”

Step 3: In the Transform Properties window, you will see a list of different tools for the video. Scroll down until you see the “Rotation” property. This is where you can manually rotate the video.

Step 4: Click on Enter to save the rotation of the video.
The second way to rotate a video in Blender is by using the Transform Properties window. To do this…
Step 1: Open the video that you want to rotate in Blender.

Step 2: Next, go to ‘Transform’ in the Active Tool portion of the screen.
Figure 5
Step 3: Go to the ‘Transform’ option in the properties window and adjust based on the rotational angle that you want.

Step 4: Click on ‘Enter’ to apply it to the video.
In this tutorial, we have shown you two different ways to rotate a video in Blender. The first way is by using the Transform Properties window, and the second way is by using the 3D Viewport.
Which method you use is up to you. However, we recommend using the 3D Viewport method, as it is more accurate.
Rotating a video in Blender can be used for other purposes than just rotating it.
Here are some other things that you can do with a rotated video:
- Scale the video up or down
- Flip the video horizontally or vertically
- Change the position of the video in the 3D Viewport
How to rotate videos in Filmora
Meanwhile, you can also use Filmora Video Editor to rotate a video without any watermark. Filmora is a video editing software that lets you rotate videos easily. It is simple to use, and has many powerful features that let you edit your videos like a pro. It also has a built-in video converter that lets you convert your videos to different formats, so they can be played on any device. You can also export your videos in 4K resolution, so they look great no matter what device you are watching them on.
For Win 7 or later (64-bit)
For macOS 10.14 or later
There are two main ways to rotate video in Filmora: through the use of keyframes or by using the Transform Tool.
Step-by-step on how to rotate videos in Filmora
To rotate a video clip using keyframes…
Step 1: Import the video clip you want to rotate to your project.

Step 2: In the timeline, place the playhead at the beginning of the clip.

Step 3: With the playhead still at the beginning of the clip, drag the rotation handle in the preview window to rotate the video.

Step 4: Move the playhead to the end of the clip and drag the rotation handle again to rotate it further.

To rotate a video clip using the Transform Tool…
Select the “Edit” tool from the toolbar.

Go to the “Transform” selection, then select the rotate option.

Adjust the rotation angle using the tool.

Both methods are fairly straightforward and easy to use. Experiment with each to see which works best for your project.
Also read:
- New 2024 Approved How to Create Discord Logo GIF
- New How To Use Face Tracking In After Effects To Make Your Videos Pop
- Updated TXT to SRT 3 Effective Ways to Convert TXT to SRT for 2024
- If You Want to Color Grading Your Video, Adobe Lightroom Will Be the Right Choice. This Article Will Teach You How to Use Lightroom to Apply Color Grading to Videos with Ease for 2024
- New In 2024, Create Intro Video with Flixpress
- Updated Guide To Using Luts Perfectly in Final Cut Pro
- In 2024, Zoom In and Out on Discord
- Updated In 2024, Do You Know How to Zoom on Facebook Livestream Videos? Through This Article, You Will Find Multiple Ways and Detailed Steps to Zoom in on the Facebook Livestream Videos
- New Best Tips on How to Design Travel Slideshow
- New In 2024, How to Loop YouTube Videos on iPhone
- New Overview About Supported iPhone Video Formats and Best iPhone Video Editor & Converter
- New How to Record Video Streams With FFmpeg on Windows and Mac, In 2024
- New In 2024, Steps to Make a Neon Dance Effect With Filmora
- New 2024 Approved This Article Presents the Guide to Using Magic Effects for Creating Competent Films with Step-by-Step Instructions and Filmoras Grow and Win Program Contest
- Updated Practical Way to Resize Video in Handbrake
- New How to Do Velocity Edits on PC for 2024
- Updated In 2024, Creative Ways to Add Green Screen Effects In Photoshop
- New How To Unlink Audio and Video in DaVinci Resolve
- Updated How to Make Vintage Film Effect 1950S
- New Here Is a Complete Overview of VSCO Video Editor; the Best Photo-Editing App that Helps You Adjust Your Pictures Right After You Capture Them
- List of Supported Whatsapp Video Format You May Want to Know
- Best Method to Split the Video Into Parts Online for 2024
- New 2024 Approved Are You Trying to Make Your Video Pause on a Specific Frame? Learn How to Do so Quickly and with Ease by Adding a Freeze-Frame Effect in These Freeze-Frame Video Editing Apps
- Do You Have Images in GIF Format, and Do You Find Converting Them to AVI Pretty Tricky? Please Stay on This Article as Well Guide You with Tools Thatll Help You Convert Your GIF to AVI Quickly and with Ease
- Discover the Ultimate LUTs for Wondershare Filmora Uncover the Answer for 2024
- New 5 Methods to Make a Fake Facetime Call Video
- New How to Make Well Done Animated GIF By Yourself?
- In 2024, How to Unlock Apple iPhone SE (2020) Passcode without iTunes without Knowing Passcode? | Dr.fone
- In 2024, Fake the Location to Get Around the MLB Blackouts on Apple iPhone 6 Plus | Dr.fone
- In 2024, How to Check Distance and Radius on Google Maps For your Samsung Galaxy M14 5G | Dr.fone
- How to Stop My Spouse from Spying on My Apple iPhone 13 Pro Max | Dr.fone
- In 2024, Two Ways to Track My Boyfriends Gionee F3 Pro without Him Knowing | Dr.fone
- In 2024, How PGSharp Save You from Ban While Spoofing Pokemon Go On Vivo V29e? | Dr.fone
- Pokémon Go Cooldown Chart On Samsung Galaxy Z Fold 5 | Dr.fone
- Stuck at Android System Recovery Of Honor 70 Lite 5G ? Fix It Easily | Dr.fone
- Methods to Change GPS Location On Infinix Hot 40i | Dr.fone
- Ultimate Guide from Xiaomi 14 Pro FRP Bypass
- Top 4 Android System Repair Software for Infinix Zero 5G 2023 Turbo Bricked Devices | Dr.fone
- In 2024, Android Unlock Code Sim Unlock Your Oppo Reno 8T Phone and Remove Locked Screen
- How to use Pokemon Go Joystick on Lava Blaze 2? | Dr.fone
- Title: How to Remove Audio From Video on Mac? Free and Official Solutions
- Author: Morgan
- Created at : 2024-06-24 01:30:39
- Updated at : 2024-06-25 01:30:39
- Link: https://ai-video-editing.techidaily.com/how-to-remove-audio-from-video-on-mac-free-and-official-solutions/
- License: This work is licensed under CC BY-NC-SA 4.0.

