:max_bytes(150000):strip_icc():format(webp)/GettyImages-104288650-cd3f369f8ead449f94d1a1ce6f55c9de.jpg)
How to Rotate Videos With Media Player Classic

How to Rotate Videos With Media Player Classic
The Internet and social media have become a staple in our daily lives. Internet users post thousands of videos every day that you can watch online or download and rewatch in your free time. Suppose you encounter a video that is upside down or shot at an angle that makes it difficult for you to enjoy it fully.
It would be nice to find a way to rotate the video to portrait mode so you can watch it without any distractions. Fortunately, this article will discuss using Media Player Classic to rotate any video. We also discuss an excellent alternative to the aforementioned media player.
What Is Media Player Classic?
In a nutshell, Media Player Classic is an open-source media player suitable for 32-bit and 64-bit Microsoft Windows. If you have used the original interface, you might notice that it resembles Windows Media Player 6.4. The only key difference is that the former is more feature-rich and provides more options. In addition, Media Player Classic is very compact and lightweight.
A programmer named “Gabest’’ created and designed this platform as a closed-source application. Things changed, and he later relicensed the media player as free under the terms of the GLP-2.0 license. He released the final version, MPC 6.4.9.0, on 20th March 2006.
Unfortunately, development stalled in 2006, much to the disappointment of many users who had grown to love it. Gabest made a public statement in 2007 saying that Media Player Classic was not dead, just that he couldn’t work on it anymore.
How To Rotate Video in Media Player Classic?
Media Player Classic allows you to rotate your video around three axes, X, Y, and Z. Once you are done, you can fix a video that was initially upside down or in landscape mode for a better viewing experience. Another perk of using Media Player Classic to rotate a video is that you can use shortcuts to make your work easier.
Before we teach you how to rotate video in windows Media Player Classic, there are a few things you should know. Unfortunately, this platform doesn’t allow you to rotate a video in its graphical user interface. You can’t also use it to edit a video. Suppose you want to add text or overwrite the original video clip. Media Player Classic can only allow you to playback a video or rotate it.
Here is a simple guide on how to rotate videos in Media Player Classic.
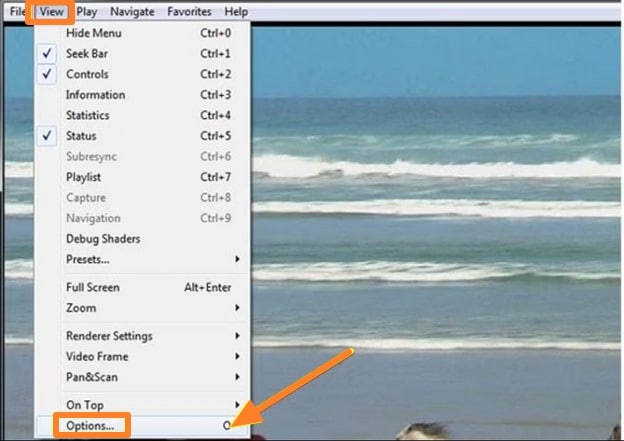
Step1 Launch Media Player Classic and click on the “View” tab. Select “Options” or click “O” to display the “Options” window.
Step2 Navigate to the left pane to the Player Group and click on “Keys.” If the Player Group is not expanded by the time, you launch the platform, double-click it and wait a few seconds. You can then navigate to the “PnS Rotate” command on the Keys list.
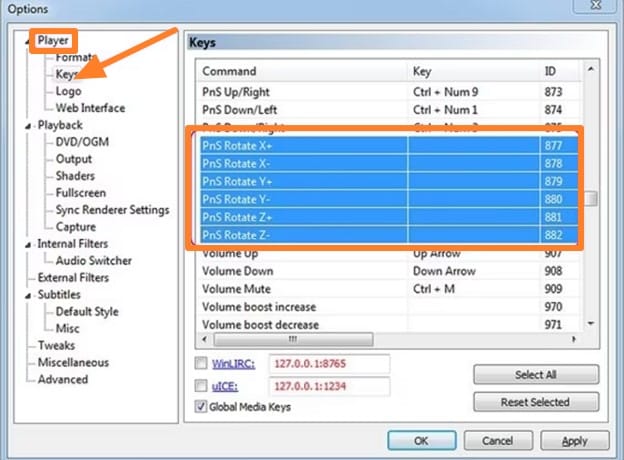
Step3 Go to the “PnS Rotate+” command and double-click the “Key” field. You can then click on any key to rotate your video around the x-axis. Once you are satisfied with the results, click “…” to apply the changes you have made.
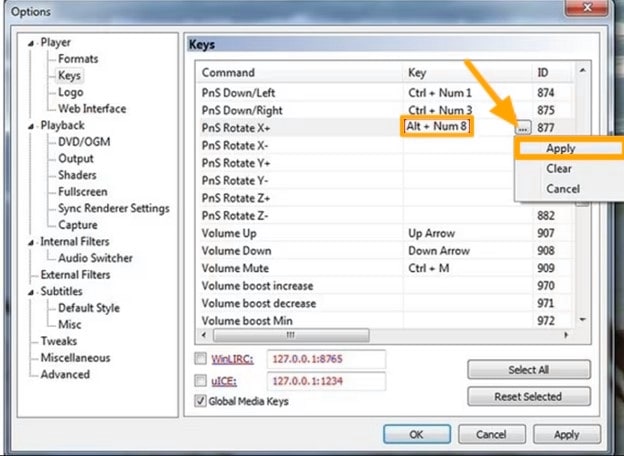
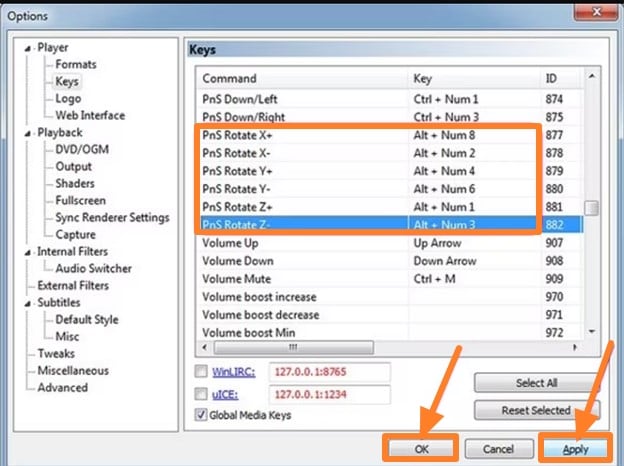
Step4 You can now assign shortcuts to “PnS Rotate” commands. For instance, you could assign PnS Rotate Y for rotation along the Y axis and PnS Z for rotation along the Z axis. After each axis has a shortcut, select “Apply” then “OK” to save your changes and close the Options window respectively.
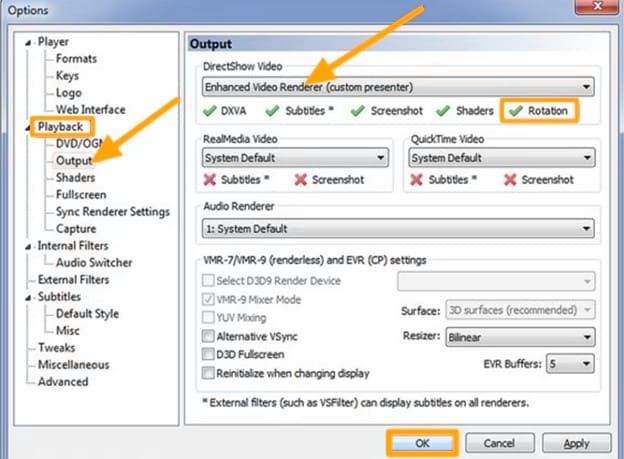
Step5 Select “Output” on the Options window and navigate to the DirectShow Video section to confirm whether the Media Classic Player supports rotation for the rendered video. Ascertain the Rotation feature has a green check mark, which indicates that the platform promotes rotation for the video. If the video has a red X, select “Apply” and click “OK.”
Step6 Use the shortcuts you assigned to the keys in Step 4 to rotate your video as you see fit. Since the rotation occurs gradually, you might need to press the keys numerous times or press and hold to see a visible change.
For instance, you can rotate your video from landscape to portrait by clicking “Alt-Num 1” and “Alt-Num 3,” respectively. To revert your video to its original state, press “Alt-Num 5.”
Need an alternative to Media Player Classic? Try Wondershare Filmora To Rotate a Video
Free Download For Win 7 or later(64-bit)
Free Download For macOS 10.14 or later
You might need a better alternative to Media Classic Player to help rotate your videos. As we mentioned, Media Classic Player doesn’t allow you to change the video. The scope of this platform only extends to playing and rotating videos along three axes. In our opinion, Wondershare Filmora is an excellent alternative.

This feature-rich platform is your one-stop solution for any creator who wants to make a mark with their videos. You can download it free on your desktop, laptop, or smartphone and use it anytime. The cloud storage allows you to snap a photo and upload it for editing at a later time.
In addition, the platform has a co-creation space where you can share your work with other users and compare notes. Here is a list of other nifty features we guarantee you will enjoy.
- Motion tracking
- Auto beat sync
- Split screen
- Title Editing
- Preset templates
- AI Portrait
- Mask and blend
- Text to speech
- Silence detection
- Audio visualizer
How To Rotate a Video 90 Degrees With Wondershare Filmora?
Now that you have seen how different this platform is from Media Classic Player, you might be curious about how effectively it rotates your videos. Perhaps our detailed guide will help you decide whether you want to give Wondershare Filmora a shot.
Stick around to learn how to rotate a video 90 degrees with Wondershare Filmora.
Step1 Import the video you want to rotate to Wondershare Filmora and drag and drop it to the timeline as shown below.
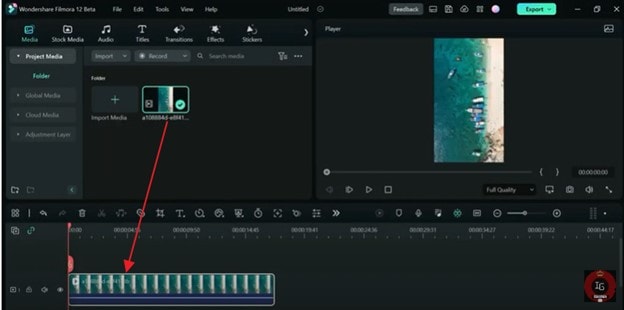
Step2 Click on the monitor icon and select “Change Project Aspect Ratio” in the drop-down menu.

Step3 In the “Project Settings” window, you can change your video’s Aspect Ratio, Resolution, Frame Rate, and Color space.
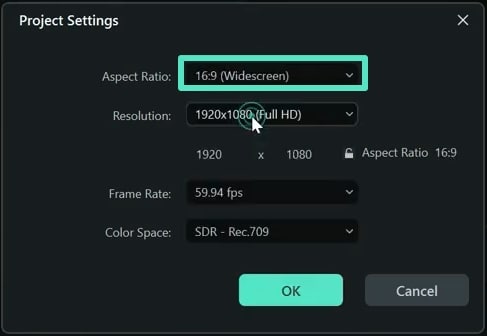
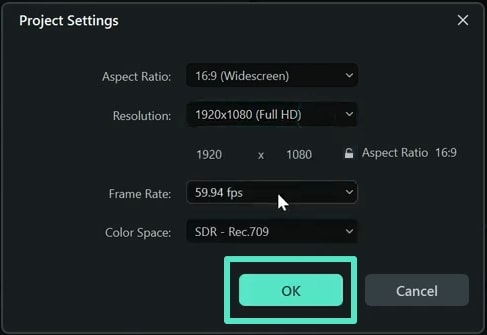
Step4 Once you are happy with your changes, click “OK” and close the window.
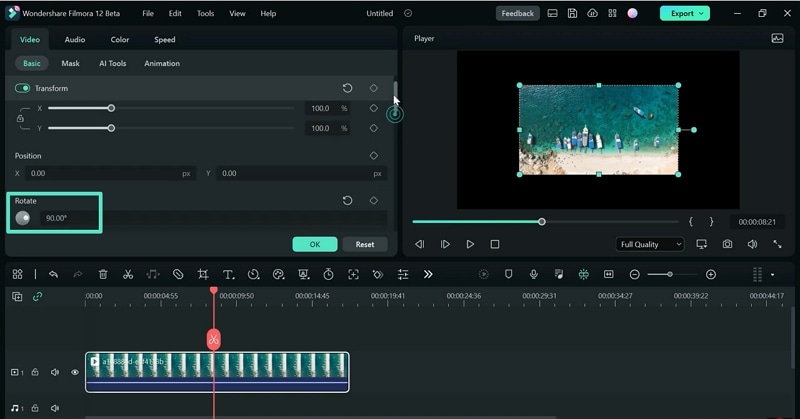
Step5 Double-click the video track and navigate to the Rotate option in the window. Hover your mouse over the dot in the Rotate tab until you get to 90 degrees. You could also adjust the rotation of the video by clicking on the pivot in the media player till the video is at 90 degrees.
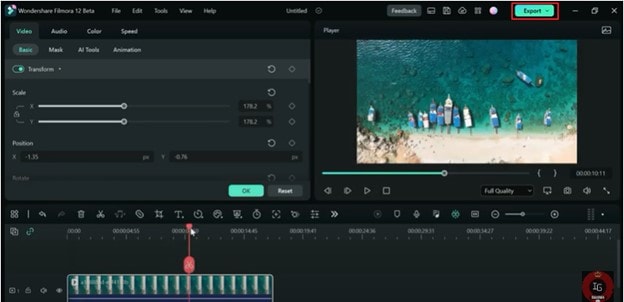
Step6 Click “Export” to save a copy of the rotated video to your device.
Which Is Better To Rotate a Video? Media Player Classic or Wondershare Filmora?
Having seen both sides of the coin, you might wonder which option is better to help you rotate a video. In this section of the article, we pit Wondershare Filmora against Media Player Classic to help you determine which option will work best for you.
Take a look at the table below.
| Media Player Classic | Wondershare Filmora | |
|---|---|---|
| Operating System | Microsoft Windows | Windows & Mac |
| Ratings from G2 | N/A | 4.4/5 stars |
| Pricing | Free | Annual Plan – US$49.99/yearCross Platform Plan - US$59.99/YearPerpetual Plan - US$79.99 |
| Features | ● Enhanced video rendering● Removal of tearing● Supports SVCD, VCD, and DVD playback● AVI subtitles● Customizable toolbar | ● AI Portrait● Mask and blend● Text to speech● Silence detection● Audio visualizer● Motion tracking● Auto beat sync● Split screen● Title Editing● Preset templates |
As you have seen, Media player Classic doesn’t have the Rotate feature per se. However, you can assign shortcuts to the keys to rotate a video along three axes as you see fit. You can also use a combination of keys like Alt and Num to change how your video sits so you can enjoy it as you like.
On the other hand, Wondershare Filmora has a more comprehensive Rotate feature that allows you to drag your pointer along a bar till the video sits at the correct number of degrees.
This platform also provides additional features, like allowing you to scale the video to fit the screen and adjusting project settings like the resolution and frame rate. If you don’t want to use the sliding bar, you can use your pointer to manually adjust the rotation by clicking on the pivot with your pointer.
In a nutshell, Windows Media Player is the ideal choice if you want to rotate your video and leave it at that. However, if you are looking for more advanced features, you are better off choosing Wondershare Filmora. The latter option also makes your videos look more polished like they were edited by a professional.
Conclusion
Videos might be trickier to edit than photos, especially when you want to rotate them. Fortunately, developers have been working tirelessly to ensure you have many tools at your disposal to edit your videos from any device at any time.
If you don’t fancy editing videos on your laptop, you could download the software to your smartphone and rotate videos on the move. Technology is truly a blessing that has come to make our work easier. Hopefully, after reading this article, you can effortlessly rotate any video you encounter.
Free Download For macOS 10.14 or later
You might need a better alternative to Media Classic Player to help rotate your videos. As we mentioned, Media Classic Player doesn’t allow you to change the video. The scope of this platform only extends to playing and rotating videos along three axes. In our opinion, Wondershare Filmora is an excellent alternative.

This feature-rich platform is your one-stop solution for any creator who wants to make a mark with their videos. You can download it free on your desktop, laptop, or smartphone and use it anytime. The cloud storage allows you to snap a photo and upload it for editing at a later time.
In addition, the platform has a co-creation space where you can share your work with other users and compare notes. Here is a list of other nifty features we guarantee you will enjoy.
- Motion tracking
- Auto beat sync
- Split screen
- Title Editing
- Preset templates
- AI Portrait
- Mask and blend
- Text to speech
- Silence detection
- Audio visualizer
How To Rotate a Video 90 Degrees With Wondershare Filmora?
Now that you have seen how different this platform is from Media Classic Player, you might be curious about how effectively it rotates your videos. Perhaps our detailed guide will help you decide whether you want to give Wondershare Filmora a shot.
Stick around to learn how to rotate a video 90 degrees with Wondershare Filmora.
Step1 Import the video you want to rotate to Wondershare Filmora and drag and drop it to the timeline as shown below.

Step2 Click on the monitor icon and select “Change Project Aspect Ratio” in the drop-down menu.

Step3 In the “Project Settings” window, you can change your video’s Aspect Ratio, Resolution, Frame Rate, and Color space.

Step4 Once you are happy with your changes, click “OK” and close the window.

Step5 Double-click the video track and navigate to the Rotate option in the window. Hover your mouse over the dot in the Rotate tab until you get to 90 degrees. You could also adjust the rotation of the video by clicking on the pivot in the media player till the video is at 90 degrees.

Step6 Click “Export” to save a copy of the rotated video to your device.

Which Is Better To Rotate a Video? Media Player Classic or Wondershare Filmora?
Having seen both sides of the coin, you might wonder which option is better to help you rotate a video. In this section of the article, we pit Wondershare Filmora against Media Player Classic to help you determine which option will work best for you.
Take a look at the table below.
| Media Player Classic | Wondershare Filmora | |
|---|---|---|
| Operating System | Microsoft Windows | Windows & Mac |
| Ratings from G2 | N/A | 4.4/5 stars |
| Pricing | Free | Annual Plan – US$49.99/yearCross Platform Plan - US$59.99/YearPerpetual Plan - US$79.99 |
| Features | ● Enhanced video rendering● Removal of tearing● Supports SVCD, VCD, and DVD playback● AVI subtitles● Customizable toolbar | ● AI Portrait● Mask and blend● Text to speech● Silence detection● Audio visualizer● Motion tracking● Auto beat sync● Split screen● Title Editing● Preset templates |
As you have seen, Media player Classic doesn’t have the Rotate feature per se. However, you can assign shortcuts to the keys to rotate a video along three axes as you see fit. You can also use a combination of keys like Alt and Num to change how your video sits so you can enjoy it as you like.
On the other hand, Wondershare Filmora has a more comprehensive Rotate feature that allows you to drag your pointer along a bar till the video sits at the correct number of degrees.
This platform also provides additional features, like allowing you to scale the video to fit the screen and adjusting project settings like the resolution and frame rate. If you don’t want to use the sliding bar, you can use your pointer to manually adjust the rotation by clicking on the pivot with your pointer.
In a nutshell, Windows Media Player is the ideal choice if you want to rotate your video and leave it at that. However, if you are looking for more advanced features, you are better off choosing Wondershare Filmora. The latter option also makes your videos look more polished like they were edited by a professional.
Conclusion
Videos might be trickier to edit than photos, especially when you want to rotate them. Fortunately, developers have been working tirelessly to ensure you have many tools at your disposal to edit your videos from any device at any time.
If you don’t fancy editing videos on your laptop, you could download the software to your smartphone and rotate videos on the move. Technology is truly a blessing that has come to make our work easier. Hopefully, after reading this article, you can effortlessly rotate any video you encounter.
FLV Editors for Windows 11/10/8.1/8/7: Easily Edit FLV Videos on PC
If you are a streamer or a content creator then you undoubtedly may have come across files having .flv format. FLV stands for “Flash Video”. It is a container file format like .mp4 and .mov. But it isn’t used quite frequently nowadays. They are mainly used for streaming videos. Because it provides compressed video while maintaining the quality and takes less space. It supports codec which is compatible with most of the devices but you may need a flash player to play these files. If you have recently started working with .flv files or need more info about it then read till the end. We have gathered all the necessary information for you in this article.
Being a content creator, you can’t just record videos and publish them directly. Sometimes it requires finishing touches or an entirely new look, for this purpose you need a good editor. And if you are working with .flv files then selecting a good editing software that supports .flv files is important. So, here we have mentioned a list of FLV video editors. You can select one depending on your needs and budget.
Best FLV Editor to Edit FlV Video on Windows and Mac:
- Wondershare – Filmora:
It is available for both Windows and Mac.
Filmora Video Editor is the most common and versatile editing software in this list that almost every content creator may have used or heard about. It has a lot of professional features used by content creators. It is one of the best video editors for .flv format, if u work with .flv files then you must get your hands on filmora.
Its UI is quite similar to premiere pro which makes it quite easy for people who are looking for premiere pro alternatives. It has hundreds of classy transitions/effects and dozens of unique and useful features but many of them are available on paid version only.
The free version also packs a punch but it is almost useless for most users as it leaves a watermark on the final product. It is good for learning video editing and once you master enough to move forward then you can purchase the pro version or you can start directly on the paid version.
For Win 7 or later (64-bit)
For macOS 10.14 or later
Features:
- Support a wide range of formats including .flv.
- Have advanced color grading options.
- Have standard Motion Tracking feature.
- Masking and Chroma key.
- Keyframing and Smooth animation. (Paid version)
- Speed ramping and Auto Synchronization. (Paid Version)
- Support industry-standard plugins (like Boris fx).
- Have a vast stock library.
Cons:
- Leaves a watermark on export. (free version)
- Have playback issues while using 4k videos.
- Lacks some standard editing features.
*Almost every software has some pros and cons. Remember these are inspected from my point of view. And it can differ from your experience.
Steps:
Import: Open filmora, a popup will appear, Select desired aspect ratio then click “New Project” to start editing or click “Open Project” to continue your old project.
On the center of the screen, you will see the import window, click it to import .flv file or any other video you want to edit.
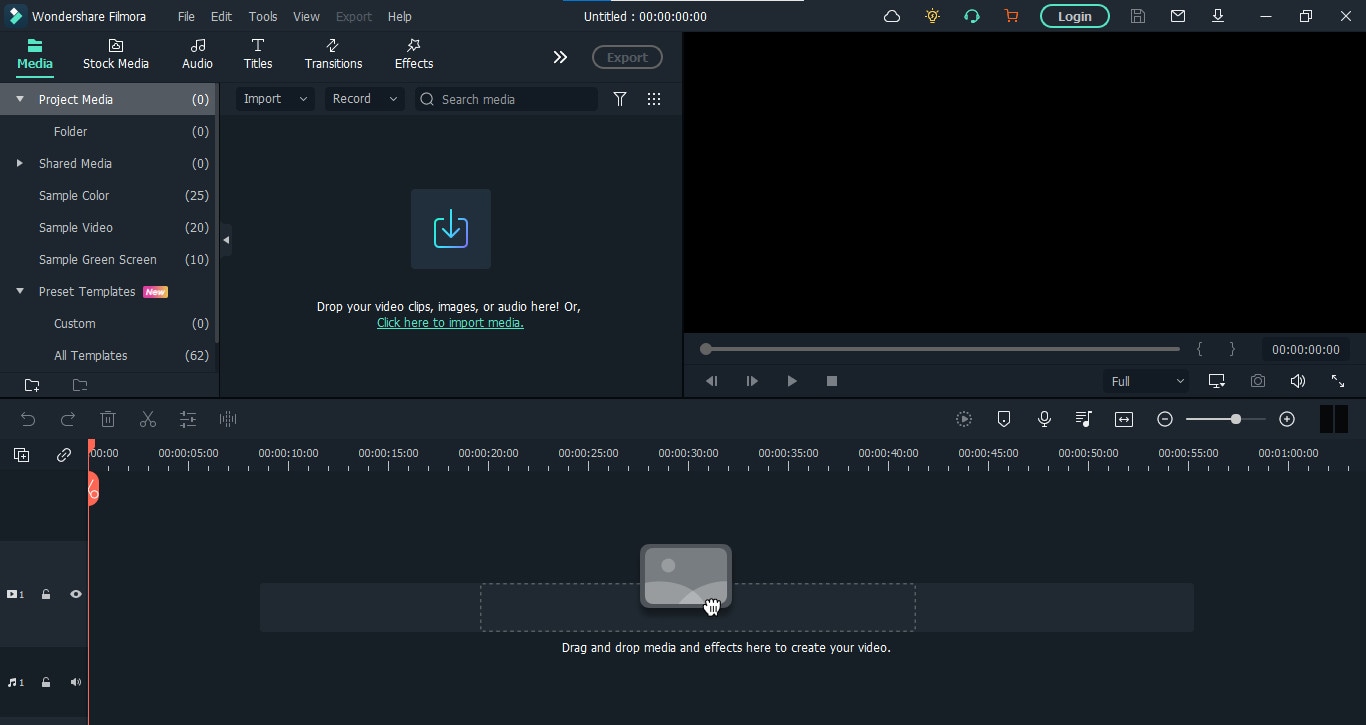
Edit: Drag the clips on the timeline to start editing. Drag the clips from the corner to trim them. Click the top left icon of the timeline (not the whole screen) to add layers. In the toolbar above the timeline, you will find a bunch of tools, like split, crop, speed ramping, animation e.t.c. Click the red scissors icon on the pointer to split the clip at the desired timestamp.

Effects: Click the “edit” icon, then you will see a bunch of icons appear on the top left corner of the screen, These are as follow.
Select the “Video” icon to transform the clip or to do motion tracking, stabilization, chroma-key, Masking, e.t.c. To do Motion tracking, on the playback screen, lock the box on the item you want to track then click “Start Tracking”.
Select the “Audio” icon to apply effects and enhance your audio.
Select the “Color” icon to do fine-tuning and color grading, Select the “3D LUT” option to import a new customized lut. You can find a number of cool luts online.
Select the “Animation” icon to add preset animations or make custom animations by using keyframes.
Select the “Speed” icon to adjust the speed of the clip or to do speed ramping.
Click the “OK” button below to go back to previous tabs.
From there you can add Audio, Titles, Transitions, Effects, Elements, and Stock Media. Simply drag and drop the effects and transition on the clip to apply it. And to use titles and stock media, click and drag them on the timeline to use them.
Export: Click the blue “Export” button. Then choose Desired format and Resolution to export your final product.
More Free FLV Editor for Windows to Edit FLV Videos:
If you are looking for a .flv video editor to perform some editing tasks without spending any money then read till the end because here we have mentioned some free FLV editors for you.
- VSDC video editors :
It is available only on Windows.
Despite being free software, it is packed with lots of features. It is a good choice for non-professionals and it can even run on low-end PCs. It supports a wide range of video/audio formats including .flv file. It has dozens of cool effects and tools that can give your videos a new look. It is a non-linear program that makes using layers much easier means you can add layers at any specific time frame and can add layers into layers for complex editing. It also supports 360 and 3D video which can easily be converted into 2D. It has a number of video and audio effects. It is an old yet powerful software which can even run in 19s Pc. Its features are mentioned below.
Features:
- Free Software with no watermark.
- Can support 4K footages on the latest versions.
- Can import/export a wide range of formats.
- Have built-in video and screen capture feature.
- Has a Non-linear interface that supports multi-layer editing.
- Have professional features like chroma key and masking.
- Can convert layers into a sprite (Grouped Sequence) for handling multiple layers easily.
Cons:
- Being a free software it has some limitations too.
- It’s hard to learn for beginners.
- It still lacks features for a professional creator.
- Doesn’t support Hardware acceleration.
Steps:
Import: Open VSDC video editor, from the “Start Project Now” tab click “Blank Project” to start a new project or click “Import Content” to browse video or image files. Then select “Project settings”.
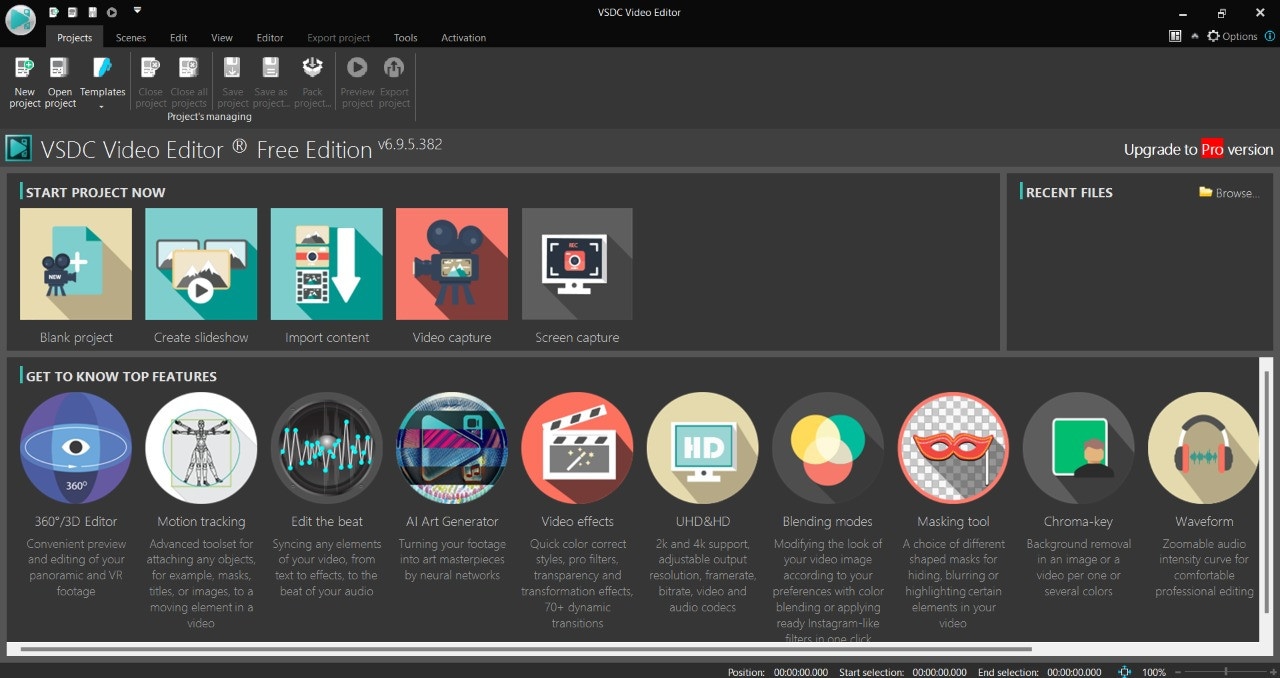
Edit: You can add more files by clicking the “Add Object” button on the top left corner. Then drag the file from Object explorer to anywhere on the timeline even on layers. On top of the “Editor Tab”, you can find the necessary tools to split, crop, and rotate the video. Click “Spacebar” to play/pause the timeline.
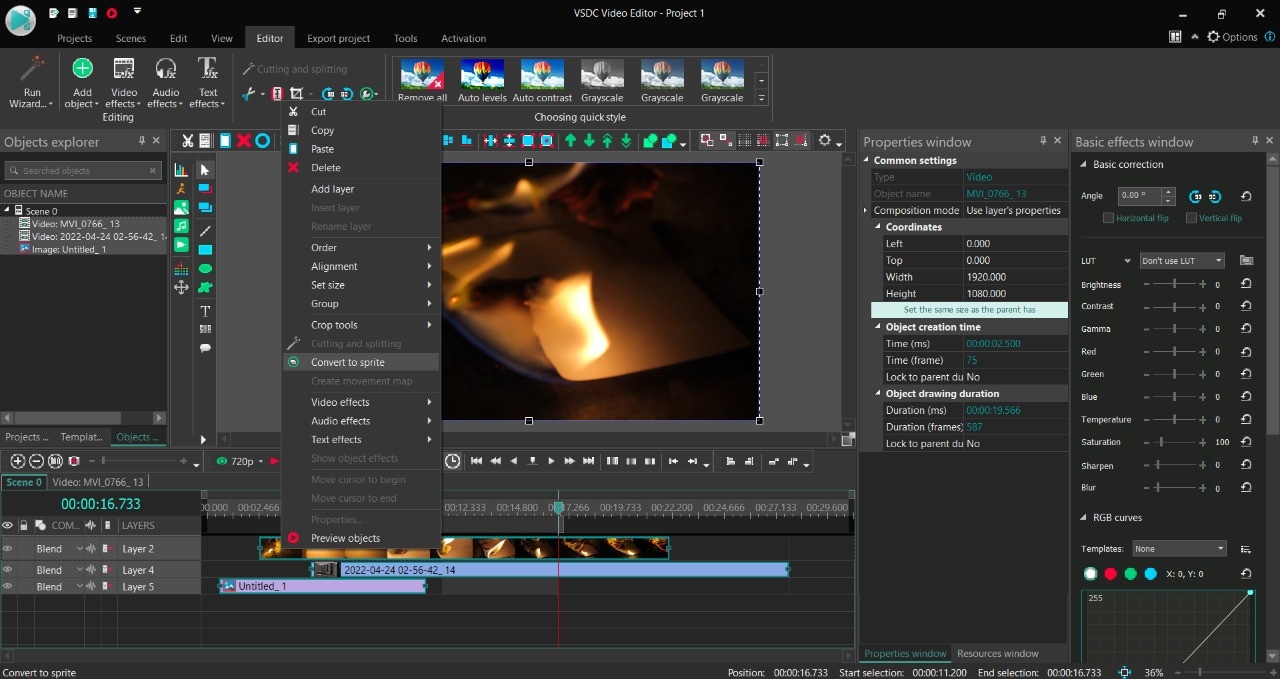
Effects: Click a video on the timeline then select the Effect buttons on top of the “Editor” tab to apply effects to your clip. Then Click the effect on “Object Explorer” to open its properties menu. On the left side of the player, you will find buttons to add text, shapes, e.t.c to the project. On the right side of the screen, you will find the “Basic effects window” where you can do color correction and grading.
Select Multiple Clips then right-click the mouse button and then the “Convert to sprite” button to make a grouped clip (clips within a clip).
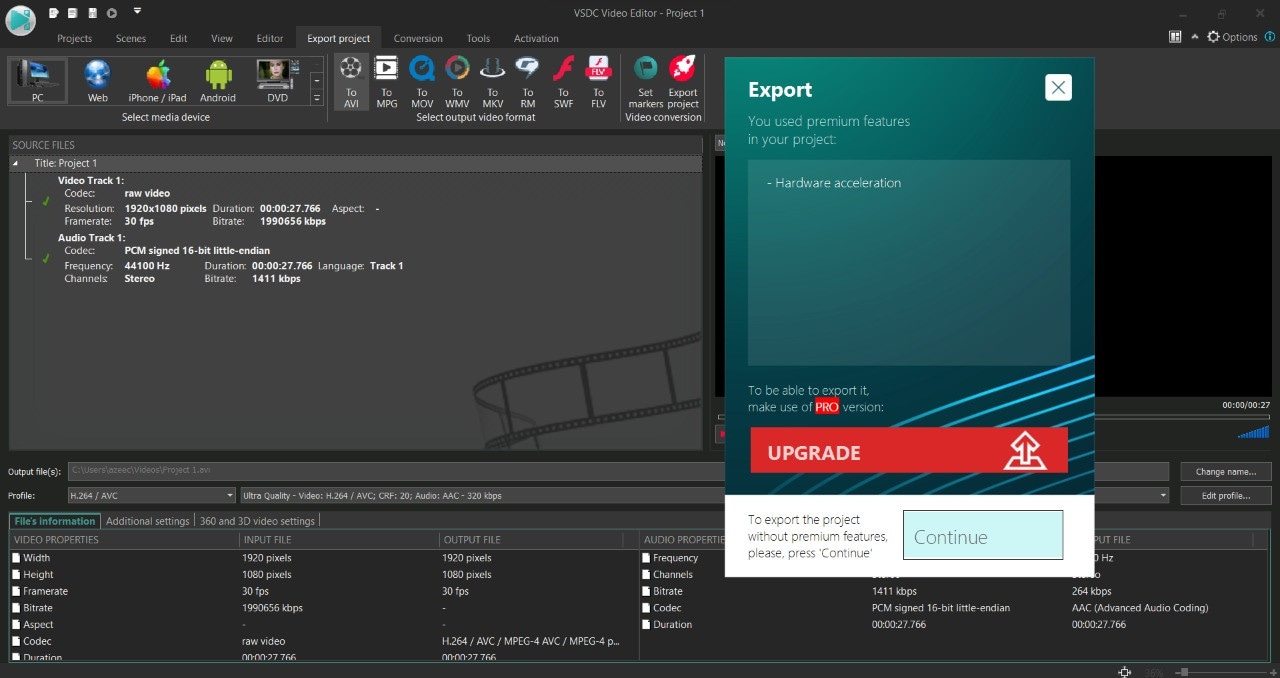
Export: Click the “Export Project” button on the top of the screen. Then choose “Media device”, “output video format” and select output destination and quality setup then click “Export Project” to export the video. If you are using the free version of the software, a popup will appear saying “export without premium features”, just click Continue. Now your file is ready to be viewed.
- Shotcut:
It is available on Windows, Mac, and Linux.
It is a free and open-source video editor which is simple and easy to use, which makes it ideal for beginners. It doesn’t have any pro version. It is an ideal software to deal with .flv files as it supports a large number of import/export formats. However, it takes some time to understand its UI. After that, it is quite easy to use. It has cool effects and transitions. It has a clean and simple timeline which is not versatile for professionals although it has some complex options to customize your timeline. It has some refined color grading options. Being a free software it has some 360 effects and 3D text which makes it comparatively good as compared to some other free softwares. It can support 4K videos also but lags or crashes sometimes when using 4K clips. All the effects and tools are combined in one tab “Filter” which is a plus point for some users. It also has some good quality audio effects. Some of its features are mentioned below.
Features:
- It is completely free software with no watermark.
- It has one of the largest file format compatibility.
- It can support 4K video resolution.
- It has 3 wheel grading tool and some other color filters.
- It has standard animation and keyframing features.
- It has some effects to support 360 videos.
Cons:
- It isn’t suitable for professionals as it lacks some useful features.
- Have issues with playback of 4K videos and sometimes crashes.
- Doesn’t have a separate text column and lacks some basic text and title effects.
- Its UI is different from other common video editors and is a bit hard to understand.
Steps:
Import: Click the “Open file” icon on the top left corner of the window to import files.
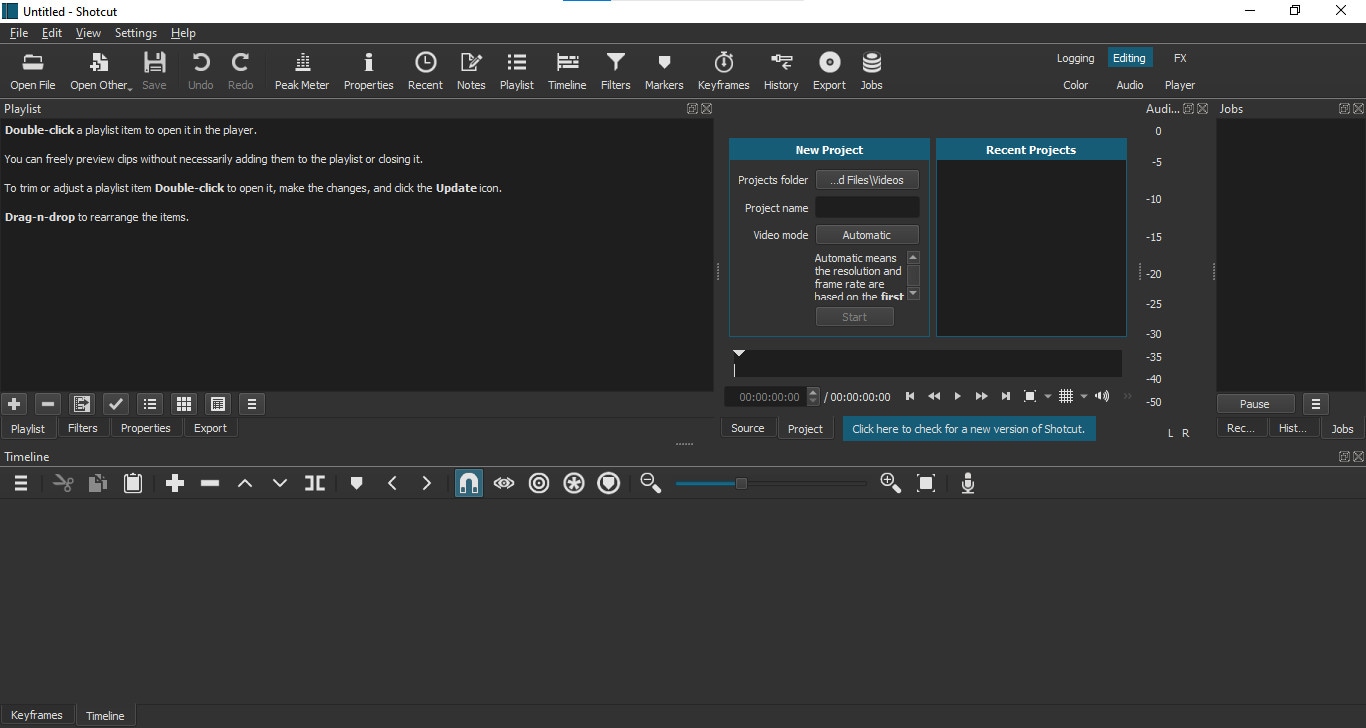
Edit: Drag and drop clips on an empty timeline panel to add tracks. Right-click on the left side of the timeline to add a video or an audio track. To trim from ends, drag the clip from corners to trim. Click the Scissors icon on the top timeline to split the clip in between.
Click the “Properties” tab above the timeline panel to change the aspect ratio and playback speed of the clip.
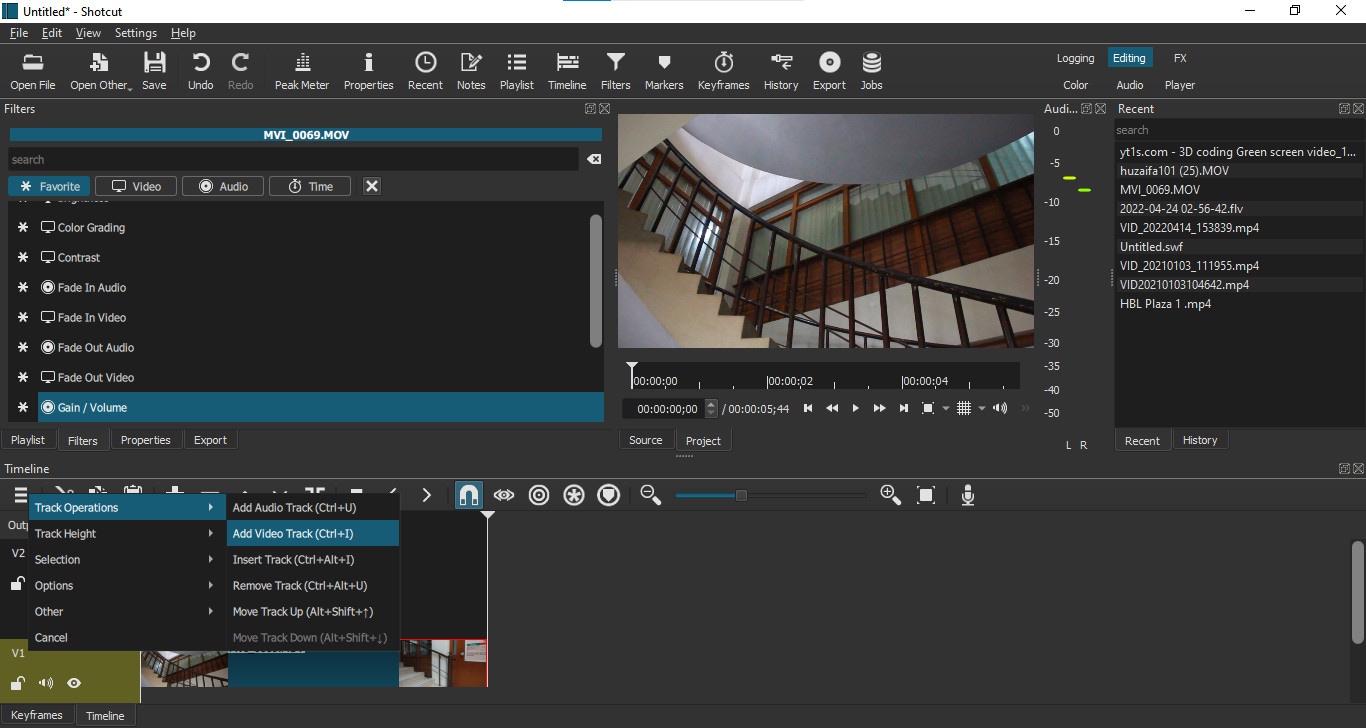
Effects: Click the “Filters” tab above the timeline panel to open the filter menu, Click “+” above it to add filters. Double click a filter to add it to the selected clip, then click the filter to change its properties.
Click the “Keyframes” icon on top of the window to open the Keyframes window. Then click the “Timeline” icon to go back to the previous window.
Export: Click the “Export” button on the top of the screen. Select a preset or click the “Advanced” button to change export settings then click “Export File”.

- OpenShot:
It is available on Windows, Mac, and Linux.
OpenShot is another choice for you if you are looking for a free FLV editor. It is simple and easy to use. Its User Interface is clean and beginner-friendly. It has hundreds of transitions and effects. It has an animated titles option also, which is powered by Blender.
Features:
- Is simple and easy to use.
- Its UI is Beginner friendly.
- Can support 4K videos.
- Support a wide range of formats.
- Have smooth keyframe animation.
- Is free and has no watermark.
Cons:
- Video Playback is a bit laggy.
- Animated titles are only supported when you have Blender (3d software) installed on your PC.
- Doesn’t have enough tools for professionals.
Steps:
Import: Start “OpenShot” then drag and drop files in the project files tab from your file system (or press CTRL + F). Drag and drop files to add them to the timeline.
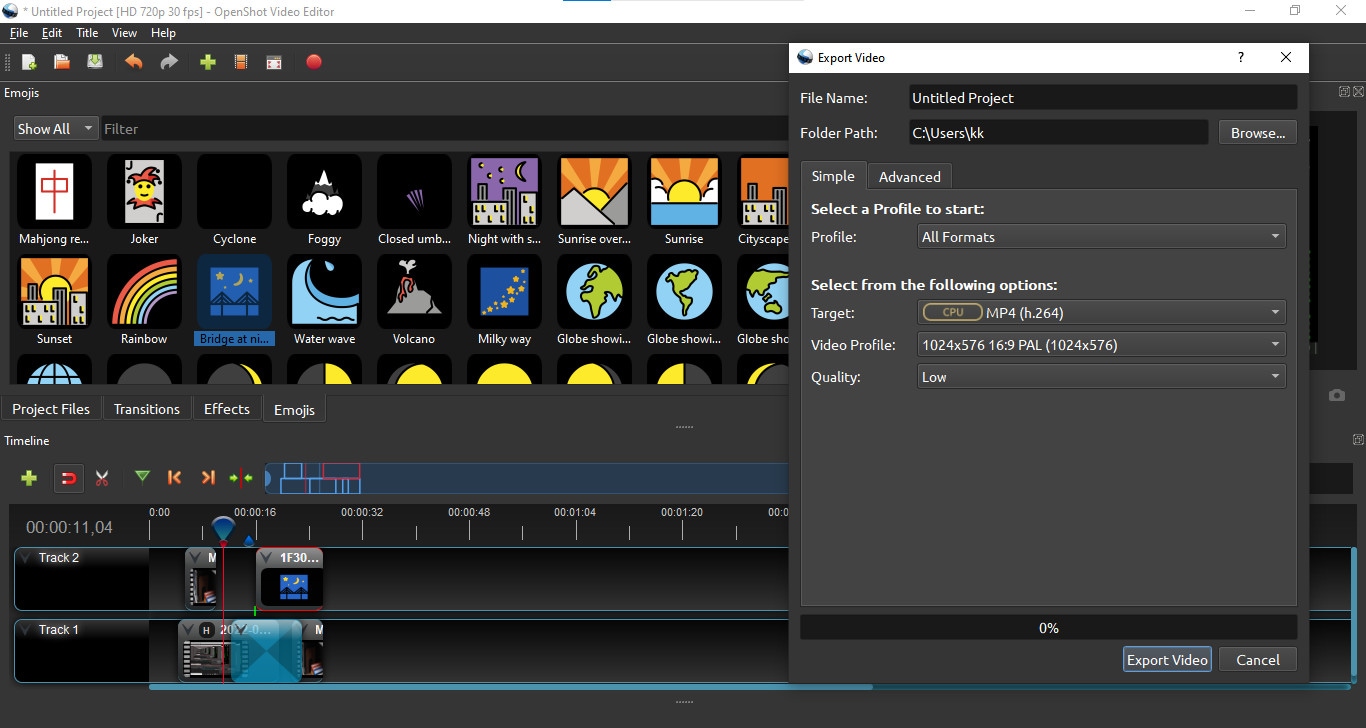
Edit: To trim from ends, drag the clip from corners to trim. There are some basic tools above the tracks in the timeline window. Click “+” to add a new track. Click the scissors icon to split the clip at the desired length. Click the magnet icon to on snapping mode. Click the green marker icon to add markers at desired points during editing.
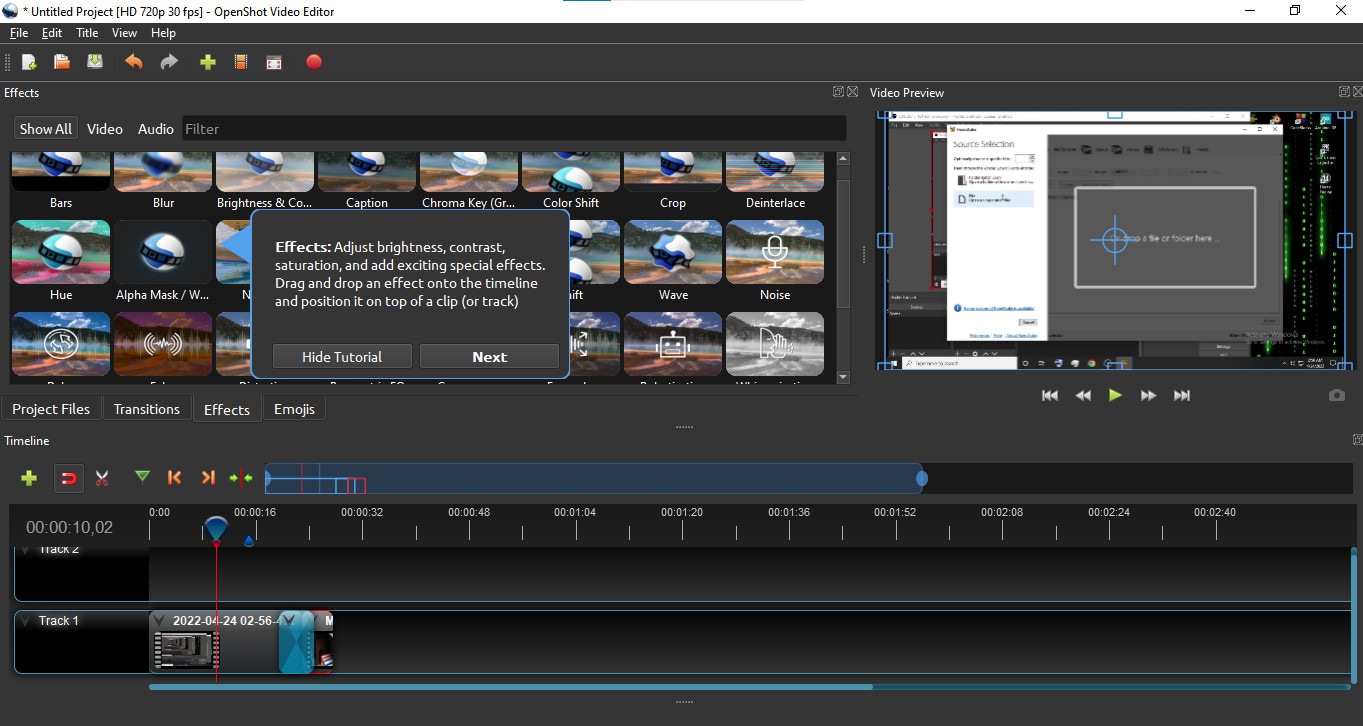
Effects: Above the timeline window you will see a bar containing 4 buttons: Project Files, Transitions, Effects, and Emojis. Drag these elements to add them to the timeline. Effects appear as a small icon on the clip. Right-click the icon then select “Remove Effect” to remove it.
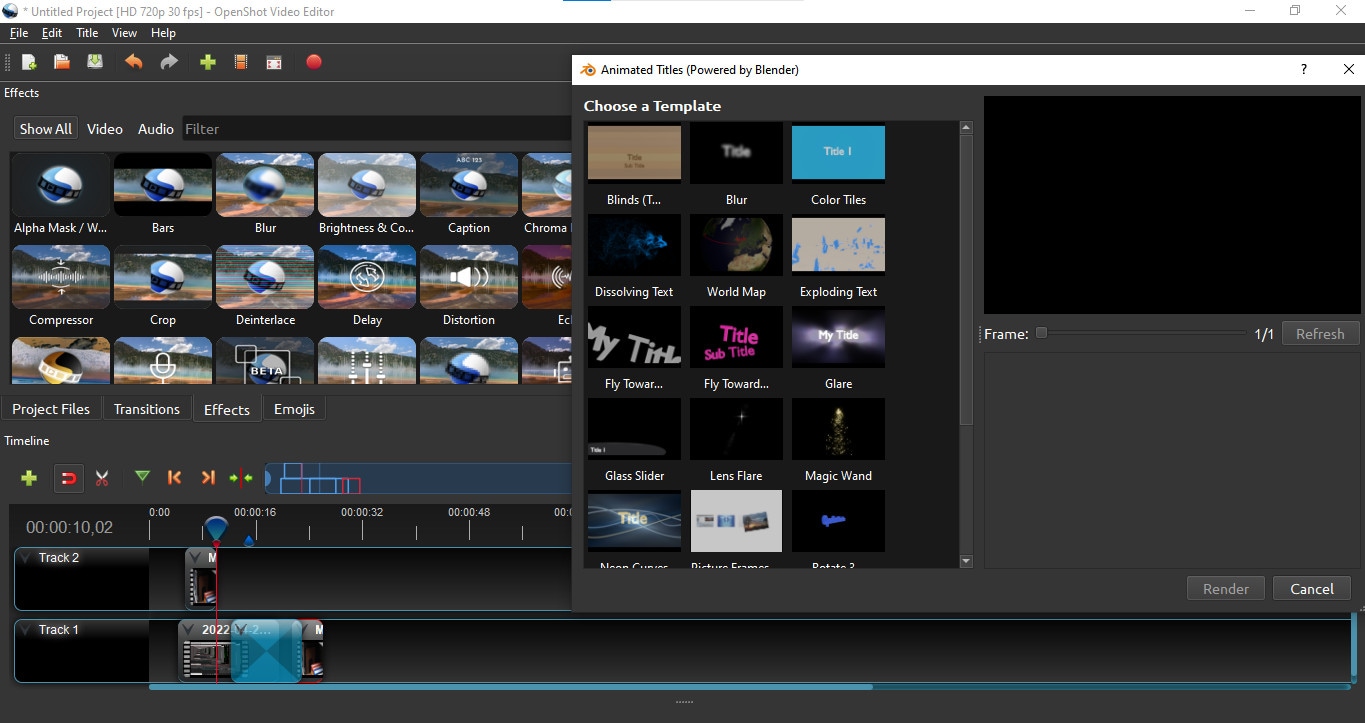
Right-click the clip to access more features like keyframe animation, playback speed, e.t.c.
Export: Click the red dot button on the top of the screen to export your video (or press CTRL + E). Select the desired Profile, Format, Quality, and Destination folder then click “Export Video” to export your file.
More Paid FLV Editor for Windows to Edit FLV Videos:
If you are looking for a good flv editor and you are ready to spend some cash on it then we have selected some paid softwares worthy of your investment.
- Power director 365 (import only):
It is available on both, Windows and Mac.
If you are looking for software to do more than just trimming and cropping the video then Cyberlink Power Director can be the right choice for you. It is packed with dozens of features that professional content creators look for. It has some professional-level plugins also. It is suitable for both beginners and advanced users.
It allows users to import .flv file and edit it like usual but you can’t export it in the same format as it exports videos in few formats only. FLV file is then converted into any of the other supported formats.
Pricing:
Its annual subscription is 69$ which is available at 30% off at 48.99$/year. This offer is valid till 4th May 2022.
Features:
- Can support 4K videos and can import a wide range of file formats.
- Have Auto Chapter and Subtitle settings.
- Multi-cam editing.
- Have hundreds of transitions, effects, and access to thousands of stock footage.
- Can Group clips for easy editing.
- Can import presets and color LUTS.
Cons:
- It lags sometimes, this issue can be resolved to an extent if you have a powerful PC.
- Some features are complicated to use.
- Export settings have fewer file formats as compared to the import file range.
Steps:
Import: Open Power Director then select the aspect ratio and click “Full Mode” to start the program. Import media files to the media room. Click the “Import Media” icon below the files tab to add more clips.
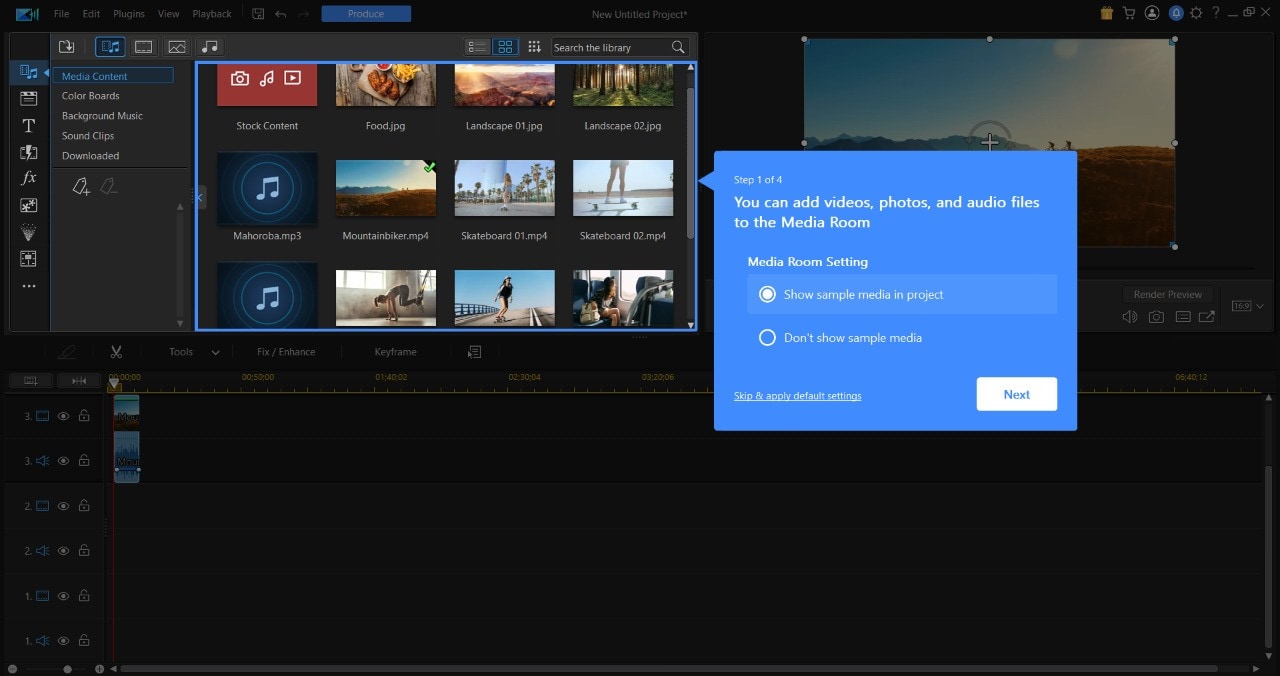
Edit: Drag and drop files to add them to the timeline. Drop files above or below to add them in layers. Click the icon on the top left corner of the timeline to add a new layer. You can find basic editing tools above the timeline.

Effects: All the effects and overlay elements are situated at the top left corner of the screen in a vertical bar. Here you will find the Project library, titles, effects, transitions, overlays, e.t.c. Simply just drag and drop on the timeline to use them. Here you can also do audio mixing and add subtitles and chapters.
Double click a clip or an overlay element to open the designer window. Here you can customize the clips and overlays to enhance your project.
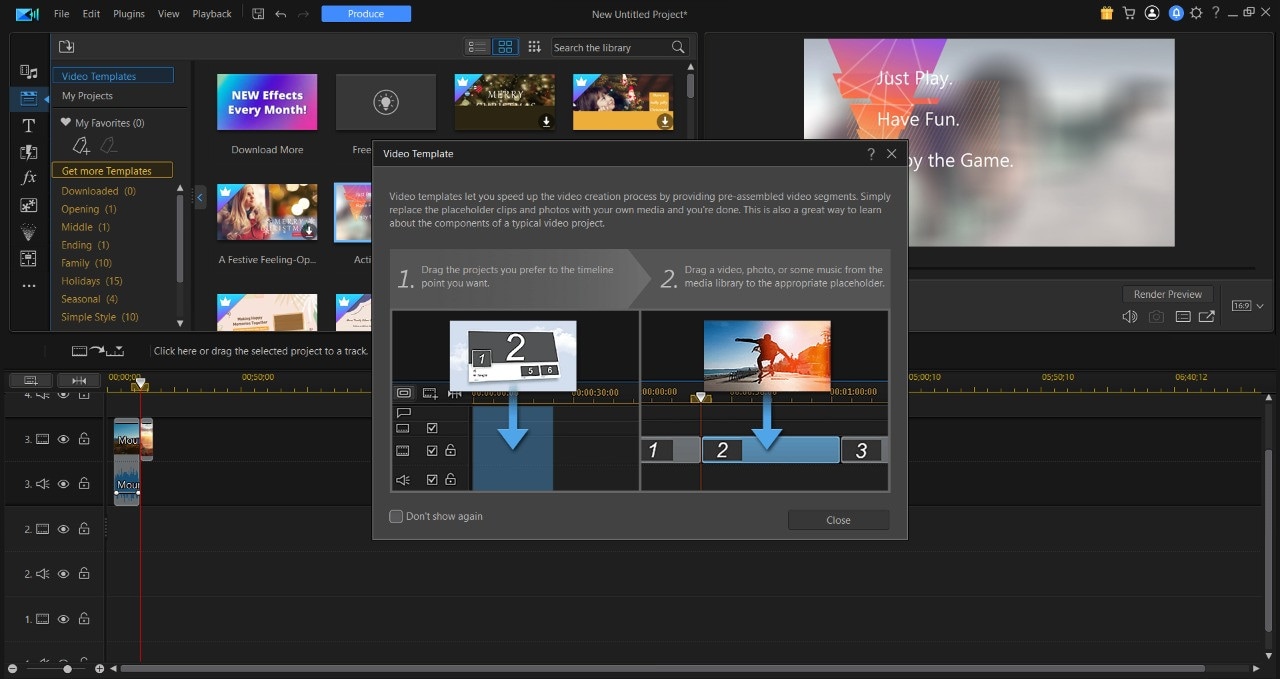
Export: Click the “Produce” button on top of the screen then select the desired mode and file format and add a destination then click “Start”.
- AVS video editor:
If you are looking for a good .flv video editor and are ready to spend some bucks then the AVS video editor is a good choice for you. It is a low-budget software that is simple and easy to use and has some great features. It was my first video editor which I used about 5-6 years ago when I started making videos. It is simple and easy to use. It has some fine features that can fulfill your basic video editing tasks. Has a unique animation trajectory feature, where you can create paths for overlays.
Pricing:
It has two different plans, the first is an annual one which is at 69$ per year and the second one is a lifetime offer for 199$. In a lifetime plan, you can own the software forever. Right now, the software is at a 70% discount(till 30th April 2022) which decreases the price of the annual subscription to 39$ and the purchase price is 59$ this offer makes the software valuable enough to invest in.
Features:
- Its UI is beginner-friendly and easy to learn.
- Can Support 4K videos.
- Has cool features like video stabilization and a chroma key.
- Has 300+ effects, transitions, and overlays.
- Has a storyboard-type editing style also, which is a great feature for some users.
- Has keyframing and animation trajectory option for overlays.
Cons:
- Lacks some commonly used features.
- It is a decade-old software and needs some new updates to compete with other editing softwares.
- It isn’t suitable for professionals as you can’t do many customizations.
- It has only one layer for every element like text, effects, overlays, e.t.c.
- If hard disk crashes you have to purchase the license again.
Steps:
Import: Click “Import Media Files” to import clips or click “Open Existing Project” to load previously saved projects. Drag and drop files to add them to the timeline.
Edit: To trim from ends, drag the clip from corners to trim. On top of the timeline, you will find a few basic tools like change speed, apply transitions, do color correction, or do video stabilization.
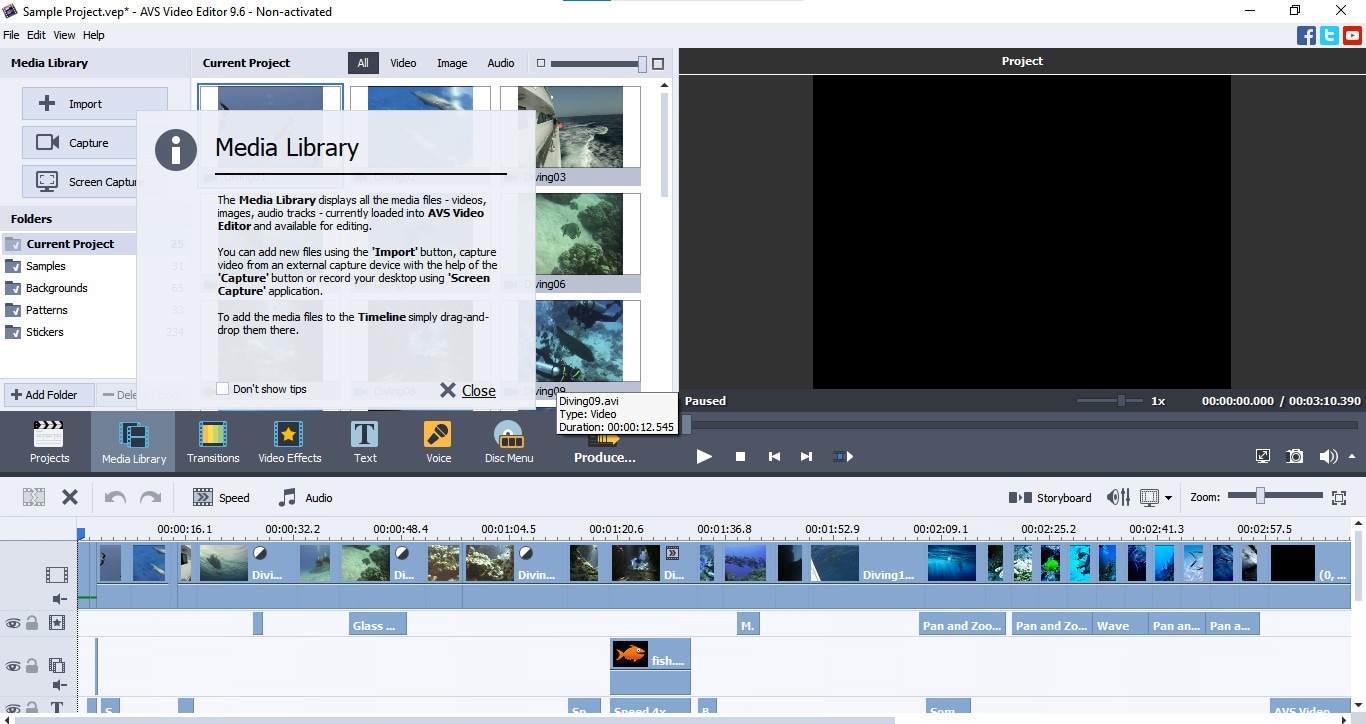
Effects: Click the “Transition” button above the timeline to apply transitions. Drag and drop transitions between two clips to apply it. Right-click on the transition to change its duration.
Click the “Video Effects” button on top of the timeline, then drag and drop the desired effect on the effects layer and trim it according to your need.
Similarly from the “Text” tab Drag and drop the desired text to the text layer in the timeline. Then select “Edit text” to change the text.
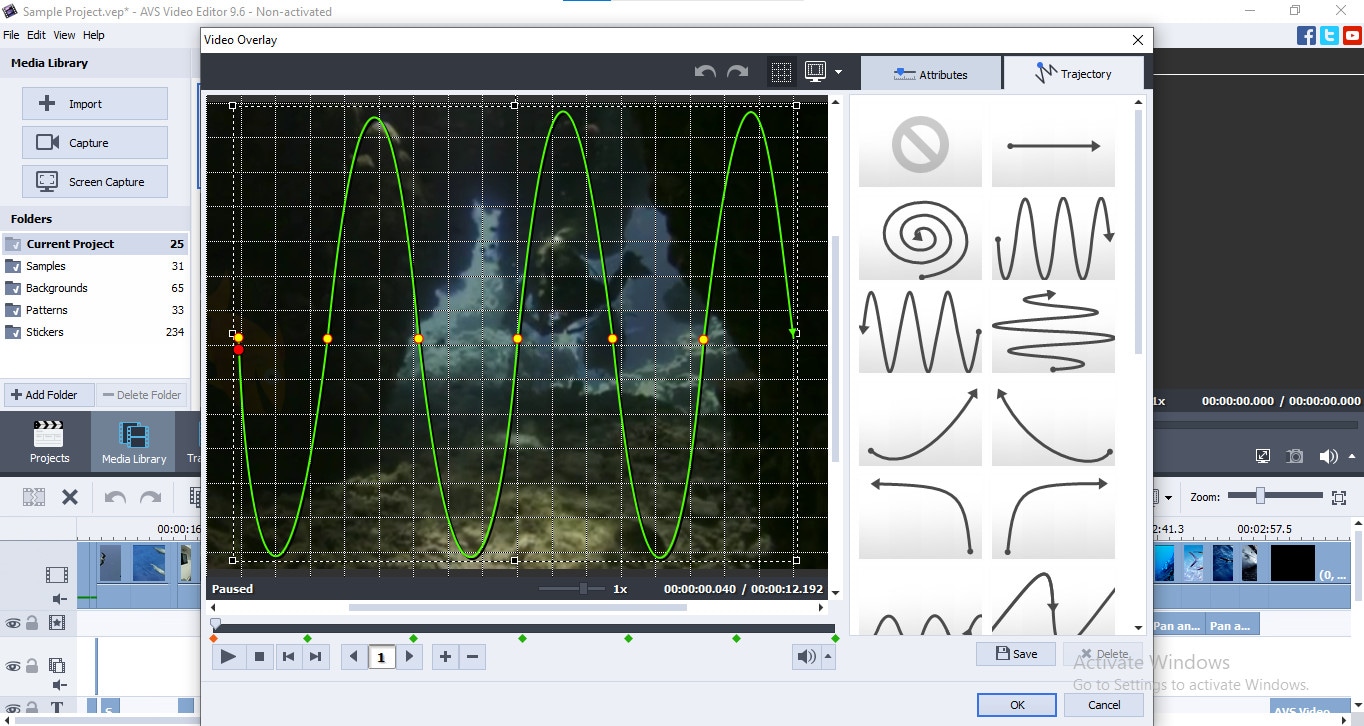
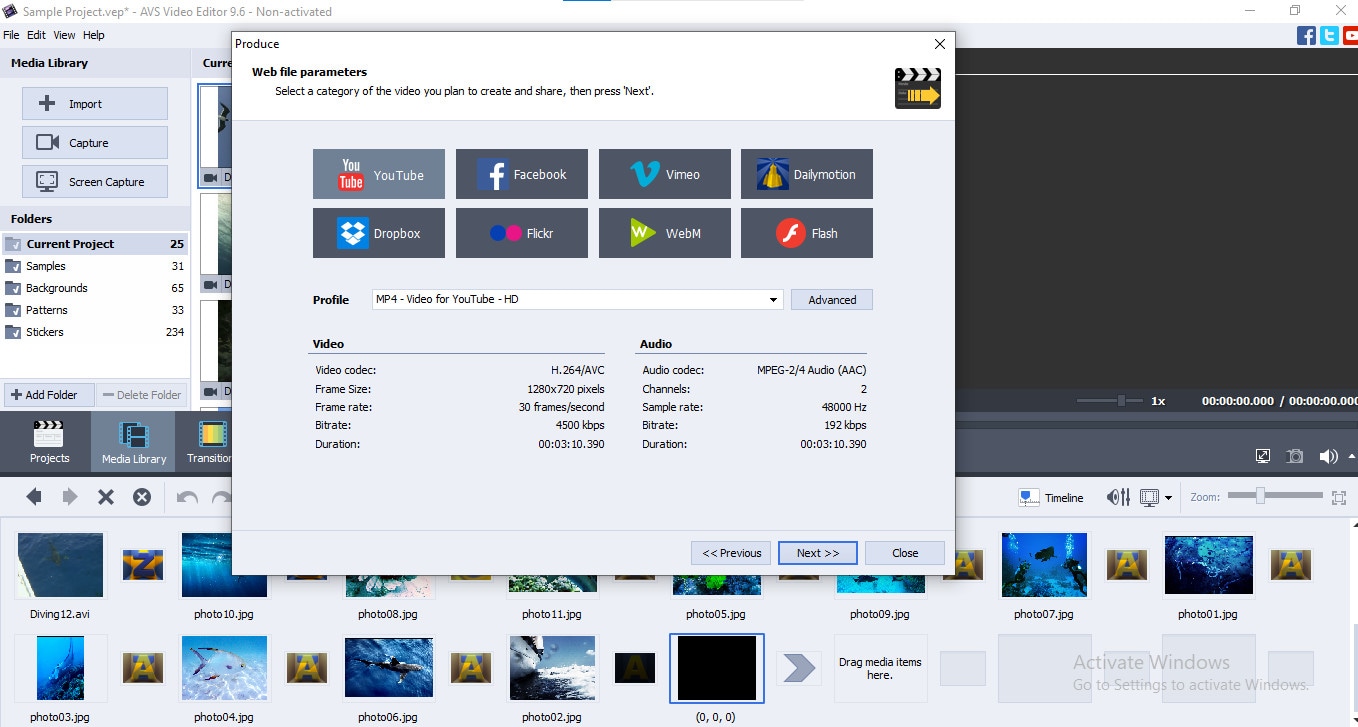
Export: Click the “Produce” button on top of the timeline to open the export window. Select the desired file format and quality then click “next” and then click the “Create” button to export your file.
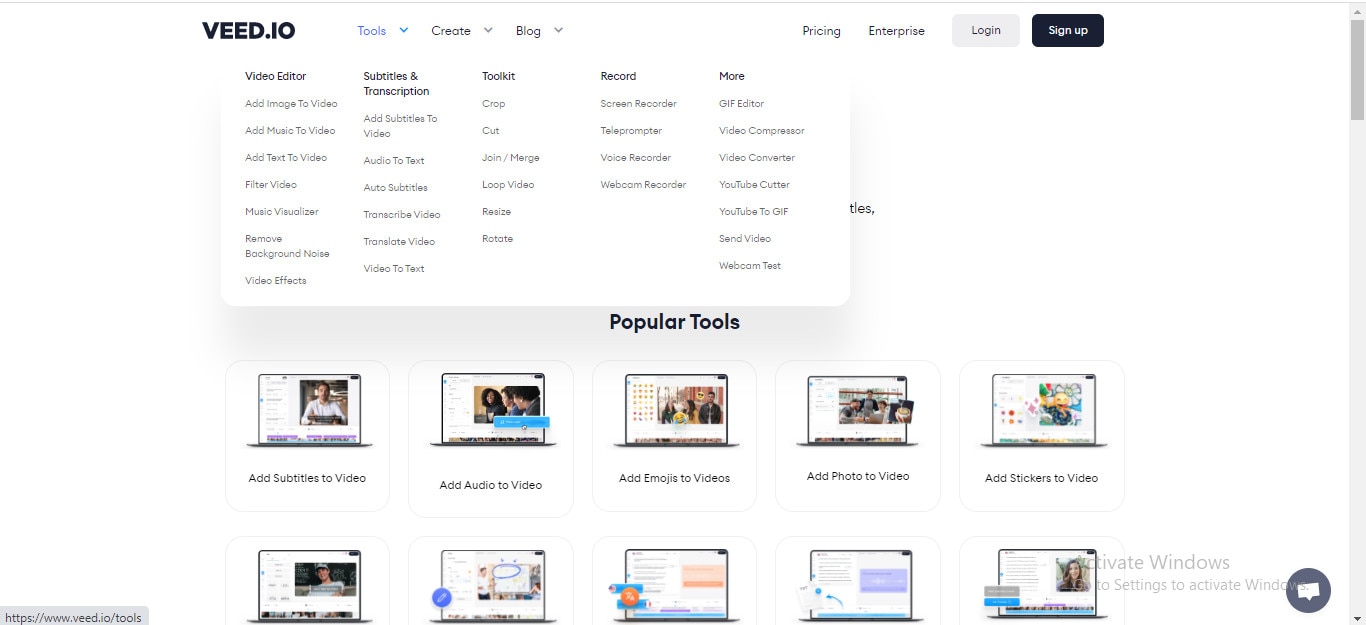
Veed.io: (Online):
If you want to edit FLV videos quickly and don’t want to install any software then Veed.io can be a good choice for you. It is an online FLV video editor that can run on any browser and is compatible with Windows, Mac, Linux, and even mobile phones. It is a quick and simple method to fulfill your basic video editing needs. It has some amazing and uniques features as compared to other basic video editors. It is a great platform to edit videos anywhere. You can start editing video on your PC and can continue it on your phone if you have to leave your workplace. But these features come at a price as its basic plan has the majority of the features but it leaves a watermark on the final video.
Pricing:
It has 3 different plans depending on your needs. The first one is the “Free Plan” which is almost useless for most users as it creates a watermark. The second one is the “Basic Plan” at 18$/month. While third is the “Pro Plan” at 30$/month which has some more features than the basic plan. You can purchase an annual plan to save up to 33%.
Features:
- It is an online platform that makes it easily accessible from any device.
- It is multi user friendly and is a good choice for team projects.
- It has a simple and clean interface which is ideal for beginners.
- It has an Auto subtitle generator + subtitle translator and editor.
- It has audio to text and video to text features that aren’t found in many other editors.
- It is compatible with many video and audio formats.
Cons:
- It is quite slow as compared to other video editing software.
- Downloading 4K videos is only available in Pro Plan.
- It is an online platform, so its data can be breached or leaked, so avoid editing your personal videos on this platform. It can rarely happen but precaution is better than cure.
Steps:
Import: Click choose FLV File on the home screen then a popup will appear, click “Browse” to upload a file or use a template.
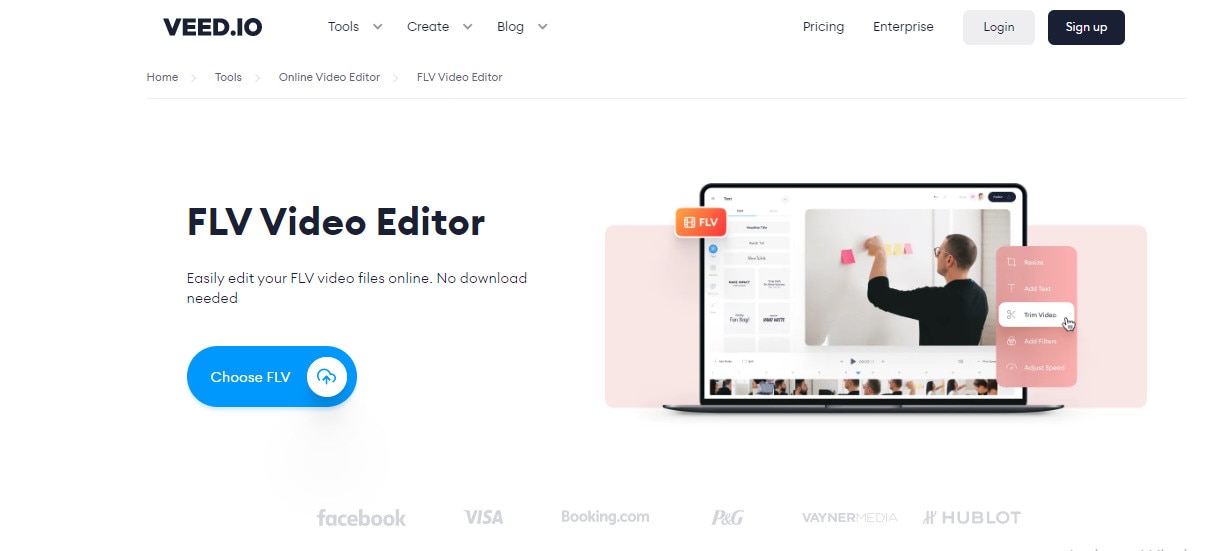
Edit: To trim from ends, drag the clip from corners to trim. Click the “Split” button above the timeline to split the clip in between.
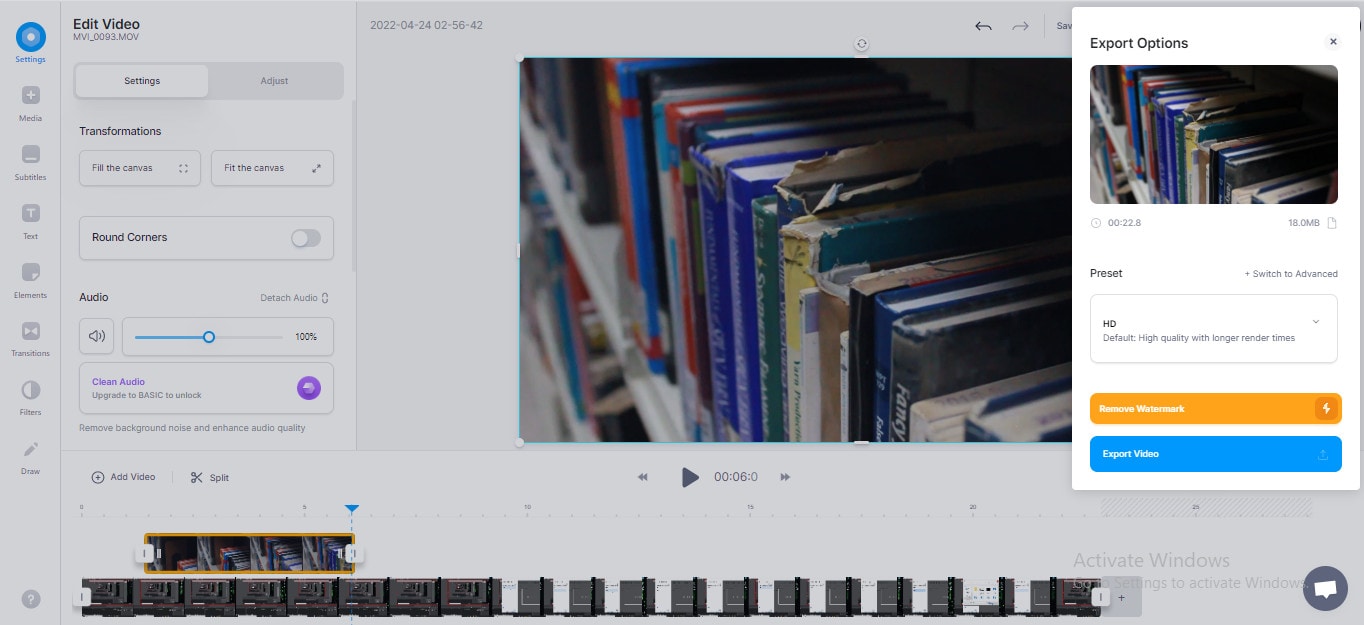
Effects: All the effects tabs like Text, Elements, Transitions lie on the left side of the screen (on windows). Click an element and it will be added to the timeline, then adjust the settings according to your will.
Export: Click the “Export” button on the top right side of the screen. Select a preset or change export settings then click “Export Video”. Soon you will get your final product.
Which Should I choose Free or Paid FLV Editor :
Are you confused to choose the FLV editor for you? Then look for the one that suits your other needs. Like if you want an editor only to crop or trim videos then save your money and go for a free video editor. But if you want some extra features to enhance your workflow or have some cash then go for paid software. For professionals, Power Director 365 or Filmora pro can be a good choice to invest your money in.
~ Some FAQs about FLV Videos:
why is .flv format used?
FLV is basically used to publish or distribute videos on the Internet. Many social platforms and web pages (such as youtube, Hulu, e.t.c.) use .flv files as it provide high-quality synchronized audio and video in compact file size. It was mostly used for embedded videos on these platforms. It is compatible with most browsers and devices even with older phones and computers.
How to play .FLV files?
To play .flv files a flash player is required. Which is pre-installed in almost most of the computers and browsers, if that’s not the case. Then you need a good video player which supports .flv format. Therefore VLC media prayer is a good choice. It is quite easy to use and has some useful features like Speed, Adding subtitles, Audio sync, e.t.c.
Is .flv file easy to edit?
FLV is just a format, It can be edited like any other format. Steps may differ from software to software. But don’t worry as I have mentioned the steps of some popular FLV video editors above.
Can the .flv file be converted?
If you don’t want to stick with the .flv format for long enough and want to switch over to a more convenient format then you can try these converters.
VLC Media Player: Yes, apart from being a video player it can convert video formats. It’s quite easy to use.
Simply Open VLC Media Player >> Click Media tab >> Click “Convert/Save” >> On pop up menu Select “Add” to add file (can add multiple files also) >> Click “Convert/Save” >> Add Destination folder and File Format (to convert in) then click “Start”.
Hand Brake: It is another popular video converter that can convert a .flv file into almost any file format.
Open HandBrake-“Drop a file” screen will appear >> Select the specific file you one to convert >> Select Destination filder >> Click “Start encoding”.
Flv vs Mp4 which is better?
FLV format was quite popular back in 2010 as it provides high-quality compressed video for the internet. It takes less space which makes it easy to download and transfer quickly. Nowadays MP4 format is used more as it is versatile and is compatible with almost all devices like Mobile, PC, TV, e.t.c. FLV uses H.263 codec while MP4 uses codec which provides better quality after compression. Still .flv file is a better choice for streaming platforms as one of the most common software used for streaming is OBS studio and it produces .flv files.
It is available for both Windows and Mac.
Filmora Video Editor is the most common and versatile editing software in this list that almost every content creator may have used or heard about. It has a lot of professional features used by content creators. It is one of the best video editors for .flv format, if u work with .flv files then you must get your hands on filmora.
Its UI is quite similar to premiere pro which makes it quite easy for people who are looking for premiere pro alternatives. It has hundreds of classy transitions/effects and dozens of unique and useful features but many of them are available on paid version only.
The free version also packs a punch but it is almost useless for most users as it leaves a watermark on the final product. It is good for learning video editing and once you master enough to move forward then you can purchase the pro version or you can start directly on the paid version.
For Win 7 or later (64-bit)
For macOS 10.14 or later
Features:
- Support a wide range of formats including .flv.
- Have advanced color grading options.
- Have standard Motion Tracking feature.
- Masking and Chroma key.
- Keyframing and Smooth animation. (Paid version)
- Speed ramping and Auto Synchronization. (Paid Version)
- Support industry-standard plugins (like Boris fx).
- Have a vast stock library.
Cons:
- Leaves a watermark on export. (free version)
- Have playback issues while using 4k videos.
- Lacks some standard editing features.
*Almost every software has some pros and cons. Remember these are inspected from my point of view. And it can differ from your experience.
Steps:
Import: Open filmora, a popup will appear, Select desired aspect ratio then click “New Project” to start editing or click “Open Project” to continue your old project.
On the center of the screen, you will see the import window, click it to import .flv file or any other video you want to edit.

Edit: Drag the clips on the timeline to start editing. Drag the clips from the corner to trim them. Click the top left icon of the timeline (not the whole screen) to add layers. In the toolbar above the timeline, you will find a bunch of tools, like split, crop, speed ramping, animation e.t.c. Click the red scissors icon on the pointer to split the clip at the desired timestamp.

Effects: Click the “edit” icon, then you will see a bunch of icons appear on the top left corner of the screen, These are as follow.
Select the “Video” icon to transform the clip or to do motion tracking, stabilization, chroma-key, Masking, e.t.c. To do Motion tracking, on the playback screen, lock the box on the item you want to track then click “Start Tracking”.
Select the “Audio” icon to apply effects and enhance your audio.
Select the “Color” icon to do fine-tuning and color grading, Select the “3D LUT” option to import a new customized lut. You can find a number of cool luts online.
Select the “Animation” icon to add preset animations or make custom animations by using keyframes.
Select the “Speed” icon to adjust the speed of the clip or to do speed ramping.
Click the “OK” button below to go back to previous tabs.
From there you can add Audio, Titles, Transitions, Effects, Elements, and Stock Media. Simply drag and drop the effects and transition on the clip to apply it. And to use titles and stock media, click and drag them on the timeline to use them.
Export: Click the blue “Export” button. Then choose Desired format and Resolution to export your final product.
More Free FLV Editor for Windows to Edit FLV Videos:
If you are looking for a .flv video editor to perform some editing tasks without spending any money then read till the end because here we have mentioned some free FLV editors for you.
- VSDC video editors :
It is available only on Windows.
Despite being free software, it is packed with lots of features. It is a good choice for non-professionals and it can even run on low-end PCs. It supports a wide range of video/audio formats including .flv file. It has dozens of cool effects and tools that can give your videos a new look. It is a non-linear program that makes using layers much easier means you can add layers at any specific time frame and can add layers into layers for complex editing. It also supports 360 and 3D video which can easily be converted into 2D. It has a number of video and audio effects. It is an old yet powerful software which can even run in 19s Pc. Its features are mentioned below.
Features:
- Free Software with no watermark.
- Can support 4K footages on the latest versions.
- Can import/export a wide range of formats.
- Have built-in video and screen capture feature.
- Has a Non-linear interface that supports multi-layer editing.
- Have professional features like chroma key and masking.
- Can convert layers into a sprite (Grouped Sequence) for handling multiple layers easily.
Cons:
- Being a free software it has some limitations too.
- It’s hard to learn for beginners.
- It still lacks features for a professional creator.
- Doesn’t support Hardware acceleration.
Steps:
Import: Open VSDC video editor, from the “Start Project Now” tab click “Blank Project” to start a new project or click “Import Content” to browse video or image files. Then select “Project settings”.

Edit: You can add more files by clicking the “Add Object” button on the top left corner. Then drag the file from Object explorer to anywhere on the timeline even on layers. On top of the “Editor Tab”, you can find the necessary tools to split, crop, and rotate the video. Click “Spacebar” to play/pause the timeline.

Effects: Click a video on the timeline then select the Effect buttons on top of the “Editor” tab to apply effects to your clip. Then Click the effect on “Object Explorer” to open its properties menu. On the left side of the player, you will find buttons to add text, shapes, e.t.c to the project. On the right side of the screen, you will find the “Basic effects window” where you can do color correction and grading.
Select Multiple Clips then right-click the mouse button and then the “Convert to sprite” button to make a grouped clip (clips within a clip).
Export: Click the “Export Project” button on the top of the screen. Then choose “Media device”, “output video format” and select output destination and quality setup then click “Export Project” to export the video. If you are using the free version of the software, a popup will appear saying “export without premium features”, just click Continue. Now your file is ready to be viewed.

- Shotcut:
It is available on Windows, Mac, and Linux.
It is a free and open-source video editor which is simple and easy to use, which makes it ideal for beginners. It doesn’t have any pro version. It is an ideal software to deal with .flv files as it supports a large number of import/export formats. However, it takes some time to understand its UI. After that, it is quite easy to use. It has cool effects and transitions. It has a clean and simple timeline which is not versatile for professionals although it has some complex options to customize your timeline. It has some refined color grading options. Being a free software it has some 360 effects and 3D text which makes it comparatively good as compared to some other free softwares. It can support 4K videos also but lags or crashes sometimes when using 4K clips. All the effects and tools are combined in one tab “Filter” which is a plus point for some users. It also has some good quality audio effects. Some of its features are mentioned below.
Features:
- It is completely free software with no watermark.
- It has one of the largest file format compatibility.
- It can support 4K video resolution.
- It has 3 wheel grading tool and some other color filters.
- It has standard animation and keyframing features.
- It has some effects to support 360 videos.
Cons:
- It isn’t suitable for professionals as it lacks some useful features.
- Have issues with playback of 4K videos and sometimes crashes.
- Doesn’t have a separate text column and lacks some basic text and title effects.
- Its UI is different from other common video editors and is a bit hard to understand.
Steps:
Import: Click the “Open file” icon on the top left corner of the window to import files.

Edit: Drag and drop clips on an empty timeline panel to add tracks. Right-click on the left side of the timeline to add a video or an audio track. To trim from ends, drag the clip from corners to trim. Click the Scissors icon on the top timeline to split the clip in between.
Click the “Properties” tab above the timeline panel to change the aspect ratio and playback speed of the clip.

Effects: Click the “Filters” tab above the timeline panel to open the filter menu, Click “+” above it to add filters. Double click a filter to add it to the selected clip, then click the filter to change its properties.
Click the “Keyframes” icon on top of the window to open the Keyframes window. Then click the “Timeline” icon to go back to the previous window.
Export: Click the “Export” button on the top of the screen. Select a preset or click the “Advanced” button to change export settings then click “Export File”.

- OpenShot:
It is available on Windows, Mac, and Linux.
OpenShot is another choice for you if you are looking for a free FLV editor. It is simple and easy to use. Its User Interface is clean and beginner-friendly. It has hundreds of transitions and effects. It has an animated titles option also, which is powered by Blender.
Features:
- Is simple and easy to use.
- Its UI is Beginner friendly.
- Can support 4K videos.
- Support a wide range of formats.
- Have smooth keyframe animation.
- Is free and has no watermark.
Cons:
- Video Playback is a bit laggy.
- Animated titles are only supported when you have Blender (3d software) installed on your PC.
- Doesn’t have enough tools for professionals.
Steps:
Import: Start “OpenShot” then drag and drop files in the project files tab from your file system (or press CTRL + F). Drag and drop files to add them to the timeline.
Edit: To trim from ends, drag the clip from corners to trim. There are some basic tools above the tracks in the timeline window. Click “+” to add a new track. Click the scissors icon to split the clip at the desired length. Click the magnet icon to on snapping mode. Click the green marker icon to add markers at desired points during editing.

Effects: Above the timeline window you will see a bar containing 4 buttons: Project Files, Transitions, Effects, and Emojis. Drag these elements to add them to the timeline. Effects appear as a small icon on the clip. Right-click the icon then select “Remove Effect” to remove it.

Right-click the clip to access more features like keyframe animation, playback speed, e.t.c.
Export: Click the red dot button on the top of the screen to export your video (or press CTRL + E). Select the desired Profile, Format, Quality, and Destination folder then click “Export Video” to export your file.

More Paid FLV Editor for Windows to Edit FLV Videos:
If you are looking for a good flv editor and you are ready to spend some cash on it then we have selected some paid softwares worthy of your investment.
- Power director 365 (import only):
It is available on both, Windows and Mac.
If you are looking for software to do more than just trimming and cropping the video then Cyberlink Power Director can be the right choice for you. It is packed with dozens of features that professional content creators look for. It has some professional-level plugins also. It is suitable for both beginners and advanced users.
It allows users to import .flv file and edit it like usual but you can’t export it in the same format as it exports videos in few formats only. FLV file is then converted into any of the other supported formats.
Pricing:
Its annual subscription is 69$ which is available at 30% off at 48.99$/year. This offer is valid till 4th May 2022.
Features:
- Can support 4K videos and can import a wide range of file formats.
- Have Auto Chapter and Subtitle settings.
- Multi-cam editing.
- Have hundreds of transitions, effects, and access to thousands of stock footage.
- Can Group clips for easy editing.
- Can import presets and color LUTS.
Cons:
- It lags sometimes, this issue can be resolved to an extent if you have a powerful PC.
- Some features are complicated to use.
- Export settings have fewer file formats as compared to the import file range.
Steps:
Import: Open Power Director then select the aspect ratio and click “Full Mode” to start the program. Import media files to the media room. Click the “Import Media” icon below the files tab to add more clips.

Edit: Drag and drop files to add them to the timeline. Drop files above or below to add them in layers. Click the icon on the top left corner of the timeline to add a new layer. You can find basic editing tools above the timeline.

Effects: All the effects and overlay elements are situated at the top left corner of the screen in a vertical bar. Here you will find the Project library, titles, effects, transitions, overlays, e.t.c. Simply just drag and drop on the timeline to use them. Here you can also do audio mixing and add subtitles and chapters.
Double click a clip or an overlay element to open the designer window. Here you can customize the clips and overlays to enhance your project.

Export: Click the “Produce” button on top of the screen then select the desired mode and file format and add a destination then click “Start”.
- AVS video editor:
If you are looking for a good .flv video editor and are ready to spend some bucks then the AVS video editor is a good choice for you. It is a low-budget software that is simple and easy to use and has some great features. It was my first video editor which I used about 5-6 years ago when I started making videos. It is simple and easy to use. It has some fine features that can fulfill your basic video editing tasks. Has a unique animation trajectory feature, where you can create paths for overlays.
Pricing:
It has two different plans, the first is an annual one which is at 69$ per year and the second one is a lifetime offer for 199$. In a lifetime plan, you can own the software forever. Right now, the software is at a 70% discount(till 30th April 2022) which decreases the price of the annual subscription to 39$ and the purchase price is 59$ this offer makes the software valuable enough to invest in.
Features:
- Its UI is beginner-friendly and easy to learn.
- Can Support 4K videos.
- Has cool features like video stabilization and a chroma key.
- Has 300+ effects, transitions, and overlays.
- Has a storyboard-type editing style also, which is a great feature for some users.
- Has keyframing and animation trajectory option for overlays.
Cons:
- Lacks some commonly used features.
- It is a decade-old software and needs some new updates to compete with other editing softwares.
- It isn’t suitable for professionals as you can’t do many customizations.
- It has only one layer for every element like text, effects, overlays, e.t.c.
- If hard disk crashes you have to purchase the license again.
Steps:
Import: Click “Import Media Files” to import clips or click “Open Existing Project” to load previously saved projects. Drag and drop files to add them to the timeline.
Edit: To trim from ends, drag the clip from corners to trim. On top of the timeline, you will find a few basic tools like change speed, apply transitions, do color correction, or do video stabilization.

Effects: Click the “Transition” button above the timeline to apply transitions. Drag and drop transitions between two clips to apply it. Right-click on the transition to change its duration.
Click the “Video Effects” button on top of the timeline, then drag and drop the desired effect on the effects layer and trim it according to your need.
Similarly from the “Text” tab Drag and drop the desired text to the text layer in the timeline. Then select “Edit text” to change the text.

Export: Click the “Produce” button on top of the timeline to open the export window. Select the desired file format and quality then click “next” and then click the “Create” button to export your file.

Veed.io: (Online):
If you want to edit FLV videos quickly and don’t want to install any software then Veed.io can be a good choice for you. It is an online FLV video editor that can run on any browser and is compatible with Windows, Mac, Linux, and even mobile phones. It is a quick and simple method to fulfill your basic video editing needs. It has some amazing and uniques features as compared to other basic video editors. It is a great platform to edit videos anywhere. You can start editing video on your PC and can continue it on your phone if you have to leave your workplace. But these features come at a price as its basic plan has the majority of the features but it leaves a watermark on the final video.
Pricing:
It has 3 different plans depending on your needs. The first one is the “Free Plan” which is almost useless for most users as it creates a watermark. The second one is the “Basic Plan” at 18$/month. While third is the “Pro Plan” at 30$/month which has some more features than the basic plan. You can purchase an annual plan to save up to 33%.

Features:
- It is an online platform that makes it easily accessible from any device.
- It is multi user friendly and is a good choice for team projects.
- It has a simple and clean interface which is ideal for beginners.
- It has an Auto subtitle generator + subtitle translator and editor.
- It has audio to text and video to text features that aren’t found in many other editors.
- It is compatible with many video and audio formats.
Cons:
- It is quite slow as compared to other video editing software.
- Downloading 4K videos is only available in Pro Plan.
- It is an online platform, so its data can be breached or leaked, so avoid editing your personal videos on this platform. It can rarely happen but precaution is better than cure.
Steps:
Import: Click choose FLV File on the home screen then a popup will appear, click “Browse” to upload a file or use a template.

Edit: To trim from ends, drag the clip from corners to trim. Click the “Split” button above the timeline to split the clip in between.

Effects: All the effects tabs like Text, Elements, Transitions lie on the left side of the screen (on windows). Click an element and it will be added to the timeline, then adjust the settings according to your will.
Export: Click the “Export” button on the top right side of the screen. Select a preset or change export settings then click “Export Video”. Soon you will get your final product.
Which Should I choose Free or Paid FLV Editor :
Are you confused to choose the FLV editor for you? Then look for the one that suits your other needs. Like if you want an editor only to crop or trim videos then save your money and go for a free video editor. But if you want some extra features to enhance your workflow or have some cash then go for paid software. For professionals, Power Director 365 or Filmora pro can be a good choice to invest your money in.
~ Some FAQs about FLV Videos:
why is .flv format used?
FLV is basically used to publish or distribute videos on the Internet. Many social platforms and web pages (such as youtube, Hulu, e.t.c.) use .flv files as it provide high-quality synchronized audio and video in compact file size. It was mostly used for embedded videos on these platforms. It is compatible with most browsers and devices even with older phones and computers.
How to play .FLV files?
To play .flv files a flash player is required. Which is pre-installed in almost most of the computers and browsers, if that’s not the case. Then you need a good video player which supports .flv format. Therefore VLC media prayer is a good choice. It is quite easy to use and has some useful features like Speed, Adding subtitles, Audio sync, e.t.c.
Is .flv file easy to edit?
FLV is just a format, It can be edited like any other format. Steps may differ from software to software. But don’t worry as I have mentioned the steps of some popular FLV video editors above.
Can the .flv file be converted?
If you don’t want to stick with the .flv format for long enough and want to switch over to a more convenient format then you can try these converters.
VLC Media Player: Yes, apart from being a video player it can convert video formats. It’s quite easy to use.
Simply Open VLC Media Player >> Click Media tab >> Click “Convert/Save” >> On pop up menu Select “Add” to add file (can add multiple files also) >> Click “Convert/Save” >> Add Destination folder and File Format (to convert in) then click “Start”.
Hand Brake: It is another popular video converter that can convert a .flv file into almost any file format.
Open HandBrake-“Drop a file” screen will appear >> Select the specific file you one to convert >> Select Destination filder >> Click “Start encoding”.
Flv vs Mp4 which is better?
FLV format was quite popular back in 2010 as it provides high-quality compressed video for the internet. It takes less space which makes it easy to download and transfer quickly. Nowadays MP4 format is used more as it is versatile and is compatible with almost all devices like Mobile, PC, TV, e.t.c. FLV uses H.263 codec while MP4 uses codec which provides better quality after compression. Still .flv file is a better choice for streaming platforms as one of the most common software used for streaming is OBS studio and it produces .flv files.
It is available for both Windows and Mac.
Filmora Video Editor is the most common and versatile editing software in this list that almost every content creator may have used or heard about. It has a lot of professional features used by content creators. It is one of the best video editors for .flv format, if u work with .flv files then you must get your hands on filmora.
Its UI is quite similar to premiere pro which makes it quite easy for people who are looking for premiere pro alternatives. It has hundreds of classy transitions/effects and dozens of unique and useful features but many of them are available on paid version only.
The free version also packs a punch but it is almost useless for most users as it leaves a watermark on the final product. It is good for learning video editing and once you master enough to move forward then you can purchase the pro version or you can start directly on the paid version.
For Win 7 or later (64-bit)
For macOS 10.14 or later
Features:
- Support a wide range of formats including .flv.
- Have advanced color grading options.
- Have standard Motion Tracking feature.
- Masking and Chroma key.
- Keyframing and Smooth animation. (Paid version)
- Speed ramping and Auto Synchronization. (Paid Version)
- Support industry-standard plugins (like Boris fx).
- Have a vast stock library.
Cons:
- Leaves a watermark on export. (free version)
- Have playback issues while using 4k videos.
- Lacks some standard editing features.
*Almost every software has some pros and cons. Remember these are inspected from my point of view. And it can differ from your experience.
Steps:
Import: Open filmora, a popup will appear, Select desired aspect ratio then click “New Project” to start editing or click “Open Project” to continue your old project.
On the center of the screen, you will see the import window, click it to import .flv file or any other video you want to edit.

Edit: Drag the clips on the timeline to start editing. Drag the clips from the corner to trim them. Click the top left icon of the timeline (not the whole screen) to add layers. In the toolbar above the timeline, you will find a bunch of tools, like split, crop, speed ramping, animation e.t.c. Click the red scissors icon on the pointer to split the clip at the desired timestamp.

Effects: Click the “edit” icon, then you will see a bunch of icons appear on the top left corner of the screen, These are as follow.
Select the “Video” icon to transform the clip or to do motion tracking, stabilization, chroma-key, Masking, e.t.c. To do Motion tracking, on the playback screen, lock the box on the item you want to track then click “Start Tracking”.
Select the “Audio” icon to apply effects and enhance your audio.
Select the “Color” icon to do fine-tuning and color grading, Select the “3D LUT” option to import a new customized lut. You can find a number of cool luts online.
Select the “Animation” icon to add preset animations or make custom animations by using keyframes.
Select the “Speed” icon to adjust the speed of the clip or to do speed ramping.
Click the “OK” button below to go back to previous tabs.
From there you can add Audio, Titles, Transitions, Effects, Elements, and Stock Media. Simply drag and drop the effects and transition on the clip to apply it. And to use titles and stock media, click and drag them on the timeline to use them.
Export: Click the blue “Export” button. Then choose Desired format and Resolution to export your final product.
More Free FLV Editor for Windows to Edit FLV Videos:
If you are looking for a .flv video editor to perform some editing tasks without spending any money then read till the end because here we have mentioned some free FLV editors for you.
- VSDC video editors :
It is available only on Windows.
Despite being free software, it is packed with lots of features. It is a good choice for non-professionals and it can even run on low-end PCs. It supports a wide range of video/audio formats including .flv file. It has dozens of cool effects and tools that can give your videos a new look. It is a non-linear program that makes using layers much easier means you can add layers at any specific time frame and can add layers into layers for complex editing. It also supports 360 and 3D video which can easily be converted into 2D. It has a number of video and audio effects. It is an old yet powerful software which can even run in 19s Pc. Its features are mentioned below.
Features:
- Free Software with no watermark.
- Can support 4K footages on the latest versions.
- Can import/export a wide range of formats.
- Have built-in video and screen capture feature.
- Has a Non-linear interface that supports multi-layer editing.
- Have professional features like chroma key and masking.
- Can convert layers into a sprite (Grouped Sequence) for handling multiple layers easily.
Cons:
- Being a free software it has some limitations too.
- It’s hard to learn for beginners.
- It still lacks features for a professional creator.
- Doesn’t support Hardware acceleration.
Steps:
Import: Open VSDC video editor, from the “Start Project Now” tab click “Blank Project” to start a new project or click “Import Content” to browse video or image files. Then select “Project settings”.

Edit: You can add more files by clicking the “Add Object” button on the top left corner. Then drag the file from Object explorer to anywhere on the timeline even on layers. On top of the “Editor Tab”, you can find the necessary tools to split, crop, and rotate the video. Click “Spacebar” to play/pause the timeline.

Effects: Click a video on the timeline then select the Effect buttons on top of the “Editor” tab to apply effects to your clip. Then Click the effect on “Object Explorer” to open its properties menu. On the left side of the player, you will find buttons to add text, shapes, e.t.c to the project. On the right side of the screen, you will find the “Basic effects window” where you can do color correction and grading.
Select Multiple Clips then right-click the mouse button and then the “Convert to sprite” button to make a grouped clip (clips within a clip).
Export: Click the “Export Project” button on the top of the screen. Then choose “Media device”, “output video format” and select output destination and quality setup then click “Export Project” to export the video. If you are using the free version of the software, a popup will appear saying “export without premium features”, just click Continue. Now your file is ready to be viewed.

- Shotcut:
It is available on Windows, Mac, and Linux.
It is a free and open-source video editor which is simple and easy to use, which makes it ideal for beginners. It doesn’t have any pro version. It is an ideal software to deal with .flv files as it supports a large number of import/export formats. However, it takes some time to understand its UI. After that, it is quite easy to use. It has cool effects and transitions. It has a clean and simple timeline which is not versatile for professionals although it has some complex options to customize your timeline. It has some refined color grading options. Being a free software it has some 360 effects and 3D text which makes it comparatively good as compared to some other free softwares. It can support 4K videos also but lags or crashes sometimes when using 4K clips. All the effects and tools are combined in one tab “Filter” which is a plus point for some users. It also has some good quality audio effects. Some of its features are mentioned below.
Features:
- It is completely free software with no watermark.
- It has one of the largest file format compatibility.
- It can support 4K video resolution.
- It has 3 wheel grading tool and some other color filters.
- It has standard animation and keyframing features.
- It has some effects to support 360 videos.
Cons:
- It isn’t suitable for professionals as it lacks some useful features.
- Have issues with playback of 4K videos and sometimes crashes.
- Doesn’t have a separate text column and lacks some basic text and title effects.
- Its UI is different from other common video editors and is a bit hard to understand.
Steps:
Import: Click the “Open file” icon on the top left corner of the window to import files.

Edit: Drag and drop clips on an empty timeline panel to add tracks. Right-click on the left side of the timeline to add a video or an audio track. To trim from ends, drag the clip from corners to trim. Click the Scissors icon on the top timeline to split the clip in between.
Click the “Properties” tab above the timeline panel to change the aspect ratio and playback speed of the clip.

Effects: Click the “Filters” tab above the timeline panel to open the filter menu, Click “+” above it to add filters. Double click a filter to add it to the selected clip, then click the filter to change its properties.
Click the “Keyframes” icon on top of the window to open the Keyframes window. Then click the “Timeline” icon to go back to the previous window.
Export: Click the “Export” button on the top of the screen. Select a preset or click the “Advanced” button to change export settings then click “Export File”.

- OpenShot:
It is available on Windows, Mac, and Linux.
OpenShot is another choice for you if you are looking for a free FLV editor. It is simple and easy to use. Its User Interface is clean and beginner-friendly. It has hundreds of transitions and effects. It has an animated titles option also, which is powered by Blender.
Features:
- Is simple and easy to use.
- Its UI is Beginner friendly.
- Can support 4K videos.
- Support a wide range of formats.
- Have smooth keyframe animation.
- Is free and has no watermark.
Cons:
- Video Playback is a bit laggy.
- Animated titles are only supported when you have Blender (3d software) installed on your PC.
- Doesn’t have enough tools for professionals.
Steps:
Import: Start “OpenShot” then drag and drop files in the project files tab from your file system (or press CTRL + F). Drag and drop files to add them to the timeline.
Edit: To trim from ends, drag the clip from corners to trim. There are some basic tools above the tracks in the timeline window. Click “+” to add a new track. Click the scissors icon to split the clip at the desired length. Click the magnet icon to on snapping mode. Click the green marker icon to add markers at desired points during editing.

Effects: Above the timeline window you will see a bar containing 4 buttons: Project Files, Transitions, Effects, and Emojis. Drag these elements to add them to the timeline. Effects appear as a small icon on the clip. Right-click the icon then select “Remove Effect” to remove it.

Right-click the clip to access more features like keyframe animation, playback speed, e.t.c.
Export: Click the red dot button on the top of the screen to export your video (or press CTRL + E). Select the desired Profile, Format, Quality, and Destination folder then click “Export Video” to export your file.

More Paid FLV Editor for Windows to Edit FLV Videos:
If you are looking for a good flv editor and you are ready to spend some cash on it then we have selected some paid softwares worthy of your investment.
- Power director 365 (import only):
It is available on both, Windows and Mac.
If you are looking for software to do more than just trimming and cropping the video then Cyberlink Power Director can be the right choice for you. It is packed with dozens of features that professional content creators look for. It has some professional-level plugins also. It is suitable for both beginners and advanced users.
It allows users to import .flv file and edit it like usual but you can’t export it in the same format as it exports videos in few formats only. FLV file is then converted into any of the other supported formats.
Pricing:
Its annual subscription is 69$ which is available at 30% off at 48.99$/year. This offer is valid till 4th May 2022.
Features:
- Can support 4K videos and can import a wide range of file formats.
- Have Auto Chapter and Subtitle settings.
- Multi-cam editing.
- Have hundreds of transitions, effects, and access to thousands of stock footage.
- Can Group clips for easy editing.
- Can import presets and color LUTS.
Cons:
- It lags sometimes, this issue can be resolved to an extent if you have a powerful PC.
- Some features are complicated to use.
- Export settings have fewer file formats as compared to the import file range.
Steps:
Import: Open Power Director then select the aspect ratio and click “Full Mode” to start the program. Import media files to the media room. Click the “Import Media” icon below the files tab to add more clips.

Edit: Drag and drop files to add them to the timeline. Drop files above or below to add them in layers. Click the icon on the top left corner of the timeline to add a new layer. You can find basic editing tools above the timeline.

Effects: All the effects and overlay elements are situated at the top left corner of the screen in a vertical bar. Here you will find the Project library, titles, effects, transitions, overlays, e.t.c. Simply just drag and drop on the timeline to use them. Here you can also do audio mixing and add subtitles and chapters.
Double click a clip or an overlay element to open the designer window. Here you can customize the clips and overlays to enhance your project.

Export: Click the “Produce” button on top of the screen then select the desired mode and file format and add a destination then click “Start”.
- AVS video editor:
If you are looking for a good .flv video editor and are ready to spend some bucks then the AVS video editor is a good choice for you. It is a low-budget software that is simple and easy to use and has some great features. It was my first video editor which I used about 5-6 years ago when I started making videos. It is simple and easy to use. It has some fine features that can fulfill your basic video editing tasks. Has a unique animation trajectory feature, where you can create paths for overlays.
Pricing:
It has two different plans, the first is an annual one which is at 69$ per year and the second one is a lifetime offer for 199$. In a lifetime plan, you can own the software forever. Right now, the software is at a 70% discount(till 30th April 2022) which decreases the price of the annual subscription to 39$ and the purchase price is 59$ this offer makes the software valuable enough to invest in.
Features:
- Its UI is beginner-friendly and easy to learn.
- Can Support 4K videos.
- Has cool features like video stabilization and a chroma key.
- Has 300+ effects, transitions, and overlays.
- Has a storyboard-type editing style also, which is a great feature for some users.
- Has keyframing and animation trajectory option for overlays.
Cons:
- Lacks some commonly used features.
- It is a decade-old software and needs some new updates to compete with other editing softwares.
- It isn’t suitable for professionals as you can’t do many customizations.
- It has only one layer for every element like text, effects, overlays, e.t.c.
- If hard disk crashes you have to purchase the license again.
Steps:
Import: Click “Import Media Files” to import clips or click “Open Existing Project” to load previously saved projects. Drag and drop files to add them to the timeline.
Edit: To trim from ends, drag the clip from corners to trim. On top of the timeline, you will find a few basic tools like change speed, apply transitions, do color correction, or do video stabilization.

Effects: Click the “Transition” button above the timeline to apply transitions. Drag and drop transitions between two clips to apply it. Right-click on the transition to change its duration.
Click the “Video Effects” button on top of the timeline, then drag and drop the desired effect on the effects layer and trim it according to your need.
Similarly from the “Text” tab Drag and drop the desired text to the text layer in the timeline. Then select “Edit text” to change the text.

Export: Click the “Produce” button on top of the timeline to open the export window. Select the desired file format and quality then click “next” and then click the “Create” button to export your file.

Veed.io: (Online):
If you want to edit FLV videos quickly and don’t want to install any software then Veed.io can be a good choice for you. It is an online FLV video editor that can run on any browser and is compatible with Windows, Mac, Linux, and even mobile phones. It is a quick and simple method to fulfill your basic video editing needs. It has some amazing and uniques features as compared to other basic video editors. It is a great platform to edit videos anywhere. You can start editing video on your PC and can continue it on your phone if you have to leave your workplace. But these features come at a price as its basic plan has the majority of the features but it leaves a watermark on the final video.
Pricing:
It has 3 different plans depending on your needs. The first one is the “Free Plan” which is almost useless for most users as it creates a watermark. The second one is the “Basic Plan” at 18$/month. While third is the “Pro Plan” at 30$/month which has some more features than the basic plan. You can purchase an annual plan to save up to 33%.

Features:
- It is an online platform that makes it easily accessible from any device.
- It is multi user friendly and is a good choice for team projects.
- It has a simple and clean interface which is ideal for beginners.
- It has an Auto subtitle generator + subtitle translator and editor.
- It has audio to text and video to text features that aren’t found in many other editors.
- It is compatible with many video and audio formats.
Cons:
- It is quite slow as compared to other video editing software.
- Downloading 4K videos is only available in Pro Plan.
- It is an online platform, so its data can be breached or leaked, so avoid editing your personal videos on this platform. It can rarely happen but precaution is better than cure.
Steps:
Import: Click choose FLV File on the home screen then a popup will appear, click “Browse” to upload a file or use a template.

Edit: To trim from ends, drag the clip from corners to trim. Click the “Split” button above the timeline to split the clip in between.

Effects: All the effects tabs like Text, Elements, Transitions lie on the left side of the screen (on windows). Click an element and it will be added to the timeline, then adjust the settings according to your will.
Export: Click the “Export” button on the top right side of the screen. Select a preset or change export settings then click “Export Video”. Soon you will get your final product.
Which Should I choose Free or Paid FLV Editor :
Are you confused to choose the FLV editor for you? Then look for the one that suits your other needs. Like if you want an editor only to crop or trim videos then save your money and go for a free video editor. But if you want some extra features to enhance your workflow or have some cash then go for paid software. For professionals, Power Director 365 or Filmora pro can be a good choice to invest your money in.
~ Some FAQs about FLV Videos:
why is .flv format used?
FLV is basically used to publish or distribute videos on the Internet. Many social platforms and web pages (such as youtube, Hulu, e.t.c.) use .flv files as it provide high-quality synchronized audio and video in compact file size. It was mostly used for embedded videos on these platforms. It is compatible with most browsers and devices even with older phones and computers.
How to play .FLV files?
To play .flv files a flash player is required. Which is pre-installed in almost most of the computers and browsers, if that’s not the case. Then you need a good video player which supports .flv format. Therefore VLC media prayer is a good choice. It is quite easy to use and has some useful features like Speed, Adding subtitles, Audio sync, e.t.c.
Is .flv file easy to edit?
FLV is just a format, It can be edited like any other format. Steps may differ from software to software. But don’t worry as I have mentioned the steps of some popular FLV video editors above.
Can the .flv file be converted?
If you don’t want to stick with the .flv format for long enough and want to switch over to a more convenient format then you can try these converters.
VLC Media Player: Yes, apart from being a video player it can convert video formats. It’s quite easy to use.
Simply Open VLC Media Player >> Click Media tab >> Click “Convert/Save” >> On pop up menu Select “Add” to add file (can add multiple files also) >> Click “Convert/Save” >> Add Destination folder and File Format (to convert in) then click “Start”.
Hand Brake: It is another popular video converter that can convert a .flv file into almost any file format.
Open HandBrake-“Drop a file” screen will appear >> Select the specific file you one to convert >> Select Destination filder >> Click “Start encoding”.
Flv vs Mp4 which is better?
FLV format was quite popular back in 2010 as it provides high-quality compressed video for the internet. It takes less space which makes it easy to download and transfer quickly. Nowadays MP4 format is used more as it is versatile and is compatible with almost all devices like Mobile, PC, TV, e.t.c. FLV uses H.263 codec while MP4 uses codec which provides better quality after compression. Still .flv file is a better choice for streaming platforms as one of the most common software used for streaming is OBS studio and it produces .flv files.
It is available for both Windows and Mac.
Filmora Video Editor is the most common and versatile editing software in this list that almost every content creator may have used or heard about. It has a lot of professional features used by content creators. It is one of the best video editors for .flv format, if u work with .flv files then you must get your hands on filmora.
Its UI is quite similar to premiere pro which makes it quite easy for people who are looking for premiere pro alternatives. It has hundreds of classy transitions/effects and dozens of unique and useful features but many of them are available on paid version only.
The free version also packs a punch but it is almost useless for most users as it leaves a watermark on the final product. It is good for learning video editing and once you master enough to move forward then you can purchase the pro version or you can start directly on the paid version.
For Win 7 or later (64-bit)
For macOS 10.14 or later
Features:
- Support a wide range of formats including .flv.
- Have advanced color grading options.
- Have standard Motion Tracking feature.
- Masking and Chroma key.
- Keyframing and Smooth animation. (Paid version)
- Speed ramping and Auto Synchronization. (Paid Version)
- Support industry-standard plugins (like Boris fx).
- Have a vast stock library.
Cons:
- Leaves a watermark on export. (free version)
- Have playback issues while using 4k videos.
- Lacks some standard editing features.
*Almost every software has some pros and cons. Remember these are inspected from my point of view. And it can differ from your experience.
Steps:
Import: Open filmora, a popup will appear, Select desired aspect ratio then click “New Project” to start editing or click “Open Project” to continue your old project.
On the center of the screen, you will see the import window, click it to import .flv file or any other video you want to edit.

Edit: Drag the clips on the timeline to start editing. Drag the clips from the corner to trim them. Click the top left icon of the timeline (not the whole screen) to add layers. In the toolbar above the timeline, you will find a bunch of tools, like split, crop, speed ramping, animation e.t.c. Click the red scissors icon on the pointer to split the clip at the desired timestamp.

Effects: Click the “edit” icon, then you will see a bunch of icons appear on the top left corner of the screen, These are as follow.
Select the “Video” icon to transform the clip or to do motion tracking, stabilization, chroma-key, Masking, e.t.c. To do Motion tracking, on the playback screen, lock the box on the item you want to track then click “Start Tracking”.
Select the “Audio” icon to apply effects and enhance your audio.
Select the “Color” icon to do fine-tuning and color grading, Select the “3D LUT” option to import a new customized lut. You can find a number of cool luts online.
Select the “Animation” icon to add preset animations or make custom animations by using keyframes.
Select the “Speed” icon to adjust the speed of the clip or to do speed ramping.
Click the “OK” button below to go back to previous tabs.
From there you can add Audio, Titles, Transitions, Effects, Elements, and Stock Media. Simply drag and drop the effects and transition on the clip to apply it. And to use titles and stock media, click and drag them on the timeline to use them.
Export: Click the blue “Export” button. Then choose Desired format and Resolution to export your final product.
More Free FLV Editor for Windows to Edit FLV Videos:
If you are looking for a .flv video editor to perform some editing tasks without spending any money then read till the end because here we have mentioned some free FLV editors for you.
- VSDC video editors :
It is available only on Windows.
Despite being free software, it is packed with lots of features. It is a good choice for non-professionals and it can even run on low-end PCs. It supports a wide range of video/audio formats including .flv file. It has dozens of cool effects and tools that can give your videos a new look. It is a non-linear program that makes using layers much easier means you can add layers at any specific time frame and can add layers into layers for complex editing. It also supports 360 and 3D video which can easily be converted into 2D. It has a number of video and audio effects. It is an old yet powerful software which can even run in 19s Pc. Its features are mentioned below.
Features:
- Free Software with no watermark.
- Can support 4K footages on the latest versions.
- Can import/export a wide range of formats.
- Have built-in video and screen capture feature.
- Has a Non-linear interface that supports multi-layer editing.
- Have professional features like chroma key and masking.
- Can convert layers into a sprite (Grouped Sequence) for handling multiple layers easily.
Cons:
- Being a free software it has some limitations too.
- It’s hard to learn for beginners.
- It still lacks features for a professional creator.
- Doesn’t support Hardware acceleration.
Steps:
Import: Open VSDC video editor, from the “Start Project Now” tab click “Blank Project” to start a new project or click “Import Content” to browse video or image files. Then select “Project settings”.

Edit: You can add more files by clicking the “Add Object” button on the top left corner. Then drag the file from Object explorer to anywhere on the timeline even on layers. On top of the “Editor Tab”, you can find the necessary tools to split, crop, and rotate the video. Click “Spacebar” to play/pause the timeline.

Effects: Click a video on the timeline then select the Effect buttons on top of the “Editor” tab to apply effects to your clip. Then Click the effect on “Object Explorer” to open its properties menu. On the left side of the player, you will find buttons to add text, shapes, e.t.c to the project. On the right side of the screen, you will find the “Basic effects window” where you can do color correction and grading.
Select Multiple Clips then right-click the mouse button and then the “Convert to sprite” button to make a grouped clip (clips within a clip).
Export: Click the “Export Project” button on the top of the screen. Then choose “Media device”, “output video format” and select output destination and quality setup then click “Export Project” to export the video. If you are using the free version of the software, a popup will appear saying “export without premium features”, just click Continue. Now your file is ready to be viewed.

- Shotcut:
It is available on Windows, Mac, and Linux.
It is a free and open-source video editor which is simple and easy to use, which makes it ideal for beginners. It doesn’t have any pro version. It is an ideal software to deal with .flv files as it supports a large number of import/export formats. However, it takes some time to understand its UI. After that, it is quite easy to use. It has cool effects and transitions. It has a clean and simple timeline which is not versatile for professionals although it has some complex options to customize your timeline. It has some refined color grading options. Being a free software it has some 360 effects and 3D text which makes it comparatively good as compared to some other free softwares. It can support 4K videos also but lags or crashes sometimes when using 4K clips. All the effects and tools are combined in one tab “Filter” which is a plus point for some users. It also has some good quality audio effects. Some of its features are mentioned below.
Features:
- It is completely free software with no watermark.
- It has one of the largest file format compatibility.
- It can support 4K video resolution.
- It has 3 wheel grading tool and some other color filters.
- It has standard animation and keyframing features.
- It has some effects to support 360 videos.
Cons:
- It isn’t suitable for professionals as it lacks some useful features.
- Have issues with playback of 4K videos and sometimes crashes.
- Doesn’t have a separate text column and lacks some basic text and title effects.
- Its UI is different from other common video editors and is a bit hard to understand.
Steps:
Import: Click the “Open file” icon on the top left corner of the window to import files.

Edit: Drag and drop clips on an empty timeline panel to add tracks. Right-click on the left side of the timeline to add a video or an audio track. To trim from ends, drag the clip from corners to trim. Click the Scissors icon on the top timeline to split the clip in between.
Click the “Properties” tab above the timeline panel to change the aspect ratio and playback speed of the clip.

Effects: Click the “Filters” tab above the timeline panel to open the filter menu, Click “+” above it to add filters. Double click a filter to add it to the selected clip, then click the filter to change its properties.
Click the “Keyframes” icon on top of the window to open the Keyframes window. Then click the “Timeline” icon to go back to the previous window.
Export: Click the “Export” button on the top of the screen. Select a preset or click the “Advanced” button to change export settings then click “Export File”.

- OpenShot:
It is available on Windows, Mac, and Linux.
OpenShot is another choice for you if you are looking for a free FLV editor. It is simple and easy to use. Its User Interface is clean and beginner-friendly. It has hundreds of transitions and effects. It has an animated titles option also, which is powered by Blender.
Features:
- Is simple and easy to use.
- Its UI is Beginner friendly.
- Can support 4K videos.
- Support a wide range of formats.
- Have smooth keyframe animation.
- Is free and has no watermark.
Cons:
- Video Playback is a bit laggy.
- Animated titles are only supported when you have Blender (3d software) installed on your PC.
- Doesn’t have enough tools for professionals.
Steps:
Import: Start “OpenShot” then drag and drop files in the project files tab from your file system (or press CTRL + F). Drag and drop files to add them to the timeline.
Edit: To trim from ends, drag the clip from corners to trim. There are some basic tools above the tracks in the timeline window. Click “+” to add a new track. Click the scissors icon to split the clip at the desired length. Click the magnet icon to on snapping mode. Click the green marker icon to add markers at desired points during editing.

Effects: Above the timeline window you will see a bar containing 4 buttons: Project Files, Transitions, Effects, and Emojis. Drag these elements to add them to the timeline. Effects appear as a small icon on the clip. Right-click the icon then select “Remove Effect” to remove it.

Right-click the clip to access more features like keyframe animation, playback speed, e.t.c.
Export: Click the red dot button on the top of the screen to export your video (or press CTRL + E). Select the desired Profile, Format, Quality, and Destination folder then click “Export Video” to export your file.

More Paid FLV Editor for Windows to Edit FLV Videos:
If you are looking for a good flv editor and you are ready to spend some cash on it then we have selected some paid softwares worthy of your investment.
- Power director 365 (import only):
It is available on both, Windows and Mac.
If you are looking for software to do more than just trimming and cropping the video then Cyberlink Power Director can be the right choice for you. It is packed with dozens of features that professional content creators look for. It has some professional-level plugins also. It is suitable for both beginners and advanced users.
It allows users to import .flv file and edit it like usual but you can’t export it in the same format as it exports videos in few formats only. FLV file is then converted into any of the other supported formats.
Pricing:
Its annual subscription is 69$ which is available at 30% off at 48.99$/year. This offer is valid till 4th May 2022.
Features:
- Can support 4K videos and can import a wide range of file formats.
- Have Auto Chapter and Subtitle settings.
- Multi-cam editing.
- Have hundreds of transitions, effects, and access to thousands of stock footage.
- Can Group clips for easy editing.
- Can import presets and color LUTS.
Cons:
- It lags sometimes, this issue can be resolved to an extent if you have a powerful PC.
- Some features are complicated to use.
- Export settings have fewer file formats as compared to the import file range.
Steps:
Import: Open Power Director then select the aspect ratio and click “Full Mode” to start the program. Import media files to the media room. Click the “Import Media” icon below the files tab to add more clips.

Edit: Drag and drop files to add them to the timeline. Drop files above or below to add them in layers. Click the icon on the top left corner of the timeline to add a new layer. You can find basic editing tools above the timeline.

Effects: All the effects and overlay elements are situated at the top left corner of the screen in a vertical bar. Here you will find the Project library, titles, effects, transitions, overlays, e.t.c. Simply just drag and drop on the timeline to use them. Here you can also do audio mixing and add subtitles and chapters.
Double click a clip or an overlay element to open the designer window. Here you can customize the clips and overlays to enhance your project.

Export: Click the “Produce” button on top of the screen then select the desired mode and file format and add a destination then click “Start”.
- AVS video editor:
If you are looking for a good .flv video editor and are ready to spend some bucks then the AVS video editor is a good choice for you. It is a low-budget software that is simple and easy to use and has some great features. It was my first video editor which I used about 5-6 years ago when I started making videos. It is simple and easy to use. It has some fine features that can fulfill your basic video editing tasks. Has a unique animation trajectory feature, where you can create paths for overlays.
Pricing:
It has two different plans, the first is an annual one which is at 69$ per year and the second one is a lifetime offer for 199$. In a lifetime plan, you can own the software forever. Right now, the software is at a 70% discount(till 30th April 2022) which decreases the price of the annual subscription to 39$ and the purchase price is 59$ this offer makes the software valuable enough to invest in.
Features:
- Its UI is beginner-friendly and easy to learn.
- Can Support 4K videos.
- Has cool features like video stabilization and a chroma key.
- Has 300+ effects, transitions, and overlays.
- Has a storyboard-type editing style also, which is a great feature for some users.
- Has keyframing and animation trajectory option for overlays.
Cons:
- Lacks some commonly used features.
- It is a decade-old software and needs some new updates to compete with other editing softwares.
- It isn’t suitable for professionals as you can’t do many customizations.
- It has only one layer for every element like text, effects, overlays, e.t.c.
- If hard disk crashes you have to purchase the license again.
Steps:
Import: Click “Import Media Files” to import clips or click “Open Existing Project” to load previously saved projects. Drag and drop files to add them to the timeline.
Edit: To trim from ends, drag the clip from corners to trim. On top of the timeline, you will find a few basic tools like change speed, apply transitions, do color correction, or do video stabilization.

Effects: Click the “Transition” button above the timeline to apply transitions. Drag and drop transitions between two clips to apply it. Right-click on the transition to change its duration.
Click the “Video Effects” button on top of the timeline, then drag and drop the desired effect on the effects layer and trim it according to your need.
Similarly from the “Text” tab Drag and drop the desired text to the text layer in the timeline. Then select “Edit text” to change the text.

Export: Click the “Produce” button on top of the timeline to open the export window. Select the desired file format and quality then click “next” and then click the “Create” button to export your file.

Veed.io: (Online):
If you want to edit FLV videos quickly and don’t want to install any software then Veed.io can be a good choice for you. It is an online FLV video editor that can run on any browser and is compatible with Windows, Mac, Linux, and even mobile phones. It is a quick and simple method to fulfill your basic video editing needs. It has some amazing and uniques features as compared to other basic video editors. It is a great platform to edit videos anywhere. You can start editing video on your PC and can continue it on your phone if you have to leave your workplace. But these features come at a price as its basic plan has the majority of the features but it leaves a watermark on the final video.
Pricing:
It has 3 different plans depending on your needs. The first one is the “Free Plan” which is almost useless for most users as it creates a watermark. The second one is the “Basic Plan” at 18$/month. While third is the “Pro Plan” at 30$/month which has some more features than the basic plan. You can purchase an annual plan to save up to 33%.

Features:
- It is an online platform that makes it easily accessible from any device.
- It is multi user friendly and is a good choice for team projects.
- It has a simple and clean interface which is ideal for beginners.
- It has an Auto subtitle generator + subtitle translator and editor.
- It has audio to text and video to text features that aren’t found in many other editors.
- It is compatible with many video and audio formats.
Cons:
- It is quite slow as compared to other video editing software.
- Downloading 4K videos is only available in Pro Plan.
- It is an online platform, so its data can be breached or leaked, so avoid editing your personal videos on this platform. It can rarely happen but precaution is better than cure.
Steps:
Import: Click choose FLV File on the home screen then a popup will appear, click “Browse” to upload a file or use a template.

Edit: To trim from ends, drag the clip from corners to trim. Click the “Split” button above the timeline to split the clip in between.

Effects: All the effects tabs like Text, Elements, Transitions lie on the left side of the screen (on windows). Click an element and it will be added to the timeline, then adjust the settings according to your will.
Export: Click the “Export” button on the top right side of the screen. Select a preset or change export settings then click “Export Video”. Soon you will get your final product.
Which Should I choose Free or Paid FLV Editor :
Are you confused to choose the FLV editor for you? Then look for the one that suits your other needs. Like if you want an editor only to crop or trim videos then save your money and go for a free video editor. But if you want some extra features to enhance your workflow or have some cash then go for paid software. For professionals, Power Director 365 or Filmora pro can be a good choice to invest your money in.
~ Some FAQs about FLV Videos:
why is .flv format used?
FLV is basically used to publish or distribute videos on the Internet. Many social platforms and web pages (such as youtube, Hulu, e.t.c.) use .flv files as it provide high-quality synchronized audio and video in compact file size. It was mostly used for embedded videos on these platforms. It is compatible with most browsers and devices even with older phones and computers.
How to play .FLV files?
To play .flv files a flash player is required. Which is pre-installed in almost most of the computers and browsers, if that’s not the case. Then you need a good video player which supports .flv format. Therefore VLC media prayer is a good choice. It is quite easy to use and has some useful features like Speed, Adding subtitles, Audio sync, e.t.c.
Is .flv file easy to edit?
FLV is just a format, It can be edited like any other format. Steps may differ from software to software. But don’t worry as I have mentioned the steps of some popular FLV video editors above.
Can the .flv file be converted?
If you don’t want to stick with the .flv format for long enough and want to switch over to a more convenient format then you can try these converters.
VLC Media Player: Yes, apart from being a video player it can convert video formats. It’s quite easy to use.
Simply Open VLC Media Player >> Click Media tab >> Click “Convert/Save” >> On pop up menu Select “Add” to add file (can add multiple files also) >> Click “Convert/Save” >> Add Destination folder and File Format (to convert in) then click “Start”.
Hand Brake: It is another popular video converter that can convert a .flv file into almost any file format.
Open HandBrake-“Drop a file” screen will appear >> Select the specific file you one to convert >> Select Destination filder >> Click “Start encoding”.
Flv vs Mp4 which is better?
FLV format was quite popular back in 2010 as it provides high-quality compressed video for the internet. It takes less space which makes it easy to download and transfer quickly. Nowadays MP4 format is used more as it is versatile and is compatible with almost all devices like Mobile, PC, TV, e.t.c. FLV uses H.263 codec while MP4 uses codec which provides better quality after compression. Still .flv file is a better choice for streaming platforms as one of the most common software used for streaming is OBS studio and it produces .flv files.
10 Creative AR Teaching Examples to Tell You What Is AR in Teaching
10 Innovative AR Teaching Examples to Tell You What Is AR in Teaching
An easy yet powerful editor
Numerous effects to choose from
Detailed tutorials provided by the official channel
In the recent few years, Augmented Reality (AR) has evolved from a sci-fi concept to one of the most prominent technologies in the world. Due to its vast applications, AR has already seeped into many industries and the education world is one of them. Augmented Reality in classrooms can do wonders for the kids and enhance the overall learning experience. Not to mention, by combining AR with other intuitive technologies like Virtual Reality (VR) and Mixed Reality (MR), teachers can uplift the entire learning experience for students and make boring topics slightly more intriguing.
The truth is that conventional teaching methods are now becoming obsolete and many educational institutes and universities are incorporating AR to make teaching more fun. Keeping that in mind, we are going to share a detailed insight into how AR integration can help the entire edtech world. We’ll also share some of the real-world examples of Augmented Reality (AR) in teaching so that you can understand its benefits in the education sector.
In this article
01 [What Is AR in Teaching?](#Part 1)
02 [5 Benefits of Augmented Reality in Education](#Part 2)
03 [10 Creative AR Teaching Examples](#Part 3)
Part 1 What Is AR in Teaching?
For readers who are not familiar with Augmented Reality, here’s what you need to know. Augmented Reality is an immersive technology that combines various virtual elements with the real world. Unlike Virtual Reality (VR), AR doesn’t completely take users away from the real world. Instead, it overlays a few virtual elements onto the physical world to make things more immersive. Let’s understand this with the help of an example.

If you download IKEA’s phone app, it has a feature that allows you to virtually place different pieces of furniture in your home/office. So, before buying something from the IKEA store, you can evaluate if it would look good at your place or not. Like IKEA, there are several other examples of Augmented Reality that prove its benefits in today’s tech-savvy society. So, let’s explore some of the advantages of incorporating Augmented Reality in classrooms and the education sector.
Part 2 Benefits of Augmented Reality in Education
01No Special Equipment Required
One of the biggest advantages of Augmented Reality over other immersive technologies is that it doesn’t require any special equipment. Users can access an AR-based application directly on their smartphones and get access to the entire course material right away. Moreover, teachers can also access AR-based platforms on their laptops and make teaching more interactive for everyone.
02Better Student Engagement
Speaking of interaction, AR has the potential to make learning more engaging for the students. Even the most boring topics can be brought to life by bringing technology like AR into the picture. One of the ways to do this is to gamify the technology and turn conventional training into something more intuitive. This way all the students will sit through the entire lesson and stay engaged till the end.
03Practical Learning
Another major advantage of Augmented Reality in teaching is its ability to boast practical learning. For example, different training institutes can help trainees get familiar with the inner elements of a machine without having to go near the physical machine itself. This also reduces security threats in the workplace and protects training institutes from compromising million-dollar equipment.
04Combined Learning
Our education sector is at a stage where it’s not possible to directly transition from textbooks to complete tech-based learning. However, we can still benefit by combining technologies like AR with conventional teaching methods to achieve an all-around success. With Augmented Reality in schools, students will have the liberty to learn the practical implementation of all the theoretical knowledge they’ve acquired during the lectures.
05Affordable
Finally, the biggest reason why universities, colleges, and training institutes must consider integrating AR into the entire curriculum is its affordability. Since colleges don’t actually need any expensive equipment to access an AR-based tech platform, they won’t have to spend thousands of dollars in the beginning. And, due to its affordable nature, it’s also easier to make AR readily available to all the students.
Part 3 10 Creative AR Teaching Examples
Now, even though it may seem a bit hard to digest, AR classrooms have already become a reality. The technology has managed to garner immense popularity in the education sector and many institutes are relishing its benefits while making learning more fun and interactive for the students. So, as promised in the beginning of the article, here are some of the real-world examples of Augmented Reality in classrooms.
01Exploring the Universe With Skyview
Skyview is a smartphone application that lets users get familiar with the cosmos. To be more precise, students can use the app to know details about different stars they see during the night from their rooftop. To do this, all they have to do is point the camera towards the night sky and the app automatically overlays information regarding the most popular stars on the screen. In fact, they can even use the app to identify the location of planets and nearby satellites. Sounds fun, right?

02Video Editing With Wondershare Filmora Video Editor
In the 21st century, video editing has become one of the most sought-after careers in the world. In fact, there are thousands of kids who want to step into this creative industry and share their stories with the world.

Wondershare Filmora - Best Video Editor for Mac/Windows
5,481,435 people have downloaded it.
Build unique custom animations without breaking a sweat.
Focus on creating epic stories and leave the details to Filmora’s auto features.
Start a creative adventure with drag & drop effects and endless possibilities.
Filmora simplifies advanced features to save you time and effort.
Filmora cuts out repetition so you can move on to your next creative breakthrough.
Now, to get started with video editing, tools like Wondershare Filmora provide kids and (even adults) the ability to edit AR-based videos in an easy-to-navigate editing panel. This way anyone planning to get started in the video editing world can start sailing in the right direction. Filmora also has a built-in store where users can find an array of AR-based stickers and video effects. All these elements could be integrated into the videos within a few clicks and help users learn different dynamics of upscaling the overall production quality.
For Win 7 or later (64-bit)
For macOS 10.12 or later
03Distance Learning With Mondly
Mondly is a language learning platform that’s designed to help students learn different languages in an interactive manner. With the platform, users get a dedicated virtual assistant that helps them work on their skills more effectively. The app replicates real-life settings in many ways and users can get a strong grasp on the desired language.
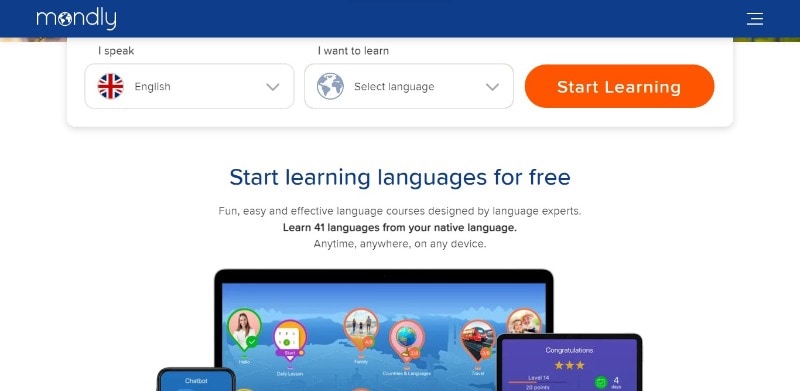
04Froggipedia
This is where things get interesting. Froggipedia is a great example of Augmented Reality in teaching. It’s basically a smartphone app that lets users explore the internal organs of a frog in a virtual environment. It means students would no longer have to get involved in the mess that dissecting an actual frog creates in the classroom and still get familiar with each organ easily.

05Effective Marketing
Another example of Augmented Reality in the teaching world has nothing to do with learning, but the marketing aspect of the industry. With AR-based platforms, universities and colleges can market their brands among the target consumers and get a higher number of applications in return. They can launch digital publications and AR-powered videos to maximize engagement and achieve the desired results through their marketing campaigns.

06Virtual Classrooms
The COVID-19 pandemic has propelled the growth of virtual classrooms as many schools still haven’t resumed physical classes to restrict the virus’s spread. In VR classrooms, mixed reality - a combination of VR and AR - can help students stay engaged, even if they are sitting apart from each other. Virtual Classrooms will eliminate boredom from remote learning and keep the engagement level high for students.
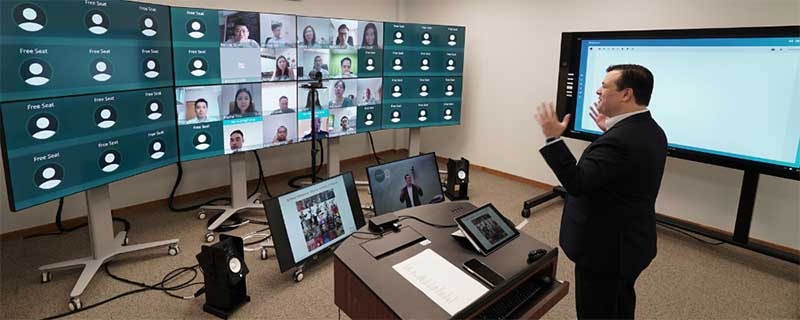
07Secure Training
As we mentioned earlier, AR integration makes training more effective and risk-free. For example, with Microsoft Holo-lens, medical students understand the inner anatomy of the human body and understand complex procedures without having to risk a patient’s life. Once they are confident and know about each organ, they can move towards the next procedure and gain expertise in the particular domain more effectively.
08Google Expeditions
For a student, exploring the world is a great way to familiarize himself with different cultures. But, it’s not always possible for young kids to go on trips alone. Well, not anymore! Thanks to virtual tour platforms like Google Expeditions, teachers can take their students on virtual trips to different corners of the world, be it Mount Everest Base Camp or the Eiffel Tower in Paris.

09Augmented Reality in Museums
The younger generation craves interactivity. They don’t have the time to read brochures in a Museum. That’s the reason why many Museums have started to launch AR-powered tech to keep the visitors engaged and let them learn various historical facts more precisely. For instance, in a nature-themed museum, visitors can experience digital animals and their position in history.
10Virtual Speech
Not particularly an Augmented Reality (AR) example, Virtual Speech is a combination of AR and VR that lets users virtually practice their public speaking skills without going on a real stage. This is a great tool to fight stage fear and speak with confidence in front of an actual crowd.
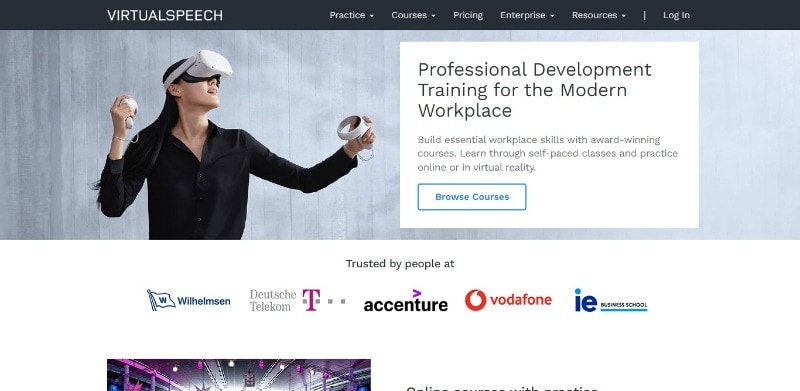
● Ending Thoughts →
● Augmented Reality (AR) is no longer a thing of the past. It has become an emerging technology that has seeped into different industries including the education world.
● There are many advantages of integrating AR into the education world. For example, AR integration makes learning more interactive and fun for the students.
● There are dozens of real-life examples of Augmented Reality in education that are a clear indication of how AR can transform the entire education industry.
In the recent few years, Augmented Reality (AR) has evolved from a sci-fi concept to one of the most prominent technologies in the world. Due to its vast applications, AR has already seeped into many industries and the education world is one of them. Augmented Reality in classrooms can do wonders for the kids and enhance the overall learning experience. Not to mention, by combining AR with other intuitive technologies like Virtual Reality (VR) and Mixed Reality (MR), teachers can uplift the entire learning experience for students and make boring topics slightly more intriguing.
The truth is that conventional teaching methods are now becoming obsolete and many educational institutes and universities are incorporating AR to make teaching more fun. Keeping that in mind, we are going to share a detailed insight into how AR integration can help the entire edtech world. We’ll also share some of the real-world examples of Augmented Reality (AR) in teaching so that you can understand its benefits in the education sector.
In this article
01 [What Is AR in Teaching?](#Part 1)
02 [5 Benefits of Augmented Reality in Education](#Part 2)
03 [10 Creative AR Teaching Examples](#Part 3)
Part 1 What Is AR in Teaching?
For readers who are not familiar with Augmented Reality, here’s what you need to know. Augmented Reality is an immersive technology that combines various virtual elements with the real world. Unlike Virtual Reality (VR), AR doesn’t completely take users away from the real world. Instead, it overlays a few virtual elements onto the physical world to make things more immersive. Let’s understand this with the help of an example.

If you download IKEA’s phone app, it has a feature that allows you to virtually place different pieces of furniture in your home/office. So, before buying something from the IKEA store, you can evaluate if it would look good at your place or not. Like IKEA, there are several other examples of Augmented Reality that prove its benefits in today’s tech-savvy society. So, let’s explore some of the advantages of incorporating Augmented Reality in classrooms and the education sector.
Part 2 Benefits of Augmented Reality in Education
01No Special Equipment Required
One of the biggest advantages of Augmented Reality over other immersive technologies is that it doesn’t require any special equipment. Users can access an AR-based application directly on their smartphones and get access to the entire course material right away. Moreover, teachers can also access AR-based platforms on their laptops and make teaching more interactive for everyone.
02Better Student Engagement
Speaking of interaction, AR has the potential to make learning more engaging for the students. Even the most boring topics can be brought to life by bringing technology like AR into the picture. One of the ways to do this is to gamify the technology and turn conventional training into something more intuitive. This way all the students will sit through the entire lesson and stay engaged till the end.
03Practical Learning
Another major advantage of Augmented Reality in teaching is its ability to boast practical learning. For example, different training institutes can help trainees get familiar with the inner elements of a machine without having to go near the physical machine itself. This also reduces security threats in the workplace and protects training institutes from compromising million-dollar equipment.
04Combined Learning
Our education sector is at a stage where it’s not possible to directly transition from textbooks to complete tech-based learning. However, we can still benefit by combining technologies like AR with conventional teaching methods to achieve an all-around success. With Augmented Reality in schools, students will have the liberty to learn the practical implementation of all the theoretical knowledge they’ve acquired during the lectures.
05Affordable
Finally, the biggest reason why universities, colleges, and training institutes must consider integrating AR into the entire curriculum is its affordability. Since colleges don’t actually need any expensive equipment to access an AR-based tech platform, they won’t have to spend thousands of dollars in the beginning. And, due to its affordable nature, it’s also easier to make AR readily available to all the students.
Part 3 10 Creative AR Teaching Examples
Now, even though it may seem a bit hard to digest, AR classrooms have already become a reality. The technology has managed to garner immense popularity in the education sector and many institutes are relishing its benefits while making learning more fun and interactive for the students. So, as promised in the beginning of the article, here are some of the real-world examples of Augmented Reality in classrooms.
01Exploring the Universe With Skyview
Skyview is a smartphone application that lets users get familiar with the cosmos. To be more precise, students can use the app to know details about different stars they see during the night from their rooftop. To do this, all they have to do is point the camera towards the night sky and the app automatically overlays information regarding the most popular stars on the screen. In fact, they can even use the app to identify the location of planets and nearby satellites. Sounds fun, right?

02Video Editing With Wondershare Filmora Video Editor
In the 21st century, video editing has become one of the most sought-after careers in the world. In fact, there are thousands of kids who want to step into this creative industry and share their stories with the world.

Wondershare Filmora - Best Video Editor for Mac/Windows
5,481,435 people have downloaded it.
Build unique custom animations without breaking a sweat.
Focus on creating epic stories and leave the details to Filmora’s auto features.
Start a creative adventure with drag & drop effects and endless possibilities.
Filmora simplifies advanced features to save you time and effort.
Filmora cuts out repetition so you can move on to your next creative breakthrough.
Now, to get started with video editing, tools like Wondershare Filmora provide kids and (even adults) the ability to edit AR-based videos in an easy-to-navigate editing panel. This way anyone planning to get started in the video editing world can start sailing in the right direction. Filmora also has a built-in store where users can find an array of AR-based stickers and video effects. All these elements could be integrated into the videos within a few clicks and help users learn different dynamics of upscaling the overall production quality.
For Win 7 or later (64-bit)
For macOS 10.12 or later
03Distance Learning With Mondly
Mondly is a language learning platform that’s designed to help students learn different languages in an interactive manner. With the platform, users get a dedicated virtual assistant that helps them work on their skills more effectively. The app replicates real-life settings in many ways and users can get a strong grasp on the desired language.

04Froggipedia
This is where things get interesting. Froggipedia is a great example of Augmented Reality in teaching. It’s basically a smartphone app that lets users explore the internal organs of a frog in a virtual environment. It means students would no longer have to get involved in the mess that dissecting an actual frog creates in the classroom and still get familiar with each organ easily.

05Effective Marketing
Another example of Augmented Reality in the teaching world has nothing to do with learning, but the marketing aspect of the industry. With AR-based platforms, universities and colleges can market their brands among the target consumers and get a higher number of applications in return. They can launch digital publications and AR-powered videos to maximize engagement and achieve the desired results through their marketing campaigns.

06Virtual Classrooms
The COVID-19 pandemic has propelled the growth of virtual classrooms as many schools still haven’t resumed physical classes to restrict the virus’s spread. In VR classrooms, mixed reality - a combination of VR and AR - can help students stay engaged, even if they are sitting apart from each other. Virtual Classrooms will eliminate boredom from remote learning and keep the engagement level high for students.

07Secure Training
As we mentioned earlier, AR integration makes training more effective and risk-free. For example, with Microsoft Holo-lens, medical students understand the inner anatomy of the human body and understand complex procedures without having to risk a patient’s life. Once they are confident and know about each organ, they can move towards the next procedure and gain expertise in the particular domain more effectively.
08Google Expeditions
For a student, exploring the world is a great way to familiarize himself with different cultures. But, it’s not always possible for young kids to go on trips alone. Well, not anymore! Thanks to virtual tour platforms like Google Expeditions, teachers can take their students on virtual trips to different corners of the world, be it Mount Everest Base Camp or the Eiffel Tower in Paris.

09Augmented Reality in Museums
The younger generation craves interactivity. They don’t have the time to read brochures in a Museum. That’s the reason why many Museums have started to launch AR-powered tech to keep the visitors engaged and let them learn various historical facts more precisely. For instance, in a nature-themed museum, visitors can experience digital animals and their position in history.
10Virtual Speech
Not particularly an Augmented Reality (AR) example, Virtual Speech is a combination of AR and VR that lets users virtually practice their public speaking skills without going on a real stage. This is a great tool to fight stage fear and speak with confidence in front of an actual crowd.

● Ending Thoughts →
● Augmented Reality (AR) is no longer a thing of the past. It has become an emerging technology that has seeped into different industries including the education world.
● There are many advantages of integrating AR into the education world. For example, AR integration makes learning more interactive and fun for the students.
● There are dozens of real-life examples of Augmented Reality in education that are a clear indication of how AR can transform the entire education industry.
In the recent few years, Augmented Reality (AR) has evolved from a sci-fi concept to one of the most prominent technologies in the world. Due to its vast applications, AR has already seeped into many industries and the education world is one of them. Augmented Reality in classrooms can do wonders for the kids and enhance the overall learning experience. Not to mention, by combining AR with other intuitive technologies like Virtual Reality (VR) and Mixed Reality (MR), teachers can uplift the entire learning experience for students and make boring topics slightly more intriguing.
The truth is that conventional teaching methods are now becoming obsolete and many educational institutes and universities are incorporating AR to make teaching more fun. Keeping that in mind, we are going to share a detailed insight into how AR integration can help the entire edtech world. We’ll also share some of the real-world examples of Augmented Reality (AR) in teaching so that you can understand its benefits in the education sector.
In this article
01 [What Is AR in Teaching?](#Part 1)
02 [5 Benefits of Augmented Reality in Education](#Part 2)
03 [10 Creative AR Teaching Examples](#Part 3)
Part 1 What Is AR in Teaching?
For readers who are not familiar with Augmented Reality, here’s what you need to know. Augmented Reality is an immersive technology that combines various virtual elements with the real world. Unlike Virtual Reality (VR), AR doesn’t completely take users away from the real world. Instead, it overlays a few virtual elements onto the physical world to make things more immersive. Let’s understand this with the help of an example.

If you download IKEA’s phone app, it has a feature that allows you to virtually place different pieces of furniture in your home/office. So, before buying something from the IKEA store, you can evaluate if it would look good at your place or not. Like IKEA, there are several other examples of Augmented Reality that prove its benefits in today’s tech-savvy society. So, let’s explore some of the advantages of incorporating Augmented Reality in classrooms and the education sector.
Part 2 Benefits of Augmented Reality in Education
01No Special Equipment Required
One of the biggest advantages of Augmented Reality over other immersive technologies is that it doesn’t require any special equipment. Users can access an AR-based application directly on their smartphones and get access to the entire course material right away. Moreover, teachers can also access AR-based platforms on their laptops and make teaching more interactive for everyone.
02Better Student Engagement
Speaking of interaction, AR has the potential to make learning more engaging for the students. Even the most boring topics can be brought to life by bringing technology like AR into the picture. One of the ways to do this is to gamify the technology and turn conventional training into something more intuitive. This way all the students will sit through the entire lesson and stay engaged till the end.
03Practical Learning
Another major advantage of Augmented Reality in teaching is its ability to boast practical learning. For example, different training institutes can help trainees get familiar with the inner elements of a machine without having to go near the physical machine itself. This also reduces security threats in the workplace and protects training institutes from compromising million-dollar equipment.
04Combined Learning
Our education sector is at a stage where it’s not possible to directly transition from textbooks to complete tech-based learning. However, we can still benefit by combining technologies like AR with conventional teaching methods to achieve an all-around success. With Augmented Reality in schools, students will have the liberty to learn the practical implementation of all the theoretical knowledge they’ve acquired during the lectures.
05Affordable
Finally, the biggest reason why universities, colleges, and training institutes must consider integrating AR into the entire curriculum is its affordability. Since colleges don’t actually need any expensive equipment to access an AR-based tech platform, they won’t have to spend thousands of dollars in the beginning. And, due to its affordable nature, it’s also easier to make AR readily available to all the students.
Part 3 10 Creative AR Teaching Examples
Now, even though it may seem a bit hard to digest, AR classrooms have already become a reality. The technology has managed to garner immense popularity in the education sector and many institutes are relishing its benefits while making learning more fun and interactive for the students. So, as promised in the beginning of the article, here are some of the real-world examples of Augmented Reality in classrooms.
01Exploring the Universe With Skyview
Skyview is a smartphone application that lets users get familiar with the cosmos. To be more precise, students can use the app to know details about different stars they see during the night from their rooftop. To do this, all they have to do is point the camera towards the night sky and the app automatically overlays information regarding the most popular stars on the screen. In fact, they can even use the app to identify the location of planets and nearby satellites. Sounds fun, right?

02Video Editing With Wondershare Filmora Video Editor
In the 21st century, video editing has become one of the most sought-after careers in the world. In fact, there are thousands of kids who want to step into this creative industry and share their stories with the world.

Wondershare Filmora - Best Video Editor for Mac/Windows
5,481,435 people have downloaded it.
Build unique custom animations without breaking a sweat.
Focus on creating epic stories and leave the details to Filmora’s auto features.
Start a creative adventure with drag & drop effects and endless possibilities.
Filmora simplifies advanced features to save you time and effort.
Filmora cuts out repetition so you can move on to your next creative breakthrough.
Now, to get started with video editing, tools like Wondershare Filmora provide kids and (even adults) the ability to edit AR-based videos in an easy-to-navigate editing panel. This way anyone planning to get started in the video editing world can start sailing in the right direction. Filmora also has a built-in store where users can find an array of AR-based stickers and video effects. All these elements could be integrated into the videos within a few clicks and help users learn different dynamics of upscaling the overall production quality.
For Win 7 or later (64-bit)
For macOS 10.12 or later
03Distance Learning With Mondly
Mondly is a language learning platform that’s designed to help students learn different languages in an interactive manner. With the platform, users get a dedicated virtual assistant that helps them work on their skills more effectively. The app replicates real-life settings in many ways and users can get a strong grasp on the desired language.

04Froggipedia
This is where things get interesting. Froggipedia is a great example of Augmented Reality in teaching. It’s basically a smartphone app that lets users explore the internal organs of a frog in a virtual environment. It means students would no longer have to get involved in the mess that dissecting an actual frog creates in the classroom and still get familiar with each organ easily.

05Effective Marketing
Another example of Augmented Reality in the teaching world has nothing to do with learning, but the marketing aspect of the industry. With AR-based platforms, universities and colleges can market their brands among the target consumers and get a higher number of applications in return. They can launch digital publications and AR-powered videos to maximize engagement and achieve the desired results through their marketing campaigns.

06Virtual Classrooms
The COVID-19 pandemic has propelled the growth of virtual classrooms as many schools still haven’t resumed physical classes to restrict the virus’s spread. In VR classrooms, mixed reality - a combination of VR and AR - can help students stay engaged, even if they are sitting apart from each other. Virtual Classrooms will eliminate boredom from remote learning and keep the engagement level high for students.

07Secure Training
As we mentioned earlier, AR integration makes training more effective and risk-free. For example, with Microsoft Holo-lens, medical students understand the inner anatomy of the human body and understand complex procedures without having to risk a patient’s life. Once they are confident and know about each organ, they can move towards the next procedure and gain expertise in the particular domain more effectively.
08Google Expeditions
For a student, exploring the world is a great way to familiarize himself with different cultures. But, it’s not always possible for young kids to go on trips alone. Well, not anymore! Thanks to virtual tour platforms like Google Expeditions, teachers can take their students on virtual trips to different corners of the world, be it Mount Everest Base Camp or the Eiffel Tower in Paris.

09Augmented Reality in Museums
The younger generation craves interactivity. They don’t have the time to read brochures in a Museum. That’s the reason why many Museums have started to launch AR-powered tech to keep the visitors engaged and let them learn various historical facts more precisely. For instance, in a nature-themed museum, visitors can experience digital animals and their position in history.
10Virtual Speech
Not particularly an Augmented Reality (AR) example, Virtual Speech is a combination of AR and VR that lets users virtually practice their public speaking skills without going on a real stage. This is a great tool to fight stage fear and speak with confidence in front of an actual crowd.

● Ending Thoughts →
● Augmented Reality (AR) is no longer a thing of the past. It has become an emerging technology that has seeped into different industries including the education world.
● There are many advantages of integrating AR into the education world. For example, AR integration makes learning more interactive and fun for the students.
● There are dozens of real-life examples of Augmented Reality in education that are a clear indication of how AR can transform the entire education industry.
In the recent few years, Augmented Reality (AR) has evolved from a sci-fi concept to one of the most prominent technologies in the world. Due to its vast applications, AR has already seeped into many industries and the education world is one of them. Augmented Reality in classrooms can do wonders for the kids and enhance the overall learning experience. Not to mention, by combining AR with other intuitive technologies like Virtual Reality (VR) and Mixed Reality (MR), teachers can uplift the entire learning experience for students and make boring topics slightly more intriguing.
The truth is that conventional teaching methods are now becoming obsolete and many educational institutes and universities are incorporating AR to make teaching more fun. Keeping that in mind, we are going to share a detailed insight into how AR integration can help the entire edtech world. We’ll also share some of the real-world examples of Augmented Reality (AR) in teaching so that you can understand its benefits in the education sector.
In this article
01 [What Is AR in Teaching?](#Part 1)
02 [5 Benefits of Augmented Reality in Education](#Part 2)
03 [10 Creative AR Teaching Examples](#Part 3)
Part 1 What Is AR in Teaching?
For readers who are not familiar with Augmented Reality, here’s what you need to know. Augmented Reality is an immersive technology that combines various virtual elements with the real world. Unlike Virtual Reality (VR), AR doesn’t completely take users away from the real world. Instead, it overlays a few virtual elements onto the physical world to make things more immersive. Let’s understand this with the help of an example.

If you download IKEA’s phone app, it has a feature that allows you to virtually place different pieces of furniture in your home/office. So, before buying something from the IKEA store, you can evaluate if it would look good at your place or not. Like IKEA, there are several other examples of Augmented Reality that prove its benefits in today’s tech-savvy society. So, let’s explore some of the advantages of incorporating Augmented Reality in classrooms and the education sector.
Part 2 Benefits of Augmented Reality in Education
01No Special Equipment Required
One of the biggest advantages of Augmented Reality over other immersive technologies is that it doesn’t require any special equipment. Users can access an AR-based application directly on their smartphones and get access to the entire course material right away. Moreover, teachers can also access AR-based platforms on their laptops and make teaching more interactive for everyone.
02Better Student Engagement
Speaking of interaction, AR has the potential to make learning more engaging for the students. Even the most boring topics can be brought to life by bringing technology like AR into the picture. One of the ways to do this is to gamify the technology and turn conventional training into something more intuitive. This way all the students will sit through the entire lesson and stay engaged till the end.
03Practical Learning
Another major advantage of Augmented Reality in teaching is its ability to boast practical learning. For example, different training institutes can help trainees get familiar with the inner elements of a machine without having to go near the physical machine itself. This also reduces security threats in the workplace and protects training institutes from compromising million-dollar equipment.
04Combined Learning
Our education sector is at a stage where it’s not possible to directly transition from textbooks to complete tech-based learning. However, we can still benefit by combining technologies like AR with conventional teaching methods to achieve an all-around success. With Augmented Reality in schools, students will have the liberty to learn the practical implementation of all the theoretical knowledge they’ve acquired during the lectures.
05Affordable
Finally, the biggest reason why universities, colleges, and training institutes must consider integrating AR into the entire curriculum is its affordability. Since colleges don’t actually need any expensive equipment to access an AR-based tech platform, they won’t have to spend thousands of dollars in the beginning. And, due to its affordable nature, it’s also easier to make AR readily available to all the students.
Part 3 10 Creative AR Teaching Examples
Now, even though it may seem a bit hard to digest, AR classrooms have already become a reality. The technology has managed to garner immense popularity in the education sector and many institutes are relishing its benefits while making learning more fun and interactive for the students. So, as promised in the beginning of the article, here are some of the real-world examples of Augmented Reality in classrooms.
01Exploring the Universe With Skyview
Skyview is a smartphone application that lets users get familiar with the cosmos. To be more precise, students can use the app to know details about different stars they see during the night from their rooftop. To do this, all they have to do is point the camera towards the night sky and the app automatically overlays information regarding the most popular stars on the screen. In fact, they can even use the app to identify the location of planets and nearby satellites. Sounds fun, right?

02Video Editing With Wondershare Filmora Video Editor
In the 21st century, video editing has become one of the most sought-after careers in the world. In fact, there are thousands of kids who want to step into this creative industry and share their stories with the world.

Wondershare Filmora - Best Video Editor for Mac/Windows
5,481,435 people have downloaded it.
Build unique custom animations without breaking a sweat.
Focus on creating epic stories and leave the details to Filmora’s auto features.
Start a creative adventure with drag & drop effects and endless possibilities.
Filmora simplifies advanced features to save you time and effort.
Filmora cuts out repetition so you can move on to your next creative breakthrough.
Now, to get started with video editing, tools like Wondershare Filmora provide kids and (even adults) the ability to edit AR-based videos in an easy-to-navigate editing panel. This way anyone planning to get started in the video editing world can start sailing in the right direction. Filmora also has a built-in store where users can find an array of AR-based stickers and video effects. All these elements could be integrated into the videos within a few clicks and help users learn different dynamics of upscaling the overall production quality.
For Win 7 or later (64-bit)
For macOS 10.12 or later
03Distance Learning With Mondly
Mondly is a language learning platform that’s designed to help students learn different languages in an interactive manner. With the platform, users get a dedicated virtual assistant that helps them work on their skills more effectively. The app replicates real-life settings in many ways and users can get a strong grasp on the desired language.

04Froggipedia
This is where things get interesting. Froggipedia is a great example of Augmented Reality in teaching. It’s basically a smartphone app that lets users explore the internal organs of a frog in a virtual environment. It means students would no longer have to get involved in the mess that dissecting an actual frog creates in the classroom and still get familiar with each organ easily.

05Effective Marketing
Another example of Augmented Reality in the teaching world has nothing to do with learning, but the marketing aspect of the industry. With AR-based platforms, universities and colleges can market their brands among the target consumers and get a higher number of applications in return. They can launch digital publications and AR-powered videos to maximize engagement and achieve the desired results through their marketing campaigns.

06Virtual Classrooms
The COVID-19 pandemic has propelled the growth of virtual classrooms as many schools still haven’t resumed physical classes to restrict the virus’s spread. In VR classrooms, mixed reality - a combination of VR and AR - can help students stay engaged, even if they are sitting apart from each other. Virtual Classrooms will eliminate boredom from remote learning and keep the engagement level high for students.

07Secure Training
As we mentioned earlier, AR integration makes training more effective and risk-free. For example, with Microsoft Holo-lens, medical students understand the inner anatomy of the human body and understand complex procedures without having to risk a patient’s life. Once they are confident and know about each organ, they can move towards the next procedure and gain expertise in the particular domain more effectively.
08Google Expeditions
For a student, exploring the world is a great way to familiarize himself with different cultures. But, it’s not always possible for young kids to go on trips alone. Well, not anymore! Thanks to virtual tour platforms like Google Expeditions, teachers can take their students on virtual trips to different corners of the world, be it Mount Everest Base Camp or the Eiffel Tower in Paris.

09Augmented Reality in Museums
The younger generation craves interactivity. They don’t have the time to read brochures in a Museum. That’s the reason why many Museums have started to launch AR-powered tech to keep the visitors engaged and let them learn various historical facts more precisely. For instance, in a nature-themed museum, visitors can experience digital animals and their position in history.
10Virtual Speech
Not particularly an Augmented Reality (AR) example, Virtual Speech is a combination of AR and VR that lets users virtually practice their public speaking skills without going on a real stage. This is a great tool to fight stage fear and speak with confidence in front of an actual crowd.

● Ending Thoughts →
● Augmented Reality (AR) is no longer a thing of the past. It has become an emerging technology that has seeped into different industries including the education world.
● There are many advantages of integrating AR into the education world. For example, AR integration makes learning more interactive and fun for the students.
● There are dozens of real-life examples of Augmented Reality in education that are a clear indication of how AR can transform the entire education industry.
Do You Want to Get Green Screen Effects on Your Video without Green Screen Setup in Your Background? Learn How to Get Virtual Green Screen Background and Shoot Videos Like a Pro
We have seen video creators on YouTube using green screen effects to beautify their background to make the video look professional and eye-catching. The same is applicable for gamers who live stream their gameplay on Twitch. Instead of physically hanging green screens in the background, some video creators opt for virtual green screens. Yes, it is possible to shoot videos with a virtual green background, and you do not have to buy screen greens and deal with the problem of hanging them in the background.
The concept of using virtual greenscreen is rather new, but it is getting popular among amateur video creators who do not want to invest in purchasing green screens initially. When you use a virtual background to shoot your video, the actual physical background is replaced completely with a virtual green background. Thereafter, you have to replace this virtual background with anything by using a video editor. In this article, we will illustrate how to use a virtual green screen to shoot video.
1. Free Virtual Green Screen
In order to shoot a video with green virtual background, you cannot shoot your video with your regular camera app. Otherwise, your physical background will get recorded, and replacing that through video editor is going to be time-consuming. Therefore, there are specific apps available through which you have to shoot your video so that your physical background gets completely replaced by virtual greenscreen in real-time.
Snap Camera from Snapchat is a free app through which you can shoot your video to get a virtual green background. The app comes with a Green Screen filter that makes this virtual background effect possible. However, you will need a camera recording app that can record your video with green screen effects from Snap Camera. We will be using OBS Studio for recording the video which is also available for free. Snap Camera is compatible with Windows 10 and Mac 10.11+, and hence, you can use it to shoot video from your computer webcam. Here are the steps to follow –
Step 1: Download and install Snap Camera app on your computer.
Step 2: Set up your webcam perfectly so that its angle is direct to your face.
Step 3: Open Snap Camera app and you will see yourself on the app through your webcam. Select the appropriate Lens(filter) and you have to select Green Screen Snap Filter.

Step 4: You should see a green virtual background by now. Now, you have to launch OBS Studio (webcam recording software).
Step 5: Go to Sources and click on “+” icon and select Video Capture Device option.

Step 6: While configuration the new device, select Snap Camera as Device. This will enable green screen virtual backgrounds and you can start recording. After recording is done, save the file on your hard drive.
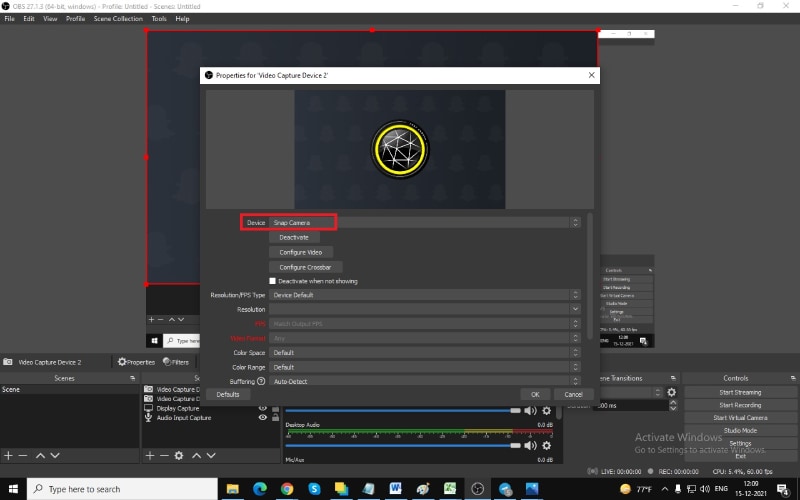
Now that you have recorded the video with green virtual background without green screen, it is time to edit the virtual greenscreen out with the video editor.
2. Best Way To Apply Green Screen Effect To Your Recorded Video
The best video editor to add green effect to your recorded video with virtual green screen is Wondershare Filmora. There are loads of video editors available with green screen feature but Filmora has the simplest steps to add green screen effects. That is why you do not have to be an expert video editor to add green screen effects to your video.
Apart from green screen effects, you can enhance the video quality by adjusting different parameters and adding other video effects to make the video interesting. Here are the steps to follow to add green screen effects to the recorded video with green virtual background.
For Win 7 or later (64-bit)
For macOS 10.12 or later
Step 1: Download and install Wondershare Filmora. Launch the video editor and select Create New Project option to get started.
Step 2: Import the recorded video with virtual green screen and drag it onto the Timeline.
Step 3: Get the stunning photo or video effect with which you want to replace the virtual background without green screen in the recorded video. Put it directly on the Timeline.
Please note that your recorded green screen video is above the replacement video on the Timeline.

Step 4: Double-click on the recorded video and you will see a panel on the upper-left side. From that panel, turn on Chroma Key option. We have already stated that green screen effect is technically referred to as Chroma Key.
Now you will the superimposed version of the replacement video effect on the green screen background of your recorded video.

Step 5: You can adjust several parameters available to fine tune the green screen effect. When you are done, click on Ok button.
Conclusion
You can now have virtual background without green screen purchase on your video. All you need is a proper application to replace your physical background with a virtual green screen and record the entire video. We have recommended free Snap Camera app and OBS Studio for this job. Then you need to edit the green screen virtual backgrounds with a video editor for which we have recommended Wondershare Filmora.
For macOS 10.12 or later
Step 1: Download and install Wondershare Filmora. Launch the video editor and select Create New Project option to get started.
Step 2: Import the recorded video with virtual green screen and drag it onto the Timeline.
Step 3: Get the stunning photo or video effect with which you want to replace the virtual background without green screen in the recorded video. Put it directly on the Timeline.
Please note that your recorded green screen video is above the replacement video on the Timeline.

Step 4: Double-click on the recorded video and you will see a panel on the upper-left side. From that panel, turn on Chroma Key option. We have already stated that green screen effect is technically referred to as Chroma Key.
Now you will the superimposed version of the replacement video effect on the green screen background of your recorded video.

Step 5: You can adjust several parameters available to fine tune the green screen effect. When you are done, click on Ok button.
Conclusion
You can now have virtual background without green screen purchase on your video. All you need is a proper application to replace your physical background with a virtual green screen and record the entire video. We have recommended free Snap Camera app and OBS Studio for this job. Then you need to edit the green screen virtual backgrounds with a video editor for which we have recommended Wondershare Filmora.
For macOS 10.12 or later
Step 1: Download and install Wondershare Filmora. Launch the video editor and select Create New Project option to get started.
Step 2: Import the recorded video with virtual green screen and drag it onto the Timeline.
Step 3: Get the stunning photo or video effect with which you want to replace the virtual background without green screen in the recorded video. Put it directly on the Timeline.
Please note that your recorded green screen video is above the replacement video on the Timeline.

Step 4: Double-click on the recorded video and you will see a panel on the upper-left side. From that panel, turn on Chroma Key option. We have already stated that green screen effect is technically referred to as Chroma Key.
Now you will the superimposed version of the replacement video effect on the green screen background of your recorded video.

Step 5: You can adjust several parameters available to fine tune the green screen effect. When you are done, click on Ok button.
Conclusion
You can now have virtual background without green screen purchase on your video. All you need is a proper application to replace your physical background with a virtual green screen and record the entire video. We have recommended free Snap Camera app and OBS Studio for this job. Then you need to edit the green screen virtual backgrounds with a video editor for which we have recommended Wondershare Filmora.
For macOS 10.12 or later
Step 1: Download and install Wondershare Filmora. Launch the video editor and select Create New Project option to get started.
Step 2: Import the recorded video with virtual green screen and drag it onto the Timeline.
Step 3: Get the stunning photo or video effect with which you want to replace the virtual background without green screen in the recorded video. Put it directly on the Timeline.
Please note that your recorded green screen video is above the replacement video on the Timeline.

Step 4: Double-click on the recorded video and you will see a panel on the upper-left side. From that panel, turn on Chroma Key option. We have already stated that green screen effect is technically referred to as Chroma Key.
Now you will the superimposed version of the replacement video effect on the green screen background of your recorded video.

Step 5: You can adjust several parameters available to fine tune the green screen effect. When you are done, click on Ok button.
Conclusion
You can now have virtual background without green screen purchase on your video. All you need is a proper application to replace your physical background with a virtual green screen and record the entire video. We have recommended free Snap Camera app and OBS Studio for this job. Then you need to edit the green screen virtual backgrounds with a video editor for which we have recommended Wondershare Filmora.
Also read:
- Updated It Is Crucial to Introduce Your Kids to the Different Colors and Practice the Color Matching Game. So, Here Are the Various Factors Related to Color Matching for Your Child with a Tool to Help You in It Ideally
- Updated How to Use Color Grading in Final Cut Pro
- How To Create The Best AI Thumbnail Using The Right Tools for 2024
- Updated 2024 Approved A Wedding Is One of the Exciting Parts that Will Happen in Your Life. Its Not that Easy to Plan a Wedding, Theres a Lot to Be Consider Like Wedding Dress, Food, Venue, Videographer Etc
- New 2024 Approved If You Wish to Edit FLV Videos without Any Problems, You Should Utilize a Multipurpose Video Editor that Supports the FLV File Format
- How to Make Discord GIF Avatar in Depth Guide
- A Comprehensive Guide to Slow Motion YouTube Videos and How to Manage Them
- Updated The Ultimate Guide to Slideshow Maker with Music for 2024
- New 2024 Approved How to Splice Videos Together on iPhone
- New 2024 Approved Can You Make an Fcpx Slideshow? Undoubtedly Yes, with the Unlimited Best Fcpx Slideshow Templates Available. To Know How to, Follow the Discussion Below
- Updated 2024 Approved Want to Create a Stunning Intro Video on Your Smartphone? Legend Intro Maker Is a Popular Choice. Learn the Steps to Design Intro Video Legend Intro Maker
- Updated In 2024, VN Editor A Prominent Option for Adding Luts for Video Editing
- Updated In 2024, How to Make Vintage Film Effect 1980S
- New Tips for Choosing Location & Scheduling Music Video for 2024
- Finding the Best Voice Changers for WhatsApp Free and Paid
- Video Course and Online Learning Are Very Popular Nowadays. Here We Are Going to Recommend some of the Best Video Websites for Teachers to Use for 2024
- Are You a Gaming YouTuber or Content Creator Whose Main Game Is COD Warzone? How Kickass Are Your Warzone Thumbnails? Heres a Guide on How to Make One for Free
- Updated This Article Introduces How Sheila Become a Youtuber and How She Started Video Editing
- In 2024, How to Add Motion Titles
- Updated Why You Should Master Slideshows In Lightroom?
- New In 2024, Do You Want to Apply LUTs Using Open Broadcaster Software? You Can Download Free LUTs for OBS and Apply Them to Your Files. There Are Many LUTs Available
- Unleash the Power of Video Slow Motion with Wondershare Filmora. Find Out How to Create Slow Motion Video with the Effective Speed Ramping Feature on Filmora for 2024
- Updated 2024 Approved Here You Can Lean About the Different Ways for GIMP Transparent Background PNG Format Files
- New Making Slow Motion Videos in Premiere Pro A Review on The Best Methods
- New Everything That You Need to Know About Video Montages- Ideas, Techniqu for 2024
- Updated The Background in Your Footage Might Be Bland or Unpleasant. This Article Will Discuss Video Background Templates You Can Use to Spice Things up and Make Your Videos Go Viral for 2024
- New Polish and Enshrine Your Music Videos with the Best Editing Software, Filmora. Add Cuts to Your Beat, Light Leaks, and Much More for 2024
- New Follow a Few Simple Steps and Learn How to Create a Professional Glowing Edge Effect to Your Videos in Filmora for 2024
- In 2024, Slow Down or Speed Up Videos Easily on PC, Online, and Phone
- Updated How to Speed up a Video on Splice for 2024
- 2024 Approved How to Use Adjustment Layer in Photoshop?
- New In 2024, Most-Used 3 Ways to Compress Video for Instagram Story, Feed, and IGTV
- Updated In 2024, How To Export Video in Filmora
- New Step by Step to Rotate Videos Using Kdenlive
- Updated 2024 Approved Top 5 Free Online Video Filter Editors
- New Learning How to Create LUTs with LUTs Generator
- 2024 Approved Are You Searching for the Best Canon LUT Download? This Article Provides the Best Recommendations for Creating the Best Professional Videos
- Updated In 2024, Kdenlive Review – Is It The Best Video Editor?
- Updated In 2024, How to Make Censor Effects with Filmora
- 2024 Approved How to Add Photos to Tik Tok Video
- Updated In 2024, Want to Add Freeze Frame Effect to Your Video on Your Device? Here Are the Steps to Add Freeze Frame on PC, Mac, Smartphone as Well as Online From Any Device
- 2024 Approved Top Tricks for Learning Photo Slideshow
- All About Factory Reset, What Is It and What It Does to Your Xiaomi 13T Pro? | Dr.fone
- Samsung Tutorial - Bypass Lock Screen,Security Password Pin,Fingerprint,Pattern
- New 2024 Approved Is This a Pigeon Meme Generator
- In 2024, How To Bypass Lava Blaze Curve 5G FRP In 3 Different Ways
- In 2024, Set Your Preferred Job Location on LinkedIn App of your Honor 90 GT | Dr.fone
- How to Unlock Xiaomi Redmi K70E Phone Pattern Lock without Factory Reset
- How to Fix My Nubia Z50 Ultra Location Is Wrong | Dr.fone
- 6 Ways to Change Spotify Location On Your Vivo Y27 5G | Dr.fone
- How Can I Use a Fake GPS Without Mock Location On Itel S23? | Dr.fone
- Complete Tutorial for Oppo K11 5G Hard Reset | Dr.fone
- In 2024, Best 3 Oppo A79 5G Emulator for Mac to Run Your Wanted Android Apps | Dr.fone
- In 2024, How to Unlock Vivo X100 Pro Phone Pattern Lock without Factory Reset
- How and Where to Find a Shiny Stone Pokémon For Realme 12 Pro+ 5G? | Dr.fone
- In 2024, 3 Ways for Android Pokemon Go Spoofing On Honor V Purse | Dr.fone
- Title: How to Rotate Videos With Media Player Classic
- Author: Morgan
- Created at : 2024-05-19 05:11:36
- Updated at : 2024-05-20 05:11:36
- Link: https://ai-video-editing.techidaily.com/how-to-rotate-videos-with-media-player-classic/
- License: This work is licensed under CC BY-NC-SA 4.0.

