How To Slow Down GIF Building an Understanding

How To Slow Down GIF: Building an Understanding
Graphic interchange format, mostly known as GIF, is extensively used to convey information. GIF is a communication tool in bitmap image format that clearly conveys your online content. When sharing GIF images, playback speed is the most important thing to count. If the playback speed of the GIF is faster than usual, viewers may skip their focus essential data.
As a solution, you must learn how to adjust slow motion GIF’s speed. This article will teach you the stepwise methods to achieve a slow-motion GIF. Before heading towards the methods, learn about some GIF video platforms. By the end, you will be able to make a matchless slow-mo GIF through a desktop solution.
Slow Motion Video Maker Slow your video’s speed with better control of your keyframes to create unique cinematic effects!
Make A Slow Motion Video Make A Slow Motion Video More Features

Part 1: Where Can I Get Impressive Slow-Motion GIFs for Myself?
Slowing down GIFs brings viewers’ attention to specific actions in video content. It exaggerates facial expressions or movements in the videos, leading to humorous results. Creators choose to slow down GIFs to convey particular moods and styles. Different contexts require different slow-mo GIF videos; below are some platforms to cater to all of them.
1. Giphy
One of the famous platforms for GIFs is Giphy, which offers an extensive collection of GIFs. If you want a GIF that can add humor to your content, pick the entertainment category from Giphy. It provides different domains of GIFs for your ease of selection. Some of its categories include sports, gaming, animals, and cartoons.

Key Features
- Using this platform, you can not only get a GIF but also upload one. Graphics designers or GIF creators can use this place to publish their work globally.
- After selecting one GIF, you can share it on any platform. It allows you to embed the GIF directly on websites or share it through links.
- Every GIF on Giphy provides in-depth details like size, frame, and source. This way, you can instantly choose one that matches your project’s requirements.
2. Tenor
Another popular platform to get high-quality GIFs is Tenor. It supports multiple languages in its interface so international users can better comprehend it. Apart from that, there are many categories in the trending searches of GIFs. It shows which domain of GIFs is ranking the most. Some trending tenors include cars, snow, happy holidays, good nights, and GIFs.

Key Features
- When you pick one GIF, you can change its format before downloading. In this regard, you can choose HD, MP4, and SD quality options.
- This platform detects your selection and suggests relevant GIFs afterward. For instance, if you pick a cat GIF, then you will find a cat GIF when scrolling down.
- Tenor provides GIF specification details under each. Besides, you can share the selected GIF image through the URL and embedded link.
Part 2: What to Do If You Want to Slow Down GIFs: The Best Tools
Knowing platforms, as mentioned above, makes it easier for you to avail the desired GIF. After grabbing one of your choices, you can make it a slow-motion GIF, if required. To do so, there are several tools in the market. Some of them are explained below, along with step-by-step instructions on how to use them.
List of Best Tools to Slow Down GIFs
1. Ezgif.com
This tool is primarily responsible for online GIF making and image editing. Besides, it can convert your video into GIF, resize, cut, crop, and optimize them. Moreover, you can add effects and text to your videos or GIFs to make them appealing. GIF animation speed changers are the real game changers among online solutions:
Step 1
Browse the official site of Ezgif.com and tap on the “Effects” section. Afterward, choose the “Adjust GIF Speed” section to proceed to further options. There, click the “Choose File” white button and look for the file you want to slow down. Optionally, paste the URL link in the given section and tap “Upload” to continue.

Step 2
Scroll down the window and insert the digits on which percentage you want to slow down the speed. Afterward, click the “Change Speed” button and find a slow-motion GIF in the output image.

2. VEED.io
VEED.io is a preferred choice by many creators for professional or high-quality videos. It offers screen recording, video editing, and subtitle translation services. Apart from that, it can fix GIF speed with the GIF speed changer feature. After changing speed, you can add transitions and animation effects in Veed.io. For now, let’s just stick to the slow-mo GIF in the following steps:
Step 1
Access the “GIF Speed Changer” in VEED.io, start by tapping “Choose GIF File” and enter the editing screen.

Step 2
From the next screen, you will get a pop-up menu first. You have to hit the “Upload a File” option and select a GIF file to import into VEED.io. Under the video preview, click on the “Speed” icon next to the “Sound” symbol. Then, choose “0.5x” and get a slow-down GIF preview in front of you.

3. Canva
Students must be aware of this platform as a presentation template provider. Canva is a tool that provides stunning templates to customize with its cloud storage system. Gradually, it’s turning more into a video editing platform. Regarding slow-motion GIFs, it can change the GIF speed online. After slowing down the GIF, you can convert it into MP4 or enhance it by adding graphics.
Step 1
Reach out to the GIF Speed Changer feature of Canva’s video editing. Then, tap the “Change GIF Speed” button to access the editing screen.

Step 2
Navigate towards the left-side panel and hit the “Upload Files.” Now, search and select your GIF to import in Canva’s editing window. Afterward, go to the “Playback” option at the top left and then direct to the left panel. Move the “Video Speed” slider to the left for a Slow-mo GIF. Click on the video for a preview, or look for any other playback adjustments.

Part 3: Make Impressive Slow Mo GIFs Using Desktop Solution
Are you getting customized speed adjustment options using any of the above tools? The answer is quite clear: no online tools do not offer personalization for slow-motion GIFs. That’s where you need Wondershare Filmora as a better alternative. It is currently the best video editor that transforms your videos into art pieces.
With more than 10 billion stock media, you don’t have to browse different sites. Filmora is an all-in-all platform that can not only edit your video but also aims to polish it to the next level. Besides, editors can use Filmora anywhere with just a password.
Free Download For Win 7 or later(64-bit)
Free Download For macOS 10.14 or later
How to Make Slow-motion GIF with Filmora
After discovering the top-notch features of Filmora, it’s time to use it. Although it’s very simple to operate, this step-by-step guide will help you process faster:
Step 1Launch Filmora and Import GIF to the Timeline
Download Wondershare Filmora from its official site. After a successful launch, you will enter its main screen. Look for the “New Project” option from the main interface. Tapping on the New Project, you will find the editing screen. Import your GIF in the media panel and drag it into the timeline section to begin the process.

Step 2Slow Down the GIF with Optical Flow
Right-click on the video and pick the “Uniform Speed” option from the list. This way, you will find an editing panel on the right side. Now, you can move the “Speed” slider towards the left. You can press the space bar and get the slow-motion GIF preview. Direct downward and choose the “Optical Flow” option from the extended menu of “AI Interpolation.”

Step 3Continue to Edit or Head to Export the Media
Finally, you will get a slow but high-quality GIF. Now, it’s up to you to continue exploring other features of Filmora or head to save the file. To save the file, go to the top right corner and press the “Export” button.

Key Features Marking Filmora’s Greatness
Filmora is proven to be the easiest software with the most powerful editing features. As proof, you can read the main features of Filmora to comprehend its functionalities better.
1. Speed Ramping
Create a unique cinematic effect in your video by adjusting keyframes. Filmora offers speed ramping features to bring a smooth transition in slow-motion or fast motions. In speed ramping, you get 6 templates, such as bullet time, montage, and jumper. Using those templates, you don’t need to manually adjust keyframes for speed ramping. Also, you can retain the original pitch of the audio after changing the speed.
2. AI Copilot Editing
To boost productivity, Filmora provides an AI Copilot editor option. It saves time that could be wasted searching for some feature or making the editing perfect. Users can ask anything to copilot in natural language. They can take help from an already existing question in the copilot editors. This feature will guide you toward practical actions through navigation buttons.
3. AI Music Generator
Who else is fed up with finding the perfect music for Vlog? Commonly, you didn’t find a video of exact length and mood. Thus, Filmora enables you to generate a soundtrack according to your mood and video length. Using it, you just have to prompt with the number of tracks, mood, and length. The AI-generated music will not require copyrights, so you can use it freely anywhere.
4. AI Image
Have you ever heard that any video editor can convert your text prompts into images? Filmora is offering this option, especially for people who are struggling to get their desired image. For this purpose, they need to describe images in simple language. Afterward, they are required to pick one style for accurate results.
5. AI Copywriting
Do you have a deadline for script submission, but it is not ready yet? Leave this headache to Filmora’s AI copywriting feature, which aims to produce engaging scripts. With ChatGPT integration, it can generate YouTube titles and descriptions. Furthermore, you can ask AI to convert your script into an appealing video.
Conclusion
To summarize, slowing down is the ultimate solution to retain the viewer’s attention. In this article, you have seen the top-notch platforms for slow-motion GIFs. They are not enough for remarkable videos because of the limited speed adjustment options. So, using Filmora remains the best option in providing easier ways to customize the speed of GIFs.
Make A Slow Motion Video Make A Slow Motion Video More Features

Part 1: Where Can I Get Impressive Slow-Motion GIFs for Myself?
Slowing down GIFs brings viewers’ attention to specific actions in video content. It exaggerates facial expressions or movements in the videos, leading to humorous results. Creators choose to slow down GIFs to convey particular moods and styles. Different contexts require different slow-mo GIF videos; below are some platforms to cater to all of them.
1. Giphy
One of the famous platforms for GIFs is Giphy, which offers an extensive collection of GIFs. If you want a GIF that can add humor to your content, pick the entertainment category from Giphy. It provides different domains of GIFs for your ease of selection. Some of its categories include sports, gaming, animals, and cartoons.

Key Features
- Using this platform, you can not only get a GIF but also upload one. Graphics designers or GIF creators can use this place to publish their work globally.
- After selecting one GIF, you can share it on any platform. It allows you to embed the GIF directly on websites or share it through links.
- Every GIF on Giphy provides in-depth details like size, frame, and source. This way, you can instantly choose one that matches your project’s requirements.
2. Tenor
Another popular platform to get high-quality GIFs is Tenor. It supports multiple languages in its interface so international users can better comprehend it. Apart from that, there are many categories in the trending searches of GIFs. It shows which domain of GIFs is ranking the most. Some trending tenors include cars, snow, happy holidays, good nights, and GIFs.

Key Features
- When you pick one GIF, you can change its format before downloading. In this regard, you can choose HD, MP4, and SD quality options.
- This platform detects your selection and suggests relevant GIFs afterward. For instance, if you pick a cat GIF, then you will find a cat GIF when scrolling down.
- Tenor provides GIF specification details under each. Besides, you can share the selected GIF image through the URL and embedded link.
Part 2: What to Do If You Want to Slow Down GIFs: The Best Tools
Knowing platforms, as mentioned above, makes it easier for you to avail the desired GIF. After grabbing one of your choices, you can make it a slow-motion GIF, if required. To do so, there are several tools in the market. Some of them are explained below, along with step-by-step instructions on how to use them.
List of Best Tools to Slow Down GIFs
1. Ezgif.com
This tool is primarily responsible for online GIF making and image editing. Besides, it can convert your video into GIF, resize, cut, crop, and optimize them. Moreover, you can add effects and text to your videos or GIFs to make them appealing. GIF animation speed changers are the real game changers among online solutions:
Step 1
Browse the official site of Ezgif.com and tap on the “Effects” section. Afterward, choose the “Adjust GIF Speed” section to proceed to further options. There, click the “Choose File” white button and look for the file you want to slow down. Optionally, paste the URL link in the given section and tap “Upload” to continue.

Step 2
Scroll down the window and insert the digits on which percentage you want to slow down the speed. Afterward, click the “Change Speed” button and find a slow-motion GIF in the output image.

2. VEED.io
VEED.io is a preferred choice by many creators for professional or high-quality videos. It offers screen recording, video editing, and subtitle translation services. Apart from that, it can fix GIF speed with the GIF speed changer feature. After changing speed, you can add transitions and animation effects in Veed.io. For now, let’s just stick to the slow-mo GIF in the following steps:
Step 1
Access the “GIF Speed Changer” in VEED.io, start by tapping “Choose GIF File” and enter the editing screen.

Step 2
From the next screen, you will get a pop-up menu first. You have to hit the “Upload a File” option and select a GIF file to import into VEED.io. Under the video preview, click on the “Speed” icon next to the “Sound” symbol. Then, choose “0.5x” and get a slow-down GIF preview in front of you.

3. Canva
Students must be aware of this platform as a presentation template provider. Canva is a tool that provides stunning templates to customize with its cloud storage system. Gradually, it’s turning more into a video editing platform. Regarding slow-motion GIFs, it can change the GIF speed online. After slowing down the GIF, you can convert it into MP4 or enhance it by adding graphics.
Step 1
Reach out to the GIF Speed Changer feature of Canva’s video editing. Then, tap the “Change GIF Speed” button to access the editing screen.

Step 2
Navigate towards the left-side panel and hit the “Upload Files.” Now, search and select your GIF to import in Canva’s editing window. Afterward, go to the “Playback” option at the top left and then direct to the left panel. Move the “Video Speed” slider to the left for a Slow-mo GIF. Click on the video for a preview, or look for any other playback adjustments.

Part 3: Make Impressive Slow Mo GIFs Using Desktop Solution
Are you getting customized speed adjustment options using any of the above tools? The answer is quite clear: no online tools do not offer personalization for slow-motion GIFs. That’s where you need Wondershare Filmora as a better alternative. It is currently the best video editor that transforms your videos into art pieces.
With more than 10 billion stock media, you don’t have to browse different sites. Filmora is an all-in-all platform that can not only edit your video but also aims to polish it to the next level. Besides, editors can use Filmora anywhere with just a password.
Free Download For Win 7 or later(64-bit)
Free Download For macOS 10.14 or later
How to Make Slow-motion GIF with Filmora
After discovering the top-notch features of Filmora, it’s time to use it. Although it’s very simple to operate, this step-by-step guide will help you process faster:
Step 1Launch Filmora and Import GIF to the Timeline
Download Wondershare Filmora from its official site. After a successful launch, you will enter its main screen. Look for the “New Project” option from the main interface. Tapping on the New Project, you will find the editing screen. Import your GIF in the media panel and drag it into the timeline section to begin the process.

Step 2Slow Down the GIF with Optical Flow
Right-click on the video and pick the “Uniform Speed” option from the list. This way, you will find an editing panel on the right side. Now, you can move the “Speed” slider towards the left. You can press the space bar and get the slow-motion GIF preview. Direct downward and choose the “Optical Flow” option from the extended menu of “AI Interpolation.”

Step 3Continue to Edit or Head to Export the Media
Finally, you will get a slow but high-quality GIF. Now, it’s up to you to continue exploring other features of Filmora or head to save the file. To save the file, go to the top right corner and press the “Export” button.

Key Features Marking Filmora’s Greatness
Filmora is proven to be the easiest software with the most powerful editing features. As proof, you can read the main features of Filmora to comprehend its functionalities better.
1. Speed Ramping
Create a unique cinematic effect in your video by adjusting keyframes. Filmora offers speed ramping features to bring a smooth transition in slow-motion or fast motions. In speed ramping, you get 6 templates, such as bullet time, montage, and jumper. Using those templates, you don’t need to manually adjust keyframes for speed ramping. Also, you can retain the original pitch of the audio after changing the speed.
2. AI Copilot Editing
To boost productivity, Filmora provides an AI Copilot editor option. It saves time that could be wasted searching for some feature or making the editing perfect. Users can ask anything to copilot in natural language. They can take help from an already existing question in the copilot editors. This feature will guide you toward practical actions through navigation buttons.
3. AI Music Generator
Who else is fed up with finding the perfect music for Vlog? Commonly, you didn’t find a video of exact length and mood. Thus, Filmora enables you to generate a soundtrack according to your mood and video length. Using it, you just have to prompt with the number of tracks, mood, and length. The AI-generated music will not require copyrights, so you can use it freely anywhere.
4. AI Image
Have you ever heard that any video editor can convert your text prompts into images? Filmora is offering this option, especially for people who are struggling to get their desired image. For this purpose, they need to describe images in simple language. Afterward, they are required to pick one style for accurate results.
5. AI Copywriting
Do you have a deadline for script submission, but it is not ready yet? Leave this headache to Filmora’s AI copywriting feature, which aims to produce engaging scripts. With ChatGPT integration, it can generate YouTube titles and descriptions. Furthermore, you can ask AI to convert your script into an appealing video.
Conclusion
To summarize, slowing down is the ultimate solution to retain the viewer’s attention. In this article, you have seen the top-notch platforms for slow-motion GIFs. They are not enough for remarkable videos because of the limited speed adjustment options. So, using Filmora remains the best option in providing easier ways to customize the speed of GIFs.
How to Make Animated Text Video on Computer/iPhone/Android/Online
In the recent times, there are many animated text video generators available; which ones are worthwhile of your time and effort? The days when only experienced video editors and designers could create animated text video are long gone. Anyone with a computer or smartphone can easily make text to animate, shimmer, and change colors thanks to the development of animated text generators. Here, we’ve put up a list of the top ways to add animated text to image so you can narrow down your search.
Animated text videos maintain audience interest, and costs nothing to produce high-quality content. Use word animation to make your next presentation, creative video, or demo video engaging and simple to follow. You may choose from a variety of distinctive font and text styles in a matter of minutes to make your films stand out. Contrary to common opinion, you can also convert text to animated video. You may create these films at no cost. The most effective methods for doing it on all devices are mentioned below.
Part 1. How to make animated text video on computer?
The first on the list is Filmora, which has a clear user interface and simple drag-and-drop features. The greatest video animation software for professional editors and artists can be found at Filmora . You can quickly make entertaining animated films with full HD support, horizontal and vertical video layouts, and predefined visuals. Text-to-speech, the possibility to add background music and sound effects, and voiceover are examples of audio functionality. You may upload your own songs or choose from Filmora’s stock music collection.
Steps to create animated text video with Filmora:
Step1Download and launch Filmora Video Editor
You probably still consider yourself a novice in the field of video editing if you don’t yet know how to include animated words in your films. With Filmora for Windows and Mac, you can achieve a powerful, user-friendly piece of software so you can get started producing excellent material right immediately. Visit the official links to download and install the tool hand in hand:
Step2Create a New Project and Add Files
The New Project button should appear when you start the program. To enter the project window, click the button. You will then be directed to your storage space. Go to the location where you have the video files saved. Hold down the control button while clicking on each file to select it all at once. Hit the Import button afterwards to add them to the Project media.
Step3Add Text Animation to Your Video
Refer to the Annotations tab to initiate the text animation. This enables you to keep the text size and length consistent throughout the whole video. To fit your tastes and the way your video flows best, you may edit the layers you’ve created. Then, by selecting Effects menu, beneath your preferred motion effect, you may change the animation of your text motion intro and outro.
Step4Save your Video
Click Export to save your video. Options for Resolution and Bitrate should be available on the new window. Up to 4K video resolutions are supported by Filmora . However, you may continue and save your film at this point since Filmora automatically selects the ideal size and quality ratio so you can export more quickly without sacrificing quality. Finally, click Export, and everything will be yours. By selecting the Upload to YouTube option, you may also upload your video to YouTube immediately.
Part 2. How to Create Animated Text Video on iPhone (Video Maker App)
The Video Maker App does an excellent job of spicing up text. You may apply basic animations to your text and alter modifications to change the outcome. It offers a very flexible editor along with a huge selection of fonts, colors, text effects, and—most importantly—animations. Additionally, a variety of fashionable text effects, ranging from neon to 3D, are available with this application.
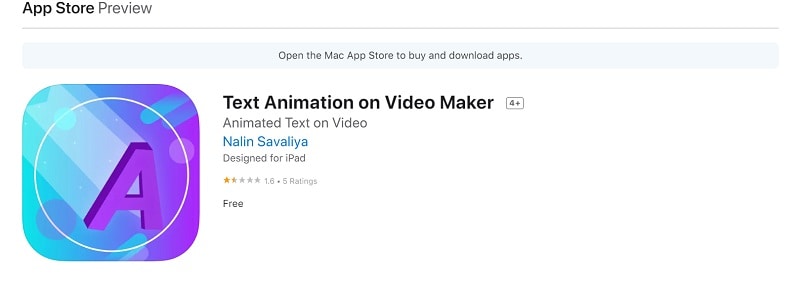
Link to Download: Text Animation on Video Maker
Steps to Create Animated Text Video on iPhone:
Step1Download Text Animation on Video Maker. This unique iOS software enables you to quickly apply vibrant text overlays to any footage. Download this on your iPhone by clicking the associated link to the App store.
Step2Choose a movie or image from your media roll, and then add custom text to the video to make it animated. Click the Next button in the upper right corner to continue.
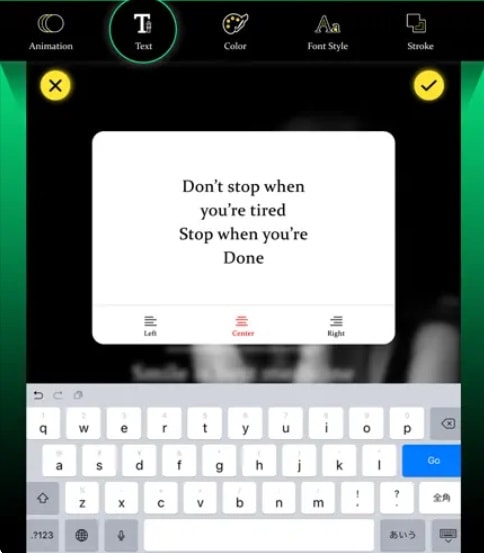
Step3Select a design from the vast array that is offered. Once you’ve chosen the animation you like most, you may further alter it by choosing a filter and text color.

Step4Click the three dots symbol at the bottom right of your screen to save the animated text movie to your camera roll. Additionally, you have the option of saving your movie in GIF format.

Part 3. How to Create Animated Text Video on Android
Users may experiment with various degrees of editing capabilities with Textor. The program offers powerful features that are simple to use and provide rapid sharing choices across numerous digital channels, making it a suitable match for experienced and inexperienced users alike. Textro is a simple, elegant tool that lets you make stunning text movies or video intros for your videos. This software is a fantastic choice for marketers trying to sell their brand on social media because of its variety of features that assist generate a premium quality output.
Link to Download: Textor
Steps to Create Animated Text Video on Android:
- Simply download the app to begin going. When you first launch the program, it will prompt you to add text.

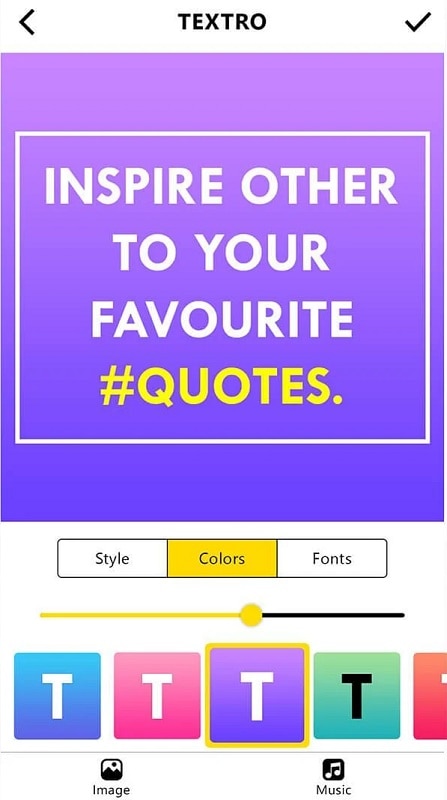
- You may embellish your post with text, images, icons, and logos. By pressing the random button, you may make a completely new combination of colors or modify the post’s color scheme using the already-existing possibilities.
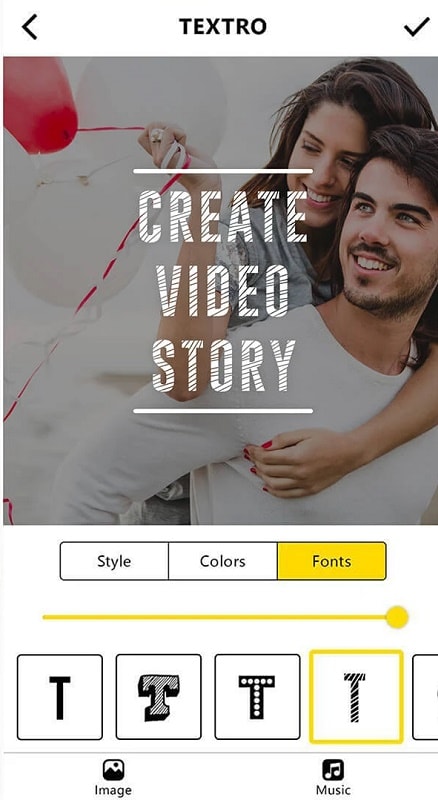
- Text may be animated using the fade, slide, grow, pan, zoom, focus, and fill effects. These effects may all be manually applied and help your project stand out from the competition.
- The post may be instantly shared on Instagram or saved to your phone. Additionally, you may share the project directly on other social platforms or download it to your phone.
Part 4. How to Create Animated Text Video Online
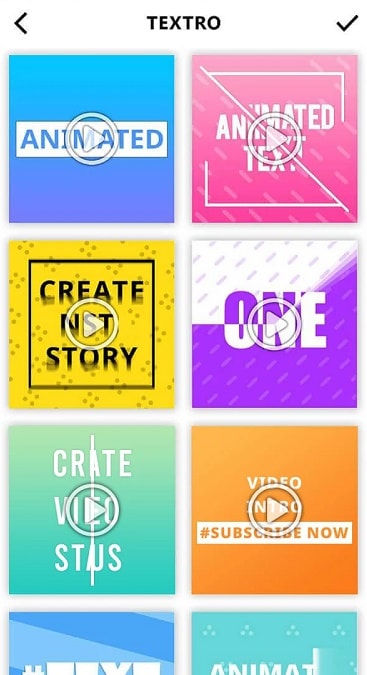
A DIY intro and slideshow-style animated video creator in the cloud, FlexClip. There is a selection of well created, editable templates to which you may add dynamic text. You may choose a template that best suits your requirements and edit the text inside it. There are a variety of ready-to-use animations available. The fonts, colors, text size, alignment, and other elements of these animations are all readily editable.
Link: FlexClip Online
Steps to Create Animated Text Video Online:
Step1Upload Your Video
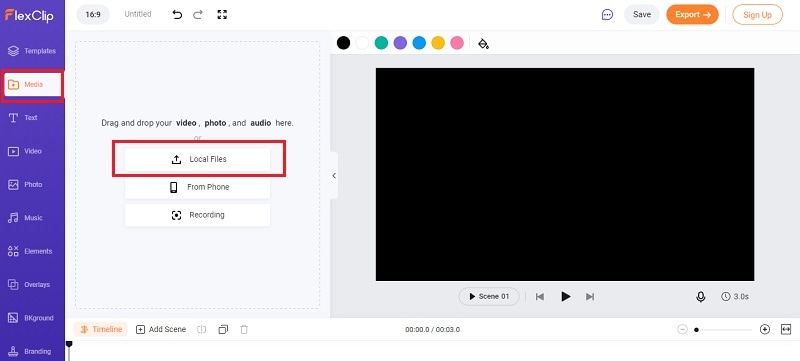
To add the video to the FlexClip media library, launch the FlexClip video editor and choose “Local Files.” To move it to the storyboard where it will be modified, click the “Plus” button. The video may also be dropped directly into the editor by dragging it from the folder.
Step2Add and Customize Text
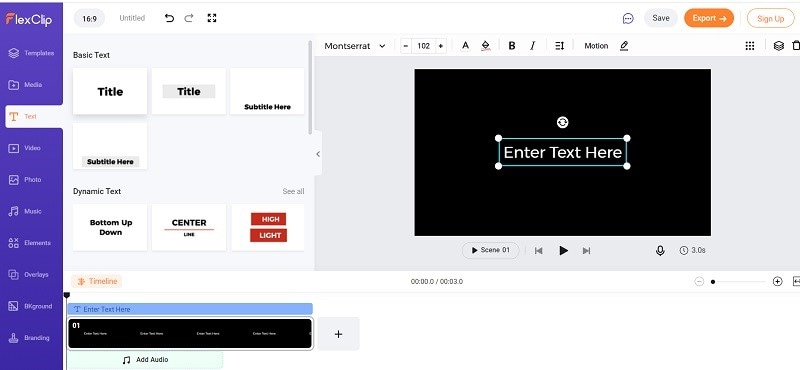
Enter the term you want to appear in the movie while choosing your chosen text (either Dynamic Texts or Basic Texts), then edit the text by changing the size, font, placement, color, and backdrop color. On the toolbar’s left side, choose the text by clicking there. To add dynamic or basic text to your movie, right-click on the text you want to use. To establish your brand, add some other items next to the text or utilize the existing textual overlay before adjusting the time.
Step3Export your Video
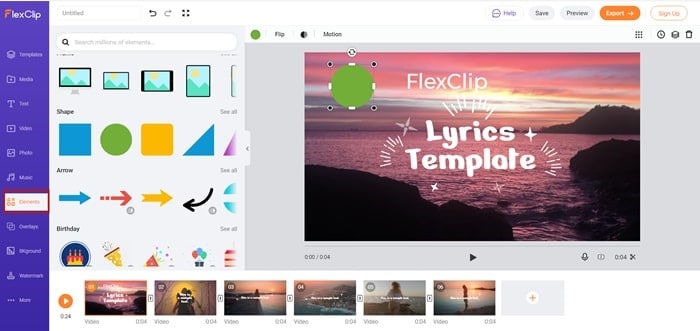
You should export your final video at this point. To accomplish this, just click “Export,” and your video will be instantly stored in your choice storage area as an MP4 file.
Conclusion
These were a few simple techniques for producing lovely text animations. The animation has a sharp, material design aesthetic. Though it seems that the most of the animations are standard. With the help of these tools, you may overlay text animations over photos and videos, making it appealing to a larger audience. No matter what sector you work in, word animation can give your films a polished appearance. Text animations may keep viewers on your page longer and prevent them from scrolling down. Use the above suggestions for any device to kickstart your own animated text video journey regardless of the device you’re on.
Free Download For Win 7 or later(64-bit)
Free Download For macOS 10.14 or later
How to Loop Video in Canva
Looping a video is a great way to make your content stand out from the competition. The looped video will repeat the same section of the video, which gives it an eerie feeling like an old-timely music box. For example, if you are creating a series of videos about a product launch, you could use loops to create anticipation for when the product will be available.
You can use this feature on Canva to create an eye-catching looped video that you can use in your social media posts and ads. It is great if you need to use a video in your project, but don’t have time to do the editing. In this article, we’ll walk you through how to Loop a video on Canva.
Part 1: How to Loop Video in Canva
Canva is a great video editing tool that allows users to create stunning videos. It has a simple interface that makes it easy to use even for beginners. Looping a video is a great way to make your content more engaging. You can add a looping effect to any video, whether it’s yours or one you find online. Creating the looping video is super easy!
Canva is a great way to create custom designs for your business. It’s also a great way to make a video for your brand. The looping feature in Canva is a great way to create more engaging infographics. By using this feature, you can create a custom loop, which allows you to create an infographic that repeats itself in the same or different sizes.
Step 1: Create an account on Canva and select the video:
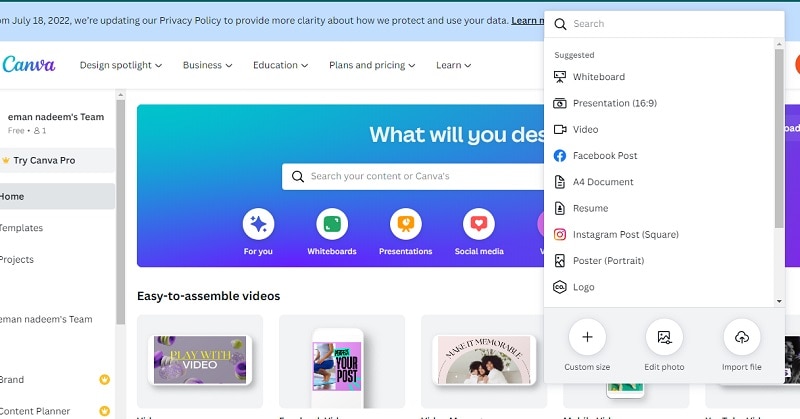
Log in to Canva and click on “Create a design”. Import your video into Canva. You can find the import button on the right side of the screen when you’re editing a new project or opening an existing project by clicking “Open.”, then click on the “Add Video” button. The new video will appear underneath your other assets.
Step 2: Choose the “Present” option by clicking on Share:
Click on the drop-down arrow next to the title bar and select “Present” from the list of available options. Then you can select the feature of Present that how your video will appear in front of you or your audience.

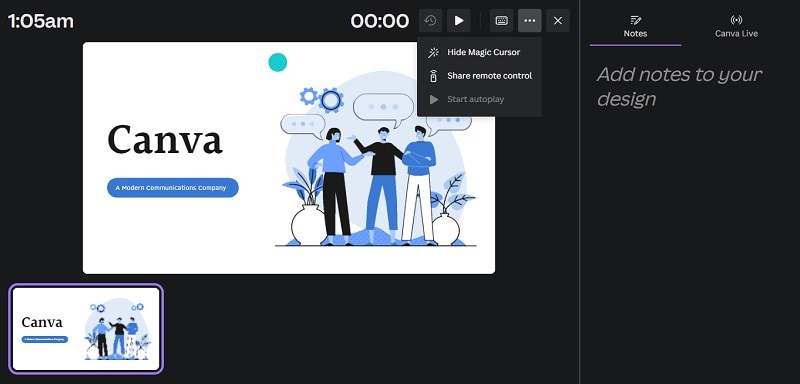
Step 3: Loop your video by choosing the feature “Start auto play”:
A new window will pop up and allow you to customize where in your project this loop will be placed: by default, it will start at 0 seconds and play until it reaches 500 seconds; however, you can change this if needed!
Why should we need the Loop video in Canva?
If you’re looking for a way to make your video stand out from the crowd, then you’ve come to the right place! Here are three ways that you can use looping videos in Canva software to create a more compelling piece of content.
- It adds more value to your content because viewers can watch it over and over again without having to do anything else.
- It helps attract new viewers because they’ll feel compelled to watch the whole thing or at least take action after watching part of it (like clicking on a button).
- It increases retention rates because people will remember something much better than just a static image or text string because there’s movement involved in each frame of the image.
Part 2: Alternative Way to Loop a Video
If you’re using a video editing software like Adobe Premiere or Final Cut Pro, it is likely that you have seen the generic technique of looping a video is by splitting it in two and pasting it together again. What if you need to put on repeat just one individual cut? This is where Filmora steps in! It is a handy tool for trimming and adding clips into your recordings.
The Filmora software can be used to quickly create continual sequences of any duration, irrespective of how long the footage is. It makes possible to synchronize sound and video clips, splice them into one another, and even add titles and motion graphics for a special effect. If you utilize Filmora, you do not need to be an expert in video editing to make professional-looking results. Let us explore why Filmora is necessary for video editing.
Filmora is a video editing software that allows you to make professional-looking videos from your footage. It has a loop feature that lets you create seamless loops where each clip in the sequence plays over and over until you stop it. This can be useful for creating music videos, for example, or for creating small clips that loop seamlessly through the whole video.
The loop feature in Filmora software is a great way to put your video editing skills to the test. It allows you to edit a clip of any length and then play it back over and over again, which can be useful when you’re looking for an ideal looping point or want to see how long a clip is before going back to find out why it didn’t work.
Let’s have a look that how can we loop the video on Filmora:
Step 1: Download Filmora for free and Create a project in it:
Free Download For Win 7 or later(64-bit)
Free Download For macOS 10.14 or later
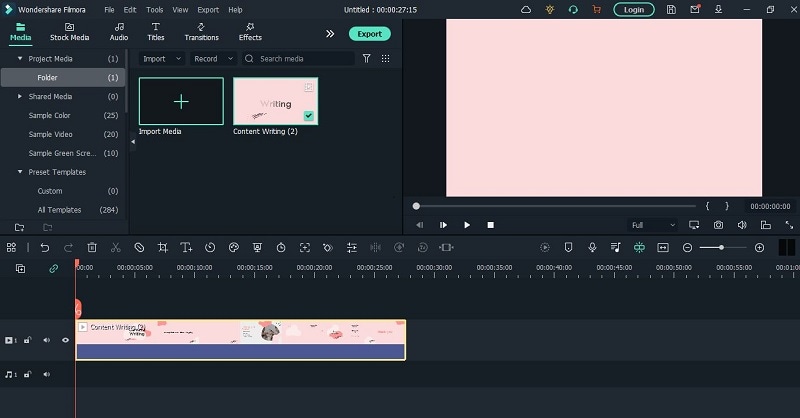
Download the Filmora software from any browser. After installation opens the software and clicks on create a project. Just add a video in your timeline that you would like to loop. With the Loop tool, you can easily add titles and credits, as well as transitions and effects to your videos.
Step 2: Select the video and make copies of it:
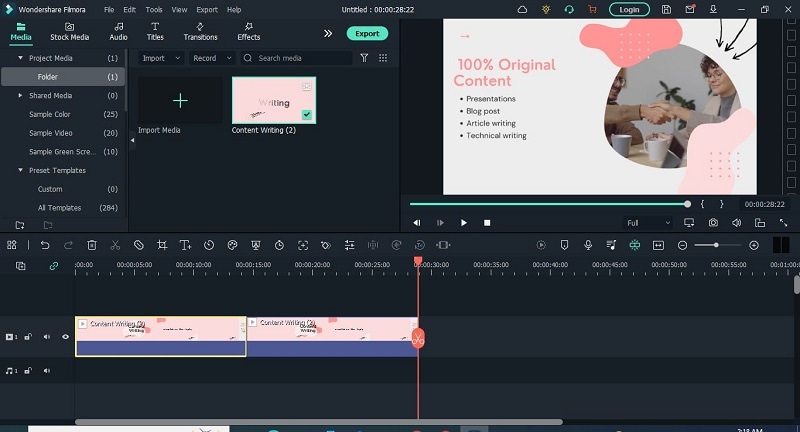
Move the play head to the end of your clip and press right-click to copy the video then use CTRL + V to paste the clip and continue pasting as many copies as you want to create.
Step 3: Add Transition to the video to make it more seamless
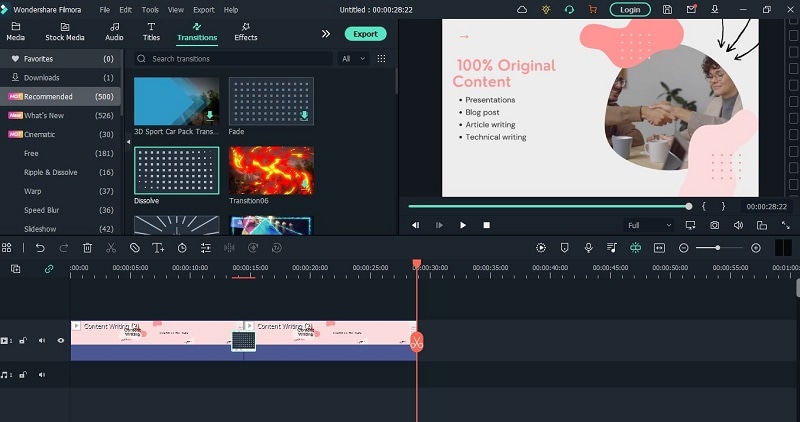
Lastly, If you want to make your loop more seamless then go to the Transitions tab and type dissolve in the search bar. Drag the dissolve transition between the two clips on the timeline. This can be useful when you want viewers to watch the video repeatedly.
Part 3: FAQs About Video Loop
1. Can you loop animation in Canva?
Yes, we can make loop animation in Canva. Looping animation in Canva software is not difficult, but it does require a little bit of practice. To loop animation in Canva, follow these steps:
- Go to the Animation tab on the left side of the screen.
- Click on the New Animation button in the top right corner of your screen.
- Select the type of animation you want to create from the drop-down menu next to “Create New Animation From.” This will open up a window that allows you to select between several different options for how your animation will appear, choose one that appeals most to you!
2. How do I loop an mp4 video?
Looping the mp4 video is a fairly simple process. First, you need to import the video into your computer. The easiest way to do this is using the .mp4 files that come with your camera or phone. You can also use any other audio file or a preview of the video as an indicator of where you want to start and end your looping.
Once you have imported your video, you can begin looping it. To do this, click on the “play” button and wait until all the videos have been played. Then, click on one of the two buttons below. The bottom button will play one frame forward in time while the top button will play one frame backward in time.
3. How do I make Canva videos longer?
We’ve got a special function in Canva that lets you crop your video while making it longer. Here’s how:
- Go to the video editor by clicking the cog icon on the top right of your screen.
- Select “Crop Video” from the menu.
- Choose how much footage you want to cut out and press “OK.”
- You’re done! Your video is now cropped and longer than before!
Wondershare Filmora Easy Video Looper Software for PC and Mac Users.
Free Download Free Download Learn More

Conclusion
Looping video generates interest and emotion in the minds of viewers and it is a great tool. According to research, over 80% of internet users watch videos online to get information or because they want to gain knowledge. People’s attention span has diminished significantly, since the invention of gadgets and all these must-have devices. The video will seem like you are editing the video in real-time.
Free Download For macOS 10.14 or later
Download the Filmora software from any browser. After installation opens the software and clicks on create a project. Just add a video in your timeline that you would like to loop. With the Loop tool, you can easily add titles and credits, as well as transitions and effects to your videos.
Step 2: Select the video and make copies of it:
Move the play head to the end of your clip and press right-click to copy the video then use CTRL + V to paste the clip and continue pasting as many copies as you want to create.
Step 3: Add Transition to the video to make it more seamless
Lastly, If you want to make your loop more seamless then go to the Transitions tab and type dissolve in the search bar. Drag the dissolve transition between the two clips on the timeline. This can be useful when you want viewers to watch the video repeatedly.
Part 3: FAQs About Video Loop
1. Can you loop animation in Canva?
Yes, we can make loop animation in Canva. Looping animation in Canva software is not difficult, but it does require a little bit of practice. To loop animation in Canva, follow these steps:
- Go to the Animation tab on the left side of the screen.
- Click on the New Animation button in the top right corner of your screen.
- Select the type of animation you want to create from the drop-down menu next to “Create New Animation From.” This will open up a window that allows you to select between several different options for how your animation will appear, choose one that appeals most to you!
2. How do I loop an mp4 video?
Looping the mp4 video is a fairly simple process. First, you need to import the video into your computer. The easiest way to do this is using the .mp4 files that come with your camera or phone. You can also use any other audio file or a preview of the video as an indicator of where you want to start and end your looping.
Once you have imported your video, you can begin looping it. To do this, click on the “play” button and wait until all the videos have been played. Then, click on one of the two buttons below. The bottom button will play one frame forward in time while the top button will play one frame backward in time.
3. How do I make Canva videos longer?
We’ve got a special function in Canva that lets you crop your video while making it longer. Here’s how:
- Go to the video editor by clicking the cog icon on the top right of your screen.
- Select “Crop Video” from the menu.
- Choose how much footage you want to cut out and press “OK.”
- You’re done! Your video is now cropped and longer than before!
Wondershare Filmora Easy Video Looper Software for PC and Mac Users.
Free Download Free Download Learn More

Conclusion
Looping video generates interest and emotion in the minds of viewers and it is a great tool. According to research, over 80% of internet users watch videos online to get information or because they want to gain knowledge. People’s attention span has diminished significantly, since the invention of gadgets and all these must-have devices. The video will seem like you are editing the video in real-time.
How To Export Video in Filmora
After you edit your video with Filmora you may wonder how to export your video in Filmora Indeed, you can export your video in Filmora in various options. This article will show you the multiple options you can get if you want to export your video in Filmora.
Steps to export your video with Filmora
To open the export box, press “CTRL+E” on your keyboard. After that, you’ll see many export options you can do.
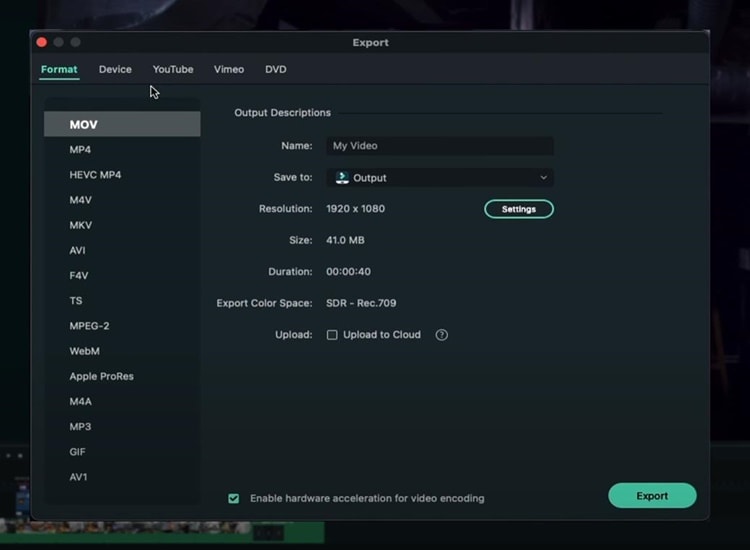
Export Video Platform
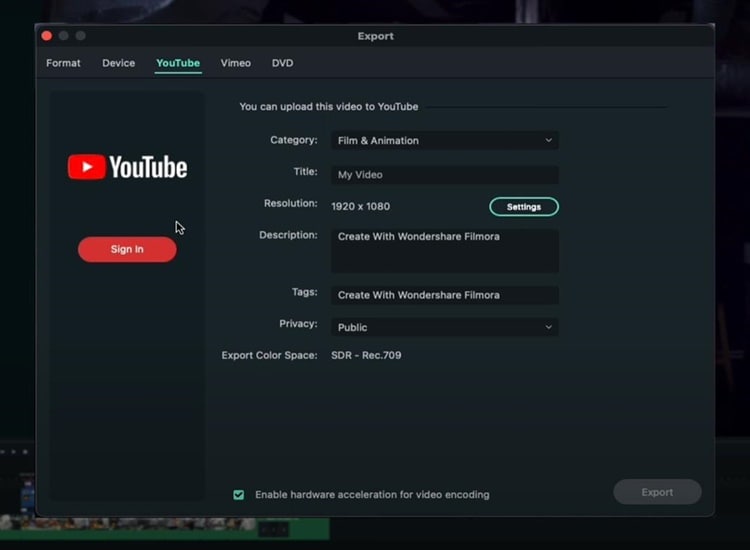
If you want your video to end up on YouTube, you can click on the “YouTube” option, sign in, and enter all the basic metadata you need for your YouTube video. Then you can click “Export”, and the video will go straight to YouTube. Also, you can have all of your privacy settings, descriptions, and everything else.
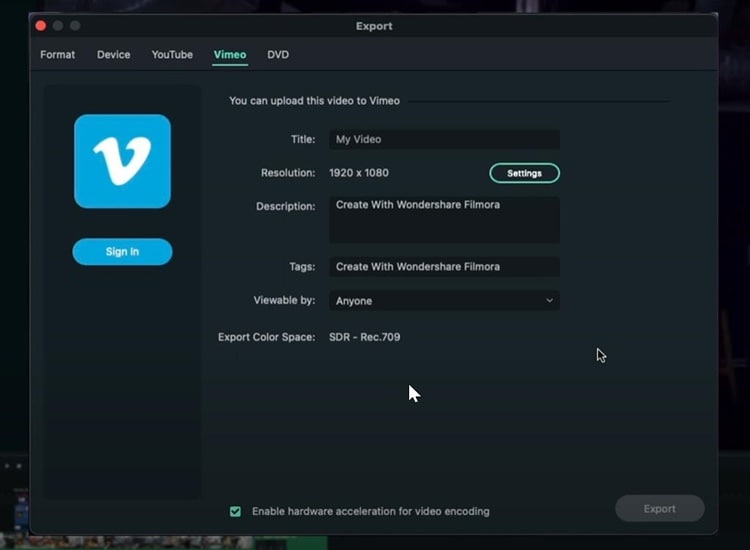
Similar to YouTube, you can do the same thing if you want to export your video on Vimeo.
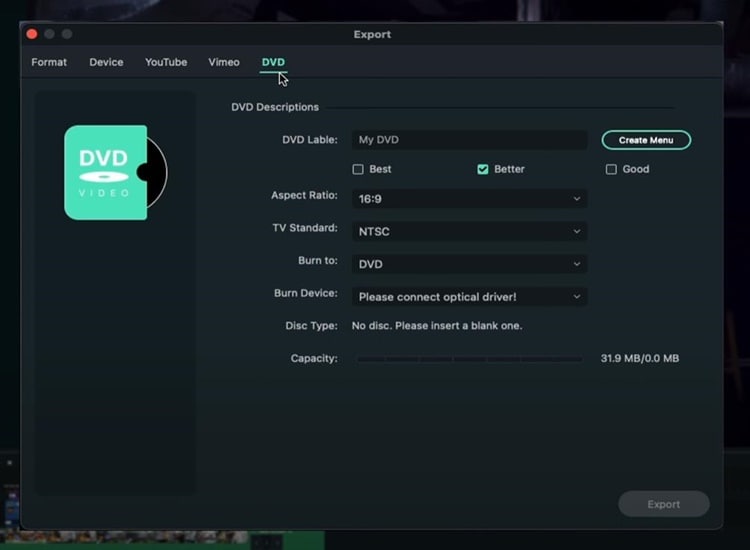
Export and Burn Video into DVD
You can also directly burn your video to a DVD. Even though video to DVD isn’t as common as it used to be, it’s still nice to be able to do it, especially if you like making DVDs.
Export Video to Other Devices
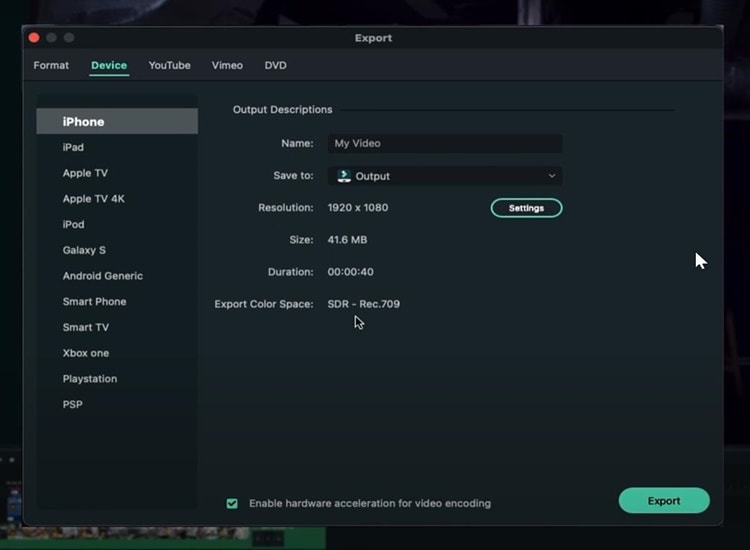
Go to the “Devices” option if you want to export your video to specific devices with everything looking good on that particular device. For instance, if you want to export your video to iPhone, you can see the size will be 41MB, and the resolution will be 1080p. All those things are going to look much better on an iPhone.
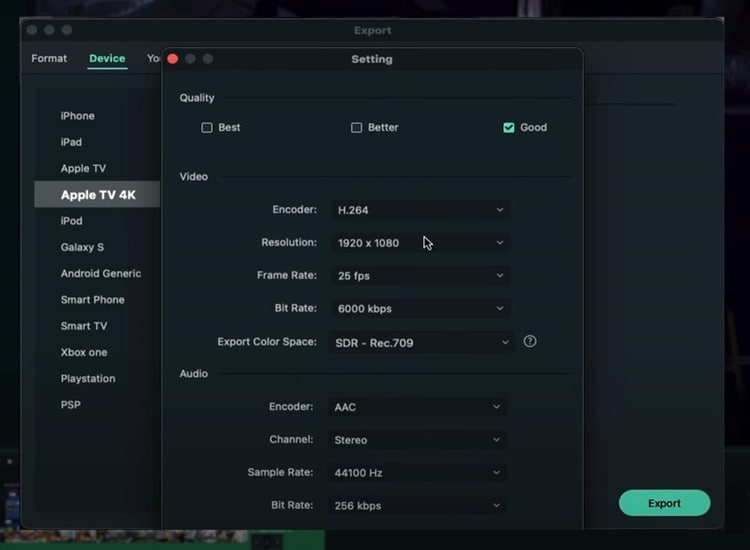
You can also adjust the quality of your video based on your needs by clicking on “Setting.”
Export Videos in High Res Quality
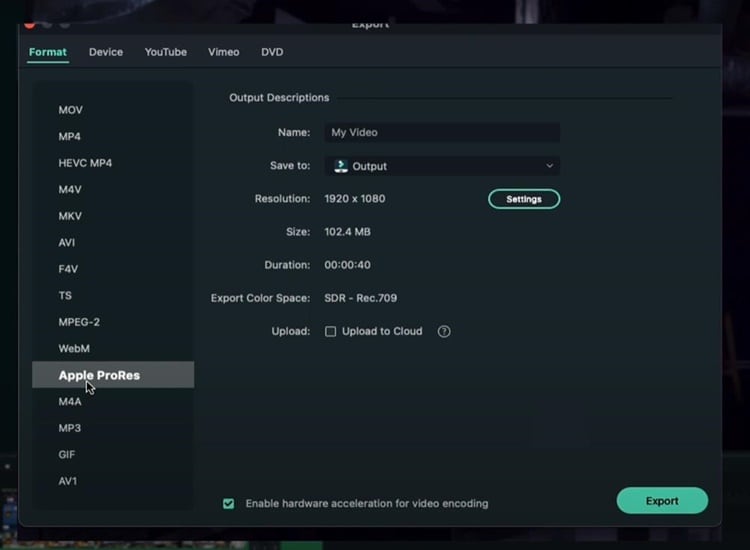
In the “Format” option you can choose the file extension, the format, or the codec. Exporting your video based on format is good if you prefer to save your video on your computer since maybe you may upload your video on YouTube, Instagram or other social media platforms.
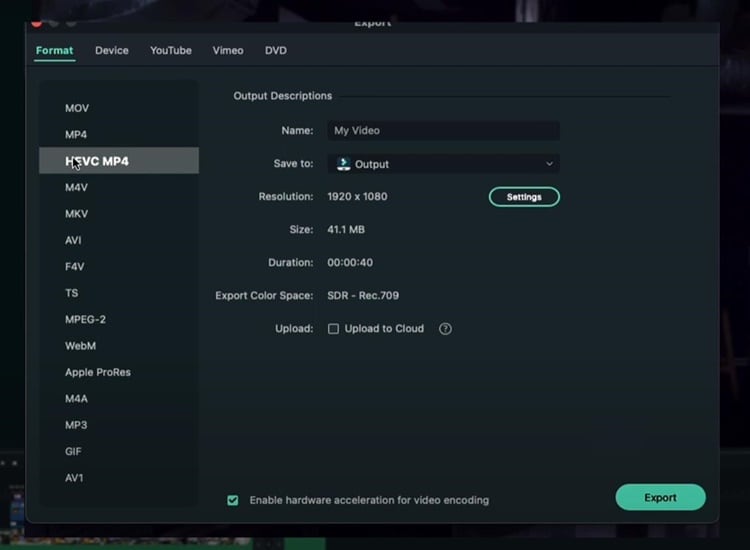
You can choose “Apple Prores” if you want the least amount of compression possible and don’t care about the file size. For example, if you want to export a video from Filmora and then import it into another video editor without losing too much quality, you should definitely choose “Apple Prores.”
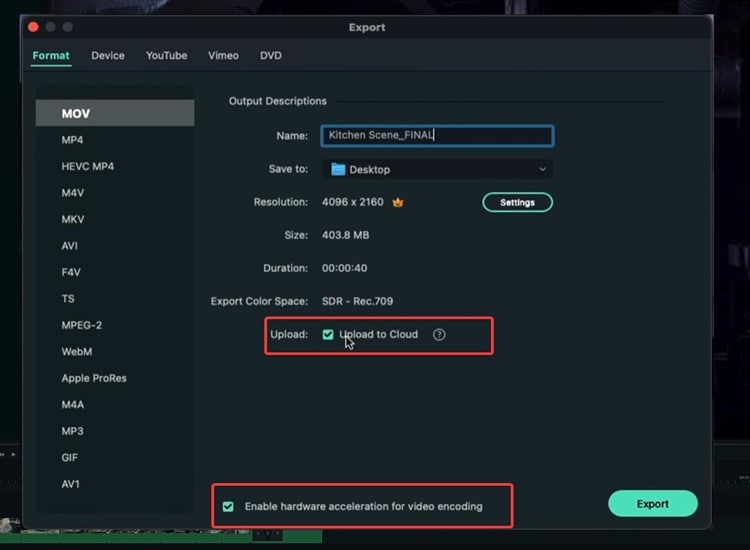
Before exporting, there is the option to upload to the cloud. If you do not know what it is, Wondershare has its own Drive, which allows you to save and remotely view your video files.
In the meantime, if you have a decent PC, you can enable “Hardware acceleration for video encoding.” This option will utilize as much computer power as you have to export the video and make the process significantly faster. Once everything is finished, click “Export.”
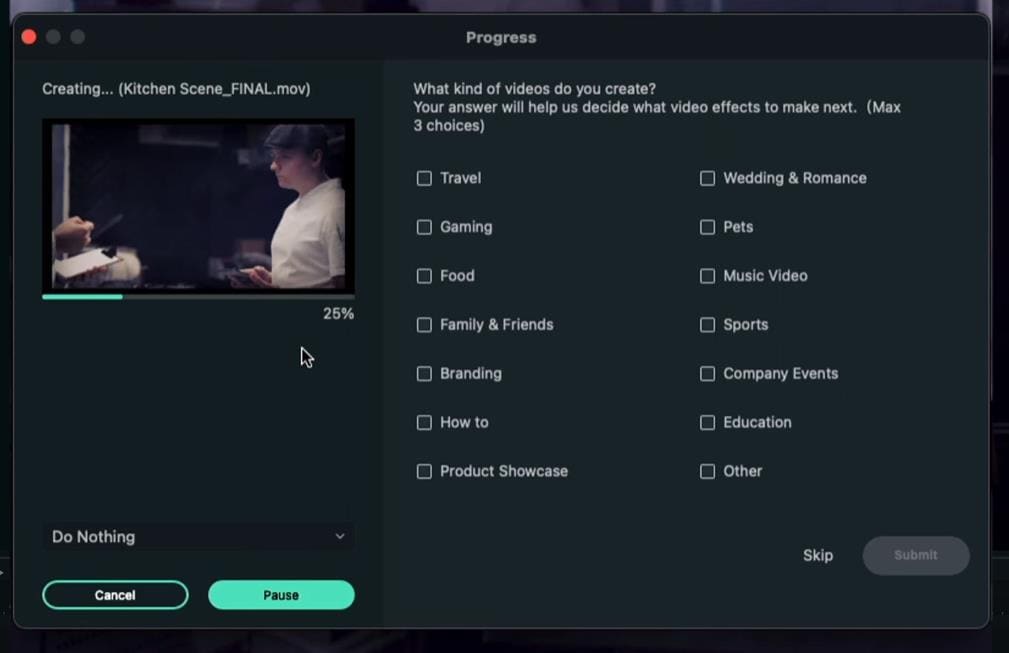
When you click Export, you can see the progress with thumbnails and everything. Lastly, your video has been exported successfully when the exporting process reaches 100%.
Summary
Indeed, there are many options to export your video using Filmora. If you wish to export your video directly to YouTube, simply select the YouTube option in the Export box. Meanwhile, if you want to export your video on your computer and upload it to various social media platforms, it’s much better to export it with a format option.
Free Download For Win 7 or later(64-bit)
Free Download For macOS 10.14 or later
Free Download For macOS 10.14 or later Free Download For macOS 10.14 or later Free Download For macOS 10.14 or later
Also read:
- [New] Steps to Clear Out Your YouTube Watch Later Collection for 2024
- [Updated] Enhancing Viewer Engagement with Smart End Screen Techniques for 2024
- [Updated] Tranquil Escapes Top 12 PC Titles
- 2024 Approved Maximizing Impact The 20 Key Principles of FB Video Marketing
- 9 Mind-Blowing Tricks to Hatch Eggs in Pokemon Go Without Walking On Vivo Y27s | Dr.fone
- Bridging the Gap: Combine iPhone's Siri with ChatGPT
- In 2024, How to Add a Spooky Shadow Effect
- In 2024, Tips to Make Cinematic Color Grading
- Monetizing Your YouTube Content Costing for 2024
- New If You Are a Free Video Editor Being a Windows User, VSDC Free Video Editor Is a Great Choice. But Is It the Best Video Editor You Should Use? Find Out From Our VSDC Free Video Editor Review
- New In 2024, How to Add Font Effect
- New Use Your Social Media App and Make Slow-Motion Videos by Reading This Guide. Besides Learning Slow-Motion Snapchat, Get Useful Apps Serving the Same Purposes
- Three Ways to Sim Unlock Google
- Updated Best Guide for Setting TikTok Countdown Timer for 2024
- Updated In 2024, How to Add Font Effects to Videos
- Updated Tips for Choosing Location & Scheduling Music Video
- YouTube's Trophy Chain for Engaged Audiences for 2024
- Title: How To Slow Down GIF Building an Understanding
- Author: Morgan
- Created at : 2024-09-28 23:03:14
- Updated at : 2024-10-05 18:09:17
- Link: https://ai-video-editing.techidaily.com/how-to-slow-down-gif-building-an-understanding/
- License: This work is licensed under CC BY-NC-SA 4.0.
