:max_bytes(150000):strip_icc():format(webp)/jens-kreuter-85328-c5ada5fb87224444a49aaa4ad1e16897.jpg)
How to Use Adjustment Layer in Final Cut Pro

How to Use Adjustment Layer in Final Cut Pro
Final Cut Pro is an advanced editing software that is available for Mac users exclusively. Using this high-end software, you can create compelling storytelling in your video clips. It offers different features through which you can effortlessly add audio and motion graphics to your videos. You can also add cinematic effects to your videos using Final Cut Pro to modify their focus points.
You can also add adjustment layers in Final Cut Pro to efficiently add the effects in video clips. By reading this article, you will learn how to add an adjustment layer in Final Cut Pro.

Part 1: What is Adjustment Layer in Final Cut Pro?
The adjustment layer in video editing can provide you with great ease as you can apply effects to multiple videos using this particular layer. Using the adjustment layer, you can apply effects and color grading to your video clips that come beneath this layer. So, apart from adding effects and executing color correction to individual clips, you can use an adjustment layer to generate quicker results.
After creating an adjustment layer in any video editor, you can easily cut and extend it like any other clip. You can also remove it anytime from your timeline with a single tap. In Final Cut Pro, you cannot insert adjustment layers in its timeline directly, like in Premiere Pro or After Effects.
To do so, you have to use third-party tools to create adjustment layers from scratch in Final Cut Pro. The process of creating an adjustment layer in Final Cut Pro is a little bit longer compared to other editors. To learn more about the adjustment layer in FCPX, continue reading this article.

Part 2: How to Add an Adjustment Layer in Final Cut Pro?
Are you eager to know how to add adjustment layers in Final Cut Pro? In this section, you can find simple instructions to generate an adjustment layer in Final Cut Pro without hassle.
Step1 First, click on this link to download the adjustment layer in your MacBook. Once done, copy your “Adjustment Layer” folder to the “User” folder. Afterward, move it to “Movies” and then “Motion Templates.” Once done, copy it to the “Titles” folder eventually.

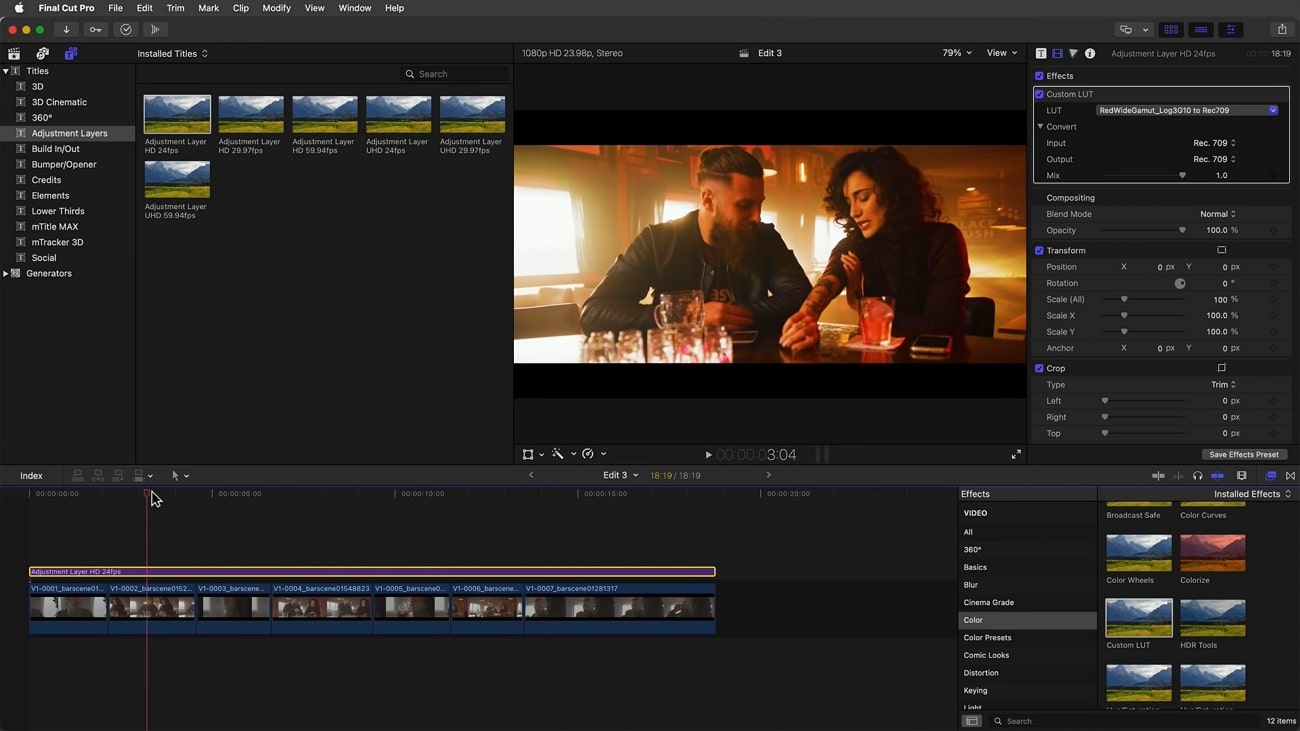
Step2 Now open Final Cut Pro and locate the “Adjustment Layer” under the “Titles” section. After locating it, drag and drop it into the timeline. This adjustment layer was created as a title layer in Apple Motion that got published in Final Cut Pro using the built-in publishing tools.

Step3 Once you have created the adjustment layer, you can apply any sort of effects to the video clips. However, you should make sure to place the adjustment layer above in the layers stack.
Bonus Tips – How to Use Adjustment Layers in the Best Alternative to FCPX?
If you want to use an alternative to Final Cut Pro for creating the adjustment layer, you can try Wondershare Filmora 12 . You can edit your videos in an advanced and secure environment using this tool. It supports all multiple platforms, such as Windows, Mac, Android, and iOS. You can do color correction in your videos to manage the saturation, brightness, contrast, exposure, and other factors in Filmora.
Free Download For Win 7 or later(64-bit)
Free Download For macOS 10.14 or later
Moreover, you can also create 3D animated titles in Filmora to give your project a unique look. It also provides a wide range of keyboard shortcut presets through which you can make your editing easier and faster. Apart from editing and modifying your videos, you can also increase their vibrancy by using Filmora effects. You can explore and select a diverse range of visual effects in Filmora to give a new dimension to your video clips.
Key Features of Filmora
- Filmora offers cloud services that allow you to collaborate with your team members effectively. On its workspace cloud platform, you can share and review the edited video clips with your team members in a comfortable environment.
- It offers a pen tool through which you can draw complex mask shapes, such as straight lines or curves around the objects.
- Using the AI Smart Cutout feature, you can use advanced technology to select people or objects in the video effectively.
- Are you annoyed by the background noises in your video clips? You can try the AI Denoise feature of Filmora that can help you to eradicate background noises from the video clips precisely.
How to Add an Adjustment Layer Using Filmora
To create and use the adjustment layer in Wondershare Filmora 12, you can proceed to the following steps:
Step1 Import the Video Clip
Launch Filmora and click on the “New Project” button. Afterward, upload the video file on the project media and then drag and drop it into the timeline.

Step2 Add the Adjustment Layer
Now head to the “Media” section on the left side, where you can find the option of the “Adjustment Layer.” Next, drag and drop the adjustment layer into the timeline. You can double-click on it to change its settings effectively.

Step3 Add Multiple Presets to Adjustment Layer
From the settings, you can change blending mode, rotation, position, and opacity easily. Moreover, you can add different presets to the adjustment layer for more modifications. You can use the color match tool to adjust the colors in your video clip. With this tool, you can also add a border across the video clips using the adjustment layer. Also, you can color code the adjustment layer to create a more attractive look in the video clip.

Conclusion
Adjustment layers can make your editing process easy and fast. If you want to pursue video editing as your profession, you should know how to use the adjustment layer in famous tools like Final Cut Pro. After reading this article, you have learned how to create an adjustment layer in Final Cut Pro without complications.
However, if you want a more compatible and easier-to-use tool to generate adjustment layers, you can try Wondershare Filmora. It’s a powerful video editor that you can use to perform professional editing using adjustment layers.
Free Download For macOS 10.14 or later
Moreover, you can also create 3D animated titles in Filmora to give your project a unique look. It also provides a wide range of keyboard shortcut presets through which you can make your editing easier and faster. Apart from editing and modifying your videos, you can also increase their vibrancy by using Filmora effects. You can explore and select a diverse range of visual effects in Filmora to give a new dimension to your video clips.
Key Features of Filmora
- Filmora offers cloud services that allow you to collaborate with your team members effectively. On its workspace cloud platform, you can share and review the edited video clips with your team members in a comfortable environment.
- It offers a pen tool through which you can draw complex mask shapes, such as straight lines or curves around the objects.
- Using the AI Smart Cutout feature, you can use advanced technology to select people or objects in the video effectively.
- Are you annoyed by the background noises in your video clips? You can try the AI Denoise feature of Filmora that can help you to eradicate background noises from the video clips precisely.
How to Add an Adjustment Layer Using Filmora
To create and use the adjustment layer in Wondershare Filmora 12, you can proceed to the following steps:
Step1 Import the Video Clip
Launch Filmora and click on the “New Project” button. Afterward, upload the video file on the project media and then drag and drop it into the timeline.

Step2 Add the Adjustment Layer
Now head to the “Media” section on the left side, where you can find the option of the “Adjustment Layer.” Next, drag and drop the adjustment layer into the timeline. You can double-click on it to change its settings effectively.

Step3 Add Multiple Presets to Adjustment Layer
From the settings, you can change blending mode, rotation, position, and opacity easily. Moreover, you can add different presets to the adjustment layer for more modifications. You can use the color match tool to adjust the colors in your video clip. With this tool, you can also add a border across the video clips using the adjustment layer. Also, you can color code the adjustment layer to create a more attractive look in the video clip.

Conclusion
Adjustment layers can make your editing process easy and fast. If you want to pursue video editing as your profession, you should know how to use the adjustment layer in famous tools like Final Cut Pro. After reading this article, you have learned how to create an adjustment layer in Final Cut Pro without complications.
However, if you want a more compatible and easier-to-use tool to generate adjustment layers, you can try Wondershare Filmora. It’s a powerful video editor that you can use to perform professional editing using adjustment layers.
Figuring Out Proper Ways to Play a Video in Slow Motion on iPhone
Before we dive into how to play a video in slow motion on iPhone, let’s see what they are. In slow motion, the video frame rate is usually manipulated. In manual or automated editing, frame rates increase to add extra seconds to the video. For instance, in normal videos, playback speed is 24, 30, or 60 fps. However, this frame rate can be increased up to 124 or 240 fps in slow motions.
These are the standard values and help achieve accurate and precise slow-motion effects. In this article, the discussion leans toward the making and playing slow-mo. Users will learn how to play videos in slow motion on iPhone. It will introduce tools to create a slow-mo effect and a guide to achieve it.
Part 1:Adding Slow Motion to Video on iPhone (Before & After)
Now that you have an insight into the significance of slow-motion videos, let’s move forward. This section involves a guide on how to play a video in slow motion on iPhone. Here is a guide to adding slow motion in your video before and after recording:
1. Making a Slow Motion Before Recording
This method involves recording a video in slow-motion mode from the start. Apple has already launched this feature in its iPhones and iPads. Here is a step-by-step guide to creating such videos:
Step 1
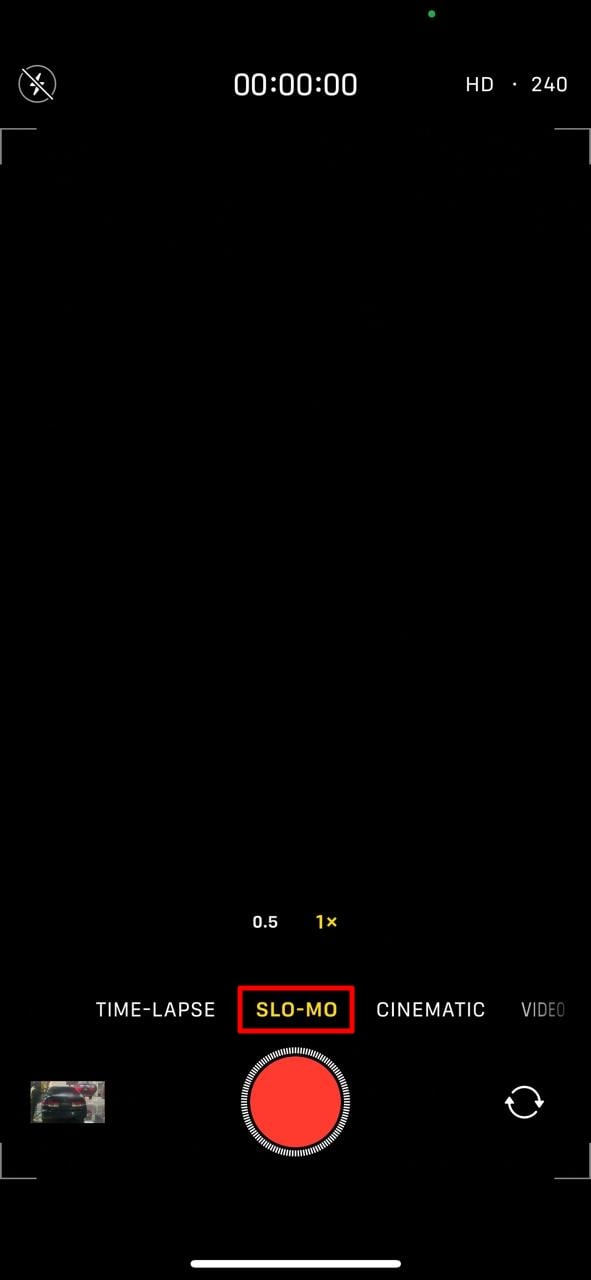
Open your iPhone and click on the “Camera” application. Once you access it, select “SLO-MO” mode from the bottom.
Step 2
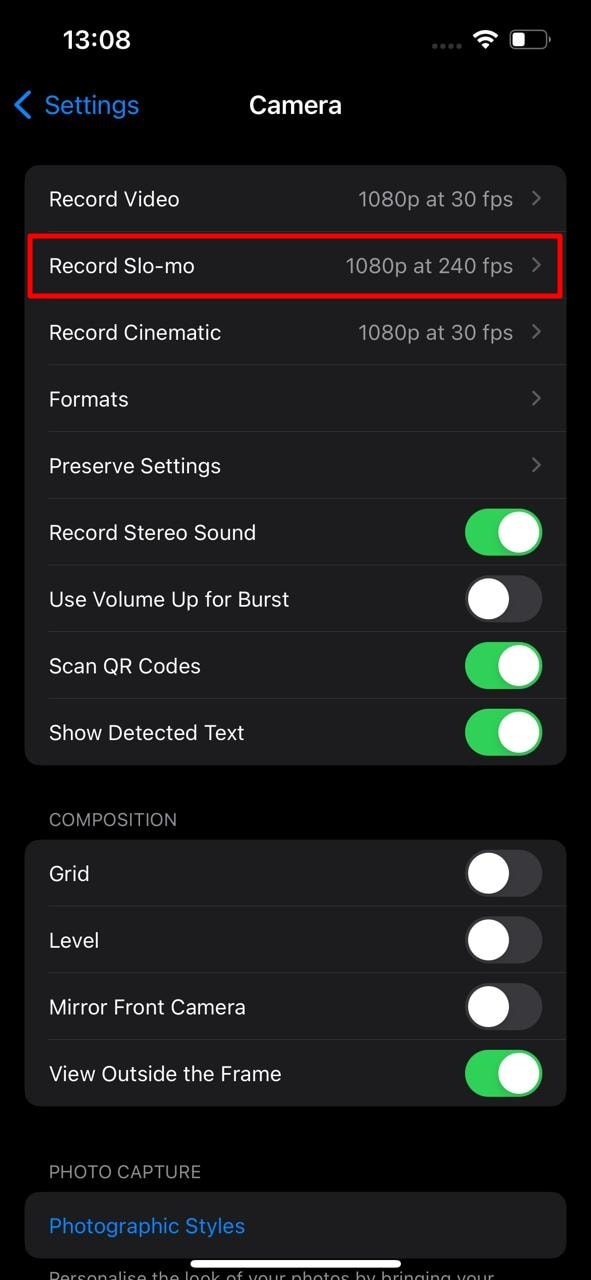
Go back and open the “Settings” and select the “Camera” section. In camera settings, select the “Record Slo-mo 1080p at 240 fps.”
2. Making a Slow Motion After Recording
The first method will record your overall video in slow motion. However, you can use the other method to add a slow-mo effect to a specific part. Follow the given instructions to learn how to operate it:
Step 1
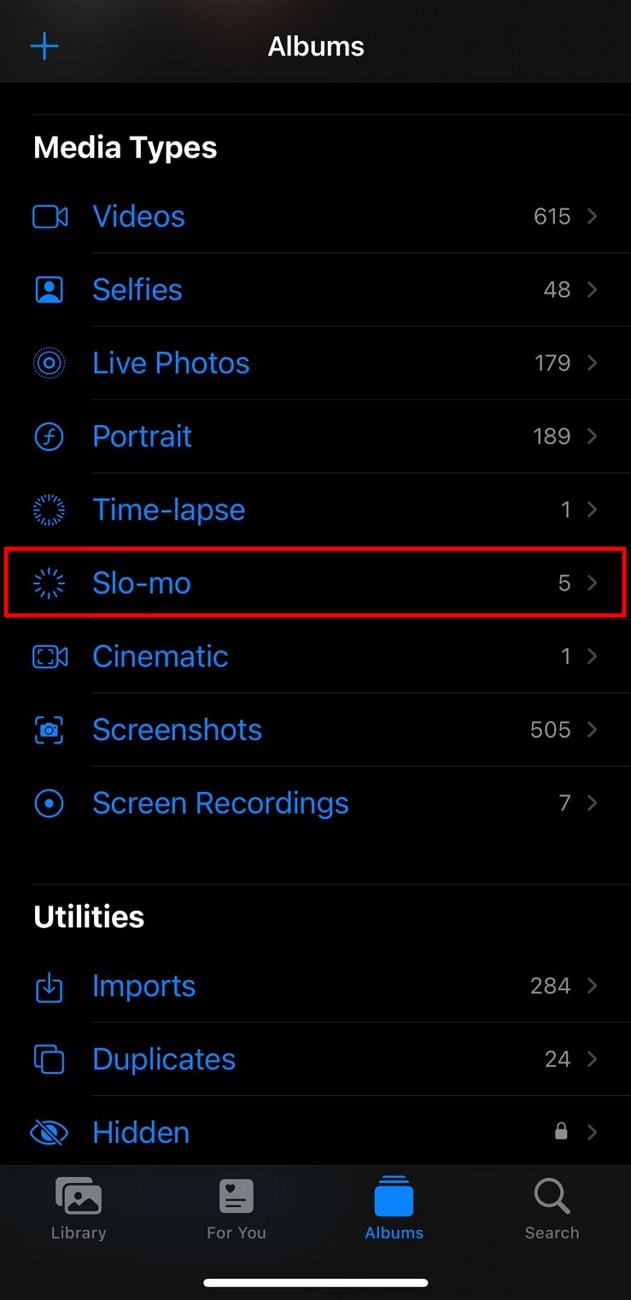
Open the “Photos” application from your home screen and click “Albums.” From the featured slider, select the “Slow-mo” option.
Step 2
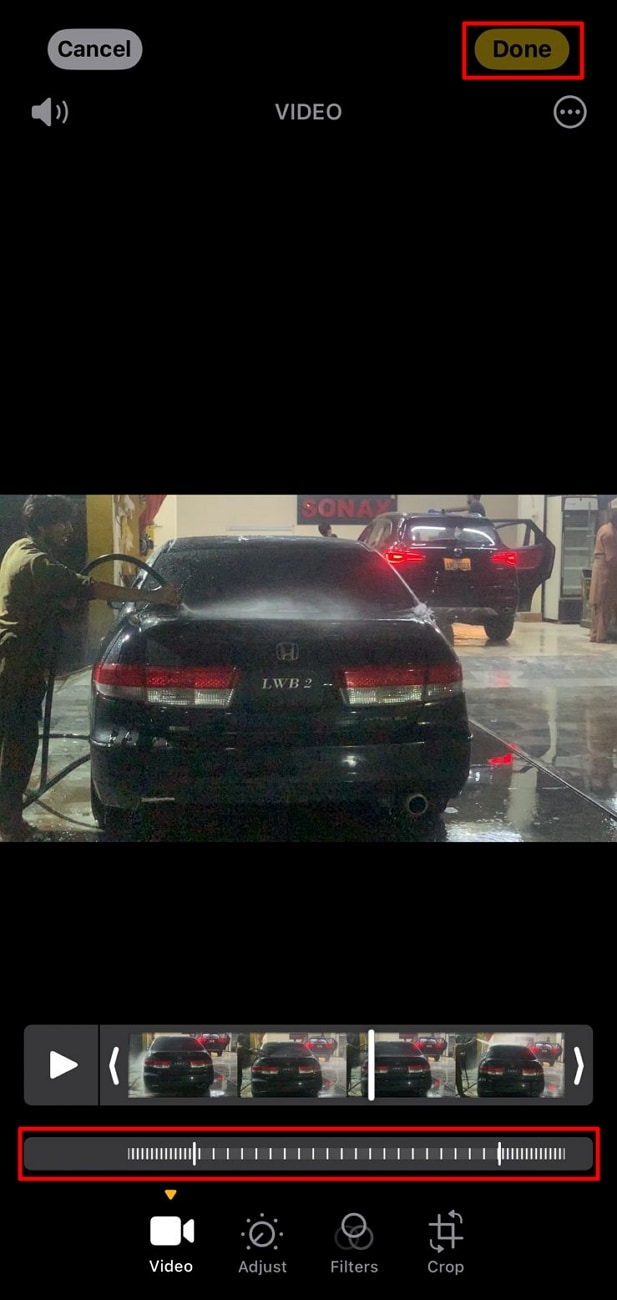
Choose a video from this album and go to the “Edit” option at the top right corner.

Step 3
Navigate towards the bottom and access the timeline. Choose the specific area for adding the effect and drag the sliders on the vertical lines below. Once satisfied with the slow-motion effect, click the “Done” button.
Part 2: Some Prominent Third-party Apps Available to Play Video in Slow-Motion
Slow-mo effects enhance the creativity of your videos and let the audience experience new things. Do you still want to learn how to play a video in slow motion on iPhone? Here is a comprehensive guide to creating slow motions:
- Video Speed: Fast, Slow Motion
- Slo Mo – Speed Up Video Editor
- Slow Mo and Fast Motion
- Video Speed Changer – Editor
1. Video Speed: Fast, Slow Motion
This is it if you are looking for an application with advanced features and manual editing. The application offers many video playback options for a suitable slow motion. You can add slow motion to a whole video or a part through timeline editing. The application offers multiple subscriptions with a trial period before use.

Key Features
- After editing a video in this application, you can integrate music and text.
- The speed manipulation doesn’t result in slow-mo but also offers fast speed options.
- It has an insightful and easy user interface; you can apply color filters after editing.
2. Slo Mo – Speed Up Video Editor
Finding answers about how to play videos in slow motion on iPhone? This is an intuitive application to create slow-mo with a high processing rate. To slow down a video using this application, you can manipulate the video frame to 240 fps. The speed modification is available to apply on specific video parts.

Key Features
- Direct video share options to Instagram, YouTube, Twitter, and Facebook.
- The premium version has 170+ music tracks to insert in your edited video.
- Users can record a live video using this application and apply speed options.
3. Slow Mo & Fast Motion
This video editor is specifically designed for those looking to modify video speed. It enables you to change the whole video speed or the marked area. Whether you want to slow an existing video or record a new one through it, the choice is yours. The video control options are not technical, and anyone can understand them.

Key Features
- The tool offers cutting options, and the timeline editing makes it more precise.
- You can use this application’s built-in features to enhance the visual outlook of video.
- The application shows support for multiple languages, including Spanish, French, and more.
4. Video Speed Changer – Editor
Whether it’s about changing speed or doing other types of speed edits, this app fits the best. It resolves your how to play videos in slow motion on iPhone problems. It allows you to change the video playback speed via a simple process. Just upload your video and drag the speed slider backward to create a slow-mo.

Key Features
- The tool offers to import or record media through its built-in recorder option.
- You can also add fast-motion elements like time-lapse, time warp, or hyper-lapse.
- The user interface is straightforward and leaves no room for confusion.
Bonus Part: Make and Play Your Video in Slow Motion: Use Wondershare Filmora
You might wonder if something is missing if you see a slow-motion video using these applications. This is where you need a professional editor for a smooth slow-mo. Wondershare Filmora is one of the editors that offers frame interpolation. With its optical flow option and high-resolution export settings, you can rely on it.
This AI video editor has two methods of creating a low-motion effect. One method involves uniform speed, and the other is speed ramping. The uniform speed option allows you to manipulate video playback speed using a slider. Meanwhile, speed ramping is a more precise method of modifying video parts.
Free Download For Win 7 or later(64-bit)
Free Download For macOS 10.14 or later
Playing and Adding Slow Motion Effect to Video Using Filmora
After hearing about this amazing software, you might want to create a slow-mo. You might wonder how to play videos in slow motion on iPhone using Filmora. Read the step-by-step guide to find your answer:
Step 1Create a New Project and Access Speed Options
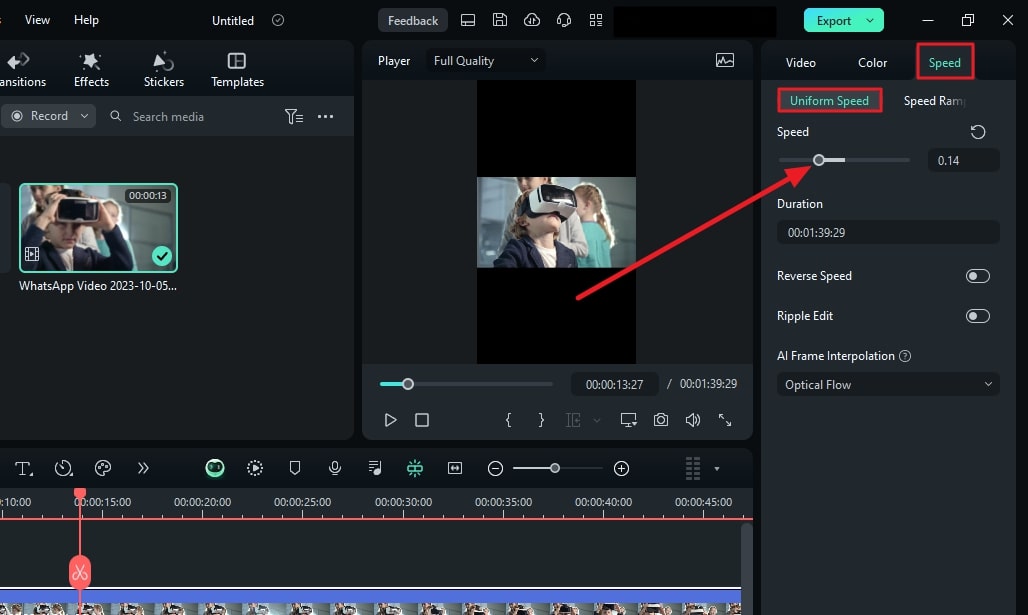
Once you have downloaded this software, access the “New Project” button. Then, use the “Command + I” keys to import media and bring it to the timeline. Select the media clip in the timeline and go to the settings panel. Under the “Speed” tab, choose “Uniform Speed” and drag the slider for speed change.
Step 2Activate AI Frame Interpolation Option
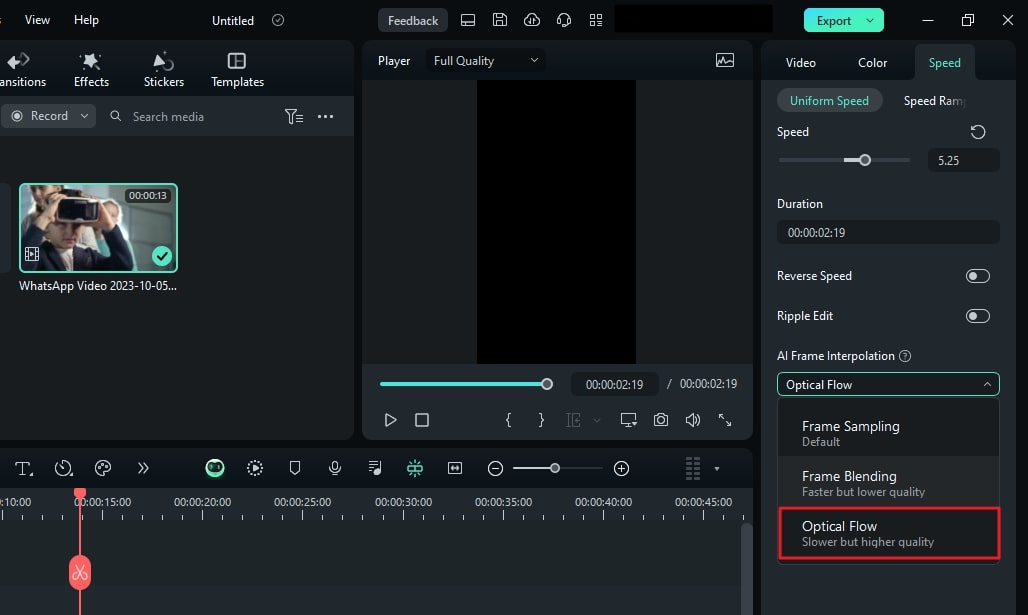
Once you finish the speed settings, there is a tip to enhance the slow-mo effect. Find the “AI Frame Interpolation” option in the same section and expand it. Select the “Optical Flow” option at the third to smoothen the video.
Step 3Rendering and Exporting
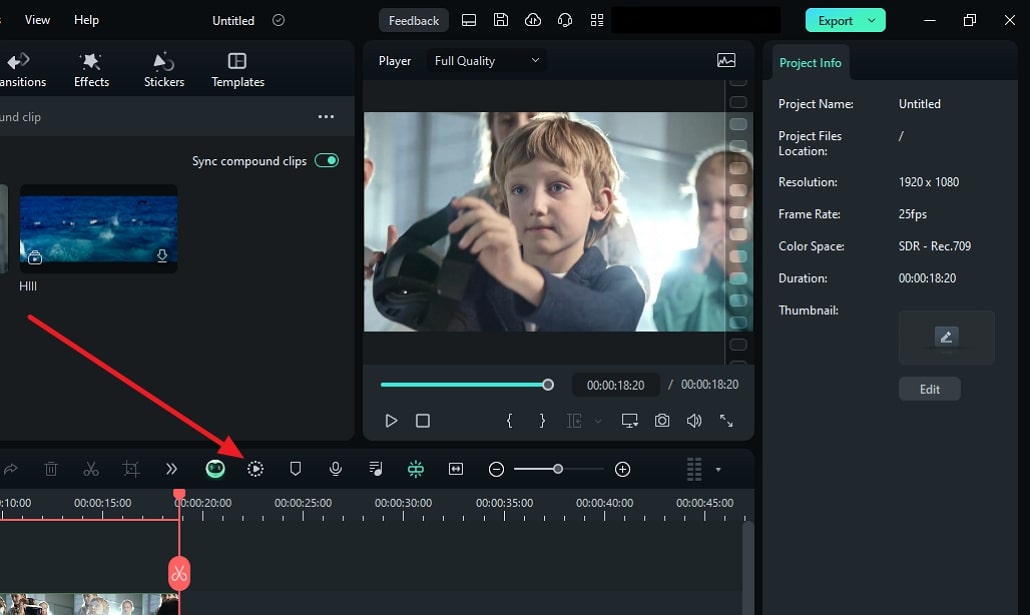
Once you have activated the optical flow, render it to see the results. For this, navigate towards the timeline toolbar and select the “Render Preview” option. It looks like a player with a doted circle around it. Preview the results, readjust if needed, and select the “Export” option to save the video.
Key Features of Wondershare Filmora
Along with speed modification, Filmora features unlimited features in its interface. The methods of accessing them are easy as accessibility is the concept it was built on. Here are some of the game-changing features for amateurs and professionals:
1. Compound Clip
We need to add a similar effect or filter to all videos in multiple situations. Instead of applying effects one by one, you can do it at once. This feature merges all videos into one and speeds up the workflow. It simplifies the complex sequences between clips and gives smooth results.
2. Green Screen
Running low on a budget for a film but want to shoot at beautiful locations. Use Filmora’s green screen or Chroma Key feature to replace backgrounds in an accurate manner. You can do this by shooting before a green screen and applying the chroma key later. Afterward, import the clip or picture you want in the background to add.
3. Motion Tracking
Do you want to blur out a whole person or apply an effect throughout the video? With Filmora’s motion tracking option, you can do these types of edits. You can insert motion graphics, animations, filters, and effects via it. Just select the object or person you want to track and activate the motion track.
4. Screen Recorder
Screen recording is important to content creation, especially in tutorial channels. In addition, the reaction or roasting channels and their owners also use this. Filmora offers an extensive screen recording option, including microphone and camera recording. You can manipulate the screen resolution, system settings, and more.
Conclusion
This article aimed to increase readers’ knowledge to effectively add slow-mo effect. Not only did we answer how to play videos in slow motion on iPhone, but we also guided to it. The article discussed some of the leading applications for slowing down video on iPhone. For precise and flawless slow-mo creation, we recommended Wondershare Filmora.
Step 2
Go back and open the “Settings” and select the “Camera” section. In camera settings, select the “Record Slo-mo 1080p at 240 fps.”

2. Making a Slow Motion After Recording
The first method will record your overall video in slow motion. However, you can use the other method to add a slow-mo effect to a specific part. Follow the given instructions to learn how to operate it:
Step 1
Open the “Photos” application from your home screen and click “Albums.” From the featured slider, select the “Slow-mo” option.

Step 2
Choose a video from this album and go to the “Edit” option at the top right corner.

Step 3
Navigate towards the bottom and access the timeline. Choose the specific area for adding the effect and drag the sliders on the vertical lines below. Once satisfied with the slow-motion effect, click the “Done” button.

Part 2: Some Prominent Third-party Apps Available to Play Video in Slow-Motion
Slow-mo effects enhance the creativity of your videos and let the audience experience new things. Do you still want to learn how to play a video in slow motion on iPhone? Here is a comprehensive guide to creating slow motions:
- Video Speed: Fast, Slow Motion
- Slo Mo – Speed Up Video Editor
- Slow Mo and Fast Motion
- Video Speed Changer – Editor
1. Video Speed: Fast, Slow Motion
This is it if you are looking for an application with advanced features and manual editing. The application offers many video playback options for a suitable slow motion. You can add slow motion to a whole video or a part through timeline editing. The application offers multiple subscriptions with a trial period before use.

Key Features
- After editing a video in this application, you can integrate music and text.
- The speed manipulation doesn’t result in slow-mo but also offers fast speed options.
- It has an insightful and easy user interface; you can apply color filters after editing.
2. Slo Mo – Speed Up Video Editor
Finding answers about how to play videos in slow motion on iPhone? This is an intuitive application to create slow-mo with a high processing rate. To slow down a video using this application, you can manipulate the video frame to 240 fps. The speed modification is available to apply on specific video parts.

Key Features
- Direct video share options to Instagram, YouTube, Twitter, and Facebook.
- The premium version has 170+ music tracks to insert in your edited video.
- Users can record a live video using this application and apply speed options.
3. Slow Mo & Fast Motion
This video editor is specifically designed for those looking to modify video speed. It enables you to change the whole video speed or the marked area. Whether you want to slow an existing video or record a new one through it, the choice is yours. The video control options are not technical, and anyone can understand them.

Key Features
- The tool offers cutting options, and the timeline editing makes it more precise.
- You can use this application’s built-in features to enhance the visual outlook of video.
- The application shows support for multiple languages, including Spanish, French, and more.
4. Video Speed Changer – Editor
Whether it’s about changing speed or doing other types of speed edits, this app fits the best. It resolves your how to play videos in slow motion on iPhone problems. It allows you to change the video playback speed via a simple process. Just upload your video and drag the speed slider backward to create a slow-mo.

Key Features
- The tool offers to import or record media through its built-in recorder option.
- You can also add fast-motion elements like time-lapse, time warp, or hyper-lapse.
- The user interface is straightforward and leaves no room for confusion.
Bonus Part: Make and Play Your Video in Slow Motion: Use Wondershare Filmora
You might wonder if something is missing if you see a slow-motion video using these applications. This is where you need a professional editor for a smooth slow-mo. Wondershare Filmora is one of the editors that offers frame interpolation. With its optical flow option and high-resolution export settings, you can rely on it.
This AI video editor has two methods of creating a low-motion effect. One method involves uniform speed, and the other is speed ramping. The uniform speed option allows you to manipulate video playback speed using a slider. Meanwhile, speed ramping is a more precise method of modifying video parts.
Free Download For Win 7 or later(64-bit)
Free Download For macOS 10.14 or later
Playing and Adding Slow Motion Effect to Video Using Filmora
After hearing about this amazing software, you might want to create a slow-mo. You might wonder how to play videos in slow motion on iPhone using Filmora. Read the step-by-step guide to find your answer:
Step 1Create a New Project and Access Speed Options
Once you have downloaded this software, access the “New Project” button. Then, use the “Command + I” keys to import media and bring it to the timeline. Select the media clip in the timeline and go to the settings panel. Under the “Speed” tab, choose “Uniform Speed” and drag the slider for speed change.

Step 2Activate AI Frame Interpolation Option
Once you finish the speed settings, there is a tip to enhance the slow-mo effect. Find the “AI Frame Interpolation” option in the same section and expand it. Select the “Optical Flow” option at the third to smoothen the video.

Step 3Rendering and Exporting
Once you have activated the optical flow, render it to see the results. For this, navigate towards the timeline toolbar and select the “Render Preview” option. It looks like a player with a doted circle around it. Preview the results, readjust if needed, and select the “Export” option to save the video.

Key Features of Wondershare Filmora
Along with speed modification, Filmora features unlimited features in its interface. The methods of accessing them are easy as accessibility is the concept it was built on. Here are some of the game-changing features for amateurs and professionals:
1. Compound Clip
We need to add a similar effect or filter to all videos in multiple situations. Instead of applying effects one by one, you can do it at once. This feature merges all videos into one and speeds up the workflow. It simplifies the complex sequences between clips and gives smooth results.
2. Green Screen
Running low on a budget for a film but want to shoot at beautiful locations. Use Filmora’s green screen or Chroma Key feature to replace backgrounds in an accurate manner. You can do this by shooting before a green screen and applying the chroma key later. Afterward, import the clip or picture you want in the background to add.
3. Motion Tracking
Do you want to blur out a whole person or apply an effect throughout the video? With Filmora’s motion tracking option, you can do these types of edits. You can insert motion graphics, animations, filters, and effects via it. Just select the object or person you want to track and activate the motion track.
4. Screen Recorder
Screen recording is important to content creation, especially in tutorial channels. In addition, the reaction or roasting channels and their owners also use this. Filmora offers an extensive screen recording option, including microphone and camera recording. You can manipulate the screen resolution, system settings, and more.
Conclusion
This article aimed to increase readers’ knowledge to effectively add slow-mo effect. Not only did we answer how to play videos in slow motion on iPhone, but we also guided to it. The article discussed some of the leading applications for slowing down video on iPhone. For precise and flawless slow-mo creation, we recommended Wondershare Filmora.
How to Create Glowing Edge Effect in TikTok Dancing Video
Preparation
What you need to prepare:
- A computer (Windows or macOS)
- Your video materials.
- Filmora video editor
Step 1
Download Filmora and run the program. Once it starts, click on “New Project”.
Step 2
Go to My Media and Import any video you want to add a glowing edge effect to. Then, drag the video to Track 1 on the Timeline.

Step 3
Copy the Clip from Track 1 and paste it on Track 2.
Step 4
Go to the Effects tab and apply the “Pixelated Edges” effect to the clip on Track 1. Then, hide Track 2 by clicking the “eye” button.

Step 5
Double-click on the Clip in Track 1. Go to Video → Effects. Here, change the color to anything you want. This will determine what color your glowing edge effect will be. When you’re done choosing a color, click OK.

Step 6
Next, Unhide the Track 2. Double-click on the clip in Track 2 and go to Video → Basic. Scroll down and change the Blending Mode to “Difference”. Click OK and Export the clip at a higher rate. Click on the blue Export button at the top center.

Step 7
Delete the clip on Track 1. Then, move the clip from Track 2 to Track 1. Now, Import the clip that you just Exported and drag it to Track 2.

Step 8
Go to Effects and find the Blur effect. Drag the Blur effect to the clip on Track 2.

Step 9
Double-click on the clip in Track 2. Go to Video → Effects. Change the Zoom Rate to 1. Click OK. Now, find the Glow effect in the Effects tab and apply it two times to the clip on Track 2. Copy the Track 2 clip and paste it on Track 3.
Step 10
Search for the Wash effect in the Effects tab and apply it twice to the Track 2 clip again. Just drag it two times on top of the clip.
Step 11
Double-click on the clip in Track 2 and change its Blending Mode to “Screen”. Do the same thing for the clip in Track 3.
Step 12
You’re done. The glow effect will now be applied to your video. You have successfully created a glowing edge effect in any dancing video you want. Congratulations!

Summary
What you’ve learned:
- How to add a glowing edge effect on any video you want
- How to add other effects to clips in Filmora
- Edit the settings and features of these effects and make them more unique
What you need to prepare:
- A computer (Windows or macOS)
- Your video materials.
- Filmora video editor
Step 1
Download Filmora and run the program. Once it starts, click on “New Project”.
Step 2
Go to My Media and Import any video you want to add a glowing edge effect to. Then, drag the video to Track 1 on the Timeline.

Step 3
Copy the Clip from Track 1 and paste it on Track 2.
Step 4
Go to the Effects tab and apply the “Pixelated Edges” effect to the clip on Track 1. Then, hide Track 2 by clicking the “eye” button.

Step 5
Double-click on the Clip in Track 1. Go to Video → Effects. Here, change the color to anything you want. This will determine what color your glowing edge effect will be. When you’re done choosing a color, click OK.

Step 6
Next, Unhide the Track 2. Double-click on the clip in Track 2 and go to Video → Basic. Scroll down and change the Blending Mode to “Difference”. Click OK and Export the clip at a higher rate. Click on the blue Export button at the top center.

Step 7
Delete the clip on Track 1. Then, move the clip from Track 2 to Track 1. Now, Import the clip that you just Exported and drag it to Track 2.

Step 8
Go to Effects and find the Blur effect. Drag the Blur effect to the clip on Track 2.

Step 9
Double-click on the clip in Track 2. Go to Video → Effects. Change the Zoom Rate to 1. Click OK. Now, find the Glow effect in the Effects tab and apply it two times to the clip on Track 2. Copy the Track 2 clip and paste it on Track 3.
Step 10
Search for the Wash effect in the Effects tab and apply it twice to the Track 2 clip again. Just drag it two times on top of the clip.
Step 11
Double-click on the clip in Track 2 and change its Blending Mode to “Screen”. Do the same thing for the clip in Track 3.
Step 12
You’re done. The glow effect will now be applied to your video. You have successfully created a glowing edge effect in any dancing video you want. Congratulations!

Summary
What you’ve learned:
- How to add a glowing edge effect on any video you want
- How to add other effects to clips in Filmora
- Edit the settings and features of these effects and make them more unique
What you need to prepare:
- A computer (Windows or macOS)
- Your video materials.
- Filmora video editor
Step 1
Download Filmora and run the program. Once it starts, click on “New Project”.
Step 2
Go to My Media and Import any video you want to add a glowing edge effect to. Then, drag the video to Track 1 on the Timeline.

Step 3
Copy the Clip from Track 1 and paste it on Track 2.
Step 4
Go to the Effects tab and apply the “Pixelated Edges” effect to the clip on Track 1. Then, hide Track 2 by clicking the “eye” button.

Step 5
Double-click on the Clip in Track 1. Go to Video → Effects. Here, change the color to anything you want. This will determine what color your glowing edge effect will be. When you’re done choosing a color, click OK.

Step 6
Next, Unhide the Track 2. Double-click on the clip in Track 2 and go to Video → Basic. Scroll down and change the Blending Mode to “Difference”. Click OK and Export the clip at a higher rate. Click on the blue Export button at the top center.

Step 7
Delete the clip on Track 1. Then, move the clip from Track 2 to Track 1. Now, Import the clip that you just Exported and drag it to Track 2.

Step 8
Go to Effects and find the Blur effect. Drag the Blur effect to the clip on Track 2.

Step 9
Double-click on the clip in Track 2. Go to Video → Effects. Change the Zoom Rate to 1. Click OK. Now, find the Glow effect in the Effects tab and apply it two times to the clip on Track 2. Copy the Track 2 clip and paste it on Track 3.
Step 10
Search for the Wash effect in the Effects tab and apply it twice to the Track 2 clip again. Just drag it two times on top of the clip.
Step 11
Double-click on the clip in Track 2 and change its Blending Mode to “Screen”. Do the same thing for the clip in Track 3.
Step 12
You’re done. The glow effect will now be applied to your video. You have successfully created a glowing edge effect in any dancing video you want. Congratulations!

Summary
What you’ve learned:
- How to add a glowing edge effect on any video you want
- How to add other effects to clips in Filmora
- Edit the settings and features of these effects and make them more unique
What you need to prepare:
- A computer (Windows or macOS)
- Your video materials.
- Filmora video editor
Step 1
Download Filmora and run the program. Once it starts, click on “New Project”.
Step 2
Go to My Media and Import any video you want to add a glowing edge effect to. Then, drag the video to Track 1 on the Timeline.

Step 3
Copy the Clip from Track 1 and paste it on Track 2.
Step 4
Go to the Effects tab and apply the “Pixelated Edges” effect to the clip on Track 1. Then, hide Track 2 by clicking the “eye” button.

Step 5
Double-click on the Clip in Track 1. Go to Video → Effects. Here, change the color to anything you want. This will determine what color your glowing edge effect will be. When you’re done choosing a color, click OK.

Step 6
Next, Unhide the Track 2. Double-click on the clip in Track 2 and go to Video → Basic. Scroll down and change the Blending Mode to “Difference”. Click OK and Export the clip at a higher rate. Click on the blue Export button at the top center.

Step 7
Delete the clip on Track 1. Then, move the clip from Track 2 to Track 1. Now, Import the clip that you just Exported and drag it to Track 2.

Step 8
Go to Effects and find the Blur effect. Drag the Blur effect to the clip on Track 2.

Step 9
Double-click on the clip in Track 2. Go to Video → Effects. Change the Zoom Rate to 1. Click OK. Now, find the Glow effect in the Effects tab and apply it two times to the clip on Track 2. Copy the Track 2 clip and paste it on Track 3.
Step 10
Search for the Wash effect in the Effects tab and apply it twice to the Track 2 clip again. Just drag it two times on top of the clip.
Step 11
Double-click on the clip in Track 2 and change its Blending Mode to “Screen”. Do the same thing for the clip in Track 3.
Step 12
You’re done. The glow effect will now be applied to your video. You have successfully created a glowing edge effect in any dancing video you want. Congratulations!

Summary
What you’ve learned:
- How to add a glowing edge effect on any video you want
- How to add other effects to clips in Filmora
- Edit the settings and features of these effects and make them more unique
How to Add Effects in Premiere Pro
In order to provide video editors a simple method to combine unprocessed material into a finished product, Adobe Premiere Pro was created. Add effects in premiere pro shines at this job if you’re trying to take the raw video of a video that was taken and remove all of the less fascinating bits while retaining all of the better pieces. You may utilize how to add video effects in premiere pro by importing your material into the application, adding it all to a sequence, and then starting to rearrange the individual clips and add effects.
In Adobe Premiere Pro, you can significantly speed up the editing process, including a large number of common effects that can be applied to your video and configurable parameters that can change the clip size, opacity, rotation, and position. Knowing how to add after effects to premiere pro can be learned with the upcoming steps as it also offers a variety of editing tools that lets you clip, split a structured sequence of tracks and is designed for playback. Additionally, Premiere Pro templates may be used to jumpstart your procedure.
Part 1. Types of Video Effects on Adobe Premiere Pro
A video editing program called Adobe Premiere Pro can be used to create everything from TV programs and movies to advertisements and family videos. These effects include Transitions, VFX, Audio, Videos as well as Advanced level effects like Green Screen. In addition, to know how to add shake effect in premiere pro, we’ve explained in the upcoming steps.
For editors who don’t want to utilize the other motion graphic packages, Premiere provides a ton of built-in effects. Here are a few effects that you may not be aware are available to you. Any filmmaker or content producer must understand how to apply effects since they are necessary for a top-notch video. We’ve compiled easy steps on applying effects in Premiere Pro to be of assistance.
Part 2. How to Add Effects in Premier Pro
Add Transition Effects
There are several transition effects in Adobe Premiere Pro, and there are countless ways to customize them to fit your film. It is quite easy to locate transitions and add them. The Effects panel, which is accessible from the very top options bar, contains all the transition options. A panel will show up on the right when you choose this. To include a transition, adhere to these procedures.
- Navigate to the Video Transitions area of the Effects panel.
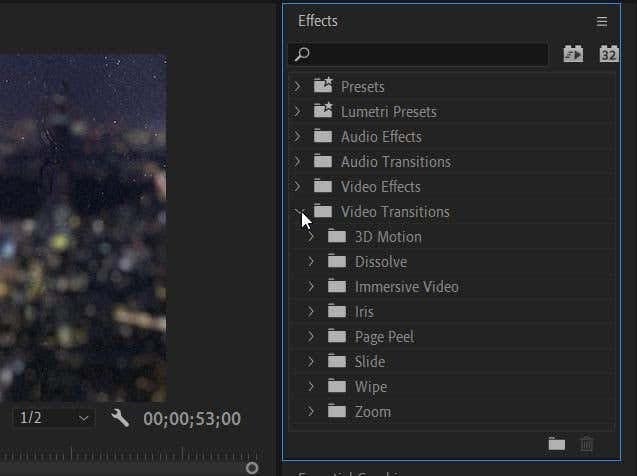
- Select the desired transition type from any of the available ones When you wish to employ a transition, press and hold it before dragging it to the start or finish of the clip. Alternately, insert it in between two clips to serve as a transition between the start and finish of each.
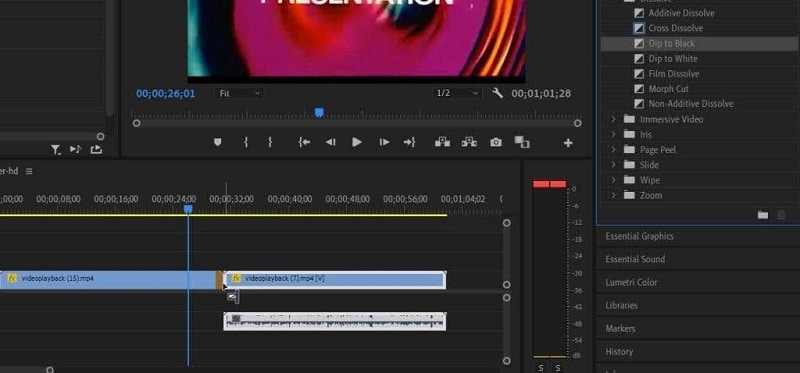
- In Premiere, there are several possible transitions, and some can be more suitable for your project than others.
Add Visual Effects
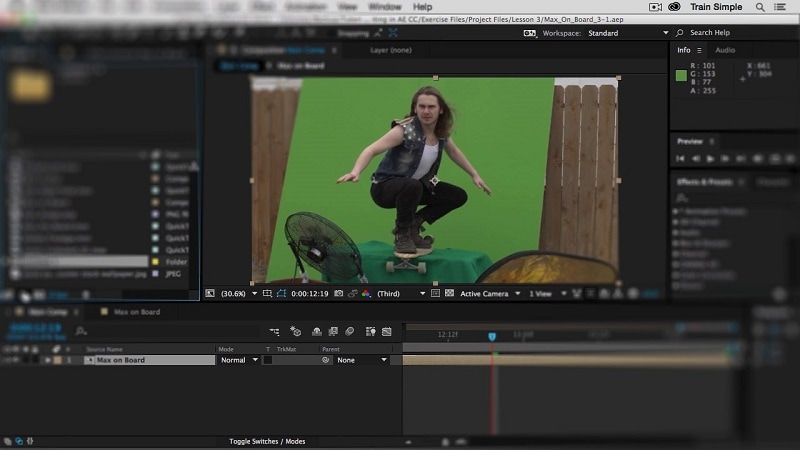
The Essential Graphics panel was added by Adobe to Premiere Pro. Users now have a much different workflow than they had with the few prior title panels. Now that everything is in one panel, you can easily create, animate, and use VFX. Some of the VFX shots were just building miniature towns and adding pieces, while others involved the standard green screen removal and backdrop replacement.
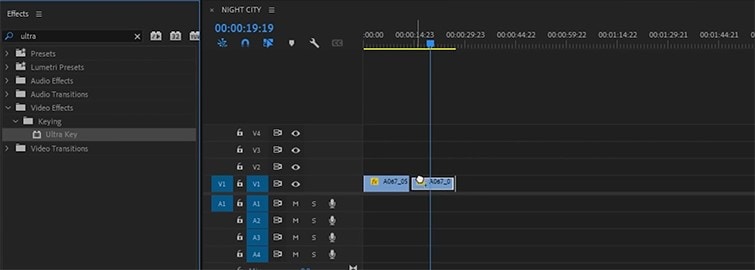
- Simply importing and uploading your video and audio files into Premiere Pro is the first step. The procedure of clicking through is fairly simple. Choose “New Project.” Press the Media Browser panel button and find the Ultra Key tool by opening the Effects panel.
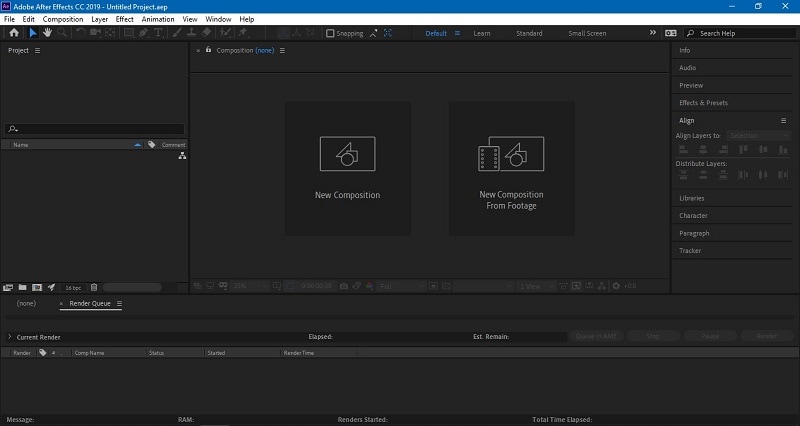
- The film clip with the green screen should have the Ultra Key added. Utilizing the matte creation and matte cleaning tools, remove the green screen using the ultra key effect. When softening, be cautious to eliminate any sharp edges. All of this can be adjusted under the Effects Control panel.
- Put your backdrop material behind your green screen clip after you have a clear key. You should now be able to view your backdrop behind the keyed layer.
Add Text Effects
There are many justifications for include text in your video. It has the ability to reach a bigger audience and is a fantastic example of cross-media integration. We must be able to write text since it is such a crucial component of video production. Learning how to add text in Adobe Premiere is quite simple; here’s an example:
- Select the type tool from the tool window. To add text, click the backdrop and then type. The segment includes a music titled visuals.
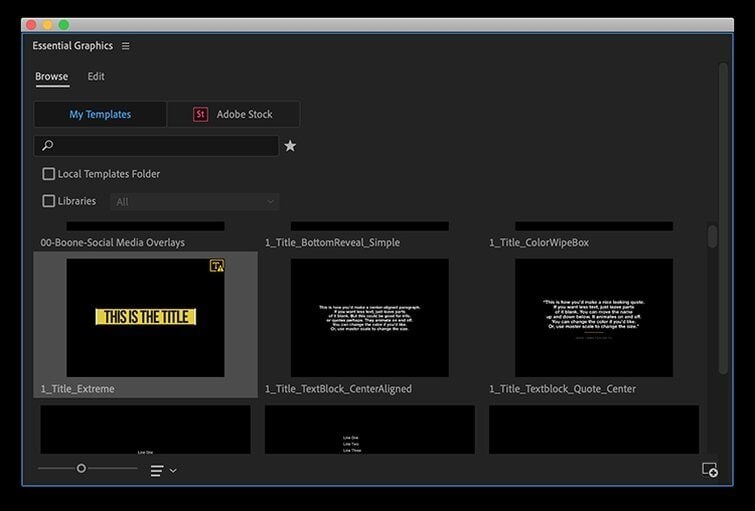
- choosing the Type Tool (T) Drag a text box onto your movie using the Graphic Type Tool, then type in it. You may need to go to Windows > Tools and click and hold on Type Tool if it isn’t already selected.
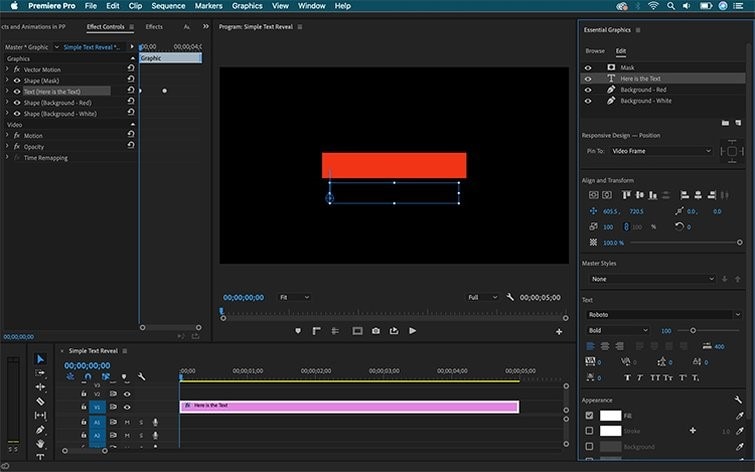
- Head over to the Effect controls panel. under the Text Tab. The text’s font and color can be changed. Decide on a place. Use the Effect Controls panel if you want to add some simple motion to your text. Motion may be added here. You can make rolling credits at the conclusion of your movie or add a rotating effect to your titles using the Properties window as shown below.
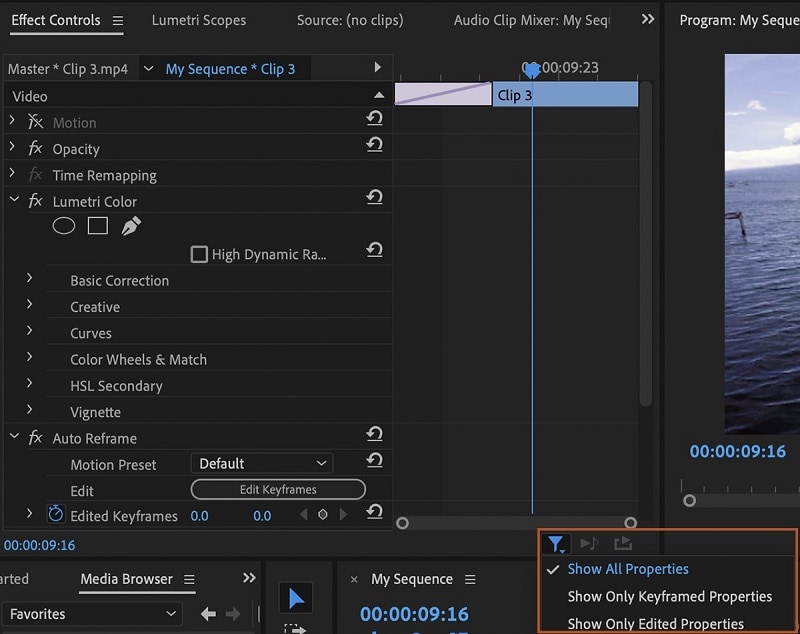
- To Fine-Tune the Text Effects, go to Window > Effect Controls You can see all of the effects I changed in the Essential Graphics panel using this panel. A graphic layer will instantly reflect and be highlighted in the Effect Controls panel when clicked on in the Essential Graphics panel, and vice versa.
Add Audio Effects
It’s simple to work with audio with Premiere Pro. By selecting Clip > Audio Options > Audio Gain (or by hitting “G” on your keyboard), you may fast change audio levels. By adding keyframes to the audio clips in your sequence, you can also get greater audio control.
- First, equalize the audio. You have thus eliminated your stutters and the buzz from the audio track of your speaker. You may use the Parametric Equalizer effect under Effects > Audio Effects to give your voices a last boost of clarity and flow.
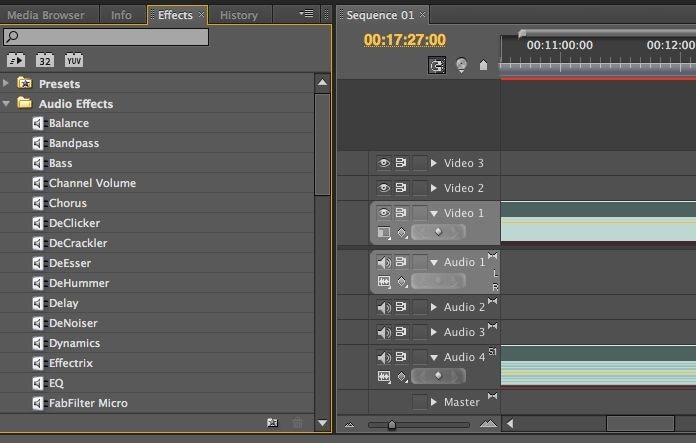
- Click on your clip and choose Effect Controls > Custom Setup > Edit to make more customizations.
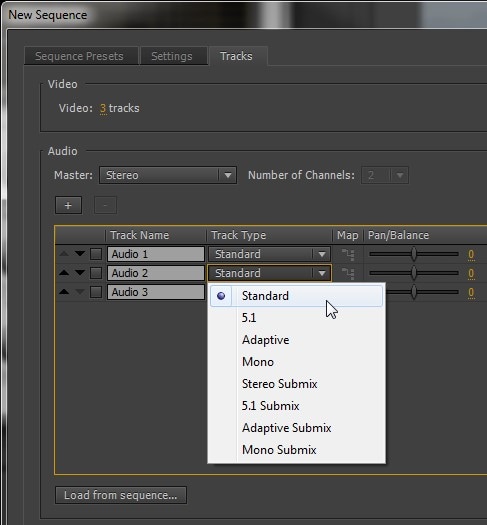
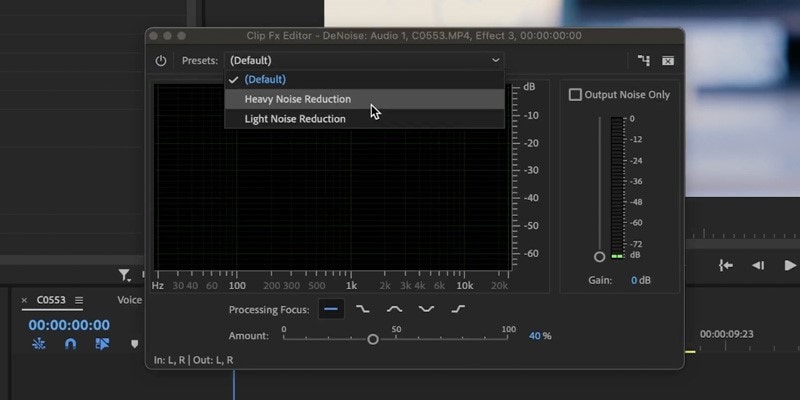
- Make use of the vocal enhancer. In the dropdown menu of your parametric equalizer, choose vocal enhancement. Next, adjust your frequencies upward and downward until everything sounds good.
- In Adobe Premiere Pro, a crossfade is used as the audio transition by default. Use them to join audio files together, provide a smooth transition from opening to closing credits, or add and remove sounds as required. Select Audio Transitions > Crossfade from the Effects menu.
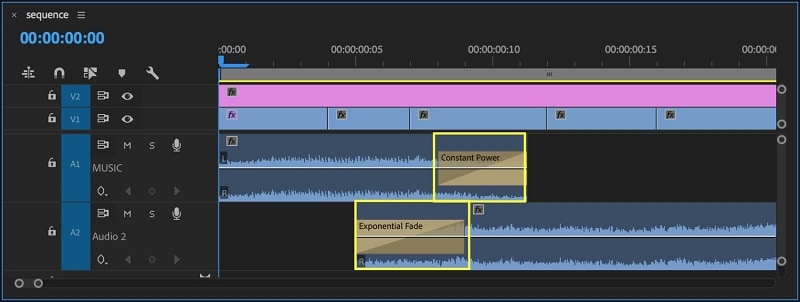
- For fine-tuning your audio, go to Preferences > Timeline > Audio Transition Default to finish. To polish your audio, use duration.
Presets Effects
Presets for Adobe Premiere Pro CC can be a useful tool while editing videos. They eliminate the need for constant manual adjustment by enabling the user to rapidly and simply apply effects, transitions, and other intricate settings. You may utilize effect presets to give your video clips effects. This is a fantastic way to give your project some flare and originality!
- After adjusting the effect to your liking, right-click the name and choose Save Preset. Your own effects are kept by default by Premiere Pro CC in the Presets folder of your Effects Window.
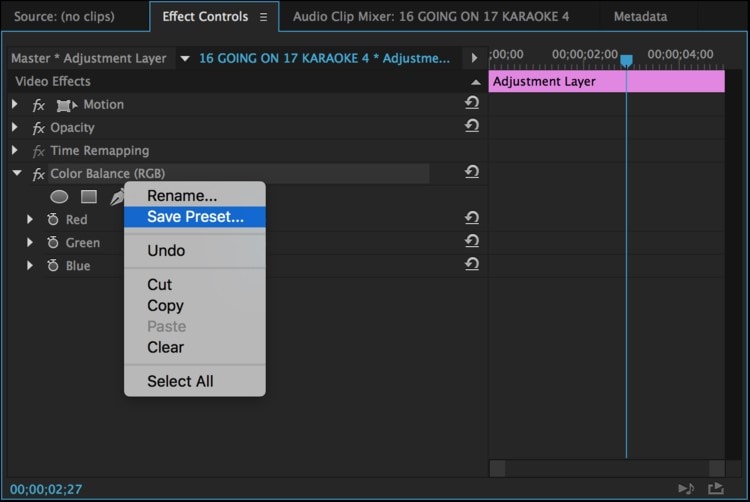
- Right-click the effect preset and choose “Preset Properties…” to alter the Name, Type, or Description of the preset. This option can also be found in the pop-up menu for the Effects panel.
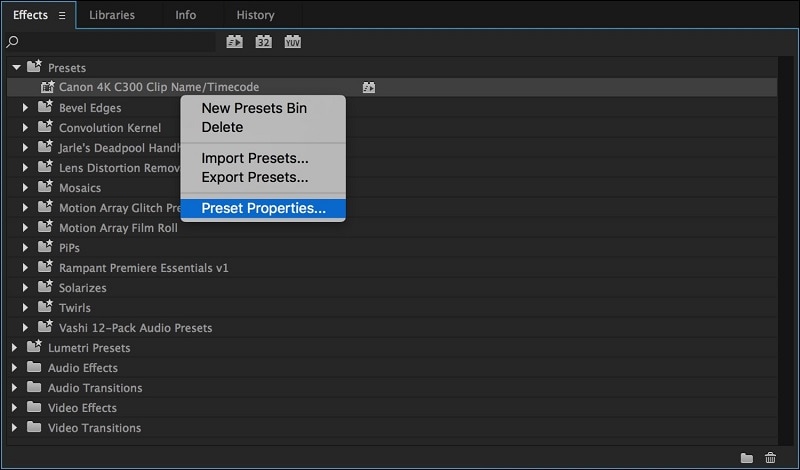
- Editors using Premiere Pro may export and share effect presets. This includes changes to the speed, opacity, and motion! Select “Export Presets” from the Effects panel pop-up menu after selecting the effect preset or presets you want to export. The names of the specific preset included in this file remain unchanged.
Part 3. Alternative Way to Add Effects to Videos [Use Filmora]
Making films can be a wonderful way to save your priceless memories, and several internet influencers have made it their full-time profession and artistic endeavor. Due to how easy it is to locate and utilize its many functions, Filmora is simpler to use than a tool like Adobe Premiere. Simply locate the effect you want to use and drag it onto your timeline. You can quickly find and use any feature you choose.
The most recent edition of a video editing tool regarded for being the most user-friendly and intuitive in its industry is called Wondershare Filmora . The magnetic timeline in Wondershare Filmora enables effects to locate and quickly snap to the boundaries of clips and other effects when they are dropped into different tracks. You may disable this function. Advanced color tuning is available, allowing you to modify the white balance, light, color, and HSL settings as well as add 3D LUTs and custom vignetting. Follow the steps below to Add effects to videos using Filmora:
Free Download For Win 7 or later(64-bit)
Free Download For macOS 10.14 or later
Steps to Use Filmora to Add Effects to Videos:
Step1Import Files
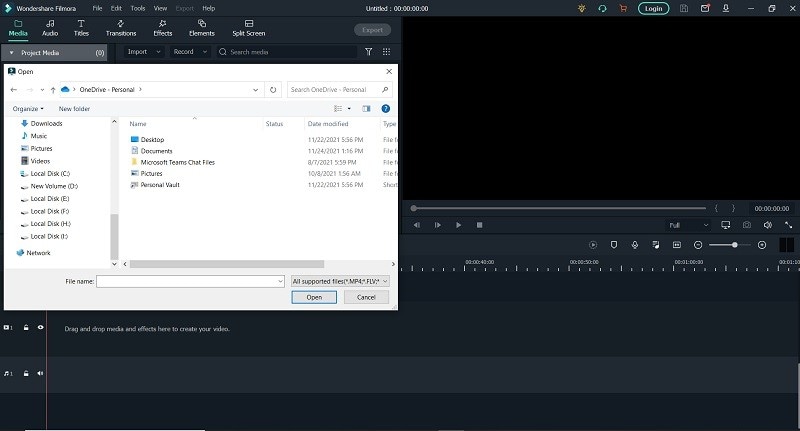
The first step is to import files. You may accomplish this by downloading videos, music, and photographs from social networking websites as well as from your computer. You can quickly arrange the Filmora Media Library to make it simple to locate your clips. To add an element to the timeline, drag it there or click the “Import Files” button.
Step2Use Sound Effects
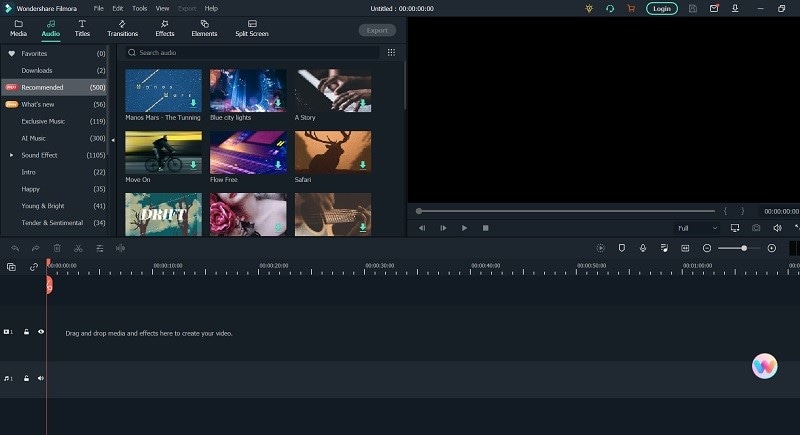
To enter the sound editing window, double-click on the soundtrack in the timeline. Drag your movie to the timeline, pick the “Music” tab, click on the sound effect, and then drag it to the timeline’s soundtrack. You may also change the sound’s tempo, fade-in and fade-out effects, loudness, and other settings. Additionally, background noise can be eliminated.
Step3Apply Effects
Simply locate the effect you want to use and drag it onto your timeline. You may employ sophisticated tools like green screen, picture-in-picture (PIP), split-screen, stabilization, and speed adjustments to elevate your films to a new level.
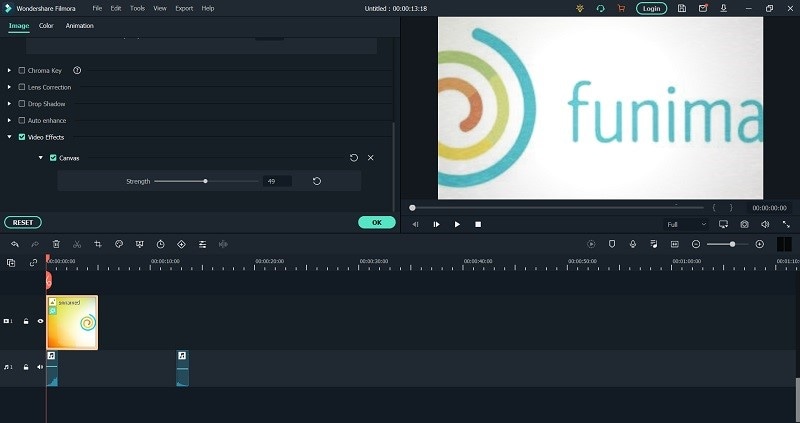
Step4Export the Masterpiece
Wondershare There are many export possibilities available with Filmora9. You can instantly publish your films to Facebook, Vimeo, YouTube, and other social networking platforms. You may pick from a variety of video file types when exporting your movie, including WMV, MP4, AVI, MOV, FLV, MKV, TS, 3GP, MPEG-2, WEBM, MP3, and GIF. A DVD might also be created.

Conclusion
Adobe Premiere Pro enables video editors to import their material and add it to sequences that can be put together anyway the editor sees fit. This involves cutting out extraneous material, combining brief portions that make a narrative, and adding sound effects, music, or effects. You now know how to add after effects to premiere pro. However, Filmora , a reliable video editor with an amazing feature set, particularly for its affordable price, is what we suggest for the best performance. The editing process is simplified, allowing users to concentrate on being creative.
A video editing program called Adobe Premiere Pro can be used to create everything from TV programs and movies to advertisements and family videos. These effects include Transitions, VFX, Audio, Videos as well as Advanced level effects like Green Screen. In addition, to know how to add shake effect in premiere pro, we’ve explained in the upcoming steps.For editors who don’t want to utilize the other motion graphic packages, Premiere provides a ton of built-in effects. Here are a few effects that you may not be aware are available to you. Any filmmaker or content producer must understand how to apply effects since they are necessary for a top-notch video. We’ve compiled easy steps on applying effects in Premiere Pro to be of assistance.
Part 2. How to Add Effects in Premier Pro
Add Transition Effects
There are several transition effects in Adobe Premiere Pro, and there are countless ways to customize them to fit your film. It is quite easy to locate transitions and add them. The Effects panel, which is accessible from the very top options bar, contains all the transition options. A panel will show up on the right when you choose this. To include a transition, adhere to these procedures.
- Navigate to the Video Transitions area of the Effects panel.

- Select the desired transition type from any of the available ones When you wish to employ a transition, press and hold it before dragging it to the start or finish of the clip. Alternately, insert it in between two clips to serve as a transition between the start and finish of each.

- In Premiere, there are several possible transitions, and some can be more suitable for your project than others.
Add Visual Effects
The Essential Graphics panel was added by Adobe to Premiere Pro. Users now have a much different workflow than they had with the few prior title panels. Now that everything is in one panel, you can easily create, animate, and use VFX. Some of the VFX shots were just building miniature towns and adding pieces, while others involved the standard green screen removal and backdrop replacement.
- Simply importing and uploading your video and audio files into Premiere Pro is the first step. The procedure of clicking through is fairly simple. Choose “New Project.” Press the Media Browser panel button and find the Ultra Key tool by opening the Effects panel.

- The film clip with the green screen should have the Ultra Key added. Utilizing the matte creation and matte cleaning tools, remove the green screen using the ultra key effect. When softening, be cautious to eliminate any sharp edges. All of this can be adjusted under the Effects Control panel.

- Put your backdrop material behind your green screen clip after you have a clear key. You should now be able to view your backdrop behind the keyed layer.

Add Text Effects
There are many justifications for include text in your video. It has the ability to reach a bigger audience and is a fantastic example of cross-media integration. We must be able to write text since it is such a crucial component of video production. Learning how to add text in Adobe Premiere is quite simple; here’s an example:
- Select the type tool from the tool window. To add text, click the backdrop and then type. The segment includes a music titled visuals.

- choosing the Type Tool (T) Drag a text box onto your movie using the Graphic Type Tool, then type in it. You may need to go to Windows > Tools and click and hold on Type Tool if it isn’t already selected.

- Head over to the Effect controls panel. under the Text Tab. The text’s font and color can be changed. Decide on a place. Use the Effect Controls panel if you want to add some simple motion to your text. Motion may be added here. You can make rolling credits at the conclusion of your movie or add a rotating effect to your titles using the Properties window as shown below.

- To Fine-Tune the Text Effects, go to Window > Effect Controls You can see all of the effects I changed in the Essential Graphics panel using this panel. A graphic layer will instantly reflect and be highlighted in the Effect Controls panel when clicked on in the Essential Graphics panel, and vice versa.
Add Audio Effects
It’s simple to work with audio with Premiere Pro. By selecting Clip > Audio Options > Audio Gain (or by hitting “G” on your keyboard), you may fast change audio levels. By adding keyframes to the audio clips in your sequence, you can also get greater audio control.
- First, equalize the audio. You have thus eliminated your stutters and the buzz from the audio track of your speaker. You may use the Parametric Equalizer effect under Effects > Audio Effects to give your voices a last boost of clarity and flow.

- Click on your clip and choose Effect Controls > Custom Setup > Edit to make more customizations.

- Make use of the vocal enhancer. In the dropdown menu of your parametric equalizer, choose vocal enhancement. Next, adjust your frequencies upward and downward until everything sounds good.

- In Adobe Premiere Pro, a crossfade is used as the audio transition by default. Use them to join audio files together, provide a smooth transition from opening to closing credits, or add and remove sounds as required. Select Audio Transitions > Crossfade from the Effects menu.

- For fine-tuning your audio, go to Preferences > Timeline > Audio Transition Default to finish. To polish your audio, use duration.
Presets Effects
Presets for Adobe Premiere Pro CC can be a useful tool while editing videos. They eliminate the need for constant manual adjustment by enabling the user to rapidly and simply apply effects, transitions, and other intricate settings. You may utilize effect presets to give your video clips effects. This is a fantastic way to give your project some flare and originality!
- After adjusting the effect to your liking, right-click the name and choose Save Preset. Your own effects are kept by default by Premiere Pro CC in the Presets folder of your Effects Window.

- Right-click the effect preset and choose “Preset Properties…” to alter the Name, Type, or Description of the preset. This option can also be found in the pop-up menu for the Effects panel.

- Editors using Premiere Pro may export and share effect presets. This includes changes to the speed, opacity, and motion! Select “Export Presets” from the Effects panel pop-up menu after selecting the effect preset or presets you want to export. The names of the specific preset included in this file remain unchanged.
Part 3. Alternative Way to Add Effects to Videos [Use Filmora]
Making films can be a wonderful way to save your priceless memories, and several internet influencers have made it their full-time profession and artistic endeavor. Due to how easy it is to locate and utilize its many functions, Filmora is simpler to use than a tool like Adobe Premiere. Simply locate the effect you want to use and drag it onto your timeline. You can quickly find and use any feature you choose.
The most recent edition of a video editing tool regarded for being the most user-friendly and intuitive in its industry is called Wondershare Filmora . The magnetic timeline in Wondershare Filmora enables effects to locate and quickly snap to the boundaries of clips and other effects when they are dropped into different tracks. You may disable this function. Advanced color tuning is available, allowing you to modify the white balance, light, color, and HSL settings as well as add 3D LUTs and custom vignetting. Follow the steps below to Add effects to videos using Filmora:
Free Download For Win 7 or later(64-bit)
Free Download For macOS 10.14 or later
Steps to Use Filmora to Add Effects to Videos:
Step1Import Files
The first step is to import files. You may accomplish this by downloading videos, music, and photographs from social networking websites as well as from your computer. You can quickly arrange the Filmora Media Library to make it simple to locate your clips. To add an element to the timeline, drag it there or click the “Import Files” button.

Step2Use Sound Effects
To enter the sound editing window, double-click on the soundtrack in the timeline. Drag your movie to the timeline, pick the “Music” tab, click on the sound effect, and then drag it to the timeline’s soundtrack. You may also change the sound’s tempo, fade-in and fade-out effects, loudness, and other settings. Additionally, background noise can be eliminated.

Step3Apply Effects
Simply locate the effect you want to use and drag it onto your timeline. You may employ sophisticated tools like green screen, picture-in-picture (PIP), split-screen, stabilization, and speed adjustments to elevate your films to a new level.

Step4Export the Masterpiece
Wondershare There are many export possibilities available with Filmora9. You can instantly publish your films to Facebook, Vimeo, YouTube, and other social networking platforms. You may pick from a variety of video file types when exporting your movie, including WMV, MP4, AVI, MOV, FLV, MKV, TS, 3GP, MPEG-2, WEBM, MP3, and GIF. A DVD might also be created.

Conclusion
Adobe Premiere Pro enables video editors to import their material and add it to sequences that can be put together anyway the editor sees fit. This involves cutting out extraneous material, combining brief portions that make a narrative, and adding sound effects, music, or effects. You now know how to add after effects to premiere pro. However, Filmora , a reliable video editor with an amazing feature set, particularly for its affordable price, is what we suggest for the best performance. The editing process is simplified, allowing users to concentrate on being creative.
Also read:
- New How to Easily Add VHS Green Screen to Your Video
- New Top 10 3D Slideshow Software Review for 2024
- 2024 Approved This Article Presents a Guide to Using the Keyframe Feature for Creating Competent Films with Detailed Instructions and Filmoras Grow and Win Program Contest
- In 2024, Using Slow Motion in Adobe After Effects A Step-by-Step Procession
- 3D Ray Traced Settings In After Effects
- New Online Video Makers to Use
- Updated 2024 Approved Create Eye-Catching Slow-Motion Videos to Set Your Own Trend. For This Purpose, Read This Article to Find and Learn to Use CapCuts New Slow-Motion Templates
- In 2024, The Complete Guide to Slideshow Maker with Music
- In 2024, Steps to Create Green Screen Videos in After Effects
- New In 2024, How to Create Your Own LUTs for Your Video with Filmora
- Updated How To Create 3D Text In Video
- Funny Content Ideas for YouTube Videos for 2024
- Start Making Procreate GIFs and Take Your Editing Creativity to the Next Level for 2024
- Updated 6 Instant Mp4 to GIF Online Tools for You for 2024
- Updated In 2024, Speed Control Is Frequently Used in Video Editing. By Speed up or Slow Down the Video Speed, You Can Achieve Different Visual Results. This Article Will Show You How to Control the Speed of a Video
- 2024 Approved How to Use Adjustment Layer in Photoshop?
- New In 2024, Free
- New In 2024, Do You Want to Print Designs Onto Your Garments or Other Fashion Accessories? Find Out How to Create a Screen Print Effect in Photoshop to Give Your Text or Graphics a Vintage or Retro Look
- Gif to Svg, Svg to Gif, Convert Gif to Svg, Animated Svg to Gif, Convert Svg to Gif, Svg to Gif Converter, Svg to Gif Animation, Svg Animation to Gif, Gif to Svg Converter for 2024
- New In 2024, How to Add Font Effect
- New In 2024, How Can You Get VHS Filter and Glitch Filter to Your Images or Videos?
- Updated 2024 Approved Read This Article to Learn How to Convert Your Slow-Motion Videos Into Normal-Speed Videos in a Few Simple Steps and Methods. So, Stick to the End
- New In 2024, The Best Peter McKinnon LUTs Recommendation
- Updated In 2024, Read This Review to Learn Everything You Need to Know About Leeming LUT Pro and How to Apply Pro LUTs Using Different Video Editors
- How to convert AVCHD MTS to MP4 for Huawei P60?
- In 2024, The Updated Method to Bypass Tecno Spark 10 Pro FRP
- In 2024, How to Bypass Google FRP Lock on Motorola Defy 2 Devices
- How to Bypass Google FRP Lock from Oppo A2 Devices
- In 2024, How To Change Your Apple ID Password On your Apple iPhone 15
- In 2024, Motorola Moto G23 ADB Format Tool for PC vs. Other Unlocking Tools Which One is the Best?
- How PGSharp Save You from Ban While Spoofing Pokemon Go On Oppo A79 5G? | Dr.fone
- Complete guide for recovering video files on Vivo T2x 5G
- In 2024, How to Screen Mirroring Infinix Hot 40 Pro to PC? | Dr.fone
- Samsung Galaxy A15 5G support - Forgotten screen lock.
- In 2024, Is Fake GPS Location Spoofer a Good Choice On Apple iPhone 6s Plus? | Dr.fone
- 11 Ways to Fix it When My Honor 90 Pro Wont Charge | Dr.fone
- Title: How to Use Adjustment Layer in Final Cut Pro
- Author: Morgan
- Created at : 2024-05-19 05:11:39
- Updated at : 2024-05-20 05:11:39
- Link: https://ai-video-editing.techidaily.com/how-to-use-adjustment-layer-in-final-cut-pro/
- License: This work is licensed under CC BY-NC-SA 4.0.

