:max_bytes(150000):strip_icc():format(webp)/duet-c82ee94b39e24788bcfd51d1eea24288.jpg)
How to Use LUTs in Premiere Pro for 2024

How to Use LUTs in Premiere Pro
Create High-Quality Video - Wondershare Filmora
An easy and powerful YouTube video editor
Numerous video and audio effects to choose from
Detailed tutorials provided by the official channel
Do you wonder how some pictures or videos look so stunning? As you keep reading you will discover the secrets of achieving similar quality for your content. You need a video or photo-editing software such as Adobe Premiere Pro and LUTS. Premier Pro luts are file types that you use to make color corrections to your content. They are available in different formats, each with varying capabilities. Below is everything you need to improve your editing skills using Adobe’s software and premiere luts.

In this article
01 How does Premiere Pro Classify LUTS?
02 How to use Luts in Adobe Premiere Pro?
03 How to save and export your LUTS?
How does Premiere Pro Classify LUTS?
A premiere pro lut can fall into two categories depending on its core function. These are:
• Looks
These are premiere luts you use to make changes to your video or photo’s appearance and color scheme. They are available as presets under the Lumetri Color Panel and offer quick fixes to your content.
• Input Lut
You use these premiere pro luts to interpret log footage. Additionally, they are the first step of your color correcting process and work best on DSLR footage. However, keep reading to discover how to use luts in Adobe Premiere Pro.
How to use Luts in Adobe Premiere Pro?
Now that you are aware of how the program classifies the Luts, here is how you can correct your footage.
1. Get the latest version of the program
You can purchase and download the program from your region’s Adobe Website. The program is available for both macOS and Windows. However, it is quite heavy on the system. According to reports, the below requirements are sufficient.
- You need a processer with 8 cores and clock speeds upwards of 3.2GHz.
- 16 GB of Ram is ideal for macOS. However, you do require upwards of 32GB if you are running Windows.
- Graphics cards from Nvidia and AMD are best if you also want to improve the program’s performance. You request one that can handle the Adobe Premiere Pro from your supplier.
- Furthermore, invest in a high-capacity storage device to save your projects since some outputs can be very large after color correction. The program allows you to render 4K files which are the largest.
- Finally, the above requirements are sufficient to run the following versions OF Adobe Premiere Pro:
i. Adobe Premiere Pro 22.2
ii. Adobe Premiere Pro 22.1.2
iii. Adobe Premiere Pro 22.1.1
iv. Adobe Premiere Pro 22.0
2. Select the video you want and put it on the timeline

3. Premiere luts are accessible from two sections of the program
Input luts are available under the Basic Correction tab from the Lumetri Panel as above.
Alternatively, you can get them by accessing the Basic Correction tab from the Lumetri Section of the Effects Control Panel.
4. Then, open the Input LUT dropdown menu and choose the premiere lut you want
Adobe Premiere Pro has preset input LUTs. However, you can also add your own by clicking browse. Doing so opens your computer’s File Explorer and you can locate your custom premiere luts. The software applies the premiere lut, after which you can use the tools to make adjustments.
Additionally, Adobe Premiere Pro allows you to install custom LUT files to use. Below is the process for macOS users.
- Create these target directories in your Adobe Premiere Installation files. • For shared devices
/Library/Application Support/Adobe/Common/LUTs/Creative
/Library/Application Support/Adobe/Common/LUTs/Technical
• You need to create these files if you have administrator access.
/Users//Library/Application Support/Adobe/Common/LUTs/Creative
/Users//Library/Application Support/Adobe/Common/LUTs/Technical - Copy your custom LUT files to each of the folders.
- These will be available in your Lumetri Panel next time you launch Adobe Premiere Pro.
The process is the same for Windows Users. However, the target directories are different.
- For shared devices:
C:\ Program Files\ Adobe\Common\LUTs\Creative
C:\ Program Files\ Adobe\Common\LUTs\Creative - You need to create these files if you have administrator access.
C:\Users\yourusername\AppData\Roaming\Adobe\Common\LUTs\Creative
C:\Users\yourusername\AppData\Roaming\Adobe\Common\LUTs\Technical
Adobe Premiere Pro accepts .look and .cube file types, allowing you more creative freedom. Additionally, you can save and export any custom premiere luts to use in other projects. The next section offers a step-by-step guide on how to do that.
Finally, Looks allow you to make quick adjustments to your videos using the presets available on the Lumetri Panel. You can access these from the Effects Panel. Furthermore, it also allows you to preview the result. The intensity of the look can vary depending on where the slider is on the effects panel.
How to save and export your LUTS?
Most filmmakers prefer to save their premier luts for later use. Here is how to do it:
- Follow the above process through to step 5.
- Once you finish your editing, click on the Lumetri Pop Up menu and choose Save Preset.
- Fill the respective fields with your custom information and click OK. The program will then save the clip to the location you specify.
- You can save custom luts in the following ways:
Scale only applies the new lut to the video. As such, all other luts you use are deleted. Therefore, if your video is one hour, your custom settings will run through the clip’s entire length.
Anchor To In Point only saves the section of the clip where your custom settings are active. Additionally, the software will add all pre-existing luts to the section without scaling. - Additionally, you can repeat the process and export your LUTs in the following formats:
.look exports the LUT as an Adobe Premiere Pro file to a location on your device.
.cube saves the Lumetri preset you can use on other color grading software. For example, you can use your .cube custom lut with Filmora.

For Win 7 or later (64-bit)
For macOS 10.12 or later
Finally, the above procedures only apply to certain versions of Adobe Premiere Pro. They may differ across devices. This is because Adobe releases new updates regularly to fix bugs and offer new functionality. So, keep checking regularly for any changes.
Conclusion
●Adobe Premiere Pro offers you fun luts to enhance the quality of your video. Additionally, the option to render videos in 4K quality allows you to output creations of the highest quality. Additionally, the option to save and export your LUTS to use with other programs like Filmora, means there is no limit to what you can create. Here is a link to some LUTs you can try on your next edit.
Do you wonder how some pictures or videos look so stunning? As you keep reading you will discover the secrets of achieving similar quality for your content. You need a video or photo-editing software such as Adobe Premiere Pro and LUTS. Premier Pro luts are file types that you use to make color corrections to your content. They are available in different formats, each with varying capabilities. Below is everything you need to improve your editing skills using Adobe’s software and premiere luts.

In this article
01 How does Premiere Pro Classify LUTS?
02 How to use Luts in Adobe Premiere Pro?
03 How to save and export your LUTS?
How does Premiere Pro Classify LUTS?
A premiere pro lut can fall into two categories depending on its core function. These are:
• Looks
These are premiere luts you use to make changes to your video or photo’s appearance and color scheme. They are available as presets under the Lumetri Color Panel and offer quick fixes to your content.
• Input Lut
You use these premiere pro luts to interpret log footage. Additionally, they are the first step of your color correcting process and work best on DSLR footage. However, keep reading to discover how to use luts in Adobe Premiere Pro.
How to use Luts in Adobe Premiere Pro?
Now that you are aware of how the program classifies the Luts, here is how you can correct your footage.
1. Get the latest version of the program
You can purchase and download the program from your region’s Adobe Website. The program is available for both macOS and Windows. However, it is quite heavy on the system. According to reports, the below requirements are sufficient.
- You need a processer with 8 cores and clock speeds upwards of 3.2GHz.
- 16 GB of Ram is ideal for macOS. However, you do require upwards of 32GB if you are running Windows.
- Graphics cards from Nvidia and AMD are best if you also want to improve the program’s performance. You request one that can handle the Adobe Premiere Pro from your supplier.
- Furthermore, invest in a high-capacity storage device to save your projects since some outputs can be very large after color correction. The program allows you to render 4K files which are the largest.
- Finally, the above requirements are sufficient to run the following versions OF Adobe Premiere Pro:
i. Adobe Premiere Pro 22.2
ii. Adobe Premiere Pro 22.1.2
iii. Adobe Premiere Pro 22.1.1
iv. Adobe Premiere Pro 22.0
2. Select the video you want and put it on the timeline

3. Premiere luts are accessible from two sections of the program
Input luts are available under the Basic Correction tab from the Lumetri Panel as above.
Alternatively, you can get them by accessing the Basic Correction tab from the Lumetri Section of the Effects Control Panel.
4. Then, open the Input LUT dropdown menu and choose the premiere lut you want
Adobe Premiere Pro has preset input LUTs. However, you can also add your own by clicking browse. Doing so opens your computer’s File Explorer and you can locate your custom premiere luts. The software applies the premiere lut, after which you can use the tools to make adjustments.
Additionally, Adobe Premiere Pro allows you to install custom LUT files to use. Below is the process for macOS users.
- Create these target directories in your Adobe Premiere Installation files. • For shared devices
/Library/Application Support/Adobe/Common/LUTs/Creative
/Library/Application Support/Adobe/Common/LUTs/Technical
• You need to create these files if you have administrator access.
/Users//Library/Application Support/Adobe/Common/LUTs/Creative
/Users//Library/Application Support/Adobe/Common/LUTs/Technical - Copy your custom LUT files to each of the folders.
- These will be available in your Lumetri Panel next time you launch Adobe Premiere Pro.
The process is the same for Windows Users. However, the target directories are different.
- For shared devices:
C:\ Program Files\ Adobe\Common\LUTs\Creative
C:\ Program Files\ Adobe\Common\LUTs\Creative - You need to create these files if you have administrator access.
C:\Users\yourusername\AppData\Roaming\Adobe\Common\LUTs\Creative
C:\Users\yourusername\AppData\Roaming\Adobe\Common\LUTs\Technical
Adobe Premiere Pro accepts .look and .cube file types, allowing you more creative freedom. Additionally, you can save and export any custom premiere luts to use in other projects. The next section offers a step-by-step guide on how to do that.
Finally, Looks allow you to make quick adjustments to your videos using the presets available on the Lumetri Panel. You can access these from the Effects Panel. Furthermore, it also allows you to preview the result. The intensity of the look can vary depending on where the slider is on the effects panel.
How to save and export your LUTS?
Most filmmakers prefer to save their premier luts for later use. Here is how to do it:
- Follow the above process through to step 5.
- Once you finish your editing, click on the Lumetri Pop Up menu and choose Save Preset.
- Fill the respective fields with your custom information and click OK. The program will then save the clip to the location you specify.
- You can save custom luts in the following ways:
Scale only applies the new lut to the video. As such, all other luts you use are deleted. Therefore, if your video is one hour, your custom settings will run through the clip’s entire length.
Anchor To In Point only saves the section of the clip where your custom settings are active. Additionally, the software will add all pre-existing luts to the section without scaling. - Additionally, you can repeat the process and export your LUTs in the following formats:
.look exports the LUT as an Adobe Premiere Pro file to a location on your device.
.cube saves the Lumetri preset you can use on other color grading software. For example, you can use your .cube custom lut with Filmora.

For Win 7 or later (64-bit)
For macOS 10.12 or later
Finally, the above procedures only apply to certain versions of Adobe Premiere Pro. They may differ across devices. This is because Adobe releases new updates regularly to fix bugs and offer new functionality. So, keep checking regularly for any changes.
Conclusion
●Adobe Premiere Pro offers you fun luts to enhance the quality of your video. Additionally, the option to render videos in 4K quality allows you to output creations of the highest quality. Additionally, the option to save and export your LUTS to use with other programs like Filmora, means there is no limit to what you can create. Here is a link to some LUTs you can try on your next edit.
Do you wonder how some pictures or videos look so stunning? As you keep reading you will discover the secrets of achieving similar quality for your content. You need a video or photo-editing software such as Adobe Premiere Pro and LUTS. Premier Pro luts are file types that you use to make color corrections to your content. They are available in different formats, each with varying capabilities. Below is everything you need to improve your editing skills using Adobe’s software and premiere luts.

In this article
01 How does Premiere Pro Classify LUTS?
02 How to use Luts in Adobe Premiere Pro?
03 How to save and export your LUTS?
How does Premiere Pro Classify LUTS?
A premiere pro lut can fall into two categories depending on its core function. These are:
• Looks
These are premiere luts you use to make changes to your video or photo’s appearance and color scheme. They are available as presets under the Lumetri Color Panel and offer quick fixes to your content.
• Input Lut
You use these premiere pro luts to interpret log footage. Additionally, they are the first step of your color correcting process and work best on DSLR footage. However, keep reading to discover how to use luts in Adobe Premiere Pro.
How to use Luts in Adobe Premiere Pro?
Now that you are aware of how the program classifies the Luts, here is how you can correct your footage.
1. Get the latest version of the program
You can purchase and download the program from your region’s Adobe Website. The program is available for both macOS and Windows. However, it is quite heavy on the system. According to reports, the below requirements are sufficient.
- You need a processer with 8 cores and clock speeds upwards of 3.2GHz.
- 16 GB of Ram is ideal for macOS. However, you do require upwards of 32GB if you are running Windows.
- Graphics cards from Nvidia and AMD are best if you also want to improve the program’s performance. You request one that can handle the Adobe Premiere Pro from your supplier.
- Furthermore, invest in a high-capacity storage device to save your projects since some outputs can be very large after color correction. The program allows you to render 4K files which are the largest.
- Finally, the above requirements are sufficient to run the following versions OF Adobe Premiere Pro:
i. Adobe Premiere Pro 22.2
ii. Adobe Premiere Pro 22.1.2
iii. Adobe Premiere Pro 22.1.1
iv. Adobe Premiere Pro 22.0
2. Select the video you want and put it on the timeline

3. Premiere luts are accessible from two sections of the program
Input luts are available under the Basic Correction tab from the Lumetri Panel as above.
Alternatively, you can get them by accessing the Basic Correction tab from the Lumetri Section of the Effects Control Panel.
4. Then, open the Input LUT dropdown menu and choose the premiere lut you want
Adobe Premiere Pro has preset input LUTs. However, you can also add your own by clicking browse. Doing so opens your computer’s File Explorer and you can locate your custom premiere luts. The software applies the premiere lut, after which you can use the tools to make adjustments.
Additionally, Adobe Premiere Pro allows you to install custom LUT files to use. Below is the process for macOS users.
- Create these target directories in your Adobe Premiere Installation files. • For shared devices
/Library/Application Support/Adobe/Common/LUTs/Creative
/Library/Application Support/Adobe/Common/LUTs/Technical
• You need to create these files if you have administrator access.
/Users//Library/Application Support/Adobe/Common/LUTs/Creative
/Users//Library/Application Support/Adobe/Common/LUTs/Technical - Copy your custom LUT files to each of the folders.
- These will be available in your Lumetri Panel next time you launch Adobe Premiere Pro.
The process is the same for Windows Users. However, the target directories are different.
- For shared devices:
C:\ Program Files\ Adobe\Common\LUTs\Creative
C:\ Program Files\ Adobe\Common\LUTs\Creative - You need to create these files if you have administrator access.
C:\Users\yourusername\AppData\Roaming\Adobe\Common\LUTs\Creative
C:\Users\yourusername\AppData\Roaming\Adobe\Common\LUTs\Technical
Adobe Premiere Pro accepts .look and .cube file types, allowing you more creative freedom. Additionally, you can save and export any custom premiere luts to use in other projects. The next section offers a step-by-step guide on how to do that.
Finally, Looks allow you to make quick adjustments to your videos using the presets available on the Lumetri Panel. You can access these from the Effects Panel. Furthermore, it also allows you to preview the result. The intensity of the look can vary depending on where the slider is on the effects panel.
How to save and export your LUTS?
Most filmmakers prefer to save their premier luts for later use. Here is how to do it:
- Follow the above process through to step 5.
- Once you finish your editing, click on the Lumetri Pop Up menu and choose Save Preset.
- Fill the respective fields with your custom information and click OK. The program will then save the clip to the location you specify.
- You can save custom luts in the following ways:
Scale only applies the new lut to the video. As such, all other luts you use are deleted. Therefore, if your video is one hour, your custom settings will run through the clip’s entire length.
Anchor To In Point only saves the section of the clip where your custom settings are active. Additionally, the software will add all pre-existing luts to the section without scaling. - Additionally, you can repeat the process and export your LUTs in the following formats:
.look exports the LUT as an Adobe Premiere Pro file to a location on your device.
.cube saves the Lumetri preset you can use on other color grading software. For example, you can use your .cube custom lut with Filmora.

For Win 7 or later (64-bit)
For macOS 10.12 or later
Finally, the above procedures only apply to certain versions of Adobe Premiere Pro. They may differ across devices. This is because Adobe releases new updates regularly to fix bugs and offer new functionality. So, keep checking regularly for any changes.
Conclusion
●Adobe Premiere Pro offers you fun luts to enhance the quality of your video. Additionally, the option to render videos in 4K quality allows you to output creations of the highest quality. Additionally, the option to save and export your LUTS to use with other programs like Filmora, means there is no limit to what you can create. Here is a link to some LUTs you can try on your next edit.
Do you wonder how some pictures or videos look so stunning? As you keep reading you will discover the secrets of achieving similar quality for your content. You need a video or photo-editing software such as Adobe Premiere Pro and LUTS. Premier Pro luts are file types that you use to make color corrections to your content. They are available in different formats, each with varying capabilities. Below is everything you need to improve your editing skills using Adobe’s software and premiere luts.

In this article
01 How does Premiere Pro Classify LUTS?
02 How to use Luts in Adobe Premiere Pro?
03 How to save and export your LUTS?
How does Premiere Pro Classify LUTS?
A premiere pro lut can fall into two categories depending on its core function. These are:
• Looks
These are premiere luts you use to make changes to your video or photo’s appearance and color scheme. They are available as presets under the Lumetri Color Panel and offer quick fixes to your content.
• Input Lut
You use these premiere pro luts to interpret log footage. Additionally, they are the first step of your color correcting process and work best on DSLR footage. However, keep reading to discover how to use luts in Adobe Premiere Pro.
How to use Luts in Adobe Premiere Pro?
Now that you are aware of how the program classifies the Luts, here is how you can correct your footage.
1. Get the latest version of the program
You can purchase and download the program from your region’s Adobe Website. The program is available for both macOS and Windows. However, it is quite heavy on the system. According to reports, the below requirements are sufficient.
- You need a processer with 8 cores and clock speeds upwards of 3.2GHz.
- 16 GB of Ram is ideal for macOS. However, you do require upwards of 32GB if you are running Windows.
- Graphics cards from Nvidia and AMD are best if you also want to improve the program’s performance. You request one that can handle the Adobe Premiere Pro from your supplier.
- Furthermore, invest in a high-capacity storage device to save your projects since some outputs can be very large after color correction. The program allows you to render 4K files which are the largest.
- Finally, the above requirements are sufficient to run the following versions OF Adobe Premiere Pro:
i. Adobe Premiere Pro 22.2
ii. Adobe Premiere Pro 22.1.2
iii. Adobe Premiere Pro 22.1.1
iv. Adobe Premiere Pro 22.0
2. Select the video you want and put it on the timeline

3. Premiere luts are accessible from two sections of the program
Input luts are available under the Basic Correction tab from the Lumetri Panel as above.
Alternatively, you can get them by accessing the Basic Correction tab from the Lumetri Section of the Effects Control Panel.
4. Then, open the Input LUT dropdown menu and choose the premiere lut you want
Adobe Premiere Pro has preset input LUTs. However, you can also add your own by clicking browse. Doing so opens your computer’s File Explorer and you can locate your custom premiere luts. The software applies the premiere lut, after which you can use the tools to make adjustments.
Additionally, Adobe Premiere Pro allows you to install custom LUT files to use. Below is the process for macOS users.
- Create these target directories in your Adobe Premiere Installation files. • For shared devices
/Library/Application Support/Adobe/Common/LUTs/Creative
/Library/Application Support/Adobe/Common/LUTs/Technical
• You need to create these files if you have administrator access.
/Users//Library/Application Support/Adobe/Common/LUTs/Creative
/Users//Library/Application Support/Adobe/Common/LUTs/Technical - Copy your custom LUT files to each of the folders.
- These will be available in your Lumetri Panel next time you launch Adobe Premiere Pro.
The process is the same for Windows Users. However, the target directories are different.
- For shared devices:
C:\ Program Files\ Adobe\Common\LUTs\Creative
C:\ Program Files\ Adobe\Common\LUTs\Creative - You need to create these files if you have administrator access.
C:\Users\yourusername\AppData\Roaming\Adobe\Common\LUTs\Creative
C:\Users\yourusername\AppData\Roaming\Adobe\Common\LUTs\Technical
Adobe Premiere Pro accepts .look and .cube file types, allowing you more creative freedom. Additionally, you can save and export any custom premiere luts to use in other projects. The next section offers a step-by-step guide on how to do that.
Finally, Looks allow you to make quick adjustments to your videos using the presets available on the Lumetri Panel. You can access these from the Effects Panel. Furthermore, it also allows you to preview the result. The intensity of the look can vary depending on where the slider is on the effects panel.
How to save and export your LUTS?
Most filmmakers prefer to save their premier luts for later use. Here is how to do it:
- Follow the above process through to step 5.
- Once you finish your editing, click on the Lumetri Pop Up menu and choose Save Preset.
- Fill the respective fields with your custom information and click OK. The program will then save the clip to the location you specify.
- You can save custom luts in the following ways:
Scale only applies the new lut to the video. As such, all other luts you use are deleted. Therefore, if your video is one hour, your custom settings will run through the clip’s entire length.
Anchor To In Point only saves the section of the clip where your custom settings are active. Additionally, the software will add all pre-existing luts to the section without scaling. - Additionally, you can repeat the process and export your LUTs in the following formats:
.look exports the LUT as an Adobe Premiere Pro file to a location on your device.
.cube saves the Lumetri preset you can use on other color grading software. For example, you can use your .cube custom lut with Filmora.

For Win 7 or later (64-bit)
For macOS 10.12 or later
Finally, the above procedures only apply to certain versions of Adobe Premiere Pro. They may differ across devices. This is because Adobe releases new updates regularly to fix bugs and offer new functionality. So, keep checking regularly for any changes.
Conclusion
●Adobe Premiere Pro offers you fun luts to enhance the quality of your video. Additionally, the option to render videos in 4K quality allows you to output creations of the highest quality. Additionally, the option to save and export your LUTS to use with other programs like Filmora, means there is no limit to what you can create. Here is a link to some LUTs you can try on your next edit.
Step by Step to Crop Videos Using Lightworks
Video cropping refers to delete unwanted parts from your videos with software like Lightworks. It is also known as clipping which ultimately result in cutting off something, cropping or reducing an image. The very important question here is how to crop video in lightworks?
Video cropping can be done with the help of various methods, some are free while others are paid. Here we will discuss about both the methods which you can choose one to get rid of unwanted portions from your videos or photos.
About Lightworks
Today, there are so many video editing software available on the internet that can be used to crop videos. Most of them are free but have limited features only, some may contain ads which you do not want to see at all. One such best free video editor is Lightworks that does not have any watermark, ad or free trail period. It is completely free for life time and the best part is that you do not need to register or subscribe here.
Lightworks is a professional non-linear editing system (NLE) created by EditShare, a technology company based in London. The software allows both amateur and professional video editors to create and edit videos like movies, TV shows, music videos etc. Lightworks has been used in over 500 Hollywood feature films including “The Wolf of Wall Street”, “Jack Ryan: Shadow Recruit” and “Edge of Tomorrow”.
Step-by-step on how to crop video in Lightworks?
Step 1: Open any video or photo. You can easily add media files in the Project panel and it will start appearing in the preview/program monitor. Once you have added your videos to the timeline, you can view them in both waveform display and Vectorscope format. You also get an option to see a live filmstrip preview, to see what is happening in the video.
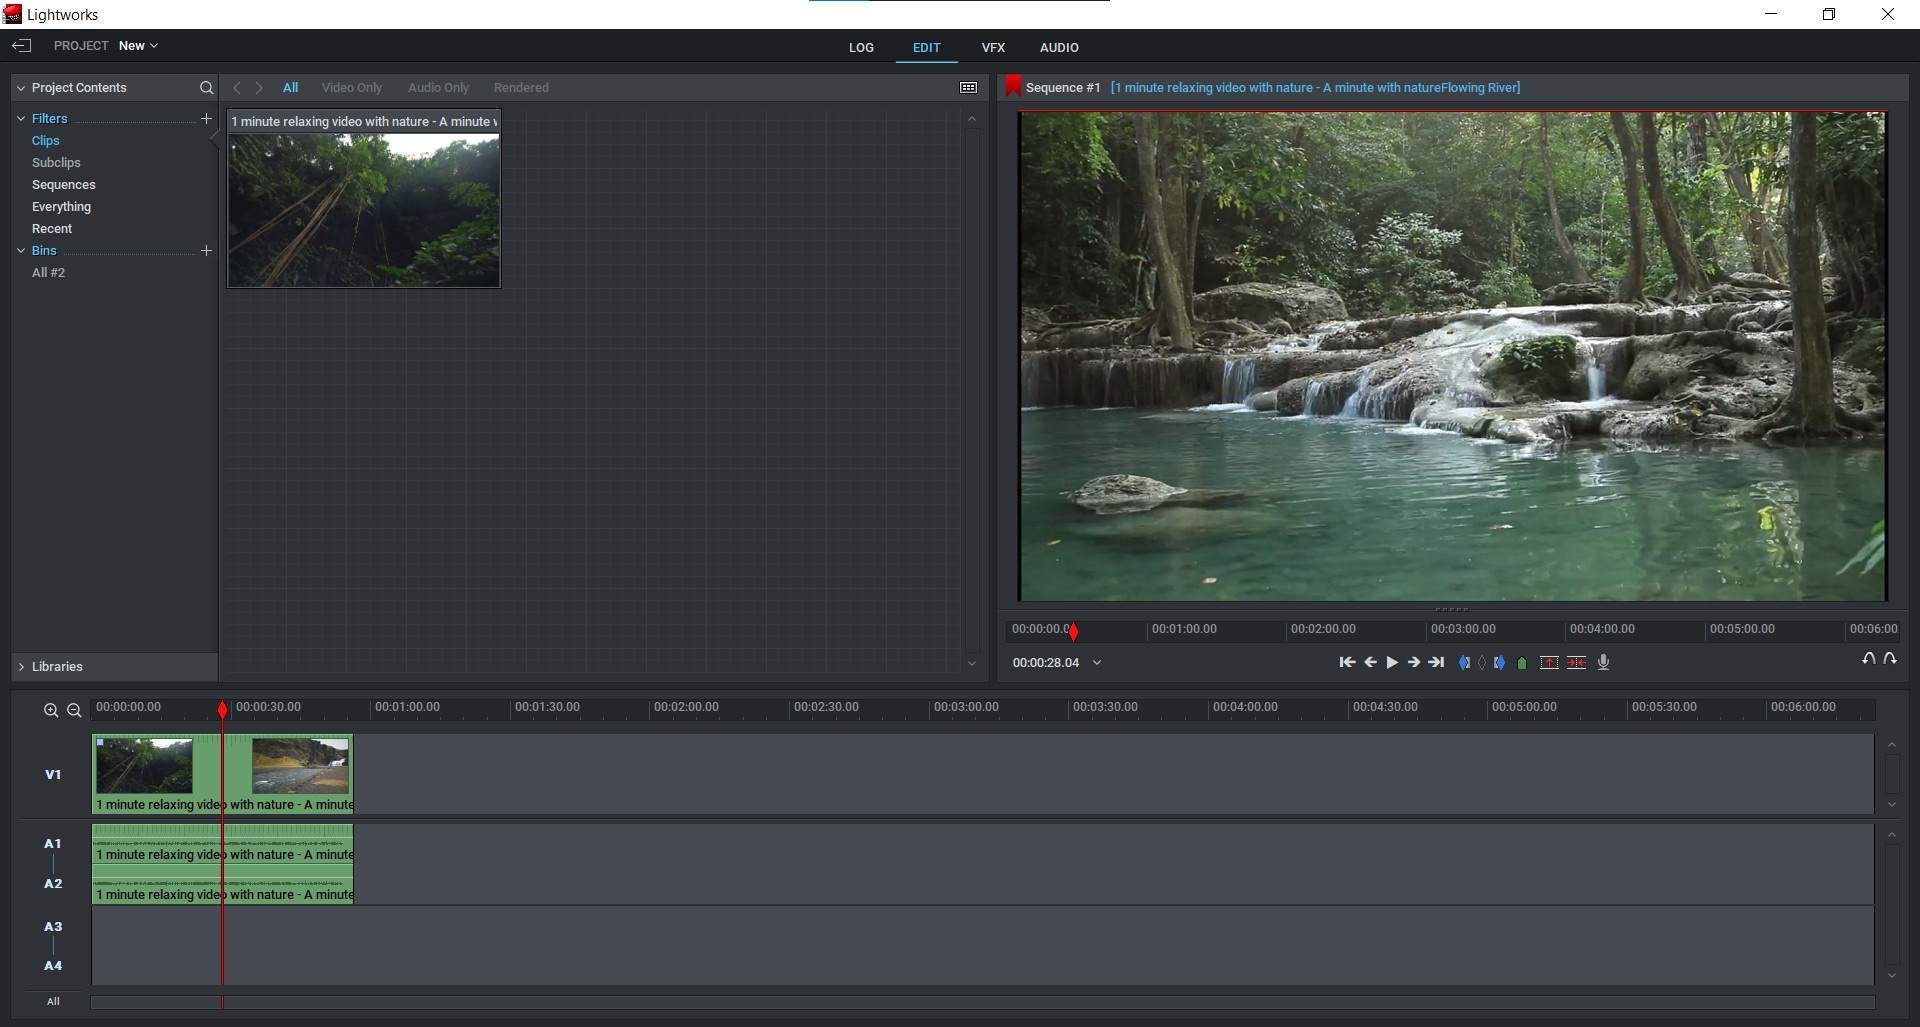
Step 2: After importing your videos into Lightworks, you can now proceed towards cropping them. For this purpose, click on the video editing tab and select the “DVE” (Dynamic Video Effect) tool.
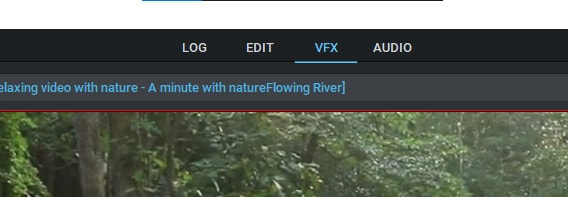
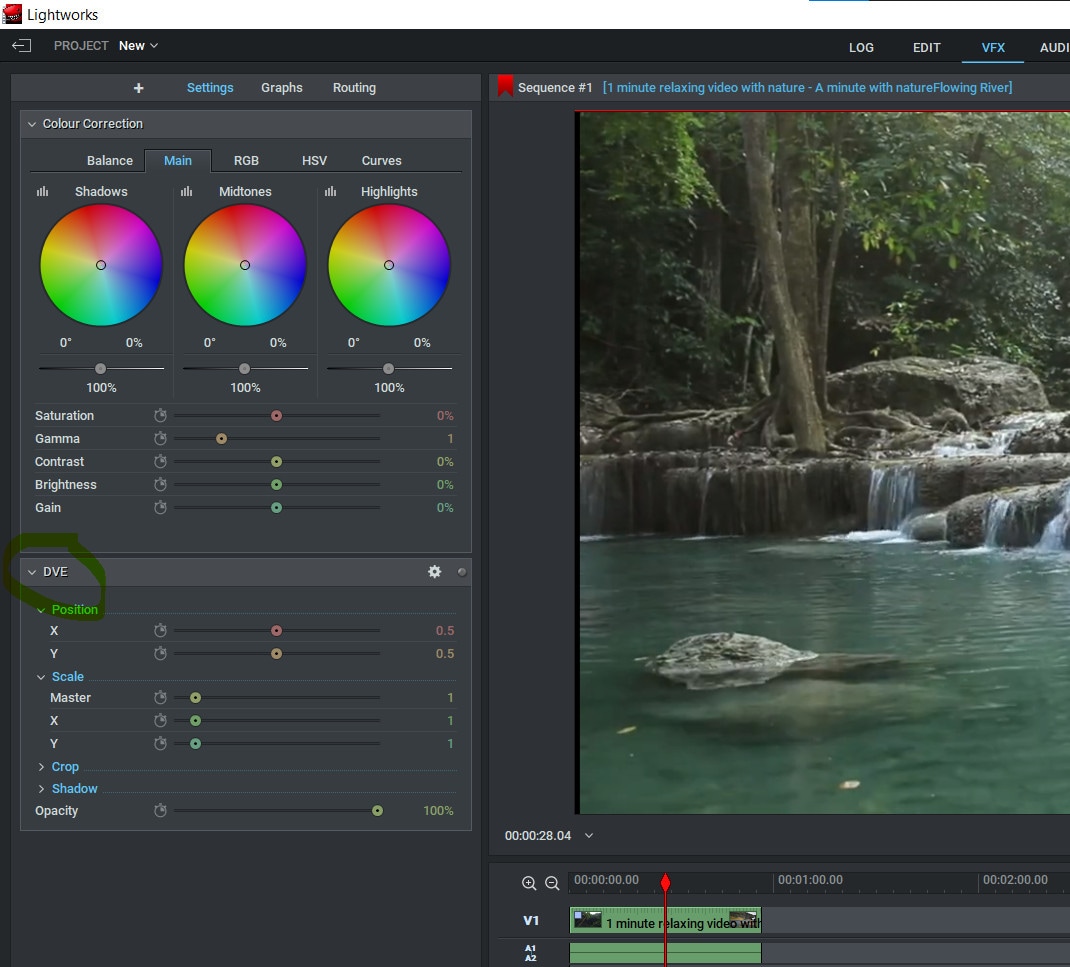
Step 3: How to crop videos using the DVE tool? You can now go to the ‘Crop’ option under the DVE tab and move your cursor over any unwanted portion of the video and click-and-drag it down and in the right direction. This will distort and stretch the video to remove that particular portion from there while preserving its overall appearance and quality.
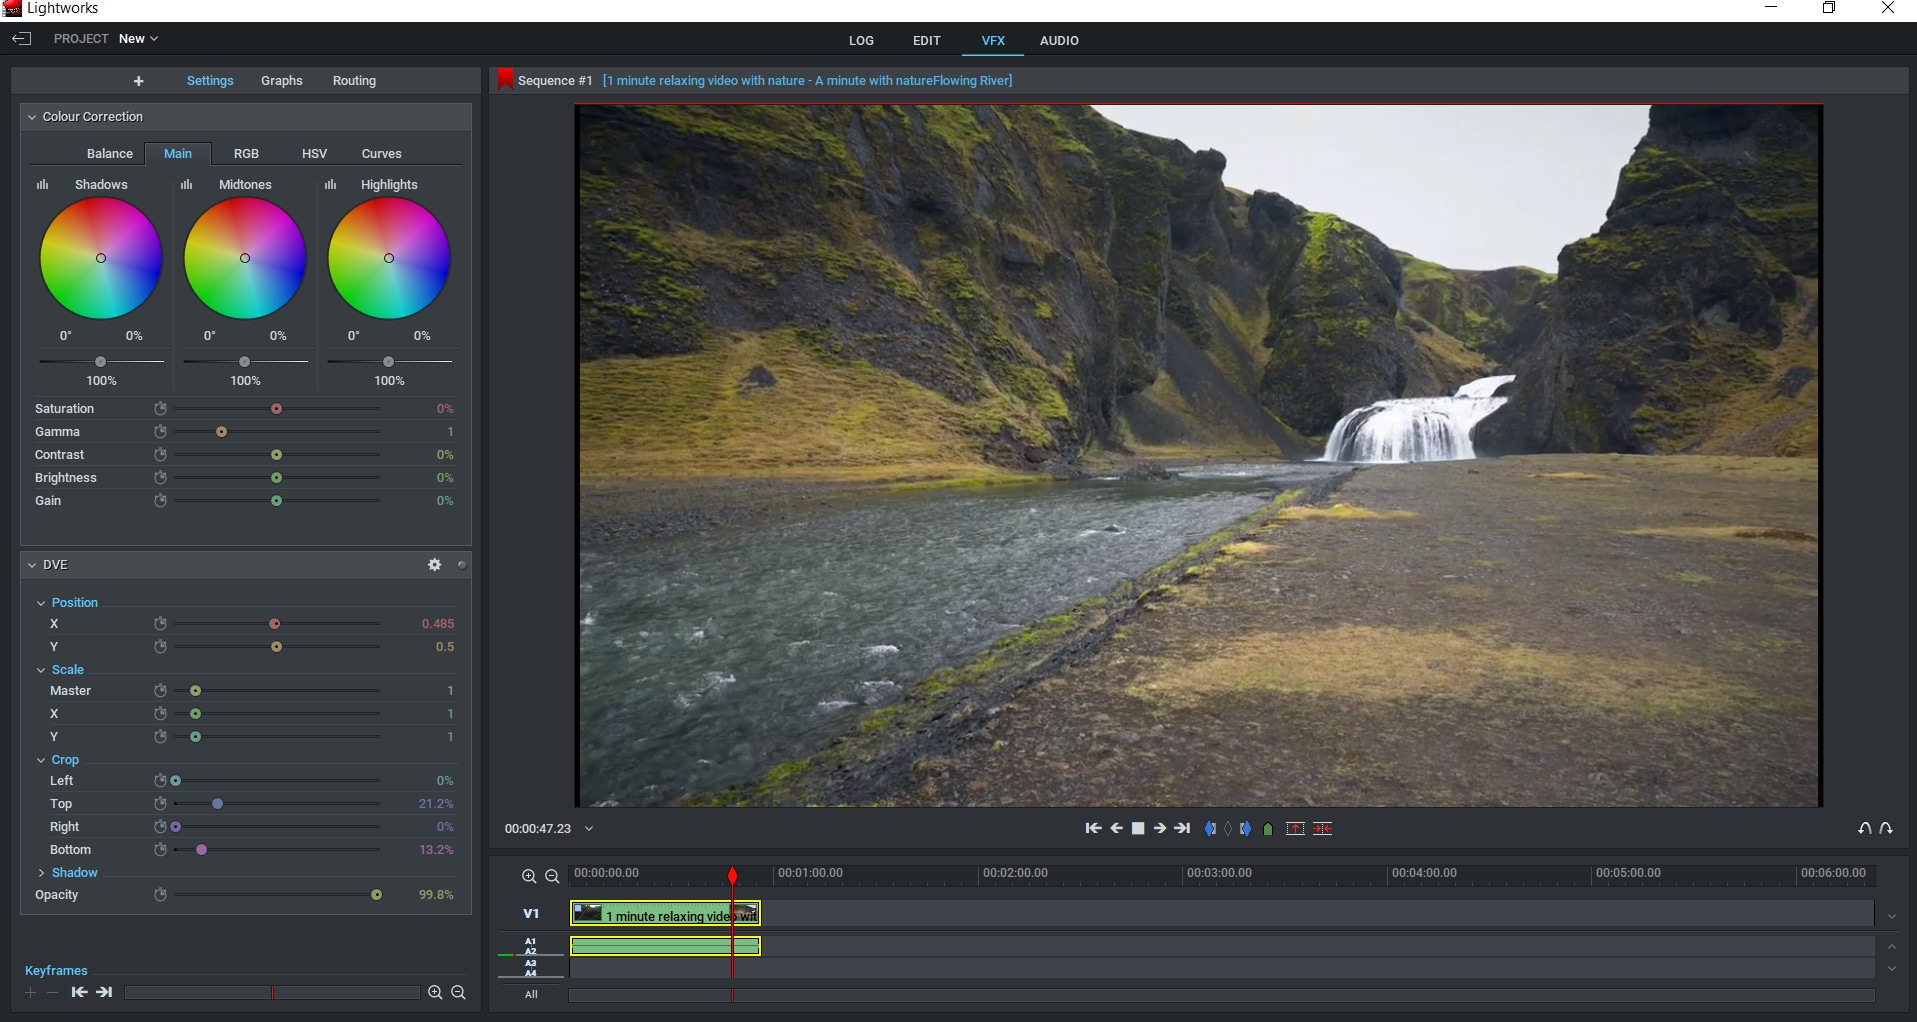
Step 4: You can now preview what your video looks like after cropping it by hitting the “Play” button. Hit play to view any changes you have made to your videos.
Step 5: Hit the “Close” button and save your project.
So, this is how you can edit or remove part of a video clip in Lightworks easily. You can also go for some other online tools which are available on the internet and offer great services at no cost for life time. Many of these tools are free to use, easy to handle and have amazing features that can be used by professionals to get their work done beautifully.
There are many video cropping tools available on the internet which can be used for free. Those who are looking for a free, easy to use video editor can download and use this tool without any hassle. That is why; Filmora is best alternative of Lightworks, which offers free version of simple editing tools with all the features you need for your home videos. The free version of this tool is available for Windows; Mac; and Linux operating systems.
An Easier Way to Crop Video Using Filmora
Filmora Video Editor is an easy to use free video editing software that can be used for cropping videos. It allows users to upload their videos online and create new ones or edit existing ones. The steps involved in cropping videos in Filmora are very easy and to the point so you can follow them without any hassle.
It also comes in two versions; free and paid. The free version has less editing tools than the paid one but offers a good enough range of options for beginners who are not looking to make pro-quality movies just yet.
Filmora (video editor) is a power software that allows you to make the most impressive video clips with few steps. This video editing tool gives users various tools to edit videos. It also offers the user-friendly interface that anyone can use to edit home videos on Windows PC, Mac, and Linux devices.
You can download Filmora free video editor from the official website easily. Just visit the behind the link and click on ‘Download’ to get the installer file. Once you have downloaded it, you need to install Filmora software on your computer to start using it. Or install it using the link below:
For Win 7 or later (64-bit)
For macOS 10.14 or later
Step-by-step on how to crop videos using Filmora?
Step 1: Open a video that you want to edit.

Step 2: Open the Filmora editing tool and select the “Crop and Zoom” icon.
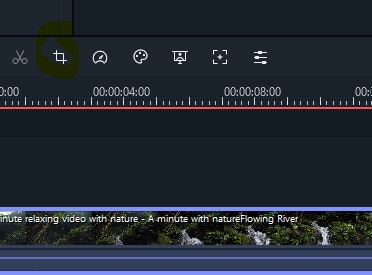
Step 3: Drag the cursor from any corner of your video preview window so as to adjust the size of the crop frame.

Step 4: Once you have adjusted it as per your needs hit the green “OK” button. So, this is how you can add or remove any part of a video clip on Filmora easily.
This free video editing tool offers great features for users and helps them edit home videos without any hassle.
Those who are looking for an easy to use online tool with user-friendly interface and advanced features can go for Wondershare Filmora. It is one of the best video editing software for beginners which will help them edit videos quickly and efficiently.
Step 2: After importing your videos into Lightworks, you can now proceed towards cropping them. For this purpose, click on the video editing tab and select the “DVE” (Dynamic Video Effect) tool.


Step 3: How to crop videos using the DVE tool? You can now go to the ‘Crop’ option under the DVE tab and move your cursor over any unwanted portion of the video and click-and-drag it down and in the right direction. This will distort and stretch the video to remove that particular portion from there while preserving its overall appearance and quality.

Step 4: You can now preview what your video looks like after cropping it by hitting the “Play” button. Hit play to view any changes you have made to your videos.
Step 5: Hit the “Close” button and save your project.
So, this is how you can edit or remove part of a video clip in Lightworks easily. You can also go for some other online tools which are available on the internet and offer great services at no cost for life time. Many of these tools are free to use, easy to handle and have amazing features that can be used by professionals to get their work done beautifully.
There are many video cropping tools available on the internet which can be used for free. Those who are looking for a free, easy to use video editor can download and use this tool without any hassle. That is why; Filmora is best alternative of Lightworks, which offers free version of simple editing tools with all the features you need for your home videos. The free version of this tool is available for Windows; Mac; and Linux operating systems.
An Easier Way to Crop Video Using Filmora
Filmora Video Editor is an easy to use free video editing software that can be used for cropping videos. It allows users to upload their videos online and create new ones or edit existing ones. The steps involved in cropping videos in Filmora are very easy and to the point so you can follow them without any hassle.
It also comes in two versions; free and paid. The free version has less editing tools than the paid one but offers a good enough range of options for beginners who are not looking to make pro-quality movies just yet.
Filmora (video editor) is a power software that allows you to make the most impressive video clips with few steps. This video editing tool gives users various tools to edit videos. It also offers the user-friendly interface that anyone can use to edit home videos on Windows PC, Mac, and Linux devices.
You can download Filmora free video editor from the official website easily. Just visit the behind the link and click on ‘Download’ to get the installer file. Once you have downloaded it, you need to install Filmora software on your computer to start using it. Or install it using the link below:
For Win 7 or later (64-bit)
For macOS 10.14 or later
Step-by-step on how to crop videos using Filmora?
Step 1: Open a video that you want to edit.

Step 2: Open the Filmora editing tool and select the “Crop and Zoom” icon.

Step 3: Drag the cursor from any corner of your video preview window so as to adjust the size of the crop frame.

Step 4: Once you have adjusted it as per your needs hit the green “OK” button. So, this is how you can add or remove any part of a video clip on Filmora easily.
This free video editing tool offers great features for users and helps them edit home videos without any hassle.
Those who are looking for an easy to use online tool with user-friendly interface and advanced features can go for Wondershare Filmora. It is one of the best video editing software for beginners which will help them edit videos quickly and efficiently.
Step 2: After importing your videos into Lightworks, you can now proceed towards cropping them. For this purpose, click on the video editing tab and select the “DVE” (Dynamic Video Effect) tool.


Step 3: How to crop videos using the DVE tool? You can now go to the ‘Crop’ option under the DVE tab and move your cursor over any unwanted portion of the video and click-and-drag it down and in the right direction. This will distort and stretch the video to remove that particular portion from there while preserving its overall appearance and quality.

Step 4: You can now preview what your video looks like after cropping it by hitting the “Play” button. Hit play to view any changes you have made to your videos.
Step 5: Hit the “Close” button and save your project.
So, this is how you can edit or remove part of a video clip in Lightworks easily. You can also go for some other online tools which are available on the internet and offer great services at no cost for life time. Many of these tools are free to use, easy to handle and have amazing features that can be used by professionals to get their work done beautifully.
There are many video cropping tools available on the internet which can be used for free. Those who are looking for a free, easy to use video editor can download and use this tool without any hassle. That is why; Filmora is best alternative of Lightworks, which offers free version of simple editing tools with all the features you need for your home videos. The free version of this tool is available for Windows; Mac; and Linux operating systems.
An Easier Way to Crop Video Using Filmora
Filmora Video Editor is an easy to use free video editing software that can be used for cropping videos. It allows users to upload their videos online and create new ones or edit existing ones. The steps involved in cropping videos in Filmora are very easy and to the point so you can follow them without any hassle.
It also comes in two versions; free and paid. The free version has less editing tools than the paid one but offers a good enough range of options for beginners who are not looking to make pro-quality movies just yet.
Filmora (video editor) is a power software that allows you to make the most impressive video clips with few steps. This video editing tool gives users various tools to edit videos. It also offers the user-friendly interface that anyone can use to edit home videos on Windows PC, Mac, and Linux devices.
You can download Filmora free video editor from the official website easily. Just visit the behind the link and click on ‘Download’ to get the installer file. Once you have downloaded it, you need to install Filmora software on your computer to start using it. Or install it using the link below:
For Win 7 or later (64-bit)
For macOS 10.14 or later
Step-by-step on how to crop videos using Filmora?
Step 1: Open a video that you want to edit.

Step 2: Open the Filmora editing tool and select the “Crop and Zoom” icon.

Step 3: Drag the cursor from any corner of your video preview window so as to adjust the size of the crop frame.

Step 4: Once you have adjusted it as per your needs hit the green “OK” button. So, this is how you can add or remove any part of a video clip on Filmora easily.
This free video editing tool offers great features for users and helps them edit home videos without any hassle.
Those who are looking for an easy to use online tool with user-friendly interface and advanced features can go for Wondershare Filmora. It is one of the best video editing software for beginners which will help them edit videos quickly and efficiently.
Step 2: After importing your videos into Lightworks, you can now proceed towards cropping them. For this purpose, click on the video editing tab and select the “DVE” (Dynamic Video Effect) tool.


Step 3: How to crop videos using the DVE tool? You can now go to the ‘Crop’ option under the DVE tab and move your cursor over any unwanted portion of the video and click-and-drag it down and in the right direction. This will distort and stretch the video to remove that particular portion from there while preserving its overall appearance and quality.

Step 4: You can now preview what your video looks like after cropping it by hitting the “Play” button. Hit play to view any changes you have made to your videos.
Step 5: Hit the “Close” button and save your project.
So, this is how you can edit or remove part of a video clip in Lightworks easily. You can also go for some other online tools which are available on the internet and offer great services at no cost for life time. Many of these tools are free to use, easy to handle and have amazing features that can be used by professionals to get their work done beautifully.
There are many video cropping tools available on the internet which can be used for free. Those who are looking for a free, easy to use video editor can download and use this tool without any hassle. That is why; Filmora is best alternative of Lightworks, which offers free version of simple editing tools with all the features you need for your home videos. The free version of this tool is available for Windows; Mac; and Linux operating systems.
An Easier Way to Crop Video Using Filmora
Filmora Video Editor is an easy to use free video editing software that can be used for cropping videos. It allows users to upload their videos online and create new ones or edit existing ones. The steps involved in cropping videos in Filmora are very easy and to the point so you can follow them without any hassle.
It also comes in two versions; free and paid. The free version has less editing tools than the paid one but offers a good enough range of options for beginners who are not looking to make pro-quality movies just yet.
Filmora (video editor) is a power software that allows you to make the most impressive video clips with few steps. This video editing tool gives users various tools to edit videos. It also offers the user-friendly interface that anyone can use to edit home videos on Windows PC, Mac, and Linux devices.
You can download Filmora free video editor from the official website easily. Just visit the behind the link and click on ‘Download’ to get the installer file. Once you have downloaded it, you need to install Filmora software on your computer to start using it. Or install it using the link below:
For Win 7 or later (64-bit)
For macOS 10.14 or later
Step-by-step on how to crop videos using Filmora?
Step 1: Open a video that you want to edit.

Step 2: Open the Filmora editing tool and select the “Crop and Zoom” icon.

Step 3: Drag the cursor from any corner of your video preview window so as to adjust the size of the crop frame.

Step 4: Once you have adjusted it as per your needs hit the green “OK” button. So, this is how you can add or remove any part of a video clip on Filmora easily.
This free video editing tool offers great features for users and helps them edit home videos without any hassle.
Those who are looking for an easy to use online tool with user-friendly interface and advanced features can go for Wondershare Filmora. It is one of the best video editing software for beginners which will help them edit videos quickly and efficiently.
Do You Know that Google Photos App Can Be Used to Edit and Stabilize Shaky Videos? In This Article, I Will Show You a Step by Step Tutorial About How to Use Google Photos to Stabilize Videos
While recording a video, it is pretty normal if you don’t end up having a stabilized clip due to camera shakes or movements on an unstable and unpaved road. This is where the Google stabilizer video editing feature comes into play. You can stabilize a video with the Google Photos app that has a built-in video stabilizer and other editing tools to give a finishing touch to your media files before they are shared online or with family, friends, and/or colleagues.
In this article, we will show you how to use Google Photos as a stabilizer video Google offers to its consumer. In addition, you will also learn about one of the most trusted and efficient third-party tools to stabilize the clips if Google video stabilizer fails to produce quality output.
In this article
01 What is Google Photos and How Does It Work?
02 How to Stabilize Videos with Google Photos on Android and iPhone?
03 How to Stabilize Videos with Google Photos Online?
04 How to Use Google Photos to Edit Video?
Part 1: What is Google Photos and How Does It Work?
Google Photos is an app that can be obtained from Play Store or App Store to be installed on an Android-based smartphone or iPhone or iPad respectively.
The program can store photos and videos from your phone, and ensures that those media files are well-backed up so they can be recovered easily if/when lost due to some mishaps. Furthermore, the tool even lets you edit, customize, and share your photos and videos with ease.
1. History and Current Policies
Earlier, Google Photos used to offer unlimited storage to the users where they can save as many photos as they want, as long as the images were saved in ‘high-quality’ resolution. However, from June 01, 2021, Google changed its policies of using the app, and now the tool offers limited storage. If more space is needed, the users must subscribe to a paid plan.
2. Accessibility
Google Photos can be accessed from a web browser, Google Drive desktop program, and smartphone app. While you can make only minor changes to the videos such as editing date, time, and location when accessing Google Photos via a web browser, the smartphone app allows you to edit the clips comparatively more sophisticatedly.
3. Deletion
The files that are stored in Google Photos remain there for an indefinite duration, of course until the entire space is completely consumed. When you delete something, it is moved to the Trash and stays there for another 60 days, after which it is automatically deleted from the Cloud forever.
Part 2: How to Stabilize Videos with Google Photos on Android and iPhone?
Google Photos is available for both Android and iPhone smartphones, and as explained earlier, the app can be downloaded from Play Store and App Store respectively. Using the built-in Google stabilizer video editor of the Photos app on both platforms is almost identical and extremely easy.
You can learn how to work with Google video stabilizer to stabilize a video by following the steps that are given below:
Step 1: Locate and Open the Source Video in Google Photos
Download and install Google Photos on your smartphone (Samsung Galaxy Note 10+ is used here for illustrations). Launch the app, tap Library from the bottom-right corner of the interface, and tap to open the source video that you want to stabilize with Google video stabilizer.

Step 2: Stabilize the Video
After the video opens in the app and the playback begins, tap Edit from the bottom. On the next screen, ensure that the Video section is selected. Tap the Stabilize icon from the lower-left area of the window, and wait while Google Photos stabilize video.

Step 3: Save the Video
Once the stabilization process is complete, click Save copy from the bottom-right corner to save the modified video as a separate copy, thus leaving the original instance intact.

Part 3: How to Stabilize Videos with Google Photos Online?
Unfortunately, Google Photos doesn’t have many editing options when accessed via a web browser, and therefore, at the time of this writing, you cannot stabilize a video with the tool’s web interface. But if you are using a Windows or Mac computer, you can try some free online video stabilization software , or use Wondershare Filmora video editor to stabilize video with one click.
For Win 7 or later (64-bit)
For macOS 10.12 or later
Wondershare Filmora video editor is available for Windows and Mac platforms, and gives a tough competition to other industry-standard video editing applications like Final Cut Pro X and Adobe Premiere Pro, etc. You can learn how to stabilize a clip with Filmora instead of using Google stabilizer video editor by following the step-by-step instructions that are explained below:
Step 1: Add the Source Video to the Timeline
After downloading and installing Wondershare Filmora on your Mac or Windows computer (a Windows 11 PC is used here for illustrations), launch the program, and click the New Project tile from the first screen that appears.

When on the main interface, ensure that Media is selected from the standard toolbar at the top, and click anywhere inside the Media window that is present at the upper-left corner. Next, locate, select, and import the source video from your PC that you want to stabilize.

Now, drag and drop the video to the timeline, or hover the mouse over the clip’s thumbnail in the Media window, click the + icon from the bottom-right area. Click the button under the Match to Media or Keep Project Settings label when the confirmation box comes up to add the film to the Timeline using the preferences that you selected.

Step 2: Stabilize the Video
Double click the video in the timeline, and then enable the Stabilization category under video editing pane. Wait while Filmora video editor stabilizes the video without Google video stabilizer. Click OK when done.

Step 3: Export the Stabilized Video
Back on the main interface, click Export from the center-top. On the Export box that opens up next, go to your preferred tab, pick an output format, define output preferences, and click Export from the bottom-right corner to export the stabilized clip without even using Google stabilizer video.

Part 4: How to Use Google Photos to Edit Video?
Google Photos doesn’t only work as a Google video stabilizer app but it also enables you to edit your media clips much more professionally. Some post-production tasks that you can perform while using Google Photos include:
1. Trimming
The trimming handles can be seen when you are on the ‘Video’ section after tapping ‘Edit’ in Google Photos after opening the video. You can drag these handles inwards to get rid of the unwanted starting and ending parts of a clip.

2. Cropping
The ‘Crop’ section enables you to crop the videos in a particular aspect ratio that can be selected from the available list, or drag the handles manually to get custom results.

3. Rotating
The ‘Crop’ section also has an option to rotate the video. Each time you tap the ‘Rotate’ icon, the screen rotates 90o in the counterclockwise direction.

4. Color Correction
The ‘Adjust’ section allows you to adjust the display of a video such as its brightness, contrast, shadows, etc.

5. Filters
You can even add a filter using the presets available in the ‘Filters’ section.

6. Annotations
The ‘Markup’ section enables you to annotate the video. You can either use the ‘Pen’ tool or ‘Highlighter’ to write text on the video or give the screen a different shade respectively.

Depending on the type of modifications you want in your video, you can use Google Photos to get the job done easily and quickly.
Conclusion
Google video stabilizer is a built-in tool in Google Photos. Google Photos can be obtained from Play Store or App Store for your Android or iOS smart devices respectively. In addition to stabilizing your videos, Google Photos app also enables you to make other modifications such as trimming, cropping, applying filters, and much more.
02 How to Stabilize Videos with Google Photos on Android and iPhone?
03 How to Stabilize Videos with Google Photos Online?
04 How to Use Google Photos to Edit Video?
Part 1: What is Google Photos and How Does It Work?
Google Photos is an app that can be obtained from Play Store or App Store to be installed on an Android-based smartphone or iPhone or iPad respectively.
The program can store photos and videos from your phone, and ensures that those media files are well-backed up so they can be recovered easily if/when lost due to some mishaps. Furthermore, the tool even lets you edit, customize, and share your photos and videos with ease.
1. History and Current Policies
Earlier, Google Photos used to offer unlimited storage to the users where they can save as many photos as they want, as long as the images were saved in ‘high-quality’ resolution. However, from June 01, 2021, Google changed its policies of using the app, and now the tool offers limited storage. If more space is needed, the users must subscribe to a paid plan.
2. Accessibility
Google Photos can be accessed from a web browser, Google Drive desktop program, and smartphone app. While you can make only minor changes to the videos such as editing date, time, and location when accessing Google Photos via a web browser, the smartphone app allows you to edit the clips comparatively more sophisticatedly.
3. Deletion
The files that are stored in Google Photos remain there for an indefinite duration, of course until the entire space is completely consumed. When you delete something, it is moved to the Trash and stays there for another 60 days, after which it is automatically deleted from the Cloud forever.
Part 2: How to Stabilize Videos with Google Photos on Android and iPhone?
Google Photos is available for both Android and iPhone smartphones, and as explained earlier, the app can be downloaded from Play Store and App Store respectively. Using the built-in Google stabilizer video editor of the Photos app on both platforms is almost identical and extremely easy.
You can learn how to work with Google video stabilizer to stabilize a video by following the steps that are given below:
Step 1: Locate and Open the Source Video in Google Photos
Download and install Google Photos on your smartphone (Samsung Galaxy Note 10+ is used here for illustrations). Launch the app, tap Library from the bottom-right corner of the interface, and tap to open the source video that you want to stabilize with Google video stabilizer.

Step 2: Stabilize the Video
After the video opens in the app and the playback begins, tap Edit from the bottom. On the next screen, ensure that the Video section is selected. Tap the Stabilize icon from the lower-left area of the window, and wait while Google Photos stabilize video.

Step 3: Save the Video
Once the stabilization process is complete, click Save copy from the bottom-right corner to save the modified video as a separate copy, thus leaving the original instance intact.

Part 3: How to Stabilize Videos with Google Photos Online?
Unfortunately, Google Photos doesn’t have many editing options when accessed via a web browser, and therefore, at the time of this writing, you cannot stabilize a video with the tool’s web interface. But if you are using a Windows or Mac computer, you can try some free online video stabilization software , or use Wondershare Filmora video editor to stabilize video with one click.
For Win 7 or later (64-bit)
For macOS 10.12 or later
Wondershare Filmora video editor is available for Windows and Mac platforms, and gives a tough competition to other industry-standard video editing applications like Final Cut Pro X and Adobe Premiere Pro, etc. You can learn how to stabilize a clip with Filmora instead of using Google stabilizer video editor by following the step-by-step instructions that are explained below:
Step 1: Add the Source Video to the Timeline
After downloading and installing Wondershare Filmora on your Mac or Windows computer (a Windows 11 PC is used here for illustrations), launch the program, and click the New Project tile from the first screen that appears.

When on the main interface, ensure that Media is selected from the standard toolbar at the top, and click anywhere inside the Media window that is present at the upper-left corner. Next, locate, select, and import the source video from your PC that you want to stabilize.

Now, drag and drop the video to the timeline, or hover the mouse over the clip’s thumbnail in the Media window, click the + icon from the bottom-right area. Click the button under the Match to Media or Keep Project Settings label when the confirmation box comes up to add the film to the Timeline using the preferences that you selected.

Step 2: Stabilize the Video
Double click the video in the timeline, and then enable the Stabilization category under video editing pane. Wait while Filmora video editor stabilizes the video without Google video stabilizer. Click OK when done.

Step 3: Export the Stabilized Video
Back on the main interface, click Export from the center-top. On the Export box that opens up next, go to your preferred tab, pick an output format, define output preferences, and click Export from the bottom-right corner to export the stabilized clip without even using Google stabilizer video.

Part 4: How to Use Google Photos to Edit Video?
Google Photos doesn’t only work as a Google video stabilizer app but it also enables you to edit your media clips much more professionally. Some post-production tasks that you can perform while using Google Photos include:
1. Trimming
The trimming handles can be seen when you are on the ‘Video’ section after tapping ‘Edit’ in Google Photos after opening the video. You can drag these handles inwards to get rid of the unwanted starting and ending parts of a clip.

2. Cropping
The ‘Crop’ section enables you to crop the videos in a particular aspect ratio that can be selected from the available list, or drag the handles manually to get custom results.

3. Rotating
The ‘Crop’ section also has an option to rotate the video. Each time you tap the ‘Rotate’ icon, the screen rotates 90o in the counterclockwise direction.

4. Color Correction
The ‘Adjust’ section allows you to adjust the display of a video such as its brightness, contrast, shadows, etc.

5. Filters
You can even add a filter using the presets available in the ‘Filters’ section.

6. Annotations
The ‘Markup’ section enables you to annotate the video. You can either use the ‘Pen’ tool or ‘Highlighter’ to write text on the video or give the screen a different shade respectively.

Depending on the type of modifications you want in your video, you can use Google Photos to get the job done easily and quickly.
Conclusion
Google video stabilizer is a built-in tool in Google Photos. Google Photos can be obtained from Play Store or App Store for your Android or iOS smart devices respectively. In addition to stabilizing your videos, Google Photos app also enables you to make other modifications such as trimming, cropping, applying filters, and much more.
02 How to Stabilize Videos with Google Photos on Android and iPhone?
03 How to Stabilize Videos with Google Photos Online?
04 How to Use Google Photos to Edit Video?
Part 1: What is Google Photos and How Does It Work?
Google Photos is an app that can be obtained from Play Store or App Store to be installed on an Android-based smartphone or iPhone or iPad respectively.
The program can store photos and videos from your phone, and ensures that those media files are well-backed up so they can be recovered easily if/when lost due to some mishaps. Furthermore, the tool even lets you edit, customize, and share your photos and videos with ease.
1. History and Current Policies
Earlier, Google Photos used to offer unlimited storage to the users where they can save as many photos as they want, as long as the images were saved in ‘high-quality’ resolution. However, from June 01, 2021, Google changed its policies of using the app, and now the tool offers limited storage. If more space is needed, the users must subscribe to a paid plan.
2. Accessibility
Google Photos can be accessed from a web browser, Google Drive desktop program, and smartphone app. While you can make only minor changes to the videos such as editing date, time, and location when accessing Google Photos via a web browser, the smartphone app allows you to edit the clips comparatively more sophisticatedly.
3. Deletion
The files that are stored in Google Photos remain there for an indefinite duration, of course until the entire space is completely consumed. When you delete something, it is moved to the Trash and stays there for another 60 days, after which it is automatically deleted from the Cloud forever.
Part 2: How to Stabilize Videos with Google Photos on Android and iPhone?
Google Photos is available for both Android and iPhone smartphones, and as explained earlier, the app can be downloaded from Play Store and App Store respectively. Using the built-in Google stabilizer video editor of the Photos app on both platforms is almost identical and extremely easy.
You can learn how to work with Google video stabilizer to stabilize a video by following the steps that are given below:
Step 1: Locate and Open the Source Video in Google Photos
Download and install Google Photos on your smartphone (Samsung Galaxy Note 10+ is used here for illustrations). Launch the app, tap Library from the bottom-right corner of the interface, and tap to open the source video that you want to stabilize with Google video stabilizer.

Step 2: Stabilize the Video
After the video opens in the app and the playback begins, tap Edit from the bottom. On the next screen, ensure that the Video section is selected. Tap the Stabilize icon from the lower-left area of the window, and wait while Google Photos stabilize video.

Step 3: Save the Video
Once the stabilization process is complete, click Save copy from the bottom-right corner to save the modified video as a separate copy, thus leaving the original instance intact.

Part 3: How to Stabilize Videos with Google Photos Online?
Unfortunately, Google Photos doesn’t have many editing options when accessed via a web browser, and therefore, at the time of this writing, you cannot stabilize a video with the tool’s web interface. But if you are using a Windows or Mac computer, you can try some free online video stabilization software , or use Wondershare Filmora video editor to stabilize video with one click.
For Win 7 or later (64-bit)
For macOS 10.12 or later
Wondershare Filmora video editor is available for Windows and Mac platforms, and gives a tough competition to other industry-standard video editing applications like Final Cut Pro X and Adobe Premiere Pro, etc. You can learn how to stabilize a clip with Filmora instead of using Google stabilizer video editor by following the step-by-step instructions that are explained below:
Step 1: Add the Source Video to the Timeline
After downloading and installing Wondershare Filmora on your Mac or Windows computer (a Windows 11 PC is used here for illustrations), launch the program, and click the New Project tile from the first screen that appears.

When on the main interface, ensure that Media is selected from the standard toolbar at the top, and click anywhere inside the Media window that is present at the upper-left corner. Next, locate, select, and import the source video from your PC that you want to stabilize.

Now, drag and drop the video to the timeline, or hover the mouse over the clip’s thumbnail in the Media window, click the + icon from the bottom-right area. Click the button under the Match to Media or Keep Project Settings label when the confirmation box comes up to add the film to the Timeline using the preferences that you selected.

Step 2: Stabilize the Video
Double click the video in the timeline, and then enable the Stabilization category under video editing pane. Wait while Filmora video editor stabilizes the video without Google video stabilizer. Click OK when done.

Step 3: Export the Stabilized Video
Back on the main interface, click Export from the center-top. On the Export box that opens up next, go to your preferred tab, pick an output format, define output preferences, and click Export from the bottom-right corner to export the stabilized clip without even using Google stabilizer video.

Part 4: How to Use Google Photos to Edit Video?
Google Photos doesn’t only work as a Google video stabilizer app but it also enables you to edit your media clips much more professionally. Some post-production tasks that you can perform while using Google Photos include:
1. Trimming
The trimming handles can be seen when you are on the ‘Video’ section after tapping ‘Edit’ in Google Photos after opening the video. You can drag these handles inwards to get rid of the unwanted starting and ending parts of a clip.

2. Cropping
The ‘Crop’ section enables you to crop the videos in a particular aspect ratio that can be selected from the available list, or drag the handles manually to get custom results.

3. Rotating
The ‘Crop’ section also has an option to rotate the video. Each time you tap the ‘Rotate’ icon, the screen rotates 90o in the counterclockwise direction.

4. Color Correction
The ‘Adjust’ section allows you to adjust the display of a video such as its brightness, contrast, shadows, etc.

5. Filters
You can even add a filter using the presets available in the ‘Filters’ section.

6. Annotations
The ‘Markup’ section enables you to annotate the video. You can either use the ‘Pen’ tool or ‘Highlighter’ to write text on the video or give the screen a different shade respectively.

Depending on the type of modifications you want in your video, you can use Google Photos to get the job done easily and quickly.
Conclusion
Google video stabilizer is a built-in tool in Google Photos. Google Photos can be obtained from Play Store or App Store for your Android or iOS smart devices respectively. In addition to stabilizing your videos, Google Photos app also enables you to make other modifications such as trimming, cropping, applying filters, and much more.
02 How to Stabilize Videos with Google Photos on Android and iPhone?
03 How to Stabilize Videos with Google Photos Online?
04 How to Use Google Photos to Edit Video?
Part 1: What is Google Photos and How Does It Work?
Google Photos is an app that can be obtained from Play Store or App Store to be installed on an Android-based smartphone or iPhone or iPad respectively.
The program can store photos and videos from your phone, and ensures that those media files are well-backed up so they can be recovered easily if/when lost due to some mishaps. Furthermore, the tool even lets you edit, customize, and share your photos and videos with ease.
1. History and Current Policies
Earlier, Google Photos used to offer unlimited storage to the users where they can save as many photos as they want, as long as the images were saved in ‘high-quality’ resolution. However, from June 01, 2021, Google changed its policies of using the app, and now the tool offers limited storage. If more space is needed, the users must subscribe to a paid plan.
2. Accessibility
Google Photos can be accessed from a web browser, Google Drive desktop program, and smartphone app. While you can make only minor changes to the videos such as editing date, time, and location when accessing Google Photos via a web browser, the smartphone app allows you to edit the clips comparatively more sophisticatedly.
3. Deletion
The files that are stored in Google Photos remain there for an indefinite duration, of course until the entire space is completely consumed. When you delete something, it is moved to the Trash and stays there for another 60 days, after which it is automatically deleted from the Cloud forever.
Part 2: How to Stabilize Videos with Google Photos on Android and iPhone?
Google Photos is available for both Android and iPhone smartphones, and as explained earlier, the app can be downloaded from Play Store and App Store respectively. Using the built-in Google stabilizer video editor of the Photos app on both platforms is almost identical and extremely easy.
You can learn how to work with Google video stabilizer to stabilize a video by following the steps that are given below:
Step 1: Locate and Open the Source Video in Google Photos
Download and install Google Photos on your smartphone (Samsung Galaxy Note 10+ is used here for illustrations). Launch the app, tap Library from the bottom-right corner of the interface, and tap to open the source video that you want to stabilize with Google video stabilizer.

Step 2: Stabilize the Video
After the video opens in the app and the playback begins, tap Edit from the bottom. On the next screen, ensure that the Video section is selected. Tap the Stabilize icon from the lower-left area of the window, and wait while Google Photos stabilize video.

Step 3: Save the Video
Once the stabilization process is complete, click Save copy from the bottom-right corner to save the modified video as a separate copy, thus leaving the original instance intact.

Part 3: How to Stabilize Videos with Google Photos Online?
Unfortunately, Google Photos doesn’t have many editing options when accessed via a web browser, and therefore, at the time of this writing, you cannot stabilize a video with the tool’s web interface. But if you are using a Windows or Mac computer, you can try some free online video stabilization software , or use Wondershare Filmora video editor to stabilize video with one click.
For Win 7 or later (64-bit)
For macOS 10.12 or later
Wondershare Filmora video editor is available for Windows and Mac platforms, and gives a tough competition to other industry-standard video editing applications like Final Cut Pro X and Adobe Premiere Pro, etc. You can learn how to stabilize a clip with Filmora instead of using Google stabilizer video editor by following the step-by-step instructions that are explained below:
Step 1: Add the Source Video to the Timeline
After downloading and installing Wondershare Filmora on your Mac or Windows computer (a Windows 11 PC is used here for illustrations), launch the program, and click the New Project tile from the first screen that appears.

When on the main interface, ensure that Media is selected from the standard toolbar at the top, and click anywhere inside the Media window that is present at the upper-left corner. Next, locate, select, and import the source video from your PC that you want to stabilize.

Now, drag and drop the video to the timeline, or hover the mouse over the clip’s thumbnail in the Media window, click the + icon from the bottom-right area. Click the button under the Match to Media or Keep Project Settings label when the confirmation box comes up to add the film to the Timeline using the preferences that you selected.

Step 2: Stabilize the Video
Double click the video in the timeline, and then enable the Stabilization category under video editing pane. Wait while Filmora video editor stabilizes the video without Google video stabilizer. Click OK when done.

Step 3: Export the Stabilized Video
Back on the main interface, click Export from the center-top. On the Export box that opens up next, go to your preferred tab, pick an output format, define output preferences, and click Export from the bottom-right corner to export the stabilized clip without even using Google stabilizer video.

Part 4: How to Use Google Photos to Edit Video?
Google Photos doesn’t only work as a Google video stabilizer app but it also enables you to edit your media clips much more professionally. Some post-production tasks that you can perform while using Google Photos include:
1. Trimming
The trimming handles can be seen when you are on the ‘Video’ section after tapping ‘Edit’ in Google Photos after opening the video. You can drag these handles inwards to get rid of the unwanted starting and ending parts of a clip.

2. Cropping
The ‘Crop’ section enables you to crop the videos in a particular aspect ratio that can be selected from the available list, or drag the handles manually to get custom results.

3. Rotating
The ‘Crop’ section also has an option to rotate the video. Each time you tap the ‘Rotate’ icon, the screen rotates 90o in the counterclockwise direction.

4. Color Correction
The ‘Adjust’ section allows you to adjust the display of a video such as its brightness, contrast, shadows, etc.

5. Filters
You can even add a filter using the presets available in the ‘Filters’ section.

6. Annotations
The ‘Markup’ section enables you to annotate the video. You can either use the ‘Pen’ tool or ‘Highlighter’ to write text on the video or give the screen a different shade respectively.

Depending on the type of modifications you want in your video, you can use Google Photos to get the job done easily and quickly.
Conclusion
Google video stabilizer is a built-in tool in Google Photos. Google Photos can be obtained from Play Store or App Store for your Android or iOS smart devices respectively. In addition to stabilizing your videos, Google Photos app also enables you to make other modifications such as trimming, cropping, applying filters, and much more.
How To Create A Green Screen Video In After Effects
You’ll probably get the finest results in After Effects out of all the editing programs. Working with green screen footage in After Effects can be done in a variety of ways. Utilizing a built-in preset that combines three effects is advised by Adobe. Due to its ability to deliver speedy (and typically excellent) outcomes, this strategy is great for both beginners and specialists. We’ll demonstrate how to do easily for you.
Let’s start off!
1. Importing your footage
After you have imported your material into the After Effects project, you should next create a new composition using the footage. In the following stage, you have the option of either adding each plugin one at a time or doing it all at once. You may find them grouped together as Keylight, Key Cleaner, and Advanced Spill Suppressor in the Animation Presets box, which is located under the “Image Utilities” heading.
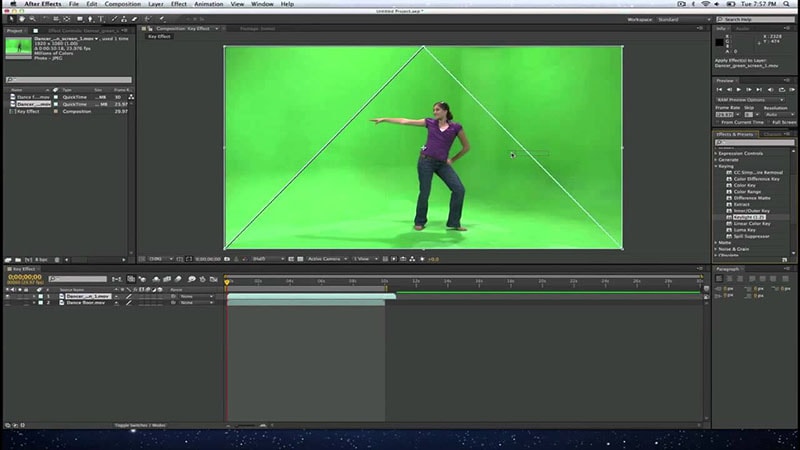
2. Remove the green color
After Effects users can get rid of a green screen by going to the “Animation Presets” window, searching for the “Keylight” preset, dragging, and dropping it over the clip, and then shifting their focus to the “Effects Controls” window. Make sure the Screen Colour is set to the color of your screen’s background (which, in this case, is green). You may do this with the color selector.
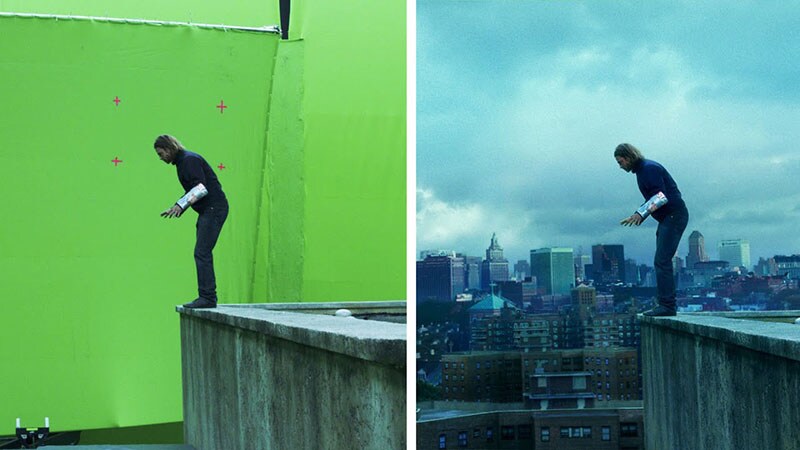
3. Clean up the shot
You have no doubt observed that some of the remaining parts do not have the correct keying installed in them. In order to get rid of them, you need to put the view into the Combined Matte mode and turn the Screen Gain up a notch.
Because everything that is not transparent is turned white by Combined Matte, any remaining debris can be seen very clearly after it has been applied. After you have finished cleaning the frame, you should change the view to Intermediate Result. Your footage may become contaminated with artifacts if the Final Result view is inadvertently switched on.
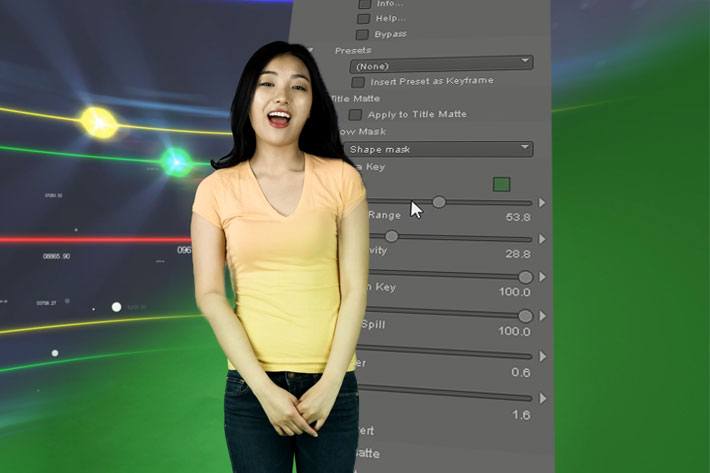
You can go to the “Screen Matte” area if you feel like the frame still needs more tweaking after you’ve applied the previous ones. You can accomplish that with the assistance of Clip Black and Clip White. Feel free to turn the Clip Black dial all the way to the right and turn the Clip White dial to the left. You can also adjust the other settings, if necessary, but based on my observations, everything should be working properly at this point.
The Bottom Line
After completing this lesson, you should have a better understanding of what a chroma key is, how to get rid of a green screen in After Effects, and how to adjust some settings if something goes wrong. Keep in mind that if the footage is not captured properly, you will not be able to successfully key out the green screen in the final video. Extra caution should be taken with the lights, and spills should be avoided at all costs!
Free Download For Win 7 or later(64-bit)
Free Download For macOS 10.14 or later
Free Download For macOS 10.14 or later
Also read:
- Updated Methods to Make Sure Your Recording Slideshow in Powerpoint Is Not Wro
- How to Loop Video in Canva for 2024
- Are You Eager to Know How to Create an Adjustment Layer in Premiere Pro? This Article Will Highlight the Significance of Adding an Adjustment Layer in Premiere Pro
- Updated Add Zoom Blur Effect In Photoshop Step by Step
- 2024 Approved Discover the Best Video Filter Software . Elevate Your Video Editing with Top Contenders Like Filmora, DaVinci Resolve, HitFilm Express, and More
- Updated How to Record Super Slow Motion Videos on Your Huawei/Samsung/iPhone, In 2024
- Updated Want to Learn How to Make a Fortnite Montage? This Guide Will Give You the Low-Down on Creating Epic Montage Fortnite Videos that You Can Share with Other Players on Social Media Platforms for 2024
- New Make Transparent Background Video Today for 2024
- Updated 2024 Approved Do You Need a Royalty-Free 5 Seconds Countdown Video for Your Video but Dont Not Where to Find One? We Will Introduce You to the Best HD and 4K Clips that You Can Always Try Anytime
- How to Use Visual Effect for Zoom
- Want to Speed up or Slow Down a Video to Make It Look Different? Here Are the Simple Steps to Change Video Speed in Lightworks Video Editor for 2024
- Updated In 2024, Learn Color Correction in After Effects with These YouTube Videos
- In 2024, Do You Know You Can Trim and Cut Your Video Into the Desired Portions Using a Reliable Video Splitter? Get an Easy Video Splitter Now to Simplify Your Work. Here Are 33 Carefully Chosen Apps to Help You in This
- Updated How to Remove or Mute Audio in Video with Android Phones, In 2024
- Updated In 2024, Want to Find a Good Camera for YouTube? This Article Brings You some of the Best Options of Different Varieties for Your Channel
- New What Is the Best MP4 Cutters for YouTubers on Mac, In 2024
- Updated This Article Will Help You Make Cinematic Shots with Simple DIY Hacks Using Stuff From Your Nearest Dollar Store. You Can Edit Your Video to Get Pro Results by Wondershare Filmora for 2024
- In 2024, Lets Look at Four Different Ways of Merging Audios and Videos. The Tools Will Help You Craft High-End Videos without Involving Any Complex Steps. You Can Make Your Videos Beautiful by Using the Following Easy to Use Tools
- New 2024 Approved Do You Want to Add a Motion Blur Effect in Valorant? Read This Guide to Find Out How to Create a Motion Blur Effect in Valorant without Any Hassle
- In 2024, LumaFusion – What Is It and the Best Alternative to Use
- Updated In 2024, Do You Want to Get Green Screen Effects on Your Video without Green Screen Setup in Your Background? Learn How to Get Virtual Green Screen Background and Shoot Videos Like a Pro
- New In 2024, Adjust Background to Black for Your Product Review Video
- New In 2024, How to Create an Aesthetic Slideshow Presentation
- Updated 8 Best Sites to Get Glitch Transition for Premiere Pro
- Updated In 2024, How to Make Eye Zoom Transition Effect with Filmora
- New Hitfilm Express - A Guide to Download, Install, Key Features
- Updated In 2024, How To Quick Guide for Making Google Slideshows
- 2024 Approved How to Create and Add an Adjustment Layer in Final Cut Pro
- New In 2024, Easy Way to Create an Alternate Reality Effect
- Final Cut Pro - How to Download and Install It for 2024
- In 2024, Steps To Fade Audio In Premier Pro
- Updated In 2024, How to Make Custom Lower Thirds with Filmora
- Best GIF to AVI Converters
- Updated 3 Actionable Ways to Create Countdown Animation for Videos
- 2024 Approved List of Supported Whatsapp Video Format You May Want to Know
- 2024 Approved While Emojis Have High End Credibility Towards Different Media Utilities, People Also Ask About Ways and Methods to Add Emoji to iPhone. Be Here to Get the Easiest Solutions to the Query
- In 2024, How to Make Foggy Text Reflection Effect
- Updated Are You Searching for Professional Subtitle Apps? Read This Article to Explore Various Compatible Subtitle Apps that You Can Run on Multiple Platforms
- Updated 2024 Approved How to Rotate Videos With Media Player Classic
- In 2024, Create a Brand Video to Make Your Business Shine
- Do You Want Your Video Footage to Resemble Kodak Films? You Can Get the Old Kodak Film Look by Searching for Kodak 2383 LUT Free Download on the Internet
- New Create Intro Video with Flixpress for 2024
- Best 8 Free Video Editing Software Reddit
- Top Tips for Camtasia Freeze-Frame for 2024
- New In 2024, Easy Guide to Zoom Video in VLC
- Green Screens Are a Fun Way for Creators to Bring Their Personality to Their Stream, Allowing Them to Dynamically Alter Their Stream Background and Make Their Content Appear Even More Engaging and Polished for 2024
- 2024 Approved General Knowledge About MP4 Format and Best MP4 Video Editor
- Top 10 Best Spy Watches For your Xiaomi 13 Ultra | Dr.fone
- Prank Your Friends! Easy Ways to Fake and Share Google Maps Location On Poco C51 | Dr.fone
- Delete Gmail Account With/Without Password On Vivo Y100
- In 2024, The Ultimate Guide to Bypassing iCloud Activation Lock from Apple iPhone 13 Pro
- In 2024, Lock Your Xiaomi Redmi Note 12 5G Phone in Style The Top 5 Gesture Lock Screen Apps
- How to Bypass Google FRP Lock from Samsung Galaxy A25 5G Devices
- In 2024, Pokemon Go Error 12 Failed to Detect Location On Oppo Reno 10 Pro+ 5G? | Dr.fone
- How to Unlock the Lock Screen on my Reno 11 Pro 5G
- Updated What Is AI Voice Over for 2024
- How To Unlock SIM Cards Of Meizu 21 Pro Without PUK Codes
- How To Restore Missing Messages Files from Vivo S17
- In 2024, What is the best Pokemon for pokemon pvp ranking On Oppo A79 5G? | Dr.fone
- Planning to Use a Pokemon Go Joystick on Samsung Galaxy F15 5G? | Dr.fone
- In 2024, Where Is the Best Place to Catch Dratini On Samsung Galaxy A23 5G | Dr.fone
- In 2024, How To Unlock SIM Cards Of Motorola Edge 40 Without PUK Codes
- How To Check if Your Vivo Y78 5G Is Unlocked
- In 2024, How To Activate and Use Life360 Ghost Mode On Nokia C12 | Dr.fone
- Full Guide on Mirroring Your Vivo V29 Pro to Your PC/Mac | Dr.fone
- In 2024, Best Ways on How to Unlock/Bypass/Swipe/Remove Oppo Reno 11 5G Fingerprint Lock
- Waht Is AI Pixel Art Generator, In 2024
- How to Bypass FRP from Itel P55T?
- How to Delete iCloud Account On iPhone 6s without Password?
- 3 Ways to Fake GPS Without Root On Realme GT 3 | Dr.fone
- How To Restore Missing Messages Files from Tecno Spark 10 4G
- Prevent Cross-Site Tracking on Oppo A18 and Browser | Dr.fone
- In 2024, Complete Tutorial to Use GPS Joystick to Fake GPS Location On Apple iPhone 14 Plus | Dr.fone
- Spoofing Life360 How to Do it on Infinix Zero 30 5G? | Dr.fone
- Title: How to Use LUTs in Premiere Pro for 2024
- Author: Morgan
- Created at : 2024-05-19 05:12:21
- Updated at : 2024-05-20 05:12:21
- Link: https://ai-video-editing.techidaily.com/how-to-use-luts-in-premiere-pro-for-2024/
- License: This work is licensed under CC BY-NC-SA 4.0.

