
:max_bytes(150000):strip_icc():format(webp)/hexadecimal-code-security-key-krzysztof-zmij-e-plus-getty-images-57c76b825f9b5829f4bd185e.jpg)
How to Use LUTs in VN Editor – Complete Guide and Best LUTs Download for 2024
How to Use LUTs in VN Editor – Complete Guide and Best LUTs Download
Hello and welcome to another article full of information and excitement. The topic of this article is LUT for the VN editor. So it will be exciting for those who want to use LUTs in their video to make them look nice and well. As we will discuss today that what is VN editor and how you can add LUTs to your videos using it on the devices it is compatible for. Moreover, where you can download some fantastic LUTs like moody LUTs, which help your videos to look nice, and which software you should use for this purpose if you are running a device on which the VN editor is not compatible. So let’s begin!
Part 1. What is VN editor?
VN editor is one of the best choices for video editing on mobiles and Mac. Fast editing, transitions, effects, filters, colors, subtitles, music, and many other features make the VN video editing app a great tool for producing and editing videos. It aims to make editing shorter and more feature-rich, empowering everyone to take control of their own lives. You cannot only produce great videos but good films as well. In the following, we will discuss how you can add LUTs to your videos using it.

Part 2. How to use LUTs in VN editor?
First, we must know that it is compatible with which platforms. So, it is now available for Android, iOS, and Mac OS only. However, you can also use it on Windows with some Android or iOS emulators, but it is not a very continent way in our suggestions. Even after doing this, it does not work well on your Windows. Maybe you will face some glitches or malfunctioning problems. So it is better to use it on only those platforms for which it is primarily available. Please read the instructions below since we will go through how to use LUTs in it later on.
On Mac:
First of all, we will learn how you can do it on Mac:
- Download the VN Editor for Mac and open it.
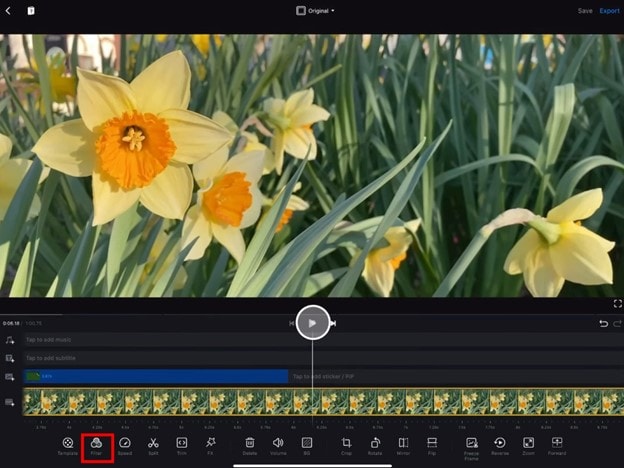
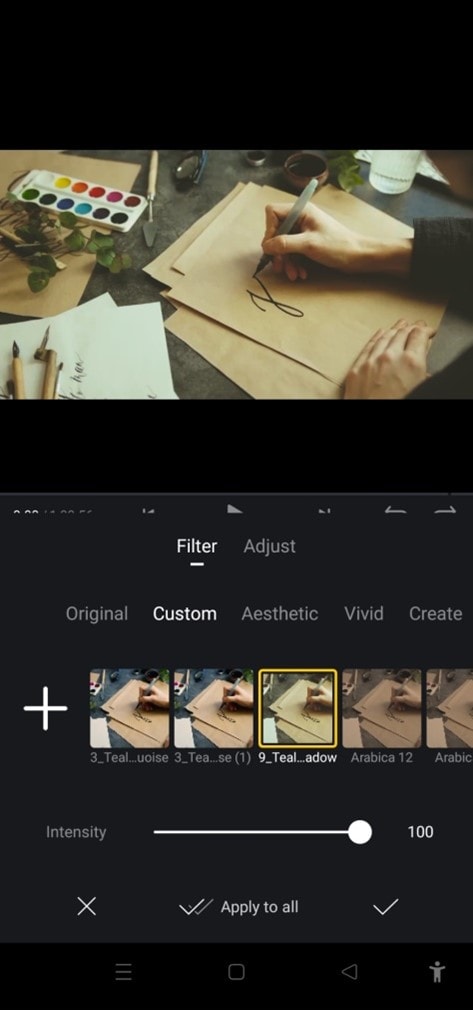
- Add your video and then tap the filters option.
- Now choose custom filters and then select the LUTs pack.

- Select the desired LUT and apply.
On Mobile:
Secondly, we will discuss how we can do this on our mobiles (Android or iOS). The procedure on both devices (Android or iOS) is almost comparable. Therefore, we will discuss the steps from the perspective of both of these here:
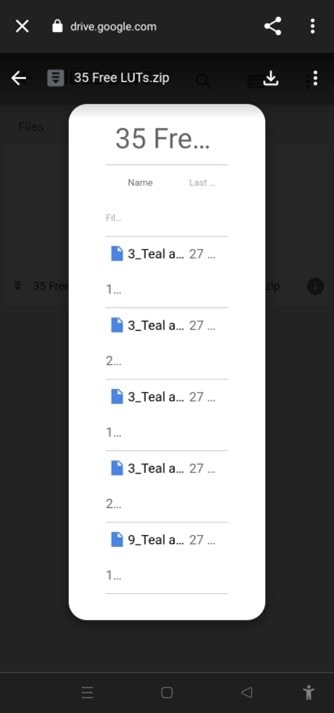
- First, download the VN editor from your mobile app store (Android or iOS) and the LUTs pack you want to use in your video.
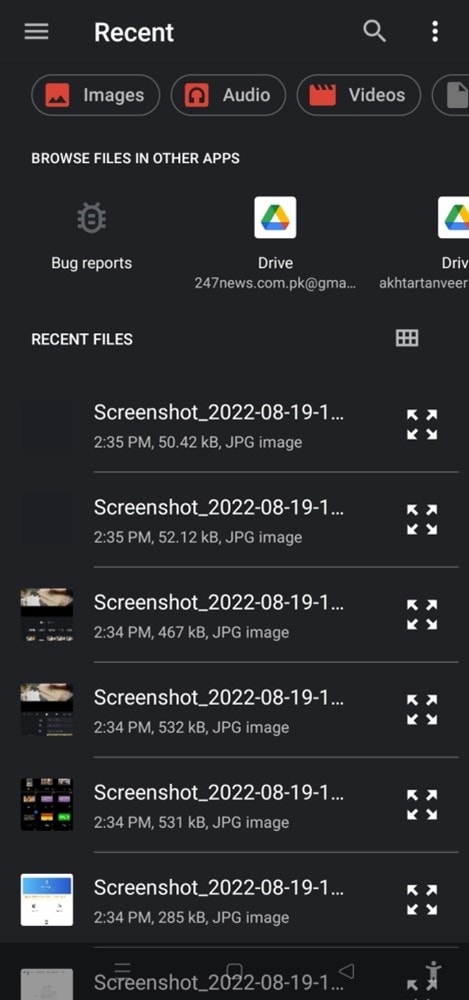
- After downloading them on your mobile, open the VN editor application.
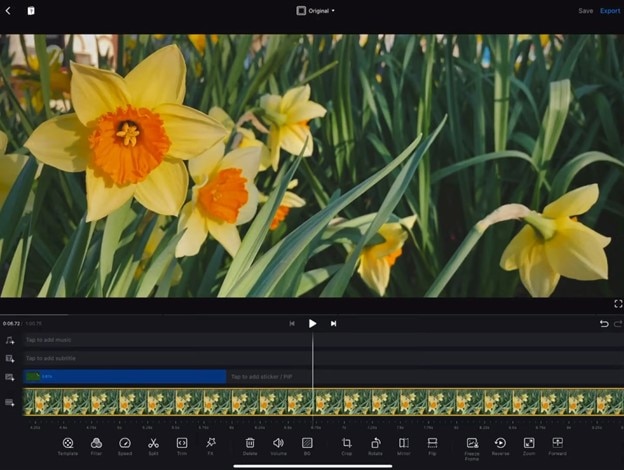
- Create a new project and add your video to it.

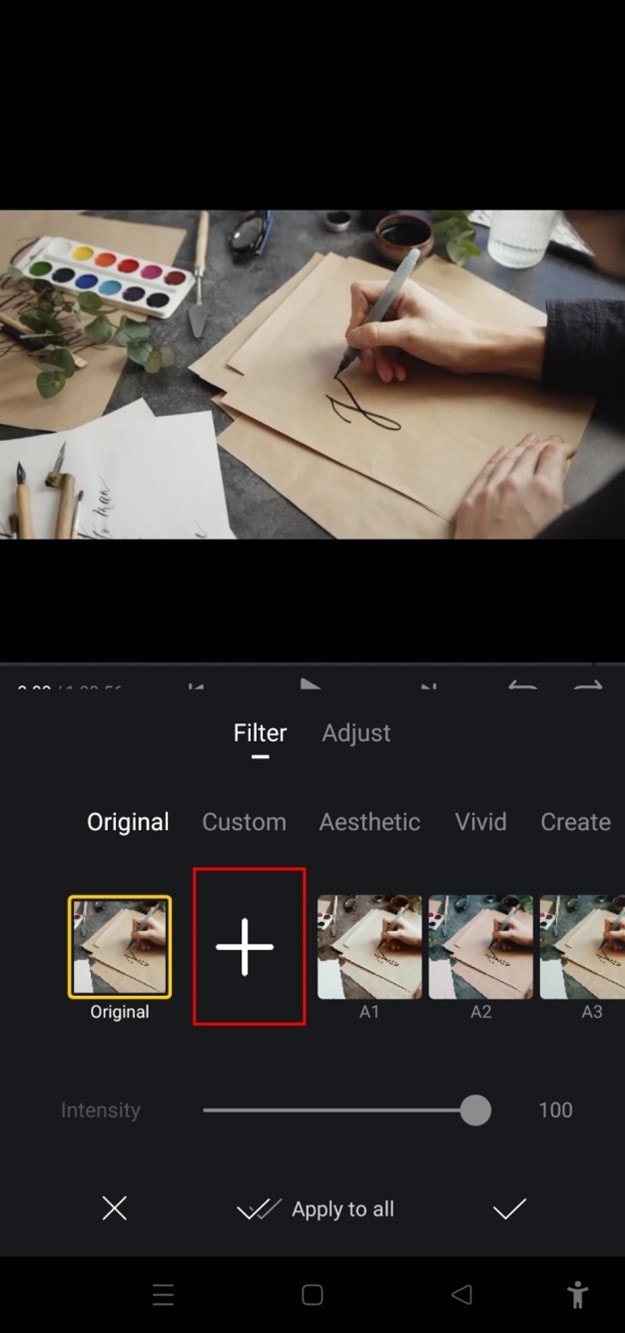
- Then click on the Filters option and select add external or custom filters option next to the existing filters.
- It will take you to the File manager of your mobile, from which you have to find the folder in which you have stored your LUTs.
- After finding them, you can select those LUTs you want to use in your video and then click on the done or select button.
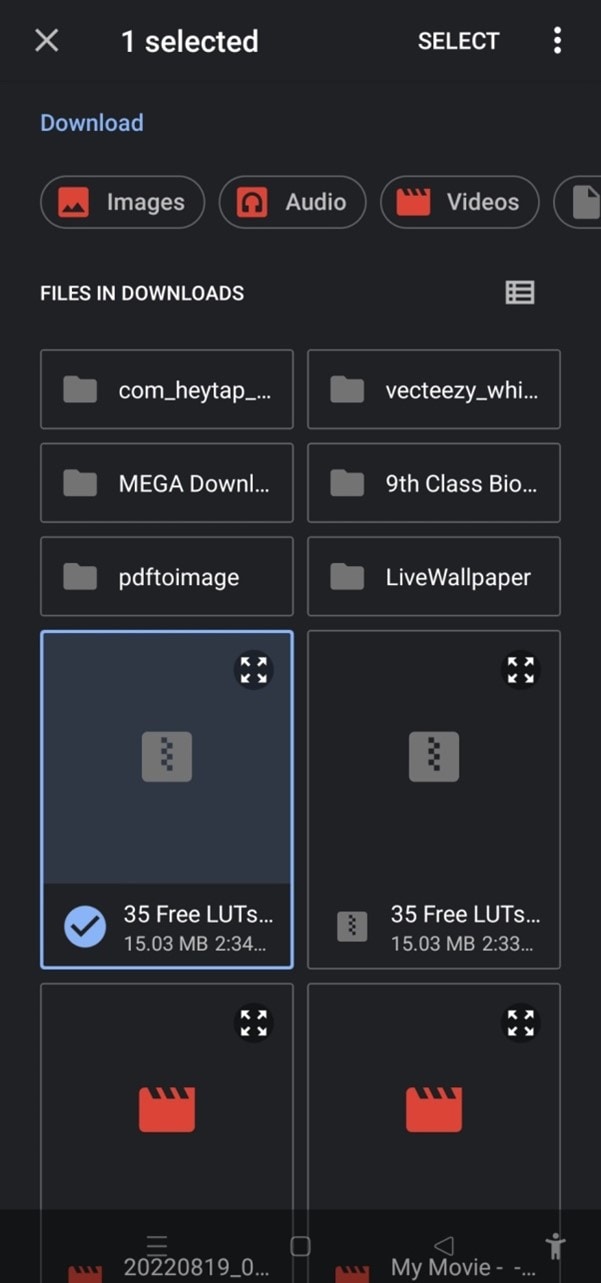
- Your downloaded LUTs start showing in the VN editor, and you can use them in your videos as you want.
Part 3. Best LUTs resource for VN video editor
1. Presets Store
Presets Store is an online platform that helps you with various Filters, LUTs, and other presets. So you can download LUTs for your videos for the VN editor using it. However, it’s not a free service. You have to pay for the LUTs you want to download from here. You can visit their YouTube channel to follow the latest LUTs, Filters and other presets on this platform.
2. Apna Editz
Apna Editz is another online platform you can use for this purpose. It also provides you with a fantastic variety of Presets like LUTs, Filters, and many other similar effects, which you can use in your video using the VN editor. The main Pros of this recommendation are that it’s a free website. So you can download LUTs for your videos from it for free. Keep an eye on their YouTube channel to be updated about the latest LUTs.
3. Lut Preset
Lut Preset is another alternative to all the above ones. You can get almost all your favorite LUTs for VN editor for free here and then use them in your videos as you want. They also share the latest LUTs on their YouTube Channel.
4. Pencil Hub
Pencil Hub is also a good option in this concern. However, it does not have too much variety of VN LUTs, but you can still use it to download some of the best LUTs for VN editors. To get informed of their every new effect and LUTs, their YouTube channel is the primary source.
5. YRP EDITZ
YRP ETIDZ is another good option if you are still looking for some fantastic VN LUTs. They, too not have a large variety of presets and LUTs. However, if you want some most commonly used LUTs for VN Editor, then they are a good option. You’ll notify of their most website updates by checking their YouTube channel.
Part 4. How to add LUTs to the best alternative to the VN editor?
VN Editor is undoubtedly an excellent choice to add LUTs to your videos. However, the VN editor is best suitable for mobile devices. To enhance your LUTs and effects, it would be great if you used some desktop software. Wondershare Filmora offers a great variety of built-in LUTs to choose from. Let’s look at how we can use Filmora to add LUTs:
- Add your video and tap the tools, then click the Color option.
- Now select the Color Correction option and then choose 3D LUT.
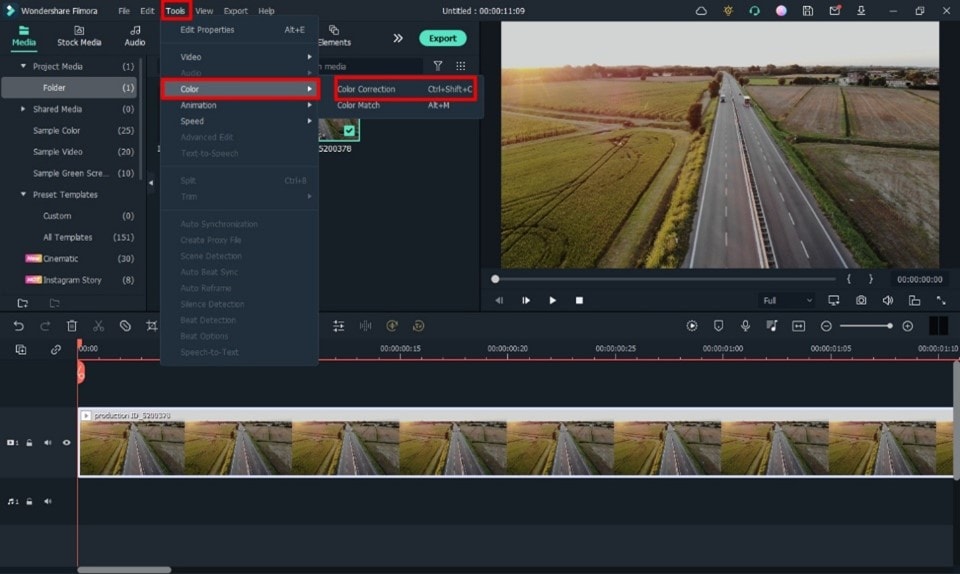
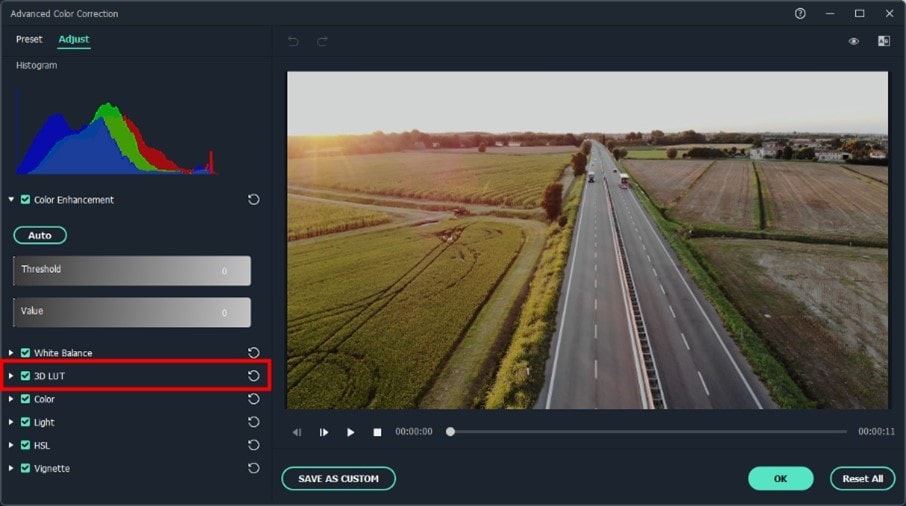
- Click the drop-down menu and select the Load new LUT option. Here you can import other downloaded preset LUTs to use
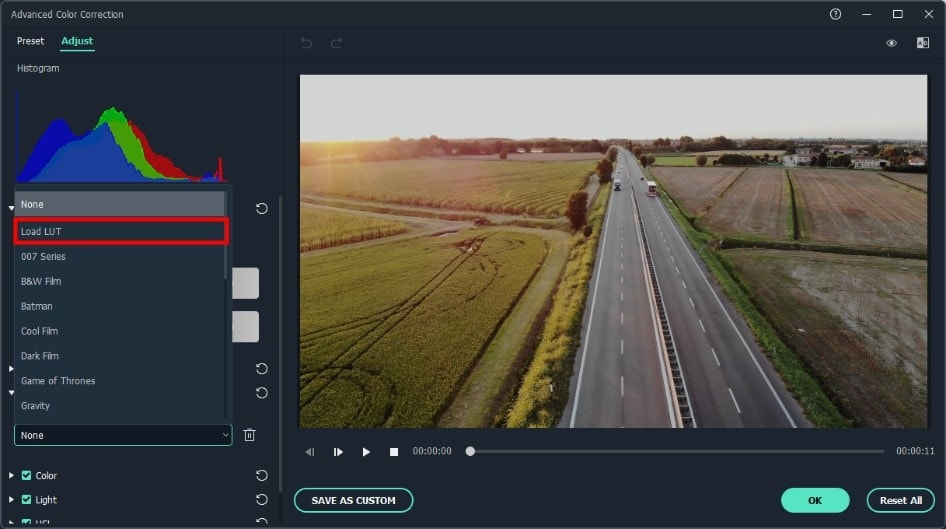
- Choose the LUT and click OK. Your new fantastic video is ready now.

Closing Thoughts
This post recommends several lut resources and demonstrates how to import them if you are a devoted user of VN editor and want to learn how to utilize it for video color grading. The more potent desktop editor Wondershare Filmora, which offers a range of built-in LUT sources and supports color grading settings, is of course recommended if you want to take your videos to the next level. Thanks for reading.
Free Download For Win 7 or later(64-bit)
Free Download For macOS 10.14 or later
2. Apna Editz
Apna Editz is another online platform you can use for this purpose. It also provides you with a fantastic variety of Presets like LUTs, Filters, and many other similar effects, which you can use in your video using the VN editor. The main Pros of this recommendation are that it’s a free website. So you can download LUTs for your videos from it for free. Keep an eye on their YouTube channel to be updated about the latest LUTs.
3. Lut Preset
Lut Preset is another alternative to all the above ones. You can get almost all your favorite LUTs for VN editor for free here and then use them in your videos as you want. They also share the latest LUTs on their YouTube Channel.
4. Pencil Hub
Pencil Hub is also a good option in this concern. However, it does not have too much variety of VN LUTs, but you can still use it to download some of the best LUTs for VN editors. To get informed of their every new effect and LUTs, their YouTube channel is the primary source.
5. YRP EDITZ
YRP ETIDZ is another good option if you are still looking for some fantastic VN LUTs. They, too not have a large variety of presets and LUTs. However, if you want some most commonly used LUTs for VN Editor, then they are a good option. You’ll notify of their most website updates by checking their YouTube channel.
Part 4. How to add LUTs to the best alternative to the VN editor?
VN Editor is undoubtedly an excellent choice to add LUTs to your videos. However, the VN editor is best suitable for mobile devices. To enhance your LUTs and effects, it would be great if you used some desktop software. Wondershare Filmora offers a great variety of built-in LUTs to choose from. Let’s look at how we can use Filmora to add LUTs:
- Add your video and tap the tools, then click the Color option.
- Now select the Color Correction option and then choose 3D LUT.
- Click the drop-down menu and select the Load new LUT option. Here you can import other downloaded preset LUTs to use
- Choose the LUT and click OK. Your new fantastic video is ready now.
Closing Thoughts
This post recommends several lut resources and demonstrates how to import them if you are a devoted user of VN editor and want to learn how to utilize it for video color grading. The more potent desktop editor Wondershare Filmora, which offers a range of built-in LUT sources and supports color grading settings, is of course recommended if you want to take your videos to the next level. Thanks for reading.
Free Download For Win 7 or later(64-bit)
Free Download For macOS 10.14 or later
How to Use Twixtor Effect to Create Super Slow-Motion Video?
Twixtor is a plug-in program for the After Effects software that allows you to create slow-motion effects from any video clip by adjusting the settings of the plug-in software. But what Twixtor is and why it is utilized are the topics we will cover in this article.
In addition, we will learn how to manipulate its characteristics to get the best possible outcome for our working composition in the Premiere Pro and After Effects plug-ins. Without any further ado, let’s get straight to the business!
In this article
01 What is Twixtor and How Does It Work?
02 How to Use Twixtor to Create Super Slow-Mo in Adobe Premiere Pro?
03 How to Create Super Slow Motion in After Effects with Twixtor?
04 How to Get the Twixtor Style Effect on iPhone?
Part 1: What is Twixtor and How Does It Work?
Twixtor is a plug-in developed by RevisionFX. It is available for purchase. The plug-in gives users the ability to speed up, slow down, or convert the frame rate of picture sequences, all with special effects. Twixtor can visually estimate what a video is meant to look like in a slow-motion setting using video analysis and interoperability.
Due to the need for unparalleled image quality, RE: Vision Effects developed unique tracking technology that determines every individual pixel’s motion. This technology allows Twixtor to synthesize new innovative frames by warping and interpolating frames from the original sequence, resulting in unprecedented image quality.
Reset the clock to a single-speed setting. Always remember that you can customize the retiming on a frame-by-frame basis!
When items are crossing in the scene, Twixtor is more accurate and shows fewer artifacts than other rendering engines. This reduces the ripping and stretching of items when they cross the frame or exit it completely.
But how does Twixtor work is the million-dollar question! While Premiere includes the ability to slow down your film and has a newer, better-quality version dubbed Optical Flow, it cannot zoom in on your footage (called Pixel Motion in After Effects).
The slow-motion quality is undoubtedly superior to that of simple frame blending, but it is not the finest grade slow motion available. The TWIXTOR from Re: Vision Effects has long been the go-to solution for the most excellent post-slow motion. It is pricey, but it is well worth it.
The Pro edition provides you with the opportunity to fine-tune the pitch of the auto track, as well as the option to employ mattes and alphas to enrich your tracks and the ability to deal with motion vectors from a 3D system, among other features.
Part 2: How to Use Twixtor to Create Super Slow-Mo in Adobe Premiere Pro?
As we’ve already mentioned, we will be analyzing how Twixtor makes slow mos; we will be starting with the Adobe Premiere Pro. The following are the steps you need to learn to perform it yourself.
Step 1: After importing the video to the timeline, do some basic editing such as trimming and removing audio from the video.

Step 2: Nest the sequence to convert the video into a new sequence automatically.
Step 3: Go to the Effects tab and search for Twixtor, and then drop the Twixtor Pro to the video clip in the timeline.

Step 5: Right-click the video in the timeline again and scroll down to Show Clip Keyframes to enable the Speed option under Time Remapping. You can now enable the GPU acceleration to fast rendering.
Step 6: Click the Keyframe icon to mark the points where you want to begin with the slow-motion effect, and then mark the end part of the slow-motion effect video.

Step 7: Now, drag the line lower to add a slo-mo effect to video.

Remember that your video can sometimes lag if you set the video speed at a meager percentage. To avoid that, utilize settings in a better way to ensure your video works flawlessly.
Part 3: How to Create Super Slow Motion in After Effects with Twixtor?
When working with After Effects software, Twixtor is a convenient plug-in since it allows us to create slow-motion effects from any video source.
We’ll look at an example to better comprehend what we’re talking about in this post. Before we begin our study of the Twixtor plug-in, let us get acquainted with the software’s operating screen to quickly understand the content of this article as we go through our assessment of the Twixtor plug-in.
Step 1: When you launch After Effects, go to File>Import>File to import your footage. Here you can see the actual frame rate of your film. You may drag your film onto the timeline by right-clicking it and selecting New Comp from Selection.
Step 2: Select your video from the timeline in the composition, then go to Effects & Presets pane to search Twixtor, and you will find Twixtor or Twixtor Pro under RE: Vision plug-ins, depending on your version. Drag and drop it to the video in the timeline.

Step 3: In the Twixtor effect controls, enter the frame rate of the film you found previously. The faster and better your slowed footage will become, the higher the frame rate.
For organizational reasons, After Effects employs the “tree-ing“ concept, sometimes known as drop-down menus. Click on the yellow number next to Input: Frame Rate under Source Control. It should be set to 29.97 by default. Please set it to the frame rate you discovered previously in the tutorial.

You can then adjust the speed and time remap mode accordingly. For more information, you can watch the video tutorial below to find out how to create smooth Twixtor effects in Adobe After Effects.
Part 4: How to Get the Twixtor Style Effect on iPhone?
It is possible to shoot videos in slow motion and then play them back at average speed using SloPro – 1000fps Slow Motion Video from Sand Mountain Studios, a fantastic video editing effects tool.
Inserting slow motion cues and changing playback speeds without waiting is possible with renderless editing. It allows you to produce slow-motion films and enables you to insert extremely rapid sequences and cycle between various speeds.
SloPro even enables you to edit your films as they are being recorded, allowing you to choose between slow and fast motion while recording.
This program provides complete support for sharing through social media platforms such as Facebook, Twitter, and YouTube, allowing you to show off your impressive video creations to the rest of the world. It has already been established that SloPro is one of the few videos editing software that includes optical flow as a stand-alone effect.

Step 1: After you’ve imported your video, click on the red Edit button in the top-right corner of the screen to bring up the editing window.
Step 2: Trim the video down to the section that you wish to modify if required using the Clip In and Clip Out functions. It is divided into clips using the speed in and speeds out controls.
Step 3: Tap on the top-left box to bring up a list of fast and slow speed choices. Drag the cursor over the clip to bring up a fast and slow speed options list.
Step 4: If you want to use a slow speed, press the box in the upper right corner and choose Optical Flow from the menu.
This will render the clip with optical flow, resulting in the smooth Twixtor effect you are familiar with. There will be a watermark on your video if you use the program’s free version, but you can easily crop it out.
Conclusion
Slow-Mo videos are undoubtedly watch-worthy. They allow us to observe the fine details and appreciate the video content. But creating one isn’t child’s play. So, we decided to compile this article to inform our worthy readers on how they can get started using Twixtor on Adobe Premiere Pro and After Effects. We hope you had a fun time learning!
02 How to Use Twixtor to Create Super Slow-Mo in Adobe Premiere Pro?
03 How to Create Super Slow Motion in After Effects with Twixtor?
04 How to Get the Twixtor Style Effect on iPhone?
Part 1: What is Twixtor and How Does It Work?
Twixtor is a plug-in developed by RevisionFX. It is available for purchase. The plug-in gives users the ability to speed up, slow down, or convert the frame rate of picture sequences, all with special effects. Twixtor can visually estimate what a video is meant to look like in a slow-motion setting using video analysis and interoperability.
Due to the need for unparalleled image quality, RE: Vision Effects developed unique tracking technology that determines every individual pixel’s motion. This technology allows Twixtor to synthesize new innovative frames by warping and interpolating frames from the original sequence, resulting in unprecedented image quality.
Reset the clock to a single-speed setting. Always remember that you can customize the retiming on a frame-by-frame basis!
When items are crossing in the scene, Twixtor is more accurate and shows fewer artifacts than other rendering engines. This reduces the ripping and stretching of items when they cross the frame or exit it completely.
But how does Twixtor work is the million-dollar question! While Premiere includes the ability to slow down your film and has a newer, better-quality version dubbed Optical Flow, it cannot zoom in on your footage (called Pixel Motion in After Effects).
The slow-motion quality is undoubtedly superior to that of simple frame blending, but it is not the finest grade slow motion available. The TWIXTOR from Re: Vision Effects has long been the go-to solution for the most excellent post-slow motion. It is pricey, but it is well worth it.
The Pro edition provides you with the opportunity to fine-tune the pitch of the auto track, as well as the option to employ mattes and alphas to enrich your tracks and the ability to deal with motion vectors from a 3D system, among other features.
Part 2: How to Use Twixtor to Create Super Slow-Mo in Adobe Premiere Pro?
As we’ve already mentioned, we will be analyzing how Twixtor makes slow mos; we will be starting with the Adobe Premiere Pro. The following are the steps you need to learn to perform it yourself.
Step 1: After importing the video to the timeline, do some basic editing such as trimming and removing audio from the video.
Step 2: Nest the sequence to convert the video into a new sequence automatically.
Step 3: Go to the Effects tab and search for Twixtor, and then drop the Twixtor Pro to the video clip in the timeline.
Step 5: Right-click the video in the timeline again and scroll down to Show Clip Keyframes to enable the Speed option under Time Remapping. You can now enable the GPU acceleration to fast rendering.
Step 6: Click the Keyframe icon to mark the points where you want to begin with the slow-motion effect, and then mark the end part of the slow-motion effect video.
Step 7: Now, drag the line lower to add a slo-mo effect to video.
Remember that your video can sometimes lag if you set the video speed at a meager percentage. To avoid that, utilize settings in a better way to ensure your video works flawlessly.
Part 3: How to Create Super Slow Motion in After Effects with Twixtor?
When working with After Effects software, Twixtor is a convenient plug-in since it allows us to create slow-motion effects from any video source.
We’ll look at an example to better comprehend what we’re talking about in this post. Before we begin our study of the Twixtor plug-in, let us get acquainted with the software’s operating screen to quickly understand the content of this article as we go through our assessment of the Twixtor plug-in.
Step 1: When you launch After Effects, go to File>Import>File to import your footage. Here you can see the actual frame rate of your film. You may drag your film onto the timeline by right-clicking it and selecting New Comp from Selection.
Step 2: Select your video from the timeline in the composition, then go to Effects & Presets pane to search Twixtor, and you will find Twixtor or Twixtor Pro under RE: Vision plug-ins, depending on your version. Drag and drop it to the video in the timeline.
Step 3: In the Twixtor effect controls, enter the frame rate of the film you found previously. The faster and better your slowed footage will become, the higher the frame rate.
For organizational reasons, After Effects employs the “tree-ing“ concept, sometimes known as drop-down menus. Click on the yellow number next to Input: Frame Rate under Source Control. It should be set to 29.97 by default. Please set it to the frame rate you discovered previously in the tutorial.
You can then adjust the speed and time remap mode accordingly. For more information, you can watch the video tutorial below to find out how to create smooth Twixtor effects in Adobe After Effects.
Part 4: How to Get the Twixtor Style Effect on iPhone?
It is possible to shoot videos in slow motion and then play them back at average speed using SloPro – 1000fps Slow Motion Video from Sand Mountain Studios, a fantastic video editing effects tool.
Inserting slow motion cues and changing playback speeds without waiting is possible with renderless editing. It allows you to produce slow-motion films and enables you to insert extremely rapid sequences and cycle between various speeds.
SloPro even enables you to edit your films as they are being recorded, allowing you to choose between slow and fast motion while recording.
This program provides complete support for sharing through social media platforms such as Facebook, Twitter, and YouTube, allowing you to show off your impressive video creations to the rest of the world. It has already been established that SloPro is one of the few videos editing software that includes optical flow as a stand-alone effect.
Step 1: After you’ve imported your video, click on the red Edit button in the top-right corner of the screen to bring up the editing window.
Step 2: Trim the video down to the section that you wish to modify if required using the Clip In and Clip Out functions. It is divided into clips using the speed in and speeds out controls.
Step 3: Tap on the top-left box to bring up a list of fast and slow speed choices. Drag the cursor over the clip to bring up a fast and slow speed options list.
Step 4: If you want to use a slow speed, press the box in the upper right corner and choose Optical Flow from the menu.
This will render the clip with optical flow, resulting in the smooth Twixtor effect you are familiar with. There will be a watermark on your video if you use the program’s free version, but you can easily crop it out.
Conclusion
Slow-Mo videos are undoubtedly watch-worthy. They allow us to observe the fine details and appreciate the video content. But creating one isn’t child’s play. So, we decided to compile this article to inform our worthy readers on how they can get started using Twixtor on Adobe Premiere Pro and After Effects. We hope you had a fun time learning!
Green Screens Are a Fun Way for Creators to Bring Their Personality to Their Stream, Allowing Them to Dynamically Alter Their Stream Background and Make Their Content Appear Even More Engaging and Polished
Green screens are a fun way for creators to bring their personality to their stream, allowing them to dynamically alter their stream background and make their content appear even more engaging and polished. With Twitch green screen background, you can easily configure Chroma key settings and detect your green screen with a single click.
The twitch green screen attaches directly to the back of your chair. You don’t have to worry about stands, or spacing behind your chair. Just attach it and go. This portable green screen can fit on the back of your chair a feature that makes it easy to assemble and use for start-up twitchers.
How to set up a Green Screen with Twitch Studio
**Set Up Your Camera
First things first, make sure that your camera is being detected on Twitch Studio. If you do not already have a layer with your webcam on your scene, click Edit Scene and add a webcam layer by clicking the + icon on the left next to Layers.
Once your webcam layer has been created, make sure that the desired device is selected, plugged in, and that you have not turned off every webcam (Camera icon on the bottom left of Twitch Studio).
**Set Up Your Green Screen
Once your green screen is set up in your background, select your webcam layers to display your webcam settings.
We recommend using the Auto-Detect Color feature as it will automatically detect the best color code for you and will be a great base to work from. If you prefer, you can manually pick the color code by either providing the color code in the Color to Remove field or clicking on the colored square to display a color spectrum that you can select from.
The Chroma Key section is located at the bottom of the webcam settings, and you will be able to toggle the chroma key on and off by clicking the eye icon.
To adjust the chroma key settings, you can click on Edit Chroma Key. You will be able to change the color code and change similarity, edge transparency and color correction for the perfect fit.
Other free ways to set up green screen for Twitch streams
OBS
OBS Studio is a free and open-source app for screen-casting and live streaming. Written in C/C++ and built with Qt, OBS Studio provides real-time capture, scene composition, recording, encoding, and broadcasting via the Real Time Messaging Protocol(RTMP).It can stream Videos to any RTMP supporting destination including YouTube, Twitch, Instagram and Facebook.
OBS Green Screen Set-up Steps
- Make sure you have the following equipment prepared: a solid green background, webcam or video camera, lighting, and OBS Studio.
- Download the latest stable version of OBS Studio from the official website and install the software. Open OBS and let the Auto-Configuration Wizard optimize the software’s settings based on your hardware.
- Now you can add a video source.
- Right-click on the video source you’ve created and select Filter.
- Click the +button under the Effects Filters section and select Chroma Key.
- Type in a name for this effect layer.
- After you add a chroma key, OBS will automatically create and adjust the baseline settings for the filter. You can experiment with the sliders and settle when you are satisfied with the result.
- Make sure you aren’t wearing any green or reflective material. You can double-checkthe performance on the preview screen.
- If things are working smoothly, you are all set to start streamingwith the green screen on.
Pro tip:
You can follow the instructions above and live stream to multiple platforms at once with Restream. Multistreaming to platforms like YouTube, Facebook, Twitter, Twitch, and LinkedIn allows you to drastically increase the audience reach and grow your followers.
XBOX
It is a video gaming brand created and owned by Microsoft. The brand consists of five video game consoles, as well as applications(games), streaming services, an online service by the name of Xbox network, and the development arm by the name of Xbox Game Studios. The brand was first introduced in the United States in November 2001, with the launch of the original Xbox console.
Steps on Using Xbox Green Screen
Make your Xbox console reflect your personal style by changing its look and feel. Choose a favourite colour, update your background with game art or a customised image, or select a different theme.
Choose your color
The color you choose will appear in tiles and accents on your Xbox. It also follows you to any console you sign in to.
- Press the Xboxbutton on your controller to open the guide, and then select Profile & system > Settings > General > Personalisation > My color & theme > My color.
- Select a color, and then select OK.
**Choose your background
Your background appears where you’d expect it to—in the background of Home. It can be a solid color or an image, such as game art, achievement art, a screenshot, or a customized image. Achievement art follows you to any Xbox, but screenshots and customized images stay on the console that they’re set to.
To choose your background, press the Xbox button on your controller to open the guide, and then select Profile & system > Settings > General > Personalization > My background.
From here, choose from the following options:
**Solid color and game art
Select a background color, and then select OK. To then add game art, choose the game most recently played and the game art will appear as the background.
**Achievement art
- Select Achievement art> Gaming.
- Select a game from your list of games with achievements.
- Select the achievement with the background art you want.
- Select Set as background.
**Custom image
Note Customized images must be smaller than 3 MB, and the best size for backgrounds is 1920 x 1080.
- Copy a JPG or PNG file that you want to use to a USB device, and then plug it into your Xbox.
- On your Xbox, select Customized image. A dialogue box appears that shows the contents of your console and attached USB device.
- Select the USB device, and then choose your image.
**Screenshot
- Select Screenshot, then choose the one you want.
- Select More actions> Set as background.
**Dynamic background
Note Dynamic backgrounds are only available on Xbox Series X|S.
- Select Dynamic background.
- Select the background art you want.
- Select Apply.
Note Some dynamic backgrounds are only available through promotions with special edition hardware (like the 20th Anniversary Special Edition controller). To see one of these special dynamic backgrounds in your list of options, make sure your special edition hardware is turned on and in use with your console when you set your background.
**Remove customized background
If you want to remove your background, select Remove customized background.
**Choose your theme
Themes can be set to dark or light and can also be scheduled. To set a theme:
- Press the Xboxbutton on your controller to open the guide, and then select Profile & system > Settings > General > Personalization.
- Select My color & theme.
- Under System theme, select Darkor Light. Select Scheduled to activate your theme according to specific times, or to start at sunrise and sunset.
Themes stay on the console they’re set to.
Solid Color
Achievement Art
Custom Image
Remove Custom Background
Filmora
Wondershare Filmora is the one of best video editing software with cool features that compares to other competing video editing Softwares. Many video editing programs claim to offer professional results; Filmora is one of a few consumer-level tools that actually delivers.
For Win 7 or later (64-bit)
For macOS 10.12 or later
Key Features
4k editing support
GIF support
Noise removal
Color tuning
Advanced tech editor
Audio mixer
Video stabilization
Scene detection
Conclusion
You probably already have an idea of how to use a green screen, at least in principle. You film something or someone in front of a colored background — the green screen — then you replace everything that’s in the color of the screen with other footage, images, charts, presentations, or whatever visuals you want. However, Chroma keying a live stream works almost the same way. The main difference is that you have to replace the green screen as you’re filming, rather than during editing.
4 Ways to Add White Borders on Mobile and Desktop
Would you like to add white borders to your videos?
Are you looking to put white backgrounds to your videos without cutting them?
You have seen many videos with attractive borders on different social media platforms (Instagram, YouTube, Facebook, LinkedIn, etc.) Adding borders allows you to create an evocative effect and also adjust the cropping issues. It plays a good role in redesigning a video. It should be noted that a border can change the entire style of the video.
There are hundreds of video editing software that allow adding borders to the videos for mobile and desktop. In this article, we shall discuss different ways to add white borders in movies used on different social media platforms.

4 Ways to Add White Borders to Video
The following 4 ways can be used to add white borders to the videos.
- Add a white border to the video on the computer (using Filmora)
- Add a white border to the video online
- Add a white border to the video on Android
- Add a white border to the video on iOS
Recommended way to add a white border to the video on the computer - using Filmora
Filmora Video Editor is one of the best video editing software. It allows editing the videos in a professional way. It has built-in editing features like splitting/cutting, trimming, cropping, adding watermark, changing speed, recording voice, and many more Along with this, you can rely on this application to add borders with different colors including white borders, black borders, colored border, and customized border. Add white borders on a computer, all this can be done in a few simple steps.
For Win 7 or later (64-bit)
For macOS 10.14 or later
Let’s download the free Wonder Share Filmora 11 software to proceed.
- Go to media, and import the video from your storage.
- Drag the video into the timeline.

- Select the video by clicking on the video.
- Hit the effects You can select the colorful effects from the panel.
- Now, write borders in the search engine. You will find various borders styles in the panel.
- Select the white border at the top of the panel.
- Simply drag and drop the border to the video/image.

- You will see the white border on the selected video.

- You can change the color of the border.
- Select the video by double-clicking on it.
- Hit the Effect tab from the Image and then click on Borders.
- Here you can change the color of your borders.
- Hit the OK

Add a white border to the video online
You can change white borders without launching software by editing online. Kapwing is an online video editing tool that is used to edit videos, images, and GIFs. It is very easy to use and the good thing about Kapwing is, it’s free and you don’t need to sign up or add watermarks to your edited videos/images.
However, it allows you to edit a video up to 250MB or you can only upload a video of almost 7 minutes in length. What you would need is to have a good internet connection and a Web.
Let’s start editing to add white borders step by step:
- Visit Kapwing collage maker and hit start collage maker
- You will see the below window.

- Click on Add media and select the desired video or image.
- Drag and drop the video into the timeline.

- Click on the video and drag the 4 corners to resize your video.
- It will eventually provide you with a white background and you can use it as a white border.

- Hit the Lock ratio tab once you got satisfied with your image borders.
- Double click the border to set the background color.

- You can change the background colors of your choice.

Add a white border to the video on Android
You can add white borders to your videos using android. BeeCut is a very simple and useful application for video editing. It presents a lot of stylish and beautiful frames and effects to make your video amazing. Along with this, it allows you to add text, filters, transitions, and many features to make your video stand out. It is very easy to use as takes a few steps to add frames to your video in android. To start the process follow these steps;
- Launch BeeCut on your mobile/android.
- Open the app and click on Media.
- Hit on Import file.

- Drag the video into the timeline or hit the +
- Hit the overlays
- Select your desired border.

- Drag the desired overlay border over the timeline. Here you can edit your design (change color, effect, etc.)
- Now, hit the export tab and choose the quality and format of your video.
- Save the file on your android.
Add a white border to the video on iOS
The PicsArt app is commonly used to edit videos on iPhone as well as on android. It is a very simple app, even a layman can use PicsArt and make professional white borders. This app is familiar among Instagram users. It changes the rectangular video or image into a square format. The aspect ratio of 1:1 is used for Instagram videos. It not only adds borders to the videos but also provides editing features like cut, resize, rotate, trims, text, etc. Let’s start with step-by-step instructions to add white borders to the video.
- Go to the app store and download the PicsArt app.
- Open the app and select the desired video.
- Hit the Fit tab from the bottom center.

- Select the color tool from the bottom.
- Choose the white color for white borders and you can also choose the desired color.
- Hit the ütab and the video will be saved to your phone gallery or you can directly share the video on Instagram.

Conclusion:
In the above content, we have introduced four methods to add white borders in your videos using windows, android, iPhone, and online. All the methods are free to use.
Wonder Share Filmora 11 is highly recommended to get the best and most professional results. It not only allows you to add borders but also provides you with an advanced editing panel. You can easily edit your videos and share with your social circle.
4 Ways to Add White Borders to Video
The following 4 ways can be used to add white borders to the videos.
- Add a white border to the video on the computer (using Filmora)
- Add a white border to the video online
- Add a white border to the video on Android
- Add a white border to the video on iOS
Recommended way to add a white border to the video on the computer - using Filmora
Filmora Video Editor is one of the best video editing software. It allows editing the videos in a professional way. It has built-in editing features like splitting/cutting, trimming, cropping, adding watermark, changing speed, recording voice, and many more Along with this, you can rely on this application to add borders with different colors including white borders, black borders, colored border, and customized border. Add white borders on a computer, all this can be done in a few simple steps.
For Win 7 or later (64-bit)
For macOS 10.14 or later
Let’s download the free Wonder Share Filmora 11 software to proceed.
- Go to media, and import the video from your storage.
- Drag the video into the timeline.
- Select the video by clicking on the video.
- Hit the effects You can select the colorful effects from the panel.
- Now, write borders in the search engine. You will find various borders styles in the panel.
- Select the white border at the top of the panel.
- Simply drag and drop the border to the video/image.
- You will see the white border on the selected video.
- You can change the color of the border.
- Select the video by double-clicking on it.
- Hit the Effect tab from the Image and then click on Borders.
- Here you can change the color of your borders.
- Hit the OK
Add a white border to the video online
You can change white borders without launching software by editing online. Kapwing is an online video editing tool that is used to edit videos, images, and GIFs. It is very easy to use and the good thing about Kapwing is, it’s free and you don’t need to sign up or add watermarks to your edited videos/images.
However, it allows you to edit a video up to 250MB or you can only upload a video of almost 7 minutes in length. What you would need is to have a good internet connection and a Web.
Let’s start editing to add white borders step by step:
- Visit Kapwing collage maker and hit start collage maker
- You will see the below window.
- Click on Add media and select the desired video or image.
- Drag and drop the video into the timeline.
- Click on the video and drag the 4 corners to resize your video.
- It will eventually provide you with a white background and you can use it as a white border.
- Hit the Lock ratio tab once you got satisfied with your image borders.
- Double click the border to set the background color.
- You can change the background colors of your choice.
Add a white border to the video on Android
You can add white borders to your videos using android. BeeCut is a very simple and useful application for video editing. It presents a lot of stylish and beautiful frames and effects to make your video amazing. Along with this, it allows you to add text, filters, transitions, and many features to make your video stand out. It is very easy to use as takes a few steps to add frames to your video in android. To start the process follow these steps;
- Launch BeeCut on your mobile/android.
- Open the app and click on Media.
- Hit on Import file.
- Drag the video into the timeline or hit the +
- Hit the overlays
- Select your desired border.
- Drag the desired overlay border over the timeline. Here you can edit your design (change color, effect, etc.)
- Now, hit the export tab and choose the quality and format of your video.
- Save the file on your android.
Add a white border to the video on iOS
The PicsArt app is commonly used to edit videos on iPhone as well as on android. It is a very simple app, even a layman can use PicsArt and make professional white borders. This app is familiar among Instagram users. It changes the rectangular video or image into a square format. The aspect ratio of 1:1 is used for Instagram videos. It not only adds borders to the videos but also provides editing features like cut, resize, rotate, trims, text, etc. Let’s start with step-by-step instructions to add white borders to the video.
- Go to the app store and download the PicsArt app.
- Open the app and select the desired video.
- Hit the Fit tab from the bottom center.
- Select the color tool from the bottom.
- Choose the white color for white borders and you can also choose the desired color.
- Hit the ütab and the video will be saved to your phone gallery or you can directly share the video on Instagram.
Conclusion:
In the above content, we have introduced four methods to add white borders in your videos using windows, android, iPhone, and online. All the methods are free to use.
Wonder Share Filmora 11 is highly recommended to get the best and most professional results. It not only allows you to add borders but also provides you with an advanced editing panel. You can easily edit your videos and share with your social circle.
Also read:
- Updated How to Create Intro Video with Filmora
- New In This Article, We Will Discuss What Lens Distortion Is, How It May Be Fixed, and the Factors You Need to Pay Attention to Avoid Lens Distortion when Taking or Recording Videos for 2024
- New 2024 Approved Art of Time Manipulation A Guide to After Effects Slow Motion Mastery
- Updated 3GP Video Format What Is 3GP Format And How To Play It?
- In 2024, Top Ways to Make Fast Motion Video on iPhone Solved
- New How to Create Educational Teaching Videos in An Outstanding Way?
- New 2024 Approved Ultimate Guide on Converting Word to SRT
- 2 Methods to Crop a Video in VLC
- New In 2024, How to Control the Speed of Video
- Updated The Ultimate Wedding Videography Checklist
- New Best Youtube Video Meme Maker for 2024
- Best Applications That Can Help Apply The Best VHS Camera Effect for 2024
- New In 2024, Adobe Photoshop Is the Best Photo Editor to Add Green Screen Effect to Your Photo While Wondershare Filmora Is the Best Video Editor to Add Green Screen Effect to Your Video
- 2024 Approved Create Photoshop GIFs with Zero Hustle
- How Did AI Video Games Act More Human Than Human, In 2024
- Want to Come up with Exciting Sony Vegas Slideshow Templates for Your Next Project on YouTube and Other Mediums Then There Is Something for You for 2024
- How to Make a Video Slideshow in iMovie for 2024
- New 2024 Approved Add Emoji to Linkedin Post – 5 Tips You Would Like to Know
- New In 2024, Whatsapp Video converterKeywords Convert Video for Whatsapp 6600; Video Converter for Whatsapp 6600; Reduce Video Size for Whatsapp 1600; Whatsapp Supported Video Formats 720; Convert Video to Whatsapp Format 590
- The Way to Make Dynamic Video Collages, In 2024
- In 2024, Create the Stranger Things Upside Down Effect Video
- Updated In 2024, How to Start a Vlog
- Updated LUTs Can Make Ordinary-Looking Footage Look More Attractive. Read This Guide to Learn How You Can Easily Create Your Own LUTs Using Filmora
- How to Add a Lower Third to Your Video for 2024
- New 2024 Approved The Craziest 10 AI Editors Youve Seen
- 2024 Approved Top 6 Darth Vader AI Generators for All Platforms
- How to Use Face ID make purchases on iPhone XS ?
- Things You Dont Know About Lenovo ThinkPhone Reset Code | Dr.fone
- 9 Solutions to Fix Process System Isnt Responding Error on Vivo Y27s | Dr.fone
- Pokemon Go Error 12 Failed to Detect Location On Nokia C02? | Dr.fone
- In 2024, How To Remove or Bypass Knox Enrollment Service On Samsung Galaxy F15 5G
- How to Transfer Photos from Motorola Moto G13 to Laptop Without USB | Dr.fone
- In 2024, A Step-by-Step Guide to Finding Your Apple ID On Your iPhone 15 Pro
- In 2024, How to Mirror PC Screen to Nokia G22 Phones? | Dr.fone
- How To Unlock Apple iPhone 14 Pro Without Passcode? 4 Easy Methods | Dr.fone
- In 2024, Hacks to do pokemon go trainer battles For Vivo V27 Pro | Dr.fone
- In 2024, How to jailbreak iCloud locked Apple iPhone 13 Pro Max
- In 2024, A Step-by-Step Guide on Using ADB and Fastboot to Remove FRP Lock on your Xiaomi 13 Ultra
- In 2024, How to Unlock Samsung Galaxy A05 PIN Code/Pattern Lock/Password
- How to recover deleted photos from Android Gallery without backup on Smart 7 HD
- How Do You Unlock your iPhone 13 Pro Max? Learn All 4 Methods | Dr.fone
- How to get back lost photos from Honor X50 GT.
- In 2024, How to Check Distance and Radius on Google Maps For your Samsung Galaxy A15 5G | Dr.fone
- In 2024, How to Get and Use Pokemon Go Promo Codes On Motorola Moto G24 | Dr.fone
- 6 Proven Ways to Unlock Samsung Galaxy A14 4G Phone When You Forget the Password
- In 2024, How to Transfer Data After Switching From Realme C51 to Latest Samsung | Dr.fone
- How to Transfer Data from Xiaomi Redmi 12 5G to Other Android Devices? | Dr.fone
- In 2024, Here are Some Pro Tips for Pokemon Go PvP Battles On Samsung Galaxy S24 | Dr.fone
- How to Transfer Everything from Apple iPhone 15 Plus to iPhone | Dr.fone
- Title: How to Use LUTs in VN Editor – Complete Guide and Best LUTs Download for 2024
- Author: Morgan
- Created at : 2024-05-19 05:12:21
- Updated at : 2024-05-20 05:12:21
- Link: https://ai-video-editing.techidaily.com/how-to-use-luts-in-vn-editor-complete-guide-and-best-luts-download-for-2024/
- License: This work is licensed under CC BY-NC-SA 4.0.
