:max_bytes(150000):strip_icc():format(webp)/ipad-pro-pencil-56a533763df78cf77286e0e0.png)
How to Use Visual Effect for Zoom

How to Use Visual Effect for Zoom
Zoom, a video calling software, has been quite popular over the last several months and is still one of the most used videos calling applications by millions of people worldwide. The site is a favorite among working professionals, but it is also utilized by individuals to connect with their friends and loved ones. Additionally, despite the app’s abundance of practical built-in tools and functions, it lacks the fun filters and special effects that the majority of users are used to when using a camera. Zoom has ingrained itself in our vocabulary during the last year. It seemed almost inevitable given that everything, from meetings to parties, has moved online.
You don’t need to seek farther than Zoom visual effects to inject a little jazz into the routine Zoom meetings during these hard times. By making adjustments to your Video configuration either before or during a video call, you may add visual effects in Zoom. Zoom meetings may be tedious to conduct over extended periods of time. Additionally, it would be helpful if you recorded the condition of your room before any Zoom meetings. You wouldn’t want to reveal your disorganized space while in a meeting. In these situations, adding visual effects will keep your private area private while also making your Zoom meetings entertaining and exciting. It will also prevent others from seeing your filthy room. This tutorial will walk you through the process of adding visual effects to Zoom step-by-step. In addition, you will get acquainted with the numerous camera functions and visual effects that you may employ during a Zoom video conversation.
- 1. What apps can add visual effect on Zoom?
- 2. How do I add visual effects to Zoom in Mobile?
- 3. How do you download Zoom effects?
Part 1: Popular Visual Effects you can add to Zoom
You may apply one of four main graphic effects to your Zoom meetings. The visual effects that you may use in your next Zoom video chat are briefly summarized below.
1. Visual Backgrounds
Virtual backdrops may transform any plain wall into an artistic setting. Zoom provides you the choice to add photographs to your backdrop in addition to offering you a few pre-made backdrops. Zoom lets you add a movie to your backdrop in addition to simply photographs. With the help of this imaginative feature, gather your pals and enjoy your favorite meme or video. A presentation’s collection of photos, a video, or a single image may all serve as virtual backdrops. A green screen would often be used as your real backdrop and consistent lighting would be required.
To avoid having to reveal your real surroundings while in a conference, you may add any picture or video as a virtual backdrop in Zoom. You have the option of adding own photos and movies or selecting from the pre-existing backdrop films and images. The file type for video backgrounds should be MP4 or MOV, and the resolution should range from 360p to a maximum of 1080p. Ensure that the mirroring of your video is deselected in the Zoom’s Video settings if your backdrop picture has text that may be read. By using virtual backdrops, you may alter the background of your video as it appears to the audience member with whom you are speaking. During the video conference you’re in, the other participants will be able to view your face and body overlaid on the backdrop of your choice.
2. Filters
With these filters, you can have fun in all of your Zoom meetings! Filters are a fun way to spend time with loved ones who are far away, particularly at a period when maintaining social distance is crucial. Filters are the modifications you make to yourself during Zoom meetings (such as a mustache, beard, etc.). They enliven the proceedings and contribute to the fun and memorability of your Zoom meetings.
Your films’ colors may be changed, and video filters can also add new aspects. By selecting a filter appropriate for each event, like team meetings or game nights, you may create the right atmosphere. You may embellish your face in the video with flowers or animal traits by using Zoom’s various filters. Alternately, you might just convert your video’s color to black and white. The video filters from a different program, however, allow you to apply more vibrant filters and place a greater emphasis on special effects.
3. Lighting and Touch-ups
The Lighting function enhances lighting effects and makes adjustments for low light situations to make you seem more professional during a Zoom conference. Similar to this, Touch-up enhances your facial characteristics by making your skin shine, erasing wrinkles, and giving your face a radiant appearance.
On your Zoom videos, changing your lighting and applying touch-ups may improve how you seem. By adjusting your lighting, you can make even dim illumination look bright. By doing touch-ups, you may get a smoother skin texture and get rid of any obvious imperfections.
4. Studio Effects
Zoom has been developing on a new feature called Studio Effects that would give customers the option of using virtual cosmetics in their movies. They are still checking it out before formally releasing it since it is still in beta. However, it is still available to users under the Backgrounds & Filters area. You may adjust the opacity as you like. You have the option to choose a new color or one of the predefined colors. Additionally, you may decide to employ the face effects in all of your next meetings, albeit doing so might be problematic if you use Zoom for business. Don’t worry if you’re running late. Zoom can give your face a natural-looking cosmetic makeover in only one minute!
This function is intended for less formal settings, such as gatherings of friends or family. Anyone who wants to seem more professional during meetings has access to Studio Effects, which offers the choice of various eyebrow colors, beards, and lipsticks. These are a few recently added features. You may add mustaches, beards, and brows in a variety of designs, hues, and intensities. Additionally, you have the option of coloring your lips.
Part 2: How to Add Visual Effects to Zoom
Along with facilitating online meetings, the Zoom program also lets you play with its visual effects. You just need to make a few adjustments to the video settings or utilize another third-party program to be ready to go.
Step1Start a Zoom meeting
You can download Zoom, install it on your computer, and log into your account if you don’t already have it if you don’t already have it.
Step2Tap Background and Filters
After logging in to Zoom, use these settings. - Options > Camera > Video
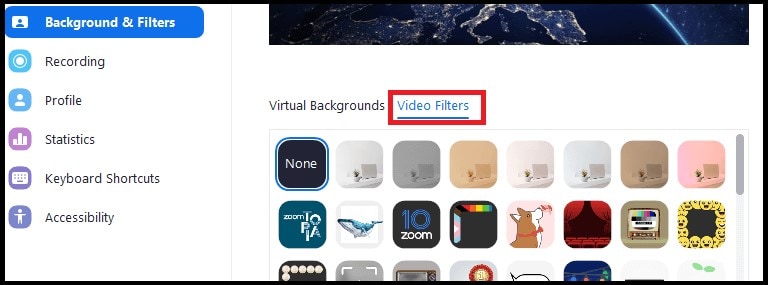
Step3Faucet Filters
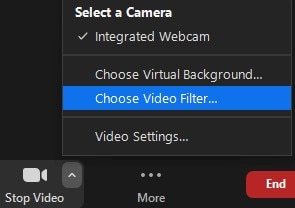
Here, you may play with a variety of visual effects and customize them to suit your tastes. Pick one of the numerous filters that are offered. To activate the filter, tap it.
Step4Set Lighting Effects to on
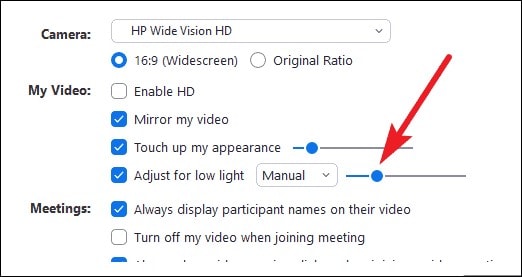
Select “Adjust for low light” in the video options. For your lighting, you may choose between Auto and Manual effects. Zoom will automatically detect and adapt for the lighting in your room if you choose Auto.
Use Zoom’s noise reduction option to keep your conversation focused during your video conference in addition to adding visual elements. To do this, go to “Audio Settings” and choose “High” under “Suppress background noise.” Once you start speaking during the video conference, this essentially cancels out any background noise.
Part 3: Related FAQs
1. What apps can add visual effect on Zoom?
Following is the list of top three apps that you can use to utilize visual effects Zoom application:
Snap Camera is regarded as the most user-friendly. It is a software that you can download for Windows or Mac that works with live broadcasts and video chats. Because it was created by the people who founded Snapchat, it shares a broad variety of filters with that platform.
Link: Snap Camera
The Mac is the only platform on which CamTwist may be used. You may also use it to give your movies additional filters and unique effects. This program lets you pick from a variety of pre-made effects while also allowing you to create your own.
Link: CamTwist
Another desktop application that lets you change and even blur your backdrop is ManyCam. It enables you to apply digital effects, filters, and 3-D masks to your face. Using this tool, you can also build layers and presets.
Link: ManyCam
2. How do I add visual effects to Zoom in Mobile?
Zoom includes a function that might be useful if you don’t want to tidy up or want to add some entertainment to your calls. You may utilize Zoom virtual backdrops to alter your surroundings and take you to a more pleasant location on both the desktop and mobile apps. After joining one on a mobile device, pick Virtual backdrop by tapping the More icon in the bottom right corner. Choose a photo from the list of choices, or click the plus sign (+) to add a photo or video from your gallery.
3. How do you download Zoom effects?
Pressing the Studio Effects button after installing Zoom for the first time will prompt a pop-up asking you to download the Studio Effects package. Several filters, suited for both business meetings and conversations with friends, let you customize the video and audio during your video calls. To start downloading the Effects bundle, click the Download button. The “Studio Effects” window will appear on the right-hand side of the Background & Filter page after the download is finished. All the face components and choices are available in this Studio Effects window.
Conclusion
The most popular video meeting tool worldwide is Zoom. Family, friends, coworkers, and any two people who want to video chat utilize it. Zoom visual effects are the ideal tool for injecting some humor into otherwise dull Zoom sessions and meetings. A few simple steps will get you a striking backdrop, a humorous filter, and some interesting effects. Since the majority of formal work is now completed from home, Zoom has taken over as the standard video conferencing program. Try out as many of the effects as you like, and use this page as a companion and a map to help you along the way.
- 1. What apps can add visual effect on Zoom?
- 2. How do I add visual effects to Zoom in Mobile?
- 3. How do you download Zoom effects?
Part 1: Popular Visual Effects you can add to Zoom
You may apply one of four main graphic effects to your Zoom meetings. The visual effects that you may use in your next Zoom video chat are briefly summarized below.
1. Visual Backgrounds
Virtual backdrops may transform any plain wall into an artistic setting. Zoom provides you the choice to add photographs to your backdrop in addition to offering you a few pre-made backdrops. Zoom lets you add a movie to your backdrop in addition to simply photographs. With the help of this imaginative feature, gather your pals and enjoy your favorite meme or video. A presentation’s collection of photos, a video, or a single image may all serve as virtual backdrops. A green screen would often be used as your real backdrop and consistent lighting would be required.
To avoid having to reveal your real surroundings while in a conference, you may add any picture or video as a virtual backdrop in Zoom. You have the option of adding own photos and movies or selecting from the pre-existing backdrop films and images. The file type for video backgrounds should be MP4 or MOV, and the resolution should range from 360p to a maximum of 1080p. Ensure that the mirroring of your video is deselected in the Zoom’s Video settings if your backdrop picture has text that may be read. By using virtual backdrops, you may alter the background of your video as it appears to the audience member with whom you are speaking. During the video conference you’re in, the other participants will be able to view your face and body overlaid on the backdrop of your choice.
2. Filters
With these filters, you can have fun in all of your Zoom meetings! Filters are a fun way to spend time with loved ones who are far away, particularly at a period when maintaining social distance is crucial. Filters are the modifications you make to yourself during Zoom meetings (such as a mustache, beard, etc.). They enliven the proceedings and contribute to the fun and memorability of your Zoom meetings.
Your films’ colors may be changed, and video filters can also add new aspects. By selecting a filter appropriate for each event, like team meetings or game nights, you may create the right atmosphere. You may embellish your face in the video with flowers or animal traits by using Zoom’s various filters. Alternately, you might just convert your video’s color to black and white. The video filters from a different program, however, allow you to apply more vibrant filters and place a greater emphasis on special effects.
3. Lighting and Touch-ups
The Lighting function enhances lighting effects and makes adjustments for low light situations to make you seem more professional during a Zoom conference. Similar to this, Touch-up enhances your facial characteristics by making your skin shine, erasing wrinkles, and giving your face a radiant appearance.
On your Zoom videos, changing your lighting and applying touch-ups may improve how you seem. By adjusting your lighting, you can make even dim illumination look bright. By doing touch-ups, you may get a smoother skin texture and get rid of any obvious imperfections.
4. Studio Effects
Zoom has been developing on a new feature called Studio Effects that would give customers the option of using virtual cosmetics in their movies. They are still checking it out before formally releasing it since it is still in beta. However, it is still available to users under the Backgrounds & Filters area. You may adjust the opacity as you like. You have the option to choose a new color or one of the predefined colors. Additionally, you may decide to employ the face effects in all of your next meetings, albeit doing so might be problematic if you use Zoom for business. Don’t worry if you’re running late. Zoom can give your face a natural-looking cosmetic makeover in only one minute!
This function is intended for less formal settings, such as gatherings of friends or family. Anyone who wants to seem more professional during meetings has access to Studio Effects, which offers the choice of various eyebrow colors, beards, and lipsticks. These are a few recently added features. You may add mustaches, beards, and brows in a variety of designs, hues, and intensities. Additionally, you have the option of coloring your lips.
Part 2: How to Add Visual Effects to Zoom
Along with facilitating online meetings, the Zoom program also lets you play with its visual effects. You just need to make a few adjustments to the video settings or utilize another third-party program to be ready to go.
Step1Start a Zoom meeting
You can download Zoom, install it on your computer, and log into your account if you don’t already have it if you don’t already have it.
Step2Tap Background and Filters
After logging in to Zoom, use these settings. - Options > Camera > Video

Step3Faucet Filters
Here, you may play with a variety of visual effects and customize them to suit your tastes. Pick one of the numerous filters that are offered. To activate the filter, tap it.

Step4Set Lighting Effects to on
Select “Adjust for low light” in the video options. For your lighting, you may choose between Auto and Manual effects. Zoom will automatically detect and adapt for the lighting in your room if you choose Auto.

Use Zoom’s noise reduction option to keep your conversation focused during your video conference in addition to adding visual elements. To do this, go to “Audio Settings” and choose “High” under “Suppress background noise.” Once you start speaking during the video conference, this essentially cancels out any background noise.
Part 3: Related FAQs
1. What apps can add visual effect on Zoom?
Following is the list of top three apps that you can use to utilize visual effects Zoom application:
Snap Camera is regarded as the most user-friendly. It is a software that you can download for Windows or Mac that works with live broadcasts and video chats. Because it was created by the people who founded Snapchat, it shares a broad variety of filters with that platform.
Link: Snap Camera
The Mac is the only platform on which CamTwist may be used. You may also use it to give your movies additional filters and unique effects. This program lets you pick from a variety of pre-made effects while also allowing you to create your own.
Link: CamTwist
Another desktop application that lets you change and even blur your backdrop is ManyCam. It enables you to apply digital effects, filters, and 3-D masks to your face. Using this tool, you can also build layers and presets.
Link: ManyCam
2. How do I add visual effects to Zoom in Mobile?
Zoom includes a function that might be useful if you don’t want to tidy up or want to add some entertainment to your calls. You may utilize Zoom virtual backdrops to alter your surroundings and take you to a more pleasant location on both the desktop and mobile apps. After joining one on a mobile device, pick Virtual backdrop by tapping the More icon in the bottom right corner. Choose a photo from the list of choices, or click the plus sign (+) to add a photo or video from your gallery.
3. How do you download Zoom effects?
Pressing the Studio Effects button after installing Zoom for the first time will prompt a pop-up asking you to download the Studio Effects package. Several filters, suited for both business meetings and conversations with friends, let you customize the video and audio during your video calls. To start downloading the Effects bundle, click the Download button. The “Studio Effects” window will appear on the right-hand side of the Background & Filter page after the download is finished. All the face components and choices are available in this Studio Effects window.
Conclusion
The most popular video meeting tool worldwide is Zoom. Family, friends, coworkers, and any two people who want to video chat utilize it. Zoom visual effects are the ideal tool for injecting some humor into otherwise dull Zoom sessions and meetings. A few simple steps will get you a striking backdrop, a humorous filter, and some interesting effects. Since the majority of formal work is now completed from home, Zoom has taken over as the standard video conferencing program. Try out as many of the effects as you like, and use this page as a companion and a map to help you along the way.
Achieving GoPro Slow Motion with Quality: An In-Depth Overview
Slow-motion videos are a new phenomenon in engaging audiences. In this decade, such effects add a dramatic feel to empathize movie clips. Slow motion is an effective way to keep viewers hooked to the content. Now, the question arises of which could be the best way to make a perfect GoPro slow-mo. To find an answer, read this guide and achieve high-quality slow-mo videos with GoPro.
Let us tell you first that GoPro is primarily a company for camera accessories. Besides, there is GoPro Quik, which is responsible for dedicated video editing. Many professionals rely on GoPro slow-motion to change video speed with a single tap. Thus, without wasting time, delve into the details given and learn to make GoPro 11 slow motion with the best available accessories.
Slow Motion Video Maker Slow your video’s speed with better control of your keyframes to create unique cinematic effects!
Make A Slow Motion Video Make A Slow Motion Video More Features

Part 1: Slowing Down Videos on Your GoPro: A Guide
GoPro offers Sony Vegas Pro Slow Motion to record videos in slow motion. Does using such technical equipment seem challenging for you as a new user? Follow this step-by-step guide and set the camera before recording to make a perfect slow-mo shot.
Step 1
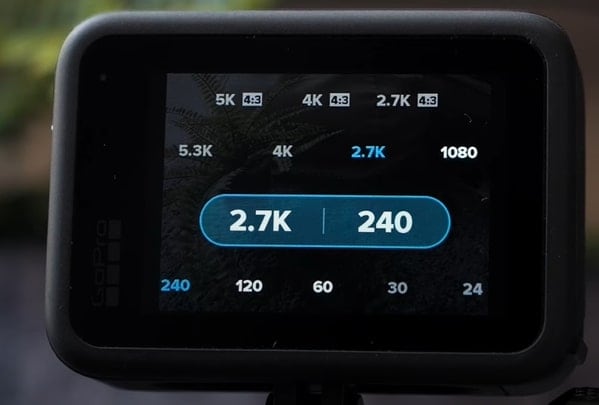
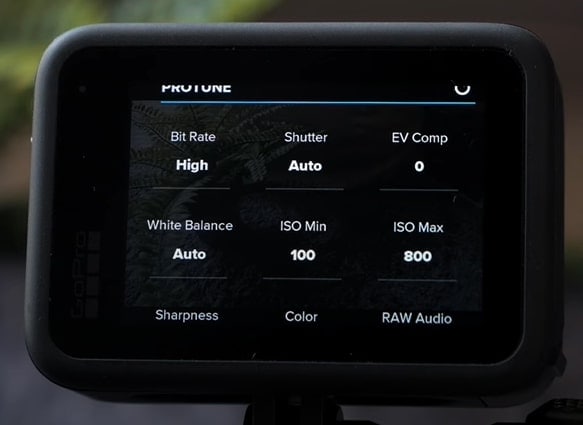
Set the resolution to 2.7k for a slow-motion video and a frame rate of 240fps. Afterward, keep the “Color” natural if you don’t want to color grade it. Moreover, adjust the “Sharping” low by using its respective options.
Step 2
Reset the “Hyper Smooth” to high and later turn ISO to a minimum of 100 and a maximum of 800. Then, head to set the “Shutter Speed” and “White Balance” to auto.
Step 3
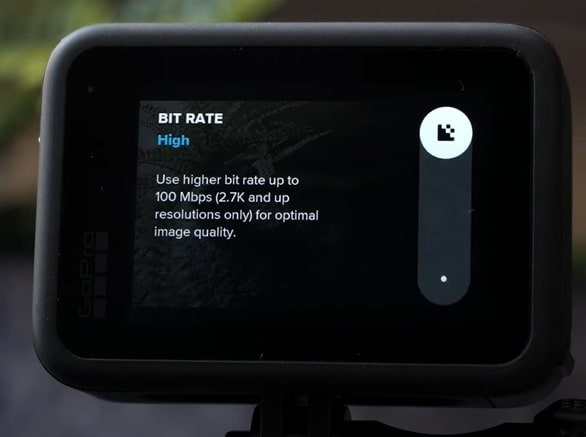
Moving ahead, choose Lens to “Linear” and keep the “Bitrate” high. Finally, select the “Exposure Value Compensation” to -0.5 using its slider. Your camera is ready to capture your desired and captivating slow-motion shots.
Part 2: Slow Down Videos on GoPro Quik After Recording
After recording the required clip, post-editing is important to polish the digital content. GoPro also offers GoPro Quik to edit slow-motion videos to your desired extent. Unfortunately, not everyone can quickly discover Go Pro slow motion in their first use. That’s why it’s necessary to follow the given steps so you can easily discover and edit slow motion.
Step 1
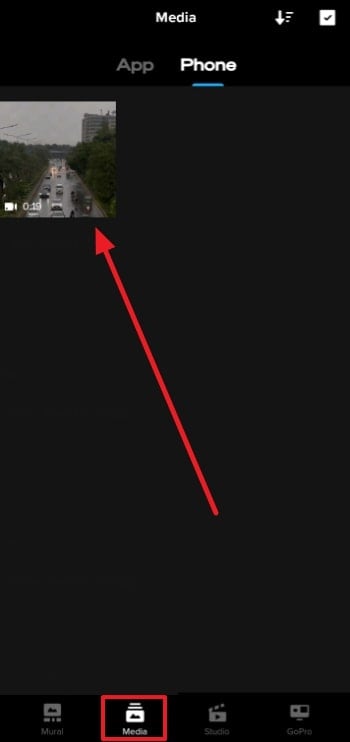
Access the GoPro Quick on your device and launch it. Choose the “Media” icon in the bottom bar and select the video you want to edit. After importing the required media files, start working on a project.
Step 2
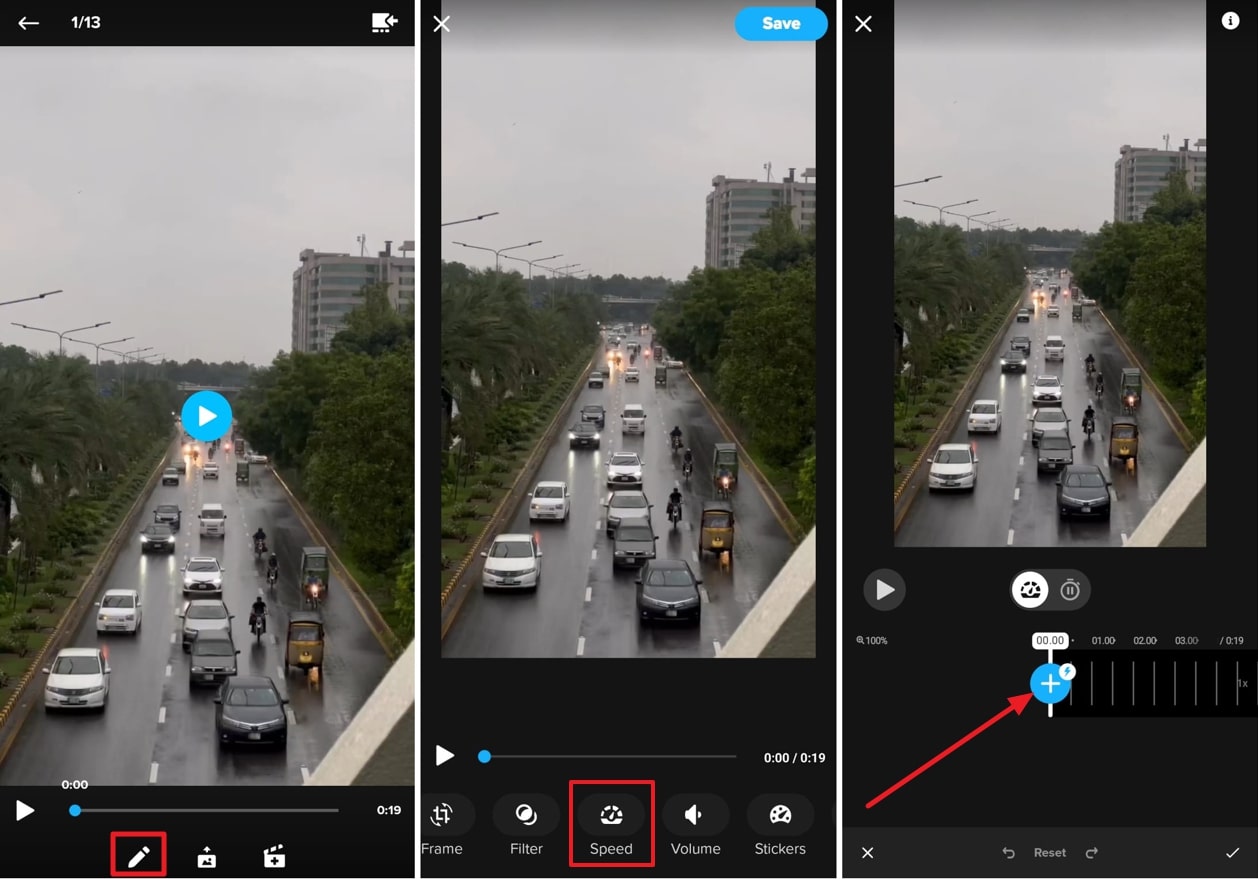
Select the “Pen” icon in the bottom bar and scroll the menu to the left side. Here, choose the “Speed” option and tap the “+” icon to drag the slider to the point where you want to apply the slow motion. Hit the end mark and get a preview of smooth speed ramping in slow motion.
Part 3: Make Better Slow-Motion Videos with Wondershare Filmora
Making a slow motion means spending cognitive effort and time on a project. Thus, video editors seek a reliable platform like GoPro Hero 11, which is slow motion. Unfortunately, this editing app is outdated, and other better platforms are being developed. In search of the latest and easy-to-use video editor, use Wondershare Filmora .
It is a video editing software with various powerful editing features compared with GoPro Quik. This platform can perform more tasks than trimming, merging, and splitting clips. Filmora is equipped with AI technology to provide maximum ease to users. You can use this tool to ensure a smooth workflow and boost your productivity.
Why Filmora is Better Than GoPro Quik?
Filmora provides many features that GoPro Quik does not offer. Everyone needs solid arguments and valid reasons to reconsider their choices. Thus, here we have highlighted some proven and logical reasons to use Filmora instead of GoPro:
- The first and foremost thing you can see is Filmora’s intuitive interface. Anyone without any video editing background can use this tool effectively for their projects.
- Video editors need assistance while editing perfect shots. Filmora offers an AI Copilot Editing system as your editing assistant, which GoPro does not provide. It directs users to create high-quality videos.
Free Download For Win 7 or later(64-bit)
Free Download For macOS 10.14 or later
- GoPro Quik allows you to edit up to 1-minute videos. In contrast, Filmora doesn’t restrict you from editing videos of a certain length.
- With Filmora AI, you can generate a customized script and turn it into a video. AI integration for unique content makes this tool better than GoPro Quik.
- Unlike GoPro Quik, getting personalized music tracks is possible with Filmora. It can create soundtracks that align with your project’s needs.
- Slow-motion GoPro can assist in speed-ramping videos for a smooth transition. Conversely, Filmora also offers an optical flow option to automate the speed ramping .
- Even GoPro Quik cannot remove vocals from the audio files. Using Filmora, this option is just a click away. It can automatically separate vocals from music tracks so you can dub high-quality videos.
- Using GoPro, users can share their videos on social media or export them anywhere. In comparison, Filmora allows you to adjust resolution, quality, project name, and destination.
- AI in Filmora can generate images with your prompts that will not claim legal rights. This service is unavailable in GoPro; it is just limited to video editing.
- Last but not least, Filmora can transform your text into engaging videos. By doing so, you can save the budget for actors, video editors, and other crew.
Step-by-Step Guide to Slow Down Video With Filmora
After learning the exceptional functionalities of Filmora, you might be considering using it. To put you at ease, we have explained stepwise usage of achieving slow motion with Filmora. It’s quite easier and more automatic than GoPro slow motion:
Free Download For Win 7 or later(64-bit)
Free Download For macOS 10.14 or later
Step 1: Install Filmora V13 and Import Your Media
Go to the official site of Wondershare Filmora and download its latest version, V13. Launch it in your system and access its intuitive main interface. Choose “New Project” from its home screen and enter in the editing screen. Press your keyboard’s “Ctrl + I” keys and import your desired file in Filmora.

Step 2: Use the Optical Flow Option and Slow Down the Video Speed
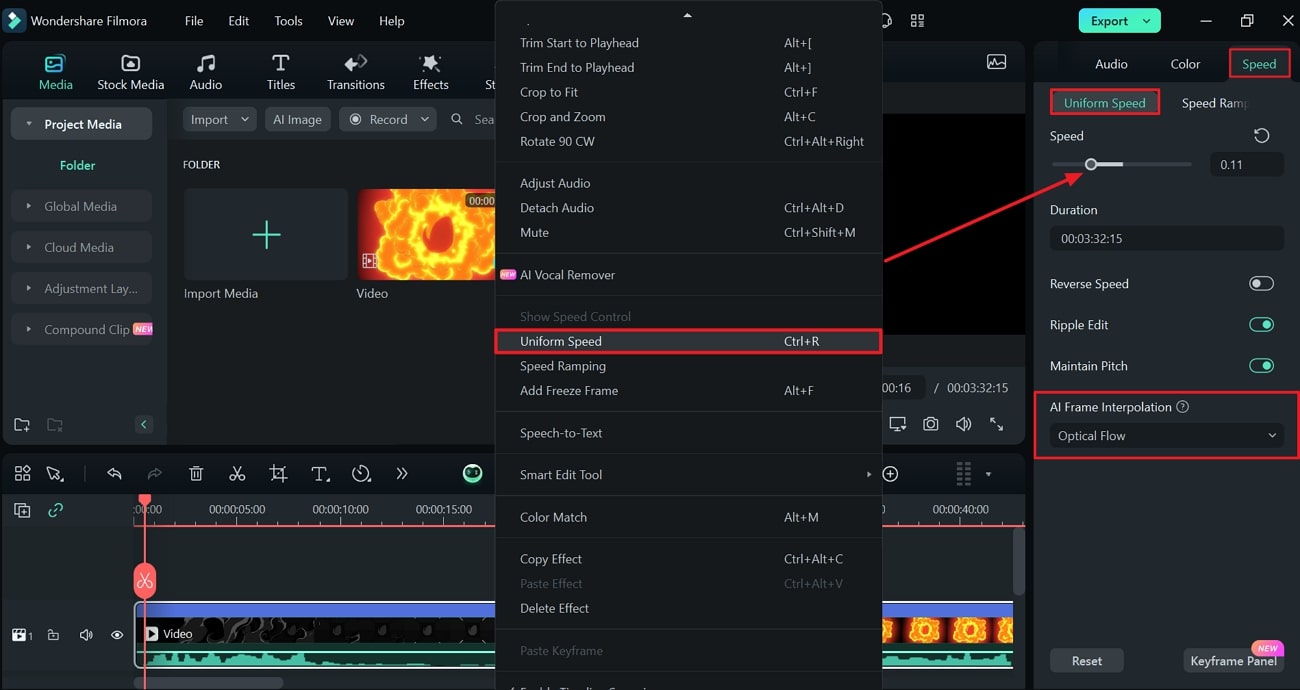
Drag and drop the imported video in the timeline section. Place your cursor on that video and right-click on it. Hit the “Uniform Speed” option from the displayed list and direct toward the right-side editing panel. There, use the “Speed” slider and slow down the video as required. Move downward and extend the “AI Frame Interpolation” menu to pick the “Optical Flow.”
Step 3: Preview the Results to Export or Continue to Edit
Finally, get a preview of a slower but high-quality video by pressing the “Space” key. Afterward, if you are satisfied with the results, move to the “Export” option at the top right. Now, set the output settings based on how you want to save the video. Finally, press the “Export” button to save the results on your system.

Conclusion
To summarize, the GoPro camera is available in the market to capture slow-motion shots. On the other hand, GoPro Quik is an editing tool that has been popular for a decade. Many users are unaware of the latest video editing software, Wondershare Filmora. It is an AI-powered platform that has proven to be better than GoPro slow-motion, as discussed above.
Make A Slow Motion Video Make A Slow Motion Video More Features

Part 1: Slowing Down Videos on Your GoPro: A Guide
GoPro offers Sony Vegas Pro Slow Motion to record videos in slow motion. Does using such technical equipment seem challenging for you as a new user? Follow this step-by-step guide and set the camera before recording to make a perfect slow-mo shot.
Step 1
Set the resolution to 2.7k for a slow-motion video and a frame rate of 240fps. Afterward, keep the “Color” natural if you don’t want to color grade it. Moreover, adjust the “Sharping” low by using its respective options.

Step 2
Reset the “Hyper Smooth” to high and later turn ISO to a minimum of 100 and a maximum of 800. Then, head to set the “Shutter Speed” and “White Balance” to auto.

Step 3
Moving ahead, choose Lens to “Linear” and keep the “Bitrate” high. Finally, select the “Exposure Value Compensation” to -0.5 using its slider. Your camera is ready to capture your desired and captivating slow-motion shots.

Part 2: Slow Down Videos on GoPro Quik After Recording
After recording the required clip, post-editing is important to polish the digital content. GoPro also offers GoPro Quik to edit slow-motion videos to your desired extent. Unfortunately, not everyone can quickly discover Go Pro slow motion in their first use. That’s why it’s necessary to follow the given steps so you can easily discover and edit slow motion.
Step 1
Access the GoPro Quick on your device and launch it. Choose the “Media” icon in the bottom bar and select the video you want to edit. After importing the required media files, start working on a project.

Step 2
Select the “Pen” icon in the bottom bar and scroll the menu to the left side. Here, choose the “Speed” option and tap the “+” icon to drag the slider to the point where you want to apply the slow motion. Hit the end mark and get a preview of smooth speed ramping in slow motion.

Part 3: Make Better Slow-Motion Videos with Wondershare Filmora
Making a slow motion means spending cognitive effort and time on a project. Thus, video editors seek a reliable platform like GoPro Hero 11, which is slow motion. Unfortunately, this editing app is outdated, and other better platforms are being developed. In search of the latest and easy-to-use video editor, use Wondershare Filmora .
It is a video editing software with various powerful editing features compared with GoPro Quik. This platform can perform more tasks than trimming, merging, and splitting clips. Filmora is equipped with AI technology to provide maximum ease to users. You can use this tool to ensure a smooth workflow and boost your productivity.
Why Filmora is Better Than GoPro Quik?
Filmora provides many features that GoPro Quik does not offer. Everyone needs solid arguments and valid reasons to reconsider their choices. Thus, here we have highlighted some proven and logical reasons to use Filmora instead of GoPro:
- The first and foremost thing you can see is Filmora’s intuitive interface. Anyone without any video editing background can use this tool effectively for their projects.
- Video editors need assistance while editing perfect shots. Filmora offers an AI Copilot Editing system as your editing assistant, which GoPro does not provide. It directs users to create high-quality videos.
Free Download For Win 7 or later(64-bit)
Free Download For macOS 10.14 or later
- GoPro Quik allows you to edit up to 1-minute videos. In contrast, Filmora doesn’t restrict you from editing videos of a certain length.
- With Filmora AI, you can generate a customized script and turn it into a video. AI integration for unique content makes this tool better than GoPro Quik.
- Unlike GoPro Quik, getting personalized music tracks is possible with Filmora. It can create soundtracks that align with your project’s needs.
- Slow-motion GoPro can assist in speed-ramping videos for a smooth transition. Conversely, Filmora also offers an optical flow option to automate the speed ramping .
- Even GoPro Quik cannot remove vocals from the audio files. Using Filmora, this option is just a click away. It can automatically separate vocals from music tracks so you can dub high-quality videos.
- Using GoPro, users can share their videos on social media or export them anywhere. In comparison, Filmora allows you to adjust resolution, quality, project name, and destination.
- AI in Filmora can generate images with your prompts that will not claim legal rights. This service is unavailable in GoPro; it is just limited to video editing.
- Last but not least, Filmora can transform your text into engaging videos. By doing so, you can save the budget for actors, video editors, and other crew.
Step-by-Step Guide to Slow Down Video With Filmora
After learning the exceptional functionalities of Filmora, you might be considering using it. To put you at ease, we have explained stepwise usage of achieving slow motion with Filmora. It’s quite easier and more automatic than GoPro slow motion:
Free Download For Win 7 or later(64-bit)
Free Download For macOS 10.14 or later
Step 1: Install Filmora V13 and Import Your Media
Go to the official site of Wondershare Filmora and download its latest version, V13. Launch it in your system and access its intuitive main interface. Choose “New Project” from its home screen and enter in the editing screen. Press your keyboard’s “Ctrl + I” keys and import your desired file in Filmora.

Step 2: Use the Optical Flow Option and Slow Down the Video Speed
Drag and drop the imported video in the timeline section. Place your cursor on that video and right-click on it. Hit the “Uniform Speed” option from the displayed list and direct toward the right-side editing panel. There, use the “Speed” slider and slow down the video as required. Move downward and extend the “AI Frame Interpolation” menu to pick the “Optical Flow.”

Step 3: Preview the Results to Export or Continue to Edit
Finally, get a preview of a slower but high-quality video by pressing the “Space” key. Afterward, if you are satisfied with the results, move to the “Export” option at the top right. Now, set the output settings based on how you want to save the video. Finally, press the “Export” button to save the results on your system.

Conclusion
To summarize, the GoPro camera is available in the market to capture slow-motion shots. On the other hand, GoPro Quik is an editing tool that has been popular for a decade. Many users are unaware of the latest video editing software, Wondershare Filmora. It is an AI-powered platform that has proven to be better than GoPro slow-motion, as discussed above.
Best Tools To Create Blend Image Collage
Best Tools To Create Blend Image Collage
An easy yet powerful editor
Numerous effects to choose from
Detailed tutorials provided by the official channel
While creating a photo collage, the blending of images needs to be perfect so that the final outcome is impressive. Though creating a collage may sound as simple as placing one image next to the other, it requires thoughtful placing and positioning of the images along with additional editing to create a visually impressive frame. To help you with this task, a good collage maker can be used.
Though there are several tools making tall claims, not all deliver what they promise. So, to make your tool selection task a little easier, we have shortlisted the best ones in the following parts.
In this article
01 [Top blended collage maker tool](#Part 1)
02 [Best tool for stock media and video editing- Wondershare Filmora](#Part 2)
Part 1 Top blended collage maker tool
A roundup of the top 5 tools to create blended photo collage is given below.
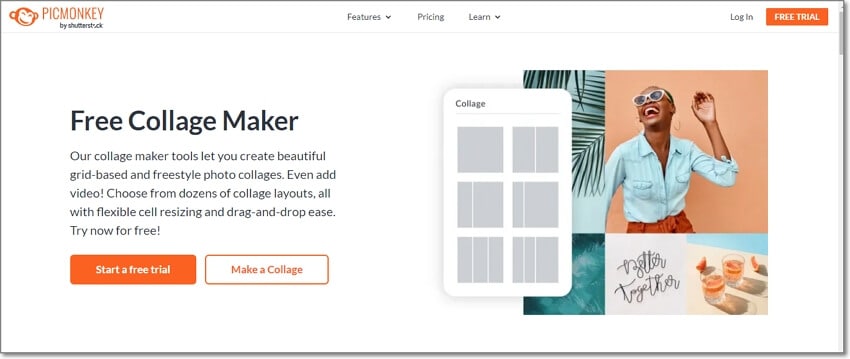
01PicMonkey
This is a free collage-making tool by Shutterstock that can let you blend images to create wonderful freestyle as well as grid-based collages. If needed, you can even add videos to the collage.
Key features
● Create freestyle grid-based blend collage using images and videos.
● Wide range of layouts to choose from.
● Offer flexible resizing of the cells for proper blending of the images.
● Support drag-and-drop.
● This photo blend collage maker allows adding graphics, text, effects, and other elements.
● Comes with a free stock of photos and videos.
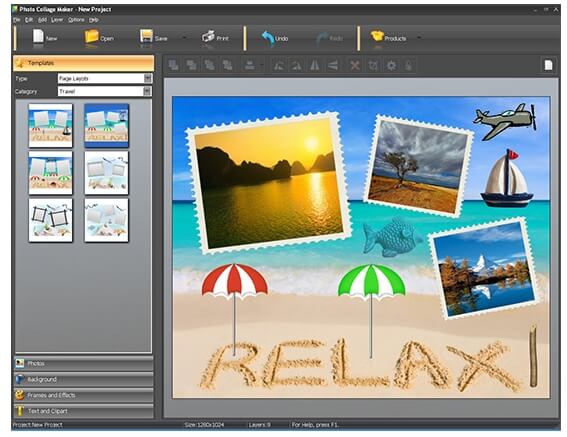
02Photo Collage Maker
This is an integrated mask tool that supports blending your images to create an impressive collage.
Key features
● Simple and intuitive interface.
● Allows creating blend collage in a few simple steps.
● More than 100 templates in different themes and designs are available.
● Enhance the collage by adding masks, clip-arts, captions, and other effects.
● Created collage can be saved in all key image formats like JPEG, PNG, GIF, and TIFF.
03Blend Collage Free
Developed by KDN Soft this is a free Android-based blend collage apk for blending images perfectly and creating an interesting collage.
Key features
● Allows to blend images and create a collage in HD quality.
● Collage can be shared over Instagram, Facebook, and other sites.
● Simple interface that makes the process easy and quick.
● Add images from your device, capture them using the camera or even use the stock collection at the app.
● Decent editing options supported.

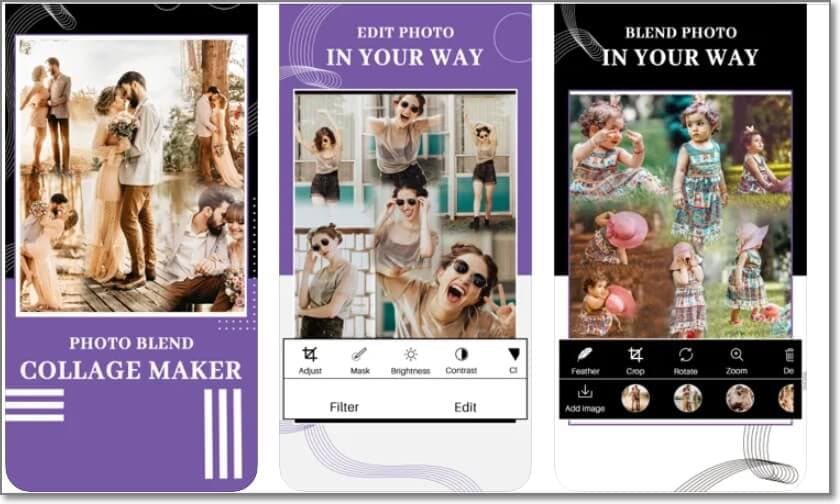
04Photo Blend
With a 3.6 rating, this is a decent blend collage app for iOS devices to blend images and create a collage.
Key features
● Blend and add images to create an impressive collage.
● Create a double-exposure effect by blending images.
● A wide range of filters is available to enhance the collage.
● Created collage can be shared with dear ones.
05Blend Collage Photo Editor
To create an impressive collage with a blending effect, this is a good tool to consider.
Key features
● Free to use tool for creating blend collage.
● Comes with more than 50 customized shapes to crop the images.
● Support multiple filters to be used on images.
● Allows cropping the images free-hand as well.
● Save the created collage on the system or share it over Twitter, Facebook, and other sites.

Part 2 Best tool for stock media and video editing- Wondershare Filmora
A lot of blend-collage makers also allow adding videos, and in such situations, the need for a good video editing tool may also arise to edit the video before adding. One such excellent tool that we recommend here is Wondershare Filmora. This is a Windows and Mac-based software that supports all basic as well as advanced video editing features. Files in almost all formats can be quickly processed using the tool.
Additionally, if you are not able to find your choice of image or video, Wondershare Filmora is a great place to checkout as it has a huge collection of media files in an array of categories and themes. You are surely going to get something of your choice and requirement.
There are several other useful features of the software like split-screen-video making, advanced editing, audio editing, and more. Check out more in detail about the software at this this link
● Key Takeaways from This Episode →
● Blend collage allows you to blend your images for creating a smooth and interesting-looking collage.
● Several online tools, desktop programs, and apps are available to create a photo blend collage.
● To get a collection of media files and edit your video professionally, Wondershare Filmora works as the best software.
While creating a photo collage, the blending of images needs to be perfect so that the final outcome is impressive. Though creating a collage may sound as simple as placing one image next to the other, it requires thoughtful placing and positioning of the images along with additional editing to create a visually impressive frame. To help you with this task, a good collage maker can be used.
Though there are several tools making tall claims, not all deliver what they promise. So, to make your tool selection task a little easier, we have shortlisted the best ones in the following parts.
In this article
01 [Top blended collage maker tool](#Part 1)
02 [Best tool for stock media and video editing- Wondershare Filmora](#Part 2)
Part 1 Top blended collage maker tool
A roundup of the top 5 tools to create blended photo collage is given below.
01PicMonkey
This is a free collage-making tool by Shutterstock that can let you blend images to create wonderful freestyle as well as grid-based collages. If needed, you can even add videos to the collage.
Key features
● Create freestyle grid-based blend collage using images and videos.
● Wide range of layouts to choose from.
● Offer flexible resizing of the cells for proper blending of the images.
● Support drag-and-drop.
● This photo blend collage maker allows adding graphics, text, effects, and other elements.
● Comes with a free stock of photos and videos.

02Photo Collage Maker
This is an integrated mask tool that supports blending your images to create an impressive collage.
Key features
● Simple and intuitive interface.
● Allows creating blend collage in a few simple steps.
● More than 100 templates in different themes and designs are available.
● Enhance the collage by adding masks, clip-arts, captions, and other effects.
● Created collage can be saved in all key image formats like JPEG, PNG, GIF, and TIFF.

03Blend Collage Free
Developed by KDN Soft this is a free Android-based blend collage apk for blending images perfectly and creating an interesting collage.
Key features
● Allows to blend images and create a collage in HD quality.
● Collage can be shared over Instagram, Facebook, and other sites.
● Simple interface that makes the process easy and quick.
● Add images from your device, capture them using the camera or even use the stock collection at the app.
● Decent editing options supported.

04Photo Blend
With a 3.6 rating, this is a decent blend collage app for iOS devices to blend images and create a collage.
Key features
● Blend and add images to create an impressive collage.
● Create a double-exposure effect by blending images.
● A wide range of filters is available to enhance the collage.
● Created collage can be shared with dear ones.

05Blend Collage Photo Editor
To create an impressive collage with a blending effect, this is a good tool to consider.
Key features
● Free to use tool for creating blend collage.
● Comes with more than 50 customized shapes to crop the images.
● Support multiple filters to be used on images.
● Allows cropping the images free-hand as well.
● Save the created collage on the system or share it over Twitter, Facebook, and other sites.

Part 2 Best tool for stock media and video editing- Wondershare Filmora
A lot of blend-collage makers also allow adding videos, and in such situations, the need for a good video editing tool may also arise to edit the video before adding. One such excellent tool that we recommend here is Wondershare Filmora. This is a Windows and Mac-based software that supports all basic as well as advanced video editing features. Files in almost all formats can be quickly processed using the tool.
Additionally, if you are not able to find your choice of image or video, Wondershare Filmora is a great place to checkout as it has a huge collection of media files in an array of categories and themes. You are surely going to get something of your choice and requirement.
There are several other useful features of the software like split-screen-video making, advanced editing, audio editing, and more. Check out more in detail about the software at this this link

● Key Takeaways from This Episode →
● Blend collage allows you to blend your images for creating a smooth and interesting-looking collage.
● Several online tools, desktop programs, and apps are available to create a photo blend collage.
● To get a collection of media files and edit your video professionally, Wondershare Filmora works as the best software.
While creating a photo collage, the blending of images needs to be perfect so that the final outcome is impressive. Though creating a collage may sound as simple as placing one image next to the other, it requires thoughtful placing and positioning of the images along with additional editing to create a visually impressive frame. To help you with this task, a good collage maker can be used.
Though there are several tools making tall claims, not all deliver what they promise. So, to make your tool selection task a little easier, we have shortlisted the best ones in the following parts.
In this article
01 [Top blended collage maker tool](#Part 1)
02 [Best tool for stock media and video editing- Wondershare Filmora](#Part 2)
Part 1 Top blended collage maker tool
A roundup of the top 5 tools to create blended photo collage is given below.
01PicMonkey
This is a free collage-making tool by Shutterstock that can let you blend images to create wonderful freestyle as well as grid-based collages. If needed, you can even add videos to the collage.
Key features
● Create freestyle grid-based blend collage using images and videos.
● Wide range of layouts to choose from.
● Offer flexible resizing of the cells for proper blending of the images.
● Support drag-and-drop.
● This photo blend collage maker allows adding graphics, text, effects, and other elements.
● Comes with a free stock of photos and videos.

02Photo Collage Maker
This is an integrated mask tool that supports blending your images to create an impressive collage.
Key features
● Simple and intuitive interface.
● Allows creating blend collage in a few simple steps.
● More than 100 templates in different themes and designs are available.
● Enhance the collage by adding masks, clip-arts, captions, and other effects.
● Created collage can be saved in all key image formats like JPEG, PNG, GIF, and TIFF.

03Blend Collage Free
Developed by KDN Soft this is a free Android-based blend collage apk for blending images perfectly and creating an interesting collage.
Key features
● Allows to blend images and create a collage in HD quality.
● Collage can be shared over Instagram, Facebook, and other sites.
● Simple interface that makes the process easy and quick.
● Add images from your device, capture them using the camera or even use the stock collection at the app.
● Decent editing options supported.

04Photo Blend
With a 3.6 rating, this is a decent blend collage app for iOS devices to blend images and create a collage.
Key features
● Blend and add images to create an impressive collage.
● Create a double-exposure effect by blending images.
● A wide range of filters is available to enhance the collage.
● Created collage can be shared with dear ones.

05Blend Collage Photo Editor
To create an impressive collage with a blending effect, this is a good tool to consider.
Key features
● Free to use tool for creating blend collage.
● Comes with more than 50 customized shapes to crop the images.
● Support multiple filters to be used on images.
● Allows cropping the images free-hand as well.
● Save the created collage on the system or share it over Twitter, Facebook, and other sites.

Part 2 Best tool for stock media and video editing- Wondershare Filmora
A lot of blend-collage makers also allow adding videos, and in such situations, the need for a good video editing tool may also arise to edit the video before adding. One such excellent tool that we recommend here is Wondershare Filmora. This is a Windows and Mac-based software that supports all basic as well as advanced video editing features. Files in almost all formats can be quickly processed using the tool.
Additionally, if you are not able to find your choice of image or video, Wondershare Filmora is a great place to checkout as it has a huge collection of media files in an array of categories and themes. You are surely going to get something of your choice and requirement.
There are several other useful features of the software like split-screen-video making, advanced editing, audio editing, and more. Check out more in detail about the software at this this link

● Key Takeaways from This Episode →
● Blend collage allows you to blend your images for creating a smooth and interesting-looking collage.
● Several online tools, desktop programs, and apps are available to create a photo blend collage.
● To get a collection of media files and edit your video professionally, Wondershare Filmora works as the best software.
While creating a photo collage, the blending of images needs to be perfect so that the final outcome is impressive. Though creating a collage may sound as simple as placing one image next to the other, it requires thoughtful placing and positioning of the images along with additional editing to create a visually impressive frame. To help you with this task, a good collage maker can be used.
Though there are several tools making tall claims, not all deliver what they promise. So, to make your tool selection task a little easier, we have shortlisted the best ones in the following parts.
In this article
01 [Top blended collage maker tool](#Part 1)
02 [Best tool for stock media and video editing- Wondershare Filmora](#Part 2)
Part 1 Top blended collage maker tool
A roundup of the top 5 tools to create blended photo collage is given below.
01PicMonkey
This is a free collage-making tool by Shutterstock that can let you blend images to create wonderful freestyle as well as grid-based collages. If needed, you can even add videos to the collage.
Key features
● Create freestyle grid-based blend collage using images and videos.
● Wide range of layouts to choose from.
● Offer flexible resizing of the cells for proper blending of the images.
● Support drag-and-drop.
● This photo blend collage maker allows adding graphics, text, effects, and other elements.
● Comes with a free stock of photos and videos.

02Photo Collage Maker
This is an integrated mask tool that supports blending your images to create an impressive collage.
Key features
● Simple and intuitive interface.
● Allows creating blend collage in a few simple steps.
● More than 100 templates in different themes and designs are available.
● Enhance the collage by adding masks, clip-arts, captions, and other effects.
● Created collage can be saved in all key image formats like JPEG, PNG, GIF, and TIFF.

03Blend Collage Free
Developed by KDN Soft this is a free Android-based blend collage apk for blending images perfectly and creating an interesting collage.
Key features
● Allows to blend images and create a collage in HD quality.
● Collage can be shared over Instagram, Facebook, and other sites.
● Simple interface that makes the process easy and quick.
● Add images from your device, capture them using the camera or even use the stock collection at the app.
● Decent editing options supported.

04Photo Blend
With a 3.6 rating, this is a decent blend collage app for iOS devices to blend images and create a collage.
Key features
● Blend and add images to create an impressive collage.
● Create a double-exposure effect by blending images.
● A wide range of filters is available to enhance the collage.
● Created collage can be shared with dear ones.

05Blend Collage Photo Editor
To create an impressive collage with a blending effect, this is a good tool to consider.
Key features
● Free to use tool for creating blend collage.
● Comes with more than 50 customized shapes to crop the images.
● Support multiple filters to be used on images.
● Allows cropping the images free-hand as well.
● Save the created collage on the system or share it over Twitter, Facebook, and other sites.

Part 2 Best tool for stock media and video editing- Wondershare Filmora
A lot of blend-collage makers also allow adding videos, and in such situations, the need for a good video editing tool may also arise to edit the video before adding. One such excellent tool that we recommend here is Wondershare Filmora. This is a Windows and Mac-based software that supports all basic as well as advanced video editing features. Files in almost all formats can be quickly processed using the tool.
Additionally, if you are not able to find your choice of image or video, Wondershare Filmora is a great place to checkout as it has a huge collection of media files in an array of categories and themes. You are surely going to get something of your choice and requirement.
There are several other useful features of the software like split-screen-video making, advanced editing, audio editing, and more. Check out more in detail about the software at this this link

● Key Takeaways from This Episode →
● Blend collage allows you to blend your images for creating a smooth and interesting-looking collage.
● Several online tools, desktop programs, and apps are available to create a photo blend collage.
● To get a collection of media files and edit your video professionally, Wondershare Filmora works as the best software.
This Is the Method Employed During Every Evening Weather Broadcast: The Newscaster Is Standing in Front of a Blank Screen, but the Viewers at Home See a Weather Map
Chroma key with gimp green screen is the method by which photographers (and videographers) use a monochromatic backdrop, then replace the blue or green “screen” with a virtual background. This is the method employed during every evening weather broadcast: the newscaster is standing in front of a blank screen, but the viewers at home see a weather map.
Green screen Chroma key can also be used with photography. Subjects can be photographed in front of a monochromatic screen, and a virtual background can be put behind the subject once the screen is removed. For example, a duck can be photographed in front of a green or blue tarp, which is then replaced by a photograph of a river.
Filmora Audio Recorder
Record computer system audio
Capture microphone audio
Customize recording volume
Record screen and webcam as well
How to use green screen in gimp
If you take a picture with a solid colored background (blue or green works best), then you can have a computer program pull out the blue or green pixels and replace them with another color or a transparent layer. This process is called “chroma key” and is used in weather forecasts and other special effects. The terms “green screen” and “blue screen” also refer to the chroma key process.
These directions outlined below describe how to use GIMP to add a transparent layer and remove blue or green pixels from an image. This allows you to layer images on different backgrounds or use pictures as Sprites in Scratch or Greenfoot.
Brief outline of process:
- Start GIMP
- Open the picture file.
- Create an “Alpha Channel” (Transparent Pixels)
- Select “Like Colored Pixels” (Click on the Green or Blue background)
- Control->K to delete the pixels and reveal the Transparent background.
- Save the picture as a .gif file. (Not .jpg!)
Detailed Directions:
- Start GIMP: (The “Gnu Image Manipulation Program”)
- Click the “K” menu
- Select “Graphics”
- Select “GIMP Image Editor”
Note about the GIMP:
Most computer applications run in one window. GIMP will run different windows for each function or object you are working with. (Separate windows for paintbrush menus, images, backgrounds, etc . . .)
- Select “File-> Open”
- Navigate to your File Area and select a chroma key picture
- Once your picture opens, add the “Alpha Channel”
a. Select “Layer” from the picture menu bar
b. Select “Transparency”
c. Select “Add Alpha Channel” - Click the “Select Region by Color” icon.
- Click once on the green or blue color in the background.
- Press “Control -> K” on the keyboard to delete the colors. The background will appear as a gray checkerboard pattern.
- Repeat the click and “Control-K” process to remove the background colors.
- Once the background colors are removed, save the picture:
a. Select “File-Save As” from the menu bar.
b. Type “LastnamePicture.gif” as the filename. - Select “Convert to Indexed” - Click Export
- Click “OK”
- the picture should save.
- You can now use this picture in Scratch for a sprite, or in other graphics projects to combine with backgrounds.
Best GIMP alternative to edit images
Krita
Krita is an application for image creation and image manipulation. We focus on painting, illustration, concept art and other creative work. This is a short an incomplete list of the most important features Krita provides.
Krita provides an OpenGL based canvas in addition to an unaccelerated canvas. Krita’s filters, histogram computation and image recomposion are multi-threaded and make use of multiple cores if available. The effect of filters is previewed on-canvas.
Key Features
- File Formats
Krita has support for a variety of file formats. Not all file formats are supported equally well, and for some there is only import, not export. Krita supports metadata for kra, ora, tiff, jpeg and png file formats.
- Color models
Krita does not support indexed color models. In general, Krita does not support color models without an alpha channel. Krita supports different channel depths, from 8 bits integer to 32 bits floating point per channel.
- Layer types
Krita supports the both layers and masks. Masks are associated with a single layer, while layers are grouped in a hierarchy.
- Tools
There are several types of tools: vector tools, raster tools, guidance tools, canvas tools and selection tools. Note some types of content are not implement as tools but as “shapes” that can be inserted, for instance richt text, text-on-a-path or geometric shapes.
- Brush engines
Krita is different from other applications in that it supports brush engine plugins. These brush engines are used in the pixel tools to stroke your painting.
- Filters
Krita provides filters that can be used directly, i.e. destructively on the pixels of a layer, when painting, or dynamically as a filter layer or filter mask.
Paint.Net
Paint.net is a free and very capable image editing software for Windows. Great alternative to Photoshop for people that do not need all the stuff PS offers.
In order to handle multiple images easily, Paint.NET uses a tabbed document interface. The tabs display a live thumbnail of the image instead of a text description. This makes navigation very simple and fast. Extensive work has gone into making Paint.NET the fastest image editor available. Whether you have a netbook with a power-conscious Atom CPU, or a Dual Intel Xeon workstation with 16+ blazingly fast processing cores, you can expect Paint.NET to start up quickly and be responsive to every mouse click.
Key Features
- **Performance
Extensive work has gone into making Paint.NET the fastest image editor available. Whether you have a netbook with a power-conscious Atom CPU, or a Dual Intel Xeon workstation with 16+ blazingly fast processing cores, you can expect Paint.NET to start up quickly and be responsive to every mouse click.
- **Layers
Usually only found on expensive or complicated professional software, layers form the basis for a rich image composition experience. You may think of them as a stack of transparency slides that, when viewed together at the same time, form one image.
- **Automatically Updated
Updates are free, and contain new features, performance improvements, and bug fixes. Upgrading to the latest version is very simple, requiring only two clicks of the mouse.
- **Special Effects
Many special effects are included for enhancing and perfecting your images. Everything from blurring, sharpening, red-eye removal, distortion, noise, and embossing are included. Also included is our unique 3D Rotate/Zoom effect that makes it very easy to add perspective and tilting. Adjustments are also included which help you tweak an image’s brightness, contrast, hue, saturation, curves, and levels. You can also convert an image to black and white, or sepia-toned.
- **Powerful Tools
Paint.NET includes simple tools for drawing shapes, including an easy-to-use curve tool for drawing splines or Bezier curves. The Gradient tool, new for 3.0, has been cited as an innovative improvement over similar tools provided by other software. The facilities for creating and working with selections is powerful, yet still simple enough to be picked up quickly. Other powerful tools include the Magic Wand for selecting regions of similar color, and the Clone Stamp for copying or erasing portions of an image. There is also a simple text editor, a tool for zooming, and a Recolor tool.
- **Unlimited History
Everybody makes mistakes, and everybody changes their mind. To accommodate this, _every action you perform on an image is recorded in the History window and may be undone. Once you’ve undone an action, you can also redo it. The length of the history is only limited by available disk space.
Adobe Photoshop
Adobe Photoshop is the commercial image editor that set the standard in creative illustration and design work with a sophisticated, layer-based workflow and robust, professional feature set.
Over the years, Photoshop developed from a small photo editing tool to an Industry-leading software that dictates the global graphic designing and multimedia industries. With every new version, Adobe introduces in the Photoshop; the graphic designing communities wait to check out the next big leap where Photoshop can take them.
Key Features of Adobe Photoshop
- Layers
With Layers palette, you can draw or design various elements of your document independently in layers and stack them up as per the order of display. With this advantage, control over every single object is catered at the click of a mouse. Mistakes happen, but the effects of the mistake are limited to the part of the canvas; you can choose to work on the particular part and leave the rest of the canvas as it is. This benefit is lacking in the traditional painting method. Artists are not allowed to relax at any part of the drawing or painting once their concentration is diverted and a stroke of painting goes wrong! They are bound to change the whole canvas.
- Selection Tools
Photoshop’s selection tools are so handy to use that designers worldwide are addicted to the set of selection tools Photoshop offers. However, there are a bunch of competitive software and open-source software designed to give tough competition for Photoshop. Users are still stuck with Adobe’s torch bearer software due to the ease its tools provide.
- Pen Tool
Today, Photoshop cannot be imagined without a Pen tool. Though the pen tool, by nature, works for drawing paths along with the anchor points, the creative scope it provides is limitless. The tool is designed so flexibly that the designer can draw any shape or edit the existing shapes as good as he is using his bare hand. The amount of control we have through placing the anchor points in the right places is taken further with the three types of Anchor points that can allow you to draw and edit paths precisely.
- Shapes
The outlook of the shape layers in Photoshop may be limited, but the capabilities of the feature go a step further than what we assume about it. In the traditional marquee selection tools, the selection is limited to the raster process, and in many cases, the output will result in the sharp pixilated edges, which are never good looking. But the shape layers can act as an individual object within the document with its attribute to maintain the finest quality.
- Vector Mask
The layer masks create a masking portion of an object by using the grayscale color combination (Shades of Gray). Once the masking part is done, the area of the object under the layer mask disappears.
- Retouching Tools
Retouching tools are an accumulation of various tools such as Stamp tool, Pattern Stamp tool, Spot Healing tool, Healing tool, Patch tool, Redeye tool and much more. Though the numbers are more, every tool has its importance. The development of retouching tools did not happen overnight. Adobe was working hard identifying the problems of the photographers and finding the solutions for the problems from time to time.
Affinity Photo
Affinity Photo is a professional, full-featured raster graphics editor. Working in Affinity Photo is always live and you can pan and zoom at 60fps, with live previews and non-destructive application.
Whatever your genre of choice, be it landscapes, portraits, macro or anything else, Affinity not only has an unbeatable set of tools to help you, but it’s also laid out in an intuitive way that is ideal for newcomers and those switching from other software alike. There are a series of modules, called Personas, that bring you dedicated interfaces, such as Tone Mapping, RAW Developing and even a powerful liquify interface that makes complex reshaping a breeze! Even better, you can take the full functionality of the desktop app on the road, thanks to the iPad version, which is the most powerful mobile editing solution available. With so much on offer for so little, it’s time that you incorporated Affinity Photo into your workflow and moved your photography to the next step. To get you started, we’re going to give you some great tips to get the most from this brilliant software and get you well on the way to creating your own Masterpieces.
- **Develop RAW Files Like A Pro
The first milestone in any photographer’s journey is unquestionably learning to shoot RAW. This image format captures even more data than JPEG and can be tweaked to create the perfect image or a solid base for further editing. To take advantage, all you need to do is open up your RAW file of choice into Affinity Photo and the Develop Persona will load up automatically. From here you can apply exposure adjustments, recover highlights and shadows and even craft a split toning effect. There’s a Curves adjustment for precision tweaks, a savvy noise reduction component and a lens correction module to combat distortion. It has everything you need for that all-important first step to brilliance.
- **Professional Skin Retouching At The Click Of A Button
If you shoot portraits, you’ll doubtless know about the power of frequency separation. This technique is favored by many pros to get that glossy high-end look that screams professional. While it may sound complicated, in Affinity Photo it’s as simple as going to the Photo Persona and clicking on Filters>Frequency Separation. Once you’ve done this, you can set your Gaussian Blur amount in real-time, click Apply and the software will split your shot into two layers, one with the color and one with the detail. From here, you can remove blemishes, add your own dodge and burn and tidy up colors – a game changer!
- **Ramp Up Your Dynamic Range With Tone Mapping
Amazingly, Affinity Photo has its very own Tone Mapping Persona with a full suite of tools to get your well on the way to high dynamic range images, whether you have a series of bracketed shots – identical photos taken at different exposures – or a single shot as we’ve used. Opening this Persona brings up a toolbar on the right-hand side with the usual exposure and enhancement tools, though also gives you access to Tone Compression, Local Contrast and detail sliders. There’s even a series of presets to get you started. Like most of Affinity, the effects can be seen in real-time and are completely reversible, meaning there’s no such thing as a permanent mistake. What we love most about the Tone Mapping Persona is the subtlety compared to others on offer, meaning you’re able to keep your shots looking natural while still getting the most from your work!
- **Adjustments Are Plentiful And Powerful
Adjustments refer to a series of functional layers that apply specific effects to your shots. These can be as simple as Exposure, Vibrance or Brightness and Contrast, which do what they say on the tin, all the way up to more powerful options like Gradient Maps, Channel Mixers and Color Balance for creative effects and color corrections. Because they’re layers, they can be altered at any time in your editing process and moved around as you see fit. They affect any layers below them in the Layer palette but can be set to cast an effect on only a single-pixel layer by using the brilliant Mask to Below feature. You can also stack as many Adjustments as you wish, giving you a huge amount of flexibility to fine-tune your work in any way possible.
- **Layers Offer You The Ultimate Creative Freedom
An editing software that doesn’t allow Layers will really set back your creative choices. Happily, Affinity Photo gives you full control over its layer system. This means that you can bring in additional elements into your scene. You can then take advantage of Affinity’s hugely powerful selection engine to select the parts you wish to cut out or scroll through the full list of Blending Modes for a more refined and creative look. To add the birds to our shot, we took one landscape and added in a shot of birds taken against a white sky. From here, it’s as easy as setting the Blending Mode to Multiply and voila, the white sky has gone. Of course, there’s no need to stop there, and you can find yourself creating in-depth composites that are truly only limited by your imagination - set yourself free!
Pixlr
Pixlr makes it easy to transform everyday images into stunning works of art. Whether you’re applying a quick fix to your photos or adding your personal touch with effects, overlays, or borders, Pixlr has everything you need to make your moments beautiful.
For now, Pixlr is free for all users: individuals to the enterprise. There is no news yet if and when the platform is set to charge people from using it. For content creators and artists on the go, Pixlr is a great app to use. It is free and available on the web. Regardless of your device, you only need an internet connection to get access to a free app but with serious functionalities. You just open your files from your device through the app like you would any popular image editing software and you are good to go. Furthermore, images edited on Pixlr are set to private. This makes your interaction with the app, over the net, is secure. Also, Pixlr does not store any copy of your images in their systems.
Key Features
- **Free and Safe
Pixlr, for now, is free. There is also no indication that the company will charge users soon. It is a legitimate site that does not engage in fraudulent activities or perpetuate any hidden charges. The images that you edit or make on Pixlr are also free for commercial use. For freelance artists and small businesses, this is the perfect starter app. For enterprises with content creators in the field, it is good to let employees know about Pixlr’s no-cost offer.
- **Versatile and Lightweight
Any browser can access Pixlr. Users can access the image editing suite regardless of device type and operating system. If you are on Mac, Windows, or Linux using Safari, Edge, Firefox, or Chrome, Pixlr is available at your disposal. All you need to have is a Flash plug-in.
If you are on mobile using iOS or Android, you can download the native apps. They do not take much of space and memory. It is a true lightweight app that packs a punch when it comes to functionality.
- **Quick Fix
Pixlr is known for being the lightweight app that packs so many editing tools and functionalities at no cost. But, maybe, more importantly, it also includes many tools for quick fixes. This is something essential for people on the go or those that just need minor adjustments. Just open your browser on any device and apply touch-ups. You do not have to open your laptop or go to your desktop for simple needs.
- **Spot heal
Super useful, the spot heal tool can help remove scratches or blemishes by simply clicking on the area. Additional options: Besides size of brush, you have a choice of Pixlr choosing to blend the area with nearby area values or generate a pattern. Generally, you will only want to choose a pattern if you’re blending an area that has a pattern (e.g., a chain-link fence).
- **Dodge
Use the dodge tool to lighten specific areas. Note that this is a tool that deals with contrast (light vs. dark) and not color, although color may sometimes appear to change based on your lightening. Additional options: You can change brush size and exposure settings. You can also choose to focus your lightening on shadows, midtones, or highlights.
- **Sponge
The sponge tool enhances or sops up color, depending on your settings. It’s a great tool for saturating or desaturating specific areas of an image. Additional options: You can change the brush size and brush strength, but the most important setting is whether you want to saturate (increase) or desaturate (decrease) coloring.
Conclusion
When choosing an object for use in chroma key, it is important to verify the background “screen” color does not exist on the object. For example, choosing a blue background for a blue butterfly would be a poor choice: portions of the butterfly would be deleted along with the background.In addition, it would be a good idea to become familiar with basic GIMP functions before attempting this tutorial: a basic knowledge of the Layers dialog and toolbox items is necessary prior to attempting this photo editing technique.
Also read:
- Updated How to Edit Recorded Video for 2024
- New 2024 Approved How To Use Voicemod On Discord Desktop+Mobile
- 2024 Approved How to Convert Videos to Slow Motion?
- New In 2024, Do You Want to Know How to Add LUTs to Premiere Pro? In This Guide, You Will Find Details and Easy Steps to Proceed with Using LUTs in Premiere Pro
- Are You Thinking of Learning Video Editing in the Final Cut Pro Software? In This Article, You Will Learn Different Ways of Splitting and Merging Multiple Videos at Once as a New Skill to Get Your Business to a New Level
- The Audio You Produce Will Inevitably Be Flawed Throughout the Production Process. So, Learn How Adobe Audition Removes Echo to Sound Better Instead of Throwing It Away
- 2024 Approved How to Create Glowing Edge Effect in TikTok Dancing Video
- Updated In 2024, Do You Want to Download Slow-Motion Apps that Can Edit Video Professionally? This Article Will Discuss some Slomo Makers for Both iOS and Android
- 2024 Approved Premiere Pro Slow Playback Issues Finding The Best Solutions
- New How to Combine Several Xvid Files Into One Windows, Mac,Android, iPhone & Online for 2024
- Updated How To Synchronize Your Audio And Videos Properly for 2024
- Updated It Is Easy to Separate the Audio From the Video in DaVinci Resolve. But, to Avail of This Feature, You Need to Follow Proper Steps, and This Article Is All About It
- New 2024 Approved This Article Talks in Detail About How to Convert Time-Lapse to Normal Video Using Certain Methods on iPhone, Online Tools, and so On. It Further Discusses Converting Time-Lapse Video to Normal on the Computer. Check Out
- New How to Make Discord Logo GIF for 2024
- New 10 Top Free GIF Background Remover for PC and Online for 2024
- What Should Be Considered to Choose A Nice GoPro for Vlogging, In 2024
- New Top 5 Tips to Freeze-Frame in After Effects
- New Things About Transparent PNG Remove and Convert
- Where To Find The Best Free Canon LUTs? Learn More for 2024
- In 2024, Adding a Spooky Shadow Effect with Filmora
- New In 2024, Top 12 Sony Vegas Slideshow Templates for Free Download
- New In 2024, How To Change Text Color In Premiere Pro
- How to Remove or Mute Audio in Video with Android Phones?
- Looking Into The Top Free Slow Motion Apps (Android & iOS)
- Updated Why Did Filmora AI Portrait Attract People for 2024
- Updated The Quick and Simple Way to Mirror Video in Premiere Pro for 2024
- New Separate Audio From Video in DaVinci Resolve Step by Step for 2024
- Easy Steps to Create Intro Video with After Effects
- New 2024 Approved Easily Combine Videos and Audios with 5 Simple Online Tools
- New Step-By-Step Guide To Creating Halftone Effects In Photoshop
- Updated 2024 Approved Step by Step to Rotate Videos Using Kdenlive
- How to to Mimic Professional Filming Gears
- New 2024 Approved Let Us Help You with Something that You Might Not Know. Have You Ever Worked with MOV File Format Before? Or Do You Know What that Is? Lets Talk About It
- Updated With This Article, We Will Be Looking at Steps to Rotate a Video in Cyberlink PowerDirector to Help You when Required. We Have Also Mentioned the Steps You Will Need to Follow in Wondershare Filmora for 2024
- Updated Best Online GIF to Image (PNG/JPG) Converters
- Updated Steps to Rotate Videos in Lightworks for 2024
- Updated What Is the Best MP4 Cutter for YouTuber on Mac, In 2024
- How to Edit Facebook eCommerce Video Ads
- New 2024 Approved Know How to Create OBS Slideshow. Creating OBS Slideshow in Simple Steps; Application for Creating OBS Slideshow. Make OBS Slideshow Online
- New 2024 Approved Figuring Out Proper Ways to Play a Video in Slow Motion on iPhone
- Updated 2024 Approved So, without Further Dilly-Dallying, Lets Learn How to Create a Retro 1950-Style Video with This Simple Filmora Tutorial
- New Denoise Video in Adobe Premiere Pro – Audio and Video Noise Removal for 2024
- New 2024 Approved Are You Searching for the Best Cinematic LUTs for Premiere Pro? You Are in the Right Place because This Article Is Dedicated to LUTs
- Updated 100 Workable How to Mask Track with Adobe Premiere Pro for 2024
- Best 7 Color Match Paint Apps
- Fixing Foneazy MockGo Not Working On Honor X9a | Dr.fone
- How to Unlock Lava Yuva 3 Pro Without Password?
- Reliable User Guide to Fix Realme 11 Pro Running Slow and Freezing | Dr.fone
- Forgot Apple iPhone X Backup Password? Heres What to Do | Dr.fone
- In 2024, Why is iPogo not working On Oppo Find X7 Ultra? Fixed | Dr.fone
- How to Unlock Vivo V30 Lite 5G Phone without Any Data Loss
- Fixes for Apps Keep Crashing on Poco X6 Pro | Dr.fone
- 3 Best Tools to Hard Reset Realme 11 Pro | Dr.fone
- Full Guide to Hard Reset Your Vivo V30 Lite 5G | Dr.fone
- Simple ways to get lost videos back from Asus ROG Phone 7
- Here Are Some Reliable Ways to Get Pokemon Go Friend Codes For Nokia C02 | Dr.fone
- Top 10 AirPlay Apps in Xiaomi Redmi 12 for Streaming | Dr.fone
- Use Device Manager to update hardware drivers on Windows 11
- In 2024, Top 15 Apps To Hack WiFi Password On Xiaomi 14 Ultra
- How to Fix when Apple Account Locked On Apple iPhone 13?
- How to Restore Deleted Motorola Edge 40 Pro Contacts An Easy Method Explained.
- Quick Fixes for Why Is My Motorola Edge 2023 Black and White | Dr.fone
- 8 Quick Fixes Unfortunately, Snapchat has Stopped on Realme C53 | Dr.fone
- 7 Ways to Unlock a Locked Nokia G310 Phone
- Undelete lost messages from HTC U23
- 7 Top Ways To Resolve Apple ID Not Active Issue For iPhone XS Max | Dr.fone
- How Can I Use a Fake GPS Without Mock Location On Oppo A78? | Dr.fone
- Universal Unlock Pattern for Vivo S18
- Apple iPhone XS Max Screen Mirroring You Must Know | Dr.fone
- In 2024, How to Remove a Previously Synced Google Account from Your Samsung Galaxy A34 5G
- New In 2024, Easy Steps To Create Talking Memoji on iPhone Free
- What is Fake GPS Location Pro and Is It Good On Apple iPhone 14 Pro Max? | Dr.fone
- 8 Solutions to Solve YouTube App Crashing on Itel P55+ | Dr.fone
- How to restore wiped music on Xiaomi Redmi Note 12 4G
- Unlock Your Device iCloud DNS Bypass Explained and Tested, Plus Easy Alternatives On iPhone 11 Pro
- 6 Solutions to Fix Error 505 in Google Play Store on Nokia XR21 | Dr.fone
- Best software to Fix and Repair Corrupt MP4,MOV,AVI video files of Xiaomi
- How to Remove Find My iPhone without Apple ID On your iPhone 14 Pro?
- In 2024, How to Transfer Apps from Oppo A2 to Another | Dr.fone
- Spoofing Life360 How to Do it on Tecno Camon 20 Pro 5G? | Dr.fone
- In 2024, Top 11 Free Apps to Check IMEI on Motorola Razr 40 Ultra Phones
- In 2024, Bypass iCloud Activation Lock with IMEI Code On your iPhone SE (2020)
- Various Methods to Transfer Pictures from Apple iPhone 6s Plus to PC | Dr.fone
- In 2024, How to Unlock Poco X6 Pro Phone Pattern Lock without Factory Reset
- Title: How to Use Visual Effect for Zoom
- Author: Morgan
- Created at : 2024-05-19 05:11:39
- Updated at : 2024-05-20 05:11:39
- Link: https://ai-video-editing.techidaily.com/how-to-use-visual-effect-for-zoom/
- License: This work is licensed under CC BY-NC-SA 4.0.

