:max_bytes(150000):strip_icc():format(webp)/Instagram_Login-5c004ff2c9e77c000104174d.png)
How to Zoom in Discord for 2024

How to Zoom in Discord
Discord is the most popular platform for communication among gaming communities and even YouTubers. Discord allows users to send text, voice, and video messages. Most importantly, Discord is available for computer users, smartphone users as well as online browser users. There are times when you may need to zoom in on Discord for better readability of messages. There are different ways on how to zoom in Discord.
There could also be a scenario where you have excessive zoom in effect, and you need to zoom out for better readability. Similarly, if you have pressed the wrong shortcuts accidentally and the screen on Discord has zoomed in, you have to zoom out to bring the screen to its original state. We will illustrate how to zoom out in Discord as well for computer, smartphone, and online users.
Part 1: How to Zoom Discord on Computer
Since Discord is mostly popular among gamers, Discord desktop app is the most widely used. If you want to zoom in on Discord desktop app, you should know that the zoom option is not readily available under any menu, and there is no keyboard shortcut you can press to zoom in and zoom out instantly. Instead, here are the steps on how to zoom in on Discord.
Step1Launch Discord desktop app on your computer. Click on the Gear icon located at the bottom left corner by the side of your username.
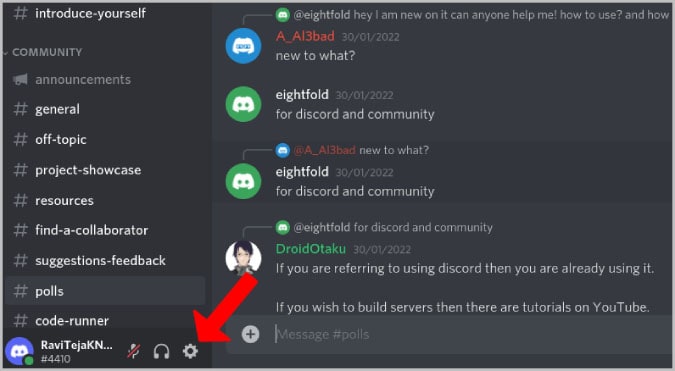
Step2Once Settings window opens, go to App Settings section from the left side and click on Appearance option.
Step3On the right section, scroll down, and you will find three options for zooming – Chat font scaling, Space between message groups, and Zoom level.
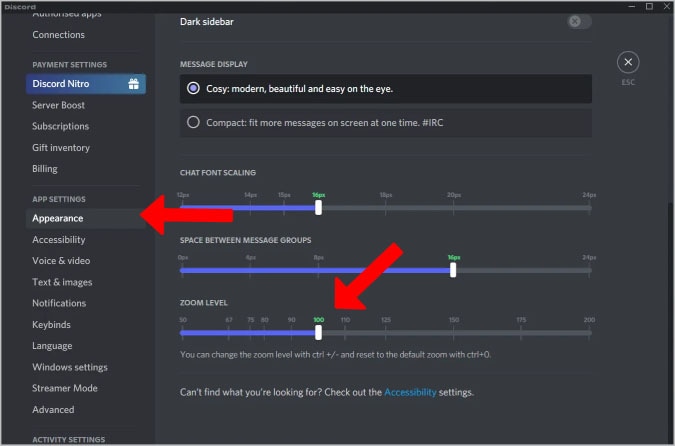
Step4According to your requirements, you can move the slider to the right to zoom in on Discord. You can also press Ctrl and “+” keys together to zoom in. Press Ctrl and “-“ keys together to zoom out. If you want to reset the changes, press Ctrl and O keys together.
Step5Once you are satisfied with the level of zooming, press Esc key on your keyboard to save the changes.
Part 2: How to Zoom Discord Online
If you are relatively new to Discord, you are likely to use its in-browser online version before downloading desktop or smartphone app. Zooming in and out on Discord is super easy when you use Discord online. This is because almost all browsers have in-built option to zoom in and zoom out any website including Discord. Here are the steps on how to zoom in Discord online.
Step1Open your web browser and visit the official website of Discord.
Step2Click on the three-dot icon at the top-right corner of the browser.
Step3From the drop-down menu, go to Zoom option. Click on “+” icon to zoom in and “-“ icon to zoom out.
![]()
Alternatively, you can simply launch Discord on any browser and press Ctrl and “+” or “-“ keys together for zooming in and out. You get to see by how much percentage the browser is zooming in and zooming out. If you want to reset, bring the percentage to 100%.

Part 3: How to Zoom Discord on Mobile
Discord is available for Android and iOS users. For any app, the zoom feature is generally unavailable. But Discord has included zoom in and zoom out options under accessibility features for the convenience of the users. Therefore, the zoom effect will only be reflected on Discord app rather than on all apps. Here are the steps on how to zoom in and how to zoom out in Discord app.
Step1On your smartphone, open Discord app. Tap on your Profile icon located at the bottom-right corner.
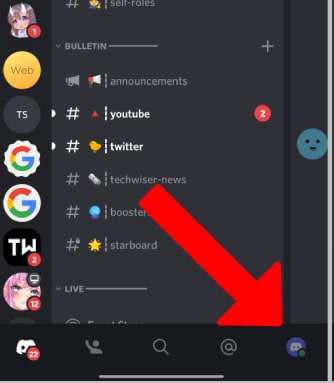
Step2You must be on User Settings page where you need to find and tap on Appearance present under App Settings.
Step3Scroll down and come to Chat Font Scaling and move the slider to the right for zooming in.
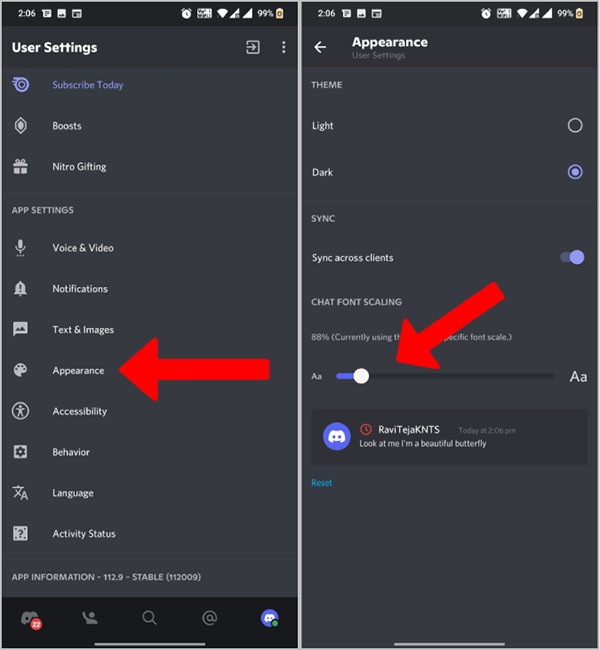
There is Reset option at the bottom to cancel out the changes made as far as zoom effect goes.
Conclusion
There are going to be times when you have to adjust the size displayed on Discord for better readability. We have illustrated how you can easily zoom in and zoom out whether you are accessing Discord from its desktop app or smartphone app. Besides, you can also zoom in and out if you are using Discord web version.
Discord is the most popular platform for communication among gaming communities and even YouTubers. Discord allows users to send text, voice, and video messages. Most importantly, Discord is available for computer users, smartphone users as well as online browser users. There are times when you may need to zoom in on Discord for better readability of messages. There are different ways on how to zoom in Discord.
There could also be a scenario where you have excessive zoom in effect, and you need to zoom out for better readability. Similarly, if you have pressed the wrong shortcuts accidentally and the screen on Discord has zoomed in, you have to zoom out to bring the screen to its original state. We will illustrate how to zoom out in Discord as well for computer, smartphone, and online users.
Part 1: How to Zoom Discord on Computer
Since Discord is mostly popular among gamers, Discord desktop app is the most widely used. If you want to zoom in on Discord desktop app, you should know that the zoom option is not readily available under any menu, and there is no keyboard shortcut you can press to zoom in and zoom out instantly. Instead, here are the steps on how to zoom in on Discord.
Step1Launch Discord desktop app on your computer. Click on the Gear icon located at the bottom left corner by the side of your username.

Step2Once Settings window opens, go to App Settings section from the left side and click on Appearance option.
Step3On the right section, scroll down, and you will find three options for zooming – Chat font scaling, Space between message groups, and Zoom level.

Step4According to your requirements, you can move the slider to the right to zoom in on Discord. You can also press Ctrl and “+” keys together to zoom in. Press Ctrl and “-“ keys together to zoom out. If you want to reset the changes, press Ctrl and O keys together.
Step5Once you are satisfied with the level of zooming, press Esc key on your keyboard to save the changes.
Part 2: How to Zoom Discord Online
If you are relatively new to Discord, you are likely to use its in-browser online version before downloading desktop or smartphone app. Zooming in and out on Discord is super easy when you use Discord online. This is because almost all browsers have in-built option to zoom in and zoom out any website including Discord. Here are the steps on how to zoom in Discord online.
Step1Open your web browser and visit the official website of Discord.
Step2Click on the three-dot icon at the top-right corner of the browser.
Step3From the drop-down menu, go to Zoom option. Click on “+” icon to zoom in and “-“ icon to zoom out.
![]()
Alternatively, you can simply launch Discord on any browser and press Ctrl and “+” or “-“ keys together for zooming in and out. You get to see by how much percentage the browser is zooming in and zooming out. If you want to reset, bring the percentage to 100%.

Part 3: How to Zoom Discord on Mobile
Discord is available for Android and iOS users. For any app, the zoom feature is generally unavailable. But Discord has included zoom in and zoom out options under accessibility features for the convenience of the users. Therefore, the zoom effect will only be reflected on Discord app rather than on all apps. Here are the steps on how to zoom in and how to zoom out in Discord app.
Step1On your smartphone, open Discord app. Tap on your Profile icon located at the bottom-right corner.

Step2You must be on User Settings page where you need to find and tap on Appearance present under App Settings.
Step3Scroll down and come to Chat Font Scaling and move the slider to the right for zooming in.

There is Reset option at the bottom to cancel out the changes made as far as zoom effect goes.
Conclusion
There are going to be times when you have to adjust the size displayed on Discord for better readability. We have illustrated how you can easily zoom in and zoom out whether you are accessing Discord from its desktop app or smartphone app. Besides, you can also zoom in and out if you are using Discord web version.
Create Amazing Slow-Motion Videos: 8 Affordable Slow-Motion Cameras
Budget slow-motion cameras are not just for filmmakers but are for everyone who loves making eye-catching videos and pictures. These specialized cheap slow mo cameras let us slow down time and see things in smooth frames that we normally can’t. However, not everyone can afford such fancy cameras, which are usually expensive. So, we will talk about affordable slow-motion cameras and their importance in videography.
Slow Motion Video Maker Slow your video’s speed with better control of your keyframes to create unique cinematic effects!
Make A Slow Motion Video Make A Slow Motion Video More Features

Part 1: Some Great Cheap Slow-Motion Cameras One Can Go Across
If you are looking for some cameras that are budget-friendly but still manage to capture those cool, slow-motion moments, this article will help you with it. We will enlist some of the best inexpensive slow-motion cameras you can buy for detailed videography without worrying about your money.
- DJI Pocket 2
- Insta360 One X2
- GoPro HERO11
- Sony Cyber-Shot DSC-RX100 VII
- Canon EOS R50
- Nikon Z6 II
- Canon PowerShot G5 X Mark II
- Fujifilm X-S20
1. DJI Pocket 2
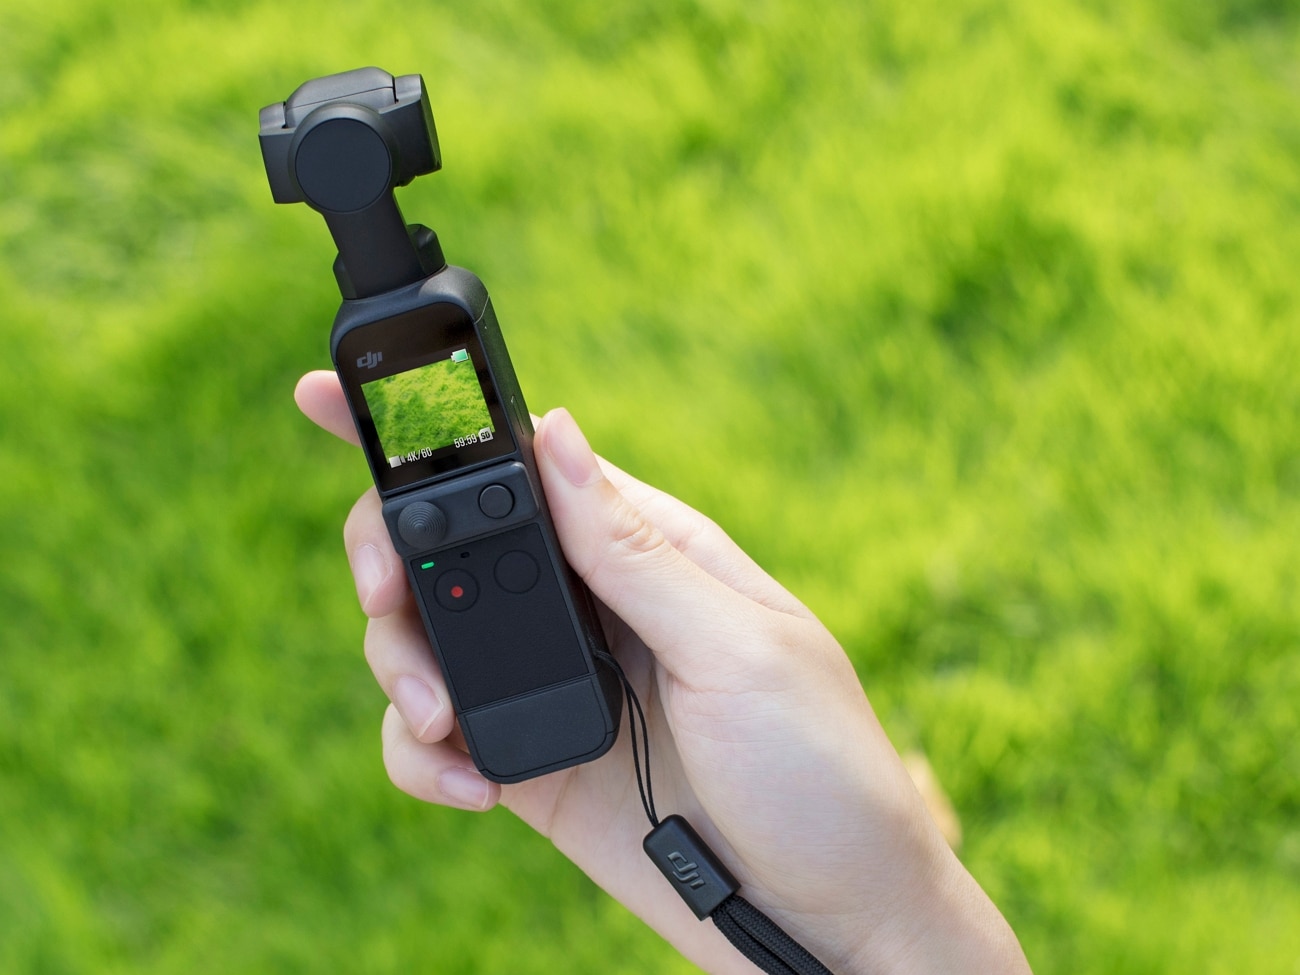
Another budget-friendly camera named DJI Pocket 2 Creative Combo is a small camera perfect for videographers. It fits right in your pocket and is easy for any adventure. The camera has a special feature that keeps videos steady, even when you’re moving. Moreover, its smart tracking feature keeps your subjects in focus no matter how they move. Plus, it takes great pictures with a good sensor and shoots super clear 4K videos at 60 frames per second.
Average Price: $344
2. Insta360 One X2
Insta360 One X2 is a versatile, pocket-sized camera that is your all-in-one filming solution. With this affordable slow-motion camera, you can capture 360-degree footage. You can also use stable wide-angle shots to capture scenes from far away. With its Flow State Stabilization, your videos stay steady without the need for a gimbal. Also, with its 100MB bitrate video recording, you can experience smoother slow-mo videos.
Average Price: $300

3. GoPro HERO11
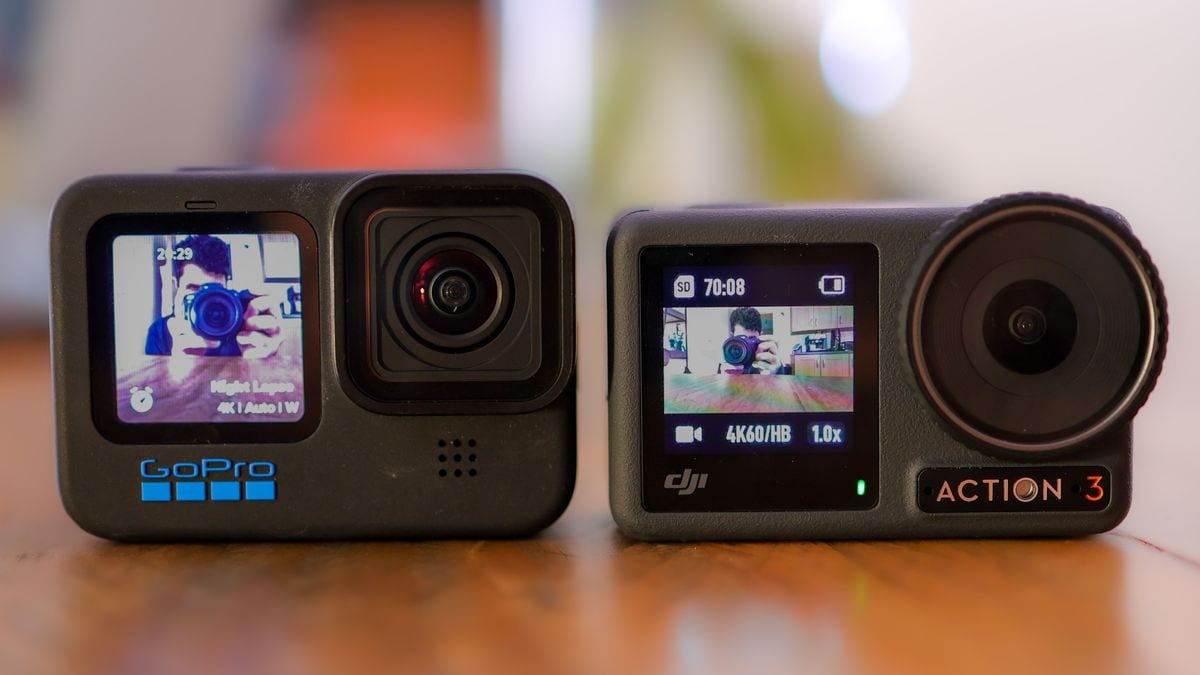
GoPro HERO11 Black allows you to shoot high-res 5.3K video at 60 fps and 4K at 120 fps. You can capture life’s action in stunning detail with its slow-motion feature. Also, thanks to Hyper Smooth 5.0 stabilization, your footage stays buttery smooth. Whether you’re a pro or a newbie, the one-button controls make it easy to use. All the features of this cheap slow-motion camera are packed into a compact and waterproof design for epic adventures.
Average Price: $299
4. Sony Cyber-Shot DSC-RX100 VII
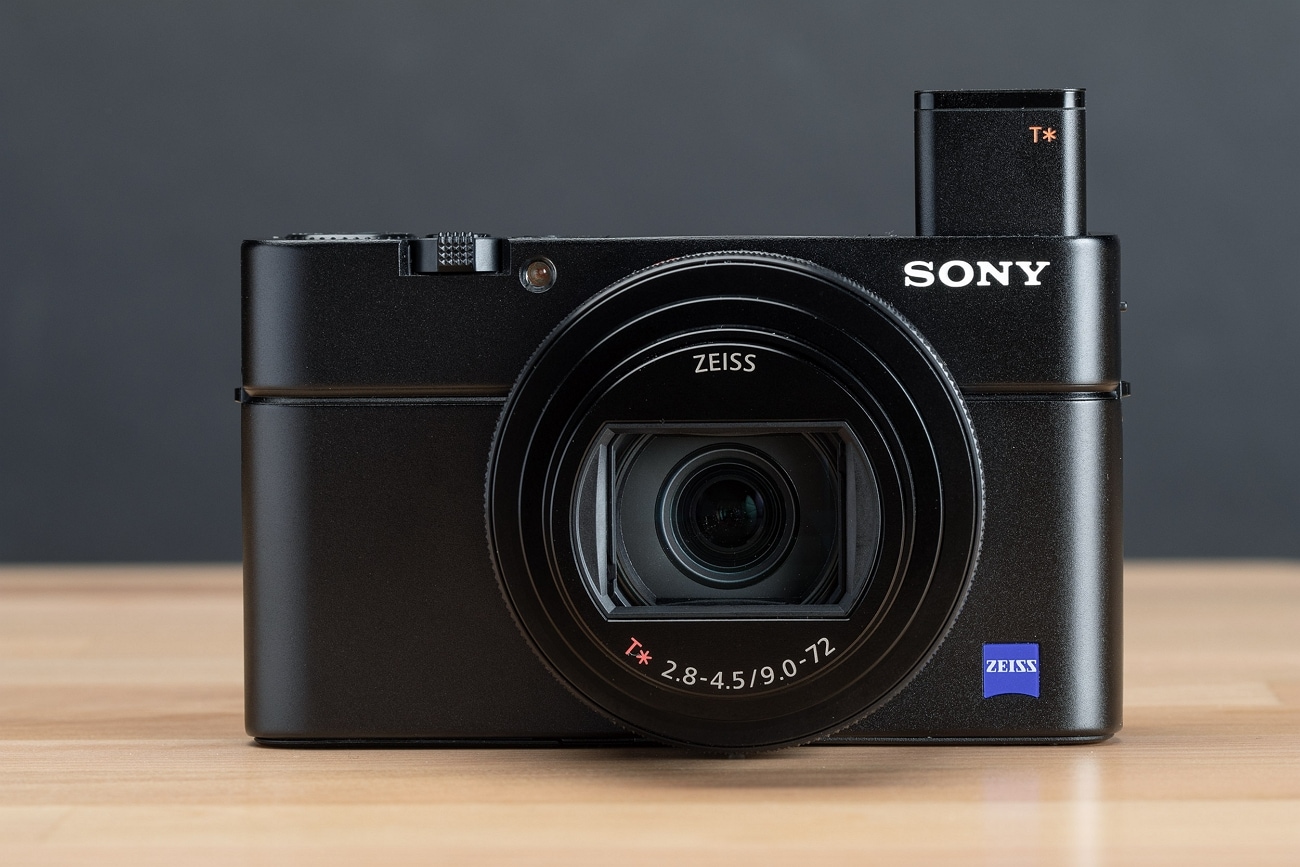
The Sony RX100 VII is a really powerful slow-motion camera. It’s got a 20.1MP sensor that takes awesome pictures. With its Zeiss Vario-Sonar T lens, it can zoom to a great extent, allowing the capture of scenes with lots of details. Also, it focuses quickly, like in 0.02 seconds, and can shoot up to 20 frames per second without any delays. It can shoot 4K videos and has features like Interval Shooting and image stabilization, making it perfect for pro-quality videos.
Average Price: $950
5. Canon EOS R50
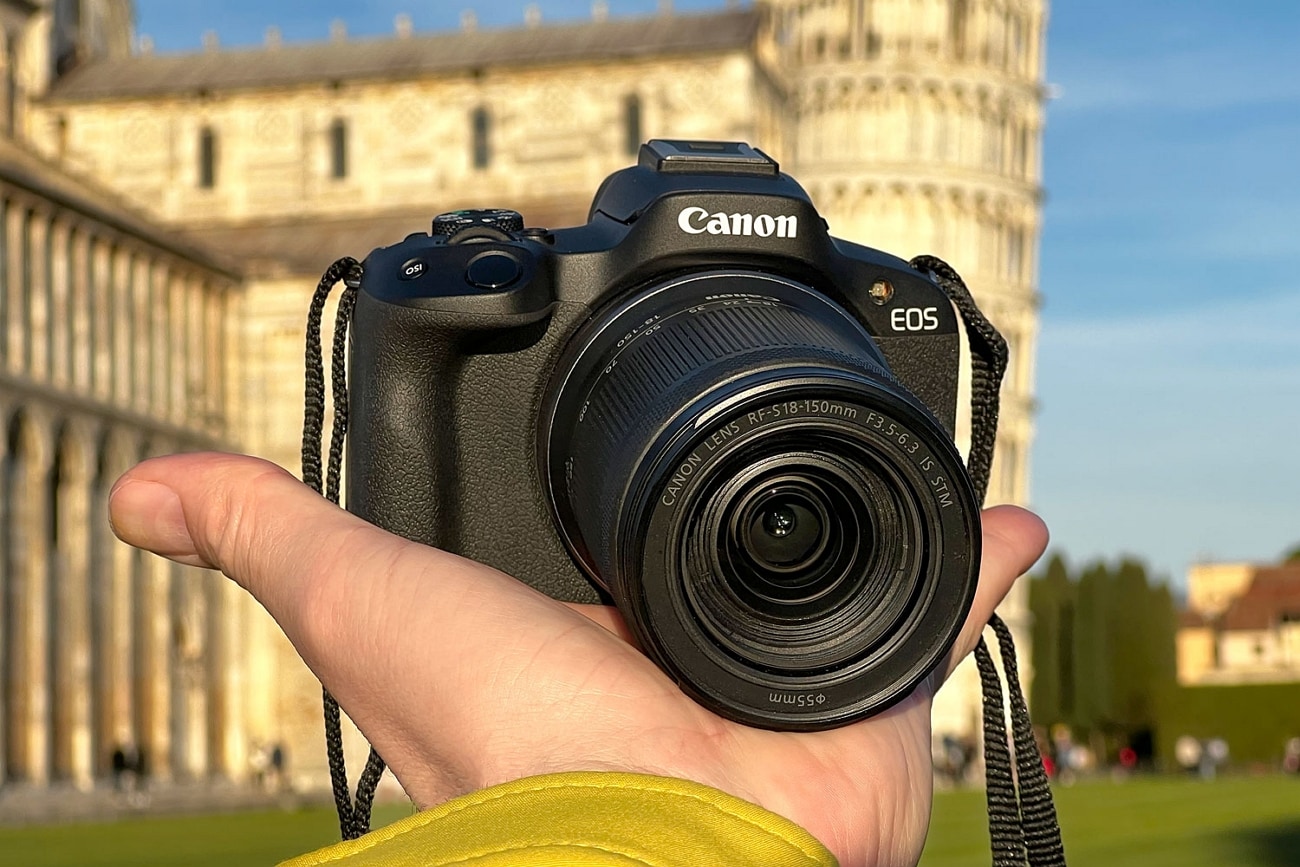
The Canon EOS R50 with an RF-S18-45mm STM Lens is a camera designed for filmmakers. The camera can shoot 4K videos and even super clear Full HD videos at 120 frames per second. Another handy thing is its auto-assist feature that helps with different photo settings. The focusing system is accurate and can quickly focus on different objects. And when the light isn’t great, it has a built-in flash that helps take better slow-motion videos at night.
Average Price: $699
6. Nikon Z6 II
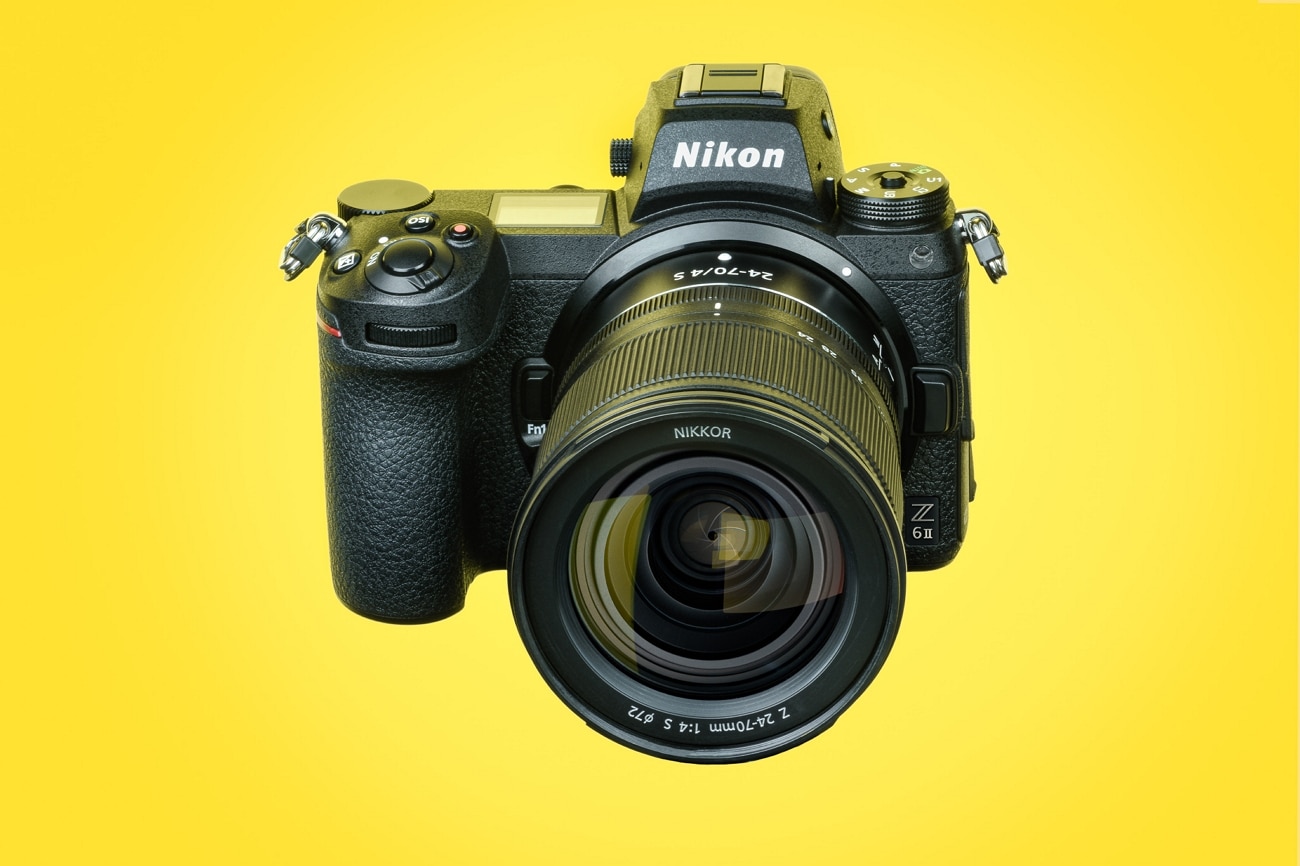
Nikon Z6 II captures smooth slow-motion at Full HD/120p. It also provides a stunning 4K Ultra HD/60p video for a professional look. With an impressive 24.5 MP sensor, it excels in low-light conditions. You can stay powered on the go with the convenience of charging via USB-C while shooting. So, enjoy the lightweight and compact design of this affordable slow-motion camera for easy portability.
Average Price: $1500
7. Canon PowerShot G5 X Mark II
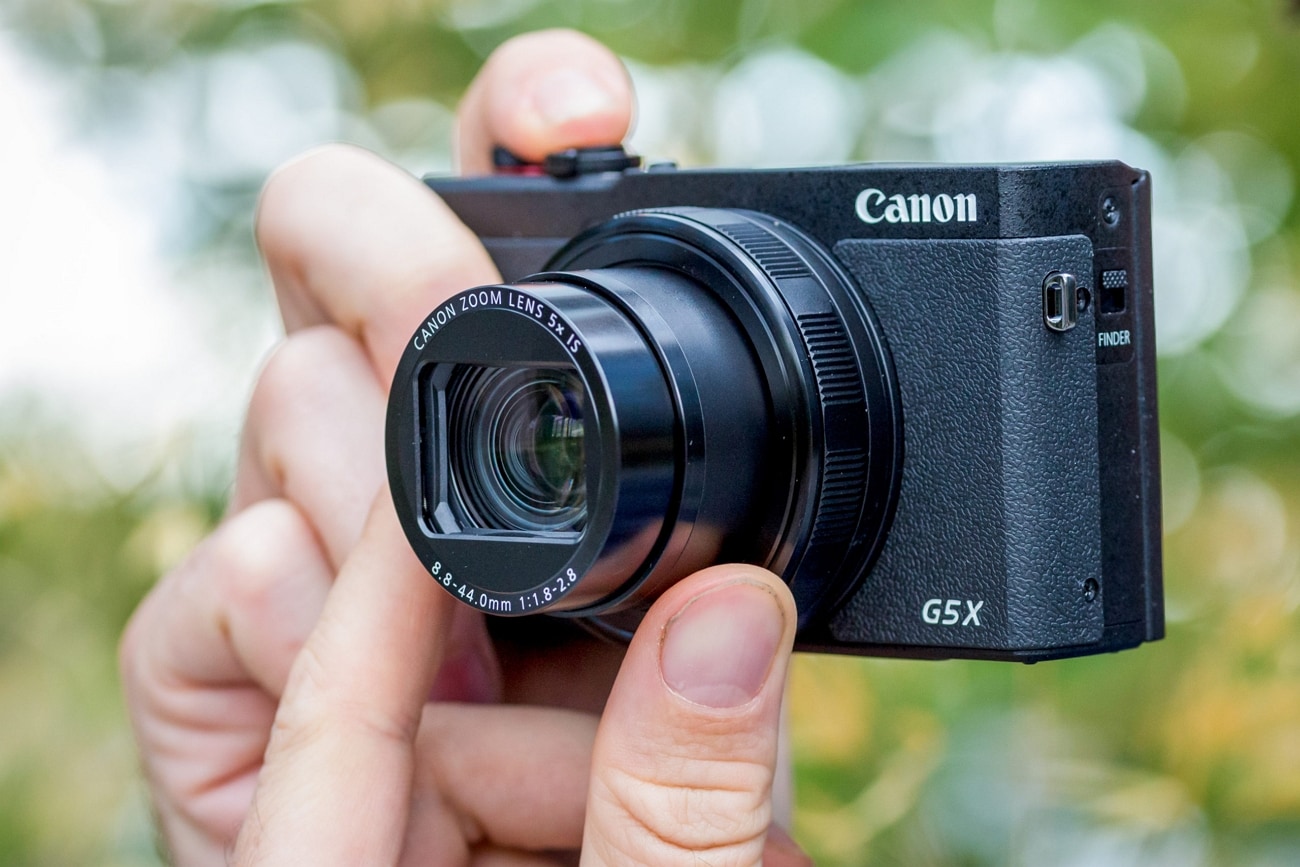
Canon PowerShot G5 X Mark II has a good 20.1-megapixel 1.0-inch Stacked CMOS Sensor that makes pictures look amazing. It also has a 5x Optical Zoom Lens with Optical Image Stabilizer, so it’s great for taking different kinds of clear and sharp photos. Plus, you can shoot awesome videos with this cheap slow-mo camera at 120 frames per second. This feature makes this camera an ideal choice for professional videography.
Average Price: $949
8. Fujifilm X-S20
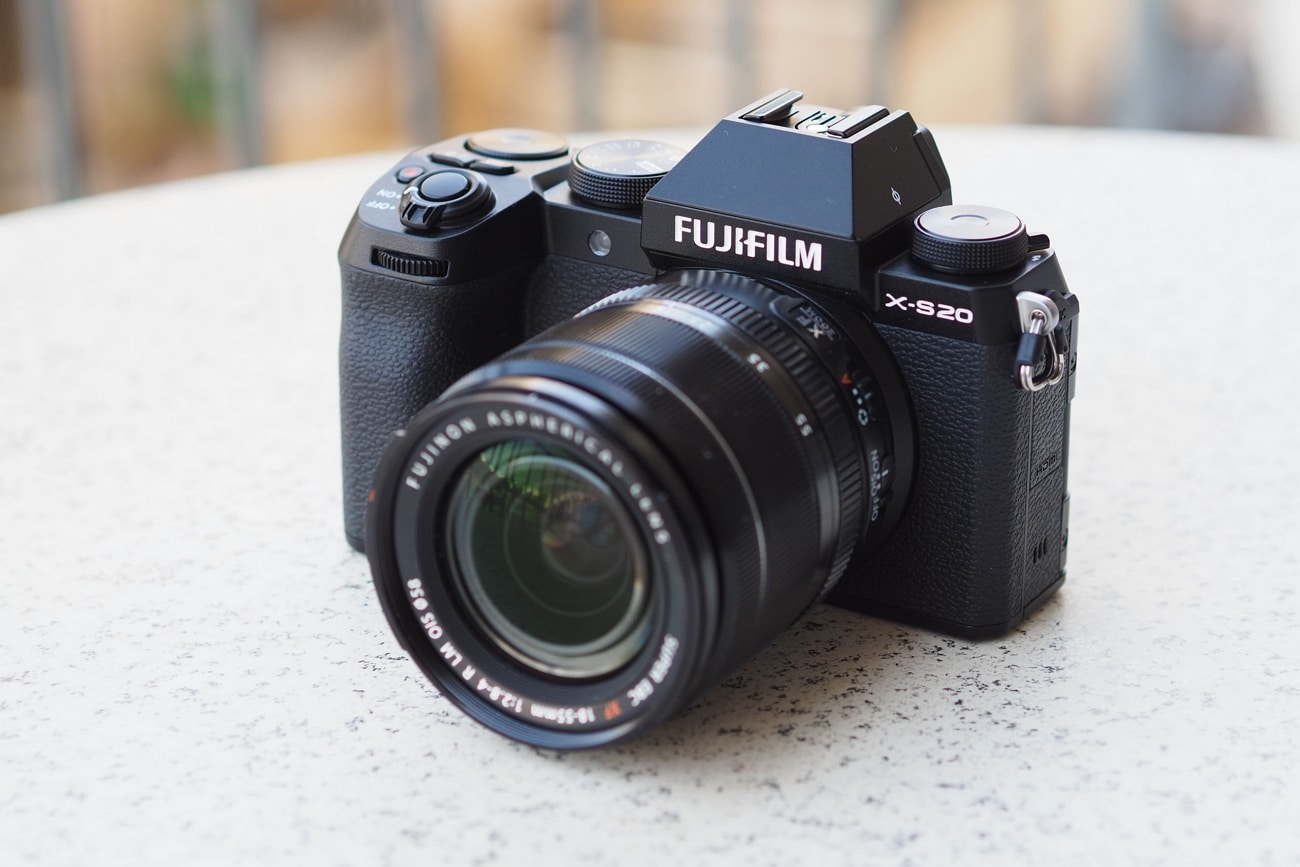
The Fujifilm X-S20 is an in-expensive slow-motion camera known for its advanced features. With a 26.1MP sensor, this camera captures high-quality images and videos. The 3.0-inch vari-angle touchscreen is user-friendly to allow even beginners to shoot professional videos. Moreover, it is ideal for aesthetic video recording, as it can capture footage in an impressive 6.2K resolution.
Average Price: $1299
Part 2: Make Perfect Slow-Motion Videos with The Best Desktop Application
Let’s discuss making slow-motion videos without using any particular camera. You heard it right! It is possible to generate a slow-motion video filmed by any smartphone camera. You just have to install Wondershare Filmora on your system and import the video into it. This tool is capable of slowing down video smoothly with the help of its advanced AI features.
Wondershare Filmora also helps you to generate AI music and scripts that enhance your productivity. Moreover, it runs without any lagging, allowing you to continue the editing process seamlessly. Explore more features of Filmora below.
Steps Involved to Slow Down Video Professionally with Speed Ramping
In this section, we will learn how to edit your video to slow down using Filmora. Wondershare Filmora has a feature named Speed Ramping that allows you to slow down different parts of a video. Let’s discover how this can be achieved in a step-wise fashion.
Free Download For Win 7 or later(64-bit)
Free Download For macOS 10.14 or later
Step 1Activate Filmora and Import the Video
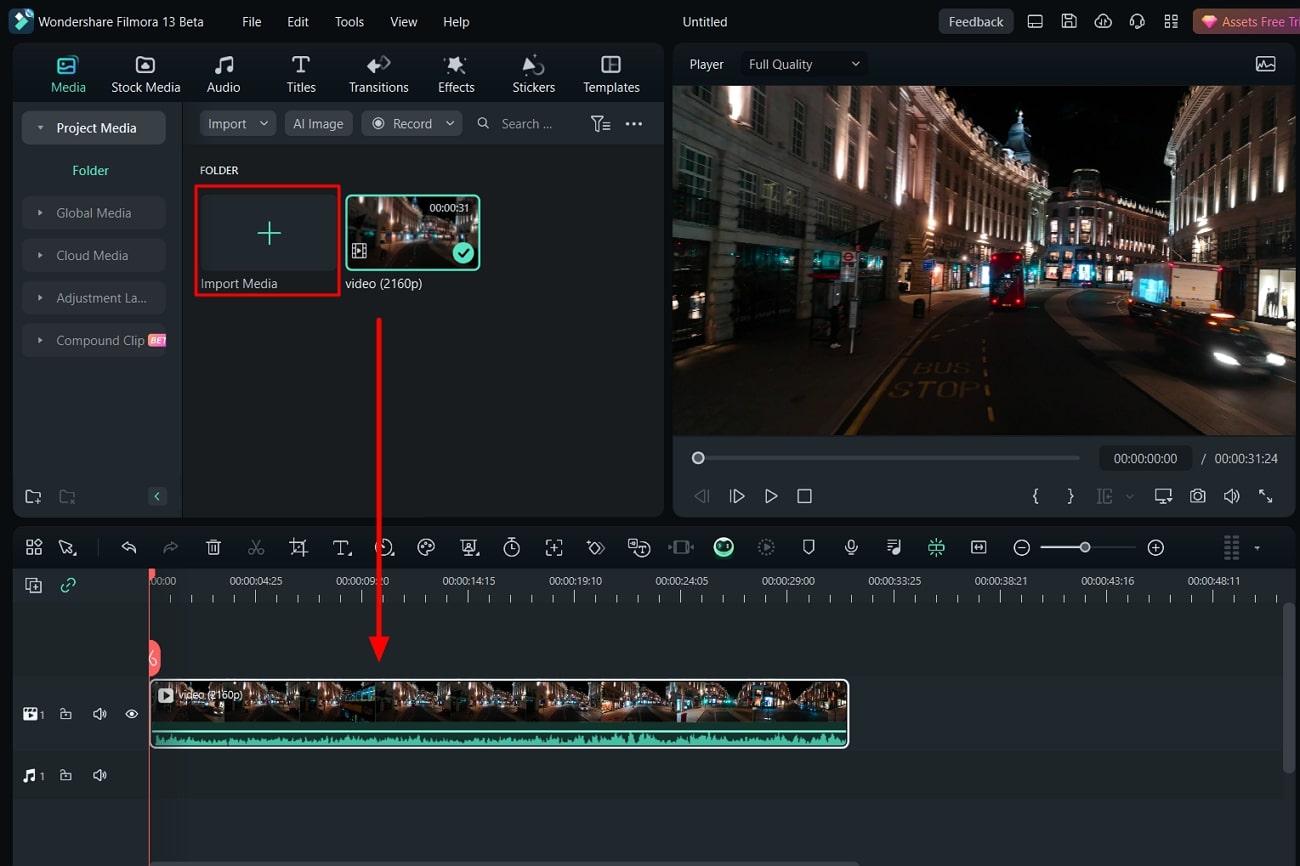
To begin, open Wondershare Filmora and create a new project, followed by importing your video. Subsequently, click the “+” icon on the video and choose the “Match to Media” option to ensure your project settings match the video’s resolution.
Step 2Make the Video to Slow Down
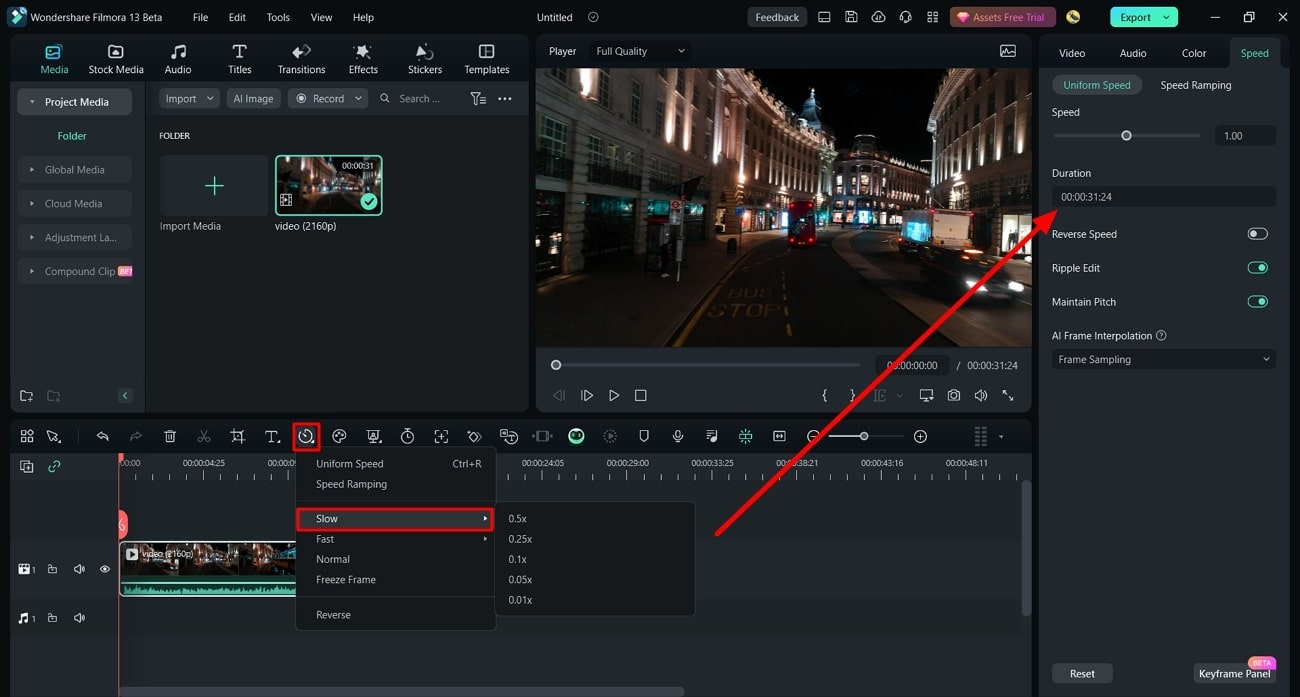
Add the video to the timeline and select the “Speed” icon. Then, pick a preset like 0.5x from the “Slow” menu to slow down the entire clip. On the other hand, you can also right-click the video, go to “Speed,” then “Uniform Speed,” and drag the slider left for slow motion.
Step 3Applying Speed Ramping on Specific Parts of Video
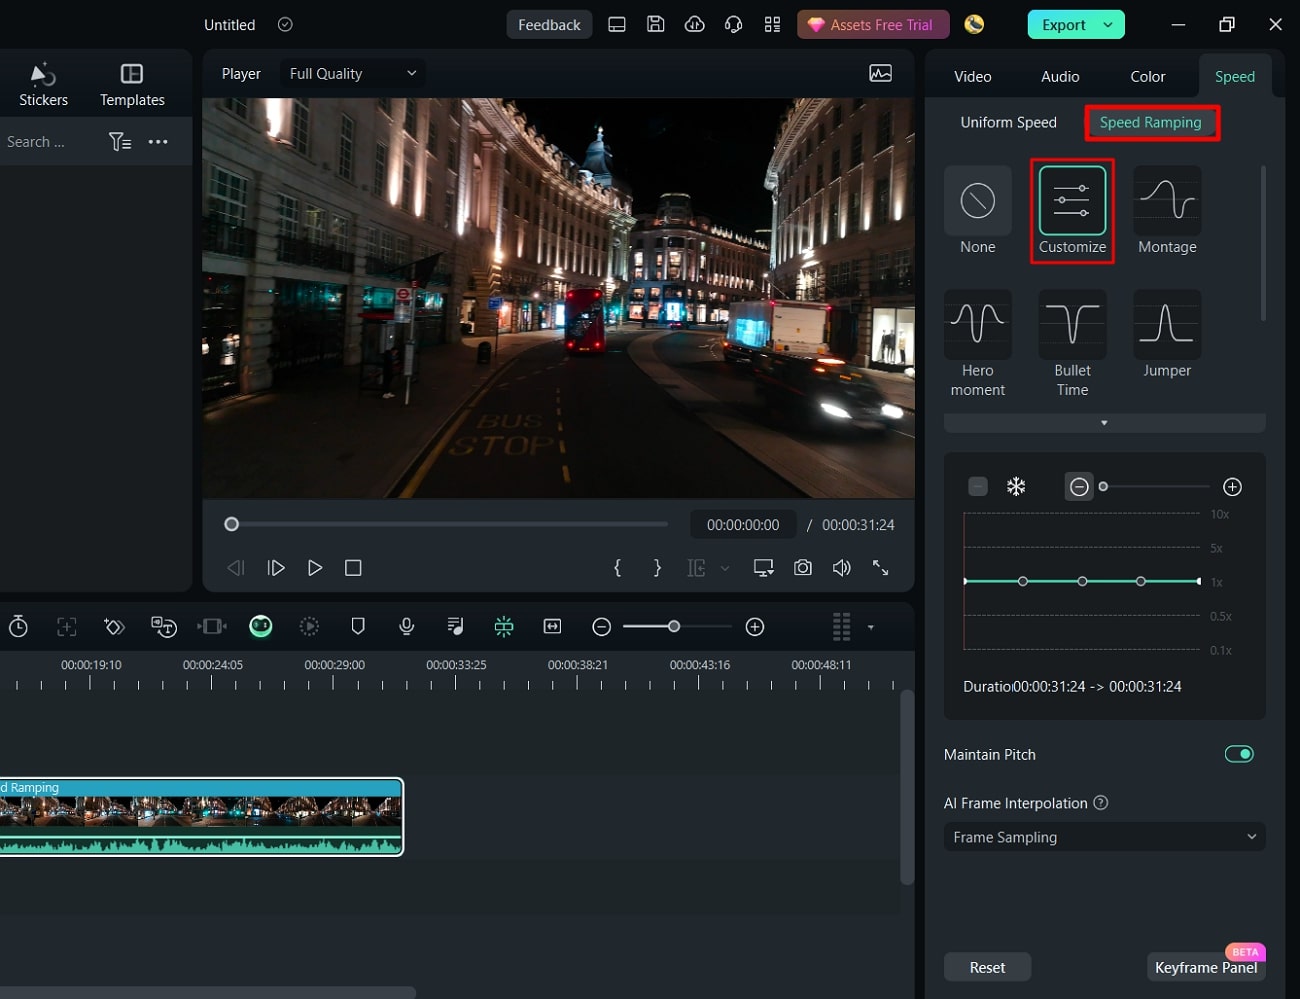
To create slow motion in specific parts of your video, go to the “Speed Ramping” window and choose the “Custom” option. Make adjustments to the speed by moving points below the line.
Step 4Freeze a Frame in the Video
If you want to freeze a frame, position the play head where you want to freeze it and select the “Add Freeze Frame” option. Set the freeze duration in the “Freeze Time Field” and adjust its position as needed. Click “OK” to save the changes.

Key Features of Wondershare Filmora
Filmora is a versatile video editing software that allows you to perform various tasks easily. This software is being used by professionals because of its innovative features. Some of these advanced features are listed below:
1. AI Copilot Editing
AI Copilot Editing is an innovative way to edit videos. It doesn’t just help; it also checks for mistakes and tells you if something’s wrong. This eliminates various errors and helps you edit smoothly. AI Copilot Editing changes how we edit videos, using smart tech to give helpful support for a smoother and more accurate editing experience.
2. AI Music Generator
The AI Music Generator changes how music gets made and helps create complete music tracks super-fast. You can choose different music styles and genres easily. Whether you need music for movies, for vlogs, or tunes for ads, this tool has you covered. This music can make your projects better and match exactly what you’re aiming for in your content.
3. AI Thumbnail Creator
The Automatic Thumbnail Generator makes creating video thumbnails super easy. It looks at your video and picks out three great shots for you to choose from. You can easily edit these shots to match what you want. You can also add text, titles, or cool graphics to the thumbnails. There are 58 different thumbnail styles to pick from, so you can find one that fits your video.
4. Screen Recorder
The Screen Recorder is an amazing tool that lets you record anything on your computer screen. It can also include your webcam footage while recording. You can capture both the sounds from your microphone and computer at the same time. It’s great for making videos of games, tutorials, or content for YouTube. Plus, it comes with editing tools and effects to make your recordings better before sharing them.
Conclusion
In conclusion, making awesome slow-motion videos doesn’t have to be hard if you’re on a budget. There are lots of affordable slow-mo cameras out there that can shoot great footage. Even then, you can always rely on the Filmora tool that can help create a slow-motion video. In this software, the Speed Ramping feature turns your raw videos into appealing slow-motion ones.
Whether you’ve got a cheap camera or editing tools, the most important thing is your imagination and how you see things.
Make A Slow Motion Video Make A Slow Motion Video More Features

Part 1: Some Great Cheap Slow-Motion Cameras One Can Go Across
If you are looking for some cameras that are budget-friendly but still manage to capture those cool, slow-motion moments, this article will help you with it. We will enlist some of the best inexpensive slow-motion cameras you can buy for detailed videography without worrying about your money.
- DJI Pocket 2
- Insta360 One X2
- GoPro HERO11
- Sony Cyber-Shot DSC-RX100 VII
- Canon EOS R50
- Nikon Z6 II
- Canon PowerShot G5 X Mark II
- Fujifilm X-S20
1. DJI Pocket 2
Another budget-friendly camera named DJI Pocket 2 Creative Combo is a small camera perfect for videographers. It fits right in your pocket and is easy for any adventure. The camera has a special feature that keeps videos steady, even when you’re moving. Moreover, its smart tracking feature keeps your subjects in focus no matter how they move. Plus, it takes great pictures with a good sensor and shoots super clear 4K videos at 60 frames per second.
Average Price: $344

2. Insta360 One X2
Insta360 One X2 is a versatile, pocket-sized camera that is your all-in-one filming solution. With this affordable slow-motion camera, you can capture 360-degree footage. You can also use stable wide-angle shots to capture scenes from far away. With its Flow State Stabilization, your videos stay steady without the need for a gimbal. Also, with its 100MB bitrate video recording, you can experience smoother slow-mo videos.
Average Price: $300

3. GoPro HERO11
GoPro HERO11 Black allows you to shoot high-res 5.3K video at 60 fps and 4K at 120 fps. You can capture life’s action in stunning detail with its slow-motion feature. Also, thanks to Hyper Smooth 5.0 stabilization, your footage stays buttery smooth. Whether you’re a pro or a newbie, the one-button controls make it easy to use. All the features of this cheap slow-motion camera are packed into a compact and waterproof design for epic adventures.
Average Price: $299

4. Sony Cyber-Shot DSC-RX100 VII
The Sony RX100 VII is a really powerful slow-motion camera. It’s got a 20.1MP sensor that takes awesome pictures. With its Zeiss Vario-Sonar T lens, it can zoom to a great extent, allowing the capture of scenes with lots of details. Also, it focuses quickly, like in 0.02 seconds, and can shoot up to 20 frames per second without any delays. It can shoot 4K videos and has features like Interval Shooting and image stabilization, making it perfect for pro-quality videos.
Average Price: $950

5. Canon EOS R50
The Canon EOS R50 with an RF-S18-45mm STM Lens is a camera designed for filmmakers. The camera can shoot 4K videos and even super clear Full HD videos at 120 frames per second. Another handy thing is its auto-assist feature that helps with different photo settings. The focusing system is accurate and can quickly focus on different objects. And when the light isn’t great, it has a built-in flash that helps take better slow-motion videos at night.
Average Price: $699

6. Nikon Z6 II
Nikon Z6 II captures smooth slow-motion at Full HD/120p. It also provides a stunning 4K Ultra HD/60p video for a professional look. With an impressive 24.5 MP sensor, it excels in low-light conditions. You can stay powered on the go with the convenience of charging via USB-C while shooting. So, enjoy the lightweight and compact design of this affordable slow-motion camera for easy portability.
Average Price: $1500

7. Canon PowerShot G5 X Mark II
Canon PowerShot G5 X Mark II has a good 20.1-megapixel 1.0-inch Stacked CMOS Sensor that makes pictures look amazing. It also has a 5x Optical Zoom Lens with Optical Image Stabilizer, so it’s great for taking different kinds of clear and sharp photos. Plus, you can shoot awesome videos with this cheap slow-mo camera at 120 frames per second. This feature makes this camera an ideal choice for professional videography.
Average Price: $949

8. Fujifilm X-S20
The Fujifilm X-S20 is an in-expensive slow-motion camera known for its advanced features. With a 26.1MP sensor, this camera captures high-quality images and videos. The 3.0-inch vari-angle touchscreen is user-friendly to allow even beginners to shoot professional videos. Moreover, it is ideal for aesthetic video recording, as it can capture footage in an impressive 6.2K resolution.
Average Price: $1299

Part 2: Make Perfect Slow-Motion Videos with The Best Desktop Application
Let’s discuss making slow-motion videos without using any particular camera. You heard it right! It is possible to generate a slow-motion video filmed by any smartphone camera. You just have to install Wondershare Filmora on your system and import the video into it. This tool is capable of slowing down video smoothly with the help of its advanced AI features.
Wondershare Filmora also helps you to generate AI music and scripts that enhance your productivity. Moreover, it runs without any lagging, allowing you to continue the editing process seamlessly. Explore more features of Filmora below.
Steps Involved to Slow Down Video Professionally with Speed Ramping
In this section, we will learn how to edit your video to slow down using Filmora. Wondershare Filmora has a feature named Speed Ramping that allows you to slow down different parts of a video. Let’s discover how this can be achieved in a step-wise fashion.
Free Download For Win 7 or later(64-bit)
Free Download For macOS 10.14 or later
Step 1Activate Filmora and Import the Video
To begin, open Wondershare Filmora and create a new project, followed by importing your video. Subsequently, click the “+” icon on the video and choose the “Match to Media” option to ensure your project settings match the video’s resolution.

Step 2Make the Video to Slow Down
Add the video to the timeline and select the “Speed” icon. Then, pick a preset like 0.5x from the “Slow” menu to slow down the entire clip. On the other hand, you can also right-click the video, go to “Speed,” then “Uniform Speed,” and drag the slider left for slow motion.

Step 3Applying Speed Ramping on Specific Parts of Video
To create slow motion in specific parts of your video, go to the “Speed Ramping” window and choose the “Custom” option. Make adjustments to the speed by moving points below the line.

Step 4Freeze a Frame in the Video
If you want to freeze a frame, position the play head where you want to freeze it and select the “Add Freeze Frame” option. Set the freeze duration in the “Freeze Time Field” and adjust its position as needed. Click “OK” to save the changes.

Key Features of Wondershare Filmora
Filmora is a versatile video editing software that allows you to perform various tasks easily. This software is being used by professionals because of its innovative features. Some of these advanced features are listed below:
1. AI Copilot Editing
AI Copilot Editing is an innovative way to edit videos. It doesn’t just help; it also checks for mistakes and tells you if something’s wrong. This eliminates various errors and helps you edit smoothly. AI Copilot Editing changes how we edit videos, using smart tech to give helpful support for a smoother and more accurate editing experience.
2. AI Music Generator
The AI Music Generator changes how music gets made and helps create complete music tracks super-fast. You can choose different music styles and genres easily. Whether you need music for movies, for vlogs, or tunes for ads, this tool has you covered. This music can make your projects better and match exactly what you’re aiming for in your content.
3. AI Thumbnail Creator
The Automatic Thumbnail Generator makes creating video thumbnails super easy. It looks at your video and picks out three great shots for you to choose from. You can easily edit these shots to match what you want. You can also add text, titles, or cool graphics to the thumbnails. There are 58 different thumbnail styles to pick from, so you can find one that fits your video.
4. Screen Recorder
The Screen Recorder is an amazing tool that lets you record anything on your computer screen. It can also include your webcam footage while recording. You can capture both the sounds from your microphone and computer at the same time. It’s great for making videos of games, tutorials, or content for YouTube. Plus, it comes with editing tools and effects to make your recordings better before sharing them.
Conclusion
In conclusion, making awesome slow-motion videos doesn’t have to be hard if you’re on a budget. There are lots of affordable slow-mo cameras out there that can shoot great footage. Even then, you can always rely on the Filmora tool that can help create a slow-motion video. In this software, the Speed Ramping feature turns your raw videos into appealing slow-motion ones.
Whether you’ve got a cheap camera or editing tools, the most important thing is your imagination and how you see things.
What Is the Best Frame Rate for 4K Videos?
People in the videography ad filmmaking world use complicated terminology like Ultra High Def to describe 4K videos. Even though you are not a complete stranger to the term 4K, you might still be unaware of what it means.
In a nutshell, 4K is the highest resolution you can watch your movies and videos. The details are incredibly crisp, meaning you can see pimples or the pores on an actor’s face through the screen. However, the frame rate will significantly affect how you enjoy a 4K video. Therefore, it would be wise to learn how to choose the ideal frame rate to suit your needs.
Keep reading this article to learn more about frame rates and which is suitable for a 4K video.

How Do Frame Rates Affect Video Viewing?
The motion will appear smoother if your video contains more frames per second. Even though your viewers are not tech-savvy, they will definitely notice the difference.
Consider a video of a duck drinking water from a pond. If you film and playback the same video in 24, 30, and 60fps, you will see a noticeable difference, assuming your shutter speed is set according to the 180-degree shutter rule.
If you are filming quicker motions of wildlife and birds, you are better off sticking to higher resolutions to give the viewer a pleasant experience and ensure the motion is fluid.
On the other hand, lower frame rates like 24fps are ideal for human movements, which are not as smooth as wildlife. Suppose you used 60fps for a cinematic film or a TV show. The video would look a bit odd because that is not how we see things in the natural world. In addition, your viewers aren’t used to such smoothness.
Viewing Requirements of 4K Videos
You may have heard about 4K videos and wondered what people mean by that term. In simple terms, a 4K video is a high-resolution video that is four times the usual 1080p HD video. When it comes to 4K videos, there are two standard resolutions. One of them is the standard for Digital Cinema which is 4096*2160 pixels. The other is for television and is 3840*2160 pixels.
To stream 4K content, you need a bandwidth between 10 and 20 Mbps. On the other hand, streaming platforms like Netflix require higher bandwidths of not less than 15 Mbps. In addition to the bandwidth we mentioned earlier, you need a 4KTV or 4K monitor.
This specification was brought up at the UHD Alliance, a union of more than 50 tech companies working together to support 4K content. Tech companies ought to ensure the devices they produce are compatible with 4K videos, which are becoming increasingly popular.
Below is a list of requirements any electronic device should fulfill before being termed a 4KTV or 4K monitor.

- A resolution of not less than 3840*2160.
- A 10-bit color depth that allows for 1,024 shades of red, yellow, and blue.
- A high dynamic range for color accuracy.
- An excellent combination of black level and peak brightness. The peak brightness should not exceed 1,000 nits, and the black level shouldn’t go below 0.5 nits. Alternatively, the peak brightness shouldn’t exceed 540 nits; neither should the black level plummet below 0.0005 nits.
Best Frame Rate for 4K Video
We all know that the frame rate you choose for your video will significantly impact the viewer’s experience and the overall style of your video. The frame rate will also affect how the video looks. For instance, a frame rate lower than 24fps will make your video look unprofessional and of poor quality. The content will also flicker because there aren’t many still images per second.
On the other hand, a lower FPS causes the file size to be smaller, causing it to consume a lower bandwidth. The vice versa is also true. Now that you understand these facts, you might wonder which frame rate would be best for your 4K videos.
Research reveals that the most acceptable frame rate is 30fps and 60fps. This is because the motion will appear natural to the human eye without being too fast or unrealistic.
If you are wondering what is the best frame rate for 4k videos, we urge you to select 60fps because it contains more detail. The higher frame rate also makes the motion look very smooth and crisp. Perhaps you want to shoot a slow-motion video. In that case, an even higher frame rate of 120fps would be ideal.
How To Choose The Base Frame Rates for Your Next Video
Choosing a frame rate for your videos is not complicated. However, it is not a straightforward process either. There are numerous moving parts that ought to work harmoniously for your video to turn out perfect and guarantee your audience will have a pleasant viewing experience. Before we dive into choosing the best frame rate for your 4K videos, let’s help you understand the filmmaking process.
Most filmmakers and videographers see it fit to shoot videos in 120p or 4K. This step makes their work easier during the editing process. If the raw footage is in 4K, they can de-emphasize or retain specific plot points that would look great in the final video. However, not everyone is shooting a video for Hollywood. Therefore, shooting in 4K on your laptop for your YouTube channel might be difficult.
Below are some factors you should consider when choosing the best frame rate for a 4k video.

File size
Shooting your video at a higher frame rate means more still images are packed into a single second of the video. Therefore, you will end up with a larger file size. If you want to shoot a video for your YouTube channel, it would be wise to stick to a smaller frame rate.
Purpose
It wouldn’t make sense to shoot a talking head video at more than 24fps. However, a higher frame rate would be ideal for a travel vlog, where the details need to be crisp.
Medium of delivery
The standard frame rate for television is 24fps. On the other hand, it would be best to stick to a higher frame rate of 60fps if you intend to shoot content for the silver screen.
Motion in the video
Lastly, the movement within the video will play a massive role in the frame rate you choose. The faster the motion, the higher the frame rate needs to be. For instance, action movies don’t do well in frame rates of less than 60 fps.
How To Set the Frame Rate of Your Editing Tools
Even though you didn’t use the ideal frame rate for 4k video during filming, you could use an editing tool to tweak the frame rate to where you need it to be. In our opinion, Wondershare Filmora is an excellent editing tool to set the ideal frame rate and take your videos to the next level.
Wondershare Filmora is a feature-rich platform that takes the tedium out of editing your videos and makes the outcome look spectacular. People won’t believe you when you say you edited the video yourself!
The platform is user-friendly, eliminating the need for a learning curve. You also don’t need to be an experienced editor or graphic designer to use this platform. Here is a list of nifty features you might find helpful on this platform.
- GIF support
- Audio equalizer
- Advanced text editing
- Noise removal
- Scene detection
- Audio mixer
- Color tuning
Out of all the wonderful features mentioned above, we will zero in on 4K editing support for now. You can use this feature to edit and export videos up to 4K without breaking a sweat.
Free Download For Win 7 or later(64-bit)
Free Download For macOS 10.14 or later
Wondershare Filmora allows you to customize your 4K videos by zooming in on a particular scene, tilting the video, or incorporating panning to give it a serene effect. We guarantee you will have fun using this platform and will get better at creating exquisite 4K content for your channel.
Below is a simple guide on using Wondershare Filmora to set the 4k video frame rate.
Step1 Launch the platform on your device and select the “File” tab. After a drop-down menu appears, select “Project Settings.”

Step2 In the dialogue box, select “Frame Rate” and choose the frame rate you think is ideal for your video.

Step3 Click “OK” and edit the videos as you like.
Conclusion
4K is the trend of the era, and it would be a shame if you got left behind. The viewer’s expectations are rising steadily, and they would rather skip your video to watch another if the quality is not up to par. In addition to giving you a competitive edge, 4K videos are very crisp and allow you to enjoy deep, vibrant colors.
You can also capture still photos from the video without compromising on quality. We can go on and on about the benefits of adopting 4K resolution in your videos. Therefore, it would be wise to increase your knowledge base and learn everything there is to know about 4K videos and how to set the best frame rates.
Free Download For macOS 10.14 or later
Wondershare Filmora allows you to customize your 4K videos by zooming in on a particular scene, tilting the video, or incorporating panning to give it a serene effect. We guarantee you will have fun using this platform and will get better at creating exquisite 4K content for your channel.
Below is a simple guide on using Wondershare Filmora to set the 4k video frame rate.
Step1 Launch the platform on your device and select the “File” tab. After a drop-down menu appears, select “Project Settings.”

Step2 In the dialogue box, select “Frame Rate” and choose the frame rate you think is ideal for your video.

Step3 Click “OK” and edit the videos as you like.
Conclusion
4K is the trend of the era, and it would be a shame if you got left behind. The viewer’s expectations are rising steadily, and they would rather skip your video to watch another if the quality is not up to par. In addition to giving you a competitive edge, 4K videos are very crisp and allow you to enjoy deep, vibrant colors.
You can also capture still photos from the video without compromising on quality. We can go on and on about the benefits of adopting 4K resolution in your videos. Therefore, it would be wise to increase your knowledge base and learn everything there is to know about 4K videos and how to set the best frame rates.
How to Denoise in After Effects – Audio and Video Noise Removal
I was filming with my mobile phone, and the light was low, and it happened so that I had to shake the phone a little because I was in movement. I return home, thinking that the shots were not so bad, look at the new footage on the bigger screen than my phone would have provided, and – no! I am totally wrong! This footage has some kind of little dots all over it, the whole shot looks sort of pixelated. I understand that the circumstances were not so good for shooting, but how come the video is actually this bad? How to get rid of this annoying dot-like overlay, that hinders me from seeing some details and makes my eyes exhausted? Is there a way to make this better at all?
Yeah, this is something called noise, and something called grain can also be in play. And is there a way to solve the problem? –Yes! Technology is getting so good from day to day that editing programs offer the ways to not be bothered because of this problem.
But noise is a word that not necessarily evoke the image of the visual side, rather, for the broader society, it is connected to the audio. A room, filled with some people hanging out and chatting, air conditioner that creates some sound, an opened window from where the chirping of the birds are coming… Anyway, I am still trying to concentrate, to make my voice recording, and then edit the video. Even in this case, I think everything is going pretty well, and the scenario is so alike: I record the whole text I have to follow, then try to listen to it in the speakers or in the headphones, and – SOS again! These noises I mentioned, are filling up my recording, where only my words should be played. Now, I don’t like to cut the parts of my whole recording one by one, and relentlessly, like a butcher, because I am just trying to create a good listener, or viewer experience, and slicing my piece will only make things work. There should be another way!
And yes, there also is. I can solve this problem using some editing software as well. It might even take me only a while and I will have a great voice recording to include in my content. So, my choice, in this case, would be Adobe After Effects – you will say, wow, why so serious? (because this is a very powerful and sophisticated program!) but the answer is – because we can, and because it gives us many opportunity.
So, as you may have noticed already, in this article we will be touching upon audio and video denoising in Adobe After Effects! Let’s get started and solve those little problems we have in our everyday life and work!
How to denoise a video in Adobe After Effects
So, denoising in image and video production is used as a technique to take footage from grainy to crystal-clear, and this is exactly our target. But when can we say that the video noise reduction went well? This method achieves its goal If it suppresses noise effectively in uniform regions; preserves edges and other characteristics, such as fine details and textures; and provides a visually natural experience.
Primarily, Adobe After Effects is a digital visual effects, motion graphics, and compositing application. If you are skilled, you are almost invincible in this software, meaning that you can do almost everything that sparks your imagination. So, if that is the sophistication of the program, why can it not be so that it can help us get rid of the unwanted noise and grain on the scene? There is no answer, because of course, it can.
Even though sometimes this kind of software requires you to download and install and then finally use some external resources, such as plugins, there is a way to do what we are going to, without any help from outside of the program.
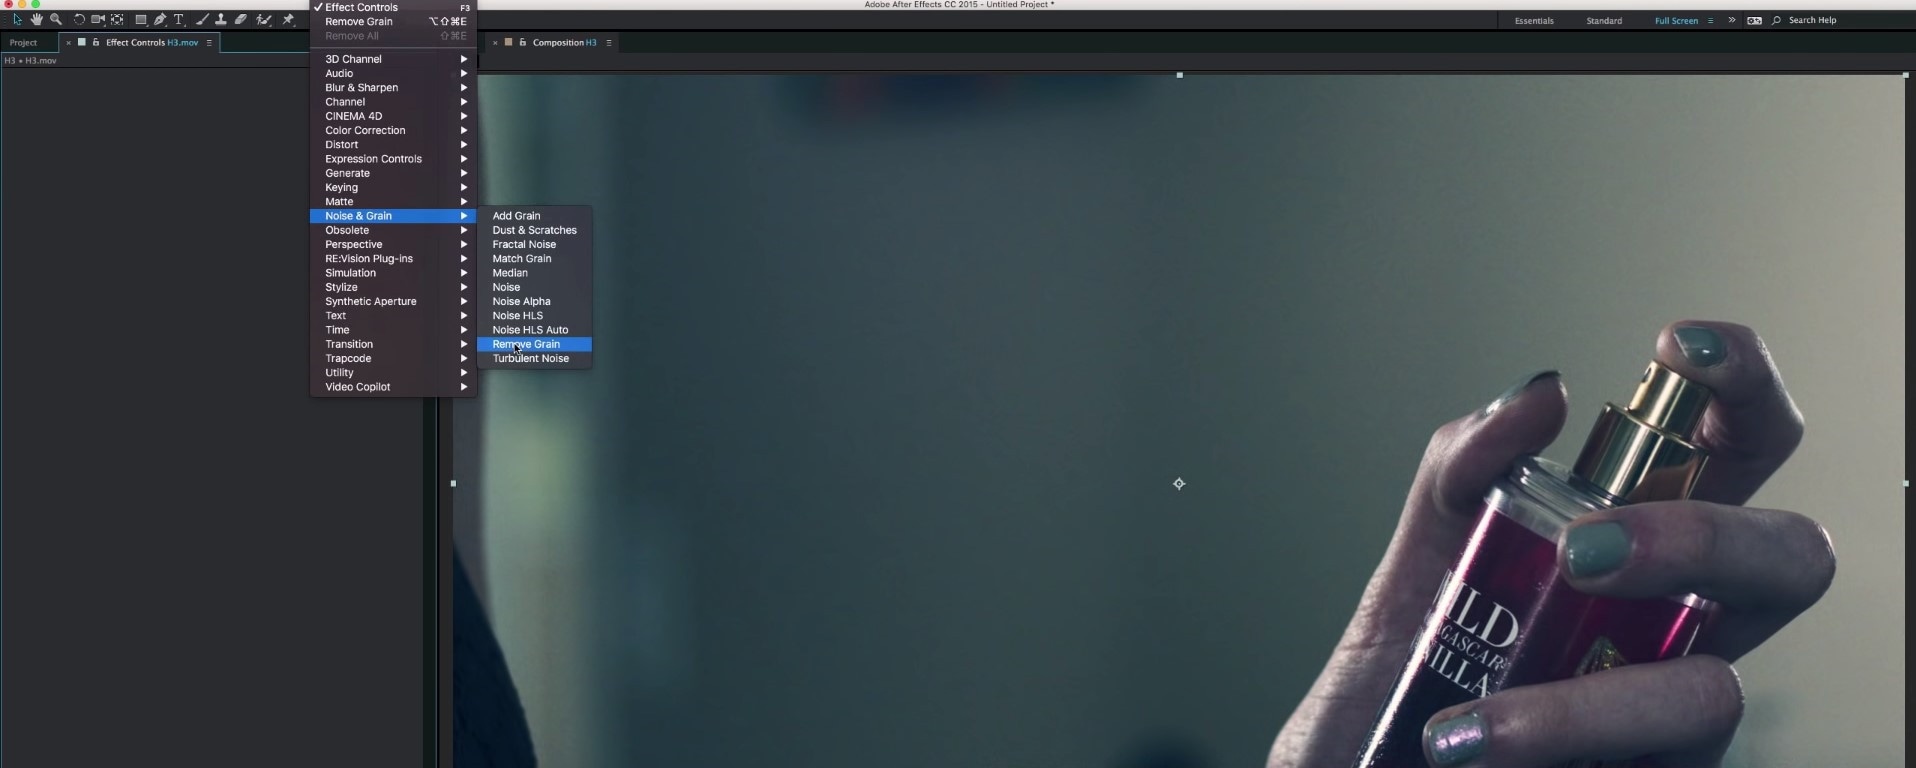
First of all, I suppose you have some video you want to edit and make better. Bringing that clip into the program would be the first step of our little adventure. And see the menu where it says Effect? – you need to click on it. Then it gets pretty, meaning very… meaning extremely straightforward – you will find it written – Noise and Grain. Of course, you will need to choose it, and then see the Remove Grain option, to which you are going to stick.
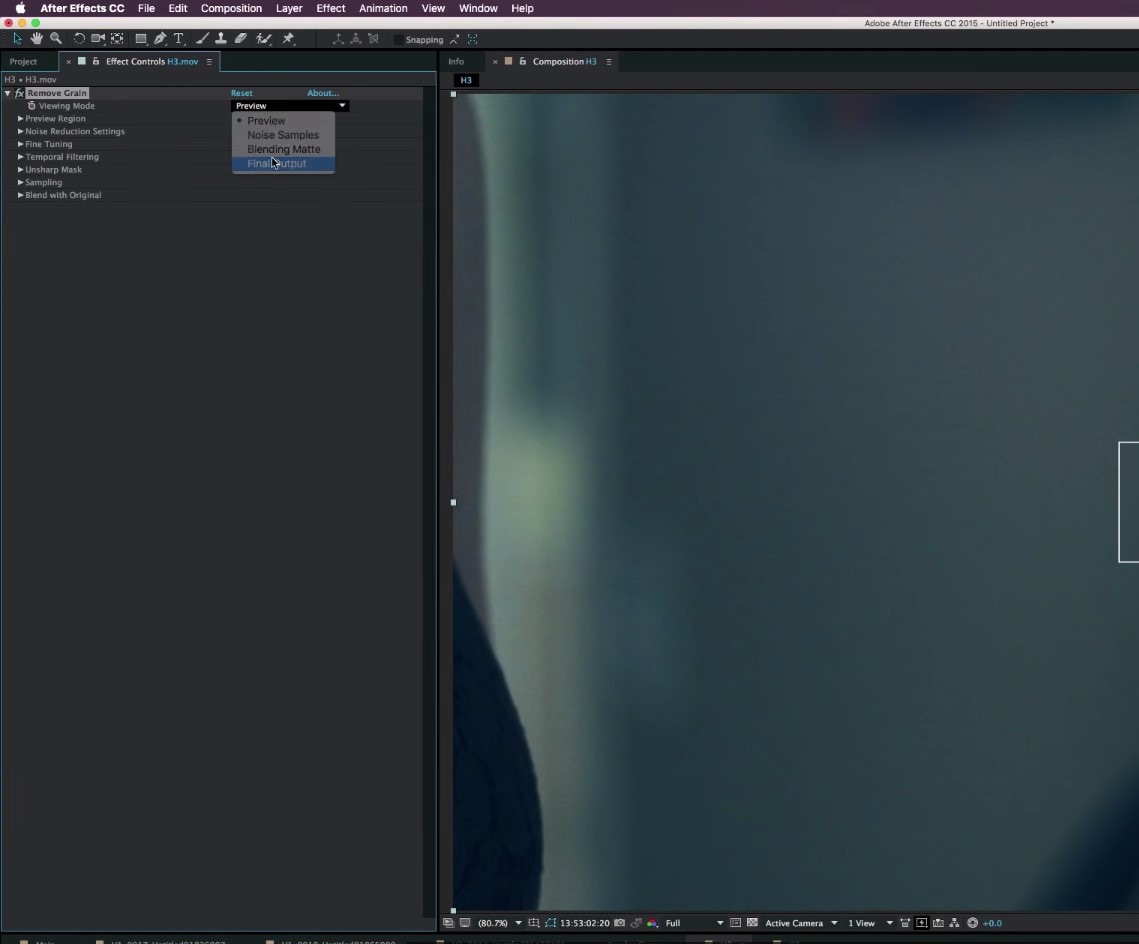
Then, you will need to move your attention to the left side of the screen, where Effects Control will open. By default, you are able to see viewing mode, where Preview can be changed to Final Output, which is exactly what you are going to do.
This will be the video with Preview checked:
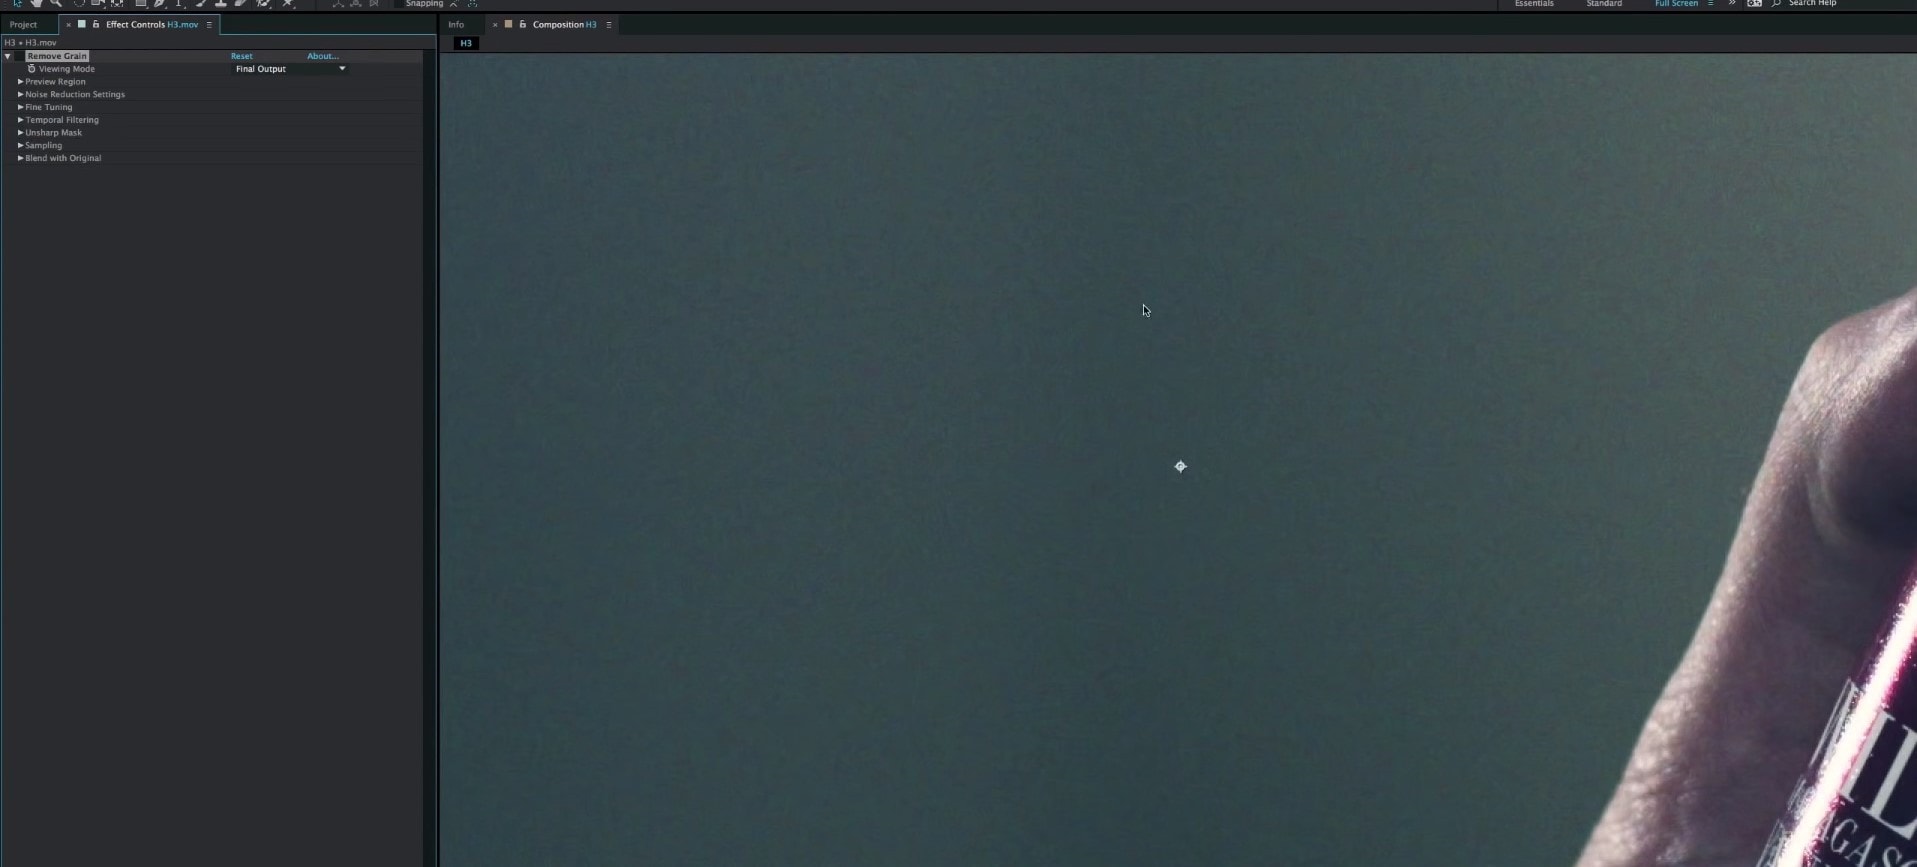
And this is the look of the same frame from the video whenever Final Output is turned on:
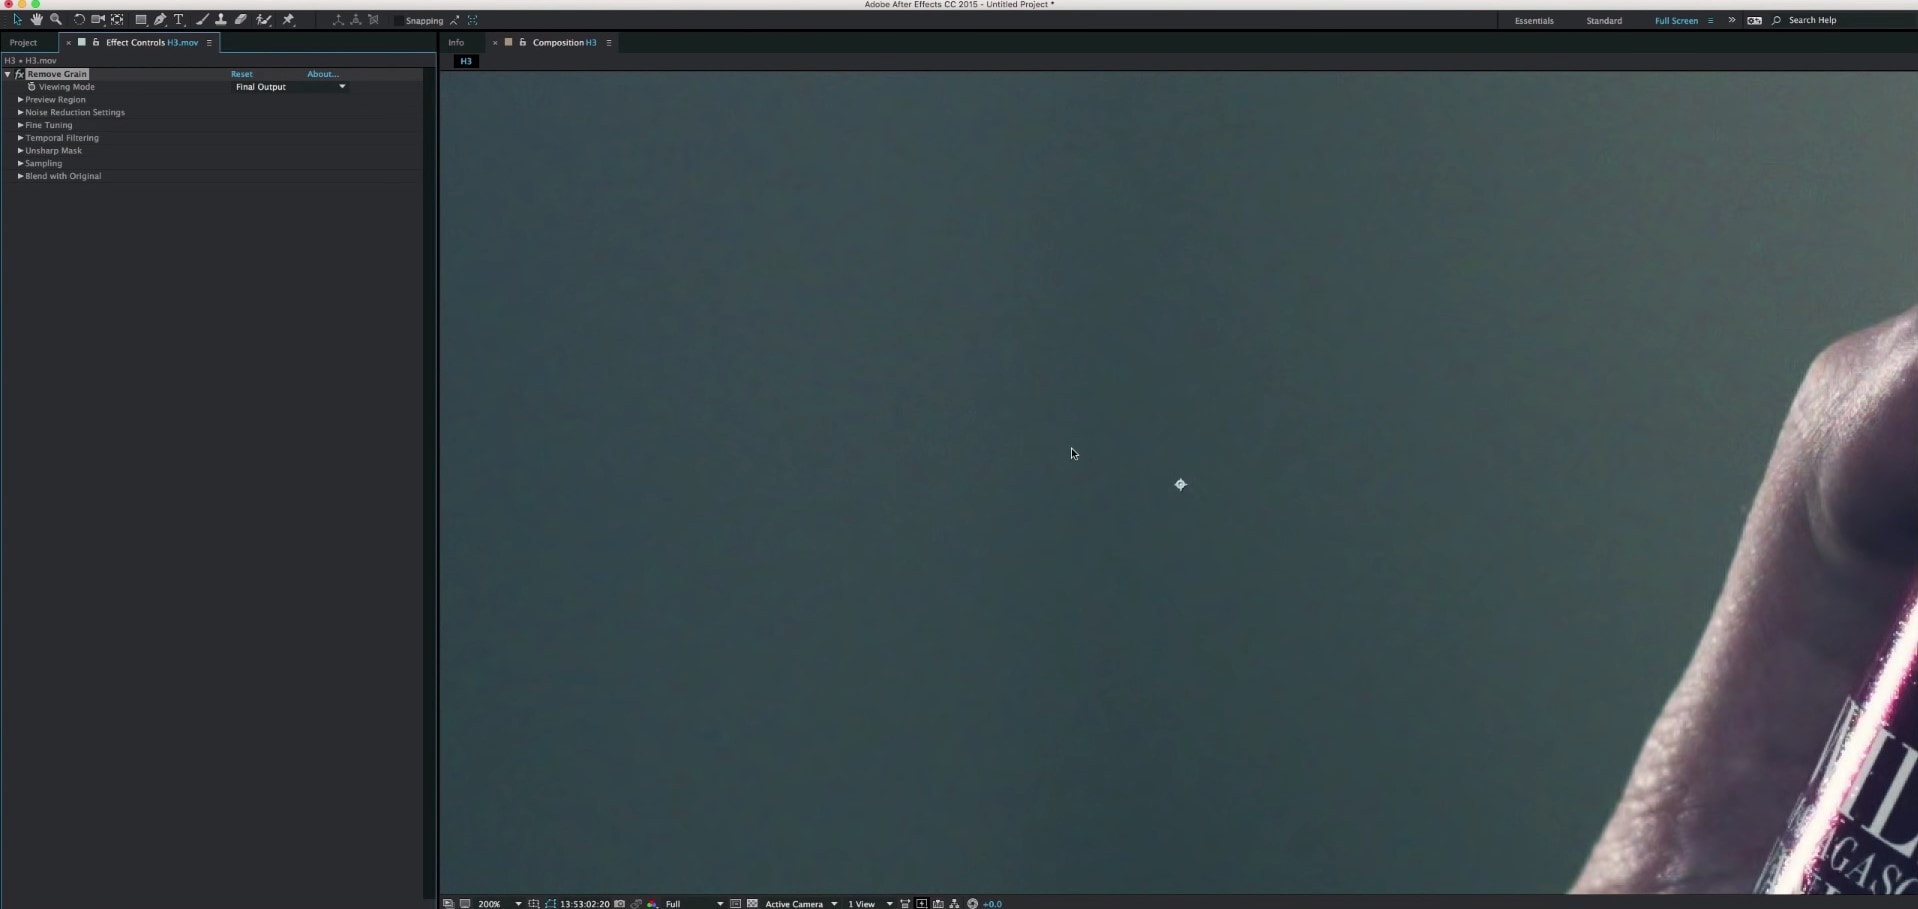
Yes, it’s true – we have done it already! This is actually this fast and easy in Adobe After Effects – no more noise, no more grain! Anyway, if you want to see the whole process on the video, you can check it here !
How to denoise an audio in Adobe After Effects
When it comes to audio noise, as we have mentioned already, it is possible to master the recording in After Effects in terms of the voice as well, but in reality, After Effects requires another Adobe program called Audition. Let us say that you have a video with audio attached, and you are working in AE, but in order to remove the background noise, you will need to open Audition. Here’s how it’s done:
First, in the sequence, you will need to click twice on the video clip, which will open audio graphics below.
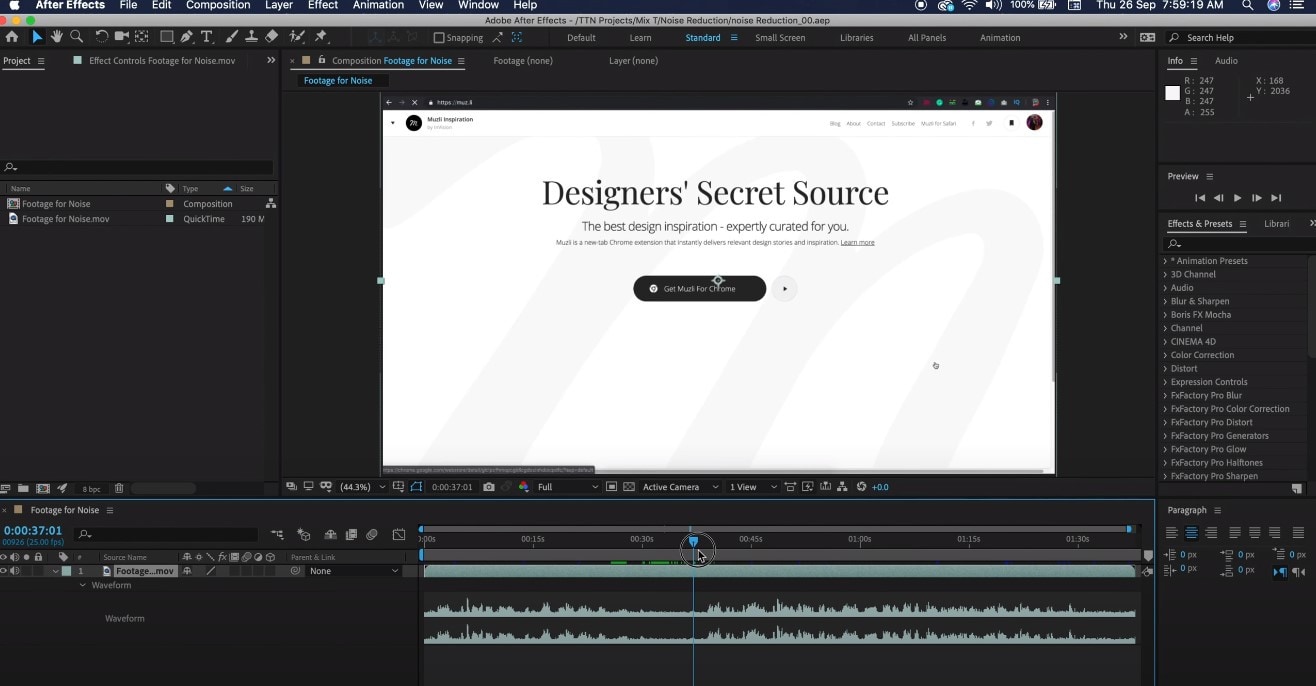
Then, go to Edit in the Navbar, and choose Edit in Adobe Audition.
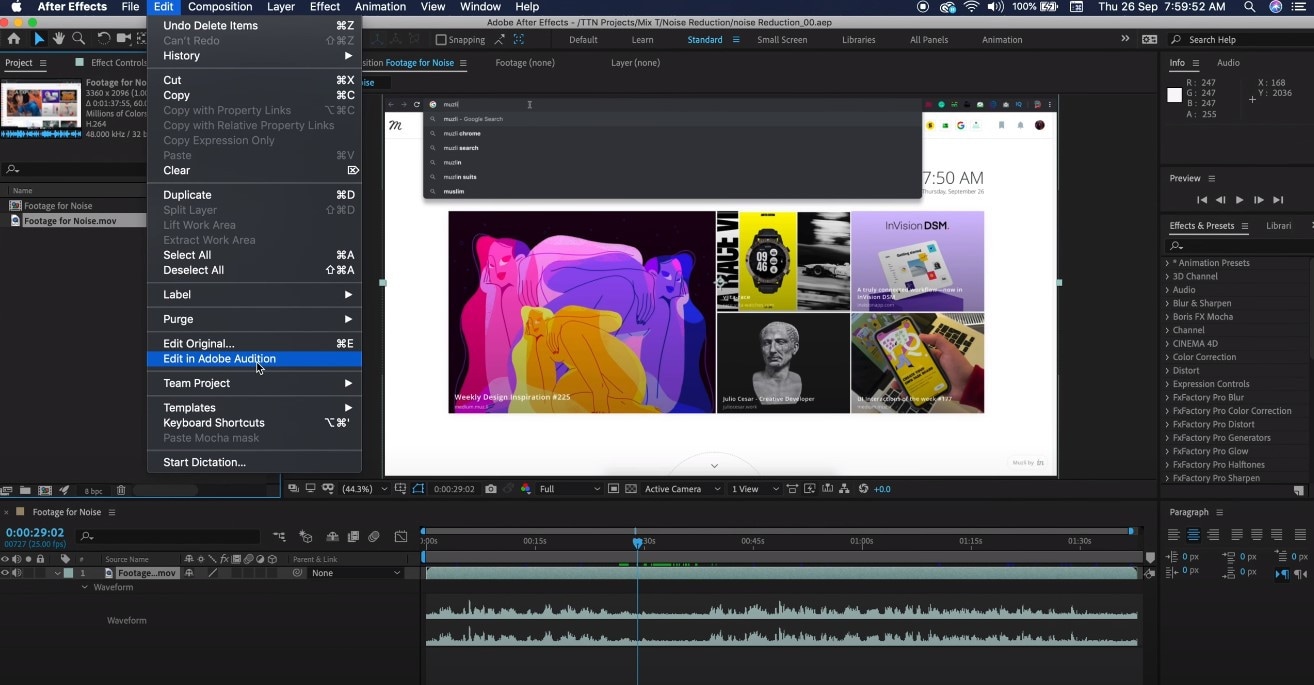
This program will open and show you more detailed graphic image of the voice recording. Now, you will find the space of time in your recording when you have a somewhat damaged audio and you will select the beginning and the end of it with the mouse. Keep in mind that in case you need to take a look at the video when your audio is played, you can see a little window showing the scene on the left and bottom of your screen.
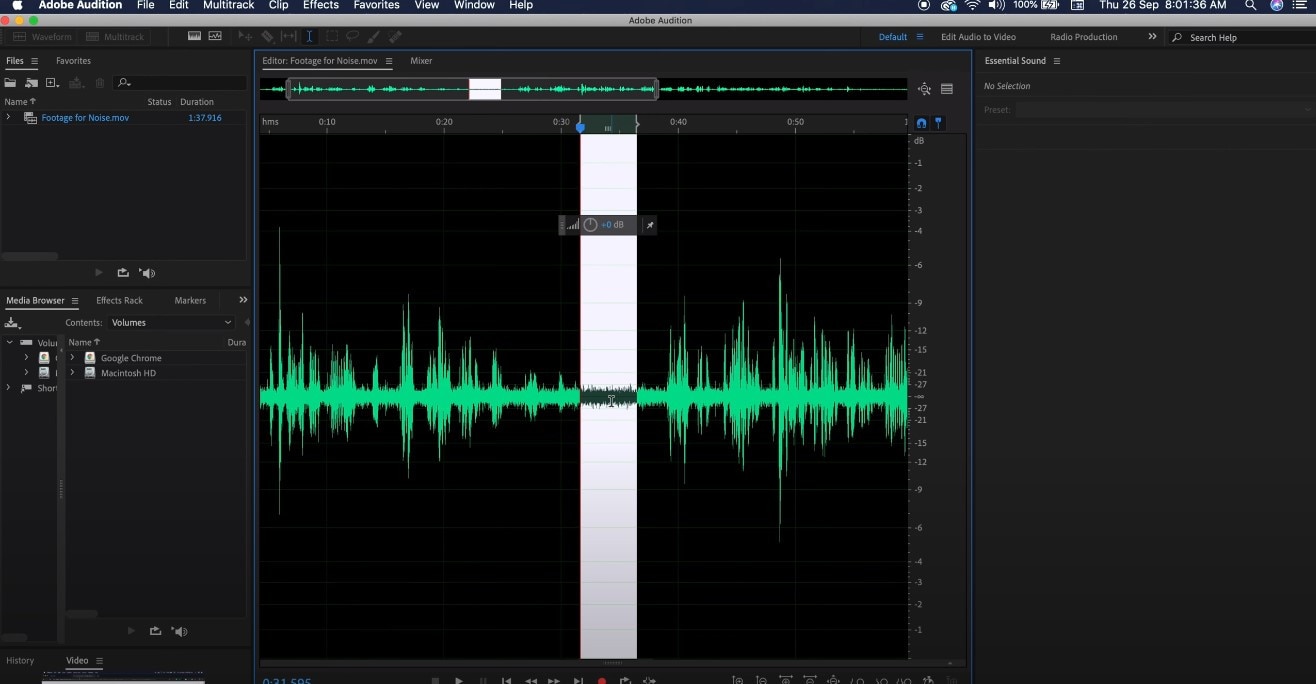
Once you have the selection and are determined with it, you right click on the selection and find Capture Noise Print. Then, you will click on the selection again and find Select all, which will cover the whole audio. That’s when you go to the Navbar again and find Effects -> Noise Reduction / Restoration -> Noise Reduction (process). This will open the graphics again, where you can reduce the noise – you will see the percentage scale where you can modify the noise.
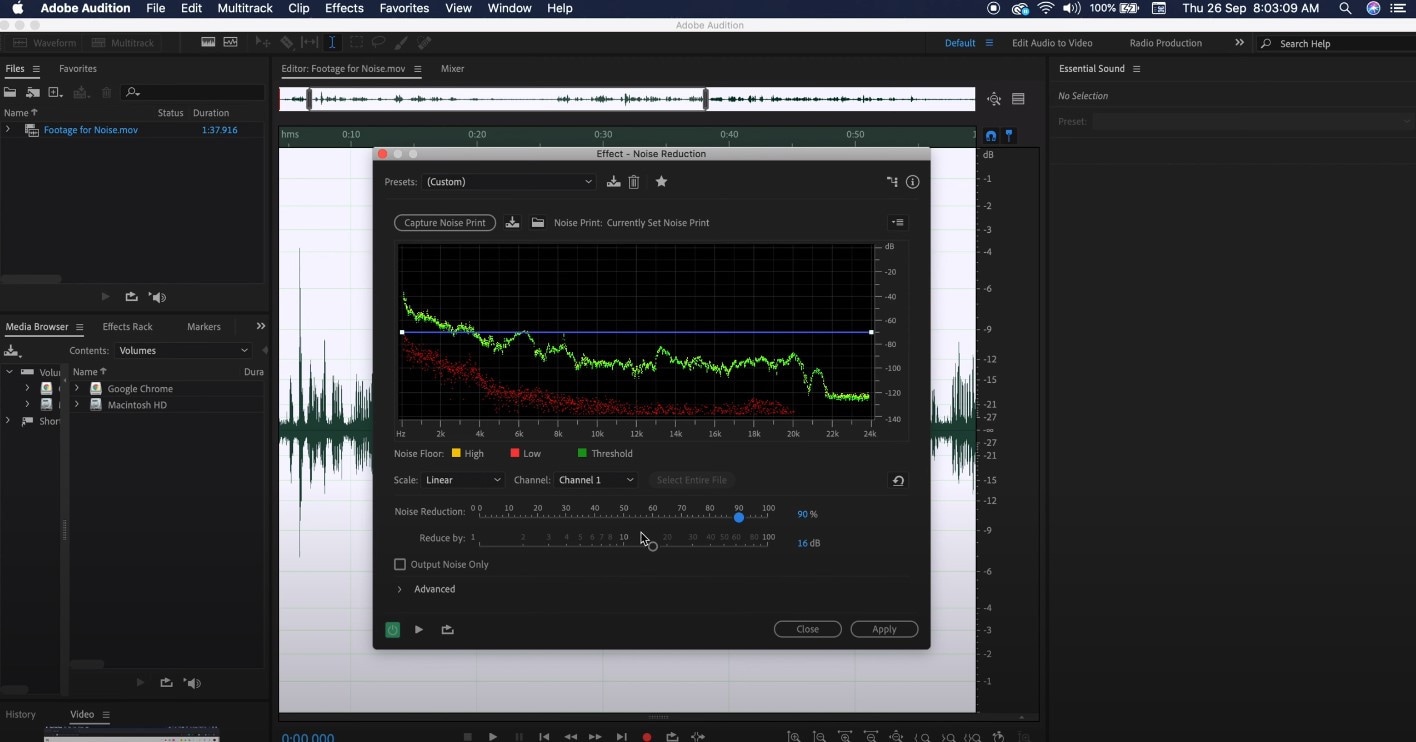
After changing it a little, you will click on the Apply and be able to visually see how the flow has changed and lowered.
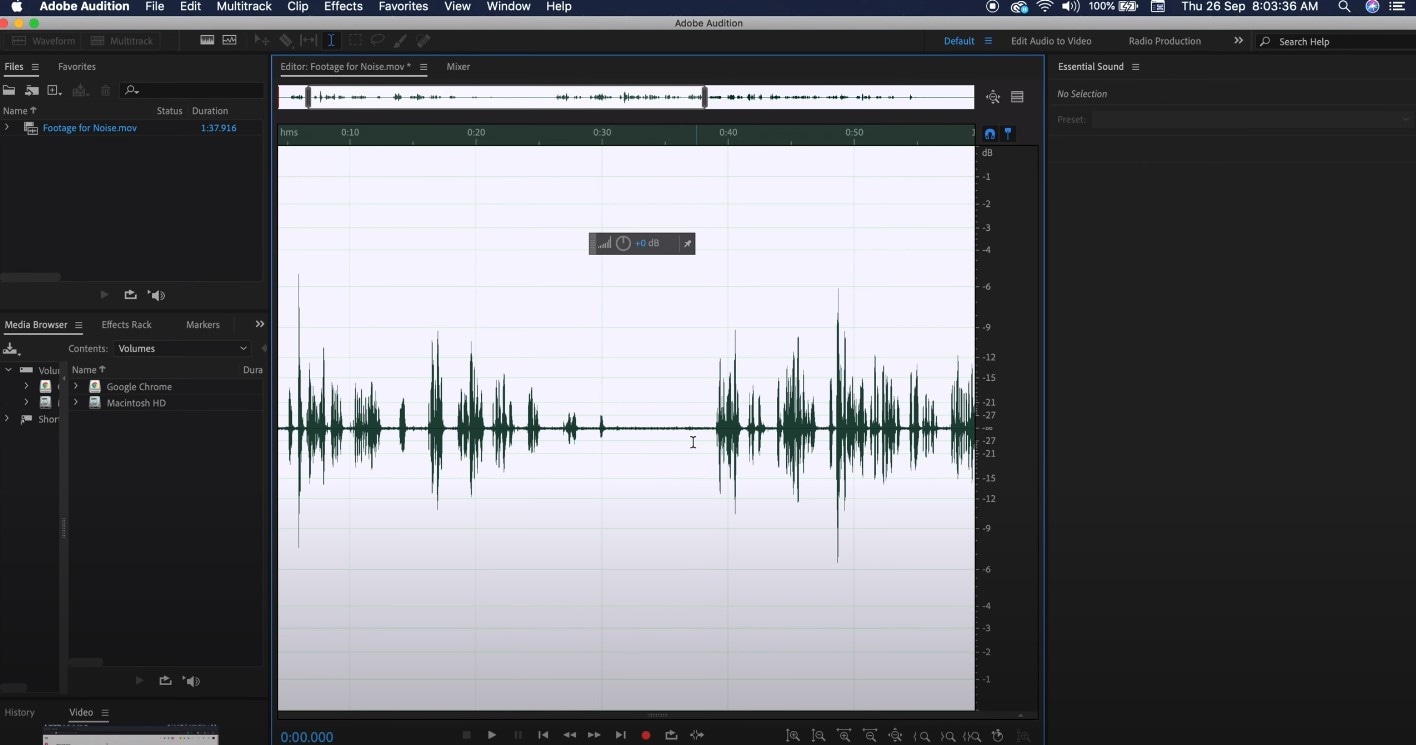
So, when you deselect the selection and play the recording, you will notice that from now on the words are hearable, but some background noise is not there anymore! In order to export, please go to the File and Export, choose your preferred settings and you are ready to go!
Bonus tip: how to remove audio noise in video with Wondershare Filmora
When it comes to audio noise removal, it’s also good to have some alternatives, and you might not even have Adobe After Effects installed on your computer, because there exist a lot of programs easier to use. One of them is Wondershare Filmora, which can play a major role in background noise removal, in a simple way. For this to play out, you will need to pursue the following steps:
To bring your video clip in the program, drag and drop it into the timeline. Right-clicking on the video and hitting Detach Audio will enable you to separate audio and video from each other and work on them individually.
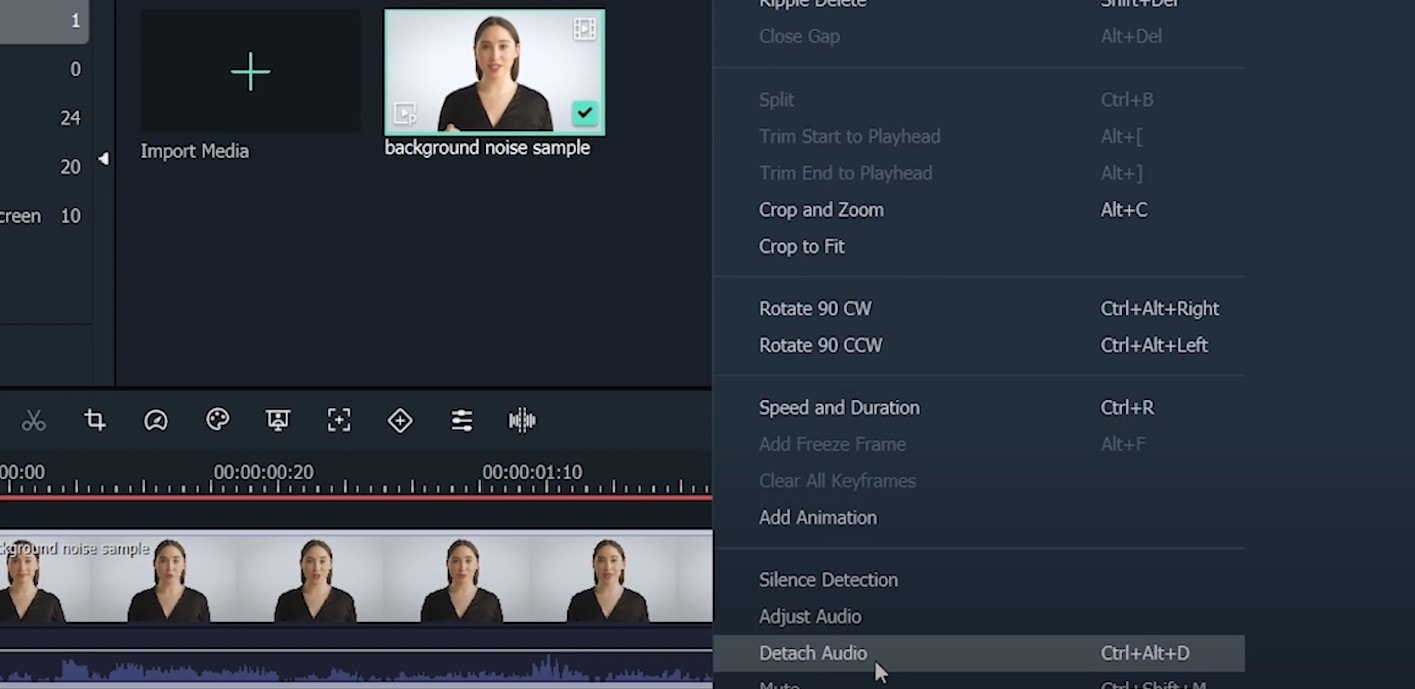
Click twice on the audio track, which will make sure you can see the editing panel and find Remove background noise option there – it can remove the noise right away.
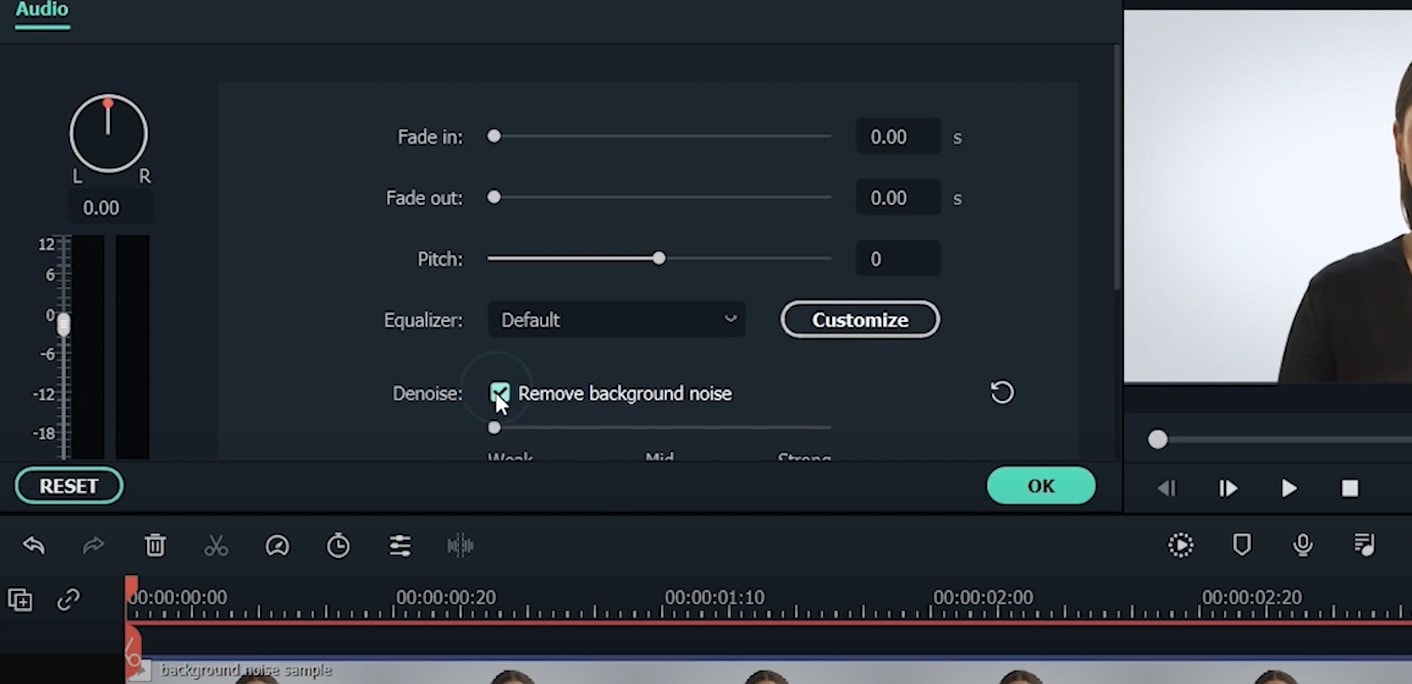
And, that’s it – hard to believe it’s so simple!
So, in this article, you followed us through the steps of how to denoise in Adobe After Effects – first, we touched upon video noise reduction, and then, background noise removal, for which we had to open the audio in Adobe Audition from After Effects. Last but not least, we took a look at how another magnificent software, Wondershare Filmora can help us in doing the same task! Armed with different tools and knowledge, now you can go for it and make your videos and audios more appealing for everyone!
Then, you will need to move your attention to the left side of the screen, where Effects Control will open. By default, you are able to see viewing mode, where Preview can be changed to Final Output, which is exactly what you are going to do.

This will be the video with Preview checked:

And this is the look of the same frame from the video whenever Final Output is turned on:

Yes, it’s true – we have done it already! This is actually this fast and easy in Adobe After Effects – no more noise, no more grain! Anyway, if you want to see the whole process on the video, you can check it here !
How to denoise an audio in Adobe After Effects
When it comes to audio noise, as we have mentioned already, it is possible to master the recording in After Effects in terms of the voice as well, but in reality, After Effects requires another Adobe program called Audition. Let us say that you have a video with audio attached, and you are working in AE, but in order to remove the background noise, you will need to open Audition. Here’s how it’s done:
First, in the sequence, you will need to click twice on the video clip, which will open audio graphics below.

Then, go to Edit in the Navbar, and choose Edit in Adobe Audition.

This program will open and show you more detailed graphic image of the voice recording. Now, you will find the space of time in your recording when you have a somewhat damaged audio and you will select the beginning and the end of it with the mouse. Keep in mind that in case you need to take a look at the video when your audio is played, you can see a little window showing the scene on the left and bottom of your screen.

Once you have the selection and are determined with it, you right click on the selection and find Capture Noise Print. Then, you will click on the selection again and find Select all, which will cover the whole audio. That’s when you go to the Navbar again and find Effects -> Noise Reduction / Restoration -> Noise Reduction (process). This will open the graphics again, where you can reduce the noise – you will see the percentage scale where you can modify the noise.

After changing it a little, you will click on the Apply and be able to visually see how the flow has changed and lowered.

So, when you deselect the selection and play the recording, you will notice that from now on the words are hearable, but some background noise is not there anymore! In order to export, please go to the File and Export, choose your preferred settings and you are ready to go!
Bonus tip: how to remove audio noise in video with Wondershare Filmora
When it comes to audio noise removal, it’s also good to have some alternatives, and you might not even have Adobe After Effects installed on your computer, because there exist a lot of programs easier to use. One of them is Wondershare Filmora, which can play a major role in background noise removal, in a simple way. For this to play out, you will need to pursue the following steps:
To bring your video clip in the program, drag and drop it into the timeline. Right-clicking on the video and hitting Detach Audio will enable you to separate audio and video from each other and work on them individually.

Click twice on the audio track, which will make sure you can see the editing panel and find Remove background noise option there – it can remove the noise right away.

And, that’s it – hard to believe it’s so simple!
So, in this article, you followed us through the steps of how to denoise in Adobe After Effects – first, we touched upon video noise reduction, and then, background noise removal, for which we had to open the audio in Adobe Audition from After Effects. Last but not least, we took a look at how another magnificent software, Wondershare Filmora can help us in doing the same task! Armed with different tools and knowledge, now you can go for it and make your videos and audios more appealing for everyone!
Then, you will need to move your attention to the left side of the screen, where Effects Control will open. By default, you are able to see viewing mode, where Preview can be changed to Final Output, which is exactly what you are going to do.

This will be the video with Preview checked:

And this is the look of the same frame from the video whenever Final Output is turned on:

Yes, it’s true – we have done it already! This is actually this fast and easy in Adobe After Effects – no more noise, no more grain! Anyway, if you want to see the whole process on the video, you can check it here !
How to denoise an audio in Adobe After Effects
When it comes to audio noise, as we have mentioned already, it is possible to master the recording in After Effects in terms of the voice as well, but in reality, After Effects requires another Adobe program called Audition. Let us say that you have a video with audio attached, and you are working in AE, but in order to remove the background noise, you will need to open Audition. Here’s how it’s done:
First, in the sequence, you will need to click twice on the video clip, which will open audio graphics below.

Then, go to Edit in the Navbar, and choose Edit in Adobe Audition.

This program will open and show you more detailed graphic image of the voice recording. Now, you will find the space of time in your recording when you have a somewhat damaged audio and you will select the beginning and the end of it with the mouse. Keep in mind that in case you need to take a look at the video when your audio is played, you can see a little window showing the scene on the left and bottom of your screen.

Once you have the selection and are determined with it, you right click on the selection and find Capture Noise Print. Then, you will click on the selection again and find Select all, which will cover the whole audio. That’s when you go to the Navbar again and find Effects -> Noise Reduction / Restoration -> Noise Reduction (process). This will open the graphics again, where you can reduce the noise – you will see the percentage scale where you can modify the noise.

After changing it a little, you will click on the Apply and be able to visually see how the flow has changed and lowered.

So, when you deselect the selection and play the recording, you will notice that from now on the words are hearable, but some background noise is not there anymore! In order to export, please go to the File and Export, choose your preferred settings and you are ready to go!
Bonus tip: how to remove audio noise in video with Wondershare Filmora
When it comes to audio noise removal, it’s also good to have some alternatives, and you might not even have Adobe After Effects installed on your computer, because there exist a lot of programs easier to use. One of them is Wondershare Filmora, which can play a major role in background noise removal, in a simple way. For this to play out, you will need to pursue the following steps:
To bring your video clip in the program, drag and drop it into the timeline. Right-clicking on the video and hitting Detach Audio will enable you to separate audio and video from each other and work on them individually.

Click twice on the audio track, which will make sure you can see the editing panel and find Remove background noise option there – it can remove the noise right away.

And, that’s it – hard to believe it’s so simple!
So, in this article, you followed us through the steps of how to denoise in Adobe After Effects – first, we touched upon video noise reduction, and then, background noise removal, for which we had to open the audio in Adobe Audition from After Effects. Last but not least, we took a look at how another magnificent software, Wondershare Filmora can help us in doing the same task! Armed with different tools and knowledge, now you can go for it and make your videos and audios more appealing for everyone!
Then, you will need to move your attention to the left side of the screen, where Effects Control will open. By default, you are able to see viewing mode, where Preview can be changed to Final Output, which is exactly what you are going to do.

This will be the video with Preview checked:

And this is the look of the same frame from the video whenever Final Output is turned on:

Yes, it’s true – we have done it already! This is actually this fast and easy in Adobe After Effects – no more noise, no more grain! Anyway, if you want to see the whole process on the video, you can check it here !
How to denoise an audio in Adobe After Effects
When it comes to audio noise, as we have mentioned already, it is possible to master the recording in After Effects in terms of the voice as well, but in reality, After Effects requires another Adobe program called Audition. Let us say that you have a video with audio attached, and you are working in AE, but in order to remove the background noise, you will need to open Audition. Here’s how it’s done:
First, in the sequence, you will need to click twice on the video clip, which will open audio graphics below.

Then, go to Edit in the Navbar, and choose Edit in Adobe Audition.

This program will open and show you more detailed graphic image of the voice recording. Now, you will find the space of time in your recording when you have a somewhat damaged audio and you will select the beginning and the end of it with the mouse. Keep in mind that in case you need to take a look at the video when your audio is played, you can see a little window showing the scene on the left and bottom of your screen.

Once you have the selection and are determined with it, you right click on the selection and find Capture Noise Print. Then, you will click on the selection again and find Select all, which will cover the whole audio. That’s when you go to the Navbar again and find Effects -> Noise Reduction / Restoration -> Noise Reduction (process). This will open the graphics again, where you can reduce the noise – you will see the percentage scale where you can modify the noise.

After changing it a little, you will click on the Apply and be able to visually see how the flow has changed and lowered.

So, when you deselect the selection and play the recording, you will notice that from now on the words are hearable, but some background noise is not there anymore! In order to export, please go to the File and Export, choose your preferred settings and you are ready to go!
Bonus tip: how to remove audio noise in video with Wondershare Filmora
When it comes to audio noise removal, it’s also good to have some alternatives, and you might not even have Adobe After Effects installed on your computer, because there exist a lot of programs easier to use. One of them is Wondershare Filmora, which can play a major role in background noise removal, in a simple way. For this to play out, you will need to pursue the following steps:
To bring your video clip in the program, drag and drop it into the timeline. Right-clicking on the video and hitting Detach Audio will enable you to separate audio and video from each other and work on them individually.

Click twice on the audio track, which will make sure you can see the editing panel and find Remove background noise option there – it can remove the noise right away.

And, that’s it – hard to believe it’s so simple!
So, in this article, you followed us through the steps of how to denoise in Adobe After Effects – first, we touched upon video noise reduction, and then, background noise removal, for which we had to open the audio in Adobe Audition from After Effects. Last but not least, we took a look at how another magnificent software, Wondershare Filmora can help us in doing the same task! Armed with different tools and knowledge, now you can go for it and make your videos and audios more appealing for everyone!
Also read:
- 2024 Approved Top 5 Solutions on How to Add Emojis to iPhone
- Adobe Premiere Pro Download and Use Guide In Depth
- Updated 2024 Approved A Full Review of Leeming LUT Pro
- 2024 Approved Change Aspect Ratio of Video
- New Scaling and Setting Videos in Filmora | Tutorial
- Some Facts That Few People Know on How to Make Transparent Background in Canva
- Updated In 2024, Best 6 Online MP4 Croppers
- Updated How to Combine Multiple Videos Into One on Instagram for 2024
- Updated 2024 Approved Add Some Shake to Videos with Alight Motion
- Updated Designed for You! Best Image (JPG/PNG) to GIF Converters
- New The Only Guide Youll Ever Need to Learn GIF Design for 2024
- Updated 2024 Approved Best GIF to AVI Converters (Online + Software Solutions)
- New In 2024, What Is TS Format and How To Play TS Files? Basic Tips
- Updated Many People Choose Video Editing or Post-Editing as Their Career in These Days. Is This a Good Choice? How to Start a Video Editing Career? This Article Will Tell You the Complete Details
- Updated In 2024, Mask Tracking with Adobe Premiere Pro A Detailed Guide
- New In 2024, There Are Many Vlogging Cameras You Can Find in the Market. However, to Get a Good Start in Vlogging, some Sony Vlogging Cameras and Canon Vlog Cameras Are to Consider. This Article Introduces You to the Respective List
- Makeup Video Is One of the Video Types that Many Vloggers Are Creating. If You Are Also the One Who Wants to Share Makeup Experiences in Videos, Then You Can Follow the Guide Below to Make a Makeup Video with Simple Steps
- Updated In 2024, Do You Want to Know Which Are the Best Wondershare Filmora LUTs to Use? There Are Many LUTs that You Can Download, Each with a Different Tone and Style
- Updated 2024 Approved Are You Searching for the Best Cinematic LUTs for Premiere Pro? You Are in the Right Place because This Article Is Dedicated to LUTs
- In 2024, How to Customize Your Loading Text Effect?
- Updated In 2024, Top 15 Best Free MP4 Video Rotators Windows, Mac, Android, iPhone & Online
- SBV to SRT How to Convert YouTube SBV Subtitle to SRT Format
- New Simple Tricks Make 3D GIF Production of Inspiration Pop Up for 2024
- Updated Step by Step to Crop Videos with CyberLink PowerDirector for 2024
- New This Article Talks About Pixel Art Wallpapers. It Gives Examples of Different Pixel Art to Show You How to Customize Your Own Pixel Art Wallpapers, and How to Make a Pixel Art Gif on Filmora for 2024
- Updated 2024 Approved Editing Videos Was Never so Easy as It Is Now. With Video Enhancer Ai, This Task Is Very Simple to Do and No Trouble Will Be There in Getting the Things Done as Needed. Choose the Right AI Video Enhancer for Task Completion
- How Can We Bypass Motorola Edge 40 Neo FRP?
- How to Downgrade Apple iPhone X to the Previous iOS System Version? | Dr.fone
- In 2024, How To Change Your iPhone 13 Apple ID on MacBook
- Possible ways to recover deleted files from Motorola Moto G13
- Full Tutorial to Bypass Your Nubia Z50S Pro Face Lock?
- 7 Fixes for Unfortunately, Phone Has Stopped on Infinix Hot 40i | Dr.fone
- Apply These Techniques to Improve How to Detect Fake GPS Location On Lava Blaze 2 5G | Dr.fone
- Quick Steps to Change Weather Location on Apple iPhone 12 Pro | Dr.fone
- In 2024, 3 Facts You Need to Know about Screen Mirroring Itel P40+ | Dr.fone
- In 2024, How To Unlock Realme 12+ 5G Phone Without Password?
- How To Fix Unresponsive Phone Touchscreen Of Realme Narzo N55 | Dr.fone
- In 2024, What Is AI Voice Over?
- Complete Guide to Hard Reset Your Honor Magic 6 Pro | Dr.fone
- 8 Ultimate Fixes for Google Play Your Poco X5 Pro Isnt Compatible | Dr.fone
- Is GSM Flasher ADB Legit? Full Review To Bypass Your Infinix Smart 7 HDFRP Lock
- In 2024, Full Guide to Bypass Tecno Spark 10 Pro FRP
- Title: How to Zoom in Discord for 2024
- Author: Morgan
- Created at : 2024-05-19 05:12:21
- Updated at : 2024-05-20 05:12:21
- Link: https://ai-video-editing.techidaily.com/how-to-zoom-in-discord-for-2024/
- License: This work is licensed under CC BY-NC-SA 4.0.

