
If You Are a Free Video Editor Being a Windows User, VSDC Free Video Editor Is a Great Choice. But Is It the Best Video Editor You Should Use? Find Out From Our VSDC Free Video Editor Review

If You Are a Free Video Editor Being a Windows User, VSDC Free Video Editor Is a Great Choice. But Is It the Best Video Editor You Should Use? Find Out From Our VSDC Free Video Editor Review
If you are a Window user and you are looking for a free video editor without a watermark, VSDC free video editor is definitely a great application. There are only a handful of free video editors available where the output video will not have a watermark, and there is no limitation on the video length. VSDC video editor belongs to the non-liner video editor group where you can combine video clips, photos, objects, and blend and overlap them as per your requirements.
For a beginner, VSDC free video editor is undoubtedly one of the best video editors. It supports different types of video and audio formats as well as codes. The system requirements are very basic, and hence, it is perfect for low-end computers? But can you rely on VSDC editor when you need slightly advanced video editing? Check out our VSDC editor review and find a better alternative.
Part 1. How to Download and Install VSDC?
VSDC editor download is only available for Windows users. It is tailor-made for those who have a low-end computer with older Windows version OS. The software is compatible with Windows 2000 to Windows 11. The minimum RAM requirement is 128MB and free disk space of 200 MB. Here are the steps to download and install VSDC editor.
Step 1: Open your web browser and visit ‘www.videosoftdev.com/free-video-editor/download” .
Step 2: Click on Download Video Editor button based on 32-bit or 64-bit version of your computer. If you have Windows XP, you have to download VDSC video editor version 6.4 instead of the latest version for compatibility.
Step 3: Give some time for the installer file to get downloaded. It is merely 100 MB and it should not take long. After downloading the installer, launch it and follow the on-screen instruction to complete the installation.
Step 4: After proper installation, launch VSDC video editor. You will get the options to create a new project and capture screen, start editing an existing video and export the finished project in a proper video format.
Part 2. Key Features of VSDC
There are two versions of VSDC video editor available – Free video editor and Pro video editor. The free version has limited features while Pro version has advanced features. Here are going to discuss the key features of VSDC Free Video Editor.
Low System Requirements – One of the reasons for the wide popularity of VSDC video editor is that it does not demand high system configurations like most other video editors. If you have a low-end computer with an outdated Windows operating system, you can use VSDC video editor without any issue.
Basic Editing – Among the basic editing tools, you can cut, trim, split and join video clips. There are options for rotating and resizing videos. You can also go for color correction and put overlays on videos as applicable. Besides, you can edit 36-degree videos with zoom and chart tools.
Effects – VSDC has a wide collection of video, audio and text effects. You can also add objects to your video and apply different ready-made filters. There are also transitions to apply in between video clips and slides. You can also use green screen effect to change your background. The special split-screen effect and picture-in-picture effects are quite eye-catching.
Capture Video – VSDC video editor is equally competent in capturing videos from your webcam as well as recording your screen video. In fact, there is a dedicated option available for creating slideshow videos from photos. You can even record your voiceover if you want to.
File Formats - VSDC supports all the popular file formats for importing and exporting video and audio files. There are different export profiles available so that you can save your edited video for different devices conveniently.
Apart from these, if you opt for the Pro version, you get motion tracking, video masking, video stabilization, and much more such advanced video editing tools.
Part 3. How to Edit Videos with VSDC
If you have the recorded video and you want to edit it with VSDC video editor, the steps are quite simple. You can even record your webcam and screen video with audio if you want to start from scratch. Coming to the editing part, you can split large video files, merge video clips, add transitions in between, add objects in the video as well as crop and rotate videos. There are different effects you can apply to uplift video content. Here are the steps to edit videos with VSDC editor.
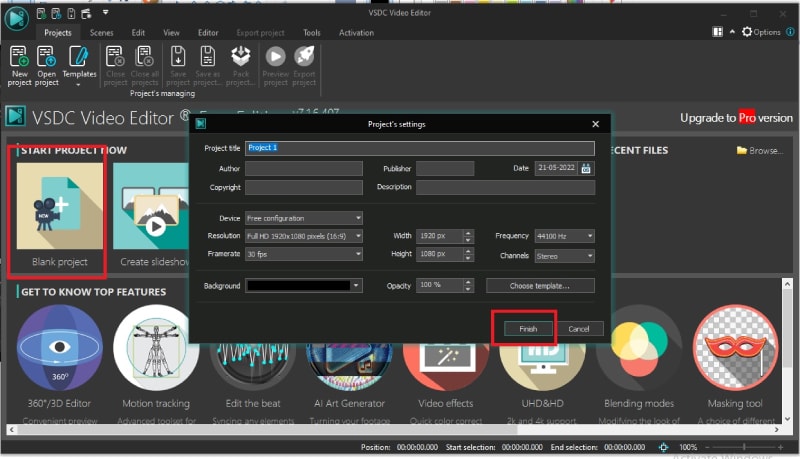
Step 1: Open VSDC Video Editor and click on Blank Project option. Name the project and change parameters, and click on Finish.
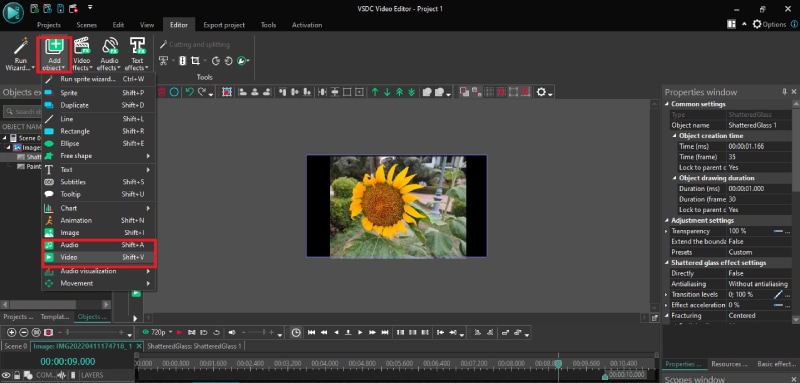
Step 2: Click on Add Object option at the top and select Video. Import the video clips saved on your hard drive. Similarly, you can go to Add Objects> Audio to import audio files.
Step 3: All the imported media files will appear on the timeline. If you have multiple video clips, you can shift the position of clips on the timeline so that one video clip ends and the other begins.
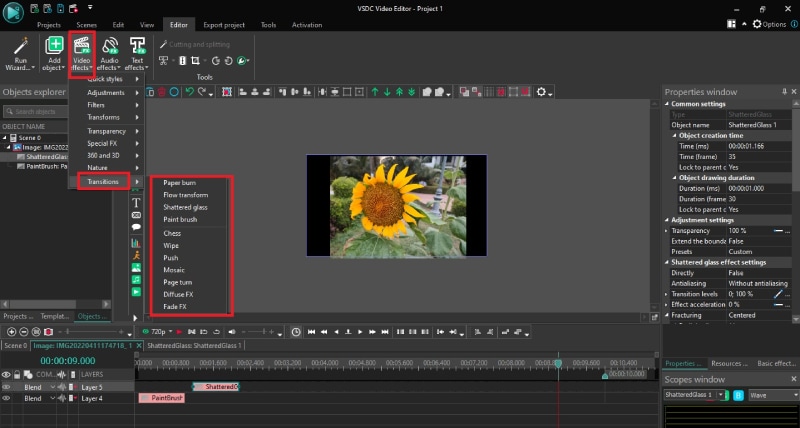
Step 4: If you want to add transitions in between the video clips, go to Video Effects> Transitions> select the effect you want to apply. Check the on-screen parameters such as duration and click on Ok button.
Step 5: If you want to add objects, go to Add Object and select shapes, texts, animations, charts, and much more. You can also add Audio Effects as well as Text Effects from the top bar.
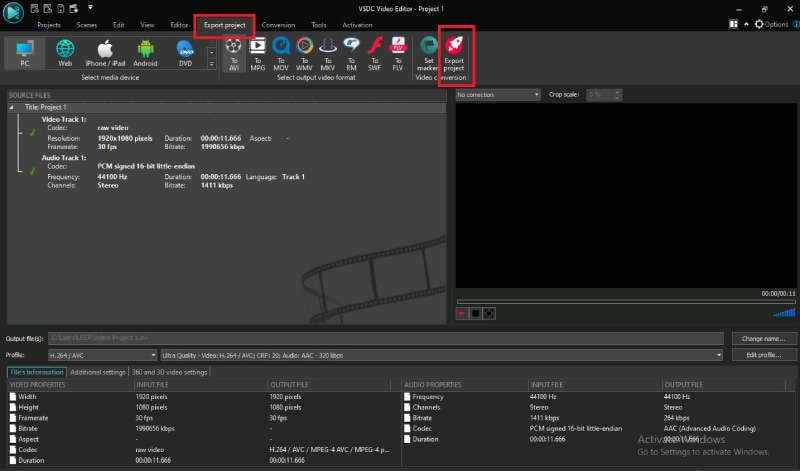
Step 6: Once you are happy with the preview of the edited video, go to Export Project and check all the parameters. Click on Export Project option.
Part 4. Best VSDC Alternative Video Editor
Since VSDC video editor is available completely free, there is no hard in downloading the application and trying it out. But soon, you will understand that the video editor is limited as far as tools and features are concerned. If you want to get more than just basic tools, you will have to upgrade to its Pro version. However, there are better premium video editors available. We recommend Wondershare Filmora as a better alternative to VSDC video editor.
Filmora is extremely popular in the professional video editing world as it has an intuitive interface and does not demand high-end computers. There are tons of transitions, effects, filters, and objects available to add to your edit. You can perform all standard and advanced video editing to take your video to the next level. Here are all the steps to edit videos on Filmora.
For Win 7 or later (64-bit)
For macOS 10.12 or later
Step 1: Download and install Filmora and it is available for Windows and Mac. Launch Filmora and click on New Project. Import all your media files into Project Media folder by drag and drop action.

Step 2: Arrange the video clips and audio clips on the timeline by drag and drop action. You should be placing the video and audio files on different tracks. This is where you can do all the basic editing such as trimming, cutting, splitting, and merging.

Step 3: To add transitions in between the video clips, go to Transitions from the top bar and drag and drop any transition in between the clips. Check out Titles, Effects, and Elements from the top bar and insert them on the timeline as you think appropriate.

Step 4: Play the video to see if everything is perfect and click on Export button to save your video to your hard drive.

Part 5. FAQs about VSDC
1. Is VSDC video editor really free?
Yes, VSDC video editor is completely free to use. However, there is a pro version available where more features are present. But the free version does not put watermark on the output video and has all the standard tools for video editing without any limitation.
2. Is VSDC better than Adobe Premiere Pro?
No, VSDC is not better than Adobe Premiere Pro. VSDC is a free video tor while Adobe Premiere Pro is a premium one. Naturally, Adobe Premiere Pro has more features and functionalities. However, VSDC is better for beginners and those who have low-end computers if you compare it with Adobe Premiere Pro.
3. Is VSDC safe?
Yes VSDC video editor is safe and stable to use. However, there was an incident in 2019 where VSDC video editor’s official website was hacked, but the software itself is safe to use on Windows computers.
For macOS 10.12 or later
Step 1: Download and install Filmora and it is available for Windows and Mac. Launch Filmora and click on New Project. Import all your media files into Project Media folder by drag and drop action.

Step 2: Arrange the video clips and audio clips on the timeline by drag and drop action. You should be placing the video and audio files on different tracks. This is where you can do all the basic editing such as trimming, cutting, splitting, and merging.

Step 3: To add transitions in between the video clips, go to Transitions from the top bar and drag and drop any transition in between the clips. Check out Titles, Effects, and Elements from the top bar and insert them on the timeline as you think appropriate.

Step 4: Play the video to see if everything is perfect and click on Export button to save your video to your hard drive.

Part 5. FAQs about VSDC
1. Is VSDC video editor really free?
Yes, VSDC video editor is completely free to use. However, there is a pro version available where more features are present. But the free version does not put watermark on the output video and has all the standard tools for video editing without any limitation.
2. Is VSDC better than Adobe Premiere Pro?
No, VSDC is not better than Adobe Premiere Pro. VSDC is a free video tor while Adobe Premiere Pro is a premium one. Naturally, Adobe Premiere Pro has more features and functionalities. However, VSDC is better for beginners and those who have low-end computers if you compare it with Adobe Premiere Pro.
3. Is VSDC safe?
Yes VSDC video editor is safe and stable to use. However, there was an incident in 2019 where VSDC video editor’s official website was hacked, but the software itself is safe to use on Windows computers.
For macOS 10.12 or later
Step 1: Download and install Filmora and it is available for Windows and Mac. Launch Filmora and click on New Project. Import all your media files into Project Media folder by drag and drop action.

Step 2: Arrange the video clips and audio clips on the timeline by drag and drop action. You should be placing the video and audio files on different tracks. This is where you can do all the basic editing such as trimming, cutting, splitting, and merging.

Step 3: To add transitions in between the video clips, go to Transitions from the top bar and drag and drop any transition in between the clips. Check out Titles, Effects, and Elements from the top bar and insert them on the timeline as you think appropriate.

Step 4: Play the video to see if everything is perfect and click on Export button to save your video to your hard drive.

Part 5. FAQs about VSDC
1. Is VSDC video editor really free?
Yes, VSDC video editor is completely free to use. However, there is a pro version available where more features are present. But the free version does not put watermark on the output video and has all the standard tools for video editing without any limitation.
2. Is VSDC better than Adobe Premiere Pro?
No, VSDC is not better than Adobe Premiere Pro. VSDC is a free video tor while Adobe Premiere Pro is a premium one. Naturally, Adobe Premiere Pro has more features and functionalities. However, VSDC is better for beginners and those who have low-end computers if you compare it with Adobe Premiere Pro.
3. Is VSDC safe?
Yes VSDC video editor is safe and stable to use. However, there was an incident in 2019 where VSDC video editor’s official website was hacked, but the software itself is safe to use on Windows computers.
For macOS 10.12 or later
Step 1: Download and install Filmora and it is available for Windows and Mac. Launch Filmora and click on New Project. Import all your media files into Project Media folder by drag and drop action.

Step 2: Arrange the video clips and audio clips on the timeline by drag and drop action. You should be placing the video and audio files on different tracks. This is where you can do all the basic editing such as trimming, cutting, splitting, and merging.

Step 3: To add transitions in between the video clips, go to Transitions from the top bar and drag and drop any transition in between the clips. Check out Titles, Effects, and Elements from the top bar and insert them on the timeline as you think appropriate.

Step 4: Play the video to see if everything is perfect and click on Export button to save your video to your hard drive.

Part 5. FAQs about VSDC
1. Is VSDC video editor really free?
Yes, VSDC video editor is completely free to use. However, there is a pro version available where more features are present. But the free version does not put watermark on the output video and has all the standard tools for video editing without any limitation.
2. Is VSDC better than Adobe Premiere Pro?
No, VSDC is not better than Adobe Premiere Pro. VSDC is a free video tor while Adobe Premiere Pro is a premium one. Naturally, Adobe Premiere Pro has more features and functionalities. However, VSDC is better for beginners and those who have low-end computers if you compare it with Adobe Premiere Pro.
3. Is VSDC safe?
Yes VSDC video editor is safe and stable to use. However, there was an incident in 2019 where VSDC video editor’s official website was hacked, but the software itself is safe to use on Windows computers.
[Top iOS Solutions] Finding Premium Slow Motion Apps For Video Creation
iPhone is undoubtedly an awesome device to capture moments. Regardless of the iOS you are using; it has better lens and resolution sensors than Android. The launch of the iPhone 5S enables users to record video in slow motion with their smartphones. Although it is best in capturing and editing slow-mo, people still look for third-party apps .
The reason might be that the iPhone slow motion app offers certain additional features. Maybe they provide more advanced settings and personalization. To find an answer, you should read this article, which lists the best iPhone slow-mo apps.
Slow Motion Video Maker Slow your video’s speed with better control of your keyframes to create unique cinematic effects!
Make A Slow Motion Video Make A Slow Motion Video More Features

Part 1: [Top 10] Slowing Down Videos With Finest iPhone Slow Motion Apps
Are you an enthusiastic user of the iPhone and want to create videos across it to save time? Provided are some quick and effective iPhone slow-motion apps that you can go with. These applications will help you create the best slow-motion content without taking up much effort:
- Slow Motion Video Fx Editor
- SloMo Slow Motion Video Editor
- Slow Motion Video Editor
- Slow Motion’ Video Editor
- Slow Motion Video FX Edit
- Slow Fast Motion Video Editor
- Slow-Fast Motion Video Editor
- TimeFreeze
- Vidma – Video Editor Music
- Vizmato: Video Editor & Maker
1. Slow Motion Video Fx Editor
If you are seeking an iPhone slo-mo app, then this application holds all the relevant features. The application is designed to assist users in achieving slow motion and other speed effects. For precise and accurate slow motion, it offers basic slider and timeline settings. You can slow down a video at any scene by incorporating Advanced or Basic options.

Key Features
- The application offers to manipulate frame rate by 240 fps and 12x slower.
- Users can improve videos by incorporating music using its music library of 170+ tracks.
- The platform provides sharing options along social platforms like Instagram and Facebook.
2. SloMo Slow Motion Video Editor
This iPhone slow-motion app has all the abilities to slow down videos and enhance them. It provides two options to slow down a video via playback speed or video frame rate. The playback speed slows a video instantly while the frame rates smoothen it. You can also choose a specific period for adding the slow-motion effect.

Key Features
- The frame manipulation goes up to 120 fps, and the playback speed goes 12x.
- The application offers 40 color filters to enhance your video’s visual outlook.
- There are multiple ratio options to export a video to upload it to different platforms.
3. Slow Motion Video Editor
Create ultra-slow motion or ultra-high motion videos with this iPhone slo-mo app. It offers distinct speed manipulation options, such as up to 10x to slow down a video. In addition, the application offers built-in speed templates to help you add speed effects to dance videos. Users can also retain the original audio of the videos after speed alteration.

Key Features
- An intuitive user interface that offers a seamless slo-mo editing method.
- Import music from iTunes into this iPhone slo-mo app and add it to your videos.
- Publish your slo-mos directly to other editing apps like GoPro and InShot for additional editing.
4. Slow Motion’ Video Editor
Make professional-grade slow-motion videos using this iPhone slow-motion app. The application can record and edit videos at 60 to 240 fps, ensuring smooth, slow motions. With its modern and accessible user interface, achieving slow motions is easy. Other speed settings include split-second freezing frames and time-lapse videos.

Key Features
- The application passes subscription charges via iTunes for a seamless and trusted process.
- You can trim the unnecessary parts of the video using its Trim tool.
- Offers one-click functionality to share videos across Instagram, YouTube, Facebook, or Email.
5. Slow Motion Video FX Edit
Do you want to be in control of your slow-motion videos while editing? This iPhone slow motion app offers custom speed manipulation options like 12x and 240 fps. You can add freeze frames if you want to highlight a specific part of the video. With its interface, speed manipulation is just as simple as dragging a slider.

Key Features
- Enhance your video’s visuals with up to 40 stunning visual filters to enhance colors.
- The application offers weekly, monthly, and yearly plans to suit your requirements.
- You can add music from your library to videos or specific scenes via this app.
6. Slow Fast Motion Video Editor
Apply slow motion effect to the specific parts of your videos using this iPhone slow motion app. You can access it on the app store; the application is free to download. It features a timeline editing interface and a playback speed of up to 8x for Slomo. It separates the video frames, and you can change their speed, and afterward, it merges them.

Key Features
- The ability to incorporate music from your music library into videos with this app.
- You can manually trim out video segments and merge them back.
- Showcase your creativity to other social platforms directly from the app.
7. Slow-Fast Motion Video Editor
This iPhone slow-motion app download unlocks a professional way of creating slo-mos. The user interface is professional and accessible for all types of editors. It displays a velocity graph to change the playback speed to 8x at specific video frames. This application slows down video to 1/10th of its actual speed. It also maintains the pitch of audio while creating fast or slow-motion videos.

Key Features
- There is no restriction on video length to edit in this iPhone slow-motion app.
- It doesn’t export video with Watermark addition, which is remarkable for branding.
- You can edit and export a video in Portrait or Landscape display.
8. TimeFreeze
If you want to create slow-motion videos effectively, then this iPhone slow-motion app can do it. It works by manipulating the video frame rates from 24 fps to 120 fps. Along with slowing down videos, you can slow down high-motion video to normal as well. The user interface is basic and lacks technicalities to be accessed by skilled people.

Key Features
- The application supports all iOS 12.1, macOS 12.1, and newer versions.
- Uses advanced image processing algorithms for video frame manipulation.
- The application is free to use and only takes up 25.3 MB of your iPhone’s storage.
9. Vidma - Video Editor Music
You have read about many applications that offer to transform normal videos into slow motions. However, this iPhone slo-mo app is much more than just a speed changer. It slows down your videos via a velocity graph and maintains the audio pitch during the process. Using this application, you can slow down videos to 0.1x while also having video reverse options.

Key Features
- With 1000+ music tracks and hundreds of visual effects and filters, your videos can stand out.
- Along with the slow motion, you can also create time-lapse and apply speed ramping presets.
- Export your video in high-quality 4K resolution without any quality loss.
10. Vizmato: Video Editor & Maker
Vizmato stands as a multipurpose video editing app with slow-motion capabilities. Beyond the creation of compelling slow-motion scenes, Vizmato adds dramatic flair by reversing the speed. Furthermore, the software extends the speed manipulation feature via a custom option. In this way, everyone gets a chance to design their videos per their preferences.

Key Features
- It offers 20+ visual themes, 40+ effects, and 140+ music assets to uplift your videos.
- The tool can transform images into slideshows, making a video of your memories.
- You can record and add voiceovers with this iPhone slow-motion app.
Bonus Part: Wondershare Filmora and Slow Motion Video Making: A Simple Connection
Having no fun while editing video with the iPhone slow-motion app? It’s obvious because such applications are limited to slowing down your videos. So, using Wondershare Filmora could change the game in video editing of all types. Users from every field can rely on Filmora to get unique and polished content. This editing platform is available online for Windows, macOS, and mobile phone users.
Wondershare Filmora is integrated with artificial intelligence to boost your productivity in editing. You can use Filmora’s asset library to get media or create your own with AI. Using Filmora will amaze you at every step of editing and creating engaging media.
Free Download For Win 7 or later(64-bit)
Free Download For macOS 10.14 or later
Steps to Slow Down Video with Speed Ramping in Filmora
Speed ramping is a way to slow down or speed up videos smoothly. A slow change in videos gives a more professional outlook to videos. Have you observed this feature in any of the above-discussed iPhone slow-motion apps? The answer is no, so let’s benefit from speed ramping in Filmora by following the given steps.
Step 1Start Working on the New Project
Begin your video editing journey after downloading Filmora on your device. After downloading, open this platform and select “New Project.” This way, you will access its editing screen to begin working. Start with importing your video and bringing it to the timeline.

Step 2Discover the Speed Ramping Option with Templates
Place your cursor on the video and right-click to choose “Speed Ramping” from the list. Now, you can see an editing screen on your right. Pick any of the templates for effortless speed ramping.

Step 3Customize Speed Ramping to Smoothly Slow Down Videos
Otherwise, hit the “Customize” and direct downward. Go to the editing panel and hold the dots to move downward if you want to slow down. You can speed up video portions by holding the dots upward. Meanwhile, you can play the video to see the changes.

Step 4Use Optical Flow for Good Quality and Move to Save Changes
Extend the “AI Frame Interpolation” menu and hit the “Optical Flow.” That’s how you will get a high-quality video with slow speed. Keep editing or save changes through the “Export” button on the upper right.

Find Core Functionalities of Wondershare Filmora
Before using Filmora, it’s important to explore it to avoid confusion. Considering this point, you should discover some of its main features below:
1. AI Copywriting
Except for AI, no one can provide you with an engaging script on short notice. Thus, Filmora integrates an AI copywriting feature for generating the desired script within seconds. It accepts natural language prompts, not limiting experts to giving commands. This feature is considered professional in creating YouTube descriptions to rank the content.
2. AI Copilot Editing
Humans typically need suggestions in editing, whether they are beginners or professionals. What could be better than having an AI as your personal editing assistant? Filmora offers an AI copilot editor that answers your editing-related queries. Besides, it navigates you toward practical solutions by providing links or buttons.
3. AI Audio Denoise
Sometimes, background noises ruin the vocals of the audio. Remove that noise with the help of AI, which can detect the noise type for exact results. This feature can enhance your audio by performing reverb reduction. It can make the voice clear that is present in surroundings, like electrical voices from devices. Audio denoise proves vital in recording podcasts and online course recording scenarios.
4. AI Portrait
It’s a human urge to look beautiful, and video editing apps are not denying it. Filmora also provides more than 70 AI portrait effects to beautify facial features. Moreover, it can assist you in removing the background and keeping humans in video frames. Some AI stickers include Heart eyes, Emojis, and Sunglasses that can evoke humorous emotions.
Conclusion
Until now, you might find your answer about using iPhone slow-motion apps. The overview of such premium apps has guided you to select an app that best aligns with your needs. If you are still confused, use Wondershare Filmora, an incredible video editor. This platform is available for iPhone, Android, Windows, and macOS with its limitless editing tools.
Make A Slow Motion Video Make A Slow Motion Video More Features

Part 1: [Top 10] Slowing Down Videos With Finest iPhone Slow Motion Apps
Are you an enthusiastic user of the iPhone and want to create videos across it to save time? Provided are some quick and effective iPhone slow-motion apps that you can go with. These applications will help you create the best slow-motion content without taking up much effort:
- Slow Motion Video Fx Editor
- SloMo Slow Motion Video Editor
- Slow Motion Video Editor
- Slow Motion’ Video Editor
- Slow Motion Video FX Edit
- Slow Fast Motion Video Editor
- Slow-Fast Motion Video Editor
- TimeFreeze
- Vidma – Video Editor Music
- Vizmato: Video Editor & Maker
1. Slow Motion Video Fx Editor
If you are seeking an iPhone slo-mo app, then this application holds all the relevant features. The application is designed to assist users in achieving slow motion and other speed effects. For precise and accurate slow motion, it offers basic slider and timeline settings. You can slow down a video at any scene by incorporating Advanced or Basic options.

Key Features
- The application offers to manipulate frame rate by 240 fps and 12x slower.
- Users can improve videos by incorporating music using its music library of 170+ tracks.
- The platform provides sharing options along social platforms like Instagram and Facebook.
2. SloMo Slow Motion Video Editor
This iPhone slow-motion app has all the abilities to slow down videos and enhance them. It provides two options to slow down a video via playback speed or video frame rate. The playback speed slows a video instantly while the frame rates smoothen it. You can also choose a specific period for adding the slow-motion effect.

Key Features
- The frame manipulation goes up to 120 fps, and the playback speed goes 12x.
- The application offers 40 color filters to enhance your video’s visual outlook.
- There are multiple ratio options to export a video to upload it to different platforms.
3. Slow Motion Video Editor
Create ultra-slow motion or ultra-high motion videos with this iPhone slo-mo app. It offers distinct speed manipulation options, such as up to 10x to slow down a video. In addition, the application offers built-in speed templates to help you add speed effects to dance videos. Users can also retain the original audio of the videos after speed alteration.

Key Features
- An intuitive user interface that offers a seamless slo-mo editing method.
- Import music from iTunes into this iPhone slo-mo app and add it to your videos.
- Publish your slo-mos directly to other editing apps like GoPro and InShot for additional editing.
4. Slow Motion’ Video Editor
Make professional-grade slow-motion videos using this iPhone slow-motion app. The application can record and edit videos at 60 to 240 fps, ensuring smooth, slow motions. With its modern and accessible user interface, achieving slow motions is easy. Other speed settings include split-second freezing frames and time-lapse videos.

Key Features
- The application passes subscription charges via iTunes for a seamless and trusted process.
- You can trim the unnecessary parts of the video using its Trim tool.
- Offers one-click functionality to share videos across Instagram, YouTube, Facebook, or Email.
5. Slow Motion Video FX Edit
Do you want to be in control of your slow-motion videos while editing? This iPhone slow motion app offers custom speed manipulation options like 12x and 240 fps. You can add freeze frames if you want to highlight a specific part of the video. With its interface, speed manipulation is just as simple as dragging a slider.

Key Features
- Enhance your video’s visuals with up to 40 stunning visual filters to enhance colors.
- The application offers weekly, monthly, and yearly plans to suit your requirements.
- You can add music from your library to videos or specific scenes via this app.
6. Slow Fast Motion Video Editor
Apply slow motion effect to the specific parts of your videos using this iPhone slow motion app. You can access it on the app store; the application is free to download. It features a timeline editing interface and a playback speed of up to 8x for Slomo. It separates the video frames, and you can change their speed, and afterward, it merges them.

Key Features
- The ability to incorporate music from your music library into videos with this app.
- You can manually trim out video segments and merge them back.
- Showcase your creativity to other social platforms directly from the app.
7. Slow-Fast Motion Video Editor
This iPhone slow-motion app download unlocks a professional way of creating slo-mos. The user interface is professional and accessible for all types of editors. It displays a velocity graph to change the playback speed to 8x at specific video frames. This application slows down video to 1/10th of its actual speed. It also maintains the pitch of audio while creating fast or slow-motion videos.

Key Features
- There is no restriction on video length to edit in this iPhone slow-motion app.
- It doesn’t export video with Watermark addition, which is remarkable for branding.
- You can edit and export a video in Portrait or Landscape display.
8. TimeFreeze
If you want to create slow-motion videos effectively, then this iPhone slow-motion app can do it. It works by manipulating the video frame rates from 24 fps to 120 fps. Along with slowing down videos, you can slow down high-motion video to normal as well. The user interface is basic and lacks technicalities to be accessed by skilled people.

Key Features
- The application supports all iOS 12.1, macOS 12.1, and newer versions.
- Uses advanced image processing algorithms for video frame manipulation.
- The application is free to use and only takes up 25.3 MB of your iPhone’s storage.
9. Vidma - Video Editor Music
You have read about many applications that offer to transform normal videos into slow motions. However, this iPhone slo-mo app is much more than just a speed changer. It slows down your videos via a velocity graph and maintains the audio pitch during the process. Using this application, you can slow down videos to 0.1x while also having video reverse options.

Key Features
- With 1000+ music tracks and hundreds of visual effects and filters, your videos can stand out.
- Along with the slow motion, you can also create time-lapse and apply speed ramping presets.
- Export your video in high-quality 4K resolution without any quality loss.
10. Vizmato: Video Editor & Maker
Vizmato stands as a multipurpose video editing app with slow-motion capabilities. Beyond the creation of compelling slow-motion scenes, Vizmato adds dramatic flair by reversing the speed. Furthermore, the software extends the speed manipulation feature via a custom option. In this way, everyone gets a chance to design their videos per their preferences.

Key Features
- It offers 20+ visual themes, 40+ effects, and 140+ music assets to uplift your videos.
- The tool can transform images into slideshows, making a video of your memories.
- You can record and add voiceovers with this iPhone slow-motion app.
Bonus Part: Wondershare Filmora and Slow Motion Video Making: A Simple Connection
Having no fun while editing video with the iPhone slow-motion app? It’s obvious because such applications are limited to slowing down your videos. So, using Wondershare Filmora could change the game in video editing of all types. Users from every field can rely on Filmora to get unique and polished content. This editing platform is available online for Windows, macOS, and mobile phone users.
Wondershare Filmora is integrated with artificial intelligence to boost your productivity in editing. You can use Filmora’s asset library to get media or create your own with AI. Using Filmora will amaze you at every step of editing and creating engaging media.
Free Download For Win 7 or later(64-bit)
Free Download For macOS 10.14 or later
Steps to Slow Down Video with Speed Ramping in Filmora
Speed ramping is a way to slow down or speed up videos smoothly. A slow change in videos gives a more professional outlook to videos. Have you observed this feature in any of the above-discussed iPhone slow-motion apps? The answer is no, so let’s benefit from speed ramping in Filmora by following the given steps.
Step 1Start Working on the New Project
Begin your video editing journey after downloading Filmora on your device. After downloading, open this platform and select “New Project.” This way, you will access its editing screen to begin working. Start with importing your video and bringing it to the timeline.

Step 2Discover the Speed Ramping Option with Templates
Place your cursor on the video and right-click to choose “Speed Ramping” from the list. Now, you can see an editing screen on your right. Pick any of the templates for effortless speed ramping.

Step 3Customize Speed Ramping to Smoothly Slow Down Videos
Otherwise, hit the “Customize” and direct downward. Go to the editing panel and hold the dots to move downward if you want to slow down. You can speed up video portions by holding the dots upward. Meanwhile, you can play the video to see the changes.

Step 4Use Optical Flow for Good Quality and Move to Save Changes
Extend the “AI Frame Interpolation” menu and hit the “Optical Flow.” That’s how you will get a high-quality video with slow speed. Keep editing or save changes through the “Export” button on the upper right.

Find Core Functionalities of Wondershare Filmora
Before using Filmora, it’s important to explore it to avoid confusion. Considering this point, you should discover some of its main features below:
1. AI Copywriting
Except for AI, no one can provide you with an engaging script on short notice. Thus, Filmora integrates an AI copywriting feature for generating the desired script within seconds. It accepts natural language prompts, not limiting experts to giving commands. This feature is considered professional in creating YouTube descriptions to rank the content.
2. AI Copilot Editing
Humans typically need suggestions in editing, whether they are beginners or professionals. What could be better than having an AI as your personal editing assistant? Filmora offers an AI copilot editor that answers your editing-related queries. Besides, it navigates you toward practical solutions by providing links or buttons.
3. AI Audio Denoise
Sometimes, background noises ruin the vocals of the audio. Remove that noise with the help of AI, which can detect the noise type for exact results. This feature can enhance your audio by performing reverb reduction. It can make the voice clear that is present in surroundings, like electrical voices from devices. Audio denoise proves vital in recording podcasts and online course recording scenarios.
4. AI Portrait
It’s a human urge to look beautiful, and video editing apps are not denying it. Filmora also provides more than 70 AI portrait effects to beautify facial features. Moreover, it can assist you in removing the background and keeping humans in video frames. Some AI stickers include Heart eyes, Emojis, and Sunglasses that can evoke humorous emotions.
Conclusion
Until now, you might find your answer about using iPhone slow-motion apps. The overview of such premium apps has guided you to select an app that best aligns with your needs. If you are still confused, use Wondershare Filmora, an incredible video editor. This platform is available for iPhone, Android, Windows, and macOS with its limitless editing tools.
Looking for the Best Online Video Editors to Add Filter to Your Video? Here Is the List of the Best Video Editors to Add Filter Video Online in Simple Steps
When you record a video with your phone camera, digital camera, or even webcam, the color scheme in the video can differ depending on the surrounding light. If it differs a lot from the natural color scheme, it can affect the viewing experience of the audience negatively. That is why color correction is an essential part of video editing, and that is where video filters can be handy. You do not need a dedicated video editor application to add video filters as you can you can put filter on video online.
Video filters can correct color imbalances and make the video have consistent colors. For example, if you had recorded a video when the sun was setting, you can use a high saturation video filter to make the video color more vivid. You can even set the mood of a video with video filters so that the audience can get the exact emotion you want to portray through your video. We will illustrate the different ways on how to add filter to video online instantly.
Way 1. Use Clideo Filter Editor
Clideo Filter Editor is one of the fastest video editors that you can apply filters to your videos instantly. There is a wide range of different presets to apply temporarily and compare. Therefore, you can choose the best video filter and save your modified video. The user interface is super intuitive for everyone.
The platform is completely secure for uploading and editing videos, and you can upload videos in different file formats. You can use Clideo Filter Editor on your web browser from your Mac, Windows PC as well as smartphone. Here are the steps to add video filters online using Clideo Filter Editor.
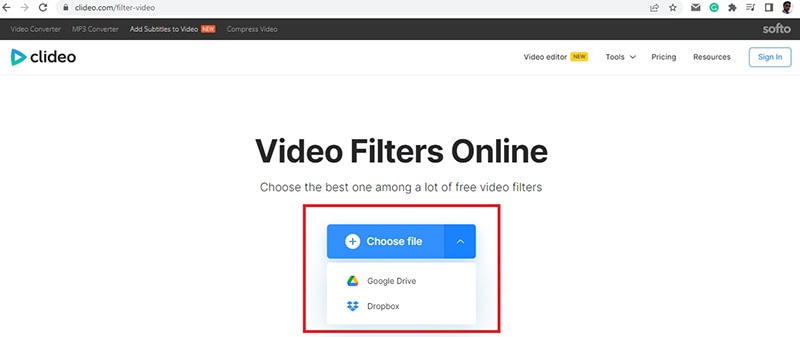
Step1Open your web browser and visit “clideo.com/filter-video”.
Step2Click on Choose File button to upload your video from your hard drive. You can also upload video from Google Drive and Dropbox.
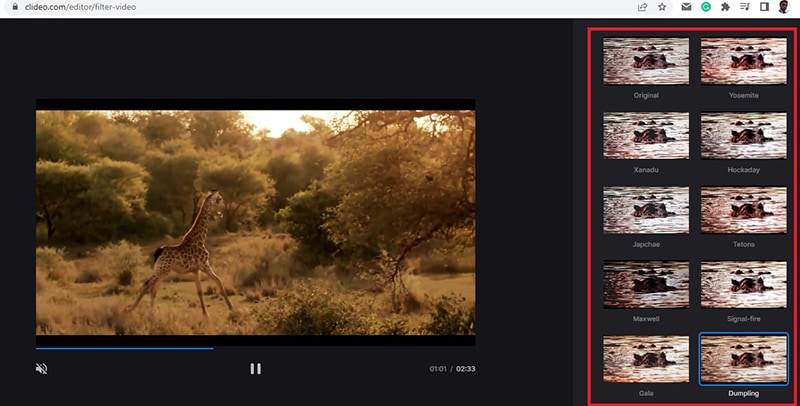
Step3After successful uploading, you will see the video filters on the right side of your video. Apply them one and one while playing your video so that you can see the changes in video color scheme instantly.
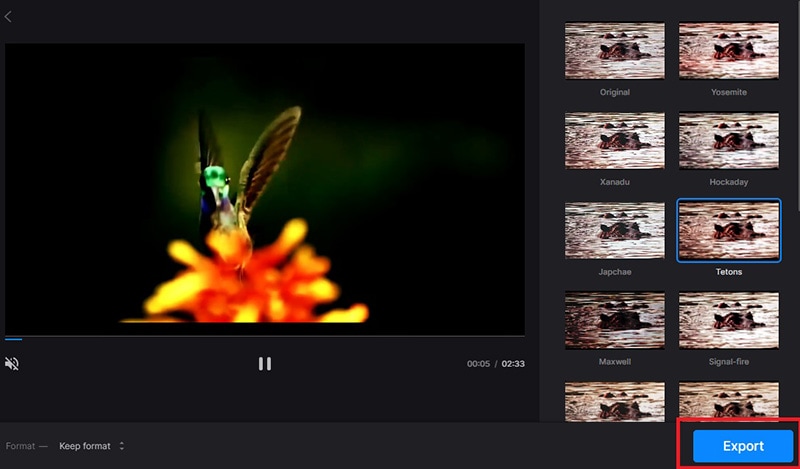
Step4Finalize a video filter to apply to your video and click on Export to save the modified video on your hard drive on any desired file format.
Way 2. Veed.io Video Filters
If you are looking for some stunning video filters to use on your video, Veed.io Video Filters is the best online platform. You can add filter to video online free, and the platform supports several video file formats. You will find color grading filters as well as effects to apply to your video and get the desired outcome. If you are going to upload videos to social media, you should definitely use Veed.io Video Filters to make your videos feel unique. Here are the steps on how to add filter video online using Veed.io Video Filters.
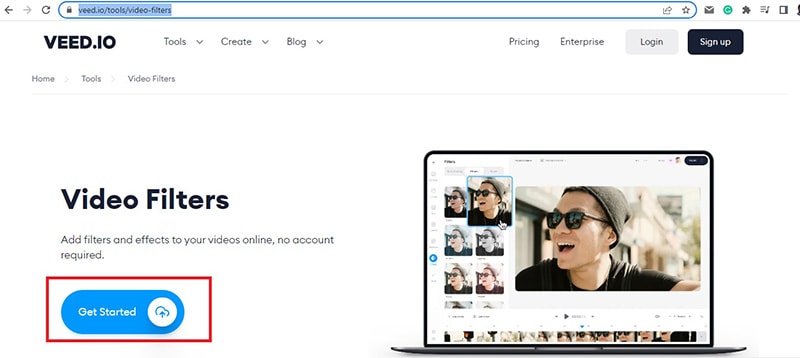
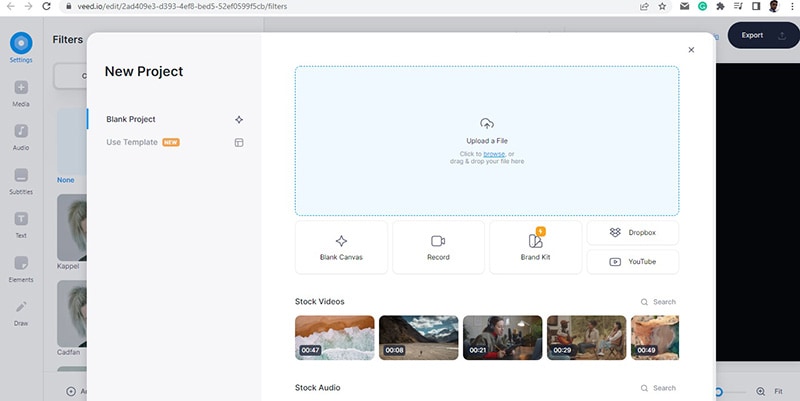
Step1Open your web browser and visit “veed.io/tools/video-filters”. Click on Get Started button.
Step2On the next screen, click on Browser or drag and drop your video file for adding video filters.
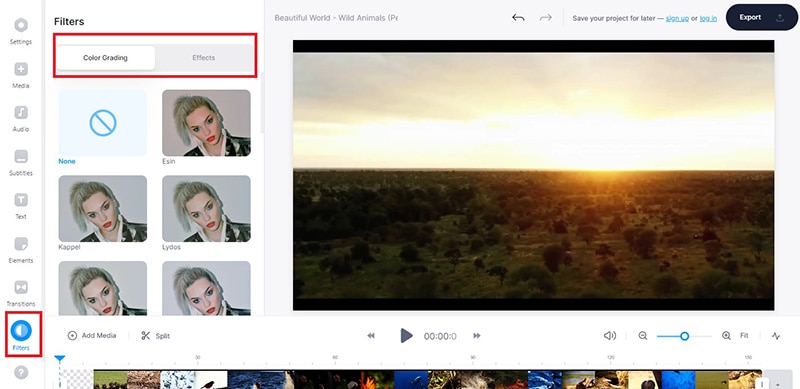
Step3After the video file gets uploaded, you will see Filters on the left side of the video. There are two different tabs – Color Grading and Effects available where there are different video filters available to apply to your video.
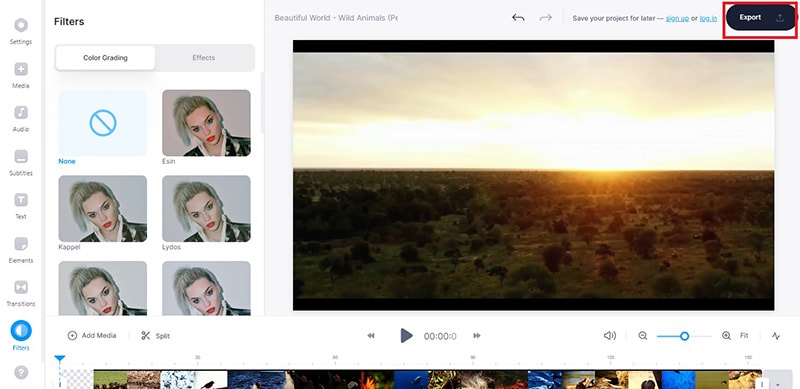
Step4Click on the filters to see how they look on your video instantly. Once you have selected a filter for the video, click on Export button to save the edited video in desired file format.
Way 3. Clipchamp Video Filter Editor
Clipchamp video filter editor has a wide range of beautiful video filters to enhance your video instantly. You can correct any color imbalance as well as set any required tone to your video. Starting from Outdoor and Portrait to Indoors and Muted, all the popular professional video filters can do the magic to your video. You can also save the edited video in different video resolution and file format as per your requirements. Here are the steps on how to add filter video online using Clipchamp video filter editor.
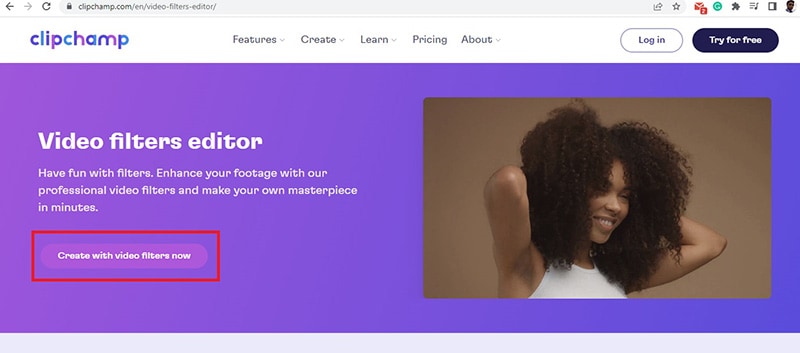
Step1Open your web browser and visit “clipchamp.com/en/video-filters-editor”. Click on Create with video filters now button.
Step2You have to sign up on the next screen so that you can apply the video filters.
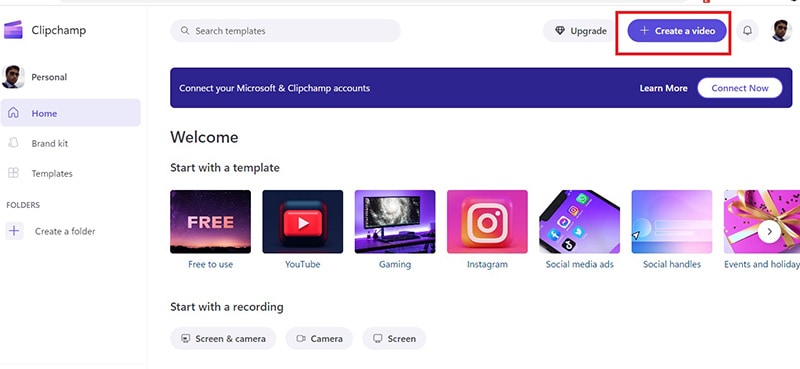
Step3Once the video editor opens, click on Create a Video button.
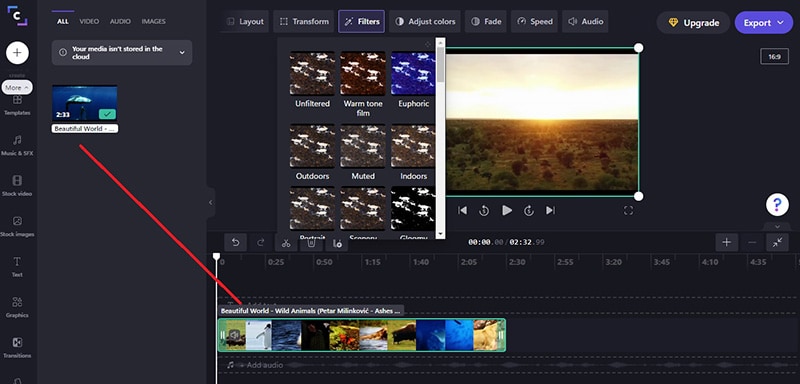
Step4Drag and drop your video on the video editor and thereafter on Timeline.
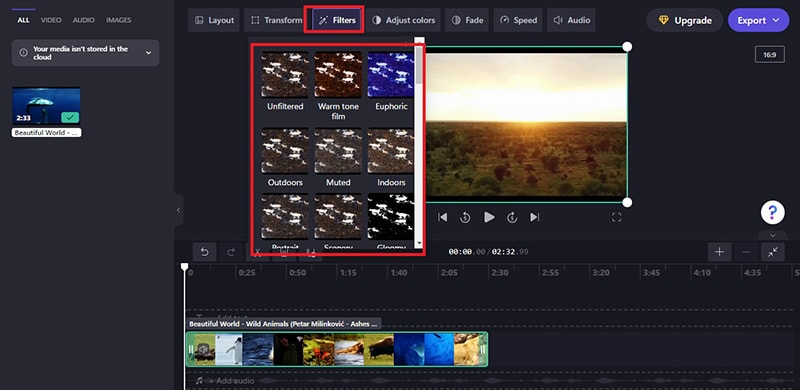
Step5Click on Filters option located at the top and you will see a drop-down containing all the filters. Place your mouse pointer on the filters one by one to see how they look on your video instantly.
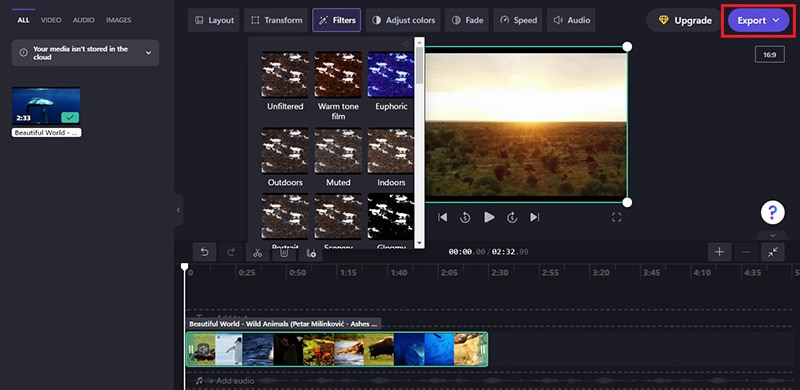
Step6Finally, click on the selected filter and click on Export button to save the edited video.
Way 4. FlexClip Video Filter Editor
FlexClip has a collection of online tools to edit your video instantly without installing any video editor application. FlexClip Video Filter Editor has over 20 popular video filters to apply to your video on the go. You can change the video outlook, and the platform supports different types of video file formats. You can add filter to video online free, and there is not going to be any watermark on your edited video. Here are the steps on how you can add filter to your video using FlexClip video filter editor.
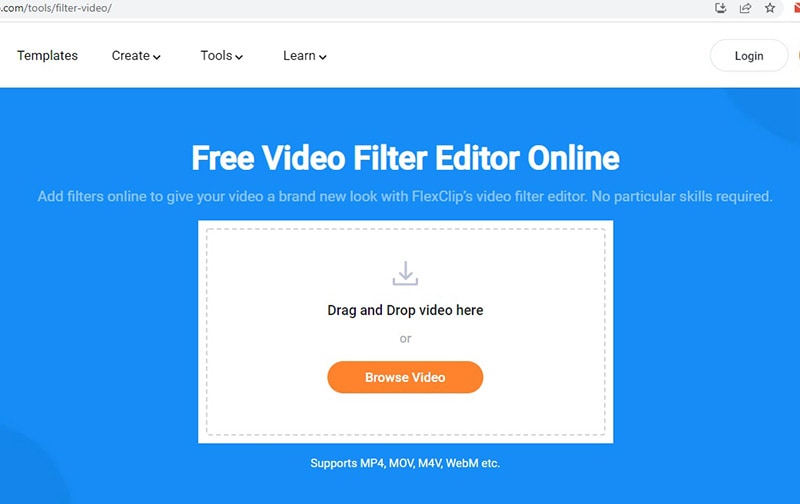
Step1Open your web browser and visit “flexclip.com/tools/filter-video”.
Step2Drag and drop your video to the free video filter editor online.
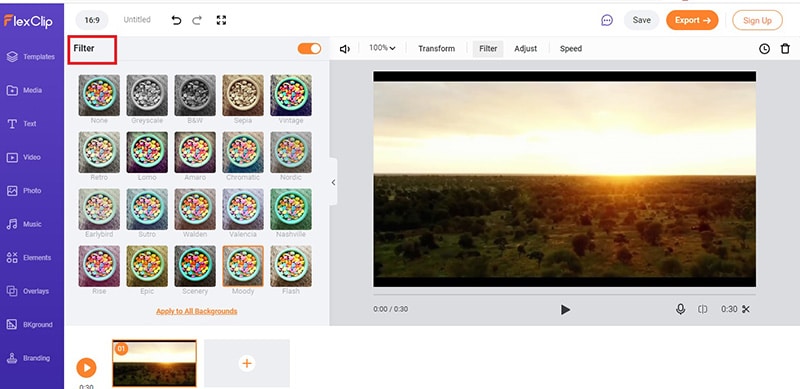
Step3After successful uploading, you will see all the video filters on the left side.
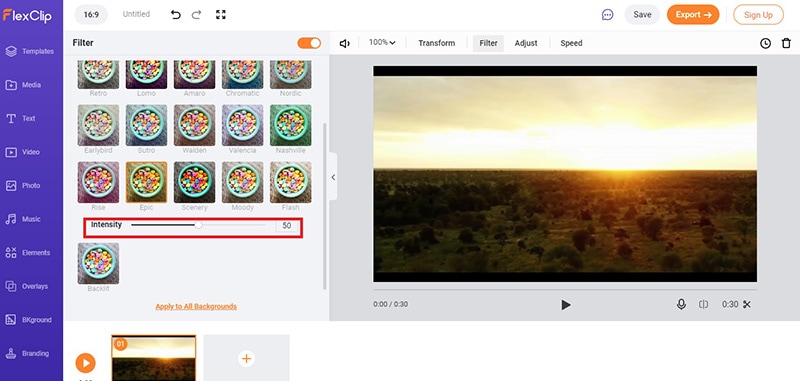
Step4Click on the video filters one to one to apply them to the video and see which one suits the best. You can adjust the intensity of the filters as per your preference.
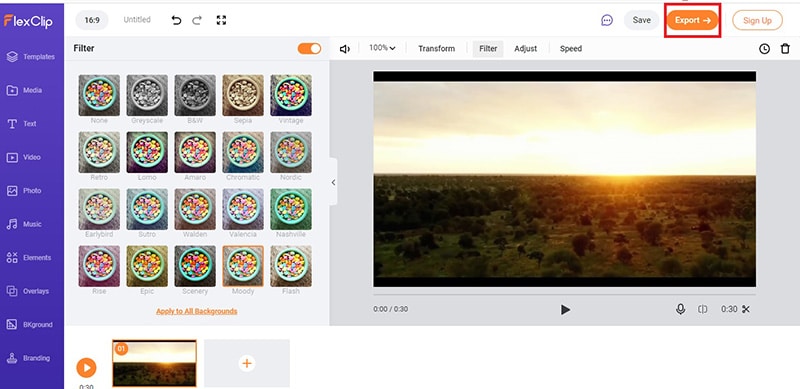
Step5Once you have applied a filter and you can satisfy with it, click on Export button to save the edited video.
Way 5. Kapwing Filter Video Editor
Kapwing is a popular online video editor, and you can add video filters to your recorded video for free. Kapwing Filter Video Editor works on all devices, and you can access it from any popular web browser. You can upload recorded video as well as paste URL of an online video stored in Google cloud platform to apply video filters. The preset filters enhance video quality starting from colors and saturation to brightness and contrast. You can also share them on social media platforms directly from Kapwing video editor. Here are the steps how to put filter on video online using Kapwing filter video editor.
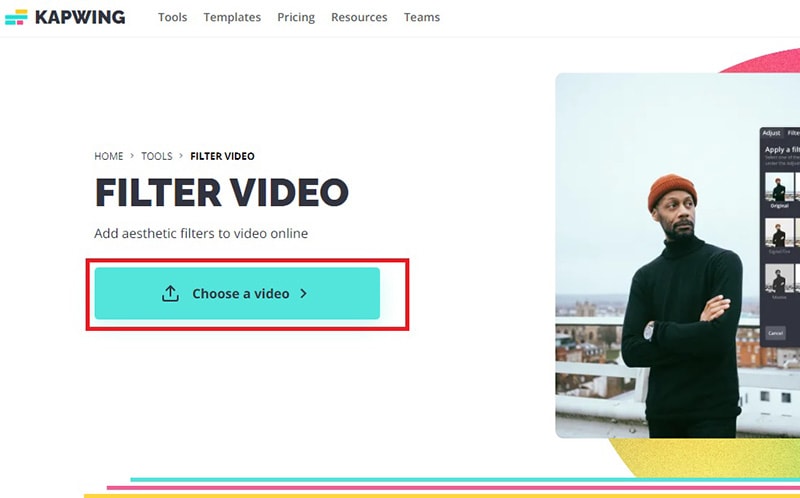
Step1Open your web browser and visit “kapwing.com/tools/filter-video”. Click on Choose a video button to get started.
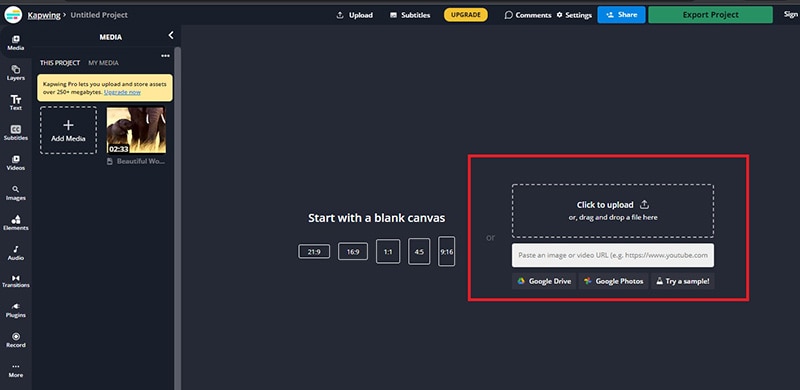
Step2Once Kapwing video editor opens, drag and drop your video to upload on the platform. You can also paste video URL from Google Drive or Google Photos.
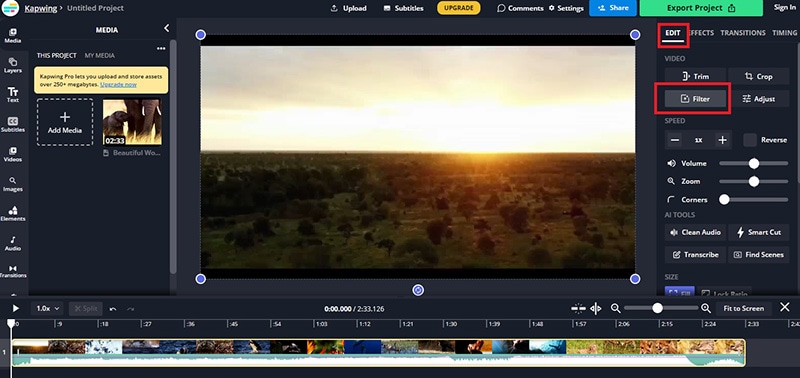
Step3Click on the video and on the right side, go to Edit tab and click on Filters under Video section.
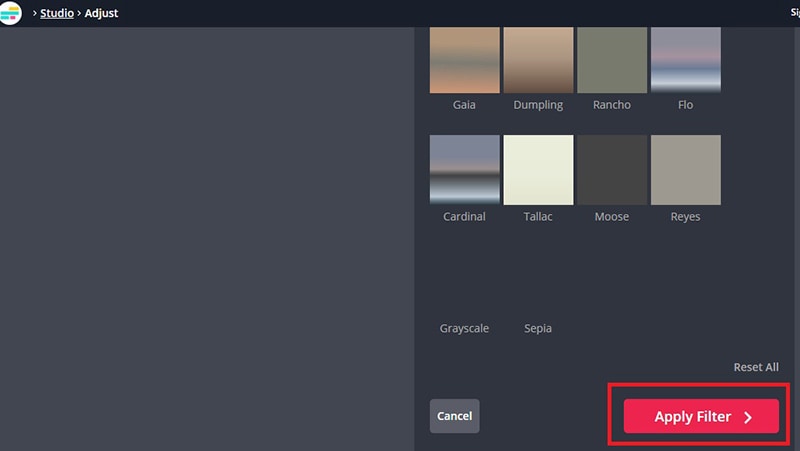
Step4You will see a host of video filters that you can apply to your video. Click on them to check them out. You can also customize the video filter by going to Adjust tab.
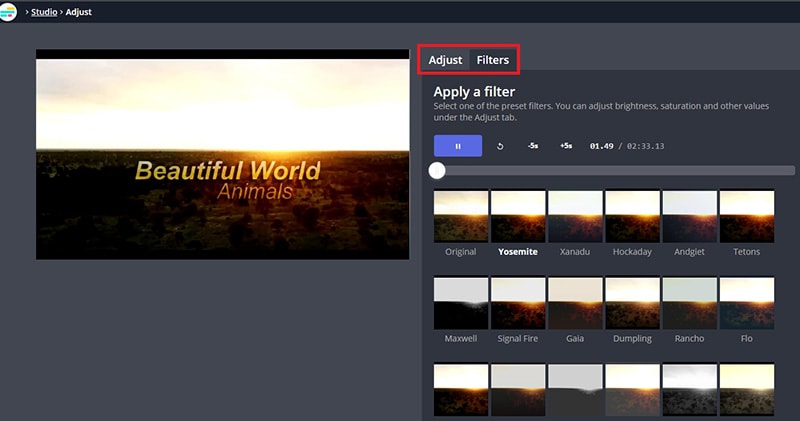
Step5Select the best one and click on Apply Filters button. Finally, click on Export Project button to save the edited video.
Conclusion
If you want to apply video filters to your recorded video in order to enhance the video outlook and adjust the color balance, you can use video filter editors online. We have illustrated five different ways on how to add video filters online for free. Each one of them has different sets of video filters. If you are looking for a dedicated video editor desktop application, we recommend Wondershare Filmora .
Free Download For Win 7 or later(64-bit)
Free Download For macOS 10.14 or later
Free Download For macOS 10.14 or later
[Updated 2024] Top Free Vintage LUTs to Use
Whether it is an image or video footage, LUTs can change the look and feel of your content. You can add a new color scheme, change the contrast, or create a new digital media look. Although there are many LUTs options, vintage LUTs are some of the most popular ones. These LUTs can add a nostalgic and warm feeling to your content and are perfect for creating a vintage or retro look.
Vintage LUTs are a great way to add a classic feel to your photos or videos, and they work especially well for old-school-themed projects. Using free vintage LUTs, you can easily add a vintage look to your content without spending too much time editing.
- Part 2: Best Free Vintage LUTs That Can Be Found in The Market
- Part 3: The Best Video Editor to Integrate LUTs - Wondershare Filmora
Part 1: What Are the Diverse Use Cases of LUTs?
LUTs are an array of numbers that helps you to change colors from one color space to another. You can use LUTs for color grading, color correction, or to change the color tone. The section below will highlight where you can use these LUTs.
- Color Grading: LUTs can be used for color grading to adjust the colors of an image to create a specific look or mood. Additionally, you can tweak an entire image’s colors or target specific colors or tones using LUTs.
- Color Correction: Another way is you can use LUTs to color-correct any image or video. It is the process of adjusting the colors of an image to make it look more natural. This technique is often used to correct color temperature, adjust contrast, and fix color imbalances.
- Film Emulation: It can emulate the look of different film stocks, such as Kodak or Fuji. This technique is commonly used in filmmaking to achieve a specific aesthetic or match older films’ looks.
- Special Effects: LUTs can create a wide range of special effects. For instance, a LUT can create the look of a night vision camera or infrared vision. This technique is often used in action movies and video games to create a more 3D experience.
- Still Photography: Furthermore, LUTs can also be used in still photography to adjust the color and tone of an image. It applies a color film that looks like a filter or an effect making the content look more creative.
- 3D Rendering: LUTs are used in 3D rendering to convert colors from one color space to another. Moreover, it can adjust the color and tone of rendered images. This technique can help in animated movies, video games, and visual effects for film and TV.
Free Download For Win 7 or later(64-bit)
Free Download For macOS 10.14 or later
Part 2: Best Free Vintage LUTs That Can Be Found in The Market
We know that LUTs change the perspective and mood of your story. There are many different LUTs to download, but vintage LUTs add more depth to your content. You can choose from different vintage look LUT packs, but here are some of the best.
1. Vintage Looks
Vintage Looks is a LUT pack that offers 10 vintage-style LUTs that can be used to give your media files a classic, old-school look. These LUTs highlight tropical colors, such as shades of blue and yellow. These shades create an old and vintage atmosphere for your photos and videos. You can apply one of the LUTs to your footage and watch your media files transform.

2.Vintage LUTs
Vintage LUTs is a pack of LUTs that can transform your media into a different vintage look. Your results look like they are taken from old Kodak or Fuji films. Moreover, use its monochromatic or B&W LUTs to give your media files the old vintage feel. You can set a different tone by applying these LUTs to your videos and photos for a retro look.

3.50 Vintage Wedding LUTs Pack
The 50 Vintage Wedding LUTs Pack is a collection of 50 high-quality LUTs. These LUTs can add a beautiful vintage-style effect to your photos and videos. Additionally, these LUTs are designed to bring your media a warm, sepia-like tone. It creates a tone giving it a classic, timeless look that is perfect for weddings. Moreover, you can create old-fashioned-themed photos and videos using these LUTs.

4. Vintage Color Grading Video Editing LUTs
It is a pack of 20 LUTs to color-grade your digital media in a vintage feel. Vintage Color Grading Video Editing LUTs overexpose your video to fade its colors. Furthermore, it highlights orange and tan shades to warm your digital files. It will create an overexposed, rich contrast, old classic Hollywood movie feel. It has different styled vintage LUTs that you apply to your videos.

5. Vintage Film LUTs
Another amazing LUT pack that creates an old retro feel to your content is Vintage Film LUTs. Achieve a cinematic style with a vintage feel with multiple vintage presets. These LUTs are designed to replicate the look of the Black Magic Pocket Cinema Camera. Similarly, you can add a classic and timeless look to your photos and videos with this vintage pack.

Empower your videos with a new mood using different LUTs. Filmora now offers 800+ top-quality 3D LUTs cover a broad range of scenarios. Transform your videos with Filmora’s powerful 3D LUTs.
Apply LUT on Videos Apply LUT on Videos Learn More

6. 50 Vintage Cinematic Lightroom Presets and LUTs
50 Vintage Cinematic Lightroom Presets and LUTs is a pack designed to give your digital media an old look. This pack contains 50 different LUTs, each with a different vintage look. It overexposes your footage and increases the contrast to achieve a retro feel. Furthermore, these LUTs add a brown shade to your media, enhancing its vintage feel.

7. Retro Film LUTs
Retro Film LUTs is a vintage LUTs pack that will give your photos and videos an old, rusty look. These LUTs highlight colors like orange and brown to create nostalgia. Furthermore, these LUTs add film grains to your media to create a better vintage look. This pack is perfect for content creators and enthusiasts who want to create something different.

8. Vibrance Colors
Yet another great vintage-style pack for your images and video footage is Vibrance Colors. It focuses on enhancing colors to give an old-school feel. This LUT adds vibrance to your photos and videos to bring the natural feel out of your content. Additionally, increasing vibrance in your content adds the late 80s and early 90s touch to your digital media files.

9. Free LUTs Retro Color
Another vintage LUT free pack is Free LUTs Retro Color. This vintage retro LUT adds warmth and nostalgia to your media. These LUTs modify your footage by fading colors and increasing the muddiness to create a classic retro look. Moreover, you can create a music video, short film, or personal video by adding depth and character to your work.

10. Green Harmony
Last but not least, Green Harmony is a free vintage LUT. This LUT adds a greenish tint to your digital files, giving your content an old sci-fi movie feel. By applying this LUT, your content will resemble The Matrix movie’s iconic color grading. Using this LUT pack, you can take your footage back to the days of old-school sci-fi movies.

Part 3: The Best Video Editor to Integrate LUTs - Wondershare Filmora
Wondershare Filmora is a great video editor that allows you to integrate LUTs into your projects. It offers over 800+ LUTs for download, which can be used for your videos. With its extensive library, choose from cinematic to vintage LUTs that fit your style. You can choose from cinematic or vintage LUTs free download and more to give your content the desired feel.
Add Vintage LUTs on Video For Win 7 or later(64-bit)
Add Vintage LUTs on Video For macOS 10.14 or later
Additionally, you can adjust the intensity of your LUTs with the latest update. The new update gives you more control over color grading and correction. In addition, Filmora comes equipped with a color wheel that enables you to adjust the color scheme of your video content. This helps you create and edit your digital content professionally using this software.

Conclusion
In conclusion, Look-Up Tables are an essential component in video editing. It enables creators to achieve the desired look and feel for their footage. Vintage LUTs, in particular, can add a unique perspective to your story by adding emotions and moods. However, Wondershare Filmora can help to integrate your favorite free vintage LUTs into your content.
Part 1: What Are the Diverse Use Cases of LUTs?
LUTs are an array of numbers that helps you to change colors from one color space to another. You can use LUTs for color grading, color correction, or to change the color tone. The section below will highlight where you can use these LUTs.
- Color Grading: LUTs can be used for color grading to adjust the colors of an image to create a specific look or mood. Additionally, you can tweak an entire image’s colors or target specific colors or tones using LUTs.
- Color Correction: Another way is you can use LUTs to color-correct any image or video. It is the process of adjusting the colors of an image to make it look more natural. This technique is often used to correct color temperature, adjust contrast, and fix color imbalances.
- Film Emulation: It can emulate the look of different film stocks, such as Kodak or Fuji. This technique is commonly used in filmmaking to achieve a specific aesthetic or match older films’ looks.
- Special Effects: LUTs can create a wide range of special effects. For instance, a LUT can create the look of a night vision camera or infrared vision. This technique is often used in action movies and video games to create a more 3D experience.
- Still Photography: Furthermore, LUTs can also be used in still photography to adjust the color and tone of an image. It applies a color film that looks like a filter or an effect making the content look more creative.
- 3D Rendering: LUTs are used in 3D rendering to convert colors from one color space to another. Moreover, it can adjust the color and tone of rendered images. This technique can help in animated movies, video games, and visual effects for film and TV.
Free Download For Win 7 or later(64-bit)
Free Download For macOS 10.14 or later
Part 2: Best Free Vintage LUTs That Can Be Found in The Market
We know that LUTs change the perspective and mood of your story. There are many different LUTs to download, but vintage LUTs add more depth to your content. You can choose from different vintage look LUT packs, but here are some of the best.
1. Vintage Looks
Vintage Looks is a LUT pack that offers 10 vintage-style LUTs that can be used to give your media files a classic, old-school look. These LUTs highlight tropical colors, such as shades of blue and yellow. These shades create an old and vintage atmosphere for your photos and videos. You can apply one of the LUTs to your footage and watch your media files transform.

2.Vintage LUTs
Vintage LUTs is a pack of LUTs that can transform your media into a different vintage look. Your results look like they are taken from old Kodak or Fuji films. Moreover, use its monochromatic or B&W LUTs to give your media files the old vintage feel. You can set a different tone by applying these LUTs to your videos and photos for a retro look.

3.50 Vintage Wedding LUTs Pack
The 50 Vintage Wedding LUTs Pack is a collection of 50 high-quality LUTs. These LUTs can add a beautiful vintage-style effect to your photos and videos. Additionally, these LUTs are designed to bring your media a warm, sepia-like tone. It creates a tone giving it a classic, timeless look that is perfect for weddings. Moreover, you can create old-fashioned-themed photos and videos using these LUTs.

4. Vintage Color Grading Video Editing LUTs
It is a pack of 20 LUTs to color-grade your digital media in a vintage feel. Vintage Color Grading Video Editing LUTs overexpose your video to fade its colors. Furthermore, it highlights orange and tan shades to warm your digital files. It will create an overexposed, rich contrast, old classic Hollywood movie feel. It has different styled vintage LUTs that you apply to your videos.

5. Vintage Film LUTs
Another amazing LUT pack that creates an old retro feel to your content is Vintage Film LUTs. Achieve a cinematic style with a vintage feel with multiple vintage presets. These LUTs are designed to replicate the look of the Black Magic Pocket Cinema Camera. Similarly, you can add a classic and timeless look to your photos and videos with this vintage pack.

Empower your videos with a new mood using different LUTs. Filmora now offers 800+ top-quality 3D LUTs cover a broad range of scenarios. Transform your videos with Filmora’s powerful 3D LUTs.
Apply LUT on Videos Apply LUT on Videos Learn More

6. 50 Vintage Cinematic Lightroom Presets and LUTs
50 Vintage Cinematic Lightroom Presets and LUTs is a pack designed to give your digital media an old look. This pack contains 50 different LUTs, each with a different vintage look. It overexposes your footage and increases the contrast to achieve a retro feel. Furthermore, these LUTs add a brown shade to your media, enhancing its vintage feel.

7. Retro Film LUTs
Retro Film LUTs is a vintage LUTs pack that will give your photos and videos an old, rusty look. These LUTs highlight colors like orange and brown to create nostalgia. Furthermore, these LUTs add film grains to your media to create a better vintage look. This pack is perfect for content creators and enthusiasts who want to create something different.

8. Vibrance Colors
Yet another great vintage-style pack for your images and video footage is Vibrance Colors. It focuses on enhancing colors to give an old-school feel. This LUT adds vibrance to your photos and videos to bring the natural feel out of your content. Additionally, increasing vibrance in your content adds the late 80s and early 90s touch to your digital media files.

9. Free LUTs Retro Color
Another vintage LUT free pack is Free LUTs Retro Color. This vintage retro LUT adds warmth and nostalgia to your media. These LUTs modify your footage by fading colors and increasing the muddiness to create a classic retro look. Moreover, you can create a music video, short film, or personal video by adding depth and character to your work.

10. Green Harmony
Last but not least, Green Harmony is a free vintage LUT. This LUT adds a greenish tint to your digital files, giving your content an old sci-fi movie feel. By applying this LUT, your content will resemble The Matrix movie’s iconic color grading. Using this LUT pack, you can take your footage back to the days of old-school sci-fi movies.

Part 3: The Best Video Editor to Integrate LUTs - Wondershare Filmora
Wondershare Filmora is a great video editor that allows you to integrate LUTs into your projects. It offers over 800+ LUTs for download, which can be used for your videos. With its extensive library, choose from cinematic to vintage LUTs that fit your style. You can choose from cinematic or vintage LUTs free download and more to give your content the desired feel.
Add Vintage LUTs on Video For Win 7 or later(64-bit)
Add Vintage LUTs on Video For macOS 10.14 or later
Additionally, you can adjust the intensity of your LUTs with the latest update. The new update gives you more control over color grading and correction. In addition, Filmora comes equipped with a color wheel that enables you to adjust the color scheme of your video content. This helps you create and edit your digital content professionally using this software.

Conclusion
In conclusion, Look-Up Tables are an essential component in video editing. It enables creators to achieve the desired look and feel for their footage. Vintage LUTs, in particular, can add a unique perspective to your story by adding emotions and moods. However, Wondershare Filmora can help to integrate your favorite free vintage LUTs into your content.
Also read:
- Updated In 2024, 8 Apps to Custom Your GIF Stickers
- 2024 Approved Discover the Top 5 Free Online Video Filter Editors to Transform Your Videos with Captivating Color Grading and Correction Presets. Elevate Your Digital Storytelling Effortlessly
- Updated Creating Collages on Canva Is Simple and Quick. The Tool Lets You Create some Amazing Customized Collages as Needed. So, Get Ready to Explore the World of Canva Collages
- 2024 Approved Top 5 AI Music Video Examples and Makers to Make Them
- New Learn About Open Broadcaster Software and How to Perform Obs Color Correction. Also, Explore the Various Aspects of Color Correction Like Contrast, Brightness, Saturation, Among Others for 2024
- New Learn to Splice Videos Together on iPhone
- New In 2024, How to Create an Instant Slideshow on Mac
- New In 2024, Ways to Make Canva Collages
- Wondering About How to Easily Create a Slideshow on Your iPhone? Well, Take Note of some of the Finest Apps to Turn Your Vision Into Reality for 2024
- New How to Do Velocity Edits on PC for 2024
- New 2024 Approved Add a Miniature Effect on Your Video for Filmy Looks. To Add This Effect, Read the Complete Guide and Make Your Video Cinematic by Wondershare Filmora
- New How to Loop a Video on Vimeo?
- 2024 Approved 20 Fantastic Video Background Templates to Make Your Video Go Viral
- New Powerpoint Slideshow Icon, Slide Sorter View Icon, Slideshow Icon Powerpoint, Slide Show View Icon for 2024
- Best 31 Video Trimmers for Computer, Phone and Online
- New Discover the Top 5 Online Tools for Merging MP4 Files Easily and Quickly. Streamline Your Video Editing Process and Create Seamless Videos with These User-Friendly Tools
- 2024 Approved This Blog Post Shows How to Create an Eye-Catching Paper Rip Effect for Your Videos Using Wondershare Filmora with These Easy-to-Follow Steps
- New 2024 Approved 2 Effective Ways to Easily Convert VTT to SRT
- Updated 2024 Approved Have You Ever Heard Hyperlapse and Tume Lapse Videos? Do You Know the Differences Between Them? This Article Will Introduce the Concepts, Features and Differnces of Them
- New 2024 Approved Splitting Video Into Frames with the FFmpeg Step by Step
- New In 2024, Having Difficulty in Choosing the Most Affordable 3D Slideshow Software? Stay Here for the Best Application Choices of All Times to Create the Most Stunning Slideshows Ever
- The Best Cinematic LUTs in The Market for 2024
- Your Powerpoint Slides Are Not Always Perfect and Sometimes Need a Little Editing Before Being Sent to the Client. Here Are some Ways You Can Make Sure Your Powerpoint Is Not Wrong for 2024
- New In 2024, How to Turn Text Into a Podcast
- New 7 Ways Add Subtitles to MKV Videos on All Platforms
- Find The Best Free Canon LUTs for 2024
- 2024 Approved The Upcoming Generation of AR and VR Is Going to Define Augmented Reality Conferencing as the New Normal for All Business Purposes. With a Global Perspective to Build Better Communication, AR Can Be the Future of Collaborative Workspace
- Updated Step-by-Step Guide | How to Edit A Time Lapse Video on iPhone for 2024
- 10 Recommended Websites to Discover Awesome Premiere Pro Video Templates
- Updated In 2024, Unlocking the Power of DaVinci Resolve Scopes Enhance Your Color Grad
- New In 2024, Linkedin Posts Can Be Made Engaging by Using the Emojis. This Article Will Tell You Its Importance and Different Ways to Add Them
- Updated 2024 Approved Do You Want Your Video Footage to Resemble Kodak Films? You Can Get the Old Kodak Film Look by Searching for Kodak 2383 LUT Free Download on the Internet
- New How Can You Make a Slideshow Look Aesthetic? Follow the Given Discussion to Learn About Creating an Aesthetic Slideshow All by Yourself for 2024
- New In 2024, How to Create Freeze Frame Clone Effect
- Updated How to Change Video Thumbnail in Google Drive for 2024
- New Best Options to Replace Sky of Any Photo Online + Offline for 2024
- Updated Ultimate Guidelines to Help You Better Use VLC Media Player
- Updated Its Always a Cool Thing to Use a 3D Intro Maker to Create Intro Videos for Your Clips. This Post Will Introduce You 4 of the Best Intro Video Makers to Help You Improve Your Video
- Will iSpoofer update On OnePlus Nord CE 3 Lite 5G | Dr.fone
- Ultimate guide to get the meltan box pokemon go For Honor Magic Vs 2 | Dr.fone
- In 2024, Forgot iPhone 6 Plus Backup Password? Heres What to Do | Dr.fone
- In 2024, Top 9 Apple iPhone 11 Pro Monitoring Apps for Parental Controls | Dr.fone
- Top 7 Skype Hacker to Hack Any Skype Account On your Lava Yuva 2 | Dr.fone
- Hard Resetting an Infinix GT 10 Pro Device Made Easy | Dr.fone
- App Wont Open on Your Vivo X90S? Here Are All Fixes | Dr.fone
- How to Share Location in Messenger On Honor X50? | Dr.fone
- In 2024, 2 Ways to Transfer Text Messages from Samsung Galaxy F14 5G to iPhone 15/14/13/12/11/X/8/ | Dr.fone
- Prank Your Friends! Easy Ways to Fake and Share Google Maps Location On Google Pixel Fold | Dr.fone
- 2024 Approved Netflix Subtitle Translation Methods Comprehensive Guide
- How To Enable USB Debugging on a Locked Samsung Galaxy A15 4G Phone
- How Do I SIM Unlock My iPhone 15 Plus?
- 3 Effective Ways to Unlock iCloud Account Without Password From iPhone 14 Pro Max
- Identify missing or malfunctioning drivers with Windows Device Manager in Windows 10 & 7
- How To Activate and Use Life360 Ghost Mode On Lava Yuva 3 | Dr.fone
- How to Upgrade Apple iPhone 14 Pro Max without Losing Data? | Dr.fone
- Hot 30i Video Recovery - Recover Deleted Videos from Hot 30i
- How to Remove a Previously Synced Google Account from Your Vivo Y27 5G
- Top 8 Live Selling Platforms & Beginners Tool Suggestion
- Complete Tutorial to Use VPNa to Fake GPS Location On Honor X50i | Dr.fone
- How to Unlock iCloud lock on your iPhone 6s and iPad?
- New Top 9 Choices for Video Auto Translate for 2024
- How to Fix It Infinix Smart 7 HD Wont Turn On | Dr.fone
- Fix the Error of Unfortunately the Process.com.android.phone Has Stopped on Oppo Find X7 Ultra | Dr.fone
- Best Ways to Bypass iCloud Activation Lock on iPhone XS Max/iPad/iPod
- How to retrieve lost files from Realme C53?
- Pattern Locks Are Unsafe Secure Your Realme Narzo 60 Pro 5G Phone Now with These Tips
- Ready To Dive Into Photo Talking Videos? Heres What You Need To Know for 2024
- Best 10 Chinese Video to English Translator for 2024
- How To Stream Anything From Samsung Galaxy XCover 7 to Apple TV | Dr.fone
- In 2024, How to Check Distance and Radius on Google Maps For your Xiaomi 14 Pro | Dr.fone
- Title: If You Are a Free Video Editor Being a Windows User, VSDC Free Video Editor Is a Great Choice. But Is It the Best Video Editor You Should Use? Find Out From Our VSDC Free Video Editor Review
- Author: Morgan
- Created at : 2024-06-08 08:36:39
- Updated at : 2024-06-09 08:36:39
- Link: https://ai-video-editing.techidaily.com/if-you-are-a-free-video-editor-being-a-windows-user-vsdc-free-video-editor-is-a-great-choice-but-is-it-the-best-video-editor-you-should-use-find-out-from-ou/
- License: This work is licensed under CC BY-NC-SA 4.0.


