
:max_bytes(150000):strip_icc():format(webp)/mothersday_NataliaCampbell_Getty-5a4baef6c7822d00371e56cd.jpg)
In 2024, Adding Text to Your Collage Not only Makes It Look Sophisticated but Also Versatile. So, if You Too Are Looking for Ways to Create a Collage Text, Check Out Our Article
Adding Text to Your Collage Not only Makes It Look Sophisticated but Also Versatile. So, if You Too Are Looking for Ways to Create a Collage Text, Check Out Our Article
The Ultimate Guide to Make a Text Collage
An easy yet powerful editor
Numerous effects to choose from
Detailed tutorials provided by the official channel
Collages are everywhere, be it online sites, social media platforms, magazines, birthday wishes, newspapers, and much tools, more. Organizing your images in some random or specific shapes to offer a visually enhanced experience is the major purpose of the collage. Besides adding images, there are several other elements and factors that combine to make up an eye-catchy collage and a key one is the “text”.

So, if you too are considering to create a photo collage with text, just stick to us and keep reading.
In this article
01 [Why Create a Text Collage?](#Part 1)
02 [When to Use Text Collage?](#Part 2)
03 [Factors to Be Considered While Creating a Text Collage](#Part 3)
04 [Top 5 Tools to Create a Text Collage](#Part 4)
05 [Use Stock Images to Pep Up Your Text Collage](#Part 5)
Part 1 Why Create a Text Collage?
Adding a text to your collage is beneficial in ways more than one. The text brings versatility to your collage, and also helps in conveying the message along with the theme. Moreover, a little interesting text line along with animations added to your collage enhances its overall visual communication and looks.
Part 2 When to Use Text Collage?
Though text can be added to all types of collages there are some specific occasions when the purpose of adding the text becomes more meaningful. For instance, adding text while creating a birthday collage, mood board collage, anniversary collage, scrapbook collage, holiday collage, or other similar ones helps in expressing the feelings, theme, and emotions in a better manner.
Part 3 Factors to Be Considered While Creating a Text Collage
There are several text-adding ways and methods by which you can make your collage look interesting. Considering a few important ones will let you create an impressive collage in no time. Check out some useful tips and tricks to use text within the photo collage.
● Identify if you wish to add the text as the focal point or not. If you are using the text as the first striking thing in the collage then ensure that it is eye-catchy and interesting.
● Keep a good balance between the text and the images so that it does not look weird.
● The color and the font of the text are among the most important factors to be considered. Make sure that both the text color as well as the font match and blend well with the theme and the images in the collage.
● Keeping the background of the text simple, less detailed, and also clutter-free is important so that the text content comes out nicely.
● Make sure only to add a few words or lines in your collage to make it look sophisticated. It’s majorly a photo collage with a dash of the text so keep it that way only and not vice-versa.
Part 4 Top 5 Tools to Create a Text Collage
There are several desktop, online, and app based text collage maker tools available. Some of the popular ones are enlisted below.
01Adobe Creative Cloud Express
Adobe is known for its advanced image editing options and its online version called creative cloud is no less. Using this browser-based tool you can create some amazing collage and also add text easily. The site offers an array of templates to choose the design as per your theme and the interface is also user-friendly. You need to free sign-up to use the program.

02Befunky
This is another interesting online tool that can be used to add text to your collages, photo projects, and designs. Free to use, the tool has multiple options for text customization like selecting the body text, headline, outline, shadow drop options, and more. Pre-set designs for adding the text to your collages are also available here.

03Fotor
When it comes to creating collages and customizing them, Fotor is one of the most widely used tools. This free online program will let you add text to your created collages for enhancing their overall looks. Several text-based templates are also available to choose from and you can even customize the text parameters like font, size, spacing, highlight color, shadow, and more.

04Canva
Canva is a popular image editing online tool that supports several other functions as well including collage creation. Using this versatile program, you can add texts to your photos as well as collages easily. Several templates in an array of categories for collage creation are available and you can even personalize the text by changing its font, color, background, and other parameters.

05PhotoCollage
This is a simple to use online collage maker with text tool that helps you create a decent collage with a text in no time. You can either use the blank space to add images and set them in the desired format for a collage or choose from the pre-set templates. Using the tool you can change the position of the text, flip it, rotate it, select the font, color, size, shadow, stroke and customize it in several other ways.

Part 5 Use stock images to pep up your text collage
The text is the additional elements of the collage to make them look more interesting while the images and photos remain as the main content. So, no matter how interesting your text and its design are, if the images in the collages are not interesting, the collage will be of no good.
So, if you do not have interesting pictures matching your theme in high quality, no need to worry as there are several tools that can help you use their stock images for creating a collage or other purposes. One such superb tool we suggest here is Wondershare Filmora Video Editor which is a complete video editing tool that also has an impressive collection of pictures and other stick media in high quality.
Search for the pictures from several categories matching your theme at Filmora and use them without any worries. Moreover, you can even create a video collage using the software’s split-screen feature.
For Win 7 or later (64-bit)
For macOS 10.12 or later
● Ending Thoughts →
● Text collage are the ones where text is added to the photo collage to convey a message or make it look more interesting.
● While creating a text collage there are several factors to be considered like the text color, font, background, and more.
● A number of text collage maker online, desktop, and app-based tools available.
● To get stock images in high quality for your collages, Wondershare Filmora is an excellent tool.
Collages are everywhere, be it online sites, social media platforms, magazines, birthday wishes, newspapers, and much tools, more. Organizing your images in some random or specific shapes to offer a visually enhanced experience is the major purpose of the collage. Besides adding images, there are several other elements and factors that combine to make up an eye-catchy collage and a key one is the “text”.
So, if you too are considering to create a photo collage with text, just stick to us and keep reading.
In this article
01 [Why Create a Text Collage?](#Part 1)
02 [When to Use Text Collage?](#Part 2)
03 [Factors to Be Considered While Creating a Text Collage](#Part 3)
04 [Top 5 Tools to Create a Text Collage](#Part 4)
05 [Use Stock Images to Pep Up Your Text Collage](#Part 5)
Part 1 Why Create a Text Collage?
Adding a text to your collage is beneficial in ways more than one. The text brings versatility to your collage, and also helps in conveying the message along with the theme. Moreover, a little interesting text line along with animations added to your collage enhances its overall visual communication and looks.
Part 2 When to Use Text Collage?
Though text can be added to all types of collages there are some specific occasions when the purpose of adding the text becomes more meaningful. For instance, adding text while creating a birthday collage, mood board collage, anniversary collage, scrapbook collage, holiday collage, or other similar ones helps in expressing the feelings, theme, and emotions in a better manner.
Part 3 Factors to Be Considered While Creating a Text Collage
There are several text-adding ways and methods by which you can make your collage look interesting. Considering a few important ones will let you create an impressive collage in no time. Check out some useful tips and tricks to use text within the photo collage.
● Identify if you wish to add the text as the focal point or not. If you are using the text as the first striking thing in the collage then ensure that it is eye-catchy and interesting.
● Keep a good balance between the text and the images so that it does not look weird.
● The color and the font of the text are among the most important factors to be considered. Make sure that both the text color as well as the font match and blend well with the theme and the images in the collage.
● Keeping the background of the text simple, less detailed, and also clutter-free is important so that the text content comes out nicely.
● Make sure only to add a few words or lines in your collage to make it look sophisticated. It’s majorly a photo collage with a dash of the text so keep it that way only and not vice-versa.
Part 4 Top 5 Tools to Create a Text Collage
There are several desktop, online, and app based text collage maker tools available. Some of the popular ones are enlisted below.
01Adobe Creative Cloud Express
Adobe is known for its advanced image editing options and its online version called creative cloud is no less. Using this browser-based tool you can create some amazing collage and also add text easily. The site offers an array of templates to choose the design as per your theme and the interface is also user-friendly. You need to free sign-up to use the program.
02Befunky
This is another interesting online tool that can be used to add text to your collages, photo projects, and designs. Free to use, the tool has multiple options for text customization like selecting the body text, headline, outline, shadow drop options, and more. Pre-set designs for adding the text to your collages are also available here.
03Fotor
When it comes to creating collages and customizing them, Fotor is one of the most widely used tools. This free online program will let you add text to your created collages for enhancing their overall looks. Several text-based templates are also available to choose from and you can even customize the text parameters like font, size, spacing, highlight color, shadow, and more.
04Canva
Canva is a popular image editing online tool that supports several other functions as well including collage creation. Using this versatile program, you can add texts to your photos as well as collages easily. Several templates in an array of categories for collage creation are available and you can even personalize the text by changing its font, color, background, and other parameters.
05PhotoCollage
This is a simple to use online collage maker with text tool that helps you create a decent collage with a text in no time. You can either use the blank space to add images and set them in the desired format for a collage or choose from the pre-set templates. Using the tool you can change the position of the text, flip it, rotate it, select the font, color, size, shadow, stroke and customize it in several other ways.
Part 5 Use stock images to pep up your text collage
The text is the additional elements of the collage to make them look more interesting while the images and photos remain as the main content. So, no matter how interesting your text and its design are, if the images in the collages are not interesting, the collage will be of no good.
So, if you do not have interesting pictures matching your theme in high quality, no need to worry as there are several tools that can help you use their stock images for creating a collage or other purposes. One such superb tool we suggest here is Wondershare Filmora Video Editor which is a complete video editing tool that also has an impressive collection of pictures and other stick media in high quality.
Search for the pictures from several categories matching your theme at Filmora and use them without any worries. Moreover, you can even create a video collage using the software’s split-screen feature.
For Win 7 or later (64-bit)
For macOS 10.12 or later
● Ending Thoughts →
● Text collage are the ones where text is added to the photo collage to convey a message or make it look more interesting.
● While creating a text collage there are several factors to be considered like the text color, font, background, and more.
● A number of text collage maker online, desktop, and app-based tools available.
● To get stock images in high quality for your collages, Wondershare Filmora is an excellent tool.
Best 15 Subtitle Apps 2023 [Windows, Mac, iPhone, Android & Online]
Every content creator wants professional subtitle generator apps to create subtitles flawlessly. There are tons of subtitle editors that you can find in the market, but not every tool produces quality results. It can be confusing and difficult to choose the best subtitle editor app among tons of options. By reading this article, you will come to know about professional subtitle apps for PC and all platforms.
- Jubler Subtitle Editor - The Best Free Subtitle Editor for Windows
- Wondershare Filmora - All-in-One Subtitle Solution
- Movavi Video Editor - Best for Adding Subtitles Manually
- VideoProc - Best Video Converter for macOS Devices
- Wondershare UniConverter - Complete Video Toolbox for Mac Users
- Adobe Premiere Pro - Video Editor for Professionals
- CapCut - Best App for TikTok Users
- MixCaptions - Specially Built for Adding Captions
- VLLO - Advanced Video and Subtitle Editor for Android Users
- iMovie - Free Video Editor for iOS Users
- Add Subtitles - Auto Captions - Enhanced Subtitle Creator for Apple Users
- InShot - Video Editor - Complete Subtitle and Video Editor
- Veed.io - Online Auto Subtitle Generator
- Happy Scribe - Subtitle Generator with Enhanced Features
- FlexClip - Manual Online Subtitle Editor
Part 1: Best 3 Subtitle Apps on Windows
Do you want to know about some reliable video subtitle apps for Windows? This section will shed light on the top 3 subtitle apps on Windows, along with their advantages and drawbacks.
| Name | Price | Support System | Supported Subtitle Files | Auto Caption | Video Editing |
|---|---|---|---|---|---|
| Jubler Subtitle Editor | Free | Linux, Windows, and Mac | ASS, SRT, SUB, Text, etc. | No | No |
| Wondershare Filmora | Month Plan: $19.99Annual Plan: $49.99Perpetual Plan: $79.99 | Windows, Mac, and iOS | SRT and Text | Yes | Yes |
| Movavi Video Editor | $69.95 | Windows and Mac | Text | No | Yes |
1. Jubler Subtitle Editor - The Best Free Subtitle Editor for Windows
Jubler is a classic example of a subtitle editor through which you can efficiently create and edit subtitles for your videos. You can also use this tool to convert, modify, transform, or correct the existing subtitles on a video file. The supported file formats are SubViewer, SubRip, SubStation, etc. Hence, it’s a compatible subtitle app for Windows users comprising all the necessary features for subtitle creation and editing.

Key Features
- This tool allows you to mark your subtitles with different colors while editing or playing the video file in real-time.
- This app can graphically display your subtitles and allows you to resize or move them.
- It provides the Undo and the Redo options to edit your subtitles without any complications.
Pros
- This tool offers a feature for spell-checking along with dictionary selection to prevent the chances of mistakes.
- You can check the current frame and waveform preview to graphically preview the subtitles using the FFMPEG library.
Cons
- You have to install a video player with this tool to preview your video to check the results.
2. Wondershare Filmora - All-in-One Subtitle Solution
Have you ever experienced using Wondershare Filmora? Filmora is a famous tool through which people can enhance and edit their video files using advanced features. You can utilize this platform with a famous video editor to create subtitles from scratch efficiently. It contains a Speech-to-Text option that can help you to generate subtitles without requiring your efforts. With a single click, this feature can automatically create subtitles by transcribing your voice with high accuracy.

Key Features
- Filmora offers more than 80 animation presets and styles that you can instantly apply to your created subtitles.
- The speech-to-text feature shows compatibility with up to 16 different languages. Thus, you can auto-create subtitles in popular languages.
- This tool contains stock footage in its library that you can easily add to your videos.
Pros
- This platform offers an AI Portrait feature that can remove the background from your videos. Moreover, it contains more than 70 AI portrait effects and stickers for further enhancement.
- This tool can act as a high-quality screen recorder to capture gameplays, online meetings, tutorials, and other screen activities.
Cons
- Filmora adds a watermark to your video in the free trial.
3. Movavi Video Editor - Best for Adding Subtitles Manually
Movavi is a popular tool that many professionals use to create and edit their videos in high quality. It contains various transition effects that you can apply to make your video look smooth and attractive. By using this tool, you can also create Softsubs and Hardsubs according to your desire. Afterward, you can select the font, color, and size of your added subtitles using this platform.

Key Features
- It contains a synchronization box that enables you to delay or advance the subtitles according to the specific time. This will make your subtitles synchronized effectively.
- You can also change the position of your subtitles with accuracy and precision using this tool.
- To make your video look customized, you can add a watermark to your video files according to your desire.
Pros
- If your video contains unnecessary noise, Movavi offers an AI Noise removal feature that allows you to eradicate the noise.
- If you have captured a shaky video, you can use its stabilization option to get rid of flaws.
Cons
- The video rendering process in this tool is slow and sluggish.
Part 2: 3 Subtitle Apps for Mac Worth Trying
Are you looking for special subtitle apps for your MacBook? In this section, we will shed light on the top 3 subtitle generator apps that can be ideal for MacBook users.
| Name | Price | Support System | Supported Subtitle Files | Auto Caption | Video Editing |
|---|---|---|---|---|---|
| VideoProc Converter | Lifetime License: $39.95 | Windows and Mac | ASS, SSA, SRT, Text | No | No |
| Wondershare UniConverter | Quarterly Plan: $29.99Annual Plan: $39.99Perpetual Plan: $55.99 | Windows and Mac | SRT. ASS, SSA, Text | Yes | Yes |
| Adobe Premier Pro | $20.99/Month | Windows and Mac | SCC, MCC, XML, STL, SRTDFXMP, Text | Yes | Yes |
1. VideoProc - Best Video Converter for macOS Devices
This app has a simple interface that enables you to manage subtitle files easily. Through this compatible tool, you can embed your subtitles into your videos without any hassle. It’s a lightweight tool as it won’t take up excessive storage space on your MacBook. Moreover, you can also use this tool to tackle video issues like noise, poor color, camera shake, etc.

Key Features
- This software can convert 4K and HD videos while maintaining their original quality.
- It offers batch conversion so that you can convert multiple video files at the same time easily.
- You can batch-download the video files in various formats and preferred resolutions. It also supports more than 1000 websites for media download.
Pros
- It offers two recording modes: Chroma key and Picture-in-picture. By utilizing these modes, you can capture live stream sessions and gameplays in high resolution.
- Using this tool instantly, you can rotate and flip your videos clockwise or counter-clockwise.
Cons
- The free trial of this tool is limited to 5 minutes video only.
2. Wondershare UniConverter - Complete Video Toolbox for Mac Users
UniConverter is one of the well-trusted platforms through which you can modify your videos by using advanced key features. It contains tons of options, such as a watermark editor, screen recorder, compressor, converter, etc. Furthermore, it provides a subtitle editor through which you can add subtitles to your videos in multiple ways. Thus, using this tool, you can add subtitles to your videos at a fast-processing speed.

Key Features
- This tool supports more than 1000 video file formats batch conversion. Thus, you can convert your multiple video files to other formats.
- You can use this tool as a downloader to download online videos of high quality.
- It contains an Auto Crop feature through which you can resize your videos according to social media channels.
Pros
- By using its AI Portrait feature, you can automatically separate the portrait and background from your video.
- To eradicate the unwanted parts from your video, you can use the trim feature of UniConverter effectively.
Cons
- It lacks advanced video editing features that are necessary for professional editing.
3. Adobe Premiere Pro - Video Editor for Professionals
Have you ever used Adobe Premiere Pro for video editing? Adobe Premiere Pro is undoubtedly the most famous software for MacBook users through which you can execute professional editing. It functions as a complete video toolbox and ensures great output results. Besides being a professional video editing software, you can also use this tool as a subtitle generator app. You can use its Speech-to-Text feature to produce subtitles automatically and with precision.

Key Features
- To increase the visual appeal of your video, you can use this tool for color grading and correction.
- You can create captivating intros and outros for your videos by using graphic templates and other elements.
- You can add different audio effects to transform the sound in your video professionally.
Pros
- Using this tool, you can convert your video to GIF within seconds.
- You can enhance or decrease the speed of your video accordingly from this professional tool.
Cons
- The interface of Adobe Premiere Pro can be intimidating for beginners.
Part 3: The Best 3 Subtitle Apps for Android
Being an Android user, you may feel to use auto caption apps to create subtitles for your videos without any hassle. By reading this section, you can come across some of the best subtitle generator apps for your Android devices.
1. CapCut - Best App for TikTok Users
CapCut is an easy-to-use Android and iOS app to add subtitles to videos professionally. It comprises different functions that can assist you in making your video look appealing and engaging. You can make adjustments such as changing the brightness, saturation, exposure, contrast, etc. To add subtitles, you can create auto captions through CapCut without manually adding them. Thus, it’s a complete tool for creating subtitles and editing videos effortlessly.

Price
- $0.99 - $74.99 Per Item
Key Features
- CapCut contains various trending text templates that you can apply while creating subtitles. It contains multiple text templates such as Titles, Outro, Spark, Chapter, Message, Tag, etc.
- You can extract audio from a video file using this app in its original quality with a single click.
- To enhance your visual appearance in a video, CapCut provides different filters such as Metal, Green Milk, Taro, Red Tea, and many more.
Pros
- You can retouch the facial features of your face by using different options such as White Teeth, Dark Circles, Smile Lines, etc.
- For more enhancements, you can modify the opacity of your video using this app.
Cons
- It does not offer impressive color grading options.
2. MixCaptions - Specially Built for Adding Captions
MixCaptions can be used as a video editor and subtitle editor app effectively. Apart from creating subtitles manually, you can utilize your SRT files to create subtitles. You can also use this app to create SRT files instantly. Moreover, you can also decide where to display your subtitles on your video. You can display your subtitles at the top, bottom, or middle using this tool.

Price
- $0.49 - $24.99 Per Item
Key Features
- Using MixCaptions, you can transcribe your voice in up to 23 languages, such as Turkish, English, French, German, Spanish, Chinese, etc.
- This tool supports common video aspect ratios that can be suitable for IGTV, TikTok, Twitter, Facebook, and Instagram posts.
- Once you have transcribed your voice to create subtitles, you can edit them by selecting the desired font, color, text style, etc.
Pros
- This tool does not add a watermark to your video files after you have bought its subscription plan.
- Using this tool, you can manually add subtitles to your videos according to the time frame.
Cons
- In a free trial, you can only transcribe the video for up to 3 minutes.
3. VLLO - Advanced Video and Subtitle Editor for Android Users
Have you ever used VLLO before? This video subtitle app offers an intuitive user interface through which you can perform different operations on your video files. You can trim, split, reverse, rotate, and crop your video quickly using this app. Moreover, you can add subtitles to your videos through this tool easily. The offered subtitle text styles are present in vector format so that you won’t lose the quality of your video.

Price
- $0.99 - $25.99 Per Item
Key Features
- VLLO provides more than 200 royalty-free background music tracks that can easily be added to your video files.
- You can also add a voice-over to your videos in high audio quality while editing in real-time.
- On this platform, you can craft your own customized text style by utilizing animation effects, shadows, and outline properties.
Pros
- To check the editing of your video, this tool provides a full-screen preview window. It also offers a grid so that you can analyze the ratio of your video easily.
- You can save all the edited videos in this app under the “My Project” folder.
Cons
- Many stickers, filters, text styles, and effects are only available for premium users.
Part 4: 3 Apps to Add Captions to Videos on iPhone
Are you ready to know about the best subtitle creators for iOS devices? Here are some of the top subtitle generators which you can use to add captions to videos on your iPhone.
1. iMovie - Free Video Editor for iOS Users
iMovie is an excellent app for iOS users through which they can try their creative editing skills easily. You can apply different styles and transitions to change the dimensions of your video clips completely. Moreover, you can also add text and subtitles to your videos using this tool. It offers various font styles and options that you can apply to create customized subtitles.

Price
- Free
Download: iOS
Key Features
- It offers 20 storyboards related to different categories that you can use to begin creating your videos effectively.
- In its timeline, you can easily rearrange and remove video clips.
- This tool offers up to 14 trailer templates through which you can produce your movie trailers.
Pros
- iMovie contains 8 distinct themes with added transitions, music tracks, and titles. You can apply these themes to create impressive videos effortlessly.
- You can share your projects created in iMovie between your iPhone and iPad using iCloud Drive.
Cons
- This tool does not include Multicam and motion tracking options.
2. Add Subtitles - Auto Captions - Enhanced Subtitle Creator for Apple Users
This video subtitle app is commonly used to add auto-captions on videos without any restrictions. The speech recognition feature in this tool works 3 times faster along with high precision. It does not restrict a user to a particular video length. Moreover, you would also receive text alternatives so that you can edit auto-generated subtitles.

Price
- Beginner: $3.99
- Expert: $9.99
- Business: $29.99
- Personal Use: $8.49
- Small Translations Pack: $2.99
- Big Translations Pack: $5.99
Download: iOS
Key Features
- The translation feature of this tool supports more than 100 languages. Moreover, you can translate up to 2 languages in one video file.
- It provides various export options such as M4V, MPEG4, 4K, HD, and QuickTime.
- You can create projects on this tool through your camera, photo library, and iCloud.
Pros
- You can filter videos to search for your project without any hassle.
- Using this tool, you can change the file name and thumbnail with a single tap.
Cons
- On this platform, you cannot edit or modify your video files.
3. InShot - Video Editor - Complete Subtitle and Video Editor
Have you ever used InShot before? InShot is a famous app that enables you to trim, cut, and merge video files instantly. Along with basic editing, you can also add music tracks, voice-overs, and effects. You can also add subtitles to your videos efficiently without any restrictions. Moreover, you can sync the added text to your videos on the timeline proficiently with a few clicks.

Price
- InShot Pro (1 Month): $3.99
- InShot Pro (1 Year): $14.99
- Remove Ads: $3.99
- InShot Pro (Permanently): $34.99
- Transition Pack - Power: $3.99
- Video Effect - FORM Pack: $1.99
- Filter Pack - CINEMA: $1.99
- Transition Pack - Glitch: $3.99
- Filter Pack - SKIN: $1.99
- Filter Pack - CREATE: $1.99
Key Features
- You can make blur borders on your video using this tool to upload them on social media platforms.
- This video subtitle app supports high video output resolution and allows you to save a video in 4K and 60FPS.
- This tool provides a wide variety of cinematic filters which you can add to make your videos more compelling.
Pros
- You can add music tracks to your video files to make your content more engaging.
- On this tool, you can add video and photo layers to display your creativity in a unique manner.
Cons
- This tool does not offer advanced features to create subtitles for video files automatically.
Part 5: 3 Online Tools to Add Subtitles to Videos
Many people don’t prefer to download apps or software on their devices. For such users, there are various online subtitle generator apps that can be accessed from any web browser. For your convenience, this part of the article will discuss the top 3 online auto caption apps.
1. Veed.io - Online Auto Subtitle Generator
When it comes to online subtitle generator apps, Veed.io is one of the most suitable choices. Through this app, you can add subtitles in three ways. To add subtitles briefly, you can use the manual option on this tool. Or, if you already have a subtitle file, you can upload it directly to this tool easily. To increase your work efficiency and productivity, you can use the auto transcription services to produce subtitles with 95% accuracy.

Pricing
- Basic: $12/Month
- Pro: $24/Month
Key Features
- To decrease the file size of your videos, this tool contains a video compressor to compress videos while preserving the original video quality.
- If you want to make your videos interesting and funny, Veed.io allows you to add emojis and stickers to video files instantly.
- It has a Subtitle Translator through which you can translate your subtitles into different languages.
Pros
- This tool can act as a video player that allows you to play videos of various file formats.
- io can function as a multi-streaming platform through which you can broadcast your live streams to multiple platforms like Twitter, YouTube, Facebook, etc.
Cons
- The video export length of the Veed.io free package is extremely low, which is 10 minutes.
2. Happy Scribe - Subtitle Generator with Enhanced Features
Happy Scribe is a famous online platform for adding subtitles to video apps impressively. It contains multiple export formats such as SRT, Word, PDF, Text, AVID, STL, VVT, etc. Without any limitations, such as creating a user account or uploading a particular file size, you can create subtitles for your videos. Furthermore, this app preserves the confidentiality and security of your files to keep personal data safe while editing it online.

Pricing
- Automatic: €0.20/minute
- Hand-made: €2.00/Minute
- Human Translation: €20.85/Minute
Key Features
- This app supports real-time collaboration so that you can modify and enhance your video files along with your friends and team members.
- In its transcription services, you can select either automatic transcription software or human-made transcription for more accurate results.
- You can customize your added subtitles with the help of CPL and CPS management.
Pros
- You can preview your subtitles in real-time and analyze their position with a soundwave.
- You can also share your subtitles by enabling the options like view-only and edit mode.
Cons
- Happy Scribe does not offer video editing features like other subtitle creators.
3. FlexClip - Manual Online Subtitle Editor
FlexClip is a classic and basic subtitle generator app through which you can produce subtitles in three simple steps. It supports popular video file formats such as MOV, MP4, M4V, etc. Without downloading any software or extension, you can quickly insert subtitles to your videos easily. This tool also provides more than 100 built-in text fonts for your ease. Hence, this online tool provides flexible subtitle editing in its clean and delightful user interface.

Pricing
- Basic: $9.99/Month
- Plus: $19.99/Month
- Business: $29.99/Month
Key Features
- To make your video look more appealing, you can enhance the video brightness through this online tool.
- You can also add text boxes to your videos to demonstrate or explain the content in an organized manner.
- To endorse your product or brand, you can easily add customized logos to your videos.
Pros
- You can use its merger feature to combine several video clips smoothly and effortlessly.
- This online tool does not charge any subscription fees from the users. Thus, you can create subtitles for your videos using this online platform free of cost.
Cons
- Using this tool, you cannot export videos in 4K and 8K.
Part 6: Three Top Picks
Do you want to know the top three picks of subtitle editors? Read this section to learn the best choices for video subtitle apps:
1. Best Easy-to-Use Subtitle Editor: Veed.io
Veed.io is an online tool that has the best clean and delightful user interface. As a beginner, you can easily navigate its interface and create subtitles without interruption or ads.
2. Most Advanced Subtitle Creator: Filmora
If you are looking for an advanced subtitle creator, Wondershare Filmora is the best choice. Its Speech-To-Text feature uses advanced algorithms through which you can auto-create subtitles for your videos.
Free Download For Win 7 or later(64-bit)
Free Download For macOS 10.14 or later
3. Most Cost-Effective Subtitle Generator: UniConverter
UniConverter is one of the most reliable and cost-effective software for subtitle editing. It provides multiple subscription plans within affordable ranges to assist students, beginners, and other individuals.
People May Also Ask
1. How can I merge subtitles and video permanently?
You can use Wondershare Filmora to edit your video files flawlessly. Once you are done editing your video, you can add subtitles to it by using your preferred option. Afterward, the tool will automatically merge subtitles and video once you have exported the video file.
2. How do I add subtitles to an already recorded or downloaded video?
Upload your video file to the interface of Filmora and head to its “Title” option. From there, select the option of “Subtitle” and choose your preferred subtitle style to add your subtitles. Using this tool, you can also choose its font style, color, size, and opacity.
Last Words
This article has shed light on the top 15 subtitle generator apps along with their descriptions, advantages, features, and drawbacks. For your help, we have provided a detailed list of subtitle apps for all platforms. However, if you want to choose the best video subtitle app, you can try Wondershare Filmora. This tool offers a Speech-to-Text feature that enables you to produce subtitles automatically and with high accuracy.
- VideoProc - Best Video Converter for macOS Devices
- Wondershare UniConverter - Complete Video Toolbox for Mac Users
- Adobe Premiere Pro - Video Editor for Professionals
- The Best 3 Subtitle Apps for Android
- CapCut - Best App for TikTok Users
- MixCaptions - Specially Built for Adding Captions
- VLLO - Advanced Video and Subtitle Editor for Android Users
- iMovie - Free Video Editor for iOS Users
- Add Subtitles - Auto Captions - Enhanced Subtitle Creator for Apple Users
- InShot - Video Editor - Complete Subtitle and Video Editor
- Veed.io - Online Auto Subtitle Generator
- Happy Scribe - Subtitle Generator with Enhanced Features
- FlexClip - Manual Online Subtitle Editor
Part 1: Best 3 Subtitle Apps on Windows
Do you want to know about some reliable video subtitle apps for Windows? This section will shed light on the top 3 subtitle apps on Windows, along with their advantages and drawbacks.
| Name | Price | Support System | Supported Subtitle Files | Auto Caption | Video Editing |
|---|---|---|---|---|---|
| Jubler Subtitle Editor | Free | Linux, Windows, and Mac | ASS, SRT, SUB, Text, etc. | No | No |
| Wondershare Filmora | Month Plan: $19.99Annual Plan: $49.99Perpetual Plan: $79.99 | Windows, Mac, and iOS | SRT and Text | Yes | Yes |
| Movavi Video Editor | $69.95 | Windows and Mac | Text | No | Yes |
1. Jubler Subtitle Editor - The Best Free Subtitle Editor for Windows
Jubler is a classic example of a subtitle editor through which you can efficiently create and edit subtitles for your videos. You can also use this tool to convert, modify, transform, or correct the existing subtitles on a video file. The supported file formats are SubViewer, SubRip, SubStation, etc. Hence, it’s a compatible subtitle app for Windows users comprising all the necessary features for subtitle creation and editing.
Key Features
- This tool allows you to mark your subtitles with different colors while editing or playing the video file in real-time.
- This app can graphically display your subtitles and allows you to resize or move them.
- It provides the Undo and the Redo options to edit your subtitles without any complications.
Pros
- This tool offers a feature for spell-checking along with dictionary selection to prevent the chances of mistakes.
- You can check the current frame and waveform preview to graphically preview the subtitles using the FFMPEG library.
Cons
- You have to install a video player with this tool to preview your video to check the results.
2. Wondershare Filmora - All-in-One Subtitle Solution
Have you ever experienced using Wondershare Filmora? Filmora is a famous tool through which people can enhance and edit their video files using advanced features. You can utilize this platform with a famous video editor to create subtitles from scratch efficiently. It contains a Speech-to-Text option that can help you to generate subtitles without requiring your efforts. With a single click, this feature can automatically create subtitles by transcribing your voice with high accuracy.
Key Features
- Filmora offers more than 80 animation presets and styles that you can instantly apply to your created subtitles.
- The speech-to-text feature shows compatibility with up to 16 different languages. Thus, you can auto-create subtitles in popular languages.
- This tool contains stock footage in its library that you can easily add to your videos.
Pros
- This platform offers an AI Portrait feature that can remove the background from your videos. Moreover, it contains more than 70 AI portrait effects and stickers for further enhancement.
- This tool can act as a high-quality screen recorder to capture gameplays, online meetings, tutorials, and other screen activities.
Cons
- Filmora adds a watermark to your video in the free trial.
3. Movavi Video Editor - Best for Adding Subtitles Manually
Movavi is a popular tool that many professionals use to create and edit their videos in high quality. It contains various transition effects that you can apply to make your video look smooth and attractive. By using this tool, you can also create Softsubs and Hardsubs according to your desire. Afterward, you can select the font, color, and size of your added subtitles using this platform.
Key Features
- It contains a synchronization box that enables you to delay or advance the subtitles according to the specific time. This will make your subtitles synchronized effectively.
- You can also change the position of your subtitles with accuracy and precision using this tool.
- To make your video look customized, you can add a watermark to your video files according to your desire.
Pros
- If your video contains unnecessary noise, Movavi offers an AI Noise removal feature that allows you to eradicate the noise.
- If you have captured a shaky video, you can use its stabilization option to get rid of flaws.
Cons
- The video rendering process in this tool is slow and sluggish.
Part 2: 3 Subtitle Apps for Mac Worth Trying
Are you looking for special subtitle apps for your MacBook? In this section, we will shed light on the top 3 subtitle generator apps that can be ideal for MacBook users.
| Name | Price | Support System | Supported Subtitle Files | Auto Caption | Video Editing |
|---|---|---|---|---|---|
| VideoProc Converter | Lifetime License: $39.95 | Windows and Mac | ASS, SSA, SRT, Text | No | No |
| Wondershare UniConverter | Quarterly Plan: $29.99Annual Plan: $39.99Perpetual Plan: $55.99 | Windows and Mac | SRT. ASS, SSA, Text | Yes | Yes |
| Adobe Premier Pro | $20.99/Month | Windows and Mac | SCC, MCC, XML, STL, SRTDFXMP, Text | Yes | Yes |
1. VideoProc - Best Video Converter for macOS Devices
This app has a simple interface that enables you to manage subtitle files easily. Through this compatible tool, you can embed your subtitles into your videos without any hassle. It’s a lightweight tool as it won’t take up excessive storage space on your MacBook. Moreover, you can also use this tool to tackle video issues like noise, poor color, camera shake, etc.
Key Features
- This software can convert 4K and HD videos while maintaining their original quality.
- It offers batch conversion so that you can convert multiple video files at the same time easily.
- You can batch-download the video files in various formats and preferred resolutions. It also supports more than 1000 websites for media download.
Pros
- It offers two recording modes: Chroma key and Picture-in-picture. By utilizing these modes, you can capture live stream sessions and gameplays in high resolution.
- Using this tool instantly, you can rotate and flip your videos clockwise or counter-clockwise.
Cons
- The free trial of this tool is limited to 5 minutes video only.
2. Wondershare UniConverter - Complete Video Toolbox for Mac Users
UniConverter is one of the well-trusted platforms through which you can modify your videos by using advanced key features. It contains tons of options, such as a watermark editor, screen recorder, compressor, converter, etc. Furthermore, it provides a subtitle editor through which you can add subtitles to your videos in multiple ways. Thus, using this tool, you can add subtitles to your videos at a fast-processing speed.
Key Features
- This tool supports more than 1000 video file formats batch conversion. Thus, you can convert your multiple video files to other formats.
- You can use this tool as a downloader to download online videos of high quality.
- It contains an Auto Crop feature through which you can resize your videos according to social media channels.
Pros
- By using its AI Portrait feature, you can automatically separate the portrait and background from your video.
- To eradicate the unwanted parts from your video, you can use the trim feature of UniConverter effectively.
Cons
- It lacks advanced video editing features that are necessary for professional editing.
3. Adobe Premiere Pro - Video Editor for Professionals
Have you ever used Adobe Premiere Pro for video editing? Adobe Premiere Pro is undoubtedly the most famous software for MacBook users through which you can execute professional editing. It functions as a complete video toolbox and ensures great output results. Besides being a professional video editing software, you can also use this tool as a subtitle generator app. You can use its Speech-to-Text feature to produce subtitles automatically and with precision.
Key Features
- To increase the visual appeal of your video, you can use this tool for color grading and correction.
- You can create captivating intros and outros for your videos by using graphic templates and other elements.
- You can add different audio effects to transform the sound in your video professionally.
Pros
- Using this tool, you can convert your video to GIF within seconds.
- You can enhance or decrease the speed of your video accordingly from this professional tool.
Cons
- The interface of Adobe Premiere Pro can be intimidating for beginners.
Part 3: The Best 3 Subtitle Apps for Android
Being an Android user, you may feel to use auto caption apps to create subtitles for your videos without any hassle. By reading this section, you can come across some of the best subtitle generator apps for your Android devices.
1. CapCut - Best App for TikTok Users
CapCut is an easy-to-use Android and iOS app to add subtitles to videos professionally. It comprises different functions that can assist you in making your video look appealing and engaging. You can make adjustments such as changing the brightness, saturation, exposure, contrast, etc. To add subtitles, you can create auto captions through CapCut without manually adding them. Thus, it’s a complete tool for creating subtitles and editing videos effortlessly.
Price
- $0.99 - $74.99 Per Item
Key Features
- CapCut contains various trending text templates that you can apply while creating subtitles. It contains multiple text templates such as Titles, Outro, Spark, Chapter, Message, Tag, etc.
- You can extract audio from a video file using this app in its original quality with a single click.
- To enhance your visual appearance in a video, CapCut provides different filters such as Metal, Green Milk, Taro, Red Tea, and many more.
Pros
- You can retouch the facial features of your face by using different options such as White Teeth, Dark Circles, Smile Lines, etc.
- For more enhancements, you can modify the opacity of your video using this app.
Cons
- It does not offer impressive color grading options.
2. MixCaptions - Specially Built for Adding Captions
MixCaptions can be used as a video editor and subtitle editor app effectively. Apart from creating subtitles manually, you can utilize your SRT files to create subtitles. You can also use this app to create SRT files instantly. Moreover, you can also decide where to display your subtitles on your video. You can display your subtitles at the top, bottom, or middle using this tool.
Price
- $0.49 - $24.99 Per Item
Key Features
- Using MixCaptions, you can transcribe your voice in up to 23 languages, such as Turkish, English, French, German, Spanish, Chinese, etc.
- This tool supports common video aspect ratios that can be suitable for IGTV, TikTok, Twitter, Facebook, and Instagram posts.
- Once you have transcribed your voice to create subtitles, you can edit them by selecting the desired font, color, text style, etc.
Pros
- This tool does not add a watermark to your video files after you have bought its subscription plan.
- Using this tool, you can manually add subtitles to your videos according to the time frame.
Cons
- In a free trial, you can only transcribe the video for up to 3 minutes.
3. VLLO - Advanced Video and Subtitle Editor for Android Users
Have you ever used VLLO before? This video subtitle app offers an intuitive user interface through which you can perform different operations on your video files. You can trim, split, reverse, rotate, and crop your video quickly using this app. Moreover, you can add subtitles to your videos through this tool easily. The offered subtitle text styles are present in vector format so that you won’t lose the quality of your video.
Price
- $0.99 - $25.99 Per Item
Key Features
- VLLO provides more than 200 royalty-free background music tracks that can easily be added to your video files.
- You can also add a voice-over to your videos in high audio quality while editing in real-time.
- On this platform, you can craft your own customized text style by utilizing animation effects, shadows, and outline properties.
Pros
- To check the editing of your video, this tool provides a full-screen preview window. It also offers a grid so that you can analyze the ratio of your video easily.
- You can save all the edited videos in this app under the “My Project” folder.
Cons
- Many stickers, filters, text styles, and effects are only available for premium users.
Part 4: 3 Apps to Add Captions to Videos on iPhone
Are you ready to know about the best subtitle creators for iOS devices? Here are some of the top subtitle generators which you can use to add captions to videos on your iPhone.
1. iMovie - Free Video Editor for iOS Users
iMovie is an excellent app for iOS users through which they can try their creative editing skills easily. You can apply different styles and transitions to change the dimensions of your video clips completely. Moreover, you can also add text and subtitles to your videos using this tool. It offers various font styles and options that you can apply to create customized subtitles.
Price
- Free
Download: iOS
Key Features
- It offers 20 storyboards related to different categories that you can use to begin creating your videos effectively.
- In its timeline, you can easily rearrange and remove video clips.
- This tool offers up to 14 trailer templates through which you can produce your movie trailers.
Pros
- iMovie contains 8 distinct themes with added transitions, music tracks, and titles. You can apply these themes to create impressive videos effortlessly.
- You can share your projects created in iMovie between your iPhone and iPad using iCloud Drive.
Cons
- This tool does not include Multicam and motion tracking options.
2. Add Subtitles - Auto Captions - Enhanced Subtitle Creator for Apple Users
This video subtitle app is commonly used to add auto-captions on videos without any restrictions. The speech recognition feature in this tool works 3 times faster along with high precision. It does not restrict a user to a particular video length. Moreover, you would also receive text alternatives so that you can edit auto-generated subtitles.
Price
- Beginner: $3.99
- Expert: $9.99
- Business: $29.99
- Personal Use: $8.49
- Small Translations Pack: $2.99
- Big Translations Pack: $5.99
Download: iOS
Key Features
- The translation feature of this tool supports more than 100 languages. Moreover, you can translate up to 2 languages in one video file.
- It provides various export options such as M4V, MPEG4, 4K, HD, and QuickTime.
- You can create projects on this tool through your camera, photo library, and iCloud.
Pros
- You can filter videos to search for your project without any hassle.
- Using this tool, you can change the file name and thumbnail with a single tap.
Cons
- On this platform, you cannot edit or modify your video files.
3. InShot - Video Editor - Complete Subtitle and Video Editor
Have you ever used InShot before? InShot is a famous app that enables you to trim, cut, and merge video files instantly. Along with basic editing, you can also add music tracks, voice-overs, and effects. You can also add subtitles to your videos efficiently without any restrictions. Moreover, you can sync the added text to your videos on the timeline proficiently with a few clicks.
Price
- InShot Pro (1 Month): $3.99
- InShot Pro (1 Year): $14.99
- Remove Ads: $3.99
- InShot Pro (Permanently): $34.99
- Transition Pack - Power: $3.99
- Video Effect - FORM Pack: $1.99
- Filter Pack - CINEMA: $1.99
- Transition Pack - Glitch: $3.99
- Filter Pack - SKIN: $1.99
- Filter Pack - CREATE: $1.99
Key Features
- You can make blur borders on your video using this tool to upload them on social media platforms.
- This video subtitle app supports high video output resolution and allows you to save a video in 4K and 60FPS.
- This tool provides a wide variety of cinematic filters which you can add to make your videos more compelling.
Pros
- You can add music tracks to your video files to make your content more engaging.
- On this tool, you can add video and photo layers to display your creativity in a unique manner.
Cons
- This tool does not offer advanced features to create subtitles for video files automatically.
Part 5: 3 Online Tools to Add Subtitles to Videos
Many people don’t prefer to download apps or software on their devices. For such users, there are various online subtitle generator apps that can be accessed from any web browser. For your convenience, this part of the article will discuss the top 3 online auto caption apps.
1. Veed.io - Online Auto Subtitle Generator
When it comes to online subtitle generator apps, Veed.io is one of the most suitable choices. Through this app, you can add subtitles in three ways. To add subtitles briefly, you can use the manual option on this tool. Or, if you already have a subtitle file, you can upload it directly to this tool easily. To increase your work efficiency and productivity, you can use the auto transcription services to produce subtitles with 95% accuracy.
Pricing
- Basic: $12/Month
- Pro: $24/Month
Key Features
- To decrease the file size of your videos, this tool contains a video compressor to compress videos while preserving the original video quality.
- If you want to make your videos interesting and funny, Veed.io allows you to add emojis and stickers to video files instantly.
- It has a Subtitle Translator through which you can translate your subtitles into different languages.
Pros
- This tool can act as a video player that allows you to play videos of various file formats.
- io can function as a multi-streaming platform through which you can broadcast your live streams to multiple platforms like Twitter, YouTube, Facebook, etc.
Cons
- The video export length of the Veed.io free package is extremely low, which is 10 minutes.
2. Happy Scribe - Subtitle Generator with Enhanced Features
Happy Scribe is a famous online platform for adding subtitles to video apps impressively. It contains multiple export formats such as SRT, Word, PDF, Text, AVID, STL, VVT, etc. Without any limitations, such as creating a user account or uploading a particular file size, you can create subtitles for your videos. Furthermore, this app preserves the confidentiality and security of your files to keep personal data safe while editing it online.
Pricing
- Automatic: €0.20/minute
- Hand-made: €2.00/Minute
- Human Translation: €20.85/Minute
Key Features
- This app supports real-time collaboration so that you can modify and enhance your video files along with your friends and team members.
- In its transcription services, you can select either automatic transcription software or human-made transcription for more accurate results.
- You can customize your added subtitles with the help of CPL and CPS management.
Pros
- You can preview your subtitles in real-time and analyze their position with a soundwave.
- You can also share your subtitles by enabling the options like view-only and edit mode.
Cons
- Happy Scribe does not offer video editing features like other subtitle creators.
3. FlexClip - Manual Online Subtitle Editor
FlexClip is a classic and basic subtitle generator app through which you can produce subtitles in three simple steps. It supports popular video file formats such as MOV, MP4, M4V, etc. Without downloading any software or extension, you can quickly insert subtitles to your videos easily. This tool also provides more than 100 built-in text fonts for your ease. Hence, this online tool provides flexible subtitle editing in its clean and delightful user interface.
Pricing
- Basic: $9.99/Month
- Plus: $19.99/Month
- Business: $29.99/Month
Key Features
- To make your video look more appealing, you can enhance the video brightness through this online tool.
- You can also add text boxes to your videos to demonstrate or explain the content in an organized manner.
- To endorse your product or brand, you can easily add customized logos to your videos.
Pros
- You can use its merger feature to combine several video clips smoothly and effortlessly.
- This online tool does not charge any subscription fees from the users. Thus, you can create subtitles for your videos using this online platform free of cost.
Cons
- Using this tool, you cannot export videos in 4K and 8K.
Part 6: Three Top Picks
Do you want to know the top three picks of subtitle editors? Read this section to learn the best choices for video subtitle apps:
1. Best Easy-to-Use Subtitle Editor: Veed.io
Veed.io is an online tool that has the best clean and delightful user interface. As a beginner, you can easily navigate its interface and create subtitles without interruption or ads.
2. Most Advanced Subtitle Creator: Filmora
If you are looking for an advanced subtitle creator, Wondershare Filmora is the best choice. Its Speech-To-Text feature uses advanced algorithms through which you can auto-create subtitles for your videos.
Free Download For Win 7 or later(64-bit)
Free Download For macOS 10.14 or later
3. Most Cost-Effective Subtitle Generator: UniConverter
UniConverter is one of the most reliable and cost-effective software for subtitle editing. It provides multiple subscription plans within affordable ranges to assist students, beginners, and other individuals.
People May Also Ask
1. How can I merge subtitles and video permanently?
You can use Wondershare Filmora to edit your video files flawlessly. Once you are done editing your video, you can add subtitles to it by using your preferred option. Afterward, the tool will automatically merge subtitles and video once you have exported the video file.
2. How do I add subtitles to an already recorded or downloaded video?
Upload your video file to the interface of Filmora and head to its “Title” option. From there, select the option of “Subtitle” and choose your preferred subtitle style to add your subtitles. Using this tool, you can also choose its font style, color, size, and opacity.
Last Words
This article has shed light on the top 15 subtitle generator apps along with their descriptions, advantages, features, and drawbacks. For your help, we have provided a detailed list of subtitle apps for all platforms. However, if you want to choose the best video subtitle app, you can try Wondershare Filmora. This tool offers a Speech-to-Text feature that enables you to produce subtitles automatically and with high accuracy.
How To Split Screen On Tiktok
TikTok is probably the most popular video-sharing app in the world right now. Many TikTokers have become famous for making videos that have a significant impact and encourage creativity and new ideas. One of the most popular TikTok trends is the split-screen effect. You’ve probably seen a lot of TikTok split-screen videos with cool effects that made you wonder how the user split their screen. Becoming skilled in using TikTok effects is not as difficult as it might look. It only requires a significant amount of practice. Read on as we show you how to make a TikTok split-screen video.
Using CapCut To Split Screen
CapCut is the official free TikTok Video Maker and Video Editor with Music for TikTok that is multifunctional. Its interface is quite similar and easy to use.
CapCut includes free advanced capabilities such as keyframe animation, stabilization, and Picture-in-Picture (PIP). These are in addition to its fundamental functions, such as video editing, adding stickers, text, and music.
Steps to Split Screen Video with CapCut On Android and IOS Devices
- To use the app, you need to install it first. iPhone and Android users can download CapCut. Navigate to the appropriate app store of your choice and download CapCut.
- After installation, launch the app.
- Then go ahead and grant CapCut permission to view your camera roll. Incorporating video clips into your project has never been easier. Go to the app’s main screen and select “New Project“ from the drop-down menu.
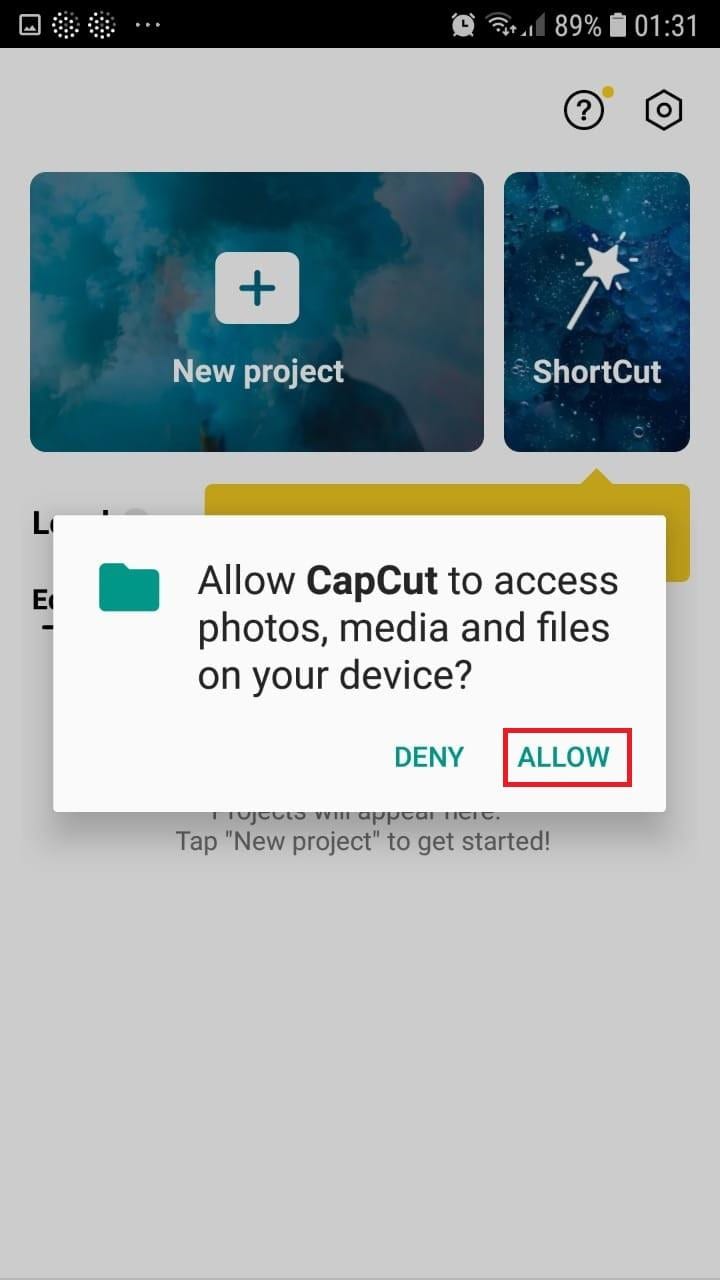
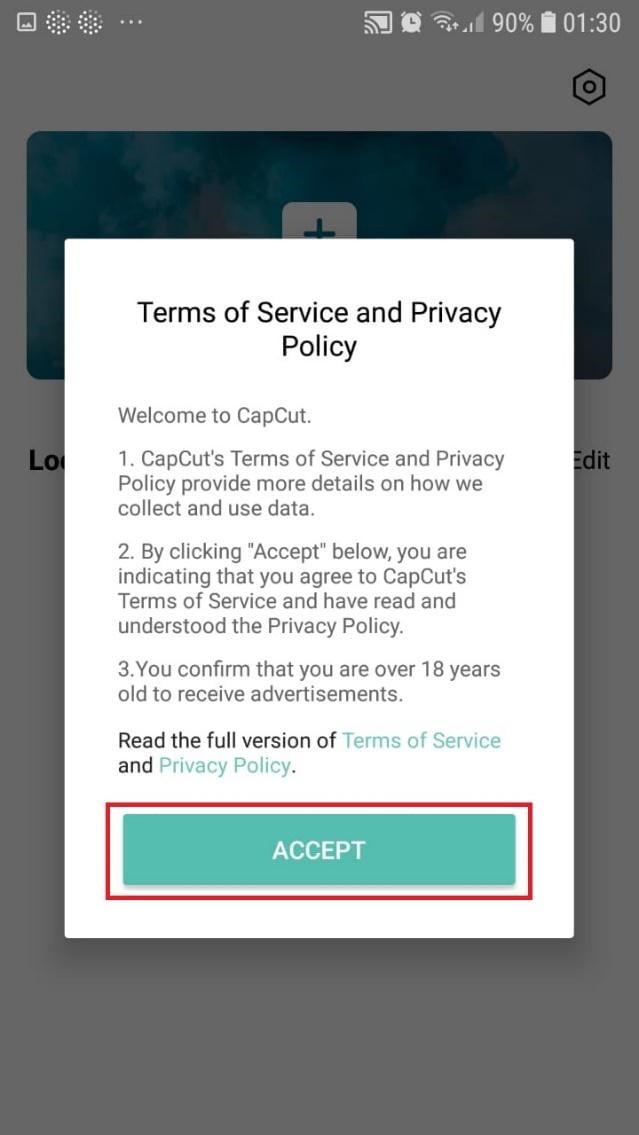
- To confirm your selection, click the green Accept This confirms that CapCut requires access to your photographs to function correctly. Tap on the button on the following pop-up window to gain access to all the photos. This is a one-time process that must be carried out the first time you launch the application.
- Begin a New Project. After opening the app, press the “New Project“ icon to bring up a new screen showing your device’s videos.

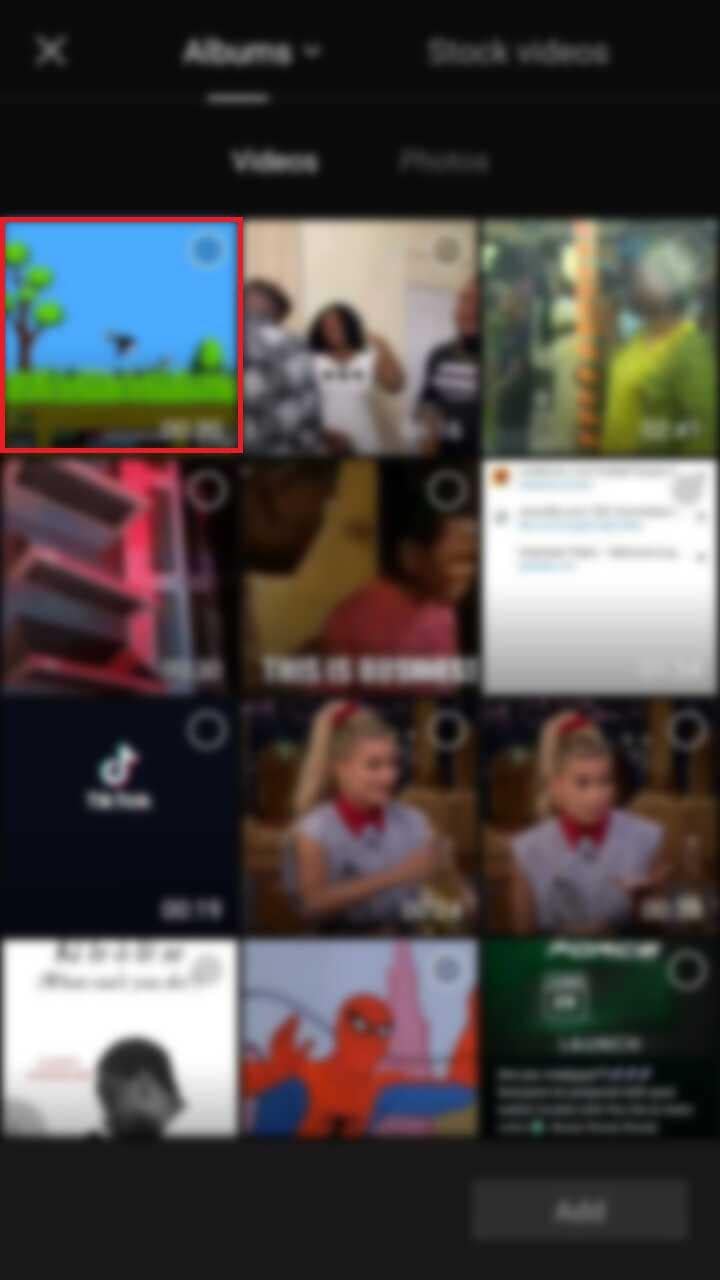
- Choose a video clip. Locate the desired video clip for your project by scrolling through the pages displaying your camera roll. Tap the video’s thumbnail and then tap the “Add“ icon in the screen’s lower part.
- Get familiar with your workspace. Upon uploading your first clip, CapCut leads you to the primary workspace. This is where you will spend most of your time within the app. The preview panel, the timeline, and the toolbar are in order from top to bottom.
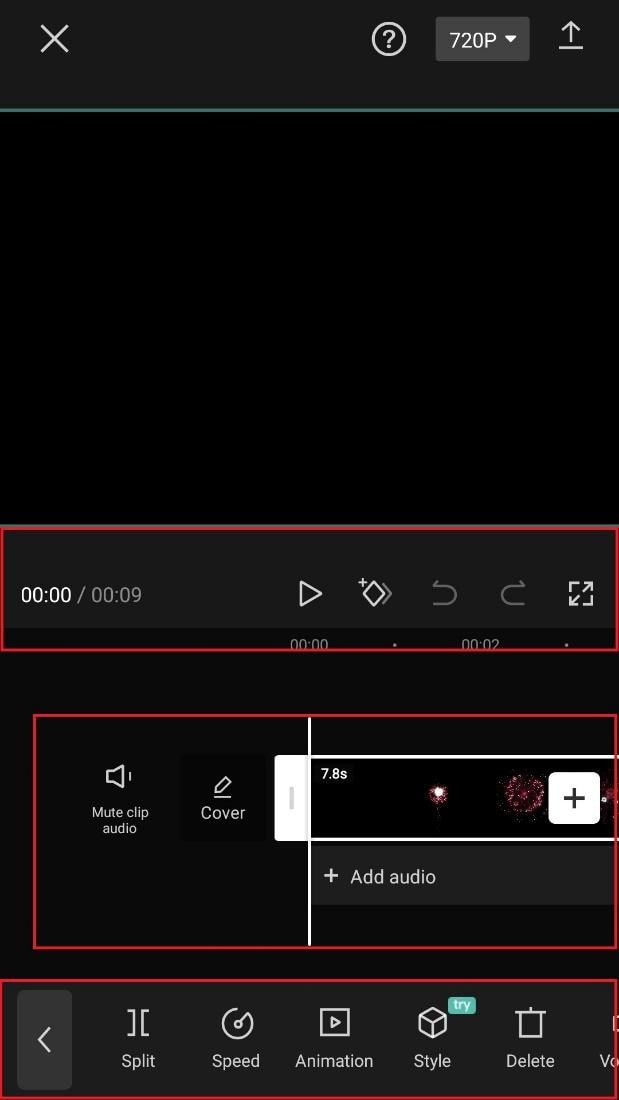
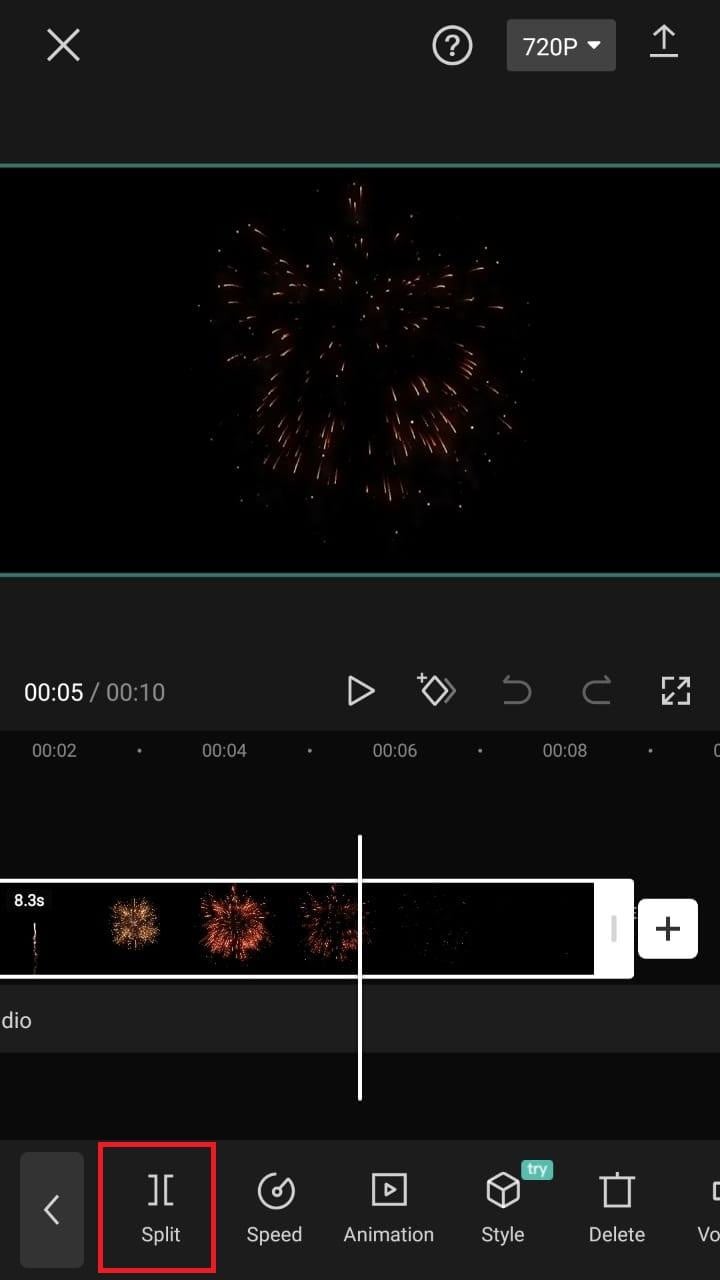
- View the toolbar and timeline. They represent your screen’s bottom half. The timeline, located below the preview panel, is where you’ll make all your adjustments. You can access all your video editing tools, including split, text, audio, effects, stickers, and more, on the toolbar at the bottom of your screen.
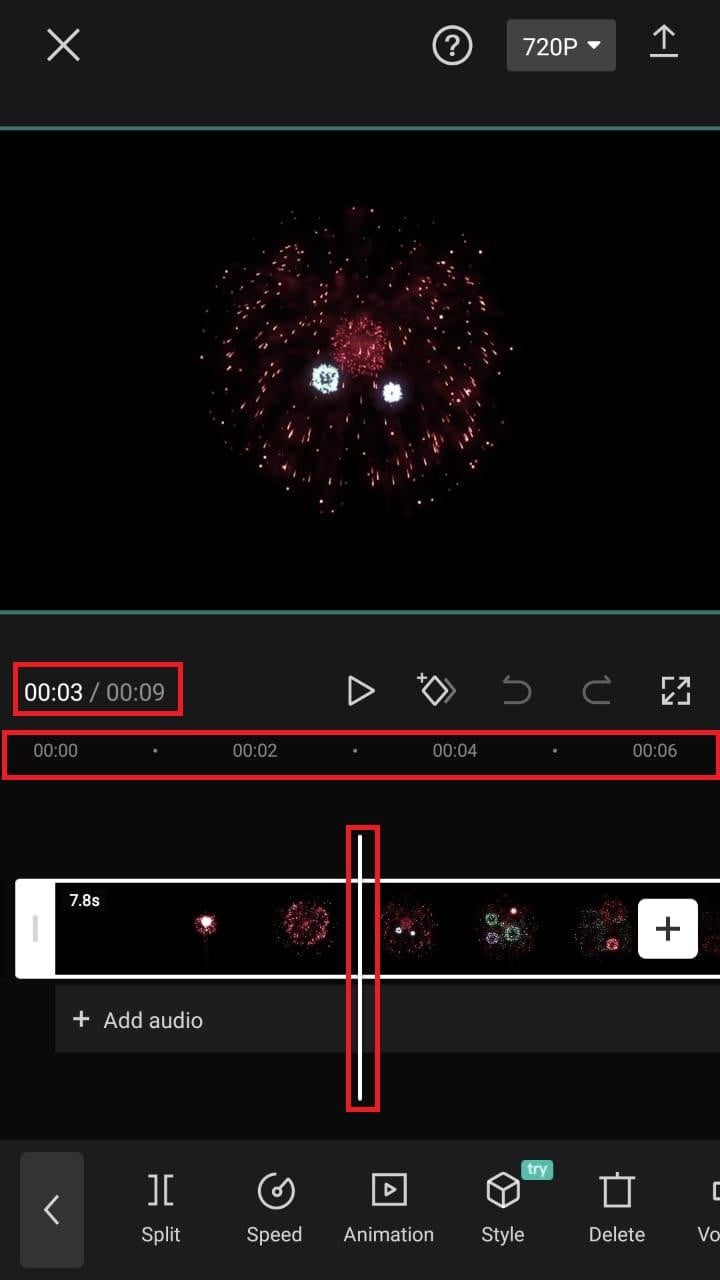
- Split video clips. To split a video clip in half, move the play head to the desired location on the timeline. Tap on your clip, then press the “Split“ toolbar icon. Your result now shows two different clips, not just one.
A Better Split-Screen Effect Video Editor
Filmora is one of the best free HD video makers and video editors with several functionalities, including text, backgrounds, filters, special effects, emoji, audio, and special effects.
Filmora is a feature-packed video editor which has a variety of tools to work with. With this video editor, producing memes, videos with images, pictures, music, stickers, and sound effects and editing videos for YouTube, Twitter, WhatsApp, Facebook, TikTok, and Instagram is simple and entertaining.
Free Download For Win 7 or later(64-bit)
Free Download For macOS 10.14 or later
Steps to Split Screen Video with Filmora
- Download Filmora from the App store
- After installation, launch it.
- Click on “Continue” to continue to use the app.

- Click on Allow to grant Filmora access to your photos and videos.
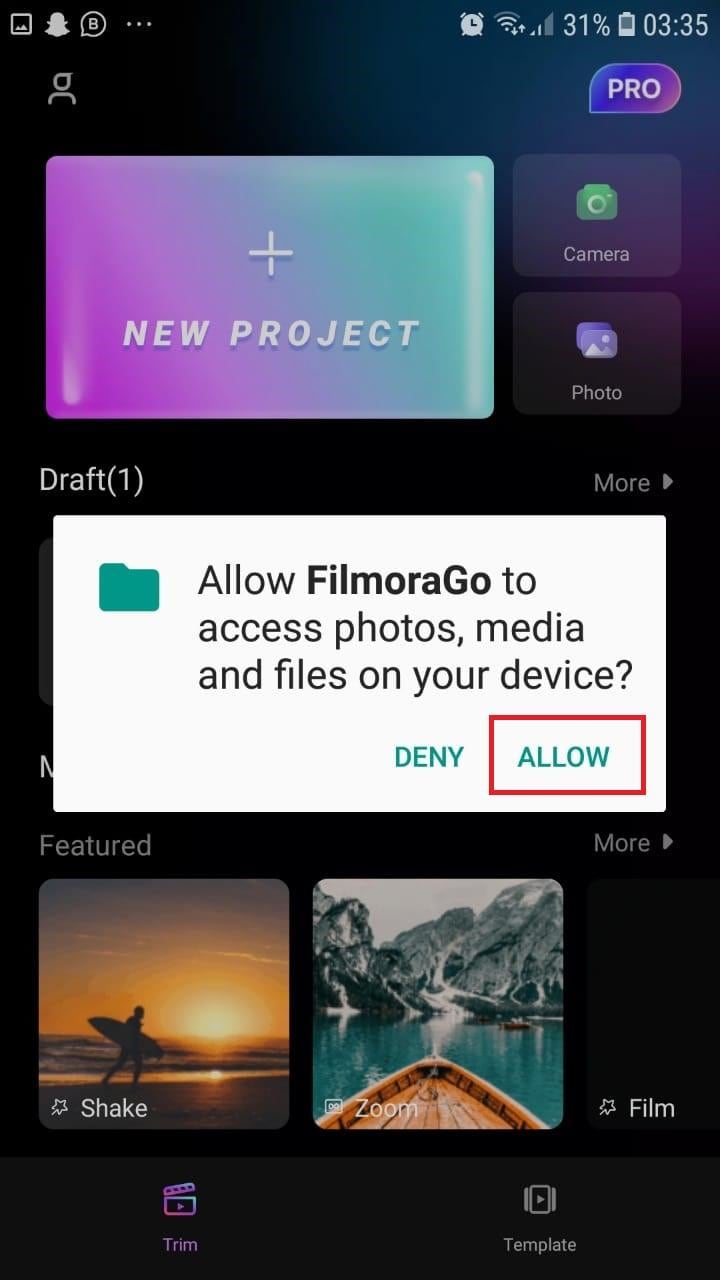
- You can now tap on “New Project” with the + Symbol.
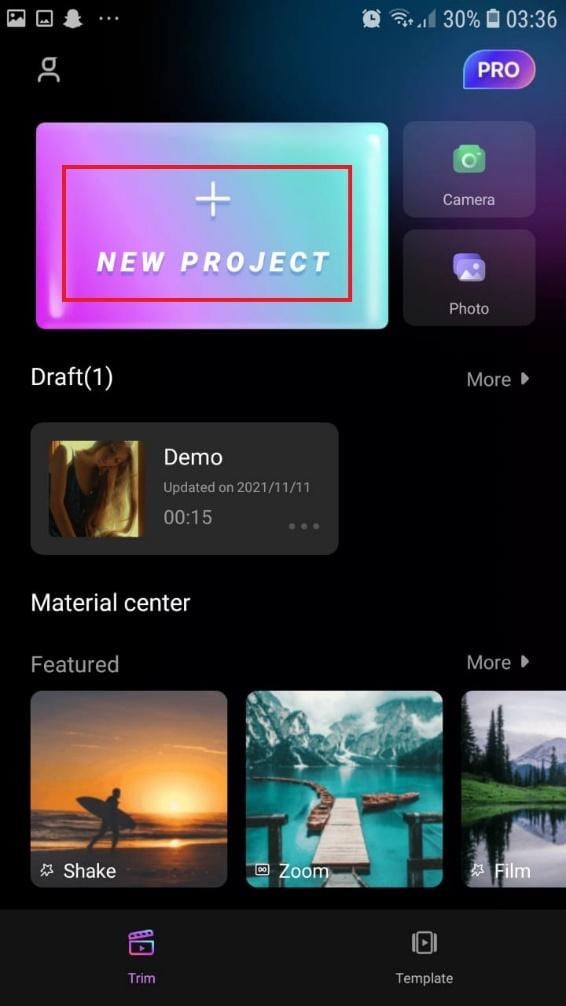
- Select your desired video and tap on “Next” at the bottom right of your screen
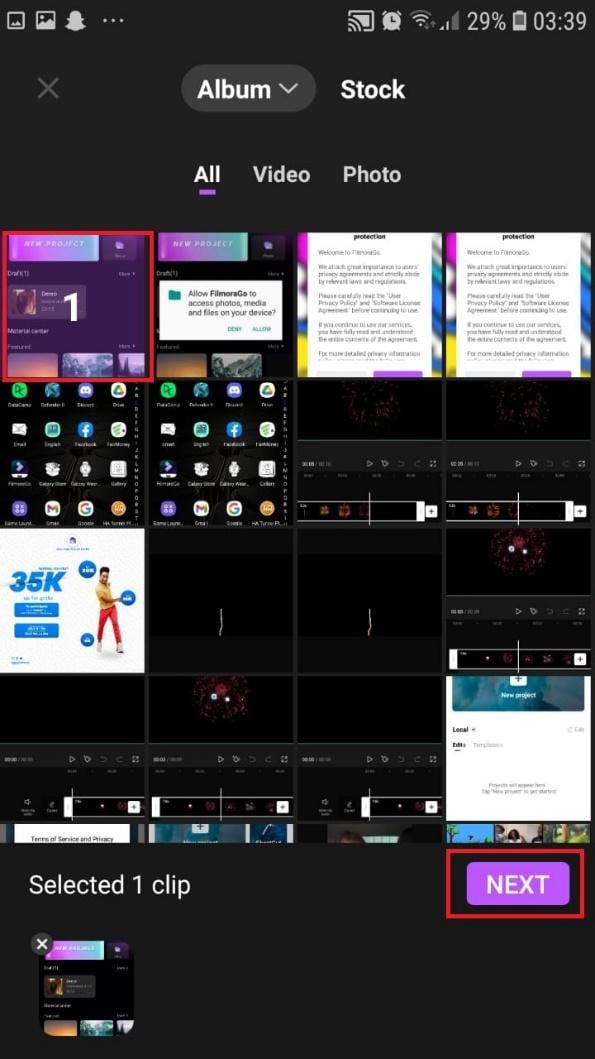
- You can select various options from the bottom of your screen to edit the selected video the way you like.

- Click on trim, and then you will see the different split-screen and collage feature options. Pick any that appeals to you.
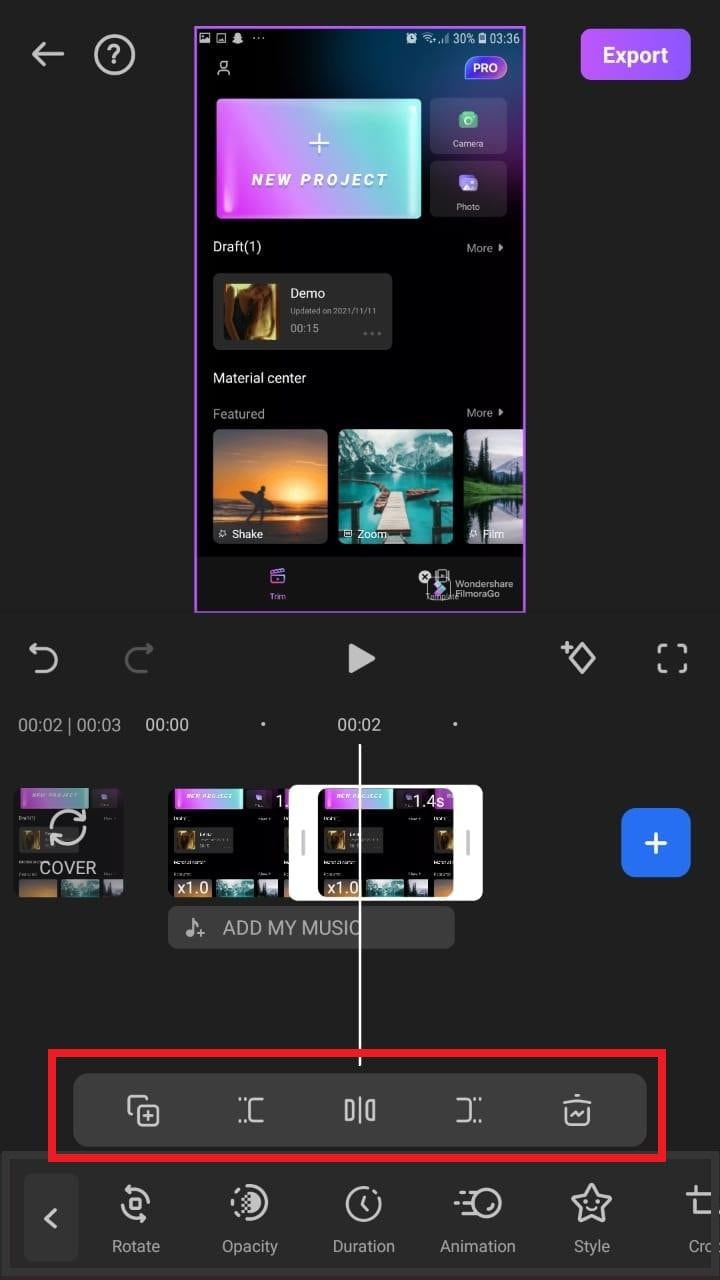
- When you are done with the editing, tap on “Export” at the top right of your screen.

- Go ahead and tap on “Export” on the next screen. Your video will be successfully exported and saved to your camera roll.
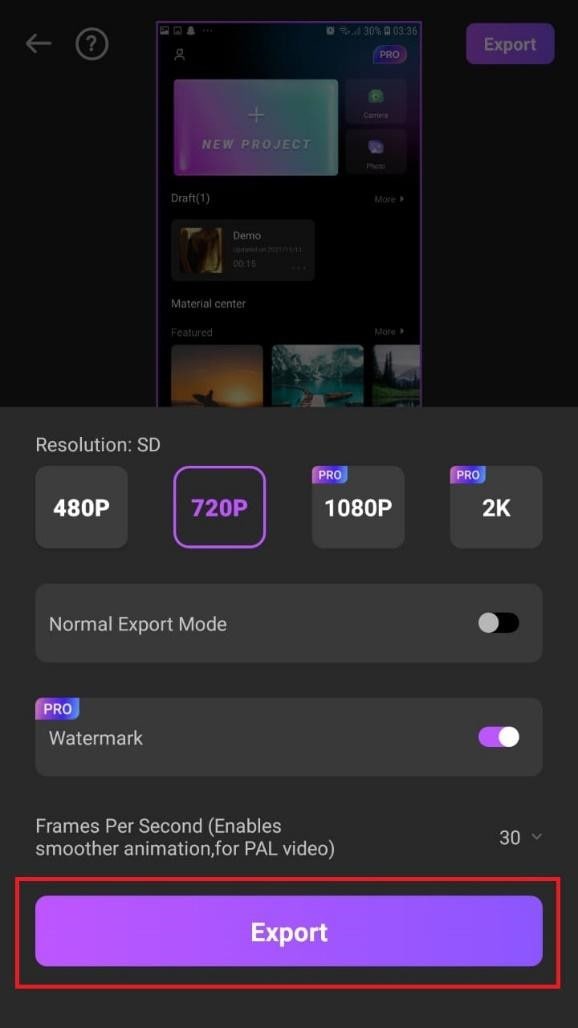
Using Filmora is very efficient in splitting your videos and making collage features for TikTok. It is a very simplified app available on both the Google Play Store and Apple Appstore.
Conclusion
TikTok is a platform that users use worldwide to create and share content. It could be pictures, videos, reels, or any other media type. Some people create videos for their audience on TikTok to educate them, while others do it to entertain them.
In any case, the goal is to build a more significant following on TikTok and garner greater attention from its users. You could even make money off the app.
One of the methods to impress your fans and explore multiple possibilities to build unique reels is to use the TikTok split-screen and collage feature effect available on TikTok. Although there are a few different ways to create a Split Screen on TikTok, the steps highlighted in this article are the most straightforward.
Free Download For macOS 10.14 or later
Steps to Split Screen Video with Filmora
- Download Filmora from the App store
- After installation, launch it.
- Click on “Continue” to continue to use the app.
- Click on Allow to grant Filmora access to your photos and videos.
- You can now tap on “New Project” with the + Symbol.
- Select your desired video and tap on “Next” at the bottom right of your screen
- You can select various options from the bottom of your screen to edit the selected video the way you like.
- Click on trim, and then you will see the different split-screen and collage feature options. Pick any that appeals to you.
- When you are done with the editing, tap on “Export” at the top right of your screen.
- Go ahead and tap on “Export” on the next screen. Your video will be successfully exported and saved to your camera roll.
Using Filmora is very efficient in splitting your videos and making collage features for TikTok. It is a very simplified app available on both the Google Play Store and Apple Appstore.
Conclusion
TikTok is a platform that users use worldwide to create and share content. It could be pictures, videos, reels, or any other media type. Some people create videos for their audience on TikTok to educate them, while others do it to entertain them.
In any case, the goal is to build a more significant following on TikTok and garner greater attention from its users. You could even make money off the app.
One of the methods to impress your fans and explore multiple possibilities to build unique reels is to use the TikTok split-screen and collage feature effect available on TikTok. Although there are a few different ways to create a Split Screen on TikTok, the steps highlighted in this article are the most straightforward.
How to Create Cooking Video Intro and End Screen for YouTube Channel?
With the number of YouTube content creators increasing every minute, the competition will be strong and unmatched. If you are a chef owning a YouTube cooking channel, this article might be your calling.
The revolutionary cooking video intros and promising outro for the channels are the need of the hour. It has become crucial to give your competitors a powerful match via robust content, incredible cooking background music, and a great end. The article covers creating a café meal intro and cooking channel YouTube end screen. So, time to begin? Shall we?
In this article
01 How to Create a Cafe Meal Intro?
02 How to Create a Cooking Channel YouTube End Screen?
03 3 Recommended Sites to Download Cooking Background Music
Part 1: How to Create a Cafe Meal Intro?
Are you a chef in a restaurant in Paris? Do you need to create a café meal intro that grabs the attention of all food fanatics worldwide? Worry no more, as this section has got you covered.
Wondershare Filmora is a one of its kind software to create an astonishing café meal intro in seconds. Let us initiate the step-by-step!
For Win 7 or later (64-bit)
For macOS 10.12 or later
Step 1: Double click on Wondershare Filmora to open the software. Head to the “Audio” tab and tap “Young and Bright.” The process will launch interesting music from there.

Step 2: Pick one and drag it to the timeline. Navigate to the “Media” tab to drag the cooking video to the first track. You can also import the video from your system.

Step 3: It is time to use the “Split Screen” to show more scenes in one video. Pick one and drag it to the timeline. It will create three vertical divisions on the preview window. Drop three different videos in each division and adjust the height using the Zoom settings.

Step 4: Import another cooking video and import it to the first track. Navigate to the “Elements” section and drag one of it as a background to the end of the first track. Look for another “café” related element to drag it to the end of the second track.

Step 5: Moving on, scroll to the “Titles” panel to pick a “restaurant” related idea and drag it to the timeline. The position of the title can be adjusted, and the name of the title can be altered by placing it in the preview window.

Step 6: Use the big titles for the beginning of the video and drag them to the second track. The title can be adjusted and renamed effortlessly. Pick another title for the middle of the video and perform the same procedure. The process is completed, and you can export the video.

Part 2: How to Create a Cooking Channel YouTube End Screen?
Are you an impeccable chef? Do you own a YouTube channel with limited subscribers?
The background music for cooking videos is essential to capture the attention of food addicts in the world. Your cooking channel’s stunning YouTube end screen is your perfect shot at improving subscribers’ range. The subsection shall reflect upon the procedure to effortlessly use Wondershare Filmora. So, let us have a look!
For Win 7 or later (64-bit)
For macOS 10.12 or later
Step 1: Open Wondershare Filmora from your computer and import the video that you need for the YouTube outro. Drag the video to the first track of your timeline. Head to the “Titles” tab and find the ideal title related to the restaurant idea. Now, drag it on to the second track.

Step 2: Now, it is time to use the “Transitions” tab to pick one and drag it to the end of the second track. First, import another video and drag it to the first track. After that, select the “Titles” and search YouTube pack lower-thirds. Hit one and drag it to the second track. Make required alterations related to the position, allocation, title name, size, and color.

Step 3: Navigate to the “Transitions” and click on one. Drag it and drop between the two clips. Screenshot the picture from the preview window and drag it from the “Media” tab to the first track. Pick the “YouTube end screen template” from titles and drag it to the second track.

Step 4: Modify your text from the “Advanced Settings.” Now, it is time to pick another media from your system to be used as a YouTube channel avatar. Place it on to the third track. It is time to adjust the photo on the end screen.

Step 5: To do so, go to the “Effects” and pick an image mask from it. Drag it to the photo avatar in the preview window. After that, double click on the track, and settings will appear. Select “Image Mask” options to adjust the size of the circle as needed.

Step 6: Adjust the position of the avatar on your preview window. Moving on, pick the keyframe to animate the position of the avatar. Change the rotation, escalation, and opacity as needed.

Step 7: It is time to add another image to the fourth track and perform the same procedure as the profile image. It will be displayed as the recent video on the end screen. Animate the imagery as done previously. You have created a creative end screen for your cooking YouTube channel.

Part 3: 3 Recommended Sites to Download Cooking Background Music
The background music for cooking videos is an important part of a cooking video intro and outro. Therefore, we can introduce three sites that offer great cooking background music free of copyright infringement issues. So, are you with us? Let us start!
Envato Elements
The first one of the lot is Envato Elements. There are different genres of music linked with cooking videos. The website filters can be tailored according to the theme of one’s cooking YouTube channel. Additionally, there are cooking moods music as well.

MobCup
MobCup has made it easy to browse the related cooking background music. The cooking music soup, monster hunt, cooking instrumental, and cooking effects are famous music options. The user can download them by hitting the “Download” button effortlessly.

SoundCloud
SoundCloud is another remarkable source for cooking videos to get hands-on background music. The royalty-free music for food, cooking music, and uplifting background music can be incorporated in the videos to give an essence of the cooking tutorials. The link can be copied, and the track can be downloaded in seconds.

Concluding Remarks
The marketing industry is getting more fame than the actual brand services due to multiple reasons. The animations and transitions are used to attract the attention of potential users and clients. If you own a restaurant with a YouTube cooking channel, the exciting cooking background music will work best for you.
The article discussed creating a café meal intro and cooking channel YouTube end screen through Filmora. The three recommended sites to download the music were also this write-up’s crux.
Wondershare Filmora
Get started easily with Filmora’s powerful performance, intuitive interface, and countless effects!
Try It Free Try It Free Try It Free Learn More >

02 How to Create a Cooking Channel YouTube End Screen?
03 3 Recommended Sites to Download Cooking Background Music
Part 1: How to Create a Cafe Meal Intro?
Are you a chef in a restaurant in Paris? Do you need to create a café meal intro that grabs the attention of all food fanatics worldwide? Worry no more, as this section has got you covered.
Wondershare Filmora is a one of its kind software to create an astonishing café meal intro in seconds. Let us initiate the step-by-step!
For Win 7 or later (64-bit)
For macOS 10.12 or later
Step 1: Double click on Wondershare Filmora to open the software. Head to the “Audio” tab and tap “Young and Bright.” The process will launch interesting music from there.
Step 2: Pick one and drag it to the timeline. Navigate to the “Media” tab to drag the cooking video to the first track. You can also import the video from your system.
Step 3: It is time to use the “Split Screen” to show more scenes in one video. Pick one and drag it to the timeline. It will create three vertical divisions on the preview window. Drop three different videos in each division and adjust the height using the Zoom settings.
Step 4: Import another cooking video and import it to the first track. Navigate to the “Elements” section and drag one of it as a background to the end of the first track. Look for another “café” related element to drag it to the end of the second track.
Step 5: Moving on, scroll to the “Titles” panel to pick a “restaurant” related idea and drag it to the timeline. The position of the title can be adjusted, and the name of the title can be altered by placing it in the preview window.
Step 6: Use the big titles for the beginning of the video and drag them to the second track. The title can be adjusted and renamed effortlessly. Pick another title for the middle of the video and perform the same procedure. The process is completed, and you can export the video.
Part 2: How to Create a Cooking Channel YouTube End Screen?
Are you an impeccable chef? Do you own a YouTube channel with limited subscribers?
The background music for cooking videos is essential to capture the attention of food addicts in the world. Your cooking channel’s stunning YouTube end screen is your perfect shot at improving subscribers’ range. The subsection shall reflect upon the procedure to effortlessly use Wondershare Filmora. So, let us have a look!
For Win 7 or later (64-bit)
For macOS 10.12 or later
Step 1: Open Wondershare Filmora from your computer and import the video that you need for the YouTube outro. Drag the video to the first track of your timeline. Head to the “Titles” tab and find the ideal title related to the restaurant idea. Now, drag it on to the second track.
Step 2: Now, it is time to use the “Transitions” tab to pick one and drag it to the end of the second track. First, import another video and drag it to the first track. After that, select the “Titles” and search YouTube pack lower-thirds. Hit one and drag it to the second track. Make required alterations related to the position, allocation, title name, size, and color.
Step 3: Navigate to the “Transitions” and click on one. Drag it and drop between the two clips. Screenshot the picture from the preview window and drag it from the “Media” tab to the first track. Pick the “YouTube end screen template” from titles and drag it to the second track.
Step 4: Modify your text from the “Advanced Settings.” Now, it is time to pick another media from your system to be used as a YouTube channel avatar. Place it on to the third track. It is time to adjust the photo on the end screen.
Step 5: To do so, go to the “Effects” and pick an image mask from it. Drag it to the photo avatar in the preview window. After that, double click on the track, and settings will appear. Select “Image Mask” options to adjust the size of the circle as needed.
Step 6: Adjust the position of the avatar on your preview window. Moving on, pick the keyframe to animate the position of the avatar. Change the rotation, escalation, and opacity as needed.
Step 7: It is time to add another image to the fourth track and perform the same procedure as the profile image. It will be displayed as the recent video on the end screen. Animate the imagery as done previously. You have created a creative end screen for your cooking YouTube channel.
Part 3: 3 Recommended Sites to Download Cooking Background Music
The background music for cooking videos is an important part of a cooking video intro and outro. Therefore, we can introduce three sites that offer great cooking background music free of copyright infringement issues. So, are you with us? Let us start!
Envato Elements
The first one of the lot is Envato Elements. There are different genres of music linked with cooking videos. The website filters can be tailored according to the theme of one’s cooking YouTube channel. Additionally, there are cooking moods music as well.
MobCup
MobCup has made it easy to browse the related cooking background music. The cooking music soup, monster hunt, cooking instrumental, and cooking effects are famous music options. The user can download them by hitting the “Download” button effortlessly.
SoundCloud
SoundCloud is another remarkable source for cooking videos to get hands-on background music. The royalty-free music for food, cooking music, and uplifting background music can be incorporated in the videos to give an essence of the cooking tutorials. The link can be copied, and the track can be downloaded in seconds.
Concluding Remarks
The marketing industry is getting more fame than the actual brand services due to multiple reasons. The animations and transitions are used to attract the attention of potential users and clients. If you own a restaurant with a YouTube cooking channel, the exciting cooking background music will work best for you.
The article discussed creating a café meal intro and cooking channel YouTube end screen through Filmora. The three recommended sites to download the music were also this write-up’s crux.
Wondershare Filmora
Get started easily with Filmora’s powerful performance, intuitive interface, and countless effects!
Try It Free Try It Free Try It Free Learn More >
Also read:
- New 2024 Approved Powerpoint Supported Video Format and User Tips
- In 2024, The Complete Guide to GIF for Discord Profile
- New How to Zoom Picture in Picture Easy Solution
- Updated Are You Looking to Find Out How to Loop YouTube Videos on iPhone? Learn How to Loop Your Favorite YouTube Video on Your iPhone, so You Can Play that Part over and Over for 2024
- New If You Want to Know More About the Basics of Final Cut Pro, It Would Be Helpful to Watch a Beginner Tutorial, with the Length of only 20 Minutes, an Introduction of the Whole Program
- Updated What Are the Best Video Background Changers Online, In 2024
- Updated Do You Seek a Guide to Add Motion in Blender? This Article Explains the Blender Motion Blur Effect in Detail and Helps You Master It
- New 2024 Approved How to Create Custom Lower Thirds in Filmora
- New 2024 Approved It Is Easy to Separate the Audio From the Video in DaVinci Resolve. But, to Avail of This Feature, You Need to Follow Proper Steps, and This Article Is All About It
- New Convert Your Videos to 60 FPS Using These Excellent Tools
- New A Roster of 8 Best Color Match Generators
- 2024 Approved A Guide To Motion Tracking Using The Best Video Editors
- Updated In 2024, How to Fade in Text in Adobe Premiere Pro
- Updated Effective 10 Ways to Convert YouTube to MOV at Ease PC & Online
- New 2024 Approved How to Create A Freeze Frame Sequence in Video
- 2024 Approved Want to Speed up Your Video to Create Short-Duration Instagram Reels? Here Is How You Can Change the Speed of Pre-Recorded and Live Videos on Instagram Reels
- Looking for Free Tools to Create Radial Blur Images Online? Read Our Full Guide to Learn About the 6 Best Programs to Add This Effect to Your Pictures for 2024
- Unlocking the Power of Smart Lock A Beginners Guide for Realme 12 Pro 5G Users
- How to Fix Google Pixel Fold Find My Friends No Location Found? | Dr.fone
- Ultimate Guide to Catch the Regional-Located Pokemon For Apple iPhone X | Dr.fone
- Remove Motorola Lock Screen without Password(Motorola Edge 2023)
- In 2024, How to Use Google Assistant on Your Lock Screen Of Xiaomi Mix Fold 3 Phone
- How to Fix Excel 2003 has Encountered a Problem
- In 2024, How Can You Transfer Files From Infinix Note 30 VIP To iPhone 15/14/13? | Dr.fone
- 2024 Approved Top 10 AI-Talking Avatars Revolutionizing Communication
- How to Transfer Data After Switching From Google Pixel 7a to Latest Samsung | Dr.fone
- How To Simulate GPS Movement With Location Spoofer On Xiaomi Redmi 13C 5G? | Dr.fone
- In 2024, 6 Methods to Share Apple iPhone 15 Pro Screen with PC | Dr.fone
- 6 Proven Ways to Unlock Vivo Y28 5G Phone When You Forget the Password
- Title: In 2024, Adding Text to Your Collage Not only Makes It Look Sophisticated but Also Versatile. So, if You Too Are Looking for Ways to Create a Collage Text, Check Out Our Article
- Author: Morgan
- Created at : 2024-05-19 05:11:51
- Updated at : 2024-05-20 05:11:51
- Link: https://ai-video-editing.techidaily.com/in-2024-adding-text-to-your-collage-not-only-makes-it-look-sophisticated-but-also-versatile-so-if-you-too-are-looking-for-ways-to-create-a-collage-text-chec/
- License: This work is licensed under CC BY-NC-SA 4.0.
