
:max_bytes(150000):strip_icc():format(webp)/wimbledonlivestream-c22d5eefbf8f40e9b25ba4cab1734ece.jpg)
In 2024, Create Photoshop GIFs with Zero Hustle
Create Photoshop GIFs with Zero Hustle
How to Create Photoshop GIF The 100% Easy Way
An easy yet powerful editor
Numerous effects to choose from
Detailed tutorials provided by the official channel
Having trouble creating Photoshop GIFs? Stay tuned to set everything straight.
In this article
01 [Easy Ways to Create an Animated GIF in Photoshop](#Part 1)
02 [6 Ways To Make An Animated GIF Without Photoshop](#Part 2)
Part 1 Easy Ways to Create an Animated GIF in Photoshop
Animated GIFs are a naturally captivating means of information exchange and entertainment. When the talk is about creating these, you can visibly see a flood of creation tools and software solutions. However, standing out in the crowd, are those catchy Photoshop snippets that certainly have the potential to leave you jaw dropped.
A Photoshop GIF is bound to capture attention, owing to its high quality imaging and top rated professional editing outlook. If you possess the editing flare, do try creating one for an amazing editing experience.
Creating Animated Photoshop GIFs: Easiest Solutions
Let’s take a look into some easy and interesting ways of creating a GIF in Photoshop, to leave you with handy solutions, just in case you feel motivated to take up the creation idea.
Before you begin, make sure to install and launch a suitable version the Photoshop application in your device and keep a set of selected images at hand that you will require for GIF creation.
● Step 1: Load Image Files
Photoshop requires you to load your selected files into its creation stack. There is no limit on the image count, but make sure you choose images in a natural series so that the GIF doesn’t give an out of the box feel.

Reach the ‘File’ tab at the top and load your image files into the Photoshop stack using the following path:
File -> Scripts -> Load Files into Stack

● Step 2: Image Selection
In the next pop-up window, click ‘Browse’ and choose the image file you wish to load into the Photoshop stack. In case the selected images seem tom lack proper alignment, click on the ‘Attempt to Automatically Align Source Images’ checkbox to set this straight and make your GIF frame stable.

Click on ‘OK’ when you are happy with your selections.

At this instant, Photoshop starts creating layers for the uploaded images, which you can see in the ‘Layers’ panel at the bottom-right. You are allowed to rearrange the image layers by selecting and dragging them or click on layer names to rename them.

If you notice distortion in Photoshop’s automatic alignment of your images, just crop the images frames to sort this out. Here’s how you can get this done:
● Tap the ‘Crop’ symbol.
● Adjust the crop frame to select the desired portion.
● Click on ‘Enter’ to confirm the action.
If you didn’t permit auto alignment previously, no worries, you can move ahead.
● Step 3: Make a Timeline Setup
Navigate to the ‘Window’ tab in the top menu and click the ’Timeline’ checkbox. You will see the ‘Timeline Window’ pop up below the Photoshop workspace, where you need to select the ‘Create Frame Animation’ tab. This will cause the options for frame animation to pop-up.

Select you topmost image layer, followed by clicking on the ‘Duplicate’ icon to generate a copy of the image frame.

● Step 4: Decide Time Frames
Select your topmost image frame to see a play duration of ‘0 sec’ below its thumbnail. Click to open the drop-down menu beside it and choose suitable time duration for the frame to run. Allot time durations to all successive frames in a similar manner.

● Step 5: Conceal Top Layers
You will see am combination of the first and second image layers in the image thumbnail. To set this right, navigate to ‘Layers’ to hide the top layer.

Continue to hide previous layers in successive frames so that each layer appears in its respective frame at the end of the process.

● Step 6: Preview Your Creation
Tap the ‘Play’ button to see your GIF preview. Ensure a smooth run with correct appearance order of images and precise frame durations.

● Step 7: Time to Share.
When you are satisfied, navigate to the ‘File’ tab and select ‘Save As’. From the menu that drops down, choose the GIF file format and click on ‘Save’.

In the ’GIF Save Options’ that follows, adjust file settings suited to your preference and tap ‘OK’.

As an alternative you can take the following path to open the ‘GIF Preview Window’:
File -> Export -> Save for Web

In the top-right comer, choose the GIF file format from the drop-down menu. There is also an option to resize your image at the bottom-right. It is advisable to keep the image size within 500 pixels for a convenient export across various media sharing platforms. When you finish, click on ‘Save’. Your creation is now ready for a media export.

Part 2 6 Ways to Make an Animated GIF Without Photoshop
The idea to create GIF in Photoshop is fun and exciting, no doubt on that, but you may often want to switch to a different platform. No issues with that, the web is there to sort out everything for you. All you need to do is open your favorite browser to land across a heap of welcoming solutions to create GIFs without Photoshop. Let’s have a look through the best ones:
01**Wondershare Filmora Video Editor **
Filmora by Wondershare is probably the best GIF maker tool you can rely on. This is packed with a diverse inventory of exciting design features that are ready to provide a creative boost to your editing skills. Loaded with a ton of classic audio visual effects, this software is certainly comprises of everything you need to create static and animated GIFs like a pro.

Wondershare Filmora - Best Video Editor for Mac/Windows
5,481,435 people have downloaded it.
Build unique custom animations without breaking a sweat.
Focus on creating epic stories and leave the details to Filmora’s auto features.
Start a creative adventure with drag & drop effects and endless possibilities.
Filmora simplifies advanced features to save you time and effort.
Filmora cuts out repetition so you can move on to your next creative breakthrough.
Key Features
● This is free software with possibly the most convenient interface.
● You get the freedom to play with hundreds of audio-visual effects to your heart’s content.
● You can create GIFs with static images and videos that are simply awesome to say the least.
● You need not worry about specific file formats. The software is compatible with almost all commonly known ones.
● Filmora allows you to expand and explore your editing talent to the fullest. You can play with tools like, cut, trim or combine image frames and make color and speed adjustments to get the perfect results for your artwork.
02Photoscape
This is another GIF maker tool you can choose to create catchy and interesting GIFs. Photoscape is a simple graphic editor that makes GIF creation exciting and fun. Available to you for free, this software allows you to design and edit animated GIFs with a series of image enhancements, like, resizing, color selection, image prints, etc. Photoscape is compatible with your Windows, Linux and Mac supported devices and has a clean interface. However, the program may sometimes take up a slow run.

Key Features
● You can improvise you GIF with image editing tools, like, color and size adjustments, clip arts, effects, overlays, etc.
● It has a unique ‘Photo Batch’ tool that you can use to process and rename multiple images simultaneously.
● Photoscape allows you to create interesting collages by merging a series of images into a single one.
● You can create captivating animated GIFs with multiple still images.
● The software is loaded with a bunch of utilities like, photo splitter, page merger, color picker, image viewer and others to give that perfect professional outlook to your creations.
03Gifted Motion
This is also among the commonly preferred GIF creator software. The best this about the tool is that it is platform independent and compatible with almost any Operating System. Another choice appeal of the software is its direct workability that is, you don’t require any program installations to create GIFs using this tool.

Key Features
● This is a simple graphic editor that runs on JAVA and is quite convenient to use.
● You can use this software to edit and create GIFs with images saved locally in your device.
● File formats supported by the software include PNG, JPEG, BMP and GIF.
● You don’t need to worry about licensing costs or in-app purchases; this tool is absolutely free to use.
● Loading big image files on this software may however, cost you some extra time.
01SSuite GIF Animator
This one is Windows compatible software that works well with both, 32 and 64-bit Operating System configurations. It lies among those ’Green Software Programs’ that cut down on your net energy cost. Apart from high quality animated GIFs, y6ou can also create movies and slides shows with this software.

Key Features
● This is a free of cost, clean and user-friendly graphic editor software.
● You don’t require Windows registration to use this software
● You can conveniently save the software into any USB or memory device; it is easily portable.
● It facilitates a speedy GIF creation and editing.
● You can explore a variety of editing features and add separate time frames to each image using this software.
● Picasion
This is a free, online GIF maker tool that gives you the liberty to import images and videos from different app galleries, like, Picasa, Flickr and others to create and edit motion GIFs. The tool, though having a simple interface and feature packed, is quite ad-stricken, but you can skip that by sticking to the right webpage.

Key Features
● The tool crosses language borders and is available to you in English, Spanish, Portuguese and Russian.
● You can make size adjustments to the GIF images, or add a completely new avatar of your own.
● The tool offers you a variety of editing effects and filters to enhance and improvise your created GIFs.
● You need not limit yourself to specific file formats with this tool; all common ones are conveniently supported.
● It is a quick and clean tool that rescues you from the glitch of a messy interface.
05GifPal
This one is also a free, online GIF creator with amazing editing features and tools. It comes with a diverse library of 20 frames and 30 effects to choose from, for creating normal and animated GIFs. It further has a variety of drawing and text editing tools you can use to add messages to your GIFs to make more impactful.

Key Features
● The tool is packed with a vast set of quality image editing tools that can create attractive motion and animated GIFs.
● The tool allows you to adjust and change the speed of image frames to give a natural flow to your GIF.
● An exclusive feature of the tool is that it allows you to edit frames in its timeline.
● Your creations with the tools are deprived of any default watermarks. You can either add one of your choice, or even create GIFs without a watermark.
● The tool site is free of unwanted and irrelevant ads.
● Key Takeaways from This Episode →
● Making a GIF in Photoshop is a great idea to design animation snippets, both for fun and a target purpose. Using the Photoshop GIF maker ensures quality and class in complete professional styles.
● However, if you are keen on browsing through other GIF creator alternatives, you can safely pick the Filmora GIF Maher software for creating excellent, next level animated GIFs.
Having trouble creating Photoshop GIFs? Stay tuned to set everything straight.
In this article
01 [Easy Ways to Create an Animated GIF in Photoshop](#Part 1)
02 [6 Ways To Make An Animated GIF Without Photoshop](#Part 2)
Part 1 Easy Ways to Create an Animated GIF in Photoshop
Animated GIFs are a naturally captivating means of information exchange and entertainment. When the talk is about creating these, you can visibly see a flood of creation tools and software solutions. However, standing out in the crowd, are those catchy Photoshop snippets that certainly have the potential to leave you jaw dropped.
A Photoshop GIF is bound to capture attention, owing to its high quality imaging and top rated professional editing outlook. If you possess the editing flare, do try creating one for an amazing editing experience.
Creating Animated Photoshop GIFs: Easiest Solutions
Let’s take a look into some easy and interesting ways of creating a GIF in Photoshop, to leave you with handy solutions, just in case you feel motivated to take up the creation idea.
Before you begin, make sure to install and launch a suitable version the Photoshop application in your device and keep a set of selected images at hand that you will require for GIF creation.
● Step 1: Load Image Files
Photoshop requires you to load your selected files into its creation stack. There is no limit on the image count, but make sure you choose images in a natural series so that the GIF doesn’t give an out of the box feel.
Reach the ‘File’ tab at the top and load your image files into the Photoshop stack using the following path:
File -> Scripts -> Load Files into Stack
● Step 2: Image Selection
In the next pop-up window, click ‘Browse’ and choose the image file you wish to load into the Photoshop stack. In case the selected images seem tom lack proper alignment, click on the ‘Attempt to Automatically Align Source Images’ checkbox to set this straight and make your GIF frame stable.
Click on ‘OK’ when you are happy with your selections.
At this instant, Photoshop starts creating layers for the uploaded images, which you can see in the ‘Layers’ panel at the bottom-right. You are allowed to rearrange the image layers by selecting and dragging them or click on layer names to rename them.
If you notice distortion in Photoshop’s automatic alignment of your images, just crop the images frames to sort this out. Here’s how you can get this done:
● Tap the ‘Crop’ symbol.
● Adjust the crop frame to select the desired portion.
● Click on ‘Enter’ to confirm the action.
If you didn’t permit auto alignment previously, no worries, you can move ahead.
● Step 3: Make a Timeline Setup
Navigate to the ‘Window’ tab in the top menu and click the ’Timeline’ checkbox. You will see the ‘Timeline Window’ pop up below the Photoshop workspace, where you need to select the ‘Create Frame Animation’ tab. This will cause the options for frame animation to pop-up.
Select you topmost image layer, followed by clicking on the ‘Duplicate’ icon to generate a copy of the image frame.
● Step 4: Decide Time Frames
Select your topmost image frame to see a play duration of ‘0 sec’ below its thumbnail. Click to open the drop-down menu beside it and choose suitable time duration for the frame to run. Allot time durations to all successive frames in a similar manner.
● Step 5: Conceal Top Layers
You will see am combination of the first and second image layers in the image thumbnail. To set this right, navigate to ‘Layers’ to hide the top layer.
Continue to hide previous layers in successive frames so that each layer appears in its respective frame at the end of the process.
● Step 6: Preview Your Creation
Tap the ‘Play’ button to see your GIF preview. Ensure a smooth run with correct appearance order of images and precise frame durations.
● Step 7: Time to Share.
When you are satisfied, navigate to the ‘File’ tab and select ‘Save As’. From the menu that drops down, choose the GIF file format and click on ‘Save’.
In the ’GIF Save Options’ that follows, adjust file settings suited to your preference and tap ‘OK’.
As an alternative you can take the following path to open the ‘GIF Preview Window’:
File -> Export -> Save for Web
In the top-right comer, choose the GIF file format from the drop-down menu. There is also an option to resize your image at the bottom-right. It is advisable to keep the image size within 500 pixels for a convenient export across various media sharing platforms. When you finish, click on ‘Save’. Your creation is now ready for a media export.
Part 2 6 Ways to Make an Animated GIF Without Photoshop
The idea to create GIF in Photoshop is fun and exciting, no doubt on that, but you may often want to switch to a different platform. No issues with that, the web is there to sort out everything for you. All you need to do is open your favorite browser to land across a heap of welcoming solutions to create GIFs without Photoshop. Let’s have a look through the best ones:
01**Wondershare Filmora Video Editor **
Filmora by Wondershare is probably the best GIF maker tool you can rely on. This is packed with a diverse inventory of exciting design features that are ready to provide a creative boost to your editing skills. Loaded with a ton of classic audio visual effects, this software is certainly comprises of everything you need to create static and animated GIFs like a pro.
Wondershare Filmora - Best Video Editor for Mac/Windows
5,481,435 people have downloaded it.
Build unique custom animations without breaking a sweat.
Focus on creating epic stories and leave the details to Filmora’s auto features.
Start a creative adventure with drag & drop effects and endless possibilities.
Filmora simplifies advanced features to save you time and effort.
Filmora cuts out repetition so you can move on to your next creative breakthrough.
Key Features
● This is free software with possibly the most convenient interface.
● You get the freedom to play with hundreds of audio-visual effects to your heart’s content.
● You can create GIFs with static images and videos that are simply awesome to say the least.
● You need not worry about specific file formats. The software is compatible with almost all commonly known ones.
● Filmora allows you to expand and explore your editing talent to the fullest. You can play with tools like, cut, trim or combine image frames and make color and speed adjustments to get the perfect results for your artwork.
02Photoscape
This is another GIF maker tool you can choose to create catchy and interesting GIFs. Photoscape is a simple graphic editor that makes GIF creation exciting and fun. Available to you for free, this software allows you to design and edit animated GIFs with a series of image enhancements, like, resizing, color selection, image prints, etc. Photoscape is compatible with your Windows, Linux and Mac supported devices and has a clean interface. However, the program may sometimes take up a slow run.
Key Features
● You can improvise you GIF with image editing tools, like, color and size adjustments, clip arts, effects, overlays, etc.
● It has a unique ‘Photo Batch’ tool that you can use to process and rename multiple images simultaneously.
● Photoscape allows you to create interesting collages by merging a series of images into a single one.
● You can create captivating animated GIFs with multiple still images.
● The software is loaded with a bunch of utilities like, photo splitter, page merger, color picker, image viewer and others to give that perfect professional outlook to your creations.
03Gifted Motion
This is also among the commonly preferred GIF creator software. The best this about the tool is that it is platform independent and compatible with almost any Operating System. Another choice appeal of the software is its direct workability that is, you don’t require any program installations to create GIFs using this tool.
Key Features
● This is a simple graphic editor that runs on JAVA and is quite convenient to use.
● You can use this software to edit and create GIFs with images saved locally in your device.
● File formats supported by the software include PNG, JPEG, BMP and GIF.
● You don’t need to worry about licensing costs or in-app purchases; this tool is absolutely free to use.
● Loading big image files on this software may however, cost you some extra time.
01SSuite GIF Animator
This one is Windows compatible software that works well with both, 32 and 64-bit Operating System configurations. It lies among those ’Green Software Programs’ that cut down on your net energy cost. Apart from high quality animated GIFs, y6ou can also create movies and slides shows with this software.
Key Features
● This is a free of cost, clean and user-friendly graphic editor software.
● You don’t require Windows registration to use this software
● You can conveniently save the software into any USB or memory device; it is easily portable.
● It facilitates a speedy GIF creation and editing.
● You can explore a variety of editing features and add separate time frames to each image using this software.
● Picasion
This is a free, online GIF maker tool that gives you the liberty to import images and videos from different app galleries, like, Picasa, Flickr and others to create and edit motion GIFs. The tool, though having a simple interface and feature packed, is quite ad-stricken, but you can skip that by sticking to the right webpage.
Key Features
● The tool crosses language borders and is available to you in English, Spanish, Portuguese and Russian.
● You can make size adjustments to the GIF images, or add a completely new avatar of your own.
● The tool offers you a variety of editing effects and filters to enhance and improvise your created GIFs.
● You need not limit yourself to specific file formats with this tool; all common ones are conveniently supported.
● It is a quick and clean tool that rescues you from the glitch of a messy interface.
05GifPal
This one is also a free, online GIF creator with amazing editing features and tools. It comes with a diverse library of 20 frames and 30 effects to choose from, for creating normal and animated GIFs. It further has a variety of drawing and text editing tools you can use to add messages to your GIFs to make more impactful.
Key Features
● The tool is packed with a vast set of quality image editing tools that can create attractive motion and animated GIFs.
● The tool allows you to adjust and change the speed of image frames to give a natural flow to your GIF.
● An exclusive feature of the tool is that it allows you to edit frames in its timeline.
● Your creations with the tools are deprived of any default watermarks. You can either add one of your choice, or even create GIFs without a watermark.
● The tool site is free of unwanted and irrelevant ads.
● Key Takeaways from This Episode →
● Making a GIF in Photoshop is a great idea to design animation snippets, both for fun and a target purpose. Using the Photoshop GIF maker ensures quality and class in complete professional styles.
● However, if you are keen on browsing through other GIF creator alternatives, you can safely pick the Filmora GIF Maher software for creating excellent, next level animated GIFs.
Best Video Editors to Add Text to a Video
While it can be very easy to add text to an image, the same cannot be said when it comes to adding even the simplest text to a video. You will need video editing software that is designed with the necessary features to help you add text to your video.
There are very many programs in the market that can technically be used to add text to a video. But the ones we will look at are video editors that make the process easy, but also give you a wide range of options to customize your text in numerous ways.
Filmora
Filmora by Wondershare is one of the best video editors in the market. Its user interface is so easy to use that adding text to the video is a simple 3-step process. Aside from adding text to the video, Filmora also allows you to edit other aspects of the video including adding transitions, overlays, and animations to any section of the video.

Key Features:
- You can use Filmora to add text to any section of the video
- It gives you the freedom to move the text to any section of the video
- Customizing the text, you add to the video can be done in numerous ways including changing the color, and font and adding animations to the text.
- It offers numerous templates to choose from and different font styles that you can use
- It has a simple user interface that makes the video editing process very easy
- It has numerous other video editing capabilities that allow you to create and edit videos in different ways including splitting videos, trimming videos, and even merging videos clips into one
- You can upload the videos directly to YouTube after editing.
After Effects
Adobe After Effects is a motion picture editing program that you can also use to add text and other animations to your video. While you can use it to add simple text to the video, it is an ideal solution when your goal is to add advanced text animations. It is however by no means a simple solution, especially for beginners who may find it hard to get going with After Effects.

Key Features:
- You can add simple lines of text to any section of the video
- Text is easily customizable by changing the color, font, and size of the text
- You can also choose to change the entire text layer and add advanced animations and effects
- There are a lot of text, animations, and effects templates to choose from
- You can easily copy text from other Adobe applications to use in After Effects
Movavi Editor
Movavi video editor is another great video editor that you can use to add and edit text on a video. Like most similar tools it is designed to simplify the process, allowing you to add text to any section of the document, move the text to any location on the video and even add text effects to customize the text. It has a very simple user interface that allows you to do that quickly and easily.

Key Features:
- You can add text to any section of the video
- Customizing the text by changing the font, color and size is also very easy
- The user interface is very easy to use, allowing you to add even blocks of text very quickly
- You also have additional options to edit the video including splitting and merging the video or adjusting the brightness, saturation, and color.
iMovie
This is a built-in video editor that you will find on macOS and iOS devices. Even though it is free, iMovie has a lot of features that come in handy when you want to add and edit text on a video. The fact that it can be used on iOS devices is an added advantage when you want to edit videos on the go.

Key Features:
- It allows users to add transitions and effects to the text you add to the video
- It comes with a lot of title templates to choose from
- Adding animated text is also very simple including Sideways Drift, Lens Flare, and more
- You can customize the text in very many ways including adding fonts, drop shadows, changing the color, and even resizing or repositioning the text.
Camtasia
TechSmith Camtasia is one of the most popular tools to create and edit videos. Of the numerous features that you get when you choose to use Camtasia is adding and editing text to the video. It has numerous templates that can be used to customize the text you add in various ways.

Key Features:
- It gives you numerous options to add text to the images including text boxes, templates, and effects
- It has a speech-to-text feature that is perfect for adding captions and subtitles to the video
- You can easily customize the text by adding transitions and effects or even by simply changing the font, color, and size of the text
- The text can be moved to any section of the video
Typito
Typito is an online video editor with simple tools that can help you make changes to any video. designed to help YouTube content creators and video editors, Typito can be used to add all kinds of text and text effects to any video. It is accessible on all browsers and it is also very easy to use.
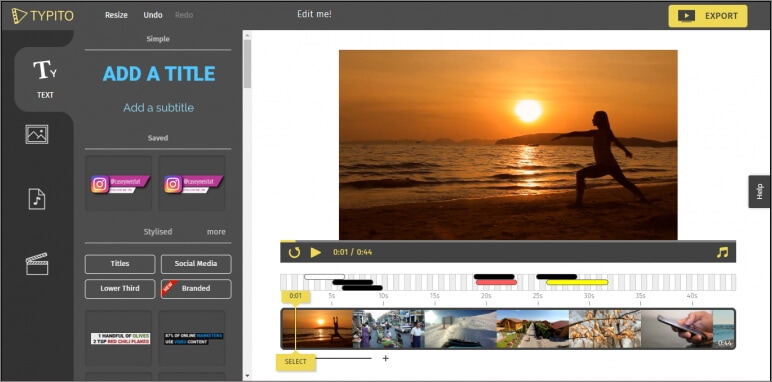
Key Features:
- It is very easy to use, allowing you to add text to any video in a few simple steps
- It has numerous templates to choose from
- Changing the font size, color, and style of the text is very easy
- You can publish videos directly to numerous video-sharing sites after editing
- It allows users to add animations, transitions, and effects to the text
Splice
Splice is an iOS app designed to help you add text to videos on iOS devices. Adding text to any video using Splice can be easily done using the overlay feature. It also has numerous other video editing features including allowing you to easily synchronize your videos and music, adding filters and transitions, and more.

Key Features:
- it has a simple user interface that makes adding text very easy
- You can customize the text in various ways including changing the font size, color and style or even adding various text effects
- Videos can be saved on the device or shared directly on social media apps like Facebook, Instagram, and YouTube
- It has numerous other video editing features including filters and animations
Clipomatic
If the text you want to add to the video is in the form of captions or subtitles, then Clipomatic is perhaps the best choice. It supports various languages including German, French, Portuguese, and even Chinese. You can also use it to add regular text to any video, reposition the text on any section of the video and customize the text in various ways.

Key Features:
- It is available for both Android and iOS
- Adding text to the video is very easy
- You can easily customize the text by changing the font color, and size and adding transitions and text effects
- It supports various languages, making it ideal for captions and subtitles
MySubtitle
MySubtitle is a simple but highly effective app that you can use to add text to your video. As the name suggests, this tool is ideal for adding subtitles and you can do that very easily by simply typing in the text and syncing the text to the video’s content.

Key Features:
- It is available for both iOS and Android devices
- You can type in your subtitles directly on the video
- Subtitles can then be paced to suit the video’s playback speed
- It is completely free to use
- You can share the videos you edit directly on various social media platforms
Free Download For Win 7 or later(64-bit)
Free Download For macOS 10.14 or later
Free Download For macOS 10.14 or later
Learn Topaz Video Enhance AI Review
Learn Topaz Video Enhance AI Review and Achieve Powerful Video Conversion
An easy yet powerful editor
Numerous effects to choose from
Detailed tutorials provided by the official channel
Earlier, you might need a professional to help you with the AI video enhancing process, but now you can do it yourself using Topaz. This app has fascinating features to make your editing experience smooth and unique. This app was used only for photo enhancement earlier. Now with time, it has been updated, and now it can be used to do AI Enhancing of your video. This article is a Topaz Video Enhance AI review. Here in this article, we focus on the usage of Topaz and its effectiveness compared to other AI software.
In this article
01 [What Does Topaz Video Enhance AI Do?](#Part 1)
02 [How Do You Use Topaz Video Enhance AI?](#Part 2)
03 [Deep Learning: Topaz Video Enhance AI Review](#Part 3)
Part 1 What Does Topaz Video Enhance AI Do?
Topaz Video Enhance IA is an all-rounder in its field. This app is used to do AI upscaling in general and is used to improve the display quality of the footage. The AI technology used in this software is so advanced that it does not need any help and edits every frame with accuracy resulting in a natural and smooth visual. Topaz Video Enhance IA can be used to restore old or low-resolution footage. This video enhance AI app allows outstanding slow-motion editing of videos. This software can give your video upscaling experience a new turn.

Part 2 How Do You Use Topaz Video Enhance AI?
When we are talking about topaz labs video enhance AI review, it’s incomplete if we do not talk about the process of using it**.** The whole process of video enhance AI topaz labs can be divided into these parts:
01Importing of videos
To open a dialogue box showing your videos, click on the center of the screen. You can select more than one video or even drag those videos directly into the app from the dialogue box that has been shown.

The videos you have selected will be shown at the bottom of the screen. You can pick each video individually to edit, or you can do a batch edit of all the videos.

To remove a video or a video queue, you can click on the delete icon above the video list.
02Choosing AI Processing Models
You need to choose the suitable models to edit or enhance your video. Different AI Processing models will be available in the app itself; you can choose if you want to choose from those models.
03Settings of the output of the video
The app offers in-built standards to set your output, or you can create your custom settings.

For the output of the video, the app allows both picture and video sequence output.

Sometimes a black bar appears on the output video when non-standard-sized videos are converted to standard preset.
But there is a solution to this, you fill the frame by clicking on the “Crop to fill frame” option.
04Setting a name for your output
With the height, width, and scale of the output video, the current name will be shown by default. You can change this by unchecking the box and selecting the “Use default output name,” Then, there will be a dialogue box on your screen.
In that dialogue box, type the name of your output video, select the format or type of your output file, select the location where you want to save your output and then click on the “Save” option.
05Preview of the output video
You can see a short clip of 30 rendered framed of your output as a preview.
To preview the render, you need to select and drag the slider on your video’s timeline. Position the slider where you want to see the preview of your render or output.
You need to wait for a while so that the clips get processed. After the processing is complete, there will be a split-screen.
One part of the split shows the original video clip, and the other split shows the edited or rendered previews on loop.
06Trimming of the output video
To understand simply, the more your output size, the more time it takes to process.
To save the processing time, you can trim only that part of the rendered video you need.
To start with the trimming process, you need to drag the slider along the video’s timeline to select the starting timestamp of the video.
After you have positioned your slider, click on the “scissor” icon on your screen to trim the beginning of your rendered video.
To trim from the end of the rendered video, you have to drag the slider to the ending position of your video.
After your slider is perfectly positioned, click on the “scissor” icon on your screen to trim the end part of your rendered video.
A part of your timeline will be highlighted; this highlighted portion will be processed as you edit, enhanced output.

07Processing of the final output
To get the final output, you need to process the video.
To start with the processing, click on the “Start Processing” option at the bottom. Your video will be shown frame by frame until the processing of the video is complete.
Part 3 Deep Learning: Topaz Video Enhance AI Review
To make the topaz video enhance review, we need to throw light on these features.
01Cost
All the users are given a one-month free trial. However, the complete version of Topaz Video Enhance AI costs $199.9 (includes an update of one year), and the yearly upgrades run at $99. If you do not want to pay for yearly upgrades, you continue using your previous version or the version you bought previously. You can use coupons to have a discount on your payment.
02Design and Performance
The main designs and performance highlights of this software are:
● Default footage set to 4K resolution.
● This software cleans up old progressive footage
● The app interlaces footage to 4K
● This app cleans up old interlaced footage
● This app supports 400% slow motion and 60fps.
03Features
Topaz Video Enhance AI has several exciting features. The most iconic among those features were:
● Upscaling of video to 4Kor 8K resolution. This application can upgrade your video from SD to HD, from HD to 4K, and from 4K to 8K.
● Topaz Video Enhance AI works as a wonder to remove noise. This app has an excellent performance in removing high ISO noise. Topaz AI uses outstanding photo editing software, which results in wonderful outputs.
● The AI automatically converts your video frame rate from 25fps to 3fps. So, if you need your custom frame rate settings, you can set them in the app.
● Topaz Video Enhance AI acts as amind-blowing editing software when it is about deinterlacing video. Deinterlacing your video gives a smooth and natural finish to your video because there are almost no or very few artifacts in the final output.
04System Requirements
Video Enhance AI has certain system requirements. The features required are:
Windows: This software is not supported by Windows 7 or Windows 8. Appropriate for Windows 10 (build 19041 v2004 and above) and Windows 11.
Mac: 10.14 Mojave and above for CPU support 10.15 Catalina and above GPU support.
The hardware requirements are:
● Processor: Intel HD 5000 iGPU or above AMD CPUs from 2016
● System Memory: 8GB (16GB recommended for better performance)
● Graphics Card: Intel HD 5000 (on CPU DirectX 12, compatible in all Windows) and Mac 10.15 and above.
● Dedicated Graphics Memory: 2GB (8GB recommended for better performance)
05Interface
When Topaz Video Enhance AI is working, the screen is divided into different parts, that is:
● Clip selection or the clip selection bar can be used to select the exact portions that you want to render and export as the final footage.
● Video Processing Window can be used to select the AI model from the preset AI models on the app itself.
● A batch processing window is used to edit the batch by adding footage to the batch for batch editing.
● In this video output section, you can select one of the presets for your footage from an upscale percentage of 1.

06A Comparison to Other Video Enhance AI Software
| Topaz Video Enhance AI | Other Video Enhance AI |
|---|---|
| Preset video resolution is 4K | Most of the video enhance AI has a maximum resolution of 4K. |
| The preset fps rate is 30, and you can change it accordingly. | Other Video Enhance AI software has one preset fps rate and does not allow users to change it. |
| Supports any output format. | Supports only particular formats of output. |
Wondershare Filmora Video Editor is another app you can use to edit your footage and retain its quality. Most of the editing app ruins the quality. You can use this app to edit your own footage or photos. This application is one of the best editing apps because of its cool and user-friendly features. The most amazing part is this app is free and available on both Windows and Mac.
For Win 7 or later (64-bit)
For macOS 10.12 or later
● Ending Thoughts →
● Now you know what usages of Topaz Video Enhance IA are through the topaz video enhance review focused on in this article.
● The main features, minimum system requirements, and, most importantly, the procedure to use this app have been elaborated on in this article.
● Please let us know your views on this post and if you liked it, do share it with your friends and comment below.
Earlier, you might need a professional to help you with the AI video enhancing process, but now you can do it yourself using Topaz. This app has fascinating features to make your editing experience smooth and unique. This app was used only for photo enhancement earlier. Now with time, it has been updated, and now it can be used to do AI Enhancing of your video. This article is a Topaz Video Enhance AI review. Here in this article, we focus on the usage of Topaz and its effectiveness compared to other AI software.
In this article
01 [What Does Topaz Video Enhance AI Do?](#Part 1)
02 [How Do You Use Topaz Video Enhance AI?](#Part 2)
03 [Deep Learning: Topaz Video Enhance AI Review](#Part 3)
Part 1 What Does Topaz Video Enhance AI Do?
Topaz Video Enhance IA is an all-rounder in its field. This app is used to do AI upscaling in general and is used to improve the display quality of the footage. The AI technology used in this software is so advanced that it does not need any help and edits every frame with accuracy resulting in a natural and smooth visual. Topaz Video Enhance IA can be used to restore old or low-resolution footage. This video enhance AI app allows outstanding slow-motion editing of videos. This software can give your video upscaling experience a new turn.
Part 2 How Do You Use Topaz Video Enhance AI?
When we are talking about topaz labs video enhance AI review, it’s incomplete if we do not talk about the process of using it**.** The whole process of video enhance AI topaz labs can be divided into these parts:
01Importing of videos
To open a dialogue box showing your videos, click on the center of the screen. You can select more than one video or even drag those videos directly into the app from the dialogue box that has been shown.
The videos you have selected will be shown at the bottom of the screen. You can pick each video individually to edit, or you can do a batch edit of all the videos.
To remove a video or a video queue, you can click on the delete icon above the video list.
02Choosing AI Processing Models
You need to choose the suitable models to edit or enhance your video. Different AI Processing models will be available in the app itself; you can choose if you want to choose from those models.
03Settings of the output of the video
The app offers in-built standards to set your output, or you can create your custom settings.
For the output of the video, the app allows both picture and video sequence output.
Sometimes a black bar appears on the output video when non-standard-sized videos are converted to standard preset.
But there is a solution to this, you fill the frame by clicking on the “Crop to fill frame” option.
04Setting a name for your output
With the height, width, and scale of the output video, the current name will be shown by default. You can change this by unchecking the box and selecting the “Use default output name,” Then, there will be a dialogue box on your screen.
In that dialogue box, type the name of your output video, select the format or type of your output file, select the location where you want to save your output and then click on the “Save” option.
05Preview of the output video
You can see a short clip of 30 rendered framed of your output as a preview.
To preview the render, you need to select and drag the slider on your video’s timeline. Position the slider where you want to see the preview of your render or output.
You need to wait for a while so that the clips get processed. After the processing is complete, there will be a split-screen.
One part of the split shows the original video clip, and the other split shows the edited or rendered previews on loop.
06Trimming of the output video
To understand simply, the more your output size, the more time it takes to process.
To save the processing time, you can trim only that part of the rendered video you need.
To start with the trimming process, you need to drag the slider along the video’s timeline to select the starting timestamp of the video.
After you have positioned your slider, click on the “scissor” icon on your screen to trim the beginning of your rendered video.
To trim from the end of the rendered video, you have to drag the slider to the ending position of your video.
After your slider is perfectly positioned, click on the “scissor” icon on your screen to trim the end part of your rendered video.
A part of your timeline will be highlighted; this highlighted portion will be processed as you edit, enhanced output.
07Processing of the final output
To get the final output, you need to process the video.
To start with the processing, click on the “Start Processing” option at the bottom. Your video will be shown frame by frame until the processing of the video is complete.
Part 3 Deep Learning: Topaz Video Enhance AI Review
To make the topaz video enhance review, we need to throw light on these features.
01Cost
All the users are given a one-month free trial. However, the complete version of Topaz Video Enhance AI costs $199.9 (includes an update of one year), and the yearly upgrades run at $99. If you do not want to pay for yearly upgrades, you continue using your previous version or the version you bought previously. You can use coupons to have a discount on your payment.
02Design and Performance
The main designs and performance highlights of this software are:
● Default footage set to 4K resolution.
● This software cleans up old progressive footage
● The app interlaces footage to 4K
● This app cleans up old interlaced footage
● This app supports 400% slow motion and 60fps.
03Features
Topaz Video Enhance AI has several exciting features. The most iconic among those features were:
● Upscaling of video to 4Kor 8K resolution. This application can upgrade your video from SD to HD, from HD to 4K, and from 4K to 8K.
● Topaz Video Enhance AI works as a wonder to remove noise. This app has an excellent performance in removing high ISO noise. Topaz AI uses outstanding photo editing software, which results in wonderful outputs.
● The AI automatically converts your video frame rate from 25fps to 3fps. So, if you need your custom frame rate settings, you can set them in the app.
● Topaz Video Enhance AI acts as amind-blowing editing software when it is about deinterlacing video. Deinterlacing your video gives a smooth and natural finish to your video because there are almost no or very few artifacts in the final output.
04System Requirements
Video Enhance AI has certain system requirements. The features required are:
Windows: This software is not supported by Windows 7 or Windows 8. Appropriate for Windows 10 (build 19041 v2004 and above) and Windows 11.
Mac: 10.14 Mojave and above for CPU support 10.15 Catalina and above GPU support.
The hardware requirements are:
● Processor: Intel HD 5000 iGPU or above AMD CPUs from 2016
● System Memory: 8GB (16GB recommended for better performance)
● Graphics Card: Intel HD 5000 (on CPU DirectX 12, compatible in all Windows) and Mac 10.15 and above.
● Dedicated Graphics Memory: 2GB (8GB recommended for better performance)
05Interface
When Topaz Video Enhance AI is working, the screen is divided into different parts, that is:
● Clip selection or the clip selection bar can be used to select the exact portions that you want to render and export as the final footage.
● Video Processing Window can be used to select the AI model from the preset AI models on the app itself.
● A batch processing window is used to edit the batch by adding footage to the batch for batch editing.
● In this video output section, you can select one of the presets for your footage from an upscale percentage of 1.
06A Comparison to Other Video Enhance AI Software
| Topaz Video Enhance AI | Other Video Enhance AI |
|---|---|
| Preset video resolution is 4K | Most of the video enhance AI has a maximum resolution of 4K. |
| The preset fps rate is 30, and you can change it accordingly. | Other Video Enhance AI software has one preset fps rate and does not allow users to change it. |
| Supports any output format. | Supports only particular formats of output. |
Wondershare Filmora Video Editor is another app you can use to edit your footage and retain its quality. Most of the editing app ruins the quality. You can use this app to edit your own footage or photos. This application is one of the best editing apps because of its cool and user-friendly features. The most amazing part is this app is free and available on both Windows and Mac.
For Win 7 or later (64-bit)
For macOS 10.12 or later
● Ending Thoughts →
● Now you know what usages of Topaz Video Enhance IA are through the topaz video enhance review focused on in this article.
● The main features, minimum system requirements, and, most importantly, the procedure to use this app have been elaborated on in this article.
● Please let us know your views on this post and if you liked it, do share it with your friends and comment below.
Do You Want to Use LUTs in Final Cut Pro? There Are Many Free LUTs for FCPX Available that You Can Use. Using LUTs, You Can Create Professional-Looking Content
Final Cut Pro is a powerful video editing software available for Mac OS. You can create professional-looking videos using this tool. To give your videos a more professional touch, you can use LUTs as well. It is a quick way to color grade and improve the feel of your media content. They are essentially a set of instructions that apply a particular color grading to your video.
Moreover, with so many options available, you can choose from any color grading style you want. From cinematic to retro, LUTs offer you a variety of color adjustment tones and overlays. All you have to do is to choose from free LUTs for Final Cut Pro and download your preferred one.
- Part 2: How to Apply LUTs on Final Cut Pro
- Part 3: Discussing Wondershare Filmora LUTs - The Best Video Editing Platform
Part 1: Discovering The Top Best LUTs for FCPX
You are at the right place if you’re having trouble finding the best LUTs for FCPX. This section will provide you with one of the best LUTs you can choose for your videos.
1.Free Cinematic LUTs Pack for Video Editing
This free LUT pack is a perfect choice to give your videos a cinematic look. It features a soft blue color grading with high contrast that can make your footage look like it was shot on film. This LUT is especially effective for outdoor scenes and action shots. Moreover, its color grading enhances the drama and feel of your video footage.

2.10 Free Vintage Color Presets for Final Cut Pro
10 Free Vintage Color Presets for Final Cut Pro is a great pack if you’re looking for a vintage or retro feel. It has a warm, yellowish color grading that can give your videos a nostalgic look. This pack is ideal for footage shot in the 70s, 80s, or 90s. It highlights the muddiness and brown shades in your video to add a touch of authenticity to it.

3. Perfect Green Video LUT
Perfect Green Video LUT is a pack of 3 cinematic-style LUTs. This pack is ideal for travel or nature videos as it increases the green tone in your videos. It has a lush, green color grading that can make your videos look vibrant and lively. Additionally, this pack is effective for outdoor scenes as it improves your video’s natural colors and makes it look more dynamic.

4. Cyberpunk Color Grades
Cyberpunk Color Grades is a pack of modern cyberpunk-style LUTs. It is a fantastic LUT pack if you’re working on a music video or a creative project. It has a bold, colorful grading with high saturation that can make your video stand out. This LUT pack is perfect for scenes with many neon lights or bright backgrounds. Moreover, it adds an extra pop of color and makes your videos look more energetic.

5. Pro Retouching Essentials Pack by Prince Meyson
Prince Meyson offers this skin tone enhancer LUT pack. It has a neutral, balanced color grading that can make your videos look more polished and professional. This LUT is ideal for interviews, documentaries, or corporate videos. Moreover, this pack is perfect for portraits and close-up shots. It can enhance the natural colors of your footage and make it look more refined.

Part 2: How to Apply LUTs on Final Cut Pro
Now that you’ve discovered there are many Final Cut Pro LUTs free to download. The most important thing is to learn how to use these free LUTs on your video using FCPX. Here are some methods to learn to apply LUTs using Final Cut Pro in simple steps.
Method 1 Using Custom Layer
Step1
Open Final Cut Pro and import your video. Once the video is imported, click on the clip you want to apply the LUT.

Step2
Go to the “Effect Browser” and search for the LUT option from the search menu. After selecting it, you will get a “Custom LUT” layer. Select the custom LUT layer and drag and drop it onto your video clip. Then, click on the video clip and go to the “Inspector” window.

Step3
Select the “Custom LUT” option in the inspector window and choose your desired LUT from the LUT drop-down menu. Final Cut Pro will apply your desired LUT to your video clip.

Method 2 Using Adjustment Layer
Step1
Click the plugin button once you’ve imported your video clip and choose RT Adjustment Layer. Furthermore, if you don’t have this plugin, you can download it for free.

Step2
An icon will appear once you’ve selected RT Adjustment Layer. Drag and drop this icon on top of your video clip.

Step3
Drag and drop the “Custom LUT” layer onto your RT Adjustment Layer from the Effect Browser. Click on the RT Adjustment Layer and choose your desired LUT from the “Inspector” menu.

Method 3 Change Settings To Enable LUTs
Step1
Import your video into Final Cut Pro and click on your video in the library and open the inspector window.

Step2
In the section of the “Inspector” menu, click the drop-down menu and select the “General” option. It will open up new options in the menu where you have to choose the “Camera LUT” option and select your preferred LUT. After selecting your LUT, save your video by choosing the option.

Part 3: Discussing Wondershare Filmora LUTs - The Best Video Editing Platform
If you’re looking for a great video editing tool, Wondershare Filmora might be just what you need. With many features embedded in it, it makes it easy to create professional-looking videos. Moreover, you can apply LUTs to add a cinematic touch to your footage. With over 200+ LUTs available, you can improve the color grading of your videos. Additionally, this tool allows you to adjust its intensity as well.
Furthermore, Wondershare Filmora offers options for color adjustments and enhancements. You can add transitions, templates, effects, and filters to your videos. In addition to this, it offers over 10 billion free media assets that you can use to enhance your videos. With Wondershare Filmora, you can play around with different features and options to make your content look fantastic.

Empower your videos with a new mood using different LUTs. Filmora now offers 100+ top-quality 3D LUTs cover a broad range of scenarios. Transform your videos with Filmora’s powerful 3D LUTs.
Apply LUT on Videos Apply LUT on Videos Learn More


Conclusion
In conclusion, Final Cut Pro is a powerful tool for video editing. This tool allows you to make color corrections and color adjustments to your videos. Furthermore, Final Cut Pro offers the option to use LUTs for color grading. You can find many best LUTs for FCPX available online to use in this tool. However, Wondershare Filmora is another amazing tool that you use to color-grade your videos professionally.
Part 1: Discovering The Top Best LUTs for FCPX
You are at the right place if you’re having trouble finding the best LUTs for FCPX. This section will provide you with one of the best LUTs you can choose for your videos.
1.Free Cinematic LUTs Pack for Video Editing
This free LUT pack is a perfect choice to give your videos a cinematic look. It features a soft blue color grading with high contrast that can make your footage look like it was shot on film. This LUT is especially effective for outdoor scenes and action shots. Moreover, its color grading enhances the drama and feel of your video footage.
2.10 Free Vintage Color Presets for Final Cut Pro
10 Free Vintage Color Presets for Final Cut Pro is a great pack if you’re looking for a vintage or retro feel. It has a warm, yellowish color grading that can give your videos a nostalgic look. This pack is ideal for footage shot in the 70s, 80s, or 90s. It highlights the muddiness and brown shades in your video to add a touch of authenticity to it.
3. Perfect Green Video LUT
Perfect Green Video LUT is a pack of 3 cinematic-style LUTs. This pack is ideal for travel or nature videos as it increases the green tone in your videos. It has a lush, green color grading that can make your videos look vibrant and lively. Additionally, this pack is effective for outdoor scenes as it improves your video’s natural colors and makes it look more dynamic.
4. Cyberpunk Color Grades
Cyberpunk Color Grades is a pack of modern cyberpunk-style LUTs. It is a fantastic LUT pack if you’re working on a music video or a creative project. It has a bold, colorful grading with high saturation that can make your video stand out. This LUT pack is perfect for scenes with many neon lights or bright backgrounds. Moreover, it adds an extra pop of color and makes your videos look more energetic.
5. Pro Retouching Essentials Pack by Prince Meyson
Prince Meyson offers this skin tone enhancer LUT pack. It has a neutral, balanced color grading that can make your videos look more polished and professional. This LUT is ideal for interviews, documentaries, or corporate videos. Moreover, this pack is perfect for portraits and close-up shots. It can enhance the natural colors of your footage and make it look more refined.
Part 2: How to Apply LUTs on Final Cut Pro
Now that you’ve discovered there are many Final Cut Pro LUTs free to download. The most important thing is to learn how to use these free LUTs on your video using FCPX. Here are some methods to learn to apply LUTs using Final Cut Pro in simple steps.
Method 1 Using Custom Layer
Step1
Open Final Cut Pro and import your video. Once the video is imported, click on the clip you want to apply the LUT.
Step2
Go to the “Effect Browser” and search for the LUT option from the search menu. After selecting it, you will get a “Custom LUT” layer. Select the custom LUT layer and drag and drop it onto your video clip. Then, click on the video clip and go to the “Inspector” window.
Step3
Select the “Custom LUT” option in the inspector window and choose your desired LUT from the LUT drop-down menu. Final Cut Pro will apply your desired LUT to your video clip.
Method 2 Using Adjustment Layer
Step1
Click the plugin button once you’ve imported your video clip and choose RT Adjustment Layer. Furthermore, if you don’t have this plugin, you can download it for free.
Step2
An icon will appear once you’ve selected RT Adjustment Layer. Drag and drop this icon on top of your video clip.
Step3
Drag and drop the “Custom LUT” layer onto your RT Adjustment Layer from the Effect Browser. Click on the RT Adjustment Layer and choose your desired LUT from the “Inspector” menu.
Method 3 Change Settings To Enable LUTs
Step1
Import your video into Final Cut Pro and click on your video in the library and open the inspector window.
Step2
In the section of the “Inspector” menu, click the drop-down menu and select the “General” option. It will open up new options in the menu where you have to choose the “Camera LUT” option and select your preferred LUT. After selecting your LUT, save your video by choosing the option.
Part 3: Discussing Wondershare Filmora LUTs - The Best Video Editing Platform
If you’re looking for a great video editing tool, Wondershare Filmora might be just what you need. With many features embedded in it, it makes it easy to create professional-looking videos. Moreover, you can apply LUTs to add a cinematic touch to your footage. With over 200+ LUTs available, you can improve the color grading of your videos. Additionally, this tool allows you to adjust its intensity as well.
Furthermore, Wondershare Filmora offers options for color adjustments and enhancements. You can add transitions, templates, effects, and filters to your videos. In addition to this, it offers over 10 billion free media assets that you can use to enhance your videos. With Wondershare Filmora, you can play around with different features and options to make your content look fantastic.
Empower your videos with a new mood using different LUTs. Filmora now offers 100+ top-quality 3D LUTs cover a broad range of scenarios. Transform your videos with Filmora’s powerful 3D LUTs.
Apply LUT on Videos Apply LUT on Videos Learn More
Conclusion
In conclusion, Final Cut Pro is a powerful tool for video editing. This tool allows you to make color corrections and color adjustments to your videos. Furthermore, Final Cut Pro offers the option to use LUTs for color grading. You can find many best LUTs for FCPX available online to use in this tool. However, Wondershare Filmora is another amazing tool that you use to color-grade your videos professionally.
Also read:
- Updated 5 Tried-And-True Ways to GIF Making for 2024
- Updated Best Ai Generated Memes
- Updated 2024 Approved Best 8 AR Apps for Android and iOS | Help You See the World of AR
- In 2024, What Is HDRI? Everything You Need to Know About HDRI
- Updated In 2024, So, without Wasting Time, Let Me Show You How to Mask a Video in Wondershare Filmora. Lets Get Started
- New In 2024, FLV Editor for Windows 11/10/8.1/8/7 Easily Edit FLV Videos on PC
- New In 2024, How Can I Control Speed of a Video
- New How to Create Your Own Subscribe Channel Graphics
- New In 2024, Do You Wish to Make Your Discord PFP an Attention-Seeker? If Yes, Try the Animated Discord PFP. Lets Go over Essential Facts on the Topic, Including How to Get an Animated Discord PFP
- Updated How to Do Censor Effects with Filmora
- New Are You Eager to Discover the Top-Rated and Reliable LUTs that Can Be Used in Shotcut? This Article Will Help You a Lot with This Matter for 2024
- In 2024, IMovie Review – Is It The Best Video Editor for Mac Users?
- Updated | Top GIF to MP4 Converters for 2024
- Updated 2024 Approved In This Article, We Introduce You Our Top 5 Picks of Video to Ppt Converter
- In 2024, Ways to Make Sure Your Recording Slideshow in Powerpoint Is Not Wrong
- New In 2024, Want to Know How to Slow Down a Video on iPhone or Speed It Up? This Guide Provides Step by Step Method to Do so Using Simple Techniques. Find Out More About It
- New 2024 Approved Add Subtitles To Videos With Kapwing Step by Step
- Updated How to Use the Logo Intro Templates for Your Next Video for 2024
- New List of Whatsapp Video Format That You May Need to Know for 2024
- New Best Green Screen Software for Beginner on Mac
- Updated Create Perfect Slow Motion Videos With The Best CapCut Templates
- In 2024, Top 10 TEXT TO SPEECH VIDEO MAKERS
- In 2024, Explore a Variety of Inexpensive Camera Models Suitable for Making Slow-Motion Footage without Compromising Quality
- 2024 Approved 12 Impressive AI Video Ideas for Creating Engaging Video Content
- New In 2024, Being a Content Creator Means Creating a Slow-Mo at some Point. Study This Piece to Learn How to Play a Video in Slow Motion on iPhone
- Updated In 2024, Use Path Blur In Photoshop To Create Motion Effect
- New The Glitch Effect Shows Errors and Flaws in the Image or a Video. The Write-Up Presents the Complete Procedure of Adding Premiere Pros Glitch Effect and Introduces Eight Free Glitch Effects
- New In 2024, Ways to Merge Videos in HandBrake? Expectation Vs. Reality
- Updated In 2024, Embrace Creativity in Your Media by Replacing Backgrounds. Learn to Replace the Sky in Lightroom Through the Steps and Details Discussed in This Article
- Are You Looking to Find Out How to Loop YouTube Videos on iPhone? Learn How to Loop Your Favorite YouTube Video on Your iPhone, so You Can Play that Part over and Over for 2024
- 2024 Approved Looking for Simple Steps to Customize the Speed of Your Video in DaVinci Resolve? Find Out How You Can Do that and Discover an Easier Alternative to DaVinci Resolve
- Updated Read on to Learn About Multi Object Tracking, Its Types, and Requirements. Youll Also Learn About the Different Approaches Toward Object Tracking for 2024
- How to Make Audio Visualizer in Filmora Easy
- Updated What Is TS Format and How To Play TS Files? Basic Tips for 2024
- In 2024, How to Make Simple Slideshow Word
- New 2024 Approved 2 Solutions to Cut Video in VLC on Windows
- Dubbing Videos With Voiceovers | Using Wondershare Filmora
- New If You Are Experiencing a Color Distortion in Your Video, You Are in the Right Place. We Have Provided a Detailed Guide with Three Methods that Will Help You Correct This Issue for 2024
- How to Add Expression in After Effects for 2024
- New Learn Eight Simple Steps that Will Allow You to Create a Stunning Text Reveal Animation in Filmora. Simple yet Very Professional for 2024
- How to recover deleted contacts from Lava Blaze 2 5G.
- In 2024, Android to Apple How To Transfer Photos From Motorola Moto E13 to iPad Easily | Dr.fone
- Use Device Manager to update hardware drivers in Windows 11 & 10 & 7
- How to Fix My Xiaomi Redmi Note 12R Location Is Wrong | Dr.fone
- In 2024, How to Unlock iPhone 14 Pro Max With an Apple Watch & What to Do if It Doesnt Work | Dr.fone
- 3 Best Tools to Hard Reset OnePlus Ace 2 | Dr.fone
- A Guide Lava Agni 2 5G Wireless and Wired Screen Mirroring | Dr.fone
- Hard Resetting an Tecno Spark Go (2023) Device Made Easy | Dr.fone
- How to Repair a Damaged video file of Realme C51?
- Hard Resetting an OnePlus Open Device Made Easy | Dr.fone
- In 2024, How to Transfer Apps from Nokia 150 (2023) to Another | Dr.fone
- Stuck at Android System Recovery Of Infinix Smart 8 ? Fix It Easily | Dr.fone
- How to Unlock iPhone 12 Pro Max Without Passcode?
- Full Guide on Mirroring Your Lava Storm 5G to Your PC/Mac | Dr.fone
- How to Fix Error 495 While Download/Updating Android Apps On Oppo Find X6 | Dr.fone
- 8 Quick Fixes Unfortunately, Snapchat has Stopped on Xiaomi Mix Fold 3 | Dr.fone
- How To Enable USB Debugging on a Locked Nokia G22 Phone
- In 2024, How to Transfer Data from Realme C55 to Any iOS Devices | Dr.fone
- 3 Easy Solutions to Hard Reset Samsung Galaxy S23 FE | Dr.fone
- In 2024, Preparation to Beat Giovani in Pokemon Go For Vivo Y78 5G | Dr.fone
- Ways to stop parent tracking your Lava Blaze 2 5G | Dr.fone
- Title: In 2024, Create Photoshop GIFs with Zero Hustle
- Author: Morgan
- Created at : 2024-05-19 05:12:31
- Updated at : 2024-05-20 05:12:31
- Link: https://ai-video-editing.techidaily.com/in-2024-create-photoshop-gifs-with-zero-hustle/
- License: This work is licensed under CC BY-NC-SA 4.0.
