

In 2024, Detailed Steps to Cut a Video in QuickTime
Detailed Steps to Cut a Video in QuickTime
Filming a video is fun and editing is more interesting and entertaining. Today, everyone is making videos and there are tons of videos on the internet. Editing videos is required to make the video stand out and retain the audience. Video trimming helps you cut out the unwanted part of the video and leave the desired portion of the viewers.
Cutting a video means your video starts quickly and you don’t lose your audience’s attention.
The first ten seconds of the video are very important when deciding whether to stay or move on to the next video.
How to cut a video in QuickTime
Quicktime is an authentic application developed by Apple in 1991. It allows the users to edit, record, play, and share videos and pictures. If some editing software confuses you, QuickTime is just for you.
You need to download the application and here are all the features you can enjoy. It is compatible with all versions of windows whereas, if you are a Mac user it is already installed in your system.
Cutting a video is one of the basic but useful functions of QuickTime. It requires a few simple steps and some features related to cutting, splitting, and trimming a video.
Let’s start…
1. Cutting/splitting a video
Cutting a video means splitting some parts of the video to edit and rearrange the clips to make a new video. Mostly, it is used where you want to edit all clips of the video differently. It is also needed as it allows you to focus on your message and delete the portion not required and make the video large. You can remove the extra fat from the video to give clarity, direction, and hope. You can convey your message in a clear and concise way.
These steps should be followed to cut/split the video in minutes.
- In the QuickTime player, open the desired video.
- Select show clips from the view on the menu bar.
- Move the red marker from right to left to select the desired portion.
- Hit split clip from the edit

- A yellow rectangular bar appears over the edges of your video.
- You can cut the desired portion and make editing as you like.
- Repeat the sequence until you are done.
- Press the done

Cutting the video by splitting is used when you have a long video and you can easily edit them by splitting them into two parts.
2. Trimming a video
If you are cutting some parts at the beginning and the end of the video, it is called trimming a video. You can say it as removing unnecessary preparation scenes. Normally, professionals start their cameras before the film scene to ensure not to miss any part of the video. Here’s, how to trim video in the QuickTime player.
Let’s dive in…
- Launch QuickTime
- Select your video from the system.
- Select edit from the top menu.
- Select the trim or command T, or you can select the hold option from the drop-down list.

- A yellow trimming bar will appear over the edges of your video.
- Remove the unwanted area by moving from the right or left trim edges also called handles.

Everything inside the yellow bars will remain. You can preview your video anytime during the editing process.
- Hit the trim from the bottom right corner.
- Select save from the file on the top menu bar.
Trimming is critical because it is the time to convince the viewers to stick around and stay with your video.
For more advanced editing without losing the quality of the video, I recommend you to use Wonder Share Filmora 11. It’s an amazing app and very easy to use even for a layman.
An easier way to cut a video with Filmora
Wonder Share Filmora is one of the best video editing tools for beginners. It simplifies the editing process using smart and congenital features that can automate repetitive tasks. It has a lot of exciting features and has collaborated with others to make the work easier.
So here, I recommend Filmora Video Editor , an easy and very powerful, all-in-one video editor software. It enables you to cut, crop, and trim the videos in a few clicks without losing the quality of the video.
For Win 7 or later (64-bit)
For macOS 10.14 or later
Point to be noted:
The cut is removing some unwanted parts of the video.
The Split is dividing the clips into two parts.
The trim is deleting the starting or endpoints of the video.
1. Cut video using Filmora video cutter
Cutting a video is necessary even if you shot a very good video because it contains some irrelevant and unwanted clips. Removing the unnecessary part of the video will make the video short, concise, and to the point. Moreover, it helps in grabbing the attention of your valuable viewers.
If your video has multiple scenes to cut, the scene detection function would be helpful.
- Install Filmora video cutter
- Select the New project.
- Select the video in the media library.
- Right-click and select scene detection to enter the scene detection window.

- Select Detect
This will automatically detach your unwanted videos based on the change in scene.

- Click add to timeline to add the separated video into the timeline.
You can also remove the unwanted videos by clicking the delete icon.
2. Manually cut/split videos
To cut the beginning and the end portion of the video, we can use the trim feature.
Let’s start…
- Import the video and drag it into the timeline.
- Add Marker in the timeline to spot a particular clip.

Pointing the Marker will help to find the unwanted potion without wasting the important portion of the clip.
Here is all about trimming the video from beginning to end but if you want to cut the video into parts to remove the rest of the fat from the clips. You can follow these steps:
- Click the split icon above the timeline.
- Drag the play head to make a rectangle to cover the unwanted portion of the video.
- Press delete from the timeline besides the split tab.

Repeat the process and cut the video into many segments to get the desired video.
Conclusion
Video editing is a critical part of creating eye-catching movies. Along with this, cutting and trimming a video is the core of the whole process as it makes sure that your audience is hooked with your content or not. Once you have downloaded the Wonder Share Filmora app, the art of cutting the video and transforming into a new film is really amazing.
- A yellow rectangular bar appears over the edges of your video.
- You can cut the desired portion and make editing as you like.
- Repeat the sequence until you are done.
- Press the done
Cutting the video by splitting is used when you have a long video and you can easily edit them by splitting them into two parts.
2. Trimming a video
If you are cutting some parts at the beginning and the end of the video, it is called trimming a video. You can say it as removing unnecessary preparation scenes. Normally, professionals start their cameras before the film scene to ensure not to miss any part of the video. Here’s, how to trim video in the QuickTime player.
Let’s dive in…
- Launch QuickTime
- Select your video from the system.
- Select edit from the top menu.
- Select the trim or command T, or you can select the hold option from the drop-down list.
- A yellow trimming bar will appear over the edges of your video.
- Remove the unwanted area by moving from the right or left trim edges also called handles.
Everything inside the yellow bars will remain. You can preview your video anytime during the editing process.
- Hit the trim from the bottom right corner.
- Select save from the file on the top menu bar.
Trimming is critical because it is the time to convince the viewers to stick around and stay with your video.
For more advanced editing without losing the quality of the video, I recommend you to use Wonder Share Filmora 11. It’s an amazing app and very easy to use even for a layman.
An easier way to cut a video with Filmora
Wonder Share Filmora is one of the best video editing tools for beginners. It simplifies the editing process using smart and congenital features that can automate repetitive tasks. It has a lot of exciting features and has collaborated with others to make the work easier.
So here, I recommend Filmora Video Editor , an easy and very powerful, all-in-one video editor software. It enables you to cut, crop, and trim the videos in a few clicks without losing the quality of the video.
For Win 7 or later (64-bit)
For macOS 10.14 or later
Point to be noted:
The cut is removing some unwanted parts of the video.
The Split is dividing the clips into two parts.
The trim is deleting the starting or endpoints of the video.
1. Cut video using Filmora video cutter
Cutting a video is necessary even if you shot a very good video because it contains some irrelevant and unwanted clips. Removing the unnecessary part of the video will make the video short, concise, and to the point. Moreover, it helps in grabbing the attention of your valuable viewers.
If your video has multiple scenes to cut, the scene detection function would be helpful.
- Install Filmora video cutter
- Select the New project.
- Select the video in the media library.
- Right-click and select scene detection to enter the scene detection window.
- Select Detect
This will automatically detach your unwanted videos based on the change in scene.
- Click add to timeline to add the separated video into the timeline.
You can also remove the unwanted videos by clicking the delete icon.
2. Manually cut/split videos
To cut the beginning and the end portion of the video, we can use the trim feature.
Let’s start…
- Import the video and drag it into the timeline.
- Add Marker in the timeline to spot a particular clip.
Pointing the Marker will help to find the unwanted potion without wasting the important portion of the clip.
Here is all about trimming the video from beginning to end but if you want to cut the video into parts to remove the rest of the fat from the clips. You can follow these steps:
- Click the split icon above the timeline.
- Drag the play head to make a rectangle to cover the unwanted portion of the video.
- Press delete from the timeline besides the split tab.
Repeat the process and cut the video into many segments to get the desired video.
Conclusion
Video editing is a critical part of creating eye-catching movies. Along with this, cutting and trimming a video is the core of the whole process as it makes sure that your audience is hooked with your content or not. Once you have downloaded the Wonder Share Filmora app, the art of cutting the video and transforming into a new film is really amazing.
How to Create Your Own LOL Montage Video
Mostly, the lol montage videos help to excite the League of Legend players by displaying powerful attacks in the game. These videos help to entertain the viewers. In this article, you will study the importance of making these videos and the related steps in creating such content like a profession. There are many video editing tools available in the digital space to build videos according to your needs. Through efficient edits, you can make the best out of the captured content. The below content helps you to choose the right tool to carry out your video edits optimally. Connect with this article and find out the best ways to make the montage videos efficiently.

LOL Montage
Why we need to make LOL Montage Video
You can create lol montage videos for various reasons. Here are some of them are listed below.
Reason 1: Enlighten the viewers on how to play the game
As the game comprises two teams each five players fight one another using their powers. There are different ways to earn points, rewards and extra features for their characters while playing the game. Using the lol montage videos, you can teach the newbie users about the tips and tricks in this game.
Reason 2: Enhanced visuals
When creating montage videos, you can bring out the real effects of the content. There are options to edit the video effects and convincingly display them. The lol montage video grabs the attention of the viewers in no time and you can convey your message easily to the audience.
Reason 3: Increase the players
After streaming the LOL montage videos, you can expect many viewers will become players trying the tips highlighted in your content. It excites the audience and helps them to succeed in the game flawlessly.
How to create your own LOL Montage video
It is simple to create a lol montage video. Creativity with innovative edits is sufficient to develop outstanding montage content for your needs.

How to Create LOL Montage
1. Prepare your LOL video clips
Initially, prepare lol video clips as separate pieces. You can also pick the older images or videos if you have any in your gallery that is recorded when you had played the game. Capture fresh copies if possible but ensure it lasts for a short duration. Avoid recording longer content because it reduces the excitement in the audience.
2. How to pick the right video editing software
Next, after collecting the number of League of legends play recordings, pick the ones that are important in creating the montage video. Then, select the best video editor to perform the desired edits on the collected content. Here is a few recommended video editing tool to enhance the overall edits on the recorded content.
• Wondershare Filmora
The Filmora video editor is a simple tool with an excellent user interface. You can perform any edits effortlessly using this program. All the controls are explicitly available for quick access. Using Filmora video editor, you can add visual effects, transitions, and animations to the content like a pro. This app serves the needs of both professionals and newbies. You can also insert advanced features like audio ducking, freeze frames, keyframes, split the screens and stream desired music tracks with the content. You can explore more if you make a quick download of this application.
You can work on many factors in the videos to enhance their overall performance. Edit the background using the Chroma key and green screen effect and adjust the visuals by modifying the attributes like color gradients, hue, saturation, and brightness. You can insert motion elements, filters, and titles to add flavors to the content. Improve the audio quality in the content by removing the noise factors and adjusting the audio equalizers to sound precise.
• OpenShot Video editor
It is an exclusive video editor compatible with multi-platforms like Linux, Mac, and Windows, and you can use this app to trim and slice the videos into desired pieces. There are options to animate and keyframe the content hassle-free. This app enables you to work with multiple tracks without any watermark issues. Insert slow-motion effects and playback speed variations to add flavors to the edited content. It supports more than 70 languages and displays a simple interface.

Openshot Video Editor
• AVS video editor
Here comes another efficient video editor that works on the HD content like a pro. It is compatible with all file formats and processes the videos using its in-built features. This app allows adding texts, annotating, and splitting the recordings according to your requirement. Get a professional look at the content by working on its color gradients. Remove the shaking effects on the footage using the video stabilization features and change the background by triggering the Chroma Key effects.

AVS video editor
The above-discussed video editors are reliable, and you can go for them without hesitation. It brings impressive effects to the recordings and helps you create lol montage video content.
How to edit your LOL Montage video
Consider the Filmora video editor after recording the content to edit the file in the Filmora video editor by following the below instructions.
Step1Install the app
Go to the official webpage of Filmora and download the correct version of the tool based on the system OS. Then, install and launch the program. Next, upload the recorded file into the working space of Filmora using the Import Files option.
Wondershare Filmora11 Express Better
Achieve More
Grow Together
Free Download Free Download Learn More

![]()
Step2Add Visual effects
Now, select the Effects option in the Menu and witness the list of visual effects available as a built-in asset in the Filmora library. Then, choose the favorite effect option and right-click to select the Apply pop-up message. This activity applies the effect to the uploaded content in no time. You can use the Preview option to view the video effect on the recordings before making the final download of the edited content.
Step3Add Transitions and Effects to make it better
If you want to increase the effects on the recordings, then try some transitions and animations.
Select the Transitions option in the Menu and choose the desired transition effect listed on the screen. Choose your favorite one and right-click to hit the Apply pop-up option. This action applies the video effect to the uploaded file. You can witness the changes in the Preview button by playing the edited video.
Likewise, you can also add animations to the content. Use the in-built resource of Filmora by using the above method. Access the asset library of Filmora to add extra flavors to the content.
image / video 16:9
Conclusion:
Thus, this article has given valuable insights into the LOL montage video making. You can use the instructions wisely and build a montage video according to your needs. Increase the overall appearance of the content using reliable video editors like Filmora. Apply the basic and advanced edits on the video content and enhance the recordings for better outcomes. Stay connected with this article to learn more about the video edits and the reliable video editors that bring miraculous changes in the video content.
Free Download Free Download Learn More
![]()
Step2Add Visual effects
Now, select the Effects option in the Menu and witness the list of visual effects available as a built-in asset in the Filmora library. Then, choose the favorite effect option and right-click to select the Apply pop-up message. This activity applies the effect to the uploaded content in no time. You can use the Preview option to view the video effect on the recordings before making the final download of the edited content.
Step3Add Transitions and Effects to make it better
If you want to increase the effects on the recordings, then try some transitions and animations.
Select the Transitions option in the Menu and choose the desired transition effect listed on the screen. Choose your favorite one and right-click to hit the Apply pop-up option. This action applies the video effect to the uploaded file. You can witness the changes in the Preview button by playing the edited video.
Likewise, you can also add animations to the content. Use the in-built resource of Filmora by using the above method. Access the asset library of Filmora to add extra flavors to the content.
image / video 16:9
Conclusion:
Thus, this article has given valuable insights into the LOL montage video making. You can use the instructions wisely and build a montage video according to your needs. Increase the overall appearance of the content using reliable video editors like Filmora. Apply the basic and advanced edits on the video content and enhance the recordings for better outcomes. Stay connected with this article to learn more about the video edits and the reliable video editors that bring miraculous changes in the video content.
Five Thoughts on Discord Create Account’s How-To Questions
Five Thoughts on Discord Create Account
An easy yet powerful editor
Numerous effects to choose from
Detailed tutorials provided by the official channel
Discord was a great alternative to voice chat systems such as TeamSpeak, Mumble, and Ventrilo for online gamers. Gamers make discord accounts for these services to play together rather than the voice communication facilities integrated into games, which are frequently of poor quality and lack functionality.
Founded in 2015, discord allowed individuals to talk while playing PC games seamlessly. Users may utilize the service to establish servers that can include many text and audio channels. A typical discord account server may feature chat rooms dedicated to specific themes (such as “gaming” and “anime x manga”), as well as voice channels devoted to specific games or activities. The service’s high-quality, low-latency audio chat is a popular tool for Twitch broadcasters and podcasters. It has also expanded to accommodate massive video conversations to compete with Zoom.
In this article
01 [How Does Discord Work and What is it Used for?](#Part 1)
02 [How to Make a Discord Signup in the Browser?](#Part 2)
03 [How to Make a Discord Signup with Desktop?](#Part 3)
04 [How to Make a Signup Discord with App?](#Part 4)
05 [Discord Create Account FAQs](#Part 5)
Part 1 How Does Discord Work and What is it Used for?
Discord account allows friends to communicate with one another one-on-one or in groups via a server. You may use it to send direct messages to pals, as well as video calls, audio chat, and screen sharing. Once on a server, you can join a voice chat channel to communicate with other gamers who are playing certain games.
You can share many things on discord, including media files like images, gifs, audio, and videos. Speaking of videos, video editing doesn’t get any better than Filmora. Wondershare Filmora Video Editor is a sophisticated editing application for Windows and Mac users. It was initially known as Wondershare Video Editor, but following its fifth release, it got renamed Filmora. The video editor’s primary features include animation, overlays, audio control, on-screen recording, and multi-editing modes. The video editor is well-known for its feature-rich but the simple interface, making it suited for both novice and experienced users.
For Win 7 or later (64-bit)
For macOS 10.12 or later
Filmora’s standout features
● Editing Audio Equalizer 4K Resolution Support
● Support for GIFs
● Screen Dividers
● Controls For Video And Audio
● Multiple Video Clips Can Be Layered
● Stabilization of Video
● Presets for Color Grading
● Text Editing Expertise
● Tilt-Shift
● The mosaic (Blurring)
● Noise Elimination
● Importance in Social Life
● Preview of Each Frame
● Controlling the Speed
● Audio-Mixer
● Backgrounds in Chroma Key
● Screen Capture
● Separation of audio
● Scene Recognition
You can make your discord account and use it on almost any platform, including discord desktop software for Windows and Mac and iOS and Android apps for talking and calling on the move. If you prefer not to download anything, it also works in a web browser. You can link your discord account app to various popular services, such as Twitch and Spotify, so your friends can see your actions. While there is no discord Xbox app, you may link your discord and Xbox accounts so that others can see what you’re up to on your Xbox Series X or Xbox Series S.
Part 2 How to Make a Discord Signup in the Browser
Don’t have the discord account?
You can quickly sign up using your preferred web browser, i.e., Chrome, Microsoft Edge, Firefox, or Safari.
Follow the steps below to make a discord account using your web browser:
Step 1: Go to <www.discord.com> and click the “Login” button in the upper right corner.
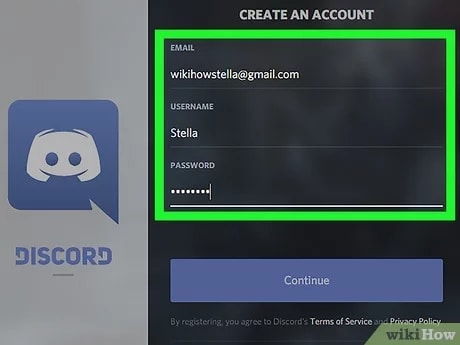
Step 2: To establish a new discord account, click “Register” underneath the login page.
Step 3:
● Enter your email, a username, and a strong password.
● Date of birth.
● Accept the terms of service.
After entering the above, click the “Continue” button.
Step 4: Check the box besides “I am human” to enable the captcha.
Step 5: You will receive an email asking you to confirm your information. Select the “Verify email” option.
Once you’ve signed up for discord, you may access it via the Discord website or the mobile app. The program is free to download for Windows, Linux, Mac, Android, and iOS.
Follow the steps above to sign up on discord account successfully. Easy right? Let’s proceed!
Part 3 How to Make a Discord Signup with Desktop?
The discord creating account on your desktop is pretty much the same as using your browser.
Follow the steps below to make a discord account using your desktop.
Step 1: Click “Login” on the Discord website (top right).
Step 2: Underneath the sign-in box, click “Register.”
Step 3: Enter the email address, username, password, and birth date.
Step 4: Agree to the terms of service and then click “Continue.”
Step 5: Use the captcha to prove that you are not a robot.
Step 6: You will get an email to confirm your data; click on the link in the email to confirm.
See that? No big deal, right?
Part 4 How to Make a Signup Discord with App
Signing up for a discord account through the app is relatively easy, like the procedures above, you will not break a sweat.
Follow the easy steps below for discord create account on your smartphone device:

Step 1: Install and launch the Discord app on your smartphone
Step 2: Select the Register option.
Step 3: Choose whether to register by cellphone number or email address and input either one.
Step 4: You will get a message with a confirmation code or an email with a link.
Step 5: Enter the code or navigate to the URL.
Step 6: Enter your username and password here.
Step 7: Enter your birth date.
Step 8: Accept the terms of the agreement.
Step 9: Click “Next” to finish the Discord registration.
What Happens When You Disable your Discord Account?
When you deactivate your account, it goes to suspension mode. You may reactivate it by signing in and following the on-screen instructions. Keep in mind that discord accounts dormant for two years are removed, so if you want to keep yours, you must reactivate it (but you can disable it after this if you like).
After you deactivate an account, users will no longer get discord alerts. Users may, however, still receive friend requests, and any friend requests users get while their account is blocked will be ready for when they reactivate it. However, when a user decides to delete their account, the said account will get permanently deleted.
Tip: If you want to stay away from your discord account for a while with a plan to return to it later, it is advisable to log out or deactivate rather than delete it.
Part 5 Discord Create Account FAQs
Q. Is discord free, or do I have to pay?
A. Yes and no. The premium edition of discord is not free. If you don’t want to utilize the premium features, you may still download and make a discord account for free.
Q. Is there anything I cannot do on discord?
A. Do not organize, promote, or participate in any unlawful or possibly dangerous activities, such as sexual solicitation, human trafficking, or selling or enabling the sale of forbidden or potentially harmful products (firearms, ammunition, drugs, and controlled substances).
Q. Do messages disappear on discord?
A. Your messages are only destroyed: 1. if they are deleted individually (by you or a user with proper rights), 2. if you get banned, and the person banning you decides to delete all of your messages at once.
Q. Does discord account keep a record of interactions?
A. Yes, discord will track every discussion you have on discord acount, record everything you say on discord, and examine all photographs you transmit over discord.
Q. How will I know when someone blocks me on discord?
A. When you block someone, their online status on discord account changes to “offline” until unblocked and vice versa. They will also show offline in mutual servers or your chat history.
Q. How do I permanently delete my discord account?
A. To delete your discord created account for good, head to user settings, then tap on ‘my account.’ From there, tap on ‘Account Removal’ then tap on ‘Delete Account.’
If you are a server owner, you will have to delete the server or pass ownership of the server.
Q. How do I find servers to join on discord?
A. If you have a buddy who has a discord server you’d want to join, request an invite. If you’re a member of a discord community, ask for an invite or check on the community website.
By tapping the magnifying glass in the left window of the discord account app, you may also search for public servers that anybody can join.
● Ending Thoughts →
● Discord is a web program that works in most browsers. A desktop version is available for Windows, macOS, Linux, iOS, and Android. Discord’s desktop and browser versions are functionally and visually identical in practically every regard if you want to make a discord account. So, re-read the article and the FAQs on discord create account, and start your journey.
● Finally, for the creatives, boost your discord create account and usage experience by using Filmora to edit videos and make cool animations.
Discord was a great alternative to voice chat systems such as TeamSpeak, Mumble, and Ventrilo for online gamers. Gamers make discord accounts for these services to play together rather than the voice communication facilities integrated into games, which are frequently of poor quality and lack functionality.
Founded in 2015, discord allowed individuals to talk while playing PC games seamlessly. Users may utilize the service to establish servers that can include many text and audio channels. A typical discord account server may feature chat rooms dedicated to specific themes (such as “gaming” and “anime x manga”), as well as voice channels devoted to specific games or activities. The service’s high-quality, low-latency audio chat is a popular tool for Twitch broadcasters and podcasters. It has also expanded to accommodate massive video conversations to compete with Zoom.
In this article
01 [How Does Discord Work and What is it Used for?](#Part 1)
02 [How to Make a Discord Signup in the Browser?](#Part 2)
03 [How to Make a Discord Signup with Desktop?](#Part 3)
04 [How to Make a Signup Discord with App?](#Part 4)
05 [Discord Create Account FAQs](#Part 5)
Part 1 How Does Discord Work and What is it Used for?
Discord account allows friends to communicate with one another one-on-one or in groups via a server. You may use it to send direct messages to pals, as well as video calls, audio chat, and screen sharing. Once on a server, you can join a voice chat channel to communicate with other gamers who are playing certain games.
You can share many things on discord, including media files like images, gifs, audio, and videos. Speaking of videos, video editing doesn’t get any better than Filmora. Wondershare Filmora Video Editor is a sophisticated editing application for Windows and Mac users. It was initially known as Wondershare Video Editor, but following its fifth release, it got renamed Filmora. The video editor’s primary features include animation, overlays, audio control, on-screen recording, and multi-editing modes. The video editor is well-known for its feature-rich but the simple interface, making it suited for both novice and experienced users.
For Win 7 or later (64-bit)
For macOS 10.12 or later
Filmora’s standout features
● Editing Audio Equalizer 4K Resolution Support
● Support for GIFs
● Screen Dividers
● Controls For Video And Audio
● Multiple Video Clips Can Be Layered
● Stabilization of Video
● Presets for Color Grading
● Text Editing Expertise
● Tilt-Shift
● The mosaic (Blurring)
● Noise Elimination
● Importance in Social Life
● Preview of Each Frame
● Controlling the Speed
● Audio-Mixer
● Backgrounds in Chroma Key
● Screen Capture
● Separation of audio
● Scene Recognition
You can make your discord account and use it on almost any platform, including discord desktop software for Windows and Mac and iOS and Android apps for talking and calling on the move. If you prefer not to download anything, it also works in a web browser. You can link your discord account app to various popular services, such as Twitch and Spotify, so your friends can see your actions. While there is no discord Xbox app, you may link your discord and Xbox accounts so that others can see what you’re up to on your Xbox Series X or Xbox Series S.
Part 2 How to Make a Discord Signup in the Browser
Don’t have the discord account?
You can quickly sign up using your preferred web browser, i.e., Chrome, Microsoft Edge, Firefox, or Safari.
Follow the steps below to make a discord account using your web browser:
Step 1: Go to <www.discord.com> and click the “Login” button in the upper right corner.
Step 2: To establish a new discord account, click “Register” underneath the login page.
Step 3:
● Enter your email, a username, and a strong password.
● Date of birth.
● Accept the terms of service.
After entering the above, click the “Continue” button.
Step 4: Check the box besides “I am human” to enable the captcha.
Step 5: You will receive an email asking you to confirm your information. Select the “Verify email” option.
Once you’ve signed up for discord, you may access it via the Discord website or the mobile app. The program is free to download for Windows, Linux, Mac, Android, and iOS.
Follow the steps above to sign up on discord account successfully. Easy right? Let’s proceed!
Part 3 How to Make a Discord Signup with Desktop?
The discord creating account on your desktop is pretty much the same as using your browser.
Follow the steps below to make a discord account using your desktop.
Step 1: Click “Login” on the Discord website (top right).
Step 2: Underneath the sign-in box, click “Register.”
Step 3: Enter the email address, username, password, and birth date.
Step 4: Agree to the terms of service and then click “Continue.”
Step 5: Use the captcha to prove that you are not a robot.
Step 6: You will get an email to confirm your data; click on the link in the email to confirm.
See that? No big deal, right?
Part 4 How to Make a Signup Discord with App
Signing up for a discord account through the app is relatively easy, like the procedures above, you will not break a sweat.
Follow the easy steps below for discord create account on your smartphone device:
Step 1: Install and launch the Discord app on your smartphone
Step 2: Select the Register option.
Step 3: Choose whether to register by cellphone number or email address and input either one.
Step 4: You will get a message with a confirmation code or an email with a link.
Step 5: Enter the code or navigate to the URL.
Step 6: Enter your username and password here.
Step 7: Enter your birth date.
Step 8: Accept the terms of the agreement.
Step 9: Click “Next” to finish the Discord registration.
What Happens When You Disable your Discord Account?
When you deactivate your account, it goes to suspension mode. You may reactivate it by signing in and following the on-screen instructions. Keep in mind that discord accounts dormant for two years are removed, so if you want to keep yours, you must reactivate it (but you can disable it after this if you like).
After you deactivate an account, users will no longer get discord alerts. Users may, however, still receive friend requests, and any friend requests users get while their account is blocked will be ready for when they reactivate it. However, when a user decides to delete their account, the said account will get permanently deleted.
Tip: If you want to stay away from your discord account for a while with a plan to return to it later, it is advisable to log out or deactivate rather than delete it.
Part 5 Discord Create Account FAQs
Q. Is discord free, or do I have to pay?
A. Yes and no. The premium edition of discord is not free. If you don’t want to utilize the premium features, you may still download and make a discord account for free.
Q. Is there anything I cannot do on discord?
A. Do not organize, promote, or participate in any unlawful or possibly dangerous activities, such as sexual solicitation, human trafficking, or selling or enabling the sale of forbidden or potentially harmful products (firearms, ammunition, drugs, and controlled substances).
Q. Do messages disappear on discord?
A. Your messages are only destroyed: 1. if they are deleted individually (by you or a user with proper rights), 2. if you get banned, and the person banning you decides to delete all of your messages at once.
Q. Does discord account keep a record of interactions?
A. Yes, discord will track every discussion you have on discord acount, record everything you say on discord, and examine all photographs you transmit over discord.
Q. How will I know when someone blocks me on discord?
A. When you block someone, their online status on discord account changes to “offline” until unblocked and vice versa. They will also show offline in mutual servers or your chat history.
Q. How do I permanently delete my discord account?
A. To delete your discord created account for good, head to user settings, then tap on ‘my account.’ From there, tap on ‘Account Removal’ then tap on ‘Delete Account.’
If you are a server owner, you will have to delete the server or pass ownership of the server.
Q. How do I find servers to join on discord?
A. If you have a buddy who has a discord server you’d want to join, request an invite. If you’re a member of a discord community, ask for an invite or check on the community website.
By tapping the magnifying glass in the left window of the discord account app, you may also search for public servers that anybody can join.
● Ending Thoughts →
● Discord is a web program that works in most browsers. A desktop version is available for Windows, macOS, Linux, iOS, and Android. Discord’s desktop and browser versions are functionally and visually identical in practically every regard if you want to make a discord account. So, re-read the article and the FAQs on discord create account, and start your journey.
● Finally, for the creatives, boost your discord create account and usage experience by using Filmora to edit videos and make cool animations.
Detailed Steps to Rotate Videos Using Kdenlive
Kdenlive is a free, open-source video editing software application. Kdenlive is a powerful video editor that can be used to create professional-quality videos. It supports all of the major video formats and has a wide range of features. Kdenlive is available for Linux, Mac OS X, and Windows. Kdenlive is a great choice for anyone looking for a powerful, yet easy-to-use video editor. It is perfect for creating professional-quality videos, and its wide range of features makes it suitable for a variety of different tasks. It is perfect for anyone who wants a versatile video editor that works on all major platforms.
Kdenlive’s user interface is divided into three main areas: the timeline, the clip monitor, and the effects stack. The timeline is where you add and arrange your clips. The clip monitor shows your video as it will appear in your final project. The effects stack allows you to apply a range of video effects to your clips.
Step-by-step on how to rotate videos using Kdenlive
There are two ways to rotate videos using Kdenlive: by using the rotate filter or by changing the project settings. The rotate filter is a video effect that allows you to rotate your video clip around its vertical and horizontal axes. To apply the rotate filter…
Step 1: Import your video clip to the timeline.

Step 2: Open the Effects tab and expand the Transform, Distort Perspective tab.

Step 3: Drag the Rotate filter onto your clip.

Step 4: The Rotate filter will open in the Effects Editor.

Step 5: Use the sliders to rotate your video clip.
Step 6: Click the ‘Save’ Icon to apply the filter.

The rotate filter is a great way to quickly rotate your video clip. However, it does have some limitations. For example, you can’t…
- use the rotate filter on clips that are already rotated
- use the rotate filter to create a 360-degree rotation
- change the rotation orientation of your clip.
If you need to rotate your video clip in a different direction, or if you want to create a 360-degree rotation, you can change the project settings. The rotate filter can be used to rotate your video clip in 90-degree increments. If you need to rotate your video clip by a different amount, you can change the project settings. To change the project settings…
Step 1: Import your video clip to the timeline.

Step 2: Right-click on the clip and select Apply an Effect > Transform from the menu.

Step 3: The Properties window will open. Select the Rotate tab.

Step 4: Use the slider to set the amount of rotation you need.

Step 5: Click the ‘Save’ Icon to apply the changes.

The project settings allow you to rotate your video clip in any direction you need.
How to rotate videos using Filmora?
Meanwhile, you can also use Filmora Video Editor to rotate your video. Filmora is a powerful video editor that can be used to create professional-quality videos. It supports all of the major video formats and has a wide range of features. Filmora is available for Windows and Mac OS X. Filmora’s user interface is divided into three main areas: the timeline, the preview window and the effects panel. The timeline is where you add and arrange your clips. The preview window shows your video as it will appear in your final project. The effects panel allows you to apply a range of video effects to your clips.
For Win 7 or later (64-bit)
For macOS 10.14 or later
Step-by-step on how to rotate videos using Filmora
Two ways to rotate your videos using Filmora: by using the rotate option when you right click it or changing the project settings. The rotate filter is a video effect that allows you to rotate your video clip around its vertical and horizontal axes.
To apply the rotate filter…
Step 1: Import your video clip into Filmora.

Step 2: Right-click on the video.
Step 3: Select ‘Rotate 90 CW’ or click Ctrl + Alt + Right to rotate the video 90 degrees clockwise.

Step 4: Select ‘Rotate 90 CCW’ or click Ctrl + Alt + Left to rotate the video 90 degrees counterclockwise.
Step 5: Repeat the steps until you are satisfied. Note: It can only rotate the video in the degrees of multiples of 90.
Step 6: The video is now rotated.
Filmora’s rotate filter is very similar to Kdenlive’s. However, there are a few differences. For example…
- you can use the rotate filter on clips that are already rotated
- you can change the rotation orientation of your clip.
If you need to rotate your video clip in a different direction, or if you want to create a 360-degree rotation, follow the below steps:
Click on the ‘Edit’ option in the tool above the timeline.

Select the ‘Transform’ option, then go to ‘Rotate’

Use the slider to set the amount of rotation you need.

Click OK to apply the changes.

The project settings allow you to rotate your video clip in any direction you need.
Both Filmora and Kdenlive offer a rotate filter that allows you to rotate your video clip by a certain amount. However, only Filmora offers the ability to rotate your video clip in any direction you need. Additionally, Filmora offers a wide range of features that can be used to create professional-quality videos. If you need to rotate your video clip in a different direction, or if you want to create a 360-degree rotation, Filmora is the best option.
Step 2: Open the Effects tab and expand the Transform, Distort Perspective tab.
Step 3: Drag the Rotate filter onto your clip.
Step 4: The Rotate filter will open in the Effects Editor.
Step 5: Use the sliders to rotate your video clip.
Step 6: Click the ‘Save’ Icon to apply the filter.
The rotate filter is a great way to quickly rotate your video clip. However, it does have some limitations. For example, you can’t…
- use the rotate filter on clips that are already rotated
- use the rotate filter to create a 360-degree rotation
- change the rotation orientation of your clip.
If you need to rotate your video clip in a different direction, or if you want to create a 360-degree rotation, you can change the project settings. The rotate filter can be used to rotate your video clip in 90-degree increments. If you need to rotate your video clip by a different amount, you can change the project settings. To change the project settings…
Step 1: Import your video clip to the timeline.
Step 2: Right-click on the clip and select Apply an Effect > Transform from the menu.
Step 3: The Properties window will open. Select the Rotate tab.
Step 4: Use the slider to set the amount of rotation you need.
Step 5: Click the ‘Save’ Icon to apply the changes.
The project settings allow you to rotate your video clip in any direction you need.
How to rotate videos using Filmora?
Meanwhile, you can also use Filmora Video Editor to rotate your video. Filmora is a powerful video editor that can be used to create professional-quality videos. It supports all of the major video formats and has a wide range of features. Filmora is available for Windows and Mac OS X. Filmora’s user interface is divided into three main areas: the timeline, the preview window and the effects panel. The timeline is where you add and arrange your clips. The preview window shows your video as it will appear in your final project. The effects panel allows you to apply a range of video effects to your clips.
For Win 7 or later (64-bit)
For macOS 10.14 or later
Step-by-step on how to rotate videos using Filmora
Two ways to rotate your videos using Filmora: by using the rotate option when you right click it or changing the project settings. The rotate filter is a video effect that allows you to rotate your video clip around its vertical and horizontal axes.
To apply the rotate filter…
Step 1: Import your video clip into Filmora.
Step 2: Right-click on the video.
Step 3: Select ‘Rotate 90 CW’ or click Ctrl + Alt + Right to rotate the video 90 degrees clockwise.
Step 4: Select ‘Rotate 90 CCW’ or click Ctrl + Alt + Left to rotate the video 90 degrees counterclockwise.
Step 5: Repeat the steps until you are satisfied. Note: It can only rotate the video in the degrees of multiples of 90.
Step 6: The video is now rotated.
Filmora’s rotate filter is very similar to Kdenlive’s. However, there are a few differences. For example…
- you can use the rotate filter on clips that are already rotated
- you can change the rotation orientation of your clip.
If you need to rotate your video clip in a different direction, or if you want to create a 360-degree rotation, follow the below steps:
Click on the ‘Edit’ option in the tool above the timeline.
Select the ‘Transform’ option, then go to ‘Rotate’
Use the slider to set the amount of rotation you need.
Click OK to apply the changes.
The project settings allow you to rotate your video clip in any direction you need.
Both Filmora and Kdenlive offer a rotate filter that allows you to rotate your video clip by a certain amount. However, only Filmora offers the ability to rotate your video clip in any direction you need. Additionally, Filmora offers a wide range of features that can be used to create professional-quality videos. If you need to rotate your video clip in a different direction, or if you want to create a 360-degree rotation, Filmora is the best option.
Also read:
- New In 2024, Do You Often Feel Fascinated to Try Hands at Anime Character Design to Spark up Your Editing Skills, or Just for a Fun-Filled Activity? Stay Here for the Best Inspirations You Can Ever Get
- New 2024 Approved How to Make Audio Visualizer in Filmora Easy
- New In 2024, Looking for a Way to Learn How to Merge Videos in HandBrake? Theres a Better Solution Waiting for You Inside
- Wondering About How to Easily Create a Slideshow on Your iPhone? Well, Take Note of some of the Finest Apps to Turn Your Vision Into Reality for 2024
- New 2024 Approved You Are Planning to Convert an AVI to GIF Online but You Are Not Sure How? If You Are Looking for an Idea on How to Do It, You Have Come to the Right Place
- Updated How to Clone Yourself in Videos with Filmora for 2024
- Learn Everything About Leeming LUT Pro
- New Your Recorded Video Footage Has some Visible Grains Making Your Video Noisy and Thus Hampering the Overall Viewing Experience. No Worries, as There AI Video Denoiser and Other Software Available to Correct the Issue
- Updated 2024 Approved As a Designer, Color Is the Most Powerful and the Most Diverse Tool at Your Disposal. Here Are Ten Matching Color Combinations to Get You Started on Your Next Project
- 2024 Approved Unlock Your Video Editing Potential With Wondershare Filmora
- In 2024, Whatever the Reason You Want to Convert an Mp4 to GIF Online, There Are a Number of Ways to Do It. Use This Guide to Learn the Best Methods. Read More Here
- Updated In 2024, 10 Best Music Video Templates to Make Your Video Popular
- Cropping Videos in VLC Step by Step
- Updated In 2024, Best 8 Augmented Reality Video Games
- New How Did AI Video Games Act More Human Than Human, In 2024
- Updated How to Add a Custom Transition to OBS for 2024
- Updated What Is MOV Format and How to Edit MOV Video Better?
- New In 2024, Create True 3D Text Effects Using After Effects
- Updated Splitting Video Into Frames with the FFmpeg Step by Step for 2024
- How to Screen Mirroring Nubia Red Magic 9 Pro to PC? | Dr.fone
- In 2024, Ultimate Guide on Infinix Smart 7 FRP Bypass
- Unlocking the Power of Smart Lock A Beginners Guide for Oppo A59 5G Users
- The Magnificent Art of Pokemon Go Streaming On Realme GT Neo 5 SE? | Dr.fone
- Fix Cant Take Screenshot Due to Security Policy on Vivo Y27s | Dr.fone
- Video Fixer Software for all Corrupt Videos of Oppo K11x
- Does find my friends work on Motorola Moto G14 | Dr.fone
- In 2024, Full Guide to Unlock iPhone 6s with iTunes | Dr.fone
- How to Unlock Apple iPhone 12 Without Passcode? | Dr.fone
- Best 10 Photo Animator Templates for 2024
- In 2024, Top 10 Telegram Spy Tools On Xiaomi Redmi Note 12 5G for Parents | Dr.fone
- In 2024, Overdub Voice With AI Virbo At Its Finest
- How To Check if Your Motorola Moto G84 5G Is Unlocked
- Unlock Realme 12 Pro+ 5G Phone Password Without Factory Reset Full Guide Here
- How To Change Realme C53 Lock Screen Password?
- In 2024, The Best Android SIM Unlock Code Generators Unlock Your Huawei Nova Y71 Phone Hassle-Free
- Title: In 2024, Detailed Steps to Cut a Video in QuickTime
- Author: Morgan
- Created at : 2024-06-15 18:56:30
- Updated at : 2024-06-16 18:56:30
- Link: https://ai-video-editing.techidaily.com/in-2024-detailed-steps-to-cut-a-video-in-quicktime/
- License: This work is licensed under CC BY-NC-SA 4.0.
