
:max_bytes(150000):strip_icc():format(webp)/kentuckyderby-5c7ed5d646e0fb00011bf3da.jpg)
In 2024, Detailed Steps to Rotate Videos in Davinci Resolve
Detailed Steps to Rotate Videos in Davinci Resolve
The first video editing machine in 1924 (Moviola) left an indelible print on the minds of the media industry. It was a maiden attempt to make edits while simultaneously viewing the film. Over time, editing videos followed the trajectory of various transitions letting the imagination run wild. According to a survey, the video editing software market will grow to 932.7 million U.S. dollars by 2025.
As video editing has become a pillar stone in post-production work, you might need to upgrade your knowledge about it. In this article, you will learn how to rotate the video.
Whether your video has an issue in the aspect ratio or you want the desired output in the mirror or flipped version, you need not panic. By exploring different options of Davinci Resolve and Filmora, you can easily change the orientation of your video.
You’ll see a complete picture guide of the above-mentioned softwares.
Changing the orientation of video by Davinci Resolve
Davinci Resolve is a comprehensive video editing software. It performs functions from colour grading to auto-enhancement for the post-production work. Though, professionals usually use this and pitch it as comparatively complex. But even novices need not worry. It comes with features that can change the entire output of the video. One of such functions is the rotation of the videos. You can give a professional and top-notch touch to your post-production work by changing the orientation of the videos. That will bring a new dimension to your project. The flipped version of videos can make the output more prompt and subtle as they stitch different videos scenes together.
Here is the step by step guide for rotating the video
Step 1: Entering the Edit Mode
Set DaVinci Resolve to Edit mode and in the upper-right corner of your workspace, select the Inspector tab.

The drop-down menu with different options will appear. Search for the Transform section. There you have to select the **Rotation Angle.**You can also enter the value of rotation.After entering the value, you will notice that your vidoe is rotated.

Tip: By pressing Ctrl + R, you can rotate the video 90 degrees clockwise.
Editing a portrait video in DaVinci Resolve
The Transform Panel has the XY Zoom fields. You can use this to scale your video to fit the vertical frame by increasing the size to ~1.750.
Voilà, you now have a vertical video you can edit and export.
Horizontal and Vertical Flip in DaVinci Resolve
You want to create a mirror effect for your video. Flipp it. You would love the results.
You can edit it by going to the same Inspector drop-down menu.

Select the kind of flip you want at the bottom of the Transform section. It can be horizontal or vertical.

How to change the direction of animation in the DaVinci Resolve?
Keyframes are an essential part of video animations. Davinci Resolve facilitates you to play a little with its keyframes parameters.
The keyframe system is not that complex.
All you need to do is select a region on your Timeline. Choose the parameters that need animation by clicking the small diamond. You can see the small diamond next to each parameter’s value.
Apart from Davinci Resolve, there is also an alternate software which has this versatility.You can also use Filmora Wonder for rotation of your vidoes
Changing the direction of video using Filmora Wondershare
If you have mistakenly taken a video at the wrong angle and don’t want to lose it. Filmora Video Editor is there to keep you out of trouble. It comes with the option of changing the orientation of your videos in your desired way. You can even zoom in or crop the unwanted parts in the videos. Adding more to it, it offers you preset ratios (16:9, 9:16; 4:5, 1:1) to find the perfect aspect ratio for YuoTube, Instagram, etc.
For Win 7 or later (64-bit)
For macOS 10.14 or later
Here is the step-by-step guide to rotating the direction of the video by using it.
Step 1: Drag and Drop
It starts with importing the desired file you wish to edit. Afterwards, you have to drag-drop it to the timeline.

Step 2: Enter the video-editing Panel
To start editing, you need to double-click on the video clip in the timeline. You’ll see various tabs above the timeline header from transformation to auto-enhance.

Step 3: Explore your options
Click on the Transform menu. It will display various options from rotation to scaling. You’ll find the “Rotate” option.

Either you can drag the slider or enter the specific value to adjust to the desired rotation.
For example, if you want to rotate this clip 170 degrees, enter the value in the box.

Moreover, you can adjust the scale. You have to drag the Scale slider to have a full-screen image. You can also edit the shape, size and position in the Viewer Panel.

Step 4:Ready to Export
Now, you have achieved the desired rotation for your video. You can export it and select the option that you want.

You can flip the direction of your video in a jiff by following these simple steps.
Conclusion
Stitching different scenes by video rotation has brought video editing to a new dimension altogether. Creating transitions in the videos has become easy more than ever. By adding effects in video editing, you can achieve your editing goals. Hence, you can have that “wow part of editing” without breaking a sweat. When the scenes with different directions are combined, they help in creating the subtle mood prompts for creating the desired flow. You can even adjust the angle of your video if you captured it at the wrong angle.
There are a variety of softwares in the digital world for this purpose. Davinci Resolve and Filmora Wondershare come with dynamic options for your post-production work. Owing to their versatility, these also have the feature of rotating your videos. Their user-friendly interface has made the entire experience of post-production work enjoyable.
The drop-down menu with different options will appear. Search for the Transform section. There you have to select the **Rotation Angle.**You can also enter the value of rotation.After entering the value, you will notice that your vidoe is rotated.
Tip: By pressing Ctrl + R, you can rotate the video 90 degrees clockwise.
Editing a portrait video in DaVinci Resolve
The Transform Panel has the XY Zoom fields. You can use this to scale your video to fit the vertical frame by increasing the size to ~1.750.
Voilà, you now have a vertical video you can edit and export.
Horizontal and Vertical Flip in DaVinci Resolve
You want to create a mirror effect for your video. Flipp it. You would love the results.
You can edit it by going to the same Inspector drop-down menu.
Select the kind of flip you want at the bottom of the Transform section. It can be horizontal or vertical.
How to change the direction of animation in the DaVinci Resolve?
Keyframes are an essential part of video animations. Davinci Resolve facilitates you to play a little with its keyframes parameters.
The keyframe system is not that complex.
All you need to do is select a region on your Timeline. Choose the parameters that need animation by clicking the small diamond. You can see the small diamond next to each parameter’s value.
Apart from Davinci Resolve, there is also an alternate software which has this versatility.You can also use Filmora Wonder for rotation of your vidoes
Changing the direction of video using Filmora Wondershare
If you have mistakenly taken a video at the wrong angle and don’t want to lose it. Filmora Video Editor is there to keep you out of trouble. It comes with the option of changing the orientation of your videos in your desired way. You can even zoom in or crop the unwanted parts in the videos. Adding more to it, it offers you preset ratios (16:9, 9:16; 4:5, 1:1) to find the perfect aspect ratio for YuoTube, Instagram, etc.
For Win 7 or later (64-bit)
For macOS 10.14 or later
Here is the step-by-step guide to rotating the direction of the video by using it.
Step 1: Drag and Drop
It starts with importing the desired file you wish to edit. Afterwards, you have to drag-drop it to the timeline.
Step 2: Enter the video-editing Panel
To start editing, you need to double-click on the video clip in the timeline. You’ll see various tabs above the timeline header from transformation to auto-enhance.
Step 3: Explore your options
Click on the Transform menu. It will display various options from rotation to scaling. You’ll find the “Rotate” option.
Either you can drag the slider or enter the specific value to adjust to the desired rotation.
For example, if you want to rotate this clip 170 degrees, enter the value in the box.
Moreover, you can adjust the scale. You have to drag the Scale slider to have a full-screen image. You can also edit the shape, size and position in the Viewer Panel.
Step 4:Ready to Export
Now, you have achieved the desired rotation for your video. You can export it and select the option that you want.
You can flip the direction of your video in a jiff by following these simple steps.
Conclusion
Stitching different scenes by video rotation has brought video editing to a new dimension altogether. Creating transitions in the videos has become easy more than ever. By adding effects in video editing, you can achieve your editing goals. Hence, you can have that “wow part of editing” without breaking a sweat. When the scenes with different directions are combined, they help in creating the subtle mood prompts for creating the desired flow. You can even adjust the angle of your video if you captured it at the wrong angle.
There are a variety of softwares in the digital world for this purpose. Davinci Resolve and Filmora Wondershare come with dynamic options for your post-production work. Owing to their versatility, these also have the feature of rotating your videos. Their user-friendly interface has made the entire experience of post-production work enjoyable.
A Full Guide to Funcall Voice Changer and Its Alternatives
Do you want to prank your friends? Everyone can agree that receiving a prank call is one of the world’s most annoying experiences. Still, you must admit that coming up with a great prank is a flex. If you want to make the next big prank film for TikTok or are just looking for something to do during a sleepover with your friends, you’ll need to have a plan before you pick up the phone. In this article, we will tell you how you can make prank calls easily with Funcall apps:
Try AI Voice Changer For Win 7 or later(64-bit)
Try AI Voice Changer For macOS 10.14 or later
Part 1: What’s Funcall App, and how to use it?
Making successful prank calls is very challenging. The Funcall - Voice Changer makes it incredibly easy to change your voice on a call and prank your family members and friends. You can call them and get their funny reactions.
You must input the target’s phone number and select whether you want the voice to be feminine, helium balloon, frightening, male, or regular sound. Funcall app also allows you to make international calls in over 150 countries on cell phones and landlines.

After installing the app, you will only have 30 seconds to play the prank. You can install other applications, view advertisements, or buy time directly through the app to get additional time. You are free to phone whatever number you like and speak in an artificial voice as long as you have the time. Additionally, you can include humorous sound effects like barking, farts, or gunfire. This voice-changing app is compatible with both Android and iPhone devices.
Follow these easy steps to use the Funcall app:
Step1Download
Go to the official website of Funcall apps and download it on your mobile device. To start the Funcall app, tap on the icon.
Step2Dial the Number
Dial the number of your friend or relative you want to prank and select the country.
Step3Select a Voice
At this point, pick the voice-altering sound you want to use. You can also add a background effect.
Step4Change Voice in Real Time
The call’s recipient will hear your customized voice rather than the original. To make the call more thrilling, you can add sound effects in addition to your altered voice.

Part 2: How to use the app for free?
Funcall is a premium software, and to use it, you must purchase one of its membership plans, which are reasonably priced. The first call on this app is free. You can earn more free minutes for prank calls by completing activities like watching advertising and downloading software.
Another option is to use Funcall MOD APK. It can be your best option if you’re seeking its free version, which allows you to enjoy an infinite number of minutes and an ad-free experience. You can use its hacked version to have free access to all of its paid features.
Part 3: Best alternatives to Funcall Voice Changer
Prank Dial
If you are looking for the best alternative to the Funcall app, you can use Prank Dial. With the help of the Prank Dial app, users can have fun while spending their free time making up to three random prank calls to friends and coworkers each day. You can press a call scenario to hear it and tap the heart to put it in your favourites so you can use it later.

The array of situations is sorted by category in the Prank Dial app, including “celebrities,” “angry,” “love,” “family prank calls,” etc. The history area displays all recent calls, including call date, caller id, scenario name, etc.
Fake Caller ID
If you want to make prank calls, make false caller ID, and have a good time, download this Fake Caller ID software. It has a very straightforward user interface that is free of any complications. You can easily prank or make fun of your friends by changing your voice pitch and caller ID.

This app gives two free calls each day and allows you to adjust your caller ID before you make the call, alter your voice while on the call, and record calls to listen to them later for fun.
MagicCall
For both Android and iOS, MagicCall is a fantastic tool to use as a voice-changing app when on the phone. It is an excellent app for making prank calls to pals and applying various effects. With multiple voice modifications and appended background effects, Magic Call is straightforward to use.

You can choose between Male, Robot, Female, Elderly Male, and Kid voices in the Voices area.
Prank Caller
With the help of the features in the Prank Caller app, you can access a massive library of prank call scripts directly from your smartphone’s screen and entertain your loved ones by using a different voice.

To try a new prank daily, you can browse the top prank call scripts and a list of all the available prank situations ranked by popularity.
FAQs
Can I use the Funcall app to make international calls?
You can use the Funcall app to make international calls in over 150 countries, including Asian, European, African, Middle Eastern regions, etc.
Can I use the Funcalls app while playing games?
No, you can’t use the Funcalls app while playing games. You can only use this app to change your voice during calls.
Can I change my voice during a call?
Yes, you can change your voice during calls. You can use Funcall apps or any alternatives to change your voice. However, we recommend you use the Funcall app because it is compatible with Android and iPhone.
What are the available voices on the Funcall app?
You can use a feminine, male, scary, helium, or a regular voice. This app also allows you to use various background sounds and effects.
Free Download For Win 7 or later(64-bit)
Free Download For macOS 10.14 or later
Try AI Voice Changer For Win 7 or later(64-bit)
Try AI Voice Changer For macOS 10.14 or later
Part 1: What’s Funcall App, and how to use it?
Making successful prank calls is very challenging. The Funcall - Voice Changer makes it incredibly easy to change your voice on a call and prank your family members and friends. You can call them and get their funny reactions.
You must input the target’s phone number and select whether you want the voice to be feminine, helium balloon, frightening, male, or regular sound. Funcall app also allows you to make international calls in over 150 countries on cell phones and landlines.
After installing the app, you will only have 30 seconds to play the prank. You can install other applications, view advertisements, or buy time directly through the app to get additional time. You are free to phone whatever number you like and speak in an artificial voice as long as you have the time. Additionally, you can include humorous sound effects like barking, farts, or gunfire. This voice-changing app is compatible with both Android and iPhone devices.
Follow these easy steps to use the Funcall app:
Step1Download
Go to the official website of Funcall apps and download it on your mobile device. To start the Funcall app, tap on the icon.
Step2Dial the Number
Dial the number of your friend or relative you want to prank and select the country.
Step3Select a Voice
At this point, pick the voice-altering sound you want to use. You can also add a background effect.
Step4Change Voice in Real Time
The call’s recipient will hear your customized voice rather than the original. To make the call more thrilling, you can add sound effects in addition to your altered voice.
Part 2: How to use the app for free?
Funcall is a premium software, and to use it, you must purchase one of its membership plans, which are reasonably priced. The first call on this app is free. You can earn more free minutes for prank calls by completing activities like watching advertising and downloading software.
Another option is to use Funcall MOD APK. It can be your best option if you’re seeking its free version, which allows you to enjoy an infinite number of minutes and an ad-free experience. You can use its hacked version to have free access to all of its paid features.
Part 3: Best alternatives to Funcall Voice Changer
Prank Dial
If you are looking for the best alternative to the Funcall app, you can use Prank Dial. With the help of the Prank Dial app, users can have fun while spending their free time making up to three random prank calls to friends and coworkers each day. You can press a call scenario to hear it and tap the heart to put it in your favourites so you can use it later.
The array of situations is sorted by category in the Prank Dial app, including “celebrities,” “angry,” “love,” “family prank calls,” etc. The history area displays all recent calls, including call date, caller id, scenario name, etc.
Fake Caller ID
If you want to make prank calls, make false caller ID, and have a good time, download this Fake Caller ID software. It has a very straightforward user interface that is free of any complications. You can easily prank or make fun of your friends by changing your voice pitch and caller ID.
This app gives two free calls each day and allows you to adjust your caller ID before you make the call, alter your voice while on the call, and record calls to listen to them later for fun.
MagicCall
For both Android and iOS, MagicCall is a fantastic tool to use as a voice-changing app when on the phone. It is an excellent app for making prank calls to pals and applying various effects. With multiple voice modifications and appended background effects, Magic Call is straightforward to use.
You can choose between Male, Robot, Female, Elderly Male, and Kid voices in the Voices area.
Prank Caller
With the help of the features in the Prank Caller app, you can access a massive library of prank call scripts directly from your smartphone’s screen and entertain your loved ones by using a different voice.
To try a new prank daily, you can browse the top prank call scripts and a list of all the available prank situations ranked by popularity.
FAQs
Can I use the Funcall app to make international calls?
You can use the Funcall app to make international calls in over 150 countries, including Asian, European, African, Middle Eastern regions, etc.
Can I use the Funcalls app while playing games?
No, you can’t use the Funcalls app while playing games. You can only use this app to change your voice during calls.
Can I change my voice during a call?
Yes, you can change your voice during calls. You can use Funcall apps or any alternatives to change your voice. However, we recommend you use the Funcall app because it is compatible with Android and iPhone.
What are the available voices on the Funcall app?
You can use a feminine, male, scary, helium, or a regular voice. This app also allows you to use various background sounds and effects.
Free Download For Win 7 or later(64-bit)
Free Download For macOS 10.14 or later
How to Make a Bokeh Effect
There’s a strong chance you’ve heard about bokeh before if you frequently visit photography websites or have friends who are photographers. What exactly is this optical effect that camera aficionados frequently discuss? Bokeh, who is derived from the Japanese word for “blur,” is a term used in photography to describe how a lens presents an out-of-focus background.
Part 1. What is a Bokeh Effect?
The Japanese word boke, which meaning “blur,” “haze,” or “boke-aji,” the “blur quality,” is where the term “bokeh” originates. The pronunciation of bokeh is BOH-K or BOH-kay. You can find a lot of people discussing the beautiful bokeh that their favorite fast lenses allow on any photography website or forum.
Bokeh is characterized by the words “smooth,” “amazing,” “superb,” “good,” “beautiful,” “sweet,” “silky,” and “great.” But what is it exactly? When using a fast lens and the widest aperture possible, such as f/2.8 or wider, you can create bokeh, which is described as “the effect of a fuzzy out-of-focus background.” Bokeh is the appealing or aesthetically pleasant aspect of out-of-focus blur in a shot, to put it simply.
Part 2. What is a Bokeh effect used for?
Most often, bokeh is employed for artistic purposes. You might occasionally desire a little background blur so that the viewer’s attention is drawn to the subject. In other cases, you can want it to completely detract from the subject, as in portraiture when you want to concentrate on the individual’s eyes or mouth while blurring the rest of the image. It’s true that some people use bokeh inadvertently, like looking for photos with excellent bokeh that they may use as free images on their websites or blogs. This isn’t advised, though, as it’s against the law and usually frowned upon in the photographic community as a whole to steal someone else’s image in this manner.
Part 3. How do you create a Bokeh effect?
Bokeh’s smooth, organic texture is among its most lovely features. The major goal in producing this effect is to distinguish the subject from the backdrop by employing a shallow depth of field. You will learn how to create beautiful bokeh for your photos in this video. One of the most alluring photographic effects, particularly for portraits, is bokeh. It can impart a sense of perfection to everything in a photo, making it look lot more appealing and engaging. Bokeh helps to create a dreamy backdrop that gives the image a whole new level of depth and perspective.
Using a camera lens with a shallow depth of focus is one of the many methods for achieving bokeh in photography. You need a short depth of field so that your lens aperture can be opened up as wide as possible to achieve beautiful bokeh. You can take pictures with shallow depth of field, often known as bokeh, with a point and shoot or a DSLR. A common photography technique used to make the subject stand out from the backdrop is called bokeh.
It can be used to draw attention to the topic by blurring or losing focus on the background. Three different kinds of lenses can create beautiful bokeh: prime lenses with a wide aperture The best lenses for bokeh are often wide-aperture prime lenses. Although they are frequently more expensive and heavier than zoom lenses, they offer a wider field of view. Since there is a greater difference in depth between the foreground and background when using a wide-open aperture, wide aperture prime lenses make blurring the background easier.
Part 4. What software do you need for a Bokeh effect?
Bokeh is one of the best techniques for creating a soft out-of-focus background and emphasizing a certain spot in a shot. Utilizing a fast lens and modifying the camera’s aperture settings are the typical methods for obtaining bokeh. Still, using software for both Windows and Mac, even amateur photographers may enhance their photographs with a fantastic bokeh effect.
It might be challenging to determine which photo editing software is ideal for producing high-quality bokeh effects without trying them all out, which isn’t always an option. The top five Bokeh Effect Makers will be discussed in this post in order to improve your photographs’ visual appeal and set them apart from the competition.
# Paintshop Pro
With a comprehensive toolkit created for users of all ability levels, Paintshop Pro enables you to edit, enhance, and repair your photos. A touch-friendly photography option with a distinctive split-screen before-and-after function was recently added to the software. Paintshop Pro is a good option if you’re searching for a reasonably priced photo editor that lets you tack on extra premium capabilities as you go.
Depending on your degree of competence, the software offers three distinct workspaces for you to choose from. Essential editing tools and cutting-edge technologies like AI Upsampling and AI Style Transfer can be found in the Photography Workspace, which is intended for beginners or those making short alterations.
All of the common editing and retouching tools are present in the Essentials Workspace, but only a limited number of tools and palettes are visible. You may also change the available settings to display or hide the controls you need. Last but not least, Paintshop Pro’s Complete Workspace shows all of its tools and features.
# Blur n Bokeh
The focus of Blur & Bokeh for Mac is blurring an image’s backdrop and foreground. It has the ability to boost the saturation, brightness, and warmth of the highlighted areas, as well as masking with edge detection. The clever edge-preserving method is one of the software’s strongest components. It offers excellent outcomes for creating realistic-looking image output.
You may modify the foreground and background of your photographs using a variety of filters. Although Blur n Bokeh is excellent at producing bokeh, it’s not the ideal choice if you’re searching for software that provides a variety of additional picture editing features.
# PhotoDirector
All skill levels will benefit greatly from using PhotoDirector, a complete photo editor that is free to download and simple to use. Express Mode, who is great for making quick edits, or Full Mode, which offers preset and manual photo alteration options along with creative effects, overlays, and beauty options, are two ways the program lets you access the editor.
The best part is that there is a special bokeh tool that lets you add bokeh lights and blur a specific section of an image with just one click. PhotoDirector employs an image’s natural light sources to create the bokeh effects, in contrast to other tools. Having said that, you may select a shape from 25 options and even enable live animation.
Both beginning and experienced photographers will find PhotoDirector to be a desirable alternative. PhotoDirector is unquestionably at the top of the list if you’re seeking for reliable post-processing software with a large range of features.
# Tadaa SLR
Although there are many amazing things about your iPhone, its camera will never be able to take pictures with the same wonderfully shallow depth of field as your DSLR. That will always be the case unless Apple manages to get a much, much larger sensor into the phone.
Software, however, may mimic that lavish, shallow depth of field appearance. Tadaa SLR accomplishes this. Actually, Tadaa allows you to alter the photo’s focus point in addition to artificially adjusting the depth of field. Similar to what you can accomplish with the cutting-edge Lytro camera, it does it after you take the picture.
Tadaa is launched in camera mode, and you compose and snap your picture. Alternately, you can pick a picture from your camera roll if you wish to start with an existing image. A few widgets are as follows: Switch between a square or wide shot, show a line of thirds grid, and turn the flash on and off. Even access to the front and back cameras is provided by Tadaa.
Conclusion
Many popular photo editing programs require intermediate-level photo editing knowledge and can be a bit on the expensive side, but there are a few programs out there that cater to all skill levels and have free versions
that don’t cut corners on quality.
While each photo editor comes with various pros and cons, only one strikes a balance between offering a wide range of editing tools and being easy to navigate, and that’s PhotoDirector.
Free Download For Win 7 or later(64-bit)
Free Download For macOS 10.14 or later
How to Use Kahoot! On Zoom
In the educational game Kahoot! participants respond to multiple-choice questions based on trivia. Each participant uses their own controller to answer questions in the online game. There are several question kinds to pick from, allowing for complete customization of the test. Each player needs their own controller for Kahoot! The game questions will be shown in the Zoom/Google Meet window, but the answers must be entered using the controller. With the Kahoot!! app for Zoom, presenters may use play and friendly rivalry to increase participant engagement. Users may organize knowledge- and feedback-gathering pulse checks with staff members, encourage original thought with word clouds, and empower participants’ voices with surveys, open-ended questions, and other tools. Utilizing the brainstorm tool, organizations may crowdsource ideas and advance teamwork.
Engagement has emerged as a crucial component of successful learning, collaboration, and connection as the globe has increased the use of video communications in social and professional situations. Users may access, host, and play Kahoot!! games and educational information with other meeting participants using the Kahoot!! app for Zoom without ever leaving the Zoom Meeting or requiring a second device. Corporate executives may motivate their staff via speeches, meetings, and online activities. Meeting hosts will have immediate access to data and statistics from their Kahoot!! experience, allowing them to respond in real time to audience engagement with the material. Additionally, hosts may email the Kahoot!! games to all participants so they can practice and improve their scores, which will increase participant engagement and learning retention. Hosts can also distribute the Kahoot!! games as self-paced challenges with individuals who couldn’t attend in person.
Part 1: Key Features of Kahoot
What more is there to discuss, Kahoot!? Every pupil adores it. Many instructors and educators use it all around the world to make learning simple, enjoyable, and interesting. Everyone may use it since it is free and extremely simple to use. These are some of its attributes:
- Quizzes may be made in a matter of minutes.
- Develop games based on the abilities of the kids. Playing at home or in the Zoom is simple for them.
- Various templates are offered. You can choose one of them with confidence.
- Kahoot! has the ability to be organized into many folders according to topics or subjects.
- Additionally, multiple choice questions may be included by quiz makers.
- Teachers using Kahoot! may combine different questions into one format, such as quizzes, polls, riddles, and slides.
- Use Apple Schoolwork, Google Zooms, and Microsoft Teams to share student-centered tasks.
Part 2: How to Host a Kahoot! Session within a Zoom Meeting
With the Zoom app, Kahoot! may be viewed, hosted, and used. It’s amazing that Kahoot!!, one of the most well-known brands in quiz-based learning, still provides a free-to-use platform, making it very accessible to both instructors and students. It’s also a useful resource for a hybrid class that combines online and classroom instruction. Most devices will be able to use the cloud-based service using a web browser. This implies that students using computers, tablets, and cellphones in class or at home may access this. Participants in Zoom Meetings may play games and learn without having to leave the Zoom meeting or bring a second device.
Step1Sign up for Zoom ahead of time and get ready. On the other hand, launch the Kahoot! test in your web browser, then be ready to share your screen in Zoom.
Step2As the participants come, allow them in and check to see whether you and they can both hear each other. To access the Kahoot! quiz, make sure they have a device or another browser tab open.
Step3Open the Kahoot! test and share it using Zoom’s “Share Screen” feature. While your screen is shared, continue to host the Kahoot! as normal. To view participants next to your shared screen, we advise selecting Side-by-Side Mode.
Part 3: How to Participate in Kahoot! Sessions within a Zoom Meeting
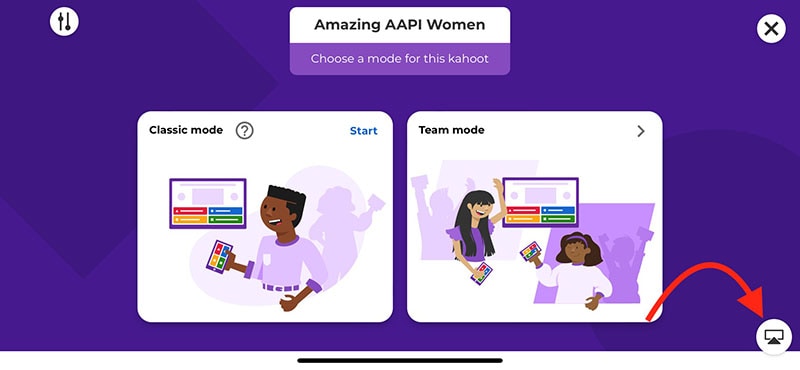
With more than 40 million ready-made games available on Kahoot!!, getting started is fast and simple. When time and resources are limited, hybrid or distant learning is ideal. After linking the Kahoot! to your Zoom account, you may utilize it. Use this app and start a meeting. Go to Apps on the toolbar and choose the program you wish to use. Select Who is Hosting to locate their host or to join a Kahoot! session being hosted by a friend or another player. Players may post a question to a shared screen on the Kahoot! platform. Kahoot!! just needs an account to be made in order to use it since it is free. Most devices may be used by students to access Kahoot!! from wherever there is an internet connection. This is how:
Step1Take the time to check that Zoom, Skype, Cisco Webex, or Google Hangout are operating and that your camera, microphone, and speaker are all operational.
Step2In the right-side panel, add the Kahoot!! app to your list of apps and click Join.
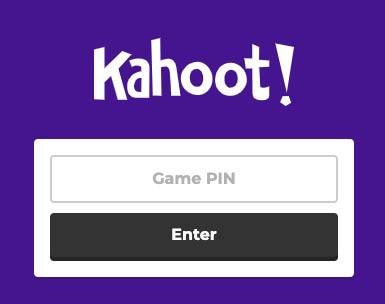
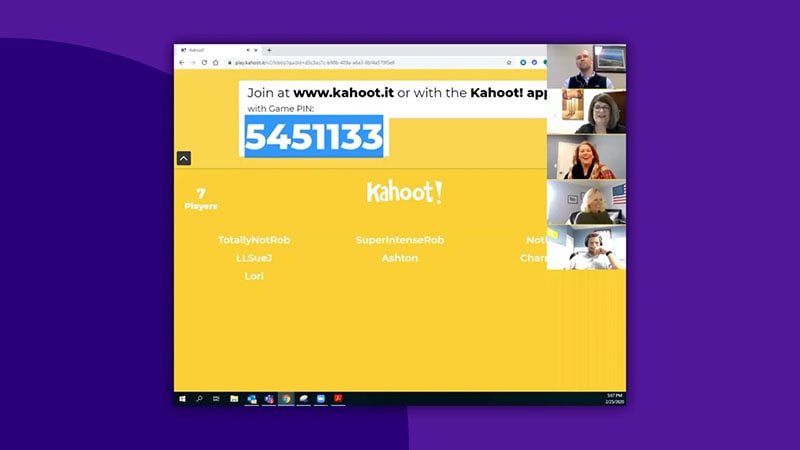
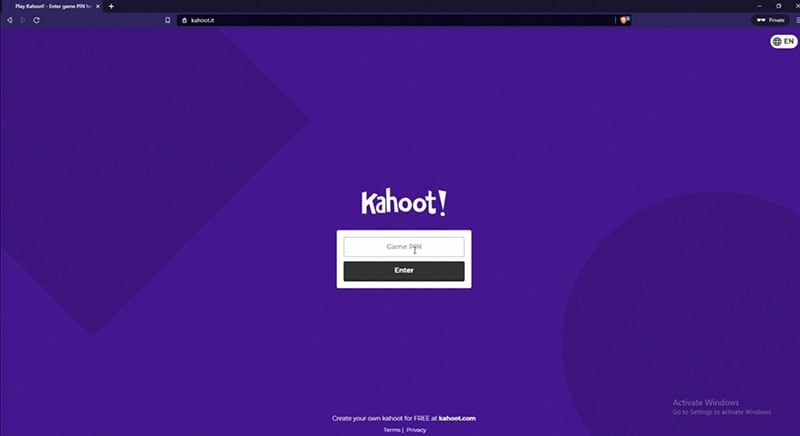
Step3The lobby will reveal your game PIN when you click the Play button, allowing the computer to show you a Kahoot! You may enter the game PIN and press Enter to join the Kahoot! session once the host shows their screen with you. To participate in a Kahoot! session, you don’t need a Kahoot! account.
Part 4: How to Record Zoom Meetings
Zoom is a conference tool that enables real-time, high-quality, low-latency communication. Filmora is an excellent video recorder for that reason, enabling users to capture on-screen activity such Zoom audio tracks and video conversations. Wondershare One of the most versatile and portable Zoom voice recorders is the Filmora. Even novices may easily utilize it due to its user-friendly UI. All you have to do is click the record button after choosing the proper audio source in the settings. The all-in-one video editing program Filmora allows you to record your screen with audio, a facecam, and a green screen effect. You can record the entire screen or just a portion of it, and you can perform a number of quick edits on your video using tools like trimming, cropping, changing the audio track’s volume, and so on.
How to Use Filmora to Record Zoom Lectures
Having said that, Filmora is a great Zoom recorder that can capture games, audio, and video conversations. This video recorder may be used to make video clip lessons in addition to recording movies, video games, and webcam footage. In addition to Zoom, it can also capture internet streaming audio. Here is information on how to record Zoom meetings using this software:
Step1Download and Install Filmora on your PC
To use this program for a number of tasks, including screen recording and recording editing, you must first download and install it on your computer. To achieve this, download the recording program by clicking the link below. Launch the program as soon as the download is finished to start the installation process, and then adhere to the on-screen directions to install and make this software available for usage.
Step2Choose the Record’s Ideal Position in the Zoom
Use it on your PC at this point. As soon as you start the program, a window interface with two choices for screen recording, editing already recorded videos, and generating videos will display. Choose the Recording option from the menu. When you click the record button, the program will direct you to the recording interface, where you can easily adjust the settings for your camera and audio. To add the microphone or Zoom sound in that particular field, use the necessary buttons as described below:
Step3Press the Record Button
It goes without saying that you must test your recording tools to ensure they are functional and capturing the highest quality audio. But once you’re ready, click the record button, which will allow you 3-5 seconds before starting to record the personalized screen of your PC as seen below:
Step4Export and Save Your Zoom Recording
You may now save the Zoom video for sharing on social media after making and modifying it. The following file types may be used to save the document: MP4, WMV, AVI, MOV, GIF, and MP3. The finest feature of Wondershare Filmora is the direct export and sharing of Zoom video recordings to YouTube; the only need is that you must be signed in to your YouTube account inside the application:
Because the MOV format is only available for online movies, you may also export your Zoom recordings to MP4 if you want to publish them to your YouTube channel. You are free to choose the format that best suits your needs. You may choose the encoder from a drop-down menu in the export options.
Conclusion
With the aid of several interesting tools and programs made accessible in this virtual environment, learning has now become enjoyable. Of them is Kahoot! In Zoom. It is an application that acts as a learning tool by providing fun games, tests, and a variety of other chances. In only a few minutes, quizzes may be made and distributed. Games and quizzes may be planned using this platform quite easily. The Kahoot! with Zoom will make it simpler than ever for corporate leaders to engage and encourage their team members with Kahoot!! engaging game-based learning experiences at a time when many organizations are staying virtual or planning for a hybrid model. Head towards recording Kahoot with Filmora to experience a smooth Kahoot! usage on Zoom. Plus, you can also share the gameplay afterwards.
In the educational game Kahoot! participants respond to multiple-choice questions based on trivia. Each participant uses their own controller to answer questions in the online game. There are several question kinds to pick from, allowing for complete customization of the test. Each player needs their own controller for Kahoot! The game questions will be shown in the Zoom/Google Meet window, but the answers must be entered using the controller. With the Kahoot!! app for Zoom, presenters may use play and friendly rivalry to increase participant engagement. Users may organize knowledge- and feedback-gathering pulse checks with staff members, encourage original thought with word clouds, and empower participants’ voices with surveys, open-ended questions, and other tools. Utilizing the brainstorm tool, organizations may crowdsource ideas and advance teamwork.
Engagement has emerged as a crucial component of successful learning, collaboration, and connection as the globe has increased the use of video communications in social and professional situations. Users may access, host, and play Kahoot!! games and educational information with other meeting participants using the Kahoot!! app for Zoom without ever leaving the Zoom Meeting or requiring a second device. Corporate executives may motivate their staff via speeches, meetings, and online activities. Meeting hosts will have immediate access to data and statistics from their Kahoot!! experience, allowing them to respond in real time to audience engagement with the material. Additionally, hosts may email the Kahoot!! games to all participants so they can practice and improve their scores, which will increase participant engagement and learning retention. Hosts can also distribute the Kahoot!! games as self-paced challenges with individuals who couldn’t attend in person.
Part 1: Key Features of Kahoot
What more is there to discuss, Kahoot!? Every pupil adores it. Many instructors and educators use it all around the world to make learning simple, enjoyable, and interesting. Everyone may use it since it is free and extremely simple to use. These are some of its attributes:
- Quizzes may be made in a matter of minutes.
- Develop games based on the abilities of the kids. Playing at home or in the Zoom is simple for them.
- Various templates are offered. You can choose one of them with confidence.
- Kahoot! has the ability to be organized into many folders according to topics or subjects.
- Additionally, multiple choice questions may be included by quiz makers.
- Teachers using Kahoot! may combine different questions into one format, such as quizzes, polls, riddles, and slides.
- Use Apple Schoolwork, Google Zooms, and Microsoft Teams to share student-centered tasks.
Part 2: How to Host a Kahoot! Session within a Zoom Meeting
With the Zoom app, Kahoot! may be viewed, hosted, and used. It’s amazing that Kahoot!!, one of the most well-known brands in quiz-based learning, still provides a free-to-use platform, making it very accessible to both instructors and students. It’s also a useful resource for a hybrid class that combines online and classroom instruction. Most devices will be able to use the cloud-based service using a web browser. This implies that students using computers, tablets, and cellphones in class or at home may access this. Participants in Zoom Meetings may play games and learn without having to leave the Zoom meeting or bring a second device.
Step1Sign up for Zoom ahead of time and get ready. On the other hand, launch the Kahoot! test in your web browser, then be ready to share your screen in Zoom.
Step2As the participants come, allow them in and check to see whether you and they can both hear each other. To access the Kahoot! quiz, make sure they have a device or another browser tab open.
Step3Open the Kahoot! test and share it using Zoom’s “Share Screen” feature. While your screen is shared, continue to host the Kahoot! as normal. To view participants next to your shared screen, we advise selecting Side-by-Side Mode.
Part 3: How to Participate in Kahoot! Sessions within a Zoom Meeting
With more than 40 million ready-made games available on Kahoot!!, getting started is fast and simple. When time and resources are limited, hybrid or distant learning is ideal. After linking the Kahoot! to your Zoom account, you may utilize it. Use this app and start a meeting. Go to Apps on the toolbar and choose the program you wish to use. Select Who is Hosting to locate their host or to join a Kahoot! session being hosted by a friend or another player. Players may post a question to a shared screen on the Kahoot! platform. Kahoot!! just needs an account to be made in order to use it since it is free. Most devices may be used by students to access Kahoot!! from wherever there is an internet connection. This is how:
Step1Take the time to check that Zoom, Skype, Cisco Webex, or Google Hangout are operating and that your camera, microphone, and speaker are all operational.
Step2In the right-side panel, add the Kahoot!! app to your list of apps and click Join.
Step3The lobby will reveal your game PIN when you click the Play button, allowing the computer to show you a Kahoot! You may enter the game PIN and press Enter to join the Kahoot! session once the host shows their screen with you. To participate in a Kahoot! session, you don’t need a Kahoot! account.
Part 4: How to Record Zoom Meetings
Zoom is a conference tool that enables real-time, high-quality, low-latency communication. Filmora is an excellent video recorder for that reason, enabling users to capture on-screen activity such Zoom audio tracks and video conversations. Wondershare One of the most versatile and portable Zoom voice recorders is the Filmora. Even novices may easily utilize it due to its user-friendly UI. All you have to do is click the record button after choosing the proper audio source in the settings. The all-in-one video editing program Filmora allows you to record your screen with audio, a facecam, and a green screen effect. You can record the entire screen or just a portion of it, and you can perform a number of quick edits on your video using tools like trimming, cropping, changing the audio track’s volume, and so on.
How to Use Filmora to Record Zoom Lectures
Having said that, Filmora is a great Zoom recorder that can capture games, audio, and video conversations. This video recorder may be used to make video clip lessons in addition to recording movies, video games, and webcam footage. In addition to Zoom, it can also capture internet streaming audio. Here is information on how to record Zoom meetings using this software:
Step1Download and Install Filmora on your PC
To use this program for a number of tasks, including screen recording and recording editing, you must first download and install it on your computer. To achieve this, download the recording program by clicking the link below. Launch the program as soon as the download is finished to start the installation process, and then adhere to the on-screen directions to install and make this software available for usage.
Step2Choose the Record’s Ideal Position in the Zoom
Use it on your PC at this point. As soon as you start the program, a window interface with two choices for screen recording, editing already recorded videos, and generating videos will display. Choose the Recording option from the menu. When you click the record button, the program will direct you to the recording interface, where you can easily adjust the settings for your camera and audio. To add the microphone or Zoom sound in that particular field, use the necessary buttons as described below:
Step3Press the Record Button
It goes without saying that you must test your recording tools to ensure they are functional and capturing the highest quality audio. But once you’re ready, click the record button, which will allow you 3-5 seconds before starting to record the personalized screen of your PC as seen below:
Step4Export and Save Your Zoom Recording
You may now save the Zoom video for sharing on social media after making and modifying it. The following file types may be used to save the document: MP4, WMV, AVI, MOV, GIF, and MP3. The finest feature of Wondershare Filmora is the direct export and sharing of Zoom video recordings to YouTube; the only need is that you must be signed in to your YouTube account inside the application:
Because the MOV format is only available for online movies, you may also export your Zoom recordings to MP4 if you want to publish them to your YouTube channel. You are free to choose the format that best suits your needs. You may choose the encoder from a drop-down menu in the export options.
Conclusion
With the aid of several interesting tools and programs made accessible in this virtual environment, learning has now become enjoyable. Of them is Kahoot! In Zoom. It is an application that acts as a learning tool by providing fun games, tests, and a variety of other chances. In only a few minutes, quizzes may be made and distributed. Games and quizzes may be planned using this platform quite easily. The Kahoot! with Zoom will make it simpler than ever for corporate leaders to engage and encourage their team members with Kahoot!! engaging game-based learning experiences at a time when many organizations are staying virtual or planning for a hybrid model. Head towards recording Kahoot with Filmora to experience a smooth Kahoot! usage on Zoom. Plus, you can also share the gameplay afterwards.
Also read:
- In 2024, How to Be a Good Podcast Host
- In 2024, How to Create a Text Effect Video with Filmora
- Perfecting the Art of Slowing Down Video on Instagram
- New Best Free Slow Motion Apps For Android and iPhone for 2024
- Updated In 2024, Slow Down Videos on Instagram With Perfection A Guide
- The Article Shall Offer an Overview to Create a Promising Sports Intro and Edit a YouTube Outro for a Sports Channel. There Will Also Be Three Recommended Apps to Download Background Music for Exercise
- How to Make a GIF With Transparent Background for 2024
- Updated In 2024, How to Make a DIY Vlog or Video
- Updated 2024 Approved Detailed Tutorial to Crop Videos Using Openshot?
- How to Make OBS Slideshow for 2024
- 2024 Approved 10 Creative AR Teaching Examples to Tell You What Is AR in Teaching
- Updated In 2024, How to Add Subtitles to Videos With Kapwing
- New 2024 Approved This Article Talks About Pixel Art Wallpapers. It Gives Examples of Different Pixel Art to Show You How to Customize Your Own Pixel Art Wallpapers, and How to Make a Pixel Art Gif on Filmora
- New Best iPhone LUTs App to Use
- New 12 Top Marketing Slideshow Templates
- Record Slow Motion Videos With Phantom Slow-Mo Camera
- New 2024 Approved A Normal Video Brings More Editing Opportunities than a Slow-Motion One. This Text Explores How to Convert Slow Motion Video to Normal on iPhone
- Updated Want to Loop a Video to Extend Its Duration? You Can Use iMovie to Loop a Video on Your Mac and iPhone and We Will Illustrate How to Loop a Video in iMovie for 2024
- Updated In 2024, How to Make a Slideshow with Movavi Slideshow Maker
- New 10+ Best Unlimited FCPX Slideshow Templates
- Updated In 2024, Looking for a Way to Learn How to Merge Videos in HandBrake? Theres a Better Solution Waiting for You Inside
- New In 2024, How to Brighten Video in Premiere Pro
- Ideas for Time-Lapse Video for 2024
- Make A Tattoo Disappear Like A Magic
- Updated Finding The Best LUTs for Wondershare Filmora
- In 2024, A Comprehensive Review of LUTs Finding LUTs Made by Danny Gevirtz
- New In 2024, How to Create Intro Video with KineMaster
- How to Delete White Background in Photoshop. How to Create a Transparent Background in Photoshop? Steps to Get Rid of White Background in Photoshop for 2024
- New In 2024, DaVinci Resolve Scopes Have Undergone Significant Improvements. Find Out How to Use These Scopes and Improve Your Video Editing Skills
- How to Download and Use Windows Movie Maker 10
- New In 2024, Discover How to Download Mobile Phone Green Screen Videos and Pictures for Free. Elevate Your Content with HD Quality Green Screen Frames
- In 2024, Top 15 Best Free MP4 Video Rotators Windows, Mac, Android, iPhone & Online
- New Finding Best GIF Websites Is Easy as Pie — Heres What You Should Know
- Slow Down Videos on Instagram With Perfection A Guide
- Updated 10 Popular Cartoon Characters That Should Top Your List 2023 Updated for 2024
- How to Repair corrupt MP4 and MOV files of 11 Pro+ using Video Repair Utility on Mac?
- How to Mirror Apple iPhone 11 Pro to PC via USB? | Dr.fone
- In 2024, Top 12 Prominent Vivo Y200e 5G Fingerprint Not Working Solutions
- In 2024, 5 Techniques to Transfer Data from Samsung Galaxy A25 5G to iPhone 15/14/13/12 | Dr.fone
- In 2024, The Magnificent Art of Pokemon Go Streaming On Tecno Camon 20 Premier 5G? | Dr.fone
- How to Transfer Data from Xiaomi 13T Pro to Any iOS Devices | Dr.fone
- In 2024, Top 4 Hatsune Miku Voice AI Generators for All Times
- In 2024, Step-by-Step Tutorial How To Bypass Motorola Edge 2023 FRP
- In 2024, Different Methods To Unlock Your Apple iPhone 14 Pro Max
- In 2024, Latest Guide How To Bypass Oppo Reno 11F 5G FRP Without Computer
- How To Unlock Apple iPhone 12 Pro Without Swiping Up? 6 Ways | Dr.fone
- In 2024, Best Pokemons for PVP Matches in Pokemon Go For Vivo Y36 | Dr.fone
- A Detailed Guide on Faking Your Location in Mozilla Firefox On Xiaomi 14 Pro | Dr.fone
- What Legendaries Are In Pokemon Platinum On Lava Agni 2 5G? | Dr.fone
- In 2024, The Ultimate Guide to Unlocking Apple Watch Or Apple iPhone 6s Plus from iCloud
- iPogo will be the new iSpoofer On Poco C51? | Dr.fone
- In 2024, 5 Quick Methods to Bypass Xiaomi Redmi 12 FRP
- How and Where to Find a Shiny Stone Pokémon For Oppo Find X6? | Dr.fone
- How to restore wiped music on Honor 100 Pro
- 3 Things You Must Know about Fake Snapchat Location On ZTE Axon 40 Lite | Dr.fone
- How Tecno Spark 10 5G Mirror Screen to PC? | Dr.fone
- Apple ID Locked or Disabled On iPhone 12 Pro? 7 Mehtods You Cant-Miss
- Title: In 2024, Detailed Steps to Rotate Videos in Davinci Resolve
- Author: Morgan
- Created at : 2024-05-19 05:12:13
- Updated at : 2024-05-20 05:12:13
- Link: https://ai-video-editing.techidaily.com/in-2024-detailed-steps-to-rotate-videos-in-davinci-resolve/
- License: This work is licensed under CC BY-NC-SA 4.0.
