
:max_bytes(150000):strip_icc():format(webp)/cq5dam.web.1280.1280-3-5c2a5dc746e0fb0001d115f0.jpeg)
In 2024, Do You Want to Know How to Add Captivating Audio in Simple Videos? Nothing to Be Concerned About because This Article Will Help You in This Matter
Do You Want to Know How to Add Captivating Audio in Simple Videos? Nothing to Be Concerned About because This Article Will Help You in This Matter
Audios are the most important part of videos in today’s world. Even if your video quality is not cinematic, audio lets you engage multiple users, even on low-quality video. To ensure the maximum number of customers on your videos, you need to add optimized quality audio to them. And it’s okay if you don’t know how to add audio to videos because you are about to.
Wondershare Filmora will let you accomplish your task in a matter of seconds. Along with providing details on adding and adjusting audio, we will also introduce the premium quality features of Filmora to present it as a powerful tool. By the end of this discussion, you will get familiar with the procedure of how to adjust TikTok audio through this video editing tool.
Part 1: Discussing The Audio Features of Wondershare Filmora in Detail
The key features of Wondershare Filmora are itself a full fledge example of innovation and modernization. You can maximize the productivity of your videos by adding soothing and studio-quality audio. Not only does it serve as a good audio adjustor, but it also makes processing easier.
Filmora is not only used for adding audio to videos, but also for modifications of audio. The AI audio-related key features of Wondershare Filmora through which you can boost your audio quality and overall video quality are presented here:
1. Audio Ducking
Integrating two soundtracks into the videos means you have to dominate one of them. With the Audio Ducking feature of Filmora, you can lower the sound of one of the two tracks presented in the videos. This is very helpful when working on YouTube videos, podcasts, and Vlogs. This tool also automatically detects soundtracks, so you don’t have to face hassles.
2. Text-to-Speech (TTS)
In this busy world, everyone looks for reliable shortcuts and ways to accomplish their task in a limited time. Filmora offers you the ability to convert text files into realistic and outclass voiceovers. You can also write lengthy blogs, share them with the site and make voiceover videos with state of art accuracy
3. Silence Detection
Do you wish to detect the silent moments in the videos and remove them without impacting the video quality? No need to worry because the Silence Detection feature of Filmora will assist you with this problem. You can also customize the Volume Threshold, Minimum Duration, and Softening Butter. Moreover, you can remove the silenced parts with a few taps.
4. Audio Visualizer
The Audio Visualizer of Filmora can add new life to your lifeless videos and match them with your videos. In addition to this, it can also add dynamic effects to videos. Not only simple, but you also have the option to add podcasts and cinematic music videos. Filmora comprises more than 25 visualizer effects for the ease of the users.
5. Audio Synchronization
Matching audio with the length of the videos without any complication is like a dream to some users. However, it can be true if you are utilizing assistive tools such as Filmora. It supports the feature of Auto Sync, through which you can synchronize the audio with video irrespective of length and format. You can also select royalty-free music from Filmora, add it to the video and sync it automatically .
6. AI Audio Stretch
To fit the duration of your audio with audio, you can retime the audio in real-time with Filmora. This feature encompasses AI powers, so you don’t have to adjust everything manually. There is no need to add fading effects or cut unnecessary parts. Along with this, you can also preview the music track to match it with the length of the videos.
7. AI Audio Denoise
Background noises in videos cause a distraction for the users and impact the engagement of users in a bad way. From removing electrical noises to the removal of pet noises, this tool can help you with everything. As it supports a wide array of audio file formats, you will not face restrictions in this part.
8. Speech-to-Text (STT)
Transcribing long videos without errors and mistakes is one of the specialties in Filmora. It also integrates several plug-ins through which you can optimize the speech-to-text in a limited time. One of the best things is it can also work on SRT files.
Part 2: How to Add and Detach Audio in Wondershare Filmora?
Integrating audio in the video somehow depends upon the user’s preferences. Yet, a reliable video editor will let you add or detach the audio from videos without any issue. The best tool through which you can accomplish this task is Wondershare Filmora. You can also discover the procedure of addition and detaching videos in the below-given information:
How to Add Audio to Video with Wondershare Filmora?
As stated above, Filmora is an industry-standard tool that offers a straightforward procedure for modifying multimedia content. The procedure for adding audio in videos with Wondershare Filmora free audio editor is listed here:
Add Audio to Video For Win 7 or later(64-bit)
Add Audio to Video For macOS 10.14 or later


Step 1Import Video and Select Audio
Initially, import the video in Filmora and drag it to “Timeline.” Next, go to the “Audio” section and select the audio of your choice. You can also click the “Learn More” icon to get more information about the audio. You can also import the customized audio from your device.

Step 2Add Audio to Video
Following this, drag your selected audio in the video in “Timeline” and “Double Click” on the audio. Next, manage the “Volume,” “Sound Balance,” “Pitch,” “Audio Ducking,” and other parameters of audio from the right panel. After this, click the “Export” button, change settings, and again hit the “Export” button to save the video on the device.

How to Detach Audio From Video with Wondershare Filmora
The procedure of audio detaching is also very smooth. Feel free to follow the steps instructed here to accomplish this task:
Detach Audio From Video For Win 7 or later(64-bit)
Detach Audio From Video For macOS 10.14 or later
Step 1Drag Video to Timeline
To get started, launch Filmora and import the video by clicking on the “Click here to import media” button. To continue, drag the imported video to the “Timeline.”

Step 2Detach Audio from Video
Once done, right-click on the video in the timeline and locate the “Detach Audio” button. Following this, hit “Detach Audio” to separate the audio from the video and continue to save it on the device.

Part 3: How to Adjust the Parameters of Audios in Filmora?
Every person wishes to customize the audio in the video so they can share their creativity with the world without any complications. To adjust the audio parameters, you need to use a reliable tool that offers versatile audio editing features.
Adjust Audio Now For Win 7 or later(64-bit)
Adjust Audio Now For macOS 10.14 or later
Luckily, Wondershare Filmora can help you a lot in modifying and customizing the audio parameters. To change the audio parameters in this audio adjuster, follow the instructions listed here:
Step 1Access Filmora and Import Video
To change the audio parameters, access Wondershare Filmora on your device and click “New Project.” Following this, hit the “Click here to import media” button to import a video and drag it to the “Timeline.”
Step 2 Change Audio Parameters in the Video
Once the video is in the timeline, double-click on the audio in the timeline. After this, the audio parameter window will be opened in the right section. From here, you can change “Sound Balance,” “Fade In,” and “Fade Out” in a customized way. Moreover, you can also toggle the “Auto-Normalization” option and optimize “Volume.”

Step 3Saving the Adjusted Video to the Device
Saving the Adjusted Video to the Device

Conclusion
In a nutshell, this discussion has guided you about the addition and adjustment of Wondershare Filmora. With Filmora, you can optimize the quality of audio in videos in no time. Moreover, it also integrates several useful features such as Audio Ducking, AI Audio Denoise, Audio Visualizer, and more.
You can discover more information about its features from the above-given discussion. This article also discusses the steps to add and detach audio from video. In addition to this, you can also adjust multiple audio parameters with Filmora’s explicit toolkit.
How to Add Audio to Video with Wondershare Filmora?
As stated above, Filmora is an industry-standard tool that offers a straightforward procedure for modifying multimedia content. The procedure for adding audio in videos with Wondershare Filmora free audio editor is listed here:
Add Audio to Video For Win 7 or later(64-bit)
Add Audio to Video For macOS 10.14 or later
Step 1Import Video and Select Audio
Initially, import the video in Filmora and drag it to “Timeline.” Next, go to the “Audio” section and select the audio of your choice. You can also click the “Learn More” icon to get more information about the audio. You can also import the customized audio from your device.
Step 2Add Audio to Video
Following this, drag your selected audio in the video in “Timeline” and “Double Click” on the audio. Next, manage the “Volume,” “Sound Balance,” “Pitch,” “Audio Ducking,” and other parameters of audio from the right panel. After this, click the “Export” button, change settings, and again hit the “Export” button to save the video on the device.
How to Detach Audio From Video with Wondershare Filmora
The procedure of audio detaching is also very smooth. Feel free to follow the steps instructed here to accomplish this task:
Detach Audio From Video For Win 7 or later(64-bit)
Detach Audio From Video For macOS 10.14 or later
Step 1Drag Video to Timeline
To get started, launch Filmora and import the video by clicking on the “Click here to import media” button. To continue, drag the imported video to the “Timeline.”
Step 2Detach Audio from Video
Once done, right-click on the video in the timeline and locate the “Detach Audio” button. Following this, hit “Detach Audio” to separate the audio from the video and continue to save it on the device.
Part 3: How to Adjust the Parameters of Audios in Filmora?
Every person wishes to customize the audio in the video so they can share their creativity with the world without any complications. To adjust the audio parameters, you need to use a reliable tool that offers versatile audio editing features.
Adjust Audio Now For Win 7 or later(64-bit)
Adjust Audio Now For macOS 10.14 or later
Luckily, Wondershare Filmora can help you a lot in modifying and customizing the audio parameters. To change the audio parameters in this audio adjuster, follow the instructions listed here:
Step 1Access Filmora and Import Video
To change the audio parameters, access Wondershare Filmora on your device and click “New Project.” Following this, hit the “Click here to import media” button to import a video and drag it to the “Timeline.”
Step 2 Change Audio Parameters in the Video
Once the video is in the timeline, double-click on the audio in the timeline. After this, the audio parameter window will be opened in the right section. From here, you can change “Sound Balance,” “Fade In,” and “Fade Out” in a customized way. Moreover, you can also toggle the “Auto-Normalization” option and optimize “Volume.”
Step 3Saving the Adjusted Video to the Device
Saving the Adjusted Video to the Device
Conclusion
In a nutshell, this discussion has guided you about the addition and adjustment of Wondershare Filmora. With Filmora, you can optimize the quality of audio in videos in no time. Moreover, it also integrates several useful features such as Audio Ducking, AI Audio Denoise, Audio Visualizer, and more.
You can discover more information about its features from the above-given discussion. This article also discusses the steps to add and detach audio from video. In addition to this, you can also adjust multiple audio parameters with Filmora’s explicit toolkit.
How To Make Split Screen Videos in Filmora
To show the interactions and exchanges of things between the characters are widely seen in movies. It seems they are close to each other, but they aren’t.
In this article, we will go with the video editor, Wondershare Filmora, to make split-screen videos instantly. Let’s move forward to check what you need to make these videos!
Part 1. Prerequisites To Make Split Screen Video To Interact
There is no need to make complex videos. Because nowadays, only short videos get viral and are more trending. The interaction videos should be as simple as passing props or playing with someone!
Split-screen videos are widely used in movies and films because it is a visual way to describe any story. The actions will be based on real-time interactions between the characters. The essential things you are required to make these videos are described as follows:
1. Storyboard
First of all, you have to create a story with your friends and family, with whomever you want to create a video. For this, follow the below steps:
- Make a script of a story by coordination, such as writing all dialogues and actions so that there will be no difficulty during a performance on screen.
- Practice those actions again and again to get a professional look.
- The storyboard should be based on the split screen templates available on Wondershare Filmora , or you can create your customized too.

Free Download For Win 7 or later(64-bit)
Free Download For macOS 10.14 or later
2. Characters on the screen
The friends with whom you are interacting should be on the screen and have assets to record a video wherever they are. It will be one person on one split screen or two persons on one. It all depends upon your story and script.
3. Prop to interact
A prop will be any particular thing used to show interaction and should be present in the homes of both characters.
![]()
Note: The prop can be any object like a tissue roll, mobile phone, or anything seen as a passing object from one character to another.

4. A helper at home
There will be one person at home during video shooting to pretend a friend’s or family’s hand reaching to the other character from off-camera.
For example, while performing a high-five action, insert the hand of any member with whom you are living in the scene, showing as the character adjacent to you. After setting up everything in a row, it’s time to record scenes for the video.

5. Record different takes
To give a professional look to the video, you have to record different takes for each person from different angles. After recording, everyone has to send footage to only one person to edit on Filmora.
After getting things and recording, it’s time to edit it on Wondershare Filmora. For this, follow the lines below!
Part 2. Steps To Edit Split Screen Video in Filmora
Split-screen video editing is as simple as throwing a prop toward someone. Wondershare Filmora with a premium domain will get your back!
Filmora is a more creative and instant platform to edit any video or to give birth to new ideas. One of the prominent features is having ready-to-use templates for editing split-screen video. Meanwhile, you can also do a manual setup for editing. Follow the steps mentioned below to edit a video by using split-screen effects.
Split Screen Effect With Templates
Step1Import footage to Filmora
After picking up the best footage of every character, download the Wondershare Filmora (if you have not already). Then to import the clips, perform the following steps:
Free Download For Win 7 or later(64-bit)
Free Download For macOS 10.14 or later
- First, click on the “Click here to Import Media” button, as shown below.

- Then, select the clips you want to edit from your PC, and then they’ll be shown in the media section of Filmora.
Step2Add split screen effect to the timeline
Before adding the clips to the timeline, add the split screen effect to the timeline by following the below-mentioned steps:
- Click on the two-headed arrow at the upper tab.
- Then the drop-down list of two options will pop up, as shown below.

- Click on the Split Screen option, and it will show many split screen effects.

- Select the effect, whatever suits you, and download it then.
- After downloading, drag and drop the effect on the timeline section.

Step3Add clips to the effect
After adding the effect to the timeline, it’s time to implement it on the clips or footage. For this, follow the below-mentioned steps:
- Drag and drop the clips based on your storyboard in the required section.
- Then import the takes wherever and however you want, according to the storyboard.

If you don’t want any templates to be used in your video, then you can manually make a screen split layout. To do this, check the below section.
Manual Split Screen Layout
If the storyboard is organized in such a way that you can’t find out any of the templates suitable, then you can easily create a customized one for your video. In a customized split screen, you can set the duration and adjust the frame rate according to your choice.
Step1Import the clips
First, you must create a timeline to edit your split-screen video. To do this, take a look at the below steps!
- Click on the Import icon in the main preview when you open Wondershare Filmora.
- Then, import all the clips or footage you want to edit.

Step2Add all footages to the timeline
After importing all the clips of interaction videos into Filmora, our next step is to add our videos to the timeline.
- Simply click on the imported clips present in the project media section.
- Then drag it to the timeline below and drop it in the required track of videos.
Do the above-mentioned steps with all the clips present in the project media block.

Doing so will create a working timeline you can view and edit as you go along the editing process.
Step3Adjust the frame rate of all clips
It is all set that your storyboard is customized, for this you have to resize all the clips manually. To arrange clips according to the size, follow the below-mentioned steps:
- First, double-click on the clip you want to edit in the timeline.
- The Basic settings of the video will open in which you have a lot of options to edit.
- Click on the Transform option, and its setting will pop up on the top left side.
- Find out the Scale option from the settings and check out its range.

Adjust the scale rate according to your choice by sliding from its section.

![]()
Note: Repeat this process with all other clips present in the timeline to adjust them in such a way so that the hands moving from frame to frame will line up.

Step4Adjust the timing of clips
After adjusting the frame, you now have to adjust the timing of the clips. To perform this action, follow the below steps:
- Arrange and move around the clips on the timeline so that the timing of the scene lines up between each shot.
- Drag the edge of the clip to the right side if you want to increase the timing and duration.
- While dragging the edge of the clip to the left side, if you want to decrease the timing of the clip.
![]()
Note: The most important part is the first time a hand is supposed to move from one frame to another.
What to do if there is any lag in the preview?
If you’re experiencing lag during the preview, click on the “render” button on the top right of the timeline. It will help to render for a smooth preview.

Step5Splitting the clips
If the timing in your scene starts to fall out of sync, then do the following steps:
- First, try splitting all of the clips.
- Ensure to split before they start to fall out of sync.

![]()
Note: Splitting the clip before one person’s dialogue is preferred.
Step6Full-screen moment
After splitting the clips according to adjustments and storyboard, you can now make one of the characters’ videos in full screen. For this, follow the below steps:
- First, make another cut in the clips before the next hand-crossing action.
- Take one of the characters’ videos from clips in-between moment and make them full screen.

![]()
Note: You can quickly do full screen by double-clicking on the clip and unchecking the “transform“ heading in the top left window.

Final Results
You’re now free to re-adjust your clips in the next part back into sync. If you still want to make any adjustments in duration or cutting or sizing, you can do it easily. Because it’s a customizable effect. Give a pat on your Back! You did a great job and accomplish the results!

Free Download For Win 7 or later(64-bit)
Free Download For macOS 10.14 or later
Conclusion
An instant way to make split screen video and edit it is hidden in Wondershare Filmora . You can unwrap it by following the above-mentioned steps and giving a new life to your interaction videos.
Enjoy new and creative ideas with your family and friends and make your video trendy by Filmora. If you are an influencer, you can interact with other bloggers and influencers and make split-screen videos. It will be a great treat for you and your social media followers!
Free Download For macOS 10.14 or later
2. Characters on the screen
The friends with whom you are interacting should be on the screen and have assets to record a video wherever they are. It will be one person on one split screen or two persons on one. It all depends upon your story and script.
3. Prop to interact
A prop will be any particular thing used to show interaction and should be present in the homes of both characters.
![]()
Note: The prop can be any object like a tissue roll, mobile phone, or anything seen as a passing object from one character to another.
4. A helper at home
There will be one person at home during video shooting to pretend a friend’s or family’s hand reaching to the other character from off-camera.
For example, while performing a high-five action, insert the hand of any member with whom you are living in the scene, showing as the character adjacent to you. After setting up everything in a row, it’s time to record scenes for the video.
5. Record different takes
To give a professional look to the video, you have to record different takes for each person from different angles. After recording, everyone has to send footage to only one person to edit on Filmora.
After getting things and recording, it’s time to edit it on Wondershare Filmora. For this, follow the lines below!
Part 2. Steps To Edit Split Screen Video in Filmora
Split-screen video editing is as simple as throwing a prop toward someone. Wondershare Filmora with a premium domain will get your back!
Filmora is a more creative and instant platform to edit any video or to give birth to new ideas. One of the prominent features is having ready-to-use templates for editing split-screen video. Meanwhile, you can also do a manual setup for editing. Follow the steps mentioned below to edit a video by using split-screen effects.
Split Screen Effect With Templates
Step1Import footage to Filmora
After picking up the best footage of every character, download the Wondershare Filmora (if you have not already). Then to import the clips, perform the following steps:
Free Download For Win 7 or later(64-bit)
Free Download For macOS 10.14 or later
- First, click on the “Click here to Import Media” button, as shown below.
- Then, select the clips you want to edit from your PC, and then they’ll be shown in the media section of Filmora.
Step2Add split screen effect to the timeline
Before adding the clips to the timeline, add the split screen effect to the timeline by following the below-mentioned steps:
- Click on the two-headed arrow at the upper tab.
- Then the drop-down list of two options will pop up, as shown below.
- Click on the Split Screen option, and it will show many split screen effects.
- Select the effect, whatever suits you, and download it then.
- After downloading, drag and drop the effect on the timeline section.
Step3Add clips to the effect
After adding the effect to the timeline, it’s time to implement it on the clips or footage. For this, follow the below-mentioned steps:
- Drag and drop the clips based on your storyboard in the required section.
- Then import the takes wherever and however you want, according to the storyboard.
If you don’t want any templates to be used in your video, then you can manually make a screen split layout. To do this, check the below section.
Manual Split Screen Layout
If the storyboard is organized in such a way that you can’t find out any of the templates suitable, then you can easily create a customized one for your video. In a customized split screen, you can set the duration and adjust the frame rate according to your choice.
Step1Import the clips
First, you must create a timeline to edit your split-screen video. To do this, take a look at the below steps!
- Click on the Import icon in the main preview when you open Wondershare Filmora.
- Then, import all the clips or footage you want to edit.
Step2Add all footages to the timeline
After importing all the clips of interaction videos into Filmora, our next step is to add our videos to the timeline.
- Simply click on the imported clips present in the project media section.
- Then drag it to the timeline below and drop it in the required track of videos.
Do the above-mentioned steps with all the clips present in the project media block.
Doing so will create a working timeline you can view and edit as you go along the editing process.
Step3Adjust the frame rate of all clips
It is all set that your storyboard is customized, for this you have to resize all the clips manually. To arrange clips according to the size, follow the below-mentioned steps:
- First, double-click on the clip you want to edit in the timeline.
- The Basic settings of the video will open in which you have a lot of options to edit.
- Click on the Transform option, and its setting will pop up on the top left side.
- Find out the Scale option from the settings and check out its range.
Adjust the scale rate according to your choice by sliding from its section.
![]()
Note: Repeat this process with all other clips present in the timeline to adjust them in such a way so that the hands moving from frame to frame will line up.
Step4Adjust the timing of clips
After adjusting the frame, you now have to adjust the timing of the clips. To perform this action, follow the below steps:
- Arrange and move around the clips on the timeline so that the timing of the scene lines up between each shot.
- Drag the edge of the clip to the right side if you want to increase the timing and duration.
- While dragging the edge of the clip to the left side, if you want to decrease the timing of the clip.
![]()
Note: The most important part is the first time a hand is supposed to move from one frame to another.
What to do if there is any lag in the preview?
If you’re experiencing lag during the preview, click on the “render” button on the top right of the timeline. It will help to render for a smooth preview.
Step5Splitting the clips
If the timing in your scene starts to fall out of sync, then do the following steps:
- First, try splitting all of the clips.
- Ensure to split before they start to fall out of sync.
![]()
Note: Splitting the clip before one person’s dialogue is preferred.
Step6Full-screen moment
After splitting the clips according to adjustments and storyboard, you can now make one of the characters’ videos in full screen. For this, follow the below steps:
- First, make another cut in the clips before the next hand-crossing action.
- Take one of the characters’ videos from clips in-between moment and make them full screen.
![]()
Note: You can quickly do full screen by double-clicking on the clip and unchecking the “transform“ heading in the top left window.
Final Results
You’re now free to re-adjust your clips in the next part back into sync. If you still want to make any adjustments in duration or cutting or sizing, you can do it easily. Because it’s a customizable effect. Give a pat on your Back! You did a great job and accomplish the results!
Free Download For Win 7 or later(64-bit)
Free Download For macOS 10.14 or later
Conclusion
An instant way to make split screen video and edit it is hidden in Wondershare Filmora . You can unwrap it by following the above-mentioned steps and giving a new life to your interaction videos.
Enjoy new and creative ideas with your family and friends and make your video trendy by Filmora. If you are an influencer, you can interact with other bloggers and influencers and make split-screen videos. It will be a great treat for you and your social media followers!
Best 8 Online MPEG to GIF Converters
Powerful Video Editor - Wondershare Filmora
Provide abundant video effects - A creative video editor
Powerful color correction and grading
Detailed tutorials provided by the official channel
GIFs are known to be quite effective in displaying a video portrayal. Many people save special moments across GIFs to make sharing easy and simple. However, when you own different forms of video formats and are looking to convert them to a GIF, you may need a proper tool for its execution. In this article, we shall be working on converting MPEG to GIF without any difficulty.
To make sure that you successfully convert a MPEG to GIF, this article will introduce a set of offline and online converters for effective execution.
In this article
Part 1: Best 3 MPEG to GIF Converter Software
Part 2: Top Online 5 MPEG to GIF Converters
Part 3: How to Convert MPEG to GIF Using Wondershare Filmora?
Part 1: Best 3 MPEG to GIF Converter Software
This part will focus on the offline software that can be considered for converting MPEG to GIF. Follow through these tools to understand more details about them:
1. Wondershare Filmora
| Compatibility | Pricing |
|---|---|
| Windows/Mac | $28.98/Monthly $68.98/Annual $98.98/Perpetual |
This offline software stands among the premium software of the market that provides efficient services in video management. From basic video editing to diverse features such as adding effects and transitions across it, Wondershare Filmora provides enthusiast-level features to its users. The advanced and modern features, combined with simple interfaces, bring a competitive environment for users.
As you create a video across Wondershare Filmora, multiple advanced tools can be consumed easily. You can find examples like motion tracking and overlays across the tool. However, if you consider converting a MPEG video to a GIF, Filmora is definitely a great option in the market.

Advantages
- Provides a wide variety of effects and overlays.
- Quick rendering of video while converting or editing.
- A cost-effective tool with a vast set of elements.
- Offers intuitive guidelines and custom animation tools.
Disadvantage
- Adds watermark across the exported video in the free version.
2. Adobe Premiere Pro
| Compatibility | Pricing |
|---|---|
| Windows/Mac | $20.99/Monthly |
Adobe has developed industry-standard tools in this developing age of digital software. Adobe Premiere Pro is an efficient example of good video editing and management software. The ecosystem of tools offered across Premiere Pro is extensive and prolific; however, the user needs to have a basic knowledge of video editing before coming across it.
The conversion opportunities across this MPEG to GIF converter software are extensive. Its execution, alongside the wide variety of conversion options, is responsive. This makes it a great choice for your organization that is in search of a perfect tool for this purpose.

Pros
The interface is quite clear and flexible for video editors.
The stabilization tool of Filmora is commendable for users.
Collaborate with other editors on different projects through Creative Cloud.
Can perform color correction and audio tweaking on videos before having them exported.
Cons
This tool is not designed for beginners and people who do not understand video editing.
3. VLC
| Compatibility | Windows/Mac/Linux |
|---|---|
| Windows/Mac | Free |
VLC is a free and open-source media player that provides an inspiring variety of tools across its platform. Unlike other free tools, VLC does not work across simple features and characteristics. It offers options for converting, streaming, video editing, and enhancing. This makes it an exceptional offer for users looking to convert their MPEG to GIF.
The tool is highly customizable and is supported with extensive file format support. Looking across the different features required in the process, you can add different plugins to expand your work across VLC.

Benefits
- Offers easy conversion of video files without loss in quality.
- Encode outbound streams without any issues.
- Works perfectly for Linux, Windows, and Mac devices. Also available across Android and iPhone devices.
- It can be expanded through plugins for better functionality.
Drawback
- You cannot edit the video using the VLC Media Player.
Part 2: Top Online 5 MPEG to GIF Converters
For this part, we shall work across a few impressive online converters that can be essentially used for converting a MPEG to GIF. Go through the functions of these tools to understand how you can convert your required video with ease.
1. Aconvert
The first option among the premium online converters for MPEG to GIF is Aconvert. This tool can be quite charismatic in providing you with a proper platform to work on your video conversion. While being a simple tool, you can make changes in the video in the best possible manner. Not only does this tool provide the conversion of the specific format, but it also covers an immense amount of conversion options.

Benefits
- Set the duration of the GIF as per your desire.
- Change the video settings, such as bitrate, frame rate, and size.
- A simple and effective user interface.
- Contains a proper description of the file formats for the user’s knowledge.
Con
- Does not keep up with the quality of the video while converting.
2. EZGIF.com
As the name suggests, this online converter is a very simple and effective tool to try. As it converts a MPEG video into a GIF with ease, you can surely look for this tool for quick results. With the option of multiple tools to work with, you can add this tool to your daily life for quick functions. EZGIF.com returns you with an animated GIF, which is quite effective compared to other online platforms.

Advantages
You can paste a URL of a video directly for conversion.
Provides a variety of file formats to its users.
Covers videos of variating frame rates, which makes it diverse.
Get an accurate start and end of the GIF with proper setting tools.
Bad
Users can only upload file sizes of 100MB.
3. CloudConvert
You may find this online platform to be the most effective for converting your MPEG files. While offering various options for converting videos, you can easily manage more than 200+ formats across the tool. Along with that, Cloudconvert ensures the security of all shared data across the platform. It does not allow anyone else to access your data.

Goods
You can ensure high-quality conversion with the online converter tool.
It offers you the option of setting the resolution of the video that you wish to convert.
Helps in changing the aspect ratio of the tool with ease.
You can also change the frame rate of the video that is to be converted.
Bad
Allows converting 25 videos in a day.
4. OnlineConvertFree
Another great website that you can consider to convert your MPEG to GIF is OnlineConvertFree. With a wide variety of conversion options available across the format, you can make quality GIFs. Along with that, the platform allows its users to upload videos through the computer and Dropbox or Google Drive. Its fast conversion makes it a premium option among users.

Pros
It is a completely free tool to use.
Provides users with support across more than 250 file formats.
Do not keep any data across the website for security reasons.
You can also save your converted data across the cloud.
Cons
The website contains a lot of ads throughout.
5. Convertio
This platform is another exceptional option in file conversion that can be considered in the online software. Convertio supports more than 25600 different file conversion options, which shows that the file format support is extremely elaborate in the platform. The process of conversion is the simplest you can find in the market. Along with that, the tool ensures that the shared files are kept secure from unauthorized access.

Pros
Provides exceptional features for free.
The interface is quite straightforward.
Allows batch conversion of multiple MPEG files into GIFs.
Ensures the quality of the converted file.
Cons
Users are bound to buy a plan for Convertio to use its full features without any file size limits.
Part 3: How to Convert MPEG to GIF Using Wondershare Filmora?
Filmora can be a great option to convert MPEG to GIF without any problems. You need to go through the steps to figure out the complete procedure with ease.
Step 1: Launch Filmora and Open Project
Download and install the latest version of Wondershare Filmora on your computer. Once done, launch the tool and click on “New Project” to open a new window.

Step 2: Import MPEG Video File
Once a new window opens up, you need to click on the “Import” icon displayed in the “Media” section. Add the MPEG video that is to be converted to a GIF. Once added, drag it across the timeline.

Step 3: Export as GIF
Click on the “Export” icon to open the export options. You need to select the option of “GIF” displayed on the left-hand column of the screen. Once done, set up a name and location for the video. Along with that, you can also change the resolution, frame rate, and size by clicking on “Settings.” Once done, click on the “Export” button to conclude the process.

Conclusion
Have you learned about the variety of software that is available to convert MPEG to GIF? You can consider any tools for making quick changes across your video. Along with that, for perfect execution with quality, you can definitely consider using Wondershare Filmora to convert your video files. Go through the article to make the perfect selection for your tasks.
GIFs are known to be quite effective in displaying a video portrayal. Many people save special moments across GIFs to make sharing easy and simple. However, when you own different forms of video formats and are looking to convert them to a GIF, you may need a proper tool for its execution. In this article, we shall be working on converting MPEG to GIF without any difficulty.
To make sure that you successfully convert a MPEG to GIF, this article will introduce a set of offline and online converters for effective execution.
In this article
Part 1: Best 3 MPEG to GIF Converter Software
Part 2: Top Online 5 MPEG to GIF Converters
Part 3: How to Convert MPEG to GIF Using Wondershare Filmora?
Part 1: Best 3 MPEG to GIF Converter Software
This part will focus on the offline software that can be considered for converting MPEG to GIF. Follow through these tools to understand more details about them:
1. Wondershare Filmora
| Compatibility | Pricing |
|---|---|
| Windows/Mac | $28.98/Monthly $68.98/Annual $98.98/Perpetual |
This offline software stands among the premium software of the market that provides efficient services in video management. From basic video editing to diverse features such as adding effects and transitions across it, Wondershare Filmora provides enthusiast-level features to its users. The advanced and modern features, combined with simple interfaces, bring a competitive environment for users.
As you create a video across Wondershare Filmora, multiple advanced tools can be consumed easily. You can find examples like motion tracking and overlays across the tool. However, if you consider converting a MPEG video to a GIF, Filmora is definitely a great option in the market.
Advantages
- Provides a wide variety of effects and overlays.
- Quick rendering of video while converting or editing.
- A cost-effective tool with a vast set of elements.
- Offers intuitive guidelines and custom animation tools.
Disadvantage
- Adds watermark across the exported video in the free version.
2. Adobe Premiere Pro
| Compatibility | Pricing |
|---|---|
| Windows/Mac | $20.99/Monthly |
Adobe has developed industry-standard tools in this developing age of digital software. Adobe Premiere Pro is an efficient example of good video editing and management software. The ecosystem of tools offered across Premiere Pro is extensive and prolific; however, the user needs to have a basic knowledge of video editing before coming across it.
The conversion opportunities across this MPEG to GIF converter software are extensive. Its execution, alongside the wide variety of conversion options, is responsive. This makes it a great choice for your organization that is in search of a perfect tool for this purpose.
Pros
The interface is quite clear and flexible for video editors.
The stabilization tool of Filmora is commendable for users.
Collaborate with other editors on different projects through Creative Cloud.
Can perform color correction and audio tweaking on videos before having them exported.
Cons
This tool is not designed for beginners and people who do not understand video editing.
3. VLC
| Compatibility | Windows/Mac/Linux |
|---|---|
| Windows/Mac | Free |
VLC is a free and open-source media player that provides an inspiring variety of tools across its platform. Unlike other free tools, VLC does not work across simple features and characteristics. It offers options for converting, streaming, video editing, and enhancing. This makes it an exceptional offer for users looking to convert their MPEG to GIF.
The tool is highly customizable and is supported with extensive file format support. Looking across the different features required in the process, you can add different plugins to expand your work across VLC.
Benefits
- Offers easy conversion of video files without loss in quality.
- Encode outbound streams without any issues.
- Works perfectly for Linux, Windows, and Mac devices. Also available across Android and iPhone devices.
- It can be expanded through plugins for better functionality.
Drawback
- You cannot edit the video using the VLC Media Player.
Part 2: Top Online 5 MPEG to GIF Converters
For this part, we shall work across a few impressive online converters that can be essentially used for converting a MPEG to GIF. Go through the functions of these tools to understand how you can convert your required video with ease.
1. Aconvert
The first option among the premium online converters for MPEG to GIF is Aconvert. This tool can be quite charismatic in providing you with a proper platform to work on your video conversion. While being a simple tool, you can make changes in the video in the best possible manner. Not only does this tool provide the conversion of the specific format, but it also covers an immense amount of conversion options.
Benefits
- Set the duration of the GIF as per your desire.
- Change the video settings, such as bitrate, frame rate, and size.
- A simple and effective user interface.
- Contains a proper description of the file formats for the user’s knowledge.
Con
- Does not keep up with the quality of the video while converting.
2. EZGIF.com
As the name suggests, this online converter is a very simple and effective tool to try. As it converts a MPEG video into a GIF with ease, you can surely look for this tool for quick results. With the option of multiple tools to work with, you can add this tool to your daily life for quick functions. EZGIF.com returns you with an animated GIF, which is quite effective compared to other online platforms.
Advantages
You can paste a URL of a video directly for conversion.
Provides a variety of file formats to its users.
Covers videos of variating frame rates, which makes it diverse.
Get an accurate start and end of the GIF with proper setting tools.
Bad
Users can only upload file sizes of 100MB.
3. CloudConvert
You may find this online platform to be the most effective for converting your MPEG files. While offering various options for converting videos, you can easily manage more than 200+ formats across the tool. Along with that, Cloudconvert ensures the security of all shared data across the platform. It does not allow anyone else to access your data.
Goods
You can ensure high-quality conversion with the online converter tool.
It offers you the option of setting the resolution of the video that you wish to convert.
Helps in changing the aspect ratio of the tool with ease.
You can also change the frame rate of the video that is to be converted.
Bad
Allows converting 25 videos in a day.
4. OnlineConvertFree
Another great website that you can consider to convert your MPEG to GIF is OnlineConvertFree. With a wide variety of conversion options available across the format, you can make quality GIFs. Along with that, the platform allows its users to upload videos through the computer and Dropbox or Google Drive. Its fast conversion makes it a premium option among users.
Pros
It is a completely free tool to use.
Provides users with support across more than 250 file formats.
Do not keep any data across the website for security reasons.
You can also save your converted data across the cloud.
Cons
The website contains a lot of ads throughout.
5. Convertio
This platform is another exceptional option in file conversion that can be considered in the online software. Convertio supports more than 25600 different file conversion options, which shows that the file format support is extremely elaborate in the platform. The process of conversion is the simplest you can find in the market. Along with that, the tool ensures that the shared files are kept secure from unauthorized access.
Pros
Provides exceptional features for free.
The interface is quite straightforward.
Allows batch conversion of multiple MPEG files into GIFs.
Ensures the quality of the converted file.
Cons
Users are bound to buy a plan for Convertio to use its full features without any file size limits.
Part 3: How to Convert MPEG to GIF Using Wondershare Filmora?
Filmora can be a great option to convert MPEG to GIF without any problems. You need to go through the steps to figure out the complete procedure with ease.
Step 1: Launch Filmora and Open Project
Download and install the latest version of Wondershare Filmora on your computer. Once done, launch the tool and click on “New Project” to open a new window.
Step 2: Import MPEG Video File
Once a new window opens up, you need to click on the “Import” icon displayed in the “Media” section. Add the MPEG video that is to be converted to a GIF. Once added, drag it across the timeline.
Step 3: Export as GIF
Click on the “Export” icon to open the export options. You need to select the option of “GIF” displayed on the left-hand column of the screen. Once done, set up a name and location for the video. Along with that, you can also change the resolution, frame rate, and size by clicking on “Settings.” Once done, click on the “Export” button to conclude the process.
Conclusion
Have you learned about the variety of software that is available to convert MPEG to GIF? You can consider any tools for making quick changes across your video. Along with that, for perfect execution with quality, you can definitely consider using Wondershare Filmora to convert your video files. Go through the article to make the perfect selection for your tasks.
How To Fade Audio With Movavi Editor
Movavi Video Editor Plus is the best option if you want to use its user-friendly Movavi fade audio feature set with plenty of functionality. There are versions of the app on Mac and Windows. For all intents and purposes, Movavi fade out music functionality is an excellent piece of this video editing software. The Movavi Video Editor Plus package comes with standard advanced features and functionality. You may also store your work and share your Movavi fade out audio exports across devices that have the software installed.
Looking for how to fade out music in Movavi? We’ve got you solutions to it. The ability to quickly and simply check that the beginning and conclusion of any audio is one of the best Movavi fade audio features. Prior to the audio, there must be a distinct period of quiet. Finding the program, like Movavi Audio fade out, that best suits your requirements is essential whether you want to fade-in, fad-out, trim, crop, clip, or combine audio files or segments of a music. Find out the details in the upcoming sections.
Part 1. How to Fade Audio with Movavi Editor
When the song’s ending is not featured in the video, fade-out is used to provide an added level of professionalism. Even if you’ve never altered a video before, using Movavi Video Editor Plus is simple. A step-by-step tutorial that walks you through all the tools you’ll need is shown to you when the software initially launches. Additionally, you may always search the Movavi official website for advice.
Steps to use Movavi Fade Audio:
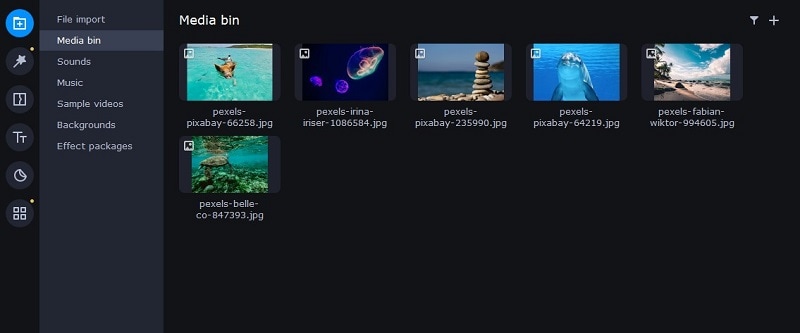
Step1The first step is to import the audio and video files you want to utilize. Drag and drop the files into the software or choose “Add Files” from the Media Bin area to do this. Drag and drop the clip into the timeline after that.
Step2Select the disconnect audio option from the edit menu. Additionally, you can see that the audio and video will no longer be connected by a little connection. Your titles’ location, color, and font may all be changed.
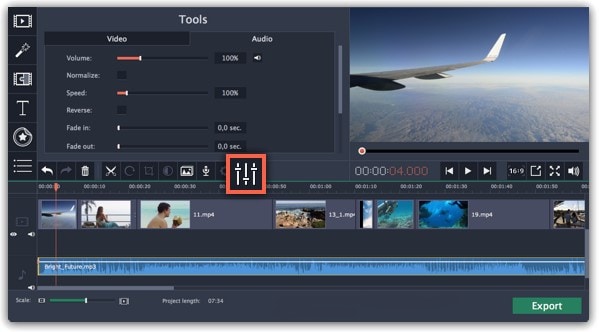
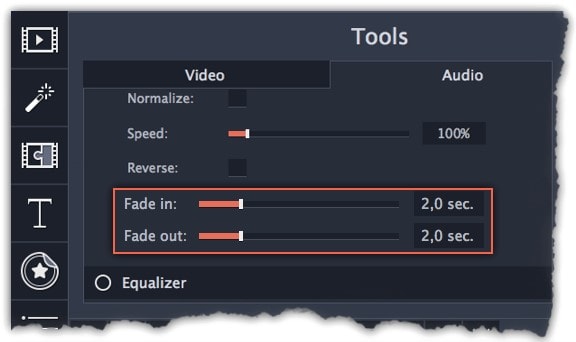
Step3Use the sliders on the Audio tab to set the fade duration by referring to the Audio Properties. Additional options may be used to increase the audio’s loudness, eliminate ambient noise, or even create an echo effect.
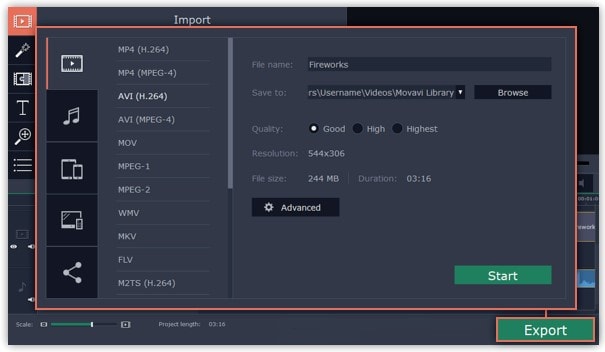
Step4Click on the export option to save this audio as an MP3. Select Audio Export. The MP3 choice is used by default. Select the Save Audio File tab after clicking the Export button. Choose the preferred format and press Start.
Part 2. Movavi Alternative to Fade Audio
Look no further than Filmora by Wondershare if you’re seeking for an effective and user-friendly Movavi audio fade out substitute. This program has all the tools you need to edit, apply special effects, and make titles for videos of a professional caliber. In contrast to Movavi, Filmora gives you the ability to create fade out music without requiring you to install a separate extension. In order to help you understand how to use this function using the Filmora video editing interface, we have enlisted the step-by-step guide for you as well.
Although there are several video editors on the market, Filmora has successfully carved out a position for itself with a variety of intriguing features. The application is appropriate for both new and more experienced users and was designed with novice users in mind. Its user interface (UI), which is rather simple when compared to professional applications. Among all the free video editing programs for beginners, Filmora also offers a far larger selection of effects, customizability, and correction tools, and its screen-splitting capability is much handier than Movavi fade audio feature.
Steps to Fade Out Audio in Filmora:
Step1Install Wondershare Filmora
The straightforward platform to start editing your audio and music files is Filmora, which is available for free. You must first download and install this application on your windows computer in order to utilize it without difficulty. Download the most current edition of this application first. It’s now time to install it on your computer when you’ve completed that. Simply install this program on your computer by following the standard setup instructions if you want to do it fast.
Step2Open Filmora Editor and Import Audio Files
In the step that follows, we’ll show you how to use this platform to fade in and out audio. Filmora may be immediately launched from your desktop or the search bar, then opened as seen below to begin going. By choosing the Video Editor option from the software’s home screen, you may now investigate the basic principles of editing. This will bring up the main interface for Filmora. To import your music and video files, just choose the Import button from the software’s main screen, as seen below:

Step3Load Built-in Audio Editor
You must drag the media files into the program’s timeline after importing them into Filmora. You may modify your media files using every tool in the timeline. To utilize the audio editor in Filmora, just right-click on the specific audio file and choose “Edit Audio” from the list, as seen below.

Step4Use Audio Fade-in/Fade-out
The initial step is to learn how to use Filmora to start fading in and, afterwards, fading out your audio recordings. The best aspect of Filmora is how simple it is to employ these techniques from the timeline. To achieve this, focus on the audio file that you want to change in the timeline; after you’ve picked it, the two icons will show up above the audio file. Drag the first one to the desired duration for the audio fade-in option, as demonstrated:

Step5Edit and Share Video/Sound
In addition to an audio editor, Filmora has a built-in toolset for video editing. You may utilize basic to sophisticated editing techniques inside the program. To choose the basic editor, just click on the video file within the timeline as seen below. There is support for all widely used video and audio formats, including MP3. Click “Export” and choose “File Format” to do this.
By pressing the Format button, choose the required configuration from the list. On a computer, the particular document will be saved to the designated directory.
The Bottom Line
Have you learned how to fade out music in Movavi? If so, then you would also find out that the Movavi fade audio alternative, Filmora , provides a selection of audio editing options in addition to video editing features. The Movavi editor is capable of spicing up your videos and audios, however; Filmora’s workflow is a little more established and well-defined than Movavi’s, which is what propels it to the top of the audio editing field. As a result, Filmora would be the better option if you intend to work as a video editor for a long time.
Free Download For Win 7 or later(64-bit)
Free Download For macOS 10.14 or later
Also read:
- Updated We All Know Very Well that a 1-Second-Video Has Several Images in a Single Row. Even with iMovie Time-Lapse, You Can Create This! So, without Any Further Ado, Lets Learn How to Make a Timelapse in iMovie for 2024
- New Best GIF to MOV Converters for 2024
- How to Add Text Behind Objects in Video for 2024
- Updated A Vacation Slideshow Is a Great Way to Relive the Vacation Memories and Also Share Them with Your Loved Ones. If You Are Looking for Ways to Create a Slideshow in Just a Few Minutes, We Will Help You with the Best Tool
- How to Make a Slideshow GIF for 2024
- New In 2024, Unlock Your Video Editing Potential With Filmora From Wondershare
- In 2024, For Artists Who Are Making Videos for Show Their Knowledge or Projects, Add some Effects for the Video Can Always Provoke Interests and Attention. This Article Will Show You How to Do that Easily
- New In 2024, What Is the Best MP4 Cutter for YouTuber on Mac?
- In 2024, Top 9 Best Solutions To Go For When Creating an AI Thumbnail
- Updated In 2024, How to Edit Facebook Video Ads for E-Commerce Business
- In 2024, Easily Cut Large Videos Faster on Mac 7 Solutions Included
- 2024 Approved Practical Ways to Resize Video in Handbrake
- New 2024 Approved Twitch Green Screen Guide
- New Making Slow Motion Videos in Premiere Pro A Review on The Best Methods
- New Want to Learn How to Trim Videos in Premiere Pro. Read on; Our Guide Will Help You Trim Videos with This Timeline-Based Video Editing Software Application to Make Them Engaging to Viewers for 2024
- Learn How to Effectively Use Masking in After Effects with This Comprehensive Guide. Includes Step-by-Step Instructions and an Alternative Masking Technique for 2024
- Updated In 2024, Have You Ever Watched YouTube Live Streams? In Fact, You Can Also Start a Live Streaming on YouTube if You Want. Here Well Share some Tips to Live Stream on YouTube
- New 2024 Approved Having Trouble with Black Backgrounds in After Effects? Land in Here to Know How You Can Quickly Escape This Glitch in the Simplest Ever Way Possible
- New | Best WMV to GIF Converters for 2024
- New Twitch Green Screen Guide
- Updated Are You Looking to Find Out How to Loop YouTube Videos on iPhone? Learn How to Loop Your Favorite YouTube Video on Your iPhone, so You Can Play that Part over and Over for 2024
- In 2024, How to Create a Bokeh Effect
- Updated In 2024, Applications and Software Take up Your Devices Storage to Create Slow-Mo. Explore This Piece to Learn About some Slow-Motion Video Online Makers
- New How to Make Discord GIF PFP
- Which is the Best Fake GPS Joystick App On Nokia C12 Plus? | Dr.fone
- In 2024, 9 Best Free Android Monitoring Apps to Monitor Phone Remotely For your Realme 11 Pro+ | Dr.fone
- In 2024, Preparation to Beat Giovani in Pokemon Go For Realme C53 | Dr.fone
- Updated In-Depth Study of Cartoon Painting Starts From Learning to Draw It
- Prank Your Friends! Easy Ways to Fake and Share Google Maps Location On Motorola Moto G 5G (2023) | Dr.fone
- How To Deal With the Nokia C300 Screen Black But Still Works? | Dr.fone
- What is the best Pokemon for pokemon pvp ranking On OnePlus Nord CE 3 Lite 5G? | Dr.fone
- How To Pause Life360 Location Sharing For Asus ROG Phone 7 | Dr.fone
- How to Unlock Samsung Galaxy Z Flip 5 Pattern Lock if Forgotten? 6 Ways
- All Must-Knows to Use Fake GPS GO Location Spoofer On ZTE Blade A73 5G | Dr.fone
- 4 solution to get rid of pokemon fail to detect location On Lava Agni 2 5G | Dr.fone
- Easily Unlock Your Samsung Galaxy A54 5G Device SIM
- How To Change Your Apple ID Password On your Apple iPhone SE
- In 2024, Apple iPhone 6 Plus Screen Mirroring You Must Know | Dr.fone
- In 2024, 8 Best Apps for Screen Mirroring Oppo Find X6 PC | Dr.fone
- In 2024, The Ultimate Guide to Get the Rare Candy on Pokemon Go Fire Red On Lava Blaze 2 5G | Dr.fone
- How does the stardust trade cost In pokemon go On Oppo Reno 11 Pro 5G? | Dr.fone
- Title: In 2024, Do You Want to Know How to Add Captivating Audio in Simple Videos? Nothing to Be Concerned About because This Article Will Help You in This Matter
- Author: Morgan
- Created at : 2024-05-19 05:12:33
- Updated at : 2024-05-20 05:12:33
- Link: https://ai-video-editing.techidaily.com/in-2024-do-you-want-to-know-how-to-add-captivating-audio-in-simple-videos-nothing-to-be-concerned-about-because-this-article-will-help-you-in-this-matter/
- License: This work is licensed under CC BY-NC-SA 4.0.
