
In 2024, How to Add a Spooky Shadow Effect

How to Add a Spooky Shadow Effect
Wondershare Filmora’s main purpose is the empowerment of content creators. The latest updates to the program are one of the pieces of evidence.
Whether you’re a horror content creator or simply living the Halloween vibe 24/7, continue reading to know how to use its latest masking feature to create a cool shadow effect for your next mind-blowing social media video.
How to Use The Masking Effect
Wondershare Filmora’s latest Masking feature allows its users to select a specific clip that they can overlay on other parts of the video or other clips.
Free Download For Win 7 or later(64-bit)
Free Download For macOS 10.14 or later
The feature allows you to insert the mask in any shape, such as a rectangle, circle, or triangle. You can also import any shapes you like if you can’t find them in the presets library. You can also adjust the mask placement, width, height, and feather effect.
Without further ado, let’s see the detailed step-by-step guide for this effect.
a. Preparation
You will need at least three shots of the same frame to get the shadow effect to work. The first is the main video, the second is the shadow clip, and the last would be a clip portraying just a plain background.
Make sure that your camera stays at the same point and angle. You can use a tripod for assurance.
Take the first main video and don’t forget to mark the positioning of the object for the next take. Then, you can shoot the shadow clip following the marking of the object to match its position in the main clip.
Finally, shoot the final clip without the object on the frame.

b. Steps to add the shadow effect to your videos using Masking
Step 1: Place the main clip on the timeline and find the start of the segment that you want to use. Press M on the keyboard to set a marker.

Step 2: Place the shadow clip on top of the main clip on the timeline. Trim and adjust until the shadow clip ends right at the marker of the main clip.

Step 3: Move the play head to the start of the shadow clip. Trim the main clip right on that mark so both clips have the same start by clicking the scissor icon and deleting the unused part.

Step 4: Double-click the shadow clip. OpenSettings > Mask Section > Rectangle to apply the mask. Adjust the blur strength to smooth out the edge.

Step 5: Play the result to see if there’s any part you need to block out. When you find them, repeat steps 1 to 4 but with the background clip. Try to conceal all things you need to hide using the masks. Make sure that you get the timings right.

Step6 Trim the length of the masking clips to match the main clip by sliding the play head and clicking the Split button.
Adjust the audio and preview the effect before you save the result. You can also add extra features like slow motion for maximum effect.

Summary
It is so easy to use this shadow effect on your video using Wondershare Filmora. The handy masking feature also comes with additional keyframe control and easy composite adjustment.
Wondershare Filmora is also packed with other powerful new features. This includes Auto Beat Sync, Speed Ramping, Quick Split Mode, and the upgraded Denoise feature. Update today to add more quirk to your content.
Free Download For macOS 10.14 or later
The feature allows you to insert the mask in any shape, such as a rectangle, circle, or triangle. You can also import any shapes you like if you can’t find them in the presets library. You can also adjust the mask placement, width, height, and feather effect.
Without further ado, let’s see the detailed step-by-step guide for this effect.
a. Preparation
You will need at least three shots of the same frame to get the shadow effect to work. The first is the main video, the second is the shadow clip, and the last would be a clip portraying just a plain background.
Make sure that your camera stays at the same point and angle. You can use a tripod for assurance.
Take the first main video and don’t forget to mark the positioning of the object for the next take. Then, you can shoot the shadow clip following the marking of the object to match its position in the main clip.
Finally, shoot the final clip without the object on the frame.

b. Steps to add the shadow effect to your videos using Masking
Step 1: Place the main clip on the timeline and find the start of the segment that you want to use. Press M on the keyboard to set a marker.

Step 2: Place the shadow clip on top of the main clip on the timeline. Trim and adjust until the shadow clip ends right at the marker of the main clip.

Step 3: Move the play head to the start of the shadow clip. Trim the main clip right on that mark so both clips have the same start by clicking the scissor icon and deleting the unused part.

Step 4: Double-click the shadow clip. OpenSettings > Mask Section > Rectangle to apply the mask. Adjust the blur strength to smooth out the edge.

Step 5: Play the result to see if there’s any part you need to block out. When you find them, repeat steps 1 to 4 but with the background clip. Try to conceal all things you need to hide using the masks. Make sure that you get the timings right.

Step6 Trim the length of the masking clips to match the main clip by sliding the play head and clicking the Split button.
Adjust the audio and preview the effect before you save the result. You can also add extra features like slow motion for maximum effect.

Summary
It is so easy to use this shadow effect on your video using Wondershare Filmora. The handy masking feature also comes with additional keyframe control and easy composite adjustment.
Wondershare Filmora is also packed with other powerful new features. This includes Auto Beat Sync, Speed Ramping, Quick Split Mode, and the upgraded Denoise feature. Update today to add more quirk to your content.
Free Download For macOS 10.14 or later
The feature allows you to insert the mask in any shape, such as a rectangle, circle, or triangle. You can also import any shapes you like if you can’t find them in the presets library. You can also adjust the mask placement, width, height, and feather effect.
Without further ado, let’s see the detailed step-by-step guide for this effect.
a. Preparation
You will need at least three shots of the same frame to get the shadow effect to work. The first is the main video, the second is the shadow clip, and the last would be a clip portraying just a plain background.
Make sure that your camera stays at the same point and angle. You can use a tripod for assurance.
Take the first main video and don’t forget to mark the positioning of the object for the next take. Then, you can shoot the shadow clip following the marking of the object to match its position in the main clip.
Finally, shoot the final clip without the object on the frame.

b. Steps to add the shadow effect to your videos using Masking
Step 1: Place the main clip on the timeline and find the start of the segment that you want to use. Press M on the keyboard to set a marker.

Step 2: Place the shadow clip on top of the main clip on the timeline. Trim and adjust until the shadow clip ends right at the marker of the main clip.

Step 3: Move the play head to the start of the shadow clip. Trim the main clip right on that mark so both clips have the same start by clicking the scissor icon and deleting the unused part.

Step 4: Double-click the shadow clip. OpenSettings > Mask Section > Rectangle to apply the mask. Adjust the blur strength to smooth out the edge.

Step 5: Play the result to see if there’s any part you need to block out. When you find them, repeat steps 1 to 4 but with the background clip. Try to conceal all things you need to hide using the masks. Make sure that you get the timings right.

Step6 Trim the length of the masking clips to match the main clip by sliding the play head and clicking the Split button.
Adjust the audio and preview the effect before you save the result. You can also add extra features like slow motion for maximum effect.

Summary
It is so easy to use this shadow effect on your video using Wondershare Filmora. The handy masking feature also comes with additional keyframe control and easy composite adjustment.
Wondershare Filmora is also packed with other powerful new features. This includes Auto Beat Sync, Speed Ramping, Quick Split Mode, and the upgraded Denoise feature. Update today to add more quirk to your content.
Free Download For macOS 10.14 or later
The feature allows you to insert the mask in any shape, such as a rectangle, circle, or triangle. You can also import any shapes you like if you can’t find them in the presets library. You can also adjust the mask placement, width, height, and feather effect.
Without further ado, let’s see the detailed step-by-step guide for this effect.
a. Preparation
You will need at least three shots of the same frame to get the shadow effect to work. The first is the main video, the second is the shadow clip, and the last would be a clip portraying just a plain background.
Make sure that your camera stays at the same point and angle. You can use a tripod for assurance.
Take the first main video and don’t forget to mark the positioning of the object for the next take. Then, you can shoot the shadow clip following the marking of the object to match its position in the main clip.
Finally, shoot the final clip without the object on the frame.

b. Steps to add the shadow effect to your videos using Masking
Step 1: Place the main clip on the timeline and find the start of the segment that you want to use. Press M on the keyboard to set a marker.

Step 2: Place the shadow clip on top of the main clip on the timeline. Trim and adjust until the shadow clip ends right at the marker of the main clip.

Step 3: Move the play head to the start of the shadow clip. Trim the main clip right on that mark so both clips have the same start by clicking the scissor icon and deleting the unused part.

Step 4: Double-click the shadow clip. OpenSettings > Mask Section > Rectangle to apply the mask. Adjust the blur strength to smooth out the edge.

Step 5: Play the result to see if there’s any part you need to block out. When you find them, repeat steps 1 to 4 but with the background clip. Try to conceal all things you need to hide using the masks. Make sure that you get the timings right.

Step6 Trim the length of the masking clips to match the main clip by sliding the play head and clicking the Split button.
Adjust the audio and preview the effect before you save the result. You can also add extra features like slow motion for maximum effect.

Summary
It is so easy to use this shadow effect on your video using Wondershare Filmora. The handy masking feature also comes with additional keyframe control and easy composite adjustment.
Wondershare Filmora is also packed with other powerful new features. This includes Auto Beat Sync, Speed Ramping, Quick Split Mode, and the upgraded Denoise feature. Update today to add more quirk to your content.
Create the Night-to-Day Effect Videos
Do you wish you could control when it’s nighttime to daytime? It would make getting ready in the morning much faster! This tutorial will show you how to use the keyframe and mask feature in Filmora to make a remarkable night-to-day transition.
How-to Guide
1) Preparation
For this effect, you will need to shoot two footage shots with the same frame. The first is for the daytime clip, and the second is for nighttime.
But before that, you need to prepare some things, such as:
- Tripod to ensure your camera stays at the same point, so the frame doesn’t change.
- Mark the place where you want to shoot the scene. You can put a marker on the floor to ensure that you perform at the same spot in different shots.
Once done, let’s start shooting to get the footage.
2) Steps
Shooting footages
First, get the daytime shot. For this tutorial, we will pretend that you are walking and transitioning into nighttime at the spot you have marked.

Now, let’s film the nighttime clip. You will walk through the living room and do the same movement again at the same spot. You can dim the light and change the camera’s white balance settings to bluer to create a night feeling.

After you have both clips that you need, let’s go to Filmora and start editing.
Night-to-day transition
Step1 Launch Filmora and import the footage into the program. If you haven’t installed it, you can download Filmora on their website here: https://filmora.wondershare.com
Step2 Place the nighttime video clip on the first video track of the timeline and place the daytime clip on the top.

Step3 Find the spot where you want to create a transition between the day and nighttime. Then, you can delete the unwanted part.

Step4 Since the transition for this tutorial is where the subject started waving, make sure to place the daytime clip at the same time the subject started waving in the nighttime clip. Hence, the timing in both clips syncs.
Masking transition
For the next step, we will make a masking transition with the Filmora mask feature.
Step1 Double-click the daytime clip on the timeline. In the Filmora setting, find the Mask section > Circle. You can see the mask is applied in the preview screen.

Step2 Scroll down the setting and click add a keyframe at the beginning of the clip.

Step3 Change the scale of the mask to the smallest number and adjust the Width and Height down to 0. You can set the blur strength to 15 to make the transition edge smoother.

Step4 Move the play head to find the spot where you want the mask fully opens up, then add another keyframe. Change the scale of the mask to 2 and the Width and Height to 50. Make sure the mask occupies the whole frame.

Now, if you play back, you can see the nighttime becomes daytime through the mask.

If the movement in the two clips is a bit off, you can fix it by adding more keyframes on the mask.
3) Pro tips
You can add one more effect in Filmora to make it more magical. To do this, open the Effects window on the top left and find “Heartbeat” under the Basic section.

Drag and drop it onto the third video track and start the effect when the mask opens up. Then, trim the effect length to match the movement. Adjust the speed of this effect if needed.

The final result will look like this:

Summary
That is how to do this night-to-day transition night-to-day time shift effect in Filmora. By the end of this tutorial, you should be able to use the masking transition technique. You can apply and adjust it based on your needs.
Free Download For Win 7 or later(64-bit)
Free Download For macOS 10.14 or later
Free Download For macOS 10.14 or later
How to Add Adjustment Layer (Clip) in DaVinci Resolve?
DaVinci Resolve is one of the popular video editors comprising many advanced features. This tool allows you to conduct 3D video editing and adjust color grading properties. You can also access its audio library to find out suitable music clips. Moreover, you can add transitions and animations to your videos for more enhancements.
While executing video editing, many people add an adjustment layer (clip) in DaVinci Resolve for convenience. By reading this article, you can discover the DaVinci Resolve adjustment layer and an easy method to add it during video editing.

Part 1: What is the Adjustment Layer (clip) in DaVinci Resolve?
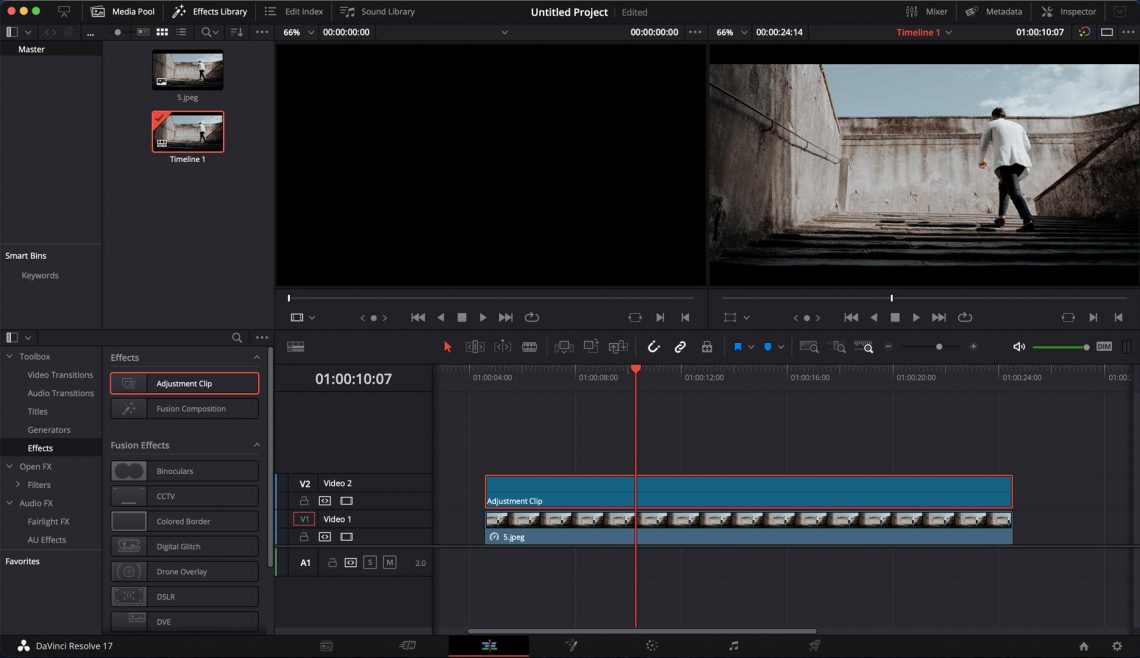
Do you know the benefits of adding an adjustment layer (clip) in DaVinci Resolve? The adjustment layer (clip) in DaVinci Resolve gives you more control and flexibility during video editing. By adding this particular layer above your other clips, you can apply tons of effects to them.
Due to this ease, you don’t have to apply the same effect to multiple clips. Thus, it saves your time and manual effort on DaVinci Resolve. One of the main advantages of adding an adjustment layer (clip) is that it does not modify the original pixels of the video. You can also rename the adjustment layers (clips) in DaVinci Resolve according to your desire.
Hence, adjustment layers in any video editor like DaVinci Resolve provide a non-destructive way to edit and apply effects to the video.
Part 2: How to Add an Adjustment Layer (clip) in DaVinci Resolve?
Are you keen to know how to add an adjustment layer in DaVinci Resolve? By reading this section, you can find easy instructions to apply the adjustment layer (clip) in DaVinci Resolve without hassle.
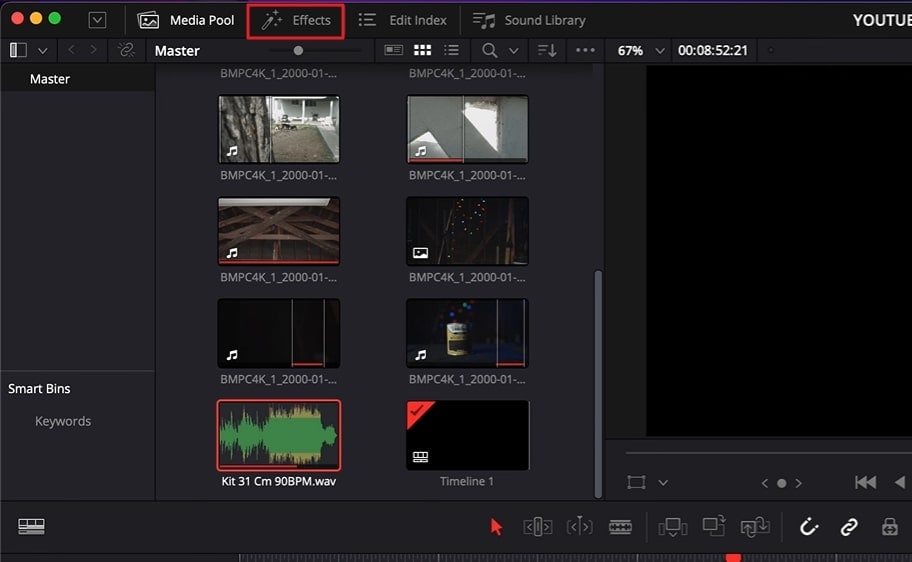
Step1 To add an adjustment layer in DaVinci Resolve, head to the “Effects Library.” From there, click on “Toolbox” and select “Effects.”
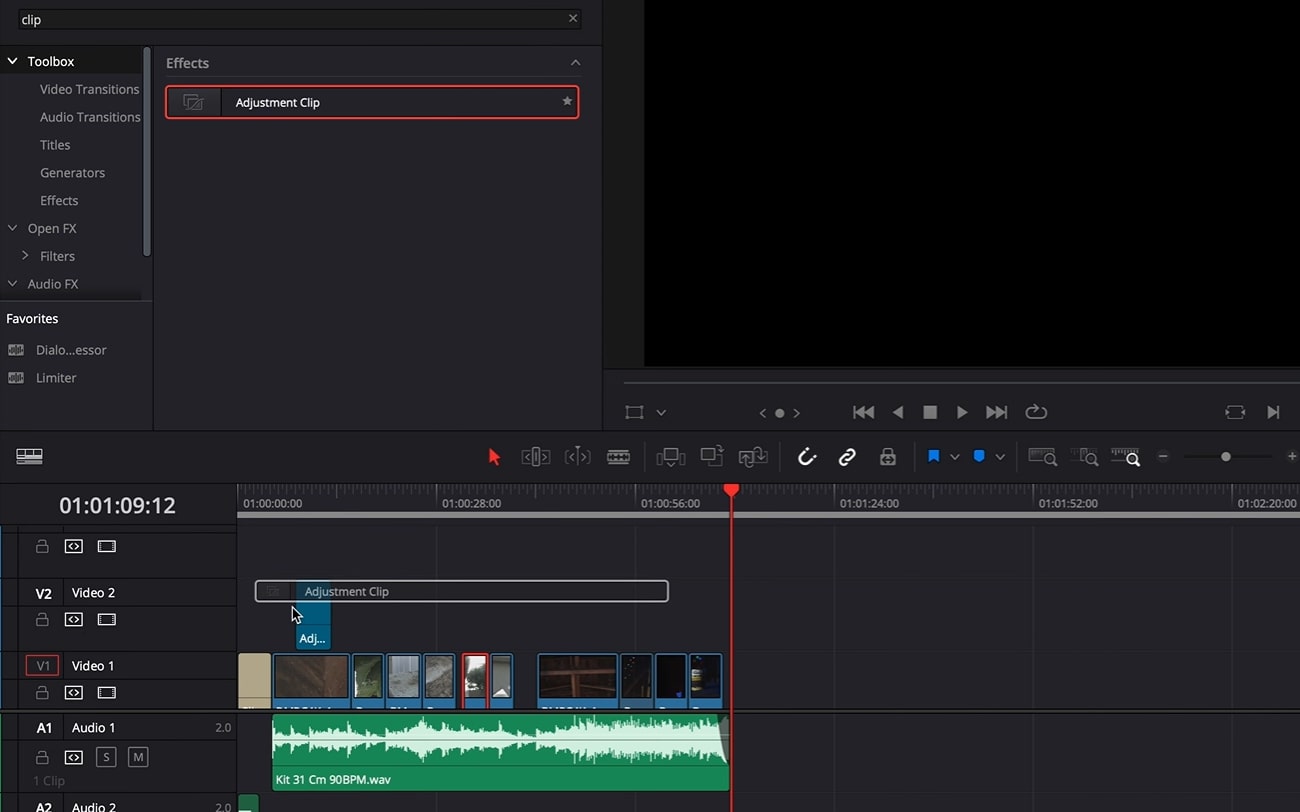
Step2 From the Effects section, you will have to search for the “Adjustment Clip.” Drag and drop the adjustment clip and apply it above the layers that you want to edit.
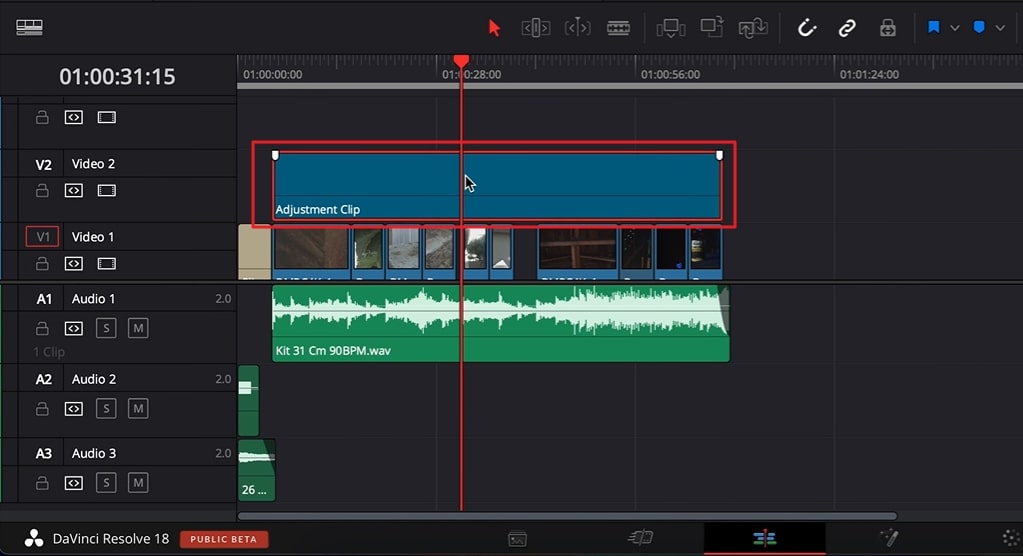
Step3 Now extend the adjustment clip according to the layers. Once done, you can apply effects and transitions to the adjustment clip to add modifications.
Part 3: Three Ways to Use Adjustment Layers in DaVinci Resolve
Do you want to know how to use the DaVinci Resolve adjustment layer? Read this part of the article to discover how to use the adjustment layer (clip) in DaVinci Resolve.
1. Zoom in
Do you want to give the zoom-in element in your video to emphasize your subject? The zoom-in effect is created to focus on the subject to engage the viewers. On DaVinci Resolve, you can create the zoom-in effect using the adjustment layer (clip). To do so, you can read and follow the below instructions:
Step1 First, add the adjustment layer to your timeline by heading to Effects Library and then Toolbox. Make sure to apply the adjustment layer above your talking head on the timeline.
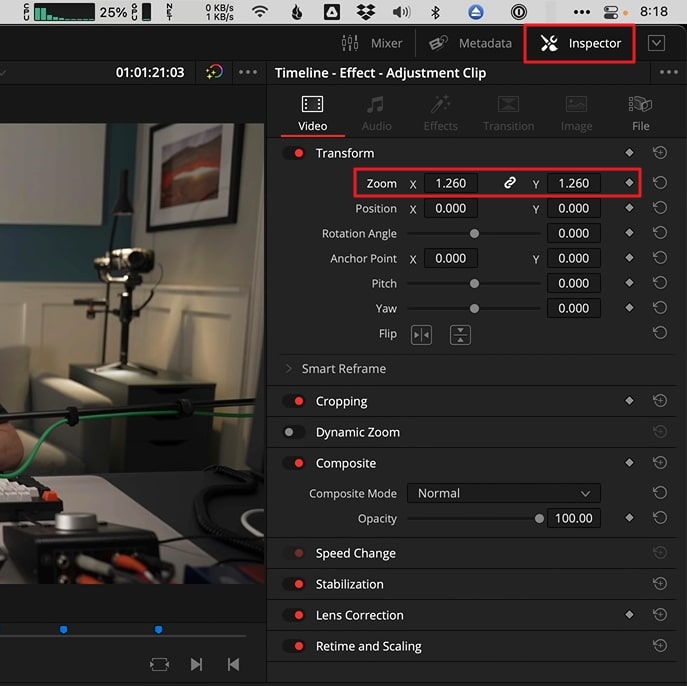
Step2 Now click on “Inspector” from the top right corner and enhance the “Zoom” value according to your desire. Once done, you can play the video to check the results.
2. Color Grading
Color grading can change the perspective of your video clip. Do you want to give your video an aesthetic, gloomy, or colorful vibe? Change the color grading properties using the adjustment layer (clip) in DaVinci Resolve. To use an adjustment layer for color grading, we have jotted down the simple steps below:
Step1 Drag and drop your clip above on the timeline. Once you are done, head to the “Color Page” given below.
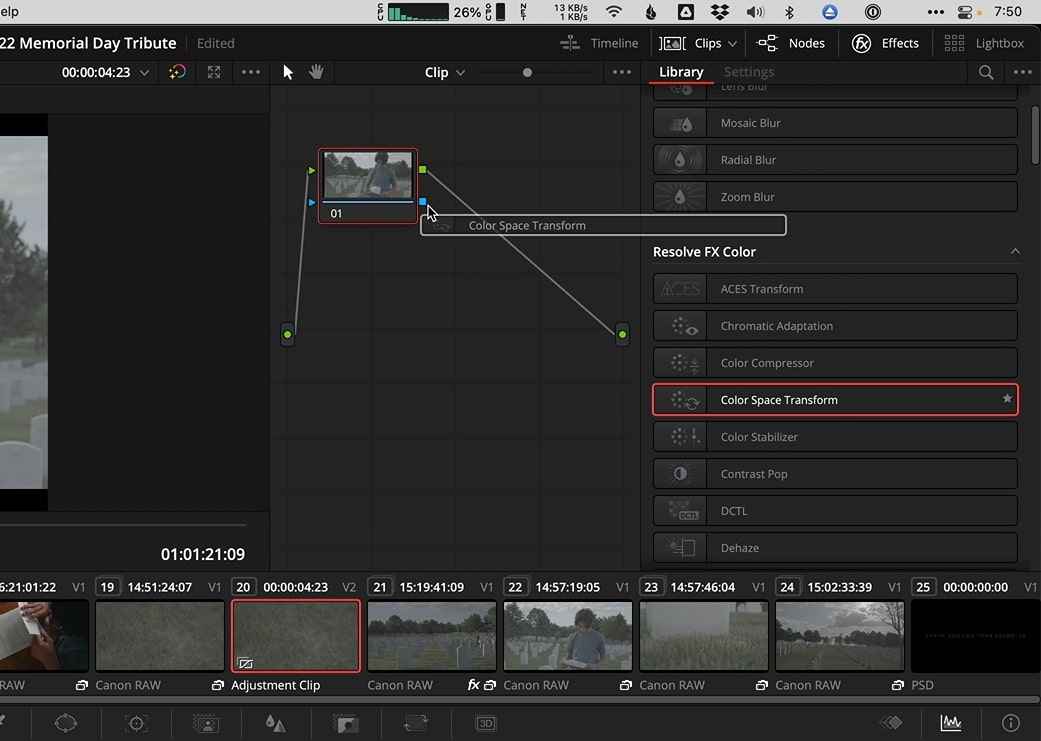
Step2 On the Color page, go to “Library” from the right side and select the effect called “Color Space Transform” from the Resolve FX Color section. After applying this effect, you can enhance the visual appearance of your video.
3. Shake Transition
The shake transition adds a dramatic feel to your video to hook up the audience. If you have recorded a music video, you can add a shake transition to make it more captivating. To add this particular transition to your video, we will use the adjustment layer in DaVinci Resolve to produce accurate results.
Step1 Add the adjustment layer to your timeline. Trim it according to the specific part of your clip where you want to create the shake transition effect.
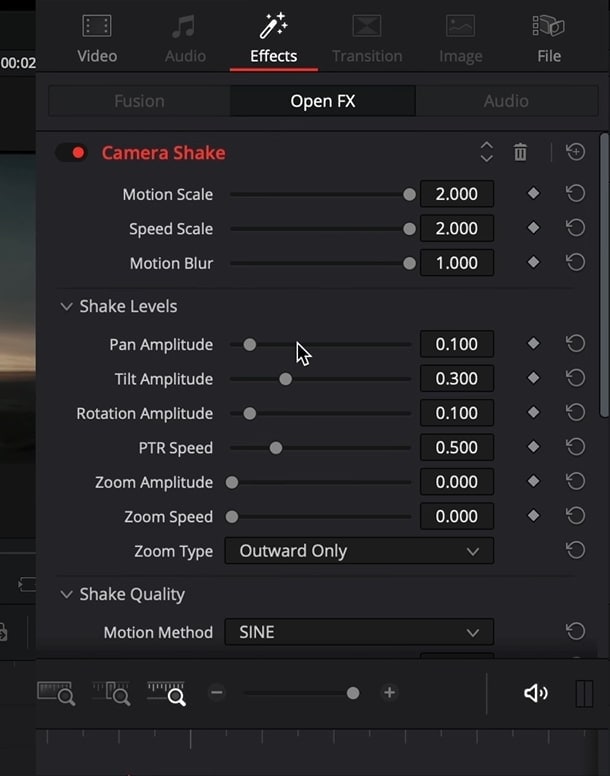
Step2 Now, from the left side, select “Open FX” library and search “Camera shake” effect. Apply it to the adjustment layer and navigate to the “Effects” tab from the top right corner. From there, increase the values of motion scale, speed scale, and motion blur. You can also make further changes in the “Shake Levels” section.
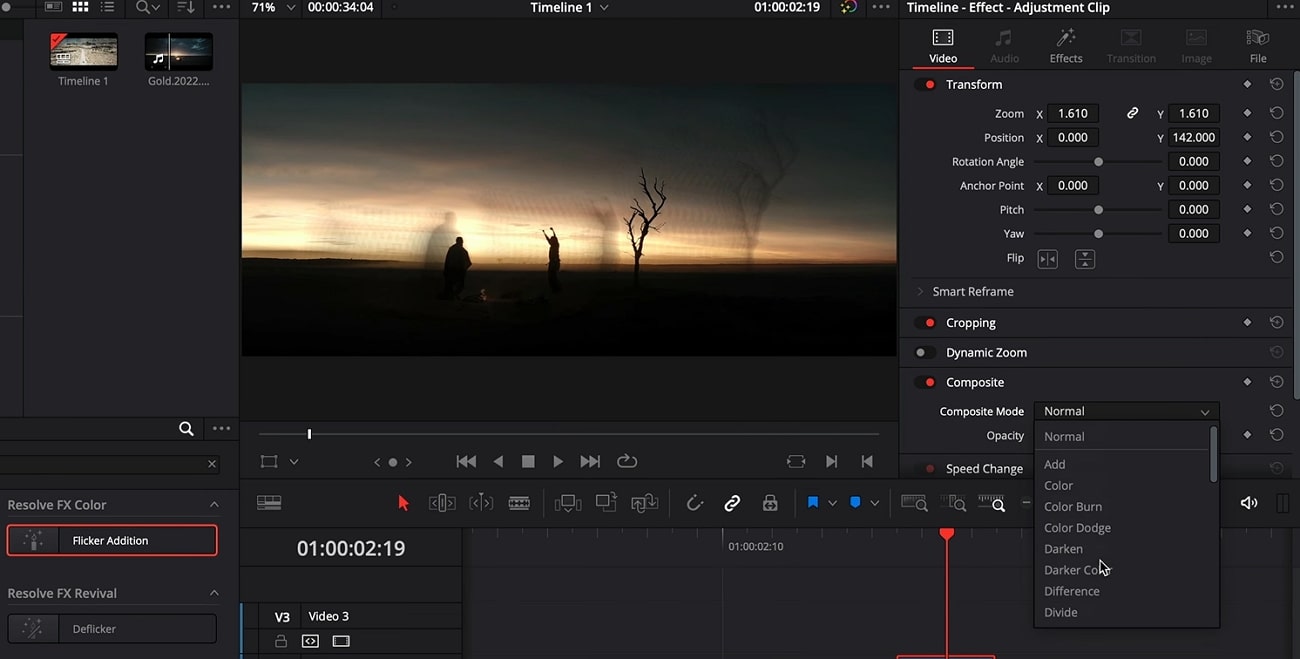
Step3 Afterward, scroll to the bottom and change the Border Type to “Reflect.” Now head back to the Open FX library and select the “Flicker Addition” effect. Apply this particular effect to the adjustment layer. From the “Effects” tab on the right side, select “Flicker Gain” as your flicker type. You can also go to the “Video” tab to enhance the zoom and position value.
Step4 You can also select different composite modes. You can also duplicate the adjustment clip and alter the composite mode of the second clip. Once done, decrease the opacity of the second clip. Now copy and place the adjustment clips on your timeline according to your desire.
Bonus Tips: Use Adjustment Layers in the Best Alternative to DaVinci Resolve
If you are not satisfied with the results of the DaVinci Resolve adjustment layer, you can try Wondershare Filmora . This professional software can prove to be the best alternative to DaVinci Resolve due to its numerous key features. You can find this tool on every major platform, such as iOS, Android, Windows, and Mac. This tool has a clean and friendly user interface so that you can enjoy editing and modifying your videos.
Free Download For Win 7 or later(64-bit)
Free Download For macOS 10.14 or later
You can also use adjustment layers to edit with great ease on this compatible video editor. Moreover, you can find multiple trending effects in its library that can help you to enhance your video clips. To add an adjustment layer in Filmora, you can follow the below steps.
Step1 Start with New Project
Once done with launching Filmora, hit the “New Project” button and upload the desired video. Drag and drop the added video to the timeline to proceed further.

Step2 Add the Adjustment Layer
Go to the “Media” tab and locate the option “Adjustment Layer.” Once done, drag and drop the adjustment layer to the timeline and double-click on it to change its settings.
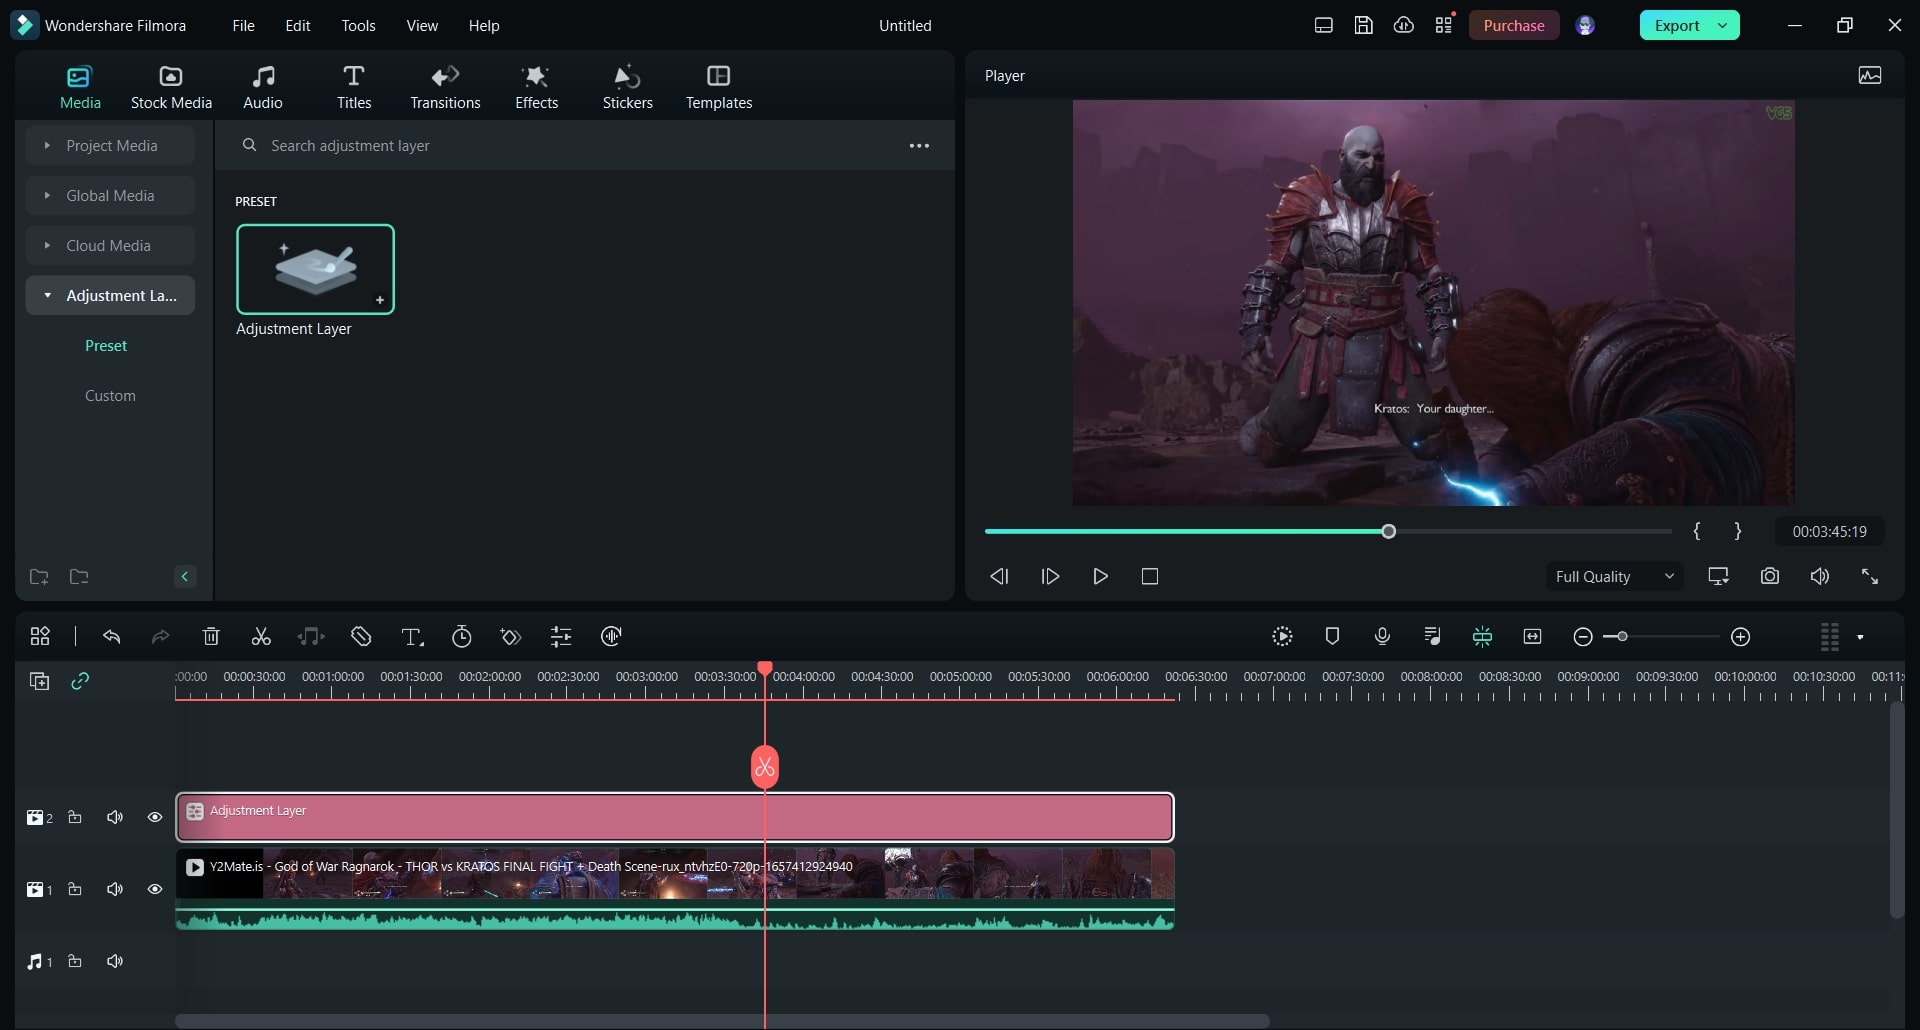
Step3 Manage the Adjustment Layer Settings
From the opened settings, you can alter the blending mode according to your choice. You can also change opacity and position for more adjustments. Also, you can apply various presets to add a cinematic look. Moreover, you can apply different borders across your video clip for a more enhanced look.
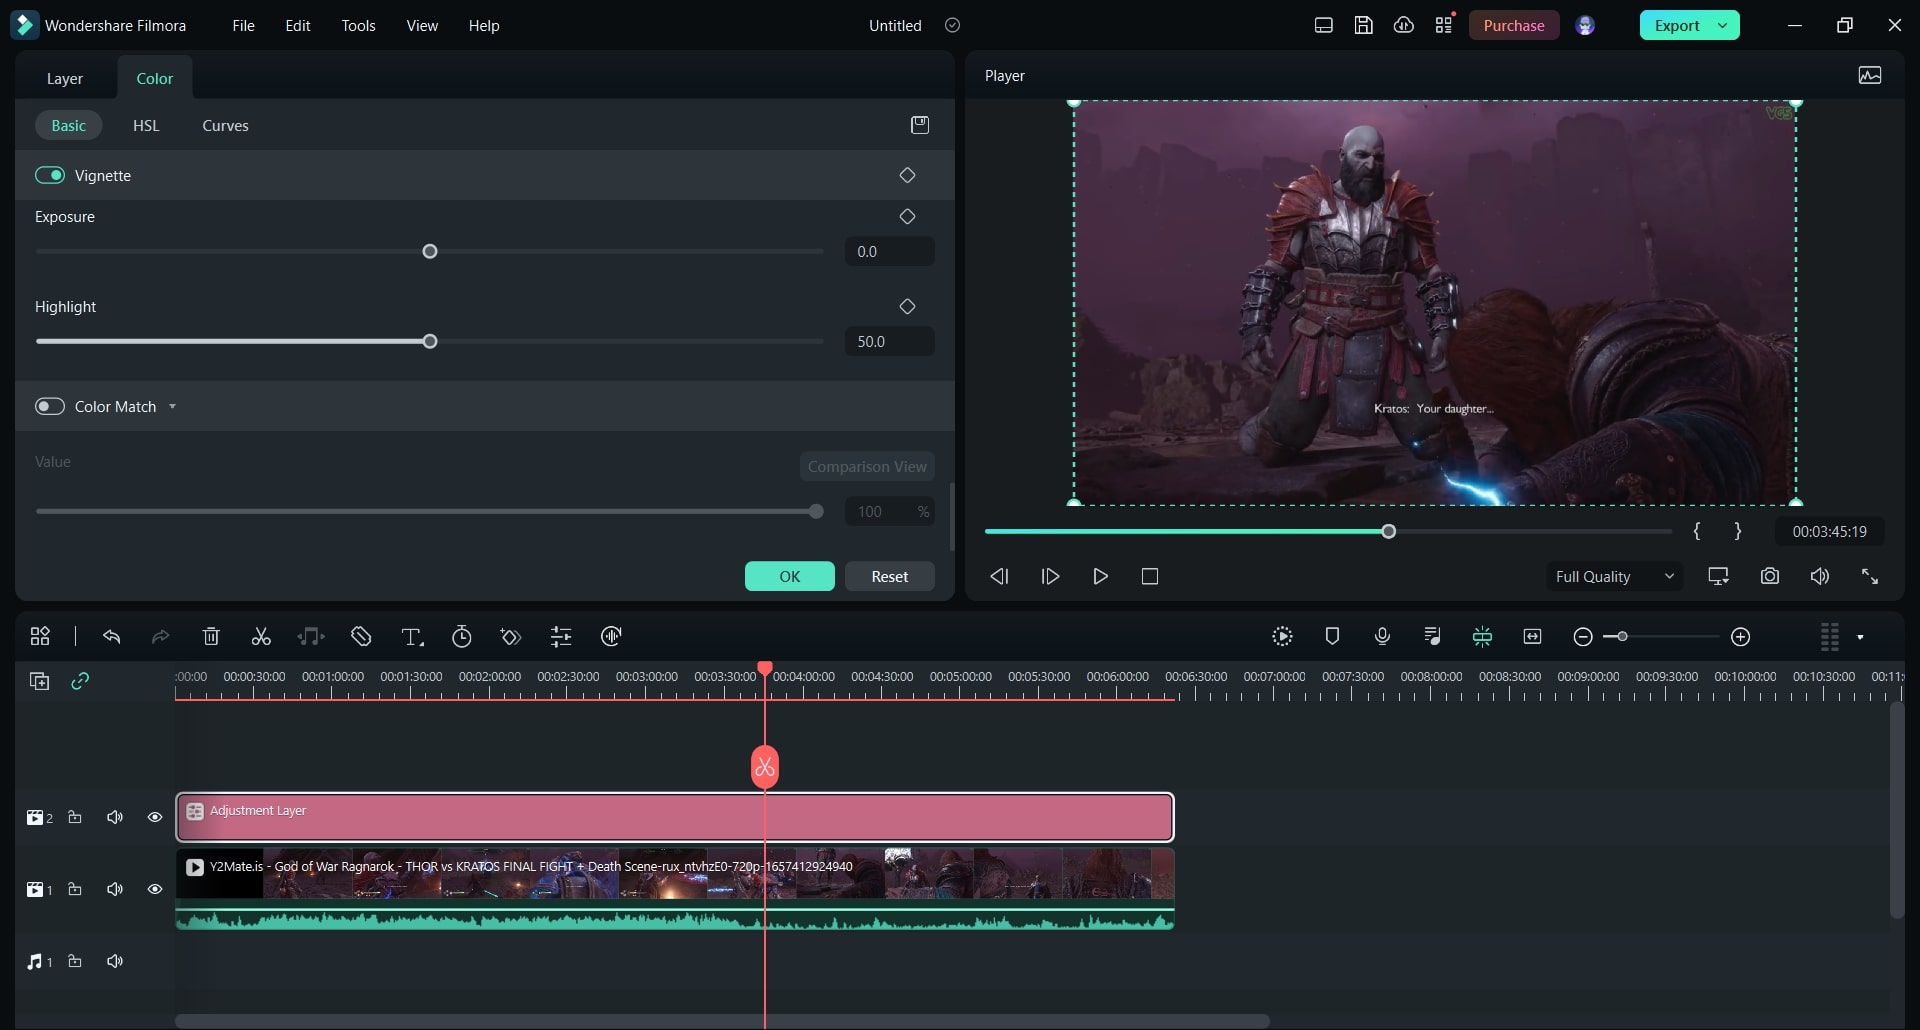
Conclusion
DaVinci Resolve is one of the most famous video editors among professionals. If you want to become an expert in using DaVinci Resolve, you must know how to add an adjustment layer (clip) to this tool. For your help, this article has provided complete guidelines on how to add an adjustment layer in DaVinci Resolve.
Moreover, we have also highlighted a better option than DaVinci Resolve, known as Wondershare Filmora. Using this software, you can apply the adjustment layers to your video to generate more precise and accurate results.
Free Download For macOS 10.14 or later
You can also use adjustment layers to edit with great ease on this compatible video editor. Moreover, you can find multiple trending effects in its library that can help you to enhance your video clips. To add an adjustment layer in Filmora, you can follow the below steps.
Step1 Start with New Project
Once done with launching Filmora, hit the “New Project” button and upload the desired video. Drag and drop the added video to the timeline to proceed further.

Step2 Add the Adjustment Layer
Go to the “Media” tab and locate the option “Adjustment Layer.” Once done, drag and drop the adjustment layer to the timeline and double-click on it to change its settings.

Step3 Manage the Adjustment Layer Settings
From the opened settings, you can alter the blending mode according to your choice. You can also change opacity and position for more adjustments. Also, you can apply various presets to add a cinematic look. Moreover, you can apply different borders across your video clip for a more enhanced look.

Conclusion
DaVinci Resolve is one of the most famous video editors among professionals. If you want to become an expert in using DaVinci Resolve, you must know how to add an adjustment layer (clip) to this tool. For your help, this article has provided complete guidelines on how to add an adjustment layer in DaVinci Resolve.
Moreover, we have also highlighted a better option than DaVinci Resolve, known as Wondershare Filmora. Using this software, you can apply the adjustment layers to your video to generate more precise and accurate results.
How to Add Video Effects with Movavi Slideshow Maker
Many video editors won’t be late in their artwork. They tend to use different effects to light up their crafts. For them, editing videos with effects applications gives more life to the story. In this composition, you will learn more about Effects, and if you are just about to do your video editing right now, these details are definitely for you.
What are Video Effects?
According to the dictionary, an effect is brought about by a cause or an agency.
In video editing, there are a few video effects you must know to apply them to your video project. Video effects can alter the speed and produce distortions, reflections, aesthetic filters, stylistic color grading, animation transitions, and more. They can also contain 3D features like CGI. When used well, these effects improve the narrative, the atmosphere, and the images’ overall impact.
Let’s dissect a few of the major effects, which will be most helpful to you.
Pans and Tilts
Your first thought upon hearing these two words may be tripod motions. Pans and tilts are a quick way to add additional movement and sensation to your video, making it more dynamic.
Change the Speed/Duration
One feature that virtually every NLE or Non-Linear Editing software gives us is the option to modify the playback speed of your video while reducing or increasing the actual duration and tempo of your segments. Slowing down your footage to match the frame rate at which the video was initially captured is one of the critical explanations for doing this.
To incorporate some frantic or chaotic moments into your production, you can use this to generate slow-motion shots and fast-forward effects. This effect can also quickly pan through footage for humorous effect. Find the “Speed/Duration” option under Effects controls to accomplish this.
Light Leaks and Flares
Nothing gives your video a more ethereal vibe than gentle, warm light emerging from the scene. A direct source visible in the photo may be the source of this light, or it may enter the frame from the edge. You’ve probably seen these flares and leaks countless times in movies, whether they were added in post-production or resulted from the cinematographer’s lens choice. You can select where the light comes from if it doesn’t distract from the task. Remember that these spills and flares must contribute to the narrative while remaining barely perceptible to the viewer.
Retro/VHS Effects
While light leaks and lens flares give your movie or film a timeless feel, nothing gives it a dated or, one would say, “scrappy” vibe. The grunge appearance of the ‘90s is in right now, and one of the most popular effects is the VHS look.
There are several ways to get this effect. Applying a preset, essentially a LUT (look-up table or filter), to your color grade will make the image appear fuzzier, desaturated, and blurrier (using the different alpha and gamma channels). This will cause “chroma errors,” which result from poor recordings and a lack of a flying erase head (a function that enables you to record over previously filmed video; imagine formatting your SD card while the video is still present on the card and you are simply recording over it), giving your images an outline of distorted blues and reds.
Color Grading and Color Correction
Besides actual editing, color grading and correction are arguably the most significant post-production steps. With the help of these tools, you may alter skin tones, highlight, and shadow levels, add vignettes, experiment with contrast, and much more. We’ll briefly go through one aspect of color grading—the ability to adjust particular colors in your image—even though this subject needs its ebook.
Adding Overlays
Although we’ve talked about adding overlays, such as VHS effects or light leaks, you may use many other editing overlays to add particular components to your shot, including weather particles!
Using Titles and Motion Graphics
Motion graphics and clean titles are essential for any video that wishes to appear professional. These could be subtitles, and the animation logo reveals post-credits, lower thirds, or even major titles. There are various free typefaces available that you may use to make your project stand out, regardless of the program you’re working in.
Once you’ve selected the appropriate font, color, and weight, it’s time to move on to motion graphics. These are crucial because they may transform a clear, ageless title or text into a lively, entertaining illustration of the product or concept your movie is attempting to market.
The abundance of tutorials nowadays makes learning the fundamentals of motion graphics a piece of cake. As I previously stated, you can access all the various effects and movements you might need, regardless of the editing program, you use.
These various methods and approaches need the practice to perfect, just like any other component of filmmaking. As you add these video editing effects to your editing toolkit, there will undoubtedly be a lot of trial and error. Still, eventually, they will become second nature to your workflow.
Importance of Applying Effects to your Video
Almost from the first motion film, cinematic storytelling and video effects have gone hand in hand. They can improve a scene, create something that doesn’t exist, hide an error, and do much more. In essence, they assist a filmmaker in telling a tale in the manner they desire.
Applying Effects using Movavi Slideshow Maker
Making picture collages is less appealing than slide show presentations. This method is ideal for presenting a gallery of images or creating a polished photo-video presentation for your brand and goods. You’ll need a creative slideshow program with loads of capabilities to create a polished slideshow that will enhance your production. The Movavi Slideshow Maker now comes into play.
In this composition, I will show you how to apply “Effects” on your video using Movavi Slideshow Maker video editing software. A professional slideshow program called Movavi slideshow creator is made for usage by both professional and amateur picture editors. It is a Mac and Windows PC freemium program with many options to give your slideshow presentation a polished and distinctive appearance.
Features of Movavi Slideshow Maker
- It offers an easy-to-use UI
- Includes a complete toolbox for altering photos
- Advanced features for improving slideshows
- Internal media tools
- Native recording capability
- Features scalable video adjustment.
Take note that this software is not just for editing pictures but also for videos.
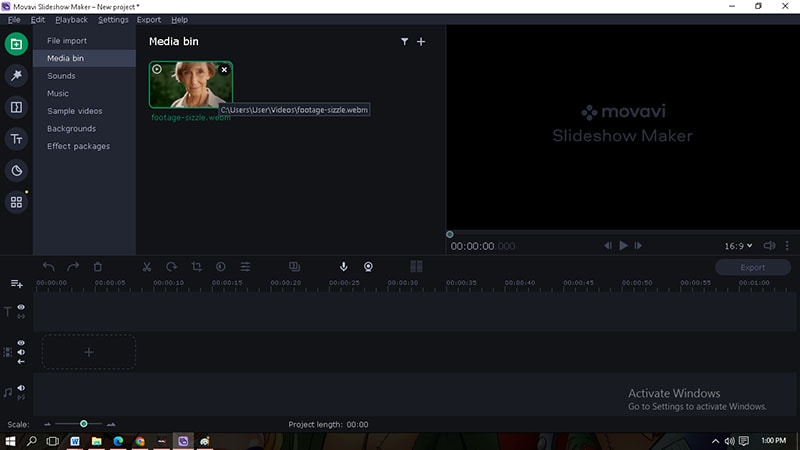
Step1 Click the Import tab.
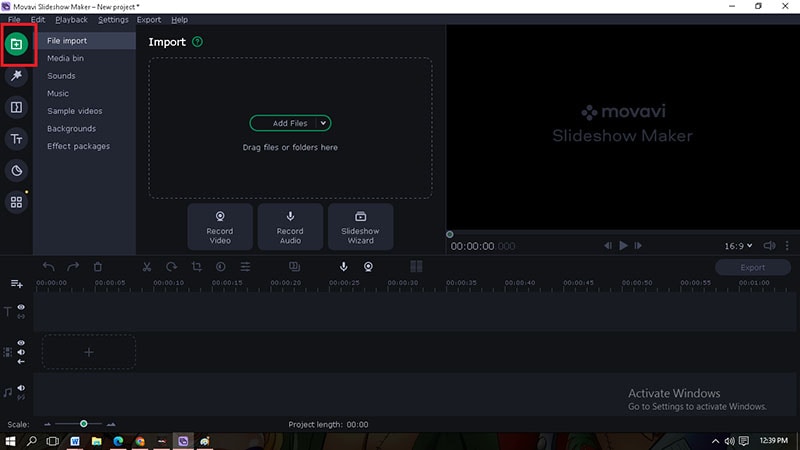
Step2 Click “Add Files” and locate your desired video to edit.
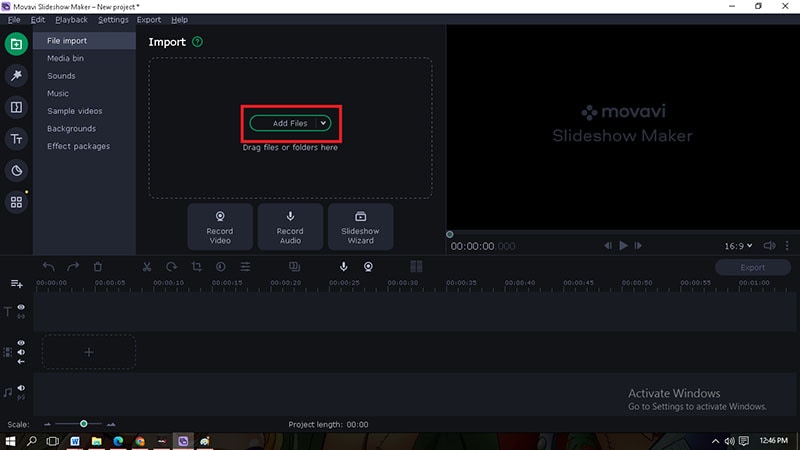
Step3 Drag the imported video that you want to edit onto the video track.
Applying Filter effects
A video filter is software that modifies a multimedia stream somehow. A filter graph is a series of filters that each accept input from an upstream filter, process the information, and then output the edited video to their downstream counterparts.
Step1 Click the Filter tab.
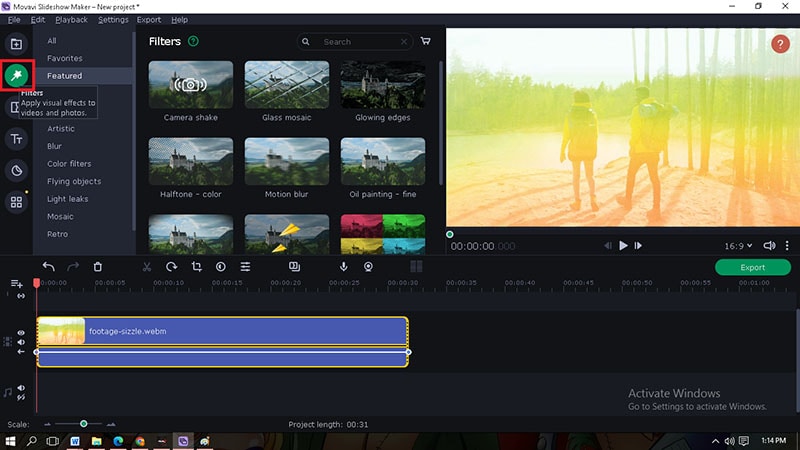
Step2 Choose your desired Filter effects depending on your preferred category.
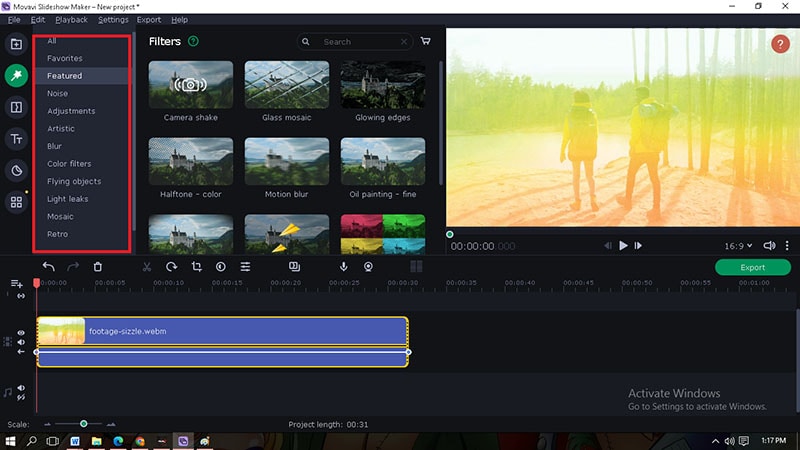
Step3 You can see the preview of a Filter effect by clicking it before applying it to your desired video to be edited.

Step4 If you finally chose a Filter effect, drag it onto the imported video.
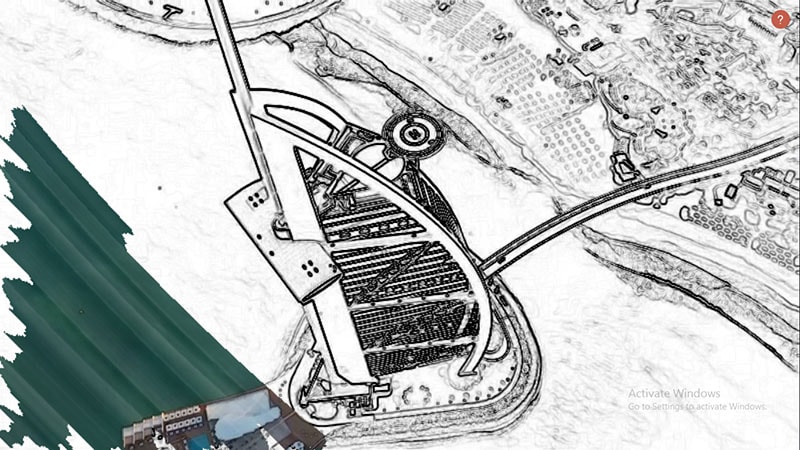
Step5 And now you will see the changes. The “star” symbol on the imported video means you have already applied a Filter effect on it.
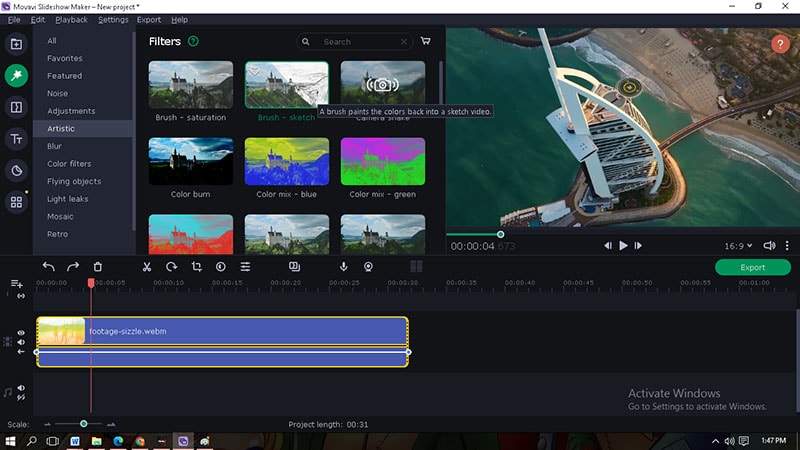
Raw Footage vs With Applied Filter Effect
Raw Footage
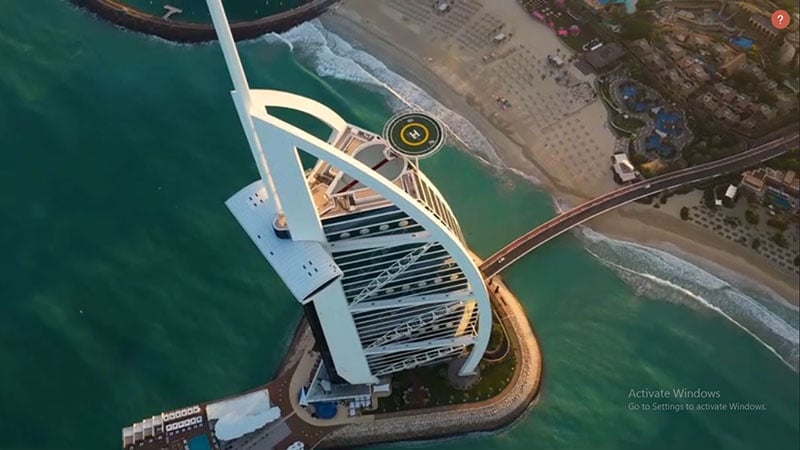
Brush – Sketch Filter effect
Adding Transition Effect
Transitions guide your audience.
From the opening to the very end, they structure the movie. There are numerous typical forms, including the wipe, dissolve, split-cut, and many others. Film editors use transitions to transfer a scene from one video clip to another practice. Transitions don’t need to be visible.
Step1 Click the Transition tab.
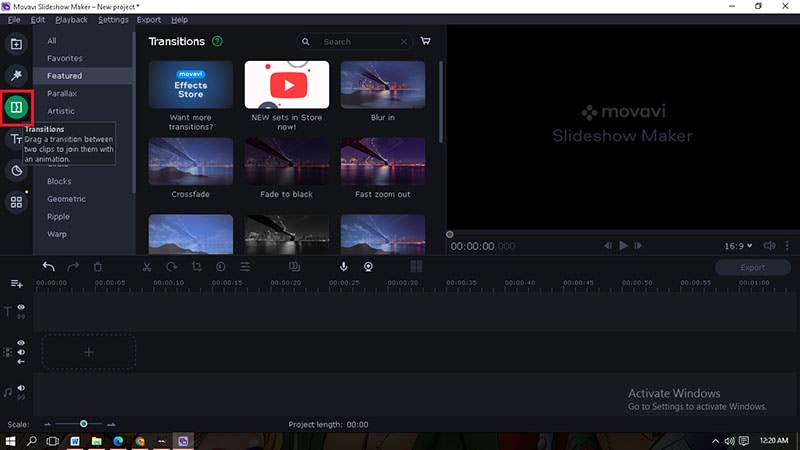
Step2 Choose your desired Transition effect depending on your preferred category.
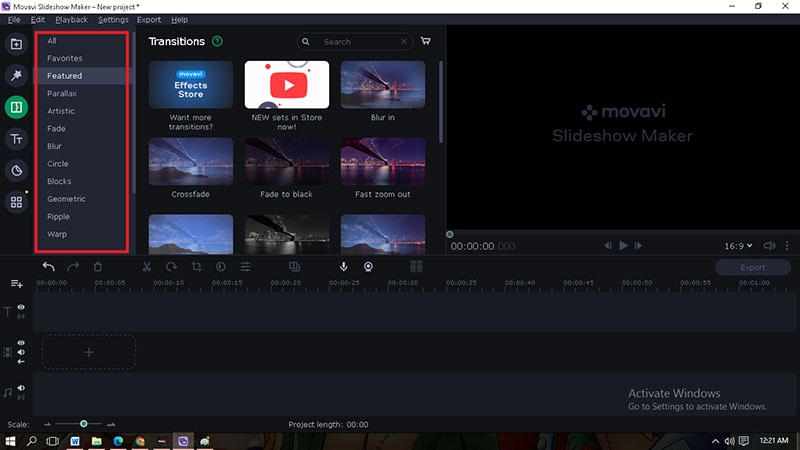
Step3 You can see the preview of a Transition effect by clicking it before applying it to your desired video to be edited.

Step4 If you finally chose a Transition effect, drag it between each imported video.
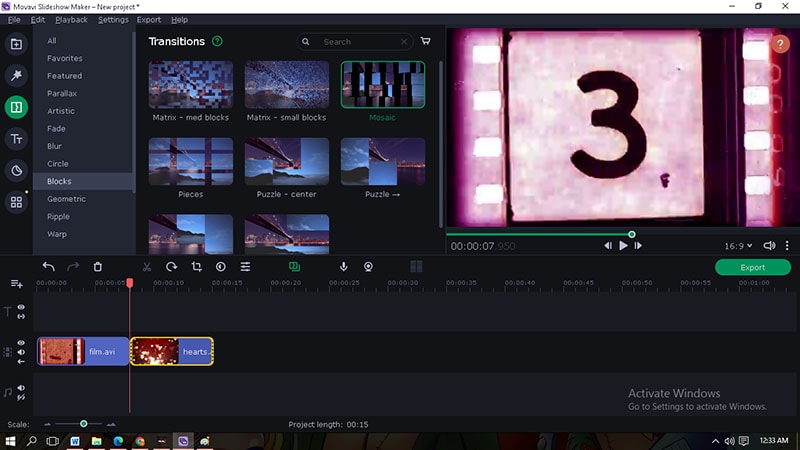
Step5 Now you will see this kind of symbol, which means you have already put a Transition effect between the imported videos.
![]()
Note: Transition effects can also be applied even if you have only one video. You can put transitions effects either at the start of the video, which could make your video introduction more appealing. Also, you can set the Transition effect at the end of the video, which could give you a pleasant closing.
Transition Effect at the start
Transition Effect at the end
Also, you can make your Transition effect longer or shorter simply by clicking this symbol then it will turn yellow. Point your cursor either on the left side of the symbol; the cursor will become a horizontal double-arrow to change the span of your Transition effect on the left video or on the right end side of the symbol to change the span of the Transition effect on the right video.
Applying Titling Motion Effect
Most video editing applications come with built-in titling choices, and many of them vary from basic letters to a collection of motion graphics that have already been pre-programmed. Enter your text into a template to insert them.
The majority of video projects have crucial titles. You can use them to build a mood, label key elements of the film, and convey information.
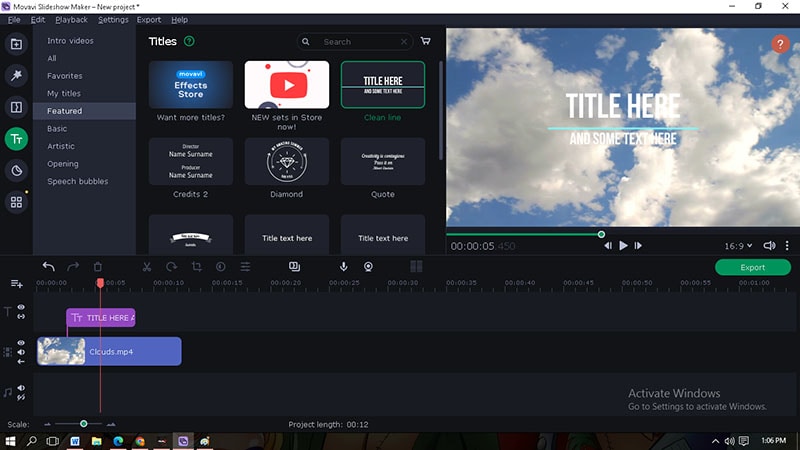
Step1 Click the Title tab.
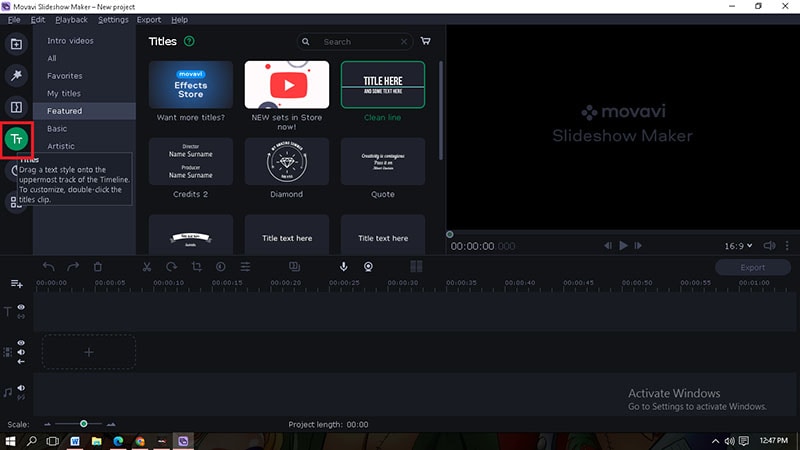
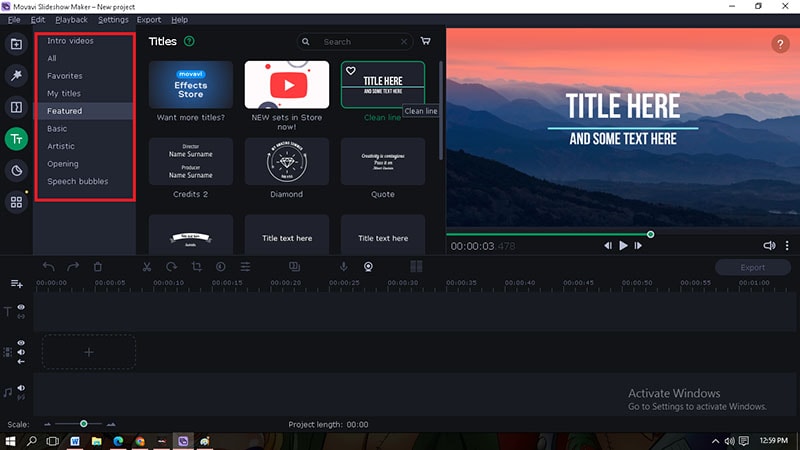
Step2 Choose your desired Titling motion effect depending on your preferred category. You can also see the preview of a title effect by clicking it before applying it to your selected video to be edited.
Step3 To apply the Title Motion effect, drag the effect onto the title track, just above the video track.
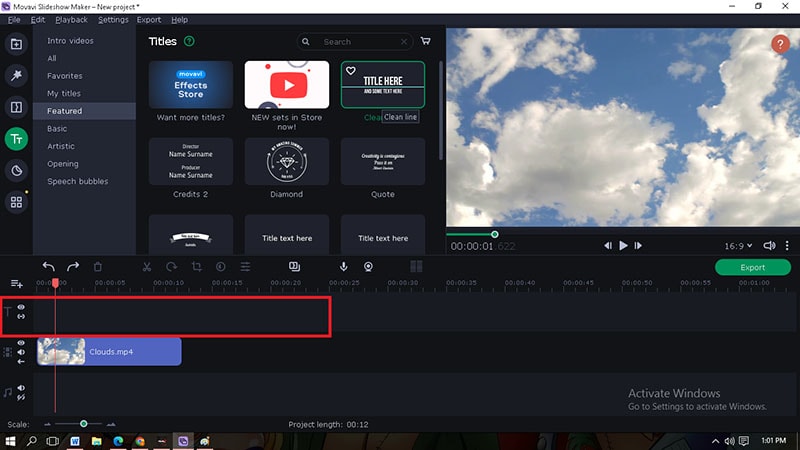
Step4 You can place your Title Motion effect on your desired time where you want it to appear.
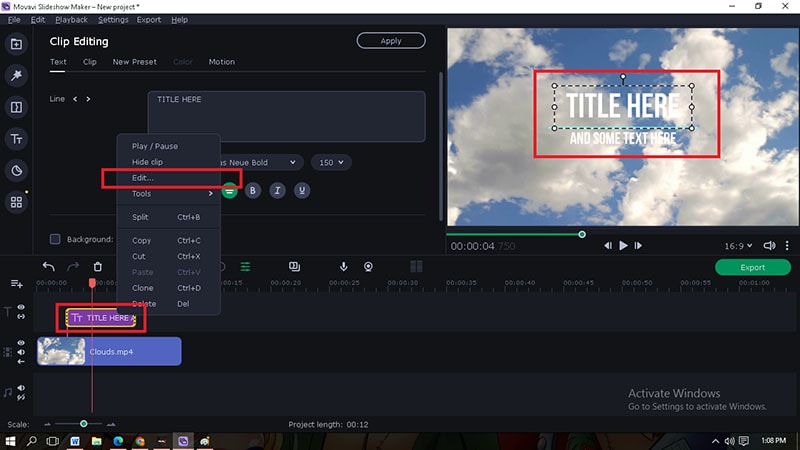
Step5 To edit your Title texts, you can double-click the applied title on the title track or right-click on it and click the “edit” option. You can also edit the text by double-clicking the title portion on the current video editing.
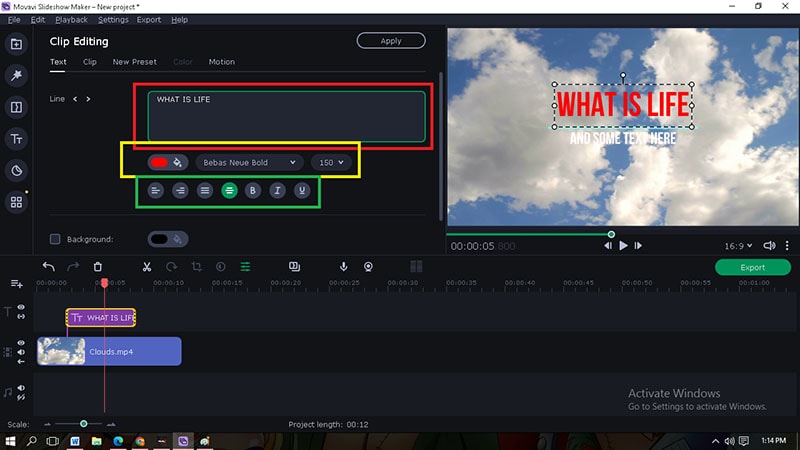
Step6 In this step, you can edit the Title text in the “clip editing” section, as seen in the red color box. You can change the color, text style, and font size on the yellow color box. And in the green color box, you can change the alignment of the text; you can Bold it, Italizing, and make it an Underlined text.
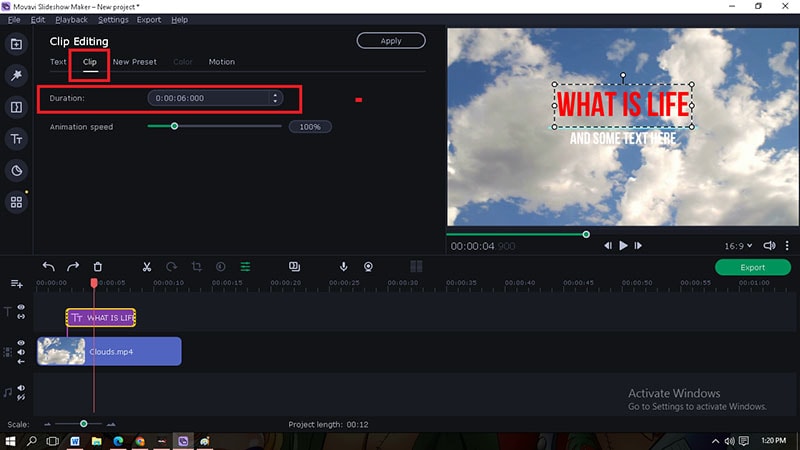
Step7 You can also adjust the time duration of the Titling Motion effect in two ways. First, by clicking the Title effect from the title track and placing your cursor on either side (the cursor will become a double-headed arrow), you have to shorten or lengthen the Title effect. The second step is to click the “Clip” section and adjust the duration.
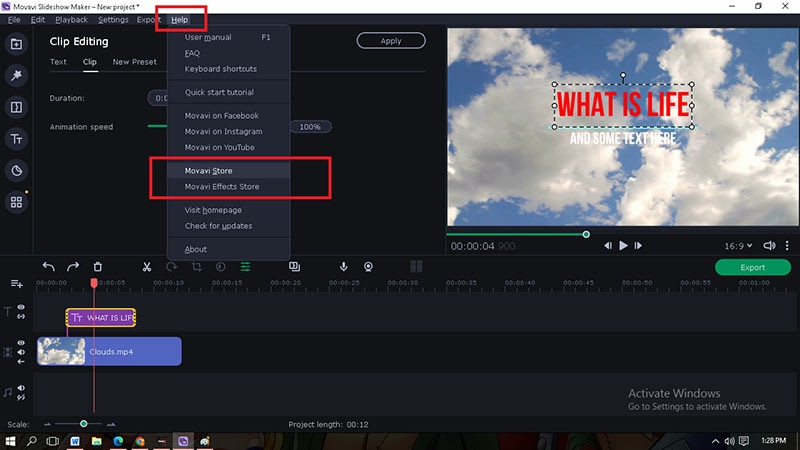
These are some ways to apply effects on Movavi Slideshow Maker video editing software. You can choose your desired effects that can make an excellent contribution to your video project. You can download other effects not included in this software by simply going to their store. Click the Help tab to find “Movavi Store” or “Movavi Effects Store.”
You know many video editing software you can find on the internet, and most of them need your subscription to unlock all their features. But of course, there are also several video editing software that is free to use, which could be very helpful for you, especially when you are just a beginner in this field. Choosing the best video editing software is recommended to develop your skills gradually. You can start with a basic one before working on a professional type of video editing software.
Overall, I hope you learn more about applying effects to video editing. I hope this article helps you decide what video effects you will be using when you start editing videos. Remember that too many effects can ruin your work, so sometimes you need to keep it simple. Just be sure that you will guide the audience very well and lead them to your beautiful story.
Free Download For Win 7 or later(64-bit)
Free Download For macOS 10.14 or later
Transition Effect at the start
Transition Effect at the end
Also, you can make your Transition effect longer or shorter simply by clicking this symbol then it will turn yellow. Point your cursor either on the left side of the symbol; the cursor will become a horizontal double-arrow to change the span of your Transition effect on the left video or on the right end side of the symbol to change the span of the Transition effect on the right video.
Applying Titling Motion Effect
Most video editing applications come with built-in titling choices, and many of them vary from basic letters to a collection of motion graphics that have already been pre-programmed. Enter your text into a template to insert them.
The majority of video projects have crucial titles. You can use them to build a mood, label key elements of the film, and convey information.
Step1 Click the Title tab.

Step2 Choose your desired Titling motion effect depending on your preferred category. You can also see the preview of a title effect by clicking it before applying it to your selected video to be edited.

Step3 To apply the Title Motion effect, drag the effect onto the title track, just above the video track.

Step4 You can place your Title Motion effect on your desired time where you want it to appear.

Step5 To edit your Title texts, you can double-click the applied title on the title track or right-click on it and click the “edit” option. You can also edit the text by double-clicking the title portion on the current video editing.

Step6 In this step, you can edit the Title text in the “clip editing” section, as seen in the red color box. You can change the color, text style, and font size on the yellow color box. And in the green color box, you can change the alignment of the text; you can Bold it, Italizing, and make it an Underlined text.

Step7 You can also adjust the time duration of the Titling Motion effect in two ways. First, by clicking the Title effect from the title track and placing your cursor on either side (the cursor will become a double-headed arrow), you have to shorten or lengthen the Title effect. The second step is to click the “Clip” section and adjust the duration.

These are some ways to apply effects on Movavi Slideshow Maker video editing software. You can choose your desired effects that can make an excellent contribution to your video project. You can download other effects not included in this software by simply going to their store. Click the Help tab to find “Movavi Store” or “Movavi Effects Store.”

You know many video editing software you can find on the internet, and most of them need your subscription to unlock all their features. But of course, there are also several video editing software that is free to use, which could be very helpful for you, especially when you are just a beginner in this field. Choosing the best video editing software is recommended to develop your skills gradually. You can start with a basic one before working on a professional type of video editing software.
Overall, I hope you learn more about applying effects to video editing. I hope this article helps you decide what video effects you will be using when you start editing videos. Remember that too many effects can ruin your work, so sometimes you need to keep it simple. Just be sure that you will guide the audience very well and lead them to your beautiful story.
Free Download For Win 7 or later(64-bit)
Free Download For macOS 10.14 or later
Also read:
- [New] 2024 Approved Elevating Your Stream with Advanced Screen Capture Tech
- [New] Melody Manual Grab, Listen & Scrutinize Songs
- 2024'S Most Economical High-Quality Bluetooth Audio Systems – Expert Picks and Reviews
- Comprehensive Strategies for Blocking Malware Fox's Redirection of Your Search and E-Commerce Advertisements
- Create the Stranger Things Upside Down Effect Video
- Editing Excellence Archive Your Q&A
- Find and Update Lenovo Docking Station Drivers Effortlessly: A Comprehensive Guide
- How To Fix Unresponsive Touch Screen on Itel P55+ | Dr.fone
- In 2024, Photoshop PicMaster Guide & Assessment
- New 2024 Approved Detailed Guide to Crop Videos in Sony Vegas Pro
- New 2024 Approved How to Make a DIY Vlog or Video
- New 2024 Approved How to Select and Use The Best BRAW LUTs
- New A Complete Overview of VSCO Video Editor
- New Do You Want to Add an Adjustment Layer to Your Video for Easier Editing? Read This Article to Find Out How to Efficiently Add an Adjustment Layer in After Effects for 2024
- New Do You Want to Know About the DaVinci Resolve Adjustment Layer? Read This Article to Learn How to Use an Adjustment Layer (Clip) in DaVinci Resolve to Edit Videos for 2024
- Personalized Fitness Plans with Safe and Effective Tips
- Updated Are You Aware that AV1 Has the Potential to Change the Way We Watch Videos Online? Read on to Learn More About AV1 and How It Could Impact Your Life
- Title: In 2024, How to Add a Spooky Shadow Effect
- Author: Morgan
- Created at : 2024-09-29 17:53:43
- Updated at : 2024-10-06 06:56:53
- Link: https://ai-video-editing.techidaily.com/in-2024-how-to-add-a-spooky-shadow-effect/
- License: This work is licensed under CC BY-NC-SA 4.0.