
:max_bytes(150000):strip_icc():format(webp)/audio-books-56a324b93df78cf7727c00f5.jpg)
In 2024, How to Add Motion Titles
How to Add Motion Titles
Do you want to make your videos eye-catching instantly? Looking for some cool title animations to make your texts stand out? You should definitely opt for motion title templates that are widely available in popular video editors. Motion title templates come preloaded with animated texts, engaging graphic elements, and even background effects.
You can add them directly to your video and customize them as per you requirements so that your video looks exactly the way you desire. Different video editors have different motion titles, and therefore, you should check them out one by one to find out the templates you are looking for. We will illustrate title motion graphics in all the leading video editors.
Part 1. Add Motion Title with Filmora
The easiest way to add motion title to your video on your computer is through Wondershare Filmora . Filmora is a professional video editor that is available for Windows and Mac users. Filmora has the best collection of motion title templates, and the user interface is super intuitive and anyone can use without any prior experience. Here are the steps to add motion title with Filmora.
Step1Install and launch Wondershare Filmora on your computer. Click on New Project option on the welcome screen or go to File menu and click on New Project option.

Step2Go to File menu and Import Media option to import your video file. Otherwise, you can simply drop the video file into Project Media folder.
Step3Drag the video file from Project Media folder and drop it into the Timeline.

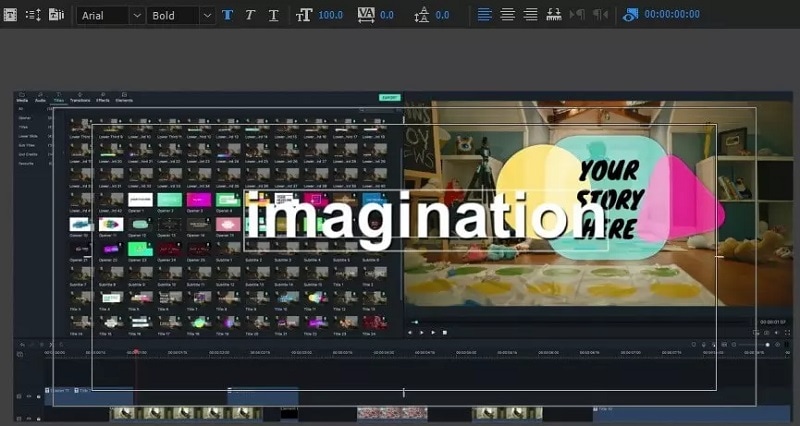
Step4Go to Titles at the top and go to the left panel. You can different categories of motion title templates. Select any desired text effect and drop into the Timeline above the video layer wherever you want.
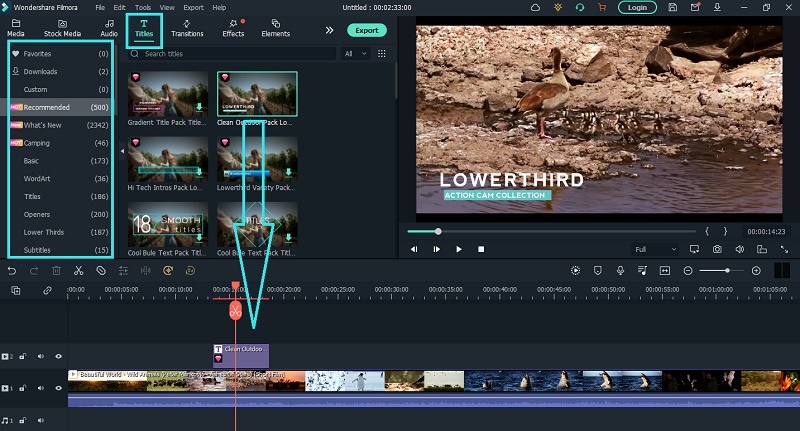
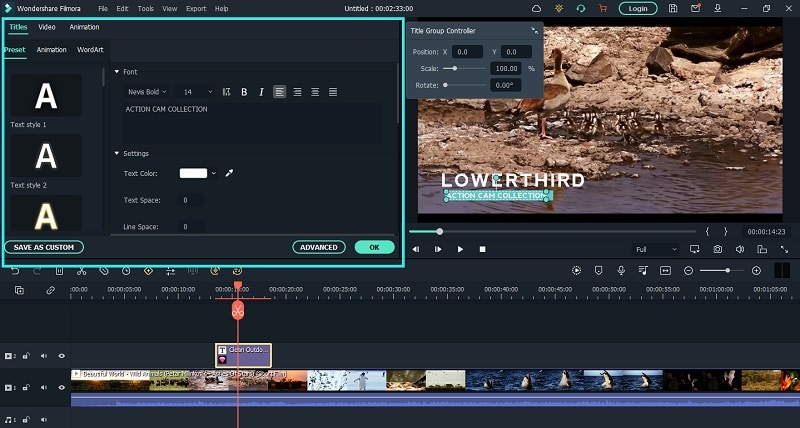
Step5Double clicking on the text layer on Timeline to edit the text and change the styles. Under Preset tab, you can change font, size, and color. Finally, click on OK button to save the edits done.
Part 2. Add Motion Title with Premiere Pro
Adobe Premiere Pro is a renowned video editor that is mostly used by professionals to edit videos and add effects and animations. Even though Premiere Pro has a steep learning curve, you can create motion title in simple steps. You can write any text on the video and select from different effects and animations to create motion title graphics. Here are the steps to add title motion graphics Premiere Pro free.
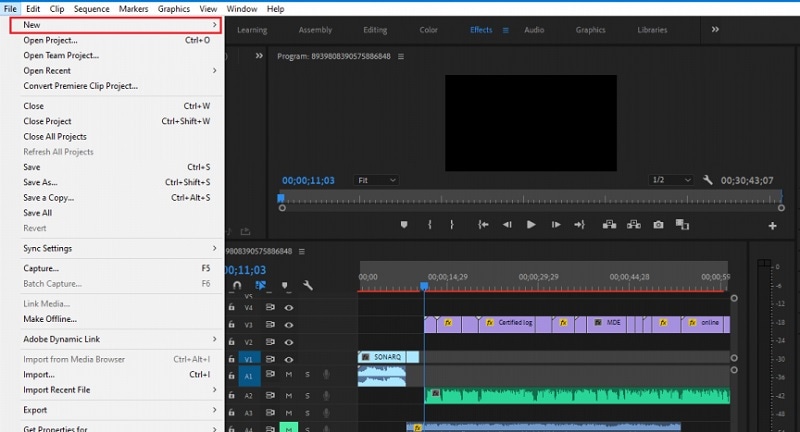
Step1Launch Premiere Pro and go to New> Project option. Import the video file and drop it into Timeline.
Step2Go to Title> New Title> Default Still option and follow the on-screen instructions.

Step3You will see different types of title styles and designs to choose from as you feel.

Step4Click on Type Tool option and click on the area on the video where you want the text to appear. You can customize them from the right panel from Title Styles, Title Properties, Tools and Title Actions.
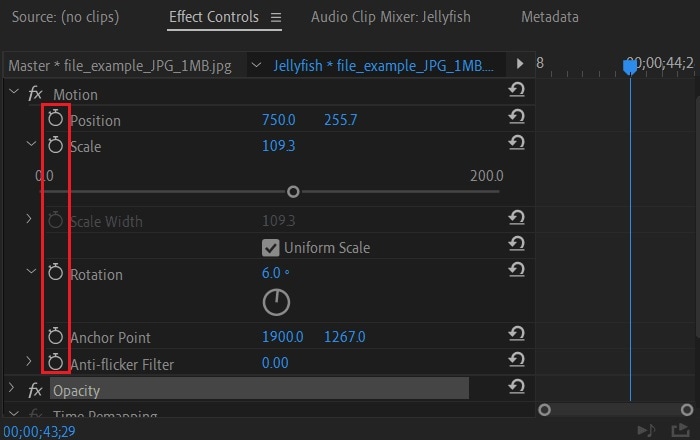
Step5To add motion to the title, click on Effects Control window. Click on any desired animation and turn to Stopwatch icon to apply the effect to the text. There is a dedicated Motion option available.
Part 3. Make motion title with Studio
Studio is a popular video editing software where you can not only apply motion title presets but also create motion title presets from scratch. The reason why video editors choose Studio is because it allows users to customize everything and create different templates and animations for personalization. Here are the steps to create title motion graphics in Studio as per your requirements.
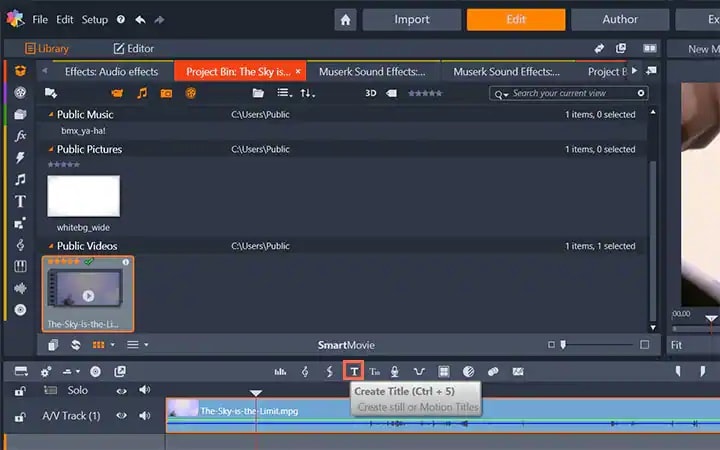
Step1Launch Studio. Import your video file, and you can import single frames such as images from a live video for stop motion titles. Once you have imported, go to the header bar above the Timeline. Click on Create Title option to open Title Editor to create title motion.
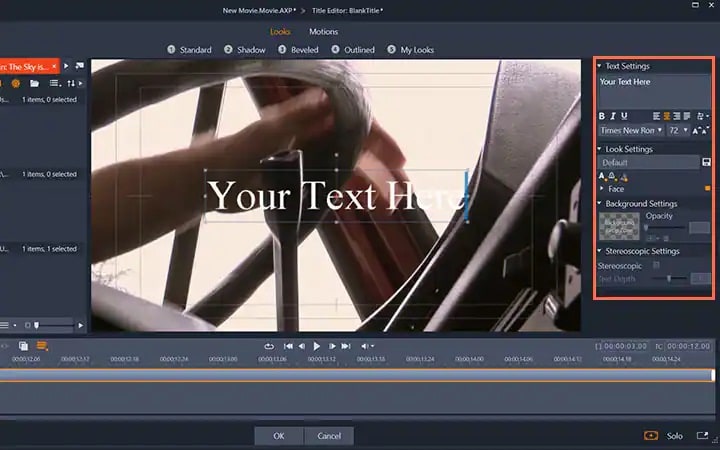
Step2Add your preferred text under Title Editor and adjust font, size, and style as you feel. Go to the right side to make changes to Look, Background, and Stereoscopic Settings to get the perfect text style from the wide range of choices available.
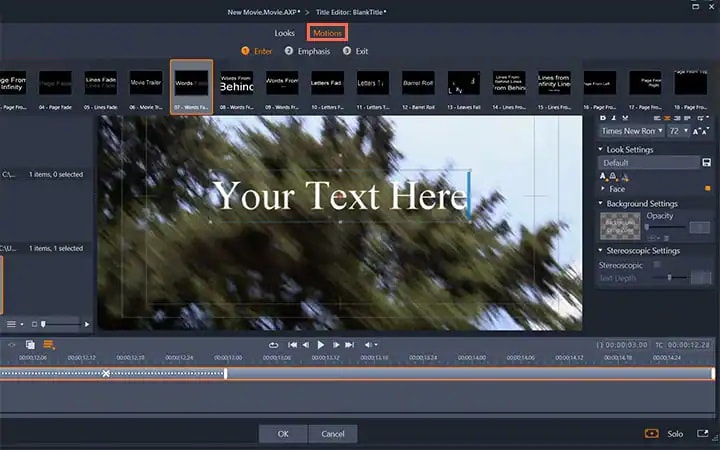
Step3Click on Motion option at the top to add motion to the text. Choose from the different motion title templates as per your preference.
Step4You can adjust the duration of the motion effect from the right panel and click on Ok button.

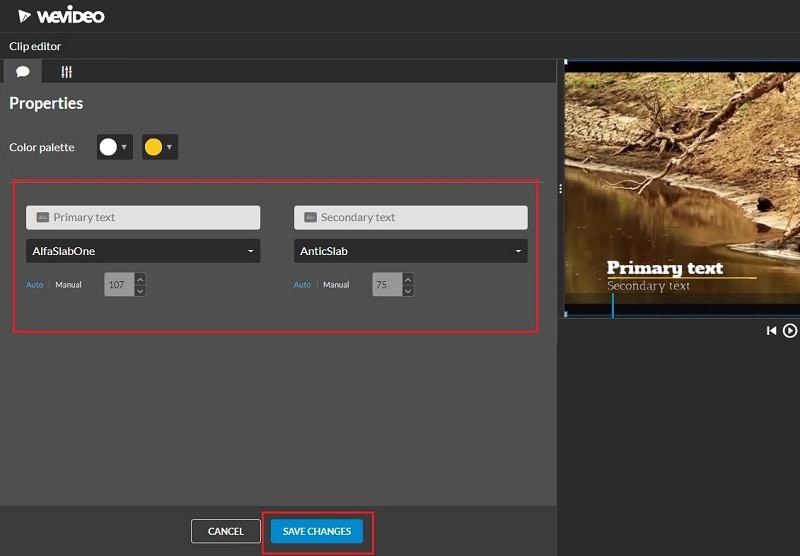
Part 4. Add Motion Title with WeVideo
WeVideo is a popular online video editor that you can use to add title motion graphics Premiere Pro free. You can find many motion titles on WeVideo for free like you get in Premiere Pro and there are many exclusive motion text templates available. You need to create a free account with WeVideo to get started. You can create your video from scratch by selecting from the available video templates. You can even import your recorded video and add motion texts and animations as per your preference. Here are the steps to add motion title with WeVideo.
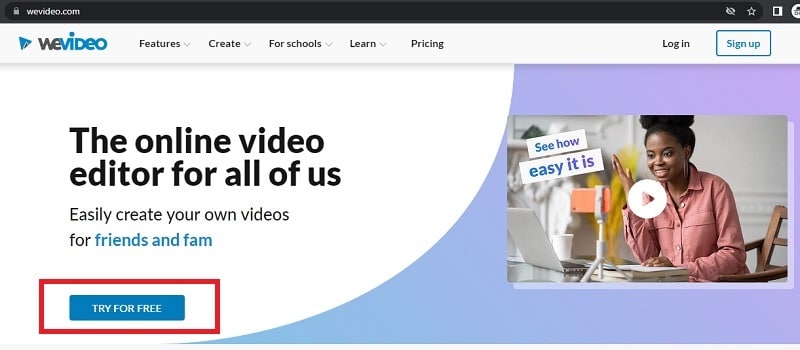
Step1Open your web browser and visit “wevideo.com”. Click on Try For Free button. Sign up for free and go to WeVideo video editor.
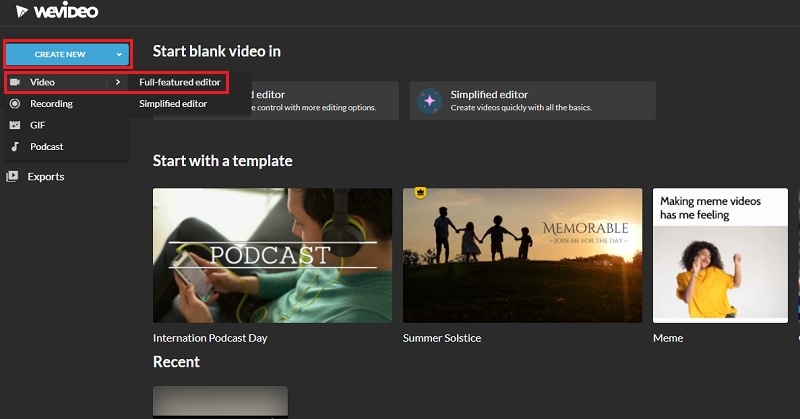
Step2Click on Create New button and select Video option. Click on Full-featured editor option.
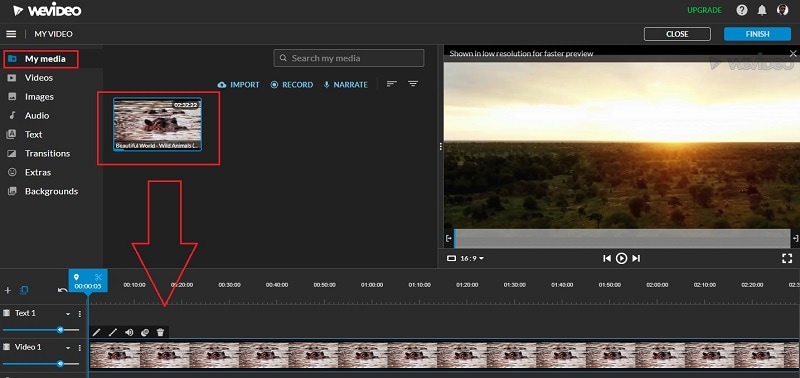
Step3Drag and drop your video file into My Media folder and bring it to Timeline.
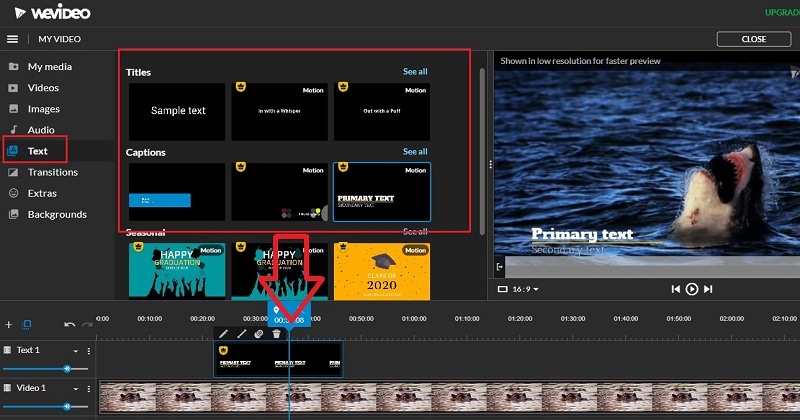
Step4Go to Text tab and you will see all the motion animated titles under Titles section. Click on them to check out their previews in Viewer. If you have selected anyone, drag and drop it into Timeline.
Step5Adjust the position where you want the title to appear on the video and stretch the duration as required. Double-click on the title to edit and customize it as per your preference. Finally, click on Save Changes button.
The Bottom Line
Motion titles are extremely important for any video because they bring in a variety to your video. They make the video eye-catching and help in getting the message across by grabbing the attention of the viewers. We have illustrated how to add motion titles Premiere Pro and Studio. You can also use WeVideo online video editor. We recommend Wondershare Filmora for its extensive collection of motion title templates to choose from and apply to your text.
Free Download For Win 7 or later(64-bit)
Free Download For macOS 10.14 or later
How to Perfectly Use Canva Color Match?
How to Perfectly Use Canva Color Match?
An easy yet powerful editor
Numerous effects to choose from
Detailed tutorials provided by the official channel
Color combination is the essential thing that you need to keep in mind designing. It helps create eye-catchy designs and can create a positive impact on the target audience.

This is the greatest secret of creating attractive and wonderful designs. Reading further will help you to understand the Canva color match in detail. So, without any further dues, let’s get started!
In this article
01 [What is the Canva Color Picker?](#Part 1)
02 [Why Use the Color Match Tool?](#Part 2)
03 [How to Use Color Match in Canva to Match Your Brand](#Part 3)
04 [Alternative to Canva Color Match](#Part 4)
Part 1 What is the Canva Color Picker?
Canva is one of the simplest and easiest ways of creating great and eye-catchy graphic designs. Color combinations help us to make these designs more attractive. But earlier, there were some limitations in Canva regarding the color picker tool; designers had to use browser extensions like ColorZilla to match the color combinations perfectly. They faced many problems while selecting the perfect color of their choice while designing their pins, social media content, logos, online invitations, etc. They had to find the perfect color code of their choice from an external source and paste it into the Canva, which was simply very time-consuming.
The most-awaited color picker tool was introduced in Canva at the end of November 202This new design tool makes the design very convenient while using Canva for graphic designing. With this tool, you don’t need to spend hours searching for the right color that matches the background. Color picker helps you to find a perfect color match according to the image, logo, or anything else uploaded on Canva.

But before using this new color match tool, you must ensure that:
● You are using the updated version of the Canva desktop app.
● You have the latest version of the browsers like Chrome, Mozilla, Internet Explorer, etc.
Part 2 Why Use the Color Match Tool?

This color match tool is the most-demanded feature that has been updated on Canva. It helps choose the perfect color match very efficiently without wasting time and effort. It works like an eyedropper tool available in graphic designing software like Photoshop. It is elementary and valuable to use, and it saves a lot of time in creating attractive and wonderful designs.
It helps determine the different colors available in a particular image uploaded on the Canva app. You can easily choose the appropriate color by placing the tool in the place that has your desired color. It is a compassionate tool, so you should be very careful while choosing the color of your choice. You can press the ‘Esc’ button to exit the command without choosing any color.
This color match tool magically helps select the desired color in seconds without using any external color picker browser extension. This tool is readily available on the color pallet in the updated version of the Canva desktop app.
Part 3 How to Use Color Match in Canva to Match Your Brand
The color match tool is now inbuilt in the Canva desktop app, which is very easy and convenient. You need to download the Canva desktop app to use this feature from the official website of Canva.

The designers need to follow the simple steps given below to use the color match tool (eyedropper tool) in the updated version of the Canva desktop app:
● First of all, open the Canva desktop app.
● After this, open any design or image of your choice that you want to edit. This color match tool can work on any type of image, regardless of the shape and size.
● Now, select the particular part of the image whose color you want to change.
● After this, click on the color block available at the top corner to open the color customization options.
● A color pallet will open.
● On the top of the color pallet, you will see a ‘+’ (add new color) button, this button has a colorful square outline.
● After this, a color chart will appear under that button. You will see the color code written over there and an eyedropper tool will be available next to that color code (hex code).
● Click on this eyedropper tool and select the color of your choice either from the image or any other color available in Canva.
● After selecting the color tap on the particular part of the image whose color you want to change.
This is how you can change the color using the new color picker tool available in Canva and enjoy editing your images using the new Canva desktop app.
Part 4 Alternative to Canva Color Match
As we all know, Canva is the most accessible online graphic designing platform used for image editing and video editing. But there are certain limitations of using it, so here we have listed some of the other graphic designing tools for both image and video editing that can be used as an alternative to the Canva app:
● Visme: It is a drag and drops editing and graphic designing tool. Using; this tool is effortless to use, and you can easily create attractive presentations, infographics, social media graphics, logos, etc. This tool can be used by anyone like students (to create their school activities), educators (to create easy to learn infographics), business people (to create attractive presentations), graphic designers (to create different content), etc.
It contains a lot of features like:
● Data Visualization Tools
● Variety of Professionally Designed Easy to Use Templates
● Infographic Maker
● A Large Number of Editing Tools
● Animation Feature with Hover Effects
● Analytics Feature
● Adobe Spark: It is an online tool launched by Adobe. Although it can’t compete with professional software like Photoshop and Illustrator, it can be treated as the best alternative for Canva. It is used to create social media posts, logos, and graphic designs easily and efficiently. The only limitation it has is that non-designers and newcomers can’t use it without any knowledge of graphic design.
● PicMonkey: PicMonkey is another great alternative to Canva, just like Visme. It has many features that help both professional and non-professional designers create attractive and wonderful designs very easily and efficiently. It has many exciting features like photo re-toucher, pattern & effects tools, etc., just like Photoshop, but it is relatively easier to use and can be used by anyone who wants to create beautiful and creative graphic designs.
● ****Wondershare Filmora Video Editor **: Filmora is a video editing software and can be used as an alternative to Canva if you create and edit the videos to medium & advanced levels. It is used to create and edit short videos for social media and ad campaigns very quickly, with many features available in professional software like Adobe Premiere Pro. It is easy-to-use with an intuitive user interface that is very helpful for non-professional and less experienced video editors.
For Win 7 or later (64-bit)
For macOS 10.12 or later
● Key Takeaways from This Episode →
● It can be concluded that Canva is a fantastic graphic designing tool for all the non-professionals and newcomers in the field of design. It helps people create attractive and creative designs with less effort and less time consumption.
● No doubt, everything has its pros and cons. Similarly, Canva also has certain limitations compared to the other professional graphic designing tools like Photoshop, Illustrator, etc.
● But still, it is continuously updating and removing those limitations. For example- the new color match tool is introduced to this platform for easy and convenient graphic designing.
● This color match tool (eyedropper tool) was demanded by the designers who use Canva for their graphics and creating attractive social media posts, infographics, video editing, etc.
Color combination is the essential thing that you need to keep in mind designing. It helps create eye-catchy designs and can create a positive impact on the target audience.
This is the greatest secret of creating attractive and wonderful designs. Reading further will help you to understand the Canva color match in detail. So, without any further dues, let’s get started!
In this article
01 [What is the Canva Color Picker?](#Part 1)
02 [Why Use the Color Match Tool?](#Part 2)
03 [How to Use Color Match in Canva to Match Your Brand](#Part 3)
04 [Alternative to Canva Color Match](#Part 4)
Part 1 What is the Canva Color Picker?
Canva is one of the simplest and easiest ways of creating great and eye-catchy graphic designs. Color combinations help us to make these designs more attractive. But earlier, there were some limitations in Canva regarding the color picker tool; designers had to use browser extensions like ColorZilla to match the color combinations perfectly. They faced many problems while selecting the perfect color of their choice while designing their pins, social media content, logos, online invitations, etc. They had to find the perfect color code of their choice from an external source and paste it into the Canva, which was simply very time-consuming.
The most-awaited color picker tool was introduced in Canva at the end of November 202This new design tool makes the design very convenient while using Canva for graphic designing. With this tool, you don’t need to spend hours searching for the right color that matches the background. Color picker helps you to find a perfect color match according to the image, logo, or anything else uploaded on Canva.
But before using this new color match tool, you must ensure that:
● You are using the updated version of the Canva desktop app.
● You have the latest version of the browsers like Chrome, Mozilla, Internet Explorer, etc.
Part 2 Why Use the Color Match Tool?
This color match tool is the most-demanded feature that has been updated on Canva. It helps choose the perfect color match very efficiently without wasting time and effort. It works like an eyedropper tool available in graphic designing software like Photoshop. It is elementary and valuable to use, and it saves a lot of time in creating attractive and wonderful designs.
It helps determine the different colors available in a particular image uploaded on the Canva app. You can easily choose the appropriate color by placing the tool in the place that has your desired color. It is a compassionate tool, so you should be very careful while choosing the color of your choice. You can press the ‘Esc’ button to exit the command without choosing any color.
This color match tool magically helps select the desired color in seconds without using any external color picker browser extension. This tool is readily available on the color pallet in the updated version of the Canva desktop app.
Part 3 How to Use Color Match in Canva to Match Your Brand
The color match tool is now inbuilt in the Canva desktop app, which is very easy and convenient. You need to download the Canva desktop app to use this feature from the official website of Canva.
The designers need to follow the simple steps given below to use the color match tool (eyedropper tool) in the updated version of the Canva desktop app:
● First of all, open the Canva desktop app.
● After this, open any design or image of your choice that you want to edit. This color match tool can work on any type of image, regardless of the shape and size.
● Now, select the particular part of the image whose color you want to change.
● After this, click on the color block available at the top corner to open the color customization options.
● A color pallet will open.
● On the top of the color pallet, you will see a ‘+’ (add new color) button, this button has a colorful square outline.
● After this, a color chart will appear under that button. You will see the color code written over there and an eyedropper tool will be available next to that color code (hex code).
● Click on this eyedropper tool and select the color of your choice either from the image or any other color available in Canva.
● After selecting the color tap on the particular part of the image whose color you want to change.
This is how you can change the color using the new color picker tool available in Canva and enjoy editing your images using the new Canva desktop app.
Part 4 Alternative to Canva Color Match
As we all know, Canva is the most accessible online graphic designing platform used for image editing and video editing. But there are certain limitations of using it, so here we have listed some of the other graphic designing tools for both image and video editing that can be used as an alternative to the Canva app:
● Visme: It is a drag and drops editing and graphic designing tool. Using; this tool is effortless to use, and you can easily create attractive presentations, infographics, social media graphics, logos, etc. This tool can be used by anyone like students (to create their school activities), educators (to create easy to learn infographics), business people (to create attractive presentations), graphic designers (to create different content), etc.
It contains a lot of features like:
● Data Visualization Tools
● Variety of Professionally Designed Easy to Use Templates
● Infographic Maker
● A Large Number of Editing Tools
● Animation Feature with Hover Effects
● Analytics Feature
● Adobe Spark: It is an online tool launched by Adobe. Although it can’t compete with professional software like Photoshop and Illustrator, it can be treated as the best alternative for Canva. It is used to create social media posts, logos, and graphic designs easily and efficiently. The only limitation it has is that non-designers and newcomers can’t use it without any knowledge of graphic design.
● PicMonkey: PicMonkey is another great alternative to Canva, just like Visme. It has many features that help both professional and non-professional designers create attractive and wonderful designs very easily and efficiently. It has many exciting features like photo re-toucher, pattern & effects tools, etc., just like Photoshop, but it is relatively easier to use and can be used by anyone who wants to create beautiful and creative graphic designs.
● ****Wondershare Filmora Video Editor **: Filmora is a video editing software and can be used as an alternative to Canva if you create and edit the videos to medium & advanced levels. It is used to create and edit short videos for social media and ad campaigns very quickly, with many features available in professional software like Adobe Premiere Pro. It is easy-to-use with an intuitive user interface that is very helpful for non-professional and less experienced video editors.
For Win 7 or later (64-bit)
For macOS 10.12 or later
● Key Takeaways from This Episode →
● It can be concluded that Canva is a fantastic graphic designing tool for all the non-professionals and newcomers in the field of design. It helps people create attractive and creative designs with less effort and less time consumption.
● No doubt, everything has its pros and cons. Similarly, Canva also has certain limitations compared to the other professional graphic designing tools like Photoshop, Illustrator, etc.
● But still, it is continuously updating and removing those limitations. For example- the new color match tool is introduced to this platform for easy and convenient graphic designing.
● This color match tool (eyedropper tool) was demanded by the designers who use Canva for their graphics and creating attractive social media posts, infographics, video editing, etc.
| Best WMV to GIF Converters
Powerful Video Editor - Wondershare Filmora
Provide abundant video effects - A creative video editor
Powerful color correction and grading
Detailed tutorials are provided by the official channel
GIFs function as a series of images that seem like an audio-less video and are widely used across numerous platforms. People send GIFs to their friends while chatting and also add them to their photos and videos. Moreover, this image format does not lose its quality during compression. Due to their high popularity, GIF converters are much needed.
If you have a WMV file and want to use it as a GIF, you can easily execute the conversion through GIF converters. You can find tons of GIF converters, but not every tool is reliable. For WMV to GIF conversion, we will provide the best GIF converters that you can utilize confidently.
In this article
Part 1: Best 3 WMV to GIF Converter Software
Part 2: 3 Online WMV to GIF Converters
Part 3: How to Convert WMV to GIF Using Wondershare Filmora?
Part 1: Best 3 WMV to GIF Converter Software
In this following part, we will discuss the best 3 offline GIF converters through which you can easily convert your files from WMV to GIF comfortably.
1. Wondershare Filmora
| Compatibility | Pricing |
|---|---|
| Windows/Mac | $28.98/Monthly $68.98/Annual $98.98/Perpetual |
Wondershare Filmora is a top-notch video editing tool comprising every basic and advanced feature that you would require. It offers smart templates that help beginners in designing their videos along with exceptional effects. Furthermore, people can utilize their royalty-free images and videos to add them to their videos for more dimensions.
Along with its extraordinary video editing features, people can also convert their videos files to numerous formats such as GIFs and other formats. Although the user interface of Filmora is extremely easy to handle, if you still find some difficulties, you can watch the tutorials from their platform to execute the editing process easier. By using this excellent platform, you can not only get rid of the flaws in your videos but can also convert them to GIF format conveniently.

Pros
The “Instant Mode” of Filmora enables the users to design and create their videos with great proficiency without spending too much time.
It comprises animated effects that can add an artistic element to your videos.
It has an excellent function of a “Screen Recorder” that can effortlessly capture the on-screen activities of your computer.
You can easily synchronize the audio and soundtracks with the videos through its “Auto Synchronization” feature.
Cons
The free version of this platform comprises a watermark that can ruin the actual impression of the video.
2. Adobe Premiere Pro
| Compatibility | Pricing |
|---|---|
| Windows/Mac | $20.99/Monthly |
This tool is an ultimate professional video editor that comprises the ability to transform videos into a high-end project. You can add various transitions to the videos and can portray interesting storytelling through them. You can easily upload the recorded video from either your smartphone or professional camera and can edit the footage in up to 8K high quality.
Furthermore, when people try to export their videos, this tool displays multiple options to convert the current video file into another. Thus, you can easily convert your video file WMV into GIF quickly with a single click. Other amazing features of this tool include Adobe Stock, through which you can import various audio files and can professionally embed them in your video.

Pros
The “Auto-Reframe” feature allows the users to intelligently reframe their videos in 4K resolution flawlessly.
You can add subtitles to your videos through “Auto Transcriptions” quickly and can edit them further.
You can color fix the videos through its excellent filters, which can give an aesthetic impression.
The export settings of this tool can be customized, and you can easily share your videos to online platforms.
Cons
The user interface of Adobe Premiere Pro is a bit complicated, and non-professionals can find it difficult to use for the first time.
3. Cyberlink PowerDirector
| Compatibility | Pricing |
|---|---|
| Windows/Mac | $19.99/Monthly $69.99/Monthly |
This trustworthy tool is widely used for converting video files to GIF format along with various intuitive features. It also functions as a video editor as it includes advanced options to edit multiple video file formats effortlessly. You can use their enhanced “Mask and Blend” option to combine numerous video clips smoothly and professionally. Also, you can replace dull and boring skies from your videos through its “Sky Replacement” feature.
Along with its powerful conversion feature, you can also remove unwanted objects or people from the videos flawlessly with a single click. For a high-quality audio experience, you can use its audio tools to remove unnecessary background noise to make the vocals sound refined. Hence, it works as a trustworthy tool that not only makes the videos appealing but also provides ease to its users.

Pros
This platform offers motion tracking through which you can precisely synchronize the elements in your video.
It has included various effects and filters ranging in diverse categories that can be used to change the perspective of the videos.
The user interface is well-defined and easy to use for beginners.
It offers fast rendering so that you can export the edited video in high quality.
Cons
This tool contains ads and has an expensive subscription plan.
Part 2: 3 Online WMV to GIF Converters
If you want to conduct online conversion of files from WMV to GIF instantly, use any of the following mentioned tools.
1. Adobe Creative Cloud Express
This online tool provides an easy way to convert WMV to GIF in a well-protected environment. You can import your WMV file to this tool easily either from your device or can utilize the drag and drop option. Afterward, you can select the quality type and file size from the displayed options. The conversion process does not take long, and you can easily share the newly converted GIF across online platforms.

Pros
This tool is free to use and offers basic editing options to create unlimited GIFs.<
You can select the file size of the GIF file so that you can easily save it on your device without worrying about space usage.<
You can adjust the aspect ratio of your manually before the conversion process.<
Through its trim option, you can eradicate unwanted parts easily.<
Cons
It only offers premium features such as refine, cutout, and resize in the premium plan.<
2. CloudConvert
CloudConvert is an online platform that will assist you in converting video files such as WMV into GIFs conveniently. This tool supports and shows compatibility with more than 200 file formats which depict that you can convert from and to GIFs in the best environment. You just need to upload the video file to this platform, and with a single click, you can get a GIF of the best possible quality.

Pros
You can simultaneously convert the videos files into GIFs through its batch processing option.
Apart from being an online tool, the software rendering integrated into this tool allows the users to get high-quality results after the conversion.
The data security in this tool is exceptional as this tool has a strict privacy policy for the users.
Apart from video and image files, you can also convert documents and audio files through this tool efficiently.
Cons
This online tool takes plenty amount of time to convert large-sized files.
3. Convertio
Convertio is another good example of an online GIF converter that supports tons of file formats. It has one of the easiest user interfaces among other online converters, as each function is well-displayed on its main interface. After uploading the video file on this online tool, you can easily select the output format, such as GIF, and within no time, you will get the desired result. This free tool also supports batch processing to offer an enhanced ecosystem to the users.

Pros
Beginners can rely on this online platform as it offers security along with tons of supported formats.
For instant conversion of the files, this tool is ideal as it does not demand the users to create accounts for sign-ups.
It does not disturb the users with constant ads and functions as a stable tool.
You can access this online tool from any browser, and it can easily work for converting videos, documents, and images.
Cons
For converting large-sized videos, you need to buy its subscription plan.
Part 3: How to Convert WMV to GIF Using Wondershare Filmora?
There are plenty of GIF converters, but to enjoy the best user experience, explore Wondershare Filmora. As we mentioned earlier, this tool includes every basic to advanced feature for both video editing and conversion process. To convert WMV to GIF through Filmora, use the below steps:
Step 1: Import WMV File
Launch Wondershare Filmora on your desktop and click to use its interface. Tap on the “New Project” option that will display a new window on your screen. At the media tab, click on the arrow and import the WMV file from browsing through your computer.

Step 2: Select GIF Format
Now drag the imported video to the timeline of this tool and tap on the “Export” button displayed on top. From the newly displayed window, select the “GIF” format from the left section.

Step 3: Click to Export
Along with changing file format, you can also name the file and can set its file location. For more settings, you can adjust its resolution, bit rate, and frame rate displayed on the right side of the screen. Once done, click on the “Export” option.

Conclusion
Create your GIFs by converting from the WMV files through powerful GIF converters. To convert WMV to GIF, we have recommended different tools along with their distinct features for your ease. However, to generate instant and best outputs, Wondershare Filmora comes on top as a powerful GIF converter. Through its advanced features, you can edit and create multiple GIFs within a well-defined platform.
GIFs function as a series of images that seem like an audio-less video and are widely used across numerous platforms. People send GIFs to their friends while chatting and also add them to their photos and videos. Moreover, this image format does not lose its quality during compression. Due to their high popularity, GIF converters are much needed.
If you have a WMV file and want to use it as a GIF, you can easily execute the conversion through GIF converters. You can find tons of GIF converters, but not every tool is reliable. For WMV to GIF conversion, we will provide the best GIF converters that you can utilize confidently.
In this article
Part 1: Best 3 WMV to GIF Converter Software
Part 2: 3 Online WMV to GIF Converters
Part 3: How to Convert WMV to GIF Using Wondershare Filmora?
Part 1: Best 3 WMV to GIF Converter Software
In this following part, we will discuss the best 3 offline GIF converters through which you can easily convert your files from WMV to GIF comfortably.
1. Wondershare Filmora
| Compatibility | Pricing |
|---|---|
| Windows/Mac | $28.98/Monthly $68.98/Annual $98.98/Perpetual |
Wondershare Filmora is a top-notch video editing tool comprising every basic and advanced feature that you would require. It offers smart templates that help beginners in designing their videos along with exceptional effects. Furthermore, people can utilize their royalty-free images and videos to add them to their videos for more dimensions.
Along with its extraordinary video editing features, people can also convert their videos files to numerous formats such as GIFs and other formats. Although the user interface of Filmora is extremely easy to handle, if you still find some difficulties, you can watch the tutorials from their platform to execute the editing process easier. By using this excellent platform, you can not only get rid of the flaws in your videos but can also convert them to GIF format conveniently.
Pros
The “Instant Mode” of Filmora enables the users to design and create their videos with great proficiency without spending too much time.
It comprises animated effects that can add an artistic element to your videos.
It has an excellent function of a “Screen Recorder” that can effortlessly capture the on-screen activities of your computer.
You can easily synchronize the audio and soundtracks with the videos through its “Auto Synchronization” feature.
Cons
The free version of this platform comprises a watermark that can ruin the actual impression of the video.
2. Adobe Premiere Pro
| Compatibility | Pricing |
|---|---|
| Windows/Mac | $20.99/Monthly |
This tool is an ultimate professional video editor that comprises the ability to transform videos into a high-end project. You can add various transitions to the videos and can portray interesting storytelling through them. You can easily upload the recorded video from either your smartphone or professional camera and can edit the footage in up to 8K high quality.
Furthermore, when people try to export their videos, this tool displays multiple options to convert the current video file into another. Thus, you can easily convert your video file WMV into GIF quickly with a single click. Other amazing features of this tool include Adobe Stock, through which you can import various audio files and can professionally embed them in your video.
Pros
The “Auto-Reframe” feature allows the users to intelligently reframe their videos in 4K resolution flawlessly.
You can add subtitles to your videos through “Auto Transcriptions” quickly and can edit them further.
You can color fix the videos through its excellent filters, which can give an aesthetic impression.
The export settings of this tool can be customized, and you can easily share your videos to online platforms.
Cons
The user interface of Adobe Premiere Pro is a bit complicated, and non-professionals can find it difficult to use for the first time.
3. Cyberlink PowerDirector
| Compatibility | Pricing |
|---|---|
| Windows/Mac | $19.99/Monthly $69.99/Monthly |
This trustworthy tool is widely used for converting video files to GIF format along with various intuitive features. It also functions as a video editor as it includes advanced options to edit multiple video file formats effortlessly. You can use their enhanced “Mask and Blend” option to combine numerous video clips smoothly and professionally. Also, you can replace dull and boring skies from your videos through its “Sky Replacement” feature.
Along with its powerful conversion feature, you can also remove unwanted objects or people from the videos flawlessly with a single click. For a high-quality audio experience, you can use its audio tools to remove unnecessary background noise to make the vocals sound refined. Hence, it works as a trustworthy tool that not only makes the videos appealing but also provides ease to its users.
Pros
This platform offers motion tracking through which you can precisely synchronize the elements in your video.
It has included various effects and filters ranging in diverse categories that can be used to change the perspective of the videos.
The user interface is well-defined and easy to use for beginners.
It offers fast rendering so that you can export the edited video in high quality.
Cons
This tool contains ads and has an expensive subscription plan.
Part 2: 3 Online WMV to GIF Converters
If you want to conduct online conversion of files from WMV to GIF instantly, use any of the following mentioned tools.
1. Adobe Creative Cloud Express
This online tool provides an easy way to convert WMV to GIF in a well-protected environment. You can import your WMV file to this tool easily either from your device or can utilize the drag and drop option. Afterward, you can select the quality type and file size from the displayed options. The conversion process does not take long, and you can easily share the newly converted GIF across online platforms.
Pros
This tool is free to use and offers basic editing options to create unlimited GIFs.<
You can select the file size of the GIF file so that you can easily save it on your device without worrying about space usage.<
You can adjust the aspect ratio of your manually before the conversion process.<
Through its trim option, you can eradicate unwanted parts easily.<
Cons
It only offers premium features such as refine, cutout, and resize in the premium plan.<
2. CloudConvert
CloudConvert is an online platform that will assist you in converting video files such as WMV into GIFs conveniently. This tool supports and shows compatibility with more than 200 file formats which depict that you can convert from and to GIFs in the best environment. You just need to upload the video file to this platform, and with a single click, you can get a GIF of the best possible quality.
Pros
You can simultaneously convert the videos files into GIFs through its batch processing option.
Apart from being an online tool, the software rendering integrated into this tool allows the users to get high-quality results after the conversion.
The data security in this tool is exceptional as this tool has a strict privacy policy for the users.
Apart from video and image files, you can also convert documents and audio files through this tool efficiently.
Cons
This online tool takes plenty amount of time to convert large-sized files.
3. Convertio
Convertio is another good example of an online GIF converter that supports tons of file formats. It has one of the easiest user interfaces among other online converters, as each function is well-displayed on its main interface. After uploading the video file on this online tool, you can easily select the output format, such as GIF, and within no time, you will get the desired result. This free tool also supports batch processing to offer an enhanced ecosystem to the users.
Pros
Beginners can rely on this online platform as it offers security along with tons of supported formats.
For instant conversion of the files, this tool is ideal as it does not demand the users to create accounts for sign-ups.
It does not disturb the users with constant ads and functions as a stable tool.
You can access this online tool from any browser, and it can easily work for converting videos, documents, and images.
Cons
For converting large-sized videos, you need to buy its subscription plan.
Part 3: How to Convert WMV to GIF Using Wondershare Filmora?
There are plenty of GIF converters, but to enjoy the best user experience, explore Wondershare Filmora. As we mentioned earlier, this tool includes every basic to advanced feature for both video editing and conversion process. To convert WMV to GIF through Filmora, use the below steps:
Step 1: Import WMV File
Launch Wondershare Filmora on your desktop and click to use its interface. Tap on the “New Project” option that will display a new window on your screen. At the media tab, click on the arrow and import the WMV file from browsing through your computer.
Step 2: Select GIF Format
Now drag the imported video to the timeline of this tool and tap on the “Export” button displayed on top. From the newly displayed window, select the “GIF” format from the left section.
Step 3: Click to Export
Along with changing file format, you can also name the file and can set its file location. For more settings, you can adjust its resolution, bit rate, and frame rate displayed on the right side of the screen. Once done, click on the “Export” option.
Conclusion
Create your GIFs by converting from the WMV files through powerful GIF converters. To convert WMV to GIF, we have recommended different tools along with their distinct features for your ease. However, to generate instant and best outputs, Wondershare Filmora comes on top as a powerful GIF converter. Through its advanced features, you can edit and create multiple GIFs within a well-defined platform.
How to Resize FLV Video Efficiently[Windows, Mac, Android, iPhone &
FLV Videos are Flash Video files with a .flv file extension. FLV video files were once one of the most popular video file types and the standard video format used for embedding videos on the internet and streaming. Even though video files like mp4 and mkv have gained more popularity today, you can still come across many Flv videos on the internet.
In this article, you’ll be learning How to Resize FLV Videos Efficiently on all the platforms. But wait, what exactly does the resizing mean? When you are working with videos, resizing can mean two things: one is changing the aspect ratio or resolution of the video and another is changing the file size of the video. So let’s see how we can resize the flv videos efficiently on different platforms:
Best FLV Editor to Resize FLV Videos on Windows and Mac – Filmora Video Editor [with steps]
Among many different video editors available today, Filmora Video Editor is the one that climbs up the rank to the top. It is the best FLV editor on Windows and Mac for resizing and editing flv videos. Different social media platforms require videos of different sizes, resolutions, and aspect ratios. For eg: YouTube requires horizontal video, TikTok requires vertical, Emails have a size limit for every file, etc. That’s when the Filmora Video Editor comes into play for fast and easy resizing of any video for different platforms.
For Win 7 or later (64-bit)
For macOS 10.14 or later
Why choose Filmora Video Editor for resizing FLV videos, you say?
- Simple UI and easy interface
- Easily crop or change the aspect ratio of the video
- Not all video editors support FLV video format, but the Filmora does
- Advanced export options to compress or change the file size of video
- Suitable for beginners as well as professionals
- Regular software updates and improvements
Plus, Filmora Video Editor has a free version, so you can instantly download the program, install it, and get started on resizing FLV Videos. Below is a step-by-step guide to resize FLV Videos on Windows and Mac with Wondershare Filmora Video Editor, so you can follow along!
Steps to resize FLV videos with Filmora Video Editor:
- Launch Filmora and open a new project
Run the Wondershare Filmora application on Windows or Mac after installing it. Then you should automatically be inside a new project. If not, you can manually open a new project by going to File on the top left corner and then clicking on ‘**New Project**’.

- Import the FLV video and add it to timeline
Click on ‘**Import Media Files**’ and import the flv video into project media from your computer’s file explorer. Then add the video to the timeline by dragging it inside the timeline.

- Edit and perform desired modifications (Optional)
If you are just looking to resize the FLV video file, then you can skip this step and move to step no. 4. Otherwise, you can do various editings on the video like cropping, muting, trimming, animating, etc. before resizing the video. Filmora provides a wide range of features for editing and adding effects to the video.

- Resize the video by changing the aspect ratio
Aspect ratio defines the shape of your video like if you want the video to be horizontal, vertical, square, or custom. Generally, the term ‘resizing video’ refers to changing the aspect ratio of the video. For that, go to the File and then to the Project Settings. Then on the Aspect Ratio box, select the one that you prefer or you can try custom scaling. You can choose your preferred resolution of the project too while you’re at it.

- Resize the video by cropping
When you change the aspect ratio of the project, some parts of your flv video might not fit or it might be shrunk small to fit. So you need to resize the flv video by cropping so that you can crop and focus on the part of the video you like. To crop the video, select the flv video clip in the timeline and click on the crop icon in the timeline toolbar. Now choose the ratio you want to crop and select the part you’d like to keep. Then click OK and your flv video will be resized.

- Adjust the file size of the video through export settings
After you’ve cropped and resized the Flv video, you need to export it by clicking the Export button on the top center part. There are different settings available for exporting the video. Click on the Settings button near the resolution and you’ll be shown some detailed preferences for exporting. Every setting here like frame rate, resolution, bitrate, etc. can affect the size of the output video.

Filmora Video Editor really makes the task of editing and resizing FLV videos easier, simpler, and faster. Since you now know the steps, it’s time you try it and resize your own FLV videos with this best FLV Editor for Windows and Mac.
Alternative Way to Resize FLV Videos on Windows
In case you want to try something different than Filmora, here are two alternative software (one paid and another free) that you can use to resize your FLV Videos on Windows:
- Movavi Video Editor Plus

Movavi Video Editor Plus is one of the best easy-to-use video editors that can help you to resize FLV videos as well as edit them on Windows. Its interface and functionalities are somewhat similar to that of the Filmora Video Editor. This is a paid software available for download on both Windows and Mac but you can try it for free with their 7 days trial version.
Steps to resize FLV videos on Windows with Movavi Video Editor:
- Install Movavi Video Editor and run the software on your PC. Then you should automatically be inside a new project in it.

- Import the FLV video file you want to resize through the ‘File Import’ tab on the left and drag it to the timeline.

- To resize the aspect ratio, expand the resolution options near the preview screen above the export button and select the preferred ratio.

- To crop or resize the video, select the clip in the timeline and use the crop tool to make adjustments as you wish. Then hit Apply to save changes.

- After the video is ready, export it with the Export button on the right side of the screen. Then choose your preferred settings for output and click on Start after which your video will be rendered and saved to your PC.

- VSDC Free Video Editor

VSDC Free Video Editor is another alternative to Filmora for resizing FLV videos on Windows. It is a free video editor that packs a wide range of editing features without any restrictions. However, it does have a paid version with some advanced features and hardware acceleration.
Steps to resize FLV videos on Windows with VSDC Free Video Editor:
- Install and open VSDC video editor on your PC. Then create a new project with preferred settings through the ‘Projects’ tab on the top left corner.

- Import the video file into the project by dragging and dropping it directly into the timeline.

- To resize the aspect ratio, click on the Projects Explorer and click on your project name. Then in the Properties windows on the right, manually adjust width, height, resolution, etc. according to your preferences.

- To crop and reposition your video, select the clip in the timeline and go to the Editor tab on the top. Then use the crop tool and adjust your video accordingly.

- Finally export your design through the Export project tab at the top with preferred settings.

Alternative Way to Resize FLV Videos on Mac
Wondershare Filmora Video Editor is also available for Mac operating system which is recommended to resize FLV videos but if you want to try out some other alternatives, then below are the two ways to resize FLV videos on Mac:
- VideoProc Converter

VideoProc is a powerful video editor/ converter that helps you edit, convert, and resize any kind of video. It also supports a wide range of codecs and video formats including flv. It is a paid software but you can also try their free trial version with some limitations.
Steps to resize FLV videos on Mac with VideoProc:
- Launch VideoProc on a Mac device and go inside the Video

- Add files in VideoProc by drag and drop method or directly through the ‘Add Video’ option.

- Then click on the Options (codec) on the right side of the video and change the resolutions and aspect ratio of the video as you want. You can also manage export settings like quality, codec, fps, bitrate, etc. from this tab.

- Then go to the Crop section inside the Edit Video tab and crop the video as you like with preview and different other options.

- Finally click Done to go back and hit the Run This’ll start rendering the video and will save it to your Mac device.

- Shotcut

Shotcut is another alternative to Filmora Video Editor for resizing FLV videos on Mac. It is a free, open-source, and cross-platform video editor that has a sleek and intuitive interface with many useful editing features which really makes it suitable for both beginners as well as advanced editors.
Steps to resize FLV videos on Mac with Shotcut:
- Run the Shotcut program on your Mac after installing it and create a new project.

- Import the Flv video file to the project by drag and drop method into the timeline.

- To change the resolution and aspect ratio of the video, go to the Settings tab, then Video mode, and choose the format you want.

- To crop the video, select the clip in the timeline and go to the Filters Now click on the ‘**+**’ icon and select Size, Position & Rotate under the Favorite section. Then adjust crop settings as you like.

- Finally, go to the Export section at the top and click on Advanced. Then configure the output settings as you like and click on Export File.

2 Ways to Resize FLV Videos on Android
Wouldn’t it be great if you could resize FLV videos on your android device rather than having to open your computer for every small task? Previously, this was a major issue due to a lack of good video editors for android with flv support but that’s no longer the case. Below are two ways to resize FLV videos on android:
- AndroVid – Video Editor, Video Maker

AndroVid is an easy-to-use, full-featured video editor especially developed to edit videos for social media like YouTube, TikTok, Facebook, Instagram, etc. It is not a very popular application with just over 300k+ downloads in Google Play Store, but after testing it out, we thought it deserves to be in this article. It is available for free to download from Google Play Store.
Steps to resize FLV videos on Android with AndroVid Video Editor:
- Open AndroVid Video Editor on an android phone and go inside the Videos

- Now select the FLV video file that you want to resize.

- Inside editor, tap on the Crop tool in the toolbar at the top.

- Then select the preferred Aspect ratio from the top right, reposition the video area and tap on the tick icon to save the video.

- If you need to change the resolution too, click on the three dots at the top right after the video is saved successfully. Then choose the preferred resolution, quality, and format and click on the tick icon to export.

2 Ways to Resize FLV Videos on iPhone
Like Android, you can also resize FLV videos on your iPhone on the go without needing to use your computer. Doing such editing on mobile phones can really save your time and effort, so here are 2 ways for you to resize FLV videos on iPhone:
- Cyberlink Powerdirector

Cyberlink Powerdirector is one of the most popular as well as powerful video editors for Android and iOS. It is a full-featured mobile video editor with over 130M+ downloads on the App Store which allows you to do an advanced level of editing. It is a paid software but also has a free version available for download.
Steps to resize FLV videos on iPhone with PowerDirector:
- Launch the PowerDirector app on your iPhone and create a new project. Unlike other apps, you cannot change the aspect ratio later, so you need to set the aspect ratio you want while creating a new project.

- Now add the FLV video file into the timeline by tapping on the ‘**+**’ icon on the video. Then tap on the play button at the top right to enter the editor.

- To resize the video, select the video clip in the timeline and tap on the pencil icon at the bottom left. Then use different crop tools available to resize your video as you want.

- After you resize the video, tap on the export button on the top right to export it. Then tap on Produce and Share, and produce resized video with preferred settings.

- Splice – Video Editor & Maker

Splice – Video Editor & Maker is a simple yet powerful application that makes it easy to create fully customized and professional-looking videos on iPhone. It is another great app for resizing FLV videos on iPhone with over 70M+ downloads on App Store and it is available for free.
Steps to resize FLV videos on iPhone with Splice:
- Open the Splice app on the iPhone and tap on the ‘**+**’ icon to create a new project.

- Now select the flv video file to add and start the project.

- To resize the video, tap on the gear icon at the top right corner which opens up Project settings from where you can change the aspect ratio.

- To crop the video, select the clip in the timeline and tap on the Crop option in the toolbar. You can crop and reposition the video from there.

- Then click on the Export icon at the top right corner to export the video with preferred configurations.

2 Ways to Resize FLV Videos Online
Resizing is not that big of a task and you might just want to quickly resize your Flv video and share it. So why bother installing and running large video editing programs on your computer or even mobile phones when you can easily resize your videos in the web browser? Yes, you read that right, and below are the 2 ways for you to resize FLV videos online:
- io

Veed is a simple online video editing tool that you can access from any device with the help of a web browser. It can help you resize your Flv videos easily within just a few clicks. It has a clean and beautiful interface with a responsive design which provides you with a good editing experience while using it. It is a paid tool but you can also try it for free before purchasing it.
Steps to resize FLV videos online with Veed.io:
- Go to veed.io on your web browser and click on ‘Upload Your Video’ to get started without any account.

- Now upload the FLV video or you can directly drag and drop the video there.

- After you upload the video, you’ll be taken inside the Veed editor. To change the aspect ratio, go to the Size section inside Project Settings and choose the size you want to resize to.

- To crop the video, select the clip in the timeline and directly resize the video from the preview area. And you can also use settings like ‘Fill the canvas’ and ‘Fit the canvas’ at the left side for ease.

- Then click on the Export button at the top right corner to open Export settings. Configure the settings as you like and click on ‘Export Video’ to render and download the video.

- Clideo

When it comes to resizing or editing videos online, Clideo is one of the best tools you can rely on. Like Veed.io, it has a clean and responsive interface and supports many video formats including flv. Clideo is free to use but also comes with various subscription plans for extra functionalities.
Steps to resize FLV videos online with Clideo:
- Go to clideo.com/resize-video and upload your video through ‘Choose file’ button.

- To resize the aspect ratio, choose your desired formats in the ‘Resize for’ section. You can also manually set the aspect ratio.

- Then just below that, you’ll find various cropping options. Use them to crop or resize the video as you like.

- Finally, click on the Export button at the bottom right corner to export the video. You can download the video or can directly save to cloud storage like Drive, Dropbox, etc.

FAQs about Resizing FLV Video
Here are some of the Frequently Asked Questions (FAQs) related to resizing FLV videos that you might be interested in:
- How do I make FLV files smaller?
You can make FLV files smaller with the help of any video editor that supports Flv video format by cutting and cropping out unnecessary parts, decreasing the resolution, and bitrate, and converting flv into another lighter file format.
- Which video editors support FLV file format?
There are few video editors like Filmora, Movavi, VSDC, etc. that support the FLV file format. But when it comes to editing FLV videos, Filmora Video Editor is the best choice.
- How do I view an FLV file?
FLV is one of the oldest video formats due to which most new and modern video players don’t recognize it or can’t play it. However, there are few programs like VLC media players which can help you view an FLV file. Or you can also convert the FLV file into other supported video formats with the help of a video converter.
- Can I convert a horizontal FLV video into a vertical one?
Yes, and that’s a piece of cake when you use Filmora Video Editor or other similar video editors. You just need to change the aspect ratio of the video or the project from horizontal (generally 16:9) to vertical (generally 9:16).
- Can I resize FLV video files on my mobile?
Though video editors on mobile are not as powerful as those on PC, there are some that are still capable enough to let you easily resize FLV video files on mobile devices. Some examples are Splice, Powerdirector, etc.
For macOS 10.14 or later
Why choose Filmora Video Editor for resizing FLV videos, you say?
- Simple UI and easy interface
- Easily crop or change the aspect ratio of the video
- Not all video editors support FLV video format, but the Filmora does
- Advanced export options to compress or change the file size of video
- Suitable for beginners as well as professionals
- Regular software updates and improvements
Plus, Filmora Video Editor has a free version, so you can instantly download the program, install it, and get started on resizing FLV Videos. Below is a step-by-step guide to resize FLV Videos on Windows and Mac with Wondershare Filmora Video Editor, so you can follow along!
Steps to resize FLV videos with Filmora Video Editor:
- Launch Filmora and open a new project
Run the Wondershare Filmora application on Windows or Mac after installing it. Then you should automatically be inside a new project. If not, you can manually open a new project by going to File on the top left corner and then clicking on ‘**New Project**’.
- Import the FLV video and add it to timeline
Click on ‘**Import Media Files**’ and import the flv video into project media from your computer’s file explorer. Then add the video to the timeline by dragging it inside the timeline.
- Edit and perform desired modifications (Optional)
If you are just looking to resize the FLV video file, then you can skip this step and move to step no. 4. Otherwise, you can do various editings on the video like cropping, muting, trimming, animating, etc. before resizing the video. Filmora provides a wide range of features for editing and adding effects to the video.
- Resize the video by changing the aspect ratio
Aspect ratio defines the shape of your video like if you want the video to be horizontal, vertical, square, or custom. Generally, the term ‘resizing video’ refers to changing the aspect ratio of the video. For that, go to the File and then to the Project Settings. Then on the Aspect Ratio box, select the one that you prefer or you can try custom scaling. You can choose your preferred resolution of the project too while you’re at it.
- Resize the video by cropping
When you change the aspect ratio of the project, some parts of your flv video might not fit or it might be shrunk small to fit. So you need to resize the flv video by cropping so that you can crop and focus on the part of the video you like. To crop the video, select the flv video clip in the timeline and click on the crop icon in the timeline toolbar. Now choose the ratio you want to crop and select the part you’d like to keep. Then click OK and your flv video will be resized.
- Adjust the file size of the video through export settings
After you’ve cropped and resized the Flv video, you need to export it by clicking the Export button on the top center part. There are different settings available for exporting the video. Click on the Settings button near the resolution and you’ll be shown some detailed preferences for exporting. Every setting here like frame rate, resolution, bitrate, etc. can affect the size of the output video.
Filmora Video Editor really makes the task of editing and resizing FLV videos easier, simpler, and faster. Since you now know the steps, it’s time you try it and resize your own FLV videos with this best FLV Editor for Windows and Mac.
Alternative Way to Resize FLV Videos on Windows
In case you want to try something different than Filmora, here are two alternative software (one paid and another free) that you can use to resize your FLV Videos on Windows:
- Movavi Video Editor Plus
Movavi Video Editor Plus is one of the best easy-to-use video editors that can help you to resize FLV videos as well as edit them on Windows. Its interface and functionalities are somewhat similar to that of the Filmora Video Editor. This is a paid software available for download on both Windows and Mac but you can try it for free with their 7 days trial version.
Steps to resize FLV videos on Windows with Movavi Video Editor:
- Install Movavi Video Editor and run the software on your PC. Then you should automatically be inside a new project in it.
- Import the FLV video file you want to resize through the ‘File Import’ tab on the left and drag it to the timeline.
- To resize the aspect ratio, expand the resolution options near the preview screen above the export button and select the preferred ratio.
- To crop or resize the video, select the clip in the timeline and use the crop tool to make adjustments as you wish. Then hit Apply to save changes.
- After the video is ready, export it with the Export button on the right side of the screen. Then choose your preferred settings for output and click on Start after which your video will be rendered and saved to your PC.
- VSDC Free Video Editor
VSDC Free Video Editor is another alternative to Filmora for resizing FLV videos on Windows. It is a free video editor that packs a wide range of editing features without any restrictions. However, it does have a paid version with some advanced features and hardware acceleration.
Steps to resize FLV videos on Windows with VSDC Free Video Editor:
- Install and open VSDC video editor on your PC. Then create a new project with preferred settings through the ‘Projects’ tab on the top left corner.
- Import the video file into the project by dragging and dropping it directly into the timeline.
- To resize the aspect ratio, click on the Projects Explorer and click on your project name. Then in the Properties windows on the right, manually adjust width, height, resolution, etc. according to your preferences.
- To crop and reposition your video, select the clip in the timeline and go to the Editor tab on the top. Then use the crop tool and adjust your video accordingly.
- Finally export your design through the Export project tab at the top with preferred settings.
Alternative Way to Resize FLV Videos on Mac
Wondershare Filmora Video Editor is also available for Mac operating system which is recommended to resize FLV videos but if you want to try out some other alternatives, then below are the two ways to resize FLV videos on Mac:
- VideoProc Converter
VideoProc is a powerful video editor/ converter that helps you edit, convert, and resize any kind of video. It also supports a wide range of codecs and video formats including flv. It is a paid software but you can also try their free trial version with some limitations.
Steps to resize FLV videos on Mac with VideoProc:
- Launch VideoProc on a Mac device and go inside the Video
- Add files in VideoProc by drag and drop method or directly through the ‘Add Video’ option.
- Then click on the Options (codec) on the right side of the video and change the resolutions and aspect ratio of the video as you want. You can also manage export settings like quality, codec, fps, bitrate, etc. from this tab.
- Then go to the Crop section inside the Edit Video tab and crop the video as you like with preview and different other options.
- Finally click Done to go back and hit the Run This’ll start rendering the video and will save it to your Mac device.
- Shotcut
Shotcut is another alternative to Filmora Video Editor for resizing FLV videos on Mac. It is a free, open-source, and cross-platform video editor that has a sleek and intuitive interface with many useful editing features which really makes it suitable for both beginners as well as advanced editors.
Steps to resize FLV videos on Mac with Shotcut:
- Run the Shotcut program on your Mac after installing it and create a new project.
- Import the Flv video file to the project by drag and drop method into the timeline.
- To change the resolution and aspect ratio of the video, go to the Settings tab, then Video mode, and choose the format you want.
- To crop the video, select the clip in the timeline and go to the Filters Now click on the ‘**+**’ icon and select Size, Position & Rotate under the Favorite section. Then adjust crop settings as you like.
- Finally, go to the Export section at the top and click on Advanced. Then configure the output settings as you like and click on Export File.
2 Ways to Resize FLV Videos on Android
Wouldn’t it be great if you could resize FLV videos on your android device rather than having to open your computer for every small task? Previously, this was a major issue due to a lack of good video editors for android with flv support but that’s no longer the case. Below are two ways to resize FLV videos on android:
- AndroVid – Video Editor, Video Maker
AndroVid is an easy-to-use, full-featured video editor especially developed to edit videos for social media like YouTube, TikTok, Facebook, Instagram, etc. It is not a very popular application with just over 300k+ downloads in Google Play Store, but after testing it out, we thought it deserves to be in this article. It is available for free to download from Google Play Store.
Steps to resize FLV videos on Android with AndroVid Video Editor:
- Open AndroVid Video Editor on an android phone and go inside the Videos
- Now select the FLV video file that you want to resize.
- Inside editor, tap on the Crop tool in the toolbar at the top.
- Then select the preferred Aspect ratio from the top right, reposition the video area and tap on the tick icon to save the video.
- If you need to change the resolution too, click on the three dots at the top right after the video is saved successfully. Then choose the preferred resolution, quality, and format and click on the tick icon to export.
2 Ways to Resize FLV Videos on iPhone
Like Android, you can also resize FLV videos on your iPhone on the go without needing to use your computer. Doing such editing on mobile phones can really save your time and effort, so here are 2 ways for you to resize FLV videos on iPhone:
- Cyberlink Powerdirector
Cyberlink Powerdirector is one of the most popular as well as powerful video editors for Android and iOS. It is a full-featured mobile video editor with over 130M+ downloads on the App Store which allows you to do an advanced level of editing. It is a paid software but also has a free version available for download.
Steps to resize FLV videos on iPhone with PowerDirector:
- Launch the PowerDirector app on your iPhone and create a new project. Unlike other apps, you cannot change the aspect ratio later, so you need to set the aspect ratio you want while creating a new project.
- Now add the FLV video file into the timeline by tapping on the ‘**+**’ icon on the video. Then tap on the play button at the top right to enter the editor.
- To resize the video, select the video clip in the timeline and tap on the pencil icon at the bottom left. Then use different crop tools available to resize your video as you want.
- After you resize the video, tap on the export button on the top right to export it. Then tap on Produce and Share, and produce resized video with preferred settings.
- Splice – Video Editor & Maker
Splice – Video Editor & Maker is a simple yet powerful application that makes it easy to create fully customized and professional-looking videos on iPhone. It is another great app for resizing FLV videos on iPhone with over 70M+ downloads on App Store and it is available for free.
Steps to resize FLV videos on iPhone with Splice:
- Open the Splice app on the iPhone and tap on the ‘**+**’ icon to create a new project.
- Now select the flv video file to add and start the project.
- To resize the video, tap on the gear icon at the top right corner which opens up Project settings from where you can change the aspect ratio.
- To crop the video, select the clip in the timeline and tap on the Crop option in the toolbar. You can crop and reposition the video from there.
- Then click on the Export icon at the top right corner to export the video with preferred configurations.
2 Ways to Resize FLV Videos Online
Resizing is not that big of a task and you might just want to quickly resize your Flv video and share it. So why bother installing and running large video editing programs on your computer or even mobile phones when you can easily resize your videos in the web browser? Yes, you read that right, and below are the 2 ways for you to resize FLV videos online:
- io
Veed is a simple online video editing tool that you can access from any device with the help of a web browser. It can help you resize your Flv videos easily within just a few clicks. It has a clean and beautiful interface with a responsive design which provides you with a good editing experience while using it. It is a paid tool but you can also try it for free before purchasing it.
Steps to resize FLV videos online with Veed.io:
- Go to veed.io on your web browser and click on ‘Upload Your Video’ to get started without any account.
- Now upload the FLV video or you can directly drag and drop the video there.
- After you upload the video, you’ll be taken inside the Veed editor. To change the aspect ratio, go to the Size section inside Project Settings and choose the size you want to resize to.
- To crop the video, select the clip in the timeline and directly resize the video from the preview area. And you can also use settings like ‘Fill the canvas’ and ‘Fit the canvas’ at the left side for ease.
- Then click on the Export button at the top right corner to open Export settings. Configure the settings as you like and click on ‘Export Video’ to render and download the video.
- Clideo
When it comes to resizing or editing videos online, Clideo is one of the best tools you can rely on. Like Veed.io, it has a clean and responsive interface and supports many video formats including flv. Clideo is free to use but also comes with various subscription plans for extra functionalities.
Steps to resize FLV videos online with Clideo:
- Go to clideo.com/resize-video and upload your video through ‘Choose file’ button.
- To resize the aspect ratio, choose your desired formats in the ‘Resize for’ section. You can also manually set the aspect ratio.
- Then just below that, you’ll find various cropping options. Use them to crop or resize the video as you like.
- Finally, click on the Export button at the bottom right corner to export the video. You can download the video or can directly save to cloud storage like Drive, Dropbox, etc.
FAQs about Resizing FLV Video
Here are some of the Frequently Asked Questions (FAQs) related to resizing FLV videos that you might be interested in:
- How do I make FLV files smaller?
You can make FLV files smaller with the help of any video editor that supports Flv video format by cutting and cropping out unnecessary parts, decreasing the resolution, and bitrate, and converting flv into another lighter file format.
- Which video editors support FLV file format?
There are few video editors like Filmora, Movavi, VSDC, etc. that support the FLV file format. But when it comes to editing FLV videos, Filmora Video Editor is the best choice.
- How do I view an FLV file?
FLV is one of the oldest video formats due to which most new and modern video players don’t recognize it or can’t play it. However, there are few programs like VLC media players which can help you view an FLV file. Or you can also convert the FLV file into other supported video formats with the help of a video converter.
- Can I convert a horizontal FLV video into a vertical one?
Yes, and that’s a piece of cake when you use Filmora Video Editor or other similar video editors. You just need to change the aspect ratio of the video or the project from horizontal (generally 16:9) to vertical (generally 9:16).
- Can I resize FLV video files on my mobile?
Though video editors on mobile are not as powerful as those on PC, there are some that are still capable enough to let you easily resize FLV video files on mobile devices. Some examples are Splice, Powerdirector, etc.
Also read:
- In 2024, Easy Ways to Change Aspect Ratio in iMovie?
- 2024 Approved Everything That You Need to Know About Video Montages- Ideas, Techniques, and Software
- New A Comprehensive Guide to Slow Motion YouTube Videos and How to Manage Them for 2024
- New Ultimate Guide on How to Film Better in Public
- Want to Make Your Canva Slideshow More Attractive? Follow the Given Discussion to Know Everything About Making the Best Slideshows with Canva
- New In 2024, Do You Seek to Blur Out Your Video and Photo to Display some Motion Blur? This Article Provides a List of the Best Motion Blur Apps for Videos and Photos
- Updated 10 Best Video Editing Apps With Templates
- Updated 2024 Approved What Are the Top 15 Slideshow Presentation Examples Your Audience Will
- Updated Create Your Slow Zoom TikTok in Minutes
- Updated In 2024, Based on Preferences, You Can Adjust the Speed of YouTube Videos. Learn How to Produce a YouTube Slow-Motion Video in This Article
- Updated Top 10 Free Text to Speech Software Windows, Mac,Android, iPhone & O
- In 2024, Best Love Video Maker with Music
- In 2024, How to Make a Slideshow GIF?
- Updated 2024 Approved How To Synchronize Your Audio And Videos Properly?
- New 2024 Approved Adobe Premiere Pro Guide to Slow-Down Video
- Updated In This Article I Will Share to You My Tips and Experiences on How to Become a YouTube Vlogger and Things You Need to Consider Being a Vlogger
- Updated How To Use Voicemod On Discord Desktop+Mobile
- Updated 2024 Approved Ideas That Will Help You Out in Converting AVI to GIF
- New In 2024, In the Realm of Creating Graphic Presentation, People Also Ask About Designing Professionally Sound Slideshow Word Presentations. Heres How You Can Go About the Process
- Updated In 2024, Progressive Solutions to Add VHS Effects to Video with Ease
- New In 2024, Final Cut Pro for iPad
- New 2024 Approved Are You Seeking an Answer for What Is a LUT in the Video? In This Article, We Will Provide You with Detailed Information About LUTs and Their Utility
- Ideas That Help You Out in Converting AVI to GIF
- New In 2024, How to Use Twixtor Effect to Create Super Slow-Motion Video?
- New In 2024, Tutorial | How to Make a Smooth Speed Ramping in Premiere Pro?
- Updated Transforming a Slow-Motion Video to Normal Mastering the Skill
- New 2024 Approved Five Thoughts on Discord Create Accounts How-To Questions
- New 2024 Approved Step by Step to Crop Videos with CyberLink PowerDirector
- New Learn About Splice Video Online and Its Advantages. Also, Check Out the Best Online Apps for Splice Editing for 2024
- In 2024, How to Get Motion Blur in Valorant?
- Which 10 Best Video Editing Online Makers Is Worth Your Attention for 2024
- Updated Looking for a Free Video Editor to Edit Videos on Mac? IMovie by Apple Is a Great Choice? But Is It the Best Video Editor or Is There a Better Alternative Available? Check Out Our iMovie Review
- Making Creative and Engaging Youtube Videos Is Now Easy with Several Tools. Now, YouTube Also Offers You Its Own Built-In Video Editor Through Which You Can Edit and Enhance the Video Quality
- 2024 Approved Synchronizing Videos Can Be Hectic, but Do You Wish to Know a Good Tool for This Purpose? This Article Will Discuss Wondershare Filmora, Which Is Perfect for This
- New 2024 Approved TOP 6 Online Video Speed Controller for Chrome, Safari, Firefox
- Wondering the Best Alternative to Hola On Itel P55 5G? Here Is the Answer | Dr.fone
- Xiaomi Redmi Note 12 Pro 5G Bootloop Problem, How to Fix it Without Data Loss | Dr.fone
- Will the iPogo Get You Banned and How to Solve It On Samsung Galaxy A54 5G | Dr.fone
- The Complete Guide to Xiaomi Redmi Note 12 5G FRP Bypass Everything You Need to Know
- Easy steps to recover deleted pictures from A70.
- In 2024, How Screen Mirroring Apple iPhone 15 Plus to TV or PC? | Dr.fone
- In 2024, How to Cast ZTE Blade A73 5G Screen to PC Using WiFi | Dr.fone
- In 2024, How to Fake Snapchat Location without Jailbreak On Vivo S17t | Dr.fone
- In 2024, How to Change/Add Location Filters on Snapchat For your Honor 90 GT | Dr.fone
- In 2024, A Working Guide For Pachirisu Pokemon Go Map On Realme V30 | Dr.fone
- Updated 2024 Approved Looking for Love Animated GIFs? Here Are 5 Free Sources For You
- How to Unlock Apple iPhone 12 mini with a Mask On | Dr.fone
- How to Transfer Photos From Infinix GT 10 Pro to Samsung Galaxy S21 Ultra | Dr.fone
- 9 Solutions to Fix Oppo Find X6 Pro System Crash Issue | Dr.fone
- How to Repair Broken video files of Xiaomi Civi 3 on Windows??
- Easy steps to recover deleted videos from Oppo Find N3 Flip
- In 2024, How to Unlock Infinix Zero 30 5G PIN Code/Pattern Lock/Password
- 3uTools Virtual Location Not Working On Itel P40+? Fix Now | Dr.fone
- Title: In 2024, How to Add Motion Titles
- Author: Morgan
- Created at : 2024-05-19 05:11:51
- Updated at : 2024-05-20 05:11:51
- Link: https://ai-video-editing.techidaily.com/in-2024-how-to-add-motion-titles/
- License: This work is licensed under CC BY-NC-SA 4.0.
